Extra accounting features
All the functions you need
The program includes a set of features to manage your business efficiently and professionally. Our users are thrilled to save time on handling accounting tasks that would otherwise take up much of their time. Additionally, you will save money by reducing the need for a financial consultant's intervention and associated costs.
Financial reports at a glance
Quickly print all the reports you need and at any time:
- Chart of accounts
- Balance sheet and Income statement
- Transaction journal
- Budget and much more!

Invoices with QR codes
You can enter invoices as simple records by indicating the invoice number and the customer's account. If you have multiple products, you can also use columns for Quantity, Unit, and Unit Price.
With a single command, your records will transform into professional invoices, ready to be printed or sent via email to your customers.

Customer and supplier management
Thanks to the ready-made templates with the customer and supplier ledger, you can manage everything optimally: simply enter the customer or supplier account in the entry.
Get the full list of suppliers and customers and keep track of payments and receipts.

VAT management
Great simplicity: indicate the VAT rate code in the transactions and the programme takes care of the rest!
Get the Swiss VAT form, detailed summaries by period, by VAT code, account and percentage in just a few clicks, either by totals or with all transactions.

Cost centres and Segments
Highlight particular areas of your business easily and efficiently with a higher level of detail!
Cost centres and segments in Banana Accounting Plus offer the possibility to see details of projects, events, construction sites, members and other specific activities, or to highlight costs and revenues by unit, department or branch.

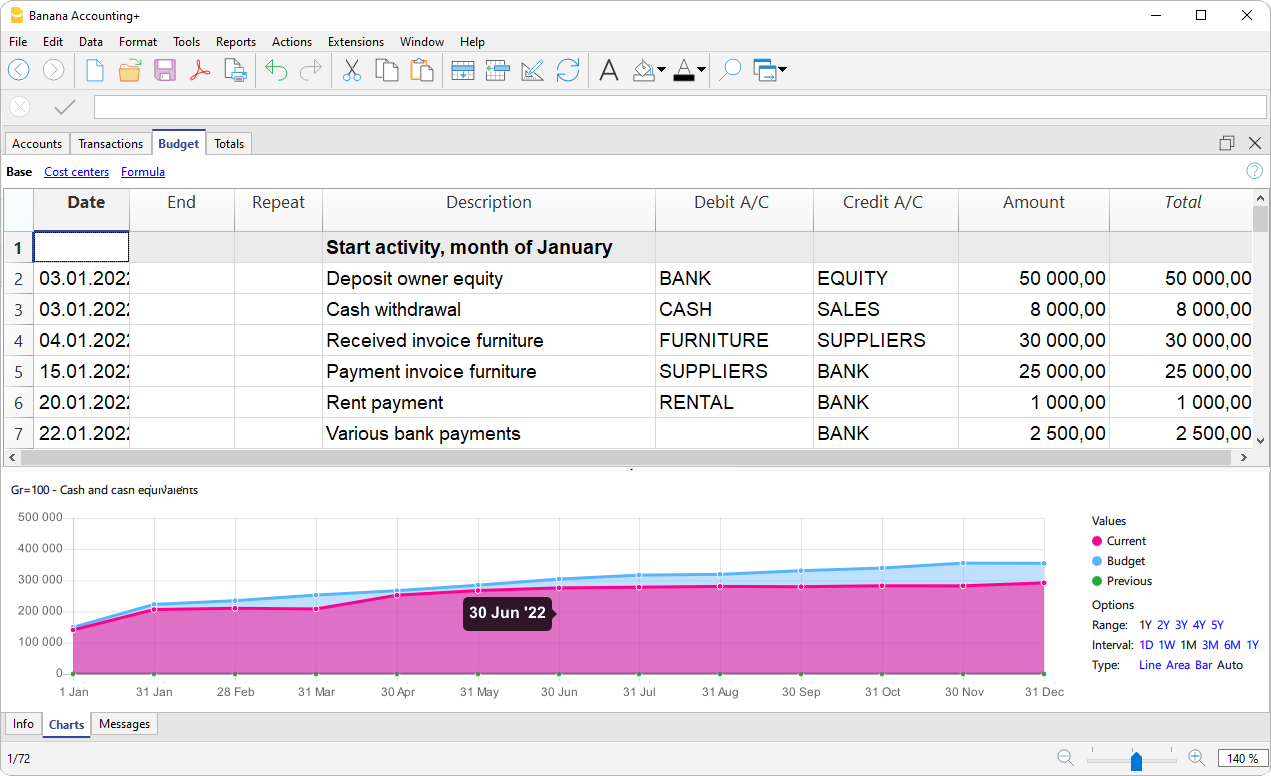
Budget and Cash plan
Easily create your budget for effective cost control and an eye on the future!
In the Budget table enter forecast entries with a future date and indicate their repetition. The programme projects your forecasts by month, quarter, half-year, year and over several years.
A great tool for anticipating times and taking timely action to achieve your goals.
Import and Automation.
Thanks to the innovative data import features from bank statements and the automation of saved rows using Rules, accounting becomes simple, immediate, and error-free.
During the import process, for each transaction that is expected to repeat in the future, you can create a Rule by entering the corresponding account, VAT code, and optional cost or profit center. In subsequent imports, all transactions that match these Rules will be automatically entered and completed by the program, drastically reducing data entry times.

Unique prints thanks to the Extensions
The Extensions are additional programs that extend the functionalities of Banana Accounting Plus. Thanks to them, you can also obtain:
- Donation certificate for associations
- List of books for libraries
- Financial analysis and cash flows
- Portfolio management for securities
- Construction and renovation management
Many of these extensions require the Advanced plan

Customising the Transactions Table
The Transactions table is the hub of accounting and can be customised to support a multitude of functions, such as entering quantities and prices, VAT, cost and profit centres and much more.
The table can be customised by displaying or adding columns, so that certain functions are only activated when needed.
Default settings
The Transactions table is set up with standard columns, such as Date, Description, etc., which are already visible when the file is opened. The user can decide which columns to make visible and customise with the command from the menu Data > Columns setup.
There are specific columns for the type of file opened. For example, in double-entry accounting, there are Debit and Credit columns, whereas in Income and Expense accounting, there are Account and Category columns.
The columns common to all accounts are fully explained on the page Columns of the transactions table - Double-entry, as listed:
- Columns for entering different dates
Currency date, document date, due date or estimated date - Documents
Columns to insert references to documents or protocol. - Remarks and observations
To add additional information of all kinds. - Links to digital documents
To immediately display the movement receipts. - Document type.
To indicate the type of entry (e.g. 01 means opening balance.) - Invoice number
- Cost and Profit centers
To subdivide costs and revenues into specific accounts for projects or other - Segments
To obtain branch or business sector reports.
Here listed the columns only present in certain types of accounts:
- VAT management
Columns only present in accounts with VAT. - Multi-currency accounting
Columns only present in double-entry accounting with multi-currency.
Customising the display
You can adapt the table display to your specific needs, as follows:
- With the command Data > Column setup
- By changing the width and formatting of columns.
- By changing the order in which columns are displayed.
- By making visible or hiding columns already present.
- By creating or modifying new views with display settings (Tables setup)
Adding additional columns
You can add additional columns according to your needs. The options are:
- Add preset columns with specific functionalities
For example, columns for quantities, unit price (as explained in the next section). - Add free columns (Data > Columns setup)
To insert any other information required. - Add columns and link them to tables added by the user
You can add additional tables, e.g. the Projects table, and then create a column where you can enter the name of the project.
Additional columns quantities and prices
You can enter quantities and prices directly in the accounting file.
Specific columns are displayed from the menu Tools > Add / Remove Functionality. The following columns are added in bulk:
- Article identifier
Which is linked to the Items table - Quantity. A numerical value
- Unit price
- Descriptive quantity.
If you enter a value in the quantity or price column, the programme automatically calculates the amount by multiplying the two values.
These columns can be used for various purposes:
- Manage quantities and prices for cost accounting.
- Specify the elements of an invoice.
- Enter the movements of items indicated in the Items table or to manage the purchase and sale of securities (see Portfolio extension).
Link to the Items table
The Items table is a kind of mini-warehouse integrated into the accounting , where:
- You can enter the list of products, quantities and prices.
- When you enter an item in a line in the transactions table, the programme automatically takes over the description and sales price.
- If you enter transactions in the Transactions table by entering quantities, the programme updates the current quantity in the Items table.
Additional Payment Management Columns
They are added from the menu Tools > Add / Remove Functionality
Please refer to the explanation in the Payment Management page.
Additional columns end date, repeat
You can also add specific columns to insert automatic movements in the Recurring Transactions table.
They are added from the menu Tools > Add / Remove Functionalities
Please refer to the explanation Automatic Transactions.
Recurring Transactions table
The Recurring Transactions table has the same columns and arrangements as the Transactions table. If you change the display of columns in the Recurring Transactions table, this will also be changed in the Recurring Transactions table.
The grouping system in Banana Accounting+
Banana Accounting's grouping system is used to totalise the amounts of accounts and groups quickly and easily. The programme gives you maximum flexibility to create as many levels of totalling as you want.
Grouping is a very powerful tool for calculating totals automatically.
Where it is used
- In the Accounts and Categories tables to define the structure of the Balance sheet and the Profit & Loss Statement.
- In the VAT Codes table to group VAT codes
- In the Items table in the Stock Application.
- In the Items table in the Fixed asset register Application.
▶ Video: Grouping and totalling system
How it works
Grouping is always based on two columns:
- The Group column, where group identifiers are indicated, which may be textual or numeric.
- The column Sum In, where for each account or group row the Totalisation Group is indicated.
Each group row is a total row, where:
- Group balances are the sum of the rows that contain the group name in the Sum In column.
- The programme calculates the totals of all columns containing amounts (type Amount), both the predefined ones (Opening, Balance, etc.) and those added manually.
Grouping allows the creation of many levels of totalisation.
The logic of the programme
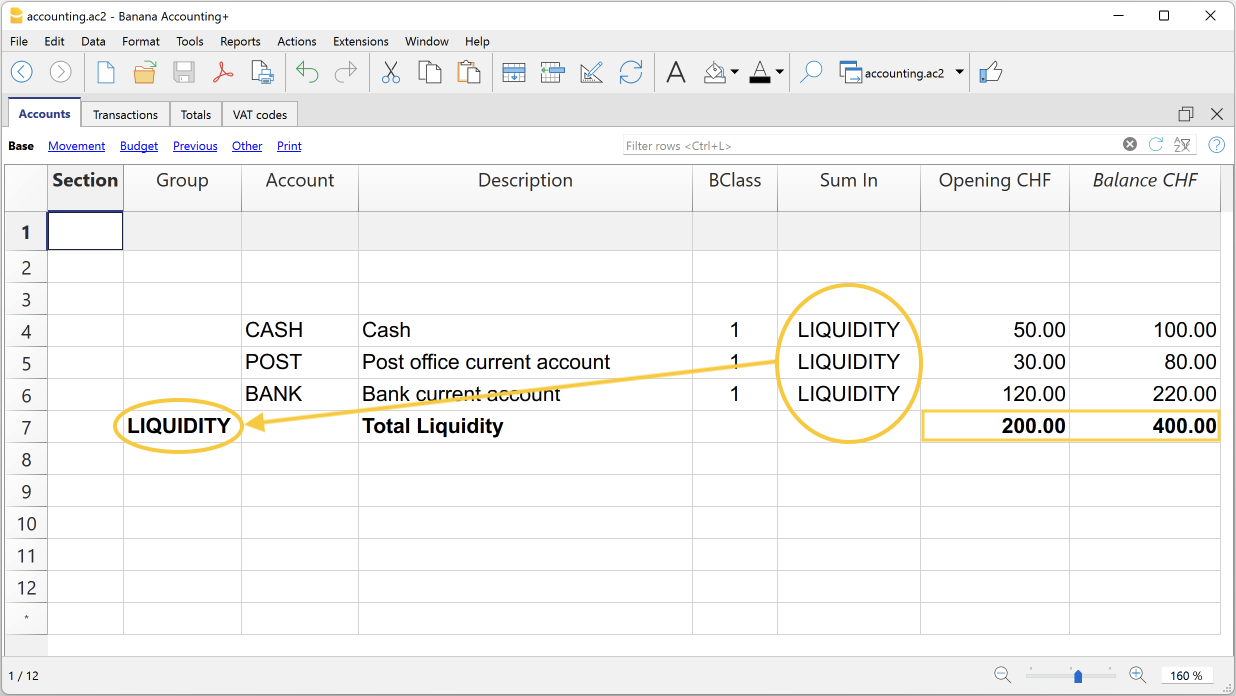
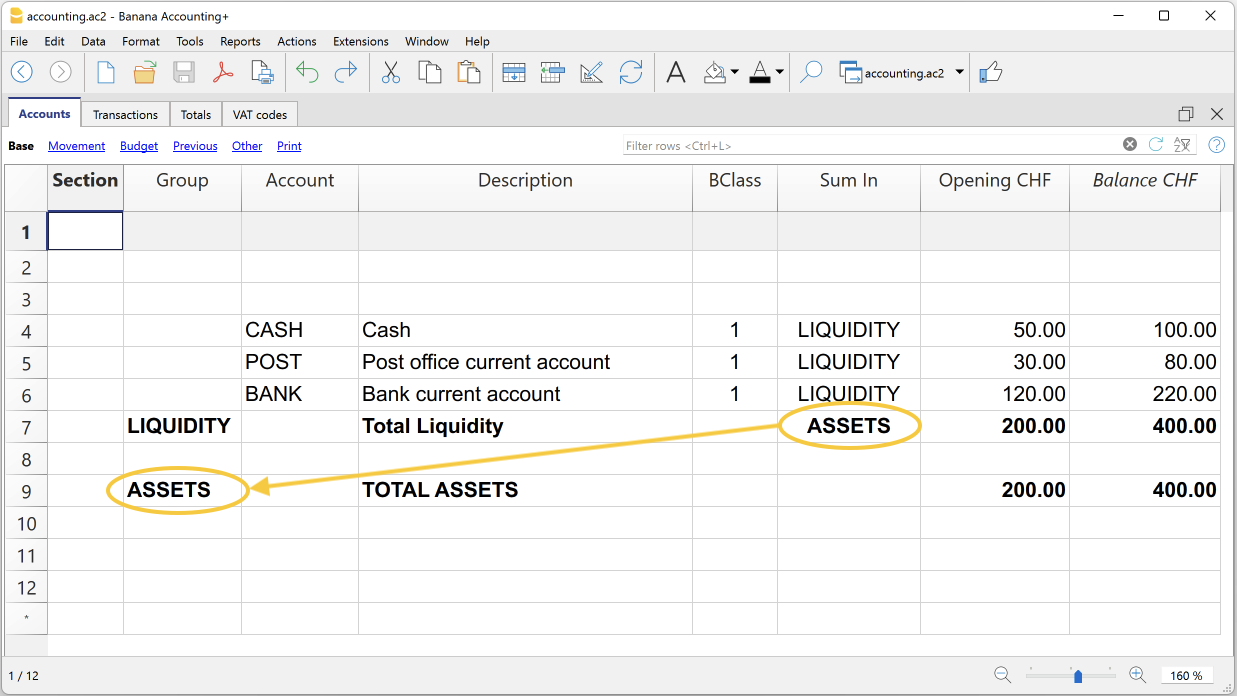
To understand the logic, let us present an example of a small part of the chart of accounts. For the accounts Cash, Post and Bank we create the Liquidity group:
- In the line below the liquidity accounts, in the Group column, enter the name of the Liquidity group.
- In the Description column, you enter the description of the group.
- In order for the programme to be able to update the balances in the liquidity group, it must be indicated which accounts are to be totalled.
In the Sum In column of the Cash, Post and Bank account, the name of the cash group is entered. The balances of the group are updated immediately.
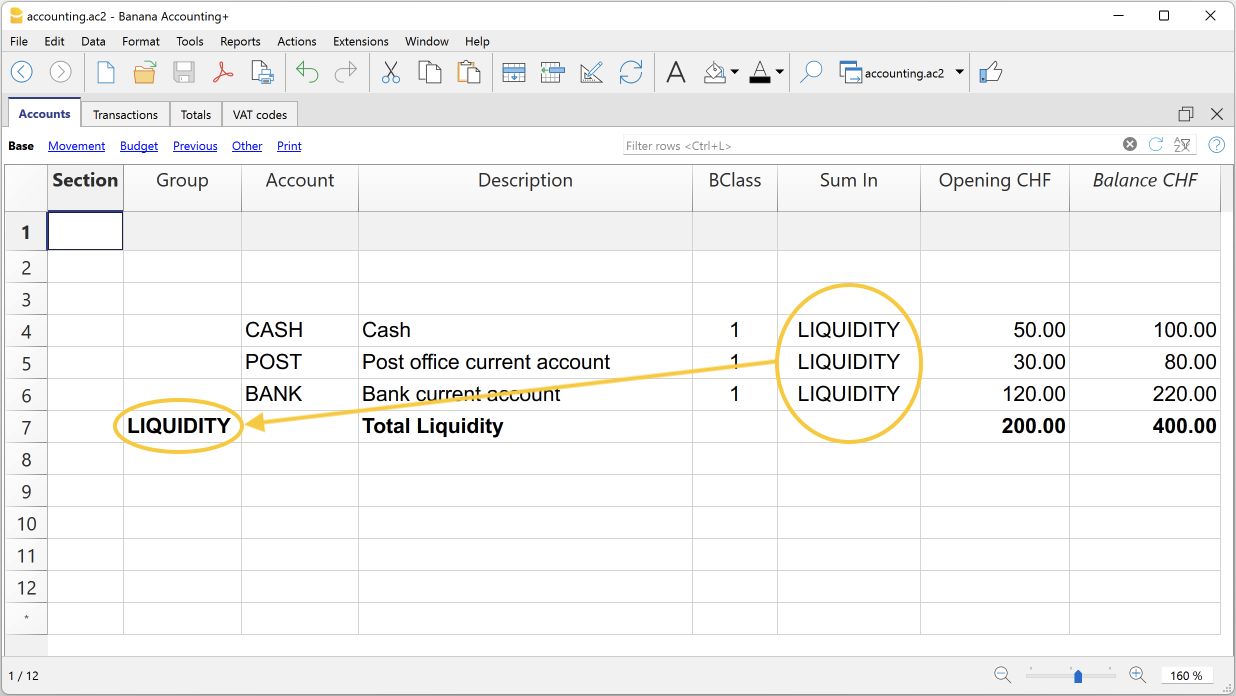
Using the same logic, we can also group groups. In fact, groups can also be totalled into other groups at a higher level.
Suppose we add a group into which to group and then total the Liquidity group.
- In the line below the Liquidity group, in the Group column, the name of the Assets group is entered.
- In the Description column, you enter the description of the group.
- In order for the programme to be able to update the balances in the Assets group, it must be indicated which groups are to be totalled.
In the Sum In column of the Liquidity group, the name of the Assets group is entered. The group's balances are updated immediately.
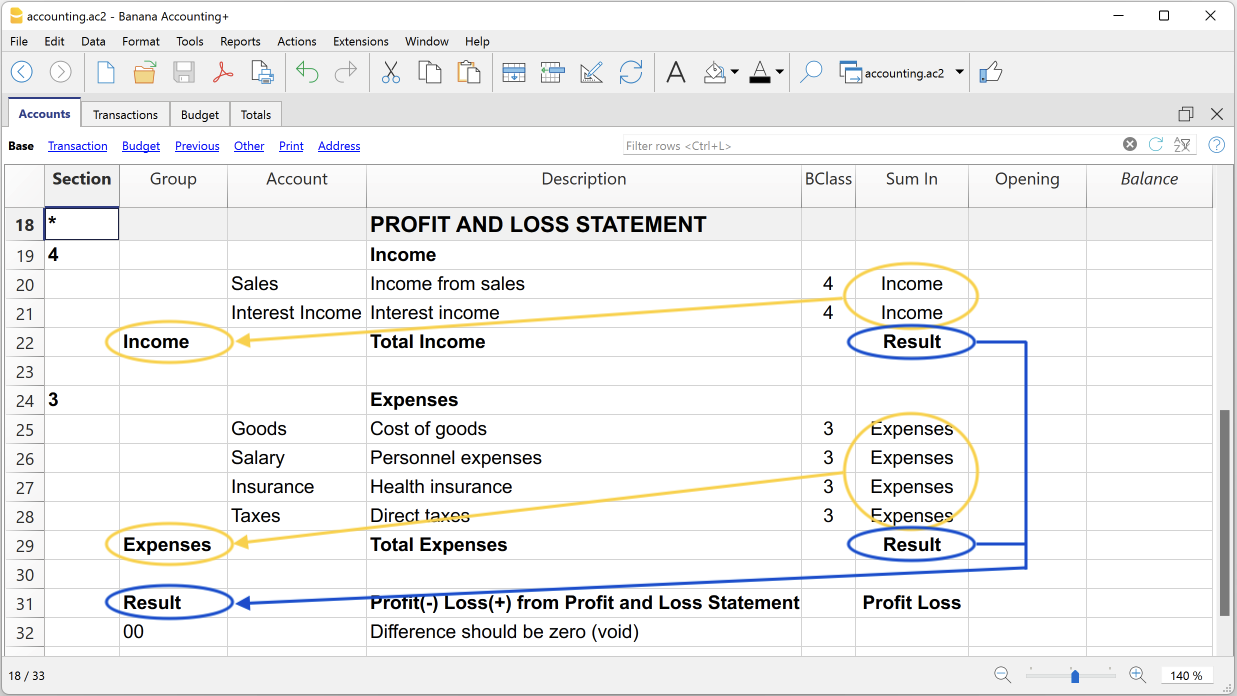
Following this logic, it is possible to create a structure with groups and subgroups for the entire chart of accounts, in order to create charts of accounts suitable for any specific country and requirement.
The exact same logic can also be applied for grouping VAT codes in the VAT Codes table, and also for grouping items in the Items table of the Warehouse and Fixed asset register.
Extensive use of the totalisation system
The totalisation system is very flexible:
- Accounts and groups can be added together in a group.
- Title texts can be assigned the group to which they belong.
- Any kind of numbering (numerical and/or letter) can be used.
- Up to 100 totalisation levels can be created.
- Group totalisation is independent of the sequence of rows:
- The total row can be defined before and after the account or group rows.
- The total row can also be defined in a completely detached position from the account and group rows, as in the case of the Accounts Payable / Suppliers ledger.
- The same account cannot be totalled in two Groups at the same time.
- The system is also used to total the Cost Centres and Segments.
The totalisation of amount columns
The calculation procedure totals the columns of type amount.
- The amount columns defined by the system are totalled.
- The amount columns added by the user are totalled.
The calculation sequence
The programme calculates totals as follows:
- Clears the column amounts of the Group rows.
- Adds up the amounts of the Accounts rows in the Group rows (first level of calculation).
- Adds up the balance of the Group rows in the higher level Groups.
Repeats the operation until all levels are calculated.
When a Group is totalled in a lower level Group, an infinite error loop is created.
Error checking and reporting
When creating groupings, the programme checks and reports any errors so that they can be corrected immediately.
When a non-existent group has been indicated in the Sum In column, the programme reports the error 'Group not found'. In this case it is sufficient to:
- Create the group in the Group column.
- Recalculate accounting with the command Check and recalculate accounting
- Recalculate all totals with the command Recalculate totals.
Rename groups
With the Rename command, existing group names can be renamed automatically, without having to manually change the matches in the Group and Sum In columns.
Printouts
When printing the Balance Sheet, Profit and Loss Statement or other reports that contain groupings, the printout shows the order of the groupings as they have been set in the various tables.
Customer Management
Customer management in Banana Accounting Plus allows you to record, organise, and manage customer information and allows you to keep track of customer transactions and payments, payment due dates, and contact information. You can track customer payments, update the payment status of issued invoices as well as enter and print invoices.
Customer management is a feature available in all accounting applications of Banana Accounting Plus, but it is especially used in double-entry accounting.
Please also visit Supplier management
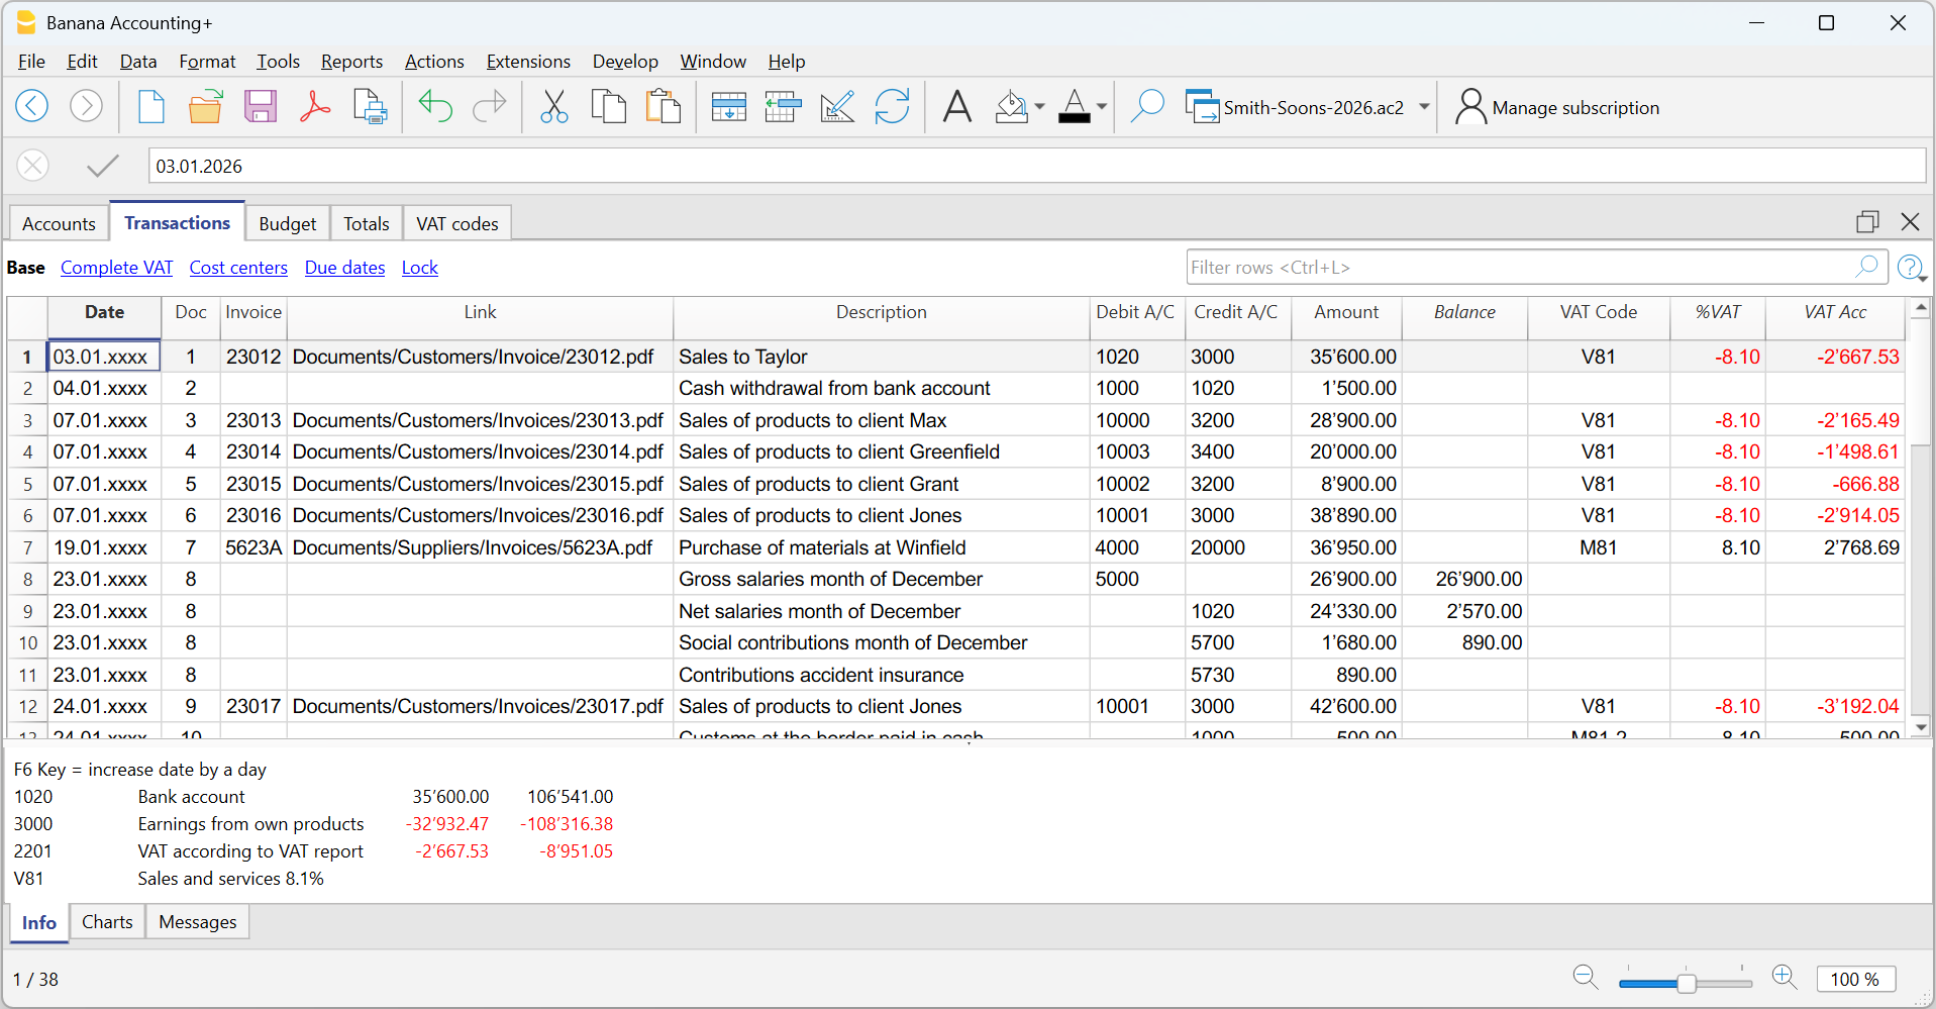
Recording customer transactions
The Transactions table is the heart of Banana Accounting and is used to record all transactions, including customer transactions, simply by entering the customer's account. You work quickly because you can select, copy and paste customer transactions that have already been entered previously. If you make mistakes you can correct them so it is easy to record:

There are columns for entering various information, as:
- The date of the transaction, due date, expectation date and payment date.
- The Invoice Number.
- The Debit and Credit Account where to indicate the customer account and the counterpart.
- The amount.
- The VAT codes for the automatic calculation of VAT.
- Links to digital documents (e.g. the invoice issued to the customer, or notes in pdf).
Customer accounts
Customer accounts are used to record all transactions relating to the customers of a company.
The main functions of customer accounts are as follows:
- Create an account for each customer and keep track of all transactions made.
- Record the invoices issued for each customer.
- Record customer payments and associate them with the invoices issued.
In Banana Accounting:
- Customer accounts and addresses (first name, surname, company name, address, customer language, VAT number, etc.) are set up in the Accounts table.
- Account movements on the accounts are entered in the Transactions table.
- After each entry, all customer account balances (Accounts table) are automatically updated and you immediately have an overview of the outstanding balances.

Recording issued invoices
The invoice is used for accounting and tax purposes, as it allows you to accurately record the company's revenues and expenses, and to calculate sales or purchase tax.
If you issue invoices in Word, Excel or other programs, you can record the issuance in accounting so that you know what the customer owes and, if necessary, send reminders.
In Banana Accounting, the invoices are recorded in the Transactions table:
- By entering the date and description
- By entering an invoice number
- By recording in the Debit account the customer's account and in the Credit account the revenue
- By entering the VAT code for sales or services. The calculations and VAT amounts are entered automatically.
When the invoice is posted, the programme automatically creates the invoice and prints it out.
Creating and printing invoices
Directly in the Transactions table, you can also enter transactions to create invoices as simple entries in the Transactions table.
By entering the Debit and Credit account, in addition to printing the invoice, you have the accounting of the invoice in the accounting file at the same time.

From the menu, Reports > Customers > Print Invoices, you can:
- Preview and print the invoice.
- Choose the Print Layout and set other information to customise the printout, such as the QR Code.
More customisation is possible with the Advanced plan.

Recording collections
In Banana Accounting, collections are recorded in the Transactions Table in one of the following ways:
- Manually:
- The date and description are recorded
- In the Invoice column, by entering the customer's account, a drop-down menu displays the invoices still open, simply select the invoice collected and press the Enter key, the program automatically enters the customer's account in Credit, and the amount of the invoice. Then simply enter the cash account in Debit to complete the transaction.
- Importing Data from Account Statements with Rules
- The programme imports data from ISO 20022 account statements and with the use of Rules the programme enters the complete entry, entering all data, without manual intervention.
Open invoices
Open invoices per customer are issued invoices that remain open or outstanding because the customer has yet to make full payment.
Open invoices per customer can be managed via an accounting ledger that keeps track of invoices issued, payment due dates and payments received. In this way, the seller can monitor the financial situation of each customer and send payment reminders if invoices remain open for too long.
It is important to note that open invoices per customer can affect the liquidity of the seller's company, as the money tied up in these invoices has not yet been collected.
Banana Accounting automatically generates an open invoice report where you can immediately see which invoices are still outstanding and from which customer, as well as the total amount of outstanding invoices.
There are two types of reports:
- Open invoices by customer, where all open invoices for each customer are listed.
- Open invoices by due date, where open invoices are listed in order of due date.

The due date of an invoice can be set in different ways. More information can be found on the following page Due dates and payment terms

Account card
Account cards are documents used in accounting that record the financial transactions of a company. Each card represents a specific account in the company's general ledger and contains detailed information on the transactions involving that account, such as the date of the financial transaction, the type of transaction, the amount and the description of the transaction.
In Banana accounting, on the basis of the data entered in the Transactions table, the programme automatically prepares the Account card for each customer, where the opening balance, all transactions and relative closing balance are shown. You can also have the account card by period.

Reminders
Payment reminders are used to request customers to pay overdue or outstanding invoices.
Through the function of payment reminders you speed up the payment process from customers, reducing delays, and at the same time effectively manage cash flow.
Banana Accounting provides functions to:
- Identify overdue or outstanding invoices.
- Generate payment reminders.
- Customise payment reminders.
In Banana Accounting Plus you can print recalls in two different ways:
- With Reminder layouts
- Print reminder summary (list of overdue invoices).
- Print without QR payment slip.
- Limited customisations.
- Function available in Banana Accounting Plus - any plan (excluding Free plan limitations).
- With Invoice layout
- Print with QR payment slip.
- Layout customisations.
- Requires Banana Accounting Plus Dev-Channel version and Advanced plan.

Credit notes
A credit note is an accounting document used to correct or cancel an invoice already issued. It may be issued for a number of reasons:
- Reimbursement of an overpayment
- Reduction in the price of a product or service
- Product return
- Correction of an invoicing error
In Banana Accounting you account for credit notes in the Transactions table, entering the revenue account in the Debit account and the customer account in the Credit account; the VAT code must be entered with a minus sign in front, so that the VAT amount is reversed at the same time.
The programme uses the accounting entry of the credit note to automatically create a printout of the credit note.

Setting up and using the customers and invoices features
- Setting up accounting on actual bills issued (accrual principal) or
- Setting up accounting on a collected cash basis.
- Setting up Customers settings.
- Setting up the Transactions table and entering the invoices.
- Reports for open, overdue and issued invoices.
- Generating invoices.
Notes
- Multi-currency accounts: reports are based on the customer's account currency balances; possible exchange rate differences will not be taken into account.
In the Issued invoices table, the recordings of exchange rate differences are also listed, whereas only the customer's currency amount is used in other printouts.
Example file
Customers' register and checking of open invoices
Directly in the accounting you can:
- Prepare customers' accounts, with the related addresses and other customers' data.
- Add to the transactions:
- the data related to the issued invoices (invoice number, customer, amount, due date).
- the data related to the payment for the invoices and the issuing of credit notes, if any.
- Retrieve the list of your Payments schedule
Other features available:
Addresses | Customers / Suppliers register | Members
In the Addresses view of the Accounts table, there are columns to manage the addresses of customers, suppliers or members.
Address data are essential in order to manage billing, reminders and to control receipts and payments.
If columns for managing address data are missing in the Accounts table, you can add them:
If IBAN column is missing, your accounting file has an old configuration and you need to convert it with the command Tools > Convert to new file...

In the Accounts table the command will add:
- The Address view which displays columns for entering address data.
To change the display or arrangement of the columns use the Setup columns command.
The columns of the Address view

Prefix
Insert courtesy code (Mr., Mrs., Doctor or other).
First name
The name of the customer, supplier or member.
Family name
The name of the customer, supplier or member.
Organization
Enter the name of the company, of the association.
Street
The street where the customer, supplier or member resides.
Address extra
Column to enter other address data, such as the post office box, or to enter a very large address.
Postal Code /ZIP
The postal/ZIP code.
Locality
The name of the city of the customer, supplier or member.
Country
The nation inherent in the city.
Country Code
The country code.
Language
You can define the language for each customer, supplier or member account. This allows you to view and print the documents (eg invoice) in their language.
Indicate:
- de - for German
- fr - for French
- it - for Italian
- en - for English
- es - for Spanish
- nl - for Dutch
- zh - for Chinese
- pt - for Portuguese
- ru - for Russian
Main phone
Landline phone number
Mobile
Mobile phone number
Fax
Fax number
Email work
email address.
www
website address of the customer, supplier, association.
Birth
The date of birth of the customer, supplier, association.
Days
Enter a number of days within which the collection and payment must take place
Limit
If a credit is made, the credit limit is indicated, or the debit limit if it is a supplier.
Bank name
The name of the customer's, supplier's or member's bank.
IBAN
IBAN number of the customer's, supplier's or member's bank.
Bank clearing
The identification code of the customer bank, supplier or member.
The accrual method management
Introduction
Banana Accounting allows you to manage the customers both on an accrual or cash method. A detailed explanation is available at the page Accounting with accrual or cash method.
The following explains how to set up separate accounts for each customer and a group for customers, so that you can have a list of separate invoices per customer available.
In case you only have few invoices and don't want to keep a detail per customer, you may also keep one single account only to record all customer invoices. The list of invoices will thus apply for all customers and not for any single customer.
Setting up the Customers' register
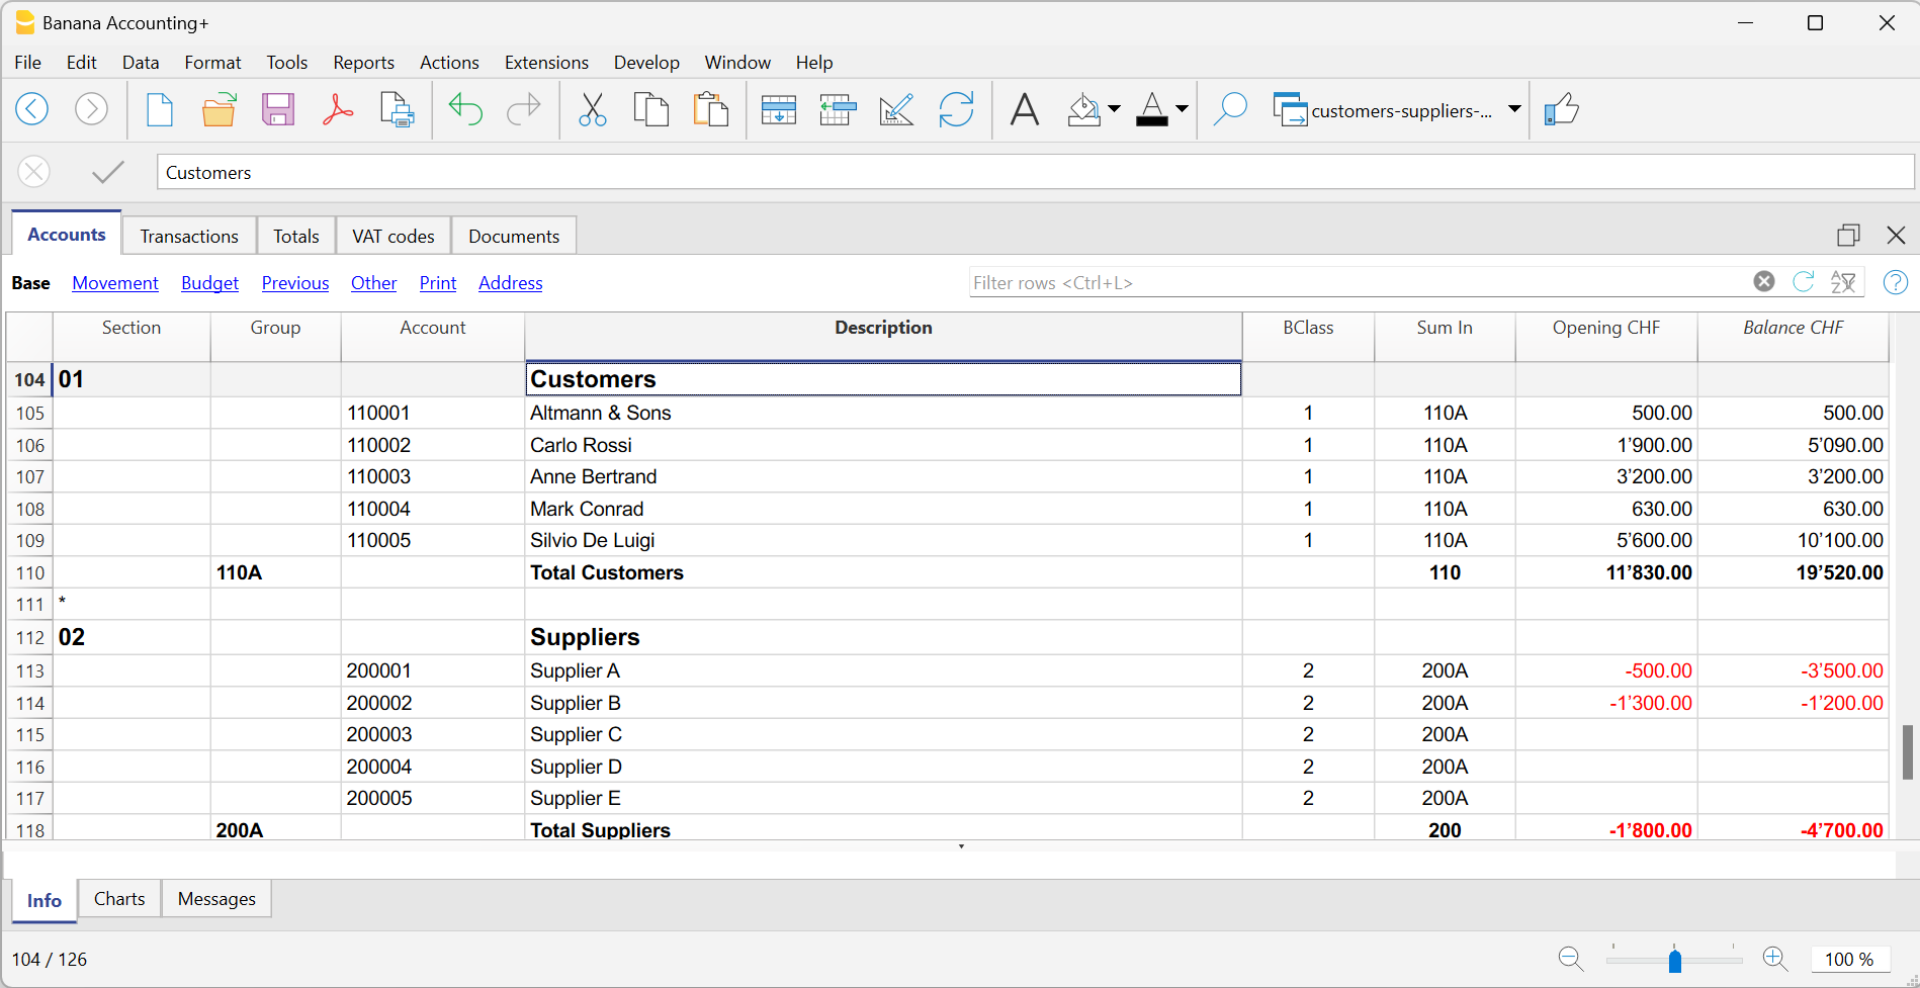
The customer ledger with its accounts and/or groups is inserted at the end of the chart of accounts with a separate section.
The following settings must be added to create the ledger:
- A * section (header) (see Sections)
- A 01 section for the Customers (see Sections)
- The Customers accounts that are required (see Adding a new account). Each customer will be allocated one row in the Chart of Accounts and a his/her single account number. Account numbers is at your discretion (see Accounts) it is however advisable to use numbers only, especially for the management of payments.
- A group where all customer accounts are totaled.
- This group, in turn, is totaled into a group present in the Assets.
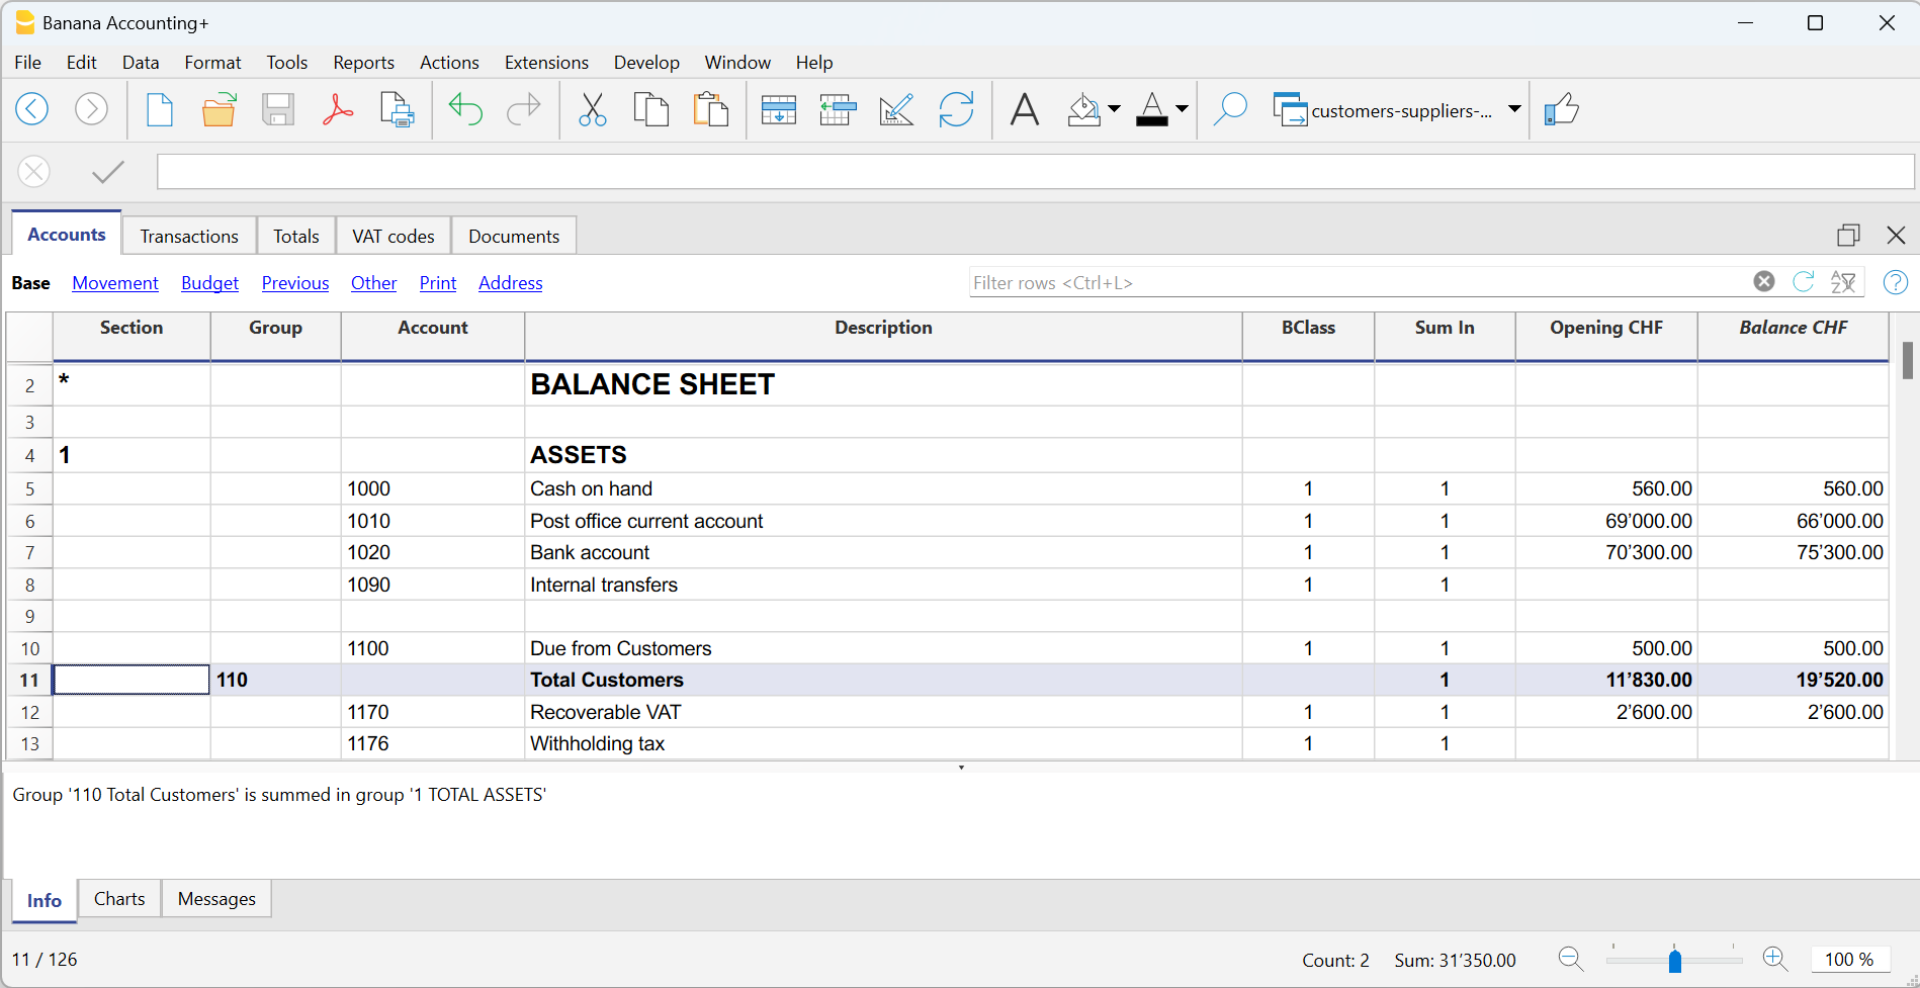
Alternatively, customer accounts and/or groups can be entered directly in the assets section.
- The total for Customers will be totaled in the summary group 110A of the Sum in column.
- The same code or number used in the Sum in column (110A), must be used in the Assets Group column, in the row corresponding to the Total Customers of the Balance Sheet.
- The groups' numbering can be freely chosen (see Groups).
Recording an issued invoice
The issued invoice is registered by entering the following data in the respective columns:
- Date of the invoice and any document number
- Invoice number - It is very important to enter the invoice number in the Invoice column, because it is used to automate the various customer reports and to automatically close the customer's open invoice when recording the payment.
- Customer account in Debit and Revenue account in Credit
- The VAT code corresponding to the sale.
Recording a payment
There are two ways to record the collection of a customer invoice:
- Manual recording of customer invoice collection.
- Automatic recording with data import from account statement in ISO 20022 format.
The collection of a customer invoice is recorded by entering the following data in the respective columns:
- In the Date column enter the transaction date
- In the Type column enter 11 (customer payment)
Note: If an advance payment is to be recorded by the customer and is to appear on the invoice, the cell in the Type column must remain empty. - In the Invoice column enter the paid invoice number.
- With a double-click on the cell, the program will show a list of all open invoices.
Alternatively, you may also press the F2 button. If the F2 button doesn't work, you need to activate your customers/suppliers settings, by entering your customers register group, via the Reports menu → Customers → Settings. - Select the number of the paid invoice. The program will automatically enter:
- In the Description column, the payment description
- In the the Credit account column, the customer account number
- In the Amount column, the invoice amount.
If the entered amount does not include VAT and the customers are set up as cost centers, you must configure the cost centers correctly to use the amount with VAT in File and accounting properties (basic data), VAT/Sales tax tab. See also VAT amount with cost and profit centers.
- With a double-click on the cell, the program will show a list of all open invoices.
- In the Debit column, you must manually enter the conra account (the bank account where the amount has been credited).

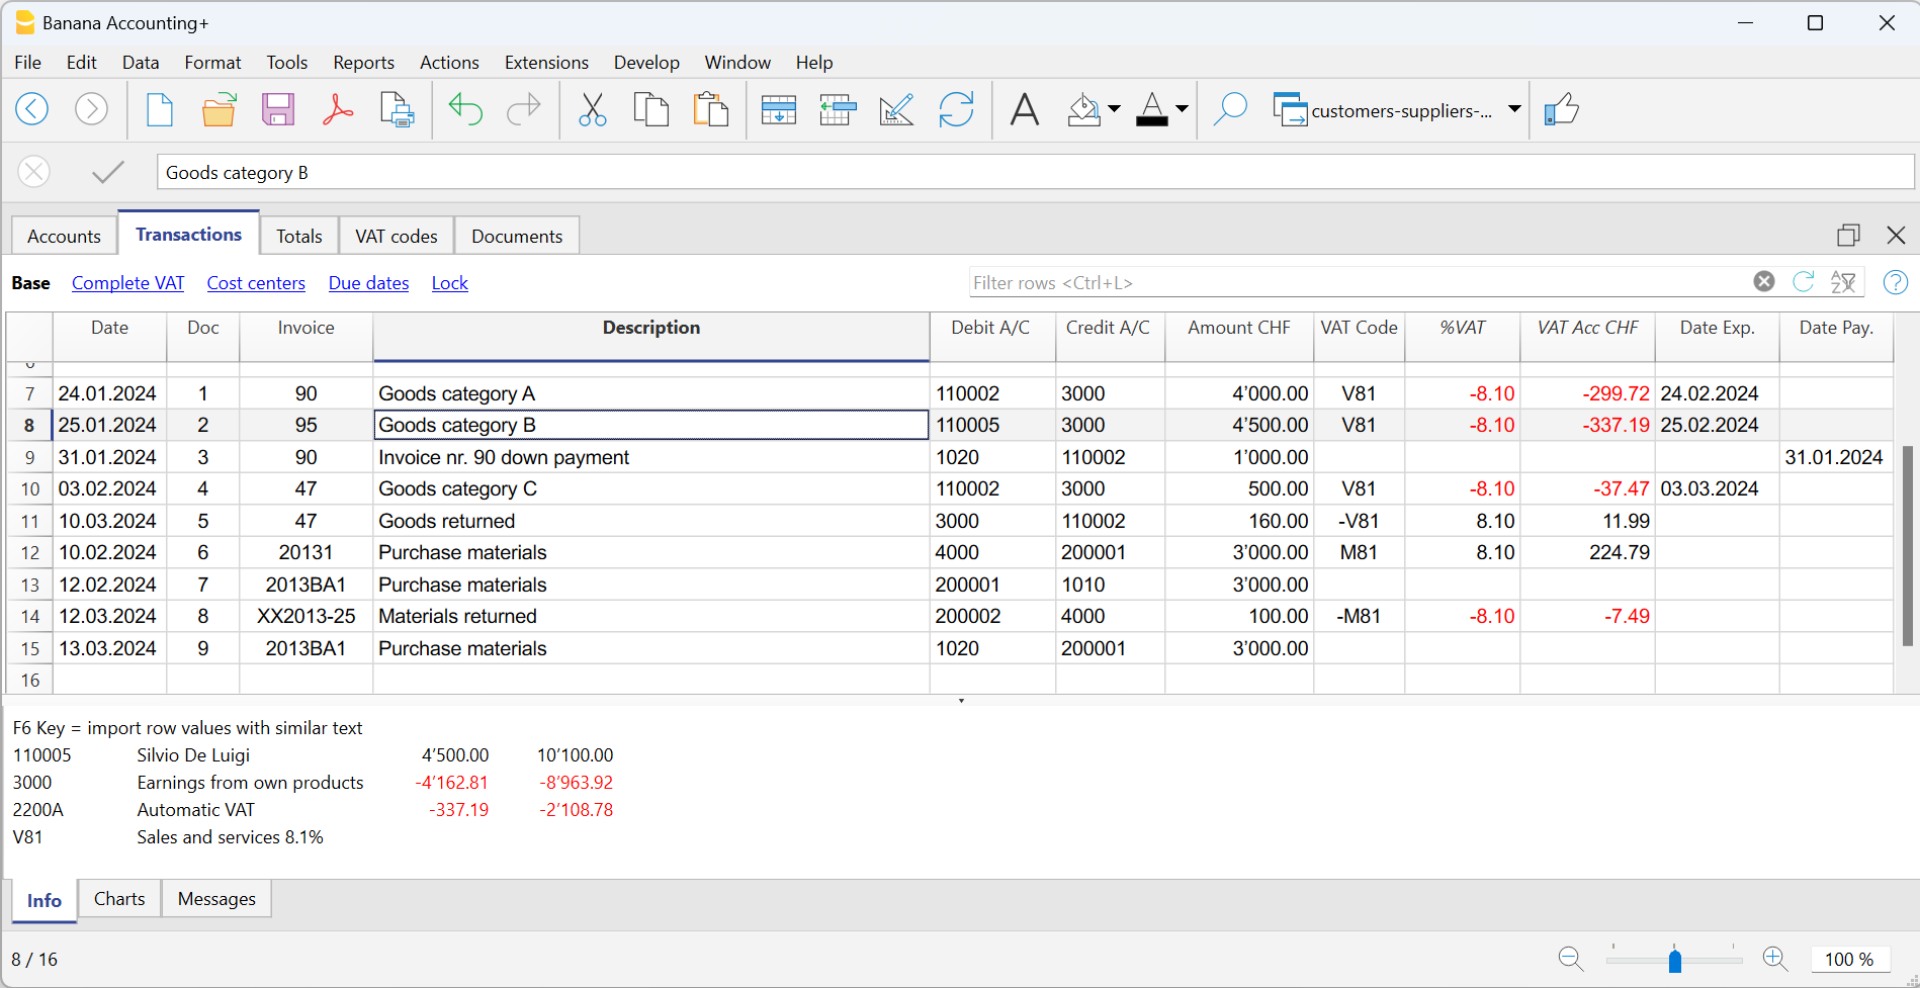
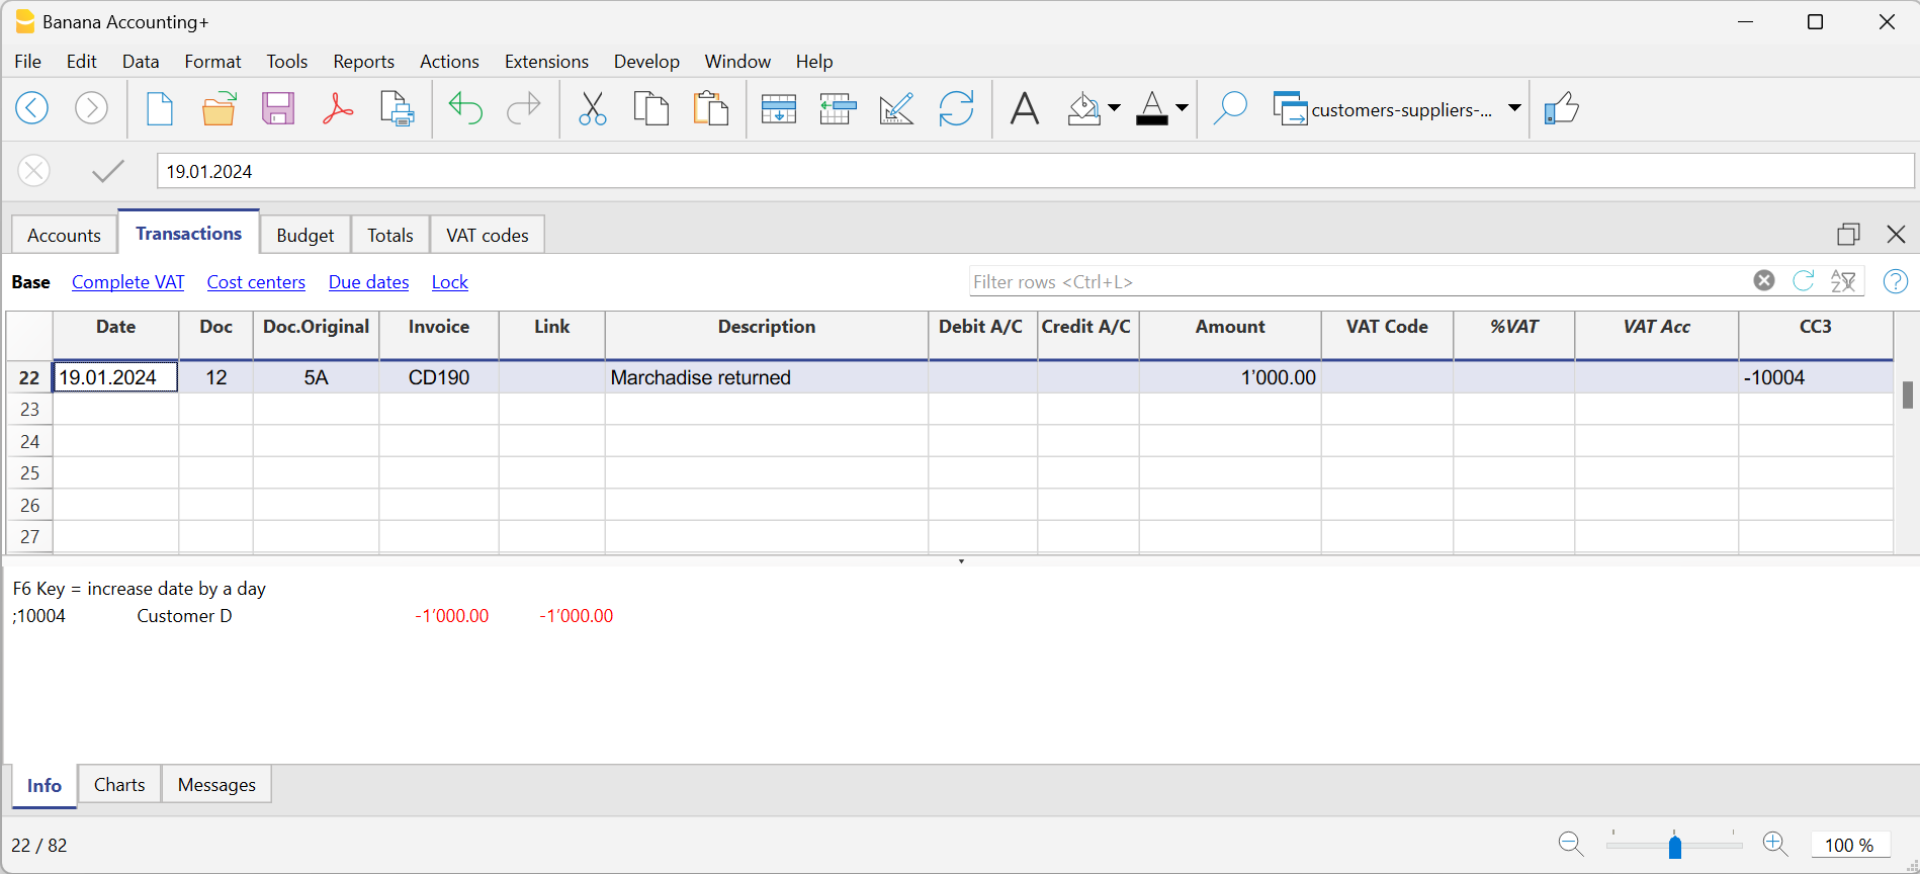
Recording a credit note
In order for the amount to be deducted from the initial invoice, the same invoice number must be used.
- If the adjustment document (for example a credit note) has a different numbering that you still need to keep available, write this reference in another column, for example Doc Original.
- Enter data for the columns Date, Doc., Original Doc, Description
- The VAT Code must be preceded by the minus sign "-" so that the VAT operation is reversed, or use a specific VAT Code for debit notes (set in the VAT Codes table).
Note: to print the credit note to be sent to the customer, it is necessary to indicate in the DocType: 12 column, see Entering a credit note.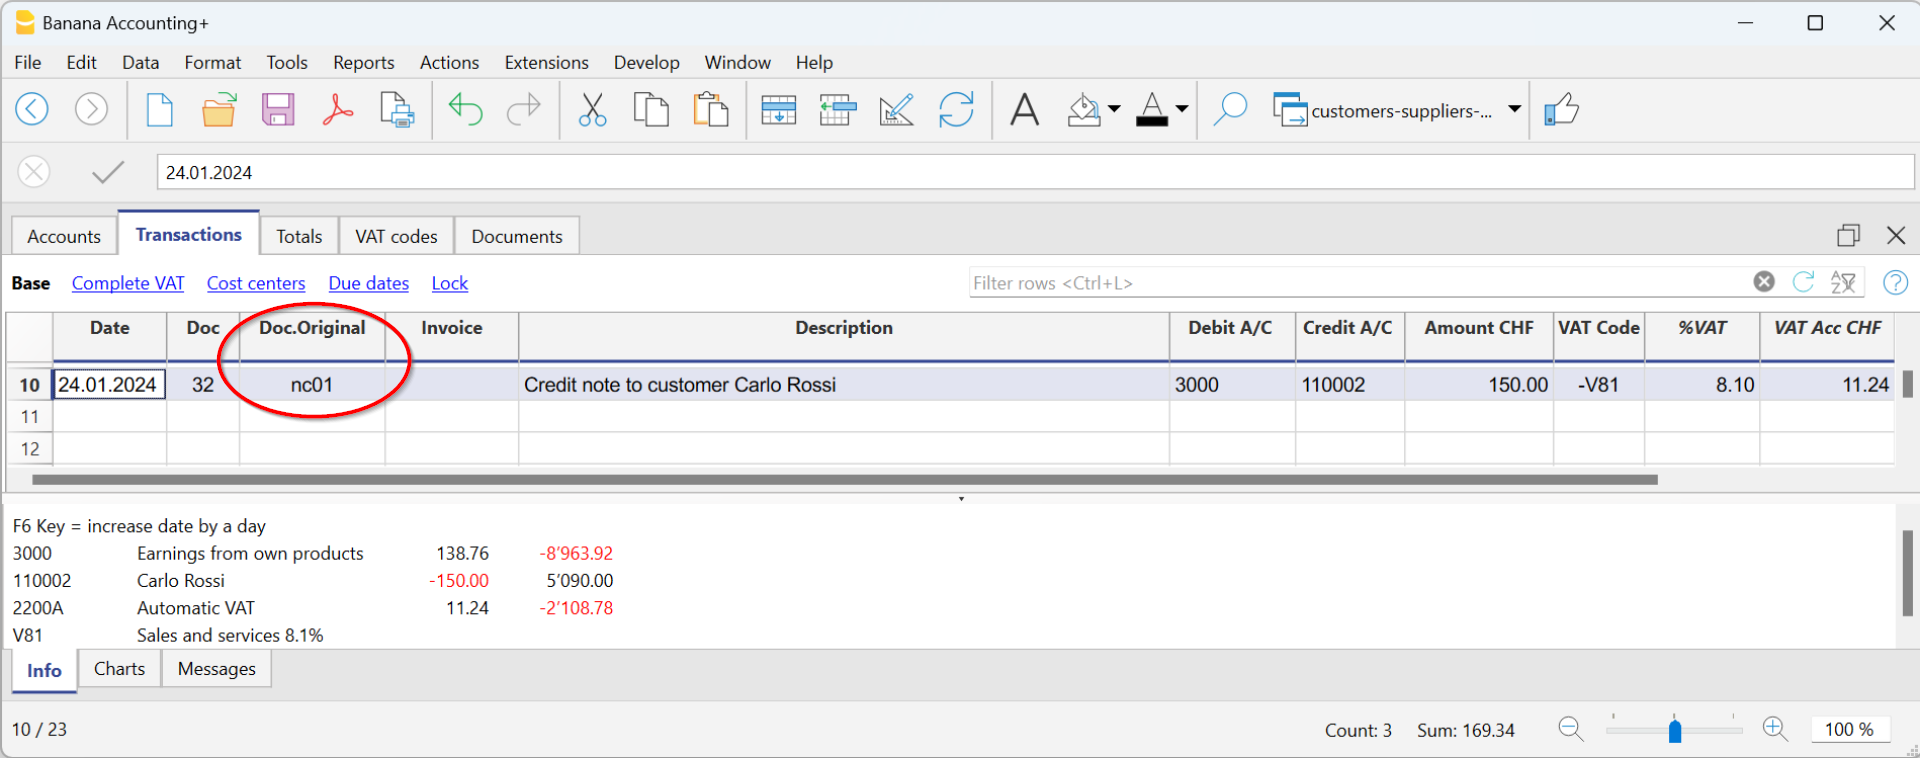
The cash method management
It is possible to manage the customers/suppliers register, even when using the cash method, as with the Cost and Profit Centers.
- We advise you to use the CC3 cost center (where the accounts are preceded by a semi-colon ";") to set up the customer and supplier register
- Set up the customers group via Reports → Customers → Settings.
For all Swiss users who manage the VAT on cash received, this setup is the best to manage the VAT. This setting allows to manage VAT optimally and to know the details for customers and suppliers.
By using this setup, the cost center balances for customers and suppliers will not appear in the Balance Sheet, but you will have all data and reports for internal purposes.

How to record when issuing an invoice
When you issue an invoice, record it as follows:
- In the Date column, enter the date of the invoice.
- In the Doc column, enter the document number if available.
- In the Invoice column, enter the invoice number.
- In the Description column, enter a description.
- In the Debit, Credit and VAT Code columns, do not enter any data.
- In the Amount column, insert the gross amount without any VAT code.
The VAT code in the case of cash management is recorded when the invoice is collected. - In the CC3 column, insert the CC3 account of the client without the ";" (ex. 10004).
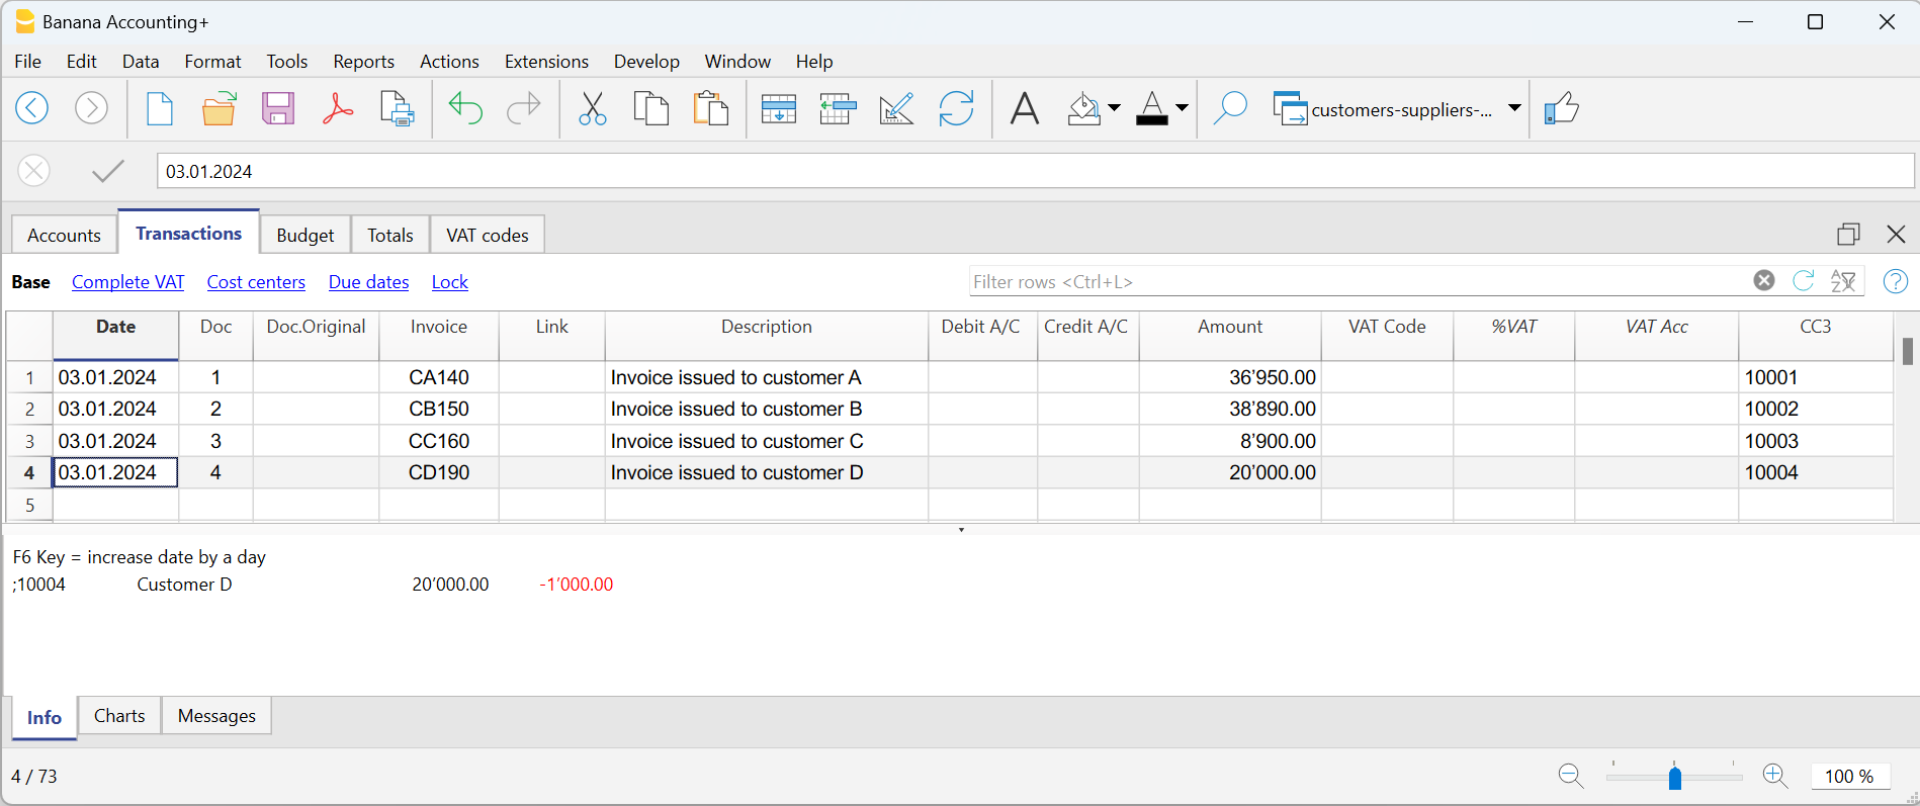
How to record when an invoice is paid
When you collect an invoice, record it as follows:
- In the Date column, enter the date the invoice was collected.
- In the Doc column, enter the document number if available.
- In the Invoice column, enter the invoice number collected.
- In the Description column, enter a description.
- In the Debit column, enter the bank account (or other cash account).
- In the Credit column, enter the revenue account corresponding to the invoice.
- In the Amount column, enter the gross amount.
- In the VAT Code column, enter the VAT code of the invoiced sales or service.
- In the CC3 column, enter the customer's CC3 account without the ";", with the minus sign "-" in front of the account (e.g. -10004).
In Integrated invoicing with Income/Expense accounting, with a customer ledger configured with profit centres, the option Record (+/-) cost centres as category should not be activated, as the account and category are not indicated when the invoice is issued.
More information can be found on page Clients and suppliers with VAT, using the Cash method.
How to record a credit note with cash method
For the amount to be deducted from the initial invoice, the same invoice number must be used.
- If the adjusting document (e.g. a credit note) has a different number, which you must still keep, write this reference in another column, e.g. Doc. Original
- Enter the data for the Date, Original Document, Description columns
- Leave the Debit and Credit columns blank
- Enter the amount and in column CC3, enter the customer's cost centre with a - sign.
N.B: In order to print the credit note to be sent to the customer, you must indicate in the column TypeDoc: 12, see Credit notes.
Customers' settings
To activate the options in the Customers menu, you need to set the customer group via the menu Reports → Customers → Settings menu.
The functions related to customers are explained below, but also apply to those of suppliers (Reports → Suppliers → Settings). the dialogues that follow are identical for both customer and supplier functionalities.
Without the indication of the group in the settings of the Customers menu, all functions are disabled.

General
Group or account
Select the generic group or account that contains the Customers or Suppliers list. The group or the account needs to be already present in the Accounts table.
For further details on customers or suppliers settings see:
- Setting up the Customers' register and Setting up the Suppliers' register (accrual method).
- Setting up the Customers' register and Setting up the Suppliers' register (cash method).
Due date invoices (in days)
The program uses the following order of priority to calculate the invoice deadline:
- The due date if you entered it in the transaction row.
If there are several dates for the same invoice number, the program takes into consideration the most recent one. - If the number of days is indicated in the PaymentTermInDays column of the Accounts table, the transaction date is incremented by the number of days set.
- The date of the transaction is incremented by the days indicated in the settings dialog box.
Include transactions from previous (years)
- If 0, the program will not display invoices from the previous year, but only the opening balances of the customer account.
- If 1, the program will also include the invoices of the previous year in the customer card.
- If 2 or more, the program will also include invoices from years before in the customer card.
Advanced

Link to the invoice document
You can save invoices (pdf, doc or other) and insert the link in the Link to invoice document cell. In the Transactions table, Invoice column, the program will open the document if the invoice number is indicated, allowing access to the content.
The link may contain:
- The XML name <DocInvoice> or the name of another column contained between <>.
If you use the "<DocInvoice>.pdf" command and you are on the row with invoice number 100, the program will try to open the "100.pdf" file. You can also prefix the filename with the name of a directory. - Any file name extension can be used. This extension must, however, be included in the list of file extensions considered safe (Tools- Program options-Advanced).
- It is also possible to indicate a path preceding the field name, that contains the name of the document to be opened.
- With the "c:\temp\<DocInvoice>.pdf" link and the invoice number 100, the program proceeds to open the file c:\temp\100.pdf.
- The name of the directory is relative to the directory where the file is located.
Alternative text for payment auto-completion (Payment %1)
The entry of a payment for an invoice can be facilitated by the auto-completion of the payment, which can be activated via the F2 key in the Invoice field of the Entries table.
The auto-completion completes the entry columns such as invoice number, description, amount, accounts. In the Description column, it is possible to edit the text 'Payment' followed by the description of the first line of the invoice (%1), indicating the desired text.
Invoice rounding (base currency)
Indicate the minimum amount for rounding the invoice total. For example:
0.01 rounds the invoice total to the nearest cent, 0.10 rounds to the nearest 10 cents.
If the field is empty, the invoice total in CHF is rounded to the nearest 5 cents, for other currencies rounding is to the nearest cent.
Disable auto-completion of invoice data
This option is usually deactivated when there are many entries in the accounts and the data entry is slowed down by the display of the list of open invoices in the Invoice field of the Entries table.
Disable automatic compensation of open invoices with opening balances
Automatic compensation (or settlement) refers to the process where the opening balance of the account is used to offset open invoices. When the opening balance can fully cover the amounts in the transaction table, the invoices are considered paid, and their status will be marked as "paidOpening." If the opening balance is insufficient to cover the invoices, they will remain open.
Disabling this function means that the system will no longer use the opening balance to offset open invoices. As a result, the opening balance will be displayed separately from the invoices in the invoice list.
If you wish to offset an invoice with the opening balance, regardless of the 'Disable automatic compensation' option, simply enter 'openBalance' in the invoice number field.
Opening an invoice document
- Position yourself in the Invoice column of the transaction row related to the invoice you wish to open
- Open the context menu with the right mouse button
- Select the Open Invoice Link command.
Miscellaneous operations
Below we will explain some very important features and settings to best manage your customers, to speed up the work and get the reports correctly.
- Displaying the Invoice column in the Transactions table
- Auto-complete of invoice data
- Extract invoice rows and Open invoice link commands
- Activating the Address columns (optional)
- Setting up the expiration date for invoices
- Setting up the Customers' parameters
Displaying the Invoice column in the Transactions table
If the Invoice column is not displayed in the Transactions table, it can be activated via the Data Menu → Columns setup → Invoice Doc column.
It is very important to enter the invoice number for various program automatism that concern the processing of the various reports and the closing of the amount in the customer card when the invoice is collected.

Access the invoice saved in pdf format by clicking on the cell in the Invoice column.

Auto-complete of invoice data
When a payment is being recorded or an issued invoice is being corrected, the program offers suggestions to complete the transaction automatically. Proceed as follows:
- Create a new transaction row and add the date and the eventual document number.
- Press the F2 key in the Invoice column :
- The list of still open invoices will appear. If you type an invoice number or a customer number, the list will be filtered according to the entered text.
- Select the invoice you want from the list and press Enter. The program will automatically complete the registration with the description, the debit or credit account and the amount. The data can of course also be changed manually.
- In addition to the date, it is also possible to indicate the customer account before pressing F2 to display the list of open invoices, in this case the list will be filtered with the customer account present in the transaction row.
Note
The list displayed in the Invoice column includes both the Customers' and Suppliers' invoices. A supplier's invoice may have the same number as the invoice of another supplier, because the criterion for display takes into consideration the invoice number besides the Supplier's account number.
Extract invoice rows and Open invoice link commands

The Extract invoice rows command displays the transactions for the selected invoice.
The command is available by clicking on the small blue icon at the upper right corner of the cell or with the right mouse button.
The Open Invoice link command provides the text, as defined in the Customers' settings (Reports - Customers - Settings - Advanced - Link to the Invoice document).
On the command line, you can also indicate other columns in the table using their XML name.
If the message 'File with extension considered unsafe' appears, add the extension (for example .doc) using the Tools - Program options, Advanced, File extension command.
Activating the Address columns (optional)
It is possible to add some specific columns in the Chart of Accounts, to insert the address and other customers data:
- Choose the Tools → Add new functionalities command from the menu
- Choose the Add addresses columns in the Accounts table command
(If you don't see this option in the list, it means that this function has already been activated).
In the Accounts table, the program will add :
- An Address view, where the added columns are made visible.
- The columns that allow the insertion of the address data and other information.
- To display one or more of these columns, use the Columns setup command from the Data menu.
- To create other views with only selected columns, use the Tables setup command (Data menu).
Select Accounts table, Address view and add the required information to the customers' accounts.

Setting up the expiry date for invoices
To set / modify invoice expiration dates, you may act on three levels, where higher priority is given to the first one. Expiration data will be displayed in the payments schedule and printed out on the invoice document.
1. level - setting the expiry date on an individual invoice
In the row of the Transactions table, where your invoice is entered, you will find an Date Exp. column when using the Due Date view. If a date is set up, it will have priority over dates set up on the 2nd or 3rd level.
2. level - setting the expiry date on an individual customer/supplier account
In order to set up an expiration date on a customer level, for example +20 days after issuance of the invoice, select the account in the Accounts table, using the Address view, go to the Days Column (PaymentTermInDays) to set up the number of days to be used.
3. level - general setup
Expiration dates applying to all Customers/Suppliers can be set up via menu Reports → Customers → Settings.
Setting up the Customers' parameters
- Select the Reports → Customers → Settings command
- Please indicate the group of the Chart of Accounts in which the different customers' accounts are grouped in "Group or account".
- For an explanation of the different options, go to Customers and Suppliers settings.
List of customer invoices
Displaying invoices issued to customers
Reports menu → Customers → Invoices issued to customers...

This dialog box is identical for both Customers and Suppliers functionalities.
The following explains the functions related to customers, but they also apply to suppliers.
All customers
Displays the account statement of all customers belonging to the group, as defined in the Customers and Suppliers settings.
Select a single customer
Displays the account statement for the customer selected belonging to the group defined in the Customers and Suppliers settings.
Displaying open invoices
Command: Reports → Customers → Open invoices by customer
Invoices showing an open balance are being listed in this table.
For multi-currency accounting, if there are unposted exchange rate differences for a particular customer, an 'Adjustment exchange rate differences' line will be displayed that balances the balance in the open invoice list with the balance on the account card.

Displaying overdue invoices
Command: Reports → Customers → Open invoices by due date
In this table, invoices showing an open balance are being listed, filtered by due date.

The due date of an invoice can be set in different ways. More information can be found on the following page: Due dates and payment terms.
Print statements
To view this window, it is necessary to configure customer settings.
Access the printing of the statements via the menu Reports > Customers > Print statements.
It is essential to install the Customer Statement layout for printing the statement. There are two ways:
- From the Extensions menu > Manage extensions select the Customer Statement layout from the list of the extensions and click onto button Install.
- From the menu Reports > Customers > Print statements > More layouts select the Customer statement layout.

Statement date
This is the date printed on the statement. It is not possible to set up a date prior to the date of the last existing transaction.
Layout
The styles allow you to change the print layout.
Export PDF
The programme displays a preview of the extracts, with the Export PDF command you can then create the file containing all extracts or PDFs for each extract.
Print payment reminders
Feature available with Banana Accounting Plus - any plan (excluding Free plan limitations)
The printing of Payment reminders is accessed from the Reports menu > Customers > Print reminders.

The program automatically creates payment reminders from past due invoices.
- In addition to the printouts, the program directly creates the transactions in the Transactions table, which are used to recreate the issued reminders history.
- These transactions show the document date and the document Type: 16-1 first reminder, 16-2 second reminder and 16-3 third reminder.
Use last payment reminders
If in the Transactions table there are reminder transactions with the indicated date, the program will suggest to print these reminders.
Create new payment reminders
For all invoices that have expired, automatic reminder transactions are created in the Transactions table, which allow the printing of reminders.

Payment reminders
The program will show the expired invoices, which you can deactivate if you do not wish to send the reminder.

Template
Two reminder templates are available, one with a logo and one without (see Logo setup) . It is not possible to include the payment slip, insert notes and free texts.If you need the payment slip, use the Print Reminders Invoices dialogue.
Manage extensions
To update the templates with the latest ones or to add your own custom templates go to the Extensions menu.
It allows you to set the parameters of the selected style.
Show expiry dates
Customers & Suppliers Management
In order to automatically manage the invoices issued or received, we advise you to use the Customers Menu and the Suppliers Menu.
Associate an expiry date to a transaction
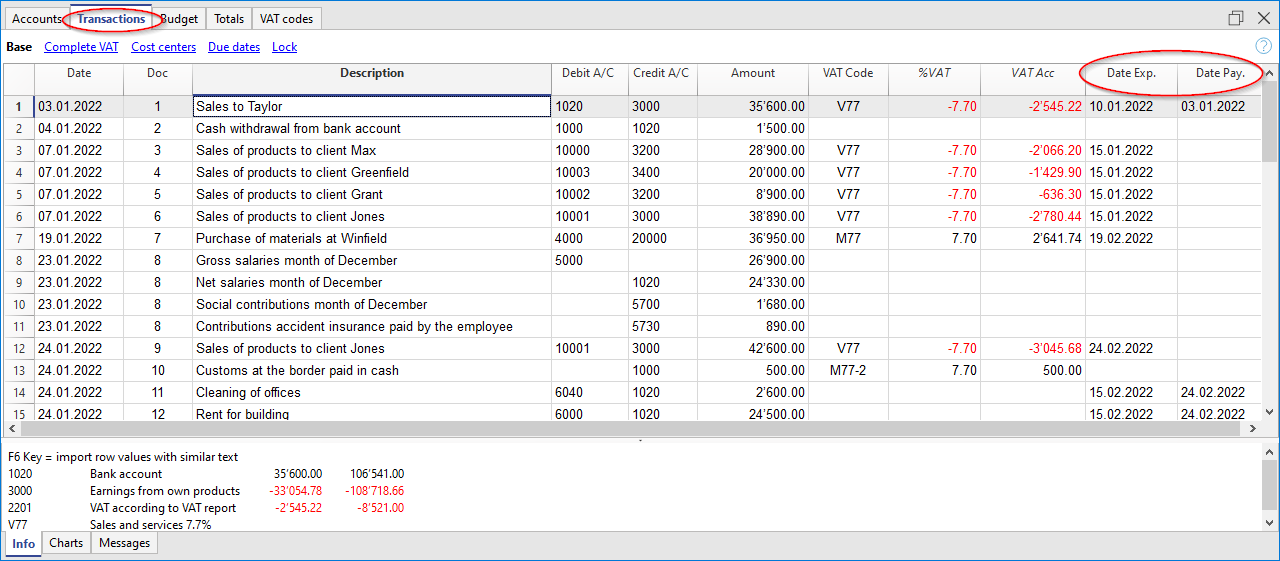
As an alternative to the customers and suppliers management, or for simpler checking purposes, you can also enter the payment date manually in the transaction row, in the Date Payment column.
This is an operating mode that consents simplified checkup.
With the Data menu → Columns Setup command, you should display the Date Exp. and Date Pay columns.
You should then enter the invoice expiration date in the Date Exp. column, and the invoice payment date in the Date Pay. column, when the payment is being recorded.
The due date of an invoice can be set in different ways. More information can be found on the following page: Due dates and payment terms.
Show expiry dates
With the Show expiry dates command of the Actions menu, the program displays in the Expiry dates table the transaction rows that have a due date and no payment date.
To obtain an automatic expiration schedule (Customer and Supplier open positions), see the List of customer invoices page.
Invoicing with Banana Accounting
In Banana Accounting Plus, you can create your invoices directly within the accounting file or manage them completely separately using the Estimates and Invoices application.
- Integrated invoicing in accounting
Additional functionality included in all accounting applications (double-entry, income/expense, multi-currency, cash manager). - Estimates and Invoices application
A separate application from all other accounting applications, used only to create offers and invoices without any connection to the accounting file. There is no link to the accounting file.
Below is a summary table for the two methods, detailing what they allow you to do and the customisations available.
Legend: ✅ with Professional or Advanced plan, 🔒 only with Advanced plan, ❌ not available
Features | Integrated Invoicing | Offers and Invoices Application |
| Common Features | ||
| Invoice Creation | ✅Yes, directly in the Transactions table. | ✅Yes, in the dedicated dialog. |
| Proforma Invoice Creation | 🔒 Yes, create the invoice in the Transactions table and print it as a Proforma Invoice (Advanced plan only). | 🔒 Yes, create the invoice in the dialog and print it as a Proforma Invoice (Advanced plan only). |
| Estimates Management | 🔒 No, but an invoice can be created with the "Estimate" label and print it as Estimate (Advanced plan only). | ✅Yes, in the dedicated dialog. |
| Payment Reminders Management | ✅Yes, automated management with the Print Reminders command. | 🔒 No, create the invoice with the "Reminder" label. and print it as a Reminder. (Advanced plan only). |
| Delivery Notes Creation | 🔒 No, only invoice with "Delivery Note" label. From the Invoice Printing dialog > Print as > Delivery Note. (Advanced plan only). | 🔒 No, only invoice with "Delivery Note" label. From the Invoice Printing dialog > Print as > Delivery Note. (Advanced plan only). |
| Order Confirmation Creation | 🔒 No, only invoice with "Order Confirmation" label. From the Invoice Printing dialog > Print as > Order Confirmation. (Advanced plan only). | 🔒 No, only invoice with "Order Confirmation" label and print as Order Confirmation. (Advanced plan only). |
| Header Logo | ✅Yes, with the Logo setup command | ✅Yes, with the Logo setup command |
| Sender Address in Header | ✅Yes, with File and Accounting Properties command. | ✅Yes, with File and Accounting Properties command. |
| Invoice Information | ✅Data of the invoice (invoice number and date, customer number, due date, etc.). | ✅Data of the invoice (invoice number and date, customer number, due date, etc.). Customizable with additional fields. |
| Invoice Address (Customer) | ✅Customer ledger management in the Accounts table, Address view. | ✅Customer address management in the Contacts table. |
| Title / Subject | ✅Yes, customizable via the DocType column in the Transactions table, or in Invoice Settings. | ✅Yes, customizable in the Dialog, or in Invoice Settings. |
| Free Initial Text | ✅Yes, through the DocType column in the Transactions table, or in Invoice Settings. | ✅Yes, in the Dialog, or in Invoice Settings. |
| Default Columns and Column Layout | ✅Columns in the Transactions table and Items ( Items, Description, Quantity, Unit, Unit Price, Amount, VAT Code). Display columns in the printout from Invoice Settings. | ✅Columns in the Dialog (Date, Item, Description, Quantity, Unit, Unit Price, Discount, Amount, VAT Code). Display columns in the printout from Invoice Settings. |
| Custom Columns (Transactions / Items Table) | 🔒 Uses custom columns in the Transactions and Items tables (Advanced plan only). | 🔒 Uses custom columns in the Items table (Advanced plan only). |
| Discounts and Reductions | ✅Yes, add a line to the invoice via accounting transaction | ✅Yes, item discount column and overall discount via Invoice Dialog. |
| Advance Payments | ✅Yes, add a line to the invoice via accounting transaction. | ✅Yes, via Dialog. |
| Notes and Final Text | ✅Yes, from the Dialog Options or Invoice Settings or DocType column | ✅Yes, via Invoice Dialog > Final Text or from Dialog options or from Invoice Settings |
| QR Bill with IBAN Account | ✅Yes, invoices with Swiss QR bill with IBAN account. | ✅Yes, invoices with Swiss QR bill with IBAN account. |
| QR Bill with Special QR-IBAN Account | ✅Yes, invoices with Swiss QR bill with special QR-IBAN account. | ✅Yes, invoices with Swiss QR bill with special QR-IBAN account. |
| Style and Color Customization | ✅Yes, from dialog Invoice Settings > Font type and Colors. | ✅Yes, from dialog Invoice Settings > Font and Colors. |
| CSS Customization | 🔒 Yes, customize invoice styles and appearance via CSS customization (Advanced plan only). | 🔒 Yes, customize invoice styles and appearance via CSS customization (Advanced plan only). |
| JavaScript Customization | 🔒 Yes, set invoice printing via JavaScript customization (Advanced plan only). | 🔒 Yes, set invoice printing via JavaScript customization (Advanced plan only). |
| Product Images | 🔒 Yes, add product or service images to invoices. See Invoice with Product Images (Advanced plan only) | 🔒 Yes, add product or service images to both offers and invoices See Invoice with Product Images. (Advanced plan only). |
| VAT management | ✅ Yes, print invoices with VAT and manage in accounting. | ✅ Yes, only print invoices with VAT |
| Multi currency invoices | ✅ Yes | ✅ Yes |
| Exclusive Features of Integrated Invoicing | ||
| Integrated Data in the Accounting File | ✅Yes, in the Transactions table. | ❌No |
| Revenue Management | ✅Yes, create invoices on revenue with customer subledger in the Balance sheet. | ❌No |
| Cash Basis Accounting Management | ✅Yes, create invoices upon cash method with Customer subledger via profit centers (CC3). | ❌No |
| Reporting | ✅Yes, account card per customer, history, and open invoice reports per customer and due date. | ❌No |
| Payment Reminders Management | ✅Yes, overdue invoice management and reminder printing with the Print Reminders command. | 🔒No, manual management of overdue invoices and reminder printing. (Advanced plan only). |
| Invoice Payment Management | ✅Yes, registration of invoice collection. | ✅No, it is possible to manually track paid invoices using the Payment column in the Invoices table. |
| Exclusive Features of the Estimates and Invoices Application | ||
| Offers Management | 🔒No, create the invoice with the label "Estimate" and print it as an Estimate (Advanced plan only) | ✅Yes, manage Estimates separately from invoices. |
| Offer Conversion | 🔒No, create the invoice with the label "Estimate" and print it as an Estimate (Advanced plan only). | ✅Yes, convert estimates into invoices with a simple command. |
Invoicing integrated in the accounting file
The integrated invoicing feature of Banana Accounting Plus uses the customer invoice recording system directly in the Transactions table. It allows you to create prints, including customizable ones, based on customer transaction records.
You can print both invoices for Switzerland with a QR payment slip and international invoices for other countries, even in foreign currency without a QR payment slip.
Creating invoices
The Transactions table is the heart of Banana Accounting and is also used to issue invoices. Nothing could be simpler: To create an invoice, enter a normal transaction that charges the customer.
Banana Accounting also allows you to create invoices in foreign currency.
The main columns for invoicing:
- Date - Invoice date
- Invoice - The invoice number.
- Description - Description of the item to be invoiced.
If there is more than one item to be invoiced, use another row that has the same customer number. - Debit - Customer account.
- Credit - Profit account.
- Amount - Invoice amount
You can also indicate the quantity, the unit price and the programme calculates the amount. - VAT code- VAT code of the profit
Advantages
With Banana Accounting's integrated invoicing you simplify your administrative work, reducing the time needed to manage invoices, customers and accounting transactions:
- Invoice transactions are always the same for both invoicing and accounting, reducing the possibility of errors and omissions.
- Banana Accounting automatically generates the related accounting documents, such as VAT registers, customer accounts, receipts registers.
- You have a more accurate and real-time view of your customers with constantly updated balances.
- Lots of automation to make your work easy and with immediate professional results:
- Automatic retrieval of addresses from contacts so that the data do not have to be re-entered on the invoice.
- No manual calculations. All calculations are automatic, always accurate and up-to-date.
- Setting of the language, currency, number of decimals and rounding for each individual invoice.
- Deadline display.
- Invoice archiving for a tidy history that is always available for tax audits.
Differences with the Estimates and Invoices application
Integrated invoicing is an additional feature included in all accounting applications: double-entry, Income / Expense, Multicurrency, Cash Manager.
Integrated invoicing is ideal for billing services or sales without the need for many structured details on the invoice.
- The elements and details for invoices (such as quantities, prices, units, etc.) are recorded solely in the Transactions table. In the Estimates and Invoices application, there is a Invoices table with an Invoice Dialog where various columns and options are available to detail the various items and data to be inserted. In this aspect, the Estimates and Invoices application is much more flexible and comprehensive because it allows for greater customization.
- In the Transactions table, in addition to the data for invoicing, by entering the Debit and Credit account, the registration remains accounted for in the accounting file without the need to register the invoice subsequently. This is ideal for managing revenue accounting.
In Estimates and Invoices, the data is not accounted for, so it is necessary to register the invoice in the accounting file. - In integrated invoicing, it's not possible to create offers. However, it is possible to create and print an invoice with the title "Estimate" (instead of "Invoice.")
The Estimates and Invoices application is specific for creating also Estimates.
Items Table
The Items Table allows you to manage the article catalogue, keep track of available quantities, sales and purchase prices.
Data for managing articles or services to be invoiced are entered in this table. Each article is assigned an ID, and groupings of articles and services in the same category can be created.
Various columns are available for complete and detailed information:
- Article (IdArticle): the code of the article.
- Description: the description of the article.
- Group membership
- Account (for accounting)
- VAT code of the sale
- Unit: an abbreviation to define the type to which the quantity refers (pieces, hours...)
- Sale: the unit sales price.
- Purchase cost.
The Items table is linked to the Items columns of the Transactions table.
The use of the Articles table speeds up the entry of invoice data into the Transactions table. By entering the ID (article code), the programme automatically takes over the description, unit and unit price. By entering the Quantity, the total price to be invoiced is calculated and entered.

Print invoice with Swiss QR Bulletin
After entering the invoice data in the Transactions table, you can create and print invoices with the Print Layouts.
From the Menu, Reports > Customers > Print Invoices:
- Choose CH10 Invoice layout with Swiss QR Code for Switzerland
- Customise your printing. More customisation is possible with the Advanced plan.
- Preview the invoice. You can save it as a PDF and send it electronically or print it.
If you use this layout, the bulletin with Swiss QR will be printed on the invoice and the reference data will appear on the statements. You can import customer payment data from the bank with the Bank statement extension Camt ISO 20022 Switzerland (Banana+). You have invoice receipts under control.
It is possible to print the invoice with a QR bulletin even without an amount and without an address, leaving an empty box to manually insert the data. More information is available on the QR-Code Customization page, section Include/Exclude from printing.
With the same registration, from the Print Invoices dialogue box, under Preferences Layout > Print as you can also choose to print Delivery Notes, Offers and Reminders.
Print International Invoices
After entering the invoice data in the Transactions table, you can create and print invoices with the Print Layouts.
From the Menu, Reports > Customers > Print Invoices:
- Choose the Layout 11 programmable Invoice
- Customise your printing. More customisation is possible with the Advanced plan.
- Preview the invoice. You can save it as a PDF and send it electronically or print it.
With the same registration, from the Print Invoices dialogue box, under Preferences Layout > Print as you can also choose to print Delivery Notes, Offers and Reminders.
Invoice Structure
In this image you can see how the invoice is structured:
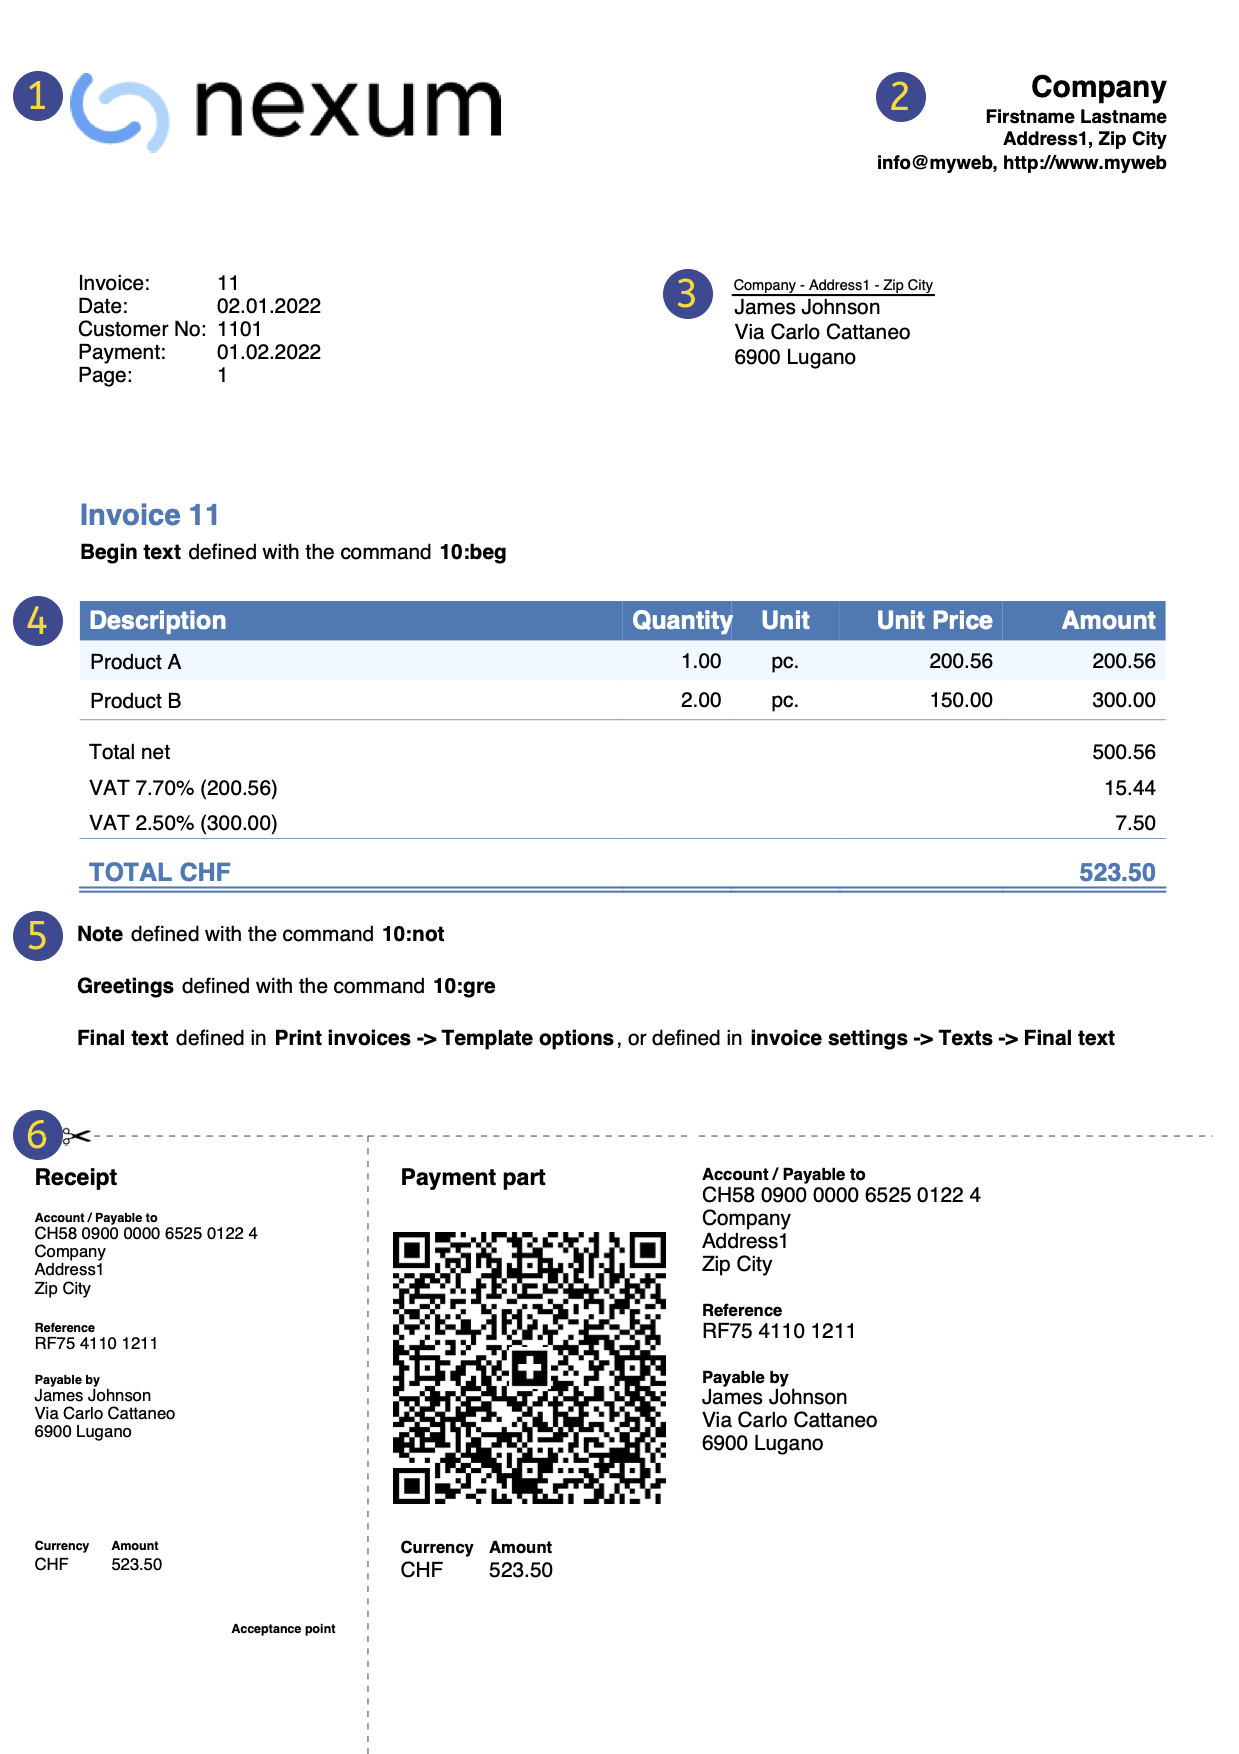 | LogoInsert a personalized logo from menu file → Logo setup | |||
HeadingThe heading of the invoice will be identical to the one entered | ||||
Customer AddressThe customer's address will be retrieved from Accounts table, see Setting up customer accounts. | ||||
Invoice dataThe contents of the invoice must be entered in the Transactions table, learn how to enter invoices. | ||||
Free textsInsert begin text, notes and greetings using the Column Type, and ending texts from menu Reports→ Clients → Print Invoices → Option layout. | ||||
Settings Swiss QR-CodeSettings can only be defined for Switzerland and with the [CH10] Swiss QR Code layout . |
Customer Management
Customer Management allows you to record, organise and manage customer information, keeping track of customer transactions and payments, payment due dates and contact information. You can track customer payments, update the payment status of issued invoices as well as enter and print invoices.
In Banana Accounting the customer data is set up in the Accounts table.
In order to create invoices, it is necessary to:
- Define the Customer Register
- Create invoices, entering the transactions in the Transactions table, debiting the customer's account.
With a range of functions you can manage the:
- Invoice collections by entering them in the Transactions table:
Creating an invoice from a profit centre
When the customer ledger is set up with profit centres (cash method management), the profit centre column CC3 is used in the invoice transactions.
In the appropriate columns of the Transactions table indicate:
- The date.
- The invoice number.
- The description of the invoice item, which you want to appear on the invoice.
If there is more than one item to be invoiced, use another row with the same customer number. - In the Debit account do not record any account
- In the Credit account do not record any account
- The amount. You can also enter the quantity and the unit price and the programme will calculate the amount.
- In column CC3 enter the customer's profit centre account (Accounts table).

Features currently not available
These features, although requested by some users, are not available at the moment:
- Automated invoice sending by email.
- Creation of estimates.
The programme allows you to print an invoice with the indication 'Estimate'. - Creation of delivery notes.
The programme allows an invoice to be printed with the indication 'Delivery Note'. - Link with Inventory application.
- Link with Timesheet.
- Creation of invoices in foreign currency with VAT in base currency (e.g. invoices in EUR with VAT in CHF).
If you want to issue invoices separately from accounting (useful for cash accounting) and also prepare estimates, you may use:
This also allows you to add additional information more easily.
Full list of features currently not available in Banana+
Insights
- Invoice printing and VAT (based on turnover and cash received)
- Set customer language in invoices
- Due dates and payment terms
- All extensions with QR invoicing
Related topics:
- Example file in Income/Expense accounting
- Example file invoices in Double-entry accounting
- Example file invoices using Cost centers
Useful for registering invoice with VAT on the cash-in basis (with customer and supplier accounts as cost centres CC3) or if you want to exclude invoice details from the balance sheet accounts.
Setting up the file
There are two ways to set up your accounting file for your invoicing
- Create a new accounting file, using an existing template.
- Adapt your existing accounting file.
New Accounting File
Several templates are available, containing a preset ledger of clients. Creating Invoicing is possible in the following accounting types:
- Double-entry accounting with or without vat.
- Multi-currency accounting with or without vat.
- Income & Expense accounting with or without vat.
A new accounting file is created as follows:
- File Menu > New.
- Select the Region and the language.
- Type Invoice in the Filter by field.
- Select a template in the right hand section.
- Save your file with a name.
Please follow the instructions contained in the Invoicing documentation.
In the accounting types with VAT, in order to correctly set up the file, we advise you to consult the explanations on the page Invoice printing and VAT.
Adapt your existing Accounting File
If you wish to adapt your existing accounting file for creating your invoices, you will have to add certain functions and settings in order to be able to print them:
Insert the data for your company
- In the File menu > File and accounting properties... > Address, you can setup your company's address and data, which will be used as the header of the invoice.
- To use your personal logo, check instructions here.
Set the list of customers in the Accounts table
- In the Accounts table, you can setup your customers register
- Add and display customer address columns.
- In the Accounts table, you can select the Address view and enter your customer's data.
- If the Address view is not visible, you can add it using the Tools menu > Add new functionalities... command > Add Address columns in the Accounts table.
- Manage your customer settings via the Reports menu > Customers > Settings.
Add the columns you wish to use in the Transactions table
- Display the columns for Invoicing in the Transactions table:
- Data menu > Columns setup and check the DocType and DocInvoice boxes.
- Add the columns for Quantity and Unit Price (optional).
Tools Menu > Add new functionalities > Add Items Columns in Transactions table. - Add Items table (optional).
This will assist you keep track of your Items and micro-manage your inventory.
Tools Menu > Add new functionalities > Add Items table.
In the accounting types with VAT, in order to correctly set up the file, we advise you to consult the explanations on the page Invoice printing and VAT.
Invoicing managed in a file dedicated to Invoicing only,
If you wish to manage your invoicing separately from your main accounting, you will have to create a new file. You will insert the accounts for the clients you need for the Invoicing only, in your Plan of Accounts. Invoices are entered via the Transactions table.
This approach is suitable for when:
- Accounting on a cash-in basis. Only the the payed amount is entered in the accounting file.
- Wishing to keep the management of your invoices completely separate from your main accounting ledger, for example for an Association that needs to send membership fees to their members.
How to create a separate accounting file for invoices:
- Download the template, open it and adjust it to your requirements.
Alternatively, you may start out with any template and adapt it - as previously indicated - for use with invoicing. - Make sure al setups and and columns are present, as explained above.
Entering invoices in the transaction rows.
Before proceeding with the creation of invoices, it is necessary to establish the accounting method. The methods are as follows:
- Accounting and invoice issuance based on turnover.
- Issued invoices are immediately recorded and accounted for.
- Revenue is recognized at the time of invoice issuance.
- Customer sub-ledger through balance sheet accounts.
- Accounting and invoice issuance based on cash received.
- Issued invoices are recorded only at the time of payment.
- Revenue is recognized only when the invoice is actually paid, recording transactions at the time of collection.
- Customer sub-ledger through CC3 profit centers.
- Accounting and invoice issuance with net tax rate method.
- Invoices are issued with a different rate than the one accounted for.
- Revenue is recognized only when the invoice is actually paid, recording transactions at the time of collection.
- Customer sub-ledger through CC3 profit centers.
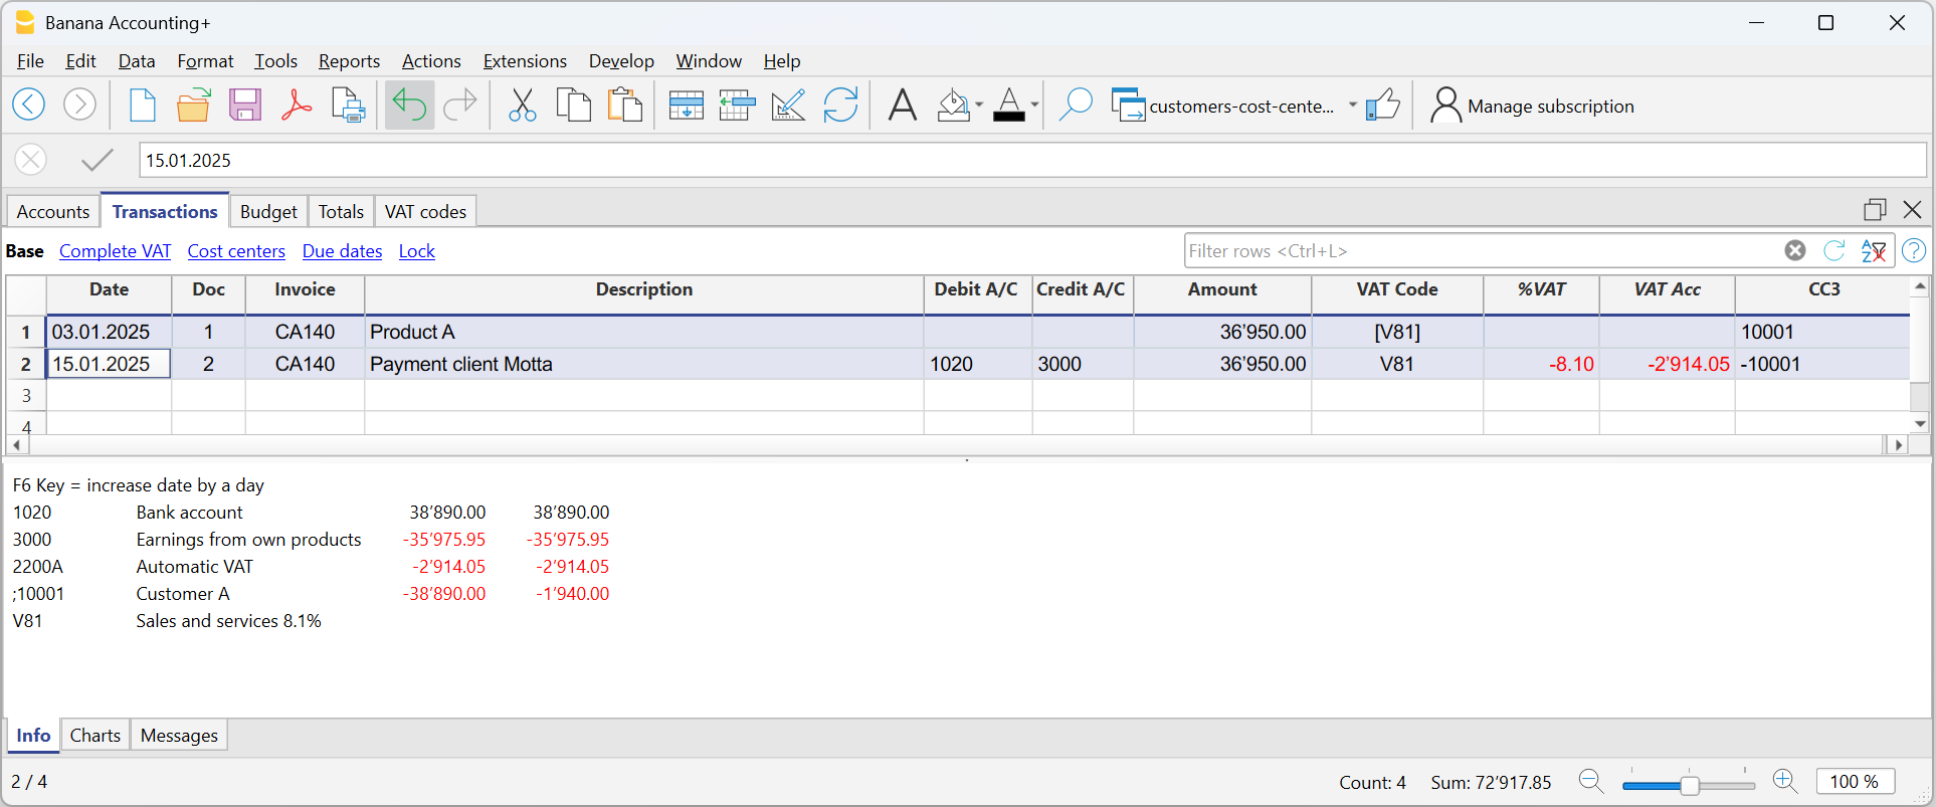
Issuing invoices with VAT with the Cash method
The Banana Accounting procedure for VAT management requires entering the VAT code on the same line where the revenue is recorded.
Revenue is recognized only when the invoice is actually paid, recording transactions at the time of collection.
It is necessary to set up the customer sub-ledger in the accounts table via the CC3 Profit Center.
Therefore, in cash-based VAT management, the VAT code is entered only when the invoice is collected.
Invoice data is entered in the Transactions table. For each new invoice, enter a new transaction line.
- Indicate the date of the transaction.
- The invoice number
- For invoicing with Swiss QR with IBAN account, use only numbers or letters, without spaces, separators, or other characters. The maximum allowed length is 7 characters.
- For invoicing with Swiss QR with QR-IBAN, use only numbers without spaces, separators, or other characters. The maximum allowed length is 7 digits.
- If Swiss QR is not used, the invoice number can be freely chosen.
- Each invoice must have a unique invoice number, even across multiple accounting years. This is important because using the same invoice number over multiple years is still considered a single document. If you wish to repeat the same invoice number, you must add the year to the invoice number or another identifier to distinguish it from previous years' invoices (e.g., 1234524, 1234525).
- The description text (products, services, consulting...) that will appear on the customer's invoice.
- The Debit account must remain empty.
- The Credit account must remain empty.
- Enter the amount.
- In cases subject to VAT, enter the VAT sales code in square brackets (e.g., "[V81]").
The VAT code entered in square brackets allows the VAT amount to be displayed on the invoice, without being recorded until the payment is registered.
Invoice with multiple lines
When there are multiple items to be invoiced (different products or services, or both), they must be recorded on multiple lines (one item per line):
- Enter a new transaction line for each item you want to print on the invoice.
- On each additional line, repeat the date and invoice number, identical to the previous lines.
Basic columns
Date
The invoice will show the date indicated in this column. All lines belonging to the document must have the same date.
Invoice
For invoice management, an invoice number must be entered in the Invoice column.
Description
A description of the products or services being invoiced. These texts appear on the invoice.
Debit
Use the column only to record the invoice payment, entering the liquidity account (bank, post,...).
Credit
Use the column only to record the invoice payment, entering the revenue account.
Amount
An amount. If VAT is managed, enter the gross amount (including VAT).
VAT Code
The VAT code corresponding to the revenue account (sales or services):
- For invoice issuance, the VAT code must be entered in square brackets (e.g., "[V81]").
- For recording the invoice payment, the VAT revenue code must be entered without square brackets.
CC3
A customer account present in the Accounts table, in the CC3 Profit Center group.
Optional columns
Type
In the Type column, detail rows can be defined, such as totalization rows or a specific payment term for an invoice.
This column is not visible by default, but it must be displayed via the menu Data > command Columns setup and checking the DocType column.
Quantity
The quantity of goods or services to be invoiced.
To add the quantity column, use the menu Tools > Add/remove functionalities > Add Item column in the Transactions table.
Unit
A type of unit (e.g., 'pz', 'h', 'm', 'kg').
Unit Price
The unit price related to the goods or services.
The program automatically calculates the total amount based on the quantities entered in the Quantity column.
Invoicing and VAT on turnover
The standard procedure of Banana Accounting in VAT management requires entering the VAT code always on the line where the revenue is recorded.
Issued invoices are immediately recorded and accounted for. Revenues are recognized at the time of invoice issuance.
It is necessary to set up the customer ledger in the Accounts table. At the end of the year, customer accounts must appear in the balance sheet.
Therefore, in VAT management on turnover, the VAT code is entered when creating the invoice.
Invoice data is entered in the Transactions table. For each new invoice, enter a new transaction row.
- Enter the date of the transaction
- The invoice number
- For invoicing with Swiss QR with IBAN account, use only numbers or letters, without spaces, separators, or other characters. The maximum allowed length is 7 characters.
- For invoicing with Swiss QR with QR-IBAN, use only numbers without spaces, separators, or other characters. The maximum allowed length is 7 digits.
- If Swiss QR is not used, the invoice number can be freely chosen.
- Each invoice must have a unique invoice number, even across multiple accounting years. It is important because using the same invoice number across years is considered as a single document. If you wish to repeat the same invoice number, add the year to the invoice number or another identifier to distinguish it from previous years' invoices (e.g., 1234524, 1234525).
- The description text (products, services, consulting...) that will appear on the customer’s invoice
- In the Debit account, enter the customer account number
- In the Credit account, enter the contraccount (Sales account, Consulting, or others)
- Enter the amount
- If subject to VAT, enter the VAT Code with the applicable VAT percentage. See Invoice printing and VAT management.

Multi-row Invoice
When there are multiple items to be invoiced (various products or services or both), they must be recorded on multiple lines (one item per line):
- Enter a new transaction row for each item to be printed on the invoice.
- On each additional line, repeat the date and invoice number, the same as the previous lines.
Basic Columns
Date
The invoice will display the date indicated in this column. All rows belonging to the document must have the same date.
Invoice
For invoice management, an invoice number must be entered in the Invoice column.
Description
A description of the products or services to be invoiced. These texts appear on the invoice.
Debit
A customer account that belongs to the ledger in the Accounts table.
Credit
A revenue account in the Accounts table.
Amount
An amount. If VAT is managed, enter the gross amount (including VAT).
VAT Code
The VAT code corresponding to the revenue account (sales or services).
Optional Columns
Type
In the Type column, you can define detail rows, such as subtotal rows or a specific payment term for an invoice.
This column is not visible by default but must be enabled through the menu Data > command Arrange columns and checking the column DocType.
Quantity
The quantity of goods or services to be invoiced.
To add the quantity column, use the menu Tools > Add new features > Add Items columns in the Transactions table.
Unit
A type of unit (e.g., 'pcs', 'h', 'm', 'kg').
Unit Price
The unit price for the goods or service.
The program automatically calculates the total amount based on the quantities entered in the Quantity column.
Invoicing and VAT net tax rate method
The Banana Accounting procedure for VAT management requires entering the VAT code on the same line where the revenue is recorded.
Revenues are recognized only when the invoice is actually paid, recording transactions at the time of collection.
It is necessary to set up the customer subledger in the accounts table using the Profit Center CC3.
When subject to VAT under the Balance Rate or Flat Rate method, invoices issued to customers must be created using normal VAT rates (e.g., 8.1%). This creates the issue of how to generate and account for invoices with two different VAT rates.
The invoice sent to the customer must include a normal VAT rate (e.g., 8.1%).
The accounting entry of the invoice must be recorded with the balance VAT rate (e.g., 6.2%).
Therefore, the issuance of the invoice must be separated from its accounting entry.
- The invoice to be sent to the customer must include a normal VAT rate (e.g., 8.1%).
- The accounting entry of the invoice must be recorded with the balance VAT rate (e.g., 6.2%).
Therefore, the issuance of the invoice must be separated from its accounting entry.
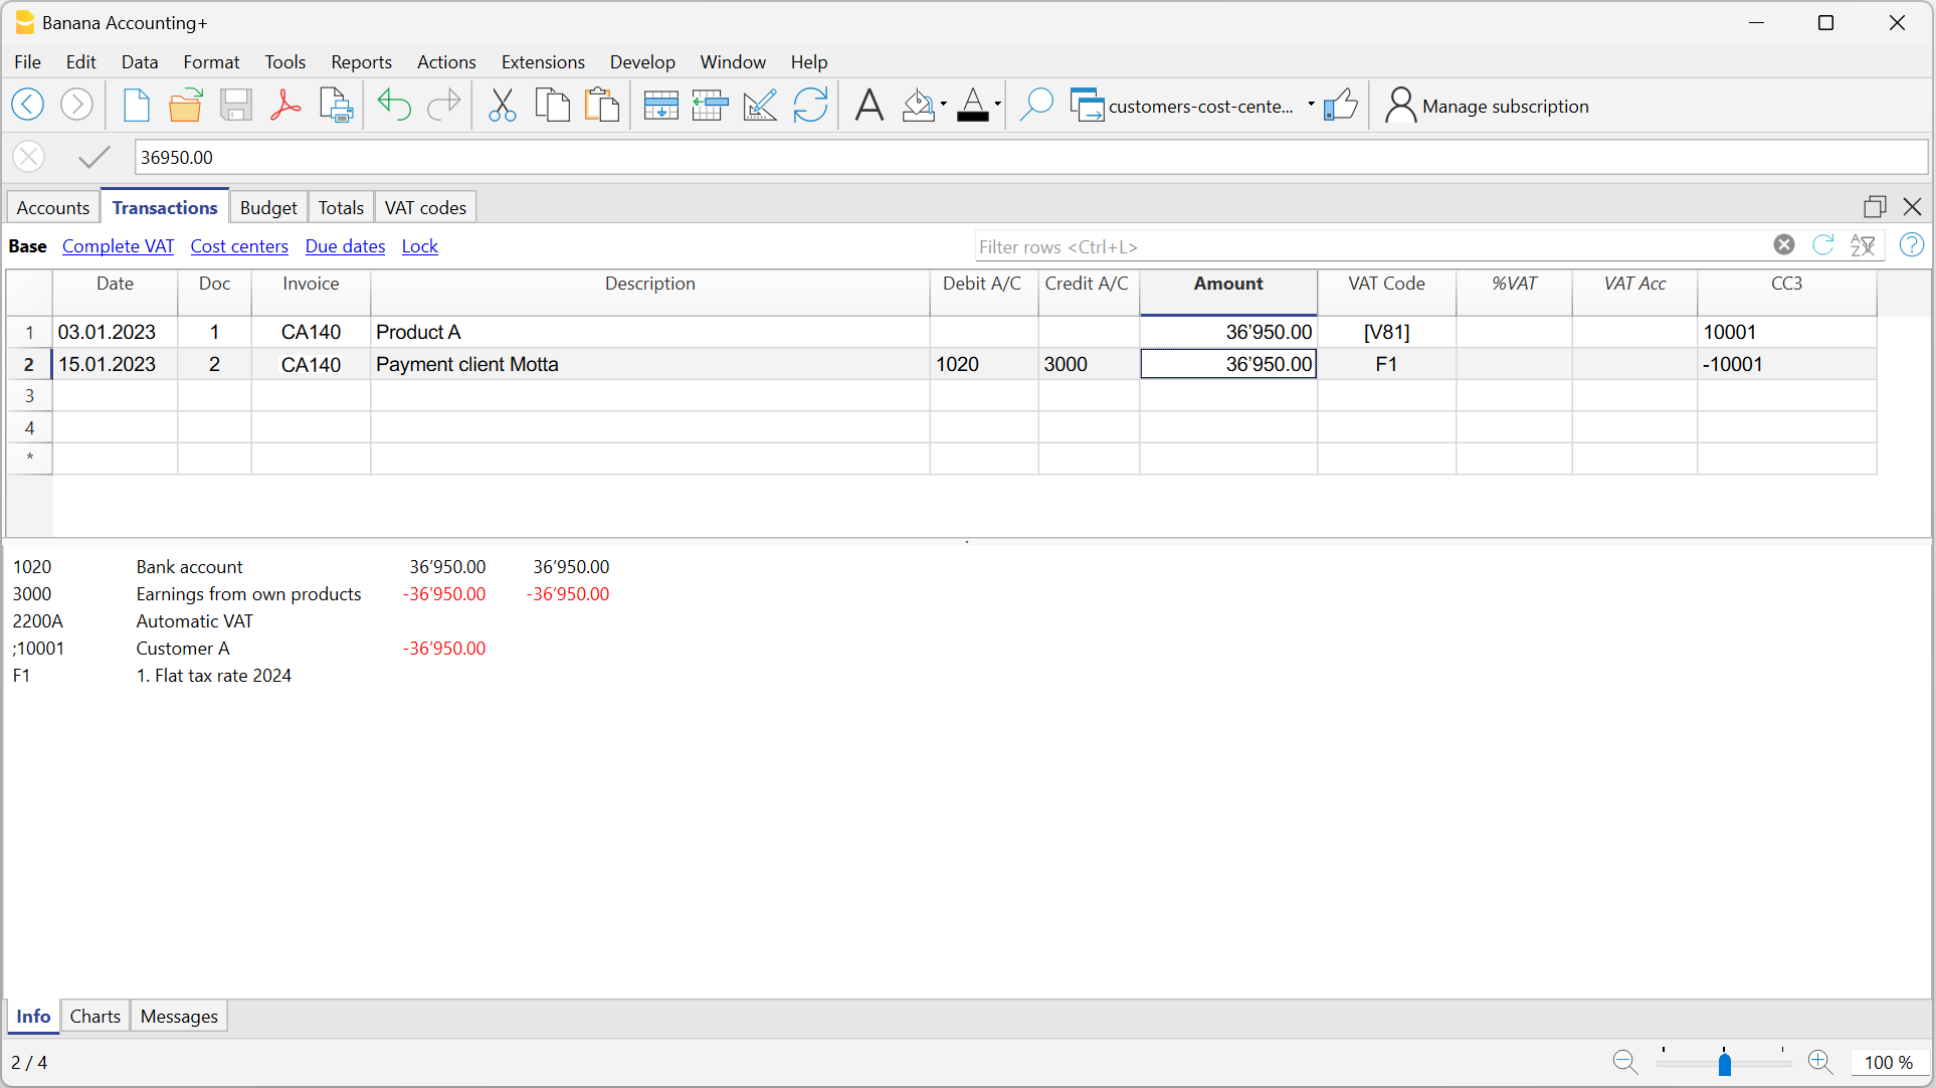
Issuing an invoice with normal VAT rates
To issue an invoice to customers with the normal VAT rate (e.g., 8.1%), it is necessary to create a customer sub-account in the Accounts table with the profit center CC3 (e.g., 10001 for customer XX), and complete all the customer information in the Address view columns.
In the Transactions table, create the invoice:
- Enter the date and description in the corresponding columns.
- In the Amount column, enter the amount.
- The Debit and Credit columns should remain empty.
- In the VAT Code column, type the code V81 in square brackets [V81].
VAT codes in square brackets do not trigger any VAT accounting. - In the CC3 column, indicate the profit center number without semicolon (e.g., 10001).
Since there are no accounts in the Debit and Credit columns, the invoice creation entry will not be recorded in the accounting.
Recording the invoice with net VAT rate
When recording the invoice in accounting, to record it with the net VAT rate, the transaction needs to be created normally, including the accounts in the Debit and Credit columns, and the VAT code corresponding to the balance VAT rate percentage:
- If the breakdown entry system is used, enter the VAT code for the net VAT percentage (e.g., V62).
- If the non-breakdown entry system is used, enter the VAT code without the rate (e.g., F1).
More information is available on the following web page:
Discounts and reductions
To enter a discount or reduction in an invoice, add a new row and enter:
- Invoice date
- Invoice number
- Description of the discount or reduction
- Accounts in the Debit and Credit columns. It is important to invert the accounts compared to the sales transaction.
When the customers / suppliers register is set up with cost centers and there are registrations with discounts and reductions, in order for the amount to be reversed, the sign of the cost centers must be inverted. - In case of VAT, indicate the VAT code with the minus sign, so that the VAT is deducted, or, if present use the VAT code for discount and reductions.

Fattura con aliquota saldo fatturato
La procedura di Banana Contabilità nella gestione IVA prevede di inserire il codice IVA sempre sulla riga dove si registra il ricavo. Quando la contabilità deve essere gestita sul fatturato, i ricavi vengono contabilizzati quando la fattura viene emessa.
Quando si è soggetti all'IVA con il metodo Aliquote saldo o forfettarie, le fatture ai clienti devono essere emesse con le aliquote normali (esempio 8.1%). La contabilizzazione delle fatture con IVA metodo Aliquote saldo o forfettarie invece prevede delle aliquote ridotte (es. 6.2%).
- Se gli importi sono al lordo si può contabilizzare sul fatturato o sull'incassato, inserendo il codice IVA tra parentesi quadre.
- Se gli importi sono al netto, non è possibile creare e contabilizzare le fatture allo stesso momento. In questo caso è necessario gestire:
- La creazione delle fatture su un file contabile, tramite la fatturazione integrata oppure con l'Applicativo Offerte e Fatture
- La contabilizzazione delle fatture sul file della contabilità.
In questo caso è necessario gestire la creazione delle fatture su un file contabile o con l'Applicativo Offerte e Fatture, e la contabilizzazione su un file separato della contabilità.
Emissione fattura con aliquota saldo e importi al lordo
Per emettere una fattura ai clienti con l’aliquota normale (es. 8,1%), è necessario creare nella tabella Conti:
- Un partitario clienti con i centri di profitto CC3 (esempio: ;10001), completando tutte le informazioni del cliente nelle colonne della vista Indirizzo.
- Inserire nelle corrispondenti colonne la data e la descrizione.
- Le colonne Dare e Avere devono rimanere vuote.
- Nella colonna Importo, inserire l’importo.
- Nella colonna Codice IVA, digitare il codice V81 tra parentesi quadre [V81].
I codici IVA tra le parentesi quadre non comportano alcune contabilizzazione dell'IVA. - Nella colonna CC3, indicare il conto del centro di profitto senza punto e virgola (es. 10001).
Non essendoci i conti nella colonna Dare e Avere, la registrazione di creazione della fattura non verrà contabilizzata.
Contabilizzazione fattura con aliquota saldo e importi al lordo
Al momento della registrazione della fattura in contabilità, per contabilizzarla con l'IVA aliquote saldo, occorre inserire la registrazione normalmente, inserendo anche i conti nelle colonne Dare e in Avere e il codice IVA dell'aliquota saldo:
- Se viene usato il sistema di registrazione con scorporo, inserire il codice IVA dell'aliquota saldo (es. V62)
- Se viene usato il sistema di registrazione senza scorporo, inserire il codice IVA senza aliquota (es. F1).
Per contabilizzare la fattura con aliquota saldo, è necessario creare nella tabella Conti:
- Un Partitario clienti tramite conti di bilancio.
- Inserire nelle corrispondenti colonne la data e la descrizione.
- Nella colonna Dare inserire il conto del cliente (Es. 10001).
- Nella colonna Avere inserire il conto del ricavo.
- Nella colonna Importo, inserire l’importo.
- Nella colonna Codice IVA, digitare il codice IVA dell'aliquota saldo (es. F1)
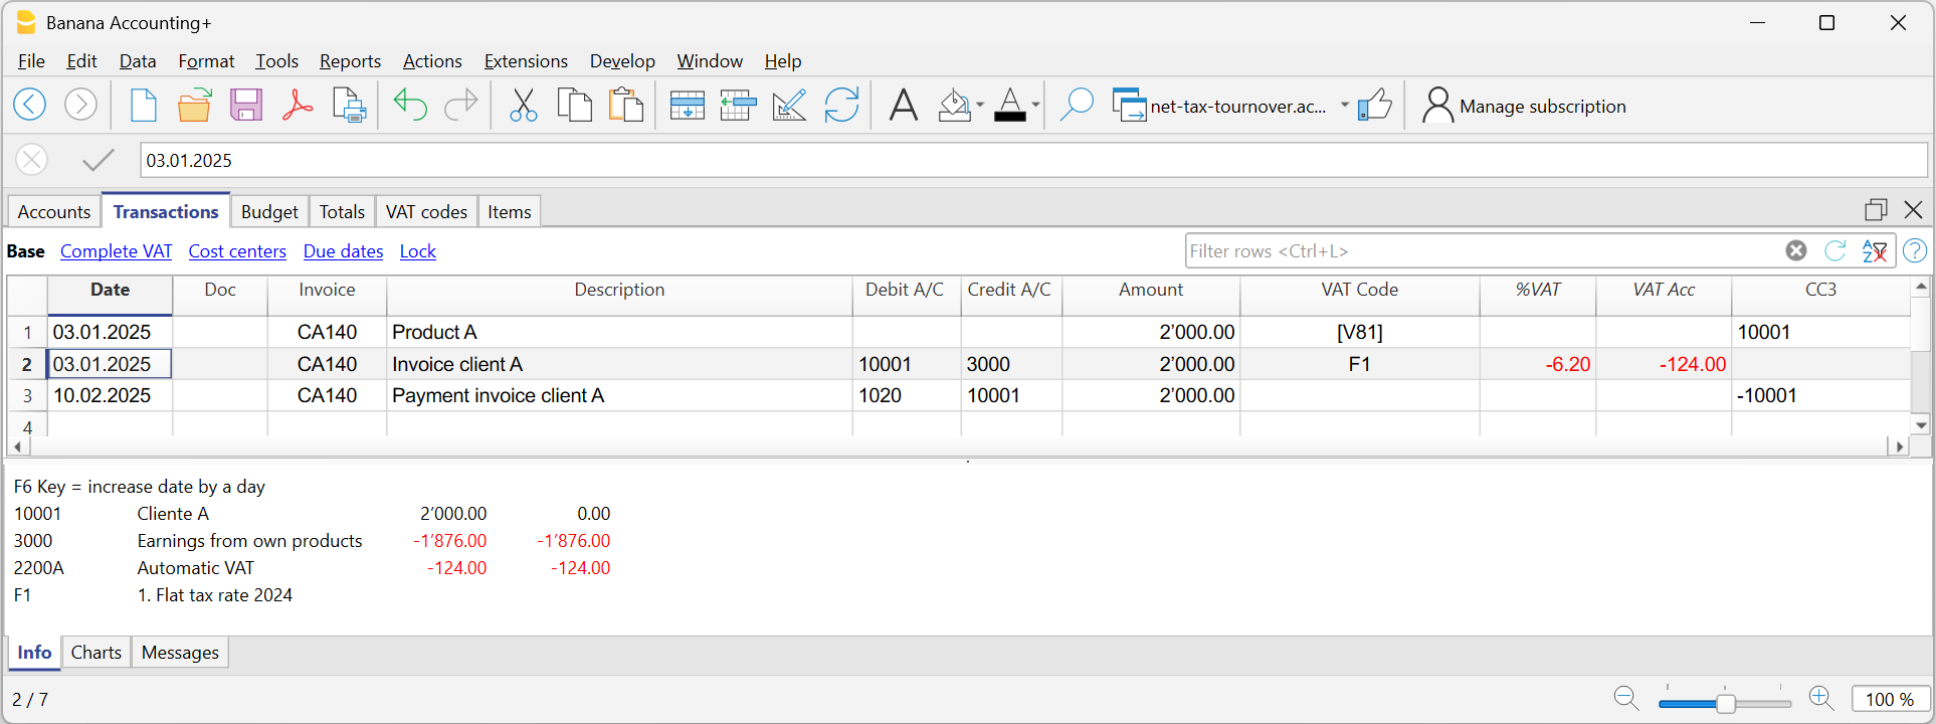
Rundung der Mehrwertsteuer auf der Rechnung
Beim Drucken von Rechnungen, die in die Buchhaltung integriert sind, entspricht der Gesamtbetrag der Mehrwertsteuer (MWST) der Summe der einzelnen MWST-Buchungen, die die gleiche Rechnung ausmachen. Da die einzelnen MWST-Buchungen auf die nächsten Hundertstel gerundet werden, kann es bei der Berechnung der MWST auf den Gesamtrechnungsbetrag zu einer Differenz kommen.
Betrachten Sie zum besseren Verständnis das folgende Beispiel:
- Zeile 1: 7,7% von CHF 187.50 = CHF 14.4375 -> Aufgerundet: CHF 14.44
- Zeile 2: 7,7% von CHF 875.00 = CHF 67.375 -> Aufgerundet: CHF 67.38
- Total: 7,7% von CHF 1062.50 = CHF 81.8125 -> Abgerundet: CHF 81.81
Auf der Rechnung wird ein Mehrwertsteuerbetrag von CHF 81.82 anstelle von CHF 81.81 ausgewiesen. Tatsächlich entspricht der Betrag von CHF 81.82 der Summe der für jeden Artikel einzeln berechneten Mehrwertsteuer (CHF 14.44 + CHF 67.38).
Diese Vorgehensweise wird angewendet, um Differenzen zwischen den in der Buchhaltung verbuchten und den auf der Rechnung ausgewiesenen Mehrwertsteuerbeträgen zu vermeiden. Auf diese Weise stimmt der Gesamtbetrag der Mehrwertsteuer in der Buchhaltung mit dem in der Rechnung ausgewiesenen Betrag überein.
Weitere Informationen sind auf der Webseite Rechnungen ausdrucken und MWST verwalten verfügbar.
Set customer language
The default layouts include the following languages: Italian, German, English, French, Dutch.
Invoice texts are printed in the customer's language, provided that this is set in the Language column (Accounts table, Address view).
The language is an ISO code, generally of 2 lowercase letters (it=italian, de=german, en=english, fr=french, nl=dutch).
When no language has been indicated for the customer account, the language of the accounting is used, defined in the File menu→ File and accounting properties (basic data) → Other.

Due dates and payment terms
The due date of an invoice can be set up in different ways:
- Generalized due date - identical due date for all invoices
Select menu Reports→ Customers → Settings → General → Invoices are due, indicate the period (in days) after which the invoice is considered due. As an example, if the date of your document is the 10th of May and you enter a value of 10 days, the due date will be the 20th of May. - Due dates per customer - specific for each customer
In the Accounts table, a DateExpiration column is available (if not on display set up via Data → Columns setup ...). The period (in days) after which the invoice is considered to be due can be set up in this column. - Specific dates per invoice
In the Transactions table, Due dates view, the Date Exp. column is visble; you can indicate the expiration date directly in this column. -
Alternative text for the expiration date
It is possible to define a text of your choice as a payment term for each invoice. This will replace the text of the expiration date. Revert to Advanced input -Type column for detailed information.
Print invoices in other currencies
With Banana Accounting Plus, you can also print invoices in foreign currency.
Invoices in foreign currency to be sent to foreign clients.
Required settings:
- Open one of our multi-currency accounting templates.
- Set up in the Accounts table, in the customer ledger, the customer with the foreign currency. Invoices are printed in the currency of the customer's account.
- If you want to send invoices in different currencies to the same customer, you must create accounts in different currencies for the same customer (Accounts table).
- Use the UNI11 layout for printing invoices to be sent abroad.
Invoices in foreign currency with VAT in base currency
It is not normally possible to enter a foreign currency invoice with VAT in base currency. This can be overcome with the following procedures:
Invoices in foreign currencies with VAT using Cash principle
- Open one of our multi-currency accounting templates with VAT with cost centres CC3.
- Set up in the Accounts table, customers in foreign currencies as CC3 cost centres (;).
If you wish to send invoices in different currencies to the same customer, you must create accounts in different currencies for the same customer (Accounts table). - In the Transactions table, you must enter the invoice data on several rows:
- In the first row:
- In the Amount column enter the amount net of VAT (without entering any debit or credit account).
- In the column CC3 enter the customer's cost centre account in foreign currency.
- In the second line:
- In the Amount column enter the VAT amount in foreign currency (without entering any debit or credit account), manually calculating the VAT amount in foreign currency.
- In column CC3 enter the customer's cost centre account in foreign currency.
- In the first row:
- For printing invoices with Swiss QR code use layout CH10.
To register the receipt:
- In the Debit column enter the liquidity account.
- In the Debit column enter the revenue account.
- In the VAT Code column enter the VAT code of the sale.
- In the column CC3 enter the customer's cost centre account in foreign currency with a negative sign.
Example: Invoice entry in foreign currency (EUR) with VAT on receipts in base currency (CHF):
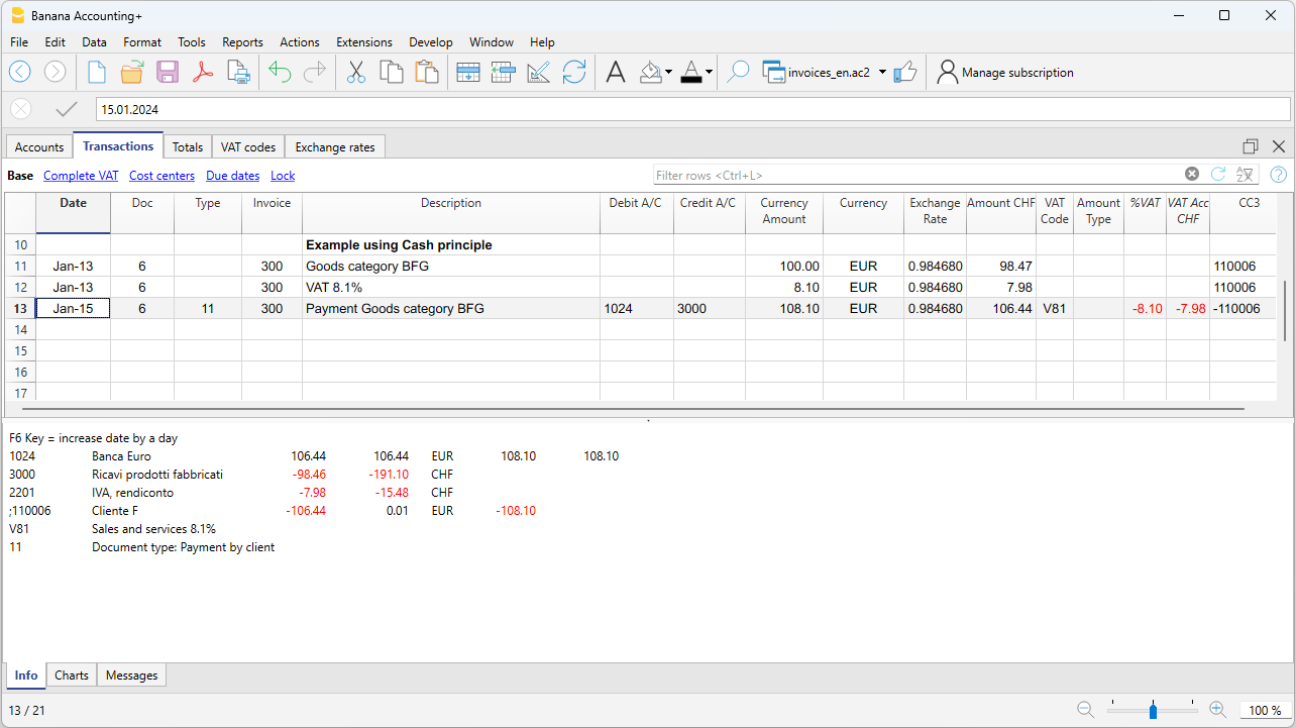
Invoices in foreign currencies with VAT on turnover
- Open one of our multi-currency accounting templates with VAT and a customer ledger.
- In the Accounts table, set the customers in foreign currencies both as a ledger (Accounts) and as CC3 cost centres (;).
- In the Transactions table, you must enter the invoice data on several rows:
- In the first line enter the invoice issue normally:
- The date, the description, in the Debit account the customer account in foreign currency and in the Debit account the revenue, the amount before VAT and the VAT code of the sale.
- The invoice number does not have to be entered.
- In the second line:
- In the Amount column enter the invoice amount net of VAT (without entering any debit or credit account).
- In column CC3 enter the customer's cost centre account in foreign currency.
- Where the columns Quantity, Unit and Unit Price are used, the unit price must be net of VAT.
- In the third line:
- In the Amount column enter the VAT amount in foreign currency (without entering any debit or credit account), manually calculating the VAT amount in foreign currency.
- In column CC3 enter the customer's cost centre account in foreign currency.
- In the first line enter the invoice issue normally:
Rows with cost centres are simply used to search invoices in foreign currency with VAT.
To register the receipt:
- In the Debit column enter the liquidity account.
- In the Debit column enter the customer's foreign currency account.
- In the column CC3 enter the customer's cost centre account in foreign currency with a negative sign.
Example: Invoice entry in foreign currency (EUR) with VAT on turnover in base currency (CHF):
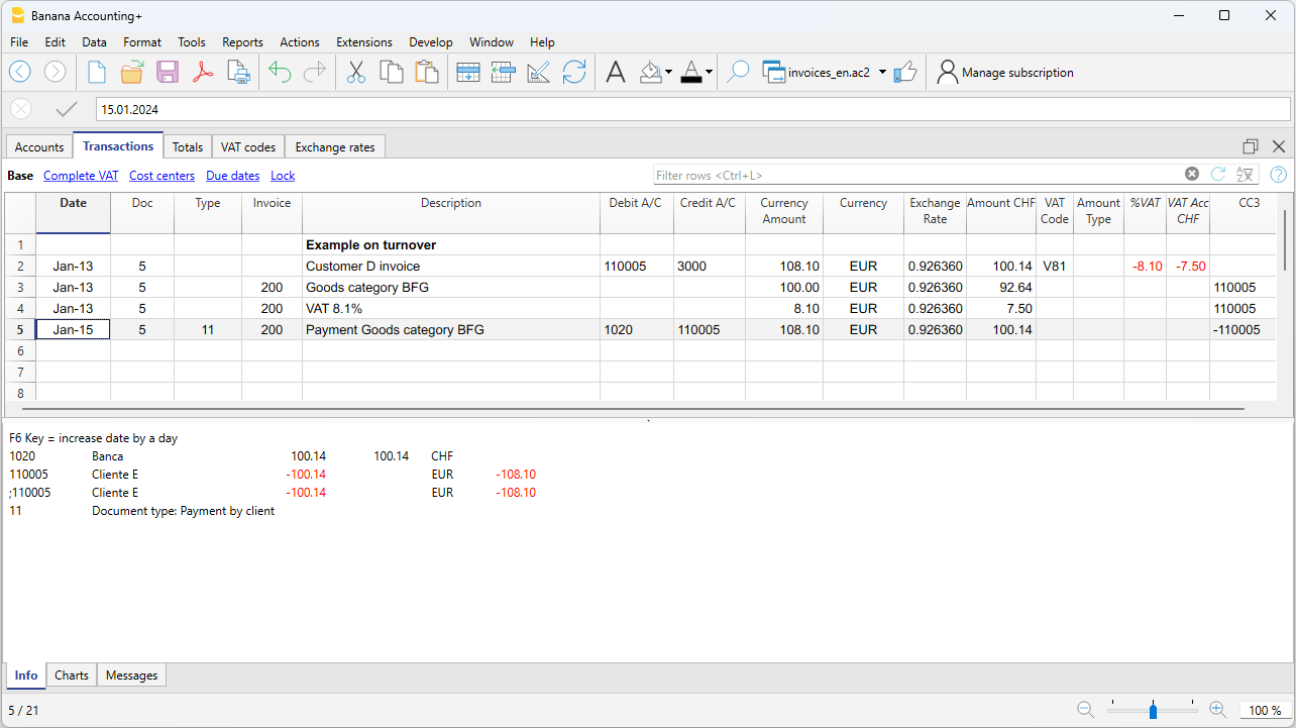
Advanced input Type column
The Type column in the Transactions table can be used to define the commands that are relevant to the display for printing data specific to your Invoice.
Check the DocType column via menu Data → Columns setup ..., to display the column and use it.
Entering data
Once the column is displayed, you may proceed by entering your data. You will need to:
- Add an empty row after the Date of the Invoice.
- Enter the date of the Invoice in the Date column.
- Enter the required command in the Type column (refer to table below)
- Enter the Invoice number in the Invoice column.
- Enter the data relevant to appear on the Invoice in the Description column.
Invoice to the customer
Typing 10: the Type column will list all possible options available to customize the data of your invoice.
| Invoice data | Column Type | Description column |
|---|---|---|
|
Client address If you want the address to look differently from the one defined in the Accounts table (Address view), you can change it using using the appropriate options. On each row a different element of the address is indicated (name, surname, address...). |
10:adr:fna |
Enter name |
| Shipping address | 10:sadr:pna 10:sadr:fna 10:sadr:lna 10:sadr:str1 10:sadr:cod 10:sadr:cit |
Enter prefix Enter name Enter surname Enter line 1 of address Enter postal code Enter the country |
|
Greetings After the invoice details, you may add a line of text for your final greetings (also see Examples invoices). |
10:gre | Enter your greetings |
|
Final notes One or several rows of notes can be inserted after the details of the invoice and before the greetings (also see Examples invoices). |
10:not | Enter your notes |
|
Order date |
10:ordd | Enter the order date |
|
Order number |
10:ordn | Enter the order number |
|
Parameters (advanced) When wanting to print personalized data on the invoice, you can use the appropriate command. This option is aimed at users with JavaScript programming knowledge, and allows you to change the invoice layout, so as to use the parameters indicated via this command. For further information please revert to Printing custom data. |
10:par | Enter your customized parameters |
|
Payment term Should you want to indicate an alternative text as a payment term, enter the desired text. This will be displayed on the invoice. |
10:ter | Enter the alternative text for the payment term |
|
Text begin |
10:beg | Enter the text printed before the invoice title |
|
Title If you do not wish to use the default invoice title, you can choose a different title. |
10:tit | Enter your text to appear as the invoice title |
|
Items subtotals It is possible to enter intermediate totals for your invoice in the table with the details of the invoice (also see Examples invoices). |
10:tot |
Enter level 0 subtotal |
|
Header line text In the invoice details table you can add headers to group items (also see Examples invoices). |
10:hdr | Enter the text you want to add to the invoice details. Leave empty to add an empty line. |
Intermediate Totals
In order to insert intermediate totals, you will need to add additional rows in the Transactions table:
- Enter 10 in the Type column: select :tot from the drop down menu, 10:tot will display. Enter again : and enter :1
- Enter the appropriate description in the Description column (ex. Total goods)
- Enter the Invoice number (in the absence of number, the total will not be printed).

Example of Invoice with intermediate totals.

Alternative text for payment terms
It is possible to define your own wording as a payment term for each invoice and this will replace the existing text for the expiry date.
- Enter an additional line with the same invoice number in the Transactions table.
- You will need to enter 10: in the Type column and select :ter from the drop-down menu, therefore the wording 10:ter will appear
- In the Description column, enter your text (ex 30 days net, 60 days etc ..).
When the invoice is printed, the value assigned as a payment term will be displayed.
Additional customisations
Other customisation options, such as the definition of bank details or final greetings, are available in the Print invoices dialog.
Customise invoice printing
Invoice printing can be customised and adapted to specific needs.
Set your company address (sender)
In the File menu → File and accounting properties (Basic data) → Address , set the address of your company.
Set up the list of customers in the Accounts table
- In the Accounts table, set up the customer's register.
- Display the address columns from the Address view and enter the customer addresses.
If the Address view is not visible, add it via the menu Tools → Add new functionalities → Add address columns in the Accounts table. - Configure the customer settings in the menu Reports > Customers > Settings.
Retrieving customer addresses from Excel
When customer data is on an Excel file, it can easily be taken back to the Accounts table, Address view.
It is assumed that in the Accounts table, at the end of the Chart of Accounts, there is the customer or shareholder register set up. Make sure you have enough empty rows to insert the data copied from Excel.
Proceed as follows:
- Select from Excel the column with the data to be copied and use the Copy (Ctrl+C) command.
- Go to Banana, Accounts table (Address view), position yourself in the corresponding column and issue the Paste (Ctrl+V or Paste) command from the Edit menu.
- Repeat this operation for all address columns (Account, First Name, Last Name, Organisation, Street, Zip, Country Code, Language).
The data corresponding to the mentioned columns are required for printing the invoice. - If you do not have all the columns mentioned in the Excel file, you must add the missing information manually.
Set customer language
You can print invoices in the customers' language. To do this you must first set the customer's language.
Logo setup position and sender address
To set the logo, you must:
- Upload the logo image in the menu File → Logo setup.
- To use the logo in the invoice, in the Invoice Settings you must activate the Logo box and enter the name of the customisation you used, respecting upper and lower case, in the Logo Name field.
For example, you can place the logo on the left and the address on the right and change the size of the logo.
The sender's address, if the default settings are not changed, is entered on the right, regardless of the presence of the logo.
If you want to set the sender address on the left without any logo, please see the following page:
Customise address in invoice header
The style of the sender's address in the invoice header (colour, size, font..) is set by default by the program.
The Advanced Plan of Banana Accounting Plus allows you to customize the style of the address. For more information see the Examples page.
Set invoice information
Invoice information is information about the date, customer number, due date, etc., which is usually located just below the header and next to the customer address.
The CH10 and UNI11 layouts allow you to define which invoice information to include and which to exclude from printing. You can find instructions on the Invoice Settings page.
For the other print layouts (CH01-CH09 / UNI01-UNI08), the information cannot be modified.
Set the payment term
The payment term for invoices by default is 30 days from the invoice date.
To change the payment term proceed as follows:
- In the Transactions table, ad a row to the invoice
- In the Date column enter the invoice date
- In the DocType column enter 10:ter (:ter Term of payment)
- In the Invoice column enter the invoice number
- In the Description column enter the desired payment term (for example "10 days")
Your text will be shown in the invoice Information.
Set customer address position
The CH10 and UNI11 layouts allow you to define the position of the customer address and the elements of the address. Please visit the Invoice Settings page for more information.
For other print layouts (CH01-CH09 / UNI01-UNI08), the location and composition of the customer address cannot be changed.
Set shipping address
To enter a shipping address in addition to the customer address, proceed as follows:
- Use the Type column of the Transactions table , command 10:sadr.
- Add a line to the invoice in the Transactions table .
- In the Date column, enter the date of the invoice
- In the Type column, enter::
- 10:sadr:fna for the name.
- 10:sadr:lna for the surname.
- 10:sadr:str1 for the address (street and number).
- 10:sadr:cod for the postcode.
- 10:sadr:cit for the location.
- In the Invoice column, enter the invoice number.
- In the Description column, enter the text to be displayed.
- With the CH10 and UNI11 layouts, go to Invoice settings → Customer address section and tick the Shipping address entry.
The data entered via the Type column of the Invoice table are taken over and inserted on the printout of the invoice.
Set title/object
To enter the title/object of the invoice, you have two options:
- Use the DocType column from the Transactions table, entering the text 10:it
- For each invoice you can define a title.
- If you leave the field empty, the default text is used.
- A text entered in the DocType column always has priority over entering the title in the layout settings (see next point).
- With the CH10 and UNI11 layouts, you can enter the text in the invoice Settings→ Texts section → Invoice title.
- The title applies to all invoices printed with this layout.
- The title applies only if no title has been defined as per the first point.
If no text is entered, the program will use the default text.
Set initial text
To enter the title/object of the invoice, you have two options:
- Use the DocType column from the Transactions table, entering the text 10:beg
- For each invoice you can define a title.
- If you leave the field empty, the default text is used.
- A text entered in the DocType column always has priority over entering the title in the layout settings (see next point).
- With the CH10 and UNI11 layouts, you can enter the text in the invoice Settings → Texts section → Begin text.
- The title applies to all invoices printed with this layout.
- The title applies only if no title has been defined as per the first point.
Setting up the invoice details
Use the Transactions table to enter invoice data.
See also Discounts and rebates.
With the CH10 and UNI11 layouts, you decide which columns to display in the printout. See how to do this on the page Invoice Settings → Invoice Details.
For the other print layouts (CH01-CH09 / UNI01-UNI08), the columns are not editable.
Set final texts
To enter the final text of the invoice proceed as follows:
- From the Invoice Print Dialog → Options section
- Select the desired language
- Enter the text in the Final text field
- This text is applied to any print layout.
The CH10 and UNI11 layouts also allow you to define a final text from the Invoice Settings
- Go to Invoice Settings → Texts section→ End text field and enter your text for each language.
- This text is applied to all invoices in the same .ac2 file created with that layout.
- This text has priority to whatever text has been entered in the has priority over the text entered from the Invoice Print Dialog.
To set different final texts for each invoice, you must use the DocType column of the Transactions table:
- In the DocType column, enter 10:not (Notes).
- In the Description column, enter the desired end text. The text you enter will appear on a single line.
- To add additional rows of notes, you must repeat the entry in the DocType and Description columns on multiple rows.
Set bank account number
If you don't use the QR-Code, you need to enter the bank account number as a reference for the invoice payment.
See the chapter above Set final texts to enter the bank account number.
Set IBAN for Swiss QR-Code printing
If you want to create QR invoices with IBAN account, you need to:
- Use the Layout CH10 for Banana Accounting Plus
- Set up IBAN account
- Set up the printing of the Swiss QR-Code
On the QR-Invoice with IBAN account page you will find more information for setting up QR-invoices with IBAN account.
Set up QR-IBAN for Swiss QR-Code printing
If you want to create QR-invoices with QR-IBAN account, you have to:
- Use the Layout CH10 for Banana Accounting Plus
- Set up QR-IBAN account
- Set up Swiss QR-Code printing
On the QR-Invoice with QR-IBAN page you can find more information about the settings of QR-invoices with QR-IBAN account.
Print QR form without amount and address
If you want to print only the QR-bill without amount and customer address, you have to:
- Use the QR-Invoice extension without amount and address.
- Set the currency, address and IBAN account.
- Create the bulletin with QR code.
See also how to print an Invoice without amount.
Set styles and colors
Invoice print layouts also have a setting where you can define:
- The font
- Enter the name of the font (e.g. Arial, Helvetica, etc).
- The colors
- You can use the English designation (black, yellow, white, blue, red, etc.).
- Or the hexadecimal value (HEX) preceded by the # sign (e.g. #000000, #009FE3, #FF00EA).
- Color codes are easily found on the internet. For example, you can consult the table at https://www.w3schools.com/cssref/css_colors.asp.
The CH10 and UNI11 layouts also have an Invoice Settings to define font size.
Set Bold texts
In the Invoice settings page you will find information on how to apply bold style to invoice texts.
Adding images to invoices
The Advanced Plan of Banana Accounting Plus allows you to add images to the offers and invoices to be sent to customers.
This functionality makes the invoice even more customizable and the client who receives it has a more complete and direct vision of the invoicing of the items.
See our information pages on how to add images:
Close cashed invoices
There are two ways to close open invoices:
Other resources
Print invoices
- You can choose the Print layout.
- You can customise invoice printing by changing the settings.
- Several layouts are available for invoice printing, here are the recommended ones:
- The CH10 layout for all users in Switzerland (with Swiss QR-Code).
- The UNI11 layout for all users in other countries. (Same as CH10, but without the QR-Code).
For more information on customisation, see:
With the Advanced plan of Banana Accounting Plus it is also possible to print several invoices at the same time and obtain single PDFs for each of them! For more information visit the page Print invoices or customer statements as separate PDFs.
Print invoice dialog

From here you can:
- Select the invoice or invoices you wish to print.
- Set the layout to be used for printing the invoice.
- Access the layout settings to customise the printout.
Once the print options have been chosen, the OK button displays the invoice in the print preview window.
From the invoice preview you can:
- Print the invoice.
- Save it in PDF so that you can easily send it by e-mail
- Save the invoice in other formats.
- Access the Print Invoices dialogue.
Print tab
Invoice numbers
You can print single or multiple invoices:
- For single prints, indicate the number of the invoice.
- For multiple prints, indicate the numbers of the invoices between commas "1,3,6".
- To print a range ( from..to..) indicate the numbers separated by hyphen "1-3" .
If the invoice itself contains a '-', for example if you have an invoice number '2016-1', this must be enclosed in brackets {}, to distinguish the numbering of a range of documents {2016-1}-{2016-3}.
Invoices from
This option allows you to print all invoices included in the selected period. You need to enter an initial and final date.
Unprinted invoices
Invoices where the InvoicePrinted column of the Transactions table is empty are printed. All unprinted invoices are therefore printed.
Layout
The styles allow you to change the invoice layout.
Layout Preferences
Requirements to be able to use the layout preferences:
- Banana Accounting Plus (version 10.1.7 or more recent).
- Advanced plan
This option allows you to set the preferences offered by the selected layout.
If a layout with no preferences is selected, this section is not displayed in the dialogue box.
- Print as
You can select the type of document you wish to print, the choices are:- Automatic: prints the document in invoice format.
- Delivery note with amounts: prints the document as a delivery note.
- Delivery note without amounts: prints the document as a delivery note, without showing the amounts and the total.
- Estimate: prints document as estimate.
- Order confirmation: prints the document as order confirmation.
- Proforma Invoice: prints document as proforma invoice.
- Invoice: prints the document in invoice format.
- QR Slip: prints only the QR slip (for layout CH10 only).
- 1st reminder: prints the document as first reminder.
- 2nd reminder: prints the document as second reminder.
- 3rd reminder: prints document as third reminder.
The chosen document type is not saved for the next time, instead it is set to "automatic" again.
Layout preferences are offered by the following layouts:
Other layouts
This button takes you to the Manage extensions dialog window, where you can install new layouts, update existing ones with the latest versions, or add your own customised layouts.
Settings
Allows you to access the settings dialogue of the selected layout, where you can customise the printing of the invoice. Each layout has its own customisable settings.
Update the InvoicePrinted column after printing
You can make this column visible by using the Data menu → Columns setup command.
The program will update the content of the column Printed after the print preview, adding the text 1. This will allow the Select unprinted invoices command to only print the invoices with no content in this column.
Options tab
In this section, language-specific texts can be added, for example, to indicate final greetings or bank details for payment. Depending on the customer's language, the programme will display at the end of the invoice the texts saved for the language indicated.
Only one type of text can be entered, one for each language.
The texts entered here are taken over when printing all invoices, whichever print layout is used.
To enter a final text:
Menu Reports > Customers > Print invoices.
In the Options section, enter the desired text.
Confirm with OK.
The text entered will appear in the print preview of the invoice.

Adding different types of end texts
In order to add different types of notes in invoices, please refer to the following paragraph in page:
Export to PDF
The program displays a preview of invoices or customer statements. From the print preview, using the Export PDF command, you can create:
- A single file that contains all invoices or customer statements.
- Separate files for each individual invoice or customer statement.
Print Delivery notes
With Integrated invoicing, when you create an invoice, it is automatically recorded in the accounting system and the customer's account. It is possible to print an invoice with the wording "Delivery Note" containing the same invoice data, using layouts CH10 and UNI11.
However, it is not possible to create a standalone record for the delivery note without any accounting impact, one that doesn't debit the customer's account or credit other accounts.
Mandatory requirements to use the layout preferences:
- Banana Accounting Plus (Release 10.1.7 or later).
- The Advanced plan
How to print a delivery note
In the Transactions table select the row where the delivery note to be printed is located and proceed as follows:
- Menu Report > Customers > Print invoices
- Select Layout CH10 or UNI11
- Under Print as, select:
- Delivery note with amounts
In this case, amounts in details and total amount are included in the delivery note. - Delivery note without amounts
Only the details of the dispatched goods are displayed in the delivery note, without any amounts.
- Delivery note with amounts
- Conferm with OK.
Delivery address
When printing the delivery note with an address other than the billing address, the delivery address must be entered in the Transactions table, using the Type column.
In this case, the delivery note will print the address entered in the Transactions table and not that of the respective customer, which is instead found in the Accounts table, Address view.
Printing customization
All settings that characterise Layout CH10 and UNI11 are also retained when printing the delivery note.
To change the settings, go to Print Layout Settings.
Under Texts > Delivery Note you can define the initial and final texts in the delivery note.
Print example:
Print Estimates
With Integrated invoicing, when you create an invoice, it is automatically recorded in the accounting system and the customer's account. It is possible to print an invoice with the wording "Estimate" containing the same invoice data, using layouts CH10 and UNI11.
However, it is not possible to create a standalone transaction for the Estimate without any accounting impact, one that doesn't debit the customer's account or credit other accounts.
Requirements in order to use layout preferences to select the label "Estimate" are
- Banana Accounting+ (version 10.1.7 or later).
- Advanced plan
How to print an estimate
In theTransactions table, select the row that corresponds to the estimate and proceed as follows:
- Menu Reports > Customers > Print invoices
- Select Layout CH10 or UNI11
- Select the option Print as, and choose Estimate
- Confirm with OK.
The offer is always printed without the Swiss QR bulletin.
Printing customization
All the settings that characterize the CH10 and UNI11 Layout are also retained in the printing of the estimate.
To modify the settings, go to the Print Layout Settings.
In the Texts > Estimate section, you can define the initial and final texts of the quote.
Print Reminders
In Banana Accounting Plus you can print reminders in two different ways:
Print Reminders from the Print Invoice dialogue
Banana Accounting Plus, with the CH10 and UNI11 layouts, also allows you to print reminders.
Requirements for using layout preferences:
On the basis of the invoice data entered in the Transactions table, reminders can be printed.
How to print a reminder
In the Transactions table select the row where the invoice for which you need to print the reminder is located and proceed as follows:
- From the Menu Reports > Customers > Print Invoices
- Select Layout CH10 or UNI11
- Under Print as, select one of the following options:
- 1. reminder
- 2. reminder
- 3. reminder
- Confirm with OK
Print customization
All settings that characterise the CH10 and UNI11 layouts are also retained in the reminder printout.
To change the settings, go to Print Layout Settings.
Under Texts → Reminder you can define the start and end texts in the reminder.
Print example:
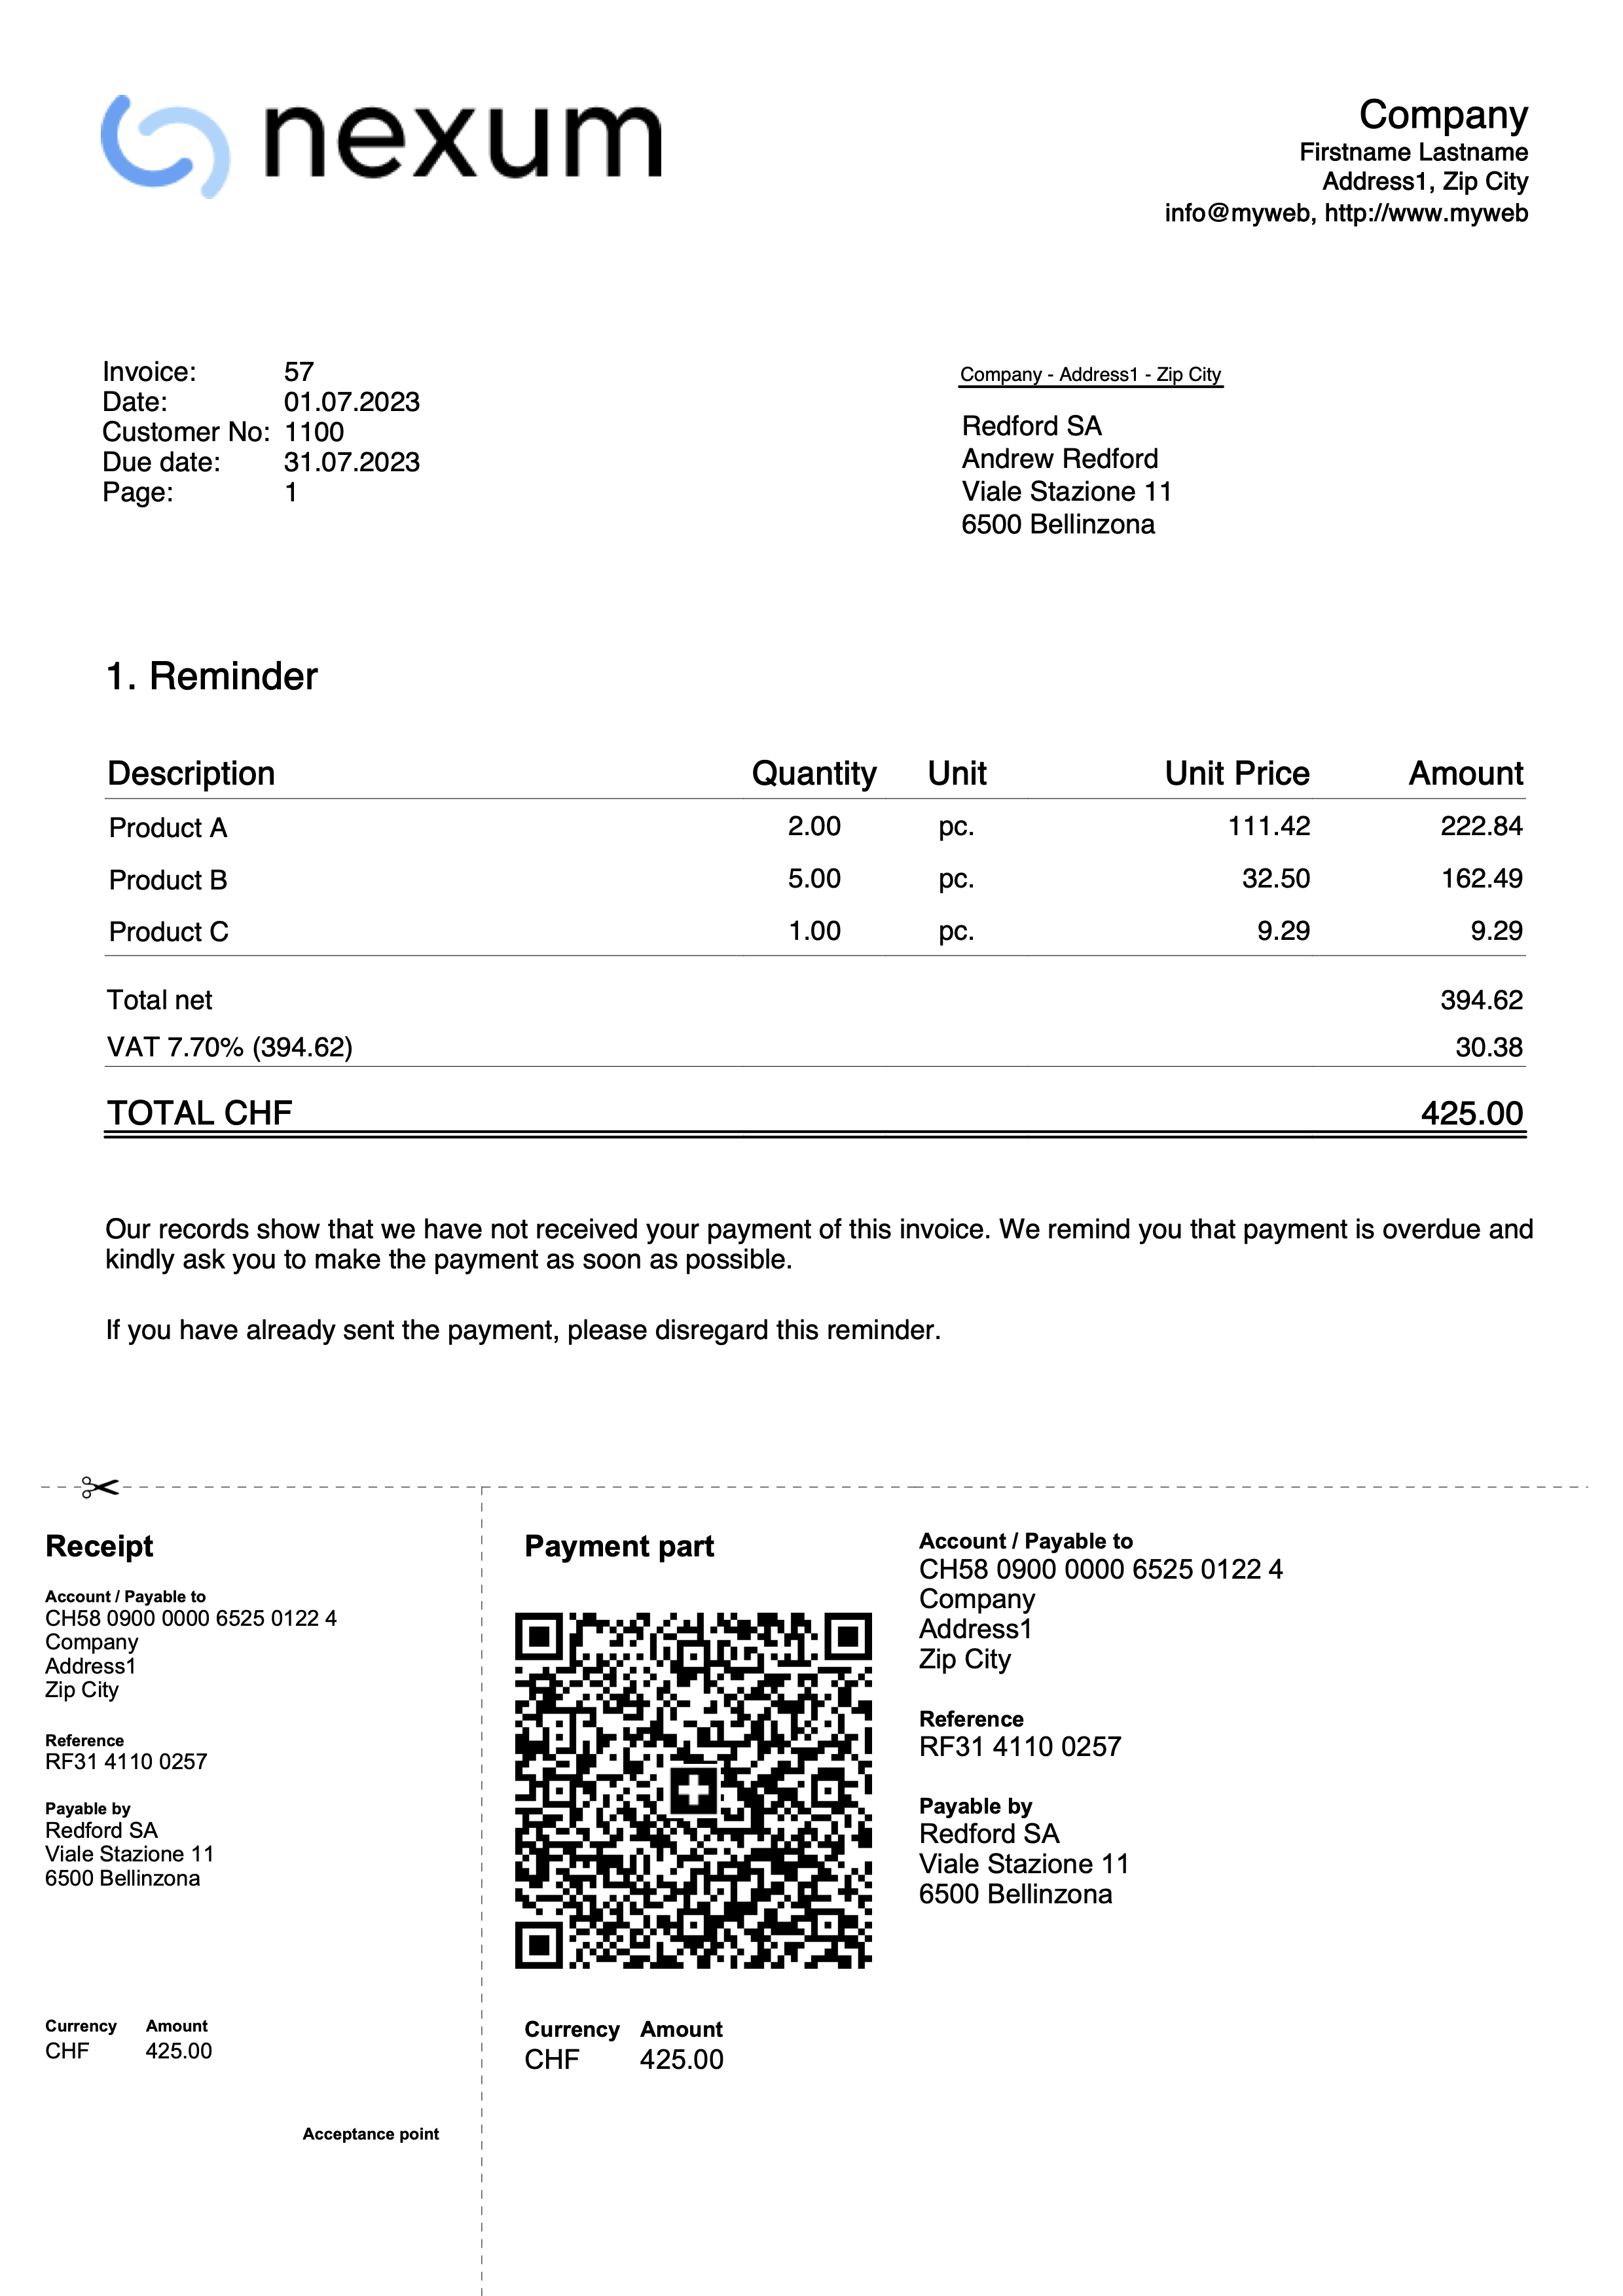
Invoice collection registration
There are two ways to close open invoices:
- Manually register the collection of customer's invoice
- Automatically register by importing the data in the bank statement in ISO 20022 format.
Closure with manual recording
To manually record the receipts of the invoices, see the following pages
- Closing with transaction on the turnover principle method
- Closing with transaction on the cash method
Closing with ISO 20022 data import (Switzerland)
To automatically close open invoices by importing statement data, you must:
- Download and save on your computer the data in ISO 20022 format directly from the bank's website.
Files in ISO 20022 formats camt052, camt053 and camt054 are supported for Swiss specifications. - Install the ISO 20022 Camt Bank Statement (Switzerland) extension.
- Set some parameters of the extension.
- Import the transactions by selecting the Camt Bank Statement ISO 20022 (Switzerland) extension.
With the import, the program automatically creates records in the Transactions table and enters the data in the corresponding columns:
- In the Date column, the date of the invoice collection.
- In the Invoice column, the invoice number extracted from the QR reference number (see parameters).
- In the Description column, the QR reference number.
- In the A/C Credit column, the customer account extracted from the QR reference number (see parameters);
- The extracted customer account will be saved as an account/category or cost center based on the parameters.
- In the Amount column, the invoice amount.
- In the A/C Debit column, the counterpart account (the bank account where the amount has been collected) if this has been enabled during the import.
For more information, see the Camt ISO 20022 (Switzerland) Bank Statement page.
QR References
The codes of the QR references are explained on the following pages:
- With the IBAN account, the Structured Creditor Reference (SCOR) type is used.
- With QR-IBAN account the QRR Reference type is used.
Kundenkonto und Rechnungsnummer bearbeiten
Wenn Sie die Kundennummer sowohl im Postenbuch als auch in den Kosten- und Profitstellen ändern oder die Rechnungsnummer anpassen, stellen Sie sicher, dass keine offenen Rechnungen aus den Vorjahren vorhanden sind.
Kundenkonto bearbeiten ohne Anfangssaldi
Das Kundenkonto kann mit dem Befehl Umbenennen geändert werden.
Wenn bereits Buchungen mit dem alten Konto existieren, werden diese automatisch auf das neue Kundenkonto aktualisiert.
Es wird empfohlen, ein Kundenkonto zu Beginn des Jahres umzubenennen, sofern keine offenen Rechnungen vorhanden sind.
Kundenkontos bearbeiten mit Anfangssaldi
Wenn ein Kundenkonto mit Eröffnungssalden (offenen Rechnungen) umbenannt werden soll, kann das Konto nicht einfach geändert werden. Stattdessen muss ein neues Konto mit der neuen Nummerierung angelegt werden. Der Eröffnungssaldo wird anschliessend durch eine Buchung vom alten Konto auf das neue Konto übertragen.
- Fügen Sie in der Tabelle Konten das neue Konto mit der neuen Nummerierung hinzu.

- Erstellen Sie in der Tabelle Buchungen eine Buchung, um den Eröffnungssaldo vom alten Konto auf das neue Konto umzubuchen.
- Falls im neuen Jahr noch Rechnungen existieren, die sich auf das alte Konto beziehen, können diese dem neuen Konto zugeordnet werden. Dazu muss die Kontonummer in allen zugehörigen Buchungen geändert werden.
Wichtige Hinweise:
- Seien Sie besonders vorsichtig, wenn Rechnungen bereits an den Kunden gesendet oder bezahlt wurden.
- Falls die Belegnummer auch die Kundennummer enthält, prüfen Sie, ob eine Änderung erforderlich oder möglich ist.

- Im Menü Aktionen > Kundenbericht > Offene Rechnungen pro Kunde wird ein Bericht angezeigt, der die Schliessung des alten Kontos sowie die Übertragung des Saldos auf das neue Konto dokumentiert.
- Ein Konto mit der alten Nummerierung und einem Nullsaldo kann im folgenden Jahr gelöscht werden, sofern der Anfangssaldo Null beträgt.

Ändern einer bereits gebuchten oder ausgestellten Rechnungsnummer
Wenn Sie die Nummer einer noch nicht bezahlten Rechnung ändern möchten, stehen Ihnen zwei Möglichkeiten zur Verfügung:
- Ersetzen Sie die Rechnungsnummer direkt in der ursprünglichen Buchung der Rechnung.
Diese Vorgehensweise wird nicht empfohlen, wenn die Rechnung mit der alten Nummer bereits in der Vorjahresdatei erfasst wurde.
- Stornierung und erneute Buchung
- Stornieren Sie die ursprüngliche Buchung der Rechnungsausstellung.
- Erfassen Sie eine neue Buchung mit folgenden Angaben:
- Spalte Rechnung – Geben Sie die neue Rechnungsnummer ein.
- Spalte Typ – Tragen Sie den Wert 15 ein (schliesst den Kundenbeleg).
- Spalte Soll – Geben Sie ein Transferkonto an.
- In der Spalte Haben – Geben Sie das Kundenkonto an.
- Spalte Betrag – Erfassen Sie den Rechnungsbetrag.
Diese Vorgehensweise wird empfohlen, wenn die Rechnung mit der alten Nummer in der Vorjahresdatei erfasst wurde, da sie sicherstellt, dass die Änderung korrekt nachvollzogen werden kann.

Credit notes
Credit notes have their own TypeDoc, different from invoices.
Enter your transaction, as if it was an invoice.
- In the Invoice column, you must indicate the invoice number to which the credit note refers.
The accounts will follow the logic of recording a credit note. As a result, the amount of the document will be negative. - Enter '12:' in the Type column.
- Enter in the Description column the text that will appear in the Credit Note details.
In some print layouts of Banana 9, the wording Invoice will however always be printed; to change, proceed as follows:- Enter a new row with identical invoice number and 12:tit in the Type column.
- Insert Credit Note in the Description column.
Printing the credit note
The same command is used as the one for printing invoices: Reports → Clients → Print invoices.

Roundings in invoices
If there is a rounding in the invoice printout, the rounding must be reported into the accounting, otherwise the programme will report an error, indicating the difference to be recorded.
From the menu Reports > Customers > Settings > Advanced it is possible to set the roundings of the invoice to the desired cents, but only in base currency.
If you do not wish to round the invoice amount, you must set the rounding in the field Invoice rounding (basic currency) to 0.01; the invoice total will correspond to the amount of the transactions.
In the Exchange Rates table, the Reference Currency column typically contains the base currency, while the Currency column contains the foreign currency.
When the reference currency is not the base currency, it is not possible to set rounding from the customer settings (menu Report > Customers > Settings > Advanced). In this case, to set rounding, you need to use the Rounding column in the Exchange Rates table (menu Data > Columns setup > display the Rounding column). If you do not wish to round the invoice amount, set the rounding to 0.01 in this column.
Record positive roundings in customer chart of accounts
When there is a positive rounding, enter the following in the Transactions table:
- Enter the date of the invoice in the Date column.
- Enter the invoice number in the Invoice column.
- Enter a description in the Description column.
- Enter the customer's account in the Debit column.
- Enter the counterpart (Sales, Consulting or other account) in the Credit column.
- Enter the hundredths of the rounding in the Amount column.

Record negative roundings in customer chart of accounts
When there is a negative rounding, enter the following in the Transactions table:
- Enter the date of the invoice in the Date column.
- Enter the invoice number in the Invoice column.
- Enter a description in the Description column.
- Enter the counterpart (Sales, Consulting or other account) in the Debit column.
- Enter the customer account in the Credit column.
- Enter hundredths of the rounding in the Amount column.
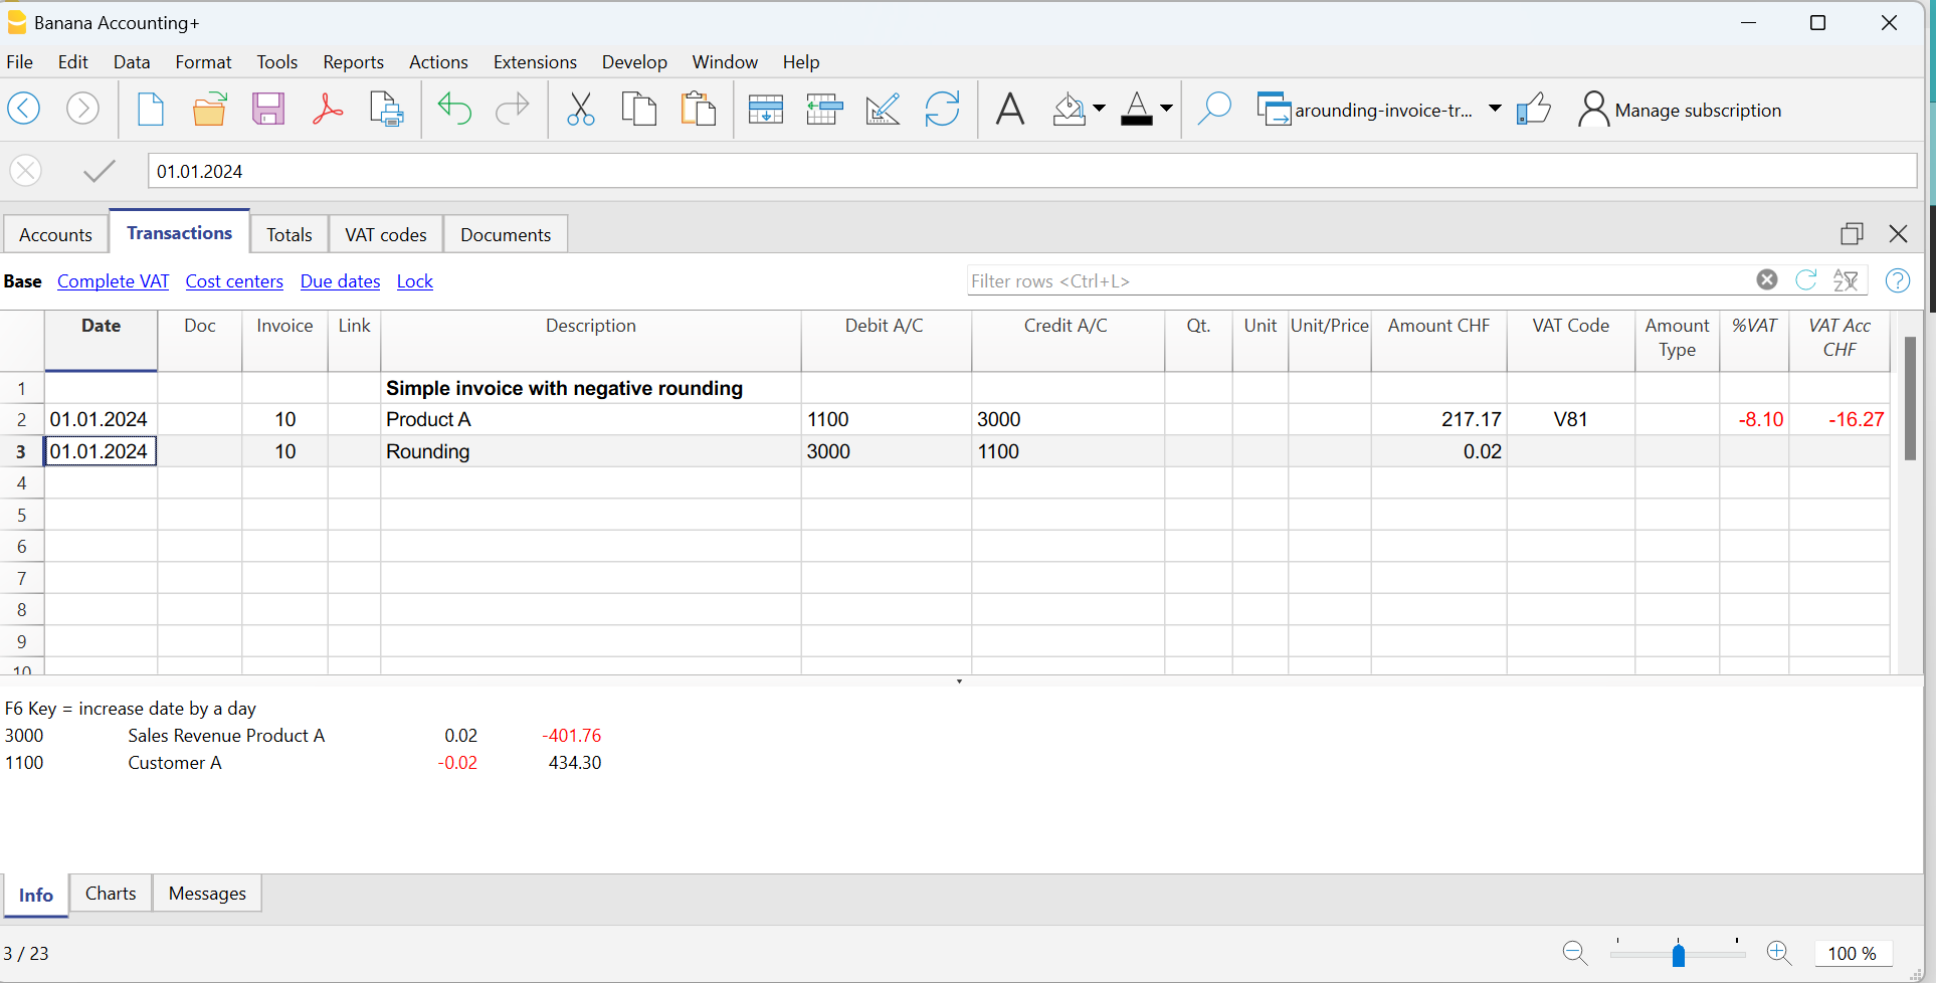
Record positive roundings in the cost centre (CC3)
When there is a positive rounding, enter the following in the Transactions table:
- Enter the date of the invoice in the Date column.
- Enter the invoice number in the Invoice column.
- Enter a description in the Description column.
- Leave the Debit column blank.
- Leave the Credit column blank.
- Enter hundredths of a rounding in the Amount column.
- In the CC3 column, enter the customer's cost centre.
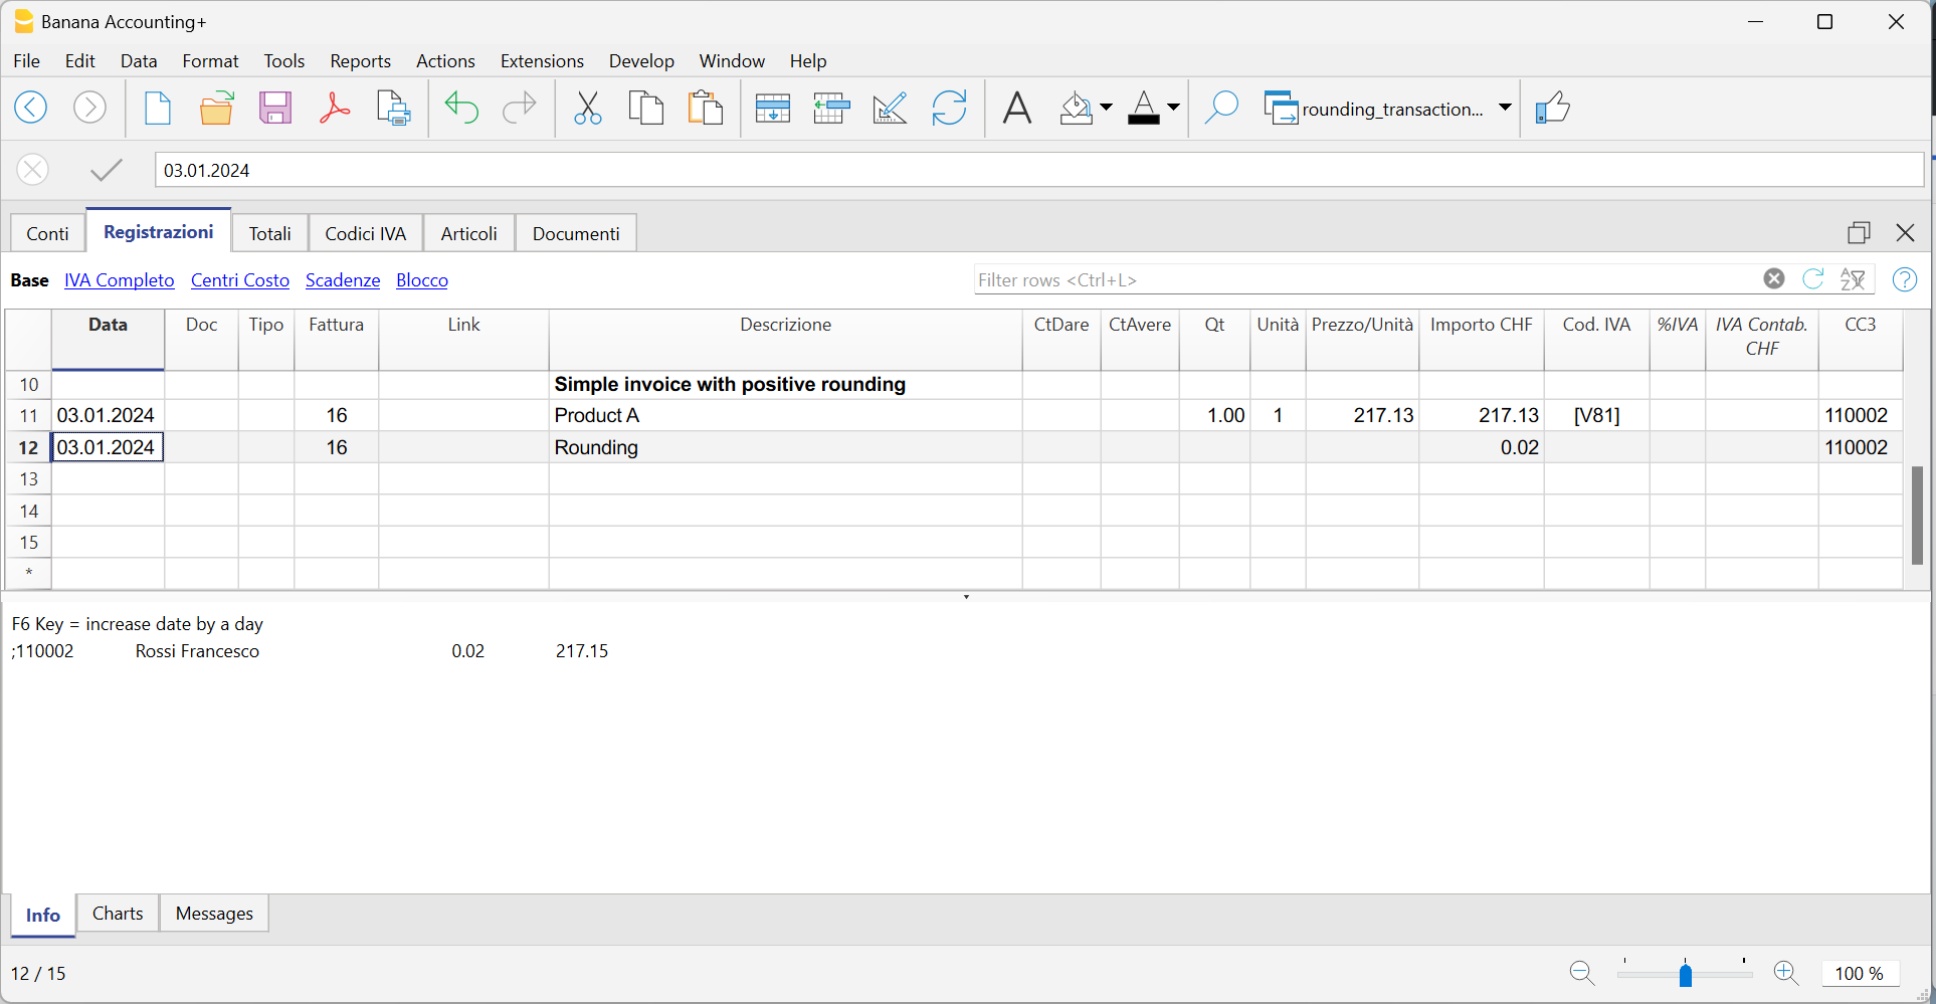
Record negative roundings in cost centre (CC3)
When there is a negative rounding, record in the Transactions table as follows:
- Enter the date of the invoice in the Date column.
- Enter the invoice number in the Invoice column.
- Enter a description in the Description column.
- Leave the Debit column blank.
- Leave the Credit column blank.
- Enter hundredths of the rounding in the Amount column.
- Enter the customer's cost centre with a minus sign in front in the CC3 column.
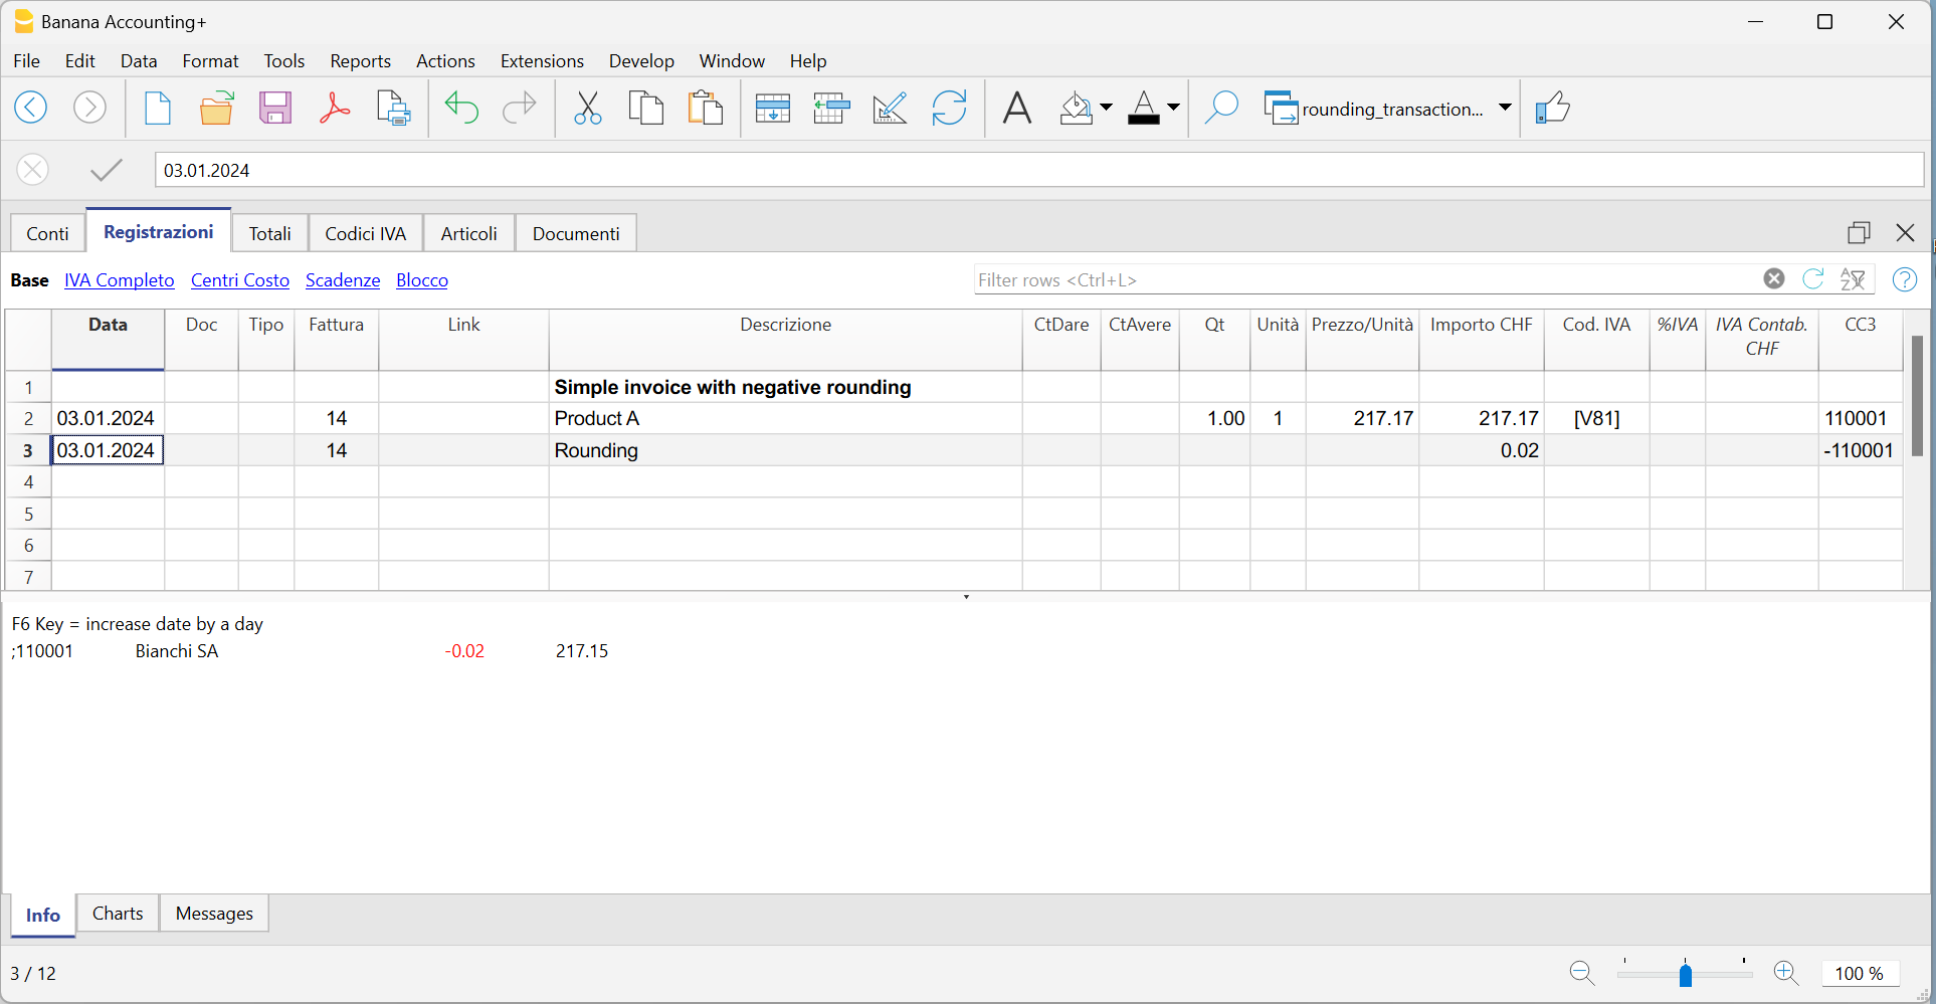
Supplier Management
The supplier management allows you to record, organize, and manage supplier information, enabling you to keep track of supplier transactions and payments, payment deadlines, and contact information. You can monitor due invoices, paid invoices, and the account balance for each supplier, as well as the total open balance.
Supplier management is one of the features of Banana Accounting Plus available in all accounting applications.
Supplier master data settings include both revenue and cash management. Foreign currency supplier accounts can also be managed.
The function of making supplier invoice payments via e-banking is only available in the Advanced plan.
Recording Supplier Transactions
The Transactions table is the heart of Banana Accounting and is used to record all operations, including supplier transactions, simply by specifying the supplier's account. You can work quickly because you can select, copy, and paste supplier transactions that have been entered previously. If you make any mistakes, you can always correct them.
The supplier transactions recorded in the Transactions table include the following:
- Receiving invoices
- Making invoice payments
- Receiving credit notes or refunds
- Managing payments via e-banking
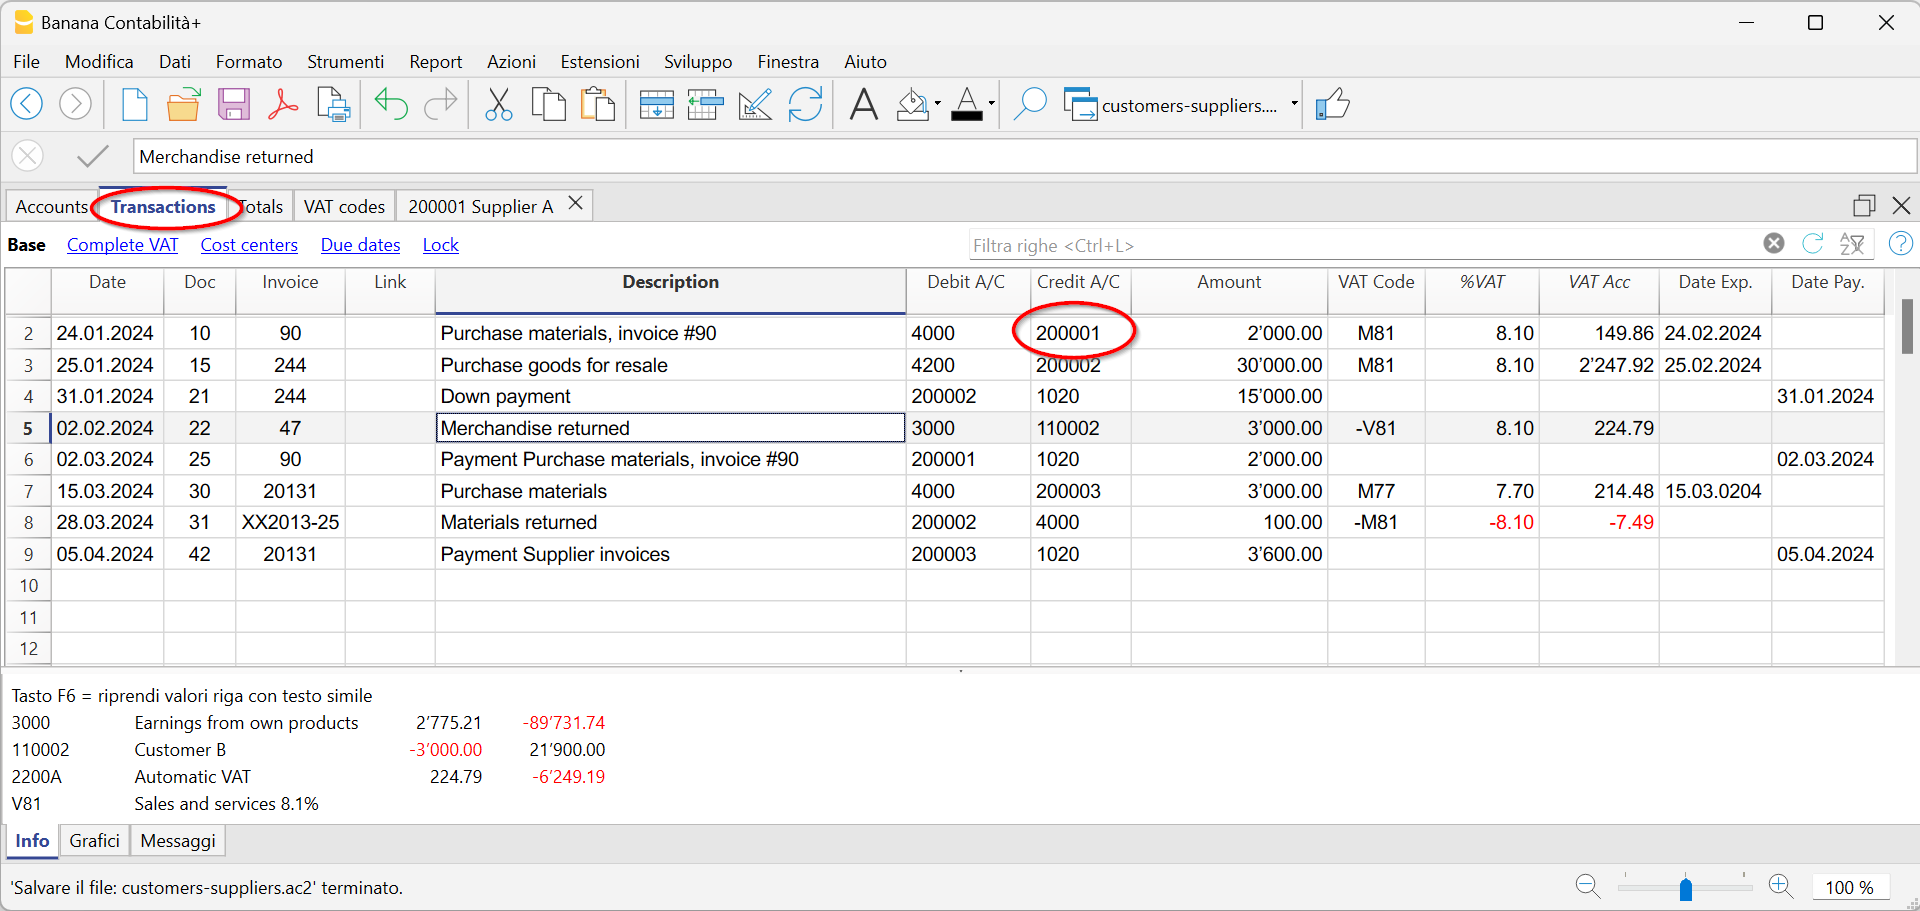
There are columns where you can enter various pieces of information, including:
- Date of the Transaction, Due Date, and Payment Date.
- Invoice number.
- Debit and Credit Accounts where you specify the supplier's account (Credit) and the counterpart account (Debit).
- Amount.
- VAT codes for the automatic calculation of VAT
- Links to Digital Documents (such as the invoice received from the supplier or PDF annotations).
Supplier Accounts
Supplier accounts are used to record all transactions related to a company's suppliers.
The main functions of supplier accounts are as follows:
- Create an Account for Each Supplier and Track All Transactions.
- Record Received Invoices for Each Supplier.
- Create an E-banking Payment Order Directly from the Supplier Invoice.
- Record Payments to Suppliers and Associate Them with Received Invoices.
- Generate Lists for Payment Verification.
In Banana Accounting Plus:
- Supplier accounts and their Addresses (name, surname, company name, address, VAT number, etc.) are set up in the Accounts table.
- Accounting transactions related to these accounts are entered in the Transactions table.
- After each entry, all supplier account balances (Accounts table) are automatically updated, providing an immediate overview of outstanding balances yet to be paid.
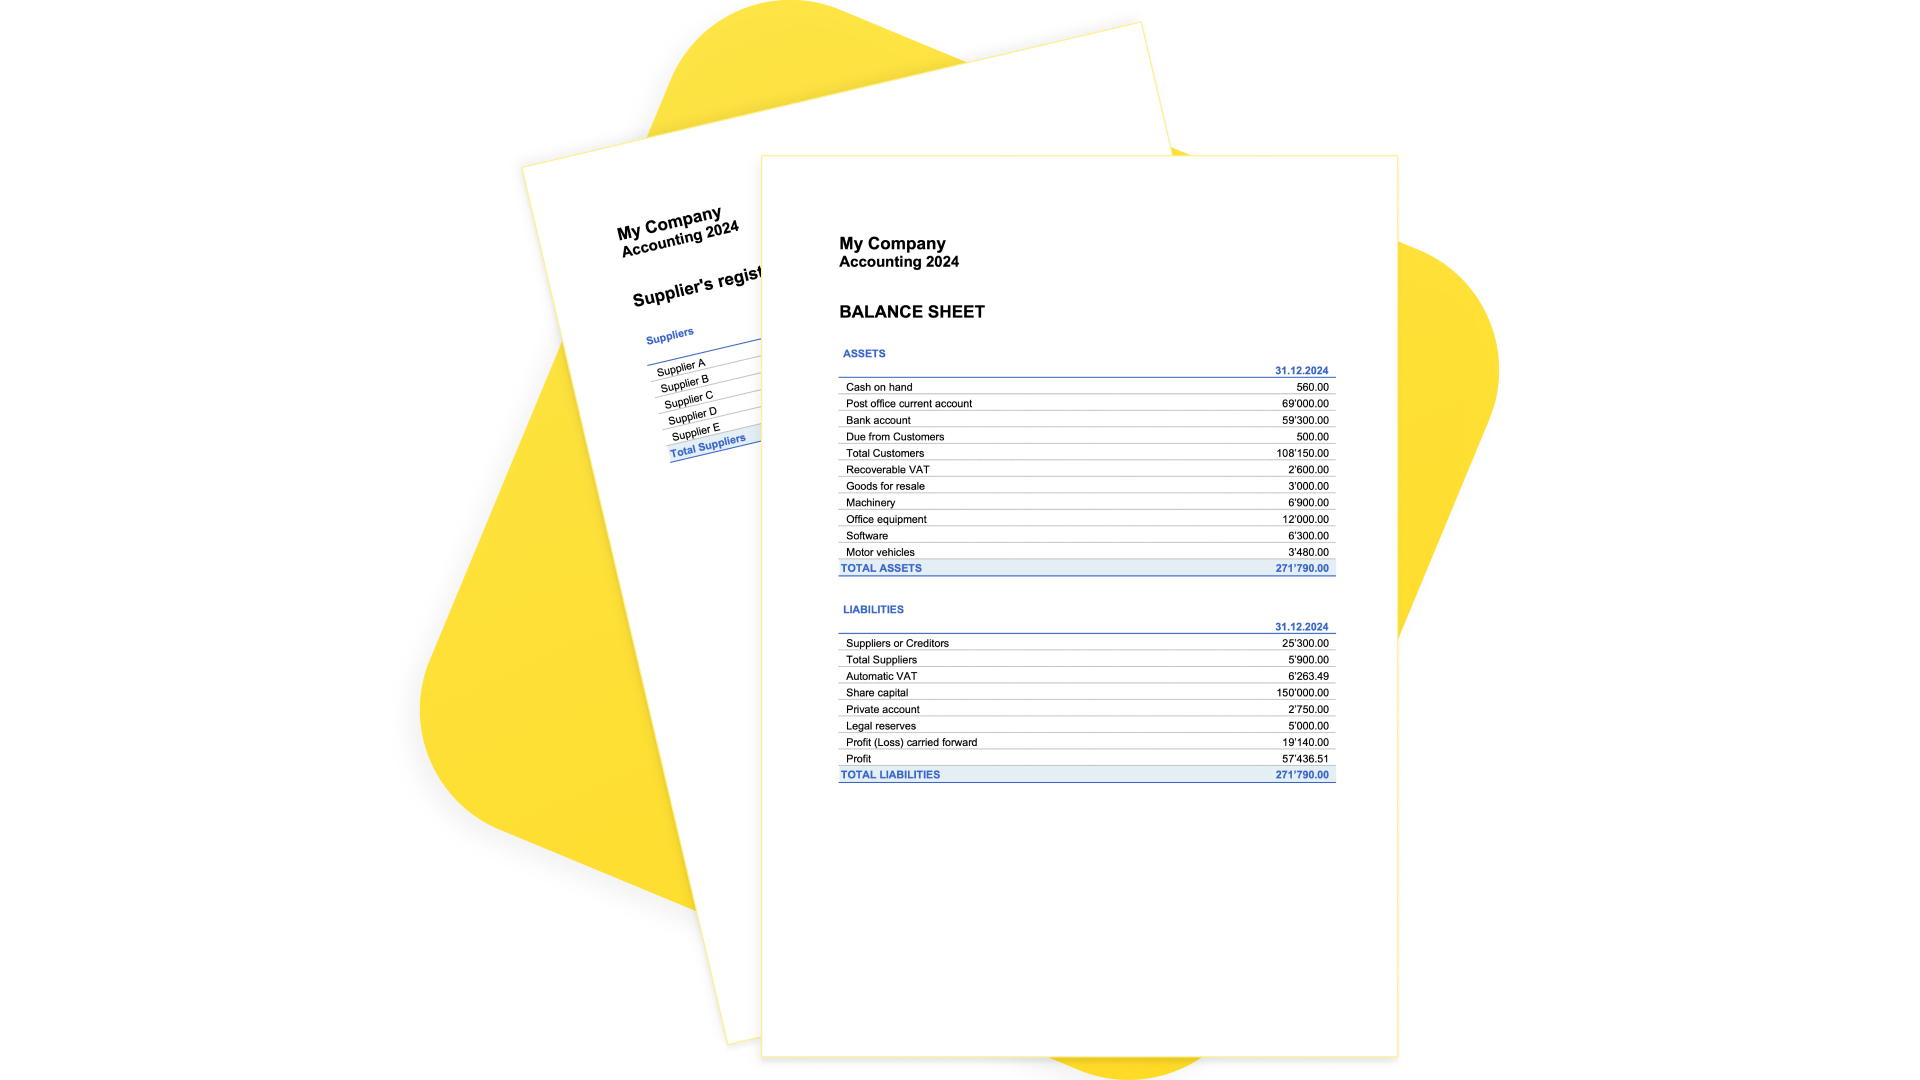
Recording Received Invoices
The invoice received from the supplier is used for accounting and tax purposes as it allows for the accurate recording of a company's costs and expenses, as well as the calculation of VAT.
In Banana Accounting, invoices are recorded in the Transactions table by:
- Entering the date and description.
- Adding an invoice number.
- Recording the cost account in the Debit column and the supplier account in the Credit column.
- Specifying the VAT code for goods or services purchased. Calculations and VAT amounts are automatically inserted.
Recording Payments
In Banana Accounting, payments are recorded in the Transactions table using one of the following methods:
- Manual Recording:
- Enter the date and description.
- In the Invoice column, specify the supplier's account. A dropdown menu will display the open invoices. Simply select the invoice received from the supplier, press Enter, and the program will automatically fill in the supplier's account in the Debit column, along with the invoice amount. Basta poi Then, enter the cash account in the Credit column to complete the recording.

- Data Import from Bank Statements Using Rules
- The program imports data from ISO 20022 bank statements, and with the use of Rules, it automatically enters complete transactions, including all necessary details, without the need for manual intervention.
Outstanding Invoices
Outstanding invoices from suppliers are those invoices that have been received but are still pending payment.
Supplier's outstanding invoices can be managed through an accounting register that tracks issued invoices, payment due dates, and received payments. This allows the seller to monitor the financial status of each supplier and send payment reminders if invoices remain unpaid for an extended period.
It's important to note that outstanding supplier invoices have an impact on a company's liquidity, as they represent funds that need to be allocated for payment.
Banana Accounting automatically generates a report of outstanding invoices, where you can quickly verify which invoices are still pending payment, from which supplier, and the total amount of outstanding invoices.
There are two types of reports:
- Open Invoices by Supplier, where all open invoices for each supplier are listed.

2. Open Invoices by Due Date, where open invoices are listed in order of their due dates.
The due date for an invoice can be set in various ways. Further information is available on the following page: "Expiry Dates and Payment Terms."
Accounts Cards
Accounts cards are accounting documents that record the financial transactions of a company. Each card represents a specific account in the company's general ledger and contains detailed information about the transactions related to that account, such as the date of the financial transaction, the type of transaction, the amount, and the description of the transaction.
In Banana Accounting, based on the data entered in the Transactions table, the program automatically generates an Accounts Card for each supplier. These cards display the opening balance, all transactions, and the final balance. You can also generate account cards for specific time periods.

Set up and use supplier features
- Set up accounts for turnover accounting (accrual principle).
- Set up accounts for collection accounting (cash principle).
- Configure supplier settings (explanation as for customers).
- Set up the transactions table and post supplier invoices.
- Open, overdue or received supplier invoice reports.
Notes
- In multi-currency accounting, the reports are based on the balances in the currency of the supplier's account, so any exchange rate differences are not taken into consideration.
- In the Invoices received table, the exchange rate differences transactions are also listed, while in the other printouts only the supplier's currency amount is valid.
- The Description column of the reports includes the first transaction row for each invoice.
- For the accounting on the collected, it is possible to set up a suppliers register with cost centers.
Example file
Managing with the accrual method
Introduction
In Banana Accounting it is possible to manage suppliers both with the accrual and cash method. A detailed explanation is available on the accounting with the accrual or cash principle page.
Below we explain how to set up the group and supplier accounts, so that you can have a separate invoice list for each supplier.
If you have few invoices and do not want to keep a detail by supplier, it is also possible to have only one account where all the invoices of the suppliers are recorded. In this case, the list of invoices will be grouped by all suppliers and not by a single supplier.
Setting up the Suppliers' register
To create the Suppliers' register, add at the end of the Chart of accounts:
- A* section (header) (see Sections)
- A 02 section for suppliers (see Sections)
- The Suppliers' accounts that are needed (see Adding a new account). Each supplier is entered on a row of the Chart of Accounts and has its own account number. The account numbering can be freely chosen (see Accounts), however it is recommended to use only numbers, in particular for the management of payments.
- A group where all the accounts payable are totaled.
- This group is in turn totaled into a group present in the liabilities.

- The total Suppliers will be totaled in the 200A summary group of the Sum in column.
- The same code or number used for the Gr (200A), must be used in the Liabilities Group column, in the row corresponding to the Total Suppliers. The groups numbering can be freely chosen (see Groups).

Record a received invoice

Record a payment
- Enter the transaction date
- Position yourself on the Invoice field and press the F2 key or double click on the cell.
The list of open invoices will be displayed. - Select the paid supplier invoice and press Enter.
The program will complete the transaction with the Description, Debit Account and Amount fields. As long as the contra account is not entered, the program will report the difference in the transactions.

Record a credit note
The same invoice number must be used for the amount to be deducted from the initial invoice. If the adjustment document (for example a credit note) has a different numbering that you still need to keep available, write this reference in another column, for example DocOriginal.

Collection management (cash principle)
Set up the suppliers register with the cost centers
For Swiss users who have VAT on their receipts, this setting allows you to manage VAT in an optimal way.
It is possible to manage the customers and suppliers register as cost centers (see also the Cost and Profit Centers page). A detailed explanation is available on the Accounting page on accrual or cash method.
- It is advisable to use the cost center CC3 (accounts preceded by a semicolon ";")
- The balances of the cost centers will therefore not appear in the balance sheet.

Transactions
The information is available on the Customers and suppliers page with VAT using the cash principle.

Miscellaneous operations
The various functions listed use the same methods as those used for clients. For further information, please refer to the relevant client pages.
View the Invoice column in the Transactions table
See Clients - Display Invoice columns.
Auto-complete
Extract invoice rows and open invoice link commands
Vedi Clients - Extract invoice rows commands.
Activating the Address columns (optional)
See Clients - Address column setup.

Configure supplier settings
- Select the Reports → Suppliers → Settings command.
- It is important to indicate in the "Group or account", the group of the chart of accounts where the various accounts of the suppliers are grouped.
- For explications of the different options see Customers/Suppliers settings.
List of supplier invoices
Displaying invoices received
Command: Reports → Suppliers → Open invoices by supplier.
All invoices that belong to the supplier register or to an individual supplier are displayed in this table.

Displaying the open invoices
Command: Reports → Suppliers → Open supplier invoices
In this table, only invoices that have an open balance are being listed.
For multi-currency accounting, if there are unrecorded exchange rate differences for a particular supplier, an 'Adjustment exchange rate differences' line will be displayed that balances the balance in the open invoice list with the balance on the account card.

Displaying invoices by due date
Command: Reports → Suppliers → Open supplier invoices by due date
Only invoices that have an open balance, are displayed in this table, grouped by due period.

Payment orders for invoices from suppliers
The new Payments function allows you to create payment orders (pain.001) either from a list of transactions or by scanning the QR codes on received invoices.
The pain.001 files are XML messages that contains details of the payments to be made and that can be uploaded to the portal of the major financial institutions. Banana currently supports the Swiss payment standards (SPS).
More info Payment orders PAIN.001.
Prerequisites and important notes
Currently the payment functionality
- Is available in the Dev-Channel version, so please install the latest version of Banana Accounting+ Dev Channel.
- This extension works only with the Advanced Plan, you can request a 1 month promo code from our support service.
- The extension is currently in Beta Test, please check everything and report any problem.
How to create the payment file (pain.001)
- Open your accounting file (double entry accounting or income-expense accounting ) or download our example file Payments_2024_en.ac2
- In the Accounts table, verify the presence of the Address view.
You can add it using the menu command Tools > Add/Remove functionalities... > Add Address columns in Accounts table.
If your Address columns are different (e.g. missing IBAN, see the documentation Address view.
- The first time, install the Payment functionalities with the command Tools > Add/Remove functionalities... > Add payment functionalities
- Set up the debit bank account, which will be used when creating the payment order. In the Accounts table, select the debit account and complete the following data (Address view):
- Name, surname or company name (bank account holder)
- IBAN (IBAN account of the bank or postal account to be debited)
- Bank clearing (BIC code of the financial institution to be debited)
- Check and update the address and payment information of your suppliers in the Accounts table (Address view).
If you don't have a list of suppliers, please define it according to our explanation in the Suppliers section.
If you make payments by scanning QR-Codes you don't need to setup the addresses because all information for the payment is included in the QR-Code
- In the Transactions table enter the invoices of your suppliers or scan your QR-Codes

- Enter and complete the payment details by clicking directly on the Payment Data column. Ensure that all transactions to be paid are completed with the payment information.
If the supplier list (Account ID) is empty, it is necessary to configure the Payments extension by setting up the Suppliers group.
See the Payment orders extension (Payment Data dialog) for guidance.
- Select the command Reports > Suppliers > Create payment file

- Please fill in with the name of the account holder to be debited, their corresponding IBAN, and BIC code. If you have previously entered this information in the Accounts table, it will be automatically suggested.
If you want to display each payment separately on the bank statement, you must enable the "Individual booking" option when creating the payment order; otherwise, only the total amount will be shown on the bank statement.
Press the "Next" button.
- A summary of the payment file is displayed and you can specify where to save it. Click on Finish, you will be asked to save the payment file, which you can upload to your bank. Note: In Banana it's not possible to connect to your bank and transmit the file, you need to upload the file from your computer into the bank app or website.

- After saving the payment file, a row containing the payment/file object will be inserted into the Transactions table.
You can view the content of the XML file again by double-clicking on the Payment Data cell or by clicking on the edit icon located at the top right of the cell.
This is a receipt, and it is no longer possible to modify the payment file or send it again.
Warning! The payment/file objects are used to determine whether a payment has been transmitted to the bank.
Therefore, it is recommended not to delete the rows containing these objects; otherwise, payments that have already been transmitted will continue to appear among the pending ones.

When creating a payment order in Banana, the related payment entries are not generated immediately, as the file must first be transmitted to the bank and the payment is only executed after bank confirmation.
Once the payments have been made, it is recommended to import into Banana the ISO 20022 file provided by the bank, which contains the details of the completed payments.
After importing the invoice payments, you can complete them by pressing F2 in the Invoice column, so that they are marked as paid in the Supplier Invoices table (menu Reports > Suppliers).
Create payment file
The command Reports→ Suppliers→ Create payment file creates an XML message collecting information from payment data objects.
See How to create the payment file (pain.001)
Scanning QR-Codes
The Reports→ Suppliers→ Scan QR-code command displays the Scan code dialog,which allows you to enter one or more QR codes and create the accounting entries and related payment files from these data.
We tested the functionality with the Datalogic QuickScan reader (more on scanner configuration).
It is also possible to scan the QR-Codes with a mobile app, copy the data to the clipboard and paste them into the Banana Scan code dialog. You can search for an app that scans QR codes and saves them to the clipboard in the Apple or Android store. Our company does not provide or publish any software of this type.
If you have multiple QR codes to scan, use the Next Scan button after each scan.
If you are picking up a list of QR codes from the clipboard, they must be separated by semicolons, without adding spaces or line breaks (...EDP;SPC...).
To automatically retrieve the supplier's account number, you must correctly specify the supplier's name in the Organization column of the Accounts table, Address view. The text in the Organization column must exactly match the name indicated in the QR code.

Configure and Use QR Code Scanner
- Configure and connect the scanner.
- In Banana, select the command Reports > Suppliers > Scan QRCode (Ctrl+8) and place the cursor in the input field.
- Press the button on the scanner.
- The scan dialog will be automatically filled in.
- Complete the process.
Configure and Use Mobile App
- Install the mobile app, scan QR codes with the app, and save the data to the clipboard.
- Transfer the saved text to your computer with Banana (e.g., via email or AirDrop).
- In Banana, select the command Reports > Suppliers > Scan QRCode (Ctrl+8) and place the cursor in the input field.
- Paste the copied text into the scan dialog.
- Complete the process.
List of payments
The command Reports→ Suppliers→ List of payments display all payments included in payment files. Payment data are not included.

Payment List

VAT Management in Banana Accounting+
Banana Accounting Plus simplifies VAT management by automating the calculation, recording, and submission of VAT returns to tax authorities. Cutting-edge features reduce manual errors, ensuring tax compliance. Banana Accounting Plus simplifies VAT management by automating the calculation, recording, and submission of declarations to tax authorities. Cutting-edge features reduce manual errors, ensuring tax compliance. Pre-set templates with VAT options and pre-configured codes are available for all accounting applications,
For Switzerland, the new 2024 VAT rates are already available. The new VAT extension for submitting returns digitally is available.
- Swiss VAT management
- ▶ Video: Swiss VAT return (in French, German, Italian)
Recording transactions with VAT
With Banana Accounting, VAT management is very simple because it is completely automated. Transactions with VAT are recorded in the Transactions table, the main hub of all accounting, by entering for each VAT transaction the corresponding VAT code, referring to the sale or purchase, according to the rates in force.
Several pre-set columns are available, the display of which can be customised.
In addition, the programme offers:
- Accounting with different VAT rates in the same transaction
- Add the invoice in PDF in the link column.

In the Transactions table there are specific VAT Columns for various VAT-related information.
To record a transaction with VAT, enter the following data:
- The date of the transaction.
- The invoice number.
- In the Link column, you can enter the digital link to the Pdf accounting document.
- The Debit and Credit Account where you can indicate the account and the contra-account
- The amount.
- The VAT code relating to the purchase or sale (codes found in the VAT Codes table).
For each transaction, the programme performs the following automatisms:
- Accurately records the VAT paid on purchases and the VAT received on sales.
- Automatically calculates the VAT amount.
- Breaks down the VAT amount from the cost or revenue.
- Retreives the VAT amount, taxable amount and VAT amount on the VAT accounts.
Predefined VAT accounts and settings
In the Banana Accounting Plus VAT models, the VAT accounts are already set up in the Accounts table. In the passive accounts, there are the automatic VAT split account and the VAT due account (or VAT receivable account).
To speed up VAT transactions, it is possible to set the VAT code to each account that has VAT transactions in the Accounts table. This setting allows you to automate the entry of the VAT code when you enter the account in the Accounts table.
More details can be found on the page Match the VAT code to account.

VAT Codes Table
The VAT Codes table defines the VAT codes for the rates in force and other parameters for calculating VAT.
- There are columns in which to set VAT codes for calculating VAT gross, net or by VAT amount only.
- There are both VAT codes for the effective method and for the flat rate method
- Swiss templates have the VAT Codes table already set up:
- with the VAT codes relating to the rates in force
- for each VAT code, in the GR1 column, the reference figure is set, which will allow the VAT data to be reported in the VAT reporting template and also in the Xml file to be transmitted to the Federal Tax Administration (FTA).
- For each country, there are files with the VAT codes already set according to the national reporting requirements.
Automated VAT reports and returns
The programme automatically generates various reports with very detailed summaries by VAT code, account, percentages, records and period. VAT summaries can be customised by displaying columns specific to the data you wish to obtain. VAT summaries are useful for understanding the movement of VAT (VAT due, recoverable and payable) and allow effective control and in the event of audits by tax authorities, targeted details are available to facilitate audit work.
More information is available on the VAT Report page.

The VAT functionalities of Banana Accounting Plus offer several advantages:
- Efficiency
You avoid preparing calculations and statements manually, saving time and effort - Accurate calculations and statements
Errors are avoided because calculations are performed automatically and accurately by the programme on the basis of the data recorded by the system. - Compliance with current regulations
The programme is updated according to current rates. Simply update the VAT Codes table and the calculations and statements are performed correctly and in a manner consistent with the regulations. - National VAT Reports Extensions
These are additional modules, different per country, that print or export VAT data in the format required by the tax authorities. Please refer to the national VAT documentation - Archiving of VAT printouts
All printouts with VAT data can be saved in pdf or other formats and archived. Archiving allows the data to be available at all times in case of tax audits.
Calculation methods
Banana Accounting is a powerful calculation tool and in VAT management, too, you can take advantage of its potential to always have accurate and correct VAT calculations and reports.
There are two calculation methods:
- Effective Method - calculations and accounting of VAT using the cash principle and on turnover
- Flat tax rate Method - Calculations and accounting of VAT upon the VAT rates granted by fiscal authorities
Accounting methods
- Turnover
Demands the for the keeping of a customer and supplier ledger.
Costs and revenues, with the corresponding VAT code, are recorded when the invoice is issued and received.
More information can be found on the page How to manage VAT on turnover.
- Cash principle/ Collection
It is not compulsory to keep a customer and supplier ledger, but if you still wish to have one, it is important to set it up with cost centres.
Costs and revenues, with the corresponding VAT code, are recorded when collected or paid.
More information can be found on the page Clients and Suppliers with VAT using the Cash principle
Features currently unavailable
These features are not available at the moment:
- In multi-currency accounting, the account to which VAT is recorded net (usually Revenue and Expense accounts) must be in base currency.
It is not possible to deduct VAT from accounts that are not in base currency. - The VAT amount is calculated by the programme and recalculated when the Recalculate accounting is done. This gives the auditor or others who check the accounts the certainty that the calculations are always made with the same logic.
For VAT rounding, it is not possible to enter a different VAT amount than the one calculated by the programme. Generally, these are VAT amounts that have been rounded on the invoice, even by a few cents.
Insights
VAT documentation specific to Switzerland, Italy and other countries.
In the section of each country you will find the most specific documentation on VAT.
English not being an official language, you will be redirected to the relevant pages in official languages for Switzerland.
- VAT management for Swizerland
Information pages specific to Switzerland:- Swiss VAT codes table.
- How to register VAT.
- Prepare the VAT return.
- Use the Swiss VAT Extension.
- VAT management for Italy
- Information pages specific to Italy:
- Italian VAT codes table.
- How to register VAT.
- Prepare the VAT return.
- Use the Italian VAT Extension.
Extensions for national VAT reports
For some countries there are Extensions that can be easily installed and allow you to print or export the VAT report in the format required by the authorities.
Each country's VAT extensions work in conjunction with the country's VAT Codes table.
Theory
VAT (Value-added Tax) is a tax that weighs on the final consumer. Every VAT subject must calculate and periodically deposit the tax to the Revenues Authority.
Every country has its own VAT rates that are established in different percentages depending on the type of merchandise or service. Certain merchandise and services are exempt or excluded.
The percentages vary according to the financial necessity of the country; therefore, there can be changes over the years.
VAT rate
In this document, to make calculations easier, we will use the following rates:
- 10 % normal rate
- 5% reduced rate
- 0% excluded operations or exempt operations
VAT calculation
Net Price x VAT Percentage / 100 = VAT Amount
Example:
Net price 300
Tax rate 10%
VAT amount = 300 x 10 / 100 = 30
Gross price calculation
Net price + VAT Amount = Gross Price
Example:
300 + 30 = 330
Sometimes the gross amount is known and it is necessary to find the net and VAT amounts.
Net price calculation
Gross Price / (100 + VAT rate) x 100 = Net Price
Example:
330 / (100 + 10) x 100 = 300
The net price represents the cost (purchase) or the revenue (sale) of the company
VAT amount calculation
Gross Price - Net Price = VAT Amount
Example:
330 - 300 = 30
or
330 - [330 / (100 + 10) x 100] = 30
The VAT amount represents the debit (sales) or the credit (purchases) towards the Revenues Authority.
VAT rate calculation
VAT Amount / Net Amount x 100 = VAT Rate
Example:
30 / 300 x 100 = 10%
or
[330 - 330 / (100 + 10) x 100]/100 = 10%
Another example:
20 / 400 x 100 = 5%
This way of calculating is used when the rate is not known.
File properties (VAT/Sales tax tab)
This tab will only appear if an accounting template with VAT/Sales tax management is selected.
The VAT section for setting up VAT accounts is accessed via the File menu > File properties (basic data) > VAT/Sales tax tab.

VAT Account
The automatic breakdown VAT account, present in the chart of accounts, is set by default. For Swiss users it corresponds to the VAT according to VAT report. In this case it is not necessary to enter the VAT account in the VAT Code Table.
With the setting of the automatic breakdown VAT account only, all the VAT amounts, both of the sales and of the purchases, flow respectively into the credit and debit of this account and it is not necessary to set up the recoverable VAT account. At the end of the quarter, the balance of the automatic breakdown VAT account is turned over to the VAT payable account (or Inland Revenue VAT account).
Recoverable VAT Account
If the automatic breakdown VAT account is not set up as the only VAT account, the recoverable VAT account is set up. In this case it is not necessary to enter the account in the VAT Codes table.
VAT rounding
It is defined how the VAT amounts must be rounded; for example, if you enter 0.05, the VAT amounts are rounded to multiples of 0.05.
Cost centers 1 (CC1), 2 (CC2), 3 (CC3)
For each type of Cost Center it is possible to choose which amount to use for registration in the cost center:
- Use the transaction amount.
- Use the amount with VAT included
(In the case of cost centers used for customer or supplier accounts) - use the amount without VAT
Setting whether the cost center is used for costs or revenues.
Note
if one of these parameters is changed, the accounting will have to be recalculated.
Related documents:
VAT Codes Table
The settings in the VAT Codes table allow you to define all the parameters necessary to manage the procedures for registering with VAT. The settings concern:
- VAT due or recoverable.
- Transaction amount recorded as net, gross, or VAT amount at 100% (Customs VAT).
- Percentage of applicable VAT rates.
- The account in which VAT is be recorded.
- Special rounding off for each code.
- Grouping and totaling method.
The VAT Codes table has a Base view and a Complete view. The difference between the two is the fact that the Complete view presents several columns that are not available in the Base view.
Calculation method
The parameters indicated in the VAT Codes table are being used to calculate the VAT of the individual transactions.
The parameters established in the VAT Codes table cannot be changed in the transactions. This modality guarantees that the VAT calculations are correct and consistent.
Please note: if the values of a VAT Code, which has already been used in the transactions, are being modified, the changes are not active immediately; in this case it is necessary to use the Actions > Check accounting command.
When modifying the VAT table, the program, as a precaution, displays a message in the Info window inviting for a complete recalculation.
The following Table refers to the codes being used according to the Swiss legislation:
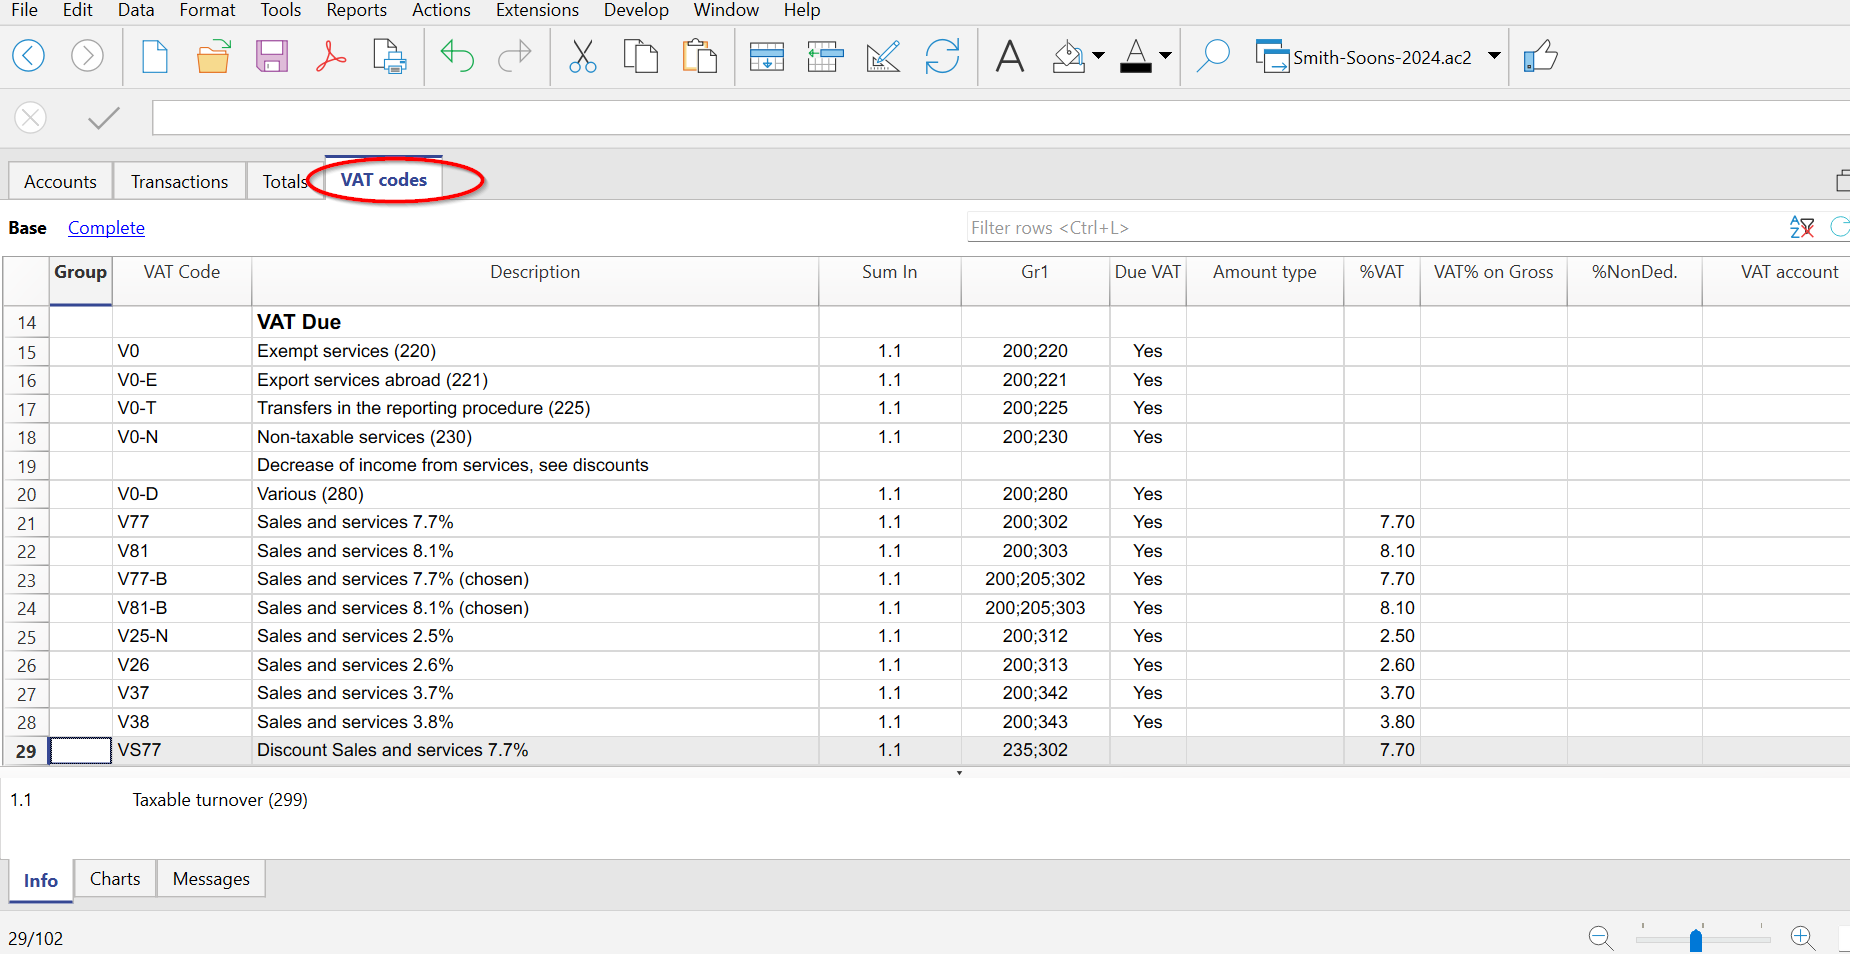
Detailed description of the columns
In the following columns, insert the following data:
- Group: an abbreviation or a number that indicates the group to which the codes belong.
For more information on the grouping system, please refer to the Grouping System page. - VAT Code:
- Normal VAT codes.
The abbreviation to identify and resume the VAT code in the registrations. - Codes preceded by a colon ":" :
They are not VAT codes. They are used in the Transactions table to specify VAT cases in greater detail (ex.: in Reverse charge transactions, two VAT codes are used at the same time, separated by ":", so that the program can calculate the VAT amount payable and receivable).
- Normal VAT codes.
- Description: a text for the description of the VAT Code or the group.
- Disable:
Allows you to disable VAT codes that are not used. Facilitates data entry in the Transactions table.- 1 - the VAT code is not visible in the auto-completion list (Transactions table), but it can still be used;
- 2 - the VAT code is not visible in the auto-complete list and must not be used.
- Sum in: abbreviation or number of the Group in which the row of a code must be totaled.
- Gr1: this column is used for specific groupings.
The screen capture shows the groupings for the encoding of the figures of the Swiss VAT return. - Gr2: code for additional groupings.
- Due VAT:
If the word Yes is being inserted, this means that the VAT is at debit (due to the State)
If the cell is empty, this means that the VAT is at credit (recoverable) - Amount type:
The code indicates how the VAT amount of the transaction is to be understood.- 0 (or empty cell) - with VAT/sales tax (the transaction amount is considered VAT included)
- 1 = without VAT/Sales tax (the transaction amount is considered VAT excluded)
- 2 = VAT amount (the transaction amount is considered the VAT amount, 100%)
The amount type 2 is used in particular to account for customs VAT paid or charged on the shipper's invoice. More details on the recording are available on the page: Entering VAT at customs for import
- % VAT: VAT code percentage.
- % NonDed.: if, for a VAT code, it is not possible to deduct the full 100%, enter the non deductible percentage here (example 100%)
- VAT% on gross: is usually left empty. The word "Yes" has to be inserted only if the VAT percentage has to be applied on the gross amount (VAT included) and not on the taxable amount (e.g. for flat rates).
- VAT account: The account to which the broken down VAT automatically is posted.
In the File and Accounting properties (File menu), a general account, that will be used as the VAT account, can be defined. - Round Min: minimum rounding value.
If left empty, the rounding indicated in the basic accounting data is used. - Don't warn: there are particular entries that the program might interpret as wrong, but which are in fact correct. To prevent the program from reporting error warnings, enter Yes to the code of interest.
Rechecking the accounting file
When the accounting is recalculated and the transactions are not blocked, the program resumes the VAT parameters assigned to each code in the transactions. Therefore, if a setting of a VAT code has been changed, the change is resumed in the respective columns of the transactions which are not editable by the user.
For this reason, when editing the VAT codes table, the program suggests to operate a full accounting recheck.
Adding a new percentage
When a new percentage is added, a new row has to be added; in the new row, insert the data of the new VAT code with the new percentage, while paying attention to insert the correct grouping. Don't change a code that has already been used in the transactions.
VAT codes for services provided abroad
In the VAT Codes table, it is possible to set up, in separate groups, VAT codes for the provision of services provided abroad, with specific rates for the country in which one operates and for which VAT is also due to foreign countries.
The corresponding VAT code is set for each country, which can be totaled in its own group or in a totalization group that refers to the VAT to be paid to foreign countries.
To view the amounts to be paid, go via the Reports > VAT /Sales tax report menu and select the specific code for the country or the totalization group for the VAT to be paid to foreign countries.
For the VAT to be paid in foreign countries, it is not possible to send it electronically.
Own Groupings
By creating groups with multiple totaling levels, the user can obtain the totals that are necessary for the VAT declaration.
In the VAT report, by activating the option Use own grouping scheme, the software calculates the totals exactly as indicated in the sequence of the indicated groupings in the VAT Codes table.
The groupings are being used to obtain totals for groups of transactions, for example, the totals for all exportations or importations.
Related document:
- Import VAT codes
- National VAT documentation
Link to specific VAT documentation for Switzerland, Italy and other countries.
Match the VAT code to the account
In an accounting with VAT, in the Accounts table, it is possible to link a VAT code to the income/expense accounts, so that, when the sales and purchases are being recorded, the program automatically inserts the VAT code and completes the columns with the VAT data while entering the account number.
In order to associate the codes:
- Click on the Other view. In this view, the VAT code column is visible by default.
In case you wish to display the VAT code column in the Base view, click on the Data > Columns setup command. - Insert the VAT codes for the income/expenses in the VAT code column. If the VAT code is inserted within square brackets, for example [V81], the VAT will only appear on issued invoices and will not be separated in the accounting records.

N.B: If the VAT rates have changed (refer to New VAT Rates 2024), the values entered in the VAT Code column must be updated manually.
The same applies to the already entered transactions (in theTransactions table, VAT Code column), which must be replaced manually in each registration row (or using the Replace command to modify them all together).
VAT rounding
The Swiss system for VAT calculation, provides for calculated to the cent, without rounding.
For those who need to have VAT amounts rounded up to cents, the following procedure is followed:
- In the Transactions table, post normally by applying the appropriate VAT code
- On the next row, post the expense or revenue account used in the previous line in debit and credit
- In the amount column, enter the cents to be rounded
- In the VAT Code column, enter a VAT code with amount type 2 (100% VAT amount), for example M81-2
- When the cents are to be decreased, enter the code with the minus sign in front of "-M81-2".

Setting up VAT accounts
What are VAT accounts?
The VAT accounts are accounting sheets where the VAT amounts are automatically posted, based on the VAT code settings in the VAT Codes table.
When a VAT code is used, the program automatically calculates the following data based on the values of the transaction:
- Taxable amount and the VAT amount.
- Taxable amount on the Debit account.
- Amount of the taxable amount on the credit account.
- Amount of the taxable amount on the credit account.
At the bottom of the information window, by moving the mouse over the transaction, you can see which amounts are recorded on the different accounts.
General VAT account (automatic)
If the VAT account is set as default in the File → Properties file → VAT, this is used whenever there is a registration with a VAT code. In this case, the VAT accounts for the various VAT codes must not be set up in the VAT Codes table.
Recoverable and Due VAT Accounts
In the VAT code table, VAT Account column, according to the VAT code (active or passive) you can indicate the recoverable VAT account or the VAT due account. In this case, if these specific accounts are set up in the VAT Codes table, the default VAT account (General VAT account - automatic) must not be set in the File Properties, VAT section.
Using a single VAT account or several VAT accounts?
In accounting, the active part must be separated from the passive part. If the recoverable VAT is offset against that due, only the VAT amount actually due must be shown in the balance sheet.
From an accounting point of view, in most cases, it is not essential, indeed it is better to have only one VAT account.
For reporting purposes, however, it is useful to have the different types of separate VAT transactions. In programs that do not use VAT codes it is necessary to separate each operation on separate accounts. With Banana Accounting, thanks to the VAT codes and the VAT Summary, it is possible to obtain much more meaningful details while also using a single VAT account:
- Movements and totals (taxable VAT, VAT amount, accounted VAT) for each VAT code.
- Movements and totals by VAT percentage.
- Movements and totals by VAT account.
- Movements and totals by amount due and recoverable.
In order to control VAT transactions, it is not necessary to use several separate VAT accounts.
Banana Accounting leaves the choice of using the general account, set up in the File Properties, or different VAT accounts, set up in the VAT Codes table.
Advantages of using a single VAT account
After several years we have seen that the use of a single VAT account is much more intuitive and, for the Swiss charts of accounts we have therefore chosen to use a single VAT account (2201, VAT statement), obviously leaving the possibility to each change the settings.
- Balance sheet and income statement much easier to read (there are not many VAT accounts).
- Possibility of having accounts (for example of revenues) in which to register transactions with different VAT rates.
- You know immediately the VAT due without having to add several accounts together.
- Immediate display of all VAT transactions.
In the VAT account card, all the VAT transactions in Debit and Credit are indicated.

Advantages of using multiple VAT accounts
If you use VAT codes, the registration on a specific VAT account is a repetition of information that you already have with the VAT code and its detailed summary.
In countries like Germany it is customary to have a different VAT account for each type of transaction, so that the VAT return can be made using the balances of the individual VAT account cards.
In these cases, for compatibility with this system, it is useful to have different VAT accounts for each VAT code.
Closing of VAT accounts at the end of the period
At the end of the VAT calculation period, it is useful to close the debit and credit VAT accounts and move the balance to one account. This allows:
- Accounting for the exact amount due to be paid or recovered
- At each new period, the account "2201, VAT return" starts from scratch, making it easier to check for any differences and errors.
For the periodic closure of the account "2201, VAT statement", see the Periodic closure and VAT payment page.
Transactions with VAT
In Banana Accounting, in the Charts of Accounts prepared for Switzerland, the VAT accounts and the VAT rates currently in force are already set. In particular, the 2201 "VAT according to VAT report" account (VAT account with automatic splitting) is set both in the Chart of accounts and in the File properties (basic data) → VAT section. In this case no VAT account needs to be inserted in the VAT Codes Table.
In case you are not using the Charts of accounts already available in Banana, make sure that the necessary VAT accounts are present in your own Chart of accounts. Our advice is to use the 2201 "VAT according to VAT report" account (VAT account with automatic splitting) and to enter it into the File properties (basic data) → VAT section.
In the VAT codes table, there are codes for the sales, the purchases and for services rendered. When entering the transactions, use the appropriate VAT code.
The software automatically splits the VAT amounts and records them in the "VAT according to VAT report" account or in the VAT account that has been indicated by the user in the File and Accounting properties.
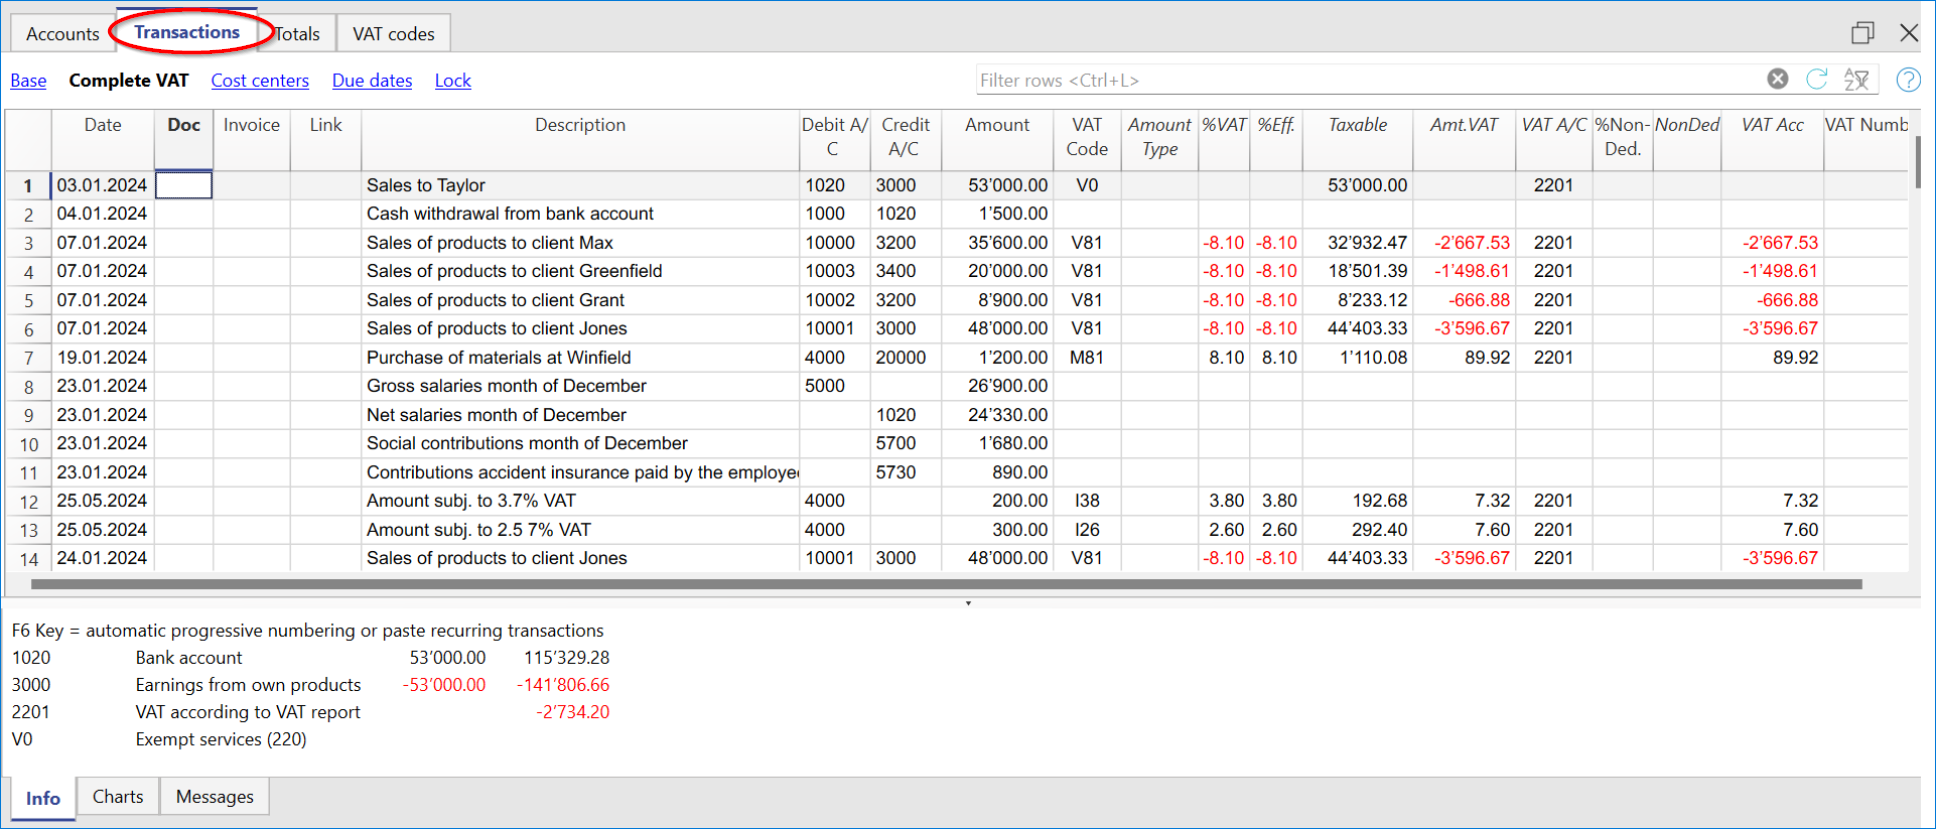
VAT columns in the Transactions table (Complete VAT view)
You can find the full explanation of the main Transactions table columns in the Columns and Views page.
In the Double-entry accounting with VAT or in the Income & Expense accounting with VAT, you will find the following VAT columns:
- VAT Code: for each transaction with VAT you need to enter one of the VAT codes from the VAT codes table. In Reverse Charge operations, two VAT codes can be used, separated by the symbol ":".
- VAT %: the program automatically enters the VAT percentage associated with the VAT code you entered. If the amount is preceded by a "+/-" sign, it is a Reverse Charge operation.
- VATExtraInfo: A code related to extra info about the VAT, to be used only in very exceptional cases.
It is possible to enter a symbol to identify specific VAT cases. The program suggests options, corresponding to the VAT Codes that start with a colon ":". - %Eff.: the program automatically enters the VAT percentage referred to the net amount (taxable amount). It is different from the percentage applied when the latter is calculated on the gross amount (balance rate).
- Taxable: once you enter the VAT code, the software automatically indicates the taxable amount (without VAT).
- VAT amount: the program automatically indicates the VAT amount.
- VAT A/C: the account where the VAT is registered is automatically indicated (for Switzerland, this is normally the 2201 "VAT according to VAT report" account) previously entered in the File Properties (basic data), VAT tab (from the File menu).
- Amount type: this is a code that indicates how the software considers the transaction amount:
- 0 (or empty cell) with VAT/sales tax, the transaction amount is VAT included.
- 1 = without VAT/Sales tax, the transaction amount is VAT excluded.
- 2 = VAT amount, the transaction amount is considered the VAT amount at 100%.
- Amount type not editable: Default mode.
- The column is protected.
- The program uses the associated value of the VAT Codes table.
- When you edit the value in the VAT Codes table and you recalculate the accounting, the program uses the new value associated with this VAT Code.
- Amount type editable: this option can be activated with the Add new functionalities command. The activation of the option cannot be undone.
- When you edit the VAT Code, the program uses the Amount type associated with this code.
- The value can be edited manually.
- When the accounting is being recalculated, the value indicated in the Transactions table is being maintained.
- Non. Ded. %: this indicates the non deductible %.
- The program uses the Non. Ded. % associated to a VAT Code that is present in the VAT Codes table.
- You can manually edit the value.
- VAT Acc.: this is the VAT amount registered in the VAT account.
It is calculated by the program according to the transaction amount, the Amount type and the non deductible percentage. - VAT number: this is the code or VAT number of your client/supplier.
When you enter a transaction with VAT, it is possible to enter the VAT number of your counterparty. If in the Accounts table, Address view, in your clients/suppliers register accounts, you enter their VAT number, this is automatically loaded in the Transactions table, in the VAT number column.
Transactions with VAT
Before entering transactions with VAT, you must keep in mind all the information on the Transactions page.
Entering a VAT transaction is very easy:
- Enter the date, document number and invoice number in the respective columns
- Enter the description, the Debit account and the Credit account
- Enter the gross amount (including VAT)
- Enter the VAT code provided for the type of transaction (purchases, sales, investments...) and present in the VAT Codes Table.
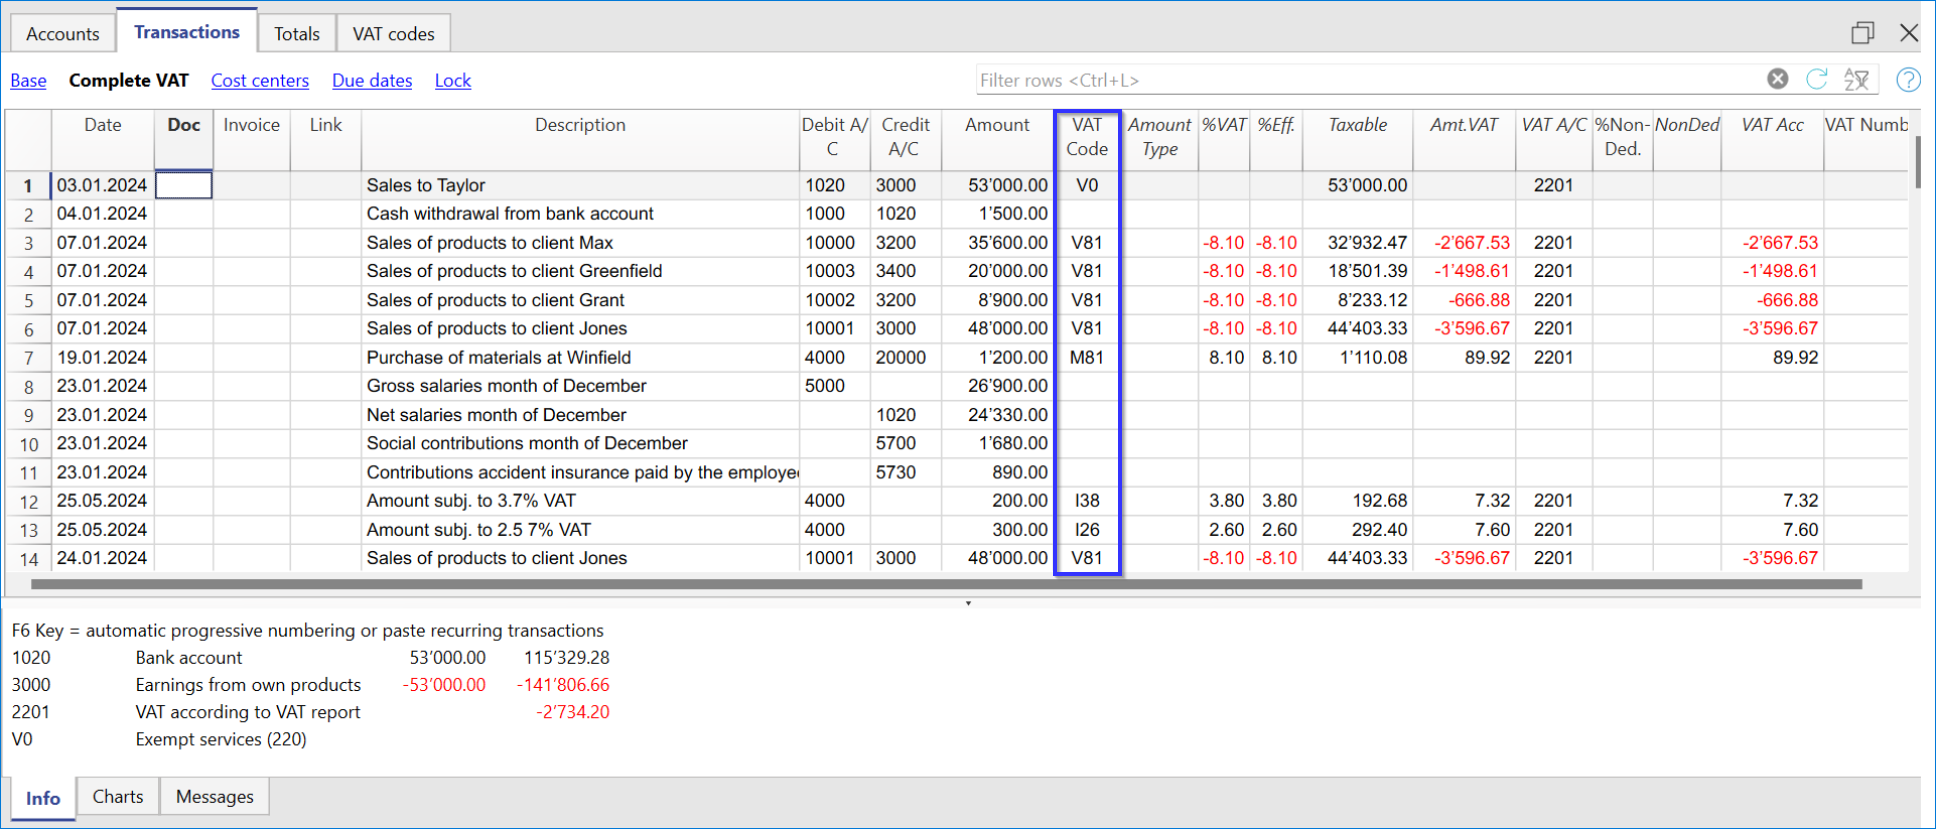
How to correct VAT transactions
In case of an error in a transaction with VAT, it is possible to correct it directly on the transaction row, provided that no VAT declaration has been submitted or no accounting lock has been executed.
If however your accounting file is locked or if you have already sent your VAT declaration, you cannot simply delete the wrong transaction, but you need to operate some cancellation-transaction and then re-enter the correct transaction.
In order to rectify VAT operation(s), you need to:
- Make a new transaction by inverting the Debit and Credit accounts used in the wrong transaction.
- Enter the same amount.
- Enter the same VAT code but preceded by the minus sign (ex.: -V81).
- Enter a new transaction with the correct accounts, amount and VAT code.
Depending on the entity of the mistake, you should consider informing your local VAT office; usually they ask you to download a specific form for correcting mistakes in the previous VAT period that you already declared.
How to only enter the VAT amount
There are cases where only the VAT amount needs to be recorded, such as when you receive compensation from the car insurance.
In these cases, you can proceed as follows:
- Enter the date, document number and description in the appropriate columns.
- In the Credit A/C column enter the account used to pay the VAT amount (the Debit A/C column remains empty).
- In the Amount column enter the VAT amount to be paid.
- In the VAT code column enter the VAT code I81-2 (the code that refers to 100% amount VAT).
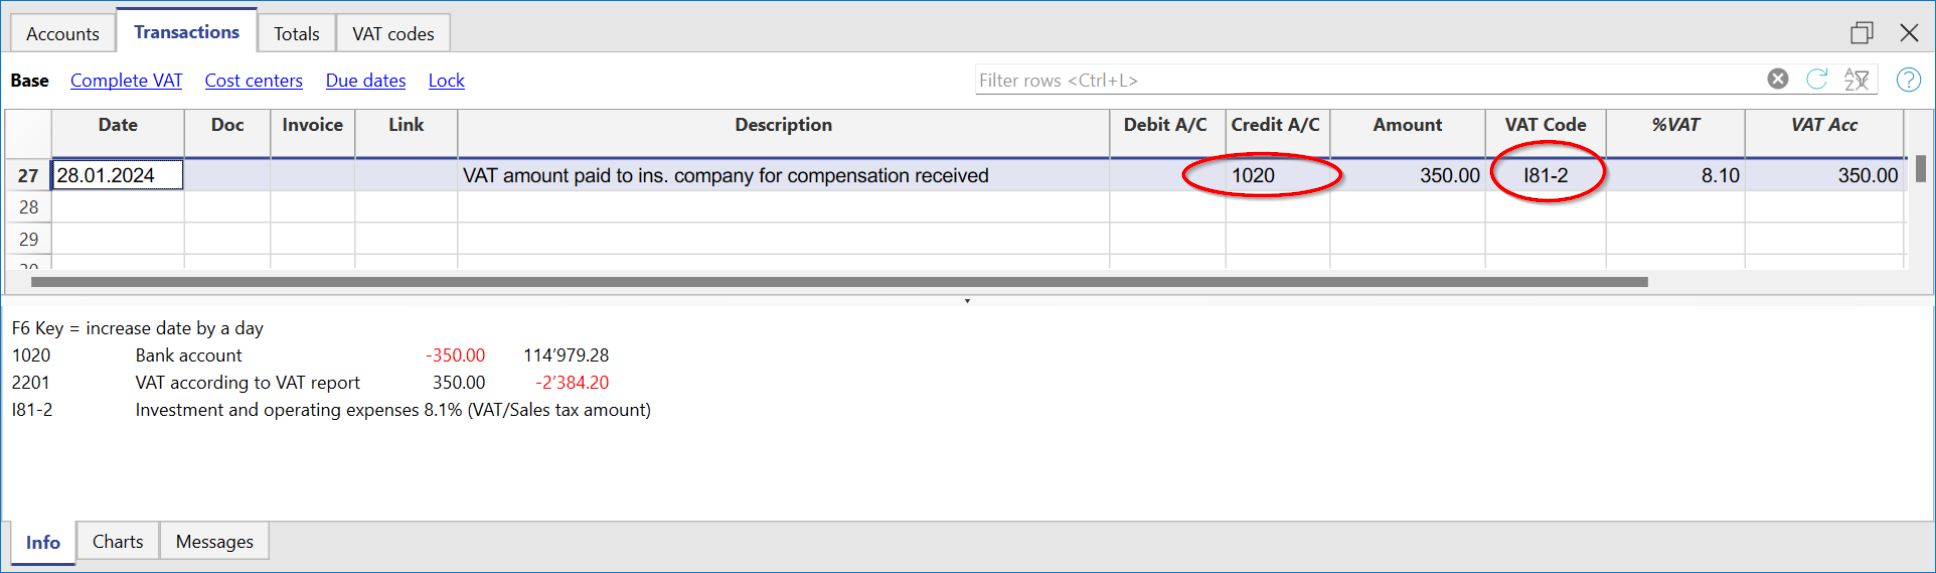
Transactions with different VAT rates
There may be cases in which the total amount is composed of several taxable amounts with different VAT rates. In this case the transaction is recorded on several rows.
For the transaction, it is necessary to:
- Subdivide the overall amount into the various amounts, each of which is subject to a specific VAT rate.
- On each row, enter the amount (amount with VAT) and insert the VAT code with the specific rate.
- Once the transaction is completed, check that the sum of the single gross amounts and the VAT amounts correspond to the invoice total.
Example
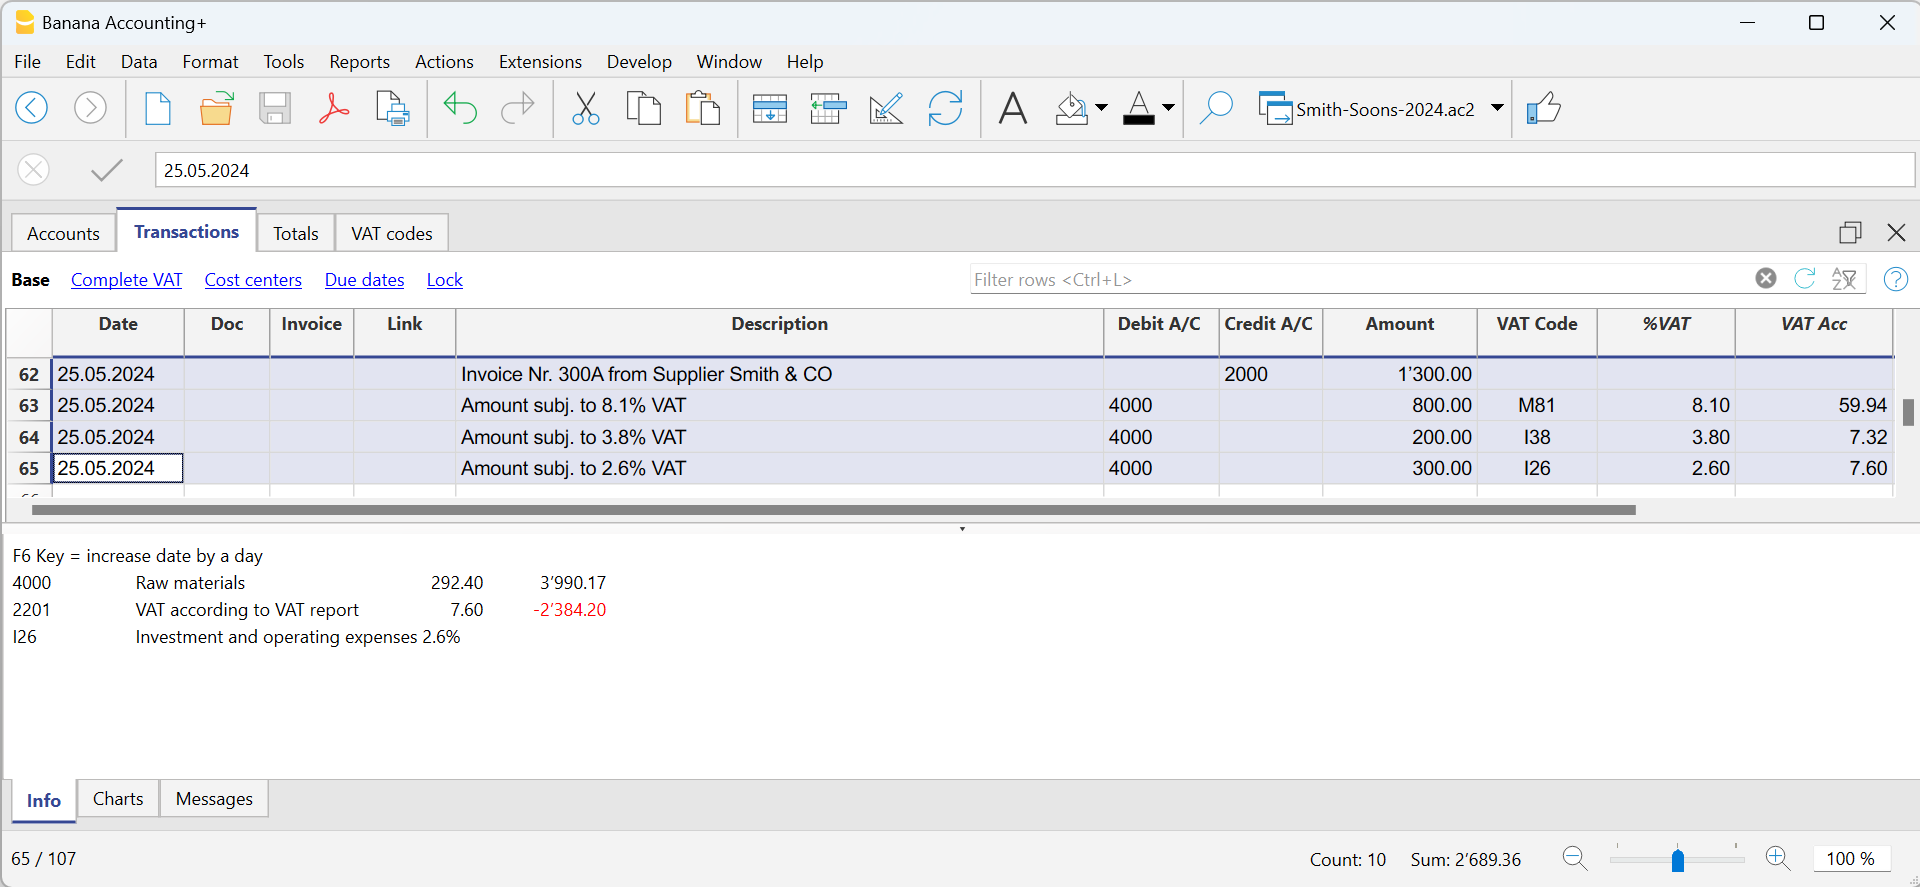
VAT EXEMPTION
When in the invoice the total amount subject to VAT is made up of a taxable part and a VAT-exempt part, it is necessary to register on more than one row as in the previous case, applying the exempt VAT code, present in the VAT Codes table.
Reversals/Credit note
When there are reversal operations for credit or debit notes, or simply to rectify previously recorded transactions whose amounts are subject to VAT, the VAT must also be reversed in the reversal transaction.
For the transaction:
- Reverse in the Debit and in the Credit column the accounts that were used in the previous transaction, to which the credit note refers.
To reverse the VAT there are two possibilities:
- Put the minus sign in front of the VAT code (e.g. -V81).
- Use one of the codes that refer to discounts, already set in the VAT Codes table.
With these procedures the VAT amount will be adjusted.
Example of a credit note on a sale
When a client finds a defect on a sold product, usually a credit note on his behalf is being issued. The credit note implies a decrease of the income and as a result a recovery of the VAT (Sales tax).
For example, we enter a sale amount of 12'000 including a 8.1% VAT. We then issue on the client's behalf a credit note of CHF 200.- for a product defect.
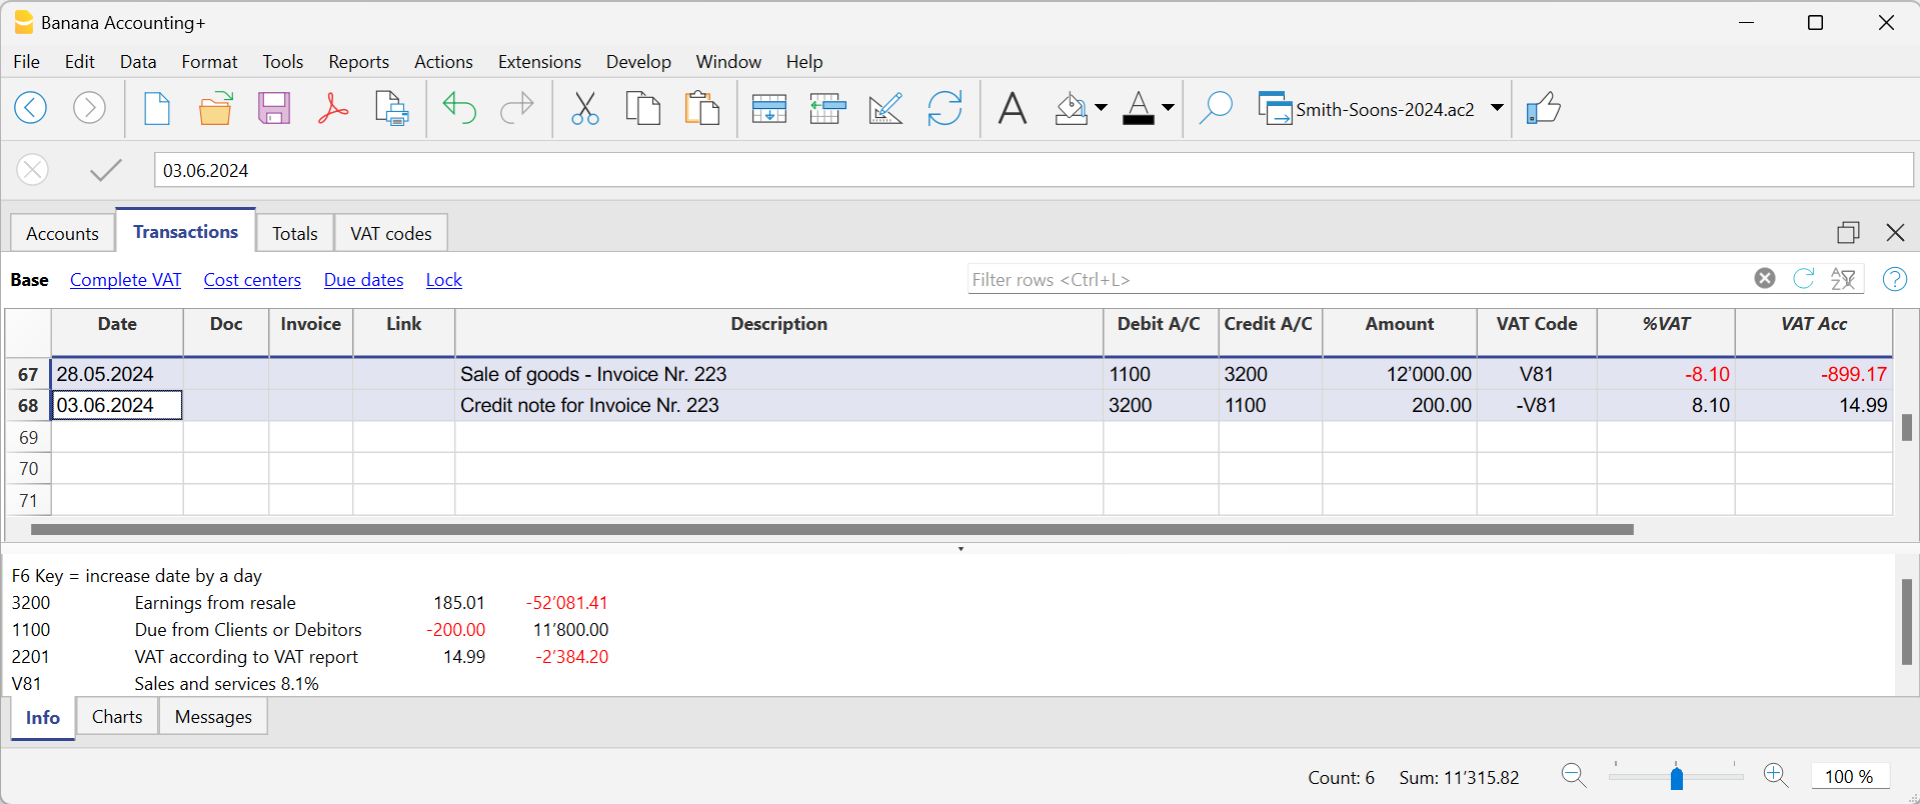
In the transaction of the credit note issued to the customer:
- The accounts of the sale, to which the credit note refers, have been reversed
- For VAT recovery on the credit note, the VAT code of the sales is recorded, preceded by the minus sign.
Example of a credit note on a purchase
When we receive a credit note from a supplier, the procedure for the transaction is similar:
- The accounts used for the purchase are reversed.
- Enter the same VAT code used for the purchase, preceded by the minus sign.
For example, we record an invoice for the purchase of goods for CHF 3'000 including a 8.1% VAT. We then receive a credit note of CHF 300.- from our supplier for a product defect.
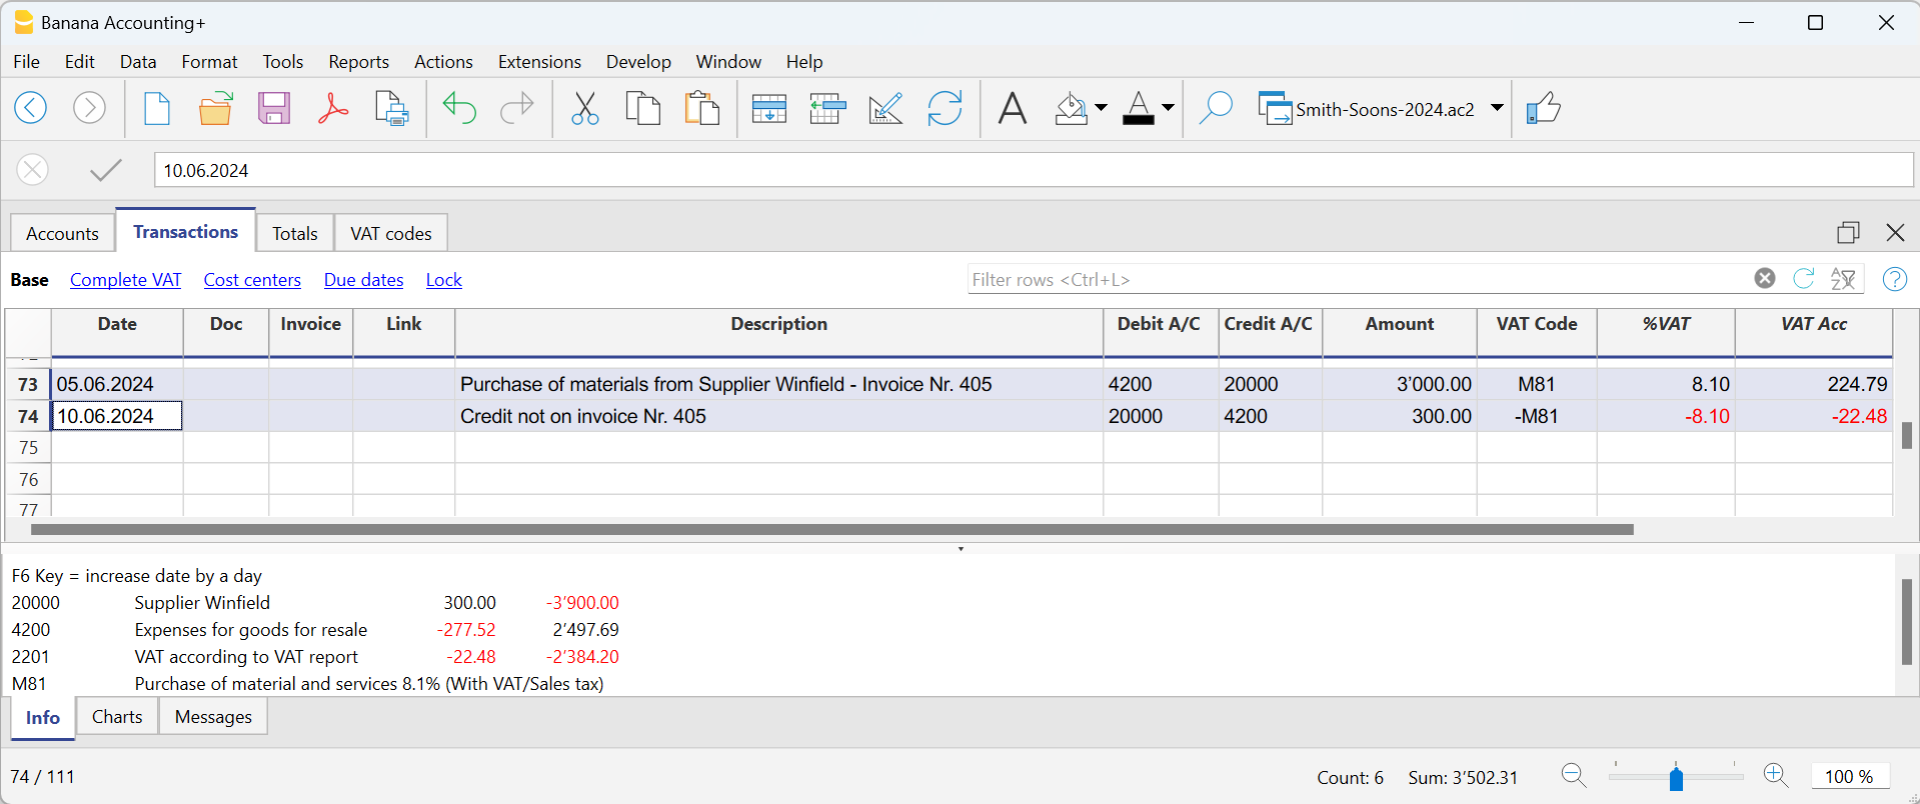
In the transaction of the credit note received from the supplier:
- The accounts of the purchase, to which the credit note refers, have been reversed.
- For VAT recovery on the credit note, the VAT code of the purchases is recorded, preceded by the minus sign.
VAT registration with the Reverse Charge
VAT with the Reverse Charge
Normally VAT is applied to the seller of the goods. Reverse Charge is the term used to indicate that the VAT tax is applied to the buyer.
The Reverse Charge is used mainly when buying goods or services abroad and that have not been taxed at customs. In these cases, the exporting seller is exempted from VAT, while the importing buyer is taxed at the local rate and can possibly deduct it. In addition, there are other cases of purchases abroad subject to the Reverse Charge and each country, in its tax legislation, provides for different situations. When registering VAT with the Reverse Charge:
- The transaction must be included so that it will result as VAT due.
- If the VAT is also deductible, the deductible part of VAT must also be recorded.
Software prerequisites
The possibility of recording the transaction subject to the Reverse Charge, tax liability and VAT recovery on one single row, is available for the Banana Accounting Plus.
Reverse Charge with tax liability only
If you have to include the purchase of goods or services, but do not have the possibility to deduct VAT:
- Indicate the VAT code due to the appropriate case in the transaction.
The liability with the Reverse Charge without deduction is generally used in the case one is benefiting from a flat-rate scheme or when the type of expense is not considered deductible.
Reverse Charge with tax liability and VAT deduction
If the amount of VAT due is equal to that of the deductible VAT, the Reverse Charge can be registered on a single row, by simultaneously entering both the code for the VAT due and the code for the recoverable VAT.
- The pre-defined VAT codes are used and there is no need to change the VAT table.
- In the row of the entry with VAT Reverse Charge, enter the two predefined VAT codes in the VAT Code column, separated by a colon ":".
- The two VAT codes must be complementary in order for the result to offset one other.
- One of the two codes must be set up with VAT due and the other with recoverable VAT.
- The VAT rate and all other calculation parameters must also be identical.
- If the VAT codes do not have the same parameters, an error message will be displayed.
- The sequence of codes is not relevant, you can put one or the other first.
- When reversing an operation, the first VAT code must be preceded by the minus sign "-".
Reversal is used to cancel an incorrectly posted transaction. In this case, the same elements are kept, but the original transaction is reversed:- The VAT payable code is recorded as recoverable.
- The recoverable VAT code is posted as due.
- In the VAT columns, the amounts are preceded by the sign "+/-", which signals that the amounts offset each other for VAT purposes.
- In the account card and in the VAT summary there are separate entries for the debit and credit entries.
Example of transaction with Reverse Charge
Below are some examples of the Reverse Charge transaction inclusive of VAT due and recoverable:
- VAT included and excluding operations.
- Cancellation transactions, with VAT codes preceded by the "-" sign.
Notes: The examples in the image below are purely indicative. These codes must be adapted according to the rates in your country. Further information:
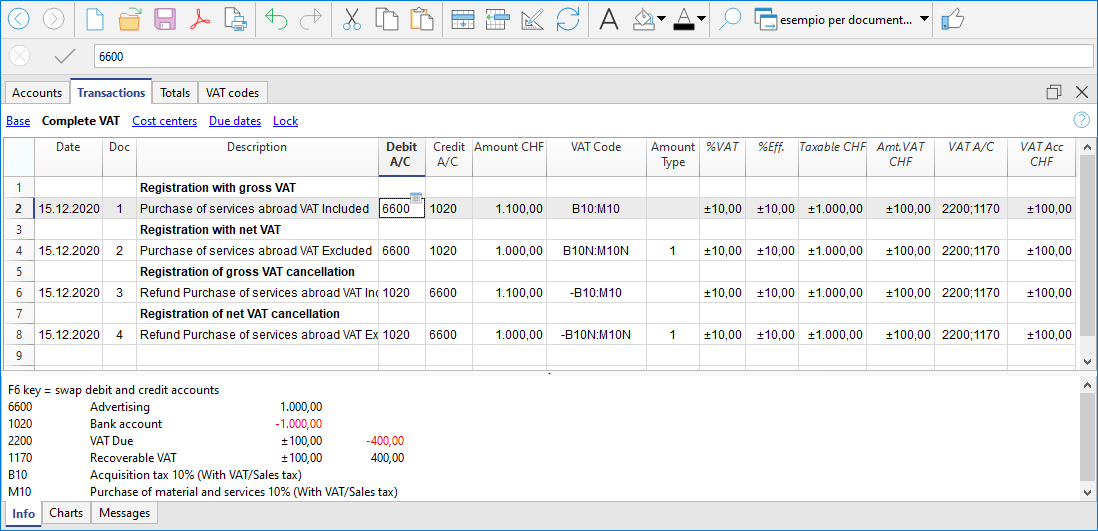
Reverse Charge with account in foreign currency
When the invoice is presented in a currency other than the accounting currency, the posting must be carried out on two lines:
- the invoice in foreign currency is entered on the first row
- the second line records the taxation and deduction of VAT, taking up the amount calculated in the accounting currency.
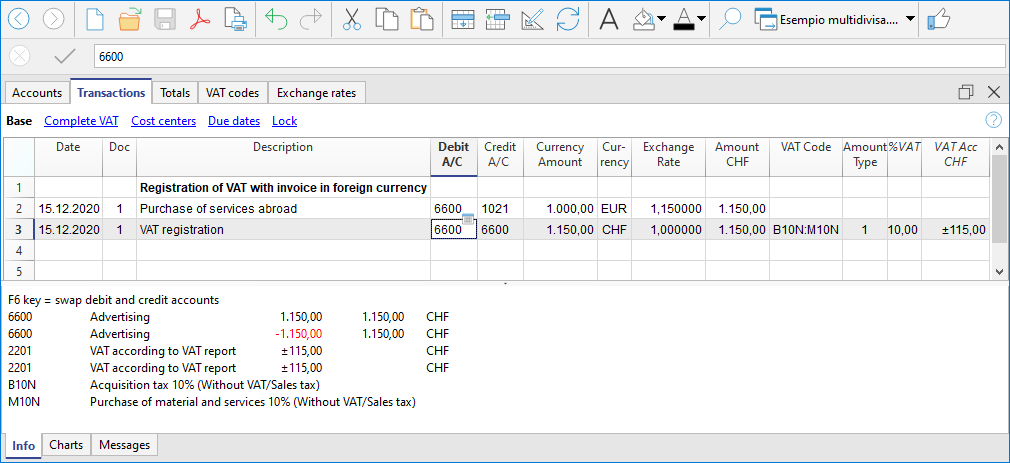
Reverse Charge at different rates
When different rates are to be considered in the taxation of the due and recoverable VAT or the VAT is partially deductible, the transaction must be made on several rows:
- On one row, enter the VAT due code (tax liability).
- On another row, the recoverable VAT code is entered.
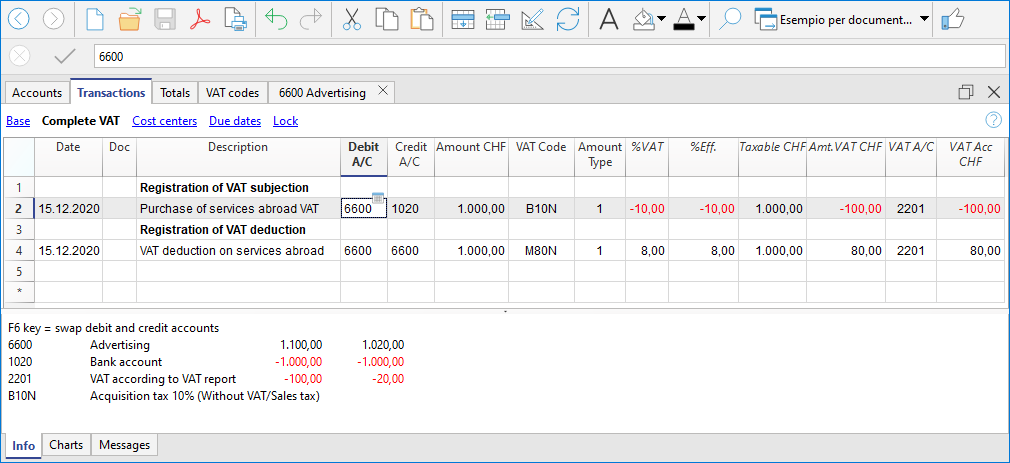
Reverse charge with the net / flat rate method (CH)
In this case, it is not possible to post the VAT deduction, as it is not possible to recover the VAT on purchases. In any case, the tax liability must be registered.
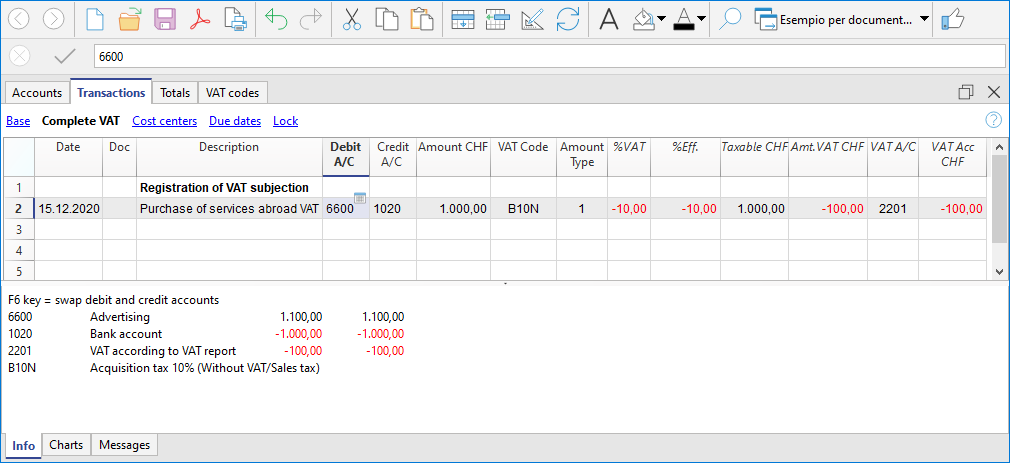
VAT Summary (Report)
The VAT Summary is a document or a section of an accounting ledger where transactions subject to Value Added Tax (VAT) are summarized for a specific period (monthly, quarterly, or yearly).
Main elements of the VAT summary
- VAT payable: total amount of VAT due on issued or collected invoices (sales).
- VAT receivable: total amount of VAT recoverable on received or paid invoices (purchases).
- VAT to be paid or credited: Difference between VAT due and VAT recoverable.
- If VAT payable > VAT receivable: The company must pay VAT to the State.
- If VAT receivable > VAT payable: The company has a VAT credit that can be offset or claimed for a refund.
The VAT Summary in Banana Accounting Plus is a journal that records VAT transactions and balances, based on the set parameters and selected options.
It is automatically generated by the program through the Reports > VAT Summary menu and can be saved and archived in PDF format. All transactions with a VAT code, depending on the selected options, can be broken down by account, VAT code, and percentage.
There are two main groups:
- Total Due
- Total Recoverable
The difference between these two totals results in the VAT to be paid or recovered with respect to the FTA (Federal Tax Administration).
Below is an example of a VAT summary table for the first quarter of 2025:
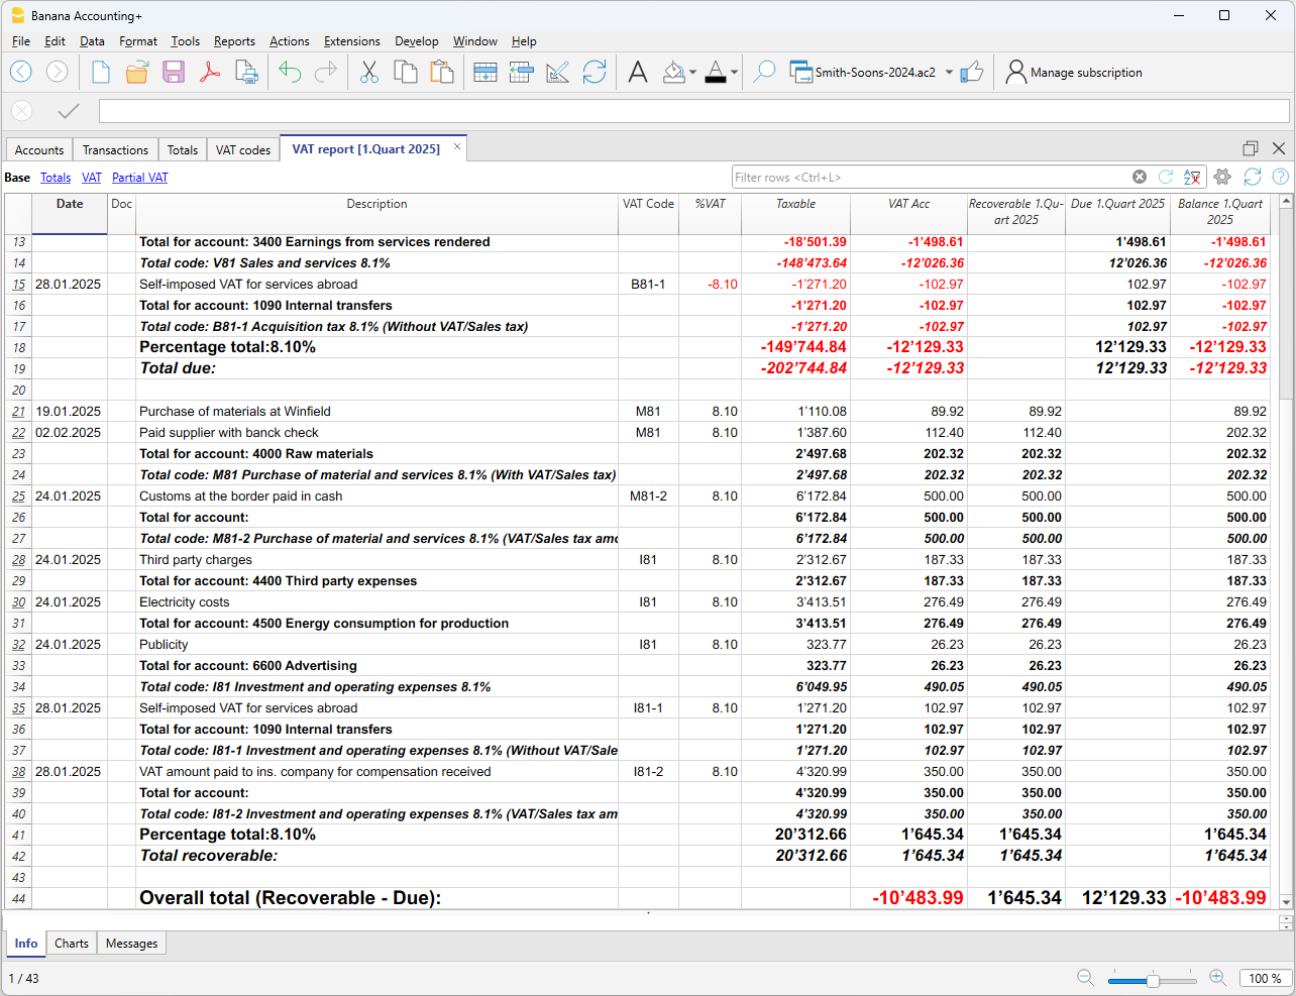
For users who do not wish to use automated solutions for managing and submitting VAT data online, the VAT Summary is essential for calculating the VAT amounts to be manually entered into the Swiss paper VAT return or the FTA online portal.
If you wish to have a fully automated Swiss VAT return and electronic VAT data transmission, we recommend using the new VAT extensions, available in the Advanced plan of Banana Accounting Plus.
Comparison between VAT summary and VAT extension
To better understand the differences between the VAT Summary and the VAT Extension, below are their main features:
VAT Summary
- Available in all plans of Banana Accounting Plus, in all accounting applications with VAT management.
- It is an integral part of accounting because it represents a ledger where all VAT transactions are recorded.
- It is particularly important as it provides details that allow monitoring of sales.
- Serves as a basis for manually preparing the VAT declaration and settlement.
- It is a support tool for auditors and tax inspections, facilitating the verification of VAT records.
- In case of tax audits, it provides all the details necessary to verify VAT transactions.
- Does not allow automatic preparation of the VAT form. Everything must be manually reported.
- The user must identify and manually sum the amounts to be reported in the various sections of the VAT return.
- Does not provide automatic submission of data to the Federal Tax Administration (FTA).
VAT Extension
- Available only with the Advanced plan of Banana Accounting Plus.
- A set of advanced features to automate VAT management and data submission to the FTA.
- Filters, calculates, and automatically fills in VAT amounts in the correct sections of the VAT return.
- Always performs calculations according to predefined rules, reducing the risk of errors.
- Automatically generates an XML file for electronic submission of VAT data to the FTA portal.
- Creates a PDF file with a facsimile of the VAT return, facilitating documentation and archiving.
At the end of the return, there is a section where any calculation and rounding differences are reported.
Thanks to the VAT Extension, VAT management becomes simpler, faster, and free from manual errors, improving administrative efficiency.
The Advanced plan includes the two VAT calculation and reporting methods:
The VAT summery dialog
The VAT report is obtained by clicking on the menu Reports > VAT report

When activated, the following options allow you to include the following data in the VAT report:
Include movements
All transactions with VAT are included.
Include totals for accounts
The totals of transactions with VAT are included, grouped by single account.
Include totals by codes
The totals of transactions with VAT are included, grouped by single VAT code.
Include totals by percentages
The totals of transactions with VAT for each individual rate are included.
Include unused codes
Also included are the unused codes present in the VAT Codes table.
Use own grouping (group and Gr)
Transactions with VAT are grouped according to the grouping of the VAT Codes table.
Order registration by
This function allows you to sort the recordings based on the selected option (date, doc.,
description, etc ....).
Partial Report
By specifying a code or a group and checking the appropriate boxes, the total of transactions with VAT is obtained:
- just the code indicated (by selecting from the list)
- just the indicated group (by selecting from the list).
Other sections
Information for the other sections is available on the following web pages:
VAT Report / transactions with totals by code
The overall total in the last row of the VAT report has to correspond with the amount for the end of period of the Automatic VAT account, Balance column, on the condition that both of them refer to the same period.
The data of the VAT report can also be transferred to and elaborated by other programs (f.i. Excel, XSLT) and be presented in formats that are similar to the forms of the tax authority
For Switzerland, one can automatically obtain a document similar to the form that has to be sent to the VAT office. This form shows the amount to enter for each number. Please consult (in German, French, or Italian) Swiss VAT Report.
Period closing and VAT payment
In VAT management, each country requires specific VAT accounts within the chart of accounts. These accounts are used to record and manage input and output VAT:
- VAT payable – Account where VAT amounts related to sales and services are recorded.
- VAT receivable – Account where VAT amounts on purchases of goods and services are recorded.
- VAT payment account – Account where, at the end of the period, the balances of VAT payable and VAT receivable are transferred.
The account balance represents the VAT to be paid to the tax authorities or the credit to be received. This account is cleared once the VAT payment is made.
In Banana Accounting, to manage VAT, you must choose an accounting model with VAT that already includes the following settings:
- In the Banana chart of accounts, the VAT accounts are already set up according to the country
- The VAT Codes table is already prepared with country-specific VAT codes
- In the menu File > File properties, basic data > VAT section, the two VAT accounts where VAT is automatically recorded are set, one VAT payable account and one VAT receivable account.
- You can also set only one VAT account. This is used for both VAT payable and VAT receivable.
- In the VAT Codes table, you can set a specific VAT account for a single VAT code.
- If these settings are missing, it is possible to:
- Add an additional VAT account in the chart of accounts, named Automatic VAT account.
- Set the automatic VAT account as default by going to File > File properties, basic data > VAT section.
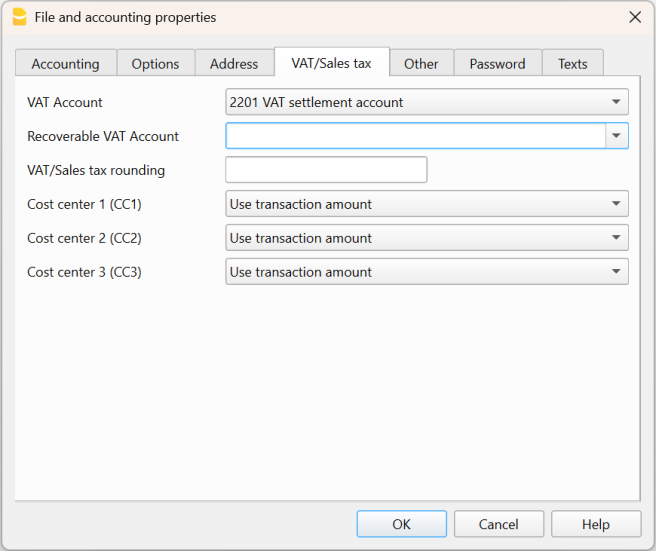
How to automatically clear VAT accounts at the end of the period
To better understand how the automatic VAT account is used, let’s look at a practical example.
Note: the VAT account numbers shown in the following example refer to the numbering used in Switzerland. In your own chart of accounts, you must adapt the account numbers according to your country.
- VAT account 2201 – Represents the automatic VAT account.
- VAT account 2200 – Represents the VAT payment account.
At the end of the period, to clear the balance of the automatic VAT account, the VAT amount recorded automatically must be transferred to the VAT payment account. This step allows you to determine the VAT to be paid or the possible VAT credit, simplifying accounting management.
In our example shown in the image, at the end of the period, scheduled for VAT submission and payment, the balance of the automatic VAT account shows a balance of 10,995.92.

The balance of account 2201 VAT Report (automatic VAT account) must be cleared with a reversal entry by entering:
- In the Debit column, account 2201 VAT report (automatic VAT account)
- In the Credit column, account 2200 VAT due (VAT payment account).
This entry is made in this way if there is an amount owed to the tax authorities. If there is a VAT credit, the VAT account transactions are reversed.
This operation results in:
- Clearing of the balance in account 2201, VAT Report (automatic VAT account).
- Transferring the VAT balance to the VAT due account (VAT payment account).

Payment of the VAT due account balance
When the VAT amount is paid to the tax authorities, the balance of the VAT due account is cleared.
For the entry:
- Enter the date, document number, and description in the respective columns.
- In the Debit column, enter the VAT Due account.
- In the Credit column, enter the liquidity account.
- In the Amount column, enter the VAT amount paid.
With this system, it is possible to monitor the balance of each quarter, and in case of errors, it is possible to identify in which period the balance no longer matches.
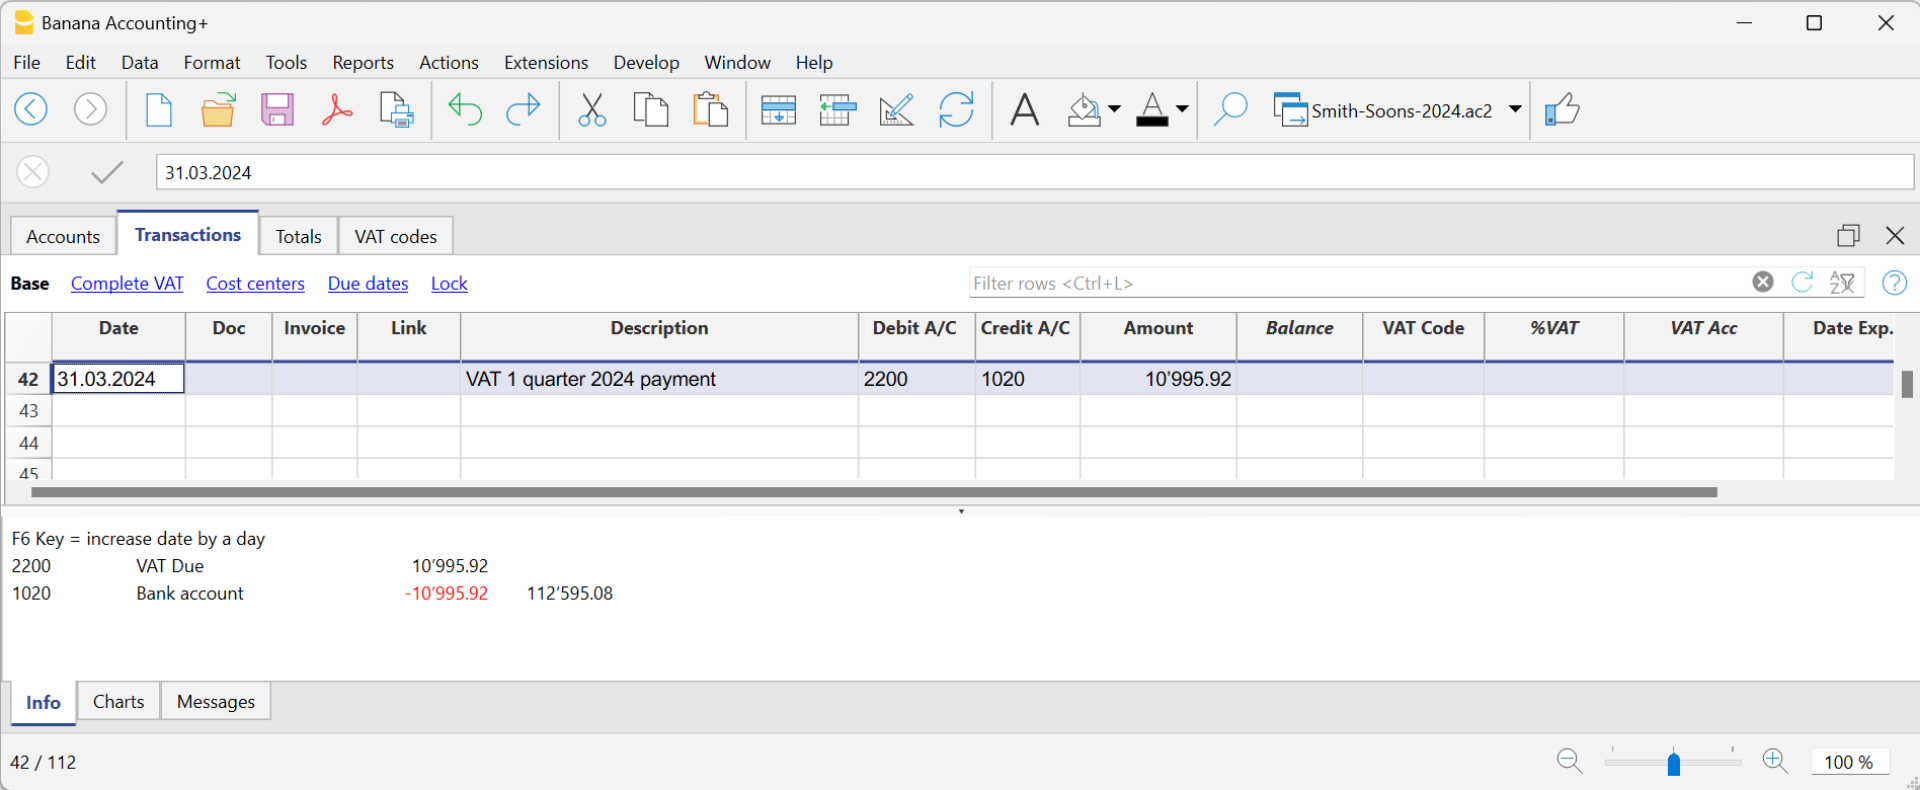
Ledger of account 2200 VAT due after recording the payment

Cost and profit centers
The Cost and Profit Centres of Banana Accounting Plus are used to analyse and monitor the performance of different areas or divisions of a company: organisational units, departments and branches, even if they are not related to each other. They allow records to be catalogued according to different criteria than normal accounts. The main objective is to minimise operating costs and optimise revenues, while guaranteeing the quality and efficiency of services.In Banana Accounting Plus, the cost and profit centre feature is available in all accounting applications.
Cost centers and profit centers are used solely for internal information purposes to monitor and control operating costs; therefore, they are not included in the Financial Statements.
▶ Video: Cost and profit centers
If you wish to have a Balance sheet broken down by projects, sectors or branches, we recommend using Segments.
Registering transactions in cost/profit centers
In Banana Accounting, cost/profit centers are recorded in the Transactions table, specifying the accounts related to the cost/profit centers in the appropriate columns, as set in the Accounts table. Cost centers are attributed to the transaction row and can be used simultaneously with segments.
Here are the most frequent uses:
- Cataloging specific expenses
- Events and manifestations
- Clients, suppliers, members
- Additional details for certain expenses (e.g., accessory expenses)

The columns for entering data are located in the Cost Centers view. If they are not visible, you can display them from any view via the menu Data > Columns setup. Three different columns are available: CC1, CC2, CC3, each of which is independent of the others.
For registration, proceed by entering:
- The date, the description, and other usual elements
- The Debit and Credit account
- The amount and any applicable VAT code
- In the appropriate column (CC1, CC2, CC3), enter the cost/profit center account without the preceding punctuation.
- To record a credit on the cost/profit center, precede the cost center with a minus sign.
In the Income/Expenses accounting and the Cash Manager, you can set the option Record (+/-) cost centers as categories so that the cost centers follow the sign of the category.
If an overall amount needs to be divided among multiple cost/profit centers at the same level, multiple transaction rows must be created. Each row specifies the amount to be allocated to the cost/profit center and the relevant account.
Recording cost centers in the Income & Expense Accounting and Cash Manager
In the Income & Expense accounting, cost centers can be set either in the Accounts table or in the Categories table, depending on the purpose for which they are created:
- Cost/profit centers related to customers/suppliers or to members/donors should be set in the Accounts table.
- Cost/profit centers related to expenses or revenues (such as refunds to members, events, projects, etc.) should be set in the Categories table.
To record an entry in a cost/profit center, simply enter the abbreviation or number defined in the Accounts table in the column designated as the cost/profit center.
When an amount needs to be reversed from a cost/profit center, it must be entered in the corresponding column with a minus sign (-) in front of the center’s abbreviation/number.
In the example:
- In the member 1 profit center, the CC3 column contains the abbreviation MEMBER 1 to indicate the credit for the membership fee owed by member 1.
- When member 1’s fee is collected, the CC3 column contains -MEMBER 1, so that the payment is recorded in member 1’s account and the credit owed by member 1 is thus zeroed out.
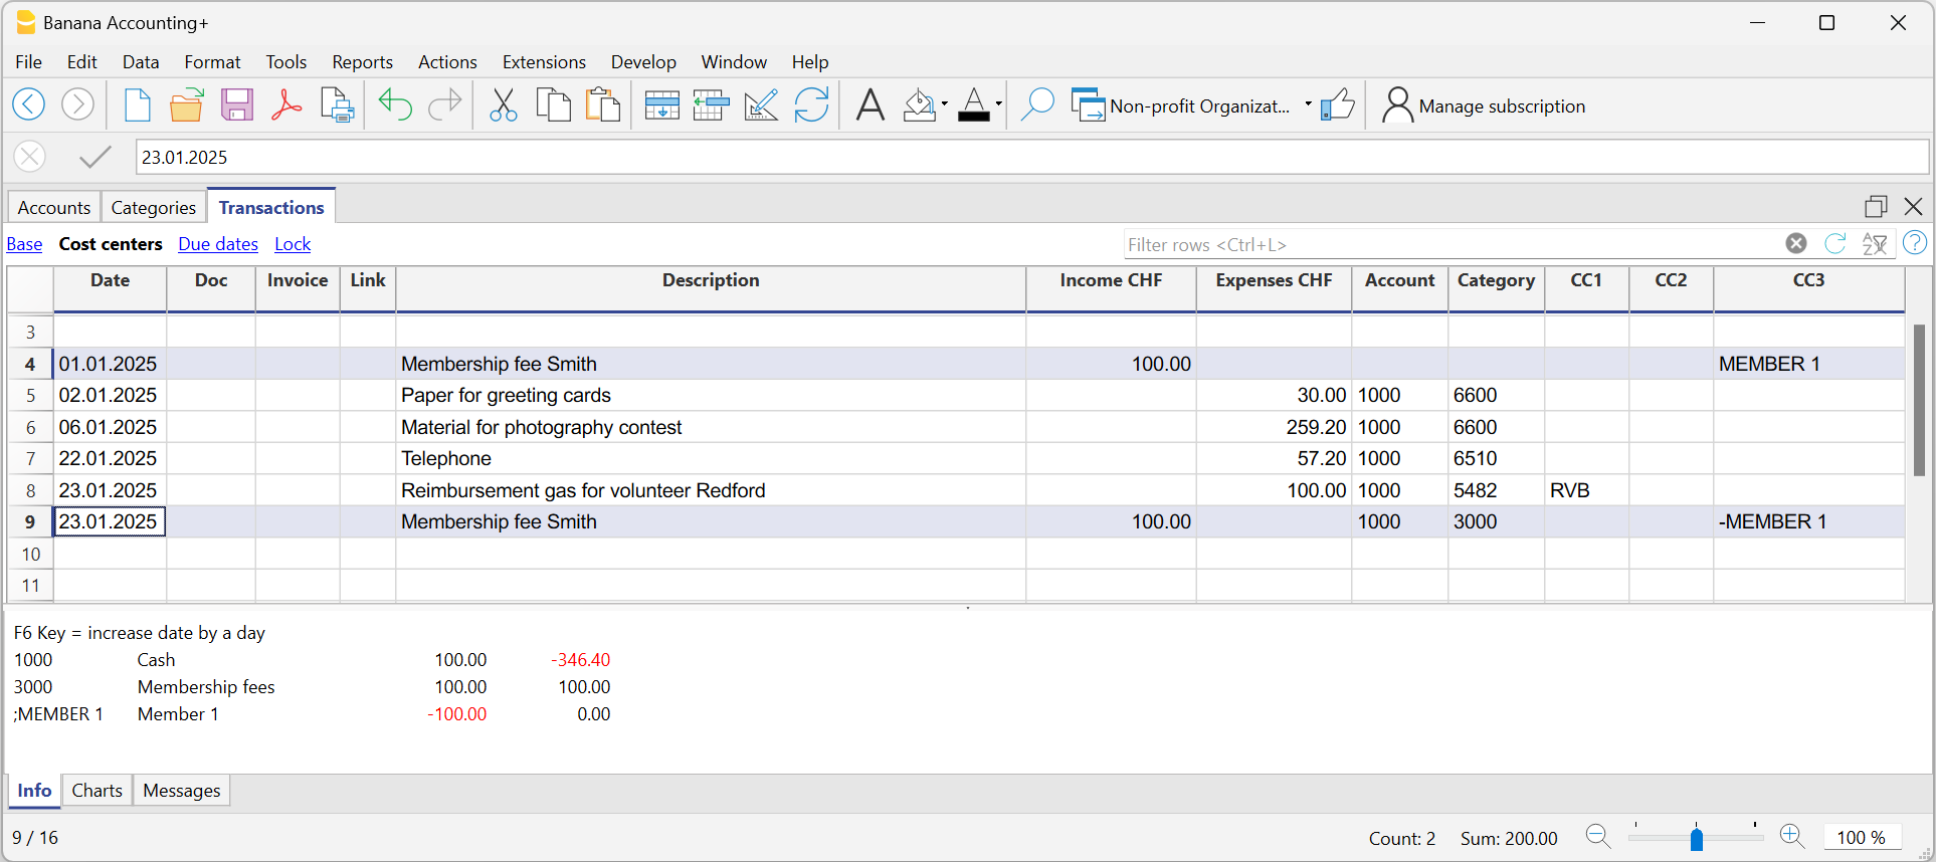
In the Income & Expense accounting and in Cash Manager, you can enable the option Record (+/-) cost centers like the category so that cost centers follow the category's sign.
However, be cautious when using this option, because if there are transactions that always go into the income or expenses column, while for the cost/profit centers the amount should be reversed, the program will sum up the amounts in the related cost/profit center ledgers.
In the previous example, the membership fee (credit and payment) is recorded in the income column for both entries. However, in the MEMBER 1 profit center, you need to reverse the amount to zero out the credit for member 1.
In this case, if you use the Record (+/-) cost centers like the category option, the balance in the corresponding profit center ledger would be incorrect. Since in both transactions the amount is always recorded in the Income column, in the corresponding profit center ledger it would be added instead of reversed, which is necessary to zero out the credit for member 1. Therefore, in these cases, you should not use this option, but rather manually place a minus sign before the cost/profit center.
It is therefore recommended to use this option only in cases where you are certain that the amount recorded in the cost/profit center aligns with the category.
Accounts of cost/profit Centers
The accounts of cost centers are set up in the Accounts table, except for the Cash Manager, where they are set up only in the Categories table.

- The Cost and Profit centers (CC) are accounts, preceded by the ".", "," and ";" signs
- There are three levels of cost centers:
- CC1 preceded by a period "."
- CC2 preceded by a comma ","
- CC3 preceded by a semicolon ";"
- Each level is independent of the other.
- For each level, there can be an unlimited number of cost and profit centers.
- A superior level can be used without using an inferior one.
- Cost center codes can be alphabetic or numeric.
- Cost centers can have their own grouping, different to that of normal accounts.
For the same level of cost centers, subgroups can be created. Be careful not to mix cost center groups with other groups of a different level or with normal accounts or segments. - Each cost and profit center has its own account card, complete with transactions and balances.
- A transaction on the cost center is independent of the account recorded in debit or credit.
It is possible to record on cost centers even if there is no account in the debit and credit column (as in the case of customer/supplier ledger with VAT on cash basis).
Setting up cost centers in the Accounts table
To set up the cost/profit centers in the Accounts table, proceed as follows:
- Create a specific section for the cost centers at the end of the chart of accounts:
- Enter a Section with an asterisk * for a section change and in the Description column, enter the title cost and profit centers.
- In the next row, on the Section column enter 03 and 04 for a profit center and the related description.
- Add rows for the cost center:
- In the Group column, enter the group to which the cost center account is assigned
- In the Account column, Add the cost or profit centers:
- With a preceding dot (.) for transactions in the CC1 column.
- With a comma (,) for bookings in the CC2 column.
- With a semicolon (;) for transactions in the CC3 column.
- In the Gr column, indicate the group into which the amounts are to be totaled.
- In a Multi-currency accounting, the account currency is also specified.
- Add the cost center groups
- In one and the same group, total only for one specific level.
- As for normal accounts, different levels can be created.
VAT amount with cost and profit Centers
In the File and accounting properties command, in the VAT tab you can set the amount of cost centers with the following options:
- Use transaction amount - The amount of the cost center is registered according the transaction amount
- Use amount excluding VAT - The amount of the cost center is registered net of VAT.
- Use amount including VAT - The amount of the cost center is registered including VAT.
Account card cost center
The cost center is treated as any other account, so each cost center has its own account card with account balance and account transactions.
Unlike all other accounts, the cost center account does not have a contra account. If you want to view the contra account we recommend using the Segments.
In order to view all cost center account cards, click on the menu Reports > Account/Category cards > Cost centers (Filter option).
Differences between Cost/Profit Centers and Segments
Cost and profit centers are units where costs or profits are assigned and accumulated with the purpose of monitoring a specific business area (departments, divisions, projects, operational units, or even specific machinery) to improve efficiency and expense management, and they serve an internal control function.
Segments, on the other hand, are assigned to a part of the business activity for external reporting purposes and strategic analysis. They are used to analyze profits and other financial metrics across different business areas, sectors, subsidiaries, projects, markets, customers, and other business dimensions to assess their economic performance
- Cost centers CC3 in Banana Accounting are used to manage Customers and Suppliers with VAT on a cash basis and to manage Members in non-profit organizations.
Differences in Settings and Transactions
In Banana Accounting, the settings and transactions for cost/profit centers and segments differ as follows:
Accounts Table
- Up to 3 cost/profit centers (CC1, CC2, CC3) can be set up, and each can have an unlimited number of cost/profit centers. They are entered in the Account column of the Accounts table with a comma, a period, and a semicolon (respectively, CC1, CC2, CC3) before the account number (or account code).
- Segments can be set up to 10 levels, and each level can have an unlimited number of segments. They are entered in the Account column of the Accounts table, with a double colon (:, ::, :::, etc.) before the code or number that defines the segment.
Transactions Table
- Cost/profit centers are recorded only in the CC1, CC2, CC3 columns of the Cost Centers view. The account is recorded without any punctuation in front.
- To record on the credit side of a cost/profit center, the cost center must be preceded by a minus sign.
Segments are recorded in the Debit and Credit columns, after the main account (e.g., 4000:P1). This means that the amount recorded in the Amount column is assigned to both the 4000 account and the P1 segment. Alternatively, they can be recorded in the specific Segment column of the Accounts table. - Segment amounts follow the debit and credit designation of the accounts.
Reports
- With Cost/Profit Centers, it is not possible to generate a Balance Sheet and an accounting report.
- Using Cost/Profit Centers, you can obtain an account statement for each cost and profit center.
- In the Accounts table, you can view the totalization of the different groups of cost and profit centers.
- With Segments, it is possible to generate a balance sheet with the breakdown of levels, showing the profit or loss for each segment.
- In the Accounts table, the total of the different segment groups is also visible, and you can view the account cards for the various Segments. Accounting reports are also possible.
- With Segments, you can also obtain a multi-level Report that combines accounts and segments, but specific extensions must be used.
Related documents:
Segments
Segments are a feature of Banana Accounting Plus available in all applications.
Segments are used to have a systematic separation of costs and revenues by unit, department or branch. When using the segments, you can have income statement divided by unit, department or branch, without creating specific accounts for each unit.
For example a museum can use the segments in order to know the income, the personnel expenses or the expenses for setting up each exhibit.
In the transactions, the segments are linked to the account, unlike in Cost centers where transactions are instead specified by and are used for less structured categorizations (for example all the expenses of an event or purchases for a specific purpose).
Cost centers and segments can be used simultaneously.
Characteristics of Segments
- Segments are accounts preceded by a colon ":".
- Segments codes can consist of numbers or letters.
- There may be up to 10 levels of segments.
- The number of colons preceding the symbol for the segment indicates the number of level.
- :LU segment of level 1
- ::P1 segment of level 2
- :::10 segment of level 3
- For each level there may be an unlimited number of segments.
- The different levels of the segment are independent of each other.
- The segments do not have BClasses and do not have a currency symbol.
- The calculations for segments are done in the basic currency.
- In the transactions, the segment follows the debit and credit account.
It is not possible to record on a segment without having an account. - Account cards of the transactions on single segments can be obtained.
Setting up Segments
The segments have to be configured in the Accounts table, Account column, at the end of the Chart of Accounts.
- Insert an asterisk in the Section column in order to define the section relative to the segments.
- In the Description column enter the Segments title.
- Enter the description of the first-level segments, and in the Account column, insert ":"
- Segments of the first level, entering an identification code for each one of them preceded by ":" (a colon)
- The segments of the second level (and possibly the third level), like those of the first level, with the difference that in the Account column, the segment codes must be preceded by :: or :::, depending on the level.

Unassigned segment
If the debit or credit account is entered in the transactions, without indicating a segment, the value is registered in the "empty" or unassigned segment.
You may indicate a description of the unassigned segment, by entering the text ": {}" as an account in the Chart of Accounts,.
Balance and segment account statement
The segment is a subdivision of what is recorded on an account.
- The value of a segment is therefore always relative to an account.
Generally, segments are used to divide the balance sheet or income statement.
Menu Reports > Accounting report or Enhanced Balance with groups > Section Subdivision , activate the Subdivision by segment option. - The segment balance listed in the accounts table is the total of the transactions within the segment.
- The balance will be zero (empty) if the same segment is used for both the debit and credit accounts in the transactions, or if the segment is entered in the Segment column.
- The balance will be present only if the segment is used exclusively with Income Statement or Balance Sheet accounts.
- In the segment's account statement, all transactions appear.
- If the same segment is used on the same transaction for both the debit and credit accounts, or if the segment is entered in the Segment column, the transaction will appear twice, once as a debit and once as a credit.
Transactions
The segments are being entered in the Transactions table, followed by the main account from the account segment.
When you need to register a segment belonging to several levels, you must follow the main account from the first level segment and continue with that of the second level.

Segment column
This column allows you to enter segments completely independently from the account.
- The Segment column is hidden and if you want to use it it must be made visible via the menu Data > Columns setup.
- The segments inserted in the Segment column are applied to the accounts used in the posting, in the Debit, Credit, VAT account columns, for which no segment has been specified.
- You can use the Segment column and also insert segments in the Debit and Credit columns.
- When using the Segment column the amount is recorded on the segment in both debit and credit, which is why the balance of the segment in the Accounts table will be zero.

Movements between Segments
The subdivision of costs is generally made for each individual accounting entry. However, there are situations where it is better to register costs in an account and then divide them into segments only at the end of the year. This is the case, for example, of administrative costs, which are divided in a percentage between the different sectors of the company.
Proceed as follows:
- During the year, transactions are recorded, indicating the accounts in the Debit and Credit column, but leaving the segment blank, or by attributing the whole amount to a single segment.
For example, all stationery costs will be posted without the segment. - At the end of the year, transactions are entered for the allocation of the portion of each segment to a specific cost or revenue account:
- In the transaction, the same account is always posted in the Debit and Credit account columns.
- The segments of origin (which may also be absent) and the one of destination are indicated.
- For example, for the allocation of stationery costs to the various sectors:
- There must be as many transactions as there are sectors.
- For each row, the credit account has no segment.
- The debit account has the segment related to the sector.
- The amount corresponds to the portion of the stationery costs to be attributed to the specific sector.
- Proceed with these transactions to assign the share of costs not yet attributed to each sector.

Opening balances of the Segments
The opening balances for the segments should preferably be entered as transactions, because only in this way can they be linked to an account. If for a segment, you enter the opening balance in the Opening column (Accounts table), these are attributed to "{} unassigned segment".
To assign opening balances to individual segments and to the related account, opening transactions must be entered (Transactions table).
- In the DocType column there must be the value 01.
- The date must be identical start date of the accounting.
With the segment opening transaction, the amount is deleted from the "empty" segment and attributed to the specific segment.
If the balance to be distributed is negative (credit), the account without segment must appear in the Debit column and the one with the segment in the Credit column.
Segment opening transaction example:
Let's assume that the opening balance of account 1000 is 100.00 (without segment, so the amount is attributed to the empty segment) and must be attributed to two segments (segment 01 for 80.00 and segment 02 for 20.00), we must proceed as follows:
- The opening transactions have the starting date of the accounting and in the DocType column the value 01.
- The first opening posting of the segment has in the debit column the account 1000: EVENTS and in the Credit column have the account 1000. The amount is 80.00.
- The second opening transaction has the account 1000:COURSES in the Debit column and the 1000 account in the CtA column. The amount is 20.00.

Create new year command
The Create New Year or Update Opening Balances command automatically creates the opening transactions for all segment levels.
If you do not want to report the balances of a segment level, you must delete the respective opening entries that the program has created automatically.
Use of the "-" sign as a separator
In transactions, you can use the "-" sign as a separator, instead of the ":" sign.
- In the File properties (basic data) activate the option Use the minus sign (-) as segment separator.
- In transactions, therefore, use the minus sign as a separator.
- If you use the "-" sign as a segment separator, you should not use accounts that contain dashes.
Reports
Reports of the segments are obtained with:
- Enhanced balance sheet with groups
- Accounting report.
- Account card
- Multi-level report
In order to obtain reports that combine accounts and segments (for example, all the expenses of the LU Branch for P1), the features of the Banana Extensions need to be used.
Report subdivision by level
In the Enhanced Balance Sheet with groups, in the Subdivision tab, indicate the segment level to be used.

Summary Report
This is a report of all the segments set up in the Chart of Accounts section with a possible subdivision by period or by segment.

Unassigned segment Report
The "empty" segment gathers all the amounts that have been recorded without specifying a segment. It is possible to set up the title for this segment in the Accounts table. Please also select the option Segment header: Description in the Subdivision section.

Differences between Segments and Cost Centers
Segments are attributed to a part of the company's business for external reporting and strategic analysis purposes. They are used to analyze profits and other financial metrics in different business areas, markets, customers, and other business dimensions to assess economic performance.
Cost and profit centers are units where costs or profits are attributed and accumulated with the aim of monitoring a specific business area (departments, divisions, projects, operational units, or even specific machinery) to improve efficiency and expense management, and they have an internal control purpose.
- Objective: Segments focus on evaluating overall financial performance, while cost centers focus on cost management and control.
- Focus: Segments are often used for external reporting and strategic decisions, while cost centers are generally used for detailed internal cost analysis.
- Structure: Segments are defined based on strategic criteria such as product lines or markets, while cost centers can be any internal operational unit that incurs costs.
- Accounting: Segments are more relevant in management and financial accounting, while cost centers are primarily relevant in analytical accounting.
Differences in Settings and Transactions
In Banana accounting, the settings and entries for cost/profit centers and segments are different:
Accounts Table
- Segments can be set up to 10 levels, and each level can have an unlimited number of segments. They are entered in the Account column of the Accounts table, with a double colon (e.g., :, ::, :::, etc.) before the code or number that defines the segment.
- Up to 3 cost/profit centers can be set up (CC1, CC2, CC3), and each can have an unlimited number of cost/profit centers. They are entered in the Account column of the Accounts table with a comma, period, or semicolon (respectively CC1, CC2, CC3) before the account number (or account code).
Transactions Table
- Segments are recorded in the Debit and Credit columns after the main account (e.g., 4000:P1). This means that the amount recorded in the Amount column is assigned to account 4000 and also to segment P1. Alternatively, they can be recorded in the specific Segment column of the Accounts table.
- Cost/profit centers are recorded only in the CC1, CC2, CC3 columns of the Cost Center view. The account is recorded without punctuation in front.
Reports
- With Segments, it is possible to have a balance sheet with the subdivision of levels, indicating profit or loss by segment.
- The total of the different segment groups is also visible in the Accounts table, and the account statements of the different segments can be viewed. Accounting reports are also possible.
- With Segments, you can also obtain the multi-level report that combines accounts and segments, but specific extensions must be used. It is not possible to have a balance sheet or an accounting report with cost/profit centers.
- With Cost/Profit Centers, you can obtain the account statement for each cost and profit center.
- In the Accounts table, it is possible to view the total of the different groups of cost and profit centers.
Insights
How to manage the company sectors with segments
With the Segments feature it is possible to manage different sectors of a company or different projects of an association and to obtain for each one the balance sheet and the complete profit & loss statement with the breakdown of revenues, costs and profit or loss.
The segments are set out in the Chart of Accounts. When you enter a transaction, you also indicate the segment. Segments can also be used to manage branches, divisions or areas of business. A museum can use them to have reports of different exhibitions, a transport agency to have reports for each individual vehicle.
Setting up segments in your Chart of Accounts
It is useful for a company with several branches that organizes events and courses and wants separate statements for each field of activity and branch.
First level field of activity, accounts preceded by a colon ":":
- Courses
- Events
Second level branches, accounts preceded by a double colon "::":
- Rome
- Milan
It is generally more convenient to use acronyms rather than long names.
- Watch the video: Segments
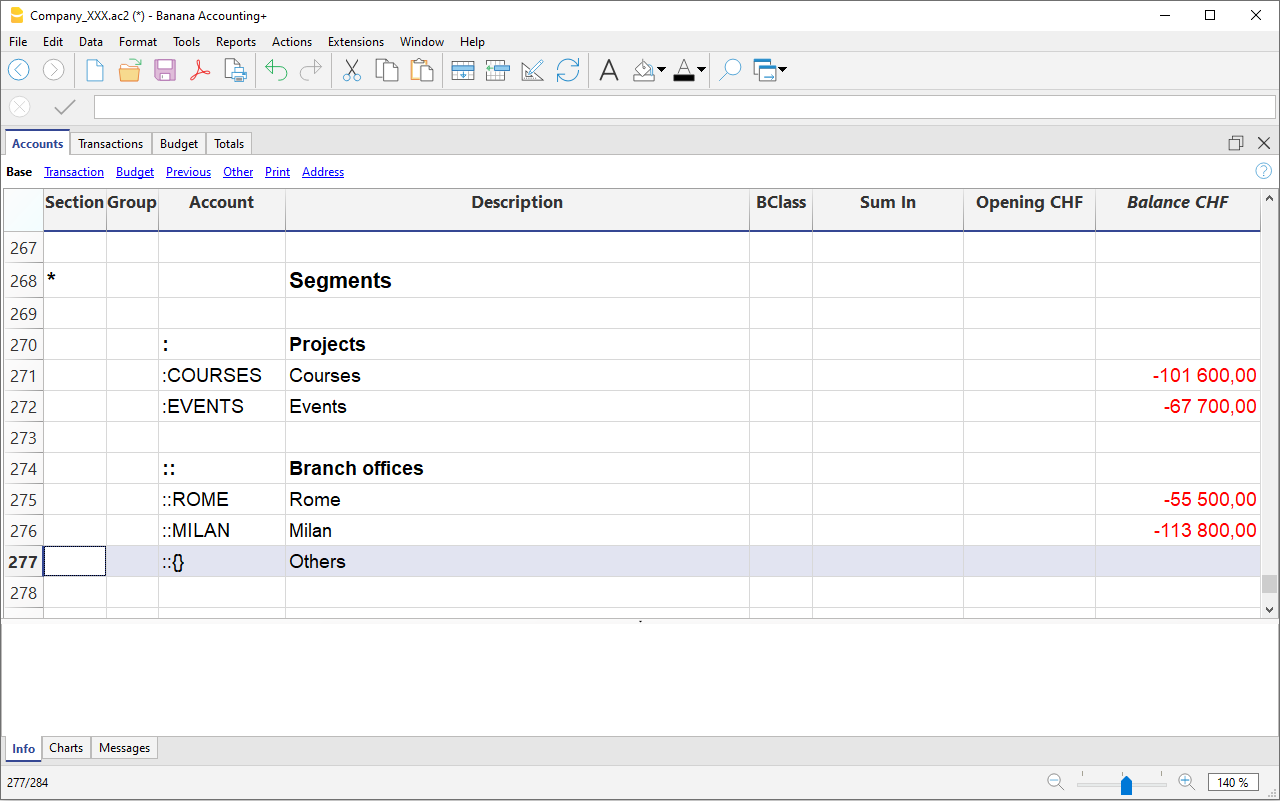
Entering transactions on the segments
Segments are entered into the Transactions table in the Debit and Credit columns following the account numbers.
- Segments can be recorded, by having them preceded after the account by either a colon (:) or a minus sign (-).
- If you want to enter segments with a minus sign preceding the segment code, you must activate the option 'Use minus sign (-) as segments separator, in the File menu, command File properties (basic data) > Options.
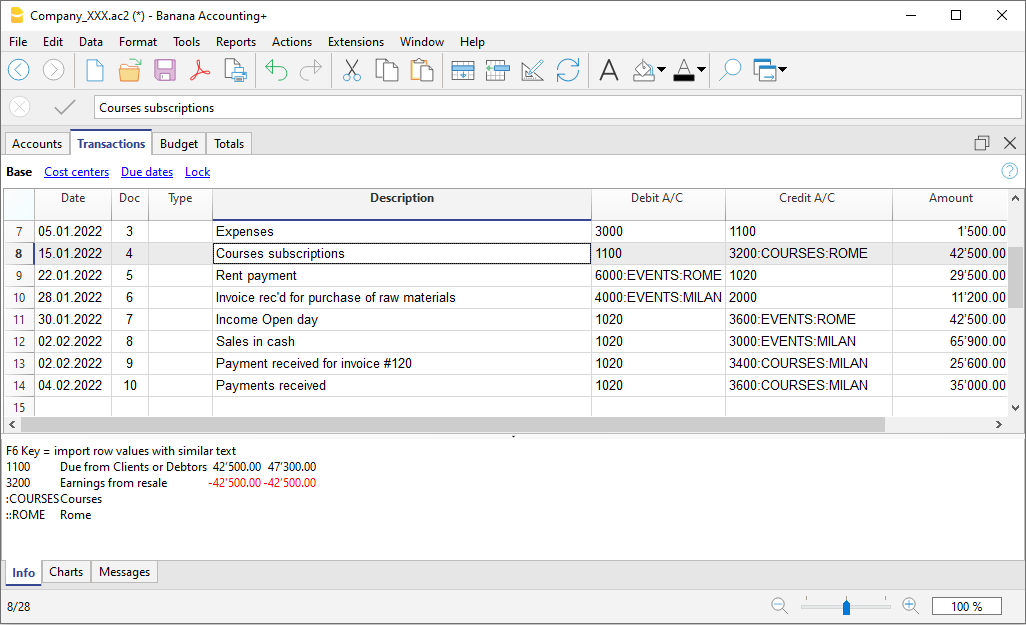
Profit & Loss Statement by segment
The report by segment can be obtained from the menu:
- Reports > Enhanced balance sheet with groups
- In the Chart of Accounts section and in the Sections section, select the Profit & Loss statement.
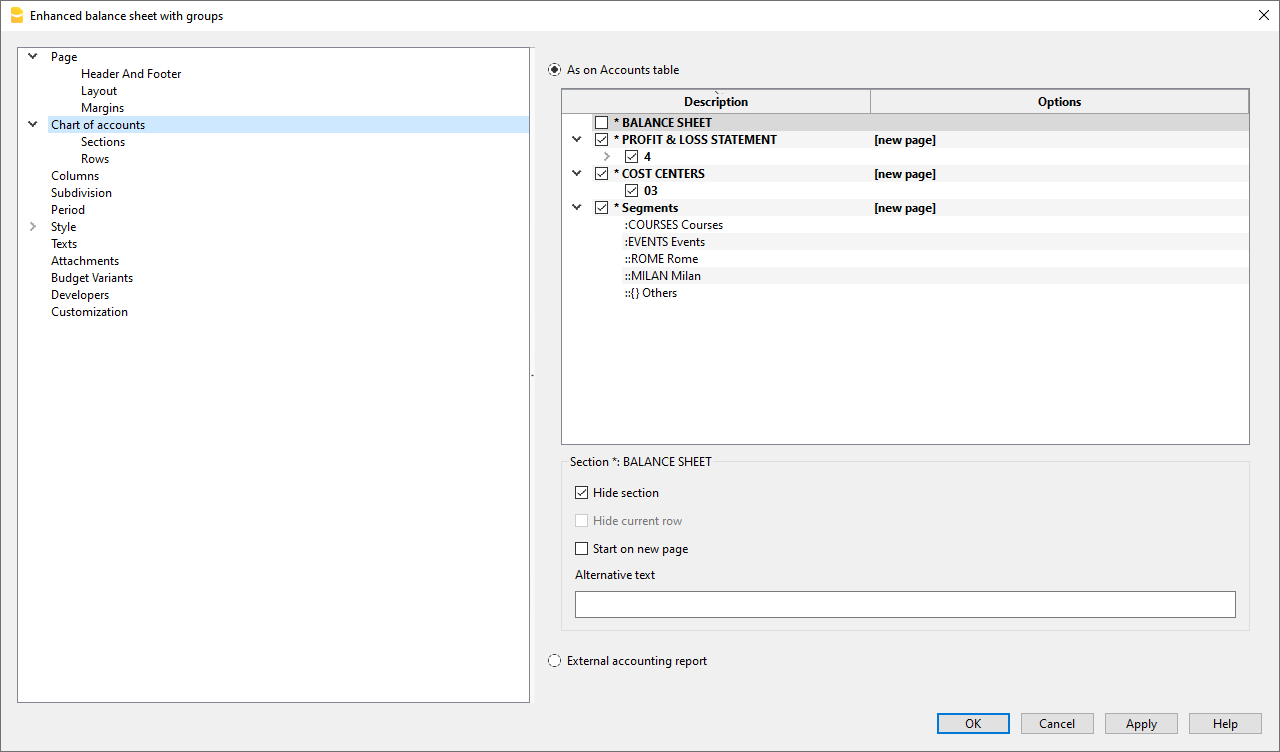
- Activate the Subdivision by segment option
- Select the segment for which the balance sheet should be obtained (by project or by branch office)
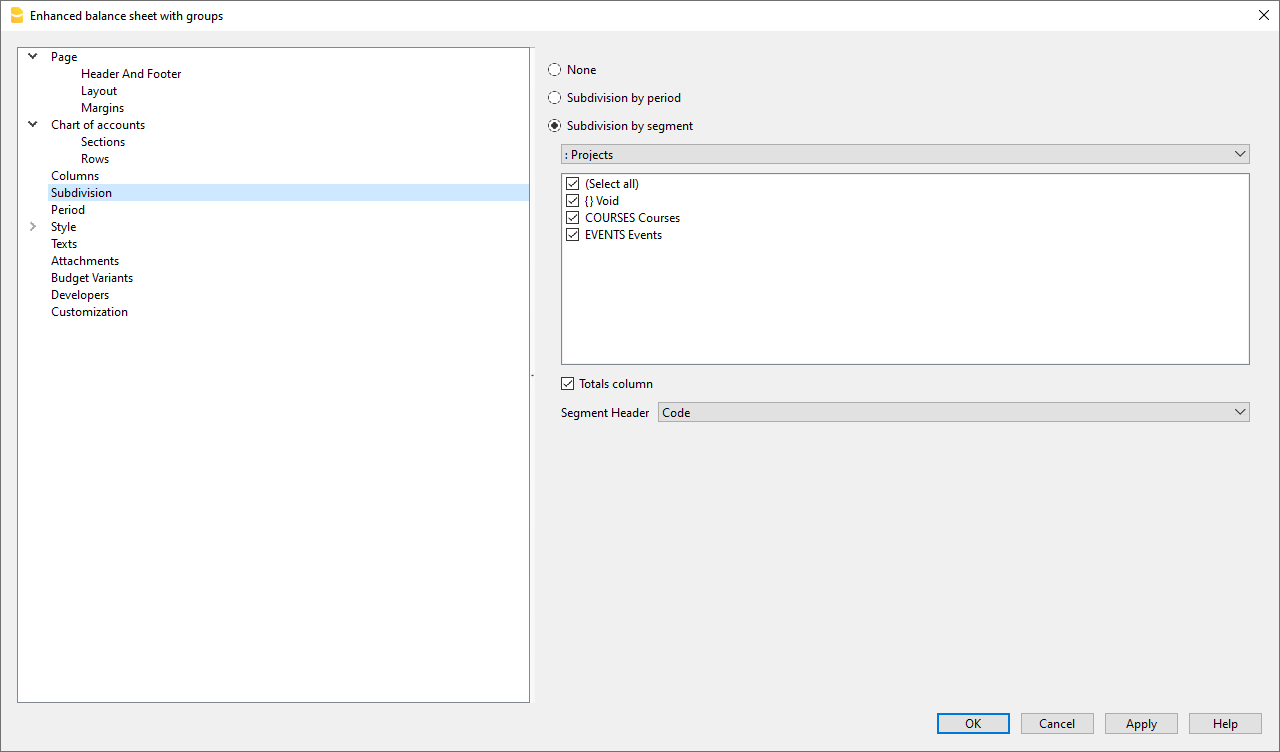
Report by Sector
The different segments appear in this report. The column with the curly brackets {} is that of values not assigned to any segment.
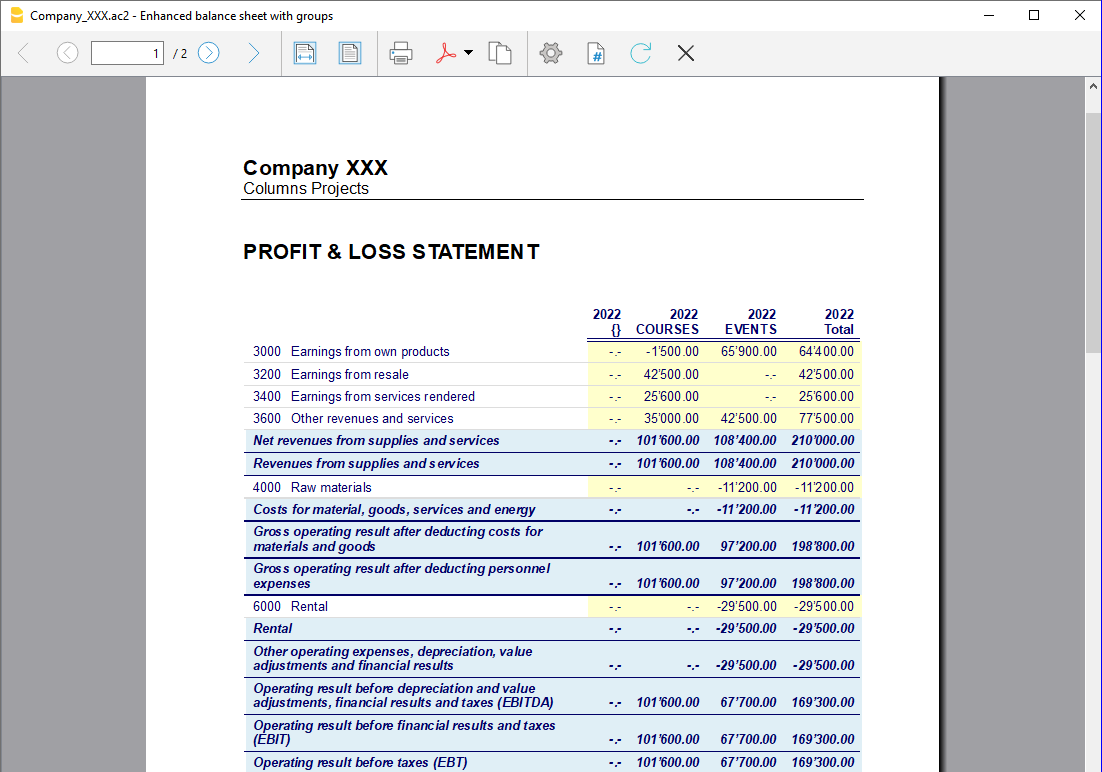
Report by Branch
The report shows revenues, expenses, and profit for the various branches.
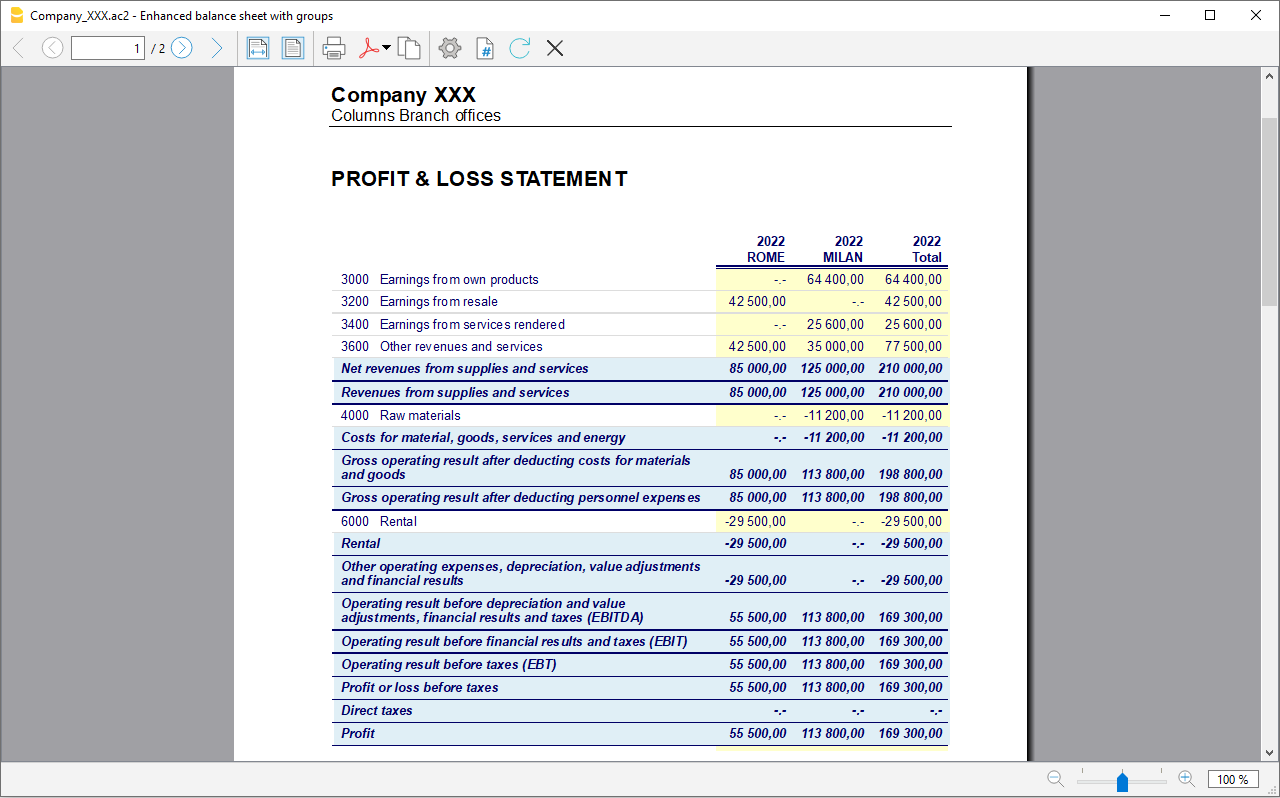
Liquidity management with the Cash Flow report
Starting from Banana+ Dev Channel 10.1.25, a new command Report > Cash Flow Report has been introduced, offering a detailed analysis of liquidity changes recorded in accounting.
This tool allows you to monitor receipts and payments, including future ones, providing valuable insights into your company's financial strength and operational efficiency.
- The logic behind this function is based on comparing the balances of liquidity accounts and the movements of counterpart accounts, which usually represent revenues or expenses.
- By understanding how the movements in liquidity accounts correspond to net cash flows for each period, you can gain an accurate view of your financial situation at any time. This comparison provides valuable information for effective financial planning and informed decision-making, helping you maintain balanced cash flow and achieve your financial goals.
- Thanks to the forecast functionality, you can analyze the evolution of liquidity over the year, using data from existing entries and budget items.
Prerequisites and important notes
Currently the Cash Flow report functionality
- Is available in the Dev-Channel version, so please install the latest version of Banana Accounting+ Dev Channel.
- This extension works only with the Advanced Plan, you can request a 1 month promo code from our support service.
- The extension is currently in Beta Test, please check everything and report any problem.
Setting up the report
The Cash Flow Report dialog window allows you to customize your liquidity reports by selecting specific liquidity accounts, periods, breakdowns, and other settings to tailor the report to your needs. With the ability to save different configurations, you can create and store multiple customized reports.
In the Banana menu, select Report > Cash Flow Report

Basic tab
- Liquidity account or group
- Selection: type the name or ID of the liquidity account or group for which you want to generate the report, then click the Add button.
- When selecting a group (indicated by Gr=), all accounts belonging to that group will be included in the report as liquidity accounts. This is useful for analyzing multiple accounts simultaneously without adding them individually.
- To remove selected accounts or groups, click the "X" button next to the account name.
- Forecast checkbox
- Available only for accounting files that contain the Budget table.
- Select this checkbox to include forecasts in the cash flow report, allowing you to project future liquidity changes based on budget entries.
- Enter the start date from which forecast data should be calculated. This date is inclusive, meaning that from the specified day onward, the report will consider budget data (from the budget table). Data before this date will instead use actual data (from the Transactions table). This feature allows for seamless integration of historical actual data with future projections in the Cash Flow analysis.
Other sections of the dialog
Explanations for the other sections are available on the following pages:
- Period
Defines the reporting period. - Subdivision
Allows you to generate a report divided into multiple periods.
Segmentation by segment is currently not implemented. - Customization
Allows you to save report settings. For example, you can create and save separate configurations for:- Cash Flow Report: including liquidity accounts.
- Working Capital Report: including working capital accounts.
Report results
After setting up the accounts and other options in the Cash Flow Report dialog and confirming your selection, a new table showing the calculated results is created.

Rows
Vertical structure of the report
- Each liquidity account
- Total of all liquidity accounts (cash accounts)
- Counterpart accounts
- Total of counterpart accounts (cash flow total changes)
- Difference (displayed only if the total of liquidity accounts differs from the total of counterpart accounts)
Some commands to filter the rows displayed in the table
- To display only the rows with an amount in the Current view
|!Movement_?_C:xml!<> |!Balance_?_C:xml!<> - To display only the rows with an amount in the Budget view
|!Movement_?_B:xml!<> |!Balance_?_B:xml!<>
Columns
The columns with amounts
- Opening balance (only for liquidity accounts)
The initial amount of the liquidity account for the period. - Closing balance (only for liquidity accounts)
The final amount of the liquidity account at the end of the period. - Movements for the period
- Inflows (hidden column)
Indicates incoming money - Outflows (hidden column)
Indicates outgoing money - Net Cash Flow
- Liquidity accounts
Calculated as Inflows minus Outflows.
Represents the total of all revenues (positive amounts) and expenses (negative amounts) within the account for the considered period. - Counterpart accounts
The origin (positive amounts) and the destination (negative amounts).
- Liquidity accounts
- Inflows (hidden column)
Views
The report has three views
- Current
Uses the opening balances and the actual transaction data. - Budget
Uses the opening balances and the data from the Budget table. - Forecast
- Uses the opening balance and the data from the transactions up to the day before the forecast start date.
- Uses the budget entries starting from the forecast start date (inclusive).
Forecast
The forecast combines current accounting data (Transactions table) with budget data (Budget table).
Example:
- In the Transactions table, movements are recorded up to the end of September.
- In the Budget table, the budget for the months of the year is recorded.
- If you set the forecast start date to October 1st, the program will calculate the forecast including:
- Actual opening balance.
- Transactions from January through the end of September.
- Budget data starting from October 1st.
- The liquidity forecast will therefore use the actual liquidity account balances and calculate the forecast through the end of the year based on the budget data.
- The forecast can be particularly useful when combined with a monthly breakdown.
If you use a monthly breakdown, you can view the projected cash flow for October, November, and December, starting from the actual data up to September.
Example of a report for the period 01.01.2025 - 30.06.2025
- Forecast start date: 01.04.2025
- 1st quarter amounts are based on actual transactions.
- 2nd quarter amounts are based on forecasts:
- The opening balance of liquidity accounts is based on actual data.
- The net cash flow is calculated based on budget entries.
- The final balance (projection) is the sum of current and forecast data (transactions + budget).

Report logic
The report will show:
- For liquidity accounts:
the total of all inflows and outflows for the period. - For other accounts:
the total of the entries that affected the liquidity accounts.
How the report works
- The user defines which accounts are liquidity accounts.
- The opening balance of the liquidity accounts is used as the starting value.
- For all entries in the Transactions and Budget tables:
- The program only considers entries involving a liquidity account.
- The amount recorded in the liquidity accounts is analyzed individually for each account.
- The amount recorded in the counterpart accounts is also analyzed separately for each account.
Definition of counterpart account
A counterpart account is an account that does not belong to the list of liquidity accounts.
- For single-entry (debit/credit) records:
the counterpart account is the one used in opposition to the liquidity account. - For entries with multiple rows and different accounts:
The position of the row including the liquidity account does not affect the decision to include or not the entry in the report.- The first liquidity account (whether debit or credit) is considered the main liquidity account.
- All other accounts used are considered counterpart accounts.
Logic for grouping entries
In the Transactions table, accounting movements are listed sequentially, without the possibility to manually define a start and end for each entry. Therefore, the program automatically determines when an entry starts and ends, as well as which accounts are part of it. This logic directly impacts the correct assignment of the counterpart to liquidity accounts.
Understanding the grouping mechanism of entries in Banana is essential for achieving an accurate interpretation and reducing any discrepancies reported in the cash flow report.
Managing differences
When the program cannot determine the counterpart in an entry with multiple rows, a difference is reported. This warning does not necessarily imply an accounting error but rather indicates the inability to identify the exact counterpart.
In these cases, you can help the program by specifying the liquidity account in square brackets on the affected row. This intervention:
- Acts only as a comment for the cash flow calculation.
- Does not modify the accounting result.
Errors and differences in entries
The inflows and outflows in liquidity accounts must always be associated with:
- a source account (for inflows, from where the money comes)
- a destination account (for outflows, where the money was transferred to).
For each entry (whether single or spread over multiple rows), the system reports an error when the total amounts recorded in the liquidity accounts do not match the total amounts assigned to the counterpart accounts.
Differences and errors can therefore arise from:
- Partial or missing counterpart assignments.
- Amount errors between liquidity movements and their counterparts.
Practical examples
Below are some examples of accounting entries split over multiple rows, involving the liquidity accounts 1020 Bank and 1000 Cash.
Although these entries are accounting-wise correct, they can generate ambiguities in cash flow calculation, highlighting a possible discrepancy between the liquidity balance and the total of the counterpart movements.
Date change
- Example: entry over multiple rows with different dates. Report of a 360.00 CHF difference at row 1.
Date Doc Invoice Description Debit Credit Amount Balance 13.01.2025 Various purchases 1020 360.00 -360.00 14.01.2025 Purchase on 14.01 4000 30.00 -330.00 15.01.2025 Purchase on 15.01 4000 330.00 Correction: indicate the liquidity account in square brackets in the second and third rows.
Date Doc Invoice Description Debit Credit Amount Balance 13.01.2025 Various purchases 1020 360.00 -360.00 14.01.2025 Purchase on 14.01 4000 [1020] 30.00 -330.00 15.01.2025 Purchase on 15.01 4000 [1020] 330.00
Change in invoice number (Invoice column)
- Example: entry over multiple rows with different invoice numbers and an empty Doc column. Report of an 8,000.00 CHF difference at row 1.
Date Doc Invoice Description Debit Credit Amount Balance 18.01.2025 Customer invoice collection 1020 8,000.00 8,000.00 18.01.2025 4545 Customer invoice collection 3000 3,000.00 5,000.00 18.01.2025 4546 Customer invoice collection 3000 5,000.00 Correction: indicate the liquidity account in square brackets in the second and third rows.
Date Doc Invoice Description Debit Credit Amount Balance 18.01.2025 Customer invoice collection 1020 8,000.00 8,000.00 18.01.2025 4545 Customer invoice collection [1020] 3000 3,000.00 5,000.00 18.01.2025 4546 Customer invoice collection [1020] 3000 5,000.00
Budgeting and Cash Planning
All the accounting applications in the Banana software include powerful and innovative Financial Planning tools based on the double entry method. You can easily display Balance Sheets, forecast Income statements, financial, liquidity and investment plans.
A vision of the future
When using the double entry accounting method, financial forecasts allow you to have a comprehensive vision of the future of the company. You can imagine what the situation will be before things happen, and you are offered the opportunity to take action in time. If you notice that the costs will be too high, you can examine measures to lower them. If you're made aware of a shortage of liquidity, you will have time to take steps to avoid it.
By using financial forecasts, you will add value to your business management.
- ▶ Video: How to start an Income & Expense accounting
- ▶ Video: How to start a Double-entry accounting
- ▶ Video: How to start a Multi-currency accounting
Financial forecasts within reach of everyone
The planning system based on the double-entry method is incredibly powerful and within everyone's reach.
- Planning is fully integrated into accounting.
- The identical Chart of Accounts as the one in your accounting is being used.
No need to set up a new file, just add the budget movements. - Forecasts are carried out with budget registrations.
The proven accounting method of double-entry accounting is used. Costs and revenues can be specified in detail. - Income statement and Balance Sheet forecasts are available.
You can see how sales, costs, profits, liquidity and the evolution of capital will evolve. - You can check the evolution of an account or a group with all the individual budget movements.
- The program prepares forecasts by month, quarter or year.
- Forecasts can be set up with quantities and calculation formulas.
When the forecast is changed, for example when an investment is increased, the year-end depreciation is automatically recalculated. - The financial plan prepared for one year can also be projected over several years.
- All accounting reports are available with the values of the past, present and future.
Methods of Financial Forecasts and Budget
The planning function, with financial projections of costs, revenues and liquidity, is integrated and available in all Banana accounting applications.
There are two operating modes:
- Complete financial planning in the Budget table
The Budget table is added to the accounting file, which allows you to enter the forecast movements, which then serve to generate complete financial forecasts.
The Budget column of the Accounts table is automatically updated by the program on the basis of the transactions entered in the Budget table. - Annual budget in the Accounts table
A very simple and traditional method that involves entering the annual estimates in the Budget column of the Accounts or Categories table.
Then on the basis of the final balance, the program indicates the variation in the Difference Budget column, Accounts or Categories table.
See: Simple annual budget.
Below we focus on the method that uses the Budget table.
Instant display of the budget values
Financial planning, based on the double-entry method, uses the same Chart of Accounts as the accounting.
In the Accounts and Categories table (Income & Expense accounting) not only the current balances are displayed but also the budget balances.
You can freely set up the structure of the Balance Sheet and Income statement by adding accounts and groups.
You can also use cost and profit centers, segments, as well as accounts for customers and suppliers.

The Budget table
The planning is prepared by inserting transactions in the Budget table. This is like entering accounting records, but they concern the future.
The rent and other recurring transactions are indicated only once, setting the repeat option and any end date.
The sum for the year is indicated in the Total column.
You may add as many lines as you need, for the current year or for the following ones, carry out changes and modifications at any time.

A clear and comprehensive vision of the future
Banana Accounting provides you with all the necessary reports to have a comprehensive view of your financial future, the same that are used for your accounting, all integrated and balanced, without differences, just like for accounting. All is automatic, you don't need to waste time setting up tables in Excel, inserting and checking formulas, setting up rows and columns.
- Liquidity plan.
You can see how liquidity will evolve in the chosen planning period, know in advance if you will have the means to cope with the different commitments. - Forecast Income statement.
You can see what the revenues and costs and the expected result will be, select a summary view with the totals per group or even detailed with the values of the individual elements. The layout of the Income statement can be freely set and changed according to requirements. The program will do the totals automatically, without you having to enter formulas. - Forecast budget.
For each account and group of Assets and Liabilities you will see the evolution over time. - Investment plan.
For each account or group of Assets you can see the evolution over time in detail. - Detailed account cards.
You can analyze each item in detail, thanks to the account card, examine how the evolution of the bank account or liquidity is. - Graphs with evolution over time.
You can instantly see the future evolution of each item. With a single glance, you can check how sales will evolve or understand if there will be a liquidity crisis. - Cost and profit centers and segments.
You can also use cost centers, profit centers and segments when forecasting.
You can get detailed forecasts for individual projects, customers or geographical areas. - Projections over several years.
You can have the Balance Sheet and Income statement for one, two, five or even ten years.
The program automatically projects the data of the year for subsequent periods. - View data by month, quarter, year or multiple years.
You can have the Balance Sheet and the Income Statement for a month, quarter, semester, year or more years.
You can thus analyze in detail the period that interests you. - Compare the budget with the actual figures.
Using the same Chart of Accounts, the comparison between the forecast and the actual is immediate. You can easily identify deviations from the estimate. - Save the report settings (customizations).
Create reports and save the customizations to be recalled when you wish.
For each report you can select the layout that interests you. The program automatically adapts the prints without you having to set up rows, columns and formulas. You can analyze the data from different points of view, moving from one visualization type to another.
- View for a period.
The program presents you with reports for the year, but you can also request to have the forecast only for a quarter. You can easily switch between annual and multi-year planning. - Evolution over time.
The program is able to present all the reports with a breakdown by period. You can thus see the evolution over time of liquidity, Balance Sheet, sales, costs and operating result. You can easily switch between views without having to reset formulas or tables. - Fully customized reports.
You can select and change the view as you require. You can present your plans professionally and make a good impression on those who support you. - Save report setup.
You can create and save print settings and recall them when needed.
Simple use
Everything is already set up, you have to enter the forecast movements with simple transactions. This approach is particularly suitable for accountants, who are instantly are able to prepare precise and complete forecasts. Thanks to the Income and Expense accounting, even people without particular accounting skills can do it.
- Entry as for accounting records.
For each future financial event, a transaction with date, description and the accounts that are concerned is inserted.
It is the program that totals the amounts by item and period, just like in accounting. - Indication of income and expenses in detail.
The different items of expenditure can be indicated in detail and at the exact moment in which they will occur. For personnel expenses, the salaries of individual employees can be indicated. - Easier changes and updates.
Adapting, adding or removing revenues or expenses is simple, because you just change the specific detail. If in the following year the rent increases, just change this item. If there is a new expense, a new line is added. The program will automatically update the budget.
Fast thanks to repetitions
Repeating operations are entered only once. The forecast movement indicates the frequency with which the operation will repeat itself and the program takes it into account for the future.
In a planning, there are many operations that repeat themselves. Comprehensive planning can be set up in no time. The repetition function is particularly effective when you have to adapt the budget, change a single amount and in an instant everything is updated.
Automation of calculations
The program automatically performs simple or complex calculations.
- Calculation based on quantities and prices.
Sales quantities can be memorized to have a more concrete vision of the budget. The program automatically calculates the amount of the movement and updates the accounting. - Calculation formula (Javascript).
The possibility to enter formulas is available in Banana Accounting Plus only with the Advanced plan. Update now!
Banana Accounting Plus provides an extremely powerful formula system, specially designed for financial planning. You have access to the budget data, so you can create movements that depend on previous events. You can calculate the depreciation based on the value of the investments made or calculate the interest on the loan based on actual use. The program after each modification will recalculate the exact values.
Formulas are expressions of the Javascript language, simple or complex schedules can be created, fully automated.- You can assign values to variables and recall them on subsequent lines.
- Javascript expressions have access to the Banana API.
- You can also program your own Javascript functions and call them up.
Automatic projections over several years
You can set the budget for one year and let the program create projections for the following years.
All reports such as liquidity plan, income statement and forecast balance sheet will also be available for subsequent years.
This way, a medium and long-term view of the financial situation are made available. The projection can be completely controlled for the following years as well. The operating logic is simple, for the operations of the year that will repeat themselves in the consecutive years, an annual repetition code is inserted. This way the program is able to project the planning data for the period in question. Schedules for two, five or even more years can easily be made.
Customer portfolio analysis and supplier control
When entering forecast movements, customer codes can be indicated. In this way, you can build realistic planning starting from your customer portfolio and understand if the costs will be covered and which customers will be more profitable.
Obviously, the same analyzes can be done for suppliers.
Planning of projects or sectors
You can also create financial plans with reports by projects, activities or by business sectors. It is sufficient to indicate in the movements that an expense or income is relevant to a project or department and the program is able to automatically prepare specific reports.
Easy adaptation
You can adapt the structure of the Chart of accounts and the layout of the Balance Sheet and Income statement; add accounts, categories and and groups, and reports change automatically, without having to set up formulas to calculate row or column totals.
Comparison between the estimate and actual data
Accounting and budget use the same calculation and report preparation engine. In the transactions table, enter the values referring to the past and in the estimate, those of the future. The Chart of Accounts and the arrangement of the balance are always the same and comparisons and indications about any changes compared to the budget are automatically displayed.
Automatic data transfer to a new year
The budgets set up with Banana Accounting are easy to update and modify. Just change the relative movements and the program automatically recalculates the formulas and updates the budget.
When you create a new year, the program reports the budget data, changing the dates. It is then a question of modifying the elements that will change compared to the previous year. This provides detailed and perfect planning for the following year.
Corporate financial simulation
Integrated planning in accounting is very powerful and opens a new era in business planning, as it offers the possibility to simulate the series of future events with great precision and in detail. Forecasts can be analyzed in detail with the same tools used for accounting analyzes; check what is the break-even point and analyze the situation of customers or projects.
Learning accounting with planning
By preparing the budget with transactions similar to accounting, one practices and learns the accounting technique. Accounting training courses can be made much more interesting and effective, because students can be offered the task of creating their own company and ensure to make it become solid and profitable. Students will not only have to practice entering transactions, but they will have to keep an eye on the activity and get used to reading the Balance Sheet and the Income statement.
Starting a financial forecast
You can easily prepare financial forecasts including liquidity plans, balance sheet and income statements.
The procedure is the same as for creating the accounting.
▶ Video: Financial Planning | Double-entry
1. Create the accounting/forecast file
With the File → New command , create a financial forecast file, using the accounting type and the accounting template that best suits your needs.
You can also start by using one of the templates already prepared for learning, which also contain examples of budget transactions.
- Financial planning for the family (with the Cash Manager)
To plan your family's expenses and income. - Financial planning for the opening of a restaurant (Income and Expenses Accounting)
This template uses alphabetical account numbers, which make comprehension more immediate.
With income and expenses; even without accounting knowledge, you can create a professional planning, including the liquidity plan, asset forecasts, costs and income. - Financial planning for the opening of a restaurant (Double-entry Accounting)
For complete financial forecasts, with the double-entry bookkeeping system, intended for those who are familiar with the double-entry bookkeeping method.
This model uses alphabetical account numbers, which make it easier to understand.
There are also sample files for more advanced functionalities:
- Double-entry accounting, using the quantity and formula columns
The different possibilities of using the formula column are listed. With examples and explanations. - Multi-currency accounting with examples of budget transactions with formulas
To use multi-currency specific formulas. - With examples of transactions on more complex themes.
Once created you can save the file under a new name, preferably composed of the company name and the year "company-2020.ac2".
2. Customize the file
Once you have created the file, adapt it to your specific needs:
- Set the File properties.
- The company name.
- The Accounting period.
Normally it is the one corresponding to the calendar year. However, you can indicate another one as needed. See Period for the forecast.
- Customize the Chart of Accounts.
You can change the description, add or delete accounts or groups.
If necessary, you can adapt the Chart of Accounts at any time later. - If it’s an activity already in progress, enter the Opening Balances.
3. Enter financial budgeting movements
In the Budget Table you can now enter the financial forecast movements.
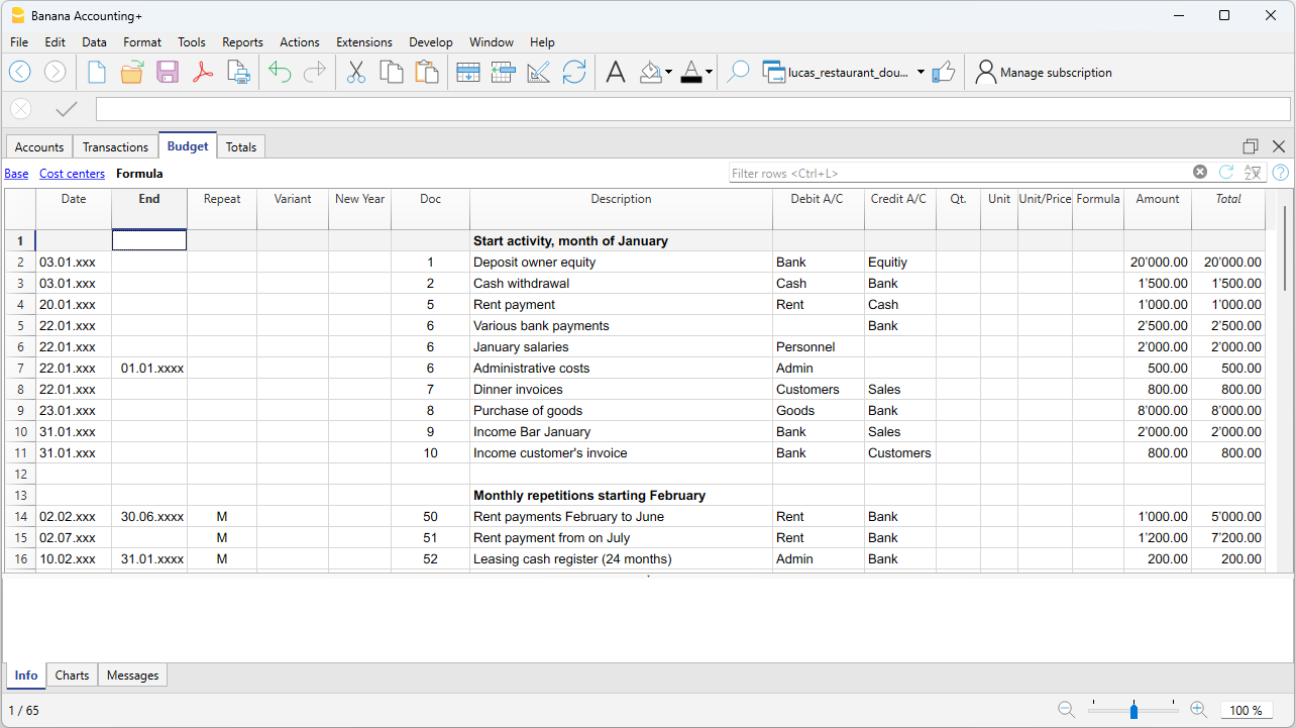
4. View the forecasts
The forecast data are visible:
- In the Charts window.
- In the Accounts table, in the Budget column.
- In the Reports, in the Budget column.
- In the Account card, Budget values.
Adapt the forecast
You can change, add or delete transactions at any time. The forecast will be immediately recalculated.
Preparing the Liquidity Plan
The liquidity plan is very important not only for startups, which need to assess possible investments based on available financial resources, but also for established companies to maintain balance over time.
A careful analysis of cash flows allows you to monitor that there are always sufficient funds available to meet financial obligations, such as salary payments, suppliers, taxes, and other operating expenses. Preparing a liquidity plan is essential for several reasons:
- Strategic planning: provides crucial information for strategic planning and decision-making, allowing the company to seize investment and growth opportunities promptly.
- Operational sustainability: ensures that the company always has sufficient funds to operate without interruptions, maintaining operational continuity.
- Prevention of liquidity crises: avoids emergency situations where the company cannot meet its financial obligations, preventing potential insolvency or bankruptcy.
- Optimization of financial costs: allows for efficient planning of financial resources, reducing financing costs and improving the return on available resources.
- Improvement of relationships with third parties: effective liquidity management strengthens the trust of investors, suppliers, employees, and other stakeholders in the company.
How to prepare the liquidity plan
To draft a liquidity plan, it is necessary to analyze a series of historical data and documents.
Data collection
Start by gathering a series of useful documents for the planning process:
- Bank Statements: to check recent transactions and balances from bank, postal, and credit card statements.
- Debtors and Creditors Accounts: to examine the receivables the company needs to collect and the payables it needs to settle.
- Current Balance Sheet: to draft a current balance sheet for an overview of all accounts.
- Balance Sheets of previous years and periods: to assess, based on historical data, especially revenue trends.
Banana Accounting Plus offers innovative features to create a liquidity plan, using the same chart of accounts as the accounting system and integrating it into the same accounting file without the need for separate spreadsheets.
To create the liquidity plan, forecasts are entered into the Budget table as regular entries, using the Debit, Credit, Amount columns, VAT codes if any, cost centers, and segments.
Estimating Inflows and Outflows
When forecasting costs and revenues, it is better to be cautious. Therefore, it is recommended to not underestimate costs and not overestimate revenues, while also considering unforeseen events to avoid liquidity shortages. It is also advisable to develop a strategy to identify which costs can be reduced because they are not strictly necessary and which revenues can be optimized.
Future Outflows
Enter forecasts for future costs based on historical data and potential extraordinary expenses:
- Operating Costs: forecast operating expenses such as salaries, rent, utilities, and production costs.
- Debts and Payments: plan payments to suppliers and loan repayments.
- Other Outflows: consider other expenses like taxes, extraordinary maintenance, or investments.
Future Inflows
Enter forecasts for future revenues:
- Revenue: based on sales from the previous year for the same period, market trends, and marketing strategies, prepare estimates for sales or services. If reliable data is not available, rely on historical data from previous years.
- Other Inflows: include other possible sources of income, such as interest from investments or potential loans.
Below is an image of the table. For an explanation of the columns, refer to the page Budget Table Columns.
Liquidity Plan from the Balance Sheet
Use the command Enhanced Balance Sheet with Groups to access the forecast balance sheet report.
- In the Sections options, enable the display of the Budget for the Balance Sheet (Assets and Liabilities).
You can view current (accounting) values, budgeted values together or separately. - Set the Period.
If you specify a period beyond the accounting period, the program automatically generates multi-year forecasts. - Specify the Period Breakdown you want.
- In the Rows options, you can exclude accounts and view only the groups.
- If the setup will be used in the future, it is advisable to create a Customization.

Liquidity Plan Report from the Accounts Table
The Accounting Report is similar to the Enhanced Balance Sheet with Groups, with the difference that data is displayed in columns, like in the Accounts table.
You can use the Accounting Report to get an immediate view of the liquidity accounts' evolution.

Começar uma Planificação financeira
Banana Contabilidade integra a Planificação financeira diretamente na contabilidade.
Habilitar a planificação num arquivo existente
Se tem já tem um arquivo de contabilidade e quer ativar também a planificação tem que Adicionar a tabela Orçamento.
Da mesma maneira, se quer gerir uma contabilidade e planificação financeira juntas, tem que criar um arquivo de contabilidade e adicionar a ttabela Orçamento.
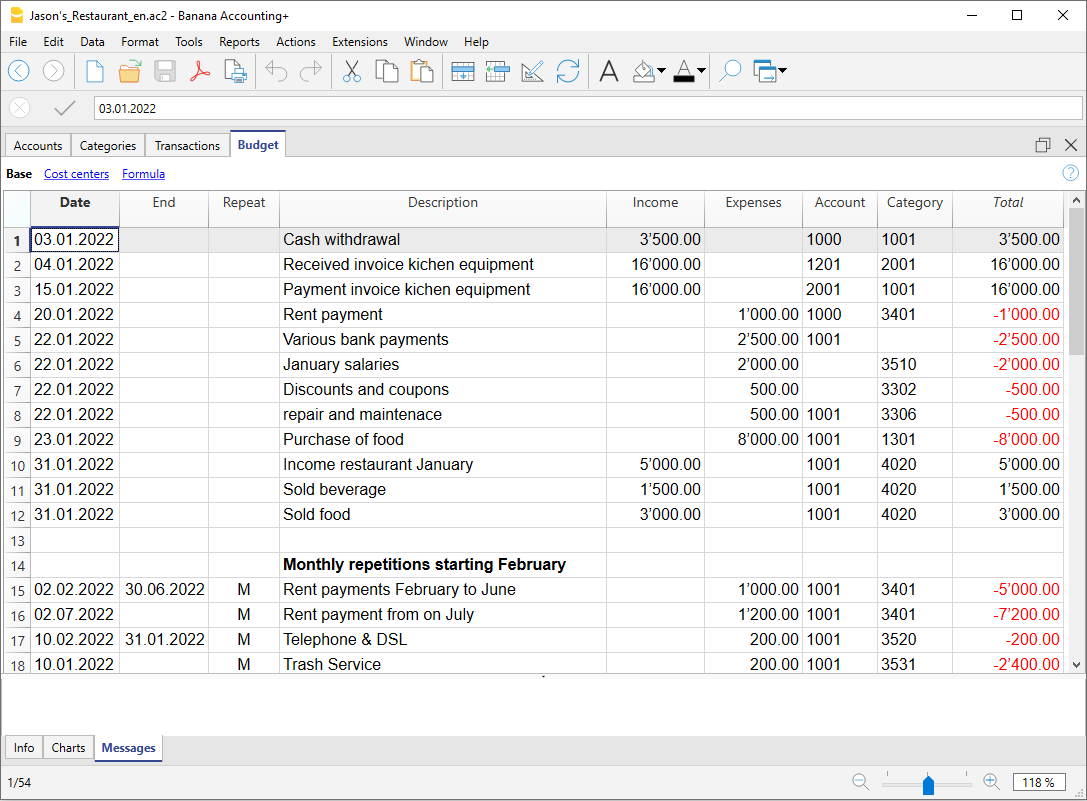
Criar um novo arquivo para a planificação
O processo é o mesmo para a gestão de uma só contabilidade, como para a gestão de planificação ou para ambas juntas:
- Criar um arquivo de contabilidade
- Configurar as propriedades do arquivo
- Configurar o plano de contas
- Inserir os saldo iniciais (se existem)
- Inserir na tabela Orçamento os valores da previsão.
A tabela Lançamento, fica preconfigurada, e pode ser invísivel: Menu Dado -> Configurar tabelas e indicar a tabela Lançamentos como não visível.
Documentação com arquivo de exemplo base
A melhor maneira para começar a planificação è usar os modelos tutorial, onde são usadas contas alfabéticas, para facilitar a compreensão dos conceitos.
Se, para inserir os dados da planificação, precisa de un plano contábil mais estruturado, modifique o arquivo, ou use um outro modelo, adicionando a Tabela Orçamento.
Tem várias possibilidades de budget:
- Plano financeiro para a família (com livro caixa)
Para planificar as despesas e receitas da própria família. - Planificação financeira para abertura de um restaurante (Contabilidade Receitas e Despesas)
Mesmo sem conhecimentos de contabilidade, simplesmente com receitas e despesas, pode criar uma planificação profissional. - Planificação financeira para abertuira de um restaurante (Contabilidade de Partidas Dobradas)
Destinada a quem conhece o método de contabilidade de partidas dobradas.
Documentação e Arquivo de exemplo avançados
As explicações e os relativos arquivos de exemplo seguintes servem para aprender funções mais avançadas, tal como o uso das quantidades e das fórmulas.
- Contabilidade de partidas dobradas, com uso das colunas quantidade e fórmulas
São especificadas as várias possibilidades de uso da coluna fórmulas. Com exemplos e explicações. - Contabilidade multimoeda com exemplos de lançamento de orçamento com fórmulas
Para usar as fórmulas específicas da multimoeda. - Com exemplos de lançamentos em temas mais complexos.
Planificação anual
Normalmente, a planificação é preparada pelo período contábil definido nas Propriedades do arquivo que, em geral, corresponde ao ano solar.
- Na coluna Abertura da tabela Contas, insira o saldo de abertura do início do período.
- Na tabela Lançamentos, insira os dados da planificação para o ano corrente.
Quando precisar dos Relatórios, se não insere um período específico, o programa utiliza o período inteiro da contabilidade.
Para preparar a planificação do ano sucessivo, tem que criar um arquivo para o novo ano. O programa relata os lançamentos de orçamento, que podem ser modificados (veja Fecho e novo ano).
Planificação por vários anos
Com Banana Contabilidade pode ter planificações por vários anos. O período de planificação é livre. No momento em que pede o report, configure o Período de previsão.
Para fazer uma planificação por vários anos, em geral, tem que proceder configurando a planificação para o primeiro ano, prolongando-a depois aos anos seguintes.
Tecnicamente, pode prosseguir como se fizesse uma planificação anual, prolongando-a depois aos anos seguintes:
- Nas Propriedades do arquivo indique como data de início e de fim, a data do primeiro ano (que, em geral, é o ano solar).
- Insira o saldo de abertura no plano de contas.
- Na tabela Orçamento, insira os movimentos da planificação
- As operações que são especificadas só no primeiro ano, têm que ser indicadas sem repetição.
- Todas as outras operações, que presume se repitam também nos anos seguintes, tem que indicá-las com o código de repetição.
- As operações que ocorrem uma vez só por ano, tem que indicá-las com a repetição "Y" anual (por exemplo, o cálculo das depreciações é feito ao fim do ano).
- As operações específicas aos anos seguintes, tem que ser indicádas com a respectiva data em que ocorrem.
- Para as operações repetitivas que são limitadas a um só ano ou a um período preciso (operações de leasing com prazo fixo) indica a data de Fim. Além desta data, não será mais feita nenhuma repetição.
- As fórmulas podem ser usadas para fazer de maneira a que o montante das linhas de repetição se adequem automaticamente.
- O cálculo das depreciações pode basear-se no saldo da conta dos ativos.
- O cálculo das taxas de interesse pode ser feita diretamente no movimento da conta bancária.
- Pode especificar uma progressão de vendas.
- As compras podem ser definidas em percentagem.
- Para obter a planificação (Relatório Balanço Patrimonial Analítico ou por Grupos, Ficha conta) indique a data de início e fim da previsão requerida.
Passar ao ano novo
A função do Banana Contabilidade para Criar um novo ano relata também os lançamentos de planificação.
- A nível de cada linha, a possibilidade de indicar se a operação deve ser relatada ou não, e se a data original deve ser mantida ou substituída com aquela do ano novo
- Criar o orçamento para o ano novo é muito simples, porque trata-se de modificar simplesmente as vozes de despesa e de receita que se pretende mudar.
Budget table
Financial planning transactions are entered in the Budget table. It's setup is similar to the Transactions table of the accounting type you are using, but has specific columns that speed up entering the budget data.
You can also modify the data as you wish, to display reliable forecasts that are always perfectly updated.
Easy and comprehensive forecasts
- You can enter all the operations in detail.
- You have comprehensive forecasts because they are based on the double-entry method:
- Based on the transactions entered, the program calculates and displays the forecasts.
- Indicate when an operation will be performed, and if and until when it will repeated.
- Indicate the account of origin and destination.
- Indicate the expected amount.
- You can complete the registration with:
- Customer account
- Accounts Payable.
- VAT code
- Cost / Profit Center
- Segments.
- Add more columns for additional information.
- You can enter the transactions in the order you want, so as to form groups.
- You can enter additional information to facilitate the transfer of data to the new year.
Adding and removing the Budget table
Adding the Budget table
Financial planning is done by adding the Budget table.
If your accounting file doesn't have the Budget table yet, proceed as follows:
- Tools menu → Add new functionalities command → Add Budget table
Warning: this operation cannot be undone (with the Cancel buttton). If you want to return to the preceding situation, keep a copy of the pre-existing file, or use the Remove Budget table function.
Thereafter, the program will:
- Add the Budget table, carrying forward the budget values indicated in the Accounts table.
- Lock the Budget column in the Accounts table.
The values of this column will be calculated according to the budget transactions, using the period defined in the File and Accounting properties, basic data of the accounting.
Remove the Budget table
From the Tools Menu → Add new functionalities, you can also remove the Budget table.
Warning: This operation can not be undone. Once the command is executed all budgeted movements will be erased.
If you have the possibility to return to previous version, make sure to save a copy before executing.
Once the Budget table is removed, the Budget column will again be available for modifications in the Accounts table.
Budget table columns
The Budget table columns are very similar to the Transactions table columns. To facilitate understanding, letters have been used for account designation in the following example. If you have accounts with numeric accounts, you will obviously use your own account numbers.

Below you will find explanations for each Budget column:
- Date
The future date when you expect the operation to take place.
If an exact date is not available, for example a monthly sales budget, enter the end of the month date. - Repeat
A repetition code is entered. for further information on use, also see Dates and Repetitions.
When the forecast is calculated, the program internally creates copies of the rows with the date set successively and based on the indicated repetition code.- Blank - no repetition takes place.
- The initial row keeps the date indicated in the Date column..
- The date of the copy rows is progressively increased as defined by the repeat code.
- If the repetition is monthly or yearly, in the created rows:
- It is generally used on the same day as the Date column.
- If the day is greater than the number of days in the month, the last day of the month is used.
- If the end of month indication "ME" or end of the year "YE" is indicated, the last day of the month/year will be used.
- Basic codes for repetition:
- "D" for a daily repetition (Day)
- "W" for a weekly repetition (Week)
- "M" for a monthly repetition (Month)
- "Y" for a yearly repetition (Year)
- Multiples
If the code is preceded by a number, the repetition occurs with the multiplied frequency.- "2M" for bimonthly
- "3M" for quarterly
- "6M" for six months
- Repetition with a later date at the end of the period.
The "M" and Y "codes with the" E "at the end move the repetition date to the end of the month.- "ME" monthly repetition, but with a date at the end of the month.
If you enter the date 1.1.2022 the next date will be 28.2.2022 and the one after 31.3.2022
If the date is 28.2.2022, the next date will be 31.3.2022. - "3ME" for quarterly end of month
If you start on 30.6.2022, the next date will be 31.12.2022. - "6ME" for half-yearly end of the month
- "YE" each year, but at the end of the month.
If the date is 28.2.2022 the next date will be 28.2.2023. - "5YE" every five years, but at the end of the month.
If the date is 28.2.2022 the next date will be 28.2.2027.
- "ME" monthly repetition, but with a date at the end of the month.
- End - End date:
- Generally to be left blank.
- Enter the date after which there must be no repetition.
For a lease, the date on which the lease ends will be indicated as the final date.
- Variant
To indicate a possible variant relating to the budget, in combination with the Extensions. - Management of a New Year
To indicate how the transfer should take place when a new year is created.- No value - the date is incremented by one year.
- "1" The date remains the same.
- "2" The transaction is not transferred to the new year.
- Description
A descriptive text for the operation that appears in the account card.- You can use Calculation formulas by entering the value between ${} (see Javascript template literals).
When the account card is prepared the formula is resolved and the result is replaced.- For example the text "Amount ${10+20} year" will be "Amount 30 year".
- If you have defined a variable "quantity=10" and "price=20"
The text "Quantity: ${quantity} Price: ${price}" will result in "Quantity: 10 Price: 20". - You can use all the formulas, but to avoid confusion, it is recommended to avoid entering value assignments in the Description column.
- You can use Calculation formulas by entering the value between ${} (see Javascript template literals).
- Debit and Credit Account, CC1, CC2, CC3
As in the Transactions table, the accounts in which the transactions are to be registered are indicated.
Segments and cost centers can also be used. This way, a budget may also be prepared for segments or cost centers. - Quantity
The quantity which, multiplied by the unit price, returns the total amount (see Quantity and Price columns) - Unit
A description referring to the quantity, for example: m2, ton, pcs. - Price/Unit
The unit price which, multiplied by the quantity, returns the total amount- In the Income and Expense accounting, enter a negative value to have the amount entered in the Expenses column.
- Formula (in base currency)
Allows you to enter Calculation formulas, in Javascript, plus the programming functions of the Banana Accounting Extensions.
If there is a formula (or any text), the value in the Amount column is set based on the result of the formula.- In double-entry accounting, the result of the formula must always be a positive number.
- In the income and expense accounting, if the result is positive, it will be considered as an revenue, if negative as a cost.
- FormulaBegin
The text that you insert in this column is inserted before the text used in the Formula and then used for calculation.- The main use of the FormulaBegin to insert a variable setting like "A=", in the Formula you then only insert the value, so that it easier to modify.
- In multi-currency accounting, the FormulaBegin refers to the Currency Formula column.
- Amount (in base currency)
The amount that is used for the forecast.
In the event in the row includes a repetition, the amount of the first transaction is indicated. The amounts of subsequent repetitions are visible in the account card.
The amount is automatically calculated in the following cases:- If you entered a value in the Quantity or Unit price columns, the amount is calculated based on the contents of these two columns.
- In double-entry accounting, the result is converted into a positive value.
- In the income and expense accounting, if the result is positive, it will be considered as an revenue, if negative as a cost.
- If a formula has been entered, the amount will be the result of the formula.
The formula also has priority over quantity and price.
- If you entered a value in the Quantity or Unit price columns, the amount is calculated based on the contents of these two columns.
- Total
This is the total of the repeated row amounts that fall within the Accounting and Forecasting Period set in the file properties.
If there is no date or if the start or end date are outside of the accounting period, this column will remain empty.
Columns in Income and Expense accounting
For the Cash Manager and the Income and Expense Accounting, the amounts are indicated are follows:
- Income and Expense Columns
The budget amounts are entered in the income and expense columns. - Use of Quantity, Price and Formula columns
When the program automatically calculates the amount based on the Quantity, Price or Formula columns, the result will be entered in the Revenue column if it is positive, and in the Expense column if it is negative.
In the Quantity and Price columns you can indicate a positive or negative value.
Columns in multi-currency accounting
- Amount in account currency
Is the amount in the currency of the transaction account (see multi-currency transactions).
This amount is used to calculate the basic currency value at the indicated exchange rate.
If there is a formula, the value is the result of the formula calculation.
If the row includes a repetition, the amount of the first transaction is indicated. - Account currency amount formula
A Calculation formula can be entered.- If the line includes a repetition, the amount of the first transaction is indicated. The amounts of subsequent repetitions are visible in the account card.
- The FormulaBegin column refers to this column.
- Exchange rate
It is the exchange rate that is applied to convert the amount into the account currency into the base currency. - Total amount in the account currency
Is the total of the amounts of the repeated lines in the currency of the account, whose date falls within the accounting period defined in the file properties
If there is no date or if the start or end date is outside the accounting period, this column remains empty.
See also: Tutorial File Budget Formulas For Multi-Currency Financial Planning
Financial Planning based on the double-entry method
The planning system of Banana Accounting is based on the same double-entry method used for accounting.
It is planned by always indicating an account of origin (credit) and one of destination (debit). This allows for a precise vision of the capital flows and offers the possibility to have a comprehensive vision which includes:
- Budget forecasts, therefore relating to the financial situation, liquidity, assets, third party and own means.
- Income statement forecast: revenues, costs and operating result.
Plan Execute Control
The planning of Banana Accounting is an integral part of the Plan-Execute-Control.
This offers a constant and dynamic control of the financial situation and evolution.

Planning and accounting in a single file
The same file contains both accounting and planning data. You can get started with a file prepared to keep the accounting and then add the schedule later, or you can start with a file to keep the planning and then also manage the accounting.
Common elements
- Basic accounting data
Header, currency, accounting period, address, other parameters. - Accounts and Categories table
Where to set up the Chart of Accounts with accounts and groups total.- Opening balances (Opening column)
They are inserted in the Accounts table and are used as the initial situation for both accounting (current values) and forecasts. - Annual Budget (Quote column)
- With the Budget table
The Budget column of the Chart of Accounts will be protected and the program indicates the budget amounts, calculated on the basis of the contents of the Budget table, referring to the accounting period. - If there is no Budget table
You enter the budget data manually.
When forecasting, the program generates the monthly value, dividing the annual value by the number of months of the accounting period.
- With the Budget table
- Opening balances (Opening column)
- The other tables
- VAT Codes Table
- Exchange rate table
Accounting data (past and present)
- The Transactions table
Where past (historical) movements are entered.
The Registration table is always present in the accounting file. If you don't use it, you can hide it - Current value (accounting, past and present)
This is the balance or movement of the period of an account or group.
In the reports, you can display the column of the Current value.
These are the values calculated on the basis of the accounting data, calculated taking into account the- Opening balances (Accounts table).
- The movements of the Transaction table
- Account card (historical)
These are the movements of an account or group prepared on the basis of the initial balances plus Transactions.
The Budget data
They are those used to make forecasts, budgets and schedules.
The term Budget is always used in the program for future data.
- The Budget table
Future budgeted transactions are inserted.
The method is the same as the one used in the Transactions table, there are the same columns, plus other specifications for planning.
Movements related to the future, included in the Budget table- Static values (as in the Transactions table).
- They use calculation formulas, which the program solves when calculating the forecast.
- Repetitive movements, which the program uses to automatically generate forecasts.
- The Budget value (future)
The forecasted value. In the reports you can display the column of the Estimate value, calculated taking into account- Opening balances (Accounts table)
- Transactions in the Budget table (if any).
- If the Budget table does not exist, using the value contained in the Budget column of the Accounts or Categories table.
- Budget Account card (future)
These are the transactions of an account or group prepared on the basis of the opening balances and budget transactions.
The Difference Budget values
Difference between the budget and current values (actual, final).
In the reports, there is a column for comparison, which displays the difference.
Mixed projection values (from a certain date)
The value at a certain future date calculated as follows:
- On the basis of current values and up to the indicated start date .
- Starting from the date indicated on the budget values.
Mixed projection values are only available through scripts and the web server.
Types of accounting
The accounting method chosen for accounting is used to insert budget transactions or movements.
- Income and Expense (Cash Manager and Income and Expense accounting)
- Double-entry (Double-entry and multi-currency accounting).
For budget calculations, the program internally always uses the double-entry based engine. The results and reporting that are obtained are therefore very similar.
Accounting, planning and forecasting period
Accounting or forecasting is always related to a period. The following periods are differentiated:
- Accounting period
Is the one defined in the file properties, with start and end date. - Budget period
It is the period for which the planning data is entered.. - Forecast period
It is the period used by the program to calculate the forecast. It is indicated when a print is requested.
For more information, see the Forecasting period.
Breakdown by period
With the double-entry method, each operation has its own date in the planning. When printing, the user chooses whether to have a forecast by month, quarter, semester or year, and the program will calculate everything automatically. Contrary to spreadsheets, there is no need, anymore to decide at the beginning whether to make forecasts by month, quarter or year and to divide the amounts manually in the columns.
Automatic projections
Thanks to the possibility of indicating that certain operations are repeated in the future, the program has the necessary elements to automatically prepare forecasts for future years. You can thus know how revenues, costs, liquidity and other assets and liabilities will evolve in the weeks, months, quarters and years to come
Details with all the operations
With the double-entry method, the forecasts are prepared by inserting transactions. The program is able to present the account card with the detailed movements for each account. This view is very useful for investigating elements and represents another advantage of liquidity-oriented planning, which is difficult to achieve with planning prepared with spreadsheets.
The calculation journal
The basis for all accounting and budget processing is the calculation journal. To prepare Financial Statements, Income Statement, Account Cards, VAT Reports, the program creates an internal data structure which is called a calculation journal. Movements are accessible through the API accounting with Journal function.
The logic for creating the calculation journal works as follows:
- It is created starting from the data entered by the user.
- For each financial movement, including also the opening balances, there is a row, where the main elements are:
- Origin
Indicates whether the transaction relates to accounting (current) or planning (budget). - Operation type
Opening balance, movement, carry forward, invoice compensation. - Date (the relevant date)
- Description
- Account
- Account Type
Indicates whether it is a normal account or a cost or profit center. - Amount (accounting base currency)
Positive values indicate an increase (debit), negative values indicate a decrease (credit) - Amount account currency
- Other columns
- All those that are present in the Transactions table.
- Several others that are used for calculations.
- Origin
The calculation log is emptied every time recalculation is performed and then the following are added:
- The rows of current transactions (relating to actual accounting).
- The rows of the budget movements.
The rows of current values (actual)
The rows for current values are added to the temporary journal starting from:
- Initial balances contained in the Accounts table
For each account with a balance, one row is created.- Date is the date of the start of accounting.
- Account is the account.
- The amount is the opening balance.
- Accounting movements from the transactions table.
If the movement has multiple accounts, debit account, credit account, VAT account, cost center, a row is generated for each account with the relative amount in positive or negative.
The rows of the budget values
The rows for the budget values are added to the temporary journal starting from:
- Initial balances contained in the Accounts table
As with accounting values, a budget line is created for each account with a balance.
- Planning movements (with the Budget table)
As for accounting, for each movement on the account, rows are created based on the Budget table.- Static ones, with all the values set.
- Repeated movements
- For the entire projection period defined, based on the repetition code, the program creates duplicates of the budget lines and sets the date.
- The program generates repeated rows based on the contents of the Start Date, End Date and Repetition columns
- If the projection period is the calendar year and in January there is the registration of the rent with monthly repetition, the program creates duplicates for the following 11 months.
- If the registration is on January 31, for the months that do not have 31 days, the day will be the last of the month.
- If the first registration is on March 28 and the repetition code is indicated as the end of the month, in the following months the day will become the last of the month.
- As for accounting entries, if there are multiple accounts on the budget row, one row is generated for each account.
- Movements starting from the annual Budget (if there is no Budget table)
If there is no Budget table, the budget rows are created based on the content of the Budget column of the Accounts and Categories table:- The number of months It is calculated how according to the accounting period.
- One row is created for each month.
- The amount contained in the Budget column is divided by the number of months.
- If there is a rounding difference, an additional row is created for the final month.
After creation, the rows are sorted by ascending order.
Amount column calculation
Once the calculation journal has been created, the contents of the amount column of all the budget rows which contain a formula or a quantity or unit price are recalculated.
Resolution of formulas in Javascript:
- Javascript interpreter creation
Every time the calculation journal is created, an instance of a Javascript interpreter, specific for the resolution of the Budget formulas, is also created - Javascript interpreter initialization
The Javascript interpreter is initialized by running scripts.- The default Banana Accounting scripts.
- The content of the _budget.js file possibly present in the Documents table.
This way the user can initialize variables or create his own calculation functions.
- Resolution of formulas
- The formulas contained in the rows of the temporary journal are solved one after the other in the progressive sequence of date.
- The state of the Javascript interpreter is maintained after each operation, therefore the formula can refer to variables defined in a row with a previous date.
- The formulas contained in the repetition lines are also executed by order of date, so the result varies according to when it is performed.
The calculation sequence is as follows
- The budget rows are processed by order of date (if they have the same date in the order of entry).
- The transaction amount is calculated, with this priority:
- If there is a formula by solving it
- If the quantity and the price are present, by multiplying them
- Otherwise the value contained in the amount column is kept.
- For multi-currency accounting, the currency amount formula is first performed and then the base currency amount formula.
If there is no formula for amount in base currency, the program reverts to the historical exchange rate and calculates the equivalent value in base currency. - For VAT accounting, VAT is recalculated based on the transaction amount.
- The previously processed rows are used for the calculations of the following lines:
- The balance of the accounts, as of the date of the estimate line, includes only the previously processed amounts.
- If you use a formula for calculating the balance for the whole year in a February transaction, you will only have the balance until February.
Calculation column Total Budget table
The Total column is calculated automatically and contains the total amount of the budget for the accounting period indicated in the file properties (start and end date of accounting).
- If it is a single transaction, the Total is equal to the amount.
- If it is a recurring operation, the Total is the sum of the amounts of all repetitions that fall within the accounting period.
- The Total column is empty if the date is preceding or goes beyond the accounting period.
Calculation of the current value, forecast and comparison
Once the calculation journal is generated, it is used to calculate the Balance Sheet and all the other processing necessary for accounting.
For the periods defined in the report, the program calculates:
- The current value (based on Transactions).
- The Budget values.
The following values are calculated for current and budget data:
- Balance at the beginning of the period.
- Debit movement
- Credit movement
- Movement (Total)
- Balance at the end of the period (Start + Movements)
The comparisons between Current and Budget are also calculated:
- Absolute Difference (Budget - Current).
- Percentage change
Automatic and manual recalculation
The budget values are automatically recalculated:
- If there is a change in the Budget table.
- If the accounting start or end date is changed.
- If the Accounts table is modified.
- When requesting a report and the Transactions table has been changed.
After each recalculation the program automatically updates:
- The Budget column in the Accounts and Categories table.
- The Total column in the Budget table.
If you modify the VAT table or the _budget.js file or other Javascript files that are used in the calculation of the formulas, you must perform a recalculation manually (Command check and control accounting).
The calculation speed depends on:
- Number of accounts and groups in the Accounts and Categories table
- Number of rows inserted in the Budget table.
- Number of rows with repetition.
- Presence of formulas.
- Schedule period set. The longer the period, the greater the number of repeat lines.
Manual recalculation
If the calculation takes a long time, it may prove difficult to enter data in the Budget table. You can switch to manual recalculation by checking the Recalculate totals manually option in the File menu → Files and accounting Properties → Options tab.
To have the updated values, you must therefore use the Recalculate Totals command.
Period for the financial forecast
The planning system based on the double-entry method allows you to prepare forecasts indicating when the operation will take place.
Unlike Excel, where you set up a sheet with the columns for the forecast periods (month, quarter or year), with Banana Accounting you simply indicate the expected date for the event. The assignment to a period is generated automatically by the program when it processes the data. You can decide to display forecasts by day, week, month, 2 months, quarter, semester, annual, 2, 5 or 10 years.
- Forecasts can be made for one or more years.
- Based on the data entered, the program calculates the liquidity, Balance Sheet and Income statement projections for the period in question.
- Daily forecasts can be obtained, particularly useful for liquidity, or even by month or year.
See Prints and financial forecast reports.
Accounting, planning and forecasting period
Accounting or forecasting is always relevant to a period. The following periods are differentiated:
- Accounting period
This is the one defined in the file properties, with start and end date.
Generally, it will be the same as the calendar year, but it can have any start and end date. - Planning period
The period for which the planning data is entered.- The schedule does not require a planning period to be set.
- It is generally assumed that it is the same as the accounting period.
- The planning period may be different from the accounting period. In the Budget table, rows are inserted which take effect beyond the accounting period.
- Transactions with dates outside the accounting period.
- Repetitive transactions without an end date or with an end date that is beyond the the accounting period.
- Forecast period
The period used by the program to calculate the forecast.- It is indicated when a print is requested.
- Use the accounting period as default.
- It can be set freely and in this way forecasts can be obtained for several years and even for several decades.
- The accounting period is used as the Forecast period for the calculation of the content of the Total column in the Budget table and of the Budget column of the Accounts and Categories tables.
- These values therefore refer to the accounting period defined in the file properties.
- If you change the accounting start and end date, the forecasts are recalculated.
- It is indicated when a print is requested.
Forecast with monthly logic
Forecast movements are entered in the Budget table indicating the date on which these are expected to occur. For the purpose of liquidity forecasting, it is important to indicate dates for revenues and costs as precisely as possible.
For all other income and expenses that occur on a day of the month or rather at the beginning or the end, such as rent, wages, bank charges and other expenses or income, it is important to indicate by selecting the day close to the actual day of payment.
For other revenues and expenses, approximations will be made. For example - except in special cases - for restaurant revenues, which come in daily, it is not adequate to make day-to-day forecasts. In this case it is sufficient to indicate the overall sales that are expected to occur in the month. We recommend to indicate day 15, the middle of the month.
Forecast for the current year
Movements with or without repetition are inserted in the Budget table.
The calculation of the forecast is generally generated, taking into account the movements that fall within the current accounting period, as defined in the file properties.
- The total amount for the current period is indicated in the Total column of the Budget table.
- The estimate balance for the current period is indicated in the Budget column of the Accounts and Categories table.
- In the various printouts, if it is indicated as the All period, there are forecasts for the current period.
If the file is also used to keep the accounting, the accounting period must obviously be the one referring to the accounting. Even when the file is used for forecasts only, it is better to set the accounting period referring to only one year. In fact, if a period of two years is entered in the base data, the values of the forecasts, in the Total and Accounts column, will be for the two years. This can lead to confusing values.

Forecasts over several years
If you insert the forecast movements with a repetition code, the program is able to prepare forecasts that extend beyond the defined period.
To obtain forecasts over several years, the movements are entered in the Budget table.
- Opening balances
- These are inserted in the Accounts table.
- Forecast movements prior to the accounting period.
- For special cases, it is also possible to insert transactions with dates prior to the accounting period.
- Attention must be paid, because these operations will change the balances at the time of opening.
- For these transactions, the Total column will be empty because it is outside the accounting period.
- Forecast movements for the accounting period.
- Movements are indicated with the date falling within the accounting period.
- If there are operations that will also repeat in the following years, the annual repetition code must be set to "Y".
- If the repetition of the operation occurs during several years, indicate the number of years before the Y, i.e. for every 2 years indicate "2Y", 5 years "5Y", 10 years "10Y".
- If the repetition does not extend beyond a set date (for example the payment of a lease), the end date must be indicated.
- Forecast movements for the following years.
- The future date, on which the transaction is expected is indicated.
- The repeat code and the end date can be indicated.
- For these transactions, the Total column will remain empty because they are outside the accounting period.
Use of formulas
The formulas allow you to automate amortization and interest calculations. When an investment increases, the income statement is also immediately updated. Formulas are especially useful when making forecasts over multiple years.
You can use the formulas to automatically adjust the amount in the repeat rows .
- The calculation of depreciation can be based on the balance of the fixed assets account.
- Interest can be calculated directly on the bank account movements.
- You can determine a sales progression.
- Purchases can be defined as a percentage.
Print with the forecast period
Thanks to the fact that movements with the repetition code or with the dates of the following years have been inserted in the Budget table, the program is able to calculate forecasts for future years.
When the report is printed, indicate the start and end date in the Period section.
Considering that the start date is January 1, 2022:
- If you want a 2-year forecast, indicate the end date as 31 December 2024.
- If you want a 5-year forecast, indicate the end date as 31 December 2027.
- If you want a 20-year forecast, indicate the end date as 31 December 2042.
The possibility of getting a forecast is available for the following printouts:
All accounting reports can contain accounting values, forecast values, or both together. The parameters available are the same for accounting reports and forecasts.
Thanks to these reports, you may generate a
- Provisional Balance Sheet,
- Provisional Income statement,
- Liquidity planning,
- Investment planning,
- Financing planning
and more, for future interest periods.
Columns divided by period
In the Subdivision section you can use the program to create columns for the period.
You can thus display the evolution by month, quarter or year.
With Customization you can set up print formats and call them up again later. If you run forecasts over several years, it is will be useful to have pre-set customizations, overall, per year, 5 years or with the comparisons between the final balance and the estimate, which can be called up immediately .
Budget - Four-year forecast

Income statement - Four-year forecast

Budget transactions
In order to prepare financial forecasts, based on the double-entry method, transactions are entered in the Budget table. Indicate origin and destination accounts for each one. The program has the information necessary to prepare Balance Sheets and Income statements, that will however relate to the future and not the past.
When one is planning with Excel, the Income statement is set up first, then the revenues and costs are listed. Generally, the liquidity and investment plan is prepared only later and on separate sheets.
When making forecasts with the double-entry method, we proceed instead as if we were keeping an accounting for the future. All the transactions that are expected to occur will be listed. The program will then automatically prepare the Balance Sheet and Profit and Loss account for the indicated period.
Structuring of budget transactions
For the preparation of a financial plan, we generally proceed by listing the different elements in the following order:
- Capital injections.
- Third party capital injections.
- Setting up expenses.
- Investments.
In furniture, equipment. - Recurring fixed costs.
Rent, staff, social security charges, energy, subscriptions. - Recurring revenues.
- Variable revenues
The turnover which is typically seasonal. - Variable costs.
Commissions, costs of the goods sold and others, which are related to the expected volume of revenues. - Year-end transactions.
Depreciation, taxes, interest on loans, dividends.
By the time you enter sales and variable costs, you already have the cost and capital structure. It will be possible to know instantly, whether the expected turnover will allow the company to generate sufficient profits and liquidity to guarantee its sustainability over time.
Amount and Formula column
As a rule, to prepare a budget, simply use the Amount column.
For more elaborate estimates, there is the possibility of indicating quantities, unit prices, or a formula. The program will automatically calculate the value in the Amount column.
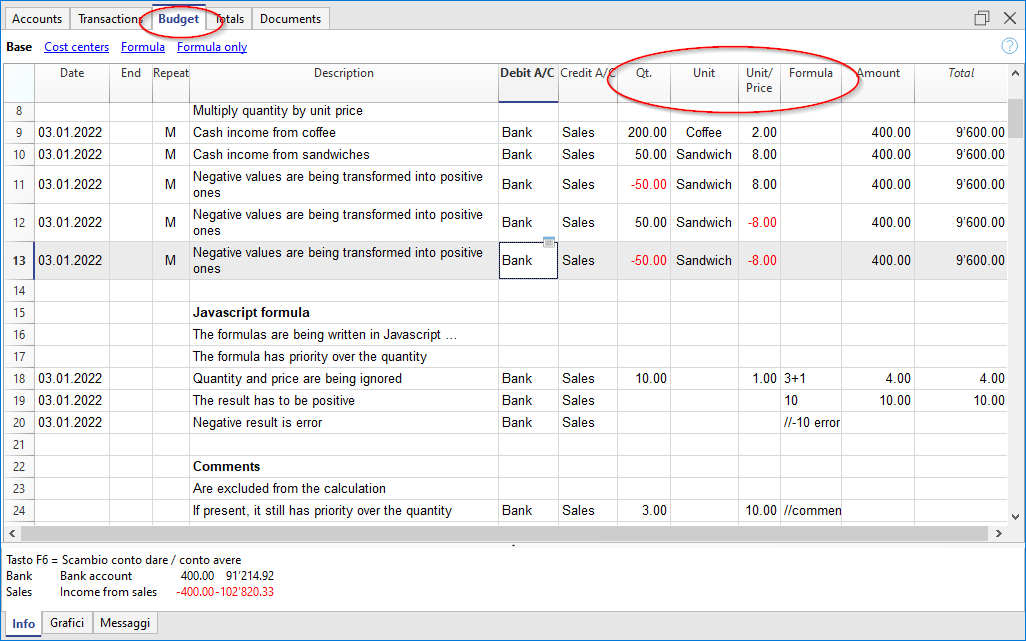
Updating forecasts
With the double-entry method, thanks to the possibility of indicating each operation in detail, it becomes easier to update and improve the forecast. Initially, estimates of different costs or investments will be entered. As you get closer to the operational phase and there will be more precise data, just replace the existing ones. Even when the activity has started and exact elements are known, the forecast can be updated easily. Precise and reliable indications on profitability and liquidity are thus available.
Dates and repetitions in financial forecast transactions
The Date column
The value contained in the Date column is the one that will validate the forecast.
- If there is no date, the transaction will be taken into account at the beginning of the planning.
If you require a forecast indicating a period, the amounts will be taken into account in the balance value at the beginning of the period.
Due to the fact that it does not fall within the period, no amount will be displayed in the Total column. - Dates in the accounting period set in the file properties.
These are the ones commonly used. The total amount will be indicated in the Total column, taking into account repetitive movements, within the accounting period. - Dates prior to the period.
You can enter movements that precede the forecast period. However, you must be careful that they do not conflict with the opening balances entered in the account table.
Due to the fact that it is not within the period, no amount will be displayed in the Total column. - Dates after the period.
If you make forecasts over several years, they allow you to indicate transactions for the years to come.
Due to the fact that it is not within the period, no amount will be displayed in the Total column.
The End date
This is used in combination with repetition, to indicate the last date beyond which there is to be no repeat.
- Must generally be left empty.
If you enter a date when it is not necessary (for example the end of the accounting period) the forecasts for the following years will not include this operation. - For leasing transactions.
Indicate the date on which the payment of the last installment will be made as the end date. - For loan repayment.
Indicate the last expected payment date. - For changes in the amount at set deadlines.
In the case, for instance, that the amount of a recurring transaction is adapted at certain deadlines (salary increase).- Create a transaction row with repeat "M" and End date as per the last payment before the increase.
Create transaction rows with Dates when the increase begins. - If the increase follows a precise and regular automation, this can also be programmed with formulas.
- Create a transaction row with repeat "M" and End date as per the last payment before the increase.
Repetitions
For recurring expenses or income, the repetition code is recommended (refer to Documentation on the columns).
- When calculating the forecast, the program creates copies of the operation and progressively increases the date, taking into account the indicated frequency.
- If there is no end date, the program will generate internal copies of the records for the entire period of the forecast indicated at the time of the report when calculating the forecast.
- If the start date is January, the frequency is monthly
- If the forecast period is the year, it will generate rows from February, 1 original row and 11 automatic rows, for a total of 12.
- If the forecast period is 10 years, it will generate rows starting from February, 1 original row and 119 automatic lines (11 the first year + 12 * 9 for the following ones), for a total of 120 lines.
- If the start date is January, the frequency is monthly
- If you want the program to automatically calculate forecasts for subsequent years.
- For recurring operations, indicate the relative repetition code.
- For transactions that occur only once a year (for example depreciation at the end of the year), indicate the repetition code "Y", so that the depreciation is also calculated in the following years.
- Don't use the repetition only if the operation will not occur in the following year.
Total column of the Budget table
The Total column is calculated automatically and represents the sum of the amounts of the current row and the repetition amounts that fall within the accounting period. The Total column is empty if the transactions have an earlier date or extend beyond the accounting period.
Schedule with precise date and monthly logic
Forecast movements are entered in the Budget table indicating the date on which these are expected to occur.
However, it is not always possible to predict all revenues and expenses with a daily precision. When making a forecast it is therefore useful, in some cases, to use approximations, generally reasoning on a monthly basis. In any case, it is useful to always follow a specific logic so that reliable liquidity forecasts can also be obtained in the short term:
- Punctual operations (capital payment, investments) are indicated with the date on which they are expected to occur.
If there is no precise date, it is useful to indicate them on the 15th day of the month in which they are expected to occur. - Recurring charges that have a precise payment date are to be set with the expected payment date and the relative repetition code:
- Bank charges, interest, amortization are to be indicated at the end of the month, quarter or year that they will take place.
- Rentals on the due expected date of payment.
- Salaries and social security charges
- For the calculation and monthly payment on the day that wages are paid.
- For thirteenths, bonuses or whatever at the moment they are paid.
- Payments for advances and adjustments of social security charges on the expected payment date.
- Payments and VAT adjustments on the typical payment due day.
- Revenue Forecasting.
The preparation of the forecasts depends on the type of activity.
If you do not know the exact day, but you will know that it will happen in a certain month, it is recommended to indicate the 15th of the month- Punctual revenue.
They are to be indicated on the date on which it is expected to take place or mid-month. - Recurring revenue.
To be indicated on the date of entry or mid-month. - In many cases a monthly forecast is well suited. The revenue can be indicated on the 15th of the month.
- If the revenues are recurring, the revenue can be entered with the monthly repetition. Using formulas you can predict growth.
- If there are seasonal differences, it is helpful to have a sales forecast row for each month.
- Forecast of projects or major works.
If there is a calendar with receipts, a transaction row is to be indicated for each expected entry. It can be approximated by indicating the 15th of the month. - Forecast for customers.
For a consultant or commercial advisor, who works both with budgets and projects, it can prove very useful to set up a detailed revenue forecast for each client, with the expected payment dates. This forecast will also be very useful to check if the customer has actually paid.
- Punctual revenue.
- Variable costs.
- Constant expenses linked to the turnover (a restaurant for example ), are indicated with the same date as the turnover. With a formula you can also calculate as a percentage value of the turnover.
- Costs can also be linked to other elements, such as the number of employees, rented premises or other.
Forecasting with the cash principle
Planning for small business and cash activities (such as shops, restaurants) it is useful to proceed with the cash principle, then indicate the revenues with the date on which they will be collected and the costs when paid.
For important operations, such as the purchase of a machine whose payment is deferred over time, it is however useful to insert forecast movements with precise details:
- Purchase of machinery (asset registration with suppliers) with date of purchase.
- Payment of the machinery, with the date(s) on which payment is expected.
Forecasts with the accrual method
In this case, the insertion of the operations takes into account when the payment will be made.
- Cash transactions.
They are obviously registered normally. - Transactions expected to be settled in the near future.
For simplicity, the operations that fall within the forecast month or the one immediately following, it can be useful to use the cash principle. - Deferred payments.
If the dates are not known with precision, you can use the 15th of the month.- Transactions with precise payment terms.
- One movement indicates the purchase date with the counterpart in the supplier account.
- One of the other movements indicates payment on the scheduled dates.
- Transactions with precise payment terms.
- Deferred collections.
- With precise payment terms, as is the case with a project:
- A movement indicates the billing date and the customer account with the counterpart.
- One of the other movements indicates payment on the scheduled dates.
- Late payment.
This is the case when a part of the revenues is collected in the short term, a percentage is collected later. It can be done like this:- Enter the revenue as cash collection.
- With the same date, a movement is created that moves a part of the collection to the customer account.
- At a later date, the cash collection is indicated with the client account of the counterpart.
- With precise payment terms, as is the case with a project:
- Use of variables for deferred collections and payments( see Example use of variables)
When the same value must be reused at the time of payment, it can prove very useful to use the formula column and variables.- In the billing transaction, the amount is assigned to a variable.
- In the payment movement, the variable is inserted so that the amount is automatically taken over.
- Variables can also be used to define the percentage of the amount that will be deferred, for example.
Examples of financial forecast movements
Scheduling transactions are entered like normal entries, with the date, description, amount, debit and credit account.
In addition, the Repeat column is used, which allows recurring transactions to be entered on a single line.
Below are several examples, taken from the template below, to which we refer for further explanation.
Start-up forecast registrations
These are forecast entries as those registered in the Transactions table.
The example shown here refers to the start of the activity, so it concerns transactions that are not repeated.

Monthly repetitive entries
Below are examples of entries with monthly repetition, code 'M'. The column Total shows the total amount for the year.
The first two entries refer to the rent, which from February to June is 1'000 monthly, while from July it is 1'200.
The date 2024, when the lease redemption amount must be paid, is also indicated. In this line, in the column Total, there is no amount, because the movement does not fall within the dates of the accounting period defined in the file properties.
The repetition code "ME" Month End is used for administrative expenses counted by the bank. For subsequent entries the day 28 is not used, but the last day of the month, thus March 31, April 30.

Quarter-end
Here we indicate some typical entries that repeat at the quarter end. We enter the 3ME repetition, which means repeat every 3 months, with end of month date.

End of Year
At the end of the year there are operations which are carried out. Use Repeat 'Y' so that these operations are also performed for subsequent years.

Forecast of income and purchase of goods
The income forecast is specific to each activity. In this case, the income and purchase forecast is shown month by month, with a specific amount.
Starting in March, the annual 'Y' repetition is indicated, so that these transactions are repeated in subsequent years.

Purchases and next year sales
The months of January and February, in the first year, were not considered significant for the following years, so they did not have a repeat.
For the first two months of the second year, we have to set sales. We also set the annual 'Y' repetition, so that we can repeat the income in the following year.

Forecasting with quantity and price
The Quantity, Unit and Unit Price columns of the Budget table allow you to prepare forecasts faster.
The value of the Amount column is calculated by the program by multiplying the Quantity by the Unit Price (under the condition that Formula column is empty).
The Quantity, Unit Price columns are set as visible in the Formula View.

Advantages of using the Quantity and Prices columns
The quantity and price columns are useful for making predictions based on quantities. For example:
- In the Unit column you can indicate what the price refers to.
- The Quantity column indicates the number of seats served daily.
- The Price column indicates the estimated revenue for each cover.
- The Amount column will be calculated automatically based on the values indicated.
This approach offers several advantages:
- All elements of the planning can be precisely detailed in the Budget.
- We remember the quantities and prices used to make the estimate.
- Changing the schedule is very simple, you can change the element you want only.
- How the profit varies, can be seen with a change in the quantities sold or in the price.
Break-even analysis.
Using formulas in the Budget table
The addition of Javascript formulas in the Budget table of Banana Accounting Plus, opens up several possibilities.
The use of formulas is available in Banana Accounting Plus with the Advanced plan only.
See all the advantages of the Advanced plan.
Formula column
The Formula column allows you to enter calculation formulas. The estimate amounts can thus be calculated on the basis of other values of the same budgeting (see Examples of formulas).
- Indicate the cost of goods based as a percentage of sales.
- Increase your sales budget based as a percentage of growth.
- At the end of the year, calculate the depreciation based on the value of the investments made.
- Quarterly, calculate interest on the bank account based on actual usage (days / 365).
- Monthly, calculate interest on the bank account based on actual usage (days / 365).
If you enter a value in the Formula column, the Amount column is calculated by the program based on that formula.
Formula Begin Column
In the Formula Begin column you can enter any formula, that is pre-pended to Formula and resolved (see documentation of the table Budget):
It is useful to specify a variable name and the assignment operator, so that you can easily change amounts:
- Instead of writing in the Formula "Price= 100", you can write
- Formula Begin "Price="
- In Formula "100" , so you can easily see the amount and change it
Formulas in Description column
You can also enter formula in the column text, so that the text is completed automatically when you request an account card (see documentation of the table Budget).
The Formula in the Description should be entered within curly brackets preceded by the dollar sign.
- Assuming that in the formula you have defined the variable Price "Price= 100"
- In the Description text you can use the variable price
"Sell of goods at price ${Price}" will results in the account card in
"Sell of goods at price 100"
Within the Description column you can use any Javascript formula, but you should avoid use assignment or other calculations, and use only the Description to for retrieving values.
Example files
For examples of the formulas, refer to the following explanations:
- Template with transactions using the Quantity and Formula columns.
- Template with transactions for Multi-Currency accounting using the Formula column in the base currency.
- Also refer to Examples of using formulas in financial forecasts.

Calculation formulas in Javascript
- The formula must be expressed in the Javascript language (not to be confused with the Java language).
- If there is a formula (or any text), the value in the Amount column is set according to the formula result.
- You can use all the functions of the Javascript language, plus the APIs provided by Banana.
Decimal separator
In JavaScript only the point "." is used as a decimal separator
If you use a different separator, the one used for numbers in the local format, the number is likely to be truncated.
Amount = result of the last instruction
In Javascript the semicolon ";" is used to separate expressions.
If the Javascript formula contains multiple expressions separated by ";" the value of the Amount column will be the result of the last executed expression.
- 10*3 //30 will be returned
- If there is a sequence of several operations separated by a semicolon ";", the last operation will be resumed.
10*3;7; //7 will be returned - If there is a return, the value is resumed after the return.
return 10; // 10 will be returned.
Variables
Javascript variables are the most powerful elements of programming, as they let you give a name to a value stored in the computer's memory, so you can easily save, reuse, and update that value in your formulas.
Variables do not exist in Excel formulas, but are similar to the name of the cells, with the difference that the name can be freely assigned.
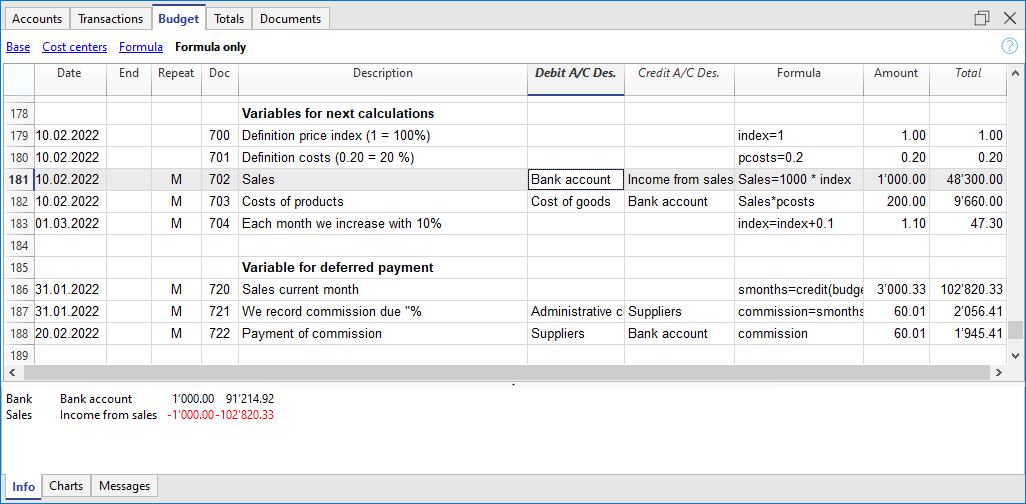
What is a variable?
A variable is like a labeled box where you store a value. For example:
price = 10This means you’re giving the name price to the value 10. You can then use "price" in other calculations:
total = price * 5This will multiply the value of "price" (which is 10) by 5 and store the result in a new variable "total".
You can also reassign the value of a variable later:
price = 20Variable initialization
To create a variable, just write a name, an equal sign (=), and a value.
There are two different ways to create and initialize a variable, and they behave slightly differently:
- Variable with the word "var"
var price = 10- This creates the variable "price" and the value 10 is assigned to it.
- The value will not appear in the Amount column. The cell looks empty.
- The value will be used and displayed only when you refer to "price" in another row.
- Variable without "var"
price = 10- This also creates the variable "price" and the value 10 is assigned to it.
- The value appears directly in the Amount column of the same row.
- Useful when you want to both define the variable and see its value immediately.
You can define and use variables directly within the rows. By entering the variable name in the formula, the saved value is taken over.
Nullish coalescing operator "??"
Sometimes, you want to give a variable a value only if it doesn’t already have one.
You can do this using a special symbol called the Nullish coalescing operator "??", in this case the value specified after the operator "??" is used only if the price has not been already assigned.
price = price ?? 10;
This means: “If price doesn’t already have a value, set it to 10. Otherwise, keep the current value.”
Before using "??", make sure the variable exists. You can write:
var price
price = price ?? 10
Or simply:
var price = price ?? 10The Nullish coalescing operator is useful for repetitions, due that it allows to assign an initial value, the first time only. So you can than increment the value and by the next repetition the value will not be assigned again.
Note: The Nullish coalescing assignment operator "??=" is not supprted.
Objects
Javascipt objects are variables that allow you to save multiple values, each indicated with a property.
The prices object is created below, indicating the curly brackets. To access and save the values, instead use the square brackets or indicate in the name of the property after the name of the object.
prices = {}
prices['car'] = 10;
prices.car = 10;
prices['computer'] = 20;
prices.computer = 20;
Array
Javascript Arrays are created using square brackets and also to access them.
The first element of the array has index 0.
costs = [1,2,3];
costs[0]=3;
result = prices['car'] - costs[0];
Repetition and variables
For more information on the calculation sequence, see Planning Logic.
- All rows (including those created for repetitions) are sorted by date. If there are rows with the same date, the order is that of insertion in the table.
- After the sorting, the rows (including the formulas) are recalculated.
- In the formulas, you therefore only have access to the budget data up to that date.
- A variable must be defined in a row that has the date preceding the row where it is used.
- If the budget entry has a repetition the variable will be reassigned each time.
sum = 10; - If you want to calculate the grand total instead.
- In an initial line create the variable with value zero.
sum = 0; - In the line that repeats in the sum also include the previous value.
sum = sum + 10;
or use the "+="
sum += 10
- In an initial line create the variable with value zero.
- Use the Nullish coalescing operator "??" for assigning a value to a variable that is not yet initialized.
Automatic variables
- budgetCurrent
It is a table that contains the budget rows after the repetitions creation.
These are used to record values in conjunction with the JRepeatNumber. - DEBUG is a variable that can be "true" or "false".
If "true", in the messages, all the results of the formulas are being displayed. - row
Is a Javascript object that refers to the current row.- The values of the cells can be retrieved with the value function ("columnNameXml").
row.value("date") returns to the date of the transaction. - row.value ("JRepeatNumber") returns the progressive of the repetition.
The first repetition is 0.
- The values of the cells can be retrieved with the value function ("columnNameXml").
- _totalPrice
This is the value of the Quantity column multiplied by the UnitPrice column.
Equivalent to the formula "row.value('Quantity')*row.value('UnitPrice')"
Budget Functions
In addition to the budget API defined in the accounting class API, there are specific functions.
budgetGetPeriod(tDate, period)
This function is used in combination with the use of repetition.
When repetitions are indicated, it is advisable to refer to a calculation period and not to a precise date.
- Parameter tDate.
The date to which the calculation of the period refers. Usually the date of the recording line. - Period parameter.
Abbreviations- For the current
- "BC" current bi-monthly (2 months)
- "DC" current day
- "MC" current month
- "QC" current trimester
- "SC" current half-year
- "YC" current year.
- "WC" current week
- For previous
- "BP" previous bi-monthly
- "DP" previous day
- "MP" previous month
- "QP" previous quarter
- "SP" previous shalf-year
- "YP" previous year
- "WP" previous week
- For the current
- Returned values.
An object composed of two dates- startDate
- endDate
// example
t = BudgetGetPeriod ('2015-01-01', 'MP') returns
t.startDate // 2014-12-01
t.endDate // 2014-12-31
Specific budget functions
The following are similar to those available with Banana.document, but can be used without indicating the object Banana.document.
To be taken into account:
- Instead of the startDate parameter, you can use one of the abbreviations "MC", "MP", explained in the budgetGetPeriod.
- If you use an abbreviation, the function calculates the start and end date of the period, based on the date of the current registration.
- It makes sense to use the end date only if it is earlier than the row date.
If it is equal or higher, it has no effect because the values after the current row are not yet available, because they have not been processed. - If the registration row date is April 15th:
- budgetBalance("1000","MP") the balance of the 1000 account returns at the end of March.
- budgetBalance("1000","MC") returns the balance at the current time is the same as budgetBalance("1000").
- budgetTotal("1000","QP") returns total of the movement for the previous quarter.
- budgetTotal("1000","QC") returns the total of the movement for the previous quarter, up to the current date.
budgetBalance(account, startDate, endDate, extraParam)
The balance up to the current row.
budgetBalance('1000', 'MP'); //returns the balance of 1000 at the end of the previous monthbudgetOpening(account, startDate, endDate, extraParam)
The balance at the beginning of the period.
budgetTotal(account, startDate, endDate, extraParam)
The difference between the debit and the credit movement of the period.
budgetTotal('1000', 'MC'); //returns the total movement of the 1000 account for the current monthbudgetInterest( account, interest, startDate, endDate, extraParam)
Calculates the interest on an account, for the period indicated (at the maximum the current date)
If you use it to calculate interest on an account at the end-of-period, the row where the formula is shown should always be the last one for this date.
- Account parameter
This is the account number on whose movements interest will be calculated - Interest parameter,
Indicates the interest rate in percent.- Positive (2.5, 4, 10) calculates the interest on the account's debit movement
- Negative (-2.5, -4, -10) calculates the interest on the account's credit movement.
credit(amount)
- If the amount parameter is negative returns the amount as a positive
credit(-100) // returns 100 - If the amount parameter is positive, returns 0 (zero)
credit(100) // returns 0
This function is useful in conjunction with the other budgetBalance functions to work only on the balances you need.
If you want to calculate the percentage on sales, using this function is easier.
credit(budgetTotal('1000')) // enter the value only if it is a negative.
debit(amount)
- If the amount parameter is positive, returns the amount
debit(100) // returns 100 - If the amount parameter is negative, returns 0 (zero)
debit(-100) // returns 0
Useful if you have to make calculations using only the debit amount and avoid using the credit amount
include
Includes and executes a Javascript file, with the possibility to create its own functions and variables that can be recalled in the script.
- Include "file:test.js"
Executes the contents of the indicated file. The name refers to the file on which one is working. - Include "documents:test.js"
Executes the contents of the text document contained in the documents table.
This has to be a file of the "text/javascript" type.
Functions for multi-currency accounting
They can also be used for accounting without multi-currency, in this case the account is always in basic currency.
budgetBalanceCurrency(account, startDate, endDate, extraParam)
The balance in the account currency up to the current line.
budgetExchangeDifference (account, [date, exchangeRate])
This formula recalls the Banana.document.budgetExchangeDifference function.
budgetOpeningCurrency(account, startDate, endDate, extraParam)
The balance in the account currency at the beginning of the period.
budgetTotalCurrency(account, startDate, endDate, extraParam)
Starting with version 9.01, the following functions are also included : budgetCreditCurrency, budgetDebitCurrency.
User defined functions
The user can define personal function with the JavaScript language, and recall them in the formulas.
It is possible to define functions:
- Directly in a formula
- In a JavaScript coded attachment; this attachment must have as row id the "_budget.js" name
- In a text of the Documents table, that needs to be included with the Include command
Note:
In the user functions it is currently not possible to use functions that access current accounting data (currentBalance, ...).
function Taxcalculation(profit)
{
   var percentage = 10;
   if (profit > 50000)
      percentage = 10;
   else if (profit > 100000)
      percentage =20;
   return profit * percentage / 100;
}
Banana Accounting Plus GPT Budget formula creator
The GPT budget formula creator is only experimental: it might be subject to changes and improvements.
This Banana Accounting Plus GPT was created using ChatGPT and is designed to generate calculation formulas to be used in the Budget table of Banana Accounting Plus.
Requirements
To use this GPT, you must have a ChatGPT Plus subscription. Without it, you can try the service for free for up to ten requests. After that, you’ll need to either upgrade to ChatGPT Plus or wait some hours before making additional requests.
How it works
- Open the Banana GPT from this link:
- In the Message field at the bottom, enter a sentence describing what formula you want to create. Explain what your purpose is. Generally, more specific requests will yield better results.
- GPT will process your request and return the corresponding result.
Based on the input provided to the GPT, examples and text strings are generated containing the formulas. - Copy the generated formulas.
- Paste the copied formulas into the Formula column of the Budget table in Banana Accounting Plus.
Examples of messages to enter in GPT
The following are examples of messages to enter into the GPT chat, along with their respective generated results:
Example 1
Input text:
I have the sales amounts for January, February and March 2024. Now I want to calculate the sales forecast for the same months in 2025. I predict that sales will increase by 20% compared to sales in 2024. Let me have the formulas keeping in mind that I want to see the calculated values right away, and then also the example records to enter.
Response:
| Date | Description | Account Debit | Account Credit | Formula |
| 2025-01-31 | January sales expected 2025 | 3000 | 4000 | var jan24 = 1000; jan24 * 1.2 |
| 2025-02-28 | February sales expected 2025 | 3000 | 4000 | var feb24 = 1200; feb24 * 1.2 |
| 2025-03-31 | March sales expected 2025 | 3000 | 4000 | var mar24 = 1500; mar24 * 1.2 |
Examples of the use of formulas in financial forecasts
The possibility to enter formulas is available in Banana Accounting Plus only with the Advanced plan. Update now!
Below you will find some examples of how to use formulas to automate financial forecasts.
Please refer to the specific documentations:
- Javascript formulas in the Budget table
- Templates with transactions using the Quantity and Formula column
Parameters
When planning, it can be useful to define variables that can and will be used later.
It is useful to create a parameter section with a posting date of January 1st, or another date that corresponds to the first day of the Budget. The parameter variables will then be used in the following rows.
// 30%
costOfGoodsSold = 0.3
// 5%
interestRateDebit = 0.05
// 2%
interestRateCredit = 0.02
// 10 %
latePaymentPercentage = 0.1
This way, all parameters that can be set are displayed instantly. When a parameter is changed, the forecast is recalculated.
Repetitions or values per month
By using the Repeat column, you can plan for the whole year on one recording row.
If however, the activity has seasonal variations, it is recommended to use a forecast by month. For each month, a row is created with the sales amount for the month.
If you wish to make forecasts automatic for several years, it is useful to insert the repetition "Y" in this row, so that the row of the year is also used for the next one.
Prices and sales quantities
When making a sales plan it will be easier to enter values using the quantity and price column. For example, a restaurant can enter the number of covers served per day, week or month and the program automatically calculates the amount. By changing the number of covers or the price, the impact on liquidity and on the result for the year is instantly displayed.
Use of formulas with variables for growth
When you use formulas, remember that they are expressed in the Javascript language:
- The variable must be defined before being used, hence the line, in which it is defined, must be a date preceding the the line in which it is used.
- Thousands separators in numbers can't be used.
- The decimal separator is always the "." (Full stop)
- The names are different for uppercase / lowercase.
You can assign a value to a variable (this name can be freely chosen) and enter the variable name in the following lines to resume the value.
By changing the value assigned to the variable, all the lines, in which the variable is used, are automatically modified.
As an example, you may set the expected sales amount, proceeding with the following months, by using a formula to increase the amount.
- Create a "S" (sales) variable , by entering the following text in the Formula column.
Sales=1000
The value 1000.00 will be inserted in the amount column - In the following lines use the variable by simply inserting the variable name in the formula:
Sales
The value 1000.00 will be inserted in the amount column - You can add 10% to the amount (multiplying by 1.1)
Sales*1.1
The value 1100.00 will be inserted in the amount column (The value of the Sales variable does not change) - You can increase the value of S
Sales=Sales+200
The value 1200.00 will be inserted in the amount column (The value of the Sales variable will change) - If the variable is used in the following line, there will be the new calculation
Sales
The value 1200.00 will be inserted in the amount column
You can also define a variable to define the percentage of growth.
- Percentage=1.1
- Amount=200
- In formulas you can use the variable name instead of the number
- Sales*Percentage
- Sales=Sales+Amount
Variables and repetitions
Let's say you expect the turnover to rise by 5% every month.
- Enter two lines where you assign the value to the variable, without putting any account with the start date of the year.
Sales=1000
Increment=5 - Then create a line with the repetition where you enter the accounts and the formula
Sales=Sales*(1+Increment/100)
Each time the row is repeated the value of the variable S will be increased by 5% and consequently also the amount of the transaction. By simply changing the growth percentage, the forecast will be recalculated.
In a row you can also insert multiple Javascript instructions, by separating them with a semicolon ";"
Sales=1000; P=5
Use of budget formulas
There are functions that allow you to access the balances and movements of the accounts for planning up to the row that is calculated.You can enter a formula that through the budgetTotal function, recovers the value of the sales account "SALES" of the previous month.
credit( budgetTotal("SALES", "MP") )
The budgetTotal function takes account numbers and periods as arguments. An abbreviation can be used instead of the period.
- MP stands for previous month.
- QP stands for previous quarter.
Revenues show in Credit, therefore the value returned by the function will be negative and will not be accepted as an amount in the double entry accounting.
Therefore use the credit () function, which uses the negative value and turn it into a positive value.
Objects for incrementing sales or costs
Instead of using a single variable you can group the elements in an objects, for sale or costs.
s = {} // sales
s.p1 = 100 // product 1
s.p2 = 200 // product 2
c = {} // costs
c.rent = 500
c.utilities = 200
c.admin = 100
You can now use a function to increments all element by a value
// function to increment the values within an object by a percentage
function Increment(obj, perc) {for (v in obj) { obj[v]+=obj[v]*(perc/100)}}
// Increment all values
Increment(s,20) // Increments sales by 20%
Increment(c,10) // Increments costs by 10%
// Decrement use a negative number
Increment(s,-10)// Decrements sales by 10%
Increment(c,-5) // Decrements costs by 5%
If you want to initialize the element in a repetition row use the Nullish coalescing operator "??"
// initialize objects
s = {} // sales
c = {} // costs
// repetition rows assign the value only the first time
s.p1 = s.p1 ?? 100
s.p2 = s.p2 ?? 200
c.rent = c.rent ?? 500
c.utilities = c.utilities ?? 200
c.admin = c.admin ?? 100

// Begin next year increments values
Increment(s,20) // Increments sales by 20%
Increment(c,10) // Increments costs by 10%
You can see an example how to insert all data:
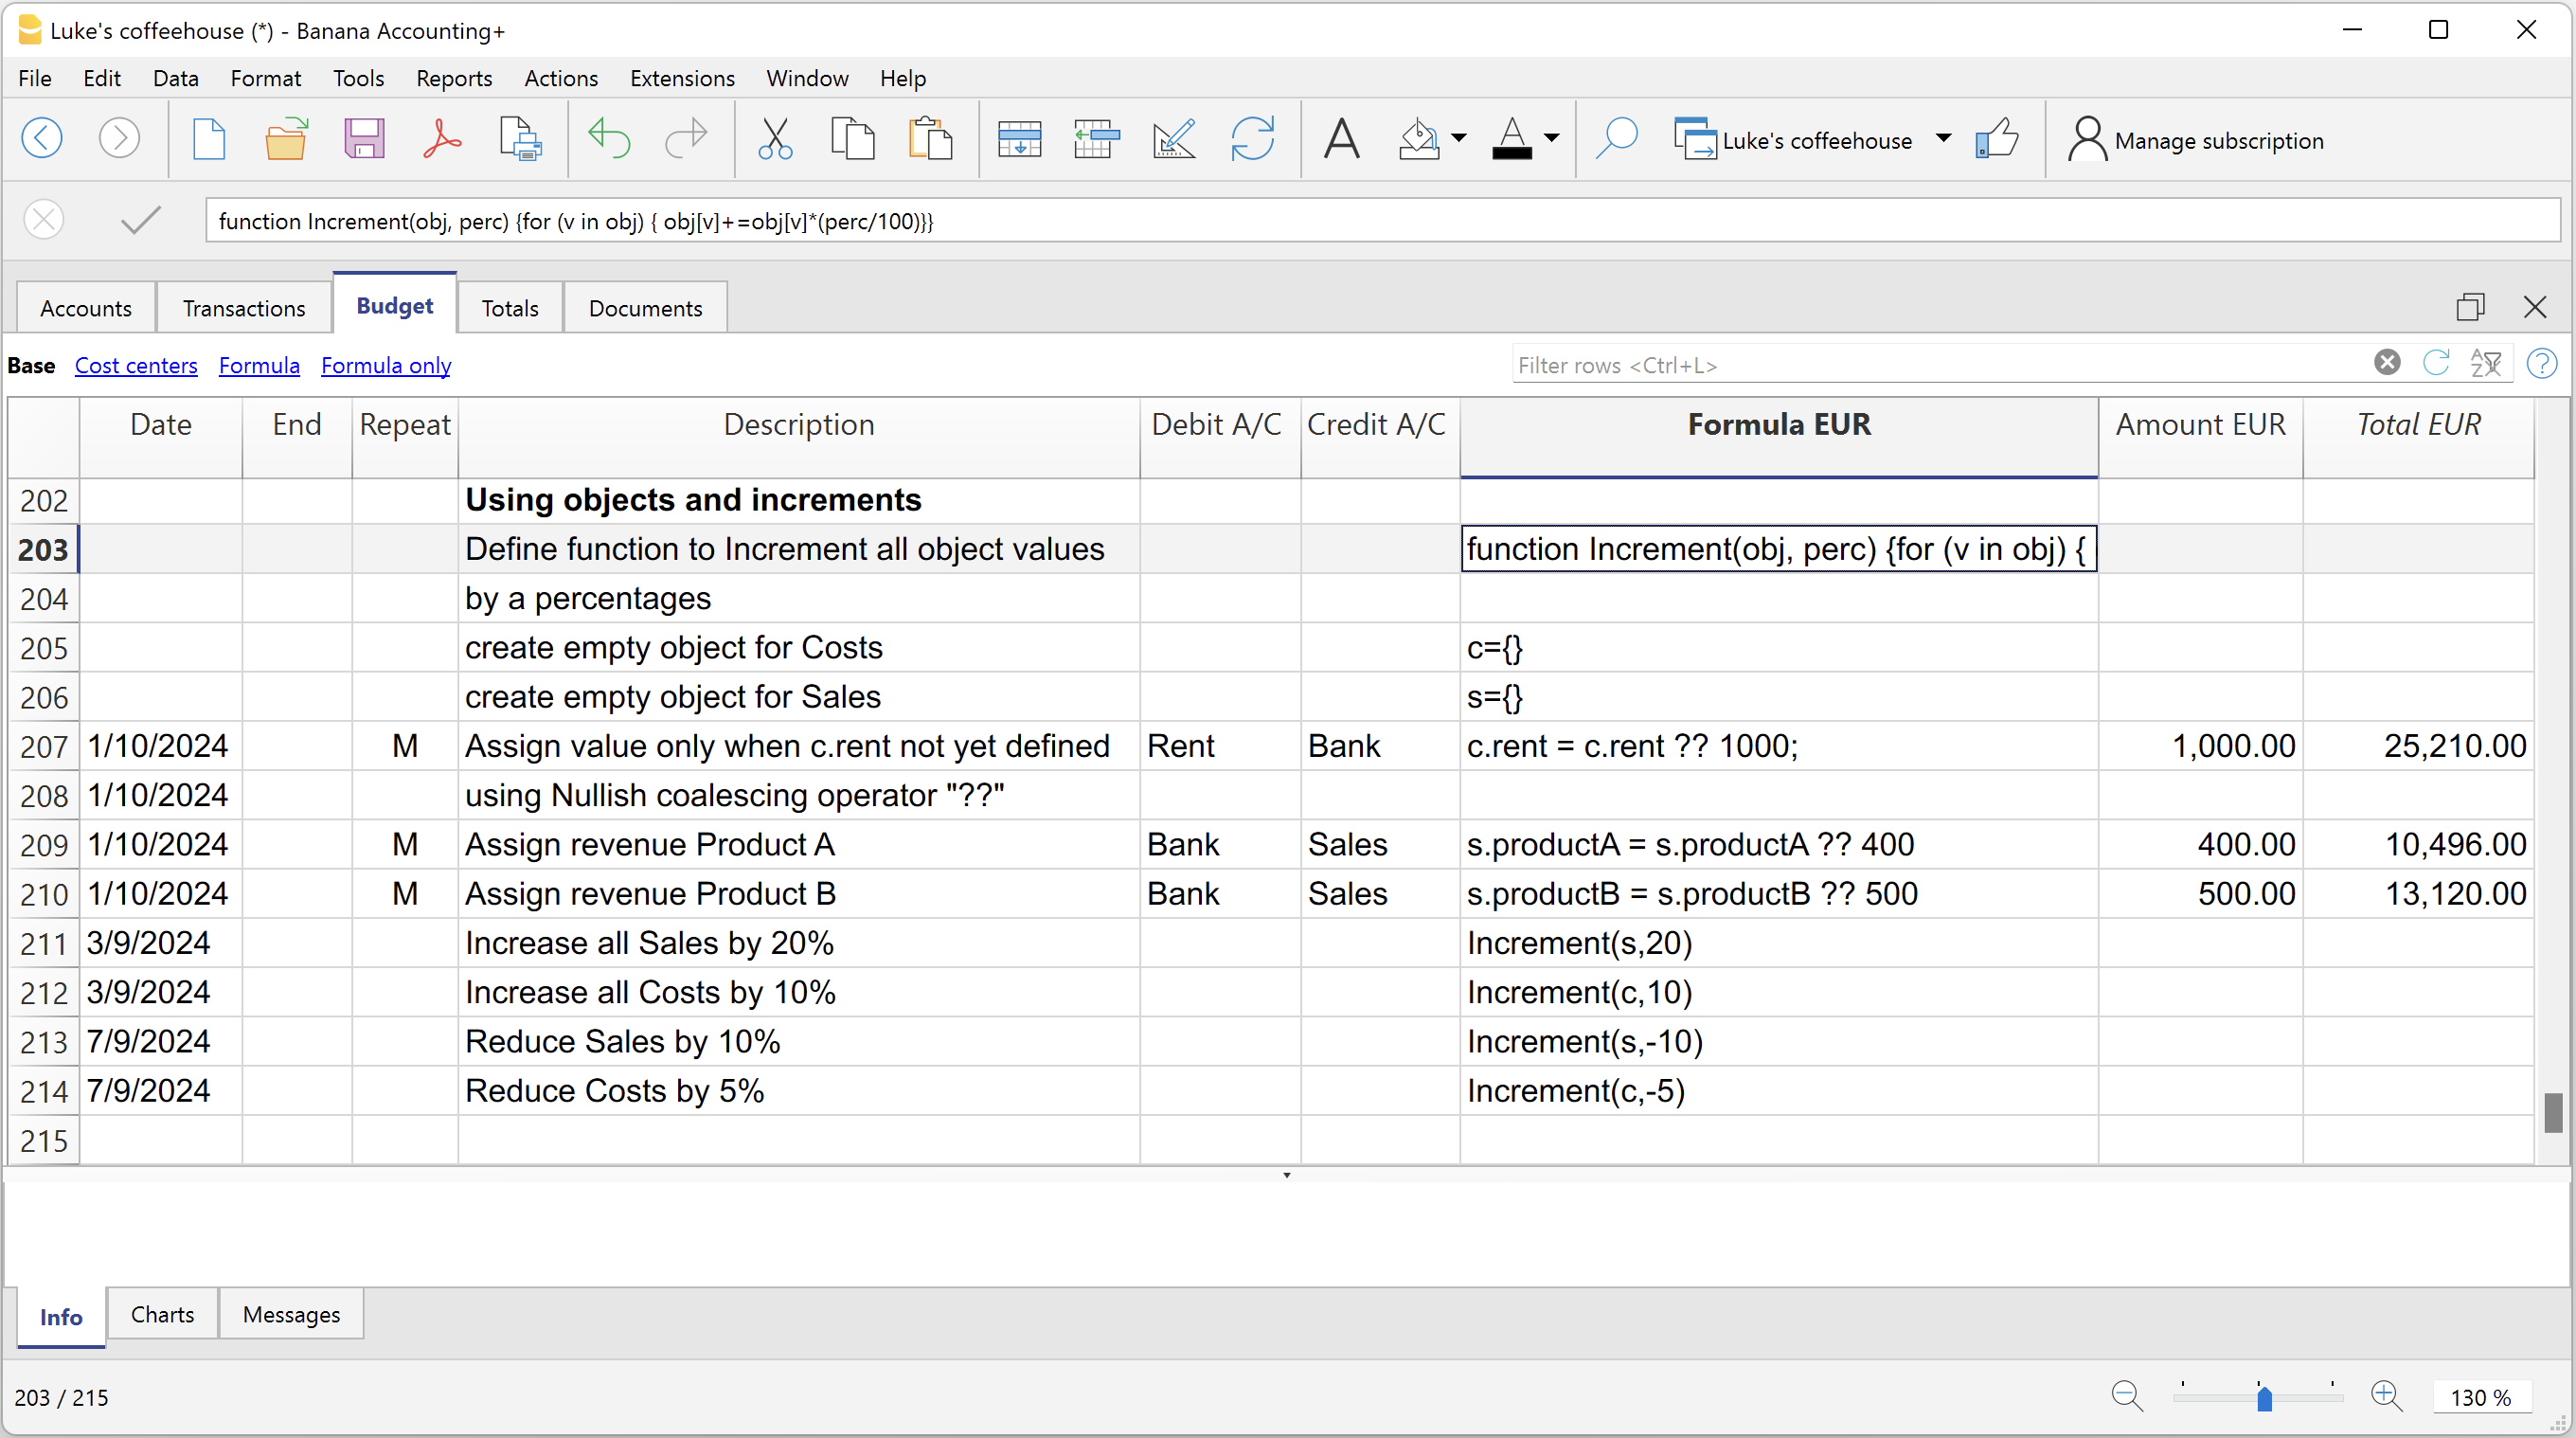
Variables for monthly sales
Sales may vary for each month. In this case it is useful to use separate registrations for each month with the variable name.
sales_01 = 1000
cost_01 = sales_01 * costOfGoodsSold
sales_01 = 1100
Deferred payments
If you want a very precise liquidity plan, it is useful to separate the sales, which are paid immediately and those that are deferred.
One approach may be to record all sales as if they were paid cash, assigning the value of the monthly variable to the amount.
sales_01 = 1000
A registration is then entered, which reverses the sales that are deferred, calculating the amount with the formula.
sales_01 * latePaymentPercentage
A payment registration with the same formula will then be inserted for the following month.
Selling costs
There are costs that can be related to sales (cost of goods) or to other costs (social charges, in relation to wages).
Cost calculation with variables
If the sales are defined with variables, the sales costs can also be indicated as a percentage of the sales.
- You can define variable S for sales and variable C for the percentage of the cost.
Sales=1000
Cost=60 - The formula for the calculation will be:
Sales*Cost/100
You can also use the same approach to calculate social security charges.
This formula can possibly be entered in a repetitive row.
Sales cost calculation with budget functions
When the costs are related to sales, the budget formula can also be used.
credit( budgetTotal("SALES", "MC") )*60/100
When the costs related to sales, "MC" stands for the current month.
This formula will return the sales value of the current month, turn them into a positive and multiply them by 60 and divide by 100.
The date must be beyond the sales registration dates, obviously.
It may be used it in a repeat row, inserting the month end date. Therefore, the costs of the sale will automatically be calculated based on the sales entered with the transaction.
The formula can be combined with variables.
- At the beginning of the year define the percentage of costs.
Cost=60 - Therefore, the formula C is used.
credit( budgetTotal("SALES", "MC") )*Cost/100
When you change the contribution percentage or any sale, the schedule will be updated automatically.
Sales commission calculation at the end of the year
At the end of the year, you calculate the commissions of 5% on the total net sales with this formula:
credit( budgetTotal("SALES", "YC") )*5/100
The bugetTotal function returns the movement of the sales account for the period "YC", current year. With the credit () function, the amount is turned into a positive value and then multiplied by 5 and divided by 100.
If you make forecasts over several years, remember to insert the repetition "Y" in the row, so that the same formula will be also calculated for the previous year. As indicated above instead of entering the 5 directly in the formula, you can assign it with a variable.
- Commission=5
- credit( budgetTotal("SALES", "YC") )*Commission/100
If the percentage changes from one year to the next, it is sufficient enter a transaction with the following year date that resets the variable for commissions.
Inflation with variables
If you want to forecast over several years, you can also take inflation into account.
- At the beginning of the planning, assign a base variable for prices and inflation (2%).
Base=1;Inflation=2 - When you use the Sales variable, you multiply it by the inflation rate
Sales=Sales*Base - At the beginning of the following year, with annual repetition, you increase the price base
Base=Base+Base*Inflation/100
Depreciation calculation
Thanks to the formulas, the calculation of depreciation can be automated.
If you change the value of your investments in planning, depreciation will be automatically recalculated. Make sure that the date of the depreciation calculation line has a date superior to that of the investments. Date is generally 31st December .
Depreciation calculation on book value
To calculate the depreciation of the "EQUIPMENT" account, insert a line at the end of the year with the following formula and the debit and credit accounts appropriately set up to register the depreciation.
budgetBalance("EQUIPMENT")*20/100
The budgetBalance function returns the balance to that date. The amortization of 20% is then calculated on this.
Use the debit function, in case you think the asset account can go into credit.
debit(budgetBalance("EQUIPMENT"))*20/100
Calculation of depreciation on the initial value
To calculate the initial value of the investments, it is necessary to use variables to remember the value of the initial investment.
Equipment=10000
If the depreciation is spread over 5 years, the formula will be inserted in the year-end depreciation line
Equipment=10000/5
The annual repetition "Y" and the end date, which corresponds to the date of the last installment of the amortization, will be inserted in the row to prevent the amortization from running on indefinitely.
For each investment you will have to create a variable and a specific row of depreciation. Numbers can also be entered in variable names.
Equipment1=10000
Equipment2=5000
Interest calculation
The budgetInterest( account, interest, startDate, endDate) function allows you to automatically calculate interest based on the actual use of an account.
The parameters are:
- Account
Whose movements are used to calculate interest, in case it will be the bank account or the loan. - Interest
The interest rate in percentage.
If the value is positive, interest on the debit balances is calculated.
If the value is negative, interest on the credit balances is calculated.. - Initial date, which may also be an acronym.
- End date, which may also be an acronym.
- The returned value is the interest calculated for 365/365 days.
Interest expense on the bank account
To calculate the interest expense of 5%, insert a line with the end date of the quarter and the repetition "3ME", which contains the formula
budgetInterest( "Bank", -5, "QC")
The interest rate is negative, because "QC" means current quarter. The debit and credit accounts must be the usual ones for recording interest expense. If the interest decreases the bank account balance will also be used in the registration. However, another account can be used if it is paid with another account.
It is important that the "3ME" repeat is used so that the date used will always be the last of the quarter.
To calculate the interest of the month use the abbreviation "MC"
budgetInterest( "Bank", -5, "MC")
Interest on the bank account
For interest income of 2%, use positive interest instead.
budgetInterest( "Bank", 2, "QC")
Interest on fixed-term loan accounts
For fixed-term loans, interest will be calculated and recorded on the specified date.
- Create an separate account for each loan.
Use the budgetInterest function indicating exactly the start and end dates .If the date is indicated as text, the notation "yyyy-mm-dd" should be used, then "2022-12-31" - Use variables.
As indicated for depreciation, the loan amount can be assigned to a variable. The interest calculation will be done with a Javascript calculation formula,- Define the loan variable
Loan=1000 - 5% interest calculation, for 120 days.
Loan*5/100*120/365.
- Define the loan variable
Profit tax calculation
Profit is the total of the group's profit for the specified period.
To calculate a 10% profit tax, use the following formula.
credit(budgetTotal("Gr=Result","MC"))*10/100
- Use the the budgetTotal function parameter in the "Gr = Result" group, which indicates that instead of an account it has to calculate the movements for the group.
- MC, current month, is indicated as the period.
- The budgetTotal function will return a positive value if there is a loss and negative (credit) if there is a profit.
- the credit function takes only negative values into account, therefore if there is a loss the tax will be zero.
Payments with deferred or different deadlines
For deferred payments or with different deadlines, you can proceed in two ways:
- Use variables to which payment amounts are to be assigned.
Use the variable in question when recording the payment. - Create customer or supplier accounts for different credit deadlines.
Other cases
Please tell us about your other requirements, so we can add more examples.
Chart of accounts for the Budget
Opening column
Enter the initial balance of your accounting period in the Opening column of the Accounts table. This will serve as:
- Initial balance for the accounting (Transactions table)
- Initial balance for budgeting data (Budget table).
Budget column
If there is no Budget table, the Budget column of the Chart of Accounts can be adapted and used to enter estimates for the current year in tabular form.
If the Budget table is set up, the Budget column of the Chart of Accounts is protected, and the values are calculated automatically on the basis of the budgeted movements, as defined in the accounting period. The value displayed in the Budget column is the balance at the end of period, and therefore includes both the initial balance and the movement for the period.
Customize the Chart of Accounts
The Balance Sheet and the Profit and Loss Account are set up in the Accounts or Categories table, with the total for accounts and groups.
The columns of the amounts are updated by the program, so the relevant table will provide an immediate picture of the current financial situation and of the estimated one, where the account balance, movement, budget and other important information are shown next to each account and group. With one click, the account card is displayed .
The Chart of Accounts is set up according to the user's needs. New accounts and groups may be added, their number or description changed or cancelled, at any time you.
For your planning, normally start with a few accounts and then add new ones when more detail is available and considered useful.
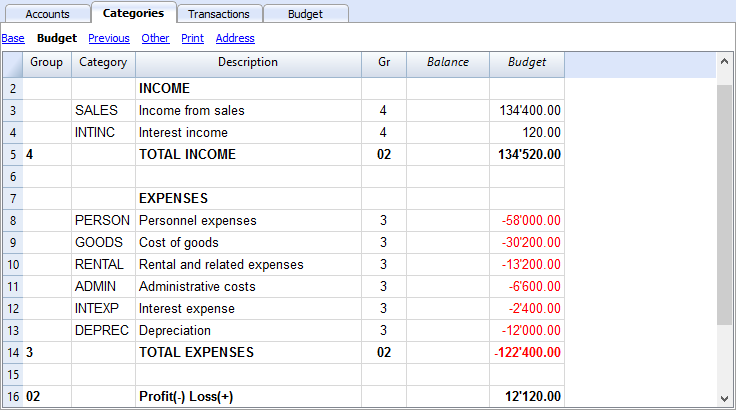
Planning with more detail
Different types of accounts can be set up in the Chart of Accounts. When recording movements, it is possible to indicate detailed amounts for:
- Customer and Supplier accounts
Allows for planning allocated to each customer, with the relative turnover and costs. - Cost and profit centres
Allows for detailed planning for a particular project or sales made by individual agents. - Segments
Manage profit and loss accounts by Department, Branch etc.
Budget separate from accounting
Preparing the file
If the Budget table is not visible in the accounting file, proceed to display it via the Tools → Add/Remove functionalities → Add Budget Table menu.
The Transactions table remains as preset in any case. If you don't need it, use the Data → Tables setup menu and un-tick Transactions table so it is not displayed.
The process will be the same whether you are managing only an accounting, a budget or both:
- Create an accounting file.
- Set the file properties.
- Set up the Chart of Accounts.
- Enter opening balances (if any).
- Enter the forecast values in the Budget table.
Accounting and budgeting are usually performed in the same Banana Accounting file. If you wish to manage the Budget separately from the accounting, just enter the Transactions in the Budget table only. In this case, the Transactions table, is left empty of posting of movements.
A Budget only file is used:
- To set up the Budget of a Startup:
- Prepare the financial plans of a new company, that has not yet started.
- Initially, if you don't have precise ideas, it might prove useful to select a template with few accounts, without VAT.
- If you plan to keep the accounting as well, it's helpful to start with one of our pre-set Charts of Accounts.
- For an existing company that keeps the accounting with another program:
- The Chart of Accounts will be modeled on the one used for the accounting.
- There are three possibilities to compare with the actual balance sheet:
- You can export the Budget data of Banana Accounting and import it into the accounting program.
- In case you wish to make a comparison between the Budget created in the Banana Accounting file and the actual data of your program on the other hand, you have to export the data and import them into the Budget file (Banana Accounting Budget table).
- Create Excel spreadsheets and report the Banana Accounting Budget data and the accounting data present in your own program.
Further information on Budget transactions can be found at the following links:
Budget period
It is not necessary to define the budgeting period. You can set up the budget for a year and still get forecasts for the following years.
Annual Budget
As a rule, the budget is prepared for the accounting period defined in the File properties, which is generally identical to the calendar year.
- Enter the opening balance at the beginning of the period in the Opening column of the Accounts table.
- Enter the forecasted data for the current year in the Budget table.
When requesting Reports, the program will use the accounting period, if you do not specify a period different from the one present in the File Properties
When you want to budget for the following year, you create a file for the new year. The program reports the budget postings, which can then be modified (see Create new year ... in Actions menu).
Multi-year budgeting
With Banana Accounting you can have planning over several years available. The planning period is free and is set at the time the report is requested.
To make a budget over several years, generally proceed by setting the budget for the first year, then extending it for the following years.
Technically, therefore, proceed as if you were establishing an annual budget, extending it for the following years:
- In the File properties, the date of the first year (which is generally the calendar year,) is indicated as the start and end date.
- The opening balances are entered in the Chart of Accounts.
- The movements of the budget are inserted in the Budget table
- Operations that are specific to the first year only, are indicated without repetition.
- Indicate the repetition code for all other operations, which are presumed to also be repeated in subsequent years.
- Operations that take place only once a year are indicated by the annual "Y" repetition code. For example, the calculation of depreciation, that is done at the end of the year.
- Specific operations for subsequent years are indicated with the respective date on which they occur.
- For repetitive operations that are limited to a single year or to a specific period (fixed-term leasing transactions) the End date will be indicated. After that date, no repetition will be made.
- Formulas may be used to make the amount of the row to be repeated automatic .
- The calculation of depreciation can be based on the balance of the fixed assets account.
- Interest can be calculated directly on the movement in the bank account.
- A progression of sales can be specified.
- Purchases can be defined as a percentage of the cost.
- To obtain the budget (Enhanced Balance Sheet or Enhanced Balance Sheet with groups, Account cards) indicate the start and end date of the required budget.
Changeover to the new year
The Banana Accounting function for Creating a new year ... also carries forward the budgeting transactions.
- At the level of each row you have the possibility to indicate whether the operation should be carried over or not, and whether the original data should be kept or replaced by that of the new year.
- Creating the budget for the new year is therefore very simple, because it is only a question of changing the items of expenditure and income that are expected to change.
Reports financial forecasting
There are several ways to access financial forecasting data. You can access all the information that interests you.
- Provisional Balance sheet
- Provisional Profit and Loss Account
- Liquidity Planning
- Forecasting sales
- Financial forecasting for customers
- Financial forecasting for suppliers
- Investments Planning
- Corporate finance Planning
- Project Planning
- Planning with segments
Budget table: Total column
The Total column contains the total amount of the budget for the accounting period indicated in the file and accounting properties (accounting start and end date). This delivers an instant indication of how much a certain expense will be for the current year.
For further information refer to Budget table columns and Dates and repetitions.
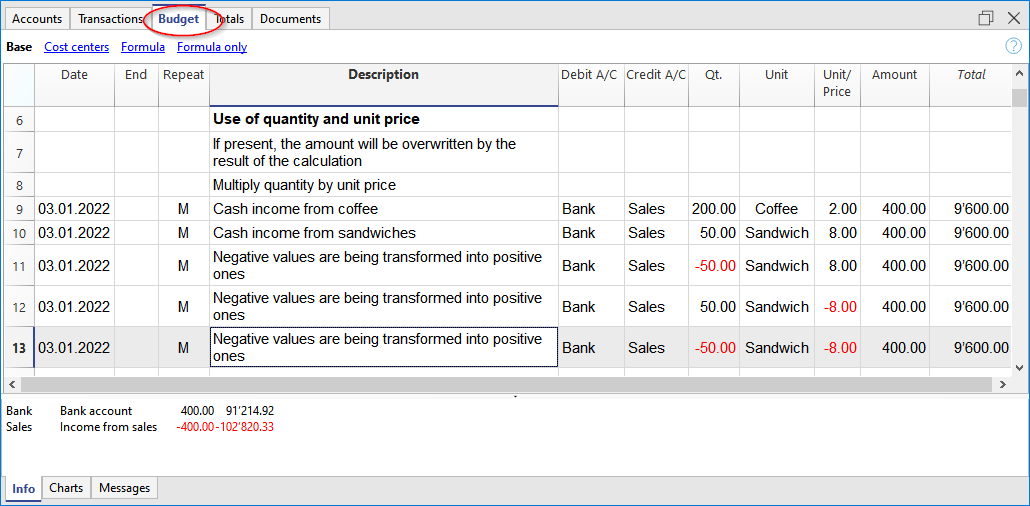
Evolution Charts - Charts window
In any table you are in, you will see the evolution of the account or group, on which the cursor is located, in the Charts window.

Budget column in the Accounts and Categories table
The Accounts and Categories table displays the updated budget values for the accounting period indicated in the file and accounting properties (accounting start and end date).
- Budget column
Indicates the total budget of the account for the accounting period.
The value indicated is inclusive of the initial balance and budget movements for the period. - Budget difference Column
Indicates the difference between the Budget and Balance column.

Account card with budget data
Via the Account card command, or in the Budget table, you can get the detail with all the forecast movements, by clicking on the button next to the account.
- In the Account card dialogue
- You can choose the account, cost center, group or segment whose movements you want to view.
- You can choose to view current data or budget data.
- In the Period accounting card, you can indicate the calculation period. If you choose an end date, beyond the accounting dates, the program automatically creates a projection of the indicated data.
- By opening the account card from the Budget table, the card for budget movements is displayed.

Enhanced Balance Sheet with groups
All the prints that are available for accounting, can include financial forecasts.
- It is sufficient to set up the Budget and Budget difference columns.
- In the Period Section, indicate the desired forecast period. You can also indicate a period over several years and the program immediately calculates and displays the forecast.
- In the Subdivision Section, you can select to display data by month, quarter, year or by choosing a segment.
Watch the video tutorial that shows how to create and print the Enhanced Balance Sheet with groups.
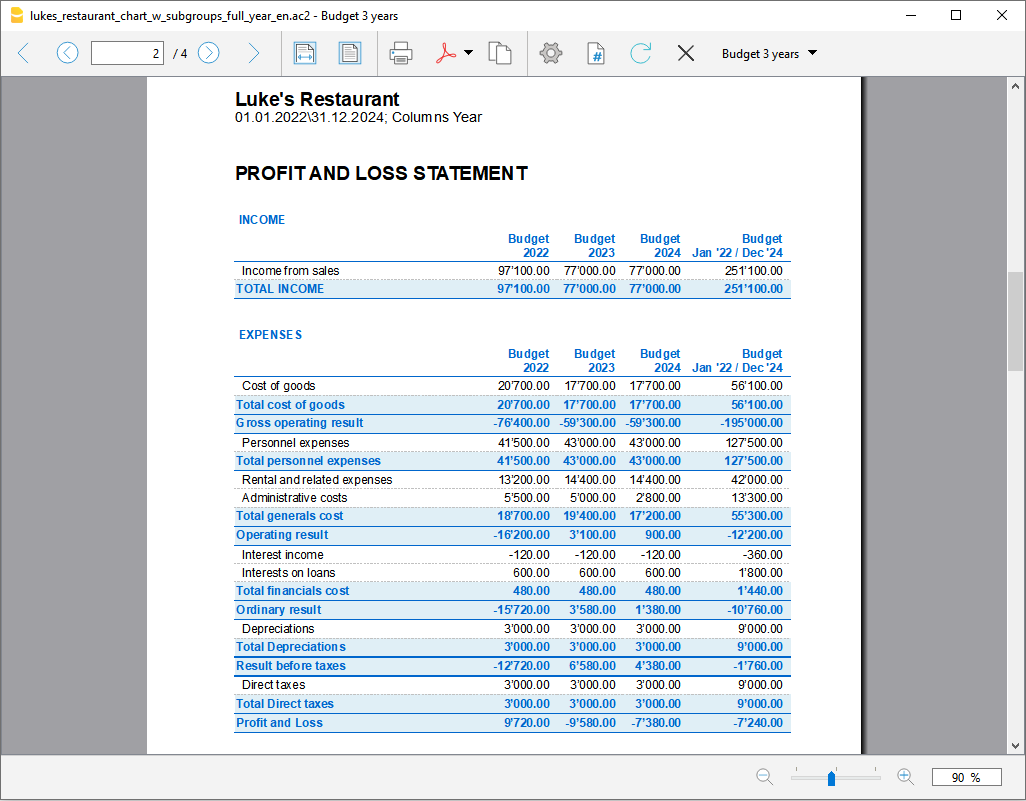
All customizations available in accounting are also applicable for planning:
- Select the desired grouping level.
Presentation with the account details or only with groups. - Choice of sections to include.
Balance Sheet only, Income Statement, Cost Centers can be printed. - Choice of the accounting period.
If you choose an accounting period beyond the accounting dates, the program automatically creates the projections up to the indicated date. - Breakdown by period (monthly, quarterly, half-yearly, annual).
By combining the calculation period and the frequency, ad hoc reports can be created.- By indicating a 1 year period without subdivisions, the forecast for the year is obtained.
- By indicating a 1 year period with quarterly subdivision, there is a printout with the columns for each quarter.
- By indicating a 6 months period with monthly subdivision, the month by month evolution can be seen in detail.
- By indicating a 5 years period with annual subdivision the columns with the evolution for the 5 years is available.
- Comparison between current and budget values.
- Addition of other columns.
- Change of print style.
- Saving Print Setups.
Print settings can be saved as a composition and can be recalled later.
You can create as many compositions as you require.
Provisional Profit and Loss account
The Profit & Loss statement forecast presents the profits, costs and result for a future period. It is an important tool for tracking the management of the company which allows you to understand how the situation will evolve, from an economic and financial point of view.
With Banana Accounting, thanks to the forecasts with the double entry method, you have complete forecast budgets that you can organize in different ways. The program also calculates forecasts over several years.
You can have a very precise vision of the evolution of the economical situation.
The structure of the Profit & Loss statement is the same as that used in accounting file. When printing, you can indicate which values to display, those of the final balance, or the budgeted balance or of both.
The forecast values are calculated taking into account the opening balances and forecast movements indicated in the Budget table. When you change a budget entry, the forecasts are instantly updated. You can simulate and test, relocate a payment, add an investment, modify sales and see how the profit and loss statement changes over time.
Profit and Loss statement values can be displayed in several ways.
Use of quantities and formulas
The quantity and price columns of the Budget table allow you to prepare more realistic forecasts, using the same methodology as spreadsheets. This allows for faster simulations. It is sufficient that you change the price and you access the new forecasts of the Profit & Loss statement automatically and also those of the Balance Sheet and Liquidity.
The formulas allow you to automate cost calculation, so that for example, when you change sales the purchase costs change in percentage. In this way you can use precise income statement forecasts that update automatically. Formulas are particularly useful when making forecasts over multiple years.
Detailed forecasts
The Income statement forecast, based on the double entry method, allows you to obtain the forecasts of the costs and revenues, using the same accounts and groups as those of the accounting file. The same structure of the items, that make up the income statements, is used for forecasting. Values and reports are available automatically to display in detail, day by day, how liquidity evolves and the situation of customers.
The structure of the Chart of Accounts, on which the forecast is also based, is customizable. This can be done by simply using the main groups and the accounts that are part of it, or more in a more complex way, by also inserting subgroups, for a more detailed view.
The structure of the Profit and Loss Account is gradually scaled and allows you to view the interim and final results for the year after paying the taxes.
PROFIT AND LOSS STATEMENT
- Revenues.
- Cost of goods.
Gross operating result (total of Revenues and Costs).
- Staff costs
- General costs.
Operating result (total of the gross operating result, personnel costs and general costs).
- Financial costs.
Operating result before taxes and depreciation(Total of operating result and financial costs).
- Depreciation.
Operating result before taxes (Total of ordinary Result and Depreciation).
- Taxes
Net operating result (total of the Result before taxes and Taxes and duties).
Accounts / Category Table
In the Accounts table, for Double entry accounting, and in the Categories table for Income and Expense accounting, the forecast values for all the accounts (or categories) and groups of the Profit and Loss statement are displayed. With a glance you have an instant view of the forecasted Profit and Loss statement. The values refer to the accounting period and the variations are compared to the current balance.
If you require more details, you can add accounts or groups.

Profit and loss with groups
Through Enhanced Balance Sheet with groups command, you can view the Provisional Profit and Loss Statement, choosing the presentation mode you need.
- Indicate in the Sections options to display the values of the Budget
You can display the current (accounting) values, the budget values or both. - Set up the Period.
If a period that exceeds the accounting period, is indicated, the program will automatically switch to budgeting over several years. - Indicate the subdivision by period required.
- In the Rows section, you can exclude accounts and thus have a view of groups only.
- If you think you're use this print setting again, create a Customization.
Using the different options you can customize your prints. Below are some examples.
Annual Budget Profit and loss
This print was set up with only the budget values for the current year.
You can also display the change as an amount and a percentage.

Budget Profit and loss statement and current year comparison
The final (current) values are compared with those of the forecast.

Quarterly forecast Profit and loss statement
In the Subdivision section set quarterly and the program shows the forecast Profit and Loss statement for the various quarters.
The evolution of the budget forecast during the year will now be displayed.

Budget and quarterly Profit and loss statement
This print is set up to print the budget and the final balance. Thus we have the budget and current situation for the quarters.

Three-year forecast for Profit and Loss account
If you insert the forecast movements with the repetition code, the program is able to prepare forecasts beyond the defined period.
To obtain forecasts over several years, the transactions are entered in the Budget table with repetition (Y).
The printout is set up to obtain the estimate of the Profit and Loss statement over three years.

Accounting Report for Budget Profit and Loss
From the Reports → Accounting Report menu you can get printouts of the Profit and Loss Statement displayed as in the accounts table, but with the required column values.
The options are similar to those explained for the Enhanced Balance Sheet by groups.

Liquidity Planning
Cash is King is the motto that indicates how important liquidity is. It is the main engine for carrying out business activities, meeting commitments and producing profits. To invest safely, it is essential to evaluate the ability to produce liquidity and its evolution over time a rational way.
The financial forecast of Banana Accounting is an important business management tool, which allows you to understand if there will be enough financial means to meet commitments and reduce your debt exposure to the maximum.
Liquidity projections are calculated on the basis of the initial balance and forecasts included in the Budget table. When a budget movement is changed, the forecasts are instantly updated. You can run different simulations, assign a payment, add an investment, modify sales and see how liquidity evolves.
Liquidity values can be displayed in several ways.
Accounts table
Set up accounts and liquidity groups in the Accounts table. In the Budget column you will also see the updated forecast balances for the accounting period. At a glance you will know what the liquidity situation will be at the end of the year.

Evolution graphs
When you open the Charts window, positioning the cursor on an account or a group you will see the graph representing the evolution of Liquidity.
In the legend are visible Current, Previous and Budget. By clicking on each one it is possible to hide or make visible the respective graphs.
Account card with Budget Group liquidity
Using the Budget Account card command, all forecast movements of the account card are displayed. Day by day you can see which movements will have an impact on the liquidity.

The Account card command allows you to specify if you want to see current or budgeted movements.
- Select budget movements.
- Set the period
If you indicate a period that exceed the accounting period, the program will automatically generate Forecasts over several years. - If you indicate a group, you will see the movements of all the accounts belonging to that group.
- When you are in the Budget table, you can access the account card with a click on the icon next to the account.
Liquidity in the Enhanced Balance sheet with groups
In the Enhanced Balance Sheet with groups you may select to work with values subdivided by column per period. In this way you can see the evolution of liquidity by day, week, month, quarter, semester, year, etc.
- In Sections options indicate the display of the Budget data.
- Select the Liquidity group.
You can choose to also display the liquidity accounts. - Set up the Period.
If a period that exceeds the accounting period, is indicated, the program will automatically switch to budgeting over several years. - Indicate the subdivision by period required.
- If you think you will use this print setting again, create a Customization.
Budget Liquidity Accounting Report
The Accounting Report is similar to the Enhanced balance sheet with groups, with the difference that the display of the data takes place in the Accounts table in columns.
You can therefore use the Accounting Report to get an instant view of the evolution of liquidity accounts.

Forecasting sales
Sales for a company are the main source of income and liquidity. Unlike costs that are more easily planned, sales are more difficult to budget. As a rule of thumb, you may base yourself on the figure of the sales of the previous year for the same period or, on the possibility important events that are in the pipeline and could lead to an increase in sales or even to the acquisition of new customers.
Based on this concept, Banana accounting, with the forecast based on double-entry accounting, allows you to simulate and project different scenarios over time. Just change the budgeted amounts for sales and the program automatically updates the forecasts and displays detailed reports for the current year or for future years.
The sales projections are calculated on the basis of the forecasts included in the Budget table and can be displayed in different ways.
Accounts table
Set up accounts and sales groups in the Accounts table. In the Budget column you will also have the updated forecast balances for the accounting period. You can check what the evolution of sales will be during the year, at a glance

Evolution charts for sales
When you open the Charts window, positioning the cursor on an account or a group you will see the graph representing the evolution of the Sales.
In the legend are visible Current, Previous and Budget. By clicking on each one it is possible to hide or make visible the respective graphs.
Account card with Budget for sales
Using the Budget Account card command, all forecast movements of the account card are displayed. Day by day you will be able to see the evolution of sales and which movements will have the greatest impact.

The Account card command allows you to specify if you want to display current or budgeted movements.
- Select the budget movements.
- Activate the account or group of Sales
You can also activate all sales accounts - Set the period.
- If you indicate a period that extends beyond the accounting period, the program will automatically generate Forecasts over several years.
- If you indicate a group, you will see the movements of all the accounts belonging to that group.
- When you are in the Budget table, you can access the account card with a click on the icon next to the account.
Income statement with Quarterly sales Budget
With the Enhanced Balance Sheet with groups you can choose which data columns to display and the reference period, to see the evolution of sales by day, week, month, quarter, semester, year, etc.
- In Sections options, you can select the Budget data to be displayed.
- Choose the sales group. You can choose to display sales accounts as well.
- Set up the Period.
If a period that exceeds the accounting period, is indicated, the program will automatically switch to budgeting over several years. - Indicate the subdivision by period required.
- If you think you will use this print setting again, create a Customization.

Accounting report with Sales estimate
The Accounting Report is similar to the Enhanced Balance Sheet with groups, with the difference that the data is displayed in columns, as in the Accounts table.
You can use the Accounting Report to have an instant view of the evolution of the sales accounts.

Financial forecasting for customers
Customers forecasting completes financial planning with customer data. For example, a company can forecast sales by indicating accounts for the most important customers.
Forecasting with the double entry method also allows you to indicate accounts for individual customers. Depending on the requirement, customer management can be done with balance sheet accounts, profit and loss accounts or with cost and profit centers.
When changing a budget movement, the forecasts for each customer are also updated individually.
Accounts table
Set up the customers in the Accounts table. In the Budget column, the forecast balances are automatically updated for the accounting period. At a glance, you can view what the forecast for the individual customer will be.

Evolution chart
When you open the Charts window, positioning the cursor on an account or a group you will see the graph representing the evolution of the Customers.
In the legend are visible Current, Previous and Budget. By clicking on each one it is possible to hide or make visible the respective graphs.
Customer Account card with budget data
With the Budget Account card command you have the possibility to see in detail all the movements for each customer.

- Select Budget movements.
- Indicate the customer account or group.
- Set up the period.
If you indicate a period that extends beyond the accounting period, the program will automatically generate Forecasts over several years. - When indicating a group, you will see the movements of all the accounts belonging to that group.
- When in the Budget table, you can access the customer's card with a click on the small icon next to the account number.
Customers in Enhanced Balance sheet with groups
With the Enhanced Balance Sheet with groups you can choose which data columns to display and the reference period, to see the evolution of the customer by day, week, month, quarter, semester, year, etc.
- In Sections options you can select the Budget data to be displayed.
- Choose the Customers group. You can choose to also view the accounts of each individual customer.
- Set up the Period.
If a period that exceeds the accounting period, is indicated, the program will automatically switch to budgeting over several years. - Indicate the subdivision by period required.
- If you think you will use this print setting again, create a Customization.

Accounting Report with Customers Budget
The Accounting Report is similar to the one for Enhanced balance sheet with groups, with the difference that the display takes place in columns, as in the Accounts table.
You can therefore use it to get an instant view of the evolution of customer accounts.

Provisional Balance Sheet
The Balance Sheet forecast displays the Balance Sheet for a future period. It is an important tool for tracking the management of your company and allows you to verify what the company's capital structure, the state of assets, of liabilities and the equity will be like.
With Banana Accounting, thanks to the forecasting with the double entry method, you have complete forecast budgets and that you can arrange in different ways. The program also calculates forecasts over several years.
You can access a very precise vision of what the future balance sheet will look like.
The structure of the budget is the same as that one used in the accounting file. When printing, you can indicate which values to display, those of the final balance, the budget or both of those.
The forecast values are calculated taking into account the opening balances and forecast movements indicated in the Budget table. When you change a budget entry, the forecasts are instantly updated. You can simulate and test, relocate a payment, add an investment, modify sales and see how the budget changes over time.
Budget forecast values can be displayed in several ways.
Detailed forecast
The financial forecast, based on the double entry method, allows to obtain the forecasts of the balance sheet values, using the same accounts and groups as those of the accounting file. The same structure of the items that make up the financial statements is used for forecasting. Values and reports are available automatically to display in detail, day by day, how liquidity , the situation of customers evolves and many more.
The Banana Accounting forecast presents the values for assessing the financial, equity and economic situation. The structure is customizable, it can be presented in a simple way, including the main groups and the accounts that are part of it, or in a more complex way, by inserting subgroups, for a more detailed view.
| ASSETS | LIABILITIES |
Current assets
Fixed assets
| Third party capital
Equity
|
Accounts table
In the Budget column of the Accounts table you access forecast values for all accounts and balance groups available. In a glance you have an instant overview of the budget. The values refer to the accounting period and the variations are calculated automatically with respect to the current balance.
If you need more details, you can add accounts or groups.
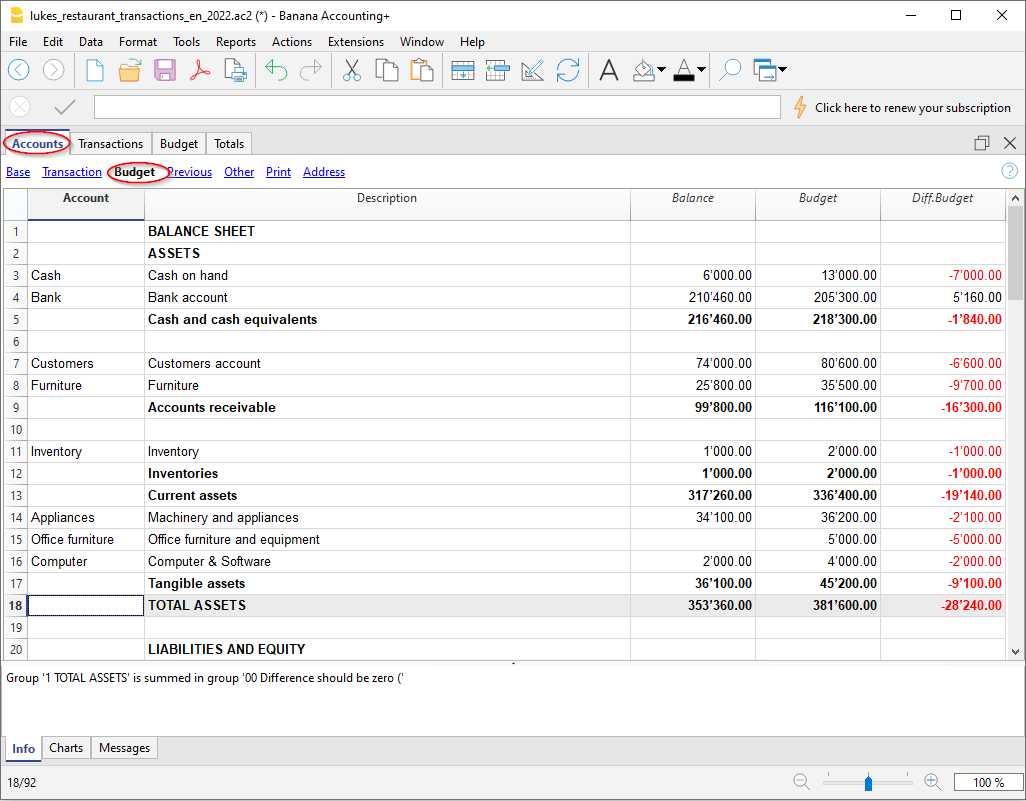
Enhanced Balance sheet with groups
Through Enhanced Balance Sheet with groups command, you can view the Provisional Balance Sheet, choosing the presentation mode you need.
- Indicate in the Sections options to display the values of the Budget
You can display the current (accounting) values, the budget values or both. - Set up the Period.
If a period that exceeds the accounting period, is indicated, the program will automatically switch to budgeting over several years. - With the subdivision by period the data are presented with the subdivisions chosen for the period.
- In the Rows section, you can exclude accounts and thus have a view of groups only.
- If you think you will use this print setting again, create a Customization.
Using the different options you can customize your prints. Below are some examples.
Enhanced Balance sheet annual Budget groups
This print has been set up to produce only the budget values for the current year.
Budget and Current Balance sheet
The actual (current) values are compared with those of the budget. You can also display the change in the comparison as an amount and a percentage.

Quarterly budget
IIn order to obtain an annual budget with a quarterly breakdown, the quarter must be indicated in the section Subdivision → Subdivision by period. The program will show the budget for the year, divided into 4 quarters.
Budget and current quarter Balance sheet
This printout is set up to display both the budget and the annual final balance with the breakdown per quarter. Thus we have the expected and current situation at the end of the quarters.

Three-year budget
This printout is set up to print the three-year budget forecast.
In the Period section set the reference period to three years and in the Subdivision section → Subdivision per period set to one year. In the File properties (File menu) there must be 3 years as the start and end period (e.g. start 01.01.2022 - end 31.12.2024).
Budget Accounting Report
From the Reports → Accounting Report menu you can get printouts of financial statements displayed as in the accounts table, but with the required column values.
The options are similar to those explained for the Enhanced Balance Sheet by groups.

Financial forecasting for suppliers
Supplier forecasting completes financial planning with supplier data. For example, a company can plan purchases by indicating purchases by indicating accounts for the most important suppliers. It will thus be able to analyze and optimize the relationship with the various suppliers, perhaps by requesting payment extensions.
Forecasting with the double entry method also allows you to indicate accounts for individual suppliers. Depending on the need, suppliers management can be done with balance sheet accounts, profit and accounts or with cost and profit centers.
When changing a budget movement, the forecasts for each individual supplier are also updated.
Accounts table
Set up accounts for suppliers in the Accounts table. In the Budget column, the forecast balances are automatically updated for the accounting period, according to the beginning and the end date, set up in the File properties. At a glance, you can view what the forecast for the individual supplier will be.

Evolution chart
When you open the Charts window, positioning the cursor on an account or a group you will see the graph representing the evolution of Suppliers.
In the legend are visible Current, Previous and Budget. By clicking on each one it is possible to hide or make visible the respective graphs.
Account card with Supplier budget data
With the Budget account card command you have the possibility to see in detail all the movements for each supplier.

- Select budget movements.
- Indicate the supplier’s account ot the supplier's group.
- Set up the period.
If you indicate a period that extends beyond the accounting period, the program will automatically generate Forecasts over several years. - When indicating a group, you will see the movements of all the accounts belonging to that group.
- When in the Budget table, you can access the customer's card with a click on the small icon next to the account number.
Suppliers Enhanced Balance sheet with groups
Through the Enhanced Balance Sheet with groups you can choose which data columns to display and the reference period, to see the evolution of the supplier by day, week, month, quarter, semester, year, etc.

- In Sections options you can select the Budget data to be displayed.
- Select the Suppliers group. You can also choose to view the accounts of each individual supplier.
- Set up the Period.
If a period that exceeds the accounting period, is indicated, the program will automatically switch to budgeting over several years. - Indicate the subdivision by period required.
- If you think you will use this print setting again, create a Customization.
Accounting Report with Suppliers Budget
The Accounting Report is similar to the one for Enhanced balance sheet with groups, with the difference that the display takes place in columns, as in the Accounts table.
You can therefore use it to get an instant view of the evolution of the Supplier accounts.

Investments Planning
The investment plan presents the expected evolution of the equipment, stocks, movable or immovable values that are necessary for the company.
With Banana Accounting, thanks to the forecasting with the double-entry method, you can track what the evolution of assets will be over time. You generate comprehensive forecasts, which you can organize in different ways. The program also calculates forecasts over several years.
The structure of the accounts is identical to the one used for accounting. When printing, you can indicate whether to select which values to display, the final ones only, the forecasted ones or both together.
You also have the Income statement forecasts, so you can display the evolution of amortization and interest. When a budget movement is changed, the forecasts are immediately updated. You can run simulations, assign a payment, add an investment, change sales and see how asset accounts evolve.
For the Investment Plan, you have the same options as in the Liquidity Planning and the Provisional Profit and Loss Account.
Using formulas
The formulas allow you to automate calculation of depreciation and interest. When you increase an investment, the Profit and Loss statement will also be instantly be updated. Formulas are particularly useful when making forecasts over multiple years.
Chart of Accounts
In the Budget column of the Chart of Accounts the forecast values for all accounts and balance groups are displayed, and therefore, for all those relating to investments equally. With a glance, you have an instant view of the values referring to the accounting period.

If you require more investment details, you may add accounts or groups.
Evolution charts
When you open the Charts window, positioning the cursor on an account or a group you will see the graph representing the evolution of the Suppliers.
In the legend are visible Current, Previous and Budget. By clicking on each one it is possible to hide or make visible the respective graphs.
Investments Account card with Budget data
Using the Budget Account card command will offer you the possibility to see in detail, all movements of the budgeted investments. You have the evolution, day by day, of every single Assets account and also of the depreciation accounts.

The Account card command allows you to specify if you want to see current or budgeted movements.
- Select budget movements.
- Indicate the account or the Investments group.
- Set up the Period.
- If you indicate a period that exceeds the accounting period, the program will automatically generate Forecasts over several years.
- If you indicate a group, you will see the movements of all the accounts belonging to that group.
- When you are in the Budget table, you can access the account card with a click on the small icon next to the account.
Investments in the Enhanced Balance sheet with groups
Through Enhanced Balance Sheet with groups you can choose which data columns to display and the reference period, to see the evolution of the investments by day, week, month, quarter, semester, year, etc.
- In Sections options you can indicate to display the Budget data.
- Choose the Investments group. You can also choose to display the accounts of each individual asset relating to an investment.
- Set up the Period.
If a period that exceeds the accounting period, is indicated, the program will automatically switch to budgeting over several years. - Indicate the subdivision by period required.
- If you think you will use this print setting again, create a Customization.

Accounting Report with Investments Budget
The Accounting Report is similar to the one for Enhanced balance sheet with groups, with the difference that the display takes place in columns, as in the Accounts table.
You can therefore use it to get an instant view of the evolution of the investments accounts.

Corporate financing plan
The corporate financing plan presents the expected evolution of the accounts relative to the origin of third party and own capital.
With Banana Accounting, thanks to the forecasting with the double-entry method, you have complete forecasts that you can arrange in different ways. The program also calculates forecasts over several years.
The structure of the accounts is identical to the one used for accounting. When printing, you can indicate whether to select which values to display, the final ones only, the forecasted ones or both together.
When a budget movement is changed, the forecasts are immediately updated. You can run simulations, assign a payment, add a new debit, change sales and see how liabilities accounts evolve.
For the Corporate financing plan, you have the same options as for the Liquidity Planing and the Provisional Profit and Loss Account.
Using formulas
The formulas allow you to automate calculation of depreciation and interest.Formulas are particularly useful when making forecasts over multiple years.
Chart of Accounts
In the Budget column of the Chart of Accounts the forecast values for all accounts and balance groups are displayed, and therefore, also for all those relating to funding. With a glance you get an instant view of the values referring to the accounting period.

If you require more details on third party capital, you may add accounts or groups.
Evolution graphs
When you open the Charts window, positioning the cursor on an account or a group you will see the graph representing the evolution of the financing of the company.
In the legend are visible Current, Previous and Budget. By clicking on each one it is possible to hide or make visible the respective graphs.
Account card with Budget for third party capital data
Using the Budget Account card command you have the opportunity to see on a day-to-day basis, how each account payable evolves, debt amortization, interest expense and understand the impact they have on financing.

The Account card command allows you to specify if you want to see current or budgeted movements.
- Select budget movements.
- Indicate the account or group of loans.
- Set up the Period
If you indicate a period that exceed the accounting period, the program will automatically generate Forecasts over several years. - If you indicate a group, you will see the movements of all the accounts belonging to that group.
- When you are in the Budget table, you can access the account card with a click on the icon next to the account.
Enhanced Balance sheet with groups
Through Enhanced Balance Sheet with groups you can choose which data columns to display and the reference period, to see the evolution of the funding of the company by day, week, month, quarter, semester, year, etc.

- In Sections options you can indicate the Budget data to be displayed.
- Choose the Third party capital group. You can also select to display the accounts of each individual funding account.
- Set up the Period.
If a period that exceeds the accounting period, is indicated, the program will automatically switch to budgeting over several years. - Indicate the subdivision by period required.
- If you think you will use this print setting again, create a Customization.
Accounting Report for Third party capital Budget
The Accounting Report is similar to the one for Enhanced balance sheet with groups, with the difference that the display takes place in columns, as in the Accounts table.
You can therefore use it to get an instant view of the evolution of third party accounts.

Project planning with profit and cost centres
Financial planning of projects allows you to take control over the income and expenses of a project. It is used to evaluate investments and returns on a project and to track its implementation.
Budgeting with the double-entry method allows you to indicate profit and cost centers as well. You only need to set up cost centers for the different projects, and in parallel to the balance and income statement forecasts, you will have the forecasts available for each individual project.
- Watch the video: Cost and profit centers
The projections are calculated on the basis of the initial balance and the forecasts entered in the Budget table. When a line is changed the budget, forecasts are instantly updated. You can produce simulations, reassign a payment, add an investment, modify sales and spot how the project changes.
Values of projects can be displayed in several ways.
Accounts table
Profit and Cost centers are set up in the Accounts table. After each movement, the updated balances of the forecast for the accounting period of reference are displayed in the Budget column. At a glance you can know immediately what the situation of the projects will be at the end of the year.

Evolution chart
When you open the Charts window, positioning the cursor on an account or a group you will see the graph representing the evolution of the projects.
In the legend are visible Current, Previous and Budget. By clicking on each one it is possible to hide or make visible the respective graphs.
Account card with budget data
With the Budget Account card command you have the possibility to display all the movements for the single project in detail, day by day.

The Account Card command allows you to specify whether you want to display current or budget transactions.
- Select budget movements.
- Indicate the cost or profit center accounts, or the group.
- Set up the Period.
- If you indicate a period that extends beyond the accounting period, the program will automatically switch to Forecasts over several years.
- When you indicate a group, you will see the movements of all the accounts belonging to that group.
- When in the Budget table, you can access the cost center tab by clicking on the small icon next to the account number.
Enhanced Balance sheet with groups
With the Enhanced Balance sheet with groups you can choose which data columns to display and the reference period, to see the evolution of the projects by day, week, month, quarter, semester, year, etc.
- In Sections options you can select the Budget data to be displayed.
- Select the Projects group. You can also choose to view the accounts of each individual project.
- Set up the Period.
If you indicate a period that extends beyond the accounting period, the program will automatically switch to Forecasts over several years. - Indicate the desired subdivision by period.
- If you think of continuing to use this print setting, create a customization.
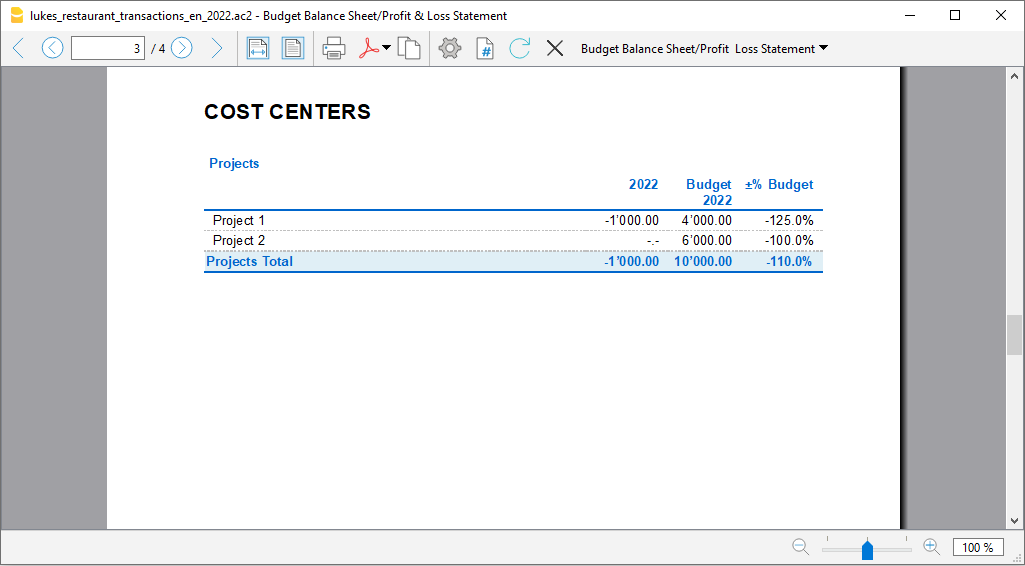
Projects Budget Accounting report
The Accounting report is similar to the Enhanced balance sheet with groups, with the difference that the display takes place in columns, as in the Accounts table.
It can therefore be used to display an instant view of the evolution of the projects.

Planning with segments per sector and branch
The financial planning by sectors allows you to run budget and income statement forecasts for each sector or branch of the company. With the Segments, you can then evaluate the different areas of the company and understand what contribution it makes to the overall business.
The forecast, with the double-entry method, also allows you to indicate the segments which are set in the Accounts table, at the end of the chart of accounts and are used both for accounting and forecasting. When recording the movements of the forecast, the accounts of the segments must be entered when necessary. Banana Accounting executes the Balance Sheet and Profit and Loss Statement of the forecast as well, with the subdivision by the different segments.
The projections are calculated on the basis of the initial balance and the forecasts entered in the Budget table. When a budget movement is changed , forecasts of the project are instantly updated. You can produce simulations, reassign a payment, add an investment, modify sales and spot how the project changes.
Sector or branch data with segments can be displayed in several ways.
Chart of Accounts
Segments are set up in the Chart of Accounts. When indicating the segments for the Balance Sheet and Profit and Loss statement accounts, the balance of the segment will always result as zero in the accounts.

Account card with Segments budget data
With the Budget Account card command you have the possibility to examine all the movements for each segment in detail.
 The Account card allows you to specify whether you want to display the current or budget movements.
- Select budget movements
- Indicate the required segment, or the group.
- Set up the Period.
If you indicate a period that extends beyond the accounting period, the program will automatically switch to Forecasts over several years. - If you indicate a group, you will see the movements of all the segments belonging to that group.
- When in the Budget table, you can access the Budget Account card by clicking on the small icon next to the account number.
Enhanced Balance sheet with groups
With the Enhanced Balance sheet with groups you can choose to divide the values into separate columns for each segment. Thus, you dispose of the Balance Sheet and Profit and Loss statement for each sector.
- Indicate that you wish to display the Budget values in the Columns section.
- In Sections you may choose to view the balance sheet or the profit and loss statement only.
- Set up the Period.
If you indicate a period that extends beyond the accounting period, the program will automatically switch to Forecasts over several years. - Indicate the required subdivision by segments.
- If you plan to continue to using this print setting, create a customization.

Accounting report for the Budget of Segments
The Accounting report is similar to the Enhanced balance sheet with groups, with the difference that, the display takes place in columns.
It can therefore be used to display an instant view of the evolution of the segments.

New year for financial forecasting
The Banana Accounting function to Create a New Year also takes up the budget movements.
For each row in the table Budget, in the New Year column, you have the possibility to indicate:
- Whether the operation is to be carried forward or not,
- If the date is to be kept or replaced with the date of the new year.
Creating the budget for the new year is therefore simple, because you have to modify or add the expense and income items that are expected to change.
Annual budget in columns (Accounts and Categories tables)
If you wish to set up a budget on an annual basis quickly, without details for the period, you can enter the forecast amounts in the Budget column of the Accounts and / or Categories table.

Annual Budget column
In the Accounts and / or Categories table, the Budget column can only be modified if the Budget table has not been added. If the Budget table is present, it can be removed as follows:
Once the Budget table has been removed, the Budget column is activated and you can enter the annual budget amounts in the Accounts and / or Categories table, Budget view .
As a rule of thumb, only the budget for expenses and revenues (double-entry accounting) and for income and expenses (income / expense accounting) will be indicated.
The budget values must be entered on each Account and / or Category. The program calculates the totals automatically, and derives the profit or loss from them.
- Accounts table:
- Revenues (Credit) must be entered as a negative value
- Expenses (Debit) as a positive.
- Categories Table:
- Income must be shown in positive
- Expenses must be indicated in negative.
Budget Difference Column
In the Budget Difference column, the program will calculate the difference between the balance and the value in the Budget column. Whenever a transaction is entered in the Accounts and / or Categories table, this column will be updated automatically.
Print per period
When printing by month or quarter, the program divides the value indicated in the Budget column into monthly quotas.
The program proceeds as follows for the subdivisions:
- Calculates the number of months, based on the start and end date indicated in the File menu → File Properties (basic data).
- The budgeted amount is divided by the number of months calculated.
- Any rounding differences will be added to the last month.
If, for example, you have indicated an amount of 10'000, this will be divided into 11 monthly amounts of 833.33 and one salary of 833.37.
If a quarterly preview has been selected, the value of the quarter will be the sum of the individual months and not the value of the year divided by quarters.
If you want a different planning by month or quarter, you should use the planning with the Budget table.
Add Budget columns
Via the Data → Columns setup → Add command you can add other columns to indicate other budget values.
- Set the Data Type with Amount.
This way the program will calculate the sums of the groups.
You may add budget columns for:
- Manage multiple Budget values (different scenarios).
- Keep a copy of the initial budget created with the Budget table:
- Prepare the budget in the Budget Table.
- Go to the first row in the Accounts table, and select the entire column (by clicking on the column header).
- Menu Edit → Copy.
- Position yourself on the first row in the budget column where to copy the data.
- Menu Edit → Paste.
Item management integrated into accounting
In the accounting file, a table can be added to manage items and link them to individual transactions via the Item Id (item identifier) that is entered in the Item column.
This feature is very powerful and useful because it allows the following automations:
- To integrate a list of products or an inventory with descriptions, quantities, prices and groupings into the accounting.
- In the Transations table, by entering invoices and simply indicating the Item Id (Item identifier) in the Item column, the description, price and account are taken over.
- In the transaction row, by entering the quantity (positive or negative), the programme automatically updates the existing quantity balance. It thus functions as a small warehouse.
Some extensions, such as those for securities management, make use of this functionality, to manage the list of securities, have an inventory and calculate the accounting profit or loss at the time of sale.
Activate the functionality
The functionality is enabled from the menu Tools menu > Add/remove functionalites.
The options are as follows:
- Add Items table
Adds the Items table in the accounting file. - Add Items table and Items Columns in the Transactions table.
Adds the Items table and Items columns to the Transactions table at the same time.
Items table in the accounting file
The Items table is a kind of mini-warehouse integrated in accounting.
It is used to:
- Manage the list of products, with their prices.
- You can group products into groups.
- In the Transactions table, you enter the item and the programme takes up the description and price.
- If you enter the quantity in the Transactions table, the programme updates the current quantity in the items table.
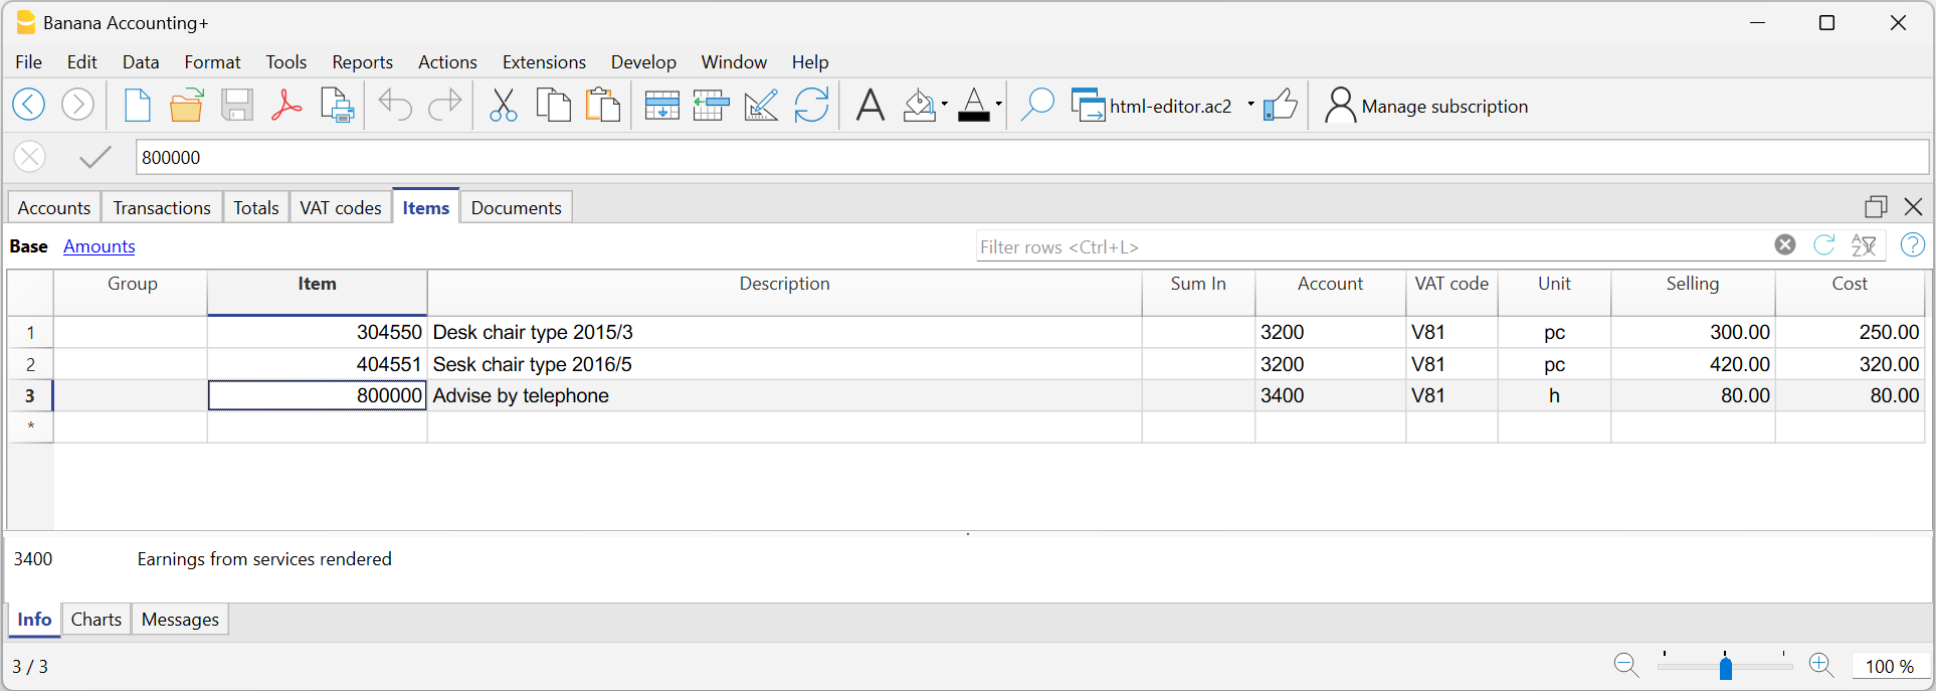
Add Items table and Transactions columns
In the Items table you may enter items, products and others. It may also be used as an inventory control, to some extent.
The Items Table is automatically connected to the ItemId and Quantity columns in the Transactions Table when this are available.
- Items table
If it is not available use this command - Transactions Table
Make sure you have the ItemId, Quantity, Price columns in the Transactions Table- Add the Items columns in the Transactions table.
- Display the Item column in the Transactions table via the Data menu →Columns setup.
- The content of the ItemId column must be an item defined in the Items table.
Columns of the Items Table
- Group: Generates the totals rows.
- Item: Item code.
- Description: Item description.
- Sum in: the group in which to total a set of items.
- Account: account used in the transactions.
- Currency: Currency to be used (for multi-currency accounting only).
- VATCode: VAT code to be used (for VAT accounting only).
- Unit: an abbreviation to define the type to which the quantity refers.
- Selling: Unit sale price.
- Cost: Unit cost price,
- Begin Qt.: initial quantity amount of the item
- Price Begin: the initial unit price of the item.
- Value Begin: the initial quantity multiplied by Price Begin.
- Current Qt.: current quantity, calculated by program, taking into account Begin Qt. and transactions of Item in Transactions table. The Quantity column of the Transactions table is being used.
- Price current: current Price of Item.
- Current value: current quantity multiplied by Current price.
Items columns in the Transactions table
The Items columns in the Transactions table are used to enter quantity and price.
The amount of the transaction is calculated based on the value of the quantity and unit price column.
Add the Items columns in the Transactions table
The Items columns are added to the Transactions table from the Tools menu → Add new functionalities → Add Items Columns in Transaction table.
The columns are the following:
- ItemsId
Item listed in Items table.
By default, in the Transactions table, the ItemsId column will not be visible. With the Columns setup command, you can make the column visible so that you can use it. - Quantity
May be a positive or negative value. - Unit
- Unit/Price
May be a positive or negative value.
For more information please visit the Transactions table documentation.
Add Transactions
- When a quantity and a unit price are entered, the amount will be calculated automatically.
- A negative amount may be entered to account for items leaving the warehouse.
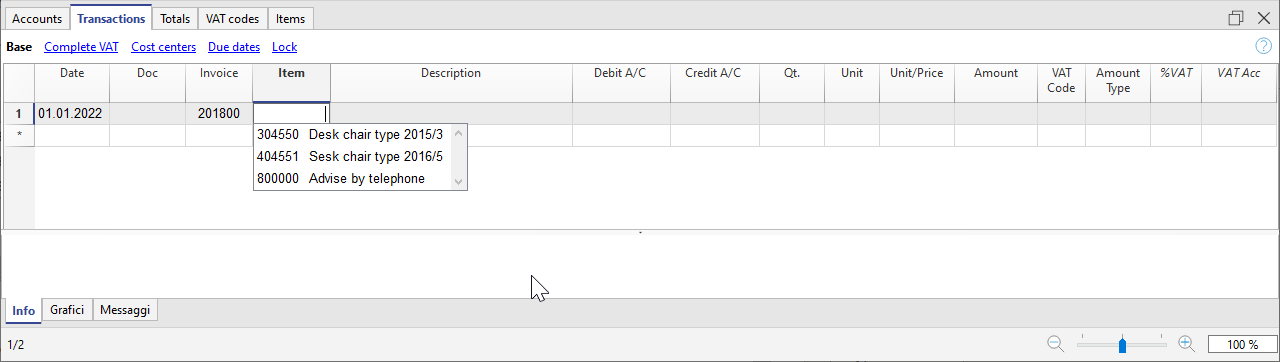
Link to the Items table
If the is an Items table is displayed, when you enter a transaction with the Item and the quantity, the current quantity of the respective row in the Items table is updated.
Refer to the Items table page.
Import and auto-completion
Banana Accounting Plus provides several ways to import transactions or other data to speed up and automate bookkeeping.
Importing and completing bank transactions
This is the functionality that allows you to keep your accounting quickly:
- Import bank transactions into your accounting file
The programme creates the entries with date, description, amount, account and exchange rate. Additional data such as the counterpart must be completed by hand.
Standard formats, such as ISO 20022 or TXT, are included in the Professional plan; other formats require the Advanced plan. - Automatically complete the transactions by using the rules (Advanced plan)
You can set auto-completion rules to import transactions, including the counterpart, VAT code, cost centres and other information you have specified.
You can always edit and further complete your entries.
Bank transactions import formats
- Banana Accounting Plus reads the transactions in different formats. Visit the Import transactions page.
- Thanks to the customised Import Extensions, you can import data from various bank statements and other standard programmes. Some extensions are only available in the Advanced plan.
Other commands for importing data
Banana Accounting Plus provides different ways to import data:
- Import into Accounting
You can import in any table and from different formats. - Import Rows
All tables allow the import of data from the CSV format. - Copy and paste from Excel or other programmes.
You can prepare movements or other data in an Excel table and copy and paste them in bulk into the Transactions table or any other table.
Manual completion and undo import
Once movements or other data have been imported, you can easily complete and edit them. This makes it very easy to automate processes, because if there are unforeseen exceptions, you can edit the data directly.
Like all commands, the import command can also be undone. So you can easily try importing the data and see if it works as expected. If you have not chosen the right format or have not set the parameters correctly, simply Undo the import and do it again.
Useful links
Import into accounting command
The import command is activated from the Actions menu → Import into accounting and allows you to import data from files in the following tables:
- Transactions - Bank transactions
Used to import bank statements into the Transactions table. - Transactions - Generic transactions
Used to import transactions in the Transactions table. - Accounts
Used to import accounts in the Accounts table. - VAT Codes
Used to import VAT codes into the VAT Codes table. - Exchange rates
Used to import exchange rates into the Exchange rates table. - File
Imports data into multiple tables and also into the Accounting File Properties. This type of import is used for example when converting the chart of accounts.
To import data from other programmes, see the page Retrieving data from other programs.
Import procedure
- Choose the destination table for the data.
- Choose the file type to be imported.
- Specify the name of the file.
- Choose the movements to be imported.
Supported import formats
Various import formats are available depending on the type of destination table.
- Import from other Banana Accounting files (.AC2)
Prepared to convert data from files. - Text files with header (CSV/TXT)
For files created that export data in the format required by Banana Accounting.
See the technical instructions on how to prepare these files. - Default file formats (generic)
ISO 20022 (generic). - Import via an import extension
Usually for bank statements.
The import extension is an additional Banana Accounting program that transforms data from a specific format
The user must install the appropriate extension.
Should there be a need to import from other file types not included in the list, a specific Banana Import Extension can be developed.

Import parameters
File name
- Indicate the name of the file of which the data need to be imported.
- For certain types of imports (e.g. bank statements)
- You can also indicate multiple files together, either by selecting them with the browse dialog or by entering them separately with a semicolon ";".
- You can indicate a zipper file that contains multiple import files.
- If you specify multiple files, they must all be of the same type.
Import data from clipboard (Excel)
With this option active, the data, instead of being read from the file, is read from the clipboard.
It is used to import data from files that cannot be directly read by Banana, such as bank statements in Excel format, or from another programme.
The advantage of importing data and not simply using the copy-and-paste function is that the data are converted by the import programme and completed automatically.
Proceed as follows:
- Open the file with the data using Excel.
- Select the data to be imported, including eventual header rows.
- Issue the copy command (Ctrl+C).
This option is shown only for certain import types.
UTF-8
Select whether the data to be imported is in the utf-8 format.
This option is shown only for certain import types.
Manage extensions...
This command brings you to the Mange extensions dialog window.
You can use it to:
- Look for, add or remove an import extension
- Edit the extension parameters.
Also use the command to change the extension settings.
Settings
The button allows you to change the settings of the extension.
The button is visible from the Banana version 10.1 and only if the extension allows parameters to be set.
OK Button
It starts the import process.
Error messages
If errors are reported during the execution of an import, the Import Extensions must first be updated.
If errors persist, please send us feedback, it may be that the file format has been updated by the originating bank or institution, and we will update our import filter accordingly.
Import transactions from ebanking
This page deals with the importing of transactions from bank statements, the most widely used and most useful feature, which allows you to automate the entry of transactions in the Transactions table.
Bank statement files are defined as those containing incoming and outgoing amounts on a single account. The import dialogue requires the entry of the account and the counterpart, and allows the use of the Auto-completion Rules.
On the other hand, in order to import from files that have other types of movements, e.g. from double-entry bookkeeping, please refer to the page Import Transactions (Generic). For these types of files, there is no possibility of applying the auto-completion rules.
Import procedure
- From Actions in the menu → Import into accounts → in the Import box select Transactions.
- Choose the file type to be imported.
See explanations below. - With the Browse button, choose the file from which you wish to import the transactions.
- Set the parameters as required.
See also: Import into accounting.
Next Steps
Once OK is confirmed, the data is read and the following dialogues are displayed:
- Import transactions dialog
Where instructions for completing the imported rows are to be given. - Apply rules (Advanced plan only)
When importing, records can be stored so that the programme will automatically complete the transactions in all subsequent imports.
Bank Statement Import Formats
In the dialogue for importing transactions you can choose between different file types:
- Import extensions for bank statements (the majority only with the Advanced plan)
These are additional programs that must be installed by the user and that convert the data to be imported in the formats foreseen by Banana Accounting Plus.
By using the Manage Extensions button you can install the extensions programmed for importing bank statements of different banks, credit cards and other formats.
Once the extension is installed it appears in the Extensions menu ready for import.- Bank statement Camt ISO 20022 Switzerland (Professional plan)
Reads the standard format made available by Swiss banks.
This extension also decodes the payment reference number, generated by the Invoice Layout CH10, and inserts the invoice or customer number. - Updated list of Banana Extensions for import.
- Bank statement Camt ISO 20022 Switzerland (Professional plan)
- Standard formats included in Banana Accounting Plus (Professional plan)
These are standard formats that banks make available and are included in Banana Accounting Plus:- MT 940 account statement
- Generic ISO 20022 Account Statement
Several banks in Europe make the account statement available in the standard ISO 20022 format.
- Generic format with Incoming and Outgoing Transactions TXT (Professional plan)
This is a text file of the CSV type, which uses the tabulator as a separator and presents the incoming and outgoing amounts of an account as columns.
File name
You indicate a file or even multiple files separated by a semicolon ";". You can also indicate a ZIP that contains multiple import files.
Import multiple files at the same time:
- If your bank provides daily camt053, you can select all the files for the month and import them in one step.
- If your bank provides a zip file, you can choose the file that contains all the statements.
The import files must, of course, be of the same type. You cannot import different formats together.
Import File Structure
The import file contains the typical movements of a bank statement:
- Date
- [transaction number] optional
- Description
- Incoming or outgoing amount.
When importing, the user indicates to which account the transactions are to be recorded, so that the Debit or Credit account is already created.
Import extensions can be created for any bank statement.
See Technical instructions for importing an Income and Expenses file.
Frequently asked questions:
I cannot see the format of my bank statement. What should I do?
Click onto Extensions menu → Manage Extensions... then on the Update Extensions button and enable the filter for the desired format.
I cannot see the format of the Postfinance xml statement (.tgz file). How can I import my movements?
This format is no longer supported. Please contact Postfinance and ask to receive your statement in ISO 20022 format.
I get the message "This ISO 20022 file does not contain a bank statement (camt.052/053/054)". How should I proceed?
This error message is displayed if the ISO 20022 file does not contain a bank statement. The ISO 20022 format is a generic format that can contain different types of information, such as bank statements and execution confirmations. In Banana Accounting Plus, it is only possible to import bank statements (camt.052/053/054).
My bank is not in the list of supported formats. Can it be added?
It is possible to create new extensions for formats that have not yet been implemented. Support for implementing custom formats is also available for a fee.
In eBanking (e.g. Raiffeisen Bank), when entering payments, you must choose the option 'individual order' instead of 'collective order'. Only in this way are payments imported as individual orders.
Import Transactions dialog
The dialogue Import transactions is activated from the menu:
Dialogue contents
The display of dialogue elements depends on the type of file being imported:
- Single account transactions and bank statements
All elements are displayed. - Double-entry accounting transactions or others
The following elements are not displayed:- Account
- Temporary contra account
- Apply rules.
- Grouping by invoice
This element is only displayed if there is content in the import file in the DocInvoice column.
Import Transactions dialogue
This is followed by the dialogue box that allows the data to be integrated into the accounts.

Destination account
This option appears when data is imported from a bank or postal statement or the entry and exit transactions of an account in text format.
- Enter the bank account number of your chart of accounts, relative to the imported statement.
- If it is left blank, the programme enters account [A] (Account) so that you can tell whether it is a Debit or a Credit movement.
Select transactions
Start date, End date
Insert the start and end dates of the period related to the transfer of the transactions. The period can also be selected automatically in the boxes under the dates area.
Don't import if exists same External reference, Date, Amount
If activated, this option allows the user to not import already entered transactions, in order to avoid recording transactions twice. This option can only be activated when the column "ExternalRef" is present in the transactions that are going to be imported. If not, this option will be deactivated.
Sort by date
The option is active by default and allows you to have the imported transactions sorted by date.
Complete the transactions with
Autocomplete values
The option is only necessary for accounting with VAT/Sales tax and multi-currency. If activated, it allows the automatic completion of values that are missing in the imported data (for example, the exchange rate in the Exchange rate table).
Apply Rules (Advanced plan only)
The option is not available for imports of transactions from double-entry accounting files (.ac2 format).
See: Rules for transactions auto-completion.
- If this option is activated, when you confirm with OK, the Apply Rules dialogue opens.
- If you have not activated this option, you can also access the Rules by issuing the command from the menu Actions → Recurring transactions→ Apply rules...
- This option is activated by default if there are already import rules in the Recurring Transactions table.
Temporary contra account
The option is not available for imports of transactions from double-entry accounting files (.ac2 format).
A temporary account needs to be indicated to complete the contra account of the entry. The account must then be replaced with the correct contra-account, either manually or with the auto-completion rules.
The programme suggests the commented account [CA] (ContraAccount) by default.
Once the entries have been completed, there should be no more transactions using the temporary account.
Initial document number
The option is not available for imports of transactions from double-entry accounting files (.ac2 format).
This is the document number that is allocated to the first record among those imported.
The number is incremented.
Group transactions by invoice number
If the import file contains values in the DocInvoice column, the dialogue will also contain the following options:

- Group transactions by invoice number
In this case, the rows of the same invoice are being grouped in such a way that there is only one transaction for the same account and the same VAT code. Please check the explanation Import invoice data.
- Destination account for balance differences
When VAT codes are being applied, there may be rounding differences of just a few cents.
In this case, Banana Accounting Plus creates an additional transaction for every invoice into which this difference can be recorded.
Of course, it is necessary to pay attention that the data to be imported obtain a balance between debit and credit. If not, the transaction row will contain the difference between Debit and Credit.
Editing of imported transactions
The programme creates transactions and adds them to the end of the Transactions table.
The transactions can be edited or deleted.
In double-entry accounting, in the DebitAccount and CreditAccount columns and in Income/Expenses accounting, in the Account and Category columns, the programme inserts symbols.
The symbols must be replaced with the appropriate account or category.
- [A]
This symbol is shown if no account is indicated in the dialogue.
Instead of the symbol [A], the account of the bank account is to be entered. - [CA]
This symbol indicates that the contra account must be entered in the cell so that Debit transactions offset Credit transactions.
For rows with only one contra account, both the account or symbol [A] and the counterpart symbol [CA] will be on the same row.
For rows with several contra accounts (transactions on multiple rows), each row will have the account or contra account symbol [CA]. If the symbol [CA] were not indicated, it would be impossible to tell whether the movement is a Debit or a Credit movement.
Import file ISO20022
Banana Accounting Plus allows the import of bank transactions in various formats.
The ISO 20022 format is an international standard that should now be provided by all European banks. This format may also be called ISO xml, xml, camt.053, camt.054 or other names. Importing bank transactions in ISO 20022 format is possible in two ways:
Generic manual ISO20022 import
Manual import of transactions one file at a time - available with the Professional plan.
- The user downloads the ISO 20022 file from their bank and saves it in a folder on their computer.
- Then, from Banana, they manually import this file.
This import is made possible by the extension Bank Statement Camt ISO 20022 Switzerland (Banana+) for Switzerland and a generic filter distributed with the application for other countries.
The import must be repeated manually each time.
Advanced ISO20022 import [Beta]
Advanced import of transactions from multiple files simultaneously - available with the Advanced plan.
It significantly speeds up the workflow because the user no longer needs to check for which periods transactions need to be imported.
- The user defines a folder containing ISO 20022 files from different bank accounts.
- In Banana, with a command, the program notifies if there are new transactions to be imported.
This new advanced import function is made possible by the extension Swiss Camt ISO20022 Reader.
Requirements
- Use of Banana Accounting Dev-Channel with the Advanced plan.
- Use of a Double-entry accounting or Income & Expenses system.
Import bank transactions in the ISO20022 format (generic)
Banana Accounting Plus allows the import of bank transactions in different formats.
The ISO 20022 format is an international standard for the transmission of financial data that should by now be available to all European banks. This format can also be referred to as ISO xml, xml, camt.053, camt.054, and others. For some banks, the ISO 20022 format may not be available by default but needs to be requested. The ISO 20022 format replaces the old MT940 standard.
By importing bank data with the ISO20022 format, Banana Accounting Plus also allows you to automatically close open invoices of customers and suppliers.
The CAMT category regroups the formats used for the account statement, reporting of account transactions and account balance confirmation:
- camt052: Account Reporting
- camt053 (including version 4): Account Statement
- camt054: Credit / Debit Notification
Preview the ISO-20022 file
Banana. offers the possibility to preview contents of a camt file.
Data importing into the current accounting
Proceed as indicated from the menu Actions > Import into accounting.
Compressed files can also be opened with this function. In this case, the program will prompt the user to select the file from which to import the data of the compressed file.
Technical notes on converting ISO 20022 files
Banana, when reading the file, tries to adapt itself to the ways in which the ISO 20022 file has been prearranged.
- As opening balance, it reads similar encodings
- As closing balance, it reads similar encodings
- All contents are read and converted into transactions
- Transaction date (Date)
- Currency date
- Transaction amount (positive or negative)
- Description
For the time being Banana Accounting displays the different descriptions as a single text. In the future, it will be possible to extract this information on a distinctive basis and indicate the columns where to allocate data. - Distinction between single transactions or transactions with details
For transactions with details, there is a row for the total and separate rows for each single transaction that constitutes the total.
Country specifications
Each country and/or bank has the possibility to insert additional information in the ISO 20022 file according to its needs. Banana Accounting Plus offers a generic filter distributed with the application and multiple country- and/or bank-specific filters distributed as Banana Extensions. To import this additional information into your accounting, you must install and use the filter that is most specific to your country and/or bank (for example Bank statement Camt ISO 20022 Switzerland (Banana+)).
Import bank transactions in the ISO20022 format (advanced) [BETA]
This new feature allows you to update your accounting by automatically importing bank transactions from Camt files (052, 053, 054). Thanks to this innovation, you can:
- Accelerate the entire transaction recording process.
- Reduce the risk of manual errors.
- Avoid duplicates, since only transactions not yet present in your accounting are imported.
The program reads the Camt files from a selected folder, saves their content in a local database, and detects any new transactions not yet recorded. These are then proposed for import into your accounting, greatly simplifying financial management. Once imported, you can leverage auto-completion rules to further streamline your work.
This feature is currently in BETA version, available for experimental use with Banana Accounting Plus (Advanced plan) in double-entry or income & expense accounting. We welcome any suggestions and feedback to improve it.
Prerequisites
- Use Banana accounting Dev-Channel with the Advanced plan.
- Use a Double-Entry or Income & Expense accounting file.
Data Preparation
Before starting the import, make sure you meet the following requirements:
- Organizing Camt Files:
Create a dedicated folder containing all the Camt (*.xml) files you want to import into your accounting.
You can organize the files within the folder as you prefer, for example, by accounting year or by financial institution. - Access Permissions:
Ensure that the selected folder is both readable and writable by the program. This guarantees the proper saving of data and import information. - Setting IBANs:
For each account in the accounting file, make sure you have entered the IBAN in the 'BankIban' column of the 'Accounts' table.- If the column is not present, add it through the menu: Tools → Add/Remove functionality → Add address columns to the Accounts table.
- Write the IBAN in uppercase, without spaces or special characters.
- Swiss Camt ISO20022 Reader Extension:
Install the Swiss Camt ISO20022 Reader extension. This is required for the program to correctly interpret Camt files and start the import process.
First Use
The first time you use the "Import bank transactions (Camt ISO20022)" command, available under the Actions menu, the program will ask you to select the folder containing the Camt files. This choice will be saved, so that for subsequent imports the program will automatically use the same folder without asking for the path again.
Note that the first execution may take longer. The program must read, process, and save all the files in the folder, and it analyzes the content of each file. During this phase, a progress bar will display the current status of the operation, indicating both the percentage of completion and the number of files processed out of the total. The same progress indicator is shown both during the reading of the files from the folder and during the opening and reading of their contents.
On subsequent imports, the process will be much faster since the program will read and import only the content of new files, already knowing which data has been previously saved in the database. This way, future operations require significantly less time and ensure a smoother, more efficient workflow.
File Processing

The processing of Camt files occurs in two distinct phases:
- Reading Files in the Folder:
In the first phase, the program analyzes the selected folder and identifies all the files present, adding them to the internal database. During this process, a progress bar is displayed, indicating how much of the file reading has been completed compared to the total number of files. - Reading the Content of the Files:
Once file reading is completed, the program moves on to the second phase, in which it opens the files saved in the database, reads their content, and processes the data. In this phase, a dedicated progress bar is also shown, clearly displaying the percentage of completion and the number of files processed.
If, for any reason, one of these processes is interrupted, the program retains the data already saved. On the next import execution, it will automatically resume from where it left off, without having to start over. This ensures an efficient workflow and avoids repeating already completed processing steps.
Bank Transactions Import Dialog
The import dialog provides an overview of the processed files, the parameters used, and the transactions to be imported. You can modify the parameters in the dialog at any time, and the data will be recalculated immediately.
Folder Tab

The “Folder” tab provides a general overview of the import, showing the currently selected folder, the files to be processed, and some options to filter the content.
- Select Folder:
Here you can view and modify the working folder path. The program constantly checks the validity of the selected path and, if the folder does not exist or is not accessible, it displays an error. - Renaming or Moving the Folder:
If you change the folder’s name or location, remember to update the path in this dialog. The program stores the last used path and, if it cannot find it, will show a warning. - Renaming Files in the Folder:
You can freely rename the files in the folder; the program does not rely on the file name but on its content. Even if two files have different names but identical content, the program considers them duplicates and will only import one of them. - Ignore Subfolders:
By default, this option is enabled, allowing you to exclude the files located in subfolders. This is useful if, for example, you only want to import files relevant to the current accounting period, avoiding older or irrelevant data. If you disable this option, all Camt files in subdirectories will be included in the database, regardless of date or file organization. - Ignore Files Older Than...:
If you set a date in this field, the program will not read the content of files older than that date. By default, files older than the accounting opening date are saved in the database but not analyzed. Adjusting this date allows you to further refine the time filter. If you enter an invalid date, the program automatically replaces it with the current date. - Read All Files:
Clicking this button forces the immediate re-reading of all files in the folder instead of waiting for the normal daily check. This function is especially useful when you add new files and want to import them right away, without waiting for the next automatic update.
Bank Accounts Tab

The “Bank Accounts” tab provides a detailed overview of all the bank accounts present in your accounting. For each account, the program shows both static information (such as the current balance in your accounting) and dynamic data, updated based on the latest imports.
Information Displayed for Each Account
- Accounting Balance:
Shows the current amount recorded in the accounting for that account. - Last Bank Balance:
Displays the most recent bank balance detected directly from the Camt files. This lets you instantly compare the figure in your accounting with the actual bank amount. - New Transactions:
Indicates how many new movements, not yet recorded in accounting, have been detected in the Camt files. - Total New Transactions:
Shows the total monetary value of the new transactions to be imported for that account, helping you quickly assess the volume of pending operations. - Last Import:
Indicates the date when the folder was last fully read, providing a useful time reference for when the last update occurred. - Status:
- Updated: There are no new movements to import for this account.
- New transactions: Unrecorded movements have been found, ready to be imported into the accounting.
Transaction Details Tab

In the “Transaction Details” tab, you will find all the banking operations identified in the Camt files that are not yet imported into the accounting, organized by account. This view allows you to quickly analyze pending movements, verify their relevance, and select which ones to import.
- Selecting Transactions to Import:
You can temporarily exclude specific transactions or, if you prefer, all those related to a particular account using the provided checkboxes. Excluded transactions are not permanently removed; they will be proposed again the next time you open the dialog, allowing you to reassess their import at any time. Currently, it’s not possible to permanently exclude a transaction. - Consider Only Transactions Starting from a Specific Date:
To reduce the number of displayed movements, you can set a date from which to consider new transactions for import. By default, the program uses the accounting start date. By setting a different date, it will only display operations occurring after that day, ignoring previous ones. This function is particularly useful if, in the past, transactions were imported without a unique ID (ExternalReference column), typically when importing from CSV files. In these cases, simply set a date after the last recorded transaction to avoid re-proposing older movements. If you enter an invalid date, the program automatically replaces it with the current date. - Unique Identification of Transactions:
Transactions from Camt files (052, 053, 054) should always include a unique ID as required by the ISO20022 standard. This identifier enables the program to accurately detect which movements have already been imported and which are new, reducing the risk of duplicates or errors.
Settings Tab

Settings Tab
In the “Settings” tab, you can manage some advanced aspects of the import process, including the possibility to restore the initial data state and define how to recognize already processed files.
- Delete Saved Data:
This function allows you to delete all data related to previous imports stored in the internal database. Once deletion is confirmed, you will be automatically redirected to the “Folder” tab, where the default values will be restored.- New Import: If you want to perform a new import after deleting the data, simply click on the “Read all files” button.
- Limited Impact on Import Data: Deleting data from the internal database does not affect any information already present in the accounting.
- Complete Database Removal: The command here only clears the database tables. If you want to completely remove the database, you must manually delete the “*.db” file in the selected folder.
- Always Verify the Existence of Files Using Hashing:
This option allows you to choose how the program identifies already processed files:- Hashing (slower): If you select this option, the program will compute a unique hash for each file, ensuring accurate duplicate detection even if names or paths change. However, this method can slow down file reading.
- Check Name, Date, and Size (default): If the checkbox is not selected, the program simply compares the file name (including path), creation date, and file size to determine uniqueness. This approach is faster but may not be as robust in scenarios where files are renamed while retaining the same content.
Database File
The program uses an SQLite database to store import-related data. The first time you activate this function, if the selected folder is valid, a database file (*.db) will be created in it.
It is important not to move or delete this file, as the program uses it as a reference for all subsequent operations. In case of loss or deletion, the program will generate a new .db file, forcing you to re-read and re-process all the files in the folder.
What is Saved in the Database?
- File List:
All the files detected in the folder are saved. If you have chosen to ignore subfolders in the settings, the files they contain will not be saved. This option is enabled by default. - Bank Accounts and Related Data:
The database stores information about the bank accounts present in the accounting. If these data are modified in the accounting file, the database updates them accordingly. - Imported Transactions:
Transactions found in the opened and read files are saved in the database, allowing you to reprocess or view them later without having to re-read the files. - Import History:
The program records who performed the import operations, when they were executed, and with which software version, providing a detailed historical trace of activities.
Log File
During the import process, the program generates a log file to help identify and diagnose potential issues. In case of anomalies or unexpected behavior, the log file provides detailed information about the operations performed, aiding developers in understanding the source of the error.
If you need assistance locating or interpreting the log file, contact our support team: they will guide you step-by-step to find the file within your active directory.
Troubleshooting
If no transactions are displayed for import despite having selected the correct folder, check the following:
- Bank Accounts: Make sure that the data related to bank accounts (including IBANs) in the “Accounts” table is complete and correct.
- Accounting Period: Check that the currently set accounting period includes the dates of the transactions you want to import. If the transactions fall outside the defined period, the program will not propose them for import.
If the problem persists after these checks, contact our technical support for further assistance.
Import transactions (generic)
The following explanation refers to the import of data into the Transactions table from files containing transactions of the double-entry type, from Banana Accounting, or other formats.
The Import of bank transactions is similar to importing transactions, but is dealt with separately in detail on the appropriate page.
Import procedure
- Via Actions in the menu > Import to accounting > In the Import box, select Transactions
- Choose the file type from which to import
See explanation below. - With the Browse button, choose the file from which to import the transactions
- Set the parameters as required.
See also: Import into accounting
Once OK is confirmed, the data are read and the following dialogue is displayed:
- Import transactions dialogue.
Where instructions must be given for the completion of the imported rows.
Importing from other Banana Accounting files
In the type of file to be imported, the programme provides a number of configurations to import data from other Banana Accounting files:
- To import transactions from an Income & Expenses accounting file (*ac2)
In order to import transactions from an Income & Expenses accounting file into a double-entry accounting file, it is necessary that the categories of the Income & Expenses file correspond to the accounts of the double-entry accounting file. - To import Cash book transactions (*ac2)
See the specific page Import Cash book transactions. - To import Double-entry accounting transactions (*ac2)
In order to import transactions from a double-entry accounting file into another double-entry accounting file, it is necessary that the accounts correspond. - To Import Fixed Asset register
Imports transactions from the Fixed Asset register .ac2 file.
Import TXT/CSV files
This format must be used to export data from another programs, which provides an export format compatible with that required by Banana Accounting. See the information at the following link:
Importing account statements with import extensions
Import Extensions are additional programs that must be installed by the user and convert the data for import into Banana Accounting.
There are extensions for importing bank statements from various banks, credit cards and other formats.
These extensions only work with the Advanced plan. All old filters will be updated over time and the new versions will only be usable for those with the Advanced plan.
Search for and install an extension:
Search and install an extension:
- Click on Manage Extensions
- Choose Import.
- Navigate to the desired extension and click onto Install.
- If the Settings button appears, it means that this extension has parameters that you can customise.
Once the extension is installed, it appears in the list of available types, directly in the Extensions menu, and you can choose it for import.
Import data from a Cash book file
Cash movements can be managed separately from the main accounting file via the Cash Manager. On a regular basis, the movements are imported into the main accounting file, grouping them according to a chosen period.
In this case you have two separate files:
- One file contains all the general accounting data (including the cash account).
- A file contains only the cash register data.
In order to integrate the cash data into the main accounting, a link must be established between the main accounting and the Cash Manager file.
There are two different ways to create the link:
- In the Cash Manager file, give the categories the same numbers as the accounts of the main accounting (double-entry accounting or Income / Expense).
-
Enter the corresponding accounts of the main accounting file in the Category2 column (Categories table).
If the Category2 column is not present, it must be displayed via Data → Columns setup.
Set up the internal transfer account
When importing the cash data into the accounting file, certain settings are required so that there are no overlaps of accounting entries for payment operations between the cash account of the main accounting and the transactions imported from the Cash Manager file.
In the Main accounting file:
- In the Accounts table, enter the Internal transfer account.
In the Cash Manager file:
- In the Categories table, Categories column in the Revenue group, enter the internal transfer account (the same number set in the main accounting) as a category for payments from the bank or postal current account.
- Alternatively, in the Categories table, Categories2 column in the Revenue group, enter the internal transfer account. In this case, a category is set in the Categories column to determine payments from the bank. The internal transfer account, located in the Categories2 column, creates the link when you import the transactions into the main ledger.
Payments from the bank account to cash account
Whenever a payment is made from the bank account to the cash desk, the movement is recorded both in the main accounting file and in the cash register file. To avoid overlapping of accounting entries when importing data from the cash desk, the internal transfer account account is used
- The receipt of funds is recorded in the cash register file, using the tour account as category or alternatively the category for payments from the bank account, if the tour account has been set in the Category2 column.
- The outflow of funds is recorded in the main accounting file, with the bank account in credit and the internal transfer account in debit.
When importing the cash register data into the main accounting file, the tour account is reset.
Import the cash register data
- Open the main accounting file
- Click Action→ Import to accounting
- In the window that appears, from the drop-down menu Import → select Transactions → Cash book movements (* .ac2) "
- Using the Browse button, select the Cash Manager file.

The explanations of this window are available at the page Import to accounting.

In accounting
Destination account
You must select the cash account number, present in Double-entry accounting or Income / Expense accounting, where the movements are to be imported.
Initial document number
An initial document number can be entered which will be attributed to the first imported transaction. In subsequent recordings, the program automatically assigns a progressive number, starting from the initial one entered.
If you do not wish to assign progressive numbering automatically, leave the box empty.
Select movements
Start date / End date (inclusive)
Enter the start and end date of the period to which the imported transactions refer.
Group transactions
By activating one of the options it is possible to choose how the movements of the period should be grouped:
- No period groupingAll rows are imported with their column contents. The Doc number present in the corresponding column of the cash register file is also imported.
- If you want to use a different numbering in the accounting and simultaneously keep the original document of the file, in the Cash Manager insert the document in the DocProtocol column.
- Monthly - groups the transactions by month.
- Quarterly - groups movements by quarter.
- Semi-annual - groups the movements by semester.
- Annual - groups the transactions by year.
One registration per account
If several categories are grouped into a single account in the accounting, but separate transactions are desired for each category, this box must be activated; the program creates recordings for each category. When using VAT codes, postings are created not only by category, but also by different VAT codes for the same category.
Note
When you have an accounting with VAT, the VAT calculations may be slightly different. If the transaction amounts are entered net, the cash account balance may also differ due to rounding differences.
The accounting file is updated with the cash register data.

Import transactions from Paypal
On the page Web filter for PayPal transactions you will find the information about the new feature that makes it possible to import all the Paypal transactions directly into Banana Accounting and the instructions on how to proceed (see below).
We have also prepared specific predefined templates for double-entry or multi-currency accounting that you can look at as an example or use as a separate accounting file just for the accounting transactions from Paypal.
More information about all types of import filters can be found on the Import filters page.
- BananaApp for importing Paypal transactions - how to proceed
- examples for the Double-entry accounting
- examples for the Multi-currency accounting
Learn more
- Double-entry accounting
- Multi-currency accounting
- Import filters - complete list
Import accounts
This command imports the accounts from a Double-entry or Income & Expenses file (*.ac2) or a text file (*.txt), and integrates them automatically in the existing Chart of accounts.
To import accounts from another file, proceed as follows:
- Via Action → Import to accounting → select Accounts in the Import box.
- Select the * .ac2 or text file type to import the accounts.
- With the Browse button, choose the file where you want to import the Accounts to imported from.

Accounts or categories can be included in current accounting by activating the following options:

Options
Include Cost Centers
When there are cost centers, these will also be carried forward.
Add new accounts
When this option is activated, all new accounts are added to the accounting plan.
Replace text description
If already existing accounts are imported, but with different descriptions, the existing descriptions are replaced by the imported ones when this option is activated.
Replace opening balance
If already existing accounts are imported with different opening balances, the existing opening balances are replaced by the imported ones when this option is activated.
Import VAT codes
This function is only available in the Accounting with VAT management, and allows the user to Import VAT codes from:
- Other accounting files (*.ac2)
- A text file with column headers (text file *.txt)
Import from an accounting file
If you manage several accounts and use customised VAT codes, you can prepare the VAT code table and then import it into your other files.
- Prepare the VAT Codes table in your accounting file.
- Command Actions > Import to Accounting > VAT Codes
- Choose the name of the file containing the updated VAT Codes table.
- Choose replace all rows.
VAT Code Import Options
When importing from another file, several options are available.
Add new codes and groups
If this option is chosen, new codes are added and existing codes are retained.
Replace all lines
If this option is chosen, all existing VAT codes are replaced with the imported VAT codes.
VAT account not found message
If the message VAT account not found appears, the VAT account must be entered automatically in the menu File > File properties > VAT /Sales tax section.
Importing Predefined Swiss VAT Codes
This procedure shows how to import VAT codes from the model with the default VAT Codes 2024, which contain both the 2024 (VAT 8.1%) and 2018 (VAT 7.7%) rates.
See also page Swiss VAT Codes
In order to import VAT Codes, please proceed as follows:
- Click Actions > Import into accounting command.
- Select VAT Codes.
- Select Switzerland new VAT Rates: in the lower field the file containing the new VAT Codes 2024 will be automatically displayed.
In the case of VAT codes of another country, you must select the file containing the VAT codes in force according to your country. - Confirm by clicking on OK
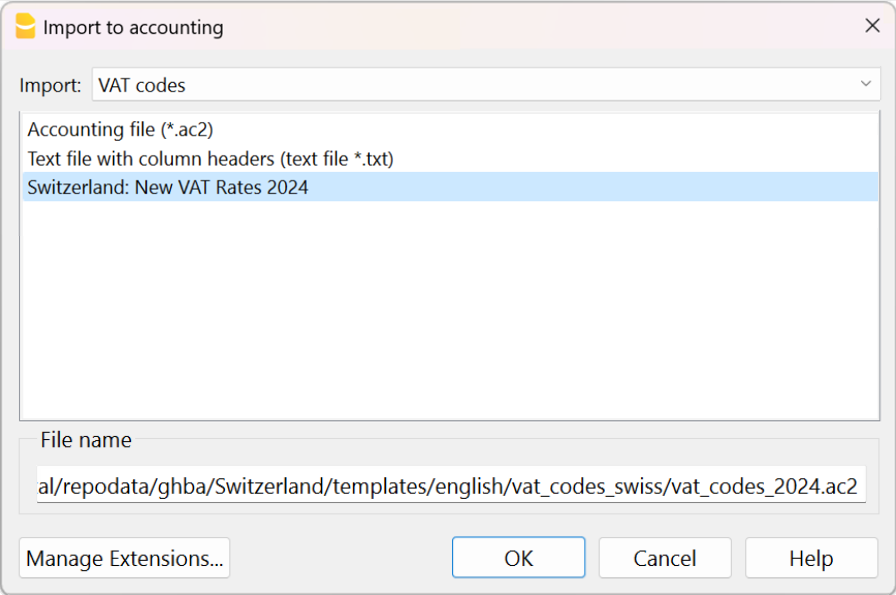
- The following window will display
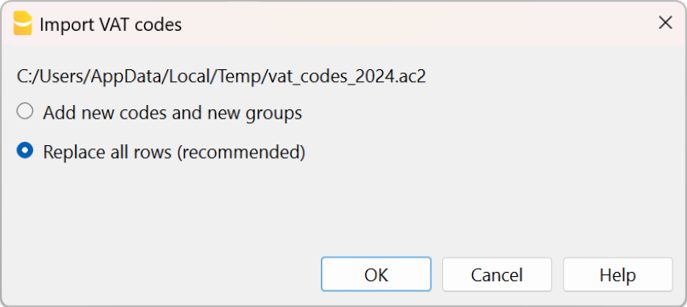
VAT Management Documentation
For more information see the VAT Management page.
Import file
To import data from a Banana Accounting File, proceed as follows:
- From the Actions→ Import to accounting menu → select File in the Import box .
- Select the * .ac2 file type to import the data.
- With the Browse button, choose the file from where you want to import the data.

The below dialogue box will be displayed with several options that allow you to determine which data to import from the file.

Source file
This is the file from the which the data are being taken.
Destination file
The file that is to receive the data.
Options
Import transactions
All the rows of the Transactions table, present in the source file, will be imported.
Import recurring transactions
All the rows of the Recurring Transactions table, present in the source file, will be imported
Import budget transactions
All the rows of the Budget table, present in the source file, will be imported.
Replace amounts in Account table
The amounts of the Opening, Budget and Previous columns of the Accounts table of the destination file are being deleted and replaced with the amounts that are present in the source file.
The accounts need to correspond, thanks to the same account numbers, or when there is a replacement, in that case the option Convert account numbers should be used.
Replace accounting properties (basic data)
The File and accounting properties of the destination file will be replaced by the ones of the source file.
Convert account numbers
Using this function, the imported account numbers will be replaced with those indicated in the alternative column.
If you use this function, you must also specify the column that contains the account numbers to be used in the import instead of the existing ones.
Next to the account number column, there should be a column that indicates the alternative number to be used when importing. If no alternative number is specified, the original account number of the source file will be used.
- The account matches are in the source file
This option is to be used when for example you keep an accounting file in a country, with a specific number system, and then you need to regularly import your transactions in a different accounting file, that uses a chart of accounts with a different numbering system.- You need to add a new text column in the accounting plan (Columns setup command)
- For each account, indicate the destination account number in the table.
- The account matches are in the destination file
This option is used when for example you want to switch to a chart of accounts with a new numbering and grouping- You create a new accounting file with the new chart of accounts.
- In the chart of accounts, you create a new column where you indicate the account matches (Columns setup command).
- In this column, indicate the account numbers of the source file.
Separate the accounts with a semi-colon "1000;1001" to indicate that several accounts need to be grouped into this account.
- Column containing the account matches (Accounts table)
Indicate a column of the chart of accounts that has been added by the user and that contains the account matches.
This option is used when switching from one chart of accounts to another, and when you need to convert accounts from one numbering to another.
For more information on converting the chart of accounts, see the page transfer data to a new accounting plan.
Results and possible errors
The program will have carried forward all the data of the previous accounting, converting the account numbers.
In case the program indicates errors (absence of accounts or other), it might very well be necessary to cancel the import operation, complete the account matches and repeat the import operation.
The program, finding different charts of accounts, cannot automatically execute extended check-ups to make sure that all the data have been imported and grouped correctly.
It is therefore advised to check the result manually, verifying that the totals of the Balance sheet and the Profit and Loss statement are indeed correct.
Advanced import options
For different and more complex and automated conversion needs, we suggest to use the scripts, that allow a total customization of the conversion and the import.
Import exchange rates
This option is only present in Double-entry accounting with multi-currencies.
It lets the user import the exchange rates from another file.
How to proceed:
- From the Actions→ Import to accounting → menu select Exchange rates. in the Import box
- Select the file type * .ac2 of the exchange history or the text file:
- With the Browse button, choose the file from where you want to import the data.
Note: Exchange rate history files only show the Foreign exchange rate table and keep a record of past exchange rates.

A box with the following options are displayed:

Select date
The window lists dates with recently used changes. If you select a date, the program resumes the changes used on that specific date.
Substitute exchange rates
If you activate this option, all the exchange rate rows are replaced in the exchange rate table with the imported ones.
Add rows
If you activate this option, only the exchange rate rows that have different values are updated in the exchange rate table.
Rules for the automatic completion of imported transactions
Artificial Intelligence (AI) is increasingly used in automation systems. In collaboration with our users, we have developed an automatic completion system for imported transactions based on predefined rules.
This feature automates and simplifies the accounting entry process, saving time and reducing data entry errors.
Rules are predefined transactions that include all the information necessary to automatically complete accounting operations accurately and quickly.
Below is the introductory video on Rules, as well as videos on how to create Rules:
- ▶ Video: Import and automatically complete transactions (introduction) - 0'55"
- ▶ Video: Rules for completing imported transactions (Apply rules dialog) - 7'26"
- ▶ Video: Rules for completing imported transactions (Recurring Transactions table) - 3'34"
To use the automatic completion Rules, the Advanced plan and the version 10.1 or higher of Banana Accounting Plus are required.
What are Rules?
Rules are pre-set transaction lines, containing useful information for the program to:
- Identify imported transactions to complete
If you enter Description in the column"Swisscom", the rule will apply to imported transactions that contain "Swisscom" in the description. - Specify elements to complete the entry
- In the Debit Account column, enter the account "Phone expenses".
- In the VAT column, enter the code "M81".
Completion rules are saved in the Recurring Transactions Table. You can enter and modify them directly in the table or use the Add/Modify Rules dialog during the rule application phase.

What are the purposes of Rules?
Normally, when you import bank movements into the Transactions table, you must manually complete the transactions by entering the Debit or Credit account, VAT code, Cost centers, or other information.
Example: when you import an outgoing transaction indicating a payment to the company "Swisscom," you must complete the Debit Account column with "Phone expenses" and the VAT Code column with "M81."
With the creation of Rules, imported movements are entered and completed automatically by the program, without any manual entry.
Depending on the method used for rule creation, these can be created either before or during the import. Once created, the Rules are also valid for all subsequent imports.
Workflow procedure
- Import bank transactions
The program creates transaction lines with date, description, amount, account, document number, and exchange rates. - Create the rule using one of the available methods.
- In the Transactions table, the program automatically completes all imported movements with counterpart, VAT codes, Cost centers, and more.
- In the Recurring Transactions table, the program saves transactions with the Rules.
Methods for creating Rules
We have created a system that provides various methods for creating Rules. You can choose how you prefer to work:
- Rules from the Transactions table.
- Rules from the Recurring Transactions table.
- Rules from the Apply rules dialog.
The benefits of rules
The benefits of the completion system are immediately evident:
- Complete transactions in just a few seconds.
- High control and precision.
- Avoid errors and omissions.
- You can easily delegate the task of importing data into accounting.
- You can see how specific transactions were recorded.
- The auditor can define how to record certain transactions.
- Immediate operation, even without a learning database.
- You can add, modify, and delete rules at any time.
Transition to the new year
When you create the file for the new year from the Actions > Create new year menu, all the Rules in the Recurring Transactions table are carried over and included in the new file.
When you import bank statement movements, the Rules are immediately applied.
You can add new Rules and adapt existing ones to new needs, such as VAT changes, adding or removing accounts.
Copying Rules from one file to another
When creating a new file, you can copy rules from one file to another, starting from the Recurring Transactions table:
- Go to the Recurring Transactions table.
Check the column arrangement to ensure they are identical in both files. - Select the rows of the Rules you want to copy.
- Copy the rows from the Edit > Copy rows menu, or with the Ctrl + C keyboard shortcut.
- Paste the copied rows into the Recurring Transactions table in the new file from the Edit > Insert copied rows menu, or with the Ctrl + V keyboard shortcut.
Rules vs. Artificial Intelligence
Artificial Intelligence (AI) is increasingly being used in automation systems.
In collaboration with our users, we have developed a system for the automatic completion of imported entries based on Rules. We believe this is a much more effective approach because:
Rules follow a deterministic logic, whereas Artificial Intelligence uses a probabilistic approach that involves a series of risks in accounting and tax contexts.
Rules offer a very high degree of control and precision.
For example, payments made to insurance companies can be accurately assigned to an account based on the contract number.All the rules form a valuable knowledge base.
They are listed in the Recurring Entries table, can be easily modified (for example when VAT changes) and serve as a reference and control tool. You can, for instance:If you do not remember, see how certain transactions have been recorded.
Explain to people who are responsible for accounting how to record various transactions.
Define for the auditor how certain transactions should be recorded.
Adapt the rules if VAT codes change or if accounts, cost centers, or other elements are added or removed.
Delete rules that are no longer applicable.
Copy and paste the rules into another accounting system and adapt them to specific needs.
They do not require a learning phase and work perfectly even for payments that occur only once or a few times a year.
Rules can be immediately adapted to regulatory changes. Artificial Intelligence, on the other hand, learns from the past and thus tends to repeat previous actions even if the situation has changed.
Currently unavailable features
These functions, while requested by some users, are not currently available:
- Ability to change the transaction text to shorten and simplify it.
- For multi-line transactions, the ability to use formulas that calculate amounts based on the imported transaction amount.
- Ability to apply a rule based on the transaction date (condition: Date column).
How the rules for completing imported transactions work in 3 steps
The following explains the procedure for how Rules work and how they are applied.
The process can be summarized in three steps:
- Import bank transactions into the Transactions table.
- Create the rules.
- Apply the rules for the automatic completion of transactions.
1. Import bank transactions
When bank transactions are imported, the program inserts a temporary counteraccount [CA]. Typically, the completion of contra accounts must be done manually for each entry.

In the example figure, in the Transactions table, it can be seen that:
- (1) - The cells have the same temporary contra account, related to sales via Twint.
- (2) - The cell has a temporary contra account related to monthly expenses for May.
- (3) - The cell has a temporary contra account related to Swisscom telephone expenses.
- (4) - The cell has a temporary contra account related to insurance costs, policy number 892-948.
- (5) - The cell has a temporary contra account related to insurance costs, policy number 987-650.
2. Creating the Rules
The Rules are used to automatically complete all temporary contra accounts of imported transactions, adding VAT codes, cost centers, links, and more.
The rules are template transactions that are already complete, found in the Recurring transactions table, where:
- The Description column contains the text (one or more keywords) that the imported transaction must include.
- The Debit Account and Credit Account columns contain the Contra account that will replace the temporary one.
We have created a system that provides different methods for creating the Rules:
- Rules from the Apply Rules dialog
- Rules from the Transactions table
- Rules from the Recurring transactions table
Regardless of the method used, the created Rules are saved in the Recurring Transactions table.

In the example, in the Recurring Transactions table, a Rule has been created for the following transactions:
- (1) - For the "Twint" transactions, the rule replaces the temporary contra account with the "Sales" account. The VAT code has also been added.
- (2) - For the "Interac Electronics" transaction, the rule replaces the temporary contra account with the "Goods" account. The VAT code has also been added.
- (3) - For the "Swisscom" transaction, the rule replaces the temporary contra account with the "Admin" account.
- (4) - For the "Best insurance" transaction with policy number "892-948", the rule replaces the temporary contra account with the "Insurance Health" account.
- (5) - For the "Best insurance" transaction with policy number "987-650", the rule replaces the temporary contra account with the "Insurance Car" account.
3. Applying the Rules for Automatic Completion (Result)
In the Transactions table, the program completes the imported transactions by adding the contra account, VAT code, etc., regardless of the method used for creating the Rules.

In the example, in the Transactions table, the imported transactions have been automatically completed:
- (1) - For the "Twint" transactions, the temporary contra account has been replaced with the "Sales" account and completed with the VAT code.
- (2) - For the "Interac Electronics" transaction, the temporary contra account has been replaced with the "Goods" account and completed with the VAT code.
- (3) - For the "Swisscom" transaction, the temporary contra account has been replaced with the "Admin" account.
- (4) - For the "Best insurance" transaction with policy number "892-948", the temporary contra account has been replaced with the "Insurance Health" account.
- (5) - For the "Best insurance" transaction with policy number "987-650", the temporary contra account has been replaced with the "Insurance Car" account.
Additionally, the program recognizes the transactions with the VAT code and completes all the columns related to VAT (VAT account and amounts).
Create Rules from the Apply Rules Dialog
One of the methods for creating Rules is from the Apply Rules dialog. The main advantages are as follows:
- You can see all imported transactions.
- The imported transactions are divided into incoming and outgoing transactions, with Rules and without Rules.
- For each group of identical transactions, the Rule being applied is shown in bold.
- Rules that are duplicated or in conflict are highlighted.
- You can add new rules and modify or delete existing ones.
- By changing the conditions of a Rule (description, amount, account), you can immediately see the list of transactions that comply with it.
- You can decide which rules to activate and which to deactivate.
Below is the complete procedure for creating Rules from the Apply Rules dialog.
1. Give the command Import into accounting
Before accessing the Apply Rules dialog, you must first import bank, postal, or other transactions as follows:
- Use the command from the Actions menu > Import into accounting > Transactions
- Select the appropriate format and indicate the path where the file with your bank statement data is located
- In the dialog that opens:
- Enter the account related to the statement from which you are importing the transactions (bank, postal service, etc.).
- Specify the start and end dates for the period of the transactions to import.
- Indicate the temporary contra account if you want it to be different from the default "[CA]".
You can use any account, and if you write it in square brackets, it will not be accounted for. - Activate the Apply Rules option (available only with the Advanced plan of Banana Accounting Plus).
- Confirm with OK.

2. Dialogue Apply Rules
The program opens the Apply Rules dialog.
In this dialog, you will find:
- The temporary contra account you entered previously or the default one "[CA]".
- The bank account entered, where all transactions imported from your bank or postal account are recorded.
- The imported transactions from the bank account, divided into:
- Incoming transactions without rules (Money In without rules).
- Outgoing transactions without rules (Money Out without rules).
- Incoming transactions with rules (Money In with rules).
- Outgoing transactions with rules (Money Out with rules).

3. Create new rules
To create new Rules:
- Position yourself on one of the transactions for which you want to create a rule.
- Go to the right-hand side until you see "...".
- Click on Add New Rule.

The 'Add Rule' dialogue appears.
In this dialog, you need to enter:
- In the Description, the text (keyword) that the program uses to find the matching Rule in the imported transactions.
Example:- Best Insurance Contract 892-948
applies to lines that contain exactly the specified text. - +Best Insurance Contract 892-948
applies to lines that contain the words "Best Insurance" and "892-948" in any position.
- Best Insurance Contract 892-948
- The contra account, used to replace the temporary contra account.
- Any other information (Cost centers, VAT codes, etc.).
The program shows the transactions found based on the entered conditions to which the new rule will be applied. In the example, we have a single transaction.
- Confirm with OK.

4. Confirm Apply Rules
In the Apply Rules dialog, you will see:
- The row of the created Rule ("NEW") where the data of the temporary counteraccount [CA] and the other information entered in the rule are indicated.
- Below are the lines of the transactions to which the rule has been applied.
You can decide when to execute the Apply Rules command:
- You can apply the rules selectively and continue working on the others.
- You can exit the dialog and return later.
- You can cancel the operation of applying the rules and repeat it later.
- The Apply Rules command also saves any changes you made to the rules.
By clicking on the buttons:
- Apply Rules:
- The program adds the new Rules to the Recurring transactions table.
- The program completes the transactions in the Transactions table.
- The dialog remains open so you can add the rules to the other transactions.
- OK
- Confirms the applied rules and closes the dialog.
- Confirms the applied rules and closes the dialog.

Undo changes made
Once the dialogue is closed, you will see the completed transactions in the Transactions table.
If you wish, you can undo the changes you have made:
- Menu Edit > Undo edit
- With the Cancel button (green arrow).
To also cancel the import of the data, you need to repeat the Cancel command a second time.
Complete other transactions with Temporary contra account
After importing bank transactions, the aim is to complete all transactions so that there are no more transactions with Temporary contra accounts [CA].
You can manually complete the remaining transactions. This is useful for special cases that do not tend to repeat.
You can create new rules by chosing one of the following methods:
Adding information to completed transactions with rules
It is possible to add supplementary information to the Rules through the Recurring Transactions table.
Auto-completion rules from the Apply Rules dialogue
The Apply Rules window offers an excellent level of control over changes to accounting transactions because it shows a preview of existing rules, with an indication of which transactions match each one and which transactions do not yet match any rules. You then have the option of creating new rules, modifying or deleting existing ones.
▶ Video: Rules for completing imported transactions (Apply Rules dialogue)
The dialogue may be displayed:
- From the Import Transactions dialogue, when the Apply Rules option is checked
Rules are only applied to imported rows
- From the Actions menu > Recurring transactions > Apply rules...
Rules are applied to the entire contents of the Transactions table
The Apply Rules dialogue, coupled with the import of banking data, becomes a crucial tool for setting up all repetitive records. In this dialogue window, when faced with multiple repetitive transactions of the same type, it suffices to set the rule for just one of the transactions, and the rules are automatically applied to all other transactions in the dialogue, eliminating the need to set the rule again.
Once the rules are confirmed, all transactions are listed in the Transactions table, ensuring consistency and accuracy in records of the same type, and speed in accounting for all transactions.
This dialogue box is divided into three sections:
Apply rules to transactions with...
- Temporary contra account:
This field is mandatory.
It filters all imported transactions that contain that specific contra account, e.g. [CA], which was indicated in the Import transactions dialogue. - Account:
Filters all imported transactions that contain a specific account, usually a bank account or [A], which has been indicated in the Import Transactions Dialogue.
The rule-based auto-completion system assumes that once the transactions have been completed, there is no longer any transaction containing the temporary contra account.
Imported data corresponding to rules or not
The window shows all transactions that have temporary contra accounts indicated above (e.g. [CA]). These are grouped in four main sections:
- Incoming transactions with rules
Transactions with positive change of account (credit) and with indication of the rule to which they correspond - Outgoing transactions with rules
Transactions with negative account variation (debit) and with indication of the rule to which they correspond - Incoming transactions without rules
Transactions with positive change of account (credit) and not belonging to any rule - Outgoing transactions without rules
Transactions with negative account variation (debit) and not belonging to any rule
Contextual commands
From the row of a transaction without a rule, a simple click or the three dots (...) to the right, or a right click anywhere on the row, opens a menu allowing you to:
- Add/Edit Rule
- Cancel an existing rule
- Change an overlapping rule

The commands at the bottom of the dialogue
- Expand All/Collapse All: displays or hides the elements of the Transactions.
- Display unused rules: checking this option displays all rules defined in the Recurring transactions table; if the option is not checked, the programme only displays rules that have matches.
- Display rows without rules: if this option is checked, all imported transactions are displayed; if the option is not checked, the programme only shows transactions that match a rule.
- Remove accounts between [ ]: in multi-row transactions, the import account is placed in square brackets [ ] in the detail rows. If this option is activated, the programme removes the import account from the detail rows.
Rules with transactions on multiple rows can only be defined in the Recurring transactions table. - OK: this button applies the active rules and closes the window.
- The temporary contra account is replaced in all transactions that have a match with a rule.
- New or changed rules are also saved in the Recurring Transactions table.
- Cancel: this button closes the window without applying the rules.
- If there have been changes to one or more rules, you will be asked for confirmation before closing the window.
- With this button you cannot undo the Apply Rules command; to do so, you must close this window and use the Undo command from the Edit menu.
- Apply Rules: this button applies the rules without closing the window.
- The temporary contra account is replaced in all transactions that have a match with a rule.
- Rules that are added or changed are saved in the Recurring transactions table.
- If you wish to undo changes, you must close the window and use the Undo command from the Edit menu.
Tips on how to use the Apply Rules window
The most effective way to work with the Apply Rules window is as follows:
- Check that the transactions matching rules are correct.
- Use the Apply Rules button to update the Transactions table with the selected rules.
- Add new rules for the remaining transactions and check that they are applied correctly.
- Use the Apply Rules button again.
- Repeat steps 3 and 4 until all recurring transactions are associated with rules.
Recurring transactions table
Rules are saved and may be edited in the Recurring transactions table.
You can complete or add rules also with transactions on multiple rows in the Recurring transactions table.
As time goes by, you will see that more and more imported transactions will have matches with rules; the more rules you add, the more your accounting work will be reduced.
Add/Edit Rules
From the Apply rules dialogue you may access the Add/Edit rule section as follows:
- By right-clicking on one of the transactions or rules:
- For transactions that already have a rule, you can choose Edit Rule or Delete Rule.
- For transactions that do not have a rule, you can choose Add New Rule.
Add New Rule example
The following example in the dialogue below is an outgoing transaction of the payment of a health insurance.
To add a new rule:
- Right-click on the movement row and choose Add New Rule.
- The dialogue Add rule appears.
- Fill in the fields available.
- Confirm with OK.

Add New Rule dialogue
The Add New Rule dialogue shows the data of the selected transaction from which you are creating the rule.
- Complete the rule with the matching parameters (conditions) and the rule completion parameters.
- All rules are saved in the Recurring Transactions table (rules for completion), where you can also:
- Edit, add and delete rules.
- Add any other column for completion, which is not available in this dialogue (e.g. Notes or DocLink columns).
- Colour the row if you want to highlight the imported transaction.
- Add transactions on multiple rows (SplitRule).

The Rule
- Rule type.
The programme, depending on the type of transaction, if in credit or debit on the bank account, sets the rule as Money in or Money out transaction. - Rule title.
It is optional, it is displayed in the Apply Rule dialogue.
Conditions
These are the elements that are used to check whether there is a match for each individual transaction.
- A match is given if all conditions are found.
- If a match is given, the entry is listed among the transactions with rule.
The description
In the description, enter the text to be searched in the text of the imported transaction. If the text is found the transaction will be considered suitable for applying the rule, if the other conditions are then met.
- Exact word or phrase
- If you write only Best Insurance 982-948 as a condition of the rule, only transactions containing those words in that exact order will be considered matches.
- If you write only Insurance, as a condition of the rule, all entries containing this exact word will be considered matches.
- All words (starting with the "+ "sign)
- If you write +Best Insurance 982-948 as a condition of the rule, all records containing these exact words, in any position, will be considered matches.
All words must be present in the description of the transaction.
The position of the words in the sentence is not relevant.
The "+" sign is not considered in the search.
- If you write +Best Insurance 982-948 as a condition of the rule, all records containing these exact words, in any position, will be considered matches.
- List of words (using |)
- If you enter "coffee|restaurant", the program searches for imported transactions that contain the word "coffee" or "restaurant".
- This mode is useful for identifying multiple categories without having to create separate searches.
- Upper and lower case
When searching for input text, no case difference is made.
The text you enter is applied to both upper and lower case text.
Amount
If you indicate an amount in the rule, only transactions with the same amount, as well as a match in the Description, will be considered as matches.
If you do not indicate any amount, any transaction of any amount that meets all other criteria will be treated as a match.
Account
In this field you will already find by default the account from which you imported the transactions. If you leave the account field empty, all transactions, imported from any account, that meet all other criteria will be considered as matches.
Actions
These are the elements used to complete the transaction row if a match is given.
If the contra account or other items to be completed are not present, you can abort the Apply rules command, add the missing account, and call up the Actions > Recurring transactions > Apply rules... command.
Contra account
Enter the account in your chart of accounts that is to be matched in the rule. In this example, the correct contra account is the Health Insurance account.
VAT
You can already enter in the rule the VAT code that the programme must add to each movement considered as a match.
CC1, CC2, CC3
You can already enter in the rule the Cost Centres that the programme must add to each movement considered as a match.
By confirming with the OK button, the new rule is saved. You will return to the previous window where the imported movements with and without rules are displayed again.
Matching Transactions
This table shows all imported transactions selected in the Apply Rules dialogue, which fall under this rule.
Buttons
- The Delete button, cancels the rule.
- The OK button, saves the rule data.
Be aware though that, until you do not give the command Apply Rules, the new rules won't be saved in the Recurring transactions table.
Rules from Transactions table
One of the methods provided for creating Rules is from the Transactions table. The main advantages are as follows:
- You work directly in the Transactions table that you already use regularly. You are already familiar with the table.
- You see all the columns.
- You create Rules simply by completing the imported transactions.
You complete the transactions manually only the first time when creating the Rules. For subsequent imports, the program applies the already created Rules to the new imported transactions. - Speed in creating Rules.
Select the rows with completed transactions and, with a single click, create all the rules in the Recurring Transactions table. You only need to modify the description of each rule to ensure a precise match for future transactions. - You do not need to insert Rules through additional dialogs.
- You do not need to manually enter all the Rule data in the Recurring Transactions table.
Below is the complete procedure for creating Rules from the Transactions table.
Import transactions
In the Transactions table, import transactions from bank, postal, or credit card statements.
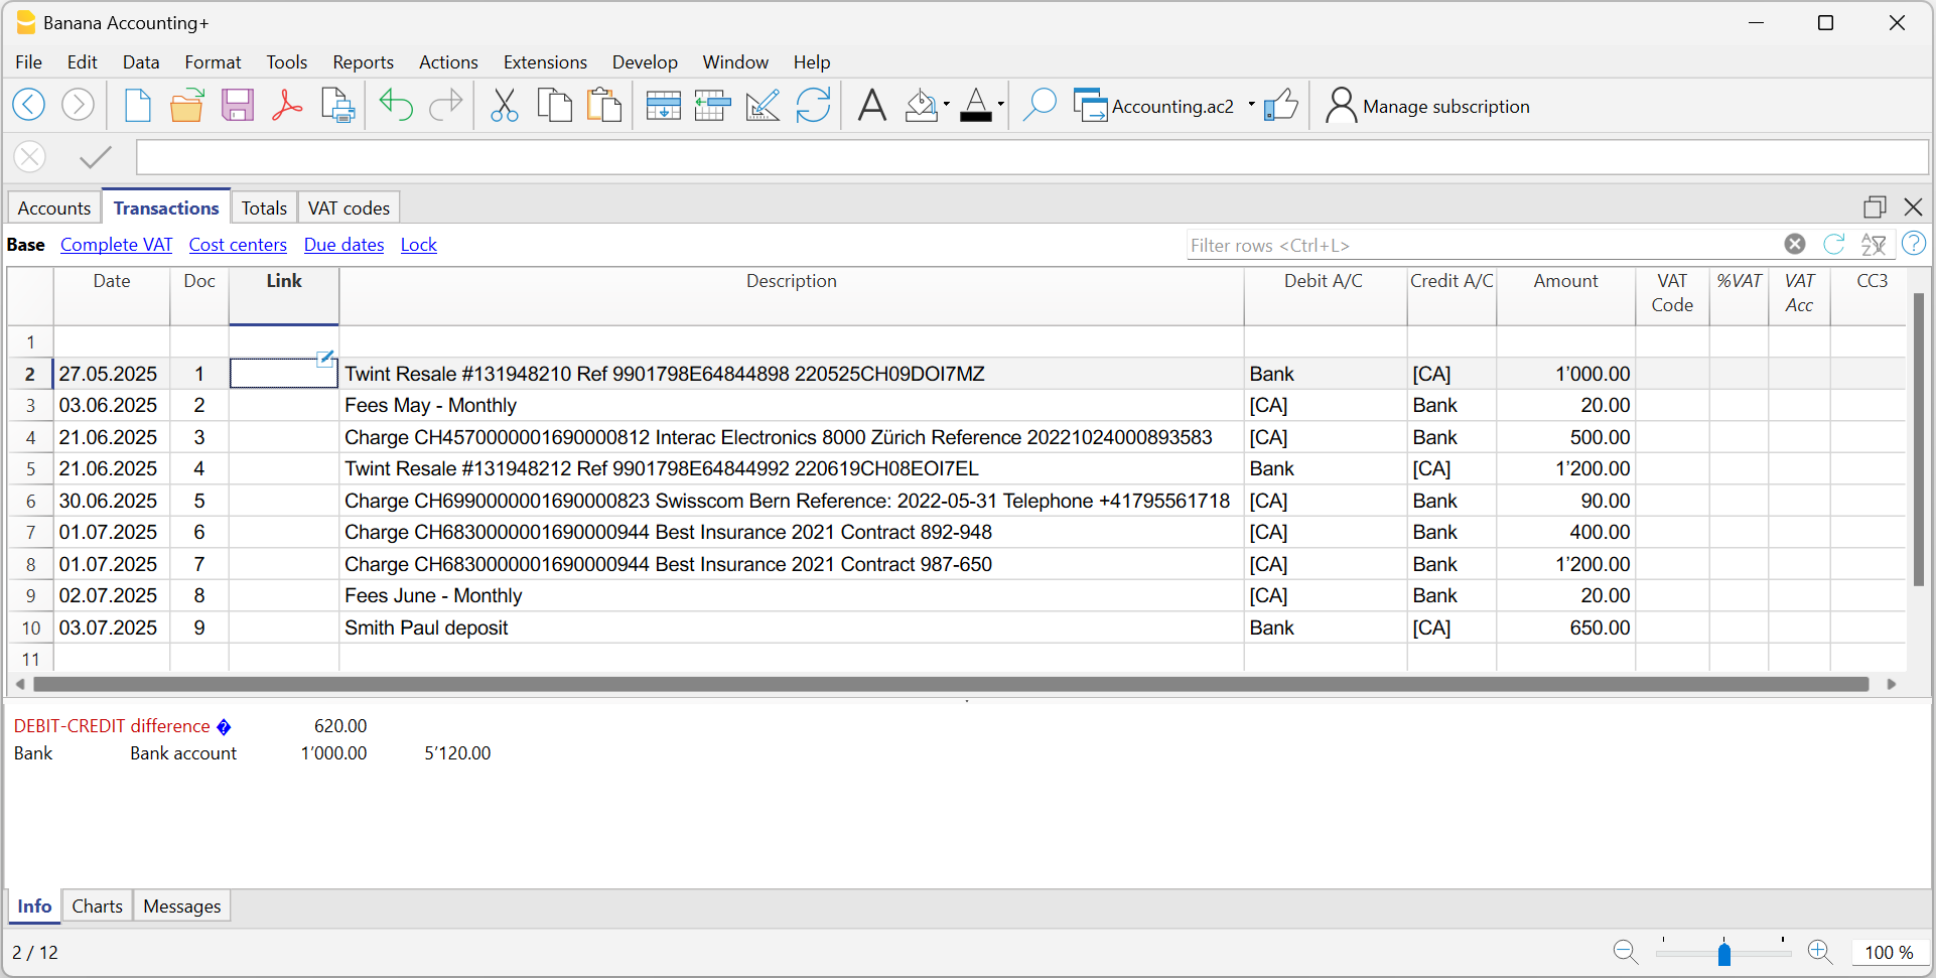
Complete the imported transactions
For each imported transaction, enter the counterpart, VAT code, cost center, or other information.
When you import a transaction that needs to be recorded on multiple lines, the program inserts a single entry with the total amount and a temporary counterpart [CA].
Proceed as follows:
- Remove the temporary counterpart account [CA] from the transaction.
- Insert new rows following the transaction. For each row, enter the complete transaction with description, counterpart, amount, any VAT code, and cost center.
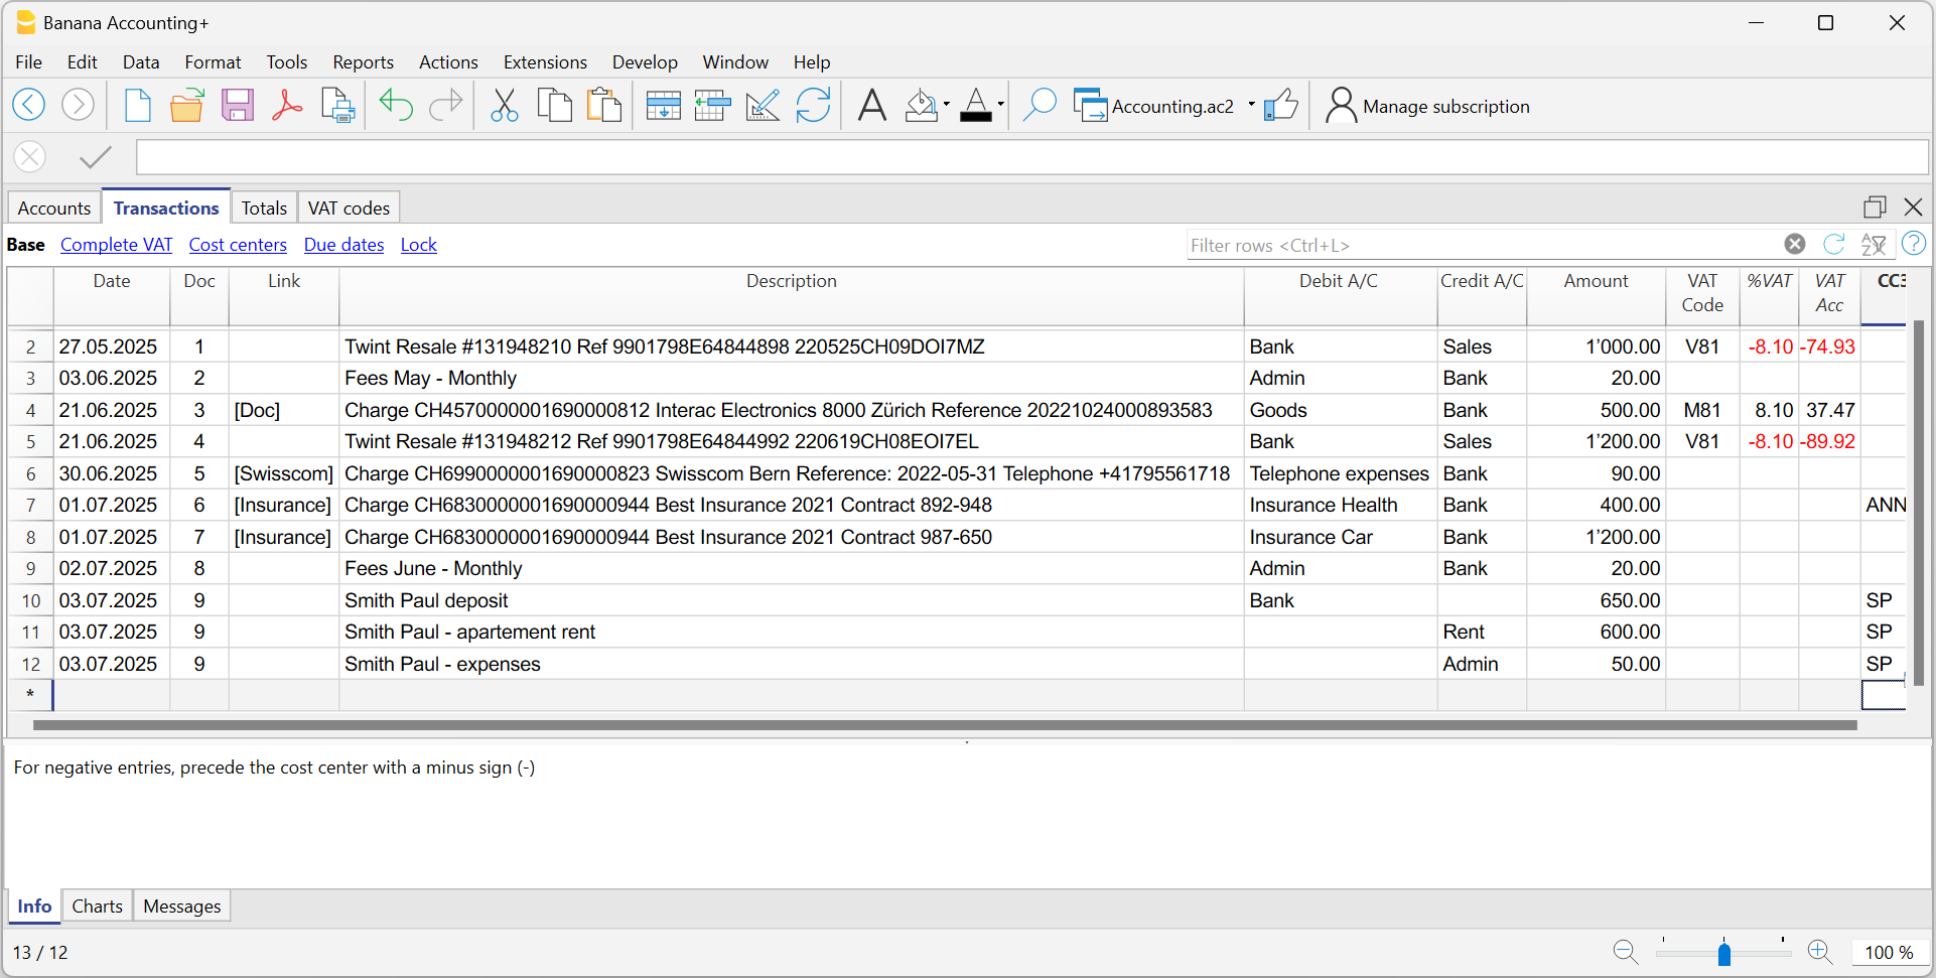
Create Rules
Starting from the completed transactions, you can create Rules:
- Select from the Transactions table the entries to which you want to apply Rules.
- Right-click on a transaction without rules > Create rule from transaction.
Alternatively, go to the Actions menu > Recurring Transactions > Create rule from transaction.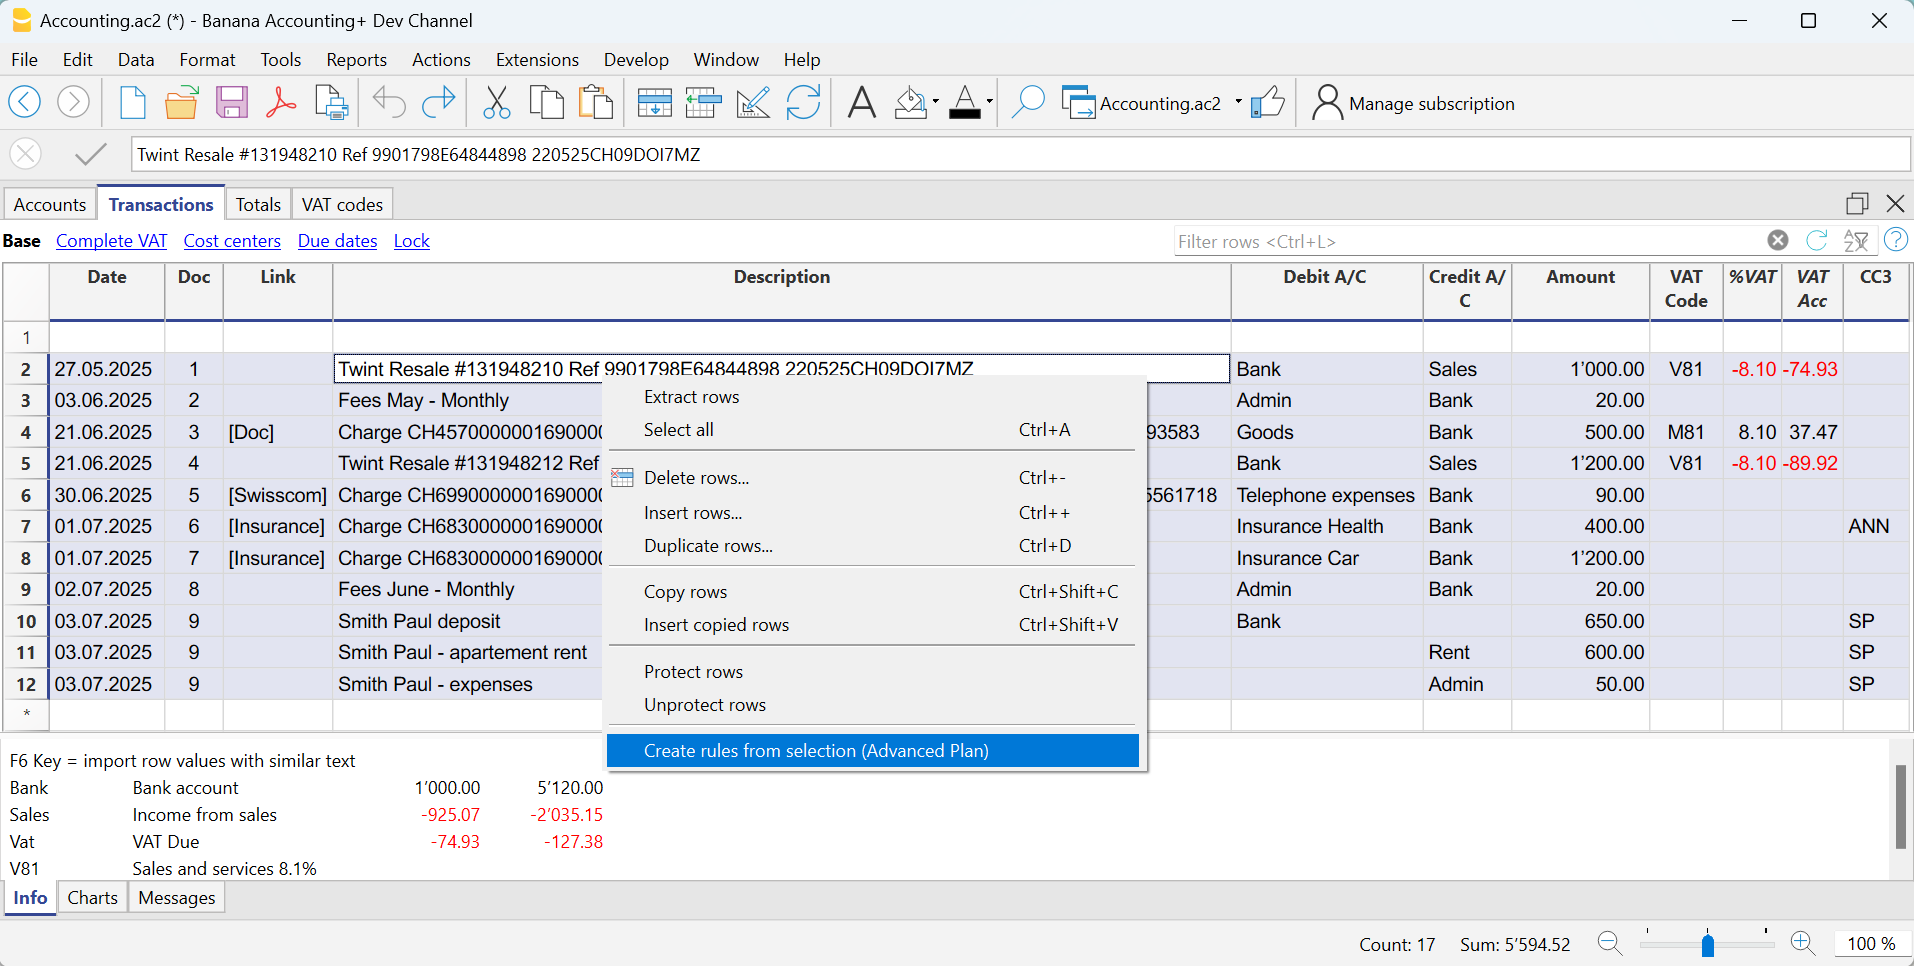
All selected transactions are transferred to the Recurring Transactions table, as they were completed in the Transactions table.
Complete the Rules
In the Recurring Transactions table, you need to complete the Rules:
- Edit the Description column.
- Modify the text of the description to search for in the imported bank statement transactions. Initially, the program automatically uses the description found in the imported transaction.
Replace this text with one or more keywords so that the program can find matches in the description of the imported transaction (e.g., + Best Insurance). - For multi-line transactions, edit the Doc column.
In the first row of the transaction, enter empty square brackets [] in the counterpart column.
In subsequent rows, enter !RuleSplit in the Doc column (see rows 7,8,9 in the image below).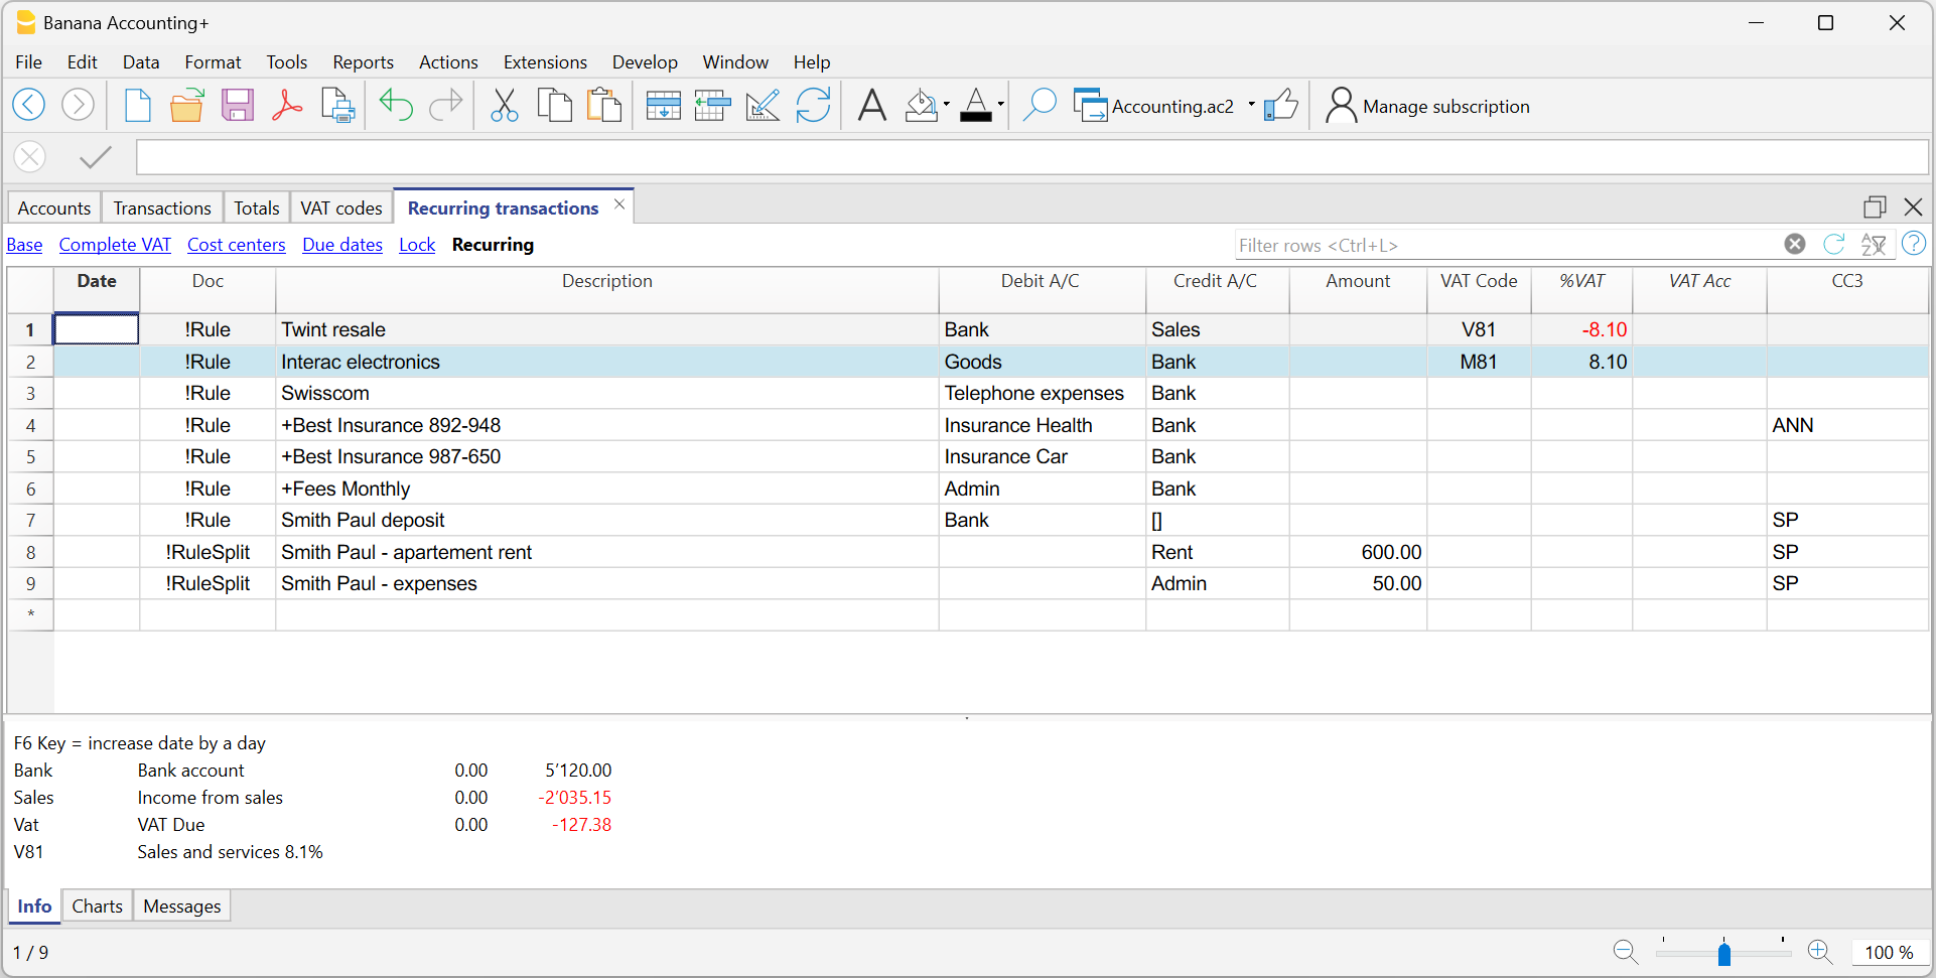
The explained procedure only needs to be performed the first time to set up the Rules. For future imports, the Rules found are applied automatically. You only need to complete the new imported transactions without a rule using the same procedure.
To find all imported transactions in the Transactions table that do not have a rule, you can use the Row filter function, entering the text "[CA]".
Recurring Transactions table Rules
One of the methods provided for creating Rules is from the Recurring Transactions table via the menu Actions > Recurring Transactions > Recurring Transactions Table.
The main advantages are as follows:
- You work directly in the Recurring Transactions table where all the Rules are saved.
- Once you have manually created all the Rules, you can import the transactions and directly apply the Rules.
- You can see all the Rules that have been created.
- You can add, modify, and delete Rules directly.
- You don’t need to use additional dialogs to add, modify, or delete Rules.
- You can define Rules for transactions across multiple rows.
- You can add digital document annotations.
- You can color the rows so that the color is carried over to the transactions in the Recurring Transactions table.
▶ Video: Rules for completing imported transactions (table Recurring transactions)
The Columns Used by the Rules
The Recurring transactions table defines the rules for the completion of imported transactions.
- Correspondence columns that contain the data for searching matches in the imported transactions.
- Doc column
- Description column
- Amount column
- Debit or Credit Account columns ( Double entry accounting) or Account and Category columns ( Income and Expense accounting).
- Substitution columns which need to be completed with additional information
- Link column
- VAT codes column
- Cost centres column (CC1, CC2, CC3)

The Doc column
For a rule to exist, there must be either the following texts in the Doc column:
- !Rule.
To show that it is a rule - !RuleSplit
To show that the rule should create transactions on multiple rows (Split rows) .
The Description column
The Description column must contain the text to be searched for in the description of the imported rows:
- The exact word or phrase
- If you write Best Insurance 982-948, as a condition of the rule, all transactions containing this exact phrase will be regarded as matches.
- If you write only Insurance, as a condition of the rule, all transactions containing this exact word will be considered as matches
- All words (starting with + at the beginning)
If you write +Best Insurance 982-948, as a condition of the rule, all transactions containing these words, in any position, will be considered as matches.- All words must be present in the description of the transaction.
- The position of the words in the sentence is not relevant.
- The '+' sign is not considered in the search.
- Upper and lower case
No difference is made between upper and lower case when searching for input text.
The text you enter is applied to both upper and lower case text. - [Rule name]
When a description starts with text in square brackets, this is used as the name of the rule. To be used for better identification of rules.
Attention: DO NOT use the entire text from the bank statement as the description, as it is unique to that specific transaction.
The Debit and Credit account columns
In the Debit and Credit columns, enter the accounts from the chart of accounts to record the transaction.
The Amount column
The Amount column can contain a specific amount to be searched for in the imported transactions. This condition is optional.
If the name of a debtor or creditor, as shown on the bank statement, is specified in the Description column and the amount is not provided, the rule will apply to any amount of the transaction.
Enter the VAT Code that should be included in the imported transaction. The program will automatically fill in all the VAT-related columns.
The CC1, CC2 o CC3 columns
Enter the Cost Center that should be included in the imported transaction.
The Notes column
Add additional information that should be included in the imported transaction.
The DocLink column
In this column, it is not possible to insert a specific link to a document because each transaction will have its own document. However, you can add an annotation in square brackets (e.g., "[Doc]") to distinguish the rows that need to be associated with a digital document.
Once the transactions are imported, it may be necessary to link them to accounting documents. To speed up this process, it is recommended to proceed as follows:
- In the DocLink column of the Recurring Transactions table, use text enclosed in square brackets [ ].
- Within the square brackets, enter the text that should be searched for in the name of the supporting document file.

- In the Transactions table, the transactions are imported with the text in square brackets in the Link column.

- In the Transactions table, use the Row Filter function and enter the text "!link![ ]". This will display all the rows in the Link column that contain square brackets where a link to the supporting document needs to be added.
- When editing the Link column in the Transactions table, the program will show, in the auto-completion, the files of supporting documents that have not yet been linked to a transaction and contain the text entered between the square brackets.
For example, if you enter "[invoice]," the program will display all the unlinked files containing the text "invoice" in the cell.
It is possible that after importing transactions with the Rules, some transactions may need to be manually completed with additional information.
To quickly find the transactions that need to be completed, you can use one of the following methods:
- Using the Notes Column
To quickly locate the transactions that need to be completed, we recommend adding temporary search texts that can be used to filter the transactions. For example:- In the Notes column of the Recurring Transactions table, or in any other column of the Rule row (except for those predefined for the Rule), enter a hashtag, such as #city.
- In the Row Filter function of the Transactions table, enter the same hashtag. This will display the rows that you need to complete.
- Coloring Rule Rows
You can color the Rule rows in the Recurring Transactions table. The row color will be transferred to the Transactions table and used to highlight the transactions to which the rule is applied.
To identify only the colored rows, you can use the Row Filter function by entering the text "!_co!"

Split -row transactions
Normally, when you import transactions from a bank statement with the Rule, a single counterpart account is recorded. If the total amount of the counterpart needs to be split across multiple counterpart accounts, you can create a multi-row Rule.
For example:
- You regularly receive a payment of 550 that must be recorded on three different accounts and therefore on three rows:
- (550) rent collection (no contra-account, as this involves recording the global amount split over three rows)
- (500) flat rent (contra account rent)
- (50) extra expenses (contra-account for extra expenses) .
To create a multi-row Rule:
- The first row corresponds to the total amount collected.
- In the Doc column, enter the text !Rule.
- In the Description column, enter the text to search for in the imported transactions.
- In the counterpart column, enter square brackets [].
In the following rows: - In the Doc column, enter the text !RuleSplit.
- In the Description column, enter the text to search for in the imported transactions.
- In the counterpart column, enter the counterpart accounts.
- In all other columns, input the values that should be included in the additional rows. In this example, we have added the tenant’s Cost Center.

In the example of a multi-row rent transaction, it is assumed that the collected amount is always 550. If the collected amount is different from 550, the transaction will need to be completed manually.
Modifying Rules in the Recurring Transactions Table
All completion Rules saved in the Recurring Transactions table, even if they were created from the Apply Rules dialog, can be modified, deleted, or new ones can be created in anticipation of a future import without a Rule.
Copying rules in bulk from one file to another
From the Recurring transactions table it is possible to copy rule rows in bulk and paste them into another Banana file.
Create a New Year with Rules
When you create a new year using the command Actions > Create New Year, the existing Rules in the Recurring Transactions table are automatically carried over to the new year's file.
Set a Different Description from the Imported One
All imported transactions display the description from the bank statement in the Description column of the Transactions table. Typically, these descriptions are very detailed.
It is not possible to automatically change this description at the time of import.
If you wish to change the imported description, you can use the Notes column in the Recurring Transactions table.
Note: if the Notes column is already used for your own annotations, it cannot be used to modify the description.
If the Notes column is not being used, proceed as follows:
- Display the Recurring Transactions table.
- Make the Notes column visible by going to the menu Data > Columns set up > check the Notes column.
- In the Notes column, enter the description text that you want to appear in the Transactions table (Description column).
Repeat this step for each desired transaction.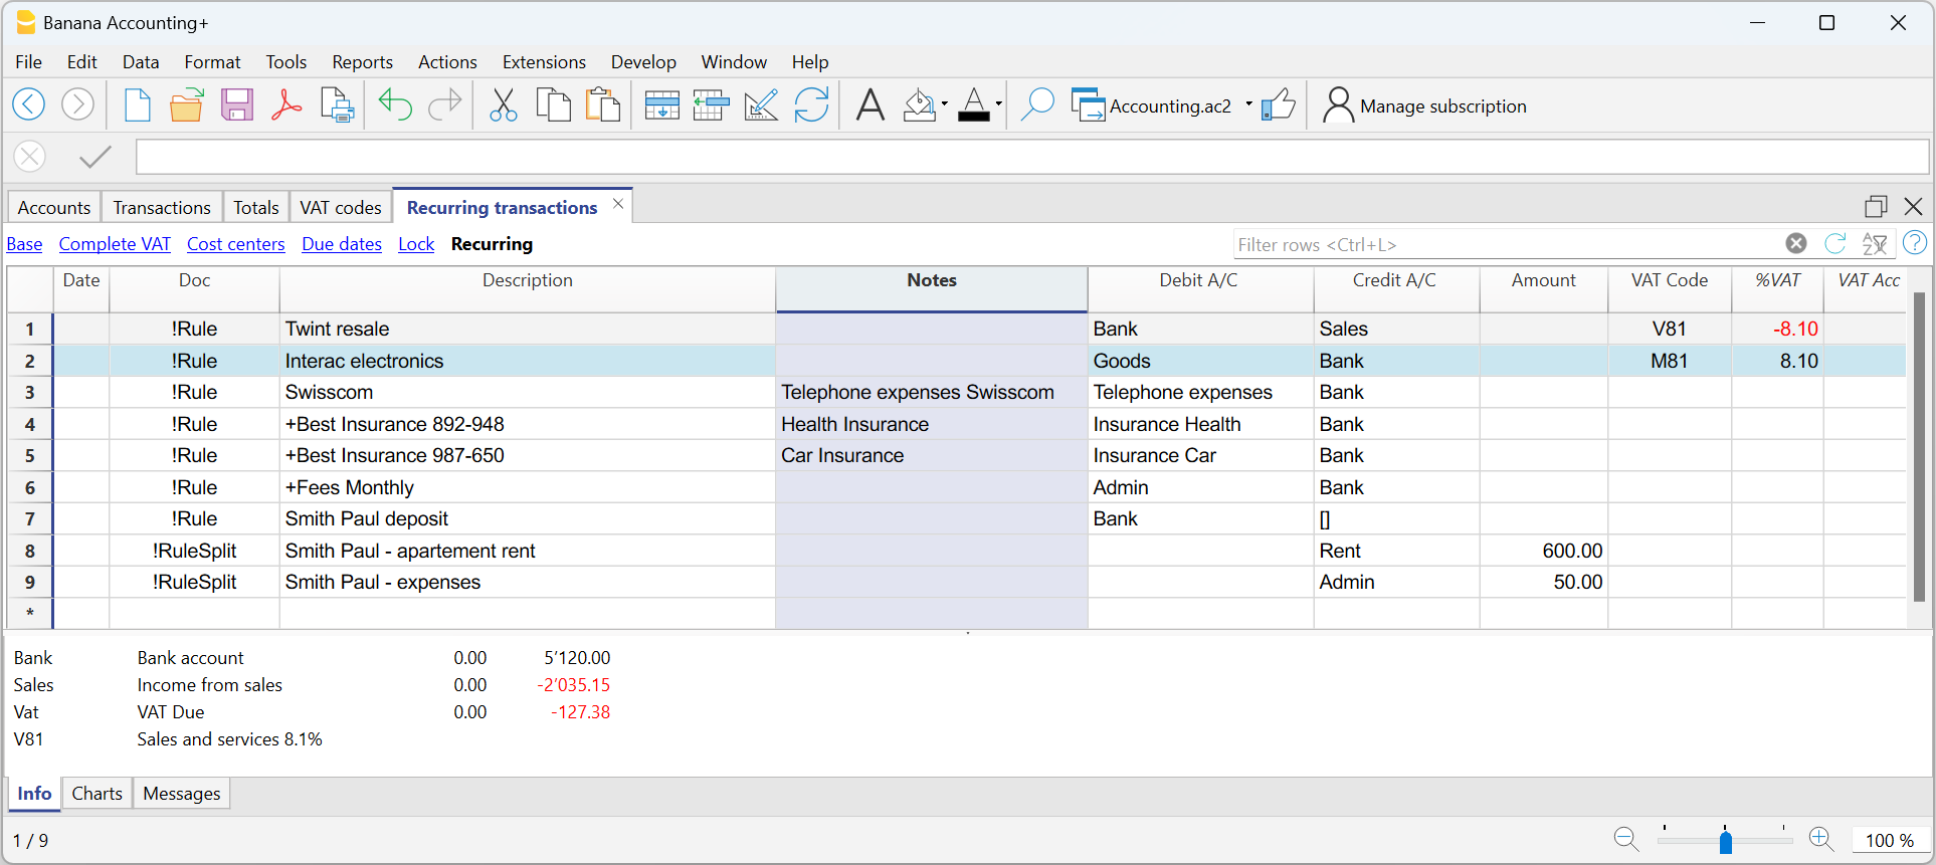
Import the transactions - After importing into the Transactions table, make the Notes column visible (menu Data > Columns setup > check the Notes column)
The Notes column will display the notes defined in the Recurring Transactions table.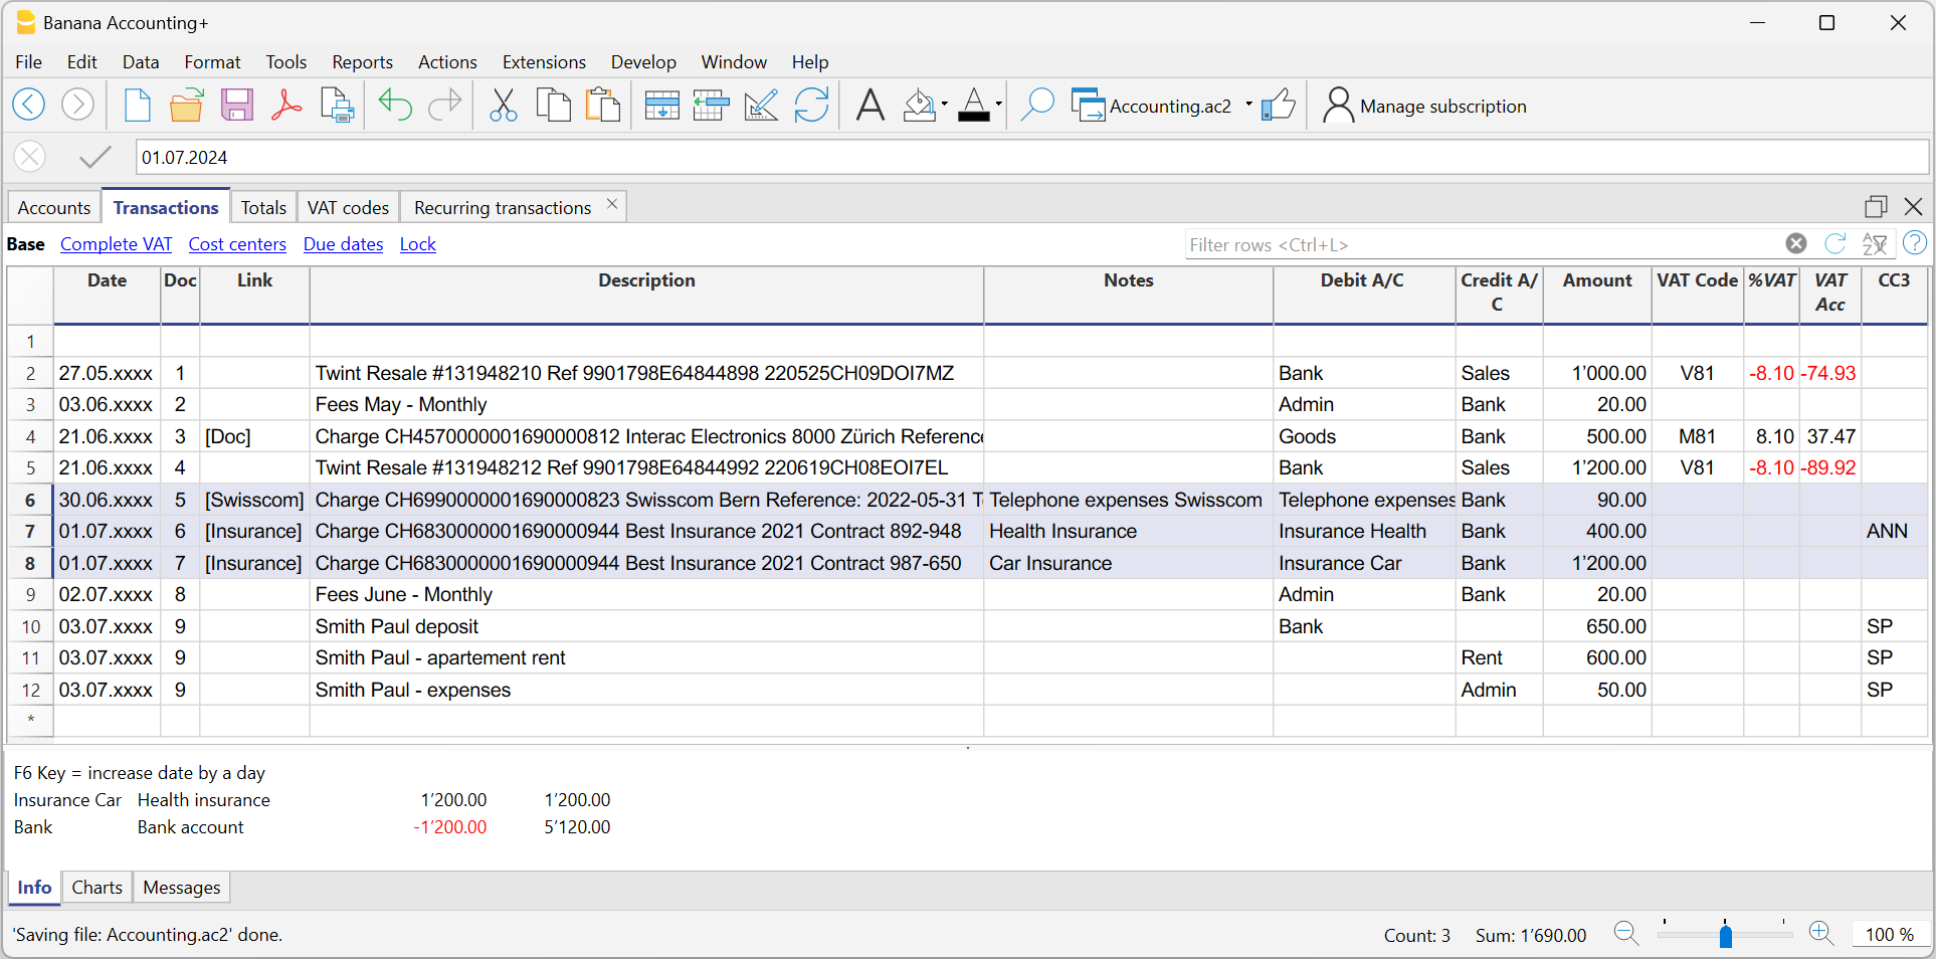
- For each transaction, copy the content from the Notes column and paste it into the Description column.
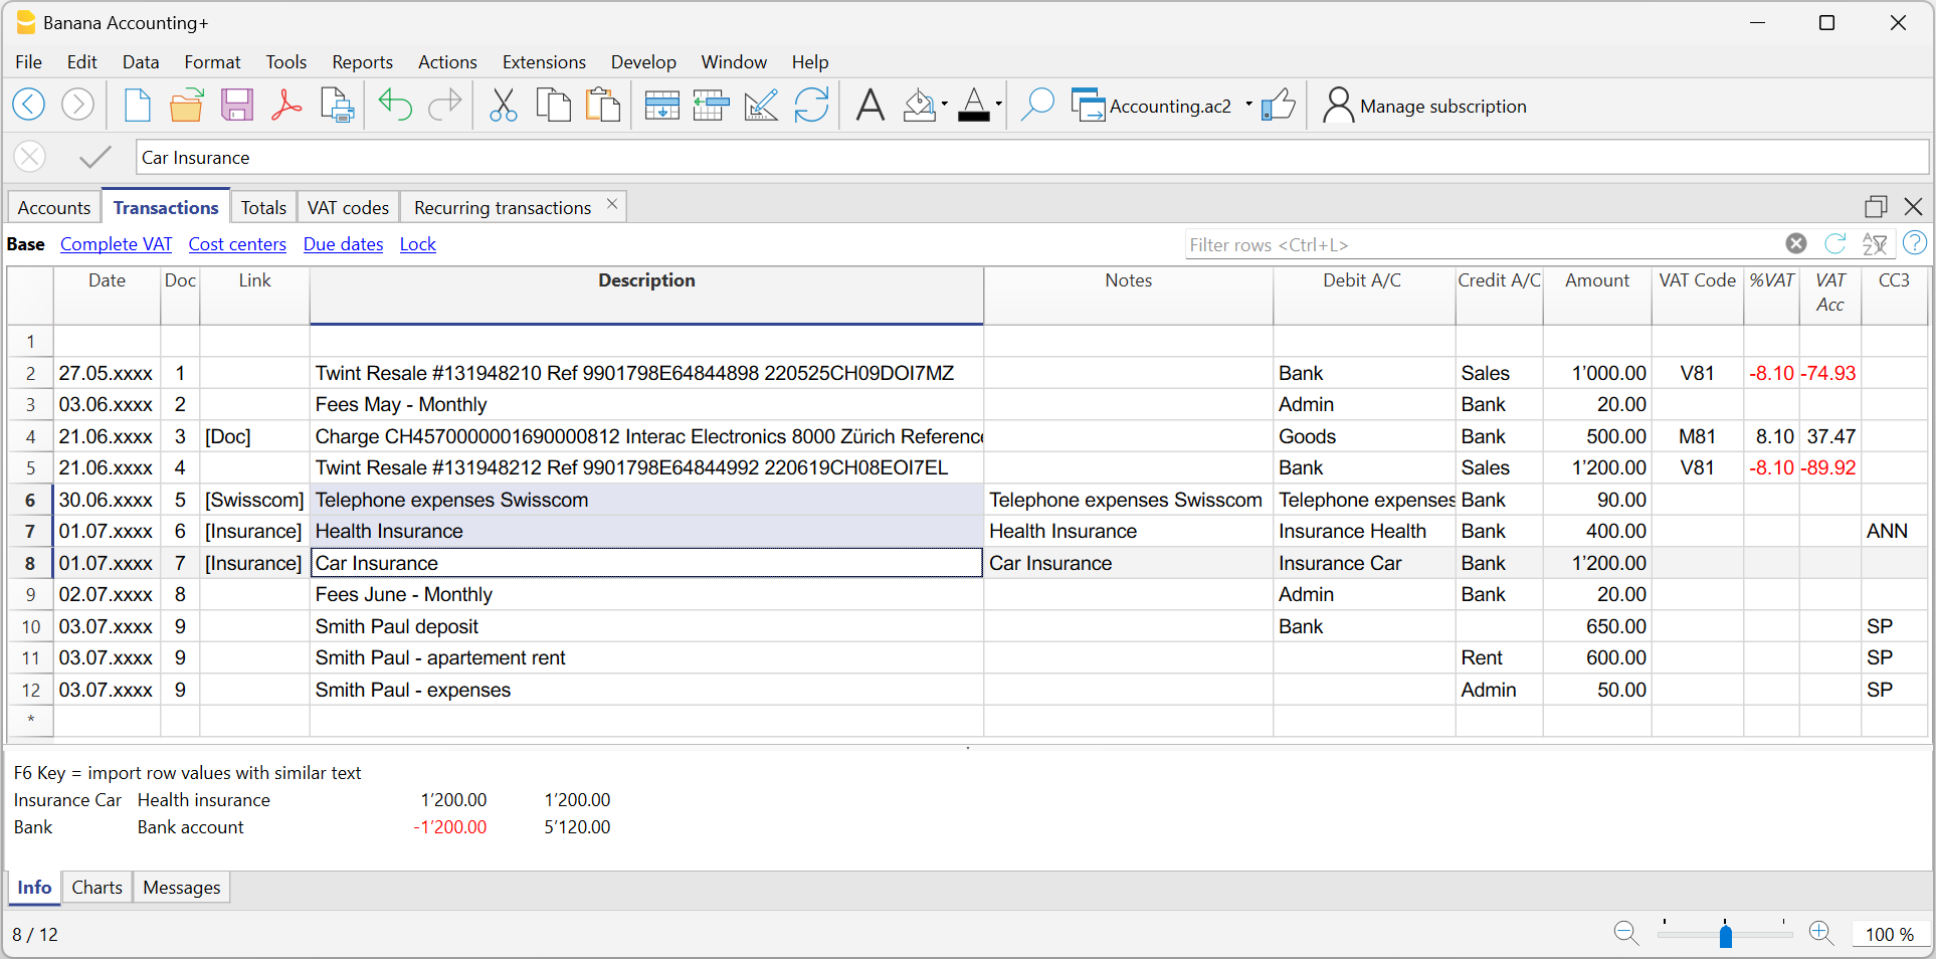
- For each transaction, copy the content from the Notes column and paste it into the Description column.
In the Recurring Transactions table, it is not possible to directly add custom columns.
To use a custom column in the Recurring Transactions table, you need to add the custom column to the Transactions table.
Once the column is added to the Transactions table, it will also be visible in the Recurring Transactions table and can be used to set a different description from the imported one.
Therefore, the insertion procedure is the same as described in the section Set a Different Description from the Imported One - Notes Column.
Auto-completion rules for income and expenses accounting
In Income and Expenses Accounting and the Cash manager, the functionality for Completing Imported transactions works in the same way as for Completing transactions in Double-entry Accounting.
The main difference is as follows:
- In the Income / Expenses accounting, the columns Account and Category are used.
- The Account column refers to the bank account.
- The Category column is where the category is specified. It represents the counterpart account entered automatically.
- The Income and Expense columns are where the amount for the transaction is indicated.
- In double-entry accounting, the Debit Account and Credit Account columns, along with the Amount column, are used.
Therefore, even with income and expense accounting, it is possible to create rules using one of the following methods:
- Rules from the Apply Rules dialog.
- Rules from the Transactions table.
- Rules from the Recurring Transactions table.
The Recurring transactions table in Income / Expenses accounting
In the Recurring Transactions table, all imported transactions to which Rules have been applied are saved:
- The columns associated with the amount are the Income and Expenses columns.
- If no amount is specified, the rule will be applied to both outgoing and incoming transactions.

The internal transfer account
Internal transfer is a holding account, used to record reverse transactions. It is used specifically in the following cases:
- Post self-taxation and recovery operations on purchase tax (VAT on services abroad).
- Import data into the main accounting from the cash book and credit cards.
- Record the net salaries debited by the bank, pending the complete recording of the gross salaries with the various monthly deductions. The internal transfer account is a support account, used to record temporary transactions. It is used specifically in the following cases:
Use of the internal transfer account when importing data from the cash book or credit card
When the cash book or credit card movements are kept in separate files from the main accounting, it is used as a counterpart account in order not to create overlapping records in the import, regarding payments from the bank to the cash or credit card accounts.
- In the cash book or credit card file, the receipt of funds will be recorded (the cash book or credit card account balance is increasing).
- The outflow from the bank or postal current account and the increase in cash book or credit card will be recorded in the main accounting file.
The internal transfer account must be used as a counter-entry, both in recording the withdrawal from the bank (main accounting), and for payment at the cash book or on the credit card (separate file).
When you import the cash book or credit card data, into the main accounting file, the internal transfer account is reset to zero:
- The data imported from the cash bookn file or the credit card account will be in the credit of the internal transfer account.
- The movements relating to payments already recorded with debit on the bank or post office account, will be credited to the internal transfer account.
More details on importing with the internal transfer account are available on the Importing data from the Cash book file.
Retrieving data from other programs
One time data importing from other programs using Excel
If you are starting to work with Banana for the first time and you need to import your data from another software, it is probably faster to rely on Excel to copy and paste data.
- With your old accounting software, export the data in a format that can be read by Excel (CSV, txt, ...)
- Import the data into Excel (see below)
- In Excel, organize the columns in the same order as they appear in the Banana Transactions table.
Instead of changing column layouts, it may be more convenient to add columns next to existing ones and copy the data into them, or to use formulas that take the data and convert it. Using formulas you can remove spaces, change text or convert amounts and dates. - Open your new accounting file in Banana Accounting.
- In Excel, select the data to be copied and use the Copy command (Ctrl+C or Copy from Edit in Menu).
- Go in Banana and execute the Paste command ((Ctrl+V or Paste from Edit in the menu).
This method is useful to transfer data from MS-Money, Intuit Quicken and Quickbooks, and from most other accounting programs.
Importing bank transactions
In this case, it is useful to use one of the import functions already available.
- See: Import transactions
If there is no import extension suitable for your case, you can also use the 'one time' import mode indicated above.
Example of CSV bank file import via EXCEL
If you need to import bank data and there is no import extension, you can also proceed via Excel, following the example explained here.
The aim is to load the data into Excel and transform it exactly as it is arranged in the Banana Transactions table, then select and copy and paste it.
- Create a new empty file in Excel.
- Go to "Data"
- From Test/CSV
- Select the file to import
- Adjust the parameters that Excel proposes.
- If necessary, use the 'Transform Data' button at the bottom to make further modifications.
- Confirm with "Charge"
2. To the right of the data, add column headings, as they are in the Transactions table of the accounting.
- Date
- Doc
- Description
- Debit A/C
- Credit A/C
- Amount
3. In the first line of data, add the formulas for taking and converting bank data.
- Date
(resumes the desired date)
=C2 - Doc
May be left blank, but could be numbered. - Description
(resumes the desired description)
=B2 - CtDebit
Add the bank account number, for example "1010", but only if the amount is positive.
=IF(E2>0;"1010","") - CtCredit
Add the Bank account number, for example "1010", only if the amount is negative.
=IF(E2<0;"1010","") - Amount
Take the value in negative.
=ABS(E2) - Copy the formulas created in all subsequent rows where there is data.
- Select the data to be copied into Excel and issue the Copy command.
- Move to the Transactions table of the accounting file, to the first empty row at the end of the table in the date column.
- Give the command "paste".

Multi-currency accounting columns
If the accounting is multi-currency add the columns as well.
- Currency initial
- Amount in base currency.
If you have the amount in currency and in base currency, the exchange value is calculated by Banana Accounting.
Further advice
- If import columns do not contain thousand separators, Excel may not convert them into numbers. In this case, select the entire column and use the "Replace" command and then insert the thousands separator.
- If the data is sorted in reverse order from the way you keep it in Banana, before proceeding with the mapping of the fields in the Date column, click the little arrow on the right and sort from oldest to newest.
- You can add the columns you need at will.
- With Excel's Office Scripts you can possibly also create a macro to automate the file conversion.
Recurring data import from other programs
It may also be necessary to import data regularly:
- To import monthly transaction from your salaries software.
- To import the invoices issued with a invoicing software.
- To import the payments made with your invoicing software.
- To import your sales transactions from your online shop.
- To import data from another accounting software.
- To import data from another cashbook management software (for example a restaurants or a hotel).
In these cases you can proceed in two different ways:
- Make sure that your application exports the data in a txt (TSV) file format specifically set to be imported in Banana.
For more information please consult the technical information on how to create a file to be imported in Banana; - Create an import script that will transform data exported from another program so that they can be imported in Banana;
- Check whether there is an extension already prepared.
See: Import extensions. - Create an Import Extension.
See: Develop an Import Extension
- Check whether there is an extension already prepared.
Recurring Transactions Table
The Recurring transactions table is used to store transactions that are used repeatedly:
- Recurring transactions stored via the Doc column in the Transactions table.
They have in the Doc column an identification code without the exclamation mark '!'. - Rules for completing imported transactions.
They are used to define how imported trasnactions are to be completed.
They have the code "!Rule" or "RuleSplit" in the Doc column. - Automatic transactions with recurring deadlines.
They are used to automatically generate transactions that are repeated at a certain frequency, for example, monthly, quarterly, half-yearly or yearly.
They are registered in the Doc column the code '!Auto'.
Display Recurring transactions table
The Recurring transactions table is displayed from the Actions menu → Recurring transactions.
Columns and views arrangement
The Recurring transactions table does not allow you to save your own view settings, but takes over the views and column settings of the Transactions table.
However, it is possible to:
- Add a new view in the Transactions table
- In the Transactions table, arrange the columns for the new view you have added.
- When viewing the recurring transaction, choose the preset view.
Entering Recurring transactions in the Doc column
For repetitive operations, codes can be created for automatic data recovery.
- If the 'End Date' column is present (see Automatic Transactions), you can also indicate a date after which this entry is no longer taken up in the Transactions table.
Transactions that are no longer used must be deleted manually.

Progressive numbering of "docnum" documents
If, when retrieving recurring transactions, you wish to have a Doc number different to the automatic one in the Transactions table, you need to create a row containing the code "docnum" in the Doc column, and your desired text in the Description column. For the following rows, the text specified in the Description column will be used.
- "0" when no automatic numbering is required.
- "1" progressive numbering.
- "cash-1" progressive numbering with the prefix "cash-" (cash-2, cash-3).
The program replaces the number indicated at the end of the text with the next progressive number.
- If you wish the program to suggest just one row per code, the description has to be preceded by:
- An "*": displays just this row and not the others with the same code.
- An "**" displays just this row, but doesn't retrieve this row (only title row).
- An "\*" allows the user to start the description with an asterisk, without it being interpreted as a command.
Retrieving recurring transactions in the Doc column into the Transactions table
In the Transactions table, you can resume the rows defined in the Recurring Transactions table:
- In the Transactions table, enter the date in the transaction row and display any other columns that are missing from the Recurring transactions table.
- In the Doc column in the Transactions table, choose one of the codes defined in the Recurring transactions table and press Enter:
- The programme inserts repetitive rows that have the same code.
- IIf you need to modify or complete any values, you can always do so.
- Rows stored in the Recurring transactions table can be resumed by entering the code in the Doc column and pressing the F6 key.
Copying transaction rows from the Transactions table into the Recurring transactions table
In order to copy rows from the Transactions table into the Recurring transactions table, you need to:
- In the Transactions table, select the rows that need to be copied.
- Edit menu → Copy rows.
- Go to the Recurring transactions table.
- Edit menu → Insert copied rows.
Automatic transactions with recurring deadlines
Automatic transactions are useful for facilitating the recording of repetitive entries, such as subscriptions, insurances or taxes. By using automatic transactions, you only have to enter the entry of interest once, set a few parameters such as the start date, the frequency and the end date and then Banana Accounting Plus will inform you when an automatic transaction is ready to be created and will create it for you.
In Banana Accounting Plus, there are two ways to create automatic entries: directly from the Recurring Transactions table or from the Manage Automatic Transactions dialogue.
Requirements
- This feature is available in the latest release of Banana Accounting+ Dev Channel.
- It requires the Advanced plan. If you do not have this plan, you can request a promotional code valid for 1 month via the contact form.
- You need to add the End Date and Repeat columns to your accounting file.
- This feature is in Beta Test; we kindly ask you to test it and report any problem.
Adding the End Date and Repeat columns to your accounting file
To be able to activate the commands for automatic transactions, the End Date and Repeat columns must be added; without these columns the commands will not be displayed.
- Open your accounting file or create a new accounting from the File menu > New command.
- Select the command from the Tools menu > Add/Remove Functionalities...
- The Add/Remove Functionality dialogue will appear with the list of available functionalities.
- Select the option Add End Date and Repeat columns in Transactions table.
If this option is not available, check the Banana version and the plan you are using, as described in the Requirements section. - Click on the OK button.

Creating an automatic transaction from the Recurring Transactions table
- Select the command from the Actions menu > Recurring transactions > Create automatic transaction.
- The Recurring transactions table will appear with a new row, showing the date of the day in the Date column and the text !Auto in the Doc column, which serves to identify the automatic transaction.
- Update the Date column with the date of the first occurrence you wish to schedule.
- Display the End Date and Repeat columns with the command from the Data menu > Columns setup...
Make sure to check the Visible box for both the End Date and Repeat columns.
If these columns are missing, you can add them as described in the Adding the End Date and Repeat columns paragraph. - Add the desired repetition to the Repeat column. For example, if you want a quarterly repetition, enter the text 3MS in the Repeat column.
- If the automatic transaction has an expiry date, set it in the End Date column.
- Complete the Description, Debit Account, Credit Account and Amount columns.
- Select the command from the Actions menu > Recurring transactions > Manage automatic transactions to display the scheduled transactions.
Note: If you use the command from the Actions menu > Recurring transactions > Create automatic transaction from an existing transactions in the Transactions table, the Description, Amount and Accounts columns will show the text of the original transaction.
The Create automatic transaction command is also available in the context menu of the Transactions table (right-click on a transaction, and choose the Create automatic transaction command).
Creating an automatic transaction from the Manage automatic transactions dialogue
- Select the command from the Actions menu > Recurring transactions > Manage automatic transactions.
- The Manage automatic transactions dialogue will appear.
- Click on New automatic transaction button at the bottom of the dialogue.
- Complete the necessary fields:
- Start date
Date from which the first automatic transaction will start. When the transactions are generated, this date will be updated with the date of the last automatic transaction created. - End Date
- Repeat
- Description
- Account
- Contra-account
- Amount
- CC1, CC2, CC3
- Name or description (optional)
- Start date
- Click on the OK button.
Check and recalculate accounting
The command to recalculate and check your accounting can be called up as follows:
- with the Shift + F9 keys (Windows and Mac) or Cmd + 9 (Mac)
Primary accounting recheck - with the Actions menu → Check accounting command
This solution includes several extensive control options - Extensive accounting recheck - Display the Balance column through the Data menu → Columns setup.
If there are error messages or differences you should correct them.
Primary accounting recheck
The Check Accounting command mainly checks the version in use and, if an updated version is available, the program prompts you to update to the latest version. We strongly recommend updating as many features have been improved and different problems solved.
The recalculate and recheck accounting function will execute the following operations:
- Reset the accounts balances, as well as the cost centers and segment balances
- Verify and report if there are errors in the various tables (Accounts, Transactions, VAT Codes and Exchange rates tables)
- Re-enter all the operations as if they were being entered for the first time
- for the multi-currency accounting, it will recalculate the opening balances in the basic currency using the latest exchange rates
- if the transactions rows are not locked, it will recalculate all transaction rows:
- the VAT percentages are taken over from the VAT Codes table and the VAT amounts are recalculated again
- Update the account balances, as well as the cost centers and the segment balances
- In the Cash Manager, the progressive account balance in the Transactions table is recalculated
- it will recalculate the Accounts and Categories table totals (income and expenses)
- it will update the Diff. Budget and the Previous year columns
- In the multi-currency accounting, it will update the Balance Calculated column in line with the latest exchange rates and the exchange rate differences.
Extensive accounting recheck - the Check Accounting window
On top of the principal recalculation and recheck of the accounting, additional checks are executed.

Recalculate accounting plus additional checks
This is one of the most useful features: the entire accounting file is being rechecked, all the balances are recalculated and the user is notified if errors are found. The command also updates the texts in the Account Descriptions and Categories columns (Transactions table), if these have been changed.
Accounting properties
This option is being activated by default. The program verifies whether the data entered into the File and accounting properties correspond to the actual accounting (for example: opening and closing date, VAT account, accounts for exchange rate differences, etc.).
Transactions
Differences within transactions
If this option is activated, the program verifies whether there are differences between Debit and Credit or between Accounts and Categories in the Income & Expense Accounting.
- The rows where the differences occur are being indicated in the Messages Window.
- The Balance Column shows the difference between the debit and credit movement. If there is an error, the balance does not go to zero.
- Also, the program shows the total difference amount in the Information window at the bottom of the screen (only when being positioned in the Transaction table).
Include intermediary differences
If this option is activated, the program verifies whether there are differences between Debit and Credit, in composed transactions (transactions over multiple rows).
Often differences are caused by incomplete entries or errors in the amounts (as for example in the following example).
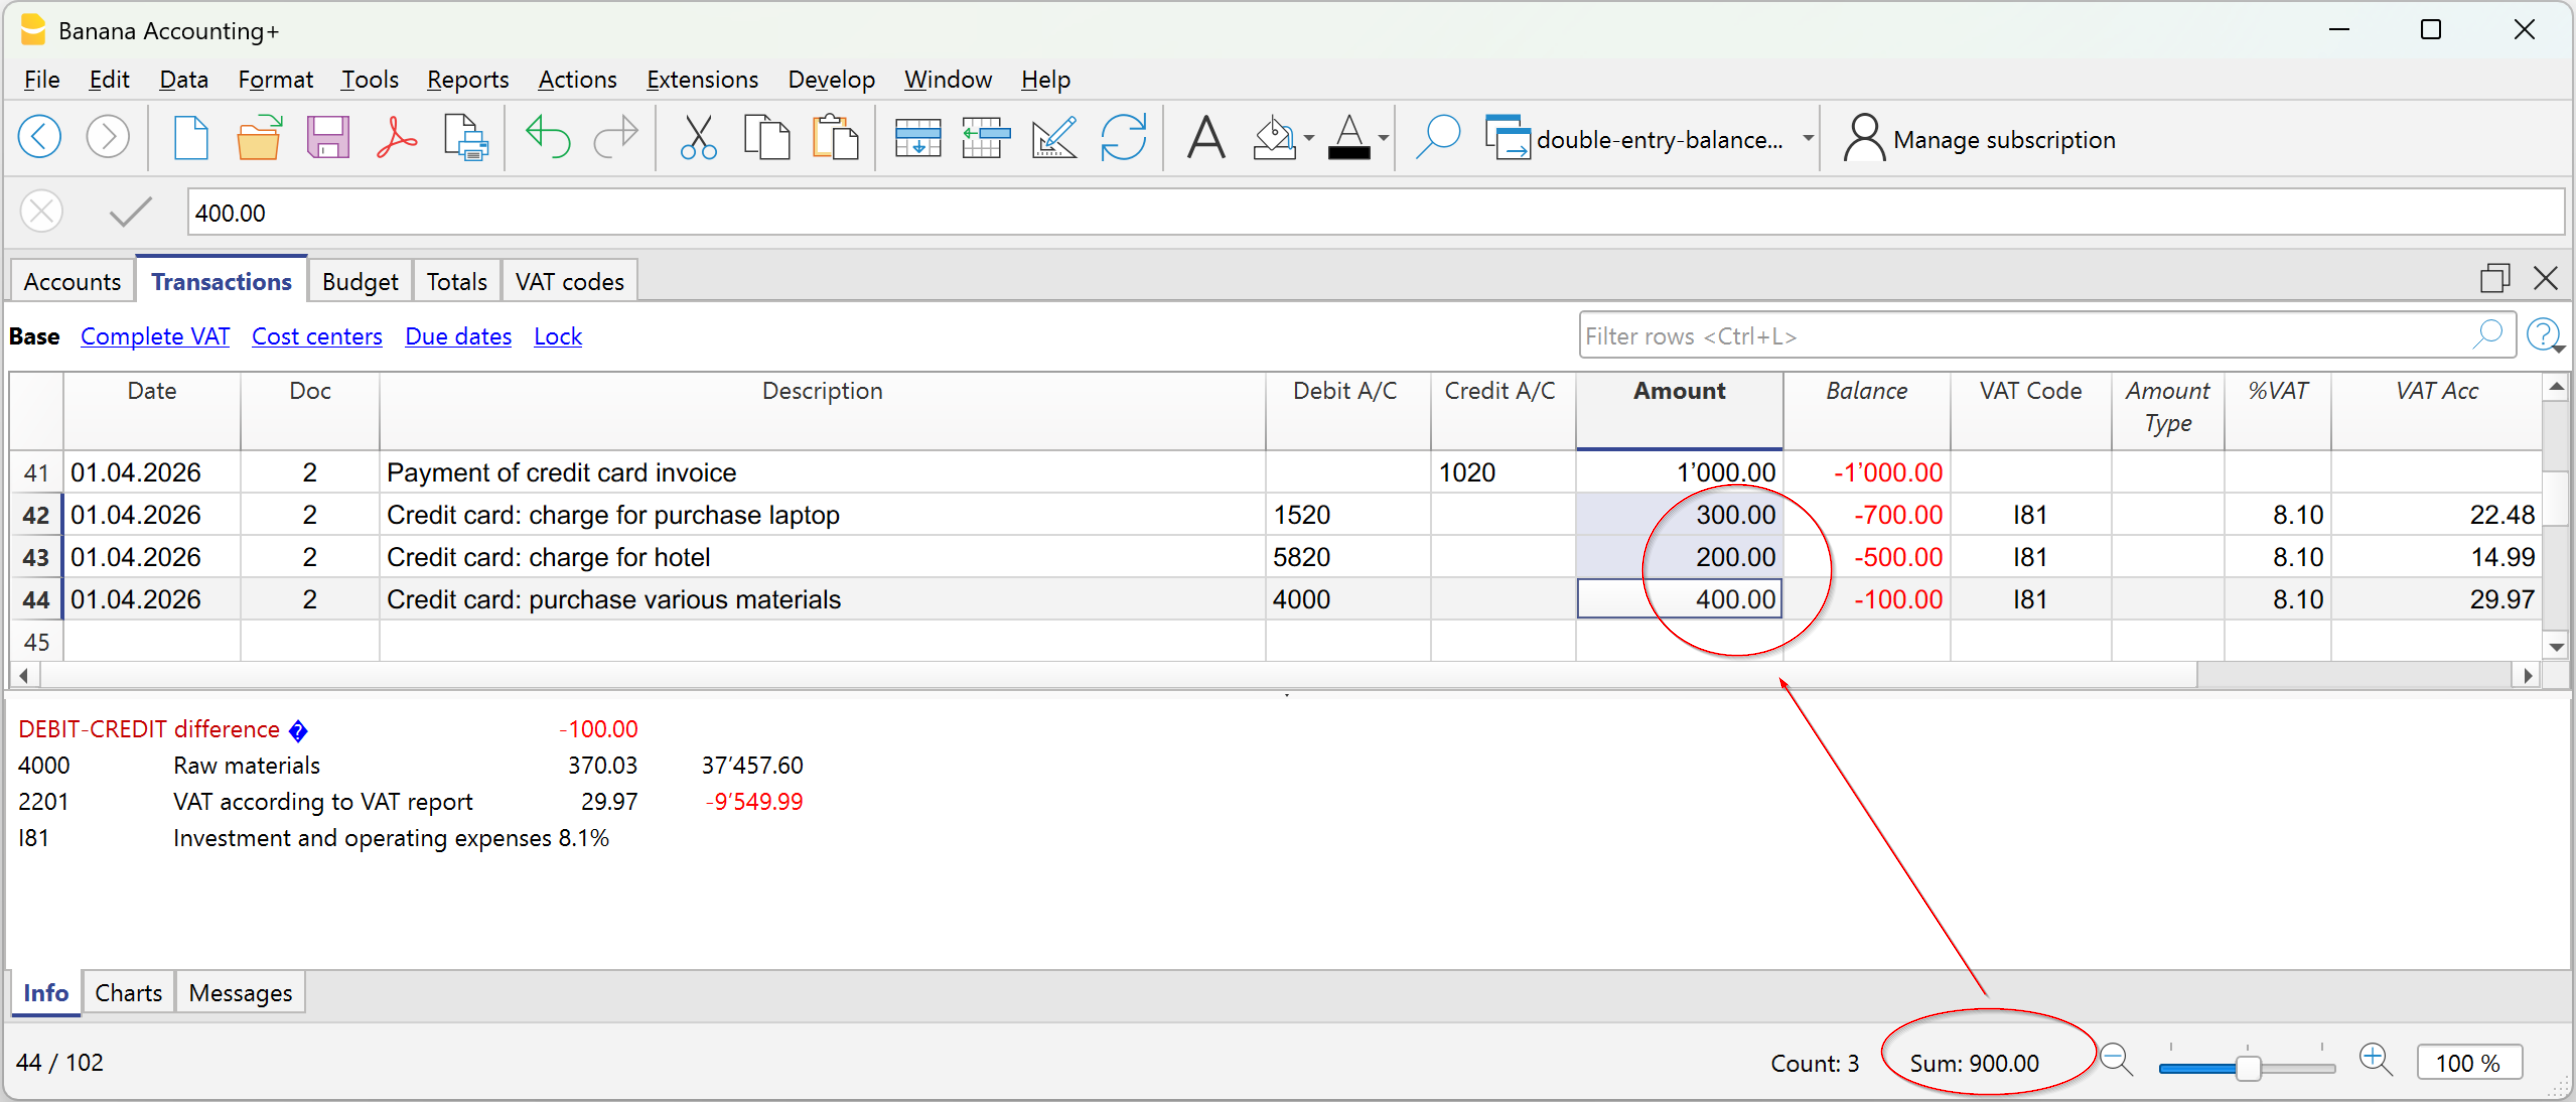
Balance checks (#CheckBalance)
By activating this check, the program will signal wether the balance indicated in the description is different from the accounting balance on the indicated data.
The transactions #CheckBalance are used to indicate that the account balance on a determinate date is correct.
At the end of the month, quarter or year it is useful to create #CheckBalance postings for the cash and bank accounts. The #CheckBalance transactions are also useful in conjunction with the lock transactions command.
Using the #CheckBalance transactions you will notice if, after closing the period, incorrect transactions have been made..
Characteristics of #CheckBalance transactions
- Date. Must be the date the balance refers to.
- Description must contain
- #CheckBalance followed by the account balance, including decimals.
#CheckBalance -1200.00
#CheckBalance 0.00 - For multi-currency accounting, the wording #CheckBalance followed by the currency abbreviation and the account balance, including decimals.
#CheckBalance CHF -1200.00
#CheckBalance EUR 0.00
#CheckBalance -1200.00 Without the currency code, the check is done on the basis of the balance of the base currency.
- #CheckBalance followed by the account balance, including decimals.
- Debit Account indicates the account on which the verification is to be carried out.
- Amount must be left blank.
The program has detected a difference between the checking balance and the account balance in the file.

Same document with different dates
When this option is activated, the program will alert if transactions with the same Doc number have a different date. For transactions on more than one row, where there is no correspondence between Doc and Date, the program cannot correctly determine the counterpart.
Accounts
Chart of accounts structure
When this option is activated, the program checks whether the grouping structure in the Chart of Accounts is correct.
Existence of exchange rate differences
When this option is activated, the program checks whether there are unrecorded exchange rate differences.
Opening balances differ from last year's balances
When this option is activated, the program verifies whether the opening balances of the new year match with the closing ones of the previous year. If there are differences between the closing balances of the previous year and the opening balances of the new year, these are reported as a total amount in the Messages window.
Include additional checks with the shortcut Shift + F9
When this option is activated, the program will run all the checks activated in the dialog window, when pressing Shift+F9. Otherwise only an accounting recalculation will be done (Mac version: Shift + Cmd + 9).
Balance column to detect accounting differences
The Balance column is present in the Transactions table in the double-entry accounting, multi-currency accounting, income/expenses accounting, and cash manager files. It is very useful because it detects accounting discrepancies in the Transactions table.
When accounting discrepancies are encountered, it is essential to identify the cause and proceed with the correction.
Errors are likely due to the following reasons:
- The cell where the Debit account, Credit account, or Category is recorded was inadvertently left blank or is incorrect.
- For an entry spanning multiple accounts or categories, the total amounts do not match.
- In an entry with a VAT code, the VAT breakdown or the VAT account is incorrect.
Note: In composed transactions of several rows, the program will display a difference between Debit and Credit until the entry is completed.
▶ Watch the video: The new Balance column
The Balance column in Double-Entry Accounting
In double-entry accounting, the Balance column shows the differences between the Debit and Credit columns.
When the accounting is correct, the Balance column should have no value (empty cells):
- The balance is zero if the sum of the amounts in the Debit and Credit columns offset each other (no difference).
- For entries spanning multiple accounts, a balance is displayed until the entry is completed for all the accounts and/or categories involved. With the final entry, the balance should reach zero.

In the example image, a difference of 150 was generated:
- In the entry on line Doc 1, the account 4999, which does not exist in the chart of accounts, was entered; therefore, a difference of 100 was created in the Balance column on the same line.
- In the entry spanning multiple accounts on the lines Doc 2, the total amount paid is 1,000, but the final entry does not zero out the total amount (1,000) between the Debit and Credit columns, because the counter entries total 950; thus, an additional difference of 50 is added, leading to a total difference of 150.
The Balance column in Income/Expense Accounting
In Income/Expenses Accounting and Cash Manager, the Balance column shows the differences between the Account and Category columns.
When the accounting is correct, the Balance column should have no value (empty cells):
- The balance is zero if the sum of the amounts in the Account and Category columns offset each other (no difference).
- For entries spanning multiple accounts, a balance is displayed until the entry is completed for all the accounts and categories involved. With the final entry, the balance should reach zero.
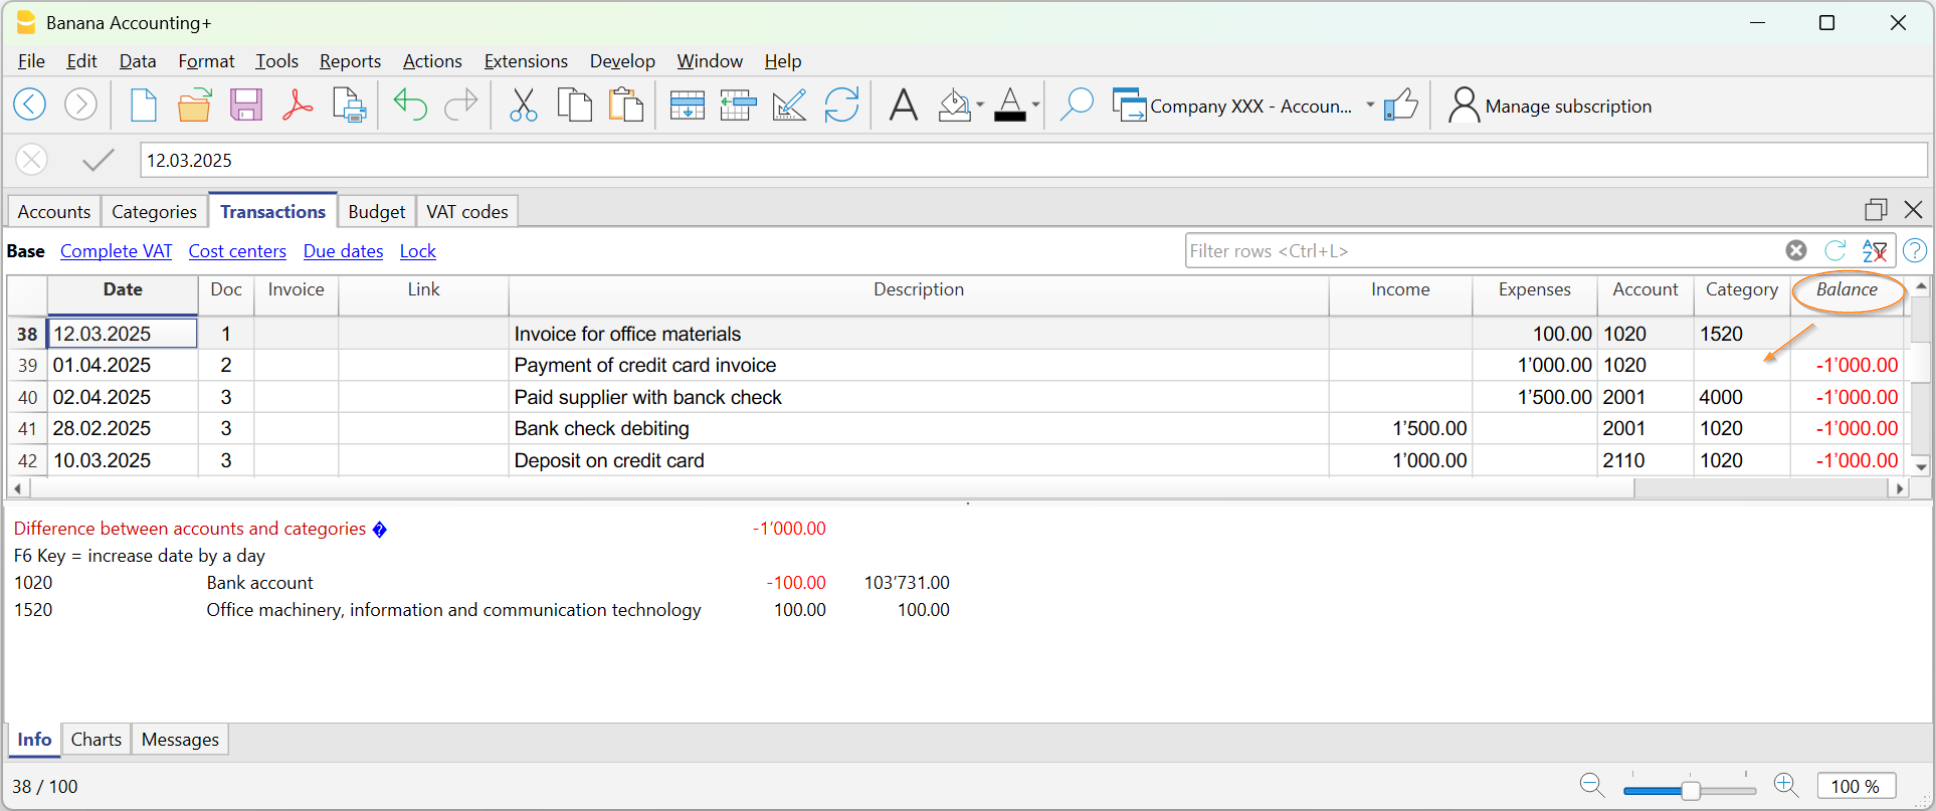
In the example image, a difference of 1000 was generated:
- In the entry on line Doc 2, the category was not entered in the Category column. Therefore, the amount, having been recorded only in the Account, resulted in a difference of 1000.
Checking the Accounting
The Check accounting command also includes a check of the Balance column.
If the Balance column is not zero, it means there are errors. To locate the first row where the accounting discrepancy occurred:
- Scroll through the Balance column to identify the first row where the discrepancy starts.
- Use the Recalculate accounting command, which indicates the row where the discrepancy begins.
Movement Column
The Movement column, available in the Account card table, shows the debit and credit movements in a single column: positive amounts for debit entries and negative amounts for credit entries. The amounts are the same as those contained in the Debit and Credit columns.
A single column should allows for better control of your accounting.
You can activate the Movement column in the Account card, via the Data → Columns setup menu.


Export from Banana Accounting+
Banana Accounting Plus offers several exporting possibilities. It is possible to export the data of a single table (export rows), of several tables (export files), or only the data contained in the print preview. You can choose to export in different formats: PDF, Xml, Excel, Html, txt, Json, etc.
New! It is now also possible to export the PDF file that also includes all digital attachments. All accounting is therefore truly included in one file.
The PDF export with digital attachments is only available in Banana Accounting Plus with the Advanced plan.
See all the advantages of the Advanced plan.
With Banana Accounting it is possible to export data from a single table or from multiple tables (files), in various formats.
Export rows
Choose Data > Export rows menu in order to export the content of a single table.
If rows are selected before giving the command, the option Only selected rows will be activated in the export dialogue.
Export file
Chose File > Export file command from the File menu in order to export several tables simultaneously.
In the Export file dialogue the following sections are also used:
- Those specific to the file type (see export formats).
- Include tab - to define the tables and the reports that must be included in the export
- Period (Accounting) tab, to define the period
- VAT tab (in the accounting files with VAT management)
- Customization tab
Export Print Preview
In the print preview toolbar:
- Click on the arrow beside the Adobe PDF button
- Choose the option that's right for you:
- Export to PDF
- Export to Html
- Export to Excel
- Copy to clipboard
Export formats
To set up a specific export, each format has one or more sections with options.
You can choose between different formats:
- PDF
This format allows to export the entire accounting file content in a unique PDF file.
New! Export PDF file including digital attachments - Excel
Creation of presentations in Excel, comparisons, estimates, index calculations, budget analysis, graphs that are directly linked to the accounting values. - HTML
With this format the data and accounting statements can be easily accessed with an Internet browser (Explorer, Mozilla, Opera).
This format fully complies with the legal requirements related to long-term archiving of accounting data. - XML
This format is the standard used for exchanging data. The accounting data can be easily read and reused with other programs or with XSLT style sheets. - Export rows in TXT
This format allows to export the table rows in a text format.
Export to Excel
To export to Excel click on the File → Export file → Export to Excel menu.

File name
In this area, you must enter the name of the new file that the program creates for exporting data. If, on the other hand, an existing file is selected using the Browse button, the program will overwrite the file with the new data.
Display files instantly
The program for viewing the newly created MS Excel archive is launched. In this way you can see the export result immediately.
Options
Define cell names
This option will automatically assign a name to each cell as the file is exported. For example, the cell that contains the balance for account 1000 will receive the name: "Accounts_1000_Balance" in Excel. This means the user can univocally identify each cell independently from its position on the sheet and thus create Excel reports that don't have to be corrected if the account plan is changed.
Define table names
With this option, the program will automatically give a name to the whole area of the cells belonging to a table, at the moment the file is exported. For example, the area formed by the cells belonging to the Accounts table will be identified by the name DB_Accounts. This option is necessary if database functions are used, when creating reports in Excel.
Use names Xml (English)
The cell names can either be defined in their original accounting language, or with their English name. In the original language, the names will be understandable to someone who speaks that language, but they will not be universally understood like a name in English would be. By selecting this option the user would have, for example, "Accounts_1000_Balance" instead of "Conti_1000_Saldo".
Protect tables
The entire content of cells is locked when selecting this option so that it is only possible to edit the format. This prevents the possibility of making any unintentional changes to the exported data. The user can remove this protection at any time by using the appropriate command in Excel.
Other Tabs
For the explanations of the other tabs, please visit the following pages:
Export result
Exporting to Excel creates a file with html content but with the extension '.xls'. The file is opened by Excel and converted automatically. Excel however warns that the file is not an actual Excel file, simply respond 'Yes' to continue.
Each accounting table is displayed in a different sheet in the Excel file
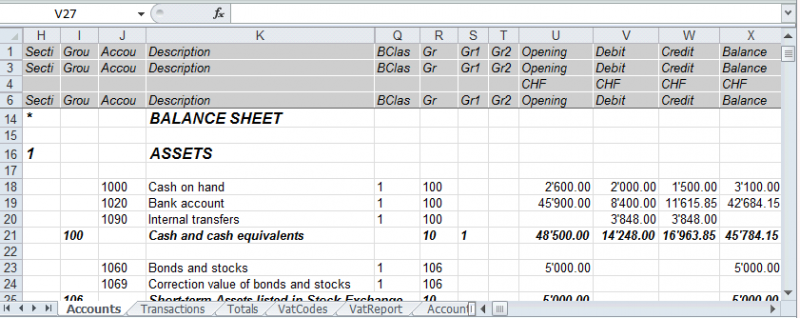
Use the cell names instead of the row/column references:
- The names return the desired value even when a new row or column is being entered.
- The names are easy to use and understand
"Accounts_1000_Balance" refers to the balance of the 1000 account
"Accounts_1000_Description" returns the value of the cell that contains the description of the 1000 account - The names can be used in the formulas
"=Accounts_1000_Balance" returns the value of the cell that contains the balance of the 1000 account
"=Accounts_1000_Balance/1000" divides the balance of the 1000 account by 1000 - By using the names, it is possible to create links to various files.
A link to a cell is being composed of:
- File name
- Table name
- Cell name
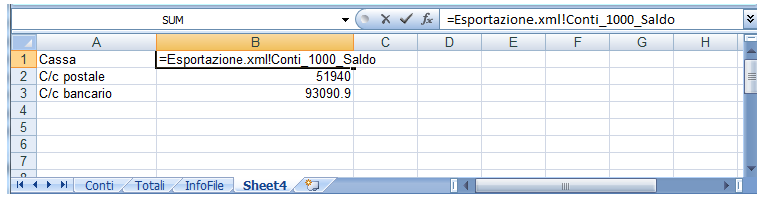
Copy/paste data from Banana to Excel
With Banana Accounting it is always possible, in addition to exporting, to copy/paste Banana data into Excel: only some cells, columns, or the whole table.
Some users have reported to us that in rare cases and only from Mac computers, when exporting data from Banana to Excel, the format of the amounts is not optimal.
However, the situation is easily resolved by simply selecting the columns with the amounts in Excel and changing the cell format to the "Number" type.
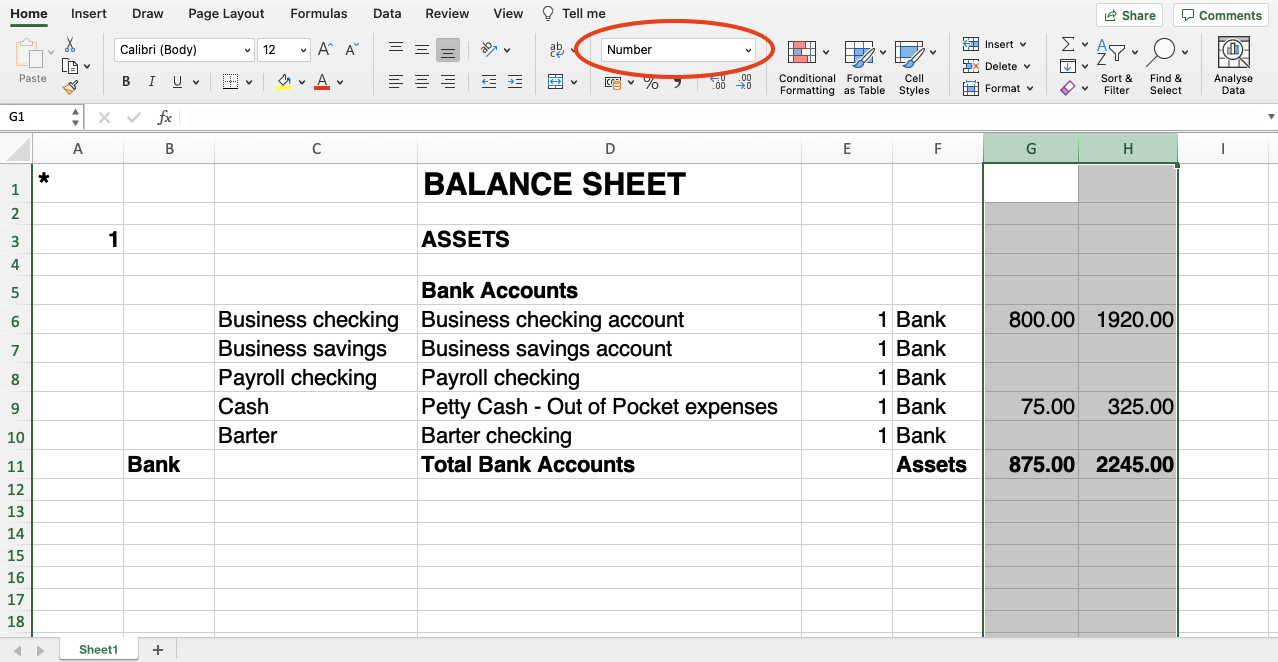
Include Tab
Via File → Export file → Export to Excel → Include section will open the dialog box that allows you to choose the tables and reports to include.

Recheck accounting
By ticking this box, the accounting will be rechecked before it is exported.
Include
Contains the list of tables and reports that can be exported. The list of data may vary depending on the type of file and accounting.
View
It is possible to select the view where the data are to be imported. This option is available for the export in PDF, Html and Xml format.
Period
This group allows you to indicate options for exporting tables with periods.
Accounts/Categories by period
Refers to the Accounting Period choice and indicates which repetition per period is desired.
VAT/Sales tax report
This option allows to export the VAT/Sales tax report according to the selected period.
Create periods for the whole year
By selecting this function, the partial balances for the whole year will be exported, and not only the ones of the specified accounting period or the selected export period.
Max number of periods
The maximum possible number of periods.
Export to Html
To export to Html click on the File menu → Export file → Export to Html.

File Name
In this area, the user must insert the name of the new Html file that the program will create to export the data. If however the user selects an existing file through the Browse button, the program will overwrite it with the new data.
Display file immediately
As soon as the Html file has been created, the software to view it will be launched. In this way, the result of the export can be seen immediately. It is best to remember that browsers like Mozilla and MS Explorer use a cache mechanism for files. When the export is made for a second time, it is possible that the user will see the previous version until the browser Reload button is pressed.
File creation options
Headers 1, 2 and 3
These are the file headers.
Other Options
For the explanation of other tabs, please visit the following pages:
Html Options Tab
From the menu File → Export file → Export to Html → Html Options section opens the dialog box that allows you to activate options when exporting the file in Html format.

Use style sheet CSS
Selecting this cell will allow the user to connect a style sheet to the exported file. By default the program will automatically use its own style sheets and incorporate it into the document.
Use predefined style sheet
The program's default style sheet is used. Disabling the box automatically activates the External style sheet option, where you can select the name of a personal style sheet.
External style sheet
File name
In case an external style sheet is being used, select the file name of the style sheet with the Browse button.
Include style sheet within html file
When the data are sent in HTML format, the style sheet file must also be sent. To avoid sending two separate files, by activating the box, it is possible to embed the style sheet in the Html accounting file.
Selecting the cells will allow the program to file the data with various graphic options:
- Export visible columns only
- Table with border
- Columns with headers
- Preserve page breaks within the table
- Export as data - data will be exported without any formatting
Export in Xml
To export to Xml click on the File menu → Export file → Export to Xml.

File Name
Enter the name of the new file to create or choose an existing one using the Browse button.
Display file immediately
The program for viewing the newly created Xml archive is launched. This way you can see the export result instantly. Remember that browsers such as Mozilla and MS-Explorer use a document cache mechanism. When exporting a second time, if you do not press the Update button on your browser, you may still see the previous version.
Style sheet XSLT
In this area you can set the style sheet (external Xml file) on the basis of which the program must graphically arrange the accounting data. Banana Accounting does not make Xslt files available.
Options
It is possible to choose between the following options:
- Export visible columns only.
- Include view list.
- Export as data.
Other Tabs
Other sections
For the explanations of the other tabs, please visit the following pages:
Export rows in txt
In order to export rows, please select the Data → Export rows → Export rows in Txt menu. The following options options are available:

File name
Enter the file name or select an existing one using the Browse button
Format
Select the desired format.
Display file immediately
As soon as the file has been created, the software to view it will be launched. In this way, the result of the export can be seen immediately. Please notice that browsers such as Mozilla or MS-Explorer have a documents cache mechanism. It is then possible that, when exporting a second time, you will still see the previous version if you don't use the Refresh browser's button.
Options
If activated, different options will allow the export of:
- selected rows only
- visible columns only
- columns header
- unicode (Utf-8)
Lock transactions with the Blockchain technology
Banana uses an accounting data certification system based on a technique that today is called blockchain. The certification method based on the chaining of data blocks "blockchain" is considered so reliable that it is used to ensure the validity of bitcoins and all modern crypto-currencies.
Banana.ch was the first company in the world to use blockchain technology in accounting. The method was filed as a patent in 2002 (US Patent No. 7,020,640). This method ensures high levels of data integrity and compliance with legal regulations.
For more information, see Blockchain for ensuring the integrity of accounting movements.
The lock transactions command
With the Lock transactions command of the Actions menu, the accounting transactions are locked and marked with control codes that can certify, over the years, that the transactions have not been modified.
- The validity of a possible already existing lock is being verified
- The transactions until the lock date are being numbered progressively and are being locked. For each transaction, the digital code of the row and the progressive one are being calculated.
The calculation of the digital codes is being done according to the sequence of the columns. - In the accounting is being indicated that transactions with an equal or earlier date than the lock date will no longer be accepted.
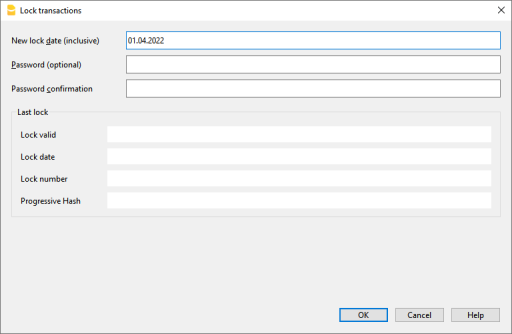
Date of new lock (inclusive)
Specify the date up until when the transactions will be locked.
Password (optional)
It is possible to insert a password to eventually unlock the transactions or to carry out a new lock in the future.
If the program finds no errors in the transactions included in the lock date, it will lock the transactions, calculate and assign individual numbers and codes to each row of transactions which can be viewed in the Lock view on the Transactions table.
Last lock
The data of the following fields are automatically filled out by the program based on the last executed lock.
Lock valid
A "Yes" is shown if the lock is valid.
Date of lock
The date of the last executed lock is shown.
Lock number
This is the value automatically entered by the program in the last row of the LockNum column.
When the lock is repeated, if the value of the last row lock number is unchanged, it means that the lock is valid and that the data have not been altered; if however the value is changed, the program shows the following codes:
- (-1) if the lock is invalid from the first row
- (-2) if there are rows that have the same LockNum.
Progressive Hash
This is the control code present in the last transaction.
Transactions: Lock View
All digital codes are shown along with all the information that the program used to create the digital signature.
![]()
- LockNum: the progressive number that identifies the row
- LockAmt: the cumulative transactions total, similar to the total at the end of the page, as required by some national regulations
- LockLine (hidden column): the digital code calculated according to the row values.
- LockProg: the global electronic signature (SHA-256).
The digital code LockProg
This is the main element of the certification; it uses the blockchain methodology.
The digital code is calculated according to the following values:
- The contents of the current entry, including amounts, descriptions and the description of the account at the moment of the lock
- The progressive number (LockNum)
- The cumulative balance (LockAmt)
- The progressive code of the preceding entry (LockProg).
In case the accounting data undergo even the slightest modification (for example, a date or an amount is changed), the digital code will be different. If the control number remains the same, it implies that the data are original and therefore have not been changed.
Check Lock
With the Actions menu → Check lock info command, the program verifies the validity of the lock and displays the data.
- The program recalculates the digital control codes and verifies if they correspond with the ones related to the transactions.
- If the codes correspond, the lock is considered valid, and therefore the data are original
- If they do not correspond, it means that the data have been changed and that they are not the original ones calculated at the time of the lock.
![]()
Unlock transactions
The Menu Actions → Unlock transactions command removes the lock and the control codes. If the lock was set with a password it will be necessary to reenter the password in order to remove the lock.
If later on you want to relock the transactions, and they have not been modified, the control numbers will be the same as the ones of the earlier lock; if however some data have been changed, the control numbers will be different.
Partial lock
If the transactions have been locked, it is possible to unlock them even partially, from a specified date. If a lock password has been set, in order proceed unlocking the transactions, you need to enter it in the specific field.
![]()
Why unlock the accounting?
In principle, the locked accounting should not be unlocked. It might happen that, after the lock, you find errors in the accounting and see the need to make corrections.
To have the opportunity to make further changes, users kept a copy of the file before the lock. If they found errors, they would restore the previous situation. In the meantime other transactions had perhaps been made, so often it happened that restoring previous versions of the accounting proved wrong. To avoid this unnecessary waste of time it was decided to make the Unlock transactions command available.
The certification must not be confused with data security. The data certification is a methodology that ensures that the accounting data are original. To prevent data from being modified, the methodology is the one related to data security. Data security procedures, however, can only be implemented in an environment that limits data access.
If the file is fully available to the user, such as when it is on a PC, people have complete control of the data. They can thus replace files easily. With a certification one cannot prevent that the data are being altered, but it will allow you to know if the data are the original ones.
The person who keeps the books is responsible for the accounting and decides whether a change is permissible or not.
Organizing the certification and data verification
Once you locked the transactions of the period, you need to:
- Print the lock information or print the last certified transaction row with its specific certification number (LockProgr).
- Sign and store this information along with the accounting documentation or in any other safe place.
In order to check that the accounting data are the original ones, you need to proceed as follows:
- Impart the Show lock info command.
- Go back to the document that shows the digital control number
- Check whether the row identified with the LockNum still has the same digital control number
- If the number matches , the accounting data are the same as those certified
- If the number does not match , it means that the accounting data have been modified.
Banana works on developing applications that make it possible to compare two files and obtain indications regarding data that have been altered.
Data security
Digital certification ensures that the data are still the original ones. It does not prevent the modification of data.
It is the responsability of the accountant to ensure that the data are not altered. Each administration must be organized according to its size and needs.
Those who want to make sure that the data are not being altered by unauthorized persons , must employ other methods and tools, such as :
- Save the data to a secure system (protected network drive), password protected.
- Keep the copies of the data.
- Encrypt archives.
Long-term archiving
The accounting file contains the entered data. In order to open the file and obtain a report or an account card, you need to have the program at your disposition.
Banana Accounting gives the possibility to export all the accounting data, and its printouts as well, to Pdf, Html and Xml.
The generated file can be saved on a CD and accessed on any computer even after many years, even by persons who do not have the Banana Accounting software.
Add or remove functionality
Banana Accounting Plus offers the possibility of adding new functionalities to the file. See also Add general functionalities.
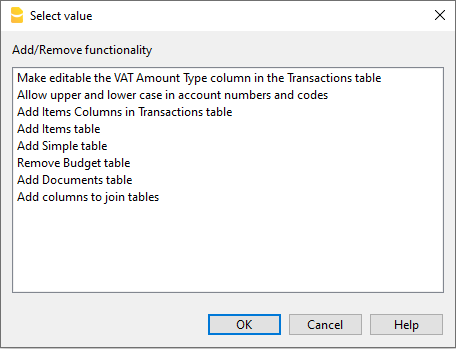
Enable Uppercase/ Lowercase in account description numbers and codes
When accounts in the Chart of Accounts, the accounts are descriptive (e.g. cash), the programme normally converts the letters to uppercase. By enabling this function, the programme allows descriptive accounts to be in upper or lower case.
In the Transactions table, the descriptions found in the Account column will be taken as they appear in the Accounts table.
Please note that the 'Cash' account written with the first letter in capital letters will be different from the 'cash' account written in lower case.
Add Items Table
Information is available on the documentation Items Table.
Add Item Columns to the Transactions table
Information is available on the documentation page Items Columns in the Transactions table.
Add Items Table and Item Columns to the Transactions Table
The information can be found on the documentation page Items Table and on the documentation page Items columns in the Transactions table
Add Address columns in the Accounts table
For accounting files.
This functionality allows you to add columns to the Accounts table for entering the addresses of customers, suppliers, partners or others.
To add this function, proceed as follows:
- Click on the Tools menu
- Select the Add/Remove functionality... command
- Select Add Address columns in the Accounts table. (If this option does not appear in the list, it means that it has already been activated).
The programme adds in the Accounts table:
- the Address view where the added columns are visible.
- The columns which allow you to enter address data and other information.
- To make one or more columns visible, even in other views, use the Columns setup command in the Data menu.
- To create other views with specific columns, use the Tables setup command from the Data menu.
Add and Remove Budget Table
This function enables the accounting file for financial planning by adding the Budget table where you can enter transactions concerning the budget.
See the Budget table for more information.
Changing VAT amount type column in transactions
In accounting files with VAT, in the Transactions table, this function allows the column Amount type (VAT amount type) to be made editable.
This column allows one of the following VAT amount types to be entered for each transaction, when required:
- 0 (or empty cell), this means VAT included
- 1 = VAT amount, means VAT excluded
- 2 = VAT amount, the amount of the entry is considered as 100 % VAT amount
- For each entry, the programme automatically enters the default data from the VAT Codes table (for each code) in the Amount type column. If, exceptionally, the type of amount changes for a VAT code, either 1 or 2 can be entered manually.
Note
By using this function there are some VAT data incompatibilities with previous versions that did not have this function.
Dialog - Period section
This section appears in various dialogues (eg in the account card, in the balance sheets ...) and has the function of limiting the display or processing of data only for a specified period.
If, for example, you enter a quarter, only the transactions for the quarter will be displayed in the account card and the results for the quarter will appear in the Balance Sheet.
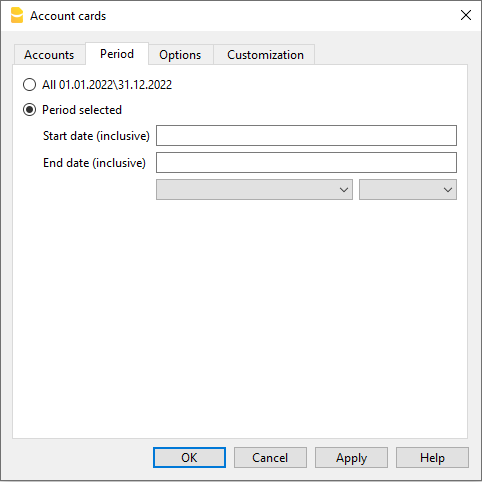
All
All accounting entries will be included.
Period selected
Defines a specified period, indicated by the start and end date.
Movements without date
If movements without dates have been entered in the accounting, they will only be considered if you select All.
On the other hand, if for example you enter, from January 1st to December 31st, the movements without a date will not appear in the report.
Banana Accounting+ charts
In Banana Accounting Plus, when opening a file, the Charts window is available at the bottom, which offers a graphical representation of the performance of a selected account, group, cost centre or segment.
The chart displays the data of the account or other selected item in a table, according to the settings that can be chosen in the right-hand panel:
- Placing the cursor on the curve or bar of the chart shows the exact values of the amounts.
- Clicking on a point in the chart opens the corresponding account tab at the corresponding position.

Control Panel
Using the right-hand panel it is possible to select the values and period to be displayed, the mode, as well as to print or save the chart.
If the size of the window does not allow all the controls to be displayed, only the controls concerning the legend will be displayed. To display all controls, either the main application window or the bottom window must be enlarged.
Time Values
The following accounting values can be displayed individually or simultaneously in the charts:
- Current - represents actual values.
- Budget - represents the budget values.
- Previous - represents the previous year's values.
By clicking on the name (Current, Budget or Previous) with the mouse, the respective values are displayed or hidden.
Legend
The Legend option selects whether to hide or display the legend within the chart window. As a rule it is hidden, but you can display it in case you need to print or save the chart.
- Off - The chart shows no legend.
- Low - The legend is displayed below the chart, in a central position.
- Left - The legend is displayed bottom left.
- High - The legend is displayed above the chart, in the middle position.
- Right - Legend is displayed bottom right.
Period
The period in years for which data is to be displayed.
1Y, 2Y, 3Y, 4Y, Y (Y indicates years).
Interval
The space between each value on the chart scale can be customised according to the following options:
- 1D (day), 1W (week), 1M (month), 3M (quarter), 6M (semester), 1Y (year).
Value
The chart can display the accounting balance at the end of the period or the accounting movement for the period. Depending on the selected value, the displayed date is adjusted accordingly:
- Balance - the chart shows the balance at the end of the period (e.g. 31 Jan '22 - period end date)
- Movement - the chart shows the movement of the period (e.g. Jan '22 - period)
- Automatic - the chart represents the balance for balance accounts and CC3, and the movement for income statement accounts, CC1, CC2 and segments.
Type
The chart can represent values in the following ways:
- Line - the chart is represented by lines.
- Area - the chart is represented by areas.
- Bar - the chart is represented by bars.
- Auto - the chart is represented as area for balance sheet accounts and CC3, and as bars for income statement accounts, CC1, CC2 and segments.
Print, Save or Copy the Chart
This feature is only available with the Advanced plan of Banana Accounting Plus.

In the top right-hand corner of the chart table, clicking on the Copy symbol displays a menu with the following commands:
- Print - Displays the chart in the print preview.
- Save - Saves the chart as a PNG image.
- Copy - Copies the chart to the clipboard as a PNG image. The copied image can be pasted into any text editor (Word, Excel, ...).
- Copy Data - Copies the values used to create the chart as a data table that can be pasted into any spreedsheet (Excel, Numbers, ...).
Extensions
Extensions are additional modules of the program that allow the use of supplementary features; most of these are exclusively available with the Advanced plan of Banana Accounting Plus.
Below is the list of the main ones:
VAT Statement 2024 for Switzerland
Starting from 01.07.2024, this extension will be available exclusively with the Advanced plan of Banana Accounting Plus. For more information...
QR Invoicing for Switzerland
Financial Analysis and Cash Flow
Advanced financial reports and charts for your double-entry accounting, including the financial statement, standard financial reports, Dupont analysis, and Altman index. You can compare historical data over multiple years and forecast data with the current year.
This extension is exclusively available with the Advanced plan of Banana Accounting Plus.
Securities Portfolio Management
To manage securities within your accounting file. It generates reports with details on the movements of your securities, reconciliation, and accounting valuation data for the portfolio.
This extension is exclusively available with the Advanced plan of Banana Accounting Plus.
Construction and Renovation Management
To manage construction and renovation projects. Easily keep track of your project costs, from the estimate phase to allocations and payments. See if costs align with estimates and avoid overruns and surprises. Data classification by expense category and companies involved.
This extension is exclusively available with the Advanced plan of Banana Accounting Plus.
List of all extensions
On our Extensions web page, you can find a list of all available extensions for Switzerland, Italy, and other countries.
Self-Programmed Extensions
For programming experts, it is possible to modify existing extensions or create new ones, and then manually install them into the program.
This possibility is exclusively available with the Advanced plan of Banana Accounting Plus.