In this article
To create a new file, go to the File menu and click on the New command.
This command opens the window for creating a new file. From the same window you can access all available templates. We recommend that you start from an existing template and customize it with your data. The window that appears offers the possibility to create a new file in three different ways:
- Using an existing Template (recommended choice)
- Copy data from an existing File
- Use a New empty File
Please note: those who have subscribed to the Professional plan of Banana Accounting Plus, while creating a new file, see the message: Active plan: Professional Plan. The functions of the Advanced Plan are available up to 70 transaction rows. This message can be ignored and automatically disappears once the 70 transaction rows are exceeded.
Start with one of our templates
This will generate a new File based on one of the existing templates. There are multiple templates suitable for every legal form and business.
According to the selected Region, the models available in the language of the nation are displayed. The image shows the templates in English language for Switzerland.

- File menu > New
- In the Region field, select your country/language
- In the Category field, select your activity's category (business, private, non profit, ...)
- In the Type field, choose the type of file you want to create (Cash Manager, income/expense accounting, double-entry accounting, ...)
- You can also search for a template by entering a keyword in the Filter by box.
- On the right side of the window, select the template that most closely matches your needs.
- Click on the file and confirm with the Create button to open the selected template.
All the files with the VAT option have the VAT Codes table adjusted to the new rates.
The chart of accounts can be adapted to your requirements (change of account description, insert or delete groups, sub-groups, etc.)
Save the file with a name
Once you have opened the template with Banana you can save it with your own name by choosing the File menu > Save as command:
- Select the destination folder
It is useful to create an “Accounting” folder for each year, so that you can save the accounting file and also the documents for that year. We recommend that you also consult the page Organize your work. - Select a file name. We recommend a name containing the company name and the accounting year (for example smith_company_2025).
- The software will add the .ac2 extension, typical for the Banana Accounting files.
Adapting a template
- Edit the File properties
- Adapt your Chart of accounts
- Enter your bank accounts.
- Enter or edit the accounts to fit it to your requirements.
While going along with your work, you will still be able to add or edit accounts, if new needs arise.
Start with a Tutorial
Tutorials are existing templates, which contain within them example accounting data (opening balances, entries, budgets, ...). A tutorial is not available for all templates.
The tutorial files are useful for understanding how to structure accounting within a certain template. The example data entered are for demonstration purposes only and can be changed, deleted or replaced with your own data at any time.
When you select a template and it has a tutorial file, the button Create from Tutorial automatically appears next to the template detail description.

Start from an existing File
Starting from an existing file or template, without modifying the existing file.

There are several possibilities to copy data:
- Open the file that is to be your template via the Browse button and indicate the path to locate your file.
- Create a copy of the open file, using the File > Save As command.
- Else, you may create a copy of the open file via the Tools > Create File Copy command. Choose which data to keep in the dialog window. If none of the three options are activated, a file is created with the chart of accounts only.

- Save the file in the folder where you wish to keep the data (normally in the documents folder). Enter the company name and the accounting year as file name, for example smith_company_xxxx.ac2.
- If you are taking over an existing accounting file, you will also need to enter the opening balances in the Opening column.
- If you are working in a multi-currency file, you need to update the opening exchange rates.
Starting from a new empty file
You will be starting from scratch, so you will need to set up the basic accounting data and the entire Chart of Accounts (not recommended).

- Menu File > New.
- Select your country/language
- Select your category
- Select your Accounting template
- On the bottom of the list click on New empty.
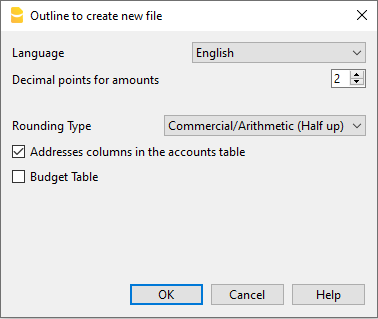
- Setup the Outline to create new file

- Setup the File and accounting properties
- Save with File Name.
- Create the Chart of Accounts structure
Related documents
- Income and expenses accounting and Cashbook
- Double-entry accounting
- Double-entry accounting with multi currency
- Utilities documents
Transferring to a new year
When transferring to a new year, there is a specific procedure to follow, in order to create a new year's file and automatically carry forward the opening balances.
New file settings
When the program creates a file with new characteristics, you need to setup the outline of the new file.