In this article
The Type column in the Transactions table can be used to define the commands that are relevant to the display for printing data specific to your Invoice.
Check the DocType column via menu Data → Columns setup ..., to display the column and use it.
Entering data
Once the column is displayed, you may proceed by entering your data. You will need to:
- Add an empty row after the Date of the Invoice.
- Enter the date of the Invoice in the Date column.
- Enter the required command in the Type column (refer to table below)
- Enter the Invoice number in the Invoice column.
- Enter the data relevant to appear on the Invoice in the Description column.
Invoice to the customer
Typing 10: the Type column will list all possible options available to customize the data of your invoice.
These command lines should, except for the total lines, be placed at the end of the invoice, after all detail lines related to items or services.
| Invoice data | Column Type | Description column |
|---|---|---|
Client address If you want the address to look differently from the one defined in the Accounts table (Address view), you can change it using using the appropriate options. On each row a different element of the address is indicated (name, surname, address...). | 10:adr:fna 10:adr:lna 10:adr:bna 10:adr:str1 10:adr:str2 10:adr:str3 10:adr:cod 10:adr:cit 10:adr:sta 10:adr:cou | Enter name Enter surname Enter name of company/organization Enter line 1 of address Enter line 2 of address Enter line 3 of address Enter postal code Enter the location Enter the state /province Enter the country |
| Shipping address | 10:sadr:pna 10:sadr:fna 10:sadr:lna 10:sadr:str1 10:sadr:cod 10:sadr:cit | Enter prefix Enter name Enter surname Enter line 1 of address Enter postal code Enter the country |
Greetings After the invoice details, you may add a line of text for your final greetings (also see Examples invoices). | 10:gre | Enter your greetings |
Final notes One or several rows of notes can be inserted after the details of the invoice and before the greetings (also see Examples invoices). | 10:not | Enter your notes |
| Order date | 10:ordd | Enter the order date |
| Order number | 10:ordn | Enter the order number |
Parameters (advanced) When wanting to print personalized data on the invoice, you can use the appropriate command. This option is aimed at users with JavaScript programming knowledge, and allows you to change the invoice layout, so as to use the parameters indicated via this command. For further information please revert to Printing custom data. | 10:par | Enter your customized parameters |
Payment term Should you want to indicate an alternative text as a payment term, enter the desired text. This will be displayed on the invoice. | 10:ter | Enter the alternative text for the payment term |
| Text begin | 10:beg | Enter the text printed before the invoice title |
Title If you do not wish to use the default invoice title, you can choose a different title. | 10:tit | Enter your text to appear as the invoice title |
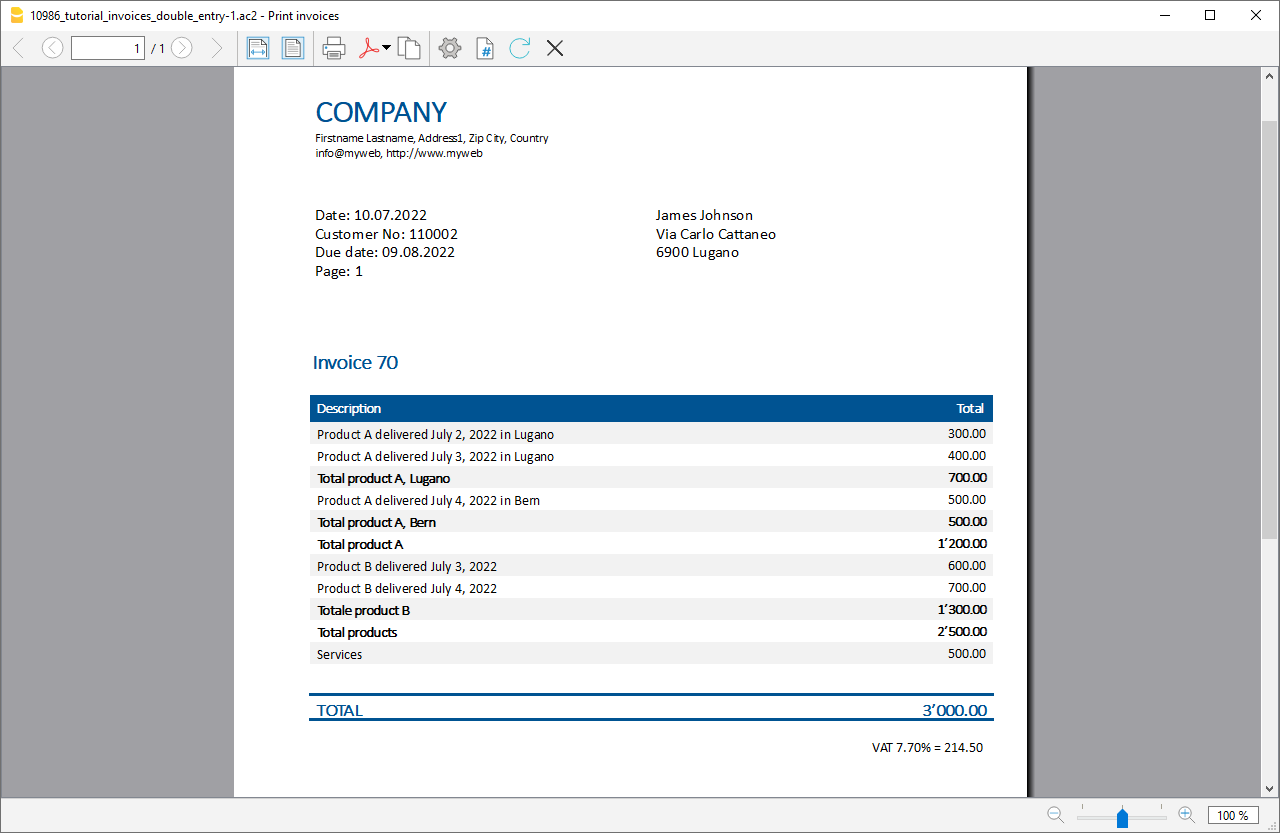
Items subtotals It is possible to enter intermediate totals for your invoice in the table with the details of the invoice (also see Examples invoices). | 10:tot 10:tot:0 10:tot:1 10:tot:2 | Enter level 0 subtotal (tot and tot: 0 is always level 0) Enter level 1 subtotal Enter level 2 subtotal |
Header line text In the invoice details table you can add headers to group items (also see Examples invoices). | 10:hdr | Enter the text you want to add to the invoice details. Leave empty to add an empty line. |
Intermediate Totals
In order to insert intermediate totals, you will need to add additional rows in the Transactions table:
- Enter 10 in the Type column: select :tot from the drop down menu, 10:tot will display. Enter again : and enter :1
- Enter the appropriate description in the Description column (ex. Total goods)
- Enter the Invoice number (in the absence of number, the total will not be printed).
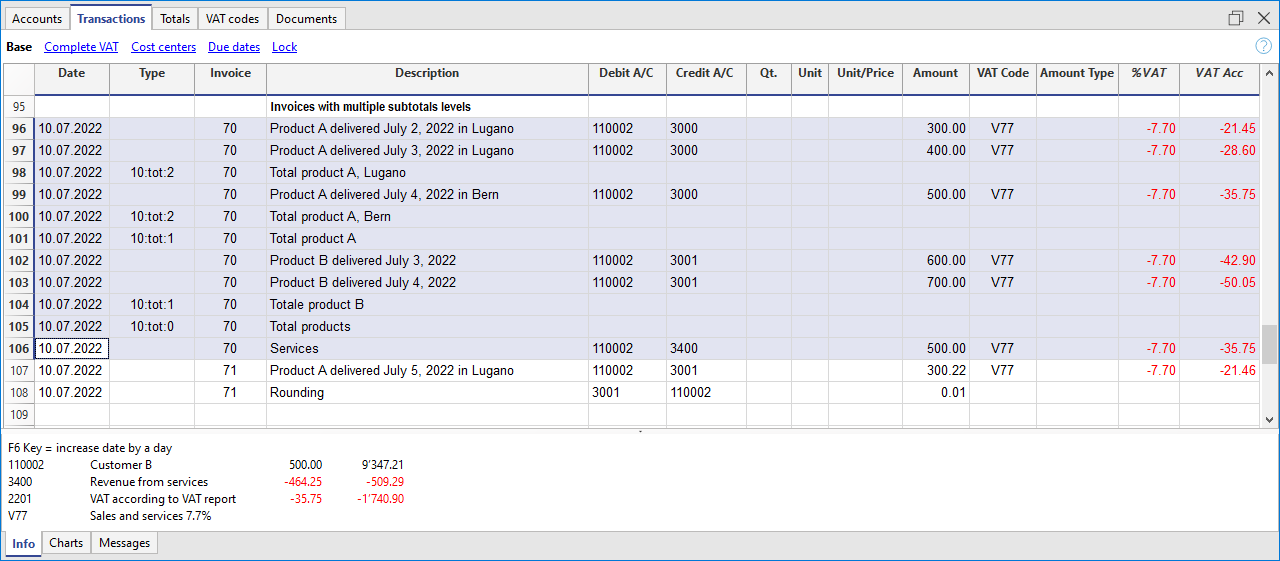
Example of Invoice with intermediate totals.
Alternative text for payment terms
It is possible to define your own wording as a payment term for each invoice and this will replace the existing text for the expiry date.
- Enter an additional line with the same invoice number in the Transactions table.
- You will need to enter 10: in the Type column and select :ter from the drop-down menu, therefore the wording 10:ter will appear
- In the Description column, enter your text (ex 30 days net, 60 days etc ..).
When the invoice is printed, the value assigned as a payment term will be displayed.
Additional customisations
Other customisation options, such as the definition of bank details or final greetings, are available in the Print invoices dialog.