In this article
This invoice layout allows you to change the print settings via the Settings dialogue. The settings are similar to the UNI11 layout with the added option of printing the Swiss QR Code.
See also:
- General Information on Customising Invoice
- Estimates and invoices
- Invoices in accounting
Invoice Settings Dialogue
To access the invoice parameter settings dialogue, you have two possibilities:
- From the Print Invoice dialogue, Layout section, Settings button.
- From the Print Preview, by clicking on the cogwheel symbol (settings).
The dialogue is composed of several levels and sub-levels that allows you to operate on a specific part of the invoice:
- Print
The elements that make up the invoice print, with the possibility of customising them. - Texts
The texts, in the different languages, which are used for printing. - QR-Code
- The settings for printing the Swiss QR-Code.
- Styles
Change font and colours. - Programming (own JavaScript file)
It is an even higher level of customization, but it requires programming knowledge.
You can change or replace the different printing elements by programming your own JavaScript file.
The Restore Defaults button in the dialogue resets all settings to the default values. Confirming with OK confirms and saves the parameters entered.
You can undo and restore changes made to parameters with the command Menu → Edit → Undo operation.
Print Property
This level defines which elements of the invoice to include and which to exclude from the invoice printing.
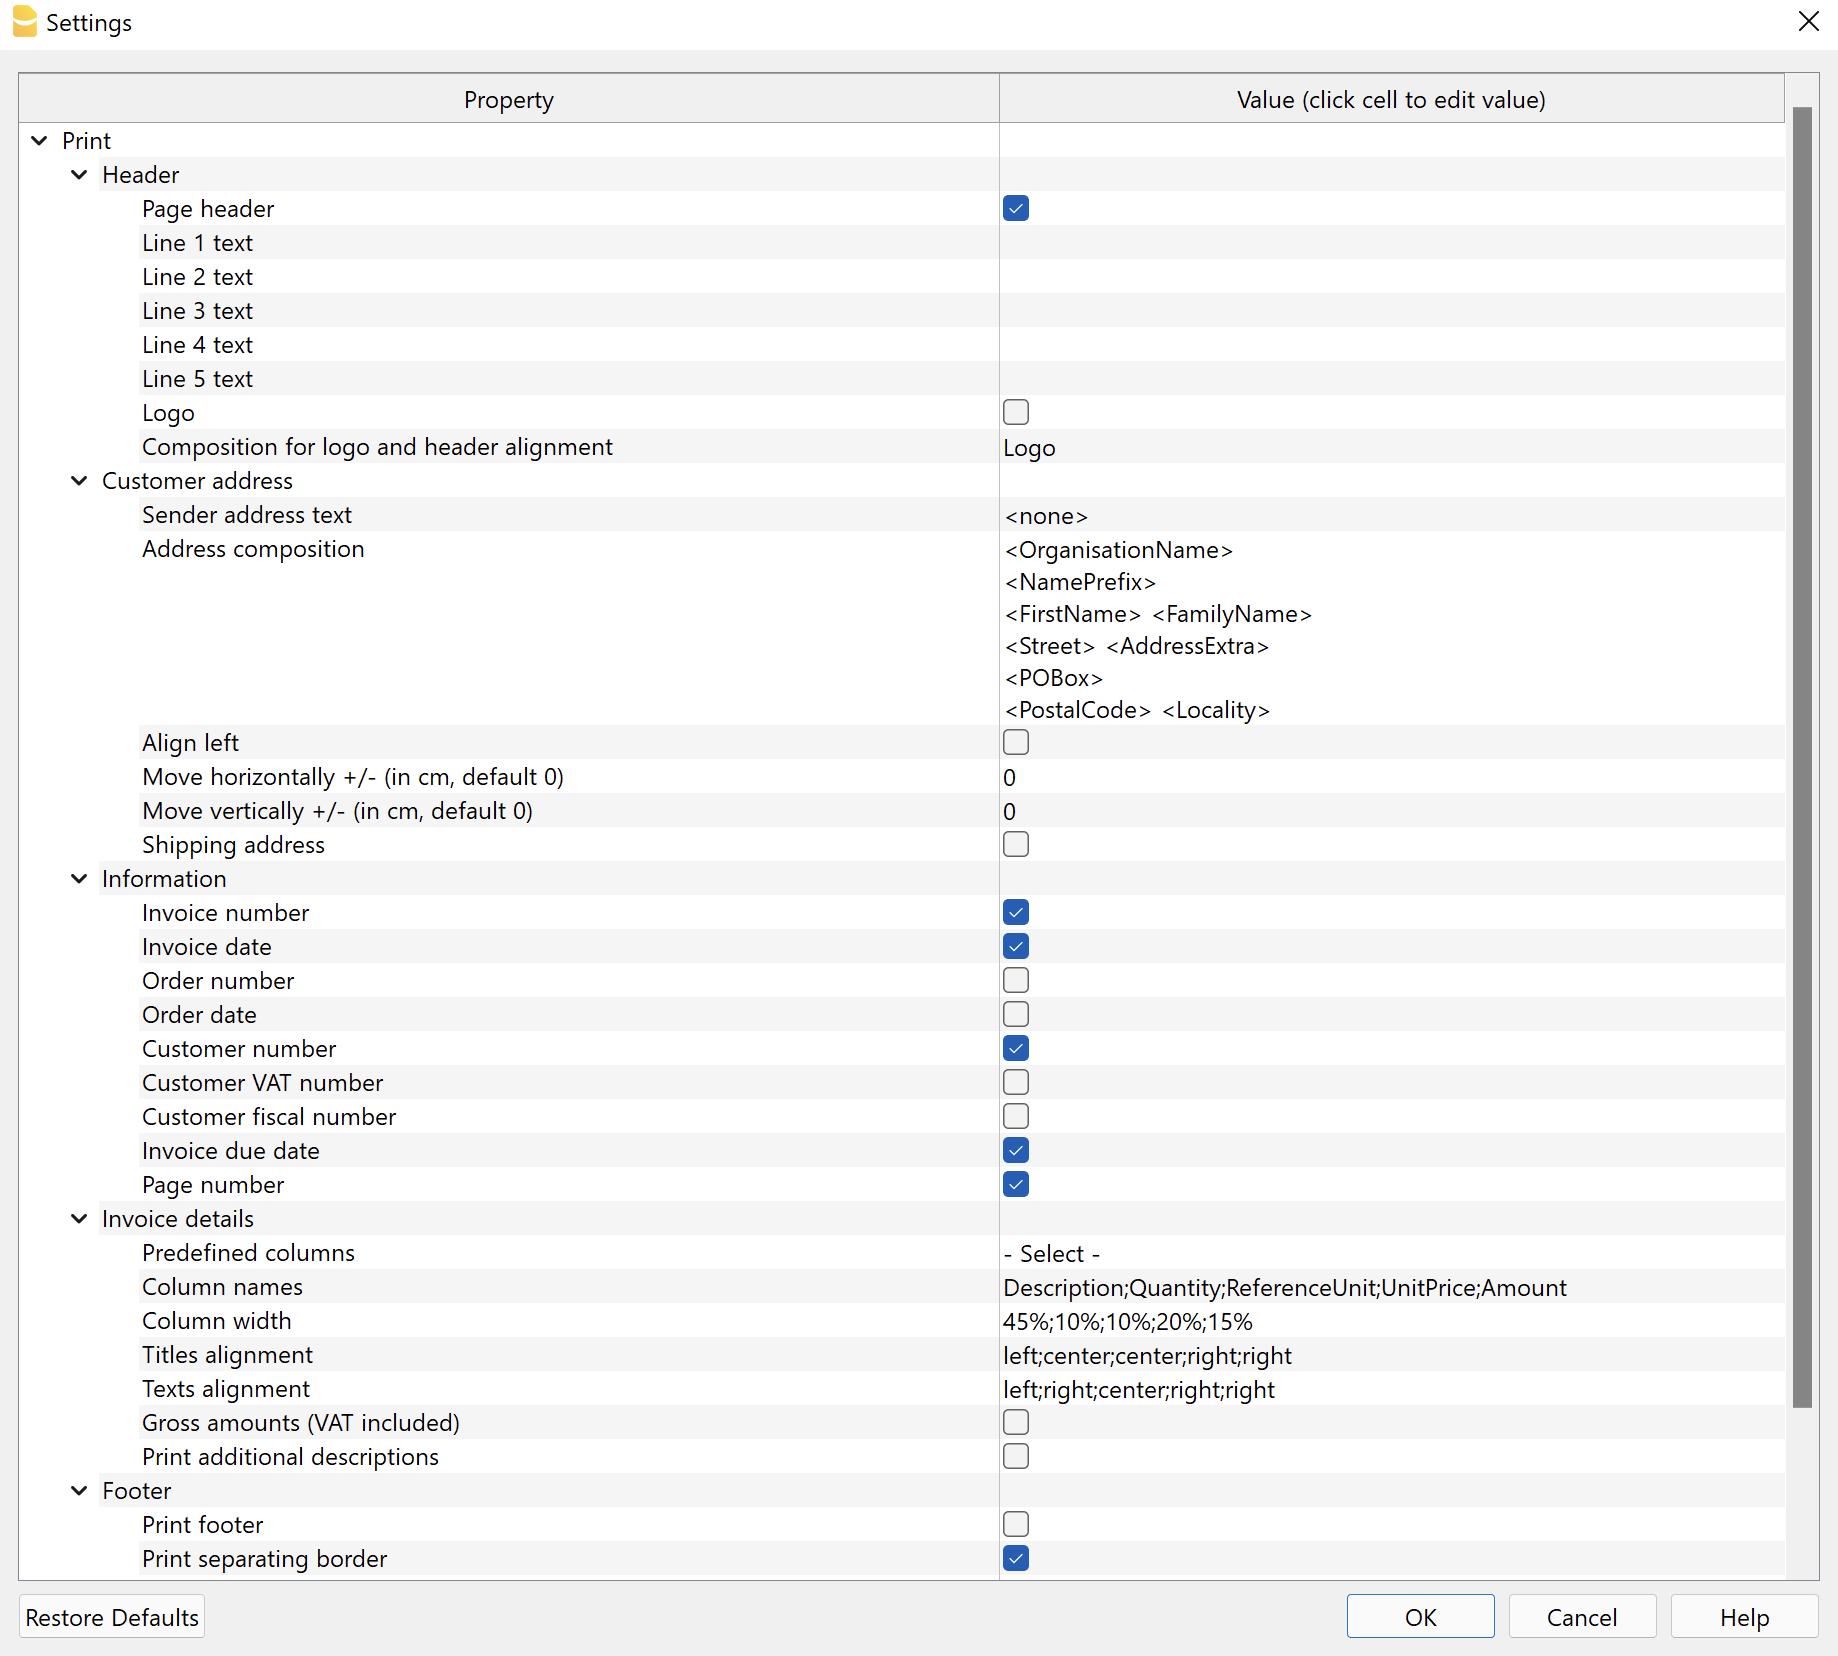
It is divided into several sub-levels that allow you to manage a different element of the invoice.
Header
Dialogue element that allows you to define the header on the top of the invoice page.
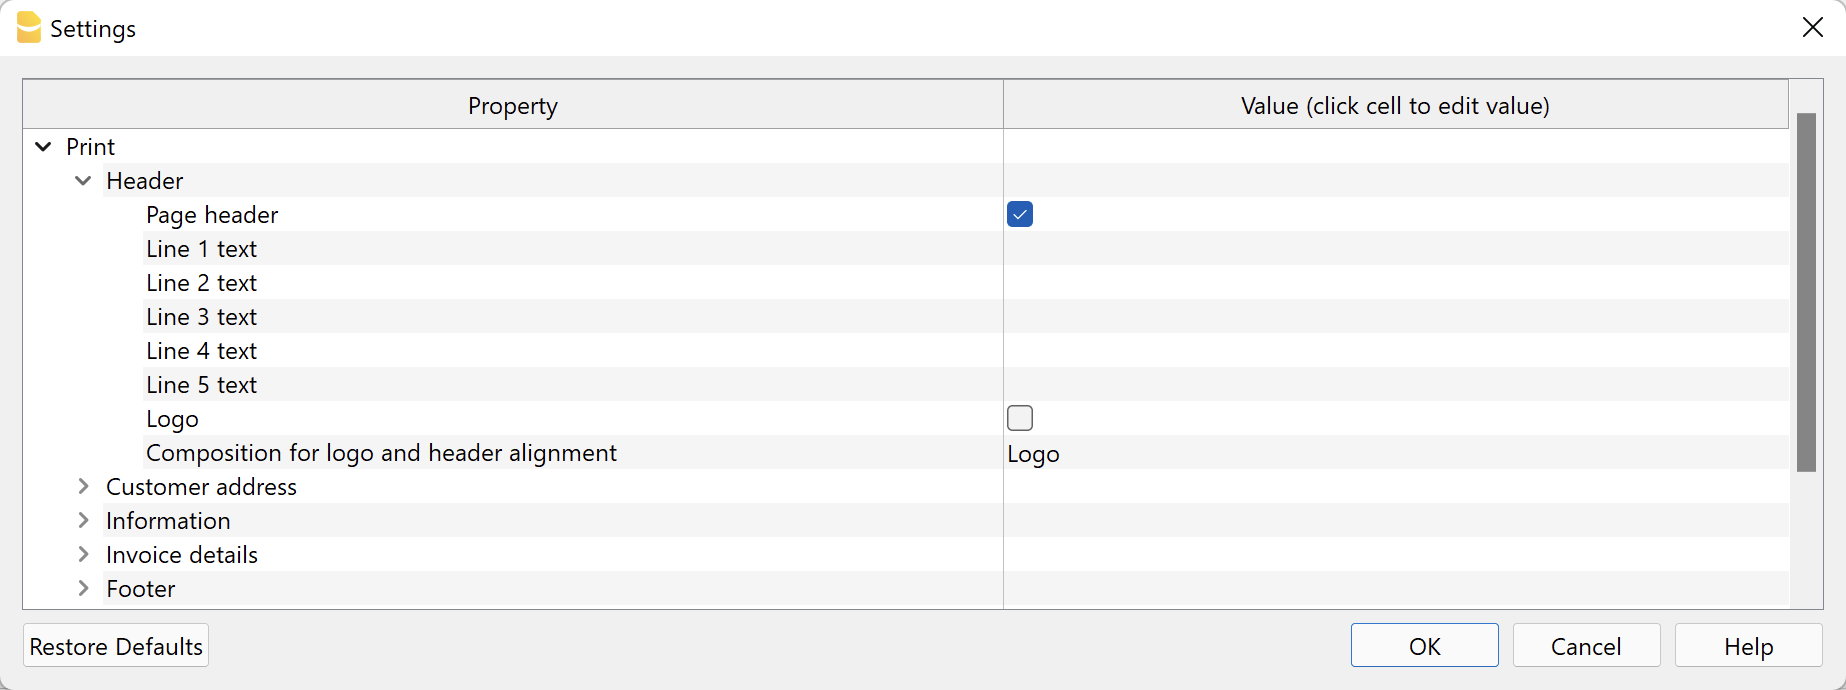
- Page header.
Check the box to include the sender's address in the invoice header.
The address is automatically taken from the basic data of the file, defined in File → File and accounting properties → Address.
The VAT number is mandatory and must be entered in the appropriate field. - Line 1 text ... Line 5 text.
If you do not wish to use the basic address data, you can enter the texts you wish to use manually.
These texts will be displayed in the header and replace any texts defined in the file properties.
In this case the VAT number is not automatically printed. Remember to add the VAT number in one line as it is mandatory. - Logo.
Check to include the logo in the header.
The logo is defined with the command File → Logo setup where you can also set the size, choose how to align it (left, centre, right), and also choose how to align the address with respect to the logo. - Logo name.
Enter the name of the logo customisation defined in the menu File → Logo setup, respecting upper and lower case.
Customer address
Element of the dialogue that allows you to set some parameters for the billing address.
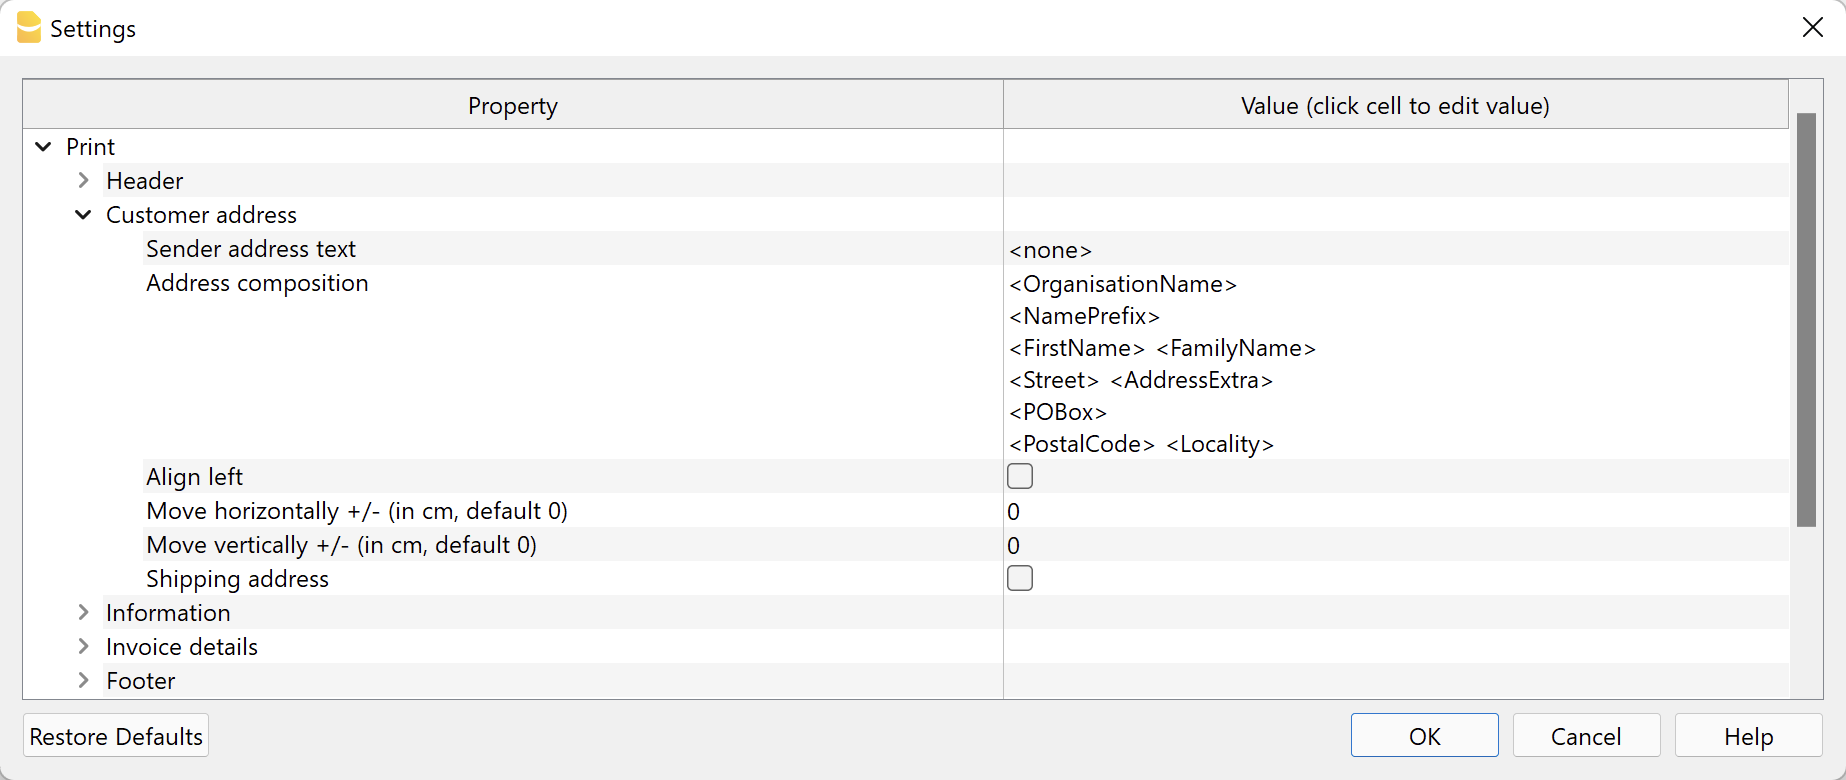
The customer addresses are taken from the specific columns of the table, see Accounts → Address view for integrated invoicing, and from the Contacts table for the Estimates and Invoices application.
- Sender address text.
Above the customer's address you can enter a line for the sender's address.
Leave empty to use the address defined in File → File and accounting properties → Address or enter text manually.
Enter <none> to not enter the sender line. - Address composition.
Decide how to compose the address. Enter the XML address column names in the order you prefer: for the integrated invoicing Accounts table (Address view), for the application Offers and Invoices Contact table. Each column name must be included between the signs '<' and '>'.
You can display the XML name of each column with the command Columns setup, Settings tab.
You may only use the following columns (other columns cannot be used):
Prefix column (XML name = NamePrefix).
Organisation Column (XML name = OrganisationName).
First Name column (XML name = FirstName).
Column Surname (Name XML = FamilyName).
Street Column (XML name = Street).
AddressExtra Column (XML name = AddressExtra).
PostBox Column (XML name = POBox).
PostalCode Column (XML name = PostalCode).
Location Column (XML name = Locality).
Region Column (XML name = Region).
Country Column (XML name = Country).
CountryCode column (XML name = CountryCode).
EmailWork column (XML name = EmailWork).
Some examples:- Include organisation name, address, postcode and location:
<OrganisationName>
<Street>
<PostalCode> <Locality> - Include prefix, first name, last name, address, postcode and locality:
<NamePrefix>
<FirstName> <FamilyName>
<Street>
<PostalCode> <Locality> - Include extra address, post office box and country code:
<OrganisationName>
<NamePrefix>
<FirstName> <FamilyName>
<Street> <AddressExtra>
<POBox>
<CountryCode> - <PostalCode> <Locality>
- Include organisation name, address, postcode and location:
- Align left.
Check to print the address on the left, otherwise it will be printed on the right. - Move horizontally.
Enter a value in cm to move the customer's address to the right (positive value) or to the left (negative value). - Move vertically.
Enter a value in cm to move the customer's address down (positive value) or up (negative value). - Shipping address.
Only available for invoicing integrated in accounting.
The shipping address is also printed.
The shipping address is entered by means of the code :sadr in the TypeDoc column of the Transactions table to define the shipping address.
Information
Element of the dialogue that allows you to define which invoice information to include and which to exclude from the print (top left):
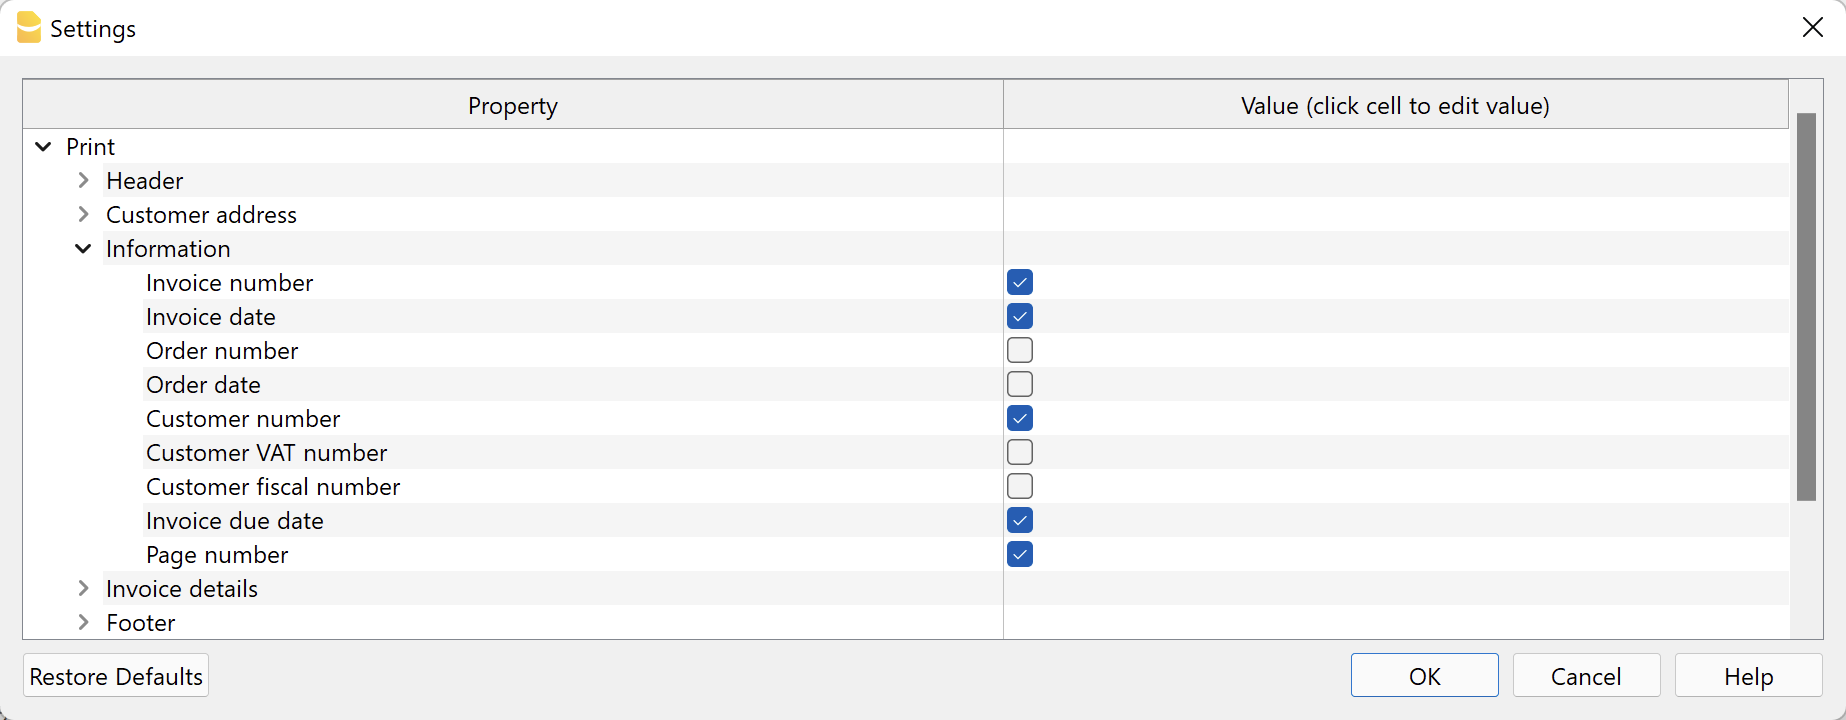
Integrated Invoicing:
- Invoice number / Credit note.
Specified in the DocInvoice column of the Transactions table. - Invoice date.
Specified in the Date column of the Transactions table. - Order number
Specified in the DocType column of the Transactions table with code: ordn - Order date
Specified in the DocType column of the Transactions table with code:ordd - Customer number
Specified in the invoice transaction of the Transactions table. - Customer VAT number.
Specified in the VAT number column of the Accounts table, Other view. - Customer fiscal number
Specified in the Fiscal number column of the Accounts table, Other view. - Invoice due date
The due date of an invoice can be set up in different ways. For more information, see the Due dates and payment terms page. - Page number
The current page number.
Estimates and invoices application
- Invoice number / Estimate
Specified in the Id column of the Invoices/Estimates table - Invoice date.
Specified in the Date column of the Invoices/Estimates table - Order number
Specified in the Order Nr of the create/edit invoice dialogue. - Order date
Specified in the order date of the create/edit invoice dialogue. - Customer number
Specified in the Contact Id column of the Invoice/Estimates table. - Customer VAT number.
Specified in the VAT number column of the Contacts table. - Customer fiscal number
Specified in the Fiscal number column of the Contacts table. - Invoice due date
Indicated in the Due Date column of the Invoices/Estimates table.
The due date of an invoice can be set up in different ways. For more information, see Set the payment term. - Page number
The current page number. - Customised fields
Only with the Advanced Plan.
Invoice section of the Invoice Dialogue are added.
Invoice Details
By invoice details we mean the table showing the items, quantities, prices and totals.
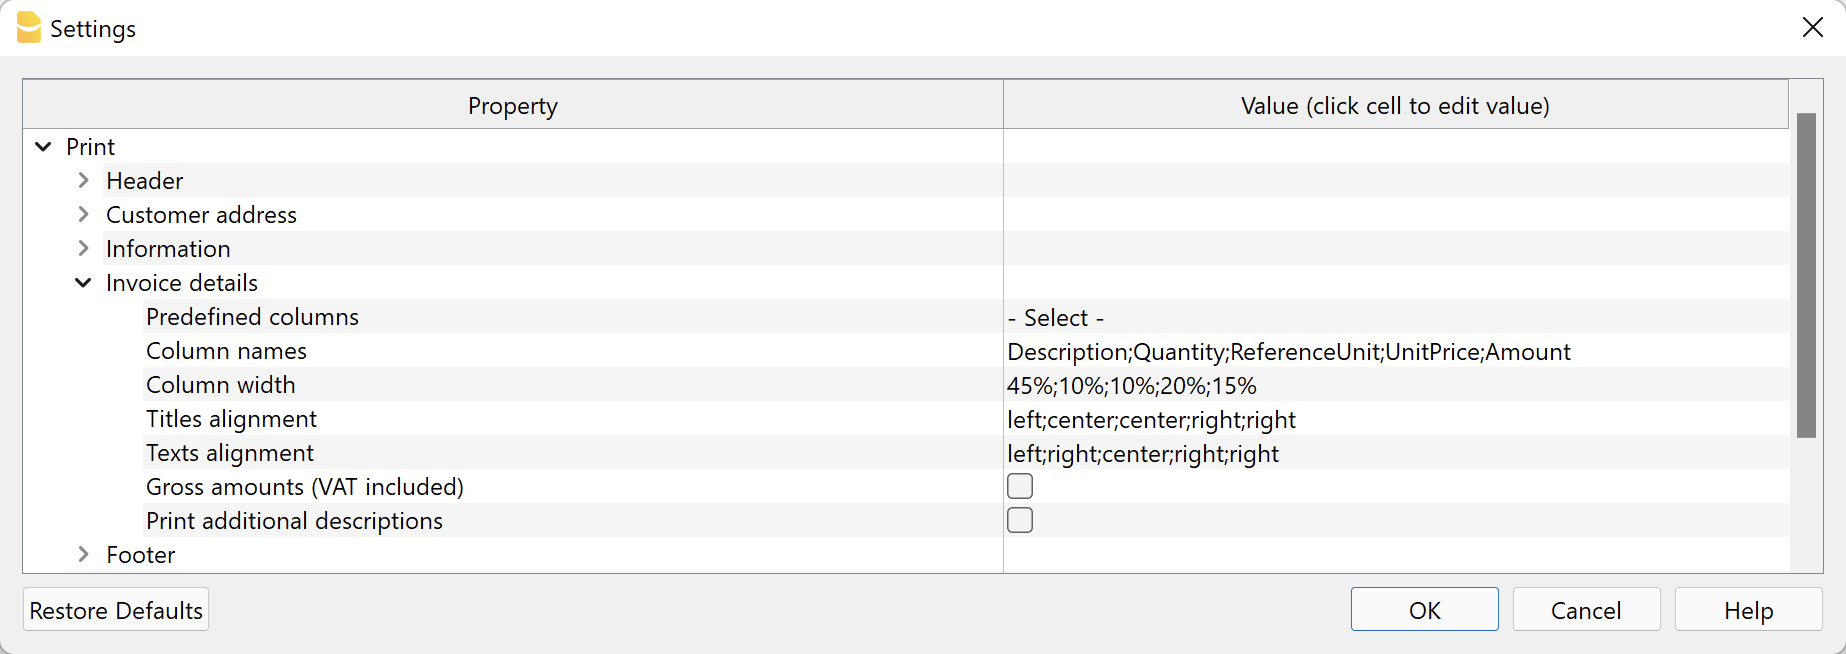
Predefined column compositions
Allows you to select the columns to be displayed in the invoice details directly from a list.
The list includes some predefined column compositions to choose from. Some of them require the Banana Accounting Plus Advanced Plan.

Select a pre-defined column composition from the list and confirm.
The values of the properties Column Names, Column Width, Title Alignment, Text Alignment of the Invoice Details section, and the property Invoice Details Column Names of the Text section, are set automatically by the programme.
Available from version 10.0.10.21348 or newer of Banana Accounting Plus.
Column Arrangement Logic
The columns to be displayed can be defined manually in this way:
- In the column names you indicate the XML names of the columns to be printed.
- In the subsequent fields, the print characteristics of the individual columns are indicated.
- Column width.
- Title alignment.
- Text alignment.
- In the section Texts you indicate the column header texts.
- For each language, the text for the header must be indicated.
If you select a default Columns setting, all elements are changed automatically.
Valid for all elements
- Elements are separated by ';' and must be the number of the defined columns.
- If one of these elements is left blank, the default values are taken over.
Column Names
Manually indicate which columns to display in the invoice details.
Enter the XML names of the columns in the Transactions table. You can display the XML name of each column with the command Columns setup, Settings tab. Separate column names with a ';' (semicolon).
The default columns are:
- For invoices integrated in accounting:
- Number (item Id)
This applies both to the Id column of the Item table in the Estimates and Invoices application, and to the Item column of the Transactions table in the Integrated Invoicing. - Description
- Quantity
- ReferenceUnit
- UnitPrice
- Amount
- VatRate
- Number (item Id)
- Plus for the invoice offer application:
- Date
- Discount
With the Advanced Plan of Banana Accounting Plus, you can add other table columns in addition to the predefined columns.
- Transactions table.
- Only for invoices integrated in accounting.
- The syntax to use is T.ColumnName.
"T." indicates that this is a column of the Transactions table, "ColumnName" is the XML name of the column (e.g. "T.Notes", "T.DateWork", etc.)
- Items table.
- The syntax to be used is I.ColumnName.
"I." indicates that it is a column of the Items table, "ColumnName" is the XML name of the column (e.g. "I.Links", etc.).
- The syntax to be used is I.ColumnName.
Column Width
Enter the width of each column with a percentage value. Each value defines how much space a column occupies in relation to the total width of the page. The sum must be 100%.
Separate column widths with a ";" (semicolon).
Title Alignment
Enter the title alignment for each column. You can align the text to the left, centre and to the right. Separate each alignment with a ";" (semicolon).
Text Alignment
Enter the text alignment of each column. You can align the text left, centre and right. Separate each alignment with a ";" (semicolon).
Gross amounts (including VAT)
You can decide whether to use gross amounts including VAT or net amounts excluding VAT.
Printing additional descriptions
Only available for invoicing integrated in accounting.
You can decide whether you want to enter additional descriptions on several rows.
- In the Transactions table with the Columns setup command add one or more additional description columns.
For each additional description row you need to add an appropriate column.
Create columns of type Text with the name "Description" followed by a number (e.g., Description1, Description2, Description3, etc.).
The "XML name" of each column must begin with the word "Description" (in English) followed by a number.
In the "Name" field you can enter whatever you want.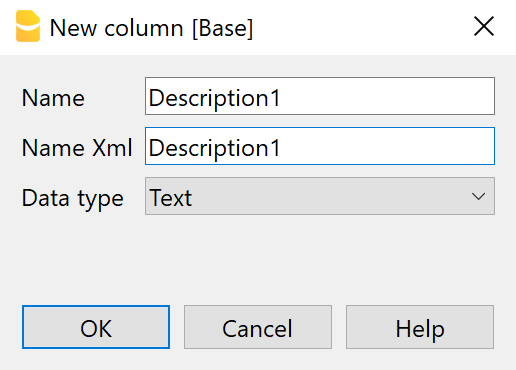
- In these columns enter additional text for invoice descriptions.
The text in each column will be displayed on a new line in the invoice description.
Some examples
- Include the columns Description, Quantity, Unit, Unit Price and Amount:
- Description;Quantity;ReferenceUnit;UnitPrice;Amount
50%;10%;10%;15%;15%
center;center;center;center;center
left;center;center;right;right
- Description;Quantity;ReferenceUnit;UnitPrice;Amount
- Include only the Description and Amount columns:
- Description;Amount
70%;30%
center;right
left;right
- Description;Amount
- Include the columns Description, Notes and Amount. Notes is not a default column, the name must be preceded by 'T.'. Requires the Banana Accounting Plus Advanced Plan.
- Description;T.Notes;Amount
35%;35%;30%
left;left;right
left;left;right
- Description;T.Notes;Amount
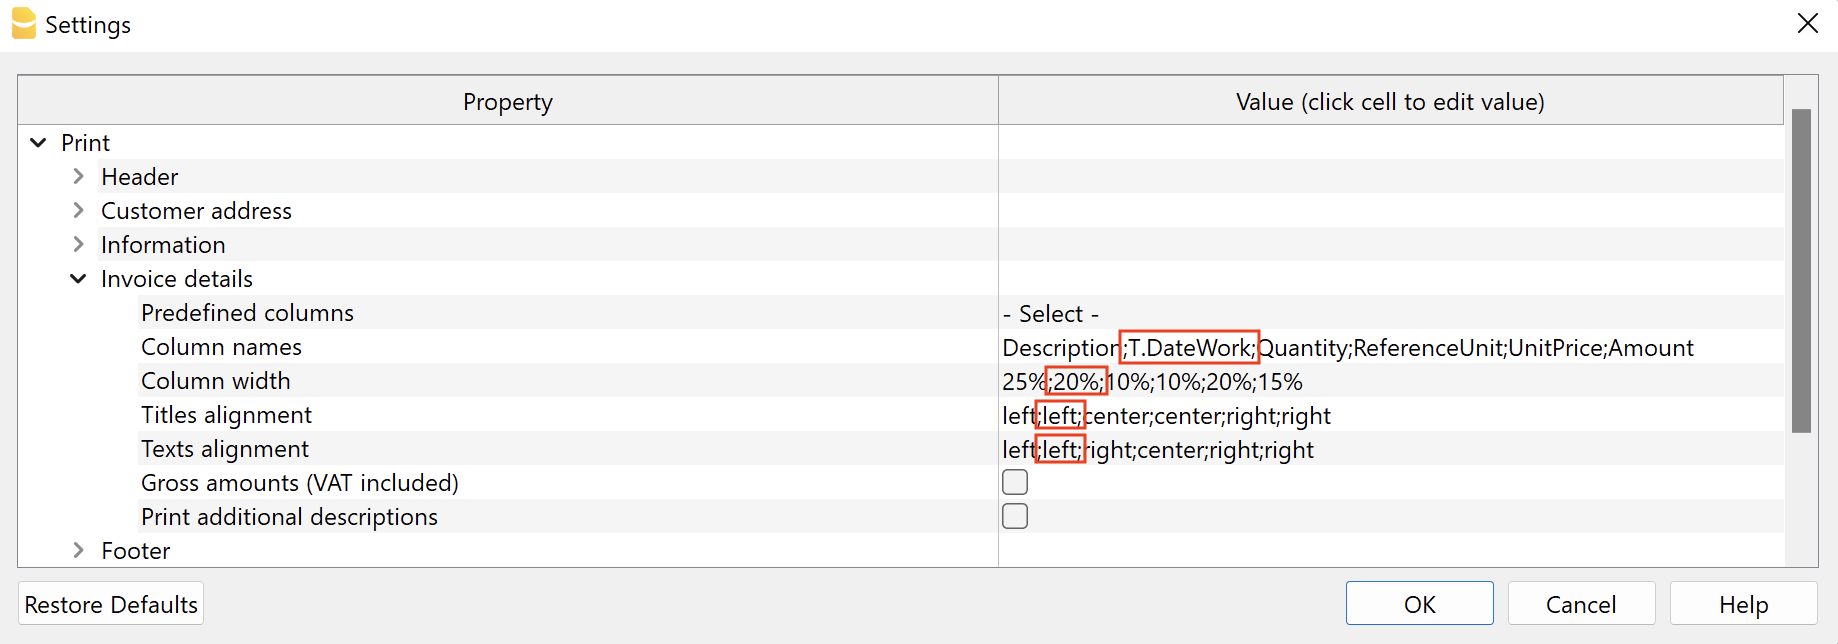
- Include the columns Description, DateWork, Quantity, Unit Price and Amount (DateWork is a manually created column, the name must be preceded by "T."). Requires the Advanced Plan of Banana Accounting Plus.
- Description;T.DateWork;Quantity;ReferenceUnit;UnitPrice;Amount
35%;15%;10%;10%;15%;15%
left;center;center;center;right;right
left;center;center;center;right;right
- Description;T.DateWork;Quantity;ReferenceUnit;UnitPrice;Amount
- For Estimates and Invoices application: include the columns Number, Date, Description, Quantity, Unit, Price, Discount and Amount.
- Item;Date;Description;Quantity;ReferenceUnit;UnitPrice;Discount;Amount
10%;10%;50%;10%;10%,10%;15%;15%
left;left;left;right;right;right;right;right
left;left;left;right;right;right;right;right
- Item;Date;Description;Quantity;ReferenceUnit;UnitPrice;Discount;Amount
Footer
Dialogue element that allows a footer to be inserted.

The footer can only be included if the QR code is excluded from printing. When the QR code is included, the footer is automatically excluded from printing.
- Print footer.
Indicates whether to include the footer, which consists of three columns (see the chapter "Text properties" below). - Print separating border.
Indicates whether to include the border on the top of the footer.
Texts Property
This level defines all invoice texts, which are grouped and divided by language.
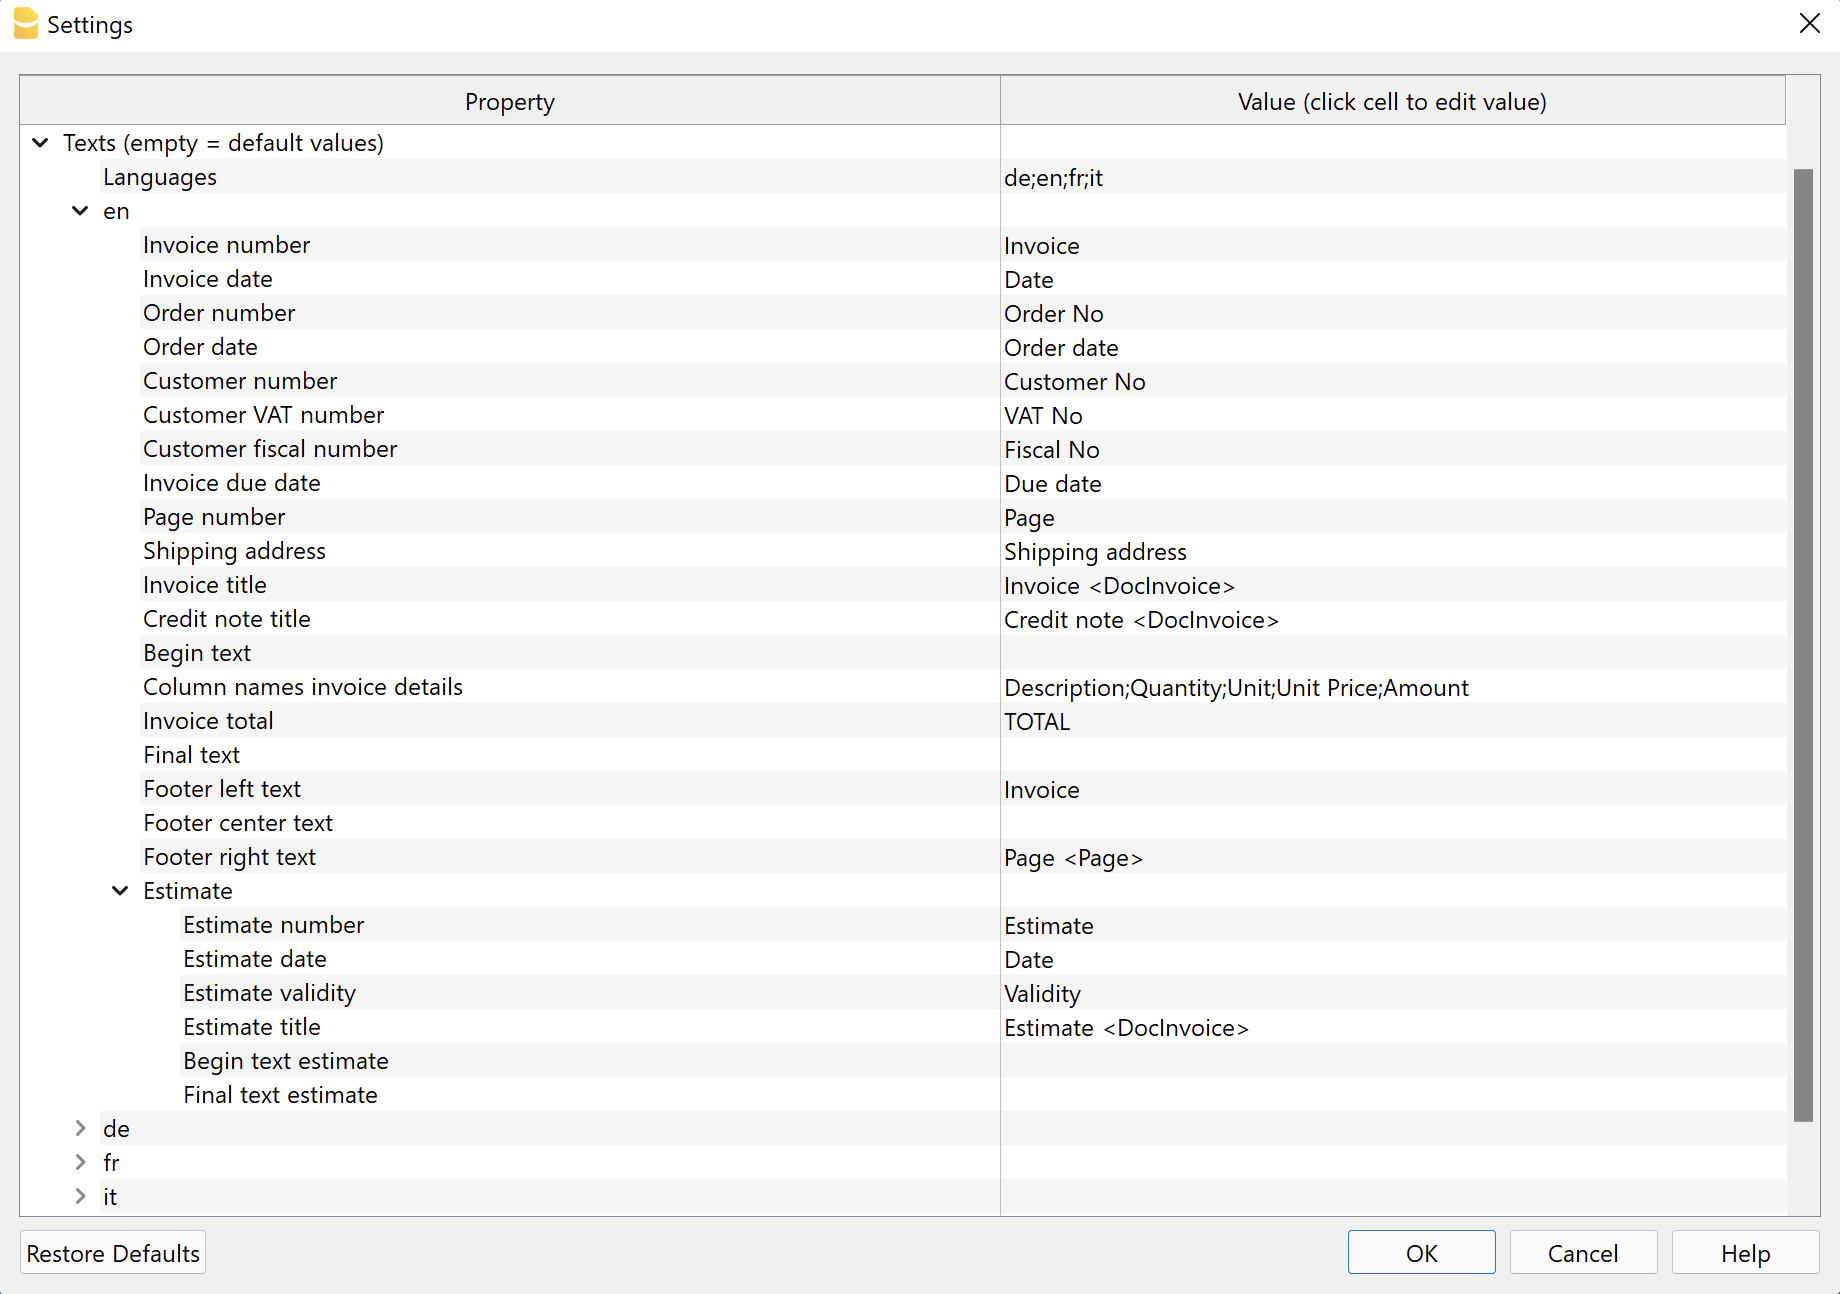
Languages
You can change the texts to be used for each language and also add translations for other languages.
The language to be used is chosen according to the language specified for the customer:
- For integrated invoicing, it is defined in the Accounts table, Address view, Language column.
- For the application Estimates and Invoices, it is defined in the Contacts table, Language Code column .
If no language is indicated for the customer, the default accounting language is used.
The default languages for which a complete translation exists are: German, English, French and Italian.
The first language to appear in the dialogue is always the current language of the file, defined in File > File and accounting properties > Other. The rest are listed in alphabetical order.
Define languages
- Default values: de;en;fr;it
- Enter the list of languages using the two-character codes.
- de = German
- en = English
- fr = French
- it = Italian
- Separate the language codes with a ";" (semicolon).
Add languages
- In the language field, at the end, add the new language code for the language you want to use.
For example if you want to use Spanish language add ";es" at the end of the existing language codes (e.g. "de;en;fr;it;es").
Always use the ";" (semicolon) to separate the language codes. - Click on Ok.
- The Settings dialogue closes to apply the changes.
- Reopen the Settings dialogue.
- In the Texts section, there is now a new section with the name of the language code you have entered (e.g. "es").
This new section contains all the texts described in the paragraph Text section for each language.
At first, all texts are in English. - In the right side, replace all existing english texts with the correct translations for the new language you added.
Do not replace texts between “<” and “>” because they are used by the program (e.g. "Factura <DocInvoice>"). - Click on Ok and print the invoice.
Remove languages
- In the language field delete the code of the language you want to remove.
- Click on Ok.
- Confirm with Yes to remove the language and its texts from the list.
- Reopen the Settings dialogue. Now the language section has been removed.
Text section for each language
Each language has its own section starting with the language code.
You can change the text to be used for each individual language.
If you delete the content, when you confirm with Ok, the default text will be automatically used.
- Invoice number.
Text in the information preceding the invoice number. - Invoice date.
Text in the information preceding the invoice date. - Invoice order.
Text in the information preceding the order number. - Order date.
Text in the information preceding the order date. - Customer number.
Text in the information preceding the customer number. - Customer VAT number
Text in the information preceding the customer's VAT number. - Customer tax number.
Text in the information preceding the customer's tax number. - Invoice due date.
Text in the information preceding the invoice due date. - Page number.
Text in the information preceding the page number. - Shipping address.
Text appearing above the shipping address. - Invoice title.
Optional text inserted before the details table.
Enter <none> to display no text. - Credit note title.
Optional text inserted before the table of details.
Enter <none> to display no text. - Begin text.
Optional text, on one or more lines, inserted immediately after the invoice title. - Invoice detail column names.
Must be separated by a ';' (semicolon).
When changing the columns to be displayed in the invoice (section Print, Invoice details, Column names), you must always also adapt the texts for the column headings. - Invoice total.
Text that appears in the invoice total line. - End text
Optional text, on one or more lines, inserted at the end of the invoice.
This text takes priority over text added from the dialogue Print invoices → Options → End text. - Left/centre/right footer text.
The <Page> code is replaced with the page number.
Enter <none> to display no text.
Specific texts for printing Proforma invoices, Estimates, Delivery notes, Order confirmations and Reminders (requires Advanced Plan):
- Proforma invoice
- Title.
Optional text inserted before the details table. Enter <none> to display no text. - Begin text.
Optional text, on one or more lines, inserted immediately after the proforma invoice title. - Final Text.
Optional text, on one or more lines, inserted at the end of the proforma invoice.
- Title.
- Estimate
- Number.
Text in the information preceding the estimate number. - Date.
Text in the information preceding the estimate date. - Validity.
Text in the information preceding the estimate validity date. - Title.
Optional text inserted before the details table. - Begin text.
Optional text, on one or more lines, inserted immediately after the estimate title. - Final text.
Optional text, on one or more lines, inserted at the end of the estimate.
- Number.
- Delivery note
- Delivery note number.
Text in the information preceding the delivery note number. - Delivery note date.
Text in the information preceding the date of the delivery note. - Title.
Optional text inserted before the details table. Enter <none> to display no text. - Begin text.
Optional text, on one or more lines, inserted immediately after the delivery note title. - End Text.
Optional text, on one or more lines, inserted at the end of the delivery note.
- Delivery note number.
- Order confirmation
- Order Confirmation Number.
Text in the information preceding the order confirmation number. - Order Confirmation Date.
Text in the information preceding the date of the order confirmation. - Title.
Optional text inserted before the details table. Enter <none> to display no text. - Begin text.
Optional text, on one or more lines, inserted immediately after the title. - Final text.
Optional text, on one or more lines, inserted at the end of the order confirmation.
- Order Confirmation Number.
- Reminder
- Invoice date (only for integrated invoicing in the accounting file).
Text in the information preceding the invoice date.
Used if there is the transaction with the reminder date created via the Reports > Customers > Print reminders command. - Date (only for integrated invoicing in the accounting file).
Text in the information preceding the reminder date.
Used if there is the transaction with the reminder date created via the Reports > Customers > Print reminders command. - Due date (only for integrated invoicing in the accounting file).
Text in the information preceding the reminder due date.
Used if there is the transaction with the reminder date created via the Reports > Customers > Print reminders command. - Title.
Optional text inserted before the details table. Enter <none> to display no text. - Begin Text
Optional text, on one or more lines, inserted immediately after the reminder title. - Final Text.
Optional text, on one or more lines, inserted at the end of the reminder.
- Invoice date (only for integrated invoicing in the accounting file).
Bold writing
With a specific annotation you can apply the bold style to certain texts. To do so, include the desired texts between double asterisks ** .
Applicable to:
- Start text.
- End text.
- Descriptions of items appearing in invoice details.
Examples:
**text** = text
**text1 text2**, text3 = text1 text2, text3
Customise title, begin text and final text
The data for the title, begin text and final text are taken over and inserted automatically with every new invoice.
If you also want to include customer information (first name, last name, etc.) or the invoice number in these texts, you can do so:
- With the Professional Plan the data must be entered manually each time you create an invoice.
- With the Advanced Plan you can automate data entry on all invoices.
For automated data entry (only with the Advanced Plan) you must use the predefined columns from which the data is taken:
- Customer Address Columns
- In integrated invoicing, from the Accounts table, Address view.
- In the Estimates and Invoices application, from the Contacts table.
- Invoice number column
- In integrated invoicing, from the Accounts table, Invoice column.
- In the Estimates and Invoices application, from the Invoices table, column Invoice Id.
In the texts you must insert the following columns, specifying the XML name of the columns between the signs '<' and '>'.
- Address
- <NamePrefix>, <OrganisationName>, <FirstName>, <FamilyName>, <Street>, <AddressExtra>, <POBox>, <PostalCode>, <Locality>, <Region>, <Country>, <CountryCode>, <EmailWork>.
- Invoice number
- <DocInvoice>.
In this case DocInvoice is used both for integrated invoicing and for the Estimates application and invoices.
- <DocInvoice>.
To display the XML name of each column, use the command Columns setup, Settings section.
When the invoice is created, these texts are replaced with the actual values.
- The text "Invoice <DocInvoice>" is converted to "Invoice 10".
- The text "Invoice <DocInvoice>, <FirstName> <FamilyName>" is converted to "Invoice 10, James Johnson".
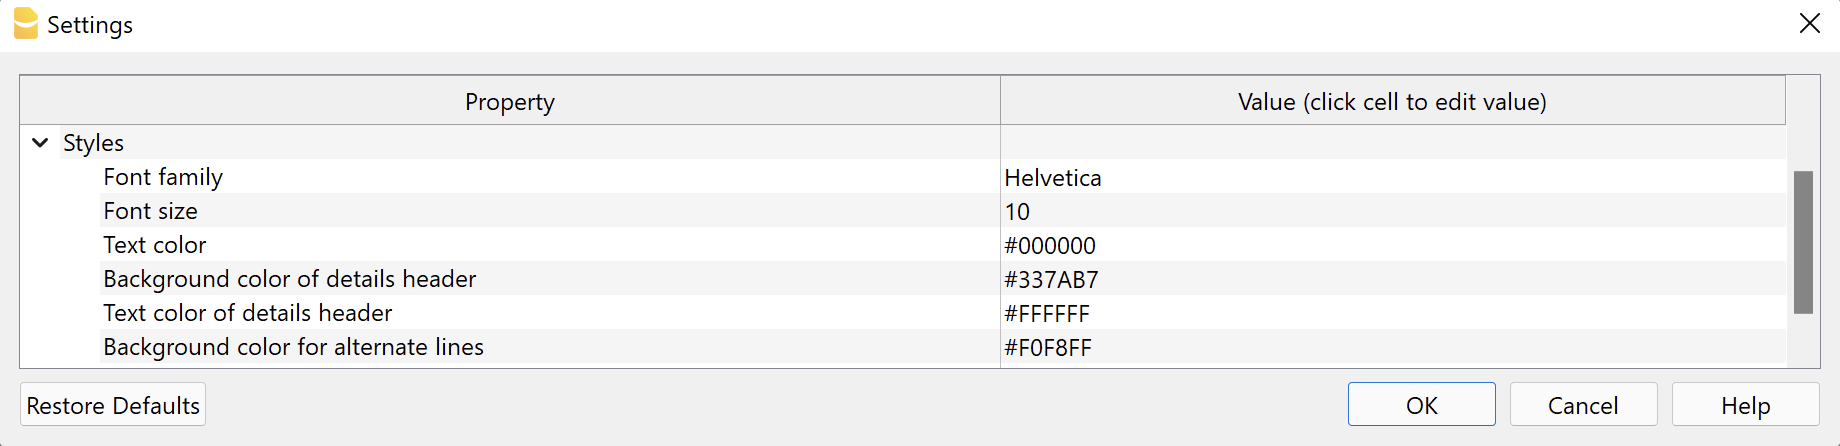
Styles Properties
This level defines the parameters that affect the visual appearance of the invoice, like font type, size and colors.
Font type and size
The font and font size are applied to all invoice texts, with the exception of the header, which has a fixed size that can only be changed with custom CSS Stylesheet.
The size of the title and the total line are resized according to the chosen font size.
For more information regarding the font that can be used and exporting to PDF, please see the Create PDF page.
Colours
Enter the colours you wish to apply to the invoice printout.
- Text Colour.
The colour applied to all text on the invoice: header, information, address, start text, invoice details, end text, footer.
The colour of the QR bulletin cannot be changed. - Header details background colour.
The main colour of the invoice. It is applied to: title, invoice details header, horizontal lines, total line and double underline. - Details header text colour.
The colour of the text in the column headings of the invoice details table. - Background colour for alternating rows.
The background colour applied to the rows of the various invoice items. - Title and total colour.
The colour of the title and total line (text and underline).
To enter a colour you have two possibilities::
- Select a color from those available.
- Enter the hexadecimal code of the colour (HEX). This is a code starting with # followed by six characters (e.g. #0000, #009FE3, #FF00EA).
Colour codes are easily found on the Internet. For example, you can consult the table at https://www.w3schools.com/cssref/css_colors.asp.
If no colour is entered (leaving the field empty), the default colour is set. Applies to every colour field. This is useful if you want to reset to the original colours.
Integrated Invoicing Texts
n integrated invoicing, certain texts can also be defined in the Transactions table when entering invoice data.
- Invoice title / credit note.
- Enter in the column TypeDoc the command 10:tit (12:tit for credit note).
- Enter the desired text in the Description column.
- It takes priority over any text defined in the settings of the invoice layout.
- Begin text.
- Enter in the column TypeDoc the command 10:beg.
- Enter the desired text in the Description column.
- Only one line of text can be entered.
- It takes priority over any text defined in the settings of the invoice layout.
- Notes.
- In the column TypeDoc enter the command 10:not.
- Enter the desired text in the Description column.
- Several lines of notes can be entered. Each note must be defined on a new line in the table Entries.
- Greetings.
- Enter the command 10:gre in the column TypeDoc.
- Enter the desired text in the Description column.
- Only one line of greetings can be entered.
Priority Title and Begin Text:
| Priority 1 | Priority 2 | |
| Invoice Proforma Invoice | Transactions table (10:tit / 10:beg) | Layout settings dialog |
| Estimate | Transactions table (10:tit / 10:beg) | Layout settings dialog |
| Delivery note | Layout settings dialog | - |
| Reminder | Layout settings dialog | - |
Priority Final Text:
| Priority 1 | Priority 2 | Priority 3 | |
| Invoice Proforma Invoice | Transactions table (10:not / 10:gre) | Layout settings dialog | Print Invoices dialog, Options section |
| Estimate | Transactions table (10:not / 10:gre) | Layout settings dialog | - |
| Delivery note | Layout settings dialog | - | - |
| Reminder | Layout settings dialog | - | - |
Error messages
- @error Text names and columns do not match.
The number of columns of the invoice details table (Print → Invoice Details → Column names) do not match with the texts to print (Texts → language code → Column names invoice details). Check the invoice settings.