Double-entry accounting
Double-entry accounting is an application of Banana Accounting Plus, to manage your accounts with great professionalism. It is free up to 70 transactions, in the Free plan of Banana Accounting Plus. In the Professional and Advanced plans it is instead unlimited.
Ideal for SMEs, experienced accountants and frequent bookkeepers. Work fast and get the Balance Sheet, Profit and Loss statement, Financial Planning, Budget and many other reports in no time.
Many complex operations, such as VAT management, multi-currency, budgeting and profit and loss accounts have been made very simple because they are all automated.
- ▶ Video: How to start double-entry Accounting
- Discover all the double-entry Accounting characteristics

Many functions, more automation
- Start Immediately: Choose one of many templates for diversified needs.
- Quick entries: Import from ebanking, store repetitive transactions with Auto-completion rules.
- Immediate checks: With the Balance column you can quickly see if there are any imbalances between the Debit and Credit columns and from which line the differences start.
- Balances updated after each entry, with an indication of the result for the year.
- Attach documents quickly: link each transaction to its digital document.
- Data import and export
- Balance sheet and Profit and Loss statement, Account cards (ledger), Journal in one click
- Analytical accounting for projects, sectors or particular activities thanks to Cost/Profit Centres and Segments
- Automated account cards (ledger). The carry forward of amounts is automatic after posting in the journal (Transactions table).
- The Balance Sheet and the Income statement can be displayed instantly with a click and you can choose either a simple structure with the grand totals or a more detailed structure, with intermediate totals for the subgroups .
- To register VAT, you do not need to enter an additional transaction, but simply enter a code that allows to calculate the VAT amount and to record it simultaneously in the VAT account.
- Automated VAT statements with data in Xml for online submission to tax authorities.
- Create budgets for financial and income planning and ensure an uncertainty-free future.
Learn more
- Organizing your accounting documents
- Accounting with accrual or cash method
- VAT management
- Multi-currency accounting
How to start | Double-entry accounting
▶ Video: How to start a Double-entry accounting file. Find out how to easily set up a Double-entry accounting, adapt the Plan of Accounts, import bank transactions easily or insert transactions manually, set up a Budget, enter the Transactions and Print reports.
Creating an accounting file, starting from a template
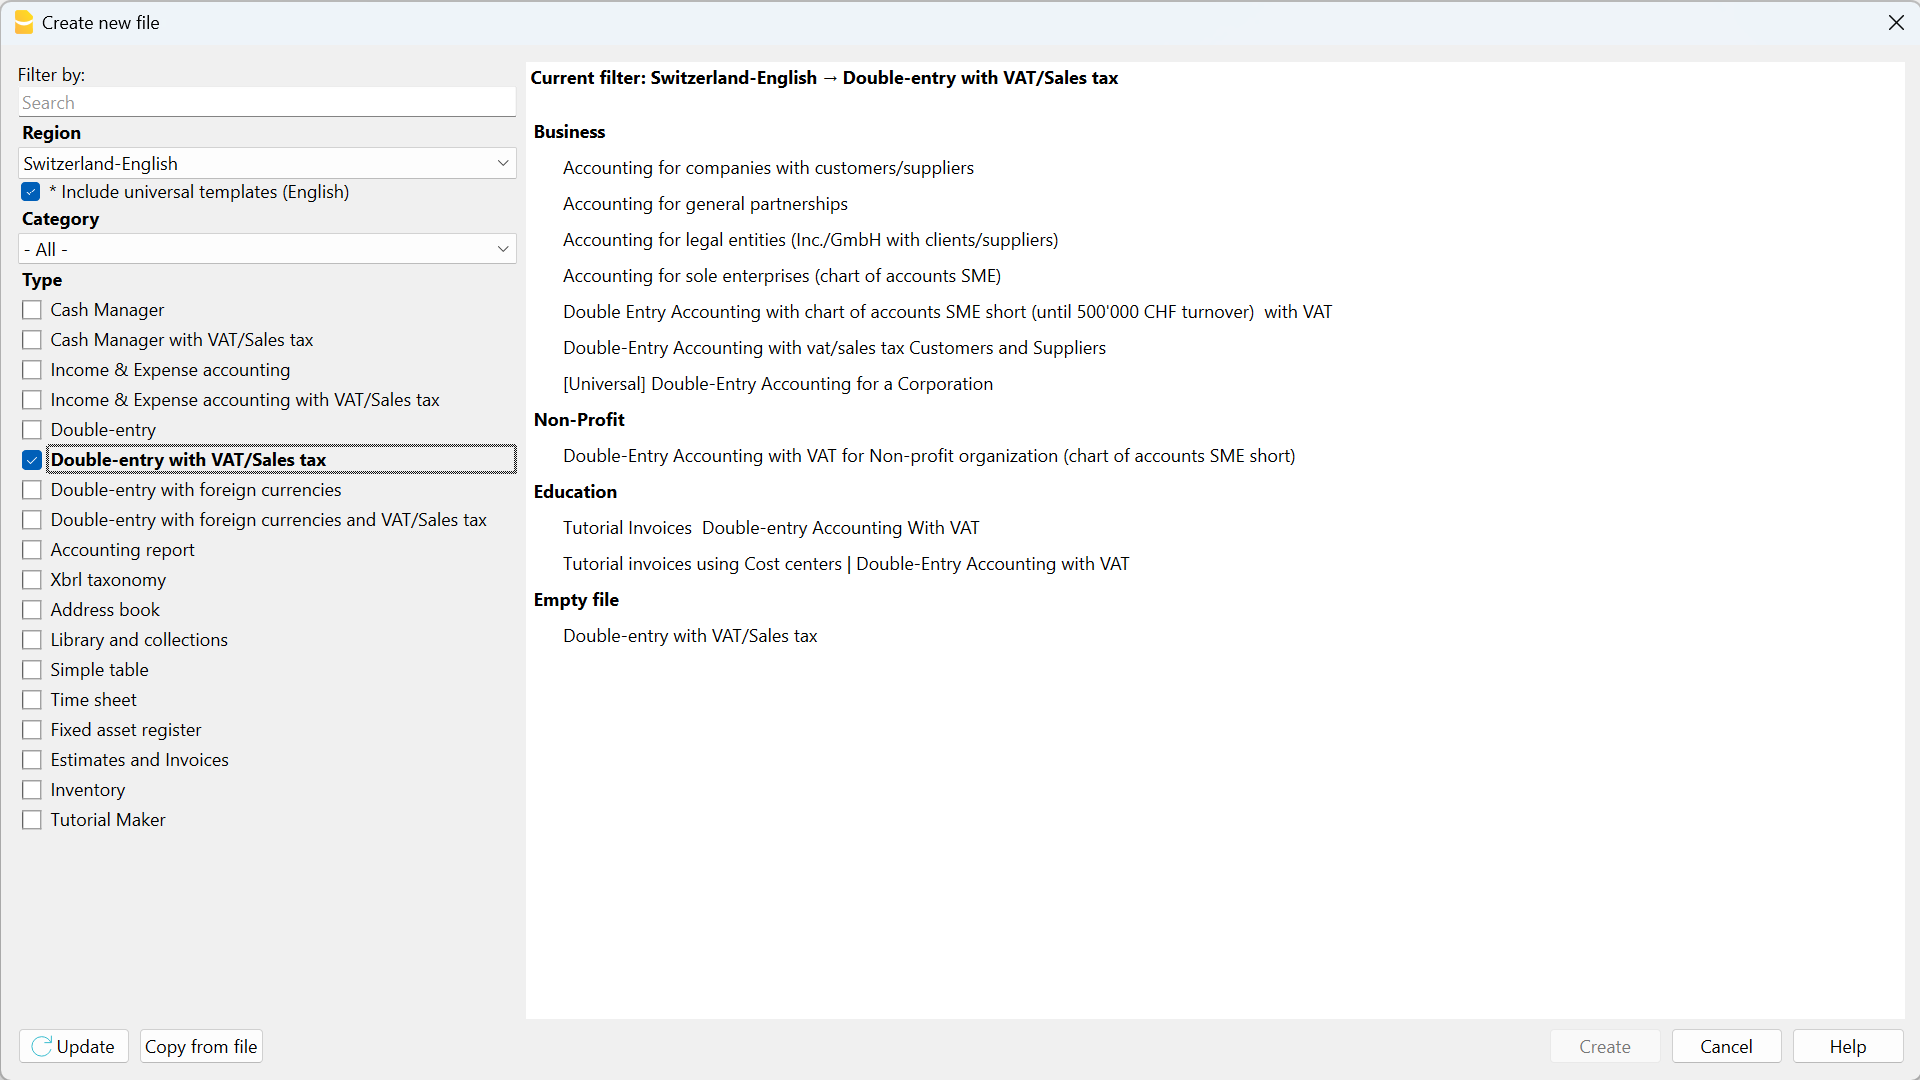
Banana Accounting Plus includes templates for all legal forms, divided by country and by category. They can be opened directly in the program, from the File menu, New... command, or they can be downloaded from our Templates page.
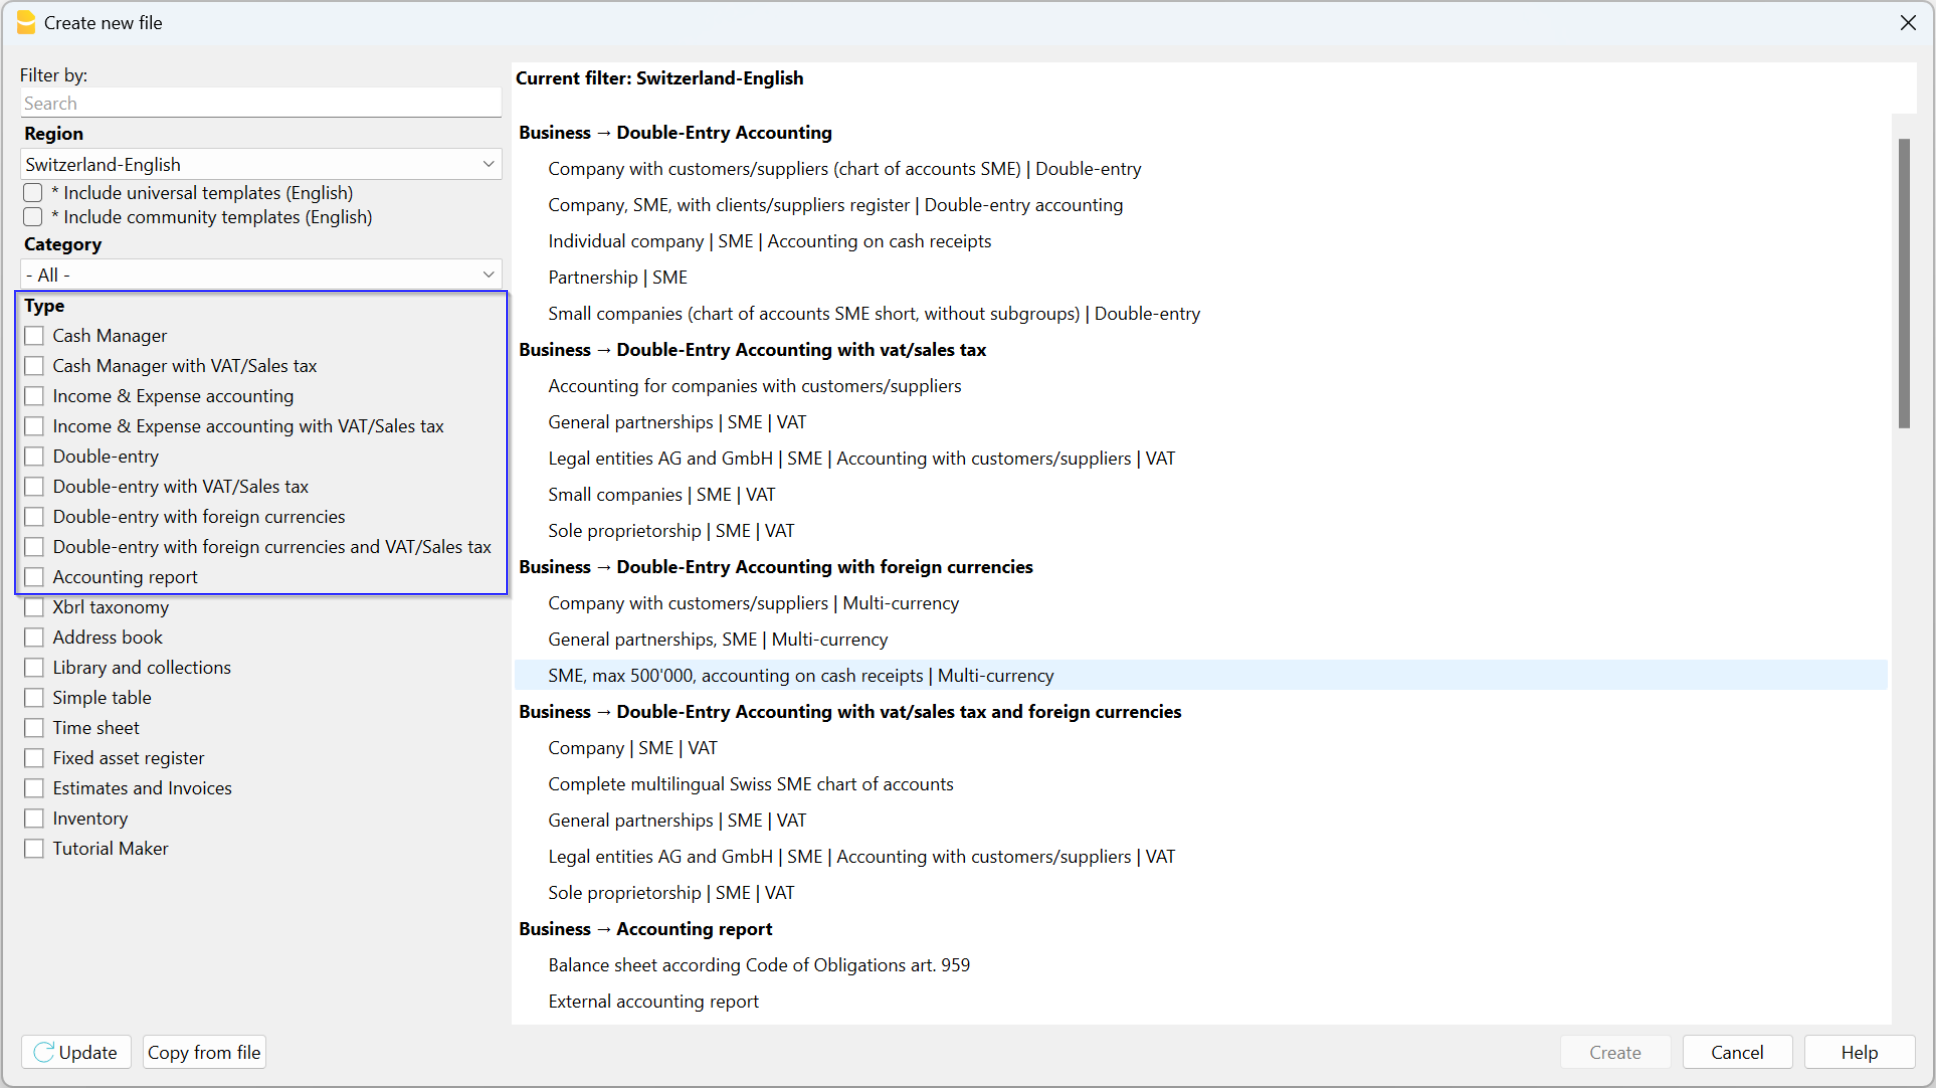
Here is how to start choosing a template directly from the program:
- File menu, > New...
- Select the region, the language, the category and the accounting type.
- From the list of the templates that appears, select the template that is closest to your own needs.
- Click on the Create Button.
In the Search area, when entering a key word, the program will display the templates that contain the entered key word.
It is equally possible to set out from a blank file, by activating the Create Empty file option. However, in order to facilitate the start and avoid grouping errors, we recommend that you always start with an existing template.
More information on the Create New File page.
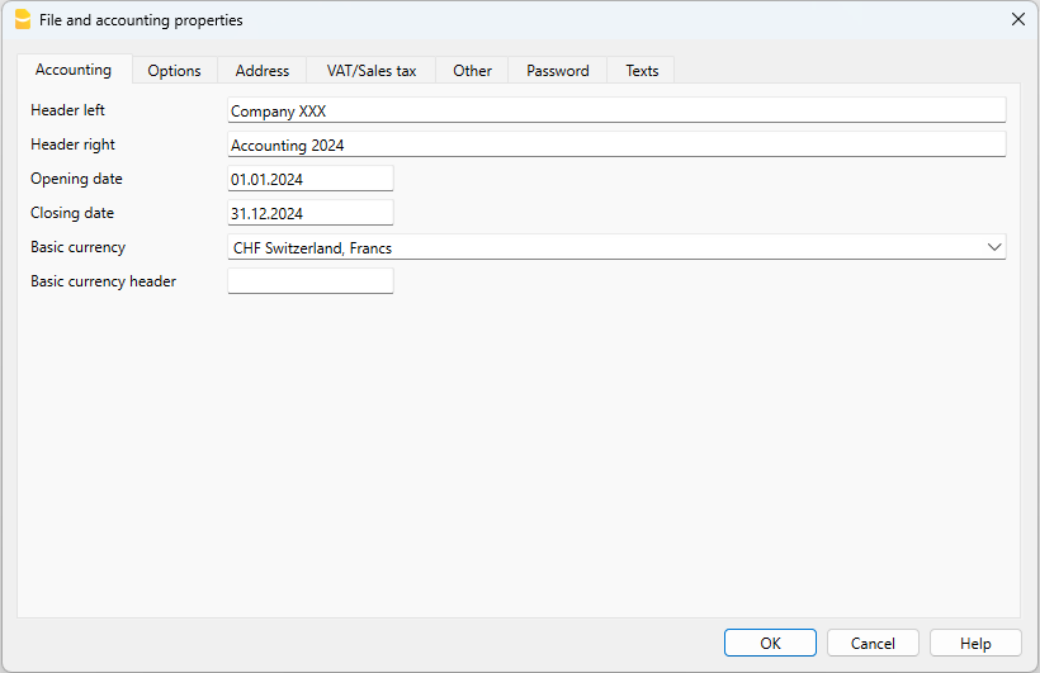
Setting up the file properties (basic data)
- Via the File > File and accounting properties command, indicate the company name that will appear in the headers of the printouts and on other data.
- Select the base currency, in which the accounting will be kept.
Save to disk
With the File > Save As command, save the data and also assign a name to the file. The typical save dialog of your operating system will be displayed.
- It is advisable to use the name of the company followed by the year "ie. Company-2020.ac2." to distinguish it from other accounting files.
- You can keep as many accounting files as you need, each will have its own name.
- You can select the path you want, (save to disk, USB key or cloud).
If you plan to have documents linked to the accounting of the current year as well, we recommend creating a separate folder for each accounting year in which to group all the files. Please also visit the Organizing your files page
General use of the program
Banana Accounting Plus is Excel-inspired. User commands are kept as similar as possible to the ones of Microsoft Office.
For more information on the general use of the program, please visit our Program interface page.
Customizing the Chart of accounts
In the Accounts table, customize the Chart of Accounts and adapt it to your own requirements.
It is possible to:
- Add new accounts and /or delete existing ones (see Adding new rows)
- Modify the account numbers, the description (for example enter the name of your own Bank account), enter other groups, etc.
- Create subgroups, please consult our Groups page.
- Define Cost centers or Segments that are used to catalogue the amounts in a more detailed and specific way.
The Transactions
Transactions must be entered into the Transactions table and they compose the Journal.
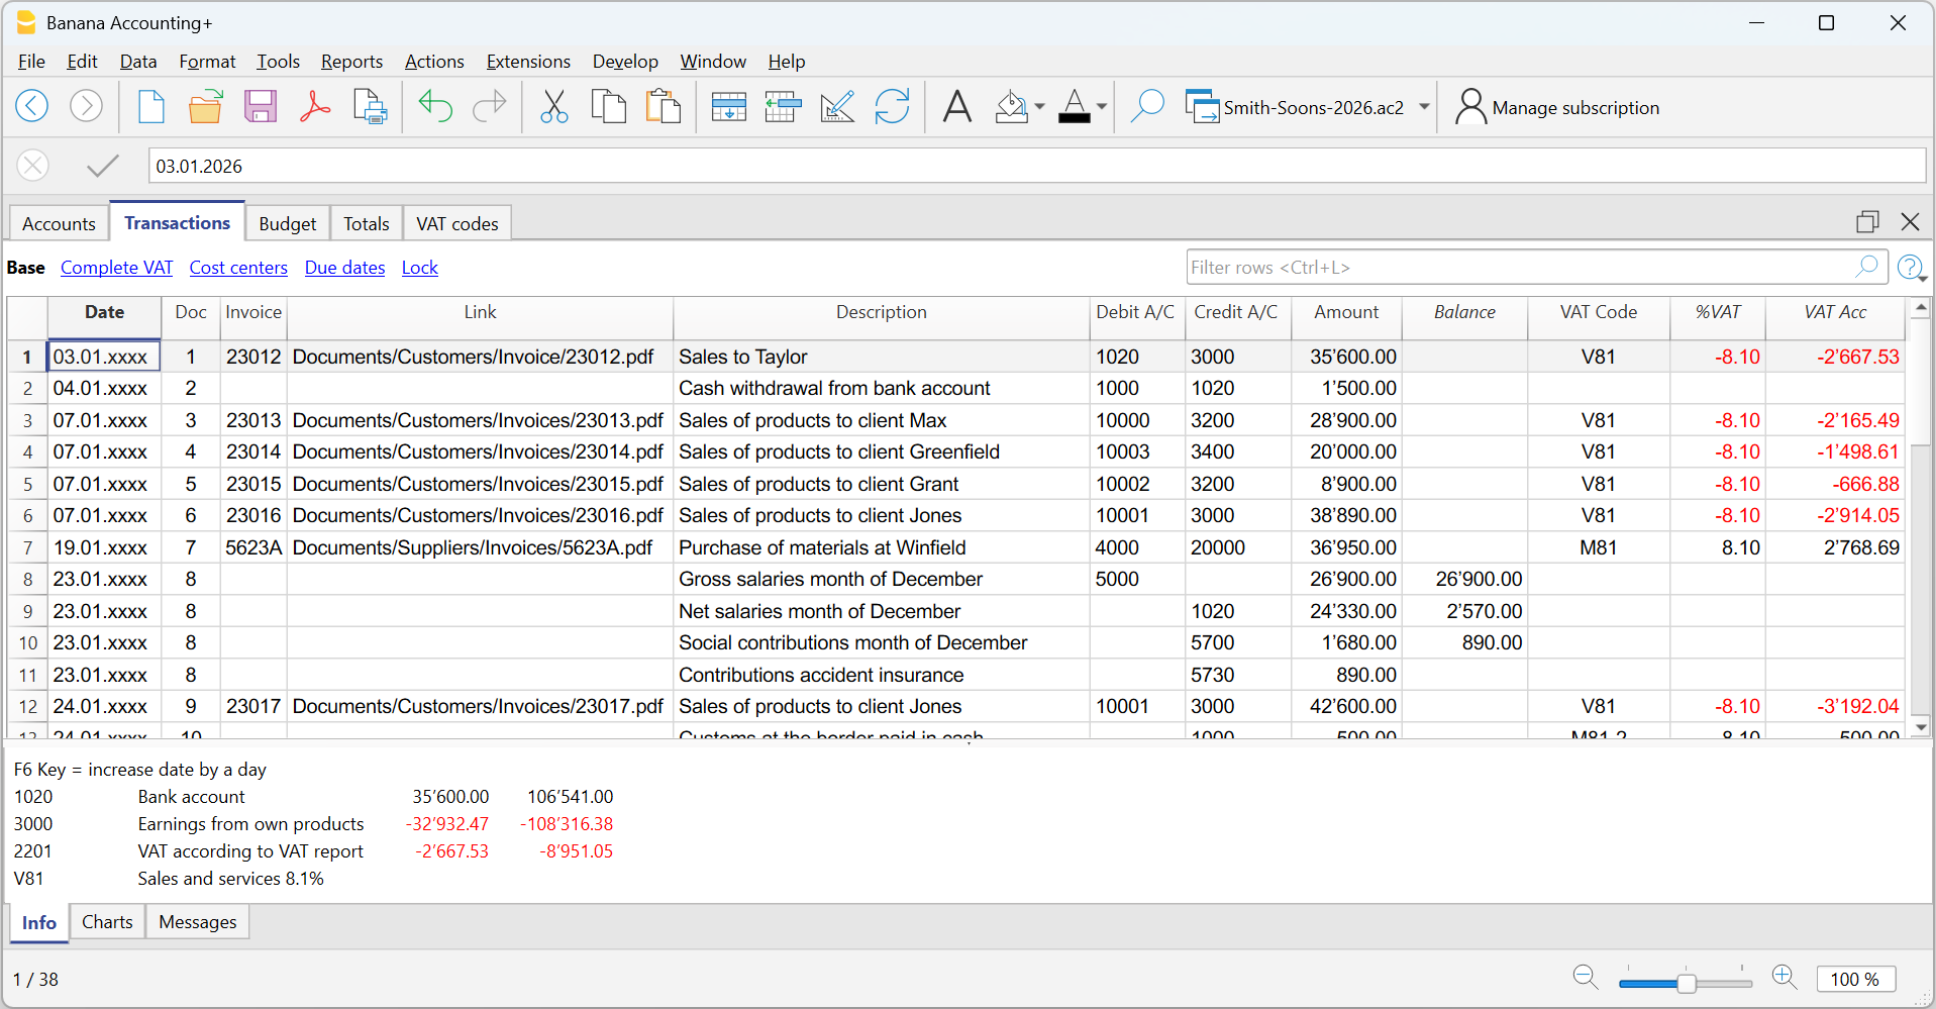
In the specific columns:
- Enter the Date
- Enter the Document number, manually assigned to the paper document. This allows for easy location of the documents once the accounting transaction has been entered.
- Enter the Description
- Into the Debit account column, enter the destination account.
- Into the Credit account column, enter the account of origin.
- Enter the Amount.
- In the accounting with VAT, enter the gross amount and VAT code. The program will separate the VAT, splitting the net cost or net income.
Make visible the Balance column in the Transactions table
The new Balance column is a very useful feature: it allows you to immediately spot possible differences.
The Balance column is not visible by default: you can make it visible via the Data → Columns setup menu.
Speeding up the recording of the transactions
In order to accelerate the recording of the transactions, you can use:
- Smart fill - allows for auto-complete of data that has already been entered previously.
- Recurring transactions - memorizes repetitive movements in a table and can be called up when necessary.
- Import transactions from bank or postal statement - imports all transactions from the bank, postal or credit card statement into the accounting file.
Transactions with VAT
In order to enter transactions with VAT please proceed as follows:
- Select Double-entry accounting with VAT/Sales tax in the File > New... menu.
- Choose one of the existing accounting templates with existing VAT Codes table, containing all prevailing VAT codes.
In order to enter transactions with VAT, please visit the Transactions page.
Transactions on multiple rows
Compound transactions, those that concern debits and / or credits to multiple accounts (e.g. when paying different invoices from the bank account) must be recorded on several rows:
- One row for each debit and / or credit account.
- When all the debits and credits have been entered there must be no differences.
For more details, consult the page Composed transactions.
Checking customer and supplier invoices
Banana Accounting allows you to keep track of invoices to be collected from customers and paid to suppliers. Further details are available on the following web pages:
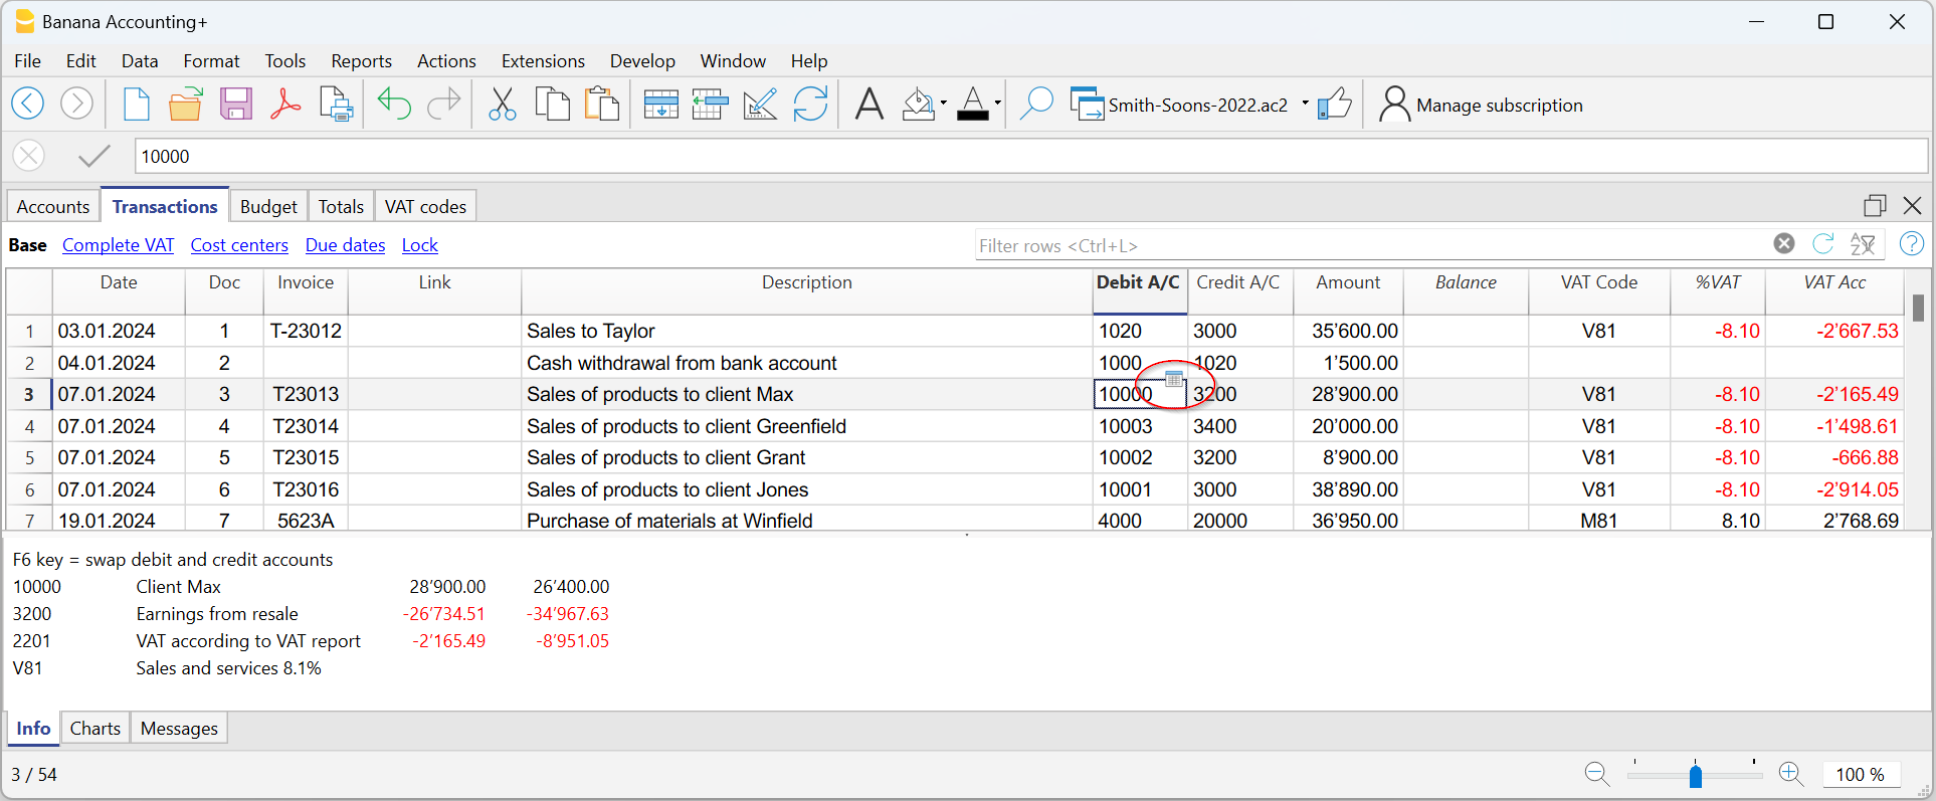
The Account cards
The account cards automatically display all the transactions that have been recorded on the same account (e.g., cash, bank, clients, etc).
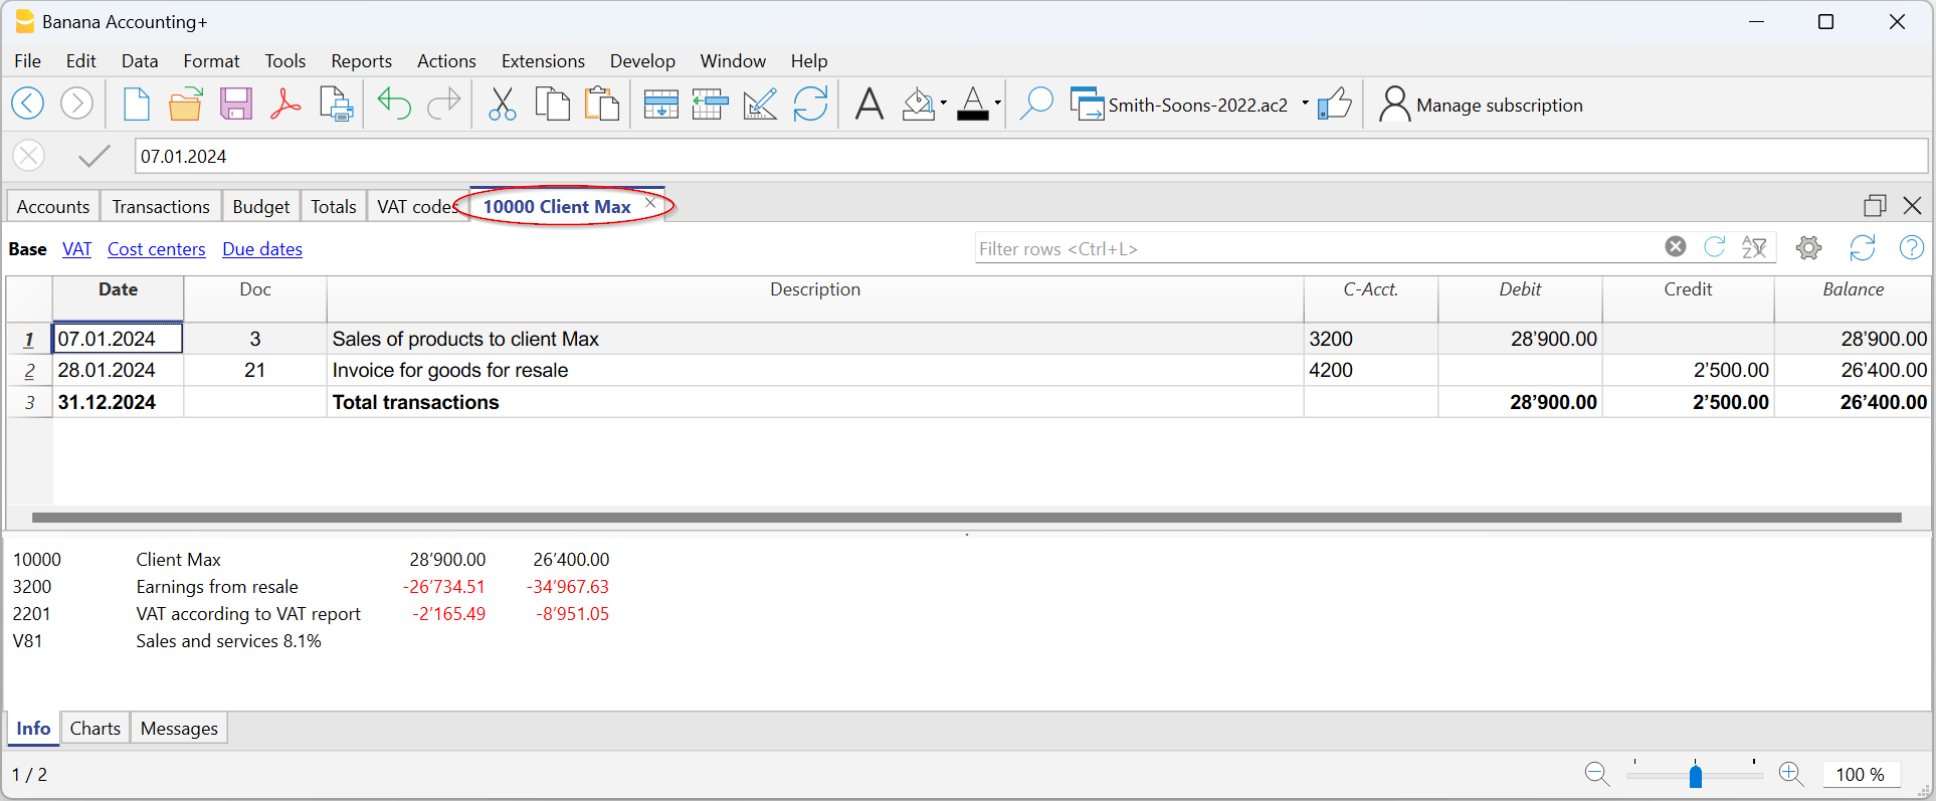
To display a single account card, just position yourself with the mouse on the account number and click on the small blue icon that appears in the cell.
Account card by period
To display the account card with the balances referring to a specific period, proceed as follows:
- Menu Reports > Account Cards.
- In the Period section, activate Period selected, by entering the start and end date of the period.
For more details, consult the Period page.
Printing one Account card
In order to print a single account card, just display the card from any table (Accounts or Transactions) and launch the print from on the File menu.
Print all or some account cards
To print all or some account cards, proceed as follows:
- Menu Reports > Account Cards,
- Select the account cards to print:
Using the filter in the window, you can automatically select all accounts, cost centers, segments, groups or you can simply select the desired accounts only.
For more details, consult the Account Cards page.
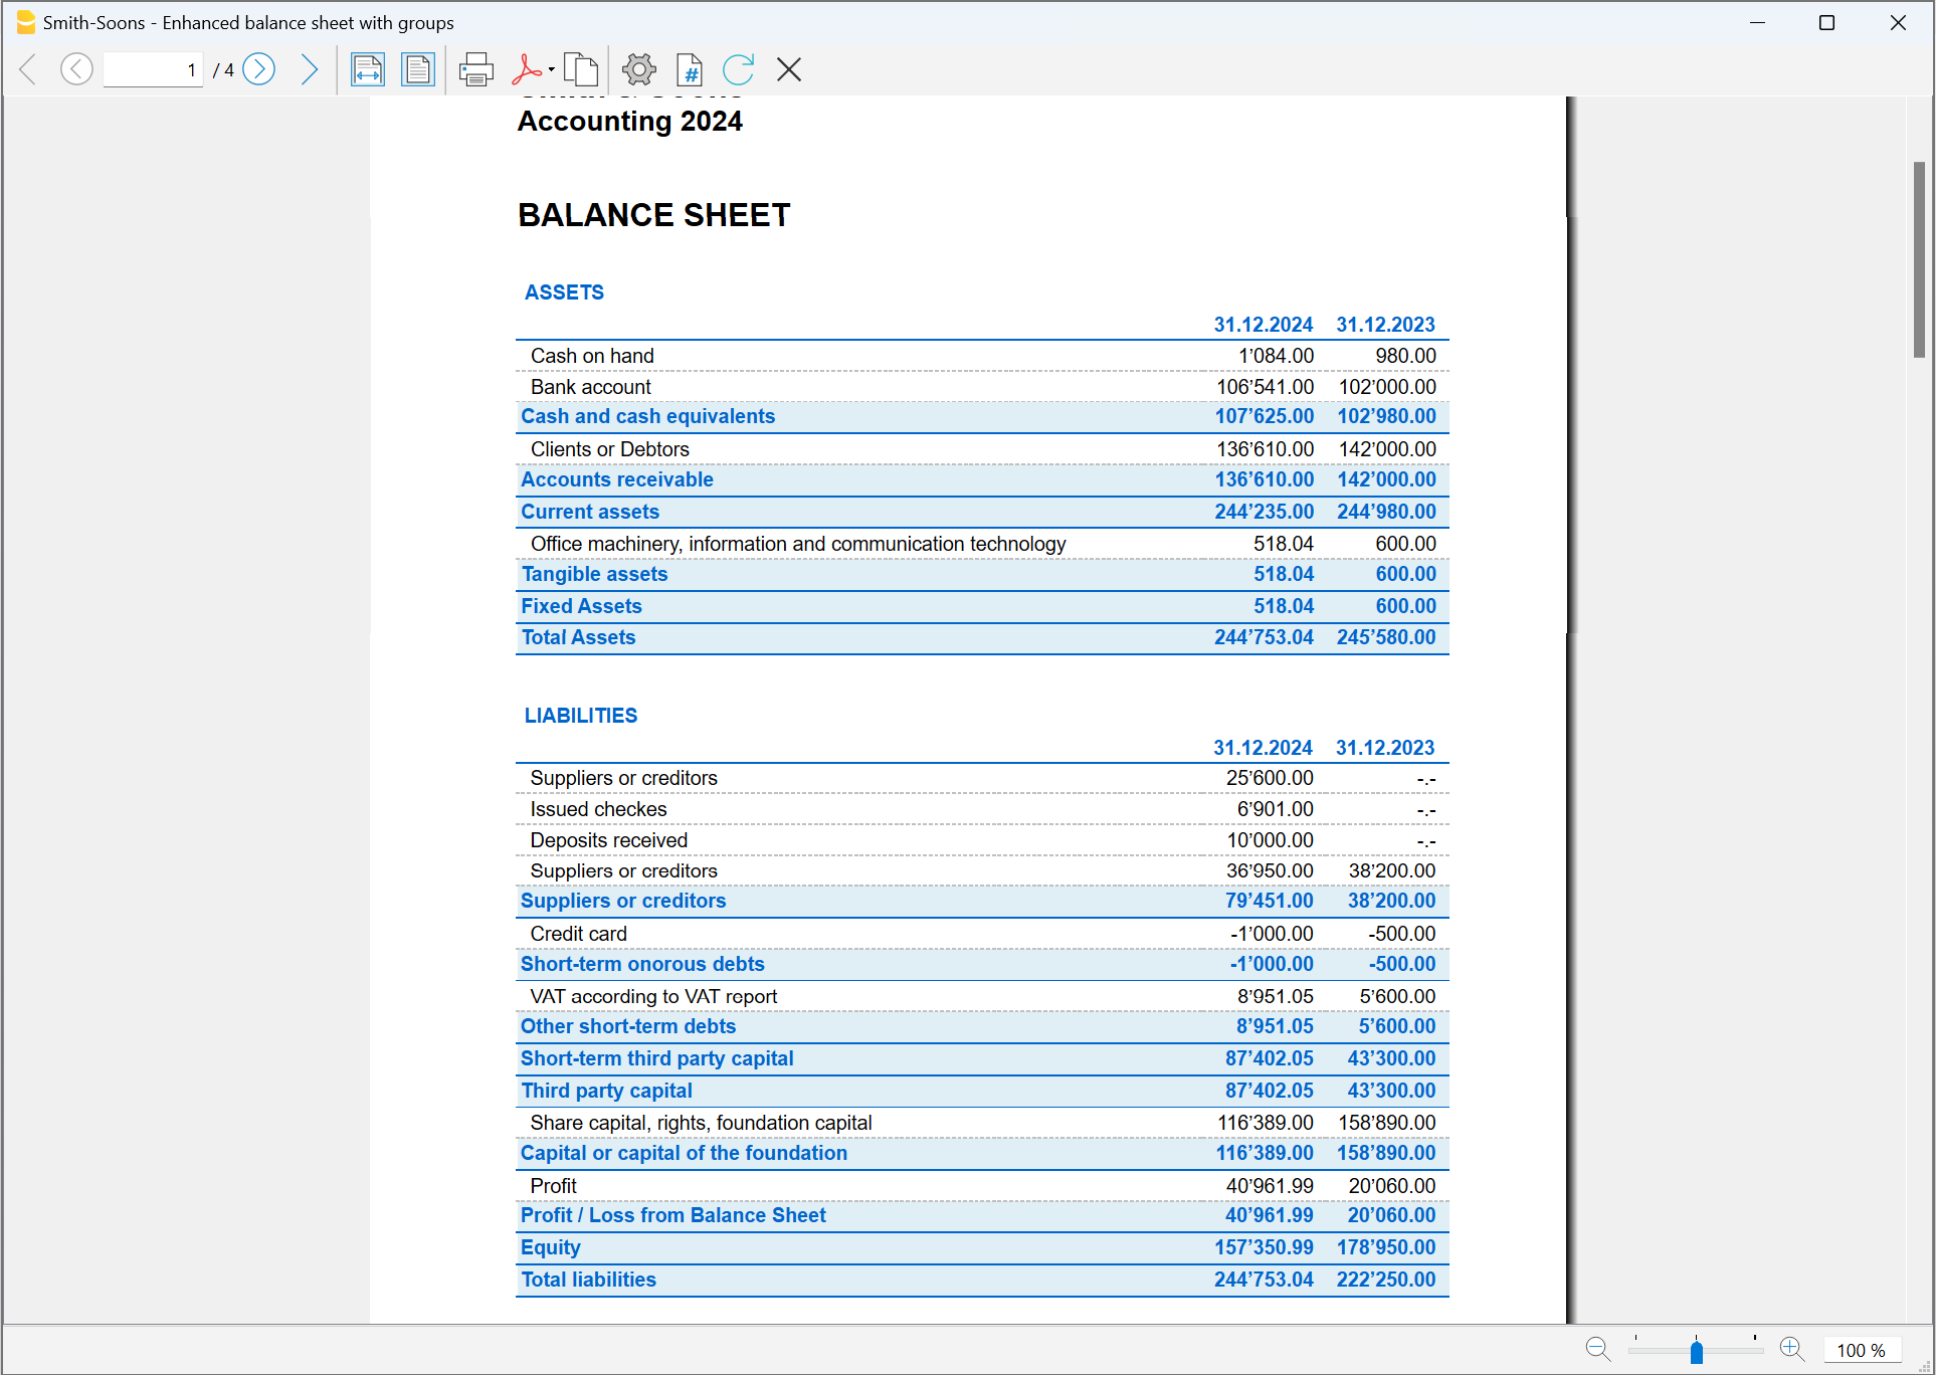
The Balance Sheet
The Balance sheet displays the balances of all the Assets & Liabilities accounts and determines the Equity capital.
The Profit and Loss Statement
The Profit & Loss statement displays all the Expenses and Income accounts indicating the Profit or Loss of the Accounting year.
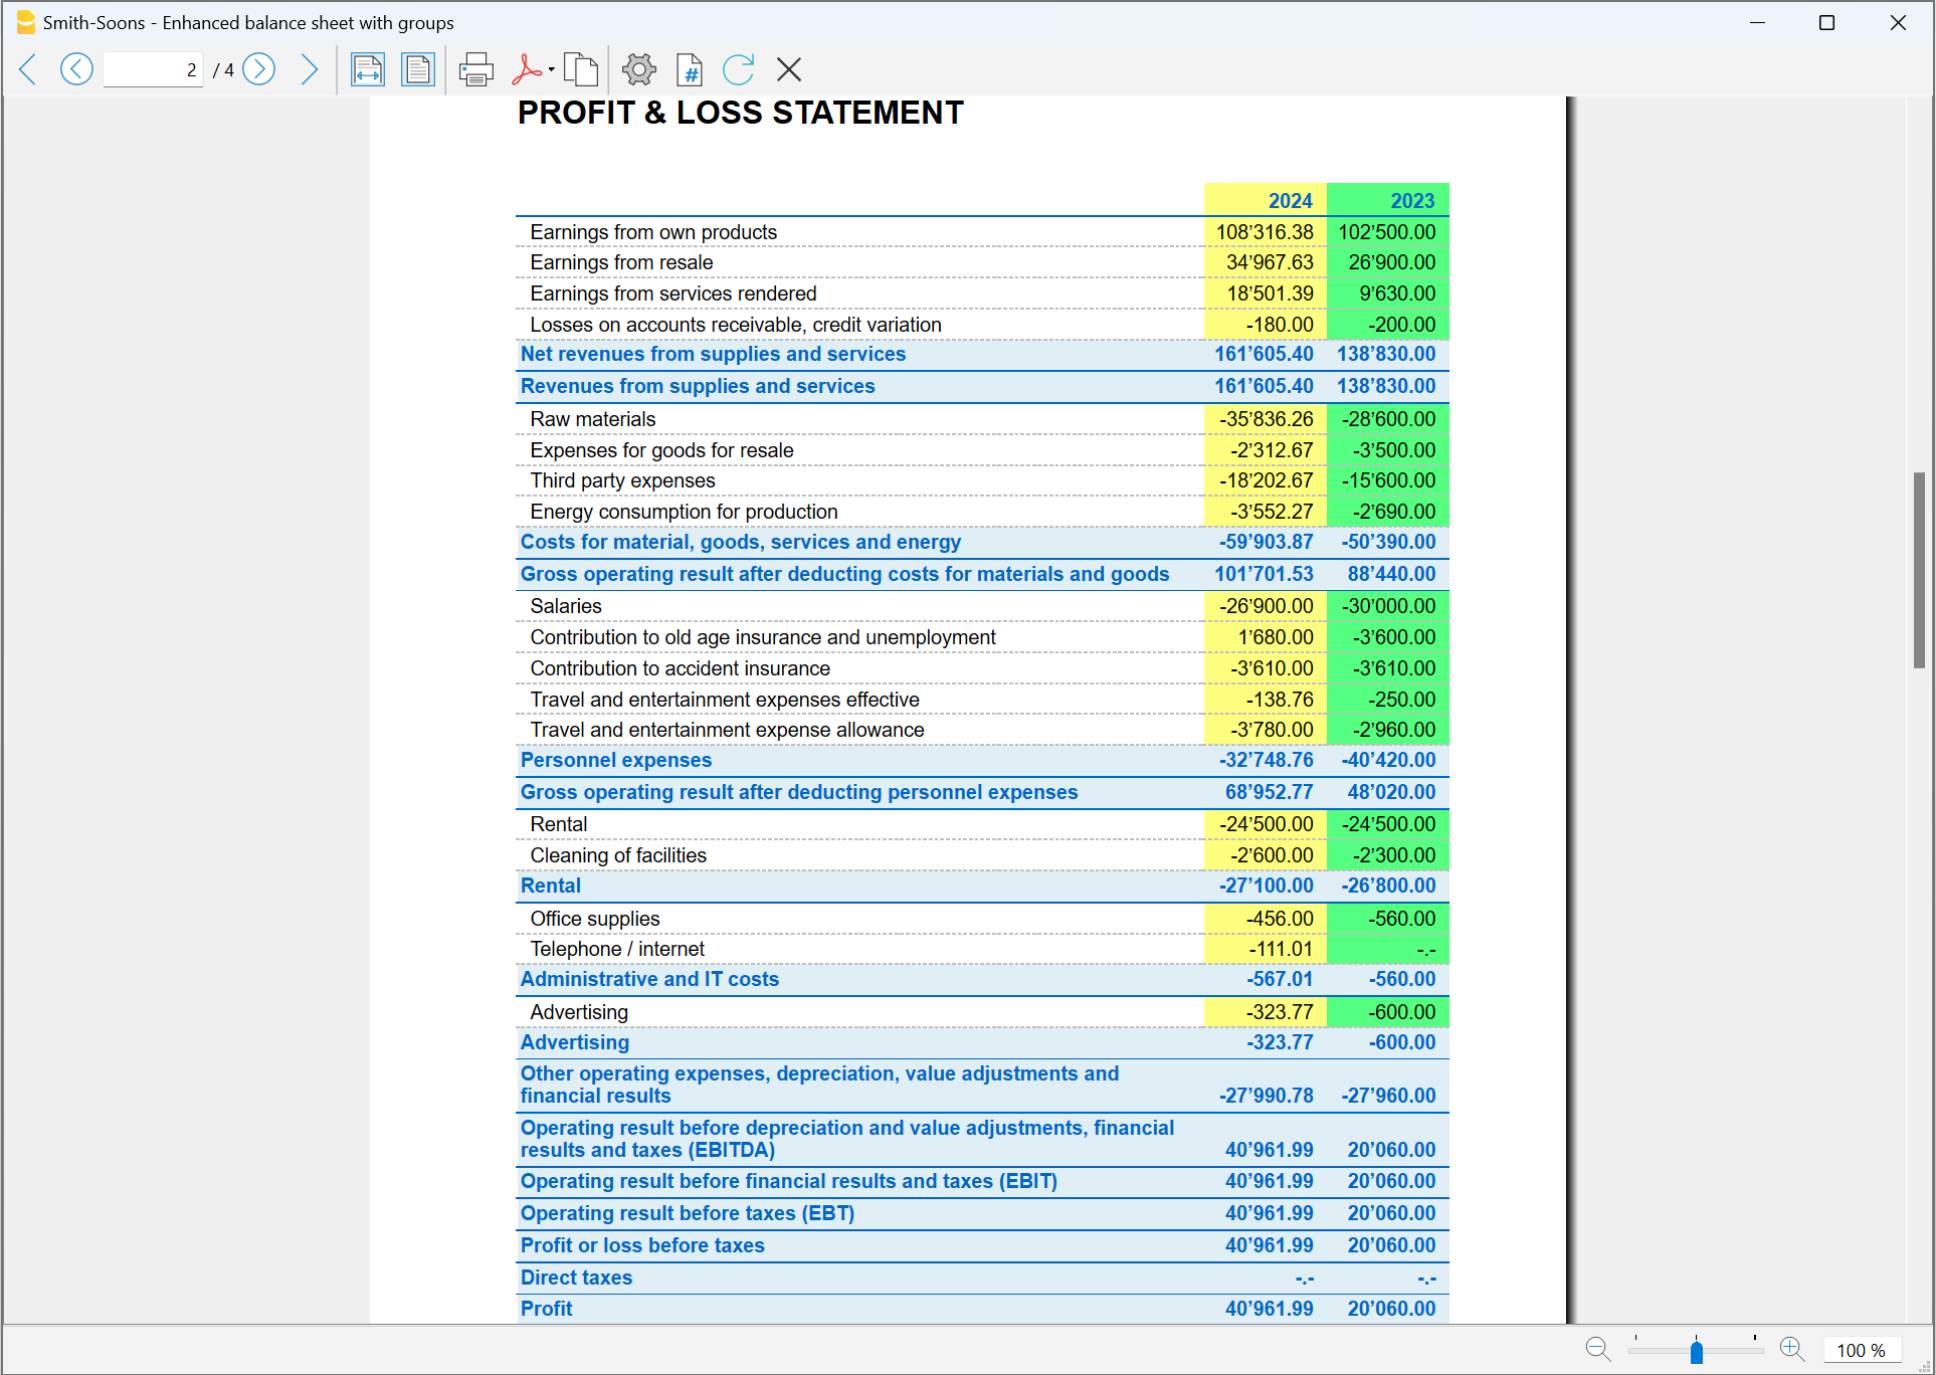
Printing of the Balance Sheet and the Income Statement
In Banana Accounting, the Balance Sheet and the Income Statement can be printed and viewed in two different ways:
- In Enhanced Balance Sheet mode, a balance sheet with a simple listing of all accounts is displayed, without distinction of Groups and Subgroups.
- In Enhanced Balance Sheet mode with groups, the balance is displayed with the accounts divided into groups and subgroups; in addition there are many features to customize the presentation that are not included in the Enhanced Balance sheet.
To print the Financial Statements and the Income Statement in the two modes:
Data archiving in PDF format
All the accounting data can be archived at the end of the year, when the entire accounting has been completed, corrected and audited:

The Budget
- Annual budget is set in the Accounts table, Budget column. The annual budget amount is indicated for each account. In this case, when the Budget is elaborated via the menu Report > Enhanced statement with groups, the budget column displays the amounts that refer to the entire year.
- Budget is set in the Budget table. The Budget table is activated via the Tools → Add/Remove functionalities menu.
This table records all the movements referring to expenses and income, as if the movements were to be recorded in the Transactions table. When this table is switched on, the Budget column of the Accounts table is automatically deactivated.
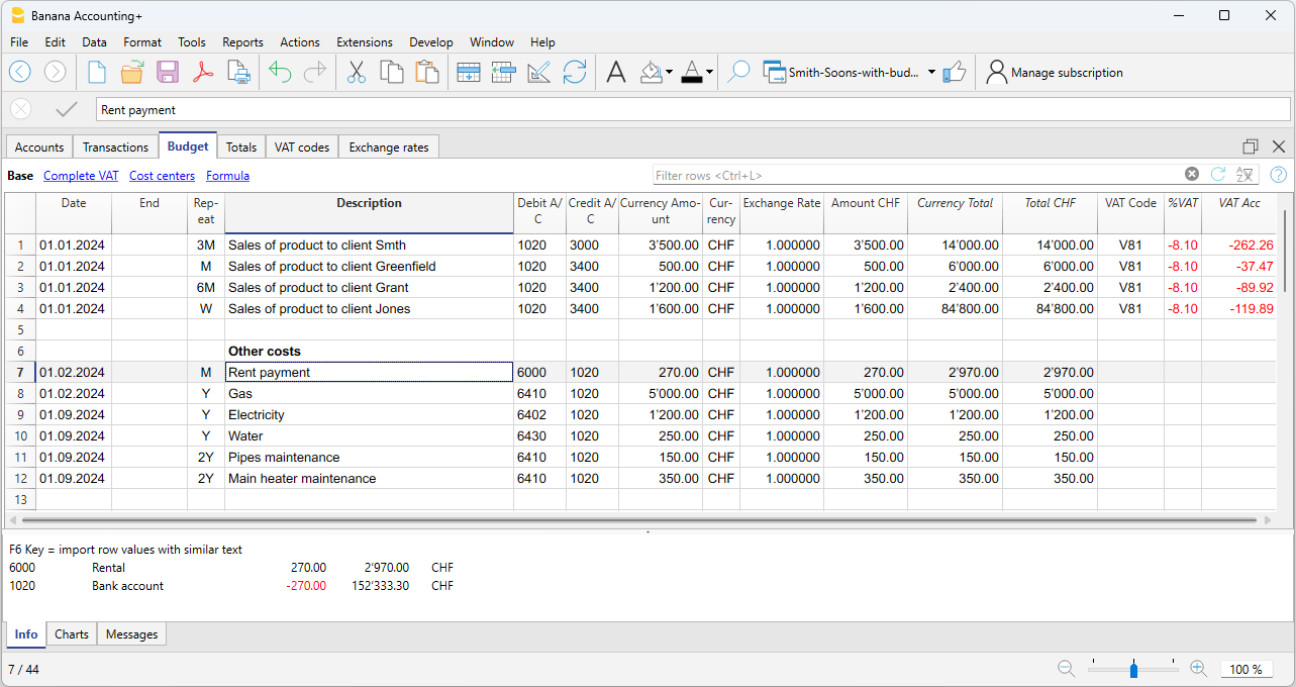
For more details, consult the Budget page.
Characteristics | Double-entry accounting
The double-entry bookkeeping application meets the professional criteria for companies and entities of any kind, where accounting is required by law.
- It is a very powerful tool, but is very flexible and easy to use at the same time, as the different features can be activated or deactivated. This allows you to manage both the main accounting as well as structured Chart of Accounts on several levels: with VAT, customer and supplier management, invoicing, cost centers and segments.
- It can be edited at any time, offering everyone perfect results. It is ideal for the experienced accountant who wants to work quickly as well as for beginners. For this reason it is used for teaching accounting in many schools.
▶ Video: How to start a Double-entry accounting
Similar to Excel
Excel-like features and commands
- All the data you enter in the tables are always on display and close at hand.
- You work quickly because you can select, copy and paste recurring transactions on multiple cells and multiple rows.
- If you make a mistake, you can correct it by canceling or restoring operations.
- Add as many rows as you want without limits, or delete the lines you don't need.
- If you have made a mistake on a a value, an account, a VAT code, a description, you are able to correct it in an instant with the Find and Replace function.
- You don't need to enter formulas because the calculations are updated instantly and you have a contextual view (like in spreadsheets).
- Everything you see can be printed or exported to pdf or other formats.
- You can set your company logo to customize the printout headers.
- The columns are customizable, you can move them to position, add new ones and change their width.
- Work with the format that suits you best.
- Colour the lines to immediately identify the transactions that you need to review or show to the accountant or that need to be completed.
Spreadsheet-based
Accounting management is concentrated in three tables, which are used in a similar way to the Excel spreadsheets, but that are already completely set up and programmed with everything needed to keep your accounting quickly and safely.
- Accounts table
Set up all liquidity accounts, customers, suppliers, etc. and enter the opening balances without having to enter them manually in the Transactions table. You can aggregate multiple accounts, such as the cash accounts, bank or post in the liquidity group, so as to have the updated balances and they can be checked immediately. - Transactions table
The centre of keeping accounts, where the transactions are entered or imported. The debit and credit transactions can be completed with additional information to manage customers and suppliers, issue invoices, manage cost / profit centers, segments, quantities and prices and anything else you need. Scrolling through the table you will have a comprehensive view of all the events. It can be modified in order to always keep accounting in perfect order. - Totals table
This displays the totals by Group and is used to check the accounting balances.
Further tables can be added to support additional functionalities.
- Budget table
Prepare financial forecasts, with the double-entry method. Complete with liquidity planning, budget and forecast income statement, customer, supplier, investment, project, segments for one or several years. - VAT Codes table
Set the required rates and parameters to be used in the Transactions table for the automatic calculation of VAT and the reports to be presented to the tax authorities. - Items table
To set up a list of items to be used for billing. The program keeps track of your income and expenses. - Free tables
To meet further needs.
Quick start
Templates
Accounting management focuses mainly on three tables, which are used in a similar way to Excel spreadsheets, but which are already fully set up and programmed with everything needed to keep accounting quickly and safely:
- Easy and immediate start, creating your accounting file starting with a template.
- If you already have your own template in Banana Accounting you can upload it with all the settings and use it for a different accounting.
- Over 1000 templates subdivided by country and type of user, customizable and with user documentation.
- Easy search and use of templates directly in the program.
Accounting setup
- Freely set the currency for your accounting, you can choose it from a list of world currencies or set it freely (cryptocurrencies).
- Freely set an accounting period, even over several years if required and not linked to the classic 1st January to 31st December period.
- Headings and accounting data set in a single dialog box, easy to display.
- Enter as many decimals as you want, from 0 to 27 (selected when the accounting) is created.
- You can change the number of accounting decimals during the year without problems.
Multi-lingual
- You are free to choose the language for your accounting when you create your file.
- Customize the column headers as you wish.
- You can run accounting in multiple languages simultaneously.
- Prints are also customizable in multiple languages.
File and data saving
- All the data is saved in a single file, where you can easily retrieve everything without wasting time.
- A separate file is created for each year. All data refer to the year so there is no confusion.
- Assign the file the name you want.
- With a single license you can manage an unlimited number of accounts.
- Data remains in your full possession.
- Data saved to any media, computer, network, cloud or can be emailed. You can access it wherever you are.
- Simultaneous access by multiple users, but only one person can open the file when in Edit mode.
- Make your accounting more secure by using password protection.
Plan-Execute-Control
In the same file and always with the double-entry method, you can keep the accounting, or your budget or both. The powerful Plan-Execute-Control approach is very intuitively used.
Double-entry accounting method
- Banana Accounting allows you to keep accounting with the international double-entry method and is compliant with international standards.
- Meets the criteria for keeping any accounting.
- Usable in any country.
- Transactions with debit and credit columns.
- Should there be imbalances in the transactions, a related notification will be generated.
Amounts are displayed in the columns in the format used by your computer, without you having to get used to other formats that you are not familiar with.- Debit amounts are indicated in positive and in credit in negative.
- Calculation is done according to the Debit - Credit = 0 equation.
- Balance sheet, Income Statement and all typical accounting printouts.
- All printouts are customizable.
- Choice of display format.
- Transactions according to the cash or accrual principle.
- Protect your data with cutting-edge blockchain technology (patented method).
- The double-entry method is used by many schools around the world to teach accounting.
Chart of Accounts
- Fully customizable Chart of Accounts to better meet your needs.
- The same Chart of Accounts is used for accounting and for financial, asset and income forecasts.
- Balance Sheet and Income statement are adaptable according to the structure and content of your requirements.
- Any national, international or free grouping scheme us supported.
- Off-balance sheet accounts for the management of items that should not be included in the budget, but that you need to mark down.
- Choose your account ID freely (numeric or alpha-numeric account, up to 256 characters).
- You can freely enter the description of the text for up to 256 characters.
- It is no longer necessary to insert the initial and final balances via accounting transactions
Enter the balances directly in the Opening column of the Accounts table and only when you use Banana Accounting the first time. In the following years the carryover will be automatic. - Balance, account movement and totals displayed contextually and always updated.
- For each customer, supplier, partner account you have the columns to enter the addresses and other useful data you need.
- Adding other columns for notes, grouping or amounts.
- If you add amount columns, they are automatically totaled.
You thus have the possibility to create columns with your own data and have very selected details.
Transactions
- You can insert single or compound transactions.
Single ones are registered in a single row, while the compound ones allow you to easily record transactions that will affect multiple accounts. - You can enter with either the cash or the competence method.
- When you enter data, already existing texts are suggested. With one click the transaction will be filled (auto-completion).
- Immediate reporting of errors and differences, with the possibility of completing them later.
- Store recurring transactions to resume them when they reappear without having to rewrite them.
- Predefined columns columns are available in all the tables and can be displayed at your choice.
- Quantity and price columns, for billing or cost control.
- Auto-numbering of documents with different numbers simultaneously.
- Documents are always at hand, by connecting the digital accounting vouchers (PDF, images) to the files, and open them with a click.
- Enter free texts of up to 256 characters as well as on multiple rows.
- Colour the lines to instantly search for the transactions you need to check or correct later, or to report them to the auditor.
- Adding columns to insert any further information.
- Recordings on Cost and Profit Centers.
- Recordings on segments.
- Save the arrangement of the columns (views) to display the content that is most important to you.
- Contextual information about account balance, differences or errors.
- Before the periodic or year-end closings you can use the Check Accounting functions.You will be able to identify errors between the actual balances (e.g. bank balances provided by the statement, and those of the accounting). You will immediately notice the errors and you can correct so as to have everything matched.
- Movements import:
- Speeds up entry of transactions by importing data from digital bank statements.
- You can import transactions in different formats provided by banks.
- Imported rows can be edited, completed or removed.
- It also imports invoice data or from other software.
Financial forecasting
- If you need to create a Budget, you can activate the function by adding the Budget table.
- Work without difficulty with the same methodology you are already used to, based on the double-entry method.
- Financial forecasts complete with liquidity plan.
- Balance Sheet forecasts.
- Income Statement forecasts.
- Automatic projections over several years.
- Entering the transactions through budget postings.
- Recurring income and expenses set with one transaction.
- All the features of accounting available:
- Calculation formulas in Javascript with access to the values of the current forecast:
- Forecast values available in accounting printouts:
- Account card with forecast movements by account or group.
Balance Sheet and Income statement
- Reports with final or Budget data or both, with indication of variations.
- Free arrangement with groups and subgroups.
- Updated results visible directly in the Accounts table.
- Customizable prints:
Watch the video tutorial that shows how to create and print the Enhanced Balance Sheet with groups.- Adding your own logo.
- Choice of columns to include.
- Choice of sections to include.
- Detailed or printout per groups
- Printouts per single period.
- Columns divided by period (month, quarter, semester, year).
- Values from previous year.
- Comparison prediction value.
- Columns with subdivision by segment.
- Added attached notes.
- Grouping as in the Chart of Accounts or according to your own scheme.
- Saving composition.
- Tabular report (similar to customizable printouts, but with the data in the table).
- Export to pdf for data conservation and export to other formats for data processing.
Other accounting prints
- Fully printable content tables or by for selection only.
- Adding your own logo to personalizing documents and prints.
- Journal.
- Account cards with account movements and groups:
- With accounting or forecast movements.
- By period.
- By Account, Group, Cost Center or Segment.
- Accounting or forecasting data.
- Customizable column arrangements.
- Export to pdf or other formats.
Charts
- Contextual, at the foot of the table.
- Different layouts.
- Evolution per accounts and groups.
- Accounting values.
- Forecasting.
- Preceding year.
- Choice of chart type.
Further management
The program also allows you to add additional information to the transaction, allowing you to use the same data needed for VAT management, for tracking customers and suppliers, issuing invoices, generating reports for projects or business sectors and to face the various corporate and tax obligations.
VAT management
- The function can be activated at choice (when creating an accounting).
- VAT code table to indicate the different VAT rates and cases.
- All national specifications supported.
- It can also be used to manage other types of sales taxes (for example US sales tax).
- Entering the VAT code.
- VAT reversal functionality (using the VAT code preceded by the minus sign).
- VAT calculation as per net or gross.
- Automatic breakdown and registration on the indicated VAT accounts.
- VAT control reports:
- By period or complete.
- With or without movements.
- Optionally, with totals per rate, VAT code, account.
- National extensions for VAT reporting based on the requirements of the relative tax authorities.
Customer management and control
- Function activated at choice (adding accounts in the Chart of Accounts).
- Checking invoices and customer payments.
- Customer master data set in the Chart of Accounts.
- Create groups and totals for customers in different groups.
- Open invoices per customer or global overview.
- Customer movement account statement and open invoices.
- Automatic reconciliation, open invoices.
- Customer management also available as cost centers (on a cash basis).
Invoices to customers
- Function can be activated at choice (using the invoice number column in the Transaction table)
- Entering invoices directly into the Transactions table.
- Requires setting up the customer database.
- Entering invoice data as normal row of transactions.
- See issue and print invoices to customers.
- Column to indicate quantities and prices.
- With or without VAT.
- Possibility of modification, correction.
- Print a single invoice with a click or several invoices combined.
- Choice of different print layouts.
- Customize the invoice according to your preferences.
- Exports in digital format via extensions.
- Customizable reminders via extensions.
- Customizable customer account statements via extensions.
Supplier management
- Function activated at choice (adding accounts in the Chart of Accounts.
- Supplier database set in the Chart of Accounts.
Possibility to group suppliers into different groups. - Invoice and payment to suppliers control .
- Open invoices per supplier or full report.
Supplier movement account statement and invoices still open. - Automatic reconciliation, open invoices.
Cost and profit centers
- Function can be activated at choice (adding the cost and profit centers accounts).
- For projects, cost accounting or profitability.
- Setting up cost centers directly in the Chart of Accounts.
- Multi-level grouping.
- Three levels of cost and profit centers.
- Unlimited number of cost centers per level.
- Negative registration (with minus sign).
- Reports such as Balance Sheet and Profit and Loss accounts:
- Balance constantly updated.
- Customizable reports.
- Card of all movements with progressive balance.
- Contextual chart.
Segments
- Function activated at choice (by adding segment accounts).
- Segment column
- The Balance Sheet and Income statement of one or more business sectors.
- Setting up segments directly in the Chart of Accounts.
- Multi-level grouping.
- Up to 10 segment levels.
- Unlimited number of segments per level.
- Balance constantly updated.
- Reports such as Balance Sheet and Profit and Loss accounts:
- Balance Sheet and Income statement for each segment.
Items table
- For invoices and with integrated warehouse or securities management.
- Linking of the articles to the movements of the Transactions table.
- Automatic update of incoming and outgoing movements.
- Initial and final value.
- Adding additional columns.
Control and closure
Error reports and accounting control
- Command to check the accounts.
The accounting is recalculated instantly, as if all operations were entered again. - Reports any wrong settings, differences or errors.
- Each report is linked to a help page that explains the causes and suggests the solution.
- Checks if the account balance matches the real one (cash, bank, VAT).
- Ability to correct.
Transaction protection
- Rows protection.
- Locking of movements entered with digital data certification technology (Bitcoin type).
- Password protection.
- Compliant with legal requirements.
- Sending data to the auditor with the certainty of the impossibility of tampering.
- Unlock movements with date.
Closing and new year
- Automatic procedure to create the new year file.
- Carryover of balances and allocation of profit.
- Work can begin on the new year, even if the previous one has not been closed.
- Command to carry over the closing balances of the previous year.
Exporting and storing data
- Copy and paste directly to and from Excel.
- Export tables to PDF and various other formats.
- Archiving of printouts and accounting data in PDF or other formats.
- Saving the accounting file on any backup device.
Extensions and other features
Added functionalities
- Adding new features.
- Removing features that are no longer needed.
- Conversion from one accounting type to another:
- Accounting with or without VAT.
- Multi-currency accounting or vice versa.
- From Income/Expense accounting to double-entry or vice versa.
Documents Table
Other additional tables
- Addition of other tables where notes or other information can be entered.
- Tables can be customized by adding columns to them.
Extensions
- Default extensions for various prints and other features.
- Quick search and installation.
- Customizable extensions.
- Automatic update.
- Ability to create and install your own local extensions.
Comprehensive documentation
File and accounting properties | Double-entry accounting
This is where the main data of the accounting file are entered, such as the printout heading, the opening and closing dates, the base currency, the company address, the VAT account, the password, etc
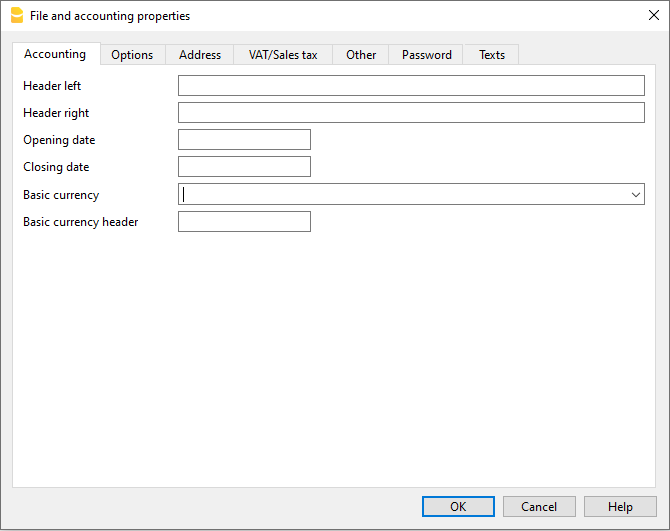
The File and accounting properties window has the following tabs:
Chart of accounts | Double-entry accounting
The Accounts table is the control room of your accounting. It's use is similar to that of an Excel spreadsheet.
In the Accounts table you set up everything you need to manage the accounting and have a quick updated overview of the financial and economic situation of your company.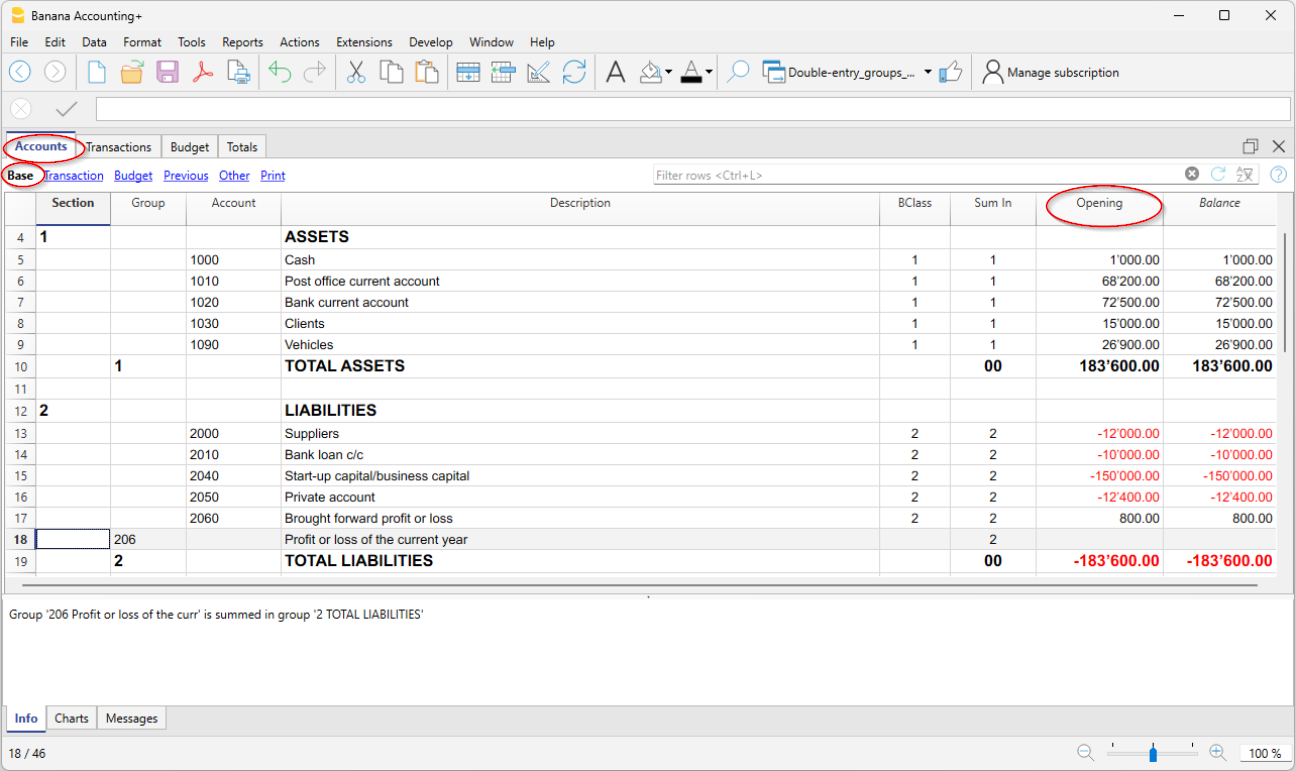
Ready-to-Use Chart of Accounts
Each accounting application by Banana offers a wide variety of chart of accounts templates, already prepared for immediate use. Simply select the file whose template meets your needs, and you'll have the chart of accounts already set up. File templates can be chosen based on the type of business activity and legal regulations.
They have the following characteristics:
- Fully customizable chart and account structure.
- Account and group numbers can be numerical or alphanumeric.
- Ability to add notes or additional columns.
- Grouping and totals adaptable to any national grouping scheme.
- Balances, account movements, and totals displayed and always up to date.
- Cost and profit centers for detailed control of costs and revenues for specific activities or projects.
- Segments for sector reporting (branch).
- Customer database, with control over outstanding invoices, reminders, and statements.
- Supplier database, control over paid and outstanding invoices.
- Management of off-budget customers and suppliers (with cost center) for cash-based accounting.
- Off-balance sheet accounts.
Entering and editing data is simple
- Add and edit accounts quickly and easily by simply inserting or deleting the row.
- There is no limit on the number of accounts to be added in the Chart of Accounts.
- Each account can be set up using numbers or texts.
- The description can also be very long.
- The Groups and Subgroups can be freely arranged to compose the Balance Sheet and the Income Statement.
- The opening balances are immediately entered in the opening column.
- Columns can be added to enter additional information.
- Accounts can be renamed and replaced automatically in the Transactions table as well.
- The columns of the amounts are updated instantly, at glance you know the status of liquidity, capital, sales, profit.
- Then, set the budget and have the comparison with the final balance.
Flexible grouping system
The grouping system is highly flexible and powerful:
- It allows to set up the Chart of Accounts according to any national scheme and to adapt exactly to the needs of the company.
- If you are not satisfied with the arrangement or numbering of accounts and groups, these can easily be changed.
The structure present in the Accounts table is also maintained in the presentation of the Balance Sheet and Income Statement.
Main elements
- Sections
They are used to indicate the subdivisions of the chart of accounts for printing the balance sheet, income statement, etc. - Groups
They allow you to create items that total the accounts and subgroups at multiple levels. - Accounts
These are the elements of accounting where the movements are recorded. They can be indicated in Debit or Credit depending on the nature of the movement, destination or origin.
Each account has a number or abbreviation (account number), a description, the B class and group to which it belongs, the opening balance, current balance, estimate, etc.
Customer and supplier data
You can have specific accounts for issuing invoices and checking payments. They are usually set at the end of the chart of accounts. They can be set up as register with the totals linked to the balance sheet, or as cost and profit centers, with all the details but without links to the balance sheet.
Cost and profit centers
Great to manage projects or have precise details of a specific event, or to manage customers and suppliers on the Cash principle (collected).
- Costs and Profits centers
They are special accounts whose number is preceded by a full stop ".", a comma "," or by a semi-colon ";". Their purpose is to be able to assign some amounts to special accounts other than the general accounting accounts.
Segments
Used to generate financial statements also for different sectors or activities in which the company operates.
- Segments
They are a sort of sub-accounts who's number is preceded by a ":". Their purpose is to be able to assign some transactions to subcategories of the chart of accounts.
Advanced printouts
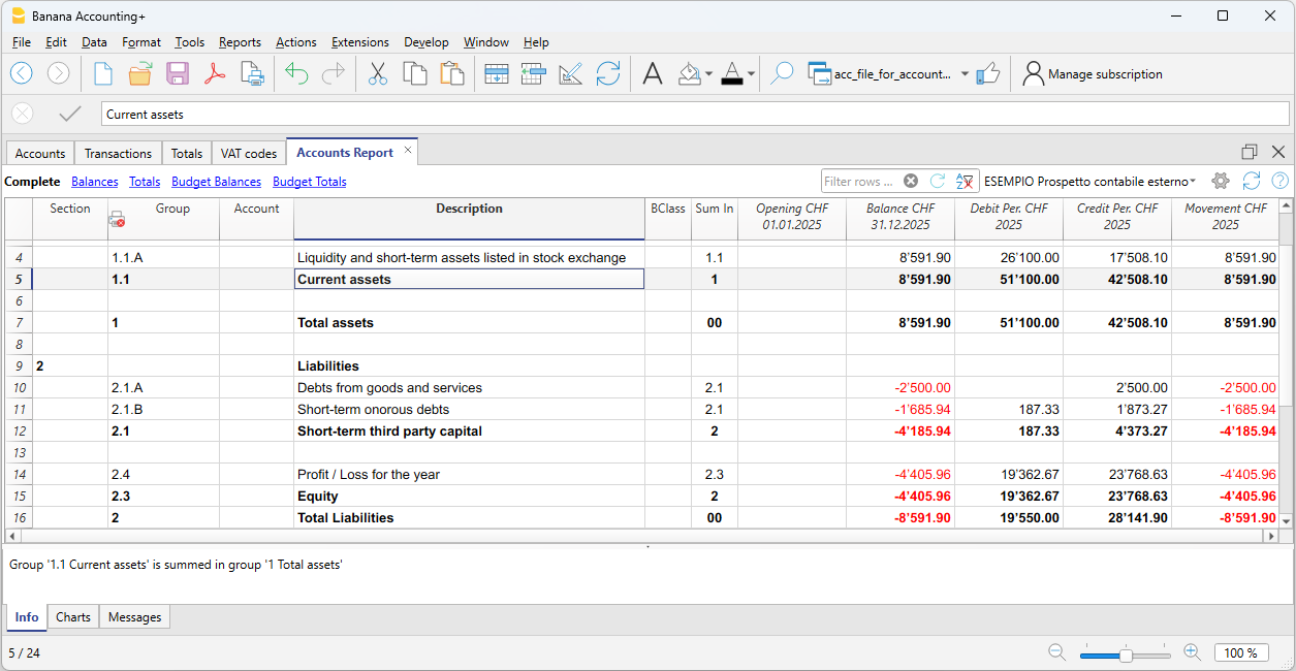
- Accounting report
It is possible to select just the accounts with transactions, to obtain temporary groupings or accounts grouped according to the BClass or an external grouping scheme. - Enhanced Balance sheet
Prints all the accounts of the accounting divided by Assets, Liabilities, Expenses and Revenue - Enhanced Balance sheet with groups
Allows the user to obtain customized printouts with groups - Specific advanced printouts are available using the Banana Extensions
The Accounts table columns | Double-entry accounting
The Accounts table is made up of several columns. Depending on the Views, columns are displayed simultaneously. Each column has its own purpose.
The data to be entered in the following columns are explained below:
- Section
Codes are being entered that allow the user to print determined parts of the Chart of accounts only, when printing the Enhanced Balance sheet by groups.
- Group
Contains the code that defines that this is a group row. The group code is then used in the GR column to indicate the total of an account or group.
- Account
The account number, cost center or segment is being entered.
- Description
A text to indicate the name of the account, group, or section.
- Disable (only visible in the Other view)
By entering 1, the account does not appear in the auto-complete list, but can be used in the Transactions table;
By entering 2, the account is disabled and can not be used.
- BClass. It indicates whether the account is 1 = Assets, 2 = Liabilities, 3 = Expenses, 4 = Revenue, see Accounts page.
- Sum in (Gr)
The code of a group is indicated so that the programme totals the amount of the line in the group.
The heading 'Sum in' has been adopted with the Banana Plus version.
The column name has remained Gr, to maintain compatibility with earlier versions of the programme.
- Gr1 and Gr2 Enter additional grouping codes to use with external accounting report files.
- Opening balance
- The account balance is entered at the beginning of the year.
- Credit amounts must be entered with a minus sign in front
- The sum of all the amounts, those in debit (positive) and credit (negative) of the accounts belonging to classes 1,2,3 and 4 must result as zero. If the opening balances do not balance, a difference is indicated in the information window. If accounts have been added and the difference is not exact, Recalculate the accounting.
- The opening balance, in the balance sheet accounts, is used to calculate the current balance.
- If values have been entered in the Budget table, the opening balance is used by the program for opening financial planning.
- For further information, see the Double Entry Opening Balances page.
- Debit and Credit movements (Protected columns) The total of the debit and credit movements included in the Transactions table.
- If there are no errors, the totals of the two columns are balanced, otherwise a difference is displayed in the Balance column which must be checked and corrected.
- In line called Difference must be zero, regarding these two columns, it is correct that there are amounts. The important thing is that their values are equal. See also Mathematical Basis of Accounting.
- Balance (protected column)
The balance of the account includes the opening balance and the movements in debit and credit. The balance in debit is positive, while a credit balance is negative (minus sign).
- Budget
You enter the budget amount for the current period.- The budgeted amount for costs (debit) must be entered in positive, for revenue in negative (credit).
- If the Budget table has been activated, the Budget column in the Accounts table is protected and the amounts are those calculated on the basis of the budget postings.
- Difference Budget (protected column) The difference between Balance and Budget amount.
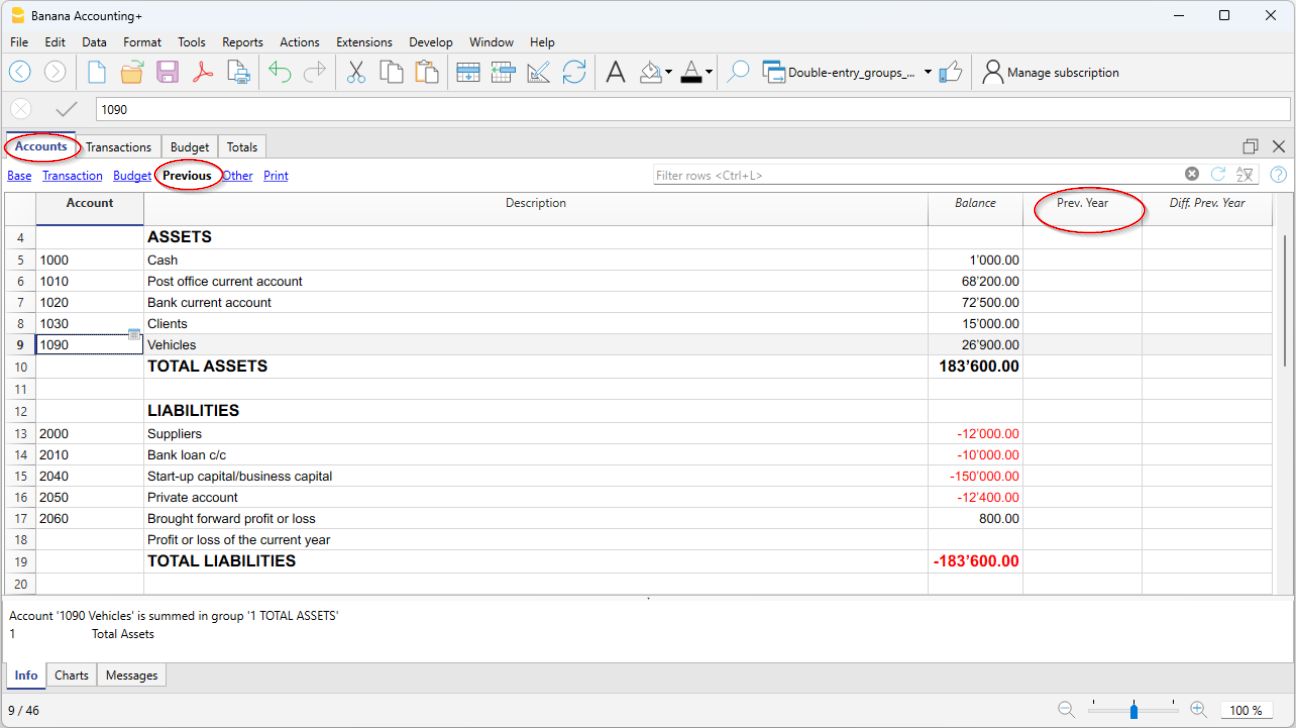
- Previous
The balance of the account at the end of the preceding year. With the command Create new year or Update opening balances the values in the Balance column of the file of the preceding year are being carried forward. When a new accounting is being created and the user wants to obtain printouts with the amounts of the preceding year, the values of that year have to be entered manually.
- Difference Prev. year (protected column) The difference between the Balance and the amount of last year.
- VATNumber
The VAT number in case this account is linked to a client or a supplier.
- VATCode
The VAT code that needs to be applied automatically, when this account is being entered in the debit A/c or credit A/c column of the Transactions.
- Address columns
These columns are used to enter the addresses of the customer and supplier accounts. If the columns are not present, they can be added by activating them via the Tools menu > Add new features > Add address columns menu in the Accounts table.
Adding or moving columns
- When an Amount column is being added in the Chart of accounts, the program will calculate the total of the amounts according to the selected grouping scheme
- Columns added of the number type, on the contrary, are not being totaled.
- With the Columns setup command, the columns can be displayed, the sequences can be altered and it is equally possible to add other columns.
- With the Page setup command one can also define the layout of the print (portrait or landscape) and the zoom.
Accounts list sorted by description or other criteria
To obtain lists of accounts sorted in different ways, use the Extract and sort rows command from the Data menu. We recommend you to be very careful when sorting the rows with different criteria in order not to create confusion in the groupings and totals.
Views
- Base The principal columns, the grouping columns and the balances are displayed.
- Transaction The columns with the Debit and Credit transactions are displayed.
- Budget The Budget column and the Difference Budget column are displayed.
- Previous The Previous column and the Difference Prior columns regarding the previous year are displayed.
- Other The Disable column, the VAT number and the Fiscal number column are being displayed.
- Print Only the Account column, the Description and the Balance are being displayed.
The views can be customized and others can be added with the Views setup command.
Accounts | Double-entry accounting
Accounts constitute the main structure on which all accounting is created. If you open one of the templates included in Banana Accounting, the accounts are already present in the Accounts table and contain all the settings needed to instantly record the transactions in the Transactions table.
The accounts in the Accounts table are divided as follows:
- Balance Sheet Accounts - Assets and Liabilities.
- Profit and Loss Accounts - Expenses and Income.
- Customer and Supplier master Data
- Account Cost and Profit centers - for managing projects or keeping the Customers / Suppliers register
- Segment Accounts - for managing business segments or branches.
The BClass
The BClass is essential for the correct total of amounts and balances. In the BClass column, each account must be assigned one of the following values, regardless of the account number or group to which it belongs:
- 1 - for Assets
- 2 - for Liabilities
- 3 - for Expenses
- 4 - for Income
Groups and subgroups do not have BClass, so the cell of the relevant column remains empty.
BClass of off-balance sheet accounts
Off-balance sheet accounts are those whose amounts and balances do not fall within the totals of the balance sheet and income statement accounts. They are accounts that are entered in the chart of accounts to view guarantees and conditional commitments.
Off-balance sheet accounts must have the following BClass:
- 5 for Off Balance Sheet Assets
- 6 for Off Balance Sheet Liabilities
- 7 - 10 - for other Off Balance Sheet accounts
Add a new account or category
In the Accounts table, Base view, you can add new accounts (or new categories in the Income / Expense accounting).
Before adding an account or a category it is important to know:
- The account or category number can consist of numbers, letters and separator characters.
- There cannot be multiple accounts or categories with the same number.
- Each account must have a grouping (Gr) and a class (BClass).
To add an account or a category proceed as follows:
- Go to the row preceding the one where the new account or category will be inserted.
- Add a row with the Edit > Insert row command
- Fill in the respective columns the account or category number, the description, the BClass (1 for assets, 2 for liabilities, 3 for costs and 4 for revenues - only for double-entry accounting), the number of Gr which must be the same as the one entered for the accounts belonging to the same Group.
Warning: if you enter a transaction with an account that does not exist in the chart of accounts and only after creating the new account, you will initially receive an error message; to eliminate it, it is necessary to recalculate the accounting with the command Shift + F9 or through the menu Actions > Recalculate totals.
Rename an account
This is a very useful function because it allows you to change an account and simultaneously have it replaced in the Transactions table. It avoids having to change the account for each transaction that contained the previous account. In addition, it also allows you to rename a group or a VAT code.
- In the Accounts table go to the Account / Category or Group column, or to the VAT Code column of the VAT Codes table.
- Use the Data > Rename command.
- Indicate the new account number, group, category or VAT code.
The program automatically updates the Transactions table with the new VAT number or code.
Delete an account
If an accounting is already started, before deleting an account, make sure that it has not been used in the Transactions table or that it does not have an opening balance.
- Locate the row of the account that is to be deleted.
- Use the command Edit > Delete rows command.
After deleting an account or a category it is advisable to use the Actions > Recalculate totals command. If the deleted account or category is in use in transactions, the program reports an error message.
Opening balances of the accounts
The opening balance of an account is shown in the Opening column.
- Debit (Asset) balances are shown normally.
- Credit (Liabilities) balances are indicated with a minus sign (in negative) in front of the amount
- Typically, only the opening balances of the Asset and Liabilities accounts are indicated.
To carry over the opening balances automatically to the following year, see the Create New Year lesson.
Further details on opening balances are available on the Opening balances page.
Differences in opening balances
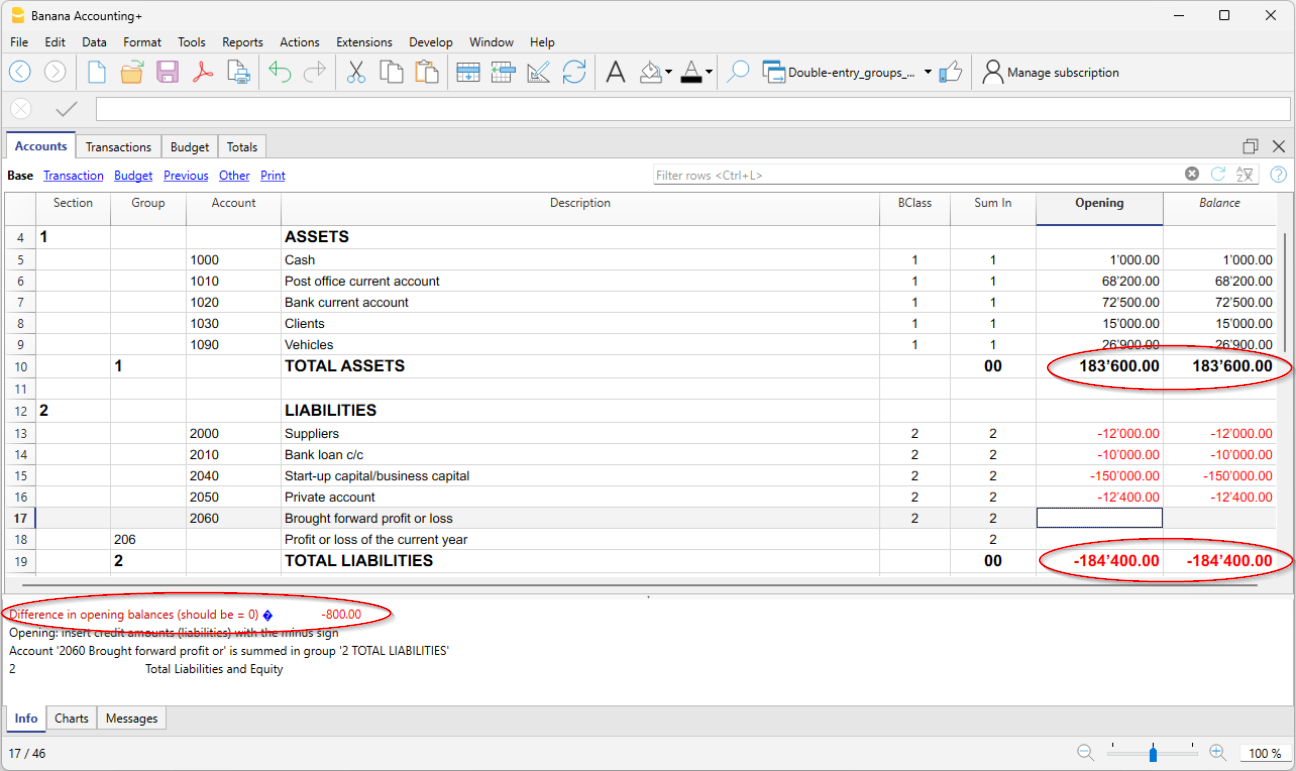
To have correct accounting, the total of the opening debit balances must match the total of the opening credit balances, so that there are no differences.
If the total does not correspond there will be a notification of the difference between the initial balances in the Info window.
If any account numbers have been changed and there are differences, perform the Full Accounting Recalculation.
When using Banana Accounting for the first time, to create the opening balance, it is necessary to manually enter the opening balances (Opening column), making sure to enter the balances of the Liabilities with the minus sign (-) in front of the amount.
Further details on opening balances are available on the:
- Differences in opening balances (Double-entry accounting).
- Differences in opening balances (Multi-currency accounting).
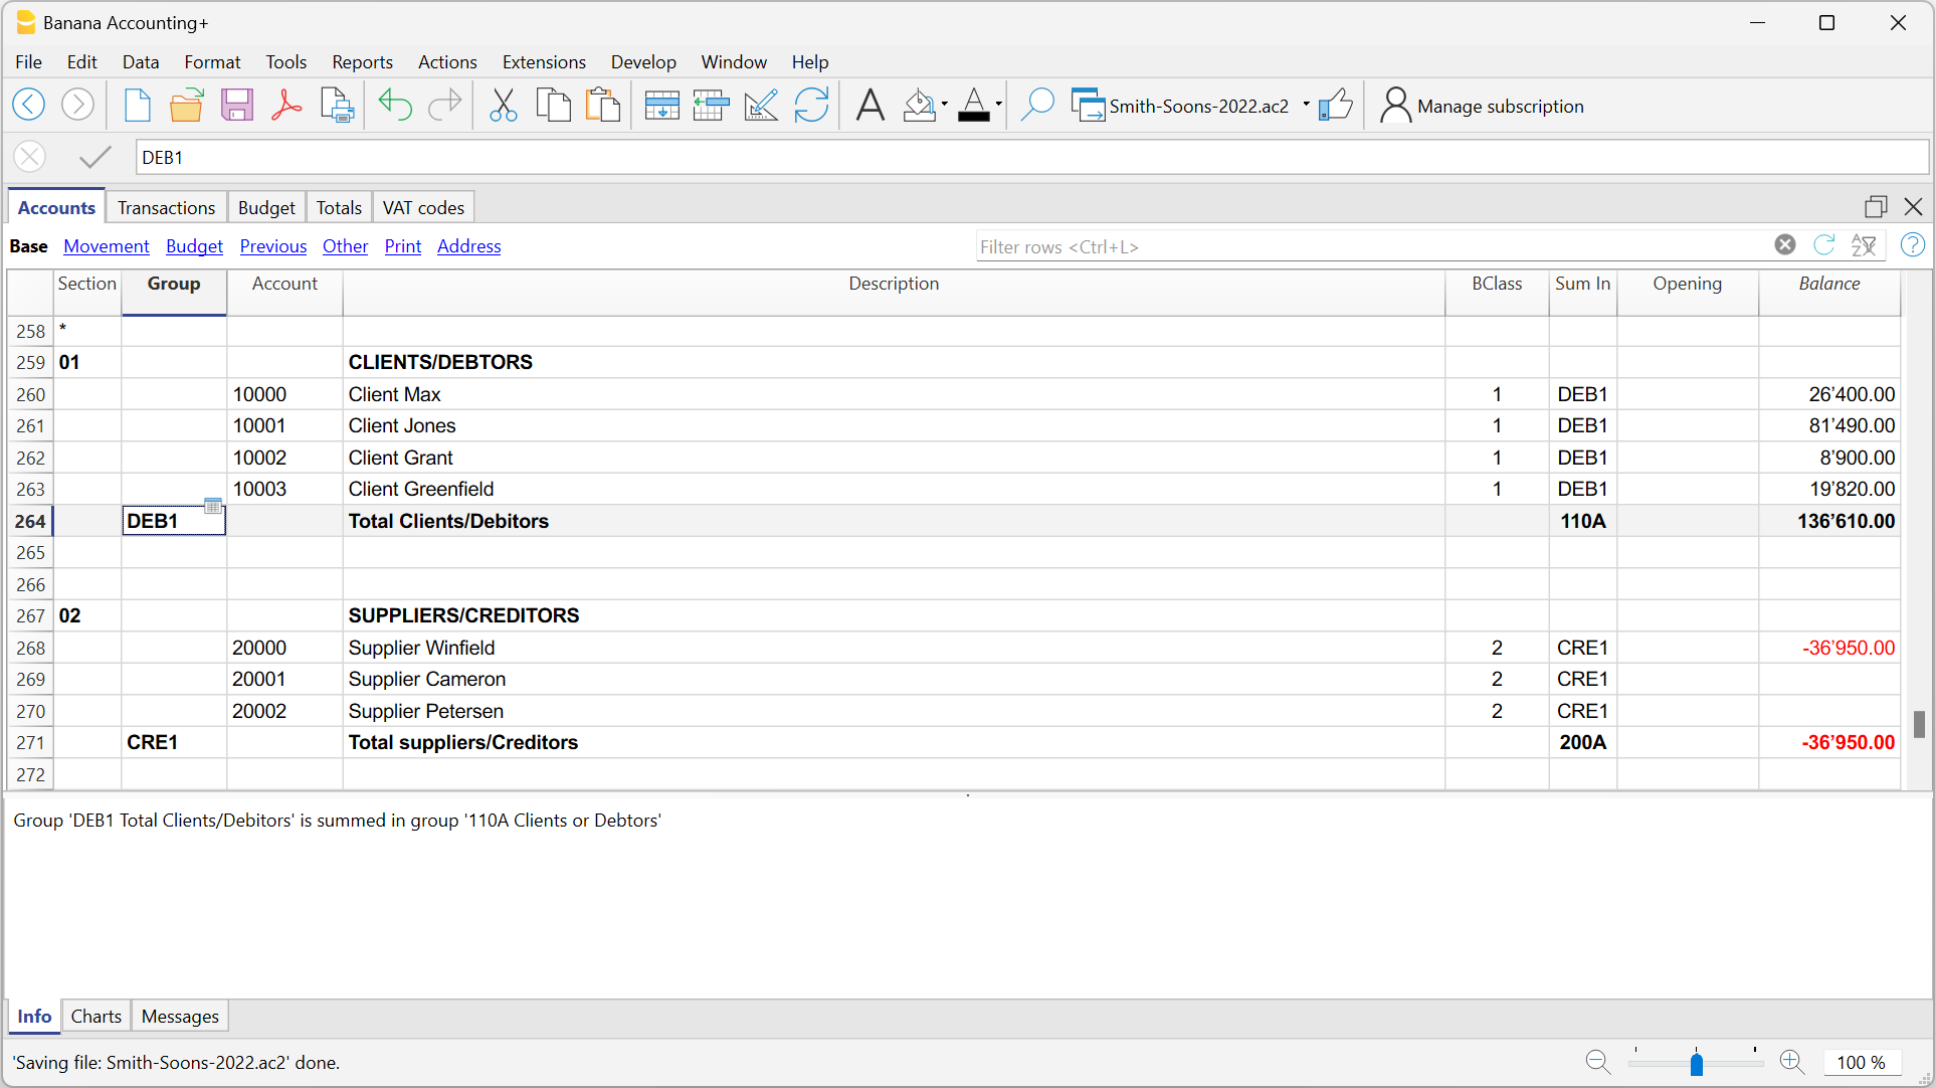
Customer and Supplier accounts
Customer and supplier accounts can be entered directly in the Balance Sheet sections, listing the accounts for each customer and supplier and creating two distinct totaling groups, one in the Assets for customers, the other in the Liabilities for suppliers. If the list of customers and suppliers is very extensive, it is possible to create a customers / suppliers ledger at the end of the chart of accounts.
There are several setting options:
- Setting up directly in the Financial Statements, listing customers and suppliers, respectively in the Assets and Liabilities.
- Setting up with the customers / suppliers register, at the end of the accounting plan, with the totalization reported in the financial statements. This setting is ideal for those who manage VAT with the accrual method.
- Setting up with cost and profit centers, at the end of the chart of accounts, without totaling in the balance sheet.
This setting is ideal for those who manage VAT with the cash method.
Accounts with addresses
In the Accounts table, Address view, there are columns to enter the addresses of customers, suppliers or members. If the columns of the address view are missing, you can add them:
The address columns are essential to be able to manage billing, reminders and the control of payments and collections.
More details are available on the Address page.

The Cost and Profit Centers accounts
They are ideal for project management, have precise details on a specific event or for any other need.
- Cost and profit centers
They are accounts that have the number preceded by a period ".", by a comma "," or by a semicolon ";" and are used to attribute the transaction amounts to additional accounts as well, with respect to the basic accounting ones.
All the amounts attributed to the cost and profit centers are separate from the Balance Sheet and the Income Statement and are entirely for information purposes.
The Segment Accounts
To have financial statements also of different sectors or activities in which the company operates.
- Segments
They are similar to sub-accounts that have the number preceded by a colon ":" and are used to attribute the accounting operations to sub-categories of accounts.
Add, rename, delete accounts
Adding a new account or category
With Banana Accounting it is possible to customize the chart of accounts by adding or deleting accounts and categories.
To add a new account or category, proceed as follows:
- Position yourself in the row above the one where you want to add the new account or category.
- Add a new empty row with the command Edit > Add rows.
- Enter in the respective columns:
- The Account number
- The Description,
- The BClass (1 for the Assets, 2 for the Liabilities, 3 for the Expenses and 4 for the Revenue)
- Grouping number (Sum in column) which must be the same as that entered for accounts or categories belonging to the same Totalization Group.
If in the Transactions table you enter a transaction with a non-existing account, the program gives you an error message; to take it away you have to create the new account in the chart of accounts and recheck the accounting with the Shift + F9 key, or with the menu Actions > Recheck accounting command.
Adding a new group
If you want new totalization groups, proceed as follows:
- Position yourself in the row above the one where you want to add the new group
- Add a new empty row with the command command Edit > Add rows.
- Enter in the respective columns:
- The Group number
- The Group Description,
- Grouping number (Sum in column) in which you wish this group to be totalized.
Renaming an account, a group, a category or a VAT Code
This is a very practical function that allows you to rename an account, a category, a group or a VAT code and to have the replacement automatically in the Transactions and Budget table without having to enter them manually.
To rename one of the elements proceed as follows:
- Position yourself in cell where the account or group (Accounts table) or the category (Categories table), that needs to be renamed, is present.
- If it is necessary to rename a VAT code, it is necessary to position yourself in the VAT Codes table, on the cell of the code to be substituted.
- Choose the Data menu > Rename command
- Indicate the new account, group, category or VAT code number.
Removing an account, a group, a category or a VAT Code
- Position yourself on the row number that contains the element that is to be deleted
- Click on the Edit menu > Delete rows.
- Enter the number of rows that you wish to delete
After deleting an account, a group, a category or a VAT code, it is necessary to use the Recheck accounting command. The program will give you a warning message if the deleted element was used in the transactions.
When deleting a group and not all accounts belonging to the deleted group are deleted, you must change the grouping number in the Sum in column for the remaining accounts, otherwise errors will be reported.
Groups
Banana has developed a very practical and immediate grouping system, which allows you to set in the Accounts table all the information necessary to define the structure of the Balance sheet, Profit & loss statement and of other sections of the accounting.
The grouping system is flexible; it allows you to implement any national chart of accounts and at the same time to adapt it to the specific needs of your business. Both very simple and very complex plans and presentations can be created, with multiple levels of totalling, for any type of accounting.
With grouping, the totals of balances, movements and the group budget are displayed immediately.
How it works
To understand how the Banana grouping system works, please refer to our documentation page:
Grouping and totalling system
The Banana grouping and totaling system is based on two columns of the Accounts and Categories table:
- Group (Total row)
- When, in a row, a group identifier is being entered, the row becomes a total row.
- In this row the amounts of the Sum in column, that contain the same identifier, are being totaled.
- In a row, when a group is present, there cannot be an account.
- Sum in
- Sums the row amounts in the indicated group.
- For each account or group row, you indicate the group in which the line is to be totaled.
- The number here must be one of the numbers defined in the Group column.

Main groups in double-entry accounting
Every accounting file template uses its own totaling system. Hereunder explanation of the main groups of double-entry accounting .
In double-entry accounting, the total of the Debit balances (positive) together with the Credit balances (negative) have to result in 0 (zero). In the case of differences, the group line 00 has a non-zero amount.
The calculation sequence to achieve 00 is therefore as follows:
- The 1000 accounts > group 1 (Total Assets) > Group 00
- The 2000 accounts > group 2 (Total Liabilities) > Group 00
- The 4000 accounts > group 4 (Total Expenses) > Group 02 (result Profit & Loss Statement) > Group 206 (Profit/Loss of the current year in the Balance Sheet) > Group 2 (Total Liabilities) > Group 00.
- The 3000 accounts > group 3 (Total Revenue) > Group 02 (result Profit & Loss Statement) > Group 206 (Profit/Loss of the current year in the Balance Sheet) > Group 2 (Total Liabilities) > Group 00.
- The 00 group is the control row where all the amounts are being added together.
- It is the "Grand total" of all the Debit & Credit balances as a result of the transactions entered in the Transactions table.
- If the line in the 00 group shows a difference (non-zero amount), this means that there are mistakes:
- If the difference is shown in the Accounts table, Opening column (all views) there are differences in the opening balances
- If the difference is shown in the Accounts table, Balance column (all views) there are differences in the Transactions table. In the Debit and Credit columns of the movement view, the totals are not balanced.
In cases where the difference is indicated issue the command Check and recalculate accounting. This command suggests any errors that need to be checked and corrected.
- In the Debit and Credit columns of the Movement view (Accounts table), the totals of the balances are always reported. If the totals in the two columns are equal, there are no errors.
The result of Profit & loss statement is added in equity capital
As you can see in the example, the Group 02 (Profit /Loss from Profit & Loss statement) is totalized in the 206 liabilities group (current year result).
With this group organization, we have several advantages:
- The current year operating result is displayed in the balance sheet
- The Total Liabilities will match the Total Assets (provided that there is no accounting error).
Set up of the Chart of Accounts structure
The chart of accounts in Banana Accounting can be set mainly in two different ways:
1. Structure without subgroups (or subtotals).
In this case, the structure is very simple. You list all accounts without subgroups, and total all accounts or categories in the main groups:
For Double-entry Accounting:
- Assets
- Liabilities
- Expenses
- Revenue
For Income/Expense Accounting or Cash Manager (Categories table):
- Income
- Expenses
2. Structure with subgroups
The structure is more complex. The accounts or categories of the main groups are divided into several subgroups, which in turn are totaled into the corresponding main groups.
Here we present a structure of the chart of accounts with an example of Subdivision with subgroups in Double-entry Accounting. Each subgroup can be in turn :
Assets
- Current Assets
- Cash and Cash equivalents
- Customers
- Inventory
- Fixed Assets
- Furniture
- Machinery and equipment
- Computers, software.
- Current Assets
Liabilities
- Third-party capital
- Suppliers
- Bank loans
- Other short-term debts
- Long-term debts
- Equity
- Equity
- Reserve funds
- Profit and loss carried forward
- Profit for the year
- Third-party capital
From the Accounts table, at any time, through the menu File > Print or Print Preview you can print the chart of accounts or part of it.
Always starting from the Accounts table, by selecting the Movement view, you have the printing of the verification balance.
Adding a new group
- Position yourself in the row preceding the one where the new group will be entered
- Add a row with the command Edit > Add Row
- Type in the group column the group number, description, and the number of the column Sum in where you want this group to be totaled.
Adding a totaling level
With this system it is easy to add totaling levels.
When we want to create a subgroup for the Cash & Cash equivalents accounts:
- Enter an empty row after the bank account
- Enter the value 10 into the Group column
- Enter the value 1 into the Sum in column
- Indicate the grouping 10 in columns Sum in the accounts 1000 and 1020
- The sequence for the calculation becomes:
The 1000 account > Group 10 (Cash & Cash equivalents) > Group 1 (Total Assets) > Group 00.
The programme totals the following:
- It totals the accounts in a group row.
For example, the Cash account is totalled in the Liquidity group. - Totallises a group or subgroup in another group, which in turn is totalled in another group, thus building the calculation structure of the Balance Sheet and Income Statement.
For example, the Liquidity group is totalled in Total Assets, which in turn will be totalled in group 00, in the control total row.

In case you want to insert another subgroup, "Current Assets", proceed in the same way.
- Add an empty row above the row of the Total Assets.
- In the new row:
- Indicate the number 11 in the Group column
- Indicate the number 1 in the Sum in column
- In the Clients and Goods for resale (inventory) rows, indicate the grouping 11 in column Sum in.
Title rows (with Sum in)
Also in the title rows it is useful to indicate the grouping Sum in (the group of the total row) to which it belongs.
In this way, in the printouts of the Enhanced Balance Sheet by groups, if the accounts are zero, the title will not be printed.

Deleting subgroups
In case the Chart of accounts shows subgroups that are no longer needed or not wanted, these can be deleted. Just delete the row of the subgroup and modify the grouping Sum in of every account that was part of that subgroup.
Checking of the structure
Once the Chart of accounts has been set up, execute the Actions menu > Check accounting command. In case there are errors, the program issues a warning.
Infinite loop error
This warning appears when a Group is being totaled in a Group of a lower level, reason for which an infinite error loop is being created.
There would be an infinite loop when, in the preceding example, the Assets Group (1) would be totaled in Group 10.
The program, after having calculated the Group 1, would total the amount in Group 10, which in turn would total the amount in Group 1, and then again in 10 without ending.
Profit & Loss Statement with Gross Profit
It is also possible to use a Profit & Loss Statement that starts with the total Business result and that subtracts the costs.
Hereunder the example of the Swiss PME Chart of Accounts is shown.

Related Documents
Sections | Double-entry accounting
In the Section column, there must be an encoding that is used to determine the various settings of the printouts. The various items that make up the financial statements are divided into several sections; each section is as if it were in its own right.
This subdivision into sections allows you to choose whether to print the entire balance sheet and income statement, or choose which sections to print (eg only the balance sheet, or just a group, excluding the other components from printing).
Below we present a table with the coding to be used in the Accounts table, Section column.
| * | Title 1 | the asterisk separates the sections and indicates the main headers |
| ** | Title 2 | to be entered for the secondary headers |
| 1 | Assets | to be entered in the row of the Assets title |
| 2 | Liabilities | to be entered in the row of the Liabilities title |
| 3 | Expenses | to be entered in the row of the Expenses title |
| 4 | Revenue | to be entered in the row of the Revenue title |
| 01 | Client's Register | to be entered in the row of the Client's Register title |
| 02 | Supplier's Register | to be entered in the row of the Supplier's Register title |
| 03 | Cost Centers | to be entered in the row of the Cost Centers title |
| 04 | Profit Centers | to be entered in the row of the Profit Centers title |
| # | Notes | to be entered in the row of the Notes title |
| #X | Hidden data | to be entered in the row from whereon the data have to be hidden |
The type of encoding set in the Section column is used to determine the print settings for Enhanced Balance Sheet with Groups.
Each section is printed as if it were a separate table.
Title section
- *
The asterisk indicates a new section.- * Title 1 generates a level 1 folder.
- This section resets the level type to 1.
- It can contain level 2 sections or folders.
- It will be useful for grouping sections that need to be printed together such as the Balance Sheet, which contains both assets and liabilities.
- **
The double asterisk indicates a level 2 section.- ** Title 2 generates a level 2 folder
When you create a new title section, the numeric section is set to 1.
After a title section, the desired number section must therefore always be reset as well.
Numerical sections
The section number determines:
- How the amounts are printed; the amounts can be displayed as in the chart of accounts or reversed.
The credit amounts (in negative,) if they are inverted, are displayed in positive, while those in positive are displayed in negative. - Which columns are used to display the amounts; either the Balance column or the Period Movement column is used.
- The Balance column indicates the account balance at a certain point in time (balance as of June 30th).
- The Total Period Movement column indicates the amount of the movement in the indicated period; it is used for the income statement and indicates expenses or income for a certain period.
The explanations of the different sections are as follows:
- 1 Assets (amounts as in the chart of accounts, balance column).
- 2 Liabilities (inverted amounts, balance column).
- 3 Costs (amounts as in the chart of accounts, total movement column).
- 4 Revenues (inverted amounts, total movement column).
This section can also be used alone and include both costs and revenues (Income statement). In this case, revenues are shown in positive and costs in negative.
These sections must be unique. There can be only one section, 1 Assets or 2 Liabilities. Similar sections can be used for other sections, ledgers or cost centers.
Derived numerical sections
These are sections that behave like the main sections:
- 01 As Assets (amounts as in the chart of accounts, balance column)
Is used for the customer register. - 02 As Liabilities (inverted amounts, balance column)
Is used for the suppliers register. - 03 As Expenses (amounts as in the chart of accounts, total movement column)
Is used for cost centers. - 04 As Revenue (inverted amounts, total movement column)
Is used for profit centers.
Other Sections
There are other sections types:
- # Used to indicate the notes section (print description only)
To be used for budget annexes. - #X Hidden section. This section is not taken up in the selection of the sections nor in the printout. It is used to indicate a part that you do not want to print.
Disposition and width of columns in print
The disposition and the width of the columns are determined automatically by the program:
- Sections 1, 2, 01, 02 are printed with the balances on the specified date.
- Sections 3, 4, 03, 04 are printed with the movements for the period.
Sections of the Balance sheet report
In order to divide the Financial Statements into the various sections, the code indicated in the Section column must be entered:
- Insert a * on the same row as the Balance sheet title.
- Enter 1 on the same line as the Assets title.
- Enter 2 on the same line as the Liabilities title.

Sections of the Profit & Loss statement
- Enter a * on the same line as the Profit & Loss title.
- Enter 4 on the same line as the Revenue title.
- Enter 3 on the same line as the Expenses title.

Sections of the Profit & Loss statement in a graduated format
In the case of a graduated income statement, the groups of expenses and revenues alternate and consequently there is no clear distinction between the section of costs and revenues, therefore enter only:
- A * on the same row as the Profit & Loss Statement title
- 4 on the blank line below the income statement.

Sections in the customers / suppliers register
The display of the amounts is the same as for assets and liabilities. This coding also applies if customers and suppliers are set up as cost centers.
- Insert a * on the same row as the Customer / Debtors Register title or on a blank row (as in the example).
- Enter 01 on the same row as the Customers Register title
- Enter 02 on the same row as the Suppliers Register title

If there are cost and profit centers, you must enter:
- a * in the same row as the Cost and Profit Centers title or on a blank line
- 03 on the same row as the Cost Centers title or on a blank line (preceding the cost centers).
- 04 on the same row as the Profit Centers title or on a blank line (preceding the Profit Centers).
The cost center amounts will be shown in positive as the costs; profit centers will be displayed in negative as revenue.

Related document:
Enhanced Balance Sheet with groups
Transfer to a new Chart of Accounts
Hereunder we explain how to proceed when:
- passing to a chart of accounts with a different numbering,
- retrieve and convert the data of an existing accounting, including the transactions into the new Chart of Accounts.
Converting to the new year
There are two possibilities if you wish to start a new year with a new chart of accounts,
- Convert the previous year (2022) and then create the new year (2023).
There will be two files for 2022 (the one containing the Accounts column with the old account numbers and the Accounts_1 column with the new account numbers) and the file for 2023 with only the new chart of accounts.
This approach is ideal for having the two-year charts of accounts aligned.
This way you can also continue to make changes in the year 2022 and then resume the initial balances in the year 2023. - Create the new year (2023) and then convert the year 2023 file with the balances carried forward.
The 2022 year file will remain the same. For 2023 there will be an intermediate file, with the old chart of accounts, but the opening balances carried forward.
The conversion of the year 2023 file can be performed immediately or even after transactions have been entered.
Having the old account numbers in the year 2022 file, you will not be able to resume any further changes made in 2022 in 2023.
Step 1: Creating a new accounting file
- Create a new file:
- Adapt the chart of accounting to your own needs.
Step 2: Adding the matching accounts
- In the Accounts table:
- menu Data → Columns setup
- click the Add button
- insert Account_1 description .
- For each new account, enter the corresponding account in the Account_1 column of the old chart of accounts.
Should the account remain the same, you may also choose not to indicate it. - In case where several accounts need to be grouped in one, enter the separated accounts with a semi-colon "1000;1001".
- If one account needs to be subdivided into several accounts, you need to proceed manually, see below.

Step 3: Starting the import operation
- Via Actions →Import to Accounting → Import File.
- Using the Browse button, select the file of your old accounting plan

- Confirm by clicking the OK button and proceed to the next window
- Define the import options
- Enable the Convert account numbers option, indicating that the matches are in the target file.

Repeat the import
If errors are reported, and it is necessary to repeat the import, it is necessary to cancel the import operation, so that the starting file is empty, otherwise the balance amounts will be duplicated, both in the opening balances and in the transactions table.
Subdivision of one account into several accounts
When one transfers to a more detailed chart of accounts, it is probably necessary to subdivide one account into several accounts.
After the import operation, proceed manually in the following way:
- In the Chart of accounts, subdivide the opening amounts, budget amounts and previous amounts of one account into several accounts.
- Go over the transactions, one by one, of the account that needs to be subdivided and assign them to the more specific account, or create extra transactions if it is necessary to subdivide one amount into more detailed amounts.
- Proceed in the same way for the transactions of the Budget table.
Results and possible errors
If the program reports mistakes (absence of accounts or others), the import operation probably needs to be canceled, complete the pairing and then repeat the import operation.
The program, confronted with different charts of accounts, cannot automatically do extensive verifications and guarantee that all the data have been imported and grouped correctly.
It is therefore strongly advised to manually check the result, making sure that the totals of the Balance Sheet and the Profit & Loss Statement are correct.
Opening balances | Double-entry accounting
On this page, you will find all the information you need to enter, modify, and restore initial balances (or opening balances) in Banana Accounting.
Opening balances when starting an accounting
When using Banana Accounting for the first time, the opening balances need to be inserted manually in order to create the opening balance sheet.
- Position yourself in the Accounts table, Base view, Opening column.
- Enter the opening balances of the Assets and Liabilities accounts manually. Liabilities are to be entered preceded by the minus sign.
- Check if the total Assets equal the total Liabilities so that your accounting squares. If there are differences in the opening balances you need to check and correct them.
Difference in opening balances
At the opening of the accounting year, the Assets accounts (positive) must balance with the Liabilities accounts (negative). If this is not the case, the accounts do not balance and error messages are displayed in the information window at the bottom; in this case, the reasons must be checked and corrected, until the message Difference in opening balances disappears. For more information and solutions see:
Opening balances of Cost Centers
In the Accounts table, the Opening column can also be used to enter the opening balances of the Cost Centers.
Opening balances for Segments
To enter the opening balances of the segments, opening transactions must be entered instead.
More details are available on the Segments page.
Opening balances for an already started accounting
If you start a new accounting, taking over work already done with other programs, there are two possibilities:
- Start accounting from the beginning of the year, by entering the opening balances for the beginning of the year (Accounts table, Opening column) and the transactions (Transactions table) that have already been previously recorded with other programs (also see Transferring data from other software). Thus you will have all the accounting details in one file.
- Starting from the date when the accounting is resumed:
- Enter the opening balances (Accounts table, Opening column), taking over the values of the other accounting.
In addition to entering the opening balances of the Assets and Liabilities accounts, it is also necessary to enter those of the Expenses (positive amounts) and Revenues (negative amounts). - The operating result up to that point must be disclosed in the Profit / Loss carried forward account.
If it is a profit, the opening balance must be entered in negative, if it is a loss as a positive. - Check that the sums of the opening balances are zero, so that the program does not signal any differences.
- Enter the new entries in the Transactions table.
- Enter the opening balances (Accounts table, Opening column), taking over the values of the other accounting.
Opening balances as opening transactions
Opening balances can also be entered as opening transactions in the Transactions table.
For each opening transaction, proceed as follows:
- Indicate the accounting start date as the transaction date.
- In the Doc Type column, enter the code "01".
- Indicate the debit or credit account and the amount.
- The total of the opening debit balances must match those in credit.
Opening balances entered as transactions are used when preparing reports. The opening balance of the transactions is added to the amount entered in the Opening column of the Accounts table.
Balances of the previous year
If you start a new accounting by taking over an existing accounting and you want the previous year's values to appear on the printouts, it is necessary to enter the previous year's balances in the Previous view, Previous Year (Prior) column of the Accounts table:
- Enter the closing balances of the previous year of the Assets accounts.
- Enter the closing balances of the previous year of the Liabilities accounts (insert the minus sign in front of the amount).
- Enter the last year's closing balances of the Expenses.
- Enter the final balances of the previous year of Revenues (insert the minus sign in front of the amount).
Create new year
When you start the new year, the program automatically carries over the opening balances to the following year.
Consult the Create New Year lesson.
If for some particular need, opening balances need to be changed, these can be modified manually in the Opening column of the Accounts table. After each modification, make sure that there are no accounting differences. Anyway, we recommend carrying over the opening balances with the Create new year command or, if the accounting for the new year has already been created, use the Update opening balances command.
The account card is in automatic and it is not possible to directly enter the opening balance or make changes.
To change an opening balance of an account card, you need to go to the Accounts table, Opening column, whereas to correct movements, you need to change the entry in the Transactions table.
Print opening balances
To print the opening balances:
- To print the contents of the table, use the Print / Preview command, by selecting the rows of the Balance Sheet.
- You can also use the Accounting printouts and set the printout for the Balance Sheet part and the opening column only.
Differences in the opening balances | Double-entry accounting
At the opening of the Accounting year, the amounts of the Total Assets should correspond to the Total Liabilities. Otherwise, the accounting balance will not square and it is necessary to verify the reasons and correct the error, so that there is no Difference in the opening balances message displayed in the information window .
There may be several causes that lead to a difference in the opening balances:
- When using the program for the first time, the liabilities were not entered with a minus sign in front of the amount.
- The result of the previous year was not automatically allocated when creating a new year.
- The balances for expenses and income have been carried over, when creating a new year, whilst they should not have been.
- When opening balances have been entered manually, the previous year's operating result has not been taken into account. In this case the difference corresponds to the carried forward profit or loss.
- When allocating the profit to multiple accounts is performed manually, thousands separators and decimals other than those provided in Banana Accounting were used for the amounts.
The solutions for each single error are explained in the error explanation page, at the https://www.banana.ch/doc/en/contamsg_en_tot_teid11des?portal=banana link.
In the example, the program reports a difference in opening balances of 800.-
After having checked and corrected the opening balances the Total Assets must correspond to the Total Liabilities.
It is also possible to check and square the balances in the Totals Table.
Transactions table | Double-entry accounting
The Transactions table is the central hub for keeping the accounts, where all the operations with financial and economic impact are entered. The use is similar to Excel. In the Transaction table the movements are always visible and in perfect order and by scrolling them, you instantly have a clear view of all the events.
All the data entered can be modified and corrected, making it easy to have a perfect accounting.
The Transaction Table is also characterized by the Balance Column, which allows identifying any differences between the Debit and Credit columns and especially the row where the difference originated. Additionally, errors and accounting differences are flagged in the information window at the bottom.
Key features:
- Single or compound entries: Single entries record simple transactions with one Debit and one Credit account, while compound entries are entered on multiple lines with different Debit and Credit accounts. The program suggests previously entered text for quick auto-completion.
- Recording Method: Transactions can be recorded using either the accrual or cash method, ensuring accuracy and compliance with accounting standards.
- Management of Repetitive Operations: Stores repetitive operations for quick future recording, reducing data entry time.
- Customizable Columns: Default columns can be made visible at the user's choice, including quantity, price, and other relevant information.
- Automatic Numbering: Automatically assigns document numbers with different numbering simultaneously, maintaining systematic order and facilitating search and archiving.
- Digital Attachments: Links digital justifications such as PDFs or images to files, accessible with a simple click for complete and organized documentation.
- Exception Management: Highlights rows to quickly identify entries to verify or correct, facilitating the review and control process.
- Data Integration: Imports transactions from various digital bank statements and other programs, speeding up entry of records and ensuring data accuracy.
- Cost/Profit Centers and Segmentation: Allows recording operations on cost/profit centers and segments for detailed analysis and better financial management.
- Balance Verification Entries: Before period or year-end closings, quickly identifies and corrects errors between actual balances, ensuring accurate and updated balances.
Fast insertion
The table is similar to Excel, you can scroll up and down and position yourself in any cell.
There are many features that make entering and editing data very fast.
The following operations are possible:
- Cancel and redo.
- Select one or more cells and copy / paste.
- Add, copy, paste and delete lines, individually or in bulk.
- Search and replace texts.
- Sort the rows by date.
- The auto-complete function suggests the values to enter (for example the list of accounts).
- With the F6 key the values of the row are completed, taking over those of the same row.
- The F4 key resumes the values from the previous row.
- The date is completed with the values from the previous row.
- In the Doc column progressive numbers (with different counters) are suggested.
- In the Debit or Credit Account column you can search for the account by typing it's description.
- In the columns of the amounts you can enter formulas, such as "30 + 25" and the program inserts the result.
Further information is available on the pages:
Movements import
By importing transactions from bank, postal or credit card statements, data entry in the Transactions table is speeded up and errors are avoided. Data is recorded exactly as it appears on the bank statement.
- In addition to the account statements, you can also import data from other programs.
- The program automatically completes the missing values.
- Several formats are available for importing.
- You can copy and paste data from other programs.
- Imported data can be completed, modified or deleted.
- Ability to program extensions to import any type of file.
Further information is available on the Import to Accounting page.
Management of multiple information
A lot of information can be indicated for each entry row:
- The value date and that of the document.
- A progressive number of document and protocol, or external reference.
- Any additional information you need by adding columns.
- Link to a digital document file.
- Add and remove links.
- Open the link and view the content.
- VAT management (if the type of accounting with VAT was chosen in the creation of the file):
- By entering the VAT code in the transaction, the program calculates the VAT automatically.
- Break down and post the VAT on the designated account.
- You can define whether the amount is net or gross of VAT.
- You can indicate that it is a reversal by inserting the minus sign "-" before the VAT code.
- You can indicate a VAT percentage that is not recoverable.
- You can encode special cases with additional codes.
- Cost and Profit centres:
- Up to 3 cost and profit centers for each posting line.
- You can post negative by indicating the "-" sign in front of the cost or profit center account.
- Segments:
- For each debit or credit account you can indicate up to 10 segments.
- Supplier management:
- Management both on the basis of competence (setting as ledger) and cash (setting as cost and profit centers).
- Management of due date and payment, to have the report of open and paid invoices.
- Client management:
- Management both on the basis of competence (setting as ledger) and cash (setting as cost and profit centers).
- Management of due date and payment, to have the report of open and collected invoices.
- Invoices to customers:
- Data entry for the creation of invoices.
- Customer account suggestion.
- Quantity and price (make columns visible).
- For billing or cost control.
- Automatic calculation of the amount.
- Item number (if option activated)
- To connect to the items table.
- Automatic calculation of the quantities of products entered and exited.
- Print invoices.
- Indication of further information needed to print the invoice.
Account card
From the Transactions table you can access any account card, just go to the account cell (in the Debit or Credit column) and click on the small icon that appears in the upper right corner of the cell.
When you are in the account card, clicking on the row number of a transaction takes you back to the Transactions table, on the original transaction precisely.
More information on account cards can be found on the Account / Category Card page.
Verify data
Entering values is very secure. Banana Accounting has functions that allow automatic detection and reporting of errors.
- The program verifies that the entered values are correct.
- If there is an imbalance between the Debit and Credit columns, this will be indicated in red in the Info window.
- Transactions you are unsure about can be left pending and completed later.
- For each error message there is a corresponding help page (requires internet connection).
- In the Info window below you have the following information:
- Description, movement and balance of the accounts used.
- Error reports error messages with a link to the help page.
- Reporting of the debit and credit difference.
- By entering the actual bank balances via the #checkbalance function, you can immediately check the correspondence of the balances in the accounting and avoid errors.
- With the Check accounting command, the program rechecks all the data entered and alerts you to oversights and errors.
- You can colour the rows, change fonts and make them bold.
- You can protect the rows.
- Lock transactions with blockchain technology.
Arrangement of columns
To have a more congenial data entry, you can arrange all the columns in your own order.
You can choose to:
- Move the columns to the right or left.
- Display additional columns or hide unnecessary ones.
- Add own columns
- Save the arrangement of the columns (views).
Further information is available on the Columns setup page.
Transactions table columns and views | Double-entry accounting
The Transactions table has a series of columns and views already set.
The columns of the Transactions table
The columns listed hereunder and preceded by an * are usually not visible.
In order to make them visible, use the Columns setup command from the Data menu.
Date
The date the program uses to attribute the transaction to a certain time frame. The date should be within the limits of the accounting period defined in the Basic data of the accounting. In the Options tab, one can indicate whether the transaction date is required, otherwise this value can also be left empty.
If there are locked transactions, the program triggers an error message when a date equal or earlier to the one of the lock is being entered.
*Date Document
The date of the document can be entered, for example the date of issue for an invoice.
*Date Value
The value date of the bank operation can be indicated. This value is being imported from an electronic bank statement.
Document
The number of the voucher that serves as a base for the accounting transaction. When entering transactions, it is advisable to indicate a progressive number on the document, so that the accounting document of the transaction can be easily traced.
The auto-complete feature proposes progressive values as well as transaction codes that have been defined earlier in the Recurring transactions table.
The program proposes the next document number, that can be resumed with the F6 key.
- In case of a numeric numbering, the program simply increases the highest value found in the Doc column.
- Alphanumeric numbering: the program increases the final numeric part; this is useful when one would like to keep a separate numbering for cash and bank movements:
- If earlier Doc number C-01 has been entered, and one starts to type C, the program proposes C-02.
- If earlier Doc number B104 has been entered, and one starts to type B, the program proposes B-105.
- If earlier Doc number D10-04 has been entered, and one starts to type D, the program proposes D10-05.
In the recurring transactions you can setup transactions groups that can be reloaded with a single code.
In order to add a large number of document numbers, you can also use Excel. You can create the desired quantity of document numbers in Excel and then copy and paste it into Banana, in the column of the Transactions Table.
*Document Protocol
An extra column in case an alternative numbering for the transactions or for the document is required.
The auto-complete feature proposes progressive values that function in the same way as the ones in the Document column. It is used, for example:
- When it is necessary to assign a progressive number to the transactions, different from the document number.
- If the transactions are entered by other people, using another file and then these are imported into the accounting. This way it is possible to use both a progressive numbering referred to the accounting and the original number.
*Document Type
Contains a code that the program uses to identify a type of transaction. If you prefer to use your own codes, it is advisable to add a new column.
- 01 In the reports, this transaction is considered an opening transaction, so it doesn't show in the period but in the opening balances.
- from 10 to 19: codes for customers' invoices
- from 20 to 29: codes for suppliers' invoices
- from 30 to 1000: codes reserved for future purposes.
*Document Invoice
A number of an issued or paid invoice that will be used together with the invoice control feature for Customers and Suppliers
*Document Original
The reference number present on a document, to enter, for example, the number of a credit note.
*DocLink to external file
Serves to enter a link to an external file, usually the accounting voucher.
Clicking on the small icon in the upper part of the cell, the program opens the document. See insert, edit and open links.
- When a link has been inserted in the cell, a small icon appears and clicking on it opens the document, but only if it is an extension considered to be safe.
- The other small icon allows you to insert and edit the link.
*External reference
The reference number that was allocated by a program that has generated this transaction. This value can be used to check whether a given operation is imported twice.
Description
The text of the transaction.
The auto-complete feature proposes the text of an already entered transaction, or of one that has been entered in the preceding year when the appropriate option has been activated. When pressing the F6 key, the program retrieves the data of the preceding row with the same description and completes the columns of the active row.
In case the description begins with #CheckBalance, the transaction is being considered as one that serves to check the balance.
Please consult our page Check accounting for more information on the subject.
*Notes
Useful to add notes to the transaction.
Debit Account
The account that will be charged.
- It is possible to also enter a segment in the Debit account column. These are usually separated by a ":" or a "-" o un "-".
By inserting the segment separator sign, immediately move to the next segment. - If instead the Enter key is being pressed, the input will end and one moves to the next column.
- The auto-complete feature proposes the accounts and segments of the Plan of Accounts.
- Instead of the account, you can enter a search text. The program proposes the list of accounts which contains the text in one of the columns.
*Debit Account Description
The description of the entered account retrieved from the Chart of accounts.
Credit Account
The account that will be credited. We refer to the explanation under Debit account for the rest of the information.
*Credit Account Description
The description of the entered account retrieved from the Chart of accounts.
Amount
The amount that will be entered unto the debit and credit account.
*Balance
The Balance column shows the sum of debit and credit. An amount is therefore only displayed for entries in several accounts. At the end of the entry the balance should be zero. If there is a recurring amount it is because there is an error.
VAT columns
Information on the VAT columns can be found att the VAT columns in the Transactions table page
CC1
The Cost center account preceded by "." to be entered without the ".".
If the initials are preceded by the minus sign "-P1", the amount is recorded in credit.
*CC1 Description
The description of the Cost centre, retrieved from the Chart of accounts.
CC2
The Cost center account preceded by "," to be entered without the ",".
If the acronym is preceded by the minus sign "-P2", the amount is recorded in credit.
*CC2 Description
The description of the Cost centre, retrieved from the Chart of accounts.
CC3
The Cost center account preceded by ";" to be entered without the ";".
If the abbreviation is preceded by the minus sign "-P3", the amount is recorded in credit.
*CC3 Description
The description of the Cost centre, retrieved from the Chart of accounts.
*Expiry date
The date before which the invoice has to be paid. For further information see the Customers and Suppliers pages.
*Payment date
Used in combination with the Show Expiry dates command.
When the invoices customers/suppliers control feature in order to check on the payments is used instead, a transaction has to be entered for an issued invoice and another one for the payment thereof.
*Lock Number, Lock Amount, Lock Progressive, Lock Line
More information at the Lock Transactions page.
Additional columns
From the menu Tools > Add New Features > Add Article columns in the Transactions table the following columns are added:
IdItem
The item identifier of the Items table. If you insert an article present in the Items table, the description, unit, unit price, VAT code and account are included.
Quantity
The quantity multiplied by the unit price will produce the total amount (can also be a negative number).
Unit
A description referring to the quantity, for example: mq, ton, pz.
Unit/Price
The unit price multiplied by the quantity, will produce the total amount (can also be a negative number).
If a value is entered in the Quantity or Unit Price columns, the amount is calculated on the basis of the contents in these two columns and converted to a positive value.
Adding new columns
With the Columns setup command, it is possible to display, hide or move the order of columns, add new ones, or indicate that a column should not be included in the printout.
- The added columns in the Transactions table will be added also in the Recurring transactions table, in the Account card and in the VAT report, without being made visible.
In order to display these columns in the other tables, use the Columns setup command. - If a column of the "amount" type is being added, the entered amounts will be added up in the Account card.
Views
When a new accounting is being created, the following views are being automatically created as well:
- Base: the main columns are being displayed
- Cost centres: the CC1, CC2 and CC3 columns are being displayed
- Expiry dates: the columns Expiry date and Payment date are being displayed
- Lock: the columns relative to the Lock function are being displayed.
With the Views setup command, the views can be customized and personal views can be created.
With the Page setup command, you can modify the print mode of the view.
Transaction types | Double-entry accounting
In double-entry accounting, there are different types of accounting transactions. Here's how to book them in Banana Accounting.
Simple transactions (on one row)
Simple transactions are the ones regarding two accounts (one Debit account and one Credit account) and entered in one single row.
The document number is different for each registration.
Composed transactions (on several rows)
Composed transactions with more than two accounts involved, have to be entered on several rows. The user should enter one account per row. The counterpart account for the entire transaction has to be entered on the first row.
The document number, entered on the different rows, is the same because we are dealing with one and the same transaction.
Note:
In composed transactions, the dates of the transaction rows should be the same, otherwise, when doing calculations by period, there may be differences in the accounting.

Opening transactions
The opening balances are normally indicated in the Accounts table.
Opening transactions are required in special cases such as:
- In multi-currency accounting, when you need to have different opening exchange rates than those indicated in the Exchange rates table, opening exchange rate. See Opening transactions in foreign currency.
- Entering Opening balances for segments.
The opening transactions are created by inserting the transactions with the opening date equal to the accounting start date and the code 01 in the DocType column.
- Opening transactions do not change the opening balance in the Accounts table.
- The opening balance entered with transactions is used in balance sheet printouts, account cards.
- If for the same account there is the opening balance and the recording of the opening balance, the two amounts will be added together.
This way, you can enter opening transactions that correct the opening of an account. - When entering opening balances in the transactions, it is necessary to make sure that the sum of the debit (positive) and credit (negative) are at zero.
For each debit entry there must be a corresponding credit entry.
It may be useful to have an opening account that serves as a counterpart for entering opening amounts.
After all the opening transactions, the balance of this account must obviously have zero balance.
When entering opening balances, only the debit or credit account is generally indicated. However, it is also possible to indicate a counterpart which is generally a specific account for openings.
Verification Balance transactions (#CheckBalance) | Double-entry accounting
Banana Accounting Plus includes the #CheckBalance function in the Check and recalculate accounting command for verifying and matching account balances.
This check is essential for the accuracy of the accounting. It is recommended to perform the balance verification periodically at the end of each month, in addition to the end of the accounting period, to avoid incorrect balances being carried over from month to month.
To perform this check, follow these steps:
- Record the date to which the balance refers.
- In the Description column, enter #CheckBalance followed by the amount corresponding to the balance to be verified (e.g., the actual cash balance, bank account balance from the bank statement, etc.).
- In the Debit column, indicate the account being checked (bank account, cash, VAT account, or another account to be verified).
- The Amount column must be left empty.
With this command, the program will flag any accounts with mismatched balances in the Messages window if discrepancies are found.
Recording Bank checks
To enter issued bank checks, the user needs to insert an Issued checks account in the Liabilities.

The check is issued at the moment of paying a supplier and later on is being debited from the Bank current account.

The Issued checks account card after the transactions.

Credit card registration with advance payment
Advance payment on Credit cards
Before taking you through the procedure, check that an account for Credit card exists in the liabilities part of the Chart of Accounts. Create it if that is not the case.
The credit card account is added to the group or sub-group of short-term debts, as long as this is pre-requisite of the Chart of Accounts selected. If there are no sub-groups, it must be listed in the liabilities section.
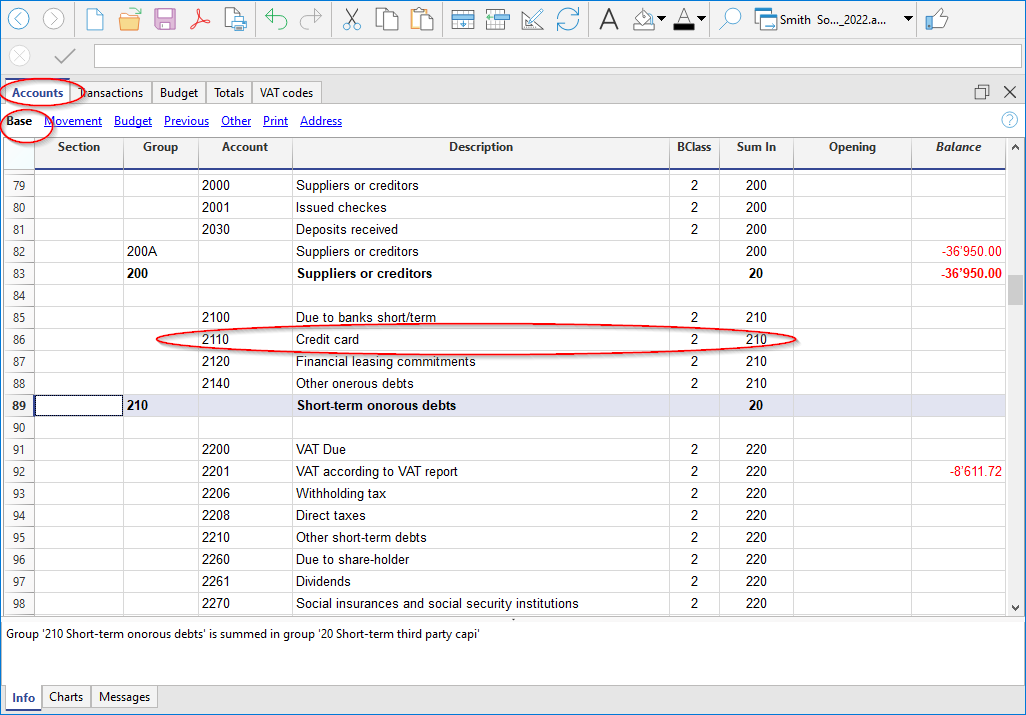
Example:
An amount of CHF 1'000.- is transferred from the bank account to the credit card.
- In Debit the credit card account is recorded
- In Credit the bank account with which the payment is made is recorded.
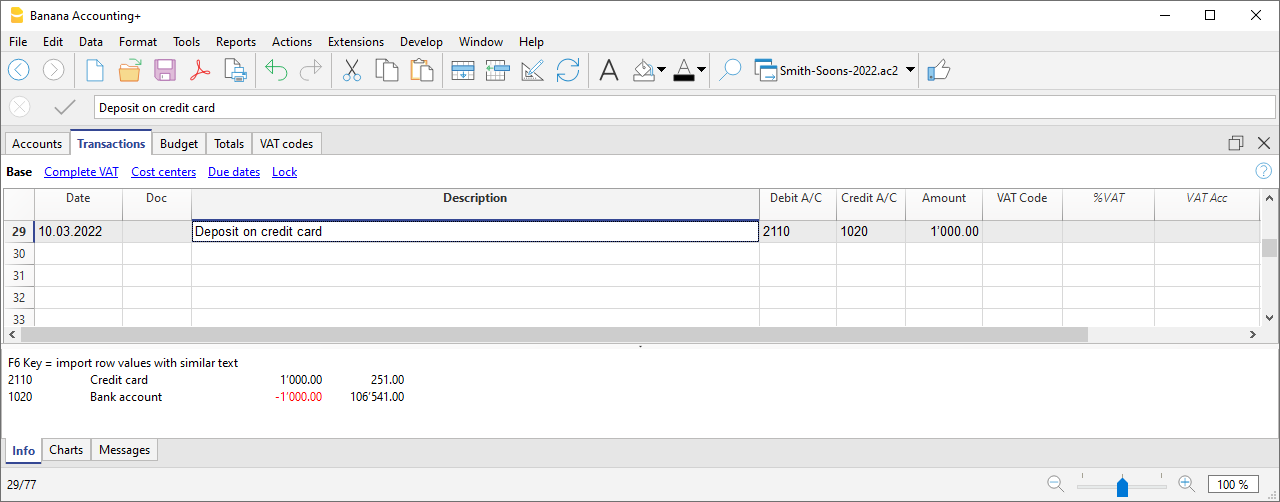
Register your credit card bill
When the credit card bill arrives, you must record all charges listed on the credit card and reverse the credit from the credit card account.
Example:
The credit card statement shows a total of CHF 749.- (detail: CHF 479.- for computer purchase, CHF 150.- for hotel expenses, CHF 120.- purchase of office supplies) (Doc.10)
Enter on several rows:
- All costs related to the expenses listed on the credit card are recorded as a Debit; you post a cost per line.
- Enter your credit card account as a Credit.

Check the credit card account balance
Each time you pay an advance towards the credit card and once all the costs listed on the credit card have been recorded, you must verify that the credit card balance matches the balance stated on the credit card.
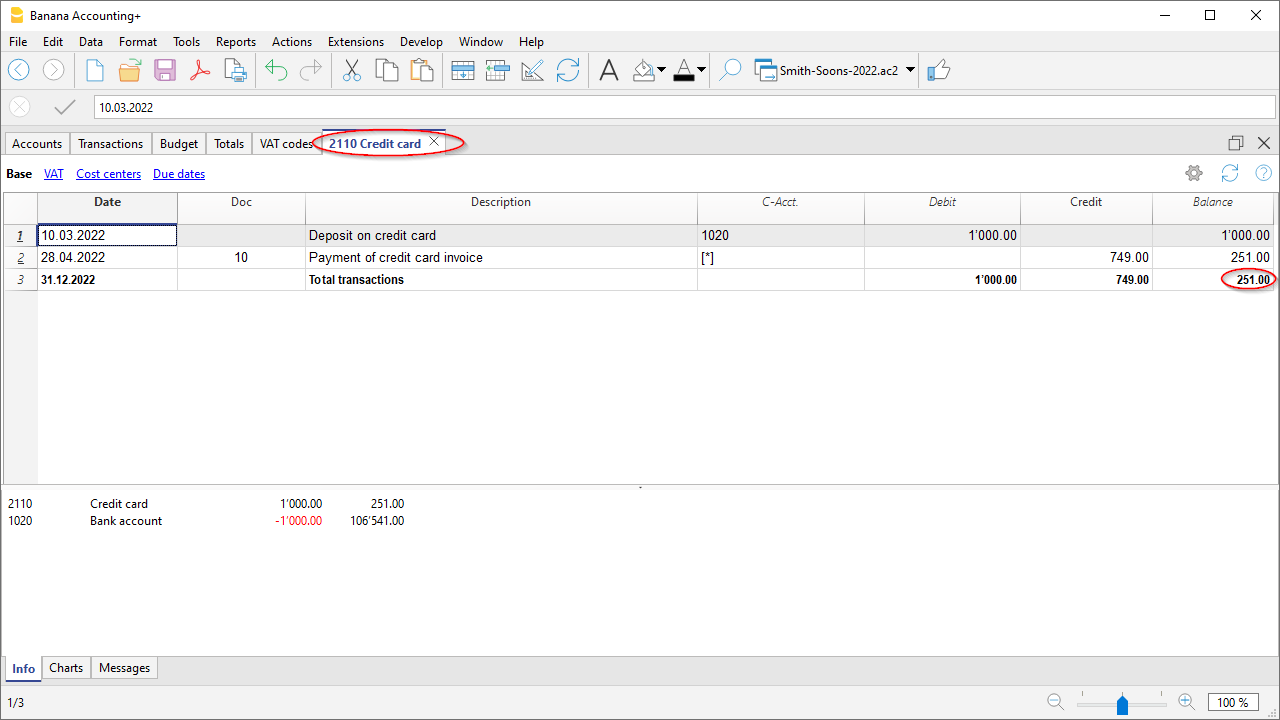
Register your credit card transactions according to the Cash and the Turnover principle
Credit Card with an accounting using the Cash principle
If no down payments are made on the credit card and the invoice is paid in full by the bank, you should record the credit card invoice at the time of payment when the costs should also be recorded.
You need to record on several rows:
- Enter the same date and the same Document No. for each transaction on all the rows that make up for the transaction.
- In the Debit column, enter one account per row, referring to the cost or investment of the credit card transaction.
- Enter the amount of each single transaction recorded in Debit.
- In the Credit column, enter the bank or post office account with which the invoice is paid.
- In the Amount column, enter the total amount paid on the credit card invoice.
- In the case of VAT liability, enter the VAT code for each row in the VAT Code column.

After recording all movements, check your credit card balance by opening the credit card account card.
Credit card and turnover accounting
If the accounting postings are based on turnover, all costs related to credit card purchases are recorded upon receipt of the credit card invoice:
- Enter the same date and the same Document No. for each transaction for all the rows that make up for the transaction.
- All cost accounts are posted as a Debit. Each cost must be recorded on one row.
- In the Amount column, enter the amount of the single transaction recorded in Debit.
- Register your credit card account, as a Credit, as any supplier.
- In the Amount column, enter the total amount to be payed by the credit card.
- In the case of VAT liability, enter the VAT code for each row in the VAT Code column.

When the credit card bill is paid, enter the payment:
- As Debit in credit card account (the debt is extinguished).
- As Credit in the bank or post office account with which the invoice is paid.
- The total amount of the credit card paid is entered as the amount.

Importing transactions from your credit card
Banana Accounting allows the importation of movements from the credit card into the main accounting file.
You must ensure that the chart of accounts includes the credit card account and the transfer account to be used for down payments.
Install the format of your bank
In order to be able to carry out the import it is necessary that the data format, provided by the credit card issuing bank, is compatible with the formats provided by Banana accounting.
To install the extension related to the data format released by the issuing bank, proceed as follows:
- Menu Extensions → Manage Extensions
- Select the issuing bank of the credit card and click on the Install button.
The format will be displayed in the Import into accounting box.
Importing the credit card movements
After having installed the extension for the Banana compatible data format, proceed as follows to import the data:
- Actions Menu → Import into accounting → Transactions:
- Select the format type of the bank that issued the credit card.
- With the Browse button, select the file transmitted by the bank and confirm with OK.
- Enter the period and indicate the credit card account and confirm with OK.
All transactions are imported into the Transactions table. - Enter the counterpart account that refers to the movement for each row.
Import credit card transactions with deposits made
When deposits have been made on the credit card, they are recorded in the accounting system. In this case, after importing the credit card data, there is the problem of the recording of the deposits. In this case a double transaction appears on the credit card account:
- Presence of the credit card account as a counterpart to the bank charges for payments to the credit card.
- Presence of the credit card account in the transactions imported from the credit card.
To avoid this overlap, the transfer account is being used at the time of import.
How to proceed with the import:
- Actions Menu → Import into accounting → Transactions:
- Select the format type of the bank that issued the credit card.
- With the Browse button, select the file transmitted by the bank and confirm with the OK button
- Enter the period and indicate the transfer account. Confirm with the OK button.
All transactions are imported into the Transactions table. - Enter the counterpart account that refers to the movement for each row.
Registrazioni su conto privato
Il conto privato è un conto finanziario, utilizzato nella contabilità per registrare quelle transazioni che non riguardano direttamente l'azienda, ma il patrimonio personale del titolare. Questo conto tiene traccia dei prelievi e degli apporti del titolare a scopi privati; pertanto serve per tenere separate le finanze aziendali da quelle personali, evitando confusione contabile.
Prelievi dall'azienda del privato/socio
I prelievi personali vengono registrati come diminuzione del patrimonio netto. Se il titolare/socio utilizza fondi aziendali per spese personali, l'importo viene addebitato al conto privato.
Esempio di scrittura contabile per un prelievo in contanti:
- Dare: Conto privato (per il prelievo del titolare/socio)
- Avere: Cassa/Banca (per l'importo prelevato).
Apporti nell'azienda dal privato/socio
Gli apporti personali del titolare (es. aumento di capitale o versamenti per coprire spese) vengono registrati come incremento del patrimonio netto.
Esempio di scrittura contabile per un apporto in contanti:
- Dare: Cassa/Banca (per l'importo versato dal titolare/socio)
- Avere: Conto privato (per l'apporto del titolare/socio).
Utili prelevati
Se il titolare/socio preleva utili maturati:
- Dare: Conto utili a nuovo (o Risultato di esercizio)
- Avere: Conto privato
Saldo del Conto Privato/socio
- Saldo positivo: indica che il titolare ha un credito verso l'azienda.
- Saldo negativo: indica che il titolare ha debito verso l'azienda.
Totals Table
The Totals table presents the totals by Group and is used to check the accounting balance.
It is processed automatically by the program and cannot be modified by the user.
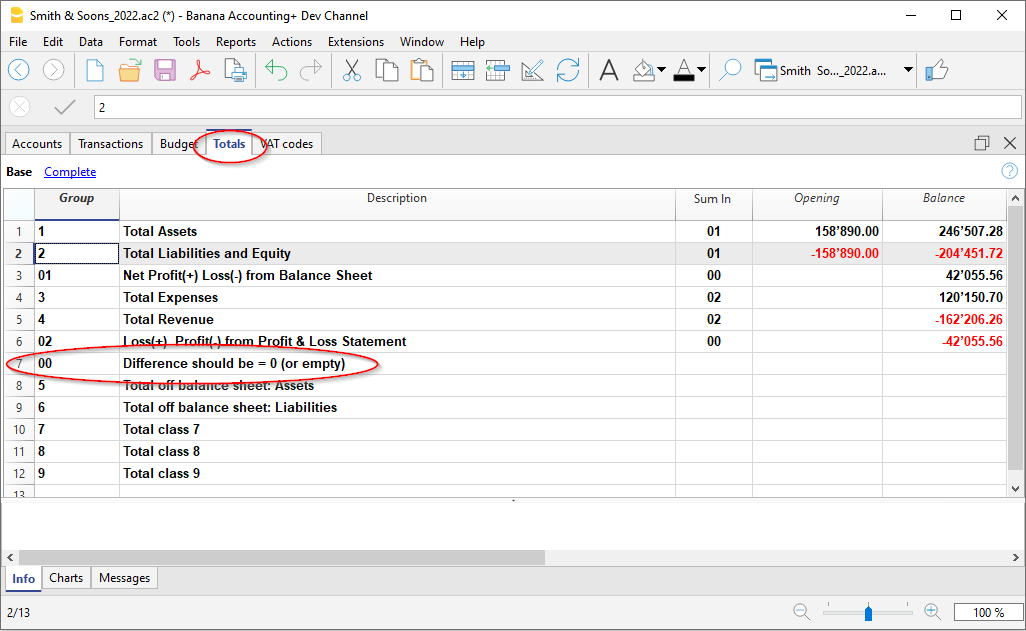
In the Totals table it is possible, to get an idea of the situation of one's own activity at a glance. You see the totals of assets, liabilities, costs and revenues and above all you see if you have a profit or a loss.
The 00 group is very important because it allows you to immediately see if everything is in place or if there are differences in the balances.
Printouts
All the printouts of the Financial Statements, the profit and loss Statement, and the various accounting Reports are available from the Reports menu. Each command has various options for customizing the various printouts.
To print the content of the tables, please refer to the Page setup section (last paragraph).
Enhanced Balance sheet with groups - colored columns
This example has been realized with the following features:
- Enhanced Balance sheet with groups.
- Columns setup to indicate which columns are to be displayed (in the example the columns of the Current and the Previous year are being displayed)
- Style: Lugano (Groups highlighted), Style properties: Groups and totals: Color.

Enhanced Balance sheet with budget
This example has been realized with the following features:
- Enhanced Balance sheet
- Options Include in print : to indicate which columns to display (in the example the Current, Estimate column is displayed).
- Style: Berlin, colored columns.

Enhanced Balance sheet
This example has been realized with the following features:
- Enhanced Balance sheet
- Options Include in print : to indicate which columns to display (in the example the Current, Previous,% Difference columns have been activated).
- Style: Berlin, colored columns.

Subdivision by semester
This example has been realized with the following features:
- Enhanced Balance sheet with groups.
- Columns setup to indicate which columns are to be displayed (Current and Budget).
- Subdivision -> Subdivision by period in order to set up the sub-divsion by period
- Style: Lugano (Groups highlighted), Style properties: Groups and totals: Color.
- Color column properties to color the columns differently.

Subdivision by segment
This example has been realized with the following features:
- Enhanced Balance sheet with groups
- Subdivision -> Subdivision by segment in order to choose the segment level to be displayed.
- Print style:
When printing the segments, it is not possible to set up the colors of the columns.

Pdf dossier with all the accounting data
The file is being created with a summary that provides access to the different printouts in an easy way.
The following data can be saved in Pdf
- Balance sheet and Profit & Loss statement
- Accounts table, Transactions, VAT Codes, Totals
- VAT reports
- Account cards
If you save this file on a non re-writable CD (to keep together with your accounting documents), this will comply with the legal requirements for archiving the accounting data.
This example has been realized with the following features:
File menu, Create Pdf dossier command

Printing an extra column
In order to print an extra column in the Balance sheet, the following features are used:
- Add a new column in the Accounts table, via the Data → Columns setup menu.
- Enhanced Balance sheet with groups
- Columns - advanced, to make the column visible.
Account cards - Ledger
The account card corresponds to the Ledger and allows you to have a comprehensive list of accounting movements concerning the same account, a cost center, segments and groups.
An Account card contains the following information:
- The name of the account represented by the card.
- The date of the financial transaction.
- The type of financial transaction (e.g., sale, purchase, payment, receipt).
- The amount.
- The description (e.g., the name of the supplier or customer, the nature of the goods or services bought or sold).
Banana Accounting automatically records all transactions entered in the Table Transactions table, allocating them to the corresponding specific accounts. Therefore, the ledger cards are updated every time a transaction is recorded in the Transactions table.
Opening the Account card
There are two methods to open an account card:
First method
This method is recommended when you want to display and print all or several account / category cards.
- Select the Reports → Account Cards in the menu

A dialog box will appear, with the following sections:
For detailed information on the sections, click on the corresponding links.
Second method
- Click on the small icon that appears when you select the cell that contains the account, category or group number.
Updating the Account card
The account or category card is temporary and is calculated at the time of the request. If transactions are changed or added in the Transactions table, the account card is not simultaneously updated.
To update the account card, following changes, the Account / category card command must be issued again, or if the account card is still open, click on the symbol shown in the image below.

Deleting or modifying data
In the accountcards or group cards, it's not possible to directly modify or delete data. If changes are required, they must be made in the Transactions table or in the Budget table (if they concern estimate transactions). After recalculating, the changes are automatically applied to the corresponding account card.
If you are in the account card and you notice an error or a modification to be made, you need to:
- Within the account card, position yourself on the row number related to the modification.
- Double-click on the row number, and the program automatically redirects to the Transactions table, right on the row related to the modification.
- Make the modification and recalculate the accounting (press Shift + F9).
The changes are automatically reflected in the corresponding account card.
The Account Selected column
Starting from any Account card, the Account Selected column, can be displayed, via the Data → Columns setup menu, the account on which the transaction took place will be shown.
When you get an account card of one or more accounts, groups and segments, you will see the exact account that has been used.
The contra account in the account cards
In the Account cards, the "Contrp" Account column (C-Acct.) is present, which indicates the account that completes the transaction.

When there are transactions on multiple accounts (transactions on multiple rows) as in the example below, and there is one account entered in debit and several accounts in credit, or the other way round, the software deducts the possible contra account using the following logic:
- In the first transaction row, the 5000 account is considered the common contra account of the transactions that follow.

- On the Account card 5000, the multiple transaction (Gross salaries for the month of December) displays the [*] symbol as the contra account. It is impossible to have the indication of the contra accounts directly in the account card, because the account has several contra accounts (1020, 5700, 5730). For this reason the program indicates the [*] , which signals that we are dealing with a transaction on multiple accounts.

- On the Account cards of the next transaction rows (1020, 5700, 5730), the common contra account is indicated between square brackets [5700], and indicates a deducted contra account.

Cards of groups and classes
In the Account card of a group or a class, all the transactions of the accounts that belong to the selected group or class are being grouped together.
The accounts of the group or the class can be displayed by making the Account Selected column visible.

Budget Account card
If the budget transactions have been entered in the Budget table, it is possible to have the account or group cards of the budget:
- Via the Reports → Account cards → Budget transactions must be activated.

Print the Ledger (all account cards)
To print the Account cards:
- Reports menu→ Account cards command
- Using the Filter, all the account cards that need to be printed entirely or partially (for example, only accounts, cost centers, segments) can be selected automatically.
- In the various sections Period, Options, Customization, activate the desired options (for ex. period, 1 account per page, ...)
- Press OK to confirm, after having selected the desired options.

For the explanations of the different tabs, please visit the next few pages: Accounts/Categories tab, Period and Options.
The program will show the selected account cards.
In order to print, choose the Print command from the File menu.
When you have activated the Budget table in your file, you may choose which transactions you wish to see (actual transactions or budget transactions).
Include a logo in the account cards
From Banana Accounting 9 it is possible to include a logo in the account cards printout as well. After obtaining your account cards details (with the Reports→ Account cards command), use the File -> Print preview command. From the print preview click on the the Setup icon, and in the dialog window that will open, select your logo with the Logo option (instead of the none option).
You can also check the how to setup a logo page.
Save the settings
In case you regularly print the account cards of specific accounts for example, all those that concern the Sales accounts, it is useful to create a specific customization.
- Go to the Customization tab
- Create a new customization, using the New button
- Indicate the name of the customization, for example "Sales accounts", in the Description field.
- Select the accounts that you want to be printed.
- Set the view options for the tab. It is possible to select and change the view, from those available, but not to create a new one. If you change the layout of a column, for example by changing its header, this will be applied to the associated view of all customisations.
Each time you want to print accounts, select the customisation you have created.
Page setup
In Page setup, you can specify the margins & other settings of the page.
Accounts
You can access this windows by choosing the Reports menu > Account cards command (see the Account cards page).
Accounts
The list of all available accounts appears.
Select all
By activating this option, all the accounts that are part of the Chart of accounts are automatically selected.
If you wish to print one or more account cards activate only the desired accounts.
Selecting accounts with the mouse
- Clicking on the account name selects the account, and if a previous selection was made, it is deselected.
- Clicking on the account tick box (within the checkbox) selects/deselects the account and the previous selection remains unchanged.
- To select multiple adjacent accounts at the same time, simply click on the first one, hold down the left mouse button, move the mouse over the list to select the desired accounts, and press the spacebar.
- To select multiple non-adjacent accounts, hold down the Ctrl key (or Cmd on Mac), and use the left mouse button to move over the list, selecting the desired accounts, and then press the spacebar.
Selecting accounts with the keyboard
- You can navigate the account list using the up/down arrow keys, and select/deselect an account by pressing the spacebar.
Search
The option allows the immediate search of one or more accounts. The account number or description of the account is entered in the box; the program filters the accounts using the search values entered.
You can also enter multiple accounts to be displayed simultaneously, or combine accounts and segments (see developer explanations):
- 1000|1001 will display the transactions for account 1000 and 1001.
- 1000:01 will display all transactions of the 1000 account with the 01 segment.
Sort by account number
If this option is activated, the accounts are sorted according to the selection applied in the Filter (at the bottom of the dialog box). If, for example, there are accounts, cost centers or segments with abbreviations, they are listed in alphabetical order.
Filter
This function allows you to filter all account cards or just a selection, specifically:
- Accounts, cost centre and segments - if no selection is made they are filtered by default
- Accounts/categories (existing cost centres and segments are excluded)
- Accounts, Cost centres (only segments are excluded)
- Cost centres (accounts and/or categories and segments are excluded)
- Segments (accounts and/or categories and cost centres are excluded)
- Groups - existing groups will be shown - you need to select the ones to be printed
- Classes - all classes will be shown - you need to select the ones to be printed.
Actual or budget transactions
When you have activated the Budget table in your file, you may select:
- Actual transactions
The entries in the Transaction tab will be processed.

- Budget transactions
The entries in the Budget tab will be processed.
If the Budget table is not present, but amounts have been entered in the Budget column of the Accounts table (Budget View), these amounts are converted into monthly amounts. The division performed by the program is based on the start and end date of the accounting period (if the duration is 1 year, the division will be into 12 monthly installments).

Account card 00 - Differences in accounting transactions
When there are discrepancies in the transactions (see Debit - Credit Difference error page), to identify where the error is located, the account statement for Group 00 is displayed (or the statement for the group in your chart of accounts that includes all accounts from Class 1, 2, 3, and 4).
You will have a list of all transactions with the successive balances, which after each entering should equal zero. The row where the balance is not at zero contains the error.
Viewing the Details of transactions
Using the Group 00 account statement, it is also possible to view the details of the transactions.
Once you have selected the Group 00 account statement, the list of transactions will appear. Select any column, double-click on the column, and a screen will appear to select the visible columns. Select the "TransactionAmount" column. After making this change, the screen opened from the Group 00 account statement will display the "Transaction" column in CHF with detailed specific amounts.
Double-click on a column:
![]()
Select the "MovementAmount" column
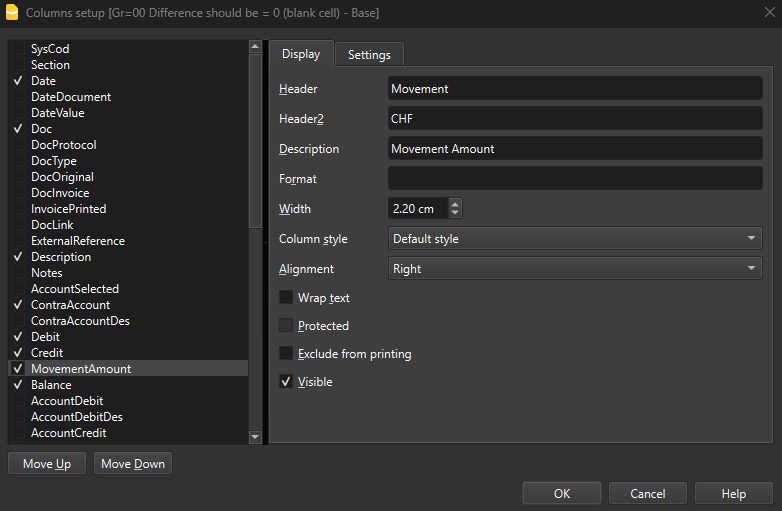
Next, a new column "Movement CHF" will be added, which will display the details of the amounts of individual transactions. This modification can be useful, for example, when a transaction includes VAT, and you want to see the details of that transaction while keeping the VAT separate.
Invoice recording with VAT:

Details of the invoice recording with VAT, with Account Card 00 and the "MovementAmount" column activated:

Period Accounting Card
The explanations of the Period tab are the same as those for the Enhanced Balance Sheet with Groups, tab Period.
Options tab
Via the Reports → Account cards → Options menu you can access the various options that can be included or excluded from displaying and printing.

Lines before end of page
This function was created in order to avoid printing an account partially on one page and partially on the following. If the account card to be printed doesn't have at least a number of rows corresponding to the number input in this field, printing the whole card will be moved to the next page.
One account per page
By activating this function, each card will be printed on a separate page (even those with few transactions).
Repeat column's headers
By activating this function, the column headers will be repeated for each account, within the page.
Include accounts with no transactions
By activating this function, cards without transactions will be printed as well.
View
You can select the columns view to be included in the account cards display and printout:
- Base
- VAT
- Cost centers
- Expiration dates
If no criteria are specified the program will keep the order present in the Transactions table.
Sort column
In the account card, transactions can be sorted according to different data criteria:
- Document date
- Value date
- Expiration date
- Payment date
Journal
In Accounting, the "journal" is a book of original entry where all financial transactions of a company are recorded in chronological order. It is a fundamental tool for recording accounting transactions and plays a crucial role in the bookkeeping process.
In Banana Accounting, the Journal is represented by the Transactions table, where transactions are entered in chronological order. From this table, the program provides a detailed and complete record of all financial activities of the company and serves as the basis for preparing other accounting documents such as the general ledger, balance sheet, and income statement.
Each transaction is recorded with detailed annotations, divided into specific columns:
- Date: The date on which the transaction occurred.
- Description: A brief description of the transaction, indicating the nature of the accounting operation.
- Debit Account: The account debited for the amount of the transaction.
- Credit Account: The account credited for the amount of the transaction.
- Amount: The amount of the transaction.
Journal prints can be generated either by selection or by using a command that also allows defining a period.
For further information, please refer to the following pages.
With Banana Accounting the Journal corresponds to the Transactions table. It is possible to print the entire journal or just a part of it, selecting the rows that you wish to print.
There are different methods to print the Journal:
- Position yourself in the Transactions table and click on the Print preview icon; then click on the Print icon
- From the Transactions table and select from the File menu → Print preview → Print icon.
- From the menu Reports menu → Journal by period ...
Period

You can choose whether to print all or a defined period. To print a specific period, enter the start date and the end date.
Sorting

In the Sort column tab it is possible to choose the criteria by which the journal should be sorted and printed.
Customize the printing of the Journal
To customize the printing of the journal, you can change the arrangement and header of the columns. Information can be found on the Columns setup page; while the options to include in the printout are found in the Page Setup lesson.
Enhanced Balance Sheet
The Balance Sheet represents all the Assets, Liabilities, Expenses and Income at a specific moment. The difference between Assets and Liabilities determines the equity capital. In Banana Accounting, the embellished Balance Sheet has the following characteristics:
- The grouping of the accounts is done according to the contents of the BClass column.
- The Enhanced Balance Sheet (Reports menu), shown in the preview, can be saved in different formats (PDF, HTML, MS Excel) and can be copied to the clipboard.
- It is possible to calculate, display and print the budget at the end of the year, or for a specific period.
- Transactions without date are considered as opening transactions and will not appear in the printouts of the Profit & Loss Statement.
To calculate, view and print out the Enhanced balance Sheet, click on the menu Report > Enhanced balance Sheet. A window appears with several sections allowing you to set the printing parameters.
See also Printout Examples.

Print pages and Include in printout
In these sections, by activating the different options listed, you can choose the content to be displayed and printed in the Enhanced balance sheet.
The option "Previous year balances" is only available if the field All is selected in the Period section. If a specific period is defined instead, the option is not active. In this case, the Enhanced balance sheet with groups should be used instead.
Page headers
Rows 1 - 4
Rows available to define the heading of the balance sheet.
Logo
It is possible to insert the logo in the header of all pages of the report.
If one or more logos have been added in the menu File > Logo setup, you can select one from the list.
If no logo has been added, the Edit button can be used to add the logo.
Print page number
If this option is activated, the number is printed in footer progression.
Print date
If this option is activated, the date is entered in the footer.
Cover page
Print cover page
Activating the function prints the cover page.
Logo
It is possible to insert the logo in the cover page of the report.
If one or more logos have been added in the menu File > Logo setup, you can select one from the list. If no logo has been added, the Edit button can be used to add the logo.
Column headers
The boxes at the bottom of the enhanced Balance Sheet dialogue box are used to insert the current and previous year headings in the printout.
The first two vertical boxes refer to the dates of the balance sheet, the second to those of the income statement.
At the moment, when opening the dialogue window of the Enhanced Balance Sheet, the boxes for entering the current and previous year are not clearly visible.
To view the boxes mentioned, one must scroll all the way down the vertical scroll bar, located on the right-hand side of the dialogue box.
Current year
Insert the final date of the current accounting.
Previous year
Enter the final date of the previous year's accounting in this field.
When switching to the new year from the menu Actions > Create New Year, the header of the previous year is not adapted automatically, so it must be changed manually. This issue will be resolved in the future.
Dialogue not fully visible
To display the Enhanced Balance dialogue box completely, choose one of two procedures:
- Enlarge the dialogue box.
- Slide the scroll bar, located on the right-hand side of the window, downwards.
Other tabs
The explanations for the other tabs are available at the following pages:
Enhanced Balance Sheet with groups
Banana Accounting automatically calculates, displays, and prints the Balance Sheet and the Profit and Lost account. These are two fundamental financial documents used by businesses to monitor and report their financial and operational activities.
The Balance Sheet and the Profit and Lost account can be customized both based on the period and the columns to be displayed. Balance Sheets can be generated for monthly, quarterly, semi-annual, and annual periods. Additionally, when selecting a period (e.g., semi-annual), the data can be further broken down by periods (month, quarter).
The Balance sheet with groups differs from the Balance sheet for the following characteristics:
- Displays the subgroups in detail.
- Offers the possibility to exclude groups or accounts (for instance, to display only the total of the group and not the accounts of which the total is composed).
- In the Chart of accounts →Sections it is possible to select which accounts to include or leave out from the printouts
- It is possible to sort by a given period (for example in the first semester, you can choose whether to obtain the data by month or by quarter)
- It is possible to have a subdivision by segment.
In order to calculate, display and print the Enhanced Balance sheet by groups, click on Reports → Enhanced balance sheet with groups command from the menu: a window appears, with different sections that allow the user to define the print setup.

Features:
- Reports with actual balance data, or budget data, or both, with indication of variances.
- Free arrangement with groups and subgroups.
- Updated results directly visible in the accounts table.
- Customizable prints:
Watch the video tutorial that shows how to create and print the Enhanced Balance Sheet with groups.- Addition of your own logo.
- Choice of columns to include.
- Choice of sections to include.
- Detailed or grouped printing.
- Prints for a single period.
- Columns with breakdown by period (month, quarter, semester, year).
- Previous year values.
- Comparison with forecast value.
- Columns with breakdown by segment.
- Addition of attached notes.
- Grouping as in the chart of accounts or according to your own scheme.
- Saving customization
- Tabular reports (similar to customizable prints, but with data present in the table).
- Export to PDF for data preservation and export in other formats for data processing.
See also Print Examples.
FAQ
- If I exclude the groups with a zero balance, the title rows that refer to the excluded groups are still being displayed; how can I erase them?
Go to Sections and activate Hide current row on the title rows that you wish to exclude. - I would like to exclude the display of the period in the titles of the printouts ("1st Semester 2013"); how can I do that?
Go to the Headers section and deactivate the Print period option. - On the cover page, when there are long titles, I would like to be able to choose how to subdivide the texts into two rows and wish to apply bold print. Is this possible?
It is not possible to change the fonts on the cover page. - Some amounts are not included in the indicated period. Why?
Transactions without a date are counted as openings and do not appear in the printouts of the Profit & Loss statement. Be sure to enter the date into all the transactions. - The total groups that contain all the accounts of the classes 3 and 4 are being renamed with the text Profit or Loss, depending on the result of the accounting period. How can I change that text?
Go to the Sections and overwrite the original text in the Alternate text zone of the active row. - How can I display the data of the previous year if it is longer than the standard year?
In the "Enhanced Balance Sheet by groups" dialogue box, under the heading "Columns", for the "Income Statement" section, click on the "Advanced" button, in the "Columns" window click on "Add". At this point, activate the "Prior" option in the "Print Columns" window. Then close all windows by pressing the "ok" button. You can customize the header of the columns in the "Columns" window, by clicking on the "properties" button, if necessary.
Headers
In the Page → Headers section are the options for heading the pages and the logo when printing the Financial Statements and Income Statement.
Header 1, Header 2, Header 3, Header 4
Enter as headers the text you wish appearing in the printouts. The headings inserted are shown on the first page (cover page) and on each sheet as main headings.
Logo
It is possible to insert the logo in the header of all pages of the report.
If one or more logos have been added in the menu File→Logo Setup, you can select one from the list.
If no logo has been added, the Edit button can be used to add the logo.
Print period and/or subdivision
This option is active only when a specific period has been defined. When you deactivate this option, the period will not be indicated in the titles of the printouts.
Footer
Print page numbers
By activating this function, page numbers will be printed.
Print date
By activating this function the date will be printed.
Cover page
Print cover page
By activating this function the cover page will be printed.
Logo:
It is possible to insert the logo in the header of all pages of the report.
If one or more logos have been added in the menu File→Logo Setup, you can select one from the list.
If no logo has been added, the Edit button can be used to add the logo.
Layout
In the Page → Layout section you set the font size and the page orientation for printing the Balance Sheet and Income Statement.

Font size
The display of the printout varies according to the entered value.
Page orientation
You can select the page orientation: automatic, landscape and portrait.
Logo
Via the File → Logo setup command it is possible to include a logo and to define its settings (width, height, position). It is also possible to create and save Customizations with different logo settings.
This feature is a simpler alternative to the logo setting with the Documents Table.
![]()
To activate the logo option when printing the Financial Statements and Income Statement, it is necessary to select Logo, instead of none.
For the Logo option to be visible, you need to have set up your logo in the File → Logo Setup menu.
Margins
In the Page → Margins section you set the margins for printing the Balance Sheet and Income Statement.

Top, Bottom, Left, Right
It's the distance between the page border and the content.
Header
Is the distance between the page header and the content.
Footer
Is the distance between the page footer and the content.
Increase margins to printable area
If the content exceeds the page margins it will be automatically adjusted to fit the printable area.
Sections
The Section section shows how the chart of accounts is structured and subdivided.
The structure is set up using the Section column in the Chart of accounts.
It allows you to set:
- Items to be printed together.
- Page changes.
- Items to be excluded from the print.
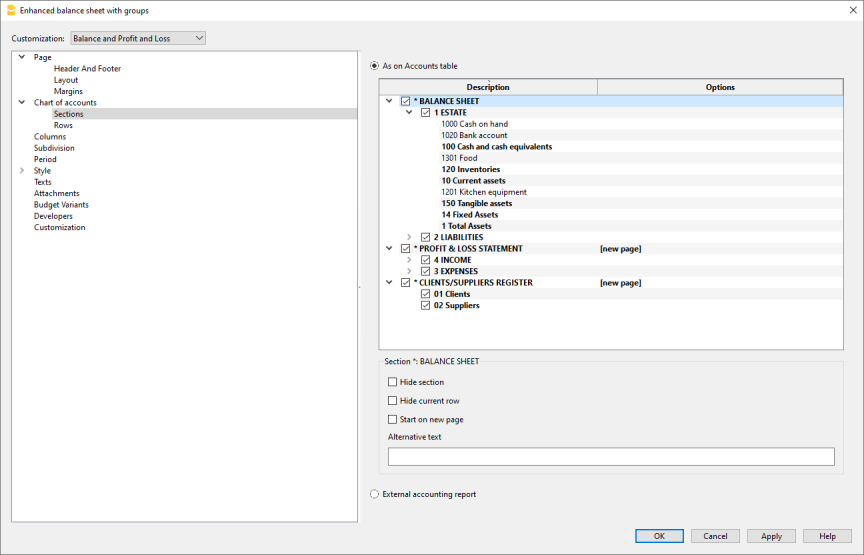
As on Accounts table
The display and the printout settings of the Enhanced Balance Sheet with groups, are the same as in the Accounts table.
By clicking on the arrow on the left you can display the components of the section. Normally only groups with a balance are displayed. To also display the groups with zero balance, go to the Rows section and click on view groups with zero balances.
Depending on the selection, there are different sections with different options:
- Sections 1, 2, 3, 4, 01, 02, 03, 04... refer to the main items of the Balance Sheet
- Account sections refer to the selected account
- Group sections refer to the selected group
Section*
If you select a section with an asterisk, you will have the following options:
Hide section
Click on the section that you wish to hide.
Hide current row
Click on the row that you wish to hide.
Start on new page
Click on the header that you want to have on a new page and activate the option.
Alternative text
Enter an alternative text if you want to have a different one for the selected section or row.
If you select a number or a group section (1, 2, 3, 4.....), there are extra options:

Group for % calculation (%)
Is visible when you select a section (assets, liabilities, costs, income ....).
It is the group that serves as the basis for calculating the percentage of the section accounts and groups.
- Determined by the software.
The group is established by the program. As a rule, it is the last group in the section (total assets, liabilities, costs and income). - Group indicated by the user.
For the income statement, a group must be indicated (for example, total sales).
Hide child rows
If you select a group and you activate this function, child rows of this group won't be printed in the Enhanced Balance Sheet.
Show as account
If you select a group and you activate this function, the group will be displayed as an account in the Balance sheet. 
External accounting report
Print the Enhanced Balance Sheet by groups, based on the structure of the Accounting report file.

Report File
You can select the file of the External Accounting report with the Browse button.
Grouping column
Column in which the accounts refer to the groups defined in the External Accounting report. Available columns: Gr1, Gr2, Gr, BClasse and GrVat.
Signal missing grouping
Checks whether all accounts belong to a group in the External Accounting report.
Rows
In the Chart of Accounts → Rows section you can choose to print the following elements: Accounts, Accounts with zero balance, Accounts with transactions, Groups with zero balance, Empty rows.
Double entry columns setup
The Chart of accounts > Columns section contains the most important options for customizing the columns to be displayed and printed in the Financial Statements and in the Income Statement and Notes.

Balance Sheet, Profit and Loss Statement and Notes
If the various options are activated, the following data will be included in the display and printing of the reports:
Account number
In addition to the account description, the account numbers are also included.
Current
The balance or movement in the basic currency, referring to the selected period or to the subdivision of the period.
% of row
Includes the column with the percentage referred to the total (e.g.% total assets).
The total group to base the percentage calculation on can be set in the Sections tab.
The group is set by the program, but especially for the Income Statement, it is not always determined ideally, so it must be set manually.
Foreign currency
This option is only visible in a multi-currency file.
By activating the option in the printout, the balance will also be displayed in foreign currency for the selected period or the subdivision of the period.
Opening
The opening balance for the period.
Budget
The amount of the budget, referring to the selected period or the subdivision of the period:
- If the Budget table has not been set up, the amount in the Budget column of the Chart of accounts is indicated.
The total amount of each account is divided over 12 months. - If the Budget table has been set up, the budget amount of the accounts is calculated based on the transactions entered in the Budget table.
Previous period
The amount for the period prior to the selected period or period split.
Previous year
The amount for the same period of the previous year.
Difference
Is the difference between the amount of the current period and that of the other column (Budget, Previous period, previous year).
% Difference
Is the difference between the amount of the current period and that of the other column (Budget, Previous period, previous year).
Year-to-date
The balance or movement from the beginning of the accounting to the date of the last posting.
Advanced
With the Advanced button you can further customize the arrangement, texts and colors of the columns.
Hide/Show.
You can hide or display a column that is indicated in the list.
Change sequence
Use the Move Up and Move Down buttons or drag the column with the mouse.
Add new column
You can include other columns from the Accounts table or one of the columns calculated by the report in the report.
Remove the column from the list
With the Delete button the column is deleted. You can always add it again:
Special cases
Previous accounting year beyond the current accounting period
If the previous accounting year is longer than the normal duration of the current year (for example, it starts in November or December), the Previous column of the Accounts table is used to correctly display the totals of the income statement of the previous year, as otherwise, Banana accounting calculates the totals of the income statement taking the same duration as the current year and the totals will differ from what is displayed in the financial statements of the previous year.
In this case proceed as follows.
- For the Income statement, deactivate the Previous year and Previous period columns
- Click on Advanced ...
- With the Add ... command, add the Columns table Accounts > Prior column
- With the Properties ... command, enter the text to be displayed as the header for the Prior column
- Row 1 > Text > "2021", "2022", ...
- Confirm and display Enhanced Balance Sheet.
Columns (Advanced)
This dialog allows you to see the list of different columns as they appear in the report and to customize their column display, headers, and column content colors or background colors.
You can change the list of columns with the Add or Remove buttons:
- Accounts table columns
Complete list of columns in the Accounts table - Acounting amounts [A]
List of columns calculated for the current accounting period. (A=Actual) - Budget amounts [B]
List of columns calculated on the basis of data from the Budget table. (B=Budget)

The following options are available:
- Hide/Show columns
With the check you can hide or make a column that is indicated in the list visible. - Change sequence.
Use the Move Up and Move Down buttons or drag the column with the mouse. - Add new column
You can include other columns from the Accounts table or one of the columns calculated by the report in the report. - Remove the column from the list
With the Delete button the column is deleted. You can always add it again. - Change text or background colour.
Columns - add
In the Balance sheet, Profit and Loss Statement and in the Notes, it is possible to add further columns.
Starting from the Reports menu → Enhanced Balance sheet with groups → Columns → Advanced button → Add button.

Available columns list
The dialog lists all the columns that can be included in the report:
- Columns present in the Accounts table.
- Columns with Accounting amounts .
- Columns with Budget amounts.
Activating the column from the list adds it to the report. In the Advanced dialog you can change the sequence and headings.
By removing the check, the column is removed from the report.
Columns present in the Accounts table
You can include any column of the Accounts table, for example:
- Note.
- Aditional description.
- Description in another language.
- Import or other columns added by you.
Accounting amounts
These are the columns with the amounts calculated by the program, the opening balances and the entered transactions, for the indicated period or for the subdivision period
Amount in the Account currency
Only visible for multi-currency files. Account balances in foreign currency are also displayed.
Current
The balances of the current year will be displayed.
Opening
The Opening balances will be displayed.
Previous (period)
The balances of the previous period are being displayed (month, quarter, semester, etc).
Previous Year
The balances of the previous year are being displayed.
YTD (Year To Date)
This column is only available in the Profit & Loss Statement. The balances from the beginning of the year until the last transaction date are being displayed.
Budget amounts
These are the columns with the amounts calculated by the program based on the budget amounts entered in the Accounts Table or in the Budget Table. If you created the Budget table and if some rows have been entered, the program will use the data of this table for its calculation, even if there are values in the Budget column of the Accounts table. Also see informations on Budget.
Budget (Current period)
The amounts related to the foreseen budget of the current period are being displayed.
Budget Previous
The amounts related to the foreseen budget of the previous period are being displayed.
Budget Previous year
The budget amounts are displayed for the same period as the current one, but from the previous year.
Calculation period annotations
The program cannot calculate values for periods that overlap between different accounting years or for years with start and end dates that do not match.
To obtain balances from the previous year that exceed one calendar year, activate the Prior column. This column replaces the "Previous year" column, which only shows the previous year's balances from 01.01.xx to 31.12.xx.
You get to this column from the menu Reports → Enhanced balance sheet by groups → Columns → Advanced button → Add. Clicking on the Account table columns header will display the list of all the columns defined in the Accounts table. Activate the Prior column.
Headers and options (Columns properties)
In this section there are options to change the column headers in reports.

Headers
Row 1/ Row 2 / Row 3
It is possible to change the columns headers by selecting the Text option (from the drop down menu) and by entering the new header. If you select the Column option, the column name of the selected column will be shown.
Options
Visible
If this cell is activated, the column header will be shown.
Display as a total column
If activated, this option only shows the amounts in the Totals column.
Colors (Columns properties)
The dialog box is accessed via the Reports → Enhanced statement by groups → Columns → Advanced button → Properties → Colors menu. There are options to change the colors of the texts and columns.

Change
With this button you can change the text or the background color
Default color
With this button you can restore the default color for the text or the background.
Subdivision
Via the Chart of Accounts section → Subdivision you can access the options to choose the subdivision of the period (year, semester, quarter, month).

None
Only the data for the overall period are present in print.
Subdivision by period
With the breakdown by period, the program creates columns for the indicated periods. For each period you will see the same columns for the overall period.
The function allows you to view the data of the period for:
- day
- month
- bi-monthly
- quarter
- four monthly
- semester
- year
- 5 years
- 10 years.
The selected period appears in the column header.
In order not to have an excessive number of columns in print:
- Limit the number of items you want to print.
- Indicate a shorter period.
- Indicate the maximum number of periods.

Create periods for the entire year
When the accounting period does not coincide with the calendar year, but you want to view all the months anyway, simply activate this function.
Totals column
This function creates a Totals column of the selected periods in the income statement and in the Totals view.
Maximum number of divisions
The maximum number of periods is by default 36. In particular cases, if you want particular statistics that are very detailed and over long periods, you can manually change this value. A very high maximum number of periods can slow down the program.
Subdivision by Segment
The segments allow you to have reports for a certain section of the company. Segments are defined in the Chart of accounts. With the breakdown by period, the program creates columns for the different segments. For each segment you will see the same columns for the overall period.
Each subdivision takes the name of the header given in the Chart of accounts. The split data (based on your selection) is displayed.
The Subdivision by Segment option is active only if segments have been set up in the Accounts table.
You can select:
- All segments - This way, when new segments are added, they will be automatically added to the printout.
- Blank - The amount not assigned to any segment is displayed.
- Choice of segments - Indicate only the segments you want to see in print.

Totals column
When this option is being checked, the totals for the selected segment will be obtained.
Segment header
You can choose the text to be displayed as column header for the segments.
Period
In the Chart of accounts → Period section, you can limit the processing of data, display and print only to an indicated period or, in the case of a budget, it allows you to obtain forecasts over several years.

All
All accounting entries are included.
Period selected
It means the specified period, indicating the start and end date.
In order to get forecasts over several years, it is necessary to enter the end date of the future year of the budget required, in the File Properties, basic data (File menu). Enter the start and end date of the period in the Period section of the Enhanced balance sheet with groups as well.
To have budgets beyond the accounting period, in the Budget table, the movements must have a repetition code.
The forecast will be displayed in the Budget column.
Movements without date
If transactions without dates have been entered in the accounting, they are considered only if All is selected.
If, on the other hand, you enter, for example, from January 1st to December 31st, the transactions without date are not displayed in the report.
Style Tab
This dialog section includes the option to choose the templates and the number format for printing the Balance Sheet and Income Statement. Each template can be customized by changing the style properties and colors. Columns can also be customized in the Columns section.

Use style
There are different models of the Enhanced balance sheet provided. By selecting one, the user can obtain the Enhanced balance sheet of his choice.
Style property
For each style, the color of the fonts and the backgrounds can be defined.
Value / Change... / Default
These functions allow the user to change style or to restore the default style.
Ignore line formatting
If this function is activated, the formatting will not be maintained.
Number formats
In the Style section you can change the number formats and the display type for negative numbers.

Divide by 1'000
If there are big amounts, by activating this option, three zeros will be taken off.
Show cents
By activating this option the cents will be shown.
Show zero amounts
By activating this option it is possible to choose between having the zero amounts shown with the 0,00 number or with the -,- symbol.
Negative numbers
Negative amounts can be shown with a minus sign before the amount, after the amount or the amount can be shown between parenthesis. You can also activate the option to have the negative numbers shown in red.
Texts
Via the Style → Texts section you can change the texts of the fixed headers that the program uses in the printouts.
To change the value, just double click on the Value cell corresponding to the key to be changed and enter the new text.

Attachments
Via the Attachments section you can add texts to be printed together with the report.
- Texts are printed after the Balance sheet and Profit & Loss statement.
- Each document begins on a new page

Documents
All documents listed in the Documents table (Html or text format) are listed here.
- You can change the report sequence, just by dragging the item with your mouse
- All documents with a check mark will be printed.
Edit
A text editor will open allowing you to enter new text or edit the existing one.
Add
Adds a new element without text.
To add plain text or Markdown documents, use the appropriate commands in the Documents table
Remove
This button will remove the selected element and its content. It's the same as removing a row from the Document table.
Add an attachment with Markdown text
- Add a new document with Markdown text as explained on page Markdown Editor
- Check the attachments list for the document with Markdown text.

Notes
- Printing of Markdown text is only available with the Advanced plan subscription.
- This feature is not available in previous versions.
If the file is open with a previous version of the Banana Accounting software, you will get a message that the file is not totally compatible. - If you edit this section and you press OK, in order to undo the operation you need to enter the Undo command more that once.
Customization
Customizations allow you to create and save print settings and recall them later.
See the page relating to Customizations.
Reports over several years
A statement over several years allows for a simple and immediate comparison of the evolution of your business. Banana Accounting can display balance sheets up to two previous years in the same report, so for example the balances of the years 2022, 2021 and 2020 on a single page.
In order to view the balances over several years it is necessary that the "file previous year" option is indicated correctly in the File and accounting Properties, → Options tab, otherwise Banana Accounting is not able to retrieve the balances of the previous accounting periods, which would therefore remain empty.
In the following example we indicate how to get a report for the years 2022, 2021 and 2020. Here is how to proceed:
- Reports menu → Enhanced balance sheet with groups ...
- Check Current and Previous year in the Columns section.
- Advanced Button (click on the button for both the Balance Sheet and the Profit and Loss Statement).

- From the dialog window that opens, click on the Add button to add a column.

- Scroll down the list until you see -2 Years (we have to go 2 years back, from the current year).

- Confirm with OK to get the report.
End of Year PDF printouts
From the print preview of a document, you can save in PDF format and print.
You can save in a PDF format the following documents:
- Balance sheet and Profit and Loss Statement
- Accounts, Transactions, VAT, Totals tables
- VAT Reports
- Account cards
This PDF file will have an index that allows for easy access for the different printouts.
If you save this file on a non rewritable CD (to be kept along with the accounting documents), you will comply with the requirements for accounting data archiving.
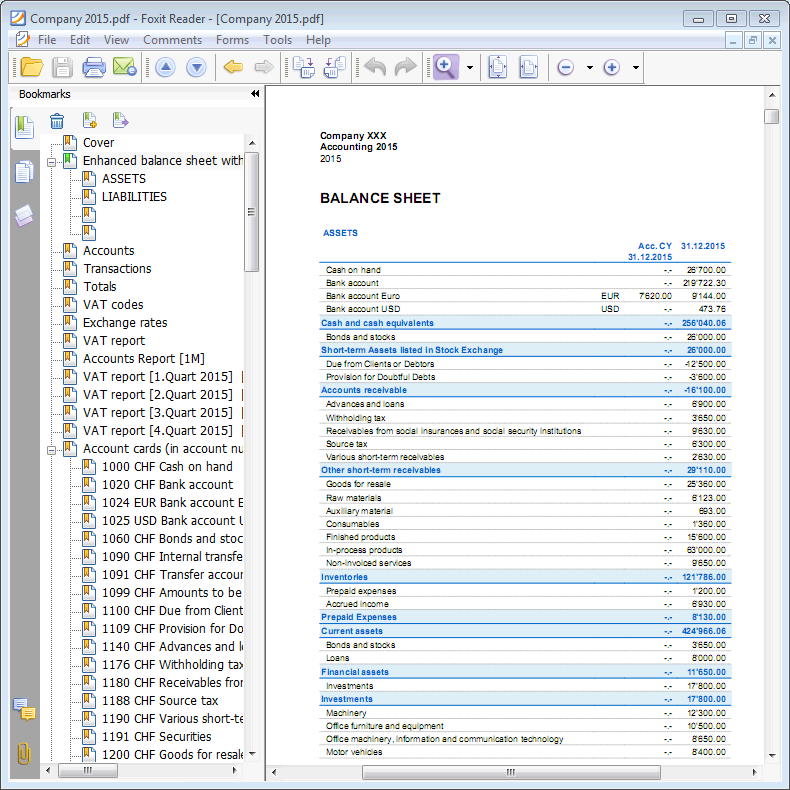
Accounting report
- The Accounting Report command from the Reports menu displays and prints the amounts of accounts with a specific grouping, for a specific period or with a specific subdivision.
- Transactions without date are being considered as opening transactions and will not appear in the printouts of the Profit & Loss Statement.
Include a logo in the accounting report printout
To obtain accounting reports with logo, after creating the accounting report, you need to:
- File Menu → Print Preview → select Page Setup
in the dialog box that opens, under Logo, indicate the logo (instead of none).
You can also check the how to setup a logo page.

Base tab
Report
You can select the desired grouping scheme:
- As on Accounts table - the Report will show a list of all accounts just as in the Accounts table with the Opening balance and Balance columns
- Accounts by class - the Report will show the list of the accounts but without subgroups
- External accounting report - the Report will show the data according to a grouping system preset in a separate file (created via File → New → Double-entry accounting → Accounting Report).
Options
You can select the accounts to be included or excluded:
- Show group totals only - only the group totals will be shown
- Include accounts with transactions - only accounts with transactions will be printed
- Include accounts with 0 balance - accounts with zero balance will be printed as well
- Exclude groups without accounts - groups that contain only accounts with zero balance will not be printed.
Other sections
The explanations for the other sections are available at the following pages:
Report result
A new table is created where the results are shown.

VAT summary (only for files with VAT options)

Budget Table
The financial planning entries are entered in the Budget Table. It is similar to the Transactions table, but has some columns specific to help speeding up and make budgeting easier.
You can also modify the data as you require, to own reliable and always perfectly updated budgets.
For more information on the Budget table, see the pages:

Year end closing operations | Double-entry accounting
End of the Year operations include all checking, assessment and time related operation that needs to be at the end of the year before preparing the year's financial statements.
Technical aspects and new year
With Banana Accounting each accounting year has its own separate file; technically there is no concept of accounting closure:
- When a New Year starts a new file is created with the Create New Year command.
- You can keep working on both the New Year's file and the previous year file at the same time. Once the closing operations are complete, you can update the opening balances of the New Year's file.
Fiscal aspects
Before closing the accounting, is is necessary to proceed with a series of operations that have fiscal implications. The inventory account needs to be adapted, transactions for depreciation need to be entered, the transitional income and liabilities, the VAT declaration needs to be completed, establish how and unto which accounts the profit or loss has to be attributed and there are many other operations of verification and checking.
From the program's point of view, there is no difference whether the profit is high or low. There are a lot of implications from a fiscal point of view however. These aspects need to be verified with your own tax advisor or accountant. It can be very useful, especially when you manage an accounting for the first the time and before you proceed with the closing of the books, to consult a specialist in order to understand what is required. Accountants are usually very busy at the beginning of the year and during the period preceding the deadline for the tax declaration. It may therefore prove useful to meet with your accountant or send him the accounting file - a few months before the closing of the books, so that you can inform yourself on how to proceed.
Check accounting command
Banana Accounting allows you to quickly record and also to leave pending operations without interrupting the continuation of the work.
The Actions > Check Accounting command performs a whole series of checks, as if you were re-entering the data from the beginning, and when errors or differences are detected, these are signaled.
It is advisable to use the Check Accounting command with a certain regularity and every time there are differences or error signals, important changes (opening exchange rates, VAT codes) and especially before closing the accounting.
Use the Filter for quick checks and corrections
To quickly perform checks, especially at year-end, we recommend using the Filter function, which allows you to filter all transactions based on a word, a phrase, an account, or a set of elements. The benefit of this function is that you can correct or modify transactions directly on the rows displayed by the filter, without having to scroll through the entire Transactions table to find transactions with the same matches.
For more details, please refer to the page:
- Filter Rows (available only with the Advanced plan).
Checks and Verifications
Before updating the opening balances, to ensure there are no discrepancies between the closing balances and the opening balances for the following year, it is important to complete all checks, verifications, and closing accounting entries. Below is a list of the main steps to follow:
Verification of Opening Balances
- In the Accounts table, in the Opening and Balance columns, the row labeled "Difference must be zero" must not display any amount. If it does, you need to identify and correct the error to ensure the opening balance sheet is balanced.
Note: In the Transactions view, amounts in the Debit and Credit columns are normal and expected. - Ensure that the accrued income and expenses from the previous year are settled.
- Verify that the opening balances match the finalized closing balances from the previous year, which should already have been reviewed and reported to the Tax Office.
- For multi-currency accounting, refer to the dedicated page: Opening Balances in Multi-Currency Accounting.
Verification of accounting balances
The first thing to do is undoubtedly to make sure that the account balances match. The cash account balance must match the actual cash balance. The balance of bank accounts, credit cards, loans, or credit balances must match the balance on the bank statement. The same applies to all other accounts with which you have deferrals, VAT, suppliers, etc.
If there is a difference, you must find out why and correct accordingly either the opening balance or the transactions.
Differences in the Transactions table
In the Transactions table (Info window at the bottom), check that no differences are reported. In addition to the features present in the Check accounting command, in the Transactions table of Banana Accounting Plus there is also the Balance column, which allows you to detect all the rows where differences are created. Just a quick scrolling of the column is enough to immediately identify the accounting differences and correct them, without carrying on the errors in the New Year.
Differences between bank balances of bank statements and accounting balances (CheckBalance feature)
This operation is fundamental for the veracity of the accounting. We advise you to carry on the verification of the balances, #CheckBalance, not only at the end of the accounting period, but periodically at the end of each month, to avoid that any mismatched balances are carried on from month to month.
More information on the verification of balance at the Checkbalance page.
Multi-currency accounting
If you are using multi-currency accounting you must also set up closing exchange rates and record unrealized exchange gains and losses. For this please refer to this page:
Closing accounting transactions
At the end of the year, before moving into the New Year, there are closing accounting operations to be made. These are adjustment entries, value adjustments and adjustments relating to personnel contributions. Here are the main ones:
Import the movements of the cash account in the main accounting file
This operation is only made in case the cash account is kept separately on a separate file from the accounting.
After the import has taken place, verify that the balance of the cash account in the main accounting file corresponds to the balance of the cash file. This verification can also be done with the Check Balance function, described in the previous paragraph.
Import the payroll transactions in the accounting file
This operation is only made if the payroll is managed with a specific accounting software that allows you to import the transactions into the Banana Accounting Plus file.
The import is carried out from the menu Actions > Import into accounting > Import transactions with column header.
Remember to insert the entry of the 13th month of December quota, if this is not created by the payroll software.
Delcredere account adjustment
Companies that record on accrual method, if they foresee potential losses, must settle the Delcredere account.
Depreciation
At 31.12 it is necessary to record the depreciation of movable and immovable assets and to evaluate the possible accelerated depreciation for those assets subject to rapid obsolescence.
You can use our application Fixed Assets Register that automatically creates the depreciation transaction and you can resume them in the accounting file.
Inventory adjustment
Our Inventory application allows you to have accurate counts both by pieces and by value, helping you to determine your inventory settlement faster.
Assess customers and suppliers open invoices at 31.12
To make the process easier, with the feature of open invoices by customer and open invoices by supplier you can quickly detect the values as of 31.12.
Private use
If the company uses a company car, you need to enter the transaction for its private use with the appropriate VAT code.
Closure and VAT declaration
Before submitting the VAT declaration, we recommend the following verification operations:
- Use the Check accounting command. In case of errors and differences, find the messages in the Information window (bottom of the screen), in the Messages section.
- Verify that there are no differences in the Balance column of the Transactions table.
- Check if your bank balances correspond to those shown in the bank statements.
- Verify that, after having reversed the balance in the VAT due account (VAT to be paid to the FTA), the automatic VAT account is zero. The VAT due account must show the amount to be paid or the credit amount to be received.
- Before submitting the last VAT return, take a look at the VAT statements for the previous quarters, to check that the amounts paid to the FTA still match the amounts displayed.
- Use the VAT Report command to view the various reports and create a PDF printout for archiving the data. In the event of tax audits they will be useful.
Settle the account for the "Tax at the source"
After calculating and recording December salaries, proceed to enter the transaction for the "Tax at the source" settlement, based on the statement sent to the "Tax at the source office".
Refunds for upper management
If provided, include the amount allowed by the tax authorities as a lump sum refund in the December salary.
Private account settlement
Verify the balance of the private account. If there is a debit/credit relationship between the business and the owner(s) (or close persons), record the income or expense interests as provided in the loan agreement or according to applicable tax guidelines.
Taxes and fees account settlement
Verify that down payments made during the year relate to the current year. Tax payments that relate to previous years should first be recorded to close the corresponding amounts put aside, and then (if there are any exceeding amounts), they should recorded using the "Direct Taxes" account (assets). If the balance of the provisions is insufficient or excessive, the difference must be recorded as an extraordinary expense/revenue or relating to previous periods.
Recording of AVS/AD/IPG/AD final balances
- During the year, in the AVS contributions account, the down payments made to the Cantonal AVS Compensation Fund (Debit) and the amounts withheld from employees' salaries (Credit) are usually recorded.
- If during the year the family allowances paid to the employees have been recorded in a dedicated account, for example in the "Family allowances contributions" account, in order to reconcile the accounting with the AVS closing statement and to record the relevant settlement, the balance of this account can be transferred to the AVS/AD contributions account.
Recording of Lainf, Lainf complementary, LPP pension final balances
With the recording of the December salaries and the payment of the thirteenth month's salaries, you must print the salary list with the indication of all gross salaries. You must report the total AVS gross amount to the employee's insurance companies, who will determine any adjustments to be paid.
Sending the file to your accountant
If the closures and/or audits are carried out by your fiduciary, just send him/her the accounting file created with Banana Accounting Plus by email or save the data on a USB key.
- If your trustee has Banana Accounting, it is sufficient to send him/her the .ac2 file by email or via USB key. You can also save your file and the digital documents in a shared folder with your trustee on Dropbox. You will no longer have to bring heavy paperwork folders to him/her. Also, the trustee will work faster without having to go through the paper documentation.
- If you your trustee doesn't have Banana Accounting, you can create a PDF file of the accounting data, through the menu File menu > Create PDF dossier and send him/her the file by email. The trustee will indicate to you all the modifications and additions to be recorded in order to correctly close the accounting period.
Alternatively, your trustee can open your accounting file using the Free version of Banana Accounting Plus, by downloading it from our Download page. If your file has over 70 transactions, he/she won't be able to add entries or make modifications, but he/she will still be able to see all the data, get accounts detailed cards just by double-clicking on any account number, etc. and advise you on possible corrections and/or improvements.
Blocking transactions
Once the closing and verification entries have been made, we recommend proceeding locking your accounting transactions.
- Actions menu > Lock transactions command.
The transaction rows will be numbered and have a blockchain code that ensures their security.
Year end printouts
For the accounting year-end printouts you can find the information by clicking on the following links:
- Account cards
- Journal
- Enhanced balance sheet with groups
- Watch the video tutorial that shows how to create and print the Enhanced Balance Sheet with groups.
- Accounting report
- VAT report
- Year-end PDF printouts
PDF Dossier
The Create PDF Dossier command allows you to have all the documents of the entire accounting period (account cards, journal, VAT statements, monthly, quarterly and annual reports...) in a single PDF file.
You can archive the accounting data, saving the accounting file and the PDF printouts. Eventually, make backup copies on an external disk drive.
Documentation for the audit process
On the Preparing the documentation for the Audit page, we have posted a series of notes and suggestions on documentation to send to the auditor. A complete documentation is a good basis for making the auditor's job more efficient and faster.
Profit/Loss allocation
In Banana Accounting Plus, the distribution of the profit or loss takes place automatically at the start of the New Year. For further information consult the page Create New Year.
Changes after closing
Normally, once the closing has been done, there shouldn't be any modifications recorded. However, sometimes there may be a need to adjust the accounting, as in the following cases:
- Unrecorded exchange rate differences at closing
- Unrecorded missing transactions
- Errors in the transactions.
- Make the necessary adjustments in the following year, clearly describing the issue in a document that you will need to attach to the rectification transactions. Of course, depending on the situation, there may be tax consequences, so it is best to seek advice from your accountant.
- In multi-currency accounting, for the issue of unrecorded exchange rate differences, follow the information on the page Differences in the opening balances.
- If the legal framework allows you to make changes to a closed year:
- Proceed with caution, limiting yourself only to truly necessary modifications.
- Double-check the accounting and perform all necessary checks to ensure that the changes do not create problems.
- After the modifications, open the file for the following year and update the initial balances using the Update opening balances command.
Preparing the documentation for Audit
Before preparing documentation to be sent to the auditor, we recommend that you review the information suggested on the Year end closure page. In addition to the information on how to use the program features, there are a number of checks and verifications that should be performed prior to closing.
Firms that are required to be audited must send a number of documents and files to the auditor.
From year to year it is easy to forget what needs to be sent to the auditor. It is therefore advisable to prepare a checklist, which includes all of the documents requested by the auditor in previous years, as well as the closing and adjusting operations to be carried out.
In order to facilitate this task, already during the year, some simple operations can be planned to ease the work for both the person managing the accounting and the one conducting the audit. We recommend the following:
- Create a folder to store scanned documents.
Save ("save as..." command) all scanned documents from the current year's accounting records. - Scan receipts
- Scan all invoices, cash receipts, and OASI statements, social security and insurance contributions.
The digital documents, such as invoices and receipts, can become an integral part of the accounting file. Banana Accounting allows you to insert the scanned document on the row of the contextual record. The auditor, by clicking on the link of the digital document, opens the document and can see its contents without wasting time looking for the information on paper.
PDF printouts to send to the auditor
Below is a reminder of a number of key documents that need to be sent to the auditor:
Declarations for employees
- Declaration of OASI salaries as sent on 31.12 and year-end adjustment
- Declaration for advanced family allowances (already included in the OASI Salary Declaration).
- Employee salary journal
- Employee salary account cards
- Salary certificate
- Non-occupational accident Insurance (NOAI) as sent on 31.12 and year-end adjustment
- Occupational accident insurance (OAI) as sent on 31.12 and year-end adjustment
- Daily allowance insurance declaration (sickness) as sent on 31.12 and year-end adjustments
- Pension fund (OP) extract as on 31.12
- Quarterly IF Swiss Withholding Tax declarations and year-end statement.
Bank/postal account statements
- Final bank and postal account statements as at 31.12
- Bank statements as of 31.12 for possible withholding tax.
- Loan statements as at 31.12
- Investment statements as of 31.12
- Copy of Form 103 sent to the FTA for the payment of withholding tax
VAT/Sales Tax declarations
- VAT/Sales Tax statements of each quarter
- VAT/Sales Tax declarations of each quarter
- Reconciliation of turnover with VAT returns (required at the end of the year)
- Possible VAT/Sales tax difference reporting forms (if differences arise between the booked and reported VAT/Sales Tax during reconciliation)
Accounting closing documents
- List of open customer invoices as of 31.12
- List of open supplier invoices as of 31.12
- Inventory valuation and adjustment as of 31.12
- Details of active and passive accruals
- Details of fixed assets and depreciation (tables, sheets, etc.). Possible accelerated depreciation
- Tax calculation
Official documents
- Minutes of Ordinary Meeting of Assembly previous year
- Extraordinary General Meeting Minutes
- Notification of taxation previous year
- Copy of withholding tax payment order and Form 103 submitted to the FTA for any dividends paid
- Copy of building insurance policy
- Documents in case of patent activation
- Copies of leasing and rental agreements
- Copies of new loan agreements
- Calculation of the expense for other long-term and short-term provisions
- Annual report of the year under review
- Appendix (with explanations) to the balance sheet and income statement
Data export
Accounting regulations require that the accounting data be made available to auditors and inspectors in digital format.
Banana Accounting complies with these regulations because:
- The auditor can use the free plan of Banana Accounting to open the accounting file.
- All accounting data is easily visible in the table.
- The data can be copied and pasted directly into other programs.
- It is possible to export the data in different formats directly from the table.
- The Create pdf file command exports all the accounting data in an ideal format for reading.
Extensions for data presentation and export
There are several extensions for presenting data export in specific formats.
- Audit File Reports create reports that may be useful to the auditor and can be copied and pasted into Excel
- Standard Audit File - for taxation
Data export in XML and other formats according to OECD guidelines and for specific countries. - Search in extensions if there are extensions specific to your country
Other useful information
Below are links where you can find other useful information for optimal accounting and document management:
MWST-Jahresabstimmung

Als Grundregel in Banana Buchhaltung tragen alle Buchungen, die mit einem MWST-Code versehen sind, zur Mehrwertsteuerberechnung und zur Bestimmung der Beträge in den entsprechenden Feldern der MWST-Abrechnung bei. In den Buchungen können verschiedene Ursachen vorliegen, die zu Diskrepanzen bei der Abstimmung des Umsatzes führen:
- Wenn in einer Buchung mit MWST der MWST-Code fehlt, wird der entsprechende MWST-Betrag und der steuerpflichtige Betrag nicht im Faksimile des MWST-Abrechnungsformulars berücksichtigt. In der Buchhaltung hingegen führt eine Verkaufsbuchung auf dem Verkaufskonto dazu, dass der Betrag den Umsatz bestimmt.
- Es wurden Buchungen mit MWST nach der Übermittlung der Mehrwertsteuerdaten an die ESTV hinzugefügt.
- Buchungen mit Mehrwertsteuer wurden, auch versehentlich, nach der Übermittlung der MWST-Daten gelöscht.
- Es wurden Buchungen mit falschem Datum eingegeben und sind in das bereits abgeschlossene Quartal berechnet worden.
- Wenn es Stornierungen gibt und der entsprechende MWST-Code mit einem Minuszeichen nicht verwendet wurde.
- Es wurden MWST-Codes bei Anpassungen und Abschlussbuchungen eingetragen, die normalerweise keinen Mehrwertsteuercode haben sollten.
- Bei Stornierungen von Auslandsverkäufen wurde fälschlicherweise der Code VE-0 eingetragen. In diesem Fall kommt es zu einer Diskrepanz, da bei einer Stornierung der Verkauf als Belastung verbucht wird und somit zu einer Verringerung des Umsatzes führt. Im Gegensatz dazu wird bei Code VE-0 der Betrag des Verkaufs vom Programm als Teil des Umsatzes betrachtet und daher hinzugefügt.
Vorbereitung eines Abstimmungsberichts
- Dokumentieren Sie den Abstimmungsprozess, indem Sie die festgestellten Unterschiede und vorgenommenen Korrekturen vermerken.
- Verfassen Sie einen detaillierten Bericht, der alle Phasen des Abstimmungsprozesses und die erzielten Ergebnisse hervorhebt.
Nützliche Werkzeuge
- Buchhaltungssoftware: Banana Buchhaltung ermöglicht es, auch zu einem späteren Zeitpunkt, Nachbildungen von Mehrwertsteuerformularen, Mehrwertsteuerzusammenfassungen, Jahresabschlussberichte und quartalsweise unterteilte Berichte zu erstellen. Dies erleichtert den Vergleich von Daten über einen längeren Zeitraum hinweg, um Unterschiede oder Fehler bei der Berechnung der Mehrwertsteuer und des Umsatzes zu identifizieren.
- Tabellenkalkulation: Erstellen Sie eine Tabellenkalkulation (z.B. Excel), in die Sie Daten aus Banana kopieren und einfügen können, um Verkaufs-, Einkaufs- und Mehrwertsteuererklärungsdaten zu verfolgen und zu vergleichen.
Empfehlungen
- Regelmässige Überprüfungen: Führen Sie regelmäßige Überprüfungen durch, um Fehler und Diskrepanzen rechtzeitig zu erkennen und zu korrigieren.
- Genauigkeit und Sorgfalt für Details: Seien Sie besonders aufmerksam und sorgfältig bei der Durchführung der Abstimmung, um sicherzustellen, dass alle Daten korrekt sind.
- Unterstützung durch einen Fachmann: Ziehen Sie die Unterstützung eines Steuerberaters oder Fachexperten in Betracht, um sicherzustellen, dass der Abstimmungsprozess richtig durchgeführt wird und mögliche Fehler vermieden werden.
Update opening balances
The Update Opening Balances (Actions menu) command takes data from the previous year's file and updates the opening balances for the current year.
When do you need to use the Update Opening balances command?
The Update Opening Balances command is required in the following cases:
- You have created the New Year with the Create New Year command, but you still made changes to the previous year's file (additional transactions, new accounts, ..).
- You decided to change the allocation of the the profit or loss for the year.
Check the previous year accounting
In order to avoid differences between the previous year closing balances and the New Year and opening balances, it is important, before using the Update opening balance command, to make sure that you have carried out all the checks, verification operation and all the closing accounting entries as indicated in the Year end closure page.
The Update Opening balances dialog window
In order to access this dialog, use the Actions menu → Update opening balances command.
You need to enter the path to where the previous year's file is located:
- The program will suggest the name of the saved file
- If the file's name or the location path is changed you the Browse button

Operations carried forward by this command
The command resumes the data from the previous year, without changing its contents. This command can therefore be repeated without any impact on the previous year's file.
The command performs the same operations as in Create New Year , except those referring to the creation of the file.
If the opening balances of the Profit and Loss Account accounts were reported in error, follow the information on the Difference in opening balances page (item 5 Solutions) to correct this.
Change of the Chart of Accounts of the previous year
If after creating the New Year you add accounts to the previous year and carry over the balances, the program may indicate an error.
- Update the Chart of Accounts for the current year.
- Repeat the Update Opening balances operation
You can import changes with the Import Accounts command.
Edit current year chart of accounts
If, after creating the new year, you change the numbering of the accounts, when you issue the command Update opening balances, the programme will indicate that it cannot find the accounts.
In this case, you must update the account balances manually:
- Opening column ( Accounts table > Base view)
- Previous column ( Accounts table > Previous view)
Profit Allocation
In accounting, the recording of profit distribution takes place when the shareholders' meeting or the competent body formally approves the allocation of the profit resulting from the financial statements.
Year-End Closing
At the end of the year, accounts are closed and the profit (or loss) for the year is determined.
- Profit for the year = the positive result of operations (revenues > costs).
- The profit is recorded in the Income Statement and carried over to Equity in the Retained Earnings account.
The distribution of profits is the allocation of this result among various items, established by the shareholders' meeting.
Resolution on Profit Allocation
Below we provide some general practice recommendations, but we suggest consulting your trusted professional.
Example of accounts for profit distribution:
- Legal reserve
- Other reserves
- Dividends to shareholders
- Retained earnings
The distribution is not recorded at the time of payment, but on the official decision date (resolution). The payment is only the subsequent phase of settling the debt to the shareholders.
- From the Profit carried forward account, the amounts are transferred to the various accounts established by the resolution.
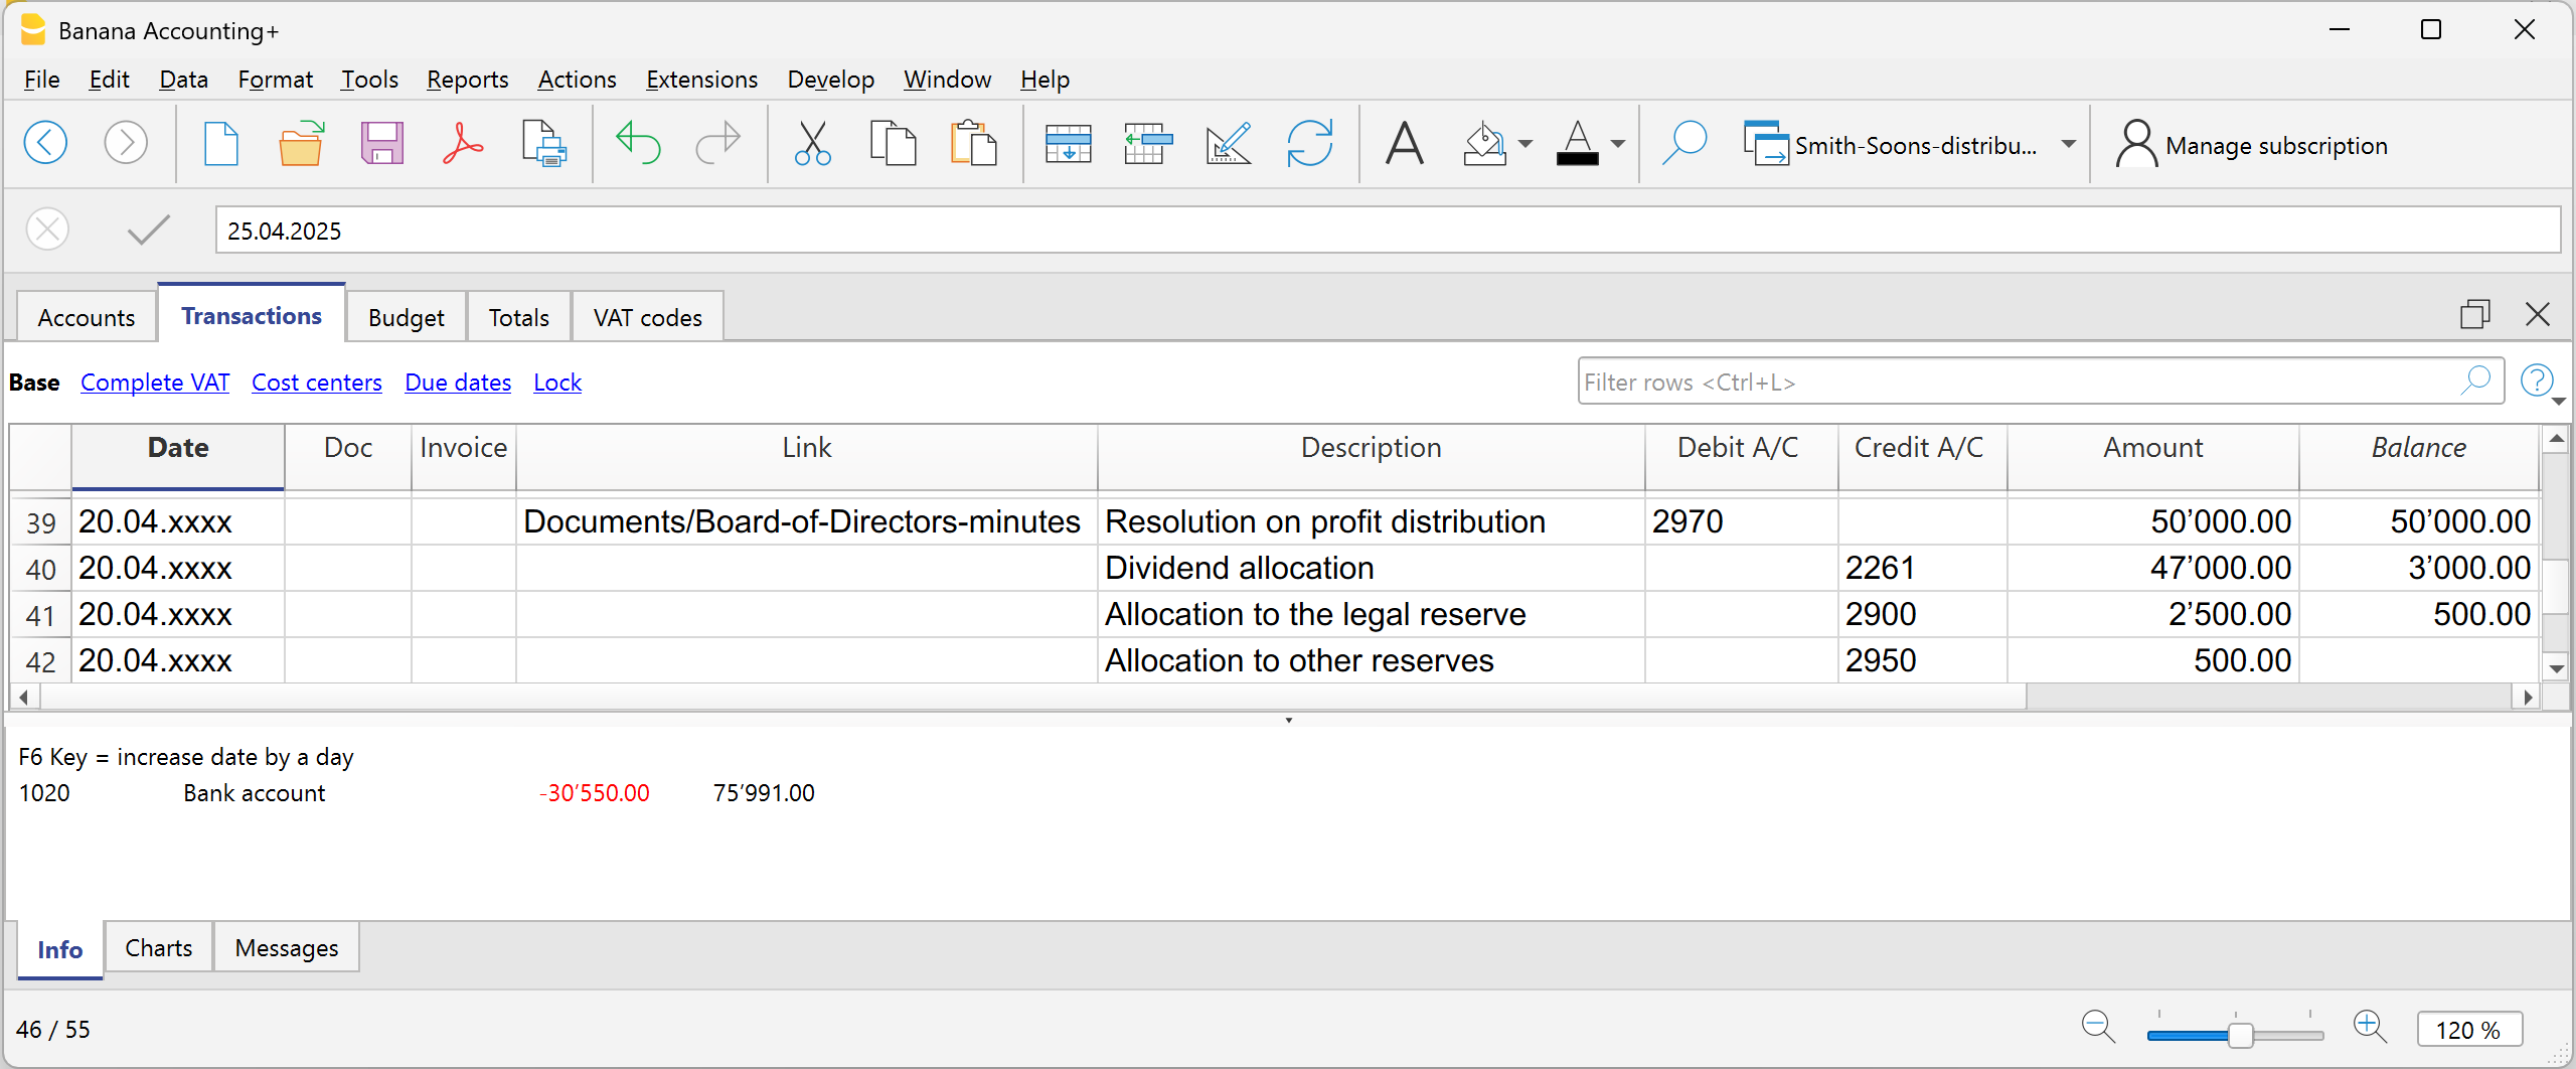
Withholding Tax on Dividends in Switzerland
In Switzerland, when a company distributes dividends to its shareholders, it must withhold a tax called “withholding tax” equal to 35% of the distributed amount.
It is called “withholding” because it is collected at the source, meaning immediately, at the time of payment, before the shareholder receives the money.
The withholding tax on dividends is a mandatory 35% tax deduction, which serves two purposes:
- Ensure tax revenue (the State receives the tax immediately).
- Prevent tax evasion (those who do not declare dividends do not recover the withholding).
Dividend Payment
At the time of dividend payment, the company withholds 35% as withholding tax.
The withholding tax must be declared on the official portal and subsequently paid to the Federal Tax Administration (FTA).
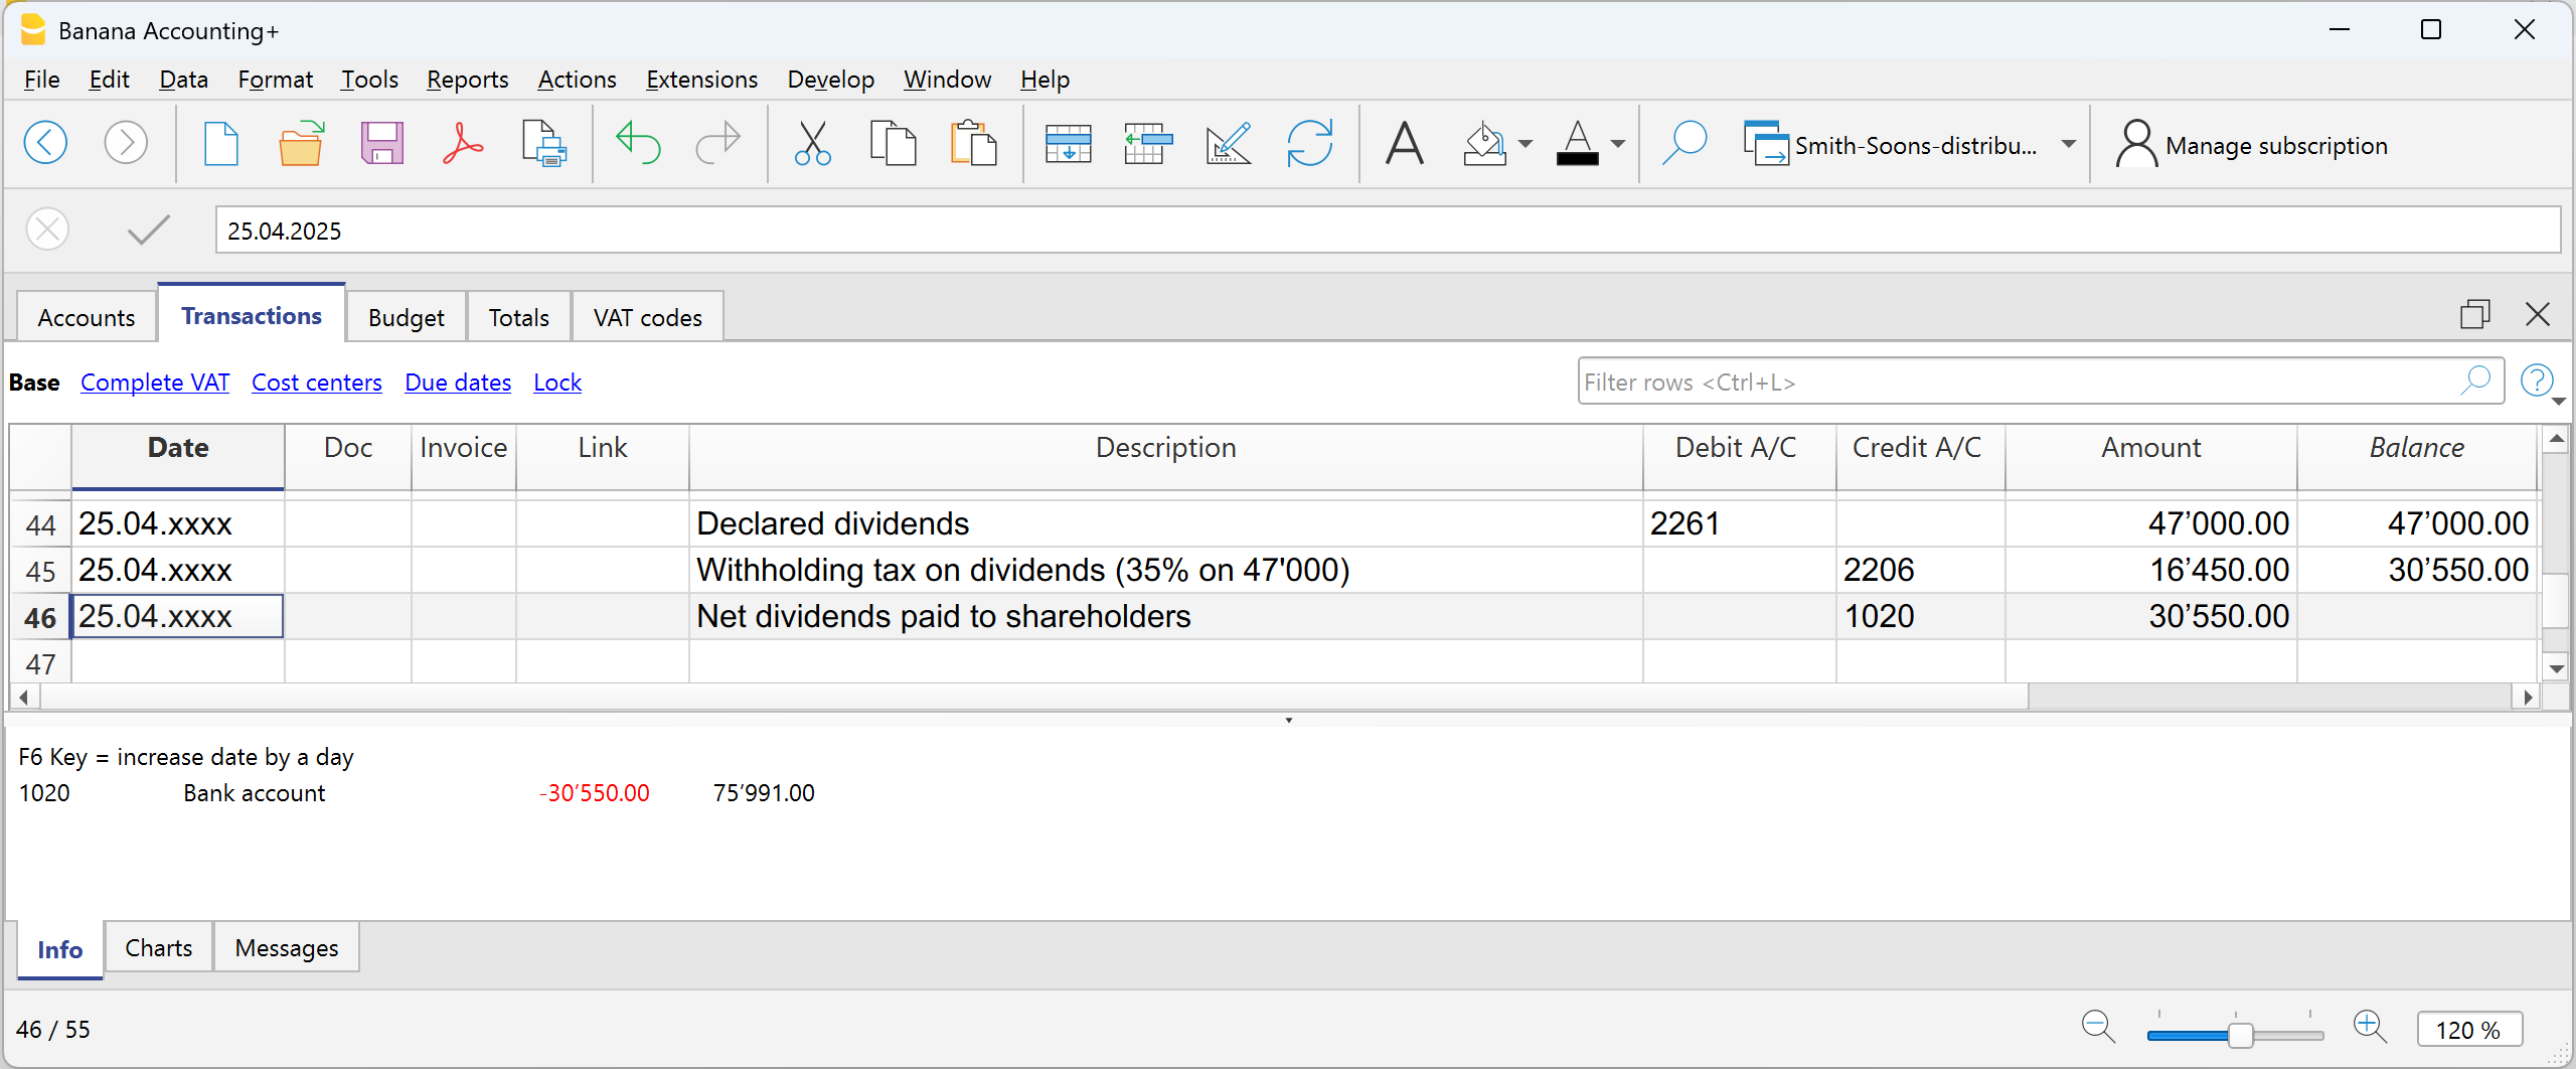
Refund of Withholding Tax on Dividends
- Shareholders residing in Switzerland can recover the full withholding by filing a tax return (the tax office offsets it against taxes due).
- Shareholders abroad can recover it partially, depending on the double taxation treaties between Switzerland and the country of residence.
Create New Year | Double-entry accounting
The Actions > Create New Year command prepares a file for the new year based on the accounting file that is about to be closed. The command does not modify the current file, so it can be executed without any effect.
Transition logic to the new year
With Banana Accounting, you have a separate file for each year. When the new year begins, the operational logic is as follows:
- With the Actions > Create New Year command, the program creates a new file for the following year using the same chart of accounts, settings, and balances of the current year that is being closed.
- Once the file for the new year is created, you must save it with a new name.
- The operation of creating the new file can be repeated if you decide not to save the file.
- It is possible to work on both files simultaneously:
- In the new file, the entries for the new year will be recorded. You can also make changes to the chart of accounts, VAT, or other items without affecting the previous one.
- In the previous year's file, you will continue to enter transactions to complete the year and carry out the typical closing operations, such as verifying balances, printing financial statements, etc.
- In the file for the new year, using the Actions > Update Opening Balances command, the changes made in the previous year's file are imported. This operation should be performed at the latest when there are no more changes in the previous year.
Note: Users with a subscription to the Professional plan of Banana Accounting Plus will see the following message at the bottom after creating the new year file: Active subscription: Professional Plan. Advanced plan features are available up to 70 transactions.
Check and close the previous year's accounting
Before updating the opening balances, to avoid discrepancies between closing and opening balances for the next year, it is important to ensure that all checks, verifications, and closing accounting entries have been completed.
In Banana Accounting Plus, in the Advanced plan, there is a Filter feature that is especially useful during closing to quickly search for rows with the same texts or values, based on the key entered for the filter (word, account, amount, etc.). With this function, you can make corrections directly on the filtered rows without having to scroll through the Transactions table—very convenient especially at year-end when the number of entries is high.
For more details, refer to the following pages:
- Filter (paragraph Filter rows)
- Check and close double-entry accounting
- Closing and exchange rates for multi-currency accounting
Specific information for setting closing rates and recording unrealized exchange gains and losses.
Operations performed by the Create New Year command
The Create New Year command, based on the parameters set by the user, automatically performs the following operations:
- Creates a new file (unnamed) with the same chart of accounts and settings as the open file, without transactions.
- Copies the data from the Balance column of the current file and inserts them into the Opening column of the new file (only for the specified classes).
- Adds the previous year's profit or loss to the opening balance of the account(s) specified for allocation (usually the Retained Earnings account).
- Copies for all Balance Sheet accounts the data from the Balance column of the current file and inserts them into the Previous Year column of the new file.
- Updates file properties:
- Sets the start and end dates of the fiscal year, adding one year to the existing ones.
- In the Options section, sets the name of the previous year’s file and enables the option to use previous year’s transactions for autocomplete.
- In multi-currency accounting, it sets the opening exchange rates to match the closing exchange rates of the previous year.
- If there is data in the Budget table, it carries forward the transactions to the new year according to the settings.
- If the Segments option is enabled, it creates opening entries for the segments.
Create New Year dialog
The Create New Year dialog allows you to specify parameters for creating the new year's file:

Carry forward opening balances of accounts
The opening balances of the activated items are carried forward:
Balance Sheet
Transfers balances of asset, liability, and equity accounts. This option should generally be activated.
Income Statement (not recommended)
Cost and revenue account balances should NOT be carried forward to the new year.
Activate this option only in special cases and only if you are sure of the implications.
Off-Balance Sheet
Transfers accounts with BClass (5 and 6 for off-balance asset and liability accounts and 7 - 10 for other off-balance accounts). If the closing balances should not be carried forward, deactivate the relevant option.
Cost Centers
Activate only if cost centers are used to manage positions that must continue over time, such as customers, suppliers, and members.
Cost Center CC1
Those starting with a dot ".".
Cost Center CC2
Those starting with a comma ",".
Cost Center CC3
Those starting with a semicolon ";".
For more information see the page Cost/Profit Centers.
Segments
The opening balances of segments are created with opening entries in the Transactions table.
- For more information see the page Segments.
- The program creates one entry for each combination of account and segment, reproducing exactly the final situation of the previous year.
- It is preferable not to enter segment opening balances using the Opening column. If this was done in the previous year, the program will again transfer the balance into the Opening column of the new year.
Note: adjusting operations such as recording and closing transitional accounts must be entered manually.
Allocation of profit/loss
When carrying forward the opening balances into the new year, the amounts indicated are added to the profit carryforward accounts.
Total to be allocated
The program automatically shows the amount of profit or loss to be allocated.
Accounts
Select the account or accounts (up to three) in which the result of the financial year should be allocated. If there are more than three destination accounts, you must manually enter the amount in the appropriate fields.
If only one account is indicated, the amount will be automatically entered in the selected account from the list.
The program automatically updates the opening balances. The total assets exactly match the total liabilities.
Allocation of the financial result to more than three accounts
In this case, automatically allocate the result only to the Retained Earnings account and continue with the creation of the new year.
In the new year (new file), in the Transactions table, perform a multiple entry to transfer the result from the Retained Earnings account to the desired accounts.
Postpone the allocation of the financial result
If you do not want to allocate the financial result yet, you can still proceed with the creation of the new year by clicking the OK button. You can later allocate the result from the Actions > Update Opening Balances menu. The program will display the same window as the Create New Year command.
Save the new file
The program creates a new accounting file for the new year:
- Confirm the Basic data of the new year. The program takes the headers from the previous year and automatically enters the start and end date of the new year.
- Click on the File menu > Save As, indicating the folder where you want to store the new accounting file. It is recommended to use the company name and year as the filename.
See also Organize your accounting files.
If there are differences or other error messages, you may choose not to save the created file and repeat the new year file creation later.
Professional Plan message with Advanced features up to 70 rows
The message that appears in the active Professional Plan, Active Plan: Professional Plan. Advanced features are available up to 70 rows, simply confirms that the Advanced plan features are also active and can be used free of charge for up to 70 transactions, without affecting the use of the Professional plan, where entries can continue without any limit. This message disappears automatically once 70 rows are exceeded.
Update opening balances
After saving the file for the new year and making modifications in the previous year, click on the Actions > Update Opening Balances menu to carry forward and reallocate the profit.
This operation can be repeated multiple times and can be performed safely, as data integrity during the transition to the new year is guaranteed and no data is lost.
If you want to switch to another type of accounting in the new year (with multi-currency or VAT), proceed with the creation of the new file and then use the Tools > Convert to New File command.
If instead you want to create a copy of the file without carrying forward the balances, use the Tools > Create File Copy command.
Modify carried forward balances
Once the balances have been carried forward into the new year (new file), if you need to modify the opening balances, you can manually change the amounts in the following columns:
- Opening column in the Accounts table.
- Previous column, for balances related to the previous year.
- In the Transactions table for Segments.
If you have made changes in the previous year's file, click on the Actions > Update Opening Balances menu to carry forward and update the opening balances again.
Check the Recurring Transactions Table
When executing the Create New Year command, the program transfers all entries saved in the Recurring Transactions table to the new year file.
Before posting the new year’s transactions, it is advisable to review all saved entries in the Recurring Transactions table:
Review the following saved entries:
- Transactions with Rules
- Recurring entries identified via the Doc column
- Regularly scheduled transactions.
If the conditions are no longer valid:
- Modify account, counterpart, VAT code, CC3, or segments.
- Delete outdated entries.
- Add new entries with Rules or other types of saved transactions.
Performing this check immediately helps prevent errors and later corrections both in the Transactions table and in the Recurring Transactions table.
How to reclassify the balance sheet and income statement
In Banana Accounting Plus, the reclassification of the balance sheet and income statement is done through the External Accounting Report, a file separate from the accounting, designed to set up a customized presentation of the data. This allows accounts to be grouped differently from the standard chart of accounts structure.
The grouping scheme defined in the External Accounting Report is linked to the accounting file to extract, total, and present the accounts according to the new desired classification. This feature is available exclusively with the Advanced plan of Banana Accounting Plus.
Create an Accounting Report File
To create an Accounting Report file:
- Menu File > New > Accounting Report
- You can choose from an existing template or start from a new one
- Once created, save the file with a name.
Below is an example of a predefined Accounting Report used to create a reclassification of the Balance Sheet according to Art. 959 of the Swiss Code of Obligations.
Everyone can choose to have their own, starting from an empty file.
- When creating your own Accounting Report, groups and totals can be freely defined.
- It is also possible to customize the Accounting Report used in this example by downloading it from our program, as indicated in the previous sections, and customize the accounts or groups for your own reclassification.

The Columns of the Accounting Report
The Accounting Report table includes the same columns found in the Accounts table, where the Accounts or Groups for Totals are set up based on a custom scheme.
In the example, groups and totals were created for the reclassification of the Balance Sheet according to Art. 959 of the Swiss Code of Obligations.

Section
This column is used to indicate the value to be used in the presentation.
For the different options, see the Documentation on sections.
Group
Indicates the group in which to totalize the accounts retrieved from the accounting and the total group.
Account (visible only in the Complete view)
The account from the accounting file to be included in the accounting report.
- If accounts are entered, only those specified accounts will be included when the Report is executed.
- If no accounts are entered, the accounts from the accounting will be included, linked via the group.
Description
Description of the grouping or account.
Sum In
In the Sum In column, the Group (total row) in which the row should be totalized is indicated.
Tot
If set to "Yes", only the total row is displayed, not the individual account rows that make it up.
See Show only group totals in the Accounting Report.
Keep
Normally, the report includes total rows that contain accounts with balances.
If set to Yes, this column ensures the row is always shown. It can be applied to both groups (totals) and accounts.
With Mov.
Applies to groups with a zero balance.
The row is displayed if there have been movements during the period.
**Traduzione blocco 3** ```html
Methods for Reclassifying the Balance Sheet and Income Statement
To reclassify the balance sheet and income statement, you must first prepare the Accounting Report file.
There are two methods to set up the Accounting Report file for the reclassification of the balance sheet and income statement:
1. Reclassify Based on the Group Column
This method allows the reclassification of the balance sheet and income statement using the Group column of the Accounting Report file.
In the Accounting Report, you create your own system of groups and subgroups
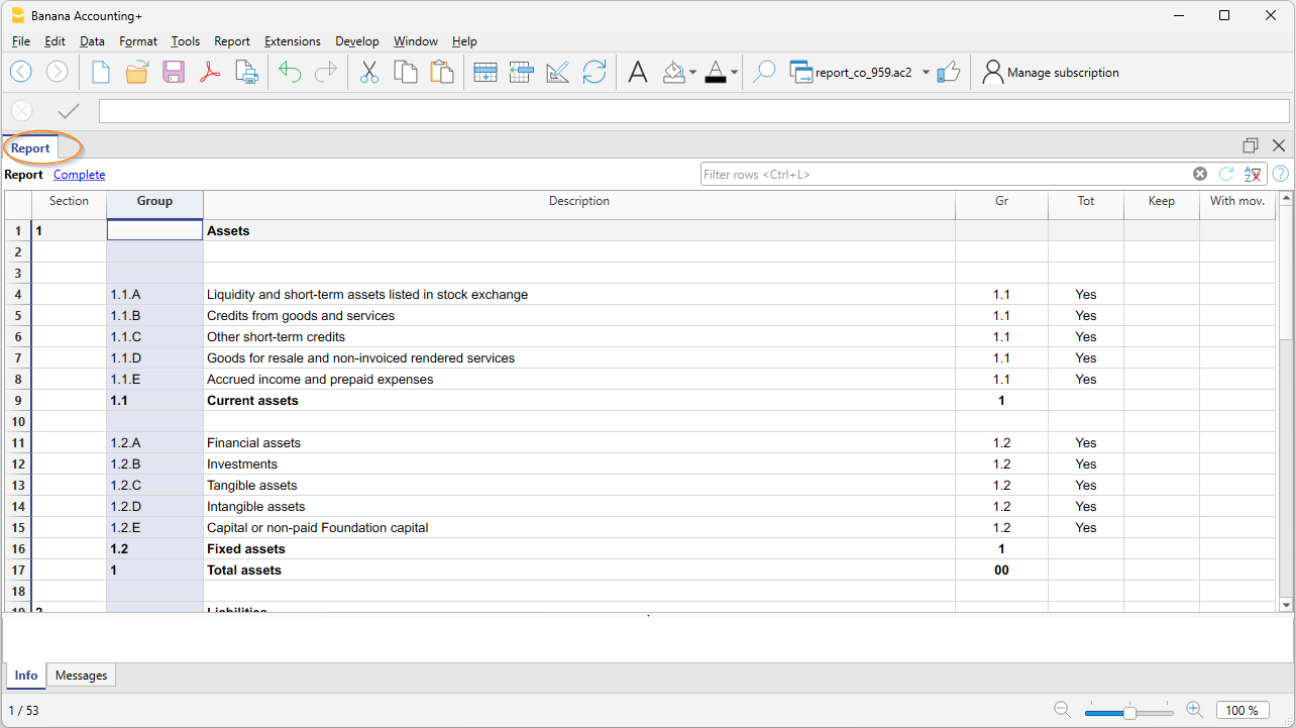
In the Section column, a number is inserted to define the title of the various sections in the printout.
- In the Group column, enter the groups that will total a series of accounts from the accounting file.
In the example, Group 101A of the accounting report totals the liquidity accounts (cash, bank, post, etc.). - In the Gr column, insert the group that will totalize the individual groups listed in the previous rows.
In the example, in the Gr column, 1.1, which corresponds to Group 1.1, will totalize the Current Assets.
In the accounting file, to link with the Accounting Report, you must set the GR1 column

- In the Accounts table, column Gr1 or Gr2, insert the group set in the Accounting Report, in which the account should be totalized.
In the example, in the GR1 column all liquidity accounts have the group 1.1.A, which in the accounting report totalizes the Liquidity accounts.
If the Gr1 column is not visible, use the command Data > Columns setup. - Accounts without any linkage will not be included in the Report.
2. Reclassify Based on Accounts
This method is useful when you want to include only certain accounts from the accounting in the Accounting Report file
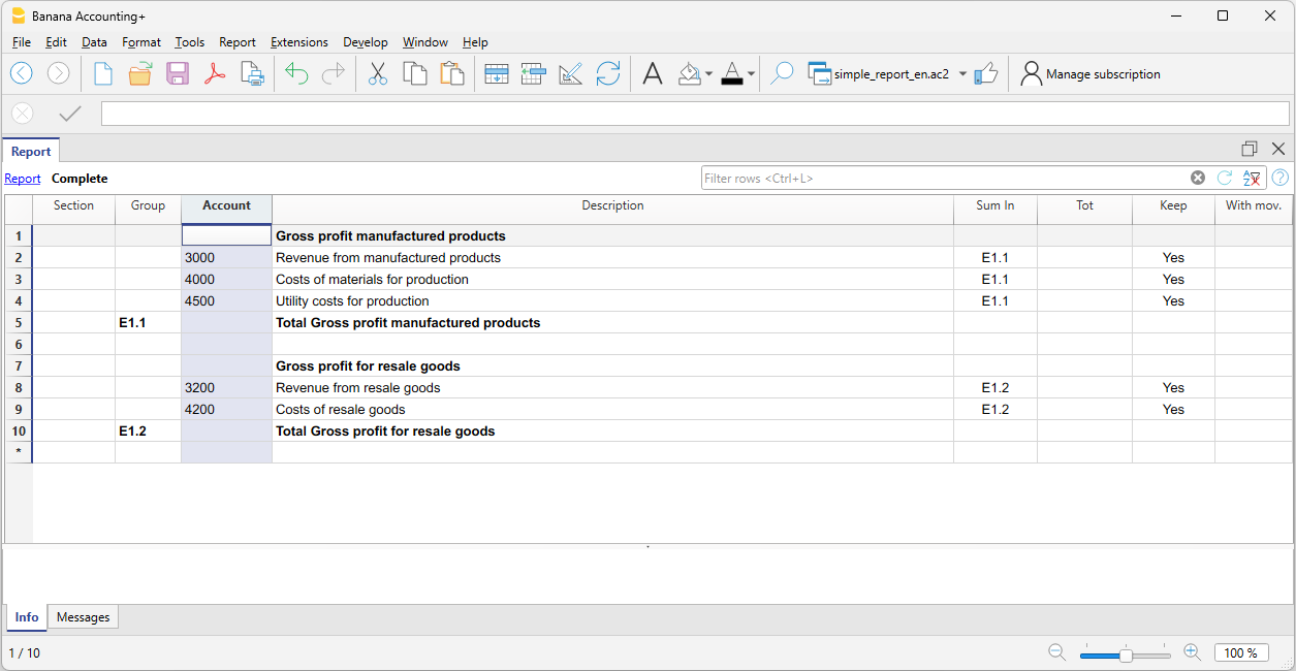
- In the Section column, a number is inserted to define the title of the various sections in the printout
- In the Group column, the groups that total each account imported from the accounting are defined
In the example, Group E1.1 of the accounting report totals accounts 3000, 4000, 4500 from the Accounting Report - In the Account column, enter the same account numbers from the accounting that you want to include in the Accounting Report
Only the specified accounts will be included in the report. - In the Description column, enter the description of the accounts
In the Sum In column, enter the totalization group (e.g. E.1, E1.2...).
Print the Accounting Report
The Accounting Report that reclassifies the balance sheet and income statement is displayed and printed from the accounting file :
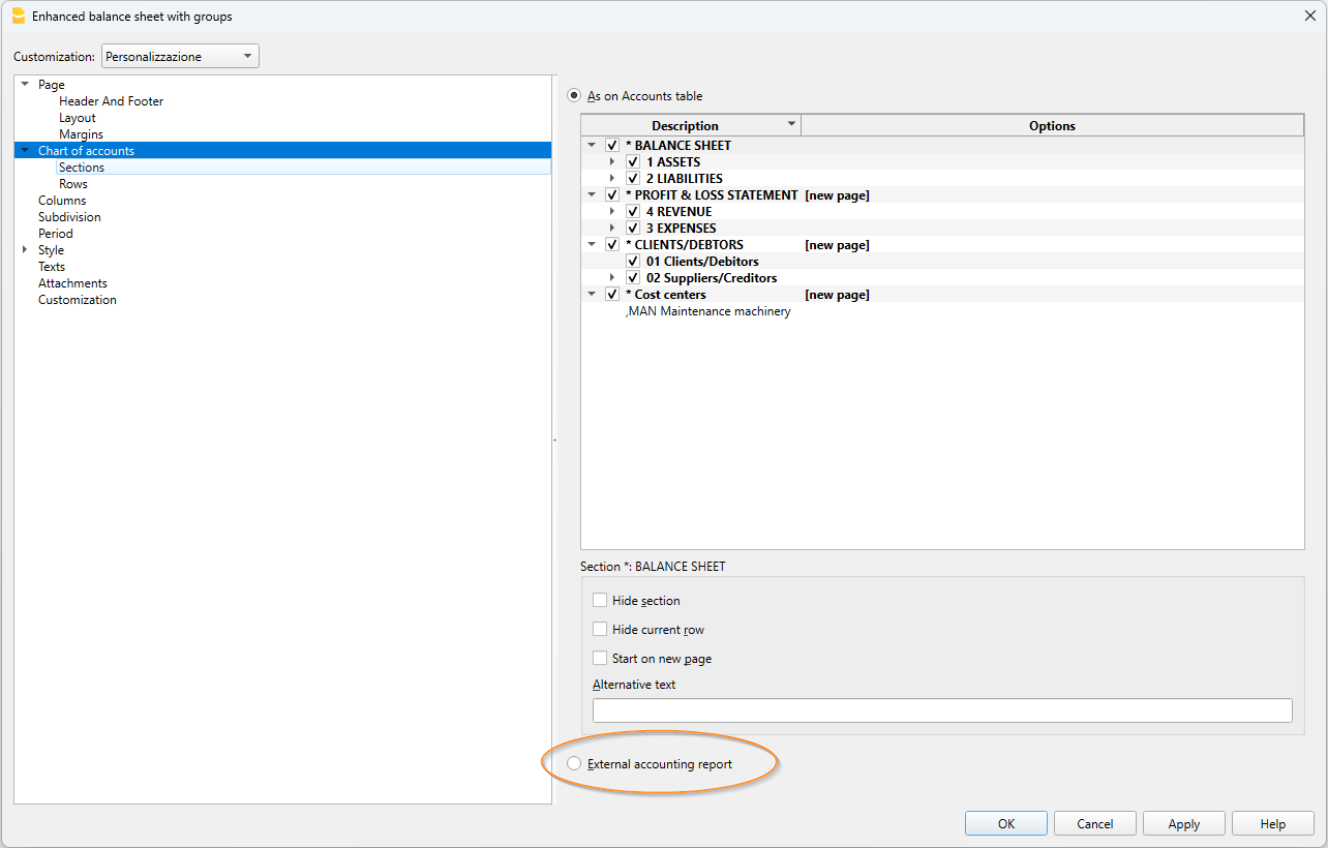
- Menu Reports > Enhanced balance sheet with groups
- Section Chart of Accounts > External Accounting Report
- In the dialog window, in the grouping column, select the column through which you want to apply the grouping (GR1, BClasse, VAT, etc...).
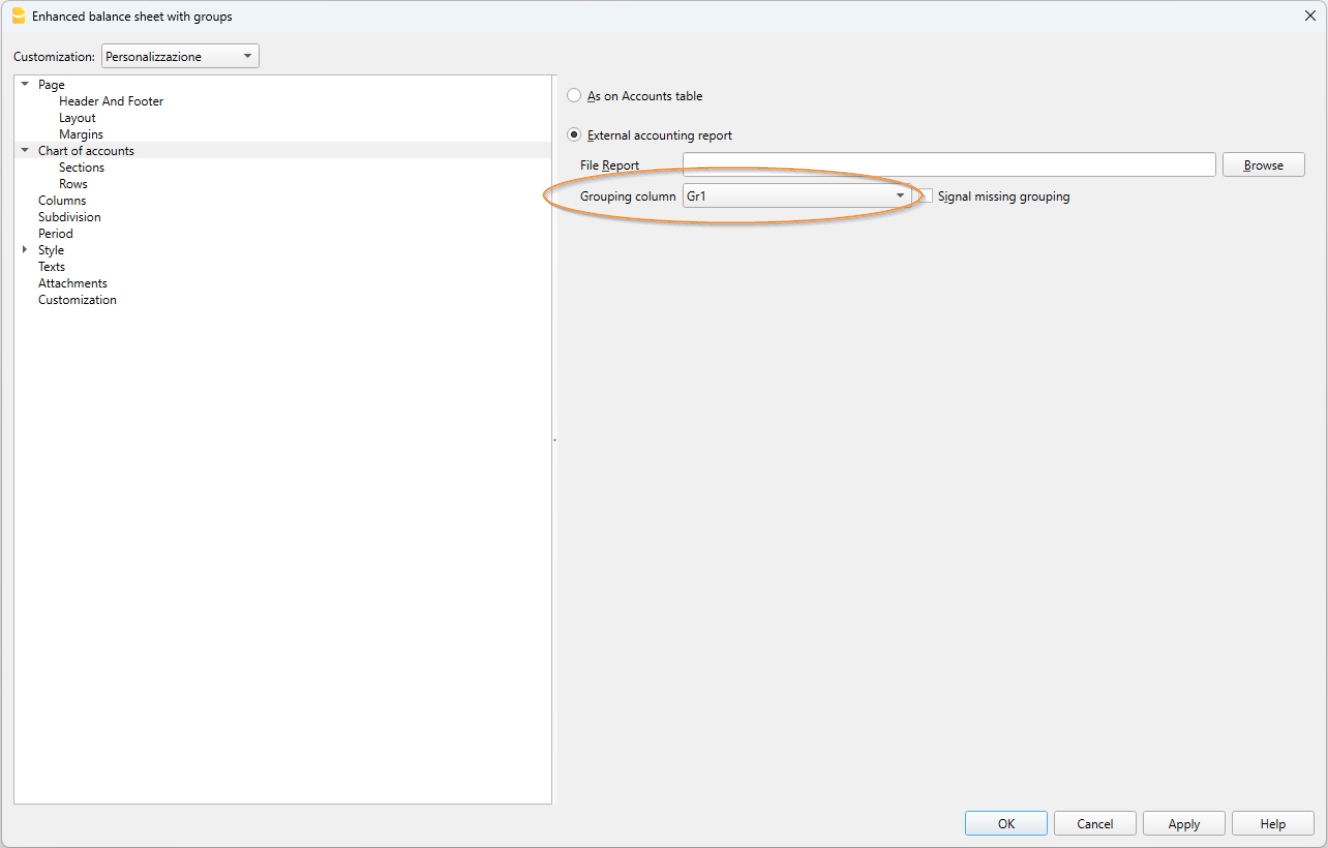
You obtain a printout like the Enhanced Balance Sheet with Groups, but with your own reclassification.
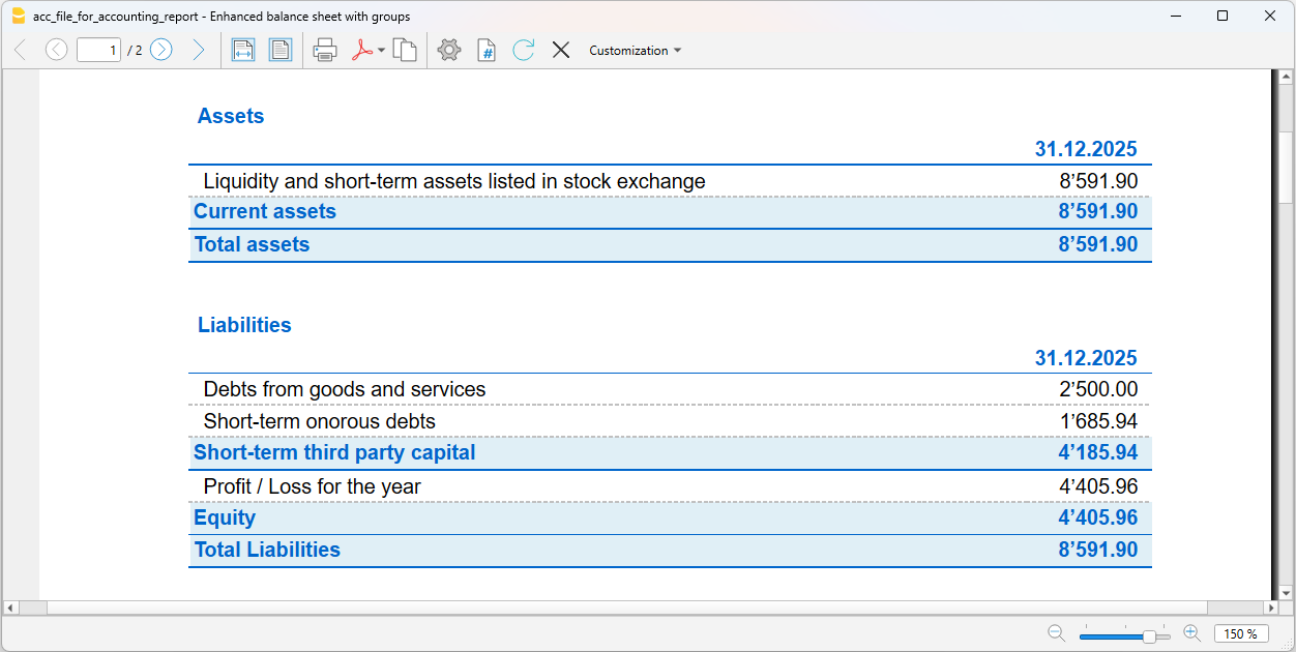
You obtain a printout like the Enhanced Balance Sheet with Groups, but with your own reclassification.
Or:
- Menu Report > Accounting Report
- In the Basic section, select the External Accounting Report option.
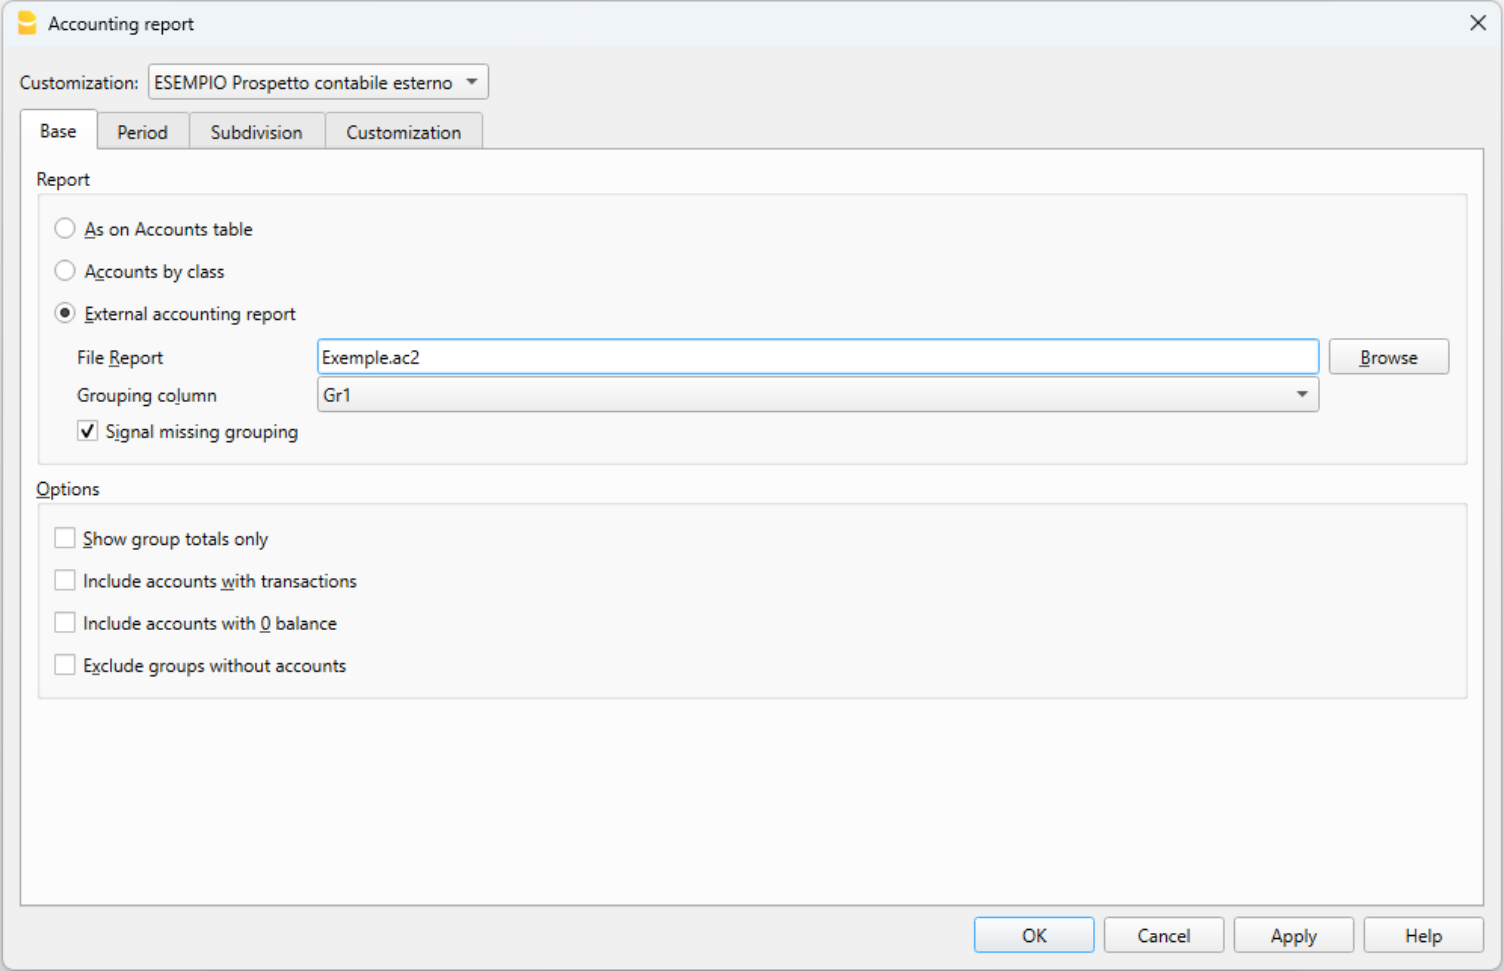
A table view is displayed, similar to the Accounts table, but with your own reclassification