In this article
The Print and Preview properties are accessed via the File menu > Page Setup command.
Each View of the table has its own print setting. The name of the view is indicated in the dialogue title.
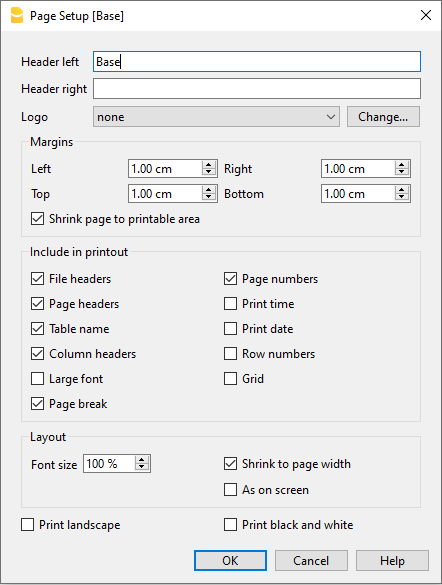
Left header
This is where the title for the current view is shown. The title can be edited and appears at the top left of the printed page.
Right header
It is possible to enter a different text that will be printed at the top right-hand side of the page.
Logo
Allows you to add a logo:
- Use the Change button to the right of the Logo box; you access the Logo Formats dialog.
- Select Add and insert your own logo.
- From File > Page Setup , enter Logo in place of none.
- Confirm with the OK button.
More details for inserting a logo are available on the Logo setup page.
Margins
It is possible to input the page margins here: Left, Right, Top, Bottom. Measurements are in centimeters.
Shrink page to printable area
This function makes it possible to adapt the printable area when the print goes past the margins of the earlier defined page margins.
Include in print
When these functions are activated, they allow to display the following data:
File headers
This is the text that is being entered in the File properties found in the File menu.
Page headers
The page header will also be included in the printout.
Table name
The table header (f.i. Accounts, Transactions, etc.) is also included in the printout.
Column headers
Allows to display the various table columns.
Large font
The program prints the headers using a slightly larger font.
Page break
When activated, this option maintains the entered page breaks; if not, they will be ignored, even if they are present.
Page numbers
Activate this option to request that the pages be numbered.
Print time
Activate this option to include the time of when the page was printed.
Print date
Activate this option to include the date when the page was printed.
Row number
Activate this option if a progressive number is to be given to each row.
Grid
The grid can be printed just as it is viewed on screen.
Attachments
In the case of exporting to PDF, the attachments are included in the PDF file.
In Banana Accounting Plus this feature is only available with the Advanced plan. Explore all the Advanced plan features. Switch now to the Advanced plan!
Layout
The program automatically adapts the page dimension.
Zoom %
This allows the increase or decrease, on a percentage basis, of the size of the font to be printed.
Reduce to page width
If some columns exceed the width of the page, the program reduces the columns or reduces the zoom so that all the columns will be printed correctly on the page.
As on screen
The print-out will be carried out exactly as presented on the screen.
In case the contents goes past the page dimension:
- If the option "Reduce to page width" is activated, the font size will be reduced;
- If the option "Reduce to page width" is not activated, the part that goes past the paper will not be printed.
Print in black and white
All colors will be converted in gray scales.
Print landscape
To print in landscape format which makes the page read horizontal.