Banana Accounting Plus Interface
Are you new to Banana Accounting Plus? Not a problem. On this page we briefly show you what you will find on the main screen and ho the various elements work.
At first glance, Banana Accounting is similar to Excel, based on tables, and its mode of use is very practical and intuitive. But you will soon discover that Banana Accounting Plus does so much more.

1. The menu bar
The menu bar changes depending on which application is open. Each menu has specific commands. The menus in accounting applications are: File, Edit, Data, Format, Tools, Reports, Actions, Extensions, Windows, Help.
From the Help menu you can manage the data of the Banana Accounting Plus subscription.
Warning: In Mac operating systems, the menu bar is located at the top, to the right of the Apple logo in the shape of an apple.

New: In the Window Menu you have several commands, which allow you to, among other things
- Change the layout of the data windows (side-by-side or cascading)
- Choose different settings from the Appearance command:
- Choose which interface elements to display, to adapt them to small screens.
- Choose the display theme.
- Make the Develop menu visible.
2. The toolbar
The toolbar provides quick access to the most frequently used dialogues and commands.
Simply move the mouse over the desired icon and wait a moment for a description of what it means.
New: If you have several files open, you can now easily see which one you are working on and switch between them very simply from the toolbar.

3. Text input area
Normally, texts are written directly in the cell, but they also appear in the area below the toolbar, where they can also be edited. Several functions speed up and automate their entry.
4. The tables
Each file consists of several tables, which show different accounting or application contents. Switch from one table to another by simply touching the table name with the mouse. Tables vary depending on which application is open. Working with tables allows you to always have data sorted and grouped according to content.
There are main tables (fixed) and auxiliary tables (which appear following certain commands). Auxiliary tables (i.e. generated by the user) must be updated if there is a change or addition of data, simply by clicking on the icon at the top right of the table ![]()

In addition to the various reports available, Banana Accounting Plus allows you to print everything you see on the screen in any table (see Page setup - last paragraph). For more information, visit the Printouts/Preview page.
5. The views
Views are different ways of displaying data from the same table, showing only certain columns. They are very useful when you want to display data differently, without altering the basic settings. Switch from one view to another simply by touching the name of the view with the mouse.
The views are located in the area below the tables and can be customised with the Tables setup command. There is also the possibility of creating new ones.
6. The Filter
The Filter rows function, available in the Advanced plan of Banana Accounting Plus, allows to instantly search, find and modify previously entered transactions. Together with the Temporary Sort Rows represents an important innovation for speeding up accounting control.
For further information visit the page Filter and Temporary Sort rows.
7. Contextual help
In Banana Accounting Plus, contextual help gives you immediate help related to exactly what you are working on. This is done in several complementary ways:
- A - The error message window, which the programme displays when it detects a possible error:
- If you press OK you are shown each individual message.
- If you press Help you are taken to the page explaining the error message with possible solutions.
- If you press Do Not Report, all error messages are saved in the Error Message window.
- B - Question mark symbol at the top right of the table question mark table

A click on the symbol takes you to our Documentation page, where you can find in-depth information on the use of the table and all other programme functions.
- C - Question mark symbol at the bottom
 of the Info or Message window
Clicking on this symbol takes you to the page explaining the error message and possible solutions. - D - Help button in dialogue windows
Clicking this button displays the online explanation page of the opened dialogue box or error message.

8. The columns
Columns are the vertical elements of the table. Each column has its own header. The arrangement, size, description, format, width, style and alignment of the columns can be customised using the functions found in the menu Data → Columns setup
In some columns the data is entered by the user, while in others the programme automatically enters the data and is therefore not editable by the user (e.g. account card columns).
You can also add new columns via Data → Columns setup, but if they contain values they will not be processed by the programme.
9. Find and replace
The Find and Replace function is activated from the Data menu and remains visible until manually closed. It is very practical for finding and changing texts quickly and easily in the table. Not to be confused with the Rename command (only in the Advanced plan), which instead changes the name of an account, VAT code or other throughout the file.
10. The Info windows
This is the area located at the bottom of the screen, where useful information about the table and the box you are in is displayed. This area is divided into three very useful windows that provide immediate information:
- the Info window reports the contents of the row and cell in which you are (e.g. name and balance of the account, VAT code and description of the code used).
- the Messages window, reports error messages.
- the Charts window, displays the chart of the contents of the cell or row you are in (e.g. if you are in an account, the chart with the account's trend appears).
Switch between windows by simply touching the window name with the mouse.
The Info window
The Info window shows the information concerning the cell and the line in which you are: the names and codes of the accounts involved in the entry, the amounts and the remaining balances. When there is an error, the difference is displayed here in red.
- Clicking on the question mark symbol takes you to the page where the error is explained.

The Messages window
When the programme encounters errors, a dialogue box appears to report them:

- Press OK to view each individual message.
- If you press Do Not Report, all error messages are saved in the Error Messages window.
- Pressing Help takes you to the page explaining the error with possible solutions (Contextual Help).
The Messages window contains a list of errors that have been reported by the programme.
- From the Messages window, double-click on the error message to jump to the line that generated the error.
- A click on the question mark symboltakes you to the page explaining the message.

The Charts window
By selecting an account or a group, you obtain the chart in the Charts window at the bottom. The chart immediately provides you with the trend of the situation, including a comparison between forecast and actual situation. You have an immediate view over time without having to consult the amounts.
With the Advanced plan of Banana Accounting Plus, it is now also possible to copy, export and print graphs, as well as copy the data that determined the graph to the clipboard. More information on the Charts page.

11. The status bar
It is located at the bottom of the programme window and contains the following information:
- Line number of the selected cell/number of rows in the table.
- If the Filter is active, the number of visible rows is also indicated
- If several numeric or time-counter type cells are selected, this is obtained:
- Count: Number of selected cells containing numbers.
- Sum : Sum of the values of the selected cells.
In the image above, 3 numeric cells were selected (1'500 + 1'500 + 1'910) and in fact the total is 4'910 in the status bar.
- Zoom
- To enlarge or reduce the size of tables.
- To change the text size of menus, use the operating system settings.
- See also Programme Options.

Fast Entry
In Banana Accounting Plus several practical functions allow you to speed up and automate the following operations:
Here are the most frequently used functions for fast data entry:
Copy, Cut and Paste
Use these functions to copy, cut and paste data from one cell to another, one row to another, one table to another, Excel to Banana, etc. See the functions in the Edit menu.
Texts, accounts and amounts auto-completion
Auto-completion makes data entry much easier and faster. As soon as you type the first few characters, the programme suggests how to complete based on already existing data (accounts, VAT codes, dates or texts you have already entered).
In the menu Tools → Program Options → Editor → Smart fill rows limit , you can limit the number of values that are suggested or even deactivate the functionality.
You can use one of the following keys to accept the value that is proposed:
- Enter key, accept the choice and move to the next editable cell, either to the right or below, depending on the settings you have chosen.
- Ctrl+ Down Arrow key, accepts the chosen value and moves to the cell below.
- Tabulator key, accepts and moves to the cell to the right.
- Shift+Tabulator key, accepts and switches to the cell to the left.
- F6 key (or Cmd+6 for Mac) accepts the text and executes the associated command (see explanation below).

Important:
To deactivate auto-completion of the previous year, the Smart fill with transactions from previous year option must be deactivated, from the menu File → File and accounting properties → Options.
Input and shortcut keys
You can speed up your data entry with various shortcut keys or by entering the dot '.', which takes on different functions depending on which column you are in.
Here are the most common ones:
- On a Date column, the dot "." inserts today's date.
- On a Time column, the dot '.' inserts the current time (e.g. in the Time Sheet).
- F4 key (or Cmd+4 on Apple computers): copies data from the cell above.
You can find the complete list of keyboard shortcuts in the menu Help → Keyboard Shortcuts.
Recurring transactions
Do you have transactions that keep on repeating or almost the same every month? You can write them in the Recurring transactions table and automatically recall them in the Transactions table when you need them.
See how to enter Recurring transactions.
Import bank statements
Automatically import data from bank, postal, credit card, or PayPal statements.
See all available options
Integrated calculator
You can quickly enter formulas in unprotected cells, then press the Enter key and the programme performs the calculation and enters the final result. This function allows you to make immediate calculations, for example when you need to quote a value from a paper document or need to calculate a percentage. The integrated calculator is useful in all tables and in all columns of the Amount type .

Execute Command (F6 key)
Some columns are associated with actions that are activated with the menu Edit → Execute Command, or with the corresponding key (F6 or Cmd+6 on Apple computers) indicated in the information window. This function makes it possible to retrieve data or rows quickly without having to retype the contents. Examples of actions:
- Doc column: resumption of recurring transactions or sequence number.
- Description column: resumption of similar row data.
Wrap text
When the text of a line is very long, the Calculate Line Height command from the Format menu allows you to display it completely, adjusting the line height. For more information see the Format Menu page.
Here are the most frequently used functions for checking and detecting possible errors:
The Balance Column
In Banana Accounting Plus the possibility has been introduced to activate, in the Transactions table, the Balance column, which verifies in real time the difference between Debit and Credit accounts and immediately shows any differences.
Watch the Balance Column Video
The Balance column page
Check accounting and recalculate accounting command
The Check Accounting command from the Actions menu, rechecks all transactions and immediately reports any errors or differences.
Totals Table
The Totals table gives you a concise overview of how your business is doing, as it shows the totals of the main groups and is used to check the balancing of accounts. See the explanations on the Totals table.
Temporary Filter & Sort rows
This double feature allows to Temporary Filter and Sort rows. It helps to temporary sort and filter table rows quickly ,without changing its permanent content or order. These are very useful functions to immediately search for data, both text and amounts.
Once the sorting criteria or filter is lifted the table rows go back to their original order. More info...
File Menu
When using Banana Accounting, each accounting management is saved as a different file.
Banana Accounting files are compatible with versions from all operating systems and with synchronization systems.
- New...
- Open...
- Close / Close all
- File and accounting properties
- Save/Save as/Save all
- Create Pdf dossier
- Export file
- Page setup
- Logo setup
- Print/Print preview
- Create Pdf...
- Send file via email
- Open file location
- Recent files / Favorite files
Close / Close all
These commands allow you to close the active file or all open files of Banana Accounting.
Create a new file
To create a new file, go to the File menu and click on the New command.
This command opens the window for creating a new file. From the same window you can access all available templates. We recommend that you start from an existing template and customize it with your data. The window that appears offers the possibility to create a new file in three different ways:
- Using an existing Template (recommended choice)
- Copy data from an existing File
- Use a New empty File
Please note: those who have subscribed to the Professional plan of Banana Accounting Plus, while creating a new file, see the message: Active plan: Professional Plan. The functions of the Advanced Plan are available up to 70 transaction rows. This message can be ignored and automatically disappears once the 70 transaction rows are exceeded.
Start with one of our templates
This will generate a new File based on one of the existing templates. There are multiple templates suitable for every legal form and business.
According to the selected Region, the models available in the language of the nation are displayed. The image shows the templates in English language for Switzerland.

- File menu > New
- In the Region field, select your country/language
- In the Category field, select your activity's category (business, private, non profit, ...)
- In the Type field, choose the type of file you want to create (Cash Manager, income/expense accounting, double-entry accounting, ...)
- You can also search for a template by entering a keyword in the Filter by box.
- On the right side of the window, select the template that most closely matches your needs.
- Click on the file and confirm with the Create button to open the selected template.
All the files with the VAT option have the VAT Codes table adjusted to the new rates.
The chart of accounts can be adapted to your requirements (change of account description, insert or delete groups, sub-groups, etc.)
Save the file with a name
Once you have opened the template with Banana you can save it with your own name by choosing the File menu > Save as command:
- Select the destination folder
It is useful to create an “Accounting” folder for each year, so that you can save the accounting file and also the documents for that year. We recommend that you also consult the page Organize your work. - Select a file name. We recommend a name containing the company name and the accounting year (for example smith_company_2025).
- The software will add the .ac2 extension, typical for the Banana Accounting files.
Adapting a template
- Edit the File properties
- Adapt your Chart of accounts
- Enter your bank accounts.
- Enter or edit the accounts to fit it to your requirements.
While going along with your work, you will still be able to add or edit accounts, if new needs arise.
Start with a Tutorial
Tutorials are existing templates, which contain within them example accounting data (opening balances, entries, budgets, ...). A tutorial is not available for all templates.
The tutorial files are useful for understanding how to structure accounting within a certain template. The example data entered are for demonstration purposes only and can be changed, deleted or replaced with your own data at any time.
When you select a template and it has a tutorial file, the button Create from Tutorial automatically appears next to the template detail description.

Start from an existing File
Starting from an existing file or template, without modifying the existing file.

There are several possibilities to copy data:
- Open the file that is to be your template via the Browse button and indicate the path to locate your file.
- Create a copy of the open file, using the File > Save As command.
- Else, you may create a copy of the open file via the Tools > Create File Copy command. Choose which data to keep in the dialog window. If none of the three options are activated, a file is created with the chart of accounts only.

- Save the file in the folder where you wish to keep the data (normally in the documents folder). Enter the company name and the accounting year as file name, for example smith_company_xxxx.ac2.
- If you are taking over an existing accounting file, you will also need to enter the opening balances in the Opening column.
- If you are working in a multi-currency file, you need to update the opening exchange rates.
Starting from a new empty file
You will be starting from scratch, so you will need to set up the basic accounting data and the entire Chart of Accounts (not recommended).

- Menu File > New.
- Select your country/language
- Select your category
- Select your Accounting template
- On the bottom of the list click on New empty.
- Setup the Outline to create new file

- Setup the File and accounting properties
- Save with File Name.
- Create the Chart of Accounts structure
Related documents
- Income and expenses accounting and Cashbook
- Double-entry accounting
- Double-entry accounting with multi currency
- Utilities documents
Transferring to a new year
When transferring to a new year, there is a specific procedure to follow, in order to create a new year's file and automatically carry forward the opening balances.
New file settings
When the program creates a file with new characteristics, you need to setup the outline of the new file.
Outline to create new file
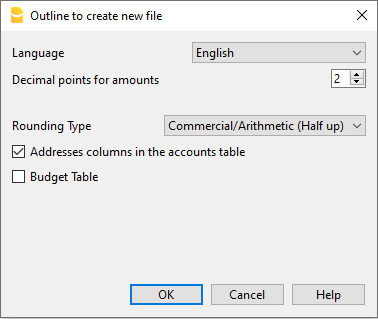
Language
The language used for the columns headers of the various tables.
Decimals and rounding
Decimal points for amounts
In order to avoid accounting differences, the number of decimal points for the amounts is fixed for each file. Two decimal points are normally used, but there are currencies where decimal points are not required so 0 needs to be inserted.
For other currencies that use multiple decimals such as the Tunisian Dinar or crypto currencies such as Bitcoin (9 decimal places), Ethereum (18 decimal places) the appropriate number must be indicated.
Accounting can be managed with amounts of up to 27 decimal places.
Decimal points for amounts in foreign currency
When using a multi-currency accounting, the number of decimals for the amounts in foreign currency must be defined. For example, if the accounting is in EUR and you are managing crypto currencies such as Ethereum, you must enter 18.
Generally, the number of decimals must not be less than the number of decimals in the base currency.
Rounding type
The rounding is applied to amounts with decimals that go beyond the set number of decimals.
If 2 decimals are set, this is the type used to round the digits over two decimals.
Depending on the methods used, the following amounts: 1.005; 1,015; 1,025; 1,035 will be rounded in a different way.
- Commercial/Arithmetic (Half up) rounding to the next whole number: 1.01; 1.02; 1.03; 1.04.. In accounting, this is most commonly used.
- Banking (Half average) rounding up or down towards the nearest even number: 1.01; 1.02; 1.03; 1.04.
Functionalities to be included
For more information on the functions to be included see:
Address fields in accounts table
When this option is activated, the Address view is created in the Accounts table. In this view, the user can enter the addresses of clients, suppliers and members.
Budget Table
When this option is activated a Budget Table is created, where the user can enter his budget transactions.
Accounting files, in different languages can thus be created, and with different decimal points. In order to change the language or the decimal points once the accounting file has been created, the accounting type must be converted via Tools → Convert to new file from the menu.
Accounting with multiple languages
With Banana Accounting Plus, you can create accounting files in different languages, and present the Balance Sheet and Profit & Loss Statement in the language you need.
The available languages are: English, Italian, German, French, Spanish, Portuguese, Chinese, Dutch.

The different languages
- Program language
The one used for the interface, menu dialogues, etc.
You can change it from the Tools menu → Program options.
See red box 1 and 3 in the image above. - Documentation in different languages
You have a complete documentation in different languages, easily accessible by clicking on the help button. - Accounting file language
See red box 2 in the image above.When you create an accounting file, the columns are set in the creation language.
- The language of the column and table header
You can change it at your convenience. For example, instead of using the term VAT, you can use the abbreviation that best suits your country's requirement. - The content in any language
In the cells you can enter texts in any language. - Additional columns for other languages.
You can add columns to have the Balance Sheet and the Profit & Loss Statement in different languages. You can create columns for other languages in the Transactions table and also in all other tables. - Views in different languages
You can easily switch between different languages and just print the output in the desired language. - Balance Sheet and Profit & Loss Statement in different languages
You can customize the printout, and just choose to show the required columns in the final reports.
How to change the file creation language
Each document on Banana Accounting Plus is a separate file. The language of the file is separate from that of the program and is defined when the file is created. (File menu → New).
Column names and headers are assigned at the time the file is created, the creation language is then used.

To change the language of the file and columns, you need to re-create a new file:
- From the Tools menu → Convert to new file command
- In the open dialog box, select the file type equivalent to your existing file and click OK
- In the next window choose the new language of the file and the type of rounding, then click OK
The program creates a new file identical to your previous one, with the new language settings. This new file must be saved with a new name.
Change the current language of the file
The current language is the one the program uses to display the wordings, such as "Opening balance" in the account card or the dates in the reports.
Normally, it will be the same as the creation language, but it may be changed in File properties → Other.
Change the column headings
You can change the column header with the Data menu → Columns setup.
Add columns for different languages
In the Accounts table and also in the other tables (Transactions, VAT codes), you can add additional columns where you can enter the descriptions in other languages.
- From the Data menu →Tables setup → Add new column command
- Use the name of the language (e.g. German, Chinese, etc.) as the column name.
- In the newly created columns, for each row, complete the description in the language that has been added.
Create Views for each language
Create a view for each language to have printout only with the desired language.
- Data menu → Tables setup command
- Create a View for each language.
In each table you can have different views for different languages, or the views that include columns of different languages. - Customize your printout in the language you require. If you want to print in different languages you can create one Customization print for each language so you don't have to change the settings each time, but have them already set up.
Enhanced Balance Sheet for each language
Once you've added the language column to the Accounts table, you can have it appear in the Enhanced Balance Sheet report as well.
- Open the Enhanced Balance Sheet with groups.
- Choose the Customization you want to print.
- In the Customization section with the Duplicate command Create a new Customization for your language.
As customization name, give the name of the language. - Go to the Columns section:
- Advanced button for the Balance Sheet columns
- Add button
In the section of the Accounts table:- Make the column of the language you are interested in visible.
- Hide the Description column of the default language.
- Repeat the operation also for the Profit and Loss columns.
- Next time when you open the Enhanced balance sheet with groups, you will have your language already set up.
- Include the Customization in the Favorites menu.
This allows you to access your report faster.
The predefined texts of the report (date etc.) are displayed in the current accounting language. It may be necessary to change the current language from time to time.
Extensions
If you have specific needs in different languages, they can be programmed as Extensions.
Open and save a file
To open a file, choose the Open command from the File menu, or use the corresponding icon in the Toolbar.
Opening a file
Data on the disk is loaded into memory, where it can be processed.
- Accounting files can be opened in Banana Accounting if they are on the local computer or if they are accessible through a network.
If they have been sent by email, you need to move them to a computer folder before opening. - Only one user at a time can edit a file.
If you edit a protected file or a file already in use by other users, you will need to save the file with different name in order to save your changes. - If the file is protected by a password, the password dialogue is displayed.
- The Banana Accounting program, notifies you that you have opened a read-only file in the following cases:
- the file is located on a non-writable disk (CD-ROM)
- the file is located on a temporary non-writable folder
- the file is protected or the user doesn't have rights to edit it
- the file has already been opened by another user
- the file has already been opened by the same user but in another session
How to look for your *.ac2 accounting files
If you don't remember in which directory your accounting files are located, you can use the search Windows Explorer or the Mac finder search tool.
Find your accounting file on a Windows computer
Banana Accounting files have an .ac2 extension. The Windows search tool will vary depending on your Windows version.
- Windows 10: click on the Search icon on the Applications bar and enter "ac2" or your file name and click on the Documents arrow.
- From the Explorer File Manager enter the "*.ac2" extension or your file name and let Windows look for it.
- When in Banana Accounting, click on the File menu > Open, enter the "*.ac2" extension in the top right search box of the dialog window and then click on the look in the whole PC icon, or select the directory where you want Windows to look for your file.
Find your accounting file on a Mac computer
- In Banana Accounting, in the opening dialog File menu > Open, enter "ac2" or a word that is part of the file name in the top right Search box. With the icons, select where you want to look for your file (in the entire computer or in selected folders).
- Open the Finder and enter "ac2" or a word belonging to the file name in the search box.
- Right click on the Finder icon, then click on Search, and then enter "ac2" or a word belonging to the file name.
Saving a file
With the Save or Save as... command, the data is saved on your computer or the chosen storage unit (external drive, memory stick, Google Drive, Drop Box, or other cloud systems). Existing data on the disk is replaced with the new one. Banana files are saved with the ".ac2" extension, which is different from the program's extension, ".exe".
- A single file can be saved by only one user at a time.
The file can be saved by the user and only if it is not also being used by other users - Files can be saved anywhere.
You can enter the file name and destination when saving it for the first time or when using the Save as command from the File menu
As a first option, Banana Accounting will suggest the Documents folder as destination folder for the .ac2 files, but this can be changed with the Browse button. - If you are managing different accounting files, we suggest you create a separate folder for each company and for each accounting year. Also check the page Organize Your Work.
- Each file can be password protected.
Warning: Banana files are not saved within the program but on the storage unit chosen by the user, like any other file, such as Word or Excel.
Automatic saving
Banana Accounting automatically creates and saves your work in a temporary file that ends with ".autosave" . When you save a file or you exit the program, this temporary file is deleted. In case your computer should crash or turn off in the middle of your work, it would be possible to recover your data by opening this file.
When the program is reopened after a crash, it will check that the temporary autosave file was not deleted, a message appears, Recover autosave file, asking whether you want to retrieve the file.
In the Program Options of the Tools menu, it is possible to setup how frequently Banana Accounting should execute this autosave.
Accounting files (*.ac2)
- Files created with Banana Accounting have an ".ac2" extension, regardless of the operating system being used.
- The .ac2 file format is specific for Banana. When saving, all data are compacted and saved in bulk.
- Ac2 files are compatible between different operating systems (Windows, Mac and Linux)
You can save a file with Windows, then open it and edit it on a Mac, and then reopen in it a Linux or Windows computer. - Each file can be sent as an email attachment, edited on different operating system and resent to the sender.
- Accounting files are completely separated from the software Banana Accounting itself, that has an .exe extension for Windows,
- The installation files for Mac have a .dmg extension and a .deb, .rmp .run or .tgz extension for Linux.
Copying or moving files
Banana Accounting can save files on any drive recognized by the operating system as a rewritable disk.
From non-rewritable drives (CD or DVD) Banana Accounting can only read files.
*.ac2 files can be moved:
- From one folder to another
- Use Windows Explorer (Windows) or Finder (Mac) to look for the folder where the files have been saved.
- Copy and move them to the new destination folder (once pasted, if necessary, they can be deleted from the original folder).
- From one computer to another
- Save the files on a USB memory stick and transfer them on the new computer:
- Open in Banana Accounting the file to be moved
- From the File menu > Save As command, choose as destination the memory stick
- You can also copy it by opening Windows Explorer and dragging the accounting file to the memory stick drive.
- Send the file as an email attachment to the new computer
- Save the files on a USB memory stick and transfer them on the new computer:
Deleting or renaming files
Banana Accounting does not have a feature for deleting or renaming files. In order to do this you must use the relative function of the operating system (Windows Explorer or Finder in Mac).
Saving files on DropBox, Google Drive and other Cloud systems
Banana Accounting Plus is a NoCloud (or non Cloud) programme: it is installed and works locally.
Files created with Banana Accounting Plus, as well as all related documents belong exclusively to you and you can save them wherever you want, including on systems such as DropBox and Google Drive that keep files synchronized with Cloud storage services. More info...
Banana Accounting overwrites the *.ac2 files and deletes the *.ac2.bak file. In the list of deleted files you can find the previous versions of the *.ac2.bak file.
Visualization of changes
Banana Accounting, Android version, works directly with the Dropbox server. If you make changes on the PC, normally you have to wait a few seconds before seeing the changes on the server and then on the Banana Accounting file.
To ensure that the file is correctly synchronized with the server on your computer, the file must be marked with a green check.
If you do not see the synchronization symbols (green, red, blue), you must update the Dropbox application installed on your computer.
Another way to check the synchronization status from your computer is to click on the Dropbox symbol in the bottom bar:

Furthermore, on Android, synchronization does not occur while you are working with the application. You must therefore close and reopen it.
Warning:
Banana Accounting cannot notice if you open and edit files on several computers at the same time. It may therefore happen that one person deletes data or another person adds new data. Only the last copy of the file that has been saved is kept.
You must therefore take care to avoid working on the same file at the same time.
Related resources:
Enter password
When the user opens a password-protected file, a dialog box appears to enter the password.
- The file password is set in File> File and accounting properties > Password tab.
- This dialog also appears with the first execution of some commands, which require access to a password-protected file, such as the previous year's accounting.

NOTE
When the previous year is password-protected, and you want to execute the Enhanced Balance Sheet with groups command , or resume transactions from the previous year, the programme will ask you to enter the password for the previous year.
To avoid being repeatedly asked to enter the password, one of the following steps must be taken:
- Enter the same password also in the new year
- Save the file after entering the password for the previous year (the password will remain stored)
If, however, you move the new year or the previous year to a new folder, you will have to re-enter the password (this is the case if you open documents from shared folders that may have different paths from computer to computer). If the file refers to several years, e.g. 2022, 2021, 2020, ... it will be necessary to open each file (thus 2022, 2021, 2020, ...) and re-enter the password for the previous year (2021, 2020, ...) in each year, then save each file. - Delete the previous year file link in File and accounting properties > Options > File from previous year (this solution is only recommended if the previous year link is no longer required)
Data backup
Here are some tips on how to minimize the risks of data loss.
Security copies (backups)
Banana Accounting lets you choose the support and the directory where to save the accounting file. You can best organize your files on the local computer, the network computer or the cloud. It doesn't include a backup management system.
We advise you to create external backup copies to make up for any loss of data, for example due to a computer crash, hard disk defect or other causes.
- For Mac use the "Time machine" function.
- For Windows use the "File History" function.
- Dropbox, OneDrive, iCloud, Google Drive offer the possibility to keep previous versions of your files.
There are also other programs on the market that allow you to automatically create backup copies of your data.
.bak files
When the saving procedure is successful, Banana Accounting replaces the contents of the existing file with the most recent accounting data:
- The data are saved in a temporary file.
The data saved on disk are replaced with the pre-existing data, only if the saving operation is completed correctly. - The Create backup copy (.bak) option, from the Tools menu → Program Options command → File handling tab, is active by default, and renames the existing file with the same name, and adds the extension ".bak".
A new file is created with the name "file name.ac2.bak" which contains the data before saving it.
If a file is corrupted, you can recover the version before saving it by opening the .bak file, by dragging and dropping it in Banana Accounting or using the File menu → Open command.
Recovering data from a *.bak file
When for any reason you can't find your accounting file, you can recover it from the backup copy that the program automatically runs.
How to proceed:
- Open the folder where the accounting file is located.
- Open the file with the extension .bak. If it does not appear in the folder, select "File type" All files (*.*) in the window below.
- Once the file is opened, save it as a file. Usually it is given the same name as the lost file.
Automatic saving
Banana Accounting automatically creates and saves the work in a temporary file. When you save or normally exit the program, this temporary file is deleted. If the computer should suddenly shut down, the data can be recovered using this file.
Damaged .ac2 file
Computers sometimes have technical problems or are infected by viruses. Sometimes documents sent by email arrive damaged. It is therefore always useful to have backup copies.
In case your files are damaged due to a technical error, our Support can verify, for a fee, whether data can be recovered.
Recover autosave file
This dialog appears when the program closes unexpectedly, and it was not possible to save changes made to the file.
When the program is reopened, it detects that the autosave file (temporary file) has not been canceled, and then asks if you want to retrieve the file.

You can choose from the following options:
- Recover
- The autosave file is copied replacing the original file
- The original file is renamed as indicated in the dialog window
- Don't recover
- The program deletes the autosave file.
- The program opens the original file.
- Ignore
- The program keeps the autosave file and doesn't open any file.
- Next time you open this file, the program will warn you that an autosave file with unsaved changes was found
If the program stops working
If the program is closed normally, it asks whether to save the modified data, and the autosave file is deleted.
The program may however unexpectedly shut down for a number of reasons:
- A power outage or another event that caused an immediate arrest of the operating system
- A problem that led to the crash of the program
- Due to another program or to a situation of the operating system or driver that caused the program to stop.
Try to restart your computer and use the program without other programs.- A flaw in the operating system or a faulty program can cause an interruption of Banana Accounting.
- A computer fault (memory error)
- A virus or some other problem
- A problem in the Banana Accounting software
Usually when, repeating the same command always causes the program to crash.
If the program stops in completely different situations, it is more likely that the problem is due to a computer or operating system (see above)- First of all, make sure that you have the latest version of the program.
Install the updates if necessary. The problem could have been solved in the meantime
- First of all, make sure that you have the latest version of the program.
- Due to another program or to a situation of the operating system or driver that caused the program to stop.
Contact technical support
Countercheck the situation in which the program stops.
- It is important to understand in what situations the program stops, so that technicians can replicate the problem.
- When you contact the technical service:
- Describe the problem and how it can be reproduced - describe the error.
- Enter your system details (you can copy them under Tools menu > Program Options > Info System.
- If the problem occurs in relation to a file, send a copy of the file (removing confidential data).
Local copy of your work
One of the key points of any Desktop application is saving files. The user's work and the data entered must not be lost. Even in the case of a computer crash, the amount of work lost must be minimized.
A new strategy for saving files has been introduced with Banana Accounting+. From the user's point of view nothing has changed, but internally important improvements have been made to make the data saving process even more secure and solid, and to optimize it for use on cloud and mobile disks.
How it works
With the new implementation of the file saving and recovery process, Banana Accounting creates a local copy of the open file and then works on the local copy present in the device (pc, mobile, tablet) until the user saves the document. At this point Banana Accounting returns and saves the modifications in the source file. In the meantime, Banana Accounting regularly saves the modifications made to the document in the local copy.
Banana Accounting proceeds as follows:
- The user selects the file to be opened (source file)
- Banana Accounting create a local copy of the source file
- Banana Accounting blocks the opening of the source file to prevent modifications from multiple users
- Banana Accounting reads the local copy
- Banana Accounting regularly saves (by default every 2 minutes) the modifications made to the document in the local copy
- As soon as the user clicks on the Save button, Banana Accounting returns and saves the modifications in the source file.
- When the file is closed, Banana Accounting unlocks the source file and deletes the local copy.
- If the application cannot close or correctly save the modifications in the source file (electricity interruption or other causes), the local copy remains on the device and the its content can be recovered at the next Banana Accounting launch.
- If the file is temporarily not accessible (example if it is on a disconnected network disk or a USB pen), the user can keep working and the document modifications are saved in the local copy until when the source file is accessible again.
In other words the local copy is both a working document and a recovery document.
Advantages
The autosave feature is always active, so the work that could be lost (with the default settings for file recovery) corresponds at most to the work of the last two minutes.
Access to the file doesn't have to be continuous. Even if a file is temporarily inaccessible (e.g.: the file resides on a network disk or a disconnected USB pen), the user can continue working, and changes to the document are saved in the local copy until the source file is accessible again.
The local copy is not synchronized in the cloud. For this reason, the performance of the application is improved and the amount of data sent to the cloud is minimized.
This process is implemented in the same way on all operating systems: Windows, MacOS, iOS, Linux, Android and WebAssembly, regardless of where the file is saved.
Data recovery
In case of an interruption of the application, the local copy remains on the user's device. The next time the Banana Accounting is started, the application informs the user that changes have been found that have not been saved in the source file.
At this point the user has 3 choices:
- Open the recovered file
The user can decide whether to save the recovered file or to abandon the changes - Ignore the message
The user can later decide what to do - Cancel de recovered file
The recovered file will be canceled
The local copy remains on the user's device as long as the document remains in use or the changes have not been correctly returned to the source file. Once the file has been closed, the local copy is deleted.
The local copies are saved in a folder hidden under the system's user data. The user does not need to access this folder, access to this folder is not recommended. In case our support requires you to open this folder, you can access it through the menu Tools → Program Options → Advanced → System Info → Working copies path → Open path ....
Keep in mind
This implementation:
- It does not replace a good backup policy.
- It does not replace a version control system.
Although this implementation is very secure and robust, we cannot guarantee that it will work 100% smoothly in all cases. For this reason, we encourage our customers to adopt a good backup policy and version control system.
Several operating systems provide backup and versioning functions. We ask you to browse the documentation of your operating system....
File compatibility with previous versions
The Banana Accounting files are compatible with the previous versions starting from version 5.12.
This means that the files can be read and written by any version of the program.
We try to preserve compatibility as much as possible, so that files can be exchanged with different versions of the program.
- Newer versions implement new features that are not available in earlier versions. Using these features leads to incompatibility. When opening the file with an older version of the program, you are warned not to use the file, because there may be errors in calculations and/or data loss.
- Newer versions offer new applications. These cannot be opened with older versions.
Below we present the list of changes that lead to incompatibilities. If you use these features you should update the program to the new version.
Version 10 (BananaPlus 2020)
- Using the new Links column.
The new version introduces the possibility of linking a document in every row of any table, through the menu Data → Links.
In previous versions, this possibility existed only in the Transactions table. The ability to add links in any table is a feature that is highly requested by users; unfortunately, it was not possible to implement it, maintaining the compatibility of files created with previous versions. If links are used, the files are no longer compatible with previous versions.
In the new version, when the file is opened, a Link column is added to each table. The data contained in the DocLink column of the Transactions table is copied to the new column, and the DocLink column is deleted. - Accounting Applications:
- Use of the new Segments column.
- Use of VAT code for the Reverse charge.
- Use of the Payments column.
- Use of the BeginFormula column in the Budget table.
- Timesheet
- Added Columns "TimeWork", "TimeAbsence".
- Column Supplement.
- Applications Invoices and Inventory
They are not supported in previous versions.
Version 9
- Accounting applications:
- Items Table.
- Quantity columns in the Transactions table.
- Accounts and VAT codes with lowercase descriptions.
- New features for the Enhanced Balance Sheet with groups.
- New features for the PDF Archive command.
- New Print functionality.
- Timesheet application
It is not supported in previous versions.
Version 8
- Accounting applications:
- Budget table
- Documents table
- Library application
It is not supported in previous versions.
Version 7
- Accounting applications:
- Modification of VAT Base amount in the Transactions table.
File properties
When a new file is created, the basic data need to be entered in the File menu > File and accounting properties.
The file properties (Base data) can vary depending on the chosen accounting type.

For the explanations of the different tabs please refer to the menu on the left.
Accounting Tab
Access this section via the File > File and accounting properties > Accounting section.
Left and right headers
These are the two empty cells at the top where any desired text can be inserted which will be used as a header for print-outs (left and right).
Opening date
The opening date is the date when the accounting begins. It can also be left blank. If a date prior to the opening date is inserted when entries are made, the program will give an error message.
Closing date
This is the closing date of the accounting. It can also be left blank. If a date greater than the closing date is inserted when entries are made, the program will give an error message.
Base currency
The code of the currency in which the accounting is being handled. You can enter any currency code, even the one that are not in the list. When the code of the basic currency is being changed, the program changes the column headers for the amounts in basic currency using the new code.
In the multi-currency accounting files it is mandatory to select the basic currency, which will work as the functional currency, the one used for the calculation of the Balance sheet and Profit & Loss statement.
Changing the Basic currency symbol
If you change the basic currency symbol the program will not change the existing amounts. We advise you to change your basic currency symbol only if you don't have yet entered any opening balances and any transactions.
Accounting file WITHOUT foreign currencies
You can replace the basic currency symbol with the new symbol.
Accounting file WITH foreign currencies
To change the currency code in accounting with foreign currencies refer to the following page Change the basic currency.
Options Tab
This section is accessed via File > File and accounting properties > Options section.

Transaction date required
If this option is activated and then a transaction is entered without a date, there will be an error message.
Recalculate totals manually (F9)
If this option is activated, the program will not automatically recalculate the principal groups of the accounting file, but the user needs to use the F9 key.
File from previous year
By using the Browse button, the user can select a file from the previous year.
Smart fill with transactions from previous year
If this cell is checked, the program keeps the transactions from the previous year in memory, and offers them as Smart Fill while the user inputs new entries.
Use the minus sign (-) as segments separator
When this option is activated, the segments have to be entered in the Transactions table with the minus (-) sign preceding the segment code. When this option is deactivated, the segments need to be entered with the colon sign (:), as in the chart of accounts. The colon needs to always precede the segment code.
Records (+/-) cost centers according to the category
This function is only active for Income & Expenses accounting and Cash Manager. By activating this box, the amount is entered in the cost center (positive or negative) according to the category.
If, instead, this option is not active, in order to enter a negative value, it is necessary to enter a minus sign before the cost center (-CC).
Related document: Text input, edit and Smart fill
Address Tab
This section is accessed via the File > File and accounting properties > Address tab.
In this section it is possible to enter data concerning the company or person whose accounting is managed.

Foreign currency
This section is accessed via the File > File and accounting properties menu >Foreign currency section.

For the explanations of the different tabs please refer to the corresponding page Starting a multi-currency accounting.
VAT/Sales tax
This section is accessed via the File > File and accounting properties menu > VAT tab.

For the explanations of the different tabs please visit the corresponding page File properties (VAT/Sales tax tab).
Other Tab
This section is accessed via the File → File and accounting properties menu → Other tab.

Current language
There are some file texts that the program generates automatically, (e.g. the lines of the Totals table, the transactions on the account card, and the printout of the Enhanced balance sheet); in this tab, the user can indicate the language for these texts (usually the same as the creation language).
Creation language
This is the language chosen and selected when the user creates an accounting file; this language is used for the column headers. If the user wants to change the creation language, then it is necessary to convert the file to a new one using the Tools menu → Convert to new file command.
Extensions
It is possible to indicate extensions of Banana Accounting. When the file is opened, the program will automatically install the extensions. They can be used for templates or files that are combined with extensions. Other users who open the file receive directions or commands to install the necessary extensions.
The list shows all extensions that can be installed.
Extensions' keywords
Enter a keyword contained in the Banana Accounting extension. Usually these keywords are specified in the installation instructions of the extensions; most extensions don't use keywords to restrict viewing to certain files.
If a script has the @docproperties attribute, the command will be visible in the Extensions menu only for those Banana files that have set the same keyword in the Extensions field. To set multiple keywords, you need to separate them with the ; (example: datev; donations).
Password Tab
This section is accessed via the File → File and accounting properties menu → Password tab.

Files can be protected by using a password.
Enter a password for a file without a password
Confirm old password
Leave the cell empty.
New password
Enter the password.
Confirm new password
Enter the same password that you entered in the New Password box
Change an existing password
- Enter the existing password.
- Enter the new password twice.
- Confirm with OK.
Password compatibility with old versions
Activate this option if you want your password to be compatible with the previous Banana Accounting versions.
This option not recommended because the password is saved in a less secure mode.
How to cancel a password
- Enter the existing password.
- Leave the boxes for the new password empty.
- Confirm with OK.
Forgotten password
For information about a forgotten password, please refer to the Questions and Answers page, Password unlock paragraph.
Note
Using a password does not give a high level of protection. In order to render the data truly inaccessible to third parties, it is necessary to have the appropriate cryptographic software.
Text Tab
This section is accessed via the File → File and accounting properties menu → Texts tab.

In this tab it is possible to enter different keys in order to save extra information, such as the accountant name, for example. These keys and the resulting texts can be taken over and used in scripts.
Key
In this field, input the reference text (e.g.: accountant name).
Value
In this field, it is necessary to input the value related to the key (e.g.: Ocean Avenue, ...).
Add
This button saves the newly entered data.
Remove
This button removes the selected Key.
Create PDF
The Create PDF command is activated from the menu File > Create PDF and it prints in a PDF format everything that you see on screen.

There is also a different command from the menu File > Create PDF dossier, that gives you the possibility to choose which contents of your Banana Accounting Plus file you want to include in your Pdf dossier.
Saving options
Saving options are only available with the Advanced plan of Banana Accounting Plus.
Include attachments
Save the attachments within the PDF file. Attachments refer to local files that have been inserted in the Link columns of various tables. In the created PDF file, a symbol will be placed next to each attachment. By clicking on the symbol, the attachment will be opened and displayed. Please note that the ability to open the attached files is only available in PDF readers like Adobe Acrobat Reader, Foxit, and others. If the PDF file is opened in a web browser, it might not be possible to open the attachments.
This option is only visible if the document(s) contain Link elements.
Technical notes
- In print and print preview (physical printer and virtual pdf printer of the operating system) all fonts supported by the operating system are possible.
- In Windows pdf export only TrueType fonts that have Unicode cmap mapping and contain the following tables "OS/2", "cmap", "cvt ", "fpgm", "glyf", "head", "hhea", "hmtx", "loca", "maxp", "name", "post", "prep".
Error creating Pdf file: %1 - If the program fails to load the indicated font, it replaces it with a default one (Helvetica or Arial depending on the operating system) and a message is displayed to the user that it is unable to use the PDF font.
Printouts/preview
Print everything you see on the screen
In addition to the various reports available, Banana Accounting allows you to print everything you see on the screen, in any table, by simply using the File > Print command.
Print preview
All the printouts of the various accounting documents can be saved in PDF, Html, MS Excel and copied to the Clipboard, allowing the user to also access them many years later.

The button pulls up the Printer Setup window from your Windows system: the selections are valid for the current working session only. Permanent alterations need to be input using the Windows control panel.
Horizontal or vertical printing and other printing parameters of the table need to be input under the Page Setup command and are different for each view.

Print selected cells only
When you have a selection of cells in the table, the Selection option is activated and the preview and printing will concern the selected cells only. To print the entire table, turn off the Selection option.
Page size
The page size is taken over from the printer preferences. To change or correct the page size, go to the printing preferences and select the desired size (for example, A4). If you have already selected this size (A4), you must select it again to correct the page size.
Exporting to other formats
Printouts can be exported in different formats:
- PDF
The format that preserves the print layout. - Html / Excel / Latex
Formats to transfer data to other software.
Copy to clipboard
The entire report is copied to the clipboard. You can then paste it into Excel or other software using these formats below:
- Text
- Html (with formatting styles)
Print settings
Clicking the Toothed Wheel in the toolbar gives you access:
- For tables, to the page setup dialog.
- For reports, to the specific report setup dialog.
By default, the program is set to automatically resize the columns or reduce the zoom so that al columns are printed correctly on the page.
Page numbering
You can modify the page numbering by setting the starting number and the prefix.
Refresh
Clicking on the Refresh button regenerates the document according to the specific print or report settings.
Printing issues
- A slow preview display may be caused by the default printer being unavailable.
- It is important to use the updated printer driver.
Accounting printouts
You can find information on specific printouts for the different accounting types at the following pages:
- Double-entry accounting
- Multi-currency accounting
- Income & Expense accounting
- Cash Manager
- VAT Report
- Swiss VAT form - page in Italian, German or French
Page setup
The Print and Preview properties are accessed via the File menu > Page Setup command.
Each View of the table has its own print setting. The name of the view is indicated in the dialogue title.

Left header
This is where the title for the current view is shown. The title can be edited and appears at the top left of the printed page.
Right header
It is possible to enter a different text that will be printed at the top right-hand side of the page.
Logo
Allows you to add a logo:
- Use the Change button to the right of the Logo box; you access the Logo Formats dialog.
- Select Add and insert your own logo.
- From File > Page Setup , enter Logo in place of none.
- Confirm with the OK button.
More details for inserting a logo are available on the Logo setup page.
Margins
It is possible to input the page margins here: Left, Right, Top, Bottom. Measurements are in centimeters.
Shrink page to printable area
This function makes it possible to adapt the printable area when the print goes past the margins of the earlier defined page margins.
Include in print
When these functions are activated, they allow to display the following data:
File headers
This is the text that is being entered in the File properties found in the File menu.
Page headers
The page header will also be included in the printout.
Table name
The table header (f.i. Accounts, Transactions, etc.) is also included in the printout.
Column headers
Allows to display the various table columns.
Large font
The program prints the headers using a slightly larger font.
Page break
When activated, this option maintains the entered page breaks; if not, they will be ignored, even if they are present.
Page numbers
Activate this option to request that the pages be numbered.
Print time
Activate this option to include the time of when the page was printed.
Print date
Activate this option to include the date when the page was printed.
Row number
Activate this option if a progressive number is to be given to each row.
Grid
The grid can be printed just as it is viewed on screen.
Attachments
In the case of exporting to PDF, the attachments are included in the PDF file.
In Banana Accounting Plus this feature is only available with the Advanced plan. Explore all the Advanced plan features. Switch now to the Advanced plan!
Layout
The program automatically adapts the page dimension.
Zoom %
This allows the increase or decrease, on a percentage basis, of the size of the font to be printed.
Reduce to page width
If some columns exceed the width of the page, the program reduces the columns or reduces the zoom so that all the columns will be printed correctly on the page.
As on screen
The print-out will be carried out exactly as presented on the screen.
In case the contents goes past the page dimension:
- If the option "Reduce to page width" is activated, the font size will be reduced;
- If the option "Reduce to page width" is not activated, the part that goes past the paper will not be printed.
Print in black and white
All colors will be converted in gray scales.
Print landscape
To print in landscape format which makes the page read horizontal.
Export PDF from print preview
This window is displayed when you need to export to PDF from the print preview.
To export invoices in PDF:
- From the menu, Reports > Customers > Print invoices
- Specify the invoices to print (e.g., 1-10)
- Confirm with OK
- From the print preview, click on the PDF icon
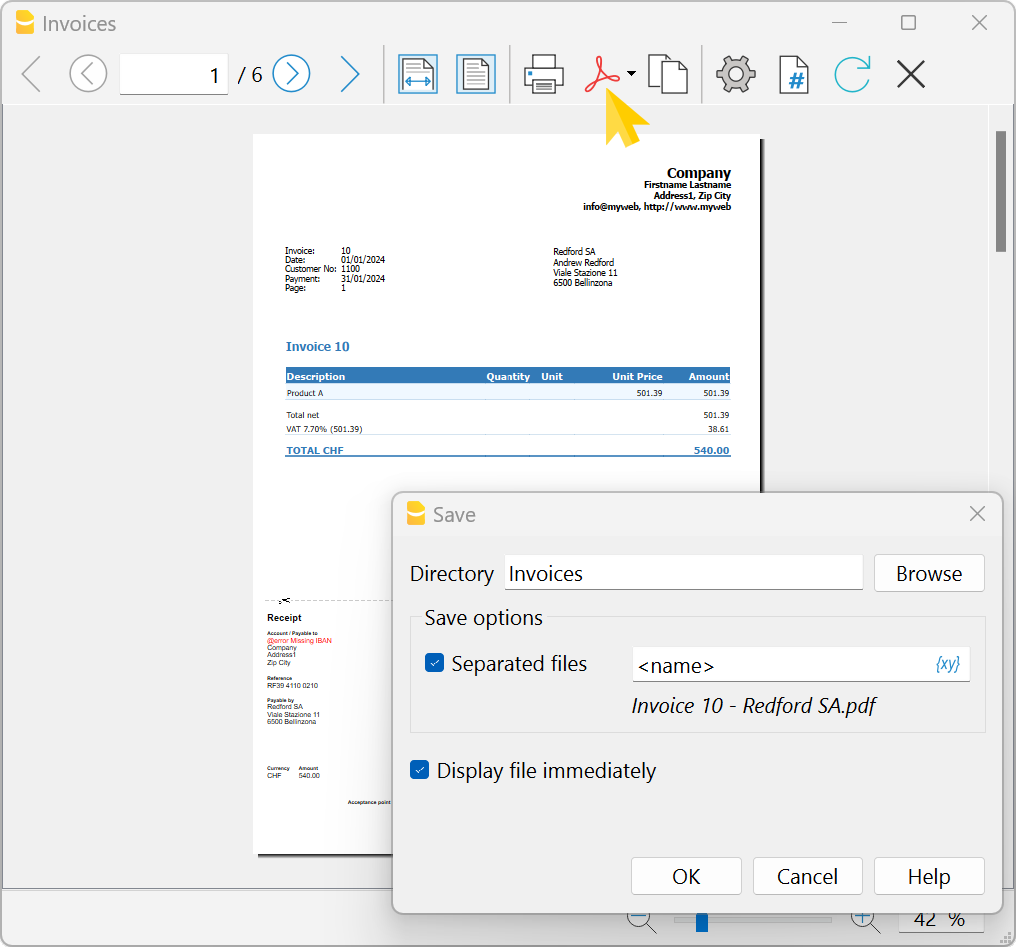
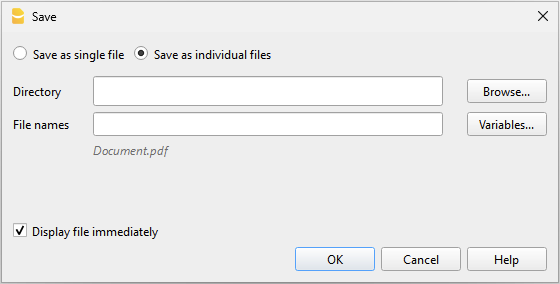
File / Folder Name
Enter the name of the new file to create or choose an existing one using the Browse button. If the Separated Files option is active, enter the name of the folder in which the files are to be saved and check that there are no empty spaces at the end of the folder name.
Saving Options (Advanced plan)
Include attachments (PDF only)
Saves attachments within the pdf file. Attachments are local files that have been inserted in the Link column.
- This option is only visible if the document(s) contain Links.
- In the created PDF file, a symbol will be inserted at the attachments. By clicking on the symbol, the attachment will be opened and displayed.
- Only attachments located in the same folder as the accounting file or in a subfolder are exported. For attachments in other folders, an "access denied" message is reported.
This limitation is imposed to prevent the inadvertent export of a link to a system or confidential file located in any folder when generating the PDF.
It is advisable, therefore, to save attached documents in a subfolder within the accounting folder. - Files with absolute paths are not exported.
PDF Readers
- Only a few advanced readers like Adobe Acrobat Reader and Foxit allow viewing attached files.
- Other PDF readers, such as those integrated into browsers, do not support viewing attachments.
More information at the Create file PDF with digital attachments page.
Separate file (PDF only)
Save the printout in separate PDF files. if several invoices or customer statements are printed. For more information please refer to the dedicated paragraph down below.
Display file immediately
As soon as the file has been created, the software to view it will be launched. In this way, the result of the export can be seen immediately.
Print invoices or customer statements in separate PDF documents
This feature allows several invoices or customer statements to be printed in a single operation, resulting in separate PDF files, which saves considerable time.
This option is only visible if multiple documents are included in the print.
- To use it, it is necessary to download the latest version of Banana Accounting Plus.
- The Print in separate files feature is only available with the Advanced plan .
To export invoices or customer statements in separate PDFs, you need to:
- From the print preview, click on Export > Create PDF.
- Enable the Separated Files option.
- Click on Browse to select or create the folder where you want to save the files.
You can customize the file names by using predefined variables listed in the dialog box. The selected variables are used to define the file name by incorporating information from each individual document.
- Click on the {xy} symbol to display the complete list of variables:
- cur_date: the current date when the PDF documents are created.
- cur_time: the current time when the PDF documents are created.
- customer_city: the customer's city.
- customer_email: the customer's email address.
- customer_name: the customer's full name or the company name (organization).
- customer_number: the customer number.
- doc_amount: the amount of the document.
- doc_date: the date of the document.
- doc_number: the document number.
- doc_title: the title of the invoice including the number and the customer's full name or company name.
- name: the default file name (invoice title with the number and the customer's full name or company name).
- Double-click on each variable you want to use to compose the file name.
As you add the variables, you'll immediately see a preview of the file name below.
Example: Use <doc_date> for the document date, <customer_name> for the customer's name, and <doc_number> for the document number.
- If a file with the same name already exists in the selected folder, the program will ask for confirmation during saving.
Page Size
The page size of the PDF is taken from the printer preferences.
Before creating PDFs for printing or emailing, ensure that the page size in the print preferences is set to A4.
PDF/A Format
The file is converted to the PDF/A format, which is an archival standard and a more restricted subset of the PDF standard. If certain elements are included, the PDF file may not comply with the PDF/A standard.
- The inclusion of attachments of any kind is compliant only in the PDF/A-3 standard.
- Links to external documents are not allowed.
Fonts
The program generates the PDF using user-specified fonts. If there are readability issues or if searching within the PDF is not functioning, you can disable True Type fonts from the Tools > Program Options > Advanced > True Type Fonts menu.
Export Print Preview
In the print preview toolbar:
- Click on the arrow beside the Adobe PDF button
- Choose the option that's right for you:
- Export PDF
- Export to Html
- Export to Excel
- Copy to clipboard
Page numbering
You can access the page numbering feature by clicking on the  icon on the Print Preview toolbar.

In this dialogue it is possible to assign the number with which to start the page numbering, and the prefix to be inserted in the numbering. Printing of the page number must be enabled or disabled through the settings of the displayed page or report.
Start with
The starting number for page numbering.
Add prefix
The prefix to insert to the page numbering.
Export file
Chose File → Export file command from the File menu in order to export several tables simultaneously.
In the Export file dialogue the following sections are also used:
- Those specific to the file type (see export formats).
- Include tab - to define the tables and the reports that must be included in the export
- Period (Accounting) tab, to define the period
- VAT tab (in the accounting files with VAT management)
- Customization tab
Create PDF dossier
Export to PDF is one of the most commonly used exports. Banana Accounting Plus allows you to export the entire accounting file, including the Reports, to PDF.
New! It is now also possible to export to PDF including all digital attachments.
The PDF export with digital attachments is only available in Banana Accounting Plus with the Advanced plan.
For the reports included in the PDF dossier, settings are taken as they were set with the commands from the Report menu. If other settings are desired, these must be changed via the commands in the Report menu.
In order to create a PDF file choose File menu > Create PDF dossier command (or click on the corresponding icon on the Toolbar).

File Name
Enter the name of the new file to be created or choose an existing one via the Browse button (the programme will rewrite the existing file with the new data).
Display file immediately
As soon as the PDF file has been created, the software to view it, will be opened. This way, the result of the export can be displayed immediately. Do remember that browsers like Mozilla and MS Explorer use a cache mechanism for files. When the export is made for a second time, it is possible that the user will see the previous version until the browser Reload button is pressed.
File creation options
Header 1, Header 2 , Header 3
You may enter up to three different headers which will appear in the PDF file.
Logo
If your logo has been set in the File menu > Logo Setup command, you can choose whether to display the logo in the PDF file or exclude it.
- None: the logo is excluded
- Logo: includes the logo.
See Logo Settings page.
Page options
By activating the page options it is possible to include:
- Page numbers
- Restart numbering for each section
- Date
Page size
You can select the page format
Create PDF file with digital attachments
The save option Include attachments allows you to include in the PDF export also all the digital documents entered in the Transactions table, in the Link column. This possibility allows you to have in a single file all your accounting, your reports such as Balance Sheet, Income Statement, etc. and all the documents (invoices, receipts, ...).
The possibility to include attachments to the PDF export is only available with the Advanced plan of Banana Accounting Plus.
See all the benefits of the Advanced plan.
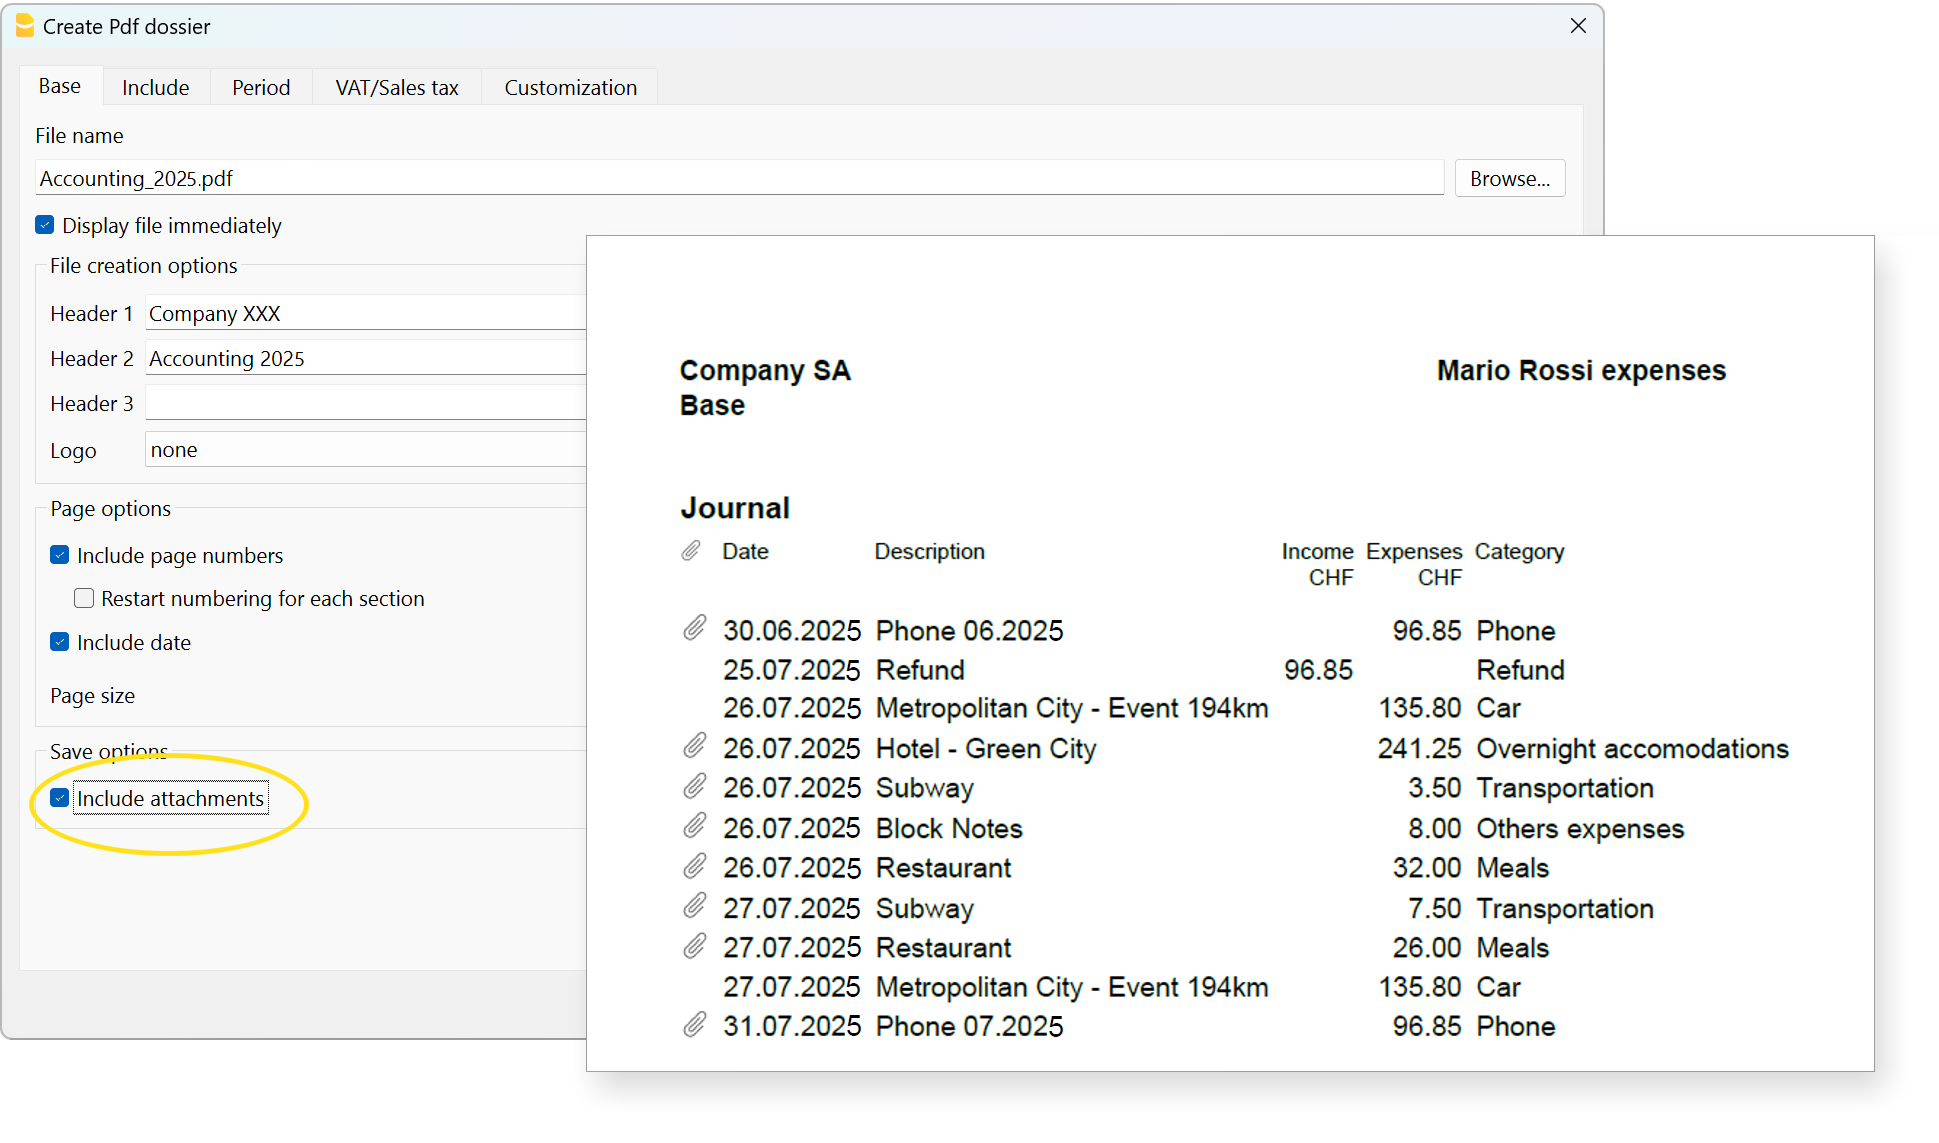
More details on the Include attachments option
Save the attachments within the PDF file. Attachments refer to local files that have been inserted in the Link columns of various tables. In the created PDF file, a symbol will be placed next to each attachment. By clicking on the symbol, the attachment will be opened and displayed. Please note that the ability to open the attached files is only available in PDF readers like Adobe Acrobat Reader, Foxit, and others. If the PDF file is opened in a web browser, it might not be possible to open the attachments.
This option is only visible if the document(s) contain Link elements.
Technical notes
For issues related to the PDF format or fonts, please refer to the Create PDF page.
Other Sections
For the explanations of the other sections, please visit the following pages:
Open file location
The Open File Location command from the File menu opens the Explorer folder (on Windows computers) or Finder folder (on Mac computers) where the file you are working on is located.
To rename, move, or delete the file, it must be closed.
Proceed as follows:
- File menu > Open File Location
- View the folder where the file is saved
- Perform the desired action (copy, rename, move the file).
Sometimes the file may remain locked even if it appears to be closed. In such cases, you may need to exit the program to fully unlock the file.
Send .ac2 file via email
To send a Banana accounting file (.ac2) you can use the command from the File menu → Send file via Email...
By choosing this command, Banana Accounting Plus opens the email program of your computer, creates a new message, inserting your Banana Accounting .ac2 file as attachment.
If your email program displays a message informing you that you need to create a Microsoft Outlook profile, you must follow the information found at the following link:
Logo setup
Logo setupIn Banana Accounting Plus to insert a logo go to the menu File → Logo setup.
Option tab
You can insert images, size and alignment of the logo and text in the header.
![]()
Logo
- Image. Allows you to add, edit and delete a logo.
- Add a logo:
- Insert a logo image via the Add button.
- Multiple images can be added.
- Edit or replace a logo:
- Select an image from the list.
- Edit or replace the selected image via the Edit button.
- Delete a logo
- Select an image from the list.
- Delete the selected image via the Delete button.
- Add a logo:
- Width.
- Enter the width in centimetres of the logo.
- Height.
- Enter the height in centimetres of the logo.
- Alignment.
- Select the position of the logo: left, centre or right.
Text
- When you activate the Text field:
- The header of the various accounting documents is inserted next to the logo image, provided the option to print the logo is activated in the report settings.
- When you deactivate the Text field:
- The logo is simply inserted without the report header information, again provided that the option to print the logo is activated in the report settings.
- Position relative to logo:
- You can choose where to position the text relative to the logo: below, on the left, above, on the right.
- Horizontal Alignment:
- You can choose to align the text left, centre, right relative to the logo.
- Vertical Alignment:
- You can choose to align the text top, centre, bottom in relation to the logo.
- Header font size:
- For printing reports or accounting documents, you can choose to set the font size for each header line.
- For invoicing, the font size can only be set by script.
Customization tab
Through this section you can customise and store various settings for your logo and texts.
If necessary, you can call them up by selecting the name of the desired customisation.
To print an invoice with the logo it is necessary to use a customization with the Logo name, to be entered in the Name box.
To print an enhanced balance sheet or an invoice with a different logo, a new customisation must be created (e.g. the name Logo_balancesheet, this name must be selected in the Embellished balance sheet setup or entered manually in the field Logo name in the Setup of the invoice layout.
Name
The name of your customisation (e.g. Logo1, Logo2,...).
Description
Enter a description for reference of the settings (e.g. 'Logo left, text right',..).
Set as default
With the set as default button you can set a customisation as default.
Options
For further information, see the Customisation page.
![]()
Add logo to all printouts
The logo can be inserted in the various printouts. Click on the links below to access information on how to insert the logo.
- Enhanced balance sheet
- Enhanced balance sheet by groups
- Invoices
- In the invoice header of the CH10 and UNI11 layout via the Invoice Settings → Logo option.
From the Print Preview of the Embellished Balance Sheet and the Embellished balance sheet by groups, the settings for the logo can also be accessed by clicking on the Settings icon (cogwheel).
Recent / Favorite files
These commands display the list of recently used files and favorite files.

Recent files
In this section, Banana Accounting lists the last files used and the path where they were saved.
A path indicates where a file is saved within the computer. It is like an ‘address’ that guides you to exactly where to find the file, for example C:\Documents\Banana\2024\Estimates and invoices.ac2.
Banana files are not stored in the programme, but it is the user who chooses where to save them.
Removing a recent file from the list
In order to remove just one single file from the Recent Files list of the Favorites (Start page), position the cursor on the file name, proceed with a right mouse click and select Remove (Mac users should use the key combination Ctrl + right mouse button).
Deleting the list of recent files
The list of recent files can be deleted in two ways:
- Place the cursor over any file name in the Recent or Favorites list, right-click and select Remove all.
- Click on File menu > Recent files > Clear list recent files.
If you cannot open Recent files
If, by chance, when clicking on one of the Recent files, you get the error message “File not found”, it means that the programme can no longer find the file in the path that was indicated.
The file may have been moved, deleted or renamed. For more information, please visit: https://www.banana.ch/doc/en/systemmsg_en_err_filenontrovato.
Open the folder where the file was saved
By selecting the Recent file and right-clicking, choose Open file location.

This automatically opens the folder in Explorer (or Finder on Macs) where the file was last saved. This can be useful to see if the file has been renamed.
In the same folder you can also find the .bak file (backup file), the backup copies that the programme automatically creates and updates each time it saves.
Favorite files
In this section you can list the files you use most often by indicating their path.
Creating a Favorite file
- Open the desired file
- Click on File > Favorite files
- Click on Add to favorites
The list can contain up to 16 files.
Editing the Favorite file's list
- File menu > Favorite files
- Edit list..
- In the window that appears, edit the favorites, by using the buttons: Add, Remove, Open folder.
Where are the accounting files saved?
Banana accounting files are saved in the .ac2 format, which should not be confused with the program’s executable file, which has the .exe extension. The file management process is similar to how Word or Excel files are handled (with the respective .doc or .xls formats).
When you save your file, you choose where to store it: on your computer (e.g., under C:\Documents...), on your Cloud service, on a USB stick, or elsewhere.
Banana Accounting shows shortcuts to the most recent files you’ve worked on (Recent) or those you’ve marked as Favorites.
The files are not stored within the program itself, but in the folder you selected when saving them. Banana.ch SA does not have any access to your files.
For more information, see Open and save files.
Filter & Temporary Sort rows
The Filter and Temporary Sort rows tools of Banana Accounting Plus allow rows in a table to be filtered and temporarily sorted, without changing their permanent order. These functions are very useful for immediately searching for data in both text and amounts.
Once the sorting or filtering criteria have been removed, the table rows return to their original order.
To change the sorting permanently, use the Data menu > Sort rows command.
The Filter and Temporary Sort Rows are new functions. Kindly give us your feedback on how to improve them. They are only available in the Advanced plan of Banana Accounting Plus.
The Temporary Sort feature
This tool makes it possible to quickly sort the content according to the column from which the Sort command is given:
- Right-click on the column header where you need sorting.
- Position yourself on the small arrow and select ascending or descending sorting criteria.
Advantages
- You can sort the displayed rows, ascending or descending, according to the column you want.
- Unlike Excel, when you remove the temporary sort, you return to the original order of the rows without having to undo the operation.


An arrow will appear in the header of the column chosen to sort the data.
Important Note
The Temporary Sort row feature is different from the Sort rows command (from the Data menu):
- The Temporary Sort row feature is a temporary sort of the rows you see on video conceived to speed the review and editing of previously entered data; you can easily lift the sorting criteria to go back to the original rows order. This feature is only available with the Advanced plan.
- The Sort rows command ( from the Data Menu) will permanently change the rows order of the table; it can only be undone with the Undo command. This command is available for all plans.
The Filter rows feature
The Flter rows feature allows to display only those rows of the table that include the keyword entered as a search criteria. This saves considerable time for the following reasons:
- You can find the transactions you are looking for within seconds.
- You can directly edit filtered transactions.
- The Temporary Filter is present in all tables (Accounts, Transactions, Exchange rates ...) and to use it, you can simply type your key words in the Filter box.
- Easily lift the Filter to go back to the original rows order.

The green text highlight is for explaining purposes only; it doesn't appear in the software.
Filter features and syntax
The filter allows you to find rows simply by entering text separated by space. While you enter the text the program filters all transactions and only shows the ones that contain all the specified space separated text.
- mario invoice
Will show the rows that contain in any position the words, "mario" and "invoice" - mar inv
Depending on the number of rows you have, you could probably get the same result just by entering an abbreviated text. - "mario invoice"
Search for text that includes spaces: if you enter the text within quotes, the program will consider the quoted text as a single word. - "!~Mario"
Normally the search is case insensitive.
You can specify the search to be case sensitive with a special command.
Space is always considered as an AND command separator.
- The space means that the conditions are additive.
- Never include spaces in search unless they are between quote characters "mario invoice".
- Examples
- mario invoice
The program consider the rows that contain the words, "mario" and "invoice"- "mario invoice"
The program will consider the quoted text as a single word, space included. Therefore it will search all rows that contain exactly the "mario invoice" (in this order).
Special characters
You can use almost any character in the search.
Only the exclamation mark "!" and the vertical bar "|" at the beginning of a text sequence have a special meaning.
- "|" OR specifier
At least one of the elements that are preceded by the "|" must be present on the row.
In the following case the search will display rows that include "mario" and either "invoice" or "fee".
mario |invoice |fee
The vertical bar is the character Alt-124. If you can’t find it on your keyboard, search on Google for - "Keyboard layout windows/mac italy/switzerland/usa" and check the images section.
- "!" command specifier
Any text preceded by the exclamation point is considered a command and has a special meaning. Text that contains a space should be entered between quotes.
For example to exclude a text use the command sequence "!-"
mario !-invoice
Advanced syntax for Filter search
The Advanced search syntax is only experimental: it might be subject to changes and improvements.
The "!" character at the begin of a text means this is a special search command.
- !
when positioned before or after a space, it starts a command sequence - !!
is considered as a simple "!" and not a command sequence - !-
the minus sign "-" is used to exclude content, and it can be used with any other operator
!-mario !-1000 !-=1000 !-^payment !-~10 - !~
The tilde "~" must come immediately after the "!" or the "!-" characters
With the "~" the search is case sensitive
!~mario
!-~mario
Command characters
They are the characters that immediately follow the command begins "!", "!-","!~" or "!-~":
They can also be used with the "-" exclude and "~" case sensitive character, but here are explained without.
- !=
Finds exact, the cell must contains exactly the specified text. Useful for accounts.
!=1000
It can be used with multiple values, with the | operator search for any of.
!=1000|2000|30000
Empty cell.
From Banana version 10.1.16 it select cell with empty values.
!= - !+
Contains, the cell must contain exactly the specified text. Useful for accounts.
It is equivalent to searching without the ! command, "mario" or "!+mario" are the same.
But the "!+"allows to be used in combinations of other characters .
!-+mario excludes rows that contains mario.
!~+mario excludes rows that contains mario case sensitive. - !<>
Different, the cell text must be different from the one provided.
!<>1000 - !.
"." wildcards (*,?), same as exact but with wildcards. Supports multiple values.
!.100*
!.100*|2?0* - !^
Starts with. The cell text must start with the specified text. Supports multiple values.
^mar
^mar|hom - !$
Ends with. The cell text must end with the specified text. Supports multiple values.
!$rio - !_
Whole word search. Does not match with "1000". Supports multiple values.
!_100
!_100|200 - !:
Regular expression. The text following ":" must be a regular expression.
!:\bmario\b
Greater than, Less than and range characters
They are characters that are used for comparing values.
For this is used the xml value of the content.
- Date in the format yyyy-mm-dd
2024-12-31 - Amount with the "." as decimal separator and without thousands separator.
1999.99
Commands characters
- !>
Greater than. Cell content that is greater than 100.
!>100 - !>=
Greater or equal than.
!>=100 - !<
Less than.
!<100 - !<=
Less or equal than.
!<=100 - !<>
Different than. - !><
Within a range of values , excluding the specified elements.
It is equivalent of using two filter > and <
A range and it need two elements separated by "|".
!><99.99|200 - !>=<
Within a range of values, including the specified elements.
It is equivalent of using two filter >= and <=
A range and it need two elements separated by "|".
!>=<100|199.99
Columns specifier
It allows to specify the column to use as a search.
Column based filter Search only within the column specified between the two exclamation point.
- !description!
It includes all the columns header that match the entered text. You can use wildcard and separators- !description!mario
Search "mario" on column header "description" - !description!=
Search empty text on column header "description" - !des*!mario
Search "mario" on all column header starting with "des" - !des*;doc!mario
Search "mario" on the column header starting with "des" and column header starting with "doc" - !description:xml!mario
Search "mario" on a column with column name XML "description" . - !debit*!=1000
Search in column with header starting with "debit" for the exact content "1000"
- !description!mario
Show rows with color
They are used for searching rows with color.
- !_co! or !_color!
Color search.
Show all lines that have a color. - !_co!2
Will show all rows with the style color 2. - !_co!2|3
Will show all rows with either the style color 2 or 3.
Style colors:
- When assigning a text and background color to a row, the program assigns for a combination of color a progressive style number. The style number depends from when a color is assigned and is then reused when the same colors are applied.
The style number will therefore be different for each accounting file.
No color and Automatic color:
- The rows with Text No color or background Automatic color have the style number 0.
- Rows that use the color black or white are considered as colored and have their own number even if they, depending on the display theme used, may look as no color.
If you don't want to view rows with black and white displayed, select the rows and apply the No Color and Automatic color.
Show rows with formatting
They are used for searching for formatting.
Currently only a row search is implemented.
- !_fo! or !_format!
Show all lines that have a specific row format. - !_fo!b
Show all rows with format bold - !_fo!i
Show all rows with format italic - !_fo!14
Show all rows with format point size 14 - !_fo!b|14
Show all rows with format bold or point size 14 - !_fo!b !_fo!14
Show all rows with format bold and point size 14
Show rows with errors
Used for searching rows that the software has marked with an error or a warning.
To check again for errors use the Recalculate all command.
- !_er! or !_error!
Show all lines marked with an error or warning. - !_er!e
Show all lines marked as errors. - !_er!w
Show all marked as warning.
Combining different filters
Enter the filter text separated by the space. For example:
- 2022 !des*!mario !debit*!=1000
Will show rows that contain "2022" in any column, "mario" in any column starting with "des" and with all column starting with "debit" that contains exactly "1000". - |!PeriodTotal_?C:xml!<> |!PeriodEnd?C:xml!<>
Displays the rows with an amount, in columns whose XML name starts with PeriodTotal and ends with _C or whose XML name starts with PeriodEnd_ and ends with _C.
Rationale for the filter syntax
The advanced search syntax looks strange, but we wanted a syntax that
- Does not interfere with the natural search, so that the user could accomplish most searches naturally, combining texts, exactly how people are used to search within a smartphone application.
- It is not specific to a language, so it only uses symbols.
- Does support all the possible searches, so that it can be used to express filters entered by the user in a way similar to Excel.
- It opens the possibility to include commands that are specific to Banana like color, errors, etc.
We have evaluated different other search syntax but they all have special uses for normal characters like the minus "-" or "+" marks or other "\", "(", "*", "?, frequently used in accounting.
So we come up with creating a special syntax where the explanation mark "!" is used as a command starter. The "!" is normally used at the end of a phrase, so it is unlikely to interfere with the search.
All feedbacks and suggestions are welcome!
Banana Accounting Plus GPT command generator for Filter search
The GPT command creator for advanced search syntax (Filter) is only experimental: it might be subject to changes and improvements.
This Banana Accounting Plus GPT was created using ChatGPT and is designed to generate advanced search syntax for filtering rows in the Transactions table.
Requirements
To use this GPT, you must:
- Download and install the last version of Banana Accounting Plus.
- Have a ChatGPT account.
- To use this GPT, you must have a ChatGPT Plus subscription. Without it, you can try the service for free for up to ten requests. After that, you’ll need to either upgrade to ChatGPT Plus or wait some hours before making additional requests.
How it works
- Open the Banana GPT from this link:
- In the Message field at the bottom, enter a sentence describing what you want to search for within the Transactions table. Generally, more specific requests will yield better results.
- GPT will process your request and return the corresponding result.
Based on the input provided to the GPT, a text string is generated containing the command needed to filter the rows in the Transactions table. - Copy the generated text string.
- Paste the copied string into the Filter of the Transactions table in Banana Accounting Plus.

Examples of messages to enter in GPT
The following are examples of messages to enter into the GPT chat, along with their respective generated results:
- "Find all transactions from the third quarter of 2024"
- Result: "!date:xml!>=2024-07-01 !date:xml!<=2024-09-30"
- "Search the rows with an amount of 450.00"
- Result: "!amount:xml!=450.00"
- "Search for rows with an amount greater than 200"
- Result: "!amount:xml!>200"
- "Search for rows with the value 3001 in the Account Credit column"
- Result: "!accountcredit:xml!=3001"
- "Give me rows with the value 1020 in the Account Credit column and an amount between 1500 and 4000"
- Result: "!accountcredit:xml!=1020 !amount:xml!>=<1500|4000"
Edit Menu
The Edit menu contains a series of practical data editing commands.
Also see Keyboard shortcut.
Undo / Redo operation
These simple commands allow you to cancel or restore the last operation made. To set the maximum number of undo operations, you need to set it in the Tools menu > Program Options > Editor > Max number of Undo Operations.
Copy, Cut and Paste
All rows of Banana Accounting tables and the data they contain (except data in protected tables and cells) can be copied, cut and pasted exactly as in Excel.
- Select the line or the area of data to be copied
- In the Edit menu, select the Copy or Cut command
- Move to the row or the area where the information should be copied
- From the Edit menu, select Paste
The user can also copy/paste by using the icons ![]() or press Ctrl+C to copy, Ctrl+X to cut and Ctrl+V to paste.
or press Ctrl+C to copy, Ctrl+X to cut and Ctrl+V to paste.
There are also the following commands:
- Copy rows, Delete rows and Paste rows: in this case they refer to a full row or rows and not to a cell selection. For this purpose the commands Copy, Cut and Paste should not be used.
- Copy rows copies the cells to the clipboard with the column header, very useful for filtering in Excel.
Select all
This command selects all the rows and columns of the active table.
It's the equivalent to clicking at the top left hand side of the table.
Copy row from above (F4 or Cmd + 4)
This command is very practical and allows you to copy the contents of the cell above to the one you are in. Applicable to a single cell, several cells or an entire row.
Execute command (F6 or Cmd + 6)
This command performs various practical functions depending on the cell in which you are located. More information on the Interface page.
Insert blank rows... (Ctrl and + key)
This command inserts blank rows above the selected row:
- Position the cursor below the line where the empty rows are to be inserted
- From the Edit menu, select the Insert rows command
- In the window that appears, type the number of rows to be inserted
- Confirm with OK.
Add rows...
To insert blank rows below the selected row, follow these steps:
- Move the cursor above the row where additional rows need to be inserted
- From the Edit menu, select the Add rows command
- In the window that appears, key in the number of rows to insert
- Confirm by clicking on OK
There is another procedure to add blank rows:
- Move the cursor above the row where additional rows need to be inserted
- Click on the following icon
 on the Tool bar, one time for each row that you want to add. This procedure is recommended when the amount of rows to be added is rather limited. The sequence for the shortcut key is: Ctrl+Enter.
Duplicate rows...
This command duplicates the selected row(s).
After duplication, the rows remain selected and can be moved with the Move Up and Move Down command.
Copy rows ... (Ctrl + Shift + C)
This command copies all row data, including non-visible columns, to a temporary space, so that they can be resumed with the command Insert copied rows
In addition, the command copies cell values to the clipboard/clipboard with the column header, which is very useful for filtering data in Excel or other programmes. If you have selected only a few cells, it copies the contents, but always with the corresponding column header.
The column header makes it easier to process data in Excel or with other programmes.
You can also make copies with the header with the Preview command.
Delete rows... (Ctrl and - key)
In order to delete one or more rows, select the row or rows that need to be deleted and from the Edit menu, click on the Delete rows command.
The deleted lines are copied and saved in memory and can be reinserted with the command Insert copied lines.
This feature of copying lines before they are deleted is very useful for functioning like the Cut command in an Excel spreadsheet.
Move up (Alt + arrow down) and Down (Alt + arrow down)
Moves the selected rows up and down one position.
Protect/Unprotect rows
Using the Protect rows command, from the Edit menu, the user activates rows protection to avoid making any changes by mistake.
Protected rows have light grey row numbers. The protected rows cannot be edited until, by using the Unprotect rows command, the protection is being removed.
To protect Rows:
- Select the desired row(s) to protect
- From the Edit menu, select the Protect rows command
- Confirm the number of rows to be protected by clicking on OK.
To Unprotect Rows:
All rows in system columns are protected and cannot be unprotected.
For example, it is not possible to unprotect rows in account tabs or rows where the program performs automatic calculations.
Data Menu
The Data menu contains the following functionalities:
Find
The Find function is located in the Data > Find menu. The section for the options for searching for data are displayed at the bottom of the table you are in.

Find text
Enter the text or value to search for. The amounts must be entered without the thousands separator.
Entire words only
Search for entire words only: For example, if the search word is Tot, it will not find Totals.
Uppercase / Lowercase
When this option is activated, the program distinguishes between uppercase and lowercase letters.
Selected zone only
With this option, the information is searched only in the previously selected area.
To start the search you need to click on the Find Next button. The first information corresponding to the request is located; to continue the search and find subsequent matches, repeat the Find next command, or use the F3 key.
Find and Replace
The Replace function, linked to the Find function, is activated by clicking on the Data → Replace ... menu. You will find the options for searching and replacing data appears in the section at the bottom of the table you are in.
 The text to search for and the text to replace must be entered in the same format as they appear in the input field. The amounts must be entered without the thousands separator.
Find text
Enter the reference you are searching for.
Replace with
Enter the new reference.
Options
Complete words only
Search for complete words only: For example, if the search word is Tot, it will not find Totals.
Uppercase / Lowercase
When this option is activated, the program distinguishes between uppercase and lowercase letters
Search in the selected zone only
With this option, the information is searched only in the previously selected area.
Replace all
This key performs the replacement of all data at the same time. It is used when a change in the Accounts, Categories, Transactions or VAT Codes table (for example an account number, a VAT code) is necessary. For change of data to be repeated, you can also use the Rename function.
Replace
Replace one item at a time.
Find all
It searches for all the information, based on the entered keyword, and displays it in the information window below.
Find next
Next available information.
Add links to digital documents
The function of linking a digital document, saved on your computer or on the Internet, to an transaction line allows you to open a receipt, invoice or other document directly in the accounting file with a simple click. Your documents will always be just a click away and you can say goodbye to paper and switch to fully digital accounting.
Also refer to Organise accounting files locally, online or in the cloud.
- The function of linking a digital document to a row is available in all tables, also for the Accounts, Items and Other tables.
- From the print preview, with Export to PDF, the programme also allows you to include the linked digital document files in PDF. When auditing, the auditor can also open the attached document (invoice, receipt, other PDF document) in the accounting file.

File names and paths
When entering a path to a file this can be of two types:
- Absolute path.
- An absolute path file name, or more simply 'absolute file name', specifies the complete path to a file, including the disk drive, folders and the name of the file itself.
- It describes exactly where the file is located in the file system.
- Examples of absolute file names:
- "C:/Documents/Images/Photo.jpg"
- "/Documents/Images/Photo.jpg"
- If the accounts folder is moved to another computer with a different path, the file will not be found.
- Relative path to the accounting file folder (Recommended).
- Relative path or more simply 'relative file name' refers to file names that are not absolute, i.e. do NOT begin with a '/'.
- Links with relative paths are understood to be relative to the folder where the accounting file is located.
- Links remain valid even if folders are moved or synchronised to other computers that have different locations, as long as the file remains in the same location relative to the accounts file.
- Does not include details of the disk drive or main folders. The name begins without a slash.
- If the file is in the same folder, only the file name 'invoice.pdf' will appear
- If the file is in the 'attachments' subfolder, it will be 'attachments/invoice.pdf'.
- If the file is in the top folder it will be "../invoice.pdf".
- The symbol '../' means upper folder.
- "../attachments/invoice.pdf' means that the file is in the 'attachments' subfolder of the top folder.
- ".../.../attachments/invoice.pdf' means that the file is in the 'attachments' subfolder of the top two-level folder.
Error File Not Found
If the programme reports that it cannot find the file, the reason may be one of the following:
- The file has been deleted or moved.
- Files have been copied or synchronised to another computer and the path name to the file is absolute.
- The accounting file has been moved and the file names contain relative files.
- The file name contains invalid characters on other operating systems:
- The programme uses the '/' character as path separator, but also accepts '\'.
- Characters such as '*' may not be used in file names.
- Care must also be taken not to use characters such as '*&%'. which are valid on MAC or Linux, but not for Windows.
The Links Column
The DocLink column (in the Transactions table) and the Links column (in all other tables) make it possible to enter a link to an external file (usually a scan of a receipt or an invoice).
- The Links column is usually not visible.
In order to display it, use the Columns setup command from the Data menu. - Once the Links column appears, you can add the link to the digital document; you can also edit the file name directly in the cell where the link has been inserted, without having to edit the file in the folder where it is located.
- It is best to use file names related to the accounting folder (see previous section File names and paths).
- In the Links cell you can enter different types of content:
- The relative or absolute file name.
- A link to an Internet page or file, preceded by 'https://' or 'http://'.
- A customised Url schema.
- A link to a resource contained in the program resources, e.g. ":/image.png".
- A link to a resource contained in the Documents table, e.g. ":documents:doc.pdf".
- A text beginning with an exclamation mark '!', to indicate in the auto-completion in which path to search for files (see the following section Auto-completion in the Links column).
- A text in square brackets [ ], which is used as an auto-complete search when editing.
Useful when creating rules and wanting to indicate the text to insert the link and facilitate searching.
To open the linked document, click on the menu Data > Links > Open Link, or click on the icon that appears in the top right-hand corner of the cell containing the link.

Entering a link to a file
There are three ways to enter a link to a document:
Add Link command
- Place yourself on the row of the table where you wish to create a link and the choose the Data menu > Links > Add link.
- Select the document file that you want to link and click on the Open button (the program inserts the link automatically).
- The program enters the path to the digital file in the Links column, even if the column is not visible.
- The file path is converted into a form relative to the accounting file.

Add Link Icon
- In the table, make the Links column visible. Also see: Columns setup.
- Click on the small icon at the top right of the cell.

- Indicate the path where the chosen file is located.
Directly enter the file name into the cell
The file name of the digital document can be entered directly in the DocLink column cell, without having to select the file in the folder where it is located.
This mode allows you to speed up the insertion work even more.
- Double-click on cell to edit it .
- Type in the file name or enter it using copy and paste.
- The auto-complete function lists the files of documents that are not yet linked.
- To get a list of available files, at least the name of a file must be entered with the file selection dialogue.
Note: It is not possible to insert a link via Drag & Drop.
Auto-completion in the Links column
When you are editing in the Links column, the programme proposes a list of files, according to the following logic:
- Only files whose extension is included among the safe extensions are proposed.
- The file name contains the text entered in the editor.
- If the text contains text separated by a space, all text must appear in the file name.
- If the text is included in square brackets [ ] only the text without the brackets is used.
- If the file is already used in the column, it is not proposed again.
You can start with '*' to ensure that all files are proposed, even those already used.
This way you can search for files that have already been included in the list. - Files contained in search folders.
- Files contained in folders already used.
If you enter the file 'attachments/invoice.pdf', it will propose the documents that are in the 'attachments' subfolder. - Files containing the text you are inserting.
- The folder was not excluded with the commands indicated below.
- Files that do not exceed the Smartfill limit.
Special names for auto-completion
You can change the search logic by entering file names that begin with an exclamation mark '!'.
- !-**1
Disables auto-completion and does not propose any files.
Use this command if, for technical reasons, access to directories is slow. - !attachments
Search for files only in the indicated subfolder - !+attachments
The '+' sign also searches in the indicated folder. - !-attachments
A '-' sign excludes the indicated folder. It takes precedence over other indications.
Serves to exclude a used file folder or the accounting file folder. - Special symbols:
- !.
The dot "." indicates the current folder where the accounting file is located.
To exclude the folder use "!-.". - !folder1*
"*" at the end of the folder name also means including all sub-folders.
If there are many sub-folders with many files, the search may be slowed down. - !*
Includes the folder where the accounting file is located and all sub-folders. - !folder1;folder2
the semicolon ';' is used to include multiple folders.
!../folder1
The ".." refers to the parent folder.
- !.
Texts for inclusion or exclusion folders for self-completion:
- They must be entered in the column where the document link is inserted.
- They can be entered in any row.
- They determine the search for all cells, even those that come before.
Edit a link
Proceed in the same way as when entering a new link.
Rename a link
This feature allows you to change/rename the link. The program will also automatically:
- Rename the file name in its original directory
- Rename all the links to that document recurring in the accounting file.
This way you can change file names without having to open the file manager.
Requirements
- The Rename function from the Data menu is only available with the Advanced plan of Banana Accounting Plus > switch now to the Advanced plan.
More info on the Rename feature.
Opening the link
There are two ways to open the link:
- Position yourself on the row and follow the Data > Links > Open link command
- Or position yourself on the cell of the Links column and click on the icon to open the link.
For security reasons, the program only opens files with an extension that is considered secure, see Program Options > File handling section, from the Tools menu.
Remove a link
There are two ways to delete a link:
- Position yourself on the row and follow via the Data menu > Links > Remove link.
- Clear the contents of the Links cell with Delete.
Export to PDF (Include attachments)
When exporting to PDF, the programme offers the possibility of also including attached files.
Please refer to the Export to PDF documentation regarding this functionality and limitations.
Other useful resources:
Scan documents with Dropbox or other Apps
Smartphone apps like Adobe Scan, Microsoft Lens, Dropbox, and other applications allow you to scan receipts and invoices and save them directly in PDF format. Afterwards, you can transfer them to the desired folder through the smartphone app of the cloud service being used. Compared to a simple photo, they crop the contents, use PDF format, and allow you to insert multiple pages into the same file.

- Start the Dropbox application (other systems have equivalent functions, which you can easily research on your mobile).
- Use the "Scan Document" command.
- Take a picture of the document. To facilitate automatic cropping, insert the receipt in a transparent map that contains a coloured or black sheet.
- Several commands are at your disposal in the preview
- If necessary, use the Rotate Image command to be vertical.
- You can add another page by repeating the scan.
- Choose the pdf format.
- Type the file name using the date you find on the document.
If you do not have your own filing system, use the year-month-day format, the name of the counterparty and a possible observation (ex.: 2022-01-15-Telecom-invoice.pdf ". - When the file is synchronized on your computer.
- Copy it to the accounting documents directory.
- In your accounting file, go to the Transaction table, go on the appropriate row and add the link to the digital document you just scanned.
The Open link command opens the digital document
We advise you to create the accounting documents folder in a child location compared to where your accounting file is located.Here below we include similar screenshots for Adobe Scan, Microsoft Lens and iCloud Drive:
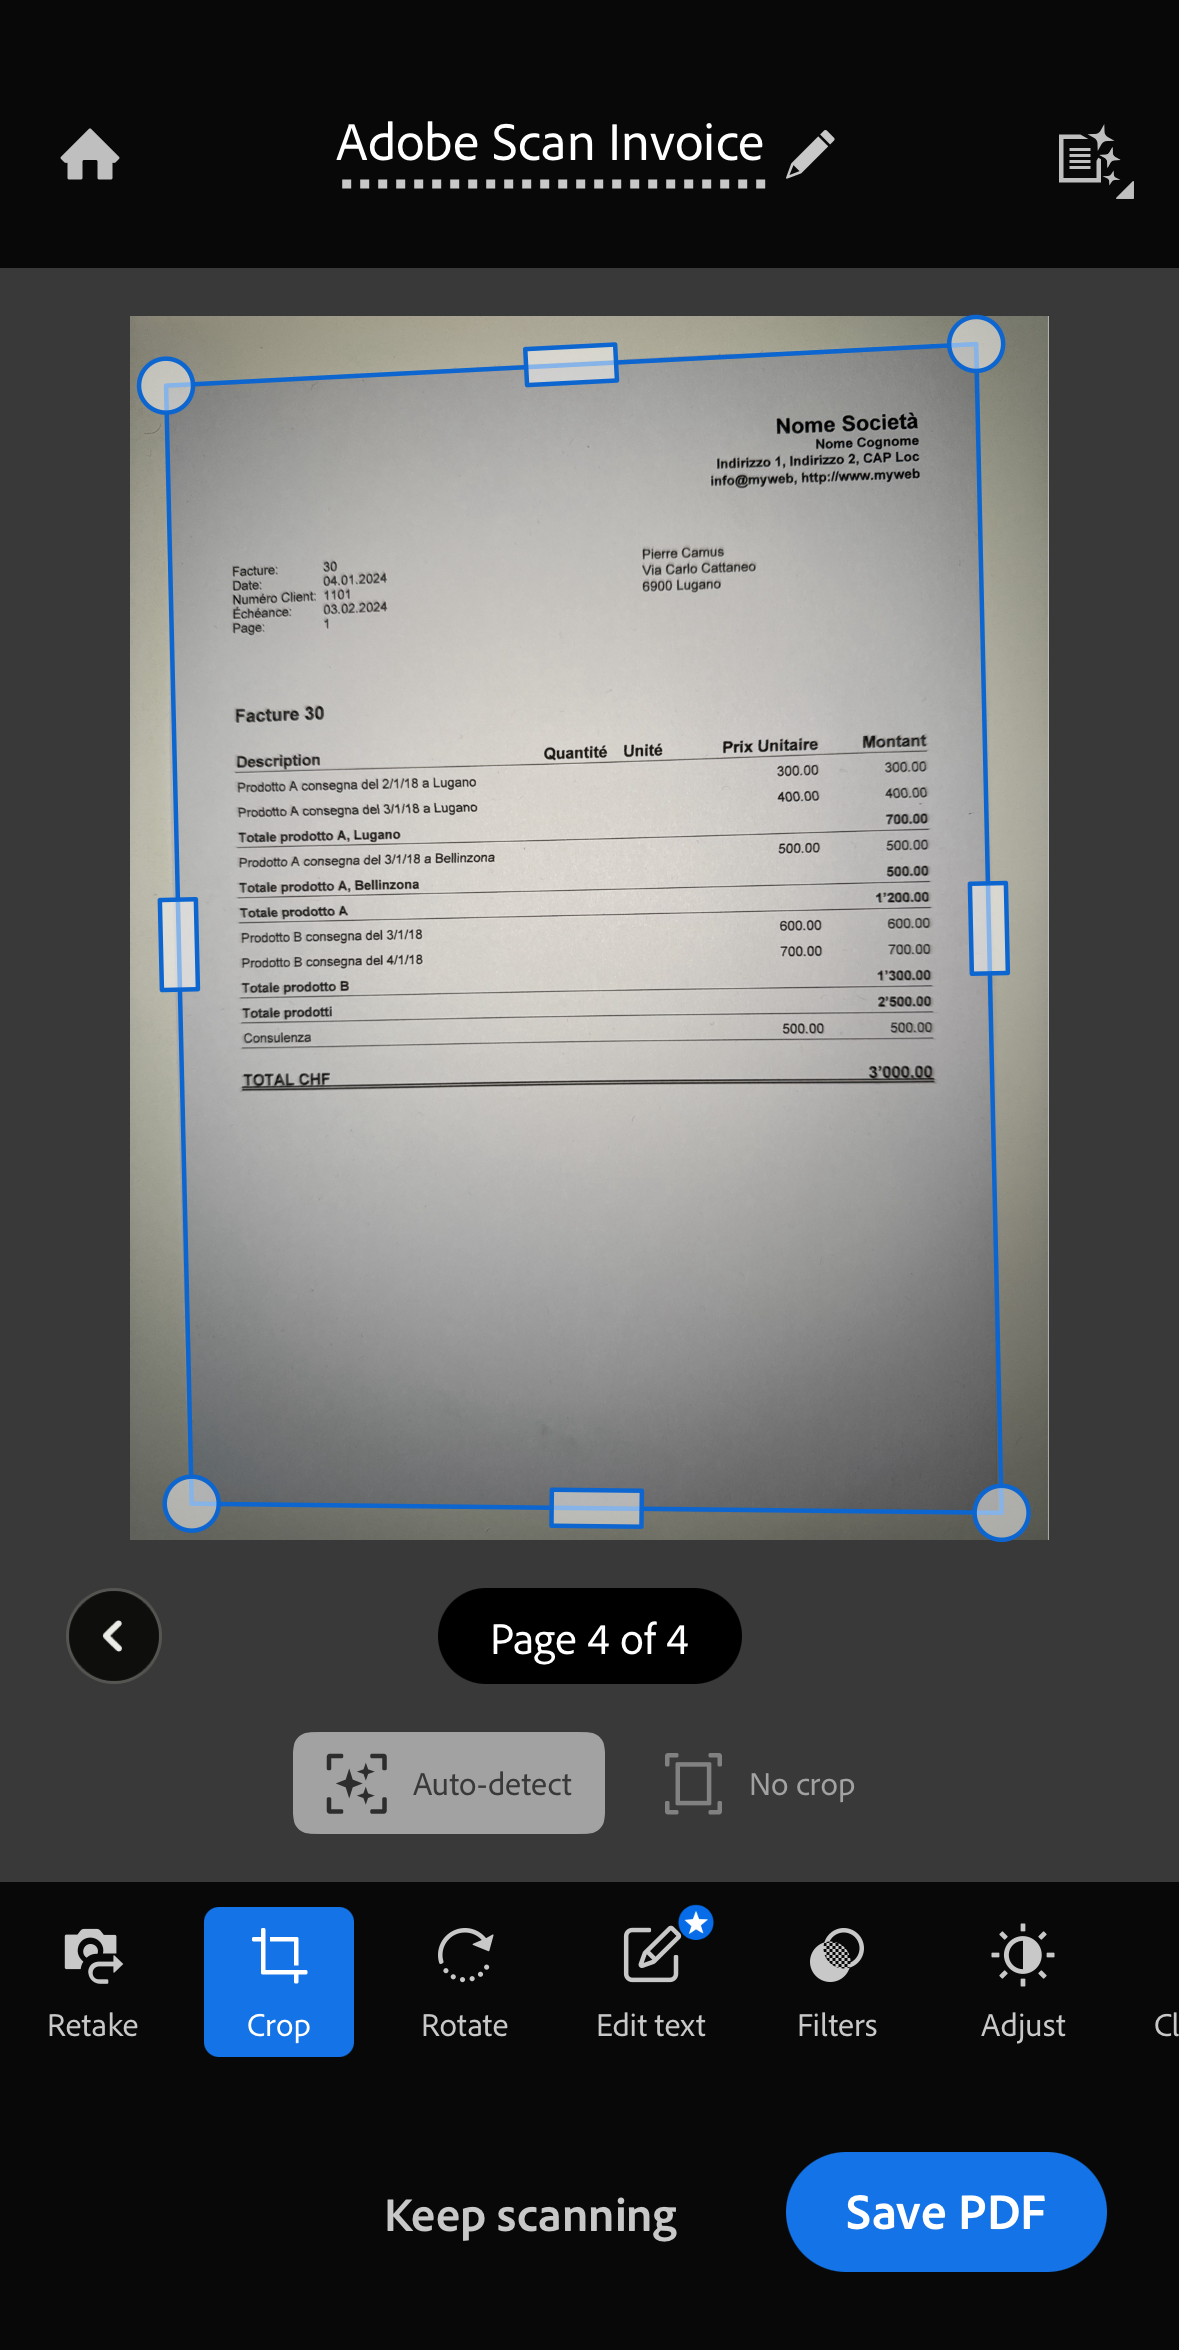
Other useful resources
Go to
The command opens a dialog box that allows you to move to the desired row.

When you are in a selection table (for example in an account card), with the Go to source line command, the program automatically returns to the corresponding row of the Transactions table.
The Rename command in Banana Accounting+
The Rename command is a very useful tool in Banana Accounting Plus. It is accessed from the Data menu and allows you to edit an account, a VAT code, an item code or a link in your accounting without having to search and replace manually each match.
In Banana Accounting Plus this feature is only available with the Advanced plan, or in the Professional and Free plans with Advanced plan in demonstration mode (70 transactions). → Switch now to the Advanced plan.
The Rename command renames the account number, the category (Accounts and Categories table), the VAT code (VAT Codes table), and items code (Items table) or a link (Link or DocLink columns) with the new text indicated in all the tables in which it is found or used (all tables and basic data). When renaming links, this feature also updates the name of the liked file in the directory where it is saved.

To rename:
- Position the mouse on the cell to be modified (account number, category, VAT code, link)
- Click on the menu Data → Rename
- In the window displayed, enter the new reference you wish to assign.
Subsequently the program:
- Verifies that there are no identical account or group numbers; if there is an identical number, the program triggers a warning message, asking if you wish to pursue anyway. If you confirm, there will be an error message.
- Searches where the account number to be renamed is used in the tables and verifies that the rows are not protected or blocked; if the rows are blocked it warns that it cannot proceed with the renaming.
- Renames the account number, in all places where it is used, Tables and File and accounting Properties, with the newly specified account number.
NOTE
It is not possible to have two identical account numbers in the Chart of Accounts. The program does not perform any recalculation, it simply renames the account numbers.
Import rows
In order to import the rows, click on Data → Import Rows command.
Activate the options of your choice in the following window:

File name
Using the Browse button, select the file from which to extract the data.
Format
This area contains the list of formats with which it is possible to import the data to the table. These include: ASCII format, Text, CSV.
Select what you need.
Options
Import data from clipboard
By selecting this box, the user can import data from the Windows clipboard.
Autocomplete values
It is advisable to select this function when it is necessary to import rows from a less complex accounting file into a more complex one. In this case, in the imported rows, some columns will stay blank. By selecting this function, the program will automatically complete the missing values with those from the current accounting.
Column headers
By selecting this box, not only data, but field headers will be included in the import.
Unicode (Utf-8)
By selecting this box, all the data will be imported in a format readable by Unicode programs.
Extract and sort rows (Extract)
This function is available vie the Data → Extract and sort rows menu ...

Contrary to the Sort rows command, the program creates a separate table where the extracted rows are displayed. Therefore, the rows of the main table are not changed.
Extract tab
In the extract table, you can click on the row number (underlined) to return to the row of the source table.
Column
You have to select the column from which you want to extract the rows.
Condition
You must select the conditions to be applied for the extraction of the lines (eg greater, less, equal, contains text, begins with, ends with ....).
Value
In this field it is necessary to enter the text to be used as a comparison, in relation to the condition (for example, if the condition is = equal, entering 25.01.2022 as the comparison value, the program extracts all the transactions with the date 25 January 2022).
The text is a date if the chosen field is Date, a numeric value if the field is an Amount, a word if the column is a Description.
Add
The button allows you to add other fields for the search.
Clear all
The button allows you to delete the settings chosen for data extraction in the various lists.
Selected rows only
This option is active only when rows have been previously selected and allows the sorting of the selected rows.
Total row
If the function is activated, the program displays the total for the extracted rows that have an amount or a time counter.
Sort tab
The sorting columns are indicated. The options are the same as the Sort rows commands.
Customization tab
Explications for this window are available on the following web page: Customization.
Account list example
It sometimes happens that you require a list containing only the accounts:
- Go to the Accounts table.
- Select Extract and sort command.
- Select Account in the the columns box
- Select Not empty in the the conditions box
If you want to extract the accounts sorted by description:
- Select Order section
- Select Order by button and select Description
If you want to display only certain columns, you can create a new view with the Tables setup command.
Sort rows Dialog
This command changes the sorting of rows permanently.
It is therefore advisable to be very careful before sorting, especially when in the Accounts Table, as it may upset the structure of the chart of accounts.
If you only wish to sort rows temporarily use:
- Temporary Filter and Sort rows.
- Extract and Sort rows that copies the data into a temporary table .
Sort Rows Dialog
This function is activated via the Data > Sort rows menu.

The rows of the table can be sorted according to the contents of the columns. Up to three sorting can be set.
Sort by
Select the type of order you need from the list that appears.
Then by
Allows you to define an additional type of sorting than the main one.
Ascending
The rows are sorted in ascending order, taking into account the type of sorting chosen (date, doc ...).
Descending
The rows are sorted in descending order, taking into account the type of sorting chosen (date, doc ...)
Number
Enable this option if the column chosen as the search condition contains only numbers.
Clear all
The button allows you to delete the settings chosen for sorting the data in the various lists.
Selected rows only
This option is active only when rows have been previously selected and allows the sorting of the selected rows
Customization Section
Through this section, you can customize and save various sorting settings for the rows.
You can choose to sort by Amount, Description, or other criteria, and save the sort settings with different names.
When needed, you can recall the sort settings by selecting the name of the desired sort.
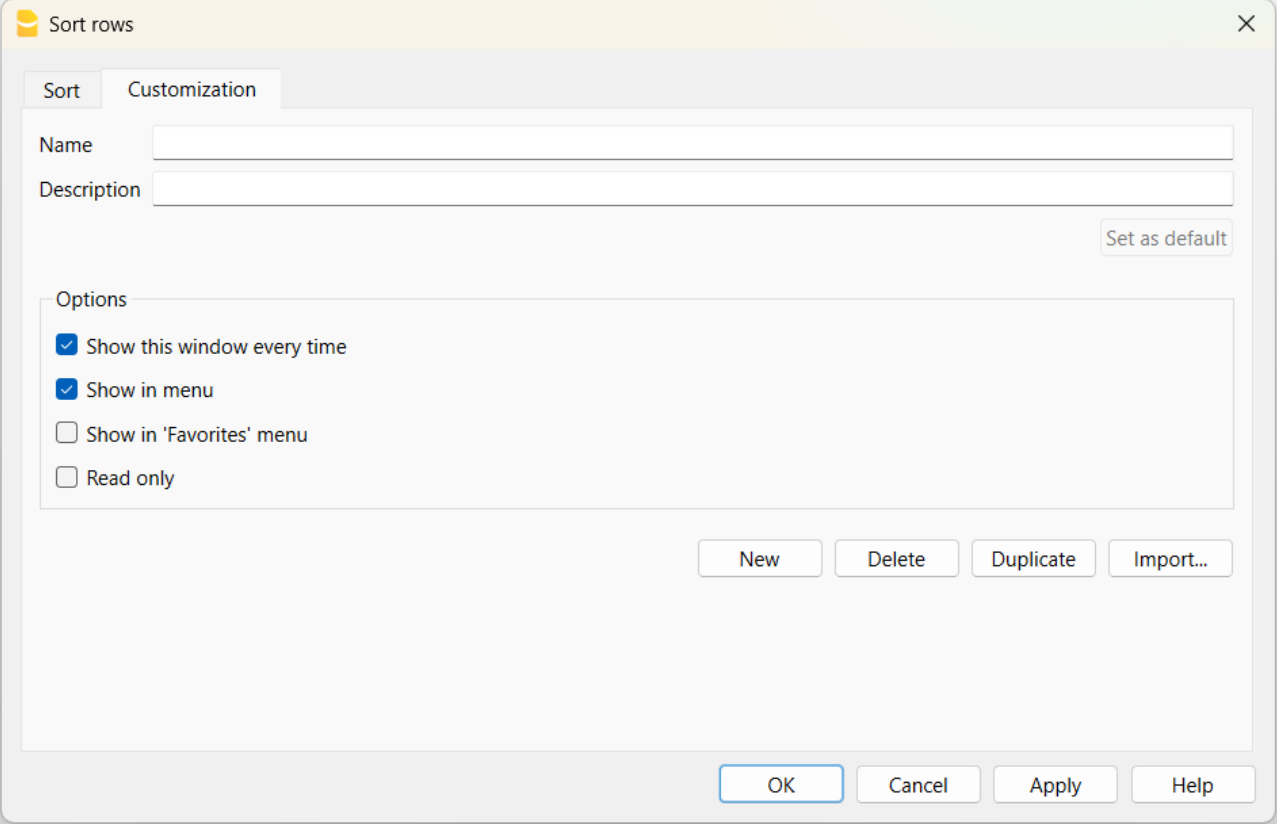
Name
The name of your customization (e.g., Sort by Description, Sort by Amount, etc.).
Description
Enter a description to reference the settings (e.g., "sorting type 1, sorting type 2", etc.).
Set as Default
With the "Set as Default" button, you can set a sort as the default.
Options
For more information, refer to the Customization page.
Columns setup
The command can be activated via the Data > Columns setup menu. With this command, columns can be:
- Displayed
- Hidden
- Renamed
- Moved left or right in the various tables.

Display Tab
Header
This is the column header.
Header 2
This header is used by the program for only a few fields (e.g. Amount column).
Description
This is the column description field. This description will be shown as a tooltip.
Format
This is the format to show numbers, date and time (refer to Columns setup page for specific information).
Width
This section defines the horizontal size of the column.
Column Style
This is a drop-down menu that indicates the style to be used. This style has priority over the style of the row.
Alignment
The user can choose whether to align the text right, left or center.
Wrap text
This option allows the user to view the input text on more than one line.
Protected
This option allows the user to protect the entire column so that no data can be input or edited.
Exclude from printing
When this option is activated, the field will be excluded from printing.
Visible
This option allows the user to make column visible.
The tables can be modified. Columns can be added, headers can be changed, and column sizes and the order in which they are displayed can be altered.
Move up, Move down
The columns can be moved to the right or to the left.
- Just click on the name of the column:
- with the Move up button, the column is moved to the left.
- with the Move down button, the column is moved to the right
- Columns can also be moved simply by dragging them with the mouse.
Add
Add columns in the active table. The columns added by the user have a purely informative function and the program does not perform calculations on any numeric data.
If you add a column of type Amount in some cases, the data entered by the user is used in the calculations. Amount columns are summed only in the following tables:
- Accounts table,
- Account cards table,
- Extract rows table.
Delete
This function is used to delete a column from the list. A system column, however, cannot be deleted.
Settings Tab
Name
Enter the field name of the column to add. The program automatically inserts the new column in the list.
Xml name
This is the name of the active field in the Xml format and it is automatically inserted by the program.
Data type
It is possible to choose between the following preset types: Text, Number, Amount, Date, Time.
Max and Min length
Maximun and minimum field length.
Max and Min Value
It is possible to enter minimum and maximum values (numbers or characters).
Decimal points
It is possible to define the field decimal points
Column number
This is a number automatically attributed to a column, and has uniquely a technical purpose.
All caps
By clicking this option all column data will be converted to capital characters.
Date and numbers format by default
Once the program is installed, it automatically uses as default your operating system settings.
If you wish to change your operating system settings, you should go to your Control Panel (Windows) or your System Preferences (Mac).
Here is the step by step process on Windows 8 and Windows 10:
- from the Start → Control Panel menu
- click on International options and then on Change date, time or numbers format
- a dialog window will appear where you can change your data format (in the Format tab)
- in order to change your numbers or currency format, from the same window you can click on the Additional settings button and then on the Numbers or currency tab.
Here is the step by step process on Mac OS X 10.9.5:
- from the Apple logo (on the top left of your screen) click on System Preferences
- from the dialog window that appears choose the Date & time icon
- a new window will appear where you can choose Open language & Region...
- a new window will appear where you can click on the Advanced button
- finally a new window will appear where you can change the numbers format (General tab), date or time format (Date and Time tabs).
Date, time and numbers format
When no particular formats are specified for the date, time and numbers, they are displayed in the formats specific to the operating system.
- Within Banana, only the display format can be changed.
- To change the input format (when changing a value) you must change the settings of your operating system.
To change the format, click on Data → Columns setup and enter the desired format type in the Format box. The format types are listed below with some explanatory examples:
| Date format | Examples for date |
| d mm yy | 1 01 15 |
| dd m yy | 01 1 15 |
| ddd mmm yyyy | Fri Jan 2015 |
| dddd mmmm yyyy | Friday January 2015 |
| The letter “d” (day) indicates the day, the “m” (month) indicates the month, and the “y” (year) indicates the year. | |
| Time format | Time examples |
| hh:mm:ss:zzz | 04:04:36:089 |
| h:m:ss:zz | 4:4:36:89 |
| Naturally the user can also invert the order of the elements making up the date or the time as desired (e.g.: mm dd yyyy). | |
| As far as the separators are concerned, the user can choose between all of those available on the keyboard (for example: #, @, -, /, ., etc.). | |
| Numbers Format | Example for numbers |
| 0. | 259 |
| 0.00 | 258.85 |
| 0.000 | 258.848 |
| The number of decimal spaces in a number field can be edited according to the user’s needs. Actual calculations are made using all the inserted decimal numbers. Rounding is only done for what is shown on screen. | |
| Link Format | Example for link |
| :link: | "receipts/office electricity october.pdf" |
| :file: | "office electricity october.pdf" |
| :file:16: | "office electrici" |
| :file:16:ellipsis | "office electr..." |
| :file:-24:ellipsis: | "...electricity october.pdf" |
| :link:symbol: | ">>" |
| Note.: The link format is only applied for printing on paper or pdf files, it does not affect the display on the screen. | |
New column
Via Data → Columns setup you can add your own columns.

Field name
Enter the field name of the column to add.
Field name Xml
The name of the column to export in Xml and in scripts.
Data type
It is possible to choose between the following predefined types: Text, Number, Amount, Date, Time.
Tables setup
This command is activated via Data > Tables setup menu.
- The Tables:
These are the elements that contain the data in a format or rows and columns.
- The Views:
Indicated under every table.
These are the elements that define the way in which the columns of the table are to be displayed.
Thanks to the views, one can define which columns need to be visible, the sequence of the displayed columns and the way in which they are displayed.

In order to add tables, please go to the Add new functionalities command.
View's Settings
For each table, you can define:
- Name
The name of the table in the file language. This field cannot contain spaces or special characters.
It can only be changed for added tables. - Xml name
The name this is being used for the programming. This field cannot contain spaces or special characters.
It can only be changed for additional tables. - Header
The name that appears in the tables list - Visible
Indicates whether the table is visible or not.
Manage Views
Name
It is possible to enter a new name for the selected View.
Xml name
This is the View name for the Xml export. For system Views this name cannot be changed.
Number
This is a number automatically assigned to the View by the program.
Visible
When this box is checked the View will be visible.
System
When this box is checked the View is a system View and cannot be deleted or edited.
Columns setup...
Displays the Columns setup page that allows to edit them, both in displaying them as well as in setting them up.
Page setup...
This button leads to the page format settings.
Add...
This button adds a new View to the active table.
Delete...
This button deletes a View.
Set as default
Defines the View that is being used.
New view
From the menu Data > Tables setup > button Add View, you can add your own views (not provided for account cards).

View name
Enter the name of the view you want to add.
View name Xml
This is the view name for the Xml export.
After its creation, the new view is displayed in the same place as the existing views and will be added at the right side of the others.
Format Menu
In the Format menu the following commands are present:
Default style
This is the default style for the entire file.
Points
Use different points to define the font size.
Bold and Italic
Highlights in bold or italic texts from the selected cell or row.
Change default style
There is a default style throughout the file. The default style is used when adding a new row.
In order to change the default style:
- attribute the desired style to a row;
- click on the Format → Change default style command from the menu
All the rows with the original default style will then be shown in the new default style.
Calculate row height
When the text for a row is very long, the Calculate row height command from the Format menu allows the user to view it completely, adapting the height of the row.
To adapt the height of the row to the text, the user should:
-
choose the Data → Columns setup command menu;
-
select the appropriate field name;
-
activate the Wrap text option in the Display tab;
-
recall the Calculate row height command from the Format menu each time it is necessary.
Calculate all row heights
The Calculate all row heights command is similar to the previous one, with the difference that it operates on all rows of the table
Reset all row heights
Restores row heights to the default value.
Page break
At any point in a file, the user can insert a page break
To insert a page break:
- Place the cursor on the first row, where the new page is to be created
- Open the Format → Page break command
To remove a page break:
- Place the cursor on the row with the page break
- Open the Format and deactivate Page break command
Highlight rows with colours
The possibility of colouring the lines will make it easier to find different types of transactions at a glance.
To color the lines or texts is necessary to select them and then use one of the following icons: 
The first icon will set the background color, the second one the text colour.
- To deactivate the fill color, simply select the row or rows and click on No colour
- To deactivate the text color, position yourself on the line and select Automatic, in this way the color returns to the default color
No colour and Automatic colour
It is recommended to always use No colour and Automatic colour instead of black and white, because when you set the program theme in the Window Menu > Appearance > Display theme we have the following cases:
- Light theme, where texts are displayed in black
- Dark theme, where texts are displayed in white
If you use a light background colour, the texts will be displayed in black. While if the background is dark, the texts will be displayed in white.
If you chose black as the text color and white as the background, the assigned colors would remain the same. The texts may therefore no longer be visible if the theme is changed. To avoid this issue, you should select Automatic for the text and No color for the background.
When you use the row filter to display only coloured rows, the program displays all rows with colours, including rows that have been assigned the colour white or black. If you don't want to see these lines you need to select them and set No color as background or Automatic color as text.
Tools Menu
File info
The File info command, activated in the Tools menu, displays the characteristics of a file.
Columns
By activating the Complete view also the Xml columns are displayed, thanks to which, it is possible to retrieve the values automatically when the table is exported.
- Section: the Group name of the values
- ID: the specific and explicit identification of the value
- Description: contains an explanation of the value
- The rows in bold print are the section titles that group the different elements together
- Value: the formatted value
- Section XML: The name of the section in English
- ID XML: the identification in English
- Value Xml: the field contents in Xml format.
The Section XML and the ID Xml identify the value unambiguously.
Create file from external data
Banana Accounting allows for reading and displaying in tabular form multiple file formats.
View CSV File
When opening, or dragging and dropping a file of the CSV or JCSV type in the Banana window, Banana will automatically create a simple Table type file, resuming the columns and data contained in the CSV table.
View ISO 20022 file
The Banana software allows the user to view and print the contents of ISO20022 - camt. 052, camt. 053 (included version 4), camt. 054 - and MT940 bank statements.
The transactions of the electronic bank statement, with description, amount income or expenses, are being presented in separate columns and can be printed or pasted into Excel.
Open the ISO 20022 or MT940 file
In order to open and see the file :
-
Download your bank statement in ISO 20022 formatIf it is a compressed file, extract the XML file to be displayed with its own utility (p.es. 7zip)S
- Install and open Banana Accounting
- Drag the file inside Banana Accounting: Banana immediately shows all entries with text and date, amount and the progressive balance (the file is being opened as "read only")
- The data of the bank statement can then be printed or copied into Excel or other programs.
Additional indications
-
The opening balance in the ISO 20022 file is entered into the Accounts table.
- The column width can be adapted with the mouse.
-
To align the text of the description on several lines, use the command Format → Calculate all row heights
-
To categorize the movements and get statements, enter the appropriate categories in the Categories table and display the Categories column in the Transactions table with the Columns setup command.Or, create a new file with an existing template and categories and accounts already set up, and import the data of the bank statement as explained in the page Import ISO 20022 file.
-
In the free Starter Edition mode, files with more than 70 transactions cannot be saved.
More information
For more information with regard to the ISO 20022 Standard, please consult the page Import ISO 20022 file.
Add/Remove functionalities
The Add/Remove functionalities command is in the Tools menu.
This option allows you to add tables completely managed by the user.
To add a new functionality you must select the functionality you need.

The options available depend on the type of file.
See the Add and remove accounting functionalities page for more details on the individual options.
Documents table
The Documents table allows you to include text documents, images (including logo) or scripts in the accounting file.
It can be added by the user in two different ways:
- From menu Tools > Add functionalities > Add Documents table.
- This is created automatically when the program needs to save documents (e.g. adding the logo or attachments to the Enhanced Statement, Enhanced Statement with groups from the menu Reports > Attachments section).

The Documents table has the following columns:
- Id
The document's name. Id it is free text but should be unique within the table.- Documents starting with "_" are used for particular features of the programme.
- "_budget.js"
You insert your own functions created for the Budget table.
- "_budget.js"
- The dlgmanageaddons Id is used to save the image used as a logo.
- The attachment_ Id it is used for attachments in the enhanced balance sheet.
- Documents starting with "_" are used for particular features of the programme.
- Description
A brief description of the file (optional) - Attachments
Contains the file. By clicking on the cell it is possible to view or modify the contents of the file.
There are these types of possible content- Image (image/png, image/jpg)
- Normal text (text/plain)
- Formatted html text (text/html),
- Markdown-formatted text (text/markdown),
- Programming in javascript (text/javascript)
- Sheet style CSS (text/css).
Adding a new document

To insert a new document in the Documents table
- Add a new row.
- In the Id column write the name of the file .
- In the Description column you can write the desired text.
- In the Attachments column double-click on the cell or select the edit symbol, select the type of document you want to add.
See also:
Markdown Editor
In Banana Accounting Plus, balance sheets attachments can now also be inserted via markdown language, in addition to html. This is very convenient for inserting tables into attachments.
In Banana Accounting Plus this feature is only available with the Advanced plan.

Markdown is a language that allows you to create formatted text using a normal text editor and a syntax that is easy to write and read.
In Banana+ it is possible to use this language in the attachments of the Documents table and the GitHub Flavored Markdown specification is supported.
Documentation published by github.com:
Adding a Markdown document
- Select the Documents table.
- Add a new row.
- In the Id column write a name that identifies the document.
- In the Description column you can write the desired text.
- In the Attachments column double-click on the cell or select the edit symbol, select the Markdown Text type.
Add a balance sheet attachment with markdown text
How to create a table
To create tables in markdown, the content of the columns must be from the vertical slash sign, preceded and followed by a space " | ".
For the column alignment you must create a row with
- Left: simple hyphens (minimum three hyphens).
- Center: hyphens preceded and followed by the colon ":---:".
- Right: hyphens followed by the colon "---:".
# Notes to the Balance (Example)
The financial statements of Example have been prepared in accordance with the International Financial Reporting Standards (IFRS).
## Cash Positions
| Account | Description | Current Year | Previous Year |
| :---: | --- | ---: | ---: |
| 1000 | Cash | 23'000.00 | 17'000.00 |
| 1020 | Bank account| 9'000.00 | 1'000.00 |
| | **Total** | **32'000.00** | **18'000.00** |
## Other Fixed Assets
| Account | Description | Current Year | Previous Year |
| :---: | --- | ---: | ---: |
| 1000 | Machinery | 13'000.00 | 17'000.00 |
| 1020 | Furniture | 5'000.00 | 4'000.00 |
| | **Total** | **18'000.00** | **21'000.00** |

How to create an unordered list
# Create an unordered list
* First item
* Second item
* Third item
* Fourth item
How to create a task list with checkboxes
# Task list with checkboxes in Markdown
- [ ] Item 1
- [X] Item 2
- [X] Item 3
- [ ] Item 4
- [ ] Item 5

How to change the text color
# Change the text color using HTML syntax
This is normal text in black color, <span style="color:blue">and this text is blue!</span>
<span style="color:red">Another text in red color.</span>

How to change color, font and size of a text
# Change the text color, font and size using HTML syntax
<span style="color:green;font-size:20pt;font-family:Times New Roman;">Change color, font and size of a text</span>

How to apply bold format
# Use double asterisks ( **text** ) before and after the text
**This is a text written in bold**
How to apply italic format
# Use single asterisks ( *text* ) before and after the text
*This is a text written in italic*
How to apply bold and italic format
# Use three asterisks ( ***text*** ) before and after the text
***This is a text written in bold and italic***
Features currently not available
These features, although requested by some users, are not available at the moment:
- Add a link in the markdown text
HTML Editor

Adding the ${...} field
The ${...} field allows the user to add dynamic text to the document, for instance an account's balance or a Banana table. The Banana API interface is available at the following web address https://www.banana.ch/doc/en/node/4714
The command can be added manually or through the command Edit - Add script
Printing a blank line (put a space between the quotes)
${' '}
Printing the current balance of account 1020
${Banana.Converter.toLocaleNumberFormat(Banana.document.currentBalance('1020','','').balance);}
Output of the Accounts table, columns: Account, Group, Description, Balance.
${HTML Banana.document.table('Accounts').toHtml(['Account','Group','Description','Balance'],true);}
It is possible to write the javascript code in a separate document and include the script through the command Banana.include.
The scripts can be saved in the Documents table or in a local file.
${Banana.include('documents:myscript1');rtnValue}
${Banana.include('c://temp//myscript16.js');rtnValue}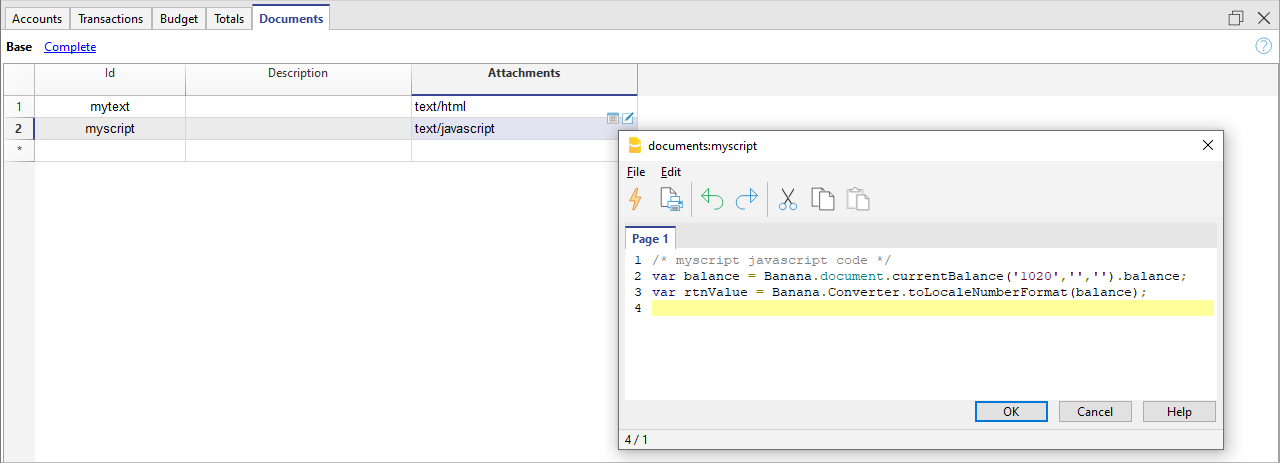
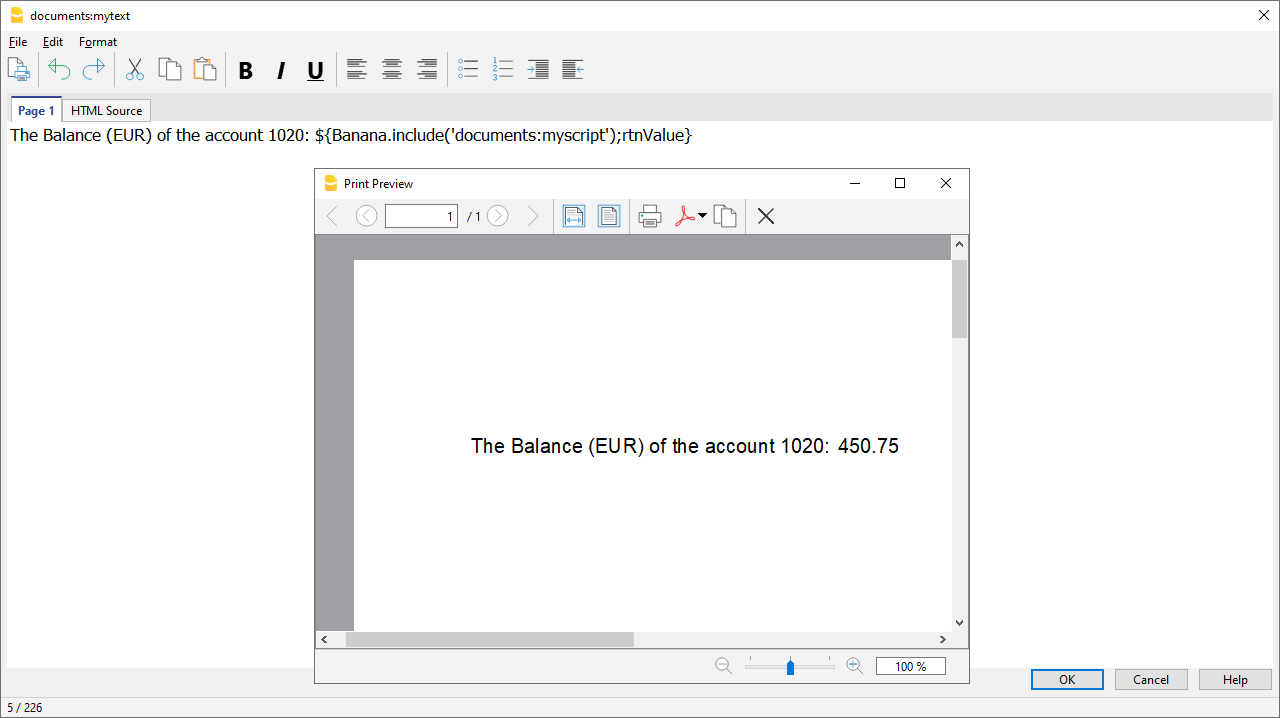
Adding a page break
The command can be added manually or through the command Edit - Add page break
Text in the first page
${PAGEBREAK}
Text in the second page
Troubleshooting
- When taking text from external sources (Word, Internet pages, ...), use the Edit > Paste as plain text command.
This command avoids problems with HTML formatting, which in some cases prevents correct display. - For the examples on this page, use the Copy link on the top right of each example, do not use CTRL+C (or CMD+C).
- If the ${…} field does not work, check that there is no HTML formatting (such as <span>…</span> elements or other) and possibly remove it from the HTML Source code.
- To remove existing HTML formatting from an entire page:
- copy text to clipboard (CTRL+C)
- go to the HTML Source tab and delete all content
- go to the Page 1 tab and paste the copied text with the Edit > Paste as plain text command.
Embedded Extension
Embedded Extensions are extensions written in JavaScript and saved directly in the Documents table of the accounting file. They work exclusively in that specific file without requiring installation. Once created, they are immediately ready to use.
Add an Embedded Extension
- Open an accounting file in Banana Accounting Plus.
- Ensure the Documents table is enabled:
- Add the extension in the Documents table:
- In the ID column enter a name for the extension.
- In the Description column enter a comment.
- In the Attachments column, attach the JavaScript code with a double click on the cell or select the edit symbol in the top right corner, then select Javascript code and confirm with OK.
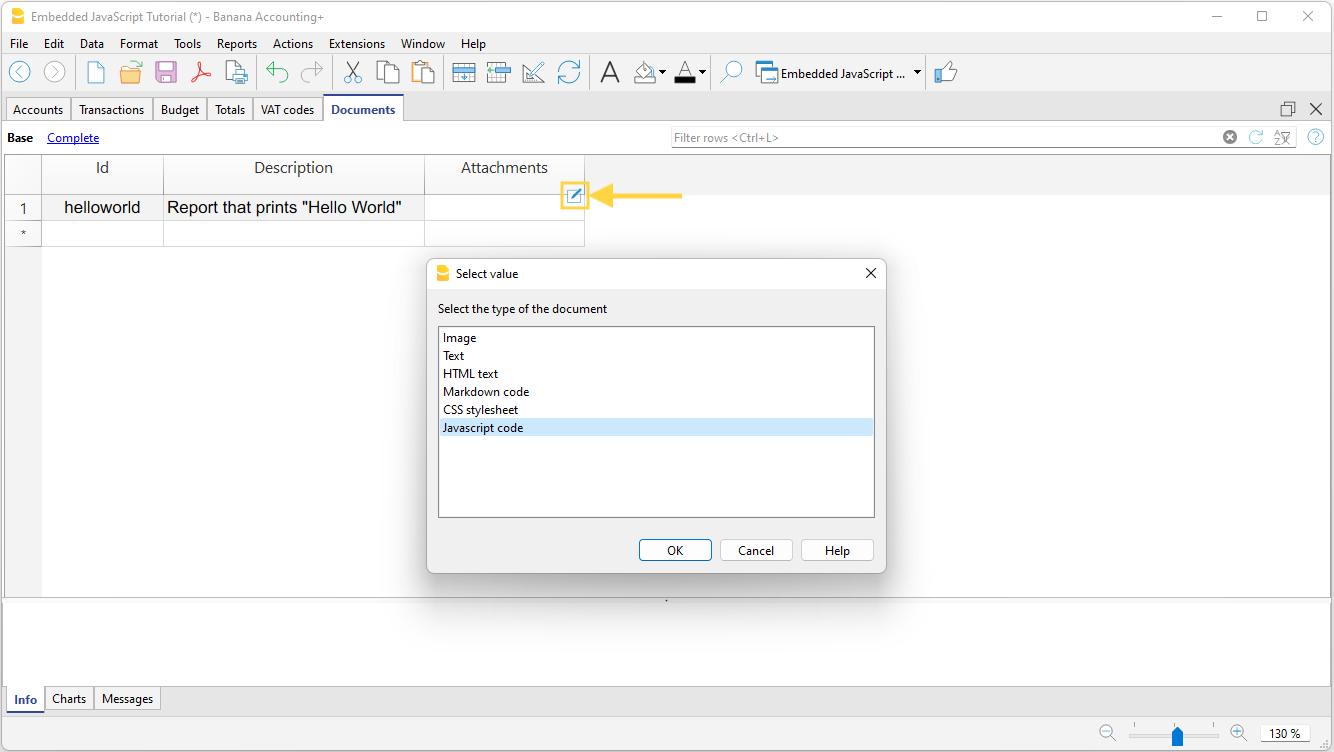
- An editor where you can write your javascript code opens.
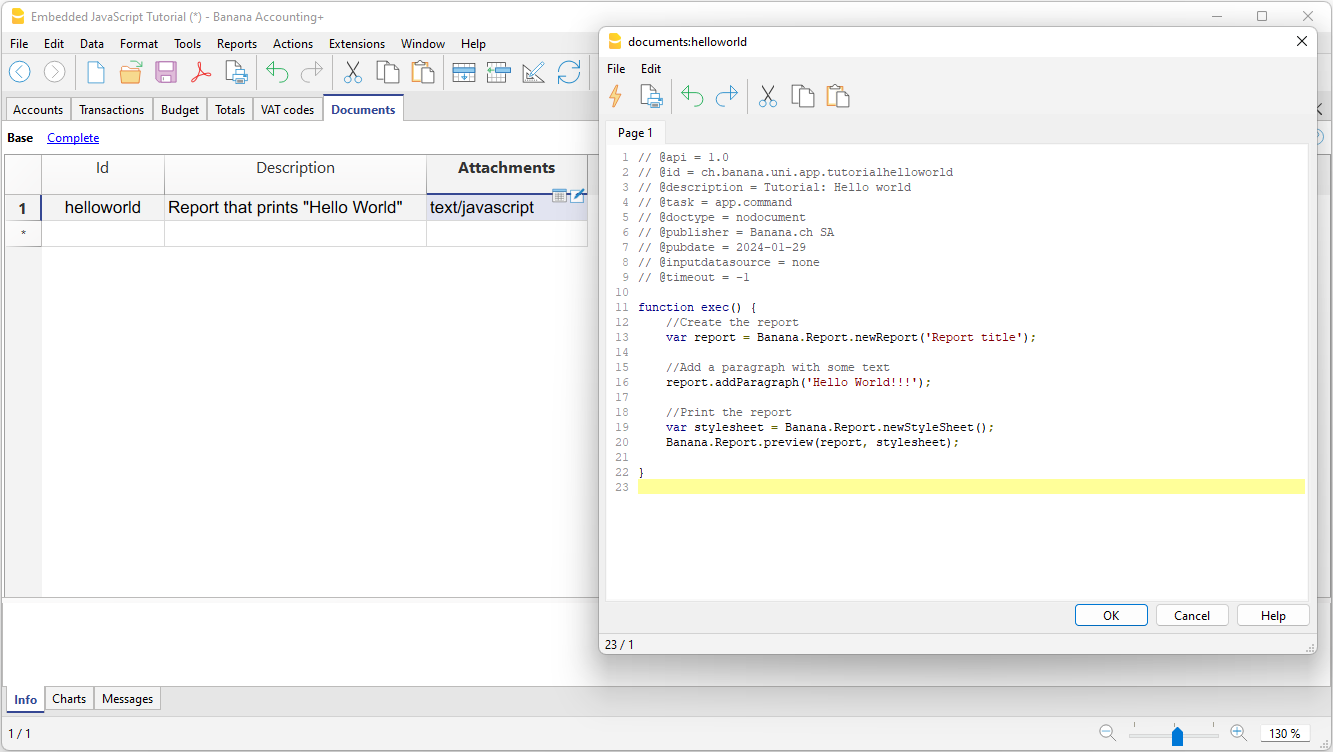
- When you are finished, confirm with OK, and save the accounting file.
Run the Extension
You have two options to run the embedded extensions:
- From the Documents table, click the run symbol in the Attachments cell containing your code.
- From the Extensions menu, select the extension from those listed.
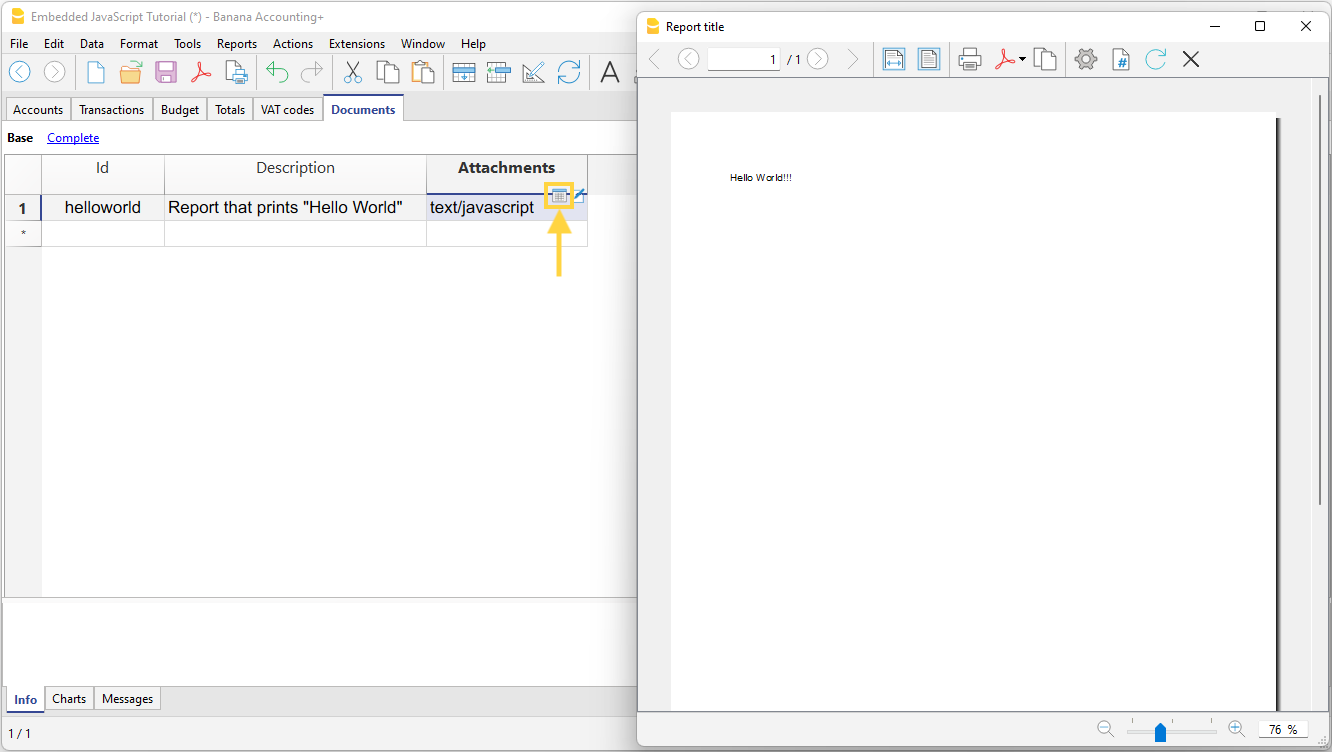
More information
Documentation for developers:
Simple table (Add fonctionalities)
The programme adds a table consisting of these columns to the existing file.
- Id
- Description
- Notes
This is used to add codes for projects, for example, or other information that you want to encode.
In other tables, a column can then be added that links to this table.

Joining Tables
Add Link Column
In Banana Accounting Plus, you can create links between columns of different tables using the RowId column.
The command Tools > Add/Remove Functionalities > Add Columns for linking tables creates a link column in the current table, with another existing table.
The Description column is automatically added, but if it is not needed, it can be deleted or hidden.
The command only works if the table to be linked contains the "RowId" column.
Choose Table Dialog
A list of tables containing the "RowId" column, which are not linked to any table, is displayed.
Choose the column after which (position) you want the link columns to be added.
Choose Column Dialog
All columns of the table are displayed.
Choose the column after which (position) you want the link columns to be added.
Link between Tables
To create a link between a column of one table and a different one, proceed as follows:
- Open the file where you want to add the table.
- Add the new table "e.g., Projects".
- In the Id column of the added table (Projects), enter the project code, and in the Description column, enter the project description.
- In the Transactions table, link the columns of the added table (Projects):
- From the Tools > Add/Remove Functionalities > Add Columns for linking tables menu.
In the dialog that opens, you can choose the position of the column. - Confirm by clicking the OK button.
- New link columns are added and displayed, starting with the name of the table.
- ProjectsId where the corresponding code from the RowId column is entered.
- ProjectsDescription (protected column) where the description corresponding to the entered code is displayed.
- When the content of the Projects table is changed by entering the Id in the other table, the description text will automatically be retrieved.
- From the Tools > Add/Remove Functionalities > Add Columns for linking tables menu.
- If descriptions in the added table (Projects) are changed, to automatically retrieve the new texts, recalculate or close and reopen the file.
The program automatically links columns that start with the same nameXml of a table and are followed by "Id" or "Description".
- Link columns can be created or added manually by assigning them specific names.
- Do not use these names for columns that should not be linked.
Create file copy
You can activate the command from the Tools menu → Create file copy.

This feature allows you to create a new file, identical to the existing one. You can choose to copy the file with the following options:
- Keep Opening balances. If the option is activated, the opening balances of the copied file will be shown in the new file.
- Keep Transactions. If this option is activated, transactions of the copied file will be shown in the new file.
- Keep Recurring transactions. If this option is activated, the recurring transactions of the copied file will be shown in the new file.
This feature is very useful when you want to make test changes and have the confidence that you can go back without losing data.
If none of the options are activated, a new file will be created only showing the same accounting plan.
The new file must be saved with a name.
Convert to new file
The command is activated from via Tools > Convert to new file.
In the dialog box that appears, the file type you are working on is selected.
A list of possible choices is also listed:

This command converts an existing file (which will not be modified) into another one with different characteristics:
- Change language
- Change the rounding
- Change the file type. For example:
- Pass from an accounting without VAT to one with VAT
- Pass from a Double-entry accounting to a Multi-currency accounting
This is similar to creating a new blank file and then transfer the data manually .
The existing file characteristics can be consulted by executing the Tools > File Info command
Creation and data transfer
The Tools → Convert to new file command:
- Creates a new file of the specified type with the predefined columns setup
- Transfers the data into the new file, proceeding with the necessary conversions
- Saves and indicates the name of the new file.
When converting a file with more options into one with fewer options, part of the data will be lost during conversion. If, for example, an accounting file with VAT/Sales tax is converted into an accounting file without VAT/Sales tax, all data in the VAT columns will be lost during conversion.
Conversion from a Double-entry accounting to a Multi-currency accounting file
- The currency symbol that is to become the basic currency must be specified in File and accounting properties
- Choose the Multi-currency accounting as destination
- The program creates a Multi-currency accounting, recovering the existing data:
- The Transactions table includes the columns for managing the Multi-currency accounting, as the base currency and a 1.0000 exchange rate
- The existing accounts in the Accounts table are being completed with the base currency symbol
- You must add the predefined accounts for exchange rate profit & loss.
- You must indicate the predefined accounts for exchange rate profit & loss in the File and accounting properties.
- The Exchange rate table will be empty; it is therefore necessary to add the currencies and exchange rates used in the transactions
- In the Accounts table, the accounts in foreign currency have to be added.
In order to change the currency of an accounting file, refer to the File Properties of the File and accounting properties.
Conversion from an accounting without VAT to one with VAT
- Choose the desired type of accounting with VAT as the destination
- The program creates an accounting with the VAT columns, recovering the existing data:
- Add the VAT accounts into the Chart of Accounts
- The File properties regarding the VAT need to be completed, and the default account on which the VAT must be recorded needs to be indicated
- Via Actions > Importa to accounting > VAT codes the applicable rates present in the VAT Codes table can be used.
Outline to create new file
For further details refer to:

Related documents:
The Merge file command in Banana Accounting+
The possibility of merging accounting files together is very useful; it allows, for example, to merge the accounting files of different branches of the same company, or to absorb the accounts of dislocated activities in the accounting file of the parent company, both for associations and businesses.
In Banana Accounting Plus this feature is only available with the Advanced plan. Explore all the Advanced plan features. Switch now to the Advanced plan!
The command is activated vie Tools → Merge File.
It is possible to merge two files, but they have to belong to the same application (for example two double-entry accounting files). It is not possible to merge files belonging to different applications (for example one double-entry accounting file and one income & expense file).
In order to successfully merge two files, it is crucial that they contain the same accounts numbers. Proceed as follows:
- Open the file which will contain the data of both files.
- Select the Tools → Merge File command.
- Select the path and the name of the file to be merged.
- Confirm the merge operation.
- If the files are not identical, even though they belong to the same application, (for example, accounting with VAT/Sales tax and accounting without VAT/Sales tax), a message will appear warning against probable data loss.
Program options
The program options are activated via the Tools → Program menu options and contain technical choices for the accounting document.

In the following pages you will find more detailed information.
General
The interface options are activated via Tools → Program Options → Interface.
Program options
Language
It is the language used by the program. You can change this setting if you want to use a language other than the default or if the default is not available.
Font type
You can choose the font.
% Zoom
If you want the data in the tables to be displayed in a different size, just adjust the Zoom percentage.
- The zoom percentage can also be changed with the zoom tool at the bottom right of the status line.
- The purpose of the zoom is to adapt the table content to the window size.
For the text size of menus, dialogues and icons, the operating system settings are used, but can also be adapted by the user.
Show negative numbers in red
Negative numbers and amounts are displayed in red in the tables.
Startup
Check for updates
Direct link the www.banana.ch website to the update download page.
Display start page
The news information home page is displayed.
Show recently used files
Recently opened files are displayed.
Start Web Server
Is used to access Banana Accounting data from external programs.
For more information see Integrated Webserver
Editor
The Editor options are activated from the menu Tools → Program Options → Editor.

Behavior
Edit table with single click
- If the function is activated, a single click on the selected cell is sufficient to introduce change.
- If the function is activated, a single click on the cell already selected is sufficient to change.
Autocomplete text (Smart fill)
By activating this option, the program automatically selects the first draft text in the drop down list and automatically fills it in the row where you are.
Add up during selection
By activating this option, the program will add up the selected amounts. Deactivate this function if this instantaneous addition slows certain operations down. One can select non-adjacent amounts by holding down the Ctrl key while selecting individual cells with the left mouse button.
On Enter go to the next row
By activating this option, the cursor will place itself on the next row when pressing the Enter key.
Input
Maximum number of undo operations
Insert the maximum number of undo operations when using the command from the menu Edit → Undo Operation (you undo one operation at a time).
Smart fill rows limit
When inserting data, the program reads the data that has already been entered and tries to suggest how to complete an entry. In cases where there are many rows, this function could slow down the process.
The user can define a limit for the number of rows, above which the smart fill will not be used. If there is no value entered or zero, smart fill will always be used.
File handling
The File Management options are activated via Tools → Program Options → File Handling tab.

Saving documents
This section contains the following options for saving documents.
Saving automatically when closing the documents
If this option is enabled, the data will be saved each time the file is closed.
Save autorecover information
The option allows automatic saving of the file with frequency (in minutes) to be indicated. The program saves the data in a document called autobackup + filename. If the program or computer crashes, you can recover the data by opening this file and saving it as from the File menu.
Create backup copy
When saving to disk with the same name, the pre-existing version of the file is renamed with the BAK extension.
Refer to the Save page for further information.
Files extension
Extension of files considered secure
This option defines the file types (eg: "pfd", "jpg", ...) and the url schemes (eg: "http:", "x-devonthink-item:", ...) that allow to open with a double click in the DocLink column of the Transactions table. Therefore, it prevents you from opening unsafe files or schemes. Extensions must be inserted without the period '.' initial, while the schemes must be inserted with a double dot ':' at the end.
Restore defaults
If certain settings have been changed, program will restore the default settings when clicking on this button.
Advanced
The Advanced options are activated Tools > Program Options > Advanced.

Enable TrueType Fonts
If this option is enabled when printing PDF files, the font selected in the Interface tab is used, otherwise a native font type of PDF files is used (Helvetica or Times New Roman). This option must be disabled if the texts in the generated PDF files are unreadable.
System info
Open the System info dialogue.
Reports Menu
Report menu commands in various applications
The Reports menu contains commands for displaying and printing various accounting documents. The commands listed will vary depending on the application selected.
By clicking on the various links, the web pages, with detailed information on the various commands, are displayed.
- Cash Manager
- Income & Expense accounting
- Double entry and multi currency Accounting
- Time sheet
- Fixed asset register
- Show Journal
- Items report
- Transactions report
- Inventory
- Estimates and Invoices
- Archive data
- Library and collections
Actions Menu
In the Actions menu, you can find the following commands:
- Recalculate totals
- Check Accounting
- Sort transactions by date
- Show expiry dates
- Recurring transactions
- Lock transactions
- Create New Year
- Update opening balances
- Import to accounting
By clicking on the various links, you will be directed to the web pages with detailed information about the various commands.
Extensions Menu
These are extensions of the program's functionalities, for reporting, calculating, exporting, importing, establishing bills and reminders and other.
They need to be set up by the user by clicking the appropriate button in the Extensions menu > Manage Extensions dialog, for example Import into accounting.
The Extensions menu lists all the already installed Banana Extensions related to the file that is open at the moment. By selecting the command, the indicated Extension will be executed.
Manage Extensions
The Manage Extensions command allows you to search for, install, alter your settings or uninstall Banana Extensions.
Installing a new Extension
For installing a new Extension, visit our Manage Extensions page.
Embedded Extension
Embedded Extensions are extensions saved in the Documents table of the accounting file that work without installation.
Technical information on Banana Extensions
Herewith some technical information on Banana Extensions
- They are programs in Javascript that make use of API's available in Banana Accounting.
- They are very secure and cannot perform functions that might impact on the operating system.
- Single Extensions.
A text file with the .js extension, which contains a program in Javascript, indicating the characteristics to be a Banana Extensions. - Extension package
A compressed file with the .sbaa extension, which can contain several other files, necessary for the application, such as commands, images, dialogues. A package can contain several commands. The title of the package and the commands it contains are indicated in the Extensions menu.
If you disable a package, all Extensions will be disabled.
Prerequisites for running Extensions
The commands for running Banana Extensions are only made available if the current file (the one on which you are working) has the features required by the Extensions. If any features are missing, the Extension will either not be visible or not executable in the Extensions menu.
- Extensions are available in specific context:
- Productivity
Commands that can be recalled in the Extensions menu. - Import
Available via the Import into accounting command. - Export
Available in the Extensions menu. The user should define the file name at the end of the process. - Invoice report
Extensions that prepare the invoice printing Report > Customers > Print invoices. - Reminders report
Prepares the reminders to be printed. They are available via Report > Customers > Print reminders. - Statement reports
Prepares the statements to be printed. They are available via Report > Customers > Print statements.
- Productivity
- Association via a File Type
This requires the current file to be - for example - an Accounting file, or the double entry file, or addresses. - Association via a property
Some Extensions will only be executable if the relevant word is specified in the File properties, Other section (from the File menu).
For example, the List of Administrators to be printed, that require specific fields, will require the word "Administrator".
Subscription to Advanced plan required
Some extensions are available in the Free and Professional plans, while several others require the Advanced plan.
The required plan information is indicated in the extension itself.
In addition:
- The Advanced plan is required to run local and web-downloaded extensions.
- Some extensions requiring the Advanced plan can also be used with other plans only as long as the accounting file has less than 70 rows.
Develop your own Extensions
Anyone can create Banana Extensions that extend the functionality of the program:
- Programming fluency is required.
- A subscription to the Advanced plan of Banana Accounting Plus is necessary.
To develop a Banana Extension, it is recommended to set out from an existing project.
- Start from an example available on the github.com \ BananaAccounting site
- Please refer to the developer documentation.
- Install the application via the Extensions menu > Manage extensions command.
Manage Extensions
This dialog window allows you to install, modify settings and uninstall Banana Extensions.
You must install an Extension in order to be able to use it.
Viewing and Installing Marketplace Extensions
In the online section of the Dialog you see and search extensions available in the marketplace.
To install an Extension, proceed as follows:
- Choose the language and country.
- From the left menu, select Online
- Select the Extension type (e.g. productivity)
- Look for the desired Extension among those listed; or in the Search box, type the name of the Extension you want
- Click on the Install button
- Click on the Close button
Below are the available Extensions :

The installed Extension will be visible in the Extensions menu.
Note
If the Extensions window does not show the complete list of extensions, you need to update them or extend the search, selecting any country, any language and all.
- If you activate the Include universal extensions option, you will also see all the extensions that can be used in any country.
If the complete list does not contain the format of your bank, you will need to request an account statement in the universal ISO 20022 format. Soon, all banks will replace the various formats (csv, MT940...) with the European standard ISO 20022 format.
List of Extensions
This list shows the installed Banana Extensions and those available for installation.
- The check sign indicates that the Extension is installed.
- The Extension denomination
- Information Banana Extensions:
- Description
- Link for main information, will open the corresponding internet page
- Last update
Extension date and hour
Local Banana Extension date and hour (as per imported file) - Category
Type of Banana Extension - Nation
Nation where Extension can be used. International will indicate that Extension can be used in several nations - Install button
Download Banana Extension for local use
- Information on installed Extensions:
- The ">" symbol preceding a packet will designate a Banana Extensions packet, that contains several commands.
- Enabled
If the enabled box is not checked, the Extension will not figure in the menu. For a packet, single commands may me deactivated. - Automatic update.
When a new version is made available, it will download automatically. - Last update
The date of publication of the extension. - Category
The Extension category - Nation
The nation of extension. Universal means that it is not tied to a specific nation. - Language
The interface language of the extension. - Default channel *)
The version of the extension. You can choose between- Stable-Channel.
Final released versions. - Beta-channel.
The versions released on a trial basis, before becoming final, but which still have to be fine-tuned. - Dev-channel.
The versions under development.
- Stable-Channel.
- Channels available *)
The versions available for this extension. - Used Channel *)
The version in use.
If the preferred channel version is not available, the programme will choose the channel version giving priority in order Stable, Beta and Developer. - URI.
- If the extension is installed locally the local location.
- If the extension is remote and has not been installed the remote url.
- Remote URI
If the extension was installed remotely, the remote repository url. - Required properties
For an Extension to function properly, they must be set up via File > File and accounting properties > Other. - Apply properties button
Will apply new properties to your file - Execute button
Will execute the specific command.
This button will only be highlighted if the App is applicable in the context of your current file.
For example, a multi-currency function will only be applicable if the file has been created as a multi-currency accounting file.
In order to create you own Extension for Banana Accounting Plus, you need to have a subscription to the Advanced plan. - Settings button
Certain Extensions allow you to set the settings for execution of your task. They will be related to your currently open file. If you use the same App with another file you must redefine the settings.
In the invoice reports, for instance, we indicate the elements necessary for printing. - Uninstall button
Will uninstall the Extension or the packet.
Using a development version
In the Marketplace we may make available different version of an extension:
- If a development version is available for the extension, this is indicated in the "Available Channels".
- In the "Default Channel" you can set the channel you prefer to use between Stable, Beta or Developer.
- In the 'Used channel', the development channel actually used is then displayed.
If the selected channel is not available, the higher level version is used. If there is no Developer, the Beta is used, and if there is no Stable
Search Extensions
Extensions are listed according to the following selection criteria:
- Language
- Nation
- Text
- Installed
Displays locally installed Extensions. - Online
List of Extensions available from the Marketplace.
Marketplace extensions will be automatically updated once a day when a new version is available. - System.
List of pre-installed Extensions. You may enable or disable via the check box.
Details
A dialog box appears with:
- The source file where the Extension is located.
- The type of Extension.
- The date of the Extension.
Parameters
If the Extension allows to set the parameters at programming level, the button is active.
When this is the case, dialogues are displayed that allow to enter fixed parameters, which will be used for this Extension.
The parameters are relative to each file.
Edit
Allows you to edit the selected Extension. Go to the folder where the Extension file is located.
Remove
Permanently removes the selected Extension. You cannot remove filters installed at the system level or for all users.
For the moment it is not possible to remove Extensions that are contained in a file with the sbaa extension either. If you want to remove the Extension you have to delete the Extension file.
Help (side button)
Leads to the internet page with information about the selected Extension.
Add from file
Lets you add a Banana Extension from a local file. Indicated especially for development of new Extensions.
In order to create you own Extension for Banana Accounting Plus, you need to have a subscription to the Advanced plan.
- The file needs to always remain in the same directory.
- If the App is modified, the program will always use the last version.
Add from URL
Allows you to install Extensions present in the list of Extensions available on the Internet.
In order to create you own Extension for Banana Accounting Plus, you need to have a subscription to the Advanced plan.
Update Extensions
Only once a day, the first time the program is started, the program will update the extensions.
If for any reason the program could not download the updated list or a new release has been made available during the day you should run the update command manually. The update command will:
- Update the list of the available extensions from the marketplace.
- Download a new release of an installed extension.
- It will modify local or Url installed extension.
For more information see: Development information for Installing and Running extensions.
Extension Settings
Some extensions allow you to set parameters that are used by the extension.
- The parameters can be set and changed with the dialog.
- At startup, the parameters are set with default values.
- The parameters are related to the accounting file..
- An extension package can contain multiple extensions and therefore there may be multiple parameters per package.
Extensions Setup Dialogue
The content of the dialogue is different for each extension.The UNI10 invoice layout is shown below.

Value insertion area
The settings dialog is structured as elements that contain sub-elements, each with:
- Property column.
- This is the name of the property.
- Value column.
- It's the value of the property, Value column. By clicking you can enter a value, change a predefined one or delete an existing one.
Buttons
At the end of the dialogue there are the following buttons:
- Help.
- The help button takes you to the documentation page of the extension you are using.
- Restore defaults..
- By clicking on this button all the default values of the Value column are restored.
- Cancel.
- Cancel and close the dialog without any changes being made.
- Ok.
- Confirm and save the entered parameters.If you have saved it by mistake, you can go back to the previous situation with the cancel operation command.
Access the settings dialog
You can access the settings dial in the following ways:
- From the >Manage Extensions, by clicking on the Settings button located on the right.
- From the Settings button in the Printouts/Preview of the report generated by the extension.
- For invoices, via Reports → Customers → print invoices, Layout section, Settings button.
Installing an Extension offline
In order to install an Extension in an offline mode proceed as follows:
- Connect yourself to our Extensions webpage, using a different computer connected to the internet
- Download the Extension that you need (a .js or .sba file ) and save it on a USB key or other device
- Copy the Extension on the computer without internet connection
- Open Banana Accounting from your computer without internet connection and open your accounting file
- Click Extensions → Manage Extensions
- Click on the Add from file button and select the path were you saved the Extension
- The Extension will now be included in the installed Apps and in the Extensions menu
Print label
Via the Extensions → Labels → Print command you can print the addresses. In the different tabs you can choose different settings, from the label format to le selection of the addresses to be sorted and printed. Each setting can be saved with the Customizations.

For the explanations of the different tabs, please consult the following pages.
Print example
Options
First label starting position
Decide on the position of the first label. For example, if 1 is entered in the horizontal and vertical fields, it refers to the upper left-hand corner of the page.
Number of copies for each label
The value of 1, in this field, means only one copy of each label is wanted.
Warning if text exceeds label
If the text runs beyond the margins for the label, the program will warn the user by sending an error message if this cell is activated.
Label format
You can choose between the label formats available in the list.
If the list doesn't have the format you wish, through the Change button, you can access the Label format dialogue windows where you can choose your desired settings.
Data
Indicate the data source for the labels to be printed:
- Table - the current table (Accounts, Transactions, Budget, Totals, VAT code) data will be printed. If a data extraction occurred, only the extracted data will be printed.
- Selected rows only - only the earlier selected addresses will be printed.
Label

Field list
This is a list of all possible label fields; to insert a field, it is possible to work in two ways:
- Double-click on an element from the list
- Click on an element from the list, confirming with the Add Field key.
The field selected will be inserted at the position of the cursor in the View labels area. One can directly insert fields by writing the field name between the < Less and > Greater symbols.
View labels
Shows the disposition of the fields. The entries "<NAME FIELD>" will be replaced with the corresponding value of the table.
The symbols Greater and Less are considered field delimiters. In order to make them appear in the text
write "\<" for "<";
write "\>" for ">"
and write "\\" for "\"
Preserve line feeds and spaces.
In case this option is deactivated, the program does not take eventual spaces and empty rows in consideration.
Extract

Sort

Customization

Labels format
Via Extensions → Labels → Formats option, you can access the labels setup.
The program already offers many predefined label formats; it is however possible to setup or edit the default parameters, as well as your customized ones, through the Customization (Default) command.
Page settings - Options

Page
Left Margin, Right Margin, To Margin, Bottom Margin
Input the size in centimeters; if no size is entered, the margin sizes will be zero.
Number of horizontal labels
Input the number of horizontal labels there are on the page.
Number of vertical labels
Input the number of vertical labels there are on the page.
Print Landscape
The page will be printed horizontally if this cell is activated.
Arrange labels from right to left
The labels will be printed from right to left and from top to bottom.
Label
Left Margin, Right Margin, To Margin, Bottom Margin
It is possible to input a margin for each label; the values for the label margins must be input in centimeters.
Center text horizontally
Select this option to horizontally center the text for each label in the cell.
Center text vertically
Select this option to vertically center the text for each label in the cell.
Font size
Base size
This field shows the default font size.
Reduce to fit, but no less than
The program calculates the maximum font size possible for a given label, starting from 14 points all the way down to 8 points. The calculation is made taking into account both the height and width of the label. If a label has a line that is too long (or has too many rows) to be printed, then an error message will appear in the message window. Even if it is incomplete, the label will still be printed.
Note:
the printers will not print on the whole surface of a page because they need minimum margins. The program tries to adapt the single labels to the margin values required by the printer.
Page settings - Customization

All the settings that have been activated in the Options tab can be saved by using Customization and can be displayed when needed.
For more information on this section, consult the Customization page.
Extensions Commit Changes Dialog
This dialog asks the user for approval for changes the extension wants to make to the data.
The dialog displays:
- The list of the affected tables
- The list of data changes with the new content:
- Rows added (green)
- Rows deleted (red)
- Rows modified (yellow)
- Rows moved, sequence is changed (blue)
- Rows replaced (magenta)
If you approve the change you can always rollback the changes with the undo.

For Developers: See also the DocumentChange API
Favorites menu
Favorites are displays of printouts or reports with customized settings.
The Favorites menu will display list all the Customizations created and can be recalled if and when necessary.
The Favorites menu is not displayed by default, but appears when the user creates customizations (the first time the accounting file must be closed and reopened), indicating that they must appear in the menu.

Customization
Customization is a display or printout with customized settings that can stored. If necessary, customized documents can be resumed without repeating the settings.
Customizations is obtained from the following menus and for the following documents:
- Report for:
- Account cards
- Enhanced Balance Sheet
- Enhanced Balance Sheet with groups
- Accounting reports
- VAT reports
- File for:
- Create Pdf dossier
- Export file
- Data for:
- Extract and sort rows
- Sort rows
- Export rows
- Extensions - for Addresses customization.
How to proceed
Depending on the document to be created, start by clicking on the menu and on the appropriate command (Account cards, Financial statements, Export file ...).
From the dialogue that appears:
- Click in the Customization section.
- Click on the New button.
- Enter the name of the new customization.
- Activate the appropriate options in the various sections.
- Click on the Apply button.
Each customization, once created, will appear in the menu of the corresponding command and can be edited, renamed, duplicated or deleted.
Name
Enter a name to identify the customization (for instance, Quarterly Report).
Description
Enter the description for the customization.
Show this window every time
If activated, when selecting a customization from the menu, the dialogue for editing the settings will be shown. If not activated, the preview of the requested report (Balance sheet, report, etc.) will be shown directly.
Show in menu... (depending on the menu/command in which one is being positioned)
If this option is activated, the customization will appear in the menu of the command.
Show in 'Favorites' menu
If this option is activated, the customization will appear in the Favorites menu.
Read only
If this option is activated, it will not be possible to edit the settings.
New
This button allows you to create a new customization.
Delete
This button allows you to delete an existing customization.
Duplicate
This button allows you to create an identical copy (a duplicate) of an existing customization.
Import
This button allows the import of an existing customization from another Banana accounting file (.ac2).
Apply
This button allows you to save the chosen settings for the new customization.
Display in the starting menu
According to the menu you are in, the Default customization and your personal saved customization will be shown.
Customization (Default)
This is the customization used by default from the program, if no other customization has been created.
In the following example the menu of the Accounting reports is shown.

Direct access to the customizations
In the tables where the customization are being shown and in the previews, the customization menu and the settings icon are being displayed. These make it possible to easily move from one customization to the next and provide rapid access to the settings in case you want to edit these.

Window menu
New Window
The command opens a new window with the same contents as the already open window.
Arrange side by side
With this command you can see, within the Banana Accounting program, the various files open at the same time, arranged side by side. If you have two screens, it is also very practical to open the Banana Accounting program have an accounting file open and in each one; this way you will have more visual space. For more information see below.
View two files simultaneously
The two files are displayed within the same program. The Info window at the bottom changes according to the file in which you are working with the cursor.
There are two ways to view two or more files at the same time.
Open the two files side by side in Banana Accounting
- Open the two files via the File > Open.
- Click Window > Tile menu.

Open the Banana Accounting program twice simultaneously
- Open the Banana Accounting program twice, starting from Windows startup.
- Open an accounting file in each of the programs,
This is a great solution if you have a large screen or two screens connected to the same computer.
Next window or Previous window
The commands allow you to switch from one window to another. The shortcut Ctrl + Tab is also very useful.
Warning messages, Acoustic signal, Clear messages
In the section reserved for messages, you can choose whether and how they should be reported. If you activate Empty messages, all messages in the information window below are deleted.
Appearance
The command allows you to customize the Interface and you have the following options:
- Show Develop Menu
See more information on the page Develop Menu - Show Cell Editor
If the display is disabled, the editor for writing text does not appear at the top below the toolbar, but you can still write text within each cell. - Show row editor key
If activated, the button to edit the row contents will be displayed. By clicking on the row editor button at the bottom right, a window will be displayed in which it will be possible to edit the single rows through a form view. This mode has been designed to facilitate the input of texts on tablet or mobile devices. - Show Info Window
If disabled, the bottom information window, graphics and error messages are not displayed. - Show Status Bar
If disabled, the status bar at the bottom of the window is not displayed, where the row number and zoom setting is shown. - Display theme
This option allows setting the dark mode functionality in the following modes:- System default - the setting is taken over from your operating system.
- Dark - the dark mode is set.
- Light - the light mode is set.
Preview
The command allows you to preview the document.
Start Page
With the command you can choose whether or not to display the home page.
Recently opened file list
Recently opened files are listed at the bottom of the Window menu. The file in use is selected, the others remain in the background.
Develop Menu
In Banana Accounting Plus this feature is only available with the Advanced plan.
The developer Menu can be made visible with the command:
Development options
Contains useful options for developers of scripts, apps or http pages for Banana Accounting.
Enable Screenshots (Ctrl + 3)
When the function is activated, with the combination of the keys Ctrl + 3 you can take screenshots and save the images of the tables and dialog boxes of the program.
Also refer to Enable sreenshots.
Show Debug output window
When activated 'Debug output' is displayed in the lower part of the main program window. All debugging messages will be displayed in this panel. The debug messages allow to verify the correct functioning during the execution of scripts, apps or calls to the web server. They are aimed at developers of scripts, apps or http sheets.
For more information see the Debugging page.
System info
This section displays information about the operating system and working environment.Information can be requested from technical support.In this case, click on the Copy to clipboard button and paste the data in the e-mail message or in the contact form.
Taking screenshots
This feature is available by using the key Ctrl+3. Facilitates the capture and saving of a program image.
In order to use this feature you need to activate it via Window-> Develop -> Enable screenshot (Ctrl + 3)
It is useful for preparing documentation, as it only captures the part of the program windows that you are interested in.
Capturing the image
When capturing an image we advise you to use a 90% zoom, so more data will fit in the image but you still get readable texts.
- Capture all
It creates an image of the full Banana window. - Capture table and info window
It only captures the table and the info window below the table (without menus, toolbar and status bar). - Capture table
It only capture the table - Capture columns
It only captures the table, and only up to the maximum columns width (it doesn't include the white spaces).
Resize window (pixel)
It resizes the program window to a pre-defined size, so if you take multiple shots you always have the same size.
Hide / Show window's components
It allows you to see more table rows, by hiding the toolbar, the info window and the status bar.
Windows - How to remove the dialogue windows shadow
Windows 8 e 10 "enhance" their dialog windows by adding a shadow to them. When capturing the window image you therefore also see the background.
In order to avoid this you can proceed as follows:
- From the Windows search box type Sysdm.cpl
- Go to the Advanced section
- Visual effects Settings
- Uncheck the option Show shadow
System info
This section displays information about the operating system and working environment. Information can be requested from technical support. In this case, click on the Copy to clipboard button and paste the data into the e-mail message or into the contact form.

Help Menu
The Help menu gives access to the followings commands:
- User's guide - gives access to the documentation that explains the various functions of the program and the accounting issues.
- Keyboard shortcuts - contains the list of all keyboard shortcuts with detailed use description.
- Check for updates - connects to our website to check if there are newer versions of the software
- Support center - access to the Banana Accounting support web page
- Manage subscription
The dialogue box to manage your subscription, indicating the following information:- Email with which you registered and the possibility to remove it.
- Version in use and expiration.
- Link to unlock your version with a product key.
- Link to purchase a subscription.
- Link that checks the availability of an updated subscription.
- About Banana Accounting
Opens a window that shows technical information about the program such as version number, serial number, Copyright.....
Keyboard shortcuts
You can also consult the list of keyboard shortcuts directly from the program, by choosing Keyboard shortcuts from the Help menu.
Keyboard shortcuts for Windows computers
Accounting Keys | Description |
F9 | Perform simple recheck. |
Shift+F9 | Perform global recheck. |
F6 | This key executes different functions depending on the column the user is working on. The functions are explained in the information window. |
Alt+ Left click | Display the Extract rows table or the Account card table when clicking on an account number. |
. (Full stop/Period) | On a date column insert the current date. |
Editing Keys | Description |
Enter, Tab | Confirming keyed-in text and advance one cell. |
Alt+Enter | Confirming keyed-in text and advance one row. |
Shift+Tab | Confirming keyed-in text and return to previous cell. |
F2 | Edit content of cell. |
Double click | Edit content of cell. Under the program options you can select to edit content of cell with a single click. |
Backspace, Space | Delete content of current cell and edit the content. |
Backspace | Delete preceding character. |
Del | Delete subsequent characters. |
Ctrl+C | Copy selected text or cells. |
Ctrl+V | Paste copied text or cells. |
Del | Delete content of selection. |
not assigned | Delete text from the cursor point to the end of the cell. |
F4 | Copy previous cell from same column. |
Shift+F4 | Copy previous cell from same column and advance one cell. |
Ctrl+Shift+C | Copy selected rows. |
Ctrl+Shift+V | Insert copied rows. |
Ctrl+- | Delete selected rows. |
| Ctrl+D | Duplicate selected rows. |
Ctrl++ | Insert rows before position of cursor. |
Ctrl+Enter, Ctrl+Return | Add one row below position of cursor. |
Moving keys | Description |
Left | Scroll towards left. |
Right | Scroll towards right. |
Up | Scroll up. |
Down | Scroll down. |
PgUp | Scroll up one screen page. |
PgDown | Scroll down one screen page. |
Home | Scroll to beginning of row. |
End | Scroll to end of row. |
Ctrl+Home | Scroll to top-left angle of table. |
Ctrl+End | Scroll to bottom-right angle of table. |
Ctrl+Left | Moves towards left to the edge of the current data region. |
Ctrl+Right | Moves towards right to the edge of the current data region. |
| Alt+Up | Move rows up. |
| Alt+Down | Move rows down. |
Ctrl+Up | Moves up to the edge of the current data region. |
Ctrl+Down | Moves down to the edge of the current data region. |
Alt+PgDown | Next view. |
Alt+PgUp | Previous view. |
Ctrl+PgDown | Next table. |
Ctrl+PgUp | Previous table. |
Ctrl+Tab | Next window. |
Ctrl+Shift+Backtab | Previous window. |
F5 | Scroll to desired row by keying in row number in active window. |
Shift+F5 | Go to original row. |
Selection Keys | Description |
Shift+PgUp | Select column moving upwards, page by page. |
Shift+PgDown | Select column moving downwards, page by page. |
Shift+Left | Select row to left. |
Shift+Right | Select row to right. |
Shift+Up | Select upper column. |
Shift+Down | Select lower column. |
Shift+Home | Select back to start of row. |
Shift+End | Select forward to end of row. |
Ctrl+Shift+Home | Select back to top of table. |
Ctrl+Shift+End | Select forward to end of table. |
Ctrl+A | Select entire table. |
Other Keys | Description |
Ctrl+F4 | Close active window. |
not assigned | Exit program. |
Ctrl+N | New file. |
Ctrl+S | Save. |
Ctrl+O | Open. |
Ctrl+P | Print. |
Esc | Cancel operation. |
Ctrl+Z | Undo operation. |
Ctrl+Y | Redo operation. |
Ctrl+F | Find. |
F3 | Find next. |
Ctrl+B | Bold text. |
Ctrl+I | Italic text. |
F1 | View help. |
Multimedia keyboard | Is performed by |
Function key (eg. F6) | Press the fn key as well as the corresponding function key (e.g. Fn+F6). |
Keyboard shortcuts for Mac (Apple) computers
Keyboard shortcuts on Apple computers are slightly different from those on Windows. The main difference is that instead of the Crtrl key on the Mac keyboard there is the Command key. You can find the complete list under Help → Keyboard shortcuts.
Accounting Keys | Description |
⌘9 | Perform simple recheck. |
⇧⌘9 | Perform global recheck. |
⌘6 | This key executes different functions depending on the column the user is working on. The functions are explained in the information window. |
⌥ Left click | Display the Extract rows table or the Account card table when clicking on an account number. |
. (Full stop/Period) | On a date column insert the current date. |
Editing Keys | Description |
⌤, ⇥ | Confirming keyed-in text and advance one cell. |
⌥⌤ | Confirming keyed-in text and advance one row. |
⇧⇥ | Confirming keyed-in text and return to previous cell. |
⌘2 | Edit content of cell. |
Double click | Edit content of cell. Under the program options you can select to edit content of cell with a single click. |
⌫, Space | Delete content of current cell and edit the content. |
⌫ | Delete preceding character. |
⌦ | Delete subsequent characters. |
⌘C | Copy selected text or cells. |
⌘V | Paste copied text or cells. |
⌦ | Delete content of selection. |
not assigned | Delete text from the cursor point to the end of the cell. |
⌘4 | Copy previous cell from same column. |
⇧⌘4 | Copy previous cell from same column and advance one cell. |
⇧⌘C | Copy selected rows. |
⇧⌘V | Insert copied rows. |
⌘- | Delete selected rows. |
⌘D | Duplicate selected rows. |
⌘+ | Insert rows before position of cursor. |
⌘⌤, ⌘↵ | Add one row below position of cursor. |
Moving keys | Description |
← | Scroll towards left. |
→ | Scroll towards right. |
↑ | Scroll up. |
↓ | Scroll down. |
⇞ | Scroll up one screen page. |
⇟ | Scroll down one screen page. |
↖ | Scroll to beginning of row. |
↘ | Scroll to end of row. |
⌘↖ | Scroll to top-left angle of table. |
⌘↘ | Scroll to bottom-right angle of table. |
⌥← | Move towards left to the edge of the current data region. |
⌥→ | Move towards right to the edge of the current data region. |
⌥↑ | Move rows up. |
⌥↓ | Move rows down. |
⌥← | Move cursor to previous cursor position. |
⌥→ | Move cursor to next cursor position. |
⌘↑ | Move up to the edge of the current data region. |
⌘↓ | Move down to the edge of the current data region. |
⌥⇟ | Next view. |
⌥⇞ | Previous view. |
⌘⇟ | Next table. |
⌘⇞ | Previous table. |
⌘} | Next window. |
⌘{ | Previous window. |
⌘5 | Scroll to desired row by keying in row number in active window. |
⇧⌘5 | Go to original row. |
Selection Keys | Description |
⇧⇞ | Select column moving upwards, page by page. |
⇧⇟ | Select column moving downwards, page by page. |
⇧← | Select row to left. |
⇧→ | Select row to right. |
⇧↑ | Select upper column. |
⇧↓ | Select lower column. |
⇧↖ | Select back to start of row. |
⇧↘ | Select forward to end of row. |
⇧⌘↖ | Select back to top of table. |
⇧⌘↘ | Select forward to end of table. |
⌘A | Select entire table. |
Other Keys | Description |
⌘W | Close active window. |
⌘Q | Exit program. |
⌘N | New file. |
⌘S | Save. |
⌘O | Open. |
⌘P | Print. |
⎋ | Cancel operation. |
⌘Z | Undo operation. |
⇧⌘Z | Redo operation. |
⌘F | Find. |
⌘G | Find next. |
⇧⌘G | Find previous. |
⌘B | Bold text. |
⌘I | Italic text. |
⌘? | View help. |
⌘3 | Save screenshot of current dialog or table. |
MacBook keyboard | Is performed by |
⌦ | fn⌫ |
↖ | fn← |
↘ | fn→ |
⇞ | fn↑ |
⇟ | fn↓ |
⌘↖ | fn⌘↖ |
⌘↘ | fn⌘↘ |
About Banana Accounting+
In the About dialog window (menu Help → About Banana Accounting+), you will find various information about the program.
Version
The version number you are using (eg 10.0.4) of Banana Accounting + is clearly visible. Banana Accounting Plus, numerically it is version 10, which will be continuously improved, so there will be additional version numbers, eg10.0.1, 10.0.2, etc. for each subsequent release.
Important: for any technical question, before contacting the support service, make sure you have the latest release (by downloading it from our download page)
Along with the version number you will also find the serial number, web address and Copyright information.
Patents and legal notices
In this tab you will find again the Copyright information, the Banana Accounting patents and the trademark declarations. You will also find the indication of all the programming platforms that the software uses with the relative licenses and copyrights.
Credits
In this section, acknowledgments and credits are given to all those who have participated and still actively participate in the development, maintenance and promotion of our program.
Error messages
When the programme encounters errors, a dialogue box appears to report them:
- Select the OK button to display each individual message.
- By activating the Do not report option, all error messages reported by the programme are saved in the Error messages window.
- Information on the Help button can be found under Contextual Help.
Warnings and error messages
- Complete list of error messages
- For further information on the Message Error window refer to the Interface page.
If the program displays error messages
- Revert to the the help page for the reported error: in the 'Info' and 'Messages' (where the error messages appear), next to the error message, the
 symbol will show. By clicking on this symbol, you will be connected directly to the online page corresponding to the error, containing the possible causes and solutions.
- If the error persists:
- Update your software to the latest available version, by downloading it at the following page Download.
- Check Accounting (menu Actions).
- In Multi-currency Accounting, ensure that Exchange Rate differences have been generated and applied (menu Actions).
Deactivate and Reactivate error messages
To deactivate/reactivate the display of the dialogue of messages:
- from the Window menu, put or remove the check mark on the Warning messages command.
- from the Actions menu launch the Check accounting command.