Accounting Applications
Banana Accounting offers various professional applications, inspired by Excel, to manage the accounting.
The accounting Apps use an accounting calculation, planning and reporting engine, based on the Double-entry accounting method and offer several common features.
Income & Expense accounting
- Cash Manager (previously "Cash Book")
For management of a single account, with the possibility of classifying income and expenses by category. - Income & Expense accounting.
To manage comprehensive accounting with various balance sheet accounts and categories, to which income and expenses are attributed.
This is a simplified mode of use, that doesn't require knowing about Debit and Credit. There are however Balance Sheet and income statement reports..
Double-entry accounting
- Double-entry accounting.
Full comprehensive accounting solution, according to the Double-entry method. Operations are classified by indicating the Debit and Credit account. The financial statements are complete with Balance Sheet, Income statement, Journal and Account cards. - Multi-currency accounting.
Double-entry accounting with the possibility of managing accounts in different currencies.
Features for accounting applications
The various accounting applications provide different functionalities - click on the links to learn more:
These features can be activated or added as per your requirements.
The program is easily applied because, if a feature is not used, it is not activated..
Accounting setup
- It supports any currency. Symbols are chosen from list or freely set.
- Possibility to alter the number of decimals (generally 2), from 0 to 12 decimals to manage crypto-currencies.
- Accounting period is set as a calendar or freely set (start and end date).
- Choice of accounting language.
Files and data saving (similar to Excel)
Applicable to all Banana applications:
- Create new file starting from preset templates or from own files.
- The data for an accounting year are saved in one single file.
- The file can be located on any media, computer, network, cloud or sent by email.
- Possibility to manage unlimited number of accounting files, of any kind.
- Data is accessible to multiple users simultaneously, but to only one person in edit mode.
Chart of Accounts
- Plan and structure of accounts are fully customizable.
- Numeric or alpha-numeric account and group number.
- Possibility to add notes or further columns.
- Grouping and totals are adaptable and according to any nationally required grouping scheme.
- Balance, account movement and totals are displayed and updated in real time.
- Cost and profit centres, for detailed control of costs and revenues of specific activities or projects.
- Segments for reporting by sector (branch), thanks to Segments.
- Customer details with monitoring of pending invoices, reminders and statements.
- Supplier statements with monitoring of paid and pending invoices.
- Management of customers and suppliers, also as non-Balance Sheet accounts (with cost centre) for accounting managed with the cash method.
- Off-Balance sheet accounts.
Transactions
- Single or collective transactions.
- Accrual or cash method..
- Use ofExcel type interface, select, copy and paste, add lines, search and replace..
- Suggestions, autocomplete and memorization of repetitive operations for faster input.
- Automatic or customized numbering of documents.
- Ability to edit data entered, organize or add columns and any other information.
- Link to files of receipts in digital format (pdf, images) and opening of documents by a click.
- Import of data from bank statements, with the possibility to complete or remove imported operations.
- Row colouring.
- Possibility to have different displays of columns.
- Contextual information concerning account balance, differences or errors.
Blockchain for data protection
- Protection of movements entered with digital data certification technology (similar to Bitcoin).
- Compliance with legal requirements.
- Transfer of data to auditor with the certainty of impossibility of tampering.
Standard and customized reports:
- Balance Sheet, Income Statement, Journal, Account cards.
- Customization and saving of print settings.
- Export and link data to Excel.
Charts
- Overview of account evolution.
- Comparison of Budget and Final Accounts..
- Real time display while entering..
VAT management
Any national specification supported:
- VAT code table to indicate the different VAT rates and case studies. Any VAT transaction supported.
- Automated VAT calculation, net or gross..
- VAT control reports.
- National extensions for VAT reporting based on the requirements of tax authorities.
Financial Planning
- For existing companies or startups.
- Inclusion of planning by means of transactions in budget.
- Automatic assumption of repetitive expenses or income (rent, wages, bank charges, etc.).
- Possibility to indicate item code, quantity and price.
- Javascript calculation formulas to automate the dependent values (calculation of interest on the actual use of a loan).
- The program automatically sets up financial plans, complete with liquidity planning, balance forecasts, balance sheet and provisional income statement and movements on an account.
- Automatic financial projections for several years.
- Choice of display per period or
- Comparison between Budget and Finalized Balance Sheet.
Invoices to Customers
- Entering invoices as regular rows of transactions.
- Column.
- With or without VAT.
- Possibility to modify or correct.
- Print a single invoice with a click or several invoices simultaneously.
- Choice of different print formats available and parametrizable.
- Export in digital format through extensions.
- Customizable reminders and statements.
Check Accounting
- Check accounting command. In one click, the accounting is recalculated as if all transactions were inserted again.
- Any erroneous settings, differences or errors will be reported.
- Each report is linked to a help page that explains the causes and provides the solution..
- Possibility to correct.
Year-end closing and Creation of New Year
- Automatic process for creating new year files, with report of balances and profit or loss.
- You may start working on the new year, even if you have not closed the previous one.
- Command to report the final balances when the previous year has been closed.
- Possibility to add and print year-end notes.
- Command for archiving all data and printouts in pdf format.
Various
- Creating new files starting from an existing file.
- Converting from one accounting type to another, in order to grow and add functionalities.
Multi-currency accounting
- Accounts as well as customers and suppliers in different currencies.
- Recording with current, historical or freely set exchange rates.
- Invoices in the client's account currency.
- Balance sheet and Transaction entries in the account's base currency or in account currency.
- Calculation of unrealized exchange gains and losses (exchange rate differences).
Double-entry accounting
The professional tool to manage assets, liabilities, expenses and income according to the international rules of the Double-entry (debit and credit) and to obtain a Balance Sheet and a Profit/loss Statement.
The double-entry accounting application is available with or without the VAT management option.
Characteristics
- Manages the estate accounts and the profit/loss accounts (assets, liabilities, expenses and revenue)
- The accounting type with VAT features the VAT calculations and VAT reports
- Produces all the accounting extracts: journal, account cards, balances by period and annual balances
- Allows Cost Centers and Segments management
- Offers different ways of data presentation
- Exports data to Excel, Html, Xml, Pdf
- Imports data from different files formats
Tables and File properties
The double-entry accounting is composed by the following tables:
- Accounts table
Where the accounting plan is located with opening balances, and where groups and subgroups can be defined along with cost centers and segments. - Transactions table
Where the accounting transactions are entered. - VAT Codes table
Where the VAT/Sales tax codes are set, only if the VAT management option has been chosen. - Exchange rates table
Where the different currencies are defined, only if the multi-currency accounting option has been chosen. - File properties
Where the accounting general settings are defined.
Changing accounting type
In order to change your file language, rounding system, or in order to add VAT or multicurrency columns, please refer to the Convert to new file command, from the Tools menu.
Learn more
- Learn Accounting
- Elements of Accounting
- Mathematical basis
- Organizing your accounting documents
- Debit and Credit
- Accounting on turnover or collected
Starting a Double-entry accounting
Video Double-entry accounting: video tutorial that shows you how to easily set up a Double-entry accounting, adapt the Accounts table, set a budget, enter the transactions and print reports.
Creating an accounting file, starting from a template
Proceed as follows:
- File menu, New command
- Select the region, the language, the category and the accounting type
- From the list of the templates that appears, select the template that is closest to your own needs.
- Click on the Create Button
In the Search area, when entering a key word, the program displays the templates that contain the entered key word.
It is equally possible to start from a blank file, by activating the Create blank file option. In any case, in order to facilitate the start and avoid grouping errors, we recommend that you always start from an existing model.

More information on how to create a new file is available on the Create New File page.
Setting up the file properties (basic data)
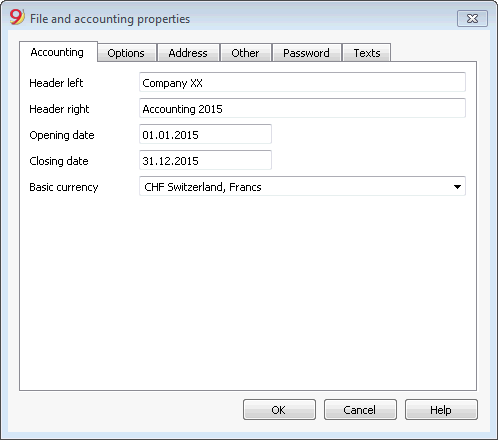
- From the File menu, File properties command, indicate the company name that will appear in the headers of the printouts and on the other data.
- Select the basic currency, with which the accounting will be kept.
Save to disk
With the File-> Save As command, save the data and also assign an name to the file. The typical save dialog of your operating system appears.
- It is advisable to use the name of the company followed by the year "Company-2020." to distinguish it from other accounting files.
The program will add the "ac2" extension. - You can keep as many accounting files as you need, each will have its own name.
- You can choose the folder you want, (for example, Documents -> Accounting) or the support you want like a disk, usb or cloud.
If you also expect to have documents linked to the current year's accounts, it is suggested that you create a separate directory for each accounting year having to group all the files.
General use of the program
Banana Accounting inspires itself from Excel. The user directions and the commands are kept as similar as possible to the ones of Microsoft Office.
For more information on the general use of the program, we refer to the explanations on our page Program interface.
The accounting is being contained in tables; all of them have the same way of operating.
Customizing the Chart of accounts
In the Accounts table, customize the Chart of accounts and adapt it to your own needs:
- Add new accounts and /or delete existing ones (see Adding new rows)
- Modify the account numbers, the descriptions (for example, enter the name of your own Bank account), enter other groups, etc.
- To create subgroups, please consult our Groups page.
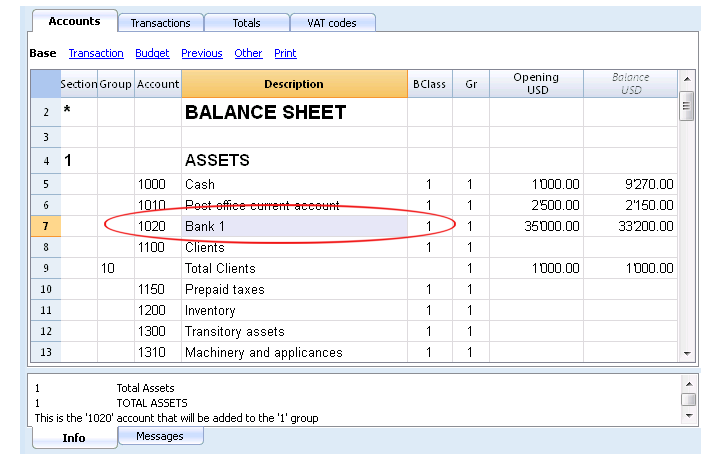
In the Chart of accounts, you can also define Cost centers or Segments, used to attribute the amounts in a more detailed or specific way.
The Transactions
The Transactions have to be entered into the Transactions table; together they compose the Journal.
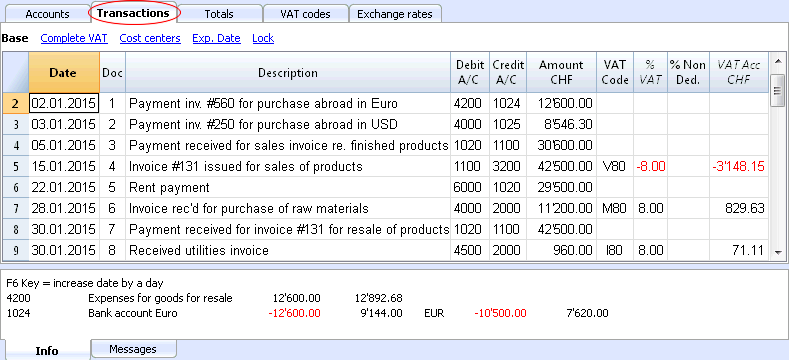
In the specific columns:
- Enter the Date
- Enter the Document number, manually assigned to the paper document. This makes it possible to easily locate the documents once the accounting transaction has been entered.
- Enter the Description
- Into the Debit account column, enter the destination account
- Into the Credit account column, enter the account of origin.
- Enter the Amount. In the accounting with VAT, enter the gross amount, VAT included. The program will separate the VAT, splitting the net cost or net income.
Speeding up the recording of the transactions
In order to accelarate the recording of the transactions, you can use
- the Smart fill function that allows the automatic autocomplete of data that have already been entered at an earlier date.
- the Recurring transactions function, used to memorize recurring transactions into a separate table.
- importing your bank or postal account statement from the e-banking.
Transactions with VAT
In order to enter transactions with VAT please proceed as follows:
- from the File menu, choose New command and choose Double-entry accounting with VAT/Sales taxes
- Choose one of the existing templates for your nation with double-entry accounting with VAT codes and VAT Codes table.
In order to enter transactions with VAT, please visit the Transactions page.
Transactions on multiple rows
Transactions on multiple rows or Composed transactions are transactions involving more than two accounts and credits/debits on multiple accounts (for example when you pay different invoices from the bank account). In this case you need to enter the transaction on multiple rows:
- in the first row enter the total amount and the account debited or credited
- when all the individual debit and credit rows are entered there shouldn't be any difference
For more details, consult the page Composed transactions.
Checking customer and supplier invoices
Banana allows you to keep an eye on the invoices to be paid and the receivable, issued invoices. Please consult:
The Account card
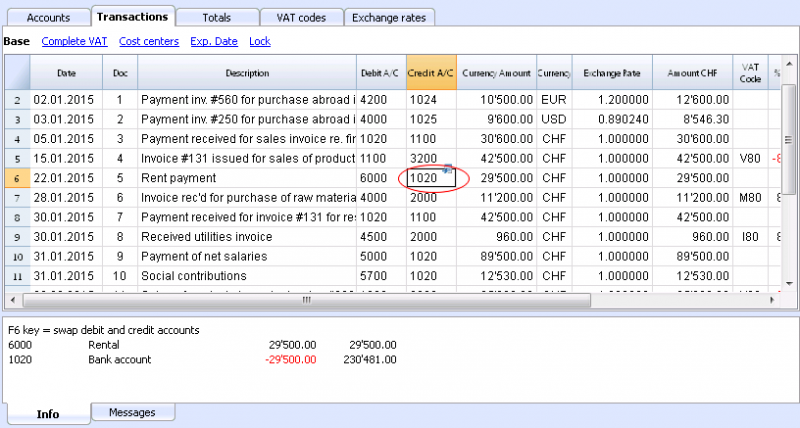
The Account card automatically displays all the transactions that have been recorded on the same account (for example, cash, bank, clients, etc).
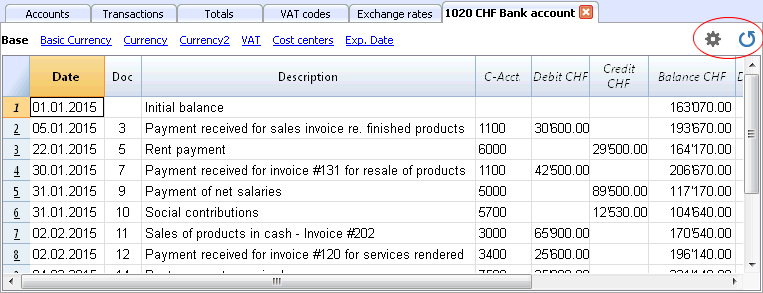
To display an account card, just position yourself with the mouse on the account number and click on the small blue symbol that appears.
Account card by period
To display the account card with the balances referring to a specific period, click on the Account1 menu, Account card command, and in the Period section, activate Period Selected, entering the Start and the End date of the period.
For more details, consult the Period page.
Printing the Account card
In order to print one account card, just display the card from the Accounts or the Transactions table and launch the print from on the File menu.
To print several or all account cards, click on the Account1 menu, Account card command, and select the account cards that need to be printed. By means of the Filter, all the account cards, or only a part of all of them (for example, only accounts, cost centers, segments), that need to be printed can be automatically selected.
For more details, consult the Account Card page.
The Balance Sheet and Profit and Loss Statement
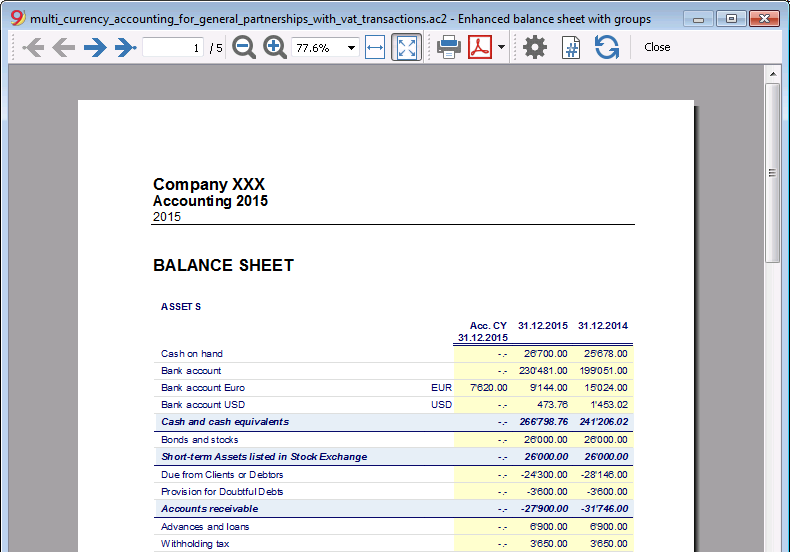
The Balance sheet shows the balances of all the estate accounts, Assets & Liabilities. The difference between the Assets and the Liabilities determines the Share capital.
The Profit & Loss statement shows all the Expense & Revenue accounts. The difference between the Expenses & Revenue determines the Profit or Loss of the Accounting year.
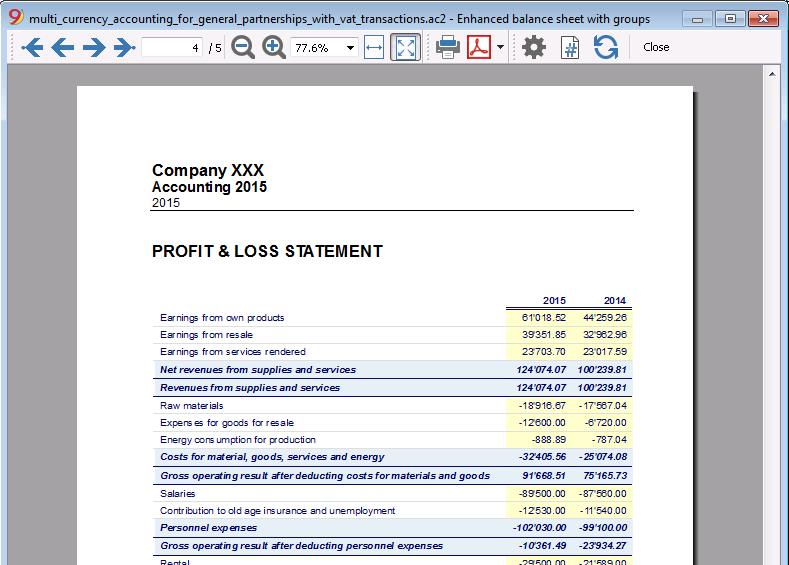
The display and the printing of the Balance Sheet is being executed from the Account1 menu, Enhanced Balance Sheet and Enhanced Balance Sheet with groups commands.
- The Enhanced Balance Sheet command simply lists all the accounts without distinguishing Groups and Subgroups
- The Enhanced Balance Sheet with groups command lists all the accounts while subdividing Groups and Subgroups; besides, it presents numerous features to customize the presentation, functions that are not provided in the Enhanced Balance Sheet.
Data archiving in PDF format
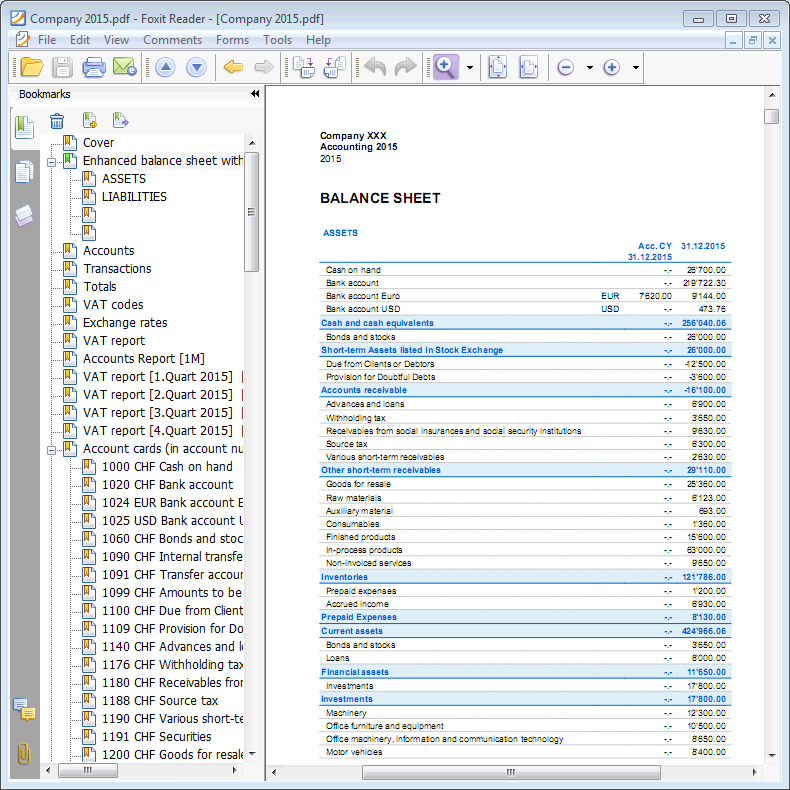
At the end of the year, when the entire accounting has been completed, corrected and audited, all the accounting data can be archived with the Create PDF dossier command of the File menu.
The Budget
- Accounts table, Budget column. For each account, the annual budget amount is being indicated.
In this case, when you set up the Budget from the Account1 menu, Enhanced Balance Sheet with groups command, the Budget column displays the amounts that refer to the entire year. - In the Budget table, that can be activated through the Tools menu, Add new functionalities command.
In this table, you can enter all the budgeted costs and revenue by means of entering transactions. If you activate this table, the column of the accounts table will be automatically deactivated.In this case you can set up a detailed budget, taking into account the possible variations over the year and in different periods of the year.
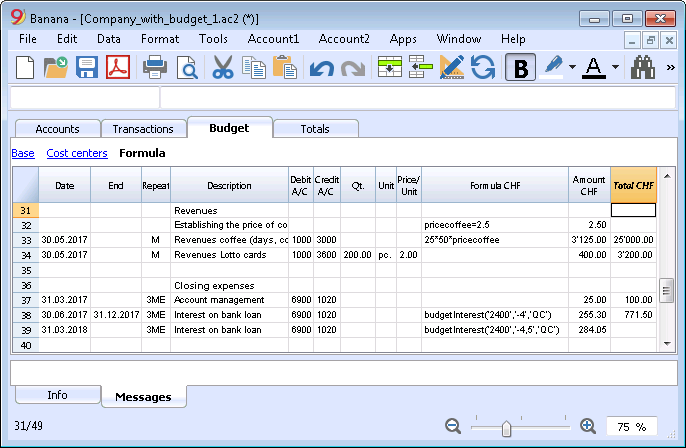
For more details, consult the page Budget.
Caratteristiche Contabilità in partita doppia
L'applicativo Contabilità in partita doppia soddisfa i criteri professionali per le società ed enti di qualsiasi genere dove è richiesta per legge la tenuta della contabilità.
- È uno strumento molto potente, ma anche flessibile e facile da usare, perché le diverse funzionalità sono attivabili e disattivabili. Questo ti permette di gestire sia contabilità essenziali, sia altre con piani conti strutturati su più livelli: con IVA, controllo clienti e fornitori, fatturazione, centri di costo e segmenti.
- Puoi sempre modificare, per cui tutti possono avere risultati perfetti. È ideale per il contabile esperto che vuole lavorare velocemente e per chi inizia. Per questo motivo è usato per insegnare la contabilità in molte scuole.
Simile a Excel
Funzionalità e comandi simili a Excel
- Tutti i dati che inserisci nelle tabelle sono sempre visibili e a portata di mano.
- Lavori velocemente perché puoi selezionare, copiare e incollare, su più celle e più righe le registrazioni che si ripetono.
- Se sbagli puoi correggere annullando o ripristinando le operazioni.
- Aggiungi quante righe vuoi senza limiti, o elimina le righe che non hai bisogno.
- Se hai sbagliato un valore, un conto, un codice IVA, una descrizione, con la funzione Cerca e sostituisci correggi in un attimo
- Non hai bisogno d'inserire formule perché i calcoli vengono aggiornati immediatamente e hai una visualizzazione contestuale (come nei fogli di calcolo).
- Tutto quello che si vede può essere stampato o esportato in pdf o altri formati.
- Puoi impostare il logo della tua azienda per personalizzare le intestazioni di stampa.
- Le colonne sono personalizzabili, puoi spostarle di posizione, aggiungerne nuove e cambiarne la larghezza.
- Lavora con il formato che ti è più congeniale.
- Colora le righe per individuare subito le registrazioni che devi rivedere o fare vedere al commercialista o da completare.
Basato su tabelle
La gestione della contabilità si concentra in due tabelle, che si usano in modo simile alle tabelle di Excel, ma che sono già completamente impostate e programmate con tutto quanto serve per tenere la contabilità in modo veloce e sicuro.
- Tabella Conti.
Imposti tutti i conti della liquidità, dei clienti, dei fornitori, ecc. e inserisci i saldi iniziali senza doverli registrare manualmente nella tabella registrazioni. Puoi raggruppare più conti insieme, come per esempio la cassa, la banca o la posta nel gruppo della liquidità, così in un attimo hai i saldi aggiornati che puoi verificare immediatamente. - Tabella Registrazioni.
Il cuore della tenuta contabile, dove si inseriscono o importano i movimenti. Le registrazioni dare e avere, possono essere completate con ulteriori informazioni per gestire clienti e fornitori, emettere fatture, gestire centri di costo/profitto, segmenti, quantità e prezzi e quant'altro si necessita. Scorrendo la tabella si ha una visione completa di tutti gli accadimenti. Si può modificare in modo da avere una contabilità sempre perfetta. - Tabella Totali.
Presenta i totali per Gruppo e serve per controllare la quadratura contabile.
Ulteriori tabelle che si possono aggiungere e che supportano ulteriori funzionalità.
- Tabella Preventivo.
Per allestire previsioni finanziarie, con il metodo della partita doppia. Quindi complete di piano della liquidità, bilancio e conto economico previsionale, previsioni clienti, fornitori, investimenti, progetti, segmenti per uno o più anni. - Tabella Codici IVA.
Per impostare le aliquote e i parametri necessari da usare nella tabella Registrazioni per il calcolo automatico dell'IVA e i rendiconti da presentare alle autorità fiscali. - Tabella Articoli.
Per impostare un elenco di articoli da usare per la fatturazione. Il programma tiene nota delle entrate e uscite. - Tabelle libere.
Per fare fronte a ulteriori necessità.
Inizio veloce
Modelli
La gestione della contabilità si concentra principalmente su tre tabelle, che si usano in modo simile alle tabelle di Excel, ma che sono già completamente impostate e programmate con tutto quanto serve per tenere la contabilità in modo veloce e sicuro:
- Avvio facile e immediato, creando il file della tua contabilità partendo da un modello.
- Se hai già un modello tuo in Banana Contabilità puoi riprenderlo con tutte le impostazioni e utilizzarlo per una seconda contabilità.
- Oltre 1000 modelli suddivisi per nazione e tipologia di utenza, personalizzabili e con documentazione d'uso.
- Ricerca facile e uso modelli direttamente nel programma.
Impostazione contabile
- Per la tua contabilità imposta liberamente la moneta, la puoi scegliere da un elenco di monete mondiali o impostata liberamente (cripto monete).
- Imposta liberamente un periodo contabile, anche su più anni e non legato al classico periodo dal 1 di gennaio al 31 di dicembre.
- Intestazioni e dati base contabilità impostate in un'unica finestra di dialogo, facile da visualizzare.
- Inserisci quanti decimali vuoi, da 0 a 27 (scelti al momento della creazione della contabilità).
- Puoi cambiare il numero dei decimali della contabilità durante l'anno senza problemi.
Multi-lingue
- Hai libertà di scelta della lingua della contabilità, quando crei il tuo file.
- Personalizza le intestazioni delle colonne come desideri.
- Puoi avere contabilità in più lingue contemporaneamente.
- Personalizza le Stampe anche per più lingue.
File e salvataggio dati
- Hai tutti i dati salvati in un unico file, dove trovi facilmente tutto senza perdite di tempo.
- Per ogni anno crei un File separato. Tutti i dati sono riferiti all'anno e non ci sono confusioni.
- Attribuisci al file il nome che desideri.
- Con una sola licenza puoi gestire un numero illimitato di contabilità.
- I dati rimangono in tuo completo possesso.
- Salva i dati del su qualsiasi supporto, computer, rete, cloud o inviato per email. Puoi accedervi ovunque sei.
- Accesso in contemporanea da più utenti, ma solo una persona può invece aprire il file in modifica.
- Rendi più sicura la tua contabilità inserendo una protezione con password.
Pianifica-Esegui-Controlla
Con lo stesso file e sempre con il metodo della partita doppia, puoi fare la contabilità, oppure le tue previsioni o entrambi. Puoi facilmente usare il potente approccio gestionale Pianifica - Esegui - Controlla.
Metodo contabilità in partita doppia
- Banana Contabilità ti permette di tenere la contabilità con il metodo internazionale della partita doppia, conforme agli standard internazionali.
- Soddisfa i criteri per la tenuta di qualsiasi contabilità.
- Utilizzabile in qualsiasi nazione.
- Registrazioni con colonne Dare e Avere.
- Se nelle registrazioni ci sono degli sbilanci, hai la segnalazione della differenza.
Nelle colonne hai la visualizzazione degli importi nel formato usato dal tuo computer, senza doverti abituare ad altri formati a te non congeniali.- Importi in dare in positivo e in avere in negativo.
- Calcoli secondo l'equazione Dare - Avere = 0.
- Bilancio, Conto Economico e tutte le tipiche stampe contabili.
- Stampe tutte personalizzabili.
- Formato di visualizzazione a scelta.
- Registrazioni secondo il principio di cassa o di competenza .
- Proteggi i tuoi dati con la tecnologia all'avanguardia del blockchain (metodo brevettato).
- Il metodo della partita doppia è usato da molte scuole in tutto il mondo, per insegnare la contabilità.
Piano dei conti
- Piano conti completamente personalizzabile per rispondere meglio alle tue necessità.
- Lo stesso piano conti lo utilizzi per la contabilità e per le previsioni finanziarie, patrimoniali e di reddito.
- Schema di Bilancio e Conto economico adattabili secondo la struttura e i contenuti che hai bisogno.
- Supporta qualsiasi schema di raggruppamento nazionale, internazionale o libero.
- Conti fuori bilancio per la gestione delle partite che non devono essere incluse nel Bilancio, ma che hai bisogno di annotare.
- Scegli tu l'identificativo del conto liberamente (conto numerico o alfa-numerico, fino a 256 caratteri).
- La descrizione del testo puoi inserirla liberamente fino a 256 caratteri.
- Non serve più inserire il bilancio iniziale e finale nelle scritture contabili
Inserisci i saldi direttamente nella colonna Apertura della tabella Conti e solo la prima volta che usi Banana Contabilità. Negli anni successivi il riporto è automatico. - Saldo, movimento conto e totali visualizzati contestualmente e sempre aggiornati.
- Ad ogni conto del cliente, fornitore, socio hai le colonne per inserire gli indirizzi e altri dati utili che necessiti.
- Aggiunta di altre colonne per note, raggruppamento o importi.
- Se aggiungi delle colonne di tipo importo, queste sono totalizzate automaticamente.
Hai così la possibilità di creare delle colonne con dati propri e avere dettagli molto selettivi.
Registrazioni
- Puoi inserire Registrazioni singole o composte.
Quelle singole le registri su un'unica riga, mentre quelle composte ti permettono di registrare senza problemi operazioni che toccano più conti. - Puoi registrare sia con il Metodo di competenza o con quello di Cassa.
- Quando registri ti vengono proposti i testi già inseriti. Basta un click per completare la registrazione (auto-completamento).
- Segnalazione immediata di errore e differenze, con possibilità di completarli successivamente.
- Memorizza le operazioni ripetitive per riprenderle quando si ripresentano senza doverle riscrivere.
- In tutte le tabelle hai delle colonne colonne predefinite che può rendere visibili a scelta.
- Colonne quantità e prezzo, per fatturazione o controllo costi.
- Auto-numerazione documenti con numerazioni diverse contemporaneamente.
- Per avere documenti in ordine e sempre a portata di mano, collega ai file i giustificativi digitali (pdf, immagini), e aprili con un click.
- Inserisci testi liberi fino a 256 caratteri e anche su più righe.
- Colora le righe per cercare subito le registrazioni che devi verificare o correggere in seguito, oppure per segnalarle al revisore.
- Aggiunta di colonne per inserire qualsiasi ulteriore informazione.
- Salva la disposizioni delle colonne (viste) per visualizzare i contenuti per te più importanti.
- Informazioni contestuali circa saldo del conto, differenze o errori.
- Prima delle chiusure periodiche o di fine anno puoi usare le Registrazione di verifica saldo.
Potrai individuare errori tra i saldi effettivi (es. saldi bancari fornite dall'estratto, e quelli della contabilità). Ti accorgerai subito degli errori e puoi correggere per avere tutto in perfetto ordine. - Importazione movimenti:
- Velocizza l'inserimento delle registrazioni importando i dati dagli estratti bancari digitali.
- Puoi importare i movimenti nei diversi formati bancari.
- Le righe importate possono essere modificate, completate o rimosse.
- Importa anche dati fatture o da altri programmi.
Previsione finanziaria
- Se necessiti di creare un preventivo puoi attivare la funzione aggiungendo la tabella Preventivo.
- Lavori senza difficolta con la stessa metodologia a cui sei già abituato, basata sul metodo della partita doppia.
- Previsioni finanziarie completi di piano della liquidità
- Previsioni di Bilancio.
- Previsioni di Conto economico.
- Proiezioni automatica per più anni.
- Inserimento della pianificazione tramite registrazioni di preventivo.
- Entrate e uscite ricorrenti impostate con una sola registrazione.
- Tutte le funzionalità disponibili in contabilità:
- Formule di calcolo in Javascript con accesso ai valori della previsione in corso:
- Valori di previsioni disponibili nelle stampe contabili:
- Scheda conto con movimenti di previsione per conto o gruppo.
Bilancio e Conto Economico
- Rendiconti con dati consuntivi, o preventivi oppure con entrambi i dati e con indicazione degli scostamenti.
- Disposizione libera con gruppi e sottogruppi.
- Risultati aggiornati visibili direttamente nella tabella conti.
- Stampe personalizzabili:
- Aggiunta del proprio logo.
- Scelta delle colonne da includere.
- Scelta delle sezioni da includere.
- Stampa dettagliata o raggruppata.
- Stampe per solo un periodo.
- Colonne con suddivisione per periodo (mese, trimestre, semestre, anno).
- Valori anno precedente.
- Valore di previsione confronto.
- Colonne con suddivisione per segmento.
- Aggiunta note allegate.
- Raggruppamento come nel piano dei conti o secondo un proprio schema.
- Salvataggio della personalizzazione.
- Report tabellare (simile alle stampe personalizzabili, ma con i dati presenti nella tabella).
- Esportazione in pdf per la conservazione dei dati ed esportazione in altri formati per una rielaborazione dati.
Altre stampe contabili
- Contenuto tabelle completamente stampabile o stampa anche solo per selezione.
- Aggiunta del proprio logo per una personalizzazione dei documenti e delle stampe.
- Giornale.
- Schede con movimenti conto e gruppi:
- Con i movimenti contabili o quelli di previsione.
- Per periodo.
- Per Conto, Gruppo, Centro di Costo o Segmento.
- Dati contabili o di previsione.
- Disposizione colonne personalizzabile.
- Esportazione in pdf o altri formati.
Grafici
- Contestuali, a piè di tabella.
- Diverse disposizioni.
- Evoluzione dei conti e gruppi.
- Valori contabili.
- Previsione.
- Anno precedente.
- Scelta del tipo di grafico.
Ulteriori gestioni
Il programma ti consente anche di aggiungere ulteriori informazioni alle registrazioni, in modo che gli stessi dati ti servono anche per la gestione IVA, per il controllo dei clienti e fornitori, emissione di fatture, avere rendiconti per progetti o settori d'attività e fare fronte ai diversi adempimenti societari e fiscali.
Gestione IVA
- Funzione attivabile a scelta (quando si crea una contabilità).
- Tabella codici IVA per indicare le diverse aliquote e casistiche IVA.
- Supporta qualsiasi specifica nazionale.
- Può essere usato anche per gestire altri tipi di tasse di vendita (p.es. Sales tax Americana).
- Inserimento in registrazione del Codice IVA.
- Funzionalità di storno IVA (usando il Codice IVA preceduto dal segno meno).
- Calcolo IVA dal netto o dal lordo.
- Scomposizione e registrazione automatica sui conti IVA indicati.
- Rendiconti IVA di controllo:
- Per periodo o completo.
- Con o senza movimenti.
- A scelta con totali per aliquota, codice IVA, conto.
- Estensioni nazionali per rendicontazione IVA in base ai requisiti delle autorità fiscali.
Gestione e controllo clienti
- Funzione attivabile a scelta (aggiungendo i conti nel piano dei conti).
- Controllo fatture e pagamento dei clienti.
- Anagrafica cliente impostata nel piano dei conti.
- Crea gruppi e totali per clienti in gruppi diversi.
- Fatture aperte per cliente o completa.
- Estratto conto movimento cliente e fatture aperte.
- Riconciliazione automatica, fatture aperte.
- Gestione clienti anche come Centri di costo (per principio di cassa).
Fatture ai clienti
- Funzione attivabile a scelta (utilizzando la colonna numero fattura nella tabella registrazione)
- Inserimento fatture direttamente nella tabella Registrazioni.
- Richiede l'impostazione dell'anagrafica clienti.
- Inserimento dei dati fatture come normali righe di registrazioni.
- Vedi emissione e stampa fatture ai clienti.
- Colonna per indicare quantità e prezzi.
- Con o senza IVA.
- Possibilità di modifica, correzione.
- Stampa della singola fattura con un click o di diverse fatture assieme.
- Scelta fra diversi layout di stampa.
- Personalizzazione della fattura in base alle proprie preferenze.
- Esportazioni in formato digitale tramite estensioni.
- Richiami personalizzabili con estensioni.
- Estratti conto clienti personalizzabili con estensioni.
Gestione fornitori
- Funzione attivabile a scelta (aggiungendo i conti nel piano dei conti).
- Anagrafica fornitori impostata nel piano dei conti.
Possibilità di raggruppare i fornitori in gruppi diversi. - Controllo fatture e pagamento ai fornitori.
- Fatture aperte per fornitore o report completo.
Estratto conto movimento fornitore e fatture ancore aperte. - Riconciliazione automatica, fatture aperte.
Centri di costo e di profitto
- Funzione attivabile a scelta (aggiungendo i conti centri di costo e profitto).
- Per progetti, contabilità costi o di redditività.
- Impostazione dei centri di costo direttamente nel piano dei conti.
- Raggruppamento multi-livello.
- Tre livelli di centri di costo e profitto.
- Numero illimitato di centri di costo per livello.
- Registrazione in negativo (con segno meno).
- Reportistica come i conti di bilancio e conto economico:
- Saldo costantemente aggiornato.
- Report personalizzabili.
- Scheda di tutti i movimenti con saldo progressivo.
- Grafico contestuale.
Segmenti
- Funzione attivabile a scelta (aggiungendo i conti segmenti).
- Per avere il bilancio e il conto economico di uno o più settori aziendali.
- Impostazione dei segmenti direttamente nel piano dei conti.
- Raggruppamento multi-livello.
- Fino a 10 livelli di segmento.
- Numero illimitato di segmenti per livello.
- Saldo costantemente aggiornato.
- Reportistica come i conti di bilancio e conto economico:
- Bilancio e Conto economico per ogni segmento.
Tabella Articoli
- Per fatture e con gestione integrata di magazzino o dei titoli.
- Collegamento degli articoli ai movimenti della tabella Registrazioni.
- Aggiornamento automatico movimenti in entrate e uscita.
- Valore iniziale e finale.
- Aggiunta di ulteriore colonne.
Controllo e chiusura
Segnalazioni errori e controllo contabilità
- Comando per controllare la contabilità.
In un attimo, la contabilità viene ricalcolata come se si inserissero tutte le operazioni nuovamente. - Segnalazione di eventuali impostazioni sbagliate, differenze o errori.
- Ogni segnalazione è collegata a una pagina di aiuto che spiega le cause e la soluzione.
- Verifica se il saldo del conto corrisponde a quello reale (cassa, banca, IVA).
- Possibilità di correggere.
Protezione delle registrazioni
- Protezione righe.
- Blocco dei movimenti inseriti con tecnologia di certificazione dati digitale (tipo Bitcoin).
- Protezione con password.
- Conforme ai requisiti di legge.
- Invio dati al revisore con la certezza dell'impossibilità di manomissioni.
- Sblocco movimenti con data.
Chiusura e nuovo anno
- Procedura automatica per creare il file del nuovo anno.
- Riporto dei saldi e attribuzione dell'utile.
- Si può iniziare a lavorare sul nuovo anno, anche se non è stato chiuso il precedente.
- Comando per riprendere i saldi definitivi quando è stato chiuso l'anno precedente.
Esportazione e archiviazione dati
- Copia e incolla direttamente da e per Excel.
- Esportazione tabelle in pdf e diversi altri formati.
- Archiviazione delle stampe e dei dati contabili in pdf o altri formati.
- Estensioni per creare gli Standard Audit File.
- Salvataggio del file contabile su qualsiasi supporto.
Estensioni e altre funzionalità
Aggiunta funzionalità
- Aggiunta di nuove funzionalità.
- Rimozione di funzionalità non più necessarie.
- Conversione da un tipo contabile a un altro:
- A contabilità con o senza IVA.
- A contabilità con multi-moneta o viceversa.
- Da contabilità entrata e uscite a doppia o viceversa.
Tabella Documenti
Altre Tabelle aggiuntive
- Aggiunta di altre tabelle dove inserire delle note o altre informazioni.
- Le tabelle possono essere personalizzate aggiungendovi colonne.
Estensioni
- Estensioni predefinite per diverse stampe e altre funzionalità.
- Ricerca e istallazione veloce.
- Estensioni personalizzabili.
- Aggiornamento automatico.
- Possibilità di creare e istallare delle proprie estensioni locali.
Documentazione completa
- Ogni dialogo ed errore ha una propria pagina di documentazione accessibile con un click.
- Documentazione aggiornata costantemente.
- Domande e risposte.
- Documentazione disponibile anche in formato Pdf.
File and accounting properties
This is where the main data of the accounting file are entered, such as the printout heading, the opening and closing dates, the basic currency, the company address, the profit and loss from exchange rate variation account (if you have a multicurrency accounting file), the VAT account (if you have chosen the VAT management option), the password, …
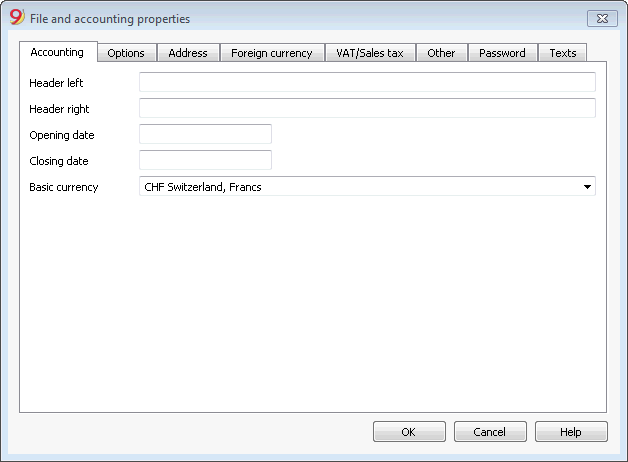
The File and accounting properties window has the following tabs:
- Accounting tab
- Options tab
- Address tab
- VAT/ICMS tab
- Foreign currency tab
- Texts tab
- Password tab
- Other tab
Chart of accounts
Financial situation under control
You need to setup you chart of accounts in the Accounts table: setup the accounts and the groups where the accounts must be totalized. With this operation you create the accouts that will be used when entering the transactions. The chart of accounts structure is the same that will show in all Balanche sheet and Profit & Loss statement presentations.
In the Accounts table there are also the columns of the initial balances, movements and current balance, which are automatically updated by the program.
The chats of accounts therefore provides an immediate and complete view of your financial situation.
- Liquidity accounts
- Balance sheet
- Profit & Loss statement
- Result of the current year
- Clients and Suppliers register
- Cost and Profit Centers
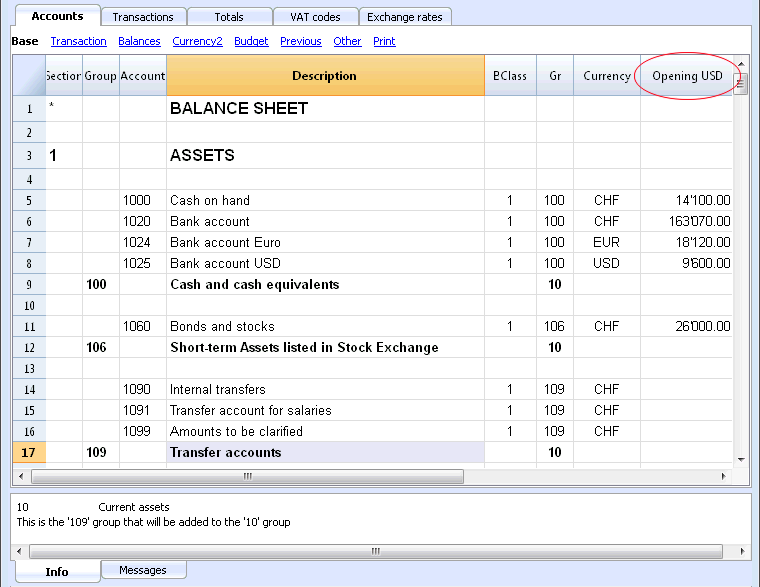
Different kinds of rows and sections
The Accounts table (charts of accounts) is both the setup tool and the viewing tool for the economic and financial situation.
In the chart of accounts (Accounts table) all data necerrary to group the mouvements are entered:
- Accounts
They indicate on what account (debit ore credit) the transactions must be registered.
Each account has a code or number (account number), a description, a class and a group to which it belongs; they also have an opening balance, the current balance, the budget, etc... - Costs and Profits centers
They are special accounts whose number is preceded by a full stop ".", a comma "," or by a semi-colon ";". Their purpose is to be able to assign some amounts to special accounts other than the basic accounting accounts. - Segments
They are a sort of sub-accounts who's number is preceded by a ":". Their purpose is to be able to assign some transactions to subcategories of the accounting plan. - Groups
Their purpose is to create rows where the program adds up the amounts of other rows. - Sections
They indicate the accounting plan divisions for the Balance Sheet and Profit and Loss Statement printouts, ...
Trial Balance sheet
At any time, positioning yourself in the Accounts table and using the Print or Print preview commands (from the File menu), you can view and print the account plan or part of it.
Also from the Accounts table, if you select Movement view, you can view and print your trial balance sheet.
Advanced printouts
- Accounting report
It is possible to select just the accounts with transactions, to obtain temporary groupings or accounts grouped according to the BClass or an external grouping scheme. - Enhanced Balance sheet
Prints all the accounts of the accounting divided by Assets, Liabilities, Expenses and Revenue - Enhanced Balance sheet by groups
Allows the user to obtain customized printouts with groups - Specific advanced printouts are available using the BananaApps
The columns of the double-entry Accounts Table
- Section
Codes are being entered that allow the user to only print determined parts of the Chart of accounts, when printing the Enhanced Balance sheet by groups. - Group
Contains the code that defines that this is a group row. The group code is then used in the GR column to indicate the totalization of an account or group.
- Account
The account number, cost center or segment is being entered. - Description
A text to indicate the name of the account, group, or section. - Disable (only visible in the Other view)
By entering 1, the account does not appear in the autocomplete list, but can be used in the Transactions table;
By entering 2, the account is disabled and can not be used. - BClass
It indicates whether the account is 1 = Assets, 2 = Liabilities, 3 = Expenses, 4 = Revenue, see the Accounts
- Gr (Totalize in)
It indicates a group so that the program can totalize this line in the group. - Gr1 and Gr2
Additional grouping codes to use with external accounting report files.
- Opening balance
Insert the account balance at the beginning of the year.The amounts in credit must be entered preceded by a minus sign. The total of the debit amounts (positive) and those in credit (negative) must balance and result in zero. If the opening balances do not balance a difference is shown in the information window.If you have added or pasted accounts and the difference is not correct, proceed with a Recheck of the accounting (Shift + F9)
- Movement Debit and Movement Credit (Protected columns)
The total of the debit and credit movements included in the Transactions table.
- Balance (Protected column)
The balance of the account includes the opening balance and the movements in debit and credit.The balance in debit is positive, while a credit balance is negative (minus sign). - Budget
The budget amount for the current year is being entered.The budget amount for the Expenses (debit) must be inserted in positive, the Revenue in negative (credit). -
Difference Budget (Protected column)
The difference between Balance and Budget amount. - Previous
The balance of the account at the end of the preceding year.
With the command "Create new year" or "Update opening balances", the values in the Balance column of the file of the preceding year are being carried forward.
When a new accounting is being created and the user wants to obtain printouts with the amounts of the preceding year, the values of that year have to be entered manually. - Prev. yr. Difference (Protected column)
The difference between the Balance and the amount of last year. - VATNumber
The VAT number in case this account is linked to a client or a supplier. - VATCode
The VAT code that needs to be applied automatically, when this account is being entered in the debit A/c or credit A/c column of the Transactions. - Adresses columns
It is possible to have the program add addresses columns in order to manage customers or suppliers data.
Adding or moving columns
- When an Amount column is being added in the Chart of accounts, the program composes the total of the amounts according to the selected grouping scheme
-
Added columns of the Number type, on the contrary, are not being totaled.
- With the Columns setup command, the columns can be made visible, the sequences can be altered and it is also possible to add other columns.
- With the Page setup command one can also define the layout of the print (portrait or landscape) and the zoom.
Accounts list ordered by description or other criteria
In you need to order your accounts in a different way, use the Extract and sort rows command from the Data menu.
Views
- Base Displayed are the principal columns, the grouping columns and the balances
- Transaction Displayed are the columns with the Debit and Credit transactions.
- Budget Displayed are the Budget column and the Difference Budget column.
- Previous Displayed are the Previous column and the Difference Prior columns regarding the previous year
- Other The Disable column, the VAT number and the Fiscal number column are being displayed.
- Print Just the Account column, the Description and the Balance is being displayed.
The views can be customized and others can be added with the command Views setup.
Accounts
Bookkeeping accounts
In order to create an account, go to the Accounts table and enter a number or a code in the Account column.
This same number is then used in the Transactions table as Debit or Credit account.
- The account number can be composed by numbers, letter and separations characters.
- It is not possible to have more than one account with the same number.
- Each account must have a BClass and must belong to a group.
The BClass
Each account must belong to one of the following BClasses:
- 1 for Assets
- 2 for Liabilities
- 3 for Expenses
- 4 for Income
The BClasse number must be as indicated, regardless the account or group code. It is also possible to create Off Balance Sheet accounts (for example for warranty down payments, e conditional committments), that must have the following BClass:
- 5 for Off Balance Sheet: Assets
- 6 for Off Balance Sheet: Liabilities
Opening balances
The opening balance of each account is entered in the Opening + currency symbol column.
- The Assets balances are shown normally
- The Liabilities balances are entered with the minus sign (negative)
- Usually only the Assets and Liabilities opening balances are entered.
In order to automatically transfer the opening balances for the following year, please visit the Create New Year lesson.
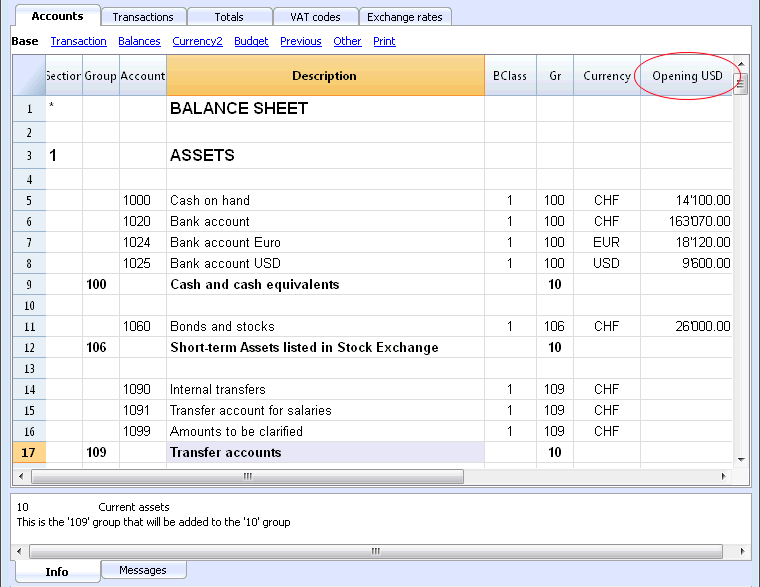
Opening balances differences
In a correct accounting file, the total of the Assets opening balance should be equal to the total of the Liabilities opening balance, so no differences are shown.
If the totals do not match, the program will show a warning message telling you that there is a opening balances difference (Information window).
If you have changed some account numbers and you think the error message is not correct, please Recheck the accounting.
When using Banana Accounting for the first time, the opening balances must be entered manually.
Accounts with addresses
It is possible to add a few columns in the chart of accounts, to include the addresses management:
Tools menu -> Add new functionalities command
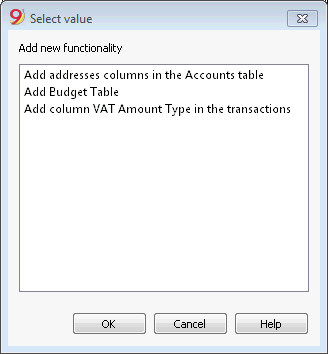
This command will add in the Chart of accounts the following things:
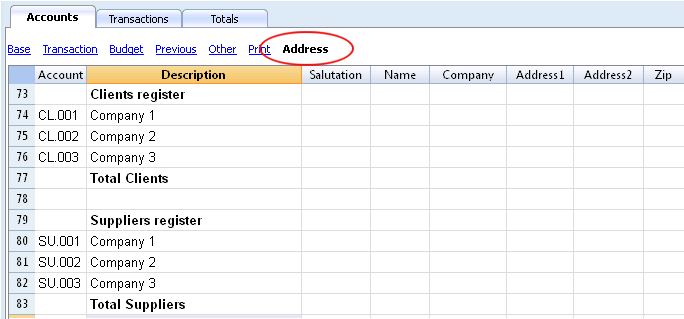
- several columns (name, last name, company, town, ...) where you can enter the client / supplier / member address and data
- the Address view where you can see the added columns (in order to change the view or the views organization please consult the Tables setup page)
Clients/supplier register
When in the accounting plan you need to manage a clients/supplier register, meaning a specific account list for all clients, you need to have complete data with address, phone number, email, VAT number, etc. in this case adding the columns of the Address view is very useful.
Groups
The grouping and totaling system
Banana has developed a very practical and immediate grouping system, which allows you to set in the Accounts table all the information necessary to define the structure of the balance sheet, profit & statement and other reports. You can therefore setup:
- Titles
- All the needed accounts, including client and customer records, cost centers and segments
- All groups and totaling levels you need (up to 100)
The grouping system is flexible; it allows you to implement any national chart of accounts and at the same time to adapt it to the specific needs of your business. Both very simple and very complex plans and presentations can be created.
Another advantage of this system is that it allows you to see the results immediately. Next to each account and group, you immediately see balance, movement and budget. Totals are updated istantly as you edit your file.
How the grouping system works
The Banana grouping and totaling system is based on the following columns of the Accounts table:
- Group (Total row)
When, in a row, a group identifier is being entered, the row becomes a TOTAL row.
In this row the amounts of the Gr column, that contain the same identifier, are being totaled.
When a group is present, there cannot be an account. - Gr (Adds this row into the TOTAL row)
The number here must be one of the numbers defined in the Group column.
With this system, an account can be totaled in a group row, the group in another group and so on... in order to create different totaling levels.
This totaling system is very flexible, but it takes some "getting used" to, in order to be able use it well.
Examples of the main groups in the Double-entry accounting
Every accounting file template uses its own totaling system. Hereunder the main groupes of the Double-entry accounting are being explained.
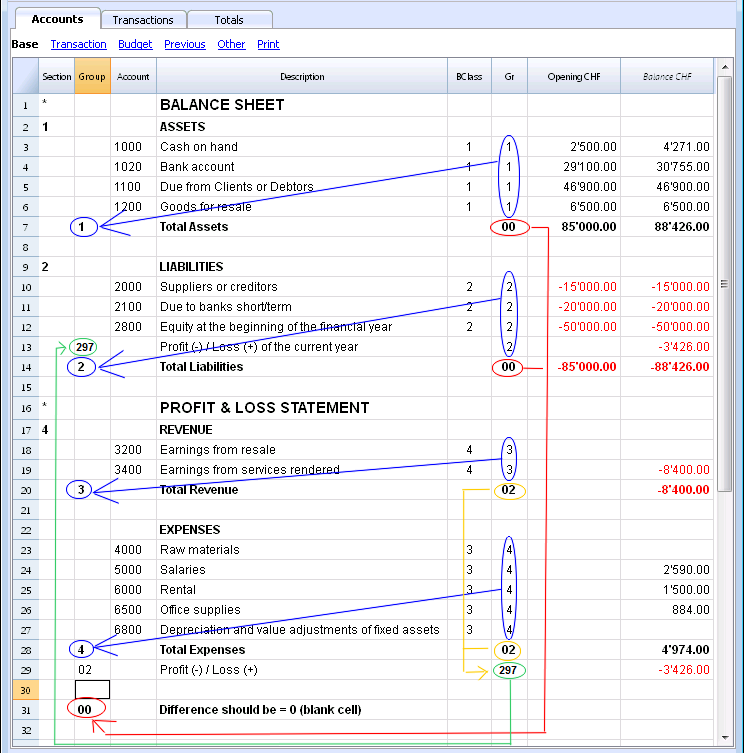
In the Double-entry accounting, the total of the Debit balances (positive) together with the Credit balances (negative) have to result in 0 (zero).
- The 00 is the row where all the amounts are being added together.
It is the grand total of all the Debit & Credit balances.
In case the Balances columns do not amount to zero, it means there is a Debit/Credit difference and thus most likely a mistake. In these cases it is useful to proceed with a checking of the accounting
In the Debit and Credit columns of the Transactions view (Accounts table), there are only positive amounts, so also in the row of the 00 group, there will be the total of the transctions not equal to zero.
The calculation sequence to arrive at 00 is therefore as follows:
- The 1000 account -> group 1 (Total Assets)-> Group 00
- The 2000 account -> group 2 (Total Liabilities) -> Group 00
- The 3000 account -> group 3 (Total Revenue) -> Group 02 (result Profit & Loss Statement) -> Group 297 (Profit/Loss of the current year in the Balance Sheet) -> Group 2 (Total Liabilities) -> Group 00.
- The 4000 account -> group 4 (Total Expenses) -> Group 02 (result Profit & Loss Statement) -> Group 297 (Profit/Loss of the current year in the Balance Sheet) -> Group 2 (Total Liabilities) -> Group 00.
The result of profit & loss statement is added in equity
As you can see in the example, the Group 02 (Profit /Loss from Profit & Loss statement) is totalized in the 297 liabilities group (current year result).
With this group organization, we have several advantages:
- In current year operating result is displayed in the balance sheet
- The Total Liabilities will match the Total Assets (provided that there is no accounting error).
Adding or deleting subgroups
Adding a totaling level
With this system it is easy to add totaling levels.
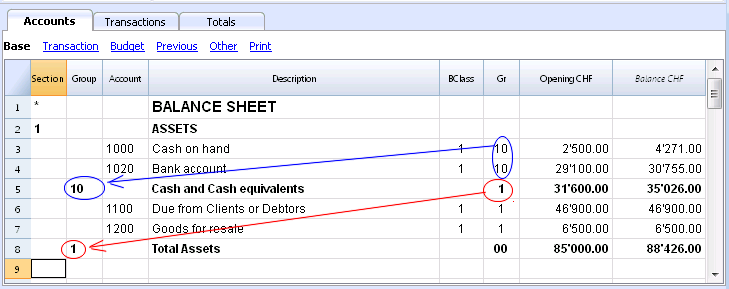
When we want to create a subgroup for the Cash & Cash equivalents accounts:
- Enter an empty row after the bank account
- Enter the value 10 into the Group column
- Enter the value 1 into the Gr column
- Indicate the Gr 10 in the accounts 1000 et 1020
- The sequence for the calculation becomes:
The 1000 account -> Group 10 (Cash & Cash equivalents) -> Group 1 (Total Assets) -> Group 00.
In case you want to insert another subgroup, "Current Assets", proceed in the same way.
- Add an empty row above the row of the Total Assets.
- In the new row:
- Indicate the number 11 in the Group column
- Indicate the number 1 in the Gr column
- In the Clients and Goods for resale (inventory) rows, indicate the Gr 11.
Deleting subgroups
In case the Chart of accounts shows subgroups that are no longer needed or not wanted, these can be deleted. Just delete the row of the subgroup and modify the Gr of every account that was part of that subgroup.
Checking of the structure
Once the Chart of accounts has been set up, execute the Check accounting command of the Account1 menu. In case there are errors, the program issues a warning.
Infinite loop error
This warning appears when a Group is being totaled in a Group of a lower level, reason for which an infinite error loop is being created.
There would be an infinite loop when, in the preceding example, the Assets Group (1) would be totaled in Group 10.
The program, after having calculated the Group 1, would total the amount in Group 10, which in turn would total the amount in Group 1, and then again in 10 without ending.
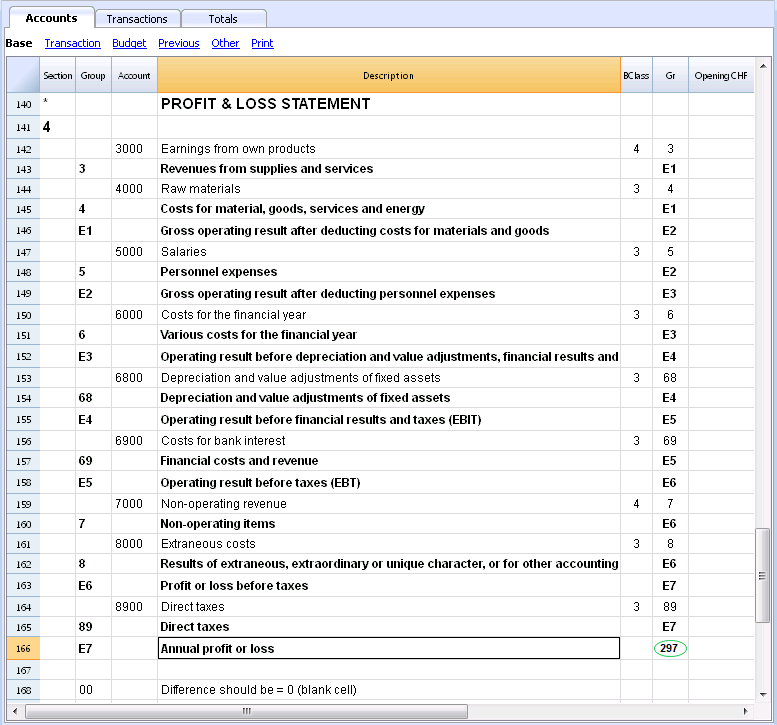
Profit & Loss Statement with Gross Profit
It is also possible to use a Profit & Loss Statement that starts with the total Business result and that subtracts the costs.
Hereunder the example of the Swiss PME Chart of Accounts is shown.
Extended use of the totaling system
The totaling system is very flexible:
- In one Group, it is possible to add Groups as well as Accounts
This can be seen in the earlier shown example where the Group Cash & cash equivalents (10) and the accounts (1100 and 1300) are being totaled in the Assets - You can use whatever kind of numbering
- You can create up to a hundred totaling levels
- The Total row can be after the rows
- The Total row can be before the rows
- The Total row can be completely elsewhere, in a separate position
This is being used to create registers (for example, a client register)
- The accounts and the Groups can be totaled in one single other Group.
It is not possible to total one and the same account at the same time in two groups. - This system is also being used to total the Cost centers and the Segments
Pay attention though to not use different groups for normal accounts and for cost centers, because the resulting amounts will not be correct.
Totaling of the Amount columns
The calculation procedure totals the amount columns
- The amount columns defined by the system are being totaled.
- The amount columns added by the user are being totaled.
The sequence of the calculation
The programme calculates the totals in the following manner:
- Sets the values of the Amount columns of the Groups rows on zero
- Totals the amounts of the Account rows into the Group rows (first calculation level)
- Adds the balance of the Group rows into the Group(s) of a superior level
Repeats the operation until all the levels have been calculated.
Related Documents
Sections
In order to create automatically an Enhanced Balance Sheet with groups, the chart of accounts needs to be configured with special codes that are to be entered in the Section column:
| * | Title 1 | the asterisk separates the sections and indicates the main headers |
| ** | Title 2 | to be entered for the secondary headers |
| 1 | Assets | to be entered in the row of the Assets title |
| 2 | Liabilities | to be entered in the row of the Liabilities title |
| 3 | Expenses | to be entered in the row of the Expenses title |
| 4 | Revenue | to be entered in the row of the Revenue title |
| 01 | Client's Register | to be entered in the row of the Client's Register title |
| 02 | Supplier's Register | to be entered in the row of the Supplier's Register title |
| 03 | Cost Centers | to be entered in the row of the Cost Centers title |
| 04 | Profit Centers | to be entered in the row of the Profit Centers title |
| # | Notes | to be entered in the row of the Notes title |
| #X | Hidden data |
to be entered in the row from whereon the data have to be hidden |
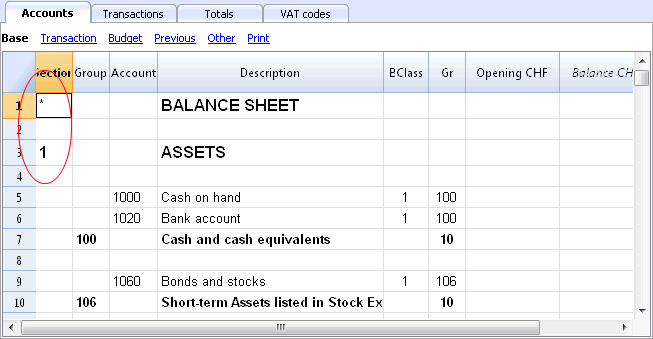
Sections in the Assets
- Enter a * on the same row as the Balance Sheet title
- Enter 1 on the same row as the Assets title
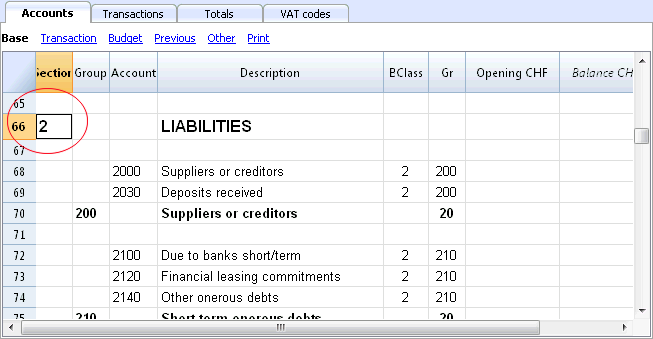
Sections in the Liabilities
- Enter 2 on the same row as the Liabilities title
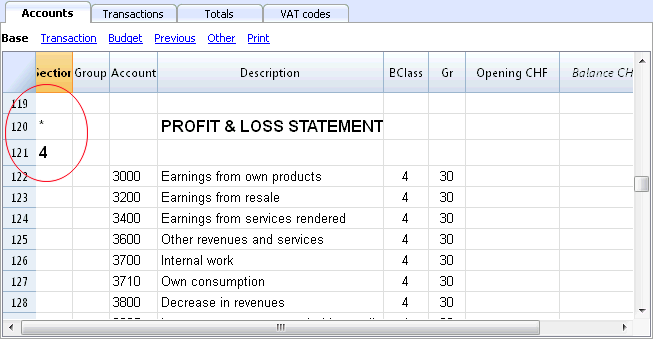
Sections in the Profit & Loss Statement
- Enter a * on the same row as the Profit/Loss Statement title
- Enter 4 on the empty row below the Profit/Loss Statement title
Note: when there is a clear distintion between Revenue and Expenses in the Chart of accounts, you need to:
- Enter 3 on the same row as the Expenses title
- Enter 4 on the same row as the Revenue (Income) title .
Sections in the clients/suppliers register
- Enter * in the same row as the Clients/Suppliers register title or on a empty row (as in the following example)
- Enter 01 on the same row as the Clients register title
- Enter 02 on the same row as the Suppliers register title
The amounts will be shown in the same way as for the Assets and the Liabilities.
This encoding is also valid when the clients and suppliers are configured as cost centers.
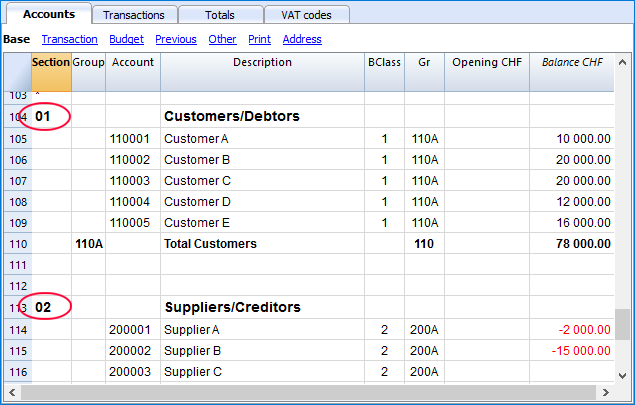
In case there are cost or profit centers configured, enter the following elements
- An * on the row of the Costs and Profit Centers title, or on a empty row
- 03 on the same row as the Cost centers title or on an empty row preceeding the Cost Centers
- 04 on the same row as the Profit centers title or on an empty row preceeding the Profit Centers
The Cost Centers amounts will be shown as positive (in black) like the expenses; the Profit Centers amounts will be shown in negative (in red) like the revenue;
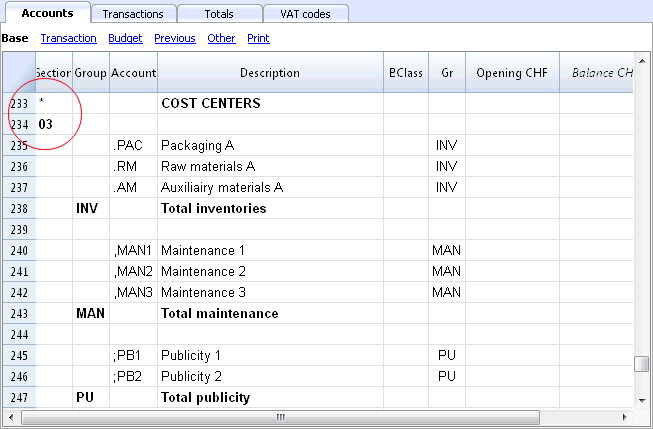
For more information please vist the Sections logic page
Related document: Enhanced Balance Sheet with groups
The Sections logic
The sections different encoding entered in the Section column determines how the printout will come out.
Each section is printed as a separate table.
The directories
- * Title 1 creates a level 1 directory.
It can contain level 2 sections or directories.
It is useful to group sections that need to be printed together, such as the Balance sheet, which contains Assets and Liabilities. - ** Title 2 creates a level 2 directory.
The Base sections
The section number or code determines:
- how the amounts are printed; the amounts can be visualized just like in the Balance sheet or inverted.
If the Credit amounts (in negative) are inverted, they will be visualized in positive, and the positive amounts will be visualized in negative. - which amount columns will be used; the Balance column or the Period Movement column are used.
The Balance column indicates the account balance at a specific date (balance at Jun 30th).
The Total Period Movement column indicates the movement amount on the indicated period.
It is used for the Profit and Loss Statement and indicates the costs or the revenues for a certain period.
Here is the explanation of the different sections
- 1 Assets (amounts as in the accounting plan, balance column)
- 2 Liabilities (inverted amounts, balance column)
- 3 Costs (amounts as in the accounting plan, total movement column)
- 4 Revenues (inverted amounts, total movement column)
This section can be also used alone and it can include both costs and revenues (in case of a Profit & Loss Statement that starts with the total Business result and that subtracts the costs). In this case revenues would be displayed in positive and costs in negative.
These sections must be unique. Therefore there can only be one 1 Assets, or one 2 Liabilities section. For other sections, like clients/suppliers register or cost center similar sections can be used.
Derivatives Sections
Those are Sections that are similar to the Base Sections
- 01 Similar to Assets (amounts as in the accounting plan, balance column)
It is used for the clients register. - 02 Similar to Liabilities (inverted amounts, balance column)
It is used for the suppliers register. - 03 Similar to Costs (amounts as in the accounting plan, total movement column)
It is used for Cost Centers. - 04 Similar to Revenues (inverted amounts, total movement column)
It is used for Profit Centers.
Other Sections
There are other kinds of sections
- # Indicates a Notes Section (it prints only the Description column)
It is used for the Balance sheet attachments - #X Hidden Section. This section is not included in the sections selection and it is not printed.
It is used to indicate parts not to be printed.
Column width in printout
The columns width is automatically set by the program.
Sections 1, 2, 01, 02 have the same column width
Sections 3, 4, 03, 04 have the same column width.
Add / Rename
Adding a new account or category
- Position yourself in the row above the one where you want to add the new account
- Add a new empty row with the command Add rows from the Edit menu
- In the columns, insert the account number, the description, the BClass (1 for the Assets, 2 for the Liabilities, 3 for the Expenses and 4 for the Revenue), and the Gr which needs to be the same as the one inserted for the accounts belonging to the same Group.
Note: If you first enter a transaction with a non existing account and later you create the new account in the accounting plan, you will first get an error message, that will go away only if you recheck the accounting with the Shift + F9 key, or the Recheck accounting command from the Account1 menu.
Adding a new group
- Position yourself in the row above the one where you want to add the new group
- Add a new empty row with the command Add rows from the Edit menu
- In the columns, insert the group number, the description and the Gr which needs to be the same as the group you wish this group to be totalized.
Renaming an account or a group
- Position yourself in the Account or Group column in the Accounts table, or in the Category column of the Categories table (or in the VAT code column in the VAT codes table)
- Choose the Rename command from the Data menu
- Enter the new account, group, category or code number
The program will automatically update the Transactions table with the new number or code.
Deleting an account or a group
- Position yourself on the row number that contains the account that is to be deleted
- From the Edit menu, click on the Delete rows command
- Enter the number of rows that you wish to delete
After deleting an account, a category or a group it is necessary to use the Recheck accounting command from the Account1 menu. The program will give you a warning message if the deleted account, category or group was used in the Transactions table.
Opening balances | Double-entry accounting
Avoid mistakes with Banana Accounting Plus
In order to facilitate checking your accounting work and to immediately find differences, in Banana Accounting Plus, our new version, we added the Balance column in the Transaction table. You can now see potential differences on each row and you can correct them right away. It is a very useful feature when closing the accounting period.
Many of our clients have already tried it and are enthusiastic about it. We advise you to switch now to Banana Accounting Plus and take advantage of the many new features.
When using Banana Accounting for the first time, the opening balances need to be inserted manually in order to create the opening balance sheet.
After having set up the Chart of Accounts, proceed as follows:
- Place yourself in the Accounts table, Base view, Opening column.
- Manually enter the opening balances of the Assets and Liabilities accounts. The Liabilities are entered preceded by the minus (-) sign.
- Check if the total Assets equals the total Liabilities so that your accounting balances. If there are differences in the opening balances you need to check and correct them.
Differences in the opening balances
At the opening of the Accounting year, in the Opening columns the amounts of the Total Assets (positive) should correspond to the Total Liabilities (negative) should arrive at zero.
If the Debit and Credit values do not result in zero, the accounting will not be correct and the program will report an error in the Info window.
Recheck and correct the amounts until the value is zero.
If you have entered and deleted accounts, changed groups or anything else, it is useful to use the Check accounting command. (Account1 menu). This recalculates all the values and lets you know if there are any errors.
In the following example the program shows an error message reporting a difference of 150.- CHF.
It is possible to check the balancing in the Totals Table.
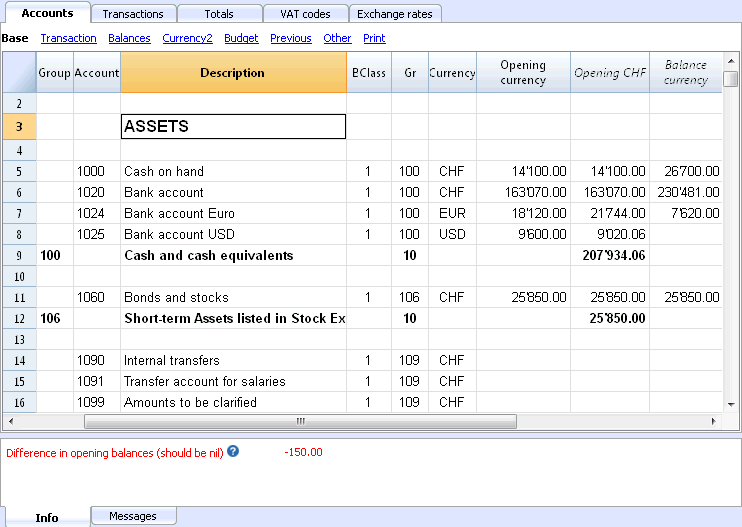
Starting the accounting during the year
If you start a new accounting, you have two options if you resume the work already done:
- Start the accounting from the beginning of the year by entering the opening balances at the beginning of the year and the transactions that have already been recorded previously in other programs (see also Transferring data from other software).
This way you have all the accounting details in one file. - Start from when you resume the accounting.
- Enter the opening balances in the Opening column, taking the values of the other accounting.
You have to enter the opening balances not only of the Assets and the Liabilities, but also of the Expenses (Debit, amounts in positive) and Revenues (Credit, amounts in negative). - The result for the year to date must be entered in the account Profit/Loss carried forward.
If it is a profit, the opening balance is to be entered in the negative, if it is a loss in the positive. - You must verify that the balance of the opening balances results in zero, so that the program does not indicate any differences.
- You can start entering new transactions in the Transactions table.
- Enter the opening balances in the Opening column, taking the values of the other accounting.
Balances of the previous year
If you start a new accounting by taking over an existing accounting and you want the previous year's values to appear on the printouts, it is necessary to enter the previous year's balances in the Previous view, Previous Year column. For the previous year, Balance sheet and Profit/Loss statement balances are usually entered.
The previous amounts are displayed in the printouts of the Enhanced balance sheet in the Previous Year column.
Create new year
When you start the new year, the program automatically carries over the opening balances for the following year.
Consult the lesson Create New Year.
Differences in the opening balances
Avoid mistakes with Banana Accounting Plus
In order to facilitate checking your accounting work and to immediately find differences, in Banana Accounting Plus, our new version, we added the Balance column in the Transaction table. You can now see potential differences on each row and you can correct them right away. It is a very useful feature when closing the accounting period.
Many of our clients have already tried it and are enthusiastic about it. We advise you to switch now to Banana Accounting Plus and take advantage of the many new features.
At the opening of the Accounting year, the amounts of the Total Assets should correspond to the Total Liabilities, otherwise it is not possible to have a correct balancing. You need to check that in the information window there is no Opening balances difference message. If there is, you first need to correct the opening balances of the Balance Sheet so that the Total Assets balances the Total Liabilities (Opening balance column).
In the following example the program shows an error message reporting a difference of 150.- CHF.

After having corrected the opening balances the Total Assets must correspond to the Total Liabilities.
It is also possible to check the balancing in the Totals Table.
Transactions | Double-entry accounting
Avoid mistakes with Banana Accounting Plus
In order to facilitate checking your accounting work and to immediately find differences, in Banana Accounting Plus, our new version, we added the Balance column in the Transaction table. You can now see potential differences on each row and you can correct them right away. It is a very useful feature when closing the accounting period.
Many of our clients have already tried it and are enthusiastic about it. We advise you to switch now to Banana Accounting Plus and take advantage of the many new features.
The Transactions table
Transactions must be entered in the Transactions table.
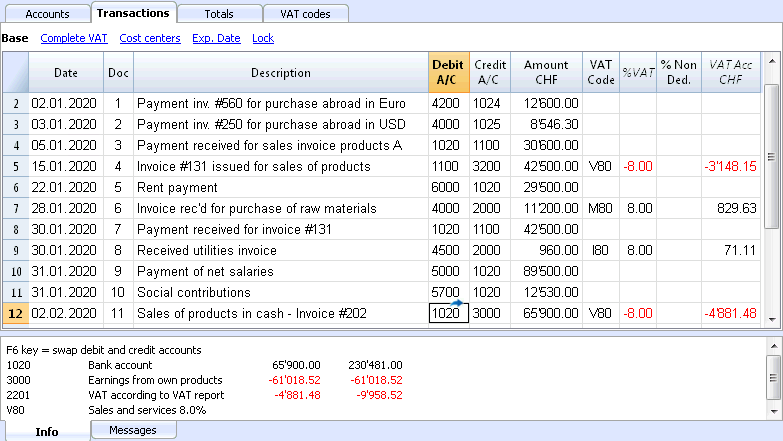
Info window
In the Information window at the bottom part of the screen, error messages and extra information about the used accounts and VAT codes are being displayed.
For the accounts, the Account number, the Description, the Amount of the transaction (debit or credit) and the Current balance of the account is being indicated.
Transaction types
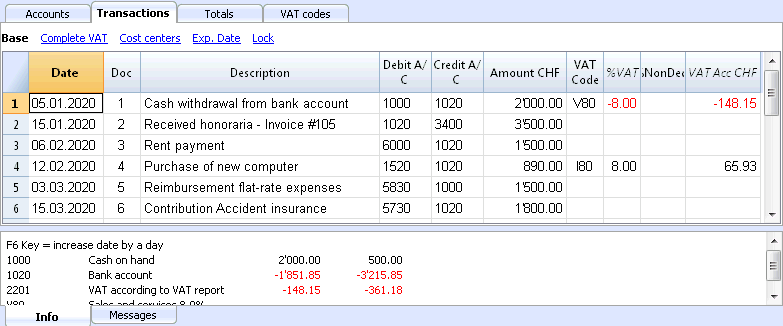
Simple transactions
Simple transactions are the ones regarding two accounts (one Debit account and one Credit account) and entered in one single row. Each transaction has its own document number.
Composed transactions
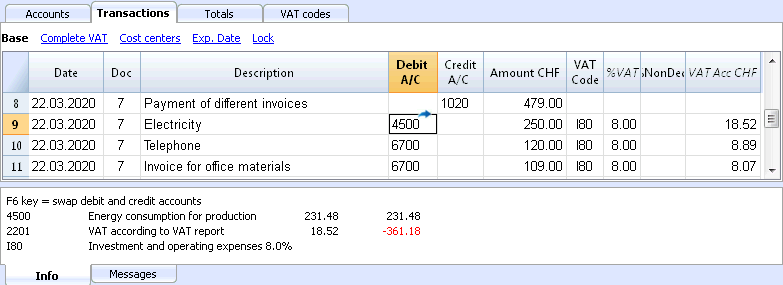
Composed transactions with more than two accounts involved, have to be entered on several rows. The user should enter one account per row. The counterpart account for the entire transaction has to be entered on the first row.
The document number, entered on the different rows, is the same because we are dealing with one and the same transaction.
Note:
In composed transactions, the dates of the transaction rows should be the same, otherwise, when doing calculations by period, there may be differences in the accounting.
The columns of the Transactions table - Double entry
The Transactions table has a series of columns and views already set.
The columns of the Transactions table
The columns listed hereunder and preceded by an * are usually not visible.
In order to make them visible, use the Columns setup command from the Data menu.
Date
The date the program uses to attribute the transaction to a certain time frame. The date should be within the limits of the accounting period defined in the Basic data of the accounting. In the Options tab, one can indicate whether the transaction date is required, if not this value can also be left empty.
If there are locked transactions, the program gives an error message when an equal or earlier date than the one of the lock is being entered.
*Date Document
The date of the document can be entered, for example the date of issue for an invoice.
*Date Value
The value date of the bank operation can be indicated. This value is being imported from an electronic bank statement.
Document
The number of the voucher that serves as a base for the accounting transaction. When entering transactions, it is advisable to indicate a progressive number on the document, so that the accounting document can be easily traced from the transaction.
The autocomplete feature proposes progressive values as well as transaction codes that have been defined earlier in the Recurring transactions table.
The program proposes the next document number, that can be resumed with the F6 key.
-
In case of a numeric numbering, the program simply increases the highest value found in the Doc column.
- Alphanumeric numbering: the program increases the final numeric part; this is useful when one would like to keep a separate numbering for cash and bank movements.
If earlier Doc number C-01 has been entered, and one starts to type C, the program proposes C-02.
If earlier Doc number B104 has been entered, and one starts to type B, the program proposes B-105.
If earlier Doc number D10-04 has been entered, and one starts to type D, the program proposes D10-05.
In the recurring transactions you can setup transactions groups that can be reloaded with a single code.
In order to add a large number of document numbers, you can also use Excel. You can create in Excel the desired quantity of document numbers and then copy and paste it into Banana, in the column of the Transactions Table.
*Document Protocol
An extra column in case an alternative numbering for the transactions or for the document is needed.
The autocomplete feature proposes progressive values that function in the same way as the ones in the Document column.
*Document Type
Contains a code that the program uses to identify a type of transaction. If you prefer to use your own codes, it is advisable to add a new column.
- 01 In the reports, this transaction is considered an opening transaction, so it doesn't show in the period but in the opening balances.
- from 10 to 19: codes for customers' invoices
- from 20 to 29: codes for suppliers' invoices
- from 30 to 1000: codes reserved for future purposes.
*Document Invoice
A number of an issued or paid invoice that will be used together with the invoice control feature for customers/suppliers
*Document Original
The reference number present on a document, to enter, for example, the number of a credit note.
*Link to external file
Serves to enter a link to an external file, usually the accounting voucher.
Pressing on the little arrow on the upper part of the cell, the program opens the document.
*External reference
Any reference number all allocated by a program that generated this operation. This value can be used to check whether a given task is imported twice.
Description
The text of the transaction.
The autocomplete feature proposes the text of an already entered transaction, or of one that has been entered in the preceding year when the appropriate option has been activated. When pressing the F6 key, the program retrieves the data of the preceding row with the same description and completes the columns of the active row.
In case the description begins with #CheckBalance, the transaction is being considered as one that serves to checkup the balance.
Please consult our page Check accounting for more information on the subject.
*Notes
Useful to add notes to the transaction.
Debit Account
The account that will be charged.
It is possible to also enter a segment in the Debit account column. These are usually separated by a ":" or a "-".
In the accounts list, pressing the key with the segment separator symbol, one goes immediately to the next segment.
If instead the Enter key is being pressed, the input finishes and one moves to the next column.
The autocomplete feature proposes the accounts and segments. One can also enter a search text and the program shows all the accounts that contain that text in one of the columns.
*Debit Account Description
The description of the entered account retrieved from the Chart of accounts.
Credit Account
The account that will be credited. We refer to the explanation under Debit account for the rest of the information.
*Credit Account Description
The description of the entered account retrieved from the Chart of accounts.
Amount
The amount that will be entered unto the debit- and credit account.
VAT columns
Information on the VAT columns can be found att the VAT columns in the Transactions table page
CC1
The Cost center account preceded by "."
*CC1 Description
The description of the Cost centre, retrieved from the Chart of accounts.
CC2
The Cost center account preceded by ","
*CC2 Description
The description of the Cost centre, retrieved from the Chart of accounts.
CC3
The Cost center account preceded by ";"
*CC3 Description
The description of the Cost centre, retrieved from the Chart of accounts.
*Expiry date
The date before which the invoice has to be paid.
*Payment date
Used in combination with the Show Expiry dates command.
When instead using the invoices customers/suppliers control feature in order to check on the payments, a transaction has to be entered for an issued invoice and another one for the payment thereof.
*Lock Number, Lock Amount, Lock Progressive, Lock Line
More information at the Lock Transactions page.
Additional columns
The following columns are added with the 'Tools' -> 'Add new functionality command, Add items columns in the Transactions table' (Refer to the Items columns in the Transactions table documentation for further information:
Item
Quantity
The quantity multiplied by the unit price will produce the total amount (can also be a negative number).
Unit
A description referring to the quantity, for example: mq, ton, pz.
Unit/Price
The unit price multiplied by the quantity, will produce the total amount (can also be a negative number).
If a value is entered in the Quantity or Unit Price columns, the amount is calculated on the basis of the contents in these two columns and converted to a positive value.
Adding new columns
With the Columns setup command, it is possible to display, hide or move the order of columns, add new ones, or indicate that a column should not be included in the printout.
- The added columns in the Transactions table will be added also in the Recurring transactions table, in the Account card and in the VAT report, without being made visible.
In order to display these columns in the other tables, use the Columns setup command. - If a column of the "amount" type is being added, the entered amounts will be added up in the Account card.
Views
When a new accounting is being created, the following views are being automatically created as well:
- Base: the main columns are being displayed
- Cost centres: the CC1, CC2 and CC3 columns are being displayed
- Expiry dates: the columns Expiry date and Payment date are being displayed
- Lock: the columns relative to the Lock function are being displayed.
With the Views setup command, the views can be customized and personal, added views can be created.
With the Page setup command, you can modify the print mode of the view.
Recurring Transactions
Recurring Transactions table
In order to avoid rewriting always the same texts, it is possible to store transaction groups in the Recurring transactions table (Account2 menu). These groups are identified with a code and can be retrieved and entered into the Transactions table just by entering the corresponding code.
When positioned on the Doc column of the Transactions table, the program proposes the list of the recurring transactions, grouped bycode. If one of these codes is selected:
- the program enters the recurring rows that have the same code
- the program completes the entered rows with the date and other values that have been entered earlier
- the program enters the progressive number in the Doc column (based on earlier entered values)
Entering recurring transactions
- You need to enter into the Recurring transactions table (or copy from the Transactions table) the transaction rows that should be retrieved regularly.
- Enter the code related to the recurring transactions group into the Doc column.
Rows with the same group code will be retrieved together (transaction on multiple rows).
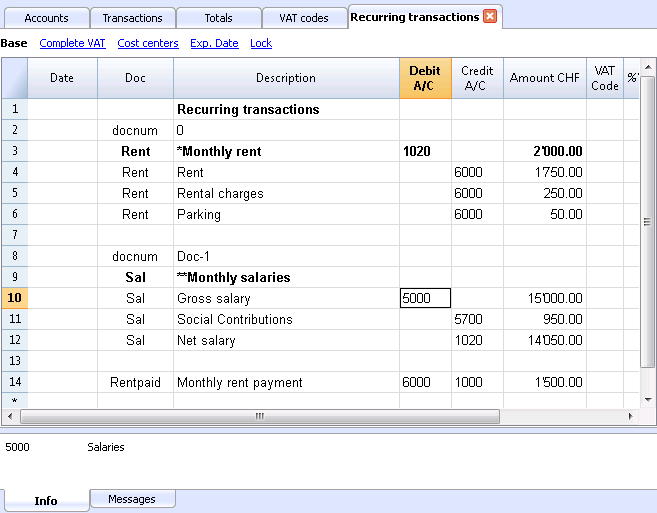
- Progressive numbering of documents "docnum"
If, when retrieving recurring transactions, you wish to have a Doc number different from the automatic one, you need to create a row containing the code "docnum" in the Doc column, and your desired text in the Description column. For the following rows, the text specified in the Description column, will be applied in the Doc column when retrieving the transactions- "0" when no automatic numbering is desired
- "1" progressive numbering
- "cash-1" progressive numbering with the prefix "cash-" (cash-2, cash-3)
The program replaces the number indicated at the end of the text with the next progressive number.
- If you wish the program to suggest just one row per code, the description has to be preceded by:
- An "*": displays just this row and not the others with the same code.
- An "**" displays just this row, but don't retrieve this row (only title row).
- An "\*" allows the user to start the description with an asterisk, without it being interpreted as a command.
It is not possible to save customized setups in the Recurring transactions table; it uses the views and columns setup of the Transactions table.
Retrieving the recurring transactions into the Transactions table
- Enter the date and the information of the other columns that should not be modified
- In the Doc column, choose one of the codes defined in the Recurring Transactions table and press Enter.
- The program enters all the transactions with the same code, repeating the data column and other already entered values.
- In the Doc column, a progressive number is being inserted or one as specified in the docnum
- Or indicate the code in the Doc column and press F6
Copying transaction rows into the Recurring Transactions table
In order to copy rows from the Transactions table into the Recurring transactions table:
- In the Transactions table, select the rows that need to be copied;
- Edit menu -> Copy rows command;
- Go into the Recurring transactions table;
- Edit menu -> Insert copied rows command;
Formatting columns and views
The Recurring transactions table uses the same formats and views as the Transactions table.
It is not possible to have a separate format only for the Recurring transactions table.
It is however possible, from the Transactions table, to add a new View, setup a new columns format, and use this same view in the Recurring transactions table.
Bank checks
To enter issued bank checks, the user needs to insert an Issued checks account in the Liabilities.
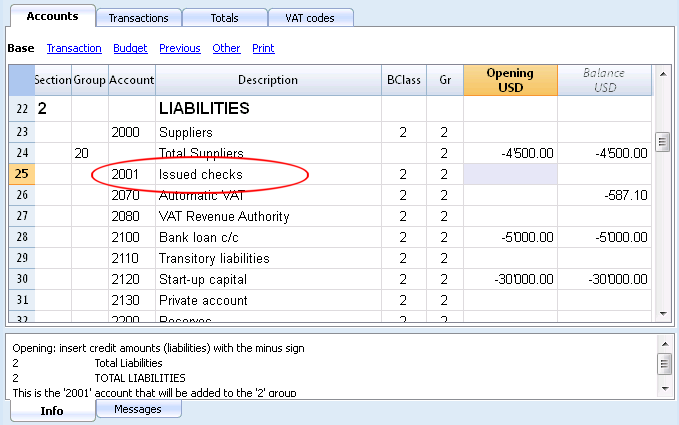
The check is issued at the moment of paying a supplier and later on is being debited from the Bank current account.
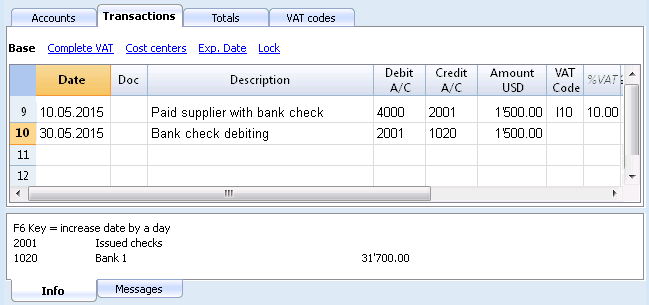
The Issued checks account card after the transactions.
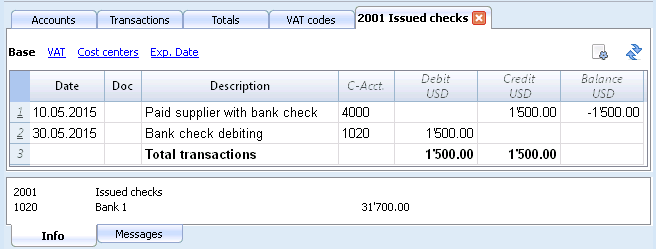
Credit card registration with advance payment
Advance payment on Credit cards
Before taking you through the procedure, check that an account for Credit card exists in the liabilites part of the Chart of Accounts. Create it if that is not the case.
The credit card account is added to the group or sub-group of short-term debts, as long as this is pre-requisite in the chosen Chart of Accounts.If there are no sub-groups, it must be listed in the liabilities section.
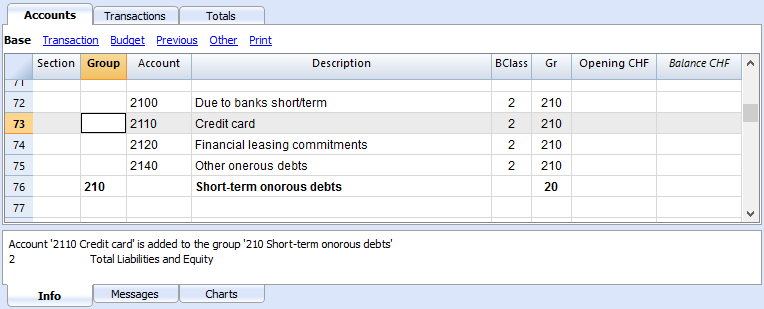
Example:
As per 10.01.2019 CHF 1'000.- are transferred from the bank account to the credit card.
- The bank account is credited and the Credit card account is debited.
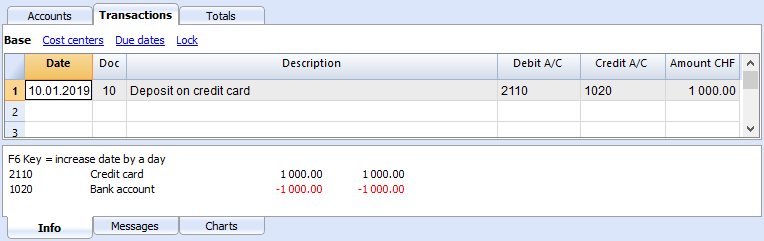
Register your credit card bill
Upon reception of the credit card bill, you must record all the costs listed on the credit card.
Example:
On 15.02.2019 we receive the January credit card bill for a total of CHF 790.- (details: CHF 560.- for computer purchases, CHF 150.- for hotel expenses, CHF 80.- purchase of office supplies) (Doc.25)
- It will be registered on several rows. All the costs relating to the expenses listed in the credit card are recorded in the Debit column; we register one expense per row; in Credit, the credit card account is registered (total of the bill).
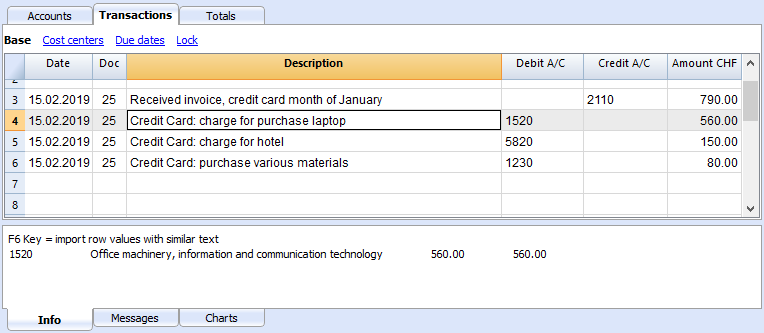
Check the credit card account balance
Each time you pay an advance towards the credit card and once all the costs listed on the credit card have been recorded, you must verify that the credit card balance matches the balance stated on the credit card.
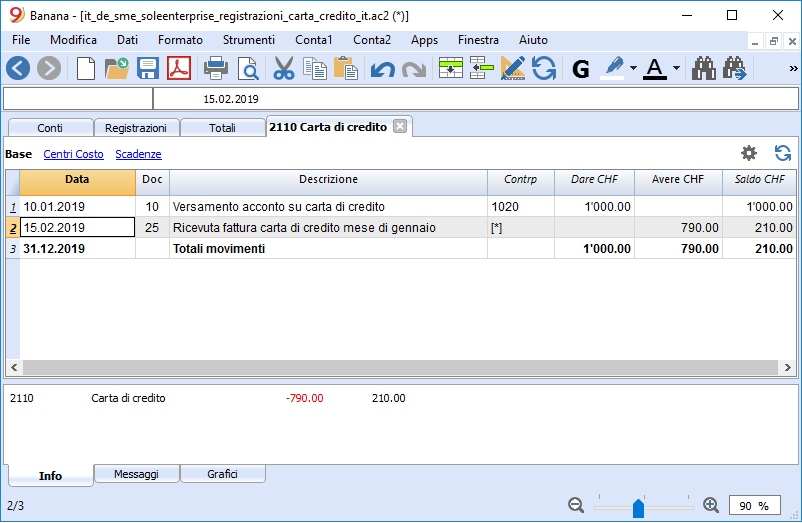
Register your credit card transactions
Credit Card with an accounting using the Cash principle
If no down payments are made on the credit card and the invoice is paid in full with the bank, you should record the credit card invoice at the time of payment when the costs also should be recorded.
You need to record in several rows:
- Enter the same date and document number for each movement on all rows that make up the registration.
- In the Debit A/C column enter the cost account, depending on the type of purchase (even those made abroad). One cost per row is recorded.
- In the Credit A/C column enter the bank or post account used to pay the invoice.
- In the Amount column enter the total amount of the credit card invoice.
After recording all movements, check your credit card balance by opening the credit card account card.
Credit Card with an accounting using the Accrual principle
If you have a turnover accounting, based on the accrual principle, all costs relating to credit card purchases are recorded when you receive the invoice:
- All costs are recorded in the Debit A/C column
- On the Credit A/C column you register the card debt, just like any other supplier
When the credit card invoice is paid, you need to register as follows:
- In the Debit A/C column you enter the credit card debit account
- Credit A/C column enter the bank account or post account used to pay the credit card invoice.
Importing transactions from your credit card
Banana Accounting allows the importation of movements from the credit card into the main accounting file.
A couple of requirements are necessary to perform the import:
- The giro account must have been set up in the Chart of Accounts.
- The format of data provided by the credit card issuing bank must be compatible with the formats provided by Banana Accounting.
To find and determine the formats you need to:
- Open BananaApps in the Account1 menu → Import to accounting ..., click on the Manage Apps... button, select Import.
- Select the bank that issued the credit card and click on the Install button. The format will be displayed in the Import to Accounting dialog.
When data from the credit card, and even bank transactions, are imported, the problem of recorded down payments needs to be addressed. In this case, two registrations are created on the credit card account:
- Presence of a credit card account as a counterpart to bank charges for credit card payments.
- Presence of the credit card account in the movements imported from the credit card.
To avoid any overlap, the giro account is used at the moment of import.
How to perform the import:
- From the Account 1 menu → Import to accounting... select Transactions.
- Select the type of format of the credit card issuing bank.
- Using the Browse button, select the file provided by the bank and confirm with OK.
-
Enter the period and indicate the giro account. Confirm with OK. All movements will be imported into the Transactions table.
- Indicate the cost account for each row.
Totals Table
The Totals table presents the totals by Group and is used to check the accounting balance.
It is processed automatically by the program and cannot be modified by the user.
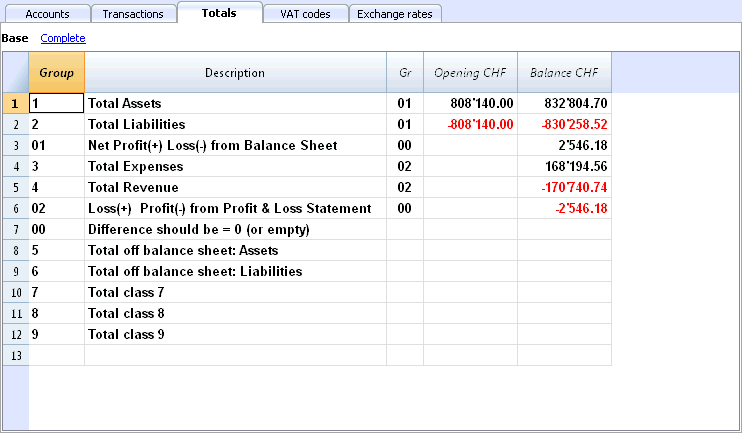
In the Totals table it is possible, at a glance, to get an idea of the situation of one's own activity. You see the totals of assets, liabilities, costs and revenues and above all you see if you have a profit or a loss.
The 00 group is very important because it allows you to immediately see if everything is in place or if there are differences in the balances.
Budget
In der Tabelle Budget findet die Finanzplanung statt und funktioniert wie die Tabelle Buchungen.
Es gibt Spalten für das Budget je nach Art von Buchhaltung.
Sie können auch Mengen und Preise sowie Berechnungsformeln eingeben.
Mehr Informationen betreffend Budget finden Sie auf der Seite Tabelle Budget.
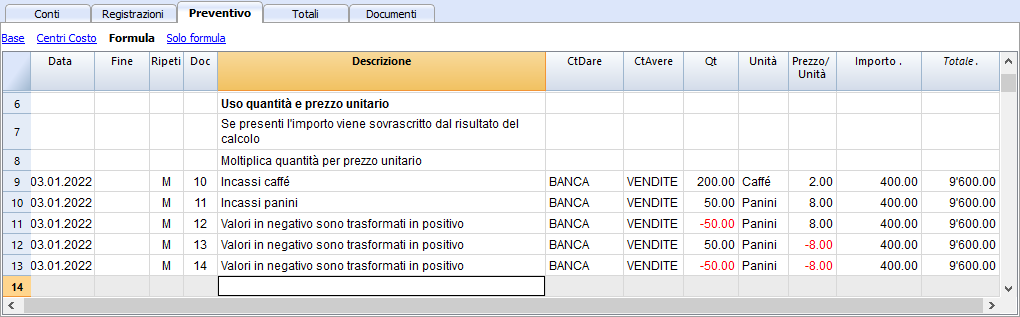
Printouts
Enhanced Balance sheet with groups - colored columns
This example has been realized with the following features:
- Enhanced Balance sheet with groups
- Columns setup to indicate which columns are to be displayed (in the example the columns of the Current and the Preceding year are being displayed)
- Colors (Column properties) to indicate the color of a column.
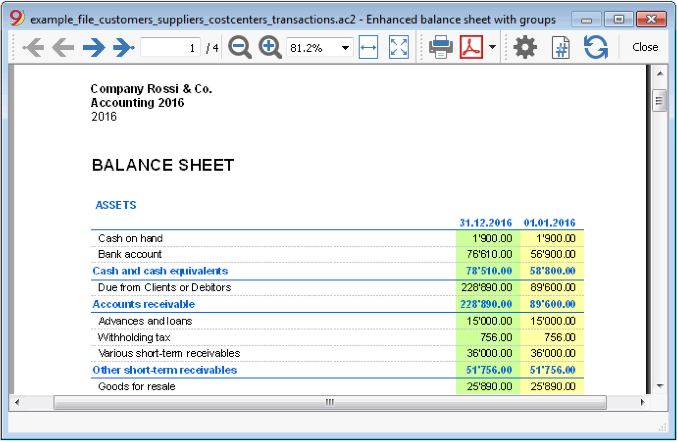
Profit & Loss Statement with budget
This example has been realized with the following features:
- Enhanced Balance sheet with groups
- Columns setup to indicate which columns are to be displayed (in the example the columns of the Current year, the Budget and the Preceding year are being displayed)
- Colors (Column properties) to indicate the color of a column.
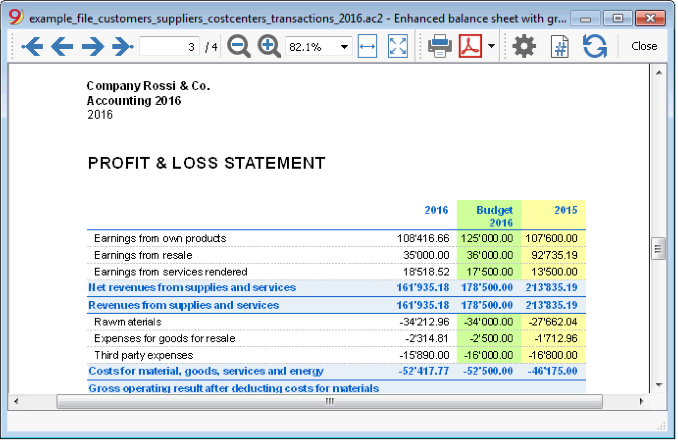
Enhanced Balance sheet
This example has been realized with the following features:
- Enhanced Balance sheet- Base tab
- Style setup (for this printout the Berlin style has been chosen)
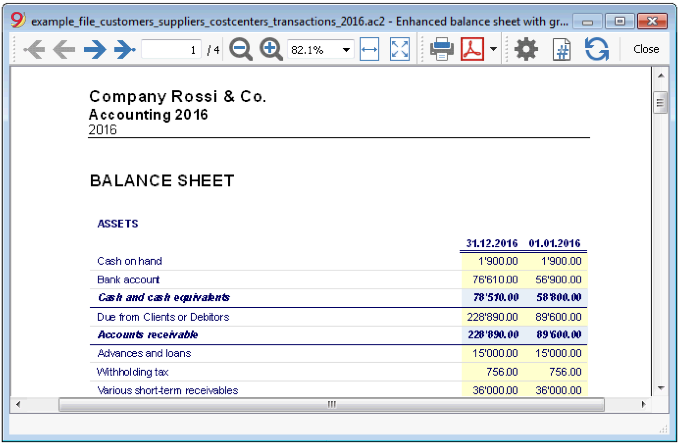
Subdivision by quarter
This example has been realized with the following features:
- Enhanced Balance sheet with groups
- Subdivision -> Subdivision by period in order to set up the subdivsion by period
- Columns setup to indicate which columns are to be displayed
- Colors (Column properties) to assign different colors to the columns.
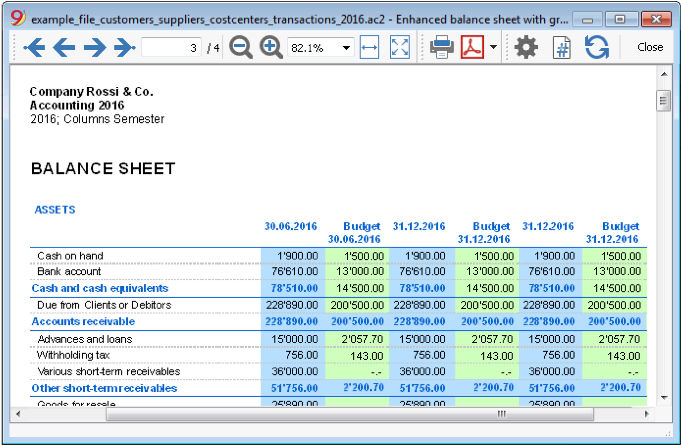
Subdivision by segment
This example has been realized with the following features:
- Enhanced Balance sheet with groups
- Subdivision -> Subdivision by segment in order to choose the segment level to be displayed.
- Print style
When printing the segments, it is not possible to set up the colors of the columns.
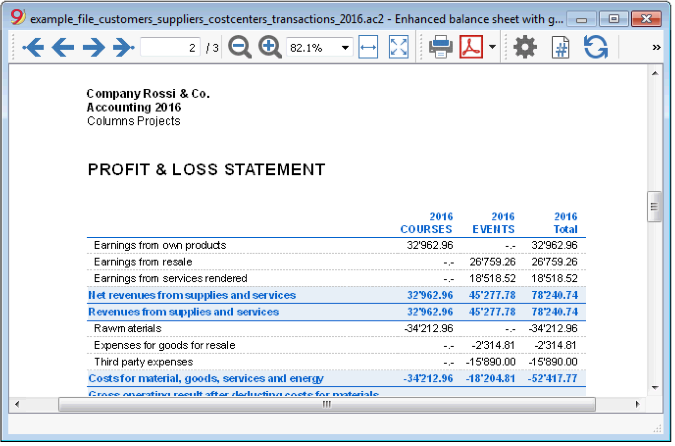
Pdf dossier with all the accounting data
The file is being created with a summary that gives access to the different printouts in an easy way.
The following data can be saved in Pdf
- Balance sheet and Profit & Loss statement
- Accounts table, Transactions, VAT Codes, Totals
- VAT reports
- Account cards
If you save this file on a non-rewritable CD (to keep together with your accounting documents), this satisfies the legal requirements for archiving the accounting data.
This example has been realized with the following features:
File menu, Create Pdf dossier command
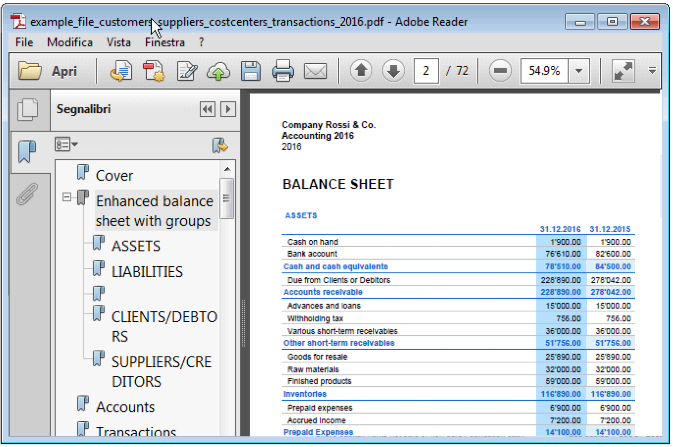
Printing an extra column
In order to print, in the Balance sheet, an extra column, the following features have been used:
- Columns setup, Data menu, in order to display or add a new column in the Accounts table
- Enhanced Balance sheet with groups
- Columns - advanced, to make the column visible.
Enhanced Balance Sheet
- The Balance Sheet represents all the Assets, Liabilities, Expenses and Income in a specific moment. The difference between Assets and Liabilities gives the personal capital.
- The grouping of the accounts is done according to the contents of the BClass column.
- The Enhanced Balance Sheet, shown in the preview, can be saved in different formats (PDF, HTML, MS Excel) and can be copied in the clipboard.
- In order to calculate, display and print it at the end of year or the end of a period, activate the Enhanced balance sheet command from the Account1 menu.
- Transactions without date are being considered as opening transactions and will not appear in the printouts of the Profit & Loss Statement.
Including a logo in the Enhanced Balance Sheet
From the Banana version 9.0.3 it is possible to include a logo and to define its settings (width, height, position) from the File meu > Logo setup command. It is also possible to create and save Compositions with different logo settings.
This feature is a simpler alternative to the logo setting with the Documents Table.
From the following window several printing options can be activated, appears.
See also Print Examples.
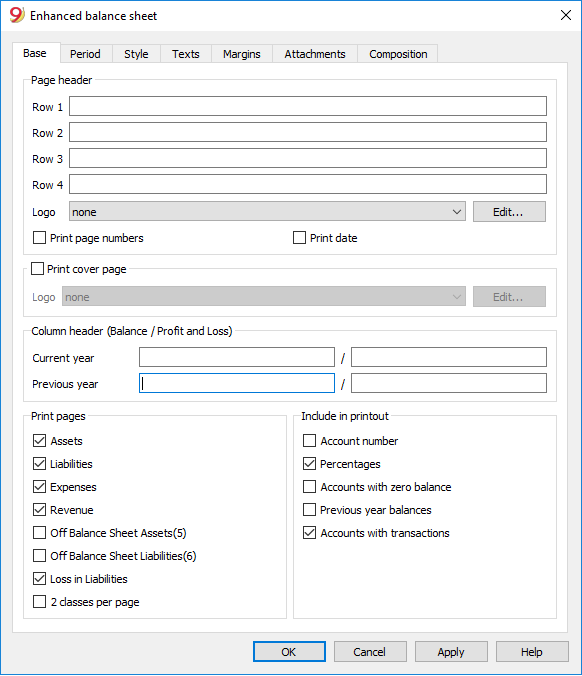
Page header
Rows 1 thru 4
In this field, enter texts to use as headers when printing.
Print cover page / Print date / Print page numbers
The activated options will be shown in the print-out.
Column header (Balance / Profit and Loss)
The first two vertical fields refer to the Balance Sheet, the two second ones refer to the Profit and Loss Statement.
Current year
Insert the final date of the current accounting.
Previous year
In this field, enter the final date of the previous year's accounting.
Print pages / Include in printout
By selecting the appropriate cells, it is possible to choose the options that should be activated in the printouts.
Other tabs
The explanations for the other tabs are available at the following pages:
Results
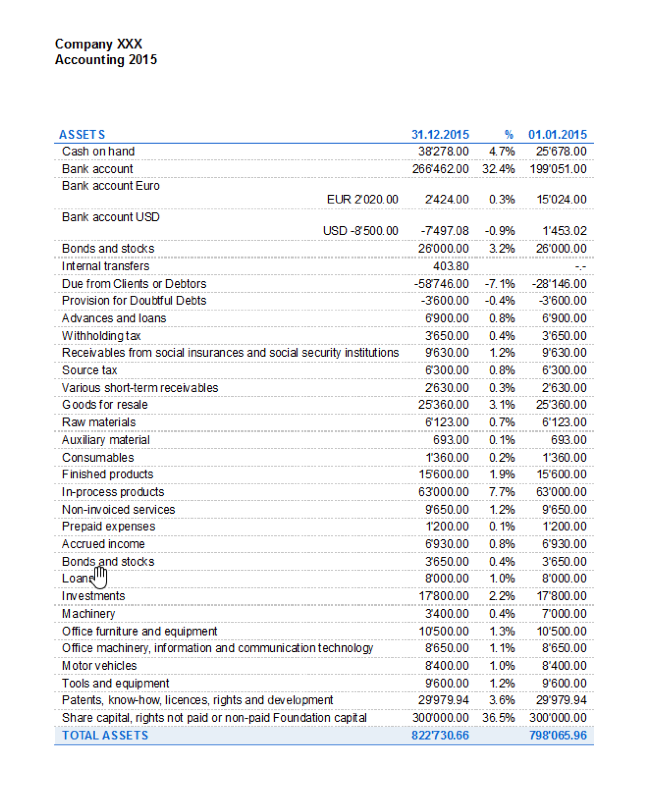
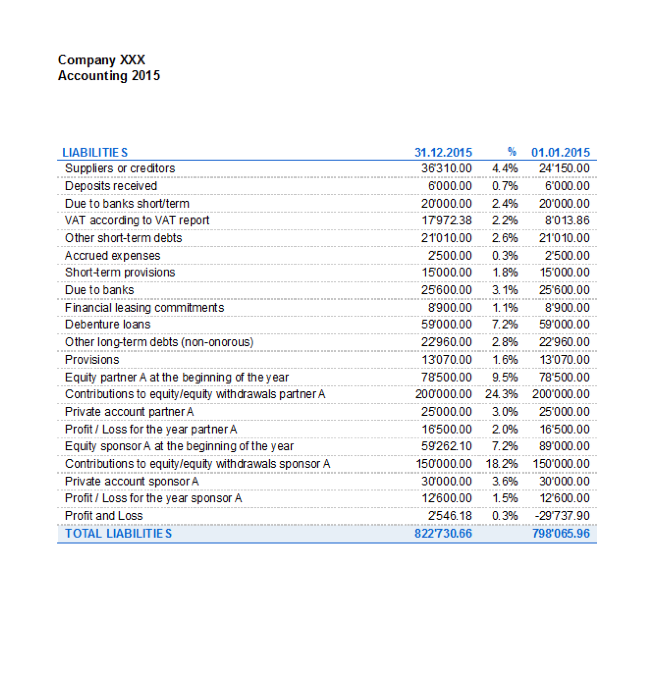
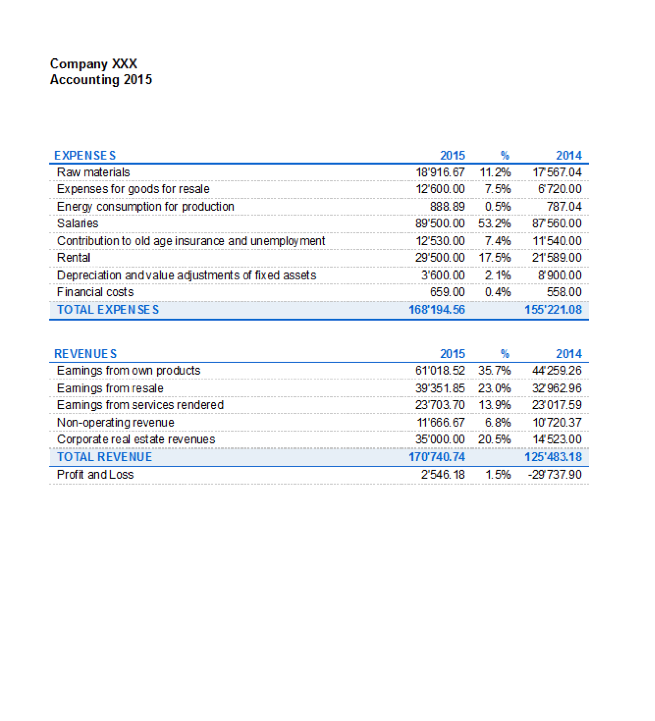
Enhanced Balance Sheet with groups
The Balance sheet with groups differs from the Balance sheet for the following characteristics:
- Includes also subgroups in the printout, as in the chart of accounts (and not only groups).
- Offers the possibility to exclude groups or accounts (for instance, to display only the total of the group and not the accounts of which the total is composed).
- In the Chart of accounts - Sections it is possible to select which accounts to include or leave out in the printouts
- It is possible to choose, for a given period, what kind of subdivision you want (for example in the first semester, you can choose wether to obtain the data by month or by quarter)
- It is possible to have a subdivision by segment
- ... and much more!
In order to calculate, display and print the Enhanced Balance sheet by groups, click on the Enhanced balance sheet with groups command from the Account1 menu; a window appears, with different sections that allow the user to define the print setup.
See also Print Examples.
FAQ
- If I exclude the groups with a zero balance, the title rows that refer to the excluded groups are still being displayed; how can I erase them?
Go to Sections and activate Hide current row on the title rows that you wish to exclude. - I would like to exclude the display of the period in the titles of the printouts ("1st Semester 2013"); how can i do it?
Go to the Headers section and deactivate the Print period option. - On the cover page, when there are long titles, I would like to be able to choose how to subdivide the texts on two rows and whether I wish to apply bold print. Is it possible?
It is impossible to change the fonts on the cover page. - Some amounts are not included in the indicated period. Why?
Transactions without a date are being counted as openings and do not appear in the printouts of the Profit & Loss statement. Be sure to enter the date into all the transactions. - The Total groups that contain all the accounts of the classes 3 and 4 are being renamed with the text Profit or Loss, depending on the result of the accounting period. Can I change that?
Go to the Sections and overwrite the original text in the Alternate text zone of the active row. - In case the Show previous year option is being activated, and in the previous year file there are groups that are no longer present in the current year, the program will give error messages. Can I do something about it?
In order to print the Balance sheet with data of the previous and the current year, the groups of the previous year have to also be present in the current year.
Headers
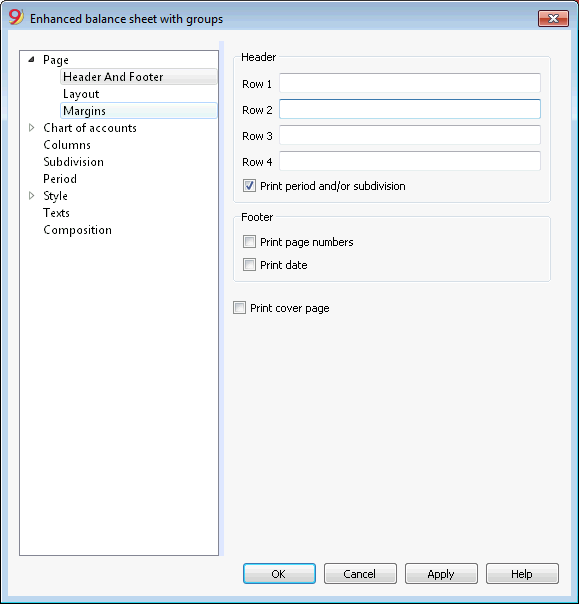
Header 1, Header 2, Header 3, Header 4
Enter as headers the text you wish appearing in the printouts. They will be on the cover page and on each page headings.
Print period and/or subdivision
This option is active only when a specific period has been defined. When you deactivate this option, the period will not be indicated in the titles of the printouts.
Footer
Print page numbers
By activating this function, page numbers will be printed.
Print date
By activating this function the date will be printed.
Print cover page
By activating this function the cover page will be printed.
Layout
Zoom
The printout layout will change according to the entered value.
Page orientation
You can select the page orientation: automatic, landscape and portrait.
Logo
From the Banana version 9.0.3 it is possible to include a logo and to define its settings (width, height, position) from the File meu > Logo setup command. It is also possible to create and save Compositions with different logo settings.
This feature is a simpler alternative to the logo setting with the Documents Table.
When you print the Balance sheet with groups - Account1 menu -> Balance sheet with groups command, Header and footer tab -> Header, as Logo you can select your own image (with the Edit button), instead of the none option.
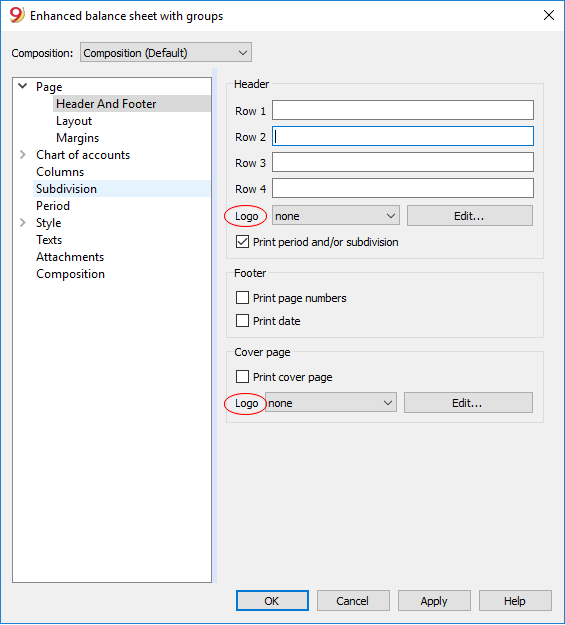
Margins
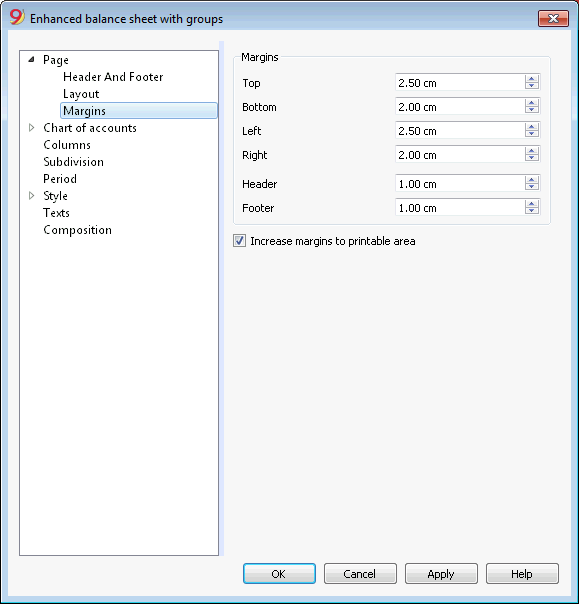
Top, Bottom, Left, Right
It's the distance between the page border and the content.
Header
It's the distance between the page header and the content.
Footer
It's the distance between the page footer and the content.
Increase margins to printable area
If the content exceeds the page margins it will be automatically adjusted to fit the printable area.
Sections
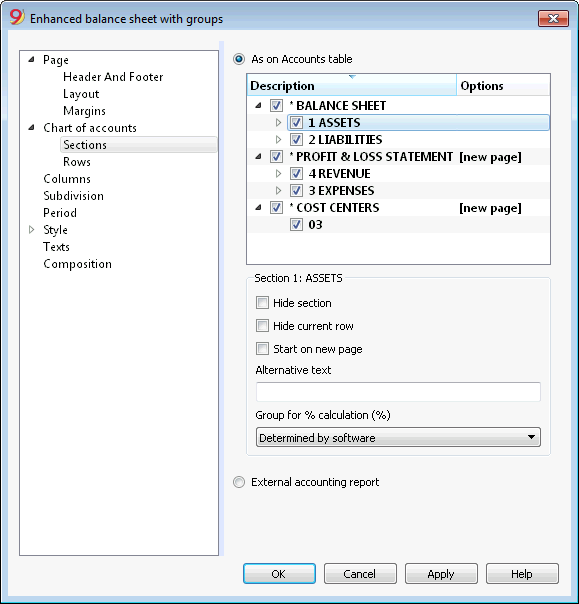
This section can vary depending on the settings of the Section column of the accounting plan - See the related document: Sections in the accounting plan
As on Accounts table
The display and the printout settings of the Enhanced Balance Sheet with groups, are the same as in the Accounts table.
Depending on the selection, there are different sections with different options:
- sections 1, 2, 3, 4, 01, 02, 03, 04... refer to the main items of the Balance Sheet
- account sections refer to the selected account
- group sections refer to the selected group
Section*
If you select a section with an asterisk, you will have the following options:
Hide section
Click on the section that you wish to hide.
Hide current row
Click on the row that you wish to hide.
Start on new page
Click on the header that you want to have on a new page and activate the option.
Alternative text
Enter an alternative text if you want to have a different one for the selected section or row.
If you select a number or a group section (1, 2, 3, 4.....), there are extra options:
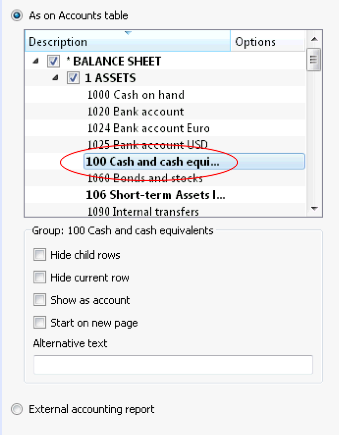
Group for % calculation (%)
This option is visible when selecting a section (Assets, Liabilities, ...). It is possible to indicate which group the % calculation should be based on.
Hide child rows
If you select a group and you activate this function, child rows of this group won't be printed in the Enhanced Balance Sheet.
Show as account
If you select a group and you activate this function, the group will be displayed as an account in the Balance sheet.
External accounting report
Print the Enhanced Balance Sheet by groups, based on the structure of the Accounting report file.
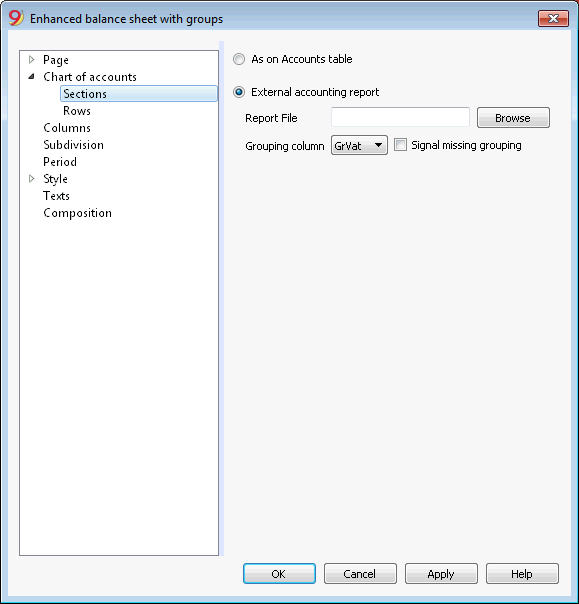
Report File
You can select the file of the External Accounting report with the Browse button.
Grouping column
Column in which the accounts refer to the groups defined in the External Accounting report. Available columns: Gr1, Gr2, Gr, BClasse and GrVat.
Signal missing grouping
Checks whether all accounts belong to a group in the External Accounting report.
Rows
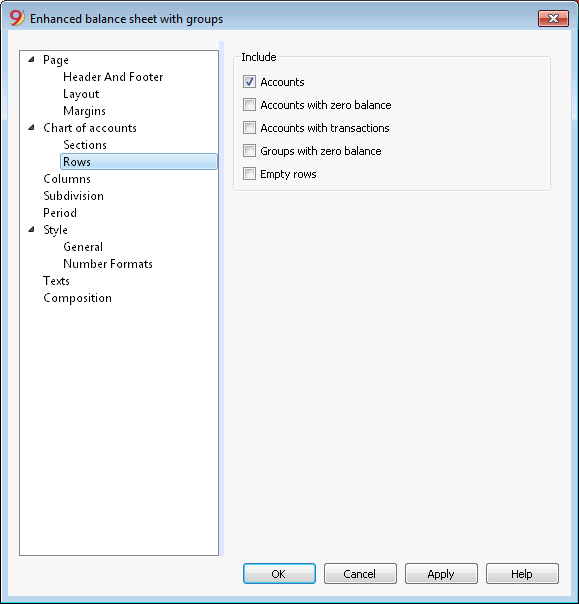
Accounts, accounts with zero balance, accounts with transactions, groups with zero balance, empty rows.
By activating the different options, you can include them in the printouts.
Columns
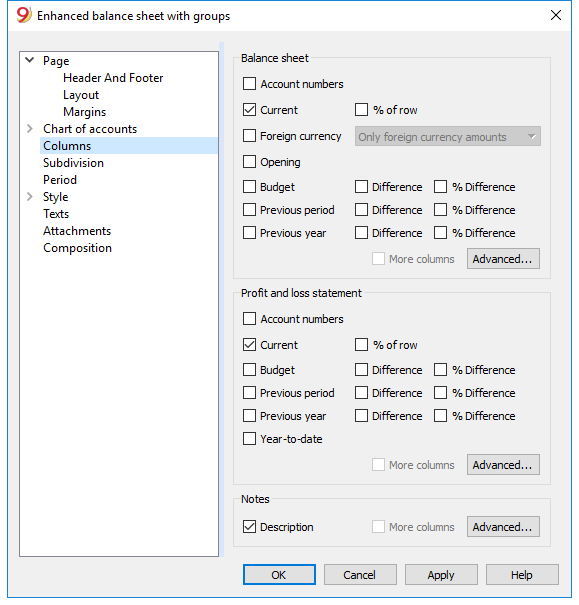
Balance Sheet, Profit & Loss Statement and Notes
You can choose the options you wish to include in the Balance Sheet, in the Profit and Loss Statement and in the Notes:
- Account number
- Current: the balance or movement in basic currency referred to the selected period or period subdivision
- Foreign currency: the balance in the account currency referred to the selected period or period subdivision
- % of row: includes the column with the percentage referring to the total (for example, % total Assets)
- Opening: opening balance at the beginning of the period
- Budget: budget amount referred to the selected period or period subdivision
- Previous period: the amount of the period previous to the selected period or period subdivision
- Previous year: the amount of the same period in the previous year
- Difference: the difference between the amounts of the current period and the other column (Budget, Previous period, Previous year)
- % Difference: is the difference, expressed in percentage, between the current period and the other column (Budget, Previous period, Previous year)
- Year-to-date: the balance or movement from the beginning of the accounting until the date of the last transaction.
Headers editing, color or display change of the columns
Each section has the Advanced button from where it is possible to change the column's settings and options.
Columns (Advanced)
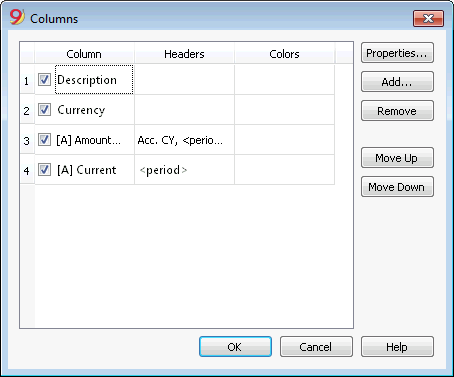
By pressing the Advanced button, it is possible to change the column's header:
- in order to make the column visible in the printout, check che corresponding checkbox
- in order to change the sequence of the columns, drag up or down the name of the column you wish to move, or use the Move Up and Move Down buttons
- In order to add new columns to be shown in the report (choosing them from a list) use the Add button
- In order to remove some columns from the list, use the Remove button
- In order to edit the display properties of a column (colors, headers, etc.) use the Properties button
Columns - add
In the Balance sheet, Profit and Loss Statement and in the Notes, it is possible to add new columns (from the ones included in the list), or to delete the undesired ones. Starting from the Account1 menu -> Enhanced Balance sheet with groups -> Columns -> Advanced button -> Add button.
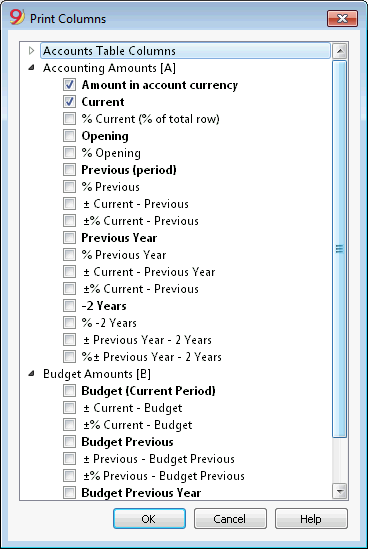
If one or more options are being activated, the program includes:
Accounts Table Columns
If you click on the header a list of all the columns of the Accounts Table will be shown:
You can then inlcude in the printout any column existing in the Accounts Table
Accounting amounts
These are the columns with the amounts calculated by the program, the opening balances and the entered transactions, for the indicated period or for the subdivision period
Amount in the Account currency
The account balances in foreign currencies will also be displayed.
Current
The balances of the current year will be displayed.
Opening
The Opening balances will be displayed.
Previous (period)
The balances of the previous period are being displayed (month, quarter, semester, etc).
Previous Year
The balances of the previous year are being displayed.
YTD (Year To Date)
This column is only available in the Profit & Loss Statement. The balances from the beginning of the year until the last transaction date are being displayed.
Budget amounts
See also Budget information. These are the columns with the amounts calculated by the program based on the budget amounts entered in the Accounts Table or in the Budget Table. If you created the Budget table and if some rows have been entered, the program will use the data of this table for its calculation, even if there are values in the Budget column of the Accounts Table.
Budget (Current period)
The amounts related to the foreseen budget of the current period are being displayed.
Budget Previous
The amounts related to the foreseen budget of the previous period are being displayed.
Budget Previous Year
The amounts related to the foreseen budget of the previous year are being displayed.
Notes on calculation period
The program cannot calculate amounts for periods overlapping between several accounting years or years with initial and final accounting dates that do not match.
Headers and options (Columns properties)
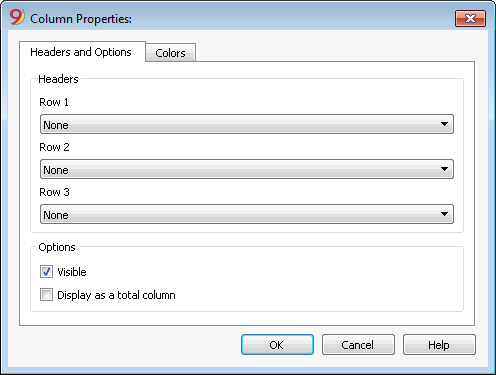
Headers
Row 1/ Row 2 / Row 3
It is possible to change the columns headers by selecting the Text option (from the drop down menu) and by entering the new header. If you select the Column option, the column name of the selected column will be shown.
Options
Visible
If this cell is activated, the column header will be shown.
Display as a total column
If activated, this option only shows the amounts in the Totals column.
Colors (Columns properties)
You can access this window by pressing on the Properties button, Colors tab (from the Enhanced balance sheet by groups command - Columns, from the Account1 menu)
Change
With this button you can change the text or the background color
Default color
With this button you can restore the default color for the text or the background.
Subdivision
From the Account1 menu choose the Enhanced Balance Sheet with groups command and select the Subdivision tab.
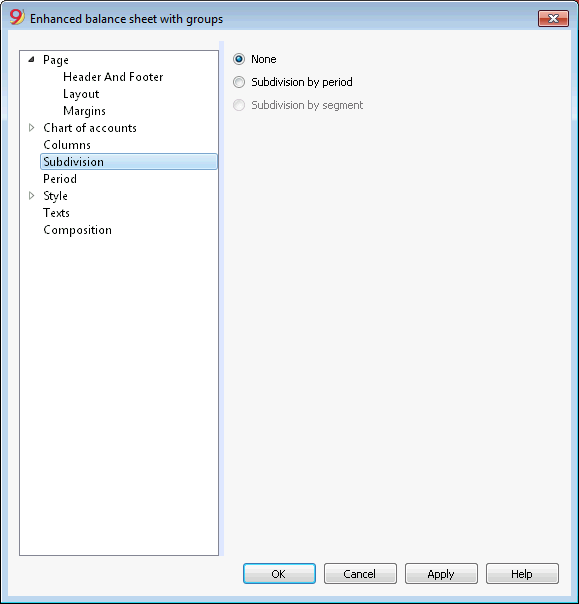
None
The whole period is shown.
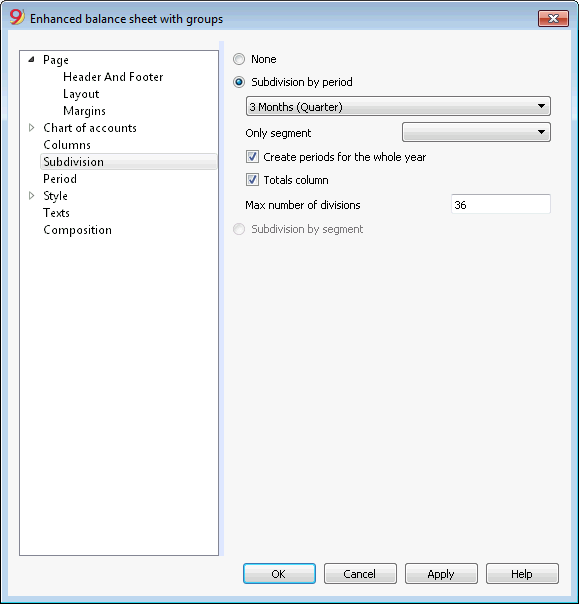
Subdivision by period
This function makes it possible to display the dates of the selected period per day, month, bi-monthly, per quarter, per 4 months, per semester or per year. The selected period will be shown in the column headers.
Only segment
Only the data related to the selected segment are being shown.
Create periods for the whole year
When the accounting period is not the same as the solar year, but when the user still wants to see all months, this function needs to be activated.
Totals column
This function creates a Totals column for the selected periods in the Profit / Loss Statement and in the Totals view of the Accounting reports command (Account1 menu).
Max number of divisions
The default maximum number of periods is 36. In particular cases, if the user would want to obtain special and very detailed statistics over a long time span, this value can be changed manually. A very high maximum number of periods can slow down the program.
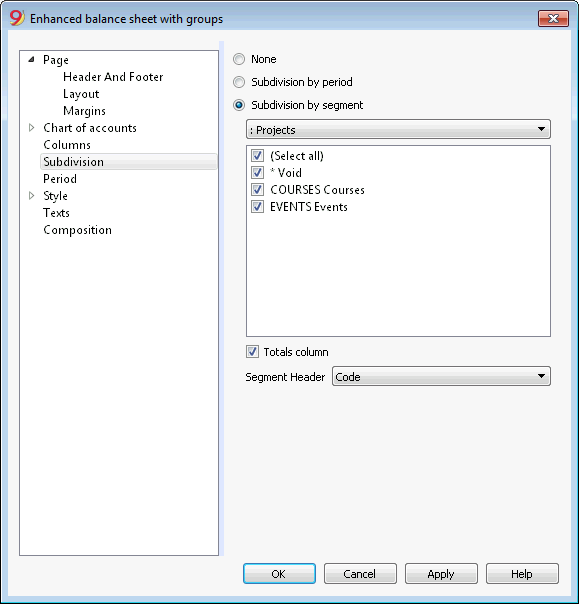
Subdivision by segment
The data related to the selected segment are being shown. This option is only available if segments have been set.
- Select all - all options will are selected
- Void - only the amount not assigned to any segment is shown
- Segments subdivision - Each subdivision will have the header given in the accounting plan. The data of the selected subdivision are shown.
Totals column
When this option is being activated, the totals for the selected segment will be obtained.
Segment header
You can choose the text to be displayed as column header for the segments.
Period
Explanations on the Period tab are available at the following link:
https://www.banana.ch/doc/en/node/2602
Style Tab
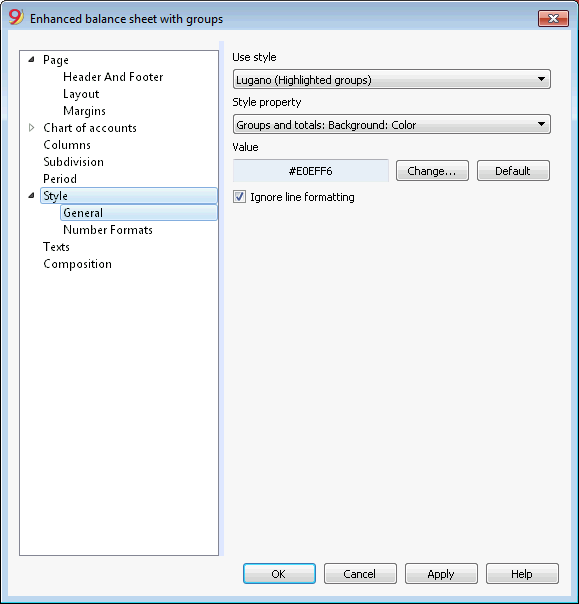
Use style
There are different models of the Enhanced balance sheet provided. By selecting one, the user can obtain the Enhanced balance sheet of his choice.
Style property
For each style, the color of the fonts and the backgrounds can be defined.
Value / Change... / Default
These functions allow the user to change style or to restore the default style.
Ignore line formatting
If this function is activated, the formatting will not be maintained.
Number formats
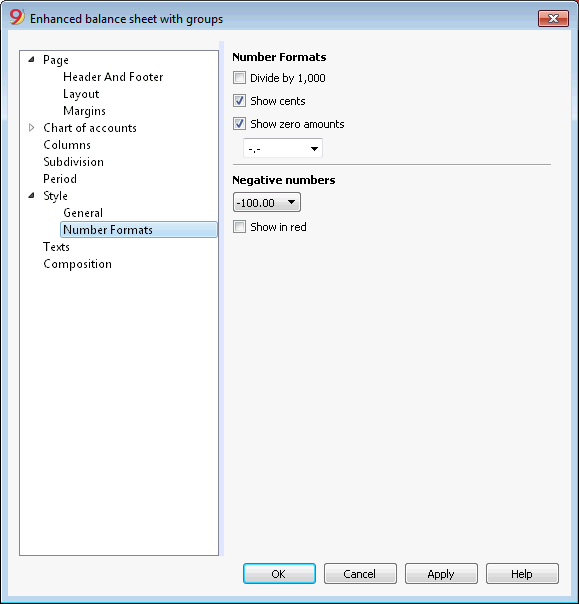
Divide by 1'000
If there are big amounts, by activating this option, three zeros will be taken off.
Show cents
By activating this option the cents will be shown.
Show zero amounts
By activating this option it is possible to choose between having the zero amounts shown with the 0,00 number or with the -,- symbol.
Negative numbers
Negative amounts can be shown with a minus sign before the amount, after the amount or the amount can be shown between parenthesis. You can also activate the option to have the negative numbers shown in red.
Texts
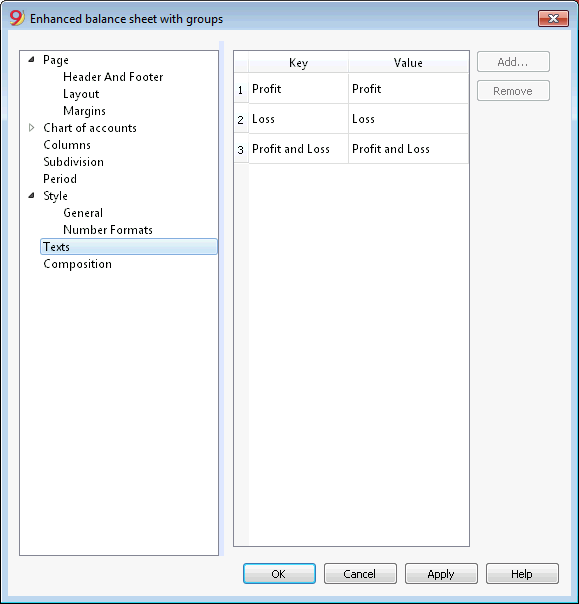
This tab is used to alter the texts of the program columns headers for print-outs.
In order to change the Value column you just have to double-click on the cell you want to edit.
Attachments
This sections allows you to add text that will be printent with the Balance sheet and Profit & Loss statement.
- texts are printed after the Balance sheet and Profit & Loss statement.
- each document begins on a new page
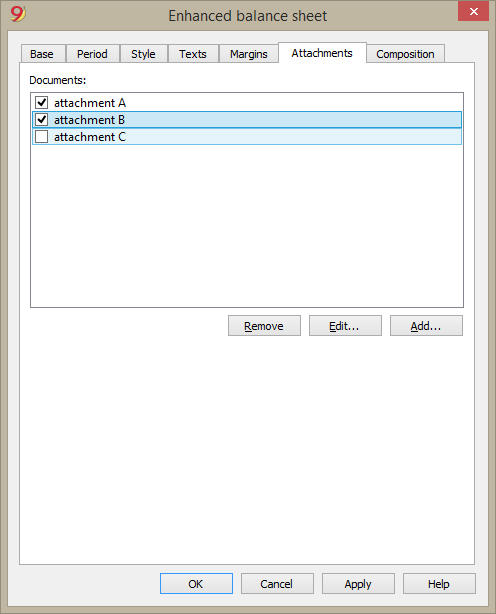
Documents
All documents listed in the Documents table (Html or text format) are listed here.
- You can change the report sequence, just by dragging the item with your mouse
- All documents with a check mark will be printed.
Edit...
A text editor will open allowing you to enter new text or edit the existing one.
Add
This button will open a text editor where you can add new text.
If you haven't created the Documents table yet, the programm will automatically add it.
Remove
This button will remove the selected element and its content.
Notes
- This feature is not available in previous versions.
If the file is open with a previous version of the Banana Accounting software, you will get a message that the file is not totally compatible. - If you edit this section and you press OK, in order to undo the operation you need to give the Undo command more that once.
Composition
Explanations on the Composition section are available at the following link:
https://www.banana.ch/doc9/en/node/2768
Journal
With Banana Accounting the Journal corresponds to the Transactions table. It is possible to print the whole journal or just a part of it, selecting the rows that you wish to print.
In order to personalize the journal printout you can change the columns order and headings: you can find all the information on how to proceed in the Columns setup page; you can also choose several options in the printout; please visit the Page setup page.
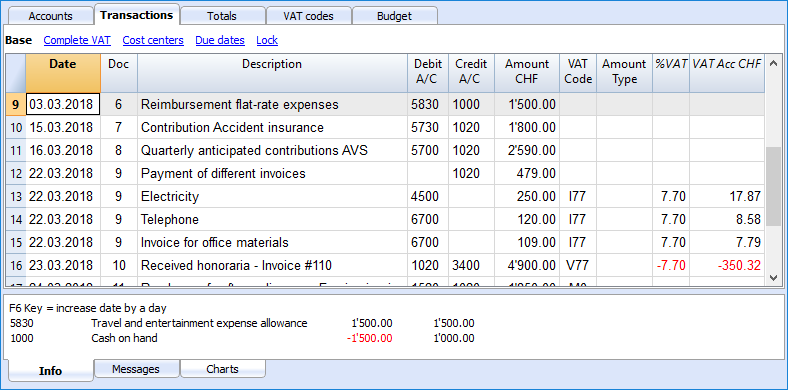
There are different ways to print:
- place yourself in the Transactions table and click on the Print icon
- place yourself in the Transactions table and launch the Print command form the File menu
- from the Account1 menu click on the Print journal by period command; in this case you should then indicate if you wish to print the whole table or just a specific period
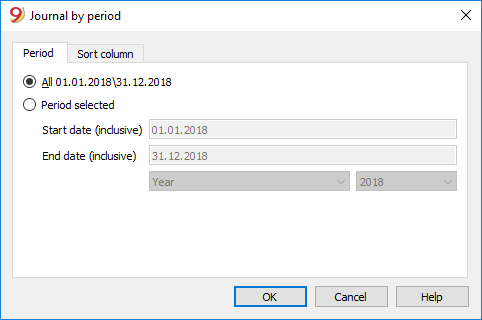
The information on the Period tab are explained in detail in the Period page of the General settings.
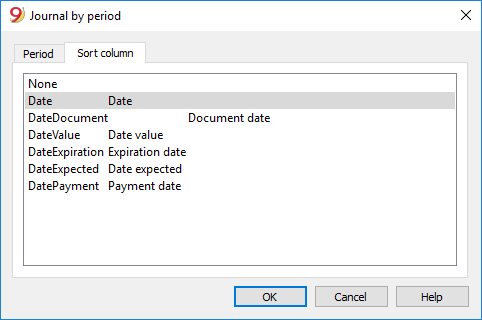
In the Sort column tab in is possible to choose the criteria the journal should be sorted and printed.
Accounting report
- This command allows the user to visualize the amounts of accounts with a specific grouping, for a specific period or with a specific subdivision.
- In order to calculate, obtaine and print reports, choose the Accounting reports command form the Account1 menu.
- Transactions without date are being considered as opening transactions and will not appear in the printouts of the Profit & Loss Statement.
Include a logo in the accounting report printout
From Banana Accounting 9 it is possible to include a logo in the accounting report printout as well. After obtaining your accounting report , go to File menu -> Print preview command. From the print preview click on the the Setup icon, and in the dialog window that will open, in the Logo option, seleg your logo insted of the none option.
You can also check the how to setup a logo page.
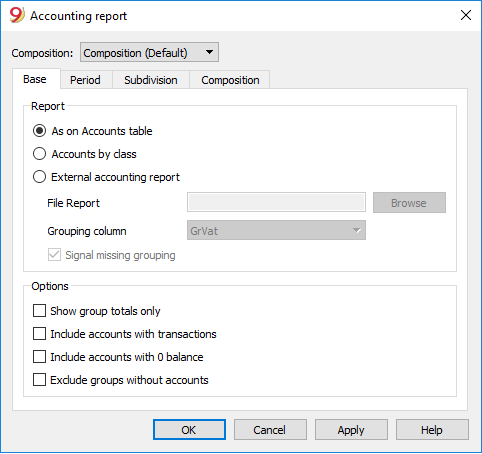
Base tab
Report
You can select the desired grouping scheme:
- As on Accounts table - the Report will show a list of all accounts just as in the Accounts table with the Opening balance and Balance columns
- Accounts by class - the Report will show the list of the accounts but without subgroups
- External accounting report - the Report will show the data according to a grouping system preset in a separate file (File menu, New command, Double-entry accounting group, Accounting Report).
Options
You can select the accounts to be included or excluded:
- Show group totals only - only the group totals will be shown
- Include accounts with transactions - only accounts with transactions will be printed
- Include accounts with 0 balance - accounts with zero balance will be printed as well
- Exclude groups without accounts - groups that contain only accounts with zero balance will not be printed.
Other tabs
The explanations for the other tabs are available at the following pages:
Report result
A new table is created where the results are shown.
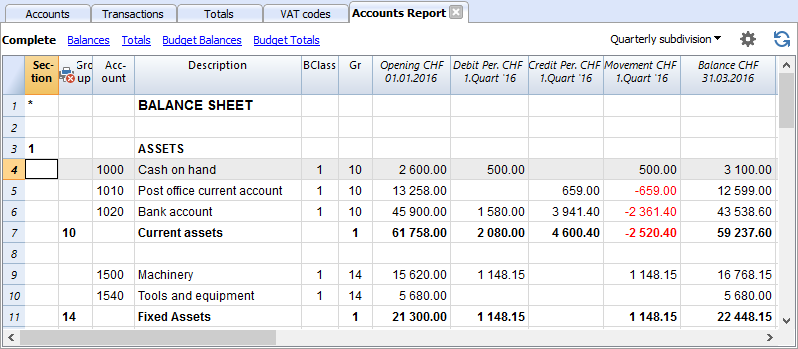
Account cards / Ledger
The account card corresponds to the Ledger and allows you to have a complete list of accounting movements concerning the same account, the same categories (income & expense accounting and cash manager), a cost centre, segments and groups.
Opening the Account card
There are two methods to open an account card or a category card:
- Select the Account/category Card (Cash book and Income & Expense accounting) command or the Account card (Double-entry accounting) command of the Account1 menu in order to open and print several or all account cards.
- On the account number cell there is a small blue symbol; click on it just once in order to obtain the account card.
The groups of the Chart of accounts have the same symbol available as well, in order to display the account card.
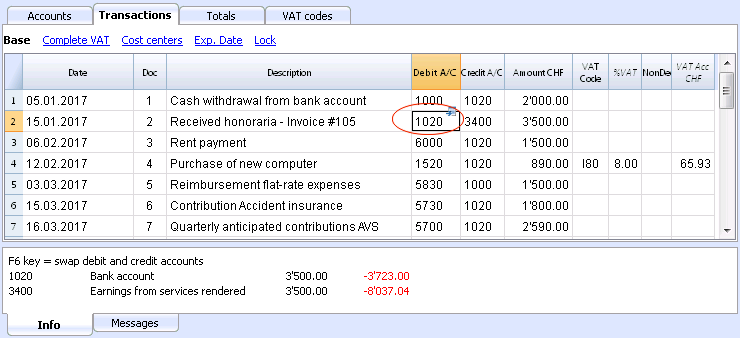
Updating the accounting card
The account card table is temporary and it is calculated when the command is given to do so. If, in the Transactions table, transactions are altered or added, they are not automatically updated on the account card - the user needs to select the Account Cards command again or click, in the Transactions table, once more on the account number's blue symbol, or in case the account card is still open, click on the small Refresh button on the right side (see image hereunder).
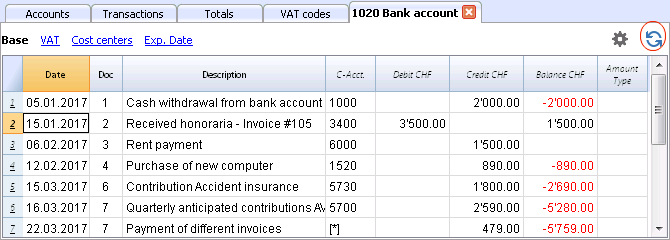
Note:
It is not possible to modify the data in the Account card. Double-click on the row number to go back to the original corresponding row of the Transactions or Budget table.
The AccountSelected column
In the AccountSelected column, which can be made visible, starting from any Account card, through the Data menu -> Columns setup, the account on which the transaction took place is being displayed.
When you get an account card of one or more accounts, groups and segments, you will see the exact account that has been used.
The contra account in the account cards
In the Account cards, the Contra Account column (C-Acct.), which indicates the account that completes the transaction, is being shown.
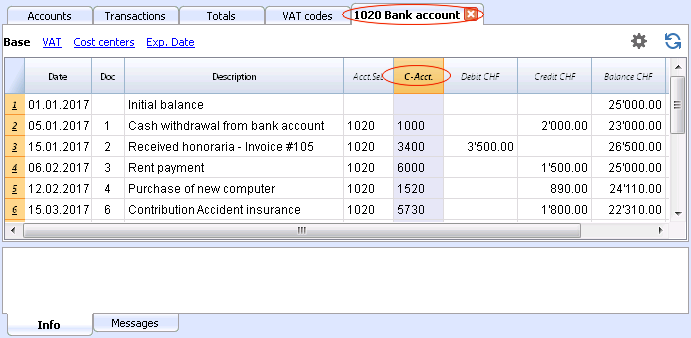
When there are transactions on multiple accounts (transactions on multiple rows) as in the example hereunder, and there is one account entered in debit and several accounts in credit, or the other way around, the software deducts the possible contra account using the following logic:
- In the first transaction row, the 1020 account is considered the common contra account of the transactions that follow.
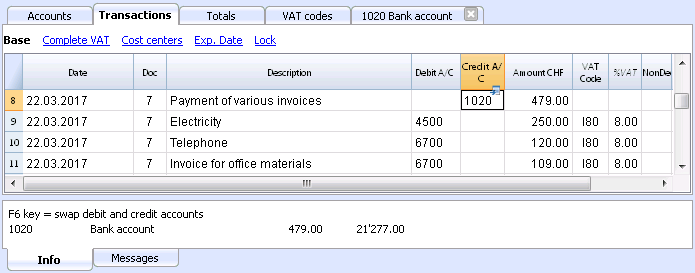
- On the Account card 1020, the composed transaction (Payment various invoices) shows the contra account indicated by the [*] symbol. It is impossible to have the indication of the contra accounts directly in the account card, because the account has several contra accounts (4500, 6700, 6700). For this reason the program indicates the [*] symbol in the C-Acct (Conta-Account) column, which means that we are dealing with a transaction on multiple accounts.
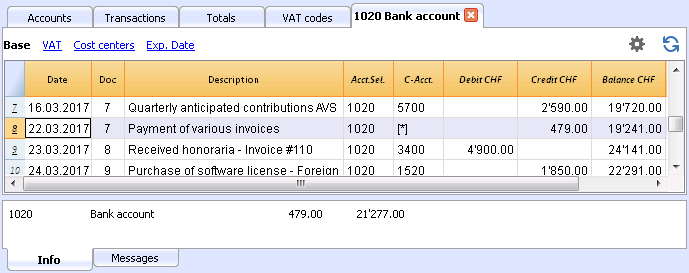
- On the Account cards of the next transaction rows (4500, 6700, 6700), the common contra account is indicated between square brackets ("[1020]"), and indicates a deducted contra account.
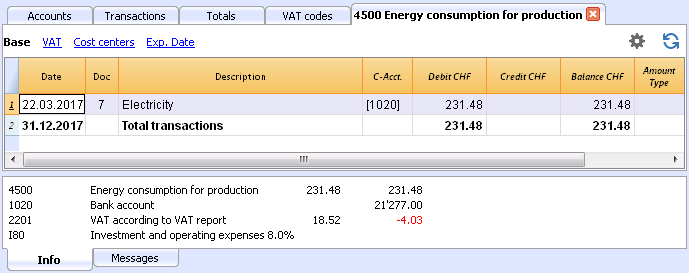
Cards of groups and classes
In the Account card of a group or a class, all the transactions of the accounts that belong to the selected group or class are being grouped together.
The accounts of the group or the class can be displayed by making the AccountSelected column visible.
Print the Ledger (all account cards)
To print the Account cards:
- Account1 menu, Account cards command
- By means of the Filter, all the account cards that need to be printed completely or partially (for example, only accounts, cost centers, segments) can be automatically selected
- In the various sections Period, Options, Composition, activate the desired options (for ex. period, 1 account per page, ...)
- Press OK to confirm, after having selected the desired options.
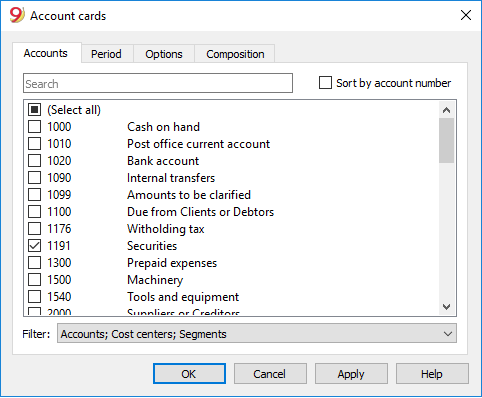
For the explanations of the different tabs, please visit the next few pages: Accounts/Categories tab, Period and Options.
The program will show the selected account cards.
In order to print, choose the Print command from the File menu.
When you have activated the Budget table in your file, you may choose which transactions you want to see (actual transactions or budget transactions).
Include a logo in the account cards
From Banana Accounting 9 it is possible to include a logo in the account cards printout as well. After obtaining your account cards details (with the Account1 -> Account cards command), go to File menu -> Print preview command. From the print preview click on the the Setup icon, and in the dialog window that will open, in the Logo option, seleg your logo insted of the none option.
You can also check the how to setup a logo page.
Save the settings
In case you regularly print the account cards of specific accounts, for example, all those that concern the Sales accounts, it is useful to create a specific composition.
- Go to the Composition tab
- Create a new composition, using the New button
- Indicate the name of the composition, for example "Sales accounts", in the Description field of the window
- Select the accounts that you want to be printed.
Every time you wish to print these accounts, you can select the composition that you created.
Page setup
In Page setup, you can specify the margins & other settings of the page.
Accounts/Categories tab
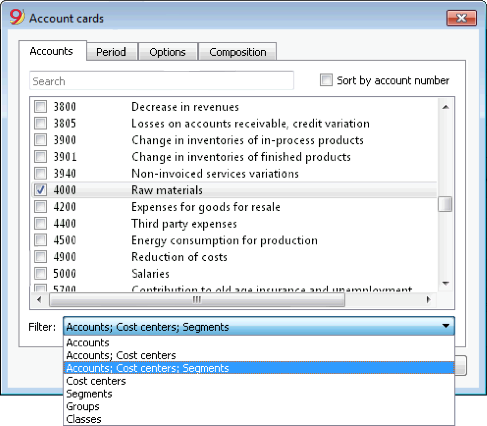
You can access this windows by choosing the Account1 menu -> Account cards command (see the Account cards page)
Search
Enter the account or the description in order to filter the accounts list.
You can also enter the account to be displayed with segments.
Accounts and segments can be combined (see developer explanations):.
- 10000:01 will show all transactions of the 1000 account with the 01 segment.
- 1000|1001will show the transactions for account 1000 and 1001.
Accounts
The list of all available accounts appears.
If you wish to print one or more account cards activate only the desired accounts.
- (Select All)
By activating this option, all the accounts that are part of the Chart of accounts are automatically selected. - Filter
This function allows you to filter all account cards or just a selection, specifically:- Accounts, cost centre and segments - if no selection is made they are filtered by default
- Accounts/categories (existing cost centres and segments are excluded)
- Accounts, Cost centres (only segments are excluded)
- Cost centres (accounts and/or categories and segments are excluded)
- Segments (accounts and/or categories and cost centres are excluded)
- Groups - existing groups will be shown - you need to select the ones to be printed
- Classes - all classes will be shown - you need to select the ones to be printed.
Actual or Budget
When you have activated the Budget table in your file, you may select:
- Actual transactions
The entries in the Transaction tab will be processed. - Budget transactions
The entries in the Budget tab will be processed.
In the absence of the Budget tab, the amounts in the budget column of the account card, will be converted to monthly amounts on the basis of the opening and closing dates of the accounting file (if this one year, will be devided by 12 monthly instalments).
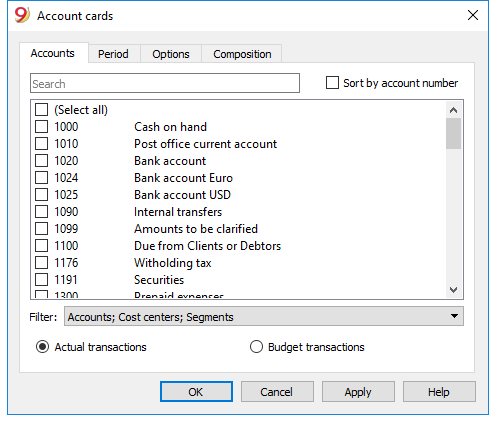
Differences in accounting entries (account card 00)
If differences in accounting entries occur (refer to the DEBIT - CREDIT difference error page), open the Group 00 account card (or the one in your Chart of Accounts that contains all the accounts of BClass 1,2,3,4).
You will have a list of all transactions with the successive balances, which after each entering should equal zero. The row which balance is not at zero contains the error.
Period Accounting Card
The explanations of the Period tab are the same as those for the Enhanced Balance Sheet with Groups.
Options tab
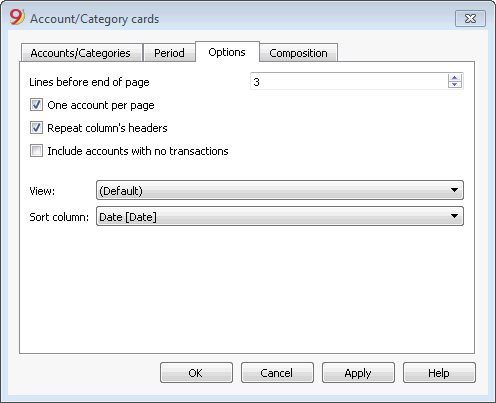
Lines before end of page
This function was created in order to avoid printing an account partially on one page and partially on the following. If the account card to be printed doesn't have at least a number of lines correspondent to the number input in this field, printing the whole card will be moved to the next page.
One account per page
By activating this function, each card will be printed on a separate page (even those with few transactions).
Repeat column's headers
By activating this function, the column headers will be repeated for each account, within the page.
Include accounts with no transactions
By activating this function, cards without transactions will be printed as well.
View
You can select the columns view to be included in the account cards display and printout:
- Base
- VAT
- Cost centers
- Expiration dates
If no criteria is specified the program will keep the order present in the transactions table.
Sort column
In the account card, transactions can be sorted according to different data criteria:
- Document date
- Value date
- Expiration date
- Payment date
End of Year PDF printouts
From the print preview of a document, you can save in PDF format and print.
You can save in a PDF format the following documents:
- Balance sheet and Profit and Loss Statement
- Accounts, Transactions, VAT, Totals tables
- VAT Reports
- Account cards
This PDF file will have an index that will allow to access easily the different printouts.
If you save this file on a non rewritable CD (to be kept along with the accounting documents), you will meet the law requirements for accounting data archiving.
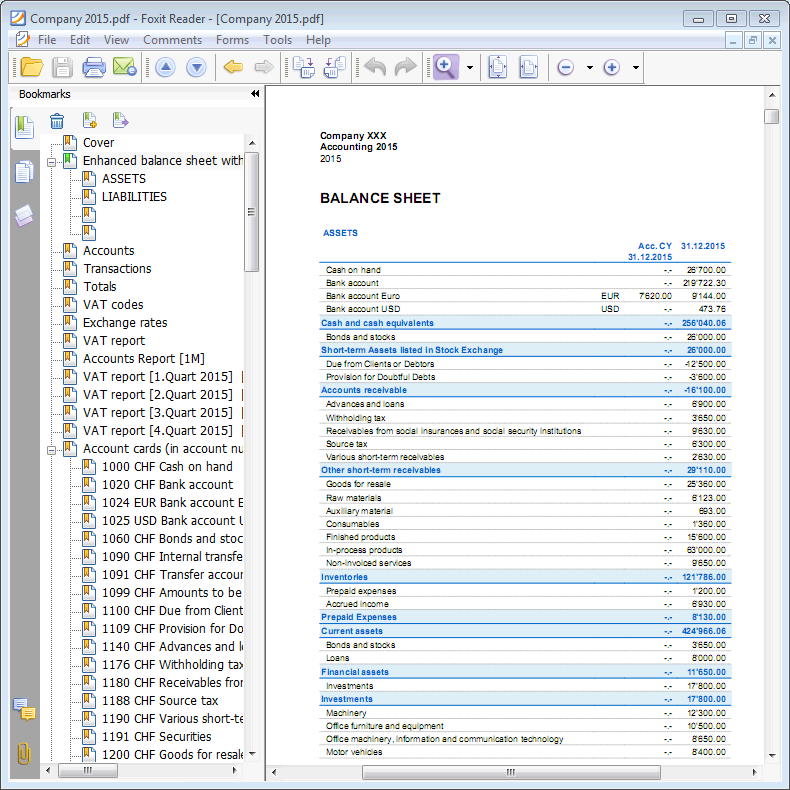
Reports over several years
A statement over several years allows a simple and immediate comparison of the evolution of your business. Banana Accounting can display the balances up to two previous years in the same report, so for example the balances of the years 2019, 2018 and 2017 on a single page.
In order to use this feature though, you need to make sure that in the basic accounting data the "previous year's file" option is activated and that the correct file is entered (File menu -> File properties (Basic data) -> Options tabn -> Previous year file), otherwise Banana Accounting cannot recover the balances of the previous accounting periods, and they won't appear in the report.
In the following example we will show you how to obtain a report over the years 2017, 2018 and 2019. Here is how to proceed:
- from the Account1 menu choose the Enhanced balance sheet with groups...
- from the Columns section, check the Current and Previous year boxes
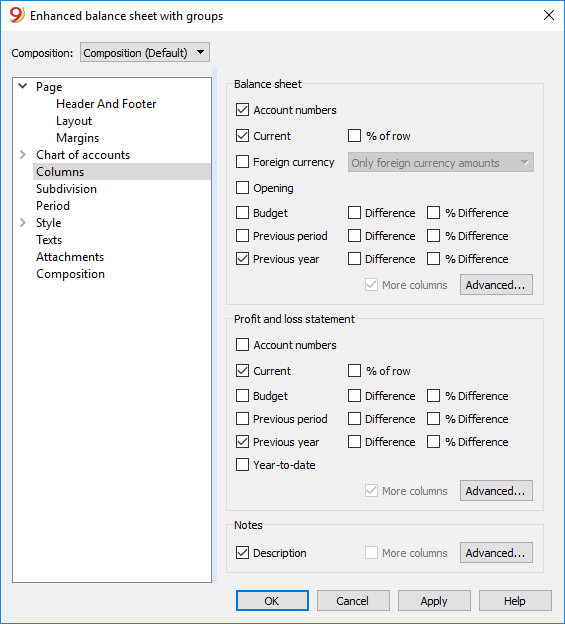
- then click on the Advanced button (this operation must be done both for the Balance sheet and for the Profit & Loss statement) and,
from the dialog window that opens, click on the Add button to add a column - scroll down the list of possibilities until you reach -2 Years - we are indeed in the year 2019 and in order to have a 2017 report we have to go 2 years back
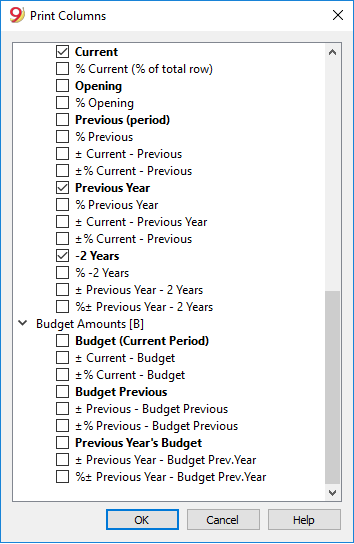
- confirm with OK and enjoy your report
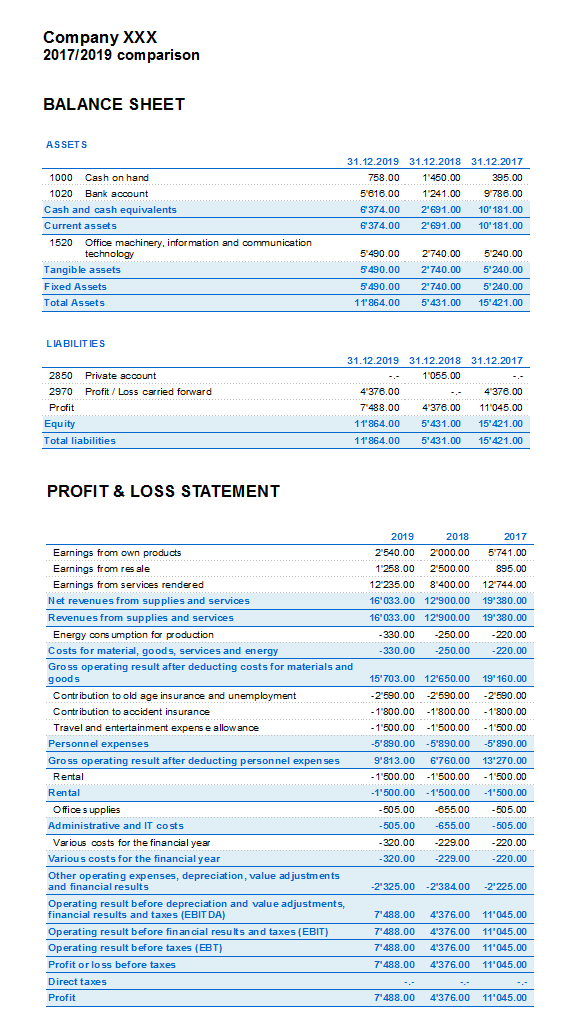
End of Year and New Year | Double-entry accounting
Avoid mistakes with Banana Accounting Plus
In order to facilitate checking your accounting work and to immediately find differences, in Banana Accounting Plus, our new version, we added the Balance column in the Transaction table. You can now see potential differences on each row and you can correct them right away. It is a very useful feature when closing the accounting period.
Many of our clients have already tried it and are enthusiastic about it. We advise you to switch now to Banana Accounting Plus and take advantage of the many new features.
At the end of every accounting year, before printing and filing the Balance Sheet and the Profit & Loss Statement, it is necessary to recheck the accounting file.
Please visit the Recheck the accounting page.
Tax aspects
Before closing the accounting, is is necessary to proceed with a series of operations that have fiscal implications. The merchandise account needs to be adapted, the transactions for depreciations need to be entered, the accrued income and liabilities, the VAT declaration needs to be completed, establish how and unto which accounts the profit or loss has to be attributed and there are many other operations for verification and checking.
From the program's point of view, there is no difference whether the profit is high or low. However, from a fiscal point of view, it implies a lot. These aspects need to be verified with your own tax advisor or accountant. It can be very useful, especially when you manage an accounting for the first the time and before you proceed with the closing of the books, to consult a specialist in order to understand what is required. The accountants are very busy at the beginning of the year and during the period preceding the deadline for the tax declaration. It can therefore be useful to meet with your accountant - or send him the accounting file - a few months before the closing of the books, so that you can inform yourself on how to proceed.
Create a New Year
Generally a different file is used for each accounting year. In order to start recording in the new year, with the Create New Year command of the Account2 menu and starting from the current year's file, a new accounting file is being created. Once the new year has been created and the file has been saved under a new name, the user can work in the file of the new year, but also in the one of the preceding year.
You can thus create the file of the new year, even before having closed the year in which you are still working. After having entered the last modifications in the previous year, use the Update Opening balances command of the Account2 menu, to retrieve the opening balances and again attribute the profit of the last year.
Performed Operations
The Create New Year command:
- Creates a new file (with no name) with the chart of accounts and all the settings identical to your current file, but without transactions.
- Copies the data from the Balance column of your current file to the Opening column of the new file (only for the selected classes)
- Adds the selected amount to the opening balance of the Profit or Loss from previous year account(s) in the new file.
- Copies the data from the Balance column of your current file to the Previous Year column of the new file (for all the accounts).
- Updates the opening and closing dates in the File and accounting Properties of the new file.
- In the Multi-currency accounting, enters the closing exchange rates of the previous year as opening exchange rates.
- If there is a Budget table, it brings over the rows in the new year taking into account the settings.
Create New Year command
- Open the current file and click on the Create New Year command from the Account2 menu: a window, that shows a difference corresponding to the profit or loss that has not yet been allocated, will appear. There may also be differences due to accounting errors.
- From the list that appears, the user can select the account to which the result of the accounting period has to be allocated, or one can directly confirm with OK if the allocation of the result has to be postponed.
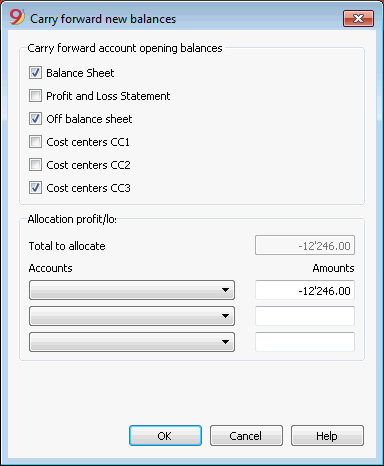
Carry forward account opening balances
The opening balances of the selected options are carried forward.
Indicate which accounts are required to have opening balances carried forward. Usually the Profit and Loss Statements balances are not carried forward. For specific needs you can always activate the option.
Allocation profit/loss
Total to allocate
The program will indicate the profit/loss that needs to be shared between various accounts.
Accounts/Amounts
If only one account is selected, the amount will automatically entered. Select the account or accounts (up to three) in which the result of the accounting period has to be allocated. In case there are several destination accounts for the result of the accounting period, the amounts should be inserted manually in the different boxes. The program will automatically update the opening balances. The Total Assets will exactly match the Total Liabilities.
Allocation of the result of the accounting period on more than three accounts.
In this case, allocate the result of the accounting period automatically on the Profit or loss brought forward account as usual, and continue to proceed with the creation of the new year.
In the new year (new file), Transactions table, proceed with a composed transaction in order to allocate the result of the accounting period from the Profit or loss brought forward account to the different destination accounts.
- Confirm the File and accounting properties for the new year.
- From the File menu, activate the Save as... command, indicating the folder where the new accounting file needs to be saved.
Updating opening balances command
The Updating Opening Balances command:
- Retrieves the closing data of the indicated file
- Copies them as data of the previous year in the current file (see Create New Year command).
This command doesn't influence the already entered recordings. In fact, it is like when creating a new year, as if you are recording in the current year.
Opening balances must be updated in the following situations:
- When you have created the new year and afterwards you entered more transactions - or made corrections - in the previous year
- When the profit/loss of the previous year has not been allocated.
Here is how to proceed to make the update:
- Open the current year accounting file and choose the Update opening balances command from the Account2 menu
- Select the previous year accounting file through the Browse button
- Follow the same steps as the ones of the Create New Year command (see top of the page)
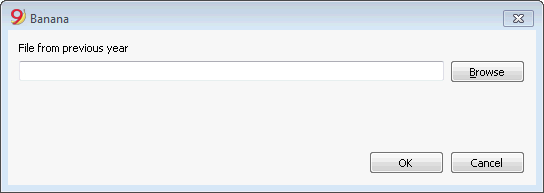
Recommended operations at year-end
- Create a Pdf dossier for the entire accounting
- Lock transactions with the Lock transactions command
- In case of a multi-currency accounting, record the exchange differences at 31.12, using the official exchange rate.
Accounting report file
The Accounting Report is a file type in which the presentation of a report is being set up, indicating the way in which the accounts are being grouped.
Thereafter, the Accounting report can be executed through the commands of the accounting:
- Enhanced balance sheet with groups (Chart of accounts, Sections, External accounting report)
- Accounting report (External accounting report section).
The grouping system, created in this manner, can be linked to the accounting to extract and totalize the accounts.
There are two ways of doing this:
- Grouping based on the indicated groups
This manner is useful when one wants to group the accounts according to different criteria, for example, present the Balance sheet and the Profit/Loss statement according to a grouping system that is different than the one set up in the Accounts table. -
- In the Report, the grouping system is being created.
- For each account of the Accounts table in the accounting, in the GR1 column (or another column), indicate the group in which the account has to be grouped.
- When the Report is being executed, all the accounts that are marked with groups in the report file are being carried forward.
- Grouping based on the indicated accounts
This manner is useful when one doesn't want a report with all the accounts but with only a few selected accounts.- In the Report, indicate the accounts of the Accounts table from the Accounting file that should be included.
- When the Report is being executed, only the indicated accounts are being carried forward.
How to create an Accounting report file
In order to create an Accounting report file: i
- File menu, New ->
- Double-entry accounting -> Accounting Report
- It is possible to choose an existing model or get started with a new one
- Once created, save the file under a new name.
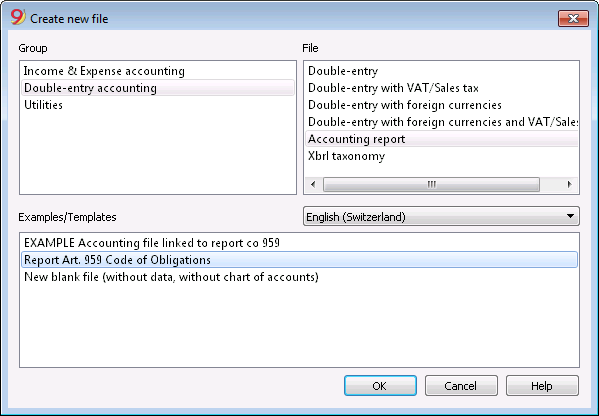
The columns of the Accounting report
The Accounting report file includes the same columns as those in the Chart of accounts of the accountiung file. They make it possible to create the groupings and the totals.
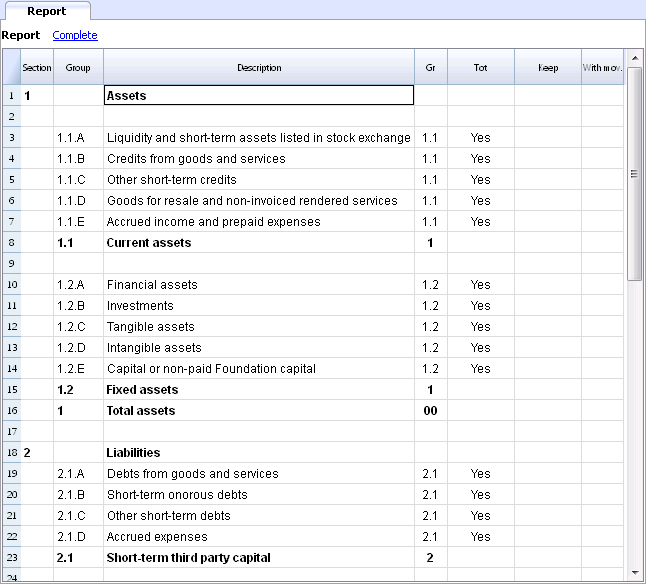
Sections
This column is being used to indicate the value that is to be used in the presentation.
For the different possibilities, see the documentation about the Sections.
Group
The group in which the accounts of the accounting have to be totalized or a group of the report.
Account (only visible in the Complete view)
The account that has to be included in the report.
- If there are accounts, when the report is executed only those indicated will be carried forward.
- In case no account has been indicated, the accounts that have been linked through a group will be carried forward.
Description
Description for the grouping or of the row itself.
Gr
In the Gr column, one indicates the total in which the row has to be totalized.
Tot
If the word "Yes" is being entered, only the Total row is being displayed and not the accounts that are a part of this total.
Please look at 'Show groups' totals only' in the Accounting report.
Keep
Usually, the totalization rows that have accounts with balances are included in the report.
If you indicate "Yes" in this column, the row is in any case always displayed. This can be applied to both the totals and to the accounts.
With mov.
This applies to groups that have a zero balance.
The row will only be displayed if there have been transactions (movements) during the time period.
Creating a Report linked through the group
- In the Report, create a system of groups and subgroups as desired.
- In the Accounts table one indicates, in the Gr1 or Gr2 column, the group in which the account has to be totalized.
In case the Gr1 column (or another preferred one) is not visible, make it visible with the Columns setup command. - The accounts that are not being linked will not be included in the Report.
- Execute the Report through the commands:
- Enhanced balance sheet with groups
- Accounting report.
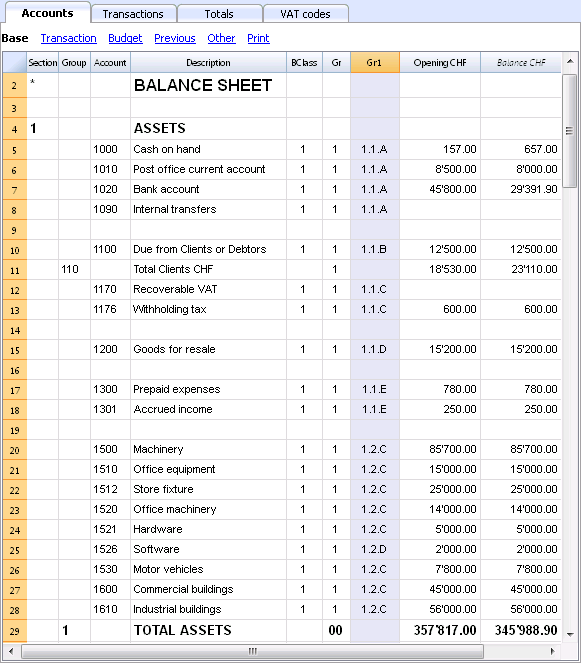
Creating a report that groups only some selected accounts of the accounting
This modality is active even when in the report only one account has been indicated.
Do not indicate any account, if you wish that the report is being executed in the group modality.
In the report are being indicated:
- The accounts of the accounting that have to grouped together.
Only the indicated accounts will be included in the report. - The groups in which the accounts have to be grouped together.
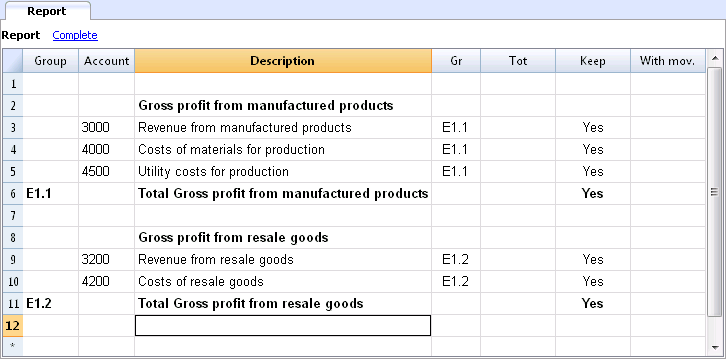
Execute the Report using the commands:
- Enhanced balance sheet with groups from the Account1 menu (then Chart of accounts -> Sections -> External accounting report)
- Accounting report from the Account1 menu (then choose the Base section and the External accounting report option).
Multi-currency accounting
Multi-currency accounting is based on the double-entry accounting method and can also manage accounts and transactions in foreign currencies.
Many topics of the multi-currency accounting are the same as the double-entry accounting. In order to find missing lessons or in-depth information, we advice you to consult our internet pages on the Double-entry accounting.
Characteristics
- Manages the accounts also in foreign currency
- Use of any currency, standard or freely defined coin codes (to use any virtual currency)
- Decimal currency configurable from 0 to 28. Usually you use 2 decimals, but you can set the accounting to use 0 decimals, or 3 decimals (Tunisia) or more if you use for crypto currencies. 9 decimals (Bitcoin) or 18 (Ethereum)
- Calculates the conversion automatically, based on the exchange rate inserted in the Exchange rate table
- Calculates the exchange rate differences automatically
- Offers Balance Sheets and Profit and Loss Statements in a second currency as well
In order to change from a double-entry accounting file to a multi-currency accounting file, check the Convert to new file command.
Information
Chart of accounts, file properties and exchange rates table
We suggest to choose one of the already configured examples and to personalize it according to your needs. Please note that the chart of accounts must include the account for profit and loss from exchange rate variation and there must be accounts in foreign currencies.
- Setup the chart of accounts
- Groups and subgroups
- File properties - foreign currencies tab
- Setup the Exchange rate table
Transactions
Accounting transactions must be entered in the same way as the double-entry accounting transactions
Printouts
Convert double-entry accounting into multi-currency accounting
In order to add multi-currency features to a double-entry accounting file, please visit the Convert to new file page.
How to start a multi-currency accounting
Creating an accounting file, starting from a template
Proceed as follows:
- File menu, New command
- Select the region, the language, the category and the accounting type
- From the list of the templates that appears, select the template that is closest to your own needs.
- Click on the Create Button
In the Search area, when entering a key word, the program displays the templates that contain the entered key word.
It is equally possible to start from a blank file, by activating the Create blank file option. In any case, in order to facilitate the start and avoid grouping errors, we recommend that you always start from an existing model.
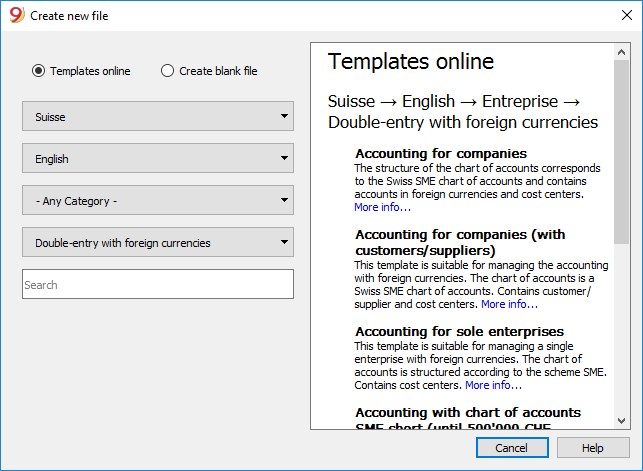
More information on how to create a new file is available on the Create New File page.
Setting up the file properties (basic data)
- From the File menu, File properties command,
Accounting tab
- Indicate the company name that will appear in the headers of the printouts and on the other data.
- Select the basic currency, with which the accounting will be kept.

With the File-> Save As command, save the data and also assign an name to the file. The typical save dialog of your operating system appears.
- It is advisable to use the name of the company followed by the year "Company-2020." to distinguish it from other accounting files.
The program will add the "ac2" extension. - You can keep as many accounting files as you need, each will have its own name.
- You can choose the folder you want, (for example, Documents -> Accounting) or the support you want like a disk, usb or cloud.
If you also expect to have documents linked to the current year's accounts, it is suggested that you create a separate directory for each accounting year having to group all the files.
General use of the program
Banana Accounting inspires itself from Excel. The user directions and the commands are kept as similar as possible to the ones of Microsoft Office.
For more information on the general use of the program, we refer to the explanations on our page Program interface.
The accounting is being contained in tables; all of them have the same way of operating.
Exchange rates table
Before entering multi-currency transactions it is necessary to define the parameters of the used currencies in the Exchange rates table.
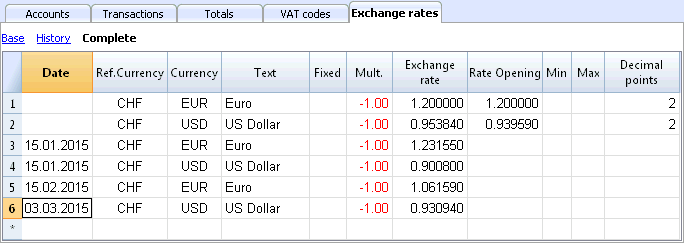
Customizing the Chart of accounts
In the Accounts table, customize the Chart of accounts and adapt it to your own needs:
- Add accounts and /or delete existing accounts (see Adding new rows)
- Modify the account numbers, the descriptions (for example, enter the name of your own Bank account), enter other groups, etc.
- To create subgroups, please consult our Groups page.
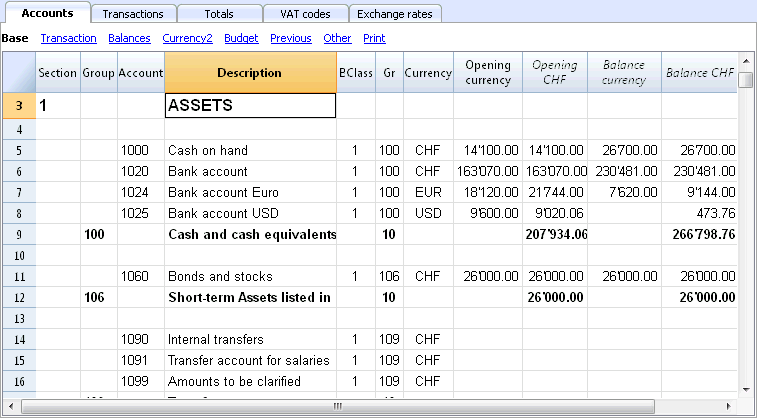
In the Chart of accounts, you can also define Cost centers or Segments, used to attribute the amounts in a more detailed or specific way.
The Transactions table
The multicurrency transactions have to be entered into the Transactions table; together they compose the Journal.
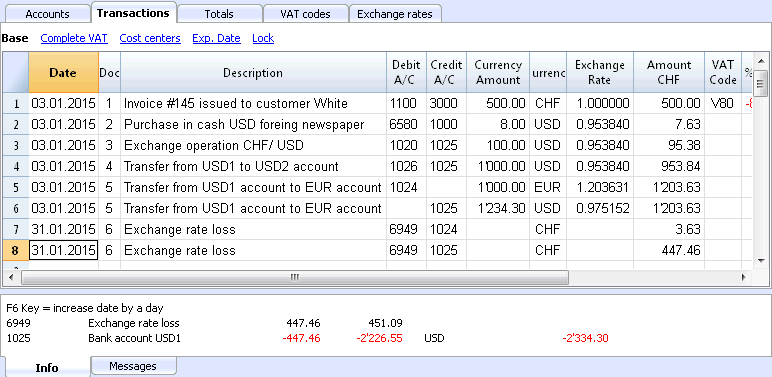
Speeding up the recording of the transactions
In order to accelerate the recording of the transactions, you can use
- the Smart fill function that allows the automatic autocomplete of data that have already been entered at an earlier date
- the Recurring transactions function, used to memorize recurring transactions into a separate table
- the import of your bank or post statement from e-banking
Checking customer and supplier invoices
Banana allows you to keep an eye on the invoices to be paid and the receivable, issued invoices. Please consult:
The Account card
The Account card automatically displays all the transactions that have been recorded on the same account (for example, cash, bank, clients, etc).
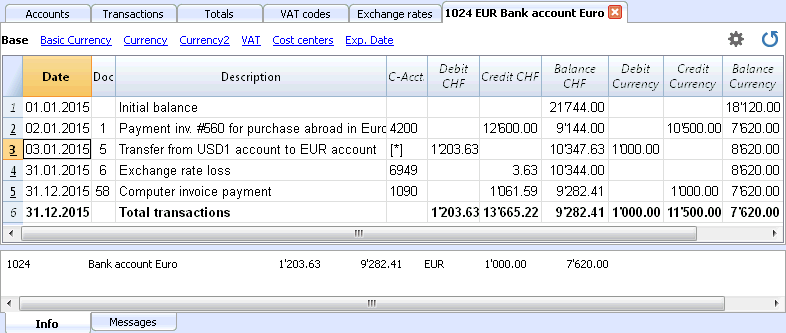
To display an account card, just position yourself with the mouse on the account number and click on the small blue symbol that appears.
Account card by period
To display the account card with the balances referring to a specific period, click on the Account1 menu, Account card command, and in the Period section, activate Period Selected, entering the Start and the End date of the period.
For more details, consult the page Period.
Printing the Account card
In order to print one account card, just display the card from the Accounts or the Transactions table and launch the print from on the File menu.
To print several or all account cards, click on the Account1 menu, Account card command, and select the account cards that need to be printed. By means of the Filter, all the account cards, or only a part of all of them (for example, only accounts, cost centers, segments), that need to be printed can be automatically selected.
For more details, consult the page Account Card.
The Balance Sheet and Profit and Loss Statement
The Balance sheet shows the balances of all the estate accounts, Assets & Liabilities. The difference between the Assets and the Liabilities determines the Share capital.
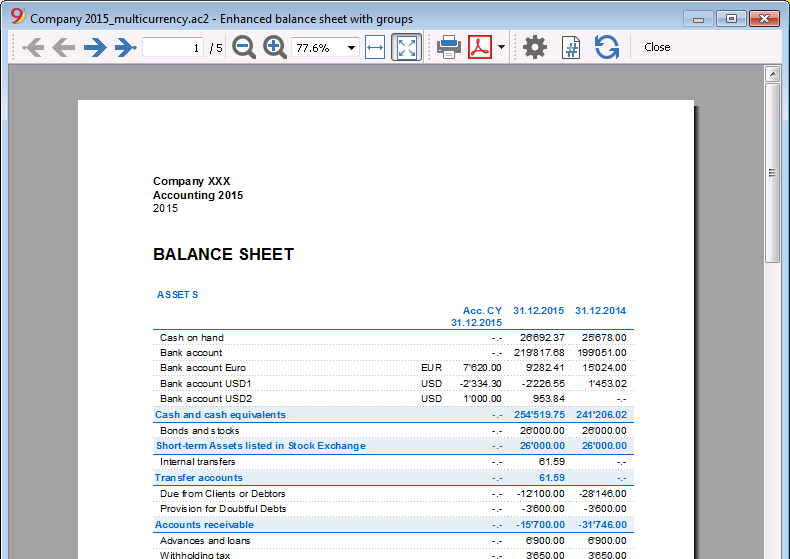
The display and the printing of the Balance Sheet is being executed from the Account1 menu, commands Enhanced Balance Sheet or Enhanced Balance Sheet with groups.
- The Enhanced Balance Sheet command simply lists all the accounts without distinguishing Groups and Subgroups
- The Enhanced Balance Sheet with groups command lists all the accounts while subdividing Groups and Subgroups; besides, it presents numerous features to customize the presentation, functions that are not provided in the Enhanced Balance Sheet.
Data archiving in PDF format
At the end of the year, when the entire accounting has been completed, corrected and audited, all the accounting data can be archived with the Create PDF dossier command of the File menu.

The Budget
- Accounts table, Budget column. For each account, the annual budget amount is being indicated.
In this case, when you set up the Budget from the Account1 menu, Enhanced Balance Sheet with groups command, the Budget column displays the amounts that refer to the entire year. - In the Budget table, that can be activated through the Tools menu, Add new functionalities command.
In this table, you can enter all the budgeted costs and revenue by means of entering transactions. If you activate this table, the column of the accounts table will be automatically deactivated.In this case you can set up a detailed budget, taking into account the possible variations over the year and in different periods of the year.

For more details, consult the Budget page.
Theory of multi-currency accounting
In this part, the basic theoretical notions about currency exchange are being explained.
Exchange rates and accounting issues
Every nation has its own currency and to obtain another currency it is necessary to buy it using the appropriate exchange. The price of a currency compared to another is called the exchange rate. To change money means to convert the amounts of one currency to another. The exchange (exchange rate) varies constantly and indicates the rate of conversion.
For example, on January 1st
- 1 Euro (EUR) was equal to 1.32030 US Dollar (USD)
- 1 US Dollar was equal to 0.7580 Euro
- 1 EUR was equal to 1.60970 Swiss Franc (CHF)
- 1 EUR was equal to 157.2030 Japanese Yen (JPY)
Multi-currency Accounting One talks about multi-currency accounting or multi-value accounting when accounts in different currencies are kept. It is necessary to have multi-currency accounting when a company has bank, cash, and debtors’ accounts in more than one currency. Even if just one account is in a foreign currency it is necessary to administer a multi-currency accounting.
Basic Currency
The amounts referring to different currencies cannot be totaled directly. It is necessary to have a basic currency to refer to and to use for the totals. The main point of accounting is that the totals of the “Debit” balances must correspond to the totals of the “Credit” balances. To verify that the accounting is balanced, there must be a single currency with which to do the totals. If there are different currencies, the basic currency must be indicated before anything else. Once the basic currency has been chosen and some operations have been executed, the basic currency can no longer be changed. To change the basic currency, the accounting must be closed and another opened with a different basic currency. The basic currency is also used to establish the Balance Sheet and to calculate the profit or loss of theoperation.
Each amount has its equivalent in basic currency
To be able to add the totals and verify that the operations balance, it is necessary to have the equivalent in basic currency for every transaction. In this way you can check that the total of the Debit entries is the same as the total of the Credit ones. If the basic currency is Euros and there are transactions in US Dollars, there needs to be an exchange value in Euros for every transaction in US Dollars. All the Euro amounts will be totaled to verify that the accounting balances.
Account currency
Each account has its own currency symbol which indicates in which currency the account will be administered. You must therefore indicate what the currency of the account will be. Each account will then have its own balance expressed in its own currency. Only entries in this currency will be permitted on this account. If the account is in Euro, then there can only be Euro entries on this account; if the account is in USD, then there can only be entries in the specified USD currency on this account. When you have to administer entries in YEN, then you have to have an account whose symbol is the YEN.
Account Balance in basic curency
For each account, alongside the balance in the account’s own currency, the balance in basic currency will also be kept, in order to calculate the balance sheet in basic currency.
The account card for the USD bank account has to correspond exactly to the bank statement as far as the USD amounts are concerned.
The value in basic currency will always be specified for each accounting entry. If the account is in USD, in the entries there will be, beyond the amounts in USD, also its value in EUR. The EUR balance will be given by the sum of all the entries expressed in EUR. The actual balance in basic currency will depend on the exchange rate factors used to calculate the exchange value of each, single entry to EUR.
If on a given day you take the actual balance in USD and convert it to EUR at the daily exchange rate, you will get an exchange value that differs from the balance of the account in basic currency. This difference is due to the fact that the exchange rate used for entries on a daily basis is different from the actual daily exchange rate.
Thus there is a difference between the actual value at the daily exchange rate and the accounting balance in basic currency. This accounting difference is called the exchange rate difference.
The difference between the balance in basic currency and the calculated value has to be registered, when the accounting is closed, as an exchange rate profit or loss.
Balances in another currency (currency2)
All the accounting reports will be calculated in basic currency. If you take the basic currency values and change them to another currency, you will get the balance in another currency. The program has a Currency2 column where all the values are automatically entered and presented in the currency specified as Currency2. The logic for the conversion of the amounts is the following:
- If Currency2 is the same as the account or operation currency, then the original value will be used.
- If the account is in USD and Currency2 is USD, the USD amount will be used.
- In all other cases the basic currency amount will be used and changed into Currency2.
- The daily exchange rate is used. Even for past entries, the exchange value in Currency2 will be expressed on the basis of the most recent exchange rate, and not on the historical one used on the day of the entry.
You need to pay attention to the fact that a balance converted to another currency will show small differences in the totals. Often the converted value of a total is not equal to the sum of split exchange values, as can be seen from the following example:
|
Moneta base EUR |
Moneta 2 USD |
|
|
Cash |
1.08 |
1.42 |
|
Bank |
1.08 |
1.42 |
|
Total Assets |
2.16 |
2.84 |
|
Personal capital |
2.16 |
2.85 |
|
Total Liabilities |
2.16 |
2.85 |
In the basic currency, total assets are equal to total liabilities. It is permitted to present a Balance Sheet that contains differences only if they are understandable and if it is indicated that they were due to calculations from another currency.
Accounts table, Currency 2 view
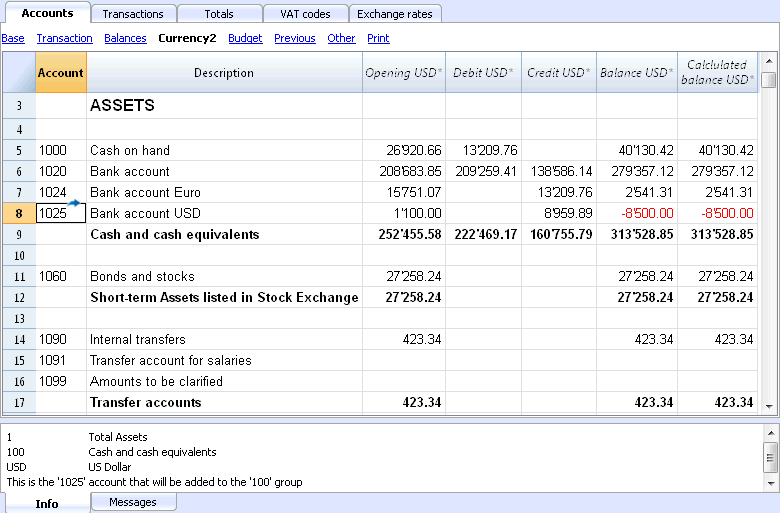
Converting currencies
Variability of exchange rates
The purchase/sale of currencies occurs in a free market. The price (exchange rate) is based on the law of supply and demand. The differences in the exchange value can be more or less important according to the fluctuations of the exchange rate.
|
Date |
Exchange rate EUR/USD |
Equivalent in EUR |
Equivalent value difference compared to 01-01 |
|
01-01 |
1.32030 |
1'320.03 |
|
|
31-03 |
1.33350 |
1'333.50 |
13.47 |
|
30-06 |
1.34750 |
1'347.50 |
27.47 |
|
30-09 |
1.42720 |
1'427.20 |
107.17 |
The exchange rate
The exchange rate refers to the basic currency. There are always two different exchange values between two currencies, according to the currency that is used as the basic currency.
For the USD and Euro currency, there are therefore two different exchange rates:
- If the basic currency of the exchange is EUR then the exchange rate is 1.32030
1 Euro (EUR) corresponds to 1.32030 US Dollars (USD) - If the basic currency of the exchange is USD then the exchange rate is 0.75800
1 US Dollar corresponds to 0.75800 Euros
In the current document, the Euro will be regularly used as the basic currency, to which other currencies will be compared.
Inverse exchange rate
Having the exchange of EUR/USD at 1.32030, it is possible to find the exchange rate of USD/EUR by dividing 1 by the exchange rate.
| Exchange rate |
Inverse exchange rate 1/exchange rate |
Inverse exchange rate rounded to 6 digits |
|
EUR/USD 1.32030 |
0.75800 |
0.758000 |
The exchange values calculated with an inverse exchange can turn out to be different from the originals because of the roundings.
| Exchange rate |
Inverse exchange rate |
Exchange value 10000 x original exchange rate |
Exchange value 10000 x inverse exchange rate |
Difference |
|
EUR/USD 1.32030 |
0.75800 |
13'203.00 |
13'192.61 |
10.39 |
Don't use inverse exchanges rates in order to avoid differences.
For example, for the transition to Euros, it was prohibited to use inverse exchange rates.
Multiplier
There are currencies that have very large exchange rates.
Always on January 1st
- 1 US Dollar = 670,800 Turkish Lira
- 1 Turkish Lira (TRL) = 0.00000149 US Dollar (USD)
Instead of using so many zeros, it can be said that
- 1000 Turkish Lira (TRL) = 0.00149 US Dollar (USD)
In this case, the multiplier is 1000 instead of 1.
Precision
As a rule, an exchange rate is specified with a precision of at least 6 figures after the decimal.
There are, however, cases where it is necessary to use more precision.
- 1 Turkish Lira (TRL) = 0.00000149 US Dollar (USD)
When the precision is changed and the exchange is rounded in a different way, the amounts also change. The precision with which the exchange is specified is very important.
Lowest denomination
For coin and paper money, especially, low denominations are used. As a rule the lowest denomination for Swiss francs is five centimes (0.05). When an exchange occurs, for example EUR/CHF:
1 EUR = 1.60970 CHF
| EUR |
Exchange rate |
Actual exchange value in CHF |
Rounded to lowest CHF denomination |
Difference |
Effective exchange rate |
|
10.00 |
1.60970 |
16.09 |
16.10 |
0.01 |
1.61 |
Calculation of exchange rates and values
When the Euro is the basic currency
The exchange factor for EUR/USD is1.32030
1 Euro (EUR) is equal to 1.32030 US Dollars (USD).
Calculation of the exchange value:
Multiply the basic currency amount by the exchange factor:
EUR 100 x 1.32030 = USD 132.03
Calculate the basic currency amount:
Divide the destination currency by the exchange rate:
USD 132.03 / 1.32030 = EUR 100
Calculate the exchange factor:
Divide the basic currency amount by the destination currency amount:
EUR 100 / USD 132.03 = 0.7574
Exchange rates for purchases and sales
Banks carry out the purchase and sale of currencies and maintain a margin of earnings. They apply different exchange rates depending on whether a determined value is being bought or sold.
Sale: the bank receives domestic money and gives (sells) foreign money.
Purchase: the bank receives (purchases) foreign money and gives domestic money.
Currency exchange and banknotes exchange (premium)
Currency exchange: exchange for written transactions (from one account to the other).
Banknote exchange: exchange for banknotes.
Premium: commission for converting a written amount to cash.
To exchange currency, the banks maintain a lesser margin (the difference between purchase/sale) compared to exchanging banknotes. When a written value is to be transformed (credit on the account) into cash currency, the bank applies a commission, called a premium.
Differences when changing back to basic currency
When an amount is exchanged into another currency, it is expected that the reverse exchange will render the same amount as it was originally.
| Basic amount |
Exchange rate |
Exchange value |
Return |
|
100.00 |
1.32030 |
132.03 |
100.00 |
However, you do not always come up with the same amount when converting currency back. Because of rounding errors, there can be cases where the same return value cannot be obtained.
| Basi amount EUR |
Exchange rate |
Exchange value in USD |
Retourn in EUR |
Differece in EUR |
|
328.67 |
1.32030 |
433.94 |
328.66 |
|
|
328.68 |
1.32030 |
433.95 |
328.67 |
0.01 |
|
328.69 |
1.32030 |
433.96 |
328.68 |
0.01 |
Differences of totals through splitting
The total exchange value of the components of an amount does not always give the same exchange value as the overall amount.
In this example, the amount of 2.16 EUR gives an exchange value in USD of 2.03. By splitting the amount and adding the two exchange values, 2.04 can be obtained.
| Amount in EUR |
Exchange rate |
Exchange value in USD |
|
2.16 |
1.32030 |
2.85
|
|
|
|
|
|
1.08 |
1.32030 |
1.42 |
|
1.08 |
1.32030 |
1.42 |
|
Totale 2.16 |
|
2.84 |
|
Differenza |
|
0.01 |
These mathematic differences cannot be eliminated if they are not recorded properly.
Revaluations and exchange rate differences
Exchange rates vary all the time and therefore also the exchange value to basic currency varies. Between one period and another, there will inevitably be exchange rate differences.
Exchange rate differences are not accounting errors but simple adjustments of the values made necessary in order to keep the accounting figures in step with normal fluctuations.
As you open the accounting, the figures in the balance column are equal to those present in the opening column. When there are entries, these will update the figures in the balance column.
The calculated balance column contains the exchange value to basic currency for the account balance, at the daily exchange (on the exchange rate table). The difference between the balance in basic currency and the calculated balance is the exchange rate difference.
|
|
Currency at opening |
Exchange value at opening in EUR |
Basic currency balance in EUR |
Calculate balance at 30.03.200xx in EUR |
Exchange rate difference |
||
|
Exchange rate |
|
|
1.32030 |
1.32030 |
1.30150 |
|
|
|
|
|
|
|
|
|
||
|
Cash |
EUR |
93.80 |
93.80 |
93.80 |
93.80 |
|
|
|
Bank |
USD |
100.00 |
75.74 |
75.74 |
76.83 |
1.09 |
|
|
Real estate |
EUR |
1'000.00 |
1'000.00 |
1'000.00 |
1'000.00 |
|
|
|
Total Assets |
|
|
1'169.54 |
1'169.54 |
1'170.63 |
|
|
|
|
|
|
|
|
|
|
|
|
|
|
|
|
|
|
|
|
|
Loan |
USD |
-500.00 |
-378.70 |
-378.70 |
-384.17 |
-5.47 |
|
|
Personal capital |
EUR |
-790.84 |
790.84 |
-790.84 |
-790.84 |
|
|
|
Total Liabelities |
|
|
-1'169.54 |
-1'169.54 |
-1'175.01 |
|
|
|
|
|
|
|
|
|
|
|
|
|
|
|
|
|
|
|
|
|
Loss |
|
|
|
|
-4.38 |
|
|
At March 30th the EUR/USD exchange rate is different from the one at the beginning of the year. In the above example there were no accounting entries during the three-month period. The situation, from an accounting point of view, has not changed since the beginning of the year. Despite this the total of the updated balance, using the rate at the end of March, is different when compared to the beginning of the year. The credit bank balance and the loan in USD have a different value in EUR. There are therefore consequences for the accounting even though there have been no entries.
In the above example, you will notice that the Euro is now worth less against the dollar compared to the beginning of the year. The dollar is therefore worth more against the Euro.
The exchange value of the balance on the account in USD is greater than it was at the beginning of the year. You have a greater estate and therefore a profit on the exchange rate.
On the debit side there is a USD 500.00 loan. Now the exchange value in EUR is greater compared to the value input at the beginning of the year. The value of the loan has increased and brings about a loss due to the exchange rate difference.
In the following example we shall use the hypothesis that there has been the opposite development. We imagine that the Euro has increased in value and is therefore worth more against the USD. The exchange value in EUR of an amount in dollars is less than the one at the beginning of the year.
|
|
|
Currency at opening |
Exchange value at opening EUR
|
Calculate balance at 30.03.20XX Eur (Hypothetical) |
Exchange rate differece |
|
Cambio |
|
|
1.32030 |
1.36150 |
|
|
|
|
|
|
|
|
|
Cash |
EUR |
93.80 |
93.80 |
93.80 |
|
|
Bank |
USD |
100.00 |
75.74 |
73.44 |
-2.30 |
|
Real estate |
EUR |
1'000.00 |
1'000.00 |
1'000.00 |
|
|
Total Assets |
|
|
1’169.54 |
1'167.24 |
|
|
|
|
|
|
|
|
|
|
|
|
|
|
|
|
Loan |
USD |
-500.00 |
-378.70 |
-367.24 |
11.46 |
|
Personal capital |
EUR |
-790.84 |
-790.84 |
-790.84 |
|
|
Totale Liabelities |
|
|
-1’169.54 |
-1'158.08 |
|
|
|
|
|
|
|
|
|
|
|
|
|
|
|
|
Profit |
|
|
|
9.16 |
9.16 |
As a consequence of an increase in the Euro/dollar exchange rate, you have a USD bank deposit with an exchange value in EUR which is less than at the beginning of the year. The total worth has diminished and there is therefore a loss.
The USD loan has a lower exchange value in EUR. A lesser liability is an advantage for the company and there is thus an exchange rate profit.
Exchange rate profit
You have an exchange rate profit when:
- The exchange value of your assets increases (increase of the investments)
- The exchange value of the liabilities decreases (decrease of the loans).
Exchange rate losses
You have an exchange rate loss when:
- The exchange value of your assets decreases (decrease of the investments)
- The exchange value of the liabilities increases (increase of the loans).
Accounting features foe exchange rate differences
Exchange rates can evolve in different ways. Often they rise, only to fall again. The principle rule for accounting is that the figures written on the Balance Sheet must be true ones. When you present your Balance Sheet, the exchange values of foreign currency accounts must be made at the exchange rate on the day of presentation.
The exchange rate difference is calculated as if you had to definitively convert the amount to basic currency. In reality there is no definitive conversion so you are only dealing with a correction to the accounting.
Closing exchange rate
At the end of each year it is necessary to prepare the complete Balance Sheet. The exchange rates thus have to be updated with the closing exchange rates. It is also necessary to enter the exchange rate differences once and for all; if these are not entered, then there will be differences in the opening balances.
Enter the exchange rate diferences
|
|
|
Currency balance |
Account balance EUR |
Calculate balance at 30.03.200xx EUR (hypothetical) |
Exchange rate difference |
|
Exchange |
|
|
1.32030 |
1.36150 |
|
|
|
|
|
|
|
|
|
Bank |
USD |
100.00 |
75.74 |
73.44 |
-2.30 |
|
|
|
|
|
|
|
|
Exchange rate difference |
EUR |
|
-2.30 |
|
|
|
|
|
|
|
|
|
|
Bank |
USD |
100.00 |
73.44 |
73.44 |
0.00 |
As can be seen from the above example, the bank balance is USD 100.00. For the accounting it has been valued at 75.74 EUR. Today’s actual exchange, though, is only EUR 73.44. There is a difference of EUR 2.30 EUR in basic currency. The entry must therefore decrease the EUR amount. You proceed with a transaction that debits the bank account and credits the exchange rate loss account by EUR 2.30. As you can see, the actual bank account balance of USD 100.00 has not been altered. The entry only alters the basic currency balance.
When entering the exchange rate difference, you need to be sure that the exchange value in basic currency corresponds to the actual exchange value, calculated at either the daily exchange rate or the closing one.
The figures in the account currency must not be altered. You must therefore proceed to make an entry that only alters the basic currency balance on the specific account.
As the account on the other side you will have the exchange rate profit or loss account.
Transactions with exchange rates at the time of purchase
Enties on account valued with the exchange rate of the time of purchase
When the positions, valued with exchange rates of the time of purchase (historical ones) are increased or decreased, you have to calculate the exchange of the exchange rate table, taking into account the development of the amounts being brought forward.
|
|
USD amount |
Exchange |
EUR exchange value |
Total USD |
Total EUR |
Historical Exchange |
|
Acquisition of shares |
100'000.00 |
0.9416 |
106'202.00 |
100'000.00 |
106'202.00 |
0.9416 |
|
Increase of shares |
50'000.00 |
0.8792 |
56'870.00 |
150'000.00 |
163'072.00 |
0.919839 |
Investiments and special exchange rates
Investments valued at the exchange rate of the time purchase
Certain investments (shares, real estate abroad) are valued using the exchange rate of the time of purchase (historical exchange) and not the current one. The exchange rate profit and loss is not accounted for until it is actually realized. You must therefore make certain these accounts do not get valued using the current exchange rate.
In order to input a fixed, historical exchange, you need to create a supplementary currency on the account table (e.g. USD1) with a fixed exchange rate. This currency will then only be used for this account with a fixed rate. If you have to make a transfer from the USD account to the USD1 account, you proceed exactly as if you were working with two different currencies. For this reason you will have to use a two-line entry.
Opening with special exchange rates
Inputting the opening balances in the “opening” column, foreign currency amounts will be converted to basic currency at the opening exchange rate.
If this system proves not to be flexible enough (you need various special rates or there are rounding differences) the opening can be done manually by making normal entries, indicating the amounts and the exchange rates you want for each account. In this case, the “opening” column of the Accounts table will be left blank.
Caratteristiche della Contabilità multimoneta
Con Banana Contabilità multi-moneta lavori facilmente a livello internazionale nella lingua che vuoi e con i conti in valuta estera di cui hai bisogno. La struttura è sempre a tabelle, simile a Excel e con tutte le facilitazioni degli altri applicativi Banana. Il funzionamento si basa sulla metodologia della Contabilità in partita doppia. Nel caso hai bisogno della gestione IVA puoi sempre attivare le funzionalità dell'IVA.
Si rivela particolarmente interessante per coloro che hanno delle attività con l'estero, per le associazioni che in genere operano in tutto il mondo o hanno dei progetti o semplicemente per coloro che nella propria contabilità hanno dei conti in moneta estera.
Tante funzioni per la Multi-moneta
- Gestisci quanti conti vuoi in moneta estera
Non hai bisogno di avere gestioni separate per gestire conti in altre monete. Nel piano contabile dove hai tutti i conti della contabilità, inserisci i conti in moneta estera, per le differenze di cambio imposti i cambi nella tabella cambi e sei pronto a registrare. - Puoi impostare qualsiasi moneta, codici monete standard o definiti liberamente (per usare qualsiasi moneta virtuale).
- Decimali moneta configurabili da 0 a 28. Generalmente si usano 2 decimali, ma si può impostare la contabilità per usare 0 decimali, oppure 3 decimali (Tunisia) o di più se si usa per le cryptovalute. 9 decimali (Bitcoin) o 18 (Ethereum)
- Stessa metodologia della contabilità in partita doppia
Lavori con lo stesso metodo della contabilità in partita doppia, pertanto registri i dare e in avere e avrai tutti i report e i dettagli di una contabilità professionale. - Calcolo automatico del cambio
Nel momento in cui registri un conto in moneta estera, non hai bisogno di calcolare manualmente il controvalore in moneta estera, il programma calcola il cambio automaticamente. Puoi inserire il cambio sia aggiornando il cambio nella tabella Cambi, sia direttamente nella tabella Registrazioni nella colonna Cambio. - Registrazioni in diverse monete
Puoi registrare tutti i casi possibili di registrazione in moneta estera, anche giroconti e operazioni che non includono la moneta base. Questo permette di avere nella contabilità operazioni anche complesse. - Report completi con Bilancio, Conto Economico
Nel Bilancio e Conto Economico, per i conti in moneta estera hai la visualizzazione dei saldi sia in moneta estera, sia del controvalore nella moneta base (moneta nazionale).
Se hai rapporti di lavoro con l'estero e devi presentare il bilancio e il conto economico in una seconda moneta, questo è possibile senza creare report separati in Excel, basta andare nella tabella Conti, nella vista moneta2 e hai la visualizzazione di tutti i conti nella seconda moneta e anche nella moneta base. - Schede conto con importi in moneta estera e moneta base
Le schede conto puoi visualizzarle con le colonne degli importi in moneta base e in moneta estera. Questo permette di valutare i saldi in entrambe le monete.
Cambi liberi nella tabella Cambi
Puoi impostare i cambi per le varie esigenze: cambi variabili, cambi fissi, cambi diversi per una stessa moneta per gestire per esempio gli investimenti e senza influenzare conti con la stessa moneta.
- Differenze di cambio in automatico
Quando necessiti di calcolare le differenze di cambio, basta aggiornare il cambio nella tabella Cambi e impartire il comando; le differenze verranno inserite automaticamente nella tabella Registrazioni. - Preventivi possibili anche con la Multi-moneta
Nel file della contabilità Multi-moneta puoi preventivare la liquidità anche dei conti in moneta estera, nonché tutte le previsioni legate agli aspetti patrimoniali ed reddituali. Puoi stampare Bilanci e report previsionali, oppure combinati, con le colonne del Peventivo, Consuntivo e relativi scostamenti. - Controllo automatico per differenze di cambio non registrate
Se usi il comando Controlla Contabilità non avrai più differenze di cambio non registrate, perché nel caso queste sussistano, ti verranno segnalate. La funzione si rivela particolarmente importante per evitare di avere differenze di cambio nei saldi di apertura quando crei il nuovo anno. - Bilanci, Conti economici e Report, anche in una seconda moneta.
La contabilità multi-moneta, basandosi sulla partita doppia ha tante altre caratteristiche identiche alla partita doppia, che trovi alla pagina seguente:
File properties multi-currency accounting
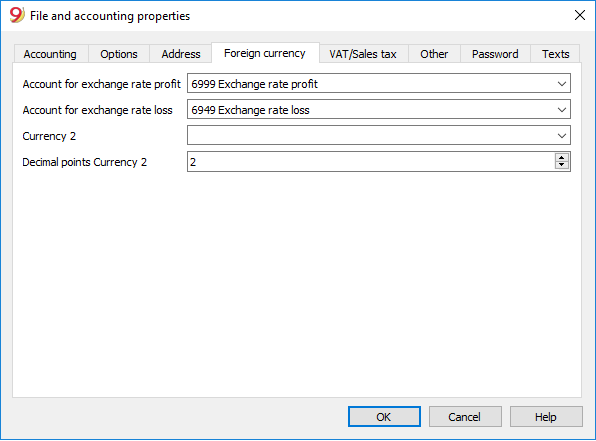
Account for exchange rate profit
From the accounts list, select the one for the exchange rate profit present in the Chart of Accounts.
Account for exchange rate loss
From the accounts list, select the one for the exchange rate loss present in the Chart of Accounts.
Currency2
It is possible to select a second currency in order to view the balances in a currency different from the basic one.
It is possible to add new currencies that might be missing from the list, please proceed as follows:
- in the Exchange rates table enter a new row; in the Ref.Currency column enter the basic currency for your accounting file, in the Currency column enter your desidred currency
- From the File menu -> File and accounting properties... command, in the Currency tab the new currency (that you entered in the Exchange rates table) will be visible, and it can be chosen as Currency2.
Decimal points Currency2
This is the number of decimal points to be used when rounding the amounts in currency2.
The multi-currency chart of accounts
The Chart of accounts of the multi-currency accounting is the same as the one of an accounting without foreign currency, except for the specifics that are indicated here below.
Basic currency
In the File and accounting properties, the basic currency should be defined and in the Exchange rates table, the foreign currencies should be defined.
In the example here below, the basic currency is the CHF, which, as can be seen, appears in the column headers with the amounts in basic currency.
Account currency
- The Assets and the Liabilities (Balance sheet accounts) can be in basic currency or in foreign currency.
-
The Costs (Expenses) and Revenue accounts must be in basic currency.

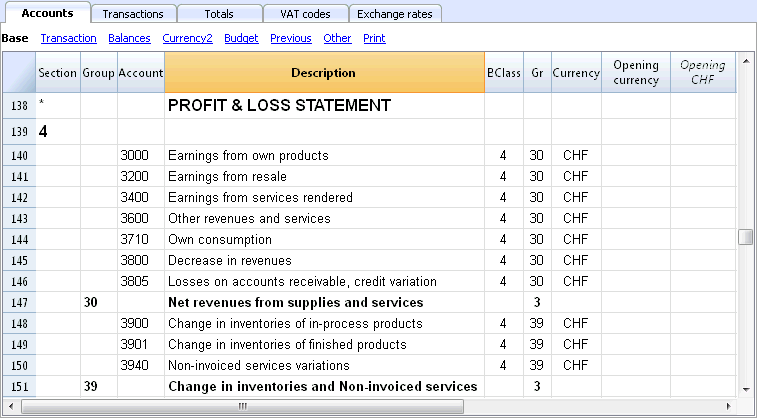
Explanation of the columns of the multi-currency accounting
- The opening balance in basic currency.
A protected column, calculated by the program based on the opening balance in currency and the opening exchange rate (exchange rate of the exchange rate table indicated in a row without date). - The current balance in currency.
Calculated by the program, using the opening balance in currency and the currency amount indicated in the transaction rows. - The current balance in basic currency.
Calculated by the program, using the opening balance in basic currency and the amount in basic currency indicated in the transaction rows. - The calculated balance
Is the balance in the account currency converted at the current exchange rate (exchange rate of the exchange rate table indicated in a row without date).
-
In the Other view from the Account table, there is the Exch. rate Diff. Acct.
In this column, for specific account/accounts, you can enter an account (or several accounts, separated by a semicolon) in order to enter the exchange rate differences. These are different accounts from those in the File and accounting properties (account for exchange rate profit and loss).
If in the Exch. rate Diff. Account column there are no accounts, the program will register exchange rate differences on the accounts indicated in the File and accounting properties; if however accounts are indicated both in the File and accounting properties and in the Exch.rate Diff.Acct. (Other view), the program will only consider the accounts indicated in the Exch.rate Diff.Acct., and ignore the File and accounting properties indications.
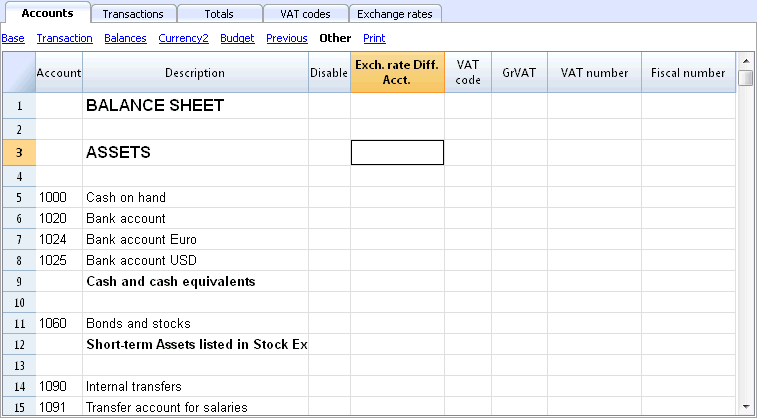
Opening Balances
- Before entering the opening balances, the opening exchange rates for the different currencies have to be indicated in the Exchange rate table.
The opening exchange rate is the one indicated in the Rate Opening column in the row of the exchange rate without date.
The opening exchange rate must be equal to the closing exchange rate of the preceding year. See Differences in the Opening Balances. - The Opening balances have to be inserted in the Accounts table, in the Opening currency column, Base view. This operation needs to be done for both basic currency and foreign currency accounts.
- The Opening Basic currency column is protected; the program automatically calculates the value in the basic currency on the basis of the opening exchange rate shown in the Exchange rate table.
- The opening balances for the liabilities have to be entered with the minus sign (-) in front of the amount.
- The opening balances of assets and liabilities have to balance out; for more information please visit the Recheck the accounting page.
Revaluation accounts and historical exchange rates
The basic currency amount of an account is being calculated using the opening exchange rate and the exchange rates that are indicated in the transactions. Because this value corresponds to equivalent of today's exchange rate, it is necessary to revaluate the account.
The revaluation takes place by calculating the exchange rate differences. We need to record on the account just an amount in basic currency (exchange rate difference), so that the balance in basic currency results equal to the equivalent (calculated balance)
There are accounts (related to, for example, investments) for which a so-called historic exchange rate is being used. By an historical exchange rate we mean un exchange rate that doesn't vary over time.
In order to have exchange rates that don't change, an extra currency symbol (for example EUR2) must be created in the Exchange rate table. To this currency, the same exchange rate is always being applied.
You can create as many currency symbols as you need for the different accounts with historic exchange rates.
Group totals in foreign currency
Normally, the columns with amounts in foreign currency don't have totals, as it has little sense to calculate totals for values in different currency.
If you have a group that includes only accounts in a specific currency, the currency symbol can be indicated at a group level and, in the Accounts table, the program totalizes these amounts. If there would be accounts with various currency symbols, there would be no amount indicated (the program would not report an error either).
Differences in the opening balances
When, in the preceding year, the exchange rate differences have not been calculated, the program signals, in the New Year, a difference in the opening balances.
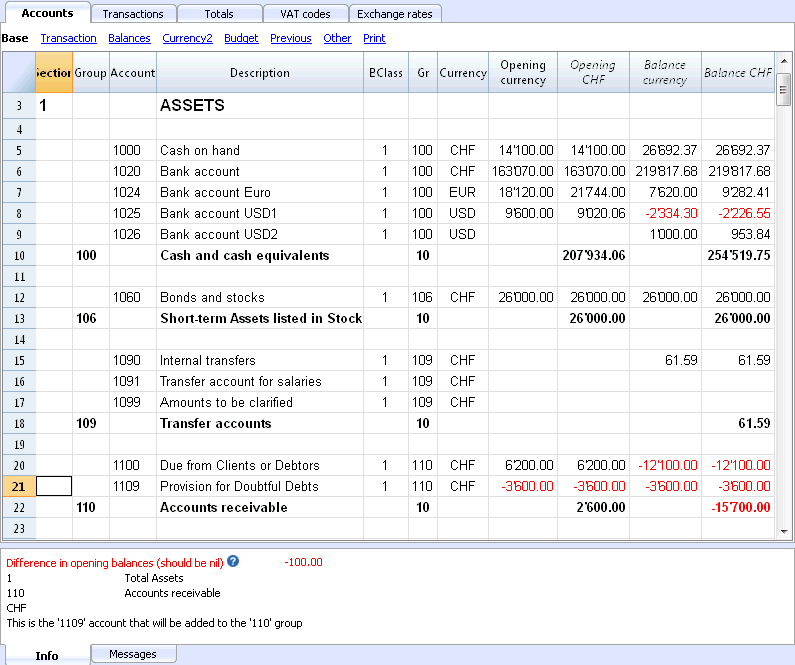
In order to resolve this problem, there are two possibilities:
- Insert in the Exchange rate table, Exchange rate column, the official exchange rates at 31.12
- Activate, from the Account2 menu, the Create transaction for exchange rate variation command
- Open the file for the New Year and update the opening balances
- Open the file of the New Year
- Insert in the Assets or the Liabilities (Accounts table), according to the situation, a new account Unrecorded Exchange rate differences or record the amount in the 1090 Internal tranfers account (as in the following example)
- In the Opening Currency column, insert the amount corresponding to the exchange rate difference
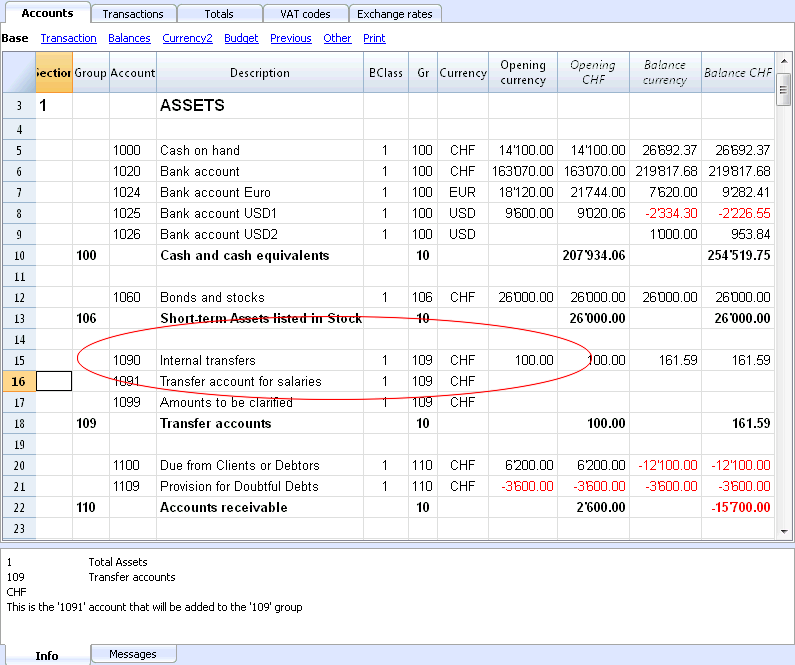
- At 01.01, the exchange rate difference account has to be put to zero by means of a transaction (Transactions table), using the account related to the exchange rate differences (Exchange rate profit/loss) of the profit/loss statement as its counterpart.
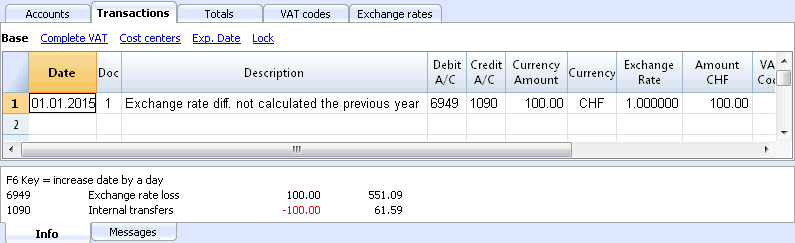
After the transaction to arrange the exchange rate differences has been made, the account that has been used should have a balance of zero, or equal to the amount corresponding to the balance prior to the transaction.
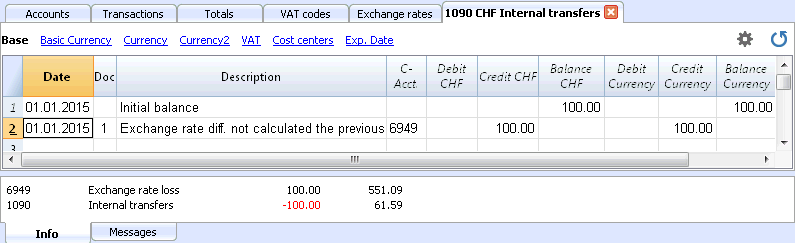
Exchange rates table
In the Exchange rates table you can define any currency and its current and opening exchange rate.
Before entering multi-currency transactions it is necessary to define the parameters of the used currencies in the Exchange rates table.
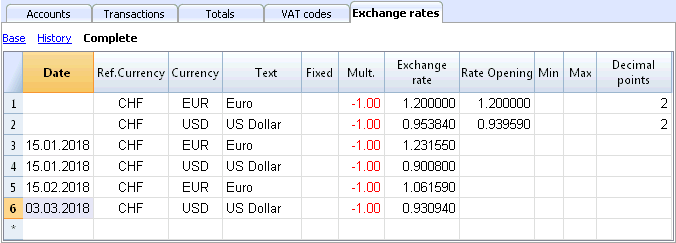
Columns of the Exchange rate table
Date
The date for the exchange rate.
-
Exchange rate rows without date. Actual and Opening exchange rate.
For each used foreign currency, it is necessary to have a row in the Exchange rate table with an exchange rate and without a date.- Exchange rate
This is the one that is considered to be the most recent and also the closing exchange rate.
It is being used for the calculation of the Balance Calculated column (Accounts table) and always when there is no historical exchange rate. - Rate Opening
It is being used to convert the opening balance amounts of foreign currencies into the opening balance amounts of the basic currency of the accounting.
- Exchange rate
-
Rows with a date (historical exchange rates)
The program chooses the exchange rate with a the date equal to the transaction row or with the closest preceding date to that row, in the following cases:- If you have an historical exchange rate, the value in the Exchange rate column will be used as default exchange rate when you insert a new transaction
- When the exchange rate differences transactions are created and the option to use the historical exchange rate is activated
- When entering an exchange rate with a date, the Opening exchange rate is not used.
Ref. Currency
This is the currency that serves as the basis for the exchange rate (the CHF in our example.)
Currency
This is the destination currency, the one into which the value of the “Ref. Currency” will be converted.
Text
A text to indicate the foreign currency that we are dealing with.
Fixed
True or false. If there is a fixed exchange rate, enter Yes in this column. The used exchange rate is specified in the Exchange Rate column.
Mult.
The multiplier is usually 1, 100 or 1000 and is used to obtain the effective exchange rate. The multiplier is used for currencies which have a very low unit value in order to avoid having to insert exchange rates with many zeros. The multiplier can also be negative (-1). In this case, the program will use an inverted exchange rate or else it will act as if the currencies inserted in the Currency and Reference Currency columns had actually been inverted. Do not alter the multiplier once there are already transactions in the same currency, otherwise the program will signal a transaction error due to erroneous exchange rates.
Exchange rate
This column shows the actual exchange rate or the closing exchange rate for the currency compared to the reference currency.
It is also being used for calculating the exchange rate differences. Before calculating the exchange rate differences or closing the accounting, this value must be updated by entering the closing exchange rate.
The exchange rate and the multiplier are being applied according to the following formulas
- With multiplier > 0
Currency amount = Ref. currency amount* (exchange rate / |mult.|)
- With multiplier < 0
Ref. currency amount = Currency amount * (exchange rate / |mult.|)
Opening Exchange rate
This is the exchange rate at the moment the accounting is opened. To be indicated only on a row without date.
- It is used to convert the opening amount of the foreign currency into the opening amount of the accounting’s basic currency.
- Should be corresponding to the closing exchange rate of the preceding year.
If the closing exchange rates are not equal to the opening exchange rates, the Assets and Liabilities might result into different totals; see Differences in the Opening Balances. - The opening exchange rate should never be changed in the course of the year, otherwise exchange rate differences are being created in the total of the opening balances.
- When creating a new year or when updating the opening balances, the program defines the opening exchange rate with the value indicated in the Exchange rate column (row without date) of the accounting of the previous year.
Minimum
This column shows the minimum exchange rate accepted. If a lesser exchange rate is used during the entry, there will be a warning.
Maximum
This column shows the maximum exchange rate accepted. If a greater exchange rate is used during the entry, there will be a warning.
Decimal Points
This column shows the number of decimal points to be used when rounding the amounts in currency2.
Modifications in the Exchange rate table
- Modification of the Opening exchange rate
The next time you recalculate the accounting, the balances in basic currency of the accounts will be recalculated with the new exchange rate. Therefore, pay attention when modifying the Opening exchange rates once you have inserted the opening balances.If you modify the Opening exchange rates and there are opening balances, it is important to recalculate the accounting.
- Modifying the multiplier
-
When changing the multiplier of a currency already used in the Transactions table, the program will report a warning as soon as the accounting is being recalculated or will move to the transaction row.The transaction amount and the correct amount in the basic currency will have to be reentered.
- When the accounting is being recalculated, as a result the opening balances in basic currency will be recalculated.
-
Direct an indirect exchange rates
- Direct exchange rates are those where the basic currency and the foreign currency are being indicated on the same row.
In the example below there are direct exchange rates USD->EUR and USD->TRL.
- Indirect exchange rates are those where a direct exchange between two currencies is not being indicated (not recommended).
The exchange rate is deducted by the programn based on other combinations of entered exchage ratesIn this example, the EUR->TRL exchange rate has not been defined, and the program relies on combining the USD-EUR and USD-TRL.
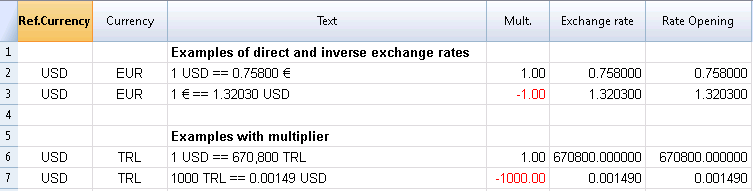
Historical exchange rates - exchange rate history
As explained above, if an exchange has a date, the program considers it to be a historical exchange rate; the program chooses the exchange rate with a date equal to the transaction row or with the closest preceding date to that row, in the following cases:
- If you have an historical exchange rate, the value in the Exchange rate column will be used as default exchange rate when you insert a new transaction
- When the exchange rate differences transactions are created and the option to use the historical exchange rate is activated
- When entering an exchange rate with a date, the Opening exchange rate is not used.
If you import several historical change rates at the end of your accounting period, that is when you have already entered accounting transactions, to make sure that the program uses the imported exchange rates instead of those entered in the transactions simply manually delete the transactions exchange rates (Exchange rate column, Transactions table).
Incompatible exchange rates from previous versions
When the basic currency is entered as the reference currency, the exchange rates with a multiplier greater than 1 can present calculation differences between Banana 9 and the previous versions. In these rare cases, while opening an accounting file of a previous version, a warning message appears and the file is being opened as "read only".
- Open the file in Banana 9 and confirm the warning message;
- Recheck the accounting (Shift + F9);
- The warning messages "Transaction multiplier is not the same as the one in the Exchange rate table" can be ignored;
- Verify whether the balances and the result of the accounting period present differences compared to those displayed in earlier versions. If there are no differences, just save the accounting under a new name; otherwise, it is necessary to proceed as follows:
- In the Exchange rate table, for the exchange rates with a multiplier greater than 1, correct the exchage rate by multiplying it with the value of the multiplier and define the multiplier as 1. For example, if we have a multiplier of 100 and an exchange rate of 0.9944608, correct the exchange rate to 99.44608 and the multiplier to 1;
- Recheck the accounting (Shift + F9);
- The warning messages "Transaction multiplier is not the same as the one in the Exchange rate table" can be ignored, or it is possible to delete them by clicking, in the corresponding transaction row, on the amount in basic currency and by pressing the F6 key;
- Verify whether the balances and the result of the accounting period correspond with the ones indicated in earlier versions;
- Save the file under a new name;
- At this time, you can define the exchange rates and the multiplier in the preferred format, reverse or direct, with or without multiplier, verifying the balances and the result of the accounting period after each modification.
Transactions multi-currency accounting
Explanations of the columns
In the Transactions Table of the multi-currency accounting, other than the columns of the double-entry accounting, there are the following extra columns:
- Currency amount
This is the amount of the currency specified in the column with the currency symbol.
This amount is used by the program to update the balance of the related account in currency. - Currency
This is the currency symbol of the currency to which the amount refers.
The currency symbol has to be the basic currency, specified in the File and accounting properties (File menu), or the currency symbol of an amount indicated in the Debit A/C or Credit A/C columns.You can also use a different currency as long as the indicated Debit A/C and the Credit A/C are basic currency accounts.In this case the amount in currency is used as a reference, but will not be used for accounting purposes - Exchange rate
Used to convert the foreign currency amount in its Basic currency equivalent. - Amount in Basic currency
The transaction amount, expressed in basic currency.
This amount is used by the program to update the balance of the related account in Basic currency - Exchange rate multiplier
Normally not visible in the view, this value is multiplied by the exchange rate.
Types of entries in the multi-currency accounting
With regard to the exchange rates, multiplier and historical exchange rates, please refer to the page Exchange rates table.

Please note
All amounts, those in basic currency as well as those in foreign currency, have to always be entered into the Currency Amount column.
For each transaction, there are two accounts (debit account and credit account). In the program, only one foreign curency per transaction row can be used. So there can be the following direct combinations:
- Entries between two accounts in basic currency with the amount in basic currency (in the image, transactions n.1 in the Doc column). The account currency is the basic currency.
- Entries between two accounts in basic currency with the amount in foreign currency (Doc 2)
The indicated accounts are in basic currency, but the currency symbol and the amount in currency, indicated in the transaction row, are not in basic currency, but in a different currency.To insert the different currency, the user has to manually change the currency symbol.This is being used when one goes abroad and money is being changed in order to pay in local currency. In this case we do not have a specific account.For the calculation of the balance (both accounts being in basic currency) only the amount of basic currency column is being used. - Entries between an account in foreign currency and one in basic currency (Doc 3)
The currency needs to be the one of the account in foreign currency.
For the calculation of the balance of the account in foreign currency, the program uses the amount in foreign currency and for the balance in basic currency, the program uses the amount in basic currency. - Entries between two accounts with the same foreign currency (Doc 4)
The currency needs to be the same as account currency of both accounts. - Entries with two accounts in different foreign currencies (Doc 5)
For example, the bank makes an exchange operation between two foreign currencies:
In this case, the transaction needs to be recorded on two rows.
The amount in basic currency needs to be the same. It is useful to use an amount close to the current exchange rate to avoid excessive exchange rate differences.
In order for the amounts in basic currency to be equal, the amount in basic currency needs to be indicated manually, and the program will calculate the exchange rate. - Exchange rate differences (Doc 6)
The goal of this transaction is to realign the balance of the Basic currency account with the equivalent of the Foreign currency account at today's exchange rate.
On the Foreign currency account, only the amount in Basic currency related to the exchange rate differences is being recorded.
They are automatically generated with the Create transaction for exchange rate variation command.- For the exchange rate profits, the program automatically indicates the account to be revaluated in debit and the exchange rate profit account in credit. The exchange rate profit account is indicated in the File and Accounting properties (Basic Data), or in the specified account -> Exchange rate differences account column of the Other view (intended for one or several specific accounts).
- For the exchange rate losses, the program automatically indicates the account to be revaluated in credit and the exchange rate loss account in debit. The exchange rate loss account is indicated in the File and Accounting properties (Basic Data), or in the specified account -> Exchange rate differences account column of the Other view (intended for one or several specific accounts).
- The Currency amount is being left empty
- The Curency symbol is the basic currency
- In the Basic currency amount column, the amount of the revaluation of the account (profit or loss) is being indicated.
Establishing the exchange rate
The accountant is the one who decides which exchange rate to use for each single operation. Generally, the following rules are being applied:
- For normal operations, the exchange rate of the day is being used
- For buying or selling currency, the values indicated by a money exchange office or a bank are being used.
First the amount in foreign currency is being indicated in the program and then the amount in basic currency. The program calculates the exchange rate. The exchange rate indicated by the bank can be slightly different, because banks specify exchange rates with few figures after the decimal point and often round the amounts. - When several operations with the same exchange rate are being recorded, it is useful to update the exchange rate in the Exchange rates table, so that the program can automatically apply it.
- For operations from abroad that are subject to VAT, the national authority might impose a standard exchange rate. In this case, that exchange rate should be inserted in the Exchange rate column of the transaction
- To purchase real estate or equity investments, an historical exchange rate is being used. In that case, a currency symbol needs to be created in the Exchange rates table (for example USD1) with an historical exchange rate, that is not being subject to the fluctuations of the exchange rate.
One can create as many currency symbols as desired for all historical exchange rates.
Transactions with VAT
The VAT account and the account from which the VAT is being deducted have to be in basic currency. It is impossible to use a VAT code to deduct the VAT from a foreign currency account. In order to record operations with VAT that have accounts in foreign currency as their counterpart, two transaction rows have to be used:
- First, the amount of the purchase is being recorded on an Internal transfers account in basic currency and the related VAT code is being applied. The amount in basic currency has to be calculated using an exchange rate in accordance with the requirements of the Tax administration.
- In a second row, the balance of the Internal transfers account is being put to zero; as its counterpart, the account in foreign currency should be entered.
The amount used for this transaction, both in basic currency and in foreign currency, has to be excluding VAT. Obviously, the exchange rate that has to be used is the same one as the one being used in the preceding transaction.
In the example, the basic currency is the CHF. We are dealing with a national purchase, but paid from a foreign currency account (EUR).
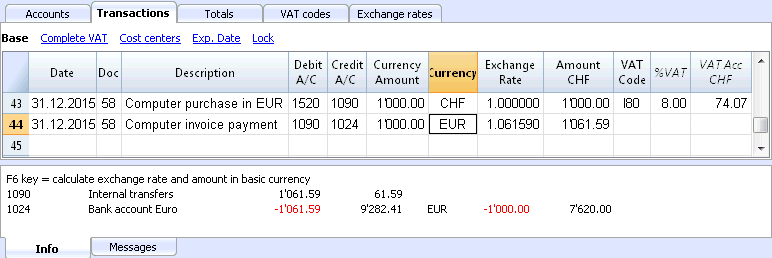
VAT and foreign currency transactions
In transactions with foreign currency accounts, it is possible to record VAT with a gross amount (Amount type 0, with VAT).
If you enter net values (Amount type 1, without VAT), the program indicates an error, because the calculation of the gross value would in many cases be incorrect due to the rounding up of VAT and of the exchange rate.
In these cases it is advisable to enter the gross value. See also the Explanations of the error.
Automatisms while entering multi-currency transactions
When a new transaction is being entered, the data in the above mentioned columns have to be completed.
When some values of the transaction row are modified, the program completes the transaction with the predefined values. If these values do not satisfy the user's requirements, these have to be modified in the transaction row.
The modification of the values in the Exchange rates table have no effect on already entered transaction rows. Thus, when the exchange rate in the Exchange rates table is modified, this has no influence whatsoever on already inserted transactions.
- When the amount in currency is entered and there is either a Debit A/C or a Credit A/C, and no other values are entered, the program operates as follows:
- the currency symbol is retrieved from the account in use, giving priority to the account that is not in basic currency;
- the exchange rate, defined in the Exchange rates table, is applied with the following logic:
- the historical exchange rate is applied, with a date earlier or equal to the transaction date
- tf there is no historical exchange rate to be found, the exchange rate from the row without date is applied.
- the multiplier, defined in the Exchange rates table, is applied or the number 1 if it is the basic currency;
- the amount in basic currency is calculated.
- When the amount in currency is modified (and there are already other values present), the program operates as follows:
- the amount in basic currency is calculated with the existing exchange rate
- If the currency symbol is modified the program operates as follows:
- the exchange rate with the multiplier is applied and the amount in basic currency is calculated (like above)
- If the exchange rate is modified the program operates as follows:
- the amount in basic currency is calculated using the entered exchange rate
- When the amount in basic currency is modified the program operates as follows:
- the exchange rate is recalculated.
More help
- While being positioned on the Currency Amount column and pressing the F6 key, the program rewrites all values with the earlier explained logic, as if there were no values present. This feature is useful when the Debit A/C or the Credit A/C is modified.
- If there is a registration with a single account in basis currency (in 'Multiple transactions' - see Transaction types) and its value of the Currency column has been changed manually in a currency symbol of a foreign currency, it is necessary to be positioned on the cell of the Currency column and press the F6 key in order to update the exchange rate and calculate the amount in basic currency.
- Smart fill for the Exchange rate column
The program suggests several exchange rates, picking them up from the Exchange rates table or from exchange rates previously used in the transactions.
Info window
In the info window, the program indicates:
- Differences, if any, between the Debit and Credit total movements in basic currency
- Explanation on the different uses of the F6 key
For the accounts related to the transaction row on which one is positioned, the program always indicates in the Info windows:
- the account number
- the account description
- the transaction's amount in basic currency
- the current account balance in basic currency
- the account currency symbol
- the transaction's amount in the account currency (if different from the basic currency)
- the current account balance in currency (if different from the basic currency)
Opening balances
For multi-currency accounting, when entering the opening balances in the Accounts table, the program converts the amounts into basic currency, using the opening exchange rate defined in the Exchange rates table, Opening exchange rate column.
To use historical exchange rates as opening balances, you can create another currency symbol or create transactions in the Transactions table with the opening balances. This way you can use different exchange rates for different accounts.
- Enter a single transaction for each account with an opening balance (Assets and Liabilities), indicating the initial accounting date and the Debit or Credit account.
- In the DocType column enter the "01" value to indicate that it is an opening value.
- In the Banana Accounting reports or printouts this amount will be shown as opening balance.
- However the transaction doesn't update the Opening balance column in the Accounts table
When using opening transactions, please consider that:
- In order to avoid the revaluation of the accounts with the current exchange rate, in the Accounts table, enter the "0;0" value in Exchange rate difference account column
- The software allows you to add both some opening balances in the Accounts table and some opening transactions in the Transactions table (Assets and Liabilities).
In both cases the amounts are considered in the calculations and, if it is the same account, they are added together.
We do not recommend using the two methods simultaneously to avoid hard-to-find errors and differences. - Opening transactions must be entered manually.
Any debit and credit differences are shown as a transaction difference.
Data transfer from earlier versions
In version 4 or earlier, the absence of a currency symbol in the Transactions table was being interpreted as a transaction in basic currency.
In version 7 and in version 8, each transaction needs to have its own currency symbol. Therefore, when you update from version 4 to version 7 or 8, in the accounting file, the transactions without a currency symbol need to be completed. To do this, a new Currency column must be added to the Transactions table by executing the Columns setup command from the Data menu.
Exchange rate differences
Create transactions for exchange rate differences
For theoretical aspects please visit the Revaluations and exchange rate differences page.
- The exchange differences transactions are adjustment transactions that balance out the foreing currency account balance with the basic currency calculated balance. In essence, it is a matter of re-adjusting the values in the basic currency, taking into account exchange rate loss or gain, due to the fluctuations of the exchange rates.
- If these exchange rate differences are not recorded, there may be differences in the opening balances of the following year.
- The exchange rate differences can be calculated at the end of the closing year or during the accounting period (for example at the end of a quarter). In this case the historical changes can be useful, as they allow you to have different exchage rates at specific dates.
- The program calculates the exchange rate difference based on the balances at the specified date. It is therefore possible to calculate the exchange rate difference at a specific date, even if you have entered transactions after that date.
For further explanations, see also the Exchange rate differences not booked page
The Calculate exchange rate differences dialog
The Create transaction for exchange rate variation... command, from the Account2 menu, calculates the revaluations for the foreign currencies accounts.
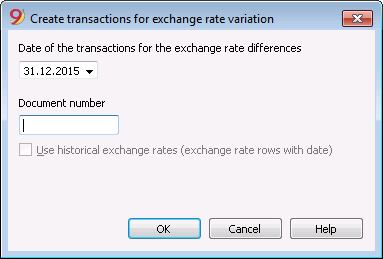
Date of the transactions for the exchange rate differences
Enter the date your exchange rate differences transactions should have. The program can create the transactions for the exchange rate differences even if there are transactions past the indicated date.
- The program will suggest the final date of the current month, related to the last entered transaction.
- If there are transactions for exchange rate differences with the same date, the program asks whether they should be replaced. The program considers the transactions for the exchange rates differences as existing if they have the same date, doc, description, accounts and currency and when there is no amount in the account currency.
Document number
Enter the document number your exchange rate differences transactions should have.
Use historical exchange rates (exchange rate rows with date)
- when this option is not active
- if in your Exchange rate table there are not historical exchange rates (exchange rates with a date) this option is not active
- if the option is not checked the program will use the exchange rate in your Exchange rate table for the rows without date
- if you are using historical exchange rates for the year closure, be careful that the exchange rate used should be the same as the current one.
- when this option is active
- The program shows the date of the exchange rate, found in the Exchange rates table, that will be used to calculate the exchange rate differences. It is going to be the exchange rate with a date equal or prior to the indicated date.
- When calculating exchange rate differences at year end we suggest this option not to be activated
- When booking exhange rate difference transactions at year end, the historical exchange rate must be the same as the current exchange rate, otherwise you get an error messagge saying that the echange rate differences have not been calculated (even though they have been).
Values used to create the transactions
For more information, we refer to our page Multi-currency transactions.
Amount of the transaction
- Transactions for exchange rate differences are being created only for the accounts in foreign currency which, at the specified date, have a different balance in basic currency compared to the calculated one.
- For the amount in basic currency, the difference between the account balance in basic currency and the account balance in foreign currency converted in basic currency is being used.
Account balance
For the calculation of the exchange rate differences, the balances in the account currency and in basic currency are being used, at the specified date.
Exchange rate profit and exchange rate loss accounts
As exchange rate profit and loss accounts are being used, in order of priority:
- The indicated accounts entered in the specific column of the chart of accounts.
- The exchange rate profit & loss accounts indicated in the File and Accounting properties.
Position of inserted rows
If, while imparting the command, you find yourself in the Transactions table, the rows are being inserted at the position of the cursor.
Otherwise, they will be inserted at the end or at the previous position in case they are replacing existing transactions.
Before using the command
- In the File and Accounting properties of the File menu, Foreign Currency section, make sure that the Exchange rate profit and loss accounts are being indicated. It is equally possible to indicate the same account for both the exchange rate profits or losses.
- Make sure that the accounts in foreign currency are being updated and that the balances in foreign currency of these accounts (for exemple bank accounts) correspond with the balance indicated by the bank.
- Update the current exchange rates of the Exchange rate table.
You should indicate the closing exchange rates or those of a period's end in the rows without a date, in the Exchange Rate column (do not modify the opening exchange rate in the Rate Opening column). In order to calculate the Exchange rate differences, the program uses the exchange rates of the rows without a date. If these last ones are absent, the program gives an error message.
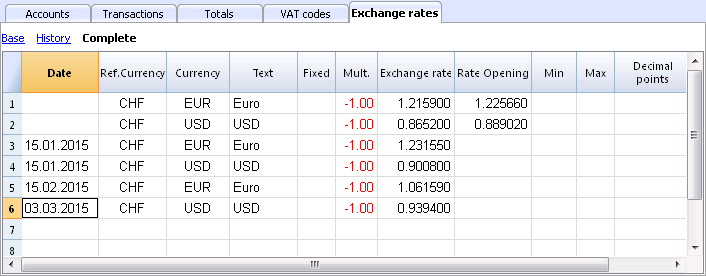
Exchange rates for the New Year
To have the Opening balances of the New Year in Basic currency correspond exactly with the closing balances of the preceding year, the Opening Exchange rates of the New Year, indicated in the Exchange Rate table, have to be the same as those being used for the closing of the accounting, so:
- The closing exchange rates have to be indicated in the Exchange rate column of the rows without a date;
- The opening exchange rates have to be indicated in the Rate Opening columns of the roes without a date.
The procedure of creating a new year or of the updating of the opening balances, copies the closing balances (Exchange rate column, rows without date) of the previous year into the opening exchange rates (Exchange rate table, Rate Opening column, rows without date) of the new year's file.
At the latest when the accounting period is being closed, the currencies need to revaluated in Basic currency, creating adjustment transactions for exchange rate loss or gain, due to the fluctuations of the exchange rates (for the theoretical aspects, please check Revaluations and exchange rate differences).
Differenze di cambio con i centri di costo
Il comando Crea registrazioni differenze di cambio non include eventuali differenze di cambio presenti nei centri di costo in moneta diversa da quella della contabilità. Queste differenze devono essere registrate manualmente a fine anno. La registrazione deve presentare unicamente l'importo in divisa della contabilità; indicare dapprima questo importo, poi il centro di costo interessato e la moneta del centro di costo. Al momento d'inserimento della moneta l'importo in divisa della contabilità verrà cancellato e dovrà quindi essere reinserito.
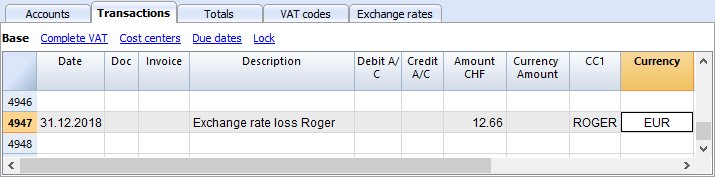
Account card multi-currency accounting
Columns and views of the account card
In the Account card, there are three groups with of columns with transactions Debit, transactions Credit and the Balance in different currencies.
- Basic currency
Indicated are the Opening Balance, the Transactions, and the Balance in Basic currency. - Account currency
The Transactions in the Account currency are being indicated.
When the accounts are in Basic currency, these values are identical to those of the Basic currency. - Currency2
For every transaction, the amount in Currency2 is being indicated. The amount in Currency2 is the equivalent of the amount in Basic currency, converted at the actual rate for the Currency2 currency symbol.
Please consult Exchange rates and accounting issues. - Base view
At the same time, the columns in Basic currency and the columns in the Account currency are visible.
In the column headers, the related currencies are being indicated.
With the appropriate commands, it is possible to modify the disposition of the columns and create other views.

Data editing
It is not possible to modify the data in the Account card. Double-click on the (underlined) row number to go back to the original corresponding row of the Transactions or Budget table. More details are available on the Account card page (paragraphe Updating the Account card).
Info Window
In the lower part of the screen, the Info window, the values of the accounts related to the active transaction are being indicated.
- Account number
- Account description
- Transaction amount of the account in Basic currency
- Actual Account Balance in Basic currency
- Account's currency symbol
- Transaction amount of the account in the Account currency
- Actual Account Balance in Account currency
Preventivo
Nella Tabella Preventivo si inserisce la pianificazione finanziaria. È impostata come la tabella Registrazioni.
Ci sono colonne per il Preventivo a dipendenza del tipo di Contabilità.
Si possono anche inserire Quantità e Prezzi e anche delle Formule di calcolo.
Per maggiori informazioni sul Preventivo, consultare la pagina Tabella Preventivo.
Enhanced balance sheet multi-currency accounting
The Enhanced Balance Sheet in the multi-currency accounting is done the same way as the one in double-entry bookkeeping. Information is available at the following link: Enhanced Balance Sheet.
The difference consists in the fact that the foreign currency accounts report the amounts in foreign currency as well as in the basis currency (amount converted).
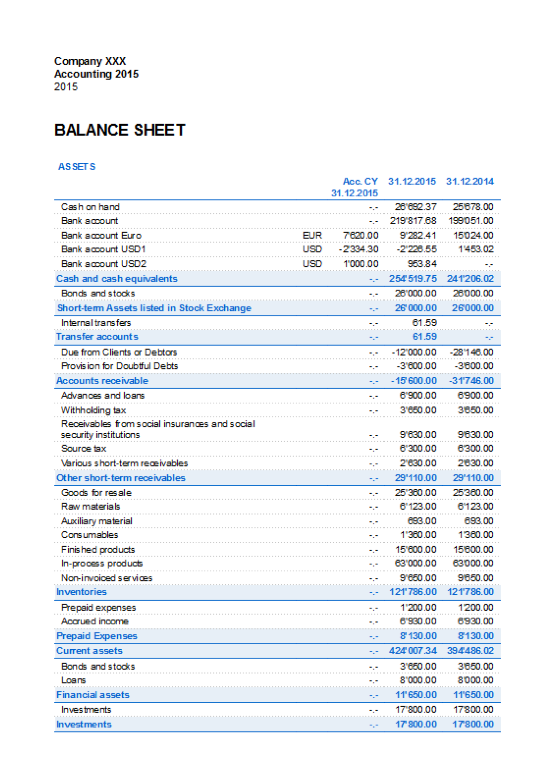
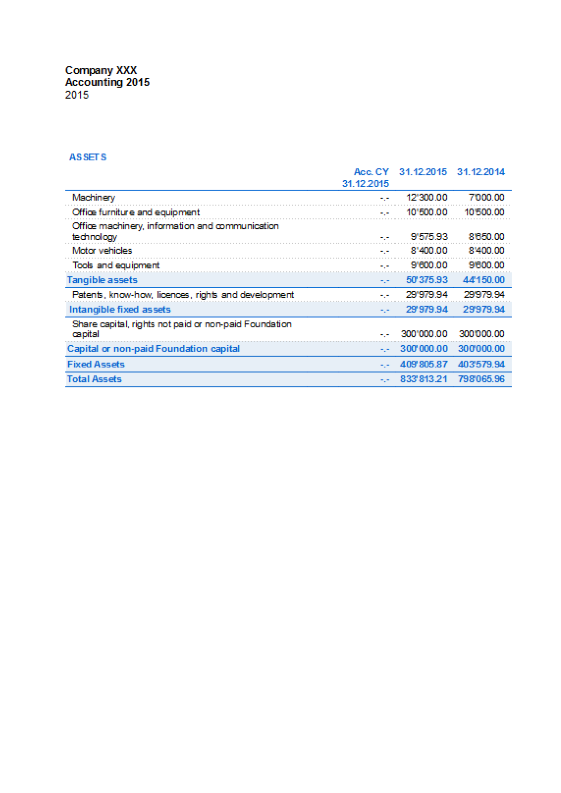
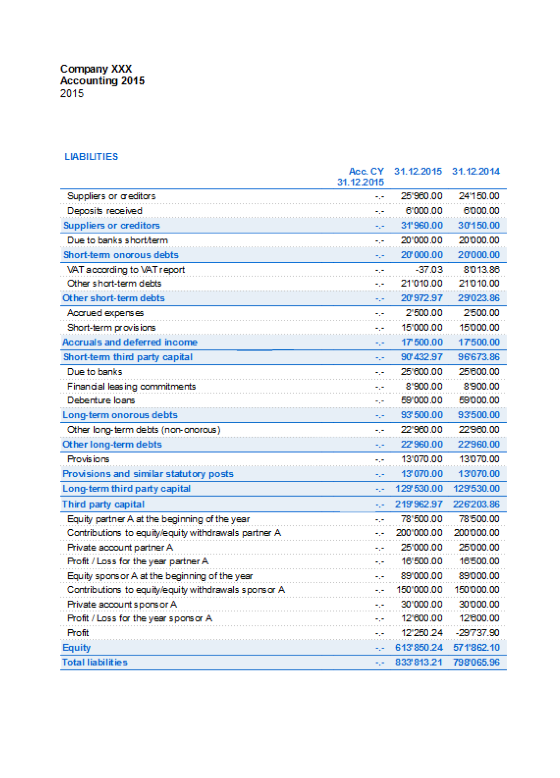
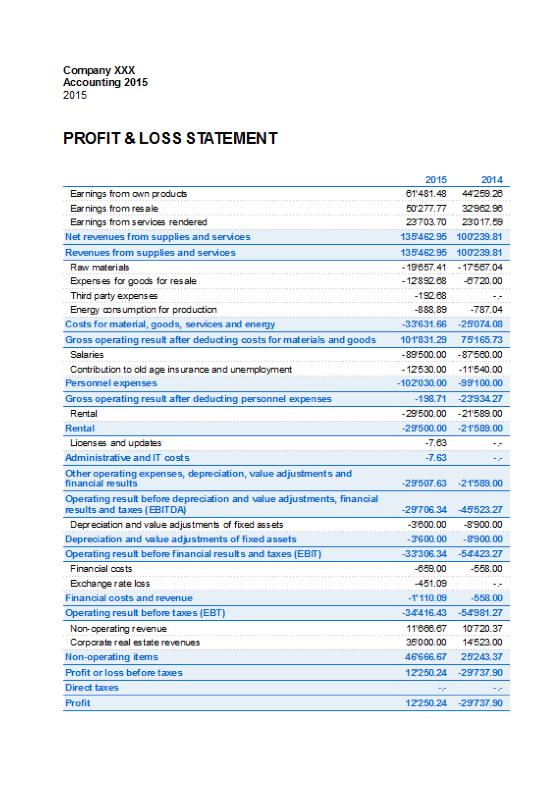
Enhanced balance sheet by groups multi-currency accounting
The Enhanced Balance Sheet by groups in multi-currency accounting is done the same way as the one in double-entry bookkeeping. Information is available at the following link: Enhanced Balance Sheet by groups.
The difference consists in the fact that the foreign currency accounts report the amounts in foreign currency as well as in the basis currency (amount converted).

Accounting reports multi-currency accounting
Accounting Reports in multi-currency accounting are done the same way as the ones in double-entry bookkeeping. Information is available at the following links: Accounting report; External accounting report.
Change the basic currency in the multi-currency accounting
In a multi-currency accounting all amounts are shown both in the account currency and in the base currency. If you change the base currency all exchange rates and amounts in base currency must be re-entered manually.
It is better to change the base currency at the beginning of the year when there are no operations yet. Anyway you can still do it during the year, for example, if you want to change the basic currency of an existing accounting file (for example if your accounting file is in EUR and you want it in USD), proceed as follows:
- Save the file under a different name
- In the File properties
- Indicate the new basic currency
- Delete the reference to the previous year file
- In the Exchange rates table enter the exchange rates referred to the basic currency
- If there are many transactions to be converted, in the exchange table you can enter intermediate exchange rates (for examble for each month, indicating the beginning of the month's date). The program will use the historic exchange rate in the transactions.
- In the Chart of accounts
- Replace the old currency with the new one
You can use the Find and Replace function also (selected area only) - If there are opening balances, you need to re-enter them in the new currency
- Also the Previous year balance, budget and other columns must be converted
- Replace the old currency with the new one
- In the Transactions table
If there are transactions, you need to correct them row by row:- For those transactions that are already in the right currency, with the F6 key the program recalculates the amount in the new basic currency.
- For other transactions you need to enter the right amount tin the basic currency and then press F6
- In the Budget table
Proceed just as in the Transactions table - Use the Check accounting command, fix possible errors, and keep using the Check accounting command until there are no more error messages.
Income & Expense accounting
Introduction
Income & Expense accounting is the ideal tool to manage the accounts of small to medium size companies, associations, private enterprise or project planning. It can be configured with or without VAT. On the other hand, it does not have the multi-currency options, that you will find in the double-entry book keeping version.
It does include:
- Income & Expense - allows you to manage income and expense for several accounts.
- Cash book - used to keep track of the income and expenses of one single account .
Features
- Manages your balance sheet and income statement (assets, liabilities, income and expense)
- VAT option allows VAT calculations and VAT tax returns
- Process all your accounting records: accounting journal, account cards, periodical and annual reporting
- Lets you manage your Cost Centres and their Segments
- Multiple options to present your data
- Export to Excel, Html, Xml, Pdf
- Import various types of data files.
Tables and Properties files
Income & Expense accounting contains the following tables:
- Accounts
Where you find the Chart of Accounts, the opening balances and define your groupings. - Categories
Define the categories of Income & Expense here, the cost centres and segments. - Transactions
Record your transactions here. - VAT Codes
If you have selected the VAT option, enter your VAT codes here. By selecting one of the VAT templates, VAT codes will be allocated correctly, allowing you to have a facsimile of your official VAT statement. - File and accounting properties
- Manage the general settings of your accounting here.
Immediate information
The account balances will be displayed instantly in the Accounts and Categories tables, after the income and expense recordings. Balances will be adjusted automatically after each registration of a transaction and you will not need to require a specific report to have an overview of your accounts, which you can call up via the Accounts and Categories tabs.
Support
- Detailed information on the different functionalities of the program, with concrete examples and screenshots of the software, for your use
- Free support for one year included.
Topics similar to Double-entry accounting
Commands
Printouts
Starting an Income/Expense accounting
Video Income & Expense accounting: video tutorial that shows you how to easily set up an Income & Expense accounting, adapt the Accounts and Categories tables, set a budget, enter the transactions and print reports.
Creating an accounting file, starting from a template
Proceed as follows:
- File menu, New command
- Select the Region, the Category and the Accounting type
- From the list of the templates that appears, select the template that is closest to your own needs.
- Click on the Create button
In the Search area, when entering a key word, the program displays the templates that contain the entered key word.
It is equally possible to start from a blank file, by activating the Create blank file option. In any case, in order to facilitate the start and avoid grouping errors, we recommend that you always start from an existing model.
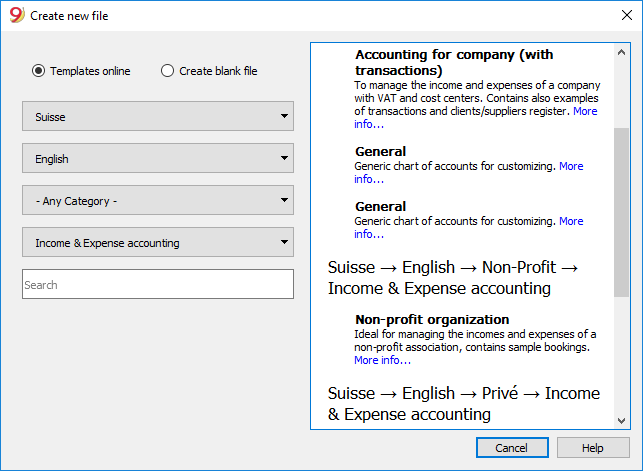
More information on how to create a new file is available on the Create New File page.
Setting up the File properties
Set up your own data from the File and Accounting properties command and save with your own file name.
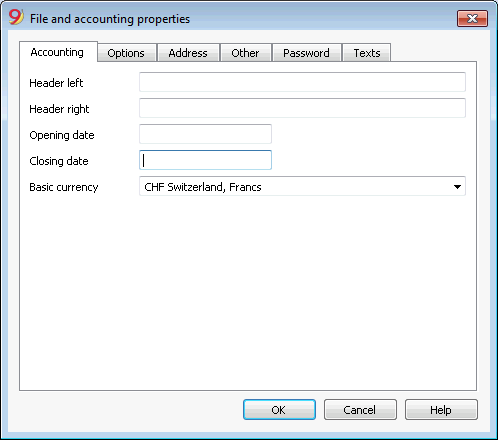
Save to disk
With the File-> Save As command, save the data and also assign an name to the file. The typical save dialog of your operating system appears.
- It is advisable to use the name of the company followed by the year "Company-2020." to distinguish it from other accounting files.
The program will add the "ac2" extension. - You can keep as many accounting files as you need, each will have its own name.
- You can choose the folder you want, (for example, Documents -> Accounting) or the support you want like a disk, usb or cloud.
If you also expect to have documents linked to the current year's accounts, it is suggested that you create a separate directory for each accounting year having to group all the files.
Customize the Accounts table
In the Accounts table, you can customize the estate accounts, according to your own needs:
- you can change the Account numbers
- you can change the Description
- In the Opening column you need to enter your opening balances
Please remember, that for the Liabilities' accounts (f.ex. debts), the opening balance should be preceded by the minus (-) sign.
This operation needs to be executed only the first time using Banana Accounting, since from then on, every end of the year, when creating a New Year (Account2 menu, Create New Year command), the opening balance will be automatically transferred.
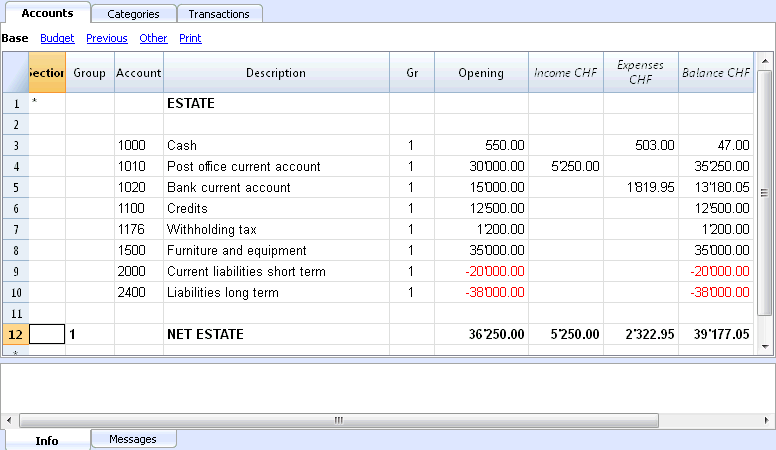
Customize the Categories table
In the Categories table, customize the income (earnings/revenue) and expense (expenses/costs) categories.
The Category numbers can be amended, as well as the Description.
The categories don't and must not contain an opening balance, in order to determine the result of the accounting year.
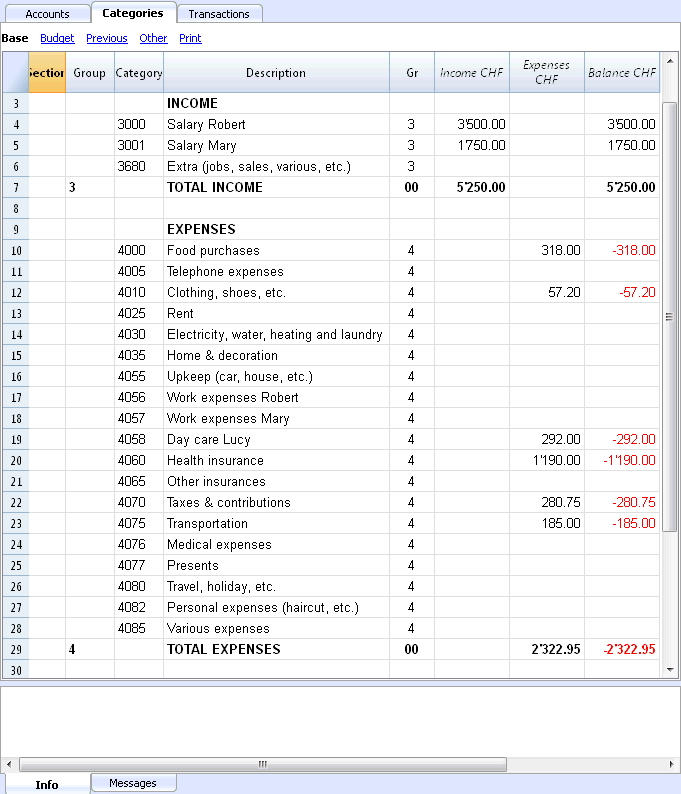
Transactions table
In the Transactions table, the daily income and expense transactions are entered, indicating the account, for which the transaction was made and the category to which the income or expense is attributed.
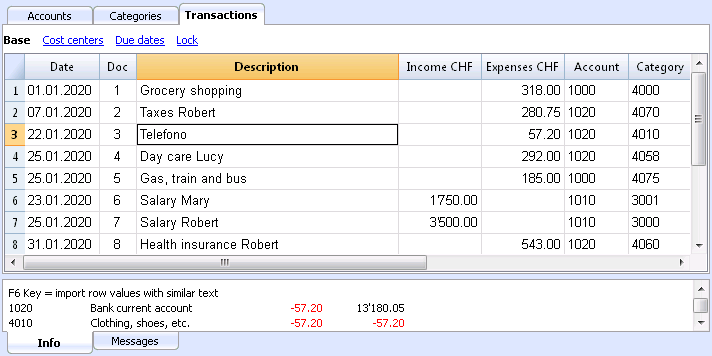
In the appropriate columns:
- Enter the date
- Enter the document number that is manually assigned to the paper document. This allows you to easily find documents, once the accounting transaction has been entered.
- Enter a description
- In the Income column, enter the income amount
- In the Expenses column, enter the expense amount
- In the Account column enter the account number (it has to be an existing account in the Accounts table, ex. Bank)
- In the Category column enter the expense or income category (it has to be an existing category in the Category table).
Speeding up the recording of the transactions
In order to speed up the recording of your transactions, you can use:
- the Smart fill function that allows the automatic autocomplete of data that have already been entered at an earlier date.
- the Recurring transactions function (Account2 menu), used to memorize recurring transactions into a separate table.
- import of your bank or post office statement.
Transactions with VAT
In order to enter transactions with VAT please proceed as follows:
- from the File menu, choose New command and choose Income /Expenses accounting with VAT/Sales taxes
- Choose one of the existing templates for your nation of the Income/expenses accounting with VAT type
In order to enter transactions with VAT, please refer to the Transactions page.
Transactions on multiple rows
Transactions on multiple rows, or Composed transactions are transactions involving more than two accounts and credits/debits on multiple accounts or categories (for example when you pay different invoices from the bank account). In this case you need to enter the transaction on multiple rows:
- in the first row enter the total amount of the income or expense and the account from which this amount is debited or credited
- in each subsequent row, enter the income or expense amount in the category column, and enter the appropriate category number.
Each individual amount is recorded on different row. When all the individual income and expenses rows are entered there shouldn't be any differences.
The Account card
The Account card allows you to have a complete list of entries relating to the same account or the same group.
- To open an account card you click once on the account number cell and then click once on the small blue arrow appearing in the upper right corner of the cell.
- To open multiple account cards you must select the Account cards command from Account1 menu.
- To update the account cards, following changes in the Transactions table, you must click on the two circular arrows symbol, located at the top right of the account card.
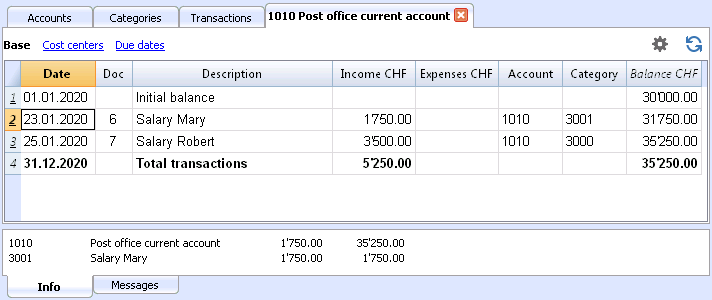
The category card
The Category card allows you to have a complete list of entries relating to the same category.
- To open a category card you click on the account number cell and then click once on the small blue arrow appearing in the upper right corner of the cell.
- To open multiple category cards you must select the Account cards command from Account1 menu.
- To update the category cards, following changes in the Transactions table, you must click on the two circular arrows symbol, located at the top right of the category card.
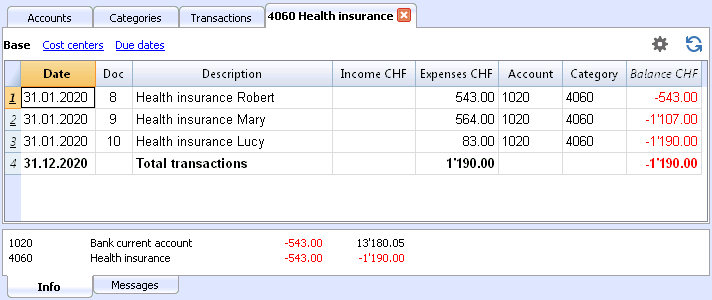
Account cards per period
To open an account card with account balances at predefined dates, click on Account1 in the menu, Account cards ... and click Period selected in the Period tab to insert your selected period.
Consult the Period page for further information.
Print the Account cards
To print an Account card, open it from any table (Accounts or Transactions) and start printing from the File menu.
To print out several or all the Account cards, click Account1 menu, select Account cards and select the Accounts you wish to print. The filter in the window allows you to select automatic selection of all accounts, cost centers, segments, groups etc.
For further information refer to the Account Cards page.
Enhanced Statement
To view the Enhanced Statement and the Enhanced Statement with groups, choose the Account1 menu and then the Enhanced statement or Enhanced statement with groups command. You can also obtain statements by period.
- The Enhanced statement displays all accounts and categories without any subgroups
- The Enhanced statement with groups displays all accounts and categories also with subgroups.
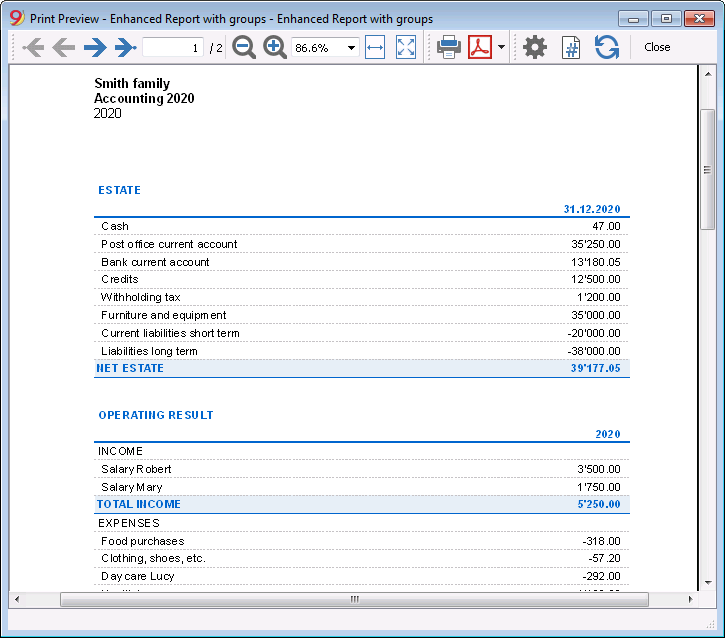
Archive data in PDF format
At the end of the year, when the accounting is done, corrected and revised, you can store all accounting data with the Create Pdf dossier command from the File menu.
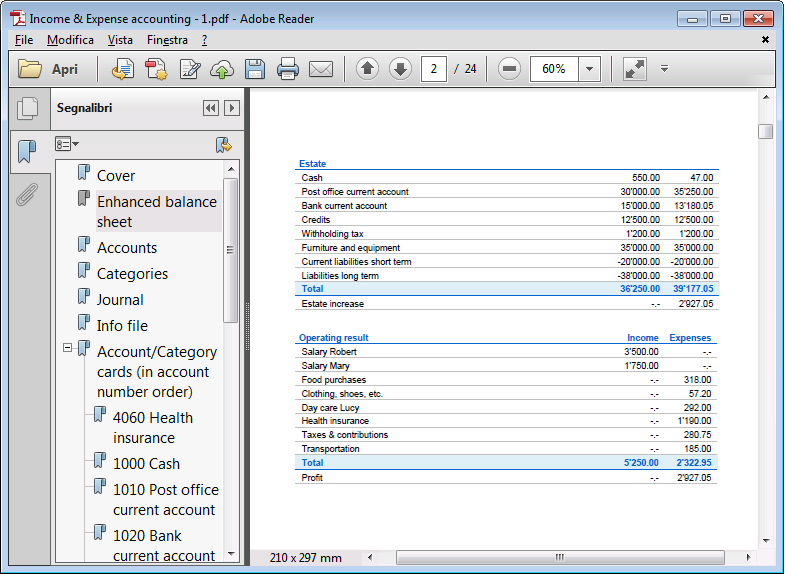
The Budget
Before starting your accounting year, you can create a budget with your assumed expenses and revenue, in order to have control over the financial and economic situation of your company.
The budget can be set in two different ways:
- From the Budget column of the Categories table. For each account the yearly budget is indicated.
In this case, when you process the budget from the Account1 menu, Enhanced statement with groups command, the Budget column shows the amounts that relate to the entire year. - From the Budget table, that you need to manually activate using the Add new functionalities command from the Tools menu.
In this table all estimates are entered as budget transactions, either income or expenses. If you activate this table, the Budget column of the Accounts table is automatically deactivated.
In the Budget table you can setup a detailed budget that takes into account possible variations during the year and in different periods of the year.
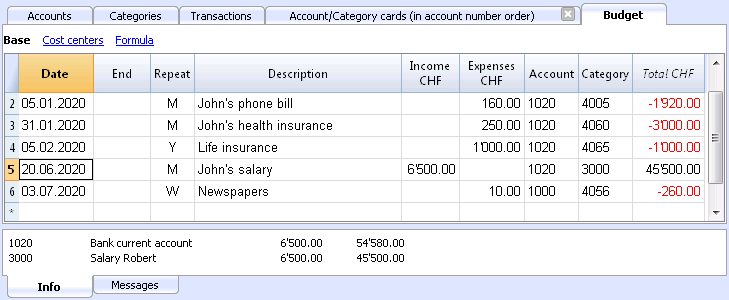
Related document: Transactions, Enhanced statement.
Caratteristiche della Contabilità Entrate e Uscite
L'applicativo Entrate e Uscite di Banana Contabilità ti consente di gestire in modo semplice le entrate e le uscite della tua azienda, anche se non hai delle conoscenze contabili. La facilità d'uso e la flessibilità rendono il lavoro intuitivo e veloce.
È ideale per gestire la contabilità di piccole ditte, associazioni, imprese individuali o per contabilità ausiliarie di progetti o immobili.
Anche se non usi la contabilità professionale della contabilità in partita doppia, puoi ottenere ugualmente rendiconti e report professionali perché tecnicamente il programma utilizza il motore della contabilità in partita doppia. Puoi impostare il file partendo da uno dei nostri modelli e personalizzarlo come vuoi tu, senza essere obbligato a utilizzare schemi rigidi senza possibilità di modifiche.
Come per la Contabilità in partita doppia puoi avere rendiconti patrimoniali e di conto economico, estratti conto, gestione IVA, centri di costo e profitto, segmenti. Non è invece possibile tenere conti in in più monete.
Simile a Excel
Funzionalità e comandi simili a Excel
- Tutti i dati che inserisci nelle tabelle sono sempre visibili e a portata di mano.
- Lavori velocemente perché puoi selezionare, copiare e incollare, su più celle e più righe le registrazioni che si ripetono.
- Se sbagli puoi correggere annullando o ripristinando le operazioni.
- Aggiungi quante righe vuoi senza limiti, o elimina le righe che non hai bisogno.
- Se hai sbagliato un valore, un conto, un codice IVA, una descrizione, con la funzione Cerca e sostituisci correggi in un attimo
- Non hai bisogno d'inserire formule perché i calcoli vengono aggiornati immediatamente e hai una visualizzazione contestuale (come nei fogli di calcolo).
- Tutto quello che si vede può essere stampato o esportato in pdf o altri formati.
- Puoi impostare il logo della tua azienda per personalizzare le intestazione della stampa.
- Le colonne sono personalizzabili, puoi spostarle di posizione, aggiungerne nuove e cambiarne la larghezza.
- Lavora con il formato che ti è più congeniale.
- Colora le righe per individuare subito le registrazioni che devi rivedere o fare vedere al commercialista o che devi completare.
Struttura basata su tabelle
La gestione della contabilità si concentra principalmente su tre tabelle, che si usano in modo simile alle tabelle di Excel, ma che sono già completamente impostate e programmate con tutto quanto serve per tenere la contabilità in modo veloce e sicuro:
- Tabella Conti.
Imposti tutti i conti della liquidità, dei clienti, dei fornitori, ecc. e inserisci i saldi iniziali senza doverli registrare manualmente nella tabella registrazioni. Puoi raggruppare più conti insieme, come per esempio la cassa, la banca o la posta nel gruppo della liquidità, così in un attimo hai i saldi aggiornati che puoi verificare immediatamente. - Tabelle Categorie
In questa tabella imposti tutte le categorie di entrata e di uscita; saprai così tutti i dettagli di ogni spesa e di ogni entrata e potrai valutare dove hai speso di più o quale entrata ti ha reso maggiormente. Come nella tabella Conti vedi immediatamente tutti i saldi aggiornati e le colonne dei movimenti in entrata e in uscita. Sai subito quanto hai speso, quanto hai incassato e il guadagno ottenuto. - Tabella Registrazioni.
È la tabella dove registri tutti i movimenti giornalieri. Per registrare velocemente hai tante funzioni da utilizzare, dalla ripresa delle righe memorizzate, al copia e incolla delle registrazioni uguali, alla ripresa di operazioni ripetitive fino a importare i movimenti dagli estratti bancari.
Ulteriori tabelle che si possono aggiungere e che supportano ulteriori funzionalità.
- Tabella Preventivo.
Per allestire previsioni finanziarie, con il metodo delle entrate e uscite, complete di piano della liquidità, conti investimenti, clienti e fornitori e della previsione delle tue entrate e uscite, progetti, segmenti per uno o più anni. - Tabella Codici IVA.
Per impostare le aliquote e i parametri necessari da usare nella tabella Registrazioni per il calcolo automatico dell'IVA e i rendiconti da presentare alle autorità fiscali. - Tabella Articoli.
Per impostare un elenco di articoli da usare per la fatturazione. Il programma tiene nota delle entrate e uscite. - Tabelle libere.
Per fare fronte a ulteriori necessità.
Inizia veloce con i nostri Modelli
Inizia immediatamente con uno dei nostri modelli, senza perdere tempo. Puoi sceglierne uno tra quelli elencati per la tua nazione e per il tipo di attività che svolgi. Puoi personalizzarlo per renderlo ancora più ideale alle tue esigenze.
- Hai un avvio facile con la creazione di un nuovo file partendo da un modello.
- Tantissimi modelli suddivisi per nazione e tipologia di utenza, personalizzabili e con documentazione d'uso.
- Ricerca facile e uso modelli direttamente nel programma.
Impostazione contabile
- Per la tua contabilità imposta liberamente la moneta, la puoi scegliere da un elenco di monete mondiali o impostata liberamente (cripto monete).
- Puoi impostare liberamente un periodo contabile, senza essere obbligato a inserire il classico periodo dal 1 di gennaio al 31 di dicembre. Il periodo contabile può essere anche su più anni.
- Intestazioni e dati base contabilità impostate in un'unica finestra di dialogo, facile da visualizzare.
- Inserisci quanti decimali vuoi, da 0 a 27 (Scelti al momento della creazione della contabilità).
- Puoi cambiare il numero dei decimali della contabilità durante l'anno senza problemi.
Multi-lingue
- Hai libertà di scelta della lingua della contabilità, quando crei il tuo file.
- Personalizza le intestazioni delle colonne come desideri.
- Puoi avere contabilità in più lingue contemporaneamente.
- Personalizza le Stampe anche per più lingue.
File e salvataggio dati
- Hai tutti i dati salvati in un unico file, dove trovi facilmente tutto senza perdite di tempo.
- Per ogni anno crei un File separato. Tutti i dati sono riferiti all'anno e non ci sono confusioni.
- Attribuisci al file il nome che desideri.
- Con una sola licenza puoi gestire un numero illimitato di contabilità.
- I dati rimangono in tuo completo possesso.
- Salva i dati del su qualsiasi supporto, computer, rete, cloud o inviato per email. Puoi accedervi ovunque sei.
- Accesso in contemporanea da più utenti, ma solo una persona può invece aprire il file in modifica.
- Rendi più sicura la tua contabilità inserendo una protezione con password.
Pianifica-Esegui-Controlla
Con lo stesso file di contabilità Entrate e Uscite e la stessa modalità puoi fare anche le previsioni per le tue entrate e uscite future, mettendo in pratica facilmente il potente approccio gestionale Pianifica - Esegui - Controlla.
Stessa metodologia per varie finalità
- Se nelle registrazioni ci sono degli sbilanci, hai la segnalazione della differenza.
- Nelle colonne hai la visualizzazione degli importi nel formato usato dal tuo computer, senza doverti abituare ad altri formati a te non congeniali.
- Visualizzazione degli importi molto intuitivo, con importi di entrata in positivo, importi d'uscita in negativo.
- Rendiconto, giornale, schede conto e altri report con un click.
- Stampe tutte personalizzabili.
- Formato di visualizzazione a scelta.
- Protezione dati con la tecnologia blockchain (metodo brevettato) per garantire la massima integrità dei tuoi dati contabili.
Piano dei conti
- Piano conti personalizzabile. Inserisci quanti conti vuoi e gruppi di totalizzazione a scelta.
- Anche la tabella Categorie è personalizzabile, inserendo tutte le categorie che ti servono.
- Con lo stesso piano dei conti puoi registrare nella contabilità e anche per le tue previsioni finanziarie.
- Scegli tu l'identificativo del conto e della categoria (conto numerico o alfa-numerico, fino a 256 caratteri).
- Nella colonna Descrizione puoi inserire testi fino a 256 caratteri.
- Non serve più inserire il bilancio iniziale e finale nelle scritture contabili, inserisci i saldi direttamente nella colonna Apertura della tabella Conti e solo la prima volta che usi Banana Contabilità. Negli anni successivi il riporto è automatico.
- Saldi, movimenti conto e totali visualizzati contestualmente e sempre aggiornati.
- Ad ogni conto del cliente e del fornitore hai le colonne per inserire i relativi indirizzi e altri dati che ti necessitano.
- Aggiunta di altre colonne per note, raggruppamento o importi.
- Non devi totalizzare gli importi nelle colonne, tutto è automatizzato ottenendo somme e calcoli perfetti.
Registrazioni
- Puoi inserire registrazioni singole, su una sola riga, o registrazioni composte su più righe, quando l'operazione riguarda più conti.
- Quando registri hai dei suggerimenti di testi che hai già registrato, basta un click per completare la registrazione (auto-completamento).
- Segnalazione immediata di errore e differenze, con possibilità di verificare a completare successivamente.
- Se memorizzi le operazioni ripetitive puoi riprenderle quando ne hai la necessità e registrare velocemente, senza riscrivere nuovamente.
- Diverse colonne predefinite, visualizzabili a scelta per non perdere di vista contenuti per te importanti.
- Colonne quantità e prezzo, per fatturazione o controllo costi.
- Auto-numerazione documenti con numerazioni diverse contemporaneamente.
- Collegamento ai file dei giustificativi digitali (pdf, immagini) e apertura del documento con un click.
- Testo registrazione fino a 256 caratteri e anche su più righe.
- Colora le righe per cercare subito le registrazioni che devi verificare o correggere in seguito, oppure per segnalarle al revisore.
- Formattazione righe per personalizzare la visualizzazione.
- Aggiunta di colonne per inserire qualsiasi ulteriore informazione.
- Salva le disposizioni delle colonne (viste) per avere sotto controllo i contenuti per te importanti.
- Informazioni contestuali circa il saldo del conto e della categoria, differenze o errori.
- Prima delle chiusure periodiche o di fine anno puoi usare le Registrazione di verifica saldo
Potrai individuare errori tra i saldi effettivi (es. saldi bancari fornite dall'estratto, e quelli della contabilità). Ti accorgerai subito degli errori e puoi correggere per avere tutto in perfetto ordine. - Importazione movimenti:
- Velocizza l'inserimento delle registrazioni importando i dati dagli estratti bancari digitali.
- Puoi importare i movimenti nei diversi formati bancari.
- Le righe importate possono essere modificate, completate o rimosse.
- Importa anche dati fatture o da altri programmi.
Previsione finanziaria
- Se necessiti di creare un preventivo puoi attivare la funzione aggiungendo la tabella Preventivo.
- Lavori con la stessa metodologia basata su Entrate e Uscite, a te già familiare.
- Previsioni finanziarie completi di piano della liquidità
- Previsioni per le categorie delle tue Entrate e Uscite.
- Se devi fare degli investimenti a lungo termine puoi creare la Proiezione automatica su più anni.
- Crei la tua pianificazione tramite delle semplici registrazioni di preventivo.
- Entrate e uscite ricorrenti impostate con una sola registrazione.
- Tutte le funzionalità disponibili in contabilità:
- Formule di calcolo in Javascript con accesso ai valori della previsione in corso:
- Valori di previsioni disponibili nelle stampe contabili:
- Scheda conto con movimenti di previsione per conto o gruppo.
Rendiconto della liquidità ed economico
- Rendiconti con dati consuntivi, o preventivi oppure con entrambi i dati con indicazione degli scostamenti.
- Disposizione libera con gruppi e sottogruppi.
- Risultati aggiornati visibili direttamente nella tabella conti.
- Stampe personalizzabili:
- Aggiunta del proprio logo.
- Scelta delle colonne da includere.
- Scelta delle sezioni da includere.
- Stampa dettagliata o raggruppata.
- Stampe per solo un periodo.
- Colonne con suddivisione per periodo (mese, trimestre, semestre, anno).
- Valori anno precedente.
- Valore di previsione confronto.
- Colonne con suddivisione per segmento.
- Aggiunta note allegate.
- Raggruppamento come nel piano dei conti o secondo un proprio schema.
- Salvataggio della personalizzazione.
- Report tabellare (simile alle stampe personalizzabili, ma con i dati presenti nella tabella).
- Esportazione in pdf o altri formati.
Altre stampe contabili
- Contenuto tabelle completamente stampabile o stampa anche solo per selezione.
- Aggiunta del proprio logo.
- Giornale.
- Schede con movimenti conto, categorie e gruppi:
- Con i movimenti contabili o quelli di previsione.
- Per periodo.
- Per Conto, Categorie, Gruppo, Centro di Costo o Segmento.
- Dati contabili o di previsione.
- Disposizione colonne personalizzabile.
- Esportazione in pdf o altri formati.
Grafici
- Contestuali, a piè di tabella.
- Diverse disposizioni.
- Evoluzione dei conti, delle categorie e dei gruppi.
- Valori contabili.
- Previsione.
- Anno precedente.
- Scelta del tipo di grafico.
Ulteriori gestioni
Il programma ti consente anche di aggiungere ulteriori informazioni alle registrazioni, in modo che gli stessi dati ti servono anche per la gestione IVA, per il controllo dei clienti e fornitori, emissione di fatture, avere rendiconti per progetti o settori d'attività e fare fronte ai diversi adempimenti societari e fiscali.
Gestione IVA
- Funzione attivabile a scelta (quando si crea una contabilità).
- Tabella codici IVA per indicare le diverse aliquote e casistiche IVA.
- Supporta qualsiasi specifica nazionale.
- Può essere usato anche per gestire altri tipi di tasse di vendita (p.es. Sales tax Americana).
- Inserimento in registrazione del Codice IVA.
- Funzionalità di storno IVA (usando il Codice IVA preceduto dal segno meno).
- Calcolo IVA dal netto o dal lordo.
- Scomposizione e registrazione automatica sui conti o categorie IVA indicati.
- Rendiconti IVA di controllo:
- Per periodo o completo.
- Con o senza movimenti.
- A scelta con totali per aliquota, codice IVA, conto.
- Estensioni nazionali per rendicontazione IVA in base ai requisiti delle autorità fiscali.
Gestione e controllo clienti
- Funzione attivabile a scelta (aggiungendo i conti nel piano dei conti, tabella Conti).
- Controllo fatture e pagamento dei clienti.
- Anagrafica cliente impostata nel piano dei conti.
- Crea gruppi e totali per clienti in gruppi diversi.
- Fatture aperte per cliente o completa.
- Estratto conto movimento cliente e fatture aperte.
- Riconciliazione automatica, fatture aperte.
- Gestione clienti anche come Centri di costo (per principio di cassa).
Fatture ai clienti
- Funzione attivabile a scelta (utilizzando la colonna numero fattura nella tabella registrazione)
- Inserimento fatture direttamente nella tabella Registrazioni.
- Richiede l'impostazione dell'anagrafica clienti.
- Inserimento dei dati fatture come normali righe di registrazioni.
- Vedi emissione e stampa fatture ai clienti.
- Colonna per indicare quantità e prezzi.
- Con o senza IVA.
- Possibilità di modifica, correzione.
- Stampa della singola fattura con un click o di diverse fatture assieme.
- Scelta fra diversi layout di stampa.
- Personalizzazione della fattura in base alle proprie preferenze.
- Esportazioni in formato digitale tramite estensioni.
- Richiami personalizzabili con estensioni.
- Estratti conto clienti personalizzabili con estensioni.
Gestione fornitori
- Funzione attivabile a scelta (aggiungendo i conti nel piano dei conti, tabella Conti).
- Anagrafica fornitori impostata nel piano dei conti.
Possibilità di raggruppare i fornitori in gruppi diversi. - Controllo fatture e pagamento ai fornitori.
- Fatture aperte per fornitore o report completo.
Estratto conto movimento fornitore e fatture ancore aperte. - Riconciliazione automatica, fatture aperte.
Centri di costo e di profitto
- Funzione attivabile a scelta (aggiungendo i conti centri di costo e profitto nella tabella Categorie).
- Per progetti, contabilità costi o di redditività.
- Impostazione dei centri di costo direttamente nella tabella Categorie.
- Raggruppamento multi-livello.
- Tre livelli di centri di costo e profitto.
- Numero illimitato di centri di costo per livello.
- Registrazione in negativo (con segno meno).
- Reportistica e Rendiconto abbellito per i conti patrimoniali ed economici:
- Saldo costantemente aggiornato.
- Report personalizzabili.
- Scheda di tutti i movimenti con saldo progressivo.
- Grafico contestuale.
Segmenti
- Funzione attivabile a scelta (aggiungendo i conti segmenti).
- Per avere il Rendiconto patrimoniale ed economico per uno o più settori aziendali.
- Impostazione dei segmenti direttamente nella tabella Conti o Categorie
- Raggruppamento multi-livello.
- Fino a 10 livelli di segmento.
- Numero illimitato di segmenti per livello.
- Saldo costantemente aggiornato.
- Reportistica e Rendiconto abbellito per i conti patrimoniali ed economici:
- Rendiconto per ogni segmento.
Tabella Articoli
- Per fatture e con gestione integrata di magazzino o dei titoli.
- Collegamento degli articoli ai movimenti della tabella Registrazioni.
- Aggiornamento automatico movimenti in entrate e uscita.
- Valore iniziale e finale.
- Aggiunta di ulteriore colonne.
Controllo e chiusura
Segnalazioni errori e controllo contabilità
- Comando per controllare la contabilità.
In un attimo, la contabilità viene ricalcolata come se si inserissero tutte le operazioni nuovamente. - Segnalazione di eventuali impostazioni sbagliate, differenze o errori.
- Ogni segnalazione è collegata a una pagina di aiuto che spiega le cause e la soluzione.
- Verifica se il saldo del conto corrisponde a quello reale (cassa, banca, IVA).
- Possibilità di correggere.
Protezione delle registrazioni
- Protezione righe.
- Blocco dei movimenti inseriti con tecnologia di certificazione dati digitale (tipo Bitcoin).
- Protezione con password.
- Conforme ai requisiti di legge.
- Invio dati al revisore con la certezza dell'impossibilità di manomissioni.
- Sblocco movimenti con data.
Chiusura e nuovo anno
- Procedura automatica per creare il file del nuovo anno.
- Riporto dei saldi iniziali per i conti patrimoniali
- Si può iniziare a lavorare sul nuovo anno, anche se non è stato chiuso il precedente.
- Comando per riprendere i saldi definitivi quando è stato chiuso l'anno precedente.
Esportazione e archiviazione dati
- Copia e incolla direttamente da e per Excel.
- Esportazione tabelle in pdf e diversi altri formati.
- Archiviazione delle stampe e dei dati contabili in pdf o altri formati.
- Estensioni per creare gli Standard Audit File.
- Salvataggio del file contabile su qualsiasi supporto.
Estensioni e altre funzionalità
Aggiunta funzionalità
- Aggiunta di nuove funzionalità.
- Rimozione di funzionalità non più necessarie.
- Conversione da un tipo contabile a un altro:
- A contabilità con o senza IVA.
- A contabilità con multi-moneta o viceversa.
- Da contabilità entrata e uscite a doppia o viceversa.
Tabella Documenti
Altre Tabelle aggiuntive
- Aggiunta di altre tabelle dove inserire delle note o altre informazioni.
- Le tabelle possono essere personalizzate aggiungendovi colonne.
Estensioni
- Estensioni predefinite per diverse stampe e altre funzionalità.
- Ricerca e istallazione veloce.
- Estensioni personalizzabili.
- Aggiornamento automatico.
- Possibilità di creare e istallare delle proprie estensioni locali.
Documentazione completa
- Ogni dialogo ed errore ha una propria pagina di documentazione accessibile con un click.
- Documentazione aggiornata costantemente.
- Domande e risposte.
- Documentazione disponibile anche in formato Pdf.
The income & expense chart of accounts
Estate accounts are entered in the Accounts table. Only one account is entered in the cash register (cash, bank, postal account ...); In Income/Expense accounting more accounts are entered (cash, customers, suppliers ...) and the accounts that refer to existing debt must have the opening amount with preceded by the minus sign (-).
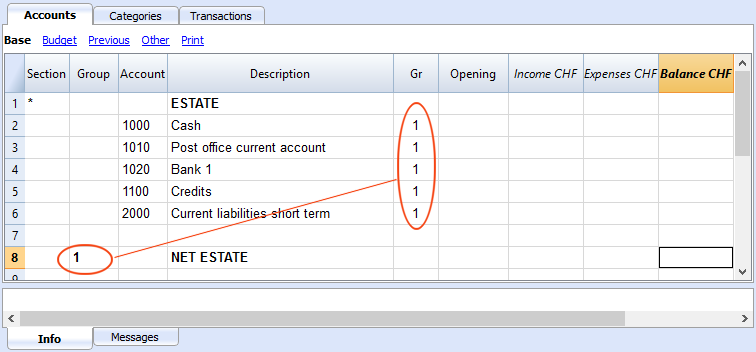
The columns of the Accounts table:
Section
Enter an asterisk to signal a section change. For example, to distinguish Total Assets from Cost Centers.
Values must be entered in the Sections table for presenting the enhanced Statement with groups.
Refer to the Sections page for further details and information.
Group
Values are added up for the categories that have the same GR. They are fundamental for totalization.
Account
Enter the number or initials of the account to be managed (cash, bank, post).
Description
Enter a description for the relative account.
Gr
Enter a value that identifies the category belonging to a specific group.
Opening
Entering an account balance is only necessary if a new file is opened or Banana Accounting 9 software is used for the first time. When creating a new accounting year, balances will be generated automatically.
Income
This locked column displays the balance of incoming entries. The balance will be updated automatically after each registration.
Expenses
This locked column displays the balance of expenses. The balance will be updated automatically after each registration.
Balance
This locked column displays the balance resulting after income and expenses. The balance will be updated automatically after each registration.
Opening balance
The first time Banana Accounting 9 software is used and new file is created, opening an account balances must be entered manually in the Accounts table Opening column.
Balances for Liabilites accounts must be entered preceeded by a minus (-) sign.
When creating a new accounting year, balances for the new year will be generated automatically.
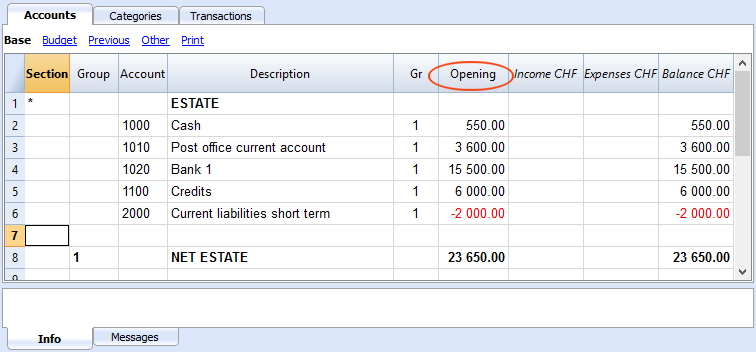
The income & expense categories
The headings for Income and Expenses are entered in the Categories table via two principal groupings, which may - in their turn - contain subgroups. The set of categories will determine the profit or loss for the accounting period.
Groupings:
In the example below, there are three principal groupings:
- Group 3 - Total for Categories that have 3 in their Gr column (total Income)
- Group 4 - Total for Categories that have 4 in their Gr column (total Expenses)
- Group 00 - Total for groups 3 and 4 (Total Income and Expenses), which will determine the result for the accounting period.
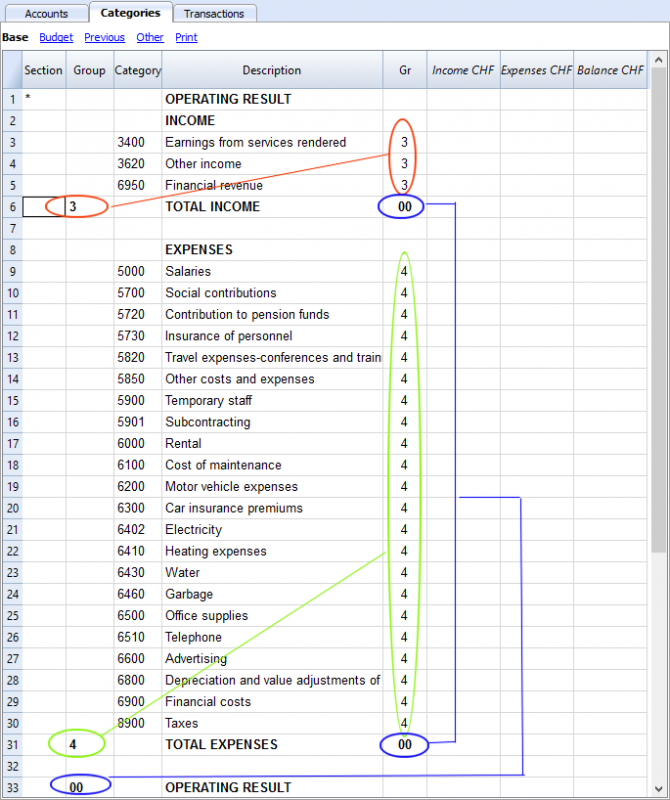
The columns of the Categories table:
Section
Enter an asterisk in the row that contains the title, to signal a section change, that will be displayed in the enhanced Statement with groups.
(the asterisk is inserted in the "Operating Result" title row in our example).
If different sections than Income and Expense are planned, such as Cost and Profit centers, another asterisk may be entered on the respective title row. Refer to the Sections page for further details and information.
Group
Enter an identifier (numerical or sign) identical to the one entered for each category in the GR column. The totals for each category belonging to the same GR will then be added up (in our example, Group 3 totals the Income Category and group 4 the Expenses category)
Description
Enter a description for the relative Income or Expense Category.
GR
Each Category has an identifier that allows the establishment of the totals for the relevant Group (in our example all categories of Income are GR3, because they will be total in Group 3, Total Income.
Income
This locked column displays the balance of incoming entries. The balance will be updated automatically after each registration.
Expenses
This locked column displays the balance of expenses. The balance will be updated automatically after each registration.
Balance
This locked column displays the balance resulting after income and expenses. The balance will be updated automatically after each registration.
Registrazioni del Preventivo
Tabella Preventivo
Nella tabella Preventivo si esegue la pianificazione finanziaria.
Le previsioni vengono inserire come se fossero delle normali registrazioni, come nella tabella Registrazioni.
Si possono anche inserire Quantità e Prezzi e anche delle Formule di calcolo.
Per maggiori informazioni sul Preventivo, consultare la pagina Tabella Preventivo.

Transactions income & expense accounting
Avoid mistakes with Banana Accounting Plus
In order to facilitate checking your accounting work and to immediately find differences, in Banana Accounting Plus, our new version, we added the Balance column in the Transaction table. You can now see potential differences on each row and you can correct them right away. It is a very useful feature when closing the accounting period.
Many of our clients have already tried it and are enthusiastic about it. We advise you to switch now to Banana Accounting Plus and take advantage of the many new features.
Transactions table
The transactions are entered in the Transactions table.
For every transaction enter the date, document number, description, incoming or expense, the account and the category.
- Income/Expenses: enter the amount coming in or going out.
- Account: enter one of the Estate accounts (cash, bank, post, clients, suppliers...).
- Category: enter an income or expense category.
Speeding up the recording of the transactions
In order to accelerate the recording of the transactions, you can use
- The Smart fill function that allows the automatic autocomplete of data that have already been entered at an earlier date.
- The Recurring transactions function, used to memorize recurring transactions into an appropriate table.
- Importing bank or post office statement.
Transactions with several bookings
When faced with operation involving several bookings, you need to enter them on several rows. We call them composed transactions.
In the following image (Doc n. 11) you can see an example, where multiple invoices are paid through the bank.
- Enter the same date and the same document number in all the rows that affect the same transaction. This allows you to easily locate a transaction with multiple bookings.
- In the first row, enter the total amount in the Expenses column if it is a payment, or in the Income column if it is deposit.
- In the Account column, enter the liquidity account (account through which you pay or collect). The Category column in the first row remains empty.
- In the following rows, enter the amount of the invoice paid or collected on each row (the Expenses column or the Income column).
Each invoice will be entered on a separate row. The Account column remains empty. - In the Category column, enter the category for each row to identify the entry or entry of the movement.

Examples of transactions without VAT
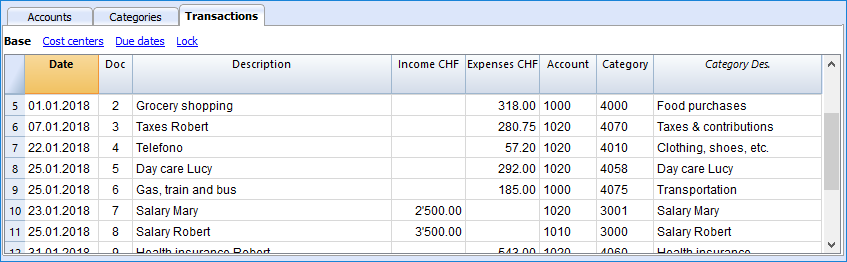
The columns of the Transactions table
Date
Enter the date for the transaction of Income or Expense
Doc
Enter Doc number. The number of the paper document is normally assigned here; this will facilitate retrieval of documents at later dates.
Description
Enter a description for the relative Income or Expense.
Income
Enter Income amount.
Expenses
Enter Expense amount.
Account
Enter the Estate account (cash, bank, Post, clients, suppliers..).
Category
Enter a category of Income or Expense, as defined in the Category table.
Examples of transactions with VAT
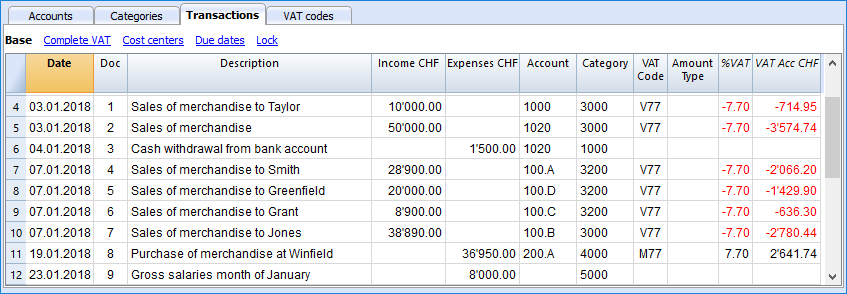
Additional columns
Depending on the type of Income / Expense accounts setup (with or without VAT) there are additional columns where VAT data is entered.
VAT Code
Enter the VAT code referring to a sale or a cost. There must be a code in the VAT Codes table.
Refer to the Transactions page for explanations of VAT codes and further information.
In the Account and Category columns, instead of entering the account and category number you can also write the text you wish to find.
The software will show you the list with all the accounts and categories containing the entered text. With the Arrow down key you can move directly in the list and select the desired account number by pressing the Enter key.
In order to display the movements of an account or a category, after entering the transactions, click on the small blue symbol in the account/category cell (top right corner of the selected cell).
Account and category card
In the account or category card, the presentation of the transactions is very similar to the ones of the Transactions table. If you enter further transactions or make changes (always operated in the Transactions table), you can update the account/category card by clicking the Refresh icon on the right side of the screen.
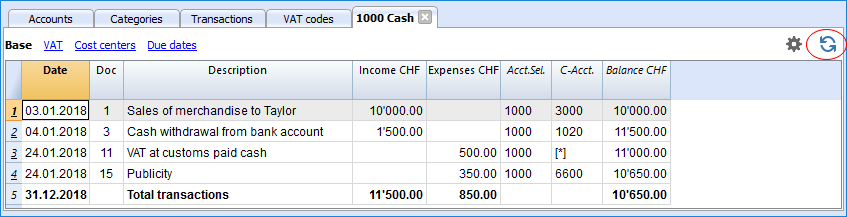
Kreditkartenbewegungen erfassen
Kreditkartenkäufe werden immer häufiger getätigt, nicht nur in Unternehmen, sondern auch in Familien. Um eine bessere Kontrolle der Ausgaben der mit Kreditkarte getätigten Einkäufe zu haben, ist es notwendig, die Bewegungen in der eigenen Buchhaltung zu erfassen. In diesem Zusammenhang muss in der Tabelle Konten ein Kreditkartenkonto vorhanden sein und falls nicht, muss es hinzugefügt werden.
Erfassung der erfolgten Anzahlungen
Das Kreditkartenkonto ist ein Debitkonto und es wird in der Tabelle Konten eingegeben.

In den Einnahmen-Ausgaben-Rechnungen muss jede Anzahlung wie folgt gebucht werden:
- Geben Sie das Datum und die Beschreibung ein.
- Tragen Sie in der Spalte Ausgaben den ausgehenden Betrag vom Bankkonto oder einem anderen Liquiditätskonto ein.
- Geben Sie in der Spalte Konto das Konto ein, von dem aus die Einzahlung geleistet wurde (Bank, Post).
- In der Spalte Kategorien, ist das Kreditkartenkonto einzugeben.
Wenn nach Erhalt der Kreditkartenrechnung die Ausgaben durch die Anzahlungen (Akonti) gedeckt sind, müssen Sie Ihre Kreditkartenbewegungen verbuchen, um die angefallenen Kosten zu erfassen und das Guthaben zu stornieren.
In diesem Fall wird auf mehreren Zeilen gebucht:
- Geben Sie für jede Bewegung immer das gleiche Datum ein (verwenden Sie das Ausstellungsdatum der Kreditkartenrechnung).
- Wenn eine Dokumentnummer eingegeben wurde, ist die selbe Nummer bei allen Buchungszeilen zu verwenden.
- Geben Sie die Beschreibung ein, die die Art des Einkaufs angibt (auch die im Ausland getätigten Einkäufe).
- In der Spalte Ausgaben (eine Zeile pro Kosten), ist der Totalbetrag der Kreditkartenrechnung einzugeben.
- In der Spalte Konto das Kreditkartenkonto eingeben.
- Erfassen Sie in den folgenden Zeilen der Spalte Ausgaben den Betrag von jeder einzelnen Ausgabe.
- In der Spalte Kategorien ist für jede Bewegung, also in jeder einzelnen Zeile, die Kategorie die sich auf den entsprechenden Kauf bezieht, einzugeben.
Nachdem alle Transaktionen eingegeben wurden, überprüfen Sie den Saldo des Kreditkartenkontos, indem Sie einfach den Kontoauszug öffnen.
Hinweis: Wenn die MwSt-Abrechnung nach vereinnahmten Entgelten erfolgt bzw. die Rechnungen bei Erhalt gebucht werden, werden gleichzeitig die Schuld der Kreditkartenrechnung wie ein üblicher Lieferant gebucht als auch die Kosten der Kreditkarte.
New Year
You can automatically transfer to the New Year in the following ways:
- Open the file of the terminated year and click on the Create New Year command from the Account2 menu.
- Confirm the basic data of the Accounting properties.
- Save the file under a new name.
The program will automatically carry forward :
- The accounts, the opening balances
- The categories will be carried forward without an opening balance, because you start from scratch, in order to determine the business result for the New Year.
Printouts
Instant information
Account balances, income and expense are on ready display in the Accounts and Category tables.
After each entry of a transaction, balances are adjusted automatically and there is no need to run a report, as you can simply display the Accounts or Categories tables.
Advanced printouts
All printing is run from the Account1 menu, where the different functions for prining are located:
-
Journal by period command. You can display and print the whole table or just a specified period.
-
Account/Category cards command. You may select all cards or define your selection.
Define the required period in the Period tab and click the required settings in the Options tab. Print settings can be saved in the Composition tab so they can be resumed without them to be having defined again. -
Enhanced statement command. You may also print a defined period and various options and compositions may be included.
-
Enhanced statement with groups command. You may also print a defined period and various options and compositions may be included.
-
Accounting report command. The required options are displayed in the Accounts table. Reports are possible for current, previous periods or previous years; each period may contain subdivisions and the compositions can be saved.
Example of printout of Enhanced statement with groups
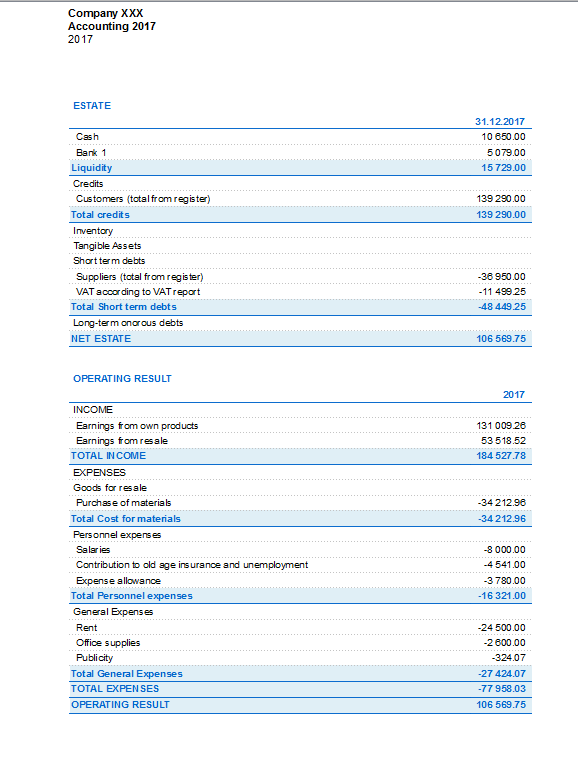
Enhanced statement with groups
This feature is only available in version 7.0.4 or higher. It allows the user to obtain the Enhanced statement with groups, with all the options that are available in the Double-entry accounting.
The Enhanced statement with groups makes it possible to:
- Include all the groups that are present in the Accounts- and the Categories tables nn the printout,
- Exclude groups or accounts individually
- Select a subdivision by period
(for example, in the first semester, one can select to have a subdivision by month or per quarter) - Select a subdivision by segment.
Sections
The sections present in the Accounts- and/or Categories table make it possible to define a set of accounts and categories to be printed with the 'Enhanced statement with groups' command from the 'Account1' menu.
- The sections are indicated in the Sections column of the Accounts- and the Categories table
- An * (asterisk) indicates the beginning of a section
- A ** (double asterisk) indicates the beginning of a subsection
- A # indicates the beginning of the Notes section
- A section ends once the next one begins
- Contrary to the Double-entry accounting, it is not possible to use numerical identications for the sections
- In case no section has been indicated, the program will enter them automatically when the command is used for the first time
- In the Accounts table "Estate"
- In the Categories table "Operating result"
- It is recommended to create separate sections if there are cost centers, segments or clients/suppliers registers.
In this way, it is possible to print reports with just the information that concerns the user.
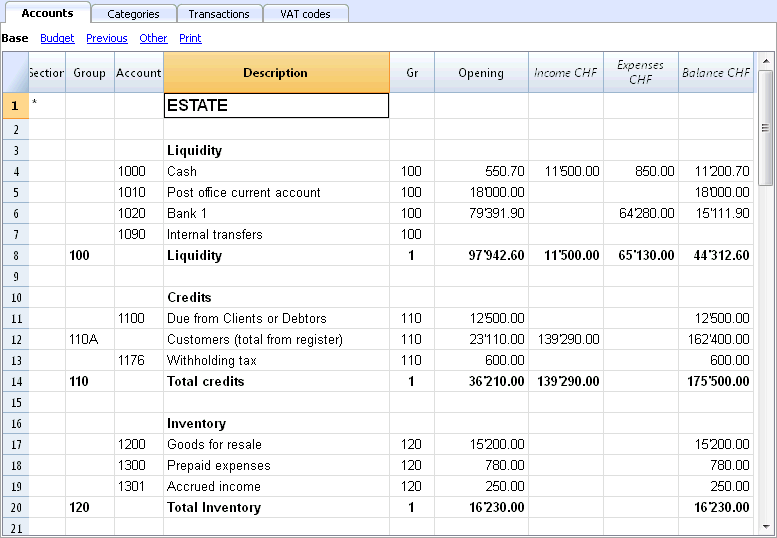
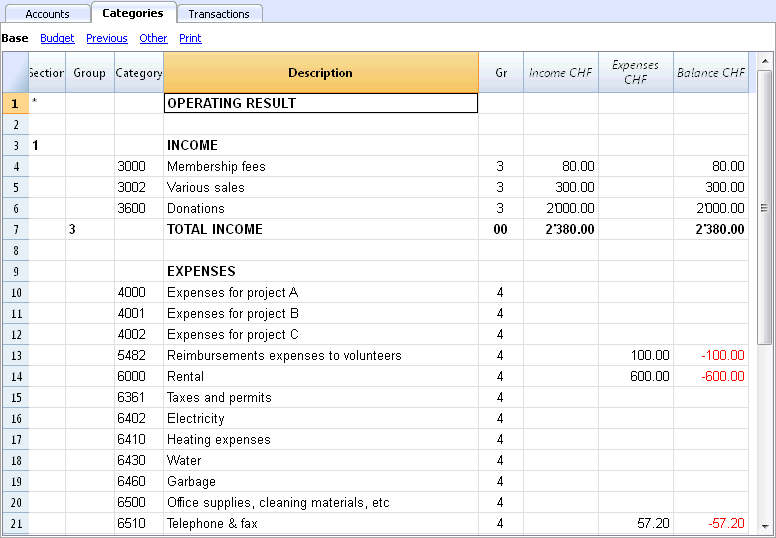
Configurations of Accounts & Categories
In the dialogue window, you can define how to print the accounts and the categories.
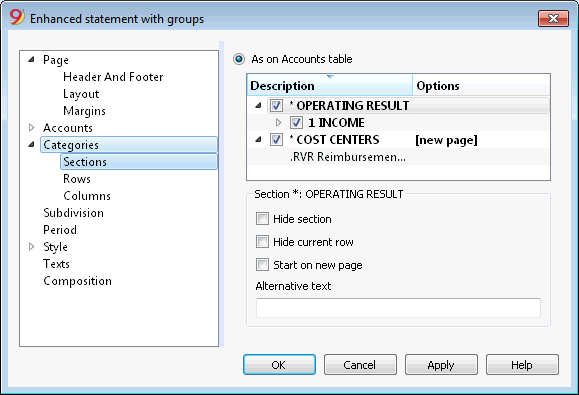
- The accounts, present in the Accounts table, will always be printed with the balances at the end of the indicated period.
- The categories will always be printed with the movements of the indicated period.
Enhanced Statement
- The Enhanced Statement gives an overview of the progression of the Estate situation and the operating result of the year. This function is present in the Income & Expense accounting.
- The Enhanced Statement is calculated and displayed by means of the Enhanced Statement command, from the Account1 menu.
- In the window that pops up, you have the possibility to insert the header that will display on the first page of the Enhanced Statement; furthermore, a series of options can be selected in order to include further details in the printout.
- Transactions without date are being considered as opening transactions and will not appear in the printouts of the Profit & Loss Statement.
See also Print Example.
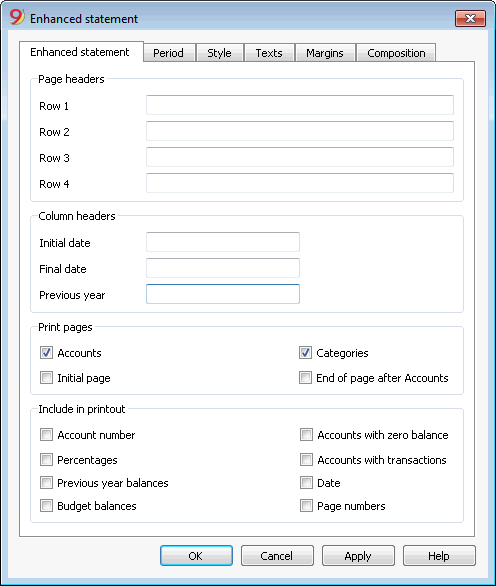
Page headers
Rows 1-4
These rows allow the definition of the Staement's headers.
Column heade
Initial date
Insert the initial date of the accounting.
Data finale
Insert the final date of the accounting.
Previous year
Insert the final date of the previous year's accounting.
Print pages
Checking the boxes you define the options you desire to appear in the statement printout:
Accounts
The accounts will be printed..
Initial page
The initial page of the document with the file headers will be printed.
Categories
The categories will be printed.
End of page after Accounts
The accounts and the categories will be printed on two different pages..
Include in printout
By selecting the boxes, you choose the options that must appear in the printout.
Some of these options are not available (e.g. Budget balances) if a specific period is selected in the Period section.
Other Tabs
The explanations for the other tabs are available at the following pages:
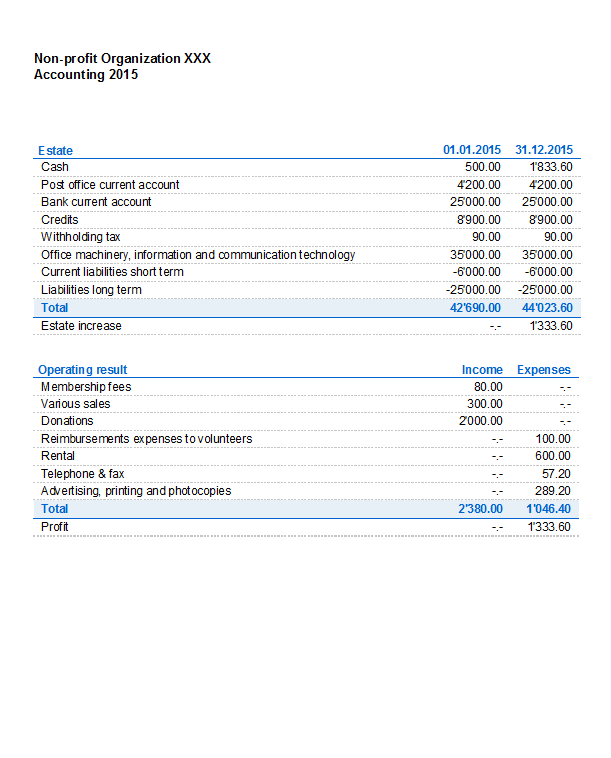
Accounting report
- This command displays the amounts of accounts according to a certain grouping, for a specified period or per subdivision.
- Transactions without date are being considered as opening transactions and will not appear in the printouts of the Profit & Loss Statement.
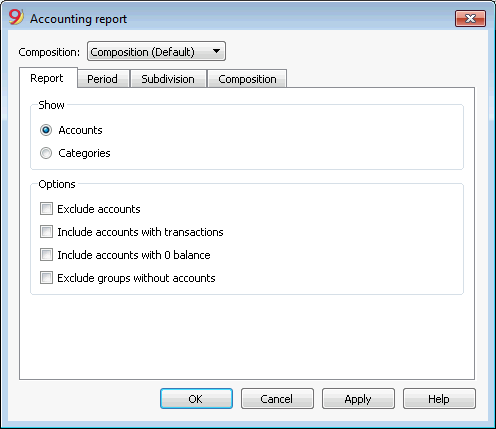
Display
You select the desired grouping scheme:
- Accounts - the Report will show a list of all accounts with the following columns: opening balance, income, expenses and account balance
- Categories - the Report will show a list of all categories with the following columns: opening balance, income, expenses and account balance.
Options
You select the accounts to be included or excluded:
- Exclude accounts - only the categories will be printed
- Include accounts with no transactions - accounts with no transactions will be printed as well
- Include accounts with 0 balance - accounts with zero balance will be printed as well
- Exclude groups without accounts - groups of accounts with zero balance will not be printed.
Other Tabs
The explanations for the other tabs are available at the following pages:
Cash Manager
Introduction
The ideal tool to manage the cash account of small sized companies, associations, private enterprises or project planning.
It can be configured with or without VAT. On the other hand, it does not have the multi-currency functions.
Features
- Manages your cash account, or another estate account and income and expenses
- VAT option allows VAT calculations and VAT tax returns
- Process all your accounting records: accounting journal, account cards, periodical and annual reporting
- Manage the Cost Centers and Segments
- Several possibilites to submit and present your data
- Export to Excel, Html, Xml, Pdf
- Import various types of data files.
Tables and Properties files
The Cash book is part of the Income & Expense accounting type. It contains the following tables:
- Accounts
Where you find the Cash account or another estate account you manage and the relative opening balance. - Categories
Define the categories of Income & Expense here, the Cost Centres and their segments. - Transactions
Record your transactions here. - VAT Codes
If you have selected the VAT option, enter your VAT codes here. By selecting one of the VAT templates, VAT codes will be allocated correctly, allowing you to have a facsimile of your official VAT statement. - File and accounting properties
Manage the general settings of your accounting here.
Immediate information
The account balances will be displayed instantly in the Accounts and Categories tables, after the income and expense recordings.
Balances will be adjusted automatically after each registration of a transaction and you will not need to require a specific report to have an overview of your financial situation, which you can call up via the Accounts and Categories tabs.
Support
- Detailed information on the different functionalities of the program, with concrete examples and screenshots of the software, for your use.
Topics similar to Double-entry accounting
Commands
Printouts
How to Start a Cash Manager
Creating an accounting file, starting from a template
Proceed as follows:
- File menu, New command
- Select the Region, the Category and the Accounting type
- From the list of the templates that appears, select the template that is closest to your own needs.
- Click on the Create button
In the Search area, when entering a key word, the program displays the templates that contain the entered key word.
It is equally possible to start from a blank file, by activating the Create blank file option. In any case, in order to facilitate the start and avoid grouping errors, we recommend that you always start from an existing model.
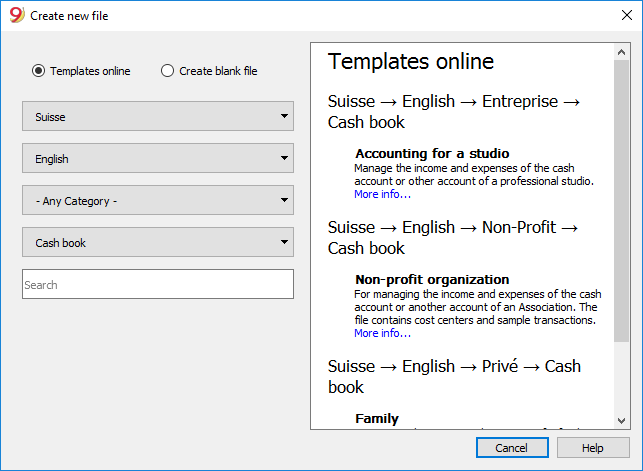
More information on how to create a new file is available on the Create New File page.
Setting up the File properties
Set up your own data from the File and Accounting properties command and save with your own file name.
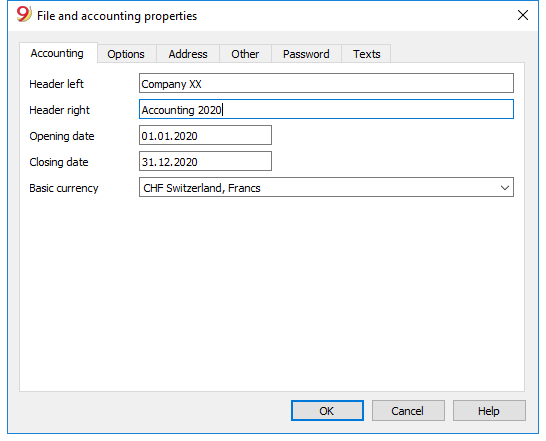
Save to disk
With the File-> Save As command, save the data and also assign a name to the file. The typical save dialog of your operating system appears.
- It is advisable to use the name of the company followed by the year "Company-2020." to distinguish it from other accounting files.
The program will add the "ac2" extension. - You can keep as many accountings as you need, each will have its own name.
- You can choose the folder you want, (for example, Documents -> Accounting) or the support you want like a disk, usb or cloud.
If you also expect to have documents linked to the current year's accounts, it is suggested that you create a separate directory for each accounting year having to group all the files.
Inserting the opening balance of the account
Enter the account you wish to manage in the Accounts table of the Cash Manager and the initial amount in the Opening column. At the start of a new year, activating the Create a new year ... command in the Account2 menu will automatically generate the opening balances to be carried forward.
Only one account can be entered.
Customizing the Categories table
In the Categories table, customize the income and expense categories, according to your own needs. It is possible to:
- change the category numbers
- change the description
- delete categories
- add categories
- insert subgroups
- delete subgroups
All balances of the categories will determine the result of the accounting year (profit or loss) and must therefore not contain any balances at the start of the year.
Add new categories
If new categories need to be added in an already existing group, proceed as follows:
- Insert an empty row (Edit menu, Insert rows ... command) before the Total of the Group
- Insert the number or code for the category in the Category column
- Insert the description that identifies the category
- Insert the identical Gr of the other categories belonging to the Group Total in the Gr column.
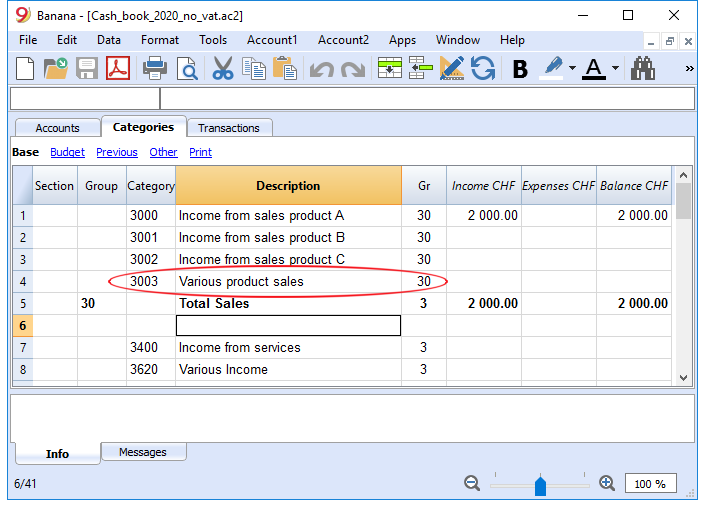
Add subgroups
To add new subgroups, proceed as follows:
- Insert an empty row (Edit menu, Insert rows ... command) where you wish to add a new subgroup
- Insert a number or code in the last empty row of the Group column (in our example 31 - Other income)
- Insert the description that identifies the new subgroup
- Insert the Group Totaling number in the Gr column (in our example 3 - Total sales).
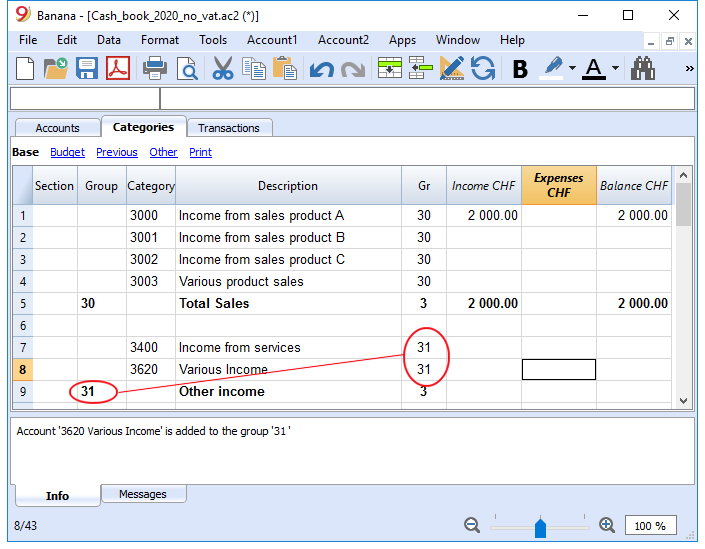
Delete categories or subgroups
Select the categories or subgroups you wish to delete and proceed in the Edit menu, Delete rows ... command to eliminate.
Transactions
In the Transactions table, income and expense transactions are entered, indicating the category to which the income or expense is attributed.
Speeding up the recording of the transactions
In order to speed up the recording of your transactions, you can use:
- the Smart fill function that allows the automatic autocomplete of data that have already been entered at an earlier date.
- the Recurring transactions function (Account2 menu), used to memorize recurring transactions into a separate table.
- import of your bank or postal account statement.
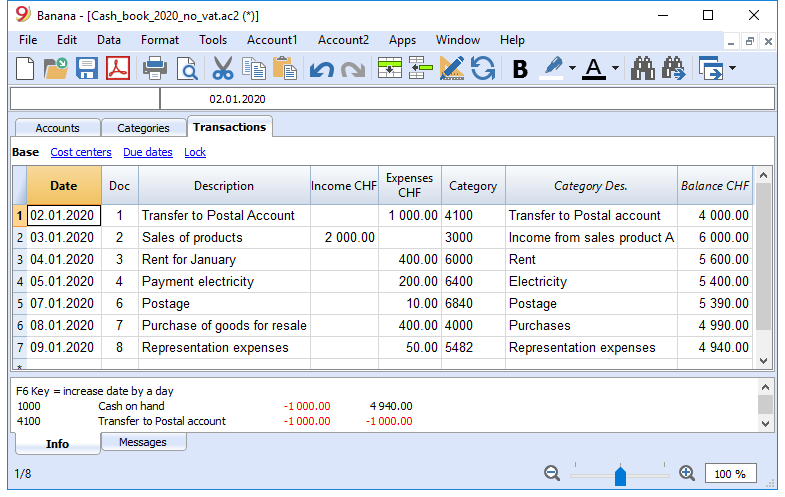
Transactions with VAT
In order to enter transactions with VAT please proceed as follows:
- from the File menu, choose New command and choose Income /Expenses accounting - Cash Manager with VAT/Sales tax
- Choose one of the existing templates for your nation.In order to enter transactions with VAT, please refer to the Transactions page.
The Category or Group card
The Category or Group card allows you to have a complete list of accounting entries relating to the same category or group.
- To open an category or group card you click once on the account number cell and then click once on the small blue arrow appearing in the upper right corner of the cell.
- To open multiple category or group cards you must select the Account cards command from Account1 menu.
- To update the category or group cards, following changes in the Transactions table, you must click on the two circular arrows symbol, located at the top right corner of the account card.
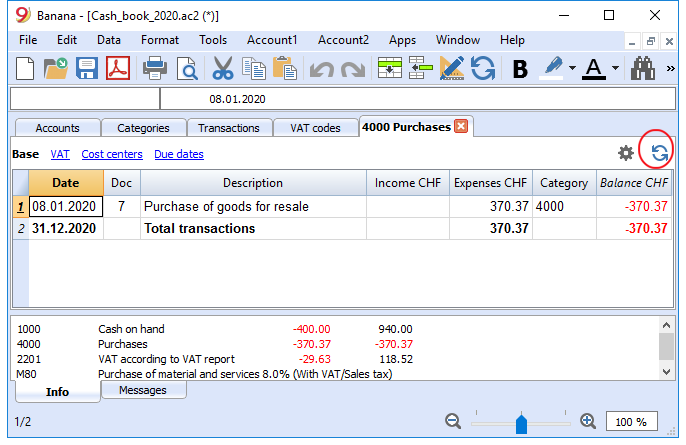
Account cards per period
To open an category cards with account balances referring to a predefined period, click on the Account1 menu, Account/Category cards ...command and click Period selected in the Period tab to insert your selected period.
Consult the Period page for further information.
Print the Category card
To print a Category card, open it from any table (Accounts or Transactions) and start printing from the File menu.
To print out several or all the Account/category cards, click Account1 menu, select Account/category cards and select the accounts/categories you wish to print. The filter in the window allows you to select automatic selection of all categories, cost centers, segments, groups etc ...
For further information refer to the Account Cards page.
Enhanced Statement
To view the Enhanced Statement and the Enhanced Statement with groups, choose the Account1 menu and then the Enhanced statement or Enhanced statement with groups command. You can also obtain statements by period.
- The Enhanced statement displays all accounts and categories without any subgroups
- The Enhanced statement with groups displays all accounts and categories also with subgroups
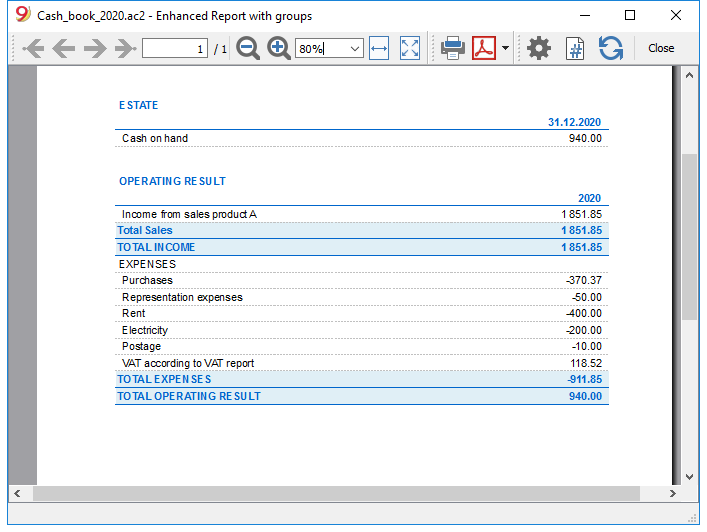
Archive data in PDF format
At the end of the year, when the accounting is done, corrected and revised, you can store all accounting data with the Create Pdf dossier command from the File menu.
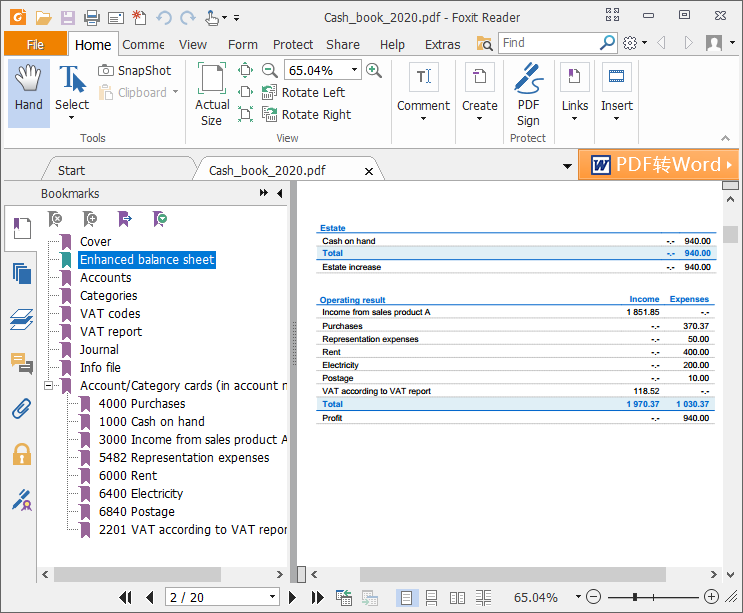
The Budget
Before starting your accounting year, you can create a budget with your assumed expenses and revenue, in order to have control over the financial and economic situation of your company.
The budget can be set in two different ways:
- From the Budget column of the Categories table. For each account the yearly budget is indicated.
In this case, when you process the Budget from the Account1 menu, Enhanced statement with groups command, the Budget column shows the amounts that relate to the entire year. - From the Budget table, that you need to manually activate using the Add new functionalities command from the Tools menu.
In this table all estimates are entered as budget transactions, either income or expenses. If you activate this table, the Budget column of the Accounts table is automatically deactivated.
In the Budget table you can setup a detailed budget that takes into account possible variations during the year and in different periods of the year.
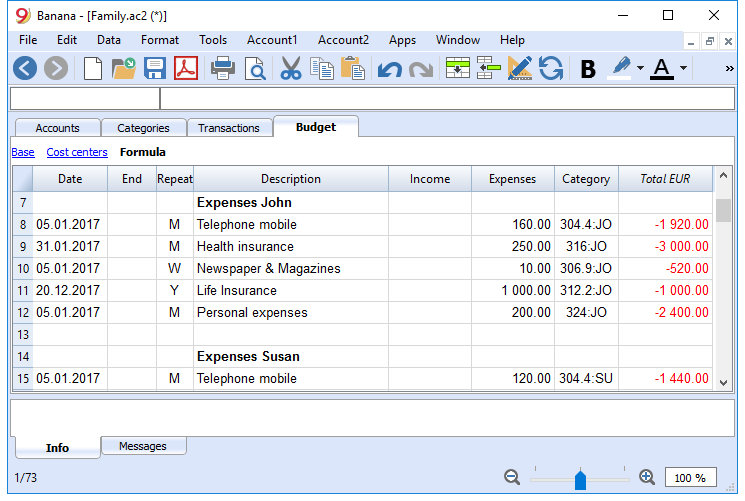
Tabella Conti
La tabella Conti del Cash Manager contiene un solo conto e non è possibile aggiungere altri conti.

Le colonne della tabella Conti:
Gruppo
La colonna rimane vuota.
Conto
Si inserisce il numero o sigla del conto da gestire (cassa, banca, posta).
Descrizione
Si inserisce una descrizione relativa al conto inserito.
Apertura
Solo la prima volta che si usa un file nuovo o si usa per la prima volta Banana contabilità, occorre inserire il saldo di apertura. All'inizio del nuovo anno con l'apertura in automatico, il saldo del conto viene aggiornato automaticamente.
Entrate
La colonna è protetta e riporta il saldo delle registrazioni in entrata. Dopo ogni registrazione il saldo è aggiornato in automatico.
Uscite
La colonna è protetta e riporta il saldo delle registrazioni in uscita. Dopo ogni registrazione il saldo è aggiornato in automatico.
Saldo
La colonna è protetta e riporta il saldo complessivo tra le entrate e le uscite. Dopo ogni registrazione il saldo è aggiornato in automatico.
Caratteristiche del Cash Manager (Libro cassa)
Il Cash Manager è un applicativo di Banana contabilità, completamente gratuito. Possono utilizzarlo tutti, dai ragazzi agli adulti e senza alcuna conoscenza contabile. È semplice e intuitivo, con una struttura a tabelle, simili a Excel.
È ideale per gestire la liquidità di piccole aziende, associazioni, imprese individuali o per gestire progetti. Per alleggerire il file della contabilità, puoi tenere il file della cassa separato e poi periodicamente importare i movimenti, raggruppati per periodo, nel file della contabilità principale.
Grazie al Cash Manager puoi registrare velocemente tutti gli scontrini e con la loro scansione puoi allegare la documentazione in pdf direttamente nel file della cassa. Tutto è ordinato e a portata di mano e se devi controllare qualche movimento, basta un click per aprire il documento.
Le caratteristiche del Cash Manager sono del tutto simili a quelle della contabilità Entrate e Uscite, con la differenza che nella tabella Conti del Cash Manager puoi inserire un solo conto, mentre nella contabilità Entrate e Uscite puoi inserire quanti conti desideri, di natura patrimoniale.
Puoi scoprire tutte le caratteristiche al link seguente:
- https://www.banana.ch/doc/it/node/9731
Tabelle Kategorien
In der Tabelle Kategorien sind die Einnahmen- und Ausgabenposten enthalten.
Folgendes kann frei definierbar eingegeben werden:
- Die Kategorien; Einnahmen- und Ausgabenposten.
- Beliebige Kosten- und Profitstellen.
- Totalisierungsgruppen.
Weitere Informationen zum Gruppierungs- und Totalisierungssystem finden Sie auf der Seite Gruppen der doppelten Buchhaltung.
Im folgenden Beispiel sind zwei Hauptgruppen vorhanden:
- Gruppe 3 - Totalisiert alle Kategorien, welche in der Spalte 'Gr' über den Wert "3" (Total Einnahmen) enthalten
- Gruppe 4 - Totalisiert alle Kategorien, welche in der Spalte 'Gr' den Wert "4" (Total Ausgaben) enthalten
- Gruppe 00 - Totalisiert Gruppen 3 und 4 (Totale Einnahmen und Total Ausgaben) und ergibt das Geschäftsresultat des Buchhaltungsjahres.

Die Spalten der Tabelle Kategorien:
Sektion
In der Spalte 'Sektion' wird dort ein Stern (*) erfasst, wo ein Titel eingefügt wird, der im Formatierten Ausdrucks nach Gruppen übernommen werden soll. Im obigen Beispiel wurde der Stern auf der Zeile mit 'Beschreibung' "Betriebsergebnis" erfasst.
Sind ausser Einnahmen und Ausgaben andere Sektionen vorgesehen, z.B. Kosten- und Profitstellen, wird in der Spalte 'Sektion' der Zeile mit dem Titel ein weiterer Stern eingefügt. Für weitere Details sehen Sie bitte unsere Anleitung Spalte Sektion.
Gruppe
In der Spalte 'Gruppe' werden Identifikationen (Nummer oder Code/Kürzel) eingefügt, welche diejenigen Kategorien der Tabelle Kategorien totalisieren, deren Spalten 'Gr' denselben Wert enthalten. Dies ist für die Totalisierung alle Kategorien mit demselben 'Gr' notwendig (im obigen Beispiel totalisiert die Gruppe 3 alle Einnahmen-Kategorien und die Gruppe 4 alle Ausgabenkategorien).
Beschreibung
In dieser Spalte wird eine Beschreibung für die Identifikation der Einnahmen-Kategorie oder Ausgabenkategorie erfasst.
Gr
Jede Kategorie hat eine Identifikation, die bestimmt, in welcher Gruppe sie totalisiert werden soll (im obigen Beispiel verfügen alle Einnahmen-Kategorien in der Spalte 'Gr' über den Wert "3", um sie in der Gruppe 3 "Total Einnahmen" zu totalisieren.
Einnahmen
Diese Spalte ist geschützt und gibt den Saldo der Einnahmen-Buchungen wieder. Der Saldo wird nach jeder Buchung automatisch aktualisiert.
Ausgaben
Diese Spalte ist geschützt und gibt den Saldo der Ausgaben-Buchungen wieder. Der Saldo wird nach jeder Buchung automatisch aktualisiert.
Saldo
Diese Spalte ist geschützt und gibt den insgesamten Saldo der Einnahmen- und Ausgaben-Buchungen wieder. Der Saldo wird nach jeder Buchung automatisch aktualisiert.
Budget
Für das Eingeben der Budgetwerte sehen Sie bitte unsere Anleitung Einfaches Jahresbudget.
Registrazioni Preventivo
Nella tabella Preventivo si esegue la pianificazione finanziaria.
Le previsioni vengono inserire come se fossero delle normali registrazioni, come nella tabella Registrazioni.
Si possono anche inserire Quantità e Prezzi e anche delle Formule di calcolo.
Per maggiori informazioni sul Preventivo, consultare la pagina Tabella Preventivo.

Transactions
The transactions are entered in the Transactions table.
For further information relative to the columns used in the Transactions table of the Cash book, refer to the Transctions (Income & Expense accounting) page.
For each operation enter the following:
- the date
- the document number
- the description
- the income or expense amount
- the category relevant to the income or expense in the Category table
- should the transaction be subject to VAT tax, enter the VAT code in the VAT code column.
The VAT codes are listed in the VAT codes table.
Speeding up the recording of the transactions
In order to accelerate the recording of the transactions, you can use
- the Smart fill function that allows the automatic autocomplete of data that have already been entered at an earlier date.
- the Recurring transactions function, used to memorize recurring transactions into an appropriate table.
- importing bank or post office statement.
Examples of transactions without VAT
Examples of transactions with VAT
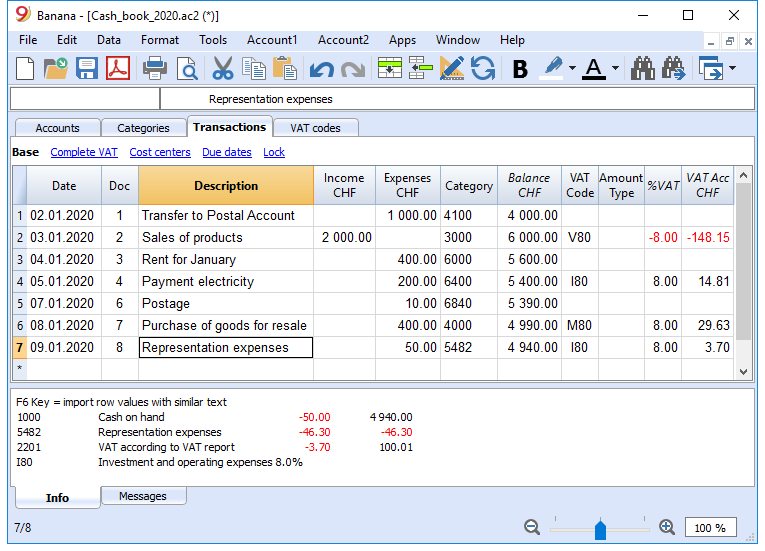
Category card
To display the entries of a category, click once on the small blue arrow appearing in the upper right corner of the cell.
The display of entries in the Categories table is identical to the one in the Transactions table.
To update the category or group cards, following new entries or changes in the Transactions table, you must click on the two circular arrows symbol, located at the top right corner of the category or group card.
Printouts
Instant information
The account balance and those of the income and expense categories are on ready display in the Accounts and Category tables.
After each entry of a transaction, balances are adjusted automatically and there is no need to run a report, as you can simply display the Accounts or Categories tables.
Advanced printouts
All printing is run from the Account1 menu, where the different functions for prining are located:
-
Journal - command to define the period. You can display and print the whole table or just a specified period.
-
Account/Category cards command. You may select all cards or define your selection.
Define the required period in the Period tab and click the required settings in the Options tab. Print settings can be saved in the Composition tab so they can be resumed without them to be having defined again. -
Enhanced statement command. You may also print a defined period and various options and compositions may be included.
-
Enhanced statement with groups command. You may also print a defined period and various options and compositions may be included.
-
Accounting report command. The required options are displayed in the Accounts table. Reports are possible for current, previous periods or previous years; each period may contain subdivisions and the compositions can be saved.
Example of printout of Enhanced statement with groups
Invoicing
New layouts
In the new Banana Accounting Plus version, two new highly customizable layouts have been added:
- The CH10 layout for all users in Switzerland (with or without QR invoice)
- The UNI11 layout for all users in other countries.
We advise you to switch now to Banana Accounting Plus and take advantage of the many new features.
Invoicing integrated in the accounting management
With the invoicing function of Banana Accounting, you will be able to create and print out your invoices very easily, thanks to a series of predefined Invoice layouts that can be customized for each country.
In order to set up your invoices, you must create an accounting file. If an accounting file already exists, you may choose to generate your invoices within it, or you may want to create a new file dedicated entirely to invoice management.
In order to generate your invoices, specific file setups must be present in the accounting file:
 |
|
LogoIt is possible to insert a personalized logo. |
||
|
|
HeadingThe heading of the invoice will be identical to the one entered |
|||
|
|
Client AddressThe client's address will be identical to the one figuring in the Accounts table, where you will have set up the customer accounts with their addresses, learn more on setting up client accounts. |
|||
|
|
Invoice dataThe contents of the invoice must be entered in the Transactions table, learn how to enter invoices. |
|||
|
|
Custom text at endThere is blank space available for you to insert your own comments at the end of your invoice. Use Menu Account2 → Clients → Print Invoices → section Option layout. |
|||
|
|
ISR (Switzerland)Settings to create your ISR policy automatically can only be defined for Switzerland and for layouts that start with CH, please check: Menu Account2→ Clients → Print invoices → Settings. |


Follow these steps to create your invoices:
- Prepare your accounting files for invoicing with Banana Accounting
- Add customer accounts with addresses
- Enter data for your invoices
- Print invoices
Other functions:
- Print invoices in different currencies
- Print invoices in your customer's language
- Define due date of an invoice
- Invoices with the Swiss QR code and reference number (NEW - It is currently released in the Experimental version of Banana Accounting).
- Invoices with the Swiss QR code with empty amount and address (NEW - It is currently released in the Experimental version of Banana Accounting).
Related topics:
- Example file in Income/Expense accounting
- Example file invoices in Double-entry accounting
- Example file invoices using Cost centers
Useful for registering VAT on the cash-in basis or if you want to remove the details of the invoices from the budget accounts.
Setting up the file for managing invoices
New layouts
In the new Banana Accounting Plus version, two new highly customizable layouts have been added:
- The CH10 layout for all users in Switzerland (with or without QR invoice)
- The UNI11 layout for all users in other countries.
We advise you to switch now to Banana Accounting Plus and take advantage of the many new features.
Setting up the file
There are two ways to set up your accounting file for your invoicing
- Create a new accounting file, using an existing template.
- Adapt your existing accounting file.
New Accounting File
Several templates are available, containing a preset ledger of clients. Creating Invoicing is possible in the following accounting types:
- Double-entry accounting.
- Multi-currency accounting.
- Income & Expense accounting.
The listed accounting types may or may not include VAT options.
A new accounting file is created as follows:
- File Menu → New.
- Select the Region and the language.
- Type Invoice in the Filter by field.
- Select a template a template in the right hand section.
- Save your file with a name.
Please follow the instructions contained in the Invoicing documentation.
Adapt your existing Accounting File
If you wish to adapt your existing accounting file for creating your invoices, you will have to add certain functions and settings in order to be able to print them:
Insert the data for your company
- In the File menu -> File and accounting properties... you can setup your company's address and data, which will be used as the header of the invoice.
- To use your personal logo, check instructions here.
Set the list of customers in the Accounts table
-
In the Accounts table, you can setup your customers register
- Add and display customer address columns.
- In the Accounts table, you can select the Address view and enter your customer's data.
- If the Address view is not visible, you can add it using the Tools menu -> Add new functionalities... command -> Add Address columns in the Accounts table.
- Manage your customer settings via the Account2 menu -> Customers -> Settings.
Add the columns you wish to use in the Transactions table
-
Display the columns for Invoicing in the Transactions table:
- Data menu → Columns setup and check the DocType and DocInvoice boxes.
- Add the columns for Quantity and Unit Price (optional).
Tools Menu → Add new functionalities → Add Items Columns in Transactions table. - Add Items table (optional).
This will assist you keep track of your Items and micro-manage your inventory.
Tools Menu → Add new functionalities → Add Items table.
Invoicing managed in a file dedicated to Invoicing only,
If you wish to manage your invoicing separately from your main accounting, you will have to create a new file. You will insert the accounts for the clients you need for the Invoicing only, in your Plan of Accounts. Invoices are entered via the Transactions table.
This approach is suitable for when:
- Accounting on a cash-in basis. Only the the payed amount is entered in the accounting file.
- Wishing to keep the management of your invoices completely separate from your main accounting ledger, for example for an Association that needs to send membership fees to their members.
How to create a separate accounting file for invoices:
- Download the template, open it and adjust it to your requirements.
Alternatively, you may start out with any template and adapt it - as previously indicated - for use with invoicing. - Make sure al setups and and columns are present, as explained above.
Entering the invoice data
Invoice Data is entered in the Transactions table. Use a new row for each new invoice.
- Enter the Date for your transaction.
- The Invoice number.
- The text entered in the Description column (product, services, consulting ...) will appear on the invoice to your client.
- Insert the client number in the Debit column.
- Insert the counterpart in the Credit column (Sales account, Consulting fees etc).
- Enter the Amount.
- If your subject to VAT, enter your VAT code with the respective applicable VAT rate.
Invoices on multiple rows
If there are several elements to your invoice (different items or services, or both) you will have to enter them on separate line (one element per row):
- Use a new row for entering each item you wish to appear when printing your invoice.In
- Use equal dates and invoice number for each row.

Basic columns for Invoices in the Transactions table
Date
The invoices's data is reported in this column. All rows appertaining to the document must report the same date.
Invoice
In order to manage the invoices, it is mandatory that you enter an invoice number in the Invoice column and an account belonging to the customers register.
Extra Columns
Type
In the Type column, you can define detailed rows, such as totalization rows or a specific payment term for an invoice. This column is not visible by default, but must be displayed via the Data menu → command Columns setup and by checking the DocType column.
Quantity
The quantity of goods and services provided is entered in this column. To add the Quantity column use the menu Tools → Add new functionalities→ Add Items Columns in Transactions table.
Unity
Insert unity type (for example 'pz', 'h', 'm', 'kg').
Unit Price
Insert Unit Price for the goods or services. The program will automatically calculate the resulting amount for your input into the Quantity column.
Discounts and rebates
To enter a discount or rebate in an invoice, add a new row and enter:
- Invoice date.
- Invoice number.
- Description of the discount or rebate
- Accounts in the Debit and Credit columns. It is important to invert the accounts compared to the sales transaction.
- In case of VAT, indicate the VAT code with the minus sign, so that the VAT is deducted, or, if present use the VAT code for discount and rebates.

Set customer language
The default layouts include the following languages: Italian, German, English, French, Dutch.
Invoice texts are printed in the customer's language, provided that this is set in the Language column (Accounts table, Address view).
The language is an ISO code generally of 2 lowercase letters (it=italian, de=german, en=english, fr=french, nl=dutch).
In acse no language has been indicated for the customer account, the language of the accounting is used, defined in the File menu→ File and accounting properties (basic data) → Other.

Due dates and payment terms
The due date of an invoice can be set up in different ways:
- Generalized due date - identical due date for all invoices
Select menu Account2 → Customers → Settings → General → Invoices are due, indicate the period (in days) after which the invoice is considered due. As an example, if the date of your document is the 10th of May and you enter a value of 10 days, the due date will be the 20th of May. - Due dates per customer - specific for each customer
In the Accounts table, a DateExpiration column is available (if not on display set up via Data → Columns setup ...). The period (in days) after which the invoice is considered to be due can be set up in this column. - Specific dates per invoice
In the Transactions table a Due dates option allows you to display the Date Exp. column. -
Alternative text for the expiration date
It is possible to define a text of your choice as a payment term for each invoice. This will replace the text of the expiration date. Revert to Advanced input -Type column for detailed information.
Printing invoices in other currencies
You can print invoices in different currencies as well
- You must use a multi-currency accounting file.
- Invoices are printed in the currency of the customer's account.
If you want to send invoices in different currencies to the same customer, you must create accounts in different currencies for the same customer.
Advanced input -Type column
Advanced input -Type columnThe Type column in the Transactions table can be used to define the commands that are relevant to the display for printing data specific to your Invoice.
Check the DocType via menu Data → Columns setup ..., to display the column.
Entering data
Once the column is displayed, you may proceed by entering your data. You will need to:
- Add an empty row after the Date of the Invoice.
- Enter the date of the Invoice in the Date column.
- Enter the required parameter in the Type column (refer to table below)
- Enter the Invoice number in the Invoice column.
- Enter the data relevant to appear on the Invoice in the Description column.
Invoice to the customer
Typing 10: the Type column will list all possible options available to customize the data of your invoice.
| Invoice data | Column Type | Description column |
|---|---|---|
|
Client address If an address different to the one defined in the Accounts table (Address view) is required, it may be specified using the appropriate options. Indicate elements of the address in each row (name, surname, address...). |
10:adr 10:adr:fna |
Enter name |
|
Greetings After the invoice details, you may add a line of text for your final greetings. |
10:gre | Enter your greetings |
|
Final notes One or several rows of notes can be inserted after the details of the invoice and before the greetings. |
10:not | Enter your notes |
|
Parameters (advanced) When wanting to print personalized data on the invoice, you can use the appropriate command. This option is aimed at users with JavaScript programming knowledge, and allows you to change the invoice layout, so as to use the parameters indicated via this command. For further information please revert to Printing custom data. |
10:par | Enter your customized parameters |
|
Payment term Should you want to indicate an alternative text as a payment term, enter the desired text. This will be displayed on the invoice. |
10:ter | Enter the alternative text for the payment term |
|
Title If you do not wish to use the default invoice title, you can choose a different title. |
10:tit | Enter your text to appear as the invoice title |
|
Items subtotals It is possible to enter intermediate totals for your invoice in the table with the details of the invoice. |
10:tot 10:tot:0 |
Enter level 0 subtotal |
Intermediate Totals
In order to insert intermediate totals, you will need to add additional rows in the Transactions table:
- Enter 10 in the Type column: select :tot from the drop down menu, 10:tot will display. Select and enter :1
- Enter the appropriate description in the Description column (ex. Total goods)
- Enter the Invoice number (in the absence of number, the total will not be printed).
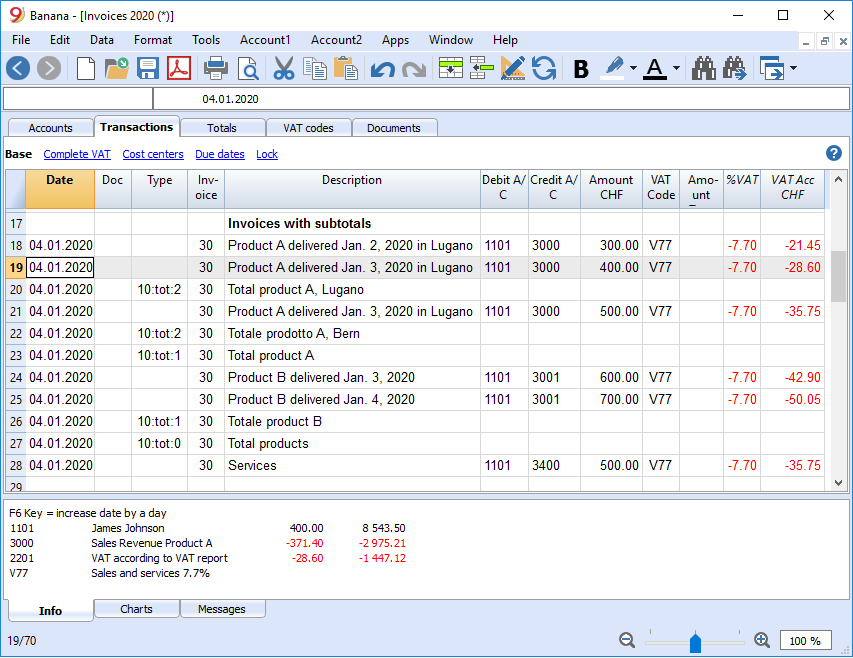
Example of Invoice with intermediate totals.
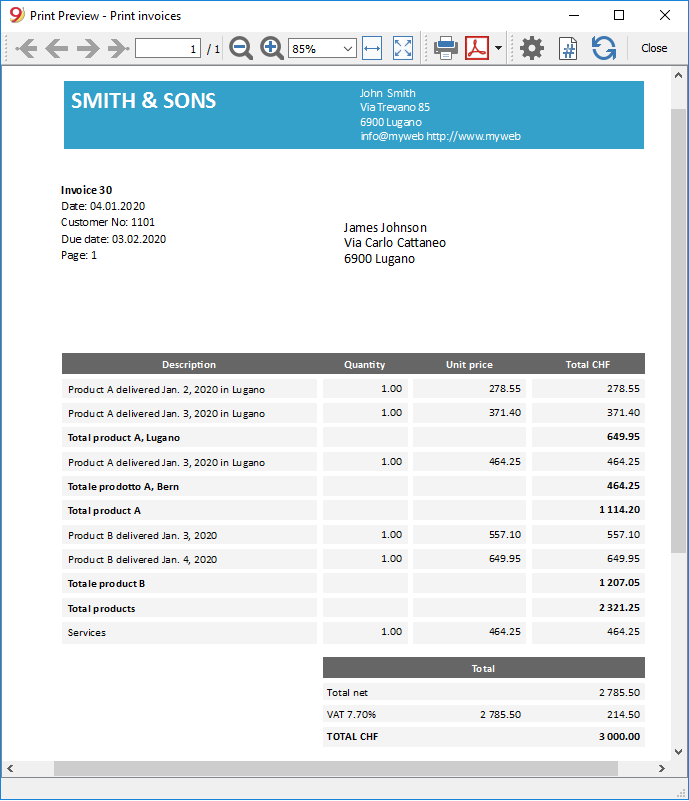
Alternative text for payment terms
It is possible to define your own wording as a payment term for each invoice and this will replace the existing text for the expiry date.
- Enter an additional line with the same invoice number in the Transactions table.
- You will need to enter 10: in the Type column and select :ter from the drop-down menu, select> 10:ter
- In the Description column, enter your text (ex 30 days net, 60 days etc ..).
When the invoice is printed, the value assigned as a payment term will be displayed.
Print invoices
The Print invoices dialog is accessed from the Account2 menu → Customers→ Print invoices...
Once you have chosen the printing options, press the OK button to preview the invoice.
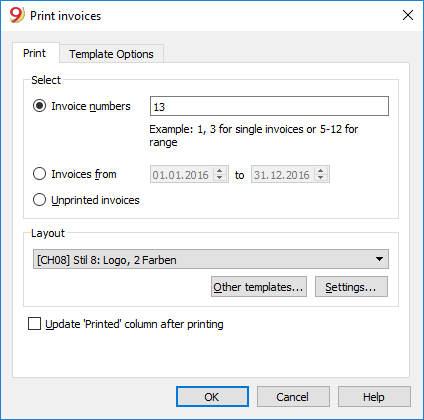
Print tab
Invoice numbers
In order to print single invoices, indicate
- The number of the invoice for a single print;
- The numbers between commas "1,3,6" for multiple prints.
- The numbers separated by hyphen "1-3" to print a range.
If the invoice itself contains a '-', for example if you have an invoice number '2016-1', this must be enclosed in brackets {}, to distinguish the numbering of a range of documents {2016-1}-{2016-3}.
Invoices from
This option allows you to print all invoices included in the selected period. You need to enter an initial and final date.
Unprinted invoices
Invoices where the 'Printed' column of the Transactions table is empty are printed. All unprinted invoices are therefore printed.
Layout
The styles allow you to change the invoice layout. Templates with logos, with quantity column or with ISR slip are available.
Other templates
This button takes you to the Manage Apps dialog window, where you update your templates to the most recent version or to add your own.
Settings
You can setup specific parameters for the selected style, refer to explanations in the Templates page for further information.
The main options are:
Update the 'Printed' column after printing
You can make this column visible by using the Data menu -> Columns setup command.
The program will update the content of this column after the print preview, adding the text '1'. This will allow the Select unprinted invoices command to only print the invoices with no content in this column.
Templates Options tab
In this tab it is possible to add specific texts for every language, such final greetings or your bank details to facilitate the payment.
Depending on the customer's language, the program will display the saved texts for the indicated language at the end of the invoice.
Select the Account2 menu → Customers → Print invoices → Templates options, enter the desired text and then press OK. You will see the print preview.
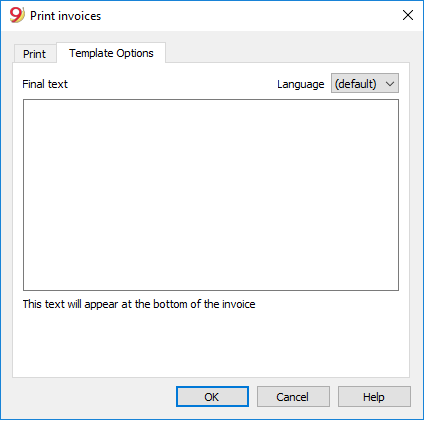
Templates and settings
New layouts
In the new Banana Accounting Plus version, two new highly customizable layouts have been added:
- The CH10 layout for all users in Switzerland (with or without QR invoice)
- The UNI11 layout for all users in other countries.
We advise you to switch now to Banana Accounting Plus and take advantage of the many new features.
Predefined Templates
Several templates for invoicing, sending reminders and reports are available in the program. Printing characteristics are different for each template.
There are some layouts that display amounts with VAT included and others that display amounts net of VAT and add VAT separately to the total.
You can install or remove the templates through menu Account2 -> Customers -> Print Invoices -> Other templates or menu Apps -> Manage Apps.
Change template parameters
For each template some parameters can be set up and changed, such as including (or not) of a header, ISR payment slip (Switzerland only), modifying text- or background colors. Here is how to proceed:
- Menu Account2 -> Customers -> Print invoices
- In the Print section -> Layout, choose the preferred template from the list
- Click on the Parameters button to define your preferences.
Select a different template
- Menu Account2 -> Customers -> Print invoices
- In the Print section -> Layout, choose the preferred template from the list
Update predefined templates
The default templates are being updated automatically, or you can force the update through the menu Apps -> Manage Apps... -> Update Apps.
Create your own customized invoice
To create an invoice App you need programming knowledge, javascript language.
Banana allows you to modify the layout of your invoice; if none of the predefined templates matches your needs, you may create your own by customizing an existing one or by creating one from scratch.
More information can be found here: Create your invoice Layout
Settings of the invoices
By clicking on the Settings button (menu Account2 → Customers → Print invoices), you access the dialog that allows you to change the parameters of the invoice (header, logo, ISR, colors,...).

- Include page header - Check box for Yes or leave empty for No, enter 1 for Yes or 0 for No in versions previous to 9.0.4.
- Print logo - Check box for Yes or leave empty for No, enter 1 for Yes or 0 for No in versions previous to 9.0.4.
- Print ISR - Check box for Yes or leave empty for No, enter 1 for Yes or 0 for No in versions previous to 9.0.4.
Layouts starting with [CHxx] allow for printing in ISR font (Switzerland only). - Bank name - indicate bank name
- Bank address - indicate bank address
- ISR account - ex. 01-9999-9 (enter with dashes).
- ISR subscriber number (ID), ex. 113456 (insert without dashes)
- Character horizontal scaling (optional) - font size - it is normally not necessary to change from the default values
- ISR X-Position and ISR Y-Position (optional) - horizontal and vertical number positions - it is normally not necessary to change from the default values
- Print ISR on new page - Check box for Yes or leave empty for No, enter 1 for Yes or 0 for No in versions previous to 9.0.4.
- Font type - enter font type you wish to use, ex. Arial, Times New Roman, ...
- Background color - Background color may be customized in the header table of the invoice. Predefined value: #005392 (blue).
- Text color - Text color may be customized in the header table of the invoice. Predefined value: #ffffff (white).
Final text
You can enter lines of text in the lower part of the invoice. This can be useful, for example, for entering bank data.
Select Account2 ->Customers -> Print invoices -> Template options. Enter the desired text in the Final text field and confirm with OK to obtain a print preview of the invoice.
Credit notes
Credit notes have their own TypeDoc, different from invoices.
- Enter your transaction, as if it was an invoice.
- Indicate the credit note number in the Invoice column.
The accounts will follow the logic of recording a credit note. As a result, the amount of the document will be negative. - Enter '12:' in the Type column.
- Enter the wording Credit Note instead of Invoice into the Description column.
In some print layouts the wording Invoice will always be printed, to change, proceed as follows:- enter a new row with identical invoice number and 12:tit in the Type column.
- insert Credit Note in the Description column.
Printing the credit note
The same command is used as the one for printing invoices: Account2 → Clients → Print invoices.
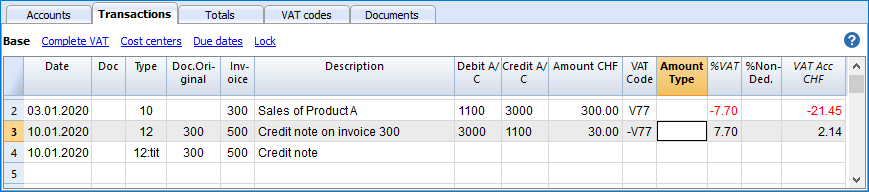
Print payment reminders
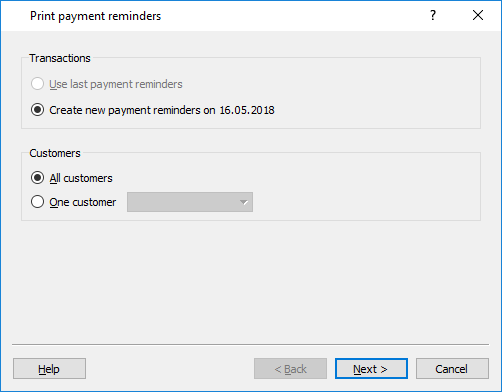
- The program automatically creates the payment reminders from the overdue invoices
- In addition to the printouts, the program directly creates the transactions in the Transactions table, which are used to recreate the issued reminders history.
- These transactions show the document date and the document Type: 16-1 first reminder, 16-2 second reminder and 16-3 third reminder.
Use last payment reminders
If in the Transactions table there are reminder transactions with the indicated date, the program will suggest to print these reminders.
Create new payment reminders
For all expired invoices new reminder transactions are created, that can be then printed.
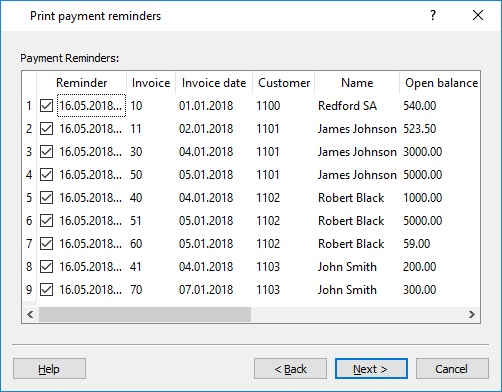
Payment reminders
The program will show the expired invoices, which you can deactivate if you do not wish to send the reminder.
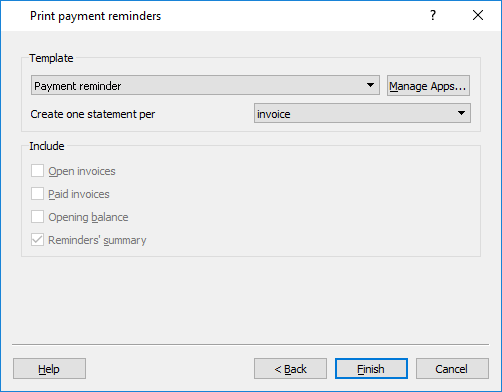
Template
The styles allow you to change the print layout.
Manage apps
Use this button in order to update the templates with the most recent ones or to add you own templates.
Use this button in order to setup the selected style parameters.
Print statements
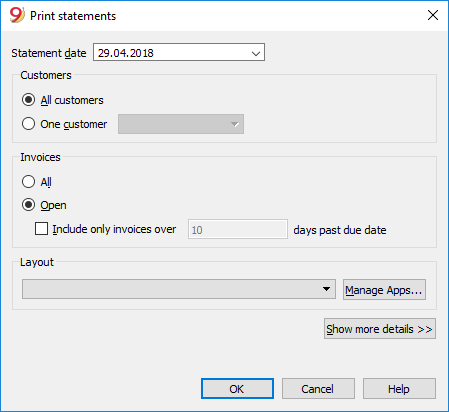
Statement date
This is the date printed on the statement. It is not possible to set up a date prior to the date of the last existing transaction.
Layout
The styles allow you to change the print layout.
Manage apps
Use this button in order to update the templates with the most recent ones or to add your own templates.
Use this button in order to setup the selected style parameters.
Roundings in the invoices
When you print out an invoice in CHF, the total will rounded to the next 5 cents, if necessary. If the total on the printed invoice does not match the transaction amount, the user will be notified of the difference.
If the rounding up of the total amount is not required, select command Account2->Customers->Settings->Advanced in order to set the desired rounding, such as 0.01, which will match the total of the invoice to the transaction amount.
Create the rounding transaction that will be included in the invoice printout, see example:
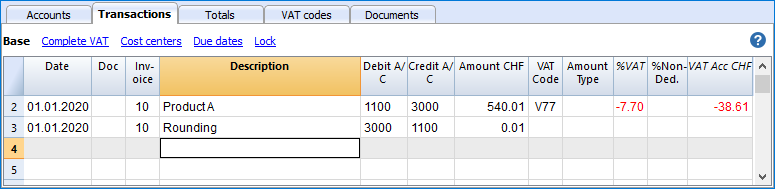
Customers sub-menu
Customers' register and checking of open invoices
Directly in the accounting you can:
- Prepare customers' accounts, with the related addresses and other customers' data.
- Add to the transactions:
- the data related to the issued invoices (invoice number, customer, amount, due date).
- the data related to the payment for the invoices and the issuing of credit notes, if any.
- Retrieve the list of your Payments schedule
Other features available:
Setting up and using the customers and invoices features
- Setting up accounting on actual bills issued (accrual principal) or setting up accounting on a collected cash basis.
- Setting up Customers and Suppliers' settings
- Setting up the Transactions table and entering the invoices
- Reports for open, overdue and issued invoices
- Generating invoices
Notes
- Multi-currency accounts: reports are based on the customer's account currency balances; possible exchange rate differences will not be taken into account.
In the Issued invoices table, the recordings of exchange rate differences are also listed, while in other prints only the customer's currency amount is used. - The Description column will replicate the first for recorded row for each invoice.
- For the accounting files based on cash received, you can setup a customers register with the Cost Centers.
Example file
Customers setup with the accrual method
Introduction
Banana Accounting allows you to manage the accounts and also the customer and supplier invoices both on an accrual basis and on a cash basis.
The following explains how to set up separate accounts for each customer and a group for customers, so that you can have a list of separate invoices per customer available.
In case you only have a few invoices and don't want to keep a detail per customer, you may also keep one account only to record all customer invoices. The list of invoices will thus apply for all customers and not for any single customer.
Setting up the Clients' register
- A * section (header) (see Sections)
- A 01 section for the Clients (see Sections)
- The Clients accounts that are required (see Adding a new account). Each customer will be allocated one row in the Plan of Accounts and a his/her single account number. Account numbers is at your discretion (see Accounts) it is however advisable to use numbers only, especially for the management of payments.
- A group where all customer accounts are totalled.
- This group, in turn, is totalised into a group present in the Assets.
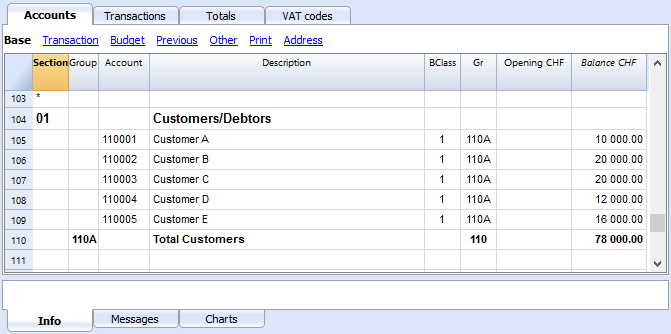
- The total for Clients will be totalised in the summary group 110A of the Gr column.
- The same code or number used for the Gr (110A), must be used in the Assets Group column, in the row corresponding to the Total Customers of the Balance Sheet.
The groups' numbering can be freely chosen (see Groups).
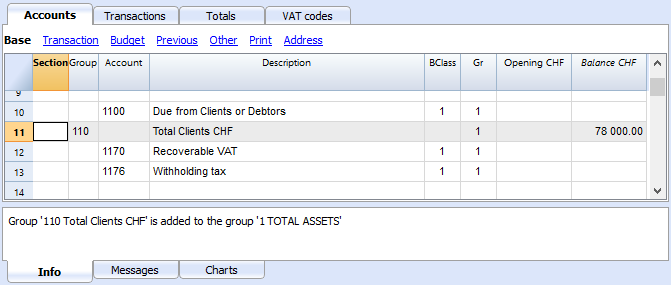
Recording an issued invoice
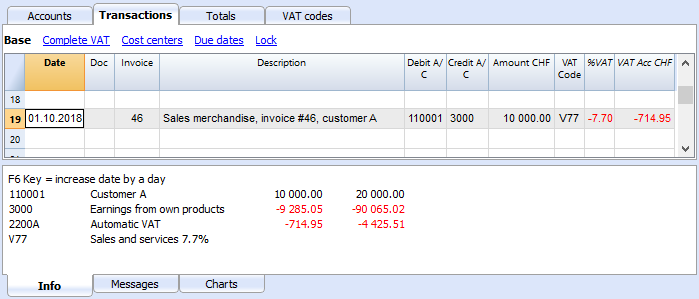
Recording a payment
- Enter the transaction date
- Position yourself in the Invoice column cell and click on the F2 button. If the F2 button doesn't work, you need to activate your customers/suppliers settings, by entering your register's group (ex.: Account2 menu, Customers, Settings). A list of all open invoices will display.
- Alternatively, you may also start by entering the invoice number, the customer/supplier name or the amount, and the program will show you the list of the open invoices according to your search data.
- Select the desired invoice and press Enter.
- The program completes the Transaction with the Description column, the Credit account and the Amount. The program will report a difference if the account number of the counterpart is not inserted.
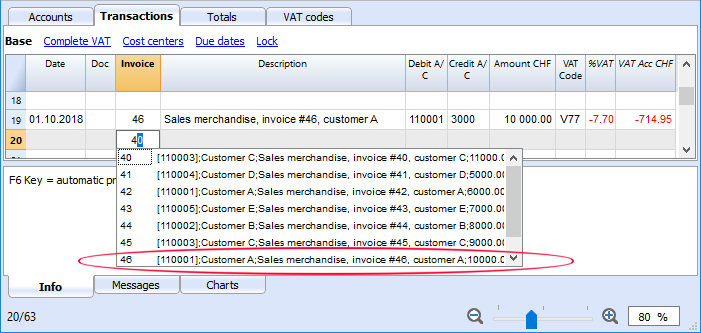
Enter the account into which the invoice amount has been transferred
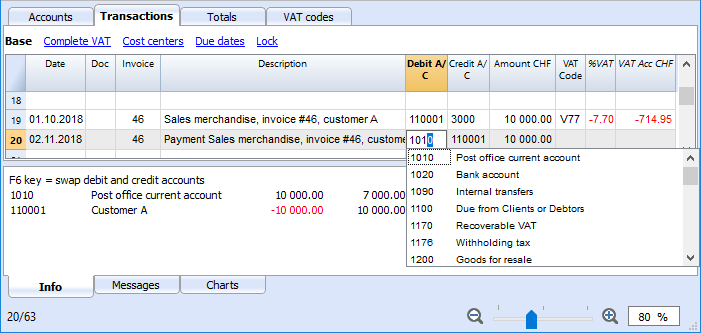
Recording a credit note
In order for the amount to be deducted from the original invoice, the same invoice number needs to be used. If the corrective document (for example, a credit note) presents a different number that needs to remain available, such a reference can be entered in another column, such as Doc. Original. Refer also to Print credit notes.
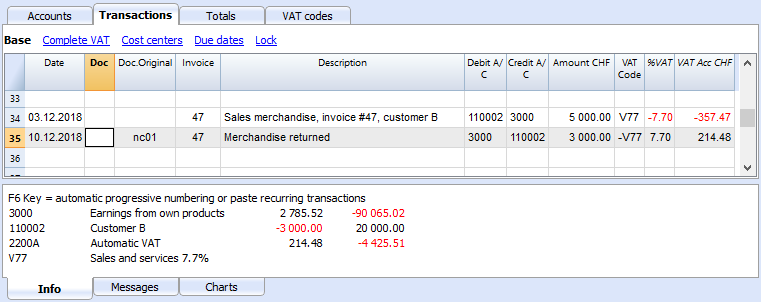
Customers setup with the cash method
Setting up the clients/suppliers register with cost centres
For all Swiss users who manage the VAT on cash received, this setup is the best to manage the VAT.
It is possible to manage the customers/suppliers register as cost centres (see also the Cost and Profit Centers page). A detailed explication is available in the Accounting on turnover or collected page.
- It is advisable to use the CC3 cost centre (where the accounts are preceded by a semi-colon ";")
- The cost centre balances for customers and suppliers will not appear in the Balance Sheet.
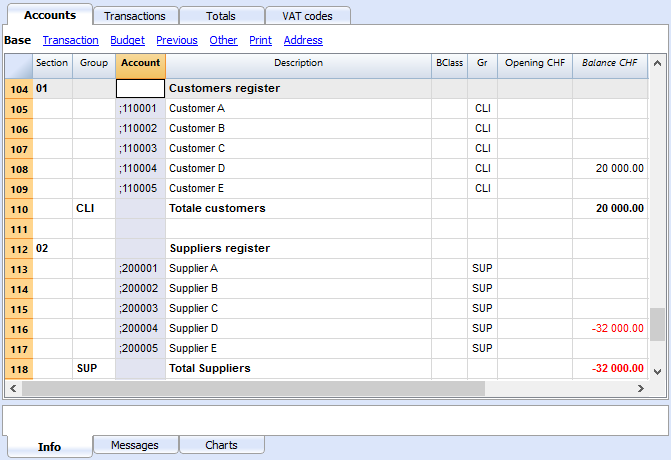
Transactions
More information is available at the page Clients and suppliers with VAT, using the Cash principle.
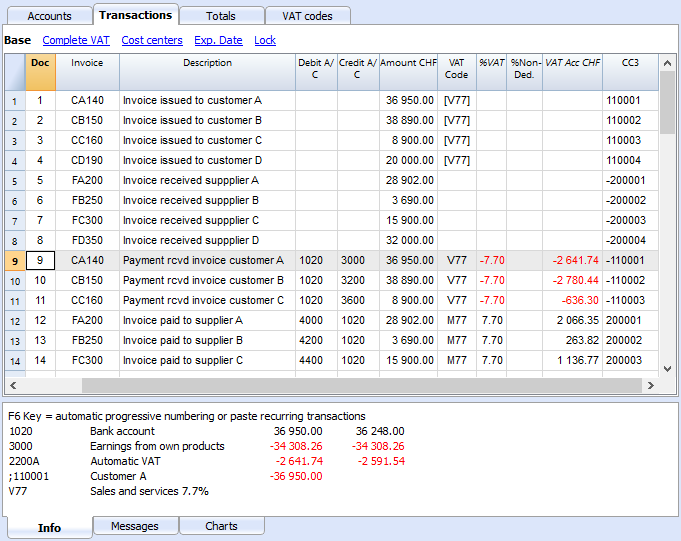
Miscellaneous operations
- Displaying the Invoice column in the Transactions table
- Autocomplete of invoice data
- Extract invoice rows and Open invoice link commands
- Activating the Address columns (optional)
- Setting up the expiration date for invoices
- Setting up the Customers' parameters
Displaying the Invoice column in the Transactions table
The invoice number has to be entered in the Invoice column (DocInvoice) which, in the default settings, is not visible in the Transactions table.
In order to display the column:
- Select the Transactions table
- Data menu
- Columns setup command
- Activate the Visible option for the DocInvoice column
The Invoice columns becomes visible.
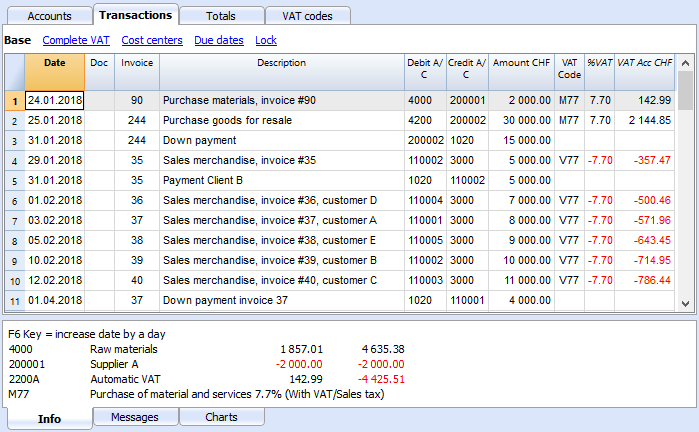
The Open Invoice link and Extract invoice rows commands, described below, are linked to the Invoice column (right click on the Invoice column's cell).
Autocomplete of invoice data
When a payment is being recorded or an issued invoice is being corrected, the program offers suggestions to complete the transaction automatically. Proceed as follows:
- Create a new transaction row and add the date
- In the Invoice column, press the F2 key; the list of open invoices will appear. If you type an invoice number or an account number, the list will be filtered based on the entered text.
- Select the required invoice and press Enter. The program will automatically complete the transaction with the description, debit or credit account and the amount. These data can also be modified manually.
- Apart from the date, you may also indicate the Customer account before pressing F2 in order to display the list of open invoices; in this case the list will be filtered, based on the Customers account of the transaction row.
Note
The list displayed in the Invoice column includes both the Customers' and Suppliers' invoices. A supplier's invoice may have the same number as the invoice of another supplier, because the criterion for display takes into consideration the invoice number besides the Supplier's account number.
The Open Invoice link and Extract invoice rows commands, described hereunder, are linked to the Invoice column (right click on the Invoice column's cell).
Extract invoice rows and Open invoice link commands
The Extract invoice rows command displays the transactions for the selected invoice.
The command is available by clicking on the small blue symbol at the upper right corner of the cell or with the right mouse button.
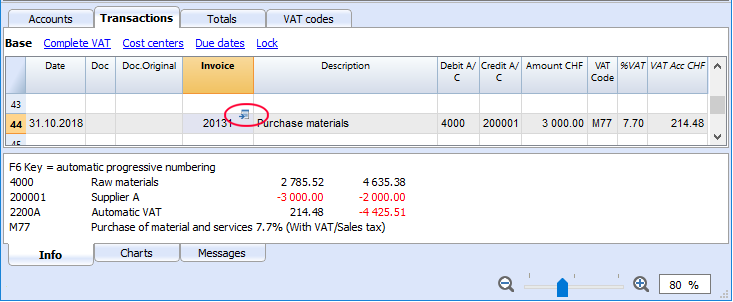
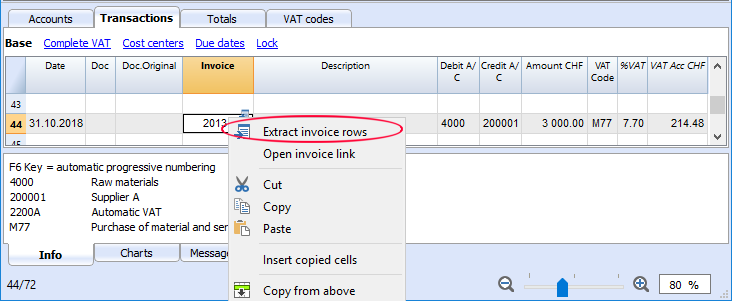
The Open Invoice link command provides the text, as defined in the Customers' settings (Account 2 - Customers - Settings - Advanced - Link to the Invoice document).
For example, if the invoices have been created with Winword and saved in the Documents folder, these files can directly be opened by setting up the command line with the text 'C:\Users\myname\Documents\<DocInvoice>.doc' . The program substitutes <DocInvoice> with the text corresponding to the column and executes the command.
In the command line, it is also possible to indicate other columns of the table by using their XML names.
If the message 'File with extension considered unsecure' is displayed, add the extension (for example .doc) using the command Tools - Program Options, Advanced, File extension command.
Activating the Address columns (optional)
It is possible to add some specific columns in the Chart of Accounts, to insert the address and other customers data:
- Choose the Add new functionalities command from the Tools menu
- Choose the Add addresses columns in the Accounts table command
(If you don't see this option in the list, it means that this function has already been activated).
In the Accounts table the program will add :
- An Address view, where the added columns are made visible.
- The columns that allow the insertion of the address data and other information.
- To display one or more of these columns, use the Columns setup command from the Data menu.
- To create other views with only selected columns, use the Tables setup command (Data menu).
Select Accounts table, Address view and add the required information to the customers' accounts.
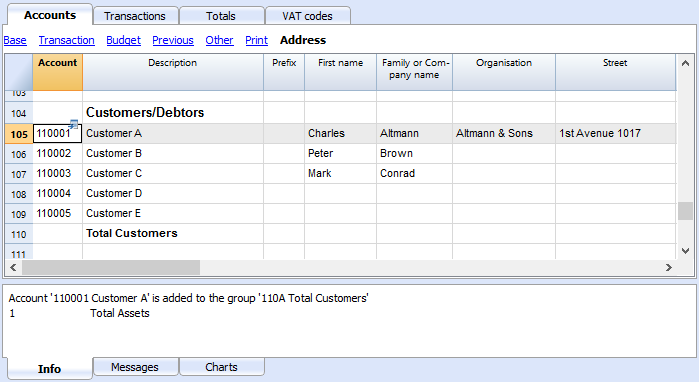
Setting up the expiration date for invoices
To set / modify invoice expiration dates, you may intervene on three levels, where higher priority is given to the first one. Expiration data will be displayed in the payments schedule and printed out on the invoice document.
1. level - setting the expiration date on an individual invoice
In the row of the Transactions table, where your invoice is entered, you will find an Date Exp. column when using the Due Date view. If a date is set up, it will have priority over dates set up on the 2nd or 3rd level.
2. level - setting the expiration date on an individual customer/supplier account
In order to set up an expiration date on a client level, for example +20 days after issuance of the invoice, select the account in the Accounts table, using the Address view, go to the Days Column (PaymentTermInDays) to set up the number of days to be used.
3. level - general setup
Expiration dates applying to all Customers/Suppliers can be set up via menu Account2>Customers>Settings...
Setting up the Customers' parameters
- Select the Account2 - Customers - Settings command
- Please indicate the group of the Chart of Accounts in which the different customers' accounts are grouped in "Group or account".
- For an explanation of the different options, go to Customers and Suppliers settings.
Payments schedule
Displaying invoices issued to customers
Account2 menu - Customers command - Invoices issued to customers...
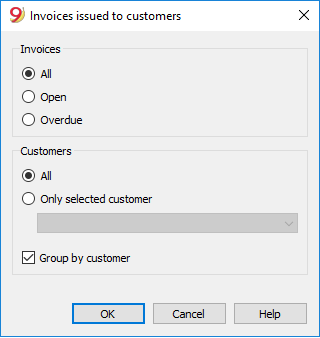
This dialog box is identical for both Customers and Suppliers functions.
The following explains the functions related to customers, but they also apply to suppliers.
All customers
Displays the account statement of all customers belonging to the group, as defined in the Customers and Suppliers settings.
A single customer
Displays the account statement for the customer selected belonging to the group defined in the Customers and Suppliers settings.
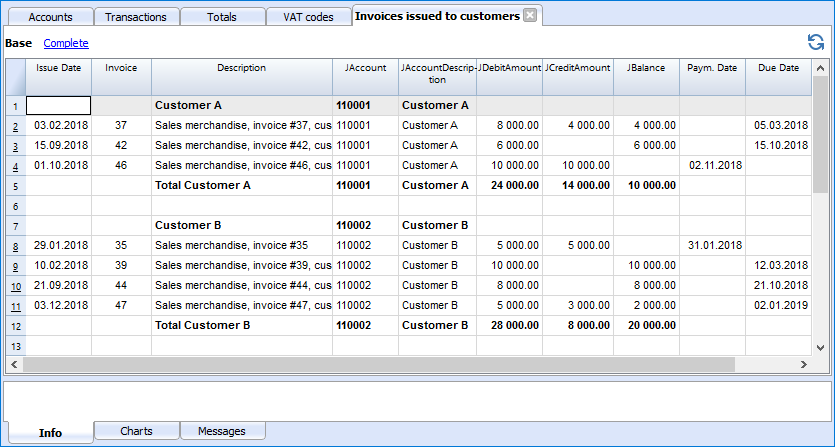
Displaying open invoices
Command: Account2 - Customers - Open invoices by customer
Invoices showing an open balance are being listed in this table.
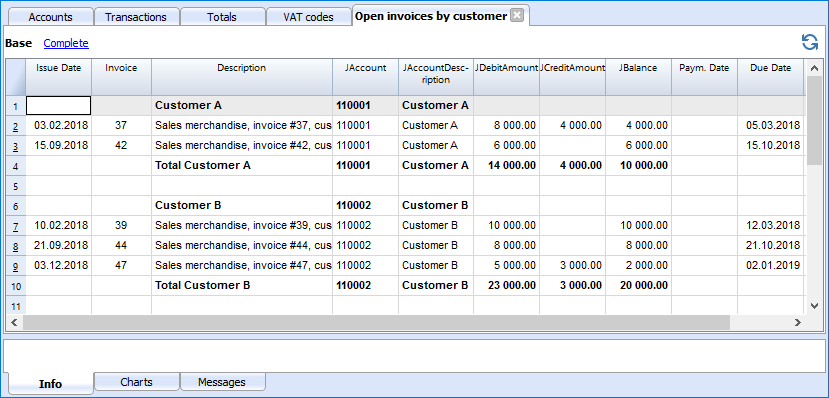
Displaying overdue invoices
Command: Account2 - Customers - Open invoices by due date
In this table, invoices showing an open balance are being listed, filtered by expiration period.
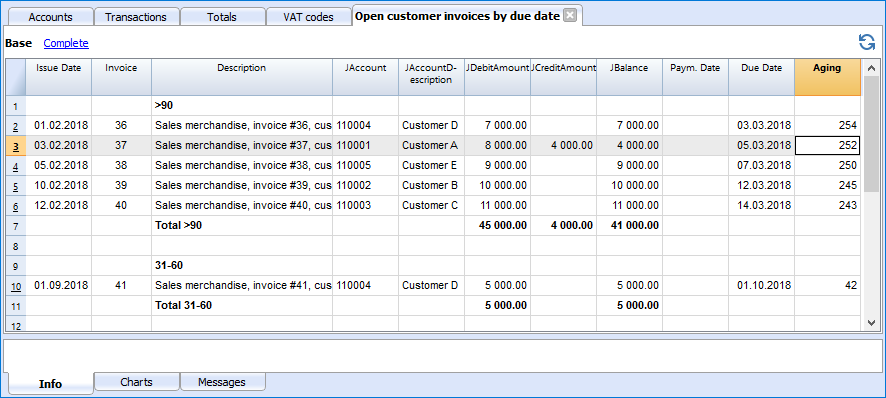
Customers' & suppliers' settings
This dialog box is identical for both customers and suppliers functions.
The following explains the functions related to customers, but they also apply to suppliers.
As long as you have not indicated the customer or supplier group, the customer menu choices are disabled.
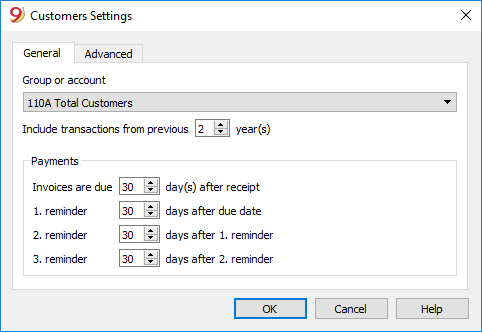
General
Group or account
Select the generic group or account that contains the Customers or Suppliers list. The group or the account needs to be already present in the Accounts table. See Setting up the Customers' register and Setting up the Suppliers' register.
Due date invoices (in days)
The program uses the following order of priority to calculate the invoice deadline:
- The due date if you entered it into the transaction row.
If there is more than one date for the same invoice number, the most recent one applies. - If the number of days is indicated in the PaymentTermInDays column of the Accounts' table, the date of the transaction, incremented by the number of days set.
- The date of the transaction is incremented by the days indicated in the settings dialog box.
Include transactions from previous (years)
- If 0, the program will not display invoices from the previous year, but only the opening balances of the customer account.
- If 1, the program will also include the invoices of the previous year in the customer card.
- If 2 or more, the program will also include invoices from years before in the customer card.
Advanced
Link to the invoice document
You can insert a link to an invoice file (pdf, doc or other) in the Link to an invoice field. If a link is inserted in the Transactions table and the invoice number is entered in the Invoice column, the program will open the document, allowing you to access all the data contained.
The link may contain:
- The XML name <DocInvoice> or the name of another column contained between <>.
If you use the "<DocInvoice>.pdf" command and you are on the row with invoice number 100, the program will try to open the "100.pdf" file. You can also prefix the filename with the name of a directory. -
You can use any file name extension. This extension must, however, be included in the list of file extensions considered safe (Tools- Program options-Advanced).
- It is also possible to indicate a path preceding the field name, that consists of the name for the document to be opened.
- With the link "c:\temp\<DocInvoice>.pdf" and the invoice number 100, the program proceeds to open the file c:\temp\100.pdf.
- The name of the directory is relative to the directory where the file is located.
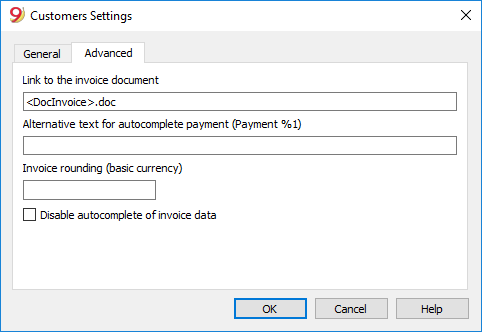
Opening an invoice document
- Position yourself in the Invoice column of the transaction row related to the invoice you wish to open
- Click the right mouse button to open the context menu
- Choose the command Open invoice link.
Suppliers sub-menu
The features, present in the Suppliers sub-menu (from the Account2 menu), allow you to obtain the following lists:
Logic for checking Suppliers' invoices
In order for the program to be able to prepare the lists of received invoices:
- In the Invoice column of the Transactions table, indicate the invoice number.
- In the Debit or Credit column of the Transactions table, indicate the account number of the Supplier
Also, before entering the transactions:
- In the Chart of accounts, Supplier accounts and/or groups need to be created
- If desired, address columns can be added
- In the Suppliers set up, indicate the Suppliers group or the general Suppliers account.
You also need to choose if, in the Chart of accounts, you need to have:
- An account for each Supplier.
This is necessary when the list of invoices needs to be presented separately by supplier.
In this case, a row needs to be created for the Suppliers and each supplier account refers to this group in the GR column (see hereunder). - One single account in which all the Suppliers are contained
The list of the open, expired invoices will be for all the Suppliers together and not per each individual Supplier.
Notes:
- Reports are based on the account currency balances; possible exchange rate differences will not be taken into account.
- The reports Description column will reproduce the first row description for each invoice.
- For the accounting files based ont cash received you can setup a suppliers register with the Cost Centers.
Detailed explanations
Setting up Suppliers accounts
- Setting up the register
- Activating the address columns (optional)
- Setting up the suppliers' settings
Entering transactions
- Displaying the Invoice column in the Transactions table
- Entering the invoice that is being issued
- Entering a payment
- Entering a credit note
- The Extract invoice rows and Open invoice link commands
Reports and printouts
- Displaying the open invoices
- Displaying the expired invoices
- Displaying the Invoices received from Suppliers
Automatic autocomplete
Example file
Gestion à partir de l'encaissement (principe de trésorerie)
Configurer le registre fournisseurs avec les centres de coût
Pour les utilisateurs en Suisse qui ont la TVA sur l'encaissé, cette configuration permet de gérer la TVA de façon optimale.
Vous pouvez gérer votre registre clients et fournisseurs comme centres de coûts (voir aussi la page Centres de coûts et de profit). Une explication détaillée se trouve à la page Comptabilisation selon Chiffre d'affaires ou Encaissement.
- Il est conseillé d'utiliser le centre de coût CC3 (avec les comptes précédés d'un point virgule ";")
- Les soldes des centres de coût n'apparaîtront donc pas dans le Bilan.
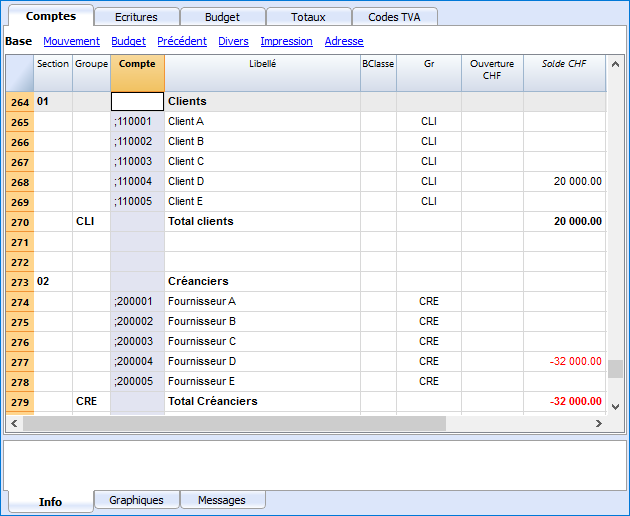
Écritures
Les informations sont disponibles sur la page Clients et fournisseurs avec la TVA, selon le principe de trésorerie.
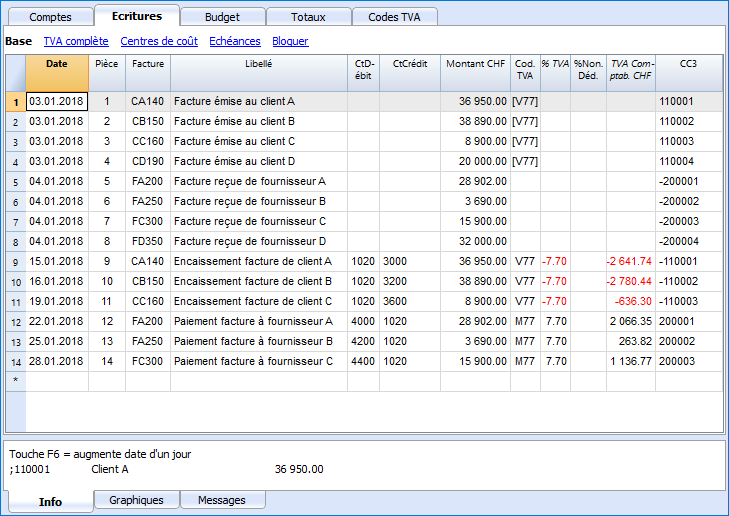
Setting up the accounts
- Setting up the register
- Activating the Address columns (optional)
- Setting up the Suppliers' parameters
Setting up the Suppliers' register
To create the Suppliers' register, add at the end of the Chart of accounts:
- A * section (header) (see Sections)
- A 02 section for the Suppliers (see Sections)
- The Suppliers' accounts that are needed (see Adding a new account). The account numbering can be freely chosen.
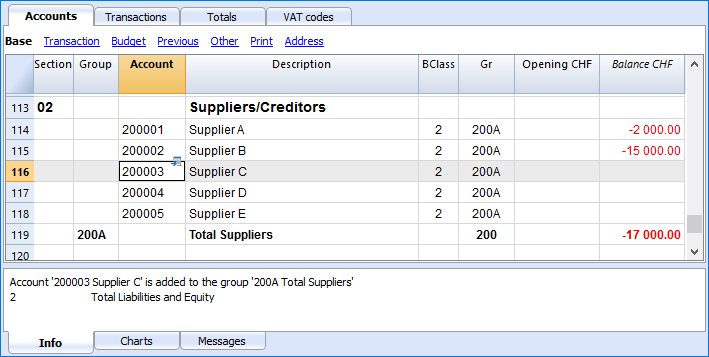
- The total Suppliers will be totalized in the summary groupe 200A of the Gr column.
- The same code or number used for the Gr (200A), must be used in the Liabilities Group column, in the row corresponding to the Total Suppliers. The groups numbering can be freely chosen (see Groups).
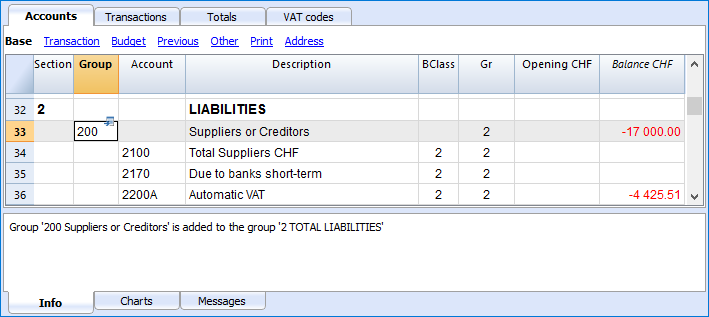
Managing the Suppliers' register with the Cost centers
In case you don't want Suppliers to be visible on the Balance Sheet (for example, for transactions with VAT on cash received), Suppliers accounts can be created by using the Cost centers (CC3). This process is similar to the Clients cost centers.
Activating the Address columns (optional)
It is possible to add some specific columns in the Chart of accounts, to insert the address and other Supplier data:
- Choose the Add new functionalities command from the Tools menu
- Choose the Add addresses columns in the Accounts table command
(If you don't see this option in the list, it means that this function has already been activated).
The programme adds in the Accounts table:
- An Address view where the added columns are visible.
- The columns that allow to insert the address data and other information.
- To display one or more of these columns, use the Columns setup command from the Data menu, also in the other views.
- To create other views with only certain columns, use the Views setup command.
Select the Accounts table, Address view and add the desired information to the Suppliers accounts.
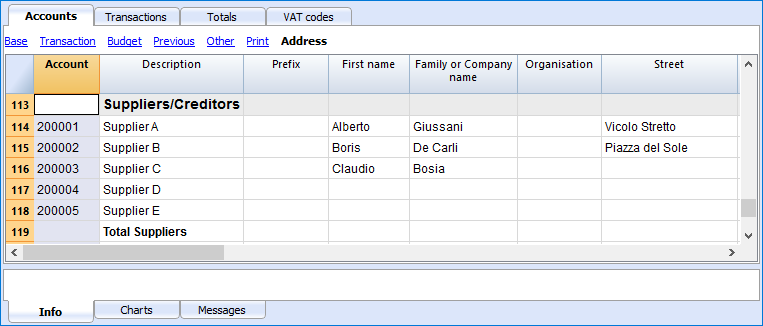
Setting up the Suppliers' parameters
- Select the Account2 - Suppliers - Settings command
- Please indicate in "Group or account", the group of the Chart of accounts in which the different Suppliers' accounts are grouped.
- For an explanation of the different options, go to Customers and Suppliers settings.
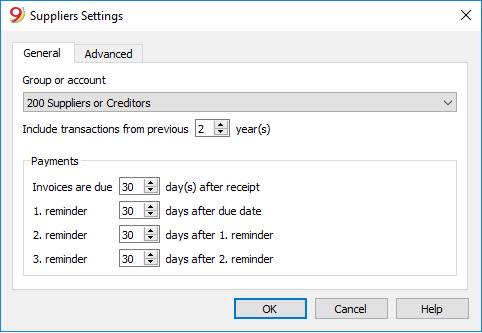
Entering transactions
Displaying the Invoice column in the Transactions table
The invoice number has to be entered in the Invoice column (DocInvoice) which, in the default settings, is not visible in the Transactions table.
In order to display the column:
- Select the Transactions table
- Data menu
- Columns setup command
- Activate the Visible option for the DocInvoice column
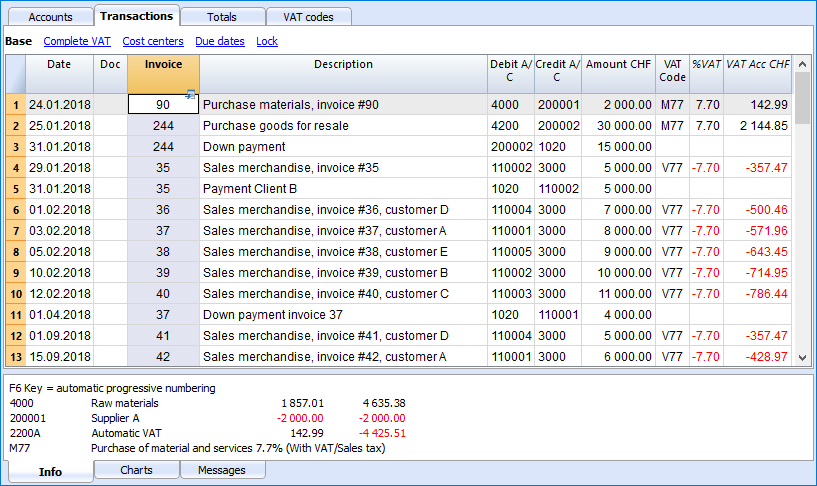
Autocomplete of invoice data
For the automatic completion see the explanation on the page Entering client transactions
Recording a received invoice
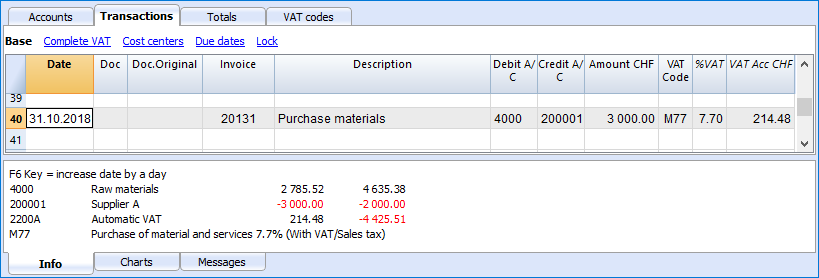
Recording a payment
- Insert the Transaction date
- Place yourself on the Invoice column and press the F2 key
The list of Open invoices will be opened. - Select the desired invoice and press Enter.
The program completes the Transaction with the Description column, the Debit account and the Amount.
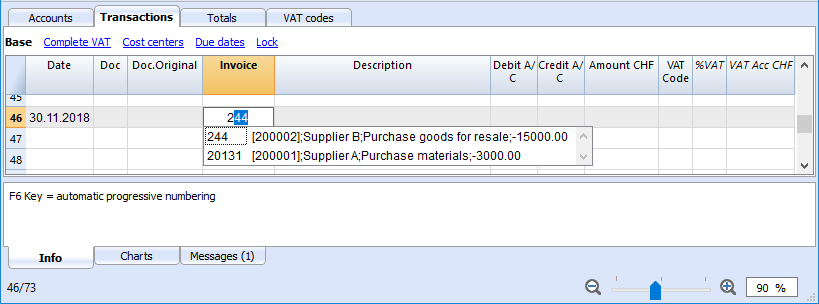
Enter the account used to pay the invoice.
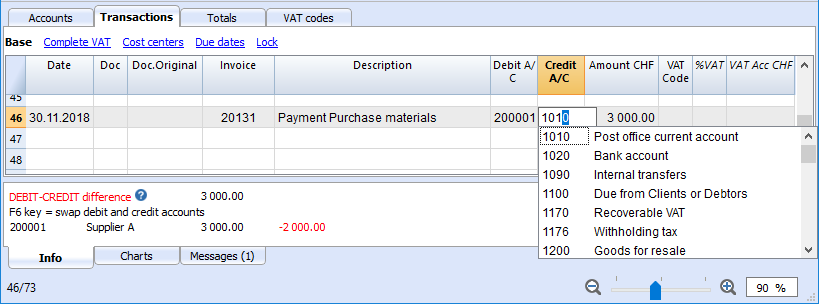
Recording a credit note
In order for the amount to be deducted from the original invoice, the same invoice number needs to be used. If the corrective document (for example, a credit note) presents a different number that needs to remain available, such a reference can be entered in another column, like Doc. Original.
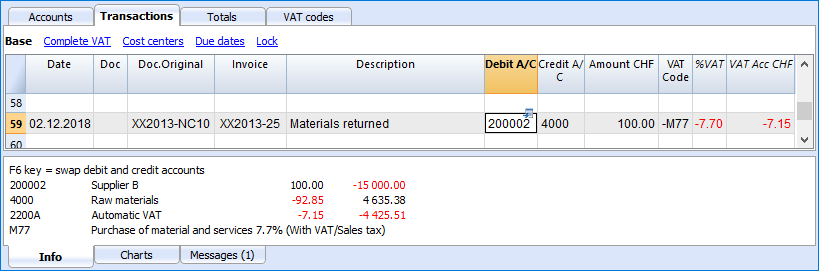
Extract invoice rows command and Open invoice link
The Extract invoice rows command displays the transactions of the selected invoice.
The command is available by clicking on the small blue symbol above at the upper right coner of the cell or with the right mouse button.
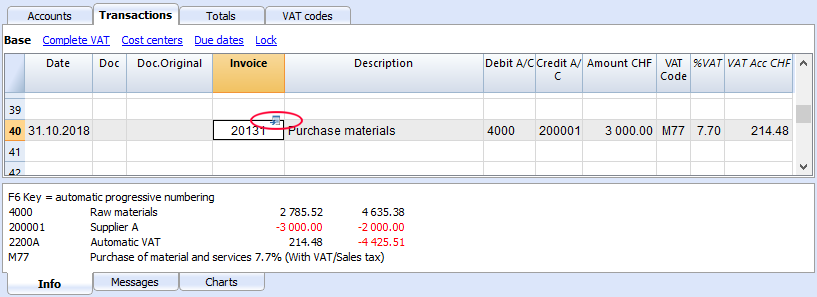
The invoice rows can also be extracted by clicking on the invoice number with the right mouse button, Extract invoice rows command.
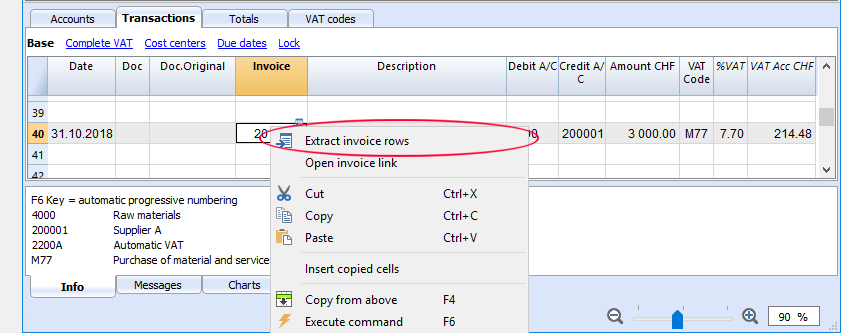
The Open Invoice link command establishes the text that has been defined in the Suppliers' settings (Account 2 - Suppliers - Settings - Link to the Invoice document).
For example, if the invoices have been created with Winword and saved in the Documents folder, these files can directly be opened by setting up the command line with the text 'C:\Users\myname\Documents\<DocInvoice>.doc' . The program substitutes <DocInvoice> with the text corresponding to the column and executes the command.
In the command line, it is possible to also indicate other columns of the table by using their XML names.
If the message 'File with extension considered unsecure' appears, add the extension (for example .doc) through the command Tools - Program Options, Advanced, File extension.
Reports and printouts
- Displaying the open invoices
- Displaying the overdue invoices
- Displaying the Invoices received from suppliers
Displaying the open invoices
Command: Account2 - Suppliers - Open invoices by supplier. In this table, the invoices that have an open balance are being listed.
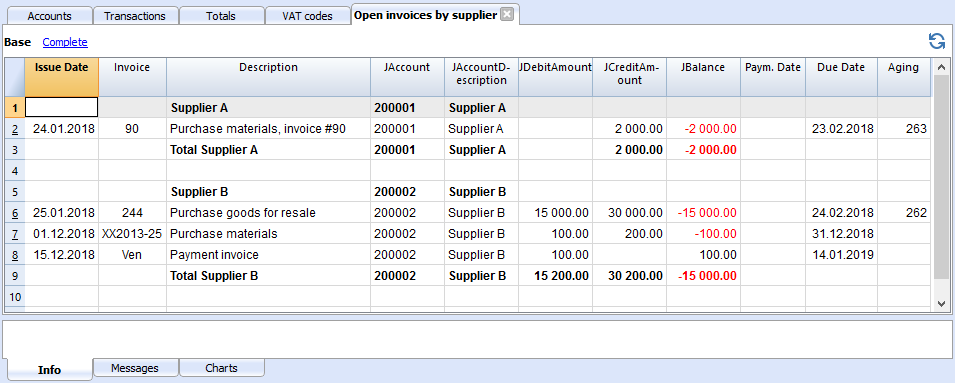
Displaying the overdue invoices
Command: Account2 - Suppliers - Open invoices by due date
In this table, the invoices that have an open balance are being listed, grouped by aging period.
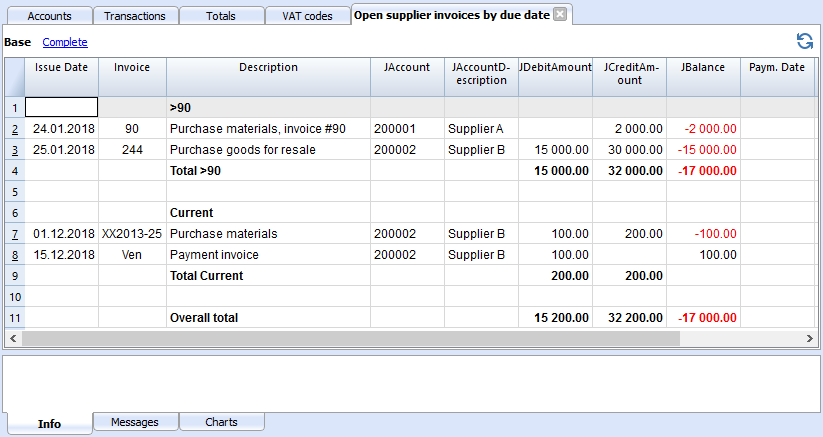
Displaying the Invoices received from suppliers
Command: Account2 - Suppliers - Invoices received from Suppliers
In this table, all the invoices that are part of the Suppliers' register, or that belong to an individual supplier, are being listed
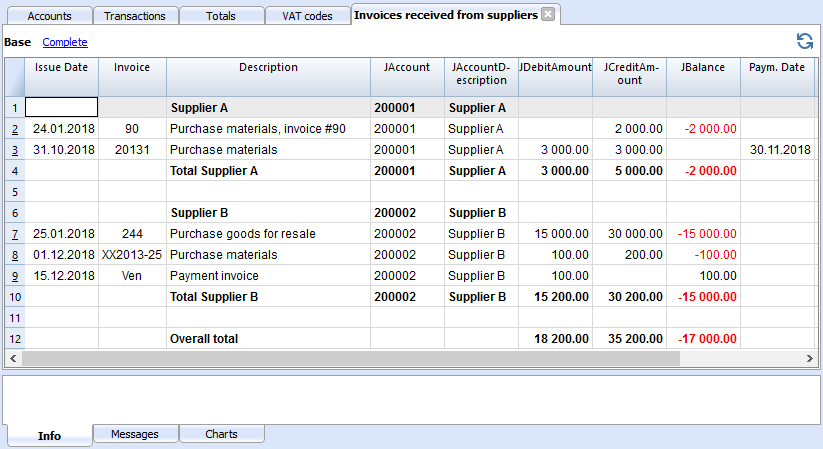
VAT and Sales tax Management
New Swiss VAT rates 2024
New VAT rates go into effect on 01.01.2024. Choose Banana Accounting Plus Advanced plan for a smooth transition.
Key benefits
- Automatically import the new rates into the VAT Codes table.
- Receive the VAT Statement in paper facsimile format or as an XML file ready for upload to AFC.
- Dramatically reduce your work time with advanced built-in features.
With Banana Accounting 9
- You CANNOT automatically import new 2024 VAT Codes; you can enter them manually.
- You CANNOT create the VAT Statement , but you can get the VAT Report from the Account1 menu command.
Choose Banana Accounting Plus - Advanced plan - get 1 month free!
VAT and Sales tax Management with Banana Accounting 9
Pages with more in-depth information:
- VAT management in Switzerland
There are several pages with specific information for Switzerland, for example on how to set up the VAT codes table, enter the VAT transactions and prepare the declaration. - VAT management in Italy - this page is in Italian
- Import VAT codes
Documentazione IVA specifica alle nazioni
Il 01.01.2024 sono entrate in vigore le nuove aliquote IVA.
Con Banana Contabilità 9
- NON puoi importare in automatico i nuovi Codici IVA; li puoi inserire manualmente.
- NON puoi creare il Rendiconto IVA, ma puoi ottenere il Riassunto IVA dal comando menu Conta1.
ll piano Advanced di Banana Contabilità Plus (nuova versione ad abbonamento) ti permette di:
- Importare automaticamente le nuove aliquote nella tabella Codici IVA.
- Ottenere il Rendiconto IVA con un semplice comando, sia in formato fac-simile cartaceo o come file XML, pronto per l'upload su AFC.
Scegli Banana Contabilità Plus - piano Advanced - ricevi 1 mese gratis!
Nella sezione di ogni nazione trovi delle documentazioni più specifiche sull'IVA.
Qui sono elencate la documentazione IVA disponibili in lingua Italiana.
- Gestione IVA Svizzera
Pagine informative specifiche per la Svizzera, sulla la tabella codici IVA Svizzera, come registrare l'IVA, preparare la dichiarazione e usare l'Estensione IVA Svizzera. - Gestione IVA Italia
Pagine informative specifiche per l'Italia, sulla tabella Codici IVA Italia, come registrare l'IVA e preparare la dichiarazione e usare l'Estensione IVA Italia.
Estensioni rendiconti IVA nazionali
Per talune nazioni sono delle Estensioni che si possono istallare facilmente, che consentono di stampare o esportare il rendiconto IVA nel formato richiesto dalle autorità.
Le estensioni per l'IVA di ogni nazione funzionano in abbinamento alla tabella Codici IVA della nazione.
Theory
New Swiss VAT rates 2024
New VAT rates go into effect on 01.01.2024. Choose Banana Accounting Plus Advanced plan for a smooth transition.
Key benefits
- Automatically import the new rates into the VAT Codes table.
- Receive the VAT Statement in paper facsimile format or as an XML file ready for upload to AFC.
- Dramatically reduce your work time with advanced built-in features.
With Banana Accounting 9
- You CANNOT automatically import new 2024 VAT Codes; you can enter them manually.
- You CANNOT create the VAT Statement , but you can get the VAT Report from the Account1 menu command.
Choose Banana Accounting Plus - Advanced plan - get 1 month free!
VAT (Value-added Tax) is a tax that weighs on the final consumer. Every VAT subject must calculate and periodically deposit the tax to the Revenues Authority.
Every country has its own VAT rates that are established in different percentages depending on the type of merchandise or service. Certain merchandise and services are exempt or excluded.
The percentages vary according to the financial necessity of the country; therefore, there can be changes over the years.
VAT rate
In this document, to make calculations easier, we will use the following rates:
- 10 % normal rate
- 5% reduced rate
- 0% excluded operations or exempt operations
VAT calculation
Net Price x VAT Percentage / 100 = VAT Amount
Example:
Net price 300
Tax rate 10%
VAT amount = 300 x 10 / 100 = 30
Gross price calculation
Net price + VAT Amount = Gross Price
Example:
300 + 30 = 330
Sometimes the gross amount is known and it is necessary to find the net and VAT amounts.
Net price calculation
Gross Price / (100 + VAT rate) x 100 = Net Price
Example:
330 / (100 + 10) x 100 = 300
The net price represents the cost (purchase) or the revenue (sale) of the company
VAT amount calculation
Gross Price - Net Price = VAT Amount
Example:
330 - 300 = 30
or
330 - [330 / (100 + 10) x 100] = 30
The VAT amount represents the debit (sales) or the credit (purchases) towards the Revenues Authority.
VAT rate calculation
VAT Amount / Net Amount x 100 = VAT Rate
Example:
30 / 300 x 100 = 10%
or
[330 - 330 / (100 + 10) x 100]/100 = 10%
Another example:
20 / 400 x 100 = 5%
This way of calculating is used when the rate is not known.
File properties (VAT/Sales tax tab)
New Swiss VAT rates 2024
New VAT rates go into effect on 01.01.2024. Choose Banana Accounting Plus Advanced plan for a smooth transition.
Key benefits
- Automatically import the new rates into the VAT Codes table.
- Receive the VAT Statement in paper facsimile format or as an XML file ready for upload to AFC.
- Dramatically reduce your work time with advanced built-in features.
With Banana Accounting 9
- You CANNOT automatically import new 2024 VAT Codes; you can enter them manually.
- You CANNOT create the VAT Statement , but you can get the VAT Report from the Account1 menu command.
Choose Banana Accounting Plus - Advanced plan - get 1 month free!
This tab only appears if an accounting with VAT/Sales tax management is chosen.
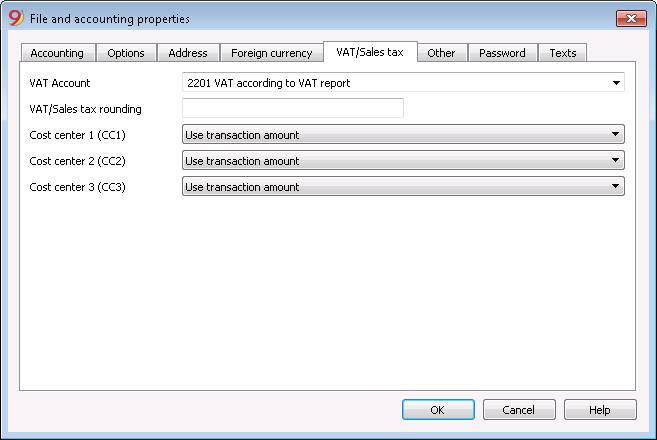
VAT Account
The Automatic VAT account, that is present in the chart of accounts, is defined here as default. In this case, the VAT account does not need to be inserted in the VAT Codes Table.
VAT/Sales tax rounding
This is where the user inserts how the VAT/Sales tax amounts should be rounded; if, for example, the user inputs 0.05, the VAT/Sales tax amounts will round to multiples of 0.05.
Cost Centers 1 (CC1), 2 (CC2), 3 (CC3)
For each type of Cost Center, the user can select which amount to use for the transaction in the cost center.
- Use transaction amount
- Use amount inclusive VAT/Sales tax
(When cost centers are being used for Client/Suppliers accounts) - Use amount without VAT/Sales tax
(When cost centers are being used for Revenue and Expenses)
Note: If one of these parameters is modified, the accounting must be recalculated.
Related documents: VAT Management, Cost and Profit Centers
VAT and Sales Tax Codes Table
New Swiss VAT rates 2024
New VAT rates go into effect on 01.01.2024. Choose Banana Accounting Plus Advanced plan for a smooth transition.
Key benefits
- Automatically import the new rates into the VAT Codes table.
- Receive the VAT Statement in paper facsimile format or as an XML file ready for upload to AFC.
- Dramatically reduce your work time with advanced built-in features.
With Banana Accounting 9
- You CANNOT automatically import new 2024 VAT Codes; you can enter them manually.
- You CANNOT create the VAT Statement , but you can get the VAT Report from the Account1 menu command.
Choose Banana Accounting Plus - Advanced plan - get 1 month free!
The VAT Code table setup allows the definition of all the parameters that are necessary to manage the transactions with VAT. The setup refers to:
- VAT due or recoverable
- Transaction amount recorded as net, gross, or VAT amount at 100% (Customs VAT)
- Freely definable applicable VAT rates
- Freely definable account in which VAT must be recorded
- Special rounding off for each code
- Definable grouping and totaling method
The VAT Codes table has a Base view and a Complete view (see top of the table hereunder). The difference between the two is the fact that the Complete view presents several columns that are not available in the Base view. These columns serve to accommodate some specific options.
How to calculate
The parameters indicated in the VAT Codes table are being used to calculate the VAT of the individual transactions. The parameters established in the VAT Codes table cannot be changed in the transactions. This modality guarantees that the VAT calculations are correct and uniform.
Please note: if the values of a VAT Code, which has already been used in the transactions, are being modified, the changes are not active immediately; in this case it is necessary to activate the Recheck accounting command (Account1 menu -> Recheck accounting). When the VAT Codes table is being modified, the program invites the user, through a message in the Info window, to execute a complete recalculation as a precaution.
The following table refers to the codes being used according to the Swiss legislation:
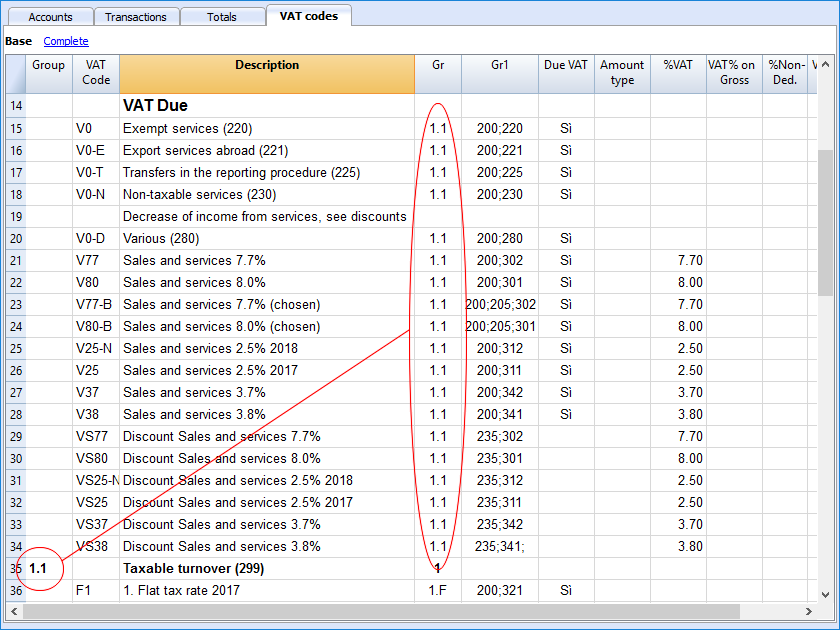
Detailed description of the columns
In the following columns, insert the following data:
- Group: a code or number that identifies the group to which the code belongs. In the example we have inserted 1 for the sales, 2 for the purchases, T for the total.
- VAT Code: the code to identify and carry forward the VAT code in the transactions.
- Description: a text for the description of the VAT Code or the group.
- Disable:
- Entering 1, the VAT code isn't displayed in the autcomplete list (Transactions table), but can still be used;
- Entering 2, the VAT code is disabled and cannot be used. - Gr: code of the "Group" in which the row has to be added.
- Gr1: In the image of the table above, the grouping codes representing the numbers for the Swiss VAT declaration are being shown.
- Gr2: code for additional groupings.
- Due VAT:
If the word Yes is being inserted, this means that the VAT is at debit (due to the State)
If the cell is empty, this means that the VAT is at credit (recoverable) - Amount type: indicates how the software considers the transaction amount:
0 (or empty cell) with VAT/sales tax (the transaction amount is considered VAT included)
1 = without VAT/Sales tax (the transaction amount is considered VAT excluded)
2 = VAT amount (the transaction amount is considered the VAT amount) - % VAT: VAT code percentage
- Non ded.: if, for a VAT code, it is not possible to deduct the full 100%, enter the non deductible percentage here (example 100%)
- VAT% on gross: is usually being left empty. In special cases, the word "Yes" has to be inserted only if the VAT percentage has to be applied on the gross amount (VAT included) and not on the taxable amount.
- VAT account: the account on which the calculated VAT is being automatically.
In the File and Accounting properties (File menu), a general account, that will be used as the VAT account, can be defined.
It is also possible to set up a specific account for every individual VAT code. - Round Min: minimum value for rounding, to be used only in particular cases. By preference, the rounding indicated in the basic data of the accounting (f.i. minimum rounding value 0.05) is being used.
- Don't warn: there are particular transactions that the software could interpret as mistaken, but which, in reality, are correct. In order to avoid for the software to signal error messages, insert the word Yes for the code that is concerned.
When the transactions with VAT are inserted, by applying the VAT Code in the VAT Code column, the software calculates automatically all the amounts related to the VAT and transfers them in the VAT account.
Rechecking of the accounting file
When rechecking the accounting file, if transactions are not locked, the program will reload the VAT parameters assigned to each code. If a VAT code setting has been changed, the change will be taken into account in the corresponding transactions columns (that cannot be edited by the user).
For this reason, when editing the VAT table, the program suggests to operate a full accounting recheck.
Adding a new percentage
When a new percentage is added, a new row has to be added; in the new row, insert the data of the new VAT code with the new percentage, while paying attention to insert the correct grouping. Don't change a code that has already been used in the transactions.
Groupings
By creating groups with multiple totaling levels, the user can obtain the totals that are necessary for the VAT declaration.
In the VAT report, by activating the option Use own grouping scheme, the software calculates the totals exactly as indicated in the sequence of the indicated groupings in the VAT Codes table.
The groupings are being used to obtain totals for groups of transactions, for example, the totals for all exportations or importations.
Related document: Import VAT codes
Associate the VAT/ST code to the account
New Swiss VAT rates 2024
New VAT rates go into effect on 01.01.2024. Choose Banana Accounting Plus Advanced plan for a smooth transition.
Key benefits
- Automatically import the new rates into the VAT Codes table.
- Receive the VAT Statement in paper facsimile format or as an XML file ready for upload to AFC.
- Dramatically reduce your work time with advanced built-in features.
With Banana Accounting 9
- You CANNOT automatically import new 2024 VAT Codes; you can enter them manually.
- You CANNOT create the VAT Statement , but you can get the VAT Report from the Account1 menu command.
Choose Banana Accounting Plus - Advanced plan - get 1 month free!
In an accounting with VAT, in the Accounts table, it is possible to associate a VAT code to the income/expense accounts, so that, when the sales and purchases are being recorded, the program automatically inserts the VAT code and completes the columns with the VAT data while entering the account number.
In order to associate the codes:
- Click on the Other view. In this view, the VAT code column is visible by default.
In case you wish to display the VAT code column in the Base view, click on the Data menu, Columns setup command (see Related document at bottom of this page). - Insert the VAT codes for the income/expenses in the VAT code column.
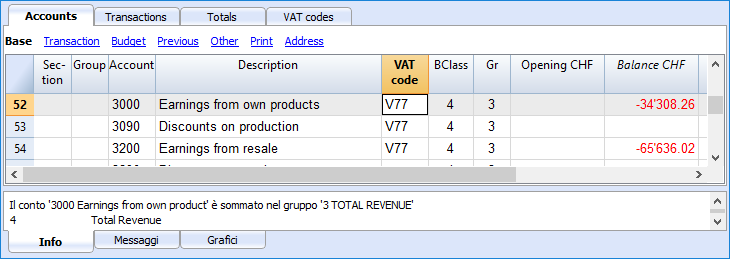 .
.
Related document: Columns setup
Arrondi IVA
Nouveaux taux de TVA suisses 2024
Le 01.01.2024, les nouveaux taux de TVA entrent en vigueur. Choisissez le plan Banana Comptabilité Plus Advanced pour une transition en douceur.
Avantages principaux
- Importez automatiquement les nouveaux taux dans le tableau Codes TVA.
- Recevez votre décompte TVA comme fac-similé papier ou comme fichier XML prêt à être téléchargé dans AFC.
- Réduisez considérablement le temps de travail grâce aux fonctions avancées intégrées.
Avec Banana Comptabilité 9
- Il n'est pas possible d'importer automatiquement les nouveaux codes TVA 2024 ; il faut les introduire manuellement.
- On ne peut pas créer le Décompte TVA, mais on peut obtenir le Résumé TVA à partir de la commande du menu Compta1.
Choisissez Banana Comptabilité Plus - Plan Advanced - 1 mois gratuit !
Le système TVA suisse prévoit pour le calcul de la TVA que celle-ci se fait calculé au centime, sans arrondi.
Pour ceux qui ont la nécessité d'avoir un arrondi des montants TVA pour les centimes, la procédure suivante a été prévue:
- Dans le tableau Écritures, insérer les Écritures comme d'habitude, en appliquant le code TVA approprié
- Dans la ligne suivante, enregistrer le compte des charges ou des produits, utilisé dans la ligne précédente, en débit et en crédit
- Dans la colonne montant, enregister les centimes de l'arrondi
- Dans la colonne Code TVA, insérer un code TVA avec type montant 2 (montant TVA au 100%) par exemple M80-2
- Quand les centimes doivent être déduits, insérer le code précédé par le signe moins "-M80-2".
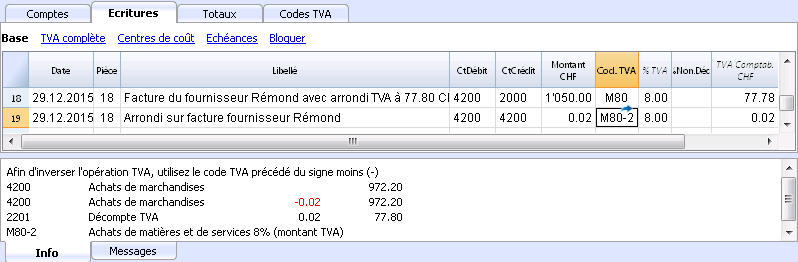
Configurer les comptes TVA
Nouveaux taux de TVA suisses 2024
Le 01.01.2024, les nouveaux taux de TVA entrent en vigueur. Choisissez le plan Banana Comptabilité Plus Advanced pour une transition en douceur.
Avantages principaux
- Importez automatiquement les nouveaux taux dans le tableau Codes TVA.
- Recevez votre décompte TVA comme fac-similé papier ou comme fichier XML prêt à être téléchargé dans AFC.
- Réduisez considérablement le temps de travail grâce aux fonctions avancées intégrées.
Avec Banana Comptabilité 9
- Il n'est pas possible d'importer automatiquement les nouveaux codes TVA 2024 ; il faut les introduire manuellement.
- On ne peut pas créer le Décompte TVA, mais on peut obtenir le Résumé TVA à partir de la commande du menu Compta1.
Choisissez Banana Comptabilité Plus - Plan Advanced - 1 mois gratuit !
Quels sont les comptes TVA?
Les comptes TVA sont des fiches comptables d'où on enregistre les montants TVA, calculés selon les configurations des codes TVA.
Quand on utilise un code TVA, le programme calcule automatiquement, selon les valeurs de l'écriture:
- le montant imposable et le montant TVA
- le montant qui doit être enregistré sur le compte Débit
- le montant qui doit être enregistré sur le compte Crédit
- le montant qui doit être enregistré sur le compte TVA
- comment doit être enregistré le montant TVA (en Débit ou en Crédit)
En déplaçant le curseur sur l'écriture, en bas de la fenêtre d'information, le programme affiche les montants enregistrés sur les différents comptes.
Configurer les comptes TVA
Compte TVA général (automatique)
Si configuré dans les Propriétés fichier (menu Fichier) comme prédéfini, ce compte TVA est utilisé à chaque fois qu'il y a une écriture pour un code TVA qui n'a pas de compte TVA défini.
Compte TVA pour le code TVA
Pour chaque code TVA, dans le tableau Codes TVA, colonne Compte TVA, on indique le compte qui doit être utilisé pour les écritures qui utilisent ce code TVA.
Utiliser un seul compte TVA ou plusieurs comptes?
Dans la comptabilité, il faut séparer la partie Actifs des Passifs. Toutefois, si la TVA récupérable est compensée par le montant de la TVA due, seulement le montant TVA effectivement dû est affiché dans le Bilan.
Du point de vue comptable réel, dans la plupart des cas il n’est pas indispensable d'avoir plusieurs comptes TVA; en fait il est préférable d’avoir un seul compte TVA.
Pour l’application de la déclaration, cependant, il est utile d’avoir différents types d’opérations de TVA distinctes. Dans les programmes qui n’utilisent pas les codes TVA, il faut séparer chaque opération sur des comptes séparés. Avec Banana, grâce aux codes TVA et au Résumé TVA, il est possible d'obtenir des détails beaucoup plus importants :
- mouvements et totaux (TVA imposable, TVA, TVA comptabilisée)
- mouvements et totaux par pourcentage TVA
- mouvements et totaux par compte TVA
- mouvements et totaux regroupés selon TVA due et selon TVA récupérable.
Pour des contrôles d'opérations TVA, il n'est pas nécessaire d'utiliser plusieurs comptes TVA séparés.
Banana Comptabilité laisse donc le choix d’utiliser le compte général ou plusieurs comptes TVA.
Avantages d’utiliser un seul compte TVA
- Bilan et compte de résultat beaucoup plus facile à lire (il n’ya pas beaucoup de comptes TVA).
- Possibilité d'avoir des comptes (par exemples, des produits) d'où enregistrer des opérations avec plusieurs taux TVA.
- Connaître immédiatement la TVA due, sans avoir à additionner les différents comptes.
- Vue immédiate de toutes les transactions TVALa fiche Décompte TVA montre toutes les opérations TVA en Débit et en Crédit.
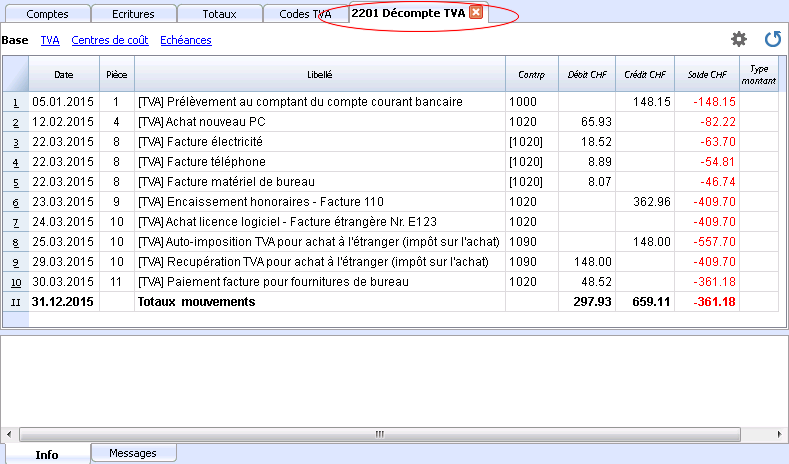
Avantages de l’utilisation de plusieurs comptes de TVA
Comme dit, si l'on utilise des codes TVA, l'enregistrement sur un compte TVA spécifique est une répétition des informations qui sont déjà disponibles grâce aux codes TVA et leur Résumé TVA detaillé.
Dans les pays tels que l’Allemagne, il est habituel d'avoir un compte TVA différent pour chaque type d'opération, afin que la déclaration TVA puisse être faite à l’aide des soldes des différents fiches de compte TVA.
Dans ces cas, pour assurer la compatibilité avec ce système, on peut considérer qu'il est utile d’avoir des comptes TVA différents pour chaque code TVA.
Clôture comptes TVA à la fin d'une période
À la fin de la période de calcul pour la TVA, il est utile de clôturer les comptes TVA de Débit et de Crédit et de déplacer le solde sur un compte unique:
- On voit, de façon comptable, quel est exactement le solde dû
- Le compte "2201, Décompte TVA" recommence avec un solde zéro pour chaque période. Il est donc plus facile d'avoir le contrôle sur d'éventuelles différences et erreurs.
Pour la clôture périodique du compte "2201, Décompte TVA", consulter la page Clôture périodique et paiement TVA.
Transactions
New Swiss VAT rates 2024
New VAT rates go into effect on 01.01.2024. Choose Banana Accounting Plus Advanced plan for a smooth transition.
Key benefits
- Automatically import the new rates into the VAT Codes table.
- Receive the VAT Statement in paper facsimile format or as an XML file ready for upload to AFC.
- Dramatically reduce your work time with advanced built-in features.
With Banana Accounting 9
- You CANNOT automatically import new 2024 VAT Codes; you can enter them manually.
- You CANNOT create the VAT Statement , but you can get the VAT Report from the Account1 menu command.
Choose Banana Accounting Plus - Advanced plan - get 1 month free!
Accounting Charts templates included in Banana Accounting are already set with the VAT accounts, the VAT according to VAT report account (automatic), both in the chart of accounts and in the File and accounting properties of the File menu - VAT tab (in this case you don't need to enter any VAT account into the VAT codes table).
In case you are not using the Charts of accounts already available in Banana, make sure that the necessary VAT accounts are present in your own Chart of accounts. Our advice is to use a "VAT according to VAT report" account and to enter it into the File and Accounting properties, VAT/Sales tax Tab.
In the VAT codes table, there are codes both for the sales and the purchases. When entering the transactions, use the appropriate VAT code.
The software automatically splits the VAT amounts and records them in the "VAT according to VAT report" account or in the VAT account that has been indicated by the user in the File and Accounting properties.
VAT columns in the Transactions table (Complete VAT view)
You can find the full explanation of the main Transactions table columns in the Transactions page.
In the Double-entry accounting files with VAT or in those of the Income & Expense accounting with VAT, you will find the following VAT columns:
- VAT Code: for each transaction with VAT you need to enter one of the VAT codes from the VAT codes table
- VAT %: the program automatically enters the VAT percentage associated with the VAT code you entered
- VATExtraInfo: A code related to extra info about the VAT, to be used only in very exceptional cases.
It is possible to enter a symbol to identify specific VAT cases. The program suggests options, corresponding to the VAT Codes that start with a colon ":". - %Eff.: the program automatically enters the VAT percentage referred to the net amount. This percentage is different from the normal percentage when this one is referred to the gross amount.
- Taxable: once you enter the VAT code, the software automatically indicates the taxable amount (without VAT)
- VAT amount: the program automatically indicates the VAT amount
- VAT A/C: the account where the VAT is registered is automatically indicated (for Switzerland normally is the 2201 VAT report account); this account was previously entered in the File Properties, VAT tab (from the File menu).
- Amount type: this is a code that indicates how the software considers the transaction amount:
- 0 (or empty cell) with VAT/sales tax, the transaction amount is VAT included
- 1 = without VAT/Sales tax, the transaction amount is VAT excluded
- 2 = VAT amount, the transaction amount is considered the VAT amount at 100%
- Amount type not editable: Default mode.
- The column is protected
- The program uses the associated value of the VAT Codes table
- When you edit the value in the VAT Codes table and you recalculate the accounting, the program uses the new value associated with this VAT Code.
- Amount type editable: this option can be activated with the Add new functionalities command. The activation of the option cannot be undone.
- When you edit the VAT Code, the program uses the Amount type associated with this code.
- The value can be edited manually
- When the accounting is being recalculated, the value indicated in the Transactions table is being maintained.
- Non. Ded. %: this indicates the non deductible %.
- When you enter or change the VAT Code, the program uses the Non. Ded. % associated to this VAT Code in the VAT Codes table.
- You can manually edit the value
- VAT Acc.: this is the VAT amount registered in the VAT account.
It is calculated by the program according to the Transaction amount, the Amount type and the non deductable percentage. - VAT number: this is the code or VAT number of your client/supplier.
When you enter a transaction with VAT, it is possible to enter the VAT number of your counterparty. If in the Accounts table, in your clients/suppliers register, you also enter their VAT number, this is automatically loaded in the Transactions table, in the VAT number column.
For more information about the Transactions table please visit the Transactions table's page.
Transactions with VAT
New Swiss VAT rates 2024
New VAT rates go into effect on 01.01.2024. Choose Banana Accounting Plus Advanced plan for a smooth transition.
Key benefits
- Automatically import the new rates into the VAT Codes table.
- Receive the VAT Statement in paper facsimile format or as an XML file ready for upload to AFC.
- Dramatically reduce your work time with advanced built-in features.
With Banana Accounting 9
- You CANNOT automatically import new 2024 VAT Codes; you can enter them manually.
- You CANNOT create the VAT Statement , but you can get the VAT Report from the Account1 menu command.
Choose Banana Accounting Plus - Advanced plan - get 1 month free!
Before entering transactions with VAT, we advise you to visit the Transactions page.
The most common way of entering a VAT transactions is to enter the gross amount (amount including VAT), then apply to it the appropriate VAT code, choosing it among the ones included in the VAT Codes table and according to your transaction type (Purchase, Sale, Discount, ...).
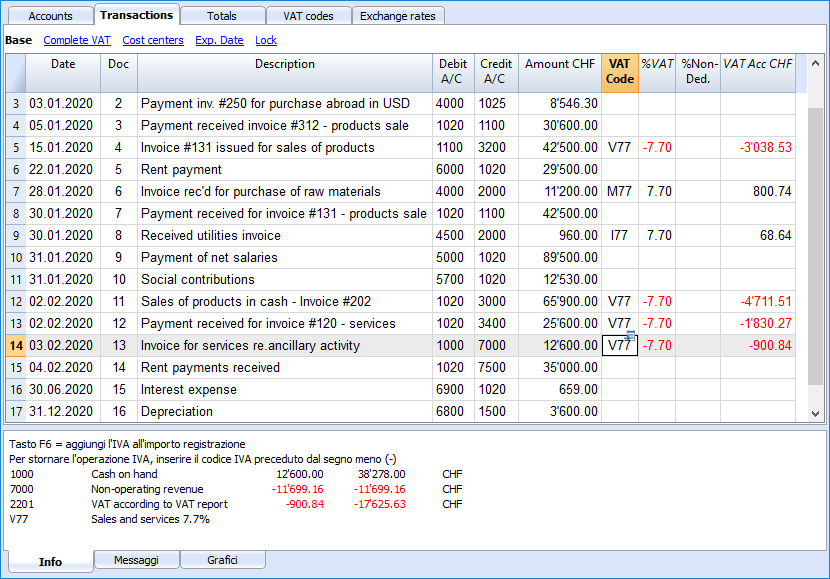
How to correct VAT transactions
If you see the mistake right away, you can just edit the transaction row; this is only possible if you haven't sent your VAT report yet and if there is no transactions lock.
If however your accounting file is locked or if you have already sent your VAT report, you cannot simply delete the wrong transaction, but you need to operate some cancellation-transaction and then re-enter the correct transaction.
In order to rectify VAT operation you need to:
- make a new transaction by inverting the Debit and Credit accounts used in the wrong transaction
- enter the same amount
- enter the same VAT code but preceded by the minus sign (ex.: -V77)
- enter a new transaction with the correct accounts, amount and VAT code
Depending on the entity of the mistake, you should consider informing your local VAT office; usually they ask you to download a specific form for correcting mistakes in the previous VAT period.
How to only enter the VAT amount
There are cases where only the VAT amount needs to be recorded, such as when you receive compensation from the car insurance.
You can proceed as follows:
- Enter the date, document number and description in the appropriate columns.
- In the Credit A/C column enter the account used to pay the VAT amount (the Debit A/C column remains empty).
- In the Amount column enter the VAT amount to be paid.
- In the VAT code column enter the VAT code I77-2 (the code that refers to 100% amount VAT).

Transactions with different VAT codes
New Swiss VAT rates 2024
New VAT rates go into effect on 01.01.2024. Choose Banana Accounting Plus Advanced plan for a smooth transition.
Key benefits
- Automatically import the new rates into the VAT Codes table.
- Receive the VAT Statement in paper facsimile format or as an XML file ready for upload to AFC.
- Dramatically reduce your work time with advanced built-in features.
With Banana Accounting 9
- You CANNOT automatically import new 2024 VAT Codes; you can enter them manually.
- You CANNOT create the VAT Statement , but you can get the VAT Report from the Account1 menu command.
Choose Banana Accounting Plus - Advanced plan - get 1 month free!
When the total amount of an invoice is composed by several amounts with different VAT percentages, you need to register as follows:
- each amount with a specific VAT percentage needs to be entered on a different row with its own VAT code (enter the gross amount)
- once you finish the multiple registration, check that the sum of the differents amount and the VAT amounts correspond to the invoice total.
Here is an example:
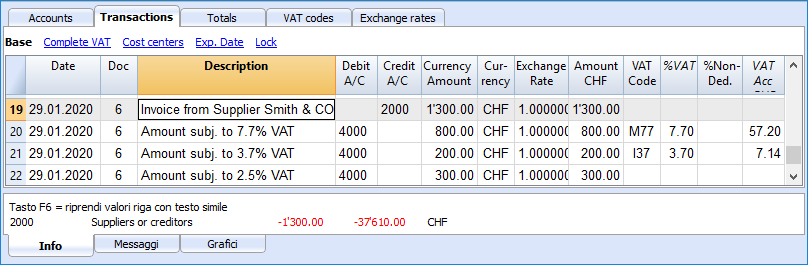
VAT EXEMPTION
If in your invoice you also have some items VAT exempt, you need to operate as above, choosing the VAT exempt code from the VAT Codes table.
Credit note
New Swiss VAT rates 2024
New VAT rates go into effect on 01.01.2024. Choose Banana Accounting Plus Advanced plan for a smooth transition.
Key benefits
- Automatically import the new rates into the VAT Codes table.
- Receive the VAT Statement in paper facsimile format or as an XML file ready for upload to AFC.
- Dramatically reduce your work time with advanced built-in features.
With Banana Accounting 9
- You CANNOT automatically import new 2024 VAT Codes; you can enter them manually.
- You CANNOT create the VAT Statement , but you can get the VAT Report from the Account1 menu command.
Choose Banana Accounting Plus - Advanced plan - get 1 month free!
In case an operation, that has been entered at an earlier date, needs to be cancelled, the same VAT code that has been used for the initial operation needs to be entered with the minus sign (-). In this way the VAT is being rectified.
Instead of using the minus sign prior to the VAT code, it is also possible to use the specific VAT codes for discounts that have been configured in the VAT Codes table.
Example of a credit note on a sale
When a client finds a defect on a sold product, usually a credit note on his behalf is being issued. The credit note implies a decrease of the income and as a result a recovery of the VAT (Sales tax).
For example, we enter a sale amount of 12'000 including a 7.7% VAT. We then issue on the client's behalf a credit note of CHF 200.- for a product defect.
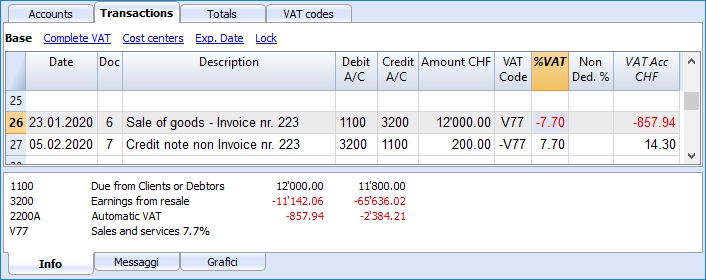
For a recovery of the VAT on the amount of the credit note, the VAT code of the sales has to be entered with a minus (-) sign.
Example of a credit note on a purchase
When we receive a credit note from a supplier, the same process as explained above applies: we use the same account codes but reverted, and we use the same VAT code with the minus (-) sign.
For example, we enter a purchase amount of 3'000 (invoice payment) including a 7.7% VAT. We then receive a credit note of CHF 300.- from our supplier for a product defect.
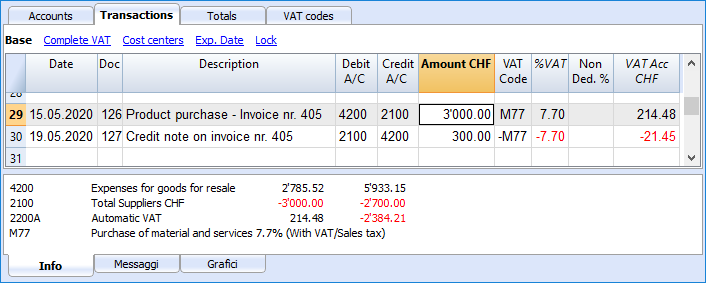
Period closing and VAT payment
New Swiss VAT rates 2024
New VAT rates go into effect on 01.01.2024. Choose Banana Accounting Plus Advanced plan for a smooth transition.
Key benefits
- Automatically import the new rates into the VAT Codes table.
- Receive the VAT Statement in paper facsimile format or as an XML file ready for upload to AFC.
- Dramatically reduce your work time with advanced built-in features.
With Banana Accounting 9
- You CANNOT automatically import new 2024 VAT Codes; you can enter them manually.
- You CANNOT create the VAT Statement , but you can get the VAT Report from the Account1 menu command.
Choose Banana Accounting Plus - Advanced plan - get 1 month free!
VAT account reset at the end of the quarter report
At the end of the period, the VAT account balance will be charged to the Due VAT account (or to the Treasury VAT account).
VAT account card before charging the period balance to the Due VAT account
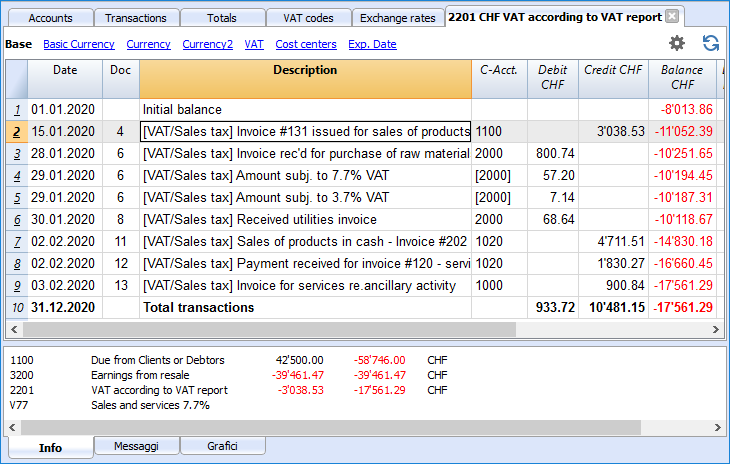
Transaction for charging the quarter balance to the Due VAT account
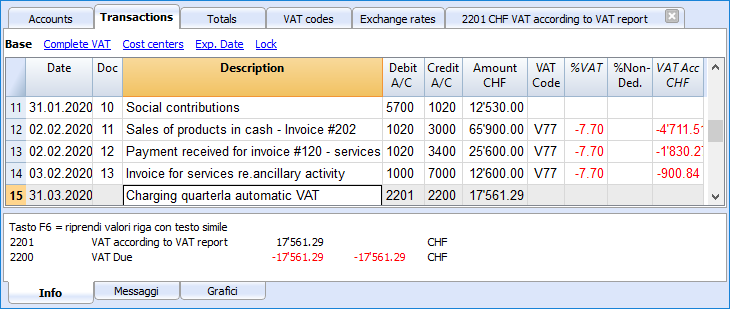
VAT account card after charging the period balance to the Due VAT account
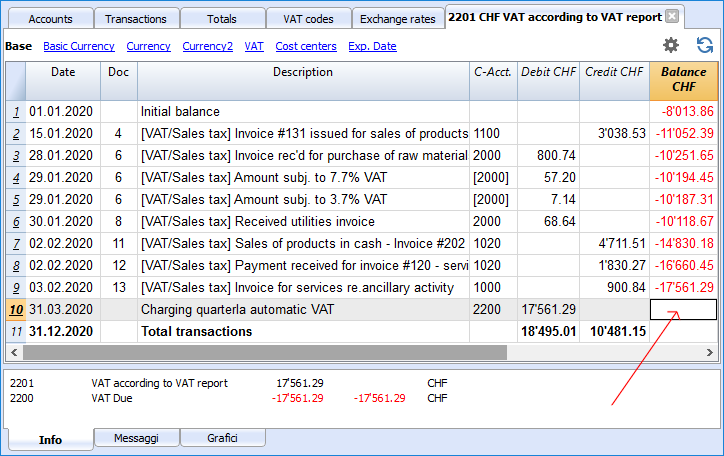
VAT payment
The Due VAT account (or the Treasury VAT account) will have a zero balance when you pay the due VAT.
With this system you can control your balance each quarter and in case of mistakes you can find in which period the balance does not correspond any more.
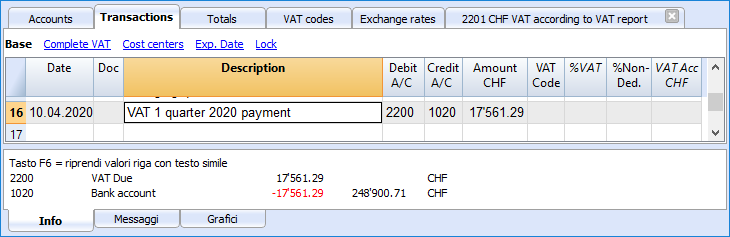
Due VAT account card after quarter payment
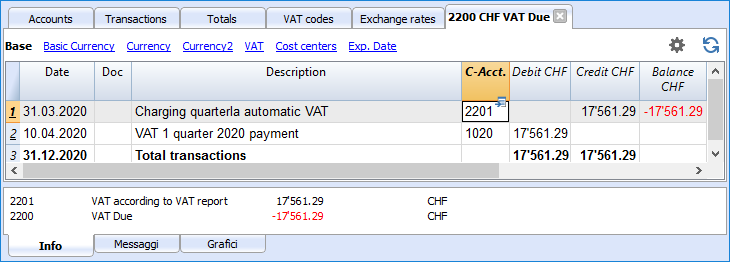
Note: the VAT payment process we just explained refers to the Swiss effective VAT payment method and the Swiss flat rate payment method with VAT separation.
If you use the Swiss flat rate payment methos without VAT separation, you can find specific information on the VAT payment and accounting assestment page (available only in Italian, German or French).
How to register a credit note (Switzerland)
If at the end of a period, when calculating the VAT report, the previous VAT is bigger than the due VAT, your VAT report has a Debit balance.
In order to charge the VAT report account you need to enter a transaction as follows:
- put in Debit A/C the Due VAT account
- put in Credit A/C the VAT report account
Usually in Switzerland the VAT credit is reimbursed, without having to move the credit to the following period.
When your VAT is reimbursed you need to enter a transaction as follows:
- put in Debit A/C your equity account
- put in Credit A/C your Due VAT account (where the balance should go to zero)
VAT/Sales Tax Report
New Swiss VAT rates 2024
New VAT rates go into effect on 01.01.2024. Choose Banana Accounting Plus Advanced plan for a smooth transition.
Key benefits
- Automatically import the new rates into the VAT Codes table.
- Receive the VAT Statement in paper facsimile format or as an XML file ready for upload to AFC.
- Dramatically reduce your work time with advanced built-in features.
With Banana Accounting 9
- You CANNOT automatically import new 2024 VAT Codes; you can enter them manually.
- You CANNOT create the VAT Statement , but you can get the VAT Report from the Account1 menu command.
Choose Banana Accounting Plus - Advanced plan - get 1 month free!
The VAT Report elaborates and displays the VAT calculation according to the selected period and parameters.
Procedure:
- Select, from the Account1 menu, the VAT report command
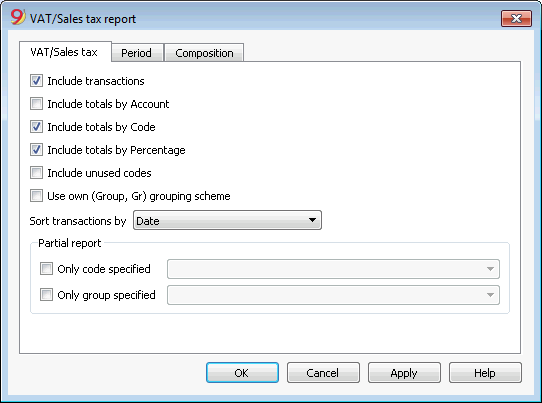
When activated, the following options allow the user to include the following data in the VAT report:
All the transactions with VAT/Sales tax are included.
Include totals by Account
All totals of operations with VAT/Sales tax, grouped per individual account, are included.
All totals of operations with VAT/Sales tax, grouped per individual VAT code, are included.
Include totals by Percentage
All totals of operations with VAT/Sales tax, grouped per individual percentage, are included.
Include unused codes
Also the unused codes of the VAT Codes table will be listed.
Use own (Group, Gr) grouping scheme
The operations with VAT/Sales tax are grouped according to the groupings of VAT Codes table.
Sort transactions by
By activating this cell, the transactions are sorted on the basis of a preselected option (Date, Doc., Description, etc….).
- only code specified (by selecting from the list)
- only group specified (by selecting from the list).
Other sections
The information relating to the other sections are available on the following internet pages:
VAT Report / transactions with totals by code
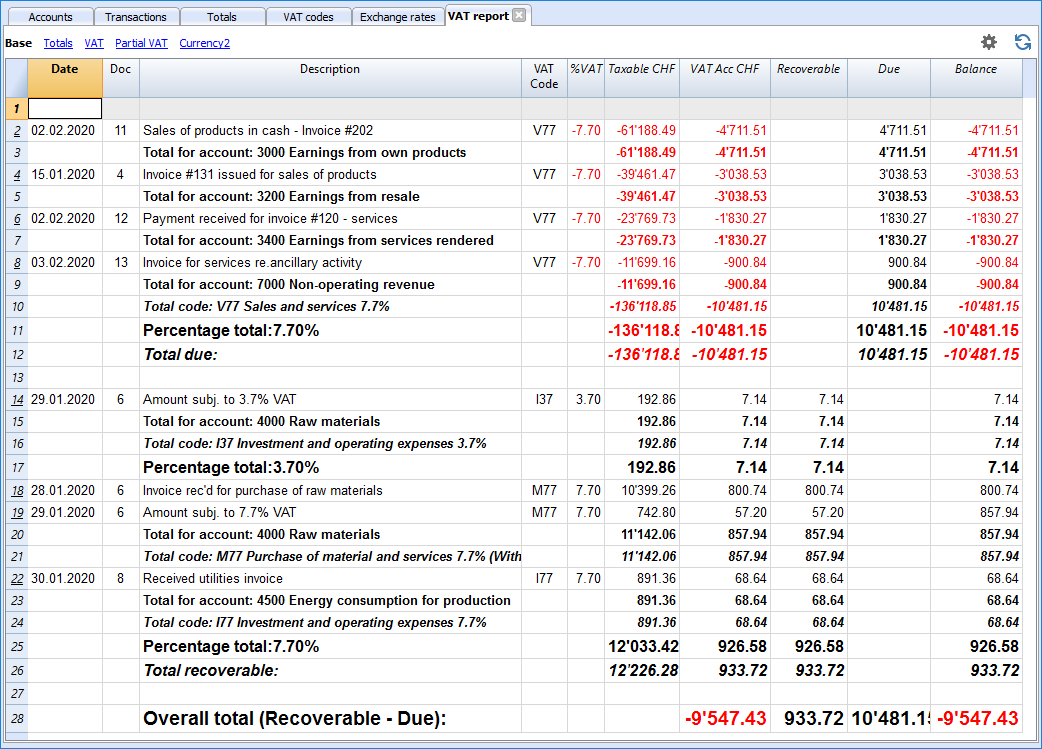
The overall total in the last row of the VAT report has to correspond with the amount for the end of period of the Automatic VAT account, Balance column, on the condition that both of them refer to the same period.
The data of the VAT report can also be transferred to and elaborated by other programs (f.i. Excel, XSLT) and be presented in formats that are similar to the forms of the tax authority
For Switzerland, one can automatically obtain a document similar to the form that has to be sent to the VAT office. This form shows the amount to enter for each number. Please consult (in German, French, or Italian) Swiss VAT Report.
Cost and Profit Centers
The Cost and Profit centers (hereunder being indicated as Cost centers) allow the user to catalog the transactions according to different criteria than the usual accounts.
Cost centers are usually used to catalogue expenses to specific activities, which may or may not have a correlation between them.
- Projects, Events, Shipyards
- Customers and suppliers, Partners, Sellers
- Additional detail for certain expenses (e.g. ancillary expenses)
The cost centers are attributed to the transaction row.
Segments, on the other hand, follow the debit and credit account, and are used as a systematic subdivision of all income and expenses.
Cost centers and segments can be used simultaneously.
Characteristics of Cost centers
- The Cost and Profit centers (CC) are accounts, preceded by the ".", "," and ";" signs
- There are three cost center levels:
- CC1 preceded by a period "."
- CC2 preceded by a comma ","
- CC3 preceded by a semicolon ";"
- Each level is independent of the other
- For each level, there can be an unlimited number of cost centers.
- A superior level can be used without using an inferior
- Cost center codes can be alphabetic or numeric
- Cost centers can have there own grouping, different than those of normal accounts. For the same level of cost centers, subgroups can be created. Be careful to not mix cost centers groups with other groups of a different level or with normal accounts or segments.
- Each cost and profit center has its own account card, complete with transactions and balance
- Recording on the cost center is independent of the account recorded in debit or credit. One can even record on a cost center without any account in the debit and credit column.
Setting up cost centers in the Accounts table
- Create a specific section for the cost centers.
This setup will be necessary for the presentation of the cost centers in the Enhanced Balance Sheet by groups.- Enter a section with an asterisk * for a section change
- In the next row, enter 03 (or 04 for a profit center).
- Add some empty rows for the cost center
- In the Group column, enter the group to which the cost center account belongs
- In the Account column, enter the cost center account preceded by a full stop "." for those to be registered in CC1 column (Transactions table), a comma "," for those to be registered in CC2 column and a semicolon ";" for the ones to be registered in the CC3 column.
- In the Gr column, indicate the group in which the amounts have to be totalized.
- In a Multi-currency accounting, the account currency is also specified.
- Add the cost center groups
- In one and the same group, totalize only one specific level.
- As for normal accounts, different levels can be created.
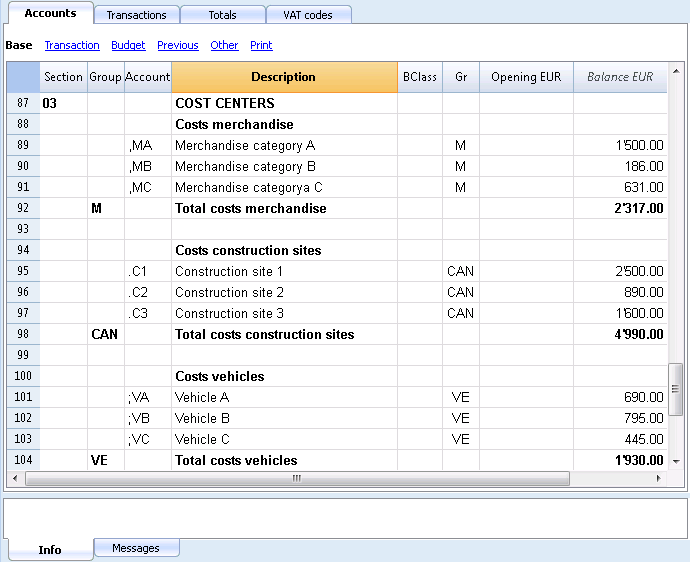
File Properties (VAT amount)
In the File and accounting properties command, in the VAT tab you can set the amount of cost centers with the following options:
- Use transaction amount - The amount of the cost center is registered according the registration amount
- Use amount excluding VAT - The amount of the cost center is registered net of VAT.
- Use amount including VAT - The amount of the cost center is registered inclusing the VAT.
Transactions
In order to register on the cost centers, it is assumed that the cost center accounts have already been entered into the Chart os accounts.
To proceed with the recordings, you need to be in the Transactions table, in the Cost centers view; in the CC1, CC2, CC3 columns, you need to enter the cost center account without the punctuation that precedes it.
- To record on the cost center in credit, the cost center needs to be entered preceded by the minus sign (-).
- For the Income & Expense accounting, in the File and accounting properties, you can define for the cost centers to follow the sign of the category.
- In order to record a global amount on more than one cost center of the same level, a different row needs to be created for each different cost center.
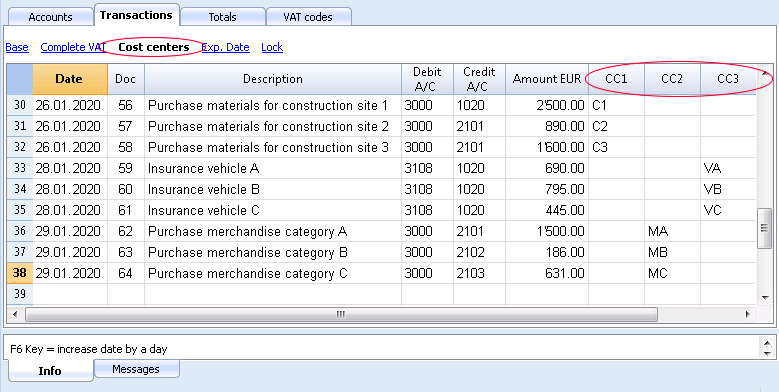
If you wish to display the Cost Center description in the Transactions table, you need to activate the corresponding column (CC1Des., CC2Des. or CC3Des.) with the Columns setup command from the Data menu.
Cost center account card
The cost center is treated as any other account, so each cost center has its own account card with account balance and account transactions.
In order to view all cost center account cards, click on the command Account/Category cards in the Account1, and then on the Cost centers button (Filter option).
Related documents:
Segments
Introduction
Segments are being used to have a more detailed classification of the costs, also to obtain calculations of components or departments of the company. By using the segments you can obtain a Profit & Loss Statement per unit, department or branch, without having to create specific accounts for each unit.
For example a museum can use the segments in order to know the income, the personnel expenses or the setting up expenses for each exhibit.
Segments are being used when a systematic attribution is necessary, that follows the transaction in debit or credit.
Cost centers, on the contrary, are normally being used for additional cataloging, less structured and when the account sign is not necessarily being followed.
Cost centers and segements can be used at the same time.
Characteristics of the segments
- Segments are accounts preceded by a colon ":".
- Segments codes can consist of numbers or letters.
- There may be up to 10 levels of segments.
- The number of colons preceding the symbol for the segment indicates the number of level.
- :LU segment of level 1
- ::P1 segment of level 2
- :::10 segment of level 3
- For each level there may be an illimited number of segments.
- The different levels of the segment are independent of each other.
- The segments do not have BClasses and do not have a currency symbol
- The calculations for segments are done in basic currency.
- In the transactions, the segment follows the debit and credit account.
It is not possible to record on a segment without having an account. - In the transactions, one can use a "-" as a separator instead of a ":" if on the File properties (Basic data) of the File menu the option Use the minus sign (-) as segments separator has been activated.
- Account cards of the transactions on single segments can be obtained.
Setting up segments
The segments have to be configured in the Accounts table, Account column, at the end of the chart of accounts.
- Insert an asterisk in the Section column in order to define the section relative to the segments
- In the Description column enter the Segments title
- Enter the description of the first-level segments, and in the Account column, insert ":"
- List the segments of the first level, entering an identification code for each one of them in the Account column, preceded by ":"
- Proceed by entering the segments of the second level (and, if necessary, those of the third), in the same way as those of the first level, with the only difference that the segment codes need to be preceded by "::" or by ":::", depending on their level.
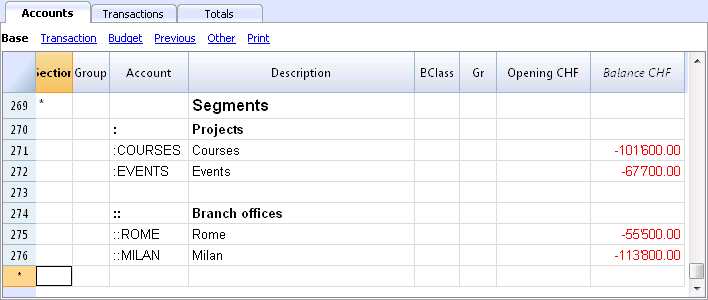
Segment balance
The segment is a subdivision of what has been entered on an account. The segment amount is thus always relative to an account, and in order to have the segment total, you need to use an Accounting report (from the Account1 menu), with a subdivision by segment (Subdivision tab).
In the chart of accounts the segment balance is indicated. This balance will be zero if the segment is used in both Debit and Credit accounts, since the amounts compensate themselves). The segment balance will be visible only when using it with the Credit or the Debit account, associated with the Profit and Loss statement account.
Transactions
The segments are being entered in the Transactions table, followed by the main account from the account segment.
Each segment is preceded by the colon, or by the minus sign (-), in case the option Use the minus sign (-) as segments separator has been activated in the File and Accounting properties (File menu).
If the chart of accounts contains accounts with "-" or "_", as for example in the clients/suppliers register's accounts), you can't use the same symbols as segments separators; in this case you need to deactivate the corresponding option and use the ":" symbol.
When a segment that belongs to more than one level is being recorded, the segment of the first level needs to be entered right after the main account; then, continue with the code of the second level.
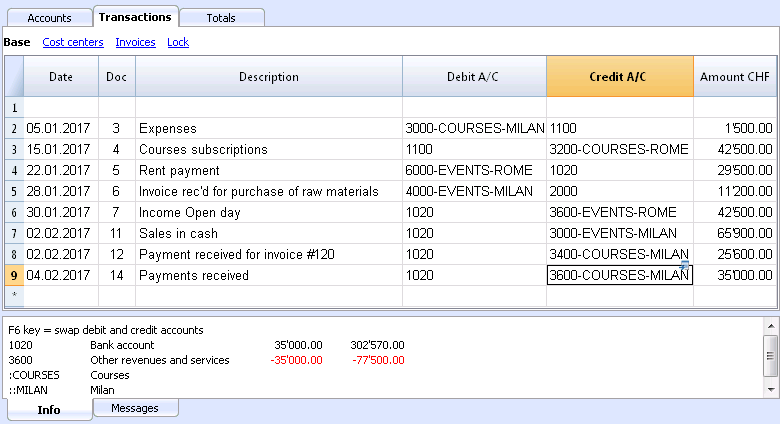
Report
Reports of the segments are obtained with:
- Enhanced balance sheet with groups
- Accounting report.
- Account card
- Multi-level report
In order to obtain reports that combine accounts and segments (for example, all the expenses of the LU Branch for P1), the features of the Banana applications need to be used.
Report subdivision by level
In the Enhanced Balance Sheet with groups, in the Subdivision tab, indicate the segment level to be used.
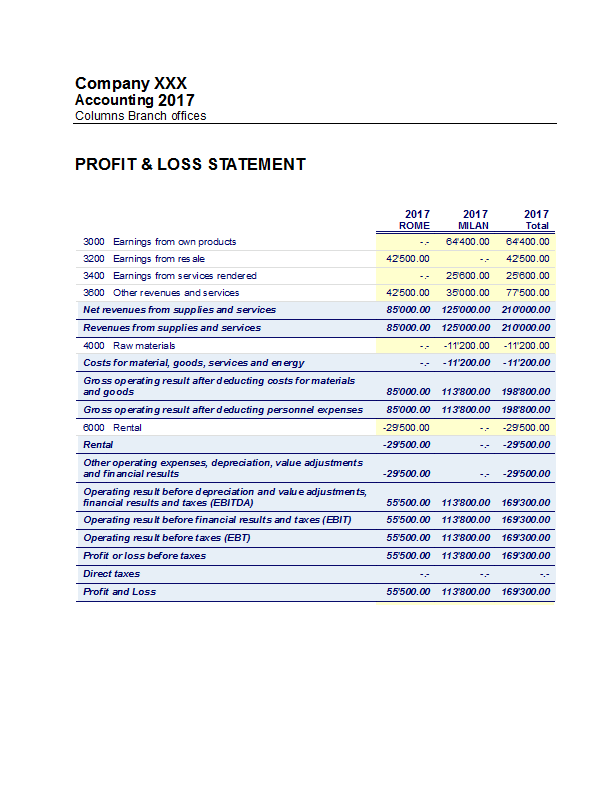
Summary Report
This is a summary with the segment that have been setup in the Accounting plan section, with a possible subdivsion (if desired) by period or by segment.
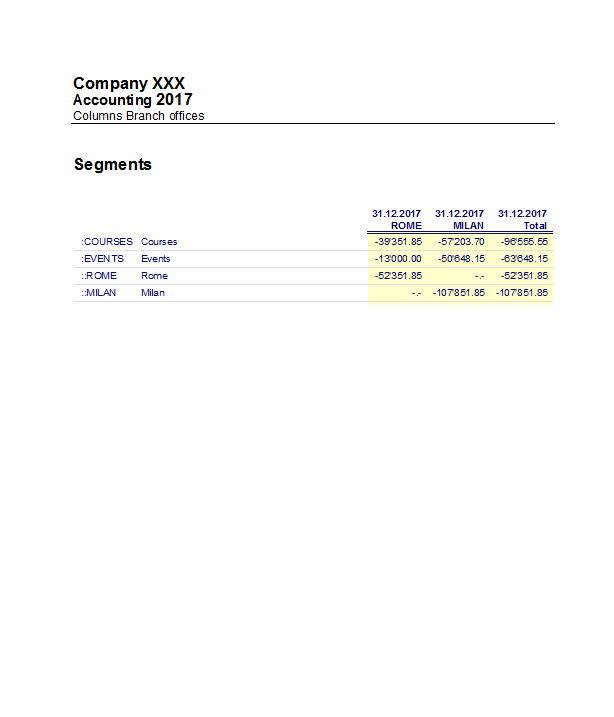
Segment non assigned
The "empy" segment gathers all the amounts that have been recorded without specifying a segment. It is possible to setup the title for this segment in the Accounts table. Please also select the Segment heather: Description option in the Subdivision section.
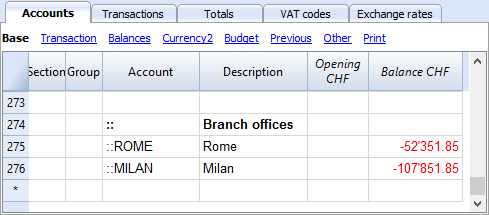
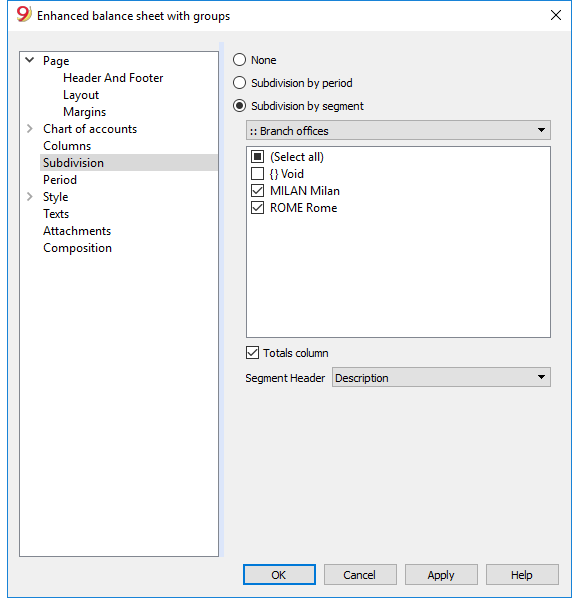
Related document: Managing different projects
Managing different projects
With the Segments feature it is possible to manage different sectors of a company or different projects of an association and to obtain for each one the balance sheet and the complete profit & loss statement with the breakdown of revenues, costs and profit or loss.
The segments are set out in the chart of accounts. When you enter a transaction, you also indicate the segment. Segments can also be used to manage branches, divisions or areas of business. A museum can use them to have reports of different exhibitions, a transport agency to have reports for each individual vehicle.
How to setup the Segment in your chart of accounts
Example
In an association, there are two projects that need to be managed:
- Courses
- Events
On top of that, there are different branch offices with the same projects to be managed:
- Rome
- Milan
The user wishes to obtain a balance sheet which indicates the profit or the loss of each project and branch office.
How to proceed:
- Insert the segments at the end of the chart of accounts
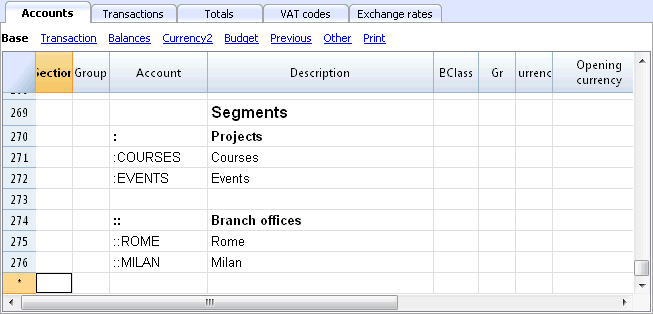
Enter transactions
Enter the transactions, and complete the debit and the credit accounts with the segments
Segments can be registered either with the colon (:) or with the minus sign (-).
If you want to enter segments with a minus sign in front of the segment code, you must activate the option 'Use minus sign (-) as segments separator, in the File menu, File properties (basic data) command, 'Options' tab.
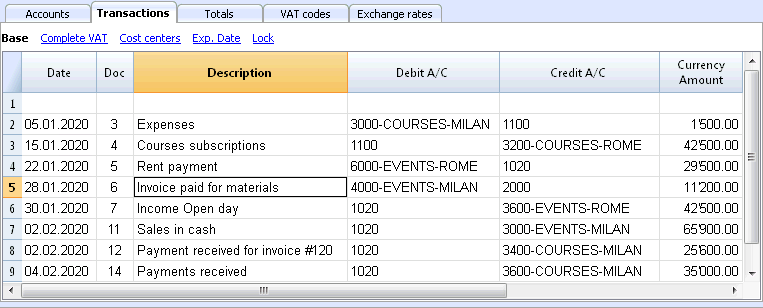
Enhanced Balance sheet by segment
- From the Account1 menu, activate the Enhanced balance sheet with groups command
- Select the available configurations in the different tabs; in the Sections tab in particular, deactivate the display of the Balance sheet accounts, the Client/Suppliers accounts and the Cost centers. The segments usually refer to the accounts of the Profit & Loss statement.
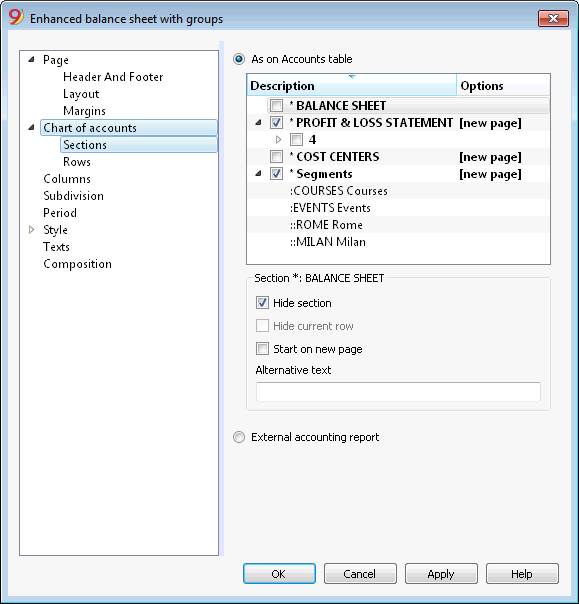
- In the Subdivision tab, activate the Subdivision by segment option
- Select the segment for which the balance sheet should be obtained (by project or by branch office)
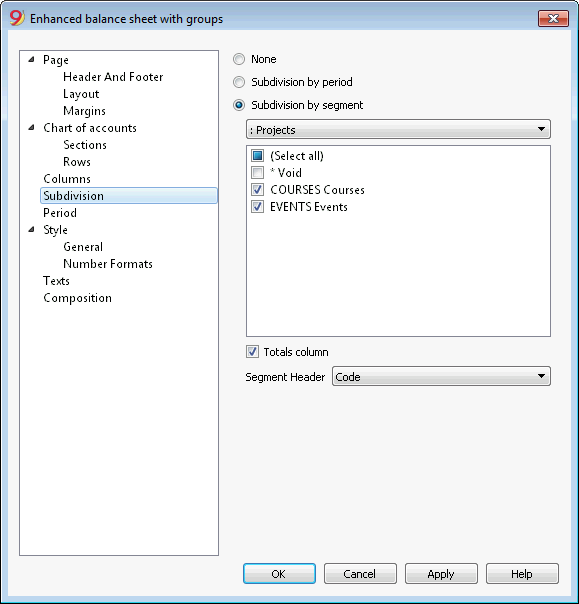
- Click on the OK button in order to display the report
Report by projects
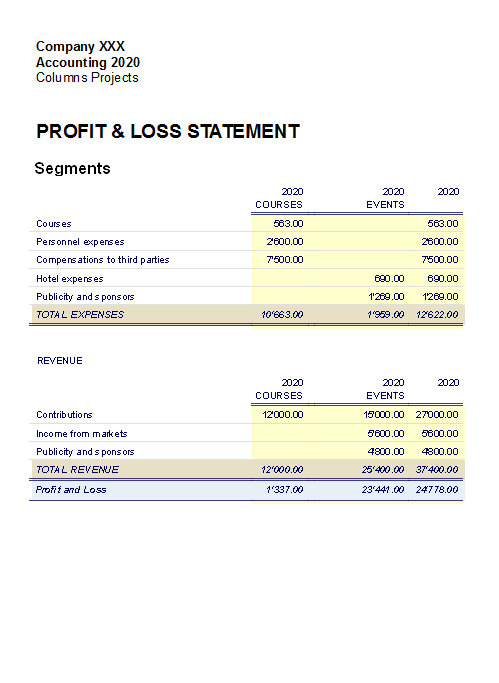
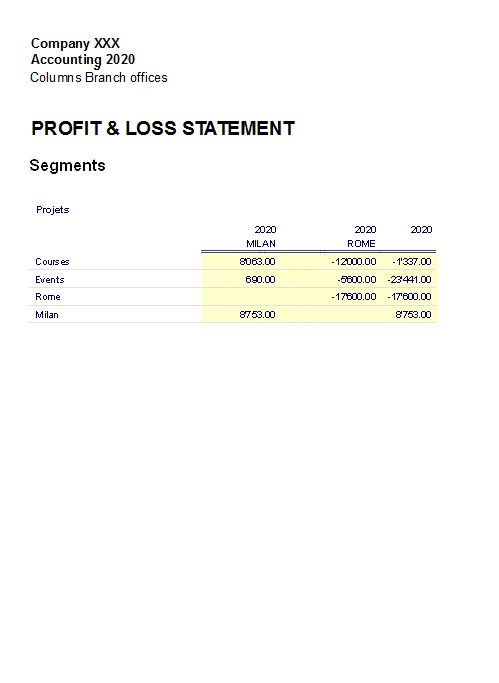
Budget, Forecasting and Financial planning
All accounting software includes powerful and innovative Financial Planning tools based on the double entry method. You can easily display Balance Sheets, forecast Income statements, financial, liquidity and investment plans.
A vision of the future
When using the double entry accounting method, financial forecasts allow you to have a comprehensive vision of the future of the company. You can imagine what the situation will be before things happen, and you are offered the opportunity to take action in time. If you notice that the costs will be too high, you can examine measures to lower them. If you're made aware of a shortage of liquidity, you will have time to take steps to avoid it.
By using financial forecasts, you will add value to your management.
Financial forecasts within reach of everyone
The planning system based on the double-entry method is incredibly powerful and within everyone's reach.
- Planning is fully integrated into accounting.
- The identical Chart of Accounts as the one in your accounting is being used.
No need to set up a new file, just add the budget movements. - Forecasts are carried out with budget registrations.
The proven accounting method of double-entry accounting is used. Costs and revenues can be specified in detail. - Income statement and Balance Sheet forecasts are available.
You can see how sales, costs, profits, liquidity and the evolution of capital will evolve. - You can check the evolution of an account or a group with all the individual budget movements.
- The program prepares forecasts by month, quarter or year.
- Forecasts can be set up with quantities and calculation formulas.
When the forecast is changed, for example when an investment is increased, the year-end depreciation is automatically recalculated. - The financial plan prepared for one year can also be projected over several years.
- All accounting reports are available with the values of the past, present and future.
Financial forecasts and a simple budget in one column
The planning function, with financial projections of costs, revenues and liquidity, is integrated and available in all accounting applications.
There are two operating modes:
- Complete financial planning in the Budget table
The Budget table is added to the accounting file, which allows you to enter the forecast movements, which then serve to generate complete financial forecasts.
The Budget column of the Accounts table is automatically updated by the program on the basis of the transactions entered in the Budget table. - Annual budget in the Accounts table
A very simple and traditional method that involves entering the annual estimates in the Budget column of the Accounts or Categories table.
Then on the basis of the final balance, the program indicates the variation in the Difference Budget column, Accounts or Categories table.
See: Simple annual budget.
Below we focus on the method that uses the Budget table.
Instant display of the budget values
Financial planning, based on the double-entry method, uses the same Chart of Accounts as the accounting.
In the Accounts and Categories table (revenue and expenditure accounting) not only the current balances are displayed but also the budget balances.
You can freely set up the structure of the Balance Sheet and Income statement by adding accounts and groups.
You can also use cost and profit centers, segments, as well as accounts for customers and suppliers.
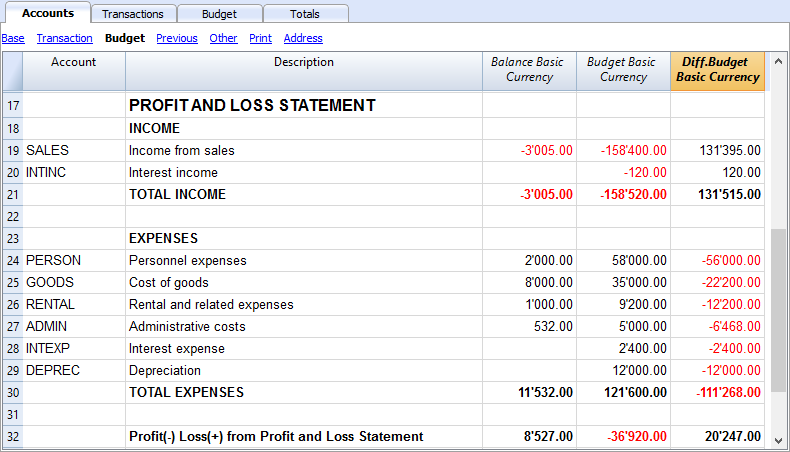
The Budget table
The planning is prepared by inserting transactions in the Budget table. This is like entering accounting records, but they concern the future.
The rent and other recurring transactions are indicated only once, setting the repeat option and any end date.
The sum for the year is indicated in the Total column.
You may add as many lines as you need, for the current year or for the following ones, carry out changes and modifications at any time.
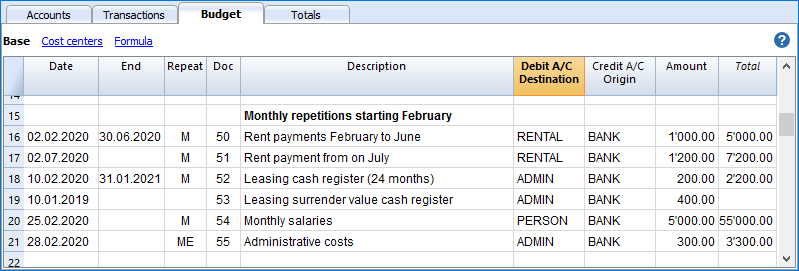
A clear and comprehensive vision of the future of your business
Banana Accounting provides you with all the necessary reports to have a comprehensive view of your financial future, the same that are used for your accounting, all integrated and balanced, without differences, just like for accounting. All is automatic, you don't need to waste time setting up tables in Excel, inserting and checking formulas, setting up rows and columns.
- Liquidity plan.
You can see how liquidity will evolve in the chosen planning period, know in advance if you will have the means to cope with the different commitments and select whether to require a synthetic, by group or detailed view, with each item listed. - Forecast Income statement.
You can see what the revenues and costs and the expected result will be, select a summary view with the totals per group or even detailed with the values of the individual elements. The layout of the Income statement can be freely set and changed according to requirements. The program will do the totals automatically, without you having to enter formulas. - Forecast budget.
For each account and group of Assets and Liabilities you will see the evolution over time. - Investment plan.
For each account or group of Assets you can see the evolution over time in detail. - Detailed account cards.
You can analyze each item in detail, thanks to the account card, examine how the evolution of the bank account or liquidity is. - Graphs with evolution over time.
You can instantly see the future evolution of each item. With a single glance, you can check how sales will evolve or understand if there will be a liquidity crisis. - Cost and profit centers and segments.
You can also use cost centers, profit centers and segments when forecasting.
You can get detailed forecasts for individual projects, customers or geographical areas. - Projections over several years.
You can have the Balance Sheet and Income statement for one, two, five or even ten years.
The program automatically projects the data of the year for subsequent periods. - View data by month, quarter, year or multiple years.
You can have the Balance Sheet and the Income Statement for a month, quarter, semester, year or more years.
You can thus analyze in detail the period that interests you. - Compare the budget with the actual figures.
Using the same Chart of Accounts, the comparison between the forecast and the actual is immediate. You can easily identify deviations from the estimate. - Save the report settings (compositions).
Create reports and save the compositions to be recalled when you wish.
For each report you can select the layout that interests you. The program automatically adapts the prints without you having to set up rows, columns and formulas. You can analyze the data from different points of view, moving from one visualization type to another.
- View for a period.
The program presents you with reports for the year, but you can also request to have the forecast only for a quarter. You can easily switch between annual and multi-year planning. - Evolution over time.
The program is able to present all the reports with a breakdown by period. You can thus see the evolution over time of liquidity, Balance Sheet, sales, costs and operating result. You can easily switch between views without having to reset formulas or tables. - Fully customized reports.
You can select and change the view as you require. You can present your plans professionally and make a good impression on those who support you. - Save report setup.
You can create and save print settings and recall them when needed.
Simple use
Everything is already set up, you have to enter the forecast movements with simple transactions. This approach is particularly suitable for accountants, who are instantly are able to prepare precise and complete forecasts. Thanks to the income and expenses accounting, even people without particular accounting skills can do it.
- Entry as for accounting records.
For each future financial event, a transaction with date, description and the accounts that are concerned is inserted.
It is the program that totals the amounts by item and period, just like in accounting. - Indication of revenues and expenses in detail.
The different items of expenditure can be indicated in detail and at the exact moment in which they will occur. For personnel expenses, the salaries of individual employees can be indicated. - Easier changes and updates.
Adapting, adding or removing revenues or expenses is simple, because you just change the specific detail. If in the following year the rent increases, just change this item. If there is a new expense, a new line is added. The program will automatically update the budget.
Fast thanks to repetitions
Repeating operations are entered only once. The forecast movement indicates the frequency with which the operation will repeat itself and the program takes it into account for the future.
In a planning, there are many operations that repeat themselves. Comprehensive planning can be set up in no time. The repetition function is particularly effective when you have to adapt the budget, change a single amount and in an instant everything is updated.
Automation of calculations
The program automatically performs simple or complex calculations.
-
Calculation based on quantities and prices.
Sales quantities can be memorized to have a more concrete vision of the budget. The program automatically calculates the amount of the movement and updates the accounting. - Calculation formula (Javascript).
Banana Accounting provides an extremely powerful formula system, specially designed for financial planning. You have access to the budget data, so you can create movements that depend on previous events. You can calculate the depreciation based on the value of the investments made or calculate the interest on the loan based on actual use. The program after each modification will recalculate the exact values.
Formulas are expressions of the Javascript language, simple or complex schedules can be created, fully automated.- You can assign values to variables and recall them on subsequent lines.
- Javascript expressions have access to the Banana API.
- You can also program your own Javascript functions and call them up.
Automatic projections over several years
You can set the budget for one year and let the program create projections for the following years.
All reports such as liquidity plan, income statement and forecast balance sheet will also be available for subsequent years.
This way, a medium and long-term view of the financial situation are made available. The projection can be completely controlled for the following years as well. The operating logic is simple, for the operations of the year that will repeat themselves in the consecutive years, an annual repetition code is inserted. This way the program is able to project the planning data for the period in question. Schedules for two, five or even more years can easily be made.
Customer portfolio analysis and supplier control
When entering forecast movements, customer codes can be indicated. In this way, you can build realistic planning starting from your customer portfolio and understand if the costs will be covered and which customers will be more profitable and therefore pay more attention.
Obviously, the same analyzes can be done for suppliers.
Planning of projects or sectors
You can also create financial plans with reports by projects, activities or by business sectors. It is sufficient to indicate in the movements that an expense or income is relevant to a project or department and the program is able to automatically prepare specific reports.
Easy adaptation
You can adapt the structure of the Chart of accounts and the layout of the Balance Sheet and Income statement; add items and groups and reports change automatically, without having to add formulas to calculate row or column totals.
Comparison between the estimate and actual data
Accounting and budget use the same calculation and report preparation engine. In the transactions table, enter the values referring to the past and in the estimate, those of the future. The Chart of Accounts and the arrangement of the balance are always the same and comparisons and indications about any changes compared to the budget are automatically displayed.
Automatic data transfer to a new year
The budgets set up with Banana Accounting are easy to update and modify. Just change the relative movements and the program automatically recalculates the formulas and updates the budget.
When you create a new year, the program reports the budget data, changing the dates. It is then a question of modifying the elements that have changed since the previous year. This provides detailed and perfect planning for the following year.
Corporate financial simulation
Integrated planning in accounting is very powerful and opens a new era in business planning, as it offers the possibility to simulate the series of future events with great precision and in detail. Forecasts can be analyzed in detail with the same tools used for accounting analyzes; check what is the break-even point and analyze the situation of customers or projects.
Learning accounting with planning
By preparing the budget with transactions similar to accounting, one practices and learns the accounting technique. Accounting training courses can be made much more interesting and effective, because students can be offered the task of creating their own company and ensure to make it become solid and profitable. Students will not only have to practice entering transactions, but they will have to keep an eye on the activity and get used to reading the Balance Sheet and the Income statement.
Starting a financial forecast
You can easily prepare financial forecasts including liquidity plans, balance sheet and income statements.
The procedure is the same as for creating the accounting.
1. Create the accounting/forecast file
With the File → New command , create a financial forecast file, using the accounting type and the accounting template that best suits your needs.
You can also start by using one of the templates already prepared for learning, which also contain examples of budget transactions.
- Financial planning for the family (with the Cash Manager)
To plan your family's expenses and income. - Financial planning for the opening of a restaurant (Income and Expenses Accounting)
This template uses alphabetical account numbers, which make comprehension more immediate.
With income and expenses; even without accounting knowledge, you can create a professional planning, including the liquidity plan, asset forecasts, costs and income. - Financial planning for the opening of a restaurant (Double-entry Accounting)
For complete financial forecasts, with the double-entry bookkeeping system, intended for those who are familiar with the double-entry bookkeeping method.
This model uses alphabetical account numbers, which make it easier to understand.
There are also sample files for more advanced functionalities:
- Double-entry accounting, using the quantity and formula columns
The different possibilities of using the formula column are listed. With examples and explanations. - Multi-currency accounting with examples of budget transactions with formulas
To use multi-currency specific formulas. - With examples of transactions on more complex themes.
Once created you can save the file and give it a name, preferably composed of the company name and the year "company-2020.ac2".
2. Customize the file
Once you have created the file, adapt it to your specific needs:
- Set the File properties.
- The company name.
- The Accounting period.
Normally it is the one corresponding to the calendar year. However, you can indicate another one as needed. See Forecasts over several years.
- Customize the Chart of Accounts.
You can change the description, add or delete accounts or groups.
If necessary, you can adapt the Chart of Accounts at any time later. - If it’s an activity already in progress, enter the Opening Balances.
3. Enter financial budgeting movements
In the Budget Table you can now enter the financial forecast movements.
4. View the forecasts
The forecast data are visible:
- In the Charts window.
- In the Accounts table, in the Budget column.
- In the Reports, in the Budget column.
- In the Account card, Budget values.
Adapt the forecast
You can change, add or delete transactions at any time. The forecast will be immediately recalculated.
Add forecasting to an existing accounting file
The following explains how to add financial planning to an existing accounting.
Adding the Budget table to an existing accounting
The first step will be to Add the Budget table to your accounting file. At this point you will have the budget table available, where you can enter the financial forecast transactions.

Entering budget transactions
Having thus the accounts and the chart of accounts already set up, you can immediately start to enter the transactions in the budget table, also refer to Transaction examples.
Just follow the instructions and templates indicated in:
Budget table
Planning transactions are entered in the Budget table. It's setup is similar to the Transactions table you are using, but has specific columns that help speed up and make planning easier.
You can also modify the data as you wish, to display reliable forecasts that are always perfectly up to date.
Easy and comprehensive forecasts
- You can enter all the operations in detail.
- You have comprehensive forecasts because they are based on the double-entry method.
- Based on the transactions entered, the program calculates and displays the forecasts.
- Indicate when an operation will be performed, and if and until when it will repeated.
- The description is indicated.
- Indicate the account of origin and destination.
- Indicate the expected amount.
- You can complete the registration with:
- Customer account
- Accounts Payable.
- VAT code
- Cost / Profit Center
- Segments.
- Add more columns for additional information.
- You can enter the transactions in the order you want, so as to form groups.
- You can enter additional information to facilitate the transfer of data to the new year.
Adding and removing the Budget table
Financial planning is done by adding the Budget table.
If your accounting file doesn't have the Budget table yet, proceed as follows:
- Tools menu -> Add new functionalities command
-
Add Budget table
Warning: this operation cannot be undone. If you want to return to the previous version, keep a copy of the pre-existing file, or use the Remove Budget table function.
Thereafter, the program will:
- Add the Budget table, carrying forward the budget values indicated in the Accounts table.
- Lock the Budget column in the Accounts table.
The values of this column are being calculated according to the budget transactions, using the period defined in the accounting tab basic data.
Remove the Budget table
With the Add new functionalities ... command (in the Tools menu) you can also remove the Budget table.
Warning: This operation can not be undone. Once the command is executed all budgeted movements will be erased.
If you have the possibility to return to previous version, make sure to save a copy before executing.
Once the Budget table is removed, the Budget column will again be available for modifications in the Accounts table.
Budget table columns
The Budget table columns are very similar to the Transactions table columns. To facilitate understanding, letters have been used for account designation in the following example. Normally you would use your own account numbers.
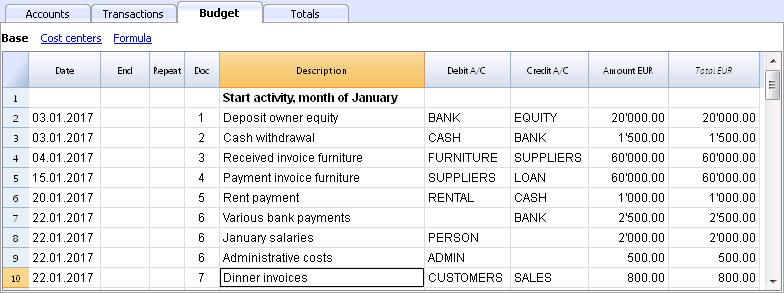
Below you will find explanations for each budget column:
- Data
The future date when you expect the operation to take place:
If an exact date is not available, for example a monthly sales budget, enter the end of the month date. - Repeat
A repetition code is entered (for further information on use, also see Dates and Repetitions.- When the forecast is calculated, the program internally creates copies of the rows with the date set successively and based on the indicated repetition code.
- Blank, no repetition takes place.
- The initial row keeps the date indicated.
- The date of the copy lines is progressively increased as defined by the repeat code.
- If the repetition is monthly or yearly in the created lines:
- It is generally used on the same day as the column being used.
- If the day is greater than the number of cycles in the month, the last day of the month is used.
- If the end of month indication "ME" or "YE" is indicated, the last day of the month will be used.
- When the forecast is calculated, the program internally creates copies of the rows with the date set successively and based on the indicated repetition code.
-
- Basic codes for repetition:
- "D" for a daily repetition (Day)
- "W" for a weekly repetition (Week)
- "M" for a monthly repetition (Month)
- "Y" for a yearly repetition (Year)
-
- Multiples
If the code is preceded by a number, the repetition occurs with the multiplied frequency.- "2M" for bimonthly
- "3M" for quarterly
- "6M" for six months
- Repetition with a later date at the end of the period.
The "M" and Y "codes with the" E "at the end move the repetition date to the end of the month.- "ME" monthly repetition, but with a date at the end of the month.
If you enter the date 1.1.2022 the next date will be 28.2.2022 and the one after 31.3.2022
If the date is 28.2.2022, the next date will be 31.3.2022. - "3ME" for quarterly end of month
If you start on 30.6.2022, the next date will be 31.12.2022. - "6ME" for half-yearly end of the month
- "YE" each year, but at the end of the month.
If the date is 28.2.2015 the next date will be 29.2.2016. - "5YE" every three years, but at the end of the month.
If the date is 28.2.2015 the next date will be 29.2.2020.
- "ME" monthly repetition, but with a date at the end of the month.
- Multiples
- End (End date)
- Generally to be left blank.
- Enter the date after which there must be no repetition.
For a lease, the date on which the lease ends will be indicated as the final date.
- Variant
To indicate a possible variant relating to the budget, in combination with the extensions. - Management of a New Year
Indicate how the transfer should take place when a new year is created.- No value - the date is incremented by one year.
- "1" The date remains the same.
- "2" The transaction is not transferred to the new year.
- Debit and Credit Account, CC1, CC2, CC3
As in the Transactions table, the accounts in which the transactions are to be registered are indicated.
Segments and cost centers can also be used. This way, a budget may also be prepared for segments or cost centers. - Quantity
The quantity which, multiplied by the unit price, returns the total amount (see Quantity and Price columns) - Unit
A description referring to the quantity, for example: m2, ton, pcs. - Price/Unit
A description referring to the quantity, for example: m2, ton, pcs.- In the income and expense accounting, enter a negative value to have the amount entered in the output column.
- Formula (in base currency)
Allows you to enter calculation formulas, in Javascript, plus the programming functions of the Banana Apps.
If there is a formula (or any text), the value in the Amount column is set based on the result of the formula.
See the next points for how to use it.- In double-entry accounting, the result of the formula must always be a positive number.
- In the income and expense accounting, if the result is positive, it will be considered as an revenue, if negative as a cost.
- Amount (in base currency)
The amount that is used for the forecast.
In the event in the row includes a repetition, the amount of the first transaction is indicated. The amounts of subsequent repetitions are visible in the account card.
The amount is automatically calculated in the following cases:- If you entered a value in the Quantity or Unit price columns, the amount is calculated based on the contents of these two columns.
- In double-entry accounting, the result is converted into a positive value.
- In the income and expense accounting, if the result is positive, it will be considered as an revenue, if negative as a cost.
- If a formula has been entered, the amount will be the result of the formula.
The formula also has priority over quantity and price.
- If you entered a value in the Quantity or Unit price columns, the amount is calculated based on the contents of these two columns.
- Total
This is the total of the repeated row amounts that fall within the Accounting and Forecasting Period set in the file properties.
If there is no date or if the start or end date are outside of the accounting period, this column will remain empty.
- Basic codes for repetition:
-
Columns in income and expense accounting
-
For the Cash Manager and the Income and Expense Accounting, the amounts are indicated in the Income and Expense column.
- Revenue and Expense Columns
The budget amounts are entered in the income and expense columns. - Use of Quantity, Price and Formula columns
When the program automatically calculates the amount based on the Quantity, Price or Formula columns, the result will be entered in the Revenue column if it is positive, and in the Expense column if it is negative
In the Quantity and Price columns you can indicate a positive or negative value. -
-
Columns in multi-currency accounting
- Revenue and Expense Columns
Is the amount in the currency of the transaction account (see multi-currency transactions).
This amount is used to calculate the basic currency value at the indicated exchange rate.
If there is a formula, the value is the result of the formula calculation .
If the row includes a repetition, the amount of the first transaction is indicated. - Account currency amount formula
A calculation formula can be entered.
If the line includes a repetition, the amount of the first transaction is indicated. The amounts of subsequent repetitions are visible in the account card. - Exchange
It is the exchange rate that is applied to convert the amount into the account currency into the base currency. - Total currency amount of the account
Is the total of the amounts of the repeated lines in the currency of the account, whose date falls within the accounting period defined in the file properties
If there is no date or if the start or end date is outside the accounting period, this column will remain empty.
-
Financial Planning based on the double-entry method
By adding the Budget table to your accounting, you can set up a comprehensive and professional financial planning.
Financial Planning based on the double-entry method
The planning system of Banana Accounting is based on the same double-entry method used for accounting.
It is planned by always indicating an account of origin (credit) and one of destination (debit). This allows for a precise vision of the capital flows and offers the possibility to have a comprehensive vision which includes:
- Budget forecasts, therefore relating to the financial situation, liquidity, assets, third party and own means.
- Income statement forecast: revenues, costs and operating result.
Plan Execute Control
The planning of Banana Accounting is an integral part of the Plan-Execute-Control.
This offers a constant and dynamic control of the financial situation and evolution.

Planning and accounting in a single file
The same file contains both accounting and planning data. You can get started with a file prepared to keep the accounting and then add the schedule later, or you can start with a file to keep the planning and then also manage the accounting.
Common elements
- Basic accounting data
Header, currency, accounting period, address, other parameters. - Accounts and Categories table
Where to set up the Chart of Accounts with accounts and groups total.- Opening balances (Opening column)
They are inserted in the Accounts table and are used as the initial situation for both accounting (current values) and forecasts. - Annual Budget (Quote column)
- With the Budget table
The Budget column of the Chart of Accounts will be protected and the program indicates the budget amounts, calculated on the basis of the contents of the Budget table, referring to the accounting period. - If there is no Budget table
You enter the budget data manually.
When forecasting, the program generates the monthly value, dividing the annual value by the number of months of the accounting period.
- With the Budget table
- Opening balances (Opening column)
- The other tables
- VAT Codes Table
- Exchange rate table
Accounting data (past and present)
- The Transactions table
Where past (historical) movements are entered.
The Registration table is always present in the accounting file. If you don't use it, you can hide it - Current value (accounting, past and present)
This is the balance or movement of the period of an account or group.
In the reports, you can display the column of the Current value.
These are the values calculated on the basis of the accounting data, calculated taking into account the- Opening balances (Accounts table).
- The movements of the Transaction table
- Account card (historical)
These are the movements of an account or group prepared on the basis of the initial balances plus Transactions.
The Budget data
They are those used to make forecasts, budgets and schedules.
The term "Budget" is always used in the program for future data.
- The Budget table
Future budgeted transactions are inserted.
The method is the same as the one used in the Transactions table, there are the same columns, plus other specifications for planning.
Movements related to the future, included in the Budget table- Static values (as in the Transactions table).
- They use calculation formulas, which the program solves when calculating the forecast.
- Repetitive movements, which the program uses to automatically generate forecasts.
- The Budget value (future)
The forecasted value. In the reports you can display the column of the Estimate value, calculated taking into account- Opening balances (Accounts table)
- Transactions in the Budget table (if any).
- If the Budget table does not exist, using the value contained in the Budget column of the Accounts or Categories table.
- Budget Account card (future)
These are the transactions of an account or group prepared on the basis of the opening balances and budget transactions.
The Difference Budget values
Difference between the budget and current values (actual, final).
In the reports, there is a column for comparison, which displays the difference.
Mixed projection values (from a certain date)
The value at a certain future date calculated as follows:
- On the basis of current values and up to the indicated start date .
- Starting from the date indicated on the budget values.
Mixed projection values are only available through scripts and the web server.
Types of accounting
The accounting method chosen for accounting is used to insert budget transactions or movements.
- Income and Expense (Cash Manager and Income and Expense accounting)
- Doubl- entry (Double-entry and multi-currency accounting).
For budget calculations, the program internally always uses the double-entry based engine. The results and reporting that are obtained are therefore very similar.
Accounting, planning and forecasting period
Accounting or forecasting is always related to a period. The following periods are differentiated:
- Accounting period
Is the one defined in the file properties, with start and end date. - Budget period
It is the period for which the planning data is entered.. - Forecast period
It is the period used by the program to calculate the forecast. It is indicated when a print is requested.
For more information, see the Forecasting period.
Breakdown by period
With the double-entry method, each operation has its own date in the planning. When printing, the user chooses whether to have a forecast by month, quarter, semester or year, and the program will calculate everything automatically. Contrary to spreadsheets, there is no need, anymore to decide at the beginning whether to make forecasts by month, quarter or year and to divide the amounts manually in the columns.
Automatic projections
Thanks to the possibility of indicating that certain operations are repeated in the future, the program has the necessary elements to automatically prepare forecasts for future years. You can thus know how revenues, costs, liquidity and other assets and liabilities will evolve in the weeks, months, quarters and years to come
Details with all the operations
With the double-entry method, the forecasts are prepared by inserting transactions. The program is able to present the account card with the detailed movements for each account. This view is very useful for investigating elements and represents another advantage of liquidity-oriented planning, which is difficult to achieve with planning prepared with spreadsheets.
The calculation journal
The basis for all accounting and budget processing is the calculation journal. To prepare Financial Statements, Income Statement, Account Cards, VAT Reports, the program creates an internal data structure which is called a calculation journal. Movements are accessible through the API accounting with Journal function.
The logic for creating the calculation journal works as follows:
- It is created starting from the data entered by the user.
- For each financial movement, including also the opening balances, there is a row, where the main elements are:
- Origin
Indicates whether the transaction relates to accounting (current) or planning (budget). - Operation type
Opening balance, movement, carry forward, invoice compensation. - Date (the relevant date)
- Description
- Account
- Account Type
Indicates whether it is a normal account or a cost or profit center. - Amount (accounting base currency)
Positive values indicate an increase (debit), negative values indicate a decrease (credit) - Amount account currency
- Other columns
- All those that are present in the Transactions table.
- Several others that are used for calculations.
- Origin
The calculation log is emptied every time recalculation is performed and then the following are added:
- The lines of current transactions (relating to actual accounting).
- The lines of the budget movements.
The rows of current values (actual)
The rows for current values are added to the temporary journal starting from:
- Initial balances contained in the Accounts table
For each account with a balance, one row is created.- Date is the date of the start of accounting.
- Account is the account.
- The amount is the opening balance.
- Accounting movements from the transactions table.
If the movement has multiple accounts, debit account, credit account, VAT account, cost center, a row is generated for each account with the relative amount in positive or negative.
The lines of the budget values
The rows for the budget values are added to the temporary journal starting from:
- Initial balances contained in the Accounts table
As with accounting values, a budget line is created for each account with a balance.
- Planning movements (with the Budget table)
As for accounting, for each movement on the account, rows are created based on the Budget table.- Static ones, with all the values set.
- Repeated movements
- For the entire projection period defined, based on the repetition code, the program creates duplicates of the budget lines and sets the date.
- The program generates repeated rows based on the contents of the Start Date, End Date and Repetition columns
- If the projection period is the calendar year and in January there is the registration of the rent with monthly repetition, the program creates duplicates for the following 11 months.
- If the registration is on January 31, for the months that do not have 31 days, the day will be the last of the month.
- If the first registration is on March 28 and the repetition code is indicated as the end of the month, in the following months the day will become the last of the month.
- As for accounting entries, if there are multiple accounts on the budget row, one row is generated for each account.
- Movements starting from the annual Budget (if there is no Budget table)
If there is no Budget table, the budget rows are created based on the content of the Budget column of the Accounts and Categories table:- The number of months It is calculated how according to the accounting period.
- One row is created for each month.
- The amount contained in the Budget column is divided by the number of months.
- If there is a rounding difference, an additional row is created for the final month.
After creation, the rows are sorted by ascending order.
Amount column calculation
Once the calculation journal has been created, the contents of the amount column of all the budget rows which contain a formula or a quantity or unit price are recalculated.
Resolution of formulas in Javascript:
- Javascript interpreter creation
Every time the calculation journal is created, an instance of a Javascript interpreter, specific for the resolution of the Budget formulas, is also created - Javascript interpreter initialization
The Javascript interpreter is initialized by running scripts.- The default Banana Accounting scripts.
- The content of the _budget.js file possibly present in the Documents table.
This way the user can initialize variables or create his own calculation functions.
- Resolution of formulas
- The formulas contained in the rows of the temporary journal are solved one after the other in the progressive sequence of date.
- The state of the Javascript interpreter is maintained after each operation, therefore the formula can refer to variables defined in a row with a previous date.
- The formulas contained in the repetition lines are also executed by order of date, so the result varies according to when it is performed.
The calculation sequence is as follows
- The budget lines are processed by order of date (if they have the same date in the order of entry).
- The transaction amount is calculated, with this priority:
- If there is a formula by solving it
- If the quantity and the price are present, by multiplying them
- Otherwise the value contained in the amount column is kept.
- For multi-currency accounting, the currency amount formula is first performed and then the base currency amount formula.
If there is no formula for amount in base currency, the program reverts to the historical exchange rate and calculates the equivalent value in base currency. - For VAT accounting, VAT is recalculated based on the transaction amount.
- Previously processed rows are for calculations of subsequent rows.
- If you use a formula for calculating the balance for the whole year in a February transaction, you will only have the balance until February.
Calculation column Total Budget table
The Total column is calculated automatically and contains the total amount of the budget for the accounting period indicated in the file properties (start and end date of accounting).
- If it is a single transaction, the Total is equal to the amount.
- If it is a recurring operation, the Total is the sum of the amounts of all repetitions that fall within the accounting period.
- The Total column is empty if the date is preceding or goes beyond the accounting period.
Calculation of the current value, forecast and comparison
Once the calculation journal is generated, it is used to calculate the Balance Sheet and all the other processing necessary for accounting.
For the periods defined in the report, the program calculates:
- The current value (based on Transactions).
- The Budget values.
The following values are calculated for current and budget data:
- Balance at the beginning of the period.
- Debit movement
- Credit movement
- Movement (Total)
- Balance at the end of the period (Start + Movements)
The comparisons between Current and Budget are also calculated:
- Absolute Difference (Budget - Current).
- Percentage change
Automatic and manual recalculation
The budget values are automatically recalculated:
- If there is a change in the Budget table.
- If the accounting start or end date is changed.
- If the Accounts table is modified.
- When requesting a report and the Transactions table has been changed.
After each recalculation the program automatically updates:
- The Budget column in the Accounts and Categories table.
- The Total column in the Budget table.
If you modify the VAT table or the _budget.js file or other Javascript files that are used in the calculation of the formulas, you must perform a recalculation manually (Command check and control accounting).
The calculation speed depends on:
- Number of accounts and groups in the Accounts and Categories table
- Number of rows inserted in the Budget table.
- Number of rows with repetition.
- Presence of formulas.
- Schedule period set. The longer the period, the greater the number of repeat lines.
Manual recalculation
If the calculation takes a long time, it may prove difficult to enter data in the Budget table. You can switch to manual recalculation by checking the Recalculate totals manually option in the File Properties (from the File menu) Options tab.
To have the updated values, you must therefore use the Recalculate Totals command.
Period for the financial forecast
The planning system based on the double-entry method allows you to prepare forecasts indicating when the operation will take place.
Unlike Excel, where you set up a sheet with the columns for the forecast periods (month, quarter or year), with Banana Accounting you simply indicate the expected date for the event. The assignment to a period is generated automatically by the program when it processes the data. You can decide to display forecasts by day, week, month, 2 months, quarter, semester, annual, 2, 5 or 10 years.
- Forecasts can be made for one or more years.
- Based on the data entered, the program calculates the liquidity, Balance Sheet and Income statement projections for the period in question.
- Daily forecasts can be obtained, particularly useful for liquidity, or even by month or year.
See Prints and financial forecast reports.
Accounting, planning and forecasting period
Accounting or forecasting is always relevant to a period. The following periods are differentiated:
- Accounting period
This is the one defined in the file properties, with start and end date.
Generally, it will be the same as the calendar year, but it can have any start and end date. - Planning period
The period for which the planning data is entered.- The schedule does not require a planning period to be set.
- It is generally assumed that it is the same as the accounting period.
- The planning period may be different from the accounting period. In the Budget table, rows are inserted which take effect beyond the accounting period.
- Transactions with dates outside the accounting period.
- Repetitive transactions without an end date or with an end date that is beyond the the accounting period.
- Forecast period
The period used by the program to calculate the forecast.- It is indicated when a print is requested.
- Use the accounting period as default.
- It can be set freely and in this way forecasts can be obtained for several years and even for several decades.
- The accounting period is used as the Forecast period for the calculation of the content of the Total column in the Budget table and of the Budget column of the Accounts and Categories tables.
- These values therefore refer to the accounting period defined in the file properties.
- If you change the accounting start and end date, the forecasts are recalculated.
- It is indicated when a print is requested.
Forecast with monthly logic
Forecast movements are entered in the Budget table indicating the date on which these are expected to occur. For the purpose of liquidity forecasting, it is important to indicate dates for revenues and costs as precisely as possible.
For all other income and expenses that occur on a day of the month or rather at the beginning or the end, such as rent, wages, bank charges and other expenses or income, it is important to indicate by selecting the day close to the actual day of payment.
For other revenues and expenses, approximations will be made. For example - except in special cases - for restaurant revenues, which come in daily, it is not adequate to make day-to-day forecasts. In this case it is sufficient to indicate the overall sales that are expected to occur in the month. We recommend to indicate day 15, the middle of the month.
Forecast for the current year
Movements with or without repetition are inserted in the Budget table.
The calculation of the forecast is generally generated, taking into account the movements that fall within the current accounting period, as defined in the file properties.
- The total amount for the current period is indicated in the Total column of the Budget table.
- The estimate balance for the current period is indicated in the Budget column of the Accounts and Categories table.
- In the various printouts, if it is indicated as the All period, there are forecasts for the current period.
If the file is also used to keep the accounting, the accounting period must obviously be the one referring to the accounting. Even when the file is used for forecasts only, it is better to set the accounting period referring to only one year. In fact, if a period of two years is entered in the base data, the values of the forecasts, in the Total and Accounts column, will be for the two years. This can lead to confusing values.

Forecasts over several years
If you insert the forecast movements with a repetition code, the program is able to prepare forecasts that extend beyond the defined period.
To obtain forecasts over several years, the movements are entered in the Budget table.
- Opening balances
- These are inserted in the Accounts table.
- Forecast movements prior to the accounting period.
- For special cases, it is also possible to insert transactions with dates prior to the accounting period.
- Attention must be paid, because these operations will change the balances at the time of opening.
- For these transactions, the Total column will be empty because it is outside the accounting period.
- Forecast movements for the accounting period.
- Movements are indicated with the date falling within the accounting period.
- If there are operations that will also repeat in the following years, the annual repetition code must be set to "Y".
- If the repetition of the operation occurs during several years, indicate the number of years before the Y, i.e. for every 2 years indicate "2Y", 5 years "5Y", 10 years "10Y".
- If the repetition does not extend beyond a set date (for example the payment of a lease), the end date must be indicated.
- Forecast movements for the following years.
- The future date, on which the transaction is expected is indicated.
- The repeat code and the end date can be indicated.
- For these transactions, the Total column will remain empty because they are outside the accounting period.
Use of formulas
The formulas allow you to automate amortization and interest calculations. When an investment increases, the income statement is also immediately updated. Formulas are especially useful when making forecasts over multiple years.
You can use the formulas to automatically adjust the amount in the repeat rows .
- The calculation of depreciation can be based on the balance of the fixed assets account.
- Interest can be calculated directly on the bank account movements.
- You can determine a sales progression.
- Purchases can be defined as a percentage.
Print with the forecast period
Thanks to the fact that movements with the repetition code or with the dates of the following years have been inserted in the Budget table, the program is able to calculate forecasts for future years.
When the report is printed, indicate the start and end date in the Period section.
Considering that the start date is January 1, 2022:
- If you want a 2-year forecast, indicate the end date as 31 December 2024.
- If you want a 5-year forecast, indicate the end date as 31 December 2027.
- If you want a 20-year forecast, indicate the end date as 31 December 2042.
The possibility of getting a forecast is available for the following printouts:
All accounting reports can contain accounting values, forecast values, or both together. The parameters available are the same for accounting reports and forecasts.
Thanks to these reports, you may generate a Provisional Balance Sheet, Provisional Income statement, Liquidity planning, Investment planning, Financing planning and more, for future interest periods .
Columns divided by period
In the Subdivision section you can use the program to create columns for the period.
You can thus display the evolution by month, quarter or year.
With Composition you can set up print formats and call them up again later. If you run forecasts over several years, it is will be useful to have pre-set compositions, overall, per year, 5 years or with the comparisons between the final balance and the estimate, which can be called up immediately .
Budget - Three-year forecast
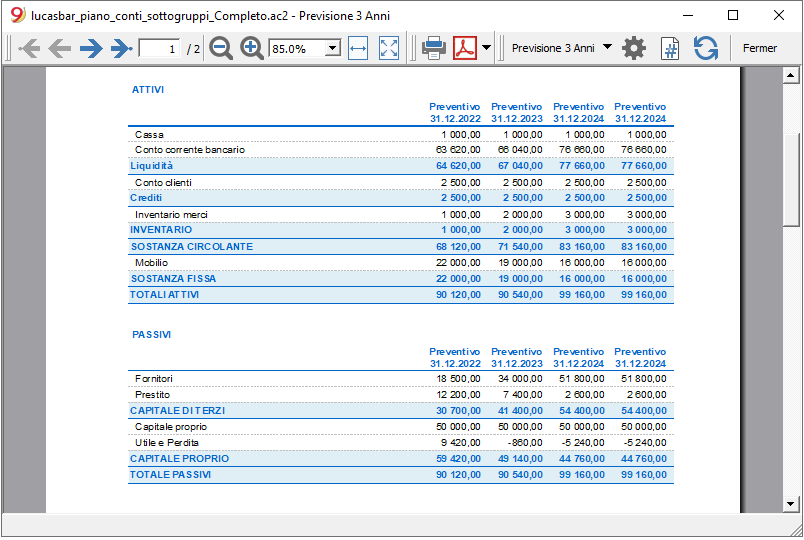
Income statement - Three-year forecast

Budget transactions
When preparing financial forecasts, based on the double-entry method, transactions are entered in the Budget table. Indicate origin and destination accounts for each one. The program has the information necessary to prepare Balance Sheets and Income statements, that will however relate to the future and not the past.
When one is planning with Excel, the Income statement is set up first, then the revenues and costs are listed. Generally, the liquidity and investment plan is prepared only later and on separate sheets.
When making forecasts with the double-entry method, we proceed instead as if we were keeping an accounting for the future. All the transactions that are expected to occur will be listed. The program will then automatically prepare the Balance Sheet and Profit and Loss account for the indicated period or periods.
Structuring of budget transactions
For the preparation of a financial plan, we generally proceed by listing the different elements in the following order:
- Capital injections.
- Third party capital injections.
- Setting up expenses.
- Investments.
In furniture, equipment. - Recurring fixed costs.
Rent, staff, social security charges, energy, subscriptions. - Recurring revenues.
- Variable revenues
The turnover which is typically seasonal. - Variable costs.
Commissions, costs of the goods sold and others, which are related to the expected volume of revenues. - Year-end transactions.
Depreciation, taxes, interest on loans, dividends.
By the time you enter sales and variable costs, you will already have the cost and capital structure. It will be possible to know instantly, whether the expected turnover will allow the company to generate sufficient profits and liquidity to guarantee its sustainability over time.
Amount and Formula column
As a rule, to prepare a budget, simply use the Amount column.
For more elaborate estimates, there is the possibility of indicating quantities, unit prices, or a formula. The program will automatically calculate the value in the Amount column.
Updating forecasts
With the double-entry method, thanks to the possibility of indicating each operation in detail, it becomes easier to update and improve the forecast. Initially, estimates of different costs or investments will be entered. As you get closer to the operational phase and there will be more precise data, just replace the existing ones. Even when the activity has started and exact elements are known, the forecast can be updated easily. Precise and reliable indications on profitability and liquidity are thus available.
Dates and repetitions in financial forecast transactions
The Data column
The value contained in the Data column is the one that will validate the forecast.
- If there is no date, the transaction will be taken into account at the beginning of the planning.
If you require a forecast indicating a period, the amounts will be taken into account in the balance value at the beginning of the period.
Due to the fact that it does not fall within the period, no amount will be displayed in the Total column. - Dates in the accounting period set in the file properties.
These are the ones commonly used. The total amount will be indicated in the Total column, taking into account repetitive movements, within the accounting period. - Dates prior to the period.
You can enter movements that precede the forecast period. However, you must be careful that they do not conflict with the opening balances entered in the account table.
Due to the fact that it is not within the period, no amount will be displayed in the Total column. - Dates after the period.
If you make forecasts over several years, they allow you to indicate transactions for the years to come.
Due to the fact that it is not within the period, no amount will be displayed in the Total column.
The End date
This is used in combination with repetition, to indicate the last date beyond which there is to be no repeat.
- Must generally be left empty.
If you enter a date when it is not necessary (for example the end of the accounting period) the forecasts for the following years will not include this operation. - For leasing transactions.
Indicate the date on which the payment of the last installment will be made as the end date. - For loan repayment.
Indicate the last expected payment date. - For changes in the amount at set deadlines.
In the case, for instance, that the amount of a recurring transaction is adapted at certain deadlines (salary increase).- Create a transaction row with repeat "M" and End date as per the last payment before the increase.
Create transaction rows with Data when the increase begins. - If the increase follows a precise and regular automation, this can also be programmed with formulas.
- Create a transaction row with repeat "M" and End date as per the last payment before the increase.
Repetitions
For recurring expenses or income, the repetition code is recommended (refer to Documentation on the columns).
- When calculating the forecast, the program creates copies of the operation and progressively increases the date, taking into account the indicated frequency.
- If there is no end date, the program will generate internal copies of the records for the entire period of the forecast indicated at the time of the report when calculating the forecast.
- If the start date is January, the frequency is monthly
- If the forecast period is the year, it will generate rows from February, 1 original row and 11 automatic rows, for a total of 12.
- If the forecast period is 10 years, it will generate rows starting from February, 1 original row and 119 automatic lines (11 the first year + 12 * 9 for the following ones), for a total of 120 lines.
- If the start date is January, the frequency is monthly
- If you want the program to automatically calculate forecasts for subsequent years.
- For recurring operations, indicate the relative repetition code.
- For transactions that occur only once a year (for example depreciation at the end of the year), indicate the repetition code "Y", so that the depreciation is also calculated in the following years.
- Don't use the repetition only if the operation will not occur in the following year.
Total column of the Budget table
The Total column is calculated automatically and represents the sum of the amounts of the current row and the repetition amounts that fall within the accounting period. The Total column is empty if the transactions have an earlier date or extend beyond the accounting period.
Schedule with precise date and monthly logic
Forecast movements are entered in the Budget table indicating the date on which these are expected to occur.
However, it is not always possible to predict all revenues and expenses with a daily precision. When making a forecast it is therefore useful, in some cases, to use approximations, generally reasoning on a monthly basis. In any case, it is useful to always follow a specific logic so that reliable liquidity forecasts can also be obtained in the short term:
- Punctual operations (capital payment, investments) are indicated with the date on which they are expected to occur.
If there is no precise date, it is useful to indicate them on the 15th day of the month in which they are expected to occur. - Recurring charges that have a precise payment date are to be set with the expected payment date and the relative repetition code:
- Bank charges, interest, amortization are to be indicated at the end of the month, quarter or year that they will take place.
- Rentals on the due expected date of payment.
- Salaries and social security charges
- For the calculation and monthly payment on the day that wages are paid.
- For thirteenths, bonuses or whatever at the moment they are paid.
- Payments for advances and adjustments of social security charges on the expected payment date.
- Payments and VAT adjustments on the typical payment due day.
- Revenue Forecasting.
The preparation of the forecasts depends on the type of activity.
If you do not know the exact day, but you will know that it will happen in a certain month, it is recommended to indicate the 15th of the month- Punctual revenue.
They are to be indicated on the date on which it is expected to take place or mid-month. - Recurring revenue.
To be indicated on the date of entry or mid-month. - In many cases a monthly forecast is well suited. The revenue can be indicated on the 15th of the month.
- If the revenues are recurring, the revenue can be entered with the monthly repetition. Using formulas you can predict growth.
- If there are seasonal differences, it is helpful to have a sales forecast row for each month.
- Forecast of projects or major works.
If there is a calendar with receipts, a transaction row is to be indicated for each expected entry. It can be approximated by indicating the 15th of the month. - Forecast for customers.
For a consultant or commercial advisor, who works both with budgets and projects, it can prove very useful to set up a detailed revenue forecast for each client, with the expected payment dates. This forecast will also be very useful to check if the customer has actually paid.
- Punctual revenue.
- Variable costs.
- Constant expenses linked to the turnover (a restaurant for example ), are indicated with the same date as the turnover. With a formula you can also calculate as a percentage value of the turnover.
- Costs can also be linked to other elements, such as the number of employees, rented premises or other.
Forecasting with the cash principle
Planning for small business and cash activities (such as shops, restaurants) it is useful to proceed with the cash principle, then indicate the revenues with the date on which they will be collected and the costs when paid.
For important operations, such as the purchase of a machine whose payment is deferred over time, it is however useful to insert forecast movements with precise details:
- Purchase of machinery (asset registration with suppliers) with date of purchase.
- Payment of the machinery, with the date(s) on which payment is expected.
Forecasts with the accrual method
In this case, the insertion of the operations takes into account when the payment will be made.
- Cash transactions.
They are obviously registered normally. - Transactions expected to be settled in the near future.
For simplicity, the operations that fall within the forecast month or the one immediately following, it can be useful to use the cash principle. - Deferred payments.
If the dates are not known with precision, you can use the 15th of the month.- Transactions with precise payment terms.
- One movement indicates the purchase date with the counterpart in the supplier account.
- One of the other movements indicates payment on the scheduled dates.
- Transactions with precise payment terms.
- Deferred collections.
- With precise payment terms, as is the case with a project:
- A movement indicates the billing date and the customer account with the counterpart.
- One of the other movements indicates payment on the scheduled dates.
- Late payment.
This is the case when a part of the revenues is collected in the short term, a percentage is collected later. It can be done like this:- Enter the revenue as cash collection.
- With the same date, a movement is created that moves a part of the collection to the customer account.
- At a later date, the cash collection is indicated with the client account of the counterpart.
- With precise payment terms, as is the case with a project:
- Use of variables for deferred collections and payments( see Example use of variables)
When the same value must be reused at the time of payment, it can prove very useful to use the formula column and variables.- In the billing transaction, the amount is assigned to a variable.
- In the payment movement, the variable is inserted so that the amount is automatically taken over.
- Variables can also be used to define the percentage of the amount that will be deferred, for example.
Esempi di movimenti di previsione finanziaria
I movimenti di pianificazione si inseriscono come delle normali registrazioni, con la data descrizione, importo, conto dare e avere.
In più si usa però il campo ripetizione, che consente di inserire le operazioni ricorrenti con una riga sola.
Qui di seguito sono elencati diversi esempi ripresi dal modello seguente a cui si rimanda per ulteriori spiegazioni.
Normali registrazioni di previsioni
Si tratta di registrazioni di previsione che sono come delle normali registrazioni.
L'esempio qui indicato è riferita all'inizio dell'attività, quindi operazioni che non si ripetono.
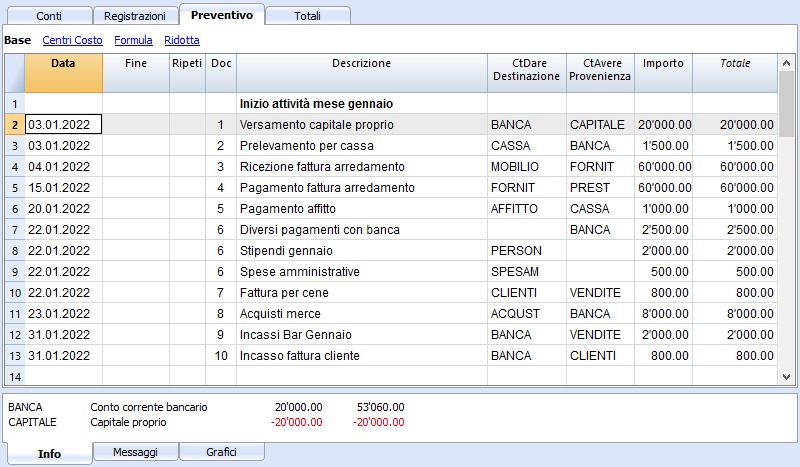
Registrazioni ripetitive mensili
Qui di seguito degli esempi di registrazione con ripetizione mensile, codice "M". La colonna Totale indica l'importo complessivo per l'anno.
Le prime due registrazioni si riferiscono all'affitto, che da febbraio a giugno è di 1'000 mensile, mentre da luglio è di 1'200.
C'é anche una data 2025, che è l'importo che si dovrà versare per il riscatto del leasing. In questa riga non vi è nulla nella colonna Totale, perché il movimento non rientra nelle date del periodo contabile definito nelle proprietà file.
Per le spese amministrative conteggiate dalla banca si è usato il codice ripetizione "ME" Fine mese (Month End). Per le registrazioni successive non sarà usato il giorno 28, ma l'ultimo giorno del mese, quindi marzo 31, aprile 30.

Fine trimestre
Qui indichiamo alcune registrazioni tipiche che si ripetono a fine trimestre. Inseriamo la ripetizione 3ME, che significa ripeti ogni 3 mesi, con data fine del mese.

Fine Anno
A fine anno ci sono delle operazioni. Qui usiamo il Ripeti "Y" in modo che queste operazioni saranno eseguite anche per gli anni successivi.

Previsione ricavi e acquisti merce
La previsione dei ricavi è specifica a ogni attività. In questo caso la previsione dei ricavi e degli acquisti viene indicata mese per mese, con un importo specifico.
A partire da marzo è indicata la ripetizione "Y" annuale, così che queste operazioni saranno ripetute negli anni successivi.

Ricavi anno successivo
I mesi di gennaio e febbraio nel primo anno di attività non erano considerati significativi per gli anni successivi, quindi non avevano una ripetizione.
Per i primi due mesi del secondo anno dobbiamo impostare le vendite. Mettiamo anche la ripetizione "Y" annuale così verranno ripetute l'anno successivo.

Forecasting with quantity and price
The Quantity, Unit and Unit Price columns of the Quotes table allow you to prepare forecasts faster.
The value of the Amount column is calculated by the program by multiplying the Quantity by the Unit Price (under the condition that Formula column is empty).
The Quantity, Unit Price columns are set as visible in the Formula View.
Advantages of using the Quantity and Prices columns
The quantity and price columns are useful for making predictions based on quantities. For example:
- In the Unit column you can indicate what the price refers to.
- The Quantity column indicates the number of seats served daily.
- The Price column indicates the estimated revenue for each cover.
- The Amount column will be calculated automatically based on the values indicated.
With this approach offers several advantages:
- All elements of the planning can be precisely detailed in the Budget.
- We remember the quantities and prices used to make the estimate.
- Changing the schedule is very simple, you can change the element you want only.
- How the profit varies, can be seen with a change in the quantities sold or in the price.
Break-even analysis.
Javascript formulas in the Budget table
Javascript formulas in the Budget table
The Formula column allows you to enter calculation formulas. The estimate amounts can thus be calculated on the basis of other values of the same budgeting.
- Indicate the cost of goods based as a percentage of sales.
- Increase your sales budget based as a percentage of growth.
- At the end of the year, calculate the depreciation based on the value of the investments made.
- Quarterly, calculate interest on the bank account based on actual usage (days / 365).
- Monthly, calculate interest on the bank account based on actual usage (days / 365).
If you enter a value in the Formula column, the Amount column is calculated by the program based on that formula.
The following functions can be used in the Formula column of the Budget table.
Example files
For examples of the formulas, refer to the following explanations:
- Template with transactions using the Quantity anf Formula columns.
- Template with transactions for Multi-Currency accounting using the Formula column in the base currency.
- Also refer to Examples of using formulas in financial forecasts.
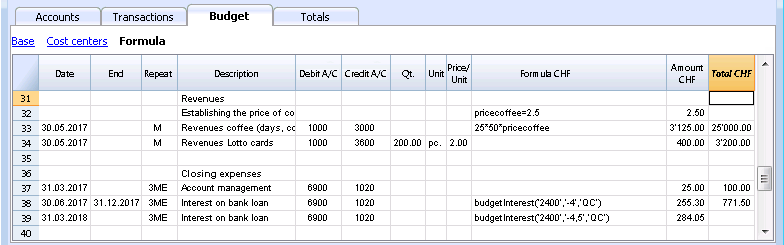
Calculation formulas in Javascript
- The formula must be expressed in the Javascript language (not to be confused with the Java language).
- If there is a formula (or any text), the value in the Amount column is set according to the formula result.
- You can use all the functions of the Javascript language, plus the APIs provided by Banana.
Decimal separator
In JavaScript only the point "." is used as a decimal separator
If you use a different separator, the one used for numbers in the local format, the number is likely to be truncated.
Calculation sequence and lack of future values
For more information on the calculation sequence, see Planning Logic.
- The rows are sorted by date and arranged starting from the lowest.
- If there are rows with the same date, the order is that of insertion.
- When a row is resolved and the following rows have not yet been processed, with the formulas you will only have access to the data up to that moment.
Amount = result of the last instruction
In Javascript the semicolon ";" is used to separate expressions.
If the Javascript formula contains multiple expressions separated by ";" the value of the Amount column will be the result of the last executed expression.
- 10*3 //30 will be returned
- If there is a sequence of several operations separated by a semicolon ";", the last operation will be resumed.
10*3;7; //7 will be returned - If there is a return, the value is resumed after the return.
return 10; // 10 will be returned.
Variables
Javascript variables are the most powerful elements of programming, as they allow you to access the computer memory with a name, save and access those values.
Variables do not exist in Excel formulas, but are similar to the name of the cells, with the difference that the name can be freely assigned.
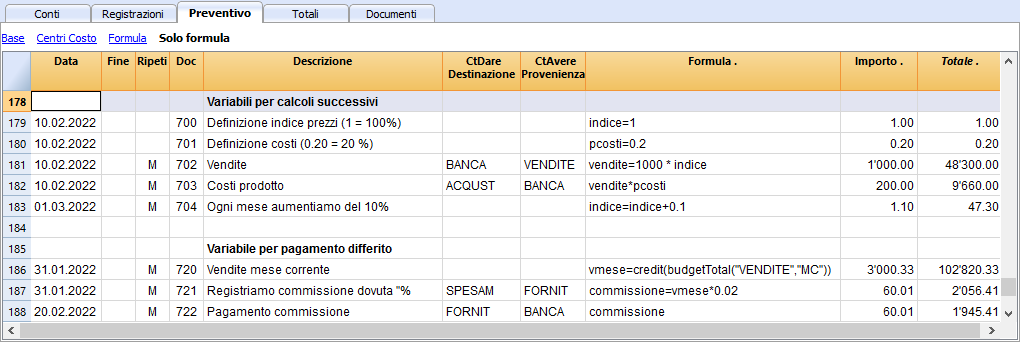
The variable is created by indicating a name and indicating with the equal sign.
You can define and use variables directly within the rows. By entering the variable name in the formula, the saved value is taken over.
The price variable is created here and the value 10 is assigned.
var price = 10;
or simply
price = 10;
below we create a total variable to which the price value multiplied by 5 is attributed.
total = price * 5;
The value of the variable can be reassigned.
price = 20;
Objects
Javascipt objects are variables that allow you to save multiple values, each indicated with a property.
The prices object is created below, indicating the curly brackets. To access and save the values, instead use the square brackets or indicate in the name of the property after the name of the object.
prices = {}
prices['car'] = 10;
prices.car = 10;
prices['computer'] = 20;
prices.computer = 20;
Array
Javascript Arrays are created using square brackets and also to access them.
The first element of the array has index 0.
costs = [1,2,3];
costs[0]=3;
result = prices['car'] - costs[0];
Automatic variables
- budgetCurrent
It is a table that contains the budget rows after the repetitions creation.
These are used to record values in conjunction with the JRepeatNumber. - DEBUG is a variable that can be "true" or "false".
If "true", in the messages, all the results of the formulas are being displayed. - row
Is a Javascript object that refers to the current row.- The values of the cells can be retrieved with the value function ("columnNameXml").
row.value("date") returns to the date of the transaction. - row.value ("JRepeatNumber") returns the progressive of the repetition.
The first repetition is 0.
- The values of the cells can be retrieved with the value function ("columnNameXml").
Budget Functions
In addition to the budget API defined in the accounting class API, there are specific functions.
budgetExchangeDifference (account, [date, exchangeRate])
This formula recalls the Banana.document.budgetExchangeDifference function.
BudgetGetPeriod(tDate, period)
This function is used in combination with the use of repetition.
When repetitions are indicated, it is advisable to refer to a calculation period and not to a precise date.
- Parameter tDate.
The date to which the calculation of the period refers. Usually the date of the recording line. - Period parameter.
Abbreviations- For the current month
- "MC" current month
- "QC" current trimester
- "YC" current year.
- For previous month
- "MP" previous month
- "QP" previous quarter
- "YP" previous year.
- In the Experimental version (starting from version 9.1) can also be used
- "DC" current day
- "DP" previous day
- "WC" current week
- "WP" previous week
- "BC" current bi-monthly (2 months)
- "BP" previous bi-monthly
- "SC" current half-year
- "SP" previous shalf-year
- For the current month
- Returned values.
An object composed of two dates- startDate
- endDate
// example
t = BudgetGetPeriod ('2015-01-01', 'MP') returns
t.startDate // 2014-12-01
t.endDate // 2014-12-31
Specific budget functions
The following are similar to those available with Banana.document, but can be used without indicating the object Banana.document.
To be taken into account:
- Instead of the startDate parameter, you can use one of the abbreviations "MC", "MP", explained in the budgetGetPeriod.
- If you use an abbreviation, the function calculates the start and end date of the period, based on the date of the current registration.
- It makes sense to use the end date only if it is earlier than the row date.
If it is equal or higher, it has no effect because the values after the current row are not yet available, because they have not been processed. - If the registration row date is April 15th:
- budgetBalance("1000","MP") the balance of the 1000 account returns at the end of March.
- budgetBalance("1000","MC") returns the balance at the current time is the same as budgetBalance("1000").
- budgetTotal("1000","QP") returns total of the movement for the previous quarter.
- budgetTotal("1000","QC") returns the total of the movement for the previous quarter, up to the current date.
budgetBalance(account, startDate, endDate, extraParam)
The balance up to the current row.
budgetBalance('1000', 'MP'); //returns the balance of 1000 at the end of the previous month
budgetOpening(account, startDate, endDate, extraParam)
The balance at the beginning of the period.
budgetTotal(account, startDate, endDate, extraParam)
The difference between the debit and the credit movement of the period.
budgetTotal('1000', 'MC'); //returns the total movement of the 1000 account for the current month
budgetInterest( account, interest, startDate, endDate, extraParam)
Calculates the interest on an account, for the period indicated (at the maximum the current date)
If you use it to calculate interest on an account at the end-of-period, the row where the formula is shown should always be the last one for this date.
- account parameter
This is the account number on whose movements interest will be calculated - interest parameter,
Indicates the interest rate in percent.- Positive (2.5, 4, 10) calculates the interest on the account's debit movement
- Negative (-2.5, -4, -10) calculates the interest on the account's credit movement.
credit(amount)
-
If the amount parameter is negative returns the amount as a positive
credit(-100) // returns 100 - If the amount parameter is positive, returns 0 (zero)
credit(100) // returns 0
This function is useful in conjunction with the other budgetBalance functions to work only on the balances you need.
If you want to calculate the percentage on sales, using this function is easier.
credit(budgetTotal('1000')) // enter the value only if it is a negative.
debit(amount)
-
If the amount parameter is positive, returns the amount
debit(100) // returns 100 - If the amount parameter is negative, returns 0 (zero)
debit(-100) // returns 0
Useful if you have to make calculations using only the debit amount and avoid using the credit amount
include
Includes and executes a Javascript file, with the possibility to create its own functions and variables that can be recalled in the script.
- include "file:test.js"
Executes the contents of the indicated file. The name refers to the file on which one is working. - include "documents:test.js"
Executes the contents of the text document contained in the documents table.
This has to be a file of the "text/javascript" type.
Functions for multi-currency accounting
They can also be used for accounting without multi-currency, in this case the account is always in basic currency.
budgetBalanceCurrency(account, startDate, endDate, extraParam)
The balance in the account currency up to the current line.
budgetOpeningCurrency(account, startDate, endDate, extraParam)
The balance in the account currency at the beginning of the period.
budgetTotalCurrency(account, startDate, endDate, extraParam)
User defined functions
The user can define personal function with the JavaScript language, and recall them in the formulas.
It is possible to define functions:
- Directly in a formula
- In a JavaScript coded attachment; this attachment must have as row id the "_budget.js" name
- In a text of the Documents table, that needs to be included with the Include command
function Taxcalculation(profit)
{
   var percentage = 10;
   if (profit > 50000)
      percentage = 10;
   else if (profit > 100000)
      percentage =20;
   return profit * percentage / 100;
}
Examples of the use of formulas in financial forecasts
Below you will find some examples of how to use formulas to automate financial forecasts.
Please refer to the specific documentations:
- Javascript formulas in the Budget table
- Templates with transactions using the Quantity and Formula column

Parameters
When planning, it can be useful to define variables that can and will be used later.
It is useful to create a parameter section with a posting date of January 1st, or another date that corresponds to the first day of the Budget. The parameter variables will then be used in the following rows.
// 30%
costOfGoodsSold = 0.3
// 5%
interestRateDebit = 0.05
// 2%
interestRateCredit = 0.02
// 10 %
latePaymentPercentage = 0.1
This way, all parameters that can be set are displayed instantly. When a parameter is changed, the forecast is recalculated.
Repetitions or values per month
By using the repeat column, you can plan for the whole year on one recording row.
If however, the activity has seasonal variations, it is recommended to use a forecast by month. For each month, a row is created with the sales amount for the month.
If you wish to make forecasts automatic for several years, it is useful to insert the repetition "Y" in this row, so that the row of the year is also used for the next one.
Prices and sales quantities
When making a sales plan it will be easier to enter values using the quantity and price column. For example, a restaurant can enter the number of covers served per day, week or month and the program automatically calculates the amount. By changing the number of covers or the price, the impact on liquidity and on the result for the year is instantly displayed.
Use of formulas with variables for growth
Use formulas, which are expressed in the Javascript language:
- The variable must be defined before being used, hence the line, in which it is defined, must be a date preceding the the line in which it is used.
- Thousands separators in numbers can't be used.
- The decimal separator is always the "." (Full stop)
- The names are different for uppercase / lowercase.
You can assign a value to a variable (this name can be freely chosen) and enter the variable name in the following lines to resume the value.
By changing the value assigned to the variable, all the lines, in which the variable is used, are automatically modified.
As an example, you may set the expected sales amount, proceeding with the following months, by using a formula to increase the amount.
- Create a "S" (sales) variable , by entering the following text in the Formula column.
Sales=1000
The value 1000.00 will be inserted in the amount column - In the following lines use the variable by simply inserting the variable name in the formula:
Sales
The value 1000.00 will be inserted in the amount column - You can add 10% to the amount (multiplying by 1.1)
Sales*1.1
The value 1100.00 will be inserted in the amount column (The value of the Sales variable does not change) - You can increase the value of S
Sales=Sales+200
The value 1200.00 will be inserted in the amount column (The value of the Sales variable will change) - If the variable is used in the following line, there will be the new calculation
Sales
The value 1200.00 will be inserted in the amount column
You can also define a variable to define the percentage of growth.
- Percentage=1.1
- Amount=200
- In formulas you can use the variable name instead of the number
- Sales*Percentage
- Sales=Sales+Amount
Variables and repetitions
Let's say you expect the turnover to rise by 5% every month.
- Enter two lines where you assign the value to the variable, without putting any account with the start date of the year.
Sales=1000
Increment=5 - Then create a line with the repetition where you enter the accounts and the formula
Sales=Sales*(1+Increment/100)
Each time the row is repeated the value of the variable S will be increased by 5% and consequently also the amount of the transaction. By simply changing the growth percentage, the forecast will be recalculated.
In a row you can also insert multiple Javascript instructions, by separating them with a semicolon ";"
Sales=1000; P=5
Use of budget formulas
There are functions that allow you to access the balances and movements of the accounts for planning up to the row that is calculated.You can enter a formula that through the budgetTotal function, recovers the value of the sales account "SALES" of the previous month.
credit( budgetTotal("SALES", "MP") )
The budgetTotal function takes account numbers and periods as arguments. An abbreviation can be used instead of the period.
- MP stands for previous month.
- QP stands for previous quarter.
Revenues show in Credit, therefore the value returned by the function will be negative and will not be accepted as an amount in the double entry accounting.
Therefore use the credit () function, which uses the negative value and turn it into a positive value.
Variables for monthly sales
Sales may vary for each month. In this case it is useful to use separate registrations for each month with the variable name.
sales_01 = 1000
cost_01 = sales_01 * costOfGoodsSold
sales_01 = 1100
Deferred payments
If you want a very precise liquidity plan, it is useful to separate the sales, which are paid immediately and those that are deferred.
One approach may be to record all sales as if they were paid cash, assigning the value of the monthly variable to the amount.
sales_01 = 1000
A registration is then entered, which reverses the sales that are deferred, calculating the amount with the formula.
sales_01 * latePaymentPercentage
A payment registration with the same formula will then be inserted for the following month.
Selling costs
There are costs that can be related to sales (cost of goods) or to other costs (social charges, in relation to wages).
Cost calculation with variables
If the sales are defined with variables, the sales costs can also be indicated as a percentage of the sales.
- You can define variable S for sales and variable C for the percentage of the cost.
Sales=1000
Cost=60 - The formula for the calculation will be:
Sales*Cost/100
You can also use the same approach to calculate social security charges.
This formula can possibly be entered in a repetitive row.
Sales cost calculation with budget functions
When the costs are related to sales, the budget formula can also be used.
credit( budgetTotal("SALES", "MC") )*60/100
When the costs related to sales, "MC" stands for the current month.
This formula will return the sales value of the current month, turn them into a positive and multiply them by 60 and divide by 100.
The date must be beyond the sales registration dates, obviously.
It may be used it in a repeat row, inserting the month end date. Therefore, the costs of the sale will automatically be calculated based on the sales entered with the transaction.
The formula can be combined with variables.
- At the beginning of the year define the percentage of costs.
Cost=60 - Therefore, the formula C is used.
credit( budgetTotal("SALES", "MC") )*Cost/100
When you change the contribution percentage or any sale, the schedule will be updated automatically.
Sales commission calculation at the end of the year
At the end of the year, you calculate the commissions of 5% on the total net sales with this formula:
credit( budgetTotal("SALES", "YC") )*5/100
The bugetTotal function returns the movement of the sales account for the period "YC", current year. With the credit () function, the amount is turned into a positive value and then multiplied by 5 and divided by 100.
If you make forecasts over several years, remember to insert the repetition "Y" in the row, so that the same formula will be also calculated for the previous year. As indicated above instead of entering the 5 directly in the formula, you can assign it with a variable.
- Commission=5
- credit( budgetTotal("SALES", "YC") )*Commission/100
If the percentage changes from one year to the next, it is sufficient enter a transaction with the following year date that resets the variable for commissions.
Inflation with variables
If you want to forecast over several years, you can also take inflation into account.
- At the beginning of the planning, assign a base variable for prices and inflation (2%).
Base=1;Inflation=2 - When you use the Sales variable, you multiply it by the inflation rate
Sales=Sales*Base - At the beginning of the following year, with annual repetition, you increase the price base
Base=Base+Base*Inflation/100
Depreciation calculation
Thanks to the formulas, the calculation of depreciation can be automated.
If you change the value of your investments in planning, depreciation will be automatically recalculated. Make sure that the date of the depreciation calculation line has a date superior to that of the investments. Date is generally 31st December .
Depreciation calculation on book value
To calculate the depreciation of the "EQUIPMENT" account, insert a line at the end of the year with the following formula and the debit and credit accounts appropriately set up to register the depreciation.
budgetBalance("EQUIPMENT")*20/100
The budgetBalance function returns the balance to that date. The amortization of 20% is then calculated on this.
Use the debit function, in case you think the asset account can go into credit.
debit(budgetBalance("EQUIPMENT"))*20/100
Calculation of depreciation on the initial value
To calculate the initial value of the investments, it is necessary to use variables to remember the value of the initial investment.
Equipment=10000
If the depreciation is spread over 5 years, the formula will be inserted in the year-end depreciation line
Equipment=10000/5
The annual repetition "Y" and the end date, which corresponds to the date of the last installment of the amortization, will be inserted in the row to prevent the amortization from running on indefinitely.
For each investment you will have to create a variable and a specific row of depreciation. Numbers can also be entered in variable names.
Equipment1=10000
Equipment2=5000
Interest calculation
The budgetInterest( account, interest, startDate, endDate) function allows you to automatically calculate interest based on the actual use of an account.
The parameters are:
- Account
Whose movements are used to calculate interest, in case it will be the bank account or the loan. - Interest
The interest rate in percentage.
If the value is positive, interest on the debit balances is calculated.
If the value is negative, interest on the credit balances is calculated.. - Initial date, which may also be an acronym.
- End date, which may also be an acronym.
- The returned value is the interest calculated for 365/365 days.
Interest expense on the bank account
To calculate the interest expense of 5%, insert a line with the end date of the quarter and the repetition "3ME", which contains the formula
budgetInterest( "Bank", -5, "QC")
The interest rate is negative, because "QC" means current quarter. The debit and credit accounts must be the usual ones for recording interest expense. If the interest decreases the bank account balance will also be used in the registration. However, another account can be used if it is paid with another account.
It is important that the "3ME" repeat is used so that the date used will always be the last of the quarter.
To calculate the interest of the month use the abbreviation "MC"
budgetInterest( "Bank", -5, "MC")
Interest on the bank account
For interest income of 2%, use positive interest instead.
budgetInterest( "Bank", 2, "QC")
Interest on fixed-term loan accounts
For fixed-term loans, interest will be calculated and recorded on the specified date.
- Create an separate account for each loan.
Use the budgetInterest function indicating exactly the start and end dates .If the date is indicated as text, the notation "yyyy-mm-dd" should be used, then "2022-12-31" - Use variables.
As indicated for depreciation, the loan amount can be assigned to a variable. The interest calculation will be done with a Javascript calculation formula,- Define the loan variable
Loan=1000 - 5% interest calculation, for 120 days.
Loan*5/100*120/365.
- Define the loan variable
Profit tax calculation
Profit is the total of the group's profit for the specified period.
To calculate a 10% profit tax, use the following formula.
credit(budgetTotal("Gr=Result","MC"))*10/100
- Use the the budgetTotal function parameter in the "Gr = Result" group, which indicates that instead of an account it has to calculate the movements for the group.
- MC, current month, is indicated as the period.
- The budgetTotal function will return a positive value if there is a loss and negative (credit) if there is a profit.
- the credit function takes only negative values into account, therefore if there is a loss the tax will be zero.
Payments with deferred or different deadlines
For deferred payments or with different deadlines, you can proceed in two ways:
- Use variables to which payment amounts are to be assigned.
Use the variable in question when recording the payment. - Create customer or supplier accounts for different credit deadlines.
Other cases
Please tell us about your other requirements, so we can add more examples.
Planning Settings
Adding a Budget table
Proceed by Adding a Budget table if the accounting file does not yet contain it.
Planning only
Accounting and planning are kept in the same file. However, it is however possible to manage the Budget only, by simply not inserting rows in the Transactions table.
- For a Startup
- For the preparation of the financial plans for a new firm, with not yet started financial plans.
- Initially, if you are working at the level of ideas it might be useful to select a model with few accounts, without VAT.
- If you plan to keep the accounting as well, it will be useful to start out with a Chart of Accounts already set up for a real company.
- For an existing firm
- Accounting is kept with another program.
- The Chart of Accounts will be modeled on that used for accounting.
- To compare with the actual accounting data:
- You can export the budget data and import it into the accounting program.
- You can export the accounting data and import it into the budget file.
- You can create Excel spreadsheets and report planning and accounting data.
Set up a planning
The procedure is the same, whether you manage one accounting on a standalone basis, only one budget or both together:
- Create an accounting file
- Set up the file properties
- Set up the Chart of Accounts
- Enter opening balances (if available)
- Enter the forecast values in the Budget table.
The Transaction table, however, remains preset, if you do not wish to display it, use the Data Menu -> Tables setup ... and tick the Transactions table as not visible.
Planning period
It is not necessary to define the planning period. You can set up the planning for one year and and also get forecasts for the following years.
Annual planning
As a rule, the planning is prepared for the accounting period defined in the file properties, which generally is identical to the calendar year.
- The opening balance at the beginning of the period is entered in the Opening column of the Accounts table.
- The budget data for the current year is entered in the Transactions table.
When requesting Reports, the program uses the accounting period, if a different period is not specified.
When you want to plan for the following year, you create a file for the new year. The program shows the budget postings, which can then be modified (see Create new year ... in Account2 menu).
Multi-year planning
With Banana Accounting you can have planning over several years available. The planning period is free, at the moment you request the report and set the Forecast period.
To make a planning over several years, generally proceed by setting the planning for the first year, then extending it for the following years.
Technically, therefore, proceed as if you were making an annual plan, extending it for the following years:
- In the file properties, the date of the first year (which is generally the calendar year,) is indicated as the start and end date.
- The opening balances are entered in the Chart of Accounts.
- The movements of the planning are inserted in the Budget table
- The operations that are specific to the first year only, when they are indicated without repetition.
- Indicate the repetition code for all other operations, which are presumed to repeat also in subsequent years.
- Operations that take place only once a year are indicated by the annual "Y" repetition code. For example, the calculation of depreciation, that is done at the end of the year.
- Specific operations for subsequent years are indicated with the respective date on which they occur.
- For repetitive operations that are limited to a single year or to a specific period (fixed-term leasing transactions) the End date will be indicated. After that date, no repetition will be made.
- Formulas may be used to make the amount to repeat automatic in the row .
- The calculation of depreciation can be based on the balance of the fixed assets account.
- Interest can be calculated directly on the movement in the bank account.
- A progression of sales can be specified.
- Purchases can be defined as a percentage of the cost.
- To obtain the planning (Enhanced Balance Sheet/with groups Report, Accounting reports, indicate the start and end date of the required budget.
Changeover to the new year
The Banana Accounting function for Creating a new year ... also carries forward the budgeting records.
- At the level of each row you have the possibility to indicate whether the operation should be carried over or not, and whether the original data should be kept or replaced by that of the new year.
- Creating the budget for the new year is therefore very simple, because it is only a question of changing the items of expenditure and income that are expected to change.
Reports financial forecasting
Provisional Balance Sheet
The Balance Sheet forecast displays the Balance Sheet for a future period. It is an important tool for tracking the management of your company and allows you to verify what the company's capital structure will be like, the state of assets, of liabilities and the equity.
With Banana Accounting, thanks to the forecasting with the double entry method, you have complete forecast budgets and that you can arrange in different ways. The program also calculates forecasts over several years.
You can access a very precise vision of what the future balance sheet will look like.
The structure of the budget is the same as that used in the accounting file. When printing, you can indicate which values to display, those of the final balance, the estimate or both of those.
The forecast values are calculated taking into account the opening balances and forecast movements indicated in the Budget table. When you change a budget entry, the forecasts are instantly updated. You can simulate and test, relocate a payment, add an investment, modify sales and see how the budget changes over time.
Budget forecast values can be displayed in several ways.
Detailed forecast
The financial forecast, based on the double entry method, allows to obtain the forecasts of the balance sheet values, using the same accounts and groups as those of the accounting file. The same structure of the items that make up the financial statements is used for forecasting. Values and reports are available automatically to display in detail, day by day, how liquidity evolves, the situation of customers.
The Banana Accounting forecast presents the values for assessing the financial, equity and economic situation. The structure is customizable, it can be presented in a simple way, including the main groups and the accounts that are part of it, or in a more complex way, by inserting subgroups, for a more detailed view.
ASSETS
Current assets
- Liquidity
- Credits
- Inventory
Fixed assets
- Movable assets
- Real estate
LIABILITIES
Third party capital
- Short term debt
- Long term debt
Own capital
- Reserves
- Profit/Loss previous years
- Profit/Loss current year
Account table
In the Budget column of the Accounts table you access forecast values for all accounts and balance groups available. In a glance you have an instant overview of the budget. The values refer to the accounting period and the variations are calculated automatically with respect to the current balance.
If you need more details, you can add accounts or groups.

Enhanced Balance sheet with groups
Through Enhanced Balance Sheet with groups command, you can view the Provisional Balance Sheet, choosing the presentation mode you need.
- Indicate the values of the Budget in the columns section.
You can display the current (accounting) values, the estimate values or both. - Set up the Period.
If a period that exceeds the accounting period, is indicated, the program will automatically switch to budgeting over several years. - Indicate the subdivision by period required.
- In the Rows section, you can exclude accounts and thus have a view of groups only.
- If you think you're use this print setting again, create a Composition.
Using the different options you can customize your prints. Below are some examples.
Forecast balance sheet at the end of the current year
This print has been set up with the figures for the current year only.

Forecast budget and comparison with the current year
The final (current) figures are compared with those of the estimate.
You can also view the variation as an amount and a percentage.
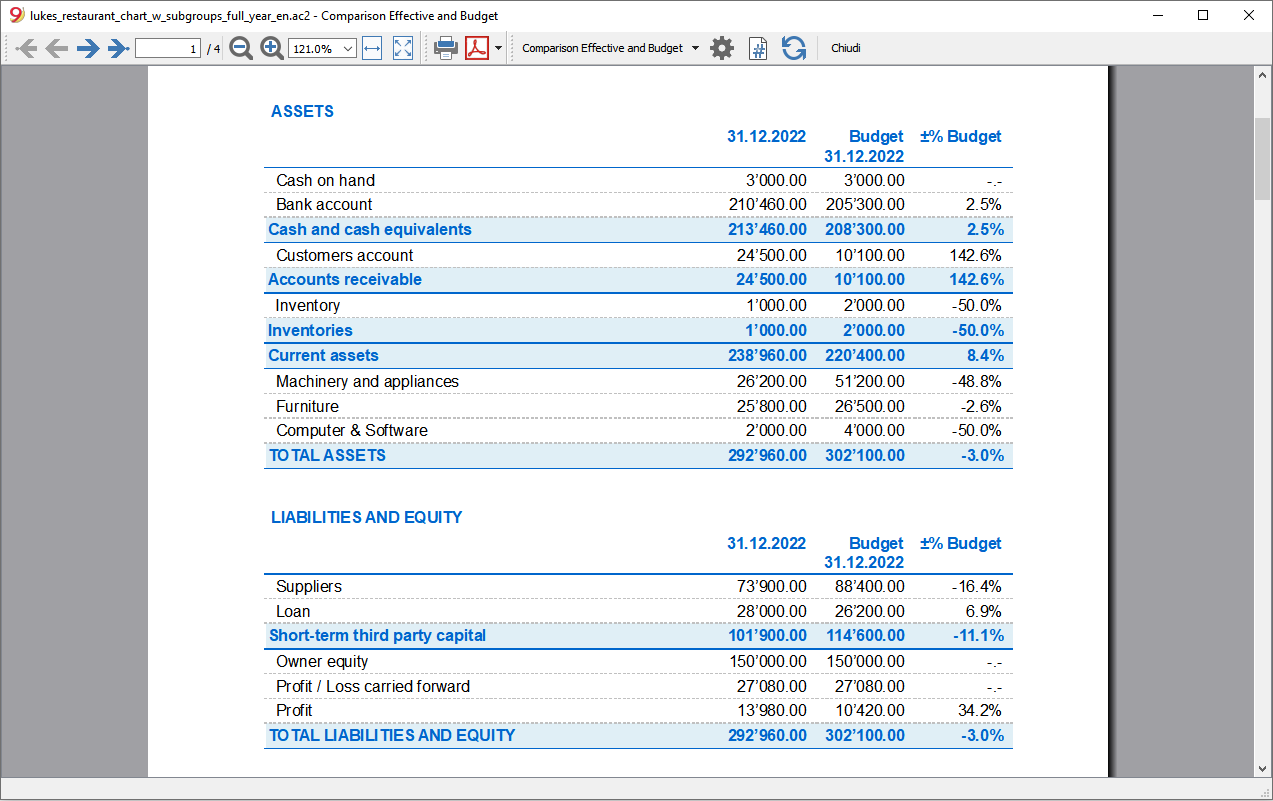
Quarterly budget
In the Subdivision section set to quarterly and the schedule shows the budget at the end of each quarter.
The evolution of the budget forecast during the year can be tracked.

Quarterly budget with comparison
This printout is set up to print both the estimate and the final balance. We therefore have the expected and current situation at the end of each quarter.

Three-year budget
This printout is set up to print the three-year budget forecast.
In the Period section set the reference period to three years and in the Subdivision section set to one year. In the File properties (File menu) there must be 3 years as the start and end period (e.g. start 01.01.2022 - end 31.12.2024).

Accounting Report
The Accounting Report is similar to the one for Enhanced balance sheet with groups, with the difference that the display takes place in the Accounts table in columns.
You can therefore use it to get an instant view of the evolution of liquidity accounts.

Provisional Profit and Loss account
The Income statement forecast presents the profits, costs and result for a future period. It is an important tool for tracking the management of the company which allows you to understand how the financial situation will evolve.
With Banana Accounting, thanks to the forecasts with the double entry method, you have complete forecast budgets and that you can organize in different ways. The program also calculates forecasts over several years.
You can have a very precise vision of the evolution of the economical situation.
The structure of the Income statement is the same as that used in accounting file. When printing, you can indicate which values to display, those of the final balance, or the budgeted balance or of both.
The forecast values are calculated taking into account the opening balances and forecast movements indicated in the Budget table. When you change a budget entry, the forecasts are instantly updated. You can simulate and test, relocate a payment, add an investment, modify sales and see how the budget changes over time.
Income statement values can be displayed in several ways.
Use of quantities and formulas
The quantity and price column of the Budget table allow you to prepare more realistic forecasts, using the same methodology as spreadsheets. This allows for faster simulations. It is sufficient that you change the price and you access the new forecasts of the income statement automatically and also those of the Balance Sheet and Liquidity.
The formulas allow you to automate cost calculation, so that for example, when you change sales the purchase costs change in percentage. In this way you can use precise income statement forecasts that update automatically. Formulas are particularly useful when making forecasts over multiple years.
Detailed forecasts
The Income statement forecast, based on the double entry method, allows you to obtain the forecasts of the costs and revenues, using the same accounts and groups as those of the accounting file. The same structure of the items, that make up the income statements, is used for forecasting. Values and reports are available automatically to display in detail, day by day, how liquidity evolves and the situation of customers.
The structure of the Chart of Accounts, on which the forecast is also based, is customizable. This can be done by simply using the main groups and the accounts that are part of it, or more in a more complex way, by also inserting subgroups, for a more detailed view.
The structure of the Profit and Loss Account is gradually scaled and allows you to view the interim and final results for the year after paying the taxes.
INCOME STATEMENT
- Revenues.
- Cost of goods.
Gross operating result (total of Revenues and Costs).
- Staff costs
- General costs.
Operating result (total of the gross operating result, personnel costs and general costs).
- Financial costs.
Operating result before taxes and depreciation(Total of operating result and financial costs).
- Depreciation.
Operating result before taxes (Total of ordinary Result and Depreciation).
- Taxes
Profit and Loss before Taxes (total of the Result before taxes and Taxes and duties).
Accounts / Category Table
In the Budget column of the Accounts table, for double entry accounting, and of the Categories table for revenue and expenditure, the forecast values for all the accounts and groups of the Income statement are displayed. With a glance you have an instant view of the forecasted Income statement. The values refer to the accounting period and the variations are compared to the current balance.
If you require more details, you can add accounts or groups.

Enhanced Balance sheet with groups
Through Enhanced Balance Sheet with groups command, you can view the Provisional Balance Sheet, choosing the presentation mode you need.
- Indicate the values of the Budget in the columns section.
You can display the current (accounting) values, the estimate values or both. - Set up the Period.
If a period that exceeds the accounting period, is indicated, the program will automatically switch to budgeting over several years. - Indicate the subdivision by period required.
- In the Rows section, you can exclude accounts and thus have a view of groups only.
- If you think you're use this print setting again, create a Composition.
Using the different options you can customize your prints. Below are some examples.
Forecast balance sheet at the end of the current year
This print has been set up with the quote values for the current year only.

Forecast income statement and current year comparison
The final (current) values are compared with those of the forecast.

Quarterly forecast income statement
In the Subdivision section set quarterly and the program shows the forecast income statement for the various quarters.
The evolution of the budget forecast during the year will now be displayed.

Quarterly budget with comparison
This printout is set up to print both the estimate and the final balance. We therefore have the expected and current situation at the end of the quarters.

Three-year forecast for Profit and Loss account
If you insert the forecast movements with the repetition code, the program is able to prepare forecasts beyond the defined period.
To obtain forecasts over several years, the transactions are entered in the Budget table with repetition (Y).
The printout is set up to obtain the estimate of the income statement over three years.

Accounting Report
The Accounting Report is similar to the one for Enhanced balance sheet with groups, with the difference that the display takes place in the Accounts table in columns.
You can therefore use it to get an instant view of the evolution of liquidity accounts.

Liquidity Planning
Cash is King is the motto that indicates how important liquidity is. It is the main engine for carrying out business activities, meeting commitments and producing profits. To invest safely, it is essential to evaluate the ability to produce liquidity and its evolution over time a rational way.
The financial forecast of Banana Accounting is an important business management tool, which allows you to understand if there will be enough financial means to meet commitments and reduce your debt exposure to the maximum.
Liquidity projections are calculated on the basis of the initial balance and forecasts included in the Budget table. When a budget movement is changed, the forecasts are instantly updated. You run simulations, assign a payment, add an investment, modify sales and see how liquidity evolves.
Liquidity values can be displayed in several ways.
Accounts table
Set up accounts and liquidity groups in the Accounts table. In the Budget column you will also see the updated forecast balances for the accounting period. At a glance you will know what the liquidity situation will be at the end of the year.

Evolution graphs
When you open the Graphs window, positioning the cursor on an account or a group you will see the graph of the evolution of Liquidity.
If you click on the Current, Previous or Estimate caption, you can hide the graph.
Account card with estimate data
Using Account card command you have the possibility to see in detail, day by day, how liquidity evolves. You can see all the movements that have an impact on liquidity.

The Account card command allows you to specify if you want to see current or budgeted movements.
- Select budget movements.
- Set the period
If you indicate a period that exceed the accounting period, the program will automatically generate Forecasts over several years. - If you indicate a group, you will see the movements of all the accounts belonging to that group.
- When you are in the Budget table, you can access the account card with a click on the icon next to the account.
Enhanced Balance sheet with groups
Through Enhanced Balance Sheet with groups you may select to work with values subdivided by column per period. In this way you can see the evolution of liquidity by day, week, month, quarter, semester, year, etc.
- In Columns section indicate that you wish to view the Budget values.
- In Sections you can select the accounts or groups you want to include in the printout.
You may select to display the asset and depreciation accounts only. - Set up the Period.
If a period that exceeds the accounting period, is indicated, the program will automatically switch to budgeting over several years. - Indicate the subdivision by period required.
- If you think you're use this print setting again, create a Composition.

Accounting Report
The Accounting Report is similar to the one for Enhanced balance sheet with groups, with the difference that the display takes place in the Accounts table in columns.
You can therefore use it to get an instant view of the evolution of liquidity accounts.

Forecasting sales
Sales for a company are the main source of income and liquidity. Unlike costs that are more easily planned, sales are more difficult to budget. As a rule of thumb, you may base yourself on the figure of the sales of the previous year for the same period or, on the possibility important events that are in the pipeline and could lead to an increase in sales or even to the acquisition of new customers.
Based on this concept, Banana accounting, with the forecast based on double-entry accounting, allows you to simulate and project different scenarios over time. Just change the budgeted amounts for sales and the program automatically updates the forecasts and displays detailed reports for the current year or for future years.
The sales projections are calculated on the basis of the forecasts included in the Budget table and can be displayed in different ways.
Accounts table
Set up accounts and sales groups in the Accounts table. In the Budget column you will also have the updated forecast balances for the accounting period. You can check what the evolution of sales will be during the year, at a glance

Evolution chart for sales
If you display the Graphs window, position the cursor on an account or a group and you will see the graph of the evolution of the sales.
If you click on the Current, Previous or Budget caption, you can hide the graph.
Account card with Budget data
With the Account card you are offered the possibility to display in detail and day by day, how sales evolve. You can examine all the movements that impact sales.

The Account card command allows you to specify if you want to display current or budgeted movements.
- Select thebudget movements.
- Set the period.
If you indicate a period that extends beyond the accounting period, the program will automatically generate Forecasts over several years. - If you indicate a group, you will see the movements of all the accounts belonging to that group.
- When you are in the Budget table, you can access the account card with a click on the icon next to the account.
Enhanced Balance sheet with groups
Through Enhanced Balance Sheet with groups you may select to work with values subdivided by column per period. In this way you can see the evolution of liquidity by day, week, month, quarter, semester, year, etc.
- In Columns section indicate that you wish to view the Budget values.
- In Sections you can select the accounts or groups you want to include in the printout.
You may select to display the asset and depreciation accounts only. - Set up the Period.
If a period that exceeds the accounting period, is indicated, the program will automatically switch to budgeting over several years. - Indicate the subdivision by period required.
- If you think you're use this print setting again, create a Composition.

Financial forecasting for customers
Customers forecasting completes financial planning with customer data. For example, a company can forecast sales by indicating accounts for the most important customers.
Forecasting with the double entry method also allows you to indicate accounts for individual clients. Depending on the requirement, customer management can be done with balance sheet accounts, profit and loss accounts or with cost and profit centers.
When changing a budget movement, the forecasts for each customer are also updated individually.
Accounts table
Set up accounts for customers in the Accounts table. In the Estimate column you will also have the updated forecast balances for the accounting period. At a glance, you can view what the forecast for the individual customer will be.

Evolution chart
If you display the Graphs window, positioning the cursor on an account or a group you will see the graph for the evolution of the customers.
If you click on the Current, Previous or Estimate caption, you can hide the graph.
Account card with estimate data
With the Account card command you have the possibility to see in detail all the movements for each customer.

- Select budget movements.
- Indicates the customer's account.
- Set up the period.
If you indicate a period that extends beyond the accounting period, the program will automatically generate Forecasts over several years. - When indicating a group, you will see the movements of all the accounts belonging to that group.
- When in the Budget table, you can access the customer's card with a click on the small icon next to the account number.
Enhanced Balance sheet with groups
Through Enhanced Balance Sheet with groups you may select to work with values subdivided by column per period. In this way you can see the evolution of liquidity by day, week, month, quarter, semester, year, etc.
- In Columns section indicate that you wish to view the Budget values.
- In Sections you can select the accounts or groups you want to include in the printout.
You may select to display the asset and depreciation accounts only. - Set up the Period.
If a period that exceeds the accounting period, is indicated, the program will automatically switch to budgeting over several years. - Indicate the subdivision by period required.
- If you think you're use this print setting again, create a Composition.
Accounting Report
The Accounting Report is similar to the one for Enhanced balance sheet with groups, with the difference that the display takes place in the Accounts table in columns.
You can therefore use it to get an instant view of the evolution of liquidity accounts.

Financial forecasting for suppliers
Supplier forecasting completes financial planning with supplier data. For exa, a company can plan purchases by indicating purchases by indicating accounts for the most important suppliers. It will thus be able to analyze and optimize the relationship with the various suppliers, perhaps by requesting payment extensions.
Forecasting with the double entry method also allows you to indicate accounts for individual suppliers. Depending on the need, suppliers management can be done with balance sheet accounts, profit and accounts or with cost and profit centers.
When changing a budget movement, the forecasts for each individual supplier are also updated.
Accounts table
Set up accounts for suppliers in the Accounts table. In the Estimate column you will also have the updated forecast balances for the accounting period. At a glance you can know what the forecast for the individual supplier will be.

Evolution chart
If you view the Graphs window, positioning the cursor on an account or a group you will see the graph for the evolution of the suppliers.
If you click on the Current, Previous or Estimate legend, you can hide the graph.
Account card with estimate data
With the Account card command you have the possibility to see in detail all the movements for each supplier.

- Select budget movements.
- Indicates the supplier’s account.
- Set up the period.
If you indicate a period that extends beyond the accounting period, the program will automatically generate Forecasts over several years. - When indicating a group, you will see the movements of all the accounts belonging to that group.
- When in the Budget table, you can access the customer's card with a click on the small icon next to the account number.
Enhanced Balance sheet with groups
Through Enhanced Balance Sheet with groups you may select to work with values subdivided by column per period. In this way you can see the evolution of liquidity by day, week, month, quarter, semester, year, etc.
- In Columns section indicate that you wish to view the Budget values.
- In Sections you can select the accounts or groups you want to include in the printout.
You may select to display the asset and depreciation accounts only. - Set up the Period.
If a period that exceeds the accounting period, is indicated, the program will automatically switch to budgeting over several years. - Indicate the subdivision by period required.
- If you think you're use this print setting again, create a Composition.
Accounting Report
The Accounting Report is similar to the one for Enhanced balance sheet with groups, with the difference that the display takes place in the Accounts table in columns.
You can therefore use it to get an instant view of the evolution of liquidity accounts.

Investments Planning
The investment plan presents the expected evolution of the equipment, stocks, movable or immovable values that are necessary for the company.
With Banana Accounting, thanks to the forecasting with the double-entry method, you can track what the evolution of assets will be over time. You generate comprehensive forecasts, which you can organize in different ways. The program also calculates forecasts over several years.
The structure of the accounts is identical to the one used for accounting. When printing, you can indicate whether to select which values to display, the final ones only, the forecasted ones or both together.
You also have the Income statement forecasts, so you can display the evolution of amortization and interest. When a budget movement is changed, the forecasts are immediately updated. You can run simulations, assign a payment, add an investment, change sales and see how asset accounts evolve.
For the Investment Plan, you have the same options as in the Liquidity Planing and the Provisional Profit and Loss Account.
Using formulas
The formulas allow you to automate calculation of depreciation and interest. When you increase an investment, the Income statement will also be instantly be updated. Formulas are particularly useful when making forecasts over multiple years.
Chart of Accounts
In the Budget column of the Chart of Accounts the forecast values for all accounts and balance groups are displayed, and therefore, for all those relating to investments equally. With a glance, you have an instant view of the values referring to the accounting period.

If you require more investment details, you may add accounts or groups.
Evolution graphs
If you view the Graphs window, positioning the cursor on an account or a group you will have the graph of the evolution of the investments.
If you click on the Current, Previous or Estimate caption, you can hide the graph.
Account card with estimate data
Using the Account card command, will offer you the possibility to see in detail, day by day, the evolution for each asset and the depreciation accounts. You can check all the movements that have an impact on investments.
The Account card command allows you to specify if you want to see current or budgeted movements.

- Select budget movements.
- Set the period
If you indicate a period that exceeds the accounting period, the program will automatically generate Forecasts over several years. - If you indicate a group, you will see the movements of all the accounts belonging to that group.
- When you are in the Budget table, you can access the account card with a click on the small icon next to the account.
Enhanced Balance sheet with groups
Through Enhanced Balance Sheet with groups you may select to work with values subdivided by column per period. In this way you can see the evolution of liquidity by day, week, month, quarter, semester, year, etc.
- In Columns section indicate that you wish to view the Budget values.
- In Sections you can select the accounts or groups you want to include in the printout.
You may select to display the asset and depreciation accounts only. - Set up the Period.
If a period that exceeds the accounting period, is indicated, the program will automatically switch to budgeting over several years. - Indicate the subdivision by period required.
- If you think you're use this print setting again, create a Composition.

Accounting Report
The Accounting Report is similar to the one for Enhanced balance sheet with groups, with the difference that the display takes place in the Accounts table in columns.
You can therefore use it to get an instant view of the evolution of liquidity accounts.

Corporate financing plan
The corporate financing plan presents the expected evolution of the accounts relative to the origin of third party and own capital.
With Banana Accounting, thanks to the forecasting with the double-entry method, you can track what the evolution of assets will be over time. You generate comprehensive forecasts, which you can organize in different ways. The program also calculates forecasts over several years.
The structure of the accounts is identical to the one used for accounting. When printing, you can indicate whether to select which values to display, the final ones only, the forecasted ones or both together.
Income statement forecasts are also available, so you can display the evolution of depreciation and interest. When a budget movement is changed, the forecasts are immediately updated. You can run simulations, assign a payment, add an investment, change sales and see how asset accounts evolve.
For the Investment Plan, you have the same options as for the Liquidity Planing and the Provisional Profit and Loss Account.
Using formulas
The formulas allow you to automate calculation of depreciation and interest. When you increase an investment, the income statement will also be instantly be updated. Formulas are particularly useful when making forecasts over multiple years.
Chart of Accounts
In the Budget column of the Chart of Accounts the forecast values for all accounts and balance groups are displayed, and therefore, also for all those relating to investments. With a glance you get an instant view of the values referring to the accounting period.

If you require more investment details, you may add accounts or groups.
Evolution graphs
If you view the Graphs window, positioning the cursor on an account or a group you will see the graph of the evolution of the corporate finances
If you click on the Current, Previous or Estimate caption, you can hide the graph.
Account card with estimate data
Using Account card command you have the opportunity to see in detail, day by day, The evolution for each asset and on the depreciation accounts. You can see all the movements that have an impact on investments.
The Account card command allows you to specify if you want to see current or budgeted movements.

- Select budget movements.
- Set the period
If you indicate a period that exceed the accounting period, the program will automatically generate Forecasts over several years. - If you indicate a group, you will see the movements of all the accounts belonging to that group.
- When you are in the Budget table, you can access the account card with a click on the icon next to the account.
Enhanced Balance sheet with groups
Through Enhanced Balance Sheet with groups you may select to work with values subdivided by column per period. In this way you can see the evolution of liquidity by day, week, month, quarter, semester, year, etc.
- In Columns section indicate that you wish to view the Budget values.
- In Sections you can select the accounts or groups you want to include in the printout.
You may select to display the asset and depreciation accounts only. - Set up the Period.
If a period that exceeds the accounting period, is indicated, the program will automatically switch to budgeting over several years. - Indicate the subdivision by period required.
- If you think you're use this print setting again, create a Composition.
Accounting Report
The Accounting Report is similar to the one for Enhanced balance sheet with groups, with the difference that the display takes place in the Accounts table in columns.
You can therefore use it to get an instant view of the evolution of liquidity accounts.

Project planning with profit and cost centres
Financial planning of projects allows you to take control over the income and expenses of a project. It is used to evaluate investments and returns on a project and to track its implementation.
Budgeting with the double-entry method allows you to indicate profit and cost centres as well. You only need to set up cost centers for the different projects, and in parallel to the balance and income statement forecasts, you will have the forecasts available for each individual project.
The projections are calculated on the basis of the initial balance and the forecasts entered in the Budget table. When a line is changed the budget, forecasts are instantly updated. You can produce simulations, reassign a payment, add an investment, modify sales and spot how the budget changes.
Values of liquidity can be displayed in several ways.
Chart of Accounts
Profit and Cost centres are set up in the Chart of Accounts. In the Estimate column you will also have the updated forecast balances for the accounting period. At a glance you can know what the liquidity situation will be at the end of the year.

Evolution chart
In the Graphs view window, position the cursor on an account or a group and a graph of the evolution of the projects will be displayed.
Clicking on the Current, Previous or Estimate legend, you can hide the graph.
Account card with budget data
With the Account card command you have the possibility to display all the movements for the single project in detail.

- Select budget movements.
- Indicate the cost or profit center.
- Set the period.
If you indicate a period that extends beyond the accounting period, the program will automatically switch to Forecasts over several years. - When you indicate a group, you will see the movements of all the accounts belonging to that group.
- When in the Budget table, you can access the cost center tab by clicking on the small icon next to the account number.
Enhanced Balance sheet with groups
With the Enhanced Balance sheet with groups you choose to divide the values into separate columns for each segment. Thus, you dispose of a view of the evolution of individual projects by day, week, month, trimester, semester, year etc..
- Indicate that you wish to display the Budget values in the Columns section.
- In Sections you may choose to view the the cost and profit centres only.
- Set up the Period.
If you indicate a period that extends beyond the accounting period, the program will automatically switch to Forecasts over several years. - Indicate the required subdivision by segments.
- If you think of continuing to use this print setting, create a composition.

Accounting report
The Accounting report is similar to the Enhanced balance sheet with groups, with the difference, that the display takes place in columns.
It can therefore be used to display an instant view of the evolution of the segments.

Planning with segments per sector and branch
The financial planning by sectors allows you to run budget and income statement forecasts for each sector or branch of the company. It therefore allows you to evaluate the various sectors of the company and understand what contribution each of them brings to the overall activity.
Budgeting with the double-entry method permits you to designate segments as well. When you set the segments for the different sectors, use them when you enter the budget movements and the budget and income statement forecasts will be made available, divided by the different sectors.
The projections are calculated on the basis of the initial balance and the forecasts entered in the Budget table. When a line in the budget is changed , forecasts are instantly updated. You can produce simulations, reassign a payment, add an investment, modify sales and spot how the budget changes.
Values of liquidity can be displayed in several ways.
Chart of Accounts
Segments are set up in the Chart of Accounts. When indicating the segments for the Balance Sheet and Income statement accounts, the balance of the segment will always result as zero in the accounts.

Account card with budget data
With the Account/Category cards command you have the possibility to examine all the movements for each segment in detail.
- Select budget movements
- Indicate the required segment.
- Set the period.
If you indicate a period that extends beyond the accounting period, the program will automatically switch to Forecasts over several years. - If you indicate a group, you will see the movements of all the segments belonging to that group.
- When you are logged in the Budget table, you can access the cost center tab with a click on the small icon next to the account number.

Enhanced Balance sheet with groups
With the Enhanced Balance sheet with groups you choose to divide the values into separate columns for each segment. Thus, you dispose of the Balance Sheet and Income statement for each sector.
- Indicate that you wish to display the Budget values in the Columns section.
- In Sections you may choose to view the balance sheet or income statement only.
- Set up the Period.
If you indicate a period that extends beyond the accounting period, the program will automatically switch to Forecasts over several years. - Indicate the required subdivision by segments.
- If you think of continuing to use this print setting, create a composition.

Accounting report
The Accounting report is similar to the Enhanced balance sheet with groups, with the difference that, the display takes place in columns.
It can therefore be used to display an instant view of the evolution of the segments.

New year for financial forecasting
The function to Create a New Year also takes up the budget movements.
For each row in the table Budget, in the For New Year column, you have the possibility to indicate:
- Whether the operation is to be copied over or not,
- If the date is to be kept or replaced with the date of the new year.
Creating the budget for the new year is therefore simple, because you have to modify or add the expense and income items that are expected to change.
Annual budget in columns (Accounts and Categories tables)
It is possible to manage the budget by indicating the amount of the annual budget for each account in the Accounts and Categories table. There are at least two approaches:
- Enter the data in the existing Budget column.
If the accounting does not have the Budget table, the Budget column in the Accounts and Categories table is editable. - Add other columns to insert the budget values.
Editable budget column
If the accounting does not have the Budget table, the Budget column in the Accounts and Categories table is editable. If the file contains the Budget table and you don't need it, you can remove it with the following command:
- Tools menu → Add new functionalities → Remove Budget table.
Once the Budget table has been removed, in the Accounts and Categories table, Budget view, the Budget column is activated and values can be entered.
As a rule, only the budget for income and expenses is indicated (or in double-entry accounting, costs and revenues).
The budget values must be entered on each account; the program calculates the totals automatically, and generates the profit or loss.
- For double-entry accounting, the Revenue (Credit) must be entered as a negative in the Accounts table. Costs (Debit) as a positive.
- For Income and expense accounting, in the Categories table, the revenues must be indicated in positive and the costs in negative.
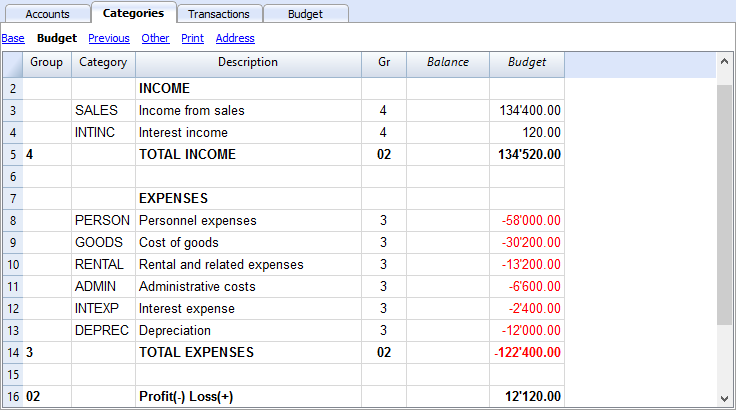
Budget Difference column
In the Budget Difference column, the program will calculate the difference between the balance and the value in the Budget column.
Print per period
When printing by month or quarter, the program divides the value indicated in the Budget column into monthly quotas.
The program proceeds as follows for subdivisions:
- The number of months, based on the start and end date indicated in the accounting properties (File menu -> Properties and basic data), is calculated.
- The budgeted amount is divided by the number of months calculated.
- Any rounding differences will be added to the last month.
If, for example, you have indicated an amount of 10'000, this will be divided into 11 monthly amounts of 833.33 and one salary of 833.37.
If a quarterly preview has been selected, the value of the quarter will be the sum of the individual months and not the value of the year divided by quarters.
If you want a different planning by month or quarter, you should use the planning with the Budget table.
Accounting common features
Lock transactions
Blockchain data certification
Banana uses a digital certification system for the accounting data, using what is now called blockchain technology. Transactions can be locked and marked with digital codes that can guarantee, even after many years, that the accounting data are authentic. They also allow the user to make sure that the accounting data have not been modified.
Banana.ch was the first company in the world to use the blockchain technology in the accounting field. This method (US Patent No. 7,020,640) was developped and patented in 2002..
This method, based on the blockchain calculation system, is considered so reliable that it is employed to ensure the validity of the bitcoin and of all other modern crypto-currency.
This method guarantees one of the highest levels of data integrity and conformity to international law prescriptions. You can also see the evaluations on this matter of the audit company Ernst&Young, who verified the system conformity to the legislation requirements. The new versions of the Banana Accounting software don't use the MD5 method anymore (the one mentioned in the documents), but use the Hash SH256 method.
- Ernst&Young, compatibility check to Swiss legislation (pdf in German)
See also: Verordnung über die Führung und Aufbewahrung der Geschaftsbücher, 24.04.2002 (in German) - Ernst&Young, compatibility check to German legislation (pdf in German)
- Securing acccounting Data (2002). Introduction document to the blockchain technology used in Banana Accounting software.
The lock transactions command
With the Lock transactions command of the Account2 menu, the accounting transactions are locked and marked with control codes that can certify, over the years, that the transactions have not been modified.
- The validity of a possible already existing lock is being verified
- The transactions until the lock date are being numbered progressively and are being locked. For each transaction, the digital code of the row and the progressive one are being calculated.
The calculation of the digital codes is being done according to the sequence of the columns. - In the accounting is being indicated that transactions with an equal or earlier date than the lock date will no longer be accepted.
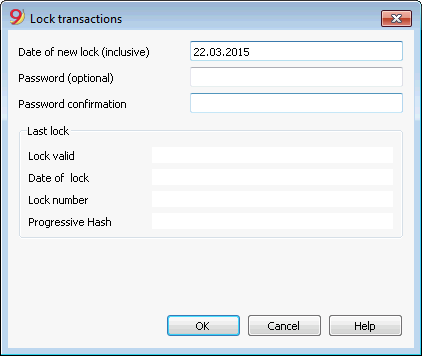
Date of new lock (inclusive)
Specify the date up until when the transactions will be locked.
Password (optional)
It is possible to insert a password to eventually unlock the transactions or to carry out a new lock in the future.
If the program finds no errors in the transactions included in the lock date, it will lock the transactions, calculate and assign individual numbers and codes to each row of transactions which can be viewed in the Lock view on the Transactions table.
Last lock
The data of the following fields are automatically filled out by the program based on the last executed lock.
Lock valid
A "Yes" is shown if the lock is valid.
Date of lock
The date of the last executed lock is shown.
Lock number
This is the value automatically entered by the program in the last row of the LockNum column.
When the lock is repeated, if the value of the last row lock number is unchanged, it means that the lock is valid and that the data have not been altered; if however the value is changed, the program shows the following codes:
- (-1) if the lock is invalid from the first row
- (-2) if there are rows that have the same LockNum.
Progressive Hash
This is the control code present in the last transaction.
Lock View
All digital codes are shown along with all the information that the program used to create the digital signature.
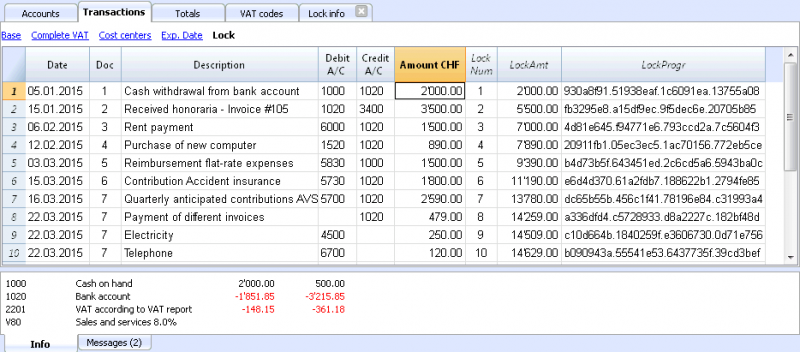
- LockNum: the progressive number that identifies the row
- LockAmt: the cumulative transactions total, similar to the total at the end of the page, as required by some national regulations
- LockLine (hidden column): the digital code calculated according to the row values.
- LockProg: the global electronic signature (SHA-256).
The digital code LockProg
This is the main element of the certification; it uses the blockchain methodology.
The digital code is calculated according to the following values:
- The contents of the current entry, including amounts, descriptions and the description of the account at the moment of the lock
- The progressive number (LockNum)
- The cumulative balance (LockAmt)
- The progressive code of the preceding entry (LockProg).
In case the accounting data undergo even the slightest modification (for example, a date or an amount is changed), the digital code will be different. If the control number remains the same, it implies that the data are original and therefore have not been changed.
Check Lock
With the Check lock info command of the Account2 menu, the program verifies the validity of the lock and displays the data.
- The program recalculates the digital control codes and verifies if they correspond with the ones related to the transactions.
- If the codes correspond, the lock is considered valid, and therefore the data are original
- If they do not correspond, it means that the data have been changed and that they are not the original ones calculated at the time of the lock.
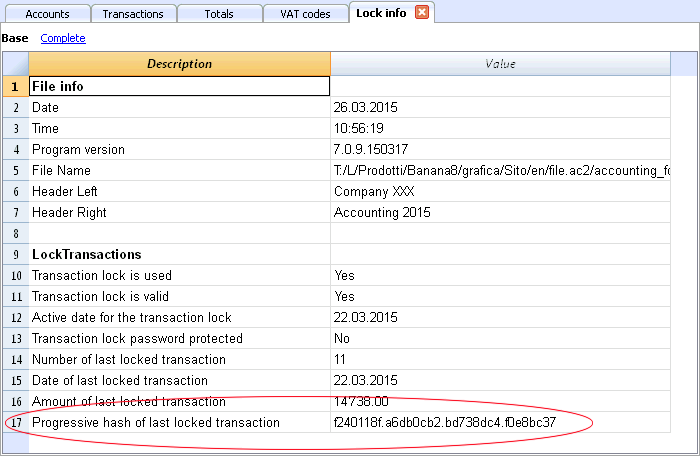
Unlock transactions
The Unlock transactions command removes the lock and the control codes. If the lock was set with a password it will be necessary to reenter the password in order to remove the lock.
If later on you want to relock the transactions, and they have not been modified, the control numbers will be the same as the ones of the earlier lock; if however some data have been changed, the control numbers will be different.
Partial lock
If the transactions have been locked, it is possible to unlock them even partially, from a specified date. If a lock password has been set, in order proceed unlocking the transactions, you need to enter it in the specific field.
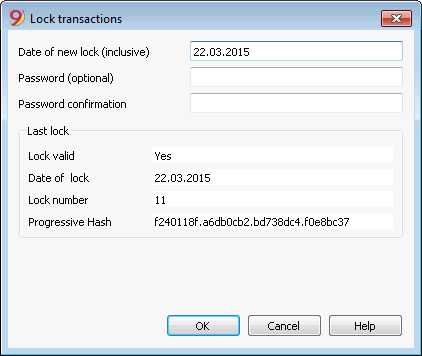
Why unlock the accounting?
In principle, the locked accounting should not be unlocked. It might happen that, after the lock, you find errors in the accounting and see the need to make corrections.
To have the opportunity to make further changes, users kept a copy of the file before the lock. If they found errors, they would restore the previous situation. In the meantime other transactions had perhaps been made, so often it happened that restoring previous versions of the accounting proved wrong. To avoid this unnecessary waste of time it was decided to make the Unlock transactions command available.
The certification must not be confused with data security. The data certification is a methodology that ensures that the accounting data are original. To prevent data from being modified, the methodology is the one related to data security. Data security procedures, however, can only be implemented in an environment that limits data access.
If the file is fully available to the user, such as when it is on a PC, people have complete control of the data. They can thus replace files easily. With a certification one cannot prevent that the data are being altered, but it will allow you to know if the data are the original ones.
The person who keeps the books is responsible for the accounting and decides whether a change is permissible or not.
Organizing the certification and data verification
Once you locked the transactions of the period, you need to:
- Print the lock information or print the last certified transaction row with its specific certification number (LockProgr).
- Sign and store this information along with the accounting documentation or in any other safe place.
In order to check that the accounting data are the original ones, you need to proceed as follows:
- Impart the Show lock info command.
- Go back to the document that shows the digital control number
- Check whether the row identified with the LockNum still has the same digital control number
- If the number matches , the accounting data are the same as those certified
- If the number does not match , it means that the accounting data have been modified.
Banana works on developing applications that make it possible to compare two files and obtain indications regarding data that have been altered.
Data security
Digital certification ensures that the data are still the original ones. It does not prevent the modification of data.
It is the responsability of the accountant to ensure that the data are not altered. Each administration must be organized according to its size and needs.
Those who want to make sure that the data are not being altered by unauthorized persons , must employ other methods and tools, such as :
- Save the data to a secure system (protected network drive), password protected.
- Keep the copies of the data.
- Encrypt archives.
Long-term archiving
The accounting file contains the entered data. In order to open the file and obtain a report or an account card, you need to have the program at your disposition.
Banana Accounting gives the possibility to export all the accounting data, and its printouts as well, to Pdf, Html and Xml.
The generated file can be saved on a CD and accessed on any computer even after many years, even by persons who do not have the Banana Accounting software.
Check and recalculate accounting
Avoid mistakes with Banana Accounting Plus
In order to facilitate checking your accounting work and to immediately find differences, in Banana Accounting Plus, our new version, we added the Balance column in the Transaction table. You can now see potential differences on each row and you can correct them right away. It is a very useful feature when closing the accounting period.
Many of our clients have already tried it and are enthusiastic about it. We advise you to switch now to Banana Accounting Plus and take advantage of the many new features.
You can recalculate and check your accounting in different ways:
- with the Shift + F9 keys (Windows and Mac) or Cmd + 9 (Mac)
Primary accounting recheck - with the Check accounting command from the Account1 menu
this solution includes several extensive control options - Extensive accounting recheck
If there are error messages or differences you should correct them.
Primary accounting recheck
This command will execute the following operations:
- it will reset the accounts balances, as well as the cost centers and segment balances
- it will verify and report if there are errors in the various tables (Accounts, Transactions, VAT Codes and Exchange rates tables)
- it will re-enter all the operations as if they were being entered for the first time
- for the multi-currency accounting, it will recalculate the opening balances in the basic currency using the latest exchange rates
- if the transactions rows are not locked, it will recalculate all transaction rows:
- the VAT percentages are taken from the VAT Codes table and the VAT amounts are recalculated again
- it will update the account balances, as well as the cost centers and the segment balances
- in the Cashbook the progressive account balance in the Transactions table is recalculated
- it will recalculate the Accounts and Categories table totals (income and expenses)
- it will update the Diff. Budget and the Previous year columns
- in the multi-currency accounting, it will update the Calculated balance with the latest exchange rate and the exchange rate difference
Extensive accounting recheck - the Check Accounting window
On top of the basic accounting recheck, additional checks are executed.
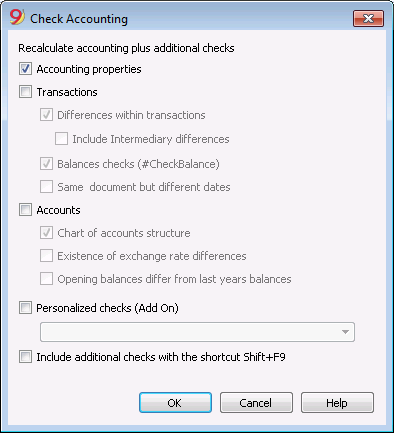
Recalculate accounting plus additional checks
This is one of the most useful features: the entire accounting file is being rechecked, all the balances are recalculated and the user is notified if errors are found.
Accounting properties
This option is being activated by default. The program verifies whether the data entered into the File and accounting properties correspond to the actual accounting (for example: opening and closing date, VAT account, accounts for exchange rate differences, etc.).
Transactions
Differences within transactions
If this option is activated, the program verifies whether there are differences between Debit and Credit or between Accounts and Categories in the Income & Expense Accounting. The rows where the differences occur are being indicated in the Messages Window. Also, the program shows the total difference amount in the Information window at the bottom of the screen (only when being positioned in the Transaction table).
Include intermediary differences
If this option is activated, the program verifies whether there are differences between Debit and Credit, in composed transactions (transactions over multiple rows). Often differences are caused by incomplete entries or errors in the amounts (as for example in the following example, in the transaction n. 8).
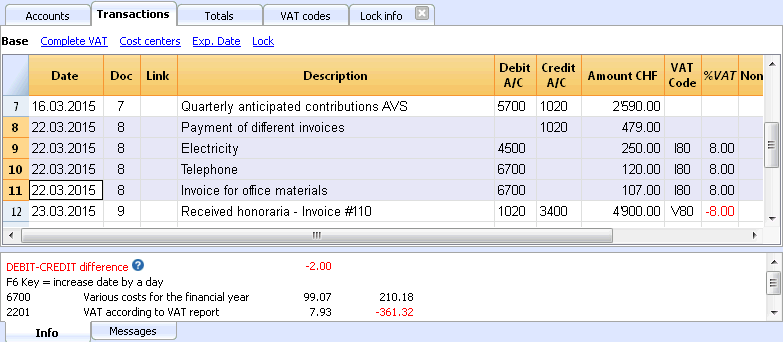
Balances checks (#CheckBalance)
By activating the Transactions option as well as this one, The program checks whether an account balance is equal to the one being inserted for verification (for example, between the bank account balance on the bank statement and the balance of that same account in the accounting file). In case the balances don't match, the program indicates the error.
In order to proceed with this check, one has to:
- In the Transactions table: enter #CheckBalance in the Description column, as well as the currency code and the balance of the account (example: #CheckBalance CHF 28'000..00). Into the Debit column, enter the account to be checked. The Amount column remains empty. The amount to be checked has to be entered with the same number of decimals as the one of the account to be checked.
- Activate the option through the Account1 menu
- While the accounting is being checked, when there are differences between the checking balance and the account balance, the program shows the error while indicating the row.
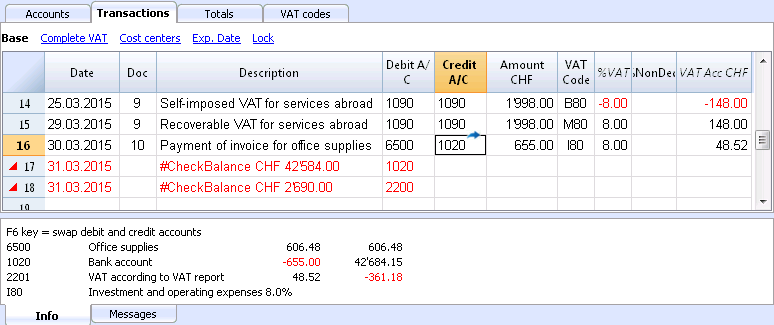
The program has detected a difference between the checking balance and the account balance in the file
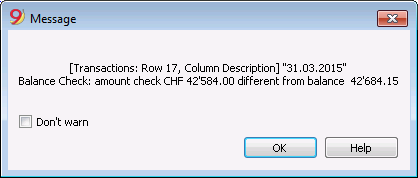
Same document with different dates
f this option is activated, the program will alert if transactions with the same Doc number have a different date. On composed transactions (=transaction on more than one row), where there is no correspondence between Doc and Date, the program cannot correctly determine the counterparty.
Accounts
Chart of accounts structure
If this option is activated, the program checks whether the chart of accounts structure is correct.
Existence of exchange rate differences
If this option is activated, the program checks whether there are unrecorded exchange rate differences.
Opening balances differ from last year's balances
If this option is activated, the program verifies whether the opening balances of the new year match with the closing ones of the previous year.
Personalized checks (Add On)
If this option is activated, the program runs checks on the functions that have been added by user (Add Ons), for customized verifications.
Include additional checks with the shortcut Shift + F9
When this option is activated, the program will run all the checks activated in the dialog window, when pressing Shift+F9. Otherwise only an accounting recalculation will be done (Mac version: Shift + Cmd + 9).
Link to a document
Connecting digital documents to your accounting transactions
With Banana, you can enter, for each transaction, links to digital documents stored on your computer.
- Arrange a folder where you will save all your digital documents. It can be the folder where you keep your accounting file or subfolder.
- Use this folder to save all files containing documents, invoices, receipts, etc.
- Link the transaction to the digital document.
- From the Account 2 menu choose the Link -> Open Link command to view the contents of the digital document.
The DocLink Column
The DocLink column (Transactions table) makes it possible to enter a link to an external file (usually a scan of a receipt or an invoice).
- The DocLink column is usually not visible.
In order to display it, use the Columns setup function. - Once the Link column is visible, you can edit the file name.
- The file name is related to the accounting file; if the documents are in a sub-folder, the file name - in the DocLink column - will be preceded by the directory name.
- It is equally possible to manually enter a web address in the Link cell.
In order to open the linked document, click on the Open link command of the Account2 menu, or click on the small square that appears on the upper right hand corner of the cell that contains the link.
Entering a link to a file
There are two ways to enter a link to a document:
- Place yourself on the row of the Transactions table and the activate the Add link command from the Account2 menu -> Links;
- Select the file that corresponds to the document which needs to be linked and click on the Open button; the program inserts the link automatically.
The program enters the file name in the DocLink column, even if this last one would be invisible.
Or
- Display the DocLink column in the Transactions table. See: Columns setup;
- Click on the small square at the upper right hand corner of the cell;
- Indicate the path where the file can be found and select it.

Editing a link
Proceed in the same way as when entering a new link.
Opening the link
There are two ways to open the link:
- Place yourself on the row of the Transactions table and the activate the Open link command from the Account2 menu -> Links;
- Place yourself on the DocLink cell and click on the icon to open the link.
For security reasons, the program opens only files with an extension that is considered secure, see Program Options -> Advanced, from the Tools menu.
Removing the link
There are two ways to remove the link:
- Place yourself on the row of the Transactions table and the activate the Remove link command from the Account2 menu -> Links;
- Delete the contents of the DocLink cell.
Displaying expiry dates
Customers & Suppliers Management
In order to manage the invoices issued or received, we advise you to use the Customers Menu and the Suppliers Menu.
Associate an expiry date to a transaction
As an alternative to the customers and suppliers management, or for simpler checking purposes, you can also enter the payment date in the transaction row.
This is an operating mode that consents simplified checkup.
With the Columns Setup command (from the Data menu), you should make visible the Date Exp. and Date Pay columns.
You should then enter the invoice expiration date in the Date Exp. column, and the invoice payment date in the Date Pay. column.
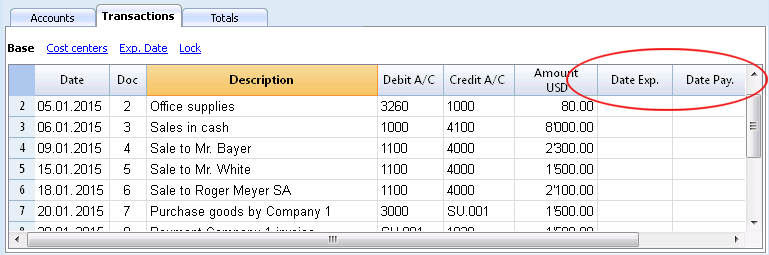
Show expiry dates
With the Show expiry dates command from the Account2 menu, the program displays the transaction rows that have an expiry date but no payment date.
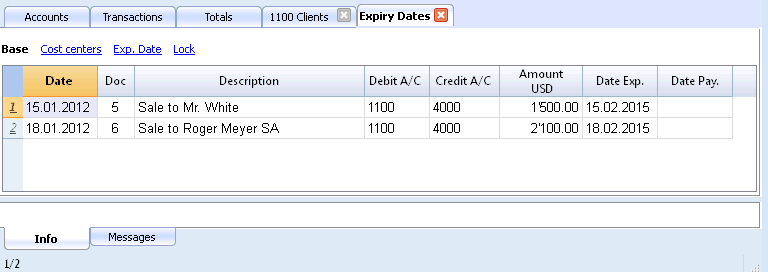
Sort transactions by date
The command Sort transactions by date:
- Sort all rows in the Transactions table in ascending order of date.
For rows with the same date, it keeps the existing sequence. - Deletes the empty rows that are inserted at the beginning.
There is no automatic reorder function, because sometimes users choose to keep records in a different order.
Add and remove accounting functionalities
Adds functionalities to your file. Also see Add new functionalites.
Add upper and lower case in account numbers and codes
The program normally converts account numbers to Uppercase.
When Uppercase/Lowercase is enabled, account numbers are not converted to Uppercase. Accounts in Uppercase/Lowercase are useful when the account number also serves as a description.
When entering account numbers in the Transactions table, the program will revert toUpper or Lowercase, as specified in the Chart of Accounts.
Using this option will require you to pay attention to case sensitivity, as the the "Cash" account, with first letter in Uppercase, will be different to "cash" account in Lowercase.
Add Items table
Revert to information available on Items table page.
Add Items columns in the Transactions table
Revert to information available on Items columns in Transactions table page.
Add Address columns in the Accounts table
For accounting files.
This function adds the columns that allow the insertion of client addresses, suppliers, members or others.
To add this function, proceed as follows:
- Click on Tools in the menu.
- Select the Add new functionalities ... command.
- Select Add Items Columns in Accounts table (If the options does not display in the list, it means it has already been activated).
The following will be added in the Accounts table:
- Address view where added columns will be displayed.
- The columns that allow you to enter address data and other information.
- In order to display one or several columns, also in other views, use the Columns setup ... command in the Data menu.
- In order to create different views, with specific columns, use the Tables setup command in the Data menu.
Add and remove the Budget table
This function enables the use of the Budget function, by adding the Budget tab to the Transactions table, where transactions relating to financial planning can be registered.
For more information see Budget table.
Modify the VAT amount type in the Transactions table
For accounting files with VAT.
This function enables the modification of the Amount type column (VAT Amount type) in the Transactions table.
The column allows you to enter one of the following VAT amount types, where applicable:
0 (empty cell), inclusive of VAT
1 = VAT excluded, exclusive of VAT
2 = VAT amount, the registration amount is considered to be 100%.
For each registration, the program automatically enters the default data in the VAT Code table in the Amount Type column (relative to each code). If, occasionally, the Amount type changes for a VAT code, you may enter 1 or 2 manually.
Note
There are incompatibilities of VAT data with previous versions when using this feature, as that did not have this functionality.
Items table
To speed up the creation of invoices, you can use the Items table, where you can insert recurring products or services.
When creating the invoice, simply press the F2 key in the Items column and select the product from the list; the registration will be completed with the data taken from the Items table.
To use the Items table you will need to:
- Add the Items table.
- Add the Items columns in the Transactions table.
- Display the Items column in the Transactions table (Data menu> Columns setup ...)
Add Items table
Use the Tools -> Add new functionalities -> Add Items table.
In the Items table you may enter items, products and others. It may also be used as an inventory control, to some extent.
- Group: Generates the totals.
- Item: Item code.
- Description: Item description.
- Gr: Group for allocation of total.
- Account: account used in Transactions table.
- Currency: Currency to be used (for multi-currency accounting only).
- CVATCode: VAT code to be used (for VAT accounting only).
- Unit: abbreviation allocated to the type used.
- Selling: Unit sale price.
- Cost: Unit cost.
- Begin Qt.: initial quantity amount.
- Price Begin: initial price of unit.
- Value Begin: initial quantity times Price Begin.
- Current Qt.: current quantity, calculated by program, taking into account Begin Qt. and registrations of Item in Transactions table. The Quantity column of the Transactions table is being used.
- Price current: current Price of Item.
- Current value: current quantity multiplied by current price.
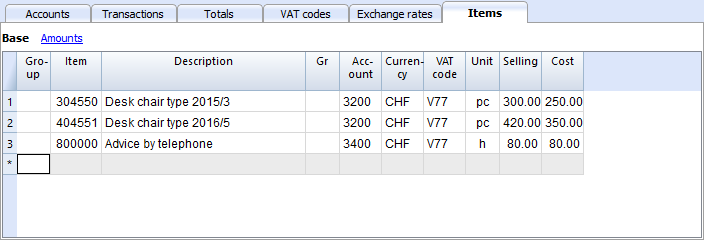
Items columns in the Transactions table
The Items columns in the Transactions table are used to enter quantity and price.
The amount of the transactions is calculated on the base of quantity and the applicable price.
Add the Items columns in the Transactions table
Use the Tools menu-> Add new functionalities ... command -> Add Items Columns in Transaction table, to insert columns to be added to the table (refer to Transactions page for further information).
- Item
Item listed in Items table.
The program's preset will not display the Items column in the Transactions table. You will have to activate it via the Data > Columns setup ... , checking the ItemsID box in order to use this function. - Quantity
May be a positive or negative value. - Unit
- Unit/PriceMay be a positive or negative value.
Add Transactions
- When a quantity and a unit price are entered, the amount will be calculated automatically.
- A negative amount may be entered to account for items leaving the warehouse.

Link to the Items table
If there is an Items table when you enter a registration with the Item and the quantity, the current quantity of the respective row in the Items table is updated.
Refer to the Items table page.