Documentation Banana Accounting 8
Banana Plus, new in-depth and optimized documentation
In the new Banana Accounting Plus version, all the documentation has been revised, optimized and expanded with information on the new functions and applications, with images and videos. A new support feature has also been implemented: by clicking on any error message, you will be directed to a page that explains its causes and the solutions.
We advise you to immediately switch to Banana Accounting Plus and take advantage of the many new features.
Accounting types
Accounting templates and examples
VAT management - basic knowledge
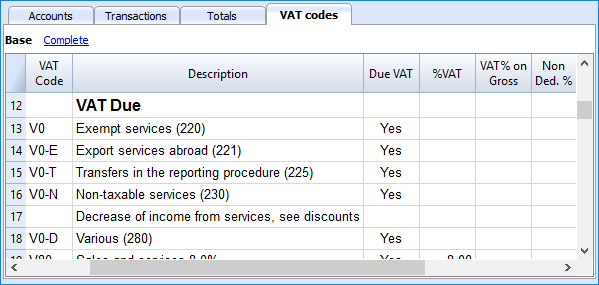
- VAT codes table
- Entering the VAT account in the File Properties
- Associate VAT code to the account
- Entering transactions with VAT
- Reversal transactions and credit notes with VAT
- Import the VAT codes table from another file
VAT management for Switzerland
- VAT codes for Switzerland (automatic English translation or available in Italian, German or French)
- Clients and suppliers with VAT on cash received
- VAT on cash received and transitory assets/liabilities at the end of year
- Entering VAT at customs for import
- VAT on services obtained abroad
- Swiss VAT Tax report - Effective method
(available in Italian, German or French) - Swiss VAT Tax report - Flat tax rate method
(available in Italian, German or French)
Year's End and New Year
- Recheck the accounting
- Dealing with transaction differences
- Create a New Year
- Update opening balances
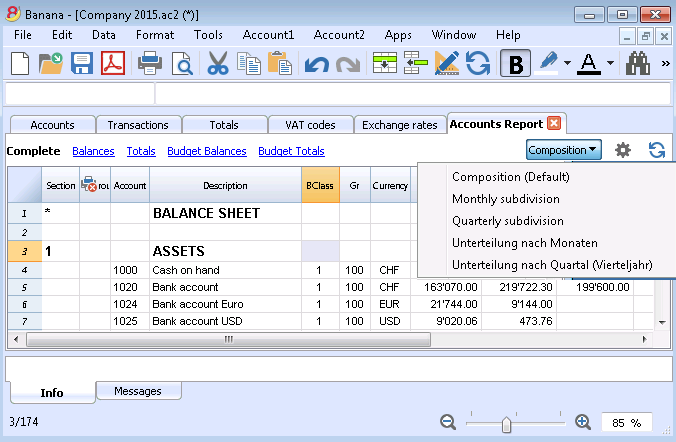
- Compositions
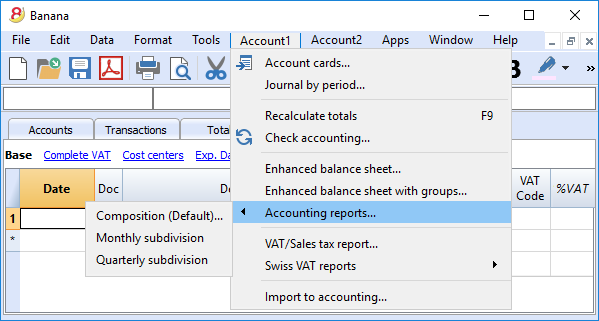
- Reports
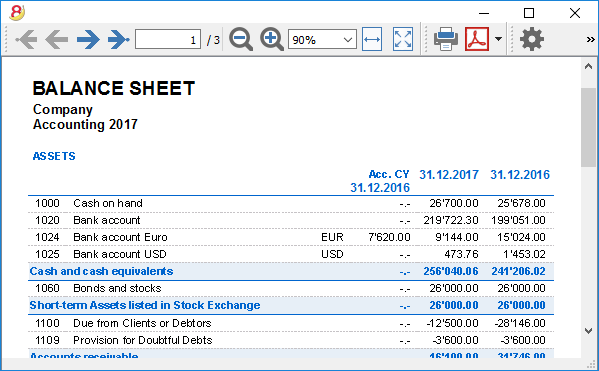
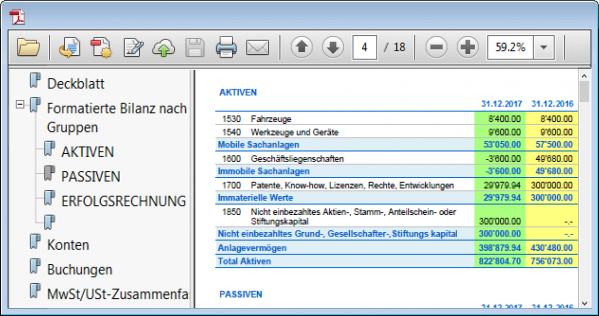
- Balance sheet and Profit and Loss Statement
- End of Year PDF printouts
Various
How to start
- The Chart of Accounts
- How to set up the Chart of Accounts from scratch
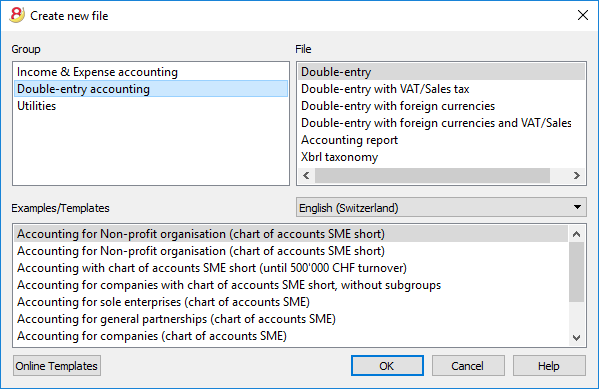
- Setting up a new accounting file based on a template
- Adding, deleting, renaming an account or a group
- Adding and deleting subgroups
- Entering opening balances in a new accounting file
- Updating existing opening balances
- Setting up a clients/suppliers register
- Multi-currency chart of accounts
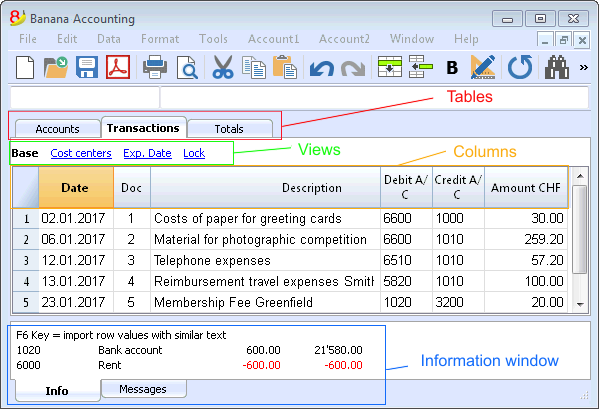
Transactions
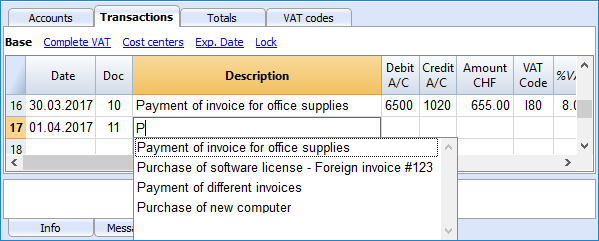
- Fast transactions input
- Automatic numbering of the Doc column
- Include a link to an electronic document
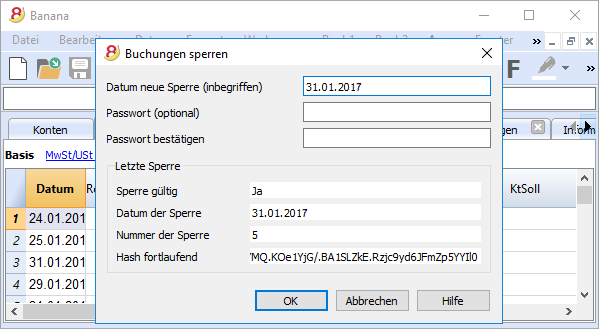
- Lock transactions
- Unlock transactions
- Entering simple transactions (a Debit and a Credit account)
- Entering complex transactions (on multiple accounts)
- Recurring transactions
- Entering transactions in a Income & Expenses or Cashbook file
- Entering transactions in a double-entry accounting file
- Entering issued bank checks
- Entering transactions in a multicurrency accounting file
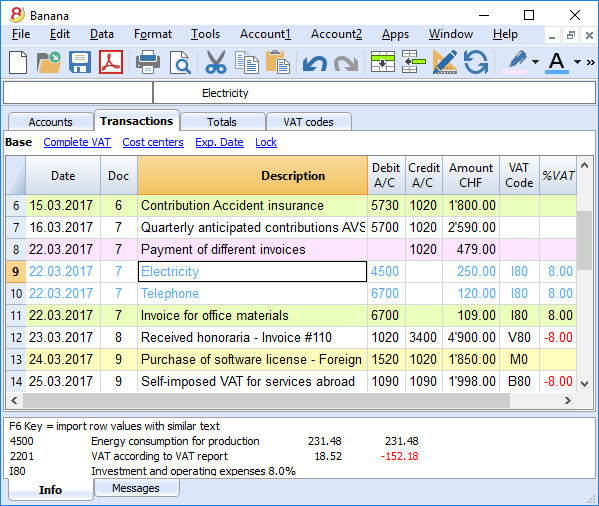
- Entering transactions with VAT
Advanced features
- Cost and profit centers
- Segments (in order to manage multiple projects)
- Invoice management (open & overdue invoices, history)
- Budget table with transactions
- Possibility to insert formulas
Data import and export
- Bank Statement SEPA/ISO 20022
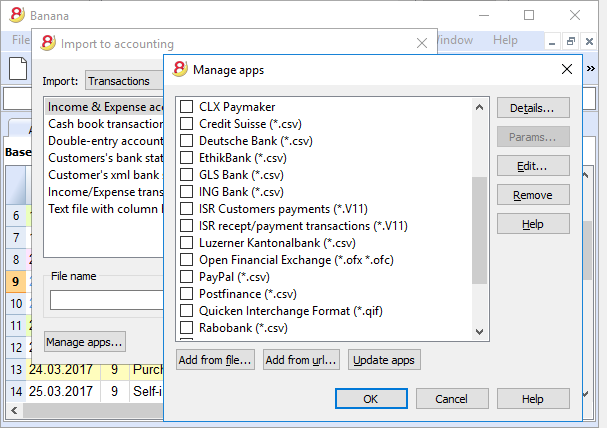
- Data import
- Import transactions from a bank or post statement
- Data export
- Transferring data from other accounting software
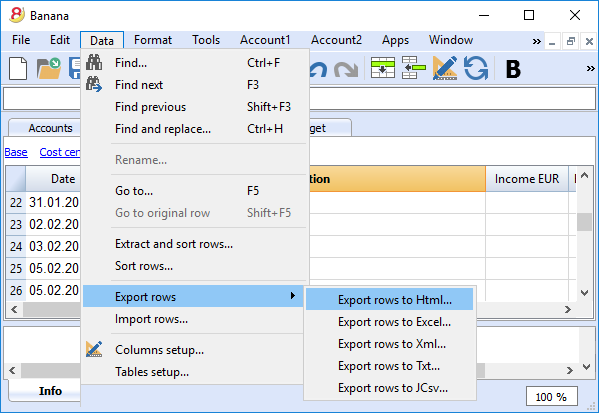
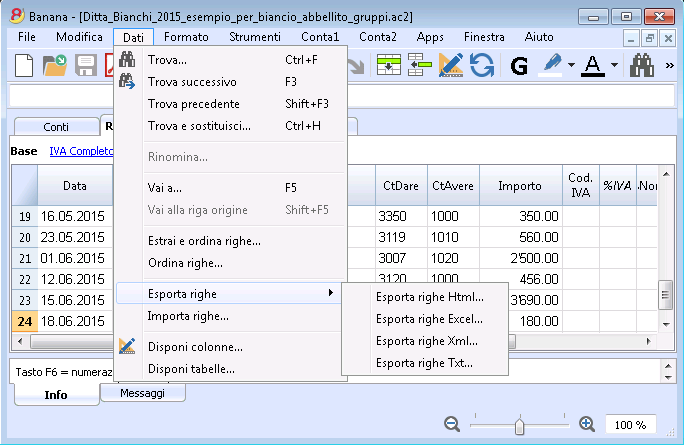
- Data export: Excel - Html - Xml - txt
- Option on which data to Include in the export
- Export rows or selected area in txt format
Security
Useful information
- Courses and consultancies
- Opening and closing days
- Lost license key
- Help menu
- If you get an error message
- Error messages
Documentation of previous versions
Index
Banana 8 characteristics
Banana Accounting for Windows, Mac and Linux main features
Banana Accounting 8 is an international software extremely versatile, perfect to keep accounting in any nation. Ideal for small economic entities.
VersatileIt adapts to your needs and accounting knowledge level.
|
Fast and easyStart now and save time every day.
|
UniversalUsed in more than 127 nations worldwide.
|
ProfessionalAn impeccable presentation of your business.
|
Security & CertificationMaximum level of security for your data.
|
Compatibility and sharing
|
Comprehensive support
|
||
Versatile
Choose from various accounting methods |
|
|
You can start with the accounting method you prefer, and you can change, if necessary. All your data will be retained:
There are also several utility tools:
|
 |
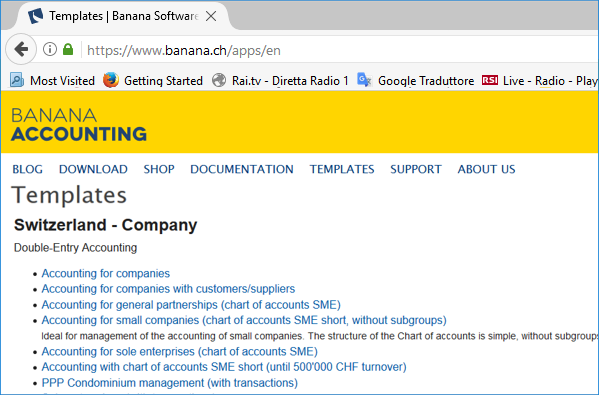
Choose from more than 500 templates |
|
|
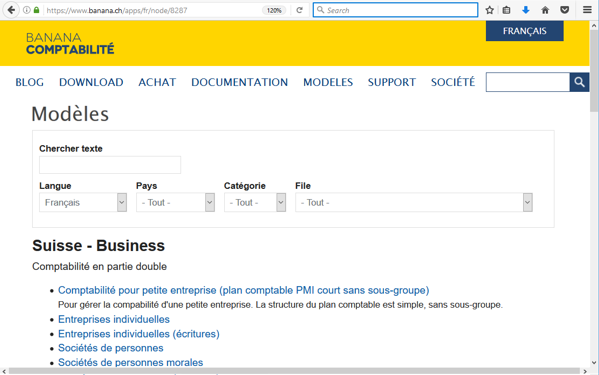
Instead of building your file from scratch, use one of our templates: they are freely available online. They are already grouped by language, nation, activity branch.
|
 |
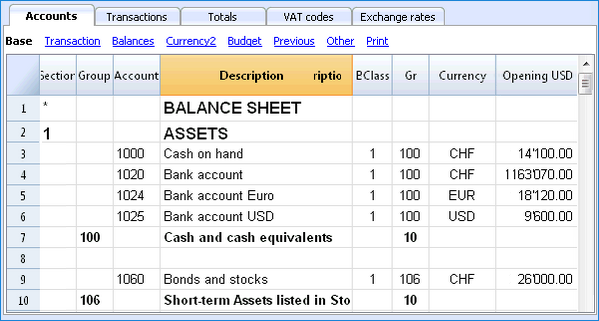
Freely organize your accounts |
|
|
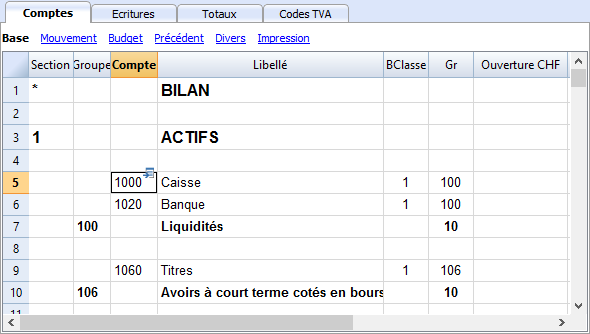
You can adapt the chart of accounts of your template to fit your needs, by adding or deleting accounts, creating groups or subgroups and different totalization levels. The results are immediately visible. You can edit and make changes to your accounting plan also during the year. You can also add extra columns or change the order of the existing ones both in the chart of accounts or in the table where you enter the transactions. |
 |
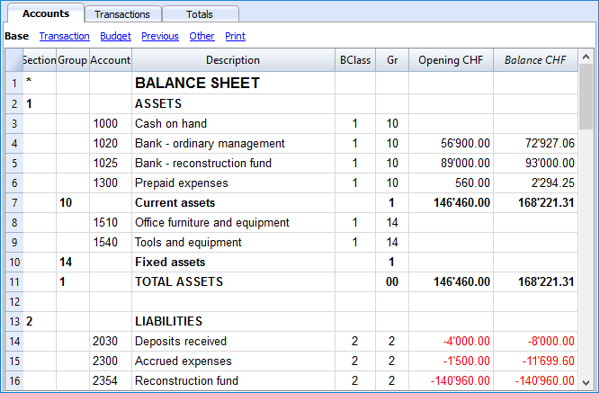
Your situation is always under control |
|
|
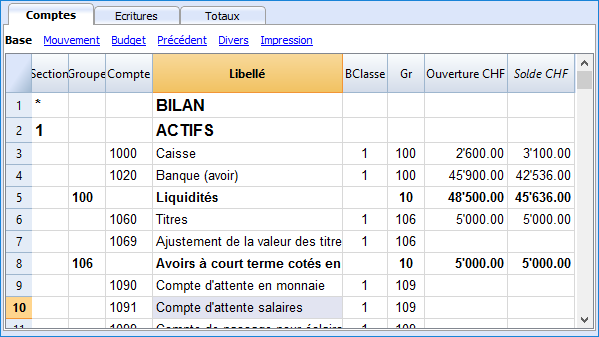
You will always have, at a glance, an updated and global situation of your business. Every time that you enter a transaction your balances will automatically update.
|
 |
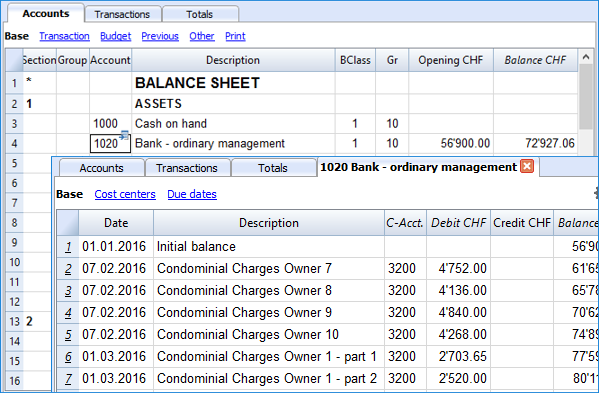
Account details just one click away |
|
|
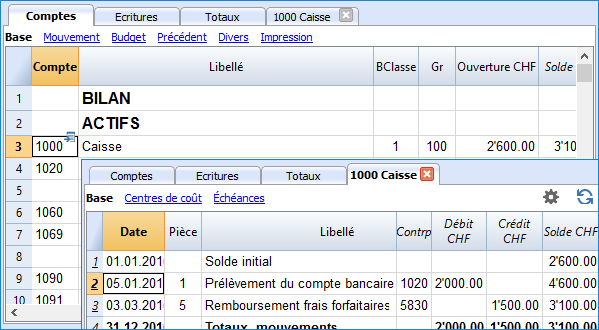
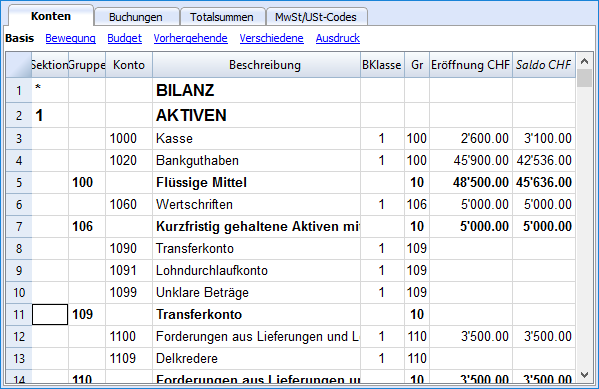
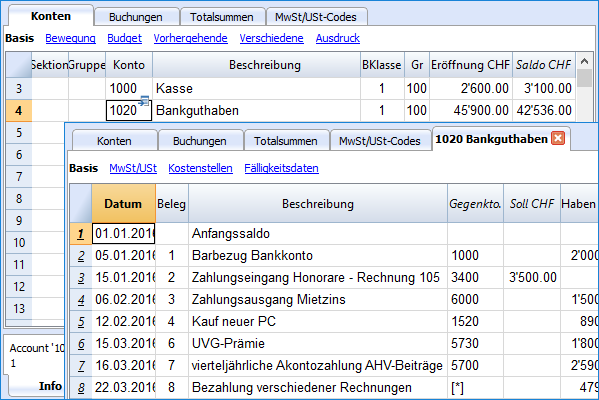
If you want to see a detailed situation of any account, category or group, you just need to click on the small blue arrow that appears in the top-right corner of the account number cell. The account card can be printed or saved in PDF format. You can also obtain your account card for a specific period. You can print a single account card, all of them, or just some selected ones.
|
 |
Use cost centers and segments to manage projects, specific business sectors or activities |
|
|
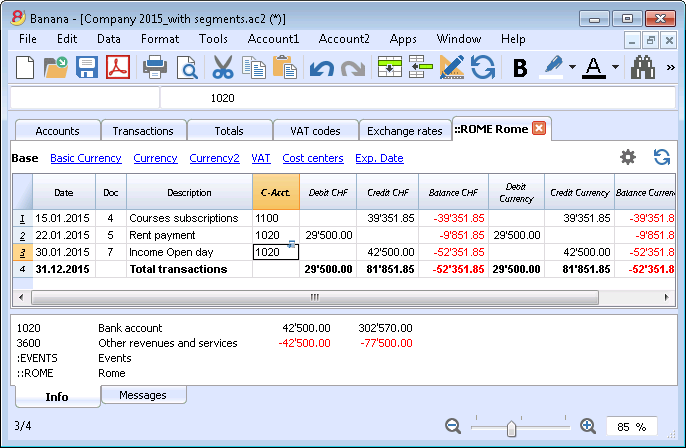
Using Segments and Cost centers, Banana Accounting allows you to manage specific activities or project in a detailed and precise way, without changing the structure of your chart of accounts. You will be able to know, in each moment, how a certain project is going and you can print out detailed reports.
|
 |
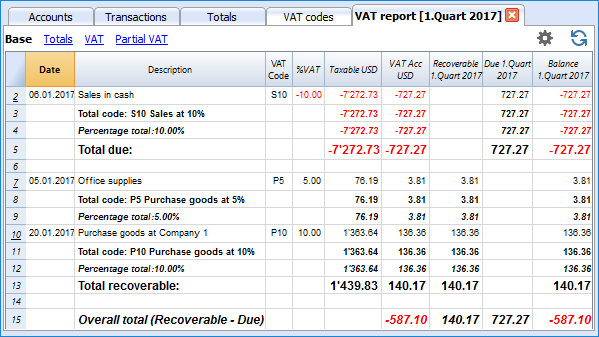
Easier VAT management |
|
|
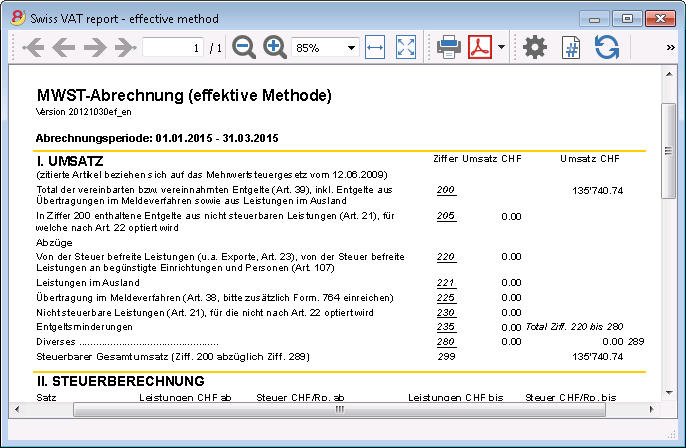
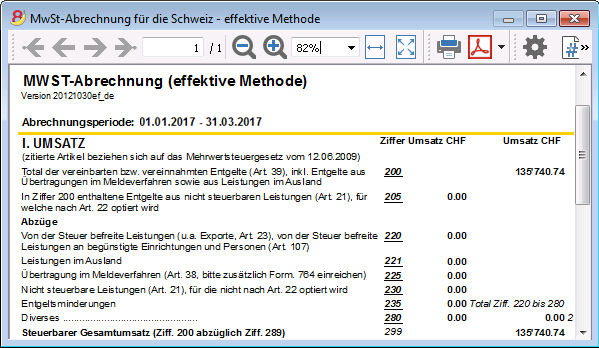
If you need to manage the VAT, choose a template that already has it or convert your existing file adding the VAT option. All VAT calculations and the VAT reports are automatic. For Switzerland the program already prepares a facsimile of the official form both for the effective method and the flat tax rate method.
|
 |
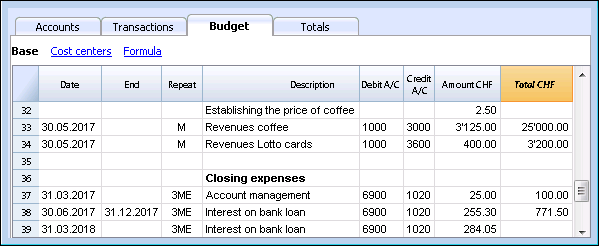
Financial planning |
|
|
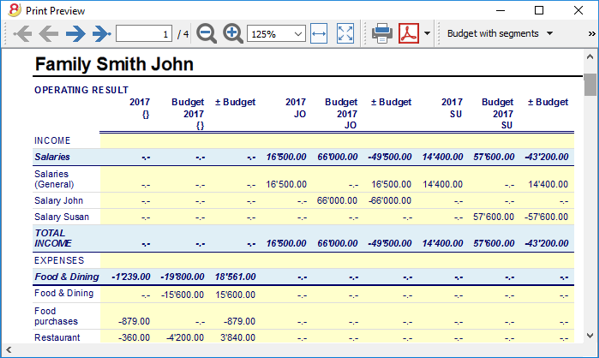
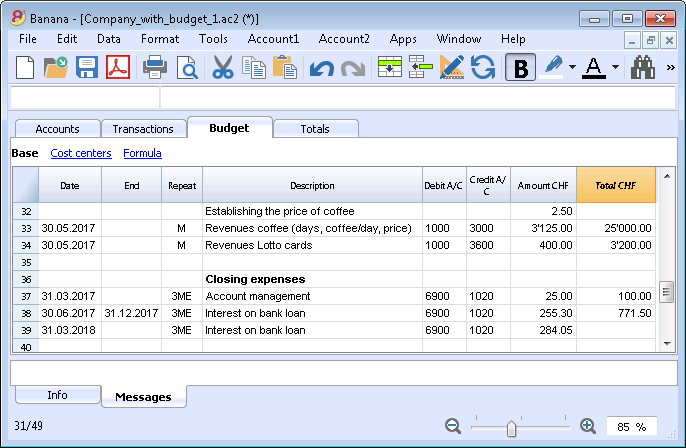
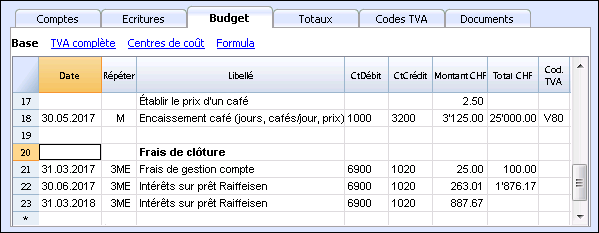
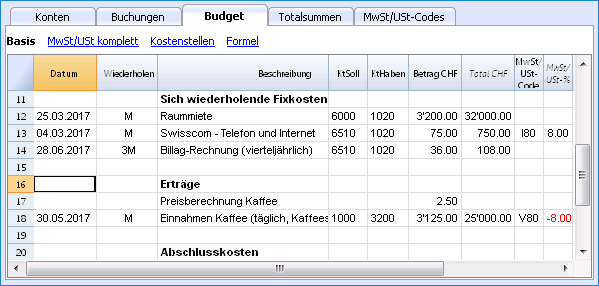
You can activate the Budget table that will allow you to directly write your budget transaction indicating the repetition (ex. M = monthly, 3M = quarterly, ...). Based on your budget transactions the program automatically creates your yearly budget. You can always compare and print the budget with the real situation, also for a specific period. This tool is a big help to foresee how your business will do and to be able to face any situation. |
 |
Fast and easy
Start immediately with 3 easy steps |
|
|
You can start working immediately with 3 easy steps:
... and the accounting is done! |
 |
Excel-like interface |
|
|
The graphic approach is very similar to Excel so your will feel right at home. |
 |
Impeccable journal |
|
|
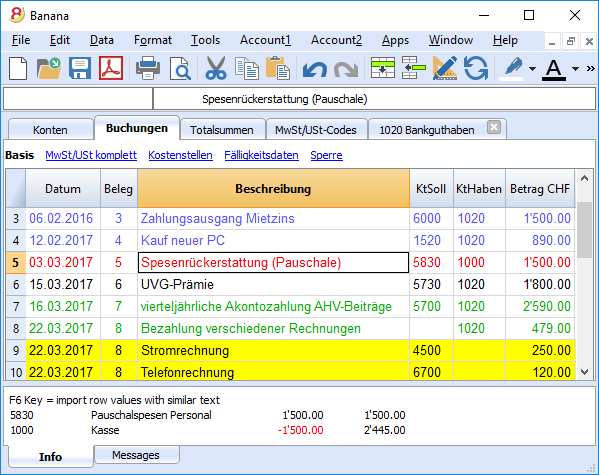
The Transactions table is in fact your journal. It is clearly organized and can be printed directly or saved in a PDF format. When you enter a transaction, all accounts totals will automatically be updated, so you can always have a global view of your business. You can also use colors, both in the text and row background, in order to highlight some entries and quickly find your data. |
 |
Memorize and recall recurring transactions |
|
|
You can select your recurring transactions and save them in the Recurring transactions table; you can then automatically recall them when needed.
|
|
Import data from e-banking and credit card statements |
|
|
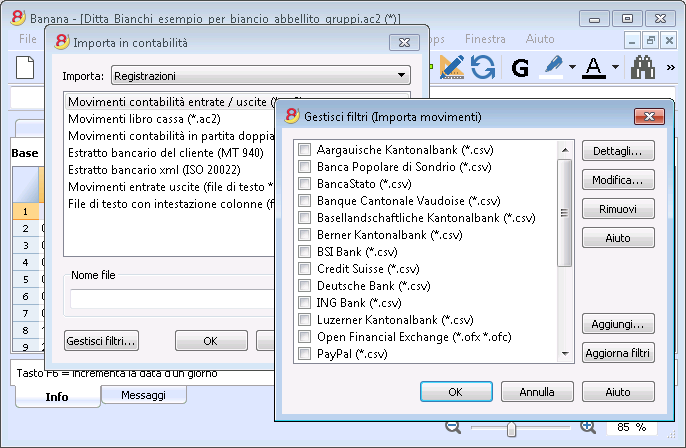
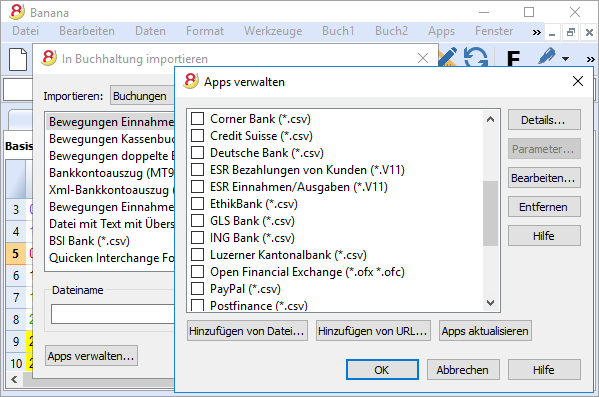
You can import your e-banking transactions or your credit card transactions directly into your Banana file, with no need of manually writing them. We now have import filters for all major banks and institutions, and they are constantly updated. If your bank doesn't appear in the list of the available filters, we can create one for you.
|
 |
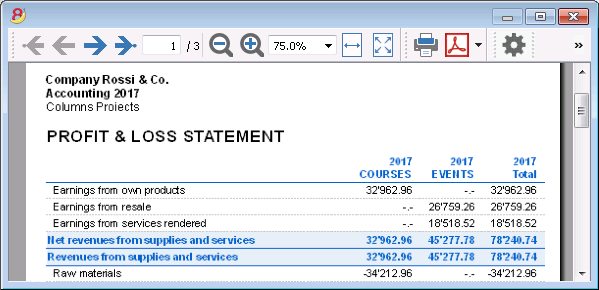
Immediate printouts and report - customizable settings |
|
|
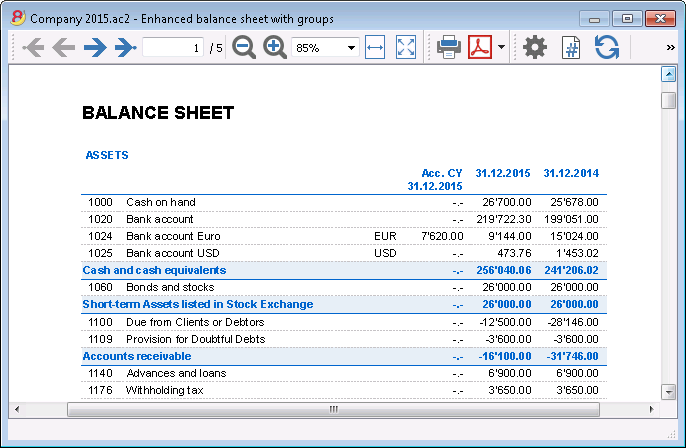
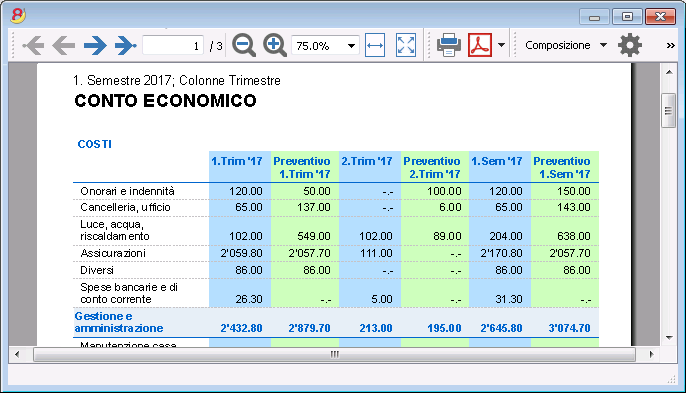
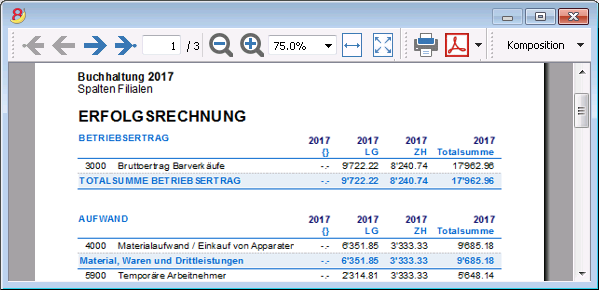
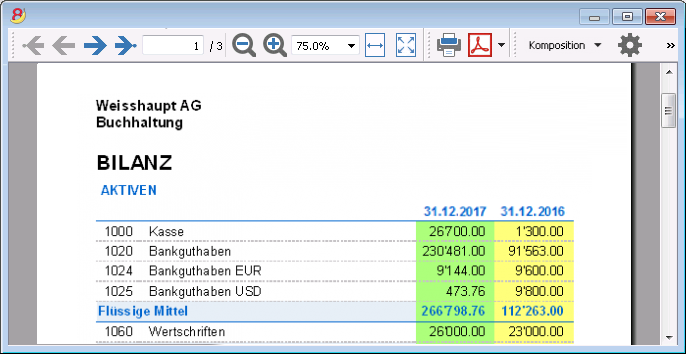
You can personalize the printouts of your Balance Sheet and Profit & Loss Statement. You can activate/deactivate several options in order to present your data just as you want; choose from different graphic styles, change colors, etc. You can play around and see the results in your Print preview. When printing your Balance sheet you can also include a text for the Swiss attachment |
 |
Save your personal printing settings |
|
|
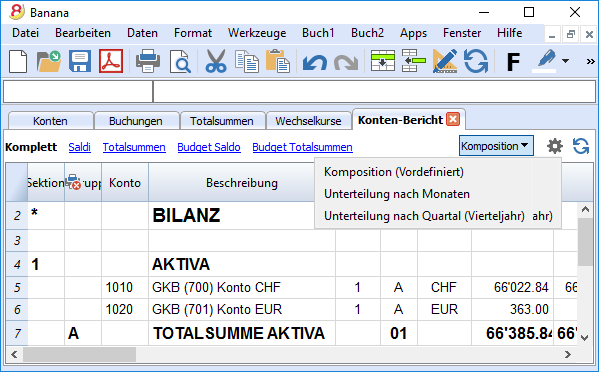
With the Compositions command, it is easy to setup custom printouts. You can save several printing settings for Balance sheet, Account details, extract and sort rows, addresses and labels, ...
|
 |
Universal
Multi-language |
|
|
The program is available in several languages: English, Italian, German, French, Spanish, Portuguese, Dutch and Chinese. You can change the program language at any time. Each file can be created in a different language; in our template section on our website, you can choose files in different languages. In order to change the language of an existing file you need to convert it into a new file choosing the desired language. |
 |
Multi-currency |
|
|
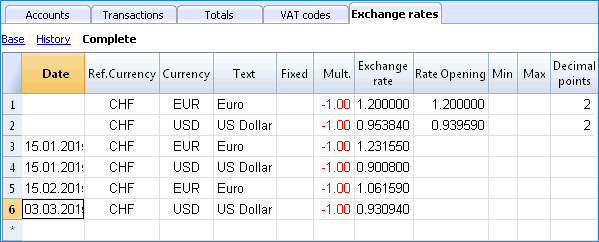
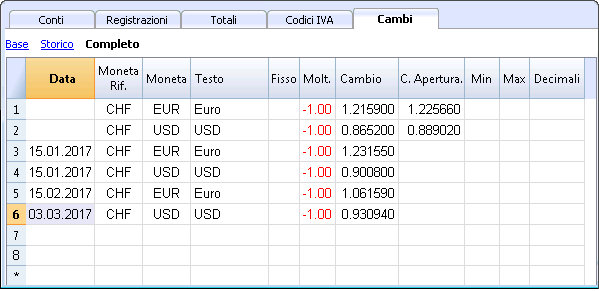
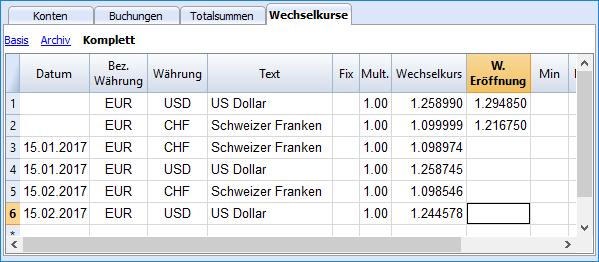
You can have as many accounts in foreign currencies as you need, and enter your exchange rates in the Exchange rates table. You can also keep an history log of your exchange rates. Exchange rate calculations and exchange rate differences are all done automatically. You can have your Balance sheet, your Profit and Loss statements and several reports in a second currency as well. |
 |
Multi-mandate |
|
|
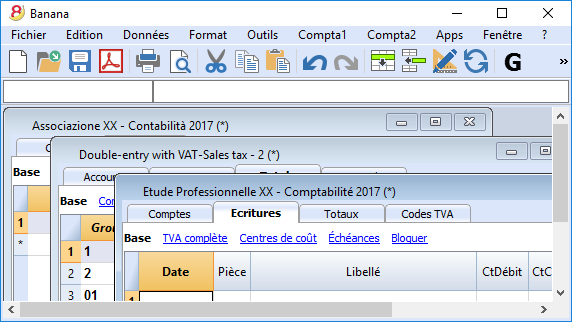
Banana Accounting has no limits on mandates. You can manage an unlimited number of mandates, each one with its personal settings: language, currency, VAT management, ... |
 |
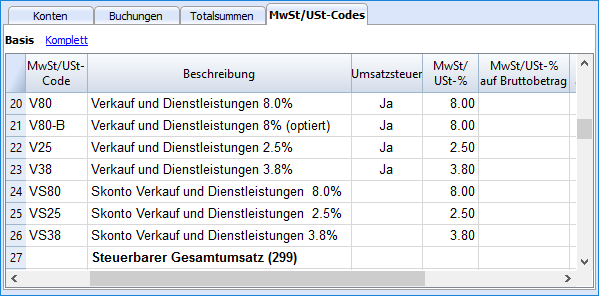
VAT codes by nation |
|
|
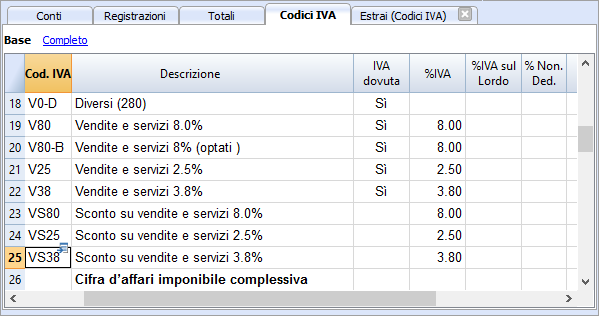
When creating a new file with the VAT/Sales tax management option, and you choose a specific nation, you will find a VAT Codes table that already contains all the VAT codes used in that nation. The VAT Codes table can however always be edited, in case you need specific codes or if some new legislation comes into effect. |
 |
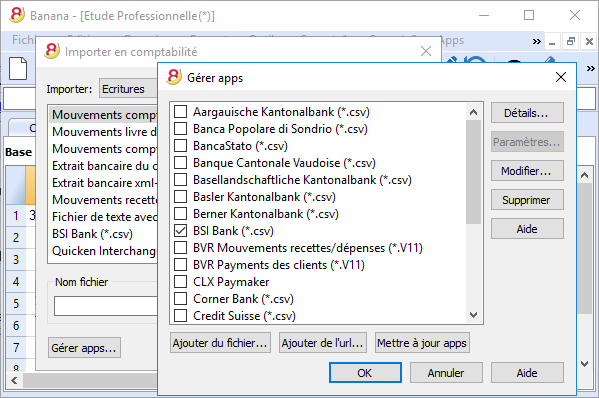
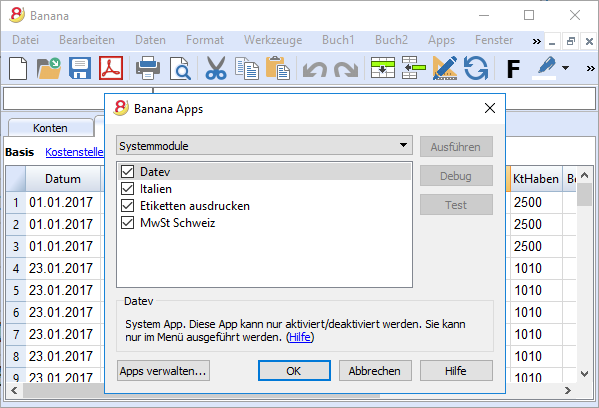
Specific Apps by nation |
|
|
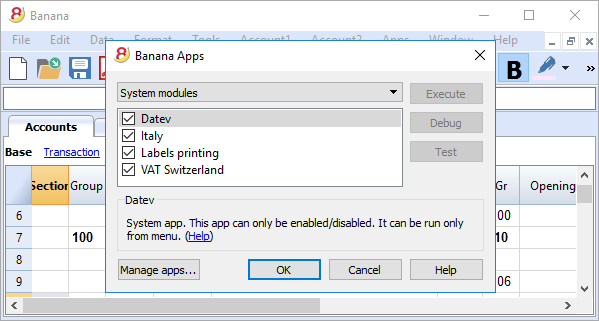
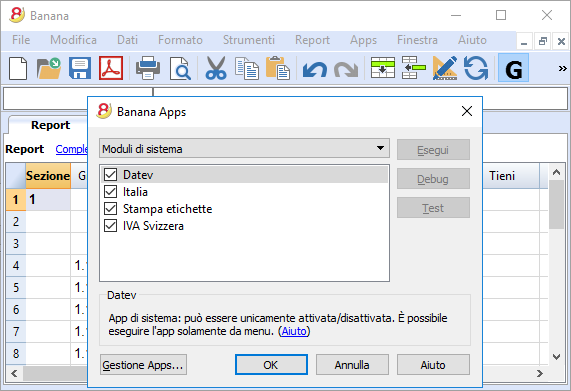
Banana Apps are applications that allow you to obtain specific printouts or reports from the Banana program; some Apps are already available for free, you just need to download them! You can also create your own Apps in order to have very specific report presentation, comply to specific local law requirements, such as for example the Swiss "curatele", or specific association's needs. |
 |
Professional
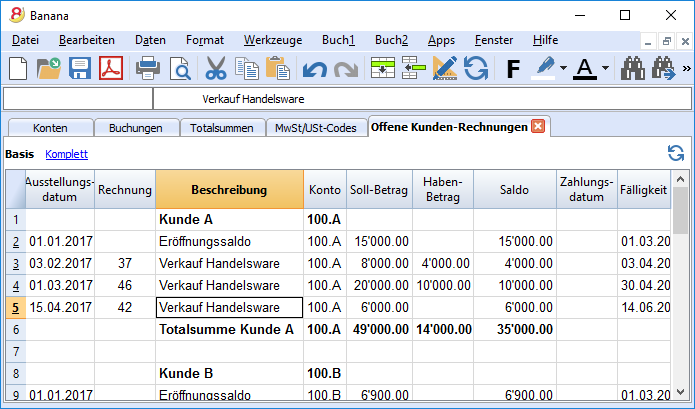
Clients and suppliers' management |
|
|
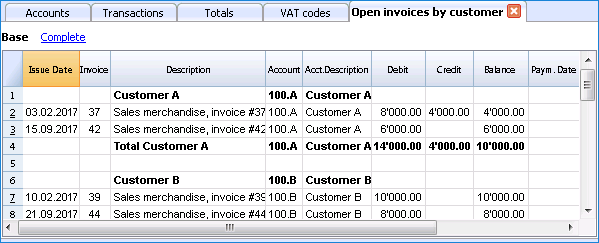
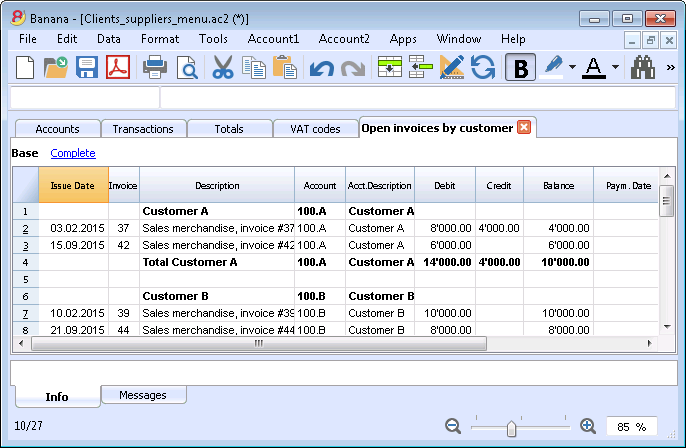
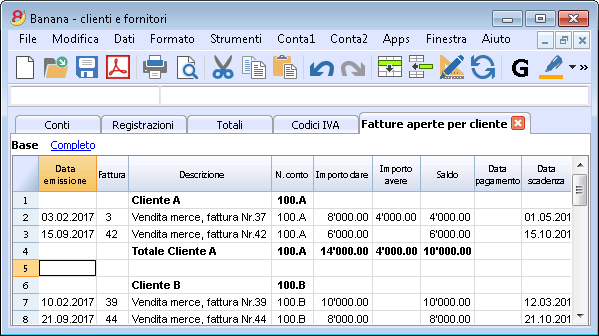
You can easily manage your Clients and Suppliers. You will be able to know, at any time, if you have expired or still unpaid invoices. You can also have the historic detail for each client or supplier. In the opening balances, you can go back to the invoices that determine the amounts. |
 |
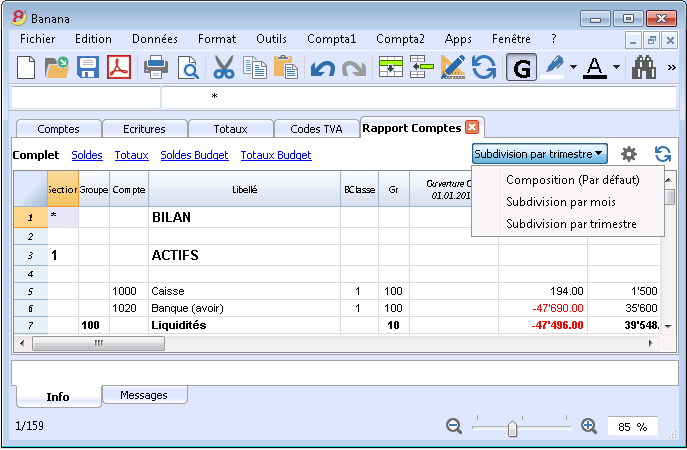
Countless reports, also by period |
|
|
Reporting possibilities are endless. Choose the columns to display, change headers, change colors.
|
 |
Excel data synchronization |
|
|
If you want your data in Excel, you do not have to copy, paste, or export any data anymore
|
 |
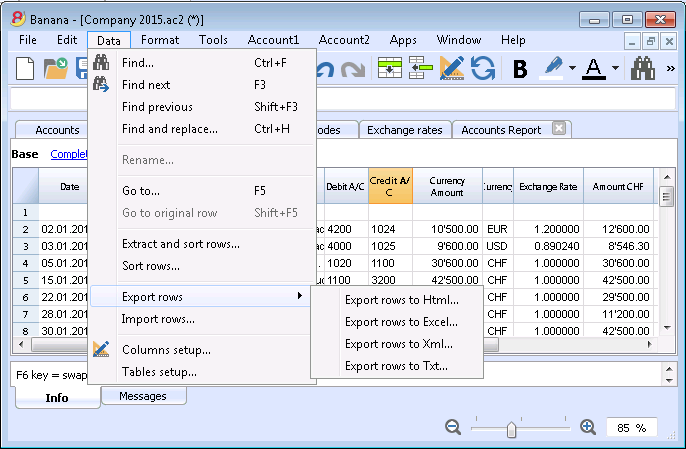
Export data in different formats |
|
|
With Banana Accounting you can export data in various formats: Html, Excel, Xml, Txt. Export can be performed on a data selection or for the whole accounting file. You can also decide to export only specific rows.
|
 |
Custom Apps development |
|
|
If you need special printout, reports or some specific outputs, please contact us: we are available to create custom applications. |
 |
Automated checks |
|
|
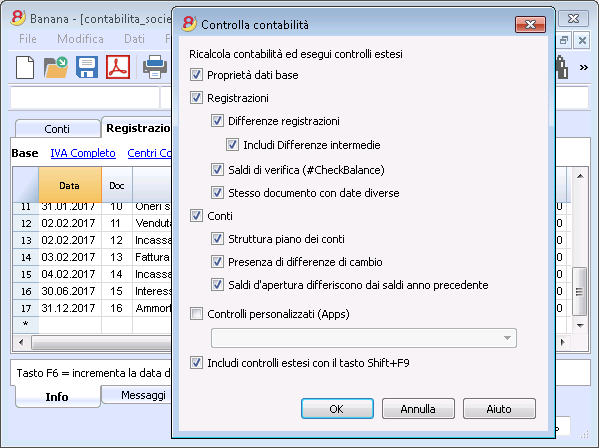
Any errors are reported automatically.
|
 |
Security and certification
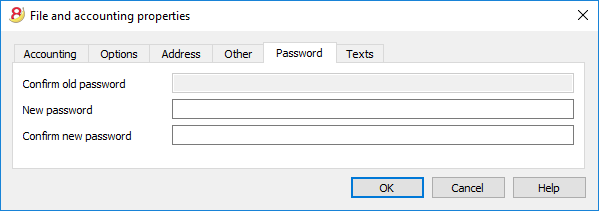
Password file protection |
|
|
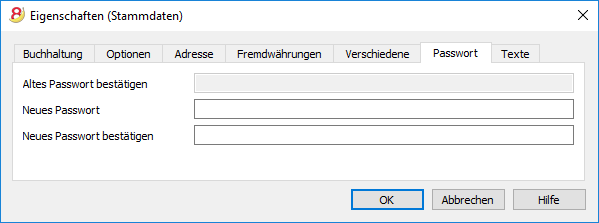
Each file can be password protected. The password can be changed or deleted anytime.
|
 |
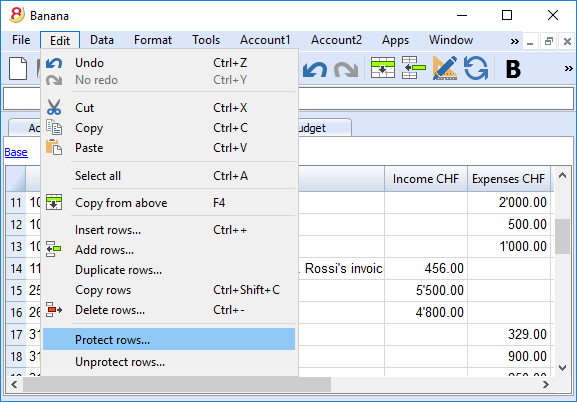
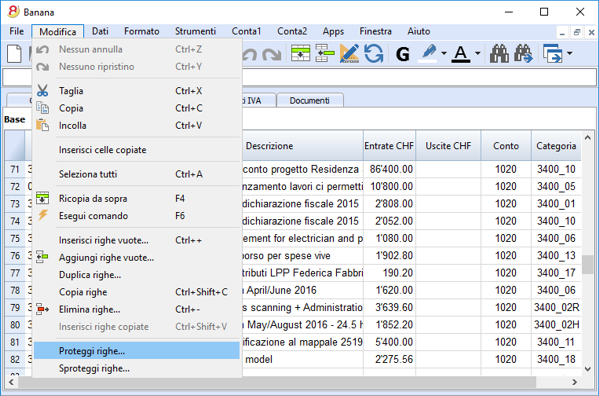
Rows protection |
|
|
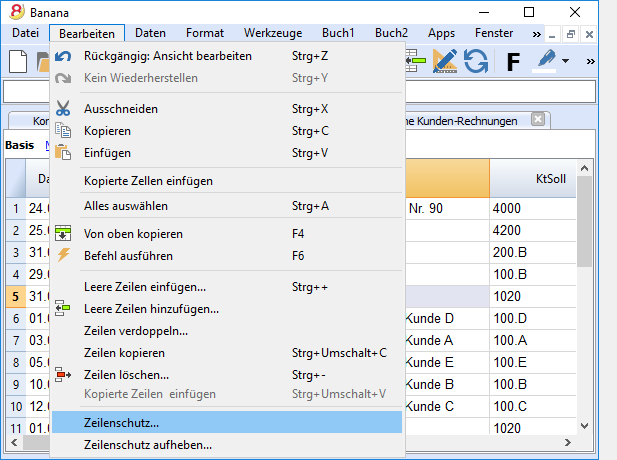
In order to work more at ease, you can protect the rows that are already definitive in your file, to avoid tampering or accidental changes. Protected rows can be unprotected.
|
 |
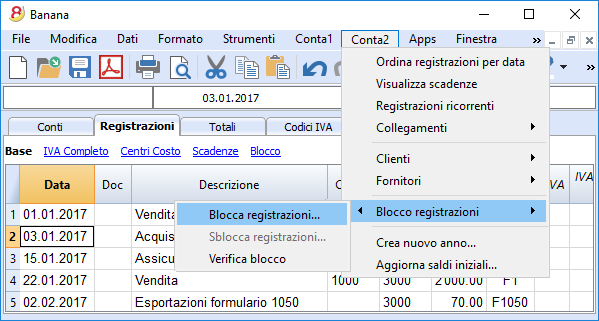
Transactions lock |
|
|
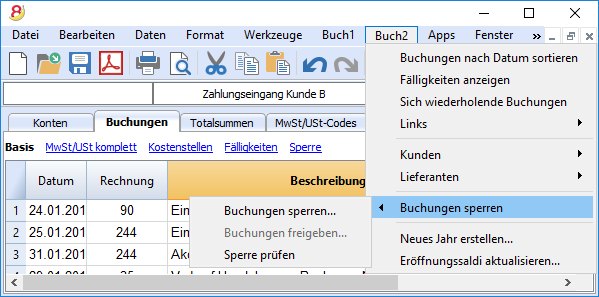
You can lock all or just some transactions; thanks to the digital certification, you can be certain that they haven't been changed. |
|
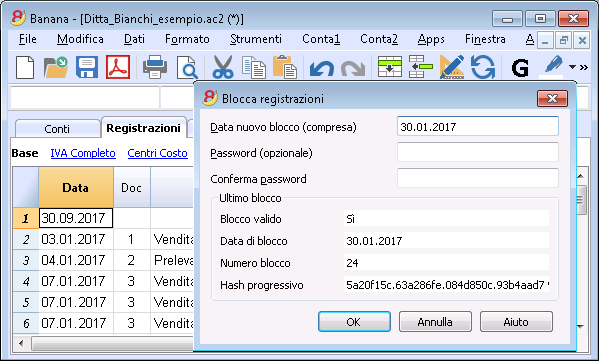
Data certification with blockchain system |
|
|
The integrity of the accounting data is guaranteed
|
|
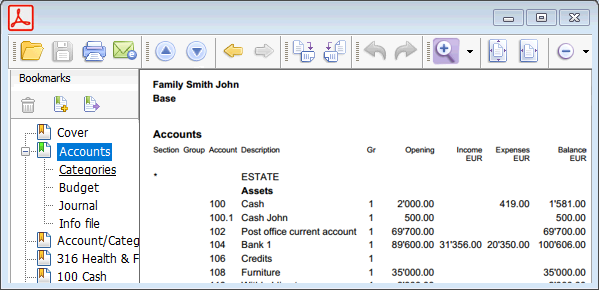
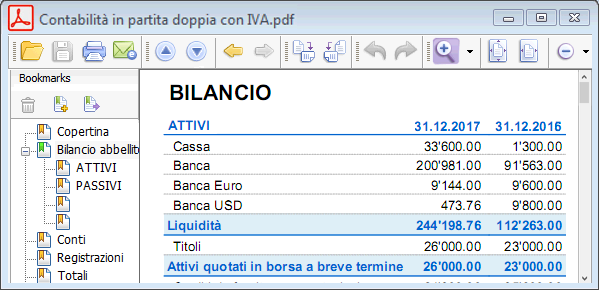
Store your file in PDF format (or just parts of it) |
|
|
You can save all your file in PDF format, or choose what parts of it to print. |
 |
Automatic Backups |
|
|
The program automatically saves, at a frequency in minutes that you can define, in a backup file.
|
 |
Compatibility and sharing
Compatible with previous versions |
|
|
Banana Accounting 8 maintains the same usage patterns and compatibility with previous versions. Files created with previous versions can be opened and all data is fully maintained. |
|

For all operating systems |
|
|
Banana Accounting 8 is available for Windows, Mac, Linux, Android and IOS. Banana files are interchangeable between different versions. |
 |
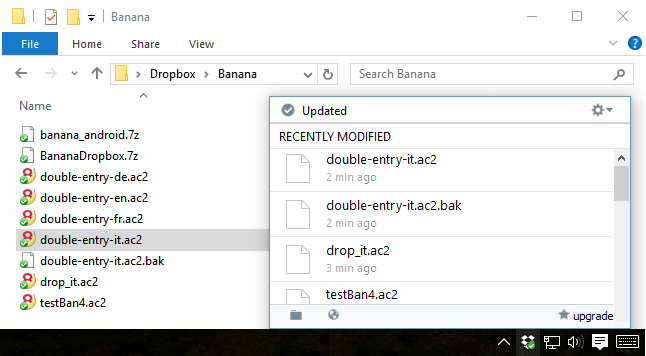
Cloud sharing |
|
|
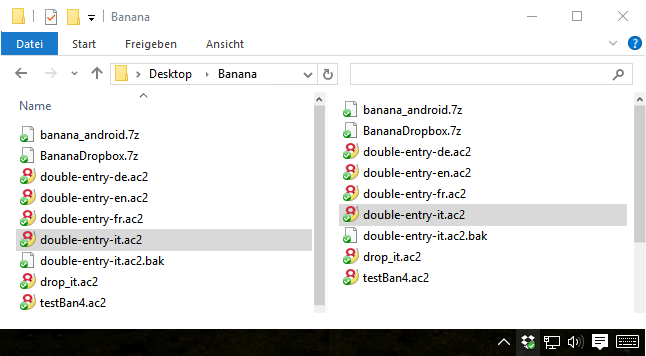
Banana files can be saved on all Cloud systems: Dropbox, I-Cloud, Google Drive, ... so that you can access your accounting data anytime, anywhere. |
 |
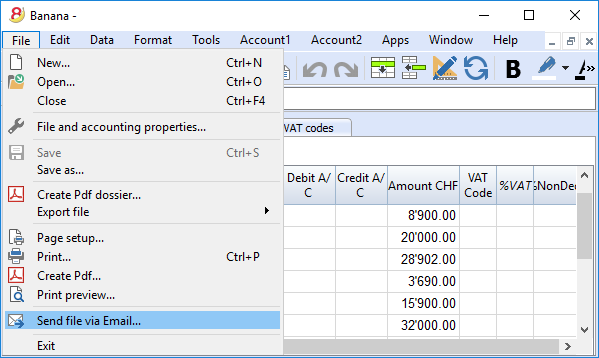
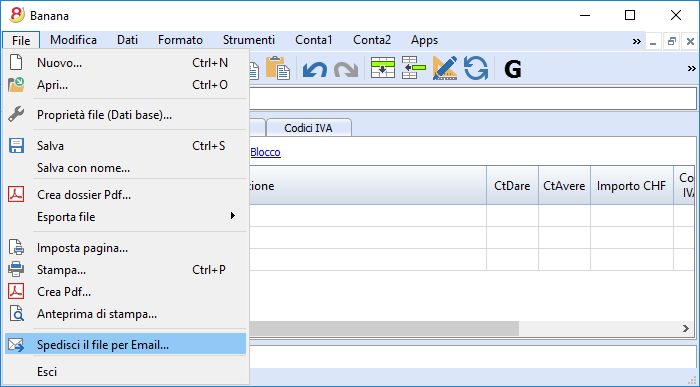
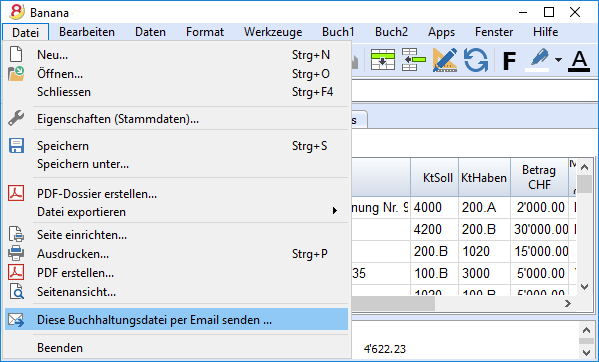
Send your Banana files by email |
|
|
Each Banana file can be sent by email, shared, saved on a USB stick, and so on.
|
 |
360 degrees support
Online documentationMore than 500 pages of free online documentation, divided by topic, with step-by-step images and explanations. Direct link to the errorAny error is immediately reported. Free supportSupport by phone or email is free for 12 months from the date of purchase and for topics related to the use of the program. Technical Advanced SupportTechnical support and custom solutions development (Apps). |
 |
Switzerland: new regulations for reports
From the end of 2015, all companies registered in the Swiss Commercial Register, will have to present their accounting reports according to a new regulation, with the minimal Balance Sheet and Profit and Loss Statement organization prescribed by the Swiss Code of Obligations (rRt. 959a and 959b CO).
The new accounting plan templates that come with both Banana 7 and Banana 8 already meet the new requirements. If you created your new accounting file using one of the new Banana templates (chart of accounts), you will get printouts that are conform to the new regulations.
If you have an "old" accounting plan, you have two possibilities:
- Migrate to the new accounting plan and get your data from the existing accounting plan
- Create a new accounting file using a Banana template that uses the new organization (account numbers and groups)
- Add a new column in the accounting plan and enter for each account, the corresponding account number in your "old" accounting file
- Use the import feature in order to get and convert your data from your "old" accounting plan.
- Keep using your existing accounting plan and use an external file (already available in Banana 8) to get a report according to the new regulation when printing
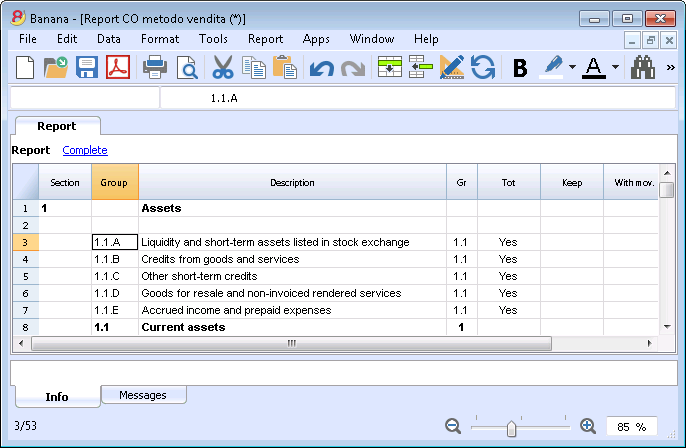
- Create a new Report file (Double-entry accounting -> Accounting Report -> Tenplates for Switzerland (English) -> Report art. 959 Swiss Code of Obligations)
- Save the file in the same directory where your accounting file is stored
- Give to each account (in the Gr1 column) the group corresponding to the new regulations, as indicated in the Accounting report file (see explanations on the page External report file)
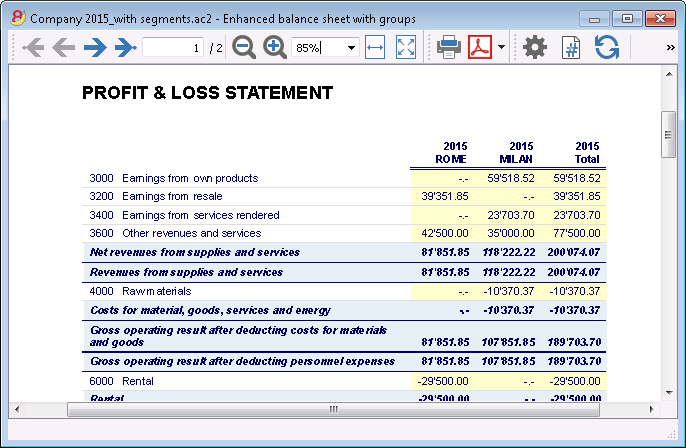
- Print the Balance Sheet and Profit and Loss Statement for fiscal purposes, by using the report file (for more information see the Enhanced Balance Sheet with groups page)
Further changes
The new regulations prescribe further changes. They also require that the Attachment to the Balance sheet should contain more detailed information. You can also decide to include some of the required details directly into the Balance Sheet and Profit and Loss statement, or you can enter the information in the attachment (for example for credits or debits towards the sharesholders or the members of the company).
These are important changes, with fiscal and legal implications.
We strongly advise you to check with your trustees, accountants, auditors and tax advisors in order to prepare the 2015 accounts presentation as prescribed.
In the following years you will simply need to follow the same organization.
What's new in version 8
Optimized for the new Windows 10, Mac und Linux Operating Systems
Banana Accounting 8 maintains the same use, it is compatible with previous versions, and introduces important new functions that our clients requested. The program now indicates whether there has been an interruption and whether there are data that have not been saved. More info...
Compatible with previous versions
Banana 8 uses the same format of the 5.12 version. Files edited with version 8 can therefore be read from previous versions.
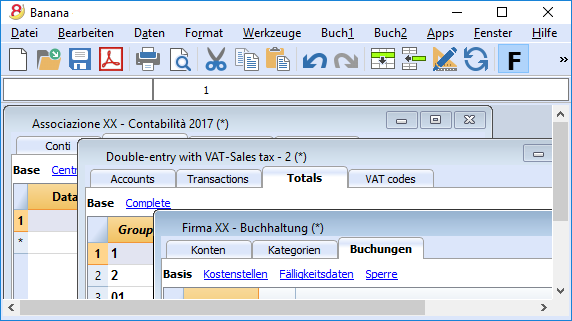
Work with colors!
By coloring the rows (text or background), it is easier to see and find accounts and transactions.
![]()
Accounting templates up to date
Several templates are available for the double-entry accounting, as well as for the income & expenses accounting and the cashbook, in several languages and for different nations.
Hi-quality accounting data
With Banana Accounting you can correct possible differences, transcription errors or change the Debit/Credit account, if wrongly entered.
Even if you are a non expert user, you can achieve a perfectly ordered accounting file, avoiding the cash going negative, and having your bank accounts match your bank reports.
Share your files
You can move your files and share them with Dropbox, I-Cloud, e-mail or USB stick.
Find texts in a more efficient way
You can now find all the texts matching your search criteria and you can leave the Find window open for future searches.
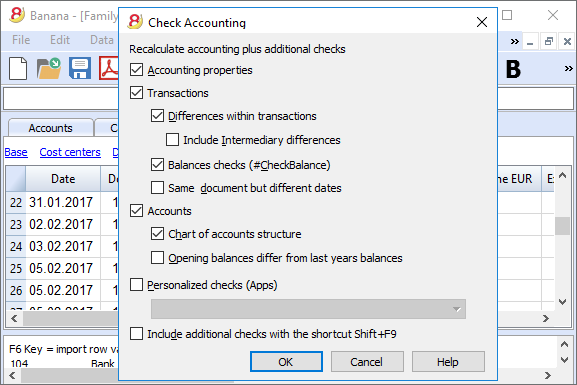
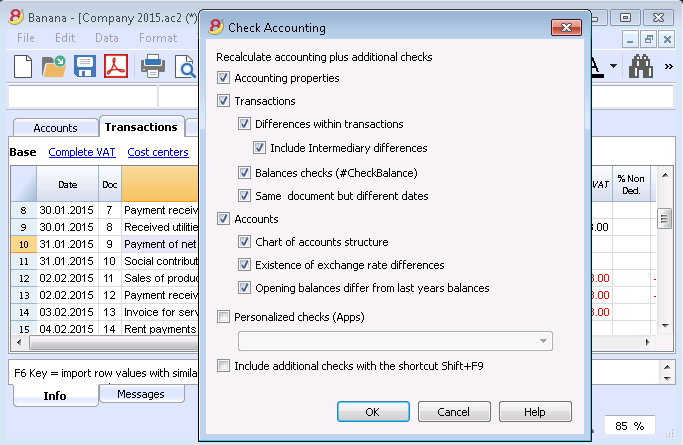
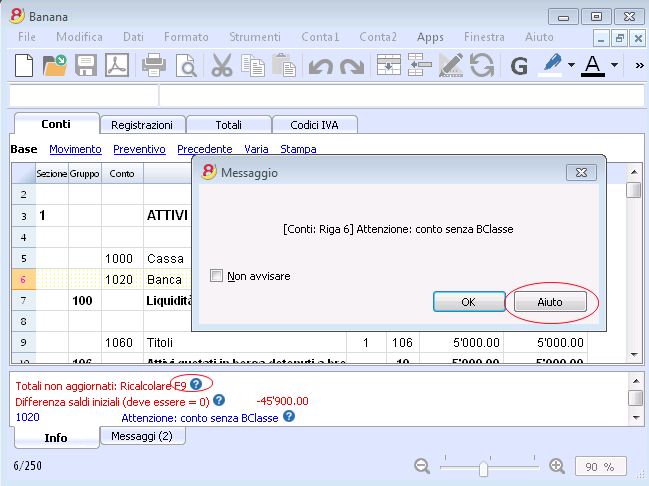
Advanced verification system
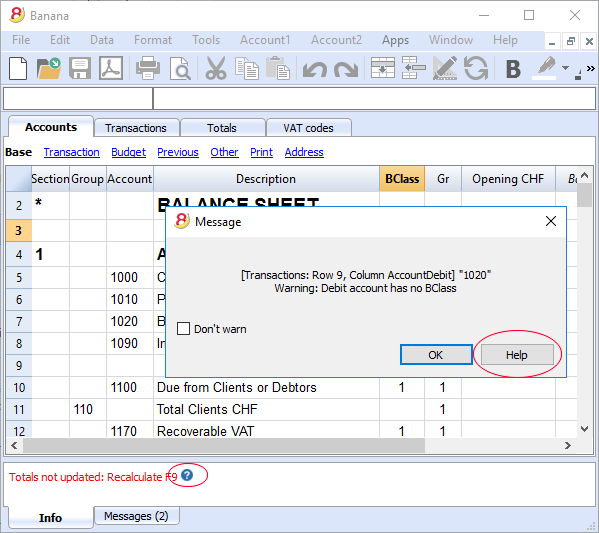
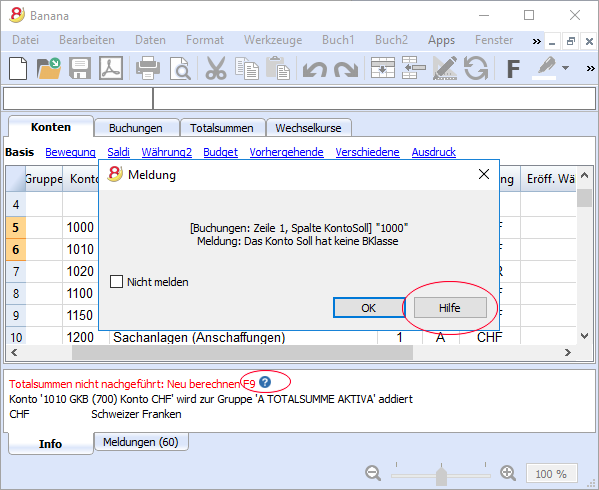
Forgot something? No problem, the Check accounting command, will instantly recalculate all your accounting file, and will alert your if possible errors or differences are found. By clicking on the  symbol, next to the error message (in the Info or Messages window), you will be directly connected to the NEW online page explaining the error message and suggesting possible causes and solutions.
Handy online documentation
Every alert message has a direct link to the corresponding page at our online documentation. You will find useful tips and step by step instructions on how to best operate and to solve your problem.
![]()
Convert your accounting plan according to the new Swiss regulations
You can set a new accounting file using one of the new templates, and then automatically resume and convert your existing data, no longer complying with new regulations.
Print your report according to the new Swiss regulations
If you decide not to change your existing accounting plan structure, you can still print your report according to the new Swiss regulations, thanks to a Banana external accounting report file.
Balance sheet attachment
In the Balance sheet printouts you can also include a text for the attachment.
List of the customers/suppliers overdue invoices
The new functions for the Customers / Suppliers management, allow you to view the list of customers and suppliers overdue invoices.
Easily create your customized printouts
With the Composition command it is easier to setup and save your customized printouts; you can also save your own settings to print Account cards, Extract and sort rows, Addresses and labels, ...
Business intelligence
Banana allows you to manage segments and cost centers.
You will have a much more precise and detailed view of each sector or project of your business.
Account cards also for groups, segments and classes
You can now obtain all movements of a segment, a group or a class, in their corresponding account card.
Plan your cash flow and your business
With the budget transactions you can now simulate in detail how your business and your cash flow will evolve.
Import your bank statements
You can import data from your bank statements or from external invoicing software.
Banana creates the transactions resuming the statement data.
Banana supports many different standard (ISO 20022) or specific (PayPal) formats.
Manage your VAT in a simple way
All VAT calculations are automatic.
For Switzerland, the program prepares the fac-simile of the VAT report for the effective method or the flat tax rate method.
You just need to copy the amounts on the official form.
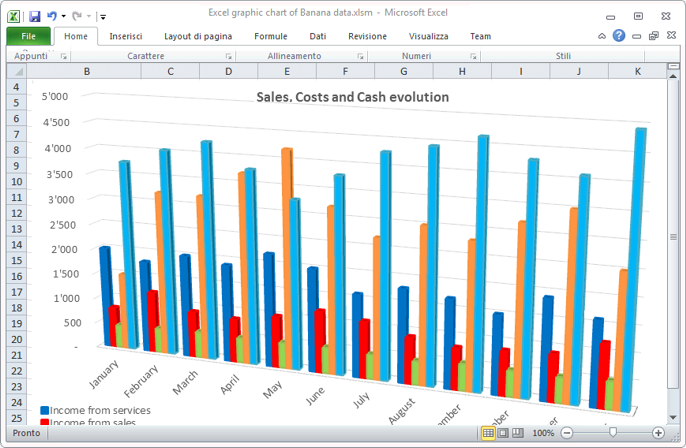
Dynamic link to Excel and graphics creation
You can create Excel sheets and graphic presentations linked to your accounting file that automatically update themselves when your accounting data are changed.

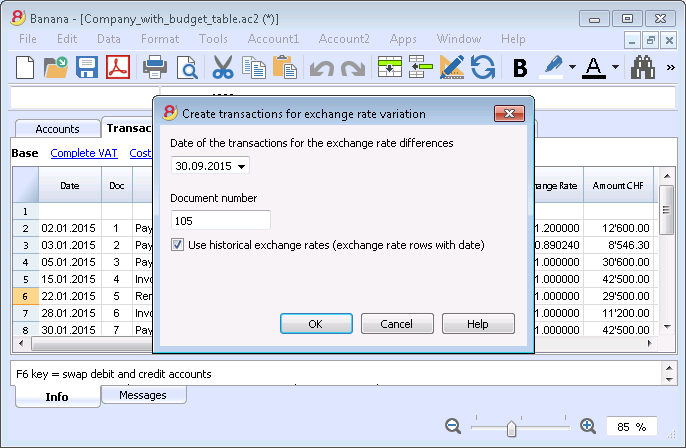
Multi-currency - Transactions for exchange rate variation at a specific date
You can enter historic exchange rates that the program will use in the transactions in order to calculate the exchange rate variation differences at a specific date.
You can also specify, for each account, a different exchange rate difference account to be used.
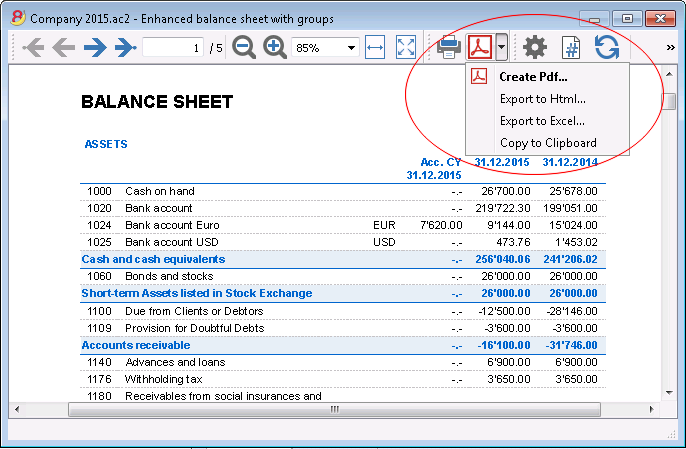
Save in Pdf from Preview
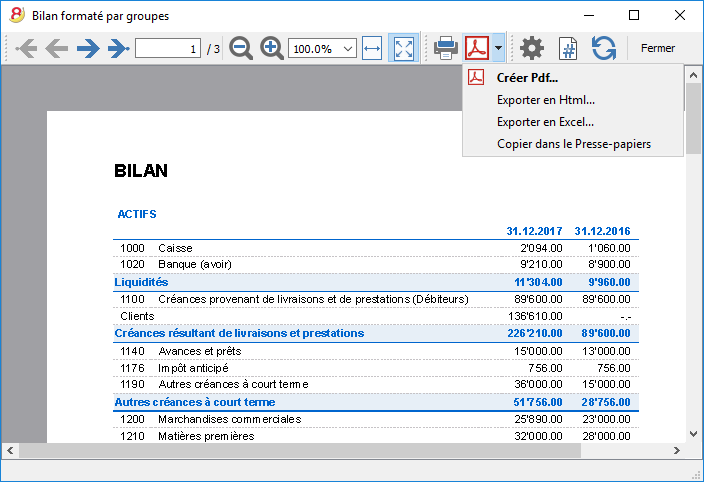
All printouts can be previewed and exported in Pdf format.
Export only specific data of the accounting file
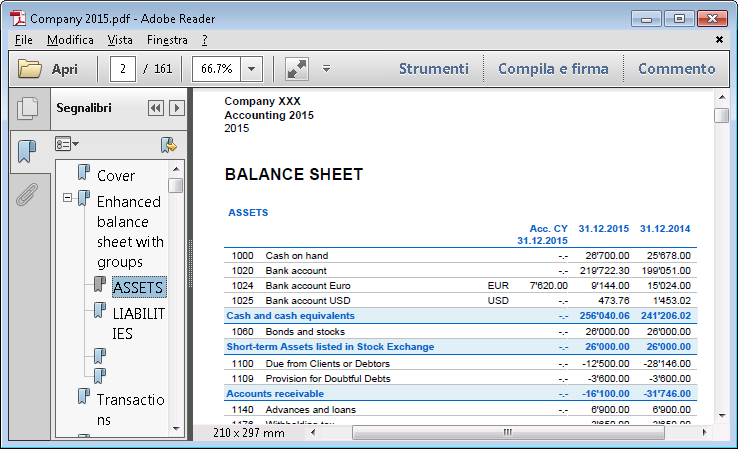
Store all your accounting data in a single Pdf file
At the end of the year you can create a Pdf file with all your accounting data: Balance sheet, Profit & Loss Statement, Transactions, Account cards, VAT report.
Get customized report with the new Banana Apps
You can download the Banana Accounting Apps or you can create your own, in order to obtain very specific presentations, required for example for specific regulations, for associations, controlled administrations, or in order to comply to a specific nation's regulations.
Digital certification of the accounting data
You can lock your transactions at a specific date and protect them with a password.
As required by the law, accounting data integrity is ensured by a top quality certification system (US Patent N.7.020 .640), the same used by electronic currencies like bitcoin.
It is now also possible to unlock transactions only partially.
![]()
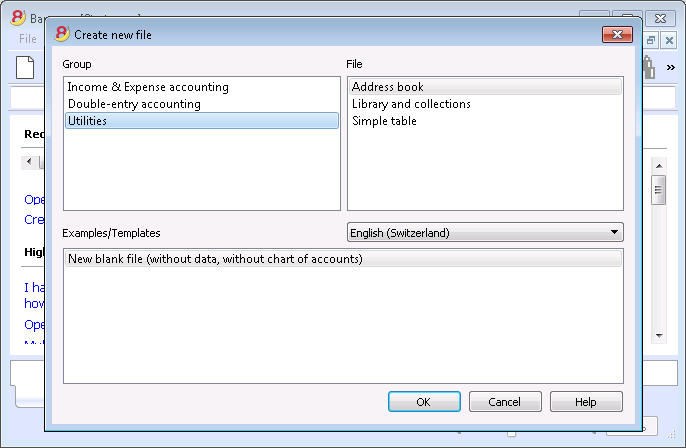
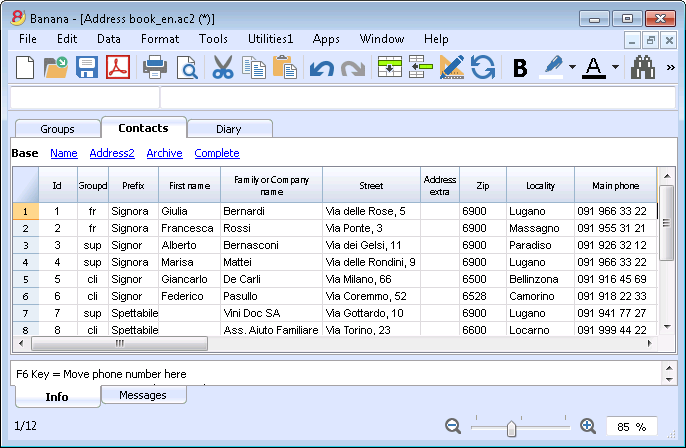
New Utilities application
The Address book utility has a new table, and there is a new utility to manage Libraries and Diary.
Address book - Link between Contacts data and diary
The new Groups table now allows you to classify your contacts in different groups (business contacts, family, etc.), while in the Diary table you can enter notes.
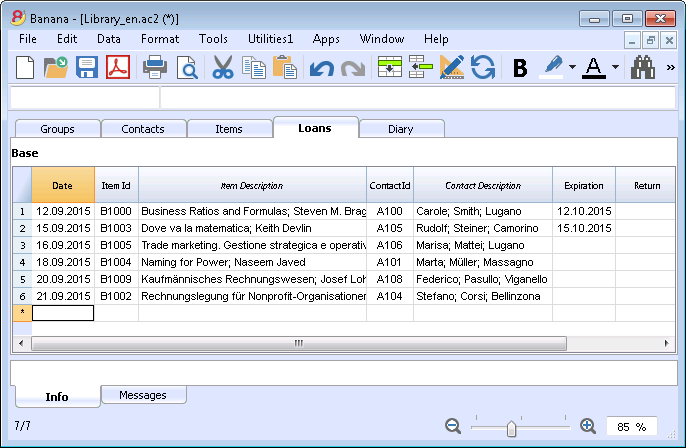
Manage books and collections items
Thanks to the new Libraries utility you can manage books (private book collections, libraries), DVD (video stores), valuables collections, etc.
In the Books table you can enter the items with all the characteristics(Title, Author, etc.), while in the other tables you can manage the loans, the due dates and the archive.
and much more ....to find out!
Caractéristiques Banana 8
Banana Comptabilité est un logiciel international extrêmement polyvalent qui se prête très bien pour la tenue de la comptabilité dans n'importe quel pays.
C'est un logiciel idéal pour les petites réalités économiques.
PolyvalentIl s'adapte à vos nécessités et connaissances
|
Facile et rapideCommencez immédiatement et épargner du temps chaque jour.
|
UniverselUtilisé dans plus de 127 pays dans le monde.
|
ProfessionnelPrésentez votre activité de manière impeccable.
|
Sûr et certifiéSécurité et protection maximale des données
|
Compatibilité et partage
|
Support complet
|
||
Polyvalent
Choisissez parmi différentes méthodes comptables |
|
|
Vous pouvez vous lancer avec la comptabilité que vous préférez, et ensuite changer, si c'est nécessaire tout en conservant vos données insérées:
Contient aussi différentes utilitaires:
|
 |
Choisissez parmi plus de 500 modèles |
|
|
Au lieu de créer votre fichier à partir de rien, utilisez un de nos nombreux modèles en ligne. Il sont disponibles gratuitement et déjà triés par langues, pays et activités. Pour de plus amples informations...
|
 |
Organisez vos comptes à souhait |
|
|
Vous pouvez adapter le plan comptable selon vos exigences, en ajoutant ou éliminant des comptes, créant des sous-groupes et différents niveaux de totalisation. Les résultats seront immédiatement visibles. Les changements dans le plan comptable sont toujours possibles même pendant l'année en cours. Vous pouvez aussi ajouter des colonnes supplémentaires ou changer l'ordre des colonnes existantes, autant dans le plan comptable que dans le tableau sur lequel vous insérez vos écritures. |
 |
Situation toujours sous contrôle |
|
|
En un clin d'oeil vous aurez toujours une vision ajournée et globale de votre activité. Chaque fois que vous insérez un mouvement comptable les soldes se mettent automatiquement à jour. Pour de plus amples informations...
|
 |
Détails des comptes en un clic |
|
|
Avec Banana, c'est très facile d'obtenir la fiche détaillée de chaque compte, catégorie ou groupe de comptes: il suffit de cliquer sur la petite flèche bleue-claire qui apparaît en haut à droite du numéro de compte. Même la fiche de compte peut être enregistrée en pdf ou imprimée, aussi pour une période précise. Vous pouvez imprimer toutes les fiches de compte ensemble, ou celles que vous aurez sélectionnées. Pour de plus amples informations...
|
 |
Utilisez centres de coûts et segments pour gérer des projets, des secteurs ou des activités particulières |
|
|
A travers les Segments et les Centres de coûts, Banana Comptabilité permet de gérer des activités ou des projets de façon précise et détaillée sans bouleverser l'organisation du plan comptable. Vous pourrez ainsi connaître à chaque instant les tendances d'un certain secteur ou projet et produire des impressions détaillées.
|
 |
Gestion facilitée de la TVA |
|
|
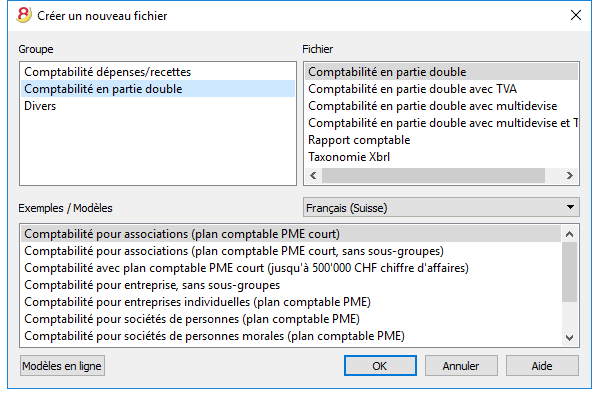
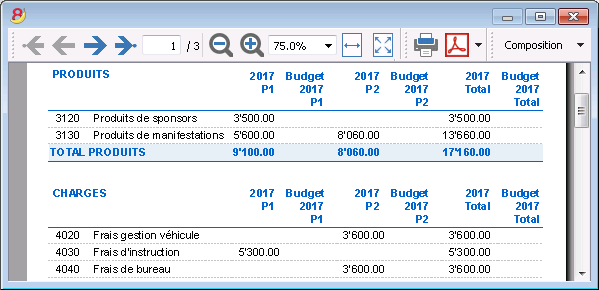
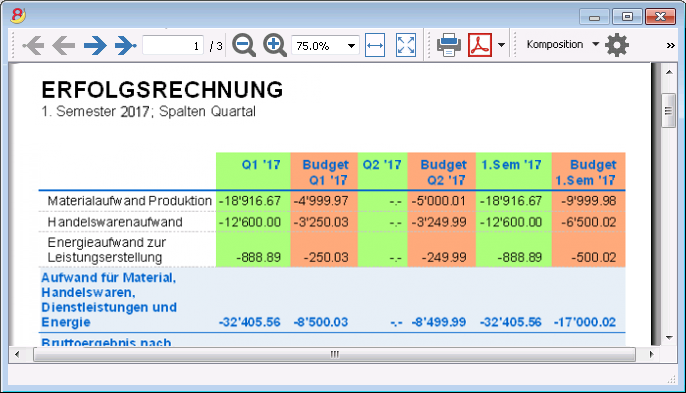
Si vous avez besoin d'une gestion avec TVA, choisissez un fichier déjà configuré avec TVA ou convertissez votre fichier existant en ajoutant l'option TVA. Tous les calculs pour la TVA sont automatiques. Le programme prépare, pour la Suisse (voir image), le facsimile du Formulaire TVA - méthode effective ou celui du Formulaire TVA - méthode taux de la dette fiscale nette et taux forfaitaires. Il ne vous suffira, ensuite, que de reporter les valeurs dans le Formulaire officiel. Rapports TVA automatiques.
|
 |
Facile et rapide
Opérationnel en 3 étapes |
|
|
En trois étapes simples vous êtes opérationnels et vous pouvez commencer à travailler:
... et votre comptabilité est en route! |
 |
Interface similaire à Excel |
|
|
L'interface graphique est très semblable à Excel et de ce fait, vous vous sentirez directement à l'aise. Dans son fonctionnement, Banana vous offre bien plus qu'une simple feuille de calcul, parce que, au fur et à mesure que vous insérez vos données, les totaux de tous les tableaux se mettent automatiquement à jour, et sur la base des données introduites, Banana crée aussitôt Bilan, Compte de Résultat et de très nombreux autres rapports. |
 |
Ecrivez rapidement - remplissage automatique des textes |
|
|
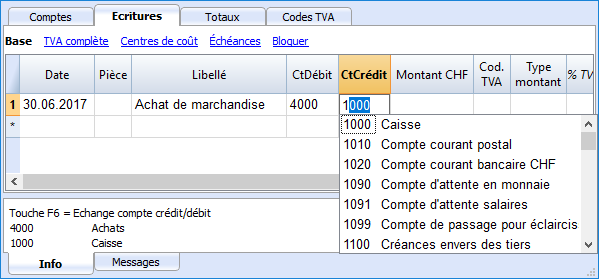
Lorsque vous devez écrire des mouvements, il suffit d'introduire dans la cellule les premiers chiffres ou les premières lettres du compte et le programme proposera automatiquement des textes insérés préalablement. Sélectionnez le texte choisi et le programme complète automatiquement la ligne. |
 |
Journal parfaitement ordonné |
|
|
Le tableau des Ecritures est, de facto, le Journal. Il est clair et bien ordonné et peut être directement imprimé ou sauvegardé en PDF. Vous pouvez aussi imprimer des périodes précises ou des lignes sélectionnées et disposer les colonnes à souhait. Lorsque vos introduisez un mouvement, les totaux des comptes se mettent automatiquement à jour, de sorte que vous ayez, en tout temps, une vision globale actuelle. Vous pouvez aussi utiliser les couleurs, autant dans le texte que dans le fond pour souligner les mouvements que vous devez facilement retracer.
|
|
Mémorisez et rappeler les écritures répétées |
|
|
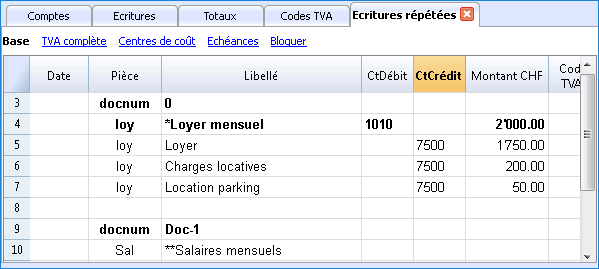
Vous pouvez sélectionner les lignes des écritures répétées et les enregistrer dans le tableau Ecritures répétées, pour ensuite les reprendre automatiquement quand vous en aurez besoin. Pour de plus amples informations...
|
 |
Importez les données de la banque ou d'une carte de crédit |
|
|
Vous pouvez importer directement dans votre fichier Banana les écritures de vos mouvements bancaires ou d'une carte de crédit sans devoir les réintroduire à la main. Nous proposons des filtres d'importation, constamment mis à jour, pour de plus grandes institutions. Si votre banque ne figure pas dans la liste, nous créerons pour vous le filtre adapté. Pour de plus amples informations...
|
 |
Impressions et rapports immédiats avec configurations personnalisables |
|
|
Personnalisez les impressions du Bilan et du Compte de Résultat. Vous pouvez activer/désactiver de nombreuses options pour présenter vos données à souhait; choisir parmi les différents styles graphiques, changer les couleurs, etc. Voir aussi le résultat de l'impression en aperçu. Dans les impressions du Bilan vous pouvez aussi inclure un texte pour les documents annexes. |
 |
Enregistrez vos configurations d'impression |
|
|
Avec la commande Composition, il est facile de configurer des impressions personnalisables. Vous pouvez enregistrer différentes configurations d'impression pour les Bilans, Fiches de compte, Extraction et trier lignes, Adresses et étiquettes... Pour de plus amples informations...
|
 |
International
Multilingue |
|
|
Le programme est disponible en différentes langues: italien, anglais, français, allemand, portugais espagnol, néerlandais, chinois. Vous pouvez changer la langue du programme à tout moment. Chaque fichier peut même être créé dans une langue différente; et dans les différents modèles disponibles en ligne, vous pouvez choisir des fichiers parmi toutes ces langues. Pour changer la langue d'un fichier existant vous devez le convertir et choisir en option la langue souhaitée. |
 |
Gestion multidevise |
|
|
Vous pouvez introduire autant de comptes en devise étrangère que vous souhaitez, et introduire dans le tableau Changes le taux de change. Vous pouvez aussi conserver le taux historique des changes. Les calculs des changes et des différences de change sont tous automatiques. Vous pouvez aussi produire des Bilans, Comptes de Résultat et Rapports dans une deuxième devise étrangère. |
 |
Multimandants |
|
|
Banana Comptabilité n'a pas de limites en mandats. Vous pouvez ouvrir autant de mandats que vous voulez, chacun avec des confugurations personnalisées de langue, devise, TVA, etc. |
 |
Codes TVA par pays |
|
|
Quand vous créez un nouveau fichier avec option TVA et que vous choisissez le pays, vous trouverez déjà dans le tableau Codes TVA tous les codes TVA en vigueur pour le pays sélectionné. Le tableau Codes TVA peut, toutefois, toujours être intégré et modifié au cas où vous auriez besoin de codes particuliers ou si, dans le cours du temps, de nouveaux codes entreraient en vigueur. Pour de plus amples informations...
|
 |
Apps spécifiques par pays |
|
|
Les Apps de Banana sont des applications qui permettent d'obtenir des impressions et des rapports particuliers à partir du programme Banana Comptabilité; certaines sont déjà disponibles à titre gratuit, il vous suffit de les télécharger. Vous pouvez aussi en créer vous-mêmes pour obtenir des présentations de rapports très précis, exigés par des règlements particuliers comme celles des curatelles, des associations, ou pour qu'ils soient conformes aux normes d'un pays déterminé. Pour de plus amples informations...
|
 |
Professionnel
Gestions des clients et fournisseurs |
|
|
Gérez simplement les Clients et Fournisseurs. Vous pouvez connaître à tout moment quelles sont les factures expirées ou ouvertes. Il est aussi possible de visualiser l'historique pour connaître tous les détails d'un client ou d'un fournisseur. Dans les soldes initiaux vous pouvez remonter aux factures qui déterminent les montants.
|
 |
D'innombrables rapports, même par périodes |
|
|
Les possibilités des rapports sont infinies. Choisissez les colonnes à afficher, changez les en-têtes, les couleurs. Vous pouvez aussi créer des rapports externes à la comptabilité avec les regroupements que vous souhaitez. Pour de plus amples informations...
|
 |
Synchronisation des données avec Excel |
|
|
Pour obtenir vous données en Excel il n'est plus nécessaire de copier, coller ou exporter. Les fonctions ExcelSync permettent de récupérer les données de Banana en Excel et de créer des feuilles et des graphiques qui s'ajourneront automatiquement. Quand de nouvelles transactions viennent s'ajouter, les feuilles Excel seront automatiquement mises à jour et calculées. Pour Apple/Mac c'est fonction n'est pas disponible.
|
|
Exportation vers différents formats |
|
|
Dans Banana comptabilité vous pouvez exporter des données vers différents formats: Html, Excel, Xml, Txt. L'exportation peut être exécutée sur une sélection de données ou sur tout le fichier comptable. Vous pouvez aussi décider d'exporter seulement quelques lignes. Pour de plus amples informations...
|
 |
Développements d'Apps personnalisées |
|
|
Si vous avez besoin d'impression ou de rapports particuliers ou de quelques outpout particuliers, contactez-nous: nous sommes à votre disposition pour créer des applications personnalisées. |
|
Vérifications automatisées |
|
|
D'éventuelles erreurs sont automatiquement signalées. Vous pouvez aussi effectuer des contrôles étendus. Si des différences comptables ou dans les soldes initiaux s'affichent il y a une commande pour les tracer automatiquement dans le tableau Comptes et Ecritures.
|
 |
Sûr et certifié
Protection de fichier avec un mot de passe |
|
|
Chaque fichier peut être protégé avec un mot de passe. Ce mot de passe peut être modifié ou annulé à tout instant. Pour de plus amples informations...
|
 |
Protection des lignes |
|
|
Pour travailler plus sereinement, vous pouvez protéger certaines lignes de votre fichier, celles qui sont déjà définitives, pour ainsi éviter qu'elles soient accidentellement endommagées ou altérées Il est aussi possible d'enlever la protection des lignes protégées. Pour de plus amples informations...
|
 |
Bloc des écritures |
|
|
Vous pouvez bloquer toutes ou certaines écritures et avoir l'assurance qu'elles ne seront pas modifiées (certification numérique). Vous pouvez aussi seulement protéger les écritures pour empêcher qu'elles soient endommagées accidentellement. |
 |
Certification des données au moyen d'un système de marquage digital |
|
|
L'intégralité des données comptables est garantie par un système de certification d'avant-garde, (US Patent N.7,020,640), le même qui est utilisé par les monnaies électroniques telles que bitcoin.
|
 |
Archivage du fichier en PDF (ou seulement quelques parties) |
|
|
Vous pouvez enregistrer un fichier entier en format PDF, ou choisir dans le détail ce que vous voudriez faire apparaître dans l'impression. L'archivage en PDF de tout le fichier permet de toujours obtenir l'intégralité des données. Il y a tellement d'options. |
 |
Sauvegardes (Backup) automatiques |
|
|
Le programme enregistre automatiquement un fichier backup, selon une fréquence en minutes que vous pouvez définir. Si le programme ou l'ordinateur se bloquent, vous pouvez ainsi récupérer vos données en ouvrant ce fichier. Pour de plus amples informations...
|
 |
Compatibilité et partage
Compatible avec les versions précédentes |
|
|
Banna Comptabilité 8 conserve la même modalité d'utilisation et est compatible avec les versions précédentes. Ainsi, il est donc possible d'ouvrir sereinement des fichiers créés avec les versions précédentes avec la certitude que toutes les données seront reportées intégralement. |
|
Pour tous les systèmes d'exploitation |
|
|
Banana Comptabilité 8 est disponible dans les versions pour Windows, Mac et Linux, Android et IOS. Les fichiers Banana sont interchangeables entre les différentes versions. |
|
Partage Cloud |
|
|
Les fichiers Banana peuvent être enregistrés sur tous les systèmes Cloud: Dropbox, I-Cloud, Google Drive, .... de sorte que plus de personnes puissent accéder aux données comptables à n'importe quel moment et quelque soit l'endroit où les utilisateurs se trouvent.
|
|
Envoi des fichiers Banana par courriel |
|
|
Tous les fichiers Banana peuvent être expédiés par courriel, partagés, et enregistrés sur un clé USB, etc. il existe aussi une commande pratique du menu Fichier qui crée automatiquement un message de courriel électronique avec votre fichier Banana an annexe, prêt à être envoyé.
|
 |
Support à 360 degrés
Documentation en lignePlus de 500 pages de documentation en ligne gratuite triée par sujet, avec des images et des explications pas à pas. Link (lien) directement à l'erreurLes erreurs éventuelles sont aussitôt signalées. Support gratuitLe support téléphonique ou par courriel est gratuit pour une période de 12 mois à partir de la date d'achat pour des questions relatives à l'utilisation du programme. Support Technique AvancéSupport technique et développement de solutions personnalisées (Apps). |
 |
Suisse: nouvelles normes pour les rapports
En Suisse, à la fin de l'année 2015, toutes les entreprises inscrites au Registre de commerce doivent présenter les rapports selon la structure minimale du Bilan et du Compte de Résultat, prevus par l'article 959 du Code des obligations (Art. 959a e 959b CO).
Les nouveaux plan comptables founis avec Banana 7 et Banana 8 reflètent déjà le système prévu. Celui qui crée - ou qui a créé - une nouvelle comptabilité avec les nouveaux plans comptables, a des rapport conformes à la loi.
Pour ceux qui ont des "anciens" plan comptables, il y a deux possibilités:
- Passer au nouveau plan comptable et reprendre les données de la comptabilité existante
- Créer une nouvelle comptabilité, en utilisant un modèle avec la nouvelle numérotation et les nouveaux regroupements
- Ajouter une colonne dans le plan des comptes, et y insérer, pour chaque nouveau compte, l' "ancien" numéro de compte.
- Utiliser la fonction d'importation pour reprendre et convertir les données provenantes du fichier de la comptabilité, créée selon "l'ancien système".
- Continuer d'utiliser la comptabilité avec le plan des comptes actuel et utiliser un fichier externe de la comptabilité avec une classification des comptes selon le nouveau système (déjà disponible dans Banana 8):
- Créer un nouveau fichier pour le Rapport
Comptabilité en partie double -> Rapport comptable -> Modèle Français (Suisse), Rapport art. 959 Code Suisse des obligations. - Enregistrer le fichier dans le même dossier où se trouve le fichier de la comptabilité.
- Attribuer à chaque compte (dans la colonne Gr1) le groupe référant à la classification selon les nouvelles dispositions, comme défini dans le Fichier rapport comptable, prévu par les nouvelles dispositions (voir page d'explication Fichier rapport externe)
- Imprimer, à des fins fiscales, le bilan et les compte de résultat, en utilisant le fichier du rapport (voir Bilan formaté par groupes).
- Créer un nouveau fichier pour le Rapport
D'autres changements
Les nouvelles normes prévoient encore d'autres changements. Elles exigent également que les notes au Bilan contiennent plus d'informations. Il est également possible d'insérer certains détails directment dans le Bilan/Compte de résultat, ou d'indiquer les informations demandées dans la pièce jointe (par example les dettes ou transitoires actifs envers les actionnaires et membres des organes de la société).
Il s'agit ici de changements importants, qui ont des conséquences fiscales et légales.
Nous vous encourageons de vous faire informer par votre fiduciaire, réviseur ou conseiller fiscal, afin de préparer les comptes 2015 conformément à la nouvelle réglementation.
Au cours des prochaines années, vous pouvez tout simplement continuer selon le système maintanent configuré.
Installing Banana
When downloading the program, it is automatically saved in your Download folder.
After you execute, if you don't indicate any other destination folder, the program will be installed by default into the Programs folder (Windows: C:\Programs; MAC OSX: /Applications; Linux: /bin).
The following pages explain how to install Banana Accounting in all operating systems.
For more information about the Banana files please visit the Save, copy and backup page.
System requirements
Banana Accounting 8 is available for Windows, Mac and Linux. For optimal performance, we recommend the following system requirements:
Banana 8 for Windows
- Windows 7, 8, 8.1, 10
(Windows Phone and RT are not supported) - 200 MB of disk space*
- Internet connection to access the Help function of the program
Banana 8 for Mac OS X
- Mac OSX 64bits 10.9, 10.10, 10.11, and macOS 10.12 "Sierra"
(iOS, IPad and 32 Bit are not supported) - Intel processor
(PowerPC processors are not supported) - 200 MB of disk space
- Internet connection to access the Help function of the program
Banana 8 for Linux
- Ubuntu 12.04 or more recent,
other distributions partially supported - Dependency: libc6 (>= 2.14), libstdc++6 (>= 3.4.15), libfontconfig1, libfreetype.6, libglib2.0-0, libgtk2.0-0, libz.1, libpng12-0
- 200 MB of disk space
- Internet connection to access the Help function of the program
Other information
- The indicated disk space requirement depends on the amount of transactions and accounts used in the accounting file. 3 MB is an average space for an accounting file with 200 accounts and 2000 transactions.
- There is no limitation to the number of files.
- The software is a single user program, just like Excel. Only one person at a time can edit a file.
- The Windows version can be installed on a server, and then be run on client computers.
- Th program can be used with Terminal Server or similar remote desktop technologies.
- Also see the Installing on a server page.
License key
Page content
What is the license key?
It's a code that is being furnished when the program is purchased and that makes the program fully operational.
The license key is furnished in the following ways:
- in the box, printed on a yellow flyer
- sent by email when bought online with a credit card
- printed on the invoice (for those buying directly from us).
IMPORTANT: Keep the license key in a safe place. In case the license key gets lost, read our page Lost license key.
A different license key for Windows, Mac and Linux
According to the user's operating system, different license keys are being furnished.
If a license key for Mac is being entered on a computer with the Windows operating system (and the other way round), the program gives an error message that the license is invalid. Those who already have one or another Banana version, can buy version 8 for Windows, Mac and Linux at the upgrade price. As an alternative you can download and use for free the Beta version of Banana Accounting 9 (until April 30th 2018) and then purchase the full license of Banana Accounting 9.
Starter Edition mode at no cost
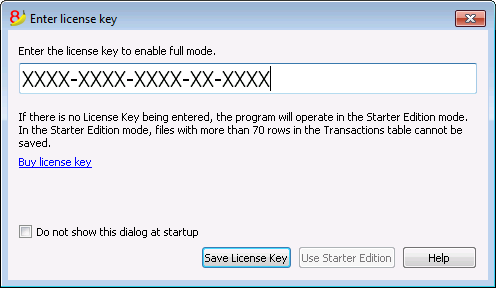
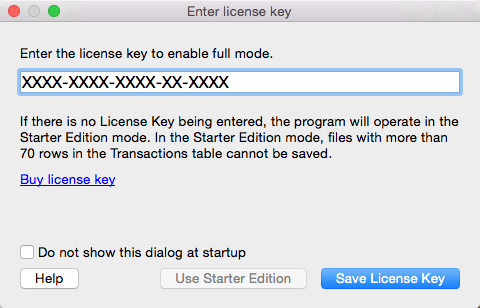
If you install the program without entering the license key, the program runs in Starter Edition mode.
With the Starter Edition mode, you can:
- Use the program in complete mode, entering up to 70 rows into the Transactions table.
If you have more than 70 rows in the Transaction table you won't be able to save or export the file, and in the print-outs the words "Starter Edition" will appear.
When the license key is being entered, Banana Accounting switches from the Starter Edition mode into the complete mode.
Entering the license key
- Open Banana Accounting
- Select the command Manage license keys from the Help menu
- Enter the license key number into the appropriate field
- Click on the Save license key button
- Confirm the operation if asked
Important: The license key is saved only for the current user of the computer.
Registration code
Once the license key has been entered and saved, the program displays the registration code and the following dialog appears in the Manage license keys (Help menu) window:
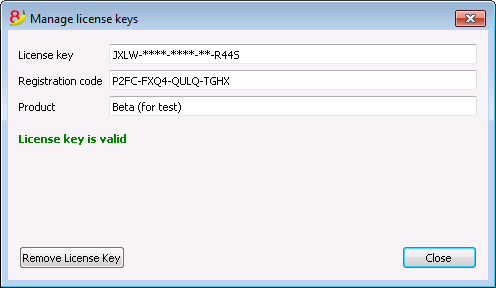
For security reasons the license key is partially hidden.
In case the user loses his license key, the registration code can be used to find the license key that he has entered.
It is important to copy this registration code and keep it in a safe place.
Modifying the license key
Before modifying an already entered license key, please save your open accounting files and close them; only the program remains open.
In order to modify a license key, you have to first remove the existing license key and then enter the new (different) license key.
Remove License Key
Click on the Remove license key button to remove the key.
By removing the license key, the program switches back to the Starter Edition mode.
Enter a new (different) license key
- Enter the new license key number into the appropriate field
- Click on the Save license key button
- Confirm the operation if asked
At the end of this operation, close the program and restart.
Lost license Key
For Banana Accounting 8 the recovery of the license key is considered technical support, which is charged at CHF 70.
It is only possible to recover the license key if you have the installation file of Banana Accounting 8. Banana.ch does not make available the installation files of previous versions (see page https://www.banana.ch/doc8/en/node/9014).
When contacting our technical service, send the registration code that can be found in the Manage License Keys window from the Help menu, or send us a screenprint of the same window as an attachment.
As an alternative to the recovery of the lost license key we recommend the switch to Banana Accounting Plus, available as an annual subscription for CHF 69.- or CHF 149.- (plan with advanced functions that also includes email and telephone support). It is possible to upgrade to Banana Accounting Plus even without the license key of the old version.
You also receive free months with the upgrade:
- Banana Accounting Plus features
- What's new in Banana Accounting Plus
- Banana Accounting Plus plans: choose the one that's best for you.
Installing under Windows
The program installation is a matter of minutes and it is all automatic.
By downloading the program, you accept the user license conditions.
Once the download is finished, just double-click on the file you downloaded.
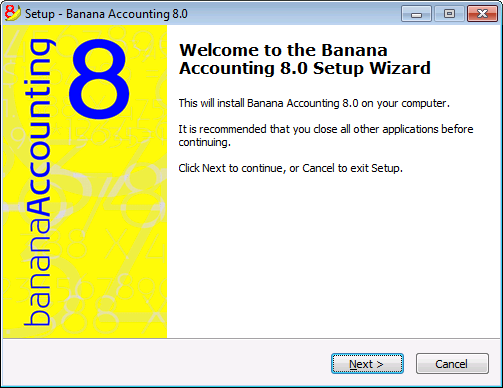
By clicking on the Next button, you will be carried to the next window.
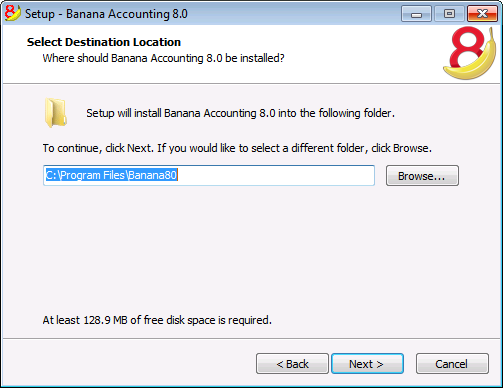
The software will be saved by default in the C:\Programmi Files\Banana80 folder. If you wish to save it in a different folder click on the Browse button and choose the desired path.
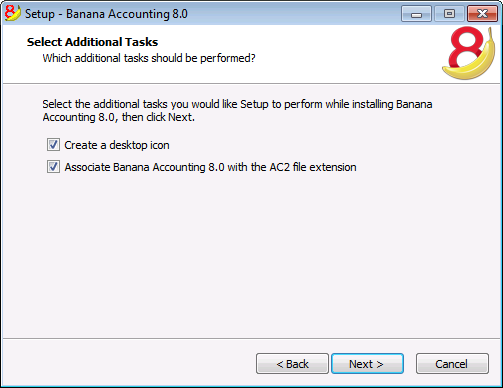
The program activates by default the Create a desktop icon and Associate Banana Accounting 8.0 with the AC2 file extension options; if you do not wish to have these options, simply uncheck them.
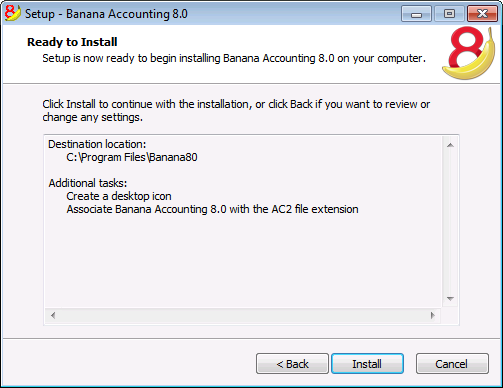
Click on the Install button to start the installation process.
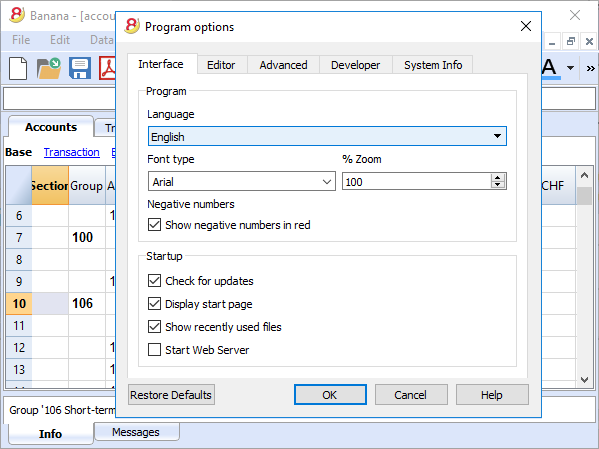
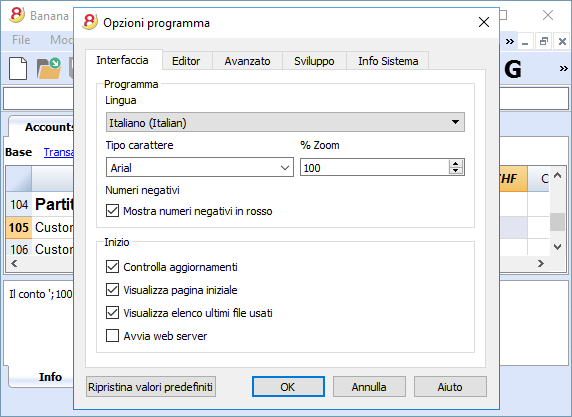
The program will be automatically installed in your operating system language; you will be able to change the program language anytime by choosing the Program options command from the Tools menu.
Entering the license key
After opening the program for the first time enter the license key and confirm with OK
By entering the license key into Banana Accounting, you go from the Starter Edition demo mode to the complete mode. If the license key is not entered, a message appears at the opening of the accounting file, warning the user that he is working in the Starter Edition mode.
Open the software
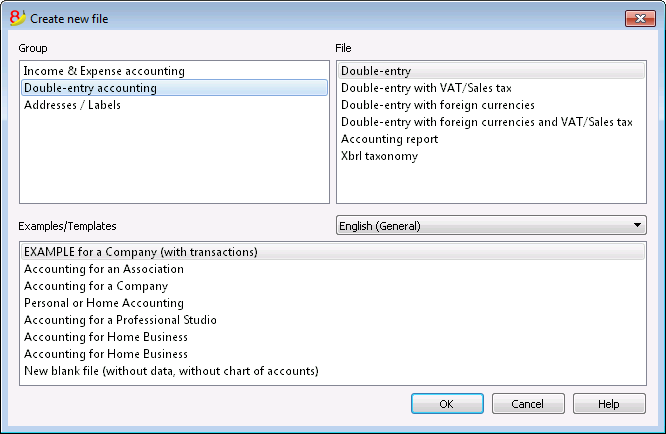
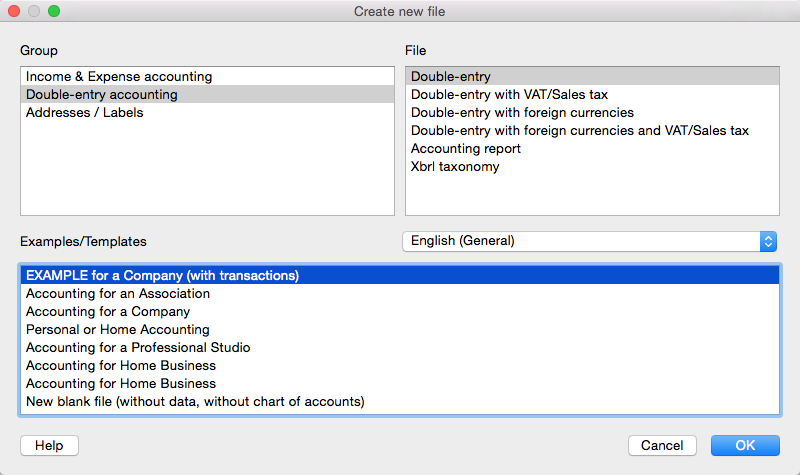
As soon as you open the software, choose the New command from the File menu. From the pop-up window you will be able to choose your accounting type, the option with or without VAT, the file language, and an example or template (or you can also open a blank file - not recommended)
Note: in order to uninstall the software, please select the Install/Uninstall applications from the Control Panel and then chose to remove Banana Accounting from the list.
Installing under Mac
Installing the software is very easy, thanks to the autoinstall function.
By downloading the program, you accept the user license conditions.
Follow these steps:
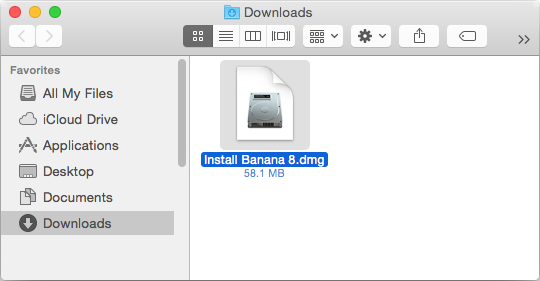
Download the .dmg file by clicking on the Save file button.
After saving the file in your Download folder, double click on it.
Drag the Banana8 icon in the Applications folder
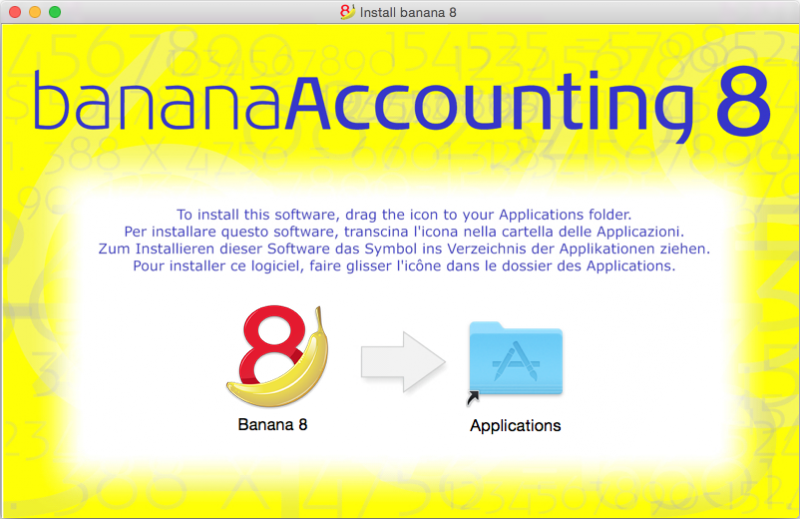
Banana Accounting 8 is now ready to be used. Double click on the Banana 8 icon from your Applications folder. The program is installed in your operating system language, but is always possible to change it from the Tools menu, using the Program options command.
Entering the license key
After opening the program for the first time, enter the license key and confirm by pressing the button Save license key.
Then launch the New command from the File menu. From the pop up window it is possible to choose the accounting type, the with or without VAT management option, the language and a template or example (or you can choose to open a blank file - not recommended).
In case of problems while installing the program: verify in Apple -> System Preferences, Security & Privacy, to have chosen the option "Anywhere" instead of "Mac App Store and identified developers". See also Apple's internet page.
NOTE: in order to uninstall the software, simply drag the Banana8 icon from the Applications folder to the Trash.
Installing under Linux
The program installation is very easy thanks to the native packages for Ubuntu and OpenSUSE.
When downloading the program, the user license conditions are automatically being accepted.
Packages .deb (Ubuntu) and .rpm (OpenSUSE)
- Download the package for your distribution
- Open the package with a double-click
- Follow the on-screen instructions
- Banana8 will be placed in the menu under Office applications
- Launch the program
- In order to enable the complete mode, insert and save the license key.
To uninstall the program, open the application Manager (Ubuntu Software Center, OpenSUSE Install/Remove software, ...), select the program and click Remove.
Packages .tgz
- Download the .tgz package
- Extract the .tgz package
- Run the file banana8/bin/banana8.sh
- In order to enable the complete mode, insert and save the license key.
To uninstall the program remove the folder containing Banana8. Be careful not to delete user data!
Advanced installing
Installing on a computer that is not connected to internet
- Use a computer that has an internet connection and download the installer that is suitable for the operating system of the computer on which the program will be installed.
- Copy the file to a USB key or a CD
- Enter the USB key into the computer where the program should be installed
- Launch the installer
- Start Banana Accounting and enter the license key.
Windows installation on a server or a USB key
Legal considerations
Remember that in order to execute Banana Accounting from multiple computers, you need to buy as many licenses as there are computers that use the program.
Banana with terminal server and package management systems
Banana accounting can, without any problem, be installed on a server, a terminal server, external disks or can be packaged for distribution, because:
-
Everything necessary to execute Banana Accounting is installed in the installation directory (exe, dll, examples)
-
Banana does not write in the system directories and the system registry
- The user settings are stored in the registry of each user
-
For each accountin, there is a single file that (as in Excel) can reside on a local disk, network, USB flash drive or a directory in DropBox, Google drive, or other similar systems
-
Banana is compatible with Remote Desktop systems or systems of software packaging for the installation
For more information on the files, see also File - Save.
Installation on a share folder or USB key
- Follow the normal installation procedure, usually the programm will be installed under C \ Program Files \ BananaXX \ (XX stands for the version number).
- Start the program BananaXX.exe "as Administrator"
- Enter and save the license key
- Copy the entire installation directory on the USB key, share folder or package management system.
For more information on this subject, contact our technical support.
Apple/Mac server installation
It is not possible to install Banana Accounting on Mac servers.
The program must be installed and the license key must be entered on each computer.
Of course, you can save the accounting files on a network disk.
Uninstalling Banana
Uninstalling Banana Accounting on Windows
- From the Start menu choose -> Control Panel
- Select -> Programs -> Uninstall a program
- Choose the program you wish to uninstall, for example a Banana Accounting old version
- Press the Uninstall button
By uninstalling Banana Accounting you will only deleting the program; your personal .ac2 files will not be modified.
Uninstalling Banana Accounting on Mac
- Go to the Finder
- Choose the Applications folder
- Choose the program you wish to uninstall, for example a Banana Accounting old version
- Drag the selected program into the Trash
By uninstalling Banana Accounting you will only deleting the program; your personal .ac2 files will not be modified.
Uninstalling Banana Accounting on Linux
For the details, we refer to our 'Installation under Linux' page: Packages .deb (Ubuntu) and .rpm (OpenSUSE) and Packages .tgz .
Troubleshooting
If you are experiencing a problem starting or using the application follow these steps:
- Install the latest version of the application;
- Install the latest version of the graphics driver:
Visit the manufacturer website, download the driver file and install it; - Consult the Support page;
- Take a look at the troubleshooting pages;
- Report the bug;
Banana 8 crashes while creating new year
Problem
In some very particular conditions, the program Banana 8 crashes while trying to create a new accounting year using the Create New Year command (Account2 Menu)
Solution
- Convert the file of the current year in which you are working (Tools menu -> Convert to new file).
- Create the new year (Account2 Menu -> Create new year) and save this file;
- No need to save the earlier converted file.
Then:
- In the file of the new year, under File Menu -> File and Accounting properties -> Options, define the correct path to the previous year.
Banana8 and hang on printing troubleshooting
Problem
Banana 8 hangs the first or second time the print dialog is opened.
System
The 'Devices and Printers' configuration contains printers no longer attached to the system or printer drivers that are not up to date.
Affected OS: Windows 10, Windows 8, Windows 7
Solution
-
Open Start and select 'Devices and Printers'
-
Remove all printers no longer used or attached to the system
-
Update the drivers of all the remanining printers
Banana8 on Acer Notebooks troubleshooting
Problem
Banana 8 stop working some seconds after the main page of the program is showed.
System
The system is running on a Acer notebook
Affected machines: Acer aspire es 17
Affected OS: Windows 10, Windows 8
Solution
-
Open in Explorer the folder C:\Program files\Banana80
-
Create a new folder 'backup_dll'
-
Move the files 'libeay32.dll' and 'ssleay32.dll' to the folder 'backup_dll'
-
Restart the application
Banana8 on Dell Pc troubleshooting
Problem
Banana 8 stops working as soon an Open File Dialog or a Save File Dialog is opened.
System
The system is running on a Dell computer or notebook.
The software Dell Backup and Recovery (from Softthink) is installed and running on the system.
Affected OS: Windows 10, Windows 8, Windows 7
Affected systems: Dell computer
Solution A (recommended)
- Update Dell Backup and Recovery tools to version 1.9.2.8 or greater
- Check Dell User's Guides and Support pages on how to update your system
Solution B
-
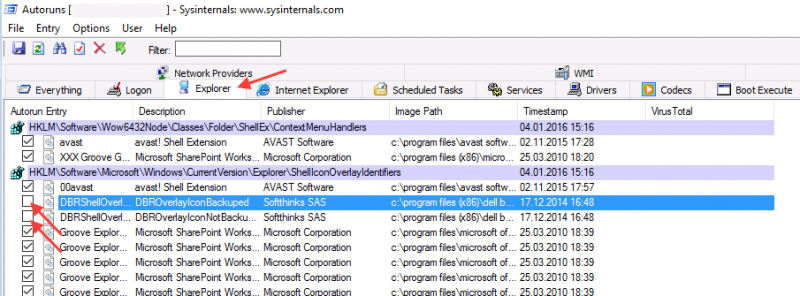
Download the Autoruns for Windows - TechNet - Microsoft utility;
-
Expand the file Autoruns.zip;
-
Run the application Autoruns.exe as Administrator;
-
Select the "Explorer" tab;
-
Deselect all "DBRShellOverlay" entries from Softthinks SAS Publisher
-
Close Autoruns;
-
Restart Banana 8.
Notes
- In one case, after the changes in the registry, the customer had some problems running Internet explorer.
Those problems could be resolved by restoring the changes in the registry. - The number of "DBRShellOverlay" entries to be disable can be on some systems more than two, those entries have to be searched in all sections listed in the tab Explorer.
Resources
-
Dell Forum page "Backup and Recovery causing applications using Qt5 DLLs to crash": http://en.community.dell.com/support-forums/software-os/f/3526/t/19634253
Banana8 with old notebooks and windows 10 troubleshooting
Problem
Banana 8 stop working on startup. After the crash the message "LoadLibrary failed with error 87: Wrong parameter." is displayed.
System
The system is an old notebooks where windows 10 was installed afterwards.
The notebook's discrete graphic card is not officilally supported by windows 10.
Affected OS: Windows 10
Solution
- Update the graphic card driver
or
- Rename in folder C:\Windows\System32 the file "atig6pxx.dll" to "atig6pxx.dll.bak"
Banana8 with second monitor troubleshooting
Banana8 with second monitor troubleshootingProblem
Banana 8 stop working on startup.
System
The computer has an ATI Dispaly card with two attached monitors.
Affected OS: Windows 10, Windows 8, Windows 7
Solution
-
Remove (just an update is not enough) and install again the ATI driver;
-
Try to start the application on the AMD window / monitor.
-
Look for more solutions at: https://bugreports.qt.io/browse/QTBUG-50371
+
Resources
-
Qt bug reports: https://bugreports.qt.io/browse/QTBUG-50371
+
How to report a bug
Send us full details of the issue, giving as much detail as possible, this can include:
- For bugs:
- Steps to Reproduce:
Minimized, easy-to-follow steps that will trigger the described problem. Include any special setup steps; - Actual Results:
What the application did after performing the above steps; - Expected Results:
What the application should have done, if there was no bug; - The accounting file:
An example of an accounting file where the problem occur;
- Steps to Reproduce:
- For feature requests:
- A description of what you would like to achieve, and why.
A user story is an effective way of conveying this;
- A description of what you would like to achieve, and why.
You can submit your issue through our contact form.
Charakteristiken Banana 8
Banana Buchhaltung ist eine äusserst vielseitige internationale Software, die sich sehr gut für die Buchführung in jedem Land eignet.
Besonders ideal für kleine Geschäftseinheiten.
VielseitigPasst sich Ihren Bedürfnissen und Kenntnissen an.
|
Einfach und schnellBeginnen Sie sofort und sparen Sie tagtäglich Zeit.
|
UniversalFindet weltweit in über 127 Ländern Einsatz.
|
ProfessionellPräsentieren Sie Ihre Aktivität einwandfrei.
|
Sicher und zertifiziertMaximale Sicherheit und Datenschutz.
|
Kompatibilität und Austausch
|
Kompletter Support
|
||
Vielseitig
Wählen Sie zwischen verschiedenen Buchhaltungsmethoden |
|
|
Starten Sie mit der bevorzugten Buchhaltungsmethode und wechseln Sie sie bei Bedarf; bereits erfasste Daten bleiben erhalten:
Es stehen ausserdem mehrere Hilfsmittel zur Verfügung:
|
 |
Wählen Sie aus über 500 Vorlagen |
|
|
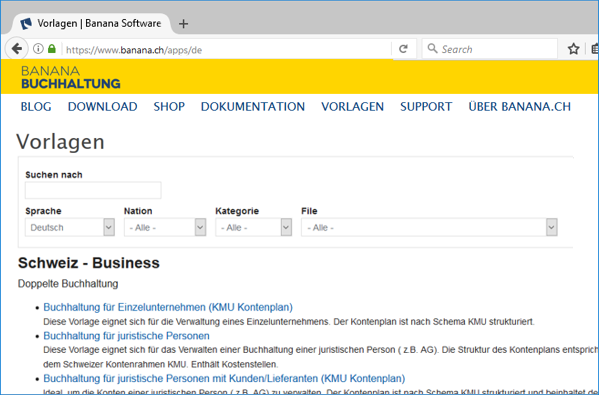
Verwenden Sie eine der vielen Online-Vorlagen, anstatt die Datei von Grund auf neu zu erstellen.
|
 |
Organisieren Sie die Konten nach Ihrem Wunsch |
|
|
Sie können den Kontenplan Ihren persönlichen Bedürfnissen anpassen, indem Sie Konten hinzufügen oder löschen und Untergruppen sowie verschiedene Totalisierungsebenen hinzufügen. |
 |
Haben Sie die Situation jederzeit unter Kontrolle |
|
|
Mit einem einzigen Blick haben Sie jederzeit einen umfassenden Überblick über die aktuelle Situation Ihre Tätigkeit.
|
 |
Erhalten Sie die Kontendetails auf einen Klick |
|
|
In Banana Buchhaltung erhält man auf einfachste Art den detaillierten Auszug jedes Kontos, jeder Kategorie oder jeder Kontengruppe: Hierzu auf das kleine blaue Symbol klicken, das oben rechts in der Zelle erscheint, wenn Sie auf eine Zelle mit einer Konto-, Kategorienummer klicken. |
 |
Verwenden Sie Segmente und Kostenstellen, um Projekte, Sektoren oder besondere Aktivitäten zu verwalten |
|
|
Mit Segmenten und Kostenstellen erlaubt Banana Buchhaltung Projekte, Sektoren oder Aktivitäten genau und detailliert zu verwalten, ohne die Kontenplanorganisation untereinanderzubringen. Sie wissen jederzeit über den Verlauf des gewissen Projektes, Sektors bzw. der gewissen Aktivität Bescheid und können detaillierte Ausdrucke erhalten.
|
 |
Erleichterte MwSt/USt-Verwaltung |
|
|
Wird MwSt/USt-Verwaltung benötigt, wählen Sie bitte von Anfang an eine Datei mit MwSt/USt oder konvertieren Sie die bestehende Datei, um die MwSt/USt-Option hinzuzufügen. Alle Berechnungen für die MwSt/USt erfolgen automatisch. Das Programm bereitet für die Schweiz das Faksimile des MwSt-Abrechnungsformulares für die effektive Methode (siehe Abbildung) oder die Saldo-/Pauschalsteuersatzmethode auf. Sie müssen die darauf aufgeführten Werte nur noch auf das Originalformular übertragen. Umsatzsteuervoranmeldung (UStVA)Für die USt-Verwaltung für Deutschland und Österreich sehen Sie bitte die spezifischen Webseiten. |
 |
Einfach und schnell
Beginnen Sie sofort mit 3 einfachen Schritten |
|
|
Mit drei einfachen Schritten sind Sie startbereit und können zu arbeiten beginnen:
... schon ist die Buchhaltung erledigt! |
 |
Excel-ähnliche Benutzeroberfläche |
|
|
Das Layout ist sehr ähnlich wie Excel, so dass Sie sich sofort damit vertraut fühlen. |
 |
Perfekt geordnetes Buchungsjournal |
|
|
Die Tabelle Buchungen entspricht dem Buchungsjournal. Sie ist klar und geordnet und kann direkt gedruckt oder im PDF-Format gespeichert werden. Sie können auch spezifische Perioden oder ausgewählte Zeilen ausdrucken und dabei die Spalten nach Wunsch anordnen. Wenn Sie eine Bewegung eingeben, aktualisieren sich die Kontentotals automatisch. So haben Sie jederzeit eine aktuelle Gesamtübersicht. Sie können für den Text als auch dessen Hintergrund Farben verwenden, um Bewegungen für ein leichtes Wiederfinden hervorzuheben. |
 |
Speichern Sie sich wiederholende Buchungen und verwenden Sie sie wieder |
|
|
Banana Buchhaltung bietet Ihnen die Möglichkeit, Zeilen von sich wiederholenden Buchungen in der Tabelle 'Sich wiederholende Buchungen' zu speichern, um sie bei Bedarf automatisch übernehmen zu können.
|
|
Importieren Sie die Daten der Bank oder Kreditkarte |
|
|
Sie können Ihre Bank- oder Kreditkartenbewegungen direkt in Ihre Banana Buchhaltungsdatei importieren und müssen sie somit nicht manuell erfassen. Die Finanzbuchhaltungssoftware Banana Buchhaltung verfügt für die grössten Institute über Importfilter, welche ständig angepasst werden; sollte sich Ihre Bank nicht auf der Liste befinden, erstellen wir Ihnen den geeigneten Filter.
|
 |
Unmittelbare Ausdrucke und Berichte mit personalisierbaren Einstellungen |
|
|
Personalisieren Sie die Bilanz- und Erfolgsrechnungsausdrucke. Um die Daten nach Ihrem Wunsch zu präsentieren, können Sie zahlreiche Optionen aktivieren/deaktivieren. Wählen Sie zwischen diversen Grafikstilen aus, ändern Sie die Farben, usw. Sehen Sie das Resultat als Druckvorschau. In den Bilanzausdrucken können Sie auch einen Text für die Bilanzbeilage einschliessen.
|
 |
Speichern Sie Ihre Einstellungen für den Ausdruck |
|
|
Mit dem Befehl Kompositionen können Sie sich auf einfachste Art personalisierte Ausdrucke einrichten. Dies erlaubt Ihnen, für Bilanzen, Kontoauszüge, Buchungen extrahieren und sortieren, Adressen und Etiketten etc. verschiedene Einstellungen zu speichern.
|
 |
Universal
Mehrsprachig |
|
|
Das Programm ist in diversen Sprachen verfügbar: Deutsch, Italienisch, Englisch, Französisch, Holländisch, Spanisch, Portugiesisch und Chinesisch. Sie können die Programmsprache jederzeit wechseln. Auch jede einzelne Datei kann in einer anderen Sprache erstellt werden; in den verschiedenen online verfügbaren Vorlagen können Sie zwischen Dateien in allen Sprachen auswählen. Um die Sprache einer bereits bestehenden Datei zu ändern, müssen Sie diese konvertieren und als Option die gewünschte Sprache auswählen.
|
 |
Verwaltung von Fremdwährungen |
|
|
Sie können soviele Konten in Fremdwährungen eingeben, wie Sie wünschen und in der Tabelle Wechselkurse die Wechselkurse erfassen. Sie haben die Möglichkeit, ein Wechselkursarchiv zu führen. Die Berechnung der Wechselkurse und der Wechselkursdifferenzen erfolgen alle automatisch. Sie können Bilanz, Erfolgsrechnung und Reports auch in einer zweiten Währung erstellen. |
 |
Mandaten (Buchhaltungen) |
|
|
Banana Buchhaltung hat kein Limit für verwaltbare Mandanten. |
 |
MwSt/USt-Codes für das Land |
|
|
Erstellen Sie einer neue Datei mit der Option MwSt/USt und wählen Sie das Land, so finden Sie in der Tabelle MwSt/USt-Codes bereits alle Codes, welche für das ausgewählte Land Gültigkeit haben. Die Tabelle MwSt/USt kann jederzeit integriert und modifiziert werden, falls spezielle MwSt/USt-Codes gebraucht würden oder im Laufe der Zeit neue Codes in Kraft treten sollten. |
 |
Länderspezifische Apps |
|
|
Die Apps von Banana Buchhaltung sind Applikationen, welche zum Beispiel erlauben, mit dem Programm Banana Buchhaltung spezielle Ausdrucke und Reports zu erhalten; einige stehen bereits kostenlos zur Verfügung und Sie müssen Sie nur herunterladen! Sie können auch Ihre eigenen Apps kreieren, um dank diesen sehr spezifische Präsentationen der Erfolgsrechnungen zu erhalten, wie sie von speziellen Vorschriften verlangt werden (z.B. diejenigen von Vormundschaften oder Vereinen) oder um die Vorschriften eines bestimmten Landes zu erfüllen. |
 |
Professionell
Verwaltung von Kunden und Lieferanten |
|
|
Verwalten Sie Kunden und Lieferanten auf einfachste Art. Sie können jederzeit wissen, welche Rechnungen offen und fällig sind. Um alle Details eines Kunden oder Lieferanten zu kennen, können Sie diverse Berichte und Ausdrucke erstellen. Sie können feststellen, aus welchen Beträgen sich die Eröffnungssaldi zusammensetzen.
|
 |
Unzählige Berichte, auch für einen bestimmten Zeitraum |
|
|
Die Möglichkeiten für Berichte sind endlos. Wählen Sie die Spalten, welche angezeigt werden sollen, ändern Sie die Überschriften sowie ändern Sie die Farben. Sie können auch externe buchhalterische Berichte mit den gewünschten Gruppierungen erstellen.
|
 |
Datensynchronisierung mit Excel |
|
|
Um in Excel über die Buchhaltungsdaten zu verfügen, müssen diese nicht mehr kopiert und eingefügt oder exportiert werden. Die ExcelSync-Funktionen erlauben, die Daten aus Ihrer Banana Buchhaltung zu übernehmen und Excelblätter und Grafiken zu erstellen, welche sich automatisch aktualisieren.
Werden in der Buchhaltungsdatei neue Transaktionen erfasst, aktualisieren und berechnen sich die Excelblätter automatisch.
Für Apple/Mac ist diese Funktion leider nicht verfügbar.
|
|
Export in verschiedene Formate |
|
|
Die Software Banana Buchhaltung erlaubt Ihnen, die Daten in verschiedene Formate zu exportieren: Html, Excel, Xml, Txt. Der Export kann für eine Auswahl von Daten oder die ganze Buchhaltungsdatei erfolgen. Sie können auch nur einige wenige Zeilen exportieren.
|
 |
Entwicklung von benutzerdefinierten Apps |
|
|
Kontaktieren Sie uns bitte, falls Sie spezielle Ausdrucke, Reports oder irgend einen speziellen Output benötigen: Wir stehen Ihnen für die Entwicklung von benutzerdefinierten Apps zur Verfügung. Bitte teilen Sie uns Ihre Ideen und Bedürfnisse mit! |
|
Automatisierte Kontrollen |
|
|
Eventuelle Fehler werden automatisch gemeldet. Werden buchhalterische Differenzen oder Differenzen in den Anfangssaldi gemeldet, gibt es einen Befehl, um diese automatisch in der Tabelle Konten oder Buchungen zu finden.
|
 |
Sicher und zertifiziert
Dateischutz mit Passwort |
|
|
Jede Datei kann mit einem Passwort geschützt werden. Das Passwort kann jederzeit geändert oder gelöscht werden.
|
 |
Zeilenschutz |
|
|
Für ein beruhigtes Arbeiten können Sie ausgewählte bereits endgültige Zeilen Ihrer Datei schützen und somit versehentliche Manipulationen oder Änderungen verhindern. Der Zeilenschutz kann bei Bedarf wieder aufgehoben werden.
|
 |
Buchungen sperren |
|
|
Sie können alle oder einige Buchungen sperren, um die Sicherheit zu haben, dass diese nicht geändert werden (digitale Zertifizierung). Sie können die Buchungen auch nur schützen, um unabsichtliche Änderungen zu verhindern. |
 |
Datenzertifizierung mit Blockchain-System |
|
|
Die Datenintegrität wird von einem Avantgarde-Zertifizierungssystem (US-Patent Nr. 7,020,640) garantiert; dasselbe, das auch für elektronische Währungen wie Bitcoin verwendet wird.
|
 |
Archivieren Sie die Datei (oder Teile davon) in PDF |
|
|
Sie können Ihre ganze Datei im PDF-Format speichern, oder auswählen, was genau davon im Ausdruck eingeschlossen werden soll. Die PDF-Archivierung der gesamten Datei erlaubt, jederzeit über die Datenintegrität zu verfügen. Mit zahlreichen Optionen. |
 |
Automatische Backups |
|
|
Das Programm speichert automatisch mit einer Frequenz von einer von Ihnen bestimmbaren Anzahl von Minuten in einer Backup-Datei. Sollten sich das Programm oder der Computer blockieren, können die Daten wiederhergestellt werden, indem diese Datei geöffnet wird.
|
 |
Kompatibilität und Austausch
Kompatibilität mit den Vorgängerversionen |
|
|
Banana Buchaltung 8 hält dieselbe Verwendungsart und Kompatibilität bei wie die Vorgängerversionen und ist mit diesen kompatibel. Mit Vorgängerversionen erstellte Dateien können geöffnet werden und alle darin enthaltenen Daten werden vollständig übernommen. |
|
Für alle Betriebssysteme |
|
|
Banana Buchhaltung 8 ist in den Versionen für Windows, Mac, Linux, Android und iOS verfügbar. Die Banana Buchhaltungsdateien können zwischen den unterschiedlichen Versionen ausgetauscht werden. |
|
Cloud-Datenaustausch |
|
|
Die Banana Buchhaltungsdateien können in allen Cloud-Systemen gespeichert werden: Dropbox, i-Cloud, Google Drive, .... so dass mehrere Personen jederzeit und überall auf die Buchhaltungsdaten zugreifen können. |
|
Versand von Banana-Dateien per Email |
|
|
Jede Banana Buchhaltungsdatei kann per Email (als Beilage) versandt werden, geteilt werden oder auf einem USB-Stick gespeichert werden. Im Menü Datei steht ein praktischer Befehl zur Verfügung, der automatisch eine Email-Nachricht mit Ihrer Datei in der Beilage erstellt, welche bereit zum Versand ist.
|
 |
360-Grad-Support
Online-DokumentationEs stehen Ihnen kostenlos über 500 Seiten Online-Dokumentation zur Verfügung. Sie ist nach Themen unterteilt, mit Bildern dokumentiert und enthält Schritt-für-Schritt-Anleitungen. Direkter Link zum FehlerEventuelle Fehler werden sofort gemeldet. Kostenloser SupportBei Fragen im Zusammenhang mit der Nutzung des Programms steht Ihnen der technische Support per Email oder Telefon 12 Monate lang (ab Kaufdatum) kostenlos zur Verfügung. Technical Advanced SupportTechnische Unterstützung und Entwicklung von benutzerspezifischen Lösungen (Apps). |
 |
Schweiz: Neue Normen für Berichte
In der Schweiz müssen ab Ende 2015 alle im Handelsregister eingetragenen Firmen die Berichte mit den vom Obligationenrecht (Art. 959a und 959b OR) vorhergesehenen Mindestanforderungen der Bilanz und Erfolgsrechnung präsentieren.
Die mit Banana 7 und Banana 8 zur Verfügung gestellten neuen Kontenpläne entsprechen bereits der vorgesehenen Systematik. Wurde eine neue Buchhaltung erstellt oder erstellt man eine neue Buchhaltung und verwendet dabei die neuen Kontenpläne, verfügt man über konforme Berichte.
Für diejenigen, die über einen "alten" Kontenplan verfügen, gibt es zwei Möglichkeiten:
- Auf den neuen Kontenplan übergehen und Daten der bestehenden Buchhaltung übernehmen
- Eine neue Buchhaltung erstellen. Hierbei einen Beispiel/Muster-Kontenplan mit neuer Nummerierung sowie neuer Gruppierung verwenden.
- In der Tabelle Konten eine neue Spalte 'Konto_1' einfügen und für jedes neue Konto das entsprechende "alte" Konto einfügen.
- Importfunktion verwenden, um die nach "alter" Systematik erstellten Daten der ursprünglichen Datei zu übernehmen und zu konvertieren.
- Weiterhin die Buchhaltung mit aktuellem Kontenplan benutzen und für die Präsentation die bereits in Banana 8 vorhandene Datei 'Buchhalterischen Bericht' mit Klassifizierung der Konten nach neuem Schema verwenden:
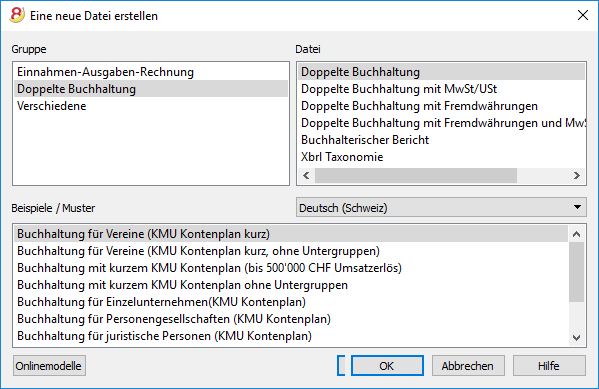
- Für den Bericht eine neue Datei erstellen:
Doppelte Buchhaltung, Buchhalterischer Bericht, Beispiele/Muster: Deutsch (Schweiz, Report Art. 959 Obligationenrecht). - Datei im Ordner speichern, in dem sich die Buchhaltungsdatei befindet.
- Für jedes Konto in der Spalte 'Gr1' die entsprechende Gruppe der Klassifizierung aufgrund den neuen Vorschriften (wie in der Datei des Buchhalterischen Berichtes definiert) zuweisen. Siehe Anleitung Berichtsdatei für Bilanz gemäss Art. 959 des Obligationenrechts.
- Für steuerliche Zwecke Bilanz und Erfolgsrechnung mittels der Datei 'Buchhalterischem Bericht' ausdrucken. Siehe Anleitung Formatierte Bilanz nach Gruppen.
- Für den Bericht eine neue Datei erstellen:
Weitere Änderungen
Die neuen Vorschriften sehen weitere Änderungen vor. Sie verlangen ausserdem, dass der Anhang der Bilanz weitere Informationen enthält. Es kann gewählt werden, ob bestimmte Details direkt in der Bilanz und Erfolgsrechnung eingefügt werden sollen, oder ob die verlangen Positionen im Anhang aufgeführt werden (z.B. die Forderungen oder Kredite gegenüber Aktionären oder Mitgliedern der Gesellschaftsorgane).
Es handelt sich um wichtige Änderungen mit steuerlichen und rechtlichen Folgen.
Bitte erkundigen Sie sich bei Ihrem Treuhänder, Revisor oder Steuerberater, um sicherzustellen, die notwendigen Vorkehrungen zu treffen, dass die Präsentation des Geschäftsresultates 2015 den neuen Vorschriften entspricht.
In den kommenden Jahren muss einfach weiterhin nach dem festgelegten Muster gearbeitet werden.
Technical data
Applications and accounting types
Banana is a native application for Windows, Linux and Mac and includes functions that allows the user to manage different types of accounting files:
Income & Expense accounting
- Income & Expense accounting (income and expenses of several accounts)
- Cash book (income and expenses of one single account)
Double-entry accounting
- Double-entry accounting
- Multi-currency accounting
Labels
Every application can be set up with or without VAT/Sales tax and includes:
- Accounting plans divided by language
- Accounting plans with VAT
- Specific accounting plans for different countries
- Accounting plans for small companies (for the family, non-profit organizations, professional studios, shopkeepers, churches, etc.)
All the different types show a resemblance with the Microsoft Office software and operate in a similar way: windows, tables, data selection, copy and paste, find and replace data, undo and redo operation, printouts with various options, data protection, password, etc.
Main interface/Accounting/ Files
- Multilingual: English, Italian, German, French, Spanish, Portugese and Dutch NEW
- Main graphic interface easier and more user friendly - computers with small screens such as notebooks will benefit the most NEW
- Management of multiple accountings: there are no limits with regard to the amount of accounting files that can be managed
- Every file contains an accounting. There is no limit to the amount of files
- Every file can be saved, moved or copied on whichever type of support (local files, network, CD, USB sticks)
- Favorite files list - it allows to access your most used files with a single click NEW
- Possibility of protecting the Composition settings NEW
- Autosave of the work in a temporary file (Auto backup + file name)
- Possibility of creating a copy of a file, with or without the transactions
- Every file of a specific type can be converted into another type
- For each accounting type, the set up of the currency can be selected by the user
- With the Open command from the File menu, the folder, in which the current accounting has been saved, will be opened. NEW
Accounts/Categories
- All the Charts of accounts for Switzerland have been updated according to the new legal regulations NEW
- Unlimited number of accounts/categories
- Numeric or alphanumeric accounts up to 256 characters
- Free setup of groupings and totaling (up to a 100 levels of totaling)
- Automatic totals recalculation (possibility of switching it to manual)
- Account/category numbers can be adapted to any kind of national requirement
- Accounts can be added or cancelled at any moment
- Double clicking on an acount/category number doesn't open the account card anymore (it goes into editing mode instead). In order to open the account card you need to click on the little blue arrow in the top right corner of the cell NEW
- From the account/category card, by double clicking in the row number (underlined as a link), you can open the Transactions table at the corresponding row, so it can be edited NEW
- Opening balance, actual balance
- Budget and difference between budget and balance (for the entire accounting period)
- Transactions and balance by period
- Balance of the previous year and difference with the previous year
- Account cards, complete or by period, with indication of the balancing entry
- Multi-currency: accounts in more than one currency
- Display of the amounts in the account currency as well as in basic currency
Transactions
- Unlimited number of transactions
- Corrections are also possible with no need to make a reverse transaction
- Possibility of editing texts directly in the cell NEW
- Smart fill (automatic completion of already used texts) directy from the cell, with possibility of filtering the texts NEW
- In the Date field, by entering the "." key the current date is entered NEW
- Automatic completion of the account number directly in the debit or credit cell (a drop down menu will appear with the list of all accounts) NEW
- In the Status bar, the information on the number of selected amounts, apart from their total, has been added. NEW
- In the Multi-currency accounting, also the changes with a date are being used for the completion of the transactions NEW
- The position of the current cell is hightlighted in the row number and in the column heather NEW
- Possibility to add and cancel transactions at any moment
- Recurring transactions can also be retrieved from the smartlist by pressing Enter or by selecting them with the mouse NEW
- Automatic totalisation also possible with the selection of individual, non contiguous cells (key Ctrl + mouse) NEW
- Simple transactions or on several accounts
- Possibility to insert links to digital documents (PDF, JPEG…)
- "Rename" command, which allows the user to modify an account or VAT code with automatic replacement in the transactions
- Automatic completion of dates and account numbers
- Search of the account number from the description
- Automatic completion of the transactions (even based on previous year's transactions)
- Possibility of memorizing repetitive transactions
- Sorting of transactions by date, document date, value date, payment date, expiration date
- For multiple transactions, the still missing amount is displayed
- Command for searching transaction differences
- Journal: complete or by period
VAT Management
- Table to define VAT codes
- Possibility to add or edit VAT codes at any moment
- For each VAT code, the number of the Swiss VAT Declaration form is present, in order to facilitate the periodical VAT Declaration.
- Account Automatic VAT already defined in the File and Accounting Properties (Basic Data)
- Automatic calculation and splitting of VAT
- Splitting and VAT report also on foreign currency amounts
- Uniformity of calculation and splitting of VAT
- Swiss VAT report, both for the effective method and the flat tax rate method, already integrated in the program. Data should be manually copied on the official VAT form NEW
- VAT form with flat tax rate method: the form also works with the automatic VAT splitting (with the percentage defined in the VAT table) NEW
- Possibility to define the VAT percentages based on the gross or the net amount
- The accounts on which the VAT should be registered can be freely defined
- The groupings for the totaling are defined directly in the VAT table
- Supplementary column for external groupings
- Possibility to freely define rounding with multiples (for instance 0.05)
- Rounding system defined for all or for a single code
- Possibility to split the VAT from the gross, the net, or only the VAT amount itself
- VAT deductible also if only partial
- Possibility to connect a VAT code to an account
- VAT/Sales tax reports, global or by period
- VAT Reports with protected personal settings (Compositions) NEW
- The VAT report can be obtained with transactions and totals by code, account, percentage, or using the user’s own grouping scheme
- VAT Code for importing
- VAT reports can be exported in Excel / HTML / XML
Reports and Balance Sheets
- In the Income & Expense accounting, the Enhanced statement with groups has been added NEW
- Balance sheets and reports with previous years and budget data NEW
- Possibility of creating budgets also by period and comparison with final balances NEW
- Reports with income and expenses being displayed and definition of capital (Cash book and Income & Expense accounting) NEW
- In the Enhanced balance sheet by groups, the columns "Diff. Budget" and "Currency 2" can be included NEW
- In the Balance sheet by groups of the Multi-currency accounting the Currency symbol is being displayed NEW
- In the Enhanced balance sheet and in the Enhanced balance sheet by groups, a zoom (font size) greater than 100% can be applied NEW
- In "Create PDF file" of the Income & Expense accounting, it is possible to include the Enhanced balance sheet and the Enhanced Balance sheet by groups NEW
- In the External accounting reports, also the columns of the "Amount" type, defined by the user, are being totalized NEW
- In the Enhanced balance sheet by groups, the Budget amounts are adapted to the selected period and subdivision NEW
- Detailed balance sheets, also with subgroups (Double-entry accounting and Income & Expense accounting) NEW
- Possibility of creating reports and balance sheets using Compositions (protected personal settings) NEW
- Possibility of editing and updating accounting reports with account card directly in the table NEW
- Possibilty of editing accounting reports and select favorite settings directly in the print preview NEW
- Different styles available (default balance sheet models)
- Possibility to modify the headers of the Balance sheet and the Profit & loss Statement
- Possibility to customize Balance sheets and reports by selecting different colors
- Possibility to exclude groups, subgroups and accounts from Balance sheets and reports
- Balance sheets and reports by period
- The data requested for a specific period can at their turn be presented by period
Segments
- Balance sheets and reports saved in Excel, Html, Xml, Pdf or copied to clipboard
- Segments are a kind of cost center without limits as to classification or levels. They are very usefull to obtain reports pertaining to projects or other reports related to main expenses and revenue
- The segments are being inserted simultaneously with the debit and credit account.
- Reports by segment
Cost and Profit centers
- Directly defined in the chart of accounts
- Have the same characteristics as the accounts
- Possibility to also manage cost centers in foreign currency
- Up to three types of cost centers for every transaction
- Possibility to make entries with or without the VAT amount included
- Periodical cost center reports available
Transfer to the New Year
- Automatic allocation of profit/loss for the accounting period (Double-entry accounting)
- Cration of the "Profit or loss of the current year" group in the Liabilities to obtain the balance between assets and liabilities
- Guided opening of the new year with the creation of a new file
- Transfer of the Chart of accounts, of the VAT table and the opening balances
- Possibility to open a new year even if the previous one has not yet been closed
- Possibility to carry forward the final closing balances of the previous year
Protection and storage of data
Data protection
- The rows can be locked in order to avoid manipulations
- Possibility of setting up a password
- Protection of the rows can also be done by selection
- System based on the electronic signature technique
- Patented method US Patent Nº 7,020,640
- Transactions lock up to a defined date
- Calculates the control numbers to verify the authenticity of the data
- Verifies whether the locked data have been manipulated
- Indicates possible manipulations in detail
- Lock information reports
- Possibility of removing the lock
Storage
All data can be stored in archives, and saved in a PDF format.
Data export
- Export in HTML
- Export in Excel
- Export in XML
- Export in PDF - the number of pages is limited to 65'000
- Global or periodical exportation
- Possibility of creating Compositions for each data export, with specific setting that can also be protected NEW
- Exportation of text files with fields separated by tabs, in Ascii or Utf8 (Unicode) characters, with the entire table or only selected rows
Data import
- Import ISO 20022: added to the importation the camt.052, camt.053 and camt.054 formats NEW
- Bank statements in ISO 20022 (*.xml) and MT940 (*.txt) format can be opened and displayed directly in Banana NEW
- Import bank statement in ISO 20022 format - the standart format adopted by all banks and institutes NEW
- Import bank statements from different banks (UBS, Credit Suisse, Raifffeisen Bank, ...) directly from Banana - no need to import and update import filters for each bank anymore NEW
- In the import scripts, it is possible to define the format of the dates and the amounts to be converted in the internal format NEW
- Text files: importation of all text files that have fields separated by tabs
- Possibility of exporting the entire table or only certain rows
- Automatic completion of missing fields (VAT codes, exchange rates)
- Possibility of importing in Ascii or Utf8 (Unicode) characters
- Possibility of importing directly from the clipboard
- AC2: import from Banana Accounting .ac2 files
- Possibility of indicating the accounting period from which to import data
- The accounts and the categories are imported following in the correct sequence
- Importing VAT Codes: sllows the user to import VAT Codes from another file (also from a .txt format)
Functions no longer supported
- DDE interface - in version 7 a new interface will be presented, based on http protocol NEW
System requirements
- Windows XP or more recent version, 32 or 64 bit
- Mac OSX 10.5 "Leopard" or more recent version, 10.9 "Mavericks" (only 64-bit) NEW
(iOS e iPad not supported) - Ubuntu 12.04 LTS or more recent version LTS NEW
- Intel or AMD Processor
(Mac with PowerPC not supported) - 150 MB Ram memory - The RAM requirements depend on the amount of transactions and the amount of accounts inserted in the accounting. The value indicated here is valid for an accoutning with 200 accounts and 2000 transactions. The amount of different accountings, accounts and transactions are not limited.
- Internet connection for accessing the Help function of the program.
Documentation
- Online help - directly accessible from the program with direct link to our website / detailed explanation of all dialog windows NEW
- Index directly linked to the subjects
- Error messages windows and warnings window directly accessible NEW
- Help center and online manuals downloadable from our website: https://www.banana.ch/doc8/en
Electronic Spreadsheet
Banana combines the ease and the flexibility of Spreadsheets with the reliability and efficiency of Accounting software.
Banana follows the example of Excel
For the development of Banana, we have referred to Excel, looking to copy the commands and the user directions. Excel is one of the best softwares for Spreadsheets, and for new developments as well we follow the example of the new Excel versions.
Banana takes from Excel:
- The concept of a single file in which all the accounting data are being saved.
It is possible to have as many files as you want, to rename, move or copy the files to external supports, to a dropbox, to attach the files to an email and to move or elaborate them on any Operating system. - The tables that gather the data and the presentation; they are very user-friendly.
- The cells with the possibility to modify, to select a group, to cancel the contents, or to operate with Copy and Paste, both inside Banana as well as to other programs.
- The columns with the possibility to add new ones, move them, hide them, enlarge them or make them more narrow with the mouse, or modify the display format.
- The rows with the possibility to insert new ones in any position, to copy them or delete them.
- The commands to undo or redo an operation, find and replace, sort rows
- The immediate recalculation, thanks to which the account balance is always up-to-date, even right after a modification.
- The preview and printout of what is being seen on the screen, with the possibility to print in PDF format
- Data export in several formats (csv, html, xml).
Banana is an Accounting program
Banana takes from the Accounting programs:
- The structured set up of the accounting
- The predefined columns and formulas that cannot be cancelled, not even by accident
-
The control and verification of data while entering them and the reporting of any possible errors
- The printouts of the accounting: Balance sheet, Profit & Loss statement, Account cards, comparision with the preceding year. All of these can be adapted according to the wishes and needs of the user.
- Importing the data of bank statements in electronic formats (ISO 20022 and others)
-
The certainty of calculations and data
Specific Banana characteristics
- Autocomplete, picking up earlier entered values and indicating values that can be entered
-
Error reporting, showing the row that contains them in red (a bit like a spell check).
- The views inside the tables that allow the user to save and recall the different arrangement of the columns.
- The compositions that allow the user to save and recall the configurations of the report printouts
- The recheck of the accounting that checks all the transactions and displays error messages if necessary
- The information window contextual information about the data of the active row
- Creates a Pdf dossier that prints the data and the reports of the accounting in a unique Pdf file.
Advantages of Banana compared to Excel
- Completely configured Spreadsheet with formaulas and reports
- Impossible to change the calculation formulas, not even by accident.
- Data plausibility check
- Accounting reports
Advantages of Banana compared to a management software
- User-friendly and flexible
- Faster data entry
-
Ability to modify and/or cancel transactions without cancellation operations.
-
Different accounting models and accounting settings with just the functions that are of interest to the user
- Ability to add columns in the tables and display them according to the users needs or wishes
-
No additional modules that complicate the program and make it more difficult to use.
- No need to pay a yearly subscription
Advantages of Excel compared to Banana
- Allows the user to create his own calculation formulas.
-
Has advanced formatting functions.
- Ability to create supplementary tables and connect the date.
- Has numereous graphic and data processing features.
Advantages of a management software compared to Banana
- There are integrated modules for invoicing or other functions.
-
Are multi-user, while in Banana, only one person at a time can modify the file
-
Have different levels of access; instead, in Banana, the person who opens the file has the ability to make any possible changes.
Technical information for updates
Important information when updating from version 5, 6 and 7 to Banana Accounting 8
In order to see what's new, visit the page What's new in version 8.
Position or name changes
From Banana 6 to Banana 7 some functions changed their names:
- Data can be edited directly in the table cell (just like in Excel)
- With a double-click you go in the cell editing mode.
In order to open an account card or to access the Extract rows command, instead of the double-click you can use:- Alt + mouse click
- Right mouse click (opens the menu)
- A mouse click on the little blue arrow next to the account number (cell top left corner)
- The Messages window has been moved in the lower corner of the screen, next to the Info window.
The Messages window can be reached by clicking on the correspondent table. - The Views list has been moved to the top of the screen, just below the tables list.
- When scrolling the vertical bar, the table content now immediately scrolls too.
- In the transactions, the indication of the date and the document are not shown any more.
- From the Banana 7 version it is possible to update the account card (see refresh button on the top right corner); in Banana Accounting 6 it was necessary to give the command again.
- When printing or when viewing the print preview, it is now possible to only print a selection of rows.
In the print dialog window, it is possible to choose if you want to print everything or just a selection (only in Banana for Windows). - In the Date column, by entering the “.” symbol, the program automatically enters the date of the day.
- Simple Accounting -> has been changed into -> Income & Expense accounting
- The Cash1, Simple1, Cash2 and Simple2 menus have been replaced by the Account1 and Account2 menus
- Accounts by period -> has been changed into -> Accounting Report
- Export file in pdf -> has been changed into -> Create Pdf dossier
- In some functions, such as the Enhanced Balance sheet, ... a new submenu called "Compositions" has been created in order to recall saved personal settings (in Banana 6 they were called Favorites).
- In the Help menu "Keyboard Shortcuts", you find the list of key-combinations and the commands that are associated with them.
- In the Info and Messages windows, next to the error message, there is now the symbol: if you click on it, you will be directly connected to the online page explaining the error message and suggesting possible causes and solutions.
File management and -exchange
Once Banana Accounting 8 has been installed (Windows or Mac), you can lauch the program and open the accounting files that have been created with Banana Accounting, 2.02, 3, 4, 5, 6 or 7.
- Files saved with Banana 8 can be opened and edited with the versions 5, 6 and 7 of Banana Accounting.
If you are using features only available in Banana 8 (Budget Table, Apps menu, colored rows) these do not work with earlier versions. - Files saved with Banana 5, 6, 7 and 8 cannot be opened anymore with Banana 2, 3 or 4.
- Files can be transfered easily from one operating system to another.
If the files are not listed in the recent files (Initial page), you can look for them following these instructions.
Starter Edition version / License key
If the program is installed without license key, Banana 7 or 8 operates in the Starter Edition mode. This allows the user to use all features and to save a file with no more than 70 transactions.
- In order to use version 8 in the complete mode, you need to purchase the update license key and enter it in the software (starter edition version) that you can download from our download page.
- An Update Version is the normal version sold at a preferential price. It can therefore as be installed on a computer that doesn't have a previous Banana version installed.
- The license keys are specific for each operating system (Windows, Mac or Linux); if you want to use the program on Mac as well as on Windows and Linux, a Multiplatform license can be purchased; you will receive one unique license key which activates the Banana Accounting 8 version on Windows, Mac & Linux. This license is valid for installing Banana 8 on a maximum of 3 computers (belonging to the same owner).
- In the Starter Edition mode, the Cash book is also limited to 70 transactions.
Version for Mac
In order to avoid conflicts with the keys used by the Apple operating system, the function keys F4, F5, F6 of Windows have become CMd+4, Cmd+5, Cmd+6 under Mac.
Resuming Banana 5 and 6 files, created under Crossover for Mac
If your accounting files have not been saved in the folder "All my files", please follow these instructions:
- In the "go to..." menu select the "go to folder..." option
- enter "~/Library"
- enter "ac2" in the Search field
- Select "Search in :.." and choose "Library"
- Copy the "ac2" files in the folder "All my files".
Warning: Before deleting the "Bottles" or before uninstalling CrossOver, please make sure that there are no more files in the "~ / Library" folder.
Importing bank statements
Banana 8 provides various import filters that can be downloaded from our website.
To import the bank statements / update the filters, you need to:
- select the Import to accounting command from the Account1 menu -> Import transactions
- click on the Manage filters button to see all the available filters
- click on the Update filters button
- enable the desired filters by selecting them and clicking on the Enable filters button
Importing Postfinance Xml file
Banana 8 imports bank statements using the new XML ISO 20022 standard. Postfinance supplies this format only when requested by the customer.
It is therefore necessary to ask your Postfinance consultant to change the format and switch to the ISO 20022.
Postfinance Business clients can ask to have the Pfd as well as the ISO 20022 format.
Multi-currency accounting
Contrary to the earlier versions 5 and 6, Banana 8 automatically calculates the other values when the amount in foreign currency, the exchange rate or the amount in basic currency has been modified. No need to use the F6 key.
Swiss VAT Report
In order to obtain the quarterly Swiss VAT report, ready for the official form, proceed as follows:
- Account1 Menu -> Swiss VAT report -> choose the desired method (effective or flat rate) -> specify the desired period
- In Banana Accounting 8 , the VAT report will also be available for those who are submitted to the flat rate method.
Enhanced Balance Sheet with Groups
In the Enhanced Balance sheet with Groups (from the Account1 menu), in the Previous Year column, the balances that have been carried forward from the previous year's file are being displayed. If, in the Options tab of the File and Accounting Properties dialog window, no previous year's file has been indicated, then the balances will be carried forward from the Prior column of the Accounts table.
No longer supported functions:
- DDE connections
Interface
Improved interface
In the new version Banana Accounting Plus, you will find an updated interface, with very intuitive and functional menus, so you can access the commands much more quickly.
We advise you to switch now to Banana Accounting Plus and take advantage of the many new features.
When a new file is being created or an existing one is opened, the software presents a structure that is characterized by the following elements
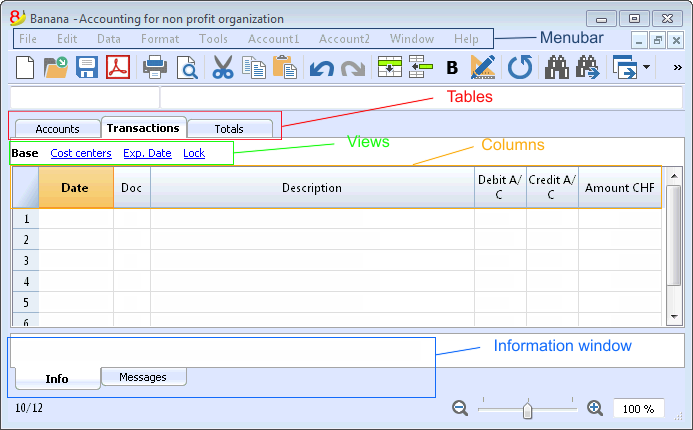
The menubar
The menubar contains all commands grouped by menus. The menubar changes depending on the chosen accounting type.

Attention: in the Mac operating system, the Banana menu bar is located on the top of the screen, at the rightside of the apple logo:
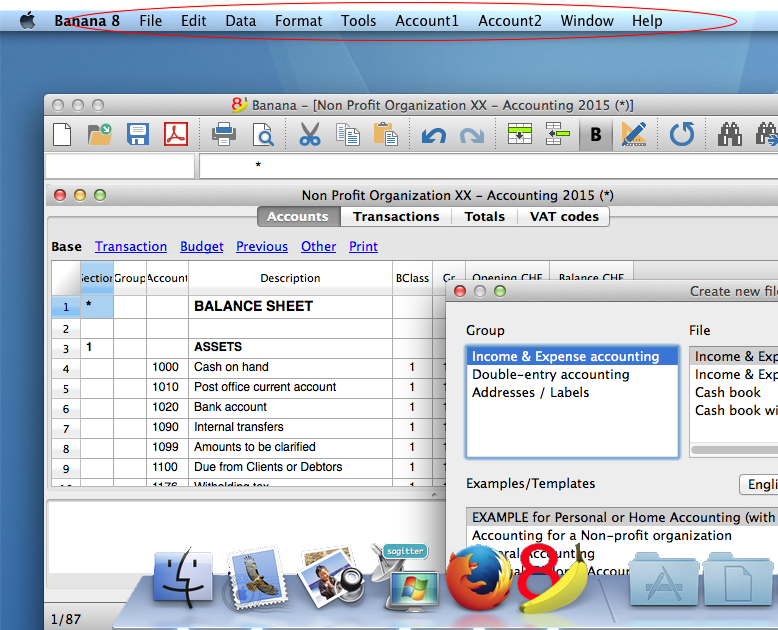
The toolbar
The toolbar contains icons that allow you to acces the most used commands and dialogs.
If you go over the icon with your mouse a command description will be displayed.

Text imput area
Text are entered directy in the cell. The entered text is also shown in the text imput area, right below the toolbar. The text can be edited in the text imput area, or direcly in the cell, by double clicking on it or by pressing the F2 key.
If the Smart fill option is activated (Program Options command from the Tools menu), a drop-down menu will be shown with all the possible text choices; just select the chosen text and press the Enter or the F6 key.
Smart fill (autocomplete)
When you enter a text, the program suggests different choices:
- Texts of similar transactions
- Accounts list. By entering a text the program will list all the accounts containing that text.
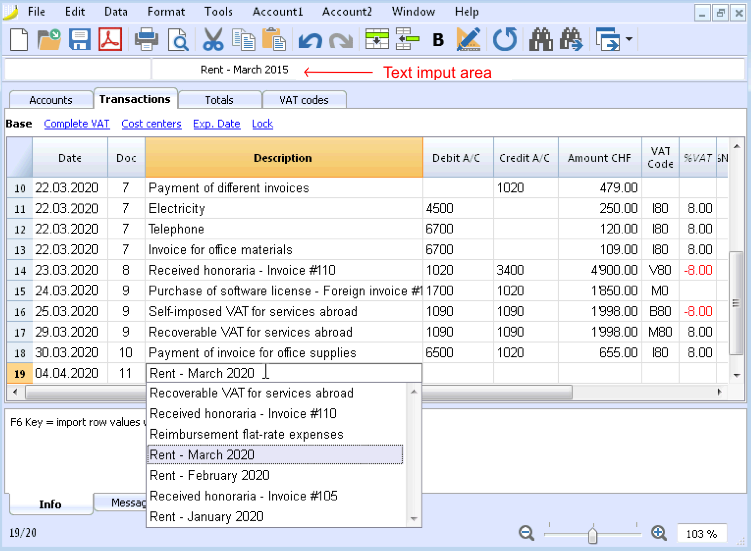
Execute command
Some columns are associated with certain actions that can be executed with the Execute command (from the Edit menu) or relative touch key, as indicated in the information window.
Some examples:
- Doc column: recovery of recurring rows or progressive number
- Description column: recovery of similar row data
The tables
Each accounting file has various tables. Some of them are main tables and others are optional. Tables vary depending on the chosen accounting type.
The views
The views are ways of showing the accounting data with specific columns. For each table there are different views and they are very useful when you want to show your data in different ways, without altering your basic settings.
Views are located right below the tables and can be personalized using the Tables setup command from the Data menu.
Related document: Tables setup; New view
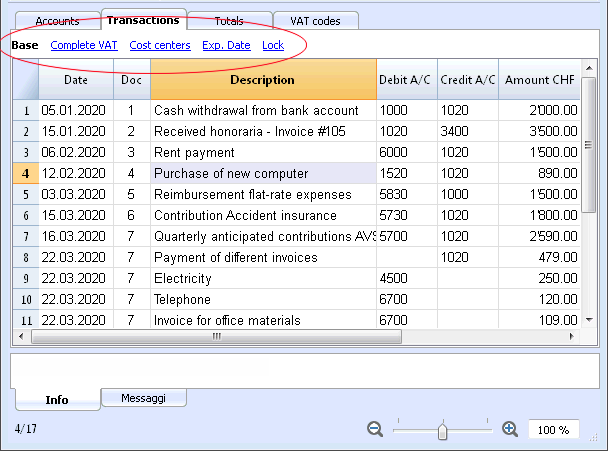
The columns
Columns are the table vertical elements. Each table has specific columns with specific heathers. The display, size, description, format, width, style, alignment can be edited thorough the Columns Setup command from the Data menu.
Some columns contain data entered by the user, and some others can only be used by the program and cannot be edited by the user (for example the account cards columns).
Users can add new columns in order to include additional information (always with the Columns Setup command from the Data menu), but the data entered will not be processed by the program.
A group of specific columns composes a view that displays only specific data.
Related document: Columns setup
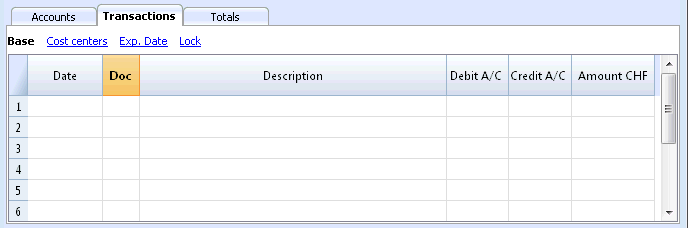
The information window
This is a window located in the lower part of the screen, where the program displays useful information related to the active table and cell. Error messages are shown in red.
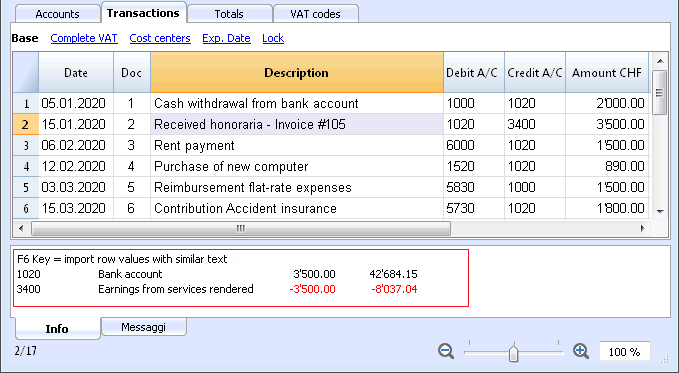
The error messages window
The Messages windows contains a list of the errors found by the program.
In order to read the messages click on the Messages tab.
From the Messages window, by double clicking on the error message, you will be taken to the row that generated the error.
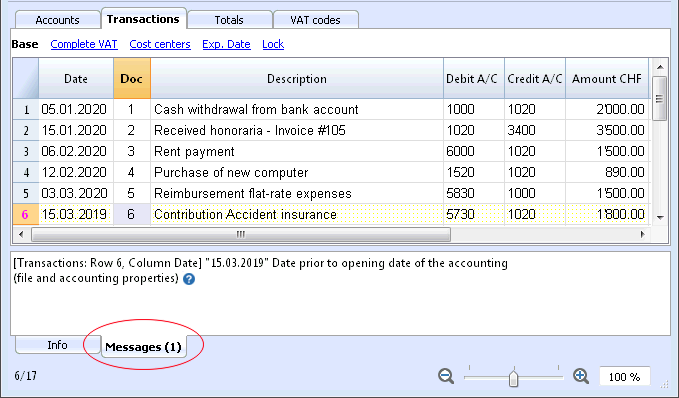
Date and numbers format by per default
Once the program is installed, it automatically uses as default your operating system settings.
If you wish to change your operating system settings, you sould go in your Control Panel (Windows) or your System Preferences (Mac).
Here is the step by step process on Windows 8 and Windows 10:
- from the Start menu, go to the Control Panel
- click on International options and then on Change date, time or numbers format
- a dialog window will appear where you can change your data format (in the Format tab)
- in order to change your numbers or currency format, from the same window you can click on the Additional settings button and then on the Numbers or currency tab.
Here is the step by step process on Mac OS X 10.9.5:
- from the Apple logo (on the top left of your screen) click on System Preferences
- from the dialog window that appears choose the Date and time icon
- a new window will appear where you can choose Open language and zone...
- a new window will appear where you can click on the Advanced button
- finally a new window will appear where you can change the numbers format (General tab), date or time format (Date and Time tabs)
Format and numbers in Banana Accounting
Cells
Copy, Cut and Paste
It is possible to copy/paste cells, rows or selected text just as it is possible to do with any normal Windows program:
- Select the line or the area of data to be copied
- In the Edit menu, select the Copy or Cut command
- Move to the row or the area where the information should be copied
- From the Edit menu, select Paste
The user can also copy/paste by using the following icons  or press Ctrl+C to copy, Ctrl+X to cut and Ctrl+V to paste.
There are also commands such as Copy rows, Delete rows and Paste rows: in this case they refer to a full row or rows and not to a cell selection. For this purpose the commands Copy, Cut and Paste should not be used.
Entering a text
In order to enter a text position yourself in the cell you wish to write in. With a double click on the cell a drop down menu will appear with all the text previously entered; as you start writing the program automatically suggest similar text previously entered; select the appropriate text and:
- press Enter - in order to automatically enter the selected text
- press the F6 key - in order to automatically enter the selected text + all other row data (debit account, credit account, amount, ...)
Editing a text
From the version 7 of Banana Accounting it is possible to edit the text directly in the cell; just double-click in the appropriate cell (or press the F2 key) and enter the new text. Also when editing the texts, the Smart fill and autocomplete texts feature suggests earlier entered texts.
It is also possible to edit a text selecting the cell and entering the new text in the text imput area, under the toolbar. On the left side of this area, two icons will appear to undo or accept the entered text.
Wrap text
When the text for a row is very long, the Calculate row height command from the Format menu allows the user to view it completely, adapting the height of the row.
To adapt the height of the row to the text, the user should:
-
choose the Columns setup command from the Data menu;
-
select the appropriate field name;
-
activate the option Wrap text in the Display tab;
-
recall the Calculate row height command from the Format menu each time it is necessary.
The Calculate all row heights command is equal to the one described above, with the difference that it operates on all rows of the table.
Entering an account number
Position yourself in the Debit or Credit account column and start entering the account number or account description; the program will suggest you all the accounts with a similar number or description. Choose the appropriate one with the Down arrow key or Up arrow and press Enter.
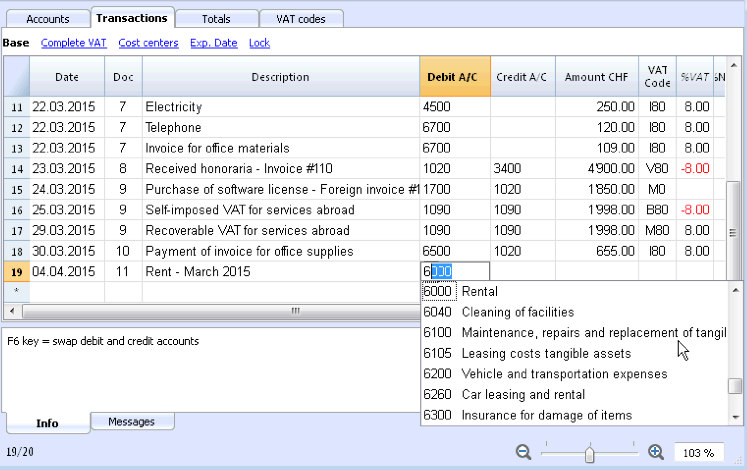
Attention: to deactivate last year's smart fill, you must deactivate the Smart fill with transactions from previous year option from the File and accounting properties command (Options tab - File menu).
File Menu
Banana files are compatible with versions from all operating systems and with syncronization systems (Dropbox, ICloud, ...)
For more information please visit the File Saving page.
Create new file
There are different ways to create a new file:
- from one of the templates included in the program
- from one of the online templates available on our website
- from an existing file or template (without editing it):
- copying the file with your operating system
- using the Save as command from the File menu
- using the Create file copy command from the Tools menu, that allows you to choose what data to keep.
- using the Convert to new file command from the Tools menu; this command will reate a new file with different characteristics but keeping the existing data.
This command is usually userd to add the VAT management or the multicurrency feature to an existing accounting file, or to change a file language.
- creating a new empty file
- creating a new file and loading the data froma an accounting file, but with a different chart of accounts.
Transfering to a new year
When transfering to a new year, there is a specific procedure to follow, in order to create a new year's file and automatically carry forward the opening balances.
New file settings
When creating a new file with new characteristics, you need to setup the outline of the new file.
Create new
Related documents
- Start a new Income and expenses accounting and Cashbook file
- Start a new Double-entry accounting file
- Start a new Double-entry accounting with multicurrency file
- Utilities documents
Choose the initial model
This procedure creates a new accounting file, starting from an existing template (New command from the File menu)

Group
In the Group section all the different applications are listed. Choose the one that meets your needs.
File
In this section you can select the characteristics of the chosen application. You can choose between the plain version, with the VAT management, with a second currency or with more than one currency.
Examples/Templates
By selecting the language you will see predefined example/models that you can use to start and that can be personalized. All the template data and settings (language, decimal rounding, ..) will be used.
Once you have personalized the template you need to save the file with a new name.
Online Templates
Clicking on the Online Templates button you can access our website where we published all templates available for free.
Create file copy
Create a new file from an existing one
- Open the source file
This file will not be changed or edited. - Use the Create file copy from the Tools menu
- Choose the data that you want to keep.
For accounting files choose if you want to keep the existing amounts.
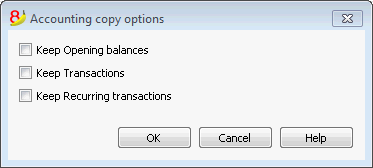
- Save the file in the folder where you wish to keep the data (normally in the documents folder)
- Enter the company name and the accounting year as file name, for example smith_company_2017.
New file from an internet template
Download and open the file with Banana
There are different ways to download the file, depending of what internet browser you are using.
- Click on the file link
- With the mouse right click choose the Save file command from the menu that appears
- Open Banana and drag the file or the file link into it.
Save the file with a name
Once you have opend the template with Banana you need to use the Save as command from the File menu
- Chose the destination folder
- It can be useful to create a separate folder for each year so you can also store there other documents related to that year.
- Chose a file name containing the company name and the accounting year, for example smith_company_2017
- The software will add the .ac2 extention, typical for the Banana files
Adapt the template
- Edit the File properties
- Enter the headings and the accounting period
- Enter the address
- You can now adapt your chart of accounts
- Enter your bank accounts
- Enter or edit the chart of account to fit it to your needs
You will still be able to add or edit it as you work, if new needs arise.
- If you are taking over an existing accounting file, you will also need to enter the opening balances in the Opening column.
- If you are working in a multicurrency file, you need to update the opening exchange rates.
Convert to new file
This command converts an existing file (which will not be modified) into another one with different characteristics:
- Change language
- Change the roundings
- Change the file type. For example:
- Pass from an accounting without VAT to one with VAT
- Pass from a Double-entry accounting to a Multi-currency accounting
It is as if you have created a new blank file and then have manually transferred the data.
The existing file characteristics can be consulted by executing the command Tools -> File Info
Creation and data transfer
The Convert to new file command, from the Tools menu:
- Creates a new file of the specified type with the predefined columns setup
- Transfers the data into the new file, proceding with the necessary conversions
- Saves and indicates the name of the new file.
When converting a file with more options into one with fewer options, part of the data will be lost during conversion. If, for example, an accounting file with VAT/Sales tax is converted into an accounting file without VAT/Sales tax, all data in the VAT columns will be lost during conversion.
Passing from a Double-entry accounting to a Multi-currency accounting file
- Make sure that in the File and accounting properties the currency symbol is being specified (which will become the basic currency)
- Choose the Multi-currency accounting as destination
- The program creates a Multi-currency accounting, recovering the existing data:
- The Transactions table includes the columns for managing the Multi-currency accounting, as a currency the basic currency and the exchange rate 1.000
- The existing accounts in the Accounts table are being completed with the basic currency symbol
- You have to add the predefined accounts for exchange rate profit & loss.
- In the File and accounting properties, you have to indicate the predefined accounts for exchange rate profit & loss.
- The Exchange rate table will be empty; it is therefore necessary to add the currencies and exchange rates used in the transactions
- In the Accounts table, the accounts in foreign currency have to be added.
In order to change the currency of an accounting file, see the Accounting tab of the File and accounting properties.
Passing from an accounting without VAT to one with VAT
- Choose the desired type of accounting with VAT as the destination
- The program creates an accounting with the VAT columns, recovering the existing data:
- Add the VAT accounts into the Chart of accounts
- The File properties regarding the VAT need to be completed, and the default acccount on which the VAT must be recorded needs to be indicated
- The VAT Codes table has to be completed with the necessary VAT Codes
With the Import to accounting command -> VAT codes, the VAT codes table of an existing accounting can be imported (for example it can be imported from a default VAT acccounting template).
Dialog
- The file type, in which the user is working, is being indicated
- For more information on the language, roundings and decimals, go to the File and accounting properties (from the File menu)
- A list with different options appears
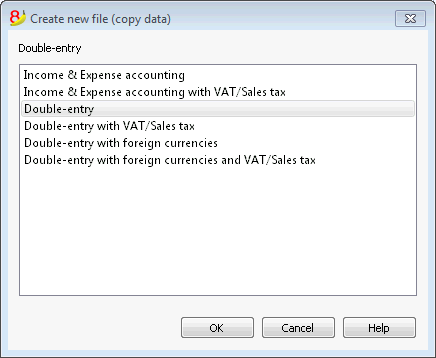
Outline to create new file
For more information, please consult the specific page.
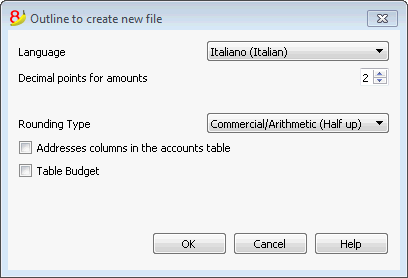
Transfer to a new accounting plan
Hereunder we explain how to proceed when:
- passing to a chart of accounts with a different numbering
- retrieve and convert the data of an existing accounting, including the transactions.
Converting for the new year
The program will convert the file for the choosen year. If you have already entered the year 2014 you can convert the 2014 file.
If you wish to start a new year with a new chart of accounts, there are two possibilities (for example considering the year 2015 as the new year):
- converting the previous year (2014) and then creating the new year (2015)
You will have two different files for the year 2014 (the one with the old chart of accounts, and the new one), and a single file for the year 2015, with the new chart of accounts. This procedure is useful when you need to have both years with the same chart of accounts - creating the new year's file (2015), and then converting it the new system.
In this case the year 2014 will remain unchanged. For the year 2015 you will have a transition file, with the old chart of accounts, but with the updated opening balances. The conversion of the 2015 file can be done right at the beginning, but also after some transactions have been entered.
Step 1: Creating a new accounting file
- Create a new accounting file, choosing the desidered type.
- Adapt the chart of accounting to your own needs
Step 2: Adding the matching accounts
- Position yourself in the Accounts table and add a new column called Account_1 (Data menu; click on the Add button of the Columns Setup window and then enter the Account_1 description);
- For each new account, in the Account_1 column, enter the corresponding account in the old chart of accounts;
In case the account remains the same, you can also choose to not indicate it. - In case several accounts need to be grouped in one, enter the separated accounts with a semi-colon "1000;1001".
- In case one account needs to be subdivided on several accounts, you need to proceed manually, see herunder.
![]()
Step 3: Starting the import operation
For more information, please check the related pages Import to Accounting and Import File.
- From the Account1 menu, choose the Import to accounting and then Import File commands
- Using the Browse button, select the file of your old accounting plan
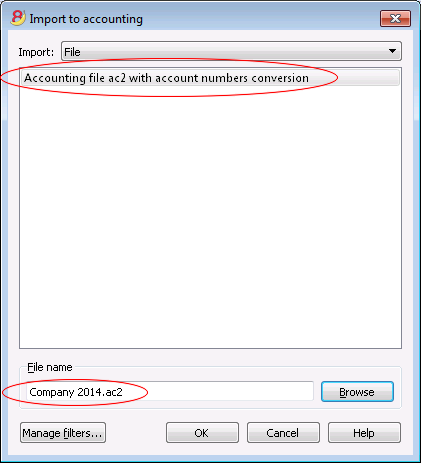
- Confirm by clicking on the OK button and pass on to the next window
- Define the import options
- Activate the Activate account numbers option, indicating that the account matches are in the destination file.
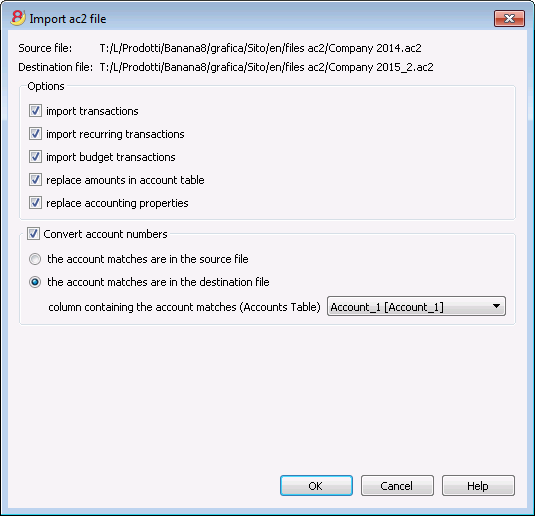
Subdivision of one account into several accounts
When one transfers to a more detailed chart of accounts, it is probably necessary to subdivide one account into several accounts.
After the import operation, proceed manually in the following way:
- In the Chart of accounts, subdivide the opening amounts, budget amounts and previous amounts of one account into several accounts;
- Go over the transactions, one by one, of the account that needs to be subdivided and assign them to the more specific account, or create extra transactions if it is necessary to subdivide one amount into more detailed amounts;
- Proceed in the same way for the transactions of the Budget table.
Results and possible errors
In case the program reports mistakes (absence of accounts or others), the import operation probably needs to be cancelled and the matches need to be completed;then repeat the import operation.
The program, confronted with different charts of accounts, cannot automatically do extensive verifications and guarantee that all the data have been imported and grouped correctly.
It is therefore strongly advised to manually check the result, making sure that the totals of the Balance Sheet and the Profit & Loss Statement are correct.
Create new empty file
In the Examples/Templates section, choose the language/nation and select the New blank file (without data, without chart of accounts)
In this case the file doesn't contain any data. You will need to create a new accounting file starting from zero.
Outline to create new file
Language
The language used for the columns headers of the various tables.
Decimal points for amounts
In order to avoid accounting differences, the number of decimal points for the amounts is fixed for each file. Two decimal points are normally used, but there are currencies where decimal points are not required so 0 needs to be inserted.
Decimal points for amounts in foreign currency
If using multi-currency accounting, then it is necessary to define the number of decimal points for the amounts in the foreign currency as well.
Rounding type
The amounts are rounded up or down to the closest whole number. In the case of exactly half (for example: 100.5 / 101.5 / 102.5 / 103.5) the following systems are being used:
- Banking (Half at even) is being rounded up or down towards the nearest even number (100 / 102 / 102 / 104).
- Commercial/Arithmetic (Half up) is being rounded up to the next whole number (101 / 102 / 103 / 104). In accounting, this is the system most used.
- Compatible version 4. A minor precision is being used, which in very special cases, can bring forth a different rounding.
Address fields in accounts table
When this option is activated, the Address view is created in the Accounts table. In this view, the user can enter the addresses of clients, suppliers and members.
Budget Table
When this option is activated a Budget Table is created, where the user can enter his budget transactions.
The user can thus create different accounting files, in different languages, and with different decimal points. In order to change the language or the decimal points once the accounting file has been created, the accounting type must be converted by selecting Convert to new file from the Tools menu.
Open, save, copy and backup
Opening a file
- Accounting files can be opened in Banana Accounting if they are on the local computer or if they are accessible through a network.
If they have been sent by email, before opening them you need to move them in a computer folder - Only one user at a time can edit a file
If you edit a protected file or a file already in use by other users, you need to save the file with another name in order to save your changes. - The Banana Accounting program, notifies that you have opened a read-only file in the following cases:
- the file is located on a non-writable disk (CD-ROM)
- the file is located on a temporary non-writable folder
- the file is protected or the user doesn't not have rights to edit it
- the file has already been opened by another user
- the file has already been opened from the same user but in another session
How to look for *.ac2 files
If you don't remember in which directory your accounting files are located, you can use the search Windows Explorer box or the Mac finder search tool.
Find your accounting file on a Windows computer
Banana Accounting files have an .ac2 or .sba extention. The Windows search tool will vary depending on your Windows version.
- Windows 10: click on the search icon on the Applications bar and enter "ac2" or "sba" or your file name and click on the Documents arrow.
- From the Explorer File Manager enter the "*.ac2" extension, the "*.sba" extension or your file name and let Windows look for it.
- When in Banana you get to the Open file dialog window (File menu -> Open), enter the "*.ac2" or "*.sba" extension in the top right search box and then click on the look in the whole PC icon, or select the directory where you want Windows to look for your file.
Find your accounting file on a Mac computer
- When in Banana you get to the Open file dialog window (File menu -> Open), enter "ac2" or "sba" or a word that is part of the file name in the top right search box. With the icons, select where you want to look for your file (in the entire computer or in selected folders).
- Open the Finder and enter "ac2" or "sba"or a word belonging to the file name in the search box.
- Right click on the Finder icon, then click on Search, and then enter "ac2" or "sba" or a word belonging to the file name.
Saving a file
With the Save or Save as... command, the data are saved onto the hard disk. Pre-existing disk data are replaced with the new ones.
- A single file can be saved by one user at a time
The file can be saved by the user only if it is not also being used by other users - Files can be saved anywhere.
You can enter the file name and destination when saving it for the first time or when using the Save as command from the File menu
As a first option, Banana Accounting suggest the Documents folder as destination folder for the .ac2 files, but it can be changed with the Browse button. - If you are managing different accounting files, we suggest you to create a separate folder for each company and for each accounting year.
- Each file can be password protected.
Accounting files (*.ac2)
- Files created with Banana Accounting have an .ac2 extension, regardless the operating system used.
The .ac2 file format is specific for Banana. When saving, all data are compacted and saved in bulk. - Ac2 files are compatible between different operating systems (Windows, Mac and Linux)
You can save a file with Windows, then open it and edit it on a Mac, and then reopen in on a Linux or Windows computer. - Each file can be sent as an email attachment, edited on different operating system and resent to the sender.
- Accounting files are completely separated from the software Banana itself, that has an .exe extension for Windows,
- The installation files for Mac have a .dmg extension and a .deb, .rmp .run .tgz or .appimage extension for Linux.
Automatic saving
Banana Accounting automatically creates and saves your work in a temporary file that ends with ".autosave" . When you press the Save button or you exit the program, this temporary file is deleted. In case your computer should crash or turn off in the middle of your work, it would be possible to recover your data by opening this file.
In order to have the program automatically create this temporary autosave file, the corresponding option should be active (it usually is by default) in the Program Options (you can access them from the Tools menu).
How to copy or move your accounting files
Banana can save your files on any unit seen by the operating system or on a rewritable disc.
From non-rewritable discs (CDs or DVDs) Banana can open the files on a "read only" mode.
All .ac2 files can be moved in different ways:
from one directory to another:
- using Windows Explorer or Mac Finder to locate the directory where your files have been saved
- copying and pasting them in the new destination directory (once you pasted them you can delete from the original directory)
from one computer to another:
- saving the files on a memory stick and then saving them on the new computer:
- open the file to be moved
- from the File menu choose the Save as command, choosing the memory stick as destination unit
- this copy can also be made from Explorer by dragging the accounting file into the memory stick unit
- by sending them as email attachments and then saving them on the new computer
DropBox, Google Drive and other synchronization systems
Banana is compatible with systems such as DropBox and Google that keep files synchronized with cloud storage services.
Banana overwrites *.ac2 files and deletes the *.ac2.bak files. In the deleted files list you will find all *.ac2.bak files previous versions.
Viewing changes
Banana Android works directly with Dropbox servers. If you make changes on your PC, usually you have to wait a few seconds before you see the changes on the server, so also on Banana.
To ensure that the file is properly synchronized with the server, the file on your PC must be marked with the green check mark.
If you do not see the sync symbols (green, red, blue), you have to update the Dropbox application installed on your PC.
Another way to check the synchronization status from your PC, is to click on the Dropbox icon in the bottom bar:
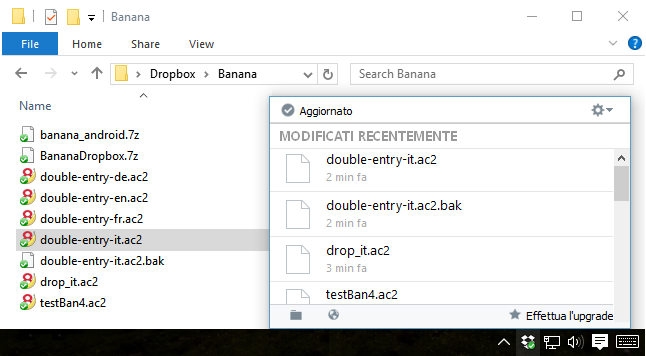
In addition, Android synchronization does not occur while you are working with the app. You must close and reopen it.
Attention: Banana cannot realize if some files are opened simultaneously on more than one computer. It could thus happen that someone erases some data or that someone else adds some new data. Only the more recent copy of the saved file is kept. For this reason we strongly advise to avoid working at the same time on the same file.
Security copies (backup)
We strongly advise you to create external backup copies of your accounting files, in order to prevent a possible data loss, due for example to a computer crash or other causes.
- if you have a Mac computer you can use "Time Machine"
- if you have a Windows computer you can use the "File history" function
You can find other programs on the market that allow you to automatically create a backup of your data.
Saving and .bak files
When saving, Banana Accounting replaces the contents of the existing file, with the more recent data, only if the saving process is successfull:
- Data are saved on a temporary file
Only if the saving process is successfull the data on your disk are replaced to the existing ones. - If the Create backup copy (.bak) option is activated (Tools menu -> Program options command -> Avanced tab) the program renames the pre-existing file with the same name, adding the .bak extension.
A new file named "filename.ac2.bak" is created, containing the data before the saving process.
If an error occurs during the saving process, if for example the network disk is no longer available, choose another file name for saving your data.
Recover your data from a .bak file
When for a number of reasons you cannot find your accounting file, you can recover your data from the backup copy automatically created by the program. Here is how to proceed:
- open the directory where your accounting file was located
- open the file with a .bak extension. If it is not shown in the dialog window, you need to select the "show all files (*.*)" option at the bottom right of the window
- once the file is opened, save it with a name. Usually the same name as the lost file is chosen.

Damaged .ac2 files
Sometimes a computer crashes due to technical problems or viruses. Sometimes data received by email are compromised or damaged. For these reasons we strongly suggest you to make copies of your files.
If, for technical reasons you have a damaged file, our support team can verify, for a fee, if there are data that can be recovered.
Recover autosave file
This dialog appears when the program closes unexpectedly, and it was not possible to save changes made to the file.
When the program is reopened, it detects that the autosave file (temporary file) has not been canceled, and then asks if you want to retrieve the file.
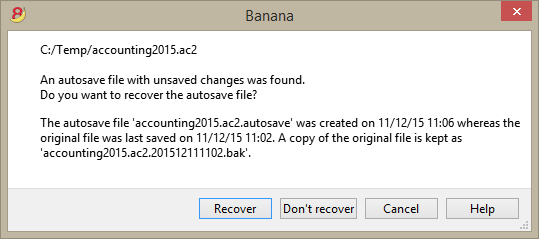
You can choose from the following options:
- Recover
- The autosave file is copied replacing the original file
- The original file is renamed as indicated in the dialog window
- Don't recover
- Both the original file and the autosave file are kept
- The program will not warn you anymore that the autosave file was kept
- Cancel
- Both the original file and the autosave file are kept
- Next time you open this file, the program will warn you that an autosave file with unsaved changes was found
The autosave files that were not recovered will be kept, and will have to be deleted manually.
If the program stops working
If the program is closed normally, it asks whether to save the modified data, and the autosave file is deleted.
However that program may be unexpectedly closed for a number of reasons:
- A power outage or another event that caused an immediate arrest of the operating system
- A problem that led to the crash of the program
- Due to another program or to a situation of the operating system or driver that caused the program to stop.
Try to restart your computer and use the program without other programs.- A flaw in the operating system or a faulty program can cause an interruption of Banana.
- Problem with some Dell computers.
- A computer fault (memory error)
- A virus or some other problem
- A flaw in the operating system or a faulty program can cause an interruption of Banana.
- A problem in the Banana Accounting software
Usually when, repeating the same command always causes the program to crash.
If the program stops in completely different situations, is more likely that the problem is due to a computer or operating system problema (see above)- First of all make sure that you have the latest version of the program
Install the updates if necessary. The problem could have been solved in the meantime
- First of all make sure that you have the latest version of the program
- Due to another program or to a situation of the operating system or driver that caused the program to stop.
Contact technical support
Verify the situation in which the program stops.
- It is important to understand in what situations the program stops, so that technicians can replicate the problem.
- When you contact the technical service:
- Describe the problem and how it can be reproduced - describe the error.
- Enter your system details (you can copy them under Tools -> Program Options -> Info System.
- If the problem occurs in relation to a file, send a copy of the file (removing confidential data).
File properties
When a new file is created, the basic data need to be entered in the File menu, using the File and accounting properties command.
The file properties can vary depending on the chosen accounting type.
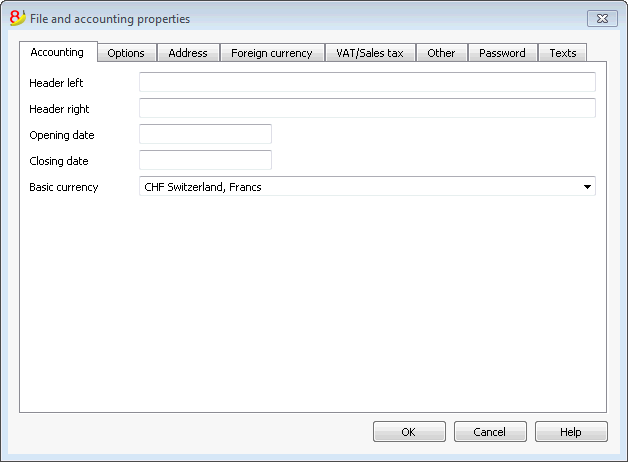
For the explanations of the different tabs please visit the pages hereunder.
Accounting Tab
Left and right headers
These are the two empty cells at the top where any desired text can be inserted which will be used as a header for print-outs (left and right).
Opening date
The opening date is the date when the accounting begins. It can also be left blank. If a date prior to the opening date is inserted when entries are made, the program will give an error message.
Closing date
This is the closing date of the accounting. It can also be left blank. If a date greater than the closing date is inserted when entries are made, the program will give an error message.
Basic currency
The code of the currency in which the accounting is being handled. You can enter any currency code, even the one that are not in the list. When the code of the basic currency is being changed, the program changes the column headers for the amounts in basic currency using the new code.
In the multicurrency accounting files it is mandatory to select the basic currency, which will work as the funcional currency, the one used for the calculation of the Balance sheet and Profit & Loss statement.
Changing the basic currency symbol
If you change the basic currency symbol the program will not change the existing amounts. We advise you to change your basic currency symbol only if you don't have yet entered any opening balances and any transactions.
Accounting file WITHOUT foreign currencies
You can replace the basic currency symbol with the new symbol.
Accounting file WITH foreign currencies
- Replace the currency symbol in the File properties dialog (from the File menu)
- in the Accounts table
- Select the whole Currency column (click on the column's header)
- Use the Find and replace command from the Data menu and enter the old and the new currency symbol - make sure to check the Selected area only option. Replace all the symbols found.
- in the Exchange rates table
Enter the new exchange rates for all the currencies. - Give the Check accounting command from the Account1 menu.
- If there are opening balances or transactions, the amounts and the exchange rates will have to be manually updated.
Options Tab
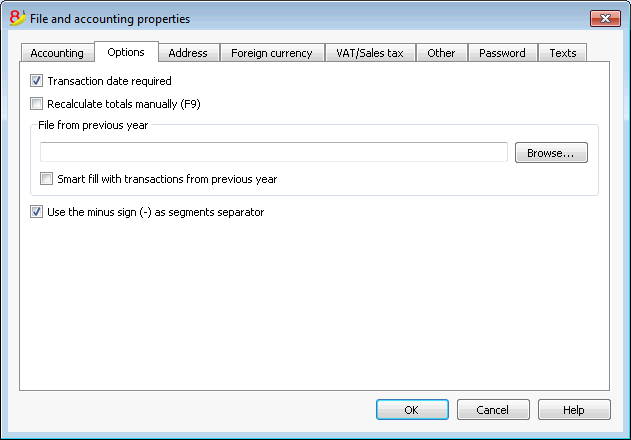
Transaction date required
If this option is activated and then a transaction is entered without a date, there will be an error message.
Recalculate totals manually (F9)
If this option is activated, the program will not automatically recalculate the principal groups of the accounting file, but the user needs to use the F9 key.
File from previous year
By using the Browse button, the user can select a file from the previous year.
Smart fill with transactions from previous year
If this cell is checked, the program keeps the transactions from the previous year in memory, and offers them as Smart Fill while the user inputs new entries.
Use the minus sign (-) as segments separator
When this option is activated, the segments have to be entered in the Transactions table with the minus (-) sign preceding the segment code. When this option is deactivated, the segments need to be entered with the colon sign (:), as in the chart of accounts. The colon needs to always preced the segment code.
Records (+/-) cost centers according to the category
This function is active only for Simple accounting and Cash book. By activating this box, the amount is entered in the cost center (positive or negative) according to the category.
If, instead, this option is not active, in order to enter a negative value, it is necessary to enter a minus sign before the cost center (-CC).
Related document: Text imput, edit and Smart fill
Address Tab
In this tab data about the company or the individual whose accounting is being handled can be entered.
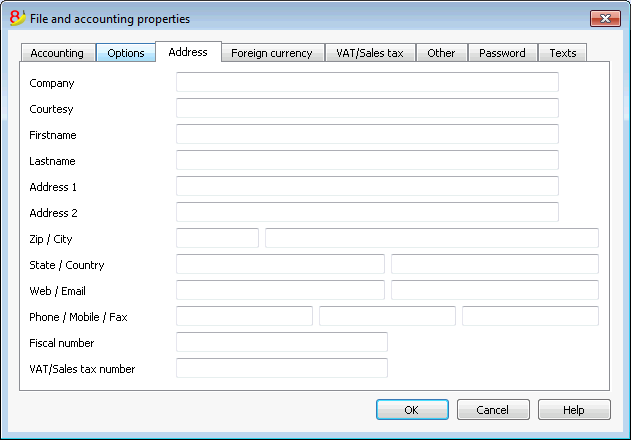
Foreign currency
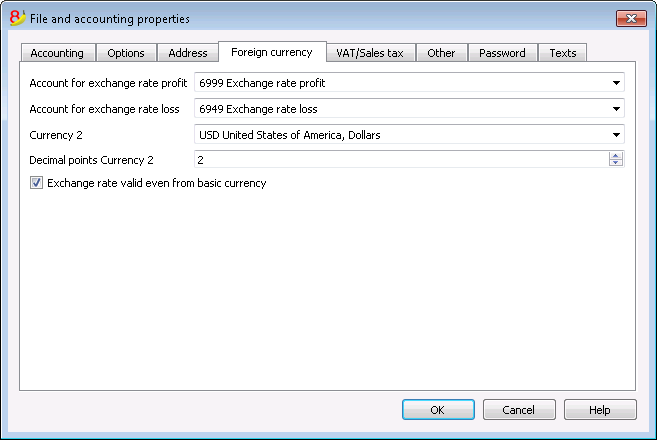
For the explanations of the different tabs please visit the corresponding page Starting a multi-currency accounting.
VAT/Sales tax
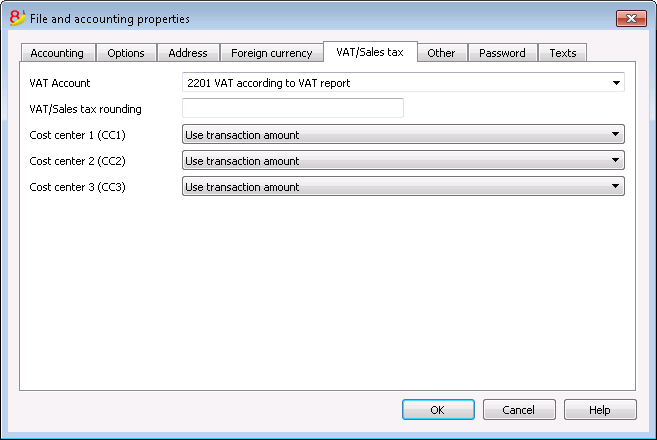
For the explanations of the different tabs please visit the corresponding page File properties (VAT/Sales tax tab).
Other Tab
Current language
There are some file texts that the program generates automatically, (e.g. the lines of the Totals table, the transactions on the account card, and the printout of the Enhanced balance sheet); in this tab, the user can indicate the language for these texts (usually the same as the creation language).
Creation language
This is the language chosen and selected when the user creates an accounting file; this language is used for the column headers. If the user wants to change the creation language, then it is necessary to convert the file to a new one using the Convert to new file command in the Tools menu.
Apps properties
List of the activated properties in the Manage Apps dialog. In order to remove an App, delete the corresponding property.
Password Tab
The files can be protected by using a password.
Entering a password in a file that doesn't have a password
- The box Confirm old password is shown in gray.
- Indicate your new password twice (New password and Confirm new password).
- Confirm with OK.
Changing an existing password
- Enter the existing password.
- Indicate your new password twice.
- Confirm with OK.
How to cancel a password
- Enter the existing password.
- Leave the boxes for the new password empty.
- Confirm with OK.
Note
Using a password does not give a high level of protection. In order to render the data truly inaccessible to third parties, it is necessary to have the appropriate cryptographic software.
Text Tab

In this tab it is possible to enter different keys in order to save extra information, such as the accountant name, for example.
Key
In this field, input the reference text (e.g.: Address).
Value
In this field, it is necessary to input the value related to the key (e.g.: Ocean Avenue, ...).
Add
This button saves the new entered data.
Remove
This button removes the selected Key.
Create Pdf dossier
In order to create a Pdf file choose the Create Pdf dossier from the File menu (or click on the corresponding icon on the Toolbar).
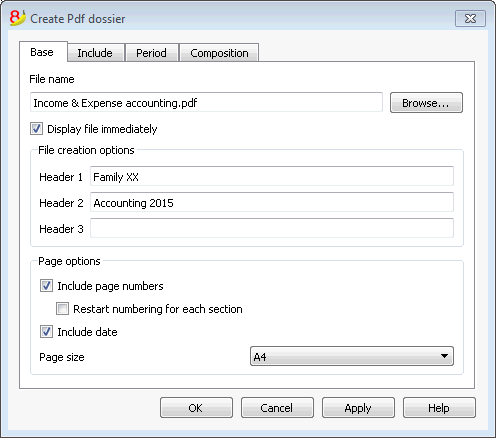
File Name
In this area you need to enter the name of the new file that the program will create to export the data. If, however, an existing file is selected by using the Browse button, the program will overwrite it with the new data.
Display file immediately
As soon as the Pdf file has been created, the software to view it will be launched. In this way, the result of the export can be seen immediately. It is best to remember that browsers like Mozilla and MS Explorer use a cache mechanism for files. When the export is made for a second time, it is possible that the user will see the previous version until the browser Reload button is pressed.
Table creation options
Headers 1, 2 and 3
These are the table headers.
Page options
By activating the page options it is possible to include:
- page numbers
- page progressive numbering
- date
Page size
You can select the page format
Other Tabs
For the explanations of the other tabs, please visit the following pages:
Recent / Favorite files
These commands display the list of recently used files and the favorite files.
In order to eliminate the list of recently used files, click on the File menu, Recent files, and on Clear list recent files.
In order to remove just one single file from the Recent Files list of the Favorites (Start page), position the cursor on the file name, proceed with a right mouse click and select Remove (Mac users should use the key combination Ctrl + right mouse button).
To make a file Favorite:
- Open the desired file
- Click on Favorite files
- Click on Add to list
To edit the list of favorites, click on:
- Favorite files
- Edit list..
- In the window that appears, edit the favorites, by using the buttons: Add, Remove, Open folder.
Associate .ac2 files with the most recent Banana version
When the Banana Accounting program is being installed, the "Associate Banana Accounting 8 with the AC2 file extension" option is activated by default; as a result all the accounting files will be opened with the new version.
If, when clicking directly on the file before opening the program, it should occur that the file gets opened with a previous version of Banana Accounting, this problem can be solved in the following way:
Windows:
- right-click on the file icon
- on the menu that appears select "Open with" and then "Choose Default Program..."
- choose the Banana program, the latest installed version.
Mac:
- right-click (or "ctrl "+ click) on the file icon
- on the menu that appears select "Get Info"
- under "Open with..." choose the latest installed version of Banana, click then on "Change All..." option.
Edit Menu
Adding and deleting rows
To insert blank rows below the selected row, follow these steps:
- Move the cursor above the row where additional rows need to be inserted
- From the Edit menu, select the Add rows command
- In the window that appears, key in the number of rows to insert
- Confirm by clicking on OK
There is still another procedure to add blank rows:
- Move the cursor above the row where additional rows need to be inserted
-
Click on the following icon
 on the Tool bar, one time for each row that you want to add. This procedure is advised when the amount of rows to be added is rather limited. The sequence for the shortcut key is: Ctrl+Enter.
To insert blank rows above the selected row, follow these steps:
- Move the cursor below the row where additional rows need to be inserted
- From the Edit menu, select the Insert rows command
- In the window that appears, key in the number of rows to insert
- Confirm by clicking on OK.
In order to delete one or more rows, select the row or rows that need to be deleted and from the Edit menu, click on the Delete rows command.
Protecting the rows
Using the Protect rows command, from the Edit menu, the user activates row protection to avoid making any changes by mistake.
The protected rows cannot be edited until, by using the Unprotect rows command, the protection is being removed.
To put protection into effect:
- Select the desired row(s) to protect
- From the Edit menu, select the Protect rows command
- Confirm the number of rows to be protected by clicking on OK.
Protected rows have light grey row numbers. In order to edit them again, first remove the protection by the Unprotect rows command in the Edit menu.
Data Menu
Find and Replace
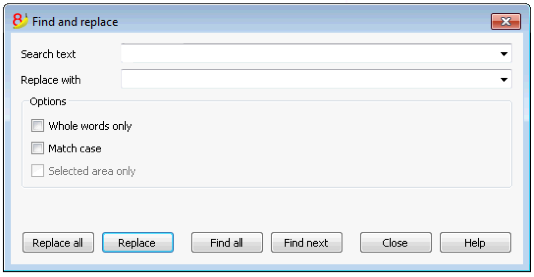
The text to be searched and the text to be used as a replacement should be inserted in the same format as the one displayed in the input field. For example, the amounts should be inserted without the separator for the thousands.
Search text
Enter the text to be searched.
Replace with
Enter the replacement text.
Options
Whole words only
If this box is activated, the program will find whole words only. For example, if the word being searched is Tot, it will not find Totals.
Match case
If this box is activated, the program will make a distinction between capital letters and small letters.
Selected area only
If this box is activated, the program will only search the information in the selected area.
Replace all
This key will replace the desired data throughout the whole document at once. When you need to change data that are being repeated in the Accounts, Categories, Transactions and VAT codes tables (for example, an account number or a VAT code), you can also use the Rename function.
Replace
This key will replace one data at a time.
Find all
Looks for all the information, according to the entered keyword, and displays it in the Information window in the lower part of the screen.
Find next
Looks for the following information item.
Find
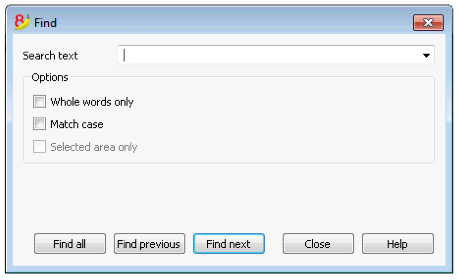
Search text
Enter the text to be searched. Amounts must be entered without separators.
Options
Whole words only
If this box is activated, the program will find whole words only. For example, if the word being searched is Tot, it will not find Totals.
Match case
If this box is activated, the program will make a distinction between capital letters and small letters.
Selected area only
If this box is activated, the program will only search the information in the selected area.
In order to begin the search, click on the Find button. The first piece of information corresponding to the request will be selected. To continue the search and find the next piece of information, select the Search next command from the Data menu, or else use the F3 key.
Rename
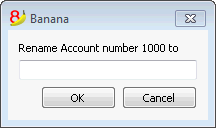
This command allows the user to change the account or category number (accounts or categories table) and the VAT code (VAT Codes table), without having to enter the necessary modifications in the transactions.
In order to rename, you need to:
- position yourself with the mouse on the cell that has to be changed (account/category number, VAT code);
- click on the Rename command from the Data menu;
- enter the new name in the appearing window.
Then, the software operates as follows (for example if you rename an account):
- verifies that there is no other account or group with the same number; if there is it the software will alert and ask if you want to proceed anyway. Please note that it is not possible to have to identical account numbers in the accounting plan;
- verifies where the account to be renamed has been used and makes sure that the rows are not protected or blocked; if they are it will alert that the rename operation cannot be carried forward;
- substitues the account number wherever it has been used, in the tables and in the File properties, with the new account number.
The software does not recalculate any total, simply renames the account number.
Go to
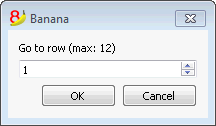
Select the Go to... command from the Data menu to open a window allowing the user to move to a desired row. When a selection table is active (for example, an account card), by using the Go to original row command, the program automatically takes the user to the corresponding row of the Transactions table.
Extract and sort rows (Extract)
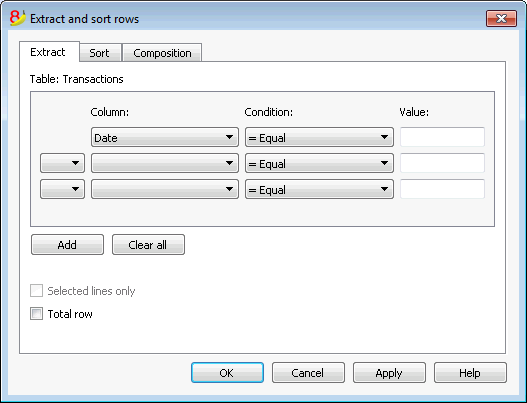
The Extract and sort rows command is available from the Data menu. This command is different from the Sort rows command, since it creates a new table where the result of the extraction or the sort is shown. The rows of the original table will not be changed.
Extract
In the Extract table you can click on the row number (underlined) to return to the row of the original table.
Column
You need to select the column you wish to extract the data from.
Condition
You need to select the condition for the extraction (ex. Greater, less, contains text, starts with, ends with, ...)
Value
In this field you must enter the text you want to use as comparison in relation to the condition (for example, if the condition is = Equal, entering 25.01.2015 as value, the program will extract all transactions with date January 25, 2015).
The value is a date if the selected column was Date, a numeric value if the selected field was Amount, a text if the selected columns was Description.
Add
This button allows you to add new fields for the extraction.
Clear all
This button allows you to clear all the settings you have entered for the extraction.
Sort selected rows only
This option is only available when rows have been pre-selected. If activated, only the selected rows will be sorted.
Total row
If this option is activated, the program will show the total row for the extracted rows with an amount.
Sort
The sorting columns are being indicated. The options are the same as for the Sort rows command.
Composition
The explanations of this window are available on the following web page: Composition.
Example accounts list
It happens sometimes that you want to have a list with only the accounts.
- Put yourself in the Accounts table.
- Impart the "Extract and Sort" command
- In column, choose "Account"
- Under condition, indicate "Not empty"
In case you wish to have accounts sorted by description
- Put yourself on the "Sort" section
- In the "Sort by" box, indicate the "Description" column
If you want to display only certain columns, you can create a new view with the Tables setup command.
Extract and sort rows (Sort)
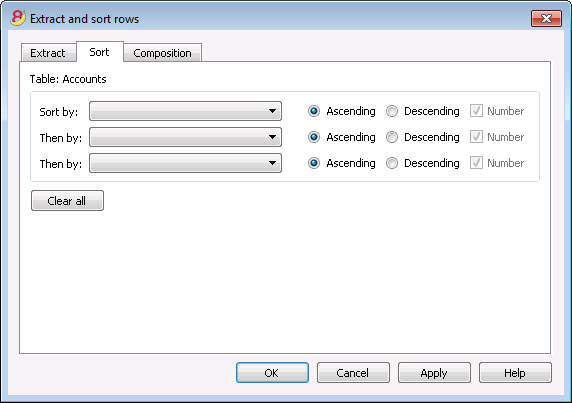
The Extract and sort rows command is available from the Data menu. This command is different from the Sort rows command, since it creates a new table where the result of the extraction or the sort is shown. The rows of the original table will not be changed.
Sort by
You can choose the desired sorting criteria.
Then by
The program allows you to choose two other sorting criteria other than the main one.
Ascending
The rows sorting is done in an ascending order, taking into consideration the selected sorting criteria (date, doc, ...)
Descending
The rows sorting is done in a descending order, taking into consideration the selected sorting criteria (date, doc, ...)
Number
If the column chosen as sorting criteria only contains numbers, you need to check this option.
Clear all
This button allows you to clear all the settings you have entered for the extraction.
Sort rows
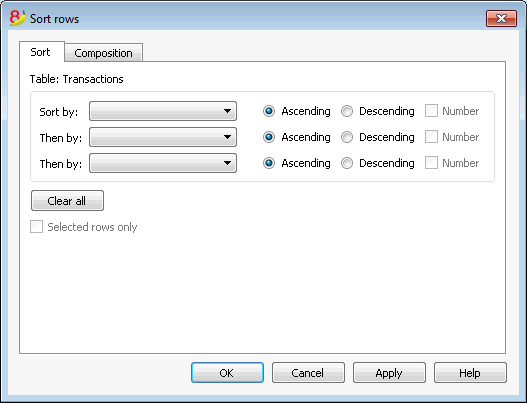
The Sort rows command is available from the Data menu. Please take note of the fact that the Sort rows command is different from the Extract and sort rows... command, since it changes the order of the rows in the table you are currently working on, according to the sort keys you entered. We advise you to be very careful before pressing the OK button, especially if you are working in the Accounts Table, because you might completely change your accounting plan structure.
The rows on the table can be sorted according to the content of the columns. It is possible to enter up to three sorting keys:
Sort by
From the dropdown list choose the desiderd sorting key
Then by
You can here choose an additional sorting key other than the first one
Ascending
The rows sorting will be in an ascending order, according to the selected sorting key (date, doc, ...)
Descending
The rows sorting will be in a descending order, according to the selected sorting key (date, doc, ...)
Number
You need to activate this option if the sorting key you chose only contains numbers
Clear all
This button allows your to clear all settings previously chosen as sorting criteria
Selected rows only
This option is only available when rows have been pre-selected. If activated, only the selected rows will be sorted.
Tables setup
This command allows you to manage
- The Tables:
These are the elements that contain the data in a format or rows and columns.
- The Views:
Indicated under every table.
These are the elements that define the way in which the columns of the table are displayed.
Thanks to the views, one can define which columns need to be visible, the sequence of the displayed columns and the way in which they are displayed.
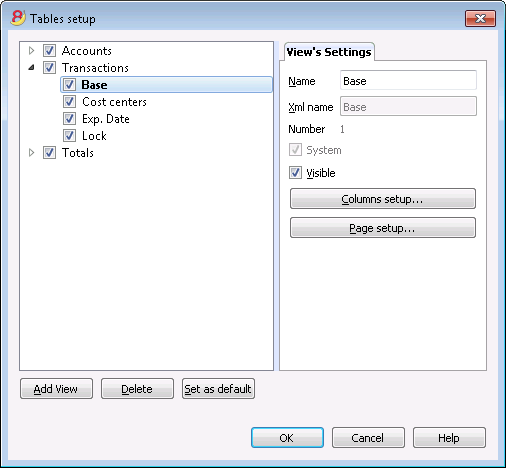
View's Settings
In order to add tables, please go to the Add new functionalities command.
For each table, you can define:
- Name
The name of the table in the file language. This field cannot contain spaces or special characters.
It can only be changed for added tables. - Xml name
The name this is being used for the programming. This field cannot contain spaces or special characters.
It can only be changed for added tables. - Header
The name that appears in thetables list - Visibile
Indicates whether the table is visible or not.
Manage Views
Name
It is possible to enter a new name for the selected View.
Xml name
This is the View name for the Xml export. For system Views this name cannot be changed.
Number
This is a number automatically given to the View by the program.
Visible
When selecting this checkbox the View will be visible.
System
If this checkbox is selected the View is a system View and cannot be deleted or edited.
Columns setup...
Displays the Columns setup page that allows to edit them, both in displaying them as well as in setting them up.
Page setup...
This button leads to the page format settings.
Add...
This button adds a new View to the active table.
Delete...
This button deletes a View.
Set as default
Defines the View that is being used.
Columns setup
New columns
In the new version Banana Accounting Plus, in the Transactions table, we have added new columns for the integrated Invoicing and the new Balance column that identifies on each row, any differences so you can immediately correct them.
We advise you to switch now to Banana Accounting Plus and take advantage of the many new features.
Display Tab
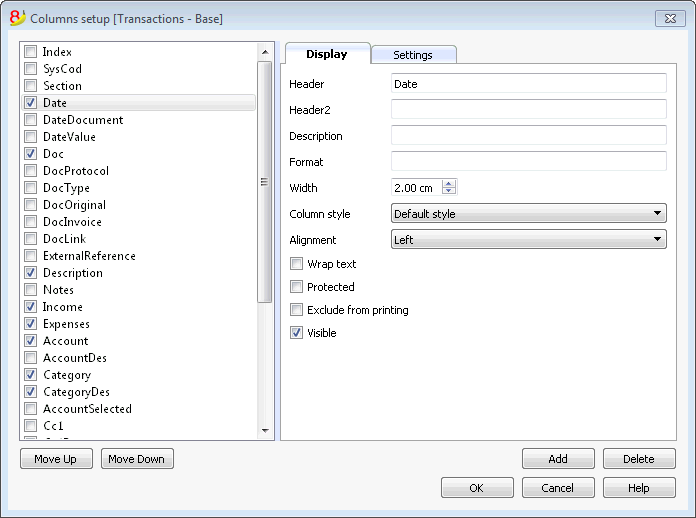
Header
This is the column header.
Header 2
This header is used by the program for only a few fields (e.g. Amount column).
Description
This is the description of the field. This description will be shown as a tooltip.
Format
This is the format to show numbers, date and time (see chapter at the end of this page).
Width
This section defines the horizontal size of the column.
Column Style
This is a drop-down menu that indicates the style to be used (Format, menu, see sub chapters). This style has priority over the style of the row.
Alignment
The user can choose whether to align the text right, left or center in this drop-down menu.
Wrap text
This option allows the user to view the input text on more than one line.
Protected
This option allows the user to protect the entire column so that no data can be input or edited.
Exclude from printing
When this option is activated, the field will be excluded from printing.
Visible
This option allows the user to make column visible.
The tables can be altered. Fields can be added, headers can be changed, and column sizes and the order in which they are shown can be altered.
Move up, Move down
The fields are listed in the order in which they appear on the table being used. The visible fields are the ones with a checkmark.
In order to alter the order in which they appear simply select the field you wish to move and drag it up or down.
Add
This button adds new fields (columns) to the current table. Field added by the user are just information fields; the program does not make any calculation on numeric data.
Delete
This function is used to delete a field (column) from the list. A system field, however, cannot be deleted.
Settings Tab
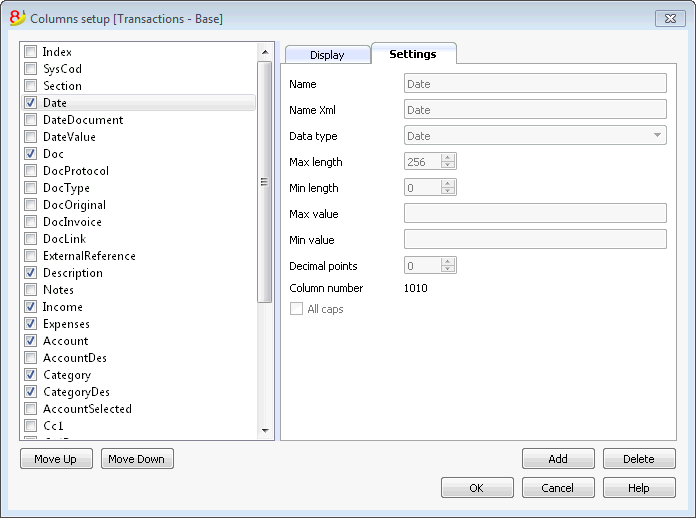
Field name
This is the name of the active field and it is automatically inserted by the program. It cannot be modified.
Field name Xml
This is the name of the active field in the Xml format and it is automatically inserted by the program. It cannot be modified.
Data type
It is possible to choose between the following predefined types: Text, Number, Amount, Date, Time.
Max and Min length
Maximun and minimum field length.
Max and Min Value
It is possible to enter minimum and maximum values (numbers or characters).
Decimal points
It is possible to define the field decimal points
Field number
This is a number automatically given to the field, and has uniquely a technical purpose.
All caps
By clicking this options all fields data will be shown in caps characters.
Date, hour and number format
When the format is modified, the way the date, time and numbers are shown, changes.
If no specific format is specified, the default format of your operating system will be used (date, time and numbers as indicated on the control panel).
In the Format area of the Set up fields/Edit attributes command (Data menu) the user can use other formats. Types of formats, with some examples, are listed below:
|
Date format |
Examples for date |
|
d mm yy |
1 01 15 |
|
dd m yy |
01 1 15 |
|
ddd mmm yyyy |
Fri Jan 2015 |
|
dddd mmmm yyyy |
Friday January 2015 |
|
The letter “d” (day) indicates the day, the “m” (month) indicates the month, and the “y” (year) indicates the year. |
|
|
Time format |
Examples for time |
|
hh:mm:ss:zzz |
04:04:36:089 |
|
h:m:ss:zz |
4:4:36:89 |
|
Naturally the user can also invert the order of the elements making up the date or the time as desired (e.g.: mm dd yyyy). |
|
|
As far as the separators are concerned, the user can choose between all of those available on the keyboard (for example: #, @, -, /, ., etc.). |
|
|
Numbers Format |
Example for numbers |
|
0. |
259 |
|
0.00 |
258.85 |
|
0.000 |
258.848 |
|
The number of decimal spaces in a number field can be edited according to the user’s needs. Actual calculations are made using all the inserted decimal numbers. Rounding is only done for what is shown on screen. |
|
New column
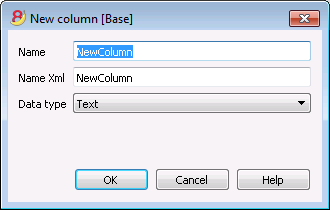
Field name
Enter the field name of the column to add.
Field name Xml
The name of the column to export in Xml and in scripts.
Data type
It is possible to choose between the following predefined types: Text, Number, Amount, Date, Time.
New view
View name
Enter the name of the view you want to add.
View name Xml
This is the view name for the Xml export.
Format Menu
In the Format menu the following commands are present:
Default style
This is the default style for the whole file.
Points
Use different points to define the font size.
Bold and Italic
Modify default style
In order to change the default style:
- attribute the desired style to a row;
- select the Modify default style command from the Format menu
All the rows with the original defaul t style will then be shown in the new default style.
Calculate row height
When the text for a row is very long, the Calculate row height command from the Format menu allows the user to view it completely, adapting the height of the row. Activate this function on condition that, in the field attributes (Data menu, Set up fields command – Edit attributes button), the Wrap text option has been selected.
Calculate all row heights
This command operates in the same way as the previous command except that it works on all the rows in a table instead of only one.
Page break
At any point in a file, the user can insert a page break
To insert a page break:
- place the cursor on the first row where the new page is to be created;
- open the Format menu;
- select the Page break command
To remove a page break:
- place the cursor on the row with the page break;
- open the Format menu;
- select the Page break command again
Highlight rows with colors
In order to highlight the rows:
- Select the rows to be highlighted and on the icon
 , click on the first symbol if you want to color the background, and on the second one if you want to color the text.
- In order to deactivate the color, select the row(s) and click on No color (present in the menu of each color).
Tools Menu
File info
The File info command, from the Tools menu, displays the characteristics of a file.
Columns
By activating the Complete view also the Xml columns are displayed, through which it is possible to transfer the values automatically when exporting the table.
- Section: the Group name of the values
- ID: the specific and explicit identification of the value
- Description: contains an explanation of the value
- The rows in bold print are the section titles that group the different elements together
- Value: the formatted value
- Section XML: The name of the section in English
- ID XML: the identification in English
- Value Xml: the field contents in Xml format.
The Section XML and the ID Xml identify the value unambiguously.
Add new functionalities
The Add new functionalities command is in the Tools menu. ff
The available option may differ according to the file type.
Add a new simple table
It allows you to add tables completely manage by the user.
Once is added, the table cannot be removed anymore.
You need to indicate the table's name.
The table will have two predefined columns:
- Id column - to indicate a selection group
- Description column - to enter a text
Inside the table you can add new columns with the Columns setup command from the Data menu.
New Documents table
Information are available at the Documents Table page.
Add addresses columns in the Accounts table
For accounting files.
This functions allows you to add, in the Accounts table, specific columns to enter clients, suppliers, or members addresses.
The program will add in the Accounts table the following items:
- the Addresses view, where the addes columns are visible
- the columns that allow you to enter addresses data and other information
- In order to make one or more of these columns visible also in other views, you need to use the Columns setup command from the Data menu.
- In order to create views with specific columns, you need to use the Tables setup command from the Data menu.
Add Budget table
For accounting files.
This function adds a Budget table, where you can enter budget transactions.
The program will do the following operations:
- Add the budget table, that will show the budget data indicated in the Accounts table (if present)
- Lock the budget column in the Accounts table
From now on, the amounts contained in this column, will be calculated based on the budget transactions and on the period defined in the File and accounting properties.
More information are available at the Budget page.
Edit the VAT Amount type column in the transactions
For accounting files with VAT management.
This function allows you to edit the Amount type (VAT amount type) in the Transactions table.
This column allows you to enter, for each transactions, when it is necessary, one of the following VAT amount types:
0 (or empty cell) - it means VAT included (with VAT/taxes)
1 = VAT excluded - it means VAT excluded (without VAT/taxes)
2 = Tax amount - the transaction amount is considered 100% VAT/taxes amount
For each transaction, the programs automatically fills in the data as setup in the VAT Codes table (for each code). If however, exceptionally, this needs to be changed, you can manually enter 1 or 2 in the Amount type column.
Program options
In the Program options window, several technical options are possible for the accounting file.
In the following pages you will find more detailed information.
Interface

Program
Language
The Program Language is the language used by the program. Use this drop-down menu to select a language if the user wants to use a language different from the default or if the default is not available.
Font type
This drop-down menu allows the user to select the desired font.
%Zoom
If the user wants the data on the table to be shown in another size, adjust the percentage of Zoom here.
Show negative numbers in red
The negative numbers and amounts will be shown in red in the tables.
Startup
Check for updates
This option establishes a connection to the Banana.ch SA website and checks if there is an update compared to the version that is used.
Display start page
The news start page is shown.
Show recently used files
In the File menu, all the most recently used files are listed.
Start Web server
Makes it possible to access Banana Accounting data through external programs.
Editor
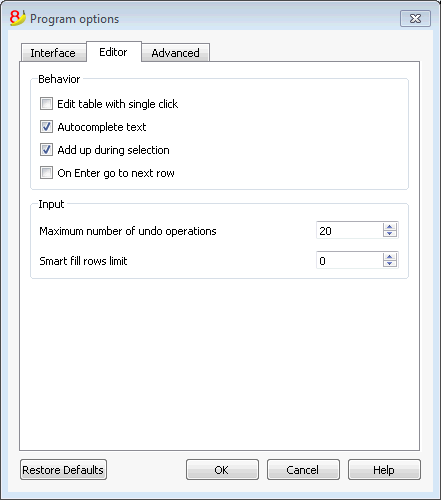
Behavior
Edit table with single click
By activating this option, a single click on the selected cell is sufficient to enter in the modification mode. If the function is not activated, you have to double-click on the cell in order to enter in the modification mode.
Autocomplete text (Smart fill)
By activating this option, the program automatically selects the first draft text in the drop down list and automatically fills it in the row where you are.
Add up during selection
By activating this option, the program will add up the selected amounts. Deactivate this function if this instantaneous addition slows certain operations down. One can select non-adjacent amounts by holding down the Ctrl key while selecting individual cells with the left mouse button.
On Enter go to the next row
By activating this option, the cursor will place itself on the next row when pressing the Enter key.
Input
Maximum number of undo operations
Insert the maximum number of undo operations (one at a time) when using the Undo command from the Edit menu.
Smart fill rows limit
When inserting data, the program reads the data that has already been entered and tries to suggest how to complete an entry. In cases where there are many rows, this function could slow down the process.
The user can define a limit for the number of rows, above which the smart fill will not be used. If there is no value entered or zero, smart fill will always be used.
Advanced
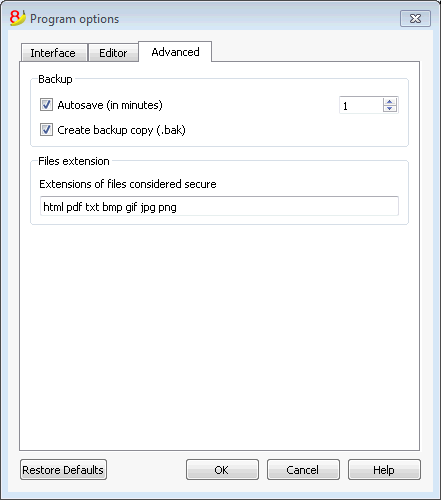
Backup
Autosave (in minutes)
This option allows saving the file automatically according to the desired frequency (in minutes). The program saves the data in a file called auto backup + file name. If the program or the computer crashes, the data can be recuperated by opening this file and saving it with a name (Save as...) from the File menu.
Create backup copy (.bak)
When the user saves to disk using the same name, the version of the file that already existed is renamed with a .BAK extension.
Files extension
Extensions of files considered secure
This option defines the file types that the software consents to open with a double click on the DocLink column of the Transactions table. This prevents from opening non-secure files by the program.
Restore Defaults
If some settings have been altered, by using this button, the default settings will be restored.
Developer
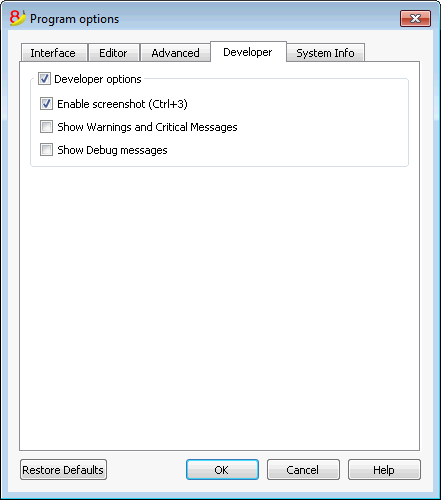
Developer options
This tab includes useful options fors cripts, apps and http pages developers for Banana Accounting.
Enable Screenshots (Ctrl+3)
If this option is activated, with the key combination Ctrl + 3 it will be possible to save screenshots of the program tables and dialog windows.
Show Warnings and Critical Messages
If this option is activated the program will show warning and critical messages.
Warning and critical messages allow to check that the program is working properly during scripts or add-ons execution or during web server calls. This option is meant for scripts, add-ons or http sheets developers.
Show Debug messages
If this option is activated Debug messages will be shown to the user.
This option needs to be activated only if asked by the Banana Accounting technical support.
System Info
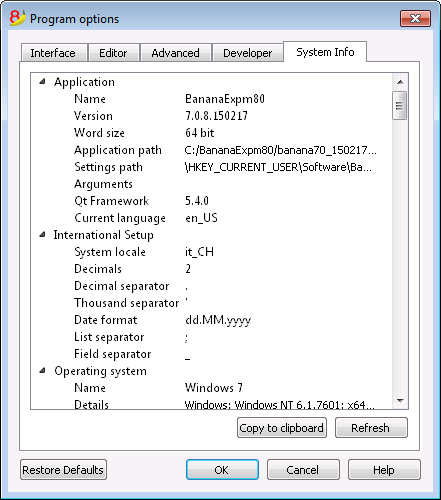
The System Info card displays information on the Operating System and the work environment. Our technical support might ask for this information. In this case, click on the "Copy to Clipboard" button and paste the data in the e-mail or the contact form.
Apps Menu
Banana Accounting applications are Javascript applications that use Banana specific programming interfaces (API Application Program Interface).
Thanks to the Banana applications, users have the ability to add new extensions that cover a wide range of needs: reporting, calculating, export, import and much more.
In order to see all available Apps and for more information, please visit the BananaApps list page.
Apps Menu
The Apps menu allows you to run the applications and manage them (add, remove, enable, ...).
Only applications that fulfill the necessary requirements are listed in the Apps menu:
- Applications of the same type of the current file
- In the File properties, they should have the properties required by the Banana application
You can assign the required properties to the current file with the Apply property button.

Add/Install a Banana App by downloading the file
In order to use a Banana application, you first need to add it in the Info window list of the Apps menu::
- Download and save the application file on your computer
- You can choose freely where to save the Banana App file. Usually:
- Use the Accounting directory, in case the file relates to a specific accounting file
- Create a directory for the BananaApps, where the applications that are being used for more than one accounting can be saved.
- The Banana application is a text file
If you click on the link containing a Banana application, you will see the Javascript program.- Use the Save page as command from your browser
- Or, instead of clicking on the link, place yourself on the link, right click and choose the Save destination command
- You can choose freely where to save the Banana App file. Usually:
- Add the Banana application to the list of available applications:
- Apps menu -> Manage Apps...
- Manage Apps button (at the bottom of the dialog window)
- Add from file button (at the bottom of the dialog window) and select the previously saved file (file with .js extension)
- Click on the Open button.
How to execute a Banana application
- Start Banana Accounting 8
- Open the desired accounting file
- Click on the Apps Menu
- Click on the application that appears in the menu
The program executes the application automatically.
Develop/Create a new application
You need to create a text Javascript file matching the requirements for the Banana applications.
In order to write the text file we advise you to use a Text Editor specific for programming, also available for free (such as, for example, Notepad++).
In order to develop a Banana application, it is better to start from an existing project.
- Start from an existing project form the github.com\BananaAccounting site
- Refer to the documentation for developpers on our website
- Install the application with the Manage Apps command
Manage Apps
This dialog window allows you to install, remove and execute Banana applications.
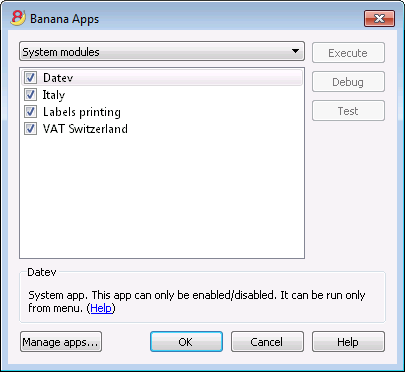
List of available applications
In this list you can find all the application that you added (installed).
Enable/Disable
By activating/deactivating the checkbox next to the application name, you will enable (disable) the applications.
Only enabled application will be visible in the Apps menu.
If an application appears in a light grey color, it means that the program does not find the Banana application file. If the file has been moved, you need to remove the application and add it again.
Information on the selected application
The program gives the following information:
System applications
The system applications are those included in the software that can be enabled or disabled:
The other applications listed are the ones installed by the user.
Application ID
The internal application ID used to save the application settings
The required file type
The file type that the application requires to be executed.
This is the directory number. 100.* means that the application requires a double entry accounting file.
Properties of the required file
A text that must be entered with the Apply properties button or manually in the File properties.
Apply properties
Enters, in the Properties of the active file, the property required by the application.
If the button is not active, it means that the current file type is not supported by this application.
Side buttons
Execute
Runs the selected application.
Debug
Run the selected app in debug modus.
Test
Opens a dialogue with details such as id, date, author, etc. of the App.
Lower buttons
Manage Apps
Opens a dialog window where you can add or remove the Apps.
Help
Opens the Help page of the App.
Notes
The Apps management is not yet as smooth as we would like it to be; we are working to improve it.
Print label
From the Labels -> Print command from the Apps menu, you can print the addresses. In the different tabs you can choose different settings, from the label format to le selection of the addresses to be sorted and printed. Each setting can be saved with the Compositions.
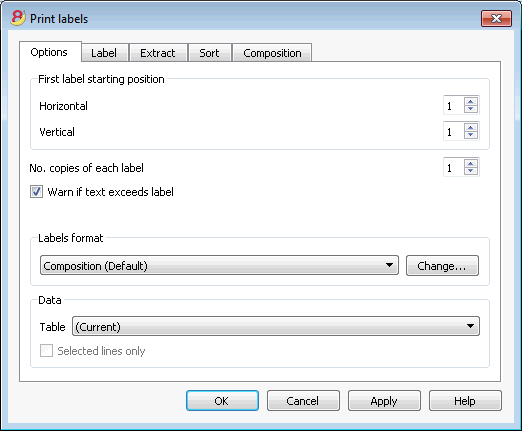
For the explanations of the different tabs, please consult the following pages.
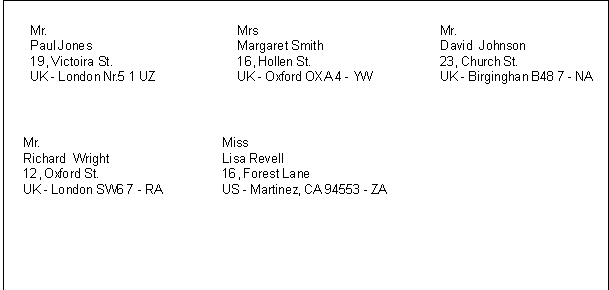
Options

First label starting position
Decide on the position of the first label. For example, if 1 is entered in the horizontal and vertical fields, it refers to the upper left-hand corner of the page.
Number of copies for each label
The value of 1, in this field, means only one copy of each label is wanted.
Warn if text exceeds label
If the text goes beyond the margins for the label, the program will warn the user by sending an error message if this cell is activated.
Labels format
You can choose between the label formats available in the list.
If the list doesn't have the format you wish, through the Change button, you can access the Label format dialog windos where you can choose your desired settings.
Data
Indicate the data source for the labels to be printed:
- Table - the current table data will be printed. If a data extraction occurred, only the extracted data will be printed.
- Addresses - all table addresses will be printed
- Selected rows only - only the earlier selected addresses will be printed.
Label
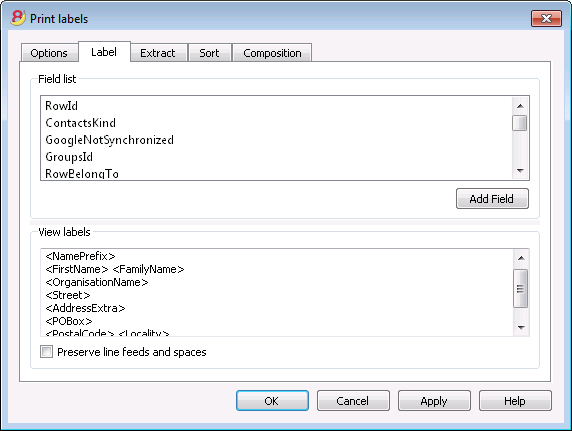
Field list
This is a list of all possible label fields; to insert a field, it is possible to work in two ways:
- Double-click on an element from the list
- Click on an element from the list, confirming with the Add Field key.
The field selected will be inserted at the position of the cursor in the View labels area. One can directly insert fields by writing the field name between the < Less and > Greater symbols.
View labels
Shows the disposition of the fields. The entries "<NAME FIELD>" will be replaced with the corresponding value of the table.
The symbols Greater and Less are considered field delimiters. In order to make them appear in the text
write "\<" for "<";
write "\>" for ">"
and write "\\" for "\"
Preserve line feeds and spaces.
In case this option is deactivated, the program does not take eventual spaces and empty rows in consideration.
Extract
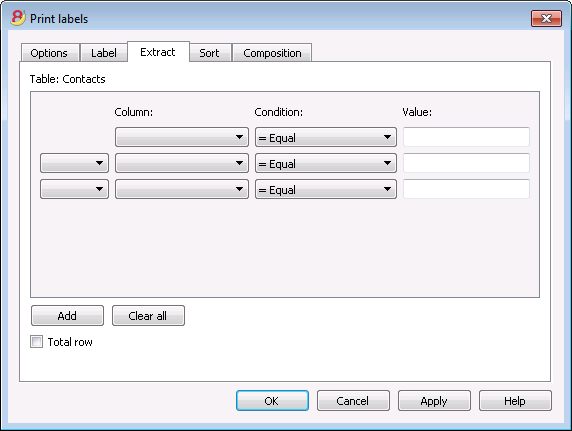
Sort
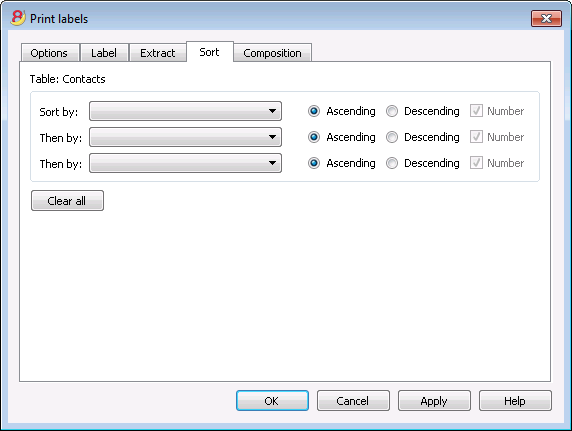
Composition
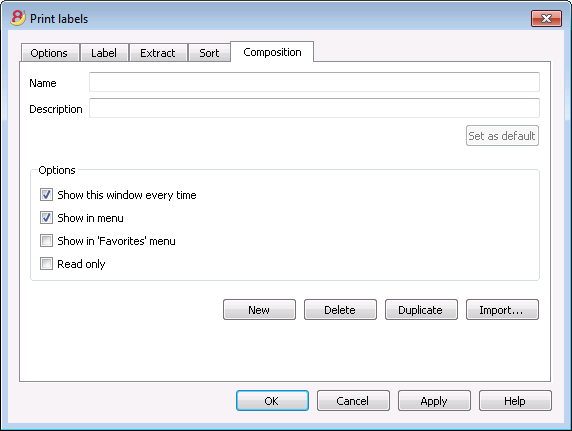
Labels format
From the Apps menu, Labels command, Formats option, you can access the labels setup.
The program already offers many predefined label formats; it is however possible to setup personalized parameters through the Default command.
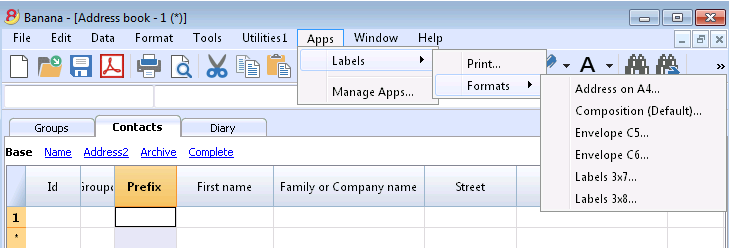
The program already offers many predefined label formats; it is however possible to setup or edit the default parameters, as well as your customized ones, through the Composition (Default) command.
Page settings - Options
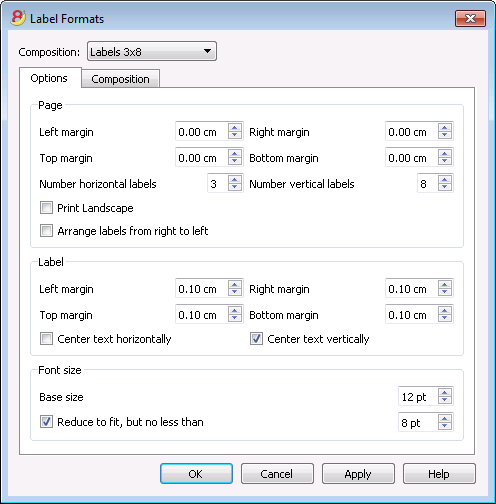
Page
Margins
Input the size in centimeters; if no size is entered, the margin sizes will be zero.
Number of horizontal labels
Input the number of horizontal labels there are on the page.
Number of vertical labels
Input the number of vertical labels there are on the page.
Print Landscape
The page will be printed horizontally if this cell is activated.
Arrange labels from right to left
The labels will be printed from right to left and from top to bottom.
Label
Margins
It is possible to input a margin for each label; the values for the label margins must be input in centimeters.
Center text horizontally
Select this option to horizontally center the text for each label in the cell.
Center text vertically
Select this option to vertically center the text for each label in the cell.
Font size
Base size
This field shows the default font size.
Reduce to fit, but no less than
The program calculates the maximum font size possible for a given label, starting from 14 points all the way down to 8 points. The calculation is made taking into account both the height and width of the label. If a label has a line that is too long (or has too many rows) to be printed, then an error message will appear in the message window. Even if it is incomplete, the label will still be printed.
Note:
the printers will not print on the whole surface of a page because they need minimum margins. The program tries to adapt the single labels to the margin values required by the printer.
Page settings - Composition
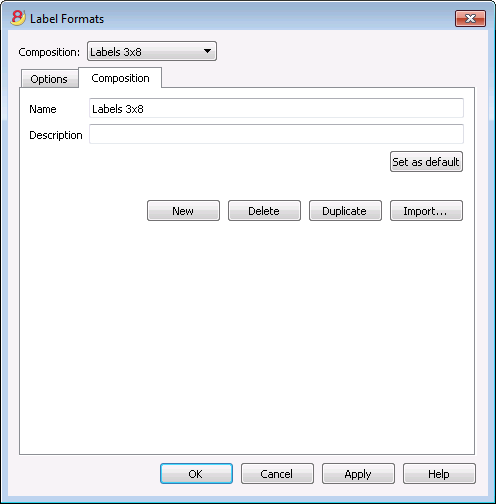
All the settings that have been activated in the "Options" tab can be saved by using the Compositions and can be displayed when needed.
For more information on this section, consult the Composition page.
Help Menu
The Help menu gives access to the followings commands:
- User's guide - access to all documentations and explanation of all technical and accounting topics
- Keyboard shortcuts - list of all keyboard shortcuts with detailed use description
- Check for updates... - access to our website to check if there are newer versions of the software
- Support center - access to Banana support web page
- Feedback - link to our website contact form where you can leave a feedback
- Register - access to Banana web page for users registration
- Manage license key - allows to enter the license key for the program
- About Banana Accounting - access to technical information about the program such as version number, serial number, Copyright.....
Keyboard shortcuts
You can also consult the list of keyboard shortcuts directly from the program, by choosing Keyboard shortcuts from the Help menu.
Short-cut Keys
|
Accounting Keys |
Description |
|
F9 |
Perform simple recheck. |
|
Shift+F9 |
Perform global recheck. |
|
F6 |
This key executes different functions depending on the column the user is working on. The functions are explained in the information window. |
|
Alt+ Left click |
Display the Extract rows table or the Account card table when clicking on an account number. |
|
. (Full stop/Period) |
On a date column insert the current date. |
|
Editing Keys |
Description |
|
Enter, Tab |
Confirming keyed-in text and advance one cell. |
|
Alt+Enter |
Confirming keyed-in text and advance one row. |
|
Shift+Tab |
Confirming keyed-in text and return to previous cell. |
|
F2 |
Edit content of cell. |
|
Double click |
Edit content of cell. Under the program options you can select to edit content of cell with a single click. |
|
Backspace, Space |
Delete content of current cell and edit the content. |
|
Backspace |
Delete preceding character. |
|
Del |
Delete subsequent characters. |
|
Ctrl+C |
Copy selected text or cells. |
|
Ctrl+V |
Paste copied text or cells. |
|
Del |
Delete content of selection. |
|
not assigned |
Delete text from the cursor point to the end of the cell. |
|
F4 |
Copy previous cell from same column. |
|
Shift+F4 |
Copy previous cell from same column and advance one cell. |
|
Ctrl+Shift+C |
Copy selected rows. |
|
Ctrl+Shift+V |
Insert copied rows. |
|
Ctrl+- |
Delete selected rows. |
|
Ctrl++ |
Insert rows before position of cursor. |
|
Ctrl+Enter, Ctrl+Return |
Add one row below position of cursor. |
|
Moving keys |
Description |
|
Left |
Scroll towards left. |
|
Right |
Scroll towards right. |
|
Up |
Scroll up. |
|
Down |
Scroll down. |
|
PgUp |
Scroll up one screen page. |
|
PgDown |
Scroll down one screen page. |
|
Home |
Scroll to beginning of row. |
|
End |
Scroll to end of row. |
|
Ctrl+Home |
Scroll to top-left angle of table. |
|
Ctrl+End |
Scroll to bottom-right angle of table. |
|
Ctrl+Left |
Moves towards left to the edge of the current data region. |
|
Ctrl+Right |
Moves towards right to the edge of the current data region. |
|
Ctrl+Up |
Moves up to the edge of the current data region. |
|
Ctrl+Down |
Moves down to the edge of the current data region. |
|
Alt+PgDown |
Next view. |
|
Alt+PgUp |
Previous view. |
|
Ctrl+PgDown |
Next table. |
|
Ctrl+PgUp |
Previous table. |
|
Ctrl+Tab |
Next window. |
|
Ctrl+Shift+Backtab |
Previous window. |
|
F5 |
Scroll to desired row by keying in row number in active window. |
|
Shift+F5 |
Go to original row. |
|
Selection Keys |
Description |
|
Shift+PgUp |
Select column moving upwards, page by page. |
|
Shift+PgDown |
Select column moving downwards, page by page. |
|
Shift+Left |
Select row to left. |
|
Shift+Right |
Select row to right. |
|
Shift+Up |
Select upper column. |
|
Shift+Down |
Select lower column. |
|
Shift+Home |
Select back to start of row. |
|
Shift+End |
Select forward to end of row. |
|
Ctrl+Shift+Home |
Select back to top of table. |
|
Ctrl+Shift+End |
Select forward to end of table. |
|
Ctrl+A |
Select entire table. |
|
Other Keys |
Description |
|
Ctrl+F4 |
Close active window. |
|
not assigned |
Exit program. |
|
Ctrl+N |
New file. |
|
Ctrl+S |
Save. |
|
Ctrl+O |
Open. |
|
Ctrl+P |
Print. |
|
Esc |
Cancel operation. |
|
Ctrl+Z |
Undo operation. |
|
Ctrl+Y |
Redo operation. |
|
Ctrl+F |
Find. |
|
F3 |
Find next. |
|
Ctrl+B |
Bold text. |
|
Ctrl+I |
Italic text. |
|
F1 |
View help. |
|
Multimedia keyboard |
Is performed by |
|
Function key (eg. F6) |
Press the fn key as well as the corresponding function key (e.g. Fn+F6). |
Error messages
If the program shows error messages:
- Update your software to the latest available version, by downloading it at the following page:
http://www.banana.ch/en/node/3215 - Check that the opening balances are correct
- Recheck the accounting file by pressing Shift+F9
- If you have a multi-currency accounting, check that the exchange rate differences have been calculated
- Search for differences in the transactions with the Search for transaction differences command from the Account1 menu.
Favorites menu
The names of all the created Compositions appear in the list of the "Favorites menu". When it is necessary to display or print a favorite, just select it from the list of the Favorites menu, without having to edit or modify its configurations.
When you have created compositions for the first time, in order to display them in the Favorites menu, you have to close and reopen the accounting file.
Composition
Compositions are saved personalized settings that can be used at a later date.
It is possible to create Compositions for the following accounting data:
- Account cards
- VAT report
- Enhanced Balance Sheet
- Enhanced Balance Sheed by groups
- Reports
- PDF dossier
- File export
- Extract and Sort rows
- Addresses / Labels
How to obtain Compositions
Compositions can been obtained mainly through the Account1 menu when it is about the Accounting cards, the Enhanced Balance sheet, the Enhanced Balance sheet with groups, the Reports and the VAT report, and from the File menu for the compositions concerning Create Pdf dossier and Export file.
- Once the document to be created has been chosen, start from the corresponding menu (Ex. Account cards or Enhanced balance sheet by groups...) and click on Default
- from the dialog windows that appears click on Composition and on the New button
- enter the name of the new composition
- check the desired options
- click on the Apply button
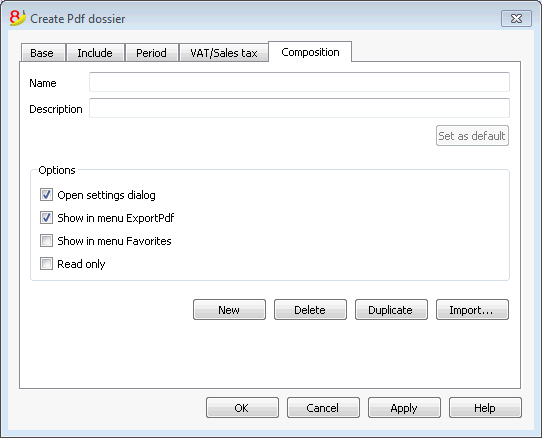
Each composition, once created, will appear in the menu of the corresponding command and can be edited, renamed, duplicated or deleted.
Name
Enter a name to identify the composition (for instance, Quarterly Report).
Description
Enter the description for the composition.
Show this window every time
If activated (default), when selecting a composition from the menu, the dialogue for editing the settings will be shown. If not activated, the preview of the requested report (Balance sheet, report, etc.) will be shown directly.
Show in menu... (depending on the menu/command in which one is being positioned)
If this option is activated, the composition will appear in the menu of the command.
Show in 'Favorites' menu
If this option is activated, the composition will appear in the Favorites menu.
Read only
If this option is activated, it will not be possible to edit the settings.
New
This button allows you to create a new composition.
Delete
This button allows you to delete an existing composition.
Duplicate
This button allows you to duplicate a composition.
Import
This button allows you to import a composition from another Banana Accounting file.
Apply
This button allows you to save the chosen settings for the new composition.
Display in the starting menu
According to the menu you are in, the Default composition and your personal saved compositions will be shown.
Composition (Default)
This is the composition used by default from the program, if no other composition has been created.
In the following example the menu of the Accounting reports is shown.
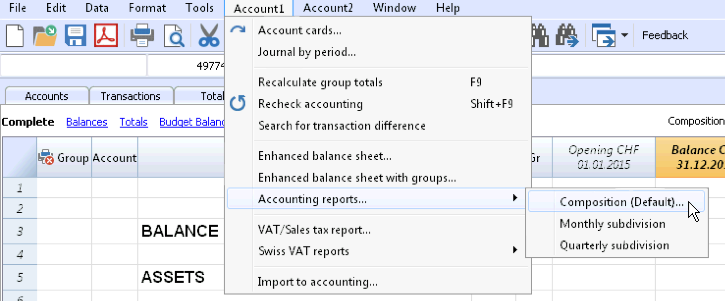
Direct access to the compositions
In the tables where the compositions are being shown and in the previews, the composition menu and the settings icon are being displayed. These make it possible to easily move from one composition to the next and provide rapid access to the settings in case you want to edit these.
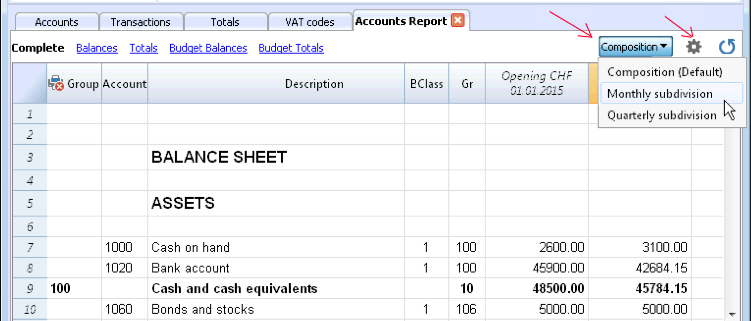
Export
With Banana accounting you can export in different formats, either the data of a single table of the whole file:
Export rows
Choose the Export rows command from the Data menu in order to export the content of a single table.
If you select some rows before launching the command, then the Export selection only option will be activated.
Export file
Chose the Export file command from the File menu in order to export more than one table. In the dialog windows that appears you will find the following tabs:
- Specific tabs of the exporting format
- Include tab, to define the tables and the reports that must be included in the export
- Period (Accounting) tab, to define the period
- VAT tab (in the accounting files with VAT management)
- Composition tab
Export formats
There are different formats available, each with its own specific options:
- Pdf
This format allows to export all accounting file content in a unique pdf file. - Excel
This format allows to create Excel spread sheets, comparisons, budgets, index calculations, Balance Sheet analysis, charts directly linked to accounting values. - HTML
With this format the data and accounting statements can be easily accessed with an Internet browser (Explorer, Mozilla, Opera).
This format fully complies with the legal requirements related to long-term archiving of accounting data. - XML
This format is the standard used for exchanging data. The accounting data can be easily read and reused with other programs or with XSLT style sheets. - Export rows in TXT
This format allows to export the table rows in a text format.
Export in Excel

Export selection only
When activating this option, the program exports only the selected area.
File Name
In this area it is necessary to insert the name of the new file that the program will create to export the data. If, however, an existing file is selected by using the Browse button, the program will overwrite it with the new data.
Display file immediately
As soon as the MS Excel file has been created, the software to view it will be launched. In this way, the result of the export can be seen immediately.
Options
Create cell names
This option will automatically give a name to each cell as the file is exported. For example, the cell that contains the balance for account 1000 will receive the name: "Accounts_1000_Balance" in Excel. This means the user can univocally identify each cell independently from its position on the sheet and thus create Excel reports that don't have to be corrected if the account plan is changed. The user thus saves having to manually carry forward any accounting data to Excel. However, inserting the names of the cells does slow down the opening of the Excel file.
Create table names
With this option, the program will automatically give a name to the whole area of the cells belonging to a table, at the moment the file is exported. For example, the area formed by the cells belonging to the Accounts table will be identified by the name DB_Accounts. This option is necessary if, when creating reports in Excel, database functions are used.
Use names Xml (English)
The cell names can either be defined in their original accounting language, or with their English name. In the original language, the names will be understandable to someone who speaks that language, but they will not be universally understood like a name in English would be. By selecting this option the user would have, for example, "Accounts_1000_Balance" instead of "Conti_1000_Saldo".
Protect tables
The entire content of cells is locked when selecting this option so that it is only possible to edit the format. This prevents the possibility of making any unintentional changes to the exported data. The user can remove this protection at any time by using the appropriate command in Excel.
Export selection only
If this cell if activated, only the selected area is exported.
Other Tabs
For the explanations of the other tabs, please visit the following pages:
Export result
Each accounting table is displayed in a different sheet in the Excel file
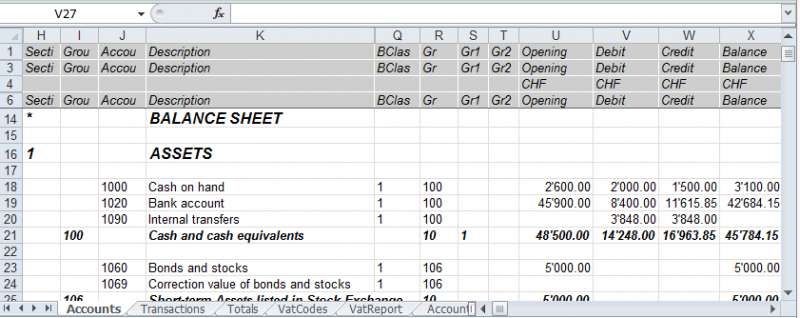
Use the cell names instead of the row/column references:
- The names return the desired value even when a new row or column is being entered.
- The names are easy to use and understand
"Accounts_1000_Balance" refers to the balance of the 1000 account
"Accounts_1000_Description" returns the value of the cell that contains the description of the 1000 account - The names can be used in the formulas
"=Accounts_1000_Balance" returns the value of the cell that contains the balance of the 1000 account
"=Accounts_1000_Balance/1000" divides the balance of the 1000 account by 1000 - By using the names, it is possible to create links to various files.
A link to a cell is being composed of:
- File name
- Table name
- Cell name

Include Tab
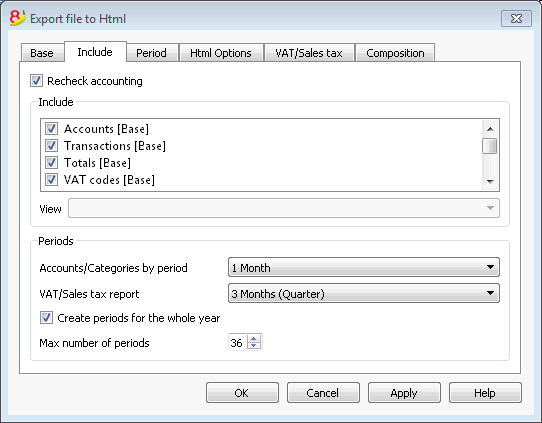
Recheck accounting
By ticking this box, the accounting will be rechecked before it is exported.
Include
By ticking the different boxes, the user can export in MS Excel Xml the various tables and/or all the account cards and the VAT/Sales tax Report.
View
It is possible to select the view where the data are to be imported. This option is available for the export in PDF, Html and Xml format.
Periods
This function lets the user export the accounting data subdivided by period.
Accounts/Categories by period
This option allows to export the accounts and categories balances according to the selected period.
VAT/Sales tax report
This option allows to export the VAT/Sales tax report according to the selected period.
Create periods for the whole year
By selecting this function, the partial balances for the whole year will be exported, and not only the ones of the specified accounting period or the selected export period.
Max number of periods
The maximum possible number of periods.
Export in Html
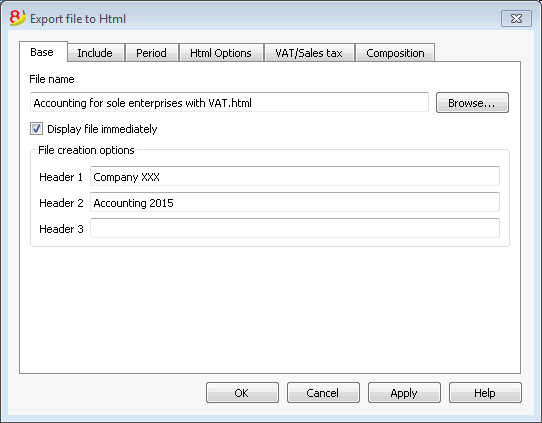
File Name
In this area, the user must insert the name of the new Html file that the program will create to export the data. If however the user selects an existing file through the Browse button, the program will overwrite it with the new data.
Display file immediately
As soon as the Html file has been created, the software to view it will be launched. In this way, the result of the export can be seen immediately. It is best to remember that browsers like Mozilla and MS Explorer use a cache mechanism for files. When the export is made for a second time, it is possible that the user will see the previous version until the browser Reload button is pressed.
File creation options
Headers 1, 2 and 3
These are the file headers.
Other Tabs
For the explanations of the other tabs, please visit the following pages:
Html Options Tab
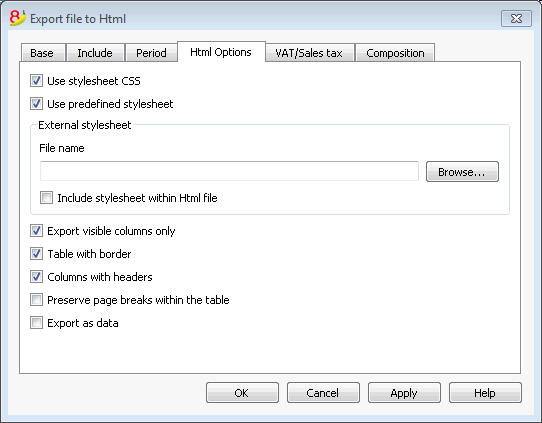
Use style sheet CSS
Selecting this cell will allow the user to connect a style sheet to the exported file. By default the program will automatically use its own style sheets and incorporate it into the document.
Use predefined style sheet
The program's default style sheet will be used.
Deactivating the cell will automatically activate the External style sheet option. The user can then select the name of a personal style sheet.
External style sheet
File name
In case an external style sheet is being used, select the file name of the style sheet with the Browse button.
Include style sheet within html file
When data is sent in Html format, the style sheet file must also be sent. To avoid sending two separate files the user can incorporate the style sheet to the Html accounting file by activating this cell.
Selecting the cells will allow the program to file the data with various graphic options:
- Export visible columns only
- Table with border
- Columns with headers
- Preserve page breaks within the table
If there are page breaks on the original accounting file, these will be carried over in the export as well. - Export as data - data will be exported without any formatting
Export in Xml
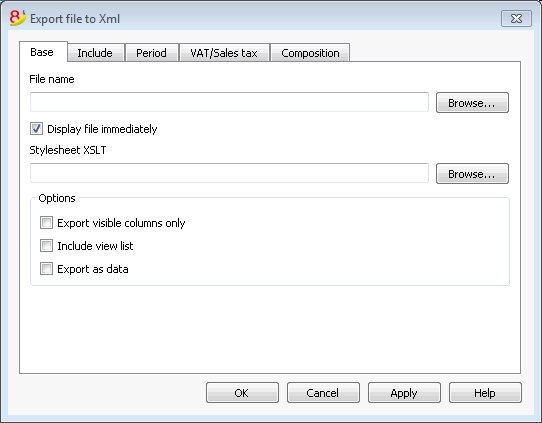
File Name
In this area it is necessary to insert the name of the new file that the program will create to export the data. If, however, an existing file is selected by using the Browse button, the program will overwrite it with the new data.
Display file immediately
As soon as the file has been created, the software to view it will be launched. In this way, the result of the export can be seen immediately.
Style sheet XSLT
In this area, the user can select the style sheet according to which the program should organize the graphic display of the accounting data. Thanks to the style sheets, the user can input his/her own data and conform to the print-outs required by the authorities. On the www.banana.ch various examples and further information on style sheets are available.
Options
It is possible to choose between the following options:
- Export visible columns only
- Include view list
Export selection only
If this option is activated, only the selected area will be exported.
Other Tabs
For the explanations of the other tabs, please visit the following pages:
Export rows in txt
In order to export rows, please select the Export rows command from the Data menu. Different options are available:
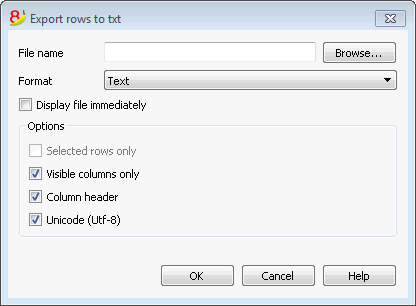
File name
Enter the file name or select an existing one using the Browse button
Format
Select the desired format.
Display file immediately
As soon as the file has been created, the software to view it will be launched. In this way, the result of the export can be seen immediately. Please notice that browsers such as Mozilla or MS-Explorer have a documents cache mechanism. It is then possible that, when exporting a second time, you will still see the previous version if you don't use the Refresh browser's button.
Options
If activated, different options will allow the export of:
- selected rows only
- visible columns only
- columns header
- unicode (Utf-8)
Save
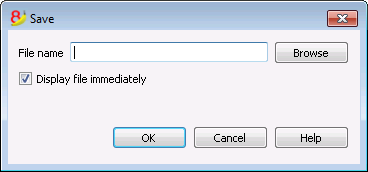
This window is shown when you need to create a PDF file, export in Html or Excel format, or copy into the clipboard.
File Name
In this area it is necessary to insert the name of the new file that the program will create to export the data. If, however, an existing file is selected by using the Browse button, the program will overwrite it with the new data.
Display file immediately
As soon as the file has been created, the software to view it will be launched. In this way, the result of the export can be seen immediately.
Import
Information on import are available in the single online lessons, listed in the left side menu.
Import into accounting
New import extensions
In the new version Banana Accounting Plus, you will find new extensions for importing data from SmartBusiness and also files in .zip format.
We advise you to switch now to Banana Accounting Plus and take advantage of the many new features.
Supported import formats
With Banana, one can import from whatever format (see the list of current supported formats). In case you should need to import from other file types that are not included in the list, specific Banana Import Apps can be developed.
The Import to accounting command
The Import to accounting command from the Account1 menu makes it possible to import the following data:
- Transactions - to transfer the transactions from another Banana file or from the bank statement
- Accounts - to transfer the accounts from another Banana or a text file
- VAT codes - to transfer the VAT codes from another Banana file or from a text file
- Files - to transfer a complete file in order to convert the Chart of accounts
In order to transfer data just one single time, please consult Transferring data from other accounting software.
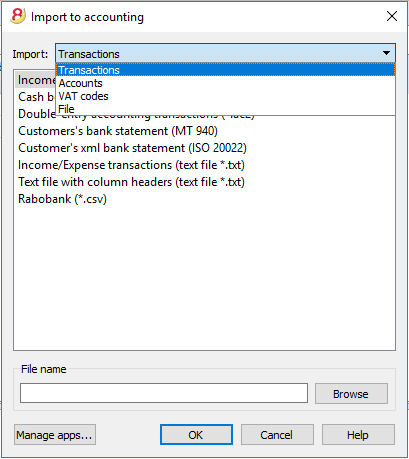
Procedure for importing
- Choose the destination table of the data
- Choose the file type from which to import
- Indicate the file name
- Choose the transactions to be imported
Destination table
For each data type, there are specifique pages
Import formats
According to the type of destination table, different import formats are availbale.
However, the following formats are available for all options:
- Text file with column headers
These are files that are especially created with other programs (for example, a program that creates invoices) so that the data can be transferred into Banana Accounting.
Technical indications on how to prepare these type of files can be found here. - There are also other file types for which a specific import filter exists or has been created.
File name
- The name of the file of which the data need to be imported needs to be indicated here.
Manage apps...
- To add or to update import filters.
Scripts that decode file types can be created.
Ok Button
- Starts the import.
Error messages
In case error messages appear during an import operation, update, first of all, the Import App.
Import transactions
New import extensions
In the new version Banana Accounting Plus, you will find new extensions for importing data from SmartBusiness and also files in .zip format.
We advise you to switch now to Banana Accounting Plus and take advantage of the many new features.
Import procedure
- From the drop down menu, choose Import transactions
- Choose the file type from which to import (Cash book transactions, Double-entry accoutning transactions)
- With the Browse button, choose the file from which to import the transactions
More information about all types of import filters can be found on the Banana Apps page.
![]()
File types that can be imported
- Import transactions from an Income & Expenses accounting file
In order to import transactions from an Income & Expenses accounting file into a double-entry accounting file, it is necessary that the categories of the Income & Expenses file correspond to the accounts of the Double-entry accounting file. - Import Cash book transactions
Apart from importing the transactions, an import summary per month or quarter can also be obtained.
See the specific page Import Cash book transactions. - Import Double-entry accounting transactions
In order to import transactions from a Double-entry accounting file into another Double-entry accounting file, it is necessary that the accounts correspond. - Import transactions from Bank statement ISO 20022 or MT 940
See page Bank Statement ISO 20022 - Import data in Txt
This file type is being used to import data from other programs, such for example:- in order to import monthly transaction from your salaries software
- in order to import the invoices issued with a invoicing software
- in order to import the payments made with your invoicing software
- in order to import your sales transactions from your online shop
- in order to import data from another accounting software
- in order to import data from another cashbook management software (for example a restaurants or a hotel).
- For more information on how to create a file to be imported in Banana, please consult the technical information.
- BananaApps for importing
- Banana allows for import from several other formats.
- Please take a look at the updated list of Banana Import Apps.
- It is possible to create one's own scripts that uncode the data contained in one's own files, more info here.
Choice of rows to be imported
After having elaborated the rows to be imported, the program displays a dialog, in which the user can indicate further options.
![]()
Destination account
This option is present when data of the bank account (or postal account) statement, or an account's income & expense transactions in a text format, are being imported.
Insert the bank account number of the chart of accounts, related to the imported statement.
Select transactions
Start date, End date
Insert the start and end dates of the period related to the transfer of the transactions. The period can also be selected automatically in the boxes under the dates area.
Don't import if exists same ExternalReference, Date, Amount
If activated, this function allows the user to not import already entered transactions, in order to avoid recording transactions twice. This option can only be activated when the column "ExternalRef" is present in the transactions that are going to be imported. If not, this option will be deactivated.
Complete the transactions with
Autocomplete values
The option is only necessary for accounting with VAT/Sales tax and multi-currency. If activated, it allows the automatic completion of values that are missing in the imported data (for example, the exchange rate in the exchange rate table).
Initial document number
This option is present when data of the bank account (or postal account) statement, or an account's income & expense transactions in a text format, are being imported. This is the document number assigned to the first imported transaction.
Group transactions by invoice number
If the import file contains values in the "DocInvoice" column, it is possible to indicate in the dialogue:
- Group transactions by invoice number
In this case, the rows of the same invoice are being grouped in such a way that there is only one transaction for the same account and the same VAT code. Please check the explanation Import invoice data.
- Destination account for balance differences
When VAT codes are being applied, there may be rounding differences of just a few cents.
In this case, Banana creates an additional transaction for every invoice into which this difference can be recorded.
Of course, it is necessary to pay attention that the data to be imported obtain a balance between debit and credit. If not, the transaction row will contain the difference between debit and credit.
Edit the imported transactions
The program creates some transactions and adds them to the Transactons table.
Transactions can be edited or deleted.
In a double-entry accounting file, the program adds some symbols in the Debit/Account and Credit/Accounts columns, where in an income and expenses file, the program adds them in the Account and Category columns.
Symbols should be replaced with the appropriate account or category.
- [A]
This symbol is indicated when no account has been indicated in the dialog.
You need to replace the [A] with the appropriate bank account.
[CA] - When ths symbol appears, you need to replace it with the appropriate contra-account, so that the Credit transactions will be balanced with the Debit transactons.
In rows with only one contra-account, you will find both the [A] and the [CA] symbols in the same row.
In rows with multiple contra-accounts, each row will have its own [CA] symbol. Without the [CA] symbol, it would be impossible to understand if the transactions is a Debit or Credit one.
Frequently Asked Questions
I see don't see the format for the bank statement of my bank
Click on "Manage apps...", followed by "Update apps" and enable the filter for the desired format.
I see don't see the format for the Xml account statement of the Postfinance (file .tgz)
This format is no longer supported. Please contact the Postfinance and ask to receive the statements in ISO 20022 format.
The following message appears 'This ISO 20022 file doesn't contain a bank statement (camt.052/053/054)'
This error message is being displayed when the ISO 20022 file doesn't contain a bank statement. The ISO 20022 format is a generic format that can contain different types of information, like the bank statement and the payment confirmations In Banana Accounting, only the bank statements can be imported (camt.052/053/054).
My bank is not in the list of supported formats
It is possible to create apps for formats that have not yet been implemented. We have also paid support available for the implementation of customized formats.
I can only import collective orders and I cannot see the details (the individual orders)
When executing a payment in the e-banking (for example in the Raiffeisen bank), you need to choose the option 'individual order' instead of the 'collective order' Only by doing so you will be then be able to import the payments as individual orders.
Import ISO 20022 file
ISO 20022 is an international standard for the transmission of financial data.
The CAMT category regroups the formats used for the account statement, reporting of account transactions and account balance confirmation:
- camt052: Account Reporting
- camt053 (including version 4): Account Statement
- camt054: Credit / Debit Notification
Preview the ISO-20022 file
Banana. offers the possibility to preview contents of a camt file.
Data importing into the current accounting
Proceed as indicated with the Import into accounting ( Account1 menu) command.
Compressed files can also be opened with this function. In this case, the program will prompt the user to select the file from which to import the data of the compressed file.
Technical notes on converting ISO 20022 files
Banana, when reading the file, tries to adapt itself to the ways in which the ISO 20022 file has been prearranged.
- Reads as opening balance the similar encodings
- Reads as closing balance the similar encodings
-
All contents are read and converted into transactions
- Transaction date (Date)
- Valuta date
- Transaction amount (positive or negative)
- Description (Banana - for now - displays the various descriptions as a single text)
In the future, it will be possible to extract this information on a distinctive basis and indicate the columns where to allocate data. - Distinction of transactions between one single and detailed lines.
For transactions that are to be detailed, there will be a row for the sum and separate rows for the singular transactions that will constitute the total.
Swiss Specificities
Specifications for the use of ISO 20022 have been issued for the Swiss banking system.
Formats have been standardised as follows:
- camt053: Account Statement, with detailed transactions.
This is the file that your bank should provide, specifying that it does also include payments received.
A summary file (without any details) might be asked for, in which case camt054 form will also have to be requested, detailing the receipts. - camt054:
Transactions detailed by type (such as bills payments received for bills issued).
If detailed cash receipts are required, the bank will provide the dates in a camt054 file (as a substitute for V11).
This results in two files:- camt053 file (Account Statement) with the several payments and the daily total of cashed bills, which details are contained in the camt054 file.
- camt054 file, detailing all transactions for cashed bills with their reference number.
- camt052: Account Reporting.
Is only used in special situations, to monitor transactions for a specific day.
Import data from a Cash book file
When managing your accounting work, it is possible to manage the cashbook separately and regularly import the transactions in the main accounting file, grouped according to a selected period.
In this case there are two separate files: a file containing all the data of the general accounting, and a second file containing only the data Cash book management. In order to be able to import data from the Cash book file into the main accounting file, those files need to be linked. This can take place in two different ways:
- Attribute to the categories of the cashbook file the same account numbers (for Double-entry accounting), or, the same category numbers (for Income & Expense accounting) as the ones used in the main accounting file.
-
In the cashbook file, in the Category2 column of the Categories table, enter the same account numbers as the main accounting file (if double-entry accounting) or the same categories numbers (if Income & Expense accounting). If the Category2 column isn't visible, you need to visualize it by selecting the Columns setup command from the Data menu, and double clicking on Category2.
Example:
In this example, the account numbers referring to the main accounting file have been entered in the Category2 column.
![]()
In order to import the data, do as follows:
- open the main accounting file and choose the Import to accounting command from the Account1 menu
- in the dialogue window that appears, select Transactions from the Import drop-down menu; then, click on Cash book transactions (*.ac2) and with the Browse button, select the cash book file.

You can find the explanations of this window at the Import to accounting page
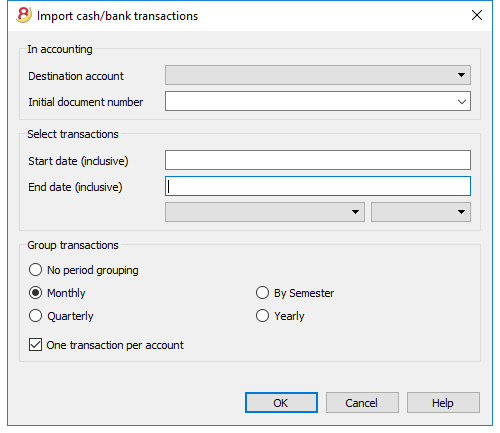
In accounting
Destination account
You have to select the account number (Double-entry or Income & Expense Accounting) to which the data will be carried over.
Initial document number
This is the document number given to the transactions carried over.
Select transactions
Start date / End date
These drop-down menus specify the start and end dates of the period to which the imported data refer.
Group Transactions
In this section the user specifies, by activating the different options, how the transactions of the period must be grouped:
- No period grouping
All the rows are being imported, with the related contents of the columns. The Doc number of the Cash book account is also being imported. If, in the main accounting, you wish to use a different number and at the same time keep the document number of the Cash book, enter the document number in the DocProtocol column of the Cash book. - Monthly - transactions are grouped by month
- Quarterly - transactions are grouped by quarter
- By semester - transactions are grouped by semester
- Yearly - transactions are grouped per year
One transaction per account
If more than one category is grouped on a single account but the user needs separate transactions for each category, this cell must be activated; then the program will create transactions for each category. When VAT codes are used, transactions will be created not only by category, but also for each different VAT code in the same category.
Note:
When the user is working on an accounting file with VAT, the calculations of the VAT may result slightly different. If the transaction amounts have been inserted as net amounts, the balance of the cash account may also be different because of rounding differences.
The accounting file is updated with the data of the Cash book.
![]()
Import VAT codes
This function is only available in the Accounting with VAT management, and allows the user to import VAT codes from:
- Other accounting files (*.ac2)
- A text file with column headers (text file *.txt)
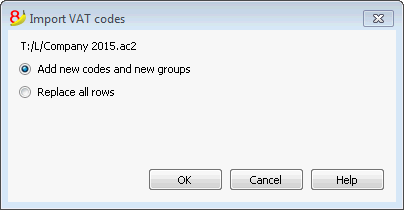
Add new codes and new groupes
The new codes and new VAT groups are being added, without eliminating the ones that are presently in the VAT codes tabel.
Replace all rows
The complete VAT codes table is being subsituted.
Note: if, after the import, you receive the error message VAT account not found, you need to select the VAT according to VAT report account in the VAT/Sales tax section of the File and accounting properties (File menu).
Update VAT Codes for Switzerland
See the pages for Switzerland in French, German or Italian.
Import file
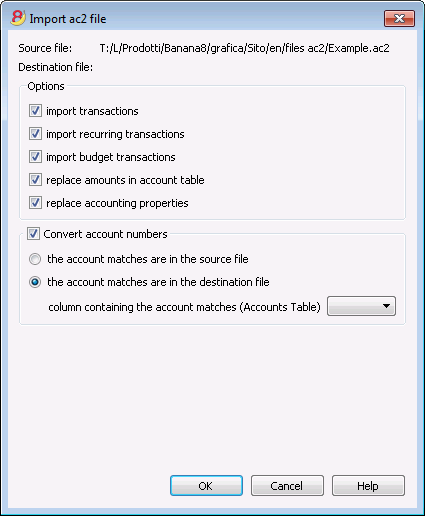
Source file
This is the file from the which the data are being taken.
Destination file
The file that "receives" the data.
Options
Import transactions
All the rows of the Transactions table, present in the source file, will be imported.
Import recurring transactions
All the rows of the Recurring Transactions table, present in the source file, will be imported
Import budget transactions
All the rows of the Budget table, present in the source file, will be imported.
Replace amounts in Account table
The amounts of the Opening, Budget and Previous columns of the Accounts table of the destination file are being deleted and replaced with the amounts that are present in the source file.
The accounts need to correspond, thanks to the same account numbers, or when there is a replacement, in that case the option "Convert account numbers" should be used.
Replace accounting properties (basic data)
The File and accounting properties of the destination file will be replaced by the ones of the source file.
Convert account numbers
Using this function, the imported account numbers will be replaced with those indicated in the alternative column.
If you use this function, you must also specify the column that contains the account numbers to be used in the import instead of the existing ones.
Next to the account number column, there should be a column that indicates the alternative number to be used when importing. If no alternative number is specified, the original account number of the source file will be used.
- The account matches are in the source file
This option is to be used when for example you keep an accounting file in a country, with a specific number system, and then you need to regularly import your transactions in a different accounting file, that uses a chart of accounts with a different numbering system.- You need to add a new text column in the accounting plan (Columns setup command)
- For each account, indicate the destination account number in the tabel.
- The account matches are in the destination file
This option is used when for example you want to switch to a chart of accounts with a new numbering and grouping- You create a new accounting file with the new chart of accounts.
- In the chart of accounts, you create a new column where you indicate the account matches (Columns setup command).
- In this column, indicate the account numbers of the source file.
Separate the accounts with a semi-colon "1000;1001" to indicate that several accounts need to be grouped into this account.
- Column containing the account matches (Accounts table)
Indicate a column of the chart of accounts that has been added by the user and that contains the account matches.
Results and possible errors
The program will have carried forward all the data of the previous accounting, converting the account numbers.
In case the program indicates errors (absence of accounts or other), it might very well be necessary to cancel the import operation, complete the account matches and repeat the import operation.
The program, finding different charts of accounts, cannot automatically execute extended check-ups to make sure that all the data have been imported and grouped correctly.
It is therefore advised to check the result manually, verifying that the totals of the Balance sheet and the Profit and Loss statement are indeed correct.
Advanced import options
For different and more complex and automated conversion needs, we suggest to use the scripts, that allow a total customization of the conversion and the import.
Manage Apps
New Extensions
In the new Banana Accounting Plus version you will find new Extensions, always up-to-date in order to obtain:
- More personalized Financial Statements and Reports in compliance with the regulations in force
- Imports from bank and credit cards statements
- Imports from other programs, such as Smart Business
- Imports from multiple files or in .zip format
Filters are extensions that make it possible to add new formats into the Import into accounting dialog window: Account1 menu -> Import into accounting -> Manage Apps... button.
In Banana Accounting 8, it is possible extend some of the functions by means of small javascript programs. In order to create your own import filters, see the Banana Apps info page.
More information about all types of import filters can be found on the Banana Apps page.
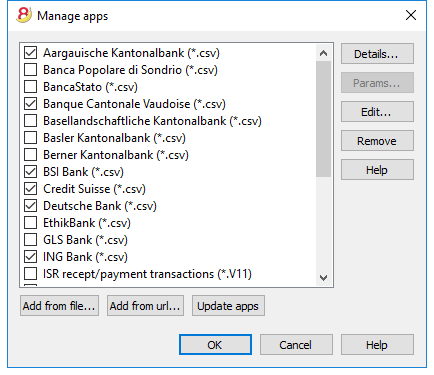
Details
A dialogue window is opened with
- the source file where the Banana App is located
- the App type
- the App date
Parameters
If the BananaApp allows the individual setup of the programming parameters, the button is active.
In that case, dialogues will be visible in which fixed parameters can be entered that will be used for this App.
The parameters are related to each file.
Edit
It allows you to edit and make changes to the selected App. It will bring you to the directory where the App file is stored.
Remove
Permanently deletes the selected App. It is not possible to delete files that are installed at the system level or that are for all users.
For the time being it is also not possible to remove Apps contained in files with an sbaa extension. If you want to remove the App you should delete the App file.
Help (side button)
It leads to the internet page with info on the selected App.
Add from file
Adds a new App from an existing file.
The file should always be available.
Add from url
Adds a new App from a link to a document available online.
- the file is downloaded from the internet
- the file is saved in the user's data folder
Update Apps
Downloads the filter's most recent version from Banana Accounting's server.
The downloaded Apps should not be modified because they will be overwritten when updated.
If there are new Apps, they will be added to the list. The imported filters will not be modified.
The Apps will be installed in the user folder. Thus only the user who imported the new Apps or updated the available ones will see them. To install Apps for all users or at a system level, a manual procedure for installing the Apps would need to be followed.
Help (bottom button)
It links to this page.
Import transactions from Paypal
On the page web filter for PayPal transactions you will find the information about the new feature that makes it possible to import all the Paypal transactions directly into Banana Accounting and the instructions on how to proceed.
We have also prepared specific predefined templates for double-entry or multi-currency accounting that you can look at as an example or use as a separate accounting file just for the accounting transactions from Paypal.
More information about all types of import filters can be found on the Import filters page.
- BananaApp for importing Paypal transactions
- examples for the Double-entry accounting
- examples for the Multi-currency accounting
Merge file
Il is possible to merge two files, but they have to belong to the same group (for example two double-entry accounting files). It is not possible to merge files belonging to different groups (for example one double-entry accounting file and one simple accounting file).
In order to successfully merge two files, it is crucial that they have the same accounts numbering. Proceed as follows:
- Open the file which will contain the data of both files
- Select the Merge File command from the Tools menu
- Select the path and the name of the file to be merged
- Confirm the merge operation
- If the files are not the same, even though they belong to the same group, (for example, accounting with VAT/Sales tax and accounting without VAT/Sales tax), a message will appear advising the probable loss of data.
Import rows
In order to import the rows, click on the Import Rows command of the Data menu.
Activate the options of your choice in the following window:
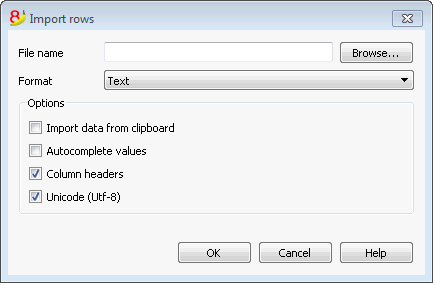
File name
Using the Browse button, select the file from which to extract the data. By clicking on the OK button, confirm the options selected.
Format
This area contains the list of formats with which it is possible to import the data to the table. These include: ASCII format, Text, CSV.
Options
Import data from clipboard
By selecting this box, the user can import data from the Windows clipboard.
Autocomplete values
It is advisable to select this function when it is necessary to import rows from a less complex accounting file into a more complex one. In this case, in the imported rows, some columns will stay blank. By selecting this function, the program will automatically complete the missing values with those from the current accounting.
Fields header
By selecting this box, not only data, but field headers will be included in the import.
Unicode (Utf-8)
By selecting this box, all the data will be imported in a format readable by Unicode programs.
Transferring data from other accounting software
New import extensions
In the new version Banana Accounting Plus, you will find new extensions for importing data from SmartBusiness and also files in .zip format.
We advise you to switch now to Banana Accounting Plus and take advantage of the many new features.
Recurring data importing from other programs
It can often happen to be regularly needing to import data from other programs.
For example:
- in order to import monthly transaction from your salaries software
- in order to import the invoices issued with a invoicing software
- in order to import the payments made with your invoicing software
- in order to import your sales transactions from your online shop
- in order to import data from another accounting software
- in order to import data from another cashbook management software (for example a restaurants or a hotel).
In these cases you can proceed in two different ways:
- adapt your data generating application by creating a txt file specifically set to be imported in Banana.
For more information please consult the technical information on how to create a file to be imported in Banana; - create an import script that will transform data exported from another program so that they can be imported in Banana; depending on the installed import filters (see the Manage filters page), many formats can be available. See also how to create filters (Banana App)
One time data importing from other programs
If you are starting to work with Banana for the first time and you need to import your data from another software, you can easily transfer data from any accounting program, passing through MS-Excel.
- With your old accounting software, export the data in a format that can be read by Excel (CSV, txt, ...)
- Open the exported file with Excel
- In Excel, organize the data (columns) in the same order as they appear in the Banana tables (Accounts, Transactions)
- Open your new accounting file in Banana
- In the Accounts or Transactions table, add as many empty rows as there are rows to transfer from Excel.
- In Excel, select the data to be copied and use the Copy command
- Go in Banana and execute the Paste command.
This method is useful to transfer data from MS-Money, Intuit Quicken and Quickbooks, and from most other accounting programs.
Printouts/preview
Print preview
All the printouts of the various accounting documents can be saved in PDF, HTML, MS Excel and copied to the Clipboard, allowing the user to also access them many years later.
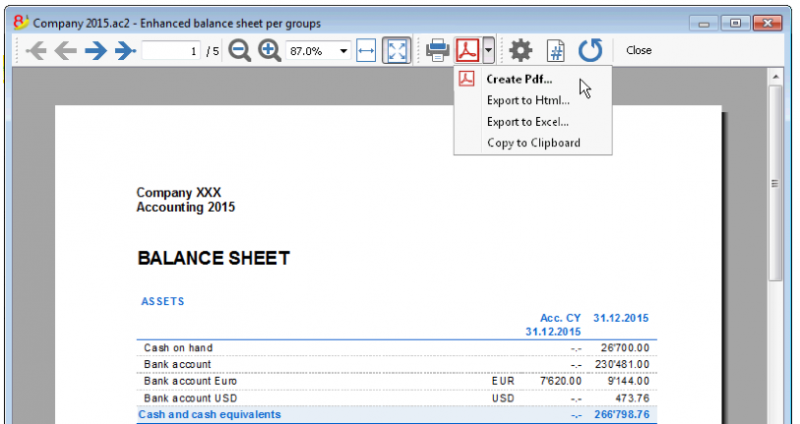
Print
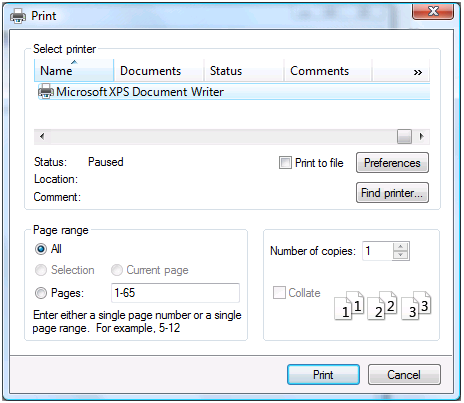
The button pulls up the Printer Setup window from Windows. The selections are only valid for the current working session. Permanent alterations need to be input using the Windows control panel. Horizontal or vertical printing needs to be input under Page Setup and is only valid for each view.
Accounting printouts
You can find information on specific printouts for the different accounting types at the following pages:
- Double-entry accounting
- Multi-currency accounting
- Cashbook and Income & Expense accounting
- VAT Report
- Swiss VAT form - page in Italian, German or French
Page numbering
You can access the page numbering feature by clicking on the  icon on the Print Preview toolbar.
In this dialog box are set the options for page numbering. The printing of the page number is enabled or disabled by using the settings of page setup or report.
Start with
The starting number for page numbering.
Add prefix
The prefix to insert to the page numbering.
Page setup
Allows to define the printing properties. Each view has its own printing setup.
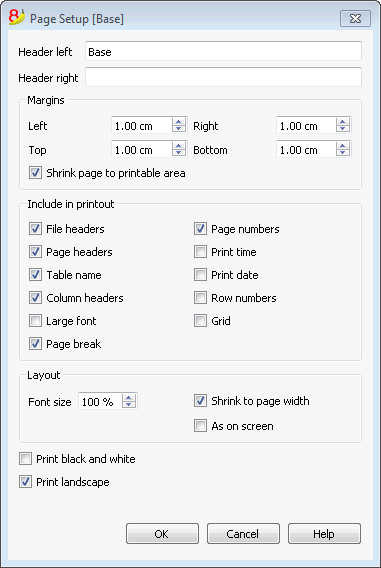
Header left
This is where the title for the current view is shown. The title can be edited to appear at the top left of the printed page.
Header right
It is possible to enter a different text that will be printed at the top right-hand side of the page.
Margins
It is possible to input the page margins here: Left, Right, Top, Bottom. Measurements are in centimeters.
Shrink page to printable area
This function makes it possible to adapt the printable area when the print goes past the earlier defined page margins.
Include in print
When these functions are being activated, they allow to display the following data:
File Headers
This is the text that is being entered in the File and Accounting properties found in the File menu.
Page Headers
The page header will also be included in the printout.
Table Name
The table header (f.i. Accounts, Transactions, etc.) is also being included in the printout.
Column headers
These are the headers for the various table columns.
Large font
The program prints the headers using a slightly larger font.
Page break
When activated, this option maintains the entered page breaks; if not, they will be ignored, even if they are present.
Page numbers
Activate this option to request that the pages be numbered.
Print time
Activate this option to include the hour when the page was printed.
Print date
Activate this option to include the date when the page was printed.
Row number
Activate this option if a progressive number is to be given to each row.
Grid
The grid can be printed just as it is viewed on screen.
Layout
The program automatically adapts the page dimension.
Font size %
This allows the increase or decrease, on a percentage basis, of the size of the font to be printed.
Reduce to page width
If some columns exceed the width of the page, the program reduces the columns or reduces the zoom so that all the columns will be printed correctly on the page.
As on screen
The print-out will be carried out exactly as presented on the screen.
In case the contents goes past the page dimension:
- If the option "Reduce to page width" is being activated, the font size will be reduced;
- If the option "Reduce to page width" is not being activated, the part that goes past the paper will not be printed.
Print black and whilte
All colors will be converted in grey scales.
Print landscape
To print in landscape format which makes the page read horizontal.
Period
This tab appears in many dialogs (for example the Account card) and can specify the period to be show or to be calculated.
If for example a quarter is selected: in the account card only the transactions of the selected quarter will be shown, and in the balance sheet only the results for the selected quarter will be calculated.
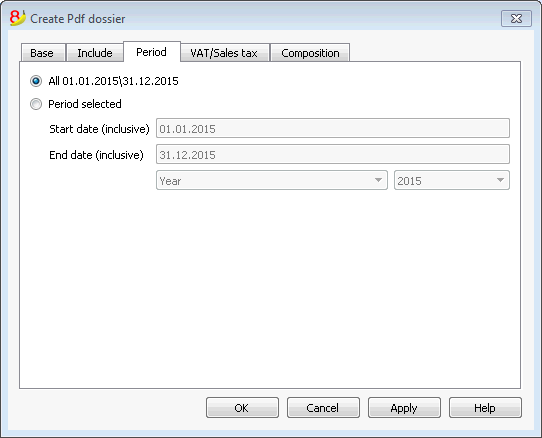
All
If this option is selected, the entire accounting period is included.
Period selected
If a specified period is desired, indicate the start and end dates.
Transactions with no date
If there are transactions with no date, they will be considered only if you chose the whole period (All...)
If however you enter the initial and final dates January 1sr and December 31, the transactions with no date will not be included in the report.
Accounting
Banana accounting makes different types of accounting available. Each user can choose the type he needs.
With the Convert to new file command of the Tools menu, the user can go from one accounting type to another.
Double-entry accounting
The professional tool to manage assets, liabilities, expenses and income according to the international rules of the Double-entry (debit and credit) and to obtain a Balance Sheet and a Profit/loss Statement.
The double-entry accounting application is available with or without the VAT management option.
Characteristics
- Manages the estate accounts and the profit/loss accounts (assets, liabilities, expenses and revenue)
- The accounting type with VAT features the VAT calculations and VAT reports
- Produces all the accounting extracts: journal, account cards, balances by period and annual balances
- Allows Cost Centers and Segments management
- Offers different ways of data presentation
- Exports data to Excel, Html, Xml, Pdf
- Imports data from different files formats
Tables and File properties
The double-entry accounting is composed by the following tables:
- Accounts table
Where the accounting plan is located with opening balances, and where groups and subgroups can be defined along with cost centers and segments. - Transactions table
Where the accounting transactions are entered. - VAT Codes table
Where the VAT/Sales tax codes are set, only if the VAT management option has been chosen. - Exchange rates table
Where the different currencies are defined, only if the multi-currency accounting option has been chosen. - File properties
Where the accounting general settings are defined.
Changing accounting type
In order to change your file language, rounding system, or in order to add VAT or multicurrency columns, please refer to the Convert to new file command, from the Tools menu.
Theoretical part
In this chapter, the basic theory of the Double-entry accounting is being explained.
Debit and Credit
Double-Entry Accounting in Practice
Main rules to learn how to manage double-entry accounting Double-entry accounting is based on four main account categories:
| ASSETS | The accounts that represent the positive elements of the estate |
| LIABILITIES | The accounts that represent the negative elements of the estate |
| COSTS | The accounts that represent the costs (but not those related to the purchase of estate goods) |
| REVENUES | The accounts that represent the earnings (not those obtained by the sale of estate goods) |
- The account is an entity that groups the amounts that belong to the same transaction category.
- Every account must be registered as debit or credit depending on the type of accounting transaction.
- Double-entry accounting uses debit and credit instead of income and expenses.
The General Rule
|
ASSETS |
→ | DEBIT |
|
LIABILITIES |
→ | CREDIT |
|
COSTS |
→ | DEBIT |
|
REVENUES |
→ | CREDIT |
- The assets, liabilities, costs and revenues are subject to continuous variations: increases and decreases.
The increasing variations
|
INCREASE IN ASSETS |
→ |
DEBIT |
|
INCREASE IN LIABILITIES |
→ |
CREDIT |
|
INCREASE IN COSTS |
→ |
DEBIT |
|
INCREASE IN REVENUES |
→ |
CREDIT |
The decreasing variations
|
DECREASE IN ASSETS |
→ |
CREDIT |
|
DECREASE IN LIABILITIES |
→ |
DEBIT |
|
DECREASE IN COSTS |
→ |
CREDIT |
|
DECREASE IN REVENUES |
→ |
DEBIT |
Instruments in Double-entry Accounting
Double-entry accounting uses the following principal instruments: the Chart of Accounts, Journal, Balance Sheet and Profit and Loss Statement.
| Chart /Accounts |
This is the list of all the accounts that group the different transactions categories together (ex. cash book, bank, purchases, sales, etc.).
-
To use Banana Accounting, one must simply take an already predefined accounting plan, adapt it to the proper requirements and insert the transactions. The rest will be executed by the program.
| Journal |
This is the list of all the operations that influence the activity daily (withdrawals, deposits, purchases, sales, salaries, rent, etc.) It corresponds to that which the larger part of the small businesses already have even if it’s only on paper or Excel, to then give to the accountant.
| Balance Sheet |
This is a summary outline of the assets and liabilities. The difference between the assets and liabilities represents the net capital amount of the firm.
| Profit and Loss Statement |
This is a summary outline of all the costs and revenues. The balance represents the operational result (profit or loss).
Starting Accounting
Procedure to start accounting with Banana Accounting
|
1 |
Take an existing accounting model with a predefined chart of accounts. |
|
2 |
Adapt the chart of accounts to the proper requirements. |
|
3 |
Insert the transactions in the journal. |
Mathematical basis
For the user of Banana's Double-entry accounting, it may seem strange that the revenue/income (sales) and the liabilities (start-up capital) appear in negative, while normally one expects that the sales appear in positive and the expenses in negative.
The double-entry accounting is based on the debit and credit principle that usually appear in two seperate columns. If the amounts in debit and in credit appear in one column, the mathematics of the Double-entry accounting anticipates the use of the minus sign (-), so that the amounts in debit can be easily distinguished from the amounts in credit.
Banana goes completely with the mathematical logic of the Double-entry accounting and thus indicates the amounts with the minus sign (and in red print to let the user distinguish even better the amounts in debit and in credit). In the Double-entry accounting the amounts in negative (credit) don't have the same meaning as in the accounting that is based on income and expenses.
The indication of the credit amounts in negative is a much more efficient system than other ones that add codes to amounts, such CR, DEB, CR or brackets.
This system is based on simple mathematical equations which assure that the accounting is correct. It is not by accident that the Double-entry accounting method has in fact been encoded by Luca Pacioli in 1494, one of the most illustrious mathematicians of the Italian Renaissance (he taught mathematics to Leonardo da Vinci). In his "Summa de arithmetica, geometria, proportioni et proportionalita", Luca Pacioli didn't just deal with the Double-entry accounting, but also with other mathematical questions.
In the Renaissance there were no electronic calculators, and so they used to indicate the amounts in debit and in credit in separate columns. The result was that it became easier to totalize the amounts. Today, with the computers, no calculations need to be made and the principal issue is to use a user-friendly system which is at the same time easy and correct.
For those interested in accounting mathematics and the equations on which Banana accounting is based, the following explanation can be interesting.
Debit/Credit
The Double-entry accounting leans on the principle that each movement is noted in debit as well as in credit and the amounts have to match.
Debit = Credit
The balance (the total difference between debit and credit) has to always be equal to zero
Debit - Credit = 0
In order to easily distinguish (very useful while working on the screen), the amounts in credit are indicated in red, preceded by the minus sign
Debit + (-Credit) = 0
|
Two transaction examples |
Debit |
Credit |
|
Debit + (- Credit) |
|
Cash income |
200 |
|
|
200 |
|
for product sales |
|
200 |
|
-200 |
|
|
|
|
|
|
|
Several cash payments |
|
170 |
|
-170 |
|
for purchase of merchandise |
100 |
|
|
100 |
|
for office supplies |
50 |
|
|
50 |
|
small expenses |
20 |
|
|
20 |
|
Total |
370 |
370 |
|
0 |
|
Balance (Debit - Credit) |
0 |
|
0 |
|
Balance Sheet and Profit/Loss Statement
The mathematics of the Double-entry accounting anticipates the use of two "accounts".
- Balance Sheet Account (Balance Sheet) keeps note of the financial state at a certain moment.
- Debit represents the Assets
- Credit represents the Liabilities (here will always means including the Equity)
- Profit/Loss Account (Profit and Loss) keeps note of the progress.
- Debit represents the Expenses
- Credit represents the Revenue
The transactions are entered in debit and in credit in the appropriate accounts of the Balance Sheet and the Profit/Loss statement.
|
|
Balance Sheet |
|
Profit/Loss Statement |
||
|
Registrazioni |
Assets |
Liabilities |
|
Expenses |
Revenue |
|
Cash income |
200 |
|
|
|
|
|
for product sales |
|
|
|
|
200 |
|
|
|
|
|
|
|
|
Several cash payments |
|
170 |
|
|
|
|
for purchase of merchandise |
|
|
|
100 |
|
|
for office supplies |
|
|
|
50 |
|
|
small expenses |
|
|
|
20 |
|
|
Total |
200 |
170 |
|
170 |
200 |
|
Balance (difference debit - credit) |
30 |
|
30 |
||
|
Equations with two columns |
|
|
Debit = Credit |
370 = 370 |
|
Assets + Expenses = Liabilities + Revenue |
200 + 170 = 170 + 200 |
|
Assets - Liabilities = Revenue - Expenses |
200 - 170 = 200 - 170 |
|
Balance = Balance |
30 = 30 |
|
|
|
The same transactions can be represented in a single column (credit in negative)
The result is, of course, the same.
|
Transactions |
Balance Sheet |
|
Profit/Loss Statement |
|
Cash income |
200 |
|
|
|
for product sales |
|
|
-200 |
|
|
|
|
|
|
Several cash payments |
-170 |
|
|
|
for purchase of merchandise |
|
|
100 |
|
for office supplies |
|
|
50 |
|
small expenses |
|
|
20 |
|
|
|
|
|
|
Balence (debit - credit) |
30 |
|
-30 |
|
Equations single column (credit in negative) |
|
|
Debit - Credit = 0 |
270 - 270 = 0 |
|
Assets + Expenses - Liabilities - Revenue = 0 |
200 + 170 - 170 - 200 = 0 |
|
Assets - Liabilities - Revenue + Expenses |
200 - 170 - 200 + 170 = 0 |
|
Balance - Balance = 0 |
30 - 30 = 0 |
Equations for the business results
The business result is the balance (Debit - Credit) of the Balance Sheet and the Profit/Loss Statement.
|
Equations double column |
|
|
Assets - Liabilities = Revenue - Expenses |
200 - 170 = 200 - 170 |
|
Balance of the Balance Sheet = Balance of Profit/Loss Statement |
30 |
|
Balance of the Balance Sheet = Assets - Liabilities |
30 |
|
Equations for the determination of the result (in two columns) |
||
|
Profit |
Assets > Liabilities |
Expenses < Revenue |
|
Balance |
Assets = Liabilities |
Expenses = Revenue |
|
Loss |
Assets < Liabilities |
Expenses > Revenue |
One has a profit when the assets are higher than the liabilities and the revenue more than the expenses.
One has a loss when the liabilities are higher than the assets and the revenue is lower than the expenses.
|
Equations single column (credit in negative) |
|
|
Assets - Liabilities - (Revenue - Expenses) = 0 |
200 - 170 - (-200 - 170) = 0 |
|
Balance of the Balance Sheet - Balance of Profit/Loss Statement = 0 |
30 - 30 = 0 |
|
Balance of the Balance Sheet |
30 |
|
Balance of Profit/Loss Statement |
-30 |
|
Equations for the determination of the result in a single column |
||
|
Profit |
Assets - Liabilities > 0 |
Expenses - Revenue < 0 |
|
Balance |
Assets - Liabilities = 0 |
Expenses - Revenue = 0 |
|
Loss |
Assets - Liabilities <0 |
Expenses - Revenue > 0 |
One has a profit, when the balance of the Balance Sheet is positive and the balance of the Profit/Loss Statement negative.
One has a loss, when the balance of the Balance Sheet is negative and the balance of the Profit/Loss Statement positive.
Use of noting in a single column
Noting the data in double columns is ideal for transactions in paper books. The amounts in debit and in credit are inscribed in separate columns. The totals are being calculated at the end of the page and the totals and calculation of the results are being done at the end of the period.
Computerized systems offer the possibility to keep the balances of the accounts constantly updated. For the calculations, the software therefore normally use noting in a single column, with the amounts in debit in positive and the amounts in credit in negative. In order to use noting in double columns, the software would have to register the credit amounts in the Balance sheet in negative, and, in the Profit/loss Statement, register the credit amounts in positive and the debit amounts in negative.
For the programmer's point of view, this solution is more complicated, and thus the majority of the software use internally the mathematics of the single column and noting in double columns only for the presentation.
Banana Accounting instead systematically uses the minus sign to indicate the credit amounts. Initially, the user has to get used to this system, but it has the advantage of being linear and allows for a better understanding of the mathematics on which the Double-entry accounting is based, especially when more complicated operations are being required like write-off's, profit at the end of the year or VAT due/recoverable.
For the presentation of the Balance Sheet and the Profit/loss Statement, the logic of the double columns is however more adapted.
Thus the print-outs of the Balance Sheet and the Profit/Loss Statement that are used for the presentation of the results are edited with Assets, Liabilities, Expenses and Revenue always in positive. When the Profit/Loss Statement is presented in a scalar format (Revenue minus Expenses), the Revenue is indicated in positive and the Expenses in negative.
Organize yourself
At the basis of the accounting, there are the accounting documents and receipts.
The type of one's organizing with regard to the accounting, depends on the size of the activity and the amount of documents.
The way one organizes things has to be adapted to what is needed.
We are listing down below an indication of possibilities that have proven to be very useful.
The different types of documents
It is important to distinguish and organize specifically the different types of documents.
- Basic documents: contracts for rent, telephone subscriptions, statutes, insurance contracts and everything that gets signed only once and is valid for several years. These documents need to be kept in a separate folder or binder, containing just this type of documents. For some of these very important documents (like receipts for down payments, etc.) it may be useful to make a photocopy and keep the original in a safe or a safe place. Don't make holes in important documents, but put them in transparent plastic folders. This binder is the basis of your activity/company and you need to handle it carefully.
- Documents related to employees: Contracts, insurances related to personnel, and other; it is useful to keep these in a separate binder.
If there are lots of documents, we advise you to use one binder per theme. - VAT Declarations: it is good to keep a special binder with the different declarations that you present at a regular basis (quarterly, by semester or yearly). For your VAT inscription or other general documents, it is better to keep them together with the basic documents.
- Accounting receipts and documents of the year: these are receipts, invoices or other items that are related to an expense or a receipt. These have to be kept separately, year by year. For every year you will have a binder with these kinds of documents.
Accounting documents
A good day- to-day order is needed in order to enter the accounting transactions and to control the situation of the company, such as the cash flow, the totals of debtors and creditors, etc.
- All accounting documents (receipts, invoices, tickets) usually have to be kept for a minimum of ten years.
- Classify and put the accounting documents in order by date, together with the related bank statements for the payment or the receipt.
- Write a progressive number on the accounting documents (statements and others). With this number, that should be inserted in the Doc column, you can locate the accounting document, with the accounting as a starting point.
- At the end of the year, print a copy of the journal and keep it together with the accounting documents.
- Usually a new binder is being used for each year for the accounting documents.
Issued invoices or receipts with an accounting at the moment of payment
Small companies and associations enter the invoices only in the accounting at the moment of payment (cash method).
- Separate the issued invoices and those for which you have received the payment.
- Verify regularly the invoices on hold for which payment still needs to be received. As soon as the due date for the payment has passed, it is useful to send a payment reminder. Don't let too much time pass by, make sure you receive the payment for unpaid invoices. This takes time, but is it important.
- Once these invoices are paid, put them together with the normal accounting documents.
Issued invoices or receipts with an accounting on the sales volume
The invoices are being registered at the moment they are issued as well as at the time of payment.
See also: Clients/Suppliers Registers
- Separate the issued invoices and those for which you have received the payment.
- Verify regularly the invoices on hold for which payment still needs to be received.
As soon as the due date for the payment has passed, it is useful to send a payment reminder.
Don't let too much time pass by, make sure you receive the payment for unpaid invoices. This takes time, but is it important. - When you enter the issuing of the invoice in the accounting, make note of the registration on the invoice. On the transaction row, use the "Doc. Original" column to insert the invoice number.
- Once the are invoices are paid, move them over to the "paid" section, and enter them in the accounting.
- When you have entered them, make note of the accounting transaction on the invoice (for example with a "checked" sign)
Transactions / frequency
- It is good to regularly enter the transactions in the accounting (daily, weekly, monthly).
- We strongly advise you to not neglect entering the accounting transactions, so that you always have updated information and can evaluate the progress of your activity.
- By going over the different expenses account numbers, you can easily have an overview of the different expenses that you made.
- The accounting is not just done for the tax authority.
Starting a new accounting file
An even easier start with the new templates
In the new Banana Accounting Plus version, the start of a new accounting is made easier because many predefined templates for every need are included directly in the program. If you don't have specific accounting knowledge, you can use the new Income/Expense templates or the Cash Manager with descriptive accounts. The work will be intuitive, fast and professional.
We advise you to immediately switch to Banana Accounting Plus and take advantage of the many new features.
In order to create a new accounting file, there are different modes.
Creating an accounting file, starting from a template included in the program
Here we explain how to start an accounting file, starting from an existing template included in the program.
- File menu, New command
- From the Group section, select Double-entry accounting
- In the File section, select Double-entry accounting or Double-entry accounting with VAT/Sales tax.
- In the Examples/Templates section, select the language/nation and choose one of the templates that is closest to your own needs.
- By clicking on the Online Templates button you can access our website where we published all templates available for free.
Setting up the file properties (basic data)
- From the File menu, File properties command, indicate the company name that will appear in the headers of the printouts and on the other data.
- Select the basic currency, with which the accounting will be kept.
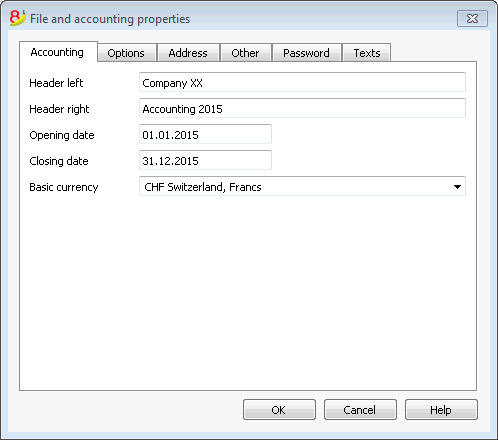
General use of the program
Banana Accounting inspires itself from Excel. The user directions and the commands are kept as similar as possible to the ones of Microsoft Office.
For more information on the general use of the program, we refer to the explanations on our page Program interface.
The accounting is being contained in tables; all of them have the same way of operating.
Saving the file
- From the File menu choose the Save as... command, preferably indicating the name of the company and the current year (for example, "company_2017")
- Choose the folder where the file should be saved (for example, Documents -> Accounting)
- The program will add the "ac2" extension.
Customizing the Chart of accounts
In the Accounts table, customize the Chart of accounts and adapt it to your own needs:
- Add new accounts and /or delete existing ones (see Adding new rows)
- Modify the account numbers, the descriptions (for example, enter the name of your own Bank account), enter other groups, etc.
- To create subgroups, please consult our Groups page.

In the Chart of accounts, you can also define Cost centers or Segments, used to attribute the amounts in a more detailed or specific way.
The Transactions
The Transactions have to be entered into the Transactions table; together they compose the Journal.
![]()
In the specific columns:
- Enter the Date
- Enter the Document number, manually assigned to the paper document. This makes it possible to easily locate the documents once the accounting transaction has been entered.
- Enter the Description
- Into the Debit account column, enter the destination account
- Into the Credit account column, enter the account of origin.
- Enter the Amount. In the accounting with VAT, enter the gross amount, VAT included. The program will separate the VAT, splitting the net cost or net income.
Speeding up the recording of the transactions
In order to accelarate the recording of the transactions, you can use
- the Smart fill function that allows the automatic autocomplete of data that have already been entered at an earlier date.
- the Recurring transactions function, used to memorize recurring transactions into a separate table.
- importing your bank or post office statement from the e-banking.
Transactions with VAT
In order to enter transactions with VAT please proceed as follows:
- from the File menu, choose New command and choose Double-entry accounting with VAT/Sales taxes
- Choose one of the existing templates for your nation with double-entry accounting with VAT codes and VAT Codes table.
In order to enter transactions with VAT, please visit the Transactions page.
Transactions on multiple rows
Transactions on multiple rows or Composed transactions are transactions involving more than two accounts and credits/debits on multiple accounts (for example when you pay different invoices from the bank account). In this case you need to enter the transaction on multiple rows:
- in the first row enter the total amount and the account debited or credited
- when all the individual debit and credit rows are entered there shouldn't be any difference
For more details, consult the page Composed transactions.
Checking customer and supplier invoices
Banana allows you to keep an eye on the invoices to be paid and the receivable, issued invoices. Please consult:
The Account card
The Account card automatically displays all the transactions that have been recorded on the same account (for example, cash, bank, clients, etc).
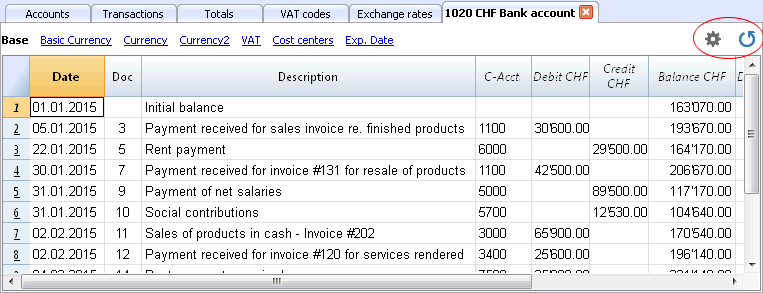
To display an account card, just position yourself with the mouse on the account number and click on the small blue symbol that appears.
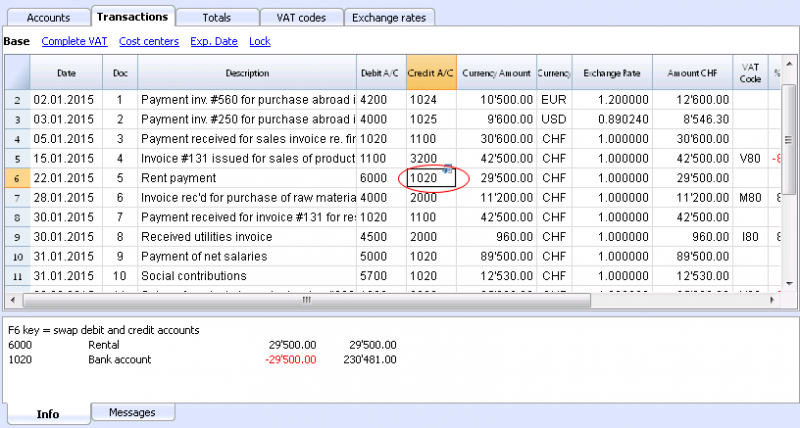
Account card by period
To display the account card with the balances referring to a specific period, click on the Account1 menu, Account card command, and in the Period section, activate Period Selected, entering the Start and the End date of the period.
For more details, consult the Period page.
Printing the Account card
In order to print one account card, just display the card from the Accounts or the Transactions table and launch the print from on the File menu.
To print several or all account cards, click on the Account1 menu, Account card command, and select the account cards that need to be printed. By means of the Filter, all the account cards, or only a part of all of them (for example, only accounts, cost centers, segments), that need to be printed can be automatically selected.
For more details, consult the Account Card page.
The Balance Sheet and Profit and Loss Statement
The Balance sheet shows the balances of all the estate accounts, Assets & Liabilities. The difference between the Assets and the Liabilities determines the Share capital.
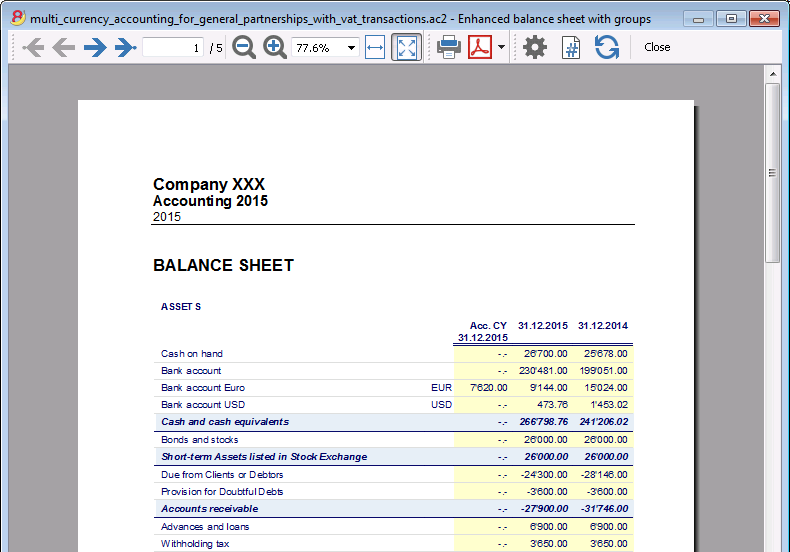
The Profit & Loss statement shows all the Expense & Revenue accounts. The difference between the Expenses & Revenue determines the Profit or Loss of the Accounting year.
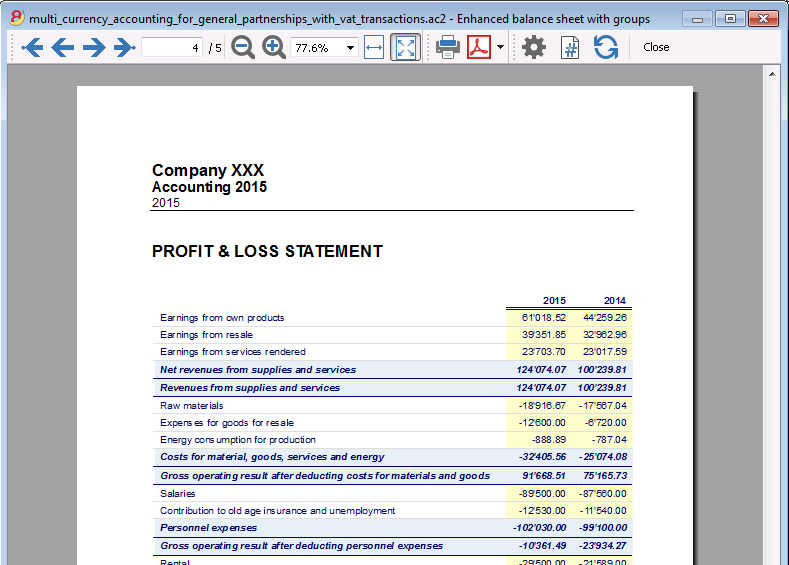
The display and the printing of the Balance Sheet is being executed from the Account1 menu, Enhanced Balance Sheet and Enhanced Balance Sheet with groups commands.
- The Enhanced Balance Sheet command simply lists all the accounts without distinguishing Groups and Subgroups
- The Enhanced Balance Sheet with groups command lists all the accounts while subdividing Groups and Subgroups; besides, it presents numerous features to customize the presentation, functions that are not provided in the Enhanced Balance Sheet.
Data archiving in PDF format
At the end of the year, when the entire accounting has been completed, corrected and audited, all the accounting data can be archived with the Create PDF dossier command of the File menu.

The Budget
- Accounts table, Budget column. For each account, the annual budget amount is being indicated.
In this case, when you set up the Budget from the Account1 menu, Enhanced Balance Sheet with groups command, the Budget column displays the amounts that refer to the entire year. - In the Budget table, that can be activated through the Tools menu, Add new functionalities command.
In this table, you can enter all the budgeted costs and revenue by means of entering transactions. If you activate this table, the column of the accounts table will be automatically deactivated.In this case you can set up a detailed budget, taking into account the possible variations over the year and in different periods of the year.

For more details, consult the page Budget.
Chart of accounts
Financial situation under control
You need to setup you chart of accounts in the Accounts table: setup the accounts and the groups where the accounts must be totalized. With this operation you create the accouts that will be used when entering the transactions. The chart of accounts structure is the same that will show in all Balanche sheet and Profit & Loss statement presentations.
In the Accounts table there are also the columns of the initial balances, movements and current balance, which are automatically updated by the program.
The chats of accounts therefore provides an immediate and complete view of your financial situation.
- Liquidity accounts
- Balance sheet
- Profit & Loss statement
- Result of the current year
- Clients and Suppliers register
- Cost and Profit Centers

Different kinds of rows and sections
The Accounts table (charts of accounts) is both the setup tool and the viewing tool for the economic and financial situation.
In the chart of accounts (Accounts table) all data necerrary to group the mouvements are entered:
- Accounts
They indicate on what account (debit ore credit) the transactions must be registered.
Each account has a code or number (account number), a description, a class and a group to which it belongs; they also have an opening balance, the current balance, the budget, etc... - Costs and Profits centers
They are special accounts whose number is preceded by a full stop ".", a comma "," or by a semi-colon ";". Their purpose is to be able to assign some amounts to special accounts other than the basic accounting accounts. - Segments
They are a sort of sub-accounts who's number is preceded by a ":". Their purpose is to be able to assign some transactions to subcategories of the accounting plan. - Groups
Their purpose is to create rows where the program adds up the amounts of other rows. - Sections
They indicate the accounting plan divisions for the Balance Sheet and Profit and Loss Statement printouts, ...
The columns of the double-entry accounting charts of accounts
- Section
Codes are being entered that allow the user to only print determined parts of the Chart of accounts, when printing the Enhanced Balance sheet by groups. - Group
Contains the code that defines that this is a group row. The group code is then used in the GR column to indicate the totalization of an account or group.
- Account
The account number, cost center or segment is being entered. - Description
A text to indicate the name of the account, group, or section. - Disable (only visible in the Other view)
By entering 1, the account does not appear in the autocomplete list, but can be used in the Transactions table;
By entering 2, the account is disabled and can not be used. - BClass
It indicates whether the account is 1 = Assets, 2 = Liabilities, 3 = Expenses, 4 = Revenue, see the Accounts
- Gr (Totalize in)
It indicates a group so that the program can totalize this line in the group. - Gr1 and Gr2
Additional grouping codes to use with external accounting report files.
- Opening balance
Insert the account balance at the beginning of the year.The amounts in credit must be entered preceded by a minus sign. The total of the debit amounts (positive) and those in credit (negative) must balance and result in zero. If the opening balances do not balance a difference is shown in the information window.If you have added or pasted accounts and the difference is not correct, proceed with a Recheck of the accounting (Shift + F9)
- Movement Debit and Movement Credit (Protected columns)
The total of the debit and credit movements included in the Transactions table.
- Balance (Protected column)
The balance of the account includes the opening balance and the movements in debit and credit.The balance in debit is positive, while a credit balance is negative (minus sign). - Budget
The budget amount for the current year is being entered.The budget amount for the Expenses (debit) must be inserted in positive, the Revenue in negative (credit). -
Difference Budget (Protected column)
The difference between Balance and Budget amount. - Previous
The balance of the account at the end of the preceding year.
With the command "Create new year" or "Update opening balances", the values in the Balance column of the file of the preceding year are being carried forward.
When a new accounting is being created and the user wants to obtain printouts with the amounts of the preceding year, the values of that year have to be entered manually. - Prev. yr. Difference (Protected column)
The difference between the Balance and the amount of last year. - VATNumber
The VAT number in case this account is linked to a client or a supplier. - VATCode
The VAT code that needs to be applied automatically, when this account is being entered in the debit A/c or credit A/c column of the Transactions. - Adresses columns
It is possible to have the program add addresses columns in order to manage customers or suppliers data.
Adding or moving columns
- When an Amount column is being added in the Chart of accounts, the program composes the total of the amounts according to the selected grouping scheme
-
Added columns of the Number type, on the contrary, are not being totaled.
- With the Columns setup command, the columns can be made visible, the sequences can be altered and it is also possible to add other columns.
- With the Page setup command one can also define the layout of the print (portrait or landscape) and the zoom.
Accounts list ordered by description or other criteria
In you need to order your accounts in a different way, use the Extract and sort rows command from the Data menu.
Views
- Base Displayed are the principal columns, the grouping columns and the balances
- Transaction Displayed are the columns with the Debit and Credit transactions.
- Budget Displayed are the Budget column and the Difference Budget column.
- Previous Displayed are the Previous column and the Difference Prior columns regarding the previous year
- Other The Disable column, the VAT number and the Fiscal number column are being displayed.
- Print Just the Account column, the Description and the Balance is being displayed.
The views can be customized and others can be added with the command Views setup.
Trial Balance sheet
At any time, positioning yourself in the Accounts table and using the Print or Print preview commands (from the File menu), you can view and print the account plan or part of it.
Also from the Accounts table, if you select Movement view, you can view and print your trial balance sheet.
Advanced printouts
- Accounting report
It is possible to select just the accounts with transactions, to obtain temporary groupings or accounts grouped according to the BClass or an external grouping scheme. - Enhanced Balance sheet
Prints all the accounts of the accounting divided by Assets, Liabilities, Expenses and Revenue - Enhanced Balance sheet by groups
Allows the user to obtain customized printouts with groups - Specific advanced printouts are available using the BananaApps
Accounts
Bookkeeping accounts
In order to create an account, go to the Accounts table and enter a number or a code in the Account column.
This same number is then used in the Transactions table as Debit or Credit account.
- The account number can be composed by numbers, letter and separations characters.
- It is not possible to have more than one account with the same number.
- Each account must have a BClass and must belong to a group.
The BClasse
Each account must belong to one of the following BClasses:
- 1 for Assets
- 2 for Liabilities
- 3 for Expenses
- 4 for Income
The BClasse number must be as indicated, regardless the account or group code. It is also possible to create Off Balance Sheet accounts (for example for warranty down payments, e conditional committments), that must have the following BClass:
- 5 for Off Balance Sheet: Assets
- 6 for Off Balance Sheet: Liabilities
Opening balances
The opening balance of each account is entered in the Opening + currency symbol column.
- The Assets balances are shown normally
- The Liabilities balances are entered with the minus sign (negative)
- Usually only the Assets and Liabilities opening balances are entered.
In order to automatically transfer the opening balances for the following year, please visit the Create New Year lesson.

Opening balances differences
In a correct accounting file, the total of the Assets opening balance should be equal to the total of the Liabilities opening balance, so no differences are shown.
If the totals do not match, the program will show a warning message telling you that there is a opening balances difference (Information window).
If you have changed some account numbers and you think the error message is not correct, please Recheck the accounting.
When using Banana Accounting for the first time, the opening balances must be entered manually.
Accounts with addresses
It is possible to add a few columns in the chart of accounts, to include the addresses management:
Tools menu -> Add new functionalities command
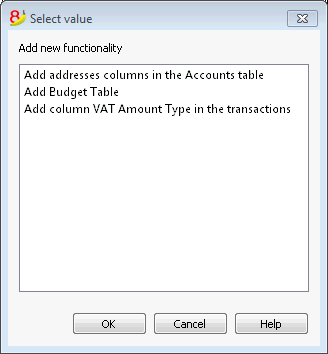
This command will add in the Chart of accounts the following things:
- several columns (name, last name, company, town, ...) where you can enter the client / supplier / member address and data
- the Address view where you can see the added columns (in order to change the view or the views organization please consult the Tables setup page)
Clients/supplier register
When in the accounting plan you need to manage a clients/supplier register, meaning a specific account list for all clients, you need to have complete data with address, phone number, email, VAT number, etc. in this case adding the columns of the Address view is very useful.

Groups
The grouping and totaling system
The Banana grouping and totaling system is based on the following columns:
- Group (TOTAL row)
When, in a row, a group identifier is being entered, the row becomes a TOTAL row.
In this row the amounts of the Gr column, that contain the same identifier, are being totaled.
When a group is present, there cannot be an account. . - Gr (Adds this row into the TOTAL row)
The number here must be one of the numbers defined in the Group column.
With this system, an account can be totaled in a group row, the group in another group and so on... in order to create different totaling levels.
This totaling system is very powerful and flexible, but it takes some "getting used" to it, in order to be able use it well.
Examples of the main groupes in the Double-entry accounting
Every Chart of accounts uses its own totaling system. Hereunder the main groupes of the Double-entry accounting are being explained.
In the Double-entry accounting, the total of the Debit balances (positive) together with the Credit balances (negative) have to result in 0 (zero).
- The 00 is the row where all the amounts are being added together.
It is the "Summa summarum" of all the Debit & Credit balances.
In case the Balances columns do not amount to zero, it means there is a Debit/Credit difference and thus most likely a mistake. In these cases it is useful to proceed with a checking of the accounting (see next point).
In the Debit and Credit columns of the Transactions view (Accounts table), there are only positive amounts, so also in the row of the 00 group, there will be the total of the transctions not equal to zero.
The calculation sequence to arrive at 00 is therefore as follows:
- The 1000 account -> group 1 (Total Assets)-> Group 00
- The 2000 account -> group 2 (Total Liabilities) -> Group 00
- The 3000 account -> group 3 (Total Revenue) -> Group 02 (result Profit & Loss Statement) -> Group 297 (Profit/Loss of the current year in the Balance Sheet) -> Group 2 (Total Liabilities) -> Group 00.
- The 4000 account -> group 4 (Total Expenses) -> Group 02 (result Profit & Loss Statement) -> Group 297 (Profit/Loss of the current year in the Balance Sheet) -> Group 2 (Total Liabilities) -> Group 00.
The result of profit & loss statement is added in equity
As you can see in the example, the Group 02 (Profit /Loss from Profit & Loss statement) is totalized in the 297 liabilities group (current year result).
With this group organization, we have several advantages:
- In current year operating result is displayed in the balance sheet
- The Total Liabilities will match the Total Assets (provided that there is no accounting error).
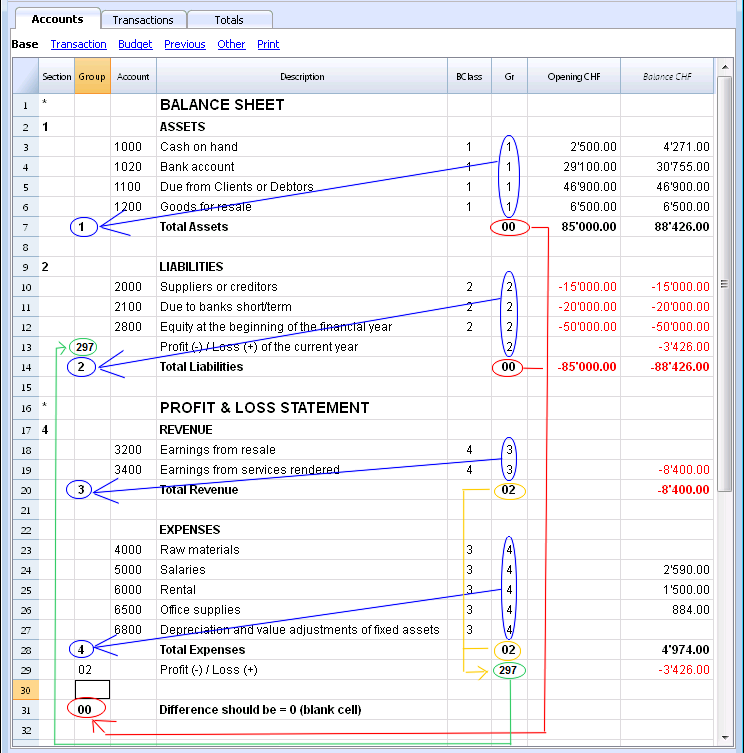
Adding or deleting subgroups
Adding a totaling level
With this system it is easy to add totaling levels.
When we want to create a subgroup for the Cash & Cash equivalents accounts:
- Enter an empty row after the bank account
- Enter the value 10 into the Group column
- Enter the value 1 into the Gr column
- Indicate the Gr 10 in the accounts 1000 et 1020
- The sequence for the calculation becomes:
The 1000 account -> Group 10 (Cash & Cash equivalents) -> Group 1 (Total Assets) -> Group 00.
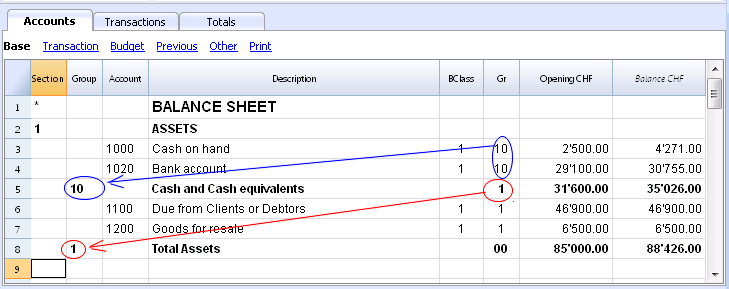
In case you want to insert another subgroup, "Current Assets", proceed in the same way.
- Add an empty row above the row of the Total Assets.
- In the new row:
- Indicate the number 11 in the Group column
- Indicate the number 1 in the Gr column
- In the Clients and Goods for resale (inventory) rows, indicate the Gr 11.
Deleting subgroups
In case the Chart of accounts shows subgroups that are no longer needed or not wanted, these can be deleted. Just delete the row of the subgroup and modify the Gr of every account that was part of that subgroup.
Checking of the structure
Once the Chart of accounts has been set up, execute the Check accounting command of the Account1 menu. In case there are errors, the program issues a warning.
Infinite loop error
This warning appears when a Group is being totaled in a Group of a lower level, reason for which an infinite error loop is being created.
There would be an infinite loop when, in the preceding example, the Assets Group (1) would be totaled in Group 10.
The program, after having calculated the Group 1, would total the amount in Group 10, which in turn would total the amount in Group 1, and then again in 10 without ending.
Profit & Loss Statement with Gross Profit
It is also possible to use a Profit & Loss Statement that starts with the total Business result and that subtracts the costs.
Hereunder the example of the Swiss PME Chart of Accounts is shown.
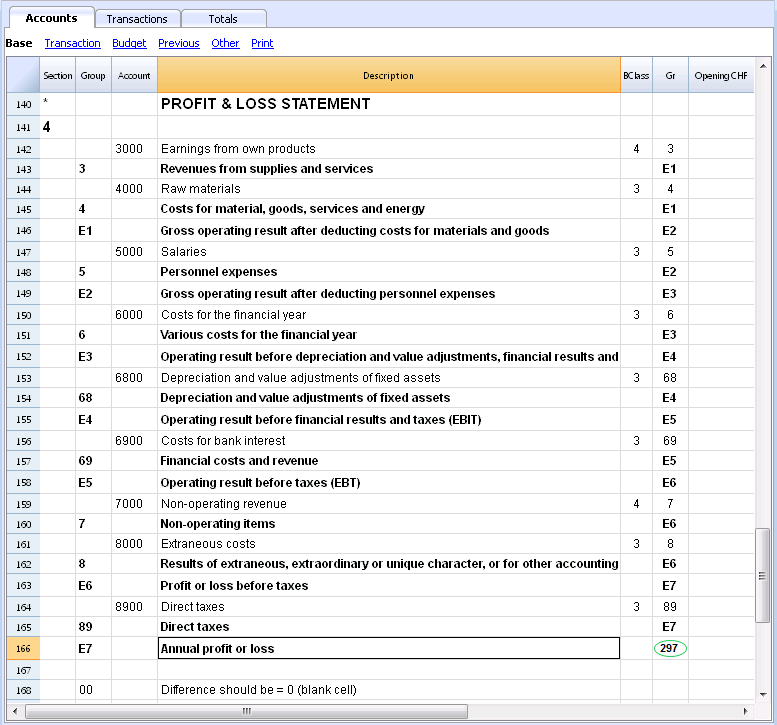
Extended use of the totaling system
The totaling system is very flexible:
- In one Group, it is possible to add Groups as well as Accounts
This can be seen in the earlier shown example where the Group Cash & cash equivalents (10) and the accounts (1100 and 1300) are being totaled in the Assets - You can use whatever kind of numbering
- You can create up to a hundred totaling levels
- The Total row can be after the rows
- The Total row can be before the rows
- The Total row can be completely elsewhere, in a separate position
This is being used to create registers (for example, a client register)
- The accounts and the Groups can be totaled in one single other Group.
It is not possible to total one and the same account at the same time in two groups. - This system is also being used to total the Cost centers and the Segments
Pay attention though to not use different groups for normal accounts and for cost centers, because the resulting amounts will not be correct.
Totaling of the Amount columns
The calculation procedure totals the amount columns
- The amount columns defined by the system are being totaled.
- The amount columns added by the user are being totaled.
The sequence of the calculation
The programme calculates the totals in the following manner:
- Sets the values of the Amount columns of the Groups rows on zero
- Totals the amounts of the Account rows into the Group rows (first calculation level)
- Adds the balance of the Group rows into the Group(s) of a superior level
Repeats the operation until all the levels have been calculated.
Related Documents
Sections
In order to create automatically an Enhanced Balance Sheet with groups, the chart of accounts needs to be configured with special codes that are to be entered in the Section column:
| * | Title 1 | the asterisk separates the sections and indicates the main headers |
| ** | Title 2 | to be entered for the secondary headers |
| 1 | Assets | to be entered in the row of the Assets title |
| 2 | Liabilities | to be entered in the row of the Liabilities title |
| 3 | Expenses | to be entered in the row of the Expenses title |
| 4 | Revenue | to be entered in the row of the Revenue title |
| 01 | Client's Register | to be entered in the row of the Client's Register title |
| 02 | Supplier's Register | to be entered in the row of the Supplier's Register title |
| 03 | Cost Centers | to be entered in the row of the Cost Centers title |
| 04 | Profit Centers | to be entered in the row of the Profit Centers title |
| # | Notes | to be entered in the row of the Notes title |
| #X | Hidden data |
to be entered in the row from whereon the data have to be hidden |
Sections in the Assets
- Enter a * on the same row as the Balance Sheet title
- Enter 1 on the same row as the Assets title
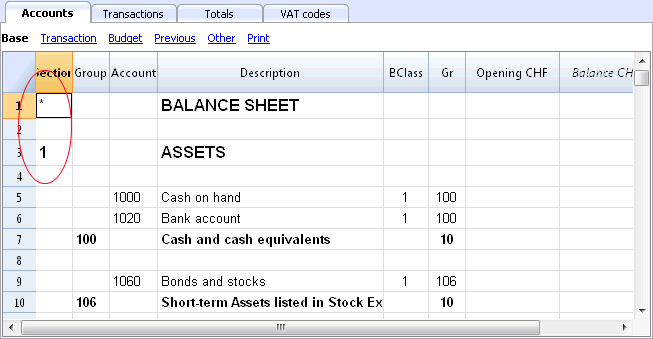
Sections in the Liabilities
- Enter 2 on the same row as the Liabilities title
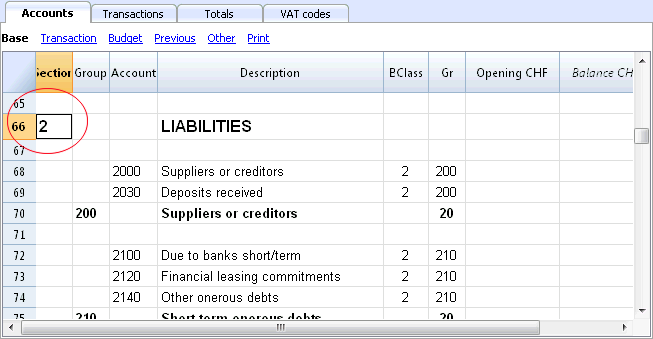
Sections in the Profit & Loss Statement
- Enter a * on the same row as the Profit/Loss Statement title
- Enter 4 on the empty row below the Profit/Loss Statement title
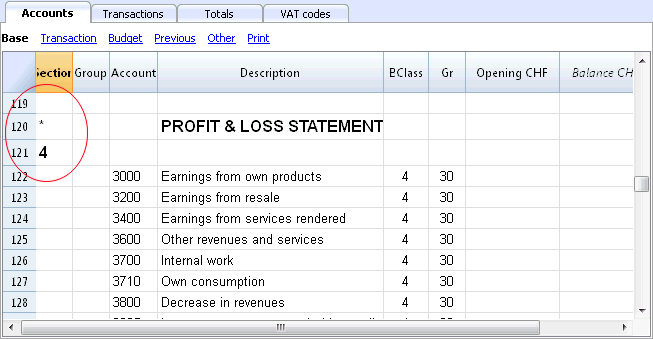
Note: when there is a clear distintion between Revenue and Expenses in the Chart of accounts, you need to:
- Enter 3 on the same row as the Expenses title
- Enter 4 on the same row as the Revenue (Income) title .
Sections in the clients/suppliers register
- Enter * in the same row as the Clients/Suppliers register title or on a empty row (as in the following example)
- Enter 01 on the same row as the Clients register title
- Enter 02 on the same row as the Suppliers register title
The amounts will be shown in the same way as for the Assets and the Liabilities.
This encoding is also valid when the clients and suppliers are configured as cost centers.
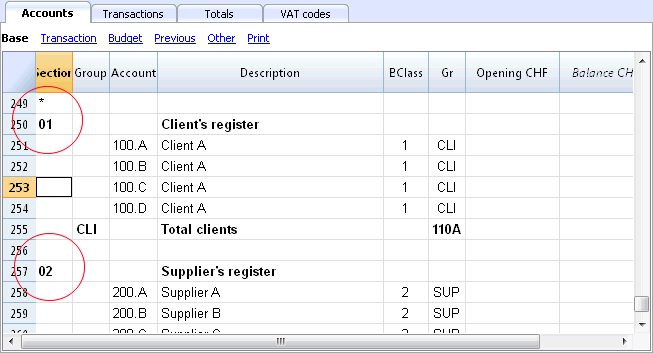
In case there are cost or profit centers configured, enter the following elements
- An * on the row of the Costs and Profit Centers title, or on a empty row
- 03 on the same row as the Cost centers title or on an empty row preceeding the Cost Centers
- 04 on the same row as the Profit centers title or on an empty row preceeding the Profit Centers
The Cost Centers amounts will be shown as positive (in black) like the expenses; the Profit Centers amounts will be shown in negative (in red) like the revenue;
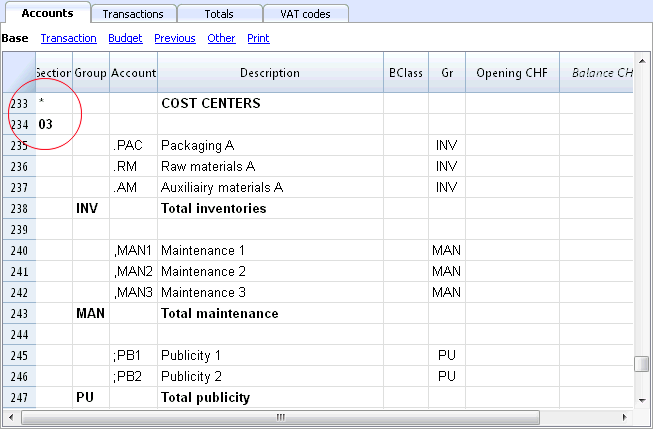
For more information please vist the Sections logic page
Related document: Enhanced Balance Sheet with groups
The Sections logic
The sections different encoding entered in the Section column determines how the printout will come out.
Each section is printed as a separate table.
The directories
- * Title 1 creates a level 1 directory.
It can contain level 2 sections or directories.
It is useful to group sections that need to be printed together, such as the Balance sheet, which contains Assets and Liabilities. - ** Title 2 creates a level 2 directory.
The Base sections
The section number or code determines:
- how the amounts are printed; the amounts can be visualized just like in the Balance sheet or inverted.
If the Credit amounts (in negative) are inverted, they will be visualized in positive, and the positive amounts will be visualized in negative. - which amount columns will be used; the Balance column or the Period Movement column are used.
The Balance column indicates the account balance at a specific date (balance at Jun 30th).
The Total Period Movement column indicates the movement amount on the indicated period.
It is used for the Profit and Loss Statement and indicates the costs or the revenues for a certain period.
Here is the explanation of the different sections
- 1 Assets (amounts as in the accounting plan, balance column)
- 2 Liabilities (inverted amounts, balance column)
- 3 Costs (amounts as in the accounting plan, total movement column)
- 4 Revenues (inverted amounts, total movement column)
This section can be also used alone and it can include both costs and revenues (in case of a Profit & Loss Statement that starts with the total Business result and that subtracts the costs). In this case revenues would be displayed in positive and costs in negative.
These sections must be unique. Therefore there can only be one 1 Assets, or one 2 Liabilities section. For other sections, like clients/suppliers register or cost center similar sections can be used.
Derivatives Sections
Those are Sections that are similar to the Base Sections
- 01 Similar to Assets (amounts as in the accounting plan, balance column)
It is used for the clients register. - 02 Similar to Liabilities (inverted amounts, balance column)
It is used for the suppliers register. - 03 Similar to Costs (amounts as in the accounting plan, total movement column)
It is used for Cost Centers. - 04 Similar to Revenues (inverted amounts, total movement column)
It is used for Profit Centers.
Other Sections
There are other kinds of sections
- # Indicates a Notes Section (it prints only the Description column)
It is used for the Balance sheet attachments - #X Hidden Section. This section is not included in the sections selection and it is not printed.
It is used to indicate parts not to be printed.
Column width in printout
The columns width is automatically set by the program.
Sections 1, 2, 01, 02 have the same column width
Sections 3, 4, 03, 04 have the same column width.
Segments
Introduction
Segments are being used to have a more detailed classification of the costs, also to obtain calculations of components or departments of the company. By using the segments you can obtain a Profit & Loss Statement per unit, department or branch, without having to create specific accounts for each unit.
For example a museum can use the segments in order to know the income, the personnel expenses or the setting up expenses for each exhibit.
Segments are being used when a systematic attribution is necessary, that follows the transaction in debit or credit.
Cost centers, on the contrary, are normally being used for additional cataloging, less structured and when the account sign is not necessarily being followed.
Cost centers and segements can be used at the same time.
Characteristics of the segments
- Segments are accounts preceded by a colon ":".
- Segments codes can consist of numbers or letters.
- There may be up to 10 levels of segments.
- The number of colons preceding the symbol for the segment indicates the number of level.
- :LU segment of level 1
- ::P1 segment of level 2
- :::10 segment of level 3
- For each level there may be an illimited number of segments.
- The different levels of the segment are independent of each other.
- The segments do not have BClasses and do not have a currency symbol
- The calculations for segments are done in basic currency.
- In the transactions, the segment follows the debit and credit account.
It is not possible to record on a segment without having an account. - In the transactions, one can use a "-" as a separator instead of a ":" if on the File properties (Basic data) of the File menu the option Use the minus sign (-) as segments separator has been activated.
- Account cards of the transactions on single segments can be obtained.
Setting up segments
The segments have to be configured in the Accounts table, Account column, at the end of the chart of accounts.
- Insert an asterisk in the Section column in order to define the section relative to the segments
- In the Description column enter the Segments title
- Enter the description of the first-level segments, and in the Account column, insert ":"
- List the segments of the first level, entering an identification code for each one of them in the Account column, preceded by ":"
- Proceed by entering the segments of the second level (and, if necessary, those of the third), in the same way as those of the first level, with the only difference that the segment codes need to be preceded by "::" or by ":::", depending on their level.
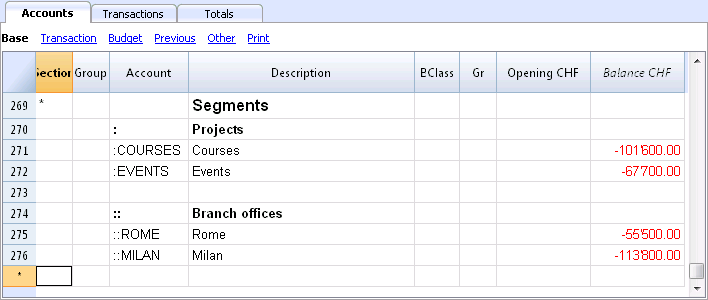
Segment balance
The segment is a subdivision of what has been entered on an account. The segment amount is thus always relative to an account, and in order to have the segment total, you need to use an Accounting report (from the Account1 menu), with a subdivision by segment (Subdivision tab).
In the chart of accounts the segment balance is indicated. This balance will be zero if the segment is used in both Debit and Credit accounts, since the amounts compensate themselves). The segment balance will be visible only when using it with the Credit or the Debit account, associated with the Profit and Loss statement account.
Transactions
The segments are being entered in the Transactions table, followed by the main account from the account segment.
Each segment is preceded by the colon, or by the minus sign (-), in case the option Use the minus sign (-) as segments separator has been activated in the File and Accounting properties (File menu).
If the chart of accounts contains accounts with "-" or "_", as for example in the clients/suppliers register's accounts), you can't use the same symbols as segments separators; in this case you need to deactivate the corresponding option and use the ":" symbol.
When a segment that belongs to more than one level is being recorded, the segment of the first level needs to be entered right after the main account; then, continue with the code of the second level.
![]()
Report
Reports of the segments are obtained with:
- Enhanced balance sheet with groups
- Accounting report.
- Account card
- Multi-level report
In order to obtain reports that combine accounts and segments (for example, all the expenses of the LU Branch for P1), the features of the Banana applications need to be used.
Report subdivision by level
In the Enhanced Balance Sheet with groups, in the Subdivision tab, indicate the segment level to be used.
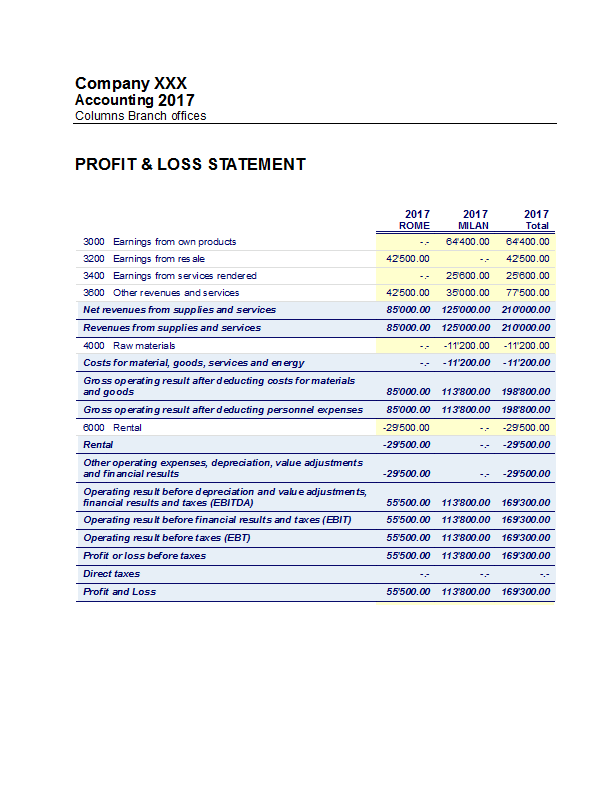
Summary Report
This is a summary with the segment that have been setup in the Accounting plan section, with a possible subdivsion (if desired) by period or by segment.
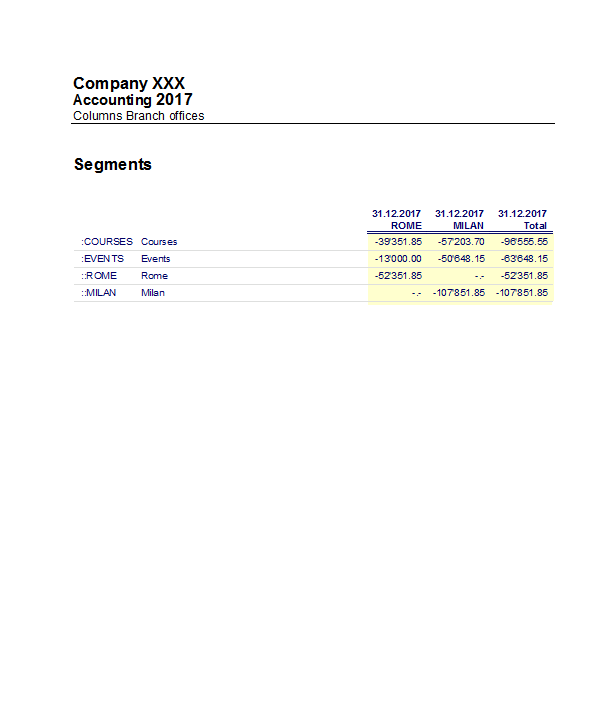
Segment non assigned
The "empy" segment gathers all the amounts that have been recorded without specifying a segment. It is possible to setup the title for this segment in the Accounts table. Please also select the Segment heather: Description option in the Subdivision section.
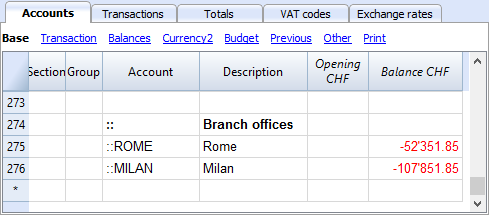

Related document: Managing different projects
Managing different projects
With the Segments feature, it is possible to manage different projects, obtaining balance sheets that determine the profit or the loss of each project.
Example
In an association, there are two projects that need to be managed:
- Courses
- Events
On top of that, there are different branch offices with the same projects to be managed:
- Rome
- Milan
The user wishes to obtain a balance sheet which indicates the profit or the loss of each project and branch office.
How to proceed:
- Insert the segments at the end of the chart of accounts
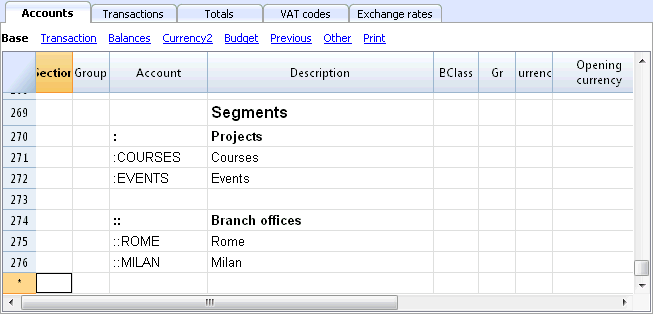
- Enter the transactions, and complete the debit and the credit accounts with the segments
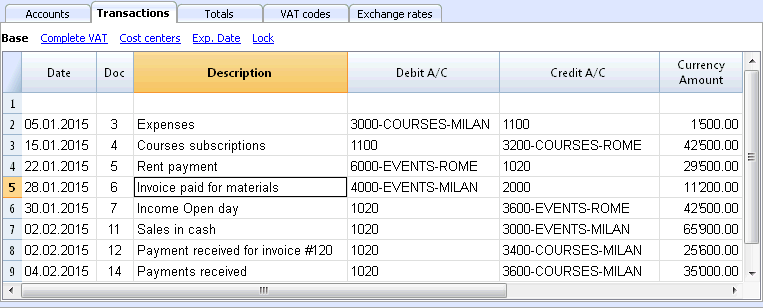
- From the Account1 menu, activate the Enhanced balance sheet with groups command
- Select the available configurations in the different tabs; in the Sections tab in particular, deactivate the display of the Balance sheet accounts, the Client/Suppliers accounts and the Cost centers. The segments usually refer to the accounts of the Profit & Loss statement.
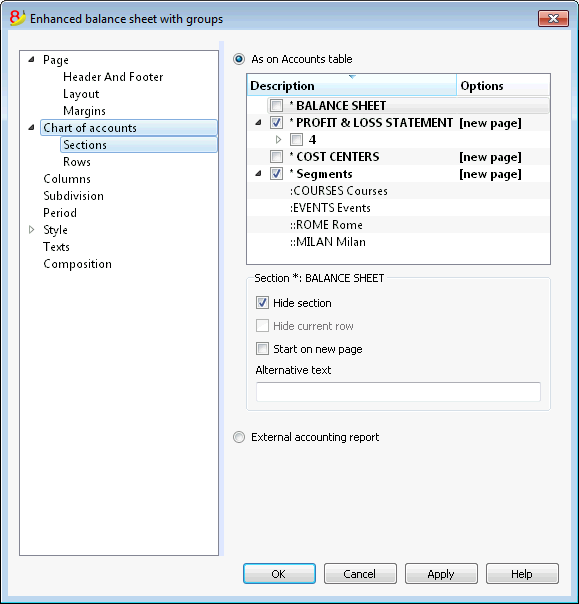
- In the Subdivision tab, activate the Subdivision by segment option
- Select the segment for which the balance sheet should be obtained (by project or by branch office)
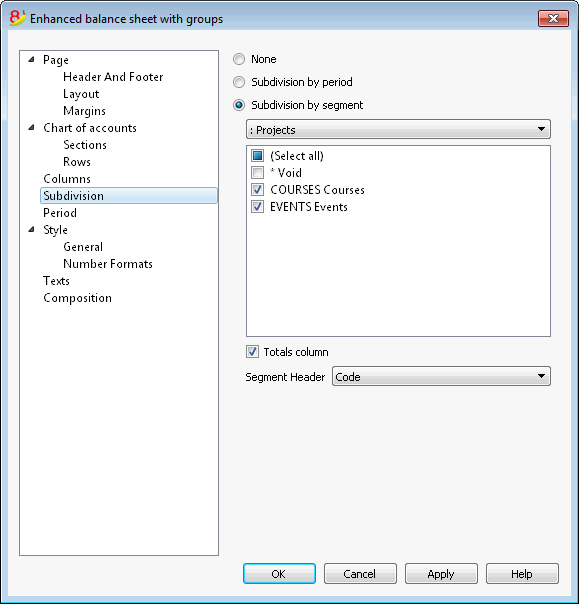
- Click on the OK button in order to display the report
Report by projects
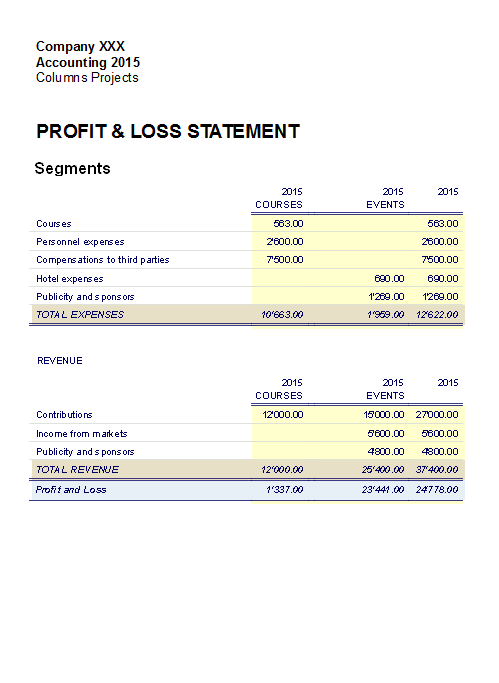
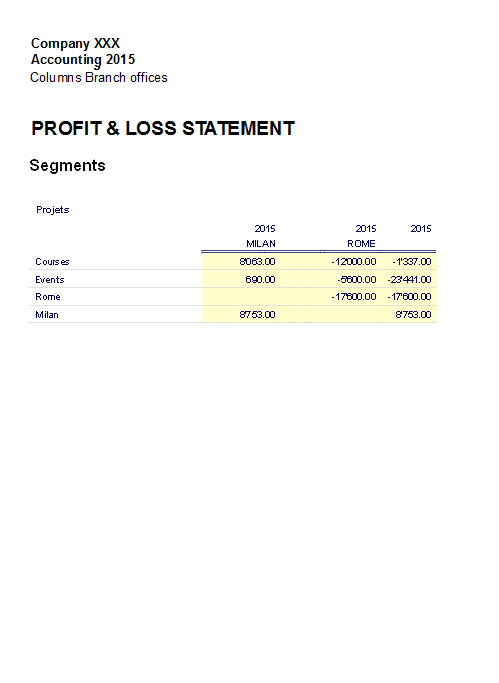
Cost and Profit Centers
The Cost and Profit centers (hereunder being indicated as Cost centers) allow the user to catalog the transactions according to different criteria than the usual accounts.
Characteristics of Cost centers
- The Cost and Profit centers (CC) are accounts, preceded by the ".", "," and ";" signs
- There are three cost center levels:
- CC1 preceded by a period "."
- CC2 preceded by a comma ","
- CC3 preceded by a semicolon ";"
- Each level is independant of the other
- For each level, there can be an unlimited number of cost centers.
- A superior level can be used without using an inferior
- Cost center codes can be alphabetic or numeric
- Cost centers can have there own grouping, different than those of normal accounts. For the same level of cost centers, subgroups can be created. Be careful to not mix cost centers groups with other groups of a different level or with normal accounts or segments.
- Each cost and profit center has its own account card, complete with transactions and balance
- Recording on the cost center is independant of the account recorded in debit or credit. One can even record on a cost center without any account in the debit and credit column.
When to use cost centers
Cost centers are usually being used to catalog certain expenses to specific activities, that are not necessarily linked between each other.
- Projects, Events, Construction sites
- Clients and suppliers, Members, Sales agents
- Extra details for certain expenses
The segments, on the contrary, follow the debit and credit accounts, and are being used as further subdivisions for expenses and revenue.
It is possible to use cost centers and segments together at the same time.
Setting up cost centers in the Accounts table
Attention: If you work with a cash book, the cost and profit centers must be set up in the Categories table!
- Create a specific section for the cost centers.
This setup will be necessary for the presentation of the cost centers in the Enhanced Balance Sheet by groups.- Enter a section with an asterisk * for a section change
- In the next row, enter 03 (or 04 for a profit center).
- Add some empty rows for the cost center
- In the Group column, enter the group to which the cost center account belongs
- In the Account column, enter the cost center account precededs by a full stop "." for those to be registered in CC1 column (Transactions table), a comma "," for those to be registered in CC2 column and a semicolon ";" for the ones to be registered in the CC3 column.
- In the Gr column, indicate the group in which the amounts have to be totalized.
- In a Multi-currency accounting, the account currency is also specified.
- Add the cost center groups
- In one and the same group, totalize only one specific level.
- As for normal accounts, different levels can be created.
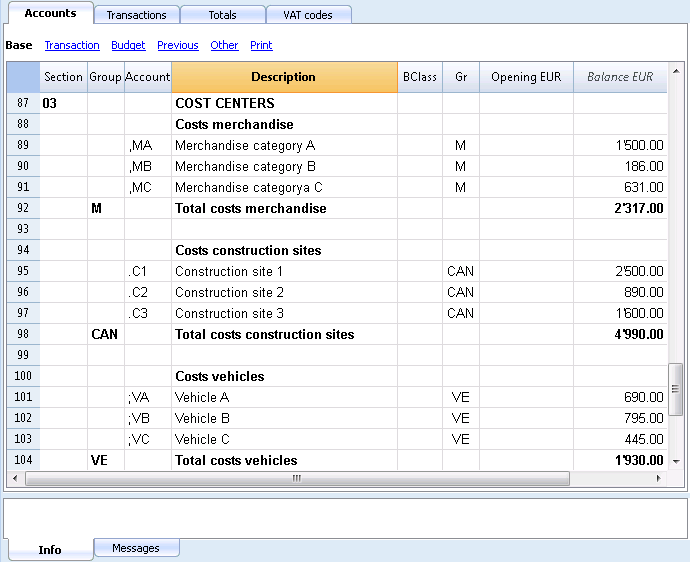
File Properties (VAT amount)
In the File and accounting properties command, in the VAT tab you can set the amount of cost centers with the following options:
- Use transaction amount - The amount of the cost center is registered according the registration amount
- Use amount excluding VAT - The amount of the cost center is registered net of VAT.
- Use amount including VAT - The amount of the cost center is registered inclusing the VAT.
Transactions
In order to register on the cost centers, it is assumed that the cost center accounts have already been entered into the Chart os accounts.
To proceed with the recordings, you need to be in the Transactions table, in the Cost centers view; in the CC1, CC2, CC3 columns, you need to enter the cost center account without the punctuation that precedes it.
- To record on the cost center in credit, the cost center needs to be entered preceded by the minus sign (-).
- For the Income & Expense accounting, in the File and accounting properties, you can define for the cost centers to follow the sign of the category.
- In order to record a global amount on more than one cost center of the same level, a different row needs to be created for each different cost center.
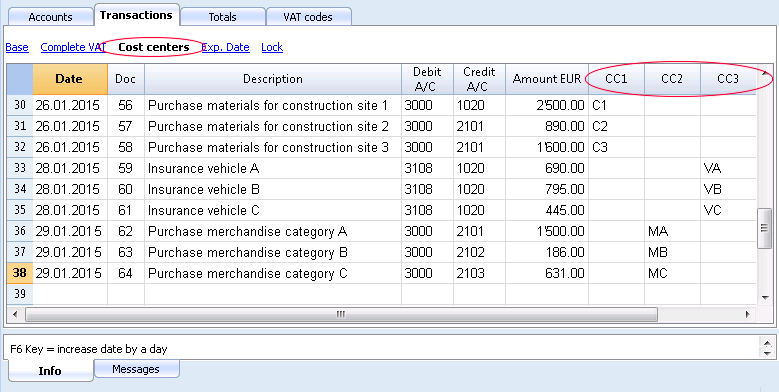
Cost center account card
The cost center is treated as any other account, so each cost center has its own account card with account balance and account transactions.
In order to view all cost center account cards, click on the command Account/Category cards in the Account1, and then on the Cost centers button (Filter option).
Related documents:
Membership list
In order to obtain the membership list with all the data that are useful for an association, the user needs to proceed as follows:
- In the Accounts table, at the end of the Chart of Accounts, the membership list can be created by using the CC3 cost center column.
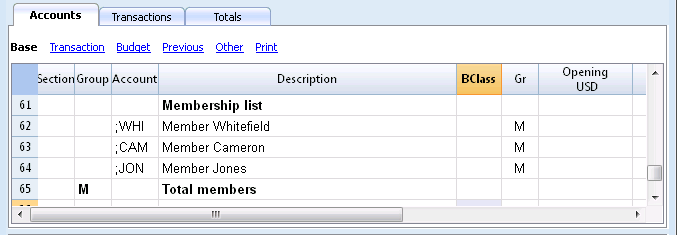
- Activate the Address view, selecting from the Tools menu, the Add new functionalities command
- In the window that appears, confirm the option Add addresses columns in Accounts table
- Insert the data of the members
- For a print-out: select the rows that need to be printed and activate the printing option only Selection.
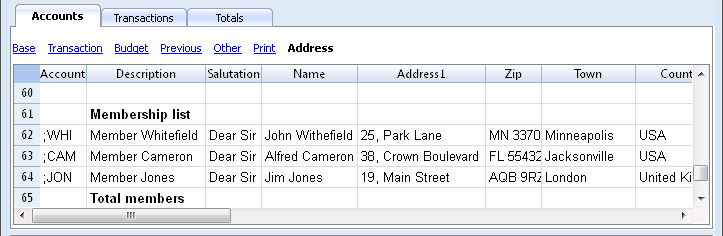
In order to record the transfers from every member in the Transactions table, insert the CC3 account for each member, using the CC3 column. In order to display the CC3 column, click on the Columns setup command of the Data menu; double click on CC3 and activate Visible check box.
![]()
In the Accounts table, the balance of the member's transactions is shown.
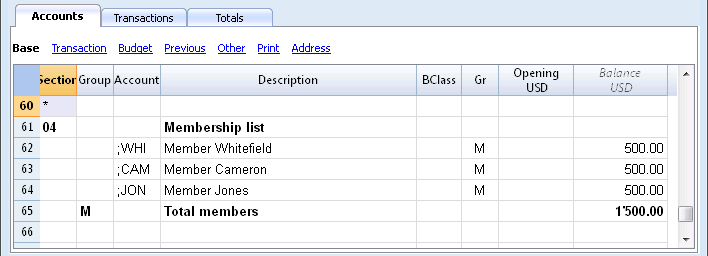
To see all of a member's transactions, double-click on the CC3 account number.
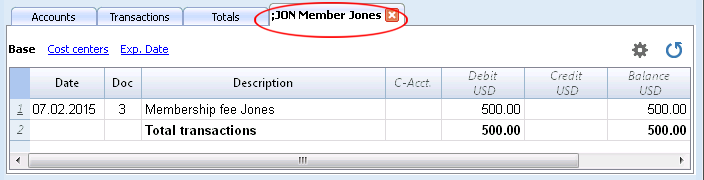
Related document: Cost and Profit centers
Add / Rename
Adding a new account or category
- Position yourself in the row above the one where you want to add the new account
- Add a new empty row with the command Add rows from the Edit menu
- In the columns, insert the account number, the description, the BClass (1 for the Assets, 2 for the Liabilities, 3 for the Expenses and 4 for the Revenue), and the Gr which needs to be the same as the one inserted for the accounts belonging to the same Group.
Note: If you first enter a transaction with a non existing account and later you create the new account in the accounting plan, you will first get an error message, that will go away only if you recheck the accounting with the Shift + F9 key, or the Recheck accounting command from the Account1 menu.
Adding a new group
- Position yourself in the row above the one where you want to add the new group
- Add a new empty row with the command Add rows from the Edit menu
- In the columns, insert the group number, the description and the Gr which needs to be the same as the group you wish this group to be totalized.
Renaming an account or a group
- Position yourself in the Account or Group column in the Accounts table, or in the Category column of the Categories table (or in the VAT code column in the VAT codes table)
- Choose the Rename command from the Data menu
- Enter the new account, group, category or code number
The program will automatically update the Transactions table with the new number or code.
Deleting an account or a group
- Position yourself on the row number that contains the account that is to be deleted
- From the Edit menu, click on the Delete rows command
- Enter the number of rows that you wish to delete
After deleting an account, a category or a group it is necessary to use the Recheck accounting command from the Account1 menu. The program will give you a warning message if the deleted account, category or group was used in the Transactions table.
Opening balances
Avoid mistakes with Banana Accounting Plus
In order to facilitate checking your accounting work and to immediately find differences, in Banana Accounting Plus, our new version, we added the Balance column in the Transaction table. You can now see potential differences on each row and you can correct them right away. It is a very useful feature when closing the accounting period.
Many of our clients have already tried it and are enthusiastic about it. We advise you to switch now to Banana Accounting Plus and take advantage of the many new features.
Opening balances
When using Banana Accounting for the first time, the opening balances need to be inserted manually in order to create the opening balance sheet.
After having set up the Chart of Accounts, proceed as follows:
- Place yourself in the Accounts table, Base view, Opening column.
- Manually enter the opening balances of the Assets and Liabilities accounts. The Liabilities are entered preceded by the minus (-) sign.
- Check if the total Assets equals the total Liabilities so that your accounting balances. If there are differences in the opening balances you need to check and correct them.
In order to automatically transfer the opening balances for the next year, consult the lesson Create New Year
Transactions
Avoid mistakes with Banana Accounting Plus
In order to facilitate checking your accounting work and to immediately find differences, in Banana Accounting Plus, our new version, we added the Balance column in the Transaction table. You can now see potential differences on each row and you can correct them right away. It is a very useful feature when closing the accounting period.
Many of our clients have already tried it and are enthusiastic about it. We advise you to switch now to Banana Accounting Plus and take advantage of the many new features.
Entering Transactions
Transactions must be entered in the Transactions table.
![]()
The columns of the Transactions table
The columns listed hereunder and preceded by an * are usually not visible.
In order to make them visible, use the Columns setup command from the Data menu.
Date
The date the program uses to attribute the transaction to a certain time frame. The date should be within the limits of the accounting period defined in the Basic data of the accounting. In the Options tab, one can indicate whether the transaction date is required, if not this value can also be left empty.
If there are locked transactions, the program gives an error message when an equal or earlier date than the one of the lock is being entered.
*Date Document
The date of the document can be entered, for example the date of issue for an invoice.
*Date Value
The value date of the bank operation can be indicated. This value is being imported from an electronic bank statement.
Document
The number of the voucher that serves as a base for the accounting transaction. When entering transactions, it is advisable to indicate a progressive number on the document, so that the accounting document can be easily traced from the transaction.
The autocomplete feature proposes progressive values as well as transaction codes that have been defined earlier in the Recurring transactions table.
The program proposes the next document number, that can be resumed with the F6 key.
-
In case of a numeric numbering, the program simply increases the highest value found in the Doc column.
- Alphanumeric numbering: the program increases the final numeric part; this is useful when one would like to keep a separate numbering for cash and bank movements.
If earlier Doc number C-01 has been entered, and one starts to type C, the program proposes C-02.
If earlier Doc number B104 has been entered, and one starts to type B, the program proposes B-105.
If earlier Doc number D10-04 has been entered, and one starts to type D, the program proposes D10-05.
In the recurring transactions you can setup transactions groups that can be reloaded with a single code.
In order to add a large number of document numbers, you can also use Excel. You can create in Excel the desired quantity of document numbers and then copy and paste it into Banana, in the bcolumn of the Transactions Table.
*Document Protocol
An extra column in case an alternative numbering for the transactions or for the document is needed.
The autocomplete feature proposes progressive values that function in the same way as the ones in the Document column.
*Document Type
Contains a code that the program uses to identify a type of transaction. If you prefer to use your own codes, it is advisable to add a new column.
- 01 In the reports, this transaction is considered an opening transaction, so it doesn't show in the period but in the opening balances.
- from 10 to 19: codes for customers' invoices
- from 20 to 29: codes for suppliers' invoices
- from 30 to 1000: codes reserved for future purposes.
*Document Invoice
A number of an issued or paid invoice that will be used together with the invoice control feature for customers/suppliers
*Document Original
The reference number present on a document, to enter, for example, the number of a credit note.
*Link to external file
Serves to enter a link to an external file, usually the accounting voucher.
Pressing on the little arrow on the upper part of the cell, the program opens the document.
*External reference
Any reference number all ocated by a program that generated this operation. This value can be used to check whether a given task is imported twice.
Description
The text of the transaction.
The autocomplete feature proposes the text of an already entered transaction, or of one that has been entered in the preceding year when the appropriate option has been activated. When pressing the F6 key, the program retrieves the data of the preceding row with the same description and completes the columns of the active row.
In case the description begins with #CheckBalance, the transaction is being considered as one that serves to checkup the balance.
Please consult our page Check accounting for more information on the subject.
*Notes
Useful to add notes to the transaction.
Debit Account
The account that will be charged.
It is possible to also enter a segment in the Debit account column. These are usually separated by a ":" or a "-".
In the accounts list, pressing the key with the segment separator symbol, one goes immediately to the next segment.
If instead the Enter key is being pressed, the input finishes and one moves to the next column.
The autocomplete feature proposes the accounts and segments. One can also enter a search text and the program shows all the accounts that contain that text in one of the columns.
*Debit Account Description
The description of the entered account retrieved from the Chart of accounts.
Credit Account
The account that will be credited. We refer to the explanation under Debit account for the rest of the information.
*Credit Account Description
The description of the entered account retrieved from the Chart of accounts.
Amount
The amount that will be entered unto the debit- and credit account.
VAT columns
Information on the VAT columns can be found att the VAT columns in the Transactions table page
CC1
The Cost center account preceded by "."
*CC1 Description
The description of the Cost center, retrieved from the Chart of accounts.
CC2
The Cost center account preceded by ","
*CC2 Description
The description of the Cost center, retrieved from the Chart of accounts.
CC3
The Cost center account preceded by ";"
*CC3 Description
The description of the Cost center, retrieved from the Chart of accounts.
*Expiry date
The date before which the invoice has to be paid.
*Payment date
Used in combination with the Show Expiry dates command.
When instead using the invoices customers/suppliers control feature in order to check on the payments, a transaction has to be entered for an issued invoice and another one for the payment thereof.
*Lock Number, Lock Amount, Lock Progressive, Lock Line
More information at the Lock Transactions page.
Adding new columns
With the Columns setup command, it is possible to display, hide or move the order of columns, add new ones, or indicate that a column should not be included in the printout.
- The added columns in the Transactions table will be added also in the Recurring transactions table, in the Account card and in the VAT report, without being made visible.
In order to display these columns in the other tables, use the Columns setup command. - If a column of the "amount" type is being added, the entered amounts will be added up in the Account card.
Views
When a new accounting is being created, the following views are being automatically created as well:
- Base: the main columns are being displayed
- Cost centers: the CC1, CC2 and CC3 columns are being displayed
- Expiry dates: the columns Expiry date and Payment date are being displayed
- Lock: the columns relative to the Lock function are being displayed.
With the Views setup command, the views can be customized and personal, added views can be created.
With the Page setup command, you can modify the print mode of the view.
Info window
In the Information window at the bottom part of the screen, error messages and extra information about the used accounts and VAT codes are being displayed.
For the accounts, the Account number, the Description, the Amount of the transaction (debit or credit) and the Current balance of the account is being indicated.
Transaction types
Avoid mistakes with Banana Accounting Plus
In order to facilitate checking your accounting work and to immediately find differences, in Banana Accounting Plus, our new version, we added the Balance column in the Transaction table. You can now see potential differences on each row and you can correct them right away. It is a very useful feature when closing the accounting period.
Many of our clients have already tried it and are enthusiastic about it. We advise you to switch now to Banana Accounting Plus and take advantage of the many new features.
Simple transactions
Simple transactions are the ones regarding two accounts (one Debit account and one Credit account) and entered in one single row. Each transaction has its own document number.
![]()
Composed transactions
Composed transactions with more than two accounts involved, have to be entered on several rows. The user should enter one account per row. The counterpart account for the entire transaction has to be entered on the first row.
The document number, entered on the different rows, is the same because we are dealing with one and the same transaction.
Note:
In composed transactions, the dates of the transaction rows should be the same, otherwise, when doing calculations by period, there may be differences in the accounting.
![]()
Recurring Transactions
Recurring Transactions table
In order to avoid rewriting always the same texts, it is possible to store transaction groups in the Recurring transactions table (Account2 menu). These groups are identified with a code and can be retrieved and entered into the Transactions table just by entering the corresponding code.
When positioned on the Doc column of the Transactions table, the program proposes the list of the recurring transactions, grouped bycode. If one of these codes is selected:
- the program enters the recurring rows that have the same code
- the program completes the entered rows with the date and other values that have been entered earlier
- the program enters the progressif number in the Doc column (based on earlier entered values)
Entering recurring transactions
- You need to enter into the Recurring transactions table (or copy from the Transactions table) the transaction rows that should be retrieved regurlarly.
- Enter the code related to the recurring transactions group into the Doc column.
Rows with the same group code will be retrieved together (transaction on multiple rows).
![]()
- Progressive numbering of documents "docnum"
If, when retrieving recurring transactions, you wish to have a Doc number different from the automatic one, you need to create a row containing the code "docnum" in the Doc column, and your desired text in the Description column. For the following rows, the text specified in the Description column, will be applied in the Doc column when retrieving the transactions- "0" when no automatic numberting is desired
- "1" progressive numbering
- "cash-1" progressive numbering with the prefix "cash-" (cash-2, cash-3)
The program replaces the number indicated at the end of the text with the next progressive number.
- If you wish the program to suggest just one row per code, the description has to be preceded by:
- An "*": displays just this row and not the others with the same code.
- An "**" displays just this row, but don't retrieve this row (only title row).
- An "\*" allows the user to start the description with an asterisk, without it being interpretated as a command.
It is not possible to save customized setups in the Recurring transactions table; it uses the views and columns setup of the Transactions table.
Retrieving the recurring transactions into the Transactions table
- Enter the date and the information of the other columns that should not be modified
- In the Doc column, choose one of the codes defined in the Recurring Transactions table and press Enter.
- The program enters all the transactions with the same code, repeating the data column and other already entered values.
- In the Doc column, a progressive number is being inserted or one as specified in the docnum
- Or indicate the code in the Doc column and press F6
Copying transaction rows into the Recurring Transactions table
In order to copy rows from the Transactions table into the Recurring transactions table:
- In the Transactions table, select the rows that need to be copied;
- Edit menu -> Copy rows command;
- Go into the Recurring transactions table;
- Edit menu -> Insert copied rows command;
Bank checks
To enter issued bank checks, the user needs to insert an Issued checks account in the Liabilities.
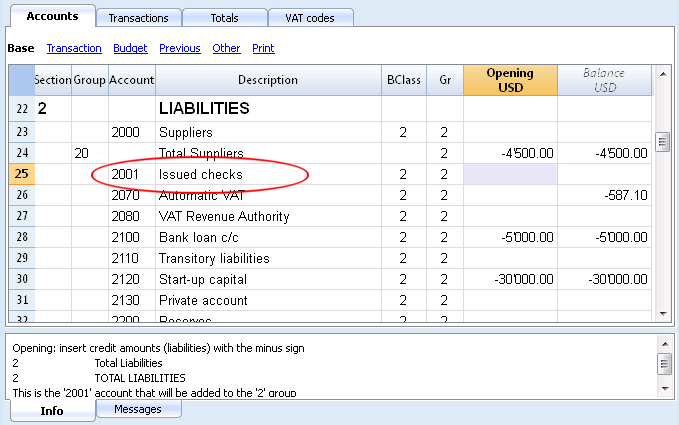
The check is issued at the moment of paying a supplier and later on is being debited from the Bank current account.
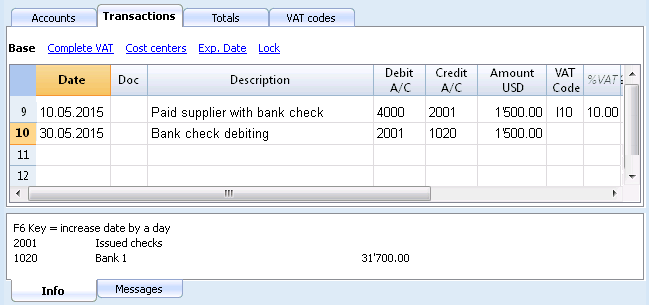
The Issued checks account card after the transactions.
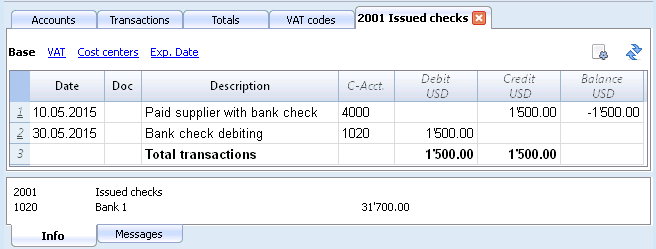
Displaying expiry dates
Customers & Suppliers Management
In order to manage the invoices issued or received, we advise you to use the Customers Menu and the Suppliers Menu.
Associate an expiry date to a transaction
As an alternative to the customers and suppliers management, or for simpler checking purposes, you can also enter the payment date in the transaction row.
This is an operating mode that consents simplified checkup.
With the Columns Setup command (from the Data menu), you should make visible the Date Exp. and Date Pay columns.
You should then enter the invoice expiration date in the Date Exp. column, and the invoice payment date in the Date Pay. column.
![]()
Show expiry dates
With the Show expiry dates command from the Account2 menu, the program displays the transaction rows that have an expiry date but no payment date.
![]()
Link to a document
Connecting digital documents to your accounting transactions
- Arrange a folder where you will save all your digital documents. It can be the folder where you keep your accounting file or subfolder.
- Use this folder to save all files containing documents, invoices, receipts, etc.
- Link the transaction to the digital document.
- From the Account 2 menu choose the Link -> Open Link command to view the contents of the digital document.
The DocLink Column
The DocLink column (Transactions table) makes it possible to enter a link to an external file (usually a scan of a receipt or an invoice).
- The DocLink column is usually not visible.
In order to display it, use the Columns setup function. - Once the Link column is visible, you can directly edit the file name.
- The file name is related to the accounting file; if the documents are in a sub-folder, the file name - in the DocLink column - will be preceded by the directory name.
- It is equally possible to manually enter a web address in the Link cell.
In order to open the linked document, click on the Open link command of the Account2 menu, or click on the small square that appears on the upper right hand corner of the cell that contains the link.
Entering a link to a file
There are two ways to enter a link to a document:
- Place yourself on the row of the Transactions table and the activate the Add link command from the Account2 menu -> Links;
- Select the file that corresponds to the document which needs to be linked and click on the Open button; the program inserts the link automatically.
The program enters the file name in the DocLink column, even if this last one would be invisible.
Or
- Display the DocLink column in the Transactions table. See: Columns setup;
- Click on the small square at the upper right hand corner of the cell;
- Indicate the path where the file can be found and select it.
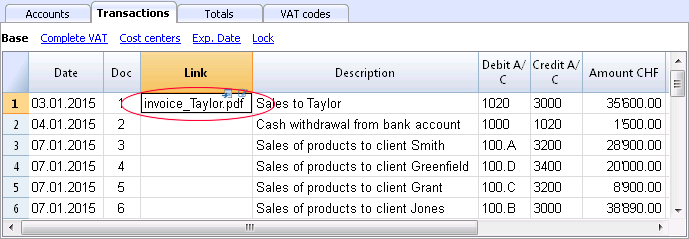
Editing a link
Proceed in the same way as when entering a new link.
Open link
There are two ways to open the link:
- Place yourself on the row of the Transactions table and the activate the Open link command from the Account2 menu -> Links;
- Place yourself on the DocLink cell and click on the icon to open the link.
For security reasons, the program opens only files with an extension that is considered secure, see Program Options -> Advanced, from the Tools menu.
Remove link
There are two ways to remove the link:
- Place yourself on the row of the Transactions table and the activate the Remove link command from the Account2 menu -> Links;
- Delete the contents of the DocLink cell.
Lock transactions
Blockchain certification
Banana uses a digital certification system for the accounting data, using what is now called blockchain technology. Transactions can be locked and marked with digital codes that can guarantee, even after many years, that the accounting data are authentic. They also allow the user to make sure that the accounting data have not been modified.
Banana.ch was the first company in the world to use the blockchain technology in the accounting field. This method (US Patent No. 7,020,640) was developped and patented in 2002..
This method guarantees one of the highest levels of data integrity and conformity to international law prescriptions. You can also see the evaluations on this matter of the audit company Ernst&Young, who verified the system conformity to the legislation requirements. The new versions of the Banana Accounting software don't use the MD5 method anymore (the one mentioned in the documents), but use the Hash SH256 method.
- Ernst&Young, compatibility check to Swiss legislation (pdf in German)
See also: Verordnung über die Führung und Aufbewahrung der Geschaftsbücher, 24.04.2002 (in German) - Ernst&Young, compatibility check to German legislation (pdf in German)
This method, based on the blockchain calculation system, is considered so reliable that it is employed to ensure the validity of the bitcoin and of all other modern crypto-currency.
The lock transactions command
With the Lock transactions command of the Account2 menu, the accounting transactions are locked and marked with control codes that can certify, over the years, that the transactions have not been modified.
- The validity of a possible already existing lock is being verified
- The transactions until the lock date are being numbered progressively and are being locked. For each transaction, the digital code of the row and the progressive one are being calculated.
The calculation of the digital codes is being done according to the sequence of the columns. - In the accounting is being indicated that transactions with an equal or earlier date than the lock date will no longer be accepted.
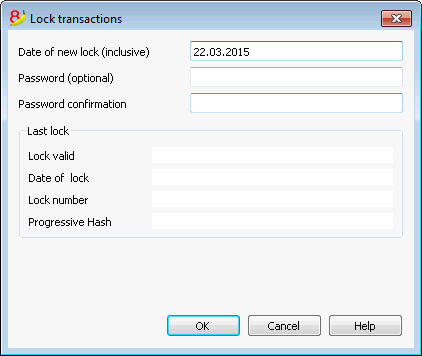
Date of new lock (inclusive)
Specify the date up until when the transactions will be locked.
Password (optional)
It is possible to insert a password to eventually unlock the transactions or to carry out a new lock in the future.
If the program finds no errors in the transactions included in the lock date, it will lock the transactions, calculate and assign individual numbers and codes to each row of transactions which can be viewed in the Lock view on the Transactions table.
Last lock
The data of the following fields are automatically filled out by the program based on the last executed lock.
Lock valid
A "Yes" is shown if the lock is valid.
Date of lock
The date of the last executed lock is shown.
Lock number
This is the value automatically entered by the program in the last row of the LockNum column.
When the lock is repeated, if the value of the last row lock number is unchanged, it means that the lock is valid and that the data have not been altered; if however the value is changed, the program shows the following codes:
- (-1) if the lock is invalid from the first row
- (-2) if there are rows that have the same LockNum.
Progressive Hash
This is the control code present in the last transaction.
Lock View
All digital codes are shown along with all the information that the program used to create the digital signature.
![]()
- LockNum: the progressive number that identifies the row
- LockAmt: the cumulative transactions total, similar to the total at the end of the page, as required by some national regulations
- LockLine (hidden column): the digital code calculated according to the row values.
- LockProg: the global electronic signature (SHA-256).
The digital code LockProg
This is the main element of the certification; it uses the blockchain methodology.
The digital code is calculated according to the following values:
- The contents of the current entry, including amounts, descriptions and the description of the account at the moment of the lock
- The progressive number (LockNum)
- The cumulative balance (LockAmt)
- The progressive code of the preceding entry (LockProg).
In case the accounting data undergo even the slightest modification (for example, a date or an amount is changed), the digital code will be different. If the control number remains the same, it implies that the data are original and therefore have not been changed.
Check Lock
With the Check lock info command of the Account2 menu, the program verifies the validity of the lock and displays the data.
- The program recalculates the digital control codes and verifies if they correspond with the ones related to the transactions.
- If the codes correspond, the lock is considered valid, and therefore the data are original
- If they do not correspond, it means that the data have been changed and that they are not the original ones calculated at the time of the lock.
![]()
Unlock transactions
The Unlock transactions command removes the lock and the control codes. If the lock was set with a password it will be necessary to reenter the password in order to remove the lock.
If later on you want to relock the transactions, and they have not been modified, the control numbers will be the same as the ones of the earlier lock; if however some data have been changed, the control numbers will be different.
Partial lock
If the transactions have been locked, it is possible to unlock them even partially, from a specified date. If a lock password has been set, in order proceed unlocking the transactions, you need to enter it in the specific field.
![]()
Why unlock the accounting?
In principle, the locked accounting should not be unlocked. It might happen that, after the lock, you find errors in the accounting and see the need to make corrections.
To have the opportunity to make further changes, users kept a copy of the file before the lock. If they found errors, they would restore the previous situation. In the meantime other transactions had perhaps been made, so often it happened that restoring previous versions of the accounting proved wrong. To avoid this unnecessary waste of time it was decided to make the Unlock transactions command available.
The certification must not be confused with data security. The data certification is a methodology that ensures that the accounting data are original. To prevent data from being modified, the methodology is the one related to data security. Data security procedures, however, can only be implemented in an environment that limits data access.
If the file is fully available to the user, such as when it is on a PC, people have complete control of the data. They can thus replace files easily. With a certification one cannot prevent that the data are being altered, but it will allow you to know if the data are the original ones.
The person who keeps the books is responsible for the accounting and decides whether a change is permissible or not.
Organizing the certification and data verification
Once you locked the transactions of the period, you need to:
- Print the lock information or print the last certified transaction row with its specific certification number (LockProgr).
- Sign and store this information along with the accounting documentation or in any other safe place.
In order to check that the accounting data are the original ones, you need to proceed as follows:
- Impart the Show lock info command.
- Go back to the document that shows the digital control number
- Check whether the row identified with the LockNum still has the same digital control number
- If the number matches , the accounting data are the same as those certified
- If the number does not match , it means that the accounting data have been modified.
Banana works on developing applications that make it possible to compare two files and obtain indications regarding data that have been altered.
Data security
Digital certification ensures that the data are still the original ones. It does not prevent the modification of data.
It is the responsability of the accountant to ensure that the data are not altered. Each administration must be organized according to its size and needs.
Those who want to make sure that the data are not being altered by unauthorized persons , must employ other methods and tools, such as :
- Save the data to a secure system (protected network drive), password protected.
- Keep the copies of the data.
- Encrypt archives.
Long-term archiving
The accounting file contains the entered data. In order to open the file and obtain a report or an account card, you need to have the program at your disposition.
Banana Accounting gives the possibility to export all the accounting data, and its printouts as well, to Pdf, Html and Xml.
The generated file can be saved on a CD and accessed on any computer even after many years, even by persons who do not have the Banana Accounting software.
File and accounting properties
This is where the main data of the accounting file are entered, such as the printout heading, the opening and closing dates, the basic currency, the company address, the profit and loss from exchange rate variation account (if you have a multicurrency accounting file), the VAT account (if you have chosen the VAT management option), the password, …
The File and accounting properties window has the following tabs:
- Accounting tab
- Options tab
- Address tab
- VAT/ICMS tab
- Foreign currency tab
- Texts tab
- Password tab
- Other tab
Printouts
New customization possibilities
In the new Banana Accounting Plus version, the printing has been improved thanks to new possibilities of customization. Moreover, you can print the invoice with the QR code and other predefined and customizable layouts.
We advise you to immediately switch to Banana Accounting Plus and take advantage of the many new features.
Enhanced Balance sheet with groups - colored columns
This example has been realized with the following features:
- Enhanced Balance sheet with groups
- Columns setup to indicate which columns are to be displayed (in the example the columns of the Current and the Preceding year are being displayed)
- Colors (Column properties) to indicate the color of a column.
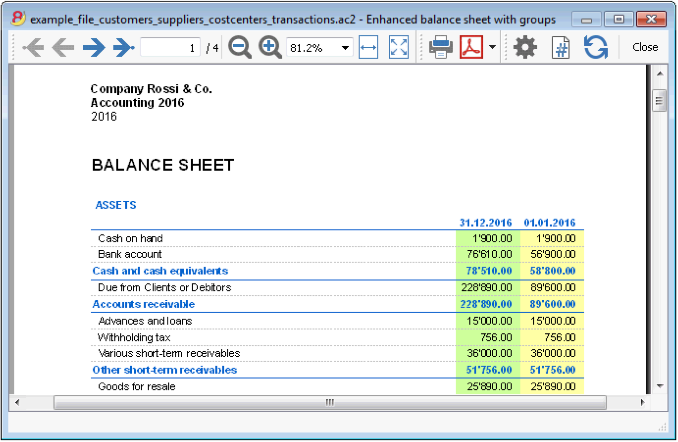
Profit & Loss Statement with budget
This example has been realized with the following features:
- Enhanced Balance sheet with groups
- Columns setup to indicate which columns are to be displayed (in the example the columns of the Current year, the Budget and the Preceding year are being displayed)
- Colors (Column properties) to indicate the color of a column.
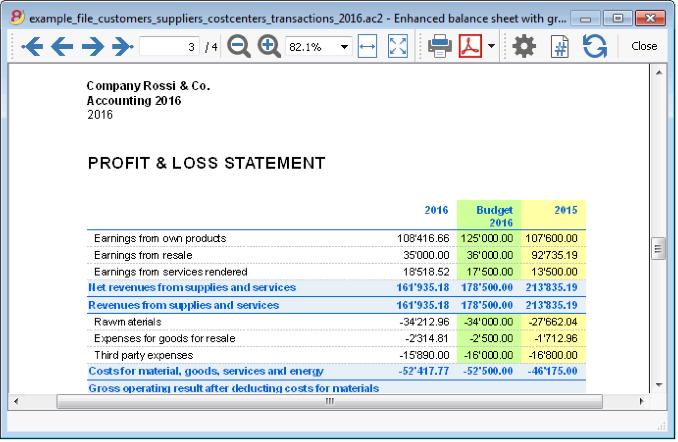
Enhanced Balance sheet
This example has been realized with the following features:
- Enhanced Balance sheet- Base tab
- Style setup (for this printout the Berlin style has been chosen)
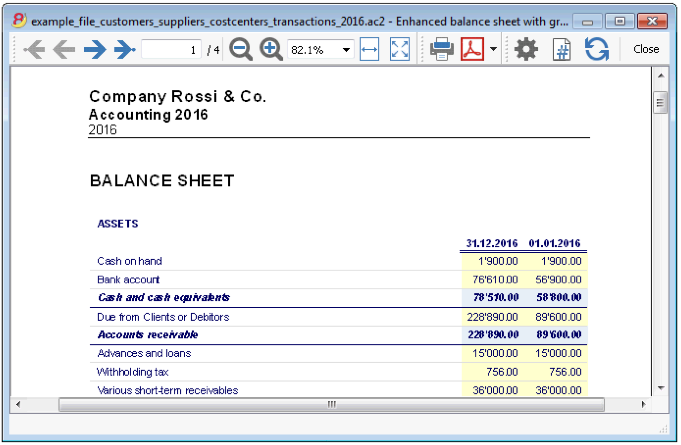
Subdivision by quarter
This example has been realized with the following features:
- Enhanced Balance sheet with groups
- Subdivision -> Subdivision by period in order to set up the subdivsion by period
- Columns setup to indicate which columns are to be displayed
- Colors (Column properties) to assign different colors to the columns.
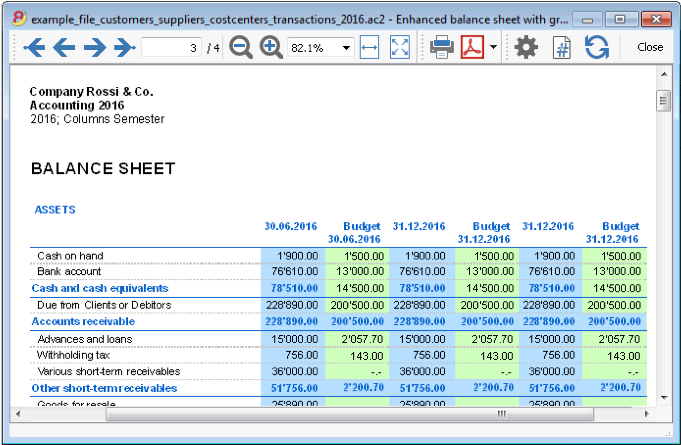
Subdivision by segment
This example has been realized with the following features:
- Enhanced Balance sheet with groups
- Subdivision -> Subdivision by segment in order to choose the segment level to be displayed.
- Print style
When printing the segments, it is not possible to set up the colors of the columns.
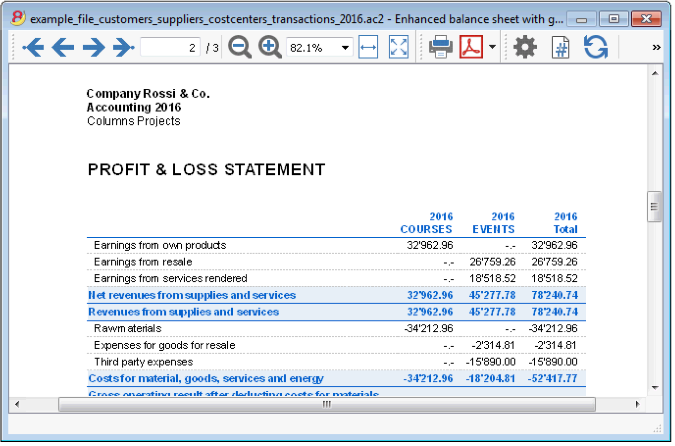
Pdf dossier with all the accounting data
The file is being created with a summary that gives access to the different printouts in an easy way.
The following data can be saved in PDF
- Balance sheet and Profit & Loss statement
- Accounts table, Transactions, VAT Codes, Totals
- VAT reports
- Account cards
If you save this file on a non-rewritable CD (to keep together with your accounting documents), this satisfies the legal requirements for archiving the accounting data.
This example has been realized with the following features:
File menu, Create Pdf dossier command
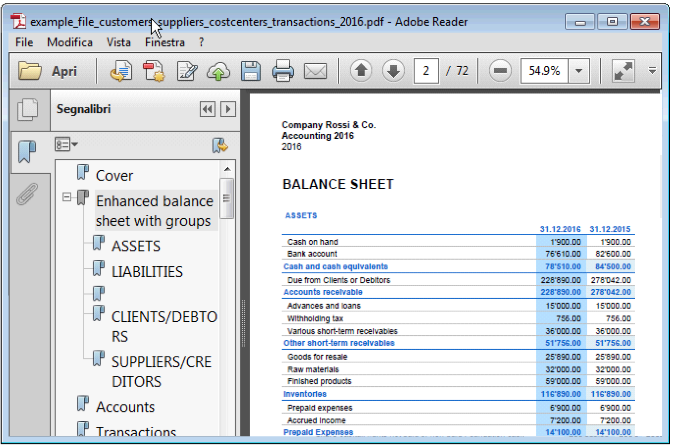
Printing an extra column
In order to print, in the Balance sheet, an extra column, the following features have been used:
- Columns setup, Data menu, in order to display or add a new column in the Accounts table
- Enhanced Balance sheet with groups
- Columns - advanced, to make the column visible.
Enhanced Balance Sheet
Print the Balance Sheet with your logo
In the new Banana Accounting Plus version, the Balance Sheet with groups printout has been improved with new customization possibilities. Among the new features, the possibility to insert your logo.
We advise you to immediately switch to Banana Accounting Plus and take advantage of the many new features.
- The Balance Sheet represents all the Assets, Liabilities, Expenses and Income in a specific moment. The difference between Assets and Liabilities gives the personal capital.
- The grouping of the accounts is done according to the contents of the BClass column.
- The Enhanced Balance Sheet, shown in the preview, can be saved in different formats (PDF, HTML, MS Excel) and can be copied in the clipboard.
- In order to calculate, display and print it at the end of year or the end of a period, activate the Enhanced balance sheet command from the Account1 menu.
- Transactions without date are being considered as opening transactions and will not appear in the printouts of the Profit & Loss Statement.
- The following window, in which several printing options can be activated, appears.
See also Print Examples.
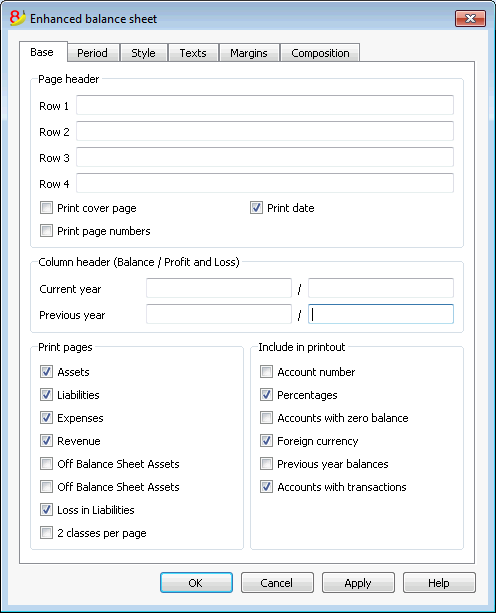
Page header
Rows 1 thru 4
In this field, enter texts to use as headers when printing.
Print cover page / Print date / Print page numbers
The activated options will be shown in the print-out.
Column header (Balance / Profit and Loss)
The first two vertical fields refer to the Balance Sheet, the two second ones refer to the Profit and Loss Statement.
Current year
Insert the final date of the current accounting.
Previous year
In this field, enter the final date of the previous year's accounting.
Print pages / Include in printout
By selecting the appropriate cells, it is possible to choose the options that should be activated in the printouts.
Other tabs
The explanations for the other tabs are available at the following pages:
Results
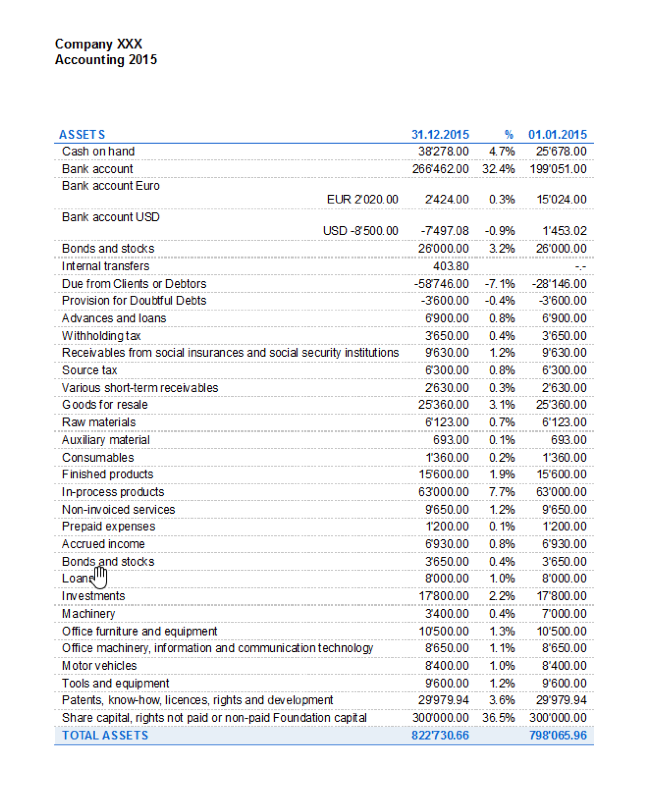
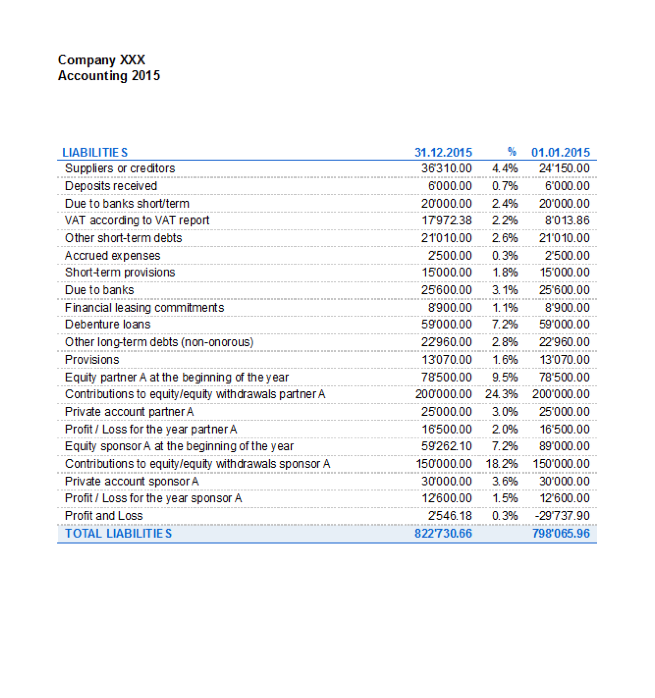
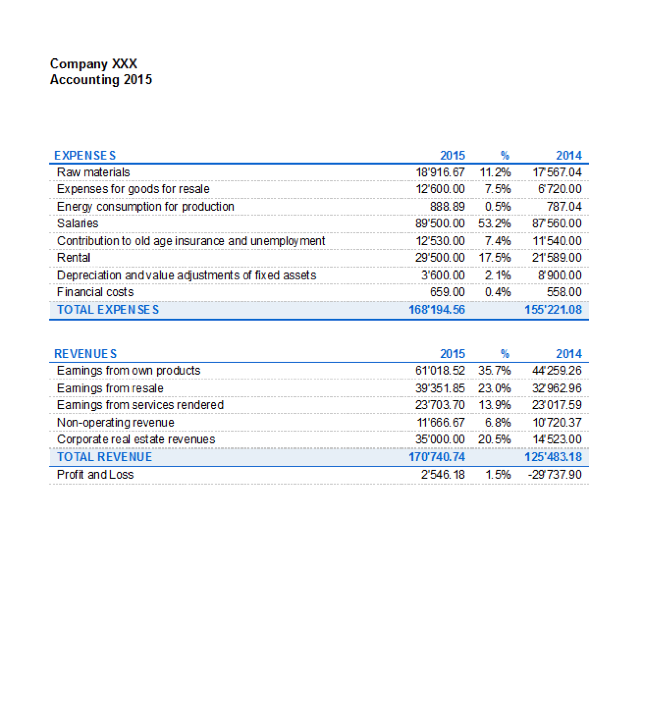
Enhanced Balance Sheet with groups
Print the Balance Sheet with your logo
In the new Banana Accounting Plus version, the Balance Sheet with groups printout has been improved with new customization possibilities. Among the new features, the possibility to insert your logo.
We advise you to immediately switch to Banana Accounting Plus and take advantage of the many new features.
The Balance sheet with groups differs from the Balance sheet for the following characteristics:
- Includes also subgroups in the printout, as in the chart of accounts (and not only groups).
- Offers the possibility to exclude groups or accounts (for instance, to display only the total of the group and not the accounts of which the total is composed).
- In the Chart of accounts - Sections it is possible to select which accounts to include or leave out in the printouts
- It is possible to choose, for a given period, what kind of subdivision you want (for example in the first semester, you can choose wether to obtain the data by month or by quarter)
- It is possible to have a subdivision by segment
- ... and much more!
In order to calculate, display and print the Enhanced Balance sheet by groups, click on the Enhanced balance sheet with groups command from the Account1 menu; a window appears, with different sections that allow the user to define the print setup.
See also Print Examples.
FAQ
- If I exclude the groups with a zero balance, the title rows that refer to the excluded groups are still being displayed; how can I erase them?
Go to Sections and activate Hide current row on the title rows that you wish to exclude. - I would like to exclude the display of the period in the titles of the printouts ("1st Semester 2013"); how can i do it?
Go to the Headers section and deactivate the Print period option. - On the cover page, when there are long titles, I would like to be able to choose how to subdivide the texts on two rows and whether I wish to apply bold print. Is it possible?
It is impossible to change the fonts on the cover page. - Some amounts are not included in the indicated period. Why?
Transactions without a date are being counted as openings and do not appear in the printouts of the Profit & Loss statement. Be sure to enter the date into all the transactions. - The Total groups that contain all the accounts of the classes 3 and 4 are being renamed with the text Profit or Loss, depending on the result of the accounting period. Can I change that?
Go to the Sections and overwrite the original text in the Alternate text zone of the active row. - In case the Show previous year option is being activated, and in the previous year file there are groups that are no longer present in the current year, the program will give error messages. Can I do something about it?
In order to print the Balance sheet with data of the previous and the current year, the groups of the previous year have to also be present in the current year.
Headers
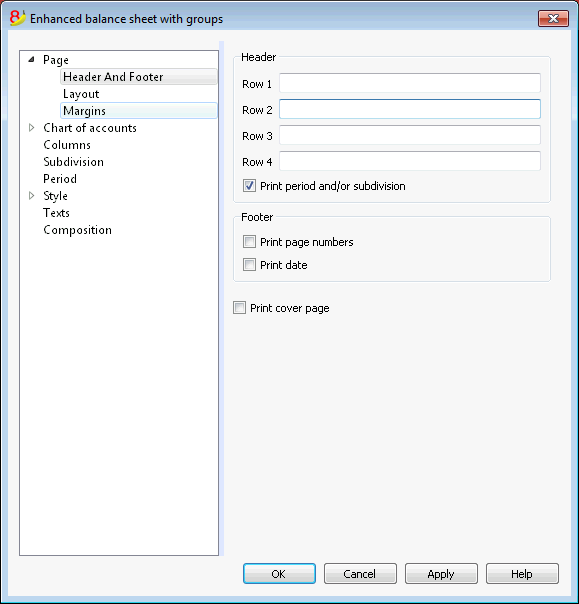
Header 1, Header 2, Header 3, Header 4
Enter as headers the text you wish appearing in the printouts. They will be on the cover page and on each page headings.
Print period and/or subdivision
This option is active only when a specific period has been defined. When you deactivate this option, the period will not be indicated in the titles of the printouts.
Footer
Print page numbers
By activating this function, page numbers will be printed.
Print date
By activating this function the date will be printed.
Print cover page
By activating this function the cover page will be printed.
Layout
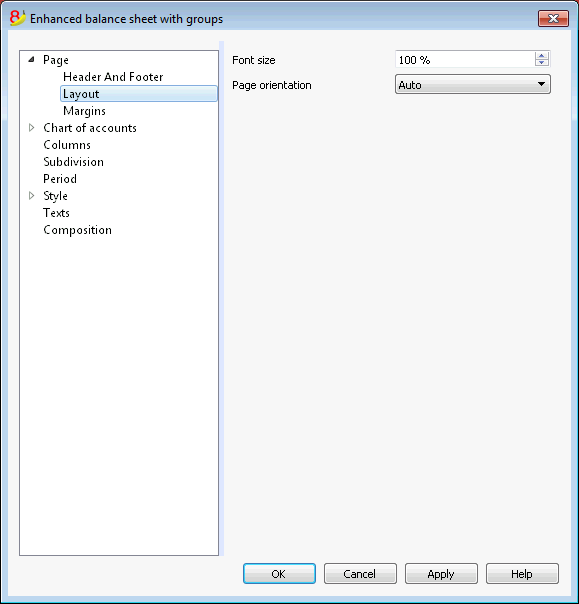
Zoom
The printout layout will change according to the entered value.
Page orientation
You can select the page orientation: automatic, landscape and portrait.
Margins
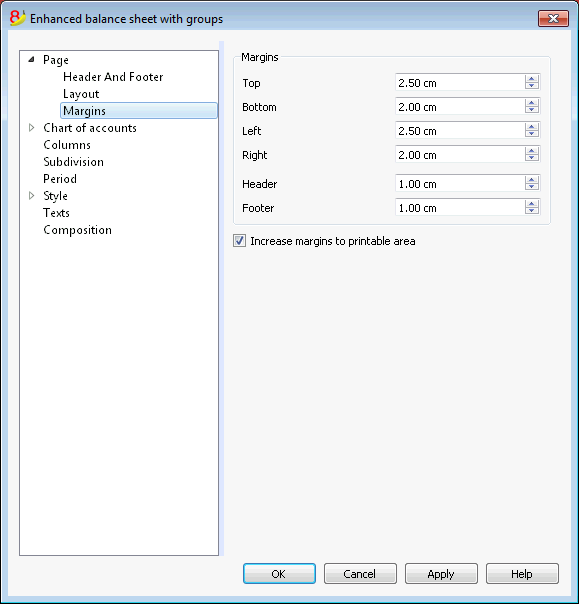
Top, Bottom, Left, Right
It's the distance between the page border and the content.
Header
It's the distance between the page header and the content.
Footer
It's the distance between the page footer and the content.
Increase margins to printable area
If the content exceeds the page margins it will be automatically adjusted to fit the printable area.
Sections
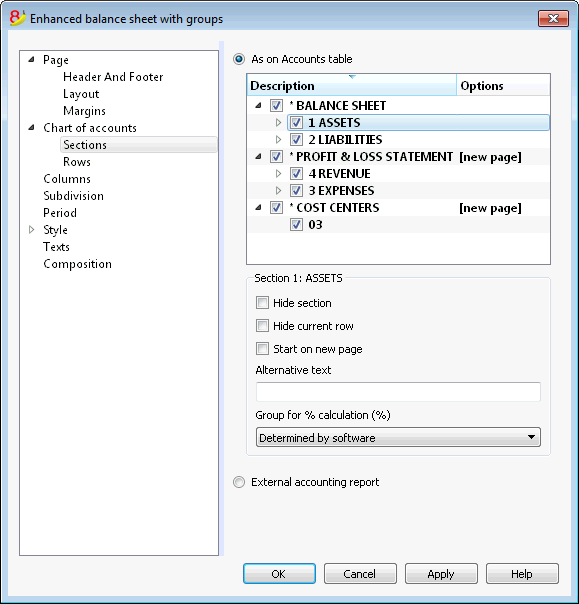
This section can vary depending on the settings of the Section column of the accounting plan - See the related document: Sections in the accounting plan
As on Accounts table
The display and the printout settings of the Enhanced Balance Sheet with groups, are the same as in the Accounts table.
Depending on the selection, there are different sections with different options:
- sections 1, 2, 3, 4, 01, 02, 03, 04... refer to the main items of the Balance Sheet
- account sections refer to the selected account
- group sections refer to the selected group
Section*
If you select a section with an asterisk, you will have the following options:
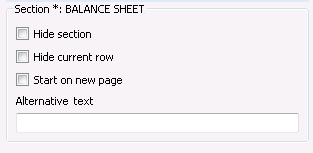
Hide section
Click on the section that you wish to hide.
Hide current row
Click on the row that you wish to hide.
Start on new page
Click on the header that you want to have on a new page and activate the option.
Alternative text
Enter an alternative text if you want to have a different one for the selected section or row.
If you select a number or a group section (1, 2, 3, 4.....), there are extra options:
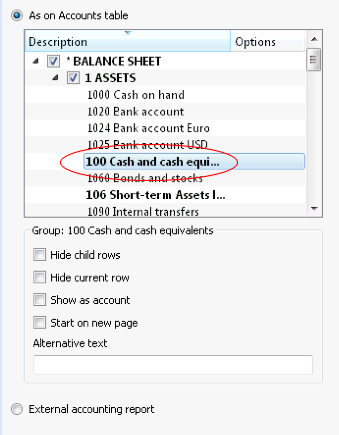
Group for % calculation (%)
This option is visible when selecting a section (Assets, Liabilities, ...). It is possible to indicate which group the % calculation should be based on.
Hide child rows
If you select a group and you activate this function, child rows of this group won't be printed in the Enhanced Balance Sheet.
Show as account
If you select a group and you activate this function, the group will be displayed as an account in the Balance sheet.
External accounting report
Print the Enhanced Balance Sheet by groups, based on the structure of the Accounting report file.
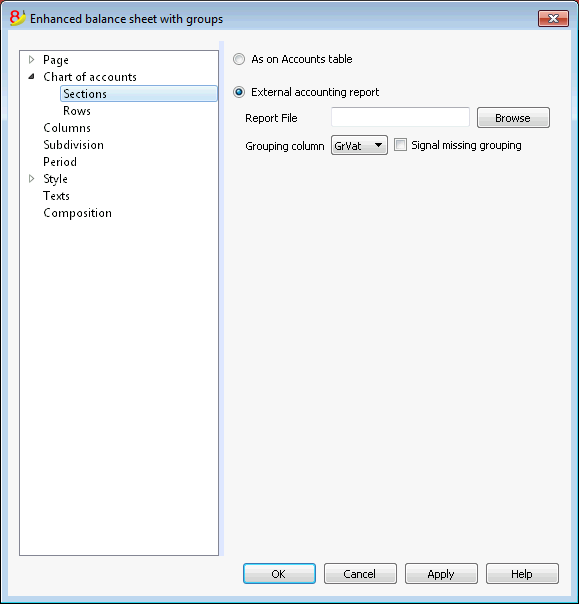
Report File
You can select the file of the External Accounting report with the Browse button.
Grouping column
Column in which the accounts refer to the groups defined in the External Accounting report. Available columns: Gr1, Gr2, Gr, BClasse and GrVat.
Signal missing grouping
Checks whether all accounts belong to a group in the External Accounting report.
Rows
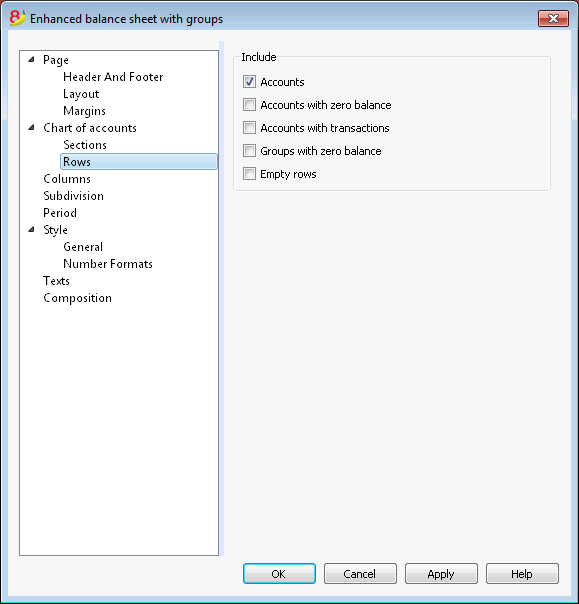
Accounts, accounts with zero balance, accounts with transactions, groups with zero balance, empty rows.
By activating the different options, you can include them in the printouts.
Columns
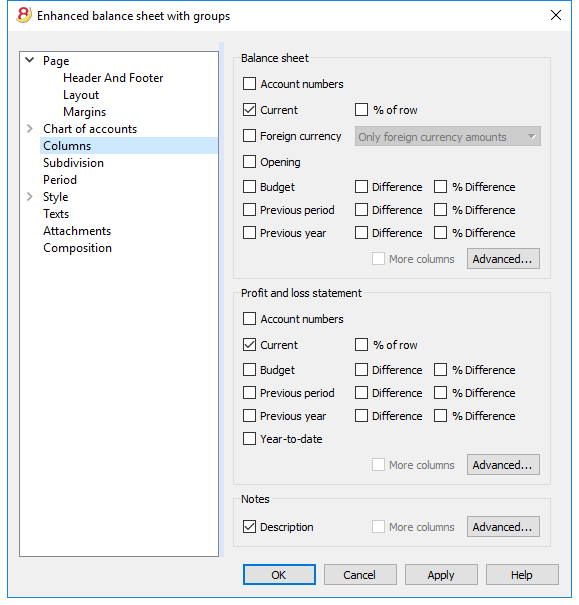
Balance Sheet, Profit & Loss Statement and Notes
You can choose the options you wish to include in the Balance Sheet, in the Profit and Loss Statement and in the Notes:
- Account number
- Current: the balance or movement in basic currency referred to the selected period or period subdivision
- Foreign currency: the balance in the account currency referred to the selected period or period subdivision
- % of row: includes the column with the percentage referring to the total (for example, % total Assets)
- Opening: opening balance at the beginning of the period
- Budget: budget amount referred to the selected period or period subdivision
- Previous period: the amount of the period previous to the selected period or period subdivision
- Previous year: the amount of the same period in the previous year
- Difference: the difference between the amounts of the current period and the other column (Budget, Previous period, Previous year)
- % Difference: is the difference, expressed in percentage, between the current period and the other column (Budget, Previous period, Previous year)
- Year-to-date: the balance or movement from the beginning of the accounting until the date of the last transaction.
Headers editing, color or display change of the columns
Each section has the Advanced button from where it is possible to change the column's settings and options.
Columns (Advanced)
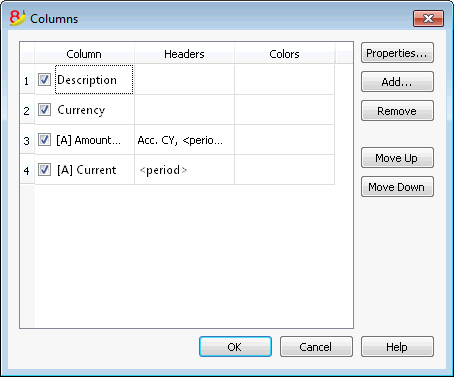
By pressing the Advanced button, it is possible to change the column's header:
- in order to make the column visible in the printout, check che corresponding checkbox
- in order to change the sequence of the columns, drag up or down the name of the column you wish to move, or use the Move Up and Move Down buttons
- In order to add new columns to be shown in the report (choosing them from a list) use the Add button
- In order to remove some columns from the list, use the Remove button
- In order to edit the display properties of a column (colors, headers, etc.) use the Properties button
Headers and options (Columns properties)
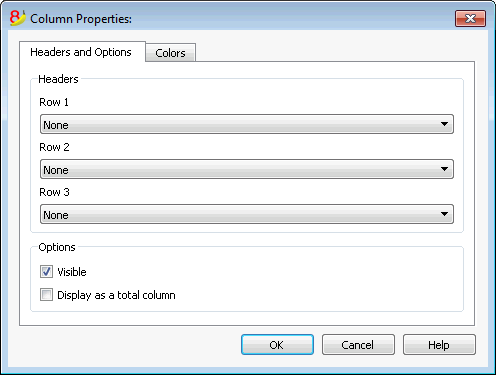
Headers
Row 1/ Row 2 / Row 3
It is possible to change the columns headers by selecting the Text option (from the drop down menu) and by entering the new header. If you select the Column option, the column name of the selected column will be shown.
Options
Visible
If this cell is activated, the column header will be shown.
Display as a total column
If activated, this option only shows the amounts in the Totals column.
Columns - add
Add / Delete
In the Balance sheet, Profit and Loss Statement and in the Notes, it is possible to add new columns (from the ones included in the list), or to delete the undesired ones. Starting from the Account1 menu -> Enhanced Balance sheet with groups -> Columns -> Advanced button -> Add button.
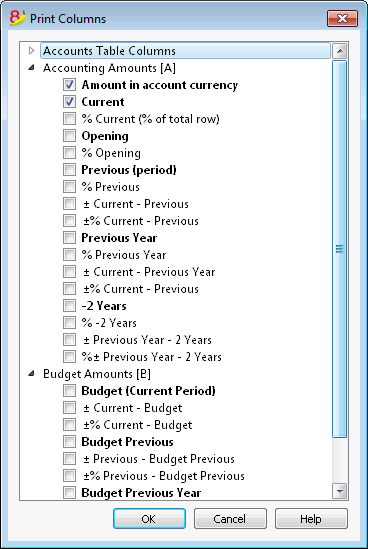
If one or more options are being activated, the program includes:
Accounts Table Columns
If you click on the header a list of all the columns of the Accounts Table will be shown:
You can then inlcude in the printout any column existing in the Accounts Table
Accounting amounts
These are the columns with the amounts calculated by the program, the opening balances and the entered transactions, for the indicated period or for the subdivision period
Amount in the Account currency
The account balances in foreign currencies will also be displayed.
Current
The balances of the current year will be displayed.
Opening
The Opening balances will be displayed.
Previous (period)
The balances of the previous period are being displayed (month, quarter, semester, etc).
Previous Year
The balances of the previous year are being displayed.
YTD (Year To Date)
This column is only available in the Profit & Loss Statement. The balances from the beginning of the year until the last transaction date are being displayed.
Budget amounts
See also Budget information. These are the columns with the amounts calculated by the program based on the budget amounts entered in the Accounts Table or in the Budget Table. If you created the Budget table and if some rows have been entered, the program will use the data of this table for its calculation, even if there are values in the Budget column of the Accounts Table.
Budget (Current period)
The amounts related to the foreseen budget of the current period are being displayed.
Budget Previous
The amounts related to the foreseen budget of the previous period are being displayed.
Budget Previous Year
The amounts related to the foreseen budget of the previous year are being displayed.
Notes on calculation period
The program cannot calculate amounts for periods overlapping between several accounting years or years with initial and final accounting dates that do not match.
Colors (Columns properties)
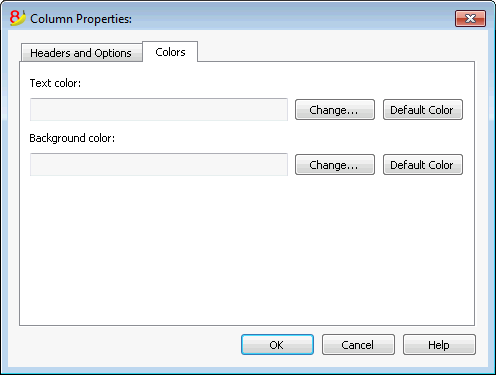
You can access this window by pressing on the Properties button, Colors tab (from the Enhanced balance sheet by groups command - Columns, from the Account1 menu)
Change
With this button you can change the text or the background color
Default color
With this button you can restore the default color for the text or the background.
Subdivision
From the Account1 menu choose the Enhanced Balance Sheet with groups command and select the Subdivision tab.
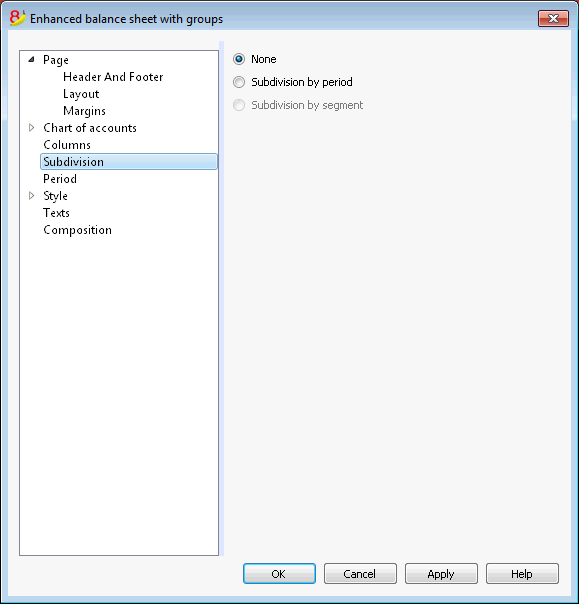
None
The whole period is shown.
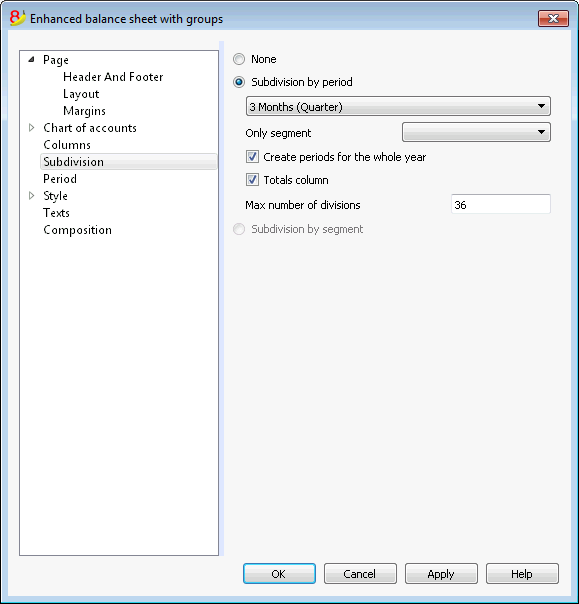
Subdivision by period
This function makes it possible to display the dates of the selected period per day, month, bi-monthly, per quarter, per 4 months, per semester or per year. The selected period will be shown in the column headers.
Only segment
Only the data related to the selected segment are being shown.
Create periods for the whole year
When the accounting period is not the same as the solar year, but when the user still wants to see all months, this function needs to be activated.
Totals column
This function creates a Totals column for the selected periods in the Profit / Loss Statement and in the Totals view of the Accounting reports command (Account1 menu).
Max number of divisions
The default maximum number of periods is 36. In particular cases, if the user would want to obtain special and very detailed statistics over a long time span, this value can be changed manually. A very high maximum number of periods can slow down the program.
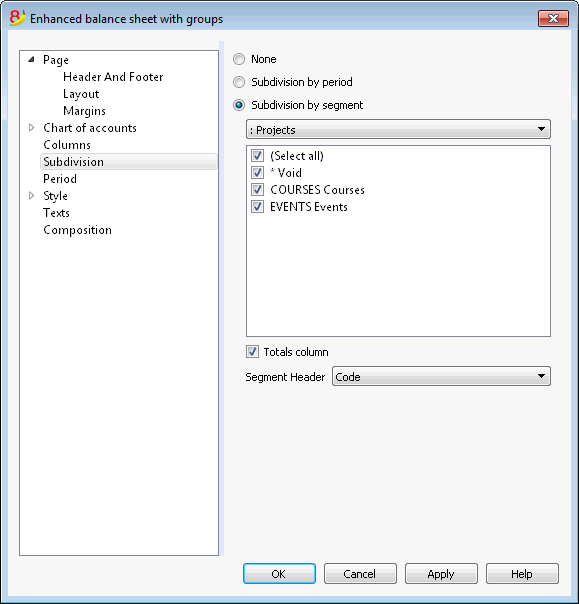
Subdivision by segment
The data related to the selected segment are being shown. This option is only available if segments have been set.
- Select all - all options will are selected
- Void - only the amount not assigned to any segment is shown
- Segments subdivision - Each subdivision will have the header given in the accounting plan. The data of the selected subdivision are shown.
Totals column
When this option is being activated, the totals for the selected segment will be obtained.
Segment header
You can choose the text to be displayed as column header for the segments.
Period
Explanation on the Period tab are available at the following link:
https://www.banana.ch/doc8/en/node/2766
Style Tab
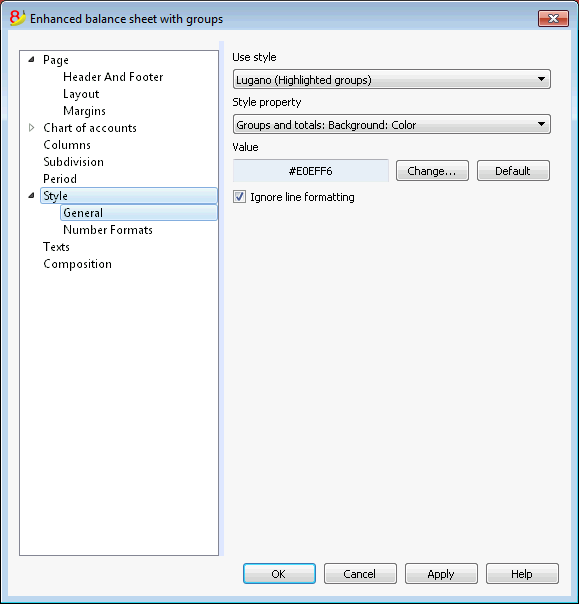
Use style
There are different models of the Enhanced balance sheet provided. By selecting one, the user can obtain the Enhanced balance sheet of his choice.
Style property
For each style, the color of the fonts and the backgrounds can be defined.
Value / Change... / Default
These functions allow the user to change style or to restore the default style.
Ignore line formatting
If this function is activated, the formatting will not be maintained.
Number formats
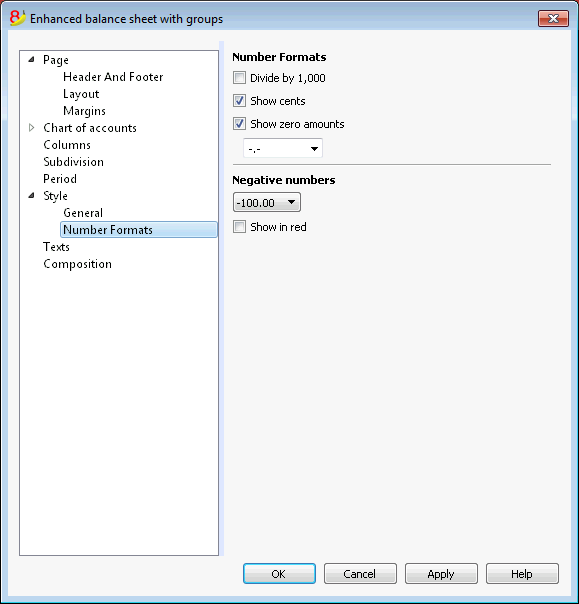
Divide by 1'000
If there are big amounts, by activating this option, three zeros will be taken off.
Show cents
By activating this option the cents will be shown.
Show zero amounts
By activating this option it is possible to choose between having the zero amounts shown with the 0,00 number or with the -,- symbol.
Negative numbers
Negative amounts can be shown with a minus sign before the amount, after the amount or the amount can be shown between parenthesis. You can also activate the option to have the negative numbers shown in red.
Texts
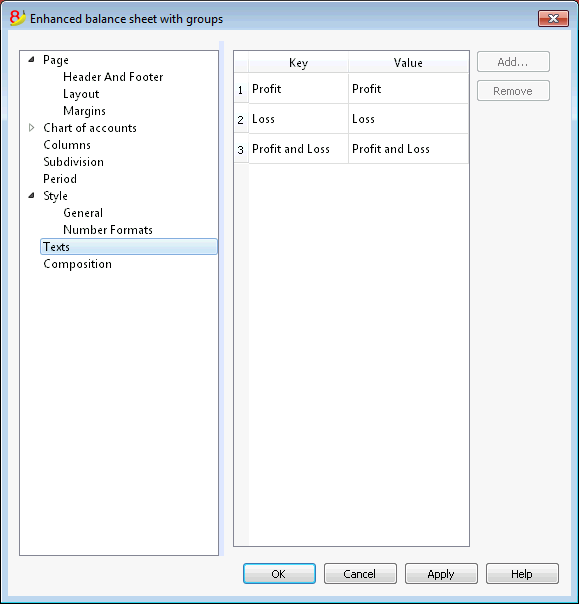
This tab is used to alter the texts of the program columns headers for print-outs.
In order to change the Value column you just have to double-click on the cell you want to edit.
Attachments
This sections allows you to add text that will be printent with the Balance sheet and Profit & Loss statement.
- texts are printed after the Balance sheet and Profit & Loss statement.
- each document begins on a new page
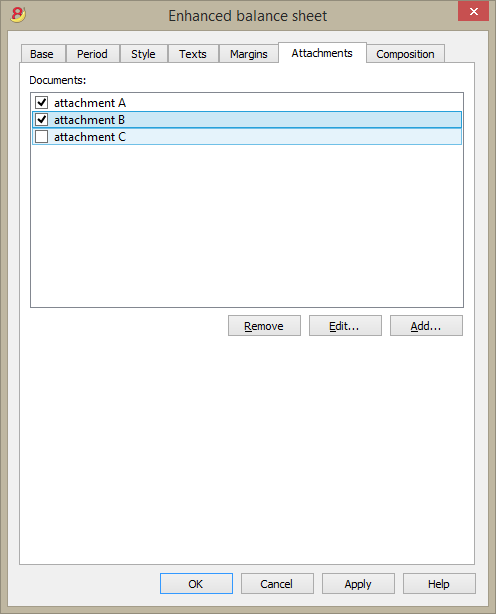
Documents
All documents listed in the Documents table (Html or text format) are listed here.
- You can change the report sequence, just by dragging the item with your mouse
- All documents with a check mark will be printed.
Edit...
A text editor will open allowing you to enter new text or edit the existing one.
Add
This button will open a text editor where you can add new text.
If you haven't created the Documents table yet, the programm will automatically add it.
Remove
This button will remove the selected element and its content.
Notes
- This feature is not available in previous versions.
If the file is open with a previous version of the Banana Accounting software, you will get a message that the file is not totally compatible. - If you edit this section and you press OK, in order to undo the operation you need to give the Undo command more that once.
Composition
Explanations on the Composition section are available at the following link:
http://doc8.banana.ch/en/node/2768
Account/Category cards
The account card gives a complete list of the accounting transactions for one or several accounts, cost centers, segments and groupes.
Opening the Account card
There are two methods to open an account card or a category card:
- Select the Account/category Card (Cash book and Income & Expense accounting) command or the Account card (Double-entry accounting) command of the Account1 menu in order to open and print several or all account cards.
- On the account number cell there is a small blue symbol; click on it just once in order to obtain the account card.
The groups of the Chart of accounts have the same symbol available as well, in order to display the account card.
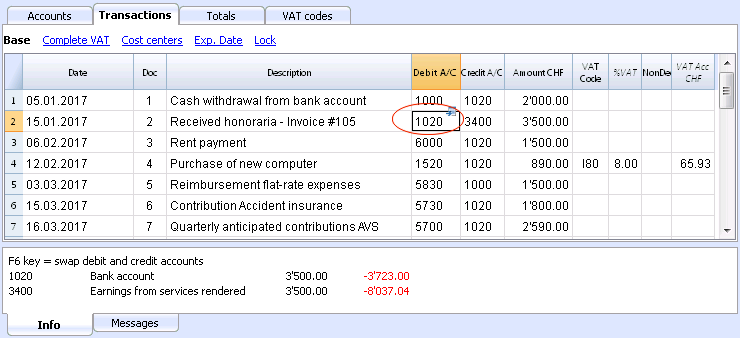
Updating the accounting card
The account card table is temporary and it is calculated when the command is given to do so. If, in the Transactions table, transactions are altered or added, they are not automatically updated on the account card - the user needs to select the Account Cards command again or click, in the Transactions table, once more on the account number's blue symbol, or in case the account card is still open, click on the small Refresh button on the right side (see image hereunder).
It is not possible to modify the data in the Account card. Double-click on the row number to go back to the original corresponding row of the Transactions or Budget table.
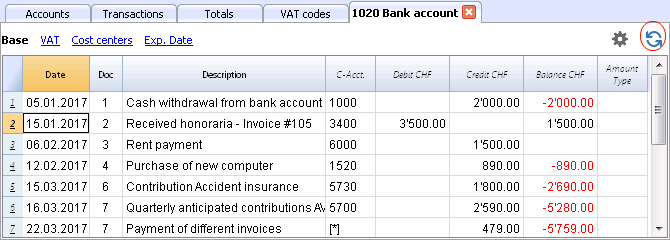
The AccountSelected column
In the AccountSelected column, which can be made visible, starting from any account card, through the Data menu -> Columns setup, the account on which the transaction took place is being displayed.
When you get an account card of one or more accounts, groups and segments, you will see the exact account that has been used.
The contra account in the account cards
In the Account cards, the Contra Account column (C-Acct.), which indicates the account that completes the transaction, is being shown.
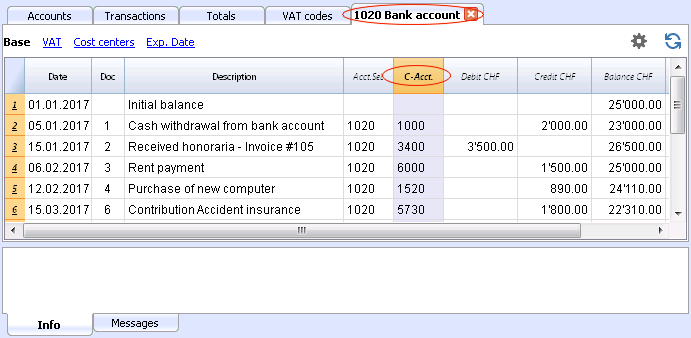
When there are transactions on multiple accounts (transactions on multiple rows) as in the example hereunder, and there is one account entered in debit and several accounts in credit, or the other way around, the software deducts the possible contra account using the following logic:
- In the first transaction row, the 1020 account is considered the common contra account of the transactions that follow.
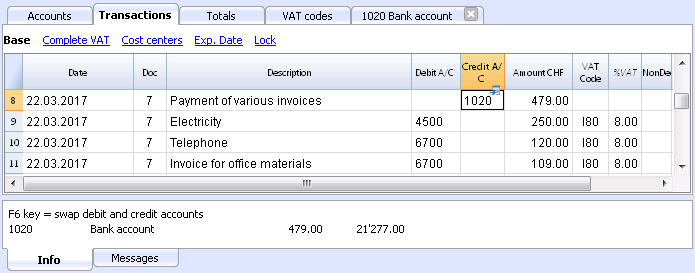
- On the Account card 1020, the composed transaction (Payment various invoices) shows the contra account indicated by the [*] symbol. It is impossible to have the indication of the contra accounts directly in the account card, because the account has several contra accounts (4500, 6700, 6700). For this reason the program indicates the [*] symbol in the C-Acct (Conta-Account) column, which means that we are dealing with a transaction on multiple accounts.
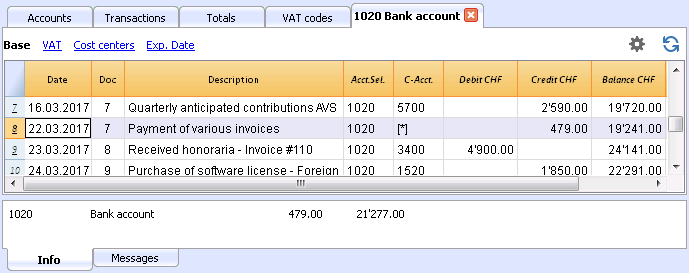
- On the Account cards of the next transaction rows (4500, 6700, 6700), the common contra account is indicated between square brackets ("[1020]"), and indicates a deducted contra account.
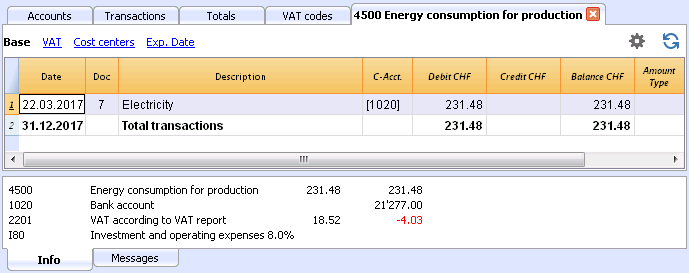
Cards of groups and classes
In the Account card of a group or a class, all the transactions of the accounts that belong to the selected group or class are being grouped together.
The accounts of the group or the class can be displayed by making the AccountSelected column visible.
Print all account cards
To print the Account cards:
- Account1 menu, Account cards command
- By means of the Filter, all the account cards that need to be printed completely or partially (for example, only accounts, cost centers, segments) can be automatically selected
- In the various sections Period, Options, Composition, activate the desired options (for ex. period, 1 account per page, ...)
- Press OK to confirm, after having selected the desired options.

For the explanations of the different tabs, please visit the next few pages: Accounts/Categories tab, Period and Options.
The program will show the selected account cards.
In order to print, choose the Print command from the File menu.
When you have activated the Budget table in your file, you may choose which transactions you want to see (actual transactions or budget transactions).
Save the settings
In case you regularly print the account cards of specific accounts, for example, all those that concern the Sales accounts, it is useful to create a specific composition.
- Go to the Composition tab
- Create a new composition, using the New button
- Indicate the name of the composition, for example "Sales accounts", in the Description field of the window
- Select the accounts that you want to be printed.
Every time you wish to print these accounts, you can select the composition that you created.
Page setup
In Page setup, you can specify the margins & other settings of the page.
Accounts/Categories tab

You can access this windows by choosing the Account1 menu -> Account cards command (see the Account cards page)
Search
Enter the account or the description in order to filter the accounts list.
You can also enter the account to be displayed with segments (only experimental version).
Accounts and segments can be combined (see developer explanations):.
- 10000:01 will show all transactions of the 1000 account with the 01 segment.
- 1000|1001will show the transactions for account 1000 and 1001.
Accounts
The list of all available accounts appears.
If you wish to print one or more account cards activate only the desired accounts.
- (Select All)
By activating this option, all the accounts that are part of the Chart of accounts are automatically selected. - Filter
This function allows you to filter all account cards or just a selection, specifically:- Accounts, cost centre and segments - if no selection is made they are filtered by default
- Accounts/categories (existing cost centres and segments are excluded)
- Accounts, Cost centres (only segments are excluded)
- Cost centres (accounts and/or categories and segments are excluded)
- Segments (accounts and/or categories and cost centres are excluded)
- Groups - existing groups will be shown - you need to select the ones to be printed
- Classes - all classes will be shown - you need to select the ones to be printed.
Actual or Budget
When you have activated the Budget table in your file, you may select:
- Actual transactions
The entries in the Transaction tab will be processed. - Budget transactions
The entries in the Budget tab will be processed.
In the absence of the Budget tab, the amounts in the budget column of the account card, will be converted to monthly amounts on the basis of the opening and closing dates of the accounting file (if this one year, will be devided by 12 monthly instalments).
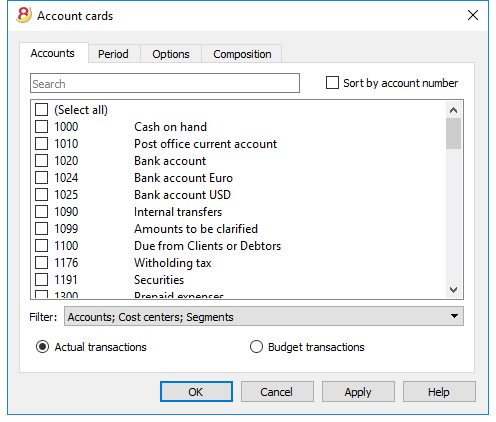
Differences in accounting entries (account card 00)
If differences in accounting entries occur (refer to the DEBIT - CREDIT difference error page), open the Group 00 account card (or the one in your Chart of Accounts that contains all the accounts of BClass 1,2,3,4).
You will have a list of all transactions with the successive balances, which after each entering should equal zero. The row which balance is not at zero contains the error.
Period tab
The explanations of the Period tab are the same as those for the Save file in Pdf - Period tab.
Options tab
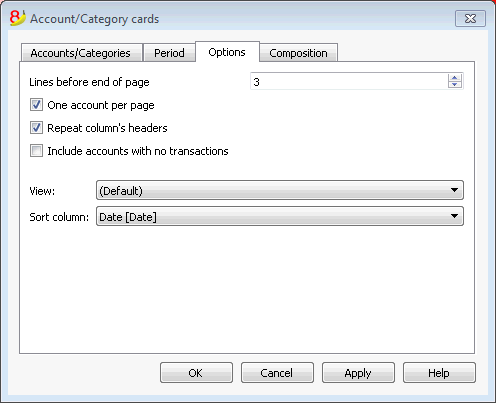
Lines before end of page
This function was created in order to avoid printing an account partially on one page and partially on the following. If the account card to be printed doesn't have at least a number of lines correspondent to the number input in this field, printing the whole card will be moved to the next page.
One account per page
By activating this function, each card will be printed on a separate page (even those with few transactions).
Repeat column's headers
By activating this function, the column headers will be repeated for each account, within the page.
Include accounts with no transactions
By activating this function, cards without transactions will be printed as well.
View
You can select the columns view to be included in the account cards display and printout:
- Base
- VAT
- Cost centers
- Expiration dates
If no criteria is specified the program will keep the order present in the transactions table.
Sort column
In the account card, transactions can be sorted according to different data criteria:
- Document date
- Value date
- Expiration date
- Payment date
Accounting report
New Customization possibilities
In the new Banana Accounting Plus version the Printouts have been improved thanks to the possibility of new customization possibilities.
We advise you to immediately switch to Banana Accounting Plus and take advantage of the many new features.
- This command allows the user to visualize the amounts of accounts with a specific grouping, for a specific period or with a specific subdivision.
- In order to calculate, obtain and print reports, choose the Accounting reports command form the Account1 menu.
- Transactions without date are being considered as opening transactions and will not appear in the printouts of the Profit & Loss Statement.
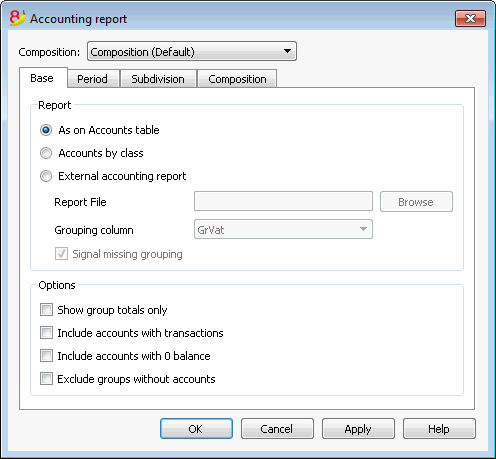
Base tab
Report
You can select the desired grouping scheme:
- As on Accounts table - the Report will show a list of all accounts just as in the Accounts table with the Opening balance and Balance columns
- Accounts by class - the Report will show the list of the accounts but without subgroups
- External accounting report - the Report will show the data according to a grouping system preset in a separate file (File menu, New command, Double-entry accounting group, Accounting Report).
Options
You can select the accounts to be included or excluded:
- Show group totals only - only the group totals will be shown
- Include accounts with transactions - only accounts with transactions will be printed
- Include accounts with 0 balance - accounts with zero balance will be printed as well
- Exclude groups without accounts - groups that contain only accounts with zero balance will not be printed.
Other tabs
The explanations for the other tabs are available at the following pages:
Report result
A new table is created where the results are shown.
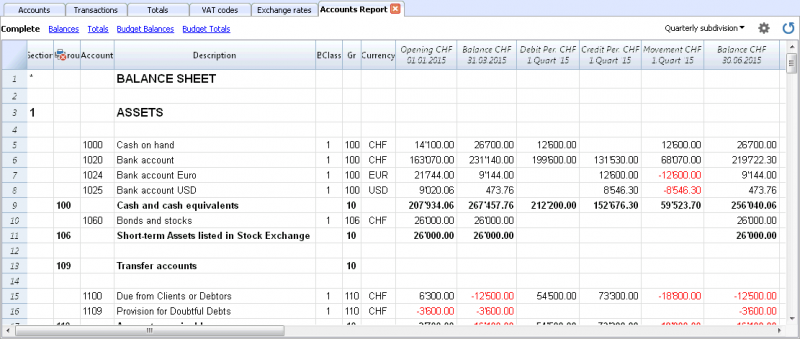
Journal
With Banana Accounting the Journal corresponds to the Transactions table. It is possible to print the whole journal or just a part of it, selecting the rows that you wish to print.
In order to personalize the journal printout you can change the columns order and headings: you can find all the information on how to proceed in the Columns setup page; you can also choose several options in the printout; please visit the Page setup page.
![]()
There are different ways to print:
- place yourself in the Transactions table and click on the Print icon
- place yourself in the Transactions table and launch the Print command form the File menu
- from the Account1 menu click on the Print journal by period command; in this case you should then indicate if you wish to print the whole table or just a specific period
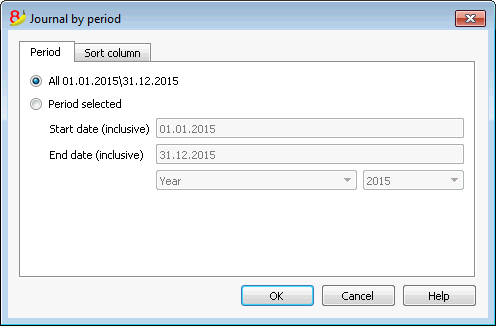
The information on the Period tab are explained in detail in the Period page of the General settings.
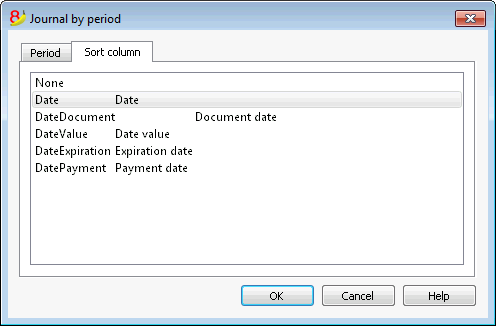
In the Sort column tab in is possible to choose the criteria the journal should be sorted and printed.
Budget
Budget amounts entered in the Accounts table
In the Accounts table, there is a Budget column where the budget for the current year can be entered.
The Budget table, on the contrary, offers many more possibilities, and allows you to enter budget transactions, creating a detailed planning of your financial and cash (or cash equivalent) situation.
For more information and examples please visit the Financial planning page.
Adding the Budget table
If your accounting file doesn't have the Budget table yet, proceed as follows.
- Go to the Tools menu
- Add new functionalities command
- Choose Add Budget table
Attention: this operation cannot be undone; if you want to go back to the previous situation, keep a copy of the pre-existing file.
Thereafter, the program will:
- Add the Budget table, carrying forward the budget values indicated in the Accounts table.
- Lock the Budget column in the Accounts table.
The values of this column are being calculated according to the budget transactions, using the period defined in the accounting tab basic data.
Preparing the budget
- Enter the individual budget transactions in the Budget table
Enter future operations as if they were normal transactions, but with a future date.
For example:- If you want to have a budget for the monthly sales, enter a sale transaction: enter your cash or cash equivalent account in the Debit account column and enter the sales account in the Credit account column, for each month. As date you can enter a date around the end of each month and as amount you can enter the amount you expect it to be.
If you want to have a budget for each product sale, enter some sale transactions for each product with your expected sale volume. - For your expenses budget, enter some transactions entering your expense account in the Debit account column your cash or cash equivalent account in the Credit account column.
If there are recurring operations, you can use the Repeat column to specify the repetition pattern.
- If you want to have a budget for the monthly sales, enter a sale transaction: enter your cash or cash equivalent account in the Debit account column and enter the sales account in the Credit account column, for each month. As date you can enter a date around the end of each month and as amount you can enter the amount you expect it to be.
- Display the budget data
- Go to the charts of accounts, and then into the Budget view, where you can view the total budget for your accounting period.
- You can also use the Balance sheet with groups print option and check the Budget column option, which will display budgeted date next to the actually registered data.
Budget table columns
The Budget table columns are very similar to the Transactions table columns. In the following example, to make it easier to understand, we used accounts with letters. Normally you would use your own account numbers.
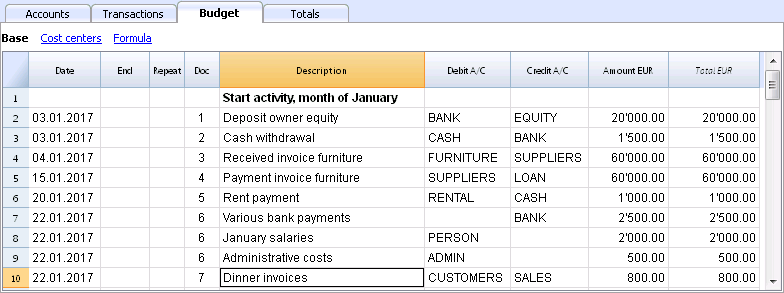
In order to prepare a budget is normally enough the amount column.
For more elaborate budgets you can also indicate the quantity, the unit prices, or you can enter a formula. The program will automatically calculate the amount in the Amount column.
Entering the Budget transaction rows
In the Budget table, the transactions can be entered in exactly the same way as in the Transactions table, indicating the date of the operation, the Debit and the Credit accounts and the amount.
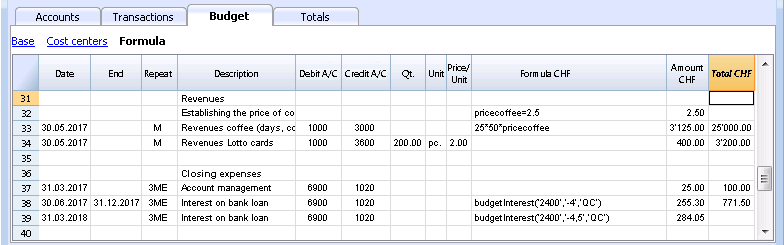
You will here find the budget columns explanations (not all columns are visible in the image above):
- Date column
The future date when you expect the operation to take place:
If you cannot precisely define the date, for example a monthly sales budget, enter the end of the month date. - Repeat column
A repetition code can be entered, possibly preceded by a number
(3M quarterly, 6M per semester, 7D weekly, 3ME quarterly end of month)- Empty: no repetition is taking place
- "D" for a daily repetition (Day)
- "W" for a weekly repetition (Week)
- "M" for a monthly repetition (Month)
- "ME" monthly repetition, but with a date at the end of the month.
If started the 28.02.2017, the next date will be 31.03.2017 - "Y" for a yearly repetition (Year)
- "YE" yearly, but with a date at the end of the month.
If started the 28.02.2015, the next date will be 29.02.2016.
- End column
The date beyond which no more repetition should appear is being indicated. - Variant column
A possible variant form of the budget can be indicated here, in combination with the Apps. - ForNewYear column
Here you can indicate how the transfer is to take place when Creating the New Year- No value: the date is being augmented by a year
- "1" The date remains the same
- "2" The operation is not being transferred to the new year
- Debit account and Credit account, CC1, CC2, CC3 columns
Just as in the Transactions table, you use these columns to define on which accounts the operation should be registered.
You can also use segments and cost centers, to obtain a budget by segment or cost center. - Quantity column
In this column you should enter the quantity description, for example sqm, ton, pc, .. - Price/Unit column
The unit price that, multiplied by the quantity, should give the total amount.- In the Income & Expenses accounting files, you should enter the price unit in negative (with a minus sign), so the amount will be entered in the Expenses column
- Amount column (in basic currency)
The amount to be recorded.
If the row has a repetition, the amount is indicated only in the first transaction; the amounts of the following transactions is shown in the account card.
The program will automatically calculate the amount in the following cases:- If there is a value in the Quantity or Price/Unit columns, the amount is automatically calculated according to the content of these two columns.
- In a double-entry accounting file the result will be a positive amount
- In an Income & Expenses accounting file, if the result is positive it will be considered an income, if it is negative it will be considered an expense.
- In case a formula was entered, the amount will be the result of the formula.
Formulas have priority over quantity and price/unit.
- If there is a value in the Quantity or Price/Unit columns, the amount is automatically calculated according to the content of these two columns.
- Total column
This is the sum of the amounts of the repetitive rows that are part of the specific accounting period.
To display the different amounts, use the Account cards command. - Formula column (in basic currency)
This column gives the user the possibility to enter calculation formulas, of the javascript language, plus the programming functions of the Banana Apps as well.
If there is a formula (or whichever text) the value of the Amount column is being set up according to the result of the formula. See below how to use it.- In a double-entry accounting file the formula result must always be a positive amount
- In an Income & Expenses accounting file, if the result is positive it will be considered an income, if it is negative it will be considered an expense.
- Amount in account currency column
This is the transaction amount in account currency (see multi-currency transactions).
This amount is necessary to calculate the value in basic currency, at the indicated exchange rate.
If there is a formula, the value is the result of the calculation of the formula.
In case of repetition, the first amount is being indicated. - Formula amount in account currency column
A calculation formula can be entered.
In case of repetition, the first amount is being indicated; the amounts of the following transactions is shown in the account card. - Total amount in account currency column
This is the sum of the amounts in account currency of the repetitive rows that are part of the specific accounting period.
If there is no date or if the initial or final date are not part of the accounting period, this column will be empty.
Functions you can use in the Formula column
If you want to see examples about formulas, please visit the following pages:
- Transactions template with use of Quantity and Formula columns.
- Transactions template for the multi-currency accounting with use of the Formula column in basic currency.
In the Formula column you can enter a formula in JavaScript language, plus the Banana Apps programming functions.
If there is a formula (or any text), the value in the Amount column is set according to the formula result.
It allows you to enter calculation formulas, in the JavaScript language, plus the Banana Apps programming functions.
- Last operation result.
The formula is executed and the result displayed.
10*3 //30 will be returned
If there is a sequence of several operations separated by a semicolon ";", the last operation will be resumed.
10*3;7;
7 will be returned - Decimal separator.
As decimal separator JavaScript only uses the point "."
If you use a different separator, the number is likely to be truncated. - DEBUG is a variable that can be true or false.
- If true, in the messages, all the results of the formulas are being displayed.
- row
Is a javascript object that refers to the current row.
The values of the cells can be retrieved with the value function ("columnNameXml").
row.value("date") returns to the date of the transaction.- row.value ("JRepeatNumber") returns the progressive of the repetition.
The first repetition is 0.
- row.value ("JRepeatNumber") returns the progressive of the repetition.
- budgetCurrent
It is a table that contains the budget rows after the repetitions creation. - budgetExchangeDifference (account, [date, exchangeRate])
This formula recalls the Banana.document.budgetExchangeDifference function. - BudgetGetPeriod(tDate, period)
Returns to the start date (startDate) and the end date (endtDate) relative to the date and the period where the period can be:- "MC", "QC", "YC" to indicate the month, the quarter or the current year.
- "MP", "QP", "YP" to indicate the month, the quarter or the previous year.
- t = BudgetGetPeriod('2015-01-01', 'MP') returns
t.strartDate // 2014-12-01
t.endtDate // 2014-12-31
- The following functions are similar to those available with Banana.document, however, with the added possibility to indicate as startDate the period of BudgetGetPeriod so that the function uses the current date and as a start date and end date the date returned of BudgetGetPeriod.
budgetBalance('1000', 'MP'); //returns the balance of 1000 to the end of the previous month
budgetTotal('1000', 'MC'); //returns the total movement of the 1000 account for the current month.- budgetBalance(account, startDate, endDate, extraParam)
- budgetOpening(account, startDate, endDate, extraParam)
- budgetTotal(account, startDate, endDate, extraParam)
- budgetBalanceCurrency(account, startDate, endDate, extraParam)
- budgetOpeningCurrency(account, startDate, endDate, extraParam)
- budgetTotalCurrency(account, startDate, endDate, extraParam)
- budgetInterest( account, interest, startDate, endDate, extraParam)
- credit(amount)
If the amount is under 0 returns the amount in positive, if not 0 returns. - debit(amount)
If the amount is greater than 0 returns the amount, if not 0 returns. - include
Includes and executes a javascript file, with the possibility to create its own functions and variables that can be recalled in the script.- include "file:test.js"
Executes the contents of the indicated file. The name refers to the file on which one is working. - include "documents:test.js"
Executes the contents of the text document contained in the documents table.
This has to be a file of the "text/javascript" type.
- include "file:test.js"
Variables
It is possible to define and use variables directly in the rows.
The variable must have been previously defined.
price = 10;
total = price * 5;
User defined functions
The user can define personal function with the JavaScript language, and recall them in the formulas.
It is possibile to define functions:
- Directly in a formula
- In a JavaScript coded attachment; this attachment must have as row id the "_budget.js" name
- In a text of the Documents table, that needs to be included with the Include command
function Taxcalculation(profit)
{
   var percentage = 10;
   if (profit > 50000)
      percentage = 10;
   else if (profit > 100000)
      percentage =20;
   return profit * percentage / 100;
}
Calculation and recalculation sequence
Each time that you change an amount in the Budget table, or that you manually recalculate the file (Shift+F9), the program:
- If it exists, first of all the program executes the "_budget.js" document content.
- It recalculates the Budget table rows:
- The program generates the repetitive row according to the Initial Date, Final Date and Repetition columns.
If there is in January a row with a monthly repetition, 12 identical rows will be created, each one with a date of a different month. - The budget rows are sorted by date (if they have the same date they will be listed in the order they were entered)
- The transaction amount is calculated according to the quantity and unit price or, if there is a formula, according to the formula result.
- For the multi-currency accounting, the program executes first the formula in the account currency, and then in the basic currency.
If there is no formula for the basic currency, the program will use the historic exchange rate and calculates the value in the basic currency. - For the accounting files with VAT, the VAT is calculated according to the transaction's amount.
- Rows previously processed will be used for the calculation of the following rows.
The accounts balance, at the budget row's date, will include the amounts previously processed.
If for example, in a February transaction you enter a formula to calculate the balance for the whole year, you will only get the balance up to the end of February.
- The program generates the repetitive row according to the Initial Date, Final Date and Repetition columns.
- It recalculates the budget values in the Accounts column, according to the budget transactions and to the opening balances.
- It updates the Total column amount in the Budget table.
If the initial or final date of the accounting is modified, as well as other values that are used for the calculation of the budget amounts (for example the VAT table), you need to operate a manual recalculation (Check accounting command from the Account1 menu).
If you have many rows, with many recurring transactions and with a long calculation period, the program may slow down when recalculation the Budget table. In this case we suggest you to uncheck the manual recalculation in the File & accounting properties (File menu).
Printing a budget
In order to print your budget, use the Balance sheet with groups command from the Account1 menu. In the Columns section, activate the Budget column.
If the budget was entered in the Budget table, you can also print the budget by period.
Creating the New Year
When creating the New Year, the program automatically recreates the budget transactions for the new year, according to the values of the New Year column in the Budget table. If this column is not visible you can activate it using the Columns setup command from the Data menu.
End of the Year closure and New Year
Avoid mistakes with Banana Accounting Plus
In order to have continuity and serenity of work, it is also worth starting the New Year with an updated software.
Facilitate checking your accounting work and immediately find differences: in Banana Accounting Plus, our new version, try the Balance column in the Transaction table. You can now see potential differences on each row and you can correct them right away. It is a very useful feature when closing the accounting period.
Many of our clients have already tried it and are enthusiastic about it. We advise you to switch now to Banana Accounting Plus and take advantage of the many new features.
Other resources: How to close and open the accounting year
End of the Year closure and New Year
At the end of every accounting year, before printing and filing the Balance Sheet and the Profit & Loss Statement, it is necessary to recheck the accounting file.
Please visit the Recheck the accounting page.
Tax aspects
Before closing the accounting, is is necessary to proceed with a series of operations that have fiscal implications. The marchandise account needs to be adapted, the transactions for depreciations need to be entered, the accrued income and liabilities, the VAT declaration needs to be completed, establish how and unto which accounts the profit or loss has to be attributed and there are many other operations for verification and checking.
From the program's point of view, there is no difference whether the profit is high or low. However, from a fiscal point of view, it implies a lot. These aspects need to be verified with your own tax advisor or accountant. It can be very useful, especially when you manage an accounting for the first the time and before you proceed with the closing of the books, to consult a specialist in order to understand what is required. The accountants are very busy at the beginning of the year and during the period preceding the deadline for the tax declaration. It can therefore be useful to meet with your accountant - or send him the accounting file - a few monts before the closing of the books, so that you can inform yourself on how to proceed.
Create a New Year
In order to start recording in the new year, with the Create New Year command of the Account2 menu and starting from the current year's file, a new accounting file is being created. Once the new year has been created and the file has been saved under a new name, the user can work in the file of the new year, but also in the one of the preceding year.
You can thus create the file of the new year, even before having closed the year in which you are still working. After having entered the last modifications in the previous year, use the Update Opening balances command of the Account2 menu, to retrieve the opening balances and again attribute the profit of the last year.
Performed Operations
The Create New Year command:
- Creates a new file (with no name) with the chart of accounts and all the settings identical to your current file, but without transactions.
- Copies the data from the Balance column of your current file to the Opening column of the new file (only for the selected classes)
- Adds the selected amount to the opening balance of the Profit or Loss from previous year account(s) in the new file.
- Copies the data from the Balance column of your current file to the Previous Year column of the new file (for all the accounts).
- Updates the opening and closing dates in the File and accounting Properties of the new file.
- In the Multi-currency accounting, enters the closing exchange rates of the previous year as opening exchange rates.
Create New Year command
- Open the current file and click on the Create New Year command from the Account2 menu: a window, that shows a difference corresponding to the profit or loss that has not yet been allocated, will appear. There may also be differences due to accounting errors.
- From the list that appears, the user can select the account to which the result of the accounting period has to be allocated, or one can directly confirm with OK if the allocation of the result has to be postponed.
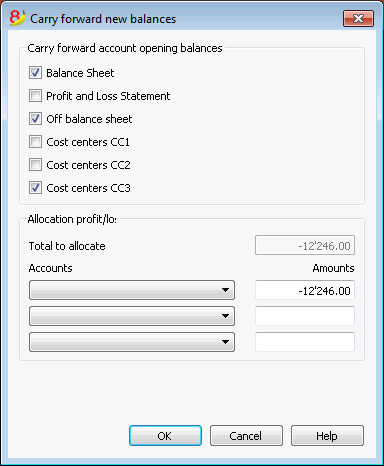
Carry forward account opening balances
The opening balances of the selected options are carried forward.
Indicate which accounts are required to have opening balances carried forward. Usually the Profit and Loss Statements balances are not carried forward. For specific needs you can always activate the option.
Allocation profit/loss
Total to allocate
The program will indicate the profit/loss that needs to be shared between various accounts.
Accounts/Amounts
If only one account is selected, the amount will automatically entered. Select the account or accounts (up to three) in which the result of the accounting period has to be allocated. In case there are several destination accounts for the result of the accounting period, the amounts should be inserted manually in the different boxes. The program will automatically update the opening balances. The Total Assets will exactly match the Total Liabilities.
Allocation of the result of the accounting period on more than three accounts.
In this case, allocate the result of the accounting period automatically on the Profit or loss brought forward account as usual, and continue to proceed with the creation of the new year.
In the new year (new file), Transactions table, proceed with a composed transaction in order to allocate the result of the accounting period from the Profit or loss brought forward account to the different destination accounts.
- Confirm the File and accounting properties for the new year.
- From the File menu, activate the Save as... command, indicating the folder where the new accounting file needs to be saved.
Updating opening balances command
The Updating Opening Balances command:
- Retrieves the closing data of the indicated file
- Copies them as data of the previous year in the current file (see Create New Year command).
This command doesn't influence the already entered recordings. Infact, it is like when creating a new year, as if you are recording in the current year.
Opening balances must be updated in the following situations:
- When you have created the new year and afterwards you entered more transactions - or made corrections - in the previous year
- When the profit/loss of the previous year has not been allocated.
Here is how to proceed to make the update:
- Open the current year accounting file and choose the Update opening balances command from the Account2 menu
- Select the previous year accounting file through the Browse button
- Follow the same steps as the ones of the Create New Year command (see top of the page)
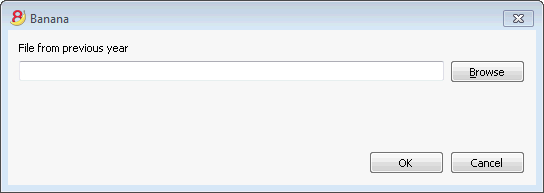
Differences in the opening balances
Avoid mistakes with Banana Accounting Plus
In order to facilitate checking your accounting work and to immediately find differences, in Banana Accounting Plus, our new version, we added the Balance column in the Transaction table. You can now see potential differences on each row and you can correct them right away. It is a very useful feature when closing the accounting period.
Many of our clients have already tried it and are enthusiastic about it. We advise you to switch now to Banana Accounting Plus and take advantage of the many new features.
Differences in the opening balances
At the opening of the Accounting year, the amounts of the Total Assets should correspond to the Total Liabilities, otherwise it is not possible to have a correct balancing. You need to check that in the information window there is no Opening balances difference message. If there is, you first need to correct the opening balances of the Balance Sheet so that the Total Assets balances the Total Liabilities (Opening balance column).
In the following example the program shows an error message reporting a difference of 150.- CHF.

After having corrected the opening balances the Total Assets must correspond to the Total Liabilities.
It is also possible to check the balancing in the Totals table.
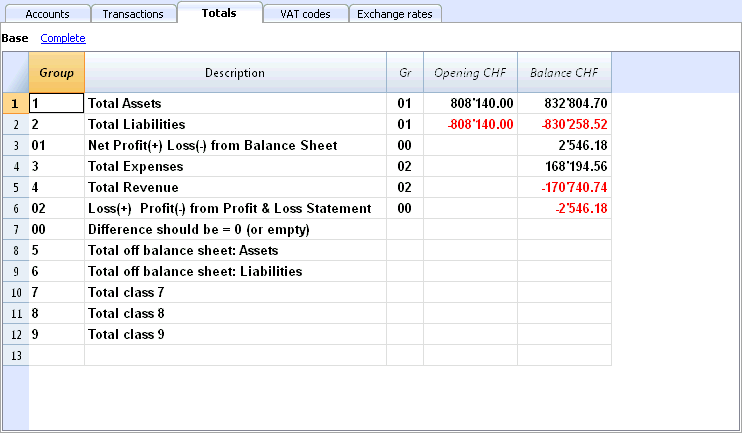
Multi-currency accounting
Multi-currency accounting is based on the double-entry accounting method and can also manage accounts and transactions in foreign currencies.
Many topics of the multicurrency accounting are the same as the double-entry accounting. In order to find missing lessons or in-depth information, we advice you to consult our internet pages on the Double-entry accounting.
Characteristics
- Manages the accounts also in foreign currency.
- Calculates the conversion automatically, based on the exchange rate inserted in the Exchange rate table
- Calculates the exchange rate differences automatically
- Offers Balance Sheets and Profit and Loss Statements in a second currency as well.
In order to change from a double-entry accounting file to a multi-currency accounting file, check the Convert to new file command
Information
Chart of accounts, file properties and exchange rates table
We suggest to choose one of the already configured examples and to personalize it according to your needs. Please note that the chart of accounts must include the account for profit and loss from exchange rate variation and there must be accounts in foreign currencies.
- Setup the chart of accounts
- Groups and subgroups
- File properties - foreign currencies tab
- Setup the Exchange rate table
Transactions
Accounting transactions must be entered in the same way as the double-entry accounting transactions
Printouts
Conversion
In order to add multicurrency features to a double entry accounting file, please visit the Convert to new file page.
If you want to change the basic currency of an existing accounting file (for example if your accounting file is in EUR and you want it in USD), proceed as follows:
- Save the file under a different name
- In the File properties
- Indicate the new basic currency
- Delete the reference to the previous year file
- In the Exchange rates table enter the exchange rates referred to the basic currency
- If there are many transactions to be converted, in the exchange table you can enter intermediate exchange rates (for examble for each month, indicating the beginning of the month's date). The program will use the historic exchange rate in the transactions.
- In the accounting plan
- Replace the old currency with the new one
You can use the Find and Replace function also (selected area only) - If there are opening balances, you need to re-enter them in the new currency
- Also the Previous year balance, budget and other columns must be converted
- Replace the old currency with the new one
- In the Transactions table
If there are trasactions, you need to correct them row by row:- For those transactions that are already in the right currency, with the F6 key the program recalculates the amount in the new basic currency.
- For other transactions you need to enter the right amount tin the basic currency and then press F6
- In the Budget table
Proceed just as in the Transactions table - Use the Check accounting command, fix possible errors, and keep using the Check accounting command until there are no more error messages.
Theoretical part
In this part, the basic theoretical notions about currency exchange are being explained.
Exchange rates and accounting issues
Every nation has its own currency and to obtain another currency it is necessary to buy it using the appropriate exchange. The price of a currency compared to another is called the exchange rate. To change money means to convert the amounts of one currency to another. The exchange (exchange rate) varies constantly and indicates the rate of conversion.
For example, on January 1st
- 1 Euro (EUR) was equal to 1.32030 US Dollar (USD)
- 1 US Dollar was equal to 0.7580 Euro
- 1 EUR was equal to 1.60970 Swiss Franc (CHF)
- 1 EUR was equal to 157.2030 Japanese Yen (JPY)
Multi-currency Accounting One talks about multi-currency accounting or multi-value accounting when accounts in different currencies are kept. It is necessary to have multi-currency accounting when a company has bank, cash, and debtors’ accounts in more than one currency. Even if just one account is in a foreign currency it is necessary to administer a multi-currency accounting.
Basic Currency
The amounts referring to different currencies cannot be totaled directly. It is necessary to have a basic currency to refer to and to use for the totals. The main point of accounting is that the totals of the “Debit” balances must correspond to the totals of the “Credit” balances. To verify that the accounting is balanced, there must be a single currency with which to do the totals. If there are different currencies, the basic currency must be indicated before anything else. Once the basic currency has been chosen and some operations have been executed, the basic currency can no longer be changed. To change the basic currency, the accounting must be closed and another opened with a different basic currency. The basic currency is also used to establish the Balance Sheet and to calculate the profit or loss of theoperation.
Each amount has its equivalent in basic currency
To be able to add the totals and verify that the operations balance, it is necessary to have the equivalent in basic currency for every transaction. In this way you can check that the total of the Debit entries is the same as the total of the Credit ones. If the basic currency is Euros and there are transactions in US Dollars, there needs to be an exchange value in Euros for every transaction in US Dollars. All the Euro amounts will be totaled to verify that the accounting balances.
Account currency
Each account has its own currency symbol which indicates in which currency the account will be administered. You must therefore indicate what the currency of the account will be. Each account will then have its own balance expressed in its own currency. Only entries in this currency will be permitted on this account. If the account is in Euro, then there can only be Euro entries on this account; if the account is in USD, then there can only be entries in the specified USD currency on this account. When you have to administer entries in YEN, then you have to have an account whose symbol is the YEN.
Account Balance in basic curency
For each account, alongside the balance in the account’s own currency, the balance in basic currency will also be kept, in order to calculate the balance sheet in basic currency.
The account card for the USD bank account has to correspond exactly to the bank statement as far as the USD amounts are concerned.
The value in basic currency will always be specified for each accounting entry. If the account is in USD, in the entries there will be, beyond the amounts in USD, also its value in EUR. The EUR balance will be given by the sum of all the entries expressed in EUR. The actual balance in basic currency will depend on the exchange rate factors used to calculate the exchange value of each, single entry to EUR.
If on a given day you take the actual balance in USD and convert it to EUR at the daily exchange rate, you will get an exchange value that differs from the balance of the account in basic currency. This difference is due to the fact that the exchange rate used for entries on a daily basis is different from the actual daily exchange rate.
Thus there is a difference between the actual value at the daily exchange rate and the accounting balance in basic currency. This accounting difference is called the exchange rate difference.
The difference between the balance in basic currency and the calculated value has to be registered, when the accounting is closed, as an exchange rate profit or loss.
Balances in another currency (currency2)
All the accounting reports will be calculated in basic currency. If you take the basic currency values and change them to another currency, you will get the balance in another currency. The program has a Currency2 column where all the values are automatically entered and presented in the currency specified as Currency2. The logic for the conversion of the amounts is the following:
- If Currency2 is the same as the account or operation currency, then the original value will be used.
- If the account is in USD and Currency2 is USD, the USD amount will be used.
- In all other cases the basic currency amount will be used and changed into Currency2.
- The daily exchange rate is used. Even for past entries, the exchange value in Currency2 will be expressed on the basis of the most recent exchange rate, and not on the historical one used on the day of the entry.
You need to pay attention to the fact that a balance converted to another currency will show small differences in the totals. Often the converted value of a total is not equal to the sum of split exchange values, as can be seen from the following example:
|
Moneta base EUR |
Moneta 2 USD |
|
|
Cash |
1.08 |
1.42 |
|
Bank |
1.08 |
1.42 |
|
Total Assets |
2.16 |
2.84 |
|
Personal capital |
2.16 |
2.85 |
|
Total Liabilities |
2.16 |
2.85 |
In the basic currency, total assets are equal to total liabilities. It is permitted to present a Balance Sheet that contains differences only if they are understandable and if it is indicated that they were due to calculations from another currency.
Accounts table, Currency 2 view
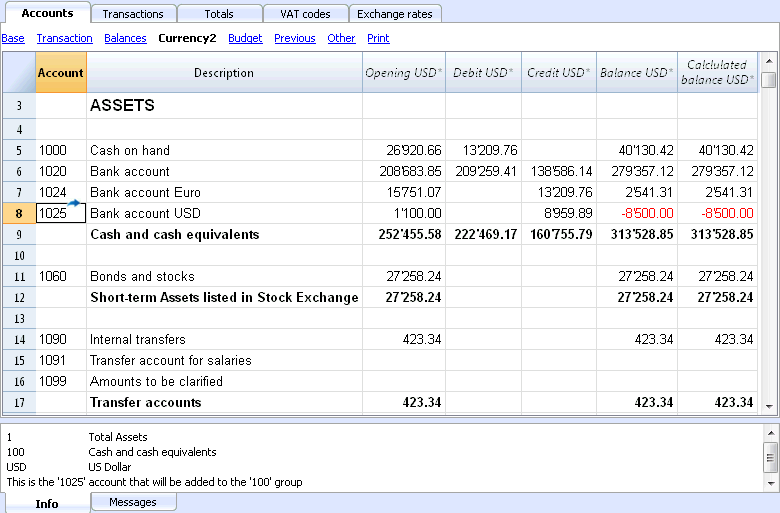
Converting currencies
Variability of exchange rates
The purchase/sale of currencies occurs in a free market. The price (exchange rate) is based on the law of supply and demand. The differences in the exchange value can be more or less important according to the fluctuations of the exchange rate.
|
Date |
Exchange rate EUR/USD |
Equivalent in EUR |
Equivalent value difference compared to 01-01 |
|
01-01 |
1.32030 |
1'320.03 |
|
|
31-03 |
1.33350 |
1'333.50 |
13.47 |
|
30-06 |
1.34750 |
1'347.50 |
27.47 |
|
30-09 |
1.42720 |
1'427.20 |
107.17 |
The exchange rate
The exchange rate refers to the basic currency. There are always two different exchange values between two currencies, according to the currency that is used as the basic currency.
For the USD and Euro currency, there are therefore two different exchange rates:
- If the basic currency of the exchange is EUR then the exchange rate is 1.32030
1 Euro (EUR) corresponds to 1.32030 US Dollars (USD) - If the basic currency of the exchange is USD then the exchange rate is 0.75800
1 US Dollar corresponds to 0.75800 Euros
In the current document, the Euro will be regularly used as the basic currency, to which other currencies will be compared.
Inverse exchange rate
Having the exchange of EUR/USD at 1.32030, it is possible to find the exchange rate of USD/EUR by dividing 1 by the exchange rate.
| Exchange rate |
Inverse exchange rate 1/exchange rate |
Inverse exchange rate rounded to 6 digits |
|
EUR/USD 1.32030 |
0.75800 |
0.758000 |
The exchange values calculated with an inverse exchange can turn out to be different from the originals because of the roundings.
| Exchange rate |
Inverse exchange rate |
Exchange value 10000 x original exchange rate |
Exchange value 10000 x inverse exchange rate |
Difference |
|
EUR/USD 1.32030 |
0.75800 |
13'203.00 |
13'192.61 |
10.39 |
Don't use inverse exchanges rates in order to avoid differences.
For example, for the transition to Euros, it was prohibited to use inverse exchange rates.
Multiplier
There are currencies that have very large exchange rates.
Always on January 1st
- 1 US Dollar = 670,800 Turkish Lira
- 1 Turkish Lira (TRL) = 0.00000149 US Dollar (USD)
Instead of using so many zeros, it can be said that
- 1000 Turkish Lira (TRL) = 0.00149 US Dollar (USD)
In this case, the multiplier is 1000 instead of 1.
Precision
As a rule, an exchange rate is specified with a precision of at least 6 figures after the decimal.
There are, however, cases where it is necessary to use more precision.
- 1 Turkish Lira (TRL) = 0.00000149 US Dollar (USD)
When the precision is changed and the exchange is rounded in a different way, the amounts also change. The precision with which the exchange is specified is very important.
Lowest denomination
For coin and paper money, especially, low denominations are used. As a rule the lowest denomination for Swiss francs is five centimes (0.05). When an exchange occurs, for example EUR/CHF:
1 EUR = 1.60970 CHF
| EUR |
Exchange rate |
Actual exchange value in CHF |
Rounded to lowest CHF denomination |
Difference |
Effective exchange rate |
|
10.00 |
1.60970 |
16.09 |
16.10 |
0.01 |
1.61 |
Calculation of exchange rates and values
When the Euro is the basic currency
The exchange factor for EUR/USD is1.32030
1 Euro (EUR) is equal to 1.32030 US Dollars (USD).
Calculation of the exchange value:
Multiply the basic currency amount by the exchange factor:
EUR 100 x 1.32030 = USD 132.03
Calculate the basic currency amount:
Divide the destination currency by the exchange rate:
USD 132.03 / 1.32030 = EUR 100
Calculate the exchange factor:
Divide the basic currency amount by the destination currency amount:
EUR 100 / USD 132.03 = 0.7574
Exchange rates for purchases and sales
Banks carry out the purchase and sale of currencies and maintain a margin of earnings. They apply different exchange rates depending on whether a determined value is being bought or sold.
Sale: the bank receives domestic money and gives (sells) foreign money.
Purchase: the bank receives (purchases) foreign money and gives domestic money.
Currency exchange and banknotes exchange (premium)
Currency exchange: exchange for written transactions (from one account to the other).
Banknote exchange: exchange for banknotes.
Premium: commission for converting a written amount to cash.
To exchange currency, the banks maintain a lesser margin (the difference between purchase/sale) compared to exchanging banknotes. When a written value is to be transformed (credit on the account) into cash currency, the bank applies a commission, called a premium.
Differences when changing back to basic currency
When an amount is exchanged into another currency, it is expected that the reverse exchange will render the same amount as it was originally.
| Basic amount |
Exchange rate |
Exchange value |
Return |
|
100.00 |
1.32030 |
132.03 |
100.00 |
However, you do not always come up with the same amount when converting currency back. Because of rounding errors, there can be cases where the same return value cannot be obtained.
| Basi amount EUR |
Exchange rate |
Exchange value in USD |
Retourn in EUR |
Differece in EUR |
|
328.67 |
1.32030 |
433.94 |
328.66 |
|
|
328.68 |
1.32030 |
433.95 |
328.67 |
0.01 |
|
328.69 |
1.32030 |
433.96 |
328.68 |
0.01 |
Differences of totals through splitting
The total exchange value of the components of an amount does not always give the same exchange value as the overall amount.
In this example, the amount of 2.16 EUR gives an exchange value in USD of 2.03. By splitting the amount and adding the two exchange values, 2.04 can be obtained.
| Amount in EUR |
Exchange rate |
Exchange value in USD |
|
2.16 |
1.32030 |
2.85
|
|
|
|
|
|
1.08 |
1.32030 |
1.42 |
|
1.08 |
1.32030 |
1.42 |
|
Totale 2.16 |
|
2.84 |
|
Differenza |
|
0.01 |
These mathematic differences cannot be eliminated if they are not recorded properly.
Revaluations and exchange rate differences
Exchange rates vary all the time and therefore also the exchange value to basic currency varies. Between one period and another, there will inevitably be exchange rate differences.
Exchange rate differences are not accounting errors but simple adjustments of the values made necessary in order to keep the accounting figures in step with normal fluctuations.
As you open the accounting, the figures in the balance column are equal to those present in the opening column. When there are entries, these will update the figures in the balance column.
The calculated balance column contains the exchange value to basic currency for the account balance, at the daily exchange (on the exchange rate table). The difference between the balance in basic currency and the calculated balance is the exchange rate difference.
|
|
Currency at opening |
Exchange value at opening in EUR |
Basic currency balance in EUR |
Calculate balance at 30.03.200xx in EUR |
Exchange rate difference |
||
|
Exchange rate |
|
|
1.32030 |
1.32030 |
1.30150 |
|
|
|
|
|
|
|
|
|
||
|
Cash |
EUR |
93.80 |
93.80 |
93.80 |
93.80 |
|
|
|
Bank |
USD |
100.00 |
75.74 |
75.74 |
76.83 |
1.09 |
|
|
Real estate |
EUR |
1'000.00 |
1'000.00 |
1'000.00 |
1'000.00 |
|
|
|
Total Assets |
|
|
1'169.54 |
1'169.54 |
1'170.63 |
|
|
|
|
|
|
|
|
|
|
|
|
|
|
|
|
|
|
|
|
|
Loan |
USD |
-500.00 |
-378.70 |
-378.70 |
-384.17 |
-5.47 |
|
|
Personal capital |
EUR |
-790.84 |
790.84 |
-790.84 |
-790.84 |
|
|
|
Total Liabelities |
|
|
-1'169.54 |
-1'169.54 |
-1'175.01 |
|
|
|
|
|
|
|
|
|
|
|
|
|
|
|
|
|
|
|
|
|
Loss |
|
|
|
|
-4.38 |
|
|
At March 30th the EUR/USD exchange rate is different from the one at the beginning of the year. In the above example there were no accounting entries during the three-month period. The situation, from an accounting point of view, has not changed since the beginning of the year. Despite this the total of the updated balance, using the rate at the end of March, is different when compared to the beginning of the year. The credit bank balance and the loan in USD have a different value in EUR. There are therefore consequences for the accounting even though there have been no entries.
In the above example, you will notice that the Euro is now worth less against the dollar compared to the beginning of the year. The dollar is therefore worth more against the Euro.
The exchange value of the balance on the account in USD is greater than it was at the beginning of the year. You have a greater estate and therefore a profit on the exchange rate.
On the debit side there is a USD 500.00 loan. Now the exchange value in EUR is greater compared to the value input at the beginning of the year. The value of the loan has increased and brings about a loss due to the exchange rate difference.
In the following example we shall use the hypothesis that there has been the opposite development. We imagine that the Euro has increased in value and is therefore worth more against the USD. The exchange value in EUR of an amount in dollars is less than the one at the beginning of the year.
|
|
|
Currency at opening |
Exchange value at opening EUR
|
Calculate balance at 30.03.20XX Eur (Hypothetical) |
Exchange rate differece |
|
Cambio |
|
|
1.32030 |
1.36150 |
|
|
|
|
|
|
|
|
|
Cash |
EUR |
93.80 |
93.80 |
93.80 |
|
|
Bank |
USD |
100.00 |
75.74 |
73.44 |
-2.30 |
|
Real estate |
EUR |
1'000.00 |
1'000.00 |
1'000.00 |
|
|
Total Assets |
|
|
1’169.54 |
1'167.24 |
|
|
|
|
|
|
|
|
|
|
|
|
|
|
|
|
Loan |
USD |
-500.00 |
-378.70 |
-367.24 |
11.46 |
|
Personal capital |
EUR |
-790.84 |
-790.84 |
-790.84 |
|
|
Totale Liabelities |
|
|
-1’169.54 |
-1'158.08 |
|
|
|
|
|
|
|
|
|
|
|
|
|
|
|
|
Profit |
|
|
|
9.16 |
9.16 |
As a consequence of an increase in the Euro/dollar exchange rate, you have a USD bank deposit with an exchange value in EUR which is less than at the beginning of the year. The total worth has diminished and there is therefore a loss.
The USD loan has a lower exchange value in EUR. A lesser liability is an advantage for the company and there is thus an exchange rate profit.
Exchange rate profit
You have an exchange rate profit when:
- The exchange value of your assets increases (increase of the investments)
- The exchange value of the liabilities decreases (decrease of the loans).
Exchange rate losses
You have an exchange rate loss when:
- The exchange value of your assets decreases (decrease of the investments)
- The exchange value of the liabilities increases (increase of the loans).
Accounting features foe exchange rate differences
Exchange rates can evolve in different ways. Often they rise, only to fall again. The principle rule for accounting is that the figures written on the Balance Sheet must be true ones. When you present your Balance Sheet, the exchange values of foreign currency accounts must be made at the exchange rate on the day of presentation.
The exchange rate difference is calculated as if you had to definitively convert the amount to basic currency. In reality there is no definitive conversion so you are only dealing with a correction to the accounting.
Closing exchange rate
At the end of each year it is necessary to prepare the complete Balance Sheet. The exchange rates thus have to be updated with the closing exchange rates. It is also necessary to enter the exchange rate differences once and for all; if these are not entered, then there will be differences in the opening balances.
Enter the exchange rate diferences
|
|
|
Currency balance |
Account balance EUR |
Calculate balance at 30.03.200xx EUR (hypothetical) |
Exchange rate difference |
|
Exchange |
|
|
1.32030 |
1.36150 |
|
|
|
|
|
|
|
|
|
Bank |
USD |
100.00 |
75.74 |
73.44 |
-2.30 |
|
|
|
|
|
|
|
|
Exchange rate difference |
EUR |
|
-2.30 |
|
|
|
|
|
|
|
|
|
|
Bank |
USD |
100.00 |
73.44 |
73.44 |
0.00 |
As can be seen from the above example, the bank balance is USD 100.00. For the accounting it has been valued at 75.74 EUR. Today’s actual exchange, though, is only EUR 73.44. There is a difference of EUR 2.30 EUR in basic currency. The entry must therefore decrease the EUR amount. You proceed with a transaction that debits the bank account and credits the exchange rate loss account by EUR 2.30. As you can see, the actual bank account balance of USD 100.00 has not been altered. The entry only alters the basic currency balance.
When entering the exchange rate difference, you need to be sure that the exchange value in basic currency corresponds to the actual exchange value, calculated at either the daily exchange rate or the closing one.
The figures in the account currency must not be altered. You must therefore proceed to make an entry that only alters the basic currency balance on the specific account.
As the account on the other side you will have the exchange rate profit or loss account.
Transactions with exchange rates at the time of purchase
Enties on account valued with the exchange rate of the time of purchase
When the positions, valued with exchange rates of the time of purchase (historical ones) are increased or decreased, you have to calculate the exchange of the exchange rate table, taking into account the development of the amounts being brought forward.
|
|
USD amount |
Exchange |
EUR exchange value |
Total USD |
Total EUR |
Historical Exchange |
|
Acquisition of shares |
100'000.00 |
0.9416 |
106'202.00 |
100'000.00 |
106'202.00 |
0.9416 |
|
Increase of shares |
50'000.00 |
0.8792 |
56'870.00 |
150'000.00 |
163'072.00 |
0.919839 |
Investiments and special exchange rates
Investments valued at the exchange rate of the time purchase
Certain investments (shares, real estate abroad) are valued using the exchange rate of the time of purchase (historical exchange) and not the current one. The exchange rate profit and loss is not accounted for until it is actually realized. You must therefore make certain these accounts do not get valued using the current exchange rate.
In order to input a fixed, historical exchange, you need to create a supplementary currency on the account table (e.g. USD1) with a fixed exchange rate. This currency will then only be used for this account with a fixed rate. If you have to make a transfer from the USD account to the USD1 account, you proceed exactly as if you were working with two different currencies. For this reason you will have to use a two-line entry.
Opening with special exchange rates
Inputting the opening balances in the “opening” column, foreign currency amounts will be converted to basic currency at the opening exchange rate.
If this system proves not to be flexible enough (you need various special rates or there are rounding differences) the opening can be done manually by making normal entries, indicating the amounts and the exchange rates you want for each account. In this case, the “opening” column of the Accounts table will be left blank.
Starting a multi-currency accounting
Creating an accounting file, starting from a template included in the program
In order to create a new accounting file, there are different modes.
Here we explain how to start an accounting, starting from an existing template included in the program.
- File menu, New command
- From the Group section, select Double-entry accounting
- In the File section, select Double-entry accounting or Double-entry accounting with VAT/Sales tax.
- In the Examples/Templates section, select the language/nation and choose one of the templates that is closest to your own needs
- By clicking on the Online Templates button you can access our website where we published all templates available for free.
- Select the language and the country for the templates.
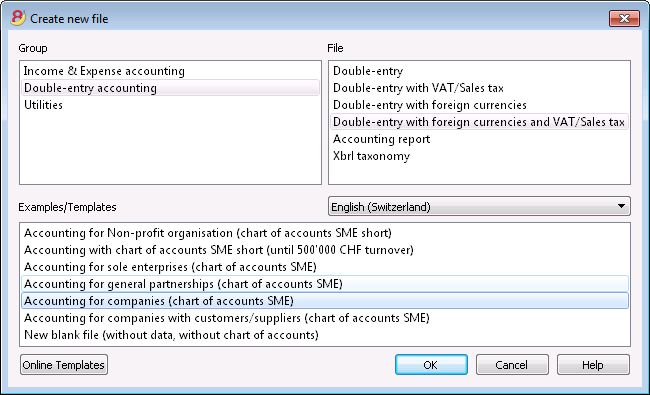
Setting up the file properties (basic data)
- From the File menu, File properties command,
Accounting tab
- Indicate the company name that will appear in the headers of the printouts and on the other data.
- Select the basic currency, with which the accounting will be kept.

General use of the program
Banana Accounting inspires itself from Excel. The user directions and the commands are kept as similar as possible to the ones of Microsoft Office.
For more information on the general use of the program, we refer to the explanations on our page Program interface.
The accounting is being contained in tables; all of them have the same way of operating.
Saving the file
- From the File menu choose the Save as... command, preferably indicating the name of the company and the current year (for example, "company_2017")
- Choose the folder where the file should be saved (for example, Documents -> Accounting)
- The program will add the "ac2" extension.
Exchange rates table
Before entering multi-currency transactions it is necessary to define the parameters of the used currencies in the Exchange rates table.

Customizing the Chart of accounts
In the Accounts table, customize the Chart of accounts and adapt it to your own needs:
- Add accounts and /or delete existing accounts (see Adding new rows)
- Modify the account numbers, the descriptions (for example, enter the name of your own Bank account), enter other groups, etc.
- To create subgroups, please consult our Groups page.

In the Chart of accounts, you can also define Cost centers or Segments, used to attribute the amounts in a more detailed or specific way.
The Transactions table
The multicurrency transactions have to be entered into the Transactions table; together they compose the Journal.

Speeding up the recording of the transactions
In order to accelerate the recording of the transactions, you can use
- the Smart fill function that allows the automatic autocomplete of data that have already been entered at an earlier date
- the Recurring transactions function, used to memorize recurring transactions into a separate table
- the import of your bank or post statement from e-banking
Checking customer and supplier invoices
Banana allows you to keep an eye on the invoices to be paid and the receivable, issued invoices. Please consult:
The Account card
The Account card automatically displays all the transactions that have been recorded on the same account (for example, cash, bank, clients, etc).
![]()
To display an account card, just position yourself with the mouse on the account number and click on the small blue symbol that appears.
Account card by period
To display the account card with the balances referring to a specific period, click on the Account1 menu, Account card command, and in the Period section, activate Period Selected, entering the Start and the End date of the period.
For more details, consult the page Period.
Printing the Account card
In order to print one account card, just display the card from the Accounts or the Transactions table and launch the print from on the File menu.
To print several or all account cards, click on the Account1 menu, Account card command, and select the account cards that need to be printed. By means of the Filter, all the account cards, or only a part of all of them (for example, only accounts, cost centers, segments), that need to be printed can be automatically selected.
For more details, consult the page Account Card.
The Balance Sheet and Profit and Loss Statement
The Balance sheet shows the balances of all the estate accounts, Assets & Liabilities. The difference between the Assets and the Liabilities determines the Share capital.

The display and the printing of the Balance Sheet is being executed from the Account1 menu, commands Enhanced Balance Sheet or Enhanced Balance Sheet with groups.
- The Enhanced Balance Sheet command simply lists all the accounts without distinguishing Groups and Subgroups
- The Enhanced Balance Sheet with groups command lists all the accounts while subdividing Groups and Subgroups; besides, it presents numerous features to customize the presentation, functions that are not provided in the Enhanced Balance Sheet.
Data archiving in PDF format
At the end of the year, when the entire accounting has been completed, corrected and audited, all the accounting data can be archived with the Create PDF dossier command of the File menu.

The Budget
- Accounts table, Budget column. For each account, the annual budget amount is being indicated.
In this case, when you set up the Budget from the Account1 menu, Enhanced Balance Sheet with groups command, the Budget column displays the amounts that refer to the entire year. - In the Budget table, that can be activated through the Tools menu, Add new functionalities command.
In this table, you can enter all the budgeted costs and revenue by means of entering transactions. If you activate this table, the column of the accounts table will be automatically deactivated.In this case you can set up a detailed budget, taking into account the possible variations over the year and in different periods of the year.

For more details, consult the Budget page.
File properties (Foreign currency)

Account for exchange rate profit
From the accounts list, select the one for the exchange rate profit present in the Chart of Accounts.
Account for exchange rate loss
From the accounts list, select the one for the exchange rate loss present in the Chart of Accounts.
Currency 2
It is possible to select a second currency in order to view the balances in a currency different from the basic one.
Exchange Rate valid even from basic currency
If this option is checked, the program will use the last entered exchange rate in the Exchange rate table (Exchange rate column).
The multi-currency chart of accounts
The Chart of accounts of the multi-currency accounting is the same as the one of an accounting without foreign currency, except for the specifics that are indicated here below.
Basic currency
In the File and accounting properties, the basic currency should be defined and in the Exchange rate table, the foreign currencies should be defined.
In the example here below, the basic currency is the CHF, which, as can be seen, appears in the column headers with the amounts in basic currency.
Account currency
- The Assets and the Liabilities (Balance sheet accounts) can be in basic currency or in foreign currency.
-
The Costs (Expenses) and Revenue accounts must be in basic currency.
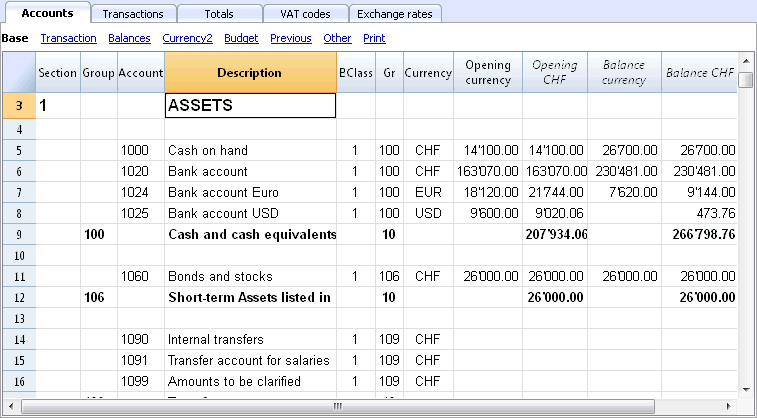
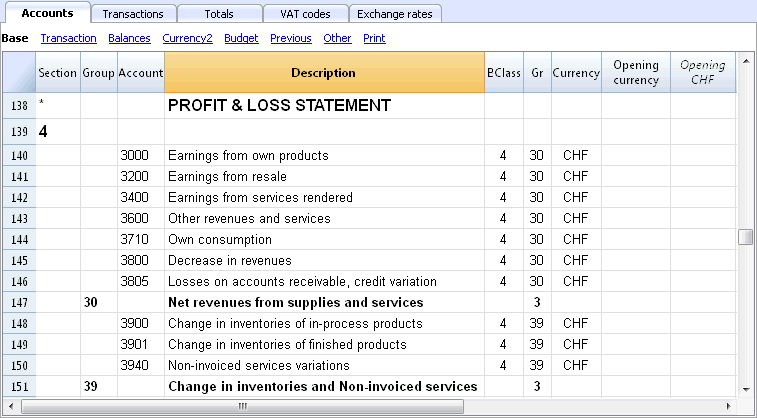
Explanation of the columns of the multicurrency accounting
- The opening balance in basic currency.
A protected column, calculated by the program based on the opening balance in currency and the opening exchange rate (exchange rate of the exchange rate table indicated in a row without date). - The current balance in currency.
Calculated by the program, using the opening balance in currency and the currency amount indicated in the transaction rows. - The current balance in basic currency.
Calculated by the program, using the opening balance in basic currency and the amount in basic currency indicated in the transaction rows. - The calculated balance
Is the balance in the account currency converted at the current exchange rate (exchange rate of the exchange rate table indicated in a row without date).
-
In the Other view from the Account table, there is the Exch. rate Diff. Acct.
In this column, for specific account/accounts, you can enter an account (or several accounts, separated by a semicolon) in order to enter the exchange rate differences. These are different accounts from those in the File and accounting properties (account for exchange rate profit and loss).
If in the Exch. rate Diff. Account column there are no accounts, the program will register exchange rate differences on the accounts indicated in the File and accounting properties; if however accounts are indicated both in the File and accounting properties and in the Exch.rate Diff.Acct. (Other view), the program will only consider the accounts indicated in the Exch.rate Diff.Acct., and ignore the File and accounting properties indications.
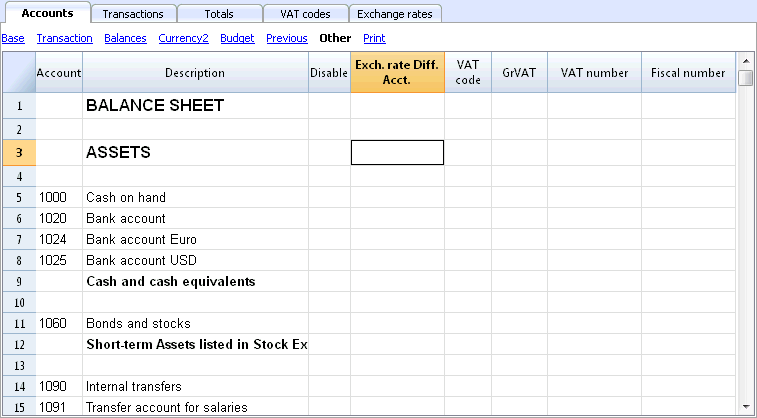
Opening Balances
- Before entering the opening balances, the opening exchange rates for the different currencies have to be indicated in the Exchange rate table.
The opening exchange rate is the one indicated in the Rate Opening column in the row of the exchange rate without date.
The opening exchange rate must be equal to the closing exchange rate of the preceding year. See Differences in the Opening Balances. - The Opening balances have to be inserted in the Accounts table, in the Opening currency column, Base view. This operation needs to be done for both basic currency and foreign currency accounts.
- The Opening Basic currency column is protected; the program automatically calculates the value in the basic currency on the basis of the opening exchange rate shown in the Exchange rate table.
- The opening balances for the liabilities have to be entered with the minus sign (-) in front of the amount.
- The opening balances of assets and liabilities have to balance out; for more information please visit the Recheck the accounting page.
Revaluation accounts and historical exchange rates
The basic currency amount of an account is being calculated using the opening exchange rate and the exchange rates that are indicated in the transactions. Because this value corresponds to equivalent of today's exchange rate, it is necessary to revaluate the account.
The revaluation takes place by calculating the exchange rate differences. We need to record on the account just an amount in basic currency (exchange rate difference), so that the balance in basic currency results equal to the equivalent (calculated balance)
There are accounts (related to, for example, investments) for which a so-called historic exchange rate is being used. By an historical exchange rate we mean un exchange rate that doesn't vary over time.
In order to have exchange rates that don't change, an extra currency symbol (for example EUR2) must be created in the Exchange rate table. To this currency, the same exchange rate is always being applied.
You can create as many currency symbols as you need for the different accounts with historic exchange rates.
Group totals in foreign currency
Normally, the columns with amounts in foreign currency don't have totals, as it has little sense to calculate totals for values in different currency.
If you have a group that includes only accounts in a specific currency, the currency symbol can be indicated at a group level and, in the Accounts table, the program totalizes these amounts. If there would be accounts with various currency symbols, there would be no amount indicated (the program would not report an error either).
Differences in the opening balances
When, in the preceding year, the exchange rate differences have not been calculated, the program signals, in the New Year, a difference in the opening balances.
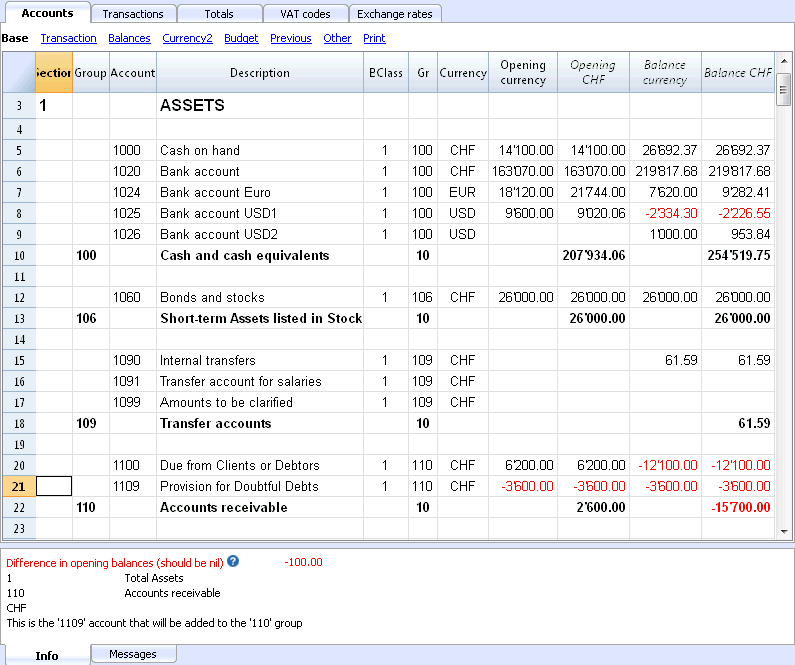
In order to resolve this problem, there are two possibilities:
- Insert in the Exchange rate table, Exchange rate column, the official exchange rates at 31.12
- Activate, from the Account2 menu, the Create transaction for exchange rate variation command.
- Open the file for the New Year and update the opening balances.
- Open the file of the New Year
- Insert in the Assets or the Liabilities (Accounts table), according to the situation, a new account Unrecorded Exchange rate differences or record the amount in the 1090 Internal tranfers account (as in the following example)
- In the Opening Currency column, insert the amount corresponding to the exchange rate difference.
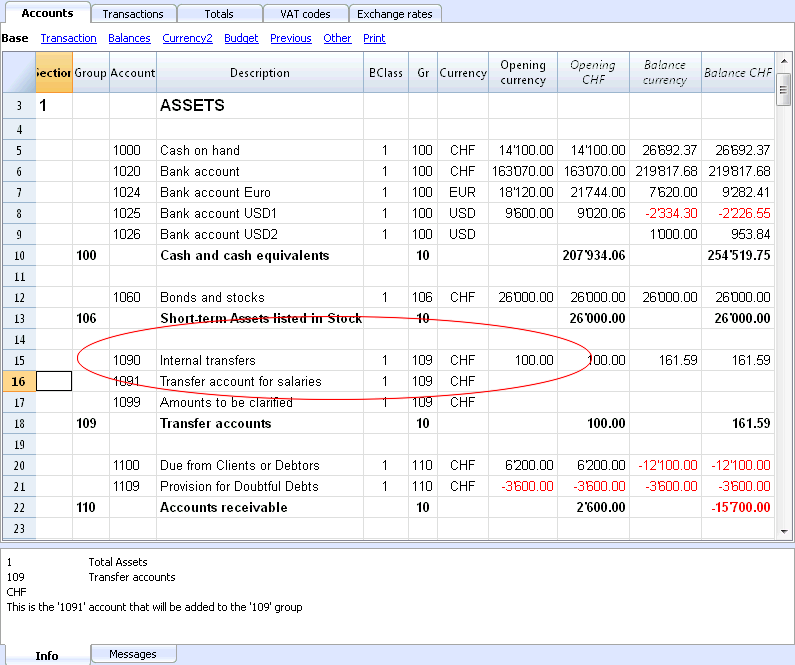
- At 01.01, the exchange rate difference account has to be put to zero by means of a transaction (Transactions table), using the account related to the exchange rate differences (Exchange rate profit/loss) of the profit/loss statement as its counterpart.
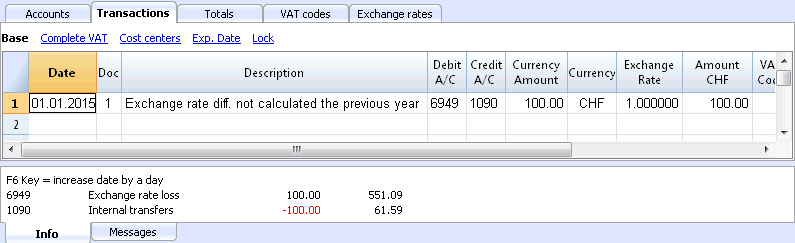
After the transaction to arrange the exchange rate differences has been made, the account that has been used should have a balance of zero, or equal to the amount corresponding to the balance prior to the transaction.
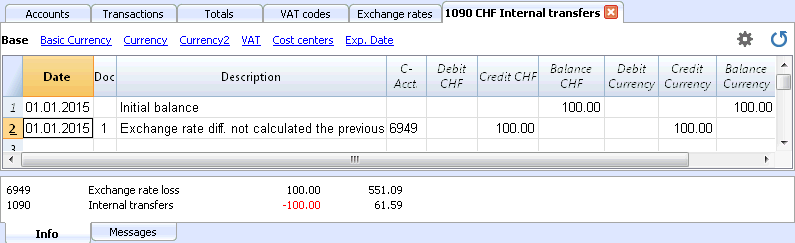
Exchange rates table
Before entering multi-currency transactions it is necessary to define the parameters of the used currencies in the Exchange rates table.
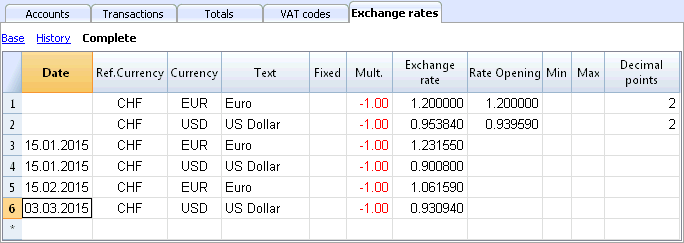
Columns of the Exchange rate table
Date
The date for the exchange rate.
-
Exchange rate rows without date. Actual and Opening exchange rate.
For each used foreign currency, it is necessary to have a row in the Exchange rate table with an exchange rate and without a date.- Exchange rate
This is the one that is considered to be the most recent and also the closing exchange rate.
It is being used for the calculation of the Balance Calculated column (Accounts table) and always when there is no historical exchange rate. - Rate Opening
It is being used to convert the opening balance amounts of foreign currencies into the opening balance amounts of the basic currency of the accounting.
- Exchange rate
-
Rows with a data (historical exchange rates)
In the here indicated cases, the program chooses the exchange rate with a the date equal to the transaction row or with the closest preceding date to that row.- If you have an historical exchange rate, the value in the Exchange rate column will be proposed as default change when you insert a new transaction;
- When transactions for exchange rate variations are being created and the option to use the historical exchange rate is being activated;
- When entering an exchange rate with a date, an Opening exchange rate should not be indicated.
Ref. Currency
This is the currency that serves as the basis for the exchange rate (the CHF in our example.)
Currency
This is the destination currency, the one into which the value of the “Ref. Currency” will be converted.
Text
A text to indicate the foreign currency that we are dealing with.
Fixed
True or false. If there is a fixed exchange rate, enter Yes in this column. The used exchange rate is specified in the Exchange Rate column.
Mult.
The multiplier is usually 1, 100 or 1000 and is used to obtain the effective exchange rate. The multiplier is used for currencies which have a very low unit value in order to avoid having to insert exchange rates with many zeros. The multiplier can also be negative (-1). In this case, the program will use an inverted exchange rate or else it will act as if the currencies inserted in the Currency and Reference Currency columns had actually been inverted. Do not alter the multiplier once there are already transactions in the same currency, otherwise the program will signal a transaction error due to erroneous exchange rates.
Exchange rate
This column shows the actual exchange rate or the closing exchange rate for the currency compared to the reference currency.
It is also being used for calculating the exchange rate differences. Before calculating the exchange rate differences or closing the accounting, this value must be updated by entering the closing exchange rate.
The exchange rate and the multiplier are being applied according to the following formulas
- With multiplier > 0
Currency amount = Ref. currency amount* (exchange rate / |mult.|)
- With multiplier < 0
Ref. currency amount = Currency amount * (exchange rate / |mult.|)
Opening Exchange rate
This is the exchange rate at the moment the accounting is opened. To be indicated only on a row without date.
- It is used to convert the opening amount of the foreign currency into the opening amount of the accounting’s basic currency.
- Should be corresponding to the closing exchange rate of the preceding year.
If the closing exchange rates are not equal to the opening exchange rates, the Assets and Liabilities might result into different totals; see Differences in the Opening Balances. - The opening exchange rate should never be changed in the course of the year, otherwise exchange rate differences are being created in the total of the opening balances.
- When creating a new year or when updating the opening balances, the program defines the opening exchange rate with the value indicated in the Exchange rate column (row without date) of the accounting of the previous year.
Minimum
This column shows the minimum exchange rate accepted. If a lesser exchange rate is used during the entry, there will be a warning.
Maximum
This column shows the maximum exchange rate accepted. If a greater exchange rate is used during the entry, there will be a warning.
Decimal Points
This column shows the number of decimal points to be used when rounding the amounts in currency2.
Modifications in the Exchange rate table
- Modification of the Opening exchange rate
The next time you recalculate the accounting, the balances in basic currency of the accounts will be recalculated with the new exchange rate. Therefore, pay attention when modifying the Opening exchange rates once you have inserted the opening balances.If you modify the Opening exchange rates and there are opening balances, it is important to recalculate the accounting.
- Modifying the multiplier
-
When changing the multiplier of a currency already used in the Transactions table, the program will report a warning as soon as the accounting is being recalculated or will move to the transaction row.The transaction amount and the correct amount in the basic currency will have to be reentered.
- When the accounting is being recalculated, as a result the opening balances in basic currency will be recalculated.
-
Direct an indirect exchange rates
- Direct exchange rates are those where the basic currency and the foreign currency are being indicated on the same row.
In the example below there are direct exchange rates USD->EUR and USD->TRL.
- Indirect exchange rates are those where a direct exchange between two currencies is not being indicated (not recommended).
The exchange rate is deducted by the programn based on other combinations of entered exchage ratesIn this example, the EUR->TRL exchange rate has not been defined, and the program relies on combining the USD-EUR and USD-TRL.
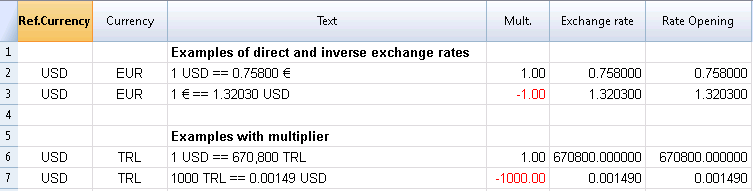
Incompatible exchange rates from previous versions
When the basic currency is entered as the reference currency, the exchange rates with a multiplier greater than 1 can present calculation differences between Banana 8 and the previous versions. In these rare cases, while opening an accounting file of a previous version, a warning message appears and the file is being opened as "read only".
- Open the file in Banana 8 and confirm the warning message;
- Recheck the accounting (Shift + F9);
- The warning messages "Transaction multiplier is not the same as the one in the Exchange rate table" can be ignored;
- Verify whether the balances and the result of the accounting period present differences compared to those displayed in earlier versions. If there are no differences, just save the accounting under a new name; otherwise, it is necessary to proceed as follows:
- In the Exchange rate table, for the exchange rates with a multiplier greater than 1, correct the exchage rate by multiplying it with the value of the multiplier and define the multiplier as 1. For example, if we have a multiplier of 100 and an exchange rate of 0.9944608, correct the exchange rate to 99.44608 and the multiplier to 1;
- Recheck the accounting (Shift + F9);
- The warning messages "Transaction multiplier is not the same as the one in the Exchange rate table" can be ignored, or it is possible to delete them by clicking, in the corresponding transaction row, on the amount in basic currency and by pressing the F6 key;
- Verify whether the balances and the result of the accounting period correspond with the ones indicated in earlier versions;
- Save the file under a new name;
- At this time, you can define the exchange rates and the multiplier in the preferred format, reverse or direct, with or without multiplier, verifying the balances and the result of the accounting period after each modification.
Transactions
Explanations of the columns
In the Transactions Table of the multi-currency accounting, other than the columns of the double-entry accounting, there are the following extra columns:
- Currency amount
This is the amount of the currency specified in the column with the currency symbol.
This amount is used by the program to update the balance of the related account in currency. - Currency
This is the currency symbol of the currency to which the amount refers.
The currency symbol has to be the Basic currency, specified in the File and accounting properties, or the currency symbol of an annount indicated in the columns Debit A/C or Credit A/C.You can also use a different currency as long as the indicated Debit A/C and the Credit A/C are Basic currency accounts.In this case the amount in currency is used as a reference, but will not be used for accounting purposes - Exchange rate
Used to convert the foreign currency amount in its Basic currency equivalent. - Amount in Basic currency
The transaction amount, expressed in Basic currency.
This amount is used by the program to update the balance of the related account in Basic currency - Exchange rate multiplier
Normally not visible in the view, this value is multiplied by the exchange rate.
Types of entries in the multicurrency accounting
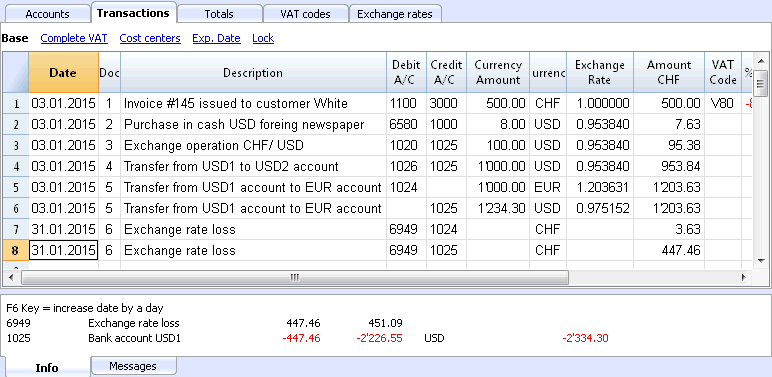
Please note
All amounts, those in basic currency as well as those in foreign currency, have to always be entered into the Currency Amount column.
For each transaction, there are two accounts (debit account and credit account). In the program, only one foreign curency per transaction row can be used. So there can be the following direct combinations:
- Entries between two accounts in basic currency with the amount in basic currency. (in the image, transactions n.1 in the Doc column)
The account currency is the basic currency. - Entries between two accounts in basic currency with the amount in foreign currency (Doc 2)
The indicated accounts are in basic currency, but the currency symbol and the amount in currency, indicated in the transaction row, are not in basic currency, but in a different currency.To insert the different currency, the user has to manually change the currency symbol.This is being used when one goes abroad and money is being changed in order to pay in local currency. In this case we do not have a specific account.For the calculation of the balance (both accounts being in basic currency) only the amount of basic currency column is being used. - Entries between an account in foreign currency and one in basic currency (Doc 3)
The currency needs to be the one of the account in foreign currency.
For the calculation of the balance of the account in foreign currency, the program uses the amount in foreign currency and for the balance in basic currency, the program uses the amount in basic currency. - Entries between two accounts with the same foreign currency (Doc 4)
The currency needs to be the same as account currency of both accounts. - Entries with two accounts in different foreign currencies (Doc 5)
For example, the bank makes an exchange operation between two foreign currencies:
In this case, the transaction needs to be recorded on two rows.
The amount in basic currency needs to be the same. It is useful to use an amount close to the current exchange rate to avoid excessive exchange rate differences.
In order for the amounts in basic currency to be equal, the amount in basic currency needs to be indicated manually, and the program will calculate the exchange rate. - Exchange rate differences (Doc 6)
The goal of this transaction is to realign the balance of the Basic currency account with the equivalent of the Foreign currency account at today's exchange rate.
On the Foreign currency account, only the amount in Basic currency related to the exchange rate differences is being recorded.
They are automatically generated with the Create transaction for exchange rate variation command.- For the exchange rate profits, the program automatically indicates the account to be revaluated in debit and the exchange rate profit account in credit. The exchange rate profit account is indicated in the File and Accounting properties (Basic Data), or in the specified account -> Exchange rate differences account column of the "Other" view (intended for one or several specific accounts).
- For the exchange rate losses, the program automatically indicates the account to be revaluated in credit and the exchange rate loss account in debit. The exchange rate loss account is indicated in the File and Accounting properties (Basic Data), or in the specified account -> Exchange rate differences account column of the "Other" view (intended for one or several specific accounts).
- The Currency amount is being left empty
- The Curency symbol is the basic currency
- In the Basic currency amount column, the amount of the revaluation of the account (profit or loss) is being indicated.
Establishing the exchange rate
The accountant is the one who decides which exchange rate to use for each single operation. Generally, the following rusles are being applied:
- For normal operations, the exchange rate of the day is being used
- For buying or selling currency, the values indicated by a money exchange office or a bank are being used.
First the amount in foreign currency is being indicated in the program and then the amount in basic currency. The program calculates the exchange rate. The exchange rate indicated by the bank can be slightly different, because banks specify exchange rates with few figures after the decimal point and often round the amounts. - When several operations with the same exchange rate are being recorded, it is useful to update the exchange rate in the Exchange rate table, so that the program can automatically apply it.
- For operations from abroad that are subject to VAT, the national authority might impose a standard exchange rate. In this case, that exchange rate should be inserted in the Exchange rate column of the transaction
- To purchase real estate or equity investments, an historical exchange rate is being used. In that case, a currency symbol needs to be created in the Exchange rate table (for example USD1) with an historical exchange rate, that is not being subject to the fluctuations of the exchange rate.
One can create as many currency symbols as desired for all historical exchange rates.
Transactions with VAT
The VAT account and the account from which the VAT is being deducted have to be in basic currency. It is impossible to use a VAT code to deduct the VAT from a foreign currency account. In order to record operations with VAT that have accounts in foreign currency as their counterpart, two transaction rows have to be used:
- First, the amount of the purchase is being recorded on an Internal transfers account in basic currency and the related VAT code is being applied. The amount in basic currency has to be calculated using an exchange rate in accordance with the requirements of the Tax administration.
- In a second row, the balance of the Internal transfers account is being put to zero; as its counterpart, the account in foreign currency should be entered.
The amount used for this transaction, both in basic currency and in foreign currency, has to be excluding VAT. Obviously, the exchange rate that has to be used is the same one as the one being used in the preceding transaction.
In the example, the basic currency is the CHF. We are dealing with a national purchase, but paid from a foreign curency account (EUR).
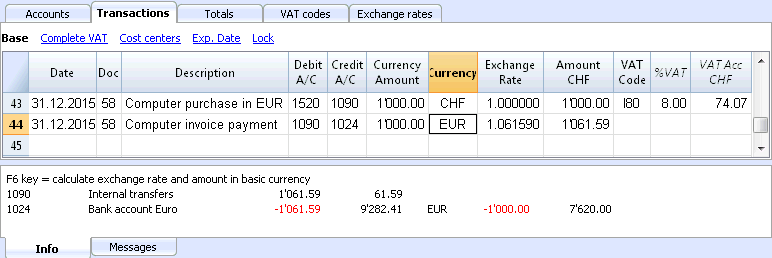
Automatisms while entering multicurrency transactions
When a new transaction is being entered, the data in the above mentioned columns have to be completed.
When some values of the transaction row are modified, the program completes the transaction with the predefined values. If these values do not satisfy the user's requirements, these have to be modified in the transaction row.
The modification of the values in the Exchange rate table have no effect on already entered transaction rows. Thus, when the exchange rate in the Exchange rate table is modified, this has no influence whatsoever on already inserted transactions.
- When the amount in currency is entered and there is either a Debit A/C or a Credit A/C, and no other values are entered, the program operates as follows:
- the currency symbol is retrieved from the account in use, giving priority to the account that is not in basic currency;
- the exchange rate, defined in the Exchange rate table, is applied with the following logic:
- the historical exchange rate is applied, with a date earlier or equal to the transaction date
- tf there is no historical exchange rate to be found, the exchange rate from the row without date is applied.
- the multiplier, defined in the Exchange rate table, is applied or the number 1 if it is the basic currency;
- the amount in basic currency is calculated.
- When the amount in currency is modified (and there are already other values present), the program operates as follows:
- the amount in basic currency is calculated with the existing exchange rate
- If the currency symbol is modified the program operates as follows:
- the exchange rate with the multiplier is applied and the amount in basic currency is calculated (like above)
- If the exchange rate is modified the program operates as follows:
- the amount in basic currency is calculated using the entered exchange rate
- When the amount in basic currency is modified the program operates as follows:
- the exchange rate is recalculated.
More help
- While being positioned on the Currency Amount column and pressing the F6 key, the program rewrites all values with the earlier explained logic, as if there were no values present. This feature is useful when the Debit A/C or the Credit A/C is modified.
- If there is a registration with a single account in basis currency (in 'Multiple transcations' - see Transaction types) and its value of the column 'Currency' has been changed manualy in a currency symbol of a foreign currency, it is necessary to be positioned on the cell of the column 'Currency' and press the F6 key in order to update the Exchange rate and calculate the amount in basis currency.
- Smart fill for the Exchange rate column
The program suggests several exchange rates, picking them up from the Exchange rates table or from exchange rates previously used in the transactions.
Info window
In the info window, the program indicates:
- Differences, if any, between the Debit and Credit total movements in baskic currency
- Explanation on the different uses of the F6 key
For the accounts related to the transaction row on which one is positioned, the program always indicates in the Info windows:
- the account number
- the account description
- the transaction's amount in basic currency
- the current account balance in basic currency
- the account currency symbol
- the transaction's amount in the account currency (if different from the basic currency)
- the current account balance in currency (if different from the basic currency)
Data transfer from earlier versions
In version 4 or earlier, the absence of a currency symbol in the Transactions table was being interpreted as a transaction in basic currency.
In version 7 and in version 8, each transaction needs to have its own currency symbol. Therefore, when you update from version 4 to version 7 or 8, in the accounting file, the transactions without a currency symbol need to be completed.
Exchange rate differences
At the latest when the accounting period is being closed, the currencies need to revaluated in Basic currency, creating adjustment transactions for exchange rate loss or gain, due to the fluctuations of the exchange rates (for the theoretical aspects, please check Revaluations and exchange rate differences).
The Create transaction for exchange rate variation... command, from the Account2 menu, calculates the revaluations for the foreign currencies accounts.
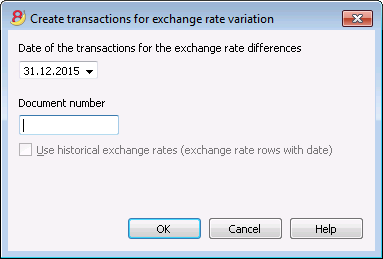
Date of the transactions for the exchange rate differences
Enter the date your exchange rate differences transactions should have.
The program will suggest the final date of the current month, related to the last entered transaction.
If there are transactions for exchange rate differences with the same date, the program asks whether they should be replaced.
The program considers the transactions for the exchange rates differences as existing if they have the same date, doc, description, accounts and currency and when there is no amount in the account currency.
Document number
Enter the document number your exchange rate differences transactions should have.
Use historical exchange rates (exchange rate rows with date)
For the calculation of the exchange rate differences, the program uses the exchange rates of the Exchange rate table without a date (the most recent exchange rates). With the option Use historical Exchange rates, the program instead uses the exchange rates of the Exchange rate table with an equal or earlier date than the one indicated.
Values used to create the transactions
For more information, we refer to our page Multi-currency transactions.
Amount of the transaction
- Transactions for exchange rate differences are being created only for the accounts in foreign currency which, at the specified date, have a different balance in basic currency compared to the calculated one.
- For the amount in basic currency, the difference between the account balance in basic currency and the account balance in foreign currency converted in basic currency is being used.
Account balance
For the calculation of the exchange rate differences, the balances in the account currency and in basic currency are being used, at the specified date.
Exchange rate profit and exchange rate loss accounts
As exchange rate profit and loss accounts are being used, in order of priority:
- The indicated accounts entered in the specific column of the chart of accounts.
- The exchange rate profit & loss accounts indicated in the File and Accounting properties.
Position of inserted rows
If, while imparting the command, you find yourself in the Transactions table, the rows are being inserted at the position of the cursor.
Otherwise, they will be inserted at the end or at the previous position in case they are replacing existing transactions.
Before using the command
- In the File and Accounting properties of the File menu, Foreign Currency section, make sure that the Exchange rate profit and loss accounts are being indicated. It is equally possible to indicate the same account for both the exchange rate profits or losses.
- Make sure that the accounts in foreign currency are being updated and that the balances in foreign currency of these accounts (for exemple bank accounts) correspond with the balance indicated by the bank.
- Update the current exchange rates of the Exchange rate table.
You should indicate the closing exchange rates or those of a period's end in the rows without a date, in the Exchange Rate column (do not modify the opening exchange rate in the Rate Opening column). In order to calculate the Exchange rate differences, the program uses the exchange rates of the rows without a date. If these last ones are absent, the program gives an error message.
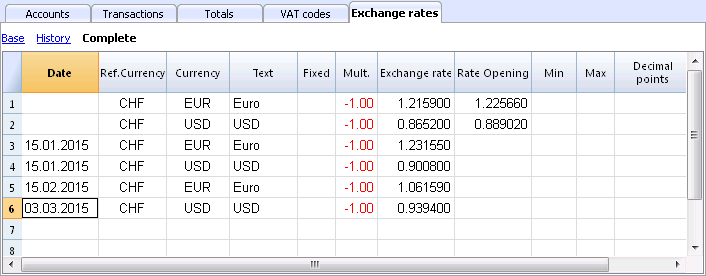
Exchange rates for the New Year
To have the Opening balances of the New Year in Basic currency correspond exactly with the closing balances of the preceding year, the Opening Exchange rates of the New Year, indicated in the Exchange Rate table, have to be the same as those being used for the closing of the accounting, so:
- The closing exchange rates have to be indicated in the Exchange rate column of the rows without a date;
- The opening exchange rates have to be indicated in the Rate Opening columns of the roes without a date.
The procedure of creating a new year or of the updating of the opening balances, copies the closing balances (Exchange rate column, rows without date) of the previous year into the opening exchange rates (Exchange rate table, Rate Opening column, rows without date) of the new year's file.
Account card
Columns and views of the account card
In the Account card, there are three groups with of columns with transactions Debit, transactions Credit and the Balance in different currencies.
- Basic currency
Indicated are the Opening Balance, the Transactions, and the Balance in Basic currency. - Account currency
The Transactions in the Account currency are being indicated.
When the accounts are in Basic currency, these values are identical to those of the Basic currency. - Currency2
For every transaction, the amount in Currency2 is being indicated. The amount in Currency2 is the equivalent of the amount in Basic currency, converted at the actual rate for the Currency2 currency symbol.
Please consult Exchange rates and accounting issues. - Base view
At the same time, the columns in Basic currency and the columns in the Account currency are visible.
In the column headers, the related currencies are being indicated.
With the appropriate commands, it is possible to modify the disposition of the columns and create other views.
![]()
Data editing
It is not possible to modify the data in the Account card. Double-click on the (underlined) row number to go back to the original corresponding row of the Transactions or Budget table. More details are available on the Account card page (paragraphe Updating the Account card).
Info Window
In the lower part of the screen, the Info window, the values of the accounts related to the active transaction are being indicated.
- Account number
- Account description
- Transaction amount of the account in Basic currency
- Actual Account Balance in Basic currency
- Account's currency symbol
- Transaction amount of the account in the Account currency
- Actual Account Balance in Account currency
Enhanced Balance Sheet
The Enhanced Balance Sheet in the multi-currency accounting is done the same way as the one in double-entry bookkeeping. Information is available at the following link: Enhanced Balance Sheet.
The difference consists in the fact that the foreign currency accounts report the amounts in foreign currency as well as in the basis currency (amount converted).
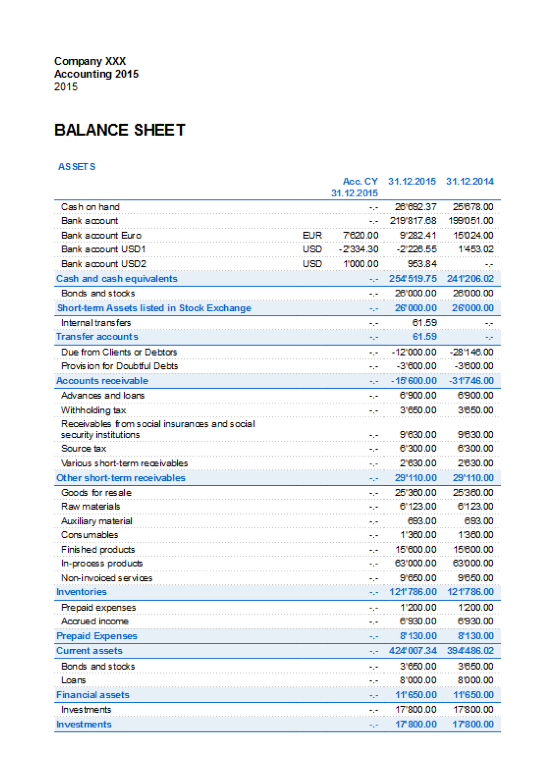
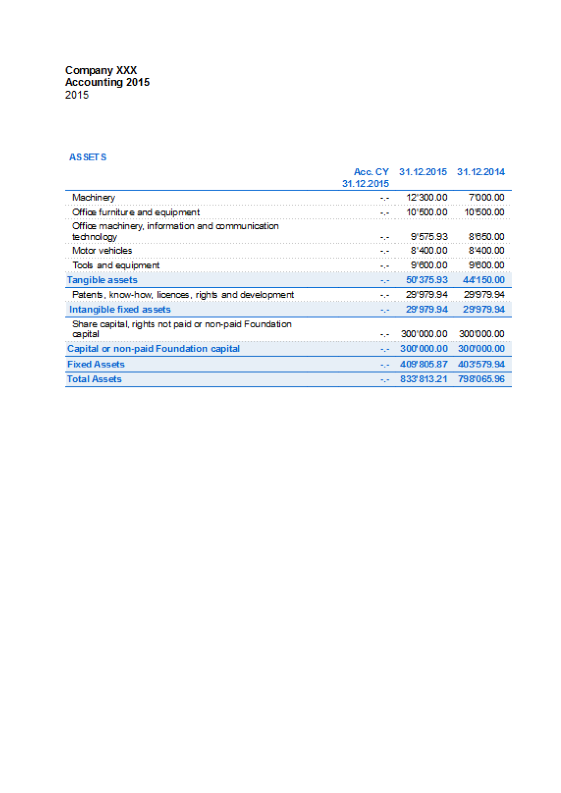
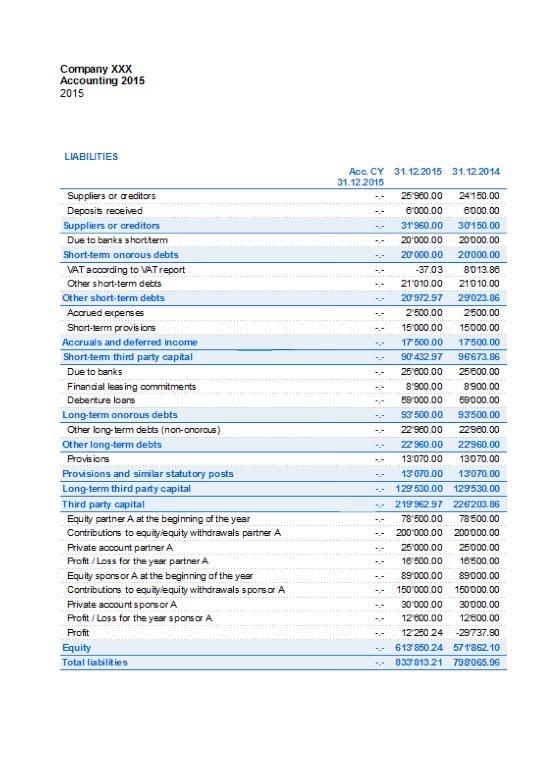
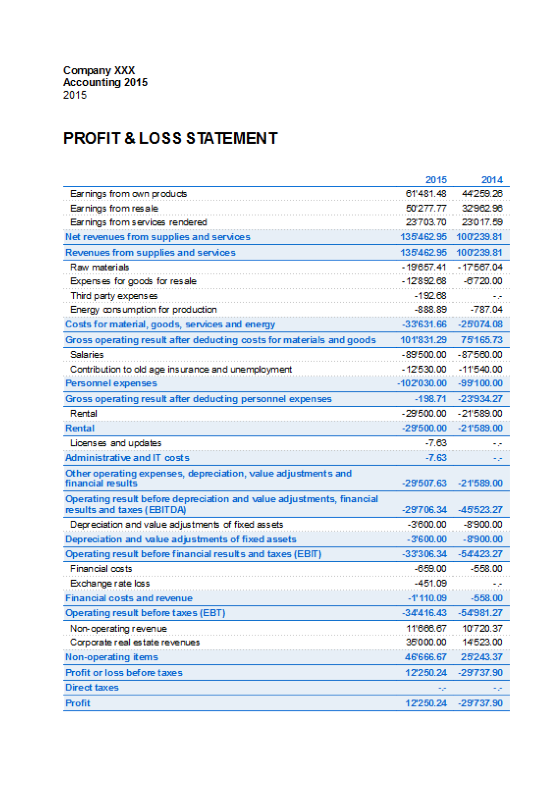
Enhanced Balance Sheet by groups
The Enhanced Balance Sheet by groups in multi-currency accounting is done the same way as the one in double-entry bookkeeping. Information is available at the following link: Enhanced Balance Sheet by groups.
The difference consists in the fact that the foreign currency accounts report the amounts in foreign currency as well as in the basis currency (amount converted).
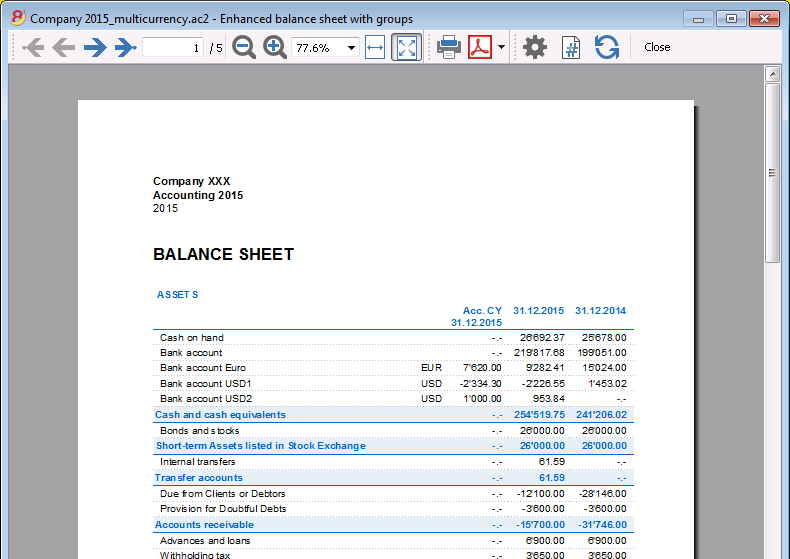
Accounting Reports
Accounting Reports in multi-currency accounting are done the same way as the ones in double-entry bookkeeping. Information is available at the following links: Accounting report; External accounting report.
Income & Expense accounting
Introduction
Income & Expense accounting is the ideal tool to manage the accounts of small to medium size companies, associations, private enterprise or project planning. It can be configured with or without VAT. On the other hand, it does not have the multi-currency options, that you will find in the double-entry book keeping version.
It does include:
- Income & Expense - allows you to manage income and expense for several accounts.
- Cash book - used to keep track of the income and expenses of one single account .
Features
- Manages your balance sheet and income statement (assets, liabilities, income and expense)
- VAT option allows VAT calculations and VAT tax returns
- Process all your accounting records: accounting journal, account cards, periodical and annual reporting
- Lets you manage your Cost Centres and their Segments
- Multiple options to present your data
- Export to Excel, Html, Xml, Pdf
- Import various types of data files.
Tables and Properties files
Income & Expense accounting contains the following tables:
- Accounts
Where you find the Chart of Accounts, the opening balances and define your groupings. - Categories
Define the categories of Income & Expense here, the cost centres and segments. - Transactions
Record your transactions here. - VAT Codes
If you have selected the VAT option, enter your VAT codes here. By selecting one of the VAT templates, VAT codes will be allocated correctly, allowing you to have a facsimile of your official VAT statement. - File and accounting properties
- Manage the general settings of your accounting here.
Immediate information
The account balances will be displayed instantly in the Accounts and Categories tables, after the income and expense recordings. Balances will be adjusted automatically after each registration of a transaction and you will not need to require a specific report to have an overview of your accounts, which you can call up via the Accounts and Categories tabs.
Support
- Detailed information on the different functionalities of the program, with concrete examples and screenshots of the software, for your use
- Free support for one year included.
Topics similar to Double-entry accounting
Commands
Printouts
Getting started
In order to start working with your Income & Expense accounting, proceed as follows:
- Download the Banana Accounting 8 software
- Install Banana Accounting 8 software by entering your license key.
Creating a new accounting file
- From the File menu, activate the New command
- Select the Income & Expense accounting group and the Income & Expense accounting File (with or without VAT)
- Select the Examples/Templates according to your language and nation
Banana provides predefined templates.
You may download:
- from the program - select the language / country and choose the model that suits you
- Clicking the button Online Templates - you will access our Apps page internet site, where all existing accounting templates are available free of charge. You can run a detailed search by entering the language, country, and category of activity (company type, non-profit, independent ...).
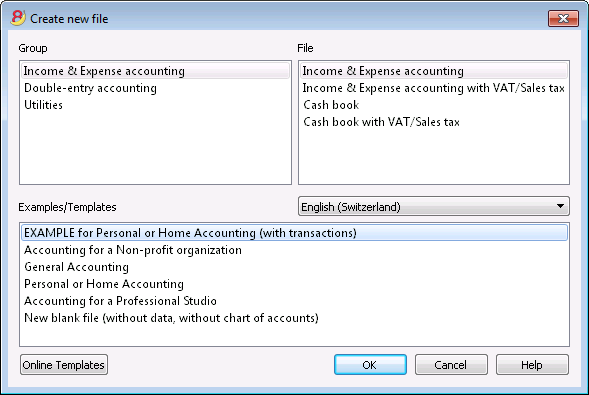
Setting up the File properties
Set up your own data from the File and Accounting properties command and save with your own file name.
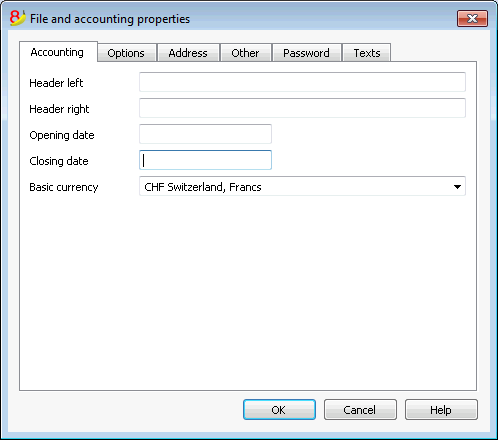
Customize the Accounts table
In the Accounts table, you can customize the estate accounts, according to your own needs:
- you can change the account numbers
- you can change the Description
- In the Opening column you need to enter your opening balances
Please remember, that for the Liabilities' accounts (f.ex. debts), the opening balance should be preceded by the minus (-) sign.
This operation needs to be executed only the first time using Banana Accounting, since from then on, every end of the year, when creating a New Year (Account2 menu, Create New Year command), the opening balance will be automatically transferred.
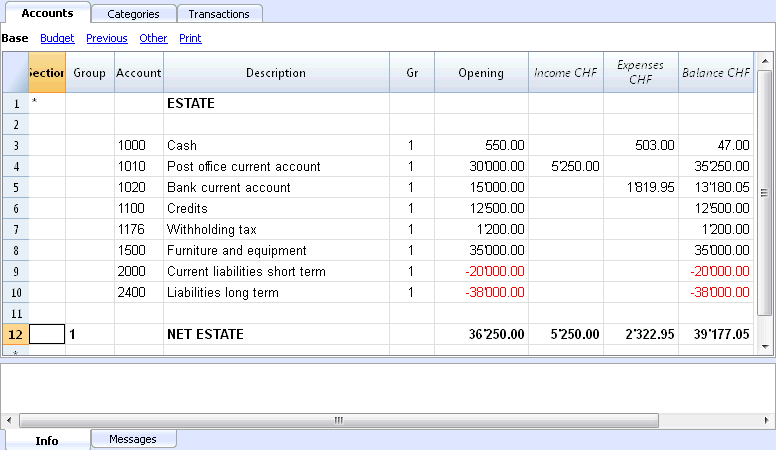
Customize the Categories table
In the Categories table, customize the income (earnings/revenue) and expense (expenses/costs) categories.
The Category numbers can be amended, as well as the Description.
The categories don't and must not contain an opening balance, in order to determine the result of the accounting year.
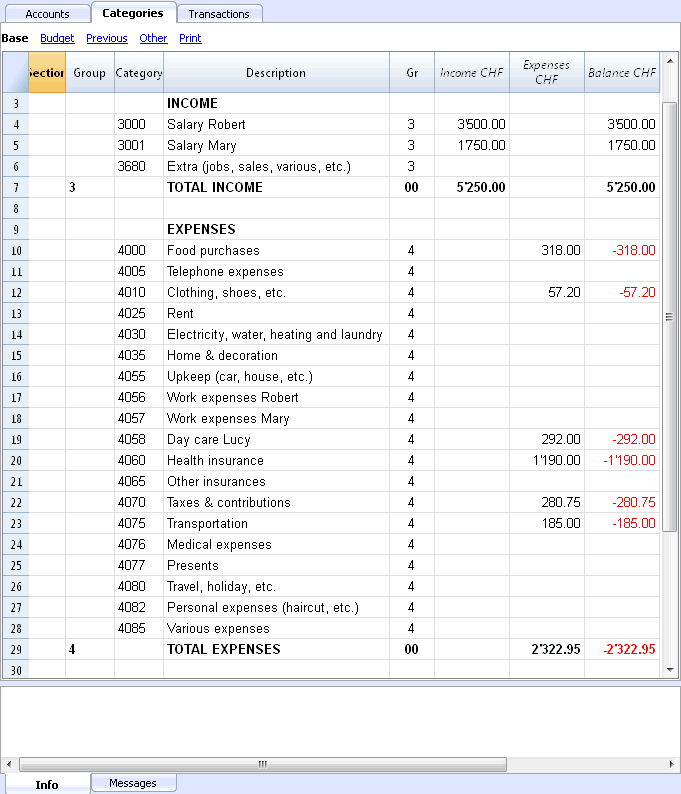
Transactions table
In the Transactions table, the daily income and expense transactions are entered, indicating the account, for which the transaction was made and the category to which the income or expense is attributed.
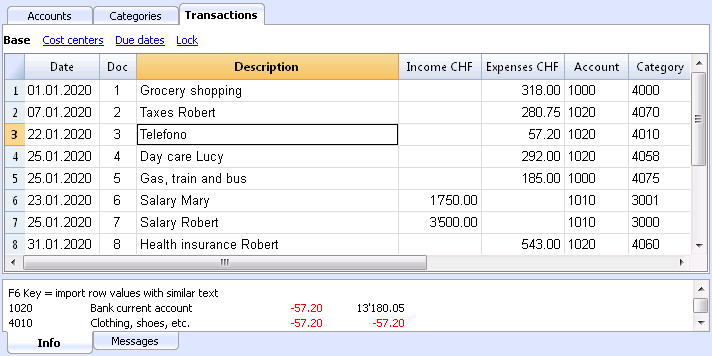
In the appropriate columns:
- Enter the date
- Enter the document number that is manually assigned to the paper document. This allows you to easily find documents, once the accounting transaction has been entered.
- Enter a description
- In the Income columns enter the income amount
- In the Expenses column, enter the expense amount
- In the Account column enter the account number (it has to be an existing account in the Accounts table, ex. Bank)
- In the Category column enter the expense or income category (it has to be an existing category in the Category table).
Speeding up the recording of the transactions
In order to speed up the recording of your transactions, you can use:
- the Smart fill function that allows the automatic autocomplete of data that have already been entered at an earlier date.
- the Recurring transactions function (Account2 menu), used to memorize recurring transactions into a separate table.
- import of your bank or post office statement.
Transactions with VAT
In order to enter transactions with VAT please proceed as follows:
- from the File menu, choose New command and choose Income /Expenses accounting with VAT/Sales taxes
- Choose one of the existing templates for your nation of the Income/expenses accounting with VAT type
In order to enter transactions with VAT, please refer to the Transactions page.
Transactions on multiple rows
Transactions on multiple rows, or Composed transactions are transactions involving more than two accounts and credits/debits on multiple accounts or categories (for example when you pay different invoices from the bank account). In this case you need to enter the transaction on multiple rows:
- in the first row enter the total amount of the income or expense and the account from which this amount is debited or credited
- in each subsequent row, enter the income or expense amount in the category column, and enter the appropriate category number.
Each individual amount is recorded on different row. When all the individual income and expenses rows are entered there shouldn't be any differences.
The Account card
The Account card allows you to have a complete list of entries relating to the same account or the same group.
- To open an account card you click once on the account number cell and then click once on the small blue arrow appearing in the upper right corner of the cell.
- To open multiple account cards you must select the Account cards command from Account1 menu.
- To update the account cards, following changes in the Transactions table, you must click on the two circular arrows symbol, located at the top right of the account card.
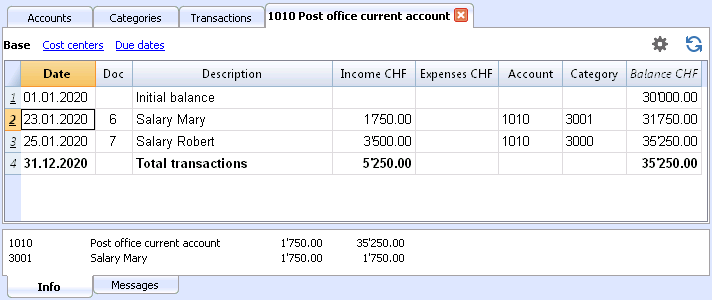
The category card
The Category card allows you to have a complete list of entries relating to the same category.
- To open a category card you click on the account number cell and then click once on the small blue arrow appearing in the upper right corner of the cell.
- To open multiple category cards you must select the Account cards command from Account1 menu.
- To update the category cards, following changes in the Transactions table, you must click on the two circular arrows symbol, located at the top right of the category card.
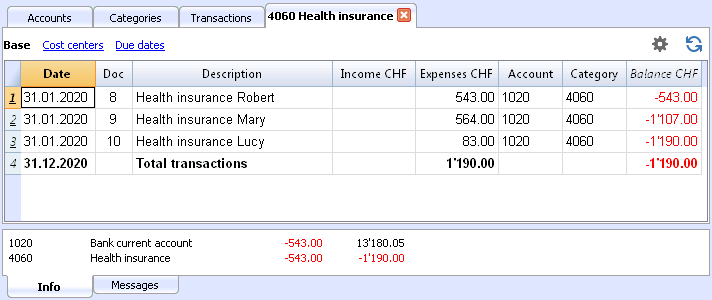
Account cards per period
To open an account card with account balances at predefined dates, click on Account1 in the menu, Account cards ... and click Period selected in the Period tab to insert your selected period.
Consult the Period page for further information.
Print the Account cards
To print an Account card, open it from any table (Accounts or Transactions) and start printing from the File menu.
To print out several or all the Account cards, click Account1 menu, select Account cards and select the Accounts you wish to print. The filter in the window allows you to select automatic selection of all accounts, cost centers, segments, groups etc ...
For further information refer to the Account Cards page.
Enhanced Statement
To view the Enhanced Statement and the Enhanced Statement with groups, choose the Account1 menu and then the Enhanced statement or Enhanced statement with groups command. You can also obtain statements by period.
- The Enhanced statements displays all accounts and categories without any subgroups
- The Enhanced statements with groups displays all accounts and categories also with subgroups

Archive data in PDF format
At the end of the year, when the accounting is done, corrected and revised, you can store all accounting data with the Create Pdf dossier command from the File menu.

The Budget
Before starting your accounting year, you can create a budget with your assumed expenses and revenue, in order to have control over the financial and economic situation of your company.
The budget can be set in two different ways:
- From the Budget column of the Categories table. For each account the yearly budget is indicated.
In this case, when you process the budget from the Account1 menu, Enhanced statement with groups command, the Budget column shows the amounts that relate to the entire year. - From the Budget table, that you need to manually activate using the Add new functionalities command from the Tools menu.
In this table all estimates are entered as budget transactions, either income or expenses. If you activate this table, the Budget column of the Accounts table is automatically deactivated.
In the Budget table you can setup a detailed budget that takes into account possible variations during the year and in different periods of the year.

Related document: Transactions, Enhanced statement.
Accounts
Estate accounts are entered in the Accounts table. Only one account is entered in the cash register (cash, bank, postal account ...); In Income/Expense accounting more accounts are entered (cash, customers, suppliers ...) and the accounts that refer to existing debt must have the opening amount with preceded by the minus sign (-).
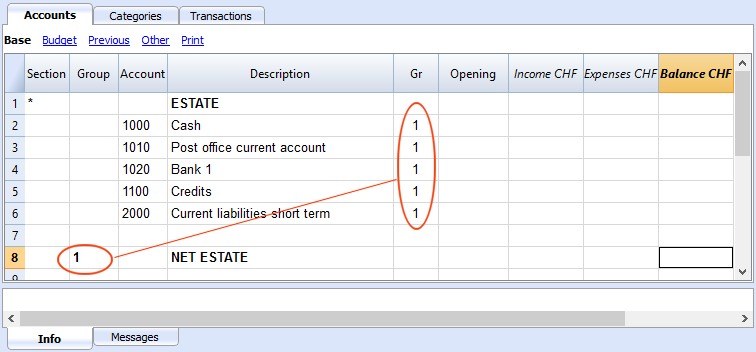
The columns of the Accounts table:
Section
Enter an asterisk to signal a section change. For example, to distinguish Total Assets from Cost Centers.
Values must be entered in the Sections table for presenting the enhanced Statement with groups.
Refer to the Sections page for further details and information.
Group
Values are added up for the categories that have the same GR. They are fundamental for totalization.
Account
Enter the number or initials of the account to be managed (cash, bank, post).
Description
Enter a description for the relative account.
Gr
Enter a value that identifies the category belonging to a specific group.
Opening
Entering an account balance is only necessary if a new file is opened or Banana Accounting 8 software is used for the first time. When creating a new accounting year, balances will be generated automatically.
Income
This locked column displays the balance of incoming entries. The balance will be updated automatically after each registration.
Expenses
This locked column displays the balance of expenses. The balance will be updated automatically after each registration.
Balance
This locked column displays the balance resulting after income and expenses. The balance will be updated automatically after each registration.
Opening balance
The first time Banana Accounting 8 software is used and new file is created, opening an account balances must be entered manually in the Accounts table Opening column.
Balances for Liabilites accounts must be entered preceeded by a minus (-) sign.
When creating a new accounting year, balances for the new year will be generated automatically.
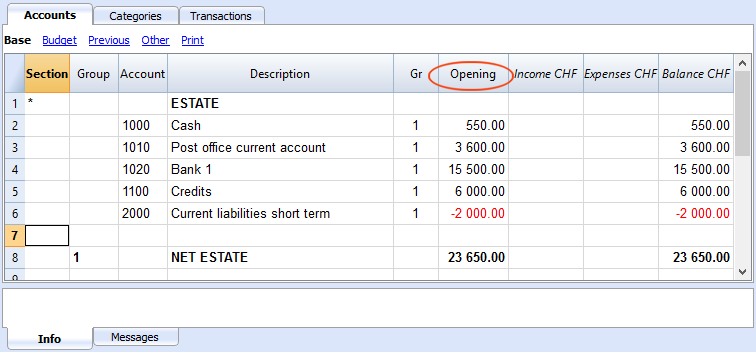
Categories
The headings for Income and Expenses are entered in the Categories table via two principal groupings, which may - in their turn - contain subgroups. The set of categories will determine the profit or loss for the accounting period.
Groupings:
In the example below, there are three principal groupings:
- Group 3 - Total for Categories that have 3 in their Gr column (total Income)
- Group 4 - Total for Categories that have 4 in their Gr column (total Expenses)
- Group 00 - Total for groups 3 and 4 (Total Income and Expenses), which will determine the result for the accounting period.
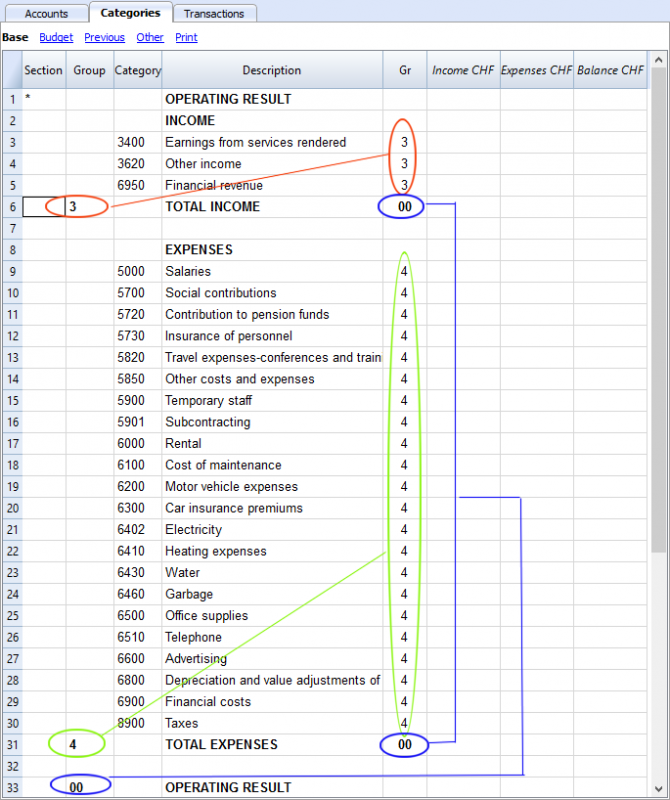
The columns of the Categories table:
Section
Enter an asterisk in the row that contains the title, to signal a section change, that will be displayed in the enhanced Statement with groups.
(the asterisk is inserted in the "Operating Result" title row in our example).
If different sections than Income and Expense are planned, such as Cost and Profit centers, another asterisk may be entered on the respective title row. Refer to the Sections page for further details and information.
Group
Enter an identifier (numerical or sign) identical to the one entered for each category in the GR column. The totals for each category belonging to the same GR will then be added up (in our example, Group 3 totals the Income Category and group 4 the Expenses category)
Description
Enter a description for the relative Income or Expense Category.
GR
Each Category has an identifier that allows the establishment of the totals for the relevant Group (in our example all categories of Income are GR3, because they will be total in Group 3, Total Income.
Income
This locked column displays the balance of incoming entries. The balance will be updated automatically after each registration.
Expenses
This locked column displays the balance of expenses. The balance will be updated automatically after each registration.
Balance
This locked column displays the balance resulting after income and expenses. The balance will be updated automatically after each registration.
Printouts
Instant information
Account balances, income and expense are on ready display in the Accounts and Category tables.
After each entry of a transaction, balances are adjusted automatically and there is no need to run a report, as you can simply display the Accounts or Categories tables.
Advanced printouts
All printing is run from the Account1 menu, where the different functions for prining are located:
-
Journal by period command. You can display and print the whole table or just a specified period.
-
Account/Category cards command. You may select all cards or define your selection.
Define the required period in the Period tab and click the required settings in the Options tab. Print settings can be saved in the Composition tab so they can be resumed without them to be having defined again. -
Enhanced statement command. You may also print a defined period and various options and compositions may be included.
-
Enhanced statement with groups command. You may also print a defined period and various options and compositions may be included.
-
Accounting report command. The required options are displayed in the Accounts table. Reports are possible for current, previous periods or previous years; each period may contain subdivisions and the compositions can be saved.
Example of printout of Enhanced statement with groups
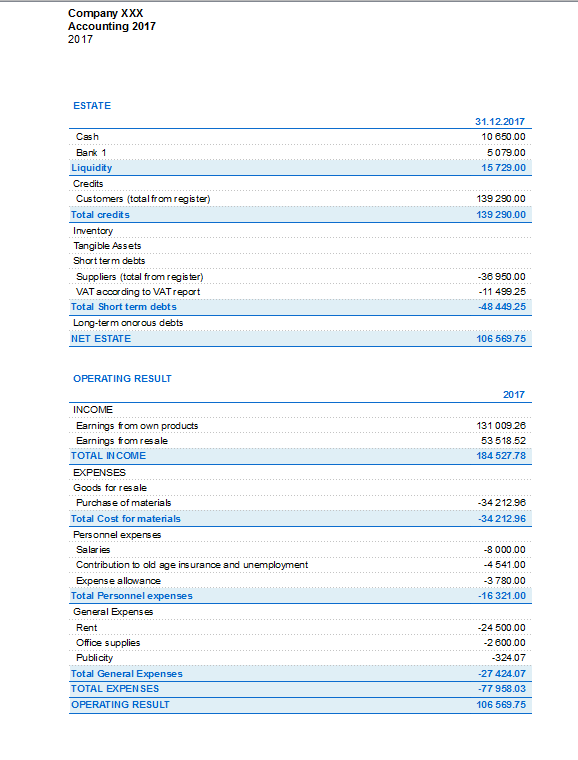
Enhanced statement with groups
This feature is only available in version 7.0.4 or higher. It allows the user to obtain the Enhanced statement with groups, with all the options that are available in the Double-entry accounting.
The Enhanced statement with groups makes it possible to:
- Include all the groups that are present in the Accounts- and the Categories tables nn the printout,
- Exclude groups or accounts individually
- Select a subdivision by period
(for example, in the first semester, one can select to have a subdivision by month or per quarter) - Select a subdivision by segment.
Sections
The sections present in the Accounts- and/or Categories table make it possible to define a set of accounts and categories to be printed with the 'Enhanced statement with groups' command from the 'Account1' menu.
- The sections are indicated in the Sections column of the Accounts- and the Categories table
- An * (asterisk) indicates the beginning of a section
- A ** (double asterisk) indicates the beginning of a subsection
- A # indicates the beginning of the Notes section
- A section ends once the next one begins
- Contrary to the Double-entry accounting, it is not possible to use numerical identications for the sections
- In case no section has been indicated, the program will enter them automatically when the command is used for the first time
- In the Accounts table "Estate"
- In the Categories table "Operating result"
- It is recommended to create separate sections if there are cost centers, segments or clients/suppliers registers.
In this way, it is possible to print reports with just the information that concerns the user.
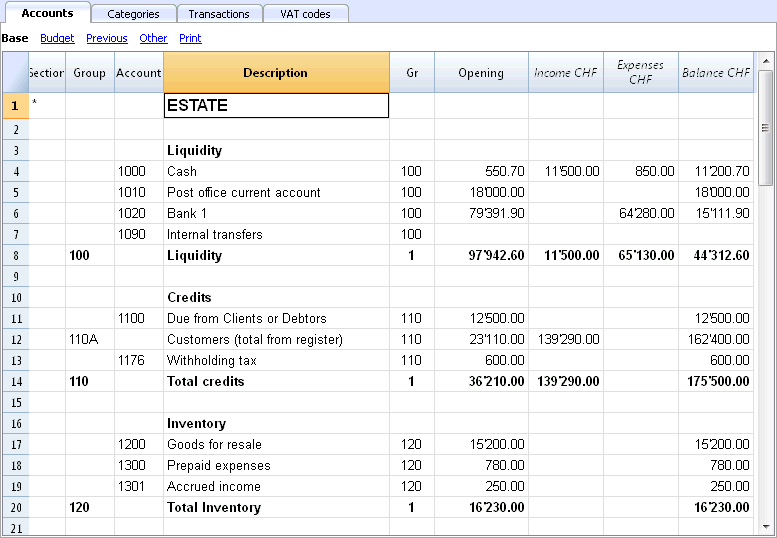
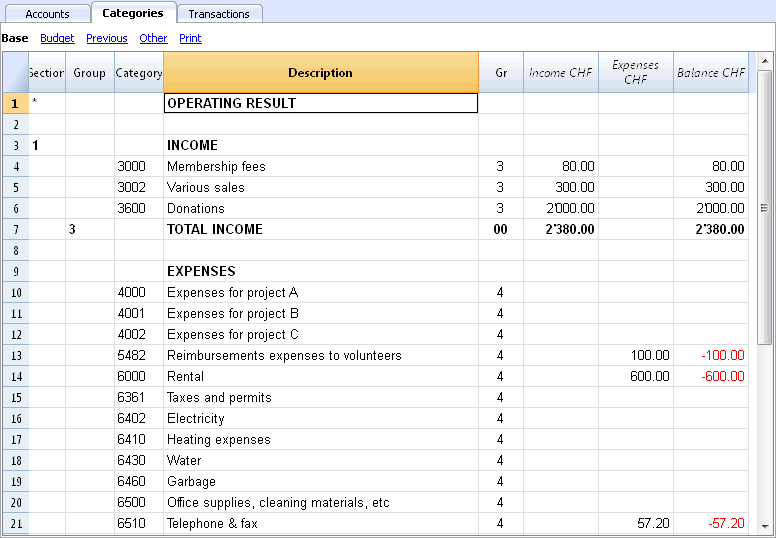
Configurations of Accounts & Categories
In the dialogue window, you can define how to print the accounts and the categories.
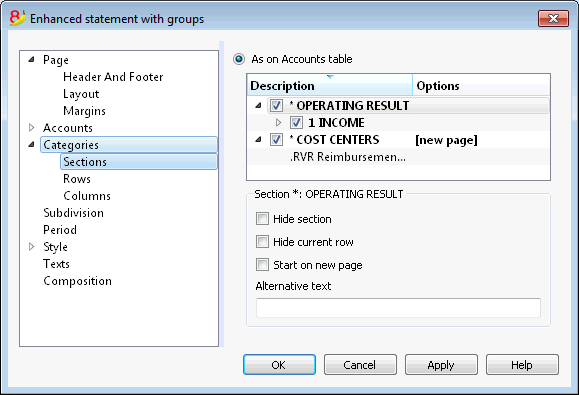
- The accounts, present in the Accounts table, will always be printed with the balances at the end of the indicated period.
- The categories will always be printed with the movements of the indicated period.
Enhanced Statement
- The Enhanced Statement gives an overview of the progression of the Estate situation and the operating result of the year. This function is present in the Income & Expense accounting.
- The Enhanced Statement is calculated and displayed by means of the Enhanced Statement command, from the Account1 menu.
- In the window that pops up, you have the possibility to insert the header that will display on the first page of the Enhanced Statement; furthermore, a series of options can be selected in order to include further details in the printout.
- Transactions without date are being considered as opening transactions and will not appear in the printouts of the Profit & Loss Statement.
See also Print Example.
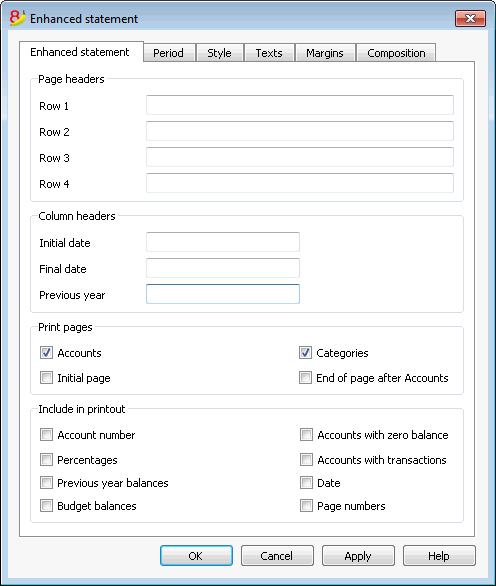
Page headers
Rows 1-4
These rows allow the definition of the Staement's headers.
Column heade
Initial date
Insert the initial date of the accounting.
Data finale
Insert the final date of the accounting.
Previous year
Insert the final date of the previous year's accounting.
Print pages
Checking the boxes you define the options you desire to appear in the statement printout:
Accounts
The accounts will be printed..
Initial page
The initial page of the document with the file headers will be printed.
Categories
The categories will be printed.
End of page after Accounts
The accounts and the categories will be printed on two different pages..
Include in printout
By selecting the boxes, you choose the options that must appear in the printout.
Other Tabs
The explanations for the other tabs are available at the following pages:
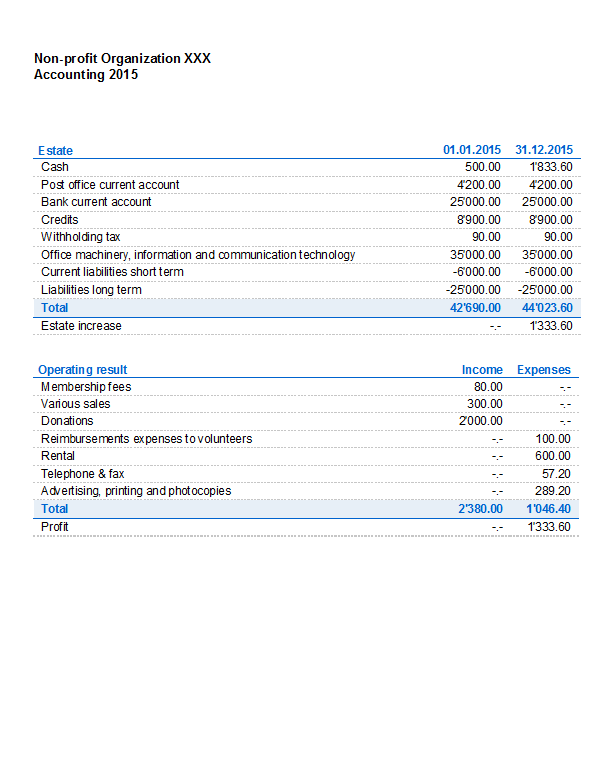
Accounting report
- This command displays the amounts of accounts according to a certain grouping, for a specified period or per subdivision.
- Transactions without date are being considered as opening transactions and will not appear in the printouts of the Profit & Loss Statement.
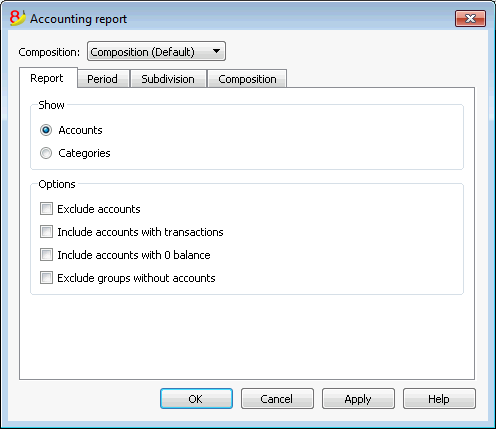
Display
You select the desired grouping scheme:
- Accounts - the Report will show a list of all accounts with the following columns: opening balance, income, expenses and account balance
- Categories - the Report will show a list of all categories with the following columns: opening balance, income, expenses and account balance.
Options
You select the accounts to be included or excluded:
- Exclude accounts - only the categories will be printed
- Include accounts with no transactions - accounts with no transactions will be printed as well
- Include accounts with 0 balance - accounts with zero balance will be printed as well
- Exclude groups without accounts - groups of accounts with zero balance will not be printed.
Other Tabs
The explanations for the other tabs are available at the following pages:
Transactions
Avoid mistakes with Banana Accounting Plus
In order to facilitate checking your accounting work and to immediately find differences, in Banana Accounting Plus, our new version, we added the Balance column in the Transaction table. You can now see potential differences on each row and you can correct them right away. It is a very useful feature when closing the accounting period.
Many of our clients have already tried it and are enthusiastic about it. We advise you to switch now to Banana Accounting Plus and take advantage of the many new features.
The transactions are entered in the Transactions table.
For every transaction enter the date, document number, description, incoming or expense, the account and the category.
- Income/Expenses: enter the amount coming in or going out.
- Account: enter one of the Estate accounts (cash, bank, post, clients, suppliers...).
- Category: enter an income or expense category.
Speeding up the recording of the transactions
In order to accelerate the recording of the transactions, you can use
- the Smart fill function that allows the automatic autocomplete of data that have already been entered at an earlier date.
- the Recurring transactions function, used to memorize recurring transactions into an appropriate table.
- importing bank or post office statement.
Examples of transactions without VAT
![]()
The columns of the Transactions table
Date
Enter the date for the transaction of Income or Expense
Doc
Enter Doc number. The number of the paper document is normally assigned here; this will facilitate retrieval of documents at later dates.
Description
Enter a description for the relative Income or Expense.
Income
Enter Income amount.
Expenses
Enter Expense amount.
Account
Enter the Estate account (cash, bank, Post, clients, suppliers..).
Category
Enter a category of Income or Expense, as defined in the Category table.
Examples of transactions with VAT
![]()
Additional columns
Depending on the type of Income / Expense accounts setup (with or without VAT) there are additional columns where VAT data is entered.
VAT Code
Enter the VAT code referring to a sale or a cost. There must be a code in the VAT Codes table.
Refer to the Transactions page for explanations of VAT codes and further information.
In the Account and Category columns, instead of entering the account and category number you can also write the text you wish to find.
The software will show you the list with all the accounts and categories containing the entered text. With the Arrow down key you can move directly in the list and select the desired account number by pressing the Enter key.
In order to display the movements of an account or a category, after entering the transactions, click on the small blue symbol in the account/category cell (top right corner of the selected cell).
Account and category card
In the account or category card, the presentation of the transactions is very similar to the ones of the Transactions table. If you enter further transactions or make changes (always operated in the Transactions table), you can update the account/category card by clicking the Refresh icon on the right side of the screen.
![]()
New Year
You can automatically transfer to the New Year in the following ways:
- Open the file of the terminated year and click on the Create New Year command from the Account2 menu.
- Confirm the basic data of the Accounting properties.
- Save the file under a new name.
The program will automatically carry forward :
- The accounts, the opening balances
- The categories will be carried forward without an opening balance, because you start from scratch, in order to determine the business result for the New Year.
Cash book
Introduction
The ideal tool to manage the cash account of small sized companies, associations, private enterprises or project planning.
It can be configured with or without VAT. On the other hand, it does not have the multi-currency functions.
Features
- Manages your cash account, or another estate account and income and expenses
- VAT option allows VAT calculations and VAT tax returns
- Process all your accounting records: accounting journal, account cards, periodical and annual reporting
- Manage the Cost Centers and Segments
- Several possibilites to submit and present your data
- Export to Excel, Html, Xml, Pdf
- Import various types of data files.
Tables and Properties files
The Cash book is part of the Income & Expense accounting type. It contains the following tables:
- Accounts
Where you find the Cash account or another estate account you manage and the relative opening balance. - Categories
Define the categories of Income & Expense here, the Cost Centres and their segments. - Transactions
Record your transactions here. - VAT Codes
If you have selected the VAT option, enter your VAT codes here. By selecting one of the VAT templates, VAT codes will be allocated correctly, allowing you to have a facsimile of your official VAT statement. - File and accounting properties
Manage the general settings of your accounting here.
Immediate information
The account balances will be displayed instantly in the Accounts and Categories tables, after the income and expense recordings.
Balances will be adjusted automatically after each registration of a transaction and you will not need to require a specific report to have an overview of your financial situation, which you can call up via the Accounts and Categories tabs.
Support
- Detailed information on the different functionalities of the program, with concrete examples and screenshots of the software, for your use
- Free support for one year included.
Topics similar to Double-entry accounting
Commands
Printouts
Getting started
To start working with Banana Accounting 8 software, proceed as follows:
- Download Banana Accounting 8 software
- Install Banana Accounting 8 software by inserting the license key.
Creating a new accounting file
- From the File menu, activate the New command
- Select the Income & Expense accounting group and the Cash Book File (with or without VAT)
- Select the Examples/Templates according to your language and nation
Banana provides predefined templates.
You may download:
- from the program - select the language / country and choose the model that suits you
- Clicking the button Online Templates - you will access our Apps page internet site, where all existing accounting templates are available free of charge. You can run a detailed search by entering the language, country, and category of activity (company type, non-profit, independent ...).
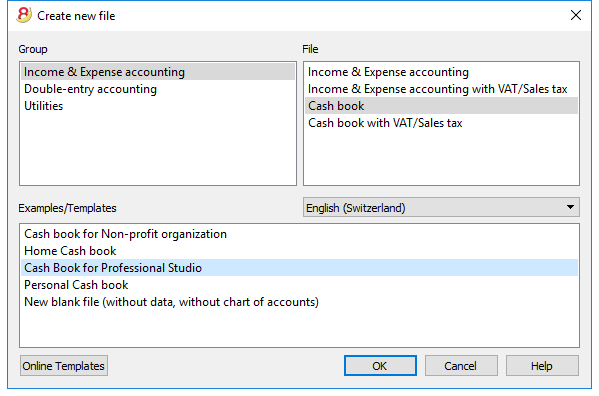
Setting up the File properties
Set up your own data from the File and Accounting properties command and save with your own file name.
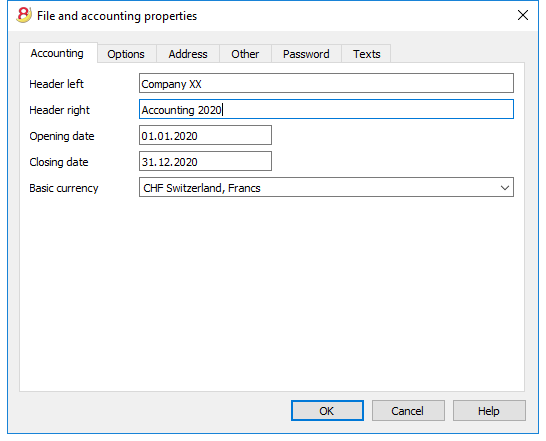
Inserting the opening balance of the account
Enter the account you wish to manage in the Accounts table of the Cash book and the initial amount in the Opening column.N. Activating the Creating a new year ... command in the Account2 menu will automatically generate the opening balances to be carried forward.
Only one account can be entered at a time.
Customizing the Categories table
In the Categories table, customize the income and expense categories, according to your own needs. It is possible to:
- change the category numbers
- change the description
- delete categories
- add categories
- insert subgroups
- delete subgroups
All balances of the categories will determine the result of the accounting year (profit or loss) and must therefore not contain any balances.
Add new categories
If new categories need to be added in an already existing group, proceed as follows:
- Insert an empty row (Edit menu, Insert rows ... command) before the Total of the Group
- Insert the number or sign for the category in the Category column
- Insert the Description that identifies the category
- Insert the identical Gr of the other categories belonging to the Group Total in the Gr column.
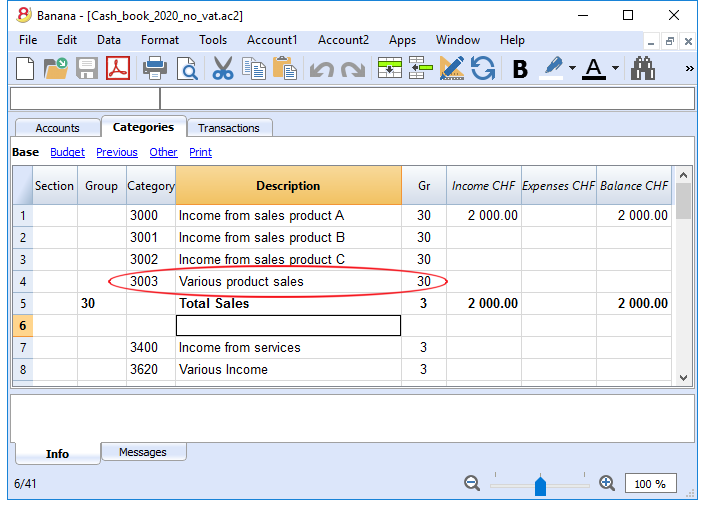
Add subgroups
To add new subgroups, proceed as follows:
- Insert an empty row (Edit menu, Insert rows ... command) where wish to add a new subgroup
- Insert a number or sign in the last empty row of the Group column (in our example 31 - Other income)
- Insert the Description that identifies the new subgroup
- Insert the Group Total number in the Gr column (in our example 3 - Total sales).
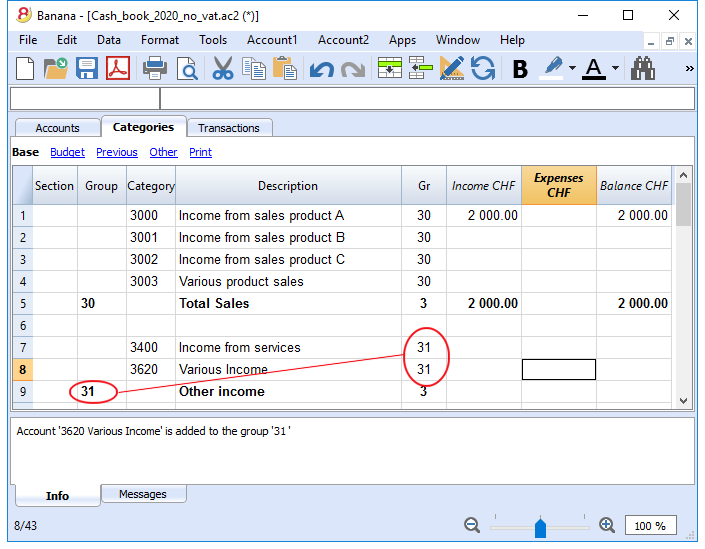
Delete categories or subgroups
Select the categories or subgroups you wish to delete and proceed in the Edit menu, Delete rows ... command to eliminate.
Transactions
In the Transactions table, income and expense transactions are entered, indicating the category to which the income or expense is attributed.
Speeding up the recording of the transactions
In order to speed up the recording of your transactions, you can use:
- the Smart fill function that allows the automatic autocomplete of data that have already been entered at an earlier date.
- the Recurring transactions function (Account2 menu), used to memorize recurring transactions into a separate table.
- import of your bank or post office statement.
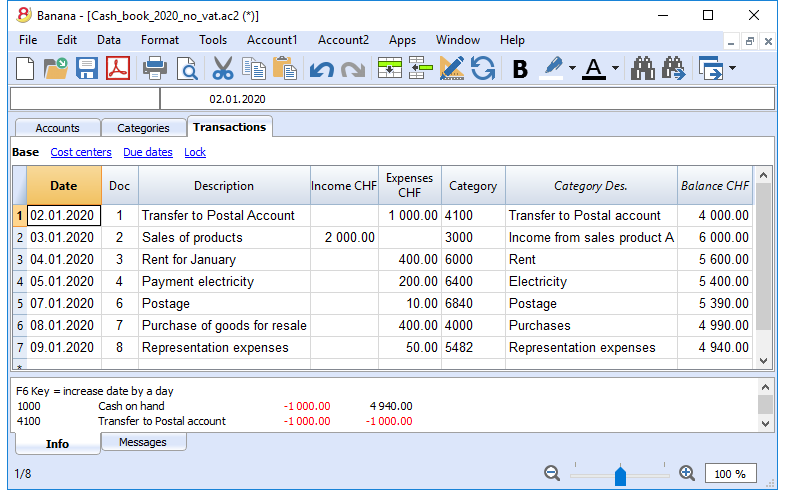
Transactions with VAT
In order to enter transactions with VAT please proceed as follows:
- from the File menu, choose New command and choose Income /Expenses accounting - Cash book with VAT/Sales tax
- Choose one of the existing templates for your nation.In order to enter transactions with VAT, please refer to the Transactions page.
The Category or Group card
The Category or Group card allows you to have a complete list of accounting entries relating to the same category or group.
- To open an category or group card you click once on the account number cell and then click once on the small blue arrow appearing in the upper right corner of the cell.
- To open multiple category or group cards you must select the Account cards command from Account1 menu.
- To update the category or group cards, following changes in the Transactions table, you must click on the two circular arrows symbol, located at the top right corner of the account card.
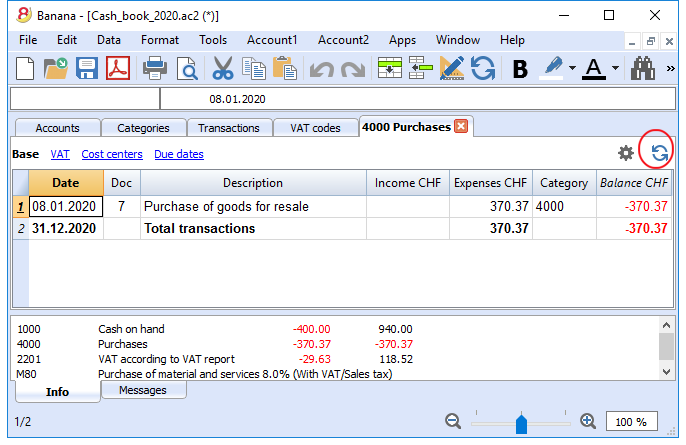
Account cards per period
To open an category cards with account balances at predefined dates, click on Account1 in the menu, Account/Category cards ... and click Period selected in the Period tab to insert your selected period.
Consult the Period page for further information.
Print the Category card
To print a Category card, open it from any table (Accounts or Transactions) and start printing from the File menu.
To print out several or all the Account/category cards, click Account1 menu, select Account/category cards and select the accounts/categories you wish to print. The filter in the window allows you to select automatic selection of all categories, cost centers, segments, groups etc ...
For further information refer to the Account Cards page.
Enhanced Statement
To view the Enhanced Statement and the Enhanced Statement with groups, choose the Account1 menu and then the Enhanced statement or Enhanced statement with groups command. You can also obtain statements by period.
- The Enhanced statements displays all accounts and categories without any subgroups
- The Enhanced statements with groups displays all accounts and categories also with subgroups
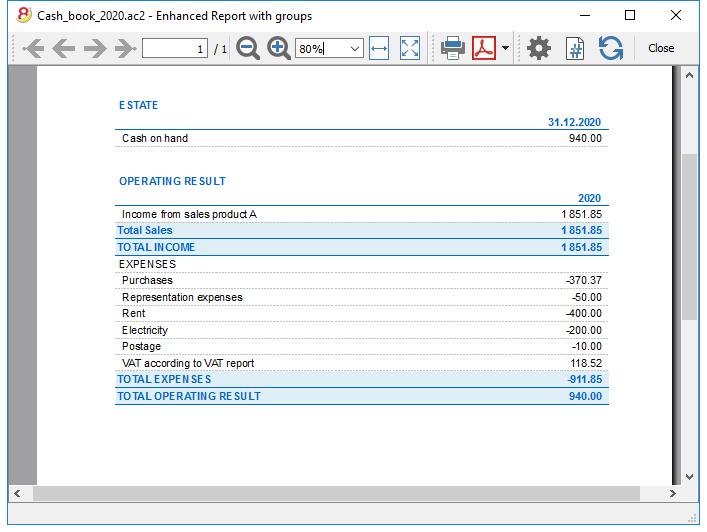
Archive data in PDF format
At the end of the year, when the accounting is done, corrected and revised, you can store all accounting data with the Create Pdf dossier command from the File menu.
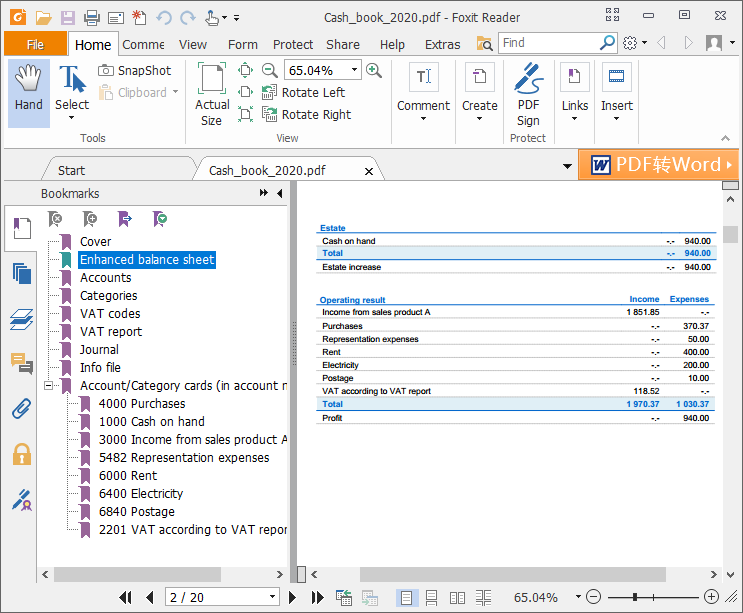
The Budget
Before starting your accounting year, you can create a budget with your assumed expenses and revenue, in order to have control over the financial and economic situation of your company.
The budget can be set in two different ways:
- From the Budget column of the Categories table. For each account the yearly budget is indicated.
In this case, when you process the budget from the Account1 menu, Enhanced statement with groups command, the Budget column shows the amounts that relate to the entire year. - From the Budget table, that you need to manually activate using the Add new functionalities command from the Tools menu.
In this table all estimates are entered as budget transactions, either income or expenses. If you activate this table, the Budget column of the Accounts table is automatically deactivated.
In the Budget table you can setup a detailed budget that takes into account possible variations during the year and in different periods of the year.
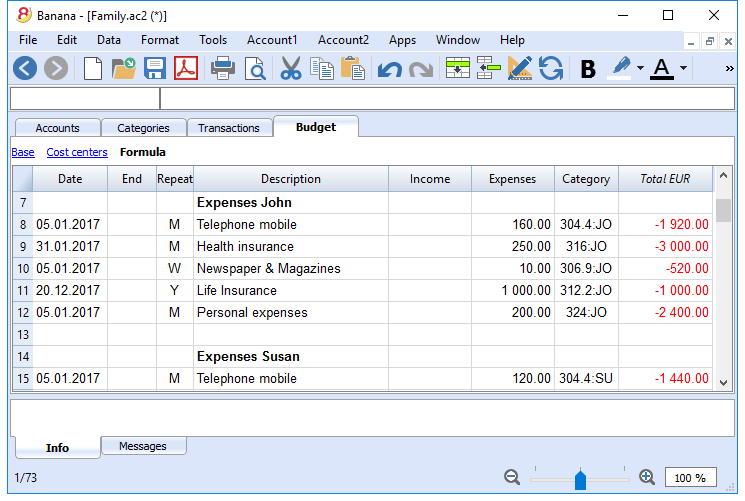
Printouts
Instant information
The account balance and those of the income and expense categories are on ready display in the Accounts and Category tables.
After each entry of a transaction, balances are adjusted automatically and there is no need to run a report, as you can simply display the Accounts or Categories tables.
Advanced printouts
All printing is run from the Account1 menu, where the different functions for prining are located:
-
Journal - command to define the period. You can display and print the whole table or just a specified period.
-
Account/Category cards command. You may select all cards or define your selection.
Define the required period in the Period tab and click the required settings in the Options tab. Print settings can be saved in the Composition tab so they can be resumed without them to be having defined again. -
Enhanced statement command. You may also print a defined period and various options and compositions may be included.
-
Enhanced statement with groups command. You may also print a defined period and various options and compositions may be included.
-
Accounting report command. The required options are displayed in the Accounts table. Reports are possible for current, previous periods or previous years; each period may contain subdivisions and the compositions can be saved.
Example of printout of Enhanced statement with groups
Transactions
The transactions are entered in the Transactions table.
For further information relative to the columns used in the Transactions table of the Cash book, refer to the Transctions (Income & Expense accounting) page.
For each operation enter the following:
- the date
- the document number
- the description
- the income or expense amount
- the category relevant to the income or expense in the Category table
- should the transaction be subject to VAT tax, enter the VAT code in the VAT code column.
The VAT codes are listed in the VAT codes table.
Speeding up the recording of the transactions
In order to accelerate the recording of the transactions, you can use
- the Smart fill function that allows the automatic autocomplete of data that have already been entered at an earlier date.
- the Recurring transactions function, used to memorize recurring transactions into an appropriate table.
- importing bank or post office statement.
Examples of transactions without VAT
Examples of transactions with VAT
![]()
Category card
To display the entries of a category, click once on the small blue arrow appearing in the upper right corner of the cell.
The display of entries in the Categories table is identical to the one in the Transactions table.
To update the category or group cards, following new entries or changes in the Transactions table, you must click on the two circular arrows symbol, located at the top right corner of the category or group card.
Customers sub-menu
New settings and documentation
In the new Banana Accounting Plus version, in the Accounts table, new columns have been added in order to allow you to enter more information about your customers and, new features automatically resume the data in the Invoicing. Moreover, you will find a new and in-depth documentation to work in a very professional way:
- Set up customer accounts on a cash method
- Set up customer accounts on a accrual method
- Automatic invoice closing
We advise you to immediately switch to Banana Accounting Plus and take advantage of the many new features.
Customers' register and checking of open invoices
Directly in the accounting you can:
- Prepare customers' accounts, with the related addresses and other customers' data.
- Enter into the transactions:
- The data related to the issued invoices (invoice number, customer, amount, due date).
- The data related to the payment for the invoices and the issuing of credit notes, if any.
- Obtain the following lists/reports
Features under development, only available in the Experimental version:
Setting up and using the customers and invoices features
- Setting up the register and the customers' accounts in the Chart of Accounts
- Setting up the Customers' & suppliers' settings
- Setting up the Transactions table and entering the invoices
- Reports Open, overdue and issued invoices
- Printing invoices (Experimental version).
Notes for the use of multi-currency
- The Reports are based on the customer's account currency balances; possible exchange rate differences will not be taken into account.
In the Issued invoices table, the recordings of exchange rate differences are also listed, while in other prints only the customer's currency amount is used. - The reports Description column will reproduce the first row description for each invoice.
- For the accounting files based ont cash received you can setup a customers register with the Cost Centers.
Example file
Setting up the accounts
New settings and documentation
In the new Banana Accounting Plus version, in the Accounts table, new columns have been added in order to allow you to enter more information about your customers and, new features automatically resume the data in the Invoicing. Moreover, you will find a new and in-depth documentation to work in a very professional way:
- Set up customer accounts on a cash method
- Set up customer accounts on a accrual method
- Automatic invoice closing
We advise you to immediately switch to Banana Accounting Plus and take advantage of the many new features.
Introduction
The following explains how to set up separate accounts for each customer and a group for customers, so that you can have a list of separate invoices per customer.
In case you only have a few invoices and don't want to keep a detail per customer, you can also have just one account to record all customer invoices.
The list of invoices will then be for all customers and not for individual customers.
Setting up the Clients' register
- Each client is a separate row in the chart of accounts and has its own account number
- There is a group that groups all the customers accounts
This group is then grouped in a group present in the Assets.
At the end of the Chart of accounts, add:
- A * section (header) (see Sections)
- A 01 section for the Clients (see Sections)
- The Clients' accounts that are needed (see Adding a new account). The account numbering can be freely chosen (see Accounts)
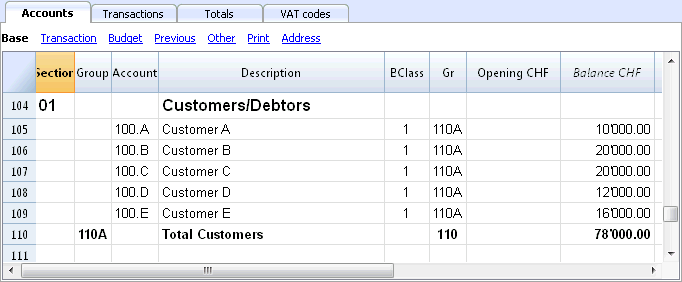
- The total Clients will be totalized in the summary groupe 110A of the Gr column.
- The same code or number used for the Gr (110A), must be used in the Assets Group column, in the row corresponding to the Total Customers of the Balance Sheet.
The groups' numbering can be freely chosen (see Groups).
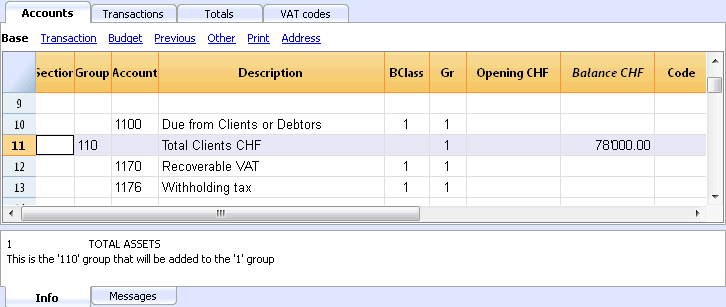
Managing the Customers' register with the Cost centers
In case you don't want customers to be visible on the Balance Sheet (for example, for transactions with VAT on cash received), customer accounts can be created by using the Cost centers (CC3).
Setting up the clients/suppliers register with cost centers
For all Swiss users who manage the VAT on cash received, this setup is the best to manage the VAT.
It is possible to manage the customers/suppliers register as cost centers (see also the Cost and Profit Centers page):
- we advise you to use the CC3 cost centers (the one where the accounts are preceeded by a semi-colon ";")
- the cost center balances for customers and suppliers will not appear in the Balance Sheet.
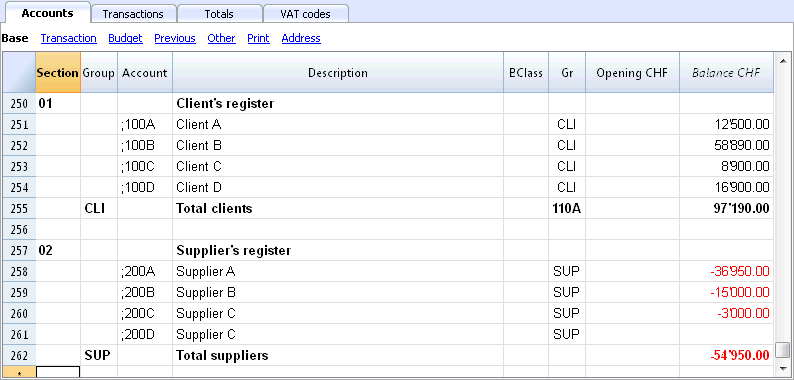
Transactions
More information is available at the page Clients and Suppliers with VAT on Cash received.
![]()
Without register
The customers accounts and groups can be entered as normal accounts into the Assets section.
Activating the Address columns (optional)
It is possible to add some specific columns in the Chart of accounts, to insert the address and other customers data:
- Choose the Add new functionalities command from the Tools menu
- Choose the Add addresses columns in the Accounts table command
(If you don't see this option in the list, it means that this function has already been activated).
The program adds in the Accounts table:
- An Address view where the added columns are visible.
- The columns that allow to insert the address data and other information.
- To display one or more of these columns, use the Columns setup command from the Data menu, also in the other views.
- To create other views with only certain columns, use the Views setup command (Data menu).
Select the Accounts table, Address view and add the desired information to the customers' accounts.
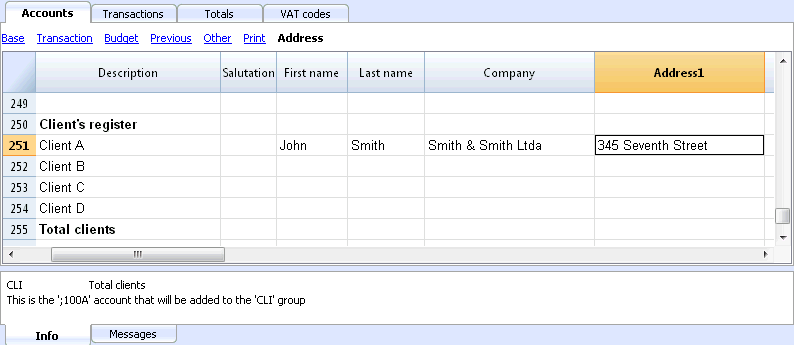
Setting up the Customers' parameters
- Select the Account2 - Customers - Settings command
- Please indicate in "Group or account", the group of the Chart of accounts in which the different customers' accounts are grouped.
- For an explanation of the different options, go to Customers and Suppliers settings.
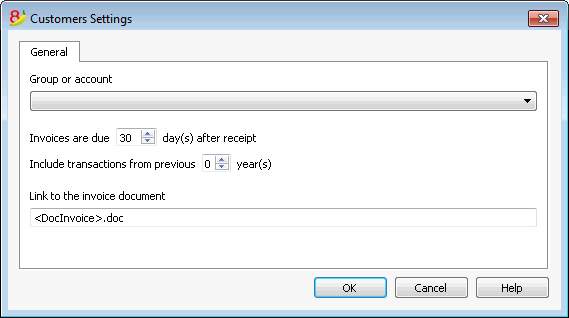
Customers' & suppliers' settings
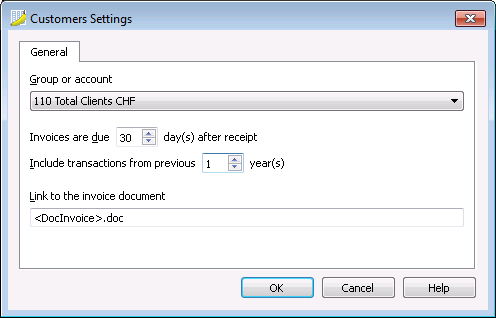
This dialogue is identical for both customers and suppliers functions.
The following explains the functions related to customers, but they also apply to suppliers.
As long as you have not indicated the customer or supplier group, the customer menu choices are disabled.
Group or account
Select the generic group or account that contains the Customers or Suppliers list. The group or the account needs to be already present in the Accounts table. See Setting up the Customers' register and Setting up the Suppliers' register.
Due date invoices (in days)
The program uses the following order of priority to calculate the invoice deadline:
- The due date if you entered it into the transaction row.
If there is more than one date for the same invoice number, the most recent one. - If the number of days is indicated in the PaymentTermInDays column of the Accounts' table, the date of the transaction increased by the number of days.
- The date of the transaction is increased by the days indicated in the settings dialogue.
Include transactions from previous (..) years (in years)
- If 0, the program will not display invoices from the previous year, but only the opening balances of the customer account.
- If 1, the program will also include the invoices of the previous year in the customer card.
- If 2 or more, the program will also include invoices from the years before in the customer card.
Link to the invoice document
You can insert a link to an invoice file (pdf, doc or other). When the link is being opened, the program substitutes the value <DocInvoice> with the invoice number present in the row.
The link can contain:
- The XML name <DocInvoice> or the name of another column contained between <>.
If you use the "<DocInvoice>.pdf" command and you are on the row with invoice number 100, the program tries to open the "100.pdf" file. You can also precede the filename with the name of a directory. -
You can use any file name extension. This extension must, however, be included in the list of file extensions considered safe (Tools- Program options-Advanced).
- It is also possibile to indicate a path preceding the field name that contains the name of the document that has to be opened.
With the link "c:\temp\<DocInvoice>.pdf" and the invoice number 100, the program proceeds to open the file c:\temp\100.pdf.
The name of the directory is relative to the directory where the file is located.
Opening an invoice document
- Place yourself in the Invoice column of the transaction row related to the invoice you want to open
- Use the right mouse button to open the context menu
- Choose the command Open invoice link.
Entering transactions
Displaying the Invoice column in the Transactions table
The invoice number has to be entered in the Invoice column (DocInvoice) which, in the default settings, is not visble in the Transactions table.
In order to display the column:
- Select the Transactions table
- Data menu
- Columns setup command
- Activate the Visible option for the DocInvoice column
The Invoice columns becomes visible.
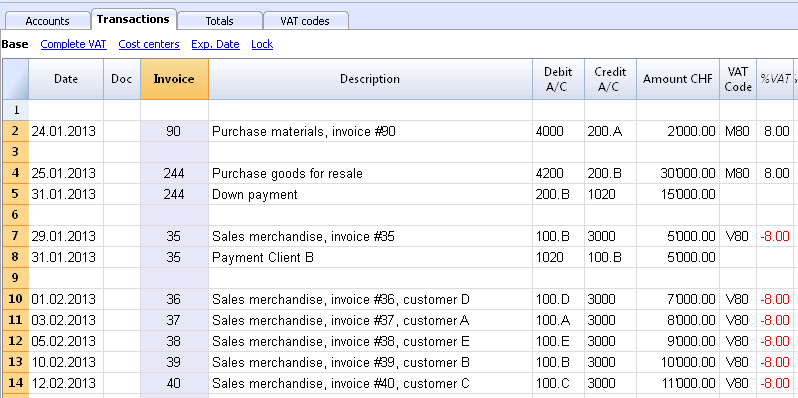
The Open Invoice link and Extract invoice rows commands, described hereunder, are linked to the Invoice column (right click on the Invoice column's cell).
Autocomplete of invoice data
When a payment is being recorded or an issued invoice is being corrected, the program proposes suggestions to complete the transaction automatically. Proceed as follows:
- Create a new transaction row and add the date
- In the Invoice column, press the F2 key; the list of open invoices will appear. If you write an invoice number or an account number, the list will be filtered based on the entered text.
- Select the desired invoice and press Enter. The program automatically completes the transaction with the description, debit or credit account and the amount. As usual, these data can be manually modified.
- Apart from the date, it is possible to also indicate the Customer account before pressing F2 in order to display the list of open invoices; in this case the list will be filtered based on the Customers account of the transaction row.
Note
The list displayed in the Invoice column includes both the Customers' and Suppliers' invoices. A supplier's invoice can have the same number as the invoice of another supplier, because the display criterium takes, apart from the invoice number, also the number of the Supplier's acccount into consideration.
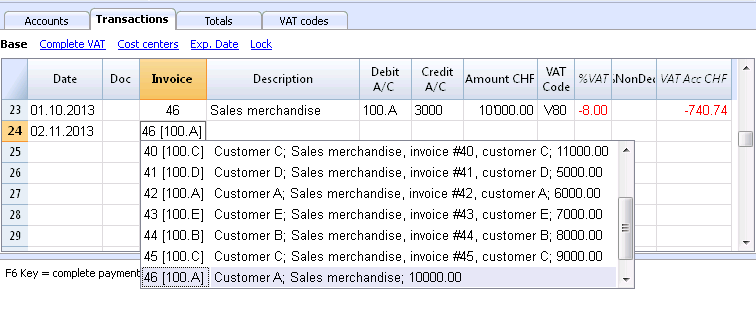
The Open Invoice link and Extract invoice rows commands, described hereunder, are linked to the Invoice column (right click on the Invoice column's cell).
Recording an issued invoice
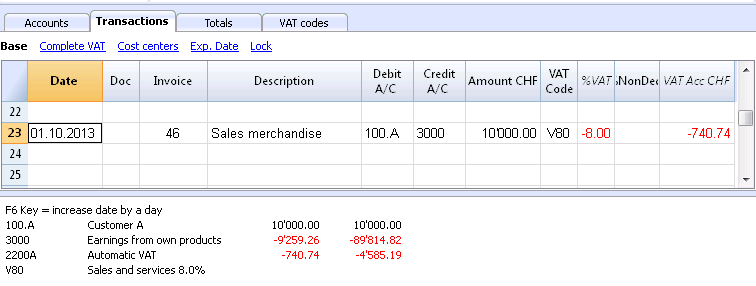
Recording a payment
- Insert the transaction date
- Place yourself in the Invoice column cell and click on the F2 button. If the F2 button doesn't work, you need to activate your customers/suppliers settings, by entering your register's group (ex.: Account2 menu, Customers, Settings). A list of all open invoices will appear.
- As an alternative you can also start to enter the invoice number, the customer/supplier name or the amount, and the program will show you the list of the open invoices according to your search data.
- Select the desired invoice and press Enter.
- The program completes the Transaction with the Description column, the Credit account and the Amount.
Enter the account into which the invoice amount has been transferred
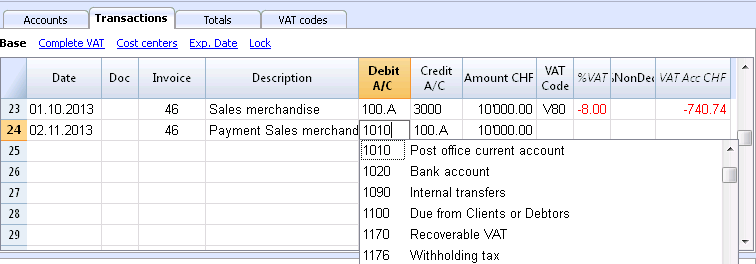
Recording a credit note
In order for the amount to be deducted from the original invoice, the same invoice number needs to be used. If the corrective document (for example, a credit note) presents a different number that needs to remain available, such a reference can be entered in another column, like Doc. Original.
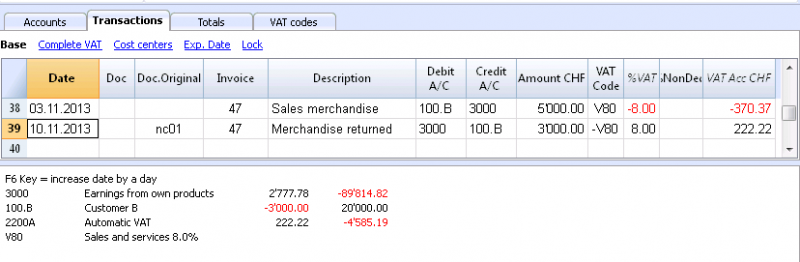
Extract invoice rows and Open invoice link commands
The Extract invoice rows command displays the transactions of the selected invoice.
The command is available by clicking on the small blue arrow at the upper right corner of the cell or with the right mouse button.

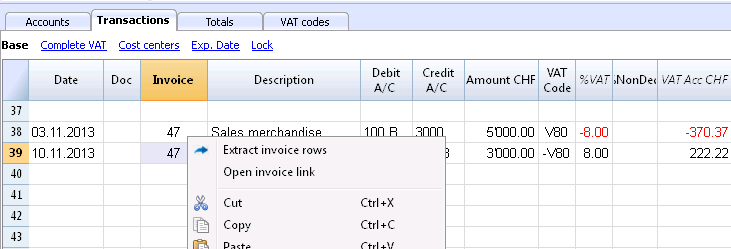
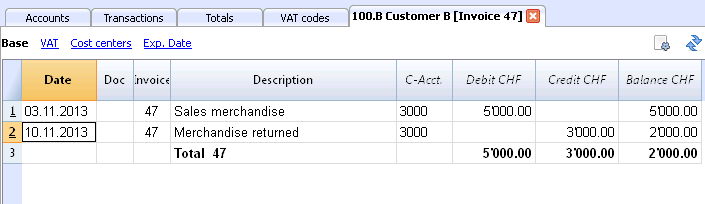
The Open Invoice link command establishes the text that has been defined in the Customers' settings (Account 2 - Customers - Settings - Link to the Invoice document).
For example, if the invoices have been created with Winword and saved in the Documents folder, these files can directly be opened by setting up the command line with the text 'C:\Users\myname\Documents\<DocInvoice>.doc' . The program substitutes <DocInvoice> with the text corresponding to the column and executes the command.
In the command line, it is possible to also indicate other columns of the table by using their XML names.
If the message 'File with extension considered unsecure' appears, add the extension (for example .doc) through the command Tools - Program Options, Advanced, File extension.
Customers' invoices lists
Displaying the invoices issued to customers
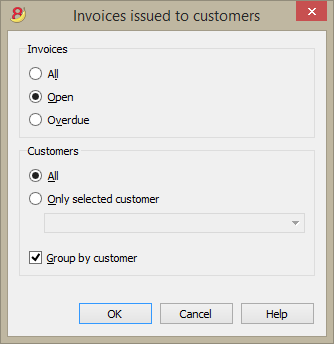
This dialogue is identical for both customers and suppliers functions.
The following explains the functions related to customers, but they also apply to suppliers.
All customers (suppliers)
Displays the Customers' Balance detail of all customers that belong to the group defined in the Customers and Suppliers settings.
Only selected customer (supplier)
Displays the Customers' Balance detail of a selected customer that belongs to the group defined in the Customers and Suppliers settings.
Example of a Customers Balance detail (Account2 menu - Customers command - Invoices issued to customers...)
Displaying the open invoices
Command: Account2 - Customers - Open invoices by customer
In this table, the invoices that have an open balance are being listed.
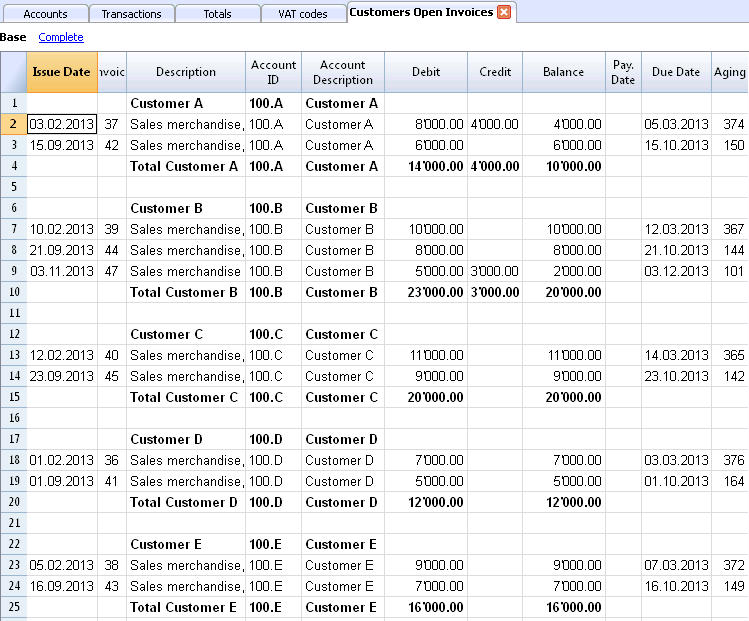
Displaying the overdue invoices
Command: Account2 - Customers - Open invoices by due date
In this table, the invoices that have an open balance are being listed, grouped by aging period.
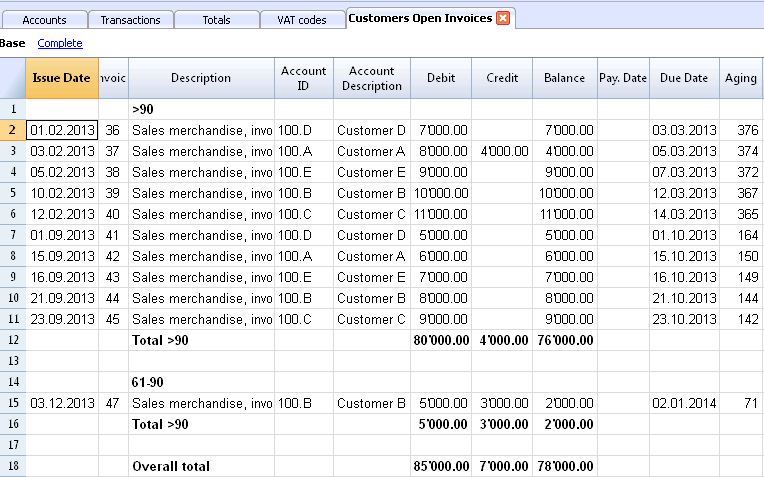
Creating invoices
New layouts
In the new Banana Accounting Plus version, two new highly customizable layouts have been added:
- The CH10 layout for all users in Switzerland (with or without QR invoice)
- The UNI11 layout for all users in other countries.
We advise you to switch now to Banana Accounting Plus and take advantage of the many new features.
This Functionality is currently only available with Banana Accounting 9.
For more information, please refer to the corresponding Banana 9 documentation.
Suppliers sub-menu
New settings and documentation
In the new Banana Accounting Plus version, in the Accounts table, new columns have been added in order to allow you to enter more information about your customers and, new features automatically resume the data in the Invoicing. Moreover, you will find a new and in-depth documentation to work in a very professional way:
- Set up suppliers accounts on a cash method
- Set up suppliers accounts on a accrual method
- Automatic invoice closing
We advise you to immediately switch to Banana Accounting Plus and take advantage of the many new features.
Suppliers sub-menu
The features, present in the Suppliers sub-menu (from the Account2 menu), allow you to obtain the following lists:
Logic for checking Suppliers' invoices
In order for the program to be able to prepare the lists of received invoices:
- In the Invoice column of the Transactions table, indicate the invoice number.
- In the Debit or Credit column of the Transactions table, indicate the account number of the Supplier
Also, before entering the transactions:
- In the Chart of accounts, Supplier accounts and/or groups need to be created
- If desired, address columns can be added
- In the Suppliers set up, indicate the Suppliers group or the general Suppliers account.
You also need to choose if, in the Chart of accounts, you need to have:
- An account for each Supplier.
This is necessary when the list of invoices needs to be presented separately by supplier.
In this case, a row needs to be created for the Suppliers and each supplier account refers to this group in the GR column (see hereunder). - One single account in which all the Suppliers are contained
The list of the open, expired invoices will be for all the Suppliers together and not per each individual Supplier.
Notes:
- Reports are based on the account currency balances; possible exchange rate differences will not be taken into account.
- The reports Description column will reproduce the first row description for each invoice.
- For the accounting files based ont cash received you can setup a suppliers register with the Cost Centers.
Detailed explanations
Setting up Suppliers accounts
- Setting up the register
- Activating the address columns (optional)
- Setting up the suppliers' settings
Entering transactions
- Displaying the Invoice column in the Transactions table
- Entering the invoice that is being issued
- Entering a payment
- Entering a credit note
- The Extract invoice rows and Open invoice link commands
Reports and printouts
- Displaying the open invoices
- Displaying the expired invoices
- Displaying the Invoices received from Suppliers
Automatic autocomplete
Example file
Setting up the accounts
- Setting up the register
- Activating the Address columns (optional)
- Setting up the Suppliers' parameters
Setting up the Suppliers' register
To create the Suppliers' register, add at the end of the Chart of accounts:
- A * section (header) (see Sections)
- A 02 section for the Suppliers (see Sections)
- The Suppliers' accounts that are needed (see Adding a new account). The account numbering can be freely chosen.
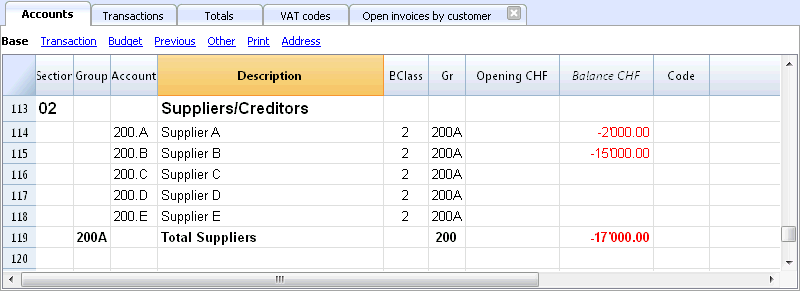
- The total Suppliers will be totalized in the summary groupe 200A of the Gr column.
- The same code or number used for the Gr (200A), must be used in the Liabilities Group column, in the row corresponding to the Total Suppliers. The groups numbering can be freely chosen (see Groups).

Managing the Suppliers' register with the Cost centers
In case you don't want Suppliers to be visible on the Balance Sheet (for example, for transactions with VAT on cash received), Suppliers accounts can be created by using the Cost centers (CC3). This process is similar to the Clients cost centers.
Activating the Address columns (optional)
It is possible to add some specific columns in the Chart of accounts, to insert the address and other Supplier data:
- Choose the Add new functionalities command from the Tools menu
- Choose the Add addresses columns in the Accounts table command
(If you don't see this option in the list, it means that this function has already been activated).
The programme adds in the Accounts table:
- An Address view where the added columns are visible.
- The columns that allow to insert the address data and other information.
- To display one or more of these columns, use the Columns setup command from the Data menu, also in the other views.
- To create other views with only certain columns, use the Views setup command.
Select the Accounts table, Address view and add the desired information to the Suppliers accounts.
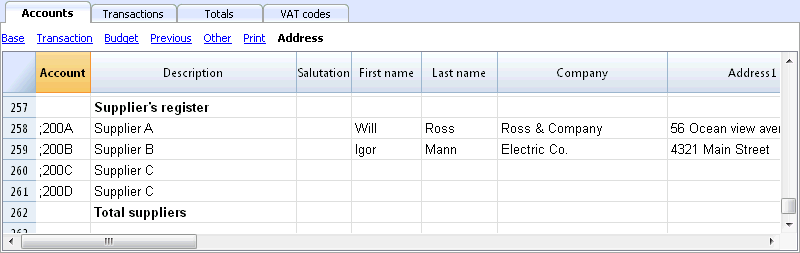
Setting up the Suppliers' parameters
- Select the Account2 - Suppliers - Settings command
- Please indicate in "Group or account", the group of the Chart of accounts in which the different Suppliers' accounts are grouped.
- For an explanation of the different options, go to Customers and Suppliers settings.
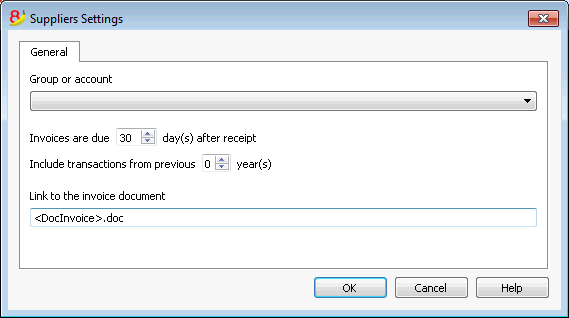
Entering transactions
- Displaying the Invoice column in the Transactions table
- Recording an received invoice
- Recording a payment
- Recording a credit note
- Supplier Balance detail and Open invoices commands
Displaying the Invoice column in the Transactions table
The invoice number has to be entered in the Invoice column (DocInvoice) which, in the default settings, is not visible in the Transactions table.
In order to dispaly the column:
- Select the Transactions table
- Data menu
- Columns setup command
- Activate the Visible option for the DocInvoice column
The Open Invoice link and Extract invoice rows commands, described hereunder, are linked to the Invoice column.
Recording a received invoice
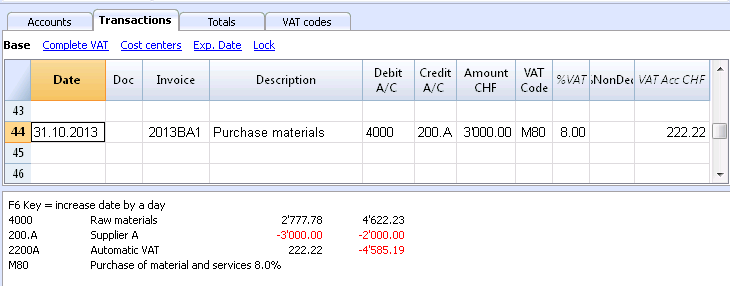
Recording a payment
- Insert the Transaction date
- Place yourself on the Invoice column and press the F2 key
The list of Open invoices will be opened. - Select the desired invoice and press Enter.
The program completes the Transaction with the Description column, the Debit account and the Amount.
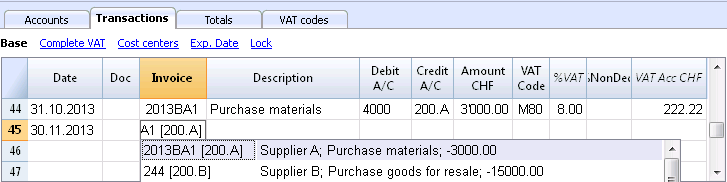
Enter the account used to pay the invoice.
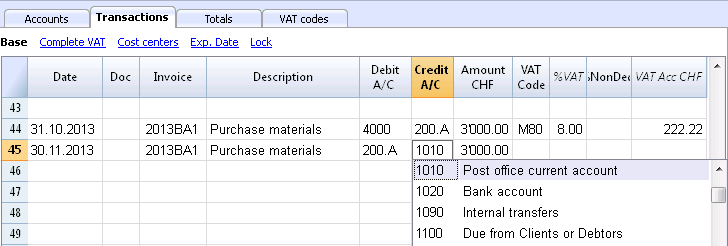
Recording a credit note
In order for the amount to be deducted from the original invoice, the same invoice number needs to be used. If the corrective document (for example, a credit note) presents a different number that needs to remain available, such a reference can be entered in another column, like Doc. Original.
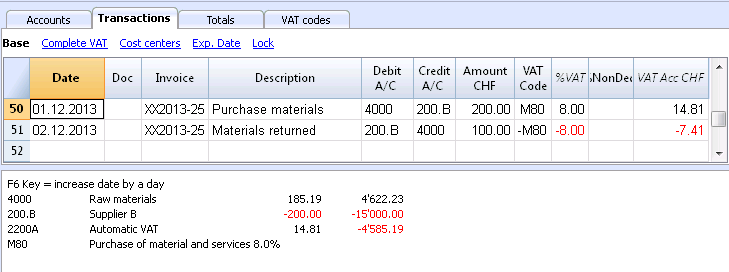
Extract invoice rows command and Open invoice link
The Extract invoice rows command displays the transactions of the selected invoice.
The command is available by clicking on the small blue symbol above at the upper right coner of the cell or with the right mouse button.

The invoice rows can also be extracted by clicking on the invoice number with the right mouse button, Extract invoice rows command.
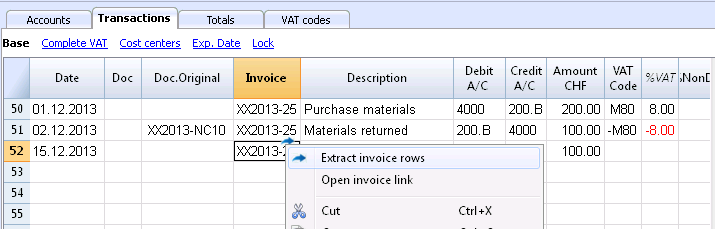
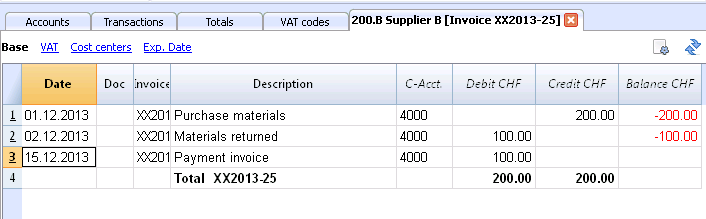
The Open Invoice link command establishes the text that has been defined in the Suppliers' settings (Account 2 - Suppliers - Settings - Link to the Invoice document).
For example, if the invoices have been created with Winword and saved in the Documents folder, these files can directly be opened by setting up the command line with the text 'C:\Users\myname\Documents\<DocInvoice>.doc' . The program substitutes <DocInvoice> with the text corresponding to the column and executes the command.
In the command line, it is possible to also indicate other columns of the table by using their XML names.
If the message 'File with extension considered unsecure' appears, add the extension (for example .doc) through the command Tools - Program Options, Advanced, File extension.
Reports and printouts
- Displaying the open invoices
- Displaying the overdue invoices
- Displaying the Invoices received from suppliers
Displaying the open invoices
Command: Account2 - Suppliers - Open invoices by supplier
In this table, the invoices that have an open balance are being listed.

Displaying the overdue invoices
Command: Account2 - Suppliers - Open invoices by due date
In this table, the invoices that have an open balance are being listed, grouped by aging period.

Displaying the Invoices received from suppliers
Command: Account2 - Suppliers - Invoices received from Suppliers
In this table, all the invoices that are part of the Suppliers' register, or that belong to an individual supplier, are being listed
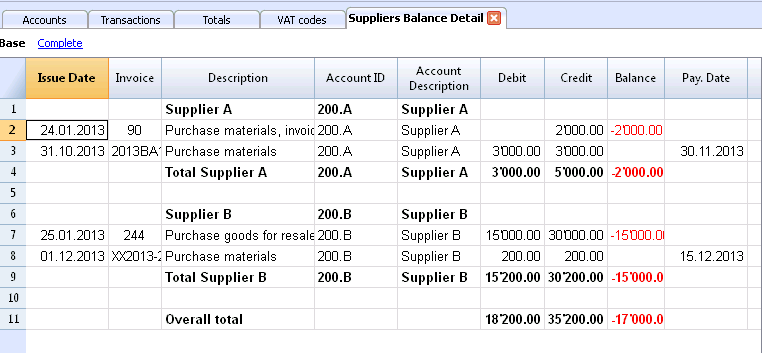
Autocomplete of invoice data
Please consult our page Customers menu - Automatic completion of invoice data.
VAT Management
Pages with more in-depth information:
- VAT management in Switzerland
There are several pages with specific information for Switzerland, for example on how to set up the VAT codes table, enter the VAT transactions and prepare the declaration. - VAT management in Italy - this page is in Italian
- Import VAT codes
Theory
VAT (Value-added Tax) is a tax that weighs on the final consumer. Every VAT subject must calculate and periodically deposit the tax to the Revenues Authority.
Every country has its own VAT rates that are established in different percentages depending on the type of merchandise or service. Certain merchandise and services are exempt or excluded.
The percentages vary according to the financial necessity of the country; therefore, there can be changes over the years.
VAT rate
In this document, to make calculations easier, we will use the following rates:
- 10 % normal rate
- 5% reduced rate
- 0% excluded operations or exempt operations
VAT calculation
Net Price x VAT Percentage / 100 = VAT Amount
Example:
Net price 300
Tax rate 10%
VAT amount = 300 x 10 / 100 = 30
Gross price calculation
Net price + VAT Amount = Gross Price
Example:
300 + 30 = 330
Sometimes the gross amount is known and it is necessary to find the net and VAT amounts.
Net price calculation
Gross Price / (100 + VAT rate) x 100 = Net Price
Example:
330 / (100 + 10) x 100 = 300
The net price represents the cost (purchase) or the revenue (sale) of the company
VAT amount calculation
Gross Price - Net Price = VAT Amount
Example:
330 - 300 = 30
or
330 - [330 / (100 + 10) x 100] = 30
The VAT amount represents the debit (sales) or the credit (purchases) towards the Revenues Authority.
VAT rate calculation
VAT Amount / Net Amount x 100 = VAT Rate
Example:
30 / 300 x 100 = 10%
or
[330 - 330 / (100 + 10) x 100]/100 = 10%
Another example:
20 / 400 x 100 = 5%
This way of calculating is used when the rate is not known.
VAT Codes Table
The VAT Code table setup allows the definition of all the parameters that are necessary to manage the transactions with VAT. The setup refers to:
- VAT due or recoverable
- Transaction amount recorded as net, gross, or VAT amount at 100% (Customs VAT)
- Freely definable applicable VAT rates
- Freely definable account in which VAT must be recorded
- Special rounding off for each code
- Definable grouping and totaling method
The VAT Codes table has a Base view and a Complete view (see top of the table hereunder). The difference between the two is the fact that the Complete view presents several columns that are not available in the Base view. These columns serve to accommodate some specific options.
How to calculate
The parameters indicated in the VAT Codes table are being used to calculate the VAT of the individual transactions. The parameters established in the VAT Codes table cannot be changed in the transactions. This modality guarantees that the VAT calculations are correct and uniform.
Please note: if the values of a VAT Code, which has already been used in the transactions, are being modified, the changes are not active immediately; in this case it is necessary to activate the Recheck accounting command (Account1 menu -> Recheck accounting). When the VAT Codes table is being modified, the program invites the user, through a message in the Info window, to execute a complete recalculation as a precaution.
The following table refers to the codes being used according to the Swiss legislation:
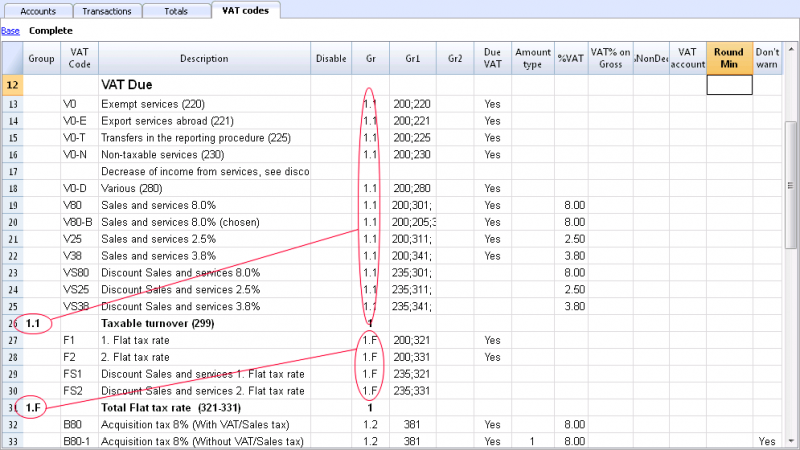
Detailed description of the columns
In the following columns, insert the following data:
- Group: a code or number that identifies the group to which the code belongs. In the example we have inserted 1 for the sales, 2 for the purchases, T for the total.
- VAT Code: the code to identify and carry forward the VAT code in the transactions.
- Description: a text for the description of the VAT Code or the group.
- Disable:
- Entering 1, the VAT code isn't displayed in the autcomplete list (Transactions table), but can still be used;
- Entering 2, the VAT code is disabled and cannot be used. - Gr: code of the "Group" in which the row has to be added.
- Gr1: In the image of the table above, the grouping codes representing the numbers for the Swiss VAT declaration are being shown.
- Gr2: code for additional groupings.
- Due VAT:
If the word Yes is being inserted, this means that the VAT is at debit (due to the State)
If the cell is empty, this means that the VAT is at credit (recoverable) - Amount type: indicates how the software considers the transaction amount:
0 (or empty cell) with VAT/sales tax (the transaction amount is considered VAT included)
1 = without VAT/Sales tax (the transaction amount is considered VAT excluded)
2 = VAT amount (the transaction amount is considered the VAT amount) - % VAT: VAT code percentage
- Non ded.: if, for a VAT code, it is not possible to deduct the full 100%, enter the non deductible percentage here (example 100%)
- VAT% on gross: is usually being left empty. In special cases, the word "Yes" has to be inserted only if the VAT percentage has to be applied on the gross amount (VAT included) and not on the taxable amount.
- VAT account: the account on which the calculated VAT is being automatically.
In the File and Accounting properties (File menu), a general account, that will be used as the VAT account, can be defined.
It is also possible to set up a specific account for every individual VAT code. - Round Min: minimum value for rounding, to be used only in particular cases. By preference, the rounding indicated in the basic data of the accounting (f.i. minimum rounding value 0.05) is being used.
- Don't warn: there are particular transactions that the software could interpret as mistaken, but which, in reality, are correct. In order to avoid for the software to signal error messages, insert the word Yes for the code that is concerned.
When the transactions with VAT are inserted, by applying the VAT Code in the VAT Code column, the software calculates automatically all the amounts related to the VAT and transfers them in the VAT account.
Rechecking of the accounting file
When rechecking the accounting file, if transactions are not locked, the program will reload the VAT parameters assigned to each code. If a VAT code setting has been changed, the change will be taken into account in the corresponding transactions columns (that cannot be edited by the user).
For this reason, when editing the VAT table, the program suggests to operate a full accounting recheck.
Adding a new percentage
When a new percentage is added, a new row has to be added; in the new row, insert the data of the new VAT code with the new percentage, while paying attention to insert the correct grouping. Don't change a code that has already been used in the transactions.
Groupings
By creating groups with multiple totaling levels, the user can obtain the totals that are necessary for the VAT declaration.
In the VAT report, by activating the option Use own grouping scheme, the software calculates the totals exactly as indicated in the sequence of the indicated groupings in the VAT Codes table.
The groupings are being used to obtain totals for groups of transactions, for example, the totals for all exportations or importations.
Related document: Import VAT codes
File properties (VAT/Sales tax tab)
This tab only appears if an accounting with VAT/Sales tax management is chosen.
VAT Account
The Automatic VAT account, that is present in the chart of accounts, is defined here as default. In this case, the VAT account does not need to be inserted in the VAT Codes Table.
VAT/Sales tax rounding
This is where the user inserts how the VAT/Sales tax amounts should be rounded; if, for example, the user inputs 0.05, the VAT/Sales tax amounts will round to multiples of 0.05.
Cost Centers 1 (CC1), 2 (CC2), 3 (CC3)
For each type of Cost Center, the user can select which amount to use for the transaction in the cost center.
- Use transaction amount
- Use amount inclusive VAT/Sales tax
(When cost centers are being used for Client/Suppliers accounts) - Use amount without VAT/Sales tax
(When cost centers are being used for Revenue and Expenses)
Note: If one of these parameters is modified, the accounting must be recalculated.
Related documents: VAT Management, Cost and Profit Centers
Arrondi IVA
Le système TVA suisse prévoit pour le calcul de la TVA que celle-ci se fait calculé au centime, sans arrondi.
Pour ceux qui ont la nécessité d'avoir un arrondi des montants TVA pour les centimes, la procédure suivante a été prévue:
- Dans le tableau Écritures, insérer les Écritures comme d'habitude, en appliquant le code TVA approprié
- Dans la ligne suivante, enregistrer le compte des charges ou des produits, utilisé dans la ligne précédente, en débit et en crédit
- Dans la colonne montant, enregister les centimes de l'arrondi
- Dans la colonne Code TVA, insérer un code TVA avec type montant 2 (montant TVA au 100%) par exemple M80-2
- Quand les centimes doivent être déduits, insérer le code précédé par le signe moins "-M80-2".
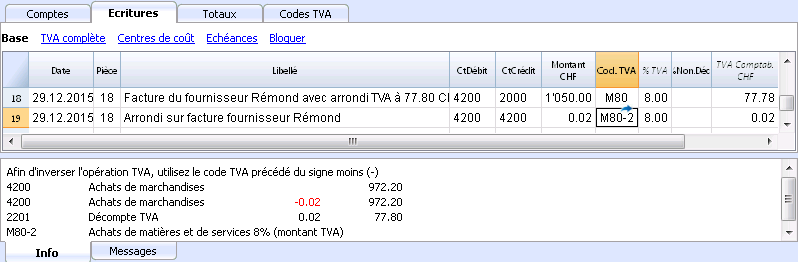
Associate VAT code to the account
In an accounting with VAT, in the Accounts table, it is possible to associate a VAT code to the income/expense accounts, so that, when the sales and purchases are being recorded, the program automatically inserts the VAT code and completes the columns with the VAT data while entering the account number.
In order to associate the codes:
- Click on the Other view. In this view, the VAT code column is visible by default.
In case you wish to display the VAT code column in the Base view, click on the Data menu, Columns setup command (see Related document at bottom of this page). - Insert the VAT codes for the income/expenses in the VAT code column.
 .
.
Related document: Columns setup
Configurer les comptes TVA
Quels sont les comptes TVA?
Les comptes TVA sont des fiches comptables d'où on enregistre les montants TVA, calculés selon les configurations des codes TVA.
Quand on utilise un code TVA, le programme calcule automatiquement, selon les valeurs de l'écriture:
- le montant imposable et le montant TVA
- le montant qui doit être enregistré sur le compte Débit
- le montant qui doit être enregistré sur le compte Crédit
- le montant qui doit être enregistré sur le compte TVA
- comment doit être enregistré le montant TVA (en Débit ou en Crédit)
En déplaçant le curseur sur l'écriture, en bas de la fenêtre d'information, le programme affiche les montants enregistrés sur les différents comptes.
Configurer les comptes TVA
Compte TVA général (automatique)
Si configuré dans les Propriétés fichier (menu Fichier) comme prédéfini, ce compte TVA est utilisé à chaque fois qu'il y a une écriture pour un code TVA qui n'a pas de compte TVA défini.
Compte TVA pour le code TVA
Pour chaque code TVA, dans le tableau Codes TVA, colonne Compte TVA, on indique le compte qui doit être utilisé pour les écritures qui utilisent ce code TVA.
Utiliser un seul compte TVA ou plusieurs comptes?
Dans la comptabilité, il faut séparer la partie Actifs des Passifs. Toutefois, si la TVA récupérable est compensée par le montant de la TVA due, seulement le montant TVA effectivement dû est affiché dans le Bilan.
Du point de vue comptable réel, dans la plupart des cas il n’est pas indispensable d'avoir plusieurs comptes TVA; en fait il est préférable d’avoir un seul compte TVA.
Pour l’application de la déclaration, cependant, il est utile d’avoir différents types d’opérations de TVA distinctes. Dans les programmes qui n’utilisent pas les codes TVA, il faut séparer chaque opération sur des comptes séparés. Avec Banana, grâce aux codes TVA et au Résumé TVA, il est possible d'obtenir des détails beaucoup plus importants :
- mouvements et totaux (TVA imposable, TVA, TVA comptabilisée)
- mouvements et totaux par pourcentage TVA
- mouvements et totaux par compte TVA
- mouvements et totaux regroupés selon TVA due et selon TVA récupérable.
Pour des contrôles d'opérations TVA, il n'est pas nécessaire d'utiliser plusieurs comptes TVA séparés.
Banana Comptabilité laisse donc le choix d’utiliser le compte général ou plusieurs comptes TVA.
Avantages d’utiliser un seul compte TVA
- Bilan et compte de résultat beaucoup plus facile à lire (il n’ya pas beaucoup de comptes TVA).
- Possibilité d'avoir des comptes (par exemples, des produits) d'où enregistrer des opérations avec plusieurs taux TVA.
- Connaître immédiatement la TVA due, sans avoir à additionner les différents comptes.
-
Vue immédiate de toutes les transactions TVALa fiche Décompte TVA montre toutes les opérations TVA en Débit et en Crédit.
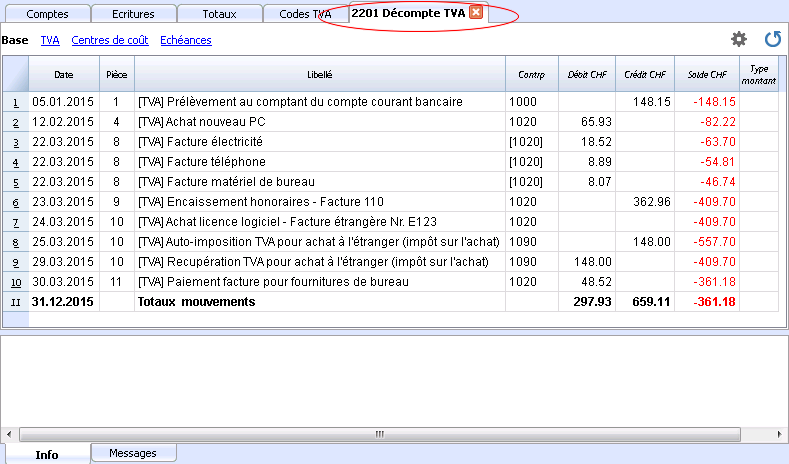
Avantages de l’utilisation de plusieurs comptes de TVA
Comme dit, si l'on utilise des codes TVA, l'enregistrement sur un compte TVA spécifique est une répétition des informations qui sont déjà disponibles grâce aux codes TVA et leur Résumé TVA detaillé.
Dans les pays tels que l’Allemagne, il est habituel d'avoir un compte TVA différent pour chaque type d'opération, afin que la déclaration TVA puisse être faite à l’aide des soldes des différents fiches de compte TVA.
Dans ces cas, pour assurer la compatibilité avec ce système, on peut considérer qu'il est utile d’avoir des comptes TVA différents pour chaque code TVA.
Clôture comptes TVA à la fin d'une période
À la fin de la période de calcul pour la TVA, il est utile de clôturer les comptes TVA de Débit et de Crédit et de déplacer le solde sur un compte unique:
- On voit, de façon comptable, quel est exactement le solde dû
- Le compte "2201, Décompte TVA" recommence avec un solde zéro pour chaque période. Il est donc plus facile d'avoir le contrôle sur d'éventuelles différences et erreurs.
Pour la clôture périodique du compte "2201, Décompte TVA", consulter la page Clôture périodique et paiement TVA.
Transactions
Accounting Charts templates included in Banana Accounting are already set with the VAT accounts, the VAT according to VAT report account (automatic), both in the chart of accounts and in the File and accounting properties of the File menu - VAT tab (in this case you don't need to enter any VAT account into the VAT codes table).
In case you are not using the Charts of accounts already available in Banana, make sure that the necessary VAT accounts are present in your own Chart of accounts. Our advice is to use a "VAT according to VAT report" account and to enter it into the File and Accounting properties, VAT/Sales tax Tab.
In the VAT codes table, there are codes both for the sales and the purchases. When entering the transactions, use the appropriate VAT code.
The software automatically splits the VAT amounts and records them in the "VAT according to VAT report" account or in the VAT account that has been indicated by the user in the File and Accounting properties.
VAT columns in the Transactions table (Complete VAT view)
You can find the full explanation of the main Transactions table columns in the Transactions page.
In the Double-entry accounting files with VAT or in those of the Income & Expense accounting with VAT, you will find the following VAT columns:
- VAT Code: for each transaction with VAT you need to enter one of the VAT codes from the VAT codes table
- VAT %: the program automatically enters the VAT percentage associated with the VAT code you entered
- VATExtraInfo: A code related to extra info about the VAT, to be used only in very exceptional cases.
It is possible to enter a symbol to identify specific VAT cases. The program suggests options, corresponding to the VAT Codes that start with a colon ":". - %Eff.: the program automatically enters the VAT percentage referred to the net amount. This percentage is different from the normal percentage when this one is referred to the gross amount.
- Taxable: once you enter the VAT code, the software automatically indicates the taxable amount (without VAT)
- VAT amount: the program automatically indicates the VAT amount
- VAT A/C: the account where the VAT is registered is automatically indicated (for Switzerland normally is the 2201 VAT report account); this account was previously entered in the File Properties, VAT tab (from the File menu).
- Amount type: this is a code that indicates how the software considers the transaction amount:
- 0 (or empty cell) with VAT/sales tax, the transaction amount is VAT included
- 1 = without VAT/Sales tax, the transaction amount is VAT excluded
- 2 = VAT amount, the transaction amount is considered the VAT amount at 100%
- Amount type not editable: Default mode.
- The column is protected
- The program uses the associated value of the VAT Codes table
- When you edit the value in the VAT Codes table and you recalculate the accounting, the program uses the new value associated with this VAT Code.
- Amount type editable: this option can be activated with the Add new functionalities command. The activation of the option cannot be undone.
- When you edit the VAT Code, the program uses the Amount type associated with this code.
- The value can be edited manually
- When the accounting is being recalculated, the value indicated in the Transactions table is being maintained.
- Non. Ded. %: this indicates the non deductible %.
- When you enter or change the VAT Code, the program uses the Non. Ded. % associated to this VAT Code in the VAT Codes table.
- You can manually edit the value
- VAT Acc.: this is the VAT amount registered in the VAT account.
It is calculated by the program according to the Transaction amount, the Amount type and the non deductable percentage. - VAT number: this is the code or VAT number of your client/supplier.
When you enter a transaction with VAT, it is possible to enter the VAT number of your counterparty. If in the Accounts table, in your clients/suppliers register, you also enter their VAT number, this is automatically loaded in the Transactions table, in the VAT number column.
Transactions with VAT
Before entering transactions with VAT, we advise you to visit the Transactions page.
The most common way of entering a VAT transactions is to enter the gross amount (amount including VAT), then apply to it the appropriate VAT code, choosing it among the ones included in the VAT codes table and according to your transaction type (Purchase, Sale, Discount, ...).
![]()
How to correct VAT transactions
If you see the mistake right away, you can just edit the transaction row; this is only possible if you haven't sent your VAT report yet and if there is no transactions lock.
If however your accounting file is locked or if you have already sent your VAT report, you cannot simply delete the wrong transaction, but you need to operate some cancellation-transaction and then re-enter the correct transaction.
In order to rectify VAT operation you need to:
- make a new transaction by inverting the Debit and Credit accounts used in the wrong transaction
- enter the same amount
- enter the same VAT code but preceeded by the minus sign (ex.: -V80)
- enter a new transaction with the correct accounts, amount and VAT code
Depending on the entity of the mistake, you should consider informing your local VAT office; usually they ask you to download a specific form for correcting mistakes in the previous VAT period.
Transactions with different VAT codes
When the total amount of an invoice is composed by several amounts with different VAT percentages, you need to register as follows:
- each amount with a specific VAT percentage needs to be entered on a different row with its own VAT code (enter the gross amount)
- once you finish the multiple registration, check that the sum of the differents amount and the VAT amounts correspond to the invoice total.
Here is an example:
![]()
VAT EXEMPTION
If in your invoice you also have some items VAT exempt, you need to operate as above, choosing the VAT exempt code from the VAT Codes table.
Credit note
In case an operation, that has been entered at an earlier date, needs to be cancelled, the same VAT code that has been used for the initial operation needs to be entered with the minus sign (-). In this way the VAT is being rectified.
Instead of using the minus sign prior to the VAT code, it is also possible to use the specific VAT codes for discounts that have been configured in the VAT Codes table.
Example of a credit note on a sale
When a client finds a defect on a sold product, usually a credit note on his behalf is being issued. The credit note implies a decrease of the income and as a result a recovery of the VAT (Sales tax).
For example, we enter a sale amount of 12'000 including a 8% VAT. We then issue on the client's behalf a credit note of CHF 200.- for a product defect.
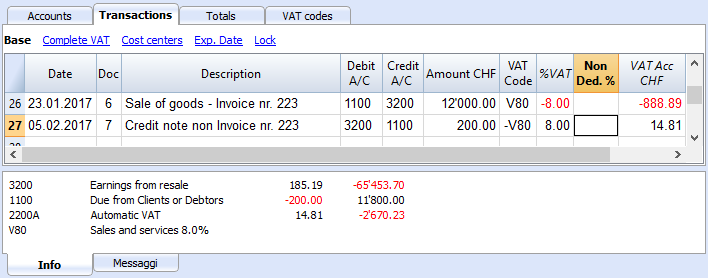
For a recovery of the VAT on the amount of the credit note, the VAT code of the sales has to be entered with a minus (-) sign.
Example of a credit note on a purchase
When we receive a credit note from a supplier, the same process as explained above applies: we use the same account codes but reverted, and we use the same VAT code with the minus (-) sign.
For example, we enter a purchase amount of 3'000 (invoice payment) including a 8% VAT. We then receive a credit note of CHF 300.- from our supplier for a product defect.
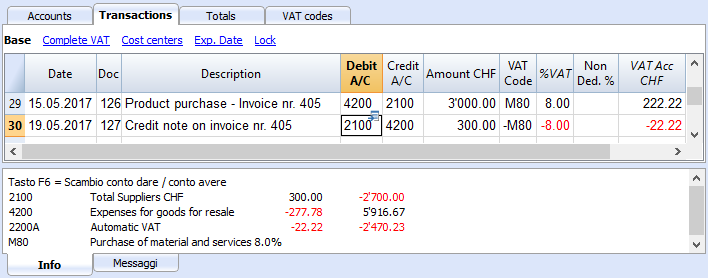
Period closing and VAT payment
VAT account reset at the end of the quarter report
At the end of the period, the VAT account balance will be charged to the Due VAT account (or to the Treasury VAT account).
VAT account card before charging the period balance to the Due VAT account

Transaction for charging the quarter balance to the Due VAT account
![]()
VAT account card after charging the period balance to the Due VAT account
![]()
VAT payment
The Due VAT account (or the Treasury VAT account) will have a zero balance when you pay the due VAT.
With this system you can control your balance each quarter and in case of mistakes you can find in which period the balance does not correspond any more.
![]()
Due VAT account card after quarter payment
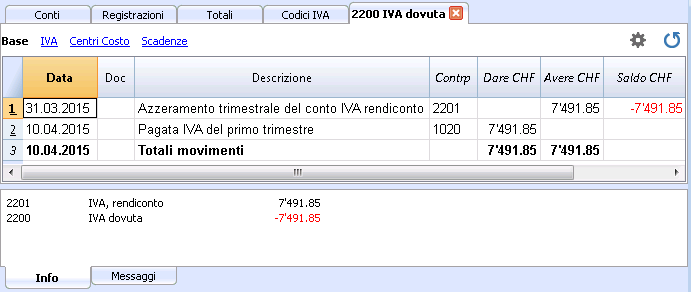
Note: the VAT payment process we just explained refers to the Swiss effective VAT payment method and the Swiss flat rate payment method with VAT separation.
If you use the Swiss flat rate payment methos without VAT separation, you can find specific information on the VAT payment and accounting assestment page (available only in Italian, German or French).
How to register a credit note (Switzerland)
If at the end of a period, when calculating the VAT report, the previous VAT is bigger than the due VAT, your VAT report has a Debit balance.
In order to charge the VAT report account you need to enter a transaction as follows:
- put in Debit A/C the Due VAT account
- put in Credit A/C the VAT report account
Usually in Switzerland the VAT credit is reimbursed, without having to move the credit to the following period.
When your VAT is reimbursed you need to enter a transaction as follows:
- put in Debit A/C your equity account
- put in Credit A/C your Due VAT account (where the balance should go to zero)
VAT Report
The VAT Report elaborates and displays the VAT calculation according to the selected period and parameters.
Procedure:
- Select, from the Account1 menu, the VAT report command
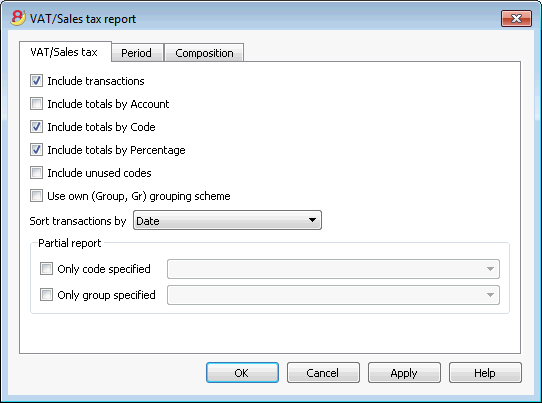
When activated, the following options allow the user to include the following data in the VAT report:
All the transactions with VAT/Sales tax are included.
Include totals by Account
All totals of operations with VAT/Sales tax, grouped per individual account, are included.
All totals of operations with VAT/Sales tax, grouped per individual VAT code, are included.
Include totals by Percentage
All totals of operations with VAT/Sales tax, grouped per individual percentage, are included.
Include unused codes
Also the unused codes of the VAT Codes table will be listed.
Use own (Group, Gr) grouping scheme
The operations with VAT/Sales tax are grouped according to the groupings of VAT Codes table.
Sort transactions by
By activating this cell, the transactions are sorted on the basis of a preselected option (Date, Doc., Description, etc….).
- only code specified (by selecting from the list)
- only group specified (by selecting from the list).
Other sections
The information relating to the other sections are available on the following internet pages:
VAT Report / transactions with totals by code
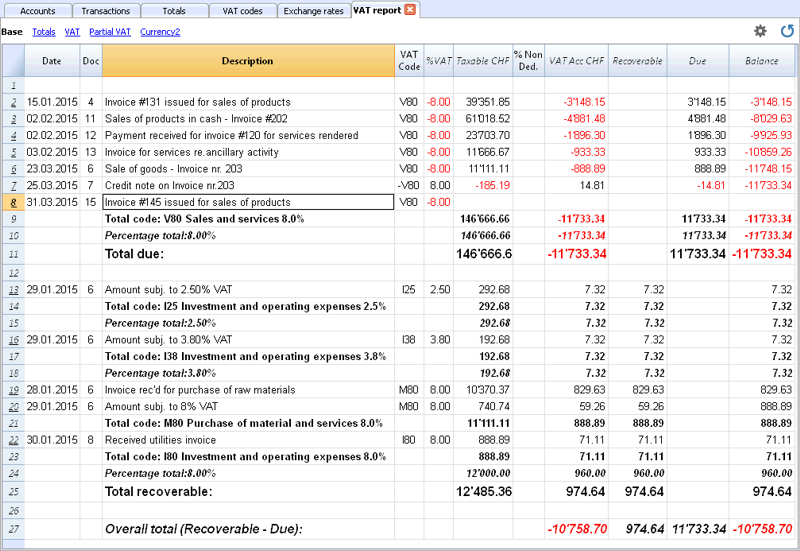
The overall total in the last row of the VAT report has to correspond with the amount for the end of period of the Automatic VAT account, Balance column, on the condition that both of them refer to the same period.
The data of the VAT report can also be transferred to and elaborated by other programs (f.i. Excel, XSLT) and be presented in formats that are similar to the forms of the tax authority
For Switzerland, one can automatically obtain a document similar to the form that has to be sent to the VAT office. This form shows the amount to enter for each number. Please consult (in German, French, or Italian) Swiss VAT Report.
Check accounting
Avoid mistakes with Banana Accounting Plus
In order to facilitate checking your accounting work and to immediately find differences, in Banana Accounting Plus, our new version, we added the Balance column in the Transaction table. You can now see potential differences on each row and you can correct them right away. It is a very useful feature when closing the accounting period.
Many of our clients have already tried it and are enthusiastic about it. We advise you to switch now to Banana Accounting Plus and take advantage of the many new features.
You can recalculate and check your accounting in different ways:
- with the Shift + F9 keys (Windows and Mac) or Cmd + 9 (Mac)
Primary accounting recheck - with the Check accounting command from the Account1 menu
this solution includes several extensive control options - Extensive accounting recheck
If there are error messages or differences you should correct them.
Primary accounting recheck
This command will execute the following operations:
- it will reset the accounts balances, as well as the cost centers and segment balances
- it will verify and report if there are errors in the various tables (Accounts, Transactions, VAT Codes and Exchange rates tables)
- it will re-enter all the operations as if they were being entered for the first time
- for the multi-currency accounting, it will recalculate the opening balances in the basic currency using the latest exchange rates
- if the transactions rows are not locked, it will recalculate all transaction rows:
- the VAT percentages are taken from the VAT Codes table and the VAT amounts are recalculated again
- it will update the account balances, as well as the cost centers and the segment balances
- in the Cashbook the progressive account balance in the Transactions table is recalculated
- it will recalculate the Accounts and Categories table totals (income and expenses)
- it will update the Diff. Budget and the Previous year columns
- in the multi-currency accounting, it will update the Calculated balance with the latest exchange rate and the exchange rate difference
Extensive accounting recheck - the Check Accounting window
On top of the basic accounting recheck, additional checks are executed.
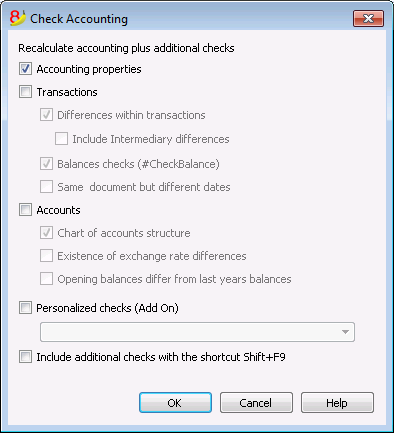
Recalculate accounting plus additional checks
This is one of the most useful features: the entire accounting file is being rechecked, all the balances are recalculated and the user is notified if errors are found.
Accounting properties
This option is being activated by default. The program verifies whether the data entered into the File and accounting properties correspond to the actual accounting (for example: opening and closing date, VAT account, accounts for exchange rate differences, etc.).
Transactions
Differences within transactions
If this option is activated, the program verifies whether there are differences between Debit and Credit or between Accounts and Categories in the Income & Expense Accounting. The rows where the differences occur are being indicated in the Messages Window. Also, the program shows the total difference amount in the Information window at the bottom of the screen (only when being positioned in the Transaction table).
Include intermediary differences
If this option is activated, the program verifies whether there are differences between Debit and Credit, in composed transactions (transactions over multiple rows). Often differences are caused by incomplete entries or errors in the amounts (as for example in the following example, in the transaction n. 8).
![]()
Balances checks (#CheckBalance)
By activating the Transactions option as well as this one, The program checks whether an account balance is equal to the one being inserted for verification (for example, between the bank account balance on the bank statement and the balance of that same account in the accounting file). In case the balances don't match, the program indicates the error.
In order to proceed with this check, one has to:
- In the Transactions table: enter #CheckBalance in the Description column, as well as the currency code and the balance of the account (example: #CheckBalance CHF 28'000..00). Into the Debit column, enter the account to be checked. The Amount column remains empty. The amount to be checked has to be entered with the same number of decimals as the one of the account to be checked.
- Activate the option through the Account1 menu
- While the accounting is being checked, when there are differences between the checking balance and the account balance, the program shows the error while indicating the row.
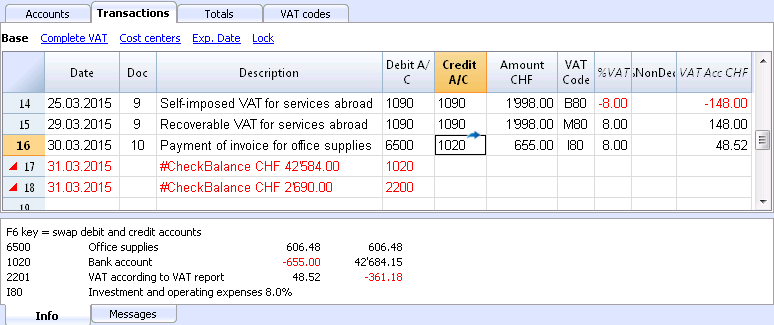
The program has detected a difference between the checking balance and the account balance in the file
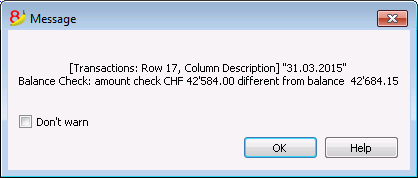
Same document with different dates
f this option is activated, the program will alert if transactions with the same Doc number have a different date. On composed transactions (=transaction on more than one row), where there is no correspondence between Doc and Date, the program cannot correctly determine the counterparty.
Accounts
Chart of accounts structure
If this option is activated, the program checks whether the chart of accounts structure is correct.
Existence of exchange rate differences
If this option is activated, the program checks whether there are unrecorded exchange rate differences.
Opening balances differ from last year's balances
If this option is activated, the program verifies whether the opening balances of the new year match with the closing ones of the previous year.
Personalized checks (Add On)
If this option is activated, the program runs checks on the functions that have been added by user (Add Ons), for customized verifications.
Include additional checks with the shortcut Shift + F9
When this option is activated, the program will run all the checks activated in the dialog window, when pressing Shift+F9. Otherwise only an accounting recalculation will be done (Mac version: Shift + Cmd + 9).
Accounting report file
The Accounting Report is a file type in which the presentation of a report is being set up, indicating the way in which the accounts are being grouped.
Thereafter, the Accounting report can be executed through the commands of the accounting:
- Enhanced balance sheet with groups (Chart of accounts, Sections, External accounting report)
- Accounting report (External accounting report section).
The grouping system, created in this manner, can be linked to the accounting to extract and totalize the accounts.
There are two ways of doing this:
- Grouping based on the indicated groups
This manner is useful when one wants to group the accounts according to different criteria, for example, present the Balance sheet and the Profit/Loss statement according to a grouping system that is different than the one set up in the Accounts table. -
- In the Report, the grouping system is being created.
- For each account of the Accounts table in the accounting, in the GR1 column (or another column), indicate the group in which the account has to be grouped.
- When the Report is being executed, all the accounts that are marked with groups in the report file are being carried forward.
- Grouping based on the indicated accounts
This manner is useful when one doesn't want a report with all the accounts but with only a few selected accounts.- In the Report, indicate the accounts of the Accounts table from the Accounting file that should be included.
- When the Report is being executed, only the indicated accounts are being carried forward.
How to create an Accounting report file
In order to create an Accounting report file: i
- File menu, New ->
- Double-entry accounting -> Accounting Report
- It is possible to choose an existing model or get started with a new one
- Once created, save the file under a new name.
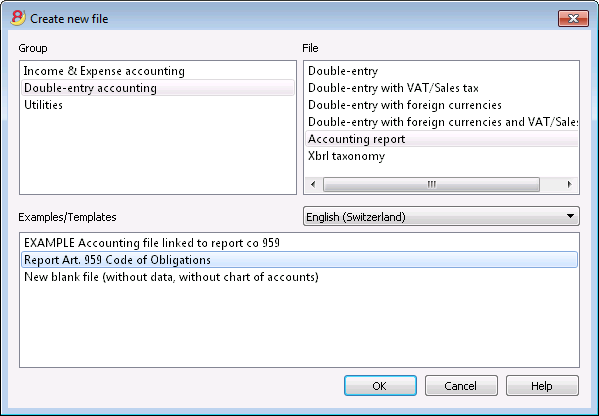
The columns of the Accounting report
The Accounting report file includes the same columns as those in the Chart of accounts of the accountiung file. They make it possible to create the groupings and the totals.

Sections
This column is being used to indicate the value that is to be used in the presentation.
For the different possibilities, see the documentation about the Sections.
Group
The group in which the accounts of the accounting have to be totalized or a group of the report.
Account (only visible in the Complete view)
The account that has to be included in the report.
- If there are accounts, when the report is executed only those indicated will be carried forward.
- In case no account has been indicated, the accounts that have been linked through a group will be carried forward.
Description
Description for the grouping or of the row itself.
Gr
In the Gr column, one indicates the total in which the row has to be totalized.
Tot
If the word "Yes" is being entered, only the Total row is being displayed and not the accounts that are a part of this total.
Please look at 'Show groups' totals only' in the Accounting report.
Keep
Usually, the totalization rows that have accounts with balances are included in the report.
If you indicate "Yes" in this column, the row is in any case always displayed. This can be applied to both the totals and to the accounts.
With mov.
This applies to groups that have a zero balance.
The row will only be displayed if there have been transactions (movements) during the time period.
Creating a Report linked through the group
- In the Report, create a system of groups and subgroups as desired.
- In the Accounts table one indicates, in the Gr1 or Gr2 column, the group in which the account has to be totalized.
In case the Gr1 column (or another preferred one) is not visible, make it visible with the Columns setup command. - The accounts that are not being linked will not be included in the Report.
- Execute the Report through the commands:
- Enhanced balance sheet with groups
- Accounting report.
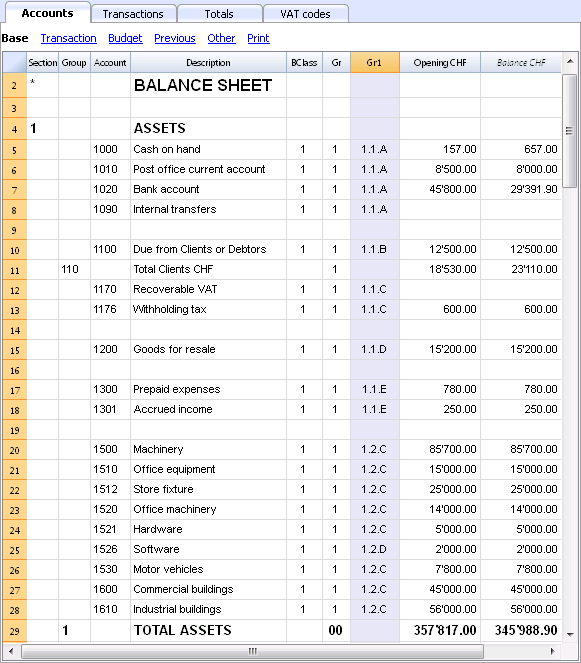
Creating a report that groups only some selected accounts of the accounting
This modality is active even when in the report only one account has been indicated.
Do not indicate any account, if you wish that the report is being executed in the group modality.
In the report are being indicated:
- The accounts of the accounting that have to grouped together.
Only the indicated accounts will be included in the report. - The groups in which the accounts have to be grouped together.
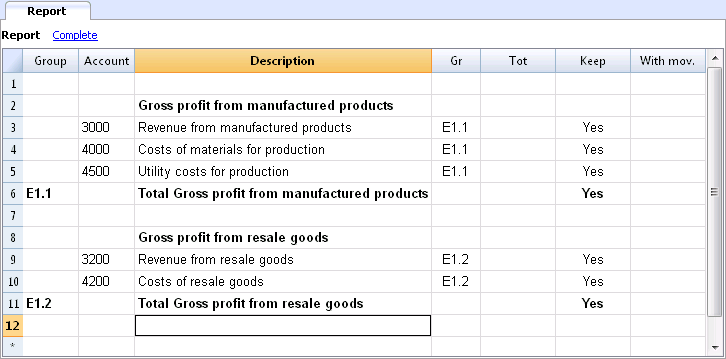
Execute the Report using the commands:
- Enhanced balance sheet with groups from the Account1 menu (then Chart of accounts -> Sections -> External accounting report)
- Accounting report from the Account1 menu (then choose the Base section and the External accounting report option).
Documents table
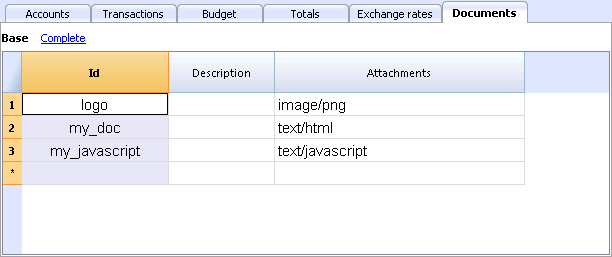
The new Documents table allows you to include texts, images or programming codes (scripts) into your accounting file.
This table is normally automatically created when attaching some documents to the Balance sheet, using the Account1 - Balance sheet command or the Account1 - Balance sheet with groups command -> Attachments section.
The Documents table has the following columns:
- Id column
This is the document's name.
Documents beginning with the "_" sign have specific meanings.- "_budget.js"
You can enter specific functions created for the Budget table.
- "_budget.js"
- Description
A short file description (optional) - Attachments
Contains the file.
If you click on the cell, an icon will appear to add or edit the file content.
Including a logo when printing the invoices
- Add a new row
- In the Id column, write 'logo'
- In the Attachment column, double-click on the cell, or select the Edit symbol, select the type of Image document and select the picture you want to insert in the printout.
The logo must be an image with a width of 120px and height of 100px.
You can also add other images, to be used in customized templates.
HTML Editor
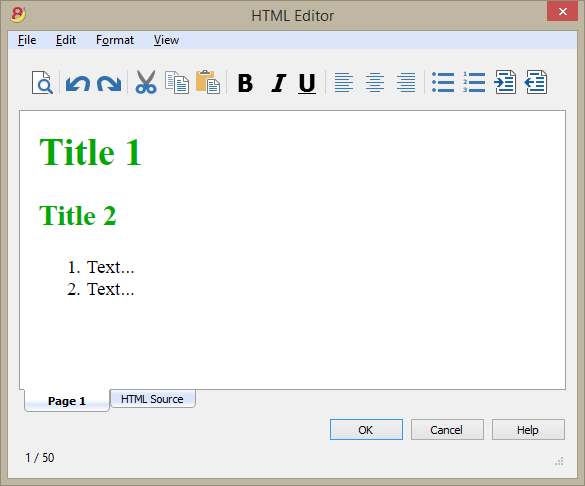
Adding the ${...} field
The ${...} field allows the user to add dynamic text to the document, for instance an account's balance or a Banana table. The Banana API interface is available at the following web address https://www.banana.ch/doc8/en/node/4714
The command can be added manually or through the command Edit - Add script
Printing the current balance of account 1020
${Banana.Converter.toLocaleNumberFormat(Banana.document.currentBalance('1020','','').balance);}
Output of the Accounts table, columns: Account, Group, Description, Balance (command not yet available)
${HTML Banana.document.table("Accounts").toHtml(['Account','Group','Description','Balance'],true);}
It is possible to write the javascript code in a separate document and include the script through the command Banana.include.
The scripts can be saved in the Documents table or in a local file.
${Banana.include("documents:myscript1");rtnValue}
${Banana.include("c://temp//myscript16.js");rtnValue}
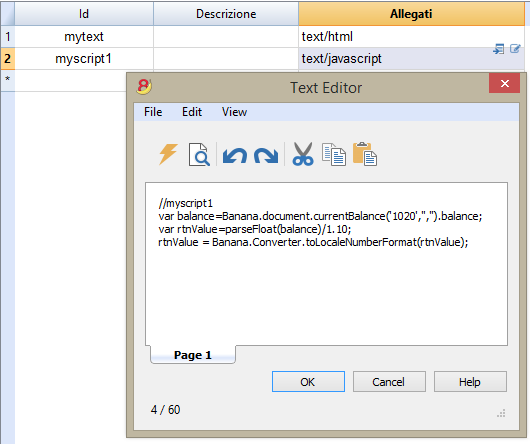
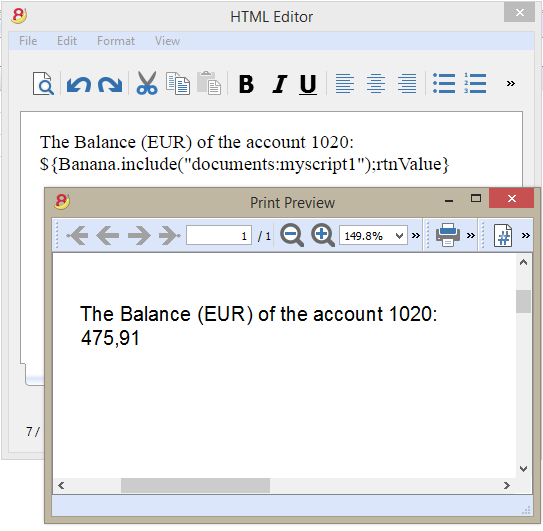
Adding a page break
The command can be added manually or through the comand Edit - Add page break
Text in the first page
${PAGEBREAK}
Text in the second page
The command ${PAGEBREAK} is not yet available, the current command to add a page break is:
<!--pagebreak-->
Aggiungi funzionalità contabilità
Aggiungi colonne Indirizzi nella tabella Conti
Per i file di contabilità.
Questa funzione permette di aggiungere, nella tabella conti, le colonne che servono per inserire gli indirizzi dei clienti, dei fornitori, dei soci o altro.
Il programma aggiunge nella tabella conti:
- la vista Indirizzi dove sono visibili le colonne aggiunte.
- Le colonne che permettono di inserire i dati dell'indirizzo e altre informazioni.
- Per rendere visibili una o più di queste colonne anche nelle altre viste usare il comando Disponi colonne del menu Dati.
- Per creare altre viste con delle colonne specifiche, usare il comando Disponi Viste.
Aggiungi tabella preventivo
Per i file di contabilità.
Questa funzione aggiunge la tabella Preventivo dove si possono inserire le registrazioni che riguardano il preventivo.
Il programma aggiunge:
- La tabella preventivo, riprendendo i valori di preventivo indicati nella tabella conti (se esistono)
- Blocca la colonna preventivo nella tabella conti
I valori di questa colonna saranno calcolati in base alle registrazioni di preventivo e come periodo, quello definito nei dati base contabilità.
Maggiori informazioni sono disponibili alla pagina Preventivo.
Modifica colonna tipo importo IVA nelle registrazioni
Per i file di contabilità, con IVA.
Questa funzione permette di rendere modificabile la colonna Tipo imp. (Tipo importo IVA) nella tabella Registrazioni.
La colonna permette di inserire per ogni registrazione, quando occorre, uno dei seguenti tipi di importo IVA:
0 (o cella vuota), si intende IVA inclusa
1 = IVA esclusa, si intende IVA esclusa
2 = importo IVA, l'importo della registrazione è considerato importo IVA al 100 %
Per ogni registrazione, il programma immette in automatico nella colonna Tipo importo i dati predefiniti della tabella Codici IVA (per ogni codice). Se eccezionalmente, per un codice IVA cambia il tipo di importo, è possibile inserire manualmente 1 o 2.
Nota
Utilizzando questa funzionalità ci sono delle incompatibilità dei dati IVA con le versioni precedenti che non avevano questa funzionalità.
Utilities application
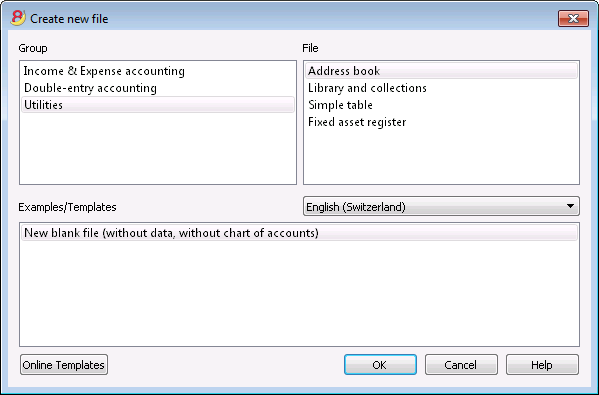
The Utilities application allows you to create the following file types:
- Address book: for addresses and labels management
- Library and collections: for the management of books or other objects (ex.: art collections, jewlery, ...)
- Simple table: the user can create a personalized table
- Depreciable assets register: the user can manage the depreciable assets (only available in the Experimental version)
By clicking on the Online Templates button you can access our website where we published all templates available for free.
Additional functions
The following commands are particularly useful when used with these applications:
- Extract and sort rows
In order to create lists of existing data. - Print labels
In order to print addresses or items labels. - Add new funtionalities
- New table documents (Swiss Balance sheet attachment...)
- New simple table
- App menu
In order to create personalized reports, calculations or else.
Link between tables
You can create a link between a field of one table to another one, through the Id field.
For example:
- Add a new simple table named "Projects"
- In the Id column indicate a project symbol and in the Description column a small explanation.
- In another simple table, add the following text columns:
- ProjectsId (Table name plus "Id")
When you go into edit mode a list of the available projects will be displayed. - ProjectsDescription (Table name plus "Description")
This column must be protected.
When you change the ProjectsId contents, the description text will be displayed.
- ProjectsId (Table name plus "Id")
- When you add a column, proceed with a check of the accounting or close and reopen the file to activate the link.
Address Book
This is an application for managing data lists and printing labels.
Characteristics:
- Free definition of the fields
- Possibility of printing only the selected rows
- Free setting of the label format
- Copy/Paste addresses from other programs (Excel and Word)
The Address Book presents three tables:
- Groups
- Contacts
- Diary
Groups
In the Groups table, one can define for each row, in the Id column, an identification code for a Group and enter the corresponding description in the Description column (es. cli - Clients, sup - Suppliers, col - Colleagues, etc.)
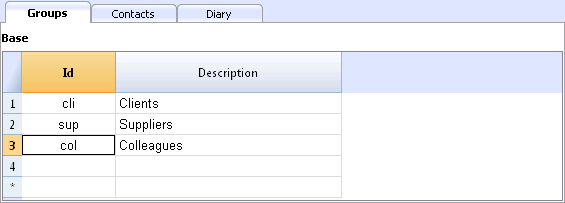
Contacts
The table presents the columns where the addresses can be entered.
The columns
There are different columns. The biggest part of the columns is invisble. The Colums setup command has to be used in order to:
- Display the columns
- Change the order of the displayed columns
- Add other columns
- Id is the contact number.
This is needed when you want to connect a contact to the diary, to the loans or to another table.
While being on that column and pressing F6, there is an automatic progressive numbering. - Prefix: you can enter "Mr", "Mrs", etc.
- Family or Company name (if it concerns a company).
If the contact is a contact person for a company, you can enter the company or entity to which the contact belongs in the Organisation column.
When pressing F6 on the Name or Family Name column, the program separates or inverts the name and last name.
If there are more than two names, this feature is not able to distinguish which one are the names or family (last) names. - LetterStart: is the greeting that is being used at the beginning of a letter. This is being used for a mail merge.
For example: Dear John or Dear Mr Smith.
The program suggests possible texts according to the contents that have already been entered into the columns.
The views
There are different views available and each view distinguishes itself from another one through the presence of specific columns; in this example (Address Book file), we have the Base, Name, Address2, Archive and Complete views. In the Complete view, all the columns are visible.
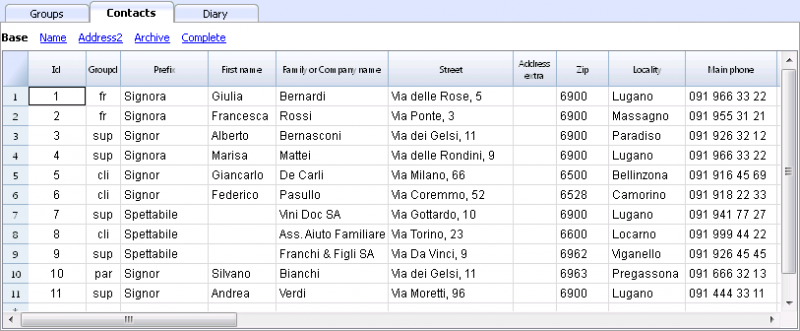
Diary
In the Diary table, you can record all kind of notes, day after day and refer to the entered contacts.
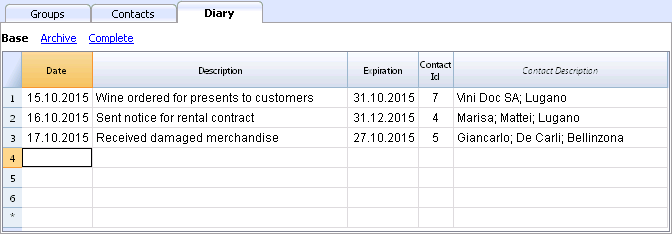
Synchronize the data with Google
Manages your own Address book with the Google contacts.
When clicking on the Synchronize with Google (Download) command of the Utilities1 menu, a window appears that displays a Chrome browser page integrated in Banana and that asks for your Google login.
- Enter your email address and the password of your own Google account.
- Banana saves only the email corresponding with the Google account.
The session's data and the password are not being saved in Banana, but are being managed by Google chrome.
Download
This feature takes the contact data from Google into Banana, or updates the Banana contacts.
- In the Groups table, the groups that are present in Google are being resumed.
- In case there are already data in the table, the program merges the different data.
Send
Sends the modified data to Google, or updates the Google contacts.
- If in the "GoogleNotSynchronized" column "Yes" is being indicated, the contact is not being synchronized with Google.
- In order to send the data, these have to be downloaded earlier.
If you have edited the data on your telephone, you need to first download the data and then press Send.
References
For the technical details referring to the connection made, please consult the Google Api documentation.
- https://developers.google.com/google-apps/contacts/v3/
- https://developers.google.com/gdata/docs/2.0/elements#gdReference
Printing Addresses/labels
Information on printing addresses/labels can be found on the following web page Print label.
Library and collections
How to use it / introduction
This is an application that allows you to keep a list of books, objects and contacts, and check on objects borrowed and returned.
There is a free downloadable template for libraries where you can also find all the explanations on how to use it.
Groups table
In this table you can assign to each user a group, for example to partition children between Kindergarten and Primary school users, etc.
You can enter a group Id (Id column). In the Description column you enter a text describing the group.

For a detailed explanation of the columns, please consult the Address Book page.
Contacts table
In the Contacts table you can to enter users data, divided into several customizable columns (you can keep visible only the ones you need and hide all others - you can also add new ones).

For a detailed explanation of the columns, please consult the Address Book page.
Items table
In this table you can enter your items data.
There are different ways of entering the items data: copy and paste from Excel, automatic data retrieving from the Internet, etc.
See detailed explanations below.

Columns
There are various columns and it is also possible to add new ones.
- Id: the item number that has to be attributed.
The F6 key assigns the number progressively.
It is also possible to use a prefix. For example: A-001, after that, the program suggests A-002. - ISBN
The International Standard Book Number.
When entering the ISBN in the Id column and pressing the F6 key, the program automatically completes all the book's data in the other columns, incorporating them from the Google database, provided there is an internet connection available.
Any already present information will be overwritten.
For more information see: Google documentation.- The data in the Google database are not always complete. For example, the title might be present, but the editor or other data might be missing.
- In order to know which data are available on Google, please visit the following page:
https://www.googleapis.com/books/v1/volumes?q=9781906042509, entering after q= the book's ISBN number.
If you see "totalItems: 0" it means that the book is NOT in Google's database
If you see a page in a JSon format (programmers format) with the book's data, it means that the book IS in Google's database.
- Title
Is the title of the work. - Author
There can be several authors entered, separating them with semicolon ";". - Publisher
There can be several editors entered, separating them with semicolon ";". - Return date
The projected return date for this item.
This column is automatically completed according to the checked out item.
Entering books data
Books data can be entered in different ways:
- Manual insertion - You can manually enter the books data in the Items table (see previous paragraph)
- Retrieve data from Excel - If you already have a list of books from another program or Excel, you can simply copy/paste the data.
In order to copy / paste the data you need to make sure the columns in Excel as arranged in the same order as in Banana. If the column order is the same in both programs you can copy the data in block, otherwise you need to proceed column by column. The copy/paste operation is possible from Excel or from txt files. - Retrieve book data automatically from the internet - The ISBN column is very useful if you have an Internet connection: each book has an ISBN code (internationally recognized and generally written on the back of the cover); If you enter a book's ISBN code on the appropriate column in Banana and press the F6 key (or Cmd + 6 for Mac), the program automatically retrieves the books data from the Internet and inserts all data (title, author, publisher, etc. even a small summary).
- If the book has different authors or publishers, just separate the names with a semi-comma ";" - they will also be found individually in searches (for example if you need to find all the books of a certain author).
Loans table
In the Loans table you can enter the checked out items, the expiration date and the return date.
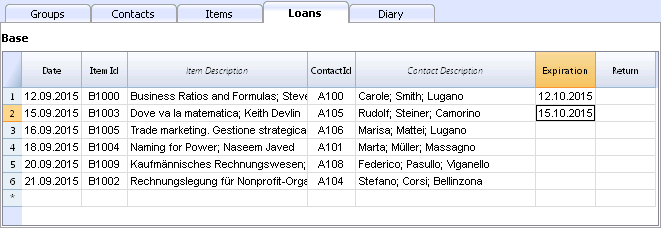
Columns
- Date
The data of the loan. - ItemId
The item number. A search can be made based upon the title. - ContactId
The contact number. A search can be made based upon the name, family name, place. - Expiration date
The projected date for the item's return.
If you enter "+30", the program proposes the date that come 30 days later. - Return date
Enter the return date.
How to manage the loans
Loan of a book
- Add a new line and indicate the date of the loan (useful shortcut: hitting dot "." on your keyboard will automatically generate the current date!)
- In the Item Id column, as you start typing the title of the book or library user, the program will display all choices available in your database; just select the right option and press the F6 key: the program will automatically fill the Item Id and Description cells.
- In the Expiration column (date of return for the book) the program automatically enter a date 30 days after your current date, but you can manually change it: you can enter the number of actual days (for example +40) to generate the correct return date (40 days later).

Return of a book
- From the Utilities1 menu, choose Items return;
- This will open a window where you type the name of the library user. This will display all books on loan to this library user.
- You can now check all returned books (usually a library user returns all the books he has on loan simultaneously).
- Click the Apply button and the program will automatically insert the actual return date in the Date column.
- In case of error, return to the Loans table and click the Undo command.

How to archive data
The Archive feature avoids the adding up of too many transactions of lent and returned books. Outdated data to be archived in hidden tabs without being deleted. This data can be recalled at any time for statistics or any other use.
Store data of returned books
- Choose Archive data from the Utilities1 menu and then Archive table data -> Loans. The program will delete all transactions of already returned books from the Loans table and store them in the Archive table.
- Only books on loan that are not yet returned will be shown in the Loans table.

Store contact information no longer used
As for your books, you can equally archive your old and unused contacts
- Indicate a storage date for all the contacts you wish to archive.
- Choose the Archive data from the Utilities1 menu and then Archive table data -> Contacts..
Diary - organization and internal notes
Diary table
In the Diary table you can enter daily notes and connect them to a specific contact.
You can for example organize the shifts of people working at the library, post notes or important facts, lists of things to do, etc.
Each row of record has it's column for date, description, expiration date, the contact Id of the originator.

Printouts
Everything that you see on screen can be printed or saved in a pdf format.
In the BananaApps section (look for library), you can also find extensions for specific printouts:
- printout of the complete book catalog in pdf, to be published on the internet
- printout of the users details with the books they have loaned and the ones still to be returned
Print library labels
Label printing
You can print two different types of labels:
- small labels (containing the book code) for use on the spine of the book, so that they are visible on the bookshelves
- larger labels are used on the inside of the cover, maybe mentioning that the book has to be returned at a specified date
Labels can be printed either on the basis of the Banana file, where you have registered all the books in the library, or from an empty file in case you wish to print a list with codes, that you will then assign to the books.
Printing labels for the spine of the book
You can choose the format that best suites your needs by consulting the websites of label producers (for example A4 sheets, 25,4 mm x 10 mm - Herma 10001 or Herma 4333 models).
In order to print the labels, you can open a new blank file in Banana, containing no data (File menu -> New), but, as stated, you may wish to start from an existing file in your library.
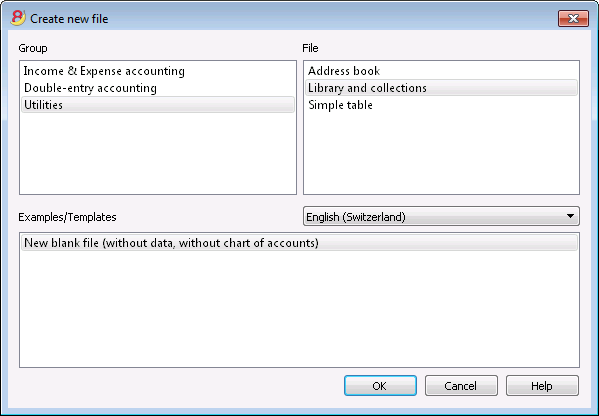
There is a useful Excel function to generate a large amount of codes in a speedy manner, rather than entering them manually or than using F6 key. Here is how you do it:
Open a new Excel file; in cell A1 entere the library code that suited your purpose (any combination of letters and numbers will do) - for example B-1000.
Choose the bottom right angle of your cell with your mouse (the point will now be a cross), and, while holding down the right click, drag down along the column; Excel will automatically generate autoprogressive numbers.
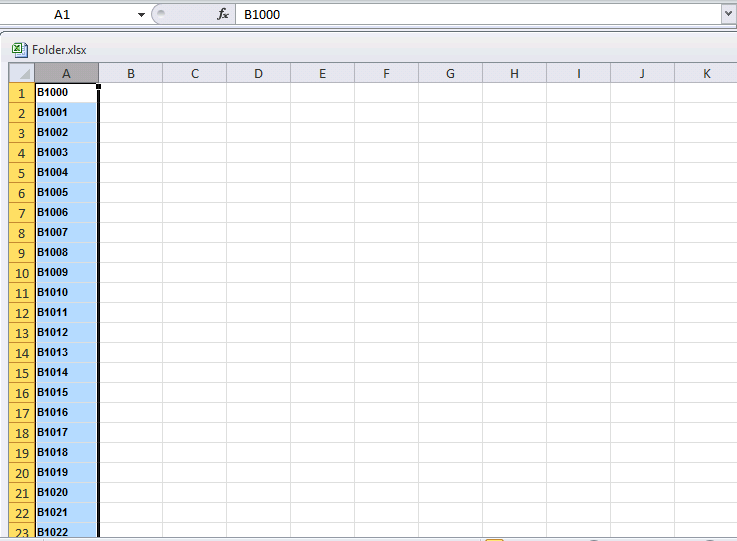
Now copy (Ctrl + C keys) the codes that have been generated into Banana's Items table, in the Id column (Ctrl + V keys).
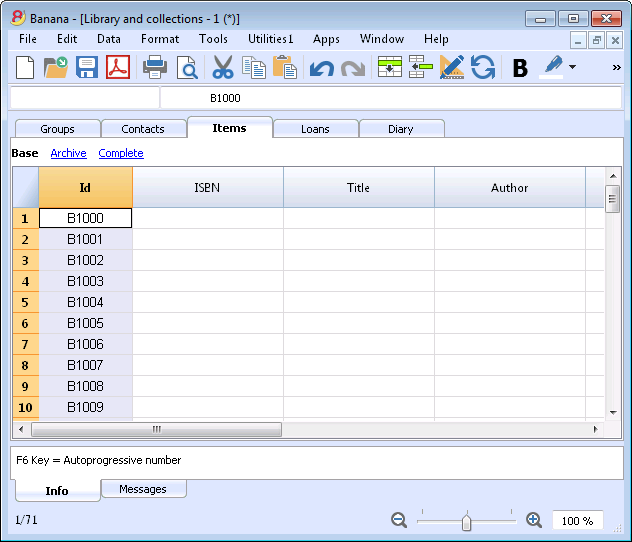
You can now create the label.
Chose the Labels -> Print command from the Apps menu. This window will be shown:
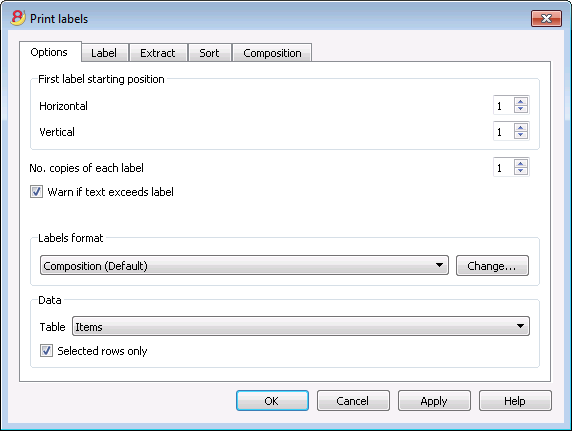
It is important to have the Items table selected as the source for Data; now you can define your label by pressing the Change... key in the Labels format section.
In the window now shown, entere the margins and other characteristics of your chosen label, Herma 10001 in this case.
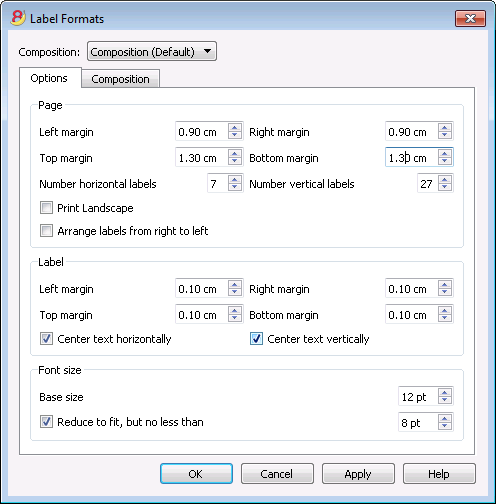
Before hitting the OK key, opene the Composition tab, where you can assign a name to your custom settings (so they can be used in the future). In this case it's Book codes (Spine).
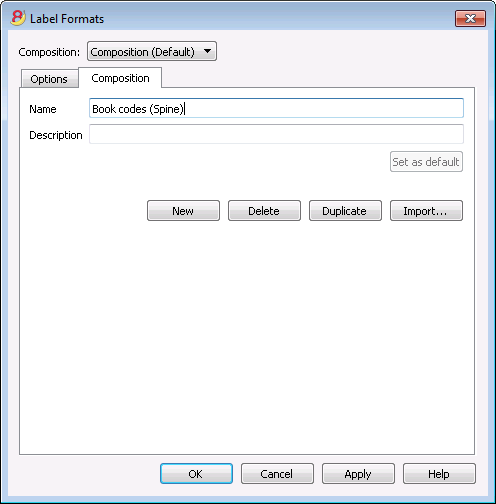
Hitting the OK key will now return you to the Print labels window.
Enter the Label tab to do so.
In the example, the label only needs to indicate the book's code, i.e. the RowId column.
You can therefore select the RowId line in the available list and press the Add Field button.
RowId will show in View labels.
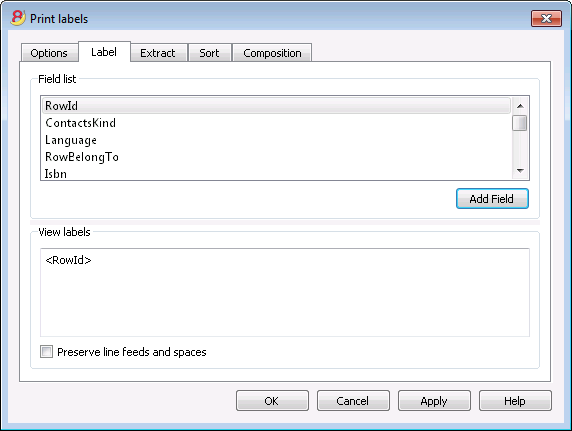
Pressing the OK button will generate a preview of your label.
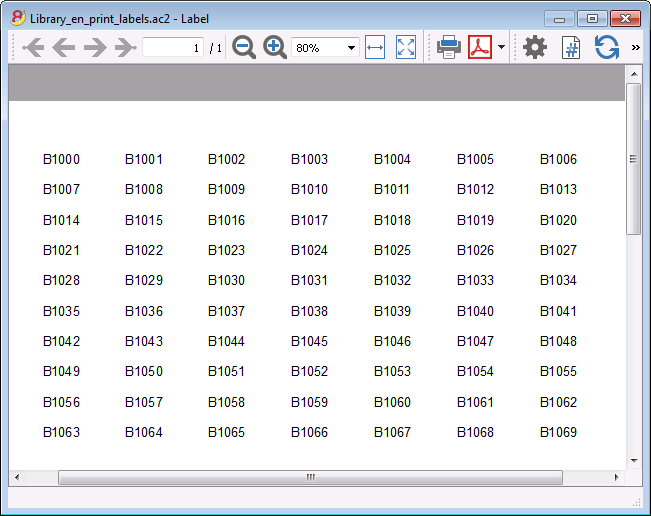
You may now print using your Herma sheets.
Printing labels for the inside cover
Choose your label format. In the example a 70x36mm (Herma 4630 or Avery 3490) format hase been chosen. The steps to follow are identical to the previous example::
- First, choose the Labels -> Print command from the Apps menu
- Click Change in the Labels format section
- Enter the margins for your new label in Labels format window.
- Before hitting the OK key, open the Composition tab, where you can assign a name for your new custom settings (Inside Cover label, for example), than hit OK.
- Select Label in the Print label section to add the content of your label.
You may enter text, other than the available fields, as well.
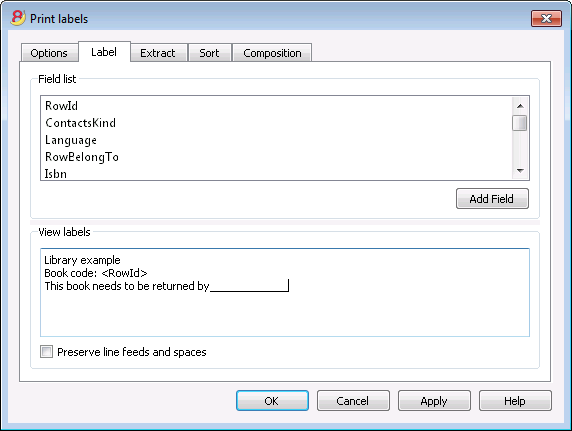
Pressing the OK button will generate a preview of your label.
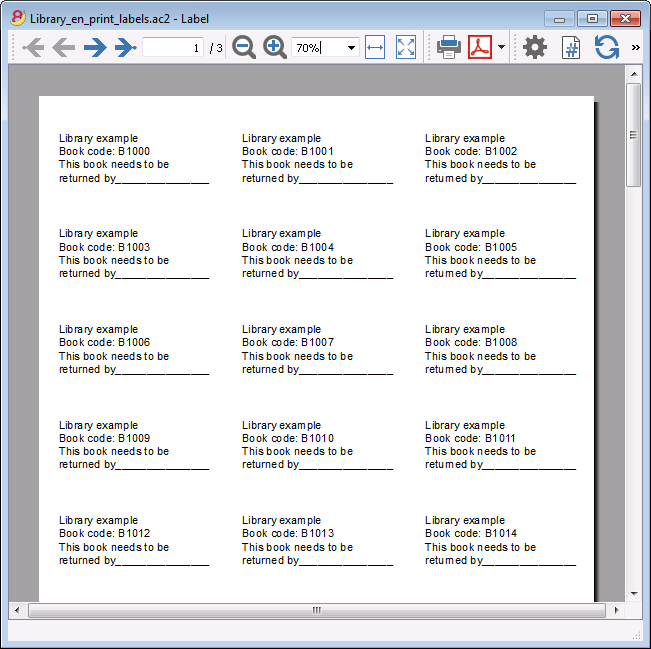
Note:
The models available in Banana already include the two mentioned label formats: label for the spine of the book and label for the inside of the cover.
Related features:
Management of yearly membership fees
If you run a library requiring an annual membership fee, or if fees are charged for the loan of individual books, it is useful to use the accounting functions of Banana Accounting.
Please check our page Accounting templates.
Simple table
This is a table that can be set up according to the needs of the user. One can add columns and views and give them the most appropriate header, with the Colums setup and Tables setup commands of the Data menu.
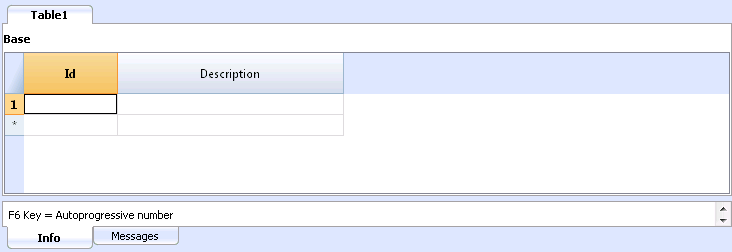
Depreciable assets register
New functions for amortizations
In the new Banana Accounting Plus version, the Fixed Assets Register has been improved with new features for an even more complete reporting.
We advise you to immediately switch to Banana Accounting Plus and take advantage of the many new features.
Available for now only in the Experimental version. This feature is under development.
This feature allows you to manage the depreciable assets, and, at the end of the period, automatically creates the depreciation transactions. It has the following tables:
- Items table
Where you list the depreciable assets and the depreciation parameters - Transactions table
Where you enter the depreciation transactions, as well as purchases assessments - Depr. Type table
Indicates the various depreciation types. - Trans. Type table
Indicates the various transaction types
Logic of the Software
The software allows you to track the value of your Assets in your Accounting.
All depreciable assets are entered in the Items table with all the parameters required for the effective calculation of depreciation. The following values figure in the Items table program:
The program uses the following values:
- Asset at purchase value
- Historic value (purchase value +/- assessment of appreciation or depreciation)
- Accounting value (historic value +/- corrections due to depreciations)
- Fiscal value (Accounting value +/- correction of fiscal value).
Variations of value for a specific item are entered in the Transactions table:
- A function for automatic calculation of periodical amortisation of predefined basic values, is integrated. Transaction values can be adjusted manually (as, for instance, in a varying calculation for a first accounting year).
- Transactions can be added manually for appreciation, extraordinary amortization, adjustment of fiscal value and so on.
Items Table
Where you enter assets subject to depreciation and their groups.
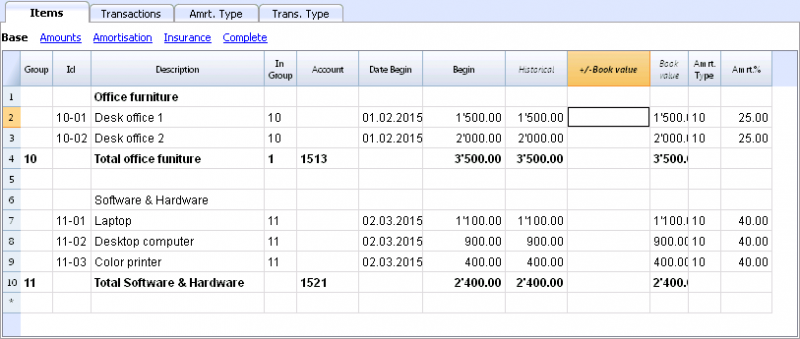
This table contains the following columns; The ones marked with an asterisk (*) are protected and calculated by the program:
- Group
If a value is present it means that the row is a group.
Items and groups values are added up in this row. - Id
The Item Id - Description
The item description. - In Group
The group the row belongs to. This must be a value present in the Group column. - Account
The account to which the item is being attributed in the accounting.
This account can also be a group. - Date Begin
The item purchase date (or at which the item was entered in the accounting file) - Document Date
The date of the item purchase document, if available - Initial value
The purchase value. - Purchase Variation*
The total purchase value, positive or negative, indicated in the transactions. - Purchase Value*
The initial value plus the purchase variation. - Historical Variation*
The positive or negative value of the historical variation (revaluations or write-downs) indicated in the transactions. - Historical Value*
The purchase value plus historical variation. - Book variation*
The positive or negative accounting value (depreciations or reverse depreciation entries) indicated in the transactions. - Book value*
Historical value plus book variations. - Fiscal Variation*
The positive or negative value of the fiscal adjustments indicated in the transactions. - Fiscal Value*
The Book Value plus the fiscal adjustments. - Residual Value
A possible minimal residual value to be indicated.
If the residual value is equal or bigger than the book value, no more depreciation rows are created. - Estimate value
An item's probable estimated value - Depreciation Id Type
The depreciation type applied to this item
The depreciation type can also be indicated for the group. - Depreciation Percentage
The depreciation percentage.
The depreciation percentage can also be indicated for the group. - Depreciation amount
A possible depreciation amount if the depreciation is not specified as a percentage. - Depreciation Percentage 2
The additional depreciation percentage to be applied to this item.The depreciation type can also be indicated for the group. - Depreciation Months First Year
The number of months the item needs to be depreciated in the first year. - Contra Account
The account where the depreciation should be registered
The contra account can also be indicated for the group. - Serial Number
The item's serial number - Warranty Date
The warranty expiration date. - Insurance Value
The value this item or group is insured for. - Insurance name
The insurance company's name. - Insurance number
The insurance policy number. - Insurance expiration
The insurance policy's expiry date. - Insurance cancellation
The date by which legal notice needs to be given to the insurance company if automatic renewal is not desired. - Archive Date and Archive notes
Columns you might use if you need to archive the item.
Transactions table
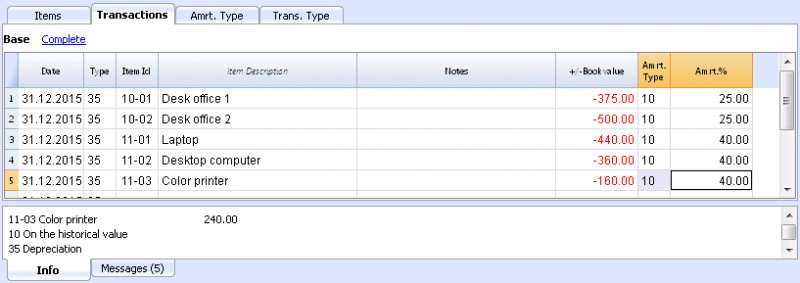
This is the table where you enter the items variations. It has several columns:
- Date
The transaction date - Transaction Type Id
The transactions type, identical to the one in the Transaction table. - Transaction Type Description*
The description from the Items table is displayed. - Item Id
The Item Id. - Items Description*
The items description from the Items table is displayed. - Notes
An additional note concerning the transaction. - Purchase Variation
The item (+/-) variation compared to the purchase or sale. - Historical Variation
The Item (+/-) variation compared to a item revaluation or write-down. - Book Variation
The item (+/-) variation value compared to the book variation.
This is particularly used for negative depreciations - Fiscal Variation
This is the fiscal variation amount. - Depreciation Type Id
The Depreciation type code as shown in the Items table. - Depreciation Type Description
The depreciation code descriptions as per the Items table. - Depreciation Percentage
The depreciation percentage applied. - Account
The Assets account where the operation must be registered - Contra Account
Contra account (for example the depreciation account) where the operation must be registered. - Archive Date and Archive notes
Columns you might use if you need to archive the item.
Depreciation type table
- Id
The depreciation code.
These codes are fixed and must not be modified.
If you change the Id number the program will not operate correctly anymore.- 00 No depreciation. No depreciation will be created.
- 01 Complete depreciation of the item. The item is depreciated all at once.
- 02 Indicated amount. The depreciation is calculated, based on the entered amount.
- 10 On the historical value. The depreciation is calculated as a percentage of the historical value.
- 11 On the book value. The depreciation is calculated on the book value.
- Description
The code explanation
Transactions type table
- Id
The transaction type code
These codes are fixed and must not be modified.
If you change the Id number the program will not operate correctly anymore.- 01 Initial value. Used to enter an initial value, instead of entering the initial value in the Items table
- 11 Purchase or production
- 15 Sale or value reduction.
- 21 Revaluation
- 25 Devaluation
- 31 Reverse depreciation
- 35 Depreciation
- 36 Additional depreciation
- 41 Fiscal value increase
- 45 Fiscal value reduction
- Description
The code explanation
Utilities1 menu
Create depreciation rows
It requires a date.
If you launch this command, the program automatically creates the monthly or yearly depreciation transactions based on the item parameters previously entered in the Items table.
- If the parameters Depr. Type, Percentage, Account or Contra account for the item are not entered, but have been entered for the group the item belongs to, the software will use the group parameters to create the depreciation transactions.
Show Journal
Will display all operations with the variation of values and the cumulative value.
Show items report
Will display the variations for each item and item groups for the selected period.
Planned developments to the software
Transfer of accounting
Under preparation, currently unavailable.
To resume amortization in accounting.
Printing
It is planned to develop printing modules within BananaApps, that will go beyond existing available printing templates, allowing for more flexibility and tailor made solutions.
Do not hesitate to report your needs and requirements to our programmers, possibly by sending an example of the type of report you wish to use, as an Excel table, with columns, totals, header data, and formatting.
Different types of amortization
It is equally planned to develop modules within BananaApps for this feature, to include different types of amortization, aiming to deliver a tailor made solution to you.
Do not hesitate to report your needs and requirements to our programmers.
Utilities1 Menu
The Utilities1 menu includes various commands that are specific for the Utilities applications.
The general commands, available in all the Utilities applications, are explained hereunder.
Other commands, specific for the Address Book and the Library application, are explained in the corresponding documentation.
Recheck all...
Checks everything and gives a warning in case there are errors.
Sort contacts by name
Sorts the rows of the Contacts table in ascending order by Name, Family Name, Second Name, Place.
Archive Data menu
The program keeps a list of the rows that have been archived, for each table.
The archived rows are being shown in the Archived rows table. Select the rows that need to be shown.
Archive data
Moves the rows of a table (Contacts, Items, Loans, Diary) to the Archived data table, where:
- The Archive data column is not empty.
- For the Loans table, there should be an expiration date and a return date (a "closed" loan)
A list of tables is being shown. The tables present on this list contain rows that can be archived.
If there are no tables with rows that can be archived, the selection is empty.
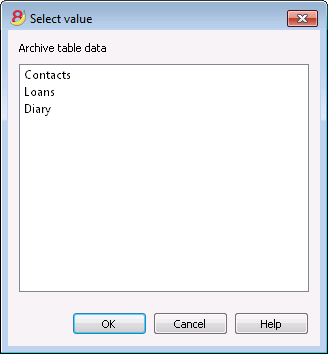
Show archived data
Shows a list of the archived rows of a specific table.

Questions and answers
Before contacting us, please verify if your question is one of the following:
- Is Banana Accounting 8 compatible with Apple macOS 10.12 "Sierra"?
Yes, the program is compatible from on version 8.0.4
- Is Banana Accounting 8 available for iOS?
At the moment, there is no Banana Accounting version available for iOS, but we are planning to release one in the future.
- Is Banana Accounting available for Android?
Yes, Banana for Android is available from on version 8.00.4. More information can be found on the Android page.
- How many mandates can be managed with Banana Accounting?
Banana Accounting has no limits on mandates. You can manage an unlimited number of mandates.
- I installed Banana Accounting 8 and the accounting file opens in the preceding version. What can I do?
Please follow the procedure on the page Associate .ac2 files with the most recent Banana version.
- When the Banana 8 Starter Edition is being installed, the Banana 8 icons become Banana 7. What can be done?
Open the Banana 8 files and in the Tools menu, Program Options, click on the button "Associate *.ac2 files to the program".
- Is there a multi-license version?
If your company needs several licenses, we can provide you with one single license key, just give us a call or contact us by email.
Discount of 10% when purchasing 20 or more licenses. For other quantities, please consult our price list.
- Transferring from one Operating System to another.
Besides the Windows version, Banana Accounting 8 exists also in a native version for Mac and Linux. Each version has its own license; therefore, Banana Accounting 8 cannot be installed on different Operating Systems with one single license key. Those who already have one or another Banana version, can buy version 8 for Windows, Mac and Linux at the upgrade price. As an alternative you can download and use for free the Banana Experimental and then purchase the full license of Banana Accounting 9.
- Is the Cash book free in version 8?
The Cash book is not free in version 8. It is included in the complete version that is for sale.
- How to convert from one accounting type unto another (for example, from an accounting without VAT to one with VAT)
It is possible to go from one type of accounting to another with the Convert to new file command from the Tools menu. The program creates a new file that should be saved under a new name. It maintains all the data that have already been entered and adds (or eliminates) the columns that are specific to the new accounting type.
- Does Banana Accounting manage the inventory?
Currently there are no modules to manage the inventory.
- Does Banana Accounting generate invoices?
From Banana Experimental, it is possible to manage the invoicing. However, some functions are still in a test phase.
- Banana Accounting needs to be reinstalled, but I can’t find my license key…
In case you still have access to the software, click on the Help menu-> Manage license keys and send us the registration code by email, with a request to receive your own license key once more. This is a service for which you will be charged.
- What should I do with my own data files when I update Banana Accounting?
Nothing: your data files are automatically updated when opened with a new version.
- Banana 8 and incompatible exchange rates from previous versions
When the basic currency is entered as the reference currency, the exchange rates with a multiplier greater than 1 can present calculation differences between Banana 8 and the previous versions.
To solve the problem, please consult our page Incompatible exchange rates from previous versions.
- Is it possible to import data from other accounting software?
Yes, just follow the instructions on this internet page: Transferring data from other accounting software.
- Can I install Banana Accounting on my laptop or on a second computer?
Installation on a laptop or on a second computer (with the same license key) is allowed as long as both computers belong to the same owner.
- Can I purchase with a credit card?
Yes it is possible to buy with a credit card. In order to buy from Switzerland, please connect to the page Purchase from Switzerland.
In order to buy from abroad with a credit card, please connect to the page Purchase from other nations.
- In the printout of the Enhanced Balance sheet by groups, the expenses and revenue have the minus sign in front of the amount. Why?
In the Accounts table, check the BClass column; the numbers should be as follows: 1 for the Assets, 2 for the Liabilities, 3 for the Expenses and 4 for the Revenue. Also, check the Section column: there should be 1 in the row of the Assets title, 2 for the Liabilities, 3 for the Expenses and 4 for the Revenue, 01 for the Clients register, 02 for the Suppliers register, 03 for the Cost centers and 04 for the Profit centers.
- Password recovery
If you are not able to remember the password anymore, our technicians can recover it for you, so that you will have access to your file. Please send us your support request by email, with the file attached to it. Very soon you will receive an email with your password. Password recovery is a paid service.
- I get an error message. What now?
By clicking on the symbol next to the error message (in the Info or Messages window) you will be directly connected to the online page explaining the error message and suggesting possible causes and solutions.
If you still need assistance, you can contact us with our Contact form or phone +41 (0)91 210 49 37.
View Data
Banana Accounting 8 Software allows for reading and appropriate displaying of multiple file formats.
View CSV File
When opening, or dragging and dropping a file of the CSV or JCSV type in the Banana window, Banana will automatically create a simple Table type file, resuming the columns and data contained in the CSV table.
View ISO 20022 file
The Banana software allows the user to view and print the contents of ISO20022 - camt. 052, camt. 053 (included version 4), camt. 054 - and MT940 bank statements.
The transactions of the electronic bank statement, with description, amount income or expenses, are being presented in separate columns and can be printed or pasted into Excel.
Open the ISO 20022 or MT940 file
In order to open and see the file :
-
Download your bank statement in ISO 20022 formatIf it is a compressed file, extract the XML file to be displayed with its own utility (p.es. 7zip)S
- Install and open Banana Accounting
- Drag the file inside Banana Accounting: Banana immediately shows all entries with text and date, amount and the progressive balance (the file is being opened as "read only")
- The data of the bank statement can then be printed or copied into Excel or other programs
In this image, one can see how an exemple file is being displayed
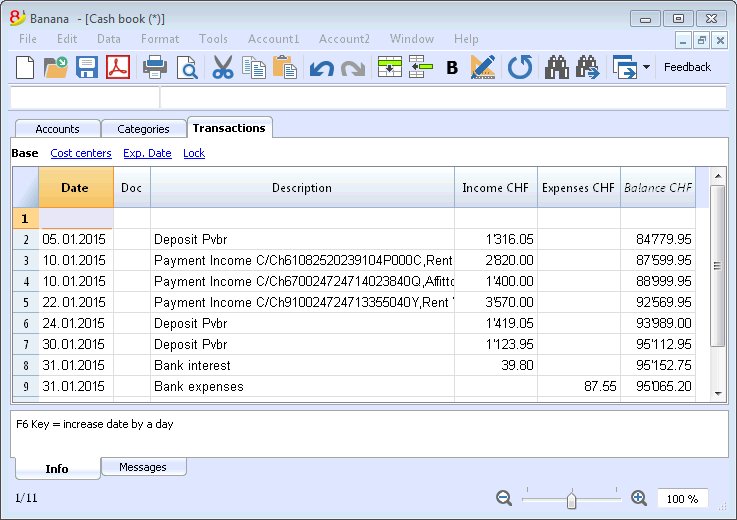
Additional indications
-
The opening balance in the ISO 20022 file is entered into the Accounts table.
- The column width can be adapted with the mouse.
-
To align the text of the description on several lines, use the command Format -> Calculate all row heights
-
To categorize the movements and get statements, enter the appropriate categories in the Categories table and display the Categories column in the Transactions table with the Columns setup command.Or, create a new file with an existing template and categories and accounts already set up, and import the data of the bank statement as explained in the page Import ISO 20022 file.
-
In the free Starter Edition mode, files with more than 70 transactions cannot be saved.
More information
For more information with regard to the ISO 20022 Standard, please consult the page Import ISO 20022 file.
Developers
BananaApps
Introduction
With BananaApps you can extend the functionalities:
- Create own calculations or reports.
- Interest calculation.
- Statistics on transactions data .
- Report based on special query.
- Import data from proprietary file format.
Import data from a bank file format and automatically assign accounts.
Import data from an invoice software.
Consolidate accounting data entered with other software. - Export data in a custom format.
Create a an Export file for the Tax autorities.
Export the balances of some accounts in a format ready to be published on internet or inserted in other documents. - Check the accounting data.
Test transactions for a particular condition; You can show the rows that didn't meet the condition in a table, or display a message with detailed information to the user;
At the moment can only retrieve data from Banana and not modify values in accounting files.
Install and run BananaApps
See documentation on the Menu Apps and command Manage Apps.
Examples file
On github.com/BananaAccounting you will find repository of BananaApps.
On the tutorial section you will find a file that contains different basic examples.
App File
Javascript compliant script
BananaApps are essentially Javascript compliant script files ( ECMA-262). People knowing Javascript can easily write BananaApps.
A BananaApp file contains the following two sections:
- Apps's attributes
The apps's attributes give information about the script, like it purpose, description and so on.
They are inserted at the beginning of the file through tags in comment's lines.
- The exec() function
The function exec() is the function that is called every time a BananaApps is executed.
It has one argument, the requested input data as a string or a Banana.Document object.
It return the result as a string.
The format of the returned string match the format defined by the tag @outputformat. Errors are notified through exceptions (clause throw), or just by returning a string beginning with "@Error:"
For a list of supported javascript functions, objects and properties see: Qt ECMAScript Reference.
BananaApps interact with Banana Accounting through some global objects made available by Banana Accounting, like for example 'Banana.document'. Those objects are described under the Banana Script API.
BananaApp "Hello World" example
Here an example that open a print preview windows, and show a document with the text "Hello world!!!". Other examples are found in the BananaApps tutorial.
// @id = ch.banana.report.helloworld
// @version = 1.0
// @doctype = nodocument
// @publisher = Banana.ch SA
// @description = Account balance for all days in a month
// @task = app.command
// @timeout = -1
function exec() {
   //Create the report
   var report =Banana.Report.newReport('Report title');
   //Add a paragraph with some text
   report.addParagraph('Hello World!!!');
   //Preview the report
   var stylesheet = Banana.Report.newStyleSheet();
   Banana.Report.preview(report, stylesheet);
}
BananaApps have a strong Security model
BananaApps are secure for the fact that are confined within Banana.
BananaApps are NOT ALLOWED to directly write or read file, web resource, change computer setting or execute programs.
BananaApps, contrary to Excel Macro, can be run with the confidence, they will not change any data and modify any file or computer settings.
To accesso or write to file you need to use the Banana Api that display a dialog box to the user.
- To write file you need to use the export functionality, that display a dialog where the user indicate the file name where to save.
- To import file you need to use the import functionality that display a dialog where the user specify the file name.
BananaApps file extention '.sbaa'
Since Banana Experimental 8.0.4.170127 the extention for BananaApps is '.sbaa'.
A .sbaa file can be either a text file containing java script code or a packaged qt resource file. The application determine automatically the type of the file. When Banana load a packaged .sbaa file, a file that can contains several apps, it look for all .js files contained in the package that have an attribute section. Those files are readen and a corresponding entry is inserted in the Apps menu.
Note: for previous versions than 8.0.4.170127 the extentions were .js for single file apps and .rcc for packaged apps.
BananaApps as a single javascript file
The script is all included in a file.
- BananaApp are saved in in UTF-8 file without BOOM.
- Prior to run the BananaApp you need to install it through the Manage Apps command or by drag and drop.
BananaApps as packaged file
It is possible to package one or more apps composed by one or more files (.js, .qml and other files) in one single .sbaa BananaApp file. This is very practical for distributing Apps composed by two or more files, or packages with two or mores BananaApps.
When Banana load a packaged .sbaa file, it look for all .js files contained in the package that have an attribute section. Those files are readen and a corresponding entry is inserted in the menu Apps.
Files in packages can include other files in the same package using the directive '@includejs' or the method 'Banana.include(fileName)'. It is not possibile to include files outside the package.
// Include a script via @includejs attribute
// @includejs = somescript.js"

// Include a script via Banana.include() method
Banana.include(somescript.js);
To create a packaged file edit a .qrc file and open it in Banana via the File Open command or drag and drop. The application will compile the qrc file and create a corresponding single .sbaa file.
It is also possibile to create package files with the 'rcc' tool from the Qt Resource system.
- Install the Qt Sdk
- Create a .qrc file with the list of the files to be included
Example: ch.banana.script.report.jaml.qrc
<!DOCTYPE RCC><RCC version="1.0">
 <qresource>
     <file>ch.banana.script.report.jaml.js</file>
     <file>lib/jaml-all.js</file>
 </qresource>
 </RCC>
- Compile the .qrc file
rcc -binary ch.banana.script.report.jaml.qrc -o ch.banana.script.report.jaml.rcc
Install BananaApps
Banana App can be installed with the Manage Apps command or by drag and drop in Banana windows.
Embedded BananaApps in documents
In the table Documents you can add script file.
On the BananaApps tutorial you will find different basic examples embedded in a document that you can run and edit.
Best way to distribute the App
- Single App file (Script file)
- Easier to edit, move and update.
- Can be included in the menu Apps
- Can be used by different accounting file
- Embedded apps
- Not available in the menu Apps
- Only relative to the file where it is included.
- More difficult to update
- Packaged App file
- Same as Script file but cannot be easily changed
- Protected from user modification
Apps Attributes
At the beginning at the script there should be a part that define the Apps Attribute.
// @api = 1.0
// @id = ch.banana.apps.example.docfilepath
// @description = Hello world
// @task = app.command
// @doctype = nodocument
// @publisher = Banana.ch SA
// @pubdate = 2015-05-12
// @inputdatasource = none
// @timeout = -1
The attribute is a commented text line
- Sart with //
- Followed by the attribute that start with @
- Fossowed by the " = " and the value
Tags defines the purpose (import, export, extract, ...), the name displayed in the dialogs, the kind of data it expect to receive, the kind of data it returns, and other information of the script. Tags are inserted at the beginning of the script in comment's lines though the following syntax: "// @tag-name = tag-value".
Attribute list
| Attribute name | Required |
Value 1) |
Description |
| @api | Yes |
The required API version. Available API versions: |
Define the required API to be executed in the form of MAIN_VERSION.SUB_VERSION The implemented API in the application have to be equal or newer. |
| @description[.lang] | Yes | The name or description of the script |
This text will be displayed in the dialogs. This tag is localisable. |
| @docproperties | any text | Define a property the script is writen for. With this attribute you can manually select for what document the script is visbile in the menu Add-ons and can be run. The property can be added to the document though the dialog Add-Ons. The property can be any text (ex.: "datev", "realestate", ...). Mulitple properties can be defined wiht a ';' as separator (ex.: "datev;skr03"). |
|
| @doctype | Yes | nodocument * XXX.* XXX.YYY !XXX.YYY ... |
Define the type of document the script is writen for. nodocument = doesn't require an open document, the add-on is always visible The sign ! is used to invert the definition. The above codes can be combined togheter like the following examples: 100.130 = for double entries with VAT and with foreign currencies100.120;100.130 = for double entry with foreign currencies 100.*;110.*;130.* = for all accounting files !130.* = for any filesexcept cash books |
| @exportfilename | A string defining the name of the file where to export the data. | If the string contains the text <Date>, it will be replaced by the current date in the format of yyyyMMdd-hhmm. | |
| @exportfiletype |
A string defining the type of data exported txt... |
This parameter is used for export scripts, it defines the type of exported data and it is used for the extension in the save file dialog. | |
| @id | Yes | An identification of the script | It is used when setting and reading the preferences. In order to avoid duplicate banana.ch use the following scheme. country.developper.app.domain.name for example: ch.banana.app.patriziato.consuntivopersubtotali |
| @includejs | Relative path to a javascript .js file to load before the execution of the script. | Include the javascript file. Every function and object defined in the file are then available to the current script. | |
| @inputdatasource | One of the following values: none openfiledialog fixedfilepath 2) |
With this attribute you can specify if you don't need to input data, if you want the user to select a file to import (openfiledialog), or if you want to get a file which path is defined in @inputfilepath. If you set fixedfilepath the program will ask the user the permission to open this file, the user's answer will be saved for the next execution. | |
| @inputencoding |
The encoding of the input data. One of the following values: |
The encoding used to read the input file (for import apps). If the attribute is empty or not defined, the application try to decode the input data with utf-8, if it fails, the application decode the input data with latin1. For a complete list see QTextCodec |
|
| @inputfilefilter[.lang] |
The file filter for the open file dialog Ex.: Text files (*.txt *.csv);;All files (*.*) |
This value describes the file filters you want to show in the input file dialog. If you need multiple filters, separate them with ';;' for instance. This tag is localizable. |
|
| @inputfilepath | The file to read for the input data | If the script has the value fixedfilepath as @inputdatasource, you can define here the path of the file to load. | |
| @inputformat | One of the following values: text ac2 |
If "text" the filter receive the selected file in inData as a text. If "ac2" the filter receive the selected file in inData as a Banana.Document object. | |
| @outputencoding |
The encoding of the input data. One of the following values: |
The encoding used to write the output file (for export apps). For a complete list see QTextCodec |
|
| @outputformat | One of the follwing values: tablewithheaders transactions.simple |
If the script has an import tasks this value define the format of the returned value. The format transaction.simple contains the transaction as income / expenses. For details of the formats see Import data from a txt file. | |
| @pubdate | Yes | The publication date in the format YYYY-MM-DD | This publication date is also used for scripts published by Banana.ch to check if newer version exist. |
| @publisher | The publisher of the script | ||
| @task | Yes |
One of following values: |
This value define the purpouse of the script, and determine in which dialog or menu the script is visible.
|
| @timeout | The timeout for the script in milliseconds, default is 2000 (2 seconds). If you set -1 the timeout is disabled and the application allow you to abort it though a progress bar. | If the script takes longer than this value to finish, it will be aborted and a message showed. If you have a script with a very long run time, you can increase the timeout or set it to -1. |
1) Default values are listed in bold.
2) Function not yet available
Example:
// @api = 1.0
// @id = ch.banana.apps.example.docfilepath
// @description = Hello world
// @task = app.command
// @doctype = nodocument
// @publisher = Banana.ch SA
// @pubdate = 2015-05-12
// @inputdatasource = none
// @timeout = -1

/**
 * Hello world example for Banana Accounting.
 */
function exec(inData) {
    Banana.Ui.showInformation("", "Hello World");

    if (Banana.document) {
       var fileName = Banana.document.info("Base","FileName");
       Banana.Ui.showInformation("Current document", fileName);
    }
}
Apps Parameters
Apps parameters allow to initialize and set parameters that are relative to a BananaApps, for example:
- Parameters for the printing.
- Header of a report that are set once only.
The script should provide a function settingDialog() that is called when the user click on the Set Parameters on the Manage Apps dialog.
The function settinDialog() should:
- Read the existing setting with the Banana.document.getScriptSettings();
- Request user to enter the information
- Set the modified values with the function Banana.document.setScriptSettings(paramToString);
The JSon text will be saved within the accounting file.
function settingsDialog() {
   var param = initParam();
   var savedParam = Banana.document.getScriptSettings();
   if (savedParam.length > 0) {
      param = JSON.parse(savedParam);
   }
   param = verifyParam(param);

   param.isr_bank_name = Banana.Ui.getText('Settings', texts.param_isr_bank_name, param.isr_bank_name);
   if (param.isr_bank_name === undefined)
      return;
   var paramToString = JSON.stringify(param);
   Banana.document.setScriptSettings(paramToString);
}
the function Exec() should then read the setting.
It is a good practice to check and verify if the setting are valid.
function printDocument(jsonInvoice, repDocObj, repStyleObj) {
  var param = initParam();
  var savedParam = Banana.document.getScriptSettings();
  if (savedParam.length > 0) {
    param = JSON.parse(savedParam);
    param = verifyParam(param);
  }
  printInvoice(jsonInvoice, repDocObj, repStyleObj, param);
}
API
The whole API (Application Program Interface) made available for Banana is under the namespace "Banana".
The are different objects and methods that belong to the name space Banana, that can be accessed by the javascript at run time:
Data formats
Date
Date values are in ISO 8601 format "YYYY-MM-DD".
Decimal
Decimal values have a '.' (dot) as decimal separator and doesn't have a group separator. For example: "12345.67".
Decimal values are rounded according to the accounting settings.
Text
Text values can contain any character supported by UTF-8.
Time
Time values are in ISO 8601 format "HH:MM:SS". The formats "HH:MM" and "HH:MM:SS.ZZZ" are also accepted.
API Versions
List of API Version made available by Banana Accounting.
| Banana Accounting Version | API Version |
| 7.0.6 | 1.0 |
| 8.0.4 or more recent | 1.0 |
Banana (Objects)
Banana is the namespace (object) through which all Banana script's methods, class and objects are accessible.
Banana.application
The object Banana.application represent the running application.
Banana.console
The object Banana.console is used to sent message to the debug the script.
Banana.Converter
The class Banana.Converter contains methods useful to convert data from and to various formats.
Banana.document
The object Banana.document represent the current document opened in the application. It contains base properties and methods, see Banana.Document (Base), and if the document represent an accounting document it contains additional accounting's properties and methods, see Banana.Document (Accounting). If any document is opened this object is of type Undefined.
Banana.IO
The class Banana.IO is used to read and write files.
Banana.Report
The class Banana.Report enable you to create reports, preview and print them in Banana Accounting.
Banana.script
The object Banana.script is used to get informations about the running script.
Banana.SDecimal
The class Banana.SDecimal contains methods useful to do decimal math calculation.
Banana.Ui
The class Banana.Ui contains predefined dialogs to interact with the user, and methods to load dialogs from .ui or .qml files.
Banana.Xml
The class Banana.Xml contains methods to parse and access Xml data.
Banana Methods
Banana.compareVersion(v1, v2)
Compare two version strings. Versions string are in the form of "x.y.w.z". Returns 0 if v1 and v2 are equal, -1 if v2 is later and 1 if v1 is later.
Since: Banana Accounting 8.0.5
var requiredVersion = "8.0.5";
if (Banana.compareVersion && Banana.compareVersion(Banana.application.version, requiredVersion) >= 0)
   Banana.Ui.showInformation("Message", "More recent or equal than version " + requiredVersion);
else
   Banana.Ui.showInformation("Message", "Older than version " + requiredVersion);
Banana.include(path)
The method Banana.include(path) include a javascript file evaluating it.
If an error occour, i.e. the file is not found or is not valid, the method throws an exception.
The path is relative to the current script being executed, if no protocol is specified. Otherwise depending on the protocol it can be relative to the main script's folder, the document's folder or the name of a document attacched to the current file.
- <relative_path_to_current_script>/<file_name>
- file:script/<relative_path_to_main_script>/<file_name>
- file:document/<relative_path_to_file>/<file_name>
- documents:<attachment_name>
Scripst included though the method Banana.include(path) can include other scripts trhough the method Banana.include(path), but not via the script's attibute @includejs. The method Banana.include(path) garantees that each distinct script is evaluated once, even if it is included more than one time from differents scripts. Path can contain ".." (parent folder), in the case the destination path is outside the main script's folder, the method will throw a security exception.
Since: Banana Accounting 8.0.5
Banana.include("cashflowlib.js");
Banana.include("folder/cashflowlib.js");
Banana.Application
Banana.Application represent the interface to the program and can be accessed through Banana.application.
Properties
isBeta
Return true if the application is a beta version.
var isBeta = Banana.application.isBeta;
Since Banana 8.0.7
isExperimental
Return true if the application is a beta version.
var isExperimental = Banana.application.isExperimental;
Since Banana 8.0.7
serial
Return the serial of the application in the form of "80006-170428".
var serial = Banana.application.serial;
Since Banana 8.0.7
version
Return the version of the application in the form of "8.0.4".
var version = Banana.application.version;
locale
Return the locale of the application in the form of "language_country", where language is a lowercase, two-letter ISO 639 language code, and country is an uppercase, two- or three-letter ISO 3166 country code.
var locale = Banana.application.locale;
progressBar
Return an object of type ProgressBar used to give the user an indication of the progress of an operation and the ability to cancel it.
var progerssBar = Banana.application.progressBar;
Methods
addMessage(msg [, idMsg])
Add the message msg to the application. The message is showed in the pane "Messages", and in a dialog if the application option "Show Messages" is turned on.
If idMsg is not empty, the help button calls an url with script's id and message's id (idMsg) as parameters.
Banana.application.addMessage("Hello World");
See also: Table.AddMessage, Row.AddMessage, Document.AddMessage.
clearMessages()
Clear all the messages showed in the pane "Messages".
Banana.application.clearMessages();
showMessages([show])
Enable or disable the notification of new messages through the message dialog.
Banana.application.showMessages(); // Next messages are showed to the user through the message dialog.
Banana.application.showMessages(false); // Next messages will not pop up the message dialog.
openDocument(ac2FilePath [, password] [, title])
Open the ac2 file located in filePath and return an Object of type Banana.Document or undefined if the file is not found. The path can be relative, in this case the base directory is the path of the current document.
If the path is empty or contains a "*" or a "?" an open file dialog is showed to the user, and the title is used in the caption of the file open dialog.
With this function you can also open ISO 20022 and MT940 files, in this case a cash book with the transactions of the file is returned.
var file1 = Banana.application.openDocument("*.*");
if (!file1)
   return;

var file2 = Banana.application.openDocument("c:/temp/accounting_2015.ac2");
if (!file2)
   return;
Banana.Application.ProgressBar
Banana.Application.ProgressBar is the interface to the program progress bar and can be accessed through Banana.application.progressBar. The progressBar object is used to give the user an indication of the progress of an operation and the possibility to interrupt the running process. The progress bar is showed in bottom left corner of the application windows.
Methods
finish()
Notify that the operation has been completed and close the progress bar.
progressBar.finish();
pause()
Notify that the operation has been paused, the cursor icon is set to the arrow cursor or poiting hand cursor. This is usually called before showing a dialog.
Banana.application.progressBar.pause();
var result = dialog.exec();
Banana.application.progressBar.resume();
resume()
Notify that the operation has been resumed, the cursor icon is set back to an hourglass or watch cursor. This is usually called after a dialog has been closed.
Banana.application.progressBar.pause();
var result = dialog.exec();
Banana.application.progressBar.resume();
start(maxSteps)
Start the progress indicator and define the number of steps this operation needs before being complete.
You can call several times this method to split the progress in main and sub steps. Every call of the method start() should be paired with a call of the method finish().
// Example use of a progress bar
var progressBar = Banana.application.progressBar;
progressBar.start(10);
for (var i = 0; i < 10; i++) {
    ...
    if (!progressBar.step(1)) {
       return; // Operation canceled by the user
    }
}
progressBar.finish();
step([stepCount])
Advance the progress indicator of stepCount steps. If stepCount is not defined it advance of one step.
Returns false if the user canceled the operation, otherwise true.
progressBar.step(1);
Example multiple steps inside a block
// Two blocks of progress bar inside a progressBar

var progressBar = Banana.application.progressBar;

progressBar.start(2);

// Block 1
progressBar.start(10)
for (i=0;i < 10; i++) {
     progressBar.step(1);
}
progressBar.finish();

// Block 2
progressBar.start(10)
for (i=0;i < 10; i++) {
     progressBar.step(1);
}
progressBar.finish();

progressBar.finish();
Banana.Console
The Banana.console object is used to display debug messages.
- Debug messages are displayed on the message window
- To see debug and log messages you should enable the option Show Debug Messages under Tools -> Program Options -> Developer
- To see critical and warning messages you should enable the option Show Developer Warnings and Messages under Tools -> Program Options -> Developer
console.critical(msg)
Display the msg in the message windows as a critical.
Banana.console.critical("critical message");
console.debug(msg)
Display the msg in the message windows.
Banana.console.debug("Debug message");
console.log(msg)
Display the msg in the message windows.
Banana.console.log("Log message");
console.warn(msg)
Display the msg in the message windows as warning.
Banana.console.warn("Warning message");
Banana.Converter
The class Banana.Converter is a collection of methods useful to convert various formats to and from data tables (array of array).
Methods
arrayToObject( headers, arrData, skipVoid)
Converts an array of array string to an array of objects
- headers is an array of strings that will become the properties of the objects.
- arrData is an array containing array of strings
- skipVoid if true skip void lines, if not present is set to false
    // read a CSV file
    var ppData = Banana.Converter.csvToArray(string, ',');
    // first line is header
    var headers = ppData[0];
    // remove first line
    ppData.splice(0, 1);
    // convert in array of objects
    var arraOfObjects = Banana.Converter.arrayToObject(fileData.headers, ppData, true);
csvToArray(string [, separator, textdelim])
Convert a csv file (coma separated values) to an array of array.
The parameter string contains the text to convert. The parameter separator specify the character that separates the values, default is a comma ','. The parameter textDelim specify the delimiter character for text values, default is a double quote '"'.
Example:
var text = "1, 2, 3\n4, 5, 6\n7, 8, 9";
var table = Banana.Converter.csvToArray(text);
var value = table[0][1];
value == '2'; // true
flvToArray(string, fieldLengths)
Convert a flv file (fixed length values) to an array of array.
The parameter string contains the text to convert. The parameter fieldLengths is an array with the lengths of the fields.
Example:
//               6                  20       8
var text = "120608Phone               00002345";
var table = Banana.Converter.flvToArray(text, [6,20,8]);
var value = table[0][2];
value == '00002345'; // true
mt940ToTable(string)
Converts mt940 file to a table (array of array).
naturalCompare(a, b [, caseSensitive])
Compare two string so that the string "2" is considered less then "100" as it would be with normal string compare.
This function can be passed to array.sort function.
- a first value to compare
- b second value to compare
- return value is -1 if a < b, 1 if a > b and 0 if a == b
Banana.Converter.naturalCompare(a,b);
objectArrayToCsv(headers, objArray, [separator])
Converts an array of objects (with identical schemas) into a CSV table.
- headers An array of strings with the list of properties to export
- objArray An array of objects. Each object in the array must have the same property list.
- separator The CSV column delimiter. Defaults to a comma (,) if omitted.
- return value a string containing the CSV text.
var csvText = Banana.Converter.objectArrayToCsv(headers, objArray, ";");
stringToCamelCase(string)
Converts a text to camel case, where only the first letter every word is upper case.
Banana.Converter.stringToCamelCase("this is an example");
// returns "This Is An Example"
stringToLines(string)
Convert a text in an array of lines. The end line character can be '\n', \r' or a combination of both.
Banana.Converter.stringToLines("this is\nan\nexample");
//returns ["this is", "an", "example"]
stringToTitleCase(string)
Converts a text to title case, where only the first letter of the text is upper case.
Banana.Converter.stringToTitleCase("this is an example");
// returns "This is an example"
arrayToTsv(table [, defaultChar])
Converts a table (array of array) to a tsv file (tabulator separated values). If a string contains a tab it will be replaced with defaultChar or a space if defaultChar is undefined.
Banana.Converter.arrayToTsv(table);
arrayToCsv(table)
Converts a table (array of array) to a csv file (coma separated values). Doubles quotes in text are replaced by apos. Texts containing comas are inserted in doubles quotes.
Banana.Converter.arrayToCsv(table);
toDate(date[, time])
Convert a date and/or time to a javascript date object.
The parameter date is a string in the formats YYYYMMDD or YYYY-MM-DD.
The time parameter is a string in the fromats HHMM[SSZZZ] or HH:MM[:SS.ZZZ].
Banana.Converter.toDate("2015-12-31");
Banana.Converter.toDate("20151231");
toInternalDateFormat(date [, inputFormat])
Converts a date to the internal format: YYYY-MM-DD.
The parameter date can be a string or a date object.
The parameter inputFormat specifies the date input format, if it is not specified the local date format is used.
Example:
Banana.Converter.toInternalDateFormat("31-12-13", "dd-mm-yy");
// returns "2013-12-31"
Banana.Converter.toInternalDateFormat(new Date());
// return current date in format "yyyy-mm-dd"
toInternalNumberFormat(value [, decimalSeparator])
Converts a number to the internal format: 123456.78.The internal number format use the character '.' as decimal separator, and doesn't contain a group separator.
The parameter value can be a string or a number object.
The parameter decimalSeparator specifies the character used to separate the decimals, if it is not specified the local decimal separator is used.
Example:
Banana.Converter.toInternalNumberFormat("1200,25", ",");
// returns "1200.25"
toInternalTimeFormat(string)
Converts a time to the internal format: HH:MM:SS.ZZZ.
Banana.Converter.toInternalTimeFormat("11:24");
// returns "11:24:00"
toLocaleDateFormat(date [, format])
Converts a date to the local format.
The parameter date can be a string or a date object.
The parameter format specifies the date ouptut format, if it is not specified the local date format is used.
Banana.Converter.toLocaleDateFormat("2014-02-24")
// returns "24.02.2014"
toLocaleNumberFormat(value [, decimals = 2, convZero = true])
Converts a number to the local format.
The parameter value can be a string or a number object.
The parameter decimals set the number of decimals.
The parameter convZero set the format returned for zero values. If false the method returns an empty string, if true it returns the zero value as string.
Example:
Banana.Converter.toLocaleNumberFormat("1200.25")
// returns "1'200,25"
toLocaleTimeFormat(string [, format])
Converts a time to the local format.
The parameter format specifies the time ouptut format, if it is not specified the local time format is used.
Banana.Converter.toLocaleTimeFormat("11:24:42");
// returns "11:24"
Banana.Document (Accounting)
Banana.Document is the interface to a document in Banana Accounting.
Banana.Document has base methods, that apply to all documents, see Banana.Document (Base), and method that are specific to the type of documents. This page describes the methods for the accounting files.
In the table documents of the example file there are also some example code.
Methods for accounting's files
This method are available only if the Document is of type Accounting
accountDescription(account [,column])
Return the Description of the specified account.
- Account can be an account or a Group (Gr=)
- Column can be an alternative column name to retrieve.
var descriptionAccount = Banana.document.accountDescription('1000');
var descriptionGroup = Banana.document.accountDescription('Gr=10');
var gr = Banana.document.accountDescription('1000','Gr');
accountsReport([startDate, endDate])
Return the account report for the specified period. Start and end date can be a string in form 'YYYY-MM-DD' or a date object.
var report = Banana.document.accountsReport();
var report = Banana.document.accountsReport('2017-01-01', '2017-03-31');
budgetBalance(account [, startDate, endDate, function(rowObj, rowNr, table)])
Sum the amounts of opening, debit, credit, total and balance for all budget transactions for this accounts .
var budget = Banana.document.budgetBalance('1000');
See for more detail the function currentBalance.
budgetCard(account [, startDate, endDate, function(rowObj, rowNr, table)])
Return for the given account and period a Table object with the budget account card.
var card = Banana.document.budgetCard('1000');
For more ditails see currentCard.
budgetExchangeDifference( account, [date, exchangeRate])
Return the unrealized exchange rate Profit or Loss fo the account at the specified date.
- account must be a valid account number not in base currency
- date
- a date that is used to calculate the balance
- if empty calculate up to the end of the period
- exchangeRate
- if empty use the historic exchange rate for the specified date or the current if not a valid exchange rate for the date are found.
- if "current" use the current exchange
- if number for example "1.95" use the specified exchange rate.
- Return value
- Positive number (debit) are exchange rate Loss.
- Negative number (credit) are exchange rate Profit.
- empty if no difference or if the account has not been found or not a multicurrency accounting file.
// unrealized exchange rate profit or loss for the account 1000
// last balance and current exchange rate
var exchangeRateDifference = Banana.document.budgetExchangeRateDifference('1000');

// at the end of Semptember and hystoric exchange rate
var exchangeRateDifference = Banana.document.budgetExchangeRateDifference('1000', "2017-09-31");

// at the end of Semptember and current exchange rate
var exchangeRateDifference = Banana.document.budgetExchangeRateDifference('1000', "2017-09-31", "current");

// at the end of Semptember and specified exchange rate
var exchangeRateDifference = Banana.document.budgetExchangeRateDifference('1000', "2017-09-31", "1.65");
Available from Banana version 8.05
budgetInterest( account, interestRate, [startDate, endDate, , function(rowObj, rowNr, table)])
Return the calculated interest for the budget transactions.
For more information see the currentInterest and current Balance
// calculate the interest debit for the whole period
var interestDebit = Banana.document.budgetInterest('1000','5.75');

// calculate the interest credit for the whole period
var interestDebit = Banana.document.budgetInterest('1000','-4.75');
currentBalance(account [, startDate, endDate, function(rowObj, rowNr, table) ])
Sum the amounts of opening, debit, credit, total and balance for all transactions for this accounts.
The calculations are perfermed by traversing by creating a journal (see journal() function) with all the transactions , and selecting the transctions with the parameters specified.
The computation is usually very fast. But if you have a file with many transactions especially the first query could take some time.
var currentBal = Banana.document.currentBalance('1000','','');
var openingBalance = currentBal.opening;
var endBalance = currentBal.balance;
- Return value
Is an object that has- opening the amount at the begining of the period (all transactions before)
- debit the amount of debit transactions for the period
- credit the amount of credit transactions for the period
- total the difference between debit-credit for the period
- balance opening + debit-credit for the period
- amount it the "normalized" amount based on the bclass of the account or group.
If there are multiple accounts or groups, takes the first BClass of the first.- for BClass 1 or 2 it return the balance (value at a specific instant).
- for BClass 3 or 4 it return the total (value for the duration).
- For BClass 2 and 4 the amount is inverted.
- openingCurrency the amount at the begining of the period in the account currency
- debitCurrency the amount of debit transactions for the period in the account currency
- creditCurrency the amount of credit transactions for the period in the account currency
- totalCurrency the difference between debit-credit for the period in the account currency
- balanceCurrency opening + debit-credit for the period in the account currency
- rowCount the number of lines that have bben found and used for this computation
- bclass (double entry accounting only) is the bclass of the account or group used to express the amount.
The bclass is the value entered in the columns bclass.
It is taken in consideration the first account or group specified. If for examble you query two account that first that has bclass 2 and the second that has bclass 1. The bclass would be 2.
The bclass is assigned by following this steps. :- The bclass of the specified account or group.
- The blcass of the partent group, for the same section.
- The blcass of the section.
- Account
- can be an account id, a cost center or a segment.
- can be a cobination of account and segments, separeted by the semicolon ":"
In this case it returns all the transactions that have the indicated account and segments- 1000:A1:B1
- can be differents accounts and multiple segments separated by the "|"
In this case it include all transactions that have the one of the specified accounts and one of the specified segments- 1000|1001
- 1000|1001:A1:B1
- 1000|1001:A1|A2:B1
- can be a wildCardMatching
Wildcards can be used for accounts, segments, Groups or BClass and in combination- ? Matches any single character.
- * Matches zero or more of any characters
- [...] Set of charachtes
- "100?" match "1001, 1002, 1003, 100A, ...)
- "100*" Matches all accounts starting with 100
- "100*|200*:A?" Matches all accounts starting with 100 or 200 and with segments with A and of two charachters.
- "[1234]000" Matches "1000 2000 3000 4000"
- Can be a group or a BClass.
It include all the transactions where the account used belong to a specified Group o r BClass.
It is also possible to use wildcards.
The program first create a list of accounts and then use the account list.
Do non mix mix groups relative to normal accounts, with groups relative to cost center or segments. Calculation could provide unexpected results.- BClass (for the double entry accounting only)
- BClass=1
- BClass=1|2
- Gr for groups that are in Accounts table.
- Gr=100
- Gr=10*
- Gr=100|101|102
- GrC for group that are in the Category table of the income and expenses accounting type.
- GrC=300
- GrC=300|301
- BClass (for the double entry accounting only)
- Contra Accounts or other fields selection
Transactions are included only if they have also a value corresponding
After the "&&" you can insert a field name of the table journal.- 1000&&JContraAccount=2000 return all transctions of the account 1000 that have a contra account 2000.
As per accounts you can specify multiple contra accounts, BClass=, Gr= with also wildcards. - 1000&&JCC1=P1|P2 will use only transactions on account 1000 and that also have the CC1=.P1 or .P2
- 1000&&JContraAccount=2000 return all transctions of the account 1000 that have a contra account 2000.
- StartDate
- is a string in form 'YYYY-MM-DD' or a date object.
- If startDate is empty the accounting start date is taken.
- End date:
- is a string in form 'YYYY-MM-DD' or a date object.
- If endDate is empty the accounting end date is taken.
- function(rowObj, rowNr, table)
This fuction will be called for each row of the selected account.
The function should return true if you want this row to be included in the calculation.
function exec( string) {
    // We retrive the total sales (account 4000) only for the cost center P1
    var balanceData = Banana.document.currentBalance('4000','', '', onlyCostCenter);
    // sales is a revenue so is negative and we invert the value
    var salesCC1 = -balanceData.total;
    // display the information
    Banana.Ui.showText("Sales of Project P1: " + salesCC1);
}

// this function return true only if the row has the cost center code  "P1"
function onlyCostCenter( row, rowNr, table){
   if(row.value('JCC1') === 'P1') {
      return true;
   }
   return false;
}
Examples
Banana.document.currentBalance("1000")              // Account 1000
Banana.document.currentBalance("1000|1010")         // Account 1000 or  1010
Banana.document.currentBalance("10*|20*")           // All account that start with 10 or with 20
Banana.document.currentBalance("Gr=10")             // Group 10
Banana.document.currentBalance("Gr=10| Gr=20")      // Group 10 or  29
Banana.document.currentBalance(".P1")               // Cost center .P1
Banana.document.currentBalance(";C01|;C02")         // Cost center ;C01 and C2
Banana.document.currentBalance(":S1|S2")            // Segment :S1  and :S2
Banana.document.currentBalance("1000:S1:T1")        // Account 1000 with segment :S1 or ::T1
Banana.document.currentBalance("1000:{}")           // Account 1000 with segment not assigned
Banana.document.currentBalance("1000:S1|S2:T1|T2")  // Account 1000 with segment :S1 or ::S2 and ::T1
                                                    //   or ::T
Banana.document.currentBalance("1000&&JCC1=P1")     // Account 1000 and cost center .P1
currentCard(account [, startDate, endDate, function(rowObj, rowNr, table)])
Return for the given account and period a Table object with the transactions for this account.
Row are sorted by JDate
parameters:
- account can be any accounts, cost center or segment as specifiend in currentBalance.
- startDate any date or symbol as specifiend in currentBalance.
- endDate any date or symbol as specifiend in currentBalance.
Return columns the same as for the Journal() function.
var transactions = Banana.document.currentCard('1000','2015-01-01','2015-12-31');
currentInterest( account, interestRate, [startDate, endDate, , function(rowObj, rowNr, table)])
Return the calculated interest on the specified account.
Interest is calculate on the effective number o days for 365 days in the years.
- account is the account or group (same as in the function currentBalance)
- interestRate. In percentage "5", "3.25". Decimal separator must be a "."
- If positive it calculate the interst on the debit amount.
- If negative it calculate the interest on the credit amounts.
- startDate, endDate, function see the currentBalance description.
If no parameters are specified it calculate the interest for the whole year.
// calculate the interest debit for the whole period
var interestDebit = Banana.document.currentInterest('1000','5.75');

// calculate the interest credit for the whole period
var interestDebit = Banana.document.currentInterest('1000','-4.75');
exchangeRate( currency, [date])
Return the exchange rate that convert the amount in currency in basic currency.
The exchange rate is retrieved from the Currency table, already considering the multiplier.
- If no date is specified the exchange rate without date is used.
- If a date is specified it retrieve the exchange rate with the date minor or equal the specified date.
invoicesCustomers()
Return a table with the customers invoices from the transaction table. A customer group must be defined and invoices must be numbered using the column DocInvoice.
invoicesSuppliers()
Return a table with the suppliers invoices from the transaction table. A supplier group must be defined and invoices must be numbered using the column DocInvoice.
journal([originType = ORIGINTYPE_NONE, int accountType = ACCOUNTTYPE_NONE])
Return for the given parameters a Table object with all the amount registered on the accounts.
The journal contain a row for each account used.
- originType specify the row to be filtered for
Can be on of- ORIGINTYPE_NONE no filter is applied and all rows are returned (current and budget)
- ORIGINTYPE_CURRENT only the normal transactions are returned
- ORIGINTYPE_BUDGET only the budget transactions are returned
- accountType specify the row to be filtered for
- ACCOUNTTYPE_NONE no filter is applyied and all rows are returned
- ACCOUNTTYPE_NORMAL only rows for normal accounts are returned
- ACCOUNTTYPE_CC1 only rows for Cost Center 1 are returned
- ACCOUNTTYPE_CC2 only rows for Cost Center 2 are returned
- ACCOUNTTYPE_CC3 only rows for Cost Center 1 are returned
- ACCOUNTTYPE_CC Cost Center rows are returned same as using (ACCOUNTTYPE_CC1 | ACCOUNTTYPE_CC2 | ACCOUNTTYPE_CC3)
// get all transactions for normal accounts
var journal = Banana.document.journal(Banana.document.ORIGINTYPE_CURRENT, Banana.document.ACCOUNTTYPE_NORMAL );
For each account used in the transaction table (AccountDebit, AccountCredit, CC1, CC2, CC3) the program generate a Journal row with the JAccount column set with the specific account.
For a double entry account transaction that use AccountDebit, AccountCredit, AccountVat, CC1, CC2, CC3 the Journal will contain 6 rows. If the transaction has only AccountDebit and AccountCredit only 2 rows will be generated.
The column JAmount contains the exact amount registered on the specific account.
The returned table has all the columns of the transaction's table plus the following columns.
The return columns are:
- JDate the date of the transction.
- JDescription the transaction's description.
- JRowOrigin the row number in the transaction's table (rows begin from 0).
- JTableOrigin the source table.
- JRepeatNumber the progressive number of the repetition of budget transactions.
- JAccount the account for this line.
There is one row for each account (AccountDebit, AccountCredit, AccountVat, CC1, CC2, CC3). - JAccountDescription the Description for this account.
- JAccountClass the BClass number for this account.
- JAccountGr the Gr for this account.
- JAccountGrDescription the Gr for this account.
- JAccountGrPath the whole Gr path.
- JAccountCurrency the currency of thi account.
- JAccountType as defined above (ACCOUNTTYPE_NORMAL, ACCOUNTTYPE_CC1, ...)
- JAmount the amount in basic currency registered on the account (positive is debit, negative is credit).
- JAmountAccountCurrency the amount in the account currency (positive i debit, regative is credit).
- JTransactionCurrency the transaction's currency.
- JAmountTransactionCurrency the amount in transaction's currency.
For account with currency not in tranasctions currency the exchange rate of the transaction is used. - JTransactionCurrencyConversionRate is the conversion rate to obtain amounts in transaction's currency.
Multiply the transcation's amount in basic currency with the JTransactionCurrencyConversionRate and you will have the amount converted in transaction's currency.
The conversion rate has 12 significant decimal so only by very large conversion should be have conversion differences. - JVatIsVatOperation true if this row has a Vat code.
- JVatCodeWithoutSign the Vat code without the evetually preceeding '-'. For example "-V10" becomomes "V10".
- JVatCodeDescription the Description for this Vat code.
- JVatCodeWithMinus true if the Vat code is preceeded by "-".
- JVatCodeNegative true if the Vat amount is negative (deductible).
- JVatTaxable the amount VatTaxable with the sign that follow the JVatCodeNegative
- VatTwinAccount the account where the net amount (without VAT) is being registered .
In case of a transaction where the Gross amount is CHF 1100, then the VAT is CHF 100 and the net amount is CHF 1000. The VatTwin account will be the account where the CHF 1000 is being registered.
We use the name Twin for the fact that the VatTwinAccount follows the sign of the VatAccount.
If the Vat amount is registered in debit, the VatTwinAccount will be the AccountDebit.
If the Vat amount is registered in credit, the VatTwinAccount will be the AccountCredit. - JContraAccount the contra account.
The contra account is deducted based on the other accounts and the sequence in the transactions table. - JContraAccountType one of the following value:
- CONTRAACCOUNTTYPE_NONE for no contra account
- CONTRAACCOUNTTYPE_DIRECT when there is on the same line credit and debit accounts.
- CONTRAACCOUNTTYPE_MULTIPLEFIRST the first line of a transaction on more accounts.
The first transactions after a line with debit and credit accounts or with a different date. - CONTRAACCOUNTTYPE_MULTIPLEFOLLOW the second or following line of a MULTIPLEFIRST with the same date.
- CONTRAACCOUNTTYPE_VAT the line for the Vat Account
- JContraAccountGroup the line number corresponding to the row number of the CONTRAACCOUNTTYPE_MULTIPLEFIRST
- JCC1 the CC1 without the preceeding sign
- JCC2 the CC2 without the preceeding sign
- JCC3 the CC3 without the preceeding sign
- JSegment1 .. JSegment10 the segment relative to the account
- JDebitAmount the amount debit in basic currency
- JCreditAmount the amount credit in basic currency
- JDebitAmountAccountCurrency the amount debit in account currency
- JCreditAmountAccountCurrency the amount credit in account currency
- JBalance the balance amount (for account card) in basic currency
- JBalanceAccountCurrency the balance amount (for account card) in account currency
- JOriginType as defined above
- ORIGINTYPE_CURRENT
- ORIGINTYPE_BUDGET
- JOperationType on of
- OPERATIONTYPE_NONE = 0
- OPERATIONTYPE_OPENING = 1
The row is generated from the opening balance - OPERATIONTYPE_CARRYFORWARD = 2
The row is used from the account card and is the balance of the account at this moment. - OPERATIONTYPE_TRANSACTION = 3
The row is generated from the Transactions table if it is ORIGINTYPE_CURRENT
or from the budget table if the row is ORIGINTYPE_BUDGET -
OPERATIONTYPE_INVOICESETTLEMENT = 21
journalCustomersSuppliers([originType = ORIGINTYPE_NONE, int accountType = ACCOUNTTYPE_NONE])
Same as journal with additional settlements rows for closing invoices and the following columns:
- JInvoiceDocType
- JInvoiceAccountId
- JInvoiceCurrency
- JInvoiceStatus
- JInvoiceDueDate
- JInvoiceDaysPastDue
- JInvoiceLastReminder
- JInvoiceLastReminderDate
- JInvoiceIssueDate
- JInvoiceExpectedDate
- JInvoicePaymentDate
- JInvoiceDuePeriod
- JInvoiceRowCustomer (1=Customer, 2=Supplier)
previousYear([nrYears])
Return the previous year as a Banana.Document object. If the previoius yeas is not defined or it is not foud it return null.
- nrYears is the number of years to go back, default is one.
var previousYearDoc = Banana.document.previousYear();
var previousTwoYearDoc = Banana.document.previousYear(2);
projectionBalance(account, projectionStartDate [, startDate, endDate, function(rowObj, rowNr, table) ])
Same as currentBalance but use the budget data starting from the projectionStartDate.
This functions calculate a projection of the end of year result (or specified period) combining the current data and the budget data for the period non yet booked.
if projectionStartDate is empty the result will be the same as currentBalance.
If you have already booked the 1. semester and would like to have a projection up to the end of the year
// We have booked the 1. semester and would like to have
// a projection up to the end of the yer
var cashProjection = Banana.document.projectionBalance('1000','2015-07-01');
var cashEnd = projection.balance;
var salesProjection = Banana.document.projectionBalance('3000','2015-07-01').total;
var salesForYear = -salesProjection.total;
projectionCard(account, projectionStartDate [, startDate, endDate, function(rowObj, rowNr, table) ])
Same as currentCard but use the budget data starting from the projectionStartDate.
If projectionStart date is empty result will be the same s currentCard.
var transactions = Banana.document.projectionCard('1000','2015-01-01','','');
endPeriod([period])
Return the end date in the form of 'YYYY-MM-DD'.
The endDate and startDate functions are used to retrieve the date of the accounting, so that you can create scripts that works on file of different years.
var dateEnd = Banana.document.endPeriod();
var dateStartFebruary = Banana.document.endPeriod('2M');
- Period:
- If period is not present the return value is the end date of the accounting.
- The period is added the starting account date, and than is returned the last date of the period..
- Period (for example 2M = 2 months) is a number followed by one of the following charachters
- D for days
- M for months
- Q for quarters
- S for semesters
- Y for years
- Assuming that the Start accounting date is 2015-01-01
- 1M return 2015-01-02
- 2M return 2015-02-28
- 2Q return 2015-06-30
- 2S return 2015-12-31
- 2Y return 2016-12-31
See also startDate.
startPeriod ([period])
Return the end date in the form of 'YYYY-MM-DD'.
The endPeriod and startPeriod functions are used to retrieve the date of the accounting, so that you can create scripts that works on file of different years.
var dateStart = Banana.document.endPeriod();
var dateStart3Q = Banana.document.endPeriod('3Q');
- Period:
If period is not present return the start date.- Period (for example 2M = 2 months) is a number followed by one of the following charachters
- D is for Days
- M for Months
- Q for Quorters
- S for Semester
- Y for year
- With 1 the starting date of the accounting is returned.
- Assuming that the Start accounting date is 2015-01-01
- 1M return 2015-01-01
- 2M return 2015-02-01
- 2Q return 2015-04-01
- 2S return 2015-07-01
- 2Y return 2016-01-01
- Period (for example 2M = 2 months) is a number followed by one of the following charachters
See also endDate.
vatBudgetBalance(vatCode[, startDate, endDate, function(rowObj, rowNr, table) ])
Sum the vat amounts for the specified vat code and period, using the Budget data.
var vatTotal = Banana.document.vatBudgetBalance('V15');
vatCurrentCard(vatCode[, startDate, endDate, function(rowObj, rowNr, table) ])
Retrieve the transactions relative to the specified VatCode.
var vatTransactions = Banana.document.vatCurrentCard('V15');
vatCurrentBalance(vatCode[, startDate, endDate, function(rowObj, rowNr, table) ])
Sum the vat amounts for the specified vat code and period.
For more info see :
- explanations of the function currentBalance.
- Case study BananaApp for VatReport.
Example:
var currentVat = Banana.document.vatCurrentBalance('V15','','');
var vatTaxable = currentVat.vatTaxable;
var vatPosted = currentVat.vatPosted;
- Return value:
Is an object that has- vatTaxable the amount of the taxable column
(the sign is the same as the vatAmount) - vatAmount the amount of vat
- vatNotDeductible the amount not deductible
- vatPosted VatAmount - VatNotDeductible
- rowCount the number of lines that have bben found and used for this computation
- vatTaxable the amount of the taxable column
- VatCode
One or more VatCode defined in the tabel Vat Codes.
Multiple vat code can be separated by "|" for example "V10|V20", or you can use vildcard "V*".
vatProjectionBalance(vatCode, projectionStartDate, [, startDate, endDate, function(rowObj, rowNr, table) ])
Same as vatCurrenBalance but use the budget data starting from the projectionStartDate.
var projectionVat = Banana.document.vatProjectionBalance('V15','','');
var vatTaxable = projectionVat.vatTaxable;
var vatPosted = projectionVat.vatPosted;
vatProjectiontCard(vatCode, projectionStartDate, [, startDate, endDate, function(rowObj, rowNr, table) ])
Same as vatCurrentCard but use the budget data starting from the projectionStartDate.
var vatTransactions = Banana.document.vatProjectiontCard('V15','2015-01-01','','');
vatReport([startDate, endDate])
Return the vat report for the specified period.
Start and end date are strings in form 'YYYY-MM-DD' or a date object. If startDate is empty the accounting start date is taken. If endDate is empty the accounting end date is taken.
var vatReport = Banana.document.vatReport('','');
Banana.Document (Base)
Banana.Document is the interface to a document in Banana Accounting. The current opened document can be accessed through the property Banana.document. A document can be also opened with the method Banana.application.openDocument.
Properties
cursor
Return a Cursor object with the current position of the cursor and the range of the selected rows.
var currentCursor = Banana.document.cursor;
locale
Return the locale of the document in the form of "language_country", where language is a lowercase, two-letter ISO 639 language code, and country is an uppercase, two- or three-letter ISO 3166 country code.
var locale = Banana.document.locale;
rounding
Return the rounding context of the current file that can be used with the SDecimal math functions.
var rounding = Banana.document.rounding;
tableNames
Return an array with the xml names of the tables in the document.
var tableNames = Banana.document.tableNames;
Methods
addMessage(msg[, idMsg])
Add the message msg to the document. The message is showed in the pane "Messages", and in a dialog if the application option "Show Messages" is turned on.
If idMsg is not empty, the help button calls an url with script's id and message's id (idMsg) as parameters.
See also: Application.AddMessage, Table.AddMessage, Row.AddMessage.
Banana.document.addMessage("Message text");
clearMessages()
Clear all the document's messages showed in the pane "Messages".
Banana.document.clearMessages();
getScriptSettings()
Get the settings of the script saved in the document. You use this method to get settings that are private to the running script. It is possible to save the settings of the script through the method "setScriptSettings".
With this method Settings are saved and restored under the script id, If you change the script's id you will lose the saved settings.
Example:
// Initialise parameter
param = {
   "searchText": "",
   "matchCase": "false",
   "wholeText": "false"
};

// Readscript settings
var strData = Banana.document.getScriptSettings();
if (strData.length > 0) {
   var objData = JSON.parse(strData);
   if (objData)
      param = objData;
}
Since Banana 8.0.8
getScriptSettings(id)
Return the settings saved in the document under the id 'id'.
You use this method to get settings that are shared between scripts. As id we recommend to use a substring of the script's id. For example if you have the scripts 'ch.banana.vat.montlyreport' and 'ch.banana.vat.endofyearreport', then you can use as id 'ch.banana.vat'.
Example:
// Initialise parameter
param = {
   "searchText": "",
   "matchCase": "false",
   "wholeText": "false"
};

// Readscript settings
var strData = Banana.document.getScriptSettings('ch.banana.vat');
if (strData.length > 0) {
   var objData = JSON.parse(strData);
   if (objData)
      param = objData;
}
Since Banana 8.0.8
info(section, id)
Return the info value of the document referenced by section and id. Section and Id correspond to the xml name listed in the Info table, see command File info in menu "Tools" and set the view to complete to see the XML columns. If the value referenced by section and id doesn't exist, an object of type undefined is returned.
Example:
// Get some value of the accounting file
var FileName = Banana.document.info("Base","FileName");
var DecimalsAmounts = Banana.document.info("Base","DecimalsAmounts");
var HeaderLeft = Banana.document.info("Base","HeaderLeft");
var HeaderRight = Banana.document.info("Base","HeaderRight");
var BasicCurrency = Banana.document.info("AccountingDataBase","BasicCurrency");

// For openingDate and closureDate use instead startDate and endDate
var openingDate = Banana.document.info("AccountingDataBase","OpeningDate");
var closureDate = Banana.document.info("AccountingDataBase","ClosureDate");

// For file accounting type
var FileType = Banana.document.info("Base","FileType");
var FileGroup = Banana.document.info("Base","FileTypeGroup");
var FileNumber = Banana.document.info("Base","FileTypeNumber");
FileTypeGroup / FileTypeNumber combinations:
- 100 Double entry accounting
- 100 No VAT
- 110 With VAT
- 120 Multi Currency
- 130 Multi Currency with VAT
- 110 Income and Expense accounting
- 100 No VAT
- 110 With VAT
- 130 Cash Book
- 100 No VAT
- 110 With VAT
- 400 Address / Labels
- 110 Labels
- 120 Address
scriptSaveSettings(string)
Save the settings of the script in the document. The next time the script is run, it si possible to read the saved settings with "scriptReadSettings".
With this method Settings are saved and restored under the script id, If you change the script's id you will lose the saved settings.
Example:
// Save script settings
var paramString = JSON.stringify(param);
var value = Banana.document.scriptSaveSettings(paramString);
Deprecated since Banana 8.0.8. Use setScriptSettings instead.
scriptReadSettings()
Return the saved settings of the script.
With this method Settings are saved and restored under the script id, If you change the script's id you will lose the saved settings.
Example:
// Initialise parameter
param = {
   "searchText": "",
   "matchCase": "false",
   "wholeText": "false"
};

// Readscript settings
var strData = Banana.document.scriptReadSettings();
if (strData.length > 0) {
   var objData = JSON.parse(strData);
   if (objData)
      param = objData;
}
Deprecated since Banana 8.0.8. Use getScriptSettings instead.
setScriptSettings(value)
Save the settings of the script in the document. It is possible to read the saved settings of the script with the method "getScriptSettings".
With this method Settings are saved and restored under the script id, If you change the script's id you will lose the saved settings.
Example:
// Save script settings
var paramString = JSON.stringify(param);
var value = Banana.document.setScriptSettings(paramString);
Since Banana 8.0.8.
setScriptSettings(id, value)
Save the settings in the document under the id 'id'. It is possible to read the saved settings with "getScriptSettings(id)".
You use this method to set settings that are shared between scripts. As id we recommend to use a substring of the script's id. For example if you have the scripts 'ch.banana.vat.montlyreport' and 'ch.banana.vat.endofyearreport', then you can use as id 'ch.banana.vat'.
Example:
// Save script settings
var paramString = JSON.stringify(param);
var value = Banana.document.setScriptSettings('ch.banana.vat', paramString);
Since Banana 8.0.8.
table(xmlTableName)
Return the table referenced by the name xmlTableName as a Table object, or undefined if it doesn't exist.
Banana.document.table("Accounts");
table(xmlTableName, xmlListName)
Return the table referenced by the name xmlTableName with the rows of the list xmlListName as a Table object, or undefined if the table or the list don't exist. The default list is the 'Data' list.
Banana.document.table("Transactions", "Examples");
Banana.document.table("Transactions").list("Examples");  // alternative way
See also: Table.list, Table.listNames.
Since Banana 8.0.5
value(tableName, rowNr, columnName)
Return the value in table tableName, row rowNr and column columnName as string. If the table, row or column are not founds it return an object of type undefined.
Banana.document.value("Accounts", 5, "Description")
Banana.Document.Cursor
Banana.Document.Cursor is the interface to the cursor and can be accessed through Banana.document.cursor.
Properties
tableName
Return the xml name of the current table.
var currentTable = Banana.document.cursor.tableName;
rowNr
Return the number of the current row.
var currentRow = Banana.document.cursor.rowNr;
columnName
Return the xml name of the current column.
var currentColumn = Banana.document.cursor.columnName;
selectionTop
Return the index of the top row of the current selection.
var currentSelectionTop = Banana.document.cursor.selectionTop;
selectionBottom
Return the index of the bottom row of the current selection.
var currentSelectionBottom = Banana.document.cursor.selectionBottom;
Banana.Document.Row
Banana.Document.Row is the interface of a row.
Properties
isEmpty
Return true if the row is completly empty.
var isEmpty = tRow.isEmpty;
rowNr
Return the index of the row.
var rowNr = tRow.rowNr;
uniqueId
Return the unique id (an interger value) of the row.
Banana assign to every new row a unique id, this value is fix a will never change.
var uniqueId = tRow.uniqueId;
Methods
addMessage(msg [, columnName] [, idMsg])
Add the message msg to the document. The message is showed in the pane "Messages", and in a dialog if the application option "Show Messages" is turned on.
If idMsg is not empty, the help button calls an url with message's id (idMsg) as parameter.
If columnName is not empty, the message is connected to the column columnName. With a double click over message in the message pane, the cursor jump to the corresponding table, rowNr and columnName.
See also: Application.AddMessage, Table.AddMessage, Document.AddMessage.
var accountsTable = Banana.document.table("Accounts");
var tRow = accountsTable.row(4);
tRow.addMessage("Message text");
toJSON([columnNames])
Return the row as JSON string. If the parameter columnNames is defined, only the columns in the array are included in the file.
// Return all the columns of the row
var json = tRow.toJSON();

// Return only the defined columns of the row
var json = tRow.toJSON(["Account", "Description", "Balance"]);
value(columnName)
Return the value in column columnName. If the column is not found or the object is invalid it return the value undefined.
var accountsTable = Banana.document.table("Accounts");
var tRow = accountsTable.row(4);
tRow.value("Description");
Banana.Document.Table
Banana.Document.Table is the interface of a table.
Properties
name
Return the xml name of the table.
var table = Banana.document.table("Accounts");
var tName = table.name;
columnNames
Return the xml names of the table's columns as an array.
var table = Banana.document.table("Accounts");
var tColumnNames = table.columnNames;
listName
Return the xml name of the list that this table object reference to. The default list is the 'Data' list.
Since Banana 8.0.5
var table = Banana.document.table("Accounts");
var tListName = table.listName;
listNames
Return the xml names of the available lists as an array. The default list is the 'Data' list.
Since Banana 8.0.5
var table = Banana.document.table("Accounts");
var tListNames = table.listNames;
rowCount
Return the number of rows in the table.
var table = Banana.document.table("Accounts");
var tRowCount = table.rowCount;
rows
Return the rows of the table as an array of Row objects.
var table = Banana.document.table("Accounts");
var tRows = table.rows;
Methods
addMessage(msg, rowNr [, columnName] [, idMsg])
Add the message msg to the queue of the document. The message is showed in the pane "Messages", and in a dialog if the application option "Show Messages" is turned on.
If idMsg is not empty, the help button calls an url with message's id (idMsg) as parameter.
If rowNr is different than "-1" the message is connected to the row rowNr. if columnName is not empty, the message is connected to the column columnName. With a double click over message in the message pane, the cursor jump to the corresponding table, rowNr and columnName.
See also: Application.AddMessage, Row.AddMessage, Document.AddMessage.
var table = Banana.document.table("Accounts");
table.addMessage("Message string", 3, "description");
extractRows( function(rowObj, rowNr, table), tableTitle)
Extract the rows that passed the test defined by function and show them in the table "Selections". The title of the table is set to tableTitle.
findRows( function(rowObj, rowNr, table))
Return an array of Row objects that pass the test defined in function.
findRowByValue(columnName, value)
Return the first row as Row object that contains the value in the the column columnName. Or undefined if any row is found.
var cashAccountRow = Banana.document.table('Accounts').findRowByValue('Account','1000');
if (!cashAccountRow)
   //Row not found
list(xmlListName)
Return a new table object with the rows of the list xmlListName, or undefined if the list xmlListName doesn't exist.
var recurringTransactions = Banana.document.table('Transactions').list('Examples');
var archivedProducts = Banana.document.table('Products').list('Archive');
Since Banana 8.0.5
row(rowNr)
Return the Row at index rownr as Row Object, or undefined if rowNr si outside the valid range.
var table = Banana.document.table("Accounts");
var row = table.row(3);
toJSON([columnNames])
Return the table as JSON string. If the parameter columnNames is defined, only the columns in the array are included in the file.
var table = Banana.document.table("Accounts");
var json = table.toJSON();
toHtml([columnNames, formatValues])
Return the table as Html file. If the parameter columnNames is defined, only the columns in the array are included in the file. If formatValues is set to true, the values are converted to the locale format.
Example:
//Show the whole row content of the table Accounts
Banana.Ui.showText(Banana.document.table('Accounts').toHtml());

//Show some columns and format dates, amounts, ... as displayed in the program
Banana.Ui.showText(
   Banana.document.table('Accounts').toHtml(['Account','Group','Description','Balance'],true)
);
toTsv([columnNames])
Return the table as Tsv file (Tab separated values). If the parameter columnNames is defined, only the columns in the array are included in the file.
var table = Banana.document.table("Accounts");
var tsv = table.toTsv();
value(rowNr, columnName)
Return the value in row rowNr and column columnName as string. Or undefined if the row or column are not found.
var table = Banana.document.table("Accounts");
var account = table.value(3,'Account');
var description = table.value(3,'Description');
Banana.IO
The Banana.IO class is used to read and write to files.
Since: Banana Accounting 8.0.7, only in Banana Experimental
Introduction
The API Banana.IO and Banana.IO.LocalFile allow a script to read or write to files in a secure way. The script can only read or writes to files that are first selected by the user though the corresponding dialogs. The script has no direct access to files on the file system. After the script finished, the permissions to write or read files are canceled.
For example to write the result of a script to a file:
var fileName = Banana.IO.getSaveFileName("Select save file", "", "Text file (*.txt);;All files (*)")
if (fileName.length) {
   var file = Banana.IO.getLocalFile(fileName)
   file.codecName = "latin1";  // Default is UTF-8
   file.write("Text to save ...");
   if (!file.errorString) {
      Banana.IO.openPath(fileContent);
   } else {
      Banana.Ui.showInformation("Write error", file.errorString);
   }
} else {
   Banana.Ui.showInformation("Info", "no file selected");
}
To read the content of a file:
var fileName = Banana.IO.getOpenFileName("Select open file", "", "Text file (*.txt);;All files (*)")
if (fileName.length) {
   var file = Banana.IO.getLocalFile(fileName)
   file.codecName = "latin1";  // Default is UTF-8
   var fileContent = file.read();
   if (!file.errorString) {
      Banana.IO.openPath(fileContent);
   } else {
      Banana.Ui.showInformation("Read error", file.errorString);
   }
} else {
   Banana.Ui.showInformation("Info", "no file selected");
}
Methods
getOpenFileName(caption, path, filter)
The method getOpenFileName returns an existing file selected by the user. If the user presses Cancel, it returns an empty string. The file selected by the user is then allowed to be readen, but not written.
The parameter caption is the caption of the dialog.
The parameter path is path inclusive the file name to be selected. If the path is relative, the current open document path or the user's document path is used.
The parameter filter set the files types to be showed. If you want multiple filters, separate them with ';;', for example: "Text file (*.txt);;All files (*)".
var fileName = Banana.IO.getOpenFileName("Select file to read", "", "Text file (*.txt);;All files (*)")
Since: Banana Accounting 8.0.7, only in Banana Experimental
getSaveFileName(caption, path, filter)
The method getSaveFileName returns an existing file selected by the user. If the user presses Cancel, it returns an empty string. The file selected by the user is then allowed to be readen and written.
The parameter caption is the caption of the dialog.
The parameter path is path inclusive the file name to be selected. If the path is relative, the current open document path or the user's document path is used.
The parameter filter set the files types to be showed. If you want multiple filters, separate them with ';;', for example: "Text file (*.txt);;All files (*)".
var fileName = Banana.IO.getSaveFileName("Select file to write", "", "Text file(*.txt);;All files (*)")
Since: Banana Accounting 8.0.7, only in Banana Experimental
getLocalFile(path)
The method getLocalFile(path) return an object of type Banana.IO.LocalFile that represent the requested file. This method always return a valid Banana.IO.LocalFile object.
The parameter path to the file.
Since: Banana Accounting 8.0.7, only in Banana Experimental
openUrl(path)
The method openUrl(path) open the file referred by path in the system default application.
The parameter path to the file.
Since: Banana Accounting 8.0.7, only in Banana Experimental
openPath(path)
The method openPath(path) show the folder containing the file referred by path in the system file manager.
The parameter path to the file.
Since: Banana Accounting 8.0.7, only in Banana Experimental
Banana.IO.LocalFile
The LocalFile class represent a file on the local file system. See Banana.IO for an example.
Since: Banana Accounting 8.0.7, only in Banana Experimental
Properties
codecName
The name of the codec to be used for reading or writing the file. Default is 'UTF-8'.
errorString
Read only. The string of the last occured error. If no error occured it is empty.
Methods
read()
Returns the content of the file. This function has no way of reporting errors. Returning an empty string can mean either that the file is empty, or that an error occurred. Check the content of the property errorString to see if an error occured.
write(text [, append])
Write text to the file. If append is set to true, text is appended to the file. Return true if the operation was succesfully, false otherwise.
Banana.Report
The class Banana.Report enable you to create reports, preview and print in Banana Accounting.
Introduction
The report logic is similar to the HTML / CSS logic:
- Create a Report object .
- A report contain a list of ReportEements (paragraphs, texts, tables and other)
- The element can contains other sub-elements
- For each element you can add a class that is used for rendering the element
- Create a StyleSheet
- A stylesheet is composed of StyleElements.
- You preview and print a report by passing the Report and the Stylesheet object.
Each report sturcture has:
- a ReportElement list
- a Header Element list
- a Footer Element list
// Report
var report = Banana.Report.newReport("Report title");
report.addParagraph("Hello World !!!", "styleHelloWorld");

// Styles
var stylesheet = Banana.Report.newStyleSheet();
var style = stylesheet.addStyle(".styleHelloWorld");
style.setAttribute("font-size", "96pt");
style.setAttribute("text-align", "center");
style.setAttribute("margin-top", "50mm");

var style2 = stylesheet.addStyle("@page");
style2.setAttribute("size", "landscape");

// Print preview
Banana.Report.preview(report, stylesheet);
Methods
newReport(title)
Creates a report with title 'title'. The returned object is of type Banana.Report.ReportElement.
To the report you can then add the desired elements, like paragraphs, texts, tables, and so on that construct the structure of the report.
var report = Banana.Report.newReport("Report title");
newStyleSheet()
Creates an empty stylesheet. The returned object is of type Banana.Report.ReportStyleSheet.
To the stylesheet you can add the styles that format the report.
var stylesheet = Banana.Report.newStyleSheet();
newStyleSheet(fileName)
Creates a stylesheet from a file. The file has the same syntax as CSS stylesheets. The file path is relative to the script's path. The path can't contain a '..'' (parent directory).
The returned object is of type Banana.Report.ReportStyleSheet.
You can add further styles to the returned stylesheet.
var reportStyles = Banana.Report.newStyleSheet("styles.css");

*** Content of file styles.css ***
.helloWorldStyle
{
font-size: 96pt;
text-align: center;
margin-top: 50mm;
}

@page
{
size: landscape;
}
*** End of file styles.css ***
preview(report, stylesheet)
Opens a print preview Dialog and shows the report with the given stylesheet.
The page orientation is given by the stylesheet. The default size and orientation is taken from the default printer, or can be set through the stylesheet.
// Set landscape orientation
stylesheet.addStyle("@page {size: landscape}");

// Set page size and orientation
stylesheet.addStyle("@page {size: A5 lanscape}");

// Displays the report
Banana.Report.preview(report, stylesheet);
Example: Hello world
// Simple test script using Banana.Report
//
// @id = ch.banana.script.report.helloworld
// @api = 1.0
// @pubdate = 2017-01-02
// @publisher = Banana.ch SA
// @description = Report Hello world
// @task = app.command
// @doctype = *
// @inputdatasource = none
// @timeout = -1
//

function exec(string) {

   // Create the report
   var report = Banana.Report.newReport("Report title");

   // Add a paragraph to the report
   report.addParagraph("Hello World !!!", "helloWorldStyle");

   // Define some styles
   var stylesheet = Banana.Report.newStyleSheet();

   var style = stylesheet.addStyle(".helloWorldStyle");
   style.setAttribute("font-size", "96pt");
   style.setAttribute("text-align", "center");
   style.setAttribute("margin-top", "50mm");

   var style2 = stylesheet.addStyle("@page");
   style2.setAttribute("size", "landscape");

   // Open Preview
   Banana.Report.preview(report, stylesheet);
}
Exemple: an example with tables, page breaks and differents styles
Result
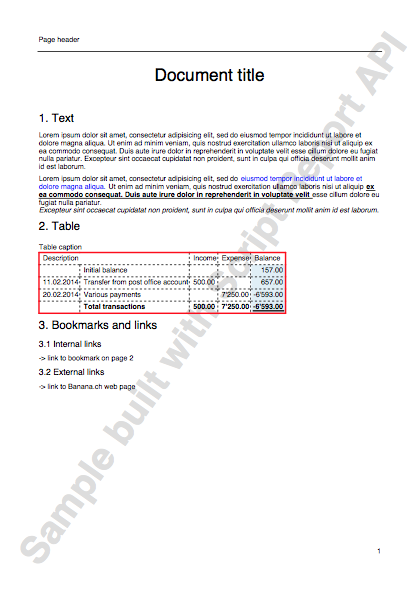
Script
// Test script using Banana.Report
//
// @id = ch.banana.script.report.report
// @api = 1.0
// @pubdate = 2017-01-02
// @publisher = Banana.ch SA
// @description = Test report api
// @task = app.command
// @doctype = *
// @outputformat = none
// @inputdatasource = none
// @timeout = -1
//

function exec(string) {

   // Report
   var report = Banana.Report.newReport("Report title");

   var pageHeader = report.getHeader()
   pageHeader.addClass("header");
   pageHeader.addText("Page header");
   report.getFooter().addFieldPageNr();

   var watermark = report.getWatermark();
   watermark.addParagraph("Sample built with Script Report API");

   report.addParagraph("Report title", "titleStyle");
   report.addParagraph("1. Text", "chapterStyle").setOutline(1);

   report.addParagraph("Lorem ipsum dolor sit amet, consectetur adipisicing elit, sed do " +
    "eiusmod tempor incididunt ut labore et dolore magna aliqua. " +
    "Ut enim ad minim veniam, quis nostrud exercitation ullamco laboris nisi ut aliquip " +
    "ex ea commodo consequat. Duis aute irure dolor in reprehenderit in voluptate velit " +
    "esse cillum dolore eu fugiat nulla pariatur. Excepteur sint occaecat cupidatat non " +
    "proident, sunt in culpa qui officia deserunt mollit anim id est laborum.");

   var paragraph2 = report.addParagraph();
   paragraph2.addText("Lorem ipsum dolor sit amet, consectetur adipisicing elit, sed do ");
   paragraph2.addText("eiusmod tempor incididunt ut labore et dolore magna aliqua. ", "blueStyle");
   paragraph2.addText("Ut enim ad minim veniam, quis nostrud exercitation ullamco laboris nisi ut aliquip ", "boldStlyle");
   paragraph2.addText("ex ea commodo consequat. Duis aute irure dolor in reprehenderit in voluptate velit ", "underlineStyle boldStyle");
   paragraph2.addText("esse cillum dolore eu fugiat nulla pariatur.");
   paragraph2.addLineBreak();
   paragraph2.addText("Excepteur sint occaecat cupidatat non proident, sunt in culpa qui officia deserunt mollit anim id est laborum.", "italicStyle");

   report.addParagraph("2. Table", "chapterStyle").setOutline(1);

   var table = report.addTable();
   table.getCaption().addText("Table caption");

   var tableHeader = table.getHeader();
   var tableHeaderRow = tableHeader.addRow();
   tableHeaderRow.addCell("Description", "", 2);
   tableHeaderRow.addCell("Income");
   tableHeaderRow.addCell("Expense");
   tableHeaderRow.addCell("Balance");

   var tableRow = table.addRow();
   tableRow.addCell();
   tableRow.addCell("Initial balance");
   tableRow.addCell();
   tableRow.addCell();
   tableRow.addCell(Banana.Converter.toLocaleNumberFormat("157.00")).addClass("balanceStyle");

   var tableRow = table.addRow();
   tableRow.addCell(Banana.Converter.toLocaleDateFormat("2014-02-11"));
   tableRow.addCell("Transfer from post office account");
   tableRow.addCell(Banana.Converter.toLocaleNumberFormat("500.00"));
   tableRow.addCell();
   tableRow.addCell(Banana.Converter.toLocaleNumberFormat("657.00")).addClass("balanceStyle");

   var tableRow = table.addRow();
   tableRow.addCell(Banana.Converter.toLocaleDateFormat("2014-02-20"));
   tableRow.addCell("Various payments");
   tableRow.addCell();
   tableRow.addCell(Banana.Converter.toLocaleNumberFormat("7250.00"));
   tableRow.addCell(Banana.Converter.toLocaleNumberFormat("-6593.00")).addClass("balanceStyle negativeStyle");

   var tableRow = table.addRow("totalrowStyle");
   tableRow.addCell();
   tableRow.addCell("Total transactions");
   tableRow.addCell(Banana.Converter.toLocaleNumberFormat("500.00"));
   tableRow.addCell(Banana.Converter.toLocaleNumberFormat("7250.00"));
   tableRow.addCell(Banana.Converter.toLocaleNumberFormat("-6593.00")).addClass("balanceStyle negativeStyle");

   report.addParagraph("3. Bookmarks and links", "chapterStyle").setOutline(1);

   report.addParagraph("3.1 Internal links", "chapter2Style").setOutline(2);
   report.addParagraph("-> link to bookmark on page 2").setLink("bookmarkpage2");

   report.addParagraph("3.2 External links", "chapter2Style").setOutline(2);
   report.addParagraph("-> link to Banana.ch web page").setUrlLink("http://www.banana.ch");

   report.addPageBreak();

   var chapter4 = report.addParagraph("4. Pages", "chapterStyle");
   chapter4.setOutline(1);

   report.addParagraph("Bookmark on page 2").setBookmark("bookmarkpage2");


   // Styles
   var docStyles = Banana.Report.newStyleSheet();

   var pageStyle = docStyles.addStyle("@page");
   pageStyle.setAttribute("margin", "20mm 20mm 20mm 20mm");

   var headerStyle = docStyles.addStyle("phead");
   headerStyle.setAttribute("padding-bottom", "1em");
   headerStyle.setAttribute("margin-bottom", "1em");
   headerStyle.setAttribute("border-bottom", "solid black 1px");

   var footerStyle = docStyles.addStyle("pfoot");
   footerStyle.setAttribute("text-align", "right");

   var paragraphStyle = docStyles.addStyle("p");
   paragraphStyle.setAttribute("margin-top", "0.5em");

   var captionStyle = docStyles.addStyle("caption");
   captionStyle.setAttribute("margin-top", "1em");

   var titleStyle = docStyles.addStyle(".titleStyle");
   titleStyle.setAttribute("font-size", "24");
   titleStyle.setAttribute("text-align", "center");
   titleStyle.setAttribute("margin-bottom", "1.2em");

   docStyles.addStyle(".chapterStyle", "font-size:16; margin-top:2em; margin-bottom:0.2em");
   docStyles.addStyle(".chapter2Style", "font-size:12; margin-top:1.4em; margin-bottom:0.2em");

   var tableStyle = docStyles.addStyle("table");
   tableStyle.setAttribute("border", "2px solid red");

   docStyles.addStyle("td", "border: 1px dashed black; padding: 2px;");

   var tableColStyle = docStyles.addStyle(".balanceStyle");
   tableColStyle.setAttribute("background-color", "#E0EFF6");
   tableColStyle.setAttribute("text-align", "right");

   var totalRowStyle = docStyles.addStyle(".totalrowStyle");
   totalRowStyle.setAttribute("font-weight", "bold");

   var totalBalanceStyle = docStyles.addStyle(".totalrowStyle td.balanceStyle");
   totalBalanceStyle.setAttribute("text-decoration", "double-underline");

   docStyles.addStyle(".blueStyle", "color:blue");
   docStyles.addStyle(".underlineStyle", "text-decoration:underline;");
   docStyles.addStyle(".italicStyle", "font-style:italic;");
   docStyles.addStyle(".boldStyle", "font-weight:bold");

   // Open Preview
   Banana.Report.preview(report, docStyles);
}
Banana.Report.ReportElement
The class Banana.Report.ReportElement represents the report itself and every element in the report, like sections, paragraphs, tables, texts and the report itself.
Once you create a new report through the method Banana.Report.newReport() you can start adding sections, paragraphs, texts, tables and so on.
When you add an element with one of the add methods, you get as return value an object of type
Elements as a container of other elements.
Banana.Report.ReportElement that represents the added element.
To this object you can add further elements and by this way construct the structure of the report.
Report
+ Paragraph
+ Table
+ Row
+ Cell
+ Cell
+ Row
+ Cell
+ Cell
...
Even if this interface enable you to add tables to text elements or columns to paragraphs, the result will be undefined.
Formatting like text size, text color, margins, and so on are set separately through a Banana.Report.ReportStyleSheet object.
Methods
addClass(classes)
Add classes to the node. A class binds the element to the corresponding class style definend in Banana.Report.ReportStyleSheet as used in CSS Stylesheets.
var report = Banana.Report.newReport("Report title");
report.addParagraph("1250.00").addClass("balanceStyle");
addSection([classes])
Add a section and return the created section as a Banana.Report.ReportElement object.
You can add sections only to sections, cells, captions, headers or footers.
var report = Banana.Report.newReport("Report title");

//Add a section with a style
var section = report.addSection("sectionStyle");
section.addParagraph("First paragraph");
section.addParagraph("Second paragraph");
addParagraph([text, classes])
Add a paragraph and return the created paragraph as a Banana.Report.ReportElement object.
You can add paragraphs only to sections, cells, captions, headers or footers.
var report = Banana.Report.newReport("Report title");

//Add an empty paragraph
report.addParagraph(" ");

//Add a paragraph with a text
report.addParagraph("Hello World !!!");

//Add a paragraph with a text and a style
report.addParagraph("Hello World !!!", "styleHelloWorld");
addText(text [, classes])
Add a text node and return the create text as a Banana.Report.ReportElement object.
You can add texts only to sections, paragraphs, cells, captions, headers or footers.
var report = Banana.Report.newReport("Report title");

//Add a text
report.addText("Hello world !!!");

//Add a text with a style
report.addText("Hello world !!!", "styleHelloWorld");
addTable([classes])
Add a table and return the created table as a Banana.Report.ReportElement object.
You can add tables only to the report or sections.
var report = Banana.Report.newReport("Report title");
var myTable = report.addTable("myTable");
addColumn([classes])
Add a column and return the created column as a Banana.Report.ReportElement object.
You can add columns only to tables.
var column1 = myTable.addColumn("column1");
var column2 = myTable.addColumn("column2");
var column3 = myTable.addColumn("column3");
addRow([classes])
Add a row and return the created row as a Banana.Report.ReportElement object.
You can add rows only to tables, table headers or table footers.
var tableRow = myTable.addRow();
...
addCell([span])
Add an empty cell and return the created cell as a Banana.Report.ReportElement object.
You can add cells only to rows. You can span cells over columns but not over rows.
tableRow.addCell();      //span empty cell over 1 column (default value)
tableRow.addCell("", 3); //span empty cell over 3 columns
...
addCell(text [,classes, span])
Add a cell to the node and return the created cell as a Banana.Report.ReportElement object.
You can add cells only to rows.You can span cells over columns but not over rows.
tableRow.addCell("Bank", "firstCellStyle", 3);      //span cell over 3 columns
tableRow.addCell("1200.65", "secondCellStyle, 1);   //span cell over 1 column
...
addLineBreak()
Add a line break and return the created line break as a Banana.Report.ReportElement object.
You can add line breaks only to paragraphs or cells.
// Add a line break to a paragraph
var p = report.addParagraph(" ");
p.addLineBreak();

// Add a line break to a cell
var c = tableRow.addCell();
c.addLineBreak();
addPageBreak()
Add a page break node and return the created page beak as a Banana.Report.ReportElement object.
You can add page breaks only to the report or sections.
var report = Banana.Report.newReport("Report title");
...
report.addPageBreak();
...
addImage(path [,classes])
Add an image and return the created image as a Banana.Report.ReportElement object. Supported formats are png and jpg.
The path can be relative to the script's folder, the document's folder, the name of a document attacched to the file or a data uri scheme (for images imbedded in the document).
- file:script/<relative_path_to_script_folder>/<image_name>
- file:document/<relative_path_to_file_folder>/<image_name>
- documents:<document_name>
- data:[<media type>][;charset=<character set>][;base64],<data>
You can add images only to sections, paragraphs, cells, captions, headers or footers.
The parameter path can be absolute or relative to the script path.
Since: Banana Accounting 8.0.5
var report = Banana.Report.newReport("Report title");

// Add an image located in the script folder
report.addImage("file:script/logo_abc.jpg");

// Add an image located in the dcoument folder
report.addImage("file:document/logo_mnp.jpg");

// Add an image saved in the table documents
report.addImage("documents:logo_xyz.jpg");

// Add an image (a red dot) included in the document
report.addImage("data:image/png;base64,iVBORw0KGgoAAAANSUhEUgAAAAUA AAAFCAYAAACNbyblAAAAHElEQVQI12P4//8/w38GIAXDIBKE0DHxgljNBAAO 9TXL0Y4OHwAAAABJRU5ErkJggg==");
addImage(path, widht, height [,classes])
Overloaded method to add an image and return the created image as a Banana.Report.ReportElement object.
The parameters widht and height have the same syntax as css lenhgt values. They can be absolute (ex.: "30px", "3cm", ... ) or relative (ex.: "50%", "3em", ...).
Since: Banana Accounting 8.0.5
var report = Banana.Report.newReport("Report title");
report.addImage("documents:image_logo", "3cm", "5cm");
addFieldPageNr([classes])
Add a field with containg the page number and return the created field as a Banana.Report.ReportElement object.
You can add this field only to sections, paragraphs, cells, captions, headers or footers.
var report = Banana.Report.newReport("Report title");
...
// Add the page number to the paragraph
report.addParagraph("Page ").addFieldPageNr();

// Add a page number to the footer
var footer = report.getFooter();
footer.addText("Page ");
footer.addFieldPageNr();
getWatermark()
Return the watermak element.
Only the report has a watermak element.
var watermark = report.getWatermark();
watermark.addParagraph("Watermark text");
getHeader()
Return the header of the element.
Only tables and the report have an header element.
var report = Banana.Report.newReport("Report title");

//Report
var reportHeader = report.getHeader();
reportHeader.addClass("header");
reportHeader.addText("Header text");

//Table
var table = report.addTable("myTable");
var tableHeader = table.getHeader();
tableRow = tableHeader.addRow();
tableRow.addCell("Description");
tableRow.addCell("Amount");
getFooter()
Return the footer of the element.
Only tables and the report have a footer element.
//Report
var footer = report.getFooter();
footer.addText("Footer text");
getCaption()
Return the caption of the element.
Only tables have a caption element.
var table = report.addTable("MyTable");
var caption = table.getCaption();
caption.addText("Table caption text", "captionStyle");
getTag()
Return the tag of the element, like 'body', 'p', 'table', 'td' and so on.
var report = Banana.Report.newReport("Report title");
...
report.getTag(); // returns 'body'
footer.getTag(); // returns 'pfoot'
...
getTitle()
Return the title of the element.
Only a document element have a title.
var report = Banana.Report.newReport("My Report Title");
var title = report.getTitle(); // return 'My Report Title'
Since: Banana Accounting 8.0.5
setOutline(level)
Set the outline level, this is used to create the index when exporting to pdf.
report.addParagraph("1. Text").setOutline(1);
setBookmark(bookmark)
Set a bookmark (or anchor), this is used in conjunction with setLink().
report.addParagraph("Bookmark on page 2").setBookmark("bookmarkpage2");
setLink(bookmark)
Set a link to a bookmark. See setBookmark().
report.addParagraph("-> link to bookmark on page 2").setLink("bookmarkpage2");
setPageBreakBefore()
Set to insert a page break before the element.
// Insert a page break before a paragraph
report.addParagraph("Hello world!!!").setPageBreakBefore();

// Insert a page break before a table
   /* first create a table then... */
myTable.setPageBreakBefore();
setSize(width, height)
Set the size of the element.
The parameters widht and height have the same syntax as css lenhgt values. They can be absolute (ex.: "30px", "3cm", ... ) or relative (ex.: "50%", "3em", ...).
You can only set the size of an image element.
Since: Banana Accounting 8.0.5
var image = report.addImage("C:/Documents/Images/img.jpg");
image.setSize("3cm", "6cm");
setStyleAttribute(attr_name, attr_value)
Set a style attribute to the element. Attributes ids and values follow the CSS specification. This attibute correspont to the inline styles in Css.
paragraph.setAttribute("font-size", "24pt");
setStyleAttributes(attributes)
Set style attributes to the element. Attributes ids and values follow the CSS specification. Those attributes correspond to the inline styles in Css.
paragraph.setAttribute("font-size:24pt;font-weight:bold;");
setTitle(title)
Set the title of the element.
Title can be only set to a document element.
Since: Banana Accounting 8.0.5
document.setTitle("Annual report");
setUrlLink(link)
Set a link to an external file (file://...) or a web page (http://....).
To the element the class "link" is automatically added.
report.addParagraph("Link to Banana.ch web page").setUrlLink("http://www.banana.ch");
Banana.Report.ReportStyle
The class Banana.Report.ReportStyle represent a single style in a stylesheet. It is used to set the style attributes.
Methods
setAttribute(attr_name, attr_value)
Set the attribute value. Attributes ids and values follow the CSS specification.
style.setAttribute("font-size", "24pt");
setAttributes(attributes)
Set attributes values. Attributes ids and values follow the CSS specification.
style.setAttributes("font-size:24pt;font-weight:bold;");
Supported attributes
font
font-family
font-size
font-style
font-weight
margin [top, right, bottom, left]
margin-top
margin-bottom
margin-left
margin-right
padding
padding-top
padding-bottom
padding-left
padding-right
hanging-ident
text-align
text-decoration
text-ellipsis
vertical-align
color
background-color
border
border-top
border-top-style
border-top-color
border-top-width
border-bottom
border-bottom-style
border-bottom-color
border-bottom-width
border-left
border-left-style
border-left-color
border-left-width
border-right
border-right-style
border-right-color
border-right-width
display
overflow
float
text-wrap
width
max-width
min-width
height
page-break-after
column-break-after
line-break-after
page-break-before
column-break-before
line-break-before
page-break-inside
line-break-inside
size
position
left
top
right
bottom
transform (matrix, translateX, translateY, translate, rotate, scaleX, scaleY, scale, skewX, skewY and skew)
transformOrigin
orphans
fill-empty-area
Non standard attributes and values
width-sym
This attribute contain a string. Columns with the same width-sym will be layouted with the same width.
layout-sym
This attribute is a string. Tables with the same layout-sym attribute will have the same layout for the width of the columns.
overflow
This attribute has the non standard value "shrink". The content of the node will be down scaled to fit given space.
style.setAttribute("overflow", "shrink");
overflow-shrink-max
This attibute the maximal down scaling factor (like 0.8).
style.setAttribute("overflow-shrink-max", "0.6");
text-decoration
This attribute can also contains the values "double-underline" or "double-strong-underline".
style.setAttribute("text-decoration", "underline");
border-style
This attribute can also contain the values "double" and "double-strong".
style.setAttribute("border-style", "double");
flexible-width
This attribute can contain the value "always" and is only used with columns. If in a table one or more columns have the attribute "flexible-widht", only those columns are enlarged to get the desired table widht, untouching the other. Otherwise all columns are enlarged.
fill-empty-area
With this attribute you can fill the remaing space of your page with lines. Lines can be defined through the attribute, which is a string and contains the color, the style and the width of the line.
Style can be: solid, dash and dot.
Examples:
var style1 = stylesheet.addStyle("@page", "black solid 1");
var style2 = stylesheet.addStyle("@page", "green dash 0.5");
Banana.Report.ReportStyleSheet
The class Banana.Report.ReportStyleSheet is used to set the styles to format a report.
Page size and orientation
At this moment the report is rendered based on the page size defined in the default printer device.
You can't define a page size, bu you can set the orientation with the Style @page.
Page orientation can't be set only once per report, you can't switch from potrait to landscape.
var stylesheet = Banana.Report.newStyleSheet();
stylesheet.addStyle("@page").setAttribute("size", "landscape");
Methods
addStyle(selector)
Create a new style with the given selector. The return object is of type Banana.Report.ReportStyle.
The syntax of selector follow the CSS specification.
- Style name without a preceding dot are reserved predefined tags like "td", "p", "table"
- Style name for new class need a preceding point ".myStyle" in the addStyle method.
The dot name is not used when adding the class name to the element
report.addParagraph("Text to print 24pt", "myStyle");
var style = stylesheet.addStyle(".myStyle");
myStyle.setAttribute("font-size", "24pt");
myStyle.setAttribute("text-align", "center");

report.addCell("Text to print");
var styleTd = stylesheet.addStyle("td");
styleTd.setAttribute("font-weight", "bold");
addStyle(selector, attributes)
Create a new style with the given selector and attributes. The return object is of type Banana.Report.ReportStyle.
The syntax of selector and attributes follow the CSS specification.
var style2 = stylesheet.addStyle(".style2", "font.size: 24pt; text-align: center");
parse(text)
Load the styles from the given text. The text follow the CSS specification.
stylesheet.parse(
  "p.style1 {font-size:24pt; text-align:center;}" +
  "@page {size:A4 landscape;}"
  );
The selector
The selector follow the css syntax, following you will find some examples:
| Selector | Selected elements |
| .xyz |
Select all elements with class xyz NB.: When you set the class to a ReportElement you enter the name without '.' |
| table | Select all tables |
| table.xyz | Select all tables with class xyz |
| table.xyz td | Select all cells in tables with class xyz |
| @page | page |
| body | content of the report |
| phead | page header |
| pfoot | page footer |
| div | section |
| p | paragraph |
| table | table |
| caption | table caption |
| thead | table header |
| tbody | table body |
| tfoot | table footer |
| tr | table row |
| td | table cell |
You can get the tag of an element through the method getTag();
Report FAQ
How can I set the orientation of the page and the margins
// Set landscape orientation
styleSheet.addStyle("@page", "size: landscape");

// Page margins top, right, bottom, left
styleSheet.addStyle("@page", "margin: 20mm 20mm 20mm 25mm");
How can I set the size of the page
// Set page size
styleSheet.addStyle("@page", "size: A5");
How can I set the margins of page header and footer
styleSheet.addStyle("phead", "margin-bottom:2em");
styleSheet.addStyle("pfoot", "margin-top:2em");
How can I print the page number on the right of the page footer
document.getFooter().addFieldPageNr("alignright");
stylesheet.addStyle("pfoot", "text-align:right");
Can I print the total number of pages
No
I like a style implemented in a report of Banana Accounting, where can I get the used stylesheet?
In print preview export the report as html and look at the code. You will find the used styles.
Banana.SDecimal
The Banana.SDecimal (String Decimal) provide functions to do decimal math calculation that
- use decimal string in the form of '10.00' or '-10' as argument and return value
- '.' is interpreted as the decimal separator
- thousand separator are not allowed
- has up to 34 digits of numeric precision
- do accurate decimal rounding
You can use this functions instead of the javascript Number that use floating point arithmetic and are not very suitable for accounting calculation do the rounding differences.
var r = Banana.SDecimal.add('6.50', '3.50');   // return '10.00'
var r = Banana.SDecimal.divide('10', '2');     // return '5.00'
var r = Banana.SDecimal.divide('10', '2', ''); // return '5'
var r = Banana.SDecimal.divide('10', '2');     // return '5.00000'
Rounding context
Functions can be passed a rounding context that specify the rounding properties:
- decimals is the number of decimal digits (default value is 2)
- null returns the value unrounded.
- '0' returns with no decimals.
- '1' to '33' returns the value with the indicated number o decimals.
- mode is the rounding mode (default value is HALF_UP)
- Banana.SDecimal.HALF_UP the amount are rounded to the nearest. The 0.5 are rounded up.
- Banana.SDecimal.HALF_EVEN the amount are rounded to the nearest. The 0.5 are rounded up or down based on the preceding digit.
If the rounding context is omitted no rounding is done.
Rounding context of the accounting file
All Banana document file have a rounding context that can be retrieved with the property Banana.document.rounding (see Banana.document).
Examples:
// no context
var r = Banana.SDecimal.divide('10', '3'); // return '3.3333333333333333333333333'

// with context
var context = {'decimals' : 4, 'mode' : Banana.SDecimal.HALF_UP};
var r = Banana.SDecimal.divide('10', '3', context);        // return '3.3333'
var r = Banana.SDecimal.divide('10', '3', {'decimals':0}); // return '3'

// use the rounding property (accunting file 2 decimals)
var r = Banana.SDecimal.divide('10', '3', Banana.document.rounding); // return '3.33'
Functions
abs(value1, [, rounding])
Returns the value1 without the sign and rounded as indicated
var r = Banana.SDecimal.abs('-10') // return '10.00'
add(value1, value2 [, rounding])
Returns the sum of value1 and value2.
var r = Banana.SDecimal.add('6.50', '3.50'); // return '10.00'
compare(value1, value2)
Returns an integer value
- 1 if value1 > value2
- 0 if value1 = value2
- -1 if value1 < value2
Banana.SDecimal.compare('3.50', '2'); // return '1'
Banana.SDecimal.compare('3.00', '3'); // return '0'
divide(value1, value2 [, rounding])
Returns value1 divided by value2.
var r = Banana.SDecimal.divide('6', '3'); // return '2.00'
isZero(value)
Returns a boolean
- true if value is zero
- false if value is not zero
var r = Banana.SDecimal.isZero('3.00'); // return 'false'
max(value1, value2 [, rounding])
Returns the max of value1 and value2.
var r = Banana.SDecimal.max('6', '3'); // return '6.00'
min(value1, value2 [, rounding])
Returns the min of value1 and value2.
var r = Banana.SDecimal.min('6', '3'); // return '3.00'
multiply(value1, value2 [, rounding])
Returns value1 multiplied by value2.
var r = Banana.SDecimal.multiply('6', '3'); // return '18.00'
remainder(value1, value2 [, rounding])
Divide value1 by value2 and returns the reminder.
var r = Banana.SDecimal.reminder('10', '3'); // return '1.00'
round(value1, [, rounding])
Returns value1 round to the spcified rounding context.
var r = Banana.SDecimal.round('6.123456'); // no context no rounding
r = Banana.SDecimal.round('6.123456', {'decimals':2}); // return '6.12'
roundNearest(value1, nearest, [, rounding])
Returns value1 round to the specified minimal amount.
var r = Banana.SDecimal.roundNearest('6.17', '0.1'); // return '6.1'
r = Banana.SDecimal.roundNearest('6.17', '0.05', {'decimals':2}); // return '6.15'
invert(value, [, rounding])
If positive returns a negative value, if negative returns a positive value.
var a = Banana.SDecimal.invert('5'); //return '-5'
var b = Banana.SDecimal.invert('-2.50'); //return '2.50'
sign(value)
Returns an integer value
- 1 if value > 0
- 0 if value = 0
- -1 if value < 0
var r = Banana.SDecimal.sign('-5'); // return '-1'
subtract(value1, value2 [, rounding])
Subtract value2 from value1 and returns the result.
var r = Banana.SDecimal.subtract('10', '3'); // return '7.00'
Locale conversion
To convert to and from the locale format use the Banana.Converter functions
-
Banana.Converter.toInternalNumberFormat(value [, decimals, convZero])
-
Banana.Converter.toLocaleNumberFormat(value [, decimalSeparator])
var sum = Banana.SDecimal.add('10000', '2000'); // return '12000.00'
var printValue = Banana.Converter.toLocaleNumberFormat(sum); // return "12'000.00"
Banana.Script
Banana.Script represent the interface to the script file and can be accessed through Banana.script. It is used to get the parameters values defined in the script. For example if you want to print out in a report the publishing date of the script.
Properties
Methods
getParamValue(paramName)
Return the value definend in the script file of the parameter paramName. Return an empty string or the internal default value if the parameter is not defined. Return the first found value, if the parameter is defined multiple times.
Banana.script.getParamValue('pubdate'); // returns for example '2016-05-11'
getParamValues(paramName)
Return all the values defined in the script file of the param paramName . Return an empty array if the parameter paramName is not defined.
// Script.js example:
// ...
// @authors = Pinco
// @authors = Pallino
// ...

Banana.script.getParamValues('authors'); // returns ['Pinco', 'Pallino']
getParamLocaleValue(paramName)
Return the localized value definend in the script file of the param paramName. Return an empty string the parameter is not defined.
// Script.js example:
// ...
// @description = English desciption
// @description.it = Descrizione italiana
// @description.de = German Beschreibung
 ...

Banana.script.getParamLocaleValue('description'); // returns 'Descrizione italiana' for a system running with the locale 'italian'.
Banana.Ui
This class Banana.Ui contains methods to interact with user interface.
Methods
createUi(uiFilePath)
Read the file uiFilepath and return an object representing the dialog. The uiFileName has to be in the same directory as the running script. For details and examples see Script dialogs.
If an error occurred undefiend is returned.
Example:
@includejs = ch.banana.calculator.dialog.js;  // Define the class Calculator
                                              // that control the .ui file
...
var calculatorUi = Banana.Ui.createUi("ch.banana.calculator.dialog.ui");
var calcJs = new Calculator(calculatorUi);
calclatorUi.exec();  //Show the dialog
getDouble(title, label [, value , min, max, decimals])
Show the user a dialog asking to insert a double. Return the inserted double or undefined if the user clicked cancel.
var a = Banana.Ui.getDouble("Title text", "Label text");
var b = Banana.Ui.getDouble("Title text", "Label text", "10.0");
getInt(title, label [, value, min, max, steps])
Show the user a dialog asking to insert a integer. Return the inserted integer or undefined if the user clicked cancel.
var a = Banana.Ui.getInt("Title text", "Label text");
var b = Banana.Ui.getInt("Title text", "Label text", "5", "1", "10","1");
getItem(title, label, items [, current, editable])
Show the user a dialog asking to select an intem from a list. Return the selected item or undefined if the user clicked cancel.
var value = Banana.Ui.getItem("Input", "Choose a value", ["a","b","c","d","e"], 2, false);
getPeriod(title, startDate, endDate [, selectionStartDate, selectionEndDate, selectionChecked])
Show the user a dialog asking to select a period like the tab Period. Return an object with the atributes 'startDate', 'endDate' and 'hasSelection' or undefined if the user clicked cancel. Date values are in the format "YYYY-MM-DD".
var period = Banana.Ui.getPeriod("Title text", "2016-01-01", "2016-12-31");
if (period) {
    var selectedStartDate = period.startDate; // return the start date of the selected period
    var selectedEndDate = period.endDate; // return the end date of the selected period
}
getText(title, label [, text])
Show the user a dialog asking to insert a text. Return the inserted text or undefined if the user clicked cancel.
var text = Banana.Ui.getText("Title text","Label text");
showHelp(uiFileName)
Show the help of a dialog. The help is loaded from the Banana.ch web site.
showInformation(title, msg)
Show the user an information dialog.
Banana.Ui.showInformation("Information", 'Insert here the text of the information.');
showQuestion(title, question)
Show the user a question dialog with Yes and No buttons. Return true if the user clicked Yes, otherwise false.
var answer = Banana.Ui.showQuestion("Question title", "Insert here the text of the question");
showText(text)
Show the given text in a dialog. The text can be plain text of html and span over multiple lines. If the text is in html the title is taken form the html. The dialog enable the user to save the content in the formats html, pdf, odf and txt.
The use of pixels to set the font sizes is not supported, the text is not rendered properly.
// Normal text
Banana.Ui.showText("Insert here the text.");

// Html text
Banana.Ui.showText('<html><header><title>This is title</title></header><body>Hello world</body></html>');
showText(title, text)
This is an overloaded function.
Show the given text in a dialog with the given title. The text can be plain text of html and span over multiple lines. The dialog enable the user to save the content in the formats html, pdf, odf and txt.
showText(title, text, options)
This is an overloaded function.
Show the given text in a dialog with the given title. The text can be plain text of html and span over multiple lines. The dialog enable the user to save the content in the formats html, pdf, odf and txt.
Through the object options it is possible to set the following additional parameters:
- codecName: the name of the codec to be used in case the content will be saved as txt file. Default is 'UTF-8'
- outputFileName: the file name without path to be used in case the content will be saved. The path is current open document path or the user's document path.
var options = {
   'codecName' : "latin1", // Default is UTF-8
   'outputFileName' : "prova.txt"
}
Banana.Ui.showText("Title", "some text...", options);
Since Banana 8.0.7
Banana.Xml
The Banana.Xml class is used to parse and access xml data.
Since: Banana Accounting 8.0.5
Introduction
The API Banana.Xml and Banana.Xml.XmlElement implement a subset of the DOM Document Object Model interface. The most used properties and methos are implemented.
For example the list of books in the following xml file:
<Library updated="2016-10-31">
   <Book>
      <Title>Paths of colours</Title>
      <Author>Rosa Indaco</Author>
   </Book>
   <Book>
      <Title>Accounting exercises</Title>
      <Author>Su Zhang</Author>
   </Book>
</Library>
Can be retrieved with the following code:
var xmlFile = Banana.Xml.parse(xml);
var xmlRoot = xmlFile.firstChildElement('Bookshelf');
var updateDate = xmlRoot.attribute('updated');
var bookNode = xmlRoot.firstChildElement('Book');  // First book
while (bookNode) {
   // For each book in the library
   var title = xmlFile.firstChildElement('Title').text();
   var authorNode = xmlFile.firstChildElement('Author');
   var author = authorNode ? authorNode.text() : 'unknow';
   bookNode = bookNode.nextSiblingElement('Book');  // Next book
}
Methods
parse(xml)
The method parse(xml) parses xml data and returns an object of type Banana.Xml.XmlElment that represents the parsed xml. If the xml data is not valid, this method returns null.
var xmlFile = Banana.Xml.parse(xml);
var xmlRoot = xmlFile.firstChildElement('Bookshelf'); // The root element is named 'Bookshelf' in this example
Banana.Xml.XmlElement
The XmlElement class represent an Xml element. See Banana.Xml for an example.
Since: Banana Accounting 8.0.5
Properties
nodeName
The read only property nodeName returns the node name of the xml element.
parent
The read only property parent returns the parent of this Xml element as a Banana.Xml.XmlElment object. If this is the root element, it return null.
text
The read only property text returns the text of this Xml element and their childs.
value
This is a synomin of the property text.
Methods
attibute(name [, defaultValue])
Returns the value of the attribute with the specified name as a string. If no attibute with the specified name is found, the defaultValue or an empty string is returned.
attibuteNS(ns, name [, defaultValue])
Returns the value of the attribute with the specified name and namespace as a string. If no attibute with the specified name is found, the defaultValue or an empty string is returned.
hasAttribute(name)
Returns true is the attribute with the specified name exists.
hasAttributeNS(ns, name)
Returns true is the attribute with the specified name and namespace exists.
firstChildElement([name])
Returns the first child element with the specified name if name is non-empty, otherwise it returns the first child element. Returns null if no such child exists.
var bookNode = xmlRoot.firstChildElement('Book');  // First book
while (bookNode) {
   // For each book in the library
   var title = xmlFile.firstChildElement('Title').text();
   bookNode = bookNode.nextSiblingElement('Book');  // Next book
}
hasChildElements([name])
Returns true if this element contains one or mode elemets with the specified name.
lastChildElement([name])
Returns the last child element with the specified name if name is non-empty, otherwise it returns the last child element. Returns null if no such child exists.
elementsByTagName(name)
Returns an array containing all descendants of this element with the specified name.
nextSiblingElement([name])
Returns the next sibling element with the specified name if name is non-empty, otherwise returns any next sibling element. Returns null if no such sibling exists.
previousSiblingElement([name])
Returns the previous sibling element with the specified name if name is non-empty, otherwise returns any previous sibling element. Returns null if no such sibling exists.
Import Apps
Import filters are import apps that read a custom format and convert in an import format suitable for using with the with the command "Import to accounting".
- For details of the formats see Import data from a txt file.
- For examples see the Github.com template page.
Import Apps
Imports apps are java-script program that read the data to import and trasform and return them as text, in a format comptatible with Banana.
Import Apps have the
- attribute @task defined as one of the import for example //@task = import.transactions
- The parameter in the function exec contains the import data (the content of the file specified in the input box)
- You can specify that the data is read from the file specified on the input box or that the user can select the file with "// @inputdatasource = openfiledialog"
- The import text is returned as a String in the function exec() with the retrun statement
// @api = 1.0
// @id = ch.banana.scripts.import.creditsuisse
// @description = Credit Suisse bank (*.csv)
// @task = import.transactions
// @doctype = nodocument
// @publisher = Banana.ch SA
// @pubdate = 2015-06-21
// @outputformat = transactions.simple
// @inputdatasource = openfiledialog
// @inputfilefilter = Text files (*.txt *.csv);;All files (*.*)
// @inputfilefilter.de = Text (*.txt *.csv);;Alle Dateien (*.*)
// @inputfilefilter.fr = Texte (*.txt *.csv);;Tous (*.*)
// @inputfilefilter.it = Testo (*.txt *.csv);;Tutti i files (*.*)

/**
* Parse the data and return the data to be imported as a tab separated file.
*/
function exec(inText) {
  // parse the inText and set to outText
  // int the return text the data is tab separated
  var outText = "Date\tDescription\tAmount\n";
  outText += "2015-01-31\tExpense text\t100.25\n";
  return outText;
}
Export Apps
Export apps are used to export data in a custom format.
-
Define attribute @task as export.file
// @task = export.file -
Define the extension of the file to be exported.
// @exportfiletype = xml -
The text to be written to the export file is the return value of the exec function and must be a return.
return "exported text". -
When the script terminate and if the return text is not null and does not start with "@Cancel ", the user will be promped with a dialog to choose a file name where to export.
Example
Export all the accounting with description and balance in a xml file.
// @id = ch.banana.apps.export
// @api = 1.0
// @pubdate = 2016-04-08
// @doctype = *.*
// @description = Export into a text file (.txt)
// @task = export.file
// @exportfiletype = txt
// @timeout = -1

function exec() {
var exportResult = '<accounts>';
    var tableAccounts = Banana.document.table('Accounts');
    if ( !tableAccounts) {
      return;
   }
   for (i=0;i<tableAccounts.rowCount;i++) {
        if (tableAccounts.row(i).value('Account')) {
            exportResult += '<account>';
            exportResult += '<accountnr>' + tableAccounts.row(i).value('Account') + '</accountnr>';
            exportResult += '<description>' + tableAccounts.row(i).value('Description') + '</description>';
            exportResult += '<balance>' + tableAccounts.row(i).value('Balance') + '</balance>';
            exportResult += '</account>';
        }
    }
    exportResult += '</accounts>';
    //return the string
    return exportResult;
}
Report Apps
Report apps are java-script programs that are used to customize printouts like invoice documents. The main function printDocument() receives the json object from Banana, writes the document and lunches the result in a print preview window.
Copies of some report apps that you can use as starting point are available at the following address: github.com/BananaAccounting
At the moment this feature is available only within Banana Accounting Experimental.
Important notes
- Banana Accounting uses Qt script engine to execute report apps.
- Mandatory functions: printDocument(jsonInvoice, repDocObj, repStyleObj) which is the main function and settingsDialog() which is called from user to set up parameters like colour or additional text.
- Available json objects: invoice json object, statement json object, reminder json object
- The extension of custom report apps should be .js and the script must contains the main attributes, see Apps Attributes.
- The attribute @id of the script should correspond to the file name.
- System report apps are downloaded to the folder /User/.../AppData/Local/Banana.ch/.../Apps
(Mac Users: /Users/.../Library/Application Support/Banana.ch/.../Apps) - Do not overwrite system report apps because updates will overwrite your changes.
- You can save your report app anywhere, Banana Accounting saves the path to your app in the configuration file /AppData/Local/Banana.ch/.../Apps/apps.cfg
Invoice
Create personalized invoice report apps
We have published our templates on github.com/BananaAccounting. In this section you will find different basic examples.
You can save a copy of one template in your computer and make the changes you wish. In order to use your custom template in Banana you have to:
- select the command Account2 - Customers - Print invoices...
- In the Print invoices dialog select Manage apps...
- In the Manage apps dialog select Add from file... and choose your invoice report file you just created
At the moment this function is available only within Banana Accounting Experimental.
Apps attributes
// @id = scriptfilename.js
// @api = 1.0
// @pubdate = yyyy-mm-dd
// @publisher = yourName
// @description = script description
// @task = report.customer.invoice
Report code
The main function is printDocument(jsonInvoice, repDocObj, repStyleObj). The parameter jsonInvoice object contains the data, repDocObj is the document object and repStyleObj is the stylesheet object where you can add styles.
function printDocument(jsonInvoice, repDocObj, repStyleObj) {
  var param = initParam();
  var savedParam = Banana.document.getScriptSettings();
  if (savedParam.length > 0) {
    param = JSON.parse(savedParam);
    param = verifyParam(param);
  }
  printInvoice(jsonInvoice, repDocObj, repStyleObj, param);
}
The function settingsDialog() is called from Banana when you select the button Params... from dialog Manage apps. You can write any code you need for your script.
/*Update script's parameters*/
function settingsDialog() {
   var param = initParam();
   var savedParam = Banana.document.getScriptSettings();
   if (savedParam.length > 0) {
      param = JSON.parse(savedParam);
   }
   param = verifyParam(param);
   ...
   var paramToString = JSON.stringify(param);
   var value = Banana.document.setScriptSettings(paramToString);
}
Printing custom data
You can add your own parameters in order to print specific data. For instance printing a reference order number or removing payments information if the invoice has already been paid.
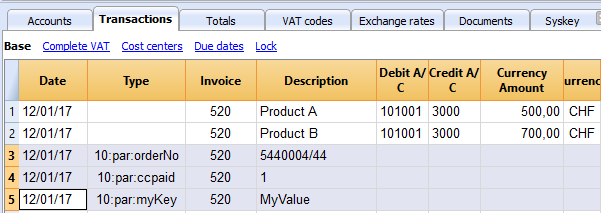
if (invoiceObj.parameters.orderNo) {
    cell1.addParagraph("Reference order: " + invoiceObj.parameters.orderNo);
  }
Printing images
With the command addImage it is possible to add images into the document. For instance
var reportObj = Banana.Report;
var repDocObj = reportObj.newReport();
repDocObj.addImage("documents:logo", "logoStyle");

var logoStyle = repStyleObj.addStyle(".logoStyle");
logoStyle.setAttribute("position", "absolute");
logoStyle.setAttribute("margin-top", "5mm");
logoStyle.setAttribute("margin-left", "20mm");
logoStyle.setAttribute("width", "120px");
If you set the width, the image will be resized to the given width. If the width is not specified the image will be printed with a 72dpi resolution.
Json Object
Invoice Json Object
Data structure you can access through the report:
{
    "billing_info": {
        "payment_term": "",
        "total_amount_vat_exclusive": "500.00",
        "total_amount_vat_exclusive_before_discount": "500.00",
        "total_amount_vat_inclusive": "540.00",
        "total_amount_vat_inclusive_before_discount": "540.00",
        "total_categories": [
        ],
        "total_discount_percent": "",
        "total_discount_vat_exclusive": "",
        "total_discount_vat_inclusive": "",
        "total_rounding_difference": "",
        "total_to_pay": "540.00",
        "total_vat_amount": "40.00",
        "total_vat_amount_before_discount": "40.00",
        "total_vat_codes": [
        ],
        "total_vat_rates": [
            {
                "total_amount_vat_exclusive": "500.00",
                "total_amount_vat_inclusive": "540.00",
                "total_vat_amount": "40.00",
                "vat_rate": "8.00"
            }
        ]
    },
    "customer_info": {
        "address1": "Viale Stazione 11",
        "address2": "",
        "address3": "",
        "balance": "102.60",
        "balance_base_currency": "102.60",
        "business_name": "Rossi SA",
        "city": "Bellinzona",
        "country": "Switzerland",
        "country_code": "CH",
        "courtesy": "Signor",
        "currency": "CHF",
        "date_birth": "1999-10-06",
        "email": "info@test.com",
        "first_name": "Andrea",
        "lang": "it",
        "last_name": "Rossi",
        "mobile": "0033608405",
        "number": "1100",
        "origin_row": "26",
        "origin_table": "Accounts",
        "postal_code": "6500",
        "vat_number": "1234"
    },
    "document_info": {
        "currency": "CHF",
        "date": "20160101",
        "decimals_amounts": 2,
        "description": "",
        "doc_type": "10",
        "locale": "it",
        "number": "201710",
        "origin_row": "1",
        "origin_table": "Transactions",
        "printed": "1",
        "rounding_total": "0.05",
        "type": "invoice"
    },
    "items": [
        {
            "account_assignment": "3000",
            "description": "Prodotto A",
            "details": "",
            "index": "0",
            "item_type": "item",
            "mesure_unit": "",
            "number": "",
            "origin_row": "1",
            "origin_table": "Transactions",
            "quantity": "1",
            "total_amount_vat_exclusive": "500.00",
            "total_amount_vat_inclusive": "540.00",
            "total_vat_amount": "40.00",
            "unit_price": {
                "amount_vat_inclusive": "540.00",
                "calculated_amount_vat_exclusive": "500.00",
                "calculated_amount_vat_inclusive": "540.00",
                "calculated_vat_amount": "40.00",
                "currency": "CHF",
                "vat_code": "V80",
                "vat_rate": "8.00"
            }
        }
    ],
    "note": [
            {
                "date": "2017-04-24",
                "description": "commande=AWO-003530",
                "origin_row": "968",
                "origin_table": "Transactions"
            }
    ],
    "parameters": {
        "ccpaid":"1",
        "orderNo":"5440004/44",
        "myKey":"MyValue"
    },
    "payment_info": {
        "date_expected": "2017-05-24",
        "due_date": "20160131",
        "due_days": "240",
        "due_period": "0_>90",
        "last_reminder": "",
        "last_reminder_date": "",
        "payment_date": ""
    },
    "shipping_info": {
         "address1": "26, lotissement Bellevue",
         "address2": "street2",
         "address3": "street3",
         "business_name": "Company",
         "city": "Clairac",
         "country": "FR",
         "different_shipping_address": true,
         "first_name": "Carla",
         "last_name": "Francine",
         "postal_code": "47320"
    },
    "supplier_info": {
        "address1": "Indirizzo 1",
        "address2": "Indirizzo 2",
        "business_name": "Società",
        "city": "Loc",
        "courtesy": "Signor",
        "email": "info@myweb",
        "fax": "+419100000",
        "first_name": "Nome",
        "fiscal_number": "222",
        "last_name": "Cognome",
        "phone": "+419100000",
        "postal_code": "CAP",
        "state": "Suisse",
        "vat_number": "1111",
        "web": "http://www.myweb"
    }
    "transactions": [
        {
            "balance": "-219.30",
            "balance_base_currency": "",
            "currency": "CHF",
            "date": "20170430",
            "description": "Paiement CERAT DES ALPES* 50 ml - Réf. AL07010",
            "origin_row": "1006",
            "origin_table": "Transactions"
        }
    ],
    "type": "invoice",
    "version": "1.0"
}
Source Data
Invoice Json Object Source Data
This list explains where the actual information on your invoice json object is coming from
| Invoice Object Property | Source |
|---|---|
| customer_info.address1 | Table: Accounts, View: Address, Column: Street |
| customer_info.address2 | Table: Accounts, View: Address, Column: AddressExtra |
| customer_info.address3 | Table: Accounts, View: Address, Column: POBox |
| customer_info.balance | Table: Accounts, View: Address, Column: Balance |
| customer_info.balance_base_currency | Table: Accounts, View: Address, Column: BalanceCurrency |
| customer_info.bank_account | Table: Accounts, View: Address, Column: BankAccount |
| customer_info.bank_clearing | Table: Accounts, View: Address, Column: BankClearing |
| customer_info.bank_name | Table: Accounts, View: Address, Column: BankName |
| customer_info.business_name | Table: Accounts, View: Address, Column: OrganisationName |
| customer_info.city | Table: Accounts, View: Address, Column: Locality |
| customer_info.country | Table: Accounts, View: Address, Column: Country |
| customer_info.country_code | Table: Accounts, View: Address, Column: CountryCode |
| customer_info.courtesy | Table: Accounts, View: Address, Column: NamePrefix |
| customer_info.credit_limit | Table: Accounts, View: Address, Column: CreditLimit |
| customer_info.currency | Table: Accounts, View: Address, Column: Currency |
| customer_info.date_birth | Table: Accounts, View: Address, Column: DateOfBirth |
| customer_info.email | Table: Accounts, View: Address, Column: EmailWork |
| customer_info.fax | Table: Accounts, View: Address, Column: Fax |
| customer_info.first_name | Table: Accounts, View: Address, Column: FirstName |
| customer_info.fiscal_number | Table: Accounts, View: Address, Column: FiscalNumber |
| customer_info.iban_number | Table: Accounts, View: Address, Column: BankIban |
| customer_info.lang | Table: Accounts, View: Address, Column: Language |
| customer_info.last_name | Table: Accounts, View: Address, Column: FamilyName |
| customer_info.member_fee | Table: Accounts, View: Address, Column: MemberFee |
| customer_info.mobile | Table: Accounts, View: Address, Column: PhoneMobile |
| customer_info.number | Table: Accounts, View: Address, Column: Account |
| customer_info.payment_term_days | Table: Accounts, View: Address, Column: PaymentTermInDays |
| customer_info.phone | Table: Accounts, View: Address, Column: PhoneMain |
| customer_info.postal_code | Table: Accounts, View: Address, Column: PostalCode |
| customer_info.state | Table: Accounts, View: Address, Column: Region |
| customer_info.vat_number | Table: Accounts, View: Address, Column: VatNumber |
| customer_info.web | Table: Accounts, View: Address, Column: Website |
| document_info.currency | Invoice currency which usually corresponds to the customer account currency |
| document_info.date | Table: Transactions, Column: DateDocument or Date |
| document_info.decimals_amounts | Decimals are the same as the decimals used in the accounting file |
| document_info.description | Not used |
| document_info.doc_type | Table: Transactions, Column: DocType |
| document_info.greetings |
Table: Transactions, Column: DocType |
| document_info.locale | Menu: File-File and accounting properties, Other, current Language |
| document_info.number | Table: Transactions, Column: DocInvoice |
| document_info.origin_row | Row index of source transaction |
| document_info.origin_table | Table name of source transaction |
| document_info.rounding_total |
Default value for CHF: 0.05 |
| document_info.type | invoice |
| items | Table: Transactions All rows with the same invoice number and transaction date are invoice's items (lines) |
| note | Table: Transactions, Column: DocType Transactions with DocType=10:not. More info... |
| parameters |
Table: Transactions, Column: DocType |
| payment_info | Calculated from journal |
| shipping_info |
Delivery address if different from the invoice address (customer_info) |
| supplier_info.address1 | Menu: File-File and accounting properties, Address, Address 1 |
| supplier_info.address2 | Menu: File-File and accounting properties, Address, Address 2 |
| supplier_info.business_name | Menu: File-File and accounting properties, Address, Company |
| supplier_info.city | Menu: File-File and accounting properties, Address, City |
| supplier_info.country | Menu: File-File and accounting properties, Address, Country |
| supplier_info.courtesy | Menu: File-File and accounting properties, Address, Courtesy |
| supplier_info.email | Menu: File-File and accounting properties, Address, Email |
| supplier_info.fax | Menu: File-File and accounting properties, Address, Fax |
| supplier_info.first_name | Menu: File-File and accounting properties, Address, Name |
| supplier_info.fiscal_number | Menu: File-File and accounting properties, Address, Fiscal Number |
| supplier_info.last_name | Menu: FilevFile and accounting properties, Address, Family Name |
| supplier_info.mobile | Menu: File-File and accounting properties, Address, Mobile |
| supplier_info.phone | Menu: File-File and accounting properties, Address, Phone |
| supplier_info.postal_code | Menu: File-File and accounting properties, Address, Zip |
| supplier_info.state | Menu: File-File and accounting properties, Address, Region |
| supplier_info.vat_number | Menu: File-File and accounting properties, Address, Vat Number |
| supplier_info.web | Menu: File-File and accounting properties, Address, Web |
| transactions | Table: Transactions All rows with the same invoice number and different transaction date, which are not considered invoice items, like payments transactions |
Statement
Create personalized statement report apps
We have published our templates on github.com/BananaAccounting. In this section you will find different basic examples.
You can save a copy of one template in your computer and make the changes you wish. In order to use your custom template in Banana you have to:
- select the command Account2 - Customers - Print statements...
- In the Print statements dialog select Manage apps...
- In the Manage apps dialog select Add from file... and choose your statement report file you just created
At the moment this function is available only within Banana Accounting Experimental.
Apps attributes
// @id = scriptfilename.js
// @api = 1.0
// @pubdate = yyyy-mm-dd
// @publisher = yourName
// @description = script description
// @task = report.customer.statement
Report code
The main function is printDocument(jsonStatement, repDocObj, repStyleObj). The parameter jsonStatement object contains the data, repDocObj is the document object and repStyleObj is the stylesheet object where you can add styles.
function printDocument(jsonStatement, repDocObj, repStyleObj) {
  var param = initParam();
  var savedParam = Banana.document.getScriptSettings();
  if (savedParam.length > 0) {
    param = JSON.parse(savedParam);
    param = verifyParam(param);
  }
  printInvoice(jsonInvoice, repDocObj, repStyleObj, param);
}
The function settingsDialog() is called from Banana when you select the button Params... from dialog Manage apps. You can write any code you need for your script.
/*Update script's parameters*/
function settingsDialog() {
   var param = initParam();
   var savedParam = Banana.document.getScriptSettings();
   if (savedParam.length > 0) {
      param = JSON.parse(savedParam);
   }
   param = verifyParam(param);
   ...
   var paramToString = JSON.stringify(param);
   var value = Banana.document.scriptSaveSettings(paramToString);
}
Json Object
Statement Json Object
Data structure you can access through the report:
{
    "customer_info": {
        "address1": "Viale Stazione 11",
        "business_name": "Rossi SA",
        "city": "Bellinzona",
        "first_name": "Andrea",
        "last_name": "Rossi",
        "number": "1100",
        "origin_row": "26",
        "origin_table": "Accounts",
        "postal_code": "6500"
    },
    "document_info": {
        "date": "20160927",
        "decimals_amounts": 2,
        "description": "",
        "locale": "it",
        "number": "",
        "type": "statement"
    },
    "items": [
        {
            "balance": "540.00",
            "credit": "",
            "currency": "CHF",
            "date": "20160101",
            "debit": "540.00",
            "due_date": "20160131",
            "due_days": "240",
            "item_type": "invoice",
            "last_reminder": "",
            "last_reminder_date": "",
            "number": "10",
            "payment_date": "",
            "status": "",
            "total_amount_vat_exclusive": "",
            "total_amount_vat_inclusive": "",
            "total_vat_amount": "",
            "unit_price": {
            }
        },
        {
            "balance": "540.00",
            "credit": "",
            "currency": "",
            "date": "",
            "debit": "540.00",
            "item_type": "total",
            "number": "",
            "status": "",
            "total_amount_vat_exclusive": "",
            "total_amount_vat_inclusive": "",
            "total_vat_amount": "",
            "unit_price": {
            }
        }
    ],
    "supplier_info": {
        "address1": "Indirizzo 1",
        "address2": "Indirizzo 2",
        "business_name": "Società",
        "city": "Loc",
        "email": "info@myweb",
        "first_name": "Nome",
        "fiscal_number": "numerofiscale",
        "last_name": "Cognome",
        "postal_code": "CAP",
        "web": "http://www.myweb"
    }
}
Reminder
Create personalized reminder report apps
We have published our templates on github.com/BananaAccounting. In this section you will find different basic examples.
You can save a copy of one template in your computer and make the changes you wish. In order to use your custom template in Banana you have to:
- select the command Account2 - Customers - Print reminders...
- In the Print payment reminders dialog select Manage apps...
- In the Manage apps dialog select Add from file... and choose your reminder report file you just created
At the moment this function is available only within Banana Accounting Experimental.
Apps attributes
// @id = scriptfilename.js
// @api = 1.0
// @pubdate = yyyy-mm-dd
// @publisher = yourName
// @description = script description
// @task = report.customer.reminder
Report code
The main function is printDocument(jsonReminder, repDocObj, repStyleObj). The parameter jsonReminder object contains the data, repDocObj is the document object and repStyleObj is the stylesheet object where you can add styles.
function printDocument(jsonReminder, repDocObj, repStyleObj) {
  var param = initParam();
  var savedParam = Banana.document.getScriptSettings();
  if (savedParam.length > 0) {
    param = JSON.parse(savedParam);
    param = verifyParam(param);
  }
  printReminder(jsonReminder, repDocObj, repStyleObj, param);
}
The function settingsDialog() is called from Banana when you select the button Params... from dialog Manage apps. You can write any code you need for your script.
/*Update script's parameters*/
function settingsDialog() {
   var param = initParam();
   var savedParam = Banana.document.getScriptSettings();
   if (savedParam.length > 0) {
      param = JSON.parse(savedParam);
   }
   param = verifyParam(param);
   ...
   var paramString = JSON.stringify(param);
   var value = Banana.document.setScriptSettings(paramString);
}
Json Object
Reminder Json Object
Data structure you can access through the report:
{
    "customer_info": {
        "address1": "Viale Stazione 11",
        "business_name": "Rossi SA",
        "city": "Bellinzona",
        "first_name": "Andrea",
        "last_name": "Rossi",
        "number": "1100",
        "origin_row": "26",
        "origin_table": "Accounts",
        "postal_code": "6500"
    },
    "document_info": {
        "date": "20160927",
        "decimals_amounts": 2,
        "description": "",
        "locale": "it",
        "number": "",
        "type": "reminder"
    },
    "items": [
        {
            "balance": "540.00",
            "balance_base_currency": "540.00",
            "base_currency": "CHF",
            "credit": "",
            "credit_base_currency": "",
            "currency": "CHF",
            "date": "20160101",
            "debit": "540.00",
            "debit_base_currency": "540.00",
            "item_type": "invoice",
            "number": "10",
            "status": "1. reminder",
            "total_amount_vat_exclusive": "",
            "total_amount_vat_inclusive": "",
            "total_vat_amount": "",
            "unit_price": {
            }
        },
        {
            "balance": "540.00",
            "balance_base_currency": "540.00",
            "base_currency": "",
            "credit": "",
            "credit_base_currency": "",
            "currency": "",
            "date": "",
            "debit": "540.00",
            "debit_base_currency": "540.00",
            "item_type": "total",
            "number": "",
            "status": "",
            "total_amount_vat_exclusive": "",
            "total_amount_vat_inclusive": "",
            "total_vat_amount": "",
            "unit_price": {
            }
        }
    ],
    "supplier_info": {
        "address1": "Indirizzo 1",
        "address2": "Indirizzo 2",
        "business_name": "Società",
        "city": "Loc",
        "email": "info@myweb",
        "first_name": "Nome",
        "fiscal_number": "numerofiscale",
        "last_name": "Cognome",
        "postal_code": "CAP",
        "web": "http://www.myweb"
    }
}
Debugging
Use the Debugger
You can debug the script using the internal debugger.
Banana Accounting use the Qt Script Debugger to debug the scripts. Qt is moving the script to a new system, and it is possible that the debugging function wil change or will not be available in the future.
To debug an app
- Menu App, Manage App
- Select the script you want to debug
- Button "Debug".
After the debugger is started click one or more times on the key Shift-F11 until you see the call of the function "exec(inData)", then click F11. At this point you are in the main function of the script.
Use Debugger messages
To see a value of a variable you can also insert a command
Banana.application.addMessage("Hello World");
Debugging import filter
You can debug import filter by istalling the filter as a normal app, and then using the debugging function.
Dialogs
For simple interactions with the user you can use the predefined dialogs of the class Banana.Ui. With those dialogs you can ask the user to insert a value, answer a question, or show to the user an information.
For a more complex dialog:
- Install Qt Creator
- Draw the dialog with Qt Creator
- Save the dialog in a .ui file,
- Load the .ui file in the script through the function Banana.Ui.createUi()
All the properties and public slots of the widgets in the dialogs will be accessible from the script.
Example: a script to search in the whole accounting a text.
The dialog:
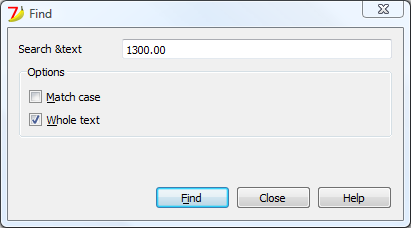
The script file ch.banana.scripts.find.js:
/**
* This example search a text in all the tables of the document,
* and show the matches in the messages pane.
*/
// @id = ch.banana.scripts.find
// @version = 1.2
// @date = 2014-08-29
// @publisher = Banana.ch SA
// @description = Find in whole accounting
// @description.it = Cerca in tutta la contabilità
// @description.de = Suchen in der gesamten Buchhaltung
// @description.fr = Chercher dans toute la comptabilité
// @task = app.command
// @inputdatasource = none
// @timeout = -1

/**
* param values are loaded from Banana.document, edited through dialog and saved to Banana.document
* This array object is like a map (associative array) i.e. "key":"value", see initParam()
* Examples of keys: searchText, wholeText, ...
*/
var param = {};

/** Dialog's functions declaration */
var dialog = Banana.Ui.createUi("ch.banana.scripts.find.ui");

dialog.checkdata = function () {
    var valid = true;

    if (dialog.searchTextLineEdit.text.length <= 0) {
        Banana.Ui.showInformation("Error", "Search text can't be empty");
        valid = false;
    }

    if (valid) {
        dialog.accept();
    }
}

dialog.showHelp = function () {
    Banana.Ui.showHelp("ch.banana.script.find");
}

/** Dialog's events declaration */
dialog.findNextButton.clicked.connect(dialog, "checkdata");
dialog.buttonBox.accepted.connect(dialog, "checkdata");
dialog.buttonBox.rejected.connect(dialog, "close");
dialog.buttonBox.helpRequested.connect(dialog, "showHelp");

/** Main function */
function exec(inData) {

    //calls dialog
    var rtnDialog = true;
    rtnDialog = dialogExec();

    //search text in the whole accounting
    if (rtnDialog && Banana.document) {
        Banana.document.clearMessages();
        searchInTables();
    }
}

/** Show the dialog and set the parameters */
function dialogExec() {

    // Read saved script settings
    initParam();
    if (Banana.document) {
        var data = Banana.document.getScriptSettings();
        if (data.length > 0) {
            param = JSON.parse(data);
        }
    }

    // Text at cursor position
    var cursor = Banana.document.cursor;
    param["searchText"] = Banana.document.value(cursor.table,cursor.row,cursor.column);

    // Set dialog parameters
    dialog.searchTextLineEdit.text = param["searchText"];
    if (param["matchCase"] == "true")
        dialog.groupBox.matchCaseCheckBox.checked = true;
    else
        dialog.groupBox.matchCaseCheckBox.checked = false;
    if (param["wholeText"] == "true")
        dialog.groupBox.wholeTextCheckBox.checked = true;
    else
        dialog.groupBox.wholeTextCheckBox.checked = false;

    Banana.application.progressBar.pause();
    var dlgResult = dialog.exec();
    Banana.application.progressBar.resume();

    if (dlgResult !== 1)
        return false;

    // Read dialog parameters
    param["searchText"] = dialog.searchTextLineEdit.text;
    if (dialog.groupBox.matchCaseCheckBox.checked)
        param["matchCase"] = "true";
    else
        param["matchCase"] = "false";
    if (dialog.groupBox.wholeTextCheckBox.checked)
        param["wholeText"] = "true";
    else
        param["wholeText"] = "false";

    // Save script settings
    var paramString = JSON.stringify(param);
    var value = Banana.document.setScriptSettings(paramString);

    return true;
}

/** Initialize dialog values with default values */
function initParam() {
    param = {
        "searchText": "",
        "matchCase": "false",
        "wholeText": "false"
    };
}

/** Search a text in the accounting's tables */
function searchInTables() {
    var searchText = param["searchText"];
    if (param["matchCase"] === "false")
        searchText = searchText.toLowerCase();
    var tables = Banana.document.tableNames;
    // Tables
    for (var t=0; t < tables.length; t++) {
        var table = Banana.document.table(tables[t]);
        var columns = table.columnNames;
        // Rows
        for (var r=0; r < table.rowCount; r++) {
            // Columns
            for (var c=0; c < columns.length; c++) {
                var textFound = false;
                var text = table.value(r, columns[c]);
                if (param["matchCase"] === "false")
                    text = text.toLowerCase();
                // Find text
                if (param["wholeText"] === "true") {
                    if (text === searchText)
                        textFound = true;
                } else {
                    if (text.indexOf(searchText) >= 0)
                        textFound = true;
                }
                // Show message
                if (textFound) {
                    table.addMessage("Text \"" + param["searchText"] +
                        "\" found in \"" + table.value(r, columns[c]) + "\"", r, columns[c]);
                }
            }
        }
    }
}
The .ui file: ch.banana.scripts.find.ui
<?xml version="1.0" encoding="UTF-8"?> <ui version="4.0"> <class>DlgFind</class> <widget class="QDialog" name="DlgFind"> <property name="geometry"> <rect> <x>0</x> <y>0</y> <width>395</width> <height>192</height> </rect> </property> <property name="windowTitle"> <string>Find</string> </property> <layout class="QVBoxLayout" name="verticalLayout_2"> <item> <layout class="QGridLayout" name="gridLayout"> <property name="horizontalSpacing"> <number>40</number> </property> <item row="0" column="0"> <widget class="QLabel" name="searchTextLabel"> <property name="text"> <string>Search &text</string> </property> </widget> </item> <item row="0" column="1"> <widget class="QLineEdit" name="searchTextLineEdit"/> </item> </layout> </item> <item> <widget class="QGroupBox" name="groupBox"> <property name="title"> <string>Options</string> </property> <property name="flat"> <bool>false</bool> </property> <property name="checkable"> <bool>false</bool> </property> <layout class="QVBoxLayout" name="verticalLayout"> <item> <widget class="QCheckBox" name="matchCaseCheckBox"> <property name="text"> <string>&Match case</string> </property> </widget> </item> <item> <widget class="QCheckBox" name="wholeTextCheckBox"> <property name="text"> <string>&Whole text</string> </property> </widget> </item> </layout> </widget> </item> <item> <spacer name="verticalSpacer"> <property name="orientation"> <enum>Qt::Vertical</enum> </property> <property name="sizeHint" stdset="0"> <size> <width>20</width> <height>15</height> </size> </property> </spacer> </item> <item> <layout class="QHBoxLayout" name="horizontalLayout"> <item> <spacer name="horizontalSpacer"> <property name="orientation"> <enum>Qt::Horizontal</enum> </property> <property name="sizeHint" stdset="0"> <size> <width>80</width> <height>20</height> </size> </property> </spacer> </item> <item> <widget class="QPushButton" name="findNextButton"> <property name="text"> <string>&Find</string> </property> </widget> </item> <item> <widget class="QDialogButtonBox" name="buttonBox"> <property name="sizePolicy"> <sizepolicy hsizetype="Minimum" vsizetype="Fixed"> <horstretch>0</horstretch> <verstretch>0</verstretch> </sizepolicy> </property> <property name="standardButtons"> <set>QDialogButtonBox::Close|QDialogButtonBox::Help</set> </property> </widget> </item> </layout> </item> </layout> </widget> <tabstops> <tabstop>matchCaseCheckBox</tabstop> <tabstop>findNextButton</tabstop> <tabstop>buttonBox</tabstop> </tabstops> <resources/> <connections/> </ui>
FAQ
Can I call an external program within a BananaApp?
For the moment, for security reason we do not allow BananaApps to works directly on file and call external programs.
Can I create QML (QtQuick) apps?
With QML application have extensive access to the computer.
Fot the moment, for security reason we do not allow BananaApps to use QML.
How can I get the start and end date of the accounting?
var openingDate = Banana.document.info("AccountingDataBase","OpeningDate");
var closureDate = Banana.document.info("AccountingDataBase","ClosureDate");
Note: the keywords "AccountingsDataBase", "OpeningDate" and "ClosureDate" correspond to the values in the columns "Section Xml" and ID Xml" of the table "Info file". See command "Info table" under the menu "Tools".
Can I save and recall in a script the values entered by the user?
Yes, use the functions Banana.Document.scriptSaveSettings and Banana.Document.scriptReadSettings.
Settings are saved and restored in the current accounting file under the script id, if you change the id your settings will not be retrieved.
// Initialise parameter
param = {
   "searchText": "",
   "matchCase": "false",
   "wholeText": "false"
};

// Read script settings
var data = Banana.document.getScriptSettings();
if (data.length > 0) {
   param = JSON.parse(data);
}

...

// Save script settings
var paramString = JSON.stringify(param);
var value = Banana.document.setScriptSettings(paramString);
Accented letters are displayed wrong
Save the script file in UTF-8.
Can I protect the app?
If you don't want to someone easily change the js file, you can package it in a rcc file.
Command line
Banana can be started by giving a series of command (for a list of command and examples file see below).
Example: open a file
banana80.exe c:\temp\example.ac2
Rule for command line command
- The arguments need to be preceded by a minus “-” sign. If an argument is missing of the “-” sign, it is interpreted as the name of the file to open.
- Include the whole argument within the delimiter “…” if the text include whitespace.
- Running import as command in the command line save the accounting file on exit
If a command fail, than a return code different than 0 is returned, and the error is inserted in the log file (only if the option –log_file was used).
Examples
Example: open a file:
banana80.exe c:\temp\example.ac2
Export to xml file
banana80.exe -cmd=export "-cmd_file=c:\temp\my example.ac2" "-cmd_p1=c:\temp\myexample.xml" -cmd_p2=xml -period_begin=2006-01-01 –period_end=2005-03-30
Example: import transactions (use the file name with the proper directory name)
Use also a log so that you know the error
banana80.exe -cmd=import -cmd_file="company.ac2" -cmd_table=Transactions -cmd_p1=import_mov.txt -cmd_exit=1 -log_file=log.txt
For detail information regarding the import of transaction see the page "Importing in txt format".
Available Command
The argument “–cmd=…” specifies the command to be executed. The other arguments specify the option for this command.
The command can be used as a command line or a DDE request.
|
Argument |
Description |
|
cmd= |
The command to execute file_open (cmd_p1=noshow) file_close (cmd_file) file_save (cmd_file) file_saveas (cmd_file, cmd_p1) file_show (cmd_file) get_tableinfo (cmd_file , cmd_table) get_getcell (cmd_file , cmd_table, cmd_column, cmd_row) get_getline (cmd_file , cmd_table, cmd_column, cmd_row) get_lasterror set_language(cmd_p1) calc_all (cmd_file) calc_simple (cmd_file) deleterows (…) *) export (…) fileinfo (…) import (…) *) acc_accountcard (…) acc_externalreport (…) acc_vatreport (…)
1) Running import in the command line save the file on exit;
|
List of arguments
|
Command |
Argument |
Description |
|
From command line |
cmd_exit=1 |
The program should exit and terminate |
|
nonetwork |
Turn off all connections to the network (i.e. to check for updates, integrated web-server, ...) |
|
|
For all commands |
cmd_file= |
the file to use or open |
|
cmd_pw= |
password to open the file |
|
|
cmd_names= |
A - Field name in XML (default on) a - Field name in original language |
|
|
log_file= |
set the log file name for writing messages (if no file name no log) |
|
|
deletelines |
cmd_p1= |
start of line to delete (number) |
|
cmd_p2= |
how many lines to delete (if not present = 1) |
|
|
cmd_table= |
The name of table |
|
|
|
|
|
|
set_language |
cmd_p1= |
The two letter ISO639 language code (de, fr, en, it) |
|
|
|
|
|
file_open |
cmd_p1= |
noshow – do not show the file |
|
|
|
|
|
file_saveas |
cmd_p1= |
file name of saved file |
|
|
|
|
|
get_tableinfo |
cmd_table= |
The name of the table to get info |
|
|
|
|
|
get_getcell |
cmd_table= |
The name of the table |
|
cmd_row= |
The number of the row, or an expression like “Account=1000:3” (In this ex. the third row where the field Account is equal to 1000 is used) |
|
|
cmd_column= |
The name of the column |
|
|
cmd_op= |
A – Format value (default on) |
|
|
get_getline |
cmd_table= |
The name of the table |
|
cmd_row= |
The number of the row, or an expression like “Account=1000:3” (In this ex. the third row where the field Account is equal to 1000 is used) |
|
|
cmd_op= |
A – Format value (default on) |
|
|
export |
export_use_param |
Instead of the default parameters use the last saved parameters (set with the dialog) and then applies the specified options with the other arguments |
|
cmd_p1= |
file name of the export file |
|
|
cmd_p2= |
Type: html, excel, xml |
|
|
cmd_table= |
The name of table to export (only the table is exported) |
|
|
export_include= |
Options: Upper case(A) = on; Lower Case(a) = off A - Recheck accounting (default on) B - Include statistics table (default on) C - Include transaction table (default on) D - Include account table (default on) E - Include category table (default on) F - Include total table (default on) G - Include Exchange rate table (default on) H - Inclue Vat code table and vat report (default on) I - Include Period Accounts (default on) L - Include Period VAT (default on) M - Create periods for the whole year (default off) N – Create accounts card |
|
|
export_include_ma= |
number of months for accounts period, for option I, (default 1) |
|
|
export_include_mv= |
number of months VAT period, for option L (default 3) |
|
|
export_include_mm= |
max numbers of periods (default 36) |
|
|
export_op_html= |
Options for html A - Use style sheet B - Use predefined style sheet (default on) C - Include style shett within html file (default on) D - Export visible fields only (default on) E - Table with borders (default on) F - Columns with headers (default on) G - Preserve page breaks within the table (default on)
|
|
|
export_op_excel= |
Options for Excel export A - Define cell name (default on) B - Define table name (default on) C - Use Xml names (default on) D - Protect tables (default on) |
|
|
export_op_xml= |
Upper case(A) = on; Lower Case(a) = off A – Visible field only (default off) B – Include view list (default off) |
|
|
period_all |
period All |
|
|
period_begin= |
Begin date (yyyy-mm-dd) |
|
|
period_end= |
period End date (yyyy-mm-dd) |
|
|
vat_use_param= |
Instead of the default parameters use the last saved parameters (set with the dialog) and then applies the options specified with vat_op |
|
|
vat_op= |
A - Include transactions B - Include total account C - Include total codes D - Include total percentage E - Use own group schema F - Only code specified G - Only group specified |
|
|
vat_sort= |
sort field |
|
|
vat_text= |
single code or groups (to use with –vat_op F and G) |
|
|
|
|
|
|
fileinfo |
cmd_op= |
A – Recalculate all (default off) |
|
import |
cmd_p1= |
File name of the file to import. Data have to be separated by tabulator, and the first row has to contain the name of the fields. |
|
cmd_p2= |
Insert al line number (0=Append to end) |
|
|
cmd_op= |
A - Complete imported raws |
|
|
cmd_table= |
The name of table where to insert the data |
|
|
|
|
|
|
acc_accountcard |
cmd_p1= |
account number |
|
cmd_p2= |
field name for sorting |
|
|
period_all |
period All (default) |
|
|
period_begin= |
Begin date (yyyy-mm-dd) |
|
|
period_end= |
period End date (yyyy-mm-dd) |
|
|
acc_externalreport |
cmd_p1= |
file name of the report |
|
cmd_p2= |
column name for grouping |
|
|
cmd_op= |
Upper case(A) = on; Lower Case(a) = off B - Include account with no transactions C - Include totals only D - Notify if an account is without a group |
|
|
|
|
|
|
acc_vatreport |
period_all |
period All (default) |
|
period_begin= |
Begin date (yyyy-mm-dd) |
|
|
period_end= |
period End date (yyyy-mm-dd) |
|
|
vat_use_param= |
use parameters from existing dialog + specified options like vat_op |
|
|
vat_op= |
Vat options Upper case(A) = on; Lower Case(a) = off A - Include transactions B - Include total account C - Include total codes D - Include total percentage E - Use own group schema F - Only code specified G - Only group specified H – Not used groups |
|
|
vat_sort= |
sort field |
|
|
vat_text= |
single code or groups (to use with –vat_op F and G) |
|
|
|
|
Excel Reports Add-in (Beta)
With this Add-in you will no longer need to make "copy and paste" of the values each time you update your accounting file.
You create worksheets with formulas, charts, formatting and more in Excel, and the Add-in will retrieve for you the data from your accounting file.
Just click on the Update button and your Excel worksheet will be automatically updated with the new values from Banana Accounting, and the results of formulas and charts will be updated accordingly.
See Documentation Banana Accounting Excel Add-in.

Example of a Balance sheet report created with the Excel Reports add-in

Example of a report with charts created with the Excel Reports Add-in
Characteristics
- This Add-in is hosted on our server.
Once you have installed the manifest on your computer, you will automatically use the last version. - The Add-in are secure.
Unlike Excel-macros the Add-in are secure and cannot compromise your computer. - The Add-in is currently in Beta Test.
- Please check everything and report any problem.
- You can use it for free now, but It is also possible that it will be made available for a cost.
Download and Installation
The steps below walk you through all the setup of the environment required to run the Banana Office Add-ins for Microsoft Office 2016.
Minimum requirements: Microsoft Office 2016 (Word, Excel, PowerPoint, Outlook).
Get Banana Accounting Experimental version
- Download Banana Accounting 9 for Windows or Mac (it is required the version 9.0.0.171128 or more recent).
- Install it on your computer.
Activate Banana Accounting web server
- Start Banana Accounting 8 Experimental.
- On Menu bar click Tools -> Program options… -> select the Interface tab
- Check the Start Web Server and Start Web Server with ssl options
- Click OK
Install the Manifest file
Each Office Add-in has its own manifest file. The manifest is an XML file that defines various settings, including description and links to all the add-in files.
Manifest file must be copied to a specific directory.
Manifest directory for Windows
On Windows you need to create a directory to save the manifest of the Add-in.
The directory needs to be a shared directory.
- Create a folder for the Add-ins manifests on a network share:
- Create a folder on your local drive (for example, C:\Manifests).
- Right click on the folder, select properties.
- Click on Sharing tab.
- Click on Advanced Sharing...
- Check the Share this folder box.
- Click Apply and then Ok.
- Tell Excel or Word to use the directory as trusted app catalog.
- Launch Excel and open a blank spreadsheet.
- Choose the File tab, and then choose Options.
- Choose Trust Center, and then choose the Trust Center Settings button.
- Choose Trusted Add-in Catalogs.
- In the Catalog URL box, enter the path to the network share you created, and then choose Add Catalog.
To see the path: right click on the shared folder -> Properties -> Sharing -> Network Path. - Select the Show in Menu check box, and then choose OK. A message appears to inform you that your settings will be applied the next time you start Office.
- Close Excel and restart it.
Manifest directory for Mac OS
On Mac you need to create a folder to save the manifest of the Add-in.
Go to one of the following folders where you'll save your Add-in's manifest file. If the wef folder doesn't exist on your computer, create it.
- For Excel:
/Users/<username>/Library/Containers/com.microsoft.Excel/Data/Documents/wef - For Word:
/Users/<username>/Library/Containers/com.microsoft.Word/Data/Documents/wef - For PowerPoint:
/Users/<username>/Library/Containers/com.microsoft.Powerpoint/Data/Documents/wef
where <username> is your name on the device.
Get the Office Add-in manifest
You can now download the manifest of the Add-in you want to use.
- Download the XML BananaAccountingExcelManifest file.
- Copy the manifest to the manifest directory.
Load the Add-ins in Excel
Once all the setup and installations are done, it is possible to run and use the Add-in.
- Open Microsoft Excel 2016
- Click on Insert tab
- Click on the Add-ins button
- Click on the Shared folder

- Select the Banana Accounting Add-in
- Click Add
Troubleshooting
- Download and install the last version of Banana Accounting 9 for Windows
- Open Banana Experimental
- Click on menu Tools -> Program Options
- Select the tab Interface
- Check the options Start Web Server and Start Web Server with ssl

- Select the tab System Info
- Click on Web server settings path

- Click on the button Open path… to open the directory
- From the directory, select and open the file httpconfig
- Right click on the file httpconfig
- Open with
- Select Notepad

- Delete the last two rows that begins with sslKeyFile=… and sslCertFile=…

- Save the file and close it

- Click OK to save the option changes
- Close and restart Banana Experimental
Documentation Excel Add-in
Introduction
With this Add-in you can create Excel sheets that are filled with Banana Accounting data. Once you have added transactions to the accounting file you just need to click on the Update button of the Add-in and your spreadsheet content will be updated with the new data.
Your existing formatting and formula will be preserved.
- Create an Excel sheet with headers information
This information allows the Add-in to retrieve data from Banana Accounting.
There are information relative to the file, column and account or group to be retrieved.
The Add-in helps you add the necessary information to retrieve the data. -
Click on the Update button
The Add-in will retrieve the values from Banana Accounting software.
It mantains the format or formula you enter.
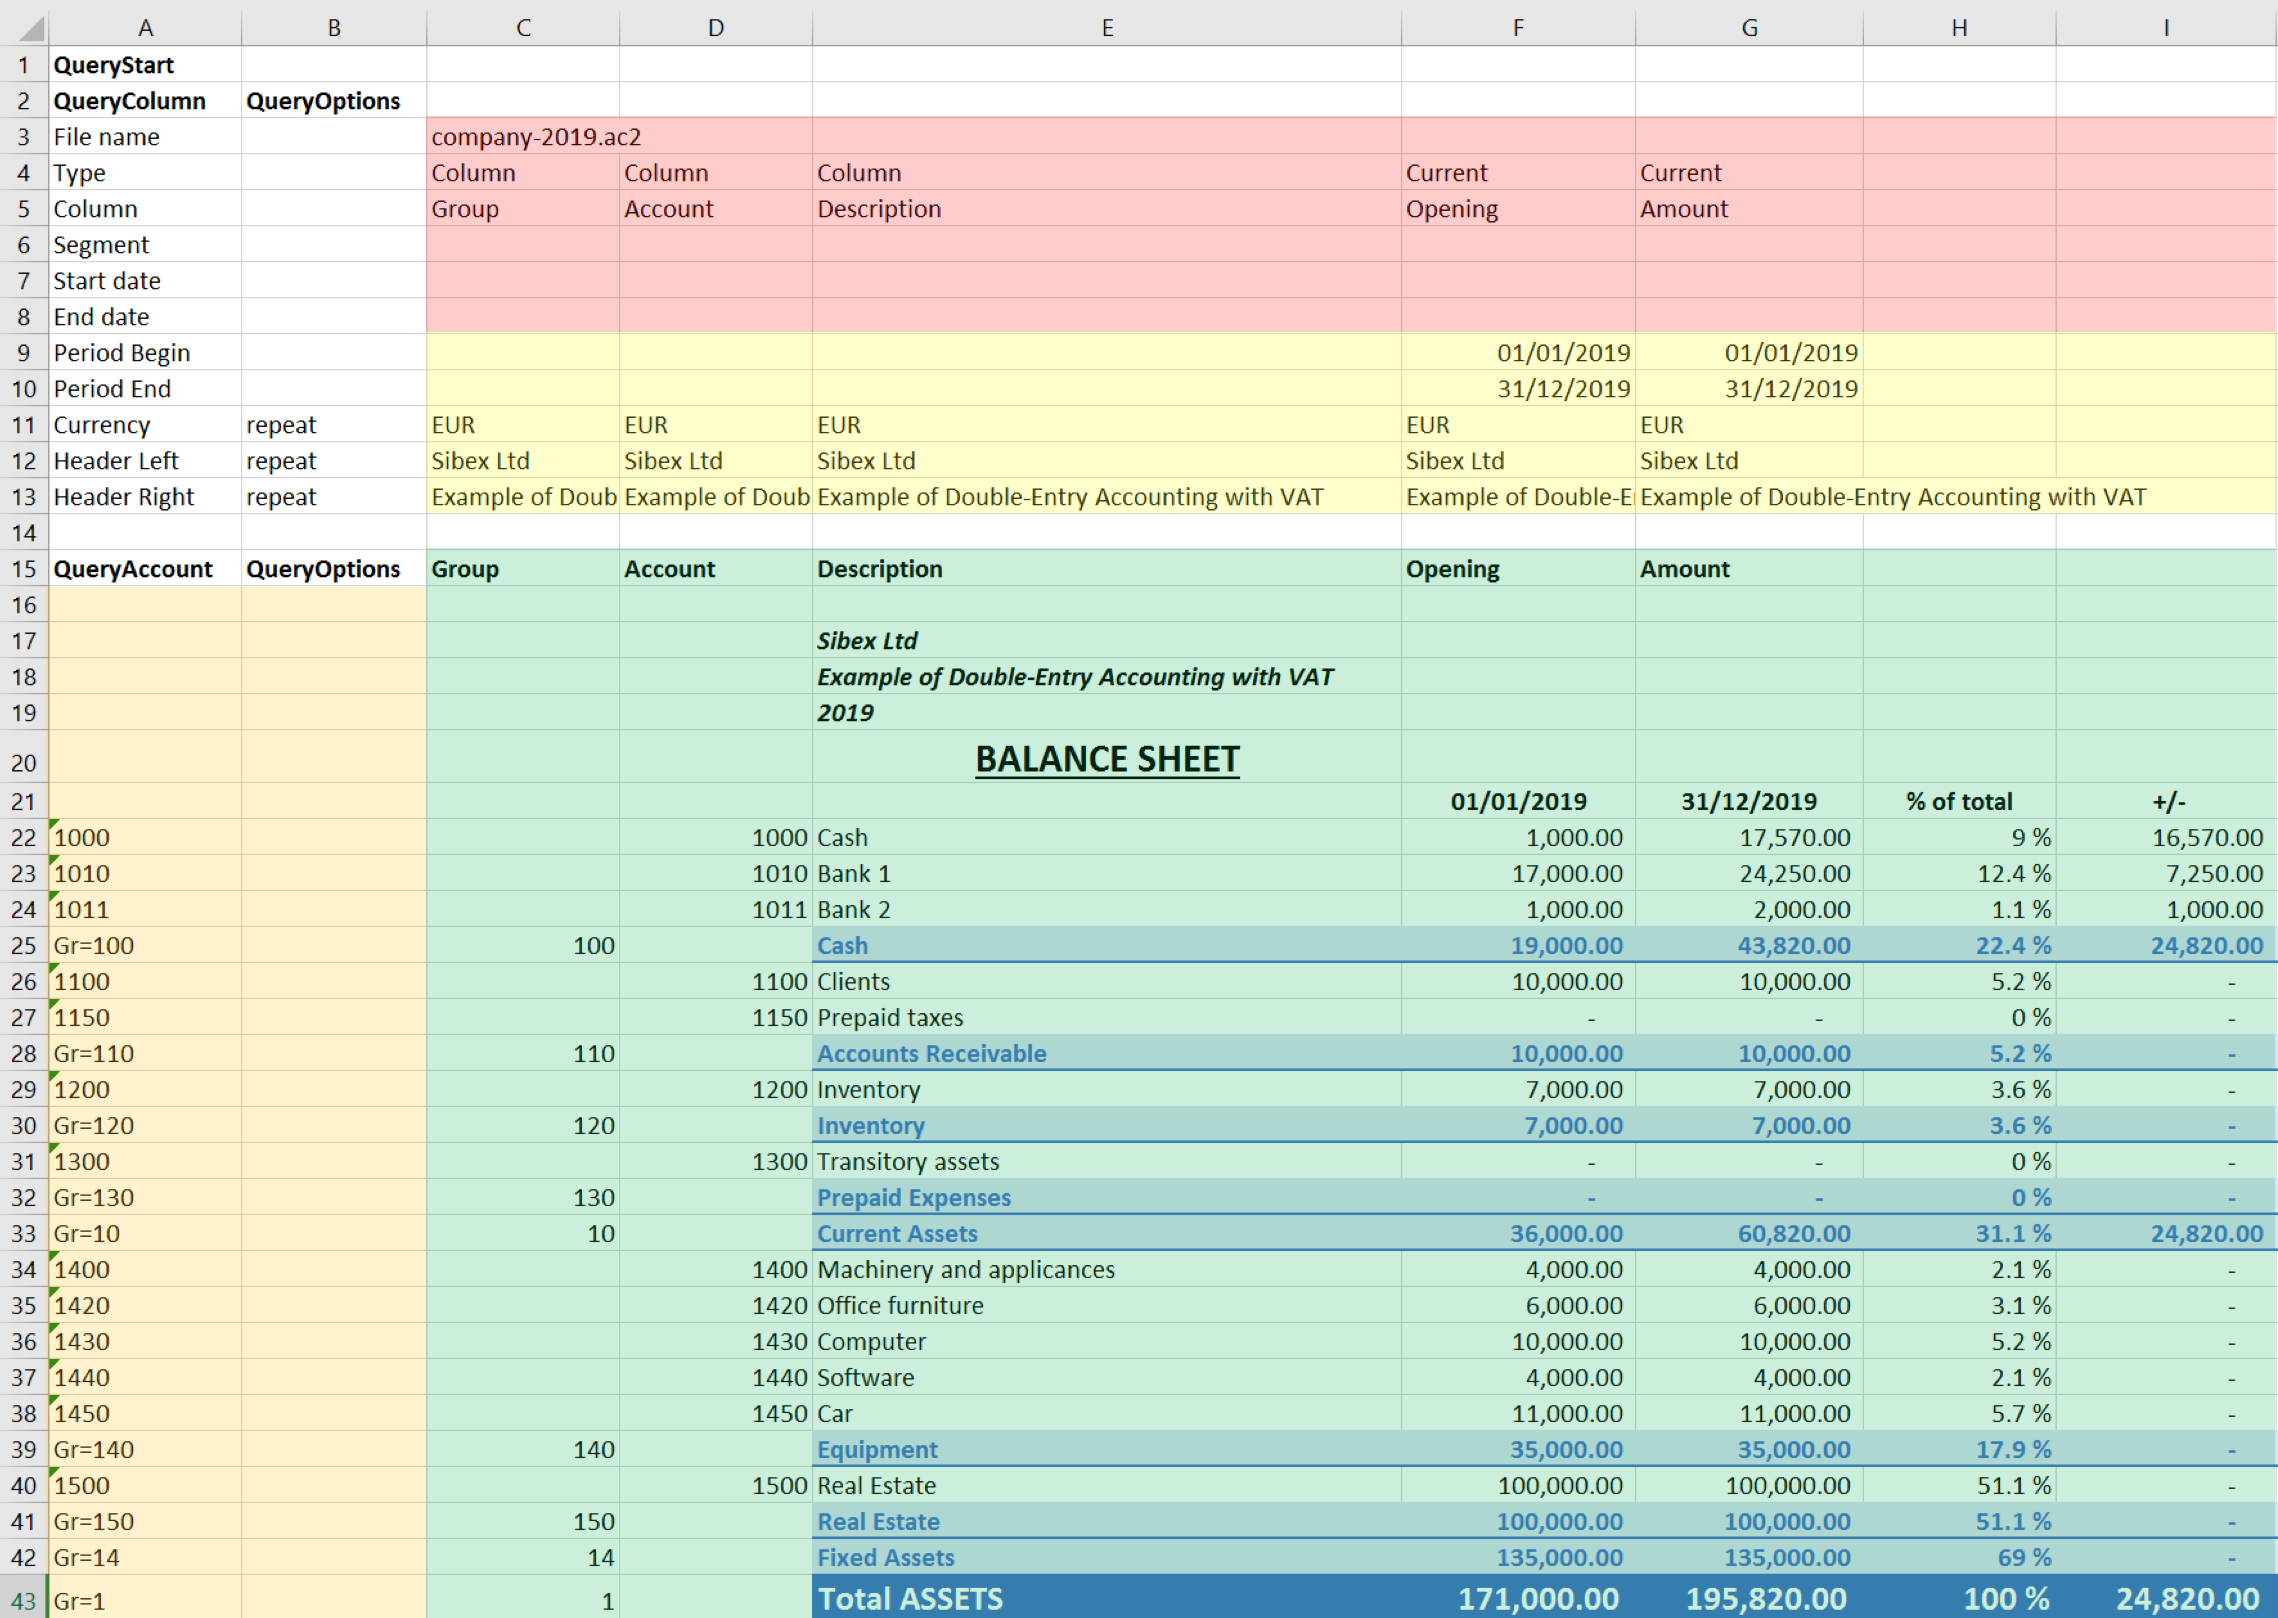
Example of a Balance sheet report created with the Banana Accounting Excel Add-in
In the example above we can see:
- The data part
Here is where the data is synchronized, based on the QueryAccount and QueryColumns.- Accounting data (Green)
Filled with the information coming from Banana Accounting - Header data (Yellow)
- Accounting data (Green)
- QueryColumns (Red)
The file name, columns names and type to retrieve.
If the column is empty no data in this column will be retrieved. You can use the columns to enter formula. - QueryAccounts (Orange)
The accounts or groups to retrieve.
If the row is empty no data in this row will be retrieved. You can use the row for entering formula o text that is not overwritten.
By clicking on the update button the Data part is updated with the new data of the accounting file, and all the previously settings like fonts, colors, formulas will remain.
Download and installation
See documentation on how to Download and install the Add-in
Example files:
- File Excel already with columns setup.
- Banana Accounting file used for the example excel file.
Add-in Command
As soon as the add-in is added in Excel, on the Home tab of the main ribbon is loaded the Banana Accounting Show Taskpane add-in command.
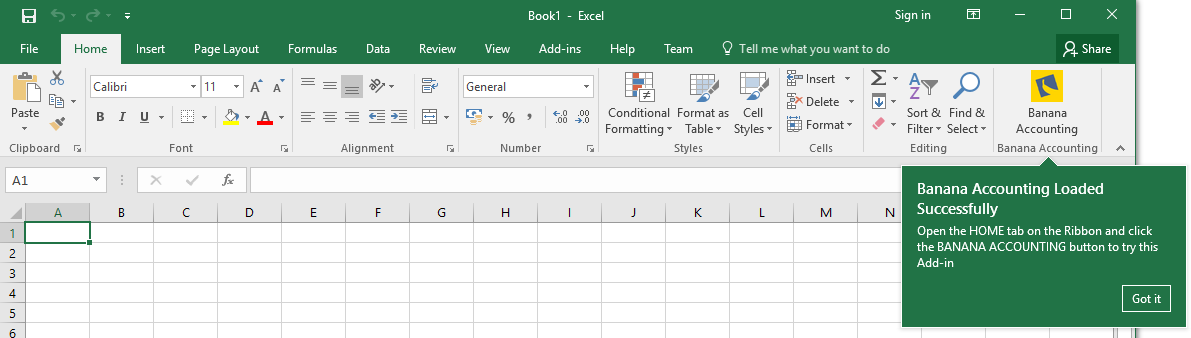
Banana Accounting Add-in command
When the Show Taskpane button is clicked, it loads the start screen of the add-in. The start screen provides additional information describing the functionalities of the add-in.
Click on the Let's Begin! button to start using the Add-in.

Banana Accounting Add-in start screen
Security alert messages for Windows users
In order to properly establish a connection between the add-in and Banana Accounting web server, it is required to accept the Banana security certificate.
After the Let's Begin! button has been clicked, securities alert dialogs like the following appear:
- The first security alert message is the following one, click on Yes to proceed:
- The second security alert message is the following one, click on Yes to proceed:

If the user clicks Yes, a connection between the add-in and the Banana Accounting web server is estabilished, and then it is possible to use the add-in. Otherwise, if the user clicks No, the add-in is loaded but none connection is established, and the add-in will not work.
If for some reason the security alert messages above do not appear, try to see the troubleshooting documentation.
Add-in general overview
The add-in is a task pane add-in type. This means that the add-in is loaded in a pane on the right side of the Excel worksheet.
It is composed by three tabs, each of them has one specific task:
- The Setup tab contains all the tools needed to add information to your sheet so that the add-in can fill the data part with the accounting data. Typically it is used every time you want to create something new, like for example the very first time you use this add-in.
- The Update tab is used to update the content of the Excel worksheet with the accounting data. It is used after the header section and some accounts has been added.
- The Logs tab it’s just a place where are displayed some messages about the add-in and the operations it does. For example when you update the sheet a message is displayed telling you that the update is completed.

Banana Accounting task pane add-in
Update of the worksheet
The Update tab is composed only of one button: Update current worksheet.
When clicked, this will start the updating process of the current Excel worksheet. Combining the Header, QueryAccount and QueryOptions, the add-in retrieves all the data directly from the Banana Accounting and writes them in the Excel worksheet.

Retrieve data from Banana Accounting and update the worksheet
Setup of the worksheet
These features will add the information to the current worksheet necessary to retrieve data from Banana Accounting.
In the setup tab there are four sections:
- Accounting file selection
- Set Header
- Set QueryColumns
- Set QueryAccounts

Setup of the worksheet tab
Select an opened Banana file
The first section of the setup page lists all the currently opened Banana Accounting file. Just select the needed one and go to the next setup section.
If for some reason an accounting file is opened in Banana Accounting after the add-in is loaded, then this file doesn’t appear in the list. In this case just click on Refresh list button in order to recheck all the opened documents and recreate the list.
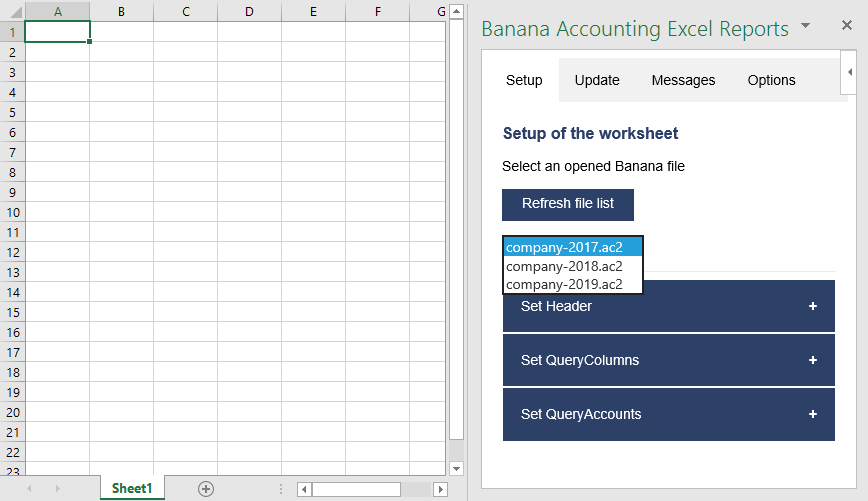
Example of file selection
Set Header
The second section of the setup page inserts, on the top of the current worksheet, the header that allows the user to insert information that will be used by the add-in to retrieve data from the accounting file.
Add an header
The first step is to select from the list a type of header. There are two options:
- Predefined header with columns to insert an header with default values for columns and options
- Empty header to insert a blank header
When the button Add Header is clicked, the selected type of header is inserted in the worksheet. It is then possible to modify by setting the QueryColumns and changing QueryOptions.
Add header options
The second step is to define some options for the Currency, Header Left and Header Right values using the QueryOptions column. The options are:
- Repeat to repeat the values in each column
- Do not repeat to avoid repeated values. Only when the file name changes the values are inserted again.
When the button Add options is clicked, the selected options will be inserted in the respective cells.

Example of predefined header
Set QueryColumns
This section guides step by step the user to modify the header by adding QueryColumns to the worksheet.
The QueryColumns information allows the user to define exactly which data the add-in has to retrieve from the accounting file and in which column of the worksheet insert them.
Each QueryColumn consists of six information:
- The Column of the worksheet is used to define in which column of the worksheet all the QueryColumns values will be inserted.
- The Accounting filename is used to define the Accounting file to use when retrieving data.
- The Type value is used to define the type of data.
- The Column value is used to define the data for the given type.
- The Segments (OPTIONAL) is used to have a more detailed classification of the costs (this is optional, if not specified none segments will be added).
- The Periods (OPTIONAL) is used to define a period of the accounting (this is optional, if not specified all accounting period will be automatically used).
When the button Add values to column is clicked, all the information will be added automatically to the selected column of the worksheet.

Set QueryColumns section
Select a column of the worksheet
Use this to define in which column of the worksheet all the values of the QueryColumns are inserted. Possible values are:
- Current selected to use the colum of the cell selected on the worksheet (ex. if the cell D8 is selected, D column will be used).
- C ... Z
Remember that it is possible to use the columns from C to ZZ, even if not all appear in the list.
Select a filename
Use this to define the file name for a QueryColumn. When a file name is specified it is used until a new file name is inserted.
The possible values are:
- Current selected to use the selected file on the top of the add-in.
- Current (void) to use the previously inserted file but let the cell empty. It works only if in previous columns there is a specified file name.
- 1 previous year (p1) to use the previous year file of the last file inserted (example: if current year is "2019.ac2", p1 refers to "2018.ac2")
- 2 previous years (p2) to use two previous years file of the last file inserted(example: if current is "2019.ac2", p2 refers to "2017.ac2")
- 3 previous years (p3) to use three previous years file of the last file inserted(example: if current is "2019.ac2", p3 refers to "2016.ac2")

Filename selection
Notes:
- remember to always open in Banana Accounting all the files specified in the header
- the p1, p2 and p3 abbreviations always refer to the last file specified in the header

Example of more file insertion
On the image above we can see there are three different files defined, each of them using different columns.
- Columns from C to G refer to the 2019.ac2 file
- Columns from H to I refer to the 2018.ac2 file
- Coumns from J to K refer to the 2017.ac2 file (p1 is the previous file of the last file inserted, in this case the 2018.ac2)
Select a Type and a Column value
Use them to define the data you want to retrieve from the accounting file.
- Type specify the type of data.
- Column specify the data for the given type.
The table below indicates for each Type of data which Column can be specified and so retrieved from the accounting (Not Case-Sensitive).
| Type | Column |
|---|---|
| column |
Group, Account, Description, Disable, FiscalNumber, BClass, Gr, Gr1, Gr2, Opening, Debit, Credit, Balance, Budget, BudgetDifference, Prior, PriorDifference, BudgetPrior, PeriodBegin, PeriodDebit, PeriodCredit, PeriodTotal, PeriodEnd, NamePrefix, FirstName, FamilyName, OrganisationName, Street, AddressExtra, POBox, PostalCode, Locality, Region, Country, CountryCode, Language, PhoneMain, PhoneMobile, Fax, EmailWork, Website, DateOfBirth, PaymentTermInDays, CreditLimit, MemberFee, BankName, BankIban, BankAccount, BankClearing, Code1 |
|
current |
amount, amountcurrency, balance, balancecurrency, bclass, credit, creditcurrency, debit, debitcurrency, enddate, opening, openingcurrency, periodstring, rowcount, startdate, total, totalcurrency |
| budget | amount, amountcurrency, balance, balancecurrency, bclass, credit, creditcurrency, debit, debitcurrency, enddate, opening, openingcurrency, periodstring, rowcount, startdate, total, totalcurrency |
| columnvat | Group, VatCode, Description, Gr, Gr1, IsDue, AmountType, VatRate, VatRateOnGross, VatPercentNonDeductible, VatAccount |
| currentvat | taxable, amount, notdeductible, posted, rowcount |
In the table below there are some examples of queries that can be used in the header to retrieve data from Banana Accounting:
| Type | Column | Segment | Start date | End date |
RESULT |
|---|---|---|---|---|---|
| column | description | Return from the Accounts table the value of the column description for the account specified in the QueryAccount column | |||
| current | debit | Return the amount of debit transactions for all the accounting period for the account specified in the QueryAccount column | |||
| current | balance | :S1 | 01.01.2019 | 10.01.2019 | Return the opening + debit-credit from the 01.01.2019 to 10.01.2019 for the account and segment specified in the QueryAccount column |
| current | total | M6 | Return the difference between debit-credit for the 6th month for the account specified in the QueryAccount column | ||
| current | total | Q2 | Return the difference between debit-credit for the second quarter for the account specified in the QueryAccount column | ||
| budget | opening | M12 | Return the amount at the begining for the 12th month for the account specified in the QueryAccount column | ||
| columnvat | description | Return from the Vat Codes table the value of the column description for the vat code specified in the QueryAccount column | |||
| currentvat | taxable | Return the amount of the taxable column for the vat code specified in the QueryAccount column |
Select a Segment (optional)
If the selected file has segments they will appear in the list.
Use this to define a segment to have a more detailed classification of the costs.
Select a period (optional)
Use this to define the accounting period that will be used to retrieve data from the accounting file.
Possible values are:
- All (void) to use all the accounting period
- Custom date to specify a Start date and End date (example: Start date "04.02.2019", End date "12.03.2019").
- Month 1 (M1) ... Month 12 (M12) to specify a single month (example: M1 for 1st month, M2 for 2nd month, etc.)
- Quarter 1 (Q1) ... Quarter 4 (Q4) to specify a single quarter (example: Q1 for the 1st quarter, period from 01.01 to 31.03)
- Semester 1 (S1) ... Semester 2 (S2) to specify a single semester (example: S2 for the 2nd semester, period from 01.07 to 31.12)
- Year 1 (Y1) ... Year 10 (Y10) to specify a single year (example: Y1 for the 1st year)
Set QueryAccounts
This section provides to insert:
- QueryAccounts to specify all the desired accounts, groups, cost centers, segments or vat codes that will be used with the data specified in the header to retrieve the accounting data.
- QueryOptions (OPTIONAL) to specify an option for a specific QueryAccount. Just select a cell next to the account and insert the option (this is optional, if not specified none options will be added).
Add accounts
When an option is selected, the add-in loads the appropriate check box list with all the elements taken from the selected accounting file. It is possible to choose between six options:
- Accounts to load a list of all the accounts/categories codes taken from the table Accounts/Category of the accounting
- Groups to load a list of all the groups codes taken from the table Accounts/Category of the accounting
- Cost centers to load a list of all the cost centers codes taken from the table Accounts/Category of the accounting
- Segments to load a list of all the segments codes taken from the table Accounts/Category of the accounting
- All to load a list of all the accounts/categories, groups, cost centers and segments codes taken from the table Accounts/Category of the accounting
- Vat codes to load a list of all the VAT codes taken from the table VAT codes of the accounting

Type of account selection
For example, choosing the All option, the add-in loads a list containing all the accounts, groups, cost centers and segments respecting the order in which they appear in the accounting file.

Example of accounts and groups selection
After all desired elements has been checked, by clicking the Add accounts button will add them to the Excel worksheet under the QueryAccount starting from the selected cell. By default the add-in starts the insertion immediately after the QueryAccount title (row 16).

Add the selected accounts and groups to the Excel worksheet
Add option
The QueryOptions column is designed to add some options to the query that will retrieve the data from Banana Accounting. It is optional. If not used no options will be used.
The possible values are:
- invert to invert the sign of the current or budget balances.
- budget to get the budget balances (even if in the header are specified to use current balances).
- budgetinvert to get the budget balances (even if in the header are specified to use current balances) and also to invert the sign.
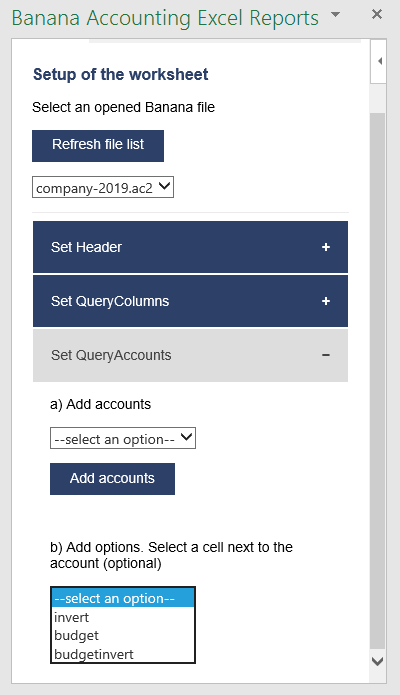
QueryAccounts options selection
Header settings
- Do not add or delete rows in the header.
- Do not add or delete columns before the column B.
- From column C forward, it is possible to add or remove columns. Columns A (QueryColumn) and B (QueryOptions) must always exist.
- Added columns can also be empty.
- If columns from AA to AZ are used, plese re-enter the file name at least on the AA column, even if it is the same used in the previous column.
To better understand how exactly the header works and how to properly modify it, below there are some explanation about the most important things.

Editable header parts
On the image above we highlighted in yellow all the header's parts that can be modified by adding information when creating a report.
Everything else will be automatically filled by the add-in when the Update current worksheet button is clicked.
Period Begin
A conversion of the start date to be easily read.
This is automatically filled for each column by the add-in when the worksheet is updated.
Period End
A conversion of the end date to be easily read.
This is automatically filled for each column by the add-in when the worksheet is updated.
Currency
The accounting basic currency.
This is automatically filled for each column by the add-in when the worksheet is updated.
Header Left
One of the information property of the accounting.
This is automatically filled for each column by the add-in when the worksheet is updated.
Header Right
One of the information property of the accounting.
This is automatically filled for each column by the add-in when the worksheet is updated.
QueryAccount
As already said, in this column are listed all the chosen accounts, each on a different row.
Instead of insert an account, is also possible to add a custom regroup using a particular accounting column.
The custom regroup QueryAccount syntax is $column=value, where:
- $ indicates that a custom regroup is used.
- column is the Xml name of the column. It can be a user created column (for example "Abc") or a column that already exists in the accounting (for example the "Gr").
- value indicates the regroup.
If we insert something like "$Abc=1" in the QueryAccount cell, this means that the add-in takes and sums together all the accounts/groups balances that have the 1 value in the "Abc" column of the accounting.
Logs
The Logs tab it’s just a text area where are displayed some messages about the add-in and the operations that it does.
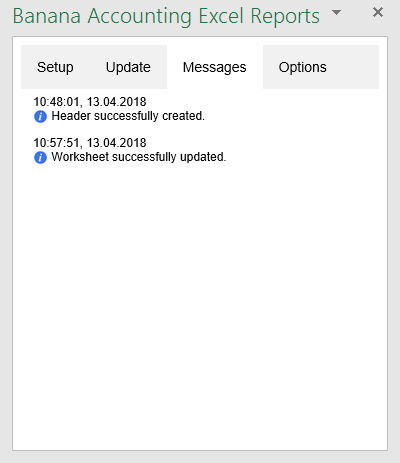
Example of logs messages
Settings
The Settings tab allows to change some settings of the add-in:
- the server URL to define the url where Banana Accounting is hosted, to avoid to have Banana Accounting installed locally. By default it is defined the local Banana Accounting web server https://127.0.0.1:8089.
- the language to define the language of the Banana Excel Add-in. Available languages are english, french, german and italian.
- the development is used only by developers for testing purposes, and users cannot access it.
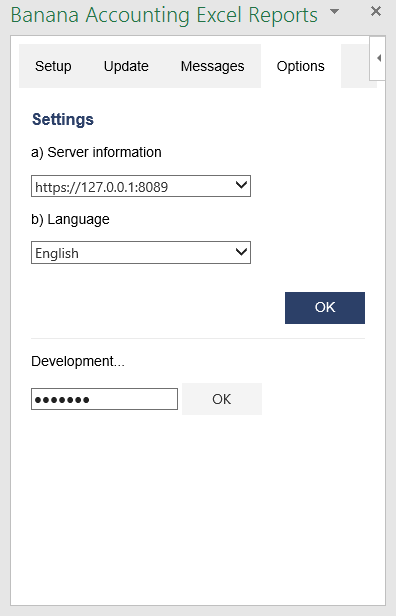
Settings tab
Release History
- 2017-06-12 First release
- 2017-07-07
- Added Add-in Commands functionality.
- Added a start screen that provides additional information describing the functionalities of the add-in.
- Added the settings tab to allow the user to change the Port of the URL.
- 2017-09-29
- Changed the name of the add-in to "Banana Accounting Excel Reports".
- Changed some texts.
- New add-in design.
- Added new functionalities that allow the user to set and insert all the required information more easily.
- Added localization language for english, french, german and italian.
- 2017-11-24
- Added new functionality that allows to set the parameters for the connection.
ExcelSync functions
With ExcelSync your accounting data is available in Excel. No more need to copy and paste or to export and import.
You add new transactions and your Excel Sheets are instantly updated and calculated. For Apple/Mac this feature is not available.
ExcelSync use VBA Macros. This technology has been replaced by the more recent Excel Add-in.
We invite you to use the Excel Report Add-in.
Example costs divided among co-owners or customers
The ExcelSync functions are used to retrieve from Banana in Excel the current accounts balances.
The costs are then divided among customers using normal Excel Formulas.
You could use the example to create a division of the apartment costs.
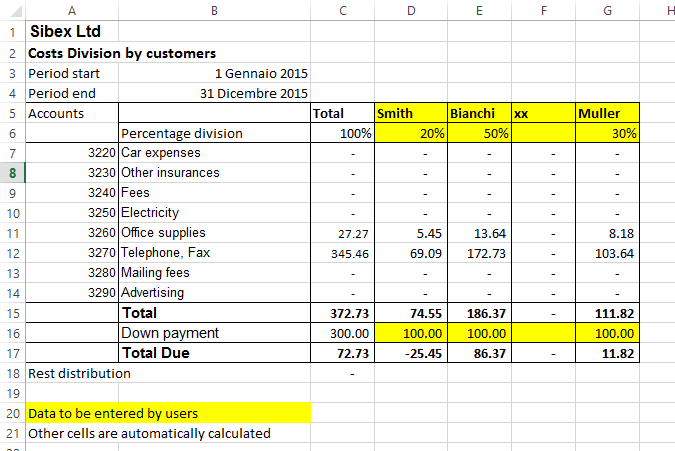
Example with the current and last year difference
In this example we take the data from the two years and create a graphic.
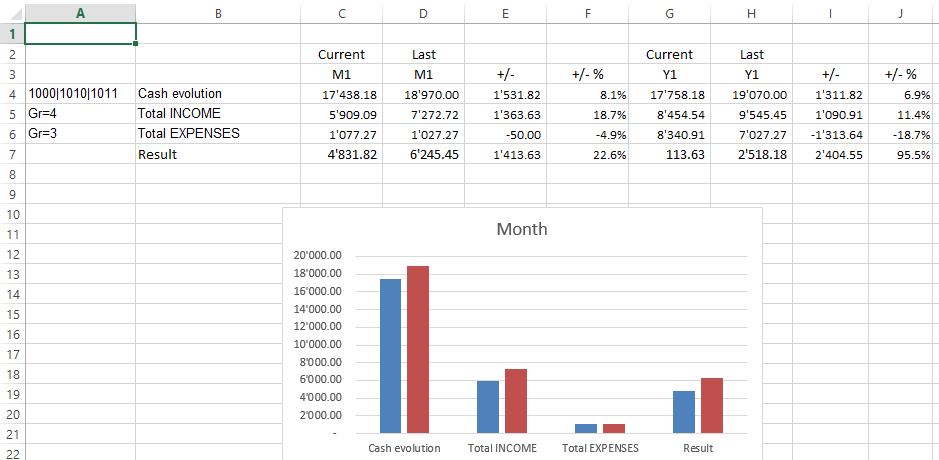
Example with segments subdivision
The amount of the segments are diveded also by segments.
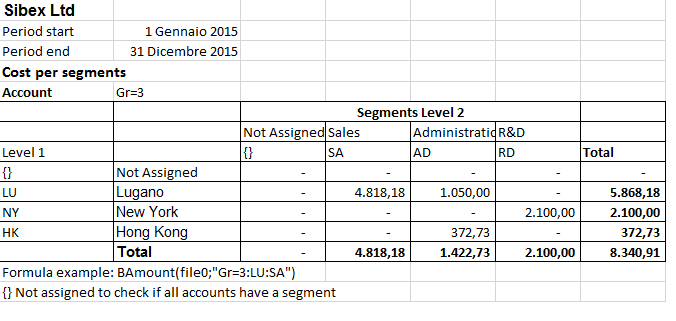
Introduction to Banana ExcelSync User defined functions
Introduction
ExcelSync are Excel User defined functions that allow to synchronize in real time your Excel spreadsheet with the data from Banana Accounting.
You update you accounting file, adding new transactions, and instantly you get your Excel Sheets updated.
Excel has the ability to integrate documents and data that are made available throught the internet protocol. Banana includes a web server, and a RESTful API, that can be accessed through http protocol. ExcelSync uses the Banana integrated web server to retrive data on real time.
Using Excel formula
Banana ExcelSync are functions, with the name that start witht the "B", that you can use within the cell to retrive accounting data.
Here some example:
// return the opening balance of the account 1000 for all the period
=BOpening("1000")
// return the description of the account 1000
=BAccountDescription("1000")
// return the end balance of the group 10
=BBalance("Gr=10")
// return the opening of the account 5000 for the period 3. month
=BOpening("2000", "2017-03-01/2017-03-31")
// return the total debit minus credit of the account 5000 for 3. month of the year
=BTotal("5000", "M3")
// return the total debit minus credit of the group 50 for 3. quarter of the year
=BTotal("Gr=50", "Q3")
The advantage of the Excel Sync functions :
- You can dynamically retrieve the take data from Banana Accounting.
- No more need to retype data in Excel (or import, copy and paste)
- When the accounting file is changed, the spreadsheet is populated with the new values
- Easy to use formulas that let you calculate values for periods and create powerful spreadsheets for evaluating, presenting accounting data or creating graphics.
Tecnical details
Banana ExcelSync are Excel User defined functions (UDF), small Visual Basic Programs that extend Excel allowing to insert formula within the cell.
- Banana ExcelSync requires a recent version of Excel, and due to the Excel Mac limitations works only on Windows versions.
- In order to use the ExcelSync UDF you need an Excel file with the extension *.xlsm.
- The Banana ExcelSync UDF are provided according the Apache License (open source software. See: /www.apache.org/licenses/LICENSE-2.0
- Development and latest version of the function are available on github.com/BananaAccounting/General/
- Banana ExcelSync UDF make use of the Banana web server.
- You can extend the ExcelSync by adding other functionalities.
For more information on the formula used see the Banana API regarding the Accounting functions
Using the examples
- Download the Excel spreadsheet with examples files.
- Unzip the content
- Start Banana Accounting
- Activate the Webserver (Tools -> Program options -> Interface -> Start web server)
- Open the Banana accounting files "company_2019.ac2" and "company_2020.ac2"
- Open the "BananaSync.xlsm" file and activate the Macro
If the macro are automatically disabled by Excel you should change your macro security setting
Eventually follow this instructions to show the developer tab in the ribbon - Recalculate the Spreadsheet with the Macro “RecalculateAll” (Ctrl+R)
Excel does not react
If you open a file and Banana or the Banana Web Server are not running, Excel will wait until it can contact the Banana Web server.
Start the Banana and the Banana Web Server.
How to create your spreadsheet
- Save as the "BananaSync.xlsm" file with another name
- Open your accounting files in Banana Accounting
- In your Excel spreadsheet, replace the file name (yellow highlighted cells) with your accounting file name
- Change the spreadsheet according to your needs
- Recalculate with the "Recalculate" button or the "Ctrl+R" shortcut
Functions use
Argument file name
Most ExcelSync functions require, as first parameters, a name of a Banana Accounting file.
- The file must be openened in Banana.
- You use only the file name without the directory.
DO NOT use the file name directly in the fuctions. Instead use a reference to a cell, that contains the file name.
- You can use the same spreadsheed also for differrent years. You only need to change the file name in on cell.
- If Banana Accounting is not open of the Banana webserver is not active you don't have to wait.
The best way is the one used in the example file.
- The file name of the current year is taken from the cell named "File0" .
- The cell File0 contains a function =BFileName(DisableConnection).
This function checks if the file is open in Banana.- If the file is not open the content of the cell is set to an empty string.
The other Banana Sync functions will not make any call to Banana, to retrive data. - If the file is open it will insert the name of the file.
- If the file is not open the content of the cell is set to an empty string.
- The cell B6 contain the name of the file to be used. Insert the file name in cell B6.
=BFileNameF(File0, DisableConnection). - The file name of the current year is taken from the cell named "File0" .
- The file name of the last year is taken from the cell named "File1" .
Argument period
Many functions use the optional argument period. This can be:
- An empty string. The start and end date of the accounting are used.
- A start date and end date in the form of yyyy-mm-dd/yyyy-mm-dd
example “2015-01-01/2015-01-31”
In order to create a period from two Excel dates use the function BCreatePeriod. - An abbreviation
With the abbreviation you can easily use the same spreadsheet for accounting file of different periods.
The start and the end date will be determined based on the date of the accounting file- M + the month number M1, M2, ..
- Q + the quarter number Q1, Q2,
- Y + the year number Y1, Y2, ....
BananaSync Functions description
Most function are available
- Without the parameter FileName.
In this case the File0 (Current Year) is used - With the paramenter FileName.
- The function is the same but end with "F"
BAccountDescription(account[, column]) and BAccountDescriptionF(fileName, account[, column])
Retrieve the account description of the specified account or group.
With argument column you can indicate to retrieve another column instead of the Description column.
Examples:
=BAccountDescription("1000")           // Description of account 1000 current year
=BAccountDescription("Gr=10")          // Description of Group 10 current year
=BAccountDescription("1000", "Gr1")    // Contet of column "Gr1" relative to the account 1000 current year
// Last year
=BAccountDescriptionF(File1, "1000") // Desctiption of account 1000
=BAccountDescriptionF(File1, "Gr=10")       // Description of Group 10
BAmount(account, [,period ]) and BAmountF(fileName, account, [,period ])
Retrieve the normalized amount based on the BClass.
Only work for double entry accounting only. For Income and expenses accounting use BBalance or BTotal.
- for accounts of BClass 1 or 2 it return the balance (value at a specific instant).
- for accounts of BClass 3 or 4 it return the total (value for the duration).
- For accounts of BClass 2 and 4 the amount is inverted.
You can use this functions also with groups provided you assign a BClass also to a group.
BBalance( account [, period]) and BBalanceF(fileName account [, period])
Retrieve the Balance at the end of the period of the indicate account, cost center, groups, segments
The BBalance result is the sum of the BOpening + BTotal
It is used for retrieving accounting data for the Balance Sheet accounts (Assets, Liabilities)
- Single account number ("1000")
- Several accounts summed toghether.
Enter the accounts numbers separated by the character “|” ("1000|1001). - You can specify normal accounts, cost centers or segments.
- You can also use wild cards and also use “Gr=” followed by the accounting group.
- For more information see the Javascript function description for currentBalance
- Example
BBalance( "1000")              // Balance of account 1000
BBalance( "1000|1010")         // Balance of account 1000 and 1010 are summed together
BBalance( "10*|20*")           // All account that start with 10 or with 20 are summed toghether
BBalance( "Gr=10")             // Group 10
BBalance( "Gr=10| Gr=20")      // Group 10 or  29
BBalance( ".P1")               // Cost center .P1
BBalance( ";C01|;C02")         // Cost center ;C01 and C2
BBalance( ":S1|S2")            // Segment :S1  and :S2
BBalance( "1000:S1:T1")        // Account 1000 with segment :S1 or ::T1
BBalance( "1000:{}")           // Account 1000 with segment not assigned
BBalance( "1000:S1|S2:T1|T2")  // Account 1000 with segment :S1 or ::S2 and ::T1 and ::T
BBalance( "1000&&JCC1=P1")     // Account 1000 and cost center .P1
// Last year
BBalanceF(File1, "1000")        // Balance of account 1000 (last year)
BBalanceF(File1, "1000|1010")   // Balance of account 1000 and 1010 are summed together (last year)
BBalanceGet( account, cmd, valueName [,period ]) and BBalanceGetF(fileName, account, cmd, valueName [,period ])
This function allows to easily access all other data made available by the REST API as “balance”, “budget”
Examples:
=BAmount( “1000”, “balance”, “currencyamount”)
=BAmount( “1000”, “balance”, “count”)
=BAmount( “1000”, “balance”, “debit”)
// Last year
=BAmount( File0, “1000”, “budget”, “debit”)
BBudgetAmount(account [, period]) and BBudgetAmountF(fileName account [, period])
Same as BAmount but use the budget data instead of the accounting data.
BBudgetBalance(account [, period]) and BBudgetBalanceF(fileName account [, period])
Same as BBalance but use the budget data instead of the accounting data.
BBudgetInterest( account, interestRate [, period]) and BBudgetInterestF(filename, account, interestRate [, period])
Same as BInterest but use the budget data instead of the accounting data.
BBudgetOpening(account [, period]) and BBudgetOpeningF(fileName account [, period])
Same as the BOpening but use the budget data instead of the accounting data.
BBudgetTotal(account [, period]) and BBudgetTotalF(fileName account [, period])
Same as the BTotal but use the budget data instead of the accounting data.
BCellAmount( table, rowColumn, column) and BCellAmountF(fileName, table, rowColumn, column)
Retrieve the content of a table cell as an amount.
Examples:
=BCellAmount(“Accounts”, 2, “Opening”)
=BCellAmount(“Accounts”, “Account=1000”, “Balance”)
=BCellAmount(“Accounts”, “Group=10”, “Balance”)
// Last year
=BCellAmountF(File1, “Accounts”, 2, “Opening”)
BCellValue( table, rowColumn, column) and BCellValueF(fileName, table, rowColumn, column)
Retrieve the content of a table cell as a text.
Examples:
=BCellValue(“Accounts”, 2, “Description”)
=BCellValue(“Accounts”, “Account=1000”, “Description”)
=BCellValue(“Accounts”, “Group=10”, “Description”)
// Last year
=BCellValueF(File1, “Accounts”, 2, “Description”)
BCreatePeriod( startDate, endDate)
Take two cell dates and create a string period
=BCreatePeriod(D4, D5)
BDate(isoDate)
Convert an Iso Date to an Excel date.
BFileName(fileName [, disable connection])
Return the FileName or an empty string if there is no connection with the web server or if the file is not correct.
If the value of disableConnection is not void the function returns an empty string.
Use the cells that contain the result of this function as the file name parameter when using the other functions. If Banana is not open only one query is made and Excel will not wait for a long time.
BFunctionsVersion()
Return the version of the function in the date format.
BInfo( sectionXml, idXml) and BInfoF(fileName, sectionXml, idXml)
Retrieve information regarding the file properties.
Examples:
=BInfo(“Base”, “HeaderLeft”)
=BInfo(“Base”, “DateLastSaved”)
=BInfo(“AccountingDataBase”, “OpeningDate”)
=BInfo(“AccountingDataBase”, “BasicCurrency”)
// Last year
=BInfoF( File1, “Base”, “HeaderLeft”)
BInterest( account, interestRate [, period]) and BInterestF(filename, account, interestRate [, period])
Calculate the interest for this account for the specified period
account can be any account as specified in BBalance
interestRate in percentage
- > 0 calculate the interest on the debit amounts
- < 0 calculate the interest on the credit amount
BOpening( account [period]) and BOpeningF(filename, account [period])
Retrieve the Balance for balance of period start for the indicated account.
BQuery(fileName, query)
Return the result of a free defined query.
Examples:
=BQuery(File0;"startperiod?M1”)
=BQuery(File0;"startperiod?M1”)
BTotal( account [,period]) and BTotalF(filename, account [,period])
Retrieve the movement for the period.
Should be used to retrieve the data for the Profit and Loss accounts (Cost and Revenues).
BVatBalance( vatCode, vatValue [, period]) and BVatBalanceF(filename, vatCode, vatValue [, period])
Return a value regarding the specified VatCode (or multiple VatCodes).
“vatValue” can be “taxable”, “amount”, “notdeductible”, “posted”
Examples:
=BVatBalance(“V10”, “taxable”)
=BVatBalance(“V10|V20”, “posted”)
//Last year
=BVatBalanceF( File0, “V10”, “taxable”)
Additional function explanation
The retrieve the exact content of the cells
If you wanto to retrive the content of a cell you can use:
- BCellValue
The content of a cell, useful for text. - BCellAmount
The content of a cell is converted to a number so that you can use it for calculation.
With this you will retrive the exact content of a column "Balance" for the row where Account is 1000.
If the Balance is credit the amount is negative.
=BCellAmount(File0, “Accounts”, “Account=1000”, “Balance”)
Accounting Period calculation
You have different formula that allow to retrieve the amount.
- BBalance.
This is equivalent to the above. It retrieve the Balance of the whole accounting period.
But BBalance allow you to use also a period.
As a period you can use the date being, date end of an abbreviation. M3 means the first month of the accounting period.
If you use abbreviation instead of date your sheet will automatically adapt to file of different year.
BBalance( "1000")  //Balance end of year
BBalance( "1000", "2017-03-01", "2017-03-31")  //Balance end of March
BBalance( "1000", M3);   // Balance and of March if accounting period start on 1. of January
- BTotal
It retrieve the total movement (Debit - Credit) for the period.
Use BTotal to the amount for income and expenss account.
Cedit amounts are retrieved as negative numbers.
BTotal( "1000")  //Total movement end of year
BBalance( "1000", "2017-03-01", "2017-03-31")  //Total end of March
BBalance( "1000", M3);   // Total and of March if accounting period start on 1. of January
- BAmount
BAmount put the sign in positive based on the BClass of the account.
The amount retrieved depend on the BClass of the account or the group.
For Balance accounts (bclass 1 and 1) retrieve the Balance.
For Income and expenses accounts (bclass 3 and 4) retrieve the Total.
It also invert the sign in case of BClass 2 and 4.
So if you use BAmount for the Account revenues (BClass 4) you will have the total sales for the period in positive.
Your are free to use the most appropriate function.
-
BAccountDescription.
It is the same as GetCellValue but it deal automatically with accounts or groups.
Is usefull to retrieve the description of an account or group, in combination with BBalance, BTotal or BAmount.
=BAccountDescription( "1000") //Retrieve the column Description of the account 1000
=BAccountDescription( "1000", "Notes") //Retrieve the column Notes of the account 1000
=BAccountDescription( "Gr=10") //Retrieve the column Descrition of the group 10
Recalculate
The automatic recalculation does not update the data from the accounting file.
In order to have the data updated it is necessary to call the macro RecalculateAll() that call the method Application.CalculateFullRebuild
The example files contain a button “Recalculate” that call the macro RecalculateAll.
Banana host name and port
Web server data is retrieved from “localhost:8081”
You can specify a different host by entering a value in a cell named “BananaHostName”
Modify the functions or add your owns
Functions are defined in the Visual Basic module “Banana”.
If you add your function it would be better to add to your module.
To access the Visual Basic Macro Functionalities you should activate the macro.
In order to see and edit the functions your nedd to show the Developer tab in the Excel ribbon.
Use a new version of the Banana functions
In order to see and edit the functions your nedd to show the Developer tab in the Excel ribbon.
- Download on your computer the latest version
- Open your file in Excel
- Open the file "BananaSync.xlsm" in Excel
- Go to the Developer Tab
- Click on "Visual Basic"
- Copy the content of the "BananaSync.xmls - Banana (Code)"
- Paste the content in the Modules->Banana of your file.
Compatibility
Banana ExcelSync functions have been tested with Excel 2013 and 2016 for Windows.
Excel for Mac is not ready yet.
In Excel for Mac is not possible to call the http.
Any contribute to solve this problem is welcome.
Release History
- 2014-07-24 First release
- 2015-02-28 Updated for new version with new functionalities
- 2015-05-12 Call to webserver now require v1
- 2015-05-12 Development moved to github
- 2015-05-25 Changed BAmoount function to use BClass
- 2015-10-04 Added BDate function
- 2015-11-12 Renamend ExcelSync
- 2015-11-28
- Added example for cost division
- Started working on Mac support
- 2016-04-26 Added BCellAmount
- 2016-04-28 Fixes in some case rounding amount to zero
- 2017-02-01 New Version 2 (Functions without the file parameters)
Office Add-ins
Introduction to Excel 2016 Add-ins
Office 2016 Add-ins are extentions of Word, Excel, PowerPoint, and Outlook.
Add-ins are composed of:
- Manifest file
An XML file that defines various settings, including description and links to all the add-in files.
It is used by Word, Excel, PowerPoint, and Outlook to locate the Add-in resources.
The manifest file can reside on a local directory or is published on the Office Store. - Webpage files
Files that compose the web app (HTML pages, JavaScript code and images).
All the files need to reside on a web server.
Add-in Examples
These examples have been made available for programmers that want to create specialized add-ins to retrieve information from Banana Accounting.
You need to insall the add-ins on a web server.
- for Excel:
- Account Card report to create an Excel worksheet with details of an account.
- Retrieve Table report to create an Excel worksheet with a full table taken from the accounting.
- for Word:
- Account Card report to create a Word document with details of an account.
Resources
For more and detailed information about the developing of the Office Add-ins, please visit https://github.com/BananaAccounting/General/tree/master/OfficeAddIns.
Open source
Banana Accounting use this open source library:
- Qt Framework Libraries with LGPL 2.1 and LGPL 3.
- Libharu libraries (pdf writing) with zlib/libpng license.
-
QtWebApp HTTP Server with the LGPL license.
The exact version of the library is visible within the software under
- Info regarding Banana Accounting
- Patent and legal informations
Building the libraries
The above indicated libraries are dinamically linked.
If you want to use modified libraries:
- Qt Framework. Banana use the dll libraries build made available by the The Qt Company for each platform.
For building your own libraries simply follow the Qt instrunctions. - Libharu libraries are also build with the default builds scripts.
- QtWebApp are also build with the default builds scripts.
Replacing the libraries
Once you have re-build the library and created the dll:
- Replace the libraries/dll
- In Windows the libraries are in the program directory
- In Mac are under the directory frameworks
- In Android are in the lib directory
- In Linux are in the lib directory
Info
If you have question let us know.
Web Server
Excel, Word, Access and other software have the ability to integrate documents and data that is made available throught the internet protocol.
To have the possibility to retrieve the Banana Accounting data from other software, Banana include a web server, and a RESTful API, that can be accessed through http protocol.
Starting the web server
The web server enable you to access the accounting data through http.
The web server is started from the dialog Program Options unter the menu Tools.
Once the web server is started you can access to the server by typing the address "http://localhost:8081/" in your browser or in your application.
Settings
The settings of the file server, like the listening port number and others, are stored in the following file:
Windows: "C:/Users/{user_name}/AppData/Local/Banana.ch/Banana/8.0/httpconfig.ini"
Mac: "/Users/{user_name}/Library/Application Support/Banana.ch/Banana/8.0/httpconfig.ini"
Linux: "/home/{user_name}/.local/share/data/Banana.ch/Banana/8.0/httpconfig.ini"
Resources API v1.0
/v1
Show the home page of the web server and enable you to navigate the content of the accounting files.
/v1/application[/{value_name}]
Return a JSON object with some information about the running application like 'version', 'serial', ... (since Banana 8.0.7).
Examples:
/v1/applicaiton
Returns:
   {
      "isbeta": false,
      "isexperimental": true,
      "name": "BananaExpm80",
      "osdetails": "Macintosh; Intel Mac OS X 10_12_4; it_CH",
      "osname": "macOS Sierra (10.12)",
      "qtversion": "5.8.0",
      "serial": "80006-170510",
      "version": "8.0.6.170510"
   }

/v1/application/serial
Returns: "80006-170510"
/v1/docs
Return the list of opened documents as json array.
Examples:
/v1/docs
Returns: ["accounting.ac2","accounting previous year.ac2", ...]
/v1/doc/{doc_name}
Return the list of available http requests for the file doc_name as html page.
To access the previous years files just postfix doc_name with '_p1', '_p2', ... (since Banana 8.0.6).
Deprecated: To access the previous year file just postfix doc_name with '_previous'.
Examples:
/v1/doc/accounting.ac2
/v1/doc/accounting.ac2_p1
/v1/doc/accounting.ac2_p2
/v1/doc/{doc_name}/tablenames
Return the list of tables in document doc_name as json array.
Examples:
/v1/doc/accounting.ac2/tablenames
Returns: ["Accounting","Transactions", ...]
/v1/doc/{doc_name}/table/{table_name}
Return the content of table table_name in document doc_name as html.
Parameters:
view Contains the the xml name of the view to be returned.
columns Contains the xml names of the columns to be returned.
navigation If set to true the html page navigation is showed, else only the data are showed.
format Contains the format to be returned. Supported formats are 'html' or 'json'. Default is 'html'. Since Banana 8.0.5.
Examples:
/v1/doc/accounting.ac2/table/Accounts
/v1/doc/accounting.ac2/table/Accounts?view=Base
/v1/doc/accounting.ac2/table/Accounts?columns=Account,Group,Description,Balance
/v1/doc/accounting.ac2/table/Accounts?format=json
/v1/doc/{doc_name}/table/{table_name}/rowcount
Return the number of rows in the table table_name as text.
/v1/doc/{doc_name}/table/{table_name}/columnnames
Return the list of columns as json array.
/v1/doc/{doc_name}/table/{table_name}/row/{row_nr}/column/{col_name}
Return the value of cell at row row_nr and column col_name as text.
The part row_nr can be a row number starting from 1 or an expression like 'Account=1000' (In this ex. the first row where the field Account is equal to 1000 is used)
The part col_name is the xml name of the requested column.
Examples:
/v1/doc/accounting.ac2/table/Accounts/row/2/column/Description
/v1/doc/accounting.ac2/table/Accounts/row/Account=1000/column/Balance
/v1/doc/{doc_name}/table/{table_name}/rowlistnames
Return the names of row lists present in the table table_name as json array.
Examples:
/v1/doc/accounting.ac2/table/Transactions/rowlistnames
Returns: ["Data","Examples", "Archives", ...]
/v1/doc/{doc_name}/table/{table_name}/rowlist/{rowlist_name}
Return the content of the row list rowlist_name in table_name of document doc_name as html.
Parameters:
view Contains the the xml name of the view to be returned.
columns Contains the xml names of the columns to be returned.
navigation If set to true the html page navigation is showed, else only the data are showed.
format Contains the format to be returned. Supported formats are 'html' or 'json'. Default is 'html'. Since Banana 8.0.5.
Examples:
/v1/doc/accounting.ac2/table/Transactions/rowlist/Examples
/v1/doc/accounting.ac2/table/Transactions/rowlist/Examples?view=Base
/v1/doc/accounting.ac2/table/Accounts?columns=Account,Group,Description,Balance
/v1/doc/accounting.ac2/table/Accounts?format=json
/v1/doc/{doc_name}/table/{table_name}/rowlist/{rowlist_name}/rowcount
Return the number of rows in the row list rowlist_name of table table_name as text.
/v1/doc/{doc_name}/table/{table_name}/rowlist/{rowlist_name}/row/{row_nr}/column/{col_name}
Return the value of cell in row list rowlist_name at row row_nr and column col_name as text.
The part row_nr can be a row number starting from 1 or an expression like 'Account=1000' (In this ex. the first row where the field Account is equal to 1000 is used)
The part col_name is the xml name of the requested column.
Examples:
/v1/doc/accounting.ac2/table/Accounts/row/2/column/Description
/v1/doc/accounting.ac2/table/Accounts/row/Account=1000/column/Balance
/v1/doc/{doc_name}/accounts
Return the list of accounts as json array.
Examples:
/v1/doc/accounting.ac2/accounts
Returns: [{"id":"1000","descr":"1000 Cash"}, {"id":"1010","descr":"1000 Post"}, ...]
/v1/doc/{doc_name}/accountdescription/{account_id|Gr=group_id}[/{col_name}]
Return the description of the requested account or group as text.
The part col_name is optional, it is the xml name of the requested column. Default is the column 'Description'.
Examples:
/v1/doc/accounting.ac2/accountdescription/1000
/v1/doc/accounting.ac2/accountdescription/Gr=1
/v1/doc/accounting.ac2/accountdescription/1000/Curreny
/v1/doc/{doc_name}/groups
Return the list of groups as json array.
Examples:
/v1/doc/accounting.ac2/groups
Returns: [{"id":"100","descr":"100 Current Assets"}, ...]
/v1/doc/{doc_name}/segments
Return the list of segments as json array.
Examples:
/v1/doc/accounting.ac2/segments
Returns: [{"id":":lugano","descr":"Lugano"}, ...]
/v1/doc/{doc_name}/vatcodes
Return the list of vatcodes as json array.
Examples:
/v1/doc/accounting.ac2/vatcodes
Returns: [{"id":"V80","descr":"V80 Sales and services 8.0%"}, ...]
/v1/doc/{doc_name}/vatdescription/{vat_code}[/{col_name}]
Return the description of the requested vat code as text.
The part col_name is optional, it is the xml name of the requested column. Default is the column 'Description'.
Examples:
/v1/doc/accounting.ac2/vatdescription/V80
/v1/doc/accounting.ac2/vatdescription/V80/Gr1
/v1/doc/{doc_name}/balance/{account_id|Gr=group_id|BClass=class_id}/{opening|credit|debit|total|balance|openingcurrency|...}
Return the current balance of the requested account, group or bclass as text.
To access the balances of the previous year file just postfix doc_name with '_p1', '_p2', ... .
The last part or the url can be one of the followings strings:
- opening
- credit
- debit
- total
- balance
- openingcurrency
- ceditcurrency
- debitcurrency
- totalcurrency
- balancecurrency
- rowcount
Parameters:
period Define the start and end date for the request.
It can contain a period abbreviation like 'Q1' or a start and end date like '2014-01-01/2014-03-31'.
A period abbreviation is defined by a number followed by one of the following charachters:
- M for months
- Q for quarters
- S for semesters
- Y for years
filter Contains a javascript expression used to filter the transactions. The object available to the expression are "row", "rowNr", and "table".
For example: filter=row.value("Date")==="2014-01-15"
Examples:
/v1/doc/accounting.ac2/balance/1000/opening
/v1/doc/accounting.ac2_p1/balance/1000/opening
/v1/doc/accounting.ac2/balance/1000|1010|1020|1030/opening
/v1/doc/accounting.ac2/balance/Gr=6/totalcurrency?period=Q1
/v1/doc/accounting.ac2/balance/BClass=1/balance
/v1/doc/{doc_name}/budget/{account_id|Gr=group_id|BClass=class_id}/{opening|credit|debit|total|balance|openingcurrency|...}
Return the budget of the requested account, group or bclass as text.
To access the budget balances of the previous year file just postfix doc_name with '_p1', '_p2', ... .
The last part or the url can be one of the followings strings:
- opening
- credit
- debit
- total
- balance
- openingcurrency
- ceditcurrency
- debitcurrency
- totalcurrency
- balancecurrency
- rowcount
Parameters:
period Define the start and end date for the request.
It can contain a period abbreviation like 'Q1' or a start and end date like '2014-01-01/2014-03-31'.
A period abbreviation is defined by a number followed by one of the following charachters:
- M for months
- Q for quarters
- S for semesters
- Y for years
filter Contains a javascript expression used to filter the transactions. The object available to the expression are "row", "rowNr", and "table".
For example: filter=row.value("Date")==="2014-01-15"
Examples:
/v1/doc/accounting.ac2/budget/1000/opening
/v1/doc/accounting.ac2_p1/budget/1000/opening
/v1/doc/accounting.ac2/budget/1000|1010|1020|1030/opening
/v1/doc/accounting.ac2/budget/BClass=1/balance
/v1/doc/{doc_name}/interest/{account_id|Gr=group_id|BClass=class_id}
Return the calculated interest on the specified account.
Parameters:
rate The interest rate in percentage (ie.: '5', '3.25'). The decimal separator must be a dot '.'. If positive it calculate the interest fo the debit amounts. If negative it calcaulate the interest on the credits amounts.
period Define the start and end date for the request.
It can contain a period abbreviation like 'Q1' or a start and end date like '2014-01-01/2014-03-31'.
A period abbreviation is defined by a number followed by one of the following charachters:
- M for months
- Q for quarters
- S for semesters
- Y for years
filter Contains a javascript expression used to filter the transactions. The object available to the expression are "row", "rowNr", and "table".
For example: filter=row.value("Date")==="2014-01-15"
Examples:
/v1/doc/accounting.ac2/interest/1000?rate=2.5
/v1/doc/accounting.ac2/interest/1000?rate=-8.0
/v1/doc/accounting.ac2/interest/1000?rate=-8.0&period=Q1
/v1/doc/{doc_name}/budgetinterest/{account_id|Gr=group_id|BClass=class_id}
Return the calculated interest on the specified account for the budget transactions.
Parameters:
rate The interest rate in percentage (ie.: '5', '3.25'). The decimal separator must be a dot '.'. If positive it calculate the interest fo the debit amounts. If negative it calcaulate the interest on the credits amounts.
period Define the start and end date for the request.
It can contain a period abbreviation like 'Q1' or a start and end date like '2014-01-01/2014-03-31'.
A period abbreviation is defined by a number followed by one of the following charachters:
- M for months
- Q for quarters
- S for semesters
- Y for years
filter Contains a javascript expression used to filter the transactions. The object available to the expression are "row", "rowNr", and "table".
For example: filter=row.value("Date")==="2014-01-15"
Examples:
/v1/doc/accounting.ac2/budgetinterest/1000?rate=2.5
/v1/doc/accounting.ac2/budgetinterest/1000?rate=-8.0
/v1/doc/accounting.ac2/budgetinterest/1000?rate=-8.0&period=Q1
/v1/doc/{doc_name}/projection/{account_id|Gr=group_id|BClass=class_id}/{opening|credit|debit|total|balance|openingcurrency|...}
Return the projection of the requested account, group or bclass as text.
To access the budget balances of the previous year file just postfix doc_name with '_p1', '_p2', ... .
The last part or the url can be one of the followings strings:
- opening
- credit
- debit
- total
- balance
- openingcurrency
- ceditcurrency
- debitcurrency
- totalcurrency
- balancecurrency
- rowcount
Parameters:
projectionstart This parameter is mandatory and define the start date of the projection.
It can contain a period abbreviation like 'Q1' (start at beginnig of) or a date like '2014-07-01'.
period Define the start and end date for the request.
It can contain a period abbreviation like 'Q1', a start and end date like '2014-01-01/2014-03-31' or a list of periods separated by a coma like 'S1,S2,ALL'.
A period abbreviation is defined by a number followed by one of the following charachters:
- M for months
- Q for quarters
- S for semesters
- Y for years
filter Contains a javascript expression used to filter the transactions. The object available to the expression are "row", "rowNr", and "table".
For example: filter=row.value("Date")==="2014-01-15"
Examples:
/v1/doc/accounting.ac2/projection/1000/opening?projectionstart=S1
/v1/doc/accounting.ac2/projection/1000/opening?projectionstart=2014-07-01
/v1/doc/accounting.ac2_p1/projection/1000/opening?projectionstart=S1
/v1/doc/{doc_name}/accountcard/{account_id}
Return the account card of account account_id as html.
Parameters:
view Contains the the xml name of the view to be returned.
columns Contains the xml names of the columns to be returned.
navigation If set to true the html page navigation is showed, else only the data are showed.
period Define the start and end date for the request.
It can contain a period abbreviation like 'Q1' or a start and end date like '2014-01-01/2014-03-31'.
A period abbreviation is defined by a number followed by one of the following charachters:
- M for months
- Q for quarters
- S for semesters
- Y for years
filter Contains a javascript expression used to filter the transactions. The object available to the expression are "row", "rowNr", and "table".
For example: filter=row.value("Date")==="2014-01-15"
format Contains the format to be returned. Supported formats are 'html' or 'json'. Default is 'html'. Since Banana 8.0.5.
Examples:
/v1/doc/accounting.ac2/accountcard/1000
/v1/doc/accounting.ac2/accountcard/1000?period=Q1
/v1/doc/accounting.ac2/accountcard/1000?period=2014-01-01/2014-03-31
/v1/doc/accounting.ac2/accountcard/1000?filter=row.value("Description").contain("xyz")
/v1/doc/accounting.ac2/accountcard/1000?format=json
/v1/doc/{doc_name}/budgetcard/{account_id}
Return the budget card of account account_id as html.
Parameters:
view Contains the the xml name of the view to be returned.
columns Contains the xml names of the columns to be returned.
navigation If set to true the html page navigation is showed, else only the data are showed.
period Define the start and end date for the request.
It can contain a period abbreviation like '1Q' or a start and end date like '2014-01-01/2014-03-31'.
A period abbreviation is defined by a number followed by one of the following charachters:
- M for months
- Q for quarters
- S for semesters
- Y for years
filter Contains a javascript expression used to filter the transactions. The object available to the expression are "row", "rowNr", and "table".
For example: filter=row.value("Date")==="2014-01-15"
format Contains the format to be returned. Supported formats are 'html' or 'json'. Default is 'html'. Since Banana 8.0.5.
Introduced in 7.0.7.0
Examples:
/v1/doc/accounting.ac2/budgetcard/1000
/v1/doc/accounting.ac2/budgetcard/1000?period=Q1
/v1/doc/accounting.ac2/budgetcard/1000?period=2014-01-01/2014-03-31
/v1/doc/accounting.ac2/budgetcard/1000?format=json
/v1/doc/{doc_name}/projectioncard/{account_id}
Return the projection card of account account_id as html.
Parameters:
view Contains the the xml name of the view to be returned.
columns Contains the xml names of the columns to be returned.
navigation If set to true the html page navigation is showed, else only the data are showed.
projectionstart This parameter is mandatory and define the start date of the projection.
It can contain a period abbreviation like 'Q1' (start at beginnig of) or a date like '2014-07-01'.
period Define the start and end date for the request.
It can contain a period abbreviation like '1Q' or a start and end date like '2014-01-01/2014-03-31'.
A period abbreviation is defined by a number followed by one of the following charachters:
- M for months
- Q for quarters
- S for semesters
- Y for years
filter Contains a javascript expression used to filter the transactions. The object available to the expression are "row", "rowNr", and "table".
For example: filter=row.value("Date")==="2014-01-15"
format Contains the format to be returned. Supported formats are 'html' or 'json'. Default is 'html'. Since Banana 8.0.5.
Introduced in 7.0.7.0
Examples:
/v1/doc/accounting.ac2/projectioncard/1000
/v1/doc/accounting.ac2/projectioncard/1000?period=Q1
/v1/doc/accounting.ac2/projectioncard/1000?period=2014-01-01/2014-03-31
/v1/doc/accounting.ac2/projectioncard/1000?format=json
/v1/doc/{doc_name}/vatbalance/{vat_code|Gr=vat_group}/{taxable|amount|notdeductible|posted}
Return the current balance of the requested vat code as text.
The last part of the url can be one of the followings strings:
- taxable
- amount
- notdeductible
- posted
- rowcount
Parameters:
period Define the start and end date for the request.
It can contain a period abbreviation like 'Q1' or a start and end date like '2014-01-01/2014-03-31'.
A period abbreviation is defined by a number followed by one of the following charachters:
- M for months
- Q for quarters
- S for semesters
- Y for years
filter Contains a javascript expression used to filter the transactions. The object available to the expression are "row", "rowNr", and "table".
For example: filter=row.value("Date")==="2014-01-15"
Examples:
/v1/doc/accounting.ac2/vatbalance/V80/balance
/v1/doc/{doc_name}/vatbudget/{vat_code|Gr=vat_group}/{taxable|amount|notdeductible|posted}
Return the budget of the requested vat code as text.
The last part or the url can be one of the followings strings:
- taxable
- amount
- notdeductible
- posted
- rowcount
Parameters:
period Define the start and end date for the request.
It can contain a period abbreviation like 'Q1' or a start and end date like '2014-01-01/2014-03-31'.
A period abbreviation is defined by a number followed by one of the following charachters:
- M for months
- Q for quarters
- S for semesters
- Y for years
filter Contains a javascript expression used to filter the transactions. The object available to the expression are "row", "rowNr", and "table".
For example: filter=row.value("Date")==="2014-01-15"
Examples:
/v1/doc/accounting.ac2/vatbudget/V80/balance
/v1/doc/{doc_name}/vatcard/{vat_code}
Return the account card of the vat code vat_code as html.
Parameters:
view Contains the the xml name of the view to be returned.
columns Contains the xml names of the columns to be returned.
navigation If set to true the html page navigation is showed, else only the data are showed.
period Define the start and end date for the request.
It can contain a period abbreviation like 'Q1' or a start and end date like '2014-01-01/2014-03-31'.
A period abbreviation is defined by a number followed by one of the following charachters:
- M for months
- Q for quarters
- S for semesters
- Y for years
filter Contains a javascript expression used to filter the transactions. The object available to the expression are "row", "rowNr", and "table".
For example: filter=row.value("Date")==="2014-01-15"
format Contains the format to be returned. Supported formats are 'html' or 'json'. Default is 'html'. Since Banana 8.0.5.
Examples:
/v1/doc/accounting.ac2/vatcard/V80
/v1/doc/accounting.ac2/vatcard/V0|V25|V80
/v1/doc/accounting.ac2/vatcard/V80?period=Q1
/v1/doc/accounting.ac2/vatcard/V80?period=2014-01-01/2014-03-31
/v1/doc/accounting.ac2/vatcard/V80?filter=row.value("Description").contain("xyz")
/v1/doc/accounting.ac2/vatcard/V80?format=json
/v1/doc/{doc_name}/vatprojection/{vat_code|Gr=vat_group}/{taxable|amount|notdeductible|posted}
Return the projection of the requested vat code as text.
The last part or the url can be one of the followings strings:
- taxable
- amount
- notdeductible
- posted
- rowcount
Parameters:
projectionstart This parameter is mandatory and define the start date of the projection.
It can contain a period abbreviation like 'Q1' (start at beginnig of) or a date like '2014-07-01'.
period Define the start and end date for the request.
It can contain a period abbreviation like 'Q1' or a start and end date like '2014-01-01/2014-03-31'.
A period abbreviation is defined by a number followed by one of the following charachters:
- M for months
- Q for quarters
- S for semesters
- Y for years
filter Contains a javascript expression used to filter the transactions. The object available to the expression are "row", "rowNr", and "table".
For example: filter=row.value("Date")==="2014-01-15"
Examples:
/v1/doc/accounting.ac2/vatprojection/V80?startdate=2016-18-31
/v1/doc/accounting.ac2/vatprojection/V80/balance?startdate=Q3
/v1/doc/{doc_name}/accreport
Return the accounting report for the document doc_name as html.
Parameters:
view Contains the the xml name of the view to be returned.
columns Contains the xml names of the columns to be returned.
navigation If set to true the html page navigation is showed, else only the data are showed.
period Define the start and end date for the request.
It can contain a period abbreviation like '1Q' or a start and end date like '2014-01-01/2014-03-31'.
A period abbreviation is defined by a number followed by one of the following charachters:
- M for months
- Q for quarters
- S for semesters
- Y for years
subdivision Define the period subdivision for the request .A period subdivision is defined by one of the following charachters:
- M for monthly subdivision
- Q for quarter sudbivision
- S for semester subdivision
- Y for year subdivision
format Contains the format to be returned. Supported formats are 'html' or 'json'. Default is 'html'. Since Banana 8.0.5.
Examples:
/v1/doc/accounting.ac2/accreport
/v1/doc/accounting.ac2/accreport?period=Q1
/v1/doc/accounting.ac2/accreport?subdivision=Q
/v1/doc/accounting.ac2/accreport?format=json
/v1/doc/{doc_name}/vatreport
Return the vat report for the document doc_name as html.
Parameters:
view Contains the the xml name of the view to be returned.
columns Contains the xml names of the columns to be returned.
navigation If set to true the html page navigation is showed, else only the data are showed.
period Define the start and end date for the request.
It can contain a period abbreviation like '1Q' or a start and end date like '2014-01-01/2014-03-31'.
A period abbreviation is defined by a number followed by one of the following charachters:
- M for months
- Q for quarters
- S for semesters
- Y for years
format Contains the format to be returned. Supported formats are 'html' or 'json'. Default is 'html'. Since Banana 8.0.5.
Examples:
/v1/doc/accounting.ac2/vatreport
/v1/doc/accounting.ac2/vatreport?period=Q3
/v1/doc/accounting.ac2/vatreport?format=json
/v1/doc/{doc_name}/journal
Return the journal for the document doc_name as html.
Parameters:
columns Contains the xml names of the columns to be returned.
navigation If set to true the html page navigation is showed, else only the data are showed.
format Contains the format to be returned. Supported formats are 'html' or 'json'. Default is 'html'. Since Banana 8.0.5.
Examples:
/v1/doc/accounting.ac2/journal
/v1/doc/accounting.ac2/journal?format=json
doc/{doc_name}/startperiod
Return the start date in the form of 'YYYY-MM-DD'.
Parameters:
period Define the period for the request.
It can contain a period abbreviation like '1Q' or be empry. If period is not present or empty the accounting start date is returned.
A period abbreviation is defined by a number followed by one of the following charachters:
- M for months
- Q for quarters
- S for semesters
- Y for years
See also endPeriod.
Introduced in 7.0.7.0
Examples:
/v1/doc/accounting.ac2/startperiod
/v1/doc/accounting.ac2/startPeriod?period=Q3
doc/{doc_name}/endPeriod
Return the end date in the form of 'YYYY-MM-DD'.
Parameters:
period Define the period for the request.
It can contain a period abbreviation like '1Q' or be empry. If period is not present or empty the accounting end date is returned.
A period abbreviation is defined by a number followed by one of the following charachters:
- M for months
- Q for quarters
- S for semesters
- Y for years
See also startPeriod.
Introduced in 7.0.7.0
Examples:
/v1/doc/accounting.ac2/endPeriod
/v1/doc/accounting.ac2/endperiod?period=Q3
/v1/doc/{doc_name}/info
Return the info table as html.
Parameters:
columns Contains the xml names of the columns to be returned.
navigation If set to true the html page navigation is showed, else only the data are showed.
format Contains the format to be returned. Supported formats are 'html' or 'json'. Default is 'html'. Since Banana 8.0.5.
Examples:
/v1/doc/accounting.ac2/info
/v1/doc/accounting.ac2/info?format=json
/v1/doc/{doc_name}/info/{info_section_name}/{info_id_name}
Return the info value section:id as text.
Examples:
/v1/doc/accounting.ac2/info/AccountingDataBase/BasicCurrency
/v1/doc/{doc_name}/infos
Return the infos of document doc_name as json object.
Examples:
/v1/doc/accounting.ac2/infos
Returns: [{"section":"Base", "id":"FileInfo", "value":""},{"section":"Base", "id":"Date", "value":"2014-05-13"}, ...]
/v1/doc/{doc_name}/messages
Return the list of message as a json array
Parameters:
recheck If set to 'yes' a 'Recheck accounting' is executed.
/v1/doc/{doc_name}/messages/count
Return the number of error messages in the accounting file.
Parameters:
recheck If set to 'yes' a 'Recheck accounting' is executed.
/v1/doc/{doc_name}/apps/{app_name}
Return the www app app_name as a html page. Www apps are a showcase of the powerfull capability of the http api.
A www app is just a html page stored under '{program_folder}/WWW' that is returned by this request. Currently banana accounting has the app "Charts" that permit to display charts of accounts, and the app "Dashboard" that show an overview of the accounting.
/v1/doc/accounting.ac2/apps/charts
/v1/doc/accounting.ac2/apps/dashboard
/v1/doc/{doc_name}/[*/]bananaapiv1.js
Return a javascript file tha define an object oriented interface to access the webserver. With this interface the http requests are hidden behind the object's methods and properties. Methods and properties follow the schema of the BananaApps API. All the request are synchronous.
/v1/doc/accounting.ac2/bananaapiv1.js
/v1/doc/accounting.ac2/charts/bananaapiv1.js // note: only the name is checked and not the path
/v1/appdata/{data_id}
The request appdata permit to save and restore parameters.
GET /v1/appdata/chart_xyz      // return the data chart_xyz
PUT /v1/appdata/chart_xyz      // save some data, the data are sent as body of the request
DELETE /v1/appdata/chart_xyz   // delete the data chart_xyz
/v1/appdataform
The request return a form that permit to create, modify or delete app data.
/v1/files/{file_name}
The request return the file file_name stored in the folder user data.
Windows: "C:/Users/{user_name}/AppData/Local/Banana.ch/Banana/8.0/httpconfig.ini"
Mac: "/Users/{user_name}/Library/Application Support/Banana.ch/Banana/8.0/httpconfig.ini"
Linux: "/home/{user_name}/.local/share/data/Banana.ch/Banana/8.0/httpconfig.ini"
/v1/help
Show the help page (this page) of the web server.
/v1/script?scriptfile=path_to_script
Execute the script scriptfile.
Parameters:
scriptfile Define the path of the script to be executed.The path can be an absolute path or a path relative to the user's document directory.
ac2file Define the name of an opened document to be passed to the script. It is optional.
indata Contains text data to be passed to the script. It is optional.
Examples:
/v1/script?scriptfile=getresults.js
/v1/script?scriptfile=getresults.js&ac2file=accounting.ac2
/v1/settings
Show the settings of the web server.
Data formats API
Date
Date values are in ISO 8601 format 'YYYY-MM-DD'.
Decimal
Decimal values have a '.' (dot) as decimal separator and doesn't have a group separator. For example: '12345.67'.
Decimal values are rounded according to the accounting settings.
Text
Text values can contain any character supported by UTF-8.
Time
Time values are in ISO 8601 format 'HH:MM:SS'. The formats 'HH:MM' and 'HH:MM:SS.ZZZ are also accepted.
Import data
See also:
- End user genaral import documentation.
- End user documentation for importing accounting data.
- If you are a developper and do want to test if the import file is correct. Download and install the Banana Software. In Starter Edition mode you can cCreate a new accounting file, use the import in to account function and make all tests you need.
ImportApp
An importApp is javascript program that is executed internally by Banana (when user want to import data) and usually convert data from a proprietary format to a Banana "Text file with columns header".
You can create an ImportApp that does more sofisticated things like:
- Appling an account number based on the content .
For example set the ContraAccount to "3000" if the amount is positive and the "Description" start with "Revenue from " - Use data contained in another banana table to complete the transactions.
- Create a table with (Tools->Add new functionalities->Add simple table) where you list text to look for in the transactions text and the corresponding account to use.
- Assume you invoice data use a customers number that is different from the account number in the Account table.
Add a new column in the Account table and then use the content to retrive the appropriate account number. - Adding a prefix to the supplier invoice number, so that you can easily distinguish incoming and outgoing invoices.
For more information see creating an ImportApp
Import and complete the data imported in Banana
Once the data is imported user can undo the operation or complete or modify the data.
By this way you can delegate to the user to check if the import is correct, if there are changes that need to be done.
Import "Text file with columns header"
The Banana import format is of type "Text file with column headers".
- Fields and column name separator is to be tab separated "\t"
- Each line (after a "\n") is a new record
- Charachter code preferably UTF8 or else the local one.
- The first line contains the columns header name
- You can use any column name existing on the table
- Names a case sensitive and must correspond to the Banana NameXml (English) of the column.
- Starting from line 2 it contains the data to be imported
- The format for the Date fields is yyyy-mm-dd
- The decimal separator is the decimal point "."
- Amount should not have any thousand separator
Two command for import
- Throught the Command in Menu Account1->Import in Accounting.
This is a specialized import for accounting data, with postprocessing of that suitable for the accounting data.- Import Accounts, VatCode, Exchange rate, Invoice number
It use the column name as in the transactions table - Transactions
You have two option:- Double entry account format (same as in the double entry transactions table)
- Income/Expense account (for bank statements)
- Import Accounts, VatCode, Exchange rate, Invoice number
- Throught the command Data import. Import from txt.
You can import data in any table. For accounting data prefer option 1.
Import double entry transactions in CSV format
For what is concerning the specific of the import of double entry see the explanations the Import Double-entry accounting transactions. The only difference is that the Complete transactions with section is active and allows the user to enter the initial document number and the destination account number. Once the import is done, the counterparty account will have to be entered manually.
Menu Account1->Import into account
The type of file to be used is a "Text file with column headers".
Main columns for import
For importing invoices the tab separated import file or translated file usually contains this columns:
- Date of the transaction (2014-12-31).
- DateDocument with the date of the invoice.
- DocInvoice the invoice number.
- Description a brief text.
- AccountDebit the account number of the customer or the general account for customers.
- AccountCredit the account number of the revenue account.
- Amount the amount of the accounting currency.
- VatCode the vat code that should be used.
- AmountCurrency if multi-currency the amount of the invoice in original currency and currency of the AccountDebit.
Example file double entry format
Fields are separated by the tab char (ASCII decimal 11, C language "\t").
In the example the tab charachter is not visible.
Date Doc Description AccountDebit AccountCredit Amount VatCode VatPercentNonDeductible

2018-01-03 Bank to Cash 1000 1020 350.00
2018-01-05 Office Supplies 6500 1000 32.50 E76
Options
- Import using clipboard data will use the content of the clipboard instead of the file
- Autocomplete values Some fields of the transactions are automatically completed (see "Importing transactions for multicurrency double entry accounting").
- Unicode (utf-8) The content of the file is in Unicode utf-8 (it support any character set).
Importing other transaction's columns
You can import any other field that is defined in the transactions table.
There are other alues that we suggest to import if available:
- DateDocument the date of the original document (for example the date of the invoice).
- DocOriginal the document number for example the invoice number.
- DocPayed the document number that has been payed.
- DocLink the address of the file that link to a scanned document (pdf, jpg, ..).
- DateExpiration due date of the invoice.
- ExternalReference a information that help to identify the transactions as unique.
It will be used in future implementation of Banana (in conjunction with the date) to warn a user that the transaction has already been imported.
This should be a externaReference generated by the software that create the transactions to be imported.
We suggest to use a name of the program and a number tha that is unique for the accounting period.
For example "invoice-2013-00001.001" with year, invoice number and a progressive number that is relative to the invoice in case it will be necessary to have more transactions lines for the same invoice.
Importing transactions for multicurrency double entry accounting
By importing multicurrency data there can be rounding or calculation differences due to different development tools used. To avoid such differences you should provide only certain fields and while importing the program will calculate the field values that are missing (with the option "Autocomplete values") .
- If you provide only "AmountCurrency" the program will use the default exchange rate and will calculate the "Amount".
- In order to avoid error provide always the "ExchangeCurrency"
- If you provide the "AmountCurrency" and the "ExchangeRate" and the "Amount" are 0 o not present the program will calculate the exchange rate based on the column "Amount" and "AmountCurrency".
Importing Invoice data
The data of your invoice software can be imported in Banana.
There are two way to do so:
- Let your invoice software generate a file for Banana a indicated in the "Import double entry transaction in txt format".
- Use the data of the export format of your existing invoicing software .
In order to import this data from a proprietary format in Banana you need to create a Javascript BananaApp that translate the data in the format accetable for Banana.
The script program take as input the content of a file and create an output that is a tab separeted text file with columns headers.
See also repository on github.
Invoices on more lines
Most invoices have different items that need to be registered in different revenues accounts or that have different VAT percentage.
In this case for each invoice you neet to have many import lines.
Date, DateDocument, DocInvoice have always the same values.
- The first line you have the
- AccountDebit the customer account number
- AccountCredit is void.
- Amount the total amount of the invoice. The amount due from Customer.
- VatCode is void
- For each item with different revenue accounts or Vat percentage you should have an additional lines
- AccountDebit is void
- AccountCredit the revenue account for this item
- Amount the total amount to be registered on this account.
If you have a VatCode it could be convenient to use the amount without VAT. - VatCode the VatCode that apply to this item.
If the Amount is Net of VAT you should define a VAT Code that is calculated on the net Value.
Group transactions by invoice number
Il the imported data contains the "DocInvoice" columns, when Banana display you a sedond DialogBox, you can choose to have Banana group the transactions by DocInvoice.
In this case Banana automatically create if necessary a transaction for rounding differences.
Use Cost center instead for customer account
If you do not want to keep track of the invoices registered but do not wan't them to be recorded on ordently account you can use the Cost center (CC3). See also Client/Suppliers register.
Import receipts/payment transactions in CSV format (Bank statements)
This format is suitable to import Bank statements in elctorinic format.
- For what is concerning the specific of the import of income/expenses transactions see the explanations Import Income & Expenses accounting transactions.
- The information for the Double Entry import are also partially applicable.
Menu Account1->Import into account
The type of file to be used is a "Receipt/Payment transactions".
- You can use any column name existing on the table
- Column with special meaning are
- Date of the transaction (2014-12-31)
- Description a brief text
- Income: The amount in credit (can also be negative a mount)
- Expenses: The amount in debit
- ContraAccount: the account nember (debit/credit) or category
- Account: If the file contains the movements of multiple accounts, the account of the transaction
- VatCode the vat code that should be used
- IsDetail for composed transactions a "S" identify a counterpart transaction and a "D" a detail transactions
- Fields header in the first line o the file Fields names a case sensitive and must correspond to the NameXml (English)
- Fields and column name separator is to be tab separated "\t"
- Each line (after a "\n") is a new record
- The format for the Date fields is yyyy-mm-dd
Example file Income/Expenses format
Fields are separated by the tab char (ASCII decimal 11, C language "\t").
In the example the tab charachter is not visible.
Date Description Income Expenses ContraAccount Account
2007-01-02 Paper  30.00
2007-01-06 material for photographic competition  259.2  3000
Options
- Import using clipboard data will use the content of the clipboard instead of the file
- Autocomplete values Some fields of the transactions are automatically completed (see "Importing transactions for multicurrency double entry accounting").
Once the import is done, the contra account will have to be entered manually. - Unicode (utf-8) The content of the file is in Unicode utf-8 (it support any character set).
Automated data importing
The import of transaction can be automated using the command.
For further information see "Command line"
Exporting data
Banana Accounting can export in different formats:
It is also possible to create Banana Apps that export the data in specific formats:
Banana software is also trying to improve the data interchange with a new JCSV file format that bring toghether the simplicity of CSV and the advanced data interchange capabilities of Json.
GitHub BananaAccounting
Contribute to BananaAccounting GitHub repository
In order to contribute to BananaAccounting GitHub repository and submit some changes it is necessary to follow some basic steps.
- Install GitHub Desktop
- Fork the repository
- Clone the repository
- Modify or add files to the repository
- Submit the changes
Install Github Desktop
Install GitHub Desktop on your computer, and if you don't have it create your own account.
Fork the repository
The first step is to fork your own copy of the repository you want to work on to your account:
- Go to the Banana Accounting's main page in github
- Click on the repository link
- Click the button Fork on top right of the page
- Select your Account
Clone the repository
The second step is to clone the forked repository:
- Click the green button Clone or download -> Open in Desktop -> Open link
- Click the button Clone and wait a moment while the forked repository is cloned on your local machine.
At this point, you have created on your computer your own copy of the repository, where you can work on the files, create directories etc, as you work as usual.
Modify or add files to the repository
To work with the repository:
- Start GitHub Desktop
- Choose the repository you like to work on
- Menu Repository -> Show in Explorer
- Work on the files, create directories etc, as you work as usual..
- Commit the changes to your own repository by clicking on Commit and then Pull buttons
Submit the changes
To submit changes with GitHub desktop:
- Start GitHub Desktop
- Choose the repository
- Click on Menu Branch -> Create Pull Request
- On the opened page of the browser set:
- base fork: select the BananaAccounting repository (example: BananaAccounting/Netherlands)
- base: select the master branch of the BananaAccounting repository
- head fork: select your own repository (example: YourAccountName/Netherlands)
- compare: select the master branch of the repository
- Click the button Create Pull Request
- Add a comment title and a comment text for the pull request
- Click the button Create Pull Request
Important: Do not click on the "Close Pull Request" button, or the pull request will be blocked!
The repository moderator will receive the pull request, evaluate and approve or refuse the contribution.
You will be automatically notified.