Productivity Applications
The Banana Accounting Plus Productivity Applications complement the accounting ones in order to manage, all the other needs additional to accounting, of a company. Everything is done in an easy, fast way and with instant and professional results. The Timesheet is completely free, because it is included in the Free plan of Banana Accounting Plus; while the other applications are free up to 70 transactions in the Free plan and unlimited in the Professional and Advanced plans.
The Productivity Applications are independent from accounting, although there are functions and extensions that can be combined with the accounting file, to create reports and import data into the accounting file.
The Productivity Applications included in Banana Accounting Plus are the following:
- Estimates and Invoices separate from accounting: for the management of offers and invoices.
- Inventory: for the management of inventory items.
- Time sheet: to record the duration and hours of work.
- Fixed assets register: for the management of amortisable assets.
- Address book: for managing addresses and labels.
- Library and collections: for the management of books or other objects (eg collection of paintings, jewels ...).
- Simple table: the possibility to create a custom table is left to the user.

Additional useful functions for the Productivity Applications
The following commands are particularly useful when used with these applications:
- Extract and sort rows
In order to create lists of existing data. - Print labels
In order to print addresses or items labels. - Add new functionalities
- New table documents (Swiss Balance sheet attachment...)
- New simple table
- Extensions menu
In order to create personalized reports, calculations or else.
Link between tables
You can create a link between a field of one table to another one, through the Id field.
For example:
- Add a new simple table named "Projects"
- In the Id column indicate a project symbol and in the Description column a small explanation.
- In another simple table, add the following text columns:
- ProjectsId (Table name plus "Id")
When you go into edit mode a list of the available projects will be displayed. - ProjectsDescription (Table name plus "Description")
This column must be protected.
When you change the ProjectsId contents, the description text will be displayed.
- ProjectsId (Table name plus "Id")
- When you add a column, proceed with a check of the accounting or close and reopen the file to activate the link.
Estimates and Invoices separate from accounting
Banana Accounting Plus offers several ways to create and manage your invoices.
The Estimates and Invoices application allows you to quickly create and print estimates and invoices. Ideal for replacing Excel when preparing invoices, switching to a professional tool at no extra cost.
This is especially useful for those who have VAT on their receipts and especially the balance rate, because they can issue invoices with the current VAT, while in the accounting file they can register with the rate granted by the FTA.
The Estimates and Invoices application is independent from accounting and does not allow the import of data into the accounting file.
- ▶ Video How to start creating Estimates and Invoices.
- ▶ Video QR invoices in 3 steps.
- ▶ Characteristics of Estimates and Invoices
To use the application you must download and install Banana Accounting Plus, and, when creating a new file, choose Offers and Estimates as the type.
Create Invoices
With the Banana Accounting application you can create your invoices easily and in no time. Simply go to the menu Invoices > New Invoice to access the dialogue and create a new invoice.
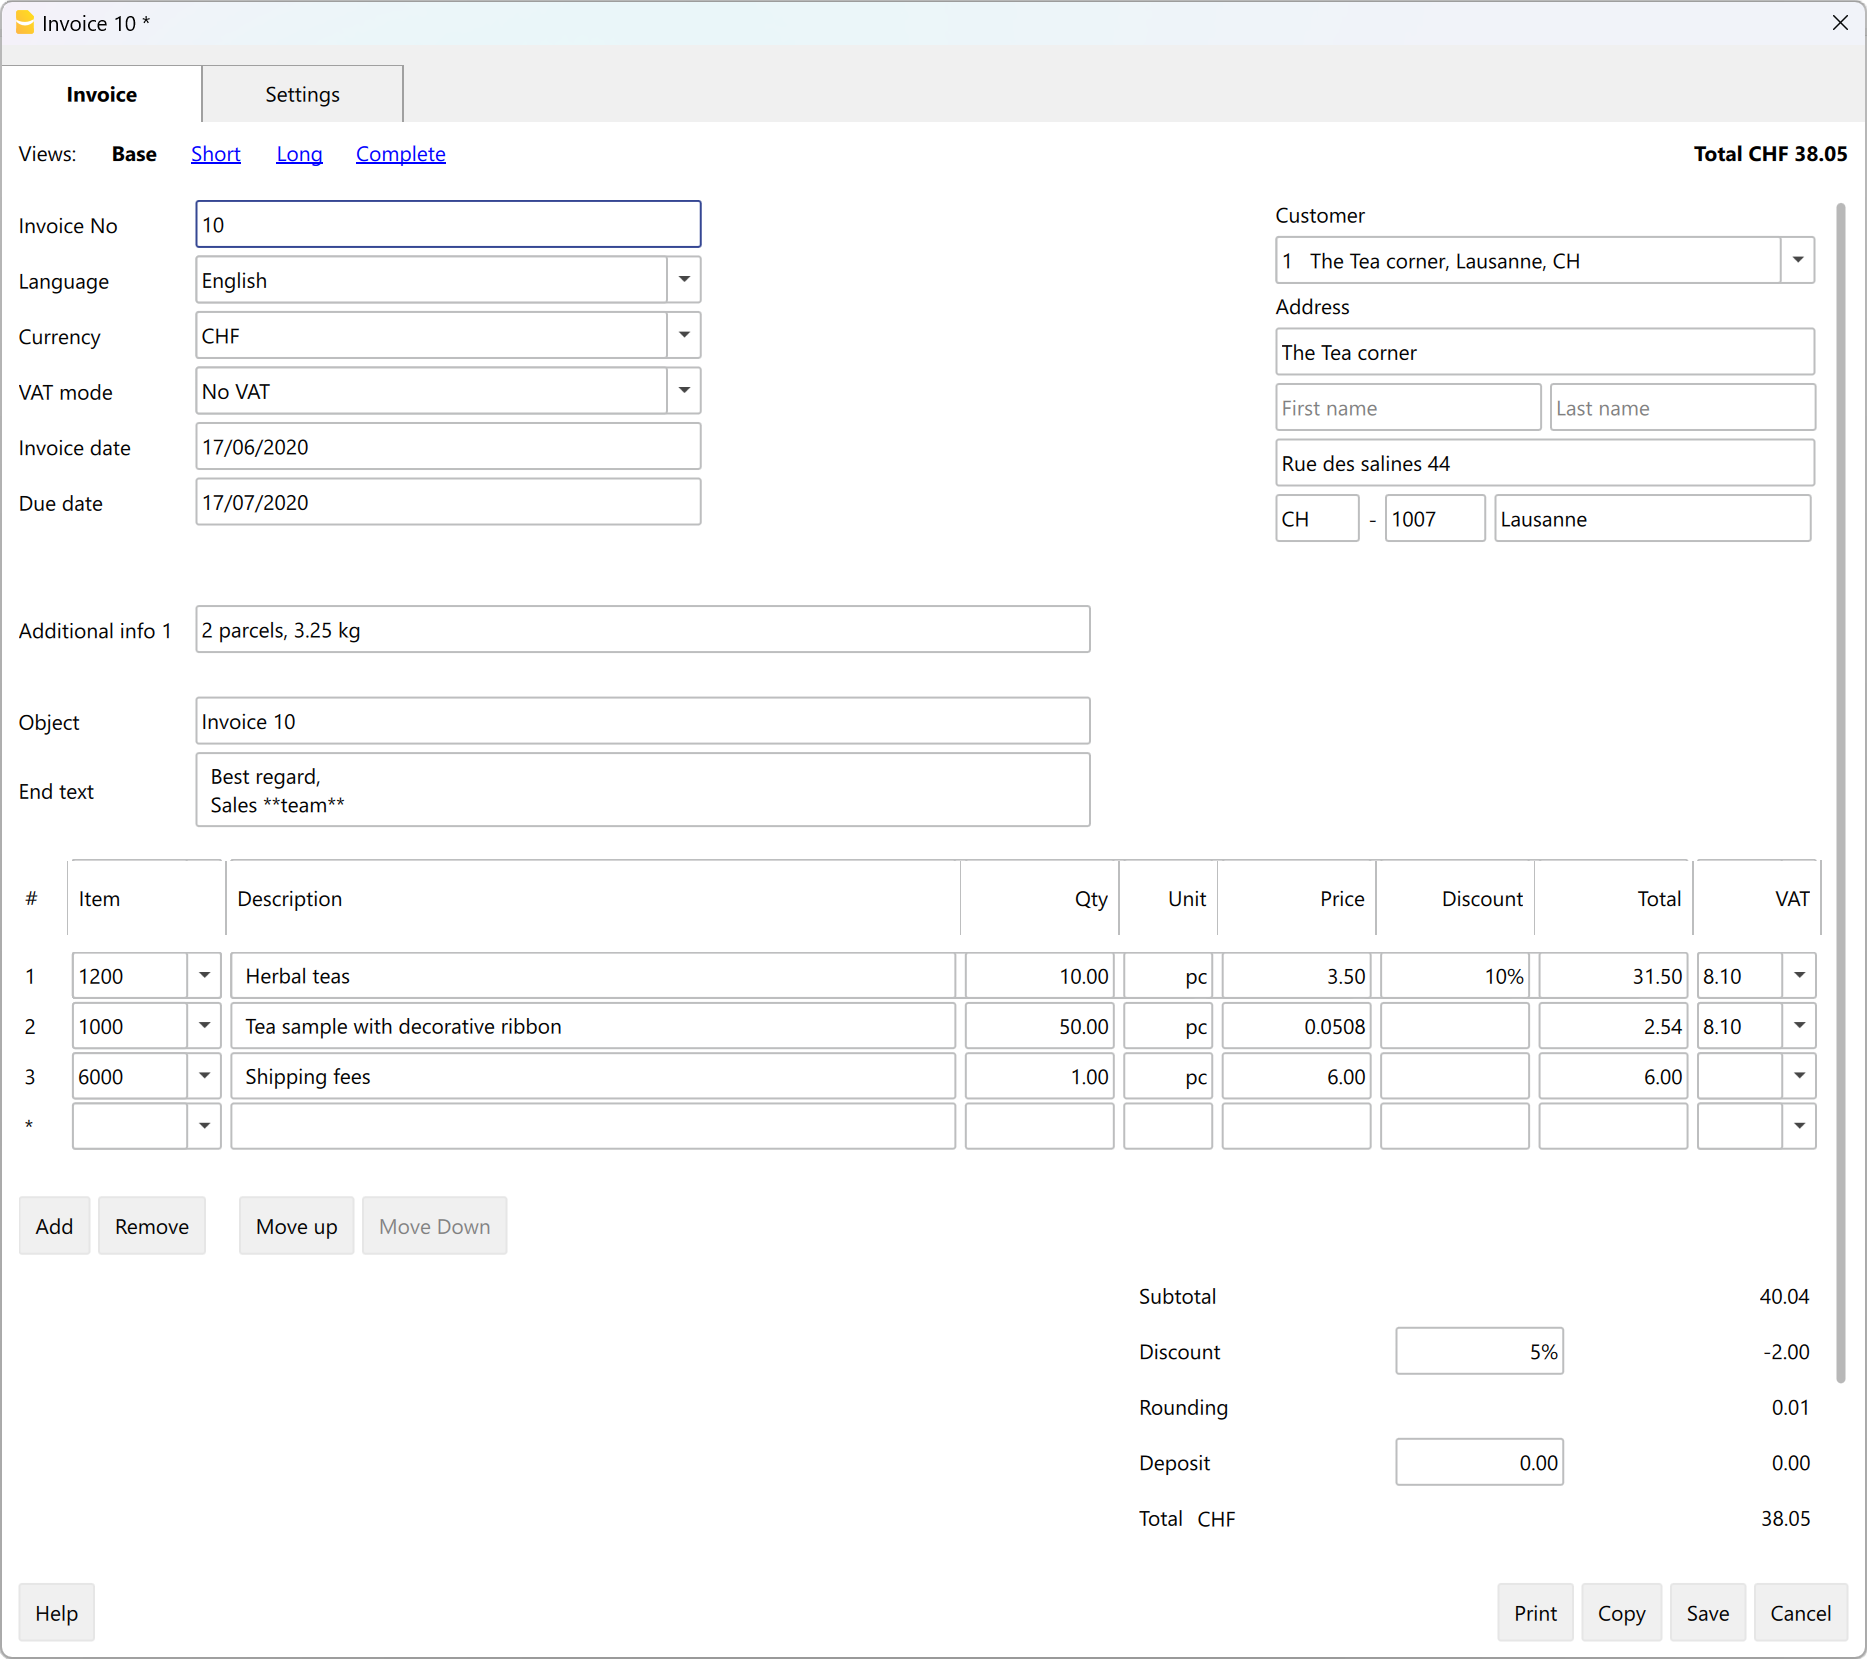
There are various fields to enter all the necessary information and items to be invoiced. Here are the main ones:
- Invoice information
Invoice no., language, currency, VAT mode (invoices without VAT, including VAT in the amount and excluding VAT, with separate VAT amount), invoice date and due date. - Customer address
By selecting the customer from the list, all data are automatically taken from the Contacts table - Invoice data
Title, initial text, invoice details (list of items to be invoiced) and final text. - Totals and discount
These are calculated by the programme, according to the values entered.
Advantages
One of the main advantages is certainly the ease of use. The data entry fields are clear and many automations simplify and reduce working time, with immediate professional results:
- No accounting knowledge required
- Automatic retrieval of addresses from contacts so that you do not have to re-enter the data on the invoice.
- No manual calculations. All calculations are automatic, always accurate and up-to-date.
- Set language, currency, number of decimals and rounding for each individual invoice.
- Edit and/or duplicate invoices and offers
- Convert offers into invoices
- View open invoices
- Archive invoices
- Access the archive at any time.
Professional Printouts
Invoice printing is not only limited to QR bulletin printing for Switzerland, but can be created and printed:
- Offers and Quotations in various currencies
- Invoices in CHF and foreign currencies
- Invoices without QR Bulletin

Invoice Structure
In this image you can see how the invoice is structured:
 | LogoIt is possible to insert a personalized logo.
| |||
HeadingThe heading of the invoice will be identical to the one entered in
| ||||
Customer's addressThe address of the client will be retrieved from the Contacts table, where you have to set up customer addresses. | ||||
Invoice dataThe content of the invoice must be entered in the new dialog for creating / editing an invoice. | ||||
Custom text at endYou can define title, initial text and final notes from the Invoice Dialogue | ||||
Swiss QR-CodeThe settings for automatically creating the QR payment slip can only be defined for Switzerland, only with the Layout with Swiss QR Code [CH10] |
Differences with the Integrated invoicing application
Estimates and Invoices is a separate application from all other accounting applications and is only used to create offers and invoices. There is no connection to the accounting file, as is the case with integrated invoicing, whose data remains in the accounting file.
Invoice data in the Estimates and Invoices application cannot be imported into the accounting file, but must be entered manually. Furthermore, it is not possible to import bank transactions (including payments) into the Bids and Invoices application. If you want these functions, we recommend that you use the integrated invoicing in the accounting file.
In the Estimates and Invoices application, there is an Invoices table with an Invoice dialogue where you can find various columns and options to detail the various positions and data to be entered. In this respect, the Estimates and Invoice application is much more flexible and comprehensive because it allows for more customisation. In integrated invoicing, the elements and details from invoices (quantities, prices, units, etc.) are only recorded in the Transactions table.
In integrated invoicing, it is not possible to create offers. It is possible to create and print an invoice with the title ‘Offer’ (instead of Invoice).
The Estimates and Invoice application is also specific for creating Offers.
- More details on page Invoicing with Banana Accounting.
How to start
The steps to create the invoices are as follows:
- Download the Invoice template
- Enter your data
- Enter the Contacts (Clients) data
- Enter Invoice data
- Print invoices
For more information, please visit the How to... page.
Other Functions:
Characteristics of Estimates and Invoices
The new Estimates and Invoices application is included in Banana Accounting Plus. Creating and printing estimates and invoices becomes quick and easy.
To start, just download for free the Free Plan. You may enter up to a maximum of 20 invoices and 20 offers.
With the yearly plan, you can add an unlimited number of estimates and invoices.
How to set up estimates and invoices
To create estimates and invoices, just set up your customer data, items or services to be invoiced, unit prices and VAT rates, while the program takes care of everything else.
There are many automations to make your work easy and with immediate professional results.
- Automatic retrieval of addresses from contacts to avoid having to re-enter the data in the invoice.
- Data import from SmallInvoice with specific Banana extension.
- No manual calculation. All calculations are automatic, always accurate and updated.
- Detailed estimates that can be quickly converted into invoices and sent to the customer.
- Invoices created with QR code for Switzerland.
- For every invoice, language, currency, number of decimals and rounding system can be set up.
- Changes and/or duplicates of invoices and offers already made to the customer. You just need to to add quantities and the new invoice is ready to be sent.
- Annotations for memos or other.
- Payment date to check receipts.
- View of overdue invoices to check due dates.
- PDF saving and paper-printable.
- Invoice archiving to have a history that is always organised and ready for possible tax inspections.
- Dark Mode on Mac and Windows.
Excel-like features
- Add as many rows as you want without limit, or delete the rows you don't require.
- You don't need to enter formulas because the calculations are updated instantly and you have a contextual view (like in spreadsheets).
- The columns are customizable, you can change their position, add new ones and change their width.
- Work with the format that suits you best.
- Colour the rows to immediately identify pending invoices or for other purposes.
Based on spreadsheets
The estimate and invoice application is built upon various tables, which are used in a similar way to those of Excel, but that are already fully set up and programmed with everything needed to manage your inventory in a fast and safe way.
- Contacts table
This is the table where customer data can be registered in a precise and orderly way. The data can always be updated and modified. - Items table
This is the table where the data for the management of the items or services to be invoiced are inserted. By assigning an ID it is possible to group the various categories of items or services to be invoiced. You enter the quantities, the unit price and you can indicate the reference account in the accounting. Columns are also available for entering the date of entry and exit of the goods and for annotations. - Invoices table
This table is intended for entering the items which need to be invoiced.It is the most automated:- Automatic resumption of the customer's address by simply selecting the customer's contact ID.
- Automatic retrieval of all invoice data: by double clicking on the cell in the Total column, an invoice dialogue opens up where you will find all the data entered in the other columns of the Invoices table (customer address, date and invoice number, reference, order number, unit price, VAT rate and other possible data). Just enter the quantities and the invoice is ready.It can be saved in PDF or printed on paper.
- Estimates table
The offer data is entered. It is completely similar to the Invoices table, with the same functions, calculations and printing methods, obviously the wording changes. The estimates can be converted into invoices at any time with automatic recovery of the data in the invoice, which can be immediately saved, printed and sent to the customer with automatic recovery of the data in the invoice, which can be immediately saved, printed and sent to the customer. - VAT codes table
VAT codes are set up for creating invoices. Whilst preparing invoices, both the rates and calculations are taken up automatically . The rates can be modified if the regulations in force change.
Accounting set up
Headings and basic data of Estimates and Invoices set up in a single dialog box, easy to display.
- Headings with free texts
- Address with all company data
- Link to predefined or customized extensions
- Password to secure your estimate and invoice
- You can create multiple Estimate and Invoice files in different languages.
File and data saving
- All your data is saved in a single file, where you can easily find everything without wasting time.
- Give the file the name you want.
- You can manage an unlimited number of files.
- Save data on any media, computer, network, cloud or send it by email. You can have access from wherever you are.
- Simultaneous access by multiple users, where, however, only one person can open the file to be edited.
- Make your accounting more secure by inserting password protection.
Handling Estimates and Invoices
- In the columns you can see the amounts in the format used by your computer.
- You choose the identifier of the article freely (numeric or alpha-numeric account, up to 256 characters).
- Balance, item movement and totals displayed at the same time and always updated.
- In the Links column of the Items table you can add a digital link for the registered item.
- In all tables you have predefined columns that you can make visible by choice.
- The Search command allows you to quickly search for the invoice or estimate data.
- The Replace command allows you to automatically replace texts or other data in the tables.
- You can sort the rows according to different sorting keys.
- Export to PDF for data storage.
- Export to other formats for data re-processing.
- Data import from other programs in Text, Ascii and CSV format.
- Data import from SmallInvoice.
Error reporting and control
- Command to quickly check accounting.
- Reporting of any wrong settings, differences or errors.
- Each report is linked to a help page that explains the causes and the solution.
- Possibility to amend at any time.
Prints and reports
- Print invoice with QR code.
- It is possible to print the invoice with a QR bulletin even without an amount and without an address, leaving an empty box to manually insert the data. More information is available on the QR-Code Customization page, section Include/Exclude from printing.
- Print invoice for all other countries.
- Print invoice on paper or in PDF format.
- Add your own logo in the printouts of estimates and invoices.
- Open invoice report.
- On the Customise invoice printing page you will find all information for printing and its settings.
- Customise the estimate and invoice print.
- With Banana accounting Professional you can use the preset settings and customize the printing of estimates and invoices.
- With Banana Advanced, you can not only customize the printing of estimates and invoices, but also add additional customisations.
Data export and storage
- Copy and paste directly to and from Excel.
- Export tables to PDF and various other formats.
- Storage of printouts and data to PDF or other formats.
- Saving of the accounting file on any device.
- Export estimates and invoices data in .csv format with the extension Estimates and Invoices Tools.
Comprehensive documentation
- Constantly updated estimate and invoice application documentation.
- Banana accounting Plus documentation.
- Banana Accounting Plus questions and answers.
- Documentation also available in PDF format.
History of updates
The Estimate and Invoice application is constantly subject to updates and improvements.
For further details, consult the page Change history of estimates and invoices extension.
Features only available with the Advanced plan
- Set the discount for each item, both in terms of percentage and final amount.
- Insert the date when the service took place for each item.
- Add fields to the invoice for additional specific information (project, additional references, etc..).
- Print delivery notes with or without amounts.
- Print payment reminders with or without Swiss QR payment slip.
- Add an interim total (Banana Accounting+ 10.1.8 or newer).
Some customisations of the printing layout CH10 and UNI11 are available only with Banana Advanced.
Features currently not available
The Estimates and Invoices application is one of the latest additions to the family and for the moment it supports the essential functions related to the preparation and printing of estimates and invoices. It does not yet support the following functionalities:
- It is not possible to import invoice data into the accounting file.
- Connect with Inventory application.
- Export individual invoice data.
- Automated sending of invoices by email.
- Automated sending of invoices by eBill.
- Define multiple IBAN codes.
- Add additional columns in the invoice details.
- Define a discount for a single contact.
- Define a discount for a single item - see Invoice Details page (only available with the Advanced plan).
- Importing QR-Code payments.
- Send a payment reminder.
- Create a new year.
- Enter the shipping address.
- The order number and date are not listed in the invoices table (this must be done manually).
- Automatically adding a charge for the reminder on the invoice.
How to start an Invoice
To use the Invoice application you must have downloaded and installed Banana Accounting Plus.
For a quick and easy start we recommend the use of one of our templates.
Create an Invoice file
Create an Invoice file starting with an existing template or by creating an empty file as follows:
- Menu File → New.
- Select Region / language.
- As Type, select Invoices.
- In the section on the right select the required template.
- Double-click on the template name or click the Create button. The program will open the selected file directly.
- Save the file indicating it's name.
Enter basic data
- Via File → File and accounting properties → Address tab, set the address of your company, which will be included in the header of the invoice.
- If you wish to insert a logo, see the Set up logo page.
Create new Invoice
Via the Invoice → New Invoice ... dialog a new invoice will be created.
- Enter the basic information of the invoice (invoice no, date, object, initial text and final text).
- Enter your billing address (customer address).
- Enter the invoice details (product, description, quantity, amount).
- Check subtotals and grand totals and enter any discounts.
- In Settings ... define some basic parameters of the invoice (currency, decimal points, rounding, payment term and VAT mode).
- Save and print the invoice.
Print an invoice
You can print the invoice via the Invoice menu → Print Invoice command. or by clicking Print in the dialog for creating or modifying an invoice, you access the window for printing the invoice.
On the Print Offers and Invoices page you will find information on how to customise and print invoices.
The tables
The Invoice file consists of the following tables:
Contacts table
The Contacts table displays the columns where you can enter customer addresses.
Contact addresses will be immediately available in the invoice dialogue when creating or editing the invoice, simplifying data entry.
Changing the data in the Contacts table does not change the data of existing invoices and offers. If you want an existing invoice or offer to be updated with the new customer data, you must:
- Change the invoice or the estimate in the invoice dialogue.
- You must select the customer again from the list in the customer address section.

The columns
The Contacts table contains many columns, those displayed in the image are those in the Basic view. The complete list is visible in the Complete view. To customise the columns see the Columns Setup page.
Id
The contact number is entered.
The ID should be used only once and must not be repeated, even if multiple years are managed in a file.
Organisation
Enter the name of the company or organisation.
Title (Prefix)
Enter the title of the contact
Name
Enter the name of the contact.
Family name
Enter the surname of the contact.
Street
Enter the address.
Address extra
Enter extra address.
If you require the QR invoice layout, refer to the documentation Common elements for the QR invoice Switzerland for further information.
ZIP
Enter the postcode.
Locality
Enter the location.
Country code
Enter the Country code.
The country code must be formed by two characters conforming to the ISO 3166-1 standard (eg CH, LI, AT, DE, IT, FR).
Language
Enter the customer's language.
Invoice texts are printed in the customer's language, provided that it is set in the corresponding column.
The language is an ISO code, usually 2 lowercase letters (it=Italian, de=German, en=English, fr=French).
If no language is specified for the customer, the language of the file is used. This language is defined in the menu File → File properties (basic data) → Other → Current language.
Tax Code
Enter the customer's tax code
VAT number
Enter the customer's VAT number
Note
Any notes may be inserted.
Items table | Estimates and invoices
The Items table presents the columns where to insert the data for the management of the items and the warehouse.
The items will be available in the Invoice Dialogue when creating or editing the invoice, simplifying data entry.

The columns
The items table contains many columns; those displayed in the image are those in the Base view. The complete list is visible in the Complete view. To customise the columns, please refer to the Columns setup page.
All column contents can also be printed on the invoice. See customisation print layout detail CH10.
Links
Link to a product image file or descriptive PDF file
Id
The item number is entered.
The ID should be used only once and must not be repeated, even if multiple years are managed in a file.
Description
The description of the item is entered.
Unit
The type of unit is entered (pieces, hours, etc.).
Unit Price
The unit price is entered.
In the invoice settings dialogue you indicate whether the amounts are VAT excluded or including VAT.
Please note that if you change the setting from VAT excluded to including VAT or vice versa, the program changes the amounts, so that the same invoice can be printed with VAT excluded amounts or amounts including VAT.
Account
Any account is entered as information to be used for manual entry in accounting.
This value serves only as information, it is not used for creating invoices.
Note
Any notes are inserted.
Import of catalogue
Using the import functions, it is possible to automate the import of data from an existing product catalogue. See Retrieving data from other software.
It is also possible to integrate product catalogues into the invoicing program.
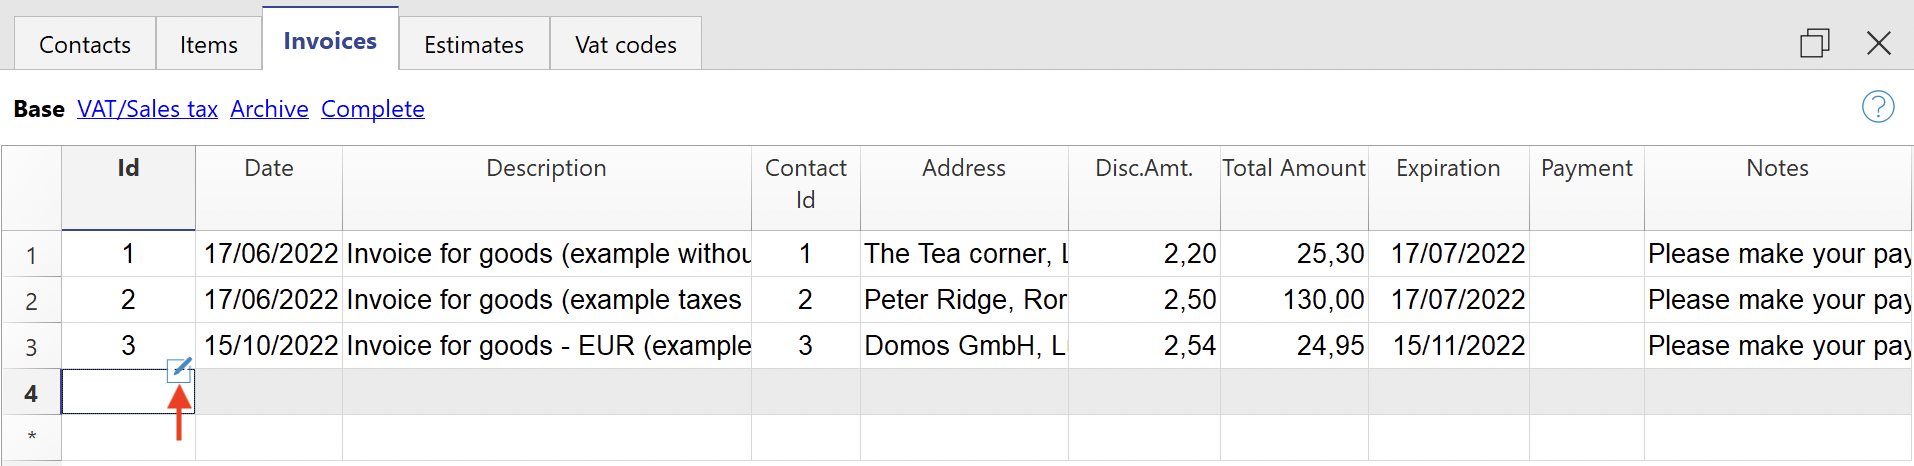
Invoices table
The Invoice table displays the columns where all invoice data that have been entered in the Invoice Dialogue are automatically retrieved.
From this table you can:
- Create new invoices
- Edit existing invoices
- Duplicate invoices
- Delete invoices
- Print invoices
- File invoices

The columns
The Invoices table contains many columns, those displayed in the image are those in the Base view. The full list is visible in the Complete view. To customise the columns, please refer to the Columns setup page.
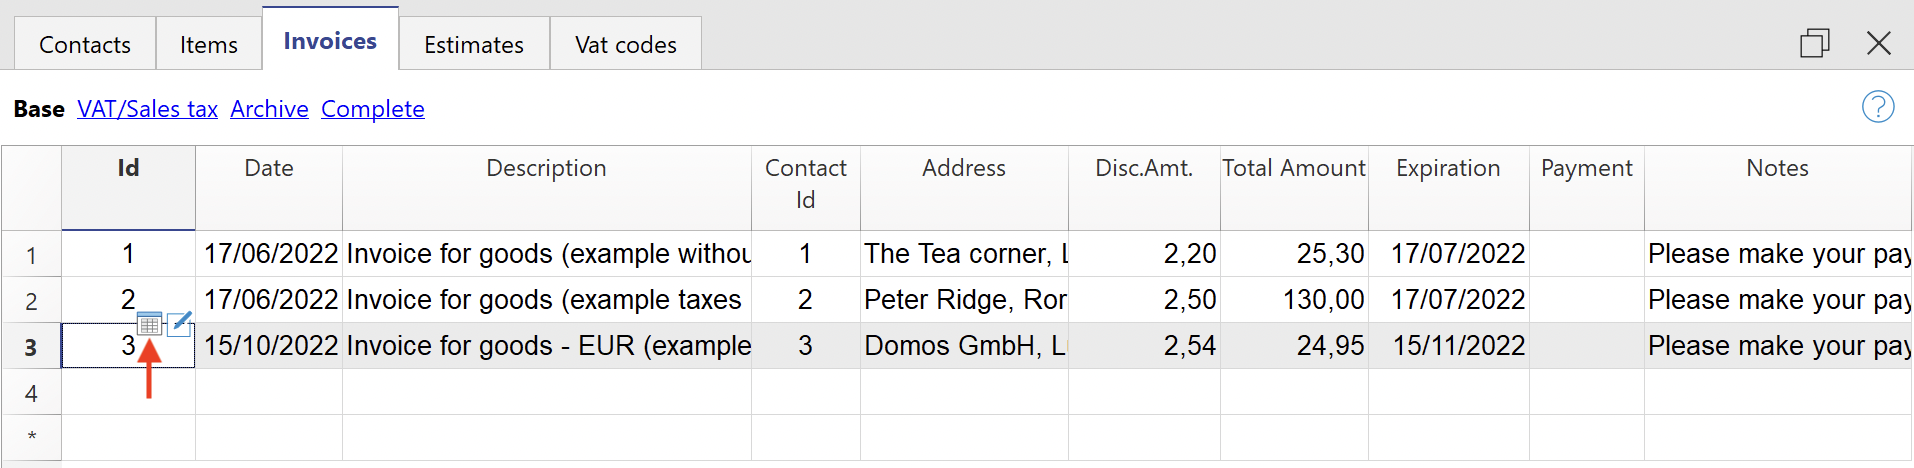
Id
Enter the invoice number.
The program will automatically resume the value entered in the Invoice dialogue.
The ID should be used only once and must not be repeated, even if multiple years are managed in a file.
Date
Enter the invoice date.
The program will automatically resume the value entered in the Invoice dialogue.
Description
Enter the subject of the invoice.
The program will automatically resume the value entered in the Invoice dialogue
This text will also be used as the title of the invoice. If defined, it overwrites the title entered in the settings.
Contact Id
Enter the contact ID number, as used in the Contacts table.
The program will automatically resume the value entered in the Invoice dialogue
Address
The program will automatically resume the customer's address data, based on the contact id number entered.
Discount Amount
Enter the amount of the discount to be applied to the invoice.
The program will automatically resume the value entered in the Invoice dialogue.
Total Amount
The program will automatically resume the value entered in the Invoice dialogue.
Expiration
The expiration date is entered.
The program will automatically resume the value entered in the Invoice dialogue.
Payment
The payment date is entered.
Notes
Further notes are entered.
The program automatically resumes the text entered in the End Text field of the Invoice Dialogue.
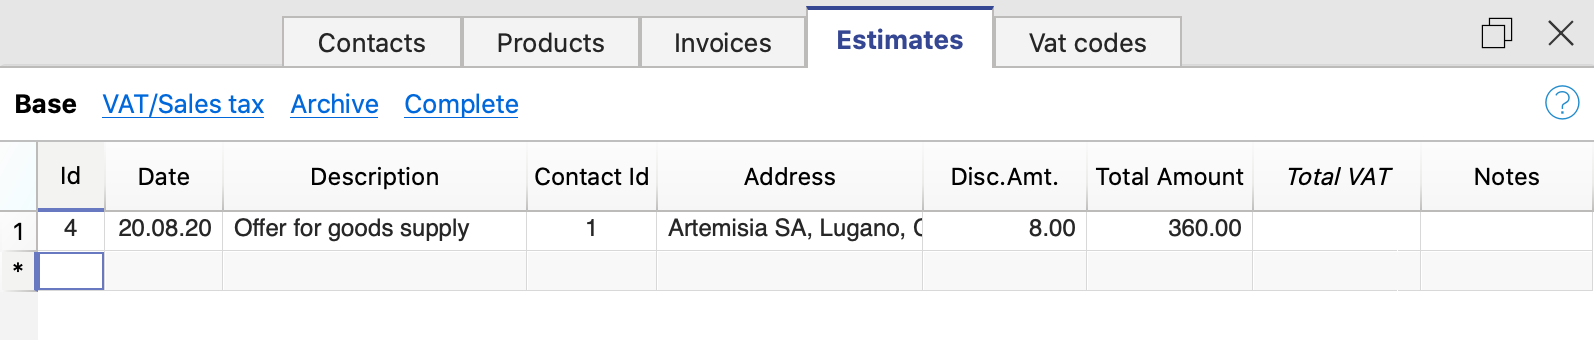
Estimates table
The Estimates table presents the columns where all offer data that has been entered in the Invoice dialogue are automatically taken over.
The columns
The Estimates table contains many columns, those displayed in the image are those in the Basic view. The complete list is visible in the Complete view. To customise the columns, please consult the Columns setup page.
Id
Enter the estimate number.
The program will automatically resume the value entered in the estimate creation dialog.
The ID should be used only once and must not be repeated, even if multiple years are managed in a file.
Date
Enter the estimate data.
The program will automatically resume the value entered in the estimate creation dialog.
Description
Enter the subject of the invoice.
The program will automatically resume the value entered in the estimate creation dialog.
Contact Id
Enter the contact ID number, as used in the Contacts table.
The program will automatically resume the value entered in the estimate creation dialog.
Address
The program will automatically resume the customer's address data, based on the contact id number entered.
Discount amount
Enter the amount of the discount to be applied to the estimate.
The program will automatically resume the value entered in the estimate creation dialog.
Total
The program will automatically resume the value entered in the estimate creation dialog.
Notes
Any notes may be inserted.
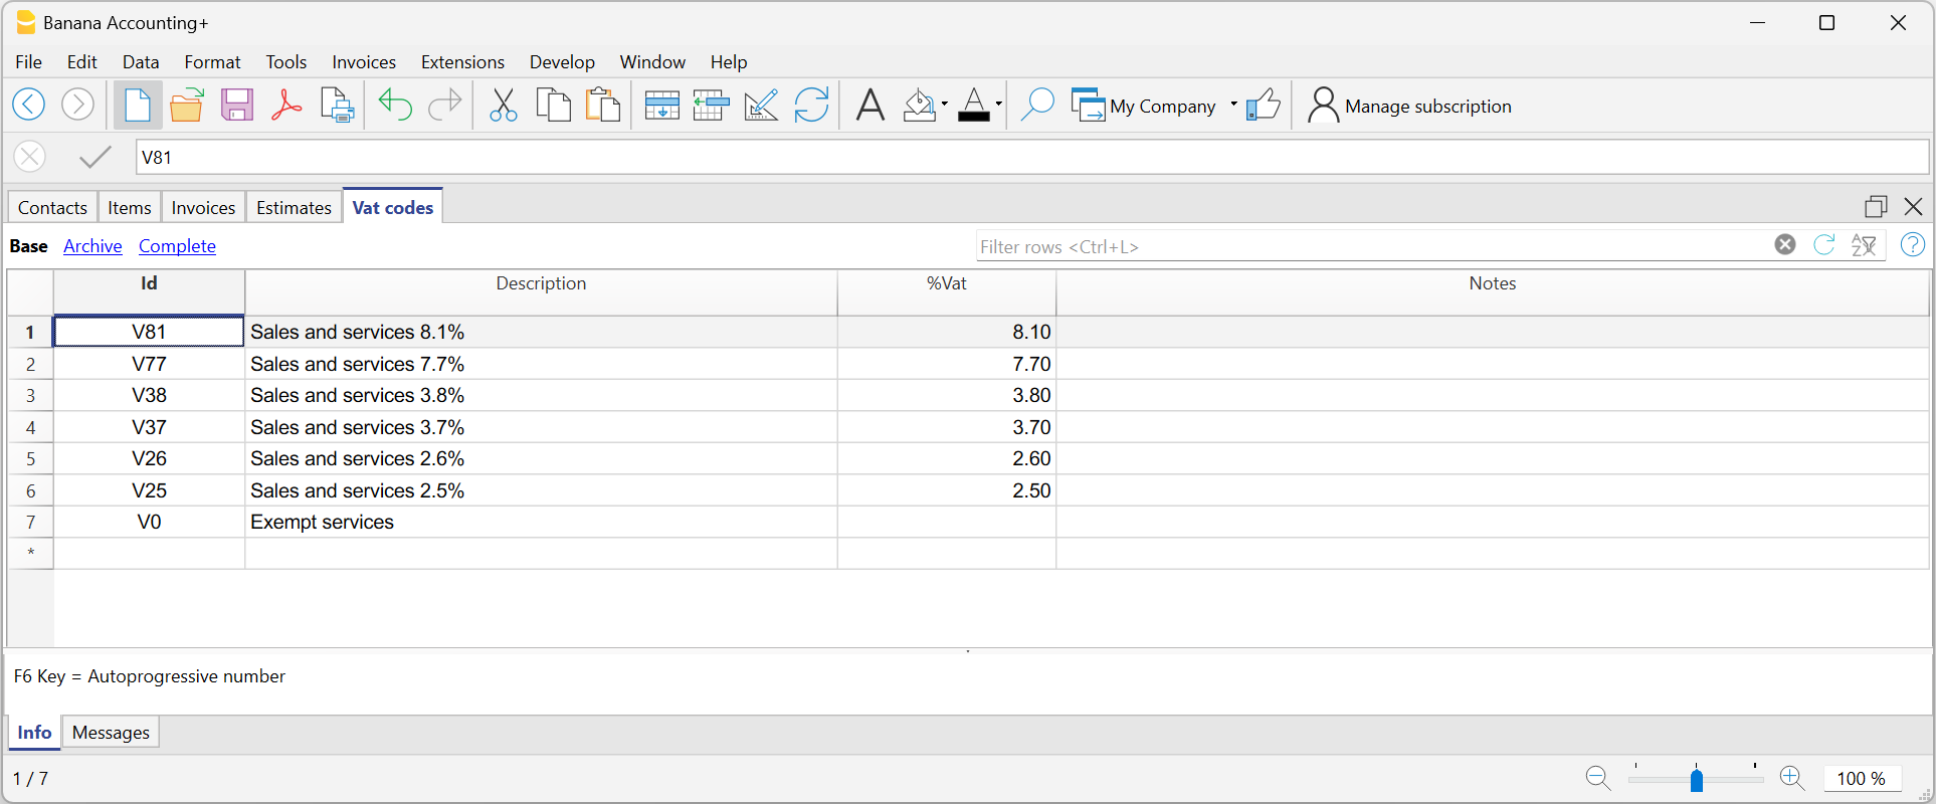
VAT codes table
The VAT codes table displays the columns where you can enter the VAT codes with the respective rates.
The data must be entered manually. When VAT rates change, the table must be updated by changing or adding the ID codes and percentages of the new tax rates.
VAT Codes will be automatically taken over in the invoice dialogue when creating or editing the invoice, simplifying data entry.
The columns
The VAT Codes table contains many columns; those displayed in the image are those in the Base view. The full list is available in the Complete view. To customise the columns, please consult the Columns setup page.
Id
The VAT code is entered.
The ID should be used only once and must not be repeated, even if multiple years are managed in a file.
Description
Enter the description of the VAT code.
%VAT
The VAT rate is entered.
Notes
Any notes may be inserted.
VAT on the gross or net amount
The setting for calculation on the net or the gross amount is done at the individual invoice level, in the Invoice settings dialogue.
Invoice Commands
Invoices menu
In the Invoices menu you will find the commands to:
- Create new invoices
- Modify existing invoices
- Duplicate invoices
- Delete invoices
- Print invoices
- Show open invoices
- Show customer's invoices
- Archive invoices
Create a new invoice
To create a new invoice you have two options:
- From the Invoices menu
- Use the command Invoices → New Invoice.
- The invoice dialogue is then opened where the data is entered.
- The new progressive invoice number is allocated by the programme. You can change it manually.
- Enter the invoice data and save
- Directly from the Invoices table:
- Select a new row in the table.
- In the Id column (invoice number), click on the small 'New Invoice' icon that appears at the top of the cell.
- The invoice dialogue then opens where you enter your data.
- Enter the invoice data and save.
When you create a new invoice, the programme automatically updates the Invoices table. The data of the new invoice are added to a new row in the table.
Edit Invoice
To edit an existing invoice, you have two options:
- From the Invoices menu:
- Select the line with the invoice you wish to edit.
- Use the command from the menu Invoices → Edit Invoice.
- The invoice dialogue opens where you can enter and edit data.
- Make the timely changes and save.
- Directly from the Invoices table
- Select the row with the invoice you want to edit.
- In the Id column (invoice number), click on the small 'Edit Invoice' icon that appears at the top of the cell.

- The invoice dialogue then opens where you can enter and edit data.
- Make the timely changes and save.
When you edit an invoice, the programme automatically updates the data in the Invoices table.
Duplicate invoice
To duplicate an invoice, you have two options:
- From the Invoices menu:
- Select the row with the invoice you wish to duplicate.
- Use the command from the menu Invoices → Duplicate Invoice.
- The new progressive invoice number is allocated by the programme. You can change it manually.
- Then the Invoice dialogue opens with the data of the invoice you have chosen to duplicate.
- Make the timely changes and save.
- The programme automatically updates the Invoices table.
- Directly from the Invoices table:
- Select the row with the invoice you want to duplicate. You can also select several rows to duplicate several invoices at once.
- Use the command from the menu Edit → Duplicate rows.
- The programme automatically updates the Invoices table by adding the duplicate rows.
- For each duplicate invoice, you must then manually edit the invoice number and data.
Delete invoice
To delete an invoice:
- Go to the Invoices table.
- Select the row with the invoice you wish to delete. You can also select several rows to delete several invoices at once.
- Use the command from the menu Edit → Delete rows.
- The invoices are deleted from the table.
Print invoices
On the Print Offers and Invoices page you will find information on how to customise and print invoices.
To print an invoice you have two options:
- From the Invoices menu:
- Select the row with the invoice you want to print.
- Use the command from the menu Invoices → Print Invoice.
- Directly from the Invoices table:
- Select the row with the invoice you want to print.
- In the column Id (invoice number), click on the small icon 'Print Invoice' which appears at the top of the cell.
Show open invoices
You can extract invoices that have not yet been collected into a table:
- Go to the Invoices table.
- Use the command from the menu Invoices → View open invoices.
- The programme extracts all rows of invoices without a payment date.
Each time a new invoice is collected, enter the date of collection in the Payment column of the Invoice table.
Show customer's invoices
You can extract customer's invoices into a table:
- Go to the Invoices table.
- Under the Contact Id column click on the customer number whose invoices you want to have.
- Right-click on the selected field and select the Extract rows command
The program extracts all rows belonging to the customer.
Archive invoices
With the Estimates and Invoices application:
- You can enter as many invoices as you want, there are no limits.
- You can keep invoices from several years in one file.
- You do not need to create a new file for each new year.
Invoices from previous years can be archived at any time:
Invoice Dialog Add and Edit Invoices
The Invoice and Estimate dialog allows invoice data to be entered and edited.
Open the Dialog
The dialog can be opened via:
- For the Invoice
- The Invoice menu > New invoice.
- The Invoice menu > Edit invoice.
- The Invoice table > Double-click on the invoice line of relevance, in the Address column.
- The Invoice table > Double-click on the invoice line of relevance, in the Total Amount column.
- From the ID column, click on the small icon Edit invoice on the right-hand-side of the cell.
- For the Estimate
- The Invoice menu > New estimate.
- The Invoice menu > Edit estimate.
- The Estimate table > Double-click on the estimate line of relevance, in the Address column.
- The Estimate table > Double-click on the estimate line of relevance, in the Total Amount column.
- From the ID column, click on the small icon Edit estimate on the right-hand-side of the cell.
Dialog Sections
The dialogue is divided into two sections:
- Invoice
- In the Invoice section you enter the invoice data.
- Settings
- In the Invoice settings section, parameters for new documents and interface settings of the invoice dialogue are defined.
Invoice Edit Dialog
Here is how the invoice dialog window appears. Below, we explain its individual elements.

Views
These are shown at the top.
They define which data entry fields are visible and which are hidden.
By switching between the different views, you can switch between more general and more detailed views.
The following views are available:
- Base
- Shows the most frequently used fields.
- Can be adjusted to one's needs.
- Short
- Focuses on the Item table.
- Can be adjusted to one's needs.
- Long
- Complete view with all fields.
- Can be adjusted to one's needs.
- Complete
- Complete view with all fields.
- Cannot be adjusted.
Via the Settings section, for the Base, Short and Long views, it is possible to define which fields to make visible and which ones to hide.
Structure
(1) Information and Free Texts
This section allows you to enter information regarding the invoice and define free texts to be included in the printout.
- Invoice number
- The invoice number is entered.
- The number is taken and inserted automatically by the programme in the Id column of the Invoices table.
- It can be included in the invoice printout.
- Language
- The language in which the invoice is to be printed is entered.
- If defined, the customer language set in the Contacts table is taken over and inserted.
- Currency
- The currency in which to print the invoice is entered.
- You can indicate the abbreviation (CHF, EUR, USD, etc.) that will be printed on the invoice.
- The programme does not make exchanges and conversions to other currencies.
- VAT mode
- Select the VAT mode.
- If the VAT mode is changed, the programme modifies the amounts already entered, so that the same invoice can be printed with gross and net amounts.
- Without VAT
No VAT is applied. - VAT excluded
Amounts are net. - VAT included
Amounts are considered gross.
- Without VAT
- The total VAT amount may vary by a few cents compared to the calculation performed directly on the VAT taxable total. The reason for this is that the VAT total is calculated by adding up the (rounded) VAT amount of each individual item. This difference is not to be considered an error, but a feature of the calculation of invoice amounts.
- Invoice date
- The invoice date is entered.
- The date is taken and inserted automatically by the programme in the Date column of the Invoices table.
- It can be included in the invoice printout.
- Due date
- The payment due date is entered automatically by the programme for all invoices.
- It can be entered manually for each invoice.
- It can be included in the invoice printout.
- Order number
- It's optional.
- The order date is entered.
- It can be included in the invoice printout.
- Order date
- It's optional.
- The order date is entered.
- It can be included in the invoice printout.
- Invoice custom fields
- It requires the Advanced Plan.
- They are optional.
- Additional information fields can be defined and added to the invoice (maximum 8 fields) where customised texts can be entered.
- The value/content is entered. In the Settings section, you define the names/texts of the fields.
- They can be included in the invoice printout using the CH10 and UNI11 layouts. In the print settings of the layouts, under Print → Information . Custom fields must be activated.
- Invoice title
- It's optional.
- The text of the invoice subject is entered.
- The text is taken over and inserted automatically by the programme in the Description column of the Invoices table.
- The text is included in the invoice printout as title/object. It takes priority over any title entered in the settings of the invoice layout.
- Begin text
- It's optional.
- You enter the initial text to be included in the invoice printout, immediately after the title/object.
- The text may be entered on several lines.
- You can put the text in bold, including the part of the text between double asterisks **.
Example: **text1 text2** text3 = text1 text2 text3.
- End text
- It's optional.
- You enter the final notes to be included in the invoice printout, immediately below the details table.
- The text is taken over and inserted automatically by the programme in the Notes column of the Invoices table.
- The text may be entered on several lines.
- You can put the text in bold, including the part of the text between double asterisks **.
Example: **text1 text2** text3 = text1 text2 text3.
(2) Customer address
This section allows you to enter the invoice address. You have two possibilities:
- Retrieve the data from the Contacts table.
- Select a customer from the list.
- You can also search directly for an address by entering the first name, surname, company, email or tax number.
- When you select a contact, the various address fields are automatically completed by the programme.
- Enter the data manually.
- Complete each element of the address field by field.
The address fields are as follows:
- Business name
- Enter business name.
- Prefix
- Enter customer's prefix.
- First Name
- Enter the first name.
- Last name
- Enter the last name.
- Address street
- Enter the street.
- Address extra
- If necessary, enter extra address.
- Post Box
- Enter Post Box
- Country code
- Enter country code.
- ZIP
- Enter ZIP.
- Locality
- Enter locality.
- Email
- Enter email.
- Phone
- Enter phone number
(3) Items / Items' Columns
This section allows line by line entry of all invoice details.
It is a table with the following columns:
- Item
- Optional.
- Using the Items table, an item can be selected from the list. In this way, the fields in the subsequent columns (Description, Quantity, Unit, Unit Price) are automatically completed by the programme.
- You can also search for an article by typing part of the descriptive text.
- Item date
- Requires the Advanced Plan.
- Optional.
- A date is entered for each item, useful for example to indicate the date of execution of the invoiced work.
- Description
- The description of the item or object of the invoice is entered.
- The text of the description may be on several lines.
- You can put the text in bold, including the part of the text between double asterisks **.
Example: **text1 text2** text3 = text1 text2 text3.
- Quantity
- It is mandatory.
- The quantity is entered.
- To create, for example, a credit note or a discount, enter the quantity with a negative sign (the total amount for the row will be negative). See also Create a Credit Note.
- Unit
- Optional.
- The text related to the unit (pcs, hours, etc.) is entered.
- Unit price
- It is mandatory.
- The price of the individual unit is entered.
- Discount
- Requires the Advanced Plan.
- Optional.
- A discount is indicated for each item.
The discount is calculated on the unit price (Unit Price column), and can be indicated:- As an amount. The amount of the discount is entered directly.
Example: Quantity 2; Unit price 10.00; Discount 1.00; Total = 18.00
If the Discount is same or greater than the Unit price the Total will be set to 0. - As a percentage. A percentage is entered (e.g. 10%).
Example: Quantity 2; Unit price 10.00; Discount 10%; Total = 18.00
If the Discount is same or greater than 100% the Total will be set to 0.
- As an amount. The amount of the discount is entered directly.
- Totals
- The totals are calculated and entered automatically by the program.
- VAT
- Optional.
- The VAT code to be used defined in the VAT Codes table is entered.
(4) Discounts and totals
This section allows any discounts to be entered and shows the invoice totals.
The programme automatically calculates the following
- Subtotal
- The sum of all amounts in the Total details column is shown.
- Discount
- It's optional
- You enter the discount to be applied to the invoice total by entering a description and the percentage or amount.
- If a percentage is entered, the programme automatically calculates and displays the discount based on the percentage value entered.
- Rounding
- Rounding is indicated.
- Deposit
- It's optional
- The deposit already paid by the customer is entered, indicating the description and amount.
- Total
- The final total of the invoice is shown.
- The total is also shown in the top right-hand corner of the dialogue to speed up invoice verification.
- VAT
- The totals of the VAT amounts are shown.
(5) Settings
The settings of the Invoice Dialogue.
For more information, please refer to the Invoice settings dialogue page.
(6) Commands
- Print
- Command to print an invoice.
- Copy
- Command to copy an invoice.
- Save
- Command to save changes.
- Close
- Command to end the dialogue.
- Cancel
- Command to delete changes and close the dialogue without saving.
- Help
- Command linking to online documentation where information on invoice dialogue can be found.
Customisation
The invoice dialog is programmed through a BananaPlus extension, and is updated independently of the application. The version provided is generic and covers most of the needs.
For contexts where invoices are complex, or many invoices are created, you can adapt the dialog to make creating invoices easier, more functional, and faster.
Invoice settings dialogue
By clicking Settings (in the lower left corner) you enter the settings dialog of the invoice.
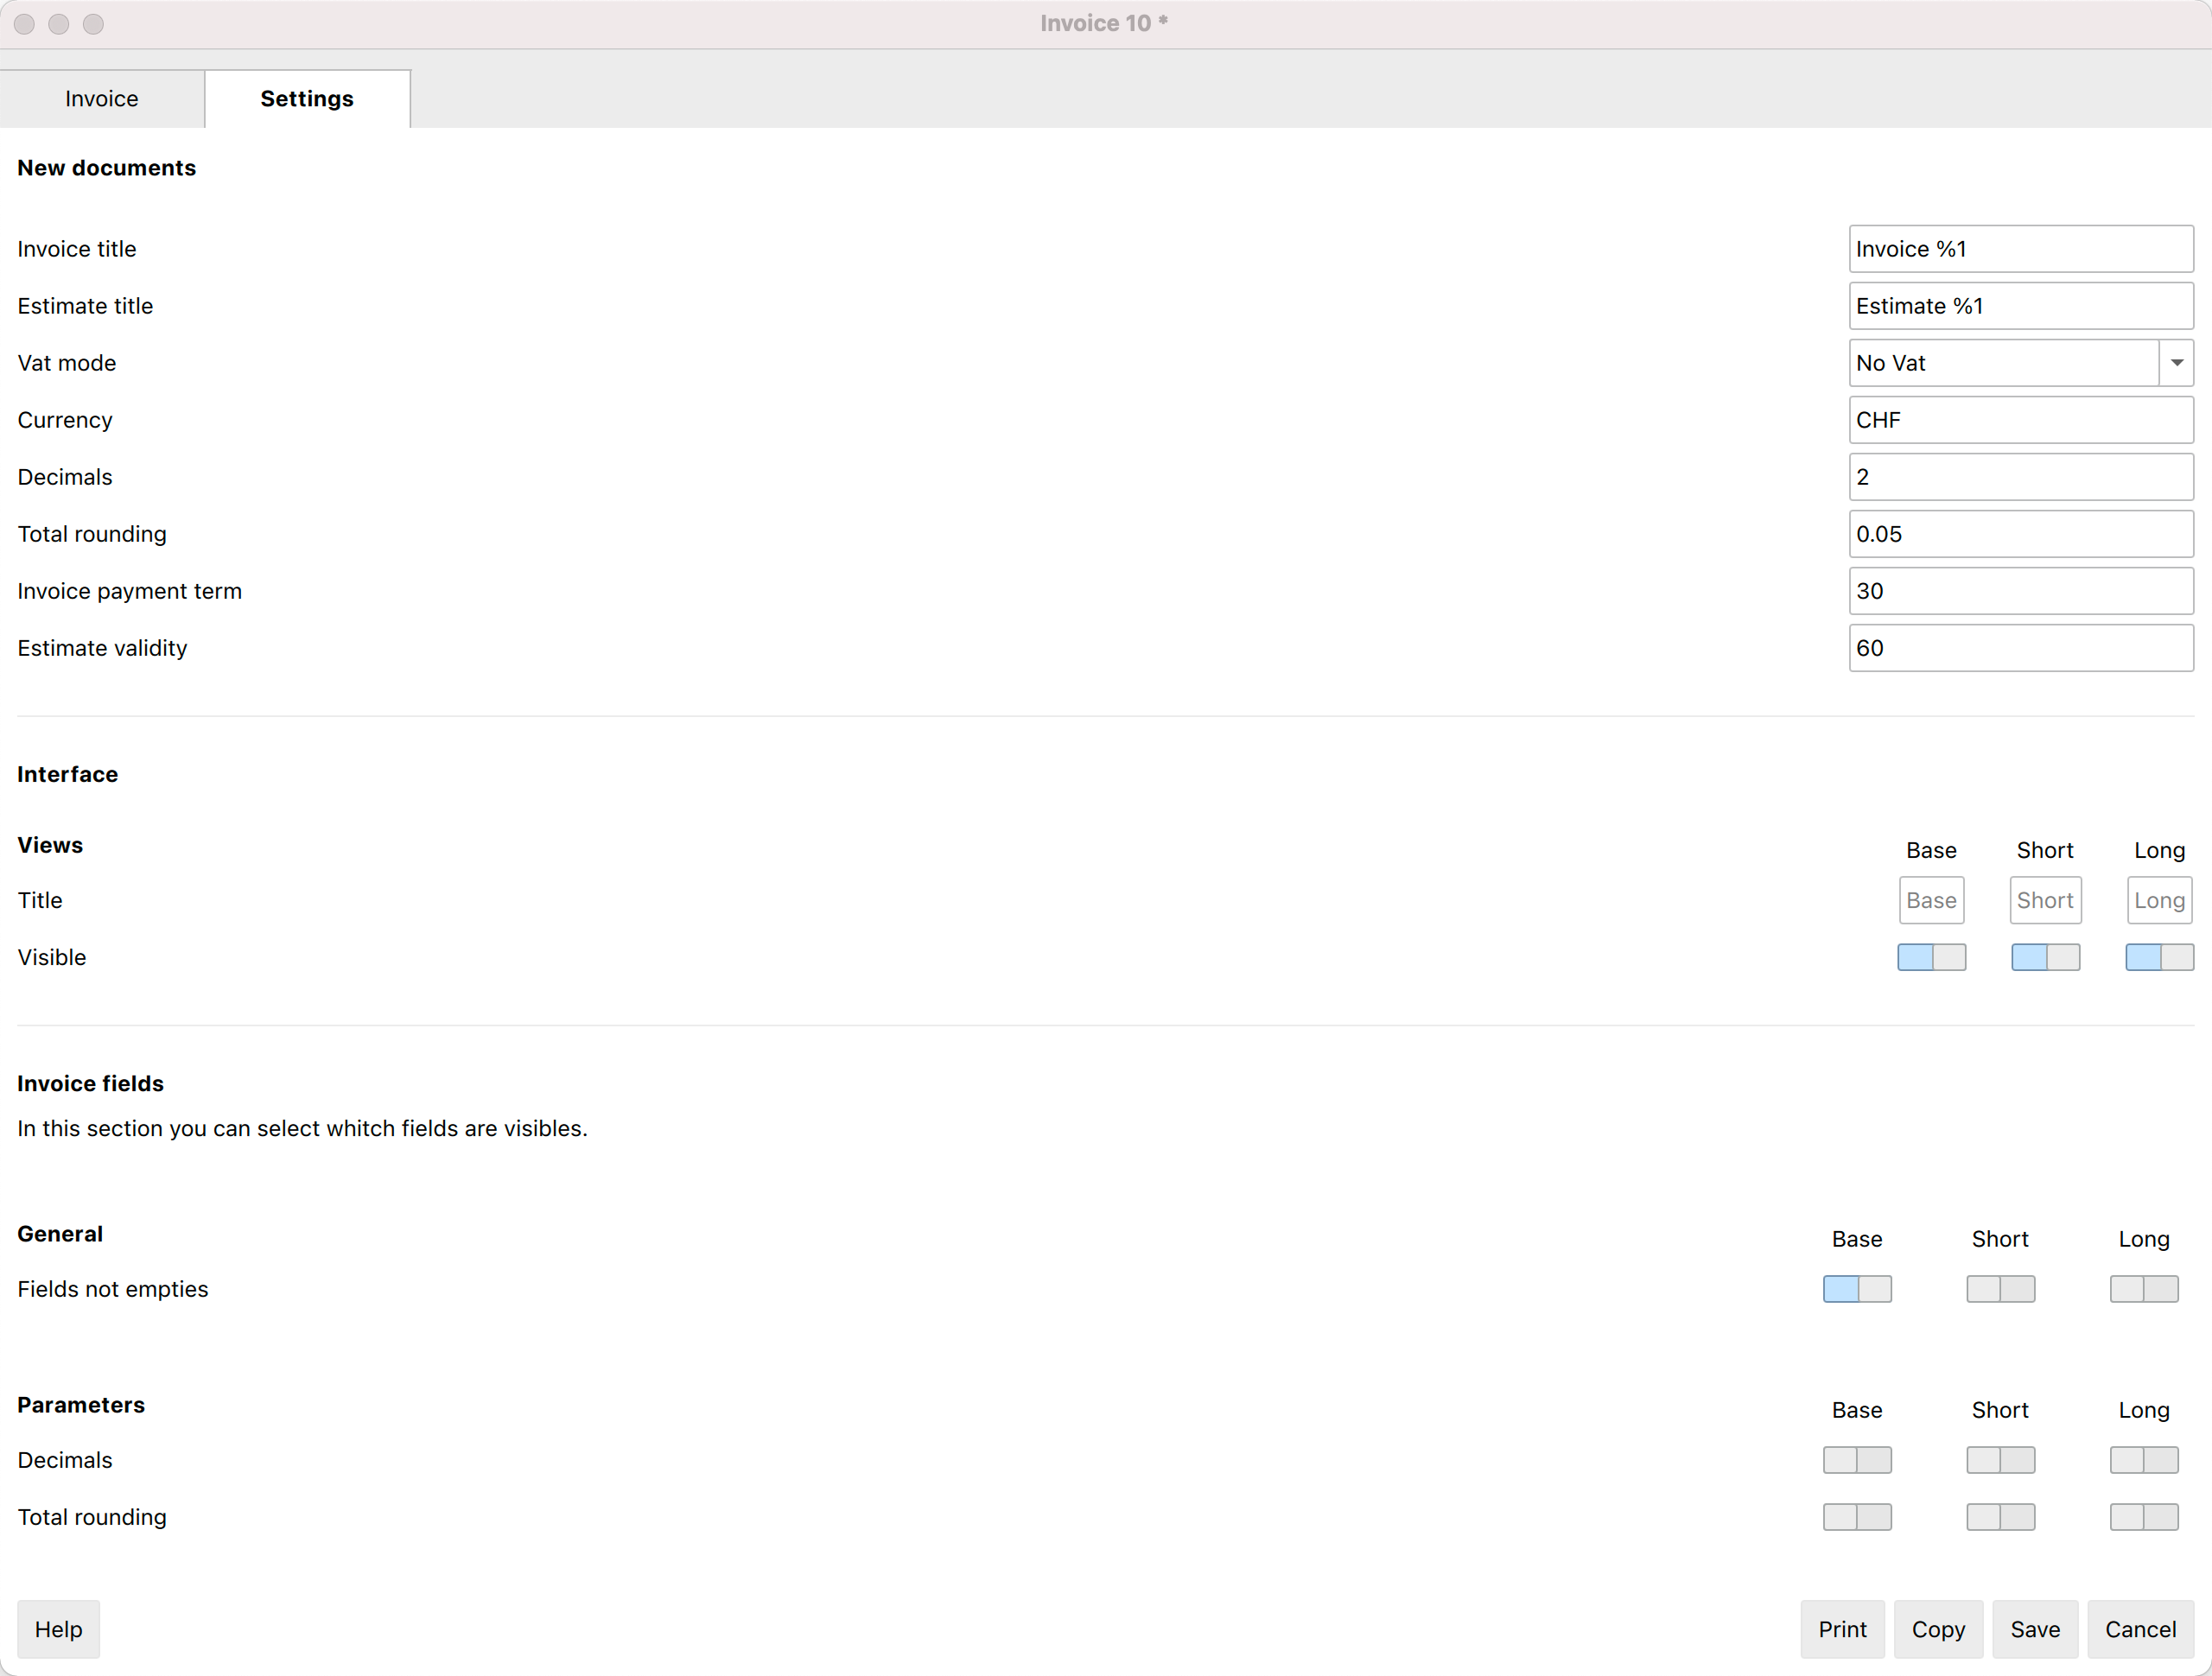
The settings you set are specific for the invoice.
- The currency code
You can indicate the code (CHF, EUR, USD, etc.) that will be printed on the invoice.
The program does not make exchanges and conversions in other currencies. - The number of decimals to be used for the amounts.
All amounts will have the number of decimals set. - Rounding up totals.
Put a "0.05", "0.10" amount that becomes the minimum rounding unit.
The decimal separator must always be the dot ".". - Payment term in days
It is used to preset the due date, which can then be changed manually. - Validity of the Estimate in days
This is used to preset the expiry date of the offer, which can then be changed manually. - The VAT mode
If the VAT mode is changed, the program modifies the amounts already entered, so that the same invoice can be printed with both gross and net amounts. If the VAT is set to gross and net amounts have been entered, once the setting has been changed, the amounts must also be changed so that they are net amounts.- No VAT. No VAT is applied.
- VAT Inclusive. The amounts are considered gross.
- VAT Exclusive. The amounts are considered net.
Use settings for new invoices
You can choose to use these settings for new invoices that will be created.
The settings of other existing invoices are not changed.
Translations of invoice's texts
In the Settings dialog, clicking on a text field, such as the title for new invoices or the description of one of the user fields, leads to the Translations dialog.
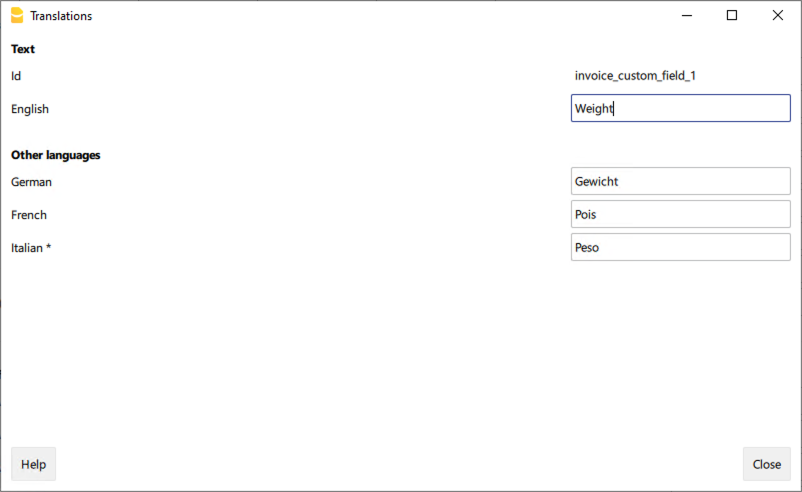
In the Translations dialog:
- You can enter the texts to be used in the various languages.
- Only the languages currently in use are listed.
- If a language is not listed, simply add a contact or invoice in the desired language.
- The first language listed corresponds to the programme language.
- The language marked with an asterisk * is the document language, defined in the menu File → File accounting properties→ Other tab → Current language.
Timeline of changes of estimates and invoices application
See what's is new in dialogs with the 2022-02-01 release.
2024-02-01
Released on February 01 2024
- General
- New: Added subtotal items feature.
- New: Added 'Payment Term in Days' column to the Contacts table.
- New: Added 'Currency' field to Invoices and Contacts tables.
- Fixed: Delete selected rows create new empty invoices in invoices table
- Fixed: 'Move Up' and 'Move Down' buttons were not functioning.
- Invoice Dialog
- Fixed: Scrolling issue in the Invoice dialog.
- Fixed: Long texts overlapping each other.
- Fixed: Section Invoice Table Items not resizing correctly when changing views.
- Fixed: Section Invoice Table Items not resizing correctly on HD screens.
- Updated: In the Settings section in the invoice dialog, the possibility to adjust the Table items height based on the rows has been removed.
2023-07-18
Released on Juli 18 2023
- General
- Fixed: the VAT is calculated even when vat mode set to no vat
- Fixed: after setting the rounding's decimals to 4 digits, the totals remain with 2 digits
- Fixed: creating an invoice from an estimate doesn't update the due date
- Fixed: the due date can't be left empty
- Fixed: wrong dialog title for estimates
- Fixed: wrong translation for Dutch language
- Interface
- Fixed: in the invoice dialog the move item down button is not active
- Fixed: in the settings tab the option's switchs are not visibles when the dialog is resized
- Fixed: moving up / down an item create an invalid item object
- Fixed: in the settings tab the vertical scrollbar has to be always visible
2023-04-03
Released on April 03 2023
- General
- Fix: vat total row not visibile in invoice's dialog
- Fix: error opening dialog with qt 6.5
2022-12-14
Released on December 14 2022
- General
- Fix: when the invoice dialog is closed, the application is closed too (this error occurred only with the latest Banana Insider Version)
2022-12-06
Released on December 6 2022
- Data entry
- New: added setting "Default Vat Code", the "Default Vat Code" is applied automatically to items added to the invoice
2022-09-29
Released on September 29 2022
- Data entry
- Fix changing from incluse vat to exclusive vat change the unit price.
Now the unit prices remain unchanged, but the invoice total is updated. - Fix entering the customer id in the combo box doesn't visual the corresponding customer entry
- New: changes to the settings for new documents settings are now applied to the current document;
- Fix changing from incluse vat to exclusive vat change the unit price.
2022-09-21
Released on September 21 2022
- Data entry
- Fix the invoice's number is not updated when it is modified in the invoice's table
- Fix the invoice's dialog does not open and an error is showed if the title for new invoices is empty
- Fix entering amounts in the local format is not working
2022-03-31
Released on March 31 2022
- Interface
- New: You can enter and print business units names in the address (advanced plan)
- Fix the language of the invoice title is not that of the document
- Fix the language of the invoice title is not updated when changing the language
- Fix the language of the invoice title is not updated when changing the customer
2022-02-10
Released on February 10 2022
- Interface
- Fix article's search is case sensitive.
- Fix highlight of the matched article in the combo box.
- Fix the item quantity can not be cleared, the user can not enter an item as description (quantity and price empty)
- Fix the quantity for articles without price is set to 1, the user can not use predefined articles as description row (quantity and price empty)
2022-02-08
Released on February 08 2022
- Interface
- Fix button create invoice does not create any new invoice.
- Fix button duplicate invoice does not create any new invoice.
2022-02-07
Released on February 07 2022
- Interface
- Fix save button is not saving the invoice in particular cases.
- Fix text fields doesn't automatically scroll horizontally, edited text beyond the field's with is not visible.
2022-02-01
Released on February 01 2022
- Data entry
- New: You can enter a discount for each item, both as amount or as percentage. (Advanced plan).
- New: You can enter an item's date (Advanced plan).
- New: You can define and add custom fields to the invoice (Advanced plan).
- New: You can enter unit prices and quantities with 4 or more decimals.
- New: You can enter multi-line texts or bold texts for the item description.
- New: You can enter multi-line texts or bold texts for the invoice begin text and the invoice final text.
- New: You can enter a deposit already paid by the client.
- New: The fields Prefix (Courtesy), Address extra and P.O.Box have been added to the customer's address.
- New: You can search for a contact address by entering the name, surname, company, email or tax number.
- New: You can search for an item by entering part of the description.
- Interface
- New: You can switch between different views of the invoice, from a general view to a more detailed one.
- New: The new Settings tab lets you set the initial values for new invoices and estimates, and select which fields are visible in the Invoice tab.
- New: You can select which fields to show and which fields to hide through views and settings.
- Added the invoice total at the top right to speed up invoice verification.
- The total VAT 0% has been added in the VAT recapitulation.
- The last dimension and position of the dialog are stored and resumed the next time the dialogue is opened.
- The width of the columns is stored and resumed the next time the dialog is opened.
- A help button has been added to all dialogs.
- General
- A notification is showed when an updated Version of the extension was installed.
- Improved compatibility with macOS dark mode.
- Improved compatibility with high resolution monitors.
What's new release 2022-02-01
The release of February 1, 2022 adds new and important functions to the application which are listed below.
What's new
Edit Invoice dialog

|
|
Settings tabThe new Settings tab lets you set the initial values for new invoices and estimates, and select which fields are visible in the Invoice tab. |
|
|
|
ViewsNew possibility of switching between different views of the invoice, from a general view to a more detailed one. |
|
|
|
Prefix and P.O.BoxThe fields Prefix (Courtesy), Address extra and P.O.Box have been added to the customer's address |
|
|
|
Custom fields (Advanced plan - Beta 2)You can define and add custom fields to the invoice. |
|
|
|
Item date (Advanced plan)You can enter an item's date, useful for example if you want to indicate the date on which invoiced work were executed. |
|
|
|
Item discount (Advanced plan)You can enter a discount for each item, both as amount or as percentage. |
|
Multi-line and bold textsYou can enter multi-line texts or bold texts for the item description. |
||
Unit price and Quantity with 4 or more decimalsYou can enter unit prices and quantities with 4 or more decimals. |
||
DepositYou can enter a deposit already paid by the client. |
Settings tab

|
|
Title for new estimates and invoicesYou can define the title for new estimates and invoices. |
|
|
|
Manage viewsYou can select which views are enabled and change their name. |
|
|
|
Visible fieldsYou can select which fields are visible in the Invoice tab. |
Estimates and Invoices Dialogue Beta Release
The beta release of the Estimates and Invoices extension adds new and important functions to the application.
All major developments have been carried out and also tested. We invite everybody to test and give us feedback.
How to install it
Watch the video tutorial which shows you how to try out the brand new Beta version of the Estimates and Invoices extension.
- Download and install the last Banana Accounting+ 10.1.18 or newer
- Open the Extensions menu > Manage Extension dialog
- Select the Estimates and Invoices extension
- Select the Beta release as preferred channel.
You can change the release channel at any time without data loss.
System Requirements:
- Banana Accounting+ 10.1.18 or newer
- [CH10] Layout with Swiss QR Code with publishing date of 2023-06-19 or newer
What's new
Released on 2024-05-06
- Fixed: Problem with decimals in the quantity column:
- It is now possible to define a quantity amount without the decimals
- Fixed a problem when entering a quantity amount with only one digit in the rows where there was already a description or date entered.
- Fixed: Problem selecting items (with mouse) from combo box.
- Fixed: Program warning when opening dialog.
Released on 2024-02-01
- Add total and subtotal of items (Advanced plan)
Released on 2024-01-16
- Fixed problem with scroll
- Fixed problem with HD monitors
- Fixed problem while deleting invoices in table Invoices
- Added column Payment term in days in table Contacts
- Added column Currency in tables Invoices and Contacts
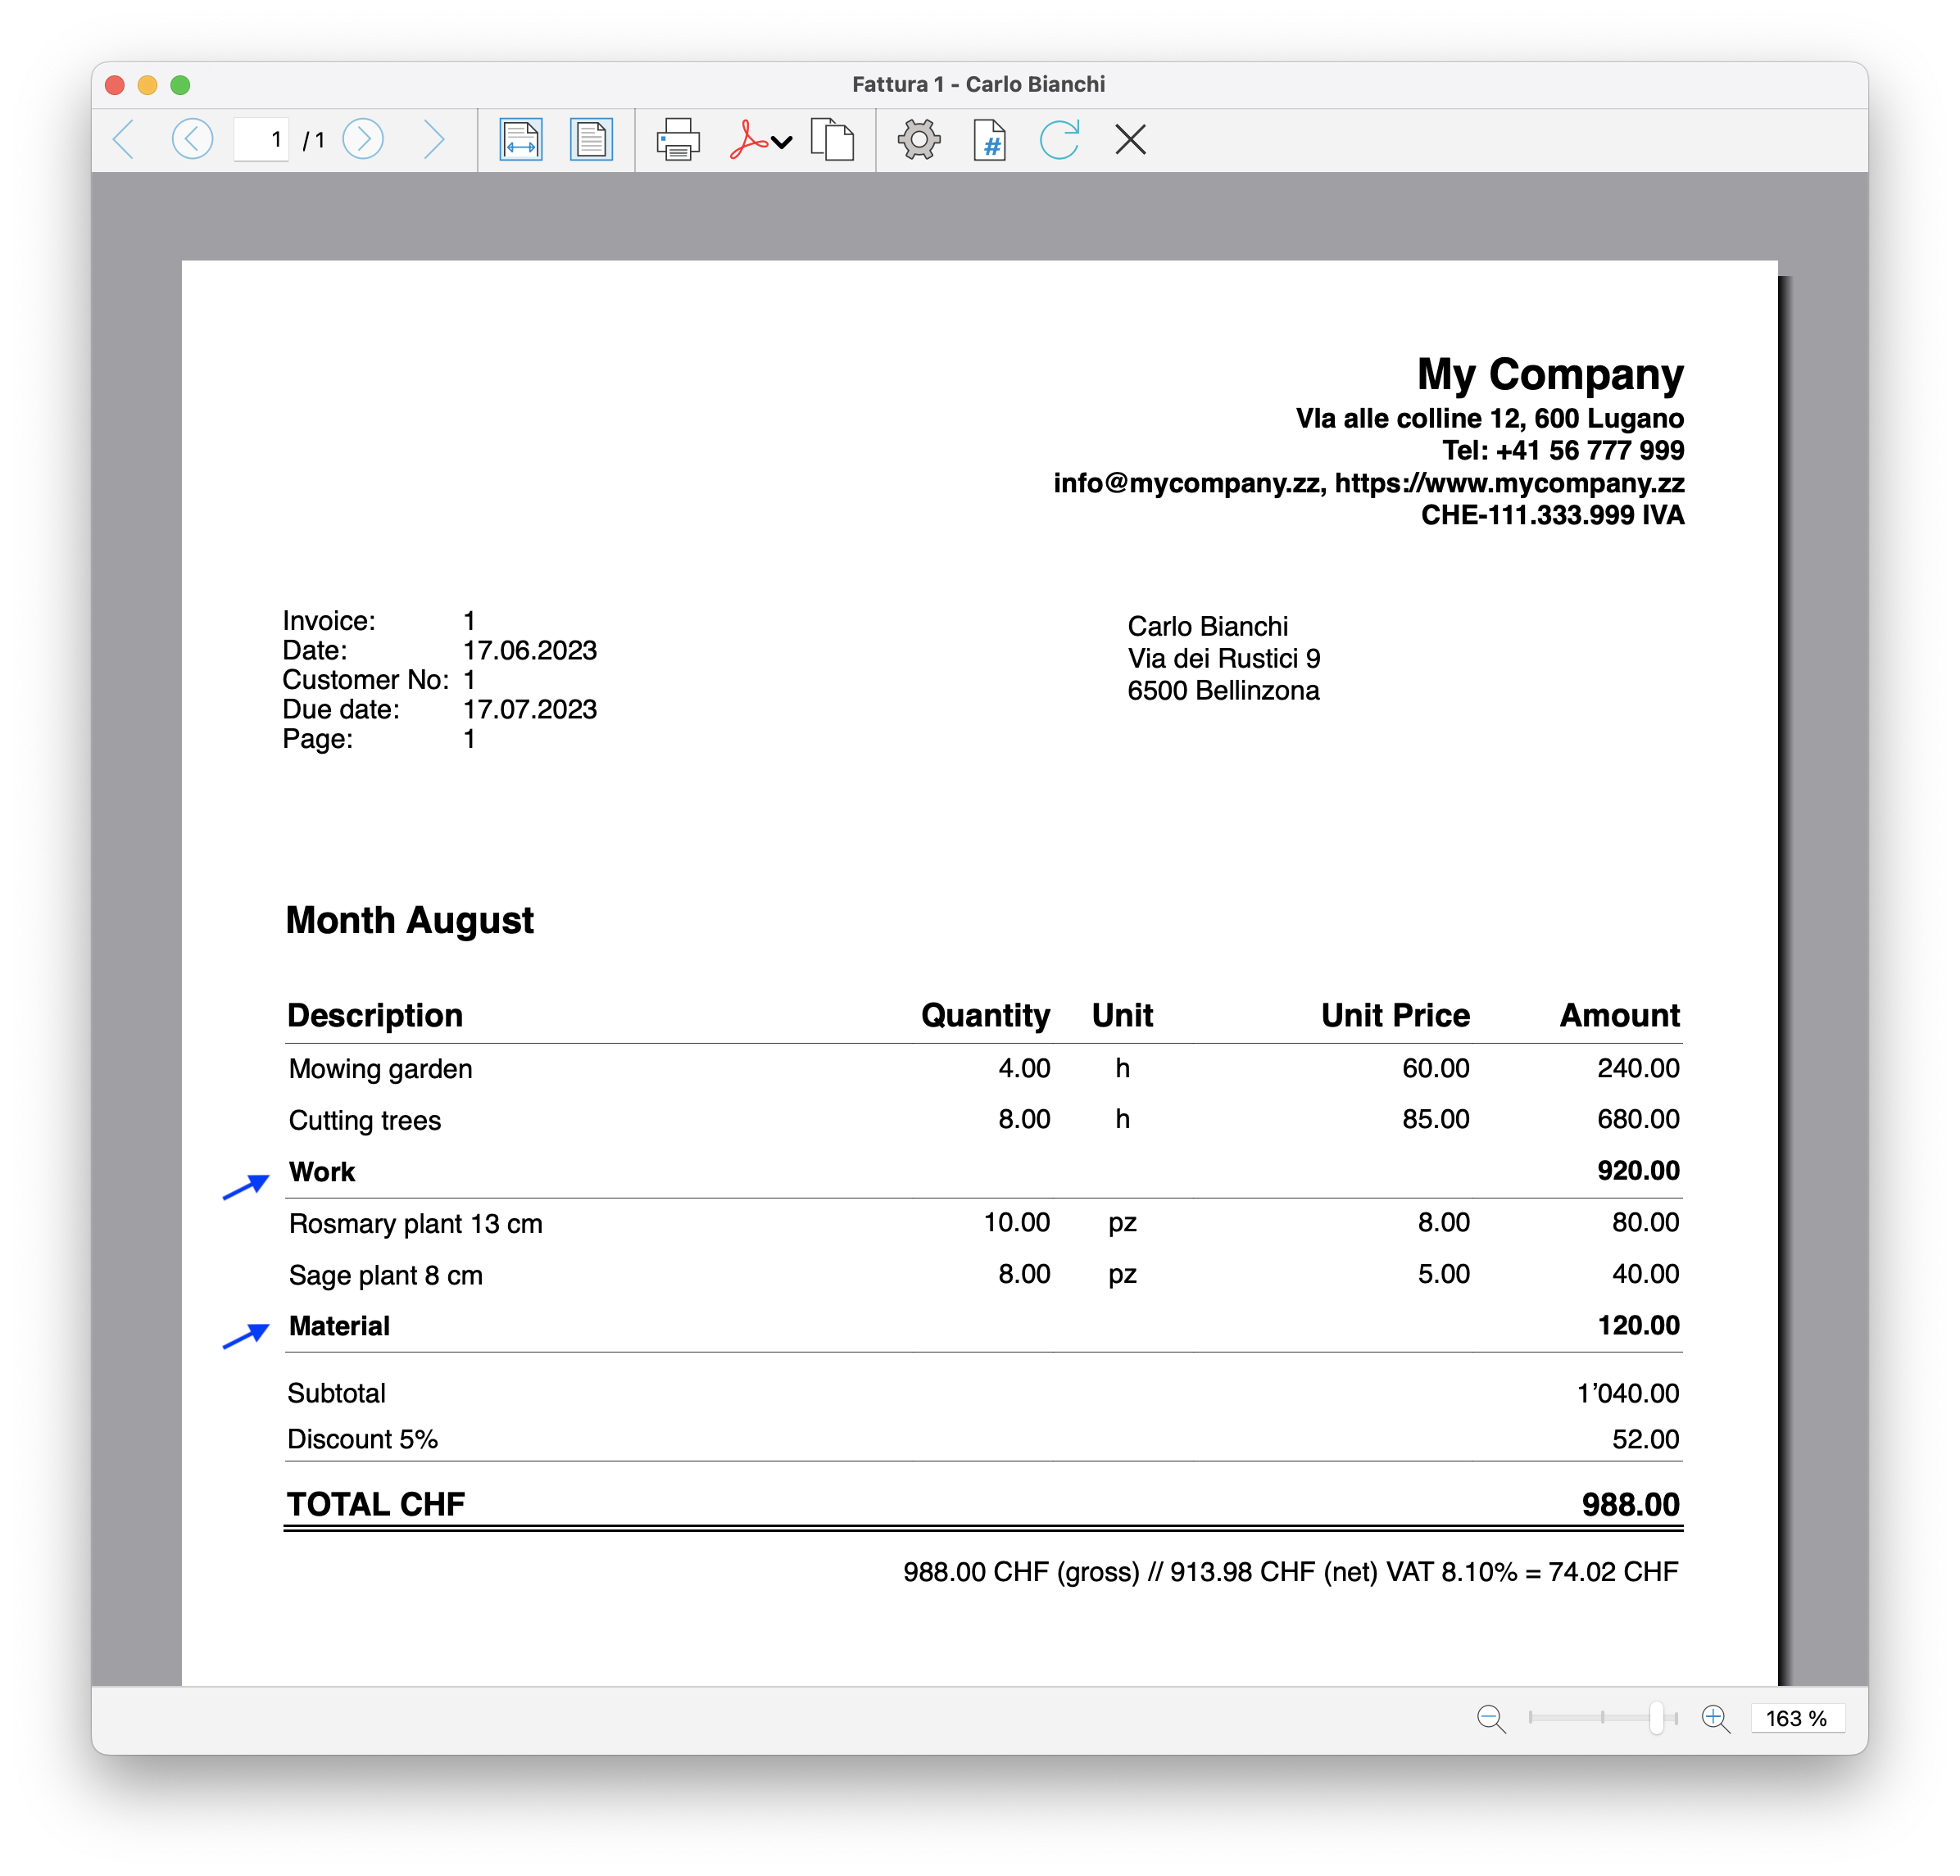
Subtotals of items
Subtotals allow you to add partial totals to the invoice. For example, it is possible to insert a subtotal with labor costs and a subtotal with material costs.
To add a subtotal:
- Go to the Settings tab > Item Columns section and switch on the column Type
- Go to the Invoice tab
- Add a new row
- In the column Type select "Total", "Total 1" or "Total 2"
- Enter the desired description for the total line.
Example:
Subtotals in the dialog

Subtotals on the invoice
Upcoming new functionalities
- Add status to the invoice (draft, sent, reminder1, canceled, ...)
Functionalities integrated in the standard release
- Possibility to print reminders (Advanced plan)
- Possibility to print delivery notes (Advanced plan)
- Possibility to print more invoices in separated pdf files
Dialogue extension
The dialogue for entering invoice data is implemented via the Estimates and Invoice Dialogue Extension.
- The extension is installed automatically when an Estimates and Invoice file is opened.
- The extension is updated automatically when a new version of the extension is released.
The dialogue can therefore change even if the Banana Accounting programme has not been updated. - To try using a development version of the extension, see Manage Extensions : Using a Development Version.
If you have the Advanced plan, you can edit the source code and upload your modified code on your instance to Banana Accounting+.
Feedback
We would appreciate every feedback about this new release.
You can send us your feedback through the contact form, please also include a short description about the context where your are using this extension.
Estimates Commands
With the Estimates and Invoices application you can also manage estimates.
The creation, modification, duplication and printing of estimates are handled exactly as the invoices.
Here is the dialog to create or edit Estimates:

From the Estimates table:
- Create a new Estimate with the menu command Invoices > New estimate.
- Edit an offer with the menu command Invoices > Edit estimate.
- Duplicate an estimate with the menu command Invoices > Duplicate estimate.
- Print an offer with the menu command Invoices > Print estimate.
- Convert an estimate into invoice:
- Via the Invoices menu > Create invoice from estimate command.
- Or using the Create invoice button from the estimate creation / modification dialog (Invoices > Edit estimate)
The dialogue for creating and modifying an estimate is the same as that of the invoice. For more information visit Invoice dialogue.
How to customise your invoice
You can easily customise and adapt invoice printing to suit your needs.
Set your company address (sender)
In the File menu > File and accounting properties (Basic data) > Address , set the address of your company.
Set customer language
You can print invoices in the language of your customers. For each customer set the language in the Contacts table. You can also change it from the Edit Invoice dialog.
Retrieving customer addresses from Excel
When customer data are on an Excel file, they can be easily transferred to the Contacts table.
Proceed as follows:
- Select from Excel the column with the data to be copied and use the Copy (Ctrl+C) command.
- Go to Banana, Contacts table, position yourself in the corresponding column and issue the Paste (Ctrl+V or Paste) command from the Edit menu.
- Repeat this operation for all address columns (Account, First Name, Last Name, Organisation, Street, Zip, Country Code, Language).
The data corresponding to the mentioned columns are required for printing the invoice. - If you do not have all the columns mentioned in the Excel file, you must add the missing information manually.
Logo setup position and sender address
To set the logo, you must:
- Upload the logo image in the menu File > Logo setup.
- To use the logo in the invoice, in the Invoice Settings you must activate the Logo box and enter the name of the customisation you used, respecting upper and lower case, in the Logo Name field.
For example, you can place the logo on the left and the address on the right and change the size of the logo.
The address is automatically taken from the file basic data.
The sender's address, if the default settings are not changed, is entered on the right, regardless of the presence of the logo.
If you want to set the sender address on the left without any logo, please see the following page:
If you want to enter a different address, via the Invoice Settings:
- Enter the texts you want using the Line 1 Text , Line 2 Text, Line 3 Text, Line 4 Text, and Line 5 Text.
Set the logo without the sender's address
On the Logo setup page you will find information on how to add and place the logo.
Through the Invoice Settings:
- Uncheck the Page header option to exclude the address in the header from printing.
- View the Logo option to include the logo in the printout.
Customise address in invoice header
The style of the sender's address in the invoice header (colour, size, font..) is set by default by the program.
The Advanced Plan of Banana Accounting Plus allows you to customize the style of the address. For more information see the Examples page.
Set invoice information
Invoice information is information about the date, customer number, due date, etc., which is usually located just below the header and next to the customer address.
The CH10 and UNI11 layouts allow you to define which invoice information to include and which to exclude from printing. You can find instructions on the Invoice Settings page.
For the other print layouts (CH01-CH09 / UNI01-UNI08), the information cannot be modified.
Add a new invoice information field
In addition to the default information fields (invoice number, date, customer number, etc.), you can also enter other custom fields.
In the Invoice section of the Invoice dialog:
- Go to the Complete view (top).
- Use the fields Additional info 1... Additional info 8 to add your own additional information fields.
- In the Information section of the Invoice Layout settings, view the Custom fields field.
- The new additional information fields are added at the end. It is not possible to change the order.
In the Settings section of the Invoice Dialog:
- Edit the texts of the Invoice User Fields as you wish.
- You can enter translations for each language.
Set the payment term
The payment term for invoices by default is 30 days.
To change the payment term you have two options:
- Change the default settings for all new invoices.
- Go to the Settings section of the Invoice dialog.
- In the New documents > Invoice Payment term(days) section set the value you want (e.g. 10).
- The invoice due date will be recalculated with the new payment term.
- Change the payment term individually for each invoice.
- Go to the Invoice dialog.
- In the Due date field enter the payment deadline date (e.g. 31.12.2022).
- The invoice due date will be replaced with the new payment term.
Set customer address position and composition
The CH10 and UNI11 layouts allow you to define:
- The location of the customer address.
- The elements of the address.
On the Invoice Settings page > Customer address section:
- In the Address composition field:
- Choose how to compose the address by entering the XML names of the columns in the Contacts table.
- You can use only the following columns (XML names):
NamePrefix, OrganizationName, FirstName, FamilyName, Street, AddressExtra, POBox, PostalCode, Locality, Region, Country, CountryCode. - Change the location of the address using the Move horizontally and Move vertically options.
For other print layouts (CH01-CH09 / UNI01-UNI08), the location and composition of the customer address cannot be changed.
If you need more than one line to print your customer's address, see print customer/company address on four lines.
Set title/object
To enter the title/object of the invoice, you have two options:
- Enter the text in the Invoice dialog > Object field.
- For each invoice you can define a title.
- If you leave the field empty, the default text is used.
- This title always has priority over entering the title in the layout settings (see next point).
- With the CH10 and UNI11 layouts, you can enter the text in the invoice Settings > Texts section > Invoice title.
- The title applies to all invoices printed with this layout.
- The title applies only if no title has been defined as per the first point.
Set initial text
To enter the title/object of the invoice, you have two options:
- Enter the text in the Invoice dialog > Begin text field.
- For each invoice you can define a title.
- If you leave the field empty, the default text is used.
- This title always has priority over entering the title in the layout settings (see next point).
- With the CH10 and UNI11 layouts, you can enter the text in the invoice Settings > Texts section > Begin text.
- The title applies to all invoices printed with this layout.
- The title applies only if no title has been defined as per the first point.
Setting up the invoice details table
The Invoice Details Table is the central table in the invoice where the invoiced items/services appear, with quantities, unit prices, totals, etc.
Use the Invoice dialogue to enter items or other items to be invoiced.
See also pages:
Set invoice item columns
With the CH10 and UNI11 layouts, you decide which columns to display in the printout. See how to do it in the page Invoice Settings > Invoice Details.
For the other print layouts (CH01-CH09 / UNI01-UNI08), the columns are not editable.
Create a Credit Note
To create a credit note:
- In the Invoices table, add a new invoice for the credit note.
The invoice can be created as new or you can copy an existing invoice and then modify it. - Open the newly created invoice for editing.
- Change the title/subject to "Credit Note."
- In the details table, add a row and set the quantity with a negative sign. This way, the total for the row will be negative.
Set final texts
To enter the final text of the invoice, you have several options:
- Enter the text in the Invoice dialog > End Text field.
- It is applied to any print layout.
- The text is inserted just below the invoice details.
- Enter the text in the Invoice Print Dialog > Options section > Final text.
- It is applied to any print layout.
- If you have already entered text as per step 1, the new text is added right after the previous one.
- Enter the text in Invoice Settings > Texts section > End text field.
- This text has priority over the text entered as per step 2.
- If you have already entered text as per step 1, the new text is added right after the previous one.
Set bank account number
If you don't use the QR-Code, you need to enter the bank account number as a reference for the invoice payment.
You have three ways to enter the bank account number as the final text:
- Invoice dialog > End text field.
- The bank account number appears in the printout only for the invoice you are creating/editing.
- It is applied to any print layout.
- The text is inserted just below the invoice details.
- Print Invoice dialog > Options > Final text.
- In this case, the bank account is inserted in all invoices you create.
- It is applied to any print layout.
- If you have already inserted text as per step 1, in this case the new text is added right after the previous one.
- Invoice Settings > Texts > End text.
- In this case the bank account is inserted in all invoices you create using this layout.
- This text has priority over the text entered as per step 2.
- If you have already entered text as per step 1, the new text is added right after the previous one.
Set IBAN for Swiss QR-Code printing
If you want to create QR invoices with IBAN account, you need to:
On the QR-Invoice with IBAN account page you will find more information for setting up QR-invoices with IBAN account.
Set up QR-IBAN for Swiss QR-Code printing
If you want to create QR-invoices with QR-IBAN account, you have to:
On the QR-Invoice with QR-IBAN page you can find more information about the settings of QR-invoices with QR-IBAN account.
Print QR form without amount and address
If you want to print only the QR-bill without amount and customer address, you have to:
- Use the QR-Invoice extension without amount and address.
- Set the currency, address and IBAN account.
- Create the bulletin with QR code.
See also how to print an Invoice without amount.
Set styles and colors
On the Invoice Settings page you will find instructions for defining:
- Font and font size.
- Colors.
Set Bold texts
In the Invoice settings page you will find information on how to apply bold style to invoice texts.
Add images in Offers or Invoices
The Advanced Plan of Banana Accounting Plus, with the new application Offers and Invoices, allows you to add images to the offers and invoices to be sent to customers.
This functionality makes the invoice even more customisable and the client who receives it has a more complete and direct vision of the invoicing of the items.
See our information pages on how to add images:
Print customer/company address on four lines
When the addressee is a company with several sectors/departments or a customer living in a housing complex with interiors, it may be necessary to have several lines available for printing the address.
This option is only available with the Advanced Plan of Banana Accounting Plus.
To activate the possibility of printing the recipient address on several lines, proceed as follows:
- Update extensions from the Extensions menu > Manage extensions > Update extensions.
- Open the invoice under Edit and in the Settings dialogue > Address section, make the fields Sector 1 ... 4 visible for the Basic view.
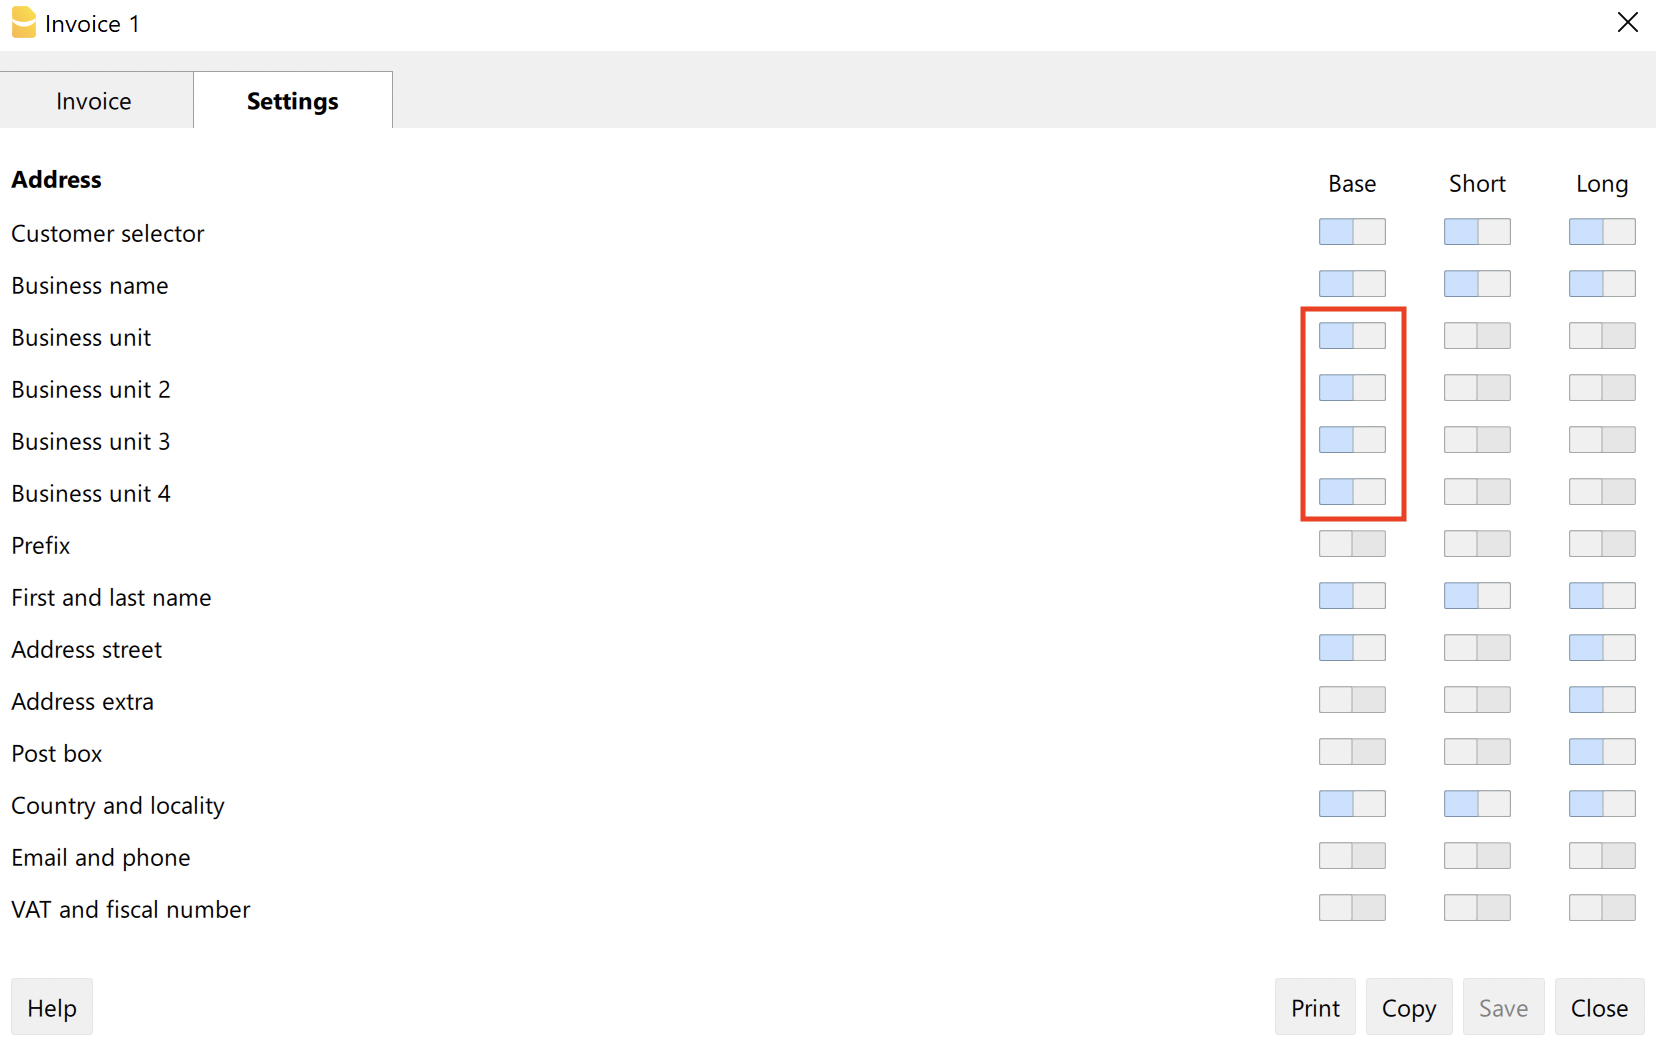
- Possibly switch from the Basic view to the Complete view without making the fields visible (in the Complete view all fields are visible).
- In the invoice address, enter text in the sector fields.
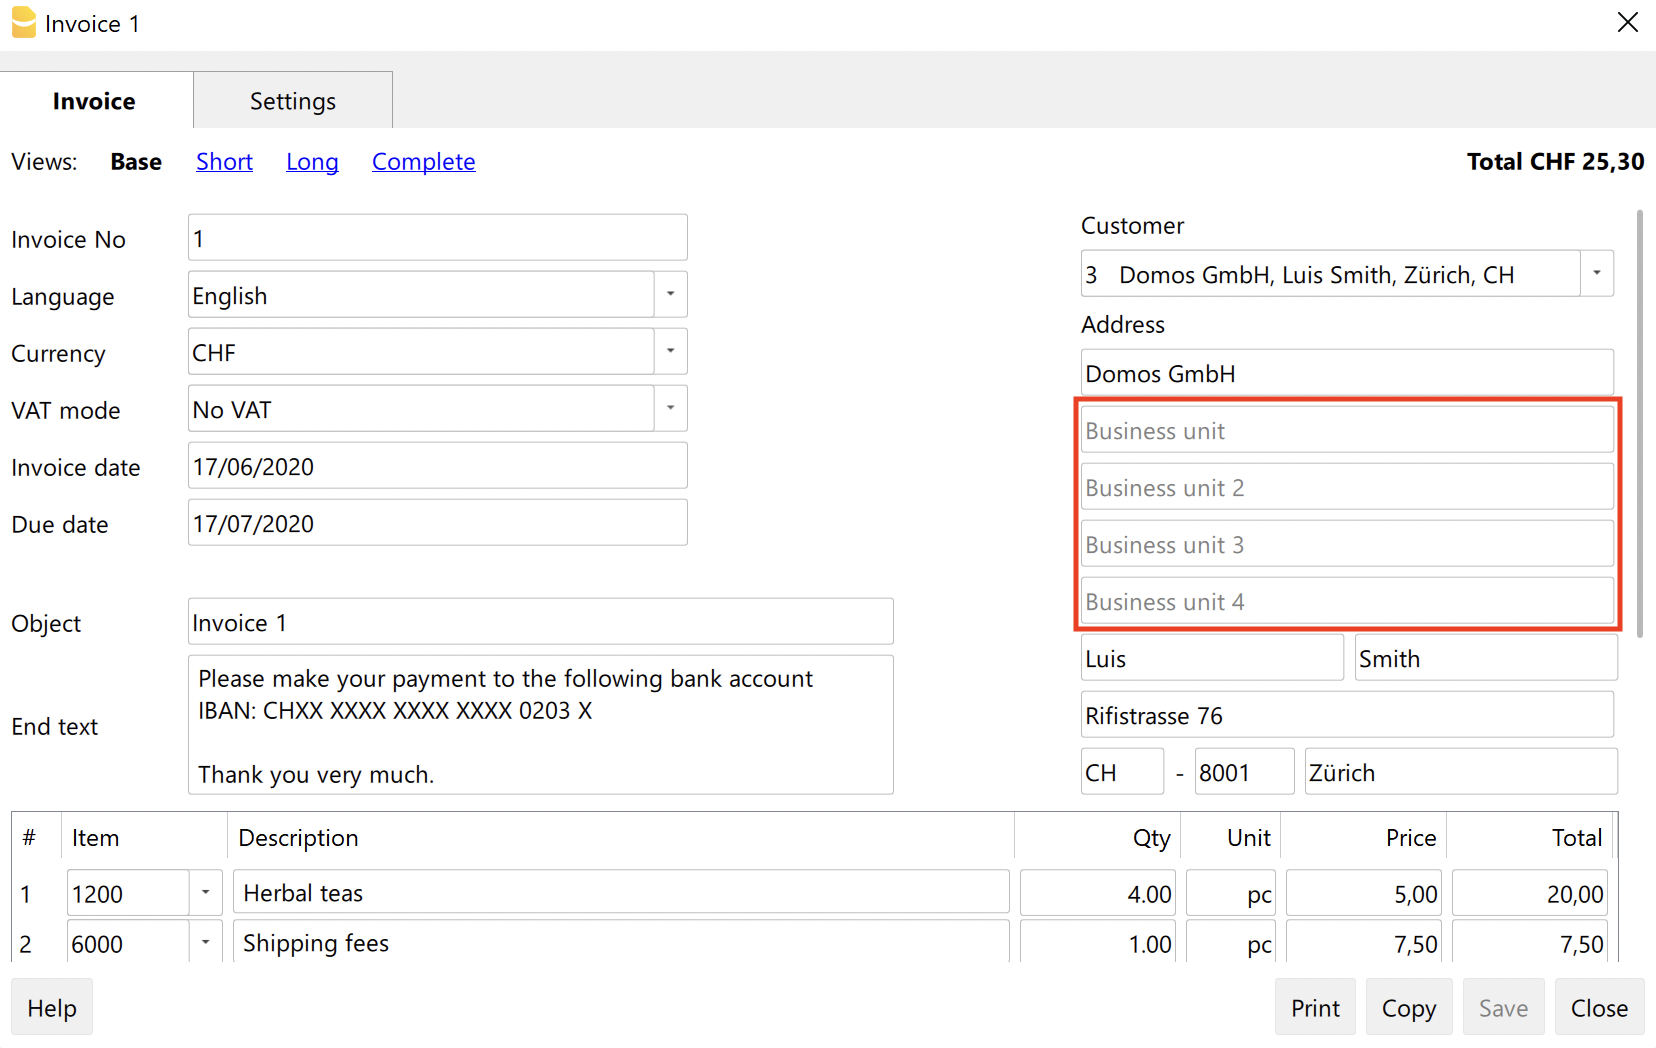
- In the print layout settings, add the Sector fields to the customer address composition.
The content will be as follows:
<OrganisationName>
<OrganisationUnit>
<OrganisationUnit2>
<OrganisationUnit3>
<OrganisationUnit4>
<NamePrefix>
<FirstName> <FamilyName>
<Street> <AddressExtra>
<POBox>
<PostalCode> <Locality>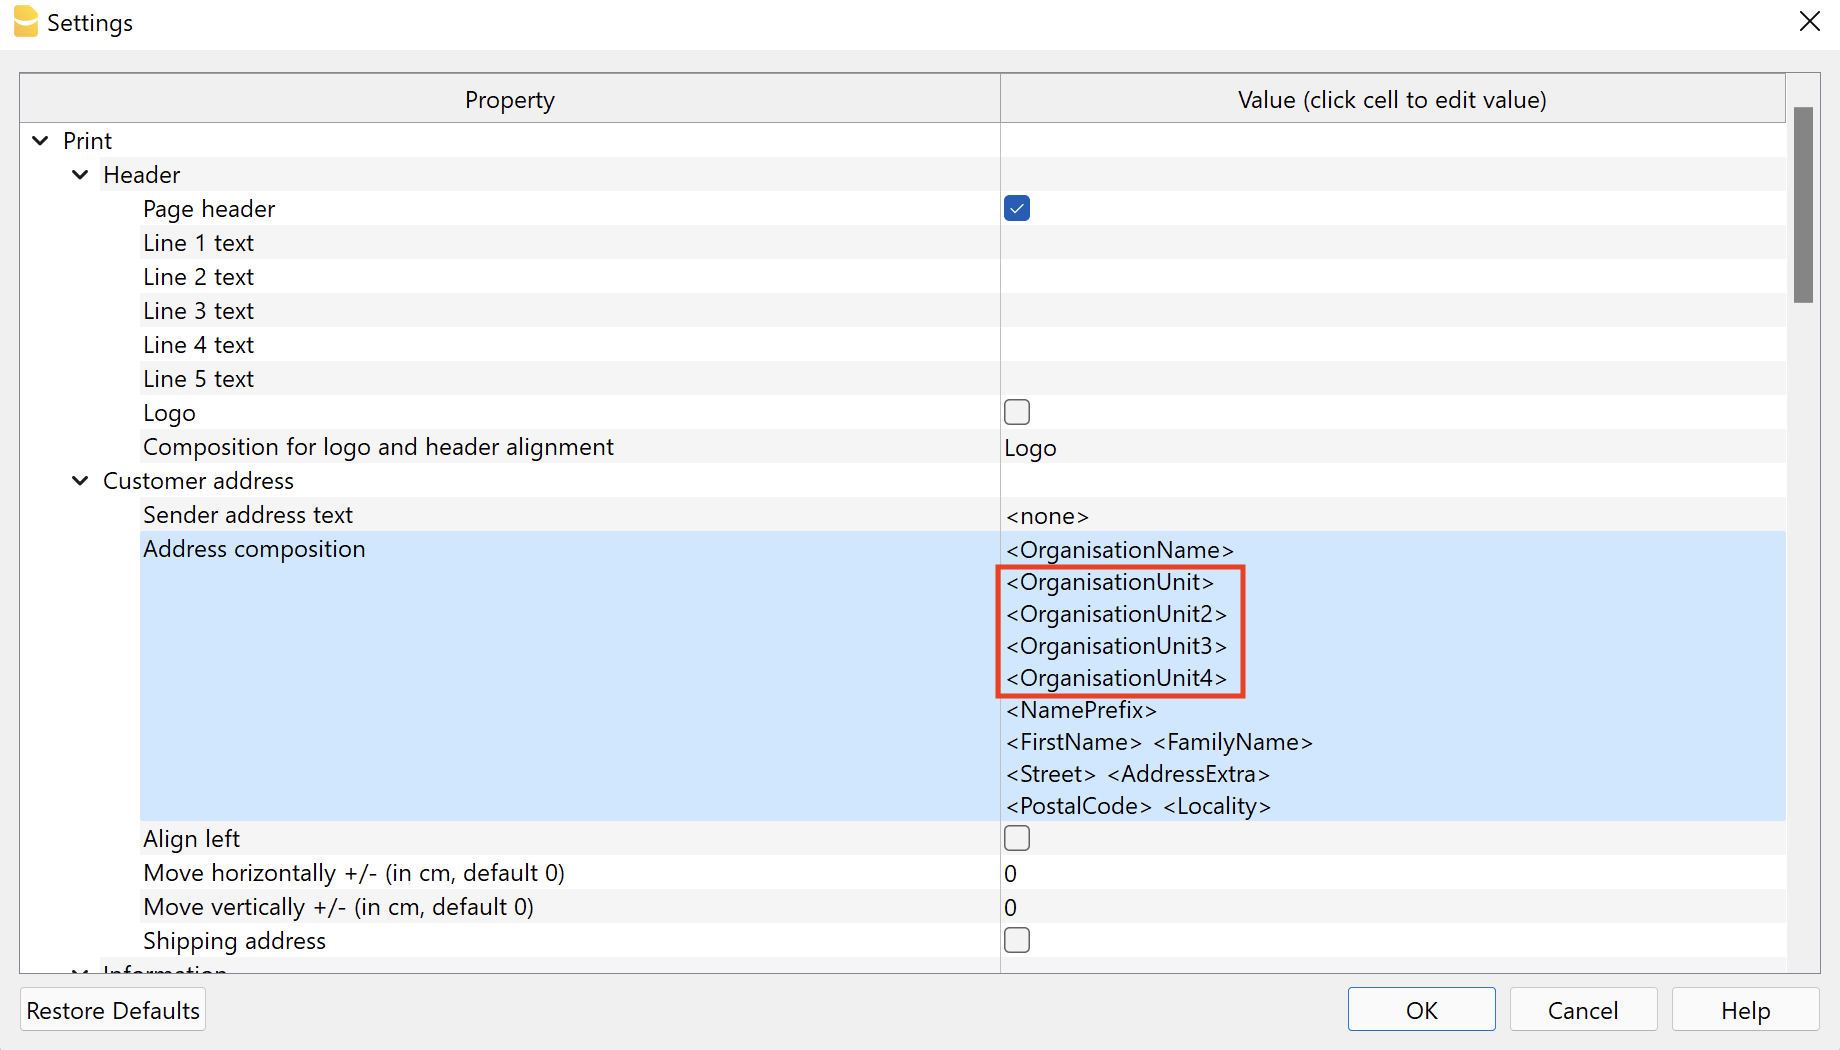
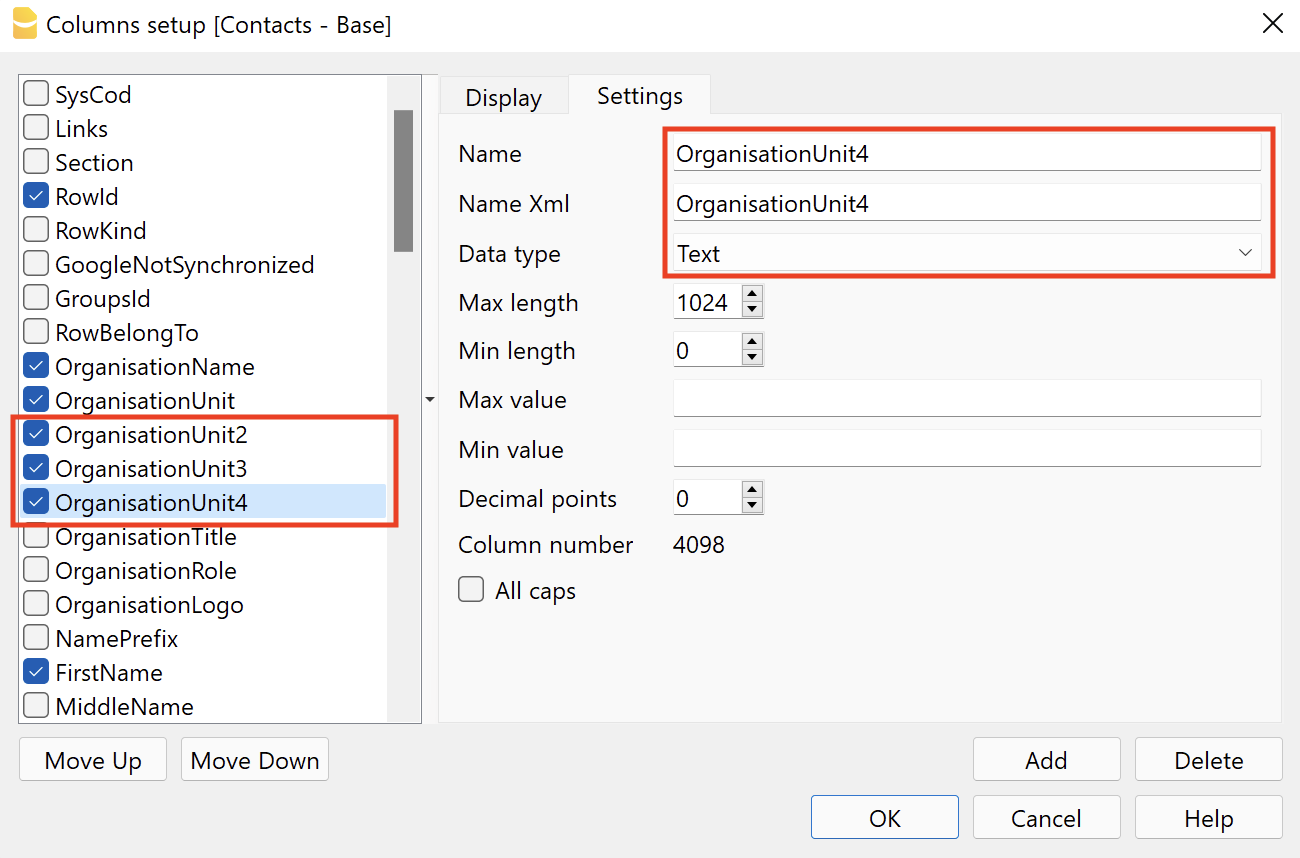
- If you wish to take these fields automatically from the Contacts table, add columns OrganisationUnit2, OrganisationUnit3 e OrganisationUnit4 to the Contacts table.
Other resources
Customize Address, Logo, Footers
Use Sub-Totals
Subtotals allow you to add partial totals to the invoice. For example, it is possible to insert a subtotal with labor costs and a subtotal with material costs.
To add a subtotal:
- Go to the Settings tab > Item Columns section and switch on the column Type
- Go to the Invoice tab
- Add a new row
- In the column Type select "Total", "Total 1" or "Total 2"
- Enter the desired description for the total line.
Example:
Subtotals in the dialog
Subtotals on the invoice
Upcoming new functionalities
- Add status to the invoice (draft, sent, reminder1, canceled, ...)
Print estimates and invoices
Command Print Estimates/Invoices
Invoice printing is done from the menu Invoices → Print Invoice.
This command creates a print preview of the invoice. Directly from the preview, by clicking on the settings symbol (cogwheel) in the toolbar, you access the following dialogue box:
- Print Invoices dialogue. From this dialogue box you can do various things:
- Set the layout to be used for printing the invoice.
- Access the layout settings to customise the printout.
- Change the print settings.
- Export the invoice in pdf or other formats.
With the Advanced plan of Banana Accounting Plus it is also possible to print several invoices at the same time and obtain single PDFs for each of them! For more information visit the page Print invoices or customer statements as separate PDFs.
Print layout and customisation
The printing of the offer or invoice is highly customisable for several reasons:
- You can choose the Print Layout.
- You can customise invoice printing by changing the layout settings.
- Several layouts are available for invoice printing, here are the recommended ones:
- The CH10 layout for all users in Switzerland.
With the option to include the Swiss QR-Code in the printout. - The UNI11 layout for all users in other countries.
Same as the CH10 layout, but without the QR-Code.
- The CH10 layout for all users in Switzerland.
For more information on customisation, please consult the following pages:
Print table content
Print Invoices dialogue
You can access the invoice printing dialog from the Print Preview by clicking on Settings (cog wheel symbol).
To access the print preview, you have three options:
- From the Invoices menu > Print Invoice command.
- From the Print button of the invoice creation/editing dialog.
- From the Invoices table, by clicking on the small Print Invoice icon at the top of the Id column cell (invoice number).
The program directly displays a preview of the invoice, using the default layout [CH10] Invoice layout with Swiss QR code.
With the Advanced plan of Banana Accounting Plus it is also possible to print several invoices at the same time and obtain single PDFs for each of them! For more information visit the page Print invoices or customer statements as separate PDFs.
Once you have chosen the printing options, with the OK button the invoice is previewed.

Print tab
Invoice numbers
You can print single or multiple invoices:
- For single prints, indicate the number of the invoice.
- For multiple prints, indicate the numbers of the invoices between commas "1,3,6".
- To print a range ( from..to..) indicate the numbers separated by hyphen "1-3" .
If the invoice itself contains a '-', for example if you have an invoice number '2016-1', this must be enclosed in brackets {}, to distinguish the numbering of a range of documents {2016-1}-{2016-3}.
Invoices from
This option allows you to print all invoices included in the selected period. You need to enter an initial and final date.
Unprinted invoices
Invoices where the InvoicePrinted column of the Transactions table is empty are printed. All unprinted invoices are therefore printed.
Layout
This option allows you to change the layout of the invoice. A number of predefined layouts are available.
Layout Preferences
Requirements for using layout preferences:
- Banana Accounting Plus (version 10.1.7 or later).
- The Advanced plan
This option allows you to set the preferences offered by the selected layout.
If a layout with no preferences is selected, this section is not displayed in the dialogue box.
- Print as
You can select the type of document you wish to print, the choices are:- Automatic: Print the document in invoice format.
- Delivery note with amounts: Print the document as a delivery note.
- Delivery note without amounts: Print the document as a delivery note, without showing the amounts and the total.
- Invoice: Prints the document in invoice format.
- Order confirmation: prints the document as order confirmation.
- 1st reminder: Prints the document as first reminder.
- 2nd reminder: Print the document as second reminder.
- 3rd reminder: Print document as third reminder.
The chosen document type is not saved for the next time, instead it is set to "automatic" again.
Layout preferences are offered by the following layouts:
Additional layouts
This button redirects you to the Manage Extensions dialog, where you can install new templates, update existing ones with the latest versions, or add your own custom templates.
Settings
Allows you to set the parameters of the selected print layout. Each layout has its own customizable settings. Visit the Invoice Settings page for more information on customizing the CH10 layout.
Update the InvoicePrinted column after printing
You can make this column visible by using the Data menu → Columns setup command.
The program will update the content of the column Printed after the print preview, adding the text 1. This will allow the Select unprinted invoices command to only print the invoices with no content in this column.
Options tab
In this section you can add specific texts for each language, for example, to indicate final greetings or bank details for payment. Depending on the language of the customer, the program will display at the end of the invoice the texts saved for the indicated language.
Only one type of text can be entered, one for each language.
The texts entered in this section will be included in the printing of all invoices, with whatever printing layout is used.
To add a final text:
- Invoice menu > Print Invoices.
- Select from the Settings icon (cog wheel symbol) > Options section. Enter the desired text.
- Confirm with OK.
The entered text will appear in the print preview of the invoice.

Save Invoice as PDF
Invoices can also be saved in PDF format so that they can be conveniently sent via email.:
- From the Print preview Invoices > Print Invoices > OK
- select Create PDF from the toolbar
Print Invoice
Once the print preview is displayed, to print the invoice:
- Go to the Print icon on the toolbar (above).
- Or save the PDF and print it.
Print Reminders
Banana Accounting Plus, with the CH10 and UNI11 layouts, also allows you to print reminders.
Requirements for using layout preferences:
- Banana Accounting+ (version 10.1.7 or later).
- The Advanced plan
On the basis of the Invoice data entered in the Invoices table, reminders can be printed.
How to print a reminder
In the Invoices table select the row where the invoice for which you wish to print the reminder is located and proceed as follows:
- From the menu Invoices > Print invoices
- Select Layout CH10 or UNI11
- Under Print as, select one of the following options:
- 1st reminder
- 2nd reminder
- 3rd reminder
- Confirm with OK

Print customization
All settings that characterise the CH10 and UNI11 layouts are also retained in the call-out printout.
To change the settings, go to Print Layout Settings.
Under Texts > Reminder you can define the start and end texts in the reminder
Print example:
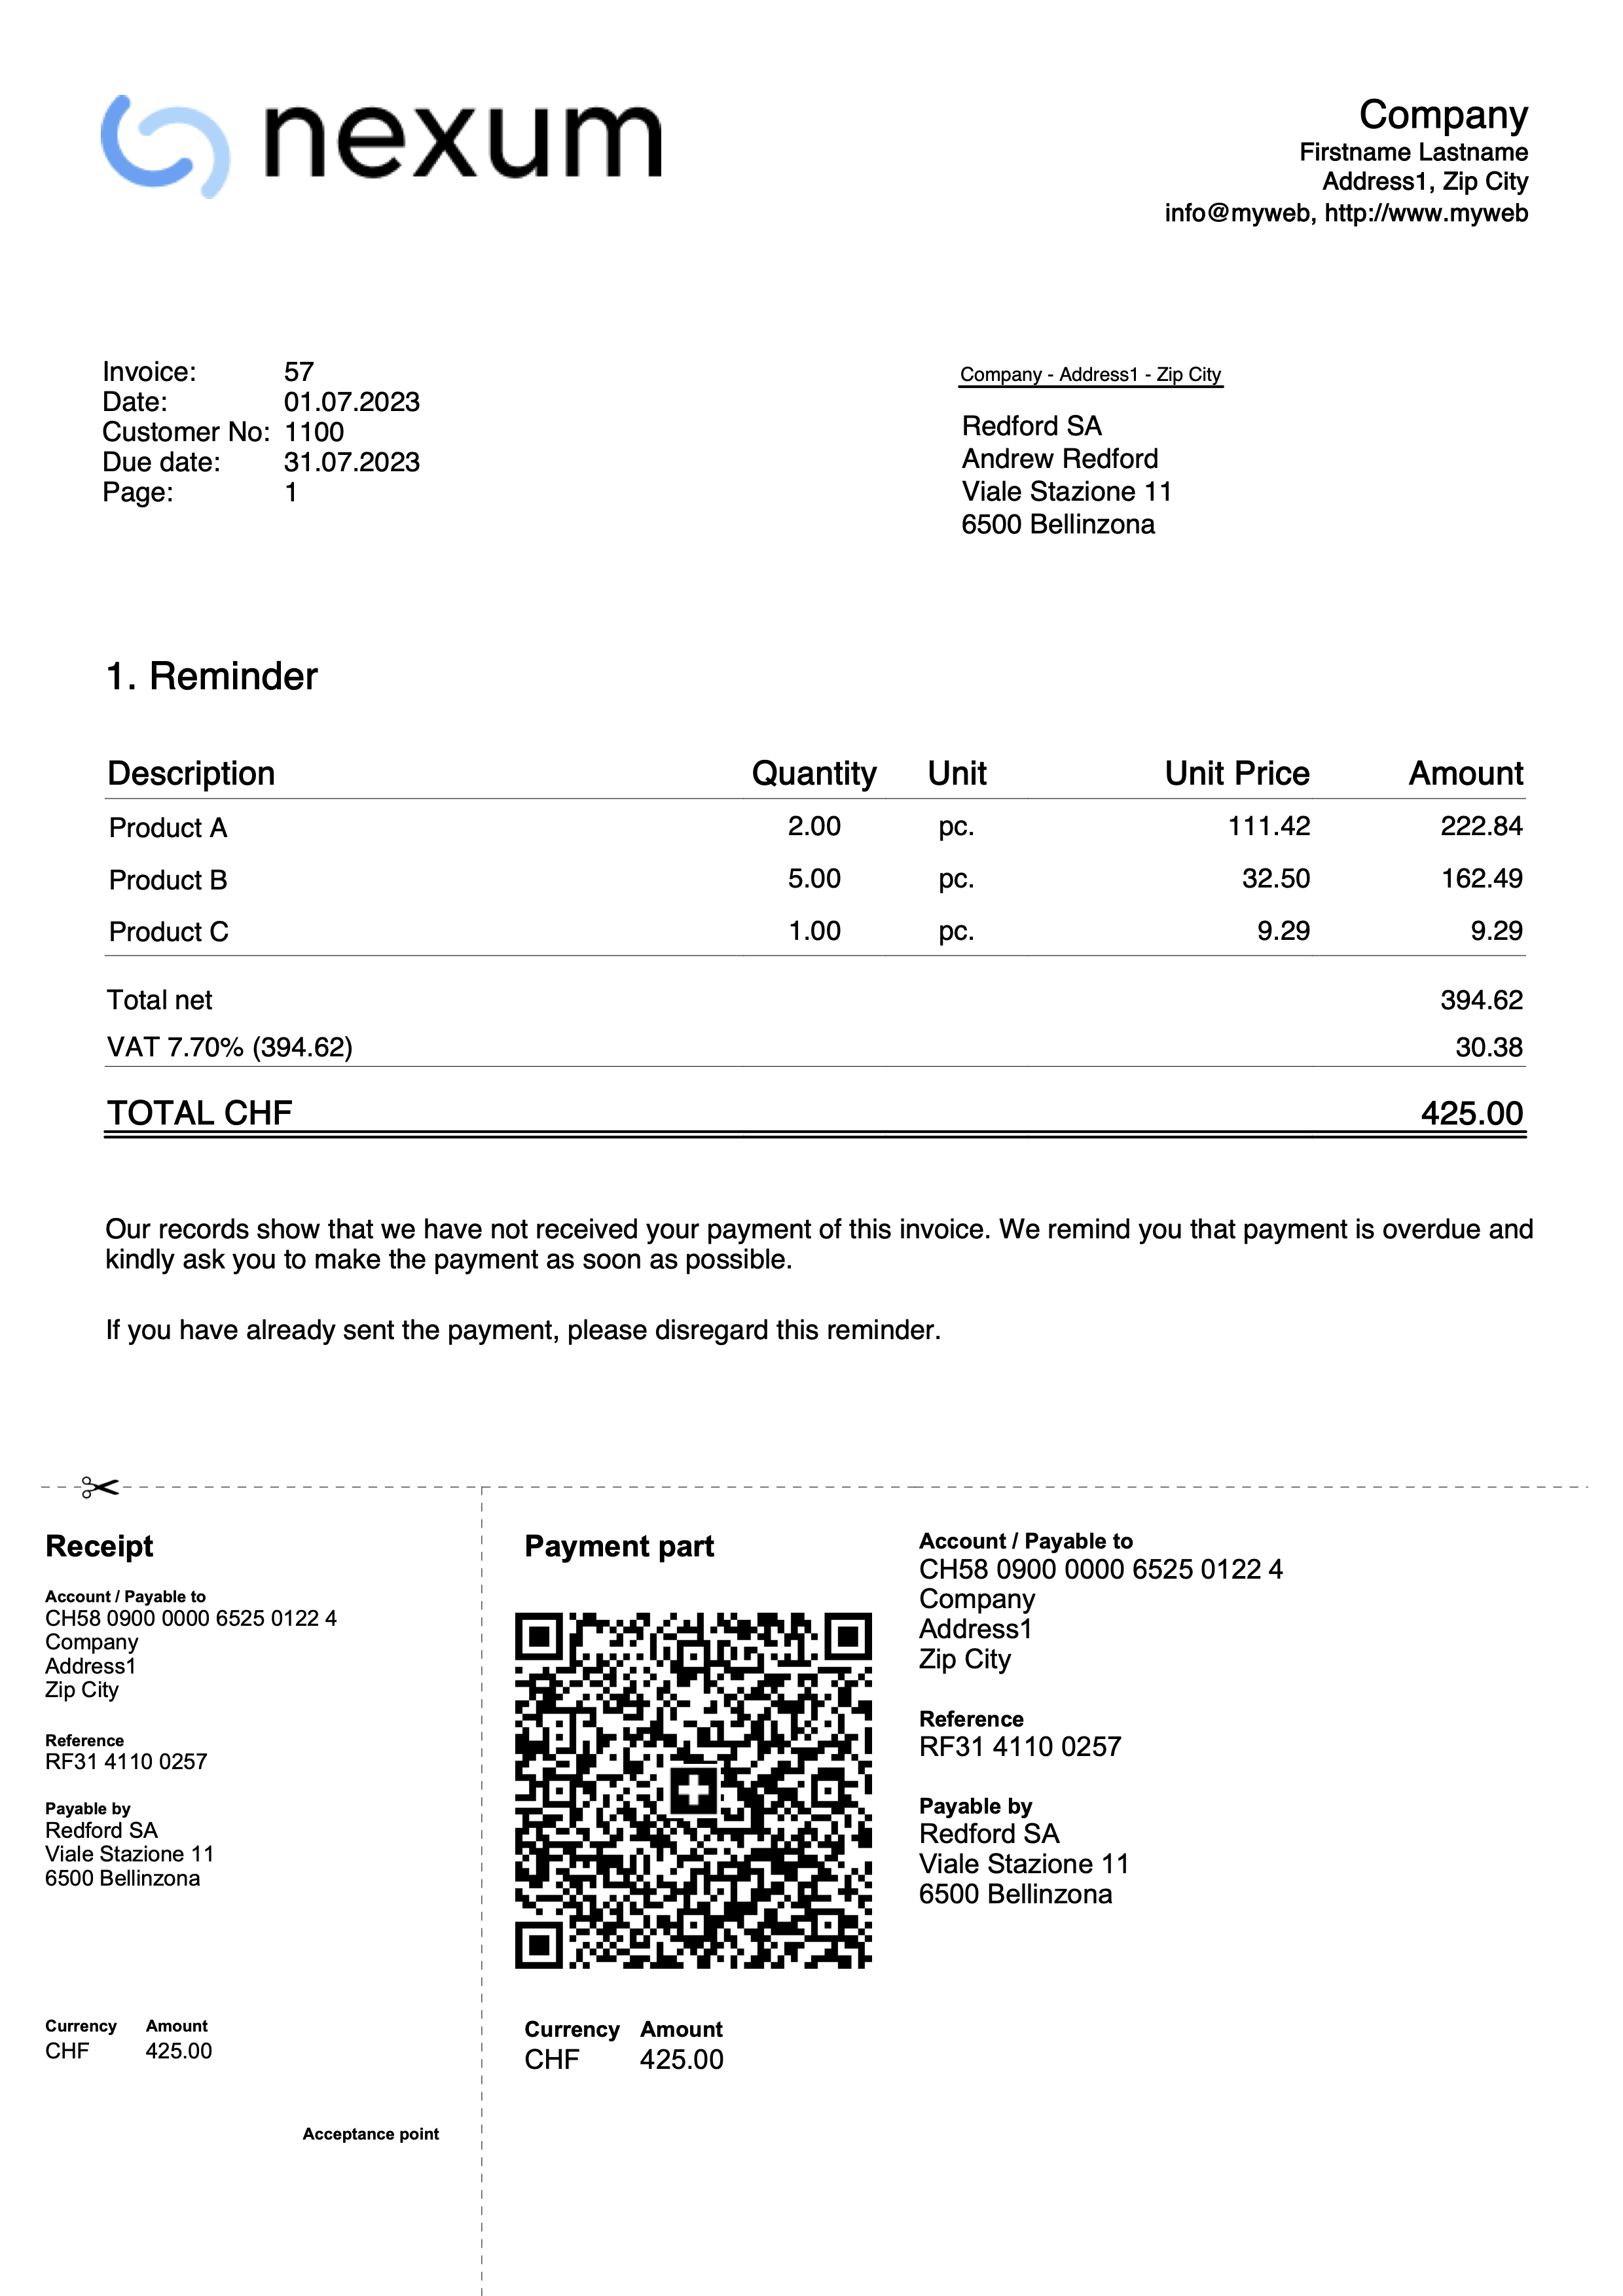
Print delivery notes
Banana Accounting Plus, with the CH10 and UNI11 layouts, also allows delivery notes to be printed.
Requirements for using layout preferences:
- Banana Accounting+ (version 10.1.7 or later).
- The Advanced plan
Delivery note data are entered in the Invoices table, as is the case for invoices.
If the data on the invoice match those on the delivery note, the same data can be used for both the printing of the delivery note and the invoice.
How to print a delivery note
In the Invoices table select the row where the delivery note to be printed is located and proceed as follows:
- From the menu Invoices > Print invoices
- Select Layout CH10 or UNI11
- Under Print as, select:
- Delivery note with amounts
In this case, amounts in the details and total amount are included in the bulletin. - Delivery note without amounts
Only the details of the dispatched goods are displayed in the delivery note, without any amounts.
- Delivery note with amounts
- Confirm with OK.
Print customization
All settings in Layout CH10 and UNI11 are also retained when printing the delivery note.
To change the settings, go to Print Layout Settings.
Under Texts → Delivery Note you can define the initial and final texts in the delivery note.
Print example:
Archiving Invoices
With the Offers and Invoices application you can archive your offers and invoices at any time of the year. The file in which the invoice data is entered remains the same over the years.
Archive invoices individually
If you want to archive one or more invoices individually, proceed as follows:
- From the Invoices table go to the Archive view.
- In the Archive date column, enter the date of when you wish to archive the invoice.
- Archive the invoice with the command Invoices > Archive data > Archive table data.
Archive invoices for the year
To archive invoices for the entire year, proceed as follows:
- From the Invoices table go to the Archive view.
- In the Archive Date column, enter the date 31.12 in the first line and copy and paste on all lines.
- Archive the invoice with the command from the menu Invoices > Archive data > Archive table data.
Invoice archive
In the invoice archive you will find all archived offers and invoices.
Archived invoices are displayed in the Archive (Invoices) table and removed from the Invoices table.
The Archive (Invoices) table:
- Is displayed automatically when archiving invoices.
- If you close the table, use the command from the menu Invoices > Archive data > Show archived data to display it.
Archiving Table Data
This feature is available in Banana Accounting+ Dev Channel.
Data from the following tables can be archived:
- Contacts
- Items
- Invoices
- Estimates
To archive table data:
- Position yourself in the table where there is data to archive.
- Activate the Arch. Date column.
- In the Arch. Date column, enter the date of when you want to archive.
- From the menu Invoices > Archive Data > Archive table data, choose the table with the data to be archived.
The programme creates the Archive table where all archived data (Contacts, Items, Invoices or Estimates) are stored.
Viewing Archived Data
This feature is available in Banana Accounting+ Dev Channel.
Archived data is saved permanently in the Archive table.
To view the tables with archived data
- From the menu Invoices > Archive data > Show archived data
- Choose the table with archived data to display
The programme shows the Archive table where all archived data (Contacts, Items, Invoices or Estimates) are stored.
New year
In the Estimates and Invoices application, it is possible to have all invoices created from one year to the next in a single file, without having to create a new file for the new year.
If, however, you wish to have separate invoices from one year to the next or not display the invoices from the previous year, there are two possible solutions:
1. Archive the registered invoices to empty the Invoices table
- From the Invoices menu, choose the option Archive data > Archive table data. More information can be found on the page Archiving Invoices.
- Archived invoices are displayed in the Archive (Invoices) table and removed from the Invoices table.
2. Create a new file by making a copy of the previous year
- Start from the current file and from File in the menu, click onto Save As command, naming the new year.
You can also create a copy of the file from the menu, Tools > Create file copy command. - In the Invoices table delete all rows where the previous year's invoices appear
For the Estimates and Invoices application, on the topic Create New Year, new developments will be possible in the future.
Import and Export
Estimates and Invoices Tools
Import/Export Estimates and Invoices
You can use the Estimates and Invoices Tools extension to import or export the following data from Banana:
- Invoices
- Offers
The imported/exported file format is described in the Estimates and Invoices Tools .
Import/Export Contacts and Items
You can use the "Data" menu to import or export the following data from Banana:
- Contacts
- Items
The imported/exported file format follows Text file with columns header.
Using catalogues for invoicing
It is possible to integrate product catalogues into the Estimates and invoice application. Companies can make catalogues available to their dealers so that they can prepare estimates and invoices more easily.
If you have any questions about this, please contact our customer service.
Serial invoices
With the Estimates and Invoices Application, you can quickly create serial invoices from a data list in Excel. It is ideal for sending bulk invoices to clients or members of an association.
- Enter the data in Excel.
- Import it into Banana Accounting Plus using the import functions.
- Create and print the invoices.
Prerequisites
To create serial invoices with the Offers and Invoices Application, you need to:
- Use the following pre-prepared Excel file to enter the contact data.
- Use the following pre-prepared Excel file to enter the invoice data.
- Use the Offers and Invoices Tools extension to import the invoice data into Banana.
- Install the Beta version of the 'Estimates and Invoices Dialog Extension' of the Estimates and Invoices application.
Create Serial Invoices
Serial invoices can be created as follows:
- Install the Offers and Invoices Tools extension.
- Create the Offers-Invoices file and enter the basic data.
- Create and import the contacts.
- Create and import the invoices.
- Print the invoices.
Launch Banana Accounting Plus and install the Estimates and Invoices Tools extension.
From the menu Extensions > Manage Extensions, search for Estimates and Invoices Tools among the online extensions and click on Install.
There are two ways to prepare the file:
- Create a new file from the menu File > New, select the region and language, select the type Estimates and Invoices, select the blank template.
- Use your existing Estimates and Invoices file.
In the menu File > File Properties (Basic Data) > Address section, set the address of your association, which will appear in the invoice header.
If you have a logo you want to use, refer to the Logo setup page.
Create and Import Contacts
Contact data can be created using an Excel file. In this file, all the data is entered and then subsequently imported into Banana. There are two ways to do this:
Method 1
The first method is described on the page Retrieving data from Other Programs > One-Time Data Importing using Excel.
- In Excel, arrange the columns exactly in the same sequence as they appear in the Contacts table of Banana accounting.
- Select the data in Excel that you want to copy and use the Copy command (Ctrl+C or Copy from the Edit menu).
- Go to Banana accounting and issue the Paste command (Ctrl+V or Paste from the Edit menu).
Method 2
The second method uses the Import Rows command from the Data menu.
- Download the specific Excel file to enter the contact data.
- The file is already set up with the necessary columns for entering the data.
- Row 1 contains the column headers. This row should not be deleted, and the column names should not be changed.
- The subsequent rows are example contacts.
- To enable editing of the file, click "Enable Editing" in the yellow bar at the top.
- Open the file and enter the address data of your contacts in the appropriate columns. The columns are as follows:
- RowId: The unique ID of the contact.
- OrganisationName: The name of the organization or company.
- FirstName: The first name.
- FamilyName: The last name.
- Street: The street.
- PostalCode: The postal code.
- Locality: The place.
- CountryCode: The country code.
- LanguageCode: The language of the contact used to create invoices. The invoice texts are printed in the defined language (it=Italian, de=German, en=English, fr=French).

- Save the file
- Select all the rows and use the Copy command (Ctrl+C or Copy from the Edit menu).
- Import the contacts into Banana accounting.
- In Banana accounting, open the Estimates and Invoices file type.
- Select the Contacts table.
- From the Data menu, select the Import Rows command.
- In the dialog that opens, check the option Import data from clipboard, then confirm with OK.
Create and Import Invoices
Invoice data can be created using an Excel file. In this file, all the data is entered and then subsequently imported into Banana accounting.
- Download the specific Excel file to enter the invoice data.
- The file is already set up with the necessary columns for entering the data.
- Row 1 contains the column headers. This row should not be deleted, and the column names should not be changed.
- The subsequent rows are example invoices.
- To enable editing of the file, click "Enable Editing" in the yellow bar at the top.
- Open the file and enter the invoice data in the appropriate columns.
- For more information on the columns, see the Column paragraph of the Estimates and invoices import page.
- Each row represents an invoice.
- You can enter an invoice with multiple items. For each item, add a row to the invoice (see example in the image, rows 5-6).

- Save the File.
- Convert the Excel invoice file into one of the two required formats (*.csv or *.txt) to import the data into Banana Plus.
- Open the Excel file with the invoice data.
- Click on File > Save As.
- Choose the option CSV (Comma delimited) if you intend to use the *.csv format; or choose Text (Tab delimited) if you intend to use the *.txt format.
- Save the file (once the file is created, it's advisable not to open it to avoid making any changes, even unintentional ones, that could compromise the import into Banana Plus).
- Import the Invoices into Banana.
- In Banana Accounting Plus, open the Estimates and Invoices file type.
- Select the Invoices table.
- From the Extensions menu, select Estimates and Invoices Tools > Import Invoices.
- Select the *.csv or *.txt file you saved.
- A dialog will show the changes that will be applied to the Banana file. Confirm by clicking OK.
- In the Invoices table you see the rows with the imported invoices.
If you do not see the imported invoices (you only see blank rows), use the command from the Invoices > Recalculate All menu.
Print Invoices
See how to print invoices and customize the print settings.
Error Messages and Troubleshooting
Per eventualFor any error messages encountered during the import process, refer to the documentation on Error Messages and Troubleshooting.
Inventory in Banana Accounting+
Recording movements
The Transactions Table is the core of the application, allowing you to enter incoming and outgoing movements for each individual item, with quantities and prices. You can specify the source warehouse (location) from which the item originates and the destination warehouse it is intended for. You can also include descriptions and annotations.
The program keeps the quantities updated, and if you make a mistake, you can modify the transactions to always maintain an accurate situation.

The Items table
All the items in the warehouse are defined in the Items Table. Each item has an ID and a description. You can group items into categories and subcategories. In the Items Table, the program also displays the available quantities and other information that is updated based on the movements.
There are several columns available, and the display can be customized. You can also add new columns from the Data > Columns setup menu. Various parameters are defined for each item, which are then reflected in the Transactions Table.

Once the parameters for each item have been defined, recording merchandise movements becomes very fast. You simply need to enter the item ID in the Transactions Table and input the quantities. All the other values are automatically filled in.
Managing customers, suppliers and projects
With the Inventory application, you can add columns and tables to input information about the customers to whom the merchandise is sold and the suppliers from whom the merchandise is received. Additionally, columns can be used to manage projects related to the merchandise.
Using the Extract Rows function, you can display operations performed with customers, suppliers, and for projects.
For more detailed information, please refer to the Advanced Functionalities page.
Multiple and virtual warehouses
To manage merchandise that arrives or is shipped from branches, the Locations Table is used, where the location of each warehouse is indicated. In the case of your company having warehouses in various locations, you can specify which warehouse the merchandise enters or exits from, or keep track of which warehouse the merchandise is shipped to customers from.
The Locations Table can also be used for other purposes by changing the header. One practical use could be to record the movements of keys in the management of a block of flats, by setting the names of the tenants.
Additionally, you can manage an online shop, and in this case, the Locations Table is used to indicate virtual warehouses.
For more detailed information, please refer to the Advanced Functionalities page.
Printouts
All data contained in the various tables can be printed, either in its entirety or by selection. Before printing, you can customize the columns.
To to carry out the printing:
- Journal
By selecting the Print option from the File > Print menu while in the Transactions Table, you will be able to print all the warehouse movements in the desired chronological order.
- Items Cards
To print article data click on the menu Report > Item Cards
One or more item cards can be selected for printing. Item cards can be printed according to the following groupings:- Group
- Location
- Period

Many advantages
Automated calculations and specific functions keep your work to a minimum, saving you time and energy:
- You have accurate stock control at all times:
- Initial values and quantities.
- Current values and quantities.
- Separate columns for incoming and outgoing items.
- Unit and total prices.
- Single item card.
- Group of items card.
- Item and group cards by location.
- You can search for items immediately and, if they are no longer available, you can replace them with others.
- Corrections are possible at any time.
- Indication of which warehouse goods enter or leave from and the exchange of goods between locations.
- Export to PDF for archiving data.
- Import of data from other programmes in Text, Ascii and CSV format.
- Columns for archiving products that are no longer available.
Features currently not available
The Inventory application was conceived as a powerful yet easy-to-use tool, which works independently from the other Banana applications.
Its main element is the ease of use, so we have refrained from loading it with too many functionalities.
Here are some of the features that, although requested by some users, are not available at the moment:
- No connection to the accounting file. The transactions of purchase and sales invoices in the accounting file do not update the data in the warehouse. The data in the warehouse file must be updated manually.
- Calculation of cost prices and margins
In the Items table, unit prices must be entered manually.- Users expect the programme to calculate cost prices and margins automatically. There are very different calculation systems (average price, LIFO, FIFO). We thought about evaluating this functionality within the Items table, but we saw that it would make the programme too complex and it would be very difficult to cover all requirements anyway.
- We are considering adding specific printouts. We welcome suggestions and possible simple solutions from you users. It would be very helpful if you could send us an Excel file of how you would like the report and which methods and calculations you would use to calculate the prices.
- Printing of stock situation at a specific time (end of month).
- Print warehouse overlook by location.
- Create a new year.
It is possible that certain functionalities will be added in the future.
In all cases we appreciate your suggestions.
Further information:
How to start an Inventory file
Create a new file
To create an Inventory file, you must have installed the Banana Accounting Plus version and take the following steps:
- Menu File → New
- Select Region and language
- Select the Inventory type.
Set the basic data
Via File → File and accounting properties ... (Base data) set up your inventory data.
Set up the Articles table
In the Items table set the list of all your items.
For each item you must enter:
- The Id to identify the item. You can use numbers, letters or both.
- The description.
- The initial quantity.
- Initial price.
- Unit price.
Once the data has been entered, the program automatically updates the values of all the columns of the Items table.
Set up the Locations table
If your company manages several inventories located in different locations, you can manage the incoming, outgoing and transfers of items for all inventories by setting the locations. You will be able to find out how many items with their relative values are in each inventory and evaluate whether it is necessary to transfer the goods from one inventory to another depending on the stock and sales requests.
In the Locations table you must enter:
- the Id to identify the location
- The description
Enter the movements of the articles
In the Transactions table enter purchases, sales and any transfers from one inventory to another.
- Enter the date
- Enter the date
- The quantity in or out
Everything is done! The columns of the values will be updated automatically, at the same time also in the Articles table.
Item cards and reports
From the Report menu, Item cards you can get the cards of each item individually, by selection or for all items.
You can also get reports by item group and also by inventory location. The options are found in the Inventory cards dialog.
File properties
In the menu File → File properties (Basic data) set the data of your inventory.

File base data
Enter the inventory header.
Address
Enter the inventory address.
Other
The Other section contains the following options:
Current language
Is the current language of the inventory file.
Creation language
It is the language in which the inventory file was created.
Extensions
Link to any extensions for custom reports.
Password
Enter any password to make the file more secure.
Texts
To make changes to the texts and keys of the inventory application.
Items table | Inventory
In the Items table, enter all the inventory items which need to be managed, along with their respective quantities and purchase values.
Create the items list
In the Items table, all the available items in the warehouse are recorded. Each item is entered individually on each row. To total the amounts for a group of items, a totalization group must be entered.
The group is defined in the Group column, at the end of the list of items of the same category. The group number must be reported in the Sum in column for each item.
For further information on the grouping system, please refer to the Grouping System page
You can create further groups of items depending on your requirements.
To complete the registration of the items it is necessary to enter:
- The Id to identify the item.
- The description.
- The initial quantity.
- The initial price.
- The unit price.
Items table columns
The command Data > Columns setup allows you to add additional columns as needed (for example, an additional description or product expiration date).
Default columns:
Columns marked with "*" are protected and calculated by the program.
- Links
Link to a digital document. - RowGroup
Column and row to enter the totaling group of a given set of items. - RowId
Enter a value (number, letters or both) to identify the item.
When it is entered in the Transactions table, the item description and unit price are automatically added. - Description
Enter a text for the description of the item. - Sum in (in the arrange columns it is written RowGroupIn)
Enter the totaling group for each item in this column. - Notes
You can insert texts for annotations on items or for other needs. - Account
Enter the account present in the main accounting file that refers to the item. - ReferenceUnit
Insert an abbreviation to indicate the unit (eg pcs to indicate the pieces). - QuantityBegin
Enter the initial quantities referring to the total.
If you want to manage separate quantities by locations, leave this column blank, and enter the initial quantities as entry transactions, with the corresponding location. - UnitPriceBegin
Initial unit price
If you want to manage separate quantities for locations, leave this column blank and enter initial quantities as entry transactions, specifying the respective location. - *Valuebegin
Initial item value calculated by multiplying the Initial Quantity and Initial Unit Price. - *QuantityPlus
Total quantity of items resulting from the sum of the Quantity Plus in the Transactions table. Both the positive and negative values are added. The internal movements between two locations are not added up, when there is TransferId indicated. - *QuantityMinus
Total quantity of items resulting from the sum of the QuantityMinus in the Transactions table.Both the positive and negative values are added.The internal movements between two locations are not added up, when there is TransferId indicated. - *QuantityChange
Difference between the item's inbound and outbound quantities. - *QuantityBalance
Quantity of items currently in stock. Sum of the starting quantity and the Quantity change. - UnitPrice
Unit price of the item, must be entered manually:- When the purchase value of an item changes compared to the initial price, it must be updated in this column.
- This value is used in the Transactions table to calculate the value of incoming or outgoing goods
- Updates the total value of the item based on the quantities in stock.
- *AmountTotal
Amount calculated by the program based on quantities and unit price. (last purchase price) - ItemQuantityEffective
For insertion of actual quantity when inventory has been done. - ItemPriceEffective
The actual quantity multiplied by the actual price. - *ItemValueEffective
The actual quantity multiplied by the actual price
Transactions table
This is the table where the movements of the items are recorded:
- Purchases
- Sales
- Transfers from one warehouse to another, in case you are running several warehouses.
By inserting the movements, the Items table is also automatically updated, in relation to the quantities and corresponding values of the items.
If several warehouses (headquarters and branches) are run simultaneously, the ID codes, set in the Locations, can be recorded, which will refer to the places where the warehouses are located, in order to keep track of the internal movements of the articles.
The ID abbreviations must be entered in the Locations and Transfer columns of the Transactions table. If they are not visible, they can be displayed via the Data → Columns setup menu.

Transactions table columns
- Links
Link to a digital document. - Date
The date of the operation. - Doc.
Document number (e.g. delivery note number). - ItemsId
Numeric or alphanumeric value to identify the item. - ItemsDescription
Text taken automatically from the Id column of the Items table for the description. - Description
Text to be entered for the description of the items. - Notes
In the column you can enter notes about the items or for any other requirement. - QuantityPlus
Value to indicate the quantities of incoming items, purchased or transferred from other inventories. - QuantityMinus
Value to indicate the quantities of items that are outbound, sold or transferred to other inventories. - ReferenceUnit
Abbreviation to indicate the type of unit. - UnitPrice
The price of the item with which the total value of the items is calculated, based on quantities. - AmountTotal
Total value of the items purchased, sold or transferred. - LocationsId
Identification of the place where the Inventory is located and from which the items enter or leave. - LocationsDescription
Name of the place where the inventory is located, from which the items come in or out. - LocationsTransferId
Code of the place where the inventory is located for which the items are intended.
It works the opposite way to the LocationsId.- If there is an entry to LocationsId, there will be an exit to LocationTransferld.
- If there is an exit from the LocationsTransferId there will be an entry.
- If LocationsTransferId is indicated, but the LocationsId is left empty, the program will still consider it as an internal movement without a specific LocationsId.
- LocationsTransferDescription
Name of the place where the inventory is located, from which the items arrive or leave, to or from another inventory.
Locations table
The Locations table is used when the company has more than one inventory in different locations. In order to take into account the total number of items in and out of all inventories, by entering the ID for the locations in the Transactions table, in the columns Location and Transfer all the values of the items are known, also for a single warehouse and the relative movements.
Refer to the Transactions table for further information.

Places table columns
- RowId
Identification of the location where the inventory is located. - Description
Name of the location where the inventory is located. - Notes
You can insert text for notes.
Recheck everything
The program recalculates, double-checks and displays any errors or differences.
Use this command whenever you are in doubt that there is a problem.
Inventory reports
Everything you see on video can be printed as a report, since, after each transaction, all values are updated.
You can print the table data from the File menu → Print command. Data can also be exported in PDF, Excel, XML, HTML, TXT and JsonCsv formats.
Reports are run from the Reports menu → Item cards command. You can obtain:
- Journal of a selected item or items.
- Complete journal of all items.
- Journal of items of a particular inventory location, in case there are multiple locations.

Inventory report

Note
To obtain the total of the articles for each location and the final balance of the articles, you need to group by article and by location.
If you want to manage separate quantities by locations, enter the initial quantities as entry transactions, with the corresponding location and don't use the column Quantity Begin in the Items table.
General
Filter
By entering the name of the item, a list of all items with the same name appears. The items of interest can be selected from the list or, by activating All, the journal with the values of all the items will be displayed.
Grouping by
Item
If this option is chosen, the tabs of all items or only those selected are displayed.
Location
If this option is chosen, the item cards related to the selected inventory location are displayed.
Display only totals
When this option is activated, the item cards are displayed with totals only.
Period

All
All item movements are included.
Period selected
It means the specified period, indicating the start and end date.
In this case, the items relating to the selected period are displayed.
Customization

Name
Enter text to define the name of the custom report.
Description
Enter a text for the description of the custom report.
Options
If one or more options are activated, the custom report will be displayed as follows:
Show this window every time
The custom report is displayed in the dialog box and can be edited.
Show in menu
The customized report is displayed in the Items cards menu.
Show in 'Favorites' menu
The customized report is displayed in the Favorites menu.
Read only
The custom report is in read-only mode.
Printout examples
Journal per Item
Journal per Items
Journal per Location

Journal per Locations

Inventory application advanced functionalies
The warehouse application can also be used for very advanced purposes.
Customer / project management
To find out to which customers a product has been sold or given, you can proceed as follows:
- Add a column in the Transactions table, where you enter the name of the customer / project.
- Add a table where you list the customers and assign a code.
- Add a column in the Transactions table that is linked to the customer.
You can add as many columns / tables as you wish to keep track of projects, suppliers or other.
To filter the transactions carried out by a customer, go to the Transactions table and in the column Customers or Projects, use one of the following commands: Extract and sort rows; right-click on the customer cell and choose Extract rows; use the filter function.
Online Shop / Virtual Stores
If you operate an online shop, you can use the Locations table to define virtual warehouses, where you can indicate the goods to be shipped, incoming, reserved, etc.
Here some cases:
- Online purchase of goods by a customer.
- As soon as the order is received, you record a movement between the physical warehouse and the virtual warehouse called "Dispatch".
- When the goods are then physically dispatched, you record the outward movement from the warehouse called "Dispatch".
- Ordering goods from a supplier.
- When you order goods, you record an incoming movement to the virtual warehouse called "Arrivals".
- When the goods arrive, record the movement from Arrivals to the main warehouse.
By creating other virtual locations, you can also manage more complex workflows.
Importing data
With the import command you can take data from other programmes, in any of the following ways:
- Open the file in Excel and arrange the columns as you have them in Banana and then use copy and paste.
You can also create a view, setting the columns in which to report movements. - Prepare extensions that import and convert data from existing formats.
Free Time Sheet application
The Timesheet is a free and unlimited application because it is included in the Banana Accounting Plus Free Plan. It works like Excel but is optimized for calculation of hours. It is therefore much more reliable and you can easily manage all kind of working hours. You have a comprehensive view of the hours and can always correct.
Follow specific settings:
 | HeadingThe Time sheet header data is taken from those entered in the menu | |||
Schedule Working time scheduleYou can plan your working hours by entering the hours carried over of the previous year, working days, holidays and working hours due in via the following menu | ||||
Dates, holidays and festive daysYou can define the period and customize holidays and non-working days. Use the Journal table of the Time Sheet, Festive column | ||||
Time sheet dataEnter the Time sheet data, recording your working hours, absences and planning your vacation day by day. Go to the Journal table of the Time Sheet to enter your data . | ||||
CheckStay in control of the totals and balances of hours worked, payment due, leaves and holidays. |
You can set the hours you have to work every day and thus have the balance of hours constantly updated. You can also indicate the vacation days you are entitled to, enter the holidays you will take, and will always know how many days are still have available.
The Time Sheet allows you to have a complete report to present to your employer, which allows you to comply with the legal obligation to keep track of hours worked.
Useful links
Characteristics of the Time Sheet
The Time sheet is the new Free Banana Accounting Plus application that allows you to easily manage your working hours and instantly know the situation of hours worked, overtime, holidays, absences.
To start, just download and install Banana Accounting Plus and, when creating a new file, choose the Time sheet template.
Multiple automations to allow for quick and easy management of hours .
- Software available free of charge, to work on any operating system, including mobile.
- Easy to use and implement solutions, no login and password required.
- Each employee keeps the file on their computer or mobile device.
- Fully adaptable to the requirements of the employee and the company.
- Great time savings and calculation errors are avoided.
- File templates available with the calendar of the current year.
- Powerful and automated calculation system.
- Uniformity of calculations. All calculations are based on hours and minutes and this makes it possible to adapt to every case and requirement.
- Balances and totals updated instantly by day, month and year.
- Data entered in predefined columns, for results that are always ordered and clear.
- Forecast for working hours.
- Management of project hours.
- Hours worked and indication of less or more hours worked and progressive balance.
- Indication of the holidays taken and remaining, with carry over to the following year.
- Possibility of coding other useful information for the company (projects, expenses, notes).
- Complies with the regulations of the European Court of Justice and Swiss regulations.

How to keep the hours
The Time Sheet supports different data collection methods:
- Systematic collection.
Enter the work start and stop times and the program will calculate the hours worked. Display the Start1-Stop1, Start2-Stop2, ... , Start5-Stop5 columns where you can enter the times of beginning and end. - Simplified collection.
Indicate the hours worked in a day,
Display Work1 and Work2columns to enter the hours worked of the day. - Mixed collection.
You can enter both the time of beginning and end, or the time worked.
Display the Start and Stop columns and the Work columns.
Accurate and uniform calculations for every use
The time sheet always uses the hour and minute format (for example: 8:15). Holidays and absences are also indicated daily with hours and minutes. This allows for easy and accurate management of situations with irregular working hours, or that are subject to change.
The totals are also always shown in hours and minutes. This uniformity allows an exact overview of one's work situation, fully compliant with legal regulations, and avoids discussions between employee and employer regarding the calculations.
Below is an overview of how data entry and calculations take place.
- Expected working time (hours due)
For each single day of the week, the exact number of hours and minutes of work expected can be indicated. The program indicates the expected total of hours per week. The working hours can also be changed only temporarily (for example change of hours during only one week). - Hours worked
The daily working hours can be entered with taking up work or leaving time(s), or even as a total of hours and minutes or a combination of both. The program then calculates the total number of daily hours worked. - Extra hours for nightshift or holidays
They can be specified both as hours and minutes and as a percentage; the program then calculates the total. - Holidays
They are indicated in hours and minutes for the entire year. It's simple, just multiply the total hours per week by the number of vacation weeks. The program calculates the remaining holiday balance which will be accurate to the minute, even if the working hours are variable. - Absences due to illness, military service or any other kind
They are also referred to as hours and minutes. The program then calculates the total number of absences per day. - Total hours
This is the sum in hours and minutes of hours worked, supplements and absences. The program calculates the daily difference between the hours due (expected) and the total. There is also a progressive counter of the differences so that you have an instant view of the hours balance. - Columns related to time counters
The program will calculate the monthly and yearly total, displayed in hours and minutes format, so that you have complete control and consistency of calculation. - Hours in decimal format
When entering hours, you can also indicate a decimal number (8.50) and the program converts it to hours and minutes (8:30). - The Time sheet also displays some totals in decimal hour format, so as to simplify the insertion into other programs.
- The monthly report presents the totals of the daily and monthly hours.
- Print extensions allow you to total and view working time in any other format.
File and data saving
- All the data is saved in a single file, where you can easily retrieve everything without wasting time.
- Give the file the name you want.
- You can manage an unlimited number of files.
- Save your data to any media, computer, network, cloud or it can be emailed. You can access it wherever you are.
- Make your Time sheet more secure by using password protection.
Based on columns such as Excel
The Time Sheet has a Journal table with columns already set up, where you can write down your working hours (start and end time), holidays, overtime or any sick leaves, day by day.
- The columns of the Journal table are predefined and can be displayed as desired.
- Predefined columns for many needs:
- Working hours forecast.
- Actual hours worked.
- Difference between hours worked and expected hours. Therefore, the overtime hours or hours to be recovered are reported.
- Annotations and Refunds.
- Hours for projects.
- Possibility to add multiple rows for the same working day.
- In the Links column you can add a Link to a document (example medical certificate).
- The Search command allows you to quickly search for data.
Error reporting and control
- Command for recalculating the Time sheet.
- Reporting of any wrong settings, differences or errors.
- Each report contains a link to a help page that explains the causes and the solution.
- Possibility to correct.
Monthly Printouts and Reports
- Printable ledger as seen on the screen, or by selection.
- Monthly Report.
Exporting, Importing and Archiving data
- Copy and paste directly to and from Excel.
- Export tables to pdf and various other formats.
- Archiving of printouts and accounting data in pdf or other formats.
- Saving the accounting file on any backup device.
- Importing time sheet data into other programs.
Comprehensive documentation
- Each dialogue and error has its own documentation page accessible in a click.
- Constantly updated documentation.
- FAQ.
- Documentation also available in Pdf format.
Features currently not available
These features, although requested by some users, are not available at the moment:
- Possibility to include the logo on the printout of the monthly report, as well as an indication for the signature, and to be able to select the columns to be printed.
- No link with billing. Working hours must be reported manually in the billing
How to start a Time Sheet
To use the Time sheet, Banana Accounting+ has to be be downloaded and installed. In the free version, the Time sheet is in unrestricted mode.
For a quick and easy start of the Time sheet, we recommend opening one of our templates.
Banana Accounting includes three types of template with preset columns:
- Systematic records - the start and end times of work are indicated, as generally required by law.
- Simplified registrations - enter the daily hours worked (with due hours setting).
- Hourly wages - the daily hours worked are indicated (without setting hours due).
Setting up your Time Sheet file
Proceed as follows to set up your file:
- File menu → New
- Select the Region/Language
- Select the Category -> All or Other
- In the Search area, type Time Sheet, or activate under Type -> Time Sheet. The program displays the available templates.
- In the section on the right, select the desired template.
- By double clicking on the name of the selected template or on the Create button, the program will directly open the file.
- Save the file under a new name.

Setting up your data
- Set up your own data from the File menu -> File and accounting properties (Basic data) -> Time Sheet .
- Enter your first and last name, start and end date, work percentage of work and other required data if available.

Set working hours as per contract
- Set the weekly working time via the File → File and accounting properties → Start .
- The cells of the Report are intended for unpaid hours of work and for hours of unused holidays carried over from the previous year.
- Enter working hours for each day and define working days, festive days and holidays. These settings are displayed in the Journal table.

Recording work time
In the Journal table you enter the daily data, the time of start and end of work, the hours of absence due to illness, holidays and leave. The data can be modified and entered as required.
- Write down the hours of vacation you are entitled to in the current year.
- Include, edit, add, personalize any holiday if needed.
- Enter your daily hours of work, sickness, vacation, etc.

- The first row of the Report shows the hours of holidays not taken from the previous year, present in the Start dialog.
- In the Start row of the first day of the month, you enter the hours of annual holidays to which you are entitled, as per contract.
- Non-working days are distinguished in blue, while holidays are in red.
- The program calculates on the basis of the data entered, the daily and monthly totals of the Due, the difference between the hours worked and those due and the progressive.
- In the window below, the balances of the weekly hours due and worked and the balance of the holiday hours are reported automatically.
Printing your end of month report
Using the Reports → Monthly Report... command, the program calculates and displays a summary report of the selected period with the main columns to be used.

For more detailed information and specific examples of the Time sheet application, please refer to the following pages:
- Time Sheet
- Characteristics
- Setting up the file
- Journal table
- Enter working hours
- Printouts
- Managing project hours
File properties - Time Sheet
Via the File menu → File and accounting properties ... → Time Sheet tab the following data must be set up:
Enter into the Timesheet tab:
- Name and Surname.
- Start and End date
You can enter any period of your choice. - Work percentage
- Any other available data.

Journal table of the Time Sheet
In the Journal table you enter the daily data of the Time sheet, which can be modified and entered according to your own requirements.
Thanks to the rows and columns with totals, it allows for an instant overview of the situation.
The Journal table includes several columns to suit all needs. Depending on your needs, the columns of your choice can be displayed.

Typology of rows, colors, and formats
When creating a new file, the rows of the Journal are generated automatically by the program. When using an existing template, they will already be predefined.
Daily rows
Daily rows are used for entering your data.
- Normal rows - refer to rows for working hours.
- Rows in red - refer to official holidays
- Rows in blue - refer to non working days.
- Rows high-lighted in yellow - refer to the current date.
Multiple rows for a day
By duplicating the day row, you can enter additional information about the same day, such as timetables by project, annotations, or other.
To differentiate between the following rows, the Day description is slightly indented.
Carried forward, Start, Total and Balance rows
The Carried forward, Start, Total and Progressive row are indicated in bold character.
- The Carried forward row will automatically display holidays and hours belonging to the previous year, that were entered via File property > Start.
- The Start rows refer to the start of the year and month. Enter the initial values for holidays and hours.
- The Total rows refer to the end of the year and month. The total of columns are automatically reported and totaled here.
- The Balance rows are automatically calculated by the program and will the progressive value of the columns that contain data.
Journal table view
The Journal table is created with a series of columns that will cover the major part of your requirements.
Predefined columns are displayed, depending on the view you select:
- Base - displays the main principal columns.
- Minimal - displays the columns to enter your data.
- Complete - displays all available columns of the Journal.
The columns of the Journal table
The columns in the Journal table can be customized according to your requirements.
Via Data > Columns setup you can display further columns or hide those you don't need, change existing headers, add your own columns and change the format.
In the columns, the program always works with hours and minutes, eg. 8:30 means 8 hours and 30 minutes:
- Internally, the values are saved as seconds and then displayed in the hours and minutes format.
- When entering schedules, the times are rounded to the minute.
Section
The column is protected. It is used by the programme to make a distinction between rows used for data entry and system-specific rows.
Rows used for data entry and editing (working hours, absences, holidays, etc.) have an empty cell in the Section column.
System-specific rows, used by the programme to make calculations, have a special identification code in the Section column cell.
This code must not be changed, otherwise the sums may be wrong.
Examples of codes used: AllStart, YearStart_2020, MonthStart_202001, MonthTotal_202001, MonthBalance_202001, SpaceAfterMonth_202001.
The value is an identification code consisting of several elements:
Period
- All - Refers to year rows.
- Year - Refers to year rows.
- Month - Refers to the month rows.
- Week - Refers to the week rows.
- Day - Refers to the day rows.
Type
- CarryForward - Carry-forward rows of hours and holiday balances from the previous year. Carryovers are automatically inserted by the programme in the file's Properties, for both positive and negative values.
- Start - Start Rows. To enter start values (planned holidays, holiday adjustments).
- Total - Rows where totals are indicated. They are summed in the total rows (daily time columns, Start and CarryForward adjustments).
- Balance - For the holiday balance. This is the difference between the sum of the holidays, found in the CarryForward and Start rows, and the sum of the daily holidays.
- SpaceAfterMonth -To indicate that there should be an empty line (year, month or day to which the identifier refers).
Date
Protected column. Is used for entering the date of the day.
Festive
Column for setting the day. If the cell remains empty, the value set in the File Properties is taken over, or the value defined with the W code (see below).
The possible values are:
- Blank - business day.
- 0 - to set the current day as a holiday (row displayed in red).
If it is a day that is generally considered as a "public holiday", but on which you are required to work, you must enter "working". - 1 - to set the current day as non-working (row displayed in blue).
- 2 - to set the current day as a working day. Overrides the default value.
- [0] - festive day set automatically, as per the File Properties. No value is indicated in the Due column.
- [1] - non-working day set automatically, as per the File Properties. No value is indicated in the Due column.
- W0 - to set the current day as festive. On the same day, in the following weeks it will be automatically set with the (0) value.
- W1 - to set the current day as non-working day. On the same day, in the following weeks it will be automatically set with the (1) value .
- W2 - to set the current day as a working day. On the same day, in the following weeks it will be automatically set with the (2) value.
- WR - to reset the current day with the value indicated in the File Properties.
- WA - to reset the current day with the value indicated in the File Properties. On the same day, in the following weeks it will be set automatically with the value indicated in the file properties.
Day description
Column used by the program for automatic insertion of the name of the day, based on the date.
If you want a text other than that reported by the program, insert a text preceded by the # character (eg #Christmas, #National holiday).
Description
Column for entering an additional description.
Code1
Column to indicate any customer, project or other number.
Work1 and Work2
The columns Work1 and Work2 are used in particular to register working hours in the Time Sheet - Systematic 2023 template. Furthermore, in the Banana Accounting Plus version they can be used to enter special working hours (e.g. nights, holidays).
Supplement columns are also used in parallel with these columns (see explanations below).
Start1, Stop1, Start2, Stop2 ...
These columns allow entry and exit times to be entered. There can be several entries and exits on the same day.
The programme calculates the time of attendance and adds up in the columns Total and Difference.
Sick leave
Column for entering the hours of absence due to illness.
Holiday
Column for entering holiday hours.
Service
Mandatory absences, such as military service, community service or other, can be entered.
Adjustment
Column for entering an adjustment value.
Other
Other types of absence, not indicated in the Service or Sick or Holiday column, may be entered.
Absence
Protected column. It is used by the programme to automatically calculate the sum of absences.
%Surcharge
You can enter the percentage of supplementary work that is paid differently.
If you do both hours without supplement and hours with supplement on the same day, you must enter the times on two lines:
- Add day row
- The first line indicates the work (start and end) normally.
- On the second line you indicate the supplementary hours and the appropriate percentage.
If you want the daily total directly in the table, you must add a daily total row.
Surcharge calculated
The column is protected. It is used by the programme to calculate theovertime, indicated in the Supplement or Supplement % column.
Surcharge total
The column is protected. It is used by the programme to calculate the total additional time, indicated in the Surcharge or Surcharge % column.
This value is added to the Total Hours column.
Total
The column is protected. It is used by the program for automatic entry of the sum of working hours, overtime, absences and adjustments.
Due Code
The column is used, in case of need, to change the value of the Due (hours of work due).
If it is left blank, the Due value is automatically resumed day by day based on the settings in the File → File Properties → Start menu.
If you wish to change the Due value from the Journal table:
- Reset due.
Codes to be entered in the Due Code column to reset the daily due from the row in which you are. The new value must then be entered in the Due column.- DS (Set Today) - Set the due hours of the current day, without changing the other days.
- WS (Set Week Day) - Sets the hours due for the day and for the same day of the following weeks.
- PS (Set Predefined) - Sets the due hours for the day and for all subsequent days without a different setting
- Daily Due Reset Codes
- WR (Reset Week Day) - Reset the default value for the day of the week.
- WA (Reset All Week Days) - Resets all the default values for the days of the week.
- PR (Reset Predefined) - Reset general default. Removes the default value set previously.
- PA (Reset Predefined and Week Days) - Reset the general default and those of the week. It is like starting everything anew.
- Progressive reset code
- RP (Restart progressive) - Restarts the value of the Progressive column from zero. You insert this code in the beginning of month row, when all hourly salaries, when all the hours of the previous month have been paid.
Due
The column is protected. The program automatically calculates the difference between the hours worked and those due. At the end of the month and year, the totals of the Due are also reported.
- If there are no values in the Due Code column, the program resumes, the values present in File Properties - Start in the Due Code column.
- If codes are entered in the Due Code column (see previous paragraph), the program calculates the due based on these codes.
- All rows that have 0 (holiday) or 1 (non-working) in the Festive column, the cell will remain empty in the Due column.
Difference
The column is protected. The program automatically calculates the difference between the hours worked (Total) and those due (Due). At the end of the month and at the end of the year, the totals of the difference are also reported.
Progressive
The column is protected. The program automatically calculates the difference between the hours worked (Total) and those due (Due). At the end of the month and at the end of the year, the totals of the difference are also reported.
Worked
The column is protected. It is used by the program for the automatic calculation of the sum of the hours worked.
Detail
The column is protected. It is used by the program to automatically display work details (eg projects). Also see details in Managing projects.
Surcharge
You can enter the additional working time paid differently, in hours and minutes. It can also be used to manage reclaims or penalties for delays or other.
Split1 and Split1
Columns that can be used to track hours invested in projects.
Hours in decimal format
You can also enter the hours in digital format (1.5 = 1:30).
- If you enter a value preceded by the sign ">" or "<" (greater or lesser), the program considers it as a decimal value and converts it to hours and minutes:
- "<1.50" is converted to 1:30
- "<1.75" is converted to 1:45 an hour and three quarters.
- In the hour counter, enter the number of hours with the decimal separator. For example, if you enter 1.75, the program displays the value in hours and minutes (1:45).
Display in digital format
- The info window also indicates the value of the hours in decimals.
- In the monthly printout certain values are also referred to as decimals (this is because payroll programs often work with decimals).
Speed up insertion
- Go to the current day.
- The row of the current day is the one marked in yellow.
- Actions → Go to today menu.
- Enter the time of entry and exit.
- With the "." computer time is entered.
- If for example, you enter +5 or -5 (or any other number), the program displays the current time with 5 minus plus minutes to the computer time.
- Copy from the previous week.
Using the Actions → Copy menu, the times of the previous week are resumed. - Take over the value of the previous row.
Use the Actions → Copy menu from above (or button F4 or Cmd 4). - Vacation or Absence Auto-Completion.
Go to cell modification (with a space) and the program suggests the hours due, minus the hours already performed.
Hour column blocks
The hours columns of the Journal table are organized into blocks, as explained below.
Hours worked columns
These are the columns used to indicate the daily working hours. The working time carried out in the day can be entered in two ways:
- As hours worked - data is entered in the Work1 and Work2 columns.
In the Banana Accounting Plus version, all columns of the hour counter type starting with TimeWork are considered hours worked. - As time of entry and exit - data is entered in the columns Start1, Stop, Start2, Stop2, etc.
The program will calculate the time elapsed.
Total hours worked
In the Total hours worked column, the hours indicated in the hours worked columns and those indicated as Start and Stop times are summed.
In the Banana Accounting Plus version there is also the total Detail column. If the Row Type contains the value "D", the working hours are summed in the Detail column and not in the Total column.
Extra hours
These columns are only available in the Banana Accounting Plus version.
They are used to insert surcharge hour. For example, in the case of holiday or night work which involves a surcharge.
The Extra Total is the sum of the extra hours, indicated as hours, and those calculated as a percentage.
Absences
Absences are entered in the Sickness, Holidays, Service or Other columns, as appropriate.
These hours are totaled in the Absence column (TimeAbsenceTotal) and then in the Total column. When calculating the difference between the hours due, absences are considered as paid.
In the Banana Accounting Plus version all the time counter columns starting with TimeAbsense are added to the total absence. The user can add absence columns for other cases.
If you need to keep track of the absences that do not have to be added to the Total hours, you have to add columns of the Hour counter type.
Adjustments
This column is used for accounting adjustments, as in the case of extra hours having been made and paid; then to scale them from the total, enter the value with the negative sign in the Adjustments column.
The Total hours
Is the sum of the total hours, considered as hours to be counted and as part of the amount due. It includes the following columns:
- Total hours worked.
- Total supplements.
- Totale absences.
- Adjustments.
Hours due
The Spreadsheet allows you to indicate the hours due. In the case of a Fixed rate salary contract, the hours of the working days are indicated per contract.
In the case of hourly wages, without a fixed number of hours included in the contract, the hours owed part is generally not used.
The employee's daily working time is indicated in the Due column. The value is indicated on the basis of various parameters (see columns of the Journal table):
- The working hours settings, indicated in File properties → Start.
- The Festive column.
The program completes the value due only for the days indicated as Business. - The Due Type column
By indicating a code, the content of the Due daily column can be set differently.
Difference and Progressive hours
In the Difference column, the program indicates the difference in hours between the Total and the Due.
In the Progressive column, the program indicates the cumulative difference.
If no Due has been indicated, the Progressive corresponds to the sum of the hours worked. This value can be reset by inserting the RP (Progressive Restart) code in the Due Type column.
Split
They are information columns that are used to indicate hours allocated to projects.
Journal Table - Additional Columns
In Banana Accounting Plus columns have been added for the calculation of the supplement (festive, night) and for the management of multiple lines for the same day.
Detail
The column is protected. It is used by the program to automatically display work details (eg projects). See Project management.
Surcharge
You can enter the additional work time paid differently, in hours and minutes. It can also be used to manage recoveries or penalties for delays or other.
%Surcharge
You can enter the percentage of additional work that is paid differently.
If both hours without supplement and hours with supplement are worked on the same day, the times must be entered in two lines:
- Add day row
- The first row will indicate the work (start and end) normally.
- The second row will indicate the extra hours and indicate the appropriate percentage.
If you want the daily total directly in the table, you will have to add a row for daily total.
Surcharge calculated
The column is protected. It is used by the program to calculate the overtime, indicated in the Supplement or Supplement% column.
Total Surcharge
The column is protected. It is used by the program to calculate the total overtime, shown in the Supplement or Supplement% column.
This value is summed in the total hours column.
New user columns
You can add columns which are then totaled into groups. The Xml name of the column must be of type time counter and must start as follows:
- TimeWork. Added to the total work.
- TimeSurchargeManual. Added to the total work.
- TimeAbsence. Added to the total absences.
- TimeSplit. Summed in the TimeSplitTotal if existing.
You can define the columns to indicate the hours of a project, also added up in the TimeWork, or, the hours of absences for training or other, considered absences and counted in the total absences.
Working Times and Hours
The program always works with hours and minutes, 8:30 means 8 hours and 30 minutes.
- Values are saved internally as seconds and then displayed in the hour and minute format.
- When entering timetables, time is rounded to the minute.
Hours in decimal format
The hours can also be entered in digital format (1.5 = 1:30).
- If you enter a value preceded by the sign ">" or "<" (greater or lesser), the program considers it as a decimal value and converts it to hours and minutes:
- "<1.50" is converted to 1:30
- "<1.75" is converted to 1:45 one and three quarters.
- In the hour counter, enter the number of hours with the decimal separator. For example if you enter 1.75, the program displays the value in hours and minutes (1:45).
Display in digital format
- The info window also indicates the value of hours in decimals.
- In the monthly printout certain values are also indicated as decimals (this is because payroll programs often work with decimals).
Speed up insertion
- Position yourself on the current day.
- The row of the current day is the one in yellow.
- Utilities menu → Go to day.
- Enter the time of start and stop.
- With the "." computer time is entered.
- If you enter +5 or -5 (or any other number) the program displays the current time with 5 minutes more or less than the computer time.
- Copy from the previous week.
Using the commands menu Actions → Copy, the times of the previous week are resumed. - Returns the value of the previous line
Use the commands menu Data → Copy from above (or the F4 or Cmd 4 button). - Vacation or Absence Auto-Completion.
Go to cell modification (with a space) and the program suggests the hours due, minus the hours already performed.
Hour column blocks
The hours columns of the Journal table are organized in blocks, as explained below.
Hours worked columns
- Data is entered as hours worked in the Start1 and Start2 columns.
In the Banana Accounting Plus version, all columns of the hour counter type starting with TimeWork are considered hours worked. - As time of entry and exit - data is entered in the columns Start1, Stop1, Start2, Stop2, etc.
The program calculates the time elapsed
In the Experimental version there is also the total Detail column. If the Row Type contains the value "D" the working hours are added together in the Detail column and not in the Total column.
Total hours worked
The hours indicated in the hours worked columns and those indicated as start and stop times are totaled in the Total hours worked column.
In the Banana Accounting Plus version, there is also the total Detail column. If the Row Type contains the value "D", the working hours are summed in the Detail column and not in the Total column.
Extra hours
These columns are only present in the Banana Accounting Plus version.
These columns are used to insert hour supplements. In the case, for example, of work on holidays or at night which involves an increase.
The Extra Total is the sum of the extra hours, indicated as hours, and those calculated as a percentage.
Absences
There are the Sickness, Holidays, Service or Other columns, where absences are entered.
These hours are added up in the Absence column (TimeAbsenceTotal) and then in the Total column. When calculating the difference between the hours due, absences are considered as paid.
In the Banana Accounting Plus version all the time counter columns starting with TimeAbsence are added to the absence total. The user can add absence columns for other cases.
If you want to take note of absences that do not have to be added to the hours Total, you have to add columns of Hour counter type.
Adjustments
This column serves for accounting adjustments, as in the case where extra hours have been made and these are paid; then to scale them from the total, enter the value with the negative sign in the Adjustments column.
Hours Total
It is the sum of the total hours, considered as hours to be counted and as part of the amount due. It includes the following columns
- Total hours worked
- Total hours supplements
- Total absences
- Adjustments
Hours due
The Spreadsheet allows you to indicate the hours due. In the case of a contract with a Fixed salary, the hours of the working days are indicated per contract.
In the case of hourly wages, without a fixed number of hours included in the contract, the hours owed part is generally not used.
The employee's daily working time is indicated in the Due column.The value is indicated based on various parameters (see Journal table):
- The working hours settings are indicated in File properties→ Start.
- The Festive column.
The program completes the value due only for the days indicated as Business. - The Due Type column
By indicating a code, the content of the Due daily column can be set differently.
Difference and Progressive hours
In the Difference column, the program indicates the difference in hours between the Total and the Due.
In the Progressive column, the program indicates the cumulative difference.
If no Due has been indicated, the Progressive will be the sum of the hours worked. This value can be reset by entering the RP (Progressive Restart) code in the Due Type column.
Subdivision
These information columns are used to indicate hours allocated to projects.
Managing holidays with the Time Sheet
Holidays are designated in hours and are entered in the Holiday column of the Journal.
Holidays carried forward
When creating a new year via File and accounting properties ... → Start, any holidays to be carried forward from the previous year must be indicated.
The value is indicated automatically in the Carry forward row of the Holiday column.
Paid holidays or paid leaves, as defined by contract
If some holidays are already included in your schedules :
- Indicate the number of hours of paid holiday in the Start year (for example, Start 2020) initial row.
- Enter the number of paid holiday hours, as per your contract, in the Holiday column. (ex. for 20 days of 8 hours, enter 160, or 80 hours in case you would work part-time at 50%).
- Paid leave days, considered as holidays:
Enter the amount of hours you are entitled to (days x daily hours) in the Start Month row .
Setting up holidays and paid leaves
The start rows are used to indicate the number of holidays granted in hours and minutes. You may indicate the holidays either in the Start year or in the Start month row.
If a person is entitled to 4 weeks of holidays and works 40 hours a week: 40 * 4 = 160. This value will be indicated in the Start year row.
If the hours of allocated holidays changes during the year, enter the number of hours as plus or minus (negative sign) in the available Start month row, Holiday column.
The Holiday column is also used to indicate paid leaves.
Completed and paid holidays
Completed or paid hours of holidays are indicated In the Holiday column of the daily rows.
Remaining holidays
The hours of remaining holidays is indicated in the Total row and calculated automatically.
When holidays are paid:
- In the start row of the following month enter the vacation hours paid with a negative sign.
- For example, indicate "Payment Holidays" in the Notes column.
Changes during the year
If working hours are changed during the year or there are any interruptions that change the holiday hours, these must be calculated and changed manually.
Plus or minus differences can be entered in the line at the beginning of the month where the change occurs.
Enter your work schedule
Working hours and other data are entered in the Journal table.
In the Carry forward row, the programme reports the holiday hours from the previous year, entered in the File and Accounting Properties > Start dialogue.

In the Journal table, data can be edited and entered as required.
- Write down the holiday hours to which you are entitled in the current year.
- Include, edit, add, customise any holidays if required.
- Enter your daily working hours, sickness, holidays, etc.
Print your monthly report
If you go to the Reports menu > Monthly Report..., you can immediately generate, print and save a complete monthly report.

Useful links
- Journal table
- Salary types (Fixed salary or Hourly salary)
Report and Timesheet Actions Menu
Working with the Banana Accounting Time sheet can be optimized, via different functions in the Reports and Actions menus.
Reports Menu
The Monthly Report command is activated via the Reports menu, to create the monthly report of working time and other data entered in the Journal (holidays, absences, other) month by month.
Actions Menu
The following commands can be activated in the Actions menu:
Go to today
Positions the cursor on today's row.
Recheck all... (F9)
The program recalculates, double-checks and displays any errors or differences.
Use this command whenever you are in doubt that there is a problem.
Sort Journal
Sort the rows by date.
Check-in or Check-out
Inserts the current time in the selected cell. Alternatively, you may type "." (point without quotes) in the selected start or end cell.
Fill Day (from last week)
Resumes work and absence time of the current day with the values of the day of the previous week.
Fill Week (from last week)
Resumes work and absence time of the current week with the values of the respective days of the previous week.
Add row day
Adds a row successive to the selected one and with the same date. Use this to enter additional daily values.
Add row total day
Adds a row, where daily values will be totaled.
Create rows for period ...
Add rows (daily, start, total, balances and carryovers) based on the selected period. All rows of the Journal will be sorted by date.
Create New Year
The command creates a new Timesheet file for the following year, transferring the initial values of the vacation balance and hours from the previous year into the new file.
Warning! When creating a new year, public holidays are not flagged. It is necessary to manually modify the days that are marked as holidays.
To avoid manually handling holidays, we recommend downloading the template file with the holidays already set according to the country. In this case, you will need to manually enter the vacation and hour balances in the File Properties > Start section (File menu). See How to start.
Import Time sheet
Takes over values from an external time sheet. You indicate the file from which to recover the values and specify which values to recover.
The program searches the imported file for rows with the same date and section, and resumes these values.
If there are multiple rows for the same date in the imported file, these values after the first line are not imported.
The dialog box allows you to choose one of the following options:
Import festive only
It only imports the values from the Festive column.
Import all values
It imports the Festive, Notes, Worked, Absences, Adjustment, Due and Subdivision values.
Inserimento valori
Ore nel formato decimale
Il programma lavora sempre con ore e minuti 8:30 significa 8 ore e 30 minuti.
Si possono però anche inserire le ore nel formato decimale (1.5 = 1:30).
- Se si inserisce un valore preceduto dal segno ">" o "<" (maggiore o minore), il programma lo considera come un valore decimale lo converte in ore e minuti:
- "<1.50" viene convertito in 1:30
- "<1.75" viene convertito in 1:45 un ora e tre quarti.
- Nei contatore ore inserire il numero delle ore con il separatore decimale. Per esempio se si inserisce 1.75, il programma visualizza il valore in ore e minuti (1:45).
Visualizzazione nel formato digitale
- Nell'info Windows viene indicato anche il valore delle ore in decimali.
- Nella stampa mensile certi valori sono anche indicati come decimali (questo perché i programmi dei salari lavorano spesso con i decimali).
Velocizzazione inserimento
- Posizionarsi sul giorno corrente
- La riga del giorno corrente corrente è quella in in giallo.
- Menu Utilità -> Vai a giorno.
- Inserisci l'ora di entrata e uscita.
- Con il "." viene inserita l'ora del computer.
- Se inserisci +5 o -5 (o qualsiasi altro numero) il programma visualizza l'ora attuale con 5 minuti in più o in meno rispetto all'ora del computer.
- Ricopia dalla settimana precedente
Usare i comandi menu Utilità1-> Ricopia si riprendono orari della settimana precedente. - Riprende il valore della riga precedente
Comando Riprendi da sopra (o il bottone F4 o Cmd 4) - Autocompletamento Vacanze o Assenza
Andare in modifica della cella (con uno spazio) e il programma suggerisce le ore dovute, meno le ore già eseguite.
Gestione progetti
Il Foglio ore si presta bene anche per prendere nota delle ore lavorate su progetti.
Nella Versione Experimental sono state aggiunte ulteriori possibilità proprio per facilitare la gestione dei progetti.
Il Foglio di calcolo offre diverse possibilità, si deve scegliere quella che fa al proprio caso, eventualmente combinando gli approcci. .
Attribuire i tempi con le colonne suddivisioni
Con questo approccio, la tenuta delle ore avviene normalmente con le normali colonne (Lavoro o ora entrata e uscita). Nelle colonne Suddivisioni indichi le ore da attribuire a un determinato progetto.
- Ci sono due colonne predefinite per la suddivisione e puoi ovviamente aggiungere altre colonne (Tipo contatore) per altri progetti.
- Nelle righe di totale si ha poi la somma per ogni progetto.
- Nella riga Riporto puoi inserire manualmente il riporto per ogni progetto.
Nella versione Experimental se aggiungi una colonna con il nome TimeSplitTotal, di tipo contatore tempo, il programma somma tutte le colonne il cui nome campo XML inizia con TimeSplit.
Se vuoi il totale giornaliero di tutti le suddivisioni, quando aggiungi una nuova colonna dagli il nome XML che inizia con TimeSplit (per esempio TimeSplitP1, TimeSplitProjectX).
Inserire le ore nelle colonne Lavoro (TimeWork)
Puoi usare le colonne Lavoro1 e Lavoro2 per inserire le ore lavorate al progetto. Le ore del progetto andranno a sommarsi alle ore di lavoro giornaliero.
Nelle righe di totale avrai la somma di ogni progetto.
Nella versione Experimental se aggiungi delle colonne di tipo contatore tempo, che iniziano con TimeWork, verranno anche queste sommate nella colonna Lavoro totale. Hai la possibilità quindi di aggiungere quante colonne progetto ti servono.
Più righe giornaliere per lo stesso giorno
Nel Foglio ore puoi avere diverse righe dello stesso giorno.
- Puoi creare una riga per ogni progetto. Se sullo stesso giorno lavori su più progetti dovrai aggiungere una nuova riga, con la stessa data del giorno.
- A partire dalla seconda riga dello stesso giorno, la descrizione risulterà leggermente rientrata.
- Per aggiungere una nuova riga puoi usare la funzione duplica riga.
- Nella versione Experimental c'é il comando per aggiungere una riga giornaliera e anche la riga di totale giorno.
Righe di Dettaglio
Nella versione Experimental è stata aggiunta una colonna RigaTipo. Se in questa colonna inserisci il valore "D" (Dettaglio), le ore di lavoro inserite in questa riga, sono sommate nella colonna Dettaglio totale, invece che nella colonna Totale.
Nella riga giornaliera normale inserisci le ore di lavoro effettive, anche con ora inizio e fine.
Nelle righe supplementari di Dettaglio, inserisci le ore per i singoli progetti. Puoi indicarli come ora inizio o fine o anche inserendo le ore nella colonna Lavoro (TimeWork).
Se usi le colonne TimeWork è meglio non usare delle colonne diverse per inserire le ore effettuate e quelle dei progetti, in questo modo nel totale giornaliero o mensile avrai le somme separate.
Stampe
Per il momento non vi sono ancora stampe che raggruppano i valori per progetto inseriti su righe diverse. Si prevede che verranno create in futuro.
Se sai programmare in Javascript puoi creare delle stampe come desideri e anche metterli a disposizione di altri.
Aggiunta Tabella Progetti, Categorie
Nella Versione Experimental puoi aggiungere delle Tabelle Progetti e Categorie, dove indicare l'elenco progetti.
Nella tabella Giornale ti troverai una colonna dove, per ogni riga, inserire il codice del progetto o della categoria.
Puoi anche aggiungere altre tabelle e collegarli con la tabella Giornale, per codificare altri valori.
New year's Time sheet
To create the Time sheet file for the new year, there are two options:
- Download the Time sheet Template with Predefined Holidays for the New Year.
- Use the Create New Year Command from the Actions Menu.
New Year Time sheet from Default Template
This is the recommended procedure. The template already includes predefined holidays according to the country.
In this case, you need to:
- Start Banana Accounting
- Go to File > New
- Choose Time sheet as the file type
- Select one of the proposed templates as the Time sheet
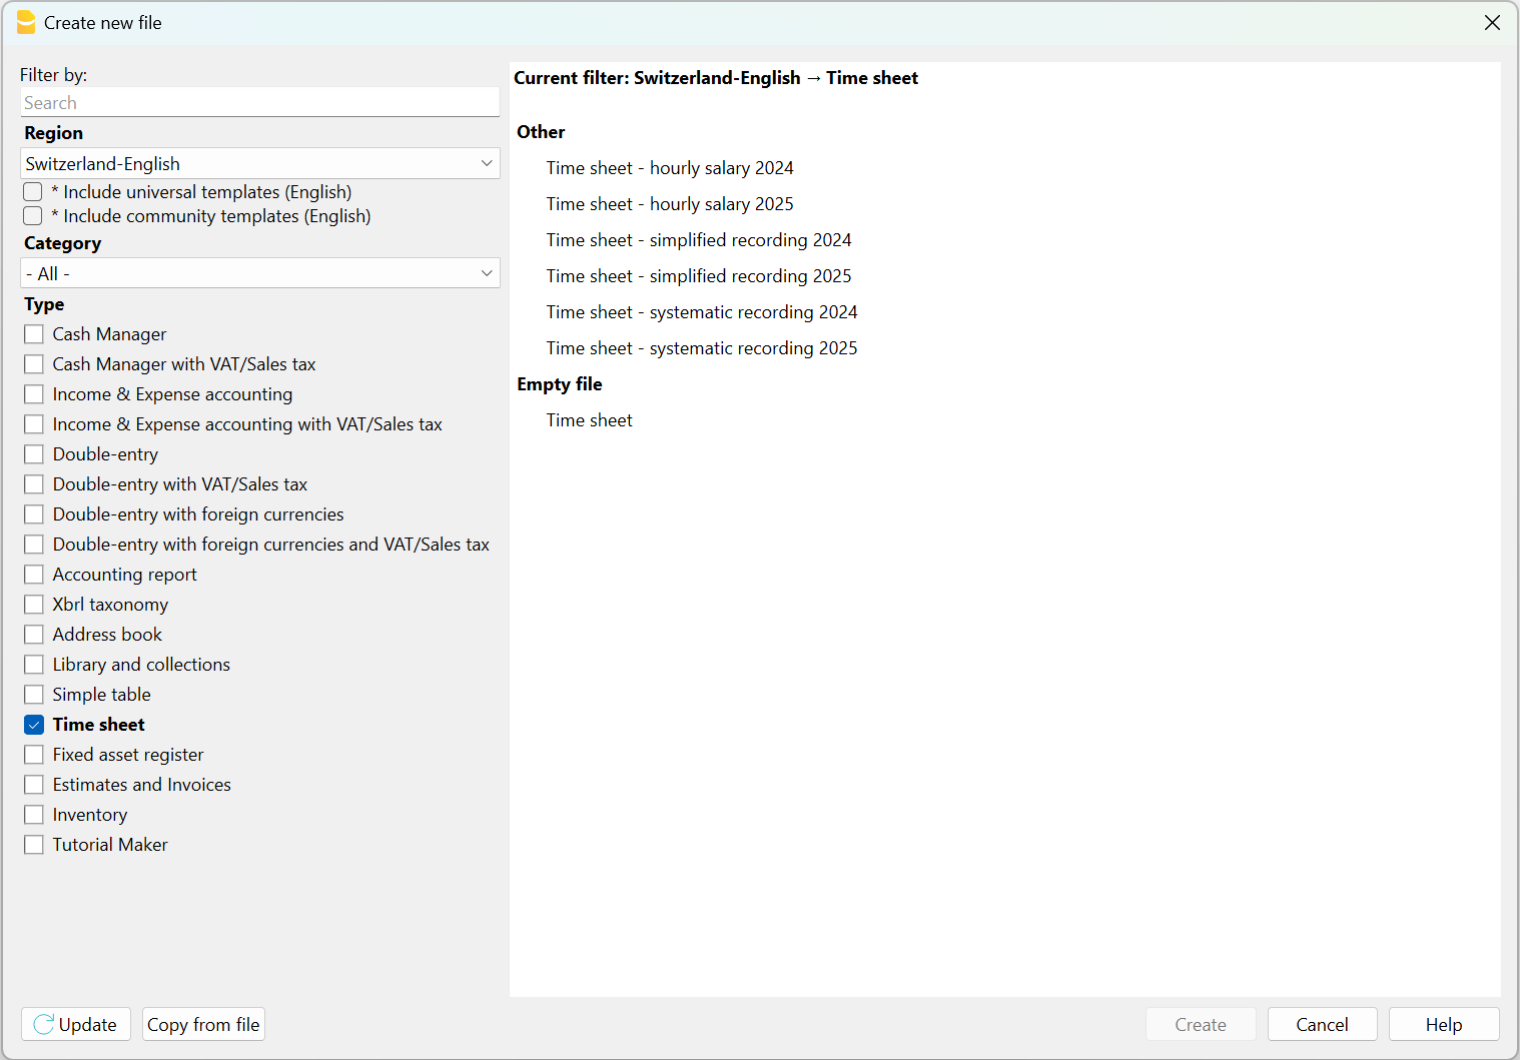
There are the following predefined templates:
Time Sheet - Systematic Recording
This model is ideal for those who need to record work hours by specifying the start and end times for all working days defined in the Basic settings (Menu File > File Properties (Basic Data) > Start section).
In the Journal table of this model, there are the following main columns:
- Start, Stop, Due, Difference and Progressive
By entering the start time and end time in their respective columns, the program automatically calculates and inserts the hours worked, the difference between the hours worked and the hours due, and the balance of hours in the Progressive column. If the balance is negative, the hours worked are less than the hours due; conversely, if the balance is positive.
Time Sheet - Simplified Recording
This model is ideal for those who record the total hours worked daily without specifying the start and end times.
In the Journal table of this model, there are the following main columns:
- Work 1, Work 2, Due, Difference, and Progressive.
Unlike the systematic recording model, the start and end times are not entered; instead, the total hours worked are recorded. The program automatically fills in the Due column (for the hours of work required by the contract), the Difference column (between the hours worked and the hours due), and the Progressive column (for the balance of hours).
Time sheet - Hourly Wage
This model is to be used in cases where work is paid by the hour without a fixed salary. Therefore, in the Basic settings (Menu File > File Properties (Basic Data) > Start section), the Start dialog remains empty without indicating the hours due.
The columns are identical to those in the Time sheet - Systematic Recording and Time sheet - Simplified Recording templates. The difference lies in the Progressive column because, starting from February, the Due Code column contains the code RP (Restart Progressive) to ensure that the Progressive column resets and does not display the balance of hours, as payments are made monthly.
Once the template is saved with a name, it is necessary to manually carry over the balances for overtime and vacations from the previous year.
- Menu File > File Properties (Basic Data) to enter the employee's data.
New Year Timesheet Using the Create New Year Command
This procedure involves creating the new year's timesheet starting from the previous year's file:
- Open the previous year's Time sheet file.
- Menu Actions > Create New Year.
- Save As the new Time sheet.
In this case, the balances for overtime and vacations from the previous year are automatically carried over to File Properties (Basic Data) > Start section (Menu File). The initial data is also carried over to the initial rows of the Journal table, where you need to enter all the hours for the vacation days to which you are entitled in the Start row.
Attention: Public holidays are carried over as they were in the previous year. Therefore, it is necessary to verify all holidays and correct them manually.
Printouts
Print Journal table
When using the File → Print ... command, you can:
- Print all the rows of the Journal table.
- Print the selected rows of the Journal table.
Monthly report
Using the Reports → Monthly report ... the program will calculate and display a summary report of the selected period including the main columns used
- If you want to change the column headers in the printout, you have to change them in the Journal table. They will be resumed automatically.
- The program prints the default columns.
For the moment it is not possible to print other columns when printing the monthly report.
Fixed Rate Salary
With the free Banana Accounting Plus Time Sheet, you can easily start entering work times, your holidays and absences and instantly know the totals and balances of all the data.
According to what is stipulated in the contract:
- Set the due working time (agreed) and include holidays.
- Actual working hours and absences are entered.
- The program calculates the daily and progressive balance.
All values, time due, hours worked, absences and holidays are entered and displayed as hours: minutes (eg 10:30).
This unified approach allows you to enter data quickly and instantly and be in control of the situation.
The values entered are checked by the program. If you enter an incorrect value, it will show instantly.
Setting up the due time
The Time Sheet, in File Properties - Start, allows you to quickly set up the weekly working time.
If the scheduled time is different or changes during the year, you can adapt it, see Set the working period and times.
Planned Holidays are set directly in the Holidays column instead of the Journal table.

Entry of working times and absences
Enter the daily values in the appropriate columns of the Journal table, relating to the following data:
- Hours of work carried out are entered as follows:
- Entry and exit times (systematic collection)
The program calculates the hours and minutes of work. - Work hours, Work 1 or 2 columns
Total hours worked are entered. - If you enter both entry and exit values and hours worked, the program adds them.
- Entry and exit times (systematic collection)
- Hours of absence (Sickness, Vacation, Service, Other).
These are the hours that will be deducted from the due hours. - Adjustments.
When accounting adjustments are required, enter a positive or negative value in the Adjustments column.
When extra hours are paid, for example, the hours are entered in negative, so that the progressive is reduced.
When you start work during the year
When the work period begins during the year, proceed as follows to reset the hours due from the first of January to the work start date:
- On 1st January, in the corresponding line and in the column Due code, enter WA. The programme resets the total hours for all days before the start of the working period.

- On the start date line, and for all working days of the first week, enter WS in the column Due code and the number of working hours in the column Due. The programme will automatically complete the hours due for all weeks until the end of the year.

How to change work days during the year
If working days change during the year, the new working day settings must not be changed in the File properties, otherwise the change is applied retroactively from the first of January, but directly in the Journal table using the appropriate codes. Several changes during the year are possible.
If a working day becomes a non-working day:
- On the line of the day you wish to change (from a working day to a non-working day), enter the code W1 in the column Holiday. For the programme to resume the change as a non-working day for all weeks of the year, the code WS must be entered in the column Due code.
If a non-working day becomes a working day:
- On the line of the day you wish to change (from a non-working day to a working day), enter the code W2 in the column Holiday. For the programme to resume the change as a working day for all weeks of the year, the code WS must be entered in the column Due code.
For further customisations see the explanation of the Journal Table columns.
How to change the work rate during the year
If the number of working hours due increases or decreases during the year, the new settings must be entered in the Journal table, in the columns Due code and Due.
On the day in which the changes are to be implemented (e.g. from 5 working hours to 8):
- In the Due code column, enter the code WS.
- In the Due column, enter the current due hours (8)
The programme resumes the change of the new due hours for all weeks of the year.

For other customisations, please refer to the explanation of the Due code column .
If the available holiday hours change during the year, the differences must be calculated and changed manually. See Changes during the year.
Multiple rows for the same days
You can manage multiple rows for the same working day, where you can enter different daily values. To make understand that it is the same row of the day, the description is indented in the following rows of the same day .
There are several possibilities to create an additional row for the same day:
- Via the Edit → Duplicate rows... menu
- Via the Edit → Add rows... menu, inserting the date of the day (you have to remove the protection from the date column).
- Via the Actions → Add row Day (only in the Banana Accounting Plus version).
The difference with respect to the amount due and the totals
In the Journal Table, the program displays the following data after each entry:
- The difference between the hours due and the hours worked on the day.
- The progressive balance.
- The total by month, year and grand total of the different hour columns and numeric columns.
The total for the holidays results as the difference between the holidays set at the beginning of the year and those used, see Holidays page. - The carry-over to the end of the month and year of the various numerical columns:
- The carry-over is the total of the position, and also takes into account the values of the previous periods.
- At the end of the month you will also known how many hours have been done since the beginning of the year.
- The final total is equal to the carry-over.
Monthly printout
The monthly printout presents all values in summary form.
Adjustments and payment of accumulated hours
The Adjustments column allows you to modify the total hours due / worked.
- If hours are accumulated and these are paid:
- In the row of the day they are paid
- Enter the hours paid in negative in the Adjustment column.
- Indicate "Payment of accumulated hours" in the notes
- The progressive balance decreases.
- In the row of the day they are paid
- When accumulated holidays are paid:
- In the row of the day when the holidays are paid.
- Enter the hours paid in negative in the Holidays column.
- Indicate "Accumulated holiday payment" in the notes
- The progressive balance decreases.
- In the row of the day when the holidays are paid.
Paid by the hour wage
It is quick and easy to enter data in the free Time sheet of Banana Accounting Plus as it immediately provides you with daily, monthly and yearly total hours.
All values (due time, worked hours , absences and holidays..) are entered and displayed as hours:minutes (10:30).
allows data to be entered quickly and the programme's automated control allows for correct reports.
The application allows you to enter the days and hours agreed as per contract and the hours of work performed highlighting any differences between what was agreed and what was carried out. The monthly Report which needs to be handed over to your employer is now complete and complies with legal requirements.
Please consult the How to start page.
Setting of weekly working hours
The Time sheet adapts to any kind of working time, whether fixed, flexible, part-time, or with combined settings.
In File Properties → Start indicate the working days and weekly working hours.
With the paid-by-the-hour wage, the hours actually worked are counted.
- If a certain number of daily working hours have been agreed, it is possible to indicate them as due hours, as for the fixed salary. In this way, the program calculates and displays the differences between what is agreed and carried out.
- If the expected working time is different or changes during the year, you can adapt it, as indicated in the next paragraph Set period and working time.
- The planned holidays are instead set directly in the Journal table columns
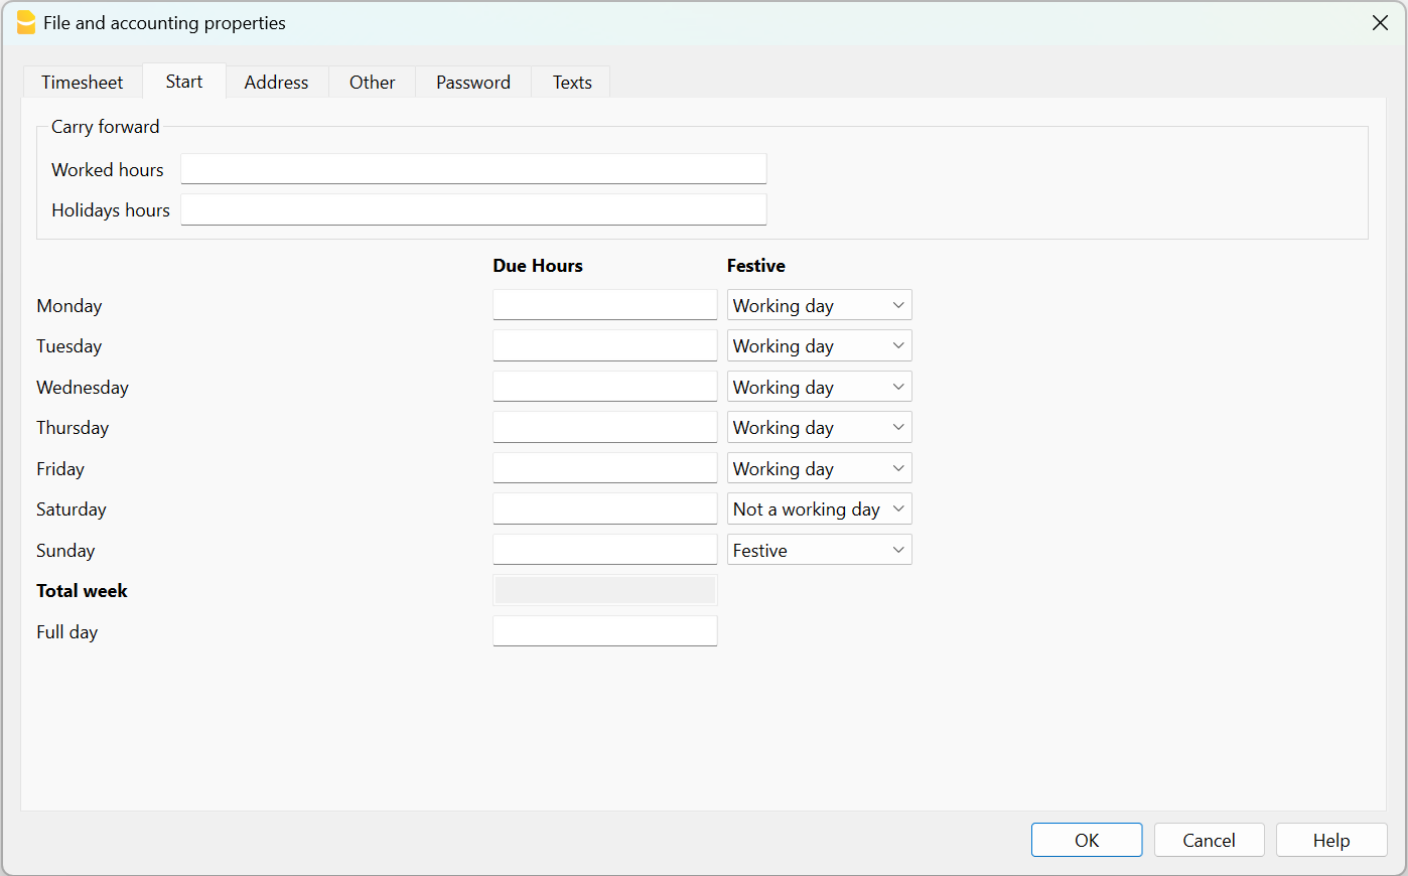
Input of working time and absences
In Paid by the hour wages, the hours worked are entered in the Journal table in one of the following ways:
- Enter the start and end time in the corresponding columns (systematic collection).
The programme calculates the hours and minutes of work in the Total column. - Enter the total of hours worked in column Work 1 or 2.
If the Start, End and also the Work 1 or 2 columns have been used, the programme sums all of the total hours in the Totals column .
Where hours due have been indicated in the File properties, the Progressive column shows the differences between hours worked and due.
Hours of absence due to illness, holiday, duty or other reasons, entered in the respective columns, are added together in the hours due.
Adjustments
When accounting adjustments are required, the adjusted hours must be entered in the Adjust. column, with a positive or negative value.
For example, when overtime hours are paid, negative hours are entered in the Adjust. column, so that in the Progressive column, the hours are reduced.
Start working during the year
When the working period begins during the year, proceed as follows to reset the hours due, from the first of January to the date of starting:
- On January 1st, enter "WA" in the column Due code.The programme resets the total hours for all days before the start of the working period.
- On the start date line, and for all working days of the first week, enter WS in the Due code column and the number of working hours in the Due column . The program will automatically complete the hours owed for all weeks until the end of the year.
Change of working days during the year
If working days change during the year, the new settings must not be changed in the File properties, otherwise the change is applied retroactively from the first of January, but directly in the Journal table, using the appropriate codes. Several changes are possible during the year.
If a working day becomes a non-working day:
- On the line of the day you wish to change (from a working day to a non-working day), enter the code W1 in the Holiday column. For the programme to resume the change as a non-working day for all weeks of the year, insert WS in the Due code column .
If a non-working day becomes a working day:
- On the line of the day you wish to change (from a non-working day to a working day), enter the code W2 in the Holiday column. For the programme to be able to resume the change as a working day for all weeks of the year, the WS code must be entered in the Code Due column.
For other customisations, see the explanation of the Journal Table columns.
Changing the percentage of work during the year
If the number of working hours due increases or decreases during the year, the new settings must be entered in the Journal table, columns Due code and Due.
On the date when the changes are to be implemented (e.g. from 5 working hours to 8):
- In the Due Code column, enter the code WS.
- In the Due column, enter the current hours due (8).
The programme amends the new hours due for all weeks of the year.
For other customisations, please refer to the explanation of the Due Code column .
If holiday hours change during the year, the differences must be calculated and changed manually. See Changes during the year.
Difference between due and total hours
In the Journal table, the program displays after each input:
- The daily and progressive due difference.
- These are the additional or less hours than contracted.
- The total by month, year and overall total of the different hours and numbers columns.
- The total for holidays is the difference between the holidays set and those taken, see Holidays page.
- The carry forward of both the end of the month and the year of the different numerical columns.
- The carry forward is the total of the position inclusive of the values of previous periods.
At the end of the month the hours which have been done since the beginning, will display.
The final total amount is equal to the carry forward amount.
Progressive balance reset
If you insert the abbreviation "RP" in the Due Code column, the progressive balance restarts from 0.
Holidays
For the setting of holidays, see the Holidays page.
Absences and sickness
Insert the hours of absence in the Sick, Holidays, Service or other columns.
Add km and expenses
To take note of the km traveled or expenses that must be reimbursed, add a special column in the Journal table, from Menu Data → Columns setup.
If the column addition is Type Amount, the program will automatically sum up in the total rows.
Adjustments and payment of accumulated hours and holidays
The Adjustments column allows you to change the total of the due/worked hours.
- If you accumulate hours and these are paid to you, on the row of the day on which you are paid, proceed as follows:
- In the Adjustments column, enter the hours paid in negative.
- In the Notes column enter "Payment Accumulated Hours".
- If you are paid for accumulated holidays. On the row of the day when the holidays are paid:
- Enter in the holiday column the hours paid in negative.
- In the Notes column enter "Accumulated holiday payment"
In both cases, the progressive balance will decrease.
Multiple rows for the same days
You can have multiple rows where to enter daily values. To make it clear that it is the same row of the day, in the following lines on the same day the description is indented.
There are several possibilities to create an additional row for the same day:
- From the Edit menu → Duplicate rows...
- From the Edit menu → Add rows...enter the date of the day (you have to remove the protection from column date).
- From the Actions menu → Add daily row (only in Banana Accounting Plus version).
Monthly Print
The monthly print resumes all the values.
Managing project hours in the Time Sheet
With Banana Accounting Plus you can easily start keeping track of the hours dedicated to projects, obtaining instant reports that you can view at any time.
Users who have files created with older versions must convert their file.
To manage working hours for projects, add the required columns in the Journal table.
There are two ways to manage project hours:
- Work with the Projects table.
- Work with the Work1, Work2 columns, etc.
Manage projects in the Projects table
You will need to add the Projects table if using this method:
Tools menu → Add new functionalities → Add table → Projects.
The following columns are available in the Projects table:
- Id - enter an id unique for each project
- Description - enter the name/description the project.
- Notes - enter any additionally required notes.
Adding the Projects table will automatically add the Projects Id and Projects Description columns in the Journal table.
Display the following columns in the Journal table via the Data → Columns display ... menu:
- RowType (Type) column - enter D if you wish to separate the detail of the project hours from the total of hours worked.
- TimeDetailTotal (Detail) - is a protected column. If D has been entered in the Type column, the program calculates and displays the total project hours projects separately.
- If the Type column is empty, the program calculates and displays the total of project hours in the Total column.
Enter project hours
The hours dedicated to projects can be managed within their own worksheet.
To separate the hours of work done, from the project hours of, it is necessary to:
- Position yourself on the line of the day to which you want to add the project (or projects).
- Via Utilities1 → Add row Day add a new row.
- Enter D in the Type column if you want to separate the detail of the project hours from the total hours worked. Leave blank, if you want the total project hours to be added to the hours worked (Total column).
- Enter the Id of the project, as set up in the Id table. The project description is automatically displayed.
- Enter the start and end time of the project.
The program calculates and updates the Total, Due, Difference and Progressive columns
Manage projects in the Work1, Work2 (etc) columns
As an alternative to the Projects table to manage project hours, it is possible to use the Work1, Work2 (etc.) columns.
Each column refers to the hours of a different project. The program includes two predefined columns, but you can add other columns under condition that TimeWork3, TimeWork4... is inserted in the Xml name of the New column window (menu: Data → Columns setup ... → Add).
Via Data → Columns setup, display the following columns in the Journal:
- RowType (Type) column - enter D if you wish to separate the detail of the project hours from the total of hours worked.
- TimeDetailTotal (Detail) column - is a protected column. If D has been entered in the Type column, the program calculates and displays the total project hours projects separately.
- If the Type column is empty, the program calculates and displays the total of project hours in the Total column.
Enter project hours
The hours dedicated to projects can be managed within their own worksheet.
To separate the hours of work done from the project hours, it is necessary to:
- Position yourself on the line of the day to which you want to add the project (or projects).
- Add a new row via Actions → Add row Day menu.
- Enter D in the Type column if you want to separate the detail of the project hours from the total hours worked. Leave blank,k if you want the total project hours to be added to the hours worked (Total column).
- Enter the Id of the project, as set up in the Id table. The project description is automatically displayed.
- Enter the start and end time of the project.
The program calculates and updates the Total, Due, Difference and Progressive columns.
Adding Additional Columns
If you need to keep track of instruments used, amounts, kilometers traveled or anything else in the project, you can add additional columns via the menu Data → Columns setup.
These can also be linked with an added table.
Report with project and resource data
You can filter your projects and resources and create a report with data for each of them.
Information on the time sheet for employers
The Time Sheet allows companies, which do not have an automated work time tracking, to easily start with a modern data collection system and have immediate counts and reports, without wasting time.
In order to protect their employees, companies are required by law to set up a system for recording the daily working time, complete with absences and holidays.
- In Europe this principle was reiterated in a ruling by the European Court of Justice. It is up to the member states to regulate this matter.
- In Switzerland there are ordinances in this regard which require the systematic recording of working time, with some exceptions for the simplified recording (only the number of hours worked).
How to implement the Time Sheet for your employees
- Each employee will have to download and install Banana Accounting on their computer, tablet or mobile phone.
- The employee creates his own time sheet for the entire year.
There are several methods:- Use a template emailed to him by his employer.
- Start the program and via the File → New menu create your own Time Sheet, for the entire year, choosing the most appropriate Time Sheet template.
- Each employee enters their working hours and saves the file on their computer.
- At the end of the month, the employee generates his own Monthly report and sends it to the employer. Alternatively, you can directly send the entire file of your time sheet.
Self-declaration of hours worked
The Banana Accounting Timesheet allows each employee to input their hours individually and to always be in control of their situation.
The month-end report will summarize all the necessary information. You can also create specific reports for specific needs, if required.
Centralized data entry
The Timesheet is also suitable if the employer collects the data of the hours delivered by the employees.
Hours can be attributed to projects or whatever else is needed.
Preparing templates for your company's employees
Each company has different requirements.
To facilitate keeping hours for your employees, it is useful to prepare Time sheet files that serve as templates, with the following presets:
- Annual holidays.
- The columns required for the type of data collection (systematic, simplified, mixed).
- The columns for the type of salary.
- The columns for absences.
- Additional columns for reimbursable expenses, projects and notes on the progress of the work can also be added.
Specific reports
Extensions allow you to create specific reports, tailored to the needs of a company.
Version for employers
We are thinking about developing an application for employers that will allow for the collection and consolidation of the data contained in the files managed by employees, for statistical or other purposes.
Should there be a wider interest in such a tool, please report it to us via the contact form, by also indicating which functionalities would be of interest to you.
Fixed assets register
The fixed assets register application is included in Banana Accounting Plus. It allows for easy management of your fixed assets and quickly obtains all the values you need, as well as the automatic posting of depreciation at the end of the year.
There are many functions to facilitate your work:
- Keep the list of your assets that need to be depreciated according to the tax regulations.
- Automatically calculate the amortization or in special cases, adapt the amounts manually.
- Choose to obtain monthly, quarterly, half-yearly or yearly depreciation.
- Transfer the amortization rows directly into your Banana Accounting file.
- Manage other changes in value (subsequent purchases, sales, divestments or other) related to each asset.
- Have a history of all the changes in the value of each asset.
- Manage other information related to each asset, such as warranty expiration, insurance, location.

For more information:
Characteristics of the Fixed Assets Register
The Fixed Assets Register is a Banana Accounting Plus application to manage your amortisable assets quickly and easily and instantly know their initial value, history, and year-end amortisation.
It is a very flexible, intuitive and powerful tool for calculations.
- You work in tables like with Excel, very intuitive and with all values always visible and updated.
- You have functionalities that automate the calculations, obtaining constantly updated values and balances:
- Initial purchase value.
- Book value.
- Quota and percentage of amortisation.
- Columns for the date of purchase and the duration of the warranty.
- Journal
- Items Report.
- Instant search for amortisable assets
- In case of errors, you can modify and correct, so as to always have order and precision.
- Application usable in any country.
Substitute for Excel tables for amortisation
The Fixed Assets register is a very precise, but also malleable tool that can be adapted perfectly to your requirements. It allows you to automate the calculation of amortisation, but also offers you the possibility to enter amortisation manually, so that, when there are special cases or exceptions, you are not obliged to change formulas and totals.
The application can be used in conjunction with other accounting programs, you are much more flexible and also save on license costs. For each period (month, quarter, semester or year) you can produce a printout of the summary of the amortisation to be recorded in your accounting program. You can export the data as well, if you wish.
- Add as many rows as you want without limit, or you can delete the rows you don't require.
- You don't need to enter formulas because the calculations are updated instantly and you have a contextual view (like in spreadsheets).
- Everything you see can be printed or exported to PDF or other formats.
- The columns are customizable, you can change their position, add new ones and change their width.
- Work with the format that suits you best.
- Color the rows to immediately identify the items that you need to order or that have been booked.
Based on tables
Fixed Assets Register management focuses on three main tables, which are used in a similar way to those of Excel, but that are already fully set up and programmed with everything needed to manage your inventory in a fast and safe way.
- Items table
This is the table where you set up all the assets subject to amortisation. Each item (or amortisable asset) has an identification ID, a description, a group and an account to which it belongs, the counterpart entry and all the calculation parameters for the amortisation. You can freely create groups of items, without any limits. When viewing this table, you immediately have a complete and updated view of all your amortisable assets.
- Transactions table
This table records all the operations that modify the historical, book or fiscal value of an asset. It is a table with automatic columns: by selecting the type of amortisation, the description of the operation is automatically entered (sale, write-down, revaluation, amortisation ...); via the selection of the article ID the description of the article is automatically inserted. When scrolling the table, you have a complete view of all the events during the year. If you realize that you have made a mistake, you can modify to always have perfect accounting.
- Amortisation type
This table where amortisation codes are to be entered so that, when you buy a new asset you can decide which type of amortisation to attribute: on historical value, book value, on a specific amount, full amortisation and no amortisation. Once the codes have been established, they must not be changed to ensure consistency and correctness in the calculations. The column of codes is visible both in the Items table and in that of the Journal, so as to always be in control of which amortisation has been calculated.
- Transaction type
This table defines the types of operations to be resumed in the Journal table. Each operation has an identification ID that must not be changed, so that the same description is always used in the journal table. This facilitates and speeds up the insertion of data in the Journal table.
Accounting setup
Fixed Assets Register headers and basic data set up in a single, easy-to-view dialog.
- Company headings and address with free texts.
- Language settings.
- Link to extensions for customizations.
- Password to secure your Amortisation Register file.
- You can have multiple files in different languages.
Easy and precise management thanks to the accounting logic
Unlike Excel spreadsheets, changes in value (amortisation, new purchases, write-downs) are not entered in columns, but in a table of transactions.
- The Items table lists the individual assets, with the date, purchase value, type and percentage of amortisation and other elements.
- The amortisation, revaluations or write-downs for each individual asset are indicated in the Transactions table.
- It is the history of all the changes in the value of the asset, from purchase to disposal.
- The Create amortisation rows command calculates the amortisation based on the settings in the Items table and generates transaction rows.
- Amortisation can be calculated monthly, quarterly, half-yearly or annually.
- Transaction values can be entered and edited manually. You can thus easily resolve any exception or special case.
- You can enter transactions for increases in value, special amortisation, tax value adjustments or other.
- Amortisation operations are resumed in the accounting file via the Import into accounting command.
Each item has different values
In contrast to accounting, where only the current book value is generally kept, different values are kept for each item in the Fixed assets register.
- Start from the initial purchase value, which is entered manually in the items table.
- All other values are calculated by the program by adding the variations entered in the transactions table.
- For each type of variation there is a special column In the Transactions table where to enter values.
- Increases are entered as a positive.
- The decreases (such as amortisation) are entered as a negative.
- For each value there is the total and the variation in the items table.
| Initial value (manually entered in the Items table) | |
| + | Purchases. Own production of modernization- Sales |
| - | Sales |
| = | Purchase value of the asset (The total outlay for the purchase). |
| + | Revaluations (for example following inflation) |
| - | Write downs (the historical value changes, other than amortisation which only changes the accounting value). |
| = | Historical value (calculation basis for linear amortisation) |
| + | Historical value (calculation basis for linear amortisation) |
| - | Amortisations |
| = | Book value (basis for calculating amortisation on residual value) |
| + | Increase in tax value (amortisation not recognized for tax purposes) |
| - | Decrease in tax value |
| = | Tax value (value recognized by the tax authorities) |
This way the program has all the elements to calculate amortisation automatically.
File and data saving
- All your data is saved in a single file, where you can easily retrieve everything without wasting time.
- Give the file the name you want.
- You can manage an unlimited number of files.
- Save data on any media, computer, network, cloud or send it by email. You can access it from wherever you are.
- Simultaneous access by multiple users, where, however, only one person can open the file to be edited.
- Make your accounting more secure by inserting password protection.
Item handling
- In the columns you can see the amounts in the format used by your computer, without having to get used to other formats that are not familiar to you.
- You choose the identifier of the article freely (numeric or alpha-numeric account, up to 256 characters).
- Balance, item movement and totals displayed at the same time and always updated.
- Add more columns for notes, grouping or other.
- In the Links column you can add a digital link for the registered item (receipt, purchase invoice, warranty).
- In all tables you have predefined columns that you can make visible by choice.
- The Search command allows you to quickly search for an item.
- You can sort the rows according to different sorting keys.
- Export to pdf for data storage and export to other formats for data re-processing.
- Importing data from other programs in Text, Ascii and CSV format, with the following options:
- Import data from the clipboard.
- Auto completion of values.
- Column header.
- Unicode (Utf-8).
- Columns for the archive of products no longer available.
Error reporting and control
- Command to check accounting.
The accounting is recalculated instantly as if all the operations were entered again. - Reporting of any wrong settings, differences or errors.
- Each report is linked to a help page that explains the causes and the solution.
- Possibility to correct.
Reports and prints
- Table content completely printable or can be printed by selection only.
- Add your own logo for customization of documents and prints.
- Customizable column arrangement.
- Accounting transactions report
- Journal view (Items cards).
Data export and archiving
- Copy and paste directly to and from Excel.
- Export tables to pdf and various other formats.
- Archiving of printouts and data to pdf or other formats.
- Extensions for creating Standard Audit Files.
- Saving of the accounting file on any medium.
Other features
Extensions
- Predefined extensions for various printing and other features.
- Quick search and installation.
- Customizable extensions.
- Automatic update.
- Possibility to create and install your own local extensions.
Comprehensive documentation
- Each dialog and error has its own documentation page accessible in one click.
- Constantly updated documentation.
- Questions and answers.
- Documentation also available in PDF format.
The fixed assets register is an application included in Banana Accounting Plus. It allows easy management of your amortisable assets and quickly obtains all the values you need, as well as the automatic posting of amortisation at the end of the year.
Como começar um Registo dos ativos fixos
Criar um novo arquivo
Menu Arquivo, comando Novo, escolha o tipo Registo dos ativos fixos.
Configure a tabela Artigos
Na tabela Artigos configure o elenco de bens e os grupos a que pertecem.
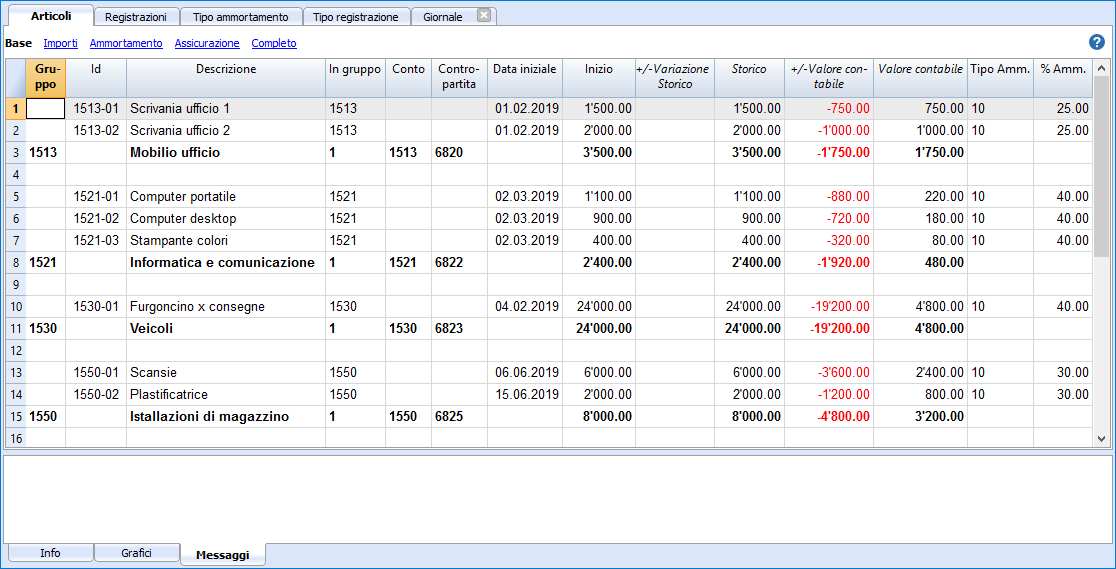
Insira linhas ou crie linhas de depreciação automaticamente
Na tabela Lançamentos insira os registos relativos à variação dos valores dos bens.
Com o comando Criar linhas de depreciação, o programa cria as linhas de depreciação para cada bem, em base aos parâmetros específicados.
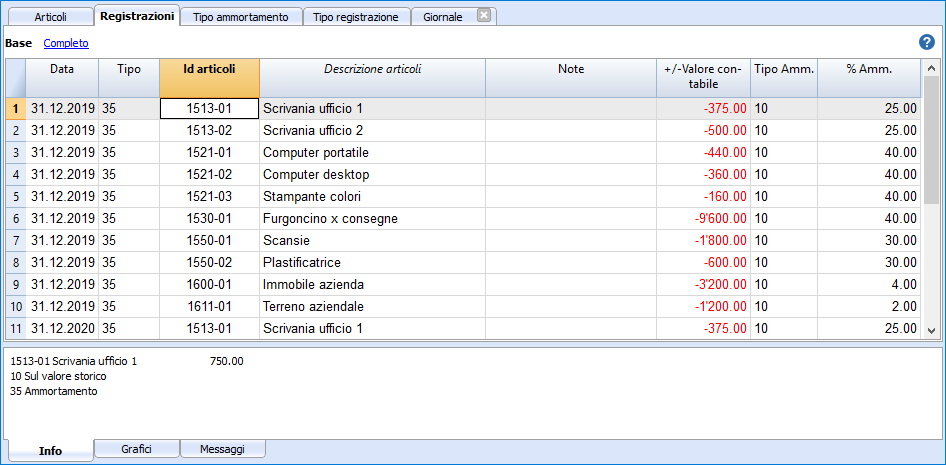
Recupere as depreciações em Contabilidade
Com a Impressão de lançamentos contábeis pode ver quais são os valores que serão importantes.
As depreciações podem ser recuperadas em contabilidade:
- Com o comando Importa em Contabilidade → Movimentos (do menu Conta1).
- Recuperando-os manualmente da impressão, isto se se usa um outro programa de contabilidade.
Items table | Fixed assets register
Fixed assets are entered in the Items table, together with their corresponding groups, the parameters for calculating amortisation and other information.
Creation of the assets list
When you buy an asset, you must register the purchase in your accounting file and, at the same time, insert a new row in the Items table with information about the new asset.
- Each item must have an Id identifying it and a description.
- The purchase date, the purchase value, the Amortisation type and the amortisation percentage are then indicated.
Groups
To total the amounts for each article category, a totalisation group is created in the Group column.The group code must be assigned to each article in the same category in the Sum in column.
Multiple group levels can be created.
For more information on the grouping system, please refer to the Grouping System page
It may be useful to create groups to correspond to the accounting accounts. If in accounting there is an "Equipment" account, it is useful to have the Equipment group in the items table. For easier checking, the accounting account number can be indicated as the group number. At the end of the year, you will need to check that the value of the Equipment Group is equal to the balance of the Equipment account.
Groups are equally useful for not having to specify parameters for each individual element. If the parameters (account, counterpart, type and percentage of depreciation, etc.) are not specified at the item level for the calculation of depreciation, the parameters of the sub-group or group are used.
Preset columns
This table contains the following columns; The ones marked with an asterisk (*) are protected and calculated by the program.
You can find more information about adding new columns in the Colums setup page.
- Identifiers, descriptions and groupings
- Group
If a value is present it means that the row is a group.
Items and groups values are added up in this row. - Id
The Item Id. - Description
The item description. - In Group
The group the row belongs to. This must be a value present in the Group column. - Account
The account to which the item is being attributed in the accounting.
This account can also be a group. - Counterpart
The account on which to post the depreciation.
The counterpart can also be indicated at group level. - DateBegin
The item purchase date (or at which the item was entered in the accounting file) - DocumentDate
The date of the item purchase document, if available.
- Group
- Value/Amounts
- Initial amount
Purchase value.
Once entered it should not be changed. Any changes should be made via transactions for the change in purchase or historical value. - Values calculated by the program
- Purchase variation *.
The positive or negative value of the total purchase indicated in the transactions. - Purchase Value *
The initial value plus the purchase variation. - Historical Variation*
The positive or negative value of the historical variation (revaluations or write-downs) indicated in the transactions. - Historical Value*
The purchase value plus historical variation. - Accounting variation*
The positive or negative value of the accounting variation (depreciation or amortisation reversals) indicated in the transactions. - Accounting value*
And the historical value plus the accounting changes. - Fiscal Variation *
The positive or negative value of the fiscal value adjustments indicated in the transactions. - Fiscal Value *
The carrying amount plus fiscal adjustments.
- Purchase variation *.
- Residual value
Any residual minimum value to be indicated.
If the residual value is equal to or greater than the book value, no more amortisation rows are generated. - Estimate value
An estimated value of the item. - ValueMarket
Eventual market value.
- Initial amount
- Amortisation parameters
- Amortisation Type
The amortisation type applied to this item
The amortisation type can also be indicated for the group. - Amortisation Percentage
The amortisation percentage.
The amortisation percentage can also be indicated for the group. - Amortisation amount
A possible amortisation amount if the amortisation is not specified as a percentage.
The amortisation type must be 2. - Amortisation Percentage 2
The additional amortisation percentage to be applied to this item.
The "Create amortisation rows" command creates an extra amortisation row, the calculation method is the same.
The extra amortisation percentage can also be indicated for a group. - Amortisation Months First Year
The number of months the item needs to be amortised in the first year.
- Amortisation Type
- Additional information
- Serial Number
The item's serial number - Warranty Date
The warranty expiration date. - Insurance Value
The value this item or group is insured for. - Insurance name
The insurance company's name. - Insurance number
The insurance policy number. - Insurance expiration
The insurance policy's expiry date. - Insurance cancellation
The date by which legal notice needs to be given to the insurance company if automatic renewal is not desired.
- Serial Number
- Archiving information
- Archiving date
A date indicates that the item should be archived. - Archiving Notes
They are used when the object is to be archived.
- Archiving date
Adding new columns
If you need more information, you can add additional columns with the Columns setup command.
Amortisation in the year of purchase of the asset
There are an infinite number of methods for establishing how the amortisation value for the first year is to be calculated.
The program offers these possibilities:
- It normally calculates amortisation for the whole year.
- In the Amortisation month first year (Month 1.Year) column , you can indicate for how many months the amortisation is to be calculated.
- If in the first year you desire to calculate only 50% of the normal amortisation, you should indicate 6 months.
- Amortisation percentage 2 Column
Used for an extra amortisation. An extra amortisation row is being created. - For other situations, let the program create the amortisation row and then adjust the automatically created amortisation transaction.
Transactions table
The Transactions table of the Fixed assets register, contains the operations that modify the historical, accounting or fiscal value of an asset.
Via the Create amortisation row command (from the Actions menu) the program will calculate the amortisation based on the parameters set and creates the transaction rows.
Or you may create entries for amortisation, write-downs, revaluations.

Transactions table Amortisation columns
This is the table where you enter the items variations. It has several columns:
- Date
The transaction date - Transaction Type Id
The transactions type, identical to the one in the Transaction table. - Transaction Type Description*
The description from the Items table is displayed. - Item Id
The Item Id. - Items Description*
The items description from the Items table is displayed. - Notes
An additional note concerning the transaction. - Purchase Variation
The item (+/-) variation compared to the purchase or sale. - Historical Variation
The Item (+/-) variation compared to a item revaluation or write-down. - Book Variation
The item (+/-) variation value compared to the book variation.
This is particularly used for negative amortization - Fiscal Variation
This is the fiscal variation amount. - Amortisation Type Id
The amortization type code as shown in the Items table. - Amortisation Type Description
The amortization code descriptions as per the Items table. - Amortisation Percentage
The amortization percentage applied. - Account
The Assets account where the operation must be registered - Contra Account
Contra account (for example the amortization account) where the operation must be registered. - Archive Date and Archive notes
Columns you might use if you need to archive the item.
Amortisation Type table
This table shows the amortisation codes.
Therse are predefined codes that must not be changed.
Columns
- Id
The amortisation code.
These codes are fixed and must not be modified.
If you change the Id number the program will not operate correctly anymore.- 00 No amortisation. No amortisation will be created.
- 01 Full amortisation at once of the item. The item is amortised all at once.
- 02 Specified amount. The amortisation is calculated, based on the entered amount.
- 10 On the historical value. The amortisation is calculated as a percentage of the historical value.
- 11 On the book value. The amortisation is calculated on the book value.
- Description
The code explanation
Transaction Type table
In the Transaction Type table there are values that define the type of operation.
The most used type is the "35 Depreciation".
Transactions types must not need to be changed.

Column
- Id
The transaction type code
These codes are fixed and must not be modified.
If you change the Id number the program will not operate correctly anymore.- 01 Initial value. Used to enter an initial value, instead of entering the initial value in the Items table
- 11 Purchase or production
- 15 Sale or value reduction.
- 21 Revaluation
- 25 Devaluation
- 31 Inverse amortization
- 35 Amortisation
- 36 Supplementary amortization
- 41 Fiscal value increase
- 45 Fiscal value reduction
- Description
The code explanation
Amortisation of assets purchased during the year
When a depreciable asset is purchased during the year, it is necessary to set the number of months over which the depreciation should be calculated.
Proceed as follows:
- In the Items table, go to the Amortisation view, column Month 1.Year
The column can also be activated and then displayed in the Base view from the menu Data > Columns setup ( AmortisationMonthFirstYear). - In the row where the vehicle purchase is recorded, enter the number of months over which depreciation should be calculated in the Month 1 Year column.
On 31.12, when amortisation is calculated, all depreciable assets that have a value in the Month 1 Year column will be depreciated not for the entire year, but only for the number of months specified in the column.
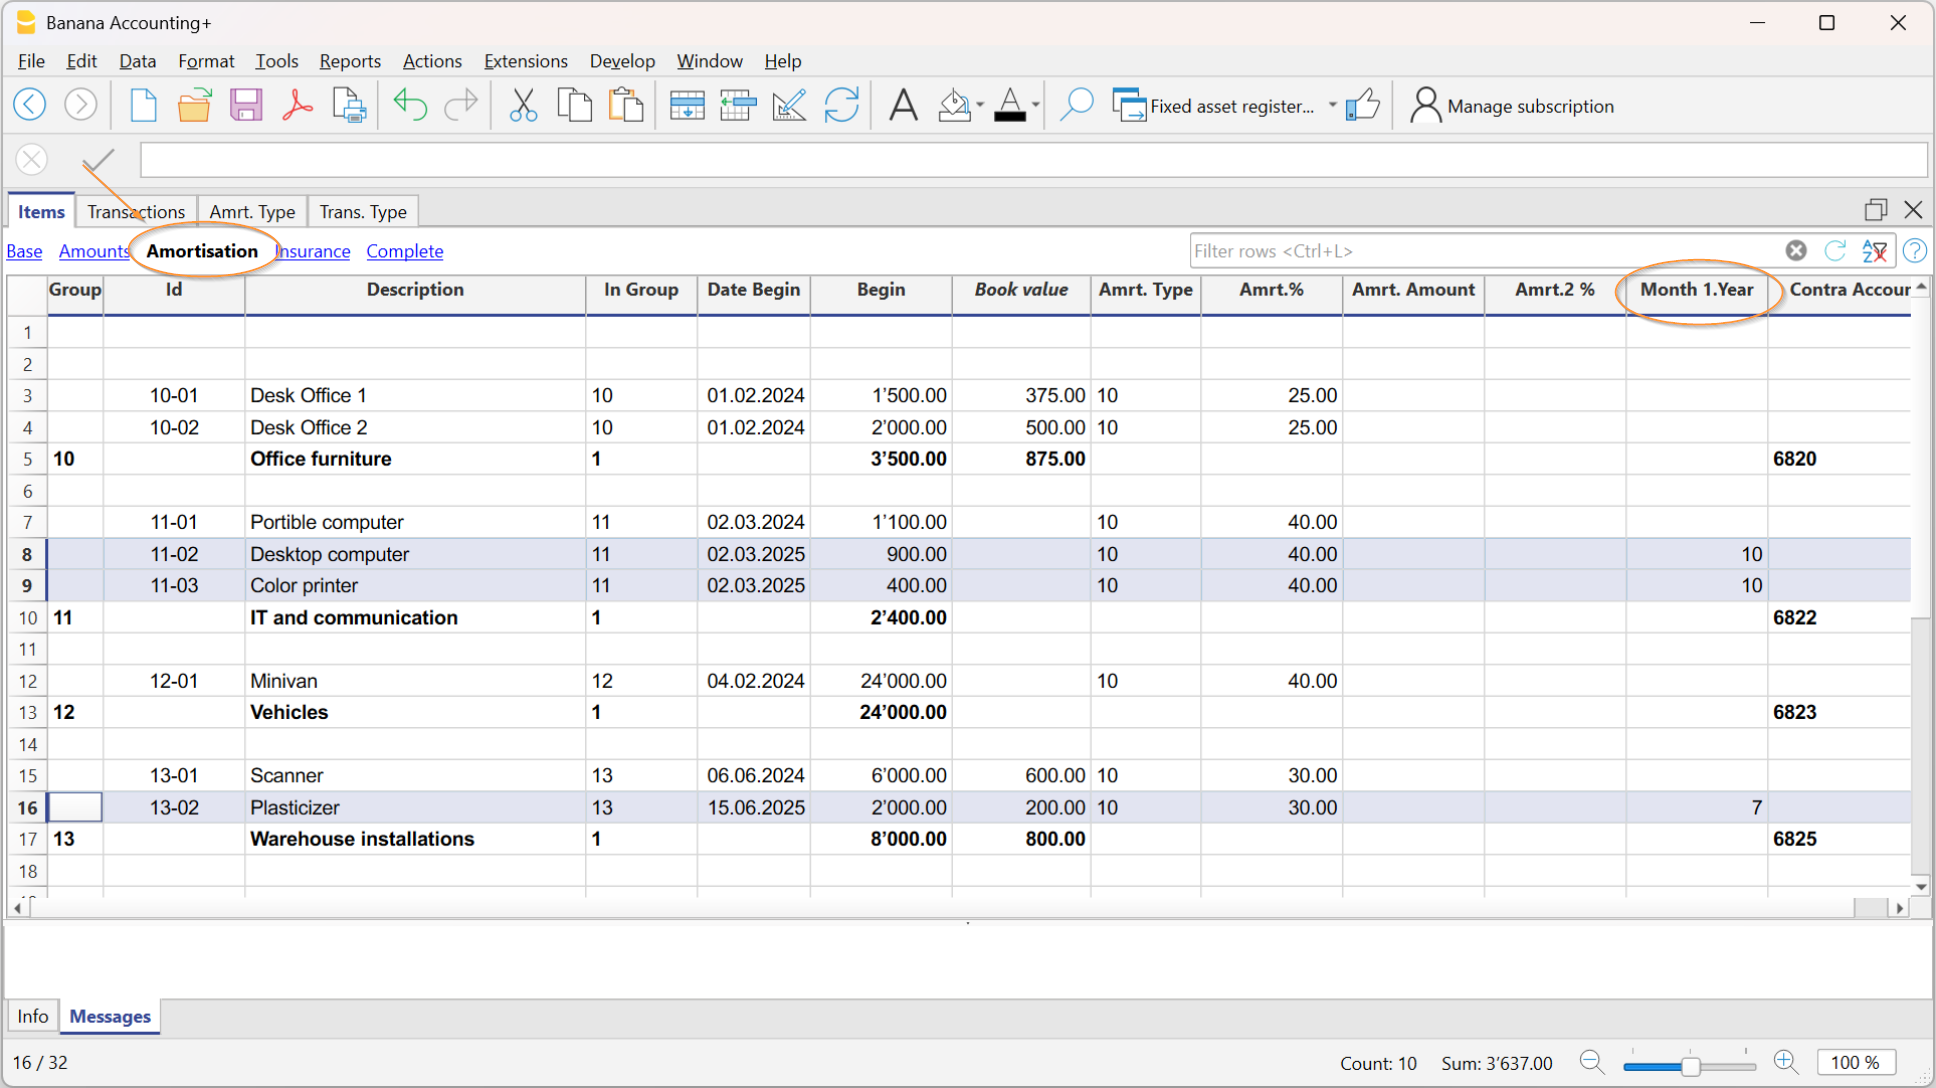
Create amortisation rows
In order to create the amortisation rows click on Actions menu → Create amortisation rows command.

Indicate:
- The date for the calculation of the amortisation.
- The period of the amortisation calculation (monthly, quarterly, half-yearly or annual).
The program creates the amortisation rows based on the parameters of the items indicated in the Items table.
- If the parameters Amrt. Type, Percentage, Account or Contra account are not entered for a single item, the software will use the group parameters of which the item is a part to create the amortisation transactions.
- If the number of months has been set for the item in the Month 1st Year column, the calculation for the first year is done on a pro-rata basis.
- The amount of depreciation is reduced to ensure that the book value does not go negative or is not less than the Residual value.
- Automatically calculated record values can be adjusted manually.
- Value adjustment records, such as devaluations or revaluations, must be entered manually.
Change the automatically calculated values
The rows that the program has created can be modified or deleted. This flexibility is very useful, as there are situations in which the automatically calculated value needs to be adjusted. This way, it is possible to cover all requirements and unexpected events.
In those cases, the amortisation value will be calculated manually and entered instead of the automatic value, such as:
- First amortisation, calculated according to different methods.
- Rounding adjustments.
- Final amortisation adjustment, to ensure that the amortisation is entire.
- Amortise to maintain an accurate final value.
- Additional amortisation, in this case it is useful to create a new transaction row.
It is also possible to insert transactions that modify the other values.
Change in the type of amortisation
Amortisation is recorded in the Transactions table, so changes in the Items table have no impact on past amortisation.
You can change the amortisation type and percentage by simply changing the relative values for an item or group in the Items table. The next time the new amortisation rows are created, the new parameters will be used.
If necessary, there are two options to adjust the book value:
- Add a new transaction with the adjustment amounts.
- Change the transaction created automatically.
Disposals of depreciable assets
When a depreciable asset is disposed of, certain steps must be followed in accounting to zero out its value both in the Fixed Asset Register and in the Balance Sheet, recording any capital gains or capital losses.
To reverse the value in the Fixed Asset Register
Before proceeding to zero the value in the Fixed Asset Register, the following elements should be considered:
- Disposal date to calculate the periodic depreciation amount (from the beginning of the year up to the date of disposal or sale)
- Residual book value
- Sale value
- The difference between the residual book value and the sale value may result in a capital loss or capital gain.
Below is an example of a vehicle disposal on 31.03.2025, with the following elements:
- Disposal date: 31.03.2025
- Residual book value: 12,000.-
- Sale value: 10,000
- Capital loss: 2,000 (12'000 - 2'000).
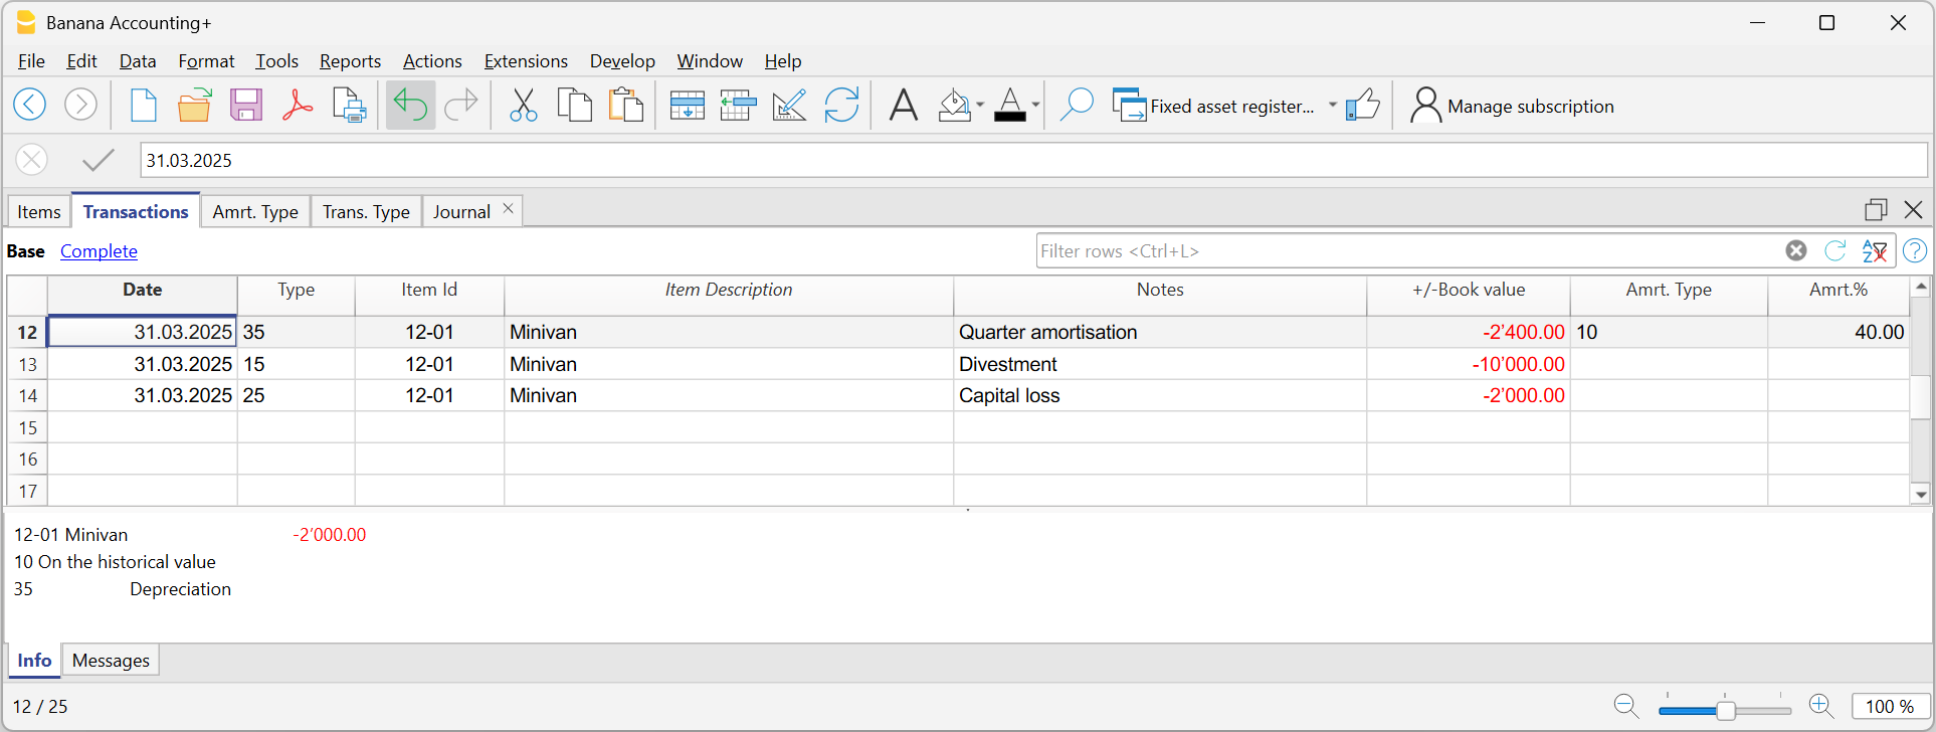
In the Fixed Asset Register application on 31.03.2025, record:
- The depreciation amount up to 31.03.2025 for the asset being disposed of.
- Enter the date, select "35" in the Type column,
- Enter the asset number in the Items Id column
- Enter the description "first quarter depreciation" in the Notes column
- Enter the depreciation amount for the first quarter in the +/- Book Value column
- The disposal or sale on 31.03.2025
- Enter the date, select "15" in the Type column
- Enter the asset number in the Items column
- Enter the description "disposal or sale" in the Notes column
- Enter the residual book value in the +/- Book Value column
- The capital loss (or capital gain, as the case may be) on 31.03.2025
- Enter the date, select "25" in the Type column,
- Enter the asset number in the Items column
- Enter the description "capital loss" in the Notes column
- Enter the difference between the book value and the sale value in the +/- Book Value column
Recording the disposal in the accounting file
When an asset is disposed of in the accounting file, its book value must be removed from the Balance Sheet.
- If there is an accumulated depreciation account related to the asset:
- Reverse the accumulated depreciation up to that point with the asset account
- Reverse the residual book value of the asset
- Recognize the capital gain or capital loss
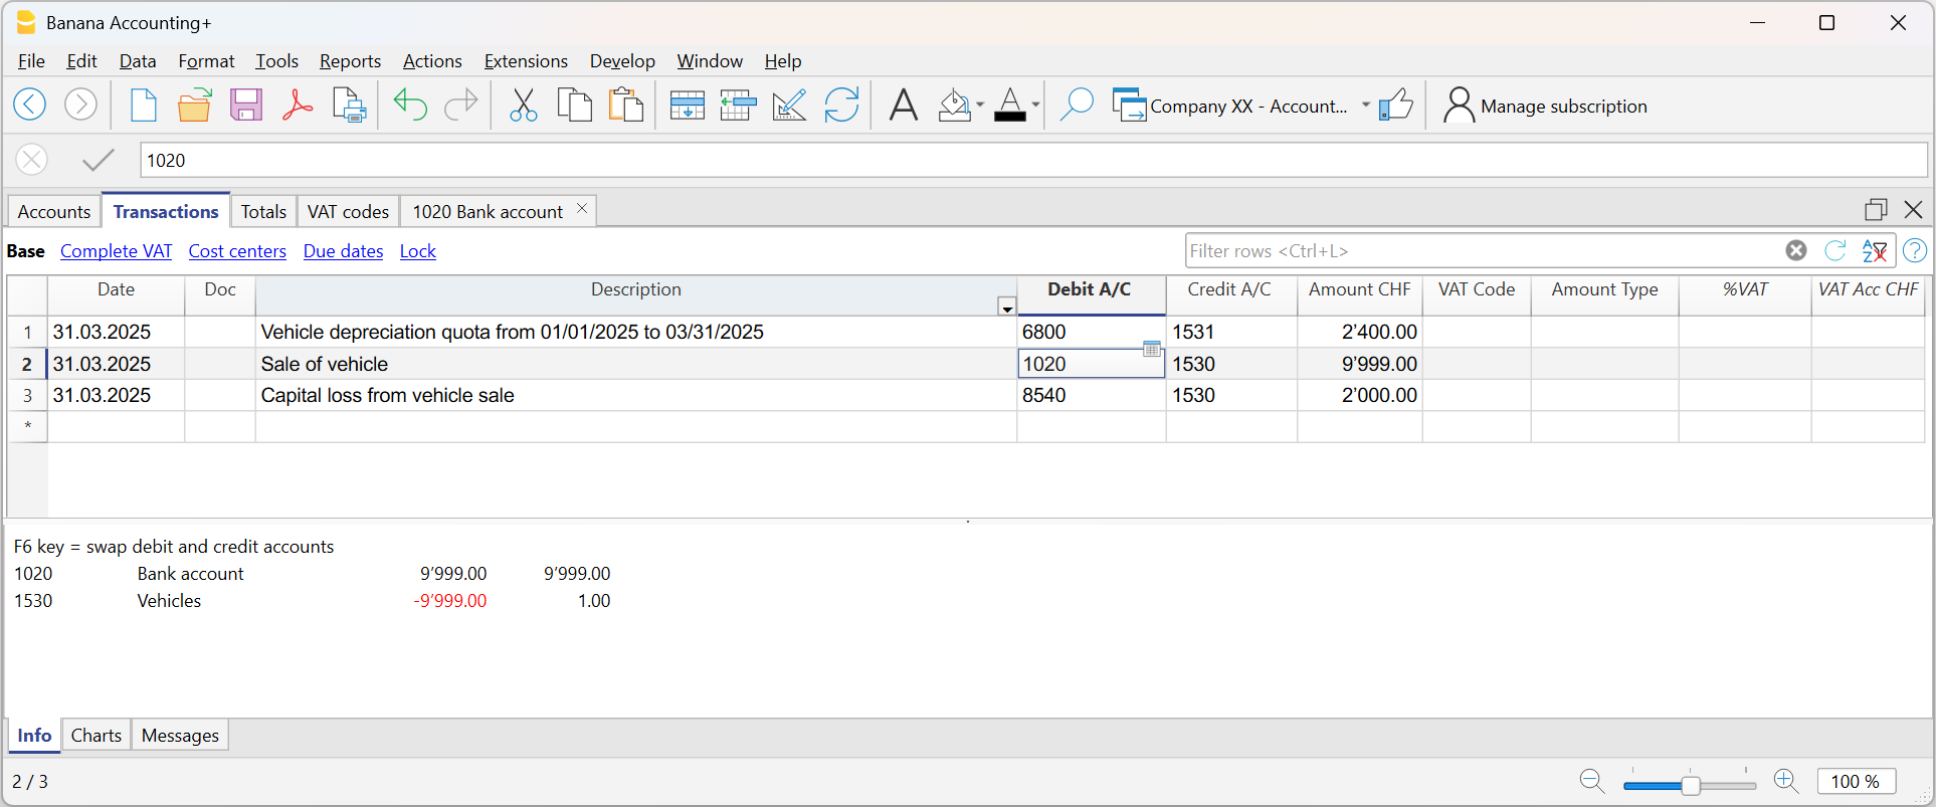
Enter transactions that modify other values
The main view of the Transactions table displays the change in book value. The full view shows all other available columns, so as to make the change of the other values possible.

Transactions to change of Purchase, Historical or Fiscal value
You can enter transactions that modify the purchase, historical or fiscal value by using the appropriate columns.
- Then add a new row and manually enter the values.
- The amount must be entered manually by the user.
- Use the appropriate Transaction type for the transaction.
- If it is a amortisation, use the Amortisation type code.
- Amount variation columns:
- +/- Purchase
- Positive amount for new purchases (Transaction type 11).
- Negative amount for partial or total sales (Transaction Type 15).
- +/- Historical
- Positive amount for revaluations (Transaction type 21).
- Negative amount for partial or total write-downs (Transaction Type Id 25).
- +/- Tax
- Positive amount for the increase in the tax value (Transaction type 41).
- Negative amount for the reduction of the tax value (Transaction Type Id 45).
- +/- Purchase
Modification of the Initial Value
The initial value in the item table should not be altered. If adjustments are required, postings must be entered that modify either:
- the Purchase value.
- or the Historical value (devaluations or revaluations).
Internal value different to the accounting one
There may be situations where the market value of the asset is higher than the book value, so there will be an internal hidden reserve.
To keep track of these differences you can proceed in two ways:
- In the Items table, display MarketValue column and enter the value.
With this system, you will always have to update the value each time it changes as a result of actual amortisation. - Use the FiscalValue column as internal value.
The assumption is that the tax value column is not already used and therefore that the tax value is equal to the book value.- In the Items and Transactions table, replace the column headings, use "Internal Value" instead of "Fiscal Value" and "+/- Internal" instead of "+/- Fiscal".
- Descriptions of codes 41 and 45 will change in the Transaction type table.
- Insert the transaction rows with the transaction type 41 and 45 and indicate the difference in positive in the "+/- Internal" column .
Modify Residual Value
When the Create Amortisation Transactions command is used, each item is amortised based on the residual value. For this reason, when an item reaches the end of its useful life, it is recommended to manually record the amortisation. If the entry is not manually adjusted, a value will be carried forward for the item in the next year.
The residual value of items can be viewed in the Items table, in the Book Value column.
How to proceed:
- Take note of the residual value of each item that has reached the end of its useful life.
- In the Transactions table, enter:
- In the Date column, the amortisation date
- In the Type column, the number 35 (amortisation)
- In the Item ID column, the ID code defined in the Items table
- In the +/- Book Value column, the amount of the residual value to be amortised.
Once the amortisation transactions for the residual values are made, in the Items table, the amortised items will show a value of zero for their residual value.
Recheck everything
The program recalculates, double-checks and displays any errors or differences.
Use this command whenever you are in doubt that there is a problem.
Fixed assets register printouts
All the information contained in the tables can be printed or exported with the appropriate commands.
There are two specific print options:
Accounting Transactions Report
This is the accounting report of the transactions, with the account number and counterpart.
It is used to import the amortisations transactions into the accounting file.
Use the Reports menu→ Accounting transactions report.
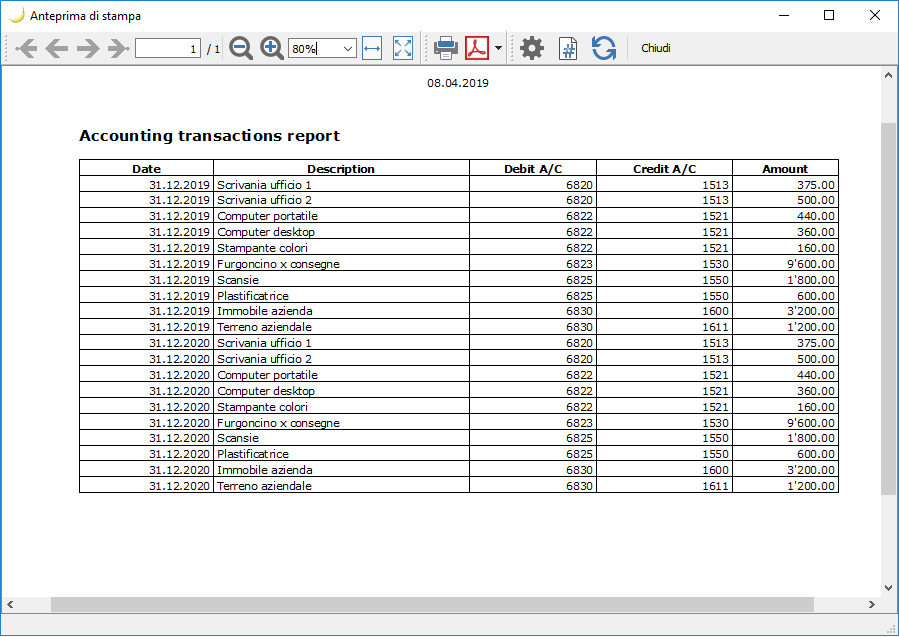
Journal View (item cards)
This printout displays all the transactions with the variation of the values and the cumulative value for each item.

Import amortisation rows into accounting
At the end of the year, the amortisation entries can be automatically imported into the accounting file. Proceed as follows:
- Via the Actions → Import into Accounting → Movements
- Choose Fixed Assets register as file
- Using the Browse button, search for and select the Fixed Assets register file.

Only the rows of the Journal that fall within the accounting period are included.
You can then choose to import only certain data.
As per version 9.04 of Banana Accounting it is possible to group amortisation transactions by account.
Livro de endereços
Aplicação para a gestão de endereços (contactos, sócios) e impressão de listas e etiquetas.
Características:
- Definição livre de campos
- Imprima só as linhas selecionadas
- Configuração livre do formato das etiquetas
- Copia/cola endereços de outros programas (Excel e Word)
O Livro de endereços contém três tabelas:
O dados do Livro de endereços podem ser sincronizados com os contatos da Google.
Imprima endereços/etiquetas
As informações relativas aos endereços/etiquetas estão disponíveis na pagina Imprima etiquetas
Characteristics of the Address Book
The Address Book and Addresses application are included in Banana Accounting Plus. It is ideal for quickly and easily setting up the addresses of your customers, suppliers, partners, family members and instantly access the contacts you need or to print the address lists for labels.
Multiple functions to speed up and make management easy:
- Predefined columns for each type of content.
- Addition of additional user defined columns by the .
- Customizable column positioning.
- Customizable label format setting.
- Ability to print only the selected rows.
- Free setting of the label format.
- Copy / paste addresses from other programs (Excel and Word).
- Ability to color the row to instantly identify the most important contacts.
Based on spreadsheets like Excel
Address management is based on pre-defined columns that can be customized as positioning and as header. The columns are grouped into three main tables:
- Groups Table
In this table the address groups are set. Each group is identified by an Id which is used to categorize the addresses. Groups can be created for suppliers, customers, partners, family members, friends. This makes searching easier and allows you to set labels even with group selection. - Contacts Table
The contacts are entered in this table, with all the relevant information.As in any other table, additional columns for notes or other can be added.Contacts can be updated and synchronized with Google contacts. - Diary Table
This table is intended to enter day by day all the annotations relating to the people contacted.
Accounting setup
Address Book headers and basic data set up in a single, easy-to-view dialog.
- Company headings and address with free texts.
- Language settings.
- Link to extensions for customizations.
- Password to secure your Depreciation Register file.
- You can have multiple files in different languages.
File and data saving
- All your data is saved in a single file, where you can easily find everything without wasting time.
- Give the file the name you want.
- You can manage an unlimited number of files.
- Save data on any media, computer, network, cloud or send it by email. You can access it from wherever you are.
- Simultaneous access by multiple users, where, however, only one person can open the file to be edited.
- Make your accounting more secure by inserting password protection.
- In the Links column you can add a digital link for the registered item (receipt, purchase invoice, warranty).
- In all tables you have predefined columns that you can make visible by choice.
- The Search command allows you to quickly search for an item.
- You can sort the rows according to different sorting keys.
- Export to pdf for data storage and export to other formats for data re-processing.
- Importing data from other programs in Text, Ascii and CSV format, with the following options:
- Import data from the clipboard.
- Auto completion of values.
- Column header.
- Unicode (Utf-8).
- Columns for the archive of products no longer available.
Error reporting and control
- Command to check accounting.
- Reporting of any wrong settings, differences or errors.
- Each report is linked to a help page that explains the causes and the solution.
- Possibility to correct.
Reports and printouts
- Table content completely printable or can be printed by selection only.
- Customizable column arrangement.
- Print labels (from the Extensions menu).
Data export and archiving
- Copy and paste directly to and from Excel.
- Export tables to pdf and various other formats.
- Archiving of printouts and data to pdf or other formats.
- Saving of the accounting file on any medium.
Other features
Added functionalities
Extensions
- Predefined extensions for various printing and other features.
- Quick search and installation.
- Customizable extensions.
- Automatic update.
- Ability to create and install your own local extensions.
Comprehensive documentation
Groups table
In the Groups table, one can define an identification code for a Group and enter the corresponding description in the Description column (es. CLI - Clients, SUP - Suppliers, COL - Colleagues, etc.) for each row, in the Id column.

Contacts table
The Contacts table presents the columns where the addresses can be entered.
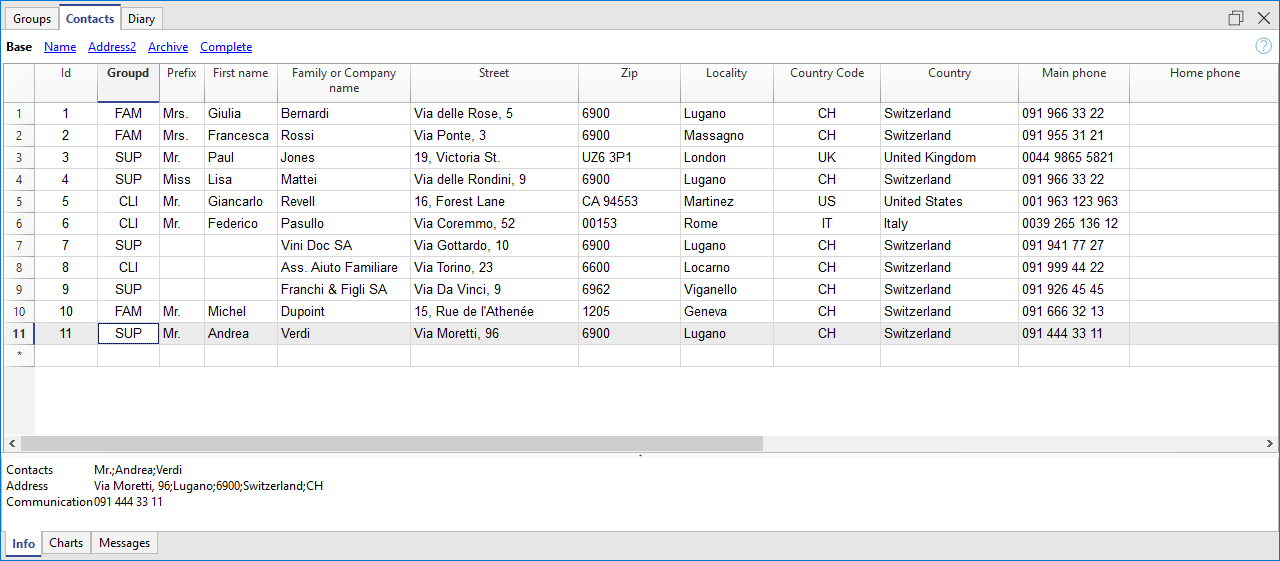
The columns
There are different columns. The biggest part of the columns is invisible. The Colums setup command has to be used in order to:
- Display the columns
- Change the order of the displayed columns
- Add other columns
- Id is the contact number.
This is needed when you want to connect a contact to the diary, to the loans or to another table.
While being on that column and pressing F6, there is an automatic progressive numbering. - Prefix: you can enter "Mr", "Mrs", etc.
- Family or Company name (if it concerns a company).
If the contact is a contact person for a company, you can enter the company or entity to which the contact belongs in the Organisation column.
When pressing F6 on the Name or Family Name column, the program separates or inverts the name and last name.
If there are more than two names, this feature is not able to distinguish which one are the names or family (last) names. - LetterStart: is the greeting that is being used at the beginning of a letter. This is being used for a mail merge.
For example: Dear John or Dear Mr Smith.
The program suggests possible texts according to the contents that have already been entered into the columns.
Import new Contacts
It is possible to import new contacts also from external sources and it can be done in several ways:
- Importing from Excel or other text programs
- Via the Import rows command.
- Synchronize with Google contacts
The views
There are different views available and each view distinguishes itself from another one through the presence of specific columns; in this example (Address Book file), we have the Base, Name, Address2, Archive and Complete views. In the Complete view, all the columns are visible.
Diary table
In the Diary table, you can record all kind of notes, day after day and referring to the entered contacts.

(Deprecated) Manage, edit, back up Google contacts
Deprecated commands and functionalities
Attention: Google has deprecated the Contacts API used by Banana to access and modify contact data.
The new People API replacement has different purposes and functionalities.
The reading and modification of Google contacts will therefore be available ONLY UNTIL Google keeps the Contacts API in service. After that the synchronization commands will give an error. The data saved in the AC2 file will still be accessible. It is not known how long the Contacts API will still be available. Please do not use these features anymore.
Documentation
Download, view and edit your Google / Android address book contacts in a tabular format. You can update and clean contacts much faster and also print, copy and paste them into Excel. You can also save the contacts file to your computer as a backup copy.

Manage Google contacts
- File->New command creates a New Empty Address Book.
- Menu->Actions->Google Contacts->Download Changes.
- You will be asked to authorize access to the contacts.
- The Contacts table will be filled with your contacts.
- Edit and update the contacts as you like.
- Menu->Data->Column Setup let you also make visible all predefined columns, like Organization Name, Organization Title.
- Menu->Actions->Google Contacts->Send Changes.
The local changes will be saved in Google.
For more information see the explanations below.
Authorize access to your contacts
Synchronizes the contents of your Banana file of the Address Book and Addresses type with the contacts of your Google account.
The first time you issue the command Download and replace existing contacts from the Actions-> Google Contacts menu, to connect to your Google contacts:
- A window appears that displays a page of the Chrome browser integrated in Banana and asks you for your Google login.
- You have to enter the email address and password of your Google account.
Banana only saves the email of your Google account: the session data and the password are not saved in Banana, but are managed by the mechanism of your browser.

Immediately afterwards you must confirm that the Banana software can access and modify your contacts.

Synchronization commands
Download changes
This function imports data from Google and updates the values in Banana.
- If there is already data existing in the table, the program will merge the various data in the tables
- Groups.
- Contacts.
Send changes
Send modified data in Banana to Google, updating your Google contacts.
- To be able to send data to Google, you must have previously downloaded it at least once.
If you have made changes on your mobile, you have will have to first download the data and then activate the command Send Changes.
A window with the elements modified, added or deleted will display.

It is not recommended to use the "GoogleNoSynchronize" column because it will no longer be used in subsequent versions. If Yes, the contact will not be synchronized with Google.
Download and Replace existing contacts
Banana will not always be able to synchronize all changes.
This command will delete the contacts in the Contacts table and replace them with the existing Google contacts.
This command will also delete items marked as "GoogleNoSynchronize"
Conversion of values in the table
Google contacts manages addresses, phone numbers and e-mail in a structured form. In the Contact stable, the data are instead managed via the column.
Telephone numbers and e-mails
Google allows you to define different e-mails and phone numbers. For each one a label and an indication by default is designed.
In Banana you must follow these directions:
- If there are different types of telephone or e-mail, you will indicate them in the appropriate column (work, home, other).
- If for each type there are several telephone numbers or e-mails, indicate them in the column, separated by a semicolon ";".
Telephone work "+1234567890;+21234567890". E-mail work "example@gmail.com;example@yahoo.com" - If the phone number or e-mail has a particular label, it will be indicated in the Other column, with the label followed by a colon ":".
If there are several numbers, separate them with a semicolon ";"
"Holidays:+1234567890*;Cousin:+1234566777". "Temporary:example@gmail.com;Mama:example@yahoo.com" - To indicate that the phone is a number by default, mark it with an asterisk "*" after the number.Between the different numbers there can be only one default number.
Addresses
Google allows you to have multiple addresses for the same contact.
Banana Accounting instead allows to synchronize only one address, the "Home" being main one.
Groups
Groups defined in Google are imported into the Groups table and new ones can be added as well.
In the Group Id column of the Contacts table you can insert multiple membership groups by separating them with a semicolon ";".
Create a backup of your Google contacts
- Create a New empty Address Book file.
- Utilities1 Menu -> Google contacts -> Download changes.
- Save the file on your computer with the day's date in the name.
Manage your Google address contacts
If you have multiple addresses in your address book, it will be easier to use the Banana address book to sort out your addresses. You can quickly correct errors, add information and remove duplicates and much more.
- Download data from Google contacts
- Effectuate your changes
Remember that the F6 key (Mac Cmd-6) has several features (see the Info window below).
In the Name and Surname column, invert the values. - Hit the Send changes command button to send the changes to Google.
Archive and remove contacts that are no longer used
You can save phone contacts that you no longer use on your computer and delete them from your phonebook.
First time:
- Create a new Address Book file.
- Utilities1 Menu-> Google Contacts-> Download Changes.
- Save the file in your documents, "Folder_Philip_donotcancel_ever", so you remember that it is an important file.
- Display the Archive view in the Contacts table
- In the Archive date column, insert the current date (type the dot ".") for all contacts you no longer require
- Utilities1 Menu -> Archive data -> Archive Table data -> Contacts.
- Utilities1 Menu-> Google Contacts -> Send Changes.
Your data will be deleted from the address book. - Utilities1-> Archive data -> View Archived data-> Contacts will allow you to access your archived contacts.
If you want to add them back to your directory, you must copy the line in the Contacts table and delete it from the Archives.
Safe-keep your file. Proceed as follows if you wish to archive unused contacts:
- Open your Address book file.
- Utilities1 Menu -> Google contacts -> Download changes or if there are problems Download and replace existing contacts
- Proceed as indicated above in the Archiving and Sending Changes procedure.
- Save the changes.
Resume data in Excel
- Download data from Google contacts.
- Select all (upper left corner button)
- Copy
- Paste into Excel.
Synchronization problems and suggestions
The Google address book offers many possibilities and can be used in very different ways. We have tried to make it work better for you , but there may be situations where the program might experience problems with the changes that have been made.
If this is the case, it will be necessary to use the command function. Download and delete existing contacts, to completely realign the two archives.
We are obviously interested in continuously improving the functioning of our software, so send us an e-mail describing the problem and show us how to replicate the problem on our computers. This will allow us to fix the problem.
Any suggestions on how to improve the product are always welcome.
For technical details related to the connection, check the Google API documentation.
- https://developers.google.com/google-apps/contacts/v3/
- https://developers.google.com/gdata/docs/2.0/elements#gdReference
Print label
The Address Book application allows you to create and print addresses on labels. Printing can be customized and adapted for various needs.
Printing labels is very simple: Menu Extensions → Print Labels. At the following links you can find detailed information about the various dialogs for printing and the format of the labels:
Biblioteca e coleções
Introdução e modo de uso
A aplicação Biblioteca e coleções do Banana Contabilidade permete inserir um elenco de livros, objetos ou contactos e manter o controlo dos objetos emprestados ou restituidos.
Criar novo
Menu Arquivo → Novo...
Selecione o tipo Biblioteca e coleções.
Tabela
Nos arquivos de tipo Biblioteca e coleções, encontrará várias tabelas:
- Tabela Grupos - onde são definidos os grupos segundo os quais se deseja separar os utentes.
- Tabela Contatos - onde são inseridos os dados dos utentes: nome, número de telefone, email, ...
- Tabela Artigos - onde são inseridos os artigos: objetos de valor, livros ou outros.
- Tabela Empréstimos - onde são geridos os artigos emprestados, o prazo e a data de restituição.
- Tabela Diário - onde se podem inserir notas diárias e combiná-las com um determinado contacto, por exemplo os turnos dos bibliotecários.
Outros comandos utéis
Impressões
Tudo aquilo que vê no ecrã pode ser imprimido ou salvo em PDF.
Use a extensão Library books Report para obter:
- Impressões do catalogo completo dos livros em PDF, para publicar num sítio internet.
- Impressão da ficha de contatos con o livros ainda em empréstimo (para enviar como anexo quando se fazem os lembretes).
Characteristics of Library and Collections
Library and collections is included in the Banana Accounting Plus version. It is the easy and innovative solution to organize books, loans, contacts and collections and, have all the lists instantly available for effective control. You can monitor loans, expiration dates and return dates or simply to put in place perfect order in your home library.
Multiple functions for a digitized and efficient organization:
- Fast data entry.
- Categorization by user groups.
- Retrieve book details from Google with ISBN.
- Copy and paste book list from Excel.
- Quick searches by title, author, keywords, user or user group.
- Internal planning with the Diary (library shifts, annotations or new orders to be made).
- Loan management.
Accounting setup
- Headers and basic data set in a single dialog box, easy to visualize.
- Headings with free texts.
- Default address fields
- Language settings.
- Link to extensions for customizations.
- Password to secure your Library file.
- You can have multiple files in different languages.
Tables
In the Library and Collection files there are several tables that allow you to always have data in order and easy to retrieve.
The tables are as follows:
Groups Table - where the groups are defined, according to the subdivision of users you require.
Contacts Table - where user data is entered: name, tel, email, ....
Items Table - items are entered: valuables, books or other.
Loans Table - manage the loaned items, the expiration and return dates.
Diary Table - to enter daily notes and link them to a specific contact, for example librarians' shifts.
File and data saving
- All your data is saved in a single file, where you can easily find everything without wasting time.
- Give the file the name you want.
- You can manage an unlimited number of files.
- Save data on any media, computer, network, cloud or send it by email. You can access it from wherever you are.
- Simultaneous access by multiple users, where, however, only one person can open the file to be edited.
- Make your accounting more secure by inserting password protection.
- In the Links column you can add a digital link for the registered item (receipt, purchase invoice, warranty).
- In all tables you have predefined columns that you can make visible by choice.
- The Search command allows you to quickly search for an item.
- You can sort the rows according to different sorting keys.
- Export to pdf for data storage and export to other formats for data re-processing.
- Importing data from other programs in Text, Ascii and CSV format, with the following options:
- Import data from the clipboard.
- Auto completion of values.
- Column header.
- Unicode (Utf-8).
- Columns for the archive of products no longer available.
Error reporting and control
- Command to check accounting.
- Reporting of any wrong settings, differences or errors.
- Each report is linked to a help page that explains the causes and the solution.
- Possibility to correct.
Reports and printouts
Everything you see on the screen can be printed or saved in pdf format.
Use the Library Books Report extension to get:
- Prints of the complete catalog of books in pdf, to be published on the website.
- Print the contact sheet with the books still on loan (to be sent as an attachment when making reminders).
- Customizable column arrangement.
- Print non returned items.
- Printing of the labels with the codes for the spine of the books.
- Print return labels inside the book.
- Print updated list of books not yet returned.
Data export and archiving
- Copy and paste directly to and from Excel.
- Export tables to pdf and various other formats.
- Archiving of printouts and data to pdf or other formats.
- Extensions for creating Standard Audit Files.
- Saving of the accounting file on any medium.
- Archive data.
Other features
Added functionalities
Extensions
- Predefined extensions for various printing and other features.
- Quick search and installation.
- Customizable extensions.
- Automatic update.
- Ability to create and install your own local extensions.
Comprehensive documentation
Other useful commands
Come iniziare con la Biblioteca e collezioni
Crea un nuovo file
È generalmente più semplice iniziare da un modello preimpostato, piuttosto che uno nuovo vuoto.
Pertanto consigliamo di procedere nel seguente modo:
- Menu File → Nuovo→ Biblioteca e collezioni. Scegli il modello che trovi a disposizione e personalizza i conti e i gruppi, secondo le proprie necessità.
- Scarica direttamente il nostro modello dalla pagina seguente: Biblioteca, collezione di libri e gestione prestiti e aprilo col Banana.
Imposta i dati base
Nel menu File → Proprietà file (Dati base) imposta i dati della tua Biblioteca.
Imposta i dati nelle tabelle
Report e Stampe
Scarica l'estensione Report libri biblioteca per ottenere le stampe dei dati e salvarli in *.pdf.
Groups table
Groups according to which you wish to divide the users are defined in the Groups table. To identify a group, enter an identification code Id (column Id). In the Description column you enter a text describing the group.

For a detailed explanation of the columns in the Groups table, please consult the Address Book page.
Contacts table
You can to enter user data in the Contacts table, divided into several customizable columns (you can make visible only the ones you need and hide all others - you can also add new ones).

For a detailed explanation of the columns, please consult the Address Book page.
Items table | Library and collections
In this table you can enter your items data: they can refer to valuables, books or other.
There are different ways of entering the items data: copy and paste from Excel, automatic data retrieving from the Internet, etc.
See detailed explanations below.

Columns
There are various columns and it is also possible to add new ones.
- Id: the item number that has to be attributed.
The F6 key assigns the number progressively.
It is also possible to use a prefix. For example: A-001, after that, the program suggests A-002. - ISBN
The International Standard Book Number.
When entering the ISBN in the Id column and pressing the F6 key (⌘+6 on Mac), the program automatically completes all the book's data in the other columns, incorporating them from the Google database, provided there is an internet connection available.
Any already present information will be overwritten.
For more information see: Google documentation.- The data in the Google database are not always complete. For example, the title might be present, but the editor or other data might be missing.
- In order to know which data are available on Google, please visit the following page:
https://www.googleapis.com/books/v1/volumes?q=9781906042509, entering after q= the book's ISBN number.
If you see "totalItems: 0" it means that the book is NOT in Google's database
If you see a page in a JSon format (programmers format) with the book's data, it means that the book IS in Google's database.
- Title
Is the title of the work. - Author
There can be several authors entered, separating them with semicolon ";". - Publisher
There can be several editors entered, separating them with semicolon ";". - Return date
The projected return date for this item.
This column is automatically completed according to the checked out item.
Entering books data
Book data can be entered in different ways:
- Manual insertion - You can manually enter the books data in the Items table (see previous paragraph)
- Retrieve data from Excel - If you already have a list of books from another program or Excel, you can simply copy/paste the data.
In order to copy / paste the data you need to make sure the columns in Excel as arranged in the same order as in Banana. If the column order is the same in both programs you can copy the data in block, otherwise you need to proceed column by column. The copy/paste operation is possible from Excel or from txt files. - Retrieve book data automatically from the internet - The ISBN column is very useful if you have an Internet connection: each book has an ISBN code (internationally recognized and generally written on the back of the cover); If you enter a book's ISBN code on the appropriate column in Banana and press the F6 key (or Cmd + 6 for Mac), the program automatically retrieves the books data from the Internet and inserts all data (title, author, publisher, etc. even a small summary).
- If the book has different authors or publishers, just separate the names with a semi-comma ";" - they will also be found individually in searches (for example if you need to find all the books of a certain author).
Loans table
In the Loans table you can enter the checked out items, the expiration date and the return date.

Columns
- Date
The date of the loan. - ItemId
The item number. A search can be made based upon the title. - ContactId
The contact number. A search can also be made based upon the name, family name, place. - Expiration date
The projected date for the item's return.
If you enter "+30", the program proposes the date that comes 30 days later. - Return date
Enter the return date.
How to manage the loans
Loan of a book
- Enter the date. If you click ".", the date of the day is automatically written.
- In the Item Id column, as you start typing the title of the book or library user, the program will display all choices available in your database; just select the right option and press the F6 key: the program will automatically fill the Item Id and Description cells.
- In the Expiration column (date of return for the book) the program automatically uses a date 30 days after your current date, but you can manually change that: you can enter the number of actual days (for example +40) to generate the correct return date (40 days later).
Diary table
In this table you can enter daily annotations and link them to a specific contact.
For example, you can enter the working shifts of librarians, or add relevant notes or facts, to-do lists, etc.
For each annotation you can enter the date, description, an expiration date and associate a user code.

Items return
How to register a book return:
To indicate that a book has been returned, simply enter the date the book was returned in the Return column of the Loans table.
If you have a lot of books on loan, the Items return dialogue lists the books on loan, allows you to search for them and indicate with a check that they have been returned.
Here is how to proceed:
- From the Actions menu, choose Items return;
- This will open a window where you type the name of the library user. This will display all books on loan to this library user.
- You can now check all returned books
- Click the Apply button and the program will automatically insert the actual date in the Return date column of the Loans table.
- In case of error, return to the Loans table and click the Undo command.

Archive table data
How to archive data
The Archive feature avoids the adding up of too many transactions of lent and returned books. Outdated data are being archived in hidden tabs without being deleted. This data can be recalled at any time for statistics or any other use.
Store data of returned books
- Choose Archive data from the Actions menu and then Archive table data → Loans. The program will delete all transactions of already returned books from the Loans table and store them in the Archive table.
- Only books on loan that are not yet returned will be shown in the Loans table.

Store contact information no longer used
As for your books, you can equally archive your old and unused contacts
- Indicate a storage date for all the contacts you wish to archive.
- Choose the Archive data from the Reports menu and then Archive table data and Contacts.
Archive data for Estimates and Invoices application
To archive data for the Estimates and Invoices application, please refer to the Archiving Invoices page.
Print library labels
You can print two different types of labels:
- Small labels (containing the book code) for use on the spine of the book, so that they are visible on the bookshelves
- Larger labels are used on the inside of the cover, mentioning that the book belongs to the library and has to be returned at a specified date
Labels can be printed either on the basis of the Banana file, where you have registered all the books in the library, or from an empty file in case you wish to print a list with codes, that you will then assign to the books.
Creating a file to print library labels
Via the File menu -> New... in the Filter by box : enter the the text "library" and select the Banana Library - printing book labels template (also make sure you have selected English as search language).
You can also find the template directly at this link: Banana Library - printing book labels
Printing labels for the spine of the book
In order to print the labels, you can open a new blank file in Banana, containing no data (File menu -> New), but, as stated, you may wish to start from an existing, as explained earlier.
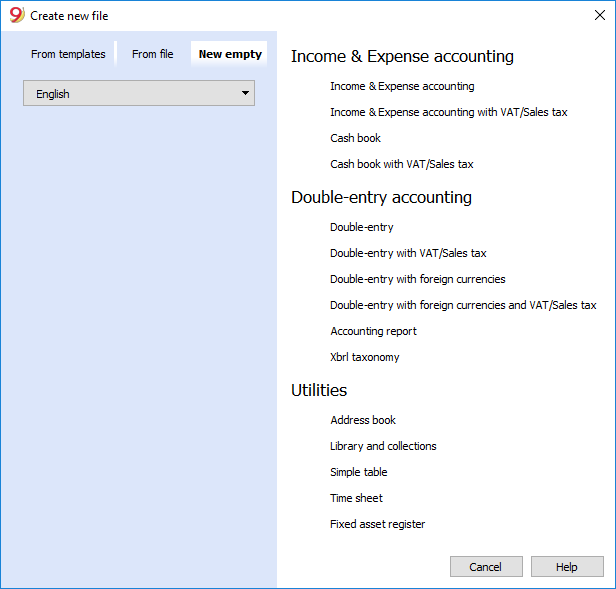
There is a useful Excel function to generate a large amount of codes in a speedy manner, rather than entering them manually or than using F6 key. Here is how you do it:
- Open a new Excel file; in cell A1 entere the library code that suited your purpose (any combination of letters followed by numbers will do) - for example B1000.
- Choose the bottom right angle of your cell with your mouse (the point will now be a cross), and, while holding down the right click, drag down along the column; Excel will automatically generate autoprogressive numbers.
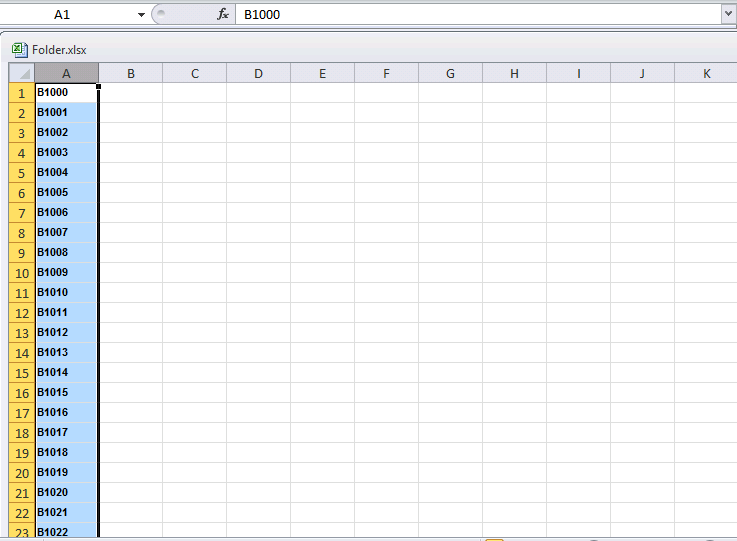
- Now copy (Ctrl + C keys) the codes that have been generated into Banana's Items table, in the Id column (Ctrl + V keys).
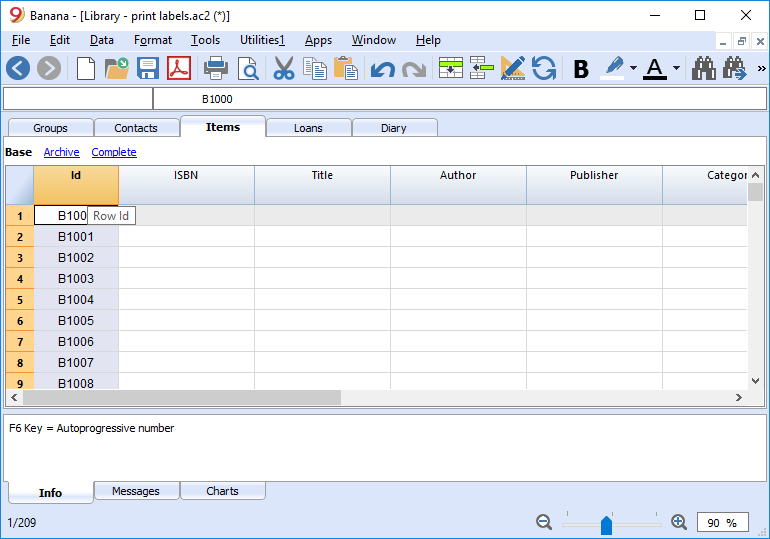
- You can now create the label. Choose the Labels -> Print command from the Extensions menu. This window will be shown:
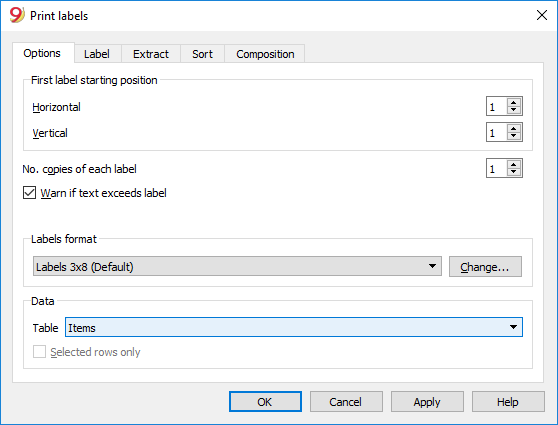
- It is important to have the Items table selected as the source for Data
- Now you can define your label by pressing the Extensions menu -> Labels -> format command.
I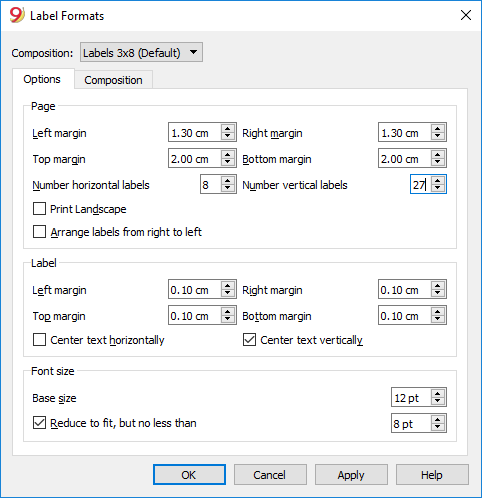
-
In the window now shown, enter the margins and other characteristics of your chosen label, Herma 10001 in this case.
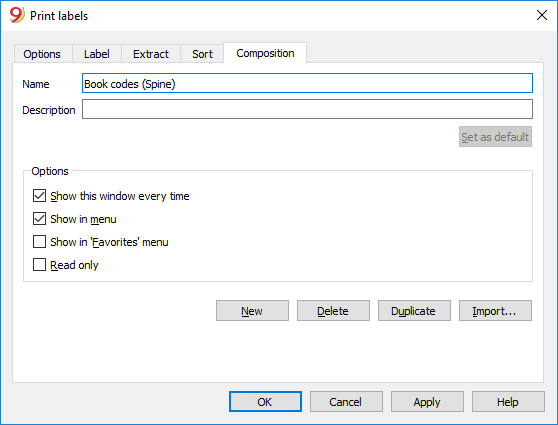
- Before hitting the OK key, open the Customization tab, where you can assign a name to your custom settings (so they can be used in the future). In this case it's Book codes (Spine).
- Hit the OK key
- In the Label section select RowId to indicate the contents of the label (in the example you indicate the book code) and press the Add field button. The RowId appears in the View Labels field.
- Pressing the OK button will generate a preview of your label.
You may now print using your Herma sheets.
Printing labels for the inside cover
Choose your label format. In the example a 70x36mm (Herma 4630 or Avery 3490) format hase been chosen. The steps to follow are identical to the previous example::
- First, choose the Labels -> Print command from the Extensions menu
- Enter the margins for your new label in Extensions -> Labels -> format window.
- Before hitting the OK key, open the Customization tab, where you can assign a name for your new custom settings (Inside Cover label, for example), than hit OK.
- Select Label in the Print label section to add the content of your label.
You may enter text, other than the available fields, as well.
Pressing the OK button will generate a preview of your label.
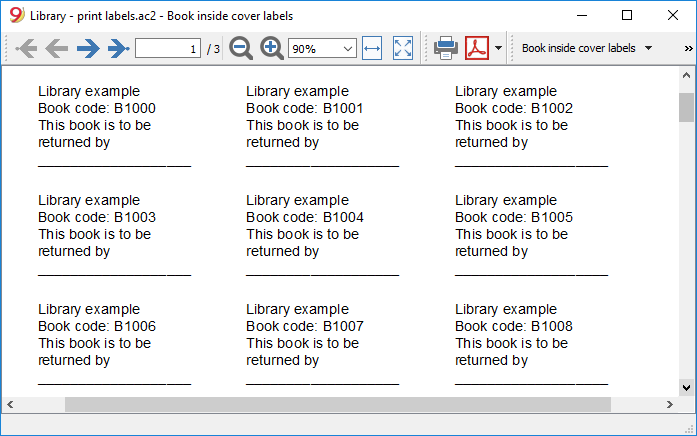
Note:
The template available in Banana already includes the two mentioned label formats: label for the spine of the book and label for the inside of the cover.
Related features:
Management of yearly membership fees
If you run a library requiring an annual membership fee, or if fees are charged for the loan of individual books, it is useful to use the accounting functions of Banana Accounting.
Please check our page Accounting templates.
Tabela simples
Trata-se de uma tabela que pode ser construída segundo as necessidades do utilizador. Podem-se adicionar colunas e panoramas e encabeçar do modo mais apropriado, através dos comandos Configurar colunas e Configurar tabelas do menu Dados.

Tutorial Maker Application: Create, Translate, and Enhance Video Tutorials
The Tutorial Maker application, developed by Banana.ch, is a versatile tool for:
- Creating comprehensive video tutorials with speech in multiple languages.
- Adding or modifying speech in various languages to existing videos.
The application, developed primarily for internal use at Banana.ch, plays a vital role in both the production and ongoing enhancement of multilingual Banana Accounting video tutorials. It employs AI-based services to facilitate efficient translation and speech generation.
While the Tutorial Maker application is currently featured in the Dev-Channel version, it has been extended to a select group of partners. You are welcome to try it; however, please be aware that it is not a fully supported product and requires the installation of additional components. Furthermore, its functionalities are subject to change at any time.
How It Works
Creating a Video Tutorial for a Desktop Application
- Capture Screenshots.
Begin by capturing screenshots of the desktop application and saving them to a directory (recommended size: 1920x1080). - Fill in the Clip Table,
Enter all necessary information to create a video:- Select the image to be used.
- Apply effects to the image, such as highlighting a section, adding arrows, or circles.
- Choose the text and voice style for the speech.
- Input the text for titles and/or text-to-speech.
- Translate the text into other languages as needed.
- Build the Video.
On executing the build video command, the program performs the following tasks based on the specified language:- Adds effects, titles, and subtitles to the images.
- Generates speech files using internal or Microsoft or Google voices, as selected.
- Creates a video sequence for each image. The duration of each sequence matches the length of the speech or a duration you specify.
- Final Video Compilation.
The final video is created by combining all the video sequences.
How it works
Assuming you are creating a video tutorial for a desktop application.
- You capture screen shots and save to a directory (size 1920x1080).
- In the Clip table you enter all the information needed to create a video:
- The image to be used.
- Create effects on the image. Like highlighting a part of image, adding an arrow or a circle.
- The text and voice style to use.
- The text to be used for titles and/or for the text to speech.
- The text translated to other languages.
- You give the build video command and the program, based on the language you specify:
- It add effects, titles and subtitles to the images.
- It generates the speech files using the Microsoft or Google voices you choose.
- For each images it create a video sequence.
The duration of the sequence is the duration of the speech, or one you specify. . - A final video is crated by putting together all video sequences.

Optimizing Videos: A Streamlined Approach
This video creation tool specializes in producing straightforward tutorials and translating them into multiple languages through a progressive process. Typically, we develop an initial version and then pass it on for review and translation. Based on user feedback, we continually modify and enhance the content.
The Tutorial Maker significantly eases the effort and time required to alter video content and text, translate, and generate new versions of the tutorial, each tailored in length to the specific language. Consequently, it employs a logic distinctly different from that of traditional video creation tools, which are more focused on creative aspects.
The speech is automatically generated from the input text, allowing for easy modifications of the text, voice-over, and video sequence duration. This feature simplifies the process of refining and creating new versions of the video.
The tool excels in translation. By entering the translated text into a designated field, a corresponding voice-over is automatically generated. The video sequence is also adjusted to match the exact duration of the new speech, streamlining the translation process.
Video tutorial of the Tutorial Maker application
Create video from images, with speech, subtitles and text decorations.
- Watch the video tutorial (03:13).
The video has been created with the Tutorial Maker Application. - Watch the video tutorial in French (text has been automatically translated).
Here is the full project and files on github.com.
Mainly for software developers
The Tutorial Maker Application offers advanced features, specifically tailored for users who are also software developers.
Currently in its alpha phase, the application has been fine-tuned for our internal use. It necessitates a particular setup and is in the early stages of incorporating error controls. Moreover, the interface and messages are exclusively in English. As such, at present, it is predominantly suitable for software developers and highly skilled users.
Be aware that the data's structure and format might evolve over time, and we may not always provide a means for transition. Additionally, both the terms of use and pricing are subject to change. We reserve the right to modify the technical content, availability, terms, and pricing at any moment without prior notice.
We invite you to share your experience using the application and greatly appreciate any feedback or suggestions you may have.
Requirements and setting up the environment for video and speech creation
Requirements
- Internet connection (necessary to create speech files)
- Banana Accounting Dev Channel Version.
- Subscription to the Advanced Plan.
- FFmpeg executables.
- Subscription to a text-to speech service
- Azure cognitive API
- Google text-to- speech service.
Setup the environment
In order to use the Educational Video Maker application.
- For Windows
- Download and Install ffmpeg tools
- Download ffmpeg tools for Windows
- Under "Get packages & executable files" select the Window operating system.
- Download the essential package.
- Unpack the file to a directory for example C:\ffmpeg
Under bin you should have the file ffmpeg.exe and fprobe.exe
- Make sure your antivirus does not block or slow the execution
- Search and go to "Virus Thread and Protection"
- Manage settings
- Add Remove Exclusions.
- Add Exclusion
- Folder
- Select the ffmpeg/bin directory
- Install a video player for mp4 files.
Video are build in mp4 format, the codec is not preinstalled on Window.- Install an alternative Video player like VLC video player.
- Download and Install ffmpeg tools
- MacOS setup (Install Ffmpeg tools)
- Download the ffmpeg and ffprobe binaries
- Under "Get packages & executable files" select the Mac operating system.
Download the - ffmpeg
- ffprobe.
- Unpack the files and copy them to a new directory.
- Make sure the ffmpeg and ffprobe are executable file type.
- Go to the "Get packages & executable files" section of the page.
- Click on macOS icon.
- Click on "Static builds for macOS 64-bit".
- Under "Get packages & executable files" select the Mac operating system.
- Download the ffmpeg and ffprobe binaries
- Setup Banana Accounting.
- Install and run the dev-channel version.
- Run the software
- Make sure you can open MP4 files
- Menu Tools → Program Settings.
- Activate the integrated Screen Capture.
- Windows-Appearance → Show developer Menus.
- Developer menu → Activate ctrl+3.
- Set the default language to English.
- Menu Tools → Program Settings.
- File Handling → Extensions of files conisdered secure
- Add mp4 to the list
- Create an empty video project
- Create a new directory for the video project.
- Download and the Empty educational video file and copy it to the video project directory.
- Setup the Global settings
- Important you need to specify the ffmpeg executable.
- Request the authorization at Banana.ch
Speech generation only work if you have the authorization.
How to for creating and translating video
Setup a video project
A video project is composed of different files. So you should create a new directory where you save all your files.
Structure of a video project
A video project is composed by:
- A directory on your computer where to save all the files relative to the video project.
- The first step is to create a new directory where your file will reside.
- Put all file in project directory unless there is a real necessity to do otherwise.
- A Banana Video Project file (ac2).
You can create a new file by:- Menu File > New file > Tutorial Maker > Create empty file
Save the file to your directory - By copying an existing one to your directory.
- Menu File > New file > Tutorial Maker > Create empty file
- The image files with the screen capture.
When possible create images with size 1920x1080 pixels or else with the 16:9 format. - Other images files that are used for titles or slides.
Image size should be 1920x1080 pixels. - If you are creating a video you can also save in the directory the files that are the base for the video creation(accounting file, presentation file or else).
- Directory for language specific images.
- Assume you have created the clips images in English.
- Create a sub-directory "it" where you will save the captured images in italian.
If the software, when building the "it" video, will find an image with the same name in the directory it will use it instead of the one that is in the main directory.
Example video projects
You can try the following examples
- Demo
A very simple project (see on files on github.com) - A presentation of how the video creation tool works, that has been created used the video creation tool.
Add a speech to a video with subtitles
You can easily add a speech to an existing video.
- The speech is generated automatically by the computer.
- The speech and subtitles remain placed on the same time position.
- If the translated speech does not fit the original video segment, the specific segment will be automatically speed down to fit the speech.
Here we explain how to translate speech of an existing video.
- First you have to setup the environment.
- Create the project and directory.
Prerequisites
- A video file with subtitles in SRT format or with a Youtube transcript.
Add the speech to a Youtube video with subtitles
- Create a new Banana video file (ac2).
- Download the video from youtube.
- In the Table Clips column Clips enter the nave of the original video.
- Copy the the youtube transcript to the clipboard
- Menu Actions>Import subtitles from youtube transcript
- Menu Actions->Build video.
First Video Tutorial Project using Screen shots
Here we explain how to create a video tutorial
- First you have to setup the environment.
- Create the project and directory.
Example video projects
You can try the following examples
- Demo
A very simple project (see on files on github.com) - A presentation of how the video creation tool works, that has been created used the video creation tool.
Create a Tutorial Maker project
- Structure the video and write the text.
- Plan the video objective and content.
- With word processor start writing text part of the video.
Writing and improving the draft is easier with the word processor.- Chapters titles.
- Speech part.
- Setup files.
- Create a video project directory.
- Download and copy on your directory the the Empty Video Tutorial Template and give a new name.
- Enter the content
- Start Banana Accounting Dev-Channel version.
- Open the Educational video file you have just created.
- Menu Actions → Add language column of your desired language.
- Copy the text you have written on Word and paste it in the column language.
- In the column Chapter enter the chapter number.
- In the column Text Style enter the appropriate style.
- In the column Speech Style enter "None" for text that should only be displayed (no audio).
- Apply the color Yellow for chapter titles.
- Build the first video version.
- Actions → Build video and the video will be build with:
- a single still image
- titles
- the speech
- the subtitles
- You will be able to see how long it is the video based on the spoken text, and also listen the high quality audio voice.
- Actions → Build video and the video will be build with:
- You should now capture the images or the video clips with the tool you already use.
Better use size of 1920x1080 px or with 16:9 factor. - Or you can create the image capture in Banana.
- Create the Banana Accounting file with all the data you will need to explain.
- Capture the screen using the ctrl+3 functionalities.
- Set the size of Banana Accounting Windows to 1920x1080 or other size with 16:9 factor.
- Save the file in the project directory.
- Better complete the file name with a numeric sequence corresponding to the chapter number.
- When using number better use 01 instead of 1, so that you get the file listed in numeric order.
- Use fine sequence multiple of 3 or 5 to easily insert other images.
- Complete your project with images.
- In the appropriate row of the column Clip File enter the file name of the images you have saved.
- Add Effects to the images.
- Build again the video .
- Improve the texts, images, effects until you are finished.
Translate the speech and subtitles of a video
You can easily translate the video in another language.
- The speech is generated automatically by the computer.
- The speech and subtitles remain placed on the same time position.
- If the translated speech does not fit in the original video segment, the specific segment will be automatically speed down to fit the speech.
Here we explain how to translate speech of an existing video.
- First you have to setup the environment.
- Create the project and directory.
Prerequisites
- A video file with subtitles in SRT format or with a Youtube transcript.
Translating an existing video with SRT subtitles
- Save the original video in the project directory.
- Create a new Banana video file (ac2).
- In the Table Clips column Clips enter the file name of the original video.
- Menu Actions>Import subtitles.
Choose the subtitle type.
- Menu Action>Add language column.
Enter the 2 letter column - Translate the text to another language with an online translation tool like www.deepl.com/translator.
- Select and copy the text column.
- Past to a translation tools.
- Copy and paste the translated text to added language column.
- Menu Actions->Build video and choose the language.
Translate the text in another language
- Table Clips
Action->Add Language column.
Choose the language.- If the language does not exists in the list.
- Menu Data ->Manage Columns->Add Column.
- Enter the name "Text_"+Language code (2 letters).
"Text_fr"
- If the language does not exists in the list.
- Translate the text to other language.
- Position on the first line of the column with the text to be translated.
- Click on the header of the source language to select all the text.
- Copy the text in the translation service.
- https://translate.google.com/
- https://www.deepl.com/translator
- If the text it to long just copy fewer lines.
- Select the language to translate to.
- Copy the translated text.
- Position the cursor on the column destination.
- Paste the text.
Dialogs for the Video Application
Dialog Video Change Global Settings
The global setting dialog allow to set the environment.
To access the dialog:
- Run Banana Accounting dev-channel version.
- Open the empty project you have just created.
- Menu Actions → Global settings.

You need to setup the
- ffmpeg executable path
- Enter the executable path, including the filename (ffmpeg.exe for windows / ffmpeg for mac).
- Text to speech service
- Internal
It will use the text-to-speech service of the computer. - Banana.ch service
It will use the Banana.ch text to speech service that is based on the Azure service.
Your need to receive a permission from Banana.ch. - Microsoft Azure
You need an Azure account and a API key for the Cognitive text to speech service.
Enter the:- Region name
- The API Key
- Google Service you need the API key
- Internal
- Menu Action → Build video to test if the build process works.
File Properties for Tutorial Maker
When a new file is created, the basic data need to be entered in the File menu → File and accounting properties.
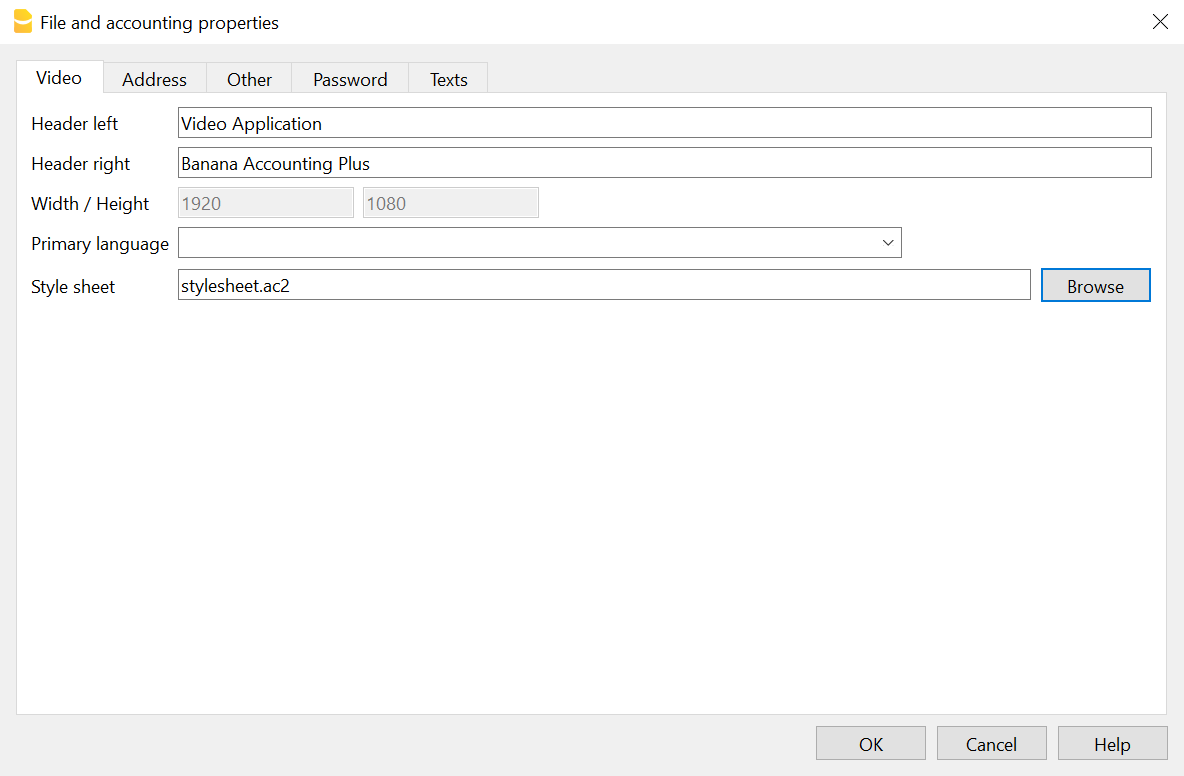
- Header left & Right
Will be displayed on printing. - With and height in pixels of the clips and output.
Currently fixed at 1920 x 1080. - Stylesheet file
Path and file name of a stylesheet.
If present the Text Styles and Voice Styles defined in the stylesheet will be available in this project.
Ideal for creating and reusing styles.
Download the stylesheet.ac2 example and modify it according to your desires.
Import Subtitles
The Actions>Import Subtitles command let you import subtitles. You can choose the available formats.

Imported columns
The commands will import the following columns
- Start Time
- Text
The text will be saved in the current selected language for build.
The lines will be appended at the end of the Clip Table.
YoutubeTranscript
This command allow to import the times and subtitles from the Youtube transcript format.
You should copy the text in the Clipboard.

To copy the transcript text in Youtube
- Clip on the 3 dots button.
- Clip con Show Transcript
Not all video have a transcript. - Select the text inclusive the time and copy to the clipboard.
Eventually save the text to a txt file so that you can easily access lately.
Example of a Youtube Transcript format
0:01
willkommen bei bex dieser folge schauen
0:05
wir uns an wie ich wiederholen die
0:07
aufträge so genannte abos in bex
0:10
erfassen kann
0:12
als erstes erstelle ich mir dafür unter
0:15
dem reiter verkauf einen auftrag auf den
0:18
entsprechenden kontakt aus
SRT Subtitles
The SubRip Subtitles file format is available in most video editing software.
Dialog Build video
Dialog build video
The command "Build Video" give you different choices.

- Build language.
Select the language to use. - Create video file (Always on)
Create the video file with Titles, Voice and Subtitles.- Prepend Chapter to Display titles
Automatically prepend the Chapter number to the Display text.
To be used for titles.
Speech text remain the same - Embed subtitles in the video
The subtitles are embedded in the (style name starting with "Subtitles") in the video.
The build process will also create a *.srt file that you can use to add subtitles. - Add control times
Include information on the clip and text start and duration time.
Useful to check if there are any problem in the sequence.
- Prepend Chapter to Display titles
- Create audio file
It save the audio in separate file. - Create GIF file
It create a GIF animated sequence.- G Width (the height is calculated automatically)
- Add progress bar.
Include a progress bar that show the make the gif look like a video progress bar. - Progress bar color in FFmpeg format
You can also specify the opacity"red@0.4". It use color red with a opacity of 0.4. color of the
- Clear cache.
The program keep a cache with all the the intermediary files. The file are recreated only in case the data change.
In case you change the data, but the audio or video is not updated, you should try clear the cache. Build time will take longer.- Clips.
The video are fully regenerated. - Speeches
All the she speech texts are recreated.
- Clips.
Build process
Once you click build the build process start:
- The audio speech are generated.
- Each row clip is created and the duration is calculated.
- The row clips are concatenated.
In the Out directory you will have:
- A generated .mp4 video file with the speech.
- The srt file with the subtitles.
- The index file with the chapter time and text
Copy the content to youtube to have the chapters. - The audio with the speech (if requested)
- The gif file (if requested)
Output directory structure
When you give a build command a new directory is created on the project directory with the same name as the project file, preceded by the "_" and a sub-directory for the specified language. All temporary data will be stored in the directory.
The directory or any sub-directory can be deleted at any time, but the build will take more time dute to the necessity to rebuild all the intermediary and cache files.
Assuming your project file name is "testvideo.ac2", the resulting directory structure will be:
- _testvideo
- en
the temporary file for the language "en"- build
Where all the intermediary file are stored. - cache
Cache for intermediary files. - out (results)
Where the output video, audio and gif are written.
- build
- it
the temporary file for the language "it". - temp
temporary files not specific to a language.
- en
Table Clips
In this table you enter the data to generate the video.
Columns
- Chapter (Optional)
- Enter a chapter number or letter, that help you organize the video in group of video clip.
- Use [] for automatic chapter numbering (progresssive).
- During build the chapter number is added to the language Text (for display only) if the build option is active.
- Chapter rows should also contain a Clip file name
- Clip File.
- The row that contains a Clip File name will be the start of a Video Clip.
- The Video clip will contains all the rows up to the next row that contains a Clip File name.
- The image file (png or jpg) or clip (mp4).
- If you go in change mode you have the list of files available.
- If you click on the little icon you see the preview and you can change the image.
- Empty.
If the clip file is empty, this row will be added to the previous video clip file. - Automatic file renumbering
Use the file in the specified format to renumber file name based on the chapter number. When you add a new chapter all the existing file with the automatic file format will be renamed.- The automatic file name format is in the form of chapternumber-progressive[-freetext].ext.
The free text is optional.
Examples:- "01-01.png" "101-101.png"
- "01-01-freetext.png" "101-101-freetext.png"
- The automatic file name format is in the form of chapternumber-progressive[-freetext].ext.
- Effects (default is hidden)
You can attach effects to the image that will be applied when the video is build.
For the syntax see the Effects page, - Text Style
The style to be used for showing the text.- Empty.
Same as Subtitles. - None.
Text is not shown. - Any other you define in the Text Style table.
- Empty.
- Speech Style
- Empty.
Default speech style. - None.
Text is not translated to speech. - Any other speech style you define in the Speech Style Table.
- Empty.
- Start (Time Start)
The start time the clip, text or speech start to be shown. Relative to the clip file.
If the time is empty, the start time is calculated based on the speech duration . - Duration
The duration of the clip, text or speech. Relative to the clip file. - Time command.
- Empty
The duration is automatically calculated based on the speech duration. - Duration Time Command
If you specify a Duration command the StartTime of the the next row is ignored.- DurationAdd (AddTime).
The entered duration is added to calculated duration. - DurationFixed (FixedTime),
The entered duration is used. If the speech is longer it will be cut.
Useful for pause. - DurationPause
Same as FixedTime, but with the option to exclude the pause in the build. - DurationPause[XX]
Same as DurationPause, but if the Duration is empty, the duration of the last Duration[XX] is used.
You can create different standard pause "DurationPauseChapter", "DurationPauseImage"
Pause will not be included in build if the option is activated. - DurationSpeech.
The entered duration is used if the calculated speech duration is shorter. - DurationMin (MinTime).
The entered duration is used if the calculated speech duration is shorter.
- DurationAdd (AddTime).
- Time Commands for Title, text or effect rows that have no speech and therefore the duration is zero
In case the rows have the SpeechStyle set to "none" or there is no text and there is no Duration.
These commands allow display the text for a duration of the speech o clip..- SameNextRow (NextRowTime),
The text will display at the same same start time and end time calculated for the next row.
Useful in case you need to use for display and speech different texts. - SamePreviousRow (PreviousRowTime),
The text will display at the same same start time and end time calculated for the previous row.
Useful in case you need to use for display and speech different texts. - SameClip (ClipTime).
The text will display for all the time the clip duration (from begin to end). - SameClipEnd (ClipTimeEnd).
The text will display for up to the end of the clip.
- SameNextRow (NextRowTime),
- Time Command that takes priority over the speech duration
- SameClipVideo (ClipVideoTime)
Only for clip files of type video.
Takes the same duration as the original video clip.
- SameClipVideo (ClipVideoTime)
- Empty
- Text (language)
The text to be displayed or for speech creation.
There is one column for each language.
Use Action->Add Language to add another language.
Structure and logic of a video
These are the basic elements of a FinalVideo.
- Chapter (optional)
It is used to group together a series of Video Clip that together form a unit, exactly as youtube.com chapters.- VideoClip (Clip File)
Start with a row that contains a file name in the column ClipFile
It include all rows up to the next row containing a file name in the column ClipFile- Non-Video Clip Row
- Non-Video Clip Row
- Video Clip
- Non-Video Clip Row
- Non-Video Clip Row
- VideoClip (Clip File)
- Chapter
- VideoClip
- Non-Video Clip Row
- Non-Video Clip Row
- VideoClip
FinalVideo
Is the result of the process of the command Build Video.
- The FinalVideo is the concatenation of the different VideoClips in the same sequence specified in the table Clips.
- The length of the FinalVideo is the sum of the length of the different VideoClips.
VideoClips
Each VideoClip is build separately and once all the VideoClips have been build they are concateneted to form a FinalVideo.
- A VideoClip is based on a ClipFile specified in the column Clip File
- All the rows before a row that contains a ClipFile are used to create the VideoClip.
- The number of Video Clips correspond to the number of Clip Files specified.
A Video clip file and can be of type.
- Image. jpg or png file.
- A video sequence (mp4 o avi file).
Times columns
The times columns (StartTime, Duration and TimeCommand) are used to determine the length of the VideoClip.
- The Time columns are specific to each VideoClip.
The VideoClips are concatenated to form a FinalVideo, so the next VideoClip will start exactly after previous one. - The time of a new VideoClip is not influenced by the times value specified before.
- The duration of a VideoClip is the sum of the duration of the different rows that form the VideoClip.
Start and duration of speech rows
The speech rows are rows that have a text and don't have the SpeechStyle to "none".
- SpeechDuration
The duration of the row is automatically calculated, based on the length of the speech. - If the speech duration is longer then the duration specified, the SpeechDuration is used.
- If the next row has a StartTime, the Duration will be expanded so that the next row will start of the StartTime specified.
- CalculatedStartTime of a row is the the sum of the duration of the previous rows of the VideoClip.
The CalculatedStartTime has precedence over the specified StartTime. - You can change the automatic mode with the Duration TimeCommands ( DurationAdd, DurationFixed, DurationMin, DurationSpeech).
Start and duration of Title rows (non speech rows)
In the VideoClip you can have rows that don't have speech:
- When there is no text
- SpeechStyle "none"
- When the text is a title.
- When the speech text need to be different than the speech.
In this case you need to synchronize the appearance of the text with the speech. So you can use the Sync Time Commands.
StartTime for Video Clip Files (Video Segments)
For Clip File that contains a video the StartTime is used to specify at what exact point a subtitles, title and speech should appears. But, if you build a Video in another language, the SpeechTime can be larger than the original one. In order not to have the speech to be cut fit the video, the program will have slow down a sequence of the video for the time necessary too fit all the speech.
- During the build the Video file is cut in different VideoSegments each one corresponding to the specified StartTime.
- Each segment is than processed separately and the duration adapted to the specific content and time.
- If the speech duration is longer than the original one, the duration of the segment is expanded (the video will be slowed down).
- If there are TimeCommand they will be applied to the row and segment.
- The speech and text are added to each segment so that the speech and titles start always at the original point.
You can control the duration of the different video segments by using the following TimeCommand:
- DurationSpeech.
Use if you want to make the segment not longer than the speech duration.- If the original video segment duration is shorter, the video will be slow down.
- If the original video segment duration is longer the video will be speed up.
- DurationAdd
Add a duration to the DurationSpeech and speed-up or slow-down the video segment. - DurationFixed
Extend or cut the original segment duration of exactly the specified duration and and speed-up or slow-down the video segment.
If there is a speech that it is longer than the specified duration the speech will be cut.
Use mostly in case for segments that have no speech.
Calculated columns
With the command Tools>Add/Remove functionalities you can:
- Add Calculated columns
- Remove Calculated columns
The Add Calculated columns are made available for the developer of the application, but may be interesting also for people creating video.
The command will add the following columns:
- Start Clip
The time when the row will start relative to the Clip. - Start Clip
The time when the row will start relative to the complete Video. - Calculated Duration
The duration taking in consideration also the Time command. - C. Speech
The Duration of the speech in the processed language. - Calculated Fill
The time that will be added to arrive at the specified Start time.

The calculated columns will be updated at the end of the build process.
The change will not change the modified flag of the file, so if you want to save the date you have to modify some text.
Table Text Styles
Define the text style to be used for displaying text on clips.
- Size and margins are defined in pixels, relative to an image size of 1920x1080.
- Colors you can use a name (red, blue, etc) or a symbol.

Use different colors for subtitles
Define the styles for any subtitle type you want to use.
Start from the default subtitle style and adapt it according to your needs.

- Id.
Enter the name of the style.
Use it in the column Text Style of the Table Clips. - Font Name.
Enter the name of the font. - Size.
Enter the size of the text. - Primary Color.
Enter the color of the text. - Outline Color.
Enter teh color of the outline of the text.
You can also change text sizes, bold, outlines, alignments and positions of any text style.
Add new voices in the Table Speech Styles, and combine each voice with a different subtitle style using the Speech Style column of the Table Clips.
Text Style Effects
In the column Effects you can enter commands and element to use in the columns Effects of the Clips table.
You can specify:
- object=RowId
A command with elements.
Example: "DrawRect:pos=800:200,size=500:400,border=red:4,opacity=0.9;Arrow:3:3
The parameters can be modified in the table Clips.
"Object:id=frect,pos=800:300,size=500:300" - style=RowId
Attributes that are used to display a command.
Example: "border=#ffe01b:3:5,fill=blue,opacity=0.1"
Table Voice Styles
Create style to use for creating speech.
If you use a style you should specify also for any language you use.

Columns Speech Styles
- Id.
- default.
The style to be used in case the speech style is not specified. - Any other name for a style.
- default.
- Language
The language code used for the column text in the Clips table. - Voice Language.
Language code and country code.
It should be the same as the one of the Voice name.
Example: "en-US".
For each language and id you should have only one country code. If you have more the program will use the first id it find. - Voice.
The voice name that available in your service.
The software will show to you a list of available voice based on the service you have selected.
Example: "en-US-AriaNeural"- Microsoft azure voices (click on section Text-To-Speech)
- Google voices.
- Rate, Pitch and Volume see Microsoft Azure explanations.
Predefined Speech Styles
If not defined the software will use this speech styles.
The Speech service used (Microsoft Azure or Google) will be automatically selected based on the API key you have entered in the global settings.
Azure and Google have different voice name, so once you enter the one that is specific to the service you use.
Microsoft Azure
Predefined languages for Microsoft Azure Service.
- "de","de-DE","de-DE-KatjaNeural"
- "es","es-ES","es-ES-ElviraNeural"
- "en","en-US","en-US-AriaNeural","cheerful"
- "fr","fr-CH","fr-CH-ArianeNeural"
- "it","it-IT","it-IT-IsabellaNeural"
- "nl","nl-NL","nl-NL-ColetteNeural"
- "pt","pt-BR", "pt-BR-FranciscaNeural"
- "zh","zh-CN","zh-CN-XiaoxiaoNeural"
Google Speech to Text
Predefined languages for Google Text to speech Service.
- "de","de-DE","de-DE-Wavenet-A"
- "es","es-ES","es-ES-Wavenet-C"
- "en","en-US","en-US-Wavenet-A"
- "fr","fr-CH","fr-FR-Wavenet-Al"
- "it","it-IT","it-IT-Wavenet-B"
- "nl","nl-NL","nl-NL-Wavenet-B";
- "pt","pt-BR", "pt-BR-Wavenet-B"
- "zh","zh-CN","cmn-CN-Wavenet-B";
Table Lexicon

Add Effects to Images
This dialog allow to add effects to the image.
Command Syntax
The column Effect support the following syntax (Version 2, from December 2021).
- Levels separated by "|"
Main commands
One per level
- DrawEllipse:
- DrawHtml:
Print the text specified in the Text column.
TextStyle and Speech style should be "none" - DrawImage:
Draw the specified image file.
The image is resized.
Use for inserting a logo. - DrawMarkdown
Convert the markdown text specified in the Text column to html and print.
TextStyle and Speech style should be "none",
See further explanation below. - DrawRect:
Draw a rectangle at the specified position and with specified size. - DrawText:
Draw a text. The text is resized to fit the rectangle. - FFmpeg:
You can enter an FFmpeg command
Examples:- FFmpeg:drawbox=x=400:y=100:w=300:h=200:color=pink@0.5:t=fill
- FFmpeg:scale=4*iw:-1,crop=iw/4:ih/4
- ObjectClip:rowid
It use an object defined in the table Clip column Effects with the RowId specified- Example: ObjectClip:id=001,pos=800:300,size=500:300
Use the object defined, but with a specified size.
- Example: ObjectClip:id=001,pos=800:300,size=500:300
- ObjectStyle:rowid
It use an object defined in the table TextStyle column Effects with the RowId specified- Example: ObjectStyle:id=frect,pos=800:300,size=500:300
Use the object defined, but with a specified size. - Use to automate the object creation and styling.
Create the object in the table Clip and then copy in the TextStyle table.
- Example: ObjectStyle:id=frect,pos=800:300,size=500:300
- Rescale:
- SelectRect:
It makes the rest of the image darker. - VideoCut:
- ZoomIn:
Elements (separated by ";")
Are relative the the commands.
- ;Arrow:
Add and arrow next to the form- ,align= 1 to 9, numeric on the keyboard
- ,dim=1 to 5
- ;Number
- ,text=
- ,align=1 to 9 , numeric on the keyboard
- ,dim= 1 to 5
- ;Grid:numberpixels
Will display a grid every specified pixels.
Example: ";Grid:100,fill=yellow" grid every 100 pixels in yellow.
It use the styles of the main command, unless a different style is specified.
Attributes (separated by comma ",")
Attribute are added to the commands or to the elements.
- ,align=[number 0 to 9)
Used for Elements Number and Arrow.
The position of the elements is as the key on the numeric keyboard. - ,Dim=1 to 5
The size of the Elements Number and Arrow. - ,border=color:[width]
- ,color=color //text color
- ,endtime=hh:mm:ss.mmm
for VideoCut - ,fill=color:[pattern]
- id=RowId
Use the text at the row with the specified RowId
For ObjectStyle it retrieve the effect specified in the table TextStyle - image=filename
for DrawImage - ,opacity=number (0 to 1)
- ,pos=x:y
- seconds=seconds
for ZoomIn - starttime=hh:mm:ss.mmm
for VideoCut - ,size=width:height
- ,style=stylename
Use the content of the column Effects in the table TextStyles at the line with the id stylename.
Examples:- DrawRect:pos=800:200,size=500:400,style=saa,border=blue:30
- ,text=text
Use the text that is specified.
Examples
- SelectRect:pos=800:300,size=500:400,border=red:3;Arrow:align=1,dim=3,fill=yellow;Number,text=1,align=7,dim=3
- DrawImage:pos=900:300,size=200:100,image=filename.png,pen=red
- DrawRect:pos=900:300,size=200:100,border=red:3,fill=yellow;Number:1:9:3;Number:6:5:3;Number:3:7:3
- DrawRect:pos=900:300,size=200:100,border=red:3
DrawMarkdown
Markdown is syntax that can be converted easily to html
You can create slides and reuse.
This is an example of markdown text
# Title 1

## Title 2

### Title 3

Proof of **bold** *italic*

* line 1
* line 2
* line 3
This commands allows to use markdown in the text.
- When using this command the columns TextStyle and SpeechStyle should be set to none.
- The markdown text is rendered in html using the style defined in the file _video.css in the table Documents
- Example:
DrawMarkdown:pos=200:100,size=800:600
With the DrawMarkdown command you can use also this elements:
- ;HtmlSelectLi:2
A class "selected" is added to the specifiend html tags "li" ;
This you can display an item with a different style. - ;HtmlAddClass:classname
A class "classname" is added to all html tags that belong to the markdowns.
You can have styles specific to a single markdown.
Actions Menu
The Actions menu includes various commands that are specific for the Productivity applications.
The general commands, available in all the Utilities applications, are explained hereunder.
Other commands, specific for the Address Book and the Library application, are explained in the corresponding documentation.
Recheck all...
Checks everything and gives a warning in case there are errors.
Sort contacts by name
Sorts the rows of the Contacts table in ascending order by Name, Family Name, Second Name, Place.
Archive Data menu
The program keeps a list of the rows that have been archived, for each table.
The archived rows are being shown in the Archived rows table. Select the rows that need to be shown.
Archive data
Moves the rows of a table (Contacts, Items, Loans, Diary) to the Archived data table, where:
- The Archive data column is not empty.
- For the Loans table, there should be an expiration date and a return date (a "closed" loan)
A list of tables is being shown. The tables present on this list contain rows that can be archived.
If there are no tables with rows that can be archived, the selection is empty.
Show archived data
Shows a list of the archived rows of a specific table.
Add or Remove functionalities Productivity applications
The Tools > Add/Remove Functionalities command lets you extend and adapt your file.
Adding New Tables
You can add these types of tables.
- Projets
- Contacts
Columns set up to manage addresses - Categories
To classify elements - Simple table
With an index field and a description
Once a table has been added, you can customise it to your liking with the Columns setup or Tables setup commands.
In other tables you can then add columns that link to these tables.
Add link to table
The programme, in the table you are in, adds a column where you can insert the link code to another table.
Par exemple, dans le tableau des écritures, vous pouvez ajouter la colonne Projet, qui renvoie au tableau des projets.