Income & Expense accounting
The Income and Expense Accounting is exclusive to Banana Accounting Plus and is designed for those who are not accounting specialists.
Thanks to the intuitive interface, you can easily enter your income and expenses, and generate professional reports in just a few clicks, even if you’ve never done accounting before. You always have everything under control: your data is clear, organized, and visible in the table.
Ideal for those new to accounting
This type of accounting is based on a table and column structure, similar to Excel, but specifically designed for accounting management. There’s no need to enter formulas: everything is made to be intuitive and straightforward. You can edit and correct the data at any time, without worrying about making mistakes.
![]()
A versatile solution ideal for:
- Micro businesses and freelancers
- Associations, foundations, and guardianships
- Families and individuals
- Accounting management of projects or real estate
Everything you need to get started right away
Easily enter income and expenses
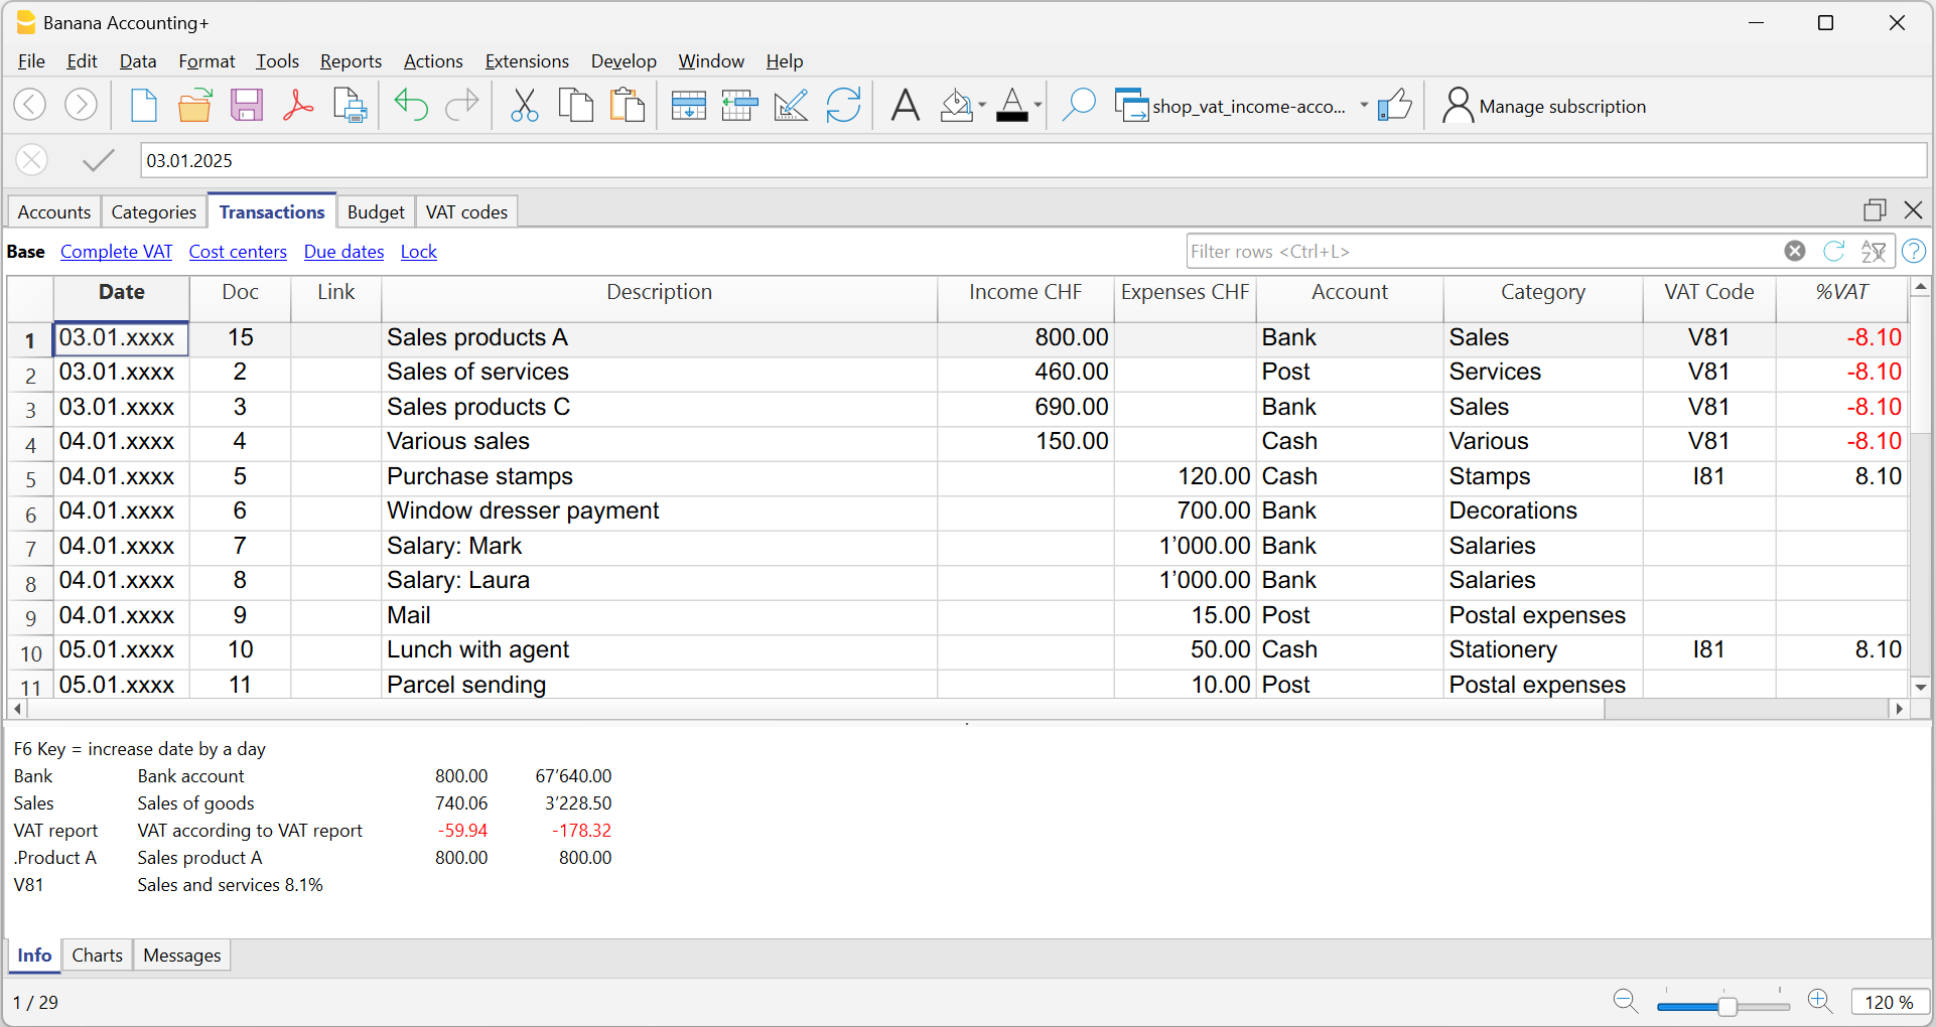
Recording income and expenses is very simple. In the Transactions table you’ll find all the columns ready for you to enter data in a clear and organized way. You just need to enter:
- The date
- Optional document number and link to the digital document
- The amount received or spent
- The account where the money comes from or is going to (cash, bank, post)
- The category, which represents the reason for the income or expense (rent, phone bills, etc.)
The program takes care of the rest!
![]()
At any time, you can correct and edit the data you've entered, copy and paste data, highlight rows with colors, filter rows by keyword, and much more. All entered data remains always visible both in the Transactions table and in the account and category cards.
To work faster, check the page Speed up data entry.
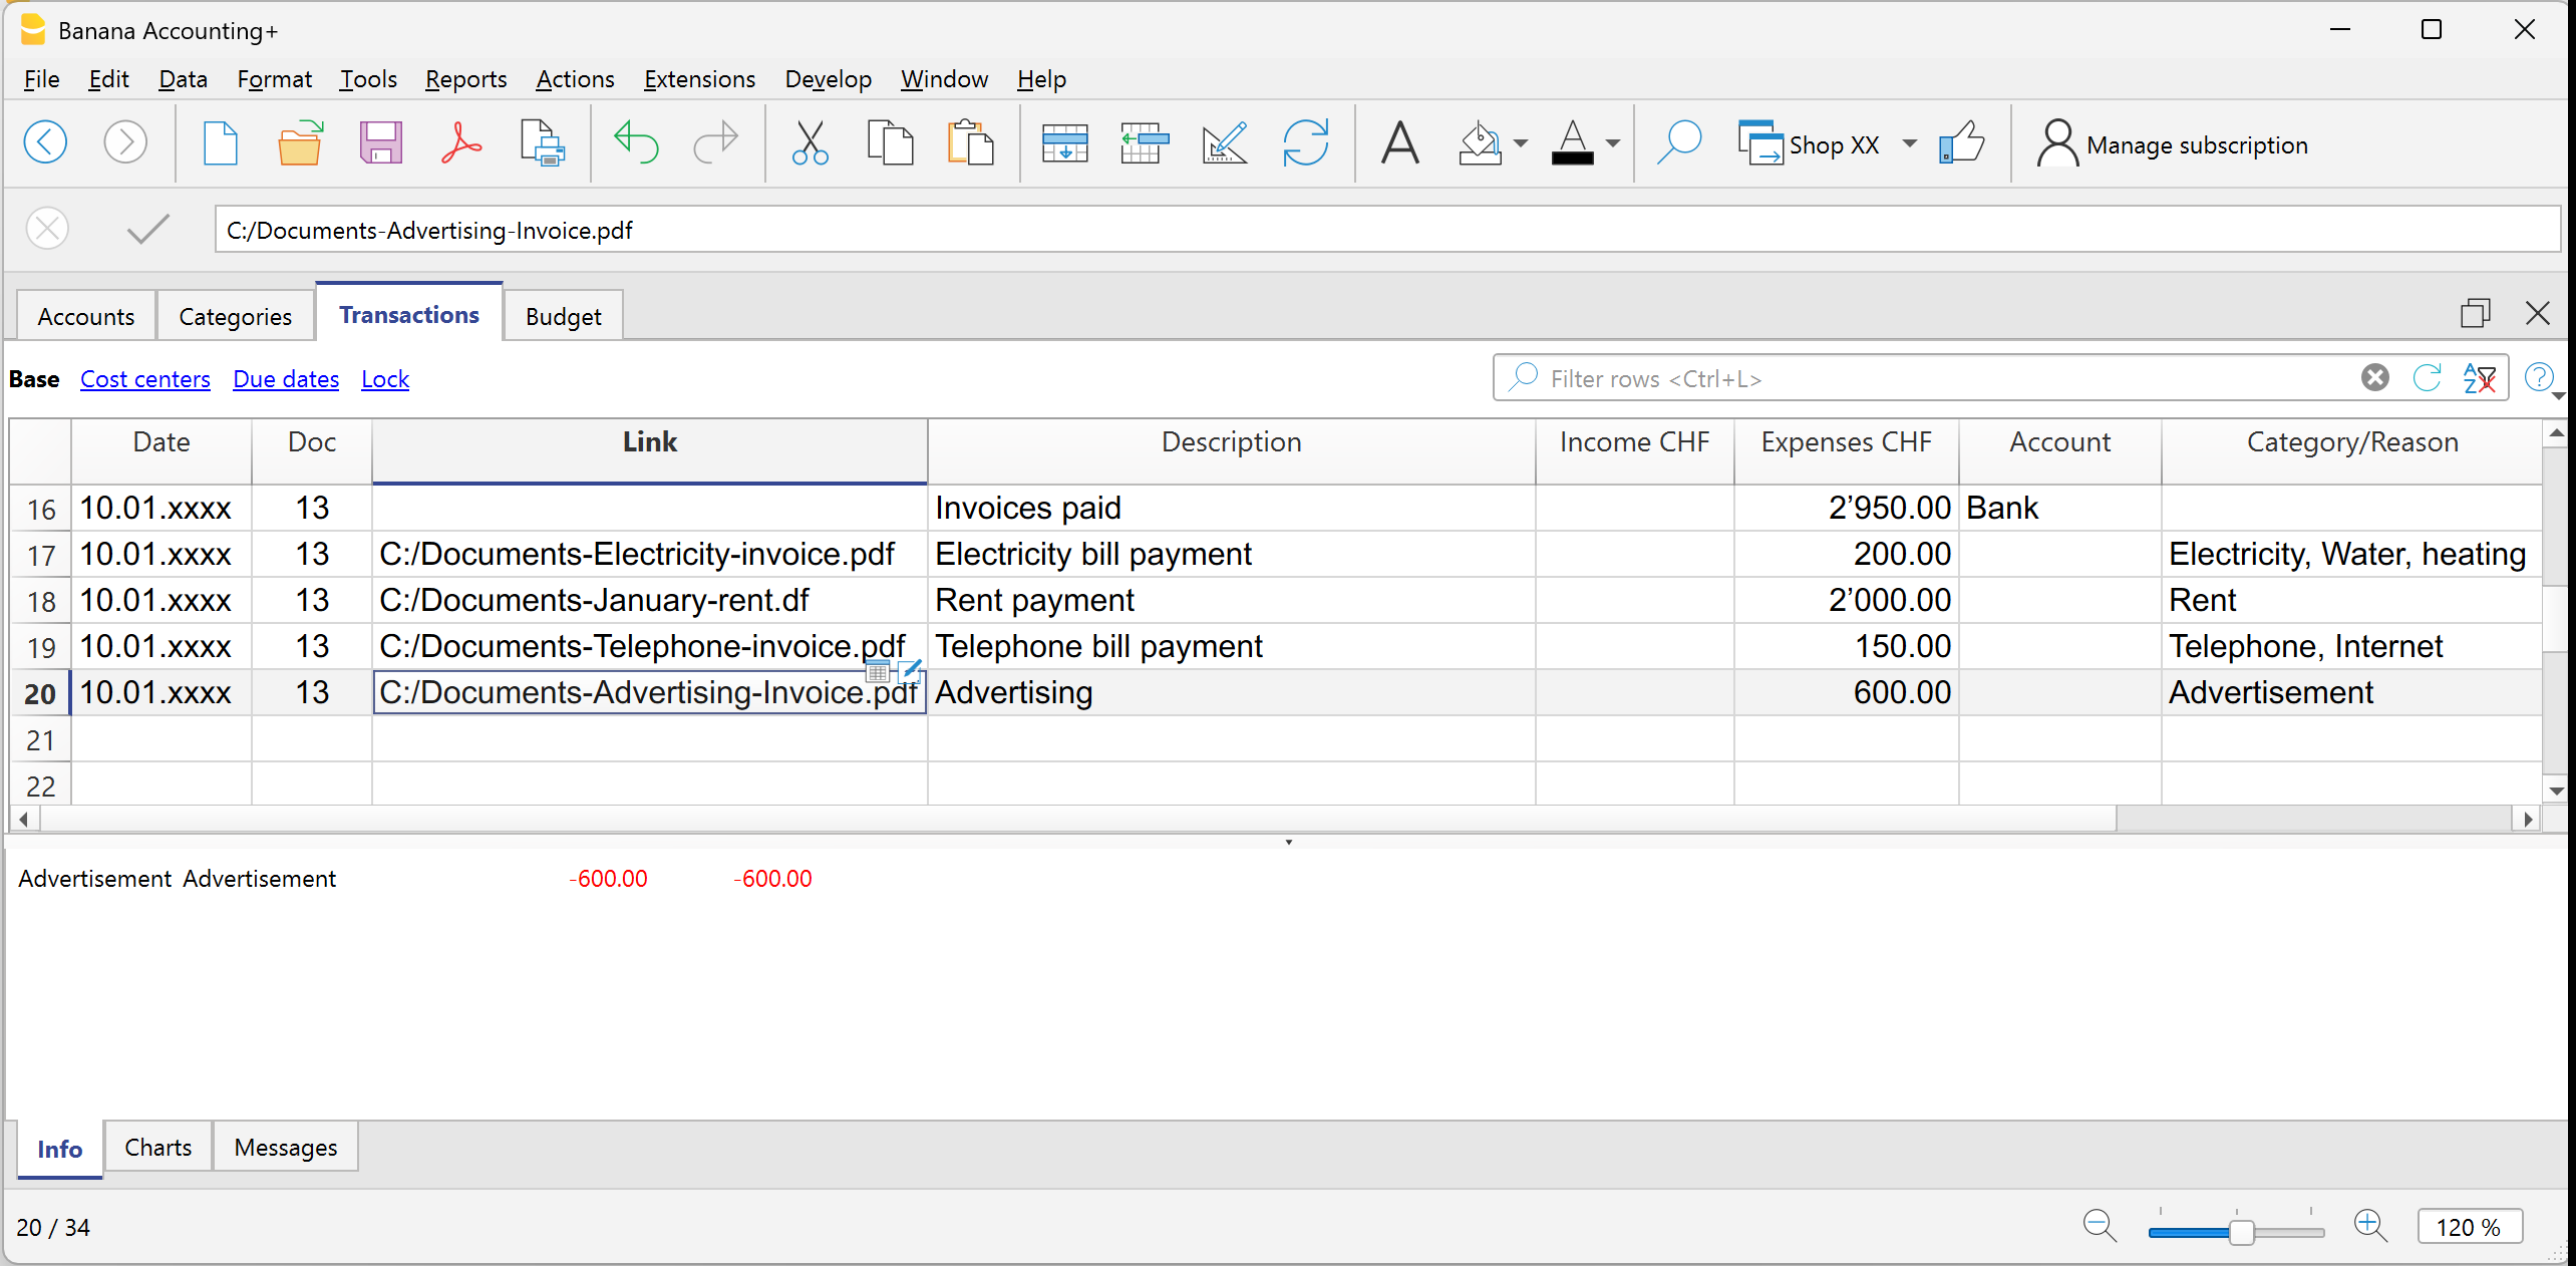
All your documents at your fingertips
Thanks to the Link column, visible in the Transactions table, you can directly attach a receipt or PDF invoice to each transaction, providing the following advantages:
- Instant access to documents, without having to search for them manually.
- Optimal preparation for tax inspections or audits by authorities.
- Easier collaboration with your accountant, who can see documents already linked to the accounting transactions.

Import your bank transactions
Despite its simplicity, with the Income / Expense accounting you can import transactions from your bank, postal accounts, and credit cards, taking full advantage of the power of professional accounting software. Additionally, by using Rules, you can instantly have a complete and accurate accounting.
You save time, avoid mistakes, and ensure that your data is always up to date and accurate from the start.
Automated checks
Many features check for errors and discrepancies to ensure your accounting is always correct. This allows you to work with greater peace of mind and confidence, knowing your accounting is always consistent, accurate, and ready for any audits or reviews.
Automatic and ready-to-print reports
A report is a document that neatly shows all the money coming in and going out over a period of time. It’s like a summary that helps you understand where the money comes from and how it was spent.
After each transaction, the program automatically updates all the balances of Accounts and Categories, automatically generating professional reports.
The report created by Banana puts everything together, in order, to help you monitor your finances and know whether you are in surplus (money left over) or deficit (you spent more than you earned).
Available report types
From the Report menu, you can choose from:
- The Enhanced statement displays all accounts and categories without subgroups
- The Enhanced statement with groups displays all accounts and categories including subgroups
- Period reports are also available.

Additional printouts
Also from the Report menu, you can access the following printouts:
- Journal – printout of the transactions in the Transactions table
- Account cards (ledgers) – details of the transactions of one or more accounts or categories with totals
Expand features at your own pace
With Banana Accounting Plus, you can start simply and, when needed, move on to more advanced features without changing your working method. For example:
- You can add Cost centers and Segments to analyze in detail projects, departments, or activities, without needing to create new accounts or categories. Using the same report layout, you can check which sectors are most profitable and which generate costs that can be optimized.
- As you become more familiar with accounting and your business grows, you can choose to switch from Income / Expense accounting to double-entry accounting. With the Convert to new file function, your data is automatically transferred to a double-entry accounting file, preserving your work.
Common information for double-entry accounting
In the Income and Expense documentation pages, you will find detailed and specific information. For all general features, please refer to the double-entry accounting documentation. In particular:
Examples of Income / Expense Accounting Templates
Banana Accounting includes a series of templates with predefined chart of accounts, designed to help you get started quickly based on your activity or needs.
Universal templates are standard models but easily adaptable for any country.
Income and Expense Templates for Micro-businesses
- Accounting for Business (Switzerland)
- Accounting for Freelancer (Switzerland)
- Income and Expense Accounting for Yacht (Universal)
Income and Expense Templates for Associations and Non-Profit Organizations
- Parish with Numeric Accounts (Universal)
Income and Expense Templates for Individuals and Families
- Household Budget and Home Accounts (Universal)
- Family Accounting (Switzerland)
- Easily manage your vacation expenses (Universal)
Start now with Income and Expense Accounting!
The Income and Expense Accounting of Banana Accounting Plus is a unique tool that allows you to immediately start your business with full control, meeting the reporting requirements set by the authorities, at a minimal cost! It is the only tool that gives you the flexibility to grow and change without losing your work and without wasting time and resources.
Como começar uma contabilidade de Despesas e Receitas
Criar uma contabilidade partindo de um modelo
Siga os seguintes passos:
- Menu Arquivo, comando Novo
- Selecionar a Região, a categoria e o tipo de contabilidade
- Da lista de modelos que aparece, escolha aquele que melhor se adapta às suas exigências
- Clicar no botão Criar.
Na caixa Procurar, ao inserir uma palavra-chave, o programa visualiza os modelos que contêm a palavra-chave.
Também é possível iniciar com um arquivo vazio, selecionando a opção Arquivo vazio. No entanto, para facilitar o início e evitar erros de agrupamento, aconselhamos começar sempre com um modelo existente.
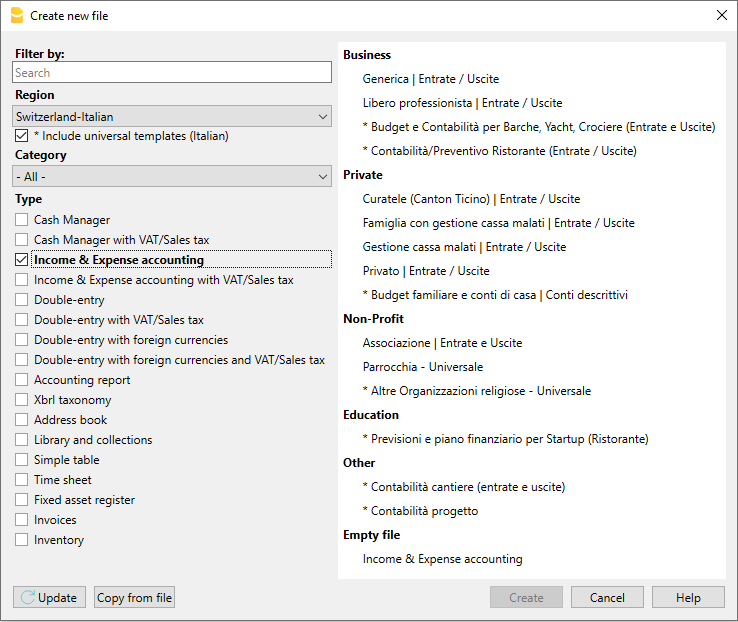
Mais informações sobre como criar un novo arquivo estão disponíveis na página Criar um novo arquivo.
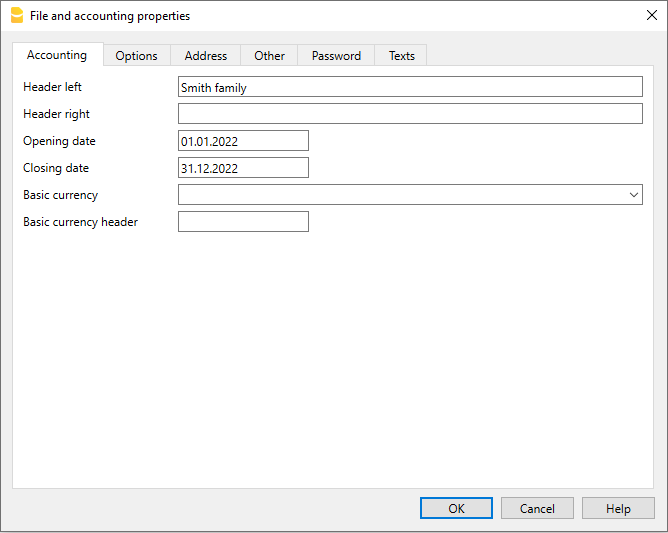
Configurar as Propriedades do arquivo
Configurar os próprios dados nas Propriedades do arquivo e salvar o arquivo com nome.
Salvar no disco
Com o comando Arquivo → Salvar como..., guarde os dados e atribua um nome ao ficheiro. Aperecerà o dialogo tipico do seu sistema operativo.
- É aconselhado usar o nome da empresa, seguido do ano "empresa-2020.ac2" para o distinguir de outros arquivos de contabilidade.
- Pode guardar quantos arquivos precisar, cada um com o seu próprio nome.
- Pode escolher o percurso e o suporte (guardar num disco, pen USB o cloud).
Se espera ter também documentos ligados à contabilidade do ano corrente, sugerimos criar uma pasta separada para cada ano de contabilidade para reunir todos os arquivos.
Personalizar a tabela Contas
Na tabela Contas é possivel personalizar as contas patrimoniais, segundo as próprias necessidades:
- podem-se mudar os números de conta
- pode-se mudar as descrições
- na coluna Abertura, insira o saldo inicial.
Os saldos de abertura das contas passivas têm que ser inseridas com i sinal de menos antes do montante.
Esta operação é efetuada só na primeira vez em que se usa Banana Contabilidade, visto que cada vez que o programa cria un ano novo (menu Conta2, comando Criar novo ano) o saldo de abertura é atualizado automaticamente.

Personalizar a tabela Categorias
Na tabela Categorais é possível personalizar as categorias de receita (ganho/receitas) e de despesa (despesas/custos).
Os números das categorias podem ser mudados, assim como as descrições.
As categorias, ao início do ano, não devem ter nenhum saldo de abertura, para poder determinar os resultados do ano de contabilidade correspondente.
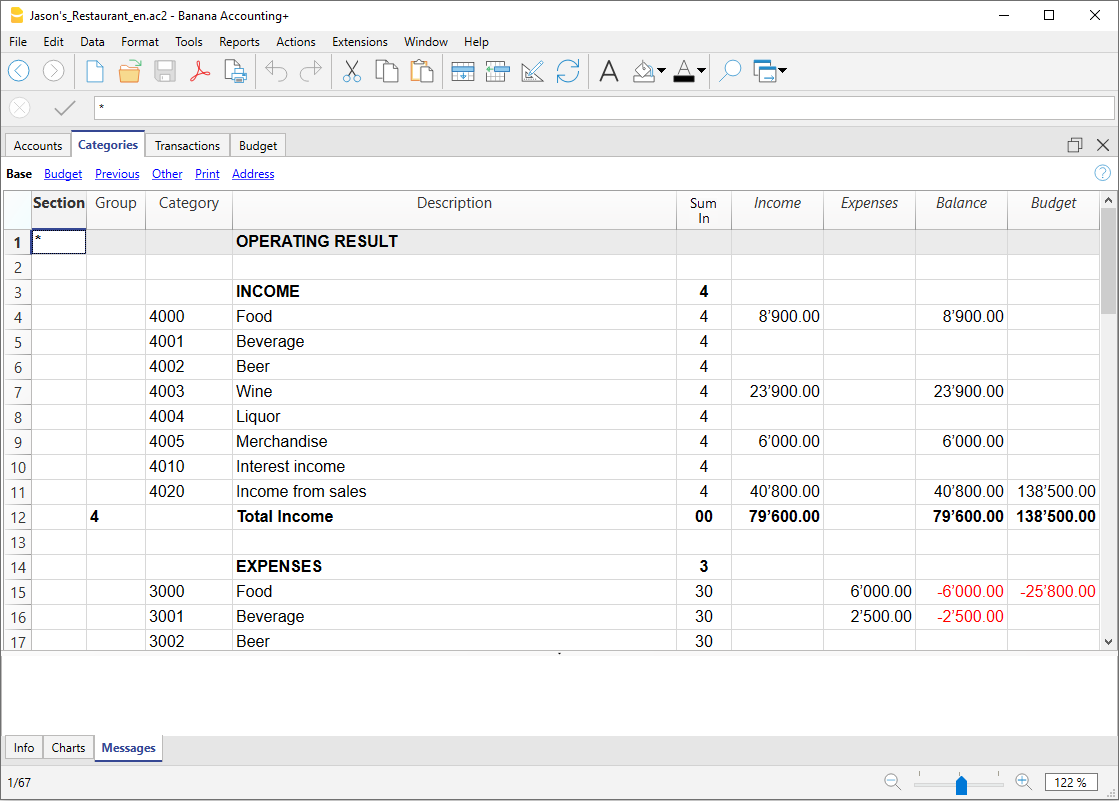
Tabela Lançamentos
Na Tabela Lançamentos inserem-se as receitas e as despesas, indicando a conta sobre a qual foi efetuado o movimento e a categoria à qual é atribuida a despesa ou a receita.
Nas colunas correspondentes:
- Inserir a data
- Inserir o número de documento que foi atribuído ao documento em papel manualmente. Isto permete recuperar facilmente o documento, uma vez contabilizada a operação
- Inserir a descrição
- Na coluna Receitas, inserir o montante ganho
- Na coluna Despesas, inserir o montate gasto
- Inserir a 'conta' (uma conta presente na tabela Contas, ex: Banco)
- Inserir a 'categoria' de despesa ou de receitas (uma categoria presente na tabela Categorias).
Acelerar a inserção dos Lançamentos
Para acelerar a inserção dos lançamentos utiliza-se:
- a função de Emissão de dados com preenchimento automático que consente recuperar automaticamente dados já inseridos previamente
- a função dos Lançamentos repetitivos (menu Conta2) que permete memorizar numa tabela os lançamentos repetitivos
- a importação de dados do extrato bancário ou postal.
Lançamentos com IVA
Para poder registrar operações com IVA ocorre:
- No menu Arquivo, comando Novo escolher como Tipo a Contabilidade de Despesas e Receitas com IVA/ICMS
- Escolher um dos Modelos já predisposto segundo a nação e que seja do tipo Contabilidade de Despesas e Receitas com IVA/ICMS.
Para os lançamentos com IVA, consultar a página Lançamentos.
Lançamentos compostos
Para os Lançamentos compostos, aqueles que concernem débitos e/ou créditos em várias contas e/ou categorias (ex: quadno se pagam faturas diferentes com a conta corrente bancária) ocorre registrar em mais do que uma linha:
- na primeira linha, registe o montante total de receitas ou de despesas e a conta da qual partem os pagamentos das faturas
- em cada linha sucessiva, registe o montante de receitas ou de despesas e na coluna categoria, insira a categoria de receita ou de despesa.
Cada montante único é registado numa linha. Quando todas as receitas e despesas única forem inseridas não deveria existir nenhuma diferença.
A ficha Conta
A ficha conta permete obter um elenco completo dos movimentos que fazem parte da mesma categoria ou do mesmo grupo.
- Para abrir uma ficha conta clique na célula que contem o número da conta, seguido de um clique no símbolo azul pequeno presente no canto superior direito da célula.
- Para abrir mais fichas conta ocorre selecionar o comando Razão por conta do menu Conta1.
- Para atualizar as fichas conta, depois de modificar a tabela Lançamentos, ocorre clicar no símbolo azul, com duas setas circulares, que se encontra no canto superior direito da ficha conta.
A ficha Categorias
A ficha categorias permete obter um elenco completo dos movimentos que fazem parte da mesma categoria.
- Para abrir uma ficha categoria clique na célula onde se encontra o número da categoria, seguido de um clique no símbolo azul pequeno que se encontra no canto superior direito da célula.
- Para abrir mais fichas categoria ocorre selecionar o comando Razão conta do menu Conta1.
- Para atualizar as fichas categoria, depois de modificações na tabela Lançamentos, ocorre clicar no símbolo azul, com duas setas circulares, que se encontra no canto superior direito da ficha.
Fichas conta por período
Para visualizar as fichas conta com os saldos referidos num determinado período, ocorre clicar no menu Conta1, comando Razão conta e na secção Período ativar Período selecionado, inserindo a data de começo e de fim do período.
Para mais informações, consulte a página Periodo.
Imprimir as fichas conta
Para imprimir uma ficha conta, basta visualizar a ficha a partir de qualquer tabela (Contas ou Lançamentos) e acionar a impressão no menu Arquivo.
Para imprimir várias ou todas as fichas conta, clicar no menu Conta1, comando Razão conta e selecionar as fichas conta para imprimir. Através do filtro presente na janela, pode-se fazer uma seleção automatica de todas as contas, os centros de custo, os segmentos, os grupos, etc.
Demonstrativo analítico
Para visualizar o Demonstrativo analítico e o Demonstrativo analítico por grupos, clicar no menu Conta1 e depois no comando Demonstrativo analítico ou Demonstrativo analítico por grupos. Também é possível fazer demonstrativos por período.
- O Demonstrativo analítico visualiza todas as contas e as categorias sem eventuais subgrupos
- O Demonstrativo analítico por grupos visualiza todas as contas e as categorias também com os subgrupos
Armazenamento de dados em PDF
Ao fim do ano, quando toda a contabilidade estiver completada, corrigida e revista, pode-se armazenar todos os dados da contabilidade com o comando Criar PDF, no menu Arquivo.
O Orçamento
Antes de começar um ano de contabilidade, pode-se criar um orçamento com possíveis despesas e receitas, de modo a ter sob controlo a situação económica e financiária da própria empresa.
O orçamento pode ser configurado de duas maneiras diferentes:
- Na tabela Categorias, coluna Orçamento. Em cada conta é indicado o montante do orçamento anual.
Neste caso, quando se elabora o Orçamento no menu Conta1, comando Demonstrativo analítico por grupos, a coluna do orçamento descreve os montantes que se referem ao ano inteiro. - Na tabela Orçamento, que se ativa no menu Ferramentas, comando Adicionar novas funcionalidades.
Nesta tabela registram-se todos os orçamentos de despesas e de receitas com lançamentos. Caso se ative esta tabela, a coluna Orçamento da tabela Contas é desativada automaticamente.
Neste caso pode-se configurar um orçamento detalhado que tenha em conta possíveis variações durante o ano e nos diversos períodos do ano.
Accounts table | Income /Expense accounting
The Accounts table is made up of all the items of what you own (cash, assets, receivables) and what you owe (debts, loans, taxes).
In accounting terms:
- what you own → Asset accounts or Assets.
- what you owe → Liability accounts or Liabilities.
The difference between what you own and what you owe is your net worth, meaning what remains after subtracting debts from your assets.
- Net worth = Assets − Liabilities
With the Accounts table, you can always keep your financial situation under control in a simple and organized way.
- You can immediately see how much liquidity you have
- The amount of your receivables and debts
- The amount of your net worth
Structure of the Accounts table
The Accounts table at the structural level is mainly composed of the following elements:
- The asset and liability accounts in the Accounts column
- The totalization groups in the Group column
In the example below, in the Accounts table, all accounts are grouped in Group 1 (Total assets). The asset accounts are added to the liability accounts and the difference determines the Net Worth. - The opening balances must be entered the first time the file is created in the Opening column.
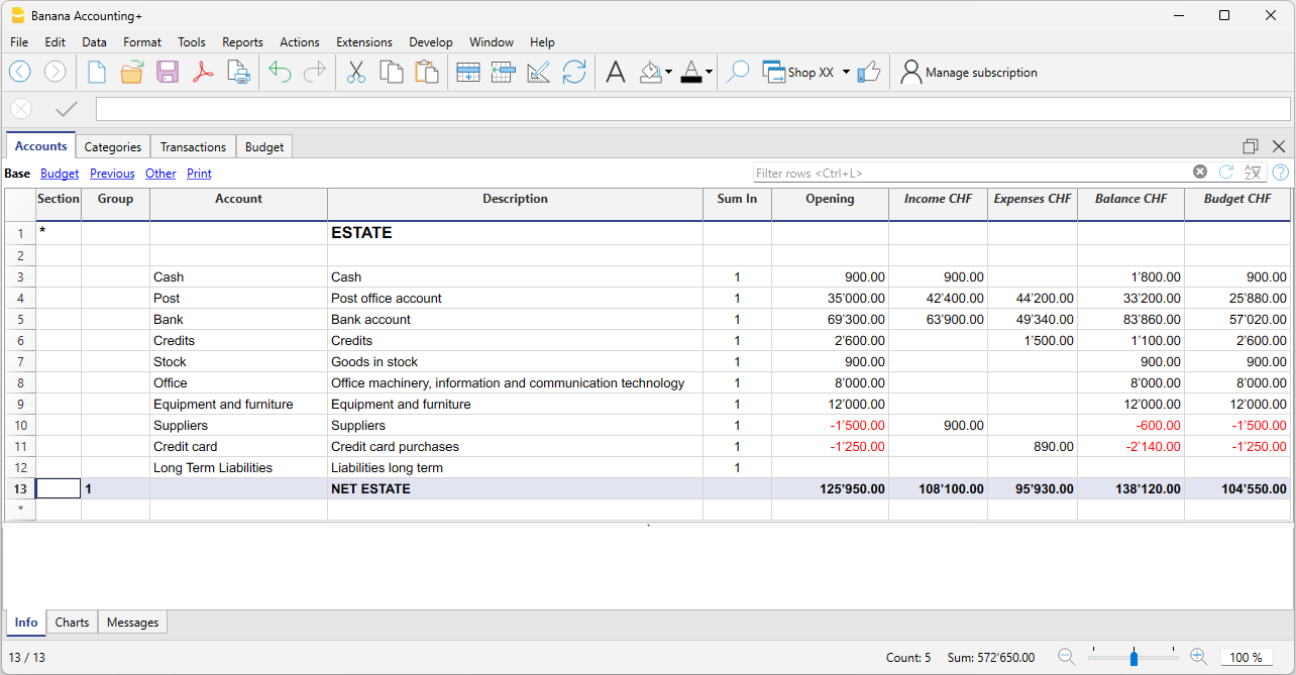
The final balances of the asset accounts are always carried forward as opening balances in the file for the following year.
Positive asset accounts (Assets)
Positive asset accounts represent the goods and values you own, so they are the resources available to you.
Some examples of positive asset accounts:
- Cash on hand or in the bank.
- Invoices to be collected from customers (money they owe you).
- Goods in stock.
- Assets such as equipment, furniture, computers, cars.
The amounts are positive.
Negative asset accounts (Liabilities)
These accounts indicate debts and obligations to be settled, such as:
- Debts to suppliers
- Loans to be repaid
- Taxes to be paid
- Contributions still due
These are therefore amounts you owe to third parties. The amounts are negative and shown in red.
Net Worth
Net worth is the difference between positive and negative asset accounts. It represents what actually remains after subtracting your debts from what you own.
- Net Worth = Positive asset accounts − Negative asset accounts
The value of your net worth reflects your financial strength and your ability to carry on operations without relying on external financing.
A positive net worth indicates that the entity (business or individual) has a book value greater than its debts. A negative net worth means that the value of the negative accounts exceeds the positive ones, signaling potential financial difficulties.
Columns of the Accounts table
In the Accounts table, you can view the account balances, the columns for incoming and outgoing transactions, and the budget. You therefore get an immediate and constantly updated view of your financial situation. Asset values are shown as positive amounts, while liabilities (debts) are shown as negative.
As you enter income and expenses (in the Transactions table), you immediately see the updated balances of the various accounts in the Accounts table.
Below are the main columns of the Accounts table. The column display changes depending on the selected view.
You can add additional columns, both system and custom, via the menu Data > Columns setup.
Section
An asterisk is entered to indicate a section change. For example, to separate Total assets from cost centers.
The values entered in the Sections table are essential for displaying the enhanced Balance Sheet with groups.
More details about Sections are available on the web page Sections.
Group
Values are entered here that summarize the categories sharing the same grouping in the Sum in column. These are essential for totalization.
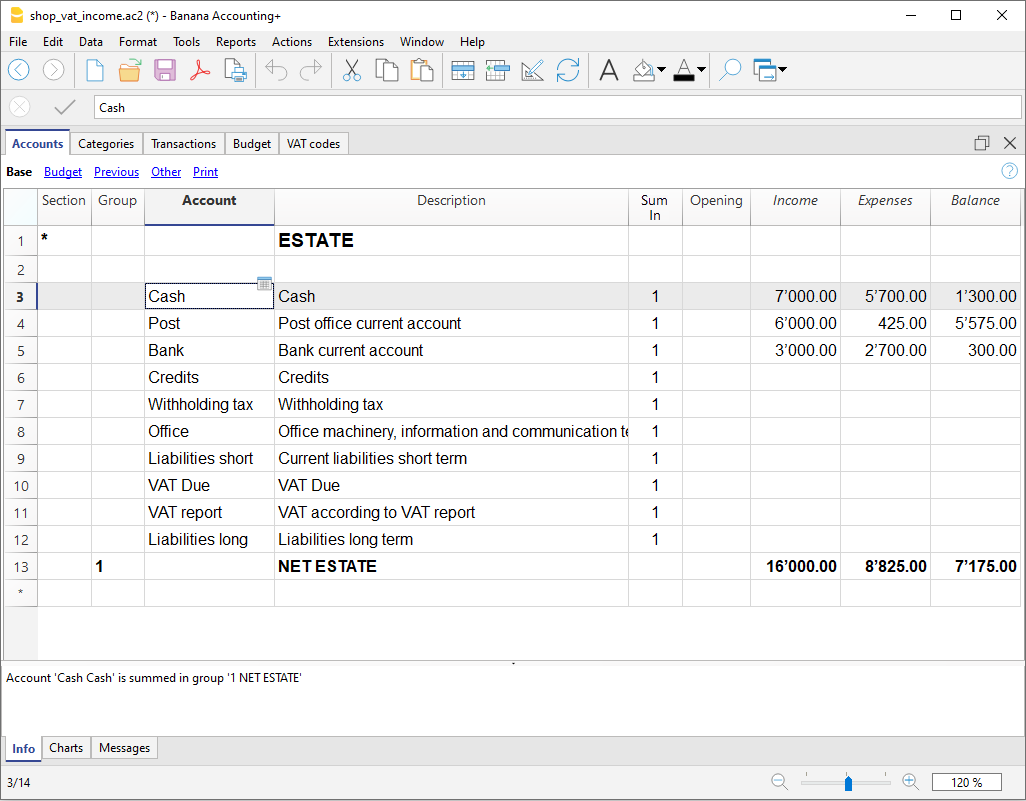
Account
Enter the account number or code to manage (cash, bank, post).
Description
Enter a description for the account. This description is automatically used in the Account Description column of the Transactions table (if visible).
Sum in (Gr)
Enter the code of a group so that the program can total the row’s amount into that group.
The "Sum in" header was introduced in Banana Plus and replaces the "Gr" used in previous versions.
Opening
This shows the opening balances. These must be entered manually only the first time you open Banana Accounting or use a new file. Later, at the beginning of a new year with automatic opening, this column is automatically filled with the closing balances from the previous year.
Income
This column is protected and shows the balance of incoming transactions. After each entry, the balance is updated automatically.
Expenses
This column is protected and shows the balance of outgoing transactions. After each entry, the balance is updated automatically.
Balance
This column is protected and shows the total balance between income and expenses. After each entry, the balance is updated automatically.
Sections
The Sections available in the Accounts and/or Categories table allow you to define the group of accounts and categories you want to print using the Report > Enhanced Statement with Groups command.
- Sections are indicated in the Sections column of the Accounts table and the Categories table.
- A * (asterisk) marks the start of a section.
- A ** (double asterisk) marks the start of a subsection.
- A # marks the beginning of the notes section.
- A section ends when a new one begins.
- Unlike double-entry accounting, in income and expense accounting you cannot use numeric sections.
- If no section is indicated, the first time the command is used, the program will insert it automatically:
- In the Accounts table: "Balance Sheet"
- In the Categories table: "Operating Result"
- It is useful to create separate sections if you have cost centers, segments, or customer/supplier ledgers. This allows you to print reports focused only on what you need.
Personalizing the Accounts table
In the Accounts table, you can customize the asset accounts according to your needs:
- You can change the account numbers
- You can change the descriptions
- In the Opening column, enter the initial balance of your accounts.
For more information, visit the following pages:
Account for allocating results from previous years
In Income/Expense accounting, the total line that groups income and expenses directly represents the net worth (equity). For this reason, there is no need to create a specific dedicated account.
Viewing results from previous years
If you want to display the amount of results from previous years, you need to:
- Add an account "Results from previous years".
- Manually enter the amount in the Opening column (in the Accounts table) at the beginning of each new year.
Categories Table | Income/Expense accounting
The Categories table contains a list of all the items that represent the reasons why you have income and expenses. It is the central tool for organizing and analyzing income and expenses, and for monitoring the progress of your activity.
In the Categories table, all income and expenses are organized in a clear and orderly way.
The categories are divided into two groups:
- Income categories
- Expense categories
The difference between income and expense categories determines the result (profit or loss).
- Operating result = Income - Expenses
Income categories
Income categories are the items that represent the reasons why you received income, so they include all sources of earnings.
Examples of income categories:
- Sales, Membership fees, Donations, Public grants, Bank interest

Expense categories
Expense categories represent the reasons why you incurred expenses.
Examples of expense categories:
- Rent, Utilities, Office supplies, Salaries, Travel expenses

Profit or Loss (Operating result)
The difference between total income and expenses is your profit or loss (Operating result), automatically calculated by the program.
- Operating result (for the year) = Total income – Total expenses
In Banana Accounting, for automatic total calculation reasons, income amounts are shown in red and negative. In reports and printouts, the amounts appear as positive.

The columns of the Categories table
Below are the main columns of the Categories table. The column view changes depending on the selected view.
You can add extra columns, either system or custom ones, using the menu Data > Arrange columns.
Section
An asterisk is inserted in the row where a title is added, which will then be used in the enhanced report with groups (in our example, the asterisk is inserted in the row with the Result title).
If there are other sections beyond income and expenses (e.g. cost and profit centers), another asterisk can be inserted in the Sections column, also on the title row. More details are available on the web page Sections.
Group
An identifier (number or code) is entered that matches what is entered in the Total in column for each category. It is used to total all the categories that belong to the same grouping in the Total in column (in the example, Group 4 totals all income categories and Group 3 totals all expense categories).
Category
Enter the category number that identifies the income or expense.
Description
Enter a description to identify the income or expense category. This description is automatically copied to the Category description column in the Transactions table (if displayed).
Total in (Gr)
Enter the code of a group so that the program totals the amount of the row into that group.
The header "Total in" was introduced with the Banana Plus version, while "Gr" was used in previous versions.
Each category has an identifier that defines in which group it should be totaled (in the example, all income categories have group 4 in the Total in column, because they are totaled in Group 4, Total income).
Income
This column is protected and shows the balance of the income transactions. After each entry, the balance is automatically updated.
Expenses
This column is protected and shows the balance of the expense transactions. After each entry, the balance is automatically updated.
Balance
This column is protected and shows the total balance between income and expenses. After each entry, the balance is automatically updated.
Customize the Categories table
In the Categories table, you can customize the income and expense items:
- Change the category numbers
- Change the category descriptions
- Add new categories
- Delete unused categories
For more information, visit the following pages:
Customising Accounts and Categories | Income/Expense accounting
All Banana Accounting templates already include the Accounts and Categories tables, with all the essential items to manage your accounting. However, if you want to adapt the chart of accounts to your business, you can easily customize these tables.
Customize Accounts
The Accounts table contains the items that represent what you own (assets) and what you owe (liabilities).
You can modify it as you wish:
- Change account descriptions
Example: in the Bank account row, enter the name of your bank (e.g. UBS Bank).
Add new accounts
If you have multiple bank accounts, add a new row and enter the bank name.
The same applies to customers and suppliers: you can create a separate account for each one, with the corresponding description. - Change account numbers
If the template uses numbers, you can replace them with descriptive names or assign different numbering. - Remove unused accounts
If you don’t need them, simply delete the corresponding row.
Customize the Categories table
The Categories table contains the reasons for your income (revenues) and expenses.
You can also freely adapt the items here:
- Change category descriptions
Example: instead of Sales, you can write Retail sales or Sales to resellers. - Add new categories
Insert a new row and define the item you need. - Change category numbers
You can replace numbers with descriptive names or assign new ones. - Remove unused categories
If you don’t need them, delete the row.
Advanced customization
As your business grows, you might need more detailed information. With Banana, you can expand the structure by adding:
- New total groups (subtotals), to get more homogeneous breakdowns.
- Customer and Supplier ledgers, to monitor each balance.
- Cost and profit centers, to analyze expenses and revenues.
- Segments, to differentiate sales or costs by area, sector, or project.
- Project management, to monitor specific activities.
- Invoicing and reminders features, if you want to issue invoices and manage reminders.
Example of customization in the Accounts table
In the following example, we explain how to add the Liquidity group in the Accounts table. This group allows you to see the total liquidity, separate from other amounts.
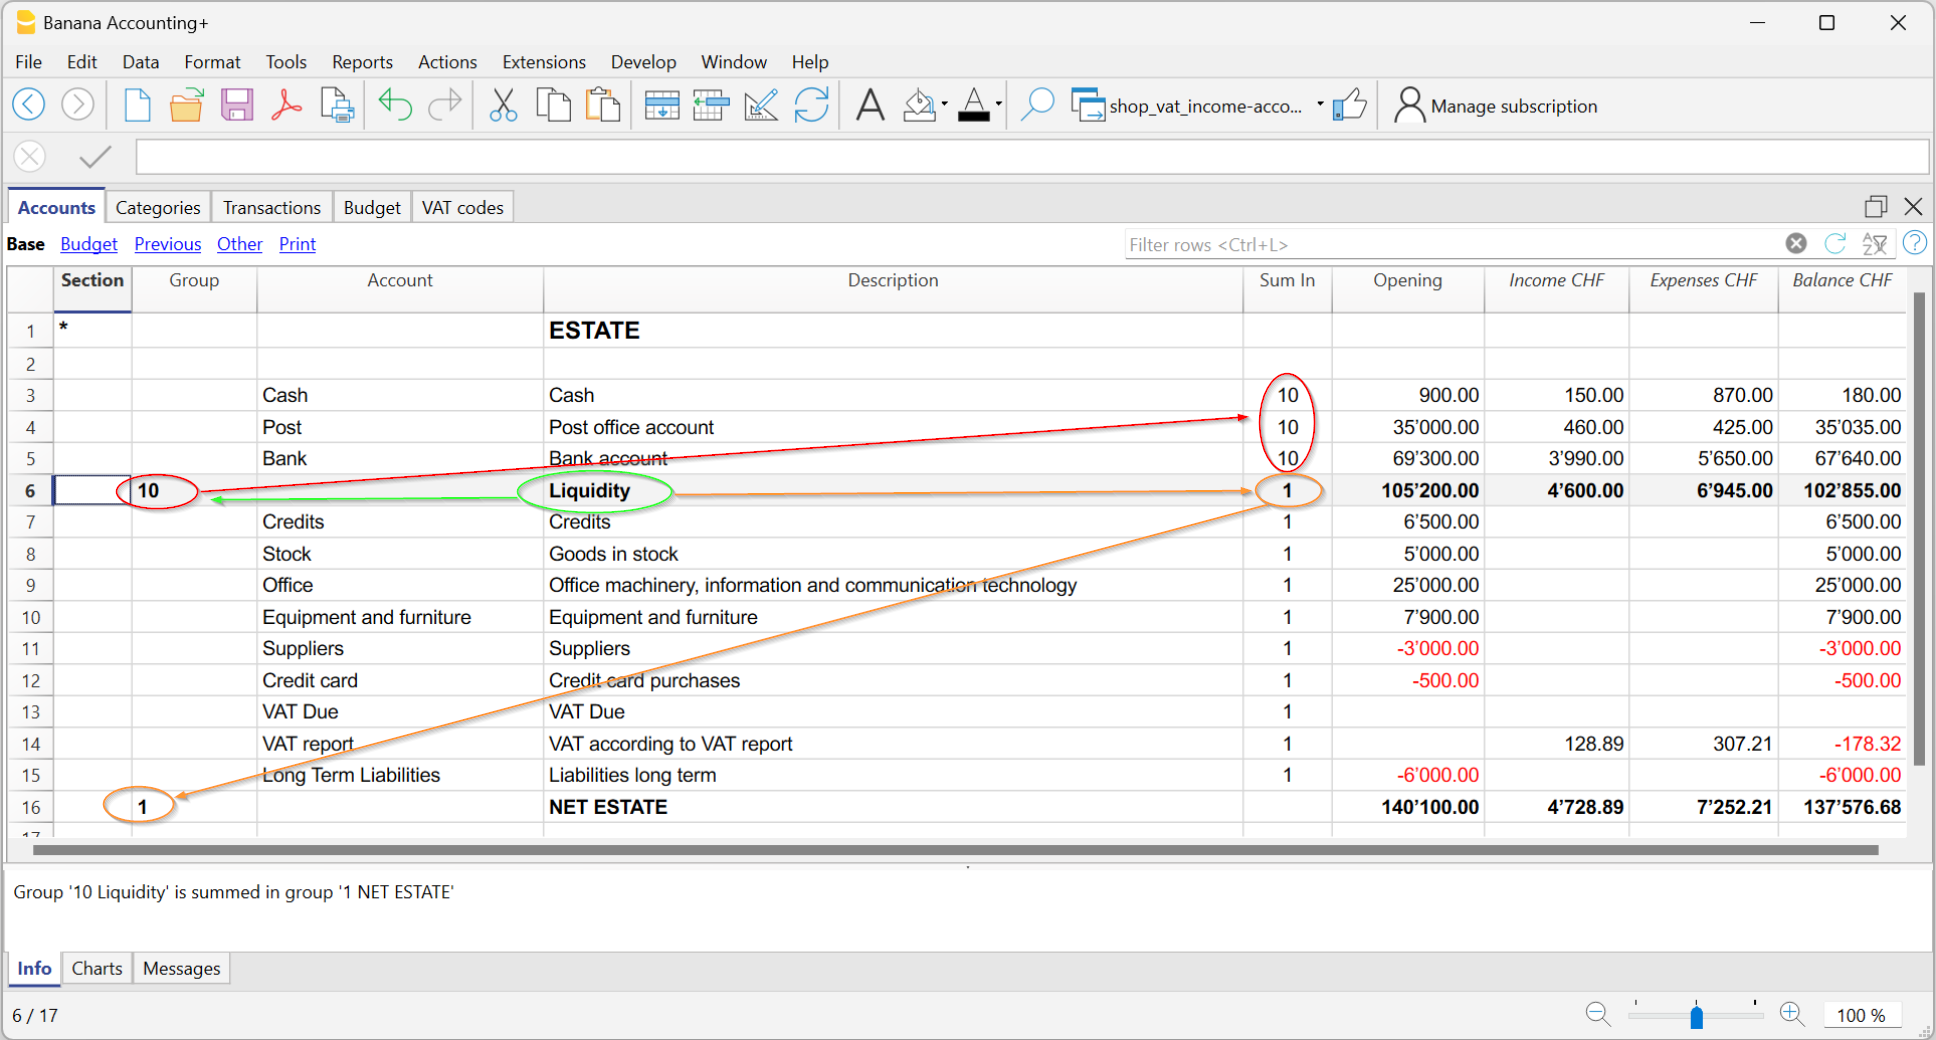
You can create a total group to sum the accounts related to liquidity (cash, postal account, bank).
- Add a new row below the bank accounts.
- In the Group column, enter the code 10 (new group).
- In the Sum in column of the Cash, Postal, and Bank rows, write 10.
This way, they will all flow into Group 10. - In the Sum in column of the Liquidity row (Group 10), write 1 so the total flows into Group 1 – Equity.
Result: a new "Liquidity" subtotal separate from other amounts.
You can also find information on the pages:
Transactions table | Income/Expense accounting
The Transactions table is the core of accounting management: this is where all accounting transactions are entered, always visible and sorted chronologically. Each entry can be modified or corrected at any time, ensuring maximum flexibility.
Main columns of the Transactions table
The column display varies depending on the selected view. You can add extra columns through the Data > Columns setup menu.
Below is a list of the main columns of the Transactions table.
Date
The date of the income or expense transaction.
Doc
The document number. Usually it matches the number assigned to the physical document to be recorded. With the increase of digital documents, the use of the Doc column has become less essential.
Link
In this column, you can enter the link to the digital document corresponding to the accounting transaction.
Description
The description used to identify the income or expense transaction.
Income
The income amount.
Expenses
The expense amount.
Account
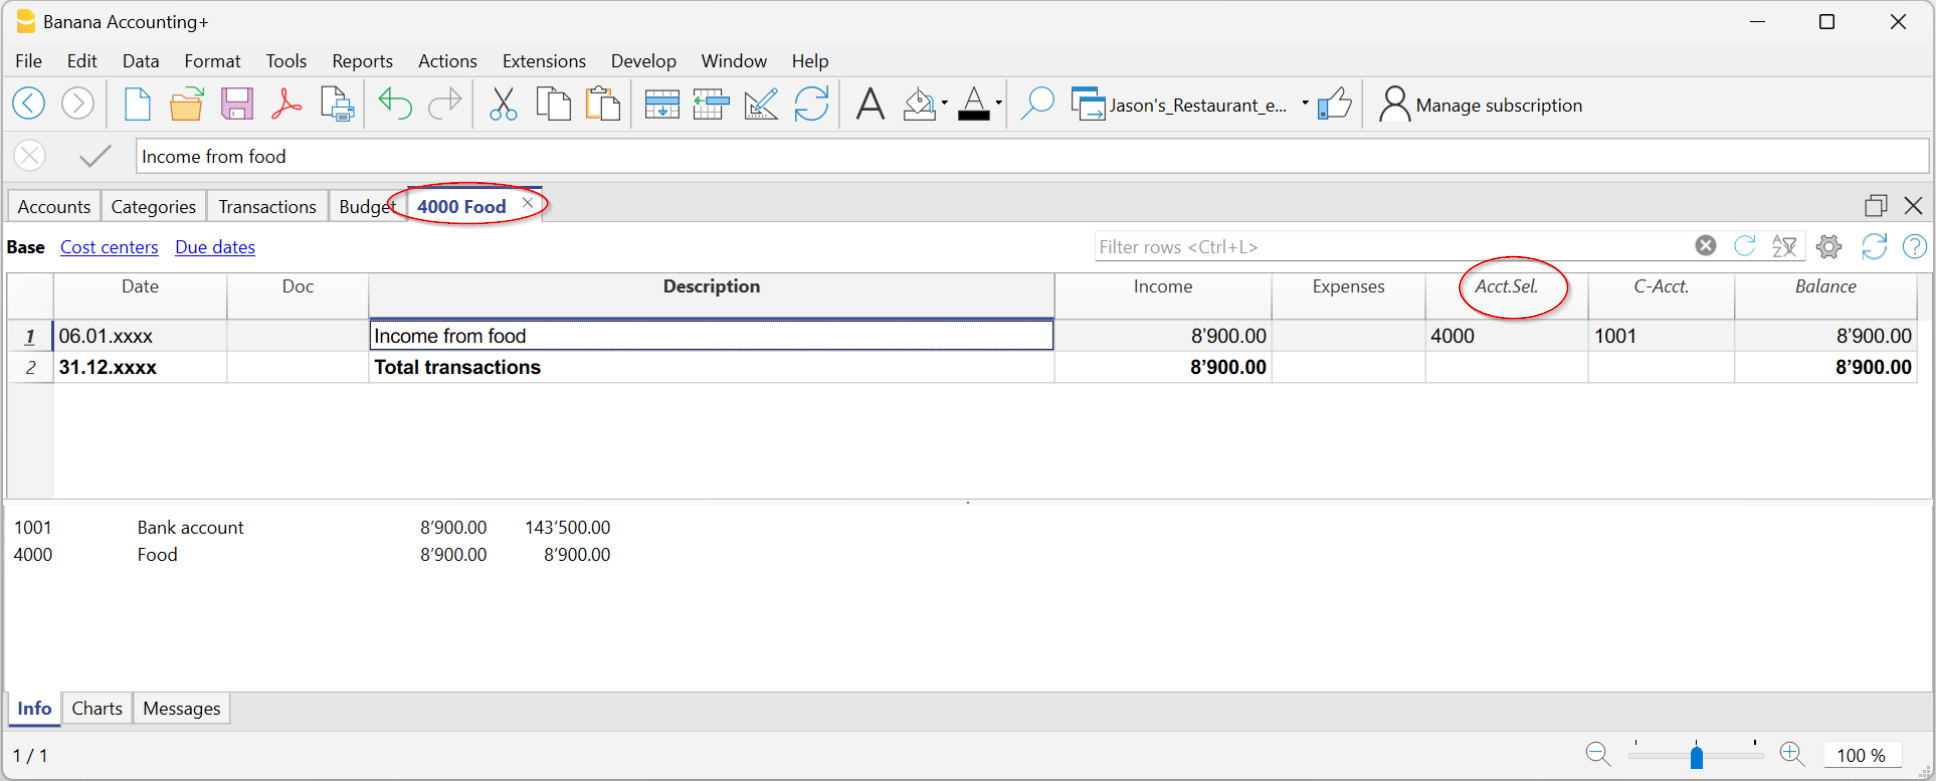
The asset account involved in the transaction, selected from those defined in the Accounts table (e.g. cash, bank, post office, customers, suppliers…). You cannot enter a category in this column.
Category
The category that explains the transaction, selected from the Categories table (e.g. Sales, Rent).
Alternatively, you can also enter an account from the Accounts table, useful for transactions between asset accounts (internal transfers).
You can find more details on the pages:
Category Description
In the Category column, a category defined in the Categories table is entered (or an account, in case of internal transfers).
If the description of a category is modified in the Categories table, to display the updated text, it is necessary to recalculate the accounting.
Balance Columns
The Balance column is not predefined: the user can choose whether to display it or not.
It is a very useful column, as it highlights differences between income and expenses. By recording line by line, it allows you to immediately identify and correct any discrepancies.
In the example, the Balance column shows the discrepancy in row 4:
- the account is missing in the Account column

Opening Balances | Income/Expense accounting
Opening balances are the values your accounting starts with when you begin a new year or create a new file.
They represent your financial situation at the beginning of the year or your accounting period.
- What you own → cash in hand and bank, assets, receivables.
- What you owe → debts, loans, taxes to be paid.
- Net worth → the difference between what you own and what you owe.
Opening balances the first time you create a file
The first time you use Banana Accounting or create a new file:
- Manually enter the balances in the Accounts table, Opening column.
- Active accounts (positive) → enter them normally.
- Passive accounts (debts) → enter them with a minus sign (-) before the amount.
From the second time on, it's no longer necessary: when you use Actions > Create New Year, the program automatically carries over the balances.

Start with Banana Accounting during the year
If you start with Banana mid-year, you can choose one of the two methods:
- Start from the beginning of the year
- In the Accounts table, Opening column, enter the initial balances you had at the beginning of the year.
- In the Transactions table, enter all the transactions of the year (previously done with other programs), so you will have a complete file. To import data, you can use copy and paste or see the information on the page Retrieving data from other programs.
2. Start from the current date
- Enter the opening balances in the Accounts table (Opening column).
- Enter Income (positive) and Expenses (negative) balances in the Categories table.
- Enter only the new transactions in the Transactions table.
Previous year balances
If you start a new accounting file based on an existing one and want your reports to also show the previous year’s values:
- Go to the Previous view of the Accounts table.
- Enter last year's closing balances in the Previous Year column.
Note:
- Positive asset accounts → enter normally.
- Negative asset accounts → use a minus sign.
- Income categories → enter as positive.
- Expense categories → enter as negative.

Create a new year
To move to the next year:
- Go to the Actions menu > Create New Year.
- Save the new file with a clear name (e.g. Accounting 2026).
The program will automatically carry over the opening balances to the new file.
For more details, see the page Create New Year.
Print opening balances
You can print the opening balances in two ways:
- Print/Preview → print the Accounts table selecting only the rows in the Opening column.
- Accounting reports → configure the report to display the Opening column.
Entering transactions | Income/Expense accounting
The Transactions table is the core of accounting: here you enter all incoming (income) and outgoing (payments) transactions. After each entry, the amount is automatically updated in the account and category cards, so you always have totals under control.
You can enter transactions in two ways:
Record data automatically
With Banana Accounting Plus you no longer need to waste time with manual entries: thanks to automation features you can record data automatically, quickly and accurately.
Speed up data entry
To speed up transaction entry, use the following automation features:
- Data entry with auto-completion – automatically retrieves previously entered data.
- Recurring transactions – allows you to store recurring entries in a dedicated table.
Import data from bank statement
With Banana Accounting, you can speed up your work by entering transactions directly from your bank statement. Instead of recording each operation manually, simply import the file you downloaded from your bank (usually in CSV or ISO20022 format). For more information, visit the page Importing data from bank or postal statements.
Apply Rules to imported transactions
Transactions with Rules – You can define instructions for the software to automatically complete imported transactions from bank statements, with contra account, cost centers, segments, and VAT code if needed.
Manual entry
Manual entry is quite intuitive. However, we explain the most common operations.
Manual entry of an income
Below is a practical example of an income. Specifically, it's a merchandise sale.
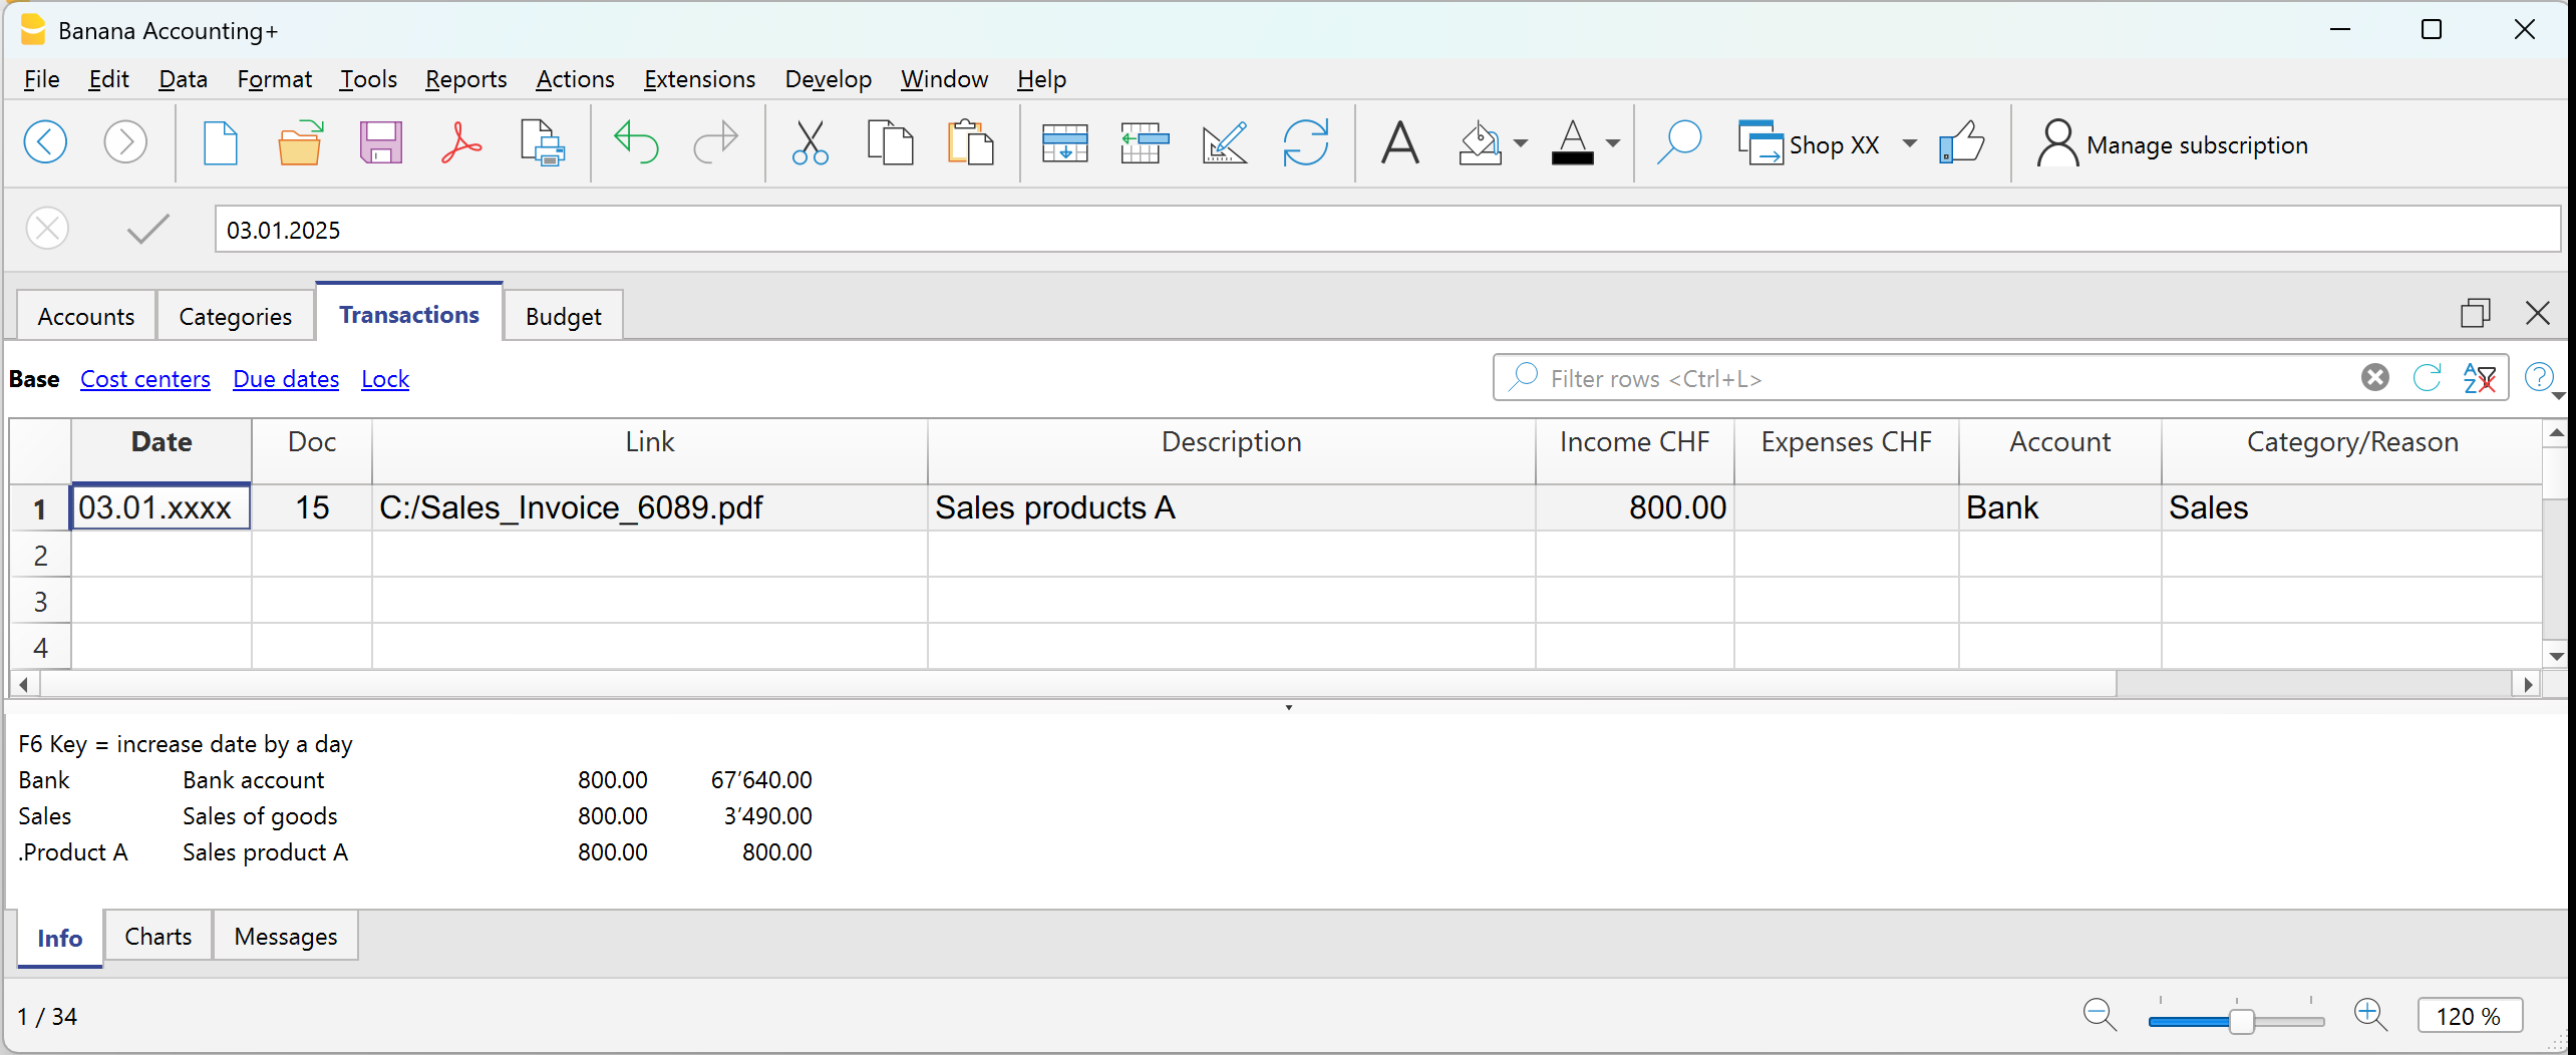
Example: payment received for a sale via bank.
- Date → enter the date of the document (e.g. invoice date).
- Doc → document number (optional).
- DocLink → link to the digital document (if available).
- Description → short description (e.g. Sale of goods to customer Rossi).
- Income → amount received.
- Account → liquidity account used (e.g. Bank).
- Category → reason for the income (e.g. Sales).
The amount will be shown as positive both in the account card and the category card.
Manual entry of an expense
Below is a practical example of an expense. Specifically, it's a merchandise purchase.
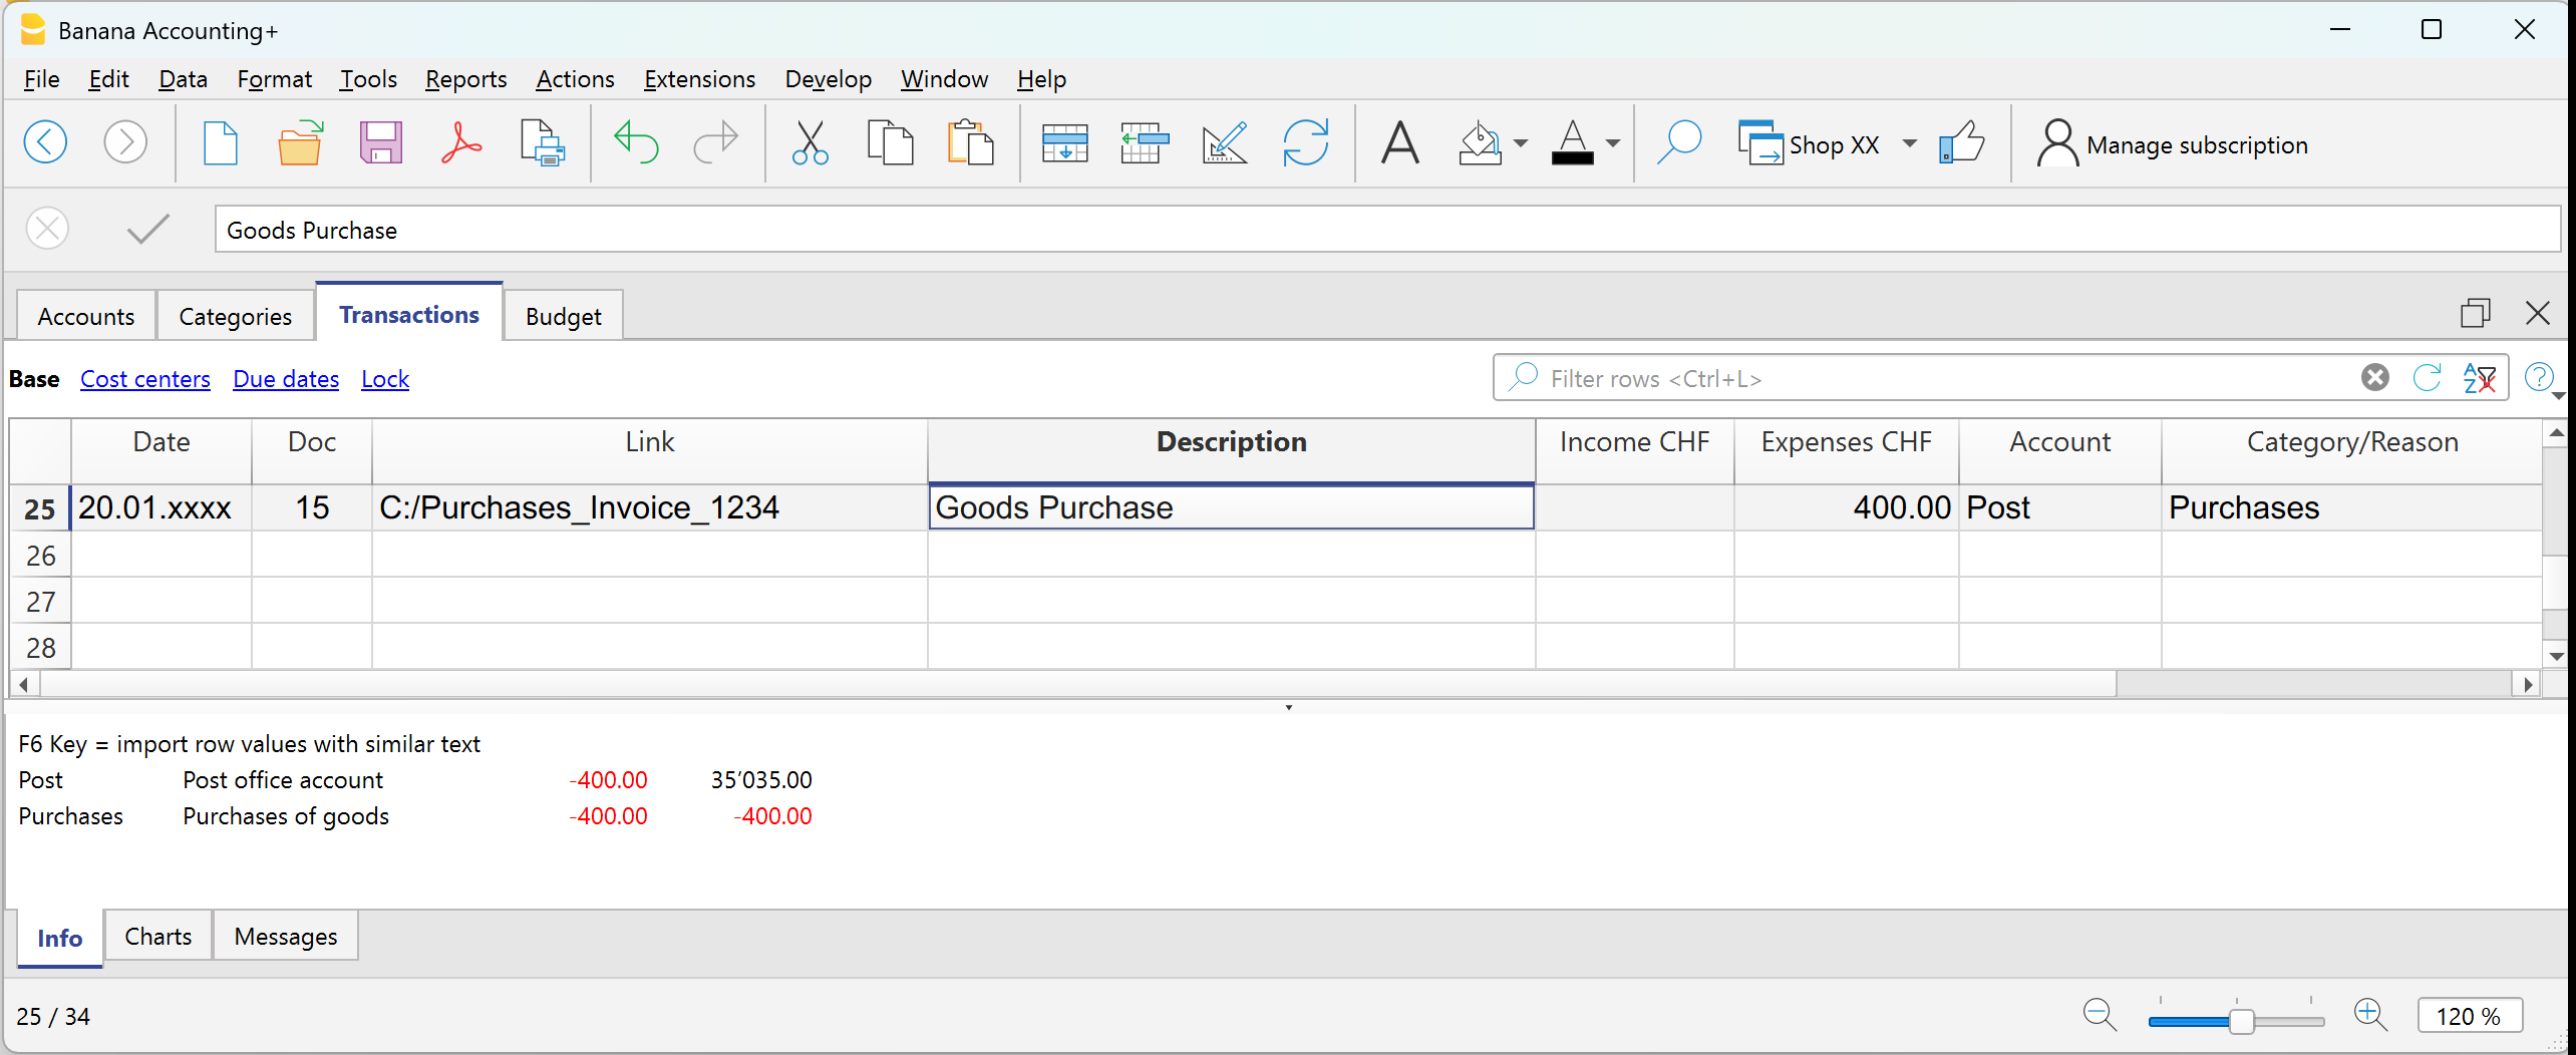
Example: paid invoice for merchandise purchase via bank.
- Date → enter the date of the document.
- Doc → document number (optional).
- DocLink → link to the digital document.
- Description → short description (e.g. Purchase of goods from supplier Bianchi).
- Expenses → amount paid.
- Account → liquidity account used (e.g. Bank).
- Category → reason for the expense (e.g. Purchases).
The amount will be shown as negative both in the account card and in the category card.
Multi-row transaction
When you have a transaction that involves multiple accounts and/or categories, you must enter it using multiple rows.
Example: payment of several invoices using cash.
- Use the same date and document number for all rows.
First row:
- Enter the total amount paid in the Expenses column.
- In the Account column, indicate the liquidity account used (e.g. Cash).
- Leave the Category column empty.
Following rows:
- Enter each paid invoice in a separate row, with the amount in the Expenses column.
- The Account column remains empty.
- In the Category column, indicate the corresponding expense item.
If you have enabled the Balance column, you will see that the remaining total decreases row by row, until it reaches zero.
Transactions between two accounts | Income/Expense accounting
In Income / Expense accounting, a transaction is generally recorded with one account entered in the Account column and one category entered in the Category column.
- The accounts are those listed in the Accounts table.
- The categories are those listed in the Categories column.
It is also possible to record a transaction involving multiple accounts or categories, by entering one account or category per row, until the entry is complete.
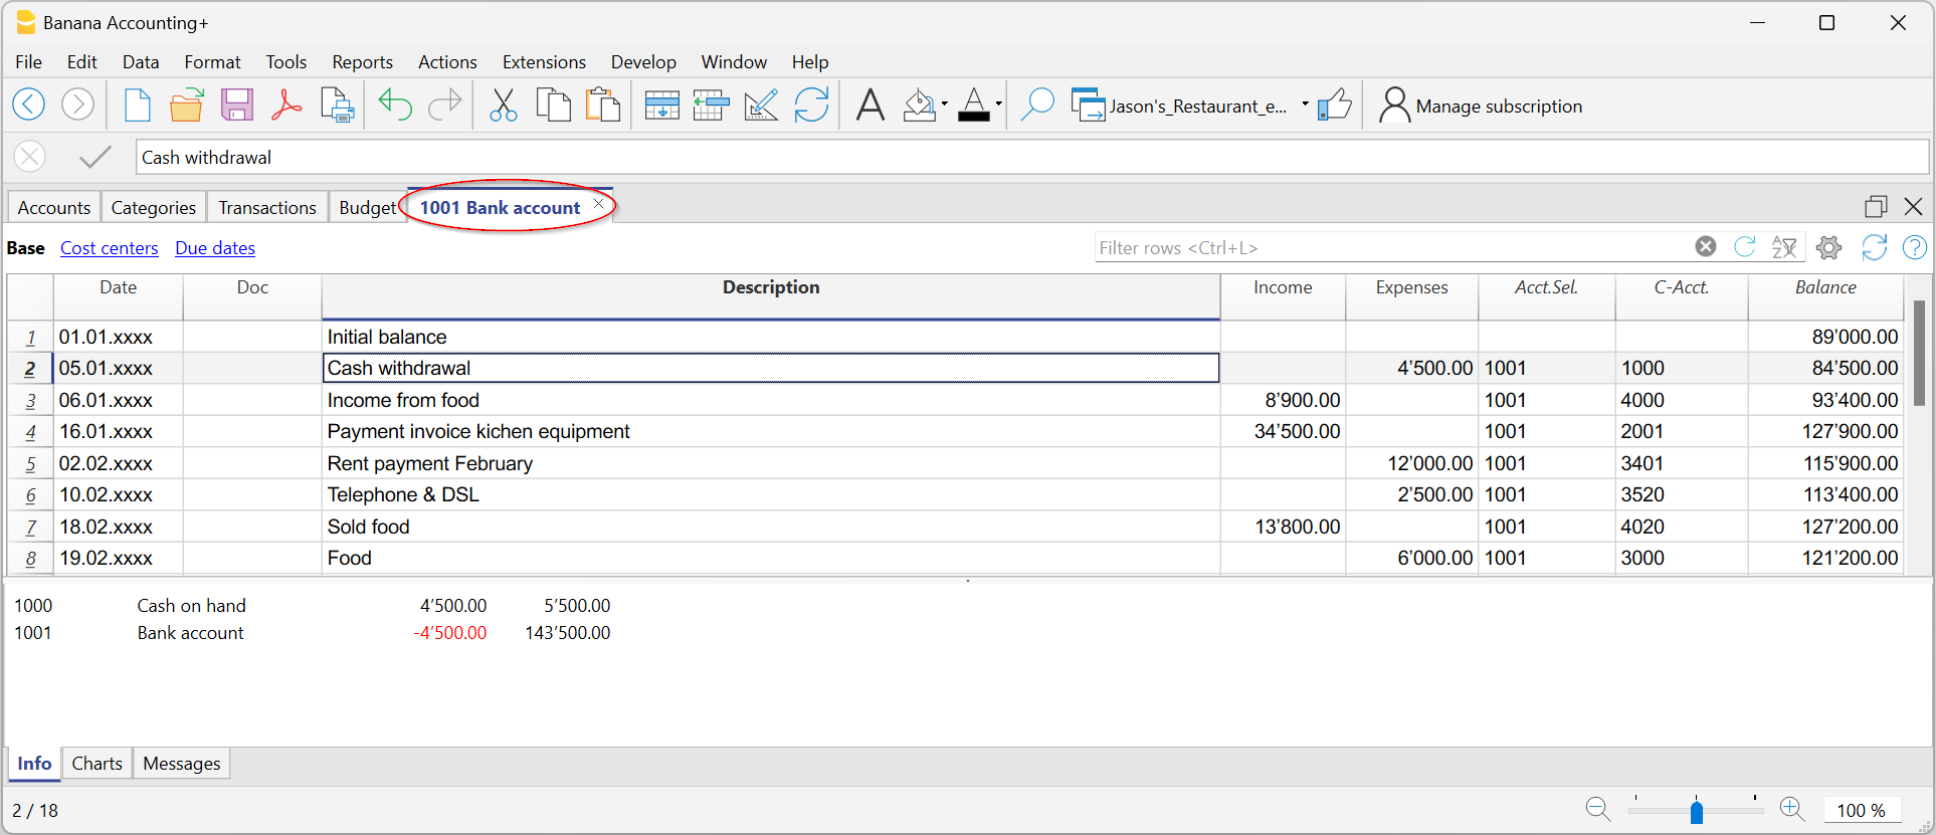
When you need to record a transaction that involves two accounts, without using a category, you can use the Category column to enter the second account from the Accounts table.
An example could be the recording of a cash withdrawal from the postal account. The transaction should be entered as shown in the example below.
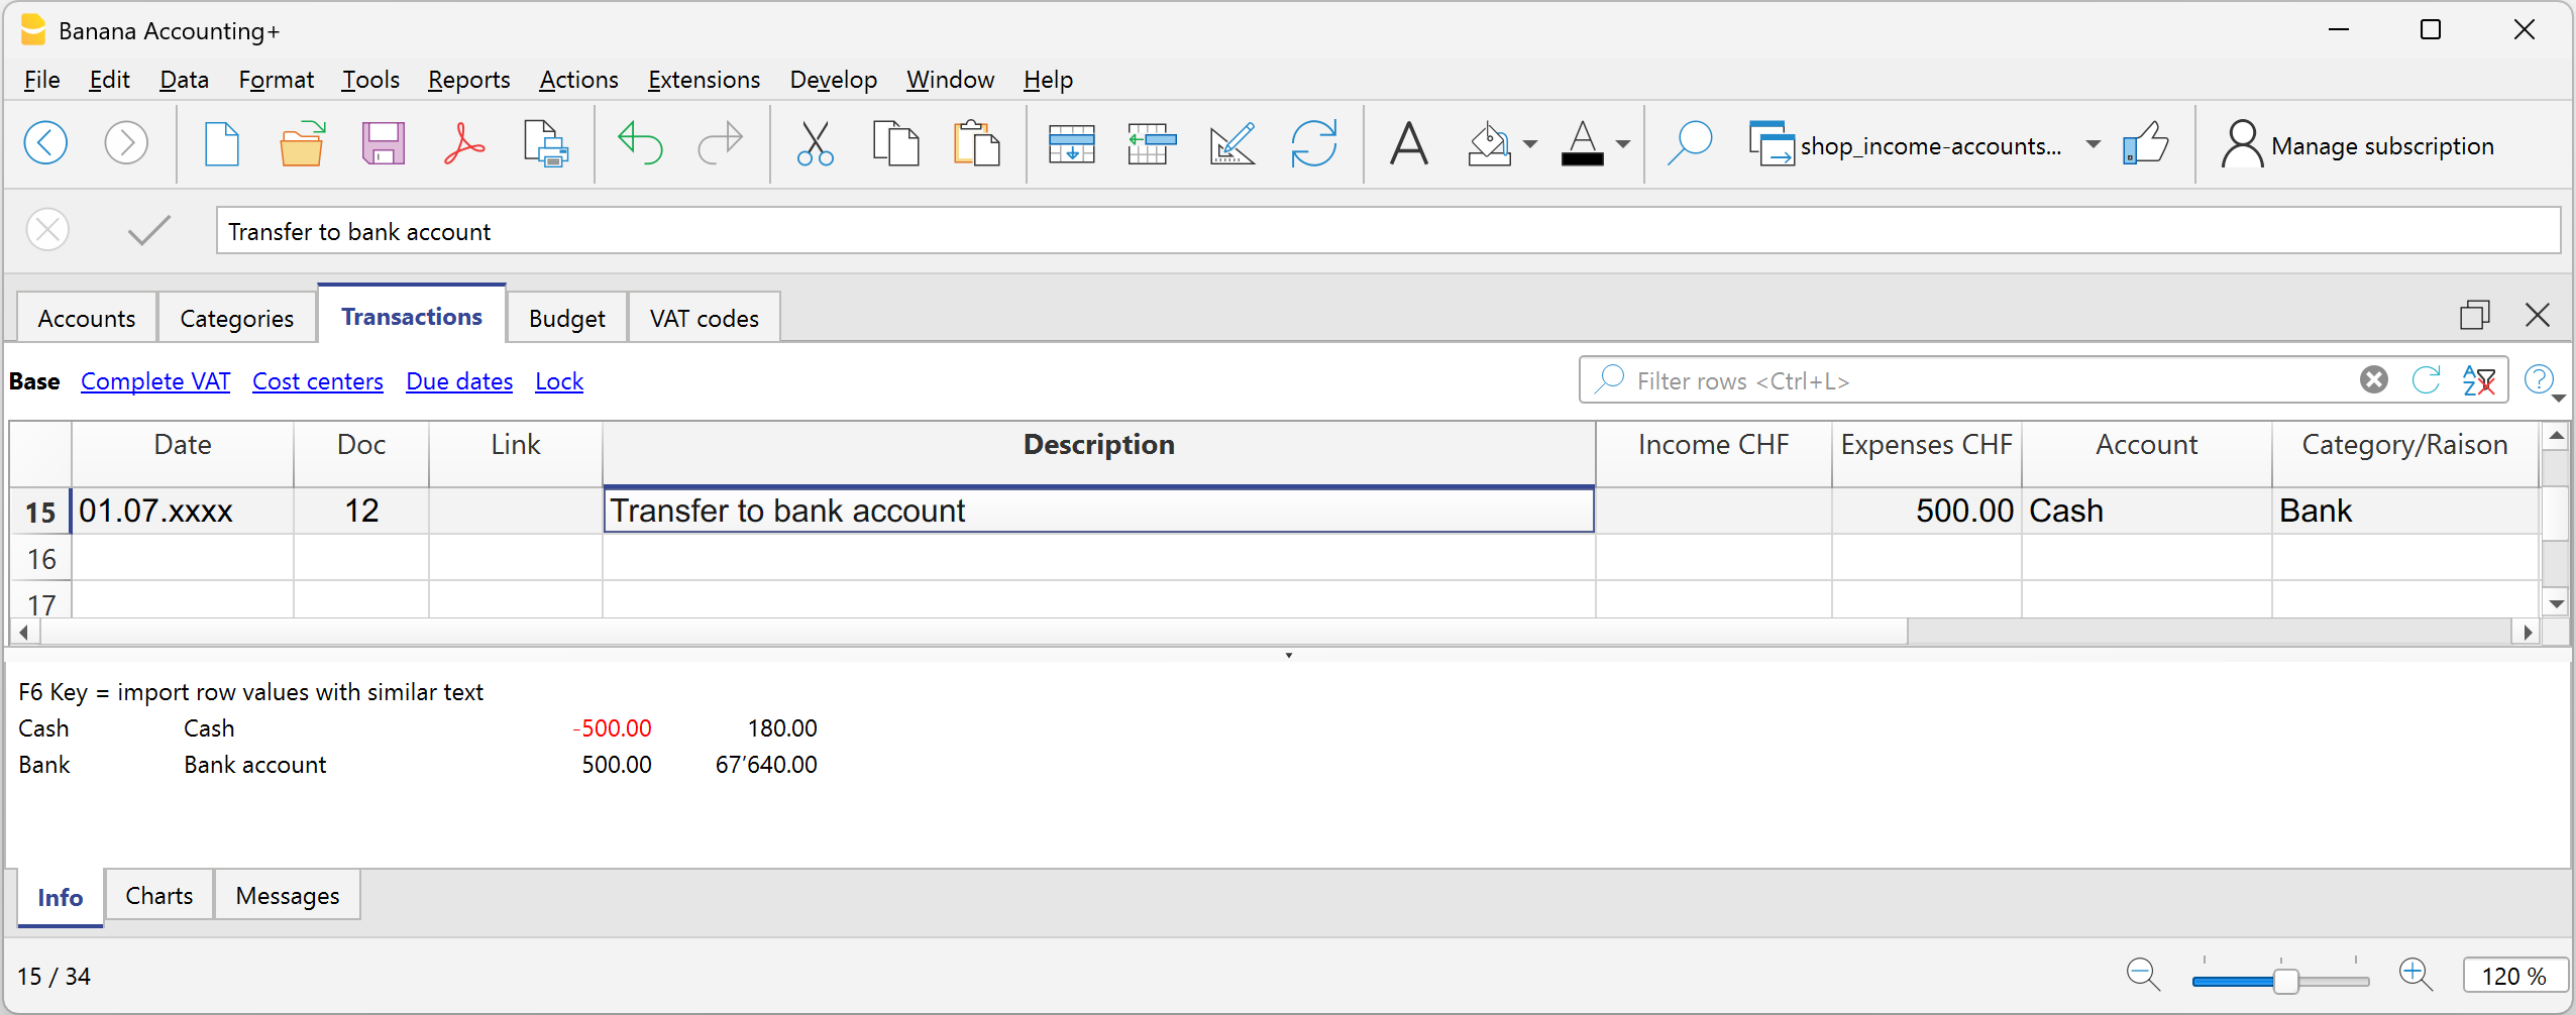
- Enter the Date and Description in the respective columns
- In the Income or Expense column, enter the amount
- In the Account column, enter the first account
- In the Category column, enter the second account
Transactions between two categories | Income/Expense accounting
In Income / Expense accounting, a transaction is generally recorded with one account, entered in the Account column, and one category, entered in the Category column.
It is also possible to record a transaction involving multiple accounts or multiple categories, by entering one row for each account or category, until the transaction is complete.
- The accounts to be used in the trasnsactions are those listed in the Accounts table.
- The categories to be used in the transactions are those listed in the Categories table.
When it is necessary to record a transaction between two categories, it is not possible to do so on a single row. A category cannot be entered in the Account column.
Therefore, the transaction between two categories must be recorded over two rows:

- On the first row:
- Enter the Date and Description in the respective columns
- Enter the amount in the Income or Expense column
- Leave the Account column empty
- Enter the first category in the Category column
- On the second row:
- Enter the Date and Description in the respective columns
You can also copy the data from the previous row - Enter the amount in the Income or Expense column.
If necessary, you can reverse the income or expense amount compared to the previous entry. - Leave the Account column empty
- Enter the second category in the Category column
- Enter the Date and Description in the respective columns
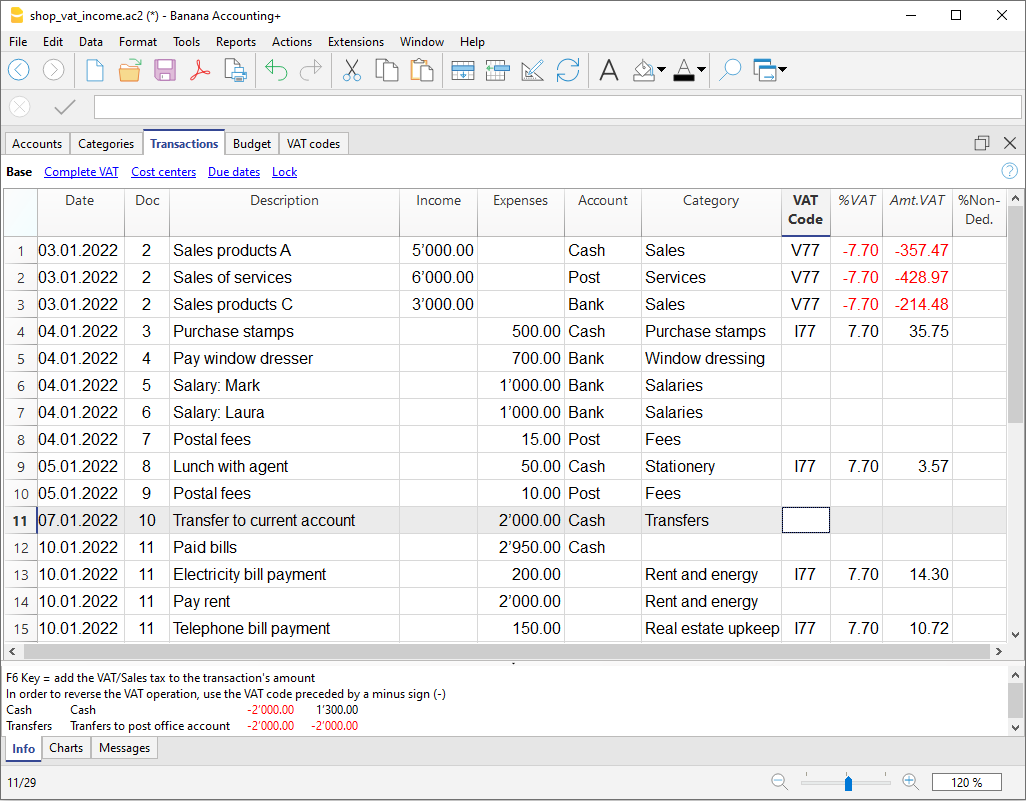
Transactions with VAT | Income/Expense accounting
To record transactions with VAT in Banana Accounting, you need to use an Income / Expense template with the VAT management option.
These templates already include all the settings needed to manage VAT:
- The Accounts table includes VAT report and VAT payable accounts.
- In File properties > Basic data > VAT, the VAT report account is set.
- The VAT Codes table already contains VAT codes updated according to regulations.
How to record transactions with VAT
The Transactions table includes specific columns for VAT. If you activate the Complete view, you can see all the dedicated columns.

For each transaction, enter:
- Date → the date of the document (invoice, receipt, etc.).
- Doc → the document number (if available).
- Invoice No. → enter the invoice number from the customer or supplier.
- Doc Link → enter the path to the PDF document to attach.
- Description → short text describing the operation (e.g. Sale of goods or Rent payment).
- Income/Expense → the amount received or paid.
- Account → an account related to the transaction from the Accounts table (e.g. Cash, Bank).
- Category → the reason for the transaction represented by a category from the Categories table (e.g. Sales, Rent).
- VAT Code → indicate the applicable rate:
- V81 → sales.
- M81 → purchases related to main business activity.
- I81 → purchases related to investments or general costs.
Automate the VAT code
To speed up entries, you can make the VAT code fill in automatically.
- Go to the Accounts and Categories table.
- From the menu Data > Columns setup, activate the VAT Code column.
- Enter the VAT code in the corresponding rows. The VAT code must exist in the VAT Codes table. For Switzerland, for example:
- On fixed asset purchase accounts → I81.
- On sales categories → V81.
- On purchase categories → M81 or I81.
This way, when you enter a transaction linked to that account or category, the program will automatically fill in the VAT Code and immediately calculate the related data.
Learn more
- VAT Summary
- Swiss VAT Management
- Various VAT transaction cases (double-entry accounting)
- Swiss VAT reports → Only with Advanced plan.
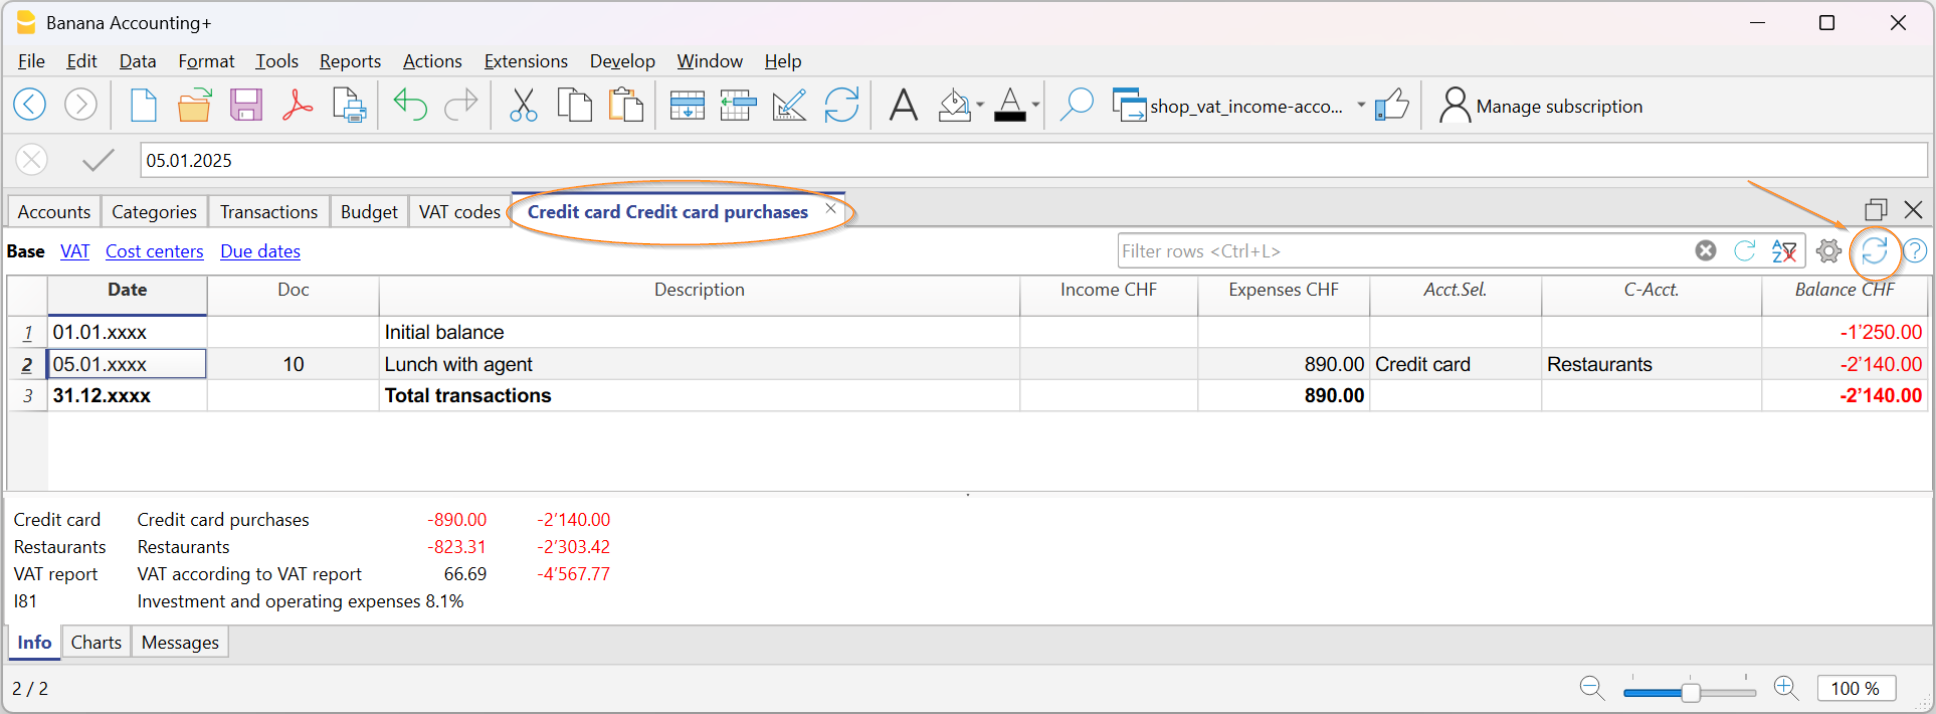
Record credit card transactions | Income/Expense accounting
Credit card purchases are becoming increasingly common, not only in businesses but also in households. In order to have a better control of the expenses for credit card purchases, it is necessary to record the movements in your accounting. In this regard, it is necessary to verify that the Accounts table contains the credit card account, otherwise it should be added.
Record credit card transactions with advance payments
The credit card account is a debit account and is entered in the Account column.

In Income/Expense accounting, whenever advance payments are made on the credit card, you must record as follows:
- Enter the date, the description
- In the Expenses column, enter the expense amount
- In the Account column, enter the liquidity account (bank, post office).
- In the Category column, enter the credit card account.
When the credit card invoice arrives and the expenses are covered by the advance payments, it is necessary to record the credit card transactions to identify the costs incurred and write off the credit.
In this case you record on multiple rows:
- Enter the same date and the same Document No. for each transaction for all the rows that make up for the transaction.
- Enter the description indicating the type of expense.
- In the Expenses column enter the total amount paid by the credit card.
- In the Account column enter the credit card account.
- In the next rows to record each expense paid by credit card, record in the Expenses column the amount of the expense, and in the Category column, the category of the expense.
After all transactions have been recorded, check your credit card balance (open your credit card account card).
Transactions on private account | Income/Expense accounting
The private account is a financial account used in accounting to record transactions that do not directly concern the business, but rather relate to the owner's private sphere. This account tracks withdrawals and contributions made by the owner for personal purposes; it serves to keep business and personal finances separate, avoiding confusion in the company's bookkeeping.
Withdrawals from the company by the owner
If the owner uses business funds for personal expenses, the amount is debited to the private account. The amounts withdrawn by the owner appear in the Accounts table, in the Income column of the private account, because they represent a receivable of the company from the owner. In the Balance column of the private account, the amount is positive.
Deposits into the company by the owner
If the owner deposits private funds into business accounts, the amount is credited to the private account. The amounts deposited by the owner appear in the Accounts table, in the Expenses column of the private account, because they represent a liability of the company to the owner. In the Balance column of the private account, the amount is negative.
Balance of the private/partner account
- Positive balance: indicates that the owner owes money to the company.
- Negative balance: indicates that the company owes money to the owner.
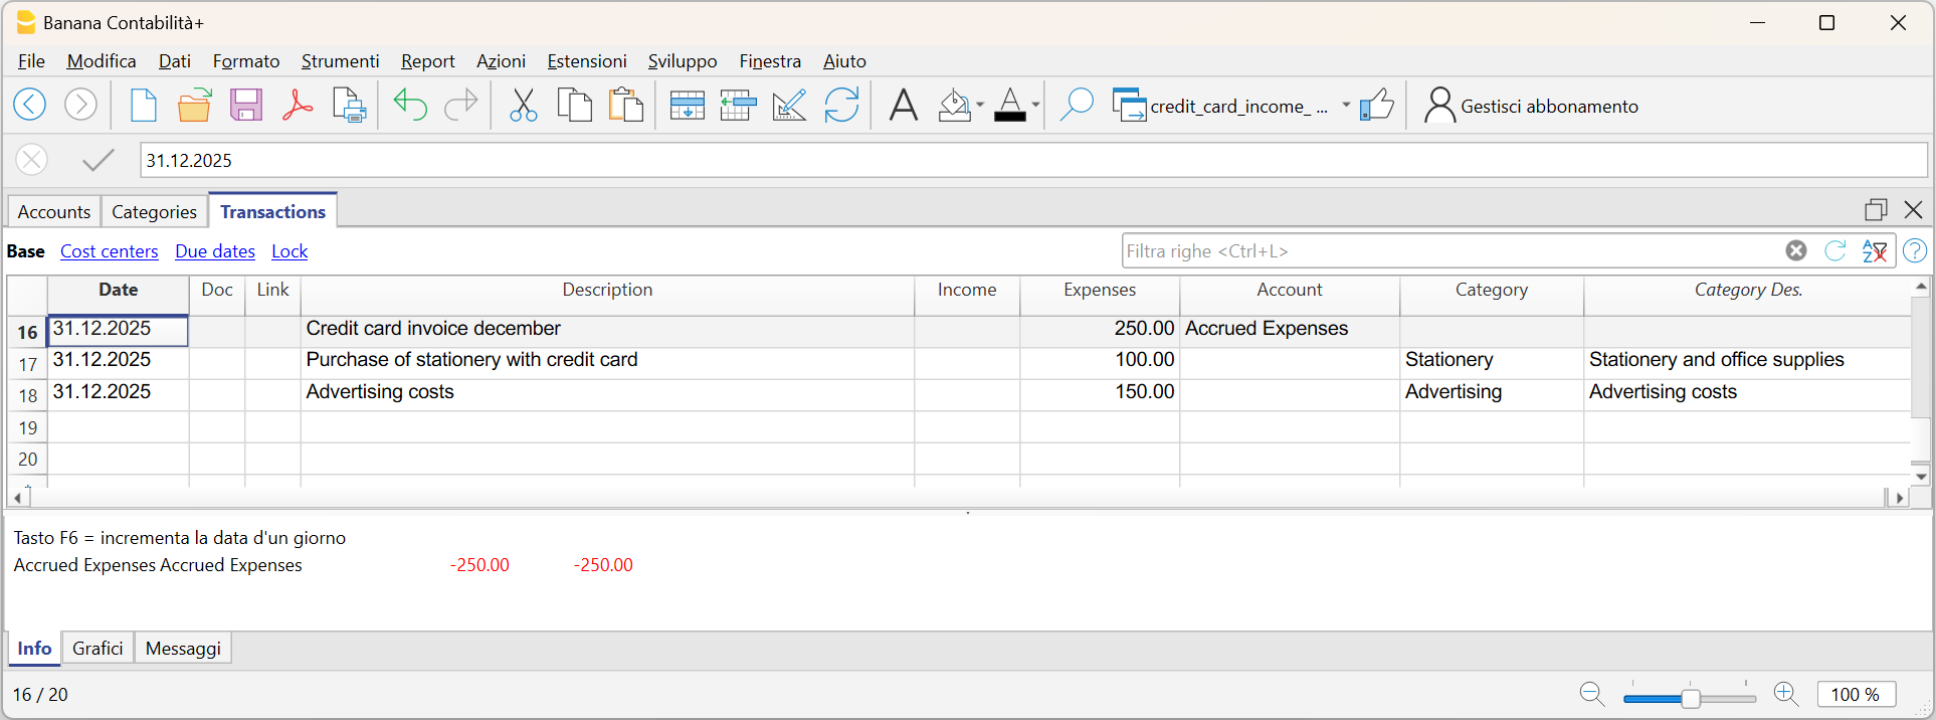
Credit card December invoice paid the following year | Income/Expense Accounting
The December credit card invoice is usually received in January of the following year, and consequently, the payment is also made in January.
All expenses listed in the December credit card invoice belong to the previous year; therefore, they must be recorded in the accounting of the previous year.
Recording the December credit card invoice
To record it correctly, it is necessary to have the liability account Costs to be Paid in the Accounts table, which is a transitional account. If it is not present, it must be added.
In the Transactions table, enter:
- Date and any document number in the respective Date and Doc. columns.
- Description
- Total credit card amount in the Expenses column
- Costs to be Paid account in the Account column
- Expense category in the Category column. If the invoice includes multiple expenses, record each expense on a separate row.
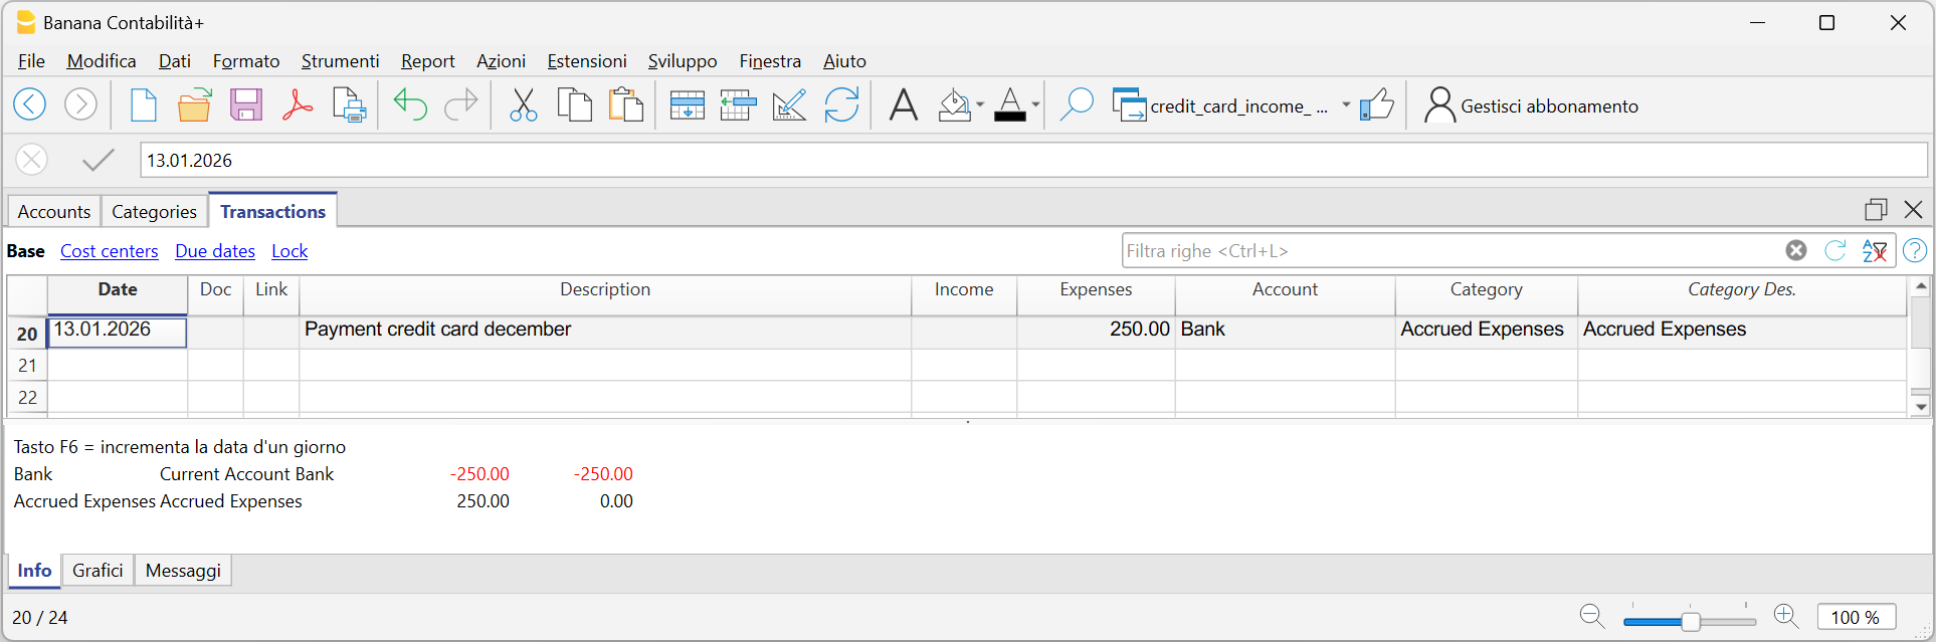
Recording the payment of the December credit card invoice in the following year
In the following year, when the new year is created, the balance of the Costs to be Paid account is displayed as an opening balance in the Accounts table.
When the credit card invoice is paid, the Costs to be Paid account is cleared.
To record the payment of the credit card invoice, enter:
- Date, any document number
- Description
- Total amount of the credit card invoice in the Expenses column
- Liquidity account from which the invoice is paid in the Account column
- The Costs to be Paid category in the Category column.
Speed up your transactions | Income/Expense accounting
In the Transactions table, to speed up data entry, you can use several automation functions.
Keyboard shortcuts
Keyboard shortcuts let you perform actions instantly, without opening menus or using the mouse.
They are a great way to save time and make your work smoother.
With keyboard shortcuts you can, for example:
- Copy and paste data.
- Quickly move between cells, columns, and tables.
- Insert the current date with one keystroke.
- Apply formatting such as bold text.
- and much more.
Data entry with auto-completion
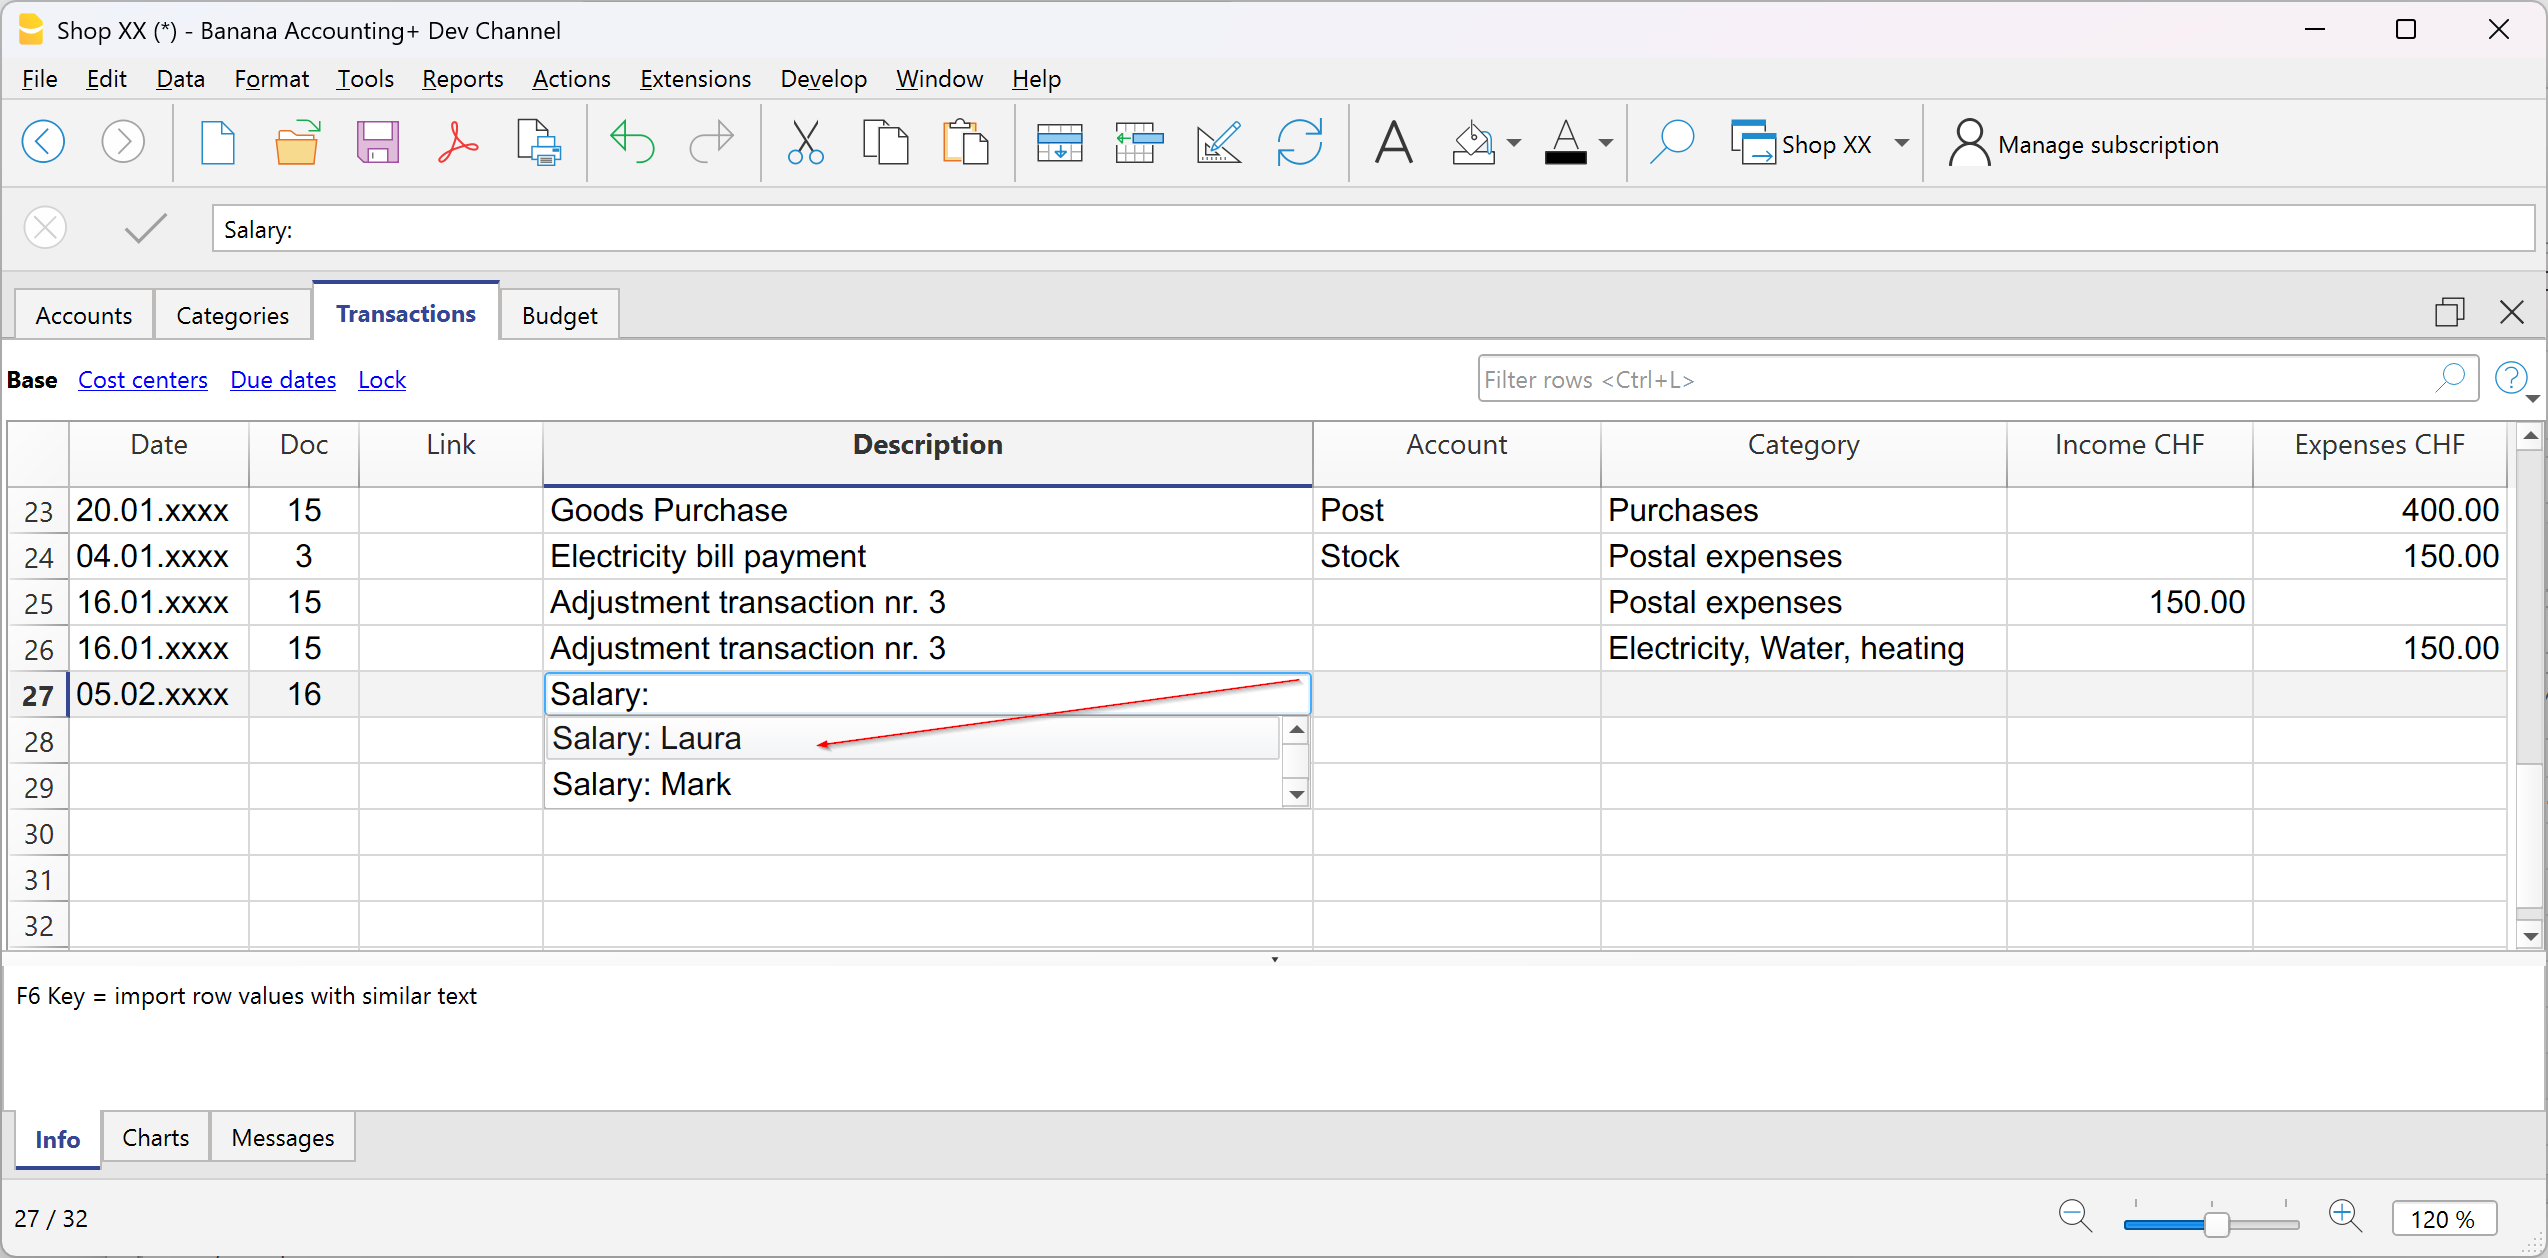
In the Transactions table, when you start typing in the Description column, the program suggests a list of previously entered transactions with the same text at the bottom of the window. If you want to reuse a previous transaction:
- Type the first letters of the description.
- Press F6.
- The transaction is automatically recalled: you just need to adjust the amount (if different) or any other necessary details.
This trick is very useful for repetitive operations, because it saves you from retyping everything each time.
Recurring transactions
In the Recurring transactions table you can save operations that are repeated during the year and reuse them when needed in the Transactions table.
More information can be found on the page:

Importing bank transactions
You can download your bank, credit card, or other account statements, as long as they are in a format compatible with Banana Accounting (csv, ISO 20022, ...), and import all the transactions into the Transactions table. This saves a lot of time and avoids errors.
More information about importing is available on the page:
Setting Rules in automatic import
Even with Income and Expense accounting, you can take advantage of the advanced Rules function to further automate your work.
With Import Rules you can automate the recording of repetitive transactions. For each imported transaction that you expect to recur, you can create a Rule, assigning not only the counterpart account (that is, the reason for the expense or income), but also other details such as cost center, VAT code, row color, and so on. This way, in subsequent imports, the program will automatically apply the Rule to the corresponding transactions, importing them already complete with all the information you have defined.
More information is available on the page:
Import bank transactions | Income/Expense accounting
Download the file with your transactions from your bank and import it directly into the Transactions table. The date, description, account, and amount will already be filled in; you will only need to assign the income or expense category.
Proceed as follows:
- Go to the Actions menu > Import into accounting.
- Select your bank. If you don’t see it in the list, click the button at the bottom left Manage extensions. Search for it and install it in the dialog window that opens, then return here.
- Select the format of the file downloaded from the bank, postal account, or credit card.
- Confirm with the OK button.
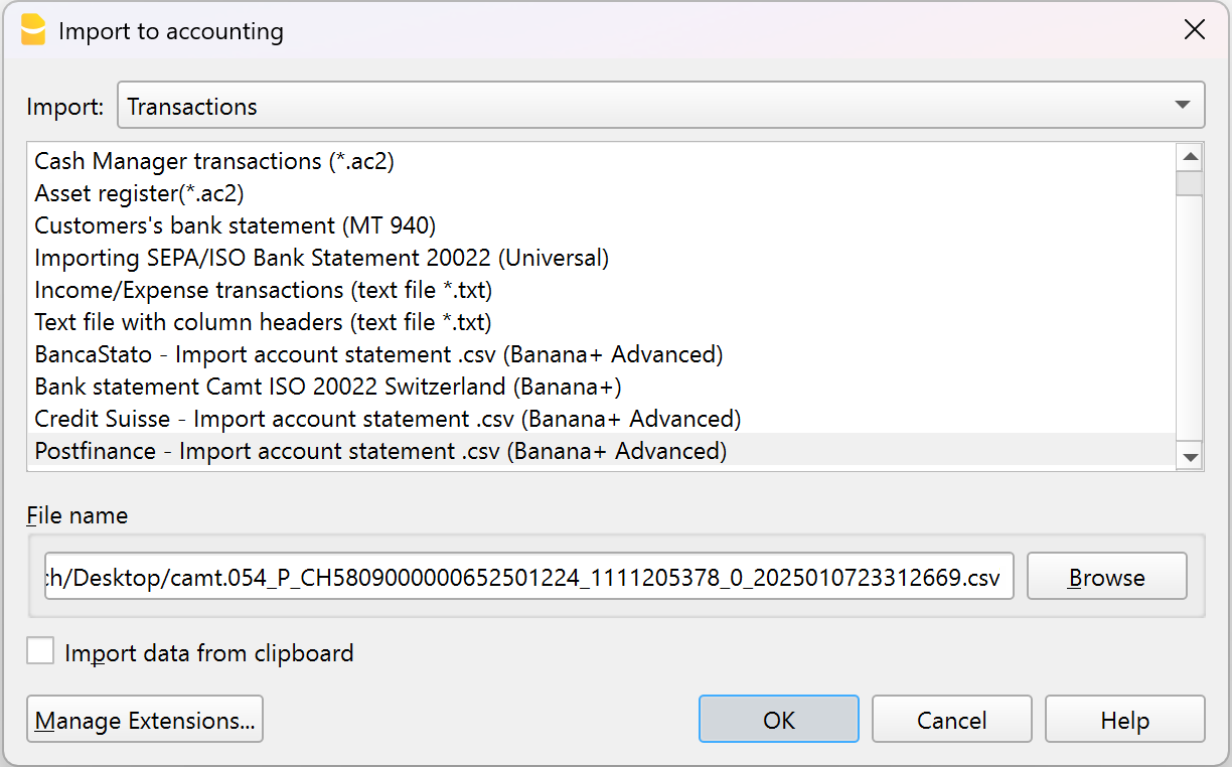
Standard formats such as ISO 20022 and .txt are available with the Professional plan, while bank-specific .csv files are included only in the Advanced plan.
Once you have selected the import file, the next dialog will appear:
The program will import all transactions into the Transactions table: you will only need to enter the counterpart, any VAT code, cost centers, or segments.
From this dialog, you can also enable the Apply Rules option (available only in the Advanced plan) to further automate transaction entry.
More information about importing is available on the page:
Rules for automatic completion of imported transactions | Income/Expenses accounting
Even with Income and Expense accounting, you can take advantage of the advanced Auto-completion Rules for imported transactions to further automate your work. Rules are available only in the Advanced plan of Banana Accounting Plus.
With Rules you can automate the recording of recurring transactions. For each imported transaction that you expect to recur, you can create a Rule, assigning not only the counterpart account (i.e. the reason for the expense or income), but also other details such as cost center, VAT code, row color, and so on. This way, in future imports, the program will automatically apply the Rule to the corresponding transactions, importing them already complete with all the information you have defined.
You can set up Rules:
- from the Transactions table
- from the Apply Rules dialog
- from the Recurring transactions table
Below we explain how to set up Rules from the Transactions table
Rules from the Transactions table
In the Transactions table you can use already imported and completed recurring transactions to create Rules.
- Select the imported transactions (after completing counterpart, VAT if applicable, cost centers, and segments).
- Right-click and choose Create rules from selection from the menu that appears.
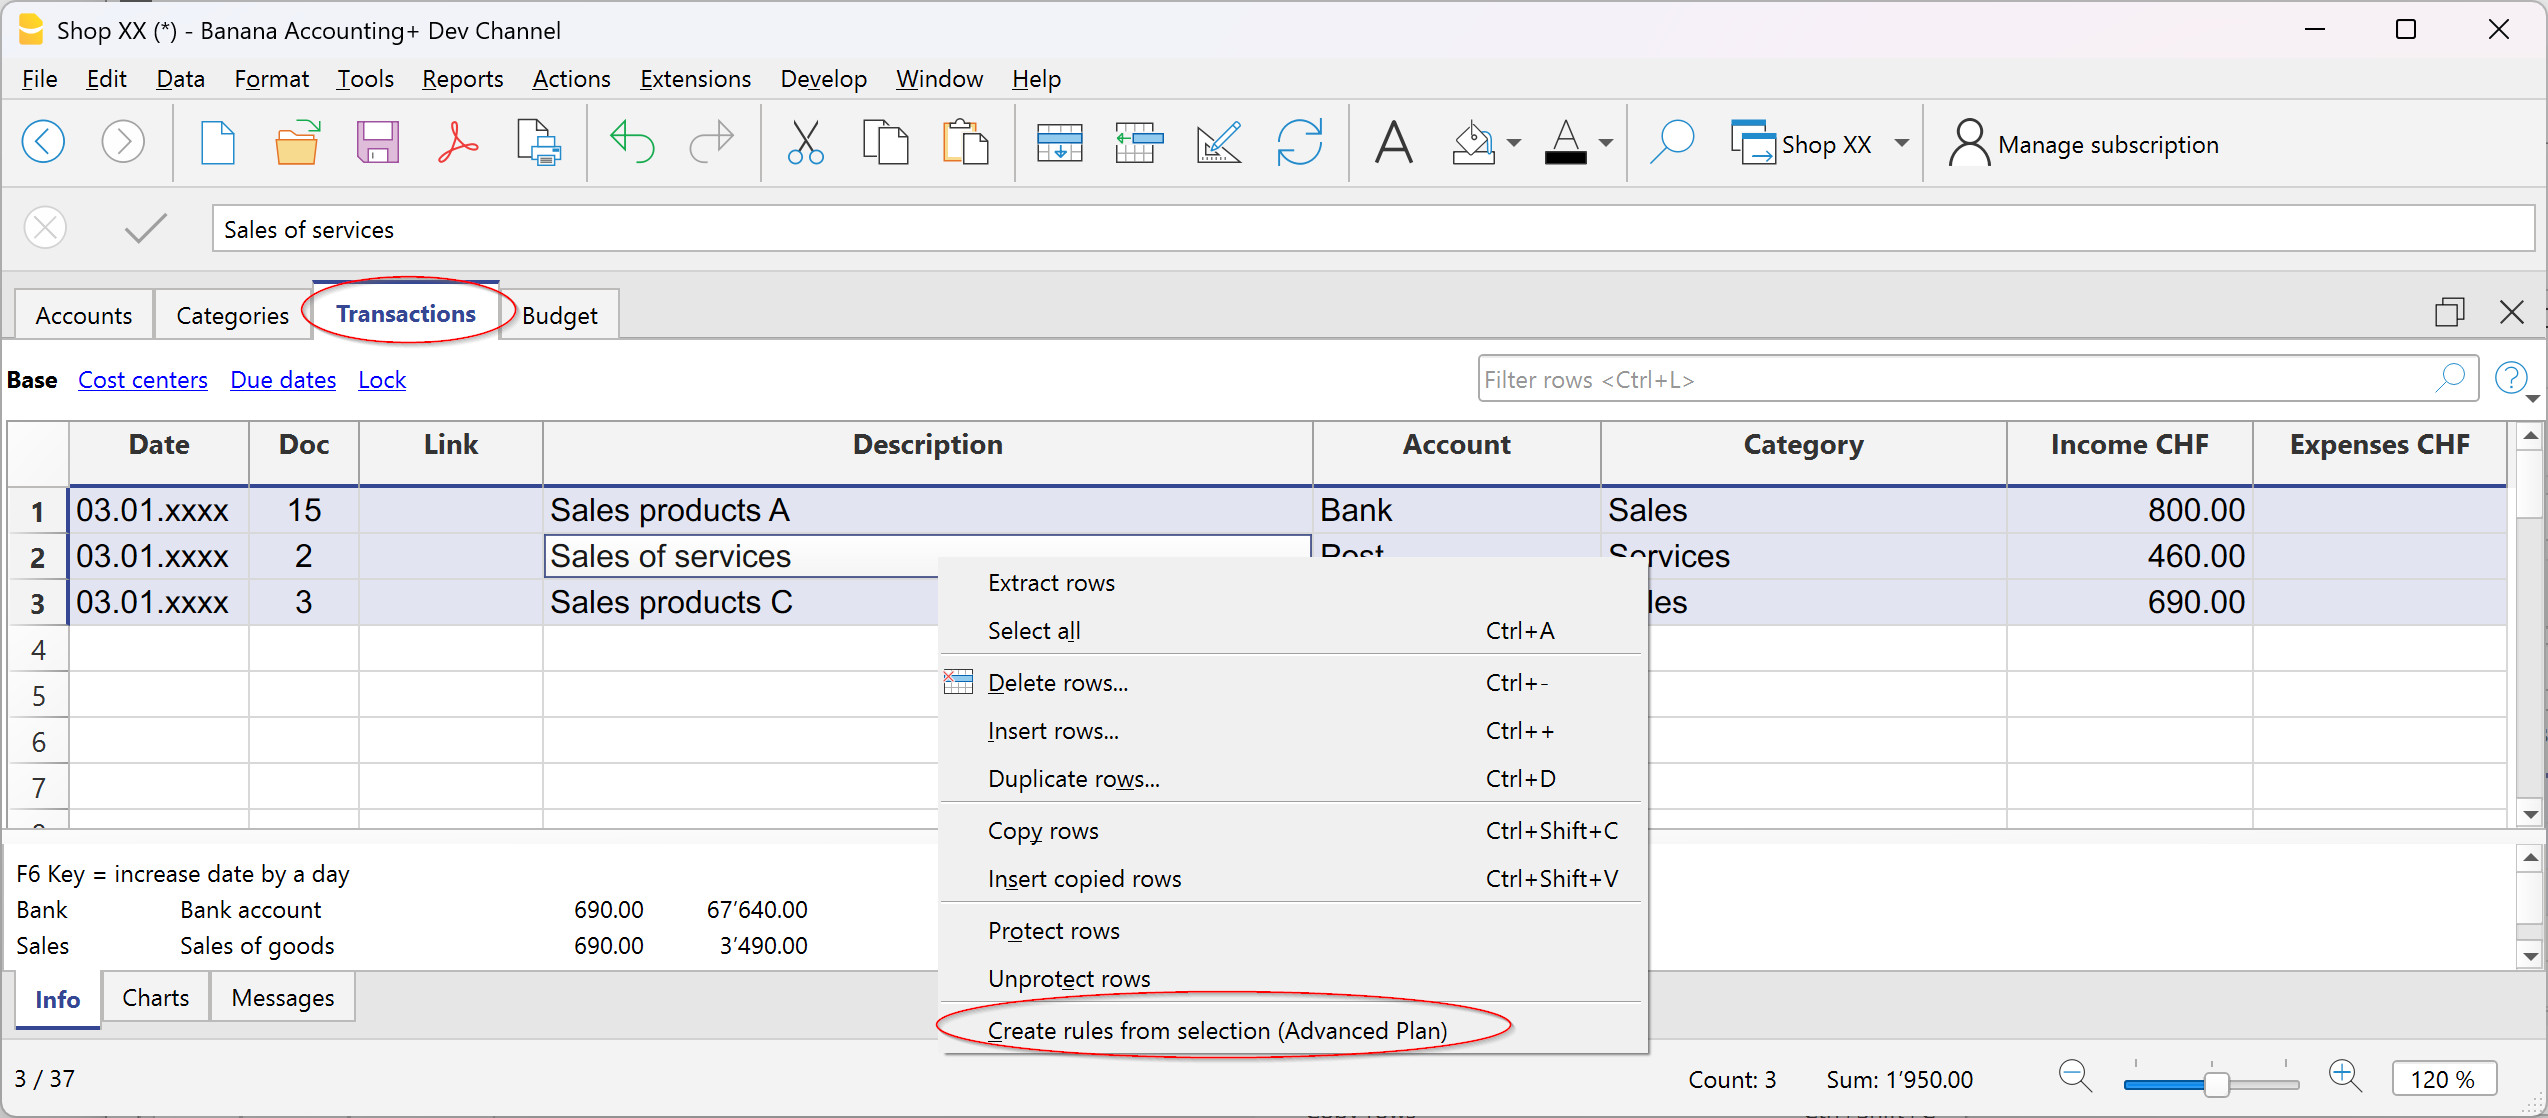
Transactions with rules are saved in the Recurring transactions table and can be identified in the Doc column by the “!Rule” identifier.
By saving rules complete with all details, at the next data import from the bank or postal statement, the program will insert the transactions automatically completing the counterpart and all the other stored elements. The amount is updated based on the latest import.
In the Recurring transactions table you can edit rule-based transactions at any time:
- add more transactions with rules
- delete transactions with rules that are no longer needed
- modify rules of already existing transactions
Rules from the Apply Rules dialog
Rules can also be set at the moment when transactions are imported from the bank statement or other statements through the Apply Rules dialog.

More information is available on the following pages:
The indicated pages use double-entry accounting files as examples, but the principles are the same for income/expense accounting.
Rules from the Recurring transactions table
This procedure requires manually entering recurring transactions directly in the Recurring transactions table before recording the transactions in the Transactions table.
To follow this procedure, see the information on the following page:
The indicated page uses double-entry accounting files as examples, but the principles are the same for income/expense accounting.
Recurring transactions | Income/Expenses accounting
The Recurring transactions table allows you to save transactions that repeat during the year and automatically recall them in the Transactions table when needed. You can store, for example:
- Salaries
- Rents
- Subscriptions
- Periodic payments
How to save a recurring transaction
- Go to the Transactions table.
- Select one or more transactions that are repeated.
- Copy them (Ctrl+C).
- Paste them into the Recurring transactions table (Ctrl+V).
In the Recurring transactions table you can also manually enter the transactions that are repeated during the year.
How to recall a recurring transaction
- In the Transactions table, place the cursor on the row where you want to insert it.
- Double-click in the Doc column: a list of saved transaction codes will appear.
- Select the code of the transaction you want to use.
- Press Enter.
The program automatically inserts all the transaction data: you only need to update the amount or date if necessary.
Advantage: with this method you avoid rewriting identical operations each time, saving time and reducing the risk of errors.
More information is available on the page:
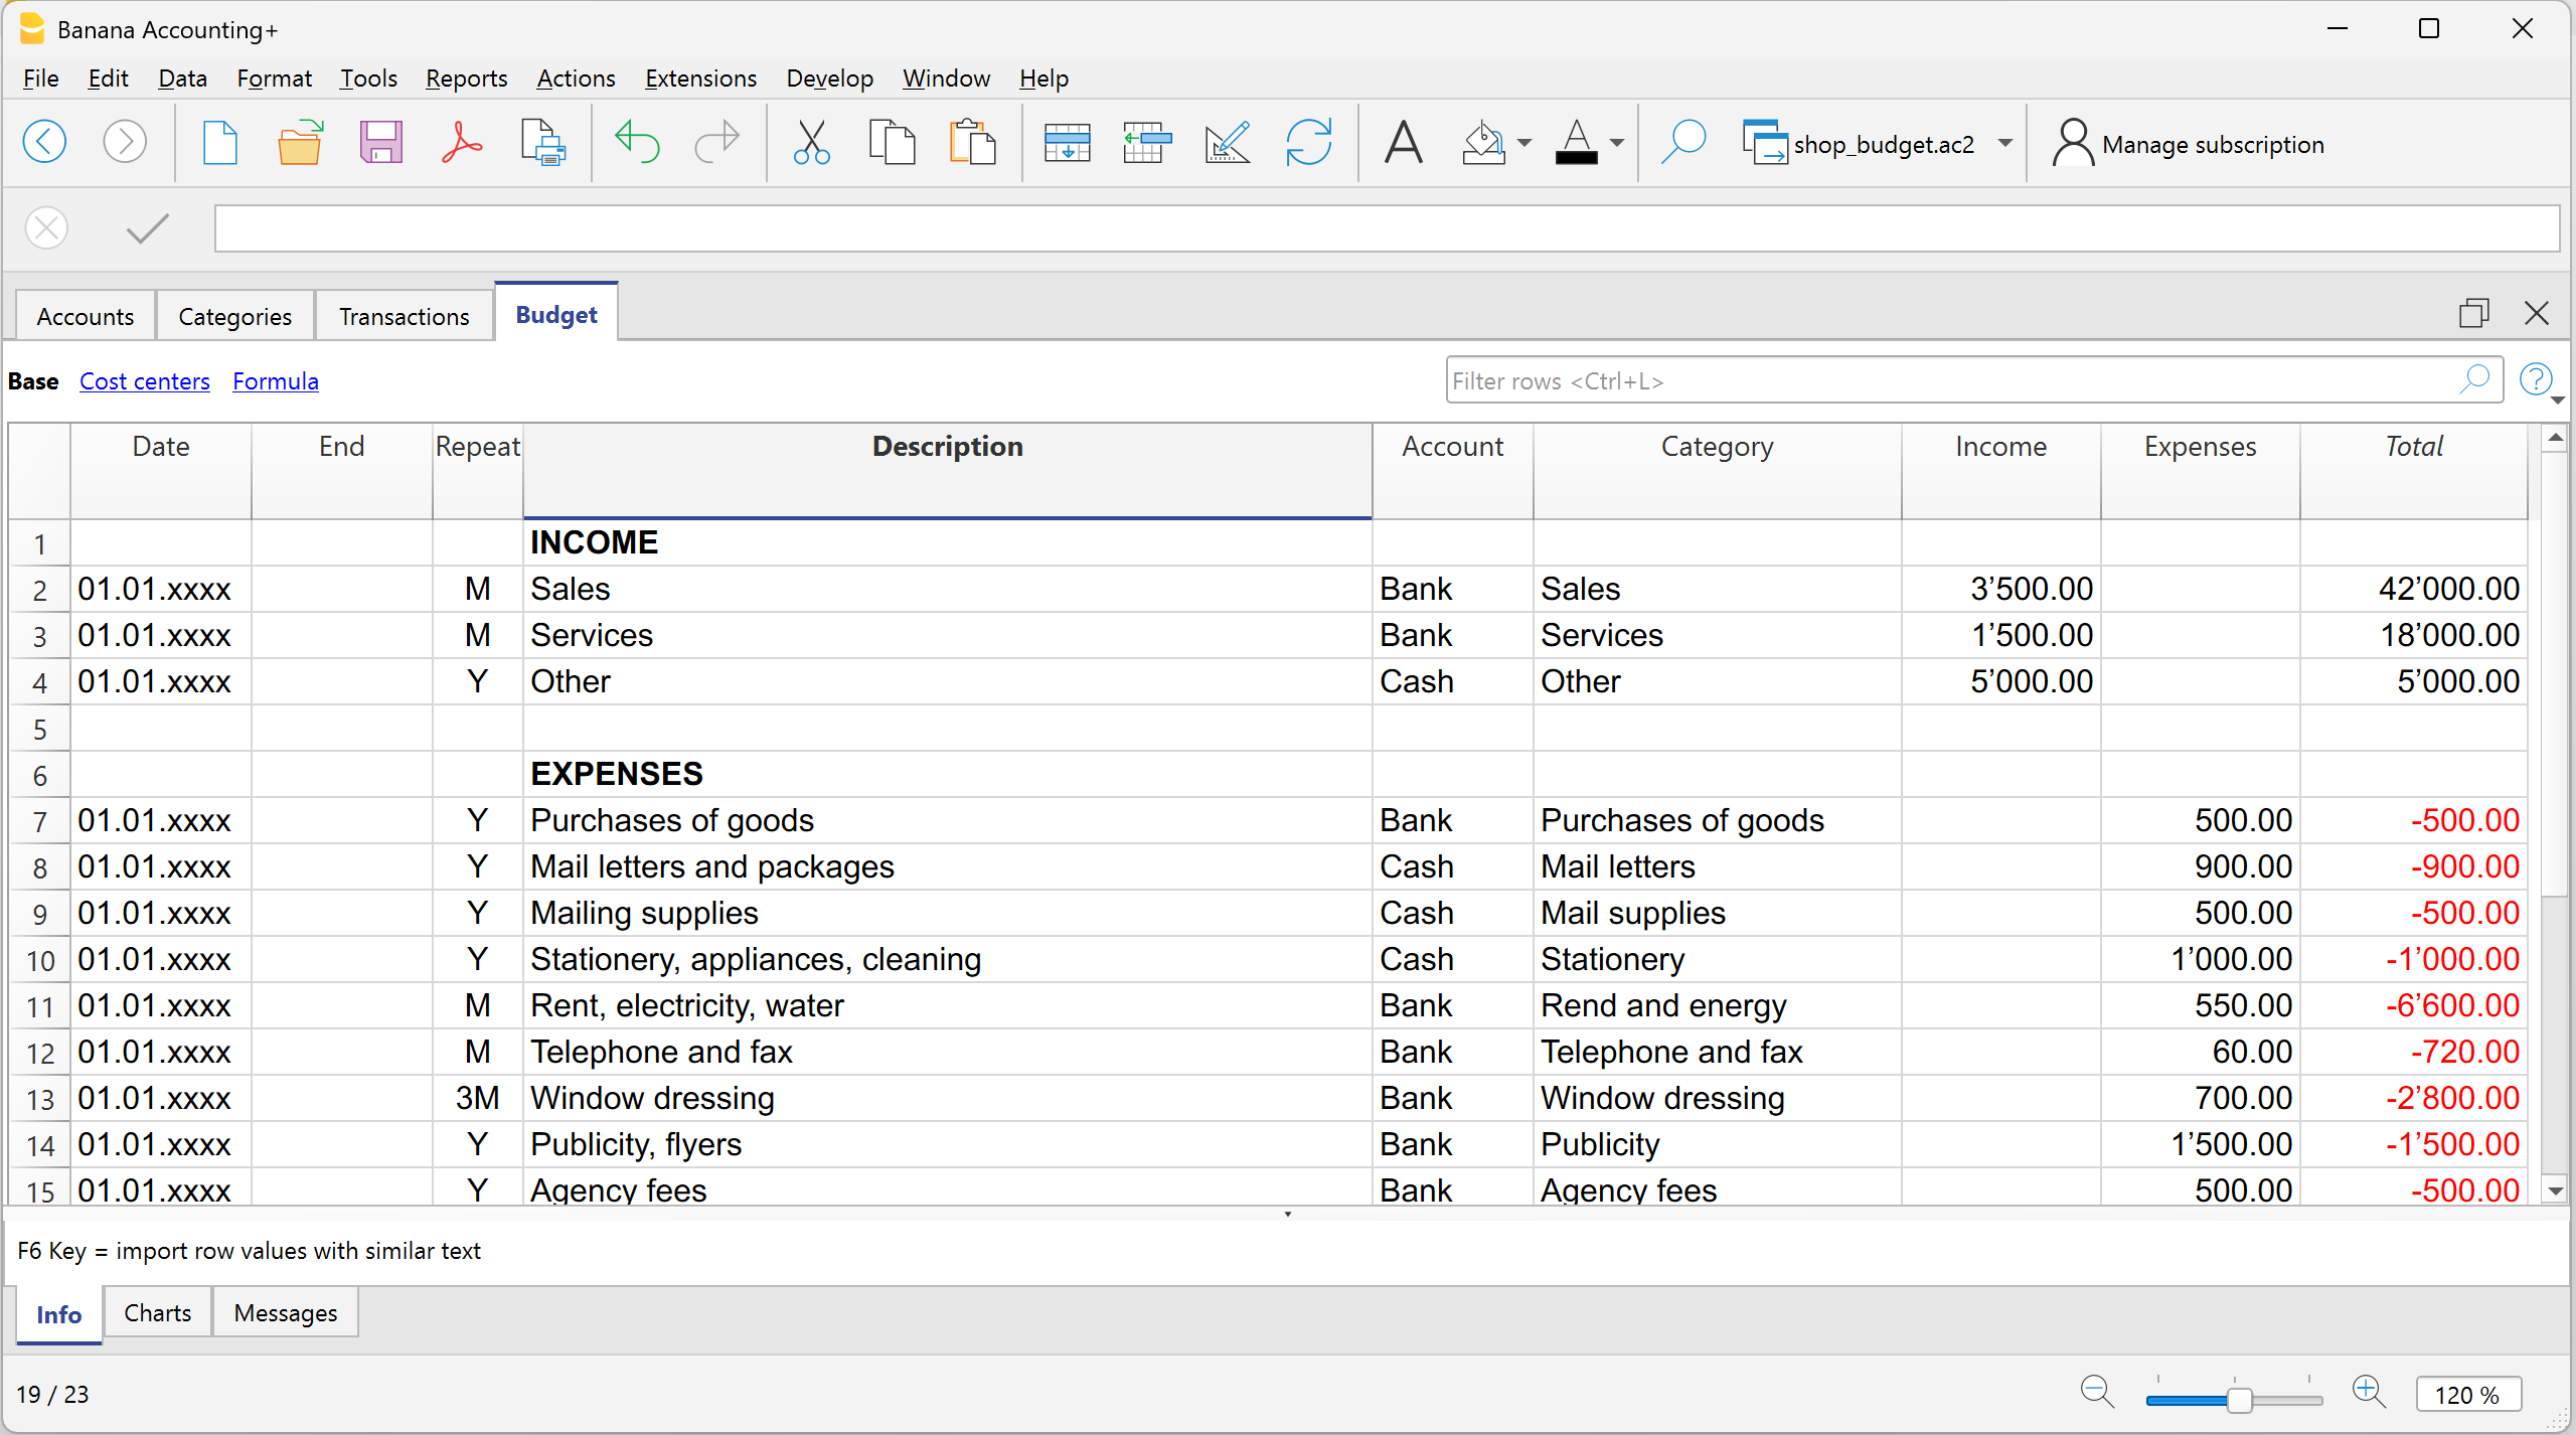
Budget | Income/Expense accounting
In accounting, the budget is a planning and control tool. It indicates in advance the income and expenses expected over a certain period (usually one year). It is like a financial map: it helps you plan and understand whether the available resources will be sufficient or if adjustments will be needed.
It allows you to keep track not only of expected income and expenses, but also of future liquidity.
The budget is based on:
- concrete data
- past experiences
- future goals
Why it is useful to set up a budget
A budget helps to:
- Make informed decisions → understand whether you can invest in a project or if it is better to reduce some expenses.
- Monitor progress → by comparing budget and actual results, you can immediately see if you are spending more or less than expected.
- Manage responsibly → especially for associations, organizations, and small businesses, it is a tool for transparency and good organization.
How to set up the budget in Banana Accounting
To set up the budget you have two options:
- In a simple way through the Budget column in the Accounts and Categories tables.
- In an advanced way through the Budget table, with detailed entries.
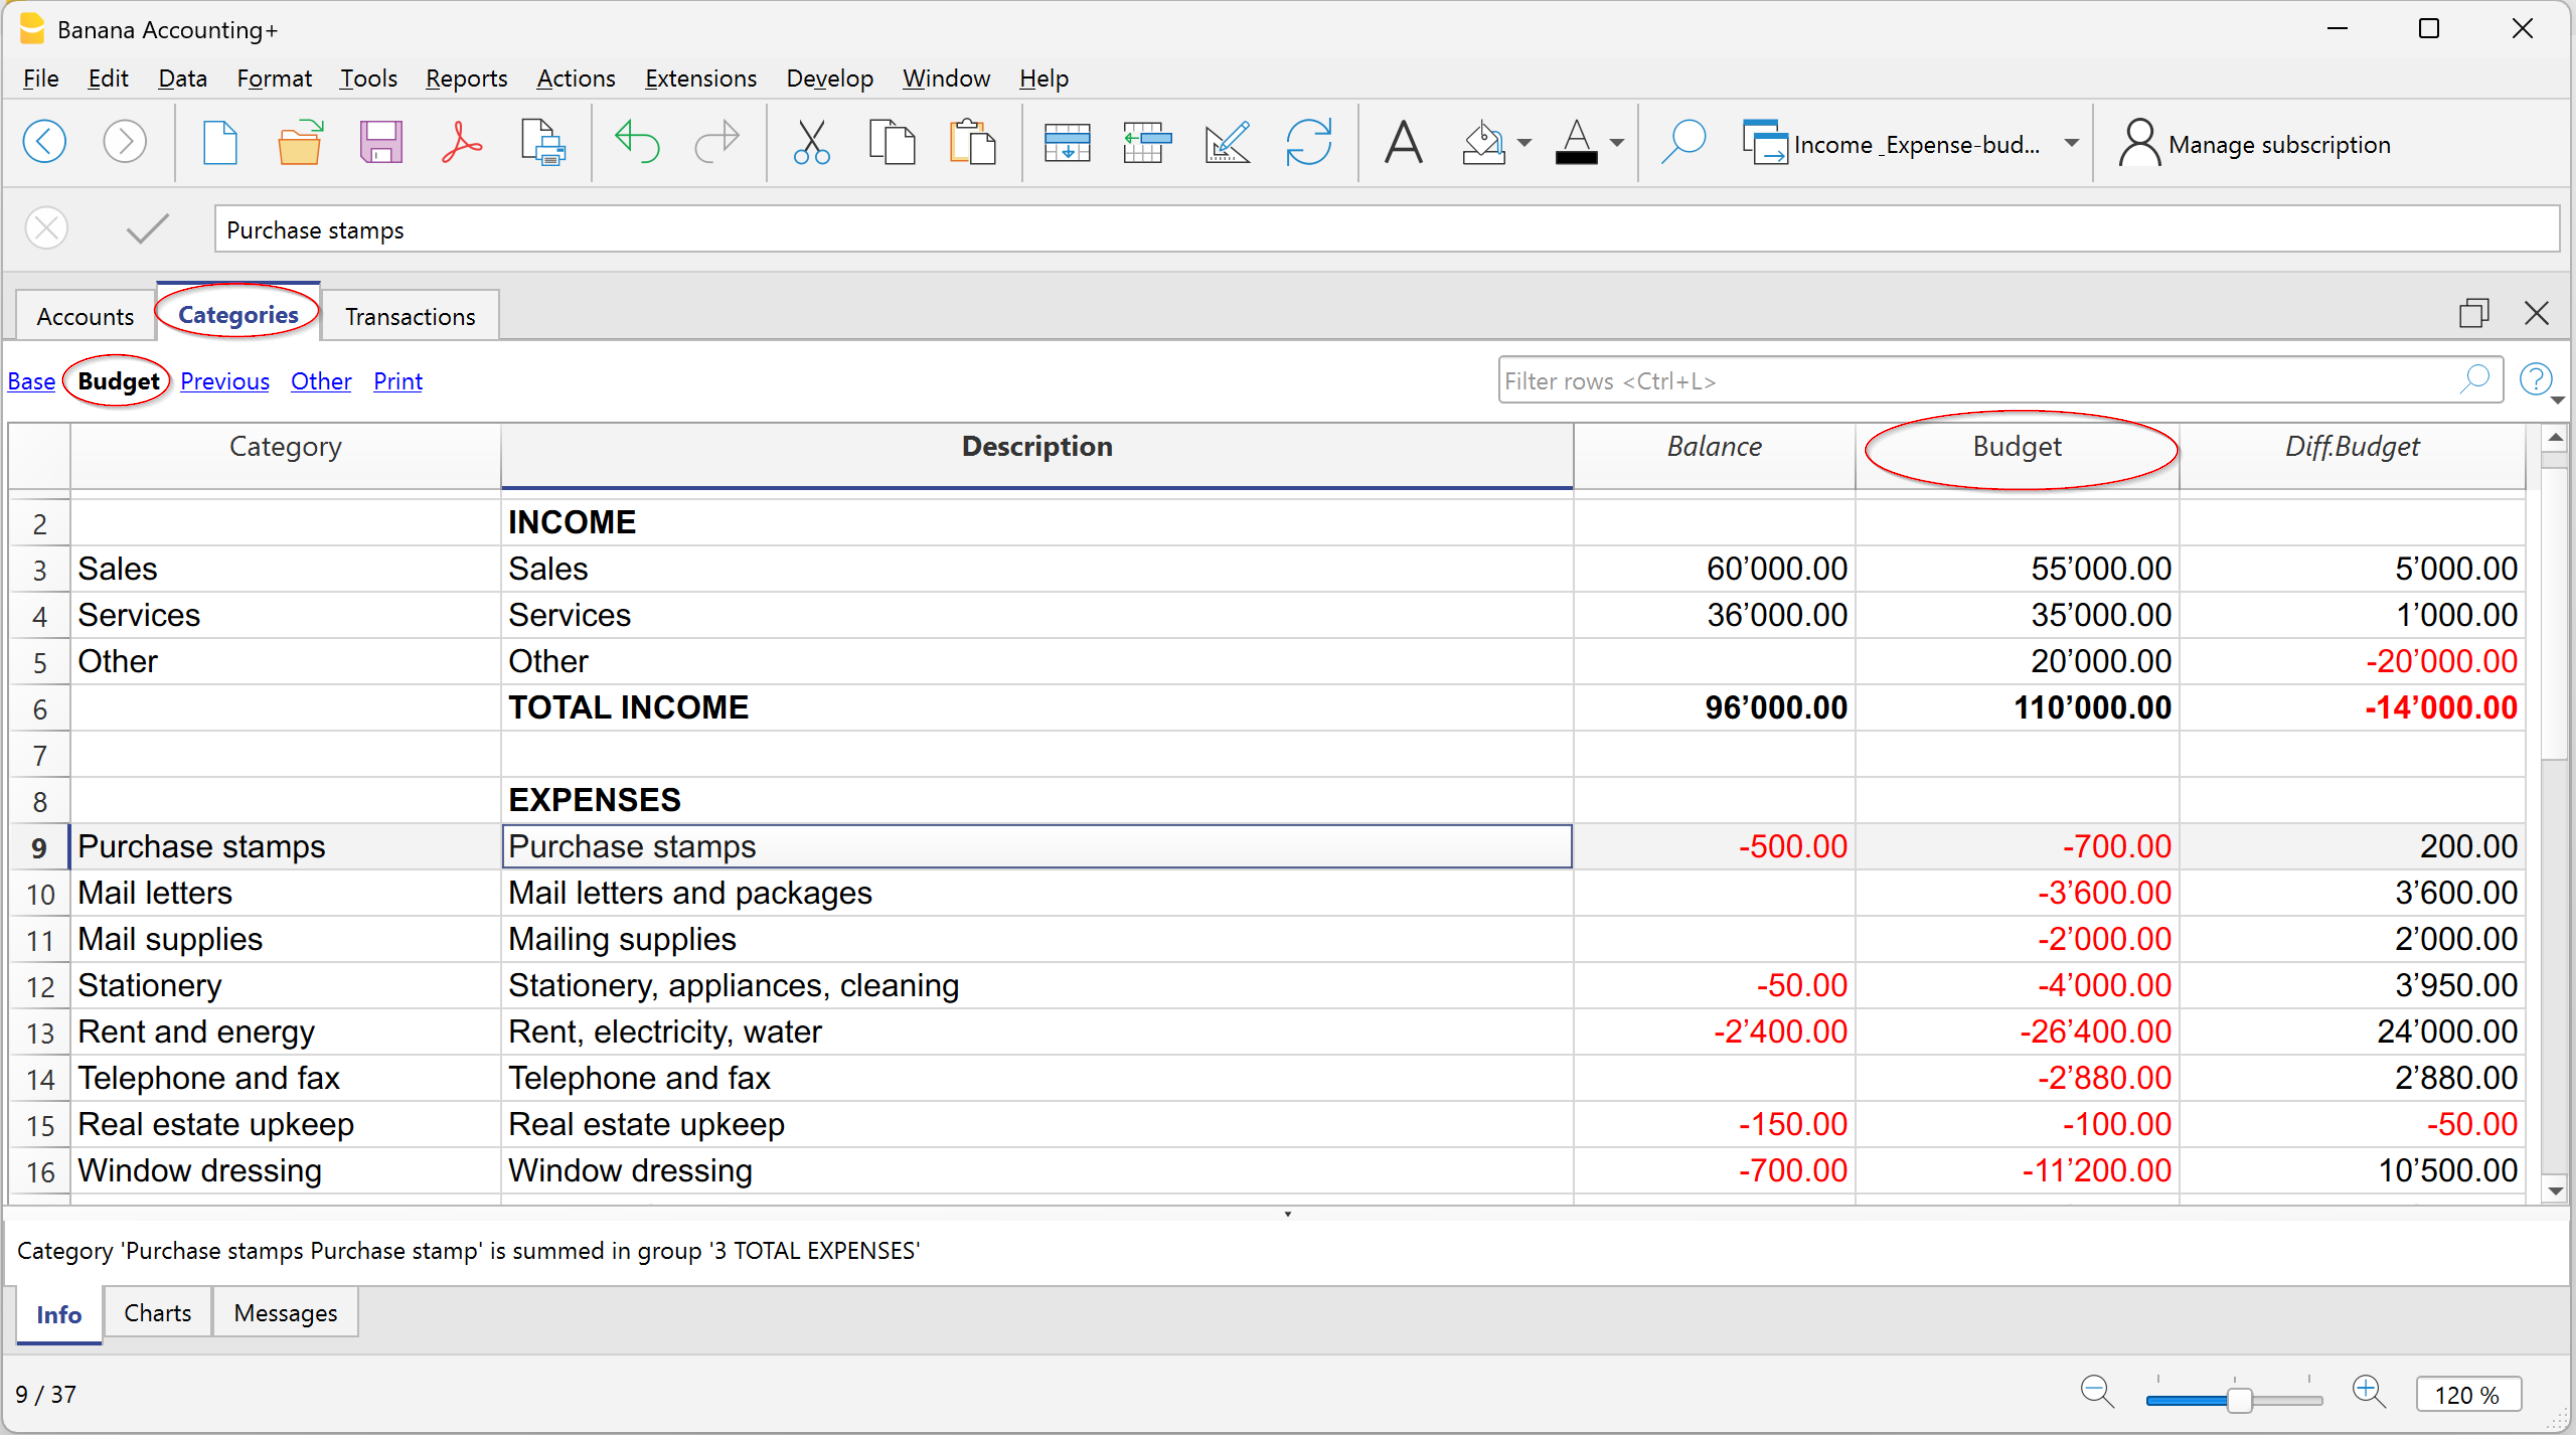
Budget in the Accounts and Categories table (annual basis)
- Enter the amounts directly in the Budget column of the Accounts and Categories tables.
- The amounts are annual.
- The Diff. Budget column shows the difference between forecast values and actual values (automatically updated with transactions).
- The budget columns are visible in the Budget view.
With this method, the Budget table is not used.
Budget in the Budget table
This is an advanced and very detailed budget. Based on the data entered and the indicated dates, the program automatically calculates specific results for each period.
- Enter forecasts as entries in the Budget table.
- If the table is not visible, activate it from Tools > Add / remove functionalities > Add Budget table.
- You can also indicate Quantities, Prices and enter Calculation formulas.
This type of budget is created by entering future transactions in the Budget table and then specifying their recurrence. Based on the data entered, the program calculates the detailed budget.
- Each entry includes:
- a liquidity account (e.g. bank, cash),
- a category (reason for expense or income).
This way you can see not only expected income and expenses, but also future liquidity movements, i.e. how much money you will have available at different times.
Columns of the Budget table
In Income and Expense Accounting, the columns of the Budget table are the same as those of Double-entry Accounting, with a few differences:
- Forecast amounts → entered in the Income or Expense columns.
- Instead of the Debit/Credit columns → there are the Account (items of what you own and owe) and Category (reason for income or expense) columns.
- Optional columns: Quantity, Price, Formula → if filled in, the program automatically calculates the amount. When the program calculates the amount automatically based on the Quantity, Price, or Formula columns, the result is entered in the Income column if positive, and in the Expense column if negative.
In the Quantity and Price columns you can enter both positive and negative values.
More information:
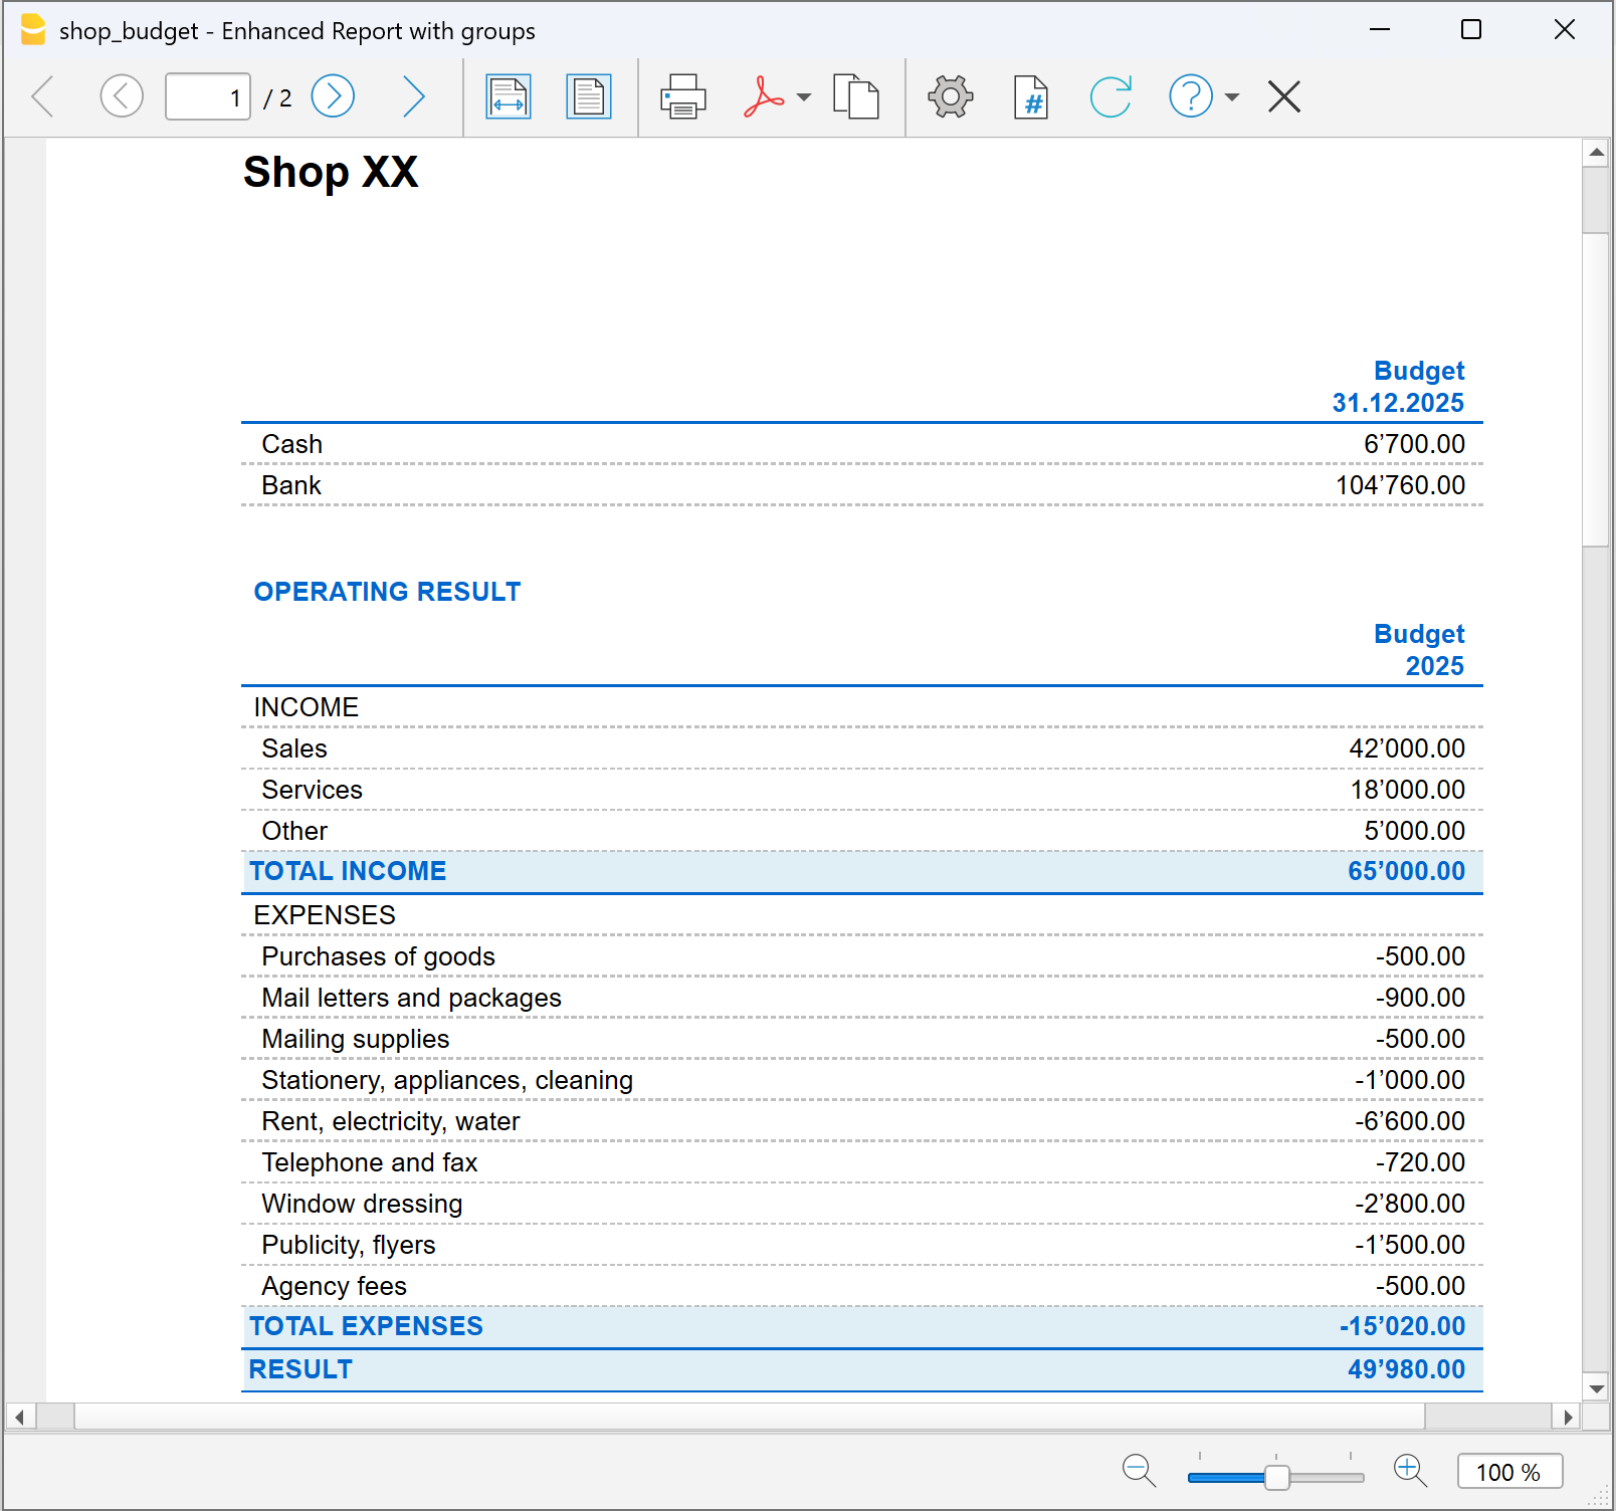
Printing the Budget
You can print the Budget in one of the following ways:
- directly from the Accounts table, in the Budget view.
This method is used when choosing the budget in the Accounts or Categories table (annual basis).
The printout shows the column layout as displayed in the image.
- from the menu Reports > Enhanced statement with groups.
This method is used when using the detailed budget from the Budget table.
In the Columns section you must enable the option:- Budget for the Categories and possibly for the Accounts.
Printouts | Income/Expense accounting
In the Accounts and Categories tables, the updated balances of all accounts are always visible: you can check your assets, receivables, and payables at any time.
After each transaction, the balances are updated automatically, without needing to generate reports: just open the Accounts or Categories table to keep the situation under control.
To print the contents of the tables, see the page Page setup (last paragraph).
Advanced printouts
All printouts are executed from the Reports menu, which contains the main functions:
Journal – (Chronological list of all transactions).
- Command Journal by period.
Allows you to view and print the entire period or a specific range.
Account, category, or group cards – (Detail of transactions for each account or category).
- Command Account / Category cards.
You can print all cards or just a selection.- In the Period section choose the desired interval
- In the Options section, activate or exclude elements to include in the printout.
- The Customization section allows you to save print settings for future use.
Enhanced Statement – (Formatted income and expense report)
- Command Enhanced Statement
Prints the list of income and expenses without subtotals (in case subgroups were entered in the Accounts and Categories table).
Enhanced Statement with groups – (Formatted income and expense report with more details)
- Command Enhanced Statement with groups
Same as above, but with the option to display and print group subtotals as well.
Accounting Report – (Summary report with various comparison options)
- Command Accounting Report
Displays in the Accounts table the reports with the chosen options. It is possible to generate reports by period, with comparisons between periods or previous years. Each report can be divided into sections and customized, with the possibility of saving the settings for later use.
Journal | Income/Expense accounting
In Banana Accounting, as in all applications, transactions are entered in the Transactions table.
If you want to print the Journal (that is, the complete list of all accounting entries), you can do it in two ways:
- from the Transactions table
- from the Journal by period command (Reports menu)
Printing the Journal from the Transactions table
- Go to the File > Page setup menu to set margins and print options.
- Return to the File > Print menu to obtain the journal with all entries.
Printing the Journal from the Reports menu
From the Reports menu select the Journal by period command.
This option allows you to print the journal with more filter options.
- Enter the start and end dates of the period you want to print.
- Confirm to obtain the journal of the selected period or the whole year.

Sorting options
In the Column for sorting section you can decide by which type of date to sort the entries, for example:
- by document date,
- by transaction date,
- or other available criteria.
More information about the Period section is available on the page Period of common functions.

Example of Journal Preview
Account/Category Cards | Income/Expense Accounting
In Banana Accounting, as in all applications, transactions are entered in the Transactions table.
If you want to print the Account card and Category card (the complete list of all entries for a specific account, category or group), you can do it in two ways:
- in the Cash account card you see all cash movements,
- in the Customers card you find the receipts collected from customers,
- in the Rent category card you see all payments related to rent.
In accounting, the set of all account cards is called the General Ledger.
How account/category cards work
When you record a transaction in the Transactions table, Banana Accounting automatically updates the account and category cards.
- Each income or expense is posted to the corresponding account and category.
- In this way, every new transaction is immediately reflected in the cards.
Structure of Account and Category cards
Each Account card or Category card has a header, i.e. the name of the account or category (for example UBS Bank or Rent), which distinguishes it from the others.
The card is made up of several main columns, which neatly list the data of each recorded transaction.
The most important columns are:
- Date → the date of the transaction.
- Document number (if present) → for example the related invoice or receipt.
- Description → a short text explaining the operation (e.g. payment to supplier Rossi).
- Income / Expenses → the amount recorded as positive (income) or negative (expense).
- Selected account → shows the number of the account or category to which the card belongs.
- Contra account → the account linked to the transaction (e.g. Rent expense paid via Bank).
- Balance → the running balance of the account or category, updated line by line.
In this way, each card becomes a sort of automatically updated “account statement”, allowing you to check in detail the movements of a single account or category.
Open the account or category card
You can open it in two ways:
- From the Transactions table or from the Accounts or Categories table → click the account/category number and then the small blue icon that appears.

- From the menu Report > Account cards → useful if you want to open or print multiple cards at once.

The account/category cards dialog has the following sections:
For detailed information about the sections, click the corresponding links.
Update the account or category card
The cards are recalculated on request.
If you modify or add transactions:
- reopen the card with the command Report > Account/Category cards,
- or, if the card is already open, click the refresh icon (two circular arrows).
The Selected Account column
From any account card, via the menu Data > Columns setup you can make visible:
- Selected account column, indicating the account on which the movement took place.
When you obtain a card for one or more accounts, categories, groups, and segments, you can see exactly which account was used.
The Contra Account column
In the account or category cards you can see:
- the C-Acct column, which indicates the contra account that completes the transaction.

Print account cards
You can print a single account/category card, a selection, or all cards.
To print one account card:
- display the card from any table (Accounts or Transactions)
- Start printing from File > Print.
To print multiple account cards:
- Menu Report > Account cards, choose which cards to include and confirm.
- You can also use the Filter to automatically select Accounts, Cost centers and Segments.
- Once shown in preview, start printing from File > Print.
Print Account cards by period
To view the account cards with balances for a specific period:
- click the menu Report > Account cards.
- in the Period section, enable Specified, entering the start and end dates.
- For more information see the page Period.
Print Budget account cards
If budget transactions have been entered in the Budget table, you can display the budget account/category or group cards:
- Report menu > Account/Category cards > Budget transactions.

Delete or edit data in account or category cards
In the cards you cannot modify or delete transactions.
If you need to correct:
- Go back to the Transactions table (or to the Budget, if it concerns planned transactions).
- Make the change.
- Recalculate the accounting (Shift + F9).
- Reopen the card to see the update.
From the card you can also go directly to the transaction to edit:
- double-click the row number.
Group cards
A group card is a statement that combines the data of several accounts or categories belonging to the same group.
In practice, instead of seeing the movements of a single account (e.g. only Bank), you can view all those of an entire group (e.g. Liquidity, which includes cash, post and bank).
To open and print a group card:
- Go to the menu Data > Columns setup
- Enable the Selected account column.
In this way, in the group card you will also see the accounts that make up the group.

Accounts and Categories in the Formatted report with groups
From the menu Report > Enhanced report with groups you can open a dialog that lets you decide how to print accounts and categories.
In this window you can:
- choose whether to include accounts, categories or both
- decide which groups to show (e.g. only administrative expenses, only sales)
- enable or disable some display options (e.g. show period balances, hide empty items, etc.)
- customize the look of the printout (headers, margins).
This way you can get a clear and organized report, with group totals and a layout suitable for official printouts or for presenting data to third parties.

Add a logo to account/category cards
If you want to personalize the account cards with your business logo, you can do it directly at print time.
Proceed as follows:
- File > logo setup and insert the logo
- Go to Report > Account cards and open the card you are interested in.
- From File > Print preview click the settings icon.
- In the dialog that opens, look for the Logo option.
- Instead of None, select Logo.
In this way, every printed account card will also show your logo, making the documents more professional.
For more details you can see the page Logo settings.
Create a print customization for account cards
If you often print the same cards (for example all the sales ones), you can create a customization that saves you from repeating the same settings every time.
Here’s how:
- Go to Report > Account cards.
- In the Customization section, click New.
- Enter a name that clearly describes the print, for example Sales accounts.
- Select the accounts you want to include.
- From File > Page setup define margins and other print settings.
From now on, whenever you need to print those cards, just select the saved customization: in a few clicks you’ll have the report ready.
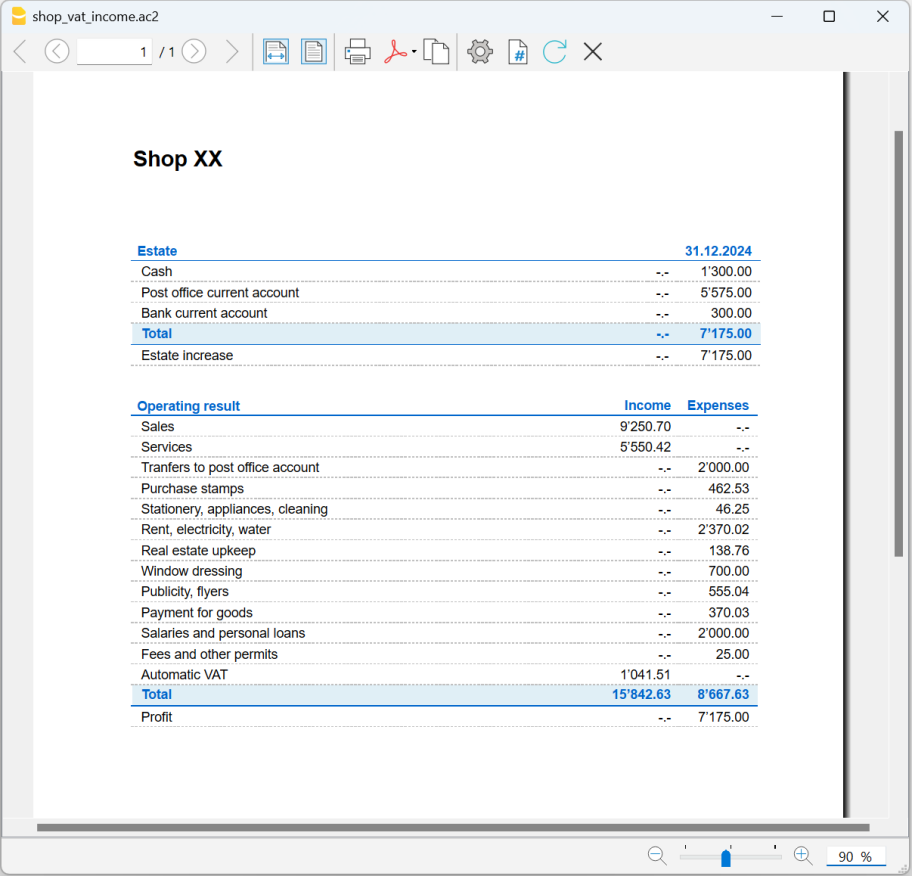
Enhanced Statement | Income/Expense Accounting
The Enhanced statement is a clear summary of the financial position and performance of your business.
What it’s for:
- to see income and expenses,
- to check the result of the period
- to have an overview of the financial trend.
How to view the Enhanced statement
- Go to Report > Enhanced statement.
- You can see a preview and, if you want, save the report in PDF, HTML, or Excel formats, or copy it to the clipboard.
Customize the Report
The report can be customized in different ways. Below you find the explanation of the different options.

Page header
- Lines 1–4: space to enter a title or other information.
- Logo: you can insert your business logo.
- If you have already loaded logos in File > logo setup, you can select one from the list.
- Alternatively, using the Edit button, you can add a new one.
Column header
- Start date: start of the accounting period.
- End date: end of the accounting period.
- Previous year: end date of the previous period (for comparisons).
Cover page
- You can print a dedicated cover page.
- Here too you can insert a logo, choosing from the ones set or adding a new one.
Print pages
You can choose what to include:
- Accounts → list of accounts.
- Categories → list of categories.
- First page → prints the document header.
- Page break after accounts → prints accounts and categories on two separate pages.
Other sections
In the Include in print section you can enable other choices, such as showing or not certain data (some options, for example budget balances, are not available if you choose a specific period).
Enhanced Statement with Groups | Income/Expense Accounting
The Enhanced report with groups is a statement that shows a summary of the financial position and performance of your business. Compared to the Enhanced report, it is the most complete and detailed version, because, in addition to the main totals, it also displays subgroup totals.
This way you not only have an overview, but you can also analyze in detail income and expenses grouped by categories or sections, getting a more precise and in-depth picture.
How to get the Enhanced report with groups
- Go to Report > Enhanced report with groups.

Options of the Enhanced report with groups
From the Enhanced report with groups dialog you can:
- Include all groups → all the groups present in the Accounts and Categories tables are printed.
- Exclude single groups or accounts → if you don’t want to show them in the report.
- Split by period → for example, in the first half-year you can choose a monthly or quarterly breakdown.
- Split by segments → useful to distinguish results by projects, sectors, or other business areas.
All the sections of the Enhanced report with groups are explained on the page Enhanced Balance Sheet with groups, with reference to double-entry accounting.
The exceptions in the contents are the following:
In the options, besides the Accounts settings there are also those related to Categories, but the approach is the same.
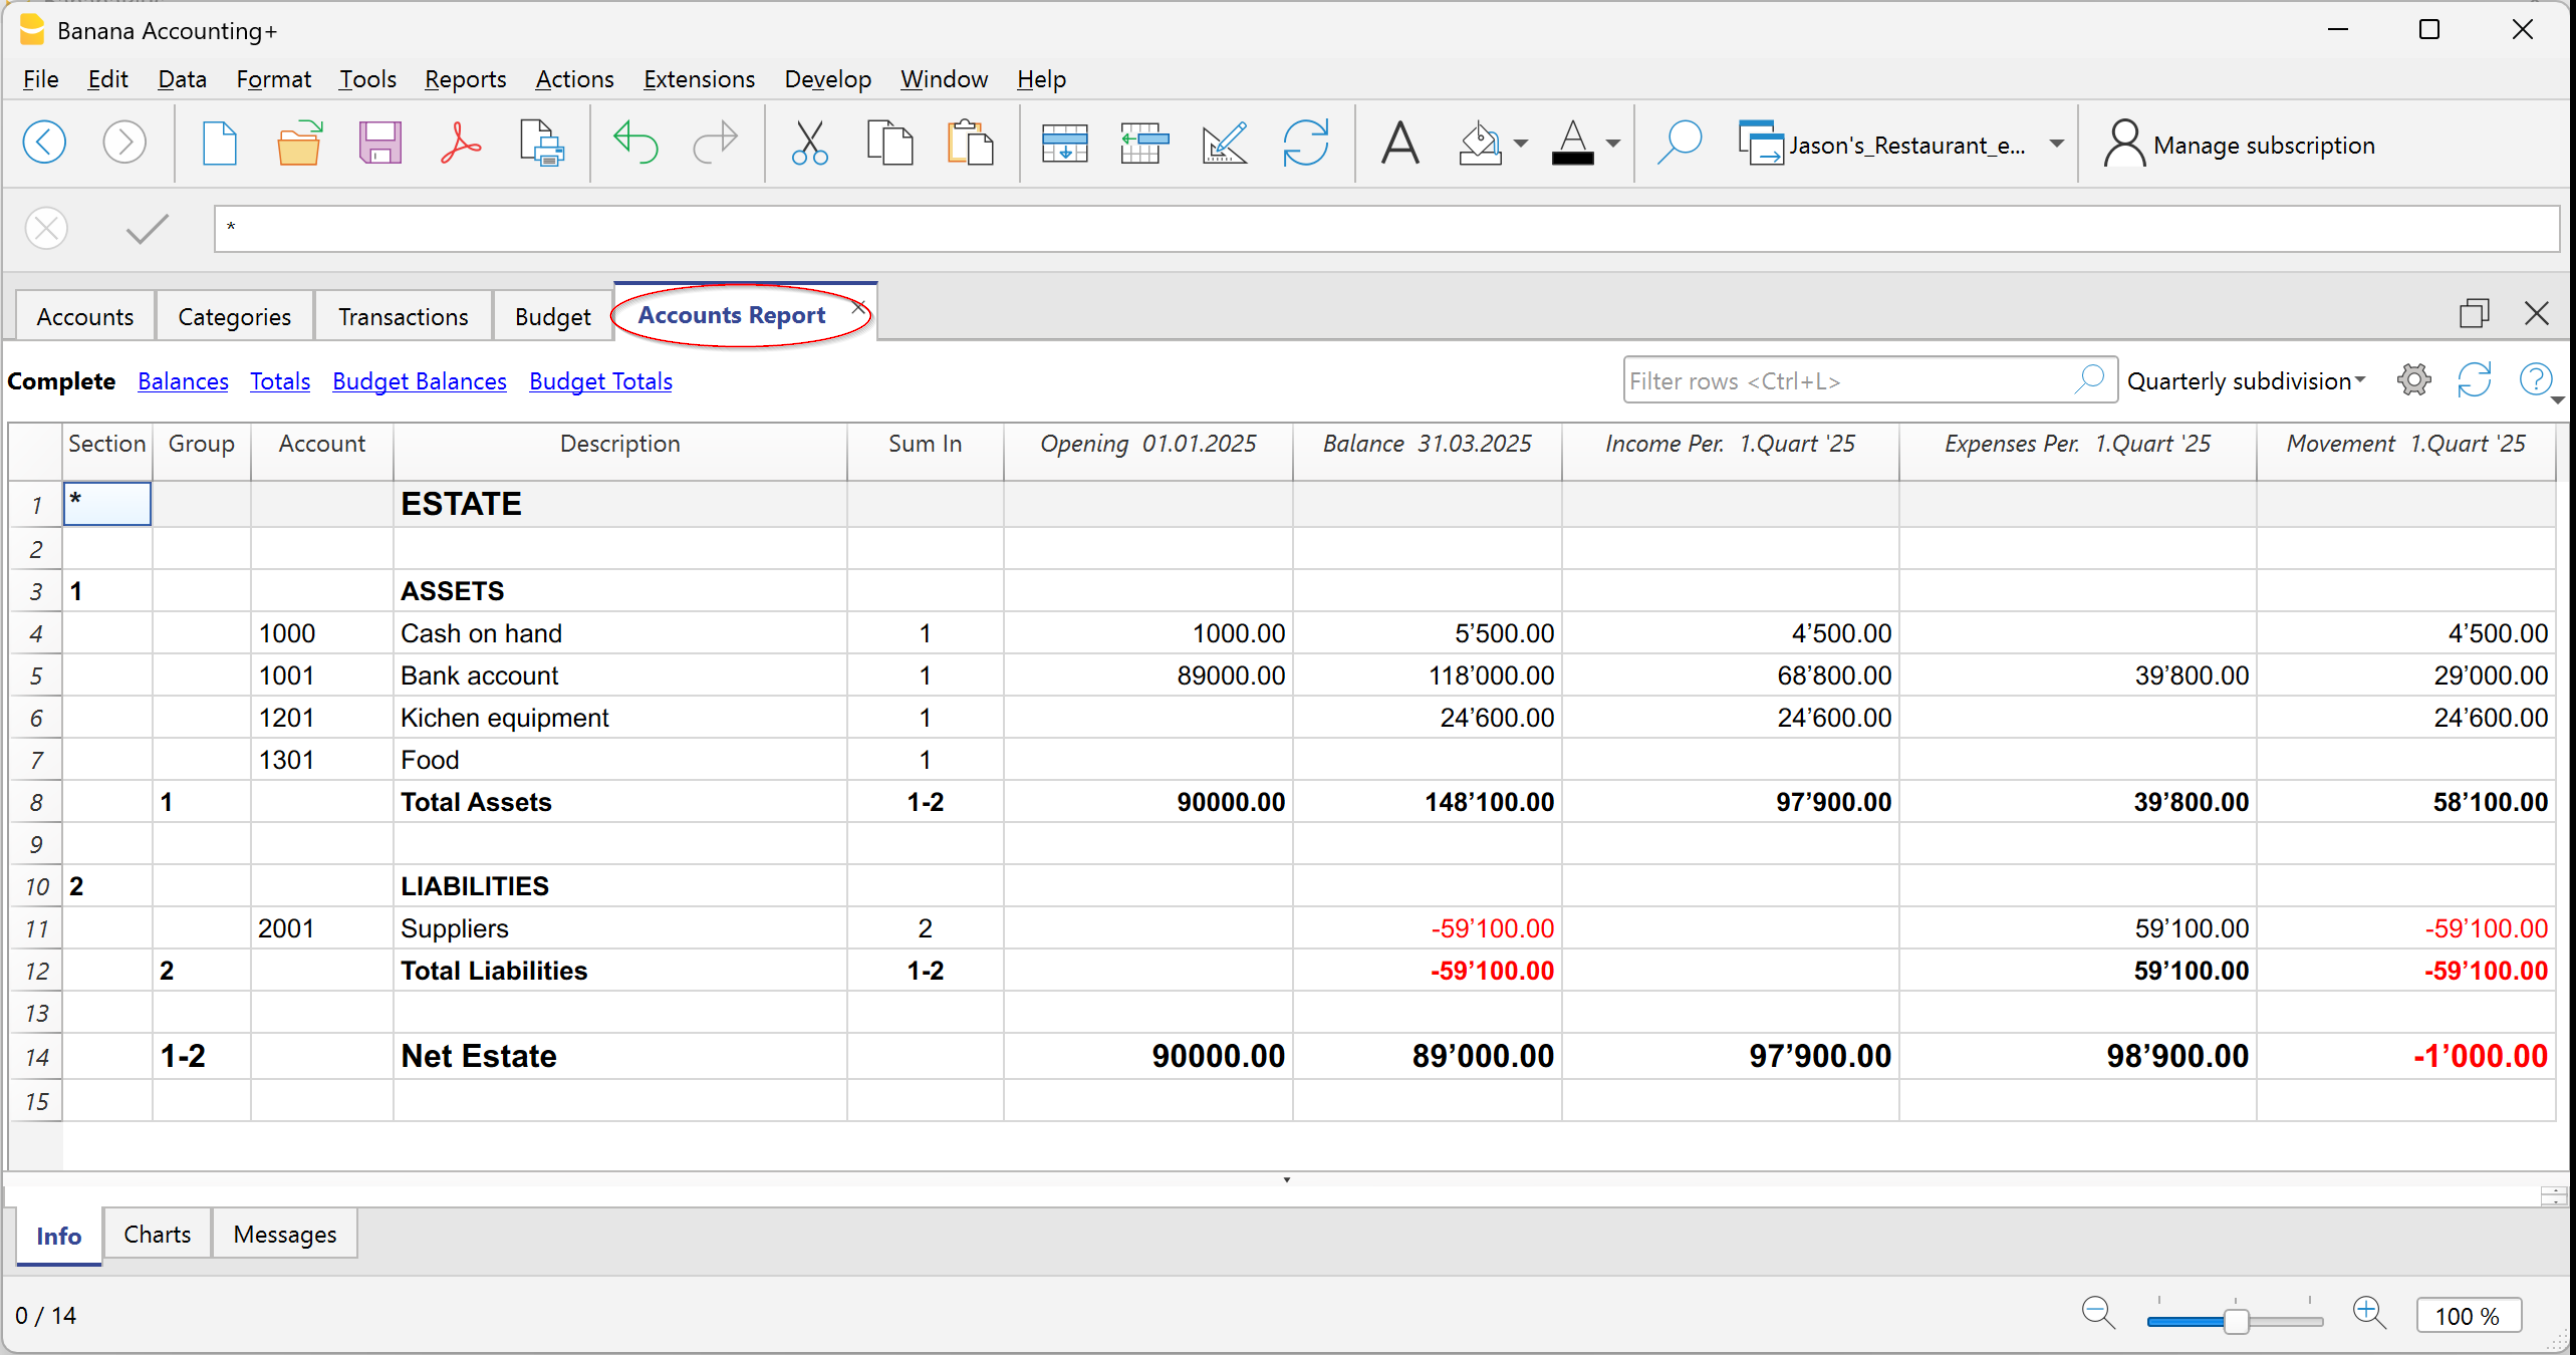
Accounting Report | Income/Expense Accounting
The Accounting Report is a tool that allows you to view the Accounts or Categories table based on the options you choose in the configuration dialog.

What you can view
You can decide the type of grouping to display:
- Accounts → the report lists all the accounts with the following columns:
- Opening
- Income for the period
- Expenses for the period
- Transactions of the period
- Final balance
Categories → the report lists all the categories with the same columns:
- Income for the period
- Expenses for the period
- Transactions of the period
- Final balance
In the categories report, the Opening column is always empty.
This is because categories are used to calculate the annual result (that is, the difference between income and expenses) and should not have opening balances carried over from the previous year.
Therefore, each year categories start from zero, so it is possible to correctly calculate the result only for the current period.

Print options
You can choose whether to include or exclude certain items:
- Exclude accounts → only the categories will be printed.
- Include accounts without transactions → also shows accounts that have no transactions.
- Include accounts with 0 balance → also includes accounts that have no balance.
- Exclude groups without accounts → hides groups made up only of accounts with a zero balance.
Other sections
For the other sections, see the following web pages:
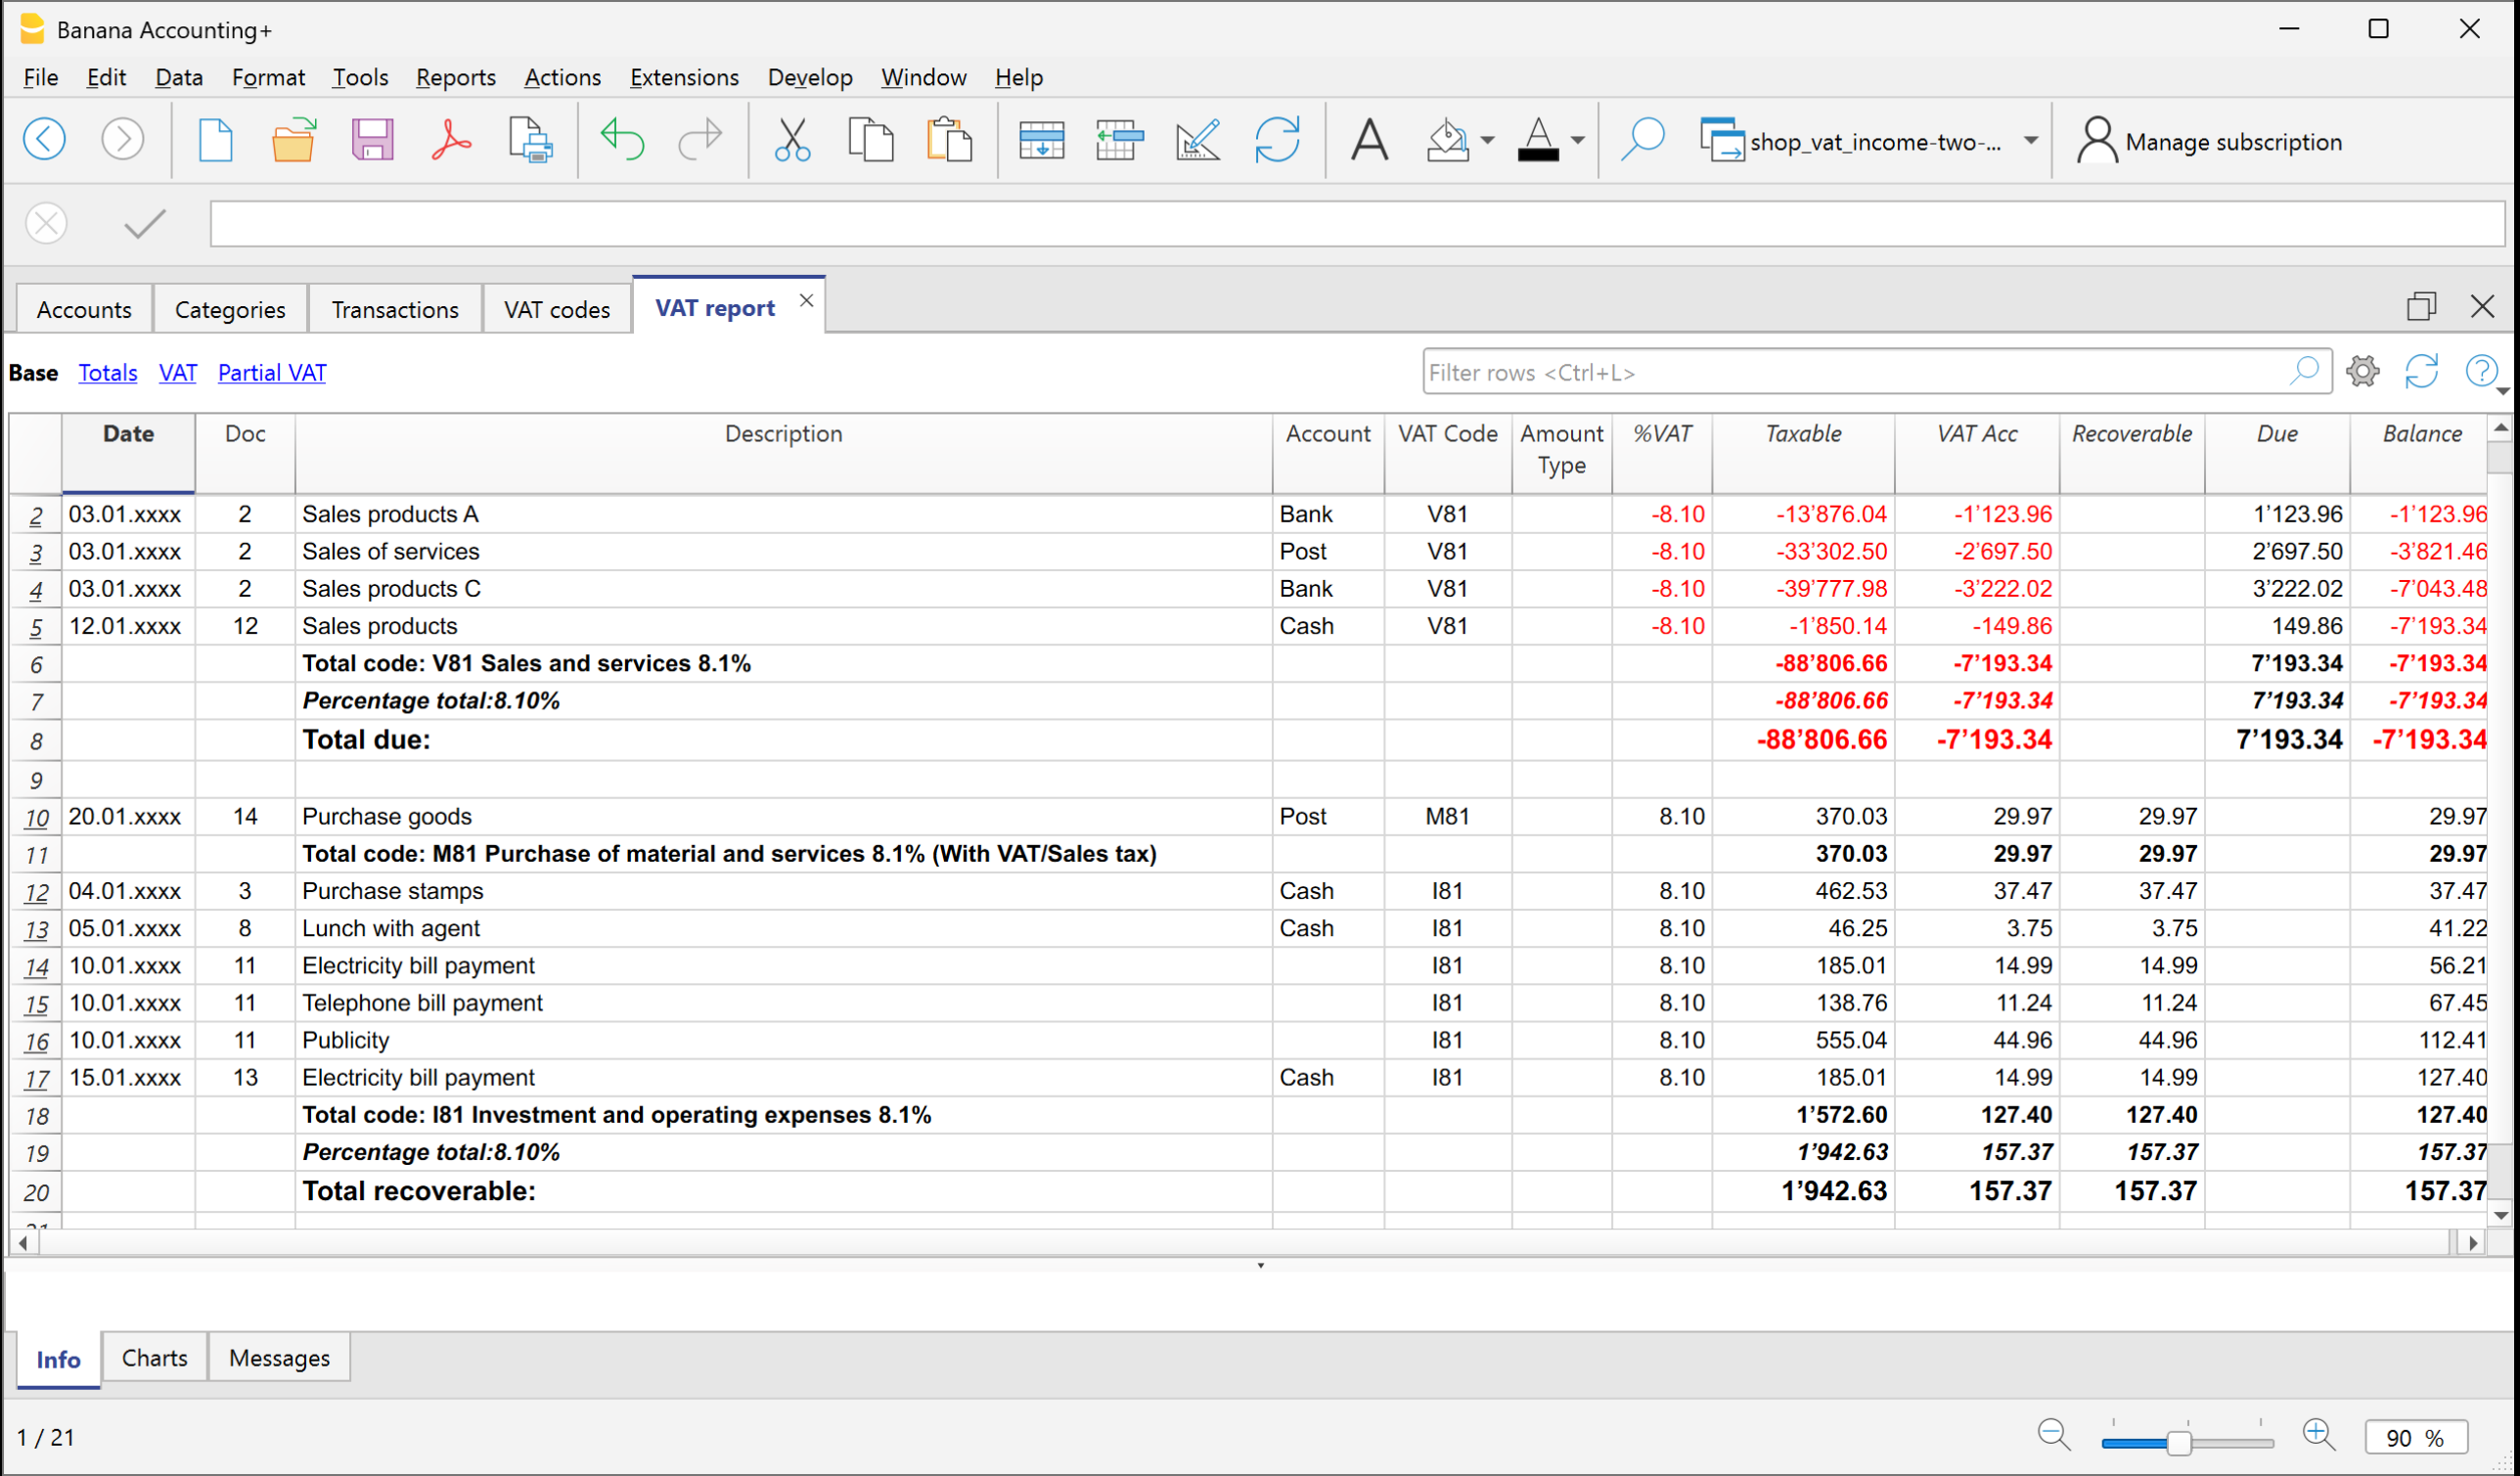
VAT Report | Income/Expense Accounting (only with VAT option)
The VAT Report in Banana Accounting is a report that gives you a complete and up-to-date overview of all VAT transactions recorded in your accounting. It is a useful tool both for internal control and for preparing periodic VAT returns.
The VAT Report function is only available in the Income and Expenses templates with VAT.
What the VAT Report is for in Banana Accounting
With the VAT Report you can:
- clearly see VAT on sales (VAT payable),
- check VAT on purchases (VAT receivable),
- calculate the VAT balance to be paid or recovered,
- get a summary of the transactions divided by VAT codes.
This way you always know your VAT position without having to make manual calculations.
How to get the VAT Report
Based on the transactions with a VAT code, the program calculates and displays the VAT Summary.
To get the VAT Summary:
- From the menu Reports > VAT /Sales tax report.
- In the window that opens you can select:
- the period to analyze (e.g. month, quarter, year),
- optional filters to display only certain codes or transactions.
The program processes the data and shows you a report with the totals of VAT collected and paid.

VAT Report options
When you generate the VAT Report, you can activate several options that allow you to create a customized VAT Report, from the details of individual transactions to totals by account, code, or rate, so that you always have your VAT position under control.
Include transactions
Shows in detail all the accounting records with VAT.
Include totals by Accounts
Sums up VAT operations grouped by each account (e.g. Bank, Cash).
Include totals by Code
Shows the totals of VAT operations grouped by VAT code (e.g. V81, M81, I81).
Include totals by Percentage
Groups the totals of VAT operations based on the applied VAT rate (e.g. 8.1%).
Include unused codes
Adds to the report also the VAT codes present in the table but not used in transactions.
Use own (group and Gr)
VAT operations are sorted according to the groupings defined in the VAT Codes table.
Sort transactions by filter
You can choose how to sort the transactions: by date, document number, description, etc.
Partial Report
Allows you to get a VAT summary limited to a specific element:
- only one VAT code (by selecting it from the list),
- only a group of codes (for example all codes related to purchases).
What the VAT Summary contains
The report shows, for each VAT code:
- the taxable amount (the amount on which VAT is calculated),
- the VAT rate applied,
- the corresponding VAT amount,
- the overall totals of VAT payable and VAT receivable.
Printing and saving the VAT Report
The VAT Report can be:
- printed on paper,
- saved in PDF, HTML or Excel for digital archiving,
- copied to the clipboard to be pasted into other documents.
Save accounting data as PDF | Income/Expense Accounting
At the end of the year, when the accounting has been completed, checked, and reviewed, you can create an archive of your data in PDF format.
To do this:
- Go to the menu File > Create PDF dossier.
The program gathers all the main accounting information of the year into a single PDF document. You can keep the file as a digital archive, print it, or share it.
This allows you to have an organized and non-editable copy of your accounting, useful for long-term storage or for presenting to auditors, partners, or external entities.

Year end Closing Checks | Income/Expense Accounting
Accounting closings are all the verification and control operations carried out at the end of the year (or accounting period) to ensure that the data is correct and that the year’s result is calculated without errors.
With Banana Accounting, many operations are simplified and automated, but it is important to use the available functions, including:
- The Balance column highlights any discrepancies and carries them forward to the following rows until they are corrected.
Tip: keep an eye on this column during the year to immediately correct errors and prevent them from accumulating.
With the Filter rows (only with the Advanced plan), you can quickly search for transactions with the same texts, amounts, or accounts, and correct them without scrolling through the entire table.

Automatic accounting check
The Check accounting command (Actions menu) automatically performs a series of checks to immediately detect any errors or differences.

We recommend using it:
- when error messages appear
- after modifying Accounts, Categories, or VAT Codes
- during the annual closing
- after creating the new year and making further changes.
Errors are shown in the Messages window, with the indication of the table and row to be corrected.
With the Check accounting command, the program searches and reports:
- Differences in the Transactions table
All amounts must balance: income and expenses must not generate differences. Differences between accounting balances and actual balances
With the CheckBalance function you can automatically compare recorded balances with those from bank statements and detect discrepancies.
This is essential to ensure the truthfulness and accuracy of the accounting: the balances of the accounts must match the actual balances:- bank and credit card accounts must match bank/postal statements,
- the cash balance must match the actual cash,
- the VAT payable account must match the balance of the VAT Report account.
More information about Verification entries is available on the page Verification balance transactions.
- Summation errors in the Accounts and Categories table
If in the Accounts or Categories table you have added, deleted, or renamed accounts, groups, or subgroups, grouping errors may occur.
These are reported by the Check accounting command and must be corrected, otherwise the totals in the reports will be wrong.
- Differences in opening balances
In the Accounts table, the balances of the balance sheet accounts must always exactly match the closing balances of the previous year (previous year’s file).
Differences may occur for the following reasons:- In the previous year’s file, transactions were added or deleted after creating the new year.
- In the previous year’s file, errors were corrected after creating the new year.
- In these cases, to correct the opening balances, you need to use Update opening balances.
How to start the new year
In Banana Accounting, each year has its own separate file:
- from the menu Actions > Create New Year you generate the new year’s file,
- you can work simultaneously on the old file and on the new one,
- once the closing is complete, update the balances in the new file with Update opening balances.
Annual Report printing
The Annual Report is the document that summarizes all the year’s income and expenses, showing the final balance and the result (profit or loss).
It is based on the following calculation scheme:
- Sum of income → revenues and proceeds.
- Sum of expenses → costs and charges.
- Difference between income and expenses → profit or loss.
You can prepare it from the menu Reports > Enhanced statement with groups, customizing columns and print settings.
Carry forward the year’s result in Income / Expenses accounting
In Income/Expenses accounting, it is not necessary to allocate profit or loss, because the Net worth total in the Accounts table already represents equity.
The year’s result (income – expenses) is automatically carried forward into the balance sheet.
If you also want to display the results of previous years, you can create a specific account Previous years’ results and manually enter the amount in the Opening column.
Locking transactions
Once the checks and closings are completed, you can lock the transactions:
- From the menu Actions > Lock transactions
- The rows will be numbered and protected by a blockchain code that ensures their integrity.
PDF Dossier
With the Create PDF dossier command you can save all the year’s documents (account cards, journal, report, VAT report, etc.) in a single PDF file. We recommend saving it and, for security, making copies on external media.
Closures, Accounting Aspects – Advanced Concepts
On this page you will find useful information for closing the accounting at the end of the year.
If you do not have basic accounting knowledge or do not feel confident in carrying out these operations, we recommend contacting a trustee or a professional accountant. This way you will be sure that the closing is done correctly and in compliance with tax regulations.The suggestions provided in no way replace the advice of your trusted tax consultant.
At year-end closing, before moving on to the new year, some adjustment and correction entries must be made. These are needed to correctly determine the year’s result and ensure that the accounting reflects the true financial and economic situation.
Salaries and staff
- Import salary transactions → if you use dedicated payroll software, you can import the transactions into Banana (Actions > Import into accounting > Import transactions with column headers).
- Thirteenth month salary → remember to record it in December, if not already managed automatically.
- Social security adjustments (AVS/AD/IPG/AD) → reconcile AVS contributions paid with the statements from the Compensation Office.
- Pension adjustments (LAINF, LPP, etc.) → report the total gross salaries to the insurance companies for possible corrections.
- Withholding taxes → record the adjustment based on the statement received from the Tax Office.
- Executive reimbursements → if applicable, include in the December salary the amounts established by the tax authorities.
Accounting adjustments
- Doubtful accounts (Allowance for doubtful debts) → record any expected losses on receivables.
- Depreciation → record the depreciation of movable and immovable assets as of 31.12. You can use the Fixed assets register application to automatically generate the entries.
- Inventory → update the values with the Inventory application to have accurate counts of quantities and values.
- Open customer and supplier invoices → record balances as of 31.12 using the dedicated functions (open invoices by customer - open invoices by supplier).
- Private use → record personal use of company assets (e.g. car) with the appropriate VAT.
- Private account → check and record any interest income or expenses relating to the owners.
- Taxes and duties → check the advances paid during the year, close the provisions from previous years and record any differences as extraordinary costs/income.
VAT closing and return
- Use the Check accounting command to verify that there are no errors.
- Make sure the VAT payable account correctly shows the amount to be paid or recovered.
- Check the quarterly VAT statements and compare them with the amounts paid to the FTA.
- Use the VAT Report to generate detailed reports and archive the data in PDF.
Collaboration with the trustee
If the closing is handled by your accountant/trustee:
- you can send the ac2 file by email or share it via Dropbox,
- if they don’t have Banana, you can create a PDF of your file from File > Create PDF dossier and send it,
- alternatively, they can open the file with the Free plan of Banana Accounting Plus (view-only mode beyond 70 rows).
Create a new year | Income and Expense Accounting
At the end of each fiscal year, to start working with the new year, you don’t need to close or delete anything. With Banana Accounting, each year has its own separate file.
The Create New Year command prepares the file for the next year without modifying the current one. You can therefore run it safely: the old year’s file remains intact.
Create the new year file
To create the New Year proceed as follows:
- Go to Actions > Create New Year.
- The program generates a new file that contains:
- the same chart of accounts,
- the same settings,
- the closing balances of the old year, carried forward as opening balances.
- Immediately save the file with a clear name, for example Accounting_2026.ac2.
You now have two separate files:
- one for the previous year,
- one for the new year.
Which operations are carried out by the Create New Year command
When you use the Create New Year command, the program:
- Creates a new unnamed file (so you can decide how to save it).
- Transfers the balances:
- the closing balances of the accounts → carried forward as opening balances,
- the balances of the report → carried forward in the Previous year column.
- Updates the file properties: new start and end dates of the fiscal year, link to the previous year’s file, auto-completion of transactions (via the Options section).
- Transfers the transactions to the Budget table if present (https://www.banana.ch/en/doc/node/9710), keeping the chosen settings.
Work in parallel
If you have not finished the accounting of the previous year you can work on both files:
- In the New Year file → record the transactions of the new year. You can also change the chart of accounts, VAT rates, or other settings without affecting the old year.
- Previous year file → complete the missing entries, perform final checks, print the reports, and close the accounts.
Update opening balances
If, after creating the new year, you add more entries in the old year’s file:
- Open the new year’s file.
- Actions > Update opening balances.
In this way, the latest changes are also transferred to the new year. It is advisable to do this only when you are sure the previous year is final.
Note for Professional Plan users
If you have a Professional Plan subscription, inside the new file you may see a message regarding the Advanced functions.
Professional Plan. The functions of the Advanced plan are available up to 70 transactions
This means that you will be able to use the Advanced plan functions up to 70 transactions: it is a trial mode automatically included.
Check the accounting of the previous year
Before updating the opening balances in the new year, make sure that the old year’s data is complete and correct. This prevents differences between closing balances and opening balances.
What to do:
- Record all closing entries (invoices, taxes, depreciation, etc).
- Use the Accounting check command to automatically verify that there are no errors.
- If you have the Advanced plan, use the Filter to quickly find and correct rows with the same account, text, or amount.
- Print or save the final reports for archiving.
Carry forward profit/loss in Income and Expense accounting
In Income/Expense accounting it is not necessary to allocate profit or loss as in double-entry accounting.
The difference between income and expenses is automatically carried forward as an increase or decrease in equity.
If you want to keep track of accumulated profits or losses over the years, you can create a specific account “Previous years’ results” in the Accounts table and manually enter the amount in the Opening column.
Review Rules in the Recurring Transactions Table
When you run the Create New Year command, the program transfers to the new year’s file all the transactions that have Rules.
Before recording the transactions of the new year, it is recommended to check and update all the Transactions with Rules in the Recurring Transactions table.
If the conditions are no longer valid you can:
- Modify account, counterpart, VAT code, CC3 or segments.
- Delete transactions that are no longer valid.
- Add new transactions with Rules.
If in the Recurring Transactions table, in addition to transactions with rules, you have also stored:
you must also check and update these.
Performing this check right away helps to avoid errors and later corrections both in the Transactions table and in the Recurring Transactions table.
Update opening balances | Income & Expense accounting
The Update opening balances command is used to retrieve the data from the previous year’s file and update the opening balances of the current year’s file. It is very useful when, after creating the new year, changes are still made in the old year’s file.
When to use the Update opening balances command
The Update opening balances command is used in the following cases:
- you created the new year with Create New Year, but the fiscal year is not yet closed;
- you added or modified transactions in the previous year;
- you added new accounts or made changes to the chart of accounts of the old year.
Check the accounting of the previous year
Before launching the command, it is essential to check that the previous year is complete and correct:
- record all closing operations (invoices, credit notes, depreciation, taxes, etc.);
- use the Check accounting command to verify totals;
- make any final prints.
This way you avoid differences between the closing balances of the closed year and the opening balances of the new year.
How to access the Update opening balances command
- Go to Actions > Update opening balances.
- A dialog box opens with the path of the previous year’s file.
- Banana automatically suggests the saved file name.
- If the name or location of the file has changed, click Browse to select it.

What the Update opening balances command does
- Retrieves balances from the previous year’s file.
- Does not modify the old year’s file in any way.
- Can be repeated multiple times without risk.
It is important to know that Update opening balances performs the same operations as the Create New Year command, but without creating a new file.
If you modified the chart of accounts of the previous year
It may happen that, after creating the new year, you added new accounts in the previous year’s file. In this case Banana will display an error.
To solve this:
- add the same new accounts also in the new year’s file;
- repeat the Update opening balances command.
If you want to speed up the operation, you can use the Import Accounts command to align the two charts of accounts.