Estimates and Invoices separate from accounting
The Quotes and Invoices application of Banana Accounting Plus is a tool independent from the accounting file. It allows you to create and print quotes and invoices quickly and easily. It is ideal for replacing Excel in invoice management, offering a professional solution at no additional cost. Its use is intuitive and does not require accounting skills.
- Automatic retrieval of addresses: addresses are automatically retrieved from contacts, avoiding the need to re-enter them in invoices.
- Automatic calculations: all calculations are performed automatically, ensuring accuracy and constant updates.
- Advanced customization: possibility to set language, currency, number of decimals and rounding for each individual invoice.
- Flexible invoice management: options to edit or duplicate invoices and quotes easily. Simple conversion of quotes into invoices.
Application independent from the accounting file
Quotes and Invoices is an application separate from the accounting file and is used only to create and print quotes and invoices. There is no connection with the accounting file.
The invoice data in the Quotes and Invoices application cannot be imported into the accounting file and must be entered manually. Furthermore, it is not possible to import bank transactions (including payments). If you need these features, we recommend using the invoicing integrated in the accounting file.
For more details on the differences between the Quotes and Invoices application and the integrated invoicing, visit the page Invoicing in Banana Accounting.
How to get started with Estimates and Invoices
To use the application, you need to download and install Banana Accounting Plus. For a quick and easy start, check out our resources:
- ▶ Video: Getting started with Estimates and Invoices
- ▶ Video: QR Invoices in three simple steps
- Characteristics of Estimates and Invoices
From the File > New menu, you can open an Invoice template to immediately create your Quotes and Invoices file. Enter your data and your customer information and you're ready to go. For more information visit the page How to...
Various fields are available to enter all necessary information and the billable items. Here are the main ones:
- Invoice information: Invoice number, language, currency, VAT mode (invoices without VAT, VAT included in the amount, or VAT excluded with a separate amount), invoice issue and due dates.
- Customer address: all customer data entered in the Contacts table is automatically retrieved in the Quotes and Invoices.
- Invoice data: title, opening text, invoice details (list of items to be invoiced, quantity, description, amount) and closing text.
- Totals and discounts: discounts and advances, partial and total amounts are calculated by the program based on the entered values.
The Tables
The Quotes and Invoices application is based on several tables that are used similarly to those in Excel, but are already fully configured and programmed to generate quotes and invoices quickly and securely.
Contacts Table: this is the table where you precisely and neatly set up customer data. The data can always be updated and modified. It is possible to import data from SmallInvoice using a specific Banana extension.
Items Table: in this table, you enter the data for managing items or services to be invoiced. By assigning an ID, you can group different categories of items or services. You enter the quantity, unit price, and can indicate the related accounting account. Columns are also available to enter entry and exit dates of goods and for notes.
Invoices Table: this table is intended for entering all invoiceable items. It is the most automated:
- Automatic retrieval of the customer's address by simply selecting the customer's contact ID.
- Automatic retrieval of all invoice data: with a double-click on the Total column cell, a invoice dialog opens, displaying all the data entered in the other columns of the Invoices table (customer address, invoice date and number, reference, order number, unit price, VAT rate, and other possible data). Just enter the quantities and the invoice is ready. It can be saved as PDF or printed on paper.
Estimates Table: this is where you enter quote data. It is very similar to the Invoices table, with the same functions, calculations, and print modes – only the title changes. Estimates can be converted into invoices at any time, automatically retrieving data into the invoice, which can then be immediately saved, printed, and sent to the customer.
VAT Codes Table: in this table you set the VAT codes for invoice creation. During invoice preparation, VAT rates are retrieved automatically and calculations are automated. The rates can be modified if the regulations change.
Invoice structure
In this image, you can see how the invoice is structured:
 | LogoYou can insert a custom logo. | |||
HeaderThe invoice header data is taken from | ||||
Customer addressThe customer address is retrieved from the Contacts Table, where you must set the customer addresses. | ||||
Invoice dataThe invoice content must be entered in the new create/edit invoice dialog. | ||||
Free textYou can define title, introductory and final notes in the Invoice dialog. | ||||
Swiss QR CodeSettings can be defined only for Switzerland, using the layout [CH10] Layout with Swiss QR Code. |
Prints and reports
- Print invoice with QR code for Switzerland:
- It is possible to print the invoice with a QR slip even without amount and address, leaving a blank box to manually fill in the data. More information on the page QR Code Customization, section Include/exclude from print.
- Print invoice for all other countries.
- Print invoice on paper or in PDF format.
- Add your logo to the printouts of Estimates and Invoices.
- View open invoices.
- On the page How to... you will find information on printing and print settings.
- Customize the print layout of quotes and invoices:
- With the Professional Plan, you can use default settings and customize the printing of Estimates and invoices.
- With the Advanced Plan, in addition to customizing quotes and invoices print layout, you can apply several additional customizations.
Exporting and archiving data
- Copy and paste directly to and from Excel.
- Export tables to PDF and various other formats.
- Archive printouts and data in PDF or other formats.
- Save the file to any storage medium.
- Export quotes and invoices data in .csv format using the Estimates and Invoices Tools extension.
Other functions
Features available only with the Advanced Plan
- Set the discount for each individual item, either as a percentage or a fixed amount.
- For each item, specify the date the service was performed.
- Add fields in the invoice to insert specific information (project, additional references, etc.).
- Print delivery notes with or without amounts.
- Print reminders with or without Swiss QR slip.
- Add intermedia
Characteristics of Estimates and Invoices
The new Estimates and Invoices application is included in Banana Accounting Plus. Creating and printing estimates and invoices becomes quick and easy.
To start, just download for free the Free Plan. You may enter up to a maximum of 20 invoices and 20 offers.
With the yearly plan, you can add an unlimited number of estimates and invoices.
How to set up estimates and invoices
To create estimates and invoices, just set up your customer data, items or services to be invoiced, unit prices and VAT rates, while the program takes care of everything else.
There are many automations to make your work easy and with immediate professional results.
- Automatic retrieval of addresses from contacts to avoid having to re-enter the data in the invoice.
- Data import from SmallInvoice with specific Banana extension.
- No manual calculation. All calculations are automatic, always accurate and updated.
- Detailed estimates that can be quickly converted into invoices and sent to the customer.
- Invoices created with QR code for Switzerland.
- For every invoice, language, currency, number of decimals and rounding system can be set up.
- Changes and/or duplicates of invoices and offers already made to the customer. You just need to to add quantities and the new invoice is ready to be sent.
- Annotations for memos or other.
- Payment date to check receipts.
- View of overdue invoices to check due dates.
- PDF saving and paper-printable.
- Invoice archiving to have a history that is always organised and ready for possible tax inspections.
- Dark Mode on Mac and Windows.
Excel-like features
- Add as many rows as you want without limit, or delete the rows you don't require.
- You don't need to enter formulas because the calculations are updated instantly and you have a contextual view (like in spreadsheets).
- The columns are customizable, you can change their position, add new ones and change their width.
- Work with the format that suits you best.
- Colour the rows to immediately identify pending invoices or for other purposes.
Based on spreadsheets
The estimate and invoice application is built upon various tables, which are used in a similar way to those of Excel, but that are already fully set up and programmed with everything needed to manage your inventory in a fast and safe way.
- Contacts table
This is the table where customer data can be registered in a precise and orderly way. The data can always be updated and modified. - Items table
This is the table where the data for the management of the items or services to be invoiced are inserted. By assigning an ID it is possible to group the various categories of items or services to be invoiced. You enter the quantities, the unit price and you can indicate the reference account in the accounting. Columns are also available for entering the date of entry and exit of the goods and for annotations. - Invoices table
This table is intended for entering the items which need to be invoiced.It is the most automated:- Automatic resumption of the customer's address by simply selecting the customer's contact ID.
- Automatic retrieval of all invoice data: by double clicking on the cell in the Total column, an invoice dialogue opens up where you will find all the data entered in the other columns of the Invoices table (customer address, date and invoice number, reference, order number, unit price, VAT rate and other possible data). Just enter the quantities and the invoice is ready.It can be saved in PDF or printed on paper.
- Estimates table
The offer data is entered. It is completely similar to the Invoices table, with the same functions, calculations and printing methods, obviously the wording changes. The estimates can be converted into invoices at any time with automatic recovery of the data in the invoice, which can be immediately saved, printed and sent to the customer with automatic recovery of the data in the invoice, which can be immediately saved, printed and sent to the customer. - VAT codes table
VAT codes are set up for creating invoices. Whilst preparing invoices, both the rates and calculations are taken up automatically . The rates can be modified if the regulations in force change.
Accounting set up
Headings and basic data of Estimates and Invoices set up in a single dialog box, easy to display.
- Headings with free texts
- Address with all company data
- Link to predefined or customized extensions
- Password to secure your estimate and invoice
- You can create multiple Estimate and Invoice files in different languages.
File and data saving
- All your data is saved in a single file, where you can easily find everything without wasting time.
- Give the file the name you want.
- You can manage an unlimited number of files.
- Save data on any media, computer, network, cloud or send it by email. You can have access from wherever you are.
- Simultaneous access by multiple users, where, however, only one person can open the file to be edited.
- Make your accounting more secure by inserting password protection.
Handling Estimates and Invoices
- In the columns you can see the amounts in the format used by your computer.
- You choose the identifier of the article freely (numeric or alpha-numeric account, up to 256 characters).
- Balance, item movement and totals displayed at the same time and always updated.
- In the Links column of the Items table you can add a digital link for the registered item.
- In all tables you have predefined columns that you can make visible by choice.
- The Search command allows you to quickly search for the invoice or estimate data.
- The Replace command allows you to automatically replace texts or other data in the tables.
- You can sort the rows according to different sorting keys.
- Export to PDF for data storage.
- Export to other formats for data re-processing.
- Data import from other programs in Text, Ascii and CSV format.
- Data import from SmallInvoice.
Error reporting and control
- Command to quickly check accounting.
- Reporting of any wrong settings, differences or errors.
- Each report is linked to a help page that explains the causes and the solution.
- Possibility to amend at any time.
Prints and reports
- Print invoice with QR code.
- It is possible to print the invoice with a QR bulletin even without an amount and without an address, leaving an empty box to manually insert the data. More information is available on the QR-Code Customization page, section Include/Exclude from printing.
- Print invoice for all other countries.
- Print invoice on paper or in PDF format.
- Add your own logo in the printouts of estimates and invoices.
- Open invoice report.
- On the Customise invoice printing page you will find all information for printing and its settings.
- Customise the estimate and invoice print.
- With Banana accounting Professional you can use the preset settings and customize the printing of estimates and invoices.
- With Banana Advanced, you can not only customize the printing of estimates and invoices, but also add additional customisations.
Data export and storage
- Copy and paste directly to and from Excel.
- Export tables to PDF and various other formats.
- Storage of printouts and data to PDF or other formats.
- Saving of the accounting file on any device.
- Export estimates and invoices data in .csv format with the extension Estimates and Invoices Tools.
Comprehensive documentation
- Constantly updated estimate and invoice application documentation.
- Banana accounting Plus documentation.
- Banana Accounting Plus questions and answers.
- Documentation also available in PDF format.
History of updates
The Estimate and Invoice application is constantly subject to updates and improvements.
For further details, consult the page Change history of estimates and invoices extension.
Features only available with the Advanced plan
- Set the discount for each item, both in terms of percentage and final amount.
- Insert the date when the service took place for each item.
- Add fields to the invoice for additional specific information (project, additional references, etc..).
- Print delivery notes with or without amounts.
- Print payment reminders with or without Swiss QR payment slip.
- Add an interim total (Banana Accounting+ 10.1.8 or newer).
Some customisations of the printing layout CH10 and UNI11 are available only with Banana Advanced.
Features currently not available
The Estimates and Invoices application is one of the latest additions to the family and for the moment it supports the essential functions related to the preparation and printing of estimates and invoices. It does not yet support the following functionalities:
- It is not possible to import invoice data into the accounting file.
- Connect with Inventory application.
- Export individual invoice data.
- Automated sending of invoices by email.
- Automated sending of invoices by eBill.
- Define multiple IBAN codes.
- Add additional columns in the invoice details.
- Define a discount for a single contact.
- Define a discount for a single item - see Invoice Details page (only available with the Advanced plan).
- Importing QR-Code payments.
- Send a payment reminder.
- Create a new year.
- Enter the shipping address.
- The order number and date are not listed in the invoices table (this must be done manually).
- Automatically adding a charge for the reminder on the invoice.
How to start an Invoice
To use the Invoice application you must have downloaded and installed Banana Accounting Plus.
For a quick and easy start we recommend the use of one of our templates.
Create an Invoice file
Create an Invoice file starting with an existing template or by creating an empty file as follows:
- Menu File → New.
- Select Region / language.
- As Type, select Invoices.
- In the section on the right select the required template.
- Double-click on the template name or click the Create button. The program will open the selected file directly.
- Save the file indicating it's name.
Enter basic data
- Via File → File and accounting properties → Address tab, set the address of your company, which will be included in the header of the invoice.
- If you wish to insert a logo, see the Set up logo page.
Create new Invoice
Via the Invoice → New Invoice ... dialog a new invoice will be created.
- Enter the basic information of the invoice (invoice no, date, object, initial text and final text).
- Enter your billing address (customer address).
- Enter the invoice details (product, description, quantity, amount).
- Check subtotals and grand totals and enter any discounts.
- In Settings ... define some basic parameters of the invoice (currency, decimal points, rounding, payment term and VAT mode).
- Save and print the invoice.
Print an invoice
You can print the invoice via the Invoice menu → Print Invoice command. or by clicking Print in the dialog for creating or modifying an invoice, you access the window for printing the invoice.
On the Print Offers and Invoices page you will find information on how to customise and print invoices.
The tables
The Invoice file consists of the following tables:
Contacts table
The Contacts table displays the columns where you can enter customer addresses.
Contact addresses will be immediately available in the invoice dialogue when creating or editing the invoice, simplifying data entry.
Changing the data in the Contacts table does not change the data of existing invoices and offers. If you want an existing invoice or offer to be updated with the new customer data, you must:
- Change the invoice or the estimate in the invoice dialogue.
- You must select the customer again from the list in the customer address section.

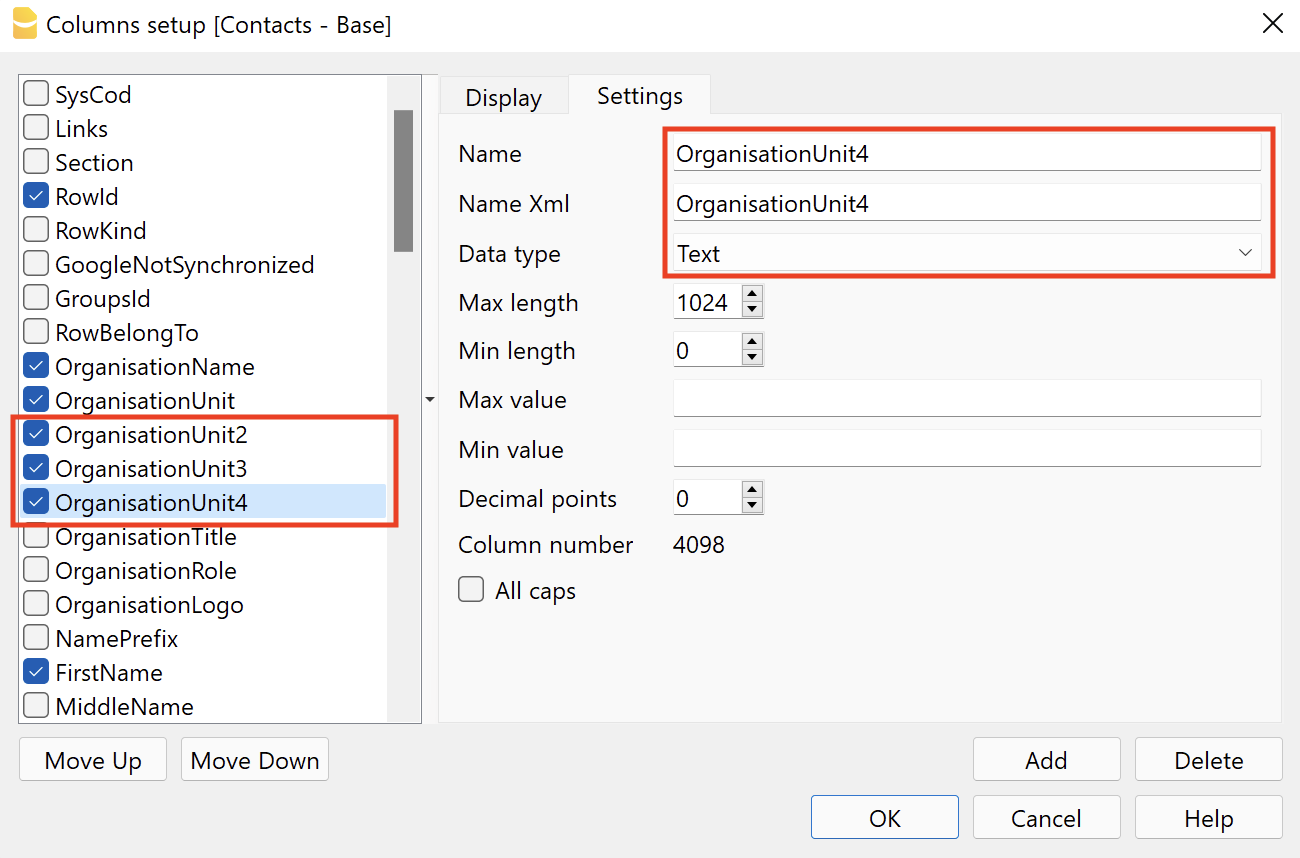
The columns
The Contacts table contains many columns, those displayed in the image are those in the Basic view. The complete list is visible in the Complete view. To customise the columns see the Columns Setup page.
Id
The contact number is entered.
The ID should be used only once and must not be repeated, even if multiple years are managed in a file.
Organisation
Enter the name of the company or organisation.
Title (Prefix)
Enter the title of the contact
Name
Enter the name of the contact.
Family name
Enter the surname of the contact.
Street
Enter the address.
Address extra
Enter extra address.
If you require the QR invoice layout, refer to the documentation Common elements for the QR invoice Switzerland for further information.
ZIP
Enter the postcode.
Locality
Enter the location.
Country code
Enter the Country code.
The country code must be formed by two characters conforming to the ISO 3166-1 standard (eg CH, LI, AT, DE, IT, FR).
Language
Enter the customer's language.
Invoice texts are printed in the customer's language, provided that it is set in the corresponding column.
The language is an ISO code, usually 2 lowercase letters (it=Italian, de=German, en=English, fr=French).
If no language is specified for the customer, the language of the file is used. This language is defined in the menu File → File properties (basic data) → Other → Current language.
Tax Code
Enter the customer's tax code
VAT number
Enter the customer's VAT number
Note
Any notes may be inserted.
Items table | Estimates and invoices
The Items table presents the columns where to insert the data for the management of the items and the warehouse.
The items will be available in the Invoice Dialogue when creating or editing the invoice, simplifying data entry.

The columns
The items table contains many columns; those displayed in the image are those in the Base view. The complete list is visible in the Complete view. To customise the columns, please refer to the Columns setup page.
All column contents can also be printed on the invoice. See customisation print layout detail CH10.
Links
Link to a product image file or descriptive PDF file
Id
The item number is entered.
The ID should be used only once and must not be repeated, even if multiple years are managed in a file.
Description
The description of the item is entered.
Unit
The type of unit is entered (pieces, hours, etc.).
Unit Price
The unit price is entered.
In the invoice settings dialogue you indicate whether the amounts are VAT excluded or including VAT.
Please note that if you change the setting from VAT excluded to including VAT or vice versa, the program changes the amounts, so that the same invoice can be printed with VAT excluded amounts or amounts including VAT.
Account
Any account is entered as information to be used for manual entry in accounting.
This value serves only as information, it is not used for creating invoices.
Note
Any notes are inserted.
Import of catalogue
Using the import functions, it is possible to automate the import of data from an existing product catalogue. See Retrieving data from other software.
It is also possible to integrate product catalogues into the invoicing program.
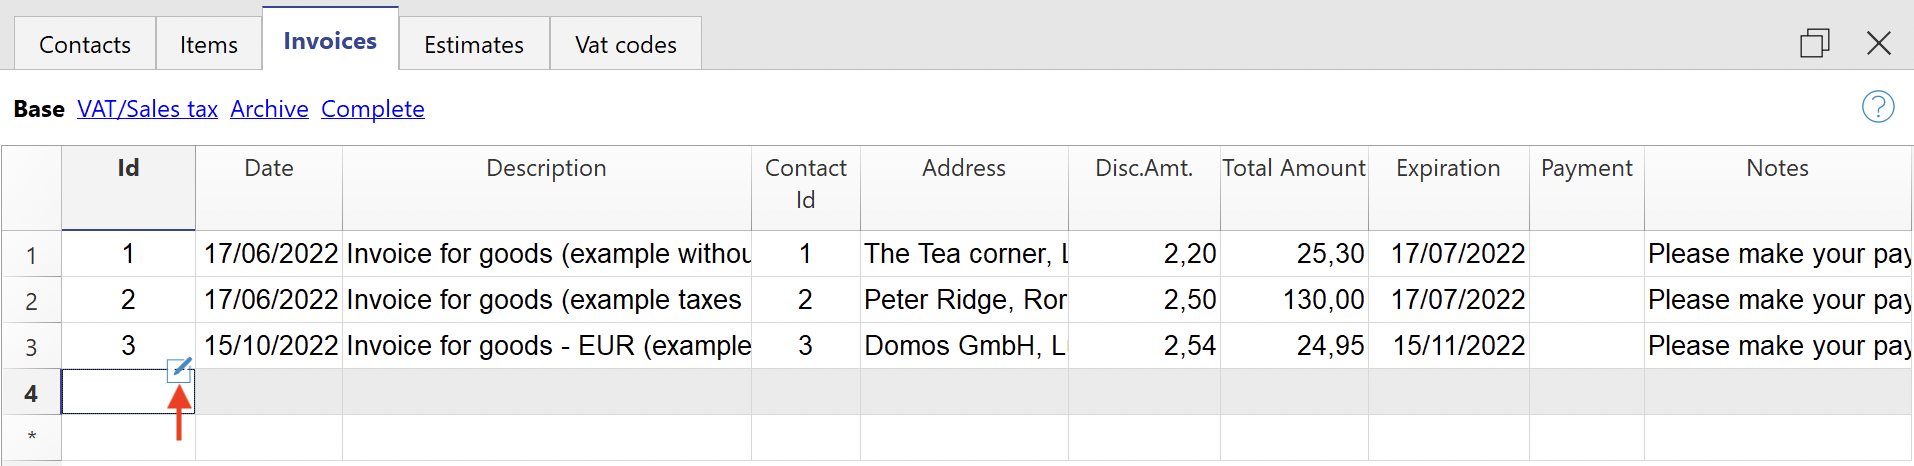
Invoices table
The Invoice table displays the columns where all invoice data that have been entered in the Invoice Dialogue are automatically retrieved.
From this table you can:
- Create new invoices
- Edit existing invoices
- Duplicate invoices
- Delete invoices
- Print invoices
- File invoices

The columns
The Invoices table contains many columns, those displayed in the image are those in the Base view. The full list is visible in the Complete view. To customise the columns, please refer to the Columns setup page.
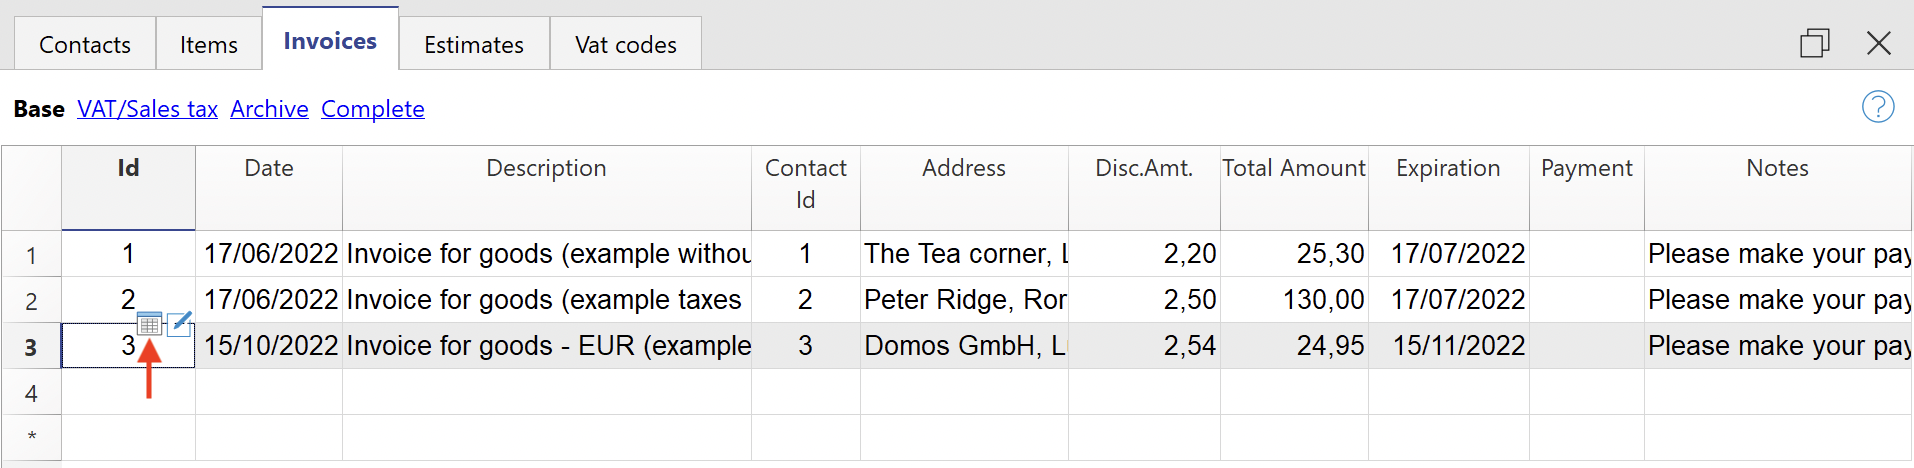
Id
Enter the invoice number.
The program will automatically resume the value entered in the Invoice dialogue.
The ID should be used only once and must not be repeated, even if multiple years are managed in a file.
Date
Enter the invoice date.
The program will automatically resume the value entered in the Invoice dialogue.
Description
Enter the subject of the invoice.
The program will automatically resume the value entered in the Invoice dialogue
This text will also be used as the title of the invoice. If defined, it overwrites the title entered in the settings.
Contact Id
Enter the contact ID number, as used in the Contacts table.
The program will automatically resume the value entered in the Invoice dialogue
Address
The program will automatically resume the customer's address data, based on the contact id number entered.
Discount Amount
Enter the amount of the discount to be applied to the invoice.
The program will automatically resume the value entered in the Invoice dialogue.
Total Amount
The program will automatically resume the value entered in the Invoice dialogue.
Expiration
The expiration date is entered.
The program will automatically resume the value entered in the Invoice dialogue.
Payment
The payment date is entered.
Notes
Further notes are entered.
The program automatically resumes the text entered in the End Text field of the Invoice Dialogue.
Estimates table
The Estimates table presents the columns where all offer data that has been entered in the Invoice dialogue are automatically taken over.
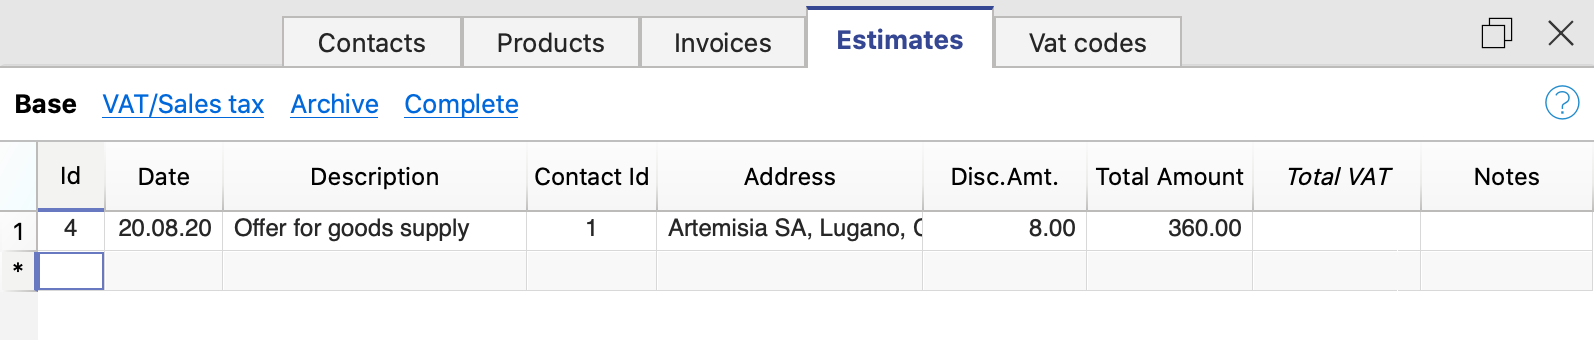
The columns
The Estimates table contains many columns, those displayed in the image are those in the Basic view. The complete list is visible in the Complete view. To customise the columns, please consult the Columns setup page.
Id
Enter the estimate number.
The program will automatically resume the value entered in the estimate creation dialog.
The ID should be used only once and must not be repeated, even if multiple years are managed in a file.
Date
Enter the estimate data.
The program will automatically resume the value entered in the estimate creation dialog.
Description
Enter the subject of the invoice.
The program will automatically resume the value entered in the estimate creation dialog.
Contact Id
Enter the contact ID number, as used in the Contacts table.
The program will automatically resume the value entered in the estimate creation dialog.
Address
The program will automatically resume the customer's address data, based on the contact id number entered.
Discount amount
Enter the amount of the discount to be applied to the estimate.
The program will automatically resume the value entered in the estimate creation dialog.
Total
The program will automatically resume the value entered in the estimate creation dialog.
Notes
Any notes may be inserted.
VAT codes table
The VAT codes table displays the columns where you can enter the VAT codes with the respective rates.
The data must be entered manually. When VAT rates change, the table must be updated by changing or adding the ID codes and percentages of the new tax rates.
VAT Codes will be automatically taken over in the invoice dialogue when creating or editing the invoice, simplifying data entry.
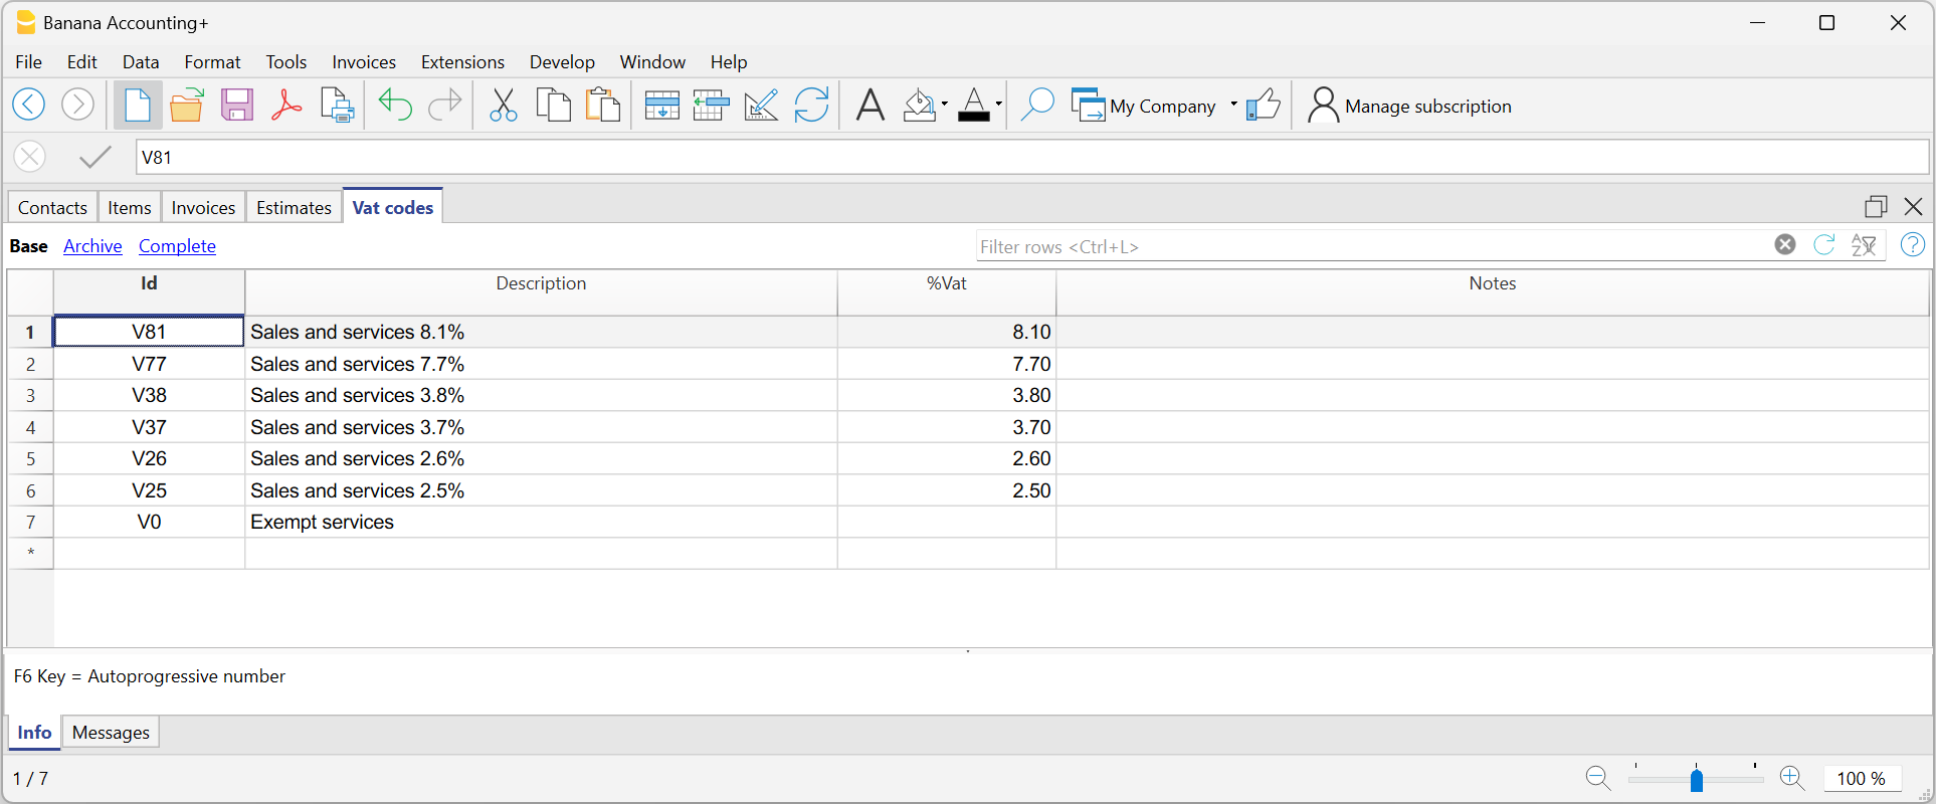
The columns
The VAT Codes table contains many columns; those displayed in the image are those in the Base view. The full list is available in the Complete view. To customise the columns, please consult the Columns setup page.
Id
The VAT code is entered.
The ID should be used only once and must not be repeated, even if multiple years are managed in a file.
Description
Enter the description of the VAT code.
%VAT
The VAT rate is entered.
Notes
Any notes may be inserted.
VAT on the gross or net amount
The setting for calculation on the net or the gross amount is done at the individual invoice level, in the Invoice settings dialogue.
Invoice Commands
Invoices menu
In the Invoices menu you will find the commands to:
- Create new invoices
- Modify existing invoices
- Duplicate invoices
- Delete invoices
- Print invoices
- Show open invoices
- Show customer's invoices
- Archive invoices
Create a new invoice
To create a new invoice you have two options:
- From the Invoices menu
- Use the command Invoices → New Invoice.
- The invoice dialogue is then opened where the data is entered.
- The new progressive invoice number is allocated by the programme. You can change it manually.
- Enter the invoice data and save
- Directly from the Invoices table:
- Select a new row in the table.
- In the Id column (invoice number), click on the small 'New Invoice' icon that appears at the top of the cell.
- The invoice dialogue then opens where you enter your data.
- Enter the invoice data and save.
When you create a new invoice, the programme automatically updates the Invoices table. The data of the new invoice are added to a new row in the table.
Edit Invoice
To edit an existing invoice, you have two options:
- From the Invoices menu:
- Select the line with the invoice you wish to edit.
- Use the command from the menu Invoices → Edit Invoice.
- The invoice dialogue opens where you can enter and edit data.
- Make the timely changes and save.
- Directly from the Invoices table
- Select the row with the invoice you want to edit.
- In the Id column (invoice number), click on the small 'Edit Invoice' icon that appears at the top of the cell.

- The invoice dialogue then opens where you can enter and edit data.
- Make the timely changes and save.
When you edit an invoice, the programme automatically updates the data in the Invoices table.
Duplicate invoice
To duplicate an invoice, you have two options:
- From the Invoices menu:
- Select the row with the invoice you wish to duplicate.
- Use the command from the menu Invoices → Duplicate Invoice.
- The new progressive invoice number is allocated by the programme. You can change it manually.
- Then the Invoice dialogue opens with the data of the invoice you have chosen to duplicate.
- Make the timely changes and save.
- The programme automatically updates the Invoices table.
- Directly from the Invoices table:
- Select the row with the invoice you want to duplicate. You can also select several rows to duplicate several invoices at once.
- Use the command from the menu Edit → Duplicate rows.
- The programme automatically updates the Invoices table by adding the duplicate rows.
- For each duplicate invoice, you must then manually edit the invoice number and data.
Delete invoice
To delete an invoice:
- Go to the Invoices table.
- Select the row with the invoice you wish to delete. You can also select several rows to delete several invoices at once.
- Use the command from the menu Edit → Delete rows.
- The invoices are deleted from the table.
Print invoices
On the Print Offers and Invoices page you will find information on how to customise and print invoices.
To print an invoice you have two options:
- From the Invoices menu:
- Select the row with the invoice you want to print.
- Use the command from the menu Invoices → Print Invoice.
- Directly from the Invoices table:
- Select the row with the invoice you want to print.
- In the column Id (invoice number), click on the small icon 'Print Invoice' which appears at the top of the cell.
Show open invoices
You can extract invoices that have not yet been collected into a table:
- Go to the Invoices table.
- Use the command from the menu Invoices → View open invoices.
- The programme extracts all rows of invoices without a payment date.
Each time a new invoice is collected, enter the date of collection in the Payment column of the Invoice table.
Show customer's invoices
You can extract customer's invoices into a table:
- Go to the Invoices table.
- Under the Contact Id column click on the customer number whose invoices you want to have.
- Right-click on the selected field and select the Extract rows command
The program extracts all rows belonging to the customer.
Archive invoices
With the Estimates and Invoices application:
- You can enter as many invoices as you want, there are no limits.
- You can keep invoices from several years in one file.
- You do not need to create a new file for each new year.
Invoices from previous years can be archived at any time:
Invoice Dialog Add and Edit Invoices
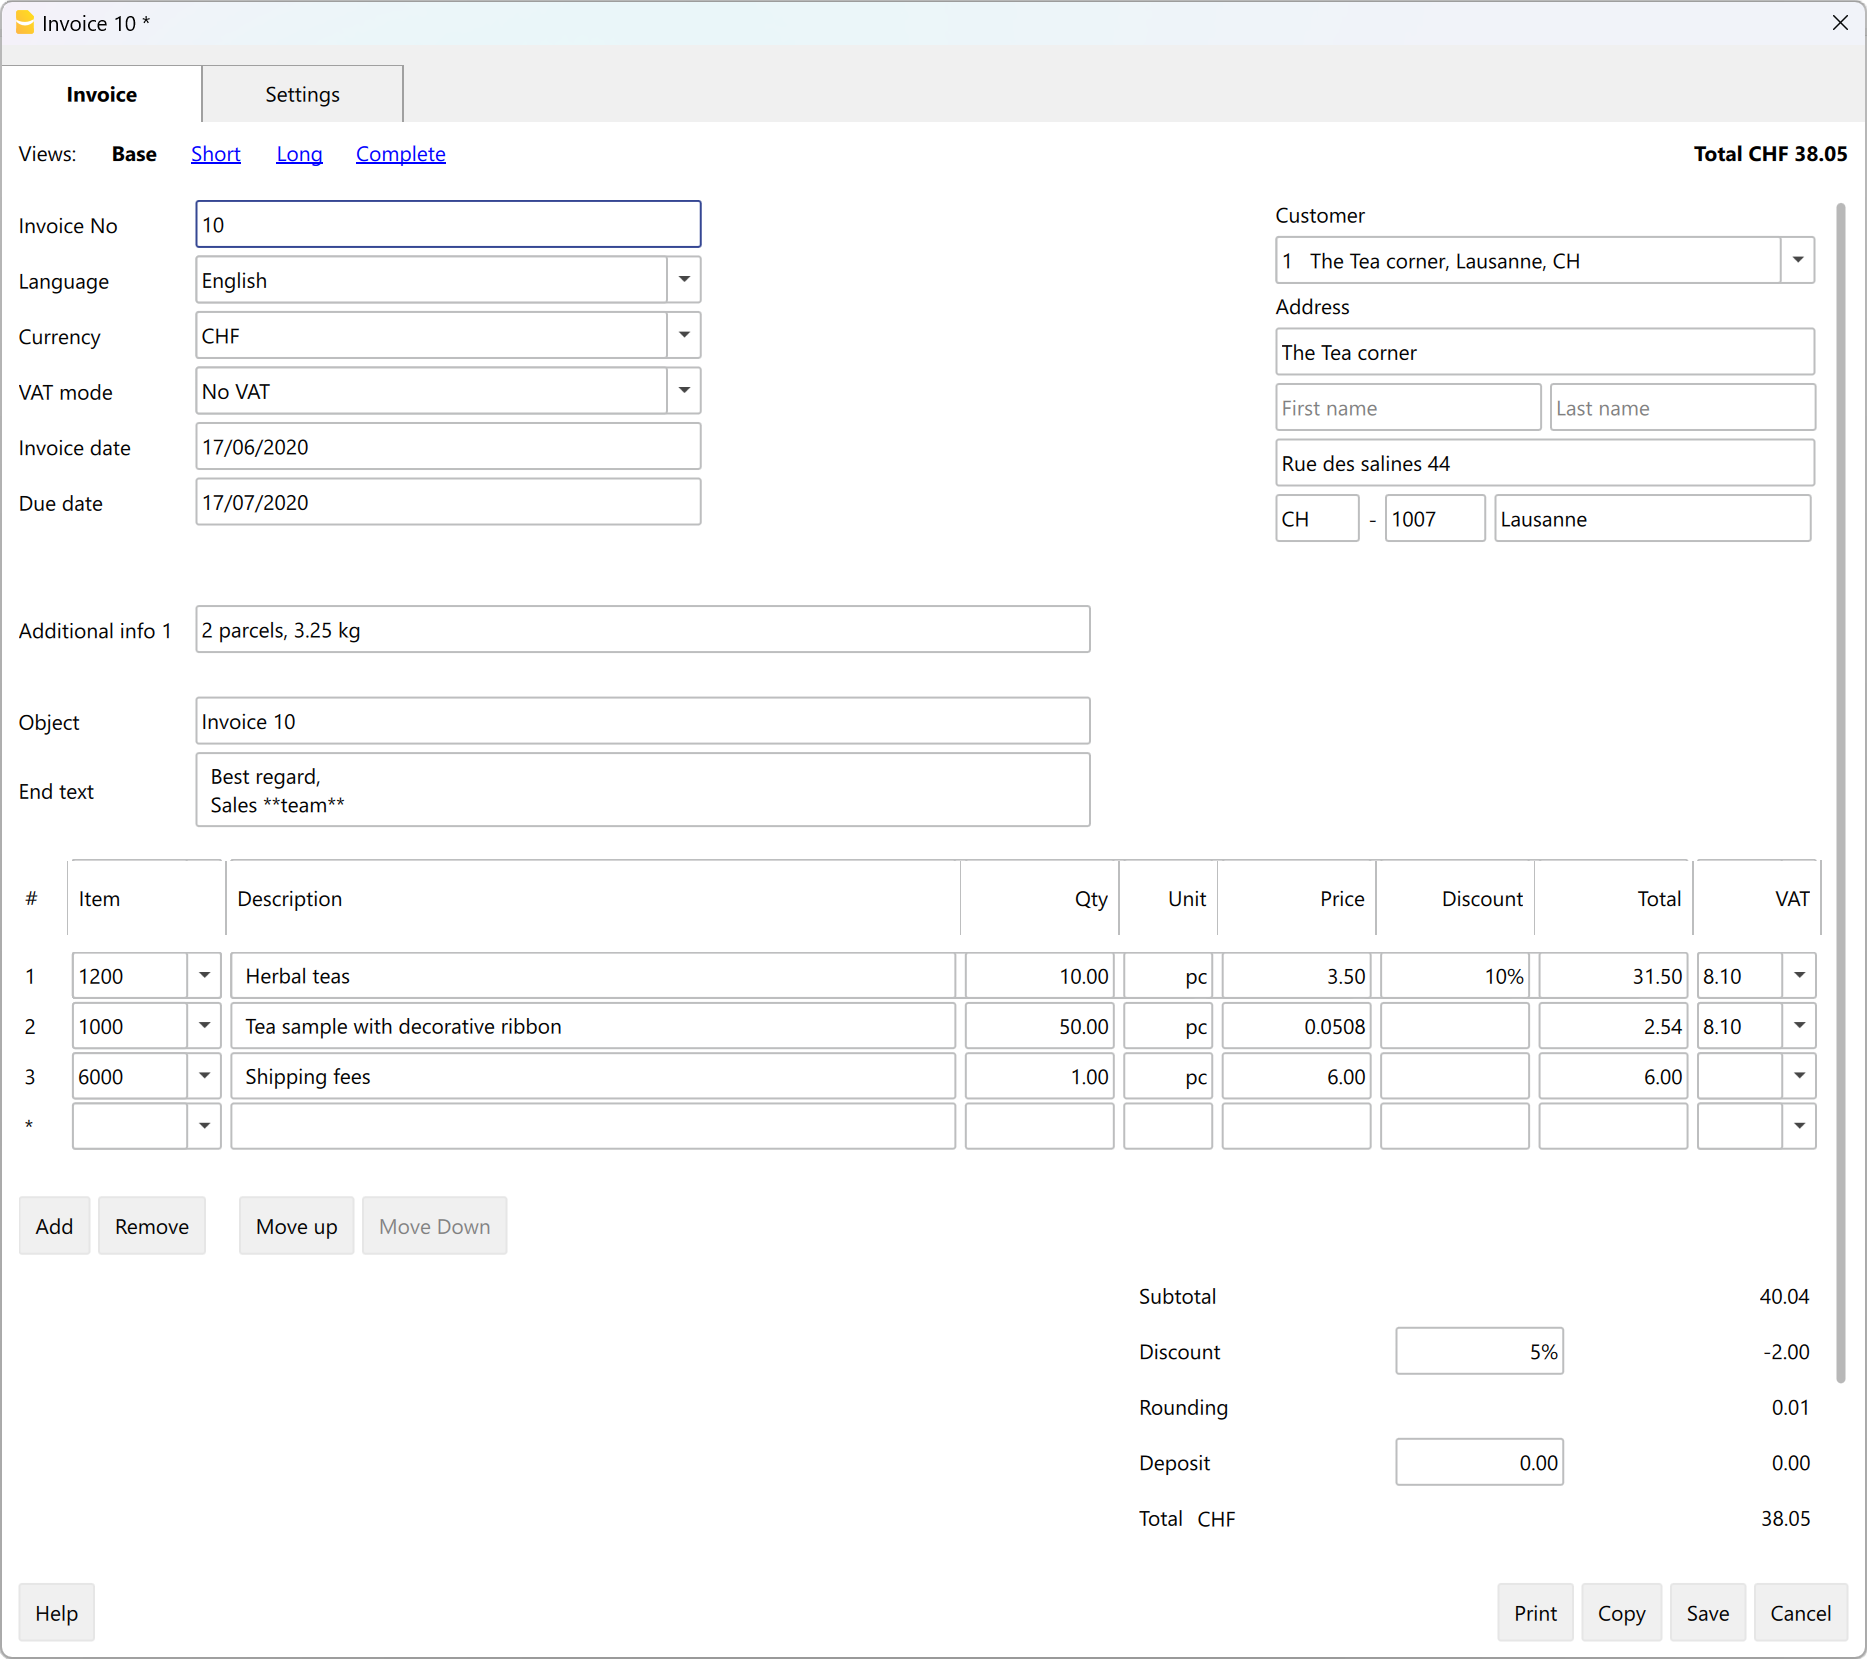
The Invoice and Estimate dialog allows invoice data to be entered and edited.
Open the Dialog
The dialog can be opened via:
- For the Invoice
- The Invoice menu > New invoice.
- The Invoice menu > Edit invoice.
- The Invoice table > Double-click on the invoice line of relevance, in the Address column.
- The Invoice table > Double-click on the invoice line of relevance, in the Total Amount column.
- From the ID column, click on the small icon Edit invoice on the right-hand-side of the cell.
- For the Estimate
- The Invoice menu > New estimate.
- The Invoice menu > Edit estimate.
- The Estimate table > Double-click on the estimate line of relevance, in the Address column.
- The Estimate table > Double-click on the estimate line of relevance, in the Total Amount column.
- From the ID column, click on the small icon Edit estimate on the right-hand-side of the cell.
Dialog Sections
The dialogue is divided into two sections:
- Invoice
- In the Invoice section you enter the invoice data.
- Settings
- In the Invoice settings section, parameters for new documents and interface settings of the invoice dialogue are defined.
Invoice Edit Dialog
Here is how the invoice dialog window appears. Below, we explain its individual elements.

Views
These are shown at the top.
They define which data entry fields are visible and which are hidden.
By switching between the different views, you can switch between more general and more detailed views.
The following views are available:
- Base
- Shows the most frequently used fields.
- Can be adjusted to one's needs.
- Short
- Focuses on the Item table.
- Can be adjusted to one's needs.
- Long
- Complete view with all fields.
- Can be adjusted to one's needs.
- Complete
- Complete view with all fields.
- Cannot be adjusted.
Via the Settings section, for the Base, Short and Long views, it is possible to define which fields to make visible and which ones to hide.
Structure
(1) Information and Free Texts
This section allows you to enter information regarding the invoice and define free texts to be included in the printout.
- Invoice number
- The invoice number is entered.
- The number is taken and inserted automatically by the programme in the Id column of the Invoices table.
- It can be included in the invoice printout.
- Language
- The language in which the invoice is to be printed is entered.
- If defined, the customer language set in the Contacts table is taken over and inserted.
- Currency
- The currency in which to print the invoice is entered.
- You can indicate the abbreviation (CHF, EUR, USD, etc.) that will be printed on the invoice.
- The programme does not make exchanges and conversions to other currencies.
- VAT mode
- Select the VAT mode.
- If the VAT mode is changed, the programme modifies the amounts already entered, so that the same invoice can be printed with gross and net amounts.
- Without VAT
No VAT is applied. - VAT excluded
Amounts are net. - VAT included
Amounts are considered gross.
- Without VAT
- The total VAT amount may vary by a few cents compared to the calculation performed directly on the VAT taxable total. The reason for this is that the VAT total is calculated by adding up the (rounded) VAT amount of each individual item. This difference is not to be considered an error, but a feature of the calculation of invoice amounts.
- Invoice date
- The invoice date is entered.
- The date is taken and inserted automatically by the programme in the Date column of the Invoices table.
- It can be included in the invoice printout.
- Due date
- The payment due date is entered automatically by the programme for all invoices.
- It can be entered manually for each invoice.
- It can be included in the invoice printout.
- Order number
- It's optional.
- The order date is entered.
- It can be included in the invoice printout.
- Order date
- It's optional.
- The order date is entered.
- It can be included in the invoice printout.
- Invoice custom fields
- It requires the Advanced Plan.
- They are optional.
- Additional information fields can be defined and added to the invoice (maximum 8 fields) where customised texts can be entered.
- The value/content is entered. In the Settings section, you define the names/texts of the fields.
- They can be included in the invoice printout using the CH10 and UNI11 layouts. In the print settings of the layouts, under Print → Information . Custom fields must be activated.
- Invoice title
- It's optional.
- The text of the invoice subject is entered.
- The text is taken over and inserted automatically by the programme in the Description column of the Invoices table.
- The text is included in the invoice printout as title/object. It takes priority over any title entered in the settings of the invoice layout.
- Begin text
- It's optional.
- You enter the initial text to be included in the invoice printout, immediately after the title/object.
- The text may be entered on several lines.
- You can put the text in bold, including the part of the text between double asterisks **.
Example: **text1 text2** text3 = text1 text2 text3.
- End text
- It's optional.
- You enter the final notes to be included in the invoice printout, immediately below the details table.
- The text is taken over and inserted automatically by the programme in the Notes column of the Invoices table.
- The text may be entered on several lines.
- You can put the text in bold, including the part of the text between double asterisks **.
Example: **text1 text2** text3 = text1 text2 text3.
(2) Customer address
This section allows you to enter the invoice address. You have two possibilities:
- Retrieve the data from the Contacts table.
- Select a customer from the list.
- You can also search directly for an address by entering the first name, surname, company, email or tax number.
- When you select a contact, the various address fields are automatically completed by the programme.
- Enter the data manually.
- Complete each element of the address field by field.
The address fields are as follows:
- Business name
- Enter business name.
- Prefix
- Enter customer's prefix.
- First Name
- Enter the first name.
- Last name
- Enter the last name.
- Address street
- Enter the street.
- Address extra
- If necessary, enter extra address.
- Post Box
- Enter Post Box
- Country code
- Enter country code.
- ZIP
- Enter ZIP.
- Locality
- Enter locality.
- Email
- Enter email.
- Phone
- Enter phone number
(3) Items / Items' Columns
This section allows line by line entry of all invoice details.
It is a table with the following columns:
- Item
- Optional.
- Using the Items table, an item can be selected from the list. In this way, the fields in the subsequent columns (Description, Quantity, Unit, Unit Price) are automatically completed by the programme.
- You can also search for an article by typing part of the descriptive text.
- Item date
- Requires the Advanced Plan.
- Optional.
- A date is entered for each item, useful for example to indicate the date of execution of the invoiced work.
- Description
- The description of the item or object of the invoice is entered.
- The text of the description may be on several lines.
- You can put the text in bold, including the part of the text between double asterisks **.
Example: **text1 text2** text3 = text1 text2 text3.
- Quantity
- It is mandatory.
- The quantity is entered.
- To create, for example, a credit note or a discount, enter the quantity with a negative sign (the total amount for the row will be negative). See also Create a Credit Note.
- Unit
- Optional.
- The text related to the unit (pcs, hours, etc.) is entered.
- Unit price
- It is mandatory.
- The price of the individual unit is entered.
- Discount
- Requires the Advanced Plan.
- Optional.
- A discount is indicated for each item.
The discount is calculated on the unit price (Unit Price column), and can be indicated:- As an amount. The amount of the discount is entered directly.
Example: Quantity 2; Unit price 10.00; Discount 1.00; Total = 18.00
If the Discount is same or greater than the Unit price the Total will be set to 0. - As a percentage. A percentage is entered (e.g. 10%).
Example: Quantity 2; Unit price 10.00; Discount 10%; Total = 18.00
If the Discount is same or greater than 100% the Total will be set to 0.
- As an amount. The amount of the discount is entered directly.
- Totals
- The totals are calculated and entered automatically by the program.
- VAT
- Optional.
- The VAT code to be used defined in the VAT Codes table is entered.
(4) Discounts and totals
This section allows any discounts to be entered and shows the invoice totals.
The programme automatically calculates the following
- Subtotal
- The sum of all amounts in the Total details column is shown.
- Discount
- It's optional
- You enter the discount to be applied to the invoice total by entering a description and the percentage or amount.
- If a percentage is entered, the programme automatically calculates and displays the discount based on the percentage value entered.
- Rounding
- Rounding is indicated.
- Deposit
- It's optional
- The deposit already paid by the customer is entered, indicating the description and amount.
- Total
- The final total of the invoice is shown.
- The total is also shown in the top right-hand corner of the dialogue to speed up invoice verification.
- VAT
- The totals of the VAT amounts are shown.
(5) Settings
The settings of the Invoice Dialogue.
For more information, please refer to the Invoice settings dialogue page.
(6) Commands
- Print
- Command to print an invoice.
- Copy
- Command to copy an invoice.
- Save
- Command to save changes.
- Close
- Command to end the dialogue.
- Cancel
- Command to delete changes and close the dialogue without saving.
- Help
- Command linking to online documentation where information on invoice dialogue can be found.
Customisation
The invoice dialog is programmed through a BananaPlus extension, and is updated independently of the application. The version provided is generic and covers most of the needs.
For contexts where invoices are complex, or many invoices are created, you can adapt the dialog to make creating invoices easier, more functional, and faster.
Advanced input Type column for Estimates and Invoices
Requires the Advanced Plan of Banana Accounting Plus.
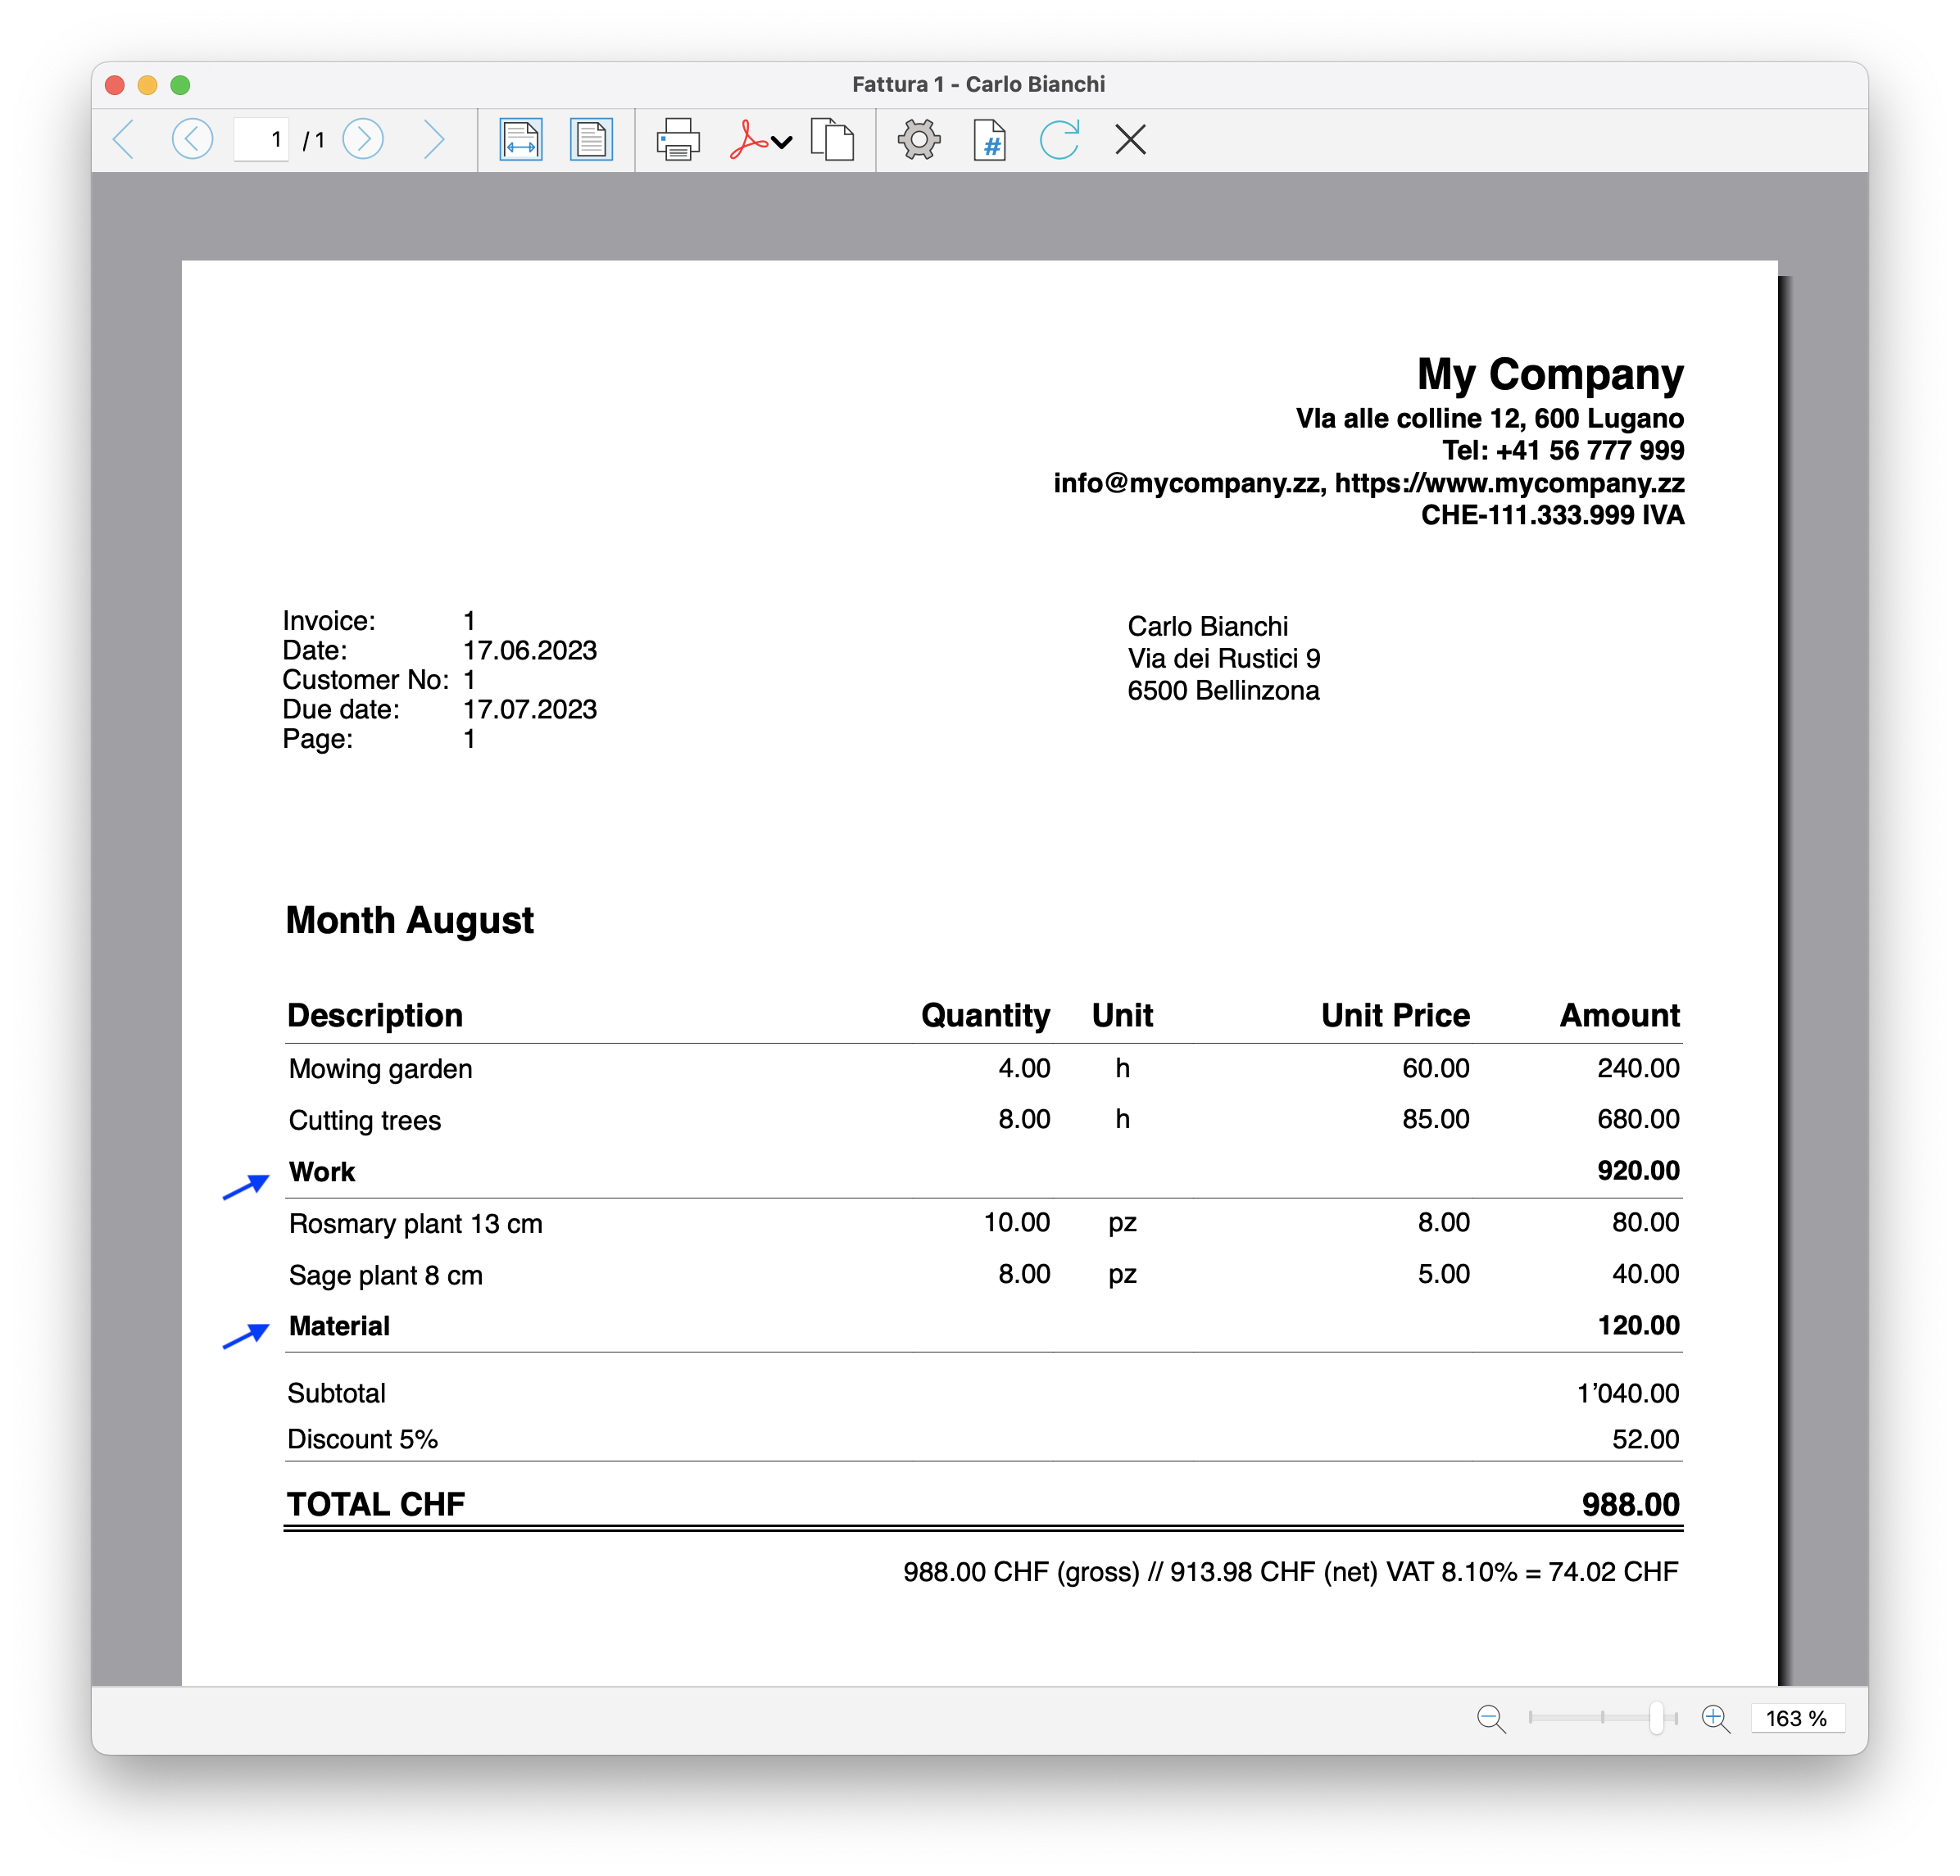
The Type column in the Invoice Edit Dialog allows you to assign a specific role (e.g. header, notes, subtotals) to the invoice row.
To use the column, you first need to make it visible in the desired view, from the Settings tab (section Items columns > enable the Type column).

The available options in the Type column are as follows:
- Header
Allows you to insert a header text to be displayed in the invoice details (in blue in the image). - Note
Allows you to insert annotation text to be displayed in the invoice details (in green in the image). - Totals
Allows you to insert up to three levels of subtotals (in yellow in the image).

Header
Inserts a header row for the content of the following rows, where the items or services are listed.
- In the Type column, select Header from the list.
- In the Description column, enter text that will be displayed in bold as the header for the content of the following rows. The text can span multiple lines.
- The other columns must remain empty.
Example of data entry:
| Type | Item | Description | Quantity | Unit price | Total |
| Header | Consulting services | ||||
| A | Service A | 1 | 150 | 150 | |
| B | Service B | 2 | 100 | 200 | |
| Header | Development services | ||||
| C | Service C | 3 | 120 | 360 | |
| D | Service D | 1 | 90 | 90 |
Note
Inserts a note row to be displayed in the invoice details, before or after the list of items or services.
- In the Type column, select Note.
- In the Description column, enter text that will be displayed on the invoice. The text can span multiple lines.
- The other columns must remain empty.
Example of data entry:
| Type | Item | Description | Quantity | Unit price | Total |
| A | Consulting service | 2 | 100 | 200 | |
| Note | Remote assistance provided | ||||
| B | Technical support | 1 | 150 | 150 | |
| Note | Support provided in April |
Total 2
Inserts a subtotal row that sums up the preceding items.
- In the Type column, select Total 2.
- In the Description column, enter text that will be displayed on the invoice. The text can also span multiple lines.
- The other columns must remain empty.
The Total 2 row:
- Automatically calculates the subtotal of the items entered in the preceding rows.
- You can insert multiple Total 2 rows: each one sums all the items that precede it.
Example of data entry:
| Type | Item | Description | Quantity | Unit price | Total |
| A | Service A | 2 | 50 | 100 | |
| B | Service B | 1 | 30 | 30 | |
| Total 2 | Subtotal 2 | 130 |
Total 1
Inserts a subtotal row that sums up Total 2 rows and the previous items or services not included in a Total 2.
- In the Type column, select Total 1.
- In the Description column, enter text that will be displayed on the invoice. The text can also span multiple lines.
- The other columns must remain empty.
The Total 1 row:
- Automatically calculates the subtotal of the items entered in the preceding rows.
- If the preceding rows contain Total 2 rows, their values are included in the subtotal calculation.
- You can insert multiple Total 1 rows: each one sums all the items and Total 2 subtotals that precede it.
Example of data entry:
| Type | Item | Description | Quantity | Unit price | Total |
| A | Service A | 2 | 50 | 100 | |
| Total 2 | Subtotal 2 | 100 | |||
| B | Service B | 1 | 30 | 30 | |
| C | Service C | 1 | 70 | 70 | |
| Total 2 | Subtotal 2 | 100 | |||
| Total 1 | Subtotal 1 | 200 |
Total
Inserts a subtotal row that sums up Total 1, Total 2 and the previous items or services not included in Total 1 or Total 2.
- In the Type column, select Total.
- In the Description column, enter text that will be displayed on the invoice. The text can also span multiple lines.
- The other columns must remain empty.
The Total row:
- Automatically calculates the subtotal of the items entered in the preceding rows.
- If the preceding rows contain Total 1 or Total 2 rows, their values are included in the subtotal calculation.
- You can insert multiple Total rows: each one sums all the items or services and Total 1 and Total 2 subtotals that precede it.
Example of data entry:
| Type | Item | Description | Quantity | Unit price | Total |
| Header | Consulting services | ||||
| A | Service A | 1 | 150 | 150 | |
| B | Service B | 2 | 100 | 200 | |
| Total 2 | Total consulting services | 350 | |||
| Header | Development services | ||||
| C | Service C | 3 | 120 | 360 | |
| D | Service D | 1 | 90 | 90 | |
| Total 2 | Total development services | 450 | |||
| Total 1 | Total work | 800 | |||
| Header | Extra expenses | ||||
| E | Travel expenses | 1 | 100 | 100 | |
| Total | Subtotal | 900 |
Invoice settings dialogue
By clicking Settings (in the lower left corner) you enter the settings dialog of the invoice.
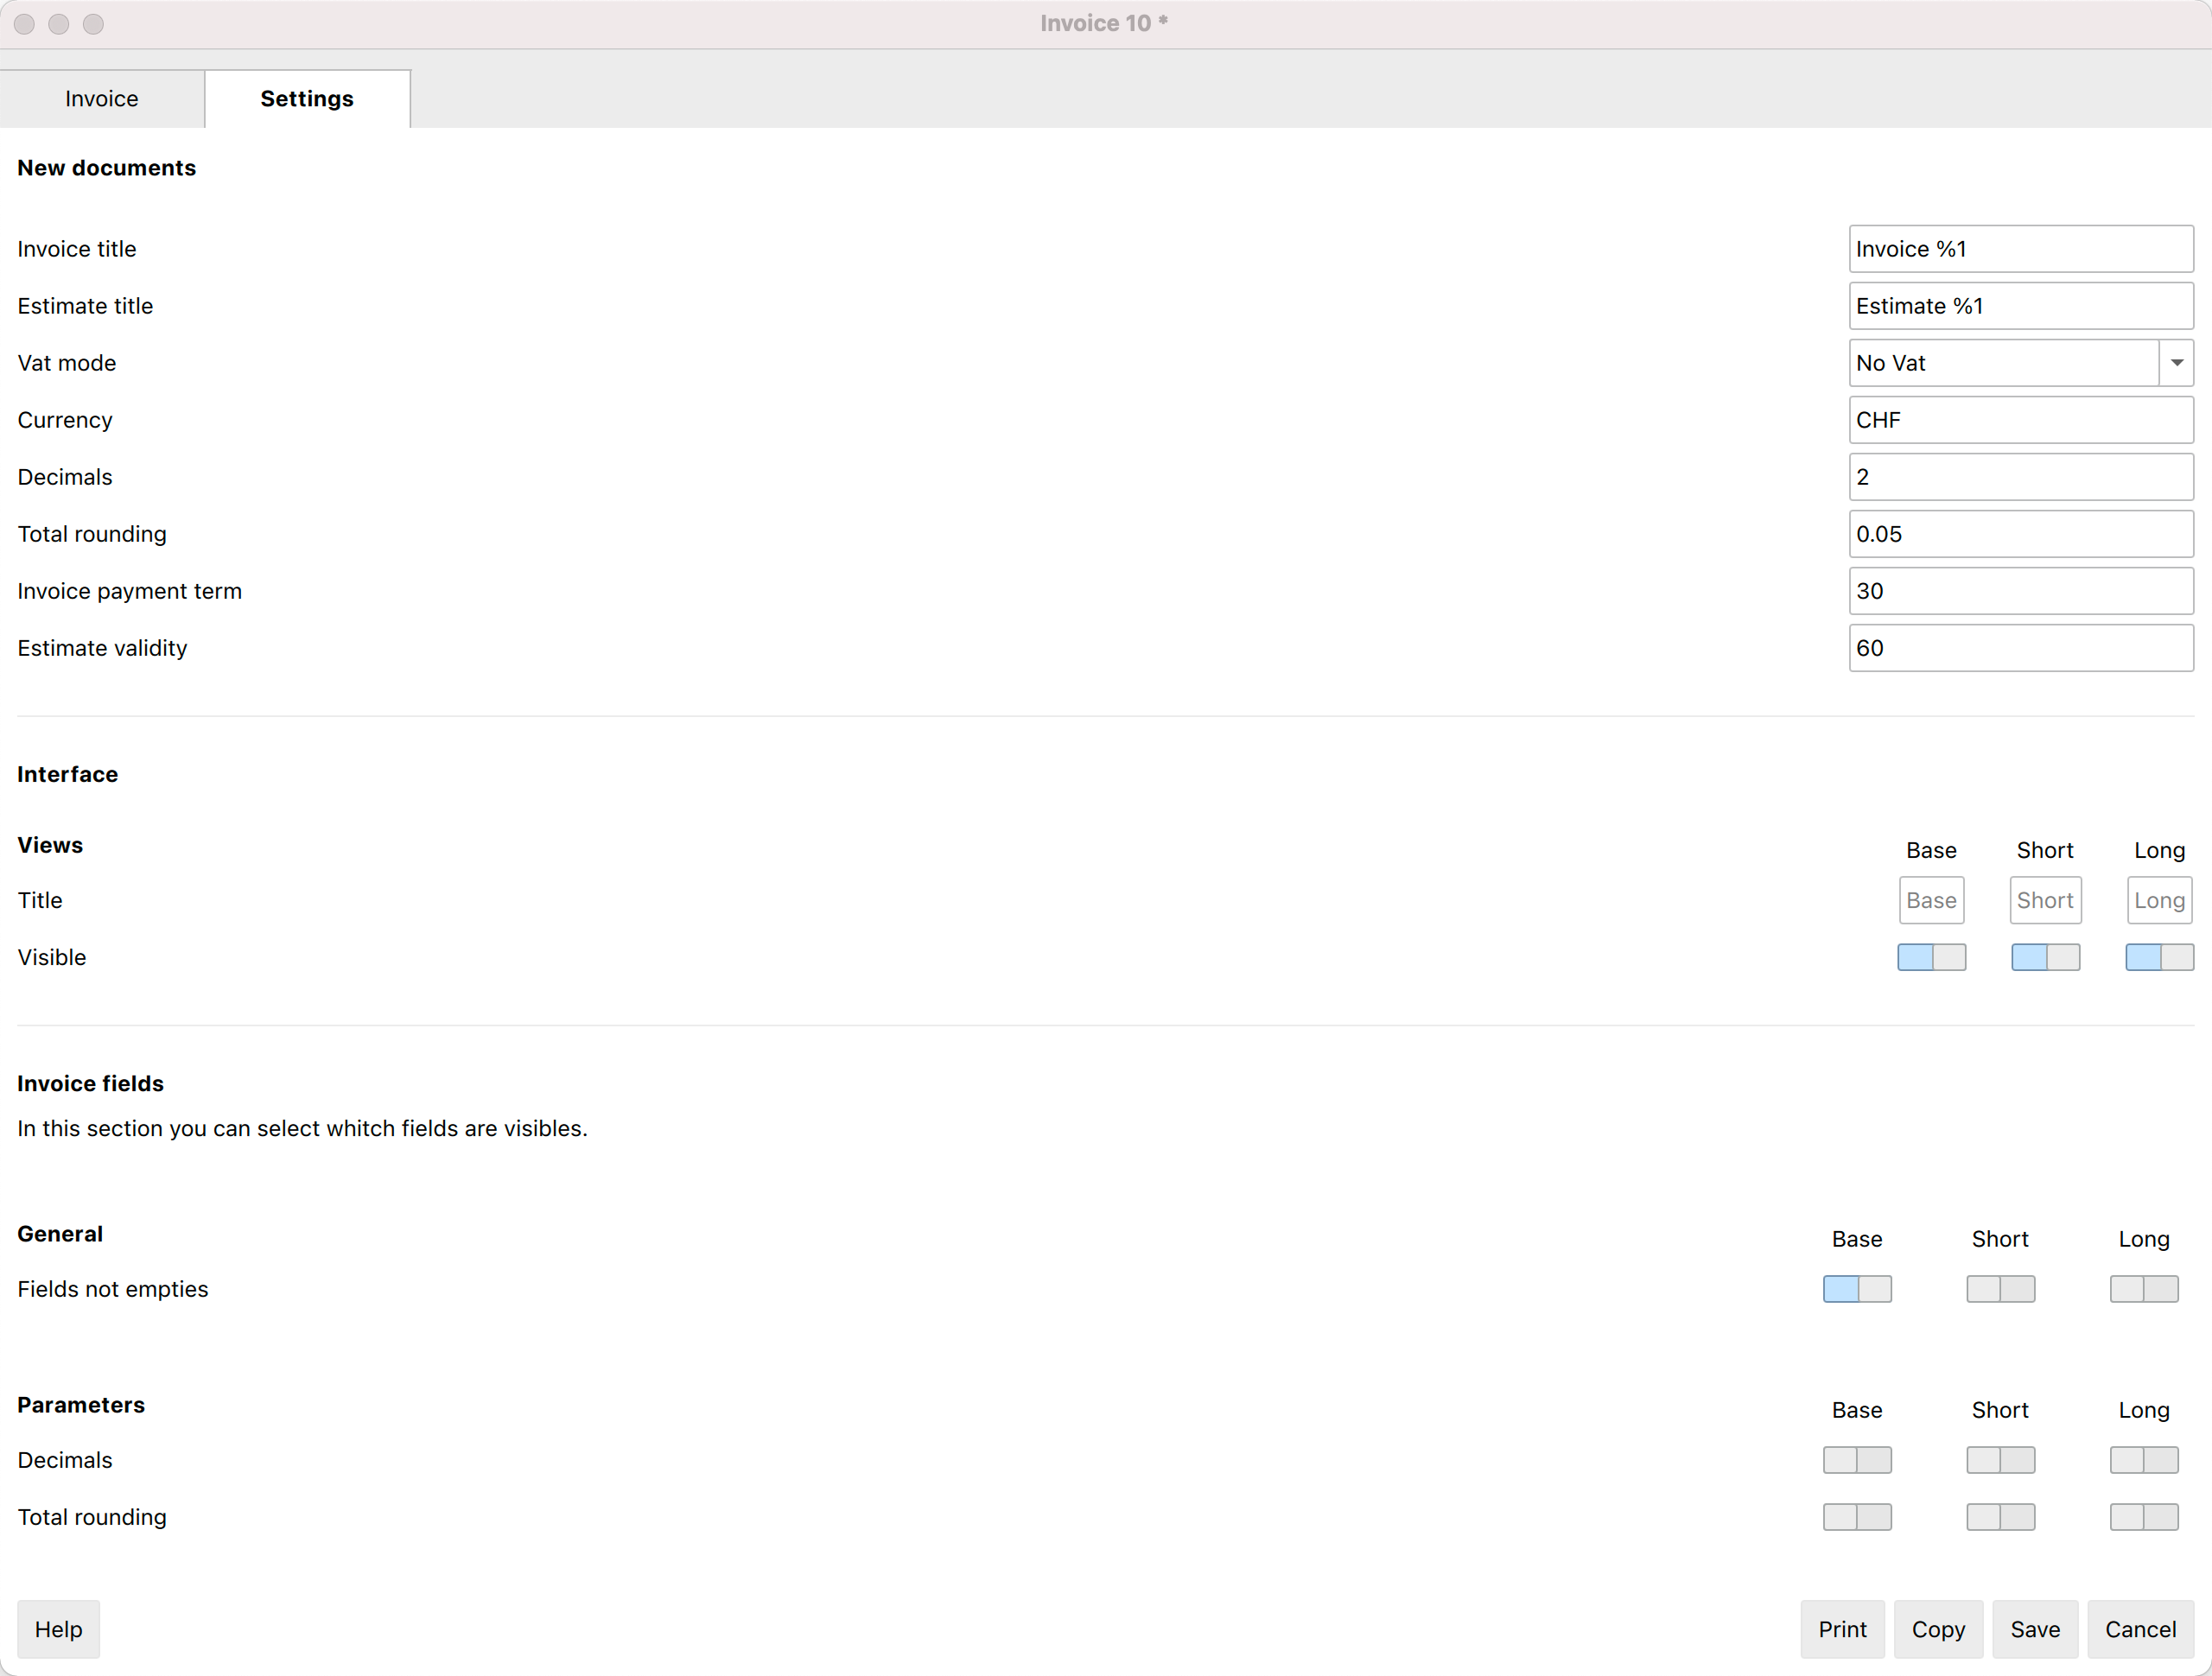
The settings you set are specific for the invoice.
- The currency code
You can indicate the code (CHF, EUR, USD, etc.) that will be printed on the invoice.
The program does not make exchanges and conversions in other currencies. - The number of decimals to be used for the amounts.
All amounts will have the number of decimals set. - Rounding up totals.
Put a "0.05", "0.10" amount that becomes the minimum rounding unit.
The decimal separator must always be the dot ".". - Payment term in days
It is used to preset the due date, which can then be changed manually. - Validity of the Estimate in days
This is used to preset the expiry date of the offer, which can then be changed manually. - The VAT mode
If the VAT mode is changed, the program modifies the amounts already entered, so that the same invoice can be printed with both gross and net amounts. If the VAT is set to gross and net amounts have been entered, once the setting has been changed, the amounts must also be changed so that they are net amounts.- No VAT. No VAT is applied.
- VAT Inclusive. The amounts are considered gross.
- VAT Exclusive. The amounts are considered net.
Use settings for new invoices
You can choose to use these settings for new invoices that will be created.
The settings of other existing invoices are not changed.
Translations of invoice's texts
In the Settings dialog, clicking on a text field, such as the title for new invoices or the description of one of the user fields, leads to the Translations dialog.
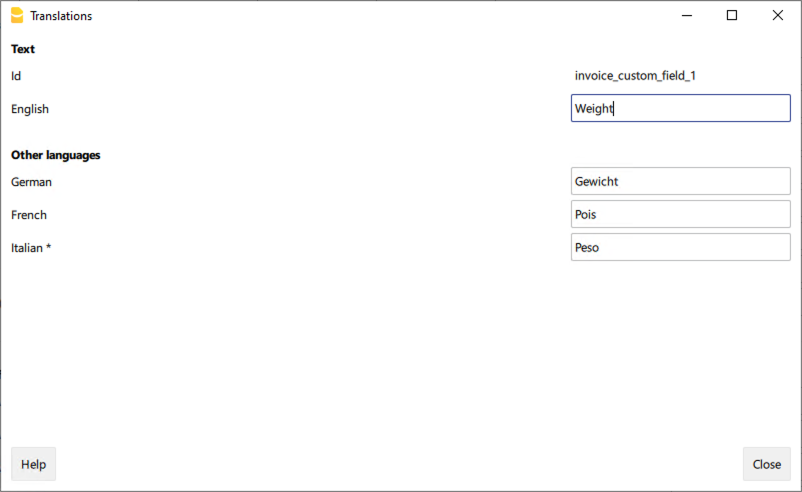
In the Translations dialog:
- You can enter the texts to be used in the various languages.
- Only the languages currently in use are listed.
- If a language is not listed, simply add a contact or invoice in the desired language.
- The first language listed corresponds to the programme language.
- The language marked with an asterisk * is the document language, defined in the menu File → File accounting properties→ Other tab → Current language.
Timeline of changes of estimates and invoices application
See what's is new in dialogs with the 2022-02-01 release.
2024-02-01
Released on February 01 2024
- General
- New: Added subtotal items feature.
- New: Added 'Payment Term in Days' column to the Contacts table.
- New: Added 'Currency' field to Invoices and Contacts tables.
- Fixed: Delete selected rows create new empty invoices in invoices table
- Fixed: 'Move Up' and 'Move Down' buttons were not functioning.
- Invoice Dialog
- Fixed: Scrolling issue in the Invoice dialog.
- Fixed: Long texts overlapping each other.
- Fixed: Section Invoice Table Items not resizing correctly when changing views.
- Fixed: Section Invoice Table Items not resizing correctly on HD screens.
- Updated: In the Settings section in the invoice dialog, the possibility to adjust the Table items height based on the rows has been removed.
2023-07-18
Released on Juli 18 2023
- General
- Fixed: the VAT is calculated even when vat mode set to no vat
- Fixed: after setting the rounding's decimals to 4 digits, the totals remain with 2 digits
- Fixed: creating an invoice from an estimate doesn't update the due date
- Fixed: the due date can't be left empty
- Fixed: wrong dialog title for estimates
- Fixed: wrong translation for Dutch language
- Interface
- Fixed: in the invoice dialog the move item down button is not active
- Fixed: in the settings tab the option's switchs are not visibles when the dialog is resized
- Fixed: moving up / down an item create an invalid item object
- Fixed: in the settings tab the vertical scrollbar has to be always visible
2023-04-03
Released on April 03 2023
- General
- Fix: vat total row not visibile in invoice's dialog
- Fix: error opening dialog with qt 6.5
2022-12-14
Released on December 14 2022
- General
- Fix: when the invoice dialog is closed, the application is closed too (this error occurred only with the latest Banana Insider Version)
2022-12-06
Released on December 6 2022
- Data entry
- New: added setting "Default Vat Code", the "Default Vat Code" is applied automatically to items added to the invoice
2022-09-29
Released on September 29 2022
- Data entry
- Fix changing from incluse vat to exclusive vat change the unit price.
Now the unit prices remain unchanged, but the invoice total is updated. - Fix entering the customer id in the combo box doesn't visual the corresponding customer entry
- New: changes to the settings for new documents settings are now applied to the current document;
- Fix changing from incluse vat to exclusive vat change the unit price.
2022-09-21
Released on September 21 2022
- Data entry
- Fix the invoice's number is not updated when it is modified in the invoice's table
- Fix the invoice's dialog does not open and an error is showed if the title for new invoices is empty
- Fix entering amounts in the local format is not working
2022-03-31
Released on March 31 2022
- Interface
- New: You can enter and print business units names in the address (advanced plan)
- Fix the language of the invoice title is not that of the document
- Fix the language of the invoice title is not updated when changing the language
- Fix the language of the invoice title is not updated when changing the customer
2022-02-10
Released on February 10 2022
- Interface
- Fix article's search is case sensitive.
- Fix highlight of the matched article in the combo box.
- Fix the item quantity can not be cleared, the user can not enter an item as description (quantity and price empty)
- Fix the quantity for articles without price is set to 1, the user can not use predefined articles as description row (quantity and price empty)
2022-02-08
Released on February 08 2022
- Interface
- Fix button create invoice does not create any new invoice.
- Fix button duplicate invoice does not create any new invoice.
2022-02-07
Released on February 07 2022
- Interface
- Fix save button is not saving the invoice in particular cases.
- Fix text fields doesn't automatically scroll horizontally, edited text beyond the field's with is not visible.
2022-02-01
Released on February 01 2022
- Data entry
- New: You can enter a discount for each item, both as amount or as percentage. (Advanced plan).
- New: You can enter an item's date (Advanced plan).
- New: You can define and add custom fields to the invoice (Advanced plan).
- New: You can enter unit prices and quantities with 4 or more decimals.
- New: You can enter multi-line texts or bold texts for the item description.
- New: You can enter multi-line texts or bold texts for the invoice begin text and the invoice final text.
- New: You can enter a deposit already paid by the client.
- New: The fields Prefix (Courtesy), Address extra and P.O.Box have been added to the customer's address.
- New: You can search for a contact address by entering the name, surname, company, email or tax number.
- New: You can search for an item by entering part of the description.
- Interface
- New: You can switch between different views of the invoice, from a general view to a more detailed one.
- New: The new Settings tab lets you set the initial values for new invoices and estimates, and select which fields are visible in the Invoice tab.
- New: You can select which fields to show and which fields to hide through views and settings.
- Added the invoice total at the top right to speed up invoice verification.
- The total VAT 0% has been added in the VAT recapitulation.
- The last dimension and position of the dialog are stored and resumed the next time the dialogue is opened.
- The width of the columns is stored and resumed the next time the dialog is opened.
- A help button has been added to all dialogs.
- General
- A notification is showed when an updated Version of the extension was installed.
- Improved compatibility with macOS dark mode.
- Improved compatibility with high resolution monitors.
What's new release 2022-02-01
The release of February 1, 2022 adds new and important functions to the application which are listed below.
What's new
Edit Invoice dialog

|
|
Settings tabThe new Settings tab lets you set the initial values for new invoices and estimates, and select which fields are visible in the Invoice tab. |
|
|
|
ViewsNew possibility of switching between different views of the invoice, from a general view to a more detailed one. |
|
|
|
Prefix and P.O.BoxThe fields Prefix (Courtesy), Address extra and P.O.Box have been added to the customer's address |
|
|
|
Custom fields (Advanced plan - Beta 2)You can define and add custom fields to the invoice. |
|
|
|
Item date (Advanced plan)You can enter an item's date, useful for example if you want to indicate the date on which invoiced work were executed. |
|
|
|
Item discount (Advanced plan)You can enter a discount for each item, both as amount or as percentage. |
|
Multi-line and bold textsYou can enter multi-line texts or bold texts for the item description. |
||
Unit price and Quantity with 4 or more decimalsYou can enter unit prices and quantities with 4 or more decimals. |
||
DepositYou can enter a deposit already paid by the client. |
Settings tab

|
|
Title for new estimates and invoicesYou can define the title for new estimates and invoices. |
|
|
|
Manage viewsYou can select which views are enabled and change their name. |
|
|
|
Visible fieldsYou can select which fields are visible in the Invoice tab. |
Estimates and Invoices Dialogue Beta Release
The beta release of the Estimates and Invoices extension adds new and important functions to the application.
All major developments have been carried out and also tested. We invite everybody to test and give us feedback.
How to install it
Watch the video tutorial which shows you how to try out the brand new Beta version of the Estimates and Invoices extension.
- Download and install the last Banana Accounting+
- Open the Extensions menu > Manage Extension dialog
- Select the Estimates and Invoices extension
- Select the Beta release as preferred channel.
You can change the release channel at any time without data loss.
What's new
Released on 2025-07-01
- Added Building Number field for compatibility with structured QR addresses.
Released on 2024-05-06
- Fixed: Problem with decimals in the quantity column:
- It is now possible to define a quantity amount without the decimals
- Fixed a problem when entering a quantity amount with only one digit in the rows where there was already a description or date entered.
- Fixed: Problem selecting items (with mouse) from combo box.
- Fixed: Program warning when opening dialog.
Released on 2024-02-01
- Add total and subtotal of items (Advanced plan)
Released on 2024-01-16
- Fixed problem with scroll
- Fixed problem with HD monitors
- Fixed problem while deleting invoices in table Invoices
- Added column Payment term in days in table Contacts
- Added column Currency in tables Invoices and Contacts
Subtotals of items
Subtotals allow you to add partial totals to the invoice. For example, it is possible to insert a subtotal with labor costs and a subtotal with material costs.
To add a subtotal:
- Go to the Settings tab > Item Columns section and switch on the column Type
- Go to the Invoice tab
- Add a new row
- In the column Type select "Total", "Total 1" or "Total 2"
- Enter the desired description for the total line.
Example:
Subtotals in the dialog

Subtotals on the invoice
Upcoming new functionalities
- Add status to the invoice (draft, sent, reminder1, canceled, ...)
Functionalities integrated in the standard release
- Possibility to print reminders (Advanced plan)
- Possibility to print delivery notes (Advanced plan)
- Possibility to print more invoices in separated pdf files
Dialogue extension
The dialogue for entering invoice data is implemented via the Estimates and Invoice Dialogue Extension.
- The extension is installed automatically when an Estimates and Invoice file is opened.
- The extension is updated automatically when a new version of the extension is released.
The dialogue can therefore change even if the Banana Accounting programme has not been updated. - To try using a development version of the extension, see Manage Extensions : Using a Development Version.
If you have the Advanced plan, you can edit the source code and upload your modified code on your instance to Banana Accounting+.
Feedback
We would appreciate every feedback about this new release.
You can send us your feedback through the contact form, please also include a short description about the context where your are using this extension.
Estimates Commands
With the Estimates and Invoices application you can also manage estimates.
The creation, modification, duplication and printing of estimates are handled exactly as the invoices.
Here is the dialog to create or edit Estimates:

From the Estimates table:
- Create a new Estimate with the menu command Invoices > New estimate.
- Edit an offer with the menu command Invoices > Edit estimate.
- Duplicate an estimate with the menu command Invoices > Duplicate estimate.
- Print an offer with the menu command Invoices > Print estimate.
- Convert an estimate into invoice:
- Via the Invoices menu > Create invoice from estimate command.
- Or using the Create invoice button from the estimate creation / modification dialog (Invoices > Edit estimate)
The dialogue for creating and modifying an estimate is the same as that of the invoice. For more information visit Invoice dialogue.
How to customise your invoice
You can easily customise and adapt invoice printing to suit your needs.
Set your company address (sender)
In the File menu > File and accounting properties (Basic data) > Address , set the address of your company.
Set customer language
You can print invoices in the language of your customers. For each customer set the language in the Contacts table. You can also change it from the Edit Invoice dialog.
Retrieving customer addresses from Excel
When customer data are on an Excel file, they can be easily transferred to the Contacts table.
Proceed as follows:
- Select from Excel the column with the data to be copied and use the Copy (Ctrl+C) command.
- Go to Banana, Contacts table, position yourself in the corresponding column and issue the Paste (Ctrl+V or Paste) command from the Edit menu.
- Repeat this operation for all address columns (Account, First Name, Last Name, Organisation, Street, Zip, Country Code, Language).
The data corresponding to the mentioned columns are required for printing the invoice. - If you do not have all the columns mentioned in the Excel file, you must add the missing information manually.
Logo setup position and sender address
To set the logo, you must:
- Upload the logo image in the menu File > Logo setup.
- To use the logo in the invoice, in the Invoice Settings you must activate the Logo box and enter the name of the customisation you used, respecting upper and lower case, in the Logo Name field.
For example, you can place the logo on the left and the address on the right and change the size of the logo.
The address is automatically taken from the file basic data.
The sender's address, if the default settings are not changed, is entered on the right, regardless of the presence of the logo.
If you want to set the sender address on the left without any logo, please see the following page:
If you want to enter a different address, via the Invoice Settings:
- Enter the texts you want using the Line 1 Text , Line 2 Text, Line 3 Text, Line 4 Text, and Line 5 Text.
Set the logo without the sender's address
On the Logo setup page you will find information on how to add and place the logo.
Through the Invoice Settings:
- Uncheck the Page header option to exclude the address in the header from printing.
- View the Logo option to include the logo in the printout.
Customise address in invoice header
The style of the sender's address in the invoice header (colour, size, font..) is set by default by the program.
The Advanced Plan of Banana Accounting Plus allows you to customize the style of the address. For more information see the Examples page.
Set invoice information
Invoice information is information about the date, customer number, due date, etc., which is usually located just below the header and next to the customer address.
The CH10 and UNI11 layouts allow you to define which invoice information to include and which to exclude from printing. You can find instructions on the Invoice Settings page.
For the other print layouts (CH01-CH09 / UNI01-UNI08), the information cannot be modified.
Add a new invoice information field
In addition to the default information fields (invoice number, date, customer number, etc.), you can also enter other custom fields.
In the Invoice section of the Invoice dialog:
- Go to the Complete view (top).
- Use the fields Additional info 1... Additional info 8 to add your own additional information fields.
- In the Information section of the Invoice Layout settings, view the Custom fields field.
- The new additional information fields are added at the end. It is not possible to change the order.
In the Settings section of the Invoice Dialog:
- Edit the texts of the Invoice User Fields as you wish.
- You can enter translations for each language.
Set the payment term
The payment term for invoices by default is 30 days.
To change the payment term you have two options:
- Change the default settings for all new invoices.
- Go to the Settings section of the Invoice dialog.
- In the New documents > Invoice Payment term(days) section set the value you want (e.g. 10).
- The invoice due date will be recalculated with the new payment term.
- Change the payment term individually for each invoice.
- Go to the Invoice dialog.
- In the Due date field enter the payment deadline date (e.g. 31.12.2022).
- The invoice due date will be replaced with the new payment term.
Set customer address position and composition
The CH10 and UNI11 layouts allow you to define:
- The location of the customer address.
- The elements of the address.
On the Invoice Settings page > Customer address section:
- In the Address composition field:
- Choose how to compose the address by entering the XML names of the columns in the Contacts table.
- You can use only the following columns (XML names):
NamePrefix, OrganizationName, FirstName, FamilyName, Street, AddressExtra, POBox, PostalCode, Locality, Region, Country, CountryCode. - Change the location of the address using the Move horizontally and Move vertically options.
For other print layouts (CH01-CH09 / UNI01-UNI08), the location and composition of the customer address cannot be changed.
If you need more than one line to print your customer's address, see print customer/company address on four lines.
Set title/object
To enter the title/object of the invoice, you have two options:
- Enter the text in the Invoice dialog > Object field.
- For each invoice you can define a title.
- If you leave the field empty, the default text is used.
- This title always has priority over entering the title in the layout settings (see next point).
- With the CH10 and UNI11 layouts, you can enter the text in the invoice Settings > Texts section > Invoice title.
- The title applies to all invoices printed with this layout.
- The title applies only if no title has been defined as per the first point.
Set initial text
To enter the title/object of the invoice, you have two options:
- Enter the text in the Invoice dialog > Begin text field.
- For each invoice you can define a title.
- If you leave the field empty, the default text is used.
- This title always has priority over entering the title in the layout settings (see next point).
- With the CH10 and UNI11 layouts, you can enter the text in the invoice Settings > Texts section > Begin text.
- The title applies to all invoices printed with this layout.
- The title applies only if no title has been defined as per the first point.
Setting up the invoice details table
The Invoice Details Table is the central table in the invoice where the invoiced items/services appear, with quantities, unit prices, totals, etc.
Use the Invoice dialogue to enter items or other items to be invoiced.
See also pages:
Set invoice item columns
With the CH10 and UNI11 layouts, you decide which columns to display in the printout. See how to do it in the page Invoice Settings > Invoice Details.
For the other print layouts (CH01-CH09 / UNI01-UNI08), the columns are not editable.
Create a Credit Note
To create a credit note:
- In the Invoices table, add a new invoice for the credit note.
The invoice can be created as new or you can copy an existing invoice and then modify it. - Open the newly created invoice for editing.
- Change the title/subject to "Credit Note."
- In the details table, add a row and set the quantity with a negative sign. This way, the total for the row will be negative.
Set final texts
To enter the final text of the invoice, you have several options:
- Enter the text in the Invoice dialog > End Text field.
- It is applied to any print layout.
- The text is inserted just below the invoice details.
- Enter the text in the Invoice Print Dialog > Options section > Final text.
- It is applied to any print layout.
- If you have already entered text as per step 1, the new text is added right after the previous one.
- Enter the text in Invoice Settings > Texts section > End text field.
- This text has priority over the text entered as per step 2.
- If you have already entered text as per step 1, the new text is added right after the previous one.
Set bank account number
If you don't use the QR-Code, you need to enter the bank account number as a reference for the invoice payment.
You have three ways to enter the bank account number as the final text:
- Invoice dialog > End text field.
- The bank account number appears in the printout only for the invoice you are creating/editing.
- It is applied to any print layout.
- The text is inserted just below the invoice details.
- Print Invoice dialog > Options > Final text.
- In this case, the bank account is inserted in all invoices you create.
- It is applied to any print layout.
- If you have already inserted text as per step 1, in this case the new text is added right after the previous one.
- Invoice Settings > Texts > End text.
- In this case the bank account is inserted in all invoices you create using this layout.
- This text has priority over the text entered as per step 2.
- If you have already entered text as per step 1, the new text is added right after the previous one.
Set IBAN for Swiss QR-Code printing
If you want to create QR invoices with IBAN account, you need to:
On the QR-Invoice with IBAN account page you will find more information for setting up QR-invoices with IBAN account.
Set up QR-IBAN for Swiss QR-Code printing
If you want to create QR-invoices with QR-IBAN account, you have to:
On the QR-Invoice with QR-IBAN page you can find more information about the settings of QR-invoices with QR-IBAN account.
Print QR form without amount and address
If you want to print only the QR-bill without amount and customer address, you have to:
- Use the QR-Invoice extension without amount and address.
- Set the currency, address and IBAN account.
- Create the bulletin with QR code.
See also how to print an Invoice without amount.
Set styles and colors
On the Invoice Settings page you will find instructions for defining:
- Font and font size.
- Colors.
Set Bold texts
In the Invoice settings page you will find information on how to apply bold style to invoice texts.
Add images in Offers or Invoices
The Advanced Plan of Banana Accounting Plus, with the new application Offers and Invoices, allows you to add images to the offers and invoices to be sent to customers.
This functionality makes the invoice even more customisable and the client who receives it has a more complete and direct vision of the invoicing of the items.
See our information pages on how to add images:
Print customer/company address on four lines
When the addressee is a company with several sectors/departments or a customer living in a housing complex with interiors, it may be necessary to have several lines available for printing the address.
This option is only available with the Advanced Plan of Banana Accounting Plus.
To activate the possibility of printing the recipient address on several lines, proceed as follows:
- Update extensions from the Extensions menu > Manage extensions > Update extensions.
- Open the invoice under Edit and in the Settings dialogue > Address section, make the fields Sector 1 ... 4 visible for the Basic view.
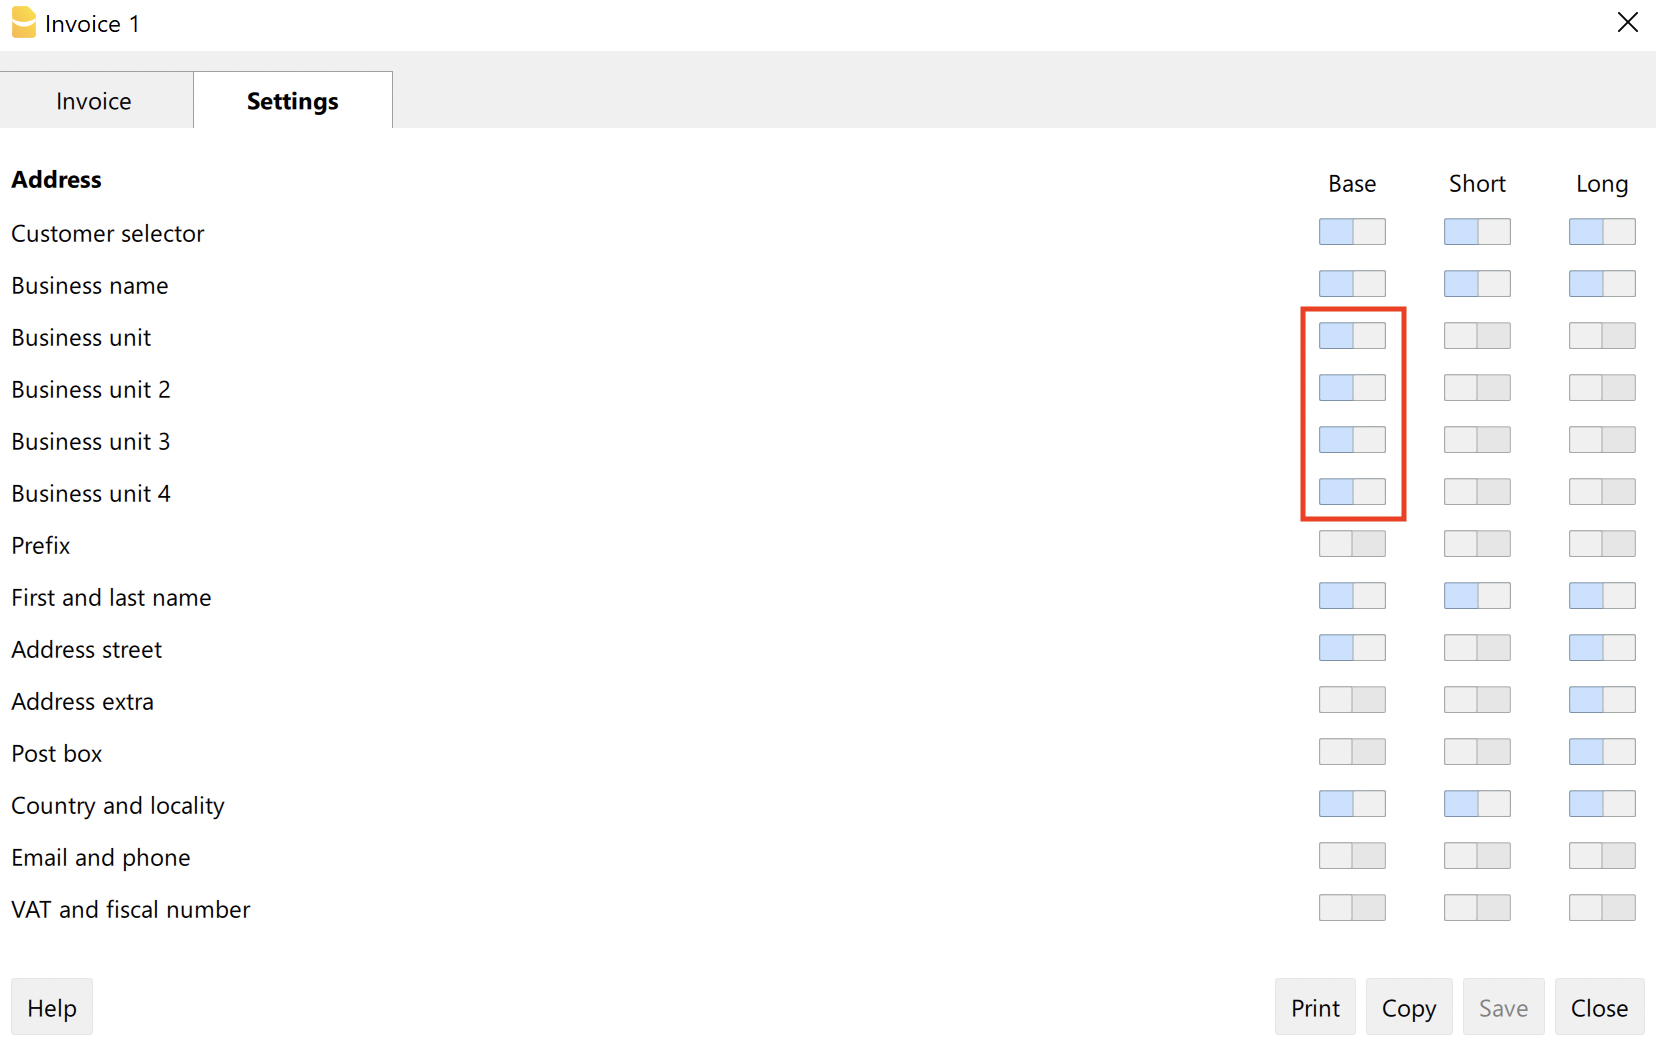
- Possibly switch from the Basic view to the Complete view without making the fields visible (in the Complete view all fields are visible).
- In the invoice address, enter text in the sector fields.
- In the print layout settings, add the Sector fields to the customer address composition.
The content will be as follows:
<OrganisationName>
<OrganisationUnit>
<OrganisationUnit2>
<OrganisationUnit3>
<OrganisationUnit4>
<NamePrefix>
<FirstName> <FamilyName>
<Street> <AddressExtra>
<POBox>
<PostalCode> <Locality>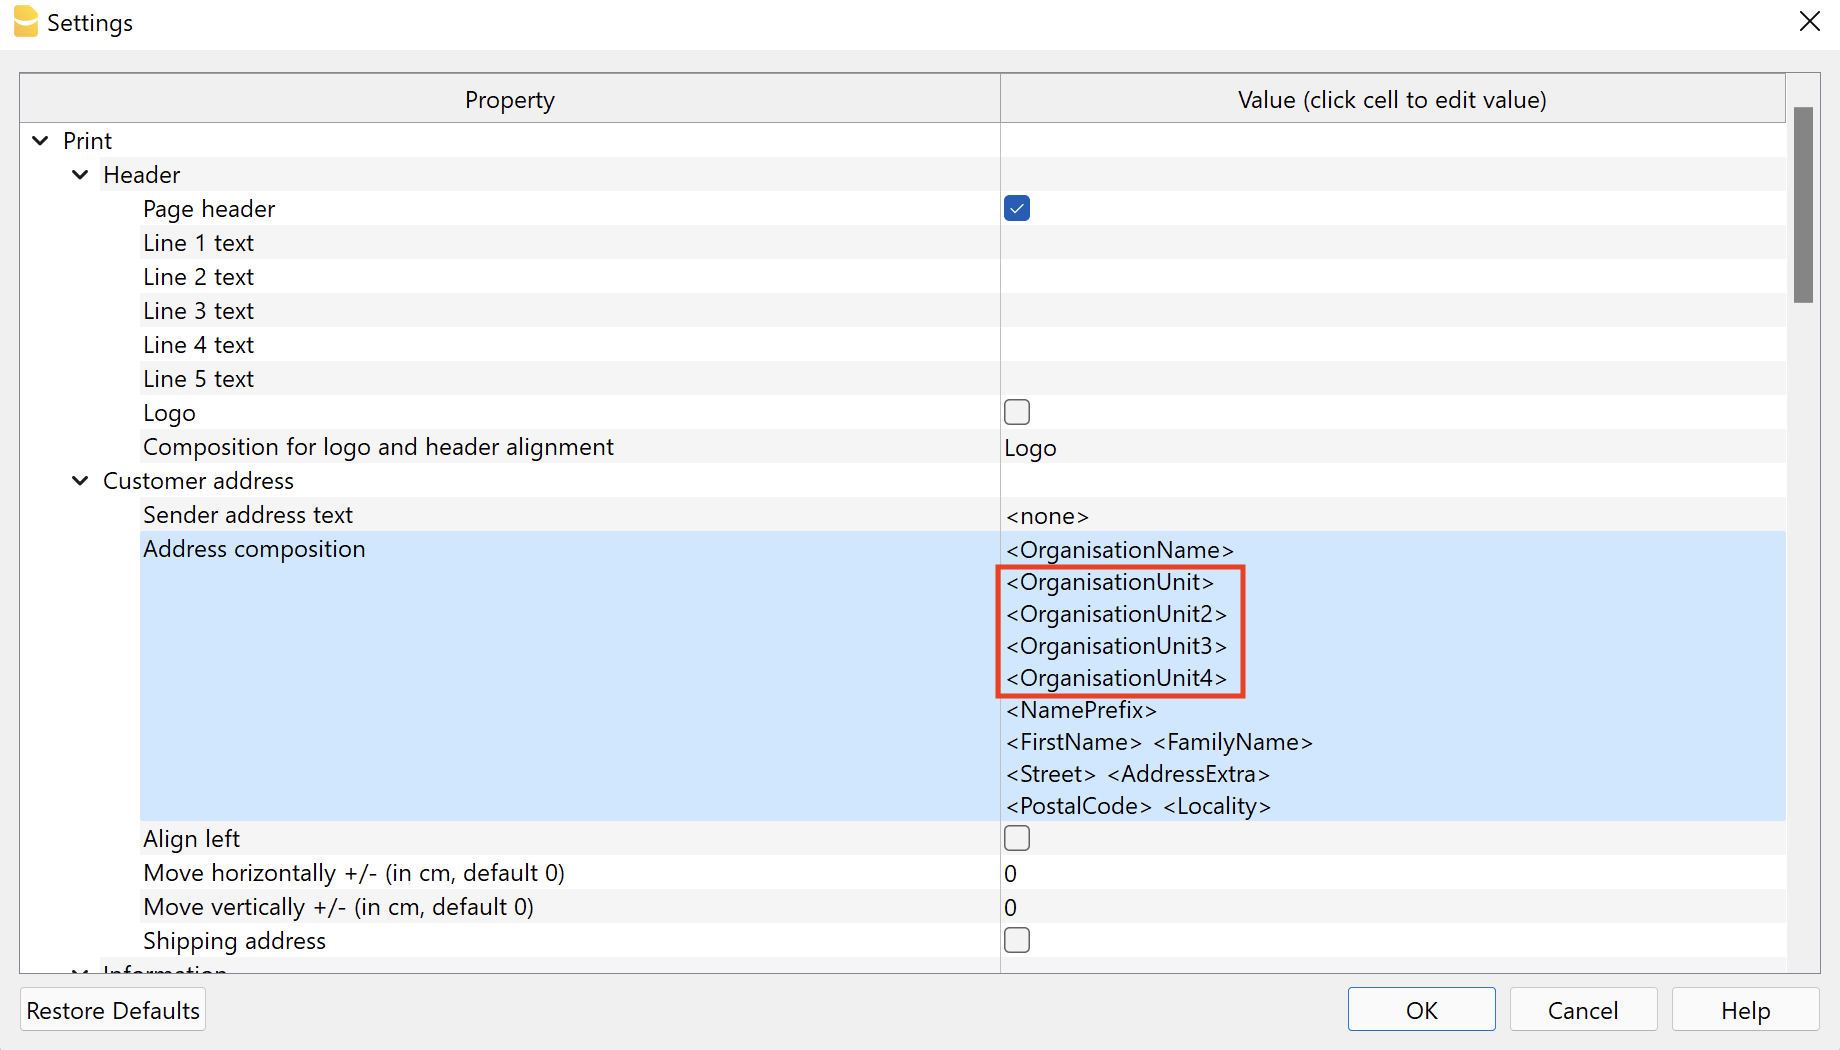
- If you wish to take these fields automatically from the Contacts table, add columns OrganisationUnit2, OrganisationUnit3 e OrganisationUnit4 to the Contacts table.
Other resources
Customize Address, Logo, Footers
Use Sub-Totals
Subtotals allow you to add partial totals to the invoice. For example, it is possible to insert a subtotal with labor costs and a subtotal with material costs.
To add a subtotal:
- Go to the Settings tab > Item Columns section and switch on the column Type
- Go to the Invoice tab
- Add a new row
- In the column Type select "Total", "Total 1" or "Total 2"
- Enter the desired description for the total line.
Example:
Subtotals in the dialog
Subtotals on the invoice
Upcoming new functionalities
- Add status to the invoice (draft, sent, reminder1, canceled, ...)
Print estimates and invoices
Command Print Estimates/Invoices
Invoice printing is done from the menu Invoices → Print Invoice.
This command creates a print preview of the invoice. Directly from the preview, by clicking on the settings symbol (cogwheel) in the toolbar, you access the following dialogue box:
- Print Invoices dialogue. From this dialogue box you can do various things:
- Set the layout to be used for printing the invoice.
- Access the layout settings to customise the printout.
- Change the print settings.
- Export the invoice in pdf or other formats.
With the Advanced plan of Banana Accounting Plus it is also possible to print several invoices at the same time and obtain single PDFs for each of them! For more information visit the page Print invoices or customer statements as separate PDFs.
Print layout and customisation
The printing of the offer or invoice is highly customisable for several reasons:
- You can choose the Print Layout.
- You can customise invoice printing by changing the layout settings.
- Several layouts are available for invoice printing, here are the recommended ones:
- The CH10 layout for all users in Switzerland.
With the option to include the Swiss QR-Code in the printout. - The UNI11 layout for all users in other countries.
Same as the CH10 layout, but without the QR-Code.
- The CH10 layout for all users in Switzerland.
For more information on customisation, please consult the following pages:
Print table content
Print Invoices dialogue
You can access the invoice printing dialog from the Print Preview by clicking on Settings (cog wheel symbol).
To access the print preview, you have three options:
- From the Invoices menu > Print Invoice command.
- From the Print button of the invoice creation/editing dialog.
- From the Invoices table, by clicking on the small Print Invoice icon at the top of the Id column cell (invoice number).
The program directly displays a preview of the invoice, using the default layout [CH10] Invoice layout with Swiss QR code.
With the Advanced plan of Banana Accounting Plus it is also possible to print several invoices at the same time and obtain single PDFs for each of them! For more information visit the page Print invoices or customer statements as separate PDFs.
Once you have chosen the printing options, with the OK button the invoice is previewed.

Print tab
Invoice numbers
You can print single or multiple invoices:
- For single prints, indicate the number of the invoice.
- For multiple prints, indicate the numbers of the invoices between commas "1,3,6".
- To print a range ( from..to..) indicate the numbers separated by hyphen "1-3" .
If the invoice itself contains a '-', for example if you have an invoice number '2016-1', this must be enclosed in brackets {}, to distinguish the numbering of a range of documents {2016-1}-{2016-3}.
Invoices from
This option allows you to print all invoices included in the selected period. You need to enter an initial and final date.
Unprinted invoices
Invoices where the InvoicePrinted column of the Transactions table is empty are printed. All unprinted invoices are therefore printed.
Layout
This option allows you to change the layout of the invoice. A number of predefined layouts are available.
Layout Preferences
Requirements for using layout preferences:
- Banana Accounting Plus (version 10.1.7 or later).
- The Advanced plan
This option allows you to set the preferences offered by the selected layout.
If a layout with no preferences is selected, this section is not displayed in the dialogue box.
- Print as
You can select the type of document you wish to print, the choices are:- Automatic: Print the document in invoice format.
- Delivery note with amounts: Print the document as a delivery note.
- Delivery note without amounts: Print the document as a delivery note, without showing the amounts and the total.
- Invoice: Prints the document in invoice format.
- Order confirmation: prints the document as order confirmation.
- 1st reminder: Prints the document as first reminder.
- 2nd reminder: Print the document as second reminder.
- 3rd reminder: Print document as third reminder.
The chosen document type is not saved for the next time, instead it is set to "automatic" again.
Layout preferences are offered by the following layouts:
Additional layouts
This button redirects you to the Manage Extensions dialog, where you can install new templates, update existing ones with the latest versions, or add your own custom templates.
Settings
Allows you to set the parameters of the selected print layout. Each layout has its own customizable settings. Visit the Invoice Settings page for more information on customizing the CH10 layout.
Update the InvoicePrinted column after printing
You can make this column visible by using the Data menu → Columns setup command.
The program will update the content of the column Printed after the print preview, adding the text 1. This will allow the Select unprinted invoices command to only print the invoices with no content in this column.
Options tab
In this section you can add specific texts for each language, for example, to indicate final greetings or bank details for payment. Depending on the language of the customer, the program will display at the end of the invoice the texts saved for the indicated language.
Only one type of text can be entered, one for each language.
The texts entered in this section will be included in the printing of all invoices, with whatever printing layout is used.
To add a final text:
- Invoice menu > Print Invoices.
- Select from the Settings icon (cog wheel symbol) > Options section. Enter the desired text.
- Confirm with OK.
The entered text will appear in the print preview of the invoice.

Save Invoice as PDF
Invoices can also be saved in PDF format so that they can be conveniently sent via email.:
- From the Print preview Invoices > Print Invoices > OK
- select Create PDF from the toolbar
Print Invoice
Once the print preview is displayed, to print the invoice:
- Go to the Print icon on the toolbar (above).
- Or save the PDF and print it.
Print Reminders
Banana Accounting Plus, with the CH10 and UNI11 layouts, also allows you to print reminders.
Requirements for using layout preferences:
- Banana Accounting+ (version 10.1.7 or later).
- The Advanced plan
On the basis of the Invoice data entered in the Invoices table, reminders can be printed.
How to print a reminder
In the Invoices table select the row where the invoice for which you wish to print the reminder is located and proceed as follows:
- From the menu Invoices > Print invoices
- Select Layout CH10 or UNI11
- Under Print as, select one of the following options:
- 1st reminder
- 2nd reminder
- 3rd reminder
- Confirm with OK

Print customization
All settings that characterise the CH10 and UNI11 layouts are also retained in the call-out printout.
To change the settings, go to Print Layout Settings.
Under Texts > Reminder you can define the start and end texts in the reminder
Print example:
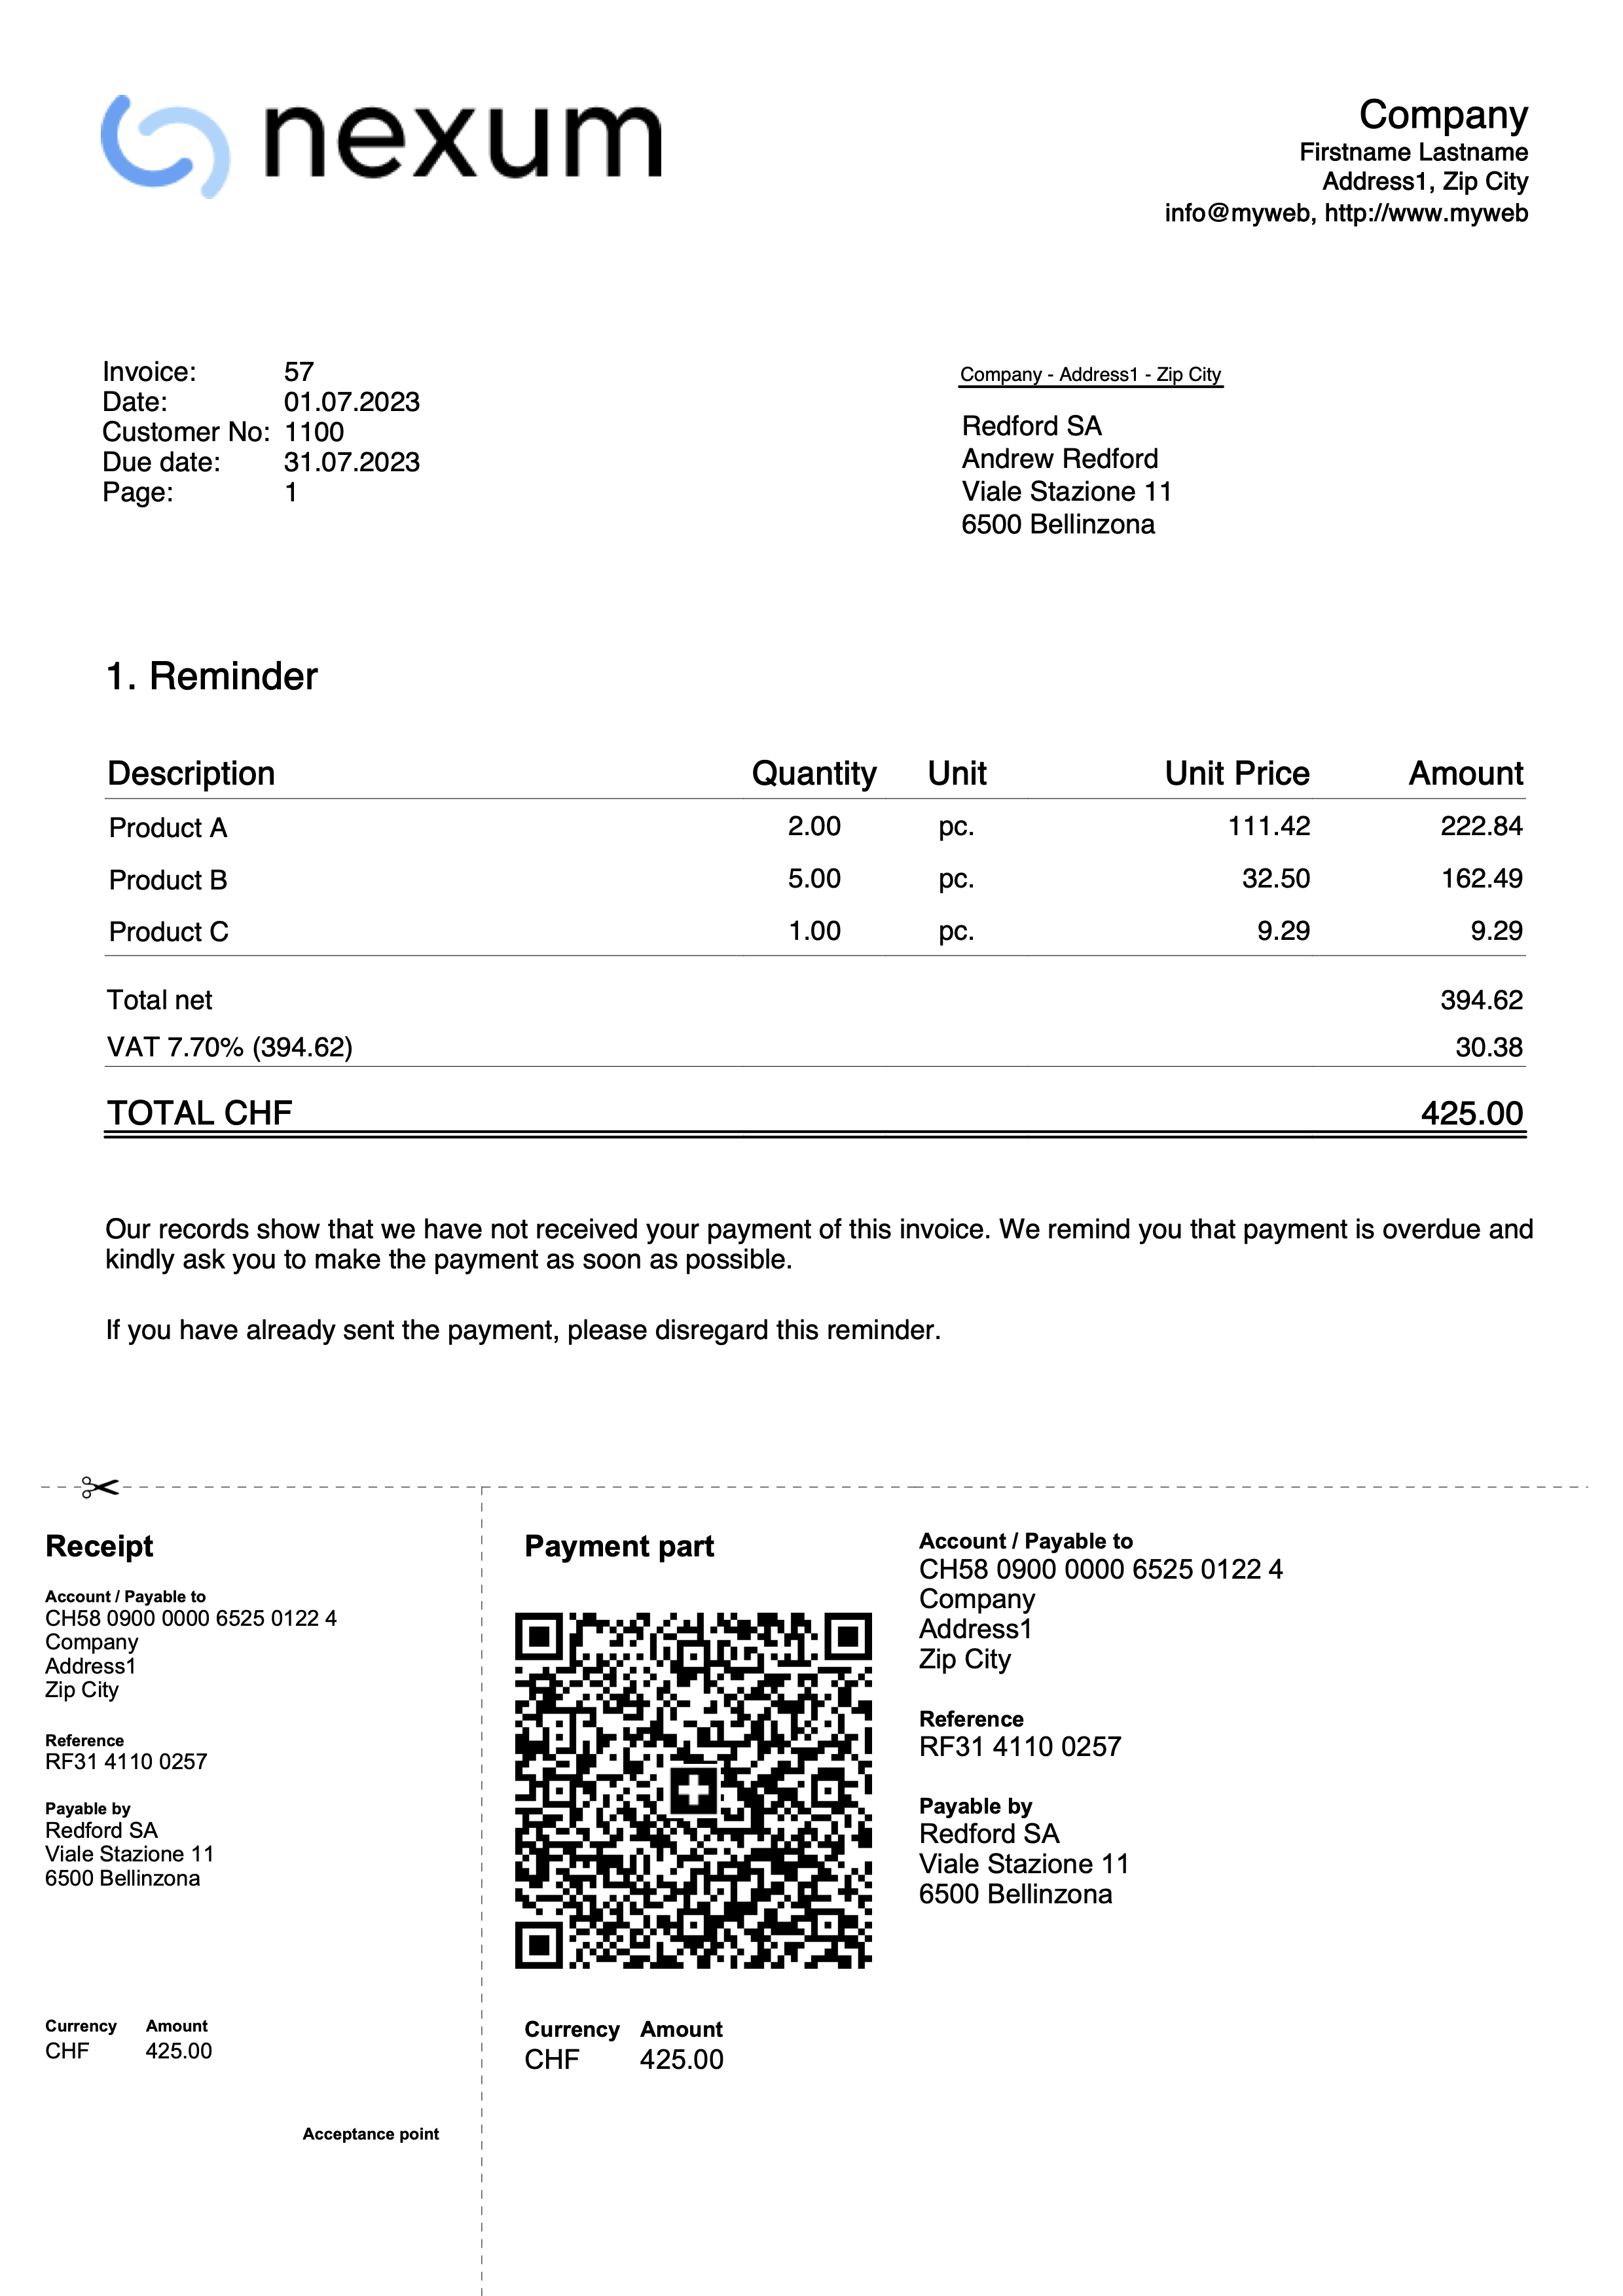
Print delivery notes
Banana Accounting Plus, with the CH10 and UNI11 layouts, also allows delivery notes to be printed.
Requirements for using layout preferences:
- Banana Accounting+ (version 10.1.7 or later).
- The Advanced plan
Delivery note data are entered in the Invoices table, as is the case for invoices.
If the data on the invoice match those on the delivery note, the same data can be used for both the printing of the delivery note and the invoice.
How to print a delivery note
In the Invoices table select the row where the delivery note to be printed is located and proceed as follows:
- From the menu Invoices > Print invoices
- Select Layout CH10 or UNI11
- Under Print as, select:
- Delivery note with amounts
In this case, amounts in the details and total amount are included in the bulletin. - Delivery note without amounts
Only the details of the dispatched goods are displayed in the delivery note, without any amounts.
- Delivery note with amounts
- Confirm with OK.
Print customization
All settings in Layout CH10 and UNI11 are also retained when printing the delivery note.
To change the settings, go to Print Layout Settings.
Under Texts → Delivery Note you can define the initial and final texts in the delivery note.
Print example:
Archiving Invoices
With the Offers and Invoices application you can archive your offers and invoices at any time of the year. The file in which the invoice data is entered remains the same over the years.
Archive invoices individually
If you want to archive one or more invoices individually, proceed as follows:
- From the Invoices table go to the Archive view.
- In the Archive date column, enter the date of when you wish to archive the invoice.
- Archive the invoice with the command Invoices > Archive data > Archive table data.
Archive invoices for the year
To archive invoices for the entire year, proceed as follows:
- From the Invoices table go to the Archive view.
- In the Archive Date column, enter the date 31.12 in the first line and copy and paste on all lines.
- Archive the invoice with the command from the menu Invoices > Archive data > Archive table data.
Invoice archive
In the invoice archive you will find all archived offers and invoices.
Archived invoices are displayed in the Archive (Invoices) table and removed from the Invoices table.
The Archive (Invoices) table:
- Is displayed automatically when archiving invoices.
- If you close the table, use the command from the menu Invoices > Archive data > Show archived data to display it.
Archiving Table Data
This feature is available in Banana Accounting+ Dev Channel.
Data from the following tables can be archived:
- Contacts
- Items
- Invoices
- Estimates
To archive table data:
- Position yourself in the table where there is data to archive.
- Activate the Arch. Date column.
- In the Arch. Date column, enter the date of when you want to archive.
- From the menu Invoices > Archive Data > Archive table data, choose the table with the data to be archived.
The programme creates the Archive table where all archived data (Contacts, Items, Invoices or Estimates) are stored.
Viewing Archived Data
This feature is available in Banana Accounting+ Dev Channel.
Archived data is saved permanently in the Archive table.
To view the tables with archived data
- From the menu Invoices > Archive data > Show archived data
- Choose the table with archived data to display
The programme shows the Archive table where all archived data (Contacts, Items, Invoices or Estimates) are stored.
New year
In the Estimates and Invoices application, it is possible to have all invoices created from one year to the next in a single file, without having to create a new file for the new year.
If, however, you wish to have separate invoices from one year to the next or not display the invoices from the previous year, there are two possible solutions:
1. Archive the registered invoices to empty the Invoices table
- From the Invoices menu, choose the option Archive data > Archive table data. More information can be found on the page Archiving Invoices.
- Archived invoices are displayed in the Archive (Invoices) table and removed from the Invoices table.
2. Create a new file by making a copy of the previous year
- Start from the current file and from File in the menu, click onto Save As command, naming the new year.
You can also create a copy of the file from the menu, Tools > Create file copy command. - In the Invoices table delete all rows where the previous year's invoices appear
For the Estimates and Invoices application, on the topic Create New Year, new developments will be possible in the future.
Import and Export
Estimates and Invoices Tools
Import/Export Estimates and Invoices
You can use the Estimates and Invoices Tools extension to import or export the following data from Banana:
- Invoices
- Offers
The imported/exported file format is described in the Estimates and Invoices Tools .
Import/Export Contacts and Items
You can use the "Data" menu to import or export the following data from Banana:
- Contacts
- Items
The imported/exported file format follows Text file with columns header.
Using catalogues for invoicing
It is possible to integrate product catalogues into the Estimates and invoice application. Companies can make catalogues available to their dealers so that they can prepare estimates and invoices more easily.
If you have any questions about this, please contact our customer service.
Serial invoices
With the Estimates and Invoices Application, you can quickly create serial invoices from a data list in Excel. It is ideal for sending bulk invoices to clients or members of an association.
- Enter the data in Excel.
- Import it into Banana Accounting Plus using the import functions.
- Create and print the invoices.
Prerequisites
To create serial invoices with the Offers and Invoices Application, you need to:
- Use the following pre-prepared Excel file to enter the contact data.
- Use the following pre-prepared Excel file to enter the invoice data.
- Use the Offers and Invoices Tools extension to import the invoice data into Banana.
- Install the Beta version of the 'Estimates and Invoices Dialog Extension' of the Estimates and Invoices application.
Create Serial Invoices
Serial invoices can be created as follows:
- Install the Offers and Invoices Tools extension.
- Create the Offers-Invoices file and enter the basic data.
- Create and import the contacts.
- Create and import the invoices.
- Print the invoices.
Launch Banana Accounting Plus and install the Estimates and Invoices Tools extension.
From the menu Extensions > Manage Extensions, search for Estimates and Invoices Tools among the online extensions and click on Install.
There are two ways to prepare the file:
- Create a new file from the menu File > New, select the region and language, select the type Estimates and Invoices, select the blank template.
- Use your existing Estimates and Invoices file.
In the menu File > File Properties (Basic Data) > Address section, set the address of your association, which will appear in the invoice header.
If you have a logo you want to use, refer to the Logo setup page.
Create and Import Contacts
Contact data can be created using an Excel file. In this file, all the data is entered and then subsequently imported into Banana. There are two ways to do this:
Method 1
The first method is described on the page Retrieving data from Other Programs > One-Time Data Importing using Excel.
- In Excel, arrange the columns exactly in the same sequence as they appear in the Contacts table of Banana accounting.
- Select the data in Excel that you want to copy and use the Copy command (Ctrl+C or Copy from the Edit menu).
- Go to Banana accounting and issue the Paste command (Ctrl+V or Paste from the Edit menu).
Method 2
The second method uses the Import Rows command from the Data menu.
- Download the specific Excel file to enter the contact data.
- The file is already set up with the necessary columns for entering the data.
- Row 1 contains the column headers. This row should not be deleted, and the column names should not be changed.
- The subsequent rows are example contacts.
- To enable editing of the file, click "Enable Editing" in the yellow bar at the top.
- Open the file and enter the address data of your contacts in the appropriate columns. The columns are as follows:
- RowId: The unique ID of the contact.
- OrganisationName: The name of the organization or company.
- FirstName: The first name.
- FamilyName: The last name.
- Street: The street.
- PostalCode: The postal code.
- Locality: The place.
- CountryCode: The country code.
- LanguageCode: The language of the contact used to create invoices. The invoice texts are printed in the defined language (it=Italian, de=German, en=English, fr=French).

- Save the file
- Select all the rows and use the Copy command (Ctrl+C or Copy from the Edit menu).
- Import the contacts into Banana accounting.
- In Banana accounting, open the Estimates and Invoices file type.
- Select the Contacts table.
- From the Data menu, select the Import Rows command.
- In the dialog that opens, check the option Import data from clipboard, then confirm with OK.
Create and Import Invoices
Invoice data can be created using an Excel file. In this file, all the data is entered and then subsequently imported into Banana accounting.
- Download the specific Excel file to enter the invoice data.
- The file is already set up with the necessary columns for entering the data.
- Row 1 contains the column headers. This row should not be deleted, and the column names should not be changed.
- The subsequent rows are example invoices.
- To enable editing of the file, click "Enable Editing" in the yellow bar at the top.
- Open the file and enter the invoice data in the appropriate columns.
- For more information on the columns, see the Column paragraph of the Estimates and invoices import page.
- Each row represents an invoice.
- You can enter an invoice with multiple items. For each item, add a row to the invoice (see example in the image, rows 5-6).

- Save the File.
- Convert the Excel invoice file into one of the two required formats (*.csv or *.txt) to import the data into Banana Plus.
- Open the Excel file with the invoice data.
- Click on File > Save As.
- Choose the option CSV (Comma delimited) if you intend to use the *.csv format; or choose Text (Tab delimited) if you intend to use the *.txt format.
- Save the file (once the file is created, it's advisable not to open it to avoid making any changes, even unintentional ones, that could compromise the import into Banana Plus).
- Import the Invoices into Banana.
- In Banana Accounting Plus, open the Estimates and Invoices file type.
- Select the Invoices table.
- From the Extensions menu, select Estimates and Invoices Tools > Import Invoices.
- Select the *.csv or *.txt file you saved.
- A dialog will show the changes that will be applied to the Banana file. Confirm by clicking OK.
- In the Invoices table you see the rows with the imported invoices.
If you do not see the imported invoices (you only see blank rows), use the command from the Invoices > Recalculate All menu.
Print Invoices
See how to print invoices and customize the print settings.
Error Messages and Troubleshooting
Per eventualFor any error messages encountered during the import process, refer to the documentation on Error Messages and Troubleshooting.