Invoicing with Banana Accounting
In Banana Accounting Plus, you can create your invoices directly within the accounting file or manage them completely separately using the Estimates and Invoices application.
- Integrated invoicing in accounting
Additional functionality included in all accounting applications (double-entry, income/expense, multi-currency, cash manager). - Estimates and Invoices application
A separate application from all other accounting applications, used only to create offers and invoices without any connection to the accounting file. There is no link to the accounting file.
Below is a summary table for the two methods, detailing what they allow you to do and the customisations available.
Legend: ✅ with Professional or Advanced plan, 🔒 only with Advanced plan, ❌ not available
Features | Integrated Invoicing | Offers and Invoices Application |
| Common Features | ||
| Invoice Creation | ✅Yes, directly in the Transactions table. | ✅Yes, in the dedicated dialog. |
| Proforma Invoice Creation | 🔒 Yes, create the invoice in the Transactions table and print it as a Proforma Invoice (Advanced plan only). | 🔒 Yes, create the invoice in the dialog and print it as a Proforma Invoice (Advanced plan only). |
| Estimates Management | 🔒 No, but an invoice can be created with the "Estimate" label and print it as Estimate (Advanced plan only). | ✅Yes, in the dedicated dialog. |
| Payment Reminders Management | ✅Yes, automated management with the Print Reminders command. | 🔒 No, create the invoice with the "Reminder" label. and print it as a Reminder. (Advanced plan only). |
| Delivery Notes Creation | 🔒 No, only invoice with "Delivery Note" label. From the Invoice Printing dialog > Print as > Delivery Note. (Advanced plan only). | 🔒 No, only invoice with "Delivery Note" label. From the Invoice Printing dialog > Print as > Delivery Note. (Advanced plan only). |
| Order Confirmation Creation | 🔒 No, only invoice with "Order Confirmation" label. From the Invoice Printing dialog > Print as > Order Confirmation. (Advanced plan only). | 🔒 No, only invoice with "Order Confirmation" label and print as Order Confirmation. (Advanced plan only). |
| Header Logo | ✅Yes, with the Logo setup command | ✅Yes, with the Logo setup command |
| Sender Address in Header | ✅Yes, with File and Accounting Properties command. | ✅Yes, with File and Accounting Properties command. |
| Invoice Information | ✅Data of the invoice (invoice number and date, customer number, due date, etc.). | ✅Data of the invoice (invoice number and date, customer number, due date, etc.). Customizable with additional fields. |
| Invoice Address (Customer) | ✅Customer ledger management in the Accounts table, Address view. | ✅Customer address management in the Contacts table. |
| Title / Subject | ✅Yes, customizable via the DocType column in the Transactions table, or in Invoice Settings. | ✅Yes, customizable in the Dialog, or in Invoice Settings. |
| Free Initial Text | ✅Yes, through the DocType column in the Transactions table, or in Invoice Settings. | ✅Yes, in the Dialog, or in Invoice Settings. |
| Default Columns and Column Layout | ✅Columns in the Transactions table and Items ( Items, Description, Quantity, Unit, Unit Price, Amount, VAT Code). Display columns in the printout from Invoice Settings. | ✅Columns in the Dialog (Date, Item, Description, Quantity, Unit, Unit Price, Discount, Amount, VAT Code). Display columns in the printout from Invoice Settings. |
| Custom Columns (Transactions / Items Table) | 🔒 Uses custom columns in the Transactions and Items tables (Advanced plan only). | 🔒 Uses custom columns in the Items table (Advanced plan only). |
| Discounts and Reductions | ✅Yes, add a line to the invoice via accounting transaction | ✅Yes, item discount column and overall discount via Invoice Dialog. |
| Advance Payments | ✅Yes, add a line to the invoice via accounting transaction. | ✅Yes, via Dialog. |
| Notes and Final Text | ✅Yes, from the Dialog Options or Invoice Settings or DocType column | ✅Yes, via Invoice Dialog > Final Text or from Dialog options or from Invoice Settings |
| QR Bill with IBAN Account | ✅Yes, invoices with Swiss QR bill with IBAN account. | ✅Yes, invoices with Swiss QR bill with IBAN account. |
| QR Bill with Special QR-IBAN Account | ✅Yes, invoices with Swiss QR bill with special QR-IBAN account. | ✅Yes, invoices with Swiss QR bill with special QR-IBAN account. |
| Style and Color Customization | ✅Yes, from dialog Invoice Settings > Font type and Colors. | ✅Yes, from dialog Invoice Settings > Font and Colors. |
| CSS Customization | 🔒 Yes, customize invoice styles and appearance via CSS customization (Advanced plan only). | 🔒 Yes, customize invoice styles and appearance via CSS customization (Advanced plan only). |
| JavaScript Customization | 🔒 Yes, set invoice printing via JavaScript customization (Advanced plan only). | 🔒 Yes, set invoice printing via JavaScript customization (Advanced plan only). |
| Product Images | 🔒 Yes, add product or service images to invoices. See Invoice with Product Images (Advanced plan only) | 🔒 Yes, add product or service images to both offers and invoices See Invoice with Product Images. (Advanced plan only). |
| VAT management | ✅ Yes, print invoices with VAT and manage in accounting. | ✅ Yes, only print invoices with VAT |
| Multi currency invoices | ✅ Yes | ✅ Yes |
| Exclusive Features of Integrated Invoicing | ||
| Integrated Data in the Accounting File | ✅Yes, in the Transactions table. | ❌No |
| Revenue Management | ✅Yes, create invoices on revenue with customer subledger in the Balance sheet. | ❌No |
| Cash Basis Accounting Management | ✅Yes, create invoices upon cash method with Customer subledger via profit centers (CC3). | ❌No |
| Reporting | ✅Yes, account card per customer, history, and open invoice reports per customer and due date. | ❌No |
| Payment Reminders Management | ✅Yes, overdue invoice management and reminder printing with the Print Reminders command. | 🔒No, manual management of overdue invoices and reminder printing. (Advanced plan only). |
| Invoice Payment Management | ✅Yes, registration of invoice collection. | ✅No, it is possible to manually track paid invoices using the Payment column in the Invoices table. |
| Exclusive Features of the Estimates and Invoices Application | ||
| Offers Management | 🔒No, create the invoice with the label "Estimate" and print it as an Estimate (Advanced plan only) | ✅Yes, manage Estimates separately from invoices. |
| Offer Conversion | 🔒No, create the invoice with the label "Estimate" and print it as an Estimate (Advanced plan only). | ✅Yes, convert estimates into invoices with a simple command. |
Invoicing integrated in the accounting file
The integrated invoicing feature of Banana Accounting Plus uses the customer invoice recording system directly in the Transactions table. It allows you to create prints, including customizable ones, based on customer transaction records.
You can print both invoices for Switzerland with a QR payment slip and international invoices for other countries, even in foreign currency without a QR payment slip.
Creating invoices
The Transactions table is the heart of Banana Accounting and is also used to issue invoices. Nothing could be simpler: To create an invoice, enter a normal transaction that charges the customer.
Banana Accounting also allows you to create invoices in foreign currency.

The main columns for invoicing:
- Date - Invoice date
- Invoice - The invoice number.
- Description - Description of the item to be invoiced.
If there is more than one item to be invoiced, use another row that has the same customer number. - Debit - Customer account.
- Credit - Profit account.
- Amount - Invoice amount
You can also indicate the quantity, the unit price and the programme calculates the amount. - VAT code- VAT code of the profit
Advantages
With Banana Accounting's integrated invoicing you simplify your administrative work, reducing the time needed to manage invoices, customers and accounting transactions:
- Invoice transactions are always the same for both invoicing and accounting, reducing the possibility of errors and omissions.
- Banana Accounting automatically generates the related accounting documents, such as VAT registers, customer accounts, receipts registers.
- You have a more accurate and real-time view of your customers with constantly updated balances.
- Lots of automation to make your work easy and with immediate professional results:
- Automatic retrieval of addresses from contacts so that the data do not have to be re-entered on the invoice.
- No manual calculations. All calculations are automatic, always accurate and up-to-date.
- Setting of the language, currency, number of decimals and rounding for each individual invoice.
- Deadline display.
- Invoice archiving for a tidy history that is always available for tax audits.
Differences with the Estimates and Invoices application
Integrated invoicing is an additional feature included in all accounting applications: double-entry, Income / Expense, Multicurrency, Cash Manager.
Integrated invoicing is ideal for billing services or sales without the need for many structured details on the invoice.
- The elements and details for invoices (such as quantities, prices, units, etc.) are recorded solely in the Transactions table. In the Estimates and Invoices application, there is a Invoices table with an Invoice Dialog where various columns and options are available to detail the various items and data to be inserted. In this aspect, the Estimates and Invoices application is much more flexible and comprehensive because it allows for greater customization.
- In the Transactions table, in addition to the data for invoicing, by entering the Debit and Credit account, the registration remains accounted for in the accounting file without the need to register the invoice subsequently. This is ideal for managing revenue accounting.
In Estimates and Invoices, the data is not accounted for, so it is necessary to register the invoice in the accounting file. - In integrated invoicing, it's not possible to create offers. However, it is possible to create and print an invoice with the title "Estimate" (instead of "Invoice.")
The Estimates and Invoices application is specific for creating also Estimates.
Items Table
The Items Table allows you to manage the article catalogue, keep track of available quantities, sales and purchase prices.
Data for managing articles or services to be invoiced are entered in this table. Each article is assigned an ID, and groupings of articles and services in the same category can be created.
Various columns are available for complete and detailed information:
- Article (IdArticle): the code of the article.
- Description: the description of the article.
- Group membership
- Account (for accounting)
- VAT code of the sale
- Unit: an abbreviation to define the type to which the quantity refers (pieces, hours...)
- Sale: the unit sales price.
- Purchase cost.
The Items table is linked to the Items columns of the Transactions table.
The use of the Articles table speeds up the entry of invoice data into the Transactions table. By entering the ID (article code), the programme automatically takes over the description, unit and unit price. By entering the Quantity, the total price to be invoiced is calculated and entered.

Print invoice with Swiss QR Bulletin
After entering the invoice data in the Transactions table, you can create and print invoices with the Print Layouts.
From the Menu, Reports > Customers > Print Invoices:
- Choose CH10 Invoice layout with Swiss QR Code for Switzerland
- Customise your printing. More customisation is possible with the Advanced plan.
- Preview the invoice. You can save it as a PDF and send it electronically or print it.
If you use this layout, the bulletin with Swiss QR will be printed on the invoice and the reference data will appear on the statements. You can import customer payment data from the bank with the Bank statement extension Camt ISO 20022 Switzerland (Banana+). You have invoice receipts under control.
It is possible to print the invoice with a QR bulletin even without an amount and without an address, leaving an empty box to manually insert the data. More information is available on the QR-Code Customization page, section Include/Exclude from printing.
With the same registration, from the Print Invoices dialogue box, under Preferences Layout > Print as you can also choose to print Delivery Notes, Offers and Reminders.
Print International Invoices
After entering the invoice data in the Transactions table, you can create and print invoices with the Print Layouts.
From the Menu, Reports > Customers > Print Invoices:
- Choose the Layout 11 programmable Invoice
- Customise your printing. More customisation is possible with the Advanced plan.
- Preview the invoice. You can save it as a PDF and send it electronically or print it.
With the same registration, from the Print Invoices dialogue box, under Preferences Layout > Print as you can also choose to print Delivery Notes, Offers and Reminders.
Invoice Structure
In this image you can see how the invoice is structured:
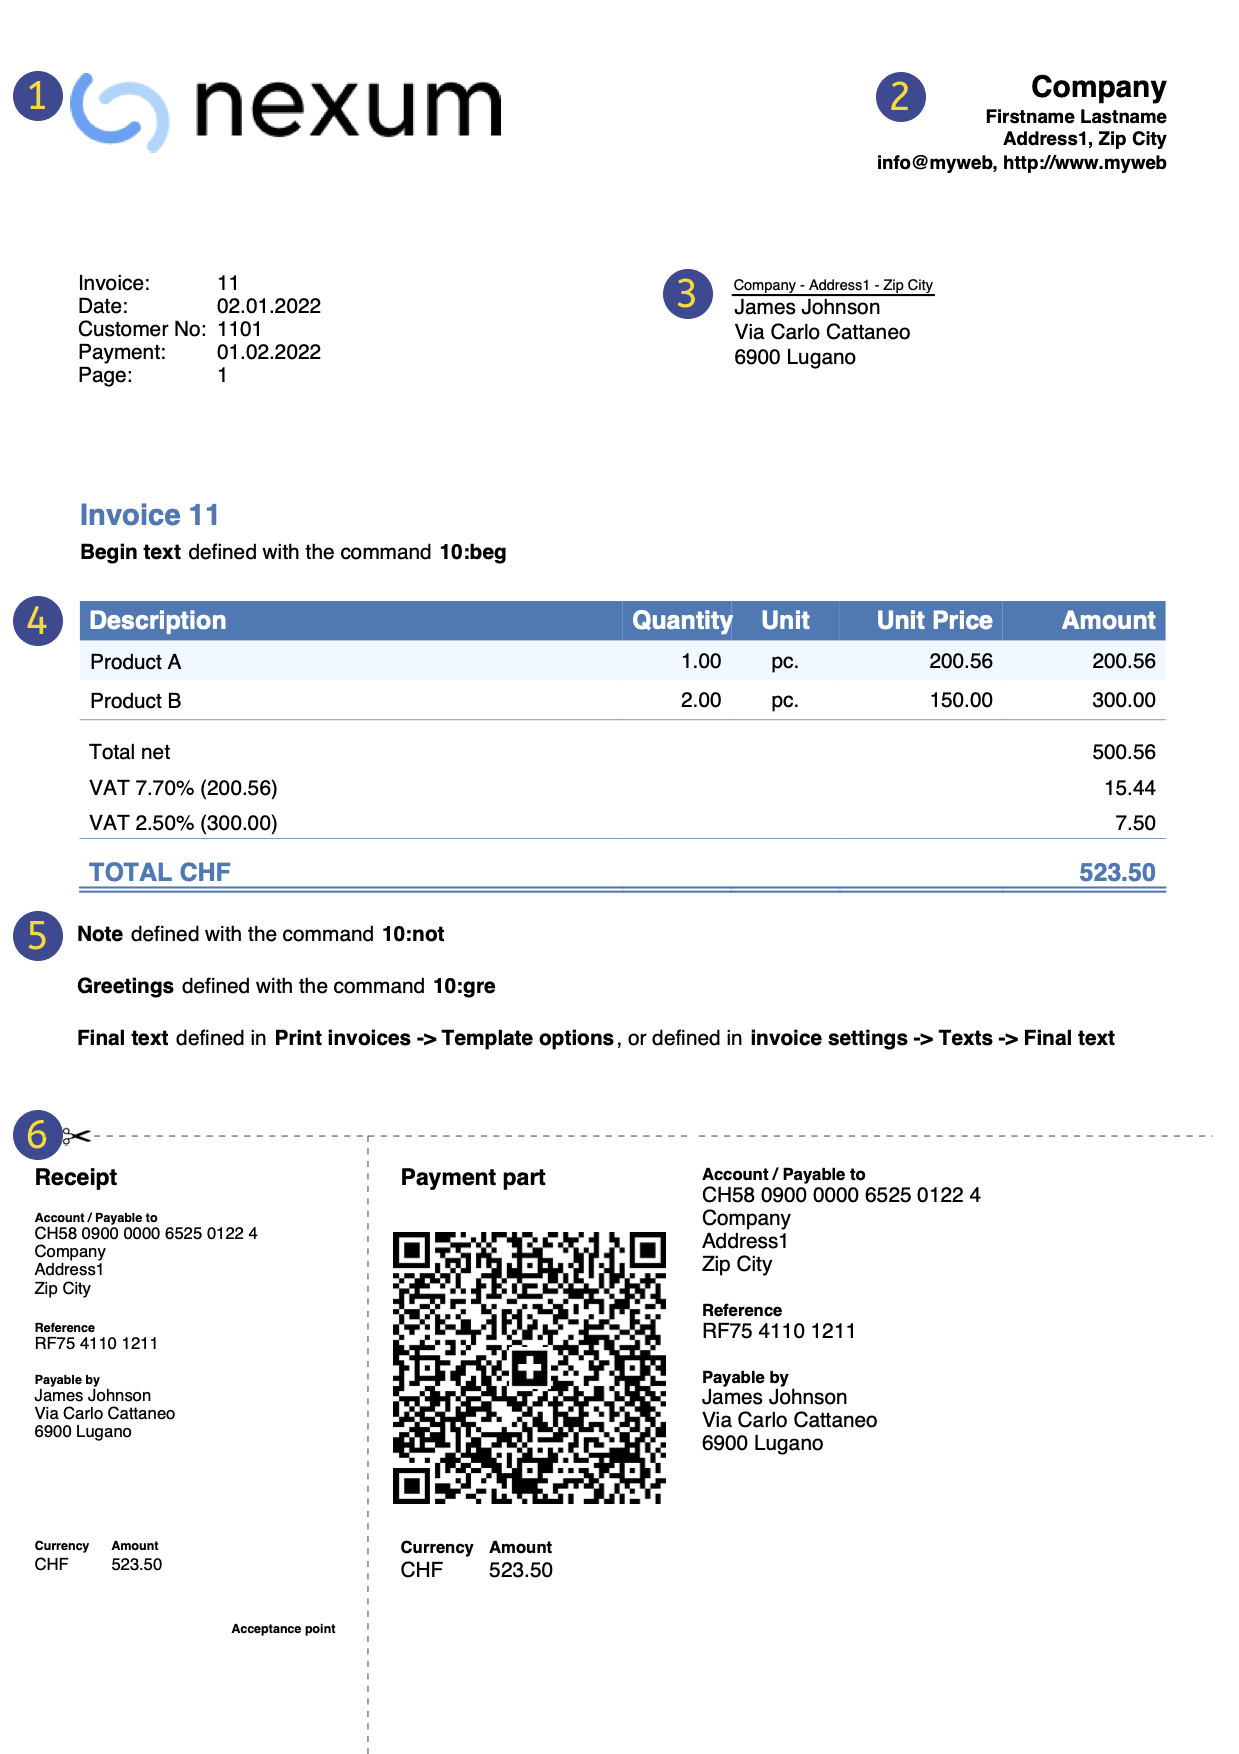 | LogoInsert a personalized logo from menu file → Logo setup | |||
HeadingThe heading of the invoice will be identical to the one entered | ||||
Customer AddressThe customer's address will be retrieved from Accounts table, see Setting up customer accounts. | ||||
Invoice dataThe contents of the invoice must be entered in the Transactions table, learn how to enter invoices. | ||||
Free textsInsert begin text, notes and greetings using the Column Type, and ending texts from menu Reports→ Clients → Print Invoices → Option layout. | ||||
Settings Swiss QR-CodeSettings can only be defined for Switzerland and with the [CH10] Swiss QR Code layout . |
Customer Management
Customer Management allows you to record, organise and manage customer information, keeping track of customer transactions and payments, payment due dates and contact information. You can track customer payments, update the payment status of issued invoices as well as enter and print invoices.
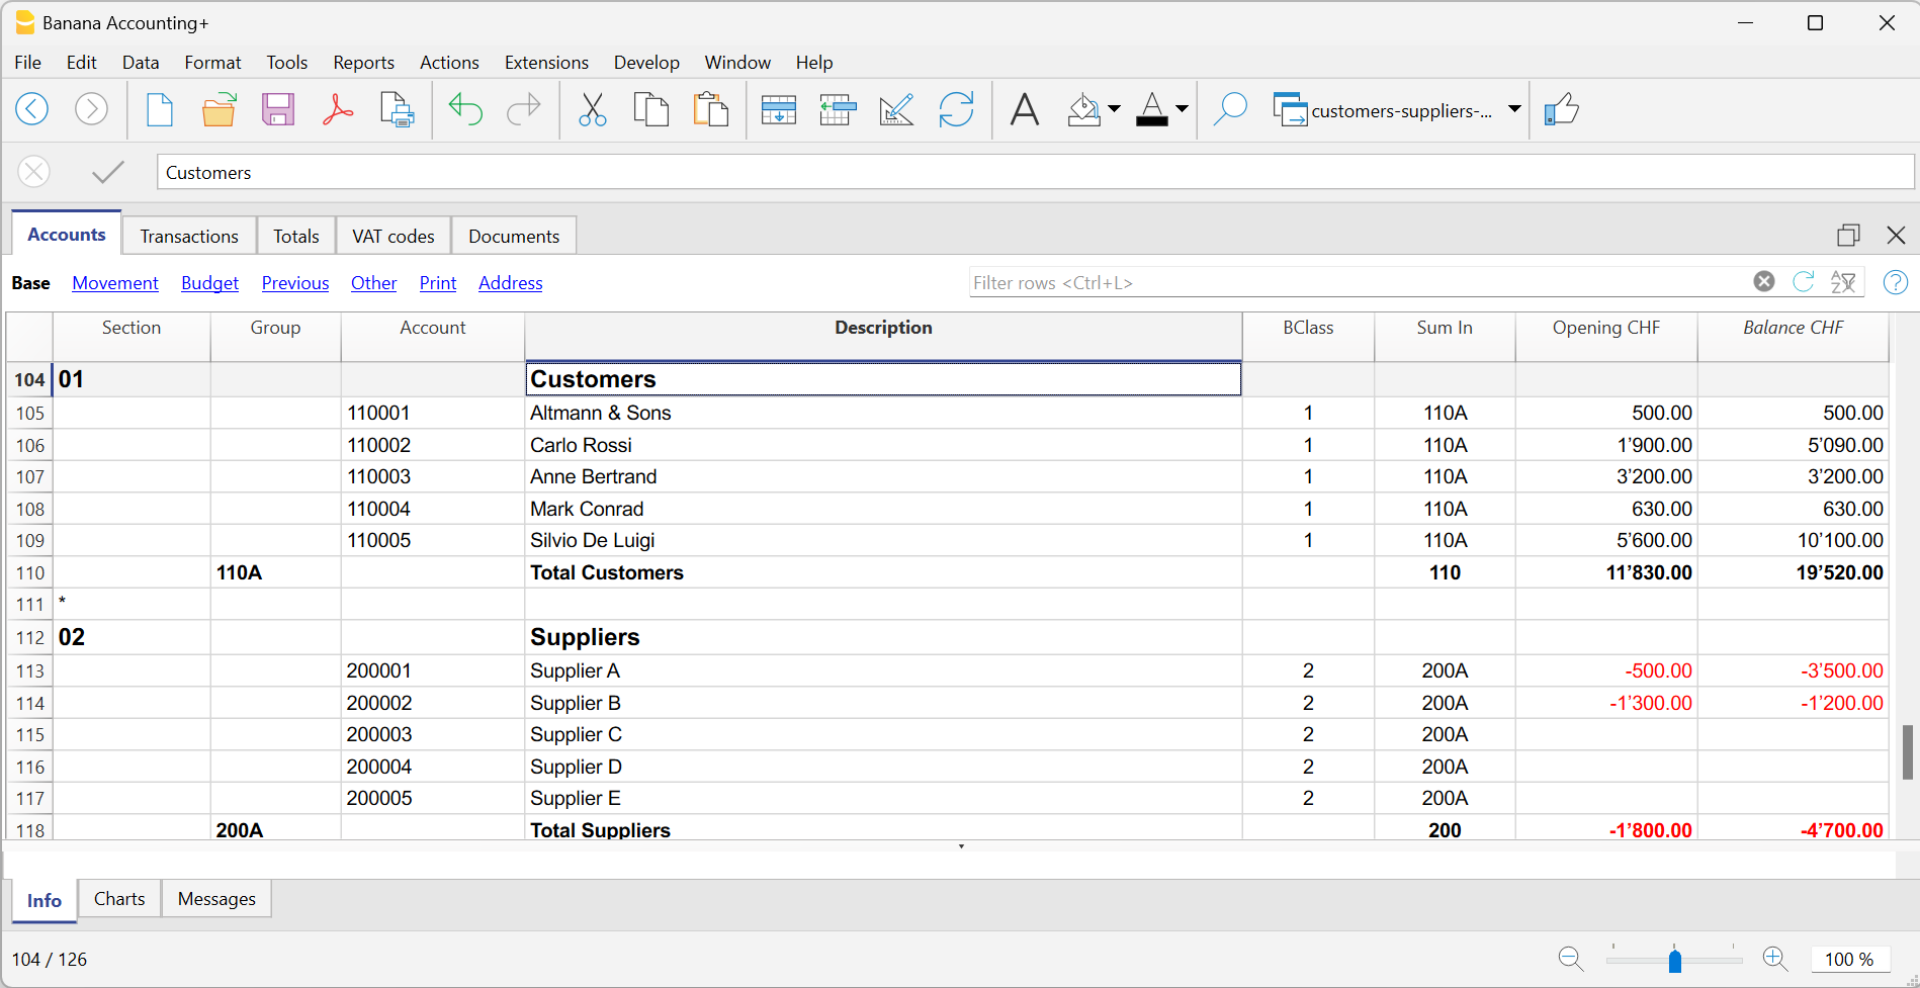
In Banana Accounting the customer data is set up in the Accounts table.
In order to create invoices, it is necessary to:
- Define the Customer Register
- Create invoices, entering the transactions in the Transactions table, debiting the customer's account.
With a range of functions you can manage the:
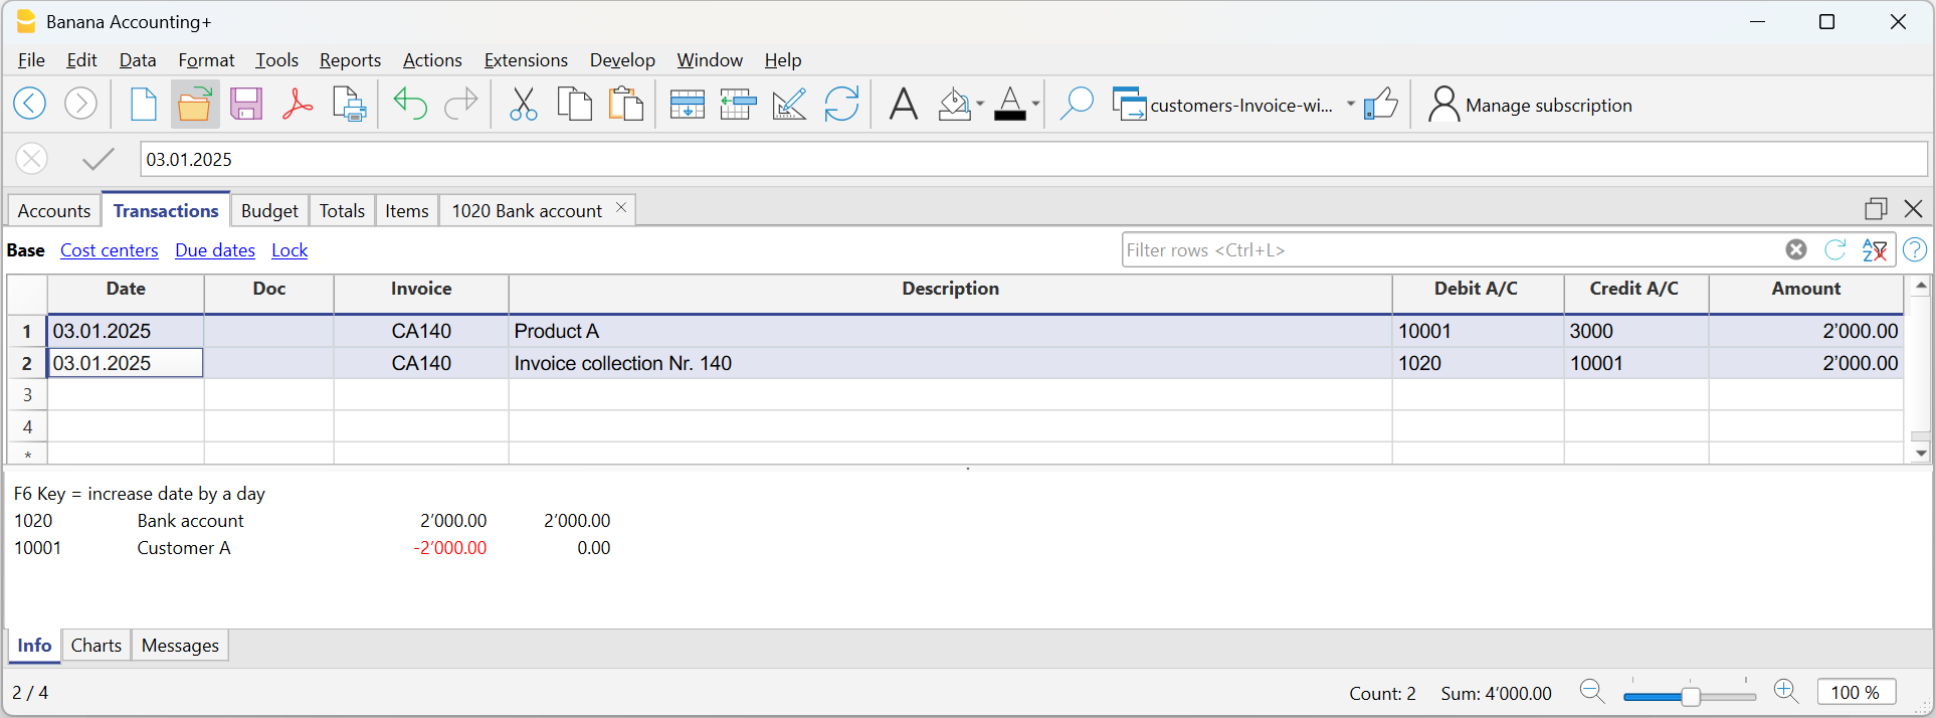
- Invoice collections by entering them in the Transactions table:
Creating an invoice from a profit centre
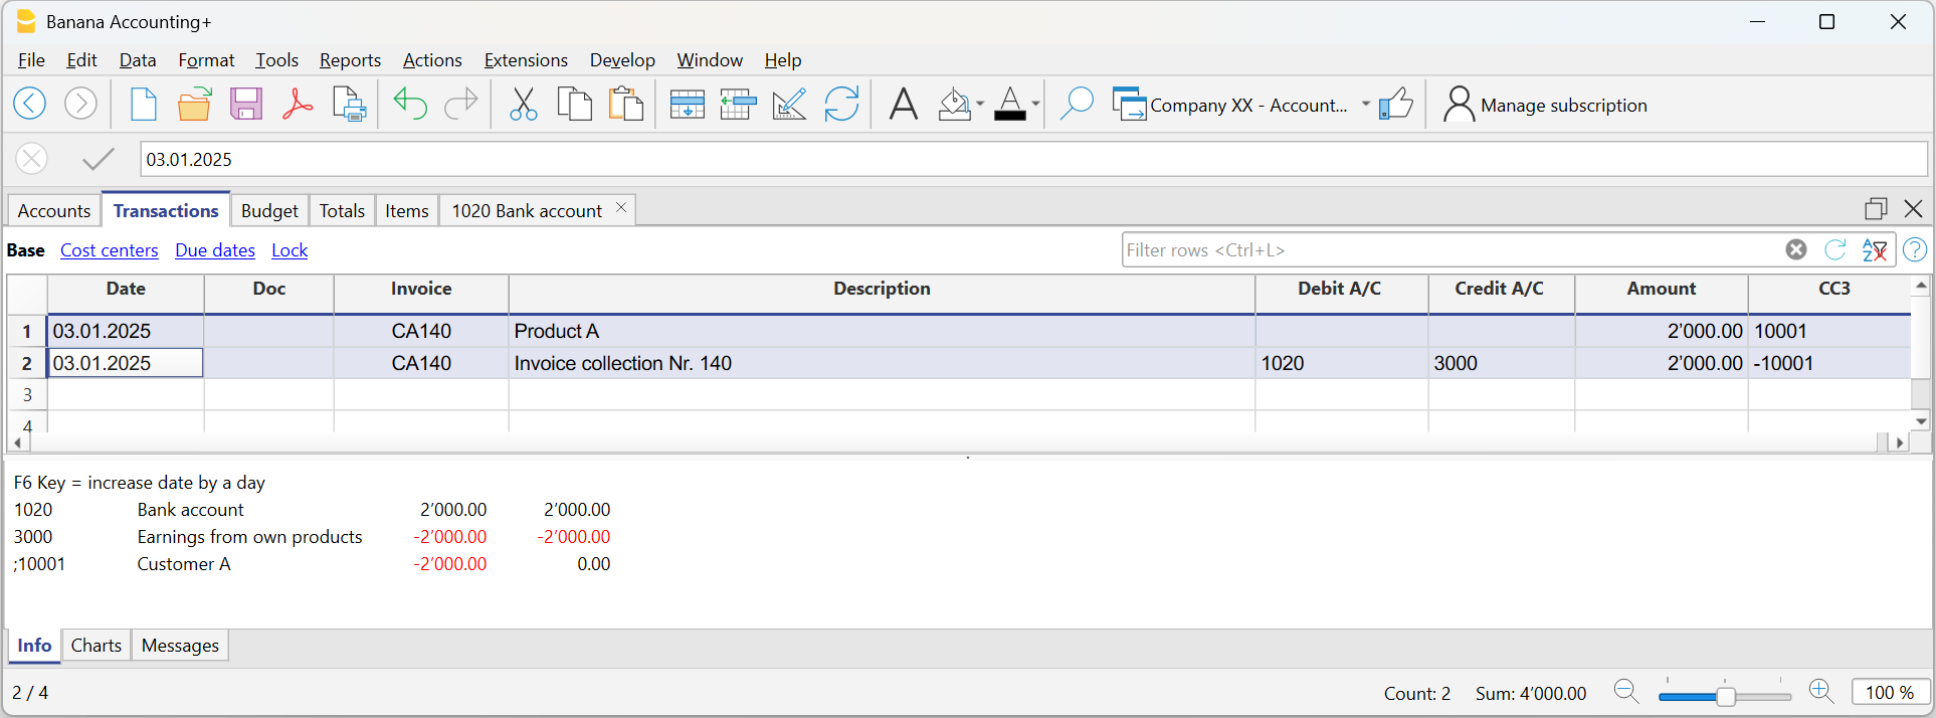
When the customer ledger is set up with profit centres (cash method management), the profit centre column CC3 is used in the invoice transactions.
In the appropriate columns of the Transactions table indicate:
- The date.
- The invoice number.
- The description of the invoice item, which you want to appear on the invoice.
If there is more than one item to be invoiced, use another row with the same customer number. - In the Debit account do not record any account
- In the Credit account do not record any account
- The amount. You can also enter the quantity and the unit price and the programme will calculate the amount.
- In column CC3 enter the customer's profit centre account (Accounts table).

Features currently not available
These features, although requested by some users, are not available at the moment:
- Automated invoice sending by email.
- Creation of estimates.
The programme allows you to print an invoice with the indication 'Estimate'. - Creation of delivery notes.
The programme allows an invoice to be printed with the indication 'Delivery Note'. - Link with Inventory application.
- Link with Timesheet.
- Creation of invoices in foreign currency with VAT in base currency (e.g. invoices in EUR with VAT in CHF).
If you want to issue invoices separately from accounting (useful for cash accounting) and also prepare estimates, you may use:
This also allows you to add additional information more easily.
Full list of features currently not available in Banana+
Insights
- Invoice printing and VAT (based on turnover and cash received)
- Set customer language in invoices
- Due dates and payment terms
- All extensions with QR invoicing
Related topics:
- Example file in Income/Expense accounting
- Example file invoices in Double-entry accounting
- Example file invoices using Cost centers
Useful for registering invoice with VAT on the cash-in basis (with customer and supplier accounts as cost centres CC3) or if you want to exclude invoice details from the balance sheet accounts.
Setting up the file
There are two ways to set up your accounting file for your invoicing
- Create a new accounting file, using an existing template.
- Adapt your existing accounting file.
New Accounting File
Several templates are available, containing a preset ledger of clients. Creating Invoicing is possible in the following accounting types:
- Double-entry accounting with or without vat.
- Multi-currency accounting with or without vat.
- Income & Expense accounting with or without vat.
A new accounting file is created as follows:
- File Menu > New.
- Select the Region and the language.
- Type Invoice in the Filter by field.
- Select a template in the right hand section.
- Save your file with a name.
Please follow the instructions contained in the Invoicing documentation.
In the accounting types with VAT, in order to correctly set up the file, we advise you to consult the explanations on the page Invoice printing and VAT.
Adapt your existing Accounting File
If you wish to adapt your existing accounting file for creating your invoices, you will have to add certain functions and settings in order to be able to print them:
Insert the data for your company
- In the File menu > File and accounting properties... > Address, you can setup your company's address and data, which will be used as the header of the invoice.
- To use your personal logo, check instructions here.
Set the list of customers in the Accounts table
- In the Accounts table, you can setup your customers register
- Add and display customer address columns.
- In the Accounts table, you can select the Address view and enter your customer's data.
- If the Address view is not visible, you can add it using the Tools menu > Add new functionalities... command > Add Address columns in the Accounts table.
- Manage your customer settings via the Reports menu > Customers > Settings.
Add the columns you wish to use in the Transactions table
- Display the columns for Invoicing in the Transactions table:
- Data menu > Columns setup and check the DocType and DocInvoice boxes.
- Add the columns for Quantity and Unit Price (optional).
Tools Menu > Add new functionalities > Add Items Columns in Transactions table. - Add Items table (optional).
This will assist you keep track of your Items and micro-manage your inventory.
Tools Menu > Add new functionalities > Add Items table.
In the accounting types with VAT, in order to correctly set up the file, we advise you to consult the explanations on the page Invoice printing and VAT.
Invoicing managed in a file dedicated to Invoicing only,
If you wish to manage your invoicing separately from your main accounting, you will have to create a new file. You will insert the accounts for the clients you need for the Invoicing only, in your Plan of Accounts. Invoices are entered via the Transactions table.
This approach is suitable for when:
- Accounting on a cash-in basis. Only the the payed amount is entered in the accounting file.
- Wishing to keep the management of your invoices completely separate from your main accounting ledger, for example for an Association that needs to send membership fees to their members.
How to create a separate accounting file for invoices:
- Download the template, open it and adjust it to your requirements.
Alternatively, you may start out with any template and adapt it - as previously indicated - for use with invoicing. - Make sure al setups and and columns are present, as explained above.
Issuing invoices in the transaction rows.
With integrated invoicing, invoices are created and simultaneously recorded in the accounting. You can create invoices with or without VAT.
Before creating and recording invoices, you must define the accounting method. The available methods are:
- Invoicing on turnover (revenue-based accounting).
- Issued invoices are immediately recorded and accounted for.
- Revenue is recognized when the invoice is issued.
- Customer ledger through balance sheet accounts.
- Cash-based accounting.
- Issued invoices are only recorded when payment is received.
- Revenue is recognized only when the invoice is actually paid, by recording the transactions at the time of payment.
- Customer ledger through profit centers CC3.
VAT Management
- Accounting with the effective method
- Invoices are issued with rates according to the effective method (e.g. 8.1%, 3.8%, 2.6%).
- Revenue is recorded when the invoice is issued.
- The amount to be recorded is usually gross of VAT.
- The VAT code is entered on the revenue line when the invoice is issued.
- If the amounts are net, the invoices must be managed in a separate file (Quotations and Invoices application or accounting file).
- Accounting with flat rate VAT.
- Invoices are issued with a VAT rate different from the one used for accounting.
- Revenue is recognized only when the invoice is actually paid, by recording the transactions at the time of payment.
- If the amounts are gross, accounting can be done on issuance or on payment, entering the VAT code in square brackets.
- If the amounts are net, the invoices must be managed in a separate file (Quotations and Invoices application or accounting file).
- Invoice with net VAT and VAT management on payment
- When creating invoices with VAT, there are limitations if in the accounting the amounts are recorded net and the cash method is used. In this case, it is not possible to enter net VAT amounts, because at the time of issuing the invoice the VAT codes must be enclosed in square brackets. VAT is not calculated automatically, but shown only as an indication for printing purposes.
- When creating invoices with VAT, there are limitations if in the accounting the amounts are recorded net and the cash method is used. In this case, it is not possible to enter net VAT amounts, because at the time of issuing the invoice the VAT codes must be enclosed in square brackets. VAT is not calculated automatically, but shown only as an indication for printing purposes.
The columns to create invoices
To enter the standard invoice data, there are basic columns. If more details are needed, such as quantity, unit price, etc., additional columns can be added by adding the Items table.
The columns can also be customized in terms of display order.

Basic columns
Date
The invoice will show the date indicated in this column. All rows belonging to the document must show the same date.
Invoice
To manage invoices, it is mandatory to indicate an invoice number in the Invoice column.
Description
A description of the goods or services to be invoiced. These texts appear on the invoice.
Debit
Use this column only to record the payment of the invoice, entering the liquidity account (bank, postal account,...).
Credit
Use this column only to record the payment of the invoice, entering the revenue account.
Amount
An amount. If VAT is managed, enter the gross amount (including VAT).
VAT Code
The VAT code corresponding to the revenue account (sales or services):
- When issuing the invoice, the VAT code must be entered in square brackets (e.g. "[V81]").
- When recording the payment of the invoice, the VAT code must be entered without square brackets.
CC3
A customer account present in the Accounts table, in the Profit Center CC3 group.
Optional columns
Type
In the Type column you can define detail rows, such as subtotal rows or specific payment terms for an invoice.
This column is not visible by default but must be displayed through the Data menu > Columns setup command and by selecting the DocType column.
Quantity
The quantity of goods or services to be invoiced.
To add the quantity column, use the menu Tools > Add new features > Add Item columns in the Transactions table.
Unit
A type of unit (e.g. 'pcs', 'h', 'm', 'kg').
Unit Price
The unit price for the goods or services.
The program automatically calculates the total amount based on the quantities entered in the Quantity column.
Invoice with multiple rows
When there are multiple items to be invoiced (different products or services or both), you need to record on multiple rows (one item per row):
- Enter a new transaction row for each item you want to print on the invoice.
- On each additional row, repeat the date and invoice number, the same as in the previous rows.
Issuing invoices with VAT with the Cash method
In integrated invoicing, invoices are created and recorded in the same file. As for cash-based accounting, invoices must be recorded at the time of payment.
In managing cash-based invoicing, it is necessary to set up the customer subaccount in the Accounts table using the Profit Center CC3.
- All customer accounts must have complete information (first name, last name or company name, address), because when creating the invoice, the program uses this data for the invoice header.
It is possible to create and record invoices with or without VAT.
Cash-based Invoice
In the cash-based system, the invoice is created to be sent to the customer, but the accounting entry is made later when payment is received.
Therefore, to create the invoice, the items to be invoiced are recorded using the customer’s CC3 profit center:
- In the Date and Doc. columns, enter the date and any document number.
- In the Invoice column, enter the invoice number.
- In the Description column, enter the items to be invoiced that should appear on the customer’s invoice.
- The Debit and Credit columns must remain empty because the accounting entry is made when the customer's payment is received.
- In the Amount column, enter the gross amount.
- In the CC3 column, enter the customer's CC3 profit center account.
Cash-based Invoice and Effective VAT Method
The Banana Accounting VAT management procedure requires that the VAT code is always entered on the line where the income is recorded.
Income is recorded only when the invoice is actually paid. Therefore, in cash-based VAT management, the VAT code is entered only when the invoice is paid.

Invoice data is entered in the Transactions table. Enter a new transaction row for each new invoice.
- Enter the transaction date
- The invoice number
- In the case of invoicing with Swiss QR with IBAN account, use only numbers or letters, without spaces, separators, or other characters. The maximum allowed length is 7 characters.
- In the case of invoicing with Swiss QR with QR-IBAN, use only numbers, without spaces, separators, or other characters. The maximum allowed length is 7 digits.
- If Swiss QR is not used, the invoice number can be freely chosen.
- Each invoice must have a unique invoice number, even across multiple accounting years. This is important because using the same invoice number over several years is still considered a single document. If you want to reuse the same invoice number, you must add the year to the invoice number, or another identifier that distinguishes it from previous years' invoices (e.g. 1234524, 1234525).
- The description text (products, services, consulting...) that will appear on the customer’s invoice
- The Debit account must remain empty
- The Credit account must remain empty
- Enter the gross amount
- In cases subject to VAT, enter the sales VAT code in square brackets (e.g. "[V81]").
The VAT code entered in square brackets allows the VAT amount to be displayed on the invoice, without its accounting entry, which will occur when the payment is recorded.
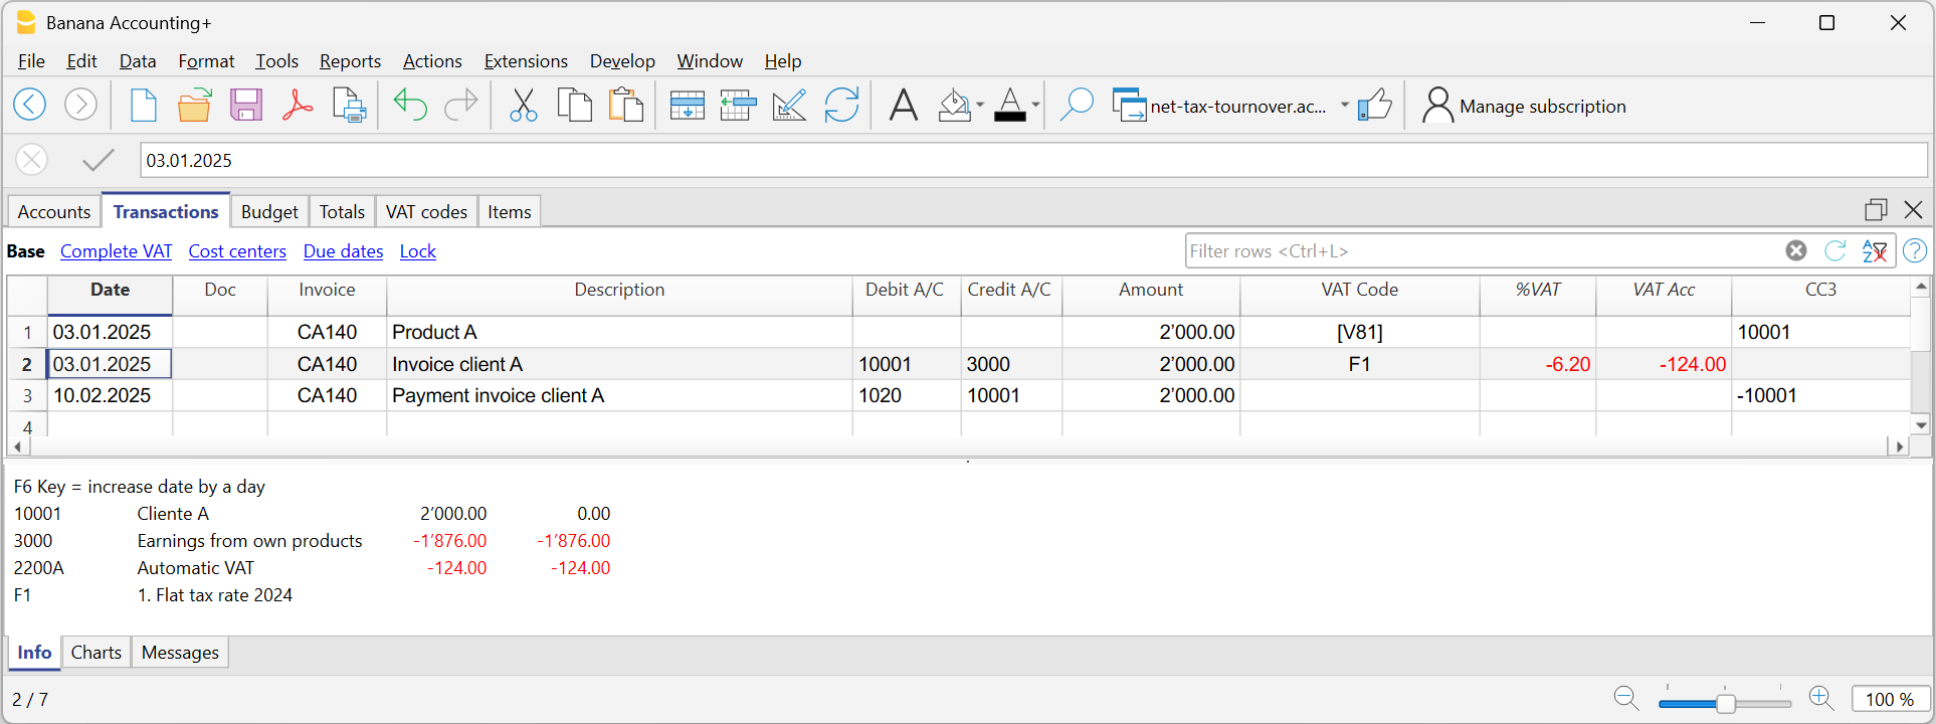
Invoicing on turnover
In integrated invoicing, invoices are created and recorded in the same file. Regarding accrual-based accounting, invoices must be recorded at the time of issuance.
In accrual-based invoicing management, it is necessary to set up the customer subaccount in the Accounts table as shown in the balance sheet.
- All customer accounts must have complete data (first name, last name or company name, address), because when creating the invoice, the program uses this data for the invoice header.
It is possible to create and record invoices with or without VAT.
Accrual-based Invoice
In the accrual-based system, the invoice is created to be sent to the customer, and it is recorded at the same time.
Therefore, with a single transaction, both the invoice is created and recorded:
- In the Date and Doc. column, enter the date and any document number.
- In the Invoice column, enter the invoice number.
- In the Description column, enter the items to be invoiced that should appear on the invoice.
- In the Debit column, enter the customer's account from the subaccount.
- In the Credit column, enter the revenue account.
- In the Amount column, enter the gross amount.
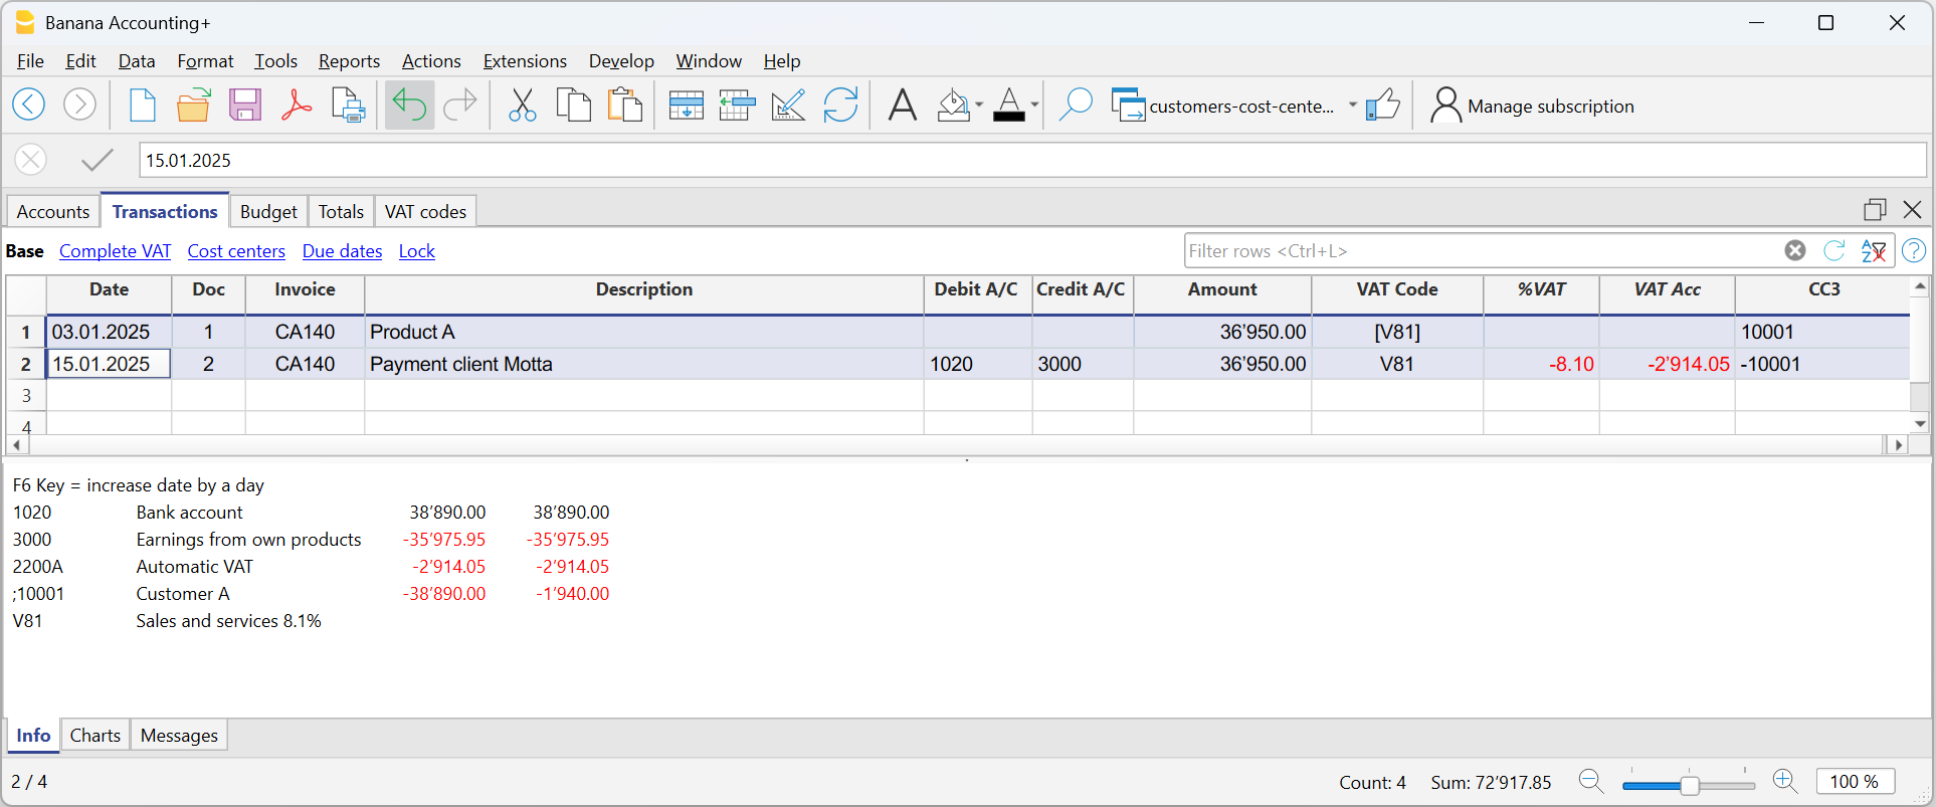
Accrual-based Invoice and VAT – Effective Method
The standard procedure in Banana Accounting for VAT management requires entering the VAT code on the same row where the income is recorded.
Issued invoices are immediately recorded and posted. Income is recognized at the time the invoice is issued.
Therefore, in accrual-based VAT management, the VAT code is added when the invoice is created.
The invoice data is entered in the Transactions table. For each new invoice, enter a new transaction row.
- Enter the date of the transaction
- The invoice number
- In the case of invoicing with Swiss QR with IBAN account, use only numbers or letters, without spaces, separators or other characters. The maximum length allowed is 7 characters.
- In the case of invoicing with Swiss QR with QR-IBAN, use only numbers, without spaces, separators or other characters. The maximum allowed length is 7 digits.
- If Swiss QR is not used, the invoice number can be freely chosen.
- Each invoice must have a unique invoice number, even across multiple accounting years. This is important because using the same invoice number over several years is still considered a single document. If you want to repeat the same invoice number, you must add the year to the invoice number or another identifier to distinguish it from invoices from previous years (e.g. 1234524, 1234525).
- The description text (products, services, consulting...) that will appear on the customer invoice
- In the Debit account, enter the customer account number
- In the Credit account, enter the counterpart (Sales account, Consulting or other)
- Enter the amount
- In cases subject to VAT, enter the VAT Code with the applicable VAT rate. See Print invoices and VAT management.
Invoicing and VAT net tax rate method
If you are subject to VAT under the balance rate or flat-rate regime with the cash-based system, you must record the invoice issuance to the customer and its accounting registration separately, for the following reasons:
- Invoice to be sent to the customer:
It must show a normal commercial VAT rate (e.g., 8.1%), as required by tax regulations. - Accounting of the invoice:
It must instead be recorded in accounting with the effective balance rate (e.g., 6.2%), using the corresponding VAT code (e.g., F1).
This approach is essential to ensure that the VAT paid corresponds to the applicable reduced regime, while still maintaining a formally correct invoice for the customer.
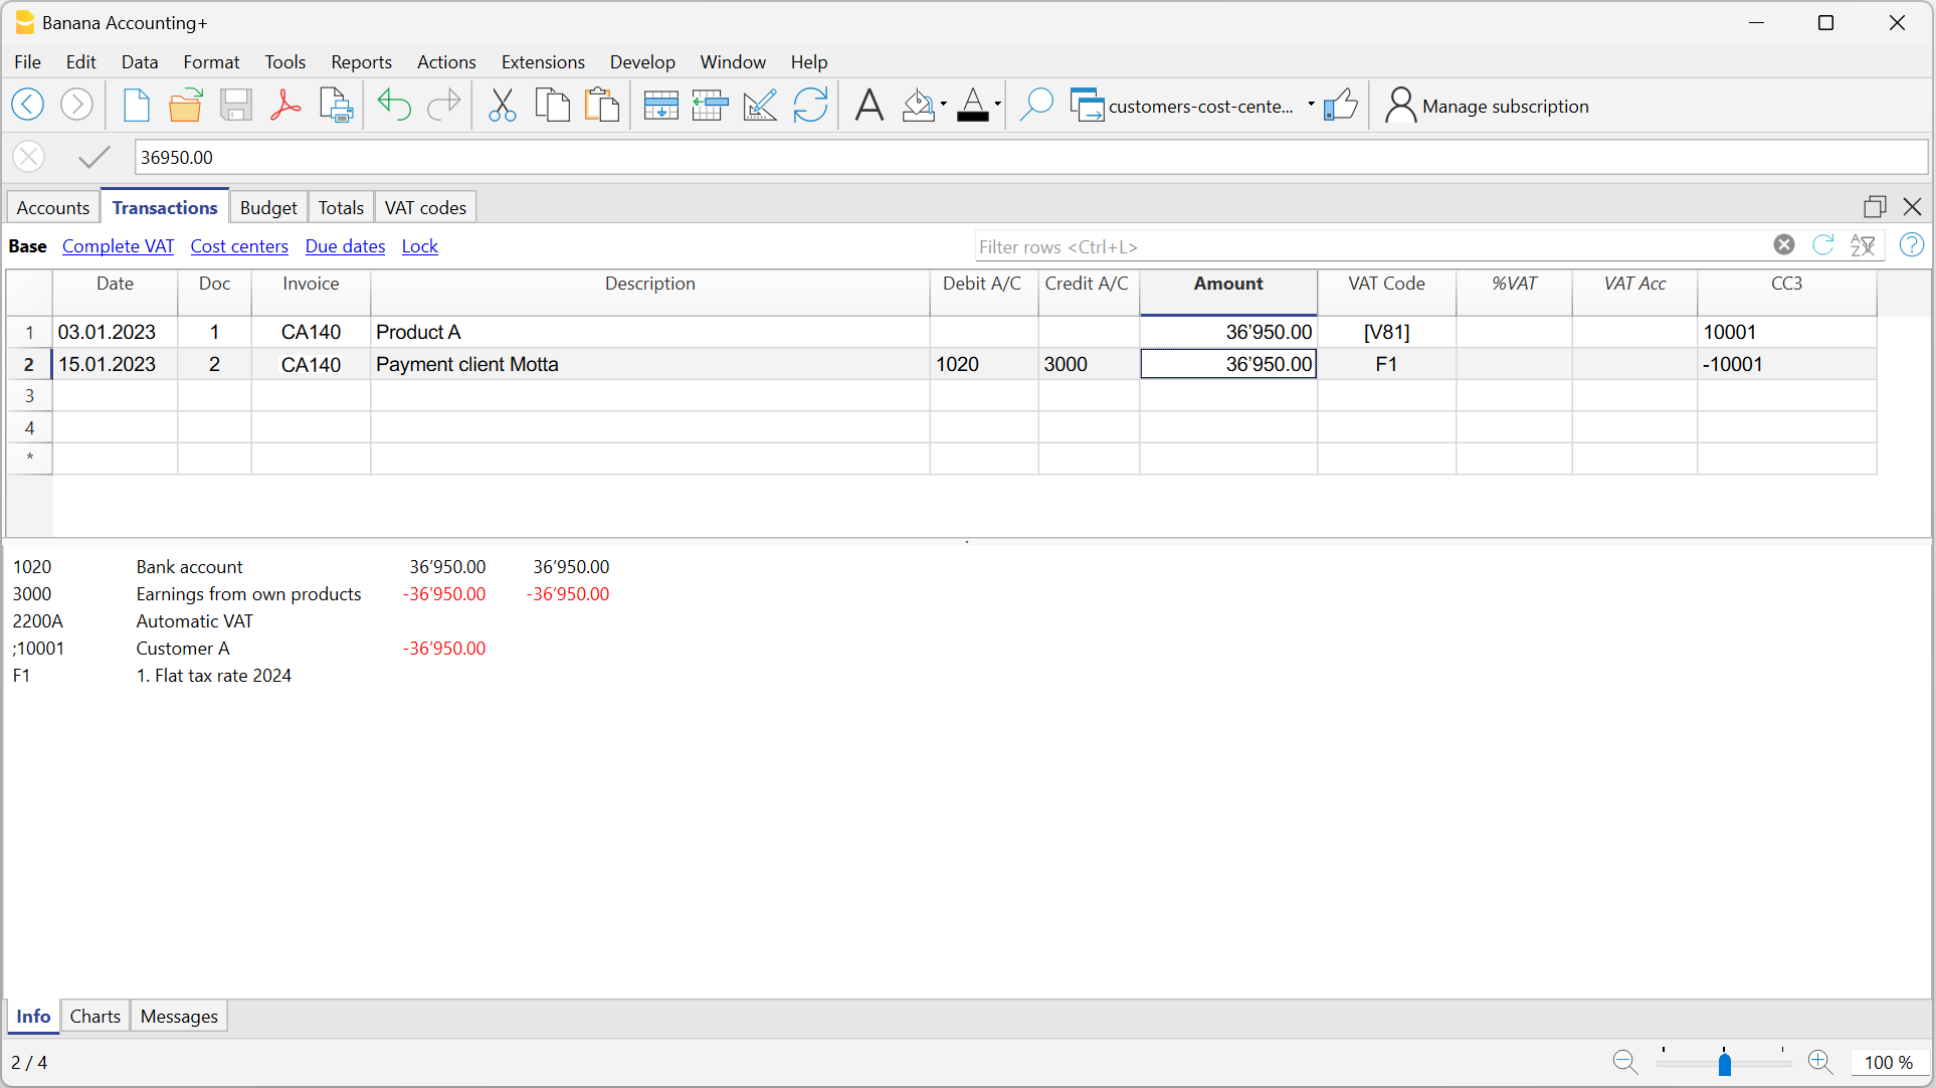
Issuing the invoice to the customer
To issue the invoice to the customer, proceed as follows:
In the Accounts Table:
- Create a customer sub-account with the profit center CC3 (example: ;10001 for customer XX)
- In the Address view, enter all customer data.
In the Transactions table:
- Enter the date and description in the corresponding columns
- In the Amount column, enter the amount
- The Debit and Credit columns must remain empty.
- In the VAT Code column, type the code V81 in square brackets [V81].
VAT codes in square brackets do not generate any VAT entry. - In the CC3 column, indicate the profit center number without semicolon (e.g., 10001).
Since there are no accounts in the Debit and Credit columns, the invoice creation entry will not be recorded in accounting.
Recording the invoice with VAT balance rate
When recording an invoice subject to VAT with a balance rate in accounting, it is sufficient to proceed as with a normal entry, indicating the accounts in the Debit and Credit columns and entering the VAT code corresponding to the balance rate (e.g., F1).
Two recording systems can be used to register the invoice with the balance rate:
- Recording with split
In the VAT codes table, VAT percentages have been assigned to balance rate VAT codes. In the transactions table, by entering the balance rate VAT code (e.g., F1), the program automatically enters the corresponding VAT percentage (e.g., 6.2) and the VAT amount. - Recording without split, by entering the balance rate VAT code (e.g., F1), percentage and amount are not entered. At the end of the period, the specific extension for calculating balance VAT is used.
Based on the rate defined in the extension dialog, the program:- Identifies all entries with balance rate VAT code.
- Automatically calculates the VAT due for the reporting period.
- Totals the amounts on a periodic basis (e.g., monthly, quarterly, yearly).
Discounts and reductions
To enter a discount or reduction in an invoice, add a new row and enter:
- Invoice date
- Invoice number
- Description of the discount or reduction
- Accounts in the Debit and Credit columns. It is important to invert the accounts compared to the sales transaction.
When the customers / suppliers register is set up with cost centers and there are registrations with discounts and reductions, in order for the amount to be reversed, the sign of the cost centers must be inverted. - In case of VAT, indicate the VAT code with the minus sign, so that the VAT is deducted, or, if present use the VAT code for discount and reductions.

Invoicing and VAT with balance rate using the invoicing method
The Banana Accounting procedure for VAT management requires entering the VAT code always on the line where the income is recorded. When accounting is managed based on turnover, the income is recorded when the invoice is issued.
When subject to VAT using the balance rates or flat-rate method, customer invoices must be issued using the normal rates (e.g., 8.1%). However, the accounting of invoices under the balance rates or flat-rate method involves reduced rates (e.g., 6.2%).
- If the amounts are gross, you can record them based on turnover or on cash received, by entering the VAT code in square brackets.
- If the amounts are net, it is not possible to create and post the invoices at the same time. In this case, it is necessary to manage:
- The creation of invoices in an accounting file, using the integrated invoicing or with the Offers and Invoices Application
- The posting of invoices in the accounting file.
In this case, the creation of the invoices must be handled in an accounting file or with the Offers and Invoices Application, and the posting in a separate accounting file.
Issuing an Invoice with Balance Rate and Gross Amounts
To issue an invoice to customers with the normal rate (e.g., 8.1%), it is necessary to create in the Accounts table:
- A customer sub-account using the CC3 profit centers (example: ;10001), completing all customer information in the columns of the Address view.
- Enter the date and description in the corresponding columns.
- The Debit and Credit columns must remain empty.
- In the Amount column, enter the amount.
- In the VAT Code column, type the code V81 in square brackets [V81].
VAT codes in square brackets do not result in any VAT posting. - In the CC3 column, indicate the profit center account without a semicolon (e.g., 10001).
As there are no accounts in the Debit and Credit columns, the invoice creation entry will not be posted.
Posting an Invoice with Balance Rate and Gross Amounts
When recording the invoice in the accounting, to post it using the VAT balance rate, you must enter the transaction as usual, also entering the accounts in the Debit and Credit columns and the VAT code of the balance rate:
- If the VAT breakdown method is used, enter the VAT code for the balance rate (e.g., F1). In this case, the VAT Codes table includes the VAT rates for the balance. In example F1 corresponds to 6.2%.
- If the non-VAT breakdown method is used, enter the VAT code without rate (e.g., F1). In the VAT code table, the balance rate codes do not have rates.
To post the invoice using the balance rate, it is necessary to create in the Accounts table:
- A customer sub-account using balance sheet accounts.
- Enter the date and description in the corresponding columns.
- In the Debit column, enter the customer account (e.g., 10001).
- In the Credit column, enter the income account.
- In the Amount column, enter the amount.
- In the VAT Code column, type the VAT code for the balance rate (e.g., F1)
Rounding in invoice printout
In the printout of invoices integrated in accounting, the total VAT amount corresponds to the sum of the individual VAT transactions that make up the invoice. Since the individual VAT transactions are rounded to the nearest cent, there may be a difference compared to the VAT calculated on the total invoice amount.
To better understand, let's consider the following example:
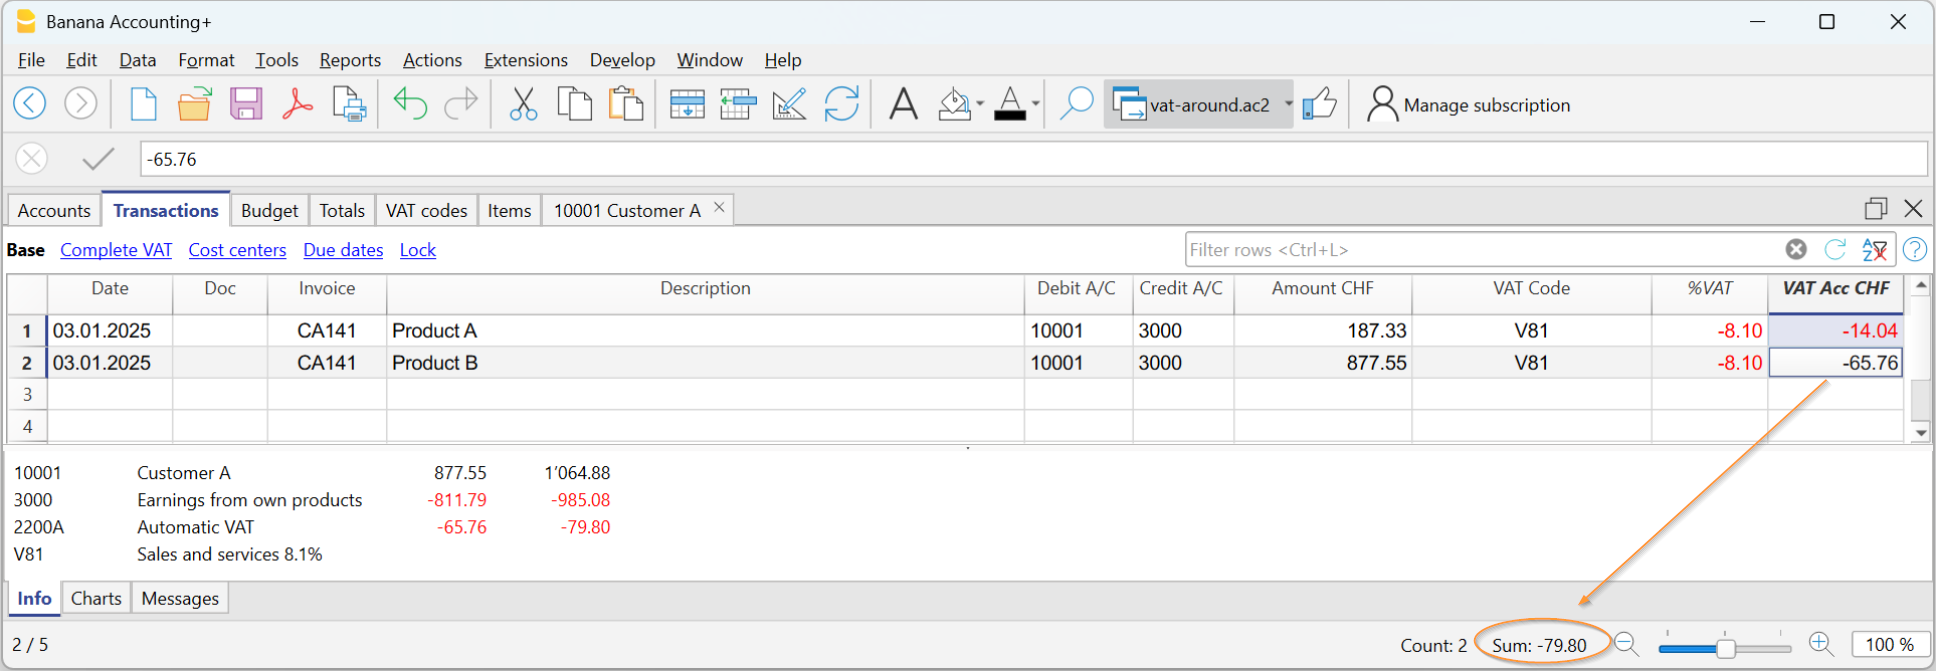
- Row 1: 8.1% of CHF 187.33 = Rounded: CHF 14.04
- Row 2: 8.1% of CHF 875.00 = Rounded: CHF 65.76
- Total: 8.1% of CHF 1064.88 = Rounded: CHF 79.80
The invoice shows a VAT amount of CHF 79.80 instead of CHF 79.79 (amount calculated directly on the total of 1064.88). In fact, the amount of CHF 79.80 corresponds to the sum of VAT individually calculated for each item (CHF 14.04 + CHF 65.76).
This logic is adopted to avoid discrepancies between the VAT amounts recorded in accounting and those shown on the invoice. In this way, the total VAT in accounting matches the one printed on the invoice.
Set customer language
The default layouts include the following languages: Italian, German, English, French, Dutch.
Invoice texts are printed in the customer's language, provided that this is set in the Language column (Accounts table, Address view).
The language is an ISO code, generally of 2 lowercase letters (it=italian, de=german, en=english, fr=french, nl=dutch).
When no language has been indicated for the customer account, the language of the accounting is used, defined in the File menu→ File and accounting properties (basic data) → Other.

Due dates and payment terms
The due date of an invoice can be set up in different ways:
- Generalized due date - identical due date for all invoices
Select menu Reports→ Customers → Settings → General → Invoices are due, indicate the period (in days) after which the invoice is considered due. As an example, if the date of your document is the 10th of May and you enter a value of 10 days, the due date will be the 20th of May. - Due dates per customer - specific for each customer
In the Accounts table, a DateExpiration column is available (if not on display set up via Data → Columns setup ...). The period (in days) after which the invoice is considered to be due can be set up in this column. - Specific dates per invoice
In the Transactions table, Due dates view, the Date Exp. column is visble; you can indicate the expiration date directly in this column. -
Alternative text for the expiration date
It is possible to define a text of your choice as a payment term for each invoice. This will replace the text of the expiration date. Revert to Advanced input -Type column for detailed information.
Print invoices in other currencies
With Banana Accounting Plus, you can also print invoices in foreign currency.
Invoices in foreign currency to be sent to foreign clients.
Required settings:
- Open one of our multi-currency accounting templates.
- Set up in the Accounts table, in the customer ledger, the customer with the foreign currency. Invoices are printed in the currency of the customer's account.
- If you want to send invoices in different currencies to the same customer, you must create accounts in different currencies for the same customer (Accounts table).
- Use the UNI11 layout for printing invoices to be sent abroad.
Invoices in foreign currency with VAT in base currency
It is not normally possible to enter a foreign currency invoice with VAT in base currency. This can be overcome with the following procedures:
Invoices in foreign currencies with VAT using Cash principle
- Open one of our multi-currency accounting templates with VAT with cost centres CC3.
- Set up in the Accounts table, customers in foreign currencies as CC3 cost centres (;).
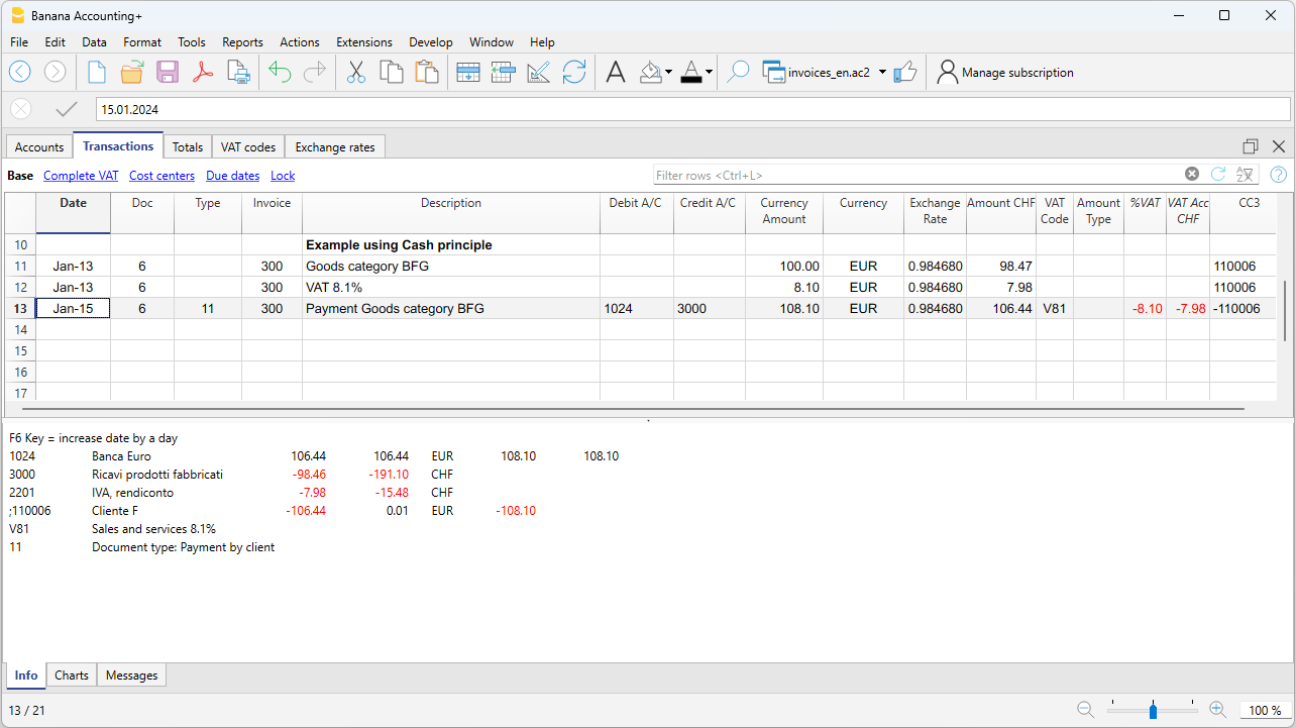
If you wish to send invoices in different currencies to the same customer, you must create accounts in different currencies for the same customer (Accounts table). - In the Transactions table, you must enter the invoice data on several rows:
- In the first row:
- In the Amount column enter the amount net of VAT (without entering any debit or credit account).
- In the column CC3 enter the customer's cost centre account in foreign currency.
- In the second line:
- In the Amount column enter the VAT amount in foreign currency (without entering any debit or credit account), manually calculating the VAT amount in foreign currency.
- In column CC3 enter the customer's cost centre account in foreign currency.
- In the first row:
- For printing invoices with Swiss QR code use layout CH10.
To register the receipt:
- In the Debit column enter the liquidity account.
- In the Debit column enter the revenue account.
- In the VAT Code column enter the VAT code of the sale.
- In the column CC3 enter the customer's cost centre account in foreign currency with a negative sign.
Example: Invoice entry in foreign currency (EUR) with VAT on receipts in base currency (CHF):
Invoices in foreign currencies with VAT on turnover
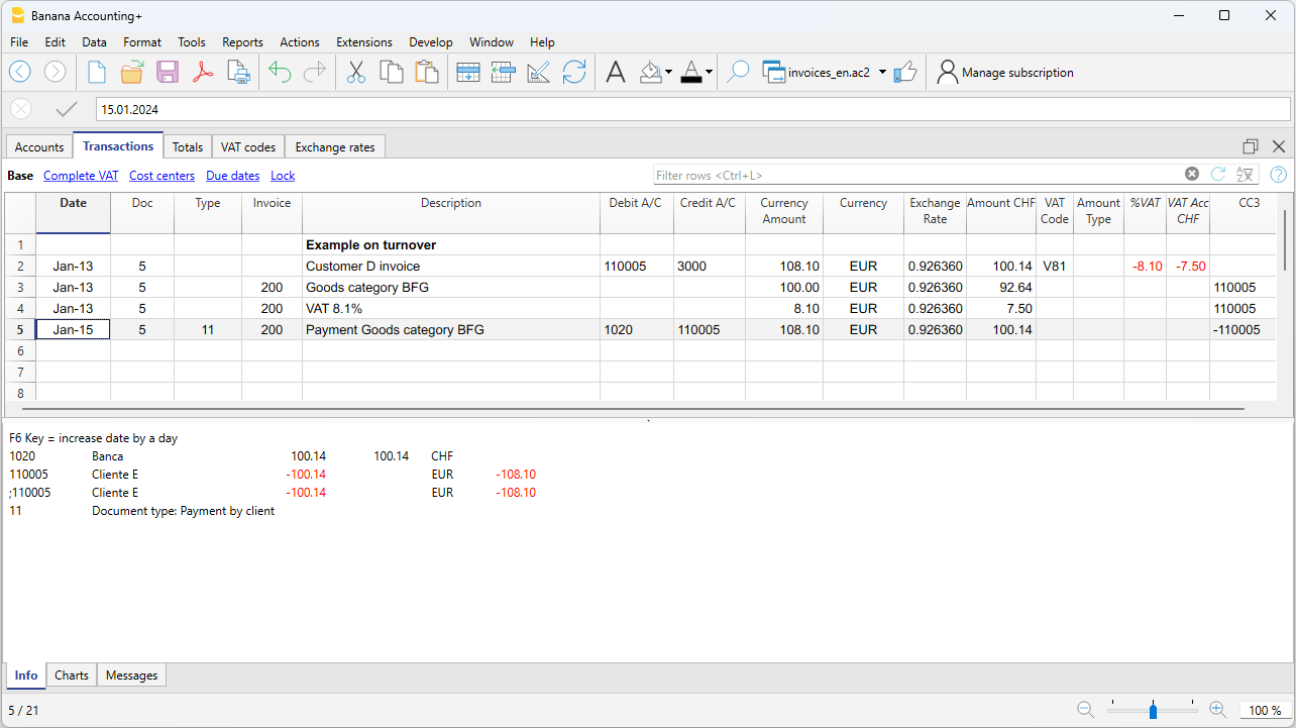
- Open one of our multi-currency accounting templates with VAT and a customer ledger.
- In the Accounts table, set the customers in foreign currencies both as a ledger (Accounts) and as CC3 cost centres (;).
- In the Transactions table, you must enter the invoice data on several rows:
- In the first line enter the invoice issue normally:
- The date, the description, in the Debit account the customer account in foreign currency and in the Debit account the revenue, the amount before VAT and the VAT code of the sale.
- The invoice number does not have to be entered.
- In the second line:
- In the Amount column enter the invoice amount net of VAT (without entering any debit or credit account).
- In column CC3 enter the customer's cost centre account in foreign currency.
- Where the columns Quantity, Unit and Unit Price are used, the unit price must be net of VAT.
- In the third line:
- In the Amount column enter the VAT amount in foreign currency (without entering any debit or credit account), manually calculating the VAT amount in foreign currency.
- In column CC3 enter the customer's cost centre account in foreign currency.
- In the first line enter the invoice issue normally:
Rows with cost centres are simply used to search invoices in foreign currency with VAT.
To register the receipt:
- In the Debit column enter the liquidity account.
- In the Debit column enter the customer's foreign currency account.
- In the column CC3 enter the customer's cost centre account in foreign currency with a negative sign.
Example: Invoice entry in foreign currency (EUR) with VAT on turnover in base currency (CHF):
Advanced input Type column
The Type column in the Transactions table can be used to define the commands that are relevant to the display for printing data specific to your Invoice.
Check the DocType column via menu Data → Columns setup ..., to display the column and use it.
Entering data
Once the column is displayed, you may proceed by entering your data. You will need to:
- Add an empty row after the Date of the Invoice.
- Enter the date of the Invoice in the Date column.
- Enter the required command in the Type column (refer to table below)
- Enter the Invoice number in the Invoice column.
- Enter the data relevant to appear on the Invoice in the Description column.
Invoice to the customer
Typing 10: the Type column will list all possible options available to customize the data of your invoice.
| Invoice data | Column Type | Description column |
|---|---|---|
|
Client address If you want the address to look differently from the one defined in the Accounts table (Address view), you can change it using using the appropriate options. On each row a different element of the address is indicated (name, surname, address...). |
10:adr:fna |
Enter name |
| Shipping address | 10:sadr:pna 10:sadr:fna 10:sadr:lna 10:sadr:str1 10:sadr:cod 10:sadr:cit |
Enter prefix Enter name Enter surname Enter line 1 of address Enter postal code Enter the country |
|
Greetings After the invoice details, you may add a line of text for your final greetings (also see Examples invoices). |
10:gre | Enter your greetings |
|
Final notes One or several rows of notes can be inserted after the details of the invoice and before the greetings (also see Examples invoices). |
10:not | Enter your notes |
|
Order date |
10:ordd | Enter the order date |
|
Order number |
10:ordn | Enter the order number |
|
Parameters (advanced) When wanting to print personalized data on the invoice, you can use the appropriate command. This option is aimed at users with JavaScript programming knowledge, and allows you to change the invoice layout, so as to use the parameters indicated via this command. For further information please revert to Printing custom data. |
10:par | Enter your customized parameters |
|
Payment term Should you want to indicate an alternative text as a payment term, enter the desired text. This will be displayed on the invoice. |
10:ter | Enter the alternative text for the payment term |
|
Text begin |
10:beg | Enter the text printed before the invoice title |
|
Title If you do not wish to use the default invoice title, you can choose a different title. |
10:tit | Enter your text to appear as the invoice title |
|
Items subtotals It is possible to enter intermediate totals for your invoice in the table with the details of the invoice (also see Examples invoices). |
10:tot |
Enter level 0 subtotal |
|
Header line text In the invoice details table you can add headers to group items (also see Examples invoices). |
10:hdr | Enter the text you want to add to the invoice details. Leave empty to add an empty line. |
Intermediate Totals
In order to insert intermediate totals, you will need to add additional rows in the Transactions table:
- Enter 10 in the Type column: select :tot from the drop down menu, 10:tot will display. Enter again : and enter :1
- Enter the appropriate description in the Description column (ex. Total goods)
- Enter the Invoice number (in the absence of number, the total will not be printed).

Example of Invoice with intermediate totals.

Alternative text for payment terms
It is possible to define your own wording as a payment term for each invoice and this will replace the existing text for the expiry date.
- Enter an additional line with the same invoice number in the Transactions table.
- You will need to enter 10: in the Type column and select :ter from the drop-down menu, therefore the wording 10:ter will appear
- In the Description column, enter your text (ex 30 days net, 60 days etc ..).
When the invoice is printed, the value assigned as a payment term will be displayed.
Additional customisations
Other customisation options, such as the definition of bank details or final greetings, are available in the Print invoices dialog.
Customise invoice printing
Invoice printing can be customised and adapted to specific needs.
Set your company address (sender)
In the File menu → File and accounting properties (Basic data) → Address , set the address of your company.
Set up the list of customers in the Accounts table
- In the Accounts table, set up the customer's register.
- Display the address columns from the Address view and enter the customer addresses.
If the Address view is not visible, add it via the menu Tools → Add new functionalities → Add address columns in the Accounts table. - Configure the customer settings in the menu Reports > Customers > Settings.
Retrieving customer addresses from Excel
When customer data is on an Excel file, it can easily be taken back to the Accounts table, Address view.
It is assumed that in the Accounts table, at the end of the Chart of Accounts, there is the customer or shareholder register set up. Make sure you have enough empty rows to insert the data copied from Excel.
Proceed as follows:
- Select from Excel the column with the data to be copied and use the Copy (Ctrl+C) command.
- Go to Banana, Accounts table (Address view), position yourself in the corresponding column and issue the Paste (Ctrl+V or Paste) command from the Edit menu.
- Repeat this operation for all address columns (Account, First Name, Last Name, Organisation, Street, Zip, Country Code, Language).
The data corresponding to the mentioned columns are required for printing the invoice. - If you do not have all the columns mentioned in the Excel file, you must add the missing information manually.
Set customer language
You can print invoices in the customers' language. To do this you must first set the customer's language.
Logo setup position and sender address
To set the logo, you must:
- Upload the logo image in the menu File → Logo setup.
- To use the logo in the invoice, in the Invoice Settings you must activate the Logo box and enter the name of the customisation you used, respecting upper and lower case, in the Logo Name field.
For example, you can place the logo on the left and the address on the right and change the size of the logo.
The sender's address, if the default settings are not changed, is entered on the right, regardless of the presence of the logo.
If you want to set the sender address on the left without any logo, please see the following page:
Customise address in invoice header
The style of the sender's address in the invoice header (colour, size, font..) is set by default by the program.
The Advanced Plan of Banana Accounting Plus allows you to customize the style of the address. For more information see the Examples page.
Set invoice information
Invoice information is information about the date, customer number, due date, etc., which is usually located just below the header and next to the customer address.
The CH10 and UNI11 layouts allow you to define which invoice information to include and which to exclude from printing. You can find instructions on the Invoice Settings page.
For the other print layouts (CH01-CH09 / UNI01-UNI08), the information cannot be modified.
Set the payment term
The payment term for invoices by default is 30 days from the invoice date.
To change the payment term proceed as follows:
- In the Transactions table, ad a row to the invoice
- In the Date column enter the invoice date
- In the DocType column enter 10:ter (:ter Term of payment)
- In the Invoice column enter the invoice number
- In the Description column enter the desired payment term (for example "10 days")
Your text will be shown in the invoice Information.
Set customer address position
The CH10 and UNI11 layouts allow you to define the position of the customer address and the elements of the address. Please visit the Invoice Settings page for more information.
For other print layouts (CH01-CH09 / UNI01-UNI08), the location and composition of the customer address cannot be changed.
Set shipping address
To enter a shipping address in addition to the customer address, proceed as follows:
- Use the Type column of the Transactions table , command 10:sadr.
- Add a line to the invoice in the Transactions table .
- In the Date column, enter the date of the invoice
- In the Type column, enter::
- 10:sadr:fna for the name.
- 10:sadr:lna for the surname.
- 10:sadr:str1 for the address (street and number).
- 10:sadr:cod for the postcode.
- 10:sadr:cit for the location.
- In the Invoice column, enter the invoice number.
- In the Description column, enter the text to be displayed.
- With the CH10 and UNI11 layouts, go to Invoice settings → Customer address section and tick the Shipping address entry.
The data entered via the Type column of the Invoice table are taken over and inserted on the printout of the invoice.
Set title/object
To enter the title/object of the invoice, you have two options:
- Use the DocType column from the Transactions table, entering the text 10:it
- For each invoice you can define a title.
- If you leave the field empty, the default text is used.
- A text entered in the DocType column always has priority over entering the title in the layout settings (see next point).
- With the CH10 and UNI11 layouts, you can enter the text in the invoice Settings→ Texts section → Invoice title.
- The title applies to all invoices printed with this layout.
- The title applies only if no title has been defined as per the first point.
If no text is entered, the program will use the default text.
Set initial text
To enter the title/object of the invoice, you have two options:
- Use the DocType column from the Transactions table, entering the text 10:beg
- For each invoice you can define a title.
- If you leave the field empty, the default text is used.
- A text entered in the DocType column always has priority over entering the title in the layout settings (see next point).
- With the CH10 and UNI11 layouts, you can enter the text in the invoice Settings → Texts section → Begin text.
- The title applies to all invoices printed with this layout.
- The title applies only if no title has been defined as per the first point.
Setting up the invoice details
Use the Transactions table to enter invoice data.
See also Discounts and rebates.
With the CH10 and UNI11 layouts, you decide which columns to display in the printout. See how to do this on the page Invoice Settings → Invoice Details.
For the other print layouts (CH01-CH09 / UNI01-UNI08), the columns are not editable.
Set final texts
To enter the final text of the invoice proceed as follows:
- From the Invoice Print Dialog → Options section
- Select the desired language
- Enter the text in the Final text field
- This text is applied to any print layout.
The CH10 and UNI11 layouts also allow you to define a final text from the Invoice Settings
- Go to Invoice Settings → Texts section→ End text field and enter your text for each language.
- This text is applied to all invoices in the same .ac2 file created with that layout.
- This text has priority to whatever text has been entered in the has priority over the text entered from the Invoice Print Dialog.
To set different final texts for each invoice, you must use the DocType column of the Transactions table:
- In the DocType column, enter 10:not (Notes).
- In the Description column, enter the desired end text. The text you enter will appear on a single line.
- To add additional rows of notes, you must repeat the entry in the DocType and Description columns on multiple rows.
Set bank account number
If you don't use the QR-Code, you need to enter the bank account number as a reference for the invoice payment.
See the chapter above Set final texts to enter the bank account number.
Set IBAN for Swiss QR-Code printing
If you want to create QR invoices with IBAN account, you need to:
- Use the Layout CH10 for Banana Accounting Plus
- Set up IBAN account
- Set up the printing of the Swiss QR-Code
On the QR-Invoice with IBAN account page you will find more information for setting up QR-invoices with IBAN account.
Set up QR-IBAN for Swiss QR-Code printing
If you want to create QR-invoices with QR-IBAN account, you have to:
- Use the Layout CH10 for Banana Accounting Plus
- Set up QR-IBAN account
- Set up Swiss QR-Code printing
On the QR-Invoice with QR-IBAN page you can find more information about the settings of QR-invoices with QR-IBAN account.
Print QR form without amount and address
If you want to print only the QR-bill without amount and customer address, you have to:
- Use the QR-Invoice extension without amount and address.
- Set the currency, address and IBAN account.
- Create the bulletin with QR code.
See also how to print an Invoice without amount.
Set styles and colors
Invoice print layouts also have a setting where you can define:
- The font
- Enter the name of the font (e.g. Arial, Helvetica, etc).
- The colors
- You can use the English designation (black, yellow, white, blue, red, etc.).
- Or the hexadecimal value (HEX) preceded by the # sign (e.g. #000000, #009FE3, #FF00EA).
- Color codes are easily found on the internet. For example, you can consult the table at https://www.w3schools.com/cssref/css_colors.asp.
The CH10 and UNI11 layouts also have an Invoice Settings to define font size.
Set Bold texts
In the Invoice settings page you will find information on how to apply bold style to invoice texts.
Adding images to invoices
The Advanced Plan of Banana Accounting Plus allows you to add images to the offers and invoices to be sent to customers.
This functionality makes the invoice even more customizable and the client who receives it has a more complete and direct vision of the invoicing of the items.
See our information pages on how to add images:
Close cashed invoices
There are two ways to close open invoices:
Other resources
Print invoices
- You can choose the Print layout.
- You can customise invoice printing by changing the settings.
- Several layouts are available for invoice printing, here are the recommended ones:
- The CH10 layout for all users in Switzerland (with Swiss QR-Code).
- The UNI11 layout for all users in other countries. (Same as CH10, but without the QR-Code).
For more information on customisation, see:
With the Advanced plan of Banana Accounting Plus it is also possible to print several invoices at the same time and obtain single PDFs for each of them! For more information visit the page Print invoices or customer statements as separate PDFs.
Print invoice dialog

From here you can:
- Select the invoice or invoices you wish to print.
- Set the layout to be used for printing the invoice.
- Access the layout settings to customise the printout.
Once the print options have been chosen, the OK button displays the invoice in the print preview window.
From the invoice preview you can:
- Print the invoice.
- Save it in PDF so that you can easily send it by e-mail
- Save the invoice in other formats.
- Access the Print Invoices dialogue.
Print tab
Invoice numbers
You can print single or multiple invoices:
- For single prints, indicate the number of the invoice.
- For multiple prints, indicate the numbers of the invoices between commas "1,3,6".
- To print a range ( from..to..) indicate the numbers separated by hyphen "1-3" .
If the invoice itself contains a '-', for example if you have an invoice number '2016-1', this must be enclosed in brackets {}, to distinguish the numbering of a range of documents {2016-1}-{2016-3}.
Invoices from
This option allows you to print all invoices included in the selected period. You need to enter an initial and final date.
Unprinted invoices
Invoices where the InvoicePrinted column of the Transactions table is empty are printed. All unprinted invoices are therefore printed.
Layout
The styles allow you to change the invoice layout.
Layout Preferences
Requirements to be able to use the layout preferences:
- Banana Accounting Plus (version 10.1.7 or more recent).
- Advanced plan
This option allows you to set the preferences offered by the selected layout.
If a layout with no preferences is selected, this section is not displayed in the dialogue box.
- Print as
You can select the type of document you wish to print, the choices are:- Automatic: prints the document in invoice format.
- Delivery note with amounts: prints the document as a delivery note.
- Delivery note without amounts: prints the document as a delivery note, without showing the amounts and the total.
- Estimate: prints document as estimate.
- Order confirmation: prints the document as order confirmation.
- Proforma Invoice: prints document as proforma invoice.
- Invoice: prints the document in invoice format.
- QR Slip: prints only the QR slip (for layout CH10 only).
- 1st reminder: prints the document as first reminder.
- 2nd reminder: prints the document as second reminder.
- 3rd reminder: prints document as third reminder.
The chosen document type is not saved for the next time, instead it is set to "automatic" again.
Layout preferences are offered by the following layouts:
Other layouts
This button takes you to the Manage extensions dialog window, where you can install new layouts, update existing ones with the latest versions, or add your own customised layouts.
Settings
Allows you to access the settings dialogue of the selected layout, where you can customise the printing of the invoice. Each layout has its own customisable settings.
Update the InvoicePrinted column after printing
You can make this column visible by using the Data menu → Columns setup command.
The program will update the content of the column Printed after the print preview, adding the text 1. This will allow the Select unprinted invoices command to only print the invoices with no content in this column.
Options tab
In this section, language-specific texts can be added, for example, to indicate final greetings or bank details for payment. Depending on the customer's language, the programme will display at the end of the invoice the texts saved for the language indicated.
Only one type of text can be entered, one for each language.
The texts entered here are taken over when printing all invoices, whichever print layout is used.
To enter a final text:
Menu Reports > Customers > Print invoices.
In the Options section, enter the desired text.
Confirm with OK.
The text entered will appear in the print preview of the invoice.

Adding different types of end texts
In order to add different types of notes in invoices, please refer to the following paragraph in page:
Export to PDF
The program displays a preview of invoices or customer statements. From the print preview, using the Export PDF command, you can create:
- A single file that contains all invoices or customer statements.
- Separate files for each individual invoice or customer statement.
Print Delivery notes
With Integrated invoicing, when you create an invoice, it is automatically recorded in the accounting system and the customer's account. It is possible to print an invoice with the wording "Delivery Note" containing the same invoice data, using layouts CH10 and UNI11.
However, it is not possible to create a standalone record for the delivery note without any accounting impact, one that doesn't debit the customer's account or credit other accounts.
Mandatory requirements to use the layout preferences:
- Banana Accounting Plus (Release 10.1.7 or later).
- The Advanced plan
How to print a delivery note
In the Transactions table select the row where the delivery note to be printed is located and proceed as follows:
- Menu Report > Customers > Print invoices
- Select Layout CH10 or UNI11
- Under Print as, select:
- Delivery note with amounts
In this case, amounts in details and total amount are included in the delivery note. - Delivery note without amounts
Only the details of the dispatched goods are displayed in the delivery note, without any amounts.
- Delivery note with amounts
- Conferm with OK.
Delivery address
When printing the delivery note with an address other than the billing address, the delivery address must be entered in the Transactions table, using the Type column.
In this case, the delivery note will print the address entered in the Transactions table and not that of the respective customer, which is instead found in the Accounts table, Address view.
Printing customization
All settings that characterise Layout CH10 and UNI11 are also retained when printing the delivery note.
To change the settings, go to Print Layout Settings.
Under Texts > Delivery Note you can define the initial and final texts in the delivery note.
Print example:
Print Estimates
With Integrated invoicing, when you create an invoice, it is automatically recorded in the accounting system and the customer's account. It is possible to print an invoice with the wording "Estimate" containing the same invoice data, using layouts CH10 and UNI11.
However, it is not possible to create a standalone transaction for the Estimate without any accounting impact, one that doesn't debit the customer's account or credit other accounts.
Requirements in order to use layout preferences to select the label "Estimate" are
- Banana Accounting+ (version 10.1.7 or later).
- Advanced plan
How to print an estimate
In theTransactions table, select the row that corresponds to the estimate and proceed as follows:
- Menu Reports > Customers > Print invoices
- Select Layout CH10 or UNI11
- Select the option Print as, and choose Estimate
- Confirm with OK.
The offer is always printed without the Swiss QR bulletin.
Printing customization
All the settings that characterize the CH10 and UNI11 Layout are also retained in the printing of the estimate.
To modify the settings, go to the Print Layout Settings.
In the Texts > Estimate section, you can define the initial and final texts of the quote.
Print Reminders
In Banana Accounting Plus you can print reminders in two different ways:
Print Reminders from the Print Invoice dialogue
Banana Accounting Plus, with the CH10 and UNI11 layouts, also allows you to print reminders.
Requirements for using layout preferences:
On the basis of the invoice data entered in the Transactions table, reminders can be printed.
How to print a reminder
In the Transactions table select the row where the invoice for which you need to print the reminder is located and proceed as follows:
- From the Menu Reports > Customers > Print Invoices
- Select Layout CH10 or UNI11
- Under Print as, select one of the following options:
- 1. reminder
- 2. reminder
- 3. reminder
- Confirm with OK
Print customization
All settings that characterise the CH10 and UNI11 layouts are also retained in the reminder printout.
To change the settings, go to Print Layout Settings.
Under Texts → Reminder you can define the start and end texts in the reminder.
Print example:
Invoice collection registration
There are two ways to close open invoices:
- Manually register the collection of customer's invoice
- Automatically register by importing the data in the bank statement in ISO 20022 format.
Closure with manual recording
To manually record the receipts of the invoices, see the following pages
- Closing with transaction on the turnover principle method
- Closing with transaction on the cash method
Closing with ISO 20022 data import (Switzerland)
To automatically close open invoices by importing statement data, you must:
- Download and save on your computer the data in ISO 20022 format directly from the bank's website.
Files in ISO 20022 formats camt052, camt053 and camt054 are supported for Swiss specifications. - Install the ISO 20022 Camt Bank Statement (Switzerland) extension.
- Set some parameters of the extension.
- Import the transactions by selecting the Camt Bank Statement ISO 20022 (Switzerland) extension.
With the import, the program automatically creates records in the Transactions table and enters the data in the corresponding columns:
- In the Date column, the date of the invoice collection.
- In the Invoice column, the invoice number extracted from the QR reference number (see parameters).
- In the Description column, the QR reference number.
- In the A/C Credit column, the customer account extracted from the QR reference number (see parameters);
- The extracted customer account will be saved as an account/category or cost center based on the parameters.
- In the Amount column, the invoice amount.
- In the A/C Debit column, the counterpart account (the bank account where the amount has been collected) if this has been enabled during the import.
For more information, see the Camt ISO 20022 (Switzerland) Bank Statement page.
QR References
The codes of the QR references are explained on the following pages:
- With the IBAN account, the Structured Creditor Reference (SCOR) type is used.
- With QR-IBAN account the QRR Reference type is used.
Kundenkonto und Rechnungsnummer bearbeiten
Wenn Sie die Kundennummer sowohl im Postenbuch als auch in den Kosten- und Profitstellen ändern oder die Rechnungsnummer anpassen, stellen Sie sicher, dass keine offenen Rechnungen aus den Vorjahren vorhanden sind.
Kundenkonto bearbeiten ohne Anfangssaldi
Das Kundenkonto kann mit dem Befehl Umbenennen geändert werden.
Wenn bereits Buchungen mit dem alten Konto existieren, werden diese automatisch auf das neue Kundenkonto aktualisiert.
Es wird empfohlen, ein Kundenkonto zu Beginn des Jahres umzubenennen, sofern keine offenen Rechnungen vorhanden sind.
Kundenkontos bearbeiten mit Anfangssaldi
Wenn ein Kundenkonto mit Eröffnungssalden (offenen Rechnungen) umbenannt werden soll, kann das Konto nicht einfach geändert werden. Stattdessen muss ein neues Konto mit der neuen Nummerierung angelegt werden. Der Eröffnungssaldo wird anschliessend durch eine Buchung vom alten Konto auf das neue Konto übertragen.
- Fügen Sie in der Tabelle Konten das neue Konto mit der neuen Nummerierung hinzu.

- Erstellen Sie in der Tabelle Buchungen eine Buchung, um den Eröffnungssaldo vom alten Konto auf das neue Konto umzubuchen.
- Falls im neuen Jahr noch Rechnungen existieren, die sich auf das alte Konto beziehen, können diese dem neuen Konto zugeordnet werden. Dazu muss die Kontonummer in allen zugehörigen Buchungen geändert werden.
Wichtige Hinweise:
- Seien Sie besonders vorsichtig, wenn Rechnungen bereits an den Kunden gesendet oder bezahlt wurden.
- Falls die Belegnummer auch die Kundennummer enthält, prüfen Sie, ob eine Änderung erforderlich oder möglich ist.

- Im Menü Aktionen > Kundenbericht > Offene Rechnungen pro Kunde wird ein Bericht angezeigt, der die Schliessung des alten Kontos sowie die Übertragung des Saldos auf das neue Konto dokumentiert.
- Ein Konto mit der alten Nummerierung und einem Nullsaldo kann im folgenden Jahr gelöscht werden, sofern der Anfangssaldo Null beträgt.

Ändern einer bereits gebuchten oder ausgestellten Rechnungsnummer
Wenn Sie die Nummer einer noch nicht bezahlten Rechnung ändern möchten, stehen Ihnen zwei Möglichkeiten zur Verfügung:
- Ersetzen Sie die Rechnungsnummer direkt in der ursprünglichen Buchung der Rechnung.
Diese Vorgehensweise wird nicht empfohlen, wenn die Rechnung mit der alten Nummer bereits in der Vorjahresdatei erfasst wurde.
- Stornierung und erneute Buchung
- Stornieren Sie die ursprüngliche Buchung der Rechnungsausstellung.
- Erfassen Sie eine neue Buchung mit folgenden Angaben:
- Spalte Rechnung – Geben Sie die neue Rechnungsnummer ein.
- Spalte Typ – Tragen Sie den Wert 15 ein (schliesst den Kundenbeleg).
- Spalte Soll – Geben Sie ein Transferkonto an.
- In der Spalte Haben – Geben Sie das Kundenkonto an.
- Spalte Betrag – Erfassen Sie den Rechnungsbetrag.
Diese Vorgehensweise wird empfohlen, wenn die Rechnung mit der alten Nummer in der Vorjahresdatei erfasst wurde, da sie sicherstellt, dass die Änderung korrekt nachvollzogen werden kann.

Credit notes
Credit notes have their own TypeDoc, different from invoices.
Enter your transaction, as if it was an invoice.
- In the Invoice column, you must indicate the invoice number to which the credit note refers.
The accounts will follow the logic of recording a credit note. As a result, the amount of the document will be negative. - Enter '12:' in the Type column.
- Enter in the Description column the text that will appear in the Credit Note details.
In some print layouts of Banana 9, the wording Invoice will however always be printed; to change, proceed as follows:- Enter a new row with identical invoice number and 12:tit in the Type column.
- Insert Credit Note in the Description column.
Printing the credit note
The same command is used as the one for printing invoices: Reports → Clients → Print invoices.

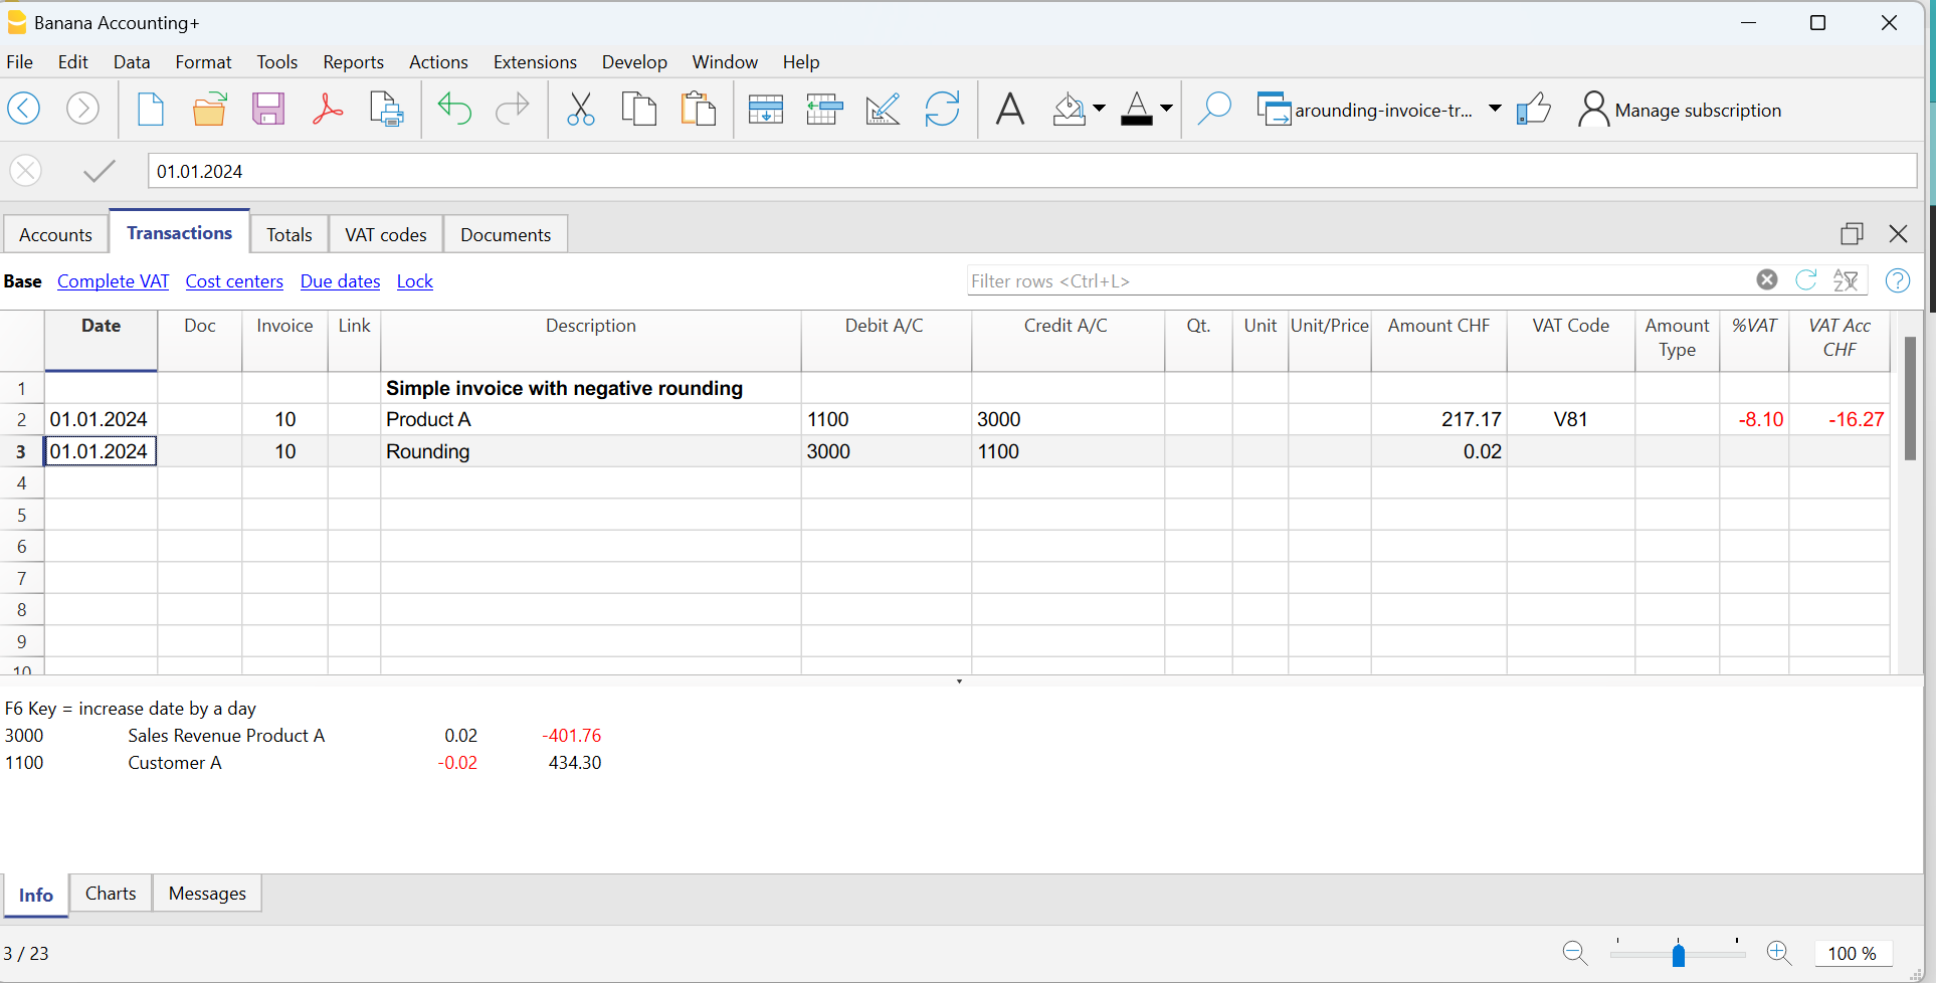
Roundings in invoices
If there is a rounding in the invoice printout, the rounding must be reported into the accounting, otherwise the programme will report an error, indicating the difference to be recorded.
From the menu Reports > Customers > Settings > Advanced it is possible to set the roundings of the invoice to the desired cents, but only in base currency.
If you do not wish to round the invoice amount, you must set the rounding in the field Invoice rounding (basic currency) to 0.01; the invoice total will correspond to the amount of the transactions.
In the Exchange Rates table, the Reference Currency column typically contains the base currency, while the Currency column contains the foreign currency.
When the reference currency is not the base currency, it is not possible to set rounding from the customer settings (menu Report > Customers > Settings > Advanced). In this case, to set rounding, you need to use the Rounding column in the Exchange Rates table (menu Data > Columns setup > display the Rounding column). If you do not wish to round the invoice amount, set the rounding to 0.01 in this column.
Record positive roundings in customer chart of accounts
When there is a positive rounding, enter the following in the Transactions table:
- Enter the date of the invoice in the Date column.
- Enter the invoice number in the Invoice column.
- Enter a description in the Description column.
- Enter the customer's account in the Debit column.
- Enter the counterpart (Sales, Consulting or other account) in the Credit column.
- Enter the hundredths of the rounding in the Amount column.

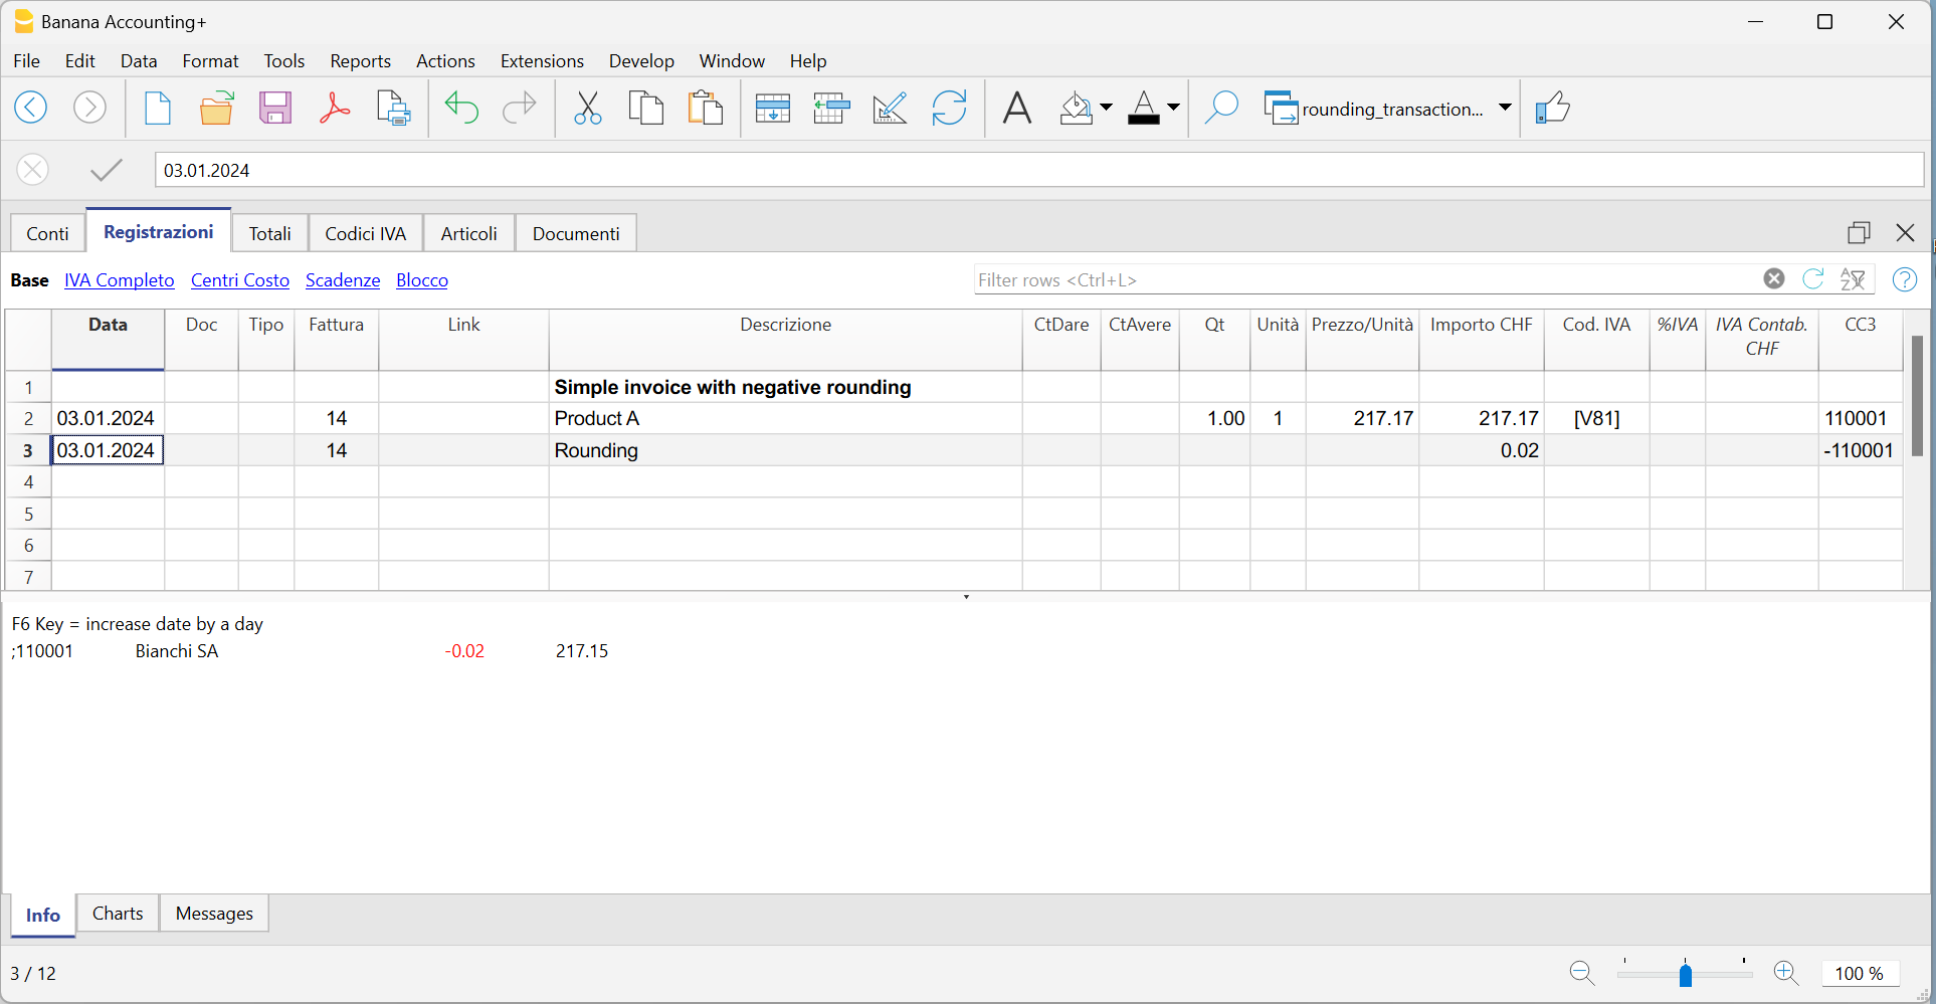
Record negative roundings in customer chart of accounts
When there is a negative rounding, enter the following in the Transactions table:
- Enter the date of the invoice in the Date column.
- Enter the invoice number in the Invoice column.
- Enter a description in the Description column.
- Enter the counterpart (Sales, Consulting or other account) in the Debit column.
- Enter the customer account in the Credit column.
- Enter hundredths of the rounding in the Amount column.
Record positive roundings in the cost centre (CC3)
When there is a positive rounding, enter the following in the Transactions table:
- Enter the date of the invoice in the Date column.
- Enter the invoice number in the Invoice column.
- Enter a description in the Description column.
- Leave the Debit column blank.
- Leave the Credit column blank.
- Enter hundredths of a rounding in the Amount column.
- In the CC3 column, enter the customer's cost centre.
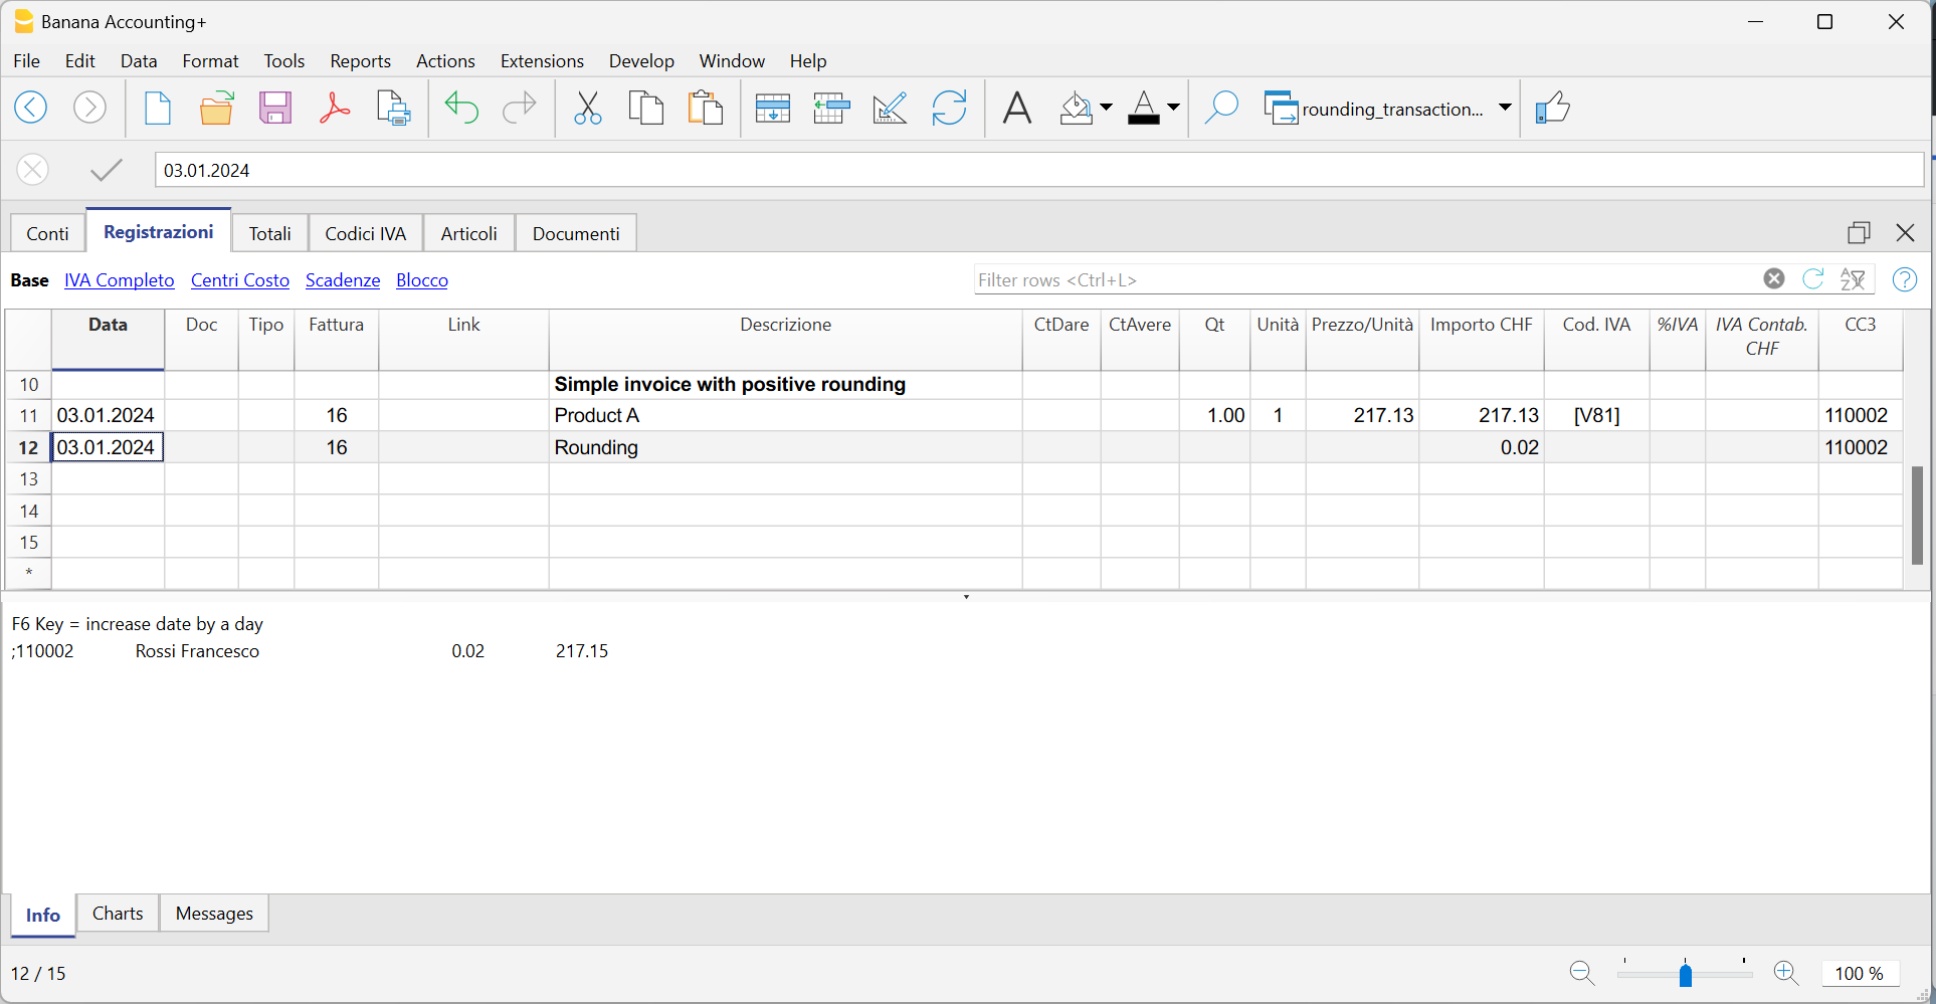
Record negative roundings in cost centre (CC3)
When there is a negative rounding, record in the Transactions table as follows:
- Enter the date of the invoice in the Date column.
- Enter the invoice number in the Invoice column.
- Enter a description in the Description column.
- Leave the Debit column blank.
- Leave the Credit column blank.
- Enter hundredths of the rounding in the Amount column.
- Enter the customer's cost centre with a minus sign in front in the CC3 column.