Import and automation
The import and automation features of Banana Accounting allow you to easily integrate data from your bank statements and automate your transactions.
These tools simplify daily management, reduce errors, and improve the efficiency of accounting work.
Thanks to these features you can:
- Save time by automatically importing transactions and data;
- Reduce posting errors thanks to automation rules;
- Ensure transaction balancing through the transfer account;
- Keep your accounting always up to date;
- Work faster, more accurately, and in a more integrated way.
Import into accounting
The Import into accounting function allows you to automatically insert transactions, contacts or other data from external files into your accounting file.
You can import transactions from bank statements, invoicing software or spreadsheets, choosing the most suitable format (CSV, Excel, MT940, ISO 20022, etc.).
During the import process, Banana matches the data with the correct accounts, greatly simplifying the posting of transactions.
Automation
The Automation features allow you to speed up repetitive or complex workflows.
You can define Import Rules, create custom extensions, or use scripts that automatically perform specific actions such as updating tables, importing data, or generating reports.
Automation allows you to keep your accounting up to date quickly and accurately, with minimal manual intervention.
The Clearing account in imports
During the import of transactions, the Clearing account serves as a temporary account to ensure the balancing of entries. When importing transfer entries from different bank accounts, to avoid recording a transfer twice when importing data from multiple banks, using the transfer account as a counter account ensures the balances are correct.
It is a useful method for correctly checking and balancing imported transactions.
Import data from other programs
The Import data from other programs function allows you to import entire accounting files from other software or previous versions of Banana.
You can easily transfer the chart of accounts, opening balances, transactions, and contacts, maintaining continuity in your work. You can import data using various formats, such as .Txt, Excel, CSV, etc.
Banana also includes extensions that allow you to import data from other programs, such as:
Import into accounting command
The import command is activated from the Actions menu → Import into accounting and allows you to import data from files in the following tables:
- Transactions - Bank transactions
Used to import bank statements into the Transactions table. - Transactions - Generic transactions
Used to import transactions in the Transactions table. - Accounts
Used to import accounts in the Accounts table. - VAT Codes
Used to import VAT codes into the VAT Codes table. - Exchange rates
Used to import exchange rates into the Exchange rates table. - File
Imports data into multiple tables and also into the Accounting File Properties. This type of import is used for example when converting the chart of accounts.
To import data from other programmes, see the page Retrieving data from other programs.
Import procedure
- Choose the destination table for the data.
- Choose the file type to be imported.
- Specify the name of the file.
- Choose the movements to be imported.
Supported import formats
Various import formats are available depending on the type of destination table.
- Import from other Banana Accounting files (.AC2)
Prepared to convert data from files. - Text files with header (CSV/TXT)
For files created that export data in the format required by Banana Accounting.
See the technical instructions on how to prepare these files. - Default file formats (generic)
ISO 20022 (generic). - Import via an import extension
Usually for bank statements.
The import extension is an additional Banana Accounting program that transforms data from a specific format
The user must install the appropriate extension.
Should there be a need to import from other file types not included in the list, a specific Banana Import Extension can be developed.

Import parameters
File name
- Indicate the name of the file of which the data need to be imported.
- For certain types of imports (e.g. bank statements)
- You can also indicate multiple files together, either by selecting them with the browse dialog or by entering them separately with a semicolon ";".
- You can indicate a zipper file that contains multiple import files.
- If you specify multiple files, they must all be of the same type.
Import data from clipboard (Excel)
With this option active, the data, instead of being read from the file, is read from the clipboard.
It is used to import data from files that cannot be directly read by Banana, such as bank statements in Excel format, or from another programme.
The advantage of importing data and not simply using the copy-and-paste function is that the data are converted by the import programme and completed automatically.
Proceed as follows:
- Open the file with the data using Excel.
- Select the data to be imported, including eventual header rows.
- Issue the copy command (Ctrl+C).
This option is shown only for certain import types.
UTF-8
Select whether the data to be imported is in the utf-8 format.
This option is shown only for certain import types.
Manage extensions...
This command brings you to the Mange extensions dialog window.
You can use it to:
- Look for, add or remove an import extension
- Edit the extension parameters.
Also use the command to change the extension settings.
Settings
The button allows you to change the settings of the extension.
The button is visible from the Banana version 10.1 and only if the extension allows parameters to be set.
OK Button
It starts the import process.
Error messages
If errors are reported during the execution of an import, the Import Extensions must first be updated.
If errors persist, please send us feedback, it may be that the file format has been updated by the originating bank or institution, and we will update our import filter accordingly.
Import transactions from ebanking
This page deals with the importing of transactions from bank statements, the most widely used and most useful feature, which allows you to automate the entry of transactions in the Transactions table.
Bank statement files are defined as those containing incoming and outgoing amounts on a single account. The import dialogue requires the entry of the account and the counterpart, and allows the use of the Auto-completion Rules.
On the other hand, in order to import from files that have other types of movements, e.g. from double-entry bookkeeping, please refer to the page Import Transactions (Generic). For these types of files, there is no possibility of applying the auto-completion rules.
Import procedure
- From Actions in the menu > Import into accounts > in the Import box select Transactions.
- Choose the file type to be imported.
See explanations below. - With the Browse button, choose the file from which you wish to import the transactions.
- Set the parameters as required.
See also: Import into accounting.
Next Steps
Once OK is confirmed, the data is read and the following dialogues are displayed:
- Import transactions dialog
Where instructions for completing the imported rows are to be given. - Apply rules (Advanced plan only)
When importing, records can be stored so that the programme will automatically complete the transactions in all subsequent imports.
Bank Statement Import Formats
In the dialogue for importing transactions you can choose between different file types:
- Import extensions for bank statements (the majority only with the Advanced plan)
These are additional programs that must be installed by the user and that convert the data to be imported in the formats foreseen by Banana Accounting Plus.
By using the Manage Extensions button you can install the extensions programmed for importing bank statements of different banks, credit cards and other formats.
Once the extension is installed it appears in the Extensions menu ready for import.- Bank statement Camt ISO 20022 Switzerland (Professional plan)
Reads the standard format made available by Swiss banks.
This extension also decodes the payment reference number, generated by the Invoice Layout CH10, and inserts the invoice or customer number. - Updated list of Banana Extensions for import.
- Bank statement Camt ISO 20022 Switzerland (Professional plan)
- Standard formats included in Banana Accounting Plus (Professional plan)
These are standard formats that banks make available and are included in Banana Accounting Plus:- MT 940 account statement
- Generic ISO 20022 Account Statement
Several banks in Europe make the account statement available in the standard ISO 20022 format.
- Generic format with Incoming and Outgoing Transactions TXT (Professional plan)
This is a text file of the CSV type, which uses the tabulator as a separator and presents the incoming and outgoing amounts of an account as columns.
File name
You indicate a file or even multiple files separated by a semicolon ";". You can also indicate a ZIP that contains multiple import files.
Import multiple files at the same time:
- If your bank provides daily camt053, you can select all the files for the month and import them in one step.
- If your bank provides a zip file, you can choose the file that contains all the statements.
The import files must, of course, be of the same type. You cannot import different formats together.
Import File Structure
The import file contains the typical movements of a bank statement:
- Date
- [transaction number] optional
- Description
- Incoming or outgoing amount.
When importing, the user indicates to which account the transactions are to be recorded, so that the Debit or Credit account is already created.
Import extensions can be created for any bank statement.
See Technical instructions for importing an Income and Expenses file.
Frequently asked questions:
I cannot see the format of my bank statement. What should I do?
Click onto Extensions menu > Manage Extensions... then on the Update Extensions button and enable the filter for the desired format.
I cannot see the format of the Postfinance xml statement (.tgz file). How can I import my movements?
This format is no longer supported. Please contact Postfinance and ask to receive your statement in ISO 20022 format.
I get the message "This ISO 20022 file does not contain a bank statement (camt.052/053/054)". How should I proceed?
This error message is displayed if the ISO 20022 file does not contain a bank statement. The ISO 20022 format is a generic format that can contain different types of information, such as bank statements and execution confirmations. In Banana Accounting Plus, it is only possible to import bank statements (camt.052/053/054).
My bank is not in the list of supported formats. Can it be added?
It is possible to create new extensions for formats that have not yet been implemented. Support for implementing custom formats is also available for a fee.
In eBanking (e.g. Raiffeisen Bank), when entering payments, you must choose the option 'individual order' instead of 'collective order'. Only in this way are payments imported as individual orders.
Download bank transactions
To keep the company's accounting up to date, it is essential to regularly import bank transactions. These transactions allow the automation of the accounting process, avoiding the manual entry of individual transactions and potential errors.
Where to download the transactions
The documents containing the bank transactions, regardless of how they are obtained, should always be saved in the same folder. This folder can be located inside the main accounting folder or in an external one. For better organization, it is recommended to structure your folders by creating a general folder and more specific subfolders: this reduces the risk of errors, especially if you decide to import the transactions manually.
By keeping the data always in the same location, import issues are avoided and there is no need to update the default import path each time. Additionally, it is not recommended to open or modify these files before importing, as this can cause errors in recognizing the transactions.
Different file formats for bank transactions
Our software offers numerous extensions that allow you to import accounting data in different formats. Among the most common formats are CAMT, CSV and XLSX.
The CAMT format (Cash Management), defined by the ISO 20022 standard, is used by banks to provide electronic account statements in a structured way. The files contain detailed information such as the date, amount, description, and references for each transaction. There are several types of CAMT files:
- camt.052: intraday statement (transactions during the day)
- camt.053: end-of-day statement
- camt.054: notification of debits and credits with details of individual transactions
The CSV format (Comma-Separated Values) is a text file that uses commas to separate the data contained within individual cells of a table. This format is compatible with most software applications. The CSV format varies from one bank to another and is updated regularly.
The XLSX format is a Microsoft Excel file used to store spreadsheets. The XLSX file can contain data, formulas, formatting, charts, and multiple worksheets within the same document.
Methods for downloading transactions
The main methods for obtaining these data are:
- Online banking
- Multibanking
- Software by Mammut Soft Computing AG
Depending on the chosen method, more or less attention should be paid to where the files are saved. Manual download from the bank portal requires extra attention.
Online banking
The manual method, traditional and most common, involves direct access to your bank’s online banking portal. Once logged in, you can navigate to the section dedicated to account transactions and download the files in one of the standard formats compatible with accounting software.
Although simple, this process requires manual interaction: the user must log in to the banking platform, select the account, download and save the files on their computer, and then import them into the accounting software.
Multibanking
Multibanking is an evolution of traditional manual methods, designed for businesses or professionals managing multiple current accounts across different banks. Thanks to this functionality, you can access a single e-banking platform or interface that aggregates multiple accounts, even from different institutions, simplifying interactions with each bank. Most multibanking solutions are based on the international EBICS standard (Electronic Banking Internet Communication Standard), which ensures secure exchange of information and payment orders between companies and banks.
The main steps for implementing multibanking are:
- Update the contract with the main bank
The first step is to contact your main bank to request activation of the multibanking service. You will need to sign an addition to the existing contract that authorizes the bank to act as the manager of multiple bank accounts. - Sign mandates with the linked banks
For each third-party bank you want to connect, you need to sign an authorization allowing the main bank to access the corresponding account information. - Technical activation and credential provisioning
Once the contractual steps are completed, you will need to follow technical instructions to enable access via API or third-party tools. This may include providing credentials or activating specific authentication methods.
Once all banking relationships are connected, it becomes possible to centrally download bank transactions and data, and process payment operations from a single tool. Although still partly a manual process, multibanking helps optimize time and resources by reducing the number of logins and simplifying overall management.
Software by Mammut Soft Computing AG
A more modern and fully automated solution is offered by the software developed by Mammut Soft Computing AG. Once implemented, this system allows you to completely skip the manual step of downloading bank files, as they are automatically saved in a folder defined during setup.
The software focuses on data exchange interfaces between banks and companies, offering connections to multiple banks worldwide and securely and automatically retrieving bank data in the required formats. These data are then automatically synchronized with the accounting software, making user intervention unnecessary.
The steps to start using the Mammut Soft Computing AG software are as follows:
- Choosing the solution
Based on your needs, you can choose a cloud solution or an on-premise installation, the latter being a physical installation on the user's devices. - Configuring bank connections
To configure and activate the bank connections, it is necessary to sign the corresponding bank agreements. These connections with banks (EBICS, SWIFT, API) allow downloading account statements and sending payments. Mammut provides support for activation with the banks. - Authorization for account access
The client, for whom the accounting is managed, grants the accountant access to their data so that all necessary information is available. - Integration with accounting/management software
The software is connected to the internal accounting or management system for automatic import and export of bank data.
The true added value of the software is the constant update of the accounting: automated downloads from all banks and direct synchronization with the accounting system ensure that the data is always up to date and ready to use.
Automated import and accounting
Once transactions are available, you can take advantage of the various features offered by Banana. Regardless of the method chosen to download the bank data, the “Import bank transactions in ISO 20022 format (advanced) [BETA]” function allows you to automate the update of the accounting in double-entry or income/expense mode using CAMT files (052/053/054). The program reads the XML files from a designated folder, saves them to a local database, identifies new transactions not yet recorded, and suggests them for import, avoiding duplicates.
Once imported, bank transactions are automatically transformed into complete accounting entries thanks to our auto-completion rules (Advanced plan), saving time and avoiding input errors. This makes accounting faster, more efficient, and more accurate.
Import Transactions dialog
The dialogue Import transactions is activated from the menu:
Dialogue contents
The display of dialogue elements depends on the type of file being imported:
- Single account transactions and bank statements
All elements are displayed. - Double-entry accounting transactions or others
The following elements are not displayed:- Account
- Temporary contra account
- Apply rules.
- Grouping by invoice
This element is only displayed if there is content in the import file in the DocInvoice column.
Import Transactions dialogue
This is followed by the dialogue box that allows the data to be integrated into the accounts.

Destination account
This option appears when data is imported from a bank or postal statement or the entry and exit transactions of an account in text format.
- Enter the bank account number of your chart of accounts, relative to the imported statement.
- If it is left blank, the programme enters account [A] (Account) so that you can tell whether it is a Debit or a Credit movement.
Select transactions
Start date, End date
Insert the start and end dates of the period related to the transfer of the transactions. The period can also be selected automatically in the boxes under the dates area.
Don't import if exists same External reference, Date, Amount
If activated, this option allows the user to not import already entered transactions, in order to avoid recording transactions twice. This option can only be activated when the column "ExternalRef" is present in the transactions that are going to be imported. If not, this option will be deactivated.
Sort by date
The option is active by default and allows you to have the imported transactions sorted by date.
Complete the transactions with
Autocomplete values
The option is only necessary for accounting with VAT/Sales tax and multi-currency. If activated, it allows the automatic completion of values that are missing in the imported data (for example, the exchange rate in the Exchange rate table).
Apply Rules (Advanced plan only)
The option is not available for imports of transactions from double-entry accounting files (.ac2 format).
See: Rules for transactions auto-completion.
- If this option is activated, when you confirm with OK, the Apply Rules dialogue opens.
- If you have not activated this option, you can also access the Rules by issuing the command from the menu Actions → Recurring transactions→ Apply rules...
- This option is activated by default if there are already import rules in the Recurring Transactions table.
Temporary contra account
The option is not available for imports of transactions from double-entry accounting files (.ac2 format).
A temporary account needs to be indicated to complete the contra account of the entry. The account must then be replaced with the correct contra-account, either manually or with the auto-completion rules.
The programme suggests the commented account [CA] (ContraAccount) by default.
Once the entries have been completed, there should be no more transactions using the temporary account.
Initial document number
The option is not available for imports of transactions from double-entry accounting files (.ac2 format).
This is the document number that is allocated to the first record among those imported.
The number is incremented.
Group transactions by invoice number
If the import file contains values in the DocInvoice column, the dialogue will also contain the following options:

- Group transactions by invoice number
In this case, the rows of the same invoice are being grouped in such a way that there is only one transaction for the same account and the same VAT code. Please check the explanation Import invoice data.
- Destination account for balance differences
When VAT codes are being applied, there may be rounding differences of just a few cents.
In this case, Banana Accounting Plus creates an additional transaction for every invoice into which this difference can be recorded.
Of course, it is necessary to pay attention that the data to be imported obtain a balance between debit and credit. If not, the transaction row will contain the difference between Debit and Credit.
Editing of imported transactions
The programme creates transactions and adds them to the end of the Transactions table.
The transactions can be edited or deleted.
In double-entry accounting, in the DebitAccount and CreditAccount columns and in Income/Expenses accounting, in the Account and Category columns, the programme inserts symbols.
The symbols must be replaced with the appropriate account or category.
- [A]
This symbol is shown if no account is indicated in the dialogue.
Instead of the symbol [A], the account of the bank account is to be entered. - [CA]
This symbol indicates that the contra account must be entered in the cell so that Debit transactions offset Credit transactions.
For rows with only one contra account, both the account or symbol [A] and the counterpart symbol [CA] will be on the same row.
For rows with several contra accounts (transactions on multiple rows), each row will have the account or contra account symbol [CA]. If the symbol [CA] were not indicated, it would be impossible to tell whether the movement is a Debit or a Credit movement.
Import file ISO20022
Banana Accounting Plus allows the import of bank transactions in various formats.
The ISO 20022 format is an international standard that should now be provided by all European banks. This format may also be called ISO xml, xml, camt.053, camt.054 or other names. Importing bank transactions in ISO 20022 format is possible in two ways:
Generic manual ISO20022 import
Manual import of transactions one file at a time - available with the Professional plan.
- The user downloads the ISO 20022 file from their bank and saves it in a folder on their computer.
- Then, from Banana, they manually import this file.
This import is made possible by the extension Bank Statement Camt ISO 20022 Switzerland (Banana+) for Switzerland and a generic filter distributed with the application for other countries.
The import must be repeated manually each time.
Advanced ISO20022 import [Beta]
Advanced import of transactions from multiple files simultaneously - available with the Advanced plan.
It significantly speeds up the workflow because the user no longer needs to check for which periods transactions need to be imported.
- The user defines a folder containing ISO 20022 files from different bank accounts.
- In Banana, with a command, the program notifies if there are new transactions to be imported.
This new advanced import function is made possible by the extension Swiss Camt ISO20022 Reader.
Requirements
- Use of Banana Accounting Dev-Channel with the Advanced plan.
- Use of a Double-entry accounting or Income & Expenses system.
Import bank transactions in the ISO20022 format (generic)
Banana Accounting Plus allows the import of bank transactions in different formats.
The ISO 20022 format is an international standard for the transmission of financial data that should by now be available to all European banks. This format can also be referred to as ISO xml, xml, camt.053, camt.054, and others. For some banks, the ISO 20022 format may not be available by default but needs to be requested. The ISO 20022 format replaces the old MT940 standard.
By importing bank data with the ISO20022 format, Banana Accounting Plus also allows you to automatically close open invoices of customers.
The CAMT category regroups the formats used for the account statement, reporting of account transactions and account balance confirmation:
- camt052: Account Reporting
- camt053 (including version 4): Account Statement
- camt054: Credit / Debit Notification
Preview the ISO-20022 file
Banana. offers the possibility to preview contents of a camt file.
Data importing into the current accounting
Proceed as indicated from the menu Actions > Import into accounting.
Compressed files can also be opened with this function. In this case, the program will prompt the user to select the file from which to import the data of the compressed file.
Technical notes on converting ISO 20022 files
Banana, when reading the file, tries to adapt itself to the ways in which the ISO 20022 file has been prearranged.
- As opening balance, it reads similar encodings
- As closing balance, it reads similar encodings
- All contents are read and converted into transactions
- Transaction date (Date)
- Currency date
- Transaction amount (positive or negative)
- Description
For the time being Banana Accounting displays the different descriptions as a single text. In the future, it will be possible to extract this information on a distinctive basis and indicate the columns where to allocate data. - Distinction between single transactions or transactions with details
For transactions with details, there is a row for the total and separate rows for each single transaction that constitutes the total.
Country specifications
Each country and/or bank has the possibility to insert additional information in the ISO 20022 file according to its needs. Banana Accounting Plus offers a generic filter distributed with the application and multiple country- and/or bank-specific filters distributed as Banana Extensions. To import this additional information into your accounting, you must install and use the filter that is most specific to your country and/or bank (for example Bank statement Camt ISO 20022 Switzerland (Banana+)).
Import bank transactions in the ISO20022 format (advanced) [BETA]
This new feature allows you to update your accounting by automatically importing bank transactions from Camt files (052, 053, 054). Thanks to this innovation, you can:
- Accelerate the entire transaction recording process.
- Reduce the risk of manual errors.
- Avoid duplicates, since only transactions not yet present in your accounting are imported.
The program reads the Camt files from a selected folder, saves their content in a local database, and detects any new transactions not yet recorded. These are then proposed for import into your accounting, greatly simplifying financial management. Once imported, you can leverage auto-completion rules to further streamline your work.
This feature is currently in BETA version, available for experimental use with Banana Accounting Plus (Advanced plan) in double-entry or income & expense accounting. We welcome any suggestions and feedback to improve it.
Prerequisites
- Use Banana accounting Dev-Channel with the Advanced plan.
- Use a Double-Entry or Income & Expense accounting file.
Data Preparation
Before starting the import, make sure you meet the following requirements:
- Organizing Camt Files:
Create a dedicated folder containing all the Camt (*.xml) files you want to import into your accounting.
You can organize the files within the folder as you prefer, for example, by accounting year or by financial institution. - Access Permissions:
Ensure that the selected folder is both readable and writable by the program. This guarantees the proper saving of data and import information. - Setting IBANs:
For each account in the accounting file, make sure you have entered the IBAN in the 'BankIban' column of the 'Accounts' table.- If the column is not present, add it through the menu: Tools → Add/Remove functionality → Add address columns to the Accounts table.
- Write the IBAN in uppercase, without spaces or special characters.
- Swiss Camt ISO20022 Reader Extension:
Install the Swiss Camt ISO20022 Reader extension. This is required for the program to correctly interpret Camt files and start the import process.
First Use
The first time you use the "Import bank transactions (Camt ISO20022)" command, available under the Actions menu, the program will ask you to select the folder containing the Camt files. This choice will be saved, so that for subsequent imports the program will automatically use the same folder without asking for the path again.
Note that the first execution may take longer. The program must read, process, and save all the files in the folder, and it analyzes the content of each file. During this phase, a progress bar will display the current status of the operation, indicating both the percentage of completion and the number of files processed out of the total. The same progress indicator is shown both during the reading of the files from the folder and during the opening and reading of their contents.
On subsequent imports, the process will be much faster since the program will read and import only the content of new files, already knowing which data has been previously saved in the database. This way, future operations require significantly less time and ensure a smoother, more efficient workflow.
File Processing

The processing of Camt files occurs in two distinct phases:
- Reading Files in the Folder:
In the first phase, the program analyzes the selected folder and identifies all the files present, adding them to the internal database. During this process, a progress bar is displayed, indicating how much of the file reading has been completed compared to the total number of files. - Reading the Content of the Files:
Once file reading is completed, the program moves on to the second phase, in which it opens the files saved in the database, reads their content, and processes the data. In this phase, a dedicated progress bar is also shown, clearly displaying the percentage of completion and the number of files processed.
If, for any reason, one of these processes is interrupted, the program retains the data already saved. On the next import execution, it will automatically resume from where it left off, without having to start over. This ensures an efficient workflow and avoids repeating already completed processing steps.
Bank Transactions Import Dialog
The import dialog provides an overview of the processed files, the parameters used, and the transactions to be imported. You can modify the parameters in the dialog at any time, and the data will be recalculated immediately.
Folder Tab

The “Folder” tab provides a general overview of the import, showing the currently selected folder, the files to be processed, and some options to filter the content.
- Select Folder:
Here you can view and modify the working folder path. The program constantly checks the validity of the selected path and, if the folder does not exist or is not accessible, it displays an error. - Renaming or Moving the Folder:
If you change the folder’s name or location, remember to update the path in this dialog. The program stores the last used path and, if it cannot find it, will show a warning. - Renaming Files in the Folder:
You can freely rename the files in the folder; the program does not rely on the file name but on its content. Even if two files have different names but identical content, the program considers them duplicates and will only import one of them. - Ignore Subfolders:
By default, this option is enabled, allowing you to exclude the files located in subfolders. This is useful if, for example, you only want to import files relevant to the current accounting period, avoiding older or irrelevant data. If you disable this option, all Camt files in subdirectories will be included in the database, regardless of date or file organization. - Ignore Files Older Than...:
If you set a date in this field, the program will not read the content of files older than that date. By default, files older than the accounting opening date are saved in the database but not analyzed. Adjusting this date allows you to further refine the time filter. If you enter an invalid date, the program automatically replaces it with the current date. - Read All Files:
Clicking this button forces the immediate re-reading of all files in the folder instead of waiting for the normal daily check. This function is especially useful when you add new files and want to import them right away, without waiting for the next automatic update.
Bank Accounts Tab

The “Bank Accounts” tab provides a detailed overview of all the bank accounts present in your accounting. For each account, the program shows both static information (such as the current balance in your accounting) and dynamic data, updated based on the latest imports.
Information Displayed for Each Account
- Accounting Balance:
Shows the current amount recorded in the accounting for that account. - Last Bank Balance:
Displays the most recent bank balance detected directly from the Camt files. This lets you instantly compare the figure in your accounting with the actual bank amount. - New Transactions:
Indicates how many new movements, not yet recorded in accounting, have been detected in the Camt files. - Total New Transactions:
Shows the total monetary value of the new transactions to be imported for that account, helping you quickly assess the volume of pending operations. - Last Import:
Indicates the date when the folder was last fully read, providing a useful time reference for when the last update occurred. - Status:
- Updated: There are no new movements to import for this account.
- New transactions: Unrecorded movements have been found, ready to be imported into the accounting.
Transaction Details Tab

In the “Transaction Details” tab, you will find all the banking operations identified in the Camt files that are not yet imported into the accounting, organized by account. This view allows you to quickly analyze pending movements, verify their relevance, and select which ones to import.
- Selecting Transactions to Import:
You can temporarily exclude specific transactions or, if you prefer, all those related to a particular account using the provided checkboxes. Excluded transactions are not permanently removed; they will be proposed again the next time you open the dialog, allowing you to reassess their import at any time. Currently, it’s not possible to permanently exclude a transaction. - Consider Only Transactions Starting from a Specific Date:
To reduce the number of displayed movements, you can set a date from which to consider new transactions for import. By default, the program uses the accounting start date. By setting a different date, it will only display operations occurring after that day, ignoring previous ones. This function is particularly useful if, in the past, transactions were imported without a unique ID (ExternalReference column), typically when importing from CSV files. In these cases, simply set a date after the last recorded transaction to avoid re-proposing older movements. If you enter an invalid date, the program automatically replaces it with the current date. - Unique Identification of Transactions:
Transactions from Camt files (052, 053, 054) should always include a unique ID as required by the ISO20022 standard. This identifier enables the program to accurately detect which movements have already been imported and which are new, reducing the risk of duplicates or errors.
Settings Tab

Settings Tab
In the “Settings” tab, you can manage some advanced aspects of the import process, including the possibility to restore the initial data state and define how to recognize already processed files.
- Delete Saved Data:
This function allows you to delete all data related to previous imports stored in the internal database. Once deletion is confirmed, you will be automatically redirected to the “Folder” tab, where the default values will be restored.- New Import: If you want to perform a new import after deleting the data, simply click on the “Read all files” button.
- Limited Impact on Import Data: Deleting data from the internal database does not affect any information already present in the accounting.
- Complete Database Removal: The command here only clears the database tables. If you want to completely remove the database, you must manually delete the “*.db” file in the selected folder.
- Always Verify the Existence of Files Using Hashing:
This option allows you to choose how the program identifies already processed files:- Hashing (slower): If you select this option, the program will compute a unique hash for each file, ensuring accurate duplicate detection even if names or paths change. However, this method can slow down file reading.
- Check Name, Date, and Size (default): If the checkbox is not selected, the program simply compares the file name (including path), creation date, and file size to determine uniqueness. This approach is faster but may not be as robust in scenarios where files are renamed while retaining the same content.
Changing the accounting account assigned to an IBAN
It is possible to change the accounting account associated with an IBAN directly in the Accounts table.
However, if bank transactions for the same bank account have already been imported in the past using a different accounting account, it is necessary to delete the data stored in the database.
This operation can be performed from the Settings tab of the import dialog, using the Delete saved data button.
Afterwards, the data must be reloaded from the folder using the Read all files button, available in the Folder tab.
This procedure allows the program to recreate the correct associations between the IBAN and the accounting account according to the new settings.
Deleting the data from the database does not affect in any way the accounting data already recorded.
Database File
The program uses an SQLite database to store import-related data. The first time you activate this function, if the selected folder is valid, a database file (*.db) will be created in it.
It is important not to move or delete this file, as the program uses it as a reference for all subsequent operations. In case of loss or deletion, the program will generate a new .db file, forcing you to re-read and re-process all the files in the folder.
What is Saved in the Database?
- File List:
All the files detected in the folder are saved. If you have chosen to ignore subfolders in the settings, the files they contain will not be saved. This option is enabled by default. - Bank Accounts and Related Data:
The database stores information about the bank accounts present in the accounting. If these data are modified in the accounting file, the database updates them accordingly. - Imported Transactions:
Transactions found in the opened and read files are saved in the database, allowing you to reprocess or view them later without having to re-read the files. - Import History:
The program records who performed the import operations, when they were executed, and with which software version, providing a detailed historical trace of activities.
Log File
During the import process, the program generates a log file to help identify and diagnose potential issues. In case of anomalies or unexpected behavior, the log file provides detailed information about the operations performed, aiding developers in understanding the source of the error.
If you need assistance locating or interpreting the log file, contact our support team: they will guide you step-by-step to find the file within your active directory.
Features currently not available
These features, requested by users, are currently not available:
- Extraction of the customer invoice number and customer account from the QR reference number
For this functionality, it is recommended to use the dedicated extension: Bank Statement Camt ISO 20022 Switzerland (Banana+) .
Troubleshooting
If no transactions are displayed for import despite having selected the correct folder, check the following:
- Bank Accounts: Make sure that the data related to bank accounts (including IBANs) in the “Accounts” table is complete and correct.
- Accounting Period: Check that the currently set accounting period includes the dates of the transactions you want to import. If the transactions fall outside the defined period, the program will not propose them for import.
If the problem persists after these checks, contact our technical support for further assistance.
Import transactions (generic)
The following explanation refers to the import of data into the Transactions table from files containing transactions of the double-entry type, from Banana Accounting, or other formats.
The Import of bank transactions is similar to importing transactions, but is dealt with separately in detail on the appropriate page.
Import procedure
- Via Actions in the menu > Import to accounting > In the Import box, select Transactions
- Choose the file type from which to import
See explanation below. - With the Browse button, choose the file from which to import the transactions
- Set the parameters as required.
See also: Import into accounting
Once OK is confirmed, the data are read and the following dialogue is displayed:
- Import transactions dialogue.
Where instructions must be given for the completion of the imported rows.
Importing from other Banana Accounting files
In the type of file to be imported, the programme provides a number of configurations to import data from other Banana Accounting files:
- To import transactions from an Income & Expenses accounting file (*ac2)
In order to import transactions from an Income & Expenses accounting file into a double-entry accounting file, it is necessary that the categories of the Income & Expenses file correspond to the accounts of the double-entry accounting file. - To import Cash book transactions (*ac2)
See the specific page Import Cash book transactions. - To import Double-entry accounting transactions (*ac2)
In order to import transactions from a double-entry accounting file into another double-entry accounting file, it is necessary that the accounts correspond. - To Import Fixed Asset register
Imports transactions from the Fixed Asset register .ac2 file.
Import TXT/CSV files
This format must be used to export data from another programs, which provides an export format compatible with that required by Banana Accounting. See the information at the following link:
Importing account statements with import extensions
Import Extensions are additional programs that must be installed by the user and convert the data for import into Banana Accounting.
There are extensions for importing bank statements from various banks, credit cards and other formats.
These extensions only work with the Advanced plan. All old filters will be updated over time and the new versions will only be usable for those with the Advanced plan.
Search for and install an extension:
Search and install an extension:
- Click on Manage Extensions
- Choose Import.
- Navigate to the desired extension and click onto Install.
- If the Settings button appears, it means that this extension has parameters that you can customise.
Once the extension is installed, it appears in the list of available types, directly in the Extensions menu, and you can choose it for import.
Import data from a Cash book file
Cash movements can be managed separately from the main accounting file via the Cash Manager. On a regular basis, the movements are imported into the main accounting file, grouping them according to a chosen period.
In this case you have two separate files:
- One file contains all the general accounting data (including the cash account).
- A file contains only the cash register data.
In order to integrate the cash data into the main accounting, a link must be established between the main accounting and the Cash Manager file.
There are two different ways to create the link:
- In the Cash Manager file, give the categories the same numbers as the accounts of the main accounting (double-entry accounting or Income / Expense).
- Enter the corresponding accounts of the main accounting file in the Category2 column (Categories table).
If the Category2 column is not present, it must be displayed via Data → Columns setup.
Set up the internal transfer account
When importing the cash data into the accounting file, certain settings are required so that there are no overlaps of accounting entries for payment operations between the cash account of the main accounting and the transactions imported from the Cash Manager file.
In the Main accounting file:
- In the Accounts table, enter the Internal transfer account.
In the Cash Manager file:
- In the Categories table, Categories column in the Revenue group, enter the internal transfer account (the same number set in the main accounting) as a category for payments from the bank or postal current account.
- Alternatively, in the Categories table, Categories2 column in the Revenue group, enter the internal transfer account. In this case, a category is set in the Categories column to determine payments from the bank. The internal transfer account, located in the Categories2 column, creates the link when you import the transactions into the main ledger.
Payments from the bank account to cash account
Whenever a payment is made from the bank account to the cash desk, the movement is recorded both in the main accounting file and in the cash register file. To avoid overlapping of accounting entries when importing data from the cash desk, the internal transfer account account is used
- The receipt of funds is recorded in the cash register file, using the tour account as category or alternatively the category for payments from the bank account, if the tour account has been set in the Category2 column.
- The outflow of funds is recorded in the main accounting file, with the bank account in credit and the internal transfer account in debit.
When importing the cash register data into the main accounting file, the tour account is reset.
Import the cash register data
- Open the main accounting file
- Click Action→ Import to accounting
- In the window that appears, from the drop-down menu Import → select Transactions → Cash book movements (* .ac2) "
- Using the Browse button, select the Cash Manager file.

The explanations of this window are available at the page Import to accounting.

In accounting
Destination account
You must select the cash account number, present in Double-entry accounting or Income / Expense accounting, where the movements are to be imported.
Initial document number
An initial document number can be entered which will be attributed to the first imported transaction. In subsequent recordings, the program automatically assigns a progressive number, starting from the initial one entered.
If you do not wish to assign progressive numbering automatically, leave the box empty.
Select movements
Start date / End date (inclusive)
Enter the start and end date of the period to which the imported transactions refer.
Group transactions
By activating one of the options it is possible to choose how the movements of the period should be grouped:
- No period groupingAll rows are imported with their column contents. The Doc number present in the corresponding column of the cash register file is also imported.
- If you want to use a different numbering in the accounting and simultaneously keep the original document of the file, in the Cash Manager insert the document in the DocProtocol column.
- Monthly - groups the transactions by month.
- Quarterly - groups movements by quarter.
- Semi-annual - groups the movements by semester.
- Annual - groups the transactions by year.
One registration per account
If several categories are grouped into a single account in the accounting, but separate transactions are desired for each category, this box must be activated; the program creates recordings for each category. When using VAT codes, postings are created not only by category, but also by different VAT codes for the same category.
Note
When you have an accounting with VAT, the VAT calculations may be slightly different. If the transaction amounts are entered net, the cash account balance may also differ due to rounding differences.
The accounting file is updated with the cash register data.

Import transactions from Paypal
On the page Web filter for PayPal transactions you will find the information about the new feature that makes it possible to import all the Paypal transactions directly into Banana Accounting and the instructions on how to proceed (see below).
We have also prepared specific predefined templates for double-entry or multi-currency accounting that you can look at as an example or use as a separate accounting file just for the accounting transactions from Paypal.
More information about all types of import filters can be found on the Import filters page.
- Banana extension for importing Paypal transactions - how to proceed
- examples for the Double-entry accounting
- examples for the Multi-currency accounting
Learn more
- Double-entry accounting
- Multi-currency accounting
- Import filters - complete list
Import accounts
This command imports the accounts from a Double-entry or Income & Expenses file (*.ac2) or a text file (*.txt), and integrates them automatically in the existing Chart of accounts.
To import accounts from another file, proceed as follows:
- Via Action → Import to accounting → select Accounts in the Import box.
- Select the * .ac2 or text file type to import the accounts.
- With the Browse button, choose the file where you want to import the Accounts to imported from.

Accounts or categories can be included in current accounting by activating the following options:

Options
Include Cost Centers
When there are cost centers, these will also be carried forward.
Add new accounts
When this option is activated, all new accounts are added to the accounting plan.
Replace text description
If already existing accounts are imported, but with different descriptions, the existing descriptions are replaced by the imported ones when this option is activated.
Replace opening balance
If already existing accounts are imported with different opening balances, the existing opening balances are replaced by the imported ones when this option is activated.
Import VAT codes
This function is only available in the Accounting with VAT management, and allows the user to Import VAT codes from:
- Other accounting files (*.ac2)
- A text file with column headers (text file *.txt)
Import from an accounting file
If you manage several accounts and use customised VAT codes, you can prepare the VAT code table and then import it into your other files.
- Prepare the VAT Codes table in your accounting file.
- Command Actions > Import to Accounting > VAT Codes
- Choose the name of the file containing the updated VAT Codes table.
- Choose replace all rows.
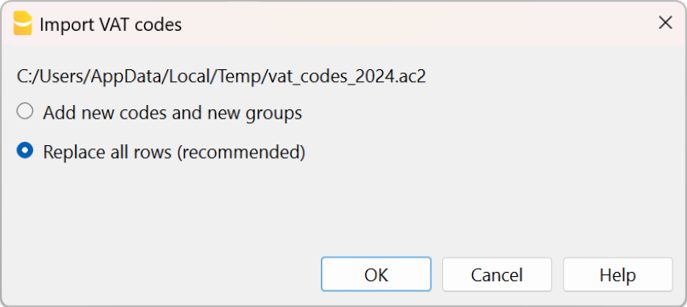
VAT Code Import Options
When importing from another file, several options are available.
Add new codes and groups
If this option is chosen, new codes are added and existing codes are retained.
Replace all lines
If this option is chosen, all existing VAT codes are replaced with the imported VAT codes.
VAT account not found message
If the message VAT account not found appears, the VAT account must be entered automatically in the menu File > File properties > VAT /Sales tax section.
Importing Predefined Swiss VAT Codes
This procedure shows how to import VAT codes from the model with the default VAT Codes 2024, which contain both the 2024 (VAT 8.1%) and 2018 (VAT 7.7%) rates.
See also page Swiss VAT Codes
In order to import VAT Codes, please proceed as follows:
- Click Actions > Import into accounting command.
- Select VAT Codes.
- Select Switzerland new VAT Rates: in the lower field the file containing the new VAT Codes 2024 will be automatically displayed.
In the case of VAT codes of another country, you must select the file containing the VAT codes in force according to your country. - Confirm by clicking on OK
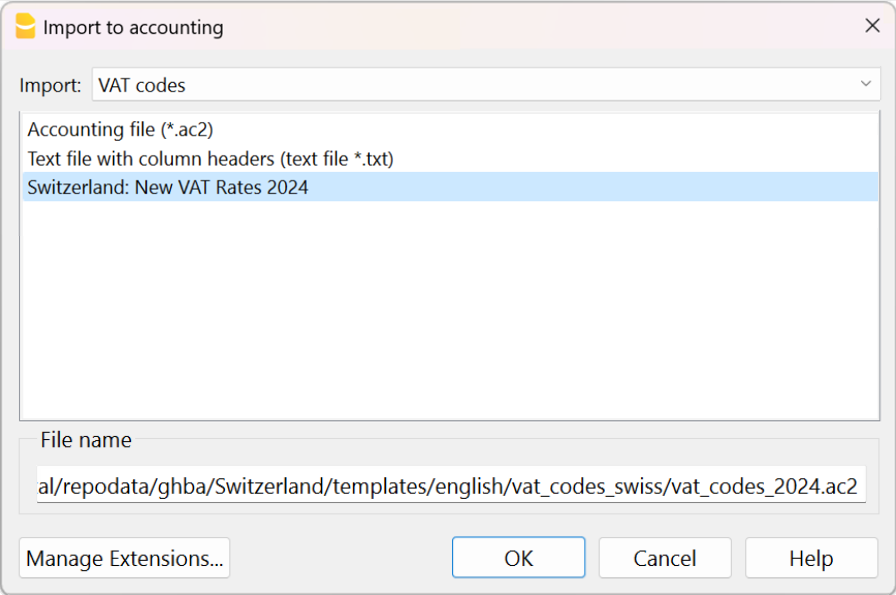
- The following window will display
VAT Management Documentation
For more information see the VAT Management page.
Import file
To import data from a Banana Accounting File, proceed as follows:
- From the Actions→ Import to accounting menu → select File in the Import box .
- Select the * .ac2 file type to import the data.
- With the Browse button, choose the file from where you want to import the data.

The below dialogue box will be displayed with several options that allow you to determine which data to import from the file.

Source file
This is the file from the which the data are being taken.
Destination file
The file that is to receive the data.
Options
Import transactions
All the rows of the Transactions table, present in the source file, will be imported.
Import recurring transactions
All the rows of the Recurring Transactions table, present in the source file, will be imported
Import budget transactions
All the rows of the Budget table, present in the source file, will be imported.
Replace amounts in Account table
The amounts of the Opening, Budget and Previous columns of the Accounts table of the destination file are being deleted and replaced with the amounts that are present in the source file.
The accounts need to correspond, thanks to the same account numbers, or when there is a replacement, in that case the option Convert account numbers should be used.
Replace accounting properties (basic data)
The File and accounting properties of the destination file will be replaced by the ones of the source file.
Convert account numbers
Using this function, the imported account numbers will be replaced with those indicated in the alternative column.
If you use this function, you must also specify the column that contains the account numbers to be used in the import instead of the existing ones.
Next to the account number column, there should be a column that indicates the alternative number to be used when importing. If no alternative number is specified, the original account number of the source file will be used.
- The account matches are in the source file
This option is to be used when for example you keep an accounting file in a country, with a specific number system, and then you need to regularly import your transactions in a different accounting file, that uses a chart of accounts with a different numbering system.- You need to add a new text column in the accounting plan (Columns setup command)
- For each account, indicate the destination account number in the table.
- The account matches are in the destination file
This option is used when for example you want to switch to a chart of accounts with a new numbering and grouping- You create a new accounting file with the new chart of accounts.
- In the chart of accounts, you create a new column where you indicate the account matches (Columns setup command).
- In this column, indicate the account numbers of the source file.
Separate the accounts with a semi-colon "1000;1001" to indicate that several accounts need to be grouped into this account.
- Column containing the account matches (Accounts table)
Indicate a column of the chart of accounts that has been added by the user and that contains the account matches.
This option is used when switching from one chart of accounts to another, and when you need to convert accounts from one numbering to another.
For more information on converting the chart of accounts, see the page transfer data to a new accounting plan.
Results and possible errors
The program will have carried forward all the data of the previous accounting, converting the account numbers.
In case the program indicates errors (absence of accounts or other), it might very well be necessary to cancel the import operation, complete the account matches and repeat the import operation.
The program, finding different charts of accounts, cannot automatically execute extended check-ups to make sure that all the data have been imported and grouped correctly.
It is therefore advised to check the result manually, verifying that the totals of the Balance sheet and the Profit and Loss statement are indeed correct.
Advanced import options
For different and more complex and automated conversion needs, we suggest to use the scripts, that allow a total customization of the conversion and the import.
Import exchange rates
This option is only present in Double-entry accounting with multi-currencies.
It lets the user import the exchange rates from another file.
How to proceed:
- From the Actions > Import to accounting > menu select Exchange rates in the Import box.
- Select the file type * .ac2 of the exchange history or the text file:
- With the Browse button, choose the file from where you want to import the data.
Note: Exchange rate history files only show the Foreign exchange rate table and keep a record of past exchange rates.

A box with the following options are displayed:

Select date
The window lists dates with recently used changes. If you select a date, the program resumes the changes used on that specific date.
Substitute exchange rates
If you activate this option, all the exchange rate rows are replaced in the exchange rate table with the imported ones.
Add rows
If you activate this option, only the exchange rate rows that have different values are updated in the exchange rate table.
Advanced Bank Transaction Import (Beta version)
The new feature allows you to update your accounting by automatically importing bank transactions from Camt files (052, 053, and 054). The program reads the files stored in a dedicated folder, identifies new transactions, and suggests importing only those transactions that have not yet been recorded.
- The feature is available in the Dev Channel, Beta version.
- You need to install the Swiss Camt ISO20022 Reader extension and correctly associate IBANs with the accounting accounts.
How it works
- Download the Camt file from your bank.
- Open the folder containing the Camt files and select it.
- The program reads and processes the files, storing the information in a local database.
- It automatically identifies new transactions thanks to the unique identifiers defined by the ISO 20022 standard.
Only transactions that have not yet been recorded are suggested for import. - After the import, you can automatically complete the transactions using Banana Accounting Rules.
More information is available on the Advanced ISO20022 Import page.
Main advantages
The feature provides advanced import options and, thanks to much more detailed settings, bank transactions are read and imported immediately, ready to be posted, including with the use of Rules.
You will benefit from:
- Time savings: your accounting will always be up to date in the shortest possible time.
- Fewer manual errors: all transactions are imported exactly as they appear on your bank statement, reducing the risk of errors.
- No duplicates: only transactions that are not already present in your accounting are imported.
- Faster imports over time: after the initial processing, the program analyzes only newly added files.
- Greater control: before importing, you can review, filter, and select the transactions to be recorded.
- Instant bank reconciliation overview: for each account, the accounting balance, bank balance, and the number and value of new transactions are displayed.
- Integration with completion Rules: after the import, you can apply Banana Accounting's automatic Rules to complete transactions quickly.
- Transaction traceability: the local database keeps a history of imports, and the program generates log files that are useful for audits and support.
Automation
Banana Accounting Plus provides several ways to import transactions or other data to speed up and automate bookkeeping.
Importing and completing bank transactions
This is the functionality that allows you to keep your accounting quickly:
- Import bank transactions into your accounting file
The programme creates the entries with date, description, amount, account and exchange rate. Additional data such as the counterpart must be completed by hand.
Standard formats, such as ISO 20022 or TXT, are included in the Professional plan; other formats require the Advanced plan. - Automatically complete the transactions by using the rules (Advanced plan)
You can set auto-completion rules to import transactions, including the counterpart, VAT code, cost centres and other information you have specified.
You can always edit and further complete your entries.
Bank transactions import formats
- Banana Accounting Plus reads the transactions in different formats. Visit the Import transactions page.
- Thanks to the customised Import Extensions, you can import data from various bank statements and other standard programmes. Some extensions are only available in the Advanced plan.
Other commands for importing data
Banana Accounting Plus provides different ways to import data:
- Import into Accounting
You can import in any table and from different formats. - Import Rows
All tables allow the import of data from the CSV format. - Copy and paste from Excel or other programmes.
You can prepare movements or other data in an Excel table and copy and paste them in bulk into the Transactions table or any other table.
Manual completion and undo import
Once movements or other data have been imported, you can easily complete and edit them. This makes it very easy to automate processes, because if there are unforeseen exceptions, you can edit the data directly.
Like all commands, the import command can also be undone. So you can easily try importing the data and see if it works as expected. If you have not chosen the right format or have not set the parameters correctly, simply Undo the import and do it again.
Useful links
Rules for the automatic completion of imported transactions
Artificial Intelligence (AI) is increasingly used in automation systems. In collaboration with our users, we have developed an automatic completion system for imported transactions based on predefined rules.
This feature automates and simplifies the accounting entry process, saving time and reducing data entry errors.
Rules are predefined transactions that include all the information necessary to automatically complete accounting operations accurately and quickly.
Below is the introductory video on Rules, as well as videos on how to create Rules:
- ▶ Video: Import and automatically complete transactions (introduction) - 0'55"
- ▶ Video: Rules for completing imported transactions (Apply rules dialog) - 7'26"
- ▶ Video: Rules for completing imported transactions (Recurring Transactions table) - 3'34"
To use the automatic completion Rules, the Advanced plan and the version 10.1 or higher of Banana Accounting Plus are required.
What are Rules?
Rules are pre-set transaction lines, containing useful information for the program to:
- Identify imported transactions to complete
If you enter Description in the column"Swisscom", the rule will apply to imported transactions that contain "Swisscom" in the description. - Specify elements to complete the entry
- In the Debit Account column, enter the account "Phone expenses".
- In the VAT column, enter the code "I81".
Completion rules are saved in the Recurring Transactions Table. You can enter and modify them directly in the table or use the Add/Modify Rules dialog during the rule application phase.

What are the purposes of Rules?
Normally, when you import bank movements into the Transactions table, you must manually complete the transactions by entering the Debit or Credit account, VAT code, Cost centers, or other information.
Example: when you import an outgoing transaction indicating a payment to the company "Swisscom," you must complete the Debit Account column with "Phone expenses" and the VAT Code column with "I81."
With the creation of Rules, imported movements are entered and completed automatically by the program, without any manual entry.
Depending on the method used for rule creation, these can be created either before or during the import. Once created, the Rules are also valid for all subsequent imports.
Workflow procedure
- Import bank transactions
The program creates transaction lines with date, description, amount, account, document number, and exchange rates. - Create the rule using one of the available methods.
- In the Transactions table, the program automatically completes all imported movements with counterpart, VAT codes, Cost centers, and more.
- In the Recurring Transactions table, the program saves transactions with the Rules.
Methods for creating Rules
We have created a system that provides various methods for creating Rules. You can choose how you prefer to work:
- Rules from the Transactions table.
- Rules from the Recurring Transactions table.
- Rules from the Apply rules dialog.
The benefits of rules
The benefits of the completion system are immediately evident:
- Complete transactions in just a few seconds.
- High control and precision.
- Avoid errors and omissions.
- You can easily delegate the task of importing data into accounting.
- You can see how specific transactions were recorded.
- The auditor can define how to record certain transactions.
- Immediate operation, even without a learning database.
- You can add, modify, and delete rules at any time.
Transition to the new year
When you create the file for the new year from the Actions > Create new year menu, all the Rules in the Recurring Transactions table are carried over and included in the new file.
When you import bank statement movements, the Rules are immediately applied.
You can add new Rules and adapt existing ones to new needs, such as VAT changes, adding or removing accounts.
Copying Rules from one file to another
When creating a new file, you can copy rules from one file to another, starting from the Recurring Transactions table:
- Go to the Recurring Transactions table.
Check the column arrangement to ensure they are identical in both files. - Select the rows of the Rules you want to copy.
- Copy the rows from the Edit > Copy rows menu, or with the Ctrl + C keyboard shortcut.
- Paste the copied rows into the Recurring Transactions table in the new file from the Edit > Insert copied rows menu, or with the Ctrl + V keyboard shortcut.
Rules vs. Artificial Intelligence
Artificial Intelligence (AI) is increasingly being used in automation systems.
In collaboration with our users, we have developed a system for the automatic completion of imported entries based on Rules. We believe this is a much more effective approach because:
Rules follow a deterministic logic, whereas Artificial Intelligence uses a probabilistic approach that involves a series of risks in accounting and tax contexts.
Rules offer a very high degree of control and precision.
For example, payments made to insurance companies can be accurately assigned to an account based on the contract number.All the rules form a valuable knowledge base.
They are listed in the Recurring Entries table, can be easily modified (for example when VAT changes) and serve as a reference and control tool. You can, for instance:If you do not remember, see how certain transactions have been recorded.
Explain to people who are responsible for accounting how to record various transactions.
Define for the auditor how certain transactions should be recorded.
Adapt the rules if VAT codes change or if accounts, cost centers, or other elements are added or removed.
Delete rules that are no longer applicable.
Copy and paste the rules into another accounting system and adapt them to specific needs.
They do not require a learning phase and work perfectly even for payments that occur only once or a few times a year.
Rules can be immediately adapted to regulatory changes. Artificial Intelligence, on the other hand, learns from the past and thus tends to repeat previous actions even if the situation has changed.
Currently unavailable features
These functions, while requested by some users, are not currently available:
- Ability to change the transaction text to shorten and simplify it.
- For multi-line transactions, the ability to use formulas that calculate amounts based on the imported transaction amount.
- Ability to apply a rule based on the transaction date (condition: Date column).
How the rules for completing imported transactions work in 3 steps
The following explains the procedure for how Rules work and how they are applied.
The process can be summarized in three steps:
- Import bank transactions into the Transactions table.
- Create the rules.
- Apply the rules for the automatic completion of transactions.
1. Import bank transactions
When bank transactions are imported, the program inserts a temporary counteraccount [CA]. Typically, the completion of contra accounts must be done manually for each entry.

In the example figure, in the Transactions table, it can be seen that:
- (1) - The cells have the same temporary contra account, related to sales via Twint.
- (2) - The cell has a temporary contra account related to monthly expenses for May.
- (3) - The cell has a temporary contra account related to Swisscom telephone expenses.
- (4) - The cell has a temporary contra account related to insurance costs, policy number 892-948.
- (5) - The cell has a temporary contra account related to insurance costs, policy number 987-650.
2. Creating the Rules
The Rules are used to automatically complete all temporary contra accounts of imported transactions, adding VAT codes, cost centers, links, and more.
The rules are template transactions that are already complete, found in the Recurring transactions table, where:
- The Description column contains the text (one or more keywords) that the imported transaction must include.
- The Debit Account and Credit Account columns contain the Contra account that will replace the temporary one.
We have created a system that provides different methods for creating the Rules:
- Rules from the Apply Rules dialog
- Rules from the Transactions table
- Rules from the Recurring transactions table
Regardless of the method used, the created Rules are saved in the Recurring Transactions table.

In the example, in the Recurring Transactions table, a Rule has been created for the following transactions:
- (1) - For the "Twint" transactions, the rule replaces the temporary contra account with the "Sales" account. The VAT code has also been added.
- (2) - For the "Interac Electronics" transaction, the rule replaces the temporary contra account with the "Goods" account. The VAT code has also been added.
- (3) - For the "Swisscom" transaction, the rule replaces the temporary contra account with the "Admin" account.
- (4) - For the "Best insurance" transaction with policy number "892-948", the rule replaces the temporary contra account with the "Insurance Health" account.
- (5) - For the "Best insurance" transaction with policy number "987-650", the rule replaces the temporary contra account with the "Insurance Car" account.
Important: where there is a contract number, a policy number, a customer number, etc., it is recommended to add a "+" in front of the rule. The + allows the rule to search for individual words (or sequences of numbers) regardless of their position within the description of the imported transaction.
3. Applying the Rules for Automatic Completion (Result)
In the Transactions table, the program completes the imported transactions by adding the contra account, VAT code, etc., regardless of the method used for creating the Rules.

In the example, in the Transactions table, the imported transactions have been automatically completed:
- (1) - For the "Twint" transactions, the temporary contra account has been replaced with the "Sales" account and completed with the VAT code.
- (2) - For the "Interac Electronics" transaction, the temporary contra account has been replaced with the "Goods" account and completed with the VAT code.
- (3) - For the "Swisscom" transaction, the temporary contra account has been replaced with the "Admin" account.
- (4) - For the "Best insurance" transaction with policy number "892-948", the temporary contra account has been replaced with the "Insurance Health" account.
- (5) - For the "Best insurance" transaction with policy number "987-650", the temporary contra account has been replaced with the "Insurance Car" account.
Additionally, the program recognizes the transactions with the VAT code and completes all the columns related to VAT (VAT account and amounts).
Create Rules from the Apply Rules Dialog
One of the methods for creating Rules is from the Apply Rules dialog. The main advantages are as follows:
- You can see all imported transactions.
- The imported transactions are divided into incoming and outgoing transactions, with Rules and without Rules.
- For each group of identical transactions, the Rule being applied is shown in bold.
- Rules that are duplicated or in conflict are highlighted.
- You can add new rules and modify or delete existing ones.
- By changing the conditions of a Rule (description, amount, account), you can immediately see the list of transactions that comply with it.
- You can decide which rules to activate and which to deactivate.
Below is the complete procedure for creating Rules from the Apply Rules dialog.
1. Give the command Import into accounting
Before accessing the Apply Rules dialog, you must first import bank, postal, or other transactions as follows:
- Use the command from the Actions menu > Import into accounting > Transactions
- Select the appropriate format and indicate the path where the file with your bank statement data is located
- In the dialog that opens:
- Enter the account related to the statement from which you are importing the transactions (bank, postal service, etc.).
- Specify the start and end dates for the period of the transactions to import.
- Indicate the temporary contra account if you want it to be different from the default "[CA]".
You can use any account, and if you write it in square brackets, it will not be accounted for. - Activate the Apply Rules option (available only with the Advanced plan of Banana Accounting Plus).
- Confirm with OK.

2. Dialogue Apply Rules
The program opens the Apply Rules dialog.
In this dialog, you will find:
- The temporary contra account you entered previously or the default one "[CA]".
- The bank account entered, where all transactions imported from your bank or postal account are recorded.
- The imported transactions from the bank account, divided into:
- Incoming transactions without rules (Money In without rules).
- Outgoing transactions without rules (Money Out without rules).
- Incoming transactions with rules (Money In with rules).
- Outgoing transactions with rules (Money Out with rules).

3. Create new rules
To create new Rules:
- Position yourself on one of the transactions for which you want to create a rule.
- Go to the right-hand side until you see "...".
- Click on Add New Rule.

The Add Rule - Edit Rule dialogue appears.
In this dialog, you need to enter:
- In the Description, the text (keyword) that the program uses to find the matching Rule in the imported transactions.
Example:- Best Insurance Contract 892-948
applies to lines that contain exactly the specified text. - +Best Insurance Contract 892-948
applies to lines that contain the words "Best Insurance" and "892-948" in any position.
- Best Insurance Contract 892-948
- The contra account, used to replace the temporary contra account.
- Any other information (Cost centers, VAT codes, etc.).
Important: where there is a contract number, a policy number, a customer number, etc., it is recommended to add a "+" in front of the rule. The + allows the rule to search for individual words (or sequences of numbers) regardless of their position within the description of the imported transaction.
The program shows the transactions found based on the entered conditions to which the new rule will be applied. In the example, we have a single transaction.
- Confirm with OK.

4. Confirm Apply Rules
In the Apply Rules dialog, you will see:
- The row of the created Rule ("NEW") where the data of the temporary counteraccount [CA] and the other information entered in the rule are indicated.
- Below are the lines of the transactions to which the rule has been applied.
You can decide when to execute the Apply Rules command:
- You can apply the rules selectively and continue working on the others.
- You can exit the dialog and return later.
- You can cancel the operation of applying the rules and repeat it later.
- The Apply Rules command also saves any changes you made to the rules.
By clicking on the buttons:
- Apply Rules:
- The program adds the new Rules to the Recurring transactions table.
- The program completes the transactions in the Transactions table.
- The dialog remains open so you can add the rules to the other transactions.
- OK
- Confirms the applied rules and closes the dialog.
- Confirms the applied rules and closes the dialog.

Undo changes made
Once the dialogue is closed, you will see the completed transactions in the Transactions table.
If you wish, you can undo the changes you have made:
- Menu Edit > Undo edit
- With the Cancel button (green arrow).
To also cancel the import of the data, you need to repeat the Cancel command a second time.
Complete other transactions with Temporary contra account
After importing bank transactions, the aim is to complete all transactions so that there are no more transactions with Temporary contra accounts [CA].
You can manually complete the remaining transactions. This is useful for special cases that do not tend to repeat.
You can create new rules by chosing one of the following methods:
Adding information to completed transactions with rules
It is possible to add supplementary information to the Rules through the Recurring Transactions table.
Auto-completion rules from the Apply Rules dialogue
The Apply Rules window offers an excellent level of control over changes to accounting transactions because it shows a preview of existing rules, with an indication of which transactions match each one and which transactions do not yet match any rules. You then have the option of creating new rules, modifying or deleting existing ones.
▶ Video: Rules for completing imported transactions (Apply Rules dialogue)
The dialogue may be displayed:
- From the Import Transactions dialogue, when the Apply Rules option is checked
Rules are only applied to imported rows
- From the Actions menu > Recurring transactions > Apply rules...
Rules are applied to the entire contents of the Transactions table
The Apply Rules dialogue, coupled with the import of banking data, becomes a crucial tool for setting up all repetitive records. In this dialogue window, when faced with multiple repetitive transactions of the same type, it suffices to set the rule for just one of the transactions, and the rules are automatically applied to all other transactions in the dialogue, eliminating the need to set the rule again.
Once the rules are confirmed, all transactions are listed in the Transactions table, ensuring consistency and accuracy in records of the same type, and speed in accounting for all transactions.

This dialogue box is divided into three sections:
Apply rules to transactions with...
- Temporary contra account:
This field is mandatory.
It filters all imported transactions that contain that specific contra account, e.g. [CA], which was indicated in the Import transactions dialogue. - Account:
Filters all imported transactions that contain a specific account, usually a bank account or [A], which has been indicated in the Import Transactions Dialogue.
The rule-based auto-completion system assumes that once the transactions have been completed, there is no longer any transaction containing the temporary contra account.
Imported data corresponding to rules or not
The window shows all transactions that have temporary contra accounts indicated above (e.g. [CA]). These are grouped in four main sections:
- Incoming transactions with rules
Transactions with positive change of account (credit) and with indication of the rule to which they correspond - Outgoing transactions with rules
Transactions with negative account variation (debit) and with indication of the rule to which they correspond - Incoming transactions without rules
Transactions with positive change of account (credit) and not belonging to any rule - Outgoing transactions without rules
Transactions with negative account variation (debit) and not belonging to any rule
Contextual commands
From the row of a transaction without a rule, a simple click or the three dots (...) to the right, or a right click anywhere on the row, opens a menu allowing you to:
- Add/Edit Rule
- Cancel an existing rule
- Change an overlapping rule

The commands at the bottom of the dialogue
- Expand All/Collapse All: displays or hides the elements of the Transactions.
- Display unused rules: checking this option displays all rules defined in the Recurring transactions table; if the option is not checked, the programme only displays rules that have matches.
- Display rows without rules: if this option is checked, all imported transactions are displayed; if the option is not checked, the programme only shows transactions that match a rule.
- Remove accounts between [ ]: in multi-row transactions, the import account is placed in square brackets [ ] in the detail rows. If this option is activated, the programme removes the import account from the detail rows.
Rules with transactions on multiple rows can only be defined in the Recurring transactions table. - OK: this button applies the active rules and closes the window.
- The temporary contra account is replaced in all transactions that have a match with a rule.
- New or changed rules are also saved in the Recurring Transactions table.
- Cancel: this button closes the window without applying the rules.
- If there have been changes to one or more rules, you will be asked for confirmation before closing the window.
- With this button you cannot undo the Apply Rules command; to do so, you must close this window and use the Undo command from the Edit menu.
- Apply Rules: this button applies the rules without closing the window.
- The temporary contra account is replaced in all transactions that have a match with a rule.
- Rules that are added or changed are saved in the Recurring transactions table.
- If you wish to undo changes, you must close the window and use the Undo command from the Edit menu.
Tips on how to use the Apply Rules window
The most effective way to work with the Apply Rules window is as follows:
- Check that the transactions matching rules are correct.
- Use the Apply Rules button to update the Transactions table with the selected rules.
- Add new rules for the remaining transactions and check that they are applied correctly.
- Use the Apply Rules button again.
- Repeat steps 3 and 4 until all recurring transactions are associated with rules.
Recurring transactions table
Rules are saved and may be edited in the Recurring transactions table.
You can complete or add rules also with transactions on multiple rows in the Recurring transactions table.
As time goes by, you will see that more and more imported transactions will have matches with rules; the more rules you add, the more your accounting work will be reduced.
Apply Rules dialog – Add Rule
From the Apply rules dialogue you may access the Add/Edit rule section as follows:
- By right-clicking on one of the transactions or rules:
- For transactions that already have a rule, you can choose Edit Rule or Delete Rule.
- For transactions that do not have a rule, you can choose Add New Rule.
Add New Rule example
The following example in the dialogue below is an outgoing transaction of the payment of a health insurance.
To add a new rule:
- Right-click on the movement row and choose Add New Rule.
- The dialogue Add rule appears.
- Fill in the fields available.
- Confirm with OK.

Add New Rule dialogue
The Add New Rule dialogue shows the data of the selected transaction from which you are creating the rule.
- Complete the rule with the matching parameters (conditions) and the rule completion parameters.
- All rules are saved in the Recurring Transactions table (rules for completion), where you can also:
- Edit, add and delete rules.
- Add any other column for completion, which is not available in this dialogue (e.g. Notes or DocLink columns).
- Colour the row if you want to highlight the imported transaction.
- Add transactions on multiple rows (SplitRule).

The Rule
- Rule type.
The programme, depending on the type of transaction, if in credit or debit on the bank account, sets the rule as Money in or Money out transaction. - Rule title.
It is optional, it is displayed in the Apply Rule dialogue.
Conditions
These are the elements that are used to check whether there is a match for each individual transaction.
- A match is given if all conditions are found.
- If a match is given, the entry is listed among the transactions with rule.
The description
In the description, enter the text to be searched in the text of the imported transaction. If the text is found the transaction will be considered suitable for applying the rule, if the other conditions are then met.
- Exact word or phrase
- If you write only Best Insurance 982-948 as a condition of the rule, only transactions containing those words in that exact order will be considered matches.
- If you write only Insurance, as a condition of the rule, all entries containing this exact word will be considered matches.
- All words (starting with the "+ "sign)
- If you write +Best Insurance 982-948 as a condition of the rule, all records containing these exact words, in any position, will be considered matches.
All words must be present in the description of the transaction.
The position of the words in the sentence is not relevant.
The "+" sign is not considered in the search.
- If you write +Best Insurance 982-948 as a condition of the rule, all records containing these exact words, in any position, will be considered matches.
- List of words (using |)
- If you enter "coffee|restaurant", the program searches for imported transactions that contain the word "coffee" or "restaurant".
- This mode is useful for identifying multiple categories without having to create separate searches.
- Upper and lower case
When searching for input text, no case difference is made.
The text you enter is applied to both upper and lower case text.
Amount
If you indicate an amount in the rule, only transactions with the same amount, as well as a match in the Description, will be considered as matches.
If you do not indicate any amount, any transaction of any amount that meets all other criteria will be treated as a match.
Account
In this field you will already find by default the account from which you imported the transactions. If you leave the account field empty, all transactions, imported from any account, that meet all other criteria will be considered as matches.
Actions
These are the elements used to complete the transaction row if a match is given.
If the contra account or other items to be completed are not present, you can abort the Apply rules command, add the missing account, and call up the Actions > Recurring transactions > Apply rules... command.
Contra account
Enter the account in your chart of accounts that is to be matched in the rule. In this example, the correct contra account is the Health Insurance account.
VAT
You can already enter in the rule the VAT code that the programme must add to each movement considered as a match.
CC1, CC2, CC3
You can already enter in the rule the Cost Centres that the programme must add to each movement considered as a match.
By confirming with the OK button, the new rule is saved. You will return to the previous window where the imported movements with and without rules are displayed again.
Matching Transactions
This table shows all imported transactions selected in the Apply Rules dialogue, which fall under this rule.
Buttons
- The Delete button, cancels the rule.
- The OK button, saves the rule data.
Be aware though that, until you do not give the command Apply Rules, the new rules won't be saved in the Recurring transactions table.
Rules from Transactions table
One of the methods provided for creating Rules is from the Transactions table. The main advantages are as follows:
- You work directly in the Transactions table that you already use regularly. You are already familiar with the table.
- You see all the columns.
- You create Rules simply by completing the imported transactions.
You complete the transactions manually only the first time when creating the Rules. For subsequent imports, the program applies the already created Rules to the new imported transactions. - Speed in creating Rules.
Select the rows with completed transactions and, with a single click, create all the rules in the Recurring Transactions table. You only need to modify the description of each rule to ensure a precise match for future transactions. - You do not need to insert Rules through additional dialogs.
- You do not need to manually enter all the Rule data in the Recurring Transactions table.
Below is the complete procedure for creating Rules from the Transactions table.
Import transactions
In the Transactions table, import transactions from bank, postal, or credit card statements.
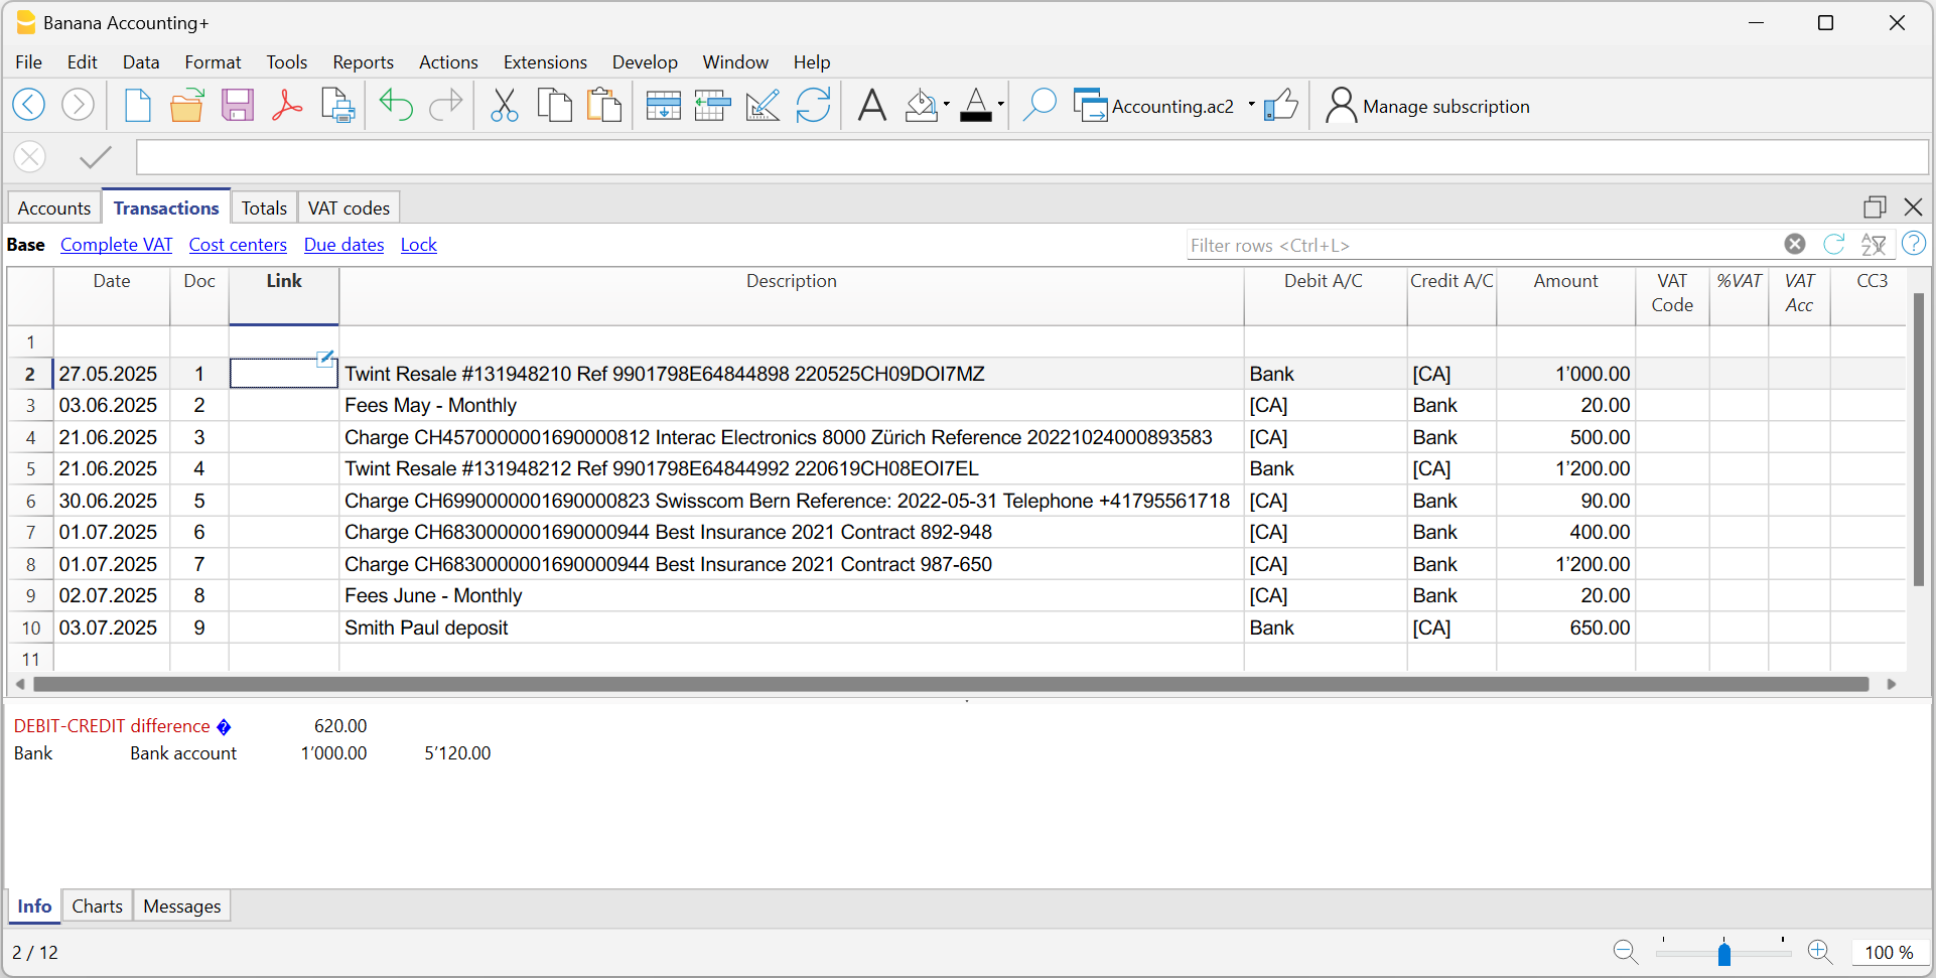
Complete the imported transactions
For each imported transaction, enter the counterpart, VAT code, cost center, or other information.
When you import a transaction that needs to be recorded on multiple lines, the program inserts a single entry with the total amount and a temporary counterpart [CA].
Proceed as follows:
- Remove the temporary counterpart account [CA] from the transaction.
- Insert new rows following the transaction. For each row, enter the complete transaction with description, counterpart, amount, any VAT code, and cost center.
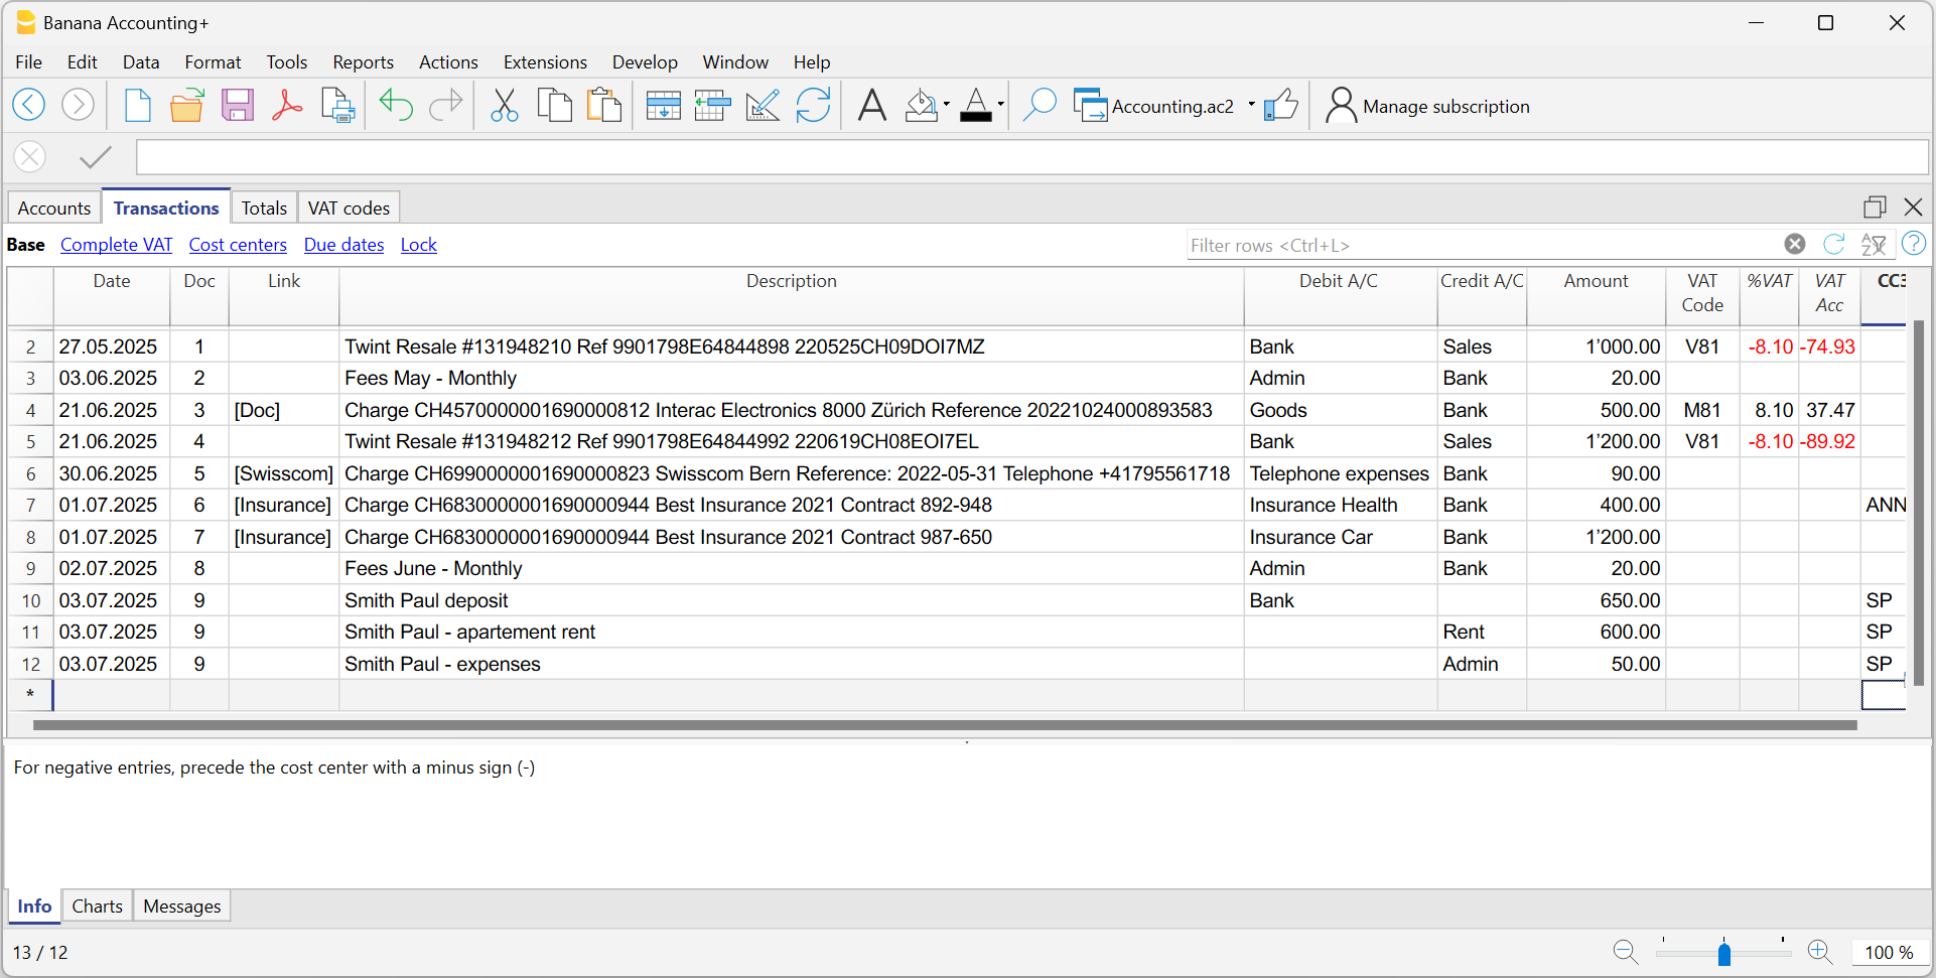
Create Rules
Starting from the completed transactions, you can create Rules:
- Select from the Transactions table the entries to which you want to apply Rules.
- Right-click on a transaction without rules > Create rules from selection.
Alternatively, go to the Actions menu > Recurring Transactions > Create rules from selection.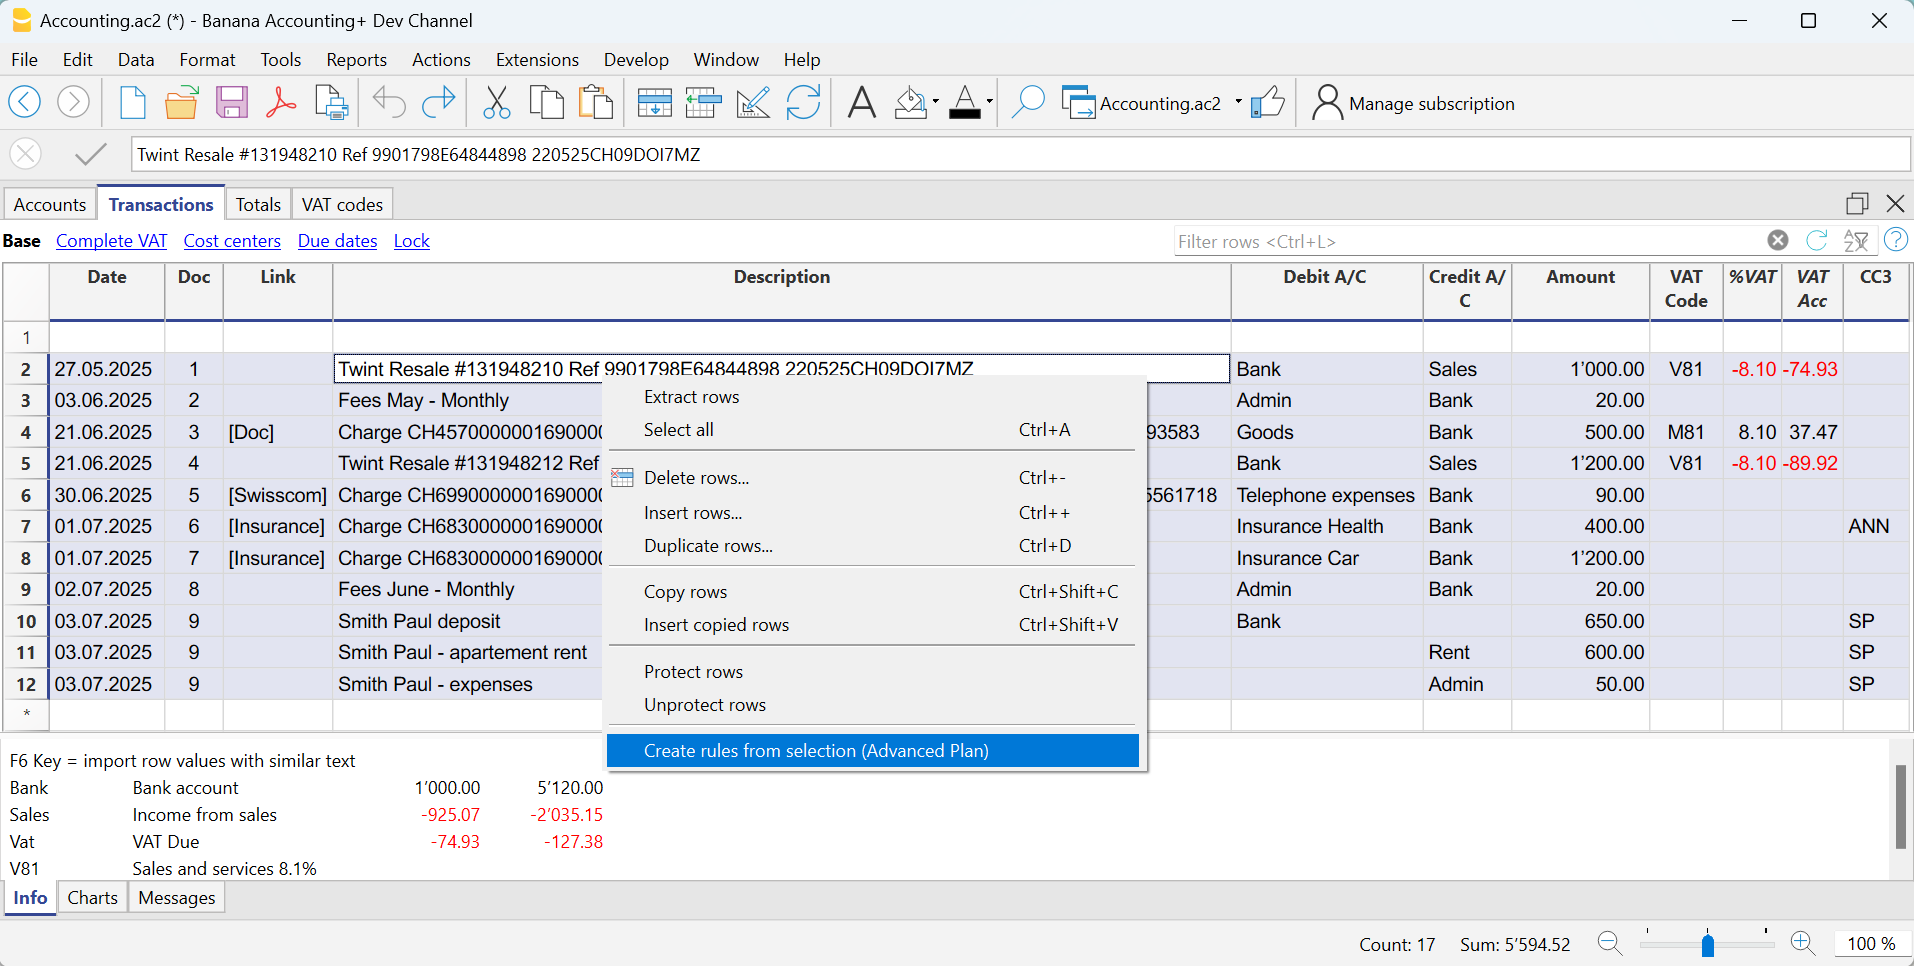
All selected transactions are transferred to the Recurring Transactions table, exactly as they were completed in the Transactions table.
How to complete the Rules
In the Recurring Transactions table, you need to complete the Rules:
- Edit the Description column.
Modify the text of the description to search for in the transactions from the imported bank statement. Initially, the program automatically uses the description found in the imported transaction.
Replace this text with one or more keywords so that the program can find matches in the description of the imported transaction (e.g., +Best Insurance).
See also Condition on Description - Debit and Credit Account Columns
The Debit and Credit columns show the counterpart and the imported bank account.- First, check whether the indicated counterpart is already the desired one; if not, update it accordingly.
- The main import account, used to identify matching transactions, must not be marked as a commented account (account enclosed in square brackets).
If the account matches the bank's main account from which the transactions are imported and is marked as a commented account, the brackets must be removed, otherwise the rule will not be applied correctly.
This may happen with detailed transactions imported from the statement for which no specific rules exist yet. - Alternatively, you can remove the main import account and leave only the counterpart. In this case, the rule will be applied based on the Description column (match with the transaction description) and will be valid for all imported bank accounts.
- For multi-line transactions, edit the Doc column.
In the first row of the transaction, enter empty square brackets [] in the counterpart column.
In subsequent rows, enter !RuleSplit in the Doc column (see rows 7,8,9 in the image below).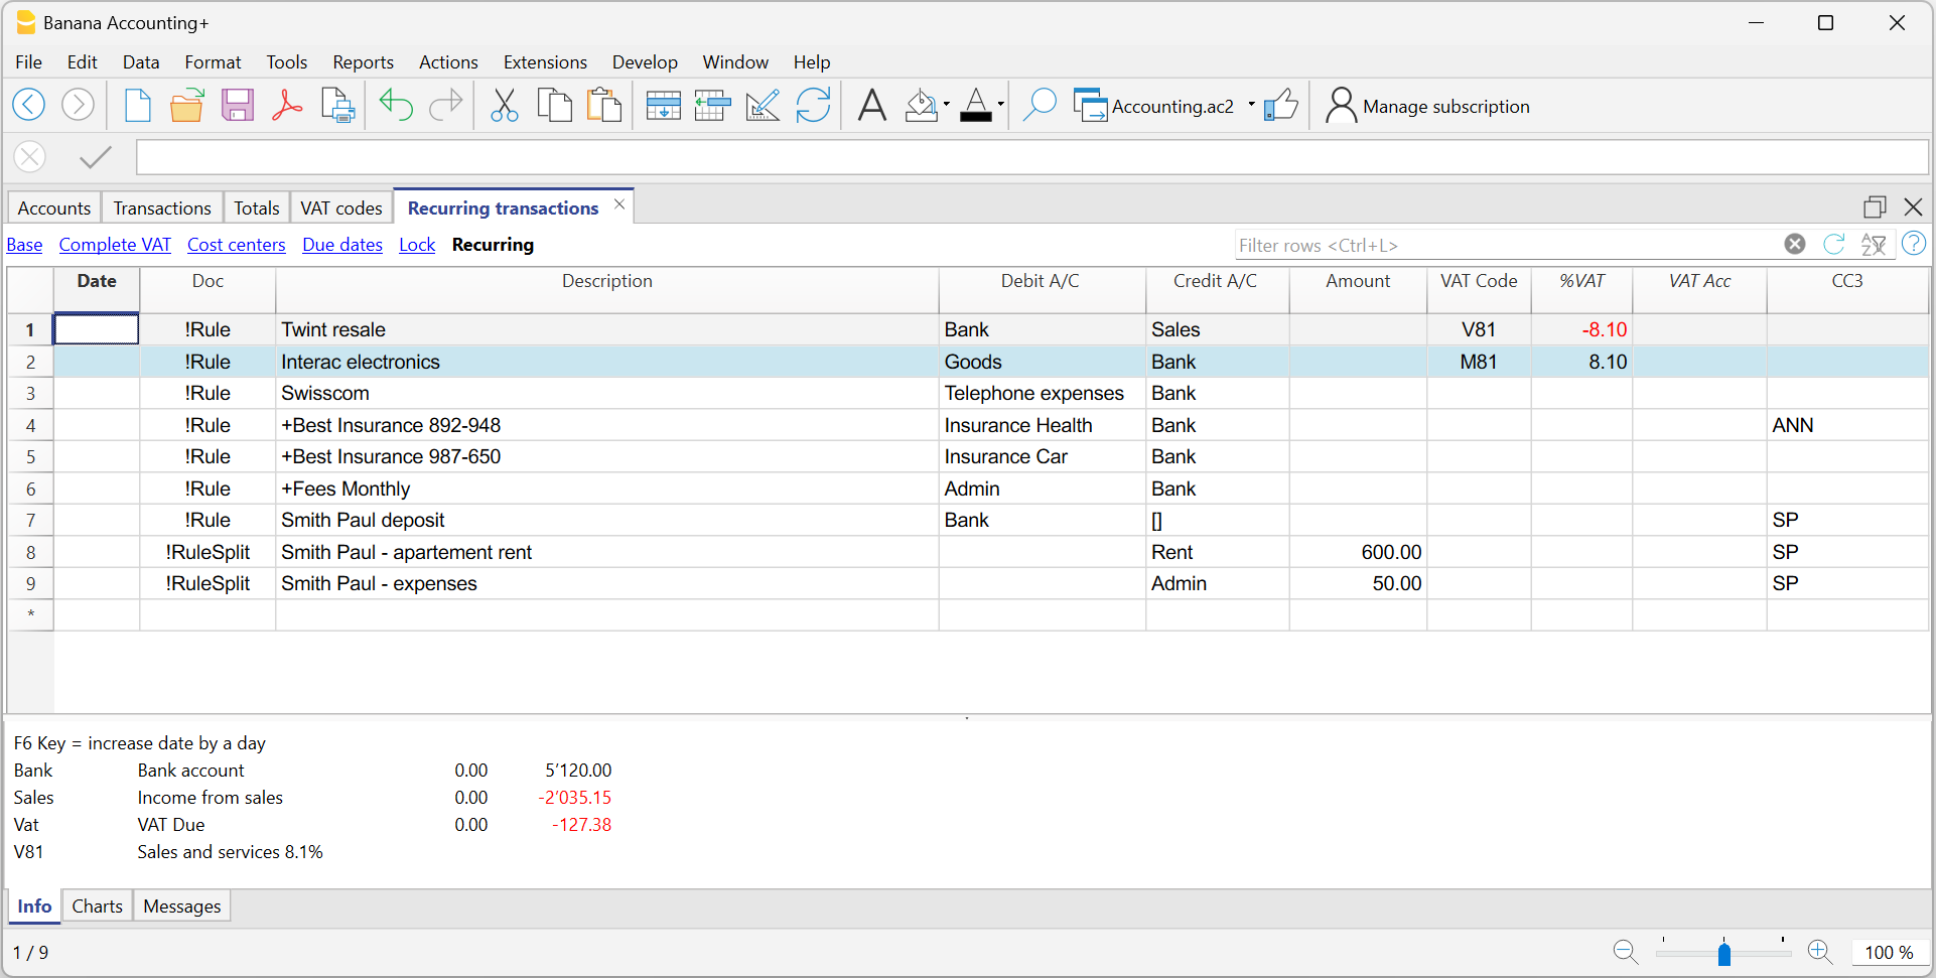
The explained procedure only needs to be performed the first time to set up the Rules. For future imports, the Rules found are applied automatically. You only need to complete the new imported transactions without a rule using the same procedure.
To find all imported transactions in the Transactions table that do not have a rule, you can use the Row filter function, entering the text "[CA]".
Recurring Transactions table Rules
The rules can be accessed via the command Actions > Recurring Transactions > Transactions table.
- Rule rows are those that contain !Rule or !RuleSplit in the Doc column.
- In rule rows, the columns have a different meaning:
- Condition Columns
Contain the values to be compared to determine whether the rule should be applied.
The condition columns are: Doc, Date, Description, Account Debit/Credit, Amount. - Action / Substitution Columns
Contain the values that will be applied and complete the imported transactions.
All columns that are not used as condition columns are considered substitution columns.
- Condition Columns

Condition columns
Condition columns (or search columns) contain the data used to search for matches in the imported transactions.
- Doc column (required)
- Must contain !Rule or !RuleSplit
- !Rule indicates it is a rule.
- !RuleSplit indicates that the rule above must also create split transactions.
- Must contain !Rule or !RuleSplit
- Description column (required)
- The Description column must contain the text to be searched in the description of imported transactions.
- When a description begins with text in square brackets, it is used as the rule name. The rule name is optional and can be used to better identify rules.
- Account column (recommended)
- In double-entry accounting: use the Debit column (to filter incoming transactions) or the Credit column (to filter outgoing transactions).
- In income and expense accounting: use the Account column.
- This is usually the bank account from which the transactions are imported.
- Date column (optional)
- Limits the application of the rule to a specific period of the transactions.
- Amount column (optional)
- Limits the application of the rule to a specific amount or range of amounts.
- In income and expense accounting: use the Income (incoming transactions) or Expense (outgoing transactions) column.
Substitution Columns
Substitution columns must be filled in with additional information.
- DocLink column
- Contra Account column
Enter the contra account that replaces the temporary contra account [CA] or the temporary contra selected in the Apply Rules dialog.- In double-entry accounting: use the Credit column (for incoming transactions) or the Debit column (for outgoing transactions).
- In income and expense accounting: use the Category column.
- VAT Code column
Enter the VAT code to be applied to the imported transaction.
The program automatically completes all VAT-related columns. - Cost Centers (CC1, CC2, CC3) columns
Specify the cost center to assign to the imported transaction. - Notes column
Enter any additional information to be included in the imported transaction. - Other columns
All columns that are not condition columns, except ExternalReference, are considered substitution columns.
ExternalReference is a reserved column used by the bank import to identify each transaction and prevent duplicates.
The DocLink column
In this column, it is not possible to insert a specific link to a document because each transaction will have its own document. However, you can add an annotation in square brackets (e.g., "[Doc]") to distinguish the rows that need to be associated with a digital document.
Once the transactions are imported, it may be necessary to link them to accounting documents. To speed up this process, it is recommended to proceed as follows:
- In the DocLink column of the Recurring Transactions table, use text enclosed in square brackets [ ].
- Within the square brackets, enter the text that should be searched for in the name of the supporting document file.

- In the Transactions table, the transactions are imported with the text in square brackets in the Link column.

- In the Transactions table, use the Row Filter function and enter the text "!link![ ]". This will display all the rows in the Link column that contain square brackets where a link to the supporting document needs to be added.
- When editing the Link column in the Transactions table, the program will show, in the auto-completion, the files of supporting documents that have not yet been linked to a transaction and contain the text entered between the square brackets.
For example, if you enter "[invoice]," the program will display all the unlinked files containing the text "invoice" in the cell.
It is possible that after importing transactions with the Rules, some transactions may need to be manually completed with additional information.
To quickly find the transactions that need to be completed, you can use one of the following methods:
- Using the Notes Column
To quickly locate the transactions that need to be completed, we recommend adding temporary search texts that can be used to filter the transactions. For example:- In the Notes column of the Recurring Transactions table, or in any other column of the Rule row (except for those predefined for the Rule), enter a hashtag, such as #city.
- In the Row Filter function of the Transactions table, enter the same hashtag. This will display the rows that you need to complete.
- Coloring Rule Rows
You can color the Rule rows in the Recurring Transactions table. The row color will be transferred to the Transactions table and used to highlight the transactions to which the rule is applied.
To identify only the colored rows, you can use the Row Filter function by entering the text "!_co!"

Split row transactions
Normally, when you import transactions from a bank statement with the Rule, a single counterpart account is recorded. If the total amount of the counterpart needs to be split across multiple counterpart accounts, you can create a multi-row Rule.
For example:
- You regularly receive a payment of 550 that must be recorded on three different accounts and therefore on three rows:
- (550) rent collection (no contra-account, as this involves recording the global amount split over three rows)
- (500) flat rent (contra account rent)
- (50) extra expenses (contra-account for extra expenses) .
To create a multi-row Rule:
- The first row corresponds to the total amount collected.
- In the Doc column, enter the text !Rule.
- In the Description column, enter the text to search for in the imported transactions.
- In the counterpart column, enter square brackets [].
In the following rows: - In the Doc column, enter the text !RuleSplit.
- In the Description column, enter the text to search for in the imported transactions.
- In the counterpart column, enter the counterpart accounts.
- In all other columns, input the values that should be included in the additional rows. In this example, we have added the tenant’s Cost Center.
In the following example, you can see the tenant’s Cost Center.
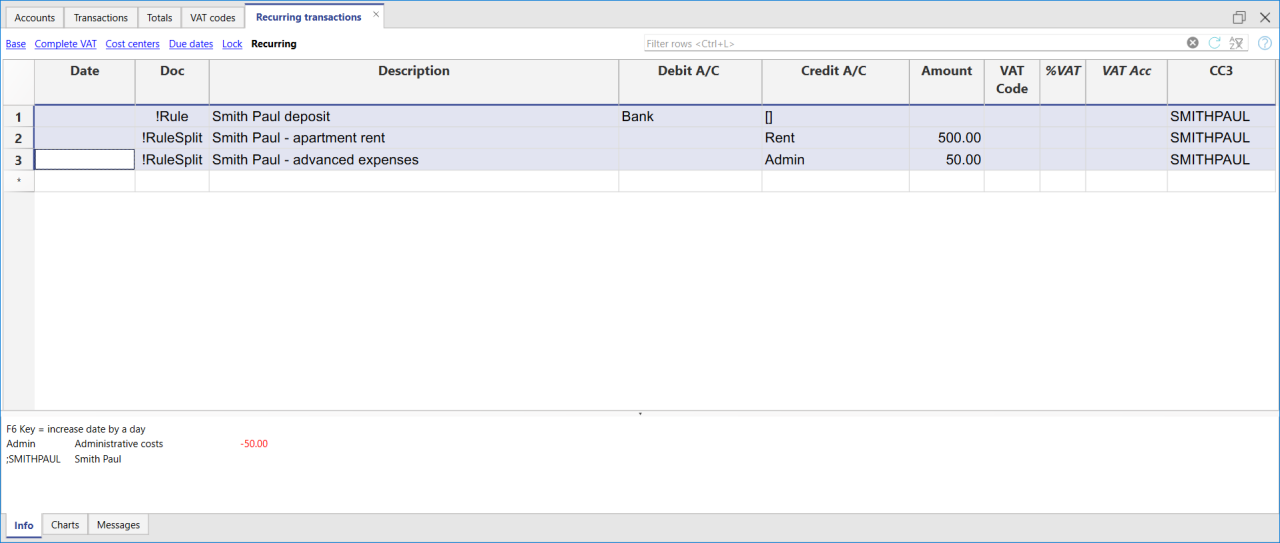
In the example of a multi-row rent transaction, it is assumed that the collected amount is always 550. If the collected amount is different from 550, the transaction will need to be completed manually.
Modifying rules in the Recurring Transactions Table
All completion Rules saved in the Recurring Transactions table, even if they were created from the Apply Rules dialog, can be modified, deleted, or new ones can be created in anticipation of a future import without a Rule.
Set a different description from the imported one
All imported transactions display the description from the bank statement in the Description column of the Transactions table. Typically, these descriptions are very detailed.
It is not possible to automatically change this description at the time of import.
If you wish to change the imported description, you can use the Notes column in the Recurring Transactions table.
Note: if the Notes column is already used for your own annotations, it cannot be used to modify the description.
If the Notes column is not being used, proceed as follows:
- Display the Recurring Transactions table.
- Make the Notes column visible by going to the menu Data > Columns set up > check the Notes column.
- In the Notes column, enter the description text that you want to appear in the Transactions table (Description column).
Repeat this step for each desired transaction.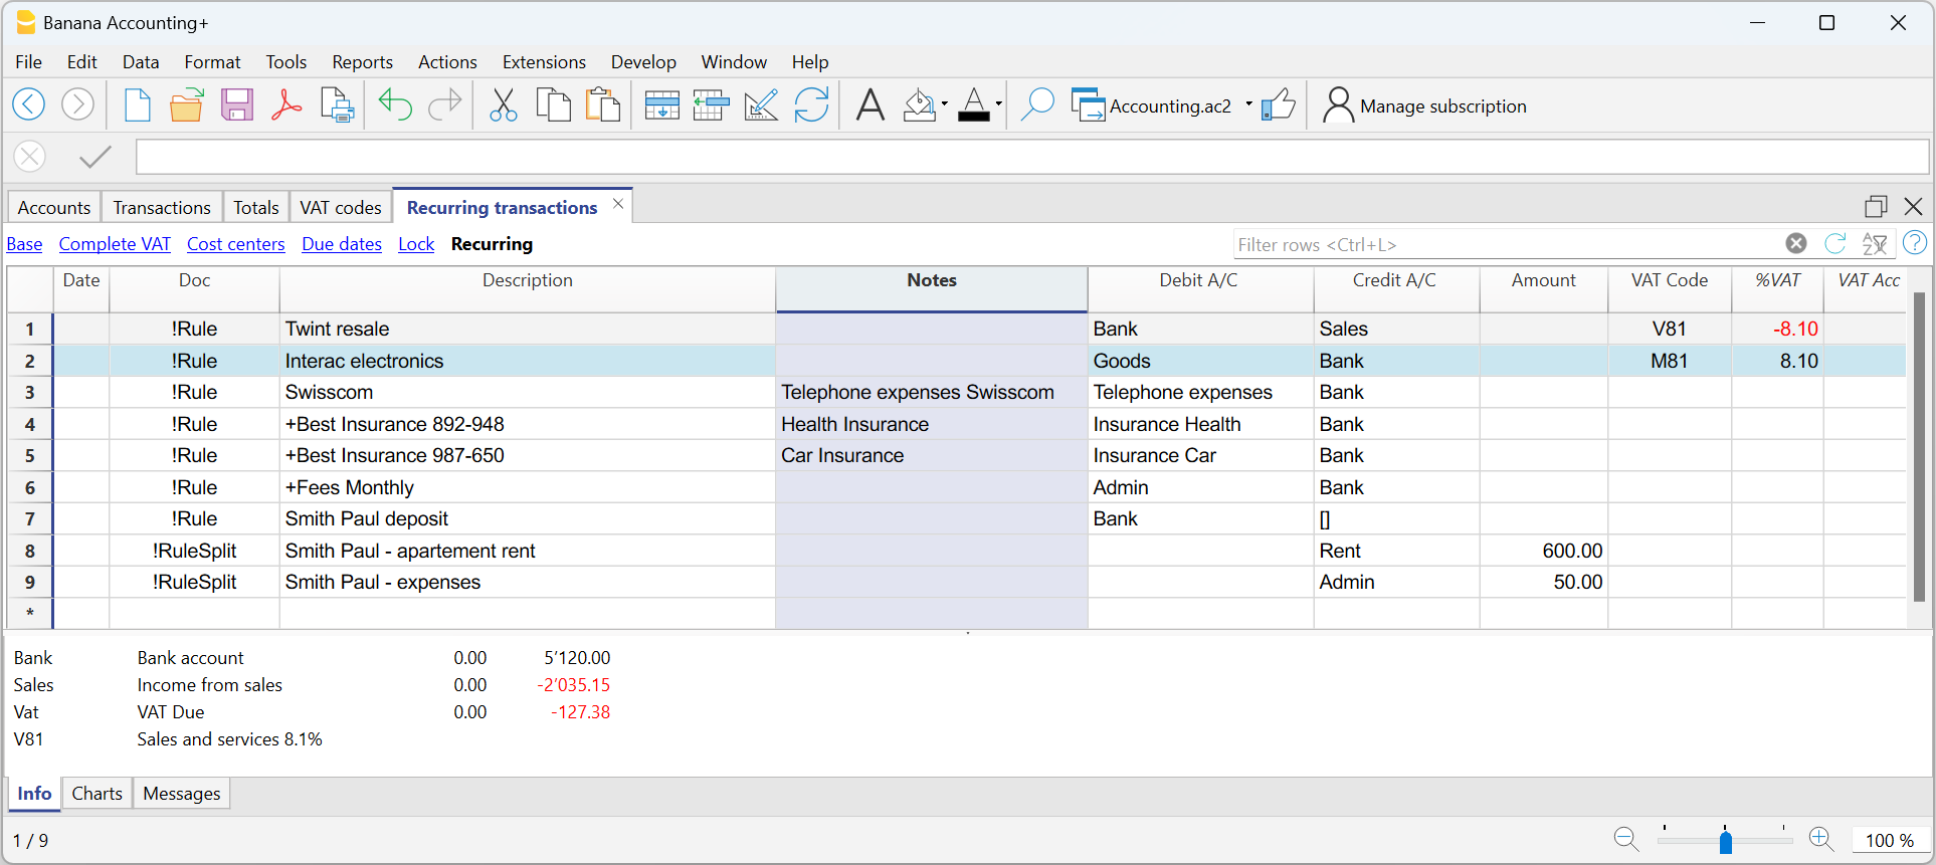
Import the transactions - After importing into the Transactions table, make the Notes column visible (menu Data > Columns setup > check the Notes column)
The Notes column will display the notes defined in the Recurring Transactions table.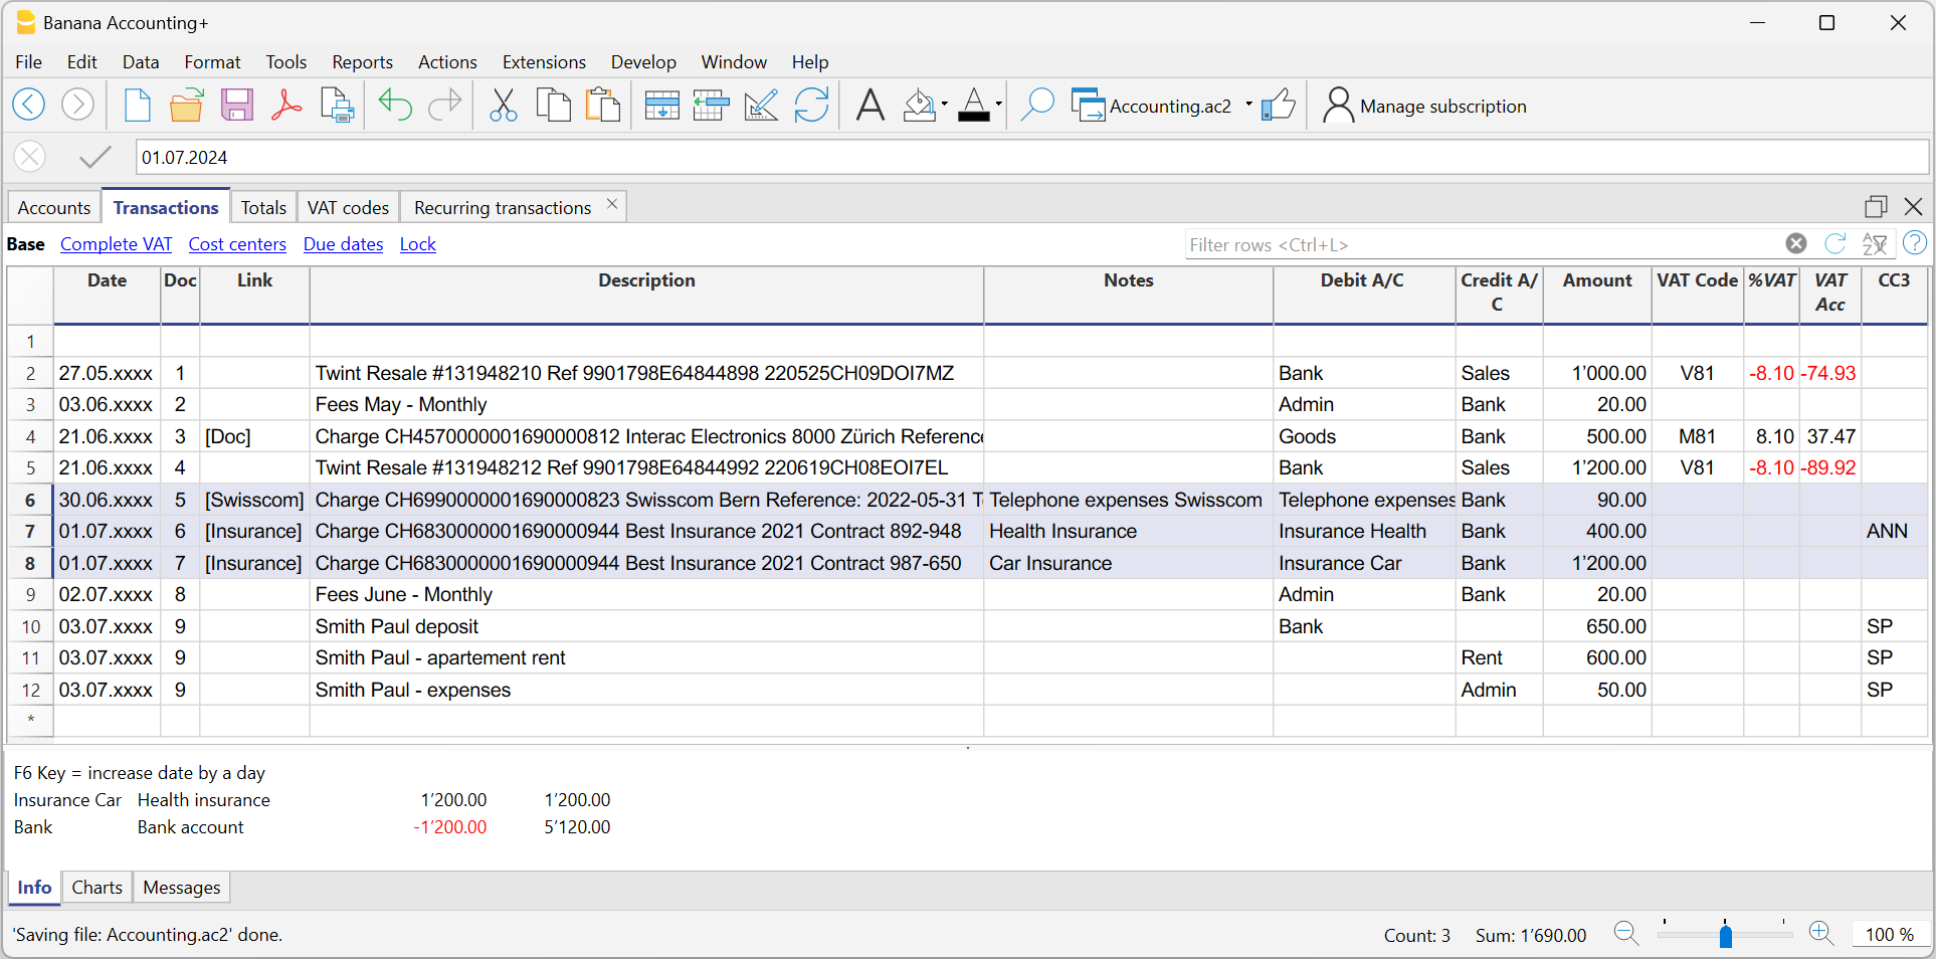
- For each transaction, copy the content from the Notes column and paste it into the Description column.
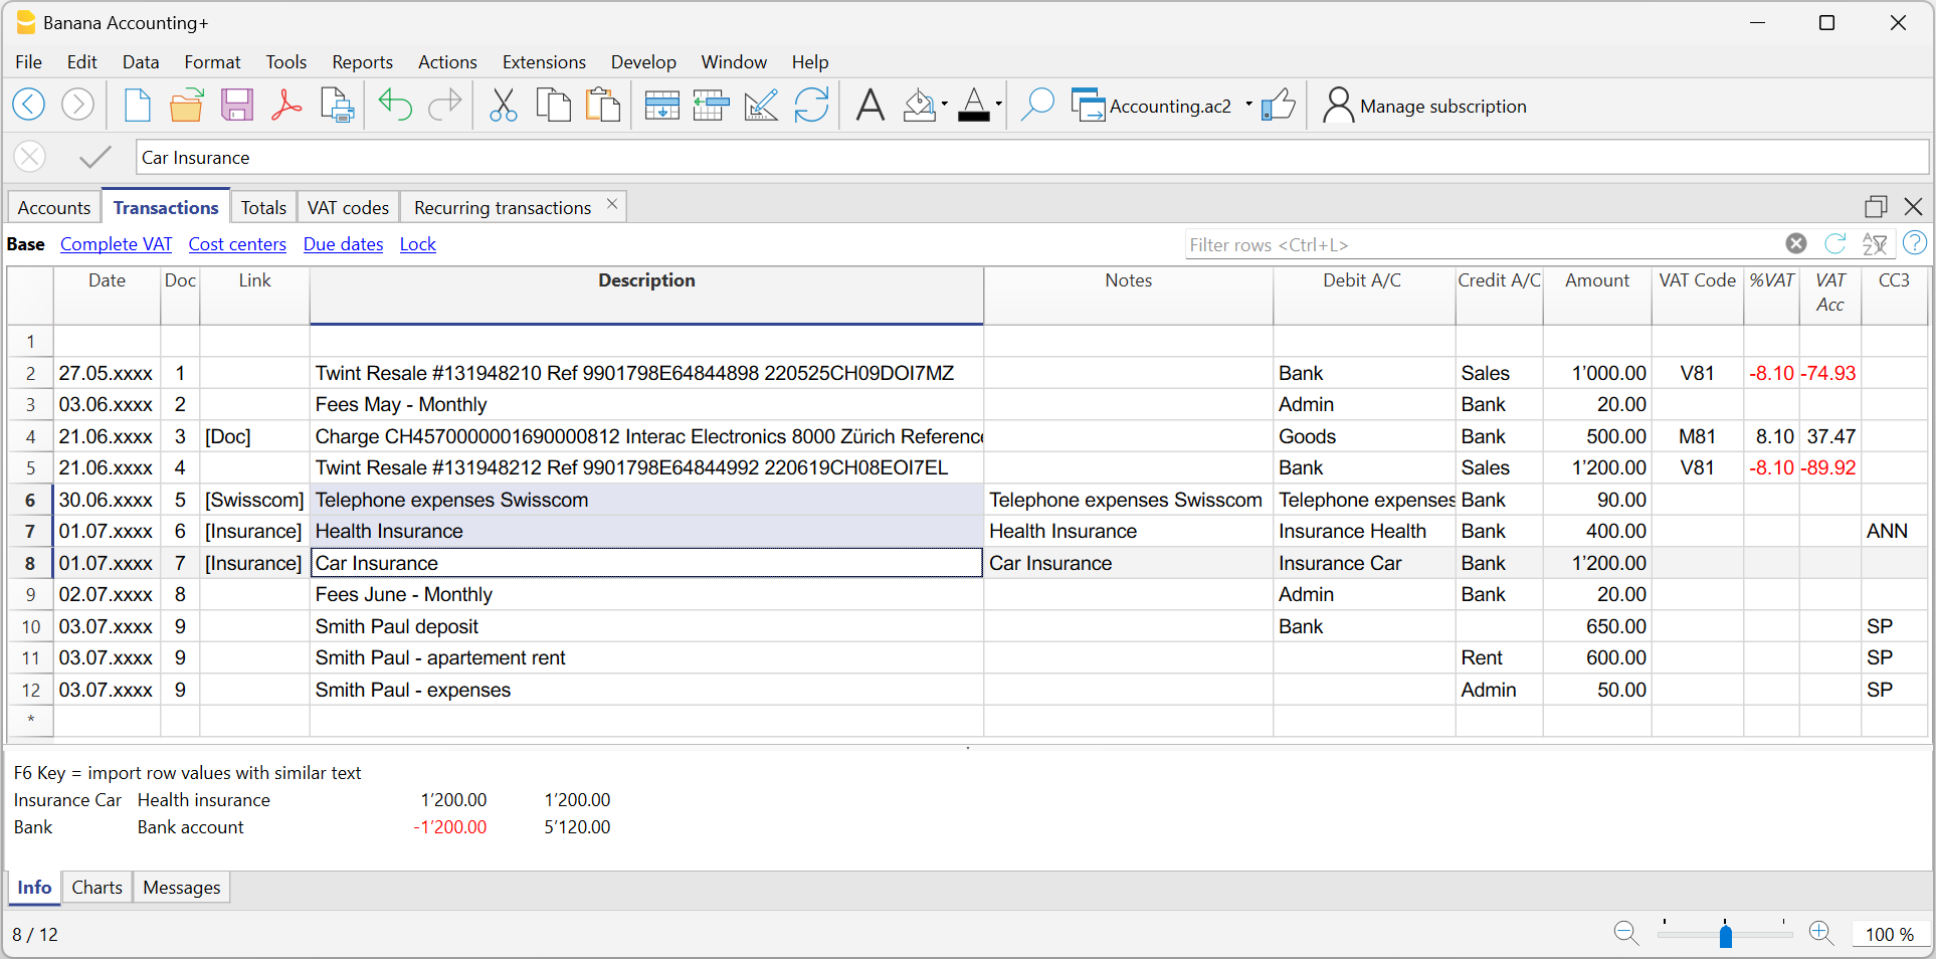
- For each transaction, copy the content from the Notes column and paste it into the Description column.
In the Recurring Transactions table, it is not possible to directly add custom columns.
To use a custom column in the Recurring Transactions table, you need to add the custom column to the Transactions table.
Once the column is added to the Transactions table, it will also be visible in the Recurring Transactions table and can be used to set a different description from the imported one.
Therefore, the insertion procedure is the same as described in the section Set a Different Description from the Imported One - Notes Column.
Create a new year with rules
When you create a new year using the command Actions > Create New Year, the existing Rules in the Recurring Transactions table are automatically carried over to the new year's file.
Accounting with the same rules
If you manage several similar accounting files (for example for clients with similar characteristics), it can be useful to reuse rules that have already been created, avoiding rewriting them every time.
When the accounting files have the same chart of accounts, or at least a compatible structure, you can copy the Recurring transactions from one file to another.
How to copy the rules
- Open the source file (the one that contains the rules to be reused).
- Display the Recurring transactions table using the command
Actions > Recurring transactions > Recurring transactions table. - Select the rows you want to copy.
- Use the Copy rows command, Edit > Copy rows.
- Open the destination file and display the Recurring transactions table.
- Paste the rules using the command Edit > Insert copied rows in the Recurring transactions table.
You can also create a dedicated accounting file, used as a rule library.
In this way, when you create a new accounting file, you can easily copy the necessary set of rules and paste it into the destination file.
Rule conditions
The rule conditions are criteria that define when a completion rule should be automatically applied to a transaction.
They are set during the creation or editing of a rule in the Apply Rules dialog, or directly in the Recurring Transactions table.
The conditions may refer to the Description, Account, Amount, and Date.
A rule is applied only if all the set conditions are met. If even a single condition is not fulfilled, the rule will not be executed. Empty conditions are ignored.
Condition on Description
Enter a word or short phrase as a keyword to identify transactions to be automated, based on the text shown in the Description column of the bank statement.
Banana Accounting automatically compares the description text of each transaction with the one specified in the rule and, if it finds a match, applies the associated rule.
To achieve more effective results, it is advisable to use only a few representative keywords (for example, the supplier or service name), so that the rule matches multiple similar transactions.
The search texts can be entered in several ways:
- Exact word or phrase
- For example, if you enter "Best Insurance 982-948", the program searches imported transactions that contain exactly "Best Insurance 982-948".
- If you only enter "Insurance", the program searches imported transactions that contain the word "Insurance".
- All words in any order (+ at the beginning)
- If you enter "+Best Insurance 892-948", the program searches imported transactions that contain the words "Best", "Insurance", and the number "892-948" in any order.
- All words must be present in the transaction description, but the order is not relevant.
- The "+" symbol is not considered in the search.
Important: where there is a contract number, a policy number, a customer number, etc., it is recommended to add a "+" in front of the rule. The + allows the rule to search for individual words (or sequences of numbers) regardless of their position within the description of the imported transaction.
- List of words (using |)
- If you enter "coffee|restaurant", the program searches imported transactions that contain the word "coffee" or "restaurant".
This method is useful to identify multiple categories without creating separate searches.
- If you enter "coffee|restaurant", the program searches imported transactions that contain the word "coffee" or "restaurant".
- Uppercase and lowercase
- The search does not distinguish between uppercase and lowercase letters. The entered text will be applied regardless of case.
All text entered in the Description is displayed in the Description column of the Recurring Transactions table.
- The search does not distinguish between uppercase and lowercase letters. The entered text will be applied regardless of case.
Warning: Do NOT use the entire text from the bank statement as the description, because it is unique for that transaction.
Condition on Account
- Enter the account from which the transactions are imported (bank, post, etc.).
- The program records in Debit or Credit depending on the imported transaction.
- The program automatically posts to Debit or Credit based on the transaction type.
- If the Account field is left empty, the rule applies to all accounts that meet the description condition.
Condition on Amount (or Currency Amount)
- Allows applying a rule only when the transaction has a specific amount.
- Alternatively, if the exact amount is not known, you can define a range of amounts by specifying a minimum, maximum, or a specific interval in which to apply the rule.
- Available from version 10.2.3 of Banana Accounting Plus (Dev Channel)
- The condition must:
- start with the symbol !
- be enclosed in square brackets [ ]
- use the unformatted amount, that is, without thousand separators and with a period as decimal separator
(other formats are not recognized) - The operators that can be used are greater >, less <, greater or equal >=, less or equal <=, not equal <>
- Example: to select transactions with amount greater or equal to CHF 1'000.00:
[!>=1000.00]

The image shows the Apply Rules dialog where you can select the Amount field and define a number range (in this example, account 1510 Furniture and Fixtures is applied to transactions with the description equal to 'Office supply purchase' and amount greater or equal to CHF 1'000).
Using this filter is useful when assigning different counterpart accounts based on the transaction amount.
Examples of conditions applicable to the Amount column
| Syntax | Meaning |
| [!=1000.00] | transactions with the exact amount of CHF 1'000.00 |
| [!>1000.00] | transactions with amount greater than CHF 1'000.00 |
| [!>=1000.00] | transactions with amount greater or equal to CHF 1'000.00 |
| [!<1000.00] | transactions with amount less than CHF 1'000.00 |
| [!<=1000.00] | transactions with amount less or equal to CHF 1'000.00 |
| [!>=1000.00 !<=2000.00] | transactions with amounts between CHF 1'000 and CHF 2'000 |
| [! |!100.00 |!<150.00] | transactions with amount exactly CHF 100.00 or CHF 150.00 |
Condition on Date
Starting from version 10.2.3 of Banana Accounting Plus (Dev Channel) you can apply a rule to transactions that fall within a specific period (for example, only transactions from January).
How to proceed:
- Add a new rule as explained on the page Apply Rules Dialog - Add Rule
- Select the Date field
- Enter the filter condition in the Comment field.
The condition must:- start with the symbol !
- be enclosed in square brackets [ ]
- use the date in ISO format YYYY-MM-DD
(other formats are not recognized)
- Example: to select transactions with dates equal or before April 1st, 2025:
[!<2025-04-01]

The image shows the Apply Rules dialog where you can select the Date field and define a date range (in this example, it is applied to transactions before April 1st, 2025).
Using this filter is helpful when differentiating processes by month, quarter or year — for example, if a specific VAT code applies until a certain date and a different one after that, such as when switching to a new VAT method.
Examples of conditions applicable to the Date column
| Syntax | Meaning |
| [!=2025-03-31] | transactions with date 31.03.2025 |
| [!>2025-03-31] | transactions with date after 31.03.2025 |
| [!>=2025-03-31] | transactions with date on or after 31.03.2025 |
| [!<2025-03-31] | transactions with date before 31.03.2025 |
| [!<=2025-03-31] | transactions with date on or before 31.03.2025 |
| [!>=2025-03-31 !<=2025-06-30] | transactions in the range from 31.03.2025 to 30.06.2025 |
| [! |!2025-03-15 |!<2025-03-18] | transactions with date 15.03.2025 or 18.03.2025 |
How to define conditions in the Recurring Transactions table
Conditions can be entered directly in the Recurring Transactions table using the same syntax explained in the previous sections.

Rule weight and conflict resolution
The weight of an autocomplete rule is determined by the number of conditions defined in the rule itself. The greater the number of specified conditions, the greater the weight assigned to the rule.
When multiple rules apply to the same transaction, Banana Accounting selects the rule with the highest weight, considering it more specific. This makes it possible to define generic rules and more detailed rules; in the event of a conflict, the more specific rule is always applied.
For example, the Recurring transactions table may contain the following rules:
| Date | Doc | Description | DebitAcc | CreditAcc |
| !Rule | Credit | 1100 Debtors | ||
| !Rule | Credit Fratelli Bernasconi | 1030 | 1150 Customer Bernasconi |
If a transaction with the description "Credit Fratelli Bernasconi" is imported into account 1030, both rules apply. However, the second rule has a higher weight because it contains an additional condition on the DebitAcc field. Since it is more specific, it is applied with priority over the first rule.
Recurring Transactions Table
The Recurring Transactions table is used to store transactions that are used repeatedly.
It contains three types of recurring transactions:
- Recurring transations stored and retrieved using the Doc column in the Transactions table.
These have an identifier code without any punctuation in the Doc column. - Rules for completing imported transactions.
These define how imported entries should be completed.
They have "!Rule" or "RuleSplit" in the Doc column. - Automatic transactions with regular intervals.
These are used to automatically generate transactions that repeat with a certain frequency, for example, monthly, quarterly, semi-annually, or annually.
They have "!Auto" in the Doc column.
Display and arrange columns and views in the Recurring Transactions table
Before inserting repetitive entries, you must display the Recurring Transactions table from the Actions > Recurring Transactions menu.
The Recurring Transactions table does not allow saving custom display settings but inherits views and column settings from the Transactions table.
To customize the columns and their layout in the Recurring Transactions table, you need to:
- Add a new view in the Transactions table.
- Arrange the columns setup the Transactions table in the desired order.
- In the Recurring Transactions table, choose the view that was created (in the Transactions table). The columns will be displayed in the same order as the created view.
Insert recurring transactions using the Doc column
- If the "End date" column is present (see Automatic transactions), you can also specify a date after which the entry should no longer be used in the Transactions table.
Transactions that are no longer used must be deleted manually.

The Recurring Transactions table in Income and Expense Accounting
The functionality of the Recurring Transactions table is the same as in Double-entry Accounting, only the columns differ:
- In Income/Expense accounting, the Account and Category columns are used.
- The Account column refers to the bank, postal, credit card account, etc. It indicates where the money is taken from or where it goes.
- The Category column indicates the category of the expense or income. It represents the reason for the expenditure or income.
- The Income and Expenses columns indicate the amount of the transaction.
- In double-entry accounting, the Debit Account and Credit Account columns and the Amount column are used.

Progressive numbering of documents "docnum"
If you need a different progressive numbering in the Doc column of the Transactions table, other than the automatic one, you can set it via the Recurring Transactions table.
Insert a row with the code docnum in the Doc column. From the following rows, the program will use the type of numbering indicated in the Description column.
"0" – If you don’t need automatic numbering.
"1" – For simple progressive numbering.
"doc-1" – For progressive numbering with a prefix, for example cash-1, cash-2, cash-3. Replace "doc-1" with the prefix you want (e.g., cash-1, cash-2, etc.).
The program replaces the number at the end of the text with a progressive number.
Managing display in suggestions
If you want only one row per code to be shown in the suggestions, you can use these prefixes in the description:
A single "*" – Displays only this row and not those with a similar code.
A double ""** – Displays only this row, but does not use it (title row only).
A backslash + asterisk "\*" – Allows you to start the description with an asterisk without it being interpreted as a command.
Retrieve recurring transactions in the Transactions table
In the Transactions table, you can retrieve the rows defined in the Recurring Transactions table:
- In the Transactions table, enter the date in the transaction row. You can also add other missing columns compared to those in the Recurring Transactions table, depending on the view you're using.
- In the Doc column of the Transactions table, select one of the codes defined in the Recurring Transactions table (Doc column) and press Enter:
- The program inserts the repetitive rows with the same code.
- If needed, you can always modify or complete some values.
- Rows stored in the Recurring Transactions table can also be retrieved in the Transactions table by entering the code in the Doc column and pressing the F6 key.
Copy transactions from the Transactions table to the Recurring Transactions table
Repetitive entries can also be inserted by copying entries from the Transactions table and pasting them into the Recurring Transactions table.
Proceed as follows:
- In the Transactions table, select the rows to copy.
- Edit Menu > Copy rows.
- Go to the Recurring Transactions table.
Edit Menu > Paste copied rows
You can also use the Ctrl + C and Ctrl + V keys to copy transactions.
Automatic transactions with recurring deadlines
Automatic transactions are useful for facilitating the recording of repetitive entries, such as subscriptions, insurances or taxes. By using automatic transactions, you only have to enter the entry of interest once, set a few parameters such as the start date, the frequency and the end date and then Banana Accounting Plus will inform you when an automatic transaction is ready to be created and will create it for you.
In Banana Accounting Plus, there are two ways to create automatic transactions:
- From the Recurring Transactions table
- From the Manage Automatic Transactions dialogue.
Requirements
- This feature is available in the latest release of Banana Accounting+ Dev Channel.
- It requires the Advanced plan. If you do not have this plan, you can request a promotional code valid for 1 month via the contact form.
- You need to add the End Date and Repeat columns to your accounting file.
- This feature is in Beta Test; we kindly ask you to test it and report any problem.
Adding the End Date and Repeat columns to your accounting file
To be able to activate the commands for automatic transactions, the End Date and Repeat columns must be added; without these columns the commands will not be displayed.
- Open your accounting file or create a new accounting from the File menu > New command.
- Select the command from the Tools menu > Add/Remove Functionalities...
- The Add/Remove Functionality dialogue will appear with the list of available functionalities.
- Select the option Add End Date and Repeat columns in Transactions table.
If this option is not available, check the Banana version and the plan you are using, as described in the Requirements section. - Click on the OK button.

Creating an automatic transaction from the Recurring Transactions table
- Select the command from the Actions menu > Recurring transactions > Create automatic transaction.
- The Recurring transactions table will appear with a new row, showing the date of the day in the Date column and the text !Auto in the Doc column, which serves to identify the automatic transaction.
- Update the Date column with the date of the first occurrence you wish to schedule.
- Display the End Date and Repeat columns with the command from the Data menu > Columns setup...
Make sure to check the Visible box for both the End Date and Repeat columns.
If these columns are missing, you can add them as described in the Adding the End Date and Repeat columns paragraph.
Note: The new columns are added to the Transactions table, but are only used in the Recurring Transactions table, visible in the Recurring view. - Add the desired repetition to the Repeat column. For example, if you want a quarterly repetition, enter the text 3MS in the Repeat column.
- If the automatic transaction has an expiry date, set it in the End Date column.
- Complete the Description, Debit Account, Credit Account and Amount columns.
- Select the command from the Actions menu > Recurring transactions > Manage automatic transactions to display the scheduled transactions.
Note: If you use the command from the Actions menu > Recurring transactions > Create automatic transaction from an existing transactions in the Transactions table, the Description, Amount and Accounts columns will show the text of the original transaction.
The Create automatic transaction command is also available in the context menu of the Transactions table (right-click on a transaction, and choose the Create automatic transaction command).
Creating an automatic transaction from the Manage automatic transactions dialogue
- Select the command from the Actions menu > Recurring transactions > Manage automatic transactions.
- The Manage automatic transactions dialogue will appear.
- Click on New automatic transaction button at the bottom of the dialogue.
- Complete the necessary fields:
- Start date
Date from which the first automatic transaction will start. When the transactions are generated, this date will be updated with the date of the last automatic transaction created. - End Date
- Repeat
- Description
- Account
- Contra-account
- Amount
- CC1, CC2, CC3
- Name or description (optional)
- Start date
- Click on the OK button.
Auto-completion rules for income and expenses accounting
In Income and Expenses Accounting and the Cash manager, the functionality for Completing Imported transactions works in the same way as for Completing transactions in Double-entry Accounting.
The main difference is as follows:
- In the Income / Expenses accounting, the columns Account and Category are used.
- The Account column refers to the bank account.
- The Category column is where the category is specified. It represents the counterpart account entered automatically.
- The Income and Expense columns are where the amount for the transaction is indicated.
- In double-entry accounting, the Debit Account and Credit Account columns, along with the Amount column, are used.
Therefore, even with income and expense accounting, it is possible to create rules using one of the following methods:
- Rules from the Apply Rules dialog.
- Rules from the Transactions table.
- Rules from the Recurring Transactions table.
The Recurring transactions table in Income / Expenses accounting
In the Recurring Transactions table, all imported transactions to which Rules have been applied are saved:
- The columns associated with the amount are the Income and Expenses columns.
- If no amount is specified, the rule will be applied to both outgoing and incoming transactions.

The Clearing account in import operations
The clearing account is an interim account used to record temporary transactions. It is specifically used in the following cases:
- Post self-taxation and recovery operations on purchase tax (VAT on services abroad).
- Import data into the main accounting from the cash book and credit cards.
- Record the net salaries debited by the bank, pending the complete recording of the gross salaries with the various monthly deductions.
- Recording incoming payments in camt.054 and camt.053 formats to avoid duplicate credits.
Use of the clearing account when importing data from the cash book or credit card
When the cash book or credit card movements are kept in separate files from the main accounting, it is used as a counterpart account in order not to create overlapping records in the import, regarding payments from the bank to the cash or credit card accounts.
- In the cash book or credit card file, the receipt of funds will be recorded (the cash book or credit card account balance is increasing).
- The outflow from the bank or postal current account and the increase in cash book or credit card will be recorded in the main accounting file.
The internal transfer account must be used as a counter-entry, both in recording the withdrawal from the bank (main accounting), and for payment at the cash book or on the credit card (separate file).
When you import the cash book or credit card data, into the main accounting file, the internal transfer account is reset to zero:
- The data imported from the cash file or the credit card account will be recorded as credits in the clearing account.
- The movements relating to payments already recorded with debit on the bank or post office account, will be credited to the clearing account.
More details on importing with the clearing account are available on the Importing data from the Cash book file.
Using the Clearing account for camt054 and camt053 Receipts
Those who collect payments via QR-IBAN can use the camt054 XML file to automatically import and record incoming payments. At the same time, they can import the entire electronic bank statement using the camt053 XML file.
- The camt054 XML file contains only the details of receipts for each customer.
- The camt053 XML file, on the other hand, reports the total daily credit without details.
- Payments received on the QR-IBAN account, imported via the camt054 XML file, are transferred daily to the associated IBAN account (bank account listed in the chart of accounts).
Problem: If both XML files (camt054 and camt053) are imported into the bank account ledger, the same credit is recorded twice: once with the details of individual receipts (camt054) and once with the total daily amount (camt053). This results in a duplication of credited amounts.
To solve this issue, the transfer account is used by following the procedure described on the page Bank Statement Camt ISO 20022 Switzerland (Banana+).
Retrieving data from other programs
Banana Accounting Plus allows you to retrieve transactions from other programs, both as a first step to start your accounting and on a recurring basis.
Import bank transactions
This is the most common data import situation. Please refer to the dedicated section:
You can use these features to import data either on a recurring basis or as a one-time operation.
Example of importing a bank CSV file using Excel
If you need to import bank data and no import extension is available, you can also proceed via Excel by creating a data structure similar to that of the Transactions table and then copying and pasting the data:
- Create an Excel sheet called "Transactions" with the same columns as the Transactions table in your accounting file.
- Date, Doc, Description, Debit account, Credit account, Amount
- Import the bank data into Excel in a separate table.
- Copy it or transfer it using formulas into the Transactions sheet.
- Select and copy the Transactions data in Excel.
- Go to the Transactions table in Banana Accounting.
- Move to the end and give the Paste command.
The program will add new rows.
To convert data from one format to the Banana Accounting format, you can also use formulas, as shown in the example in this image, where the
The Debit and Credit accounts are assigned using a formula based on the sign of the amount.

Multi-currency accounting columns
If the accounting is multi-currency, also add the columns.
- Currency code
- Amount in base currency.
If you have the amount in foreign currency and in base currency, the exchange rate is calculated by Banana Accounting.
Additional tips
- If the amount columns do not contain thousand separators, Excel may not convert them into numbers. In this case, select the entire column and use the "Replace" command, then enter the thousand separator.
- If the data is sorted in reverse order compared to how you keep it in Banana, before proceeding with field mapping, position yourself on the Date column, click the arrow on the right and sort from oldest to newest.
- You can add any additional columns you need.
- With Excel Office Scripts, you can also create a macro to automate file conversion.
Use ChatGPT or another AI assistant
If the data is not confidential, you can use ChatGPT or another AI assistant to create an Excel file with the same columns as those in the Transactions table.
- Upload your transaction file to the AI assistant.
- Indicate that it is a file containing bank transactions and, if possible, briefly explain the format, logic, and meaning of the columns.
- Ask to transform the content into an Excel file and specify that:
- The file must be compatible with Banana Accounting, so that the assistant can correctly use the format information.
- The columns must correspond to those of the Transactions table in Banana Accounting, for example:
Date, Doc, Description, Debit account, Credit account, Amount. - It must complete the Debit account and Credit account with the related bank account number, based on the sign of the amount.
- Specify the character used in the file as the thousands and decimal separator, for example.
Thousands separator ".", decimals "."
- Open the generated file in Excel and verify the result.
- You may need to make manual changes or provide further instructions to the AI assistant to refine the result.
- When the file is correct, select and copy the data from Excel.
- Go to the end of the Transactions table in Banana Accounting and paste it.
Recurring import from other programs
It may also be necessary to regularly import data:
- Import monthly transactions from the payroll program.
- Import invoices issued with an invoicing program.
- Import payments recorded with the invoicing program.
- Import sales recorded in an online shop.
- Import data from another accounting program.
- Import data from a cash register management program (for example for a restaurant or a hotel).
In these cases, there are two possibilities:
- Make sure your application exports the data in the txt (TSV) file format, specifically prepared for import into Banana Accounting.
See the Instructions for creating a file to import into Banana Accounting (in English). - Use an import extension that converts the data exported from the program into the format accepted by Banana.
- Check whether there is already a prepared extension.
See: Import extensions. - Create an import extension.
See: Develop an Import Extension
- Check whether there is already a prepared extension.
Creating a new accounting file starting from existing data
If you want to use Banana Accounting starting from accounting managed with other software, or if you want to reconstruct the accounting from existing data.
Retrieving data from audit files or other formats
You can recreate an accounting file in Banana Accounting starting from files that contain all accounting data such as:
One-time data import with Excel
If you start keeping your accounting with Banana and need to retrieve transactions from another accounting software, it is probably faster to use Excel to copy and paste the data.
- With the old accounting program, export the data in a format readable by Excel (CSV, txt, ..).
- Import the data into Excel (see below)
- In Excel, arrange the columns exactly in the same sequence as they appear in the Transactions table of Banana.
- Instead of changing the column order, it may be more convenient to add new columns next to the existing ones and copy the data there, or use formulas to retrieve and convert the data. With formulas, you can remove spaces, modify texts or convert amounts and dates.
- Open the new accounting file in Banana Accounting.
- In Excel, select the data to copy and use the Copy (Ctrl+C or Copy from the Edit menu) command.
- Go to Banana and use the Paste (Ctrl+V or Paste from the Edit menu) command.
This method is useful for retrieving data from MS-Money, Intuit Quicken and QuickBooks, and from most other accounting programs.
Import from other programs to switch to Banana
To facilitate switching to Banana Accounting from other programs, we have developed some extensions that allow users to import into Banana Accounting transactions already entered in other software. We therefore recommend consulting the specific pages related to the program you want to migrate from: