File Menu
When using Banana Accounting, each accounting management is saved as a different file.
Banana Accounting files are compatible with versions from all operating systems and with synchronization systems.
- New...
- Open...
- Close / Close all
- File and accounting properties
- Save/Save as/Save all
- Create Pdf dossier
- Export file
- Page setup
- Logo setup
- Print/Print preview
- Create Pdf...
- Send file via email
- Open file location
- Recent files / Favorite files
Close / Close all
These commands allow you to close the active file or all open files of Banana Accounting.
Create a new file
To create a new file, go to the File menu and click on the New command.
This command opens the window for creating a new file. From the same window you can access all available templates. We recommend that you start from an existing template and customize it with your data. The window that appears offers the possibility to create a new file in three different ways:
- Using an existing Template (recommended choice)
- Copy data from an existing File
- Use a New empty File
Please note: those who have subscribed to the Professional plan of Banana Accounting Plus, while creating a new file, see the message: Active plan: Professional Plan. The functions of the Advanced Plan are available up to 70 transaction rows. This message can be ignored and automatically disappears once the 70 transaction rows are exceeded.
Start with one of our templates
This will generate a new File based on one of the existing templates. There are multiple templates suitable for every legal form and business.
According to the selected Region, the models available in the language of the nation are displayed. The image shows the templates in English language for Switzerland.

- File menu > New
- In the Region field, select your country/language
- In the Category field, select your activity's category (business, private, non profit, ...)
- In the Type field, choose the type of file you want to create (Cash Manager, income/expense accounting, double-entry accounting, ...)
- You can also search for a template by entering a keyword in the Filter by box.
- On the right side of the window, select the template that most closely matches your needs.
- Click on the file and confirm with the Create button to open the selected template.
All the files with the VAT option have the VAT Codes table adjusted to the new rates.
The chart of accounts can be adapted to your requirements (change of account description, insert or delete groups, sub-groups, etc.)
Save the file with a name
Once you have opened the template with Banana you can save it with your own name by choosing the File menu > Save as command:
- Select the destination folder
It is useful to create an “Accounting” folder for each year, so that you can save the accounting file and also the documents for that year. We recommend that you also consult the page Organize your work. - Select a file name. We recommend a name containing the company name and the accounting year (for example smith_company_2025).
- The software will add the .ac2 extension, typical for the Banana Accounting files.
Adapting a template
- Edit the File properties
- Adapt your Chart of accounts
- Enter your bank accounts.
- Enter or edit the accounts to fit it to your requirements.
While going along with your work, you will still be able to add or edit accounts, if new needs arise.
Start with a Tutorial
Tutorials are existing templates, which contain within them example accounting data (opening balances, entries, budgets, ...). A tutorial is not available for all templates.
The tutorial files are useful for understanding how to structure accounting within a certain template. The example data entered are for demonstration purposes only and can be changed, deleted or replaced with your own data at any time.
When you select a template and it has a tutorial file, the button Create from Tutorial automatically appears next to the template detail description.

Start from an existing File
Starting from an existing file or template, without modifying the existing file.

There are several possibilities to copy data:
- Open the file that is to be your template via the Browse button and indicate the path to locate your file.
- Create a copy of the open file, using the File > Save As command.
- Else, you may create a copy of the open file via the Tools > Create File Copy command. Choose which data to keep in the dialog window. If none of the three options are activated, a file is created with the chart of accounts only.

- Save the file in the folder where you wish to keep the data (normally in the documents folder). Enter the company name and the accounting year as file name, for example smith_company_xxxx.ac2.
- If you are taking over an existing accounting file, you will also need to enter the opening balances in the Opening column.
- If you are working in a multi-currency file, you need to update the opening exchange rates.
Starting from a new empty file
You will be starting from scratch, so you will need to set up the basic accounting data and the entire Chart of Accounts (not recommended).

- Menu File > New.
- Select your country/language
- Select your category
- Select your Accounting template
- On the bottom of the list click on New empty.
- Setup the Outline to create new file

- Setup the File and accounting properties
- Save with File Name.
- Create the Chart of Accounts structure
Related documents
- Income and expenses accounting and Cashbook
- Double-entry accounting
- Double-entry accounting with multi currency
- Utilities documents
Transferring to a new year
When transferring to a new year, there is a specific procedure to follow, in order to create a new year's file and automatically carry forward the opening balances.
New file settings
When the program creates a file with new characteristics, you need to setup the outline of the new file.
Outline to create new file
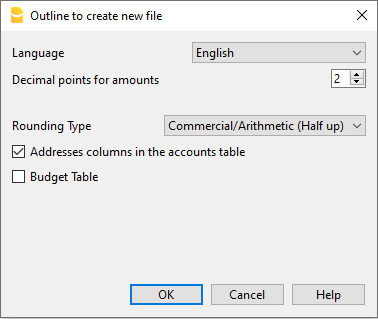
Language
The language used for the columns headers of the various tables.
Decimals and rounding
Decimal points for amounts
In order to avoid accounting differences, the number of decimal points for the amounts is fixed for each file. Two decimal points are normally used, but there are currencies where decimal points are not required so 0 needs to be inserted.
For other currencies that use multiple decimals such as the Tunisian Dinar or crypto currencies such as Bitcoin (9 decimal places), Ethereum (18 decimal places) the appropriate number must be indicated.
Accounting can be managed with amounts of up to 27 decimal places.
Decimal points for amounts in foreign currency
When using a multi-currency accounting, the number of decimals for the amounts in foreign currency must be defined. For example, if the accounting is in EUR and you are managing crypto currencies such as Ethereum, you must enter 18.
Generally, the number of decimals must not be less than the number of decimals in the base currency.
Rounding type
The rounding is applied to amounts with decimals that go beyond the set number of decimals.
If 2 decimals are set, this is the type used to round the digits over two decimals.
Depending on the methods used, the following amounts: 1.005; 1,015; 1,025; 1,035 will be rounded in a different way.
- Commercial/Arithmetic (Half up) rounding to the next whole number: 1.01; 1.02; 1.03; 1.04.. In accounting, this is most commonly used.
- Banking (Half average) rounding up or down towards the nearest even number: 1.01; 1.02; 1.03; 1.04.
Functionalities to be included
For more information on the functions to be included see:
Address fields in accounts table
When this option is activated, the Address view is created in the Accounts table. In this view, the user can enter the addresses of clients, suppliers and members.
Budget Table
When this option is activated a Budget Table is created, where the user can enter his budget transactions.
Accounting files, in different languages can thus be created, and with different decimal points. In order to change the language or the decimal points once the accounting file has been created, the accounting type must be converted via Tools → Convert to new file from the menu.
Accounting with multiple languages
With Banana Accounting Plus, you can create accounting files in different languages, and present the Balance Sheet and Profit & Loss Statement in the language you need.
The available languages are: English, Italian, German, French, Spanish, Portuguese, Chinese, Dutch.

The different languages
- Program language
The one used for the interface, menu dialogues, etc.
You can change it from the Tools menu → Program options.
See red box 1 and 3 in the image above. - Documentation in different languages
You have a complete documentation in different languages, easily accessible by clicking on the help button. - Accounting file language
See red box 2 in the image above.When you create an accounting file, the columns are set in the creation language.
- The language of the column and table header
You can change it at your convenience. For example, instead of using the term VAT, you can use the abbreviation that best suits your country's requirement. - The content in any language
In the cells you can enter texts in any language. - Additional columns for other languages.
You can add columns to have the Balance Sheet and the Profit & Loss Statement in different languages. You can create columns for other languages in the Transactions table and also in all other tables. - Views in different languages
You can easily switch between different languages and just print the output in the desired language. - Balance Sheet and Profit & Loss Statement in different languages
You can customize the printout, and just choose to show the required columns in the final reports.
How to change the file creation language
Each document on Banana Accounting Plus is a separate file. The language of the file is separate from that of the program and is defined when the file is created. (File menu → New).
Column names and headers are assigned at the time the file is created, the creation language is then used.

To change the language of the file and columns, you need to re-create a new file:
- From the Tools menu → Convert to new file command
- In the open dialog box, select the file type equivalent to your existing file and click OK
- In the next window choose the new language of the file and the type of rounding, then click OK
The program creates a new file identical to your previous one, with the new language settings. This new file must be saved with a new name.
Change the current language of the file
The current language is the one the program uses to display the wordings, such as "Opening balance" in the account card or the dates in the reports.
Normally, it will be the same as the creation language, but it may be changed in File properties → Other.
Change the column headings
You can change the column header with the Data menu → Columns setup.
Add columns for different languages
In the Accounts table and also in the other tables (Transactions, VAT codes), you can add additional columns where you can enter the descriptions in other languages.
- From the Data menu →Tables setup → Add new column command
- Use the name of the language (e.g. German, Chinese, etc.) as the column name.
- In the newly created columns, for each row, complete the description in the language that has been added.
Create Views for each language
Create a view for each language to have printout only with the desired language.
- Data menu → Tables setup command
- Create a View for each language.
In each table you can have different views for different languages, or the views that include columns of different languages. - Customize your printout in the language you require. If you want to print in different languages you can create one Customization print for each language so you don't have to change the settings each time, but have them already set up.
Enhanced Balance Sheet for each language
Once you've added the language column to the Accounts table, you can have it appear in the Enhanced Balance Sheet report as well.
- Open the Enhanced Balance Sheet with groups.
- Choose the Customization you want to print.
- In the Customization section with the Duplicate command Create a new Customization for your language.
As customization name, give the name of the language. - Go to the Columns section:
- Advanced button for the Balance Sheet columns
- Add button
In the section of the Accounts table:- Make the column of the language you are interested in visible.
- Hide the Description column of the default language.
- Repeat the operation also for the Profit and Loss columns.
- Next time when you open the Enhanced balance sheet with groups, you will have your language already set up.
- Include the Customization in the Favorites menu.
This allows you to access your report faster.
The predefined texts of the report (date etc.) are displayed in the current accounting language. It may be necessary to change the current language from time to time.
Extensions
If you have specific needs in different languages, they can be programmed as Extensions.
Open and save a file
To open a file, choose the Open command from the File menu, or use the corresponding icon in the Toolbar.
Opening a file
Data on the disk is loaded into memory, where it can be processed.
- Accounting files can be opened in Banana Accounting if they are on the local computer or if they are accessible through a network.
If they have been sent by email, you need to move them to a computer folder before opening. - Only one user at a time can edit a file.
If you edit a protected file or a file already in use by other users, you will need to save the file with different name in order to save your changes. - If the file is protected by a password, the password dialogue is displayed.
- The Banana Accounting program, notifies you that you have opened a read-only file in the following cases:
- the file is located on a non-writable disk (CD-ROM)
- the file is located on a temporary non-writable folder
- the file is protected or the user doesn't have rights to edit it
- the file has already been opened by another user
- the file has already been opened by the same user but in another session
How to look for your *.ac2 accounting files
If you don't remember in which directory your accounting files are located, you can use the search Windows Explorer or the Mac finder search tool.
Find your accounting file on a Windows computer
Banana Accounting files have an .ac2 extension. The Windows search tool will vary depending on your Windows version.
- Windows 10: click on the Search icon on the Applications bar and enter "ac2" or your file name and click on the Documents arrow.
- From the Explorer File Manager enter the "*.ac2" extension or your file name and let Windows look for it.
- When in Banana Accounting, click on the File menu > Open, enter the "*.ac2" extension in the top right search box of the dialog window and then click on the look in the whole PC icon, or select the directory where you want Windows to look for your file.
Find your accounting file on a Mac computer
- In Banana Accounting, in the opening dialog File menu > Open, enter "ac2" or a word that is part of the file name in the top right Search box. With the icons, select where you want to look for your file (in the entire computer or in selected folders).
- Open the Finder and enter "ac2" or a word belonging to the file name in the search box.
- Right click on the Finder icon, then click on Search, and then enter "ac2" or a word belonging to the file name.
Saving a file
With the Save or Save as... command, the data is saved on your computer or the chosen storage unit (external drive, memory stick, Google Drive, Drop Box, or other cloud systems). Existing data on the disk is replaced with the new one. Banana files are saved with the ".ac2" extension, which is different from the program's extension, ".exe".
- A single file can be saved by only one user at a time.
The file can be saved by the user and only if it is not also being used by other users - Files can be saved anywhere.
You can enter the file name and destination when saving it for the first time or when using the Save as command from the File menu
As a first option, Banana Accounting will suggest the Documents folder as destination folder for the .ac2 files, but this can be changed with the Browse button. - If you are managing different accounting files, we suggest you create a separate folder for each company and for each accounting year. Also check the page Organize Your Work.
- Each file can be password protected.
Warning: Banana files are not saved within the program but on the storage unit chosen by the user, like any other file, such as Word or Excel.
Automatic saving
Banana Accounting automatically creates and saves your work in a temporary file that ends with ".autosave" . When you save a file or you exit the program, this temporary file is deleted. In case your computer should crash or turn off in the middle of your work, it would be possible to recover your data by opening this file.
When the program is reopened after a crash, it will check that the temporary autosave file was not deleted, a message appears, Recover autosave file, asking whether you want to retrieve the file.
In the Program Options of the Tools menu, it is possible to setup how frequently Banana Accounting should execute this autosave.
Accounting files (*.ac2)
- Files created with Banana Accounting have an ".ac2" extension, regardless of the operating system being used.
- The .ac2 file format is specific for Banana. When saving, all data are compacted and saved in bulk.
- Ac2 files are compatible between different operating systems (Windows, Mac and Linux)
You can save a file with Windows, then open it and edit it on a Mac, and then reopen in it a Linux or Windows computer. - Each file can be sent as an email attachment, edited on different operating system and resent to the sender.
- Accounting files are completely separated from the software Banana Accounting itself, that has an .exe extension for Windows,
- The installation files for Mac have a .dmg extension and a .deb, .rmp .run or .tgz extension for Linux.
Copying or moving files
Banana Accounting can save files on any drive recognized by the operating system as a rewritable disk.
From non-rewritable drives (CD or DVD) Banana Accounting can only read files.
*.ac2 files can be moved:
- From one folder to another
- Use Windows Explorer (Windows) or Finder (Mac) to look for the folder where the files have been saved.
- Copy and move them to the new destination folder (once pasted, if necessary, they can be deleted from the original folder).
- From one computer to another
- Save the files on a USB memory stick and transfer them on the new computer:
- Open in Banana Accounting the file to be moved
- From the File menu > Save As command, choose as destination the memory stick
- You can also copy it by opening Windows Explorer and dragging the accounting file to the memory stick drive.
- Send the file as an email attachment to the new computer
- Save the files on a USB memory stick and transfer them on the new computer:
Deleting or renaming files
Banana Accounting does not have a feature for deleting or renaming files. In order to do this you must use the relative function of the operating system (Windows Explorer or Finder in Mac).
Saving files on DropBox, Google Drive and other Cloud systems
Banana Accounting Plus is a NoCloud (or non Cloud) programme: it is installed and works locally.
Files created with Banana Accounting Plus, as well as all related documents belong exclusively to you and you can save them wherever you want, including on systems such as DropBox and Google Drive that keep files synchronized with Cloud storage services. More info...
Banana Accounting overwrites the *.ac2 files and deletes the *.ac2.bak file. In the list of deleted files you can find the previous versions of the *.ac2.bak file.
Visualization of changes
Banana Accounting, Android version, works directly with the Dropbox server. If you make changes on the PC, normally you have to wait a few seconds before seeing the changes on the server and then on the Banana Accounting file.
To ensure that the file is correctly synchronized with the server on your computer, the file must be marked with a green check.
If you do not see the synchronization symbols (green, red, blue), you must update the Dropbox application installed on your computer.
Another way to check the synchronization status from your computer is to click on the Dropbox symbol in the bottom bar:

Furthermore, on Android, synchronization does not occur while you are working with the application. You must therefore close and reopen it.
Warning:
Banana Accounting cannot notice if you open and edit files on several computers at the same time. It may therefore happen that one person deletes data or another person adds new data. Only the last copy of the file that has been saved is kept.
You must therefore take care to avoid working on the same file at the same time.
Related resources:
Enter password
When the user opens a password-protected file, a dialog box appears to enter the password.
- The file password is set in File> File and accounting properties > Password tab.
- This dialog also appears with the first execution of some commands, which require access to a password-protected file, such as the previous year's accounting.

NOTE
When the previous year is password-protected, and you want to execute the Enhanced Balance Sheet with groups command , or resume transactions from the previous year, the programme will ask you to enter the password for the previous year.
To avoid being repeatedly asked to enter the password, one of the following steps must be taken:
- Enter the same password also in the new year
- Save the file after entering the password for the previous year (the password will remain stored)
If, however, you move the new year or the previous year to a new folder, you will have to re-enter the password (this is the case if you open documents from shared folders that may have different paths from computer to computer). If the file refers to several years, e.g. 2022, 2021, 2020, ... it will be necessary to open each file (thus 2022, 2021, 2020, ...) and re-enter the password for the previous year (2021, 2020, ...) in each year, then save each file. - Delete the previous year file link in File and accounting properties > Options > File from previous year (this solution is only recommended if the previous year link is no longer required)
Data backup
Here are some tips on how to minimize the risks of data loss.
Security copies (backups)
Banana Accounting lets you choose the support and the directory where to save the accounting file. You can best organize your files on the local computer, the network computer or the cloud. It doesn't include a backup management system.
We advise you to create external backup copies to make up for any loss of data, for example due to a computer crash, hard disk defect or other causes.
- For Mac use the "Time machine" function.
- For Windows use the "File History" function.
- Dropbox, OneDrive, iCloud, Google Drive offer the possibility to keep previous versions of your files.
There are also other programs on the market that allow you to automatically create backup copies of your data.
.bak files
When the saving procedure is successful, Banana Accounting replaces the contents of the existing file with the most recent accounting data:
- The data are saved in a temporary file.
The data saved on disk are replaced with the pre-existing data, only if the saving operation is completed correctly. - The Create backup copy (.bak) option, from the Tools menu → Program Options command → File handling tab, is active by default, and renames the existing file with the same name, and adds the extension ".bak".
A new file is created with the name "file name.ac2.bak" which contains the data before saving it.
If a file is corrupted, you can recover the version before saving it by opening the .bak file, by dragging and dropping it in Banana Accounting or using the File menu → Open command.
Recovering data from a *.bak file
When for any reason you can't find your accounting file, you can recover it from the backup copy that the program automatically runs.
How to proceed:
- Open the folder where the accounting file is located.
- Open the file with the extension .bak. If it does not appear in the folder, select "File type" All files (*.*) in the window below.
- Once the file is opened, save it as a file. Usually it is given the same name as the lost file.
Automatic saving
Banana Accounting automatically creates and saves the work in a temporary file. When you save or normally exit the program, this temporary file is deleted. If the computer should suddenly shut down, the data can be recovered using this file.
Damaged .ac2 file
Computers sometimes have technical problems or are infected by viruses. Sometimes documents sent by email arrive damaged. It is therefore always useful to have backup copies.
In case your files are damaged due to a technical error, our Support can verify, for a fee, whether data can be recovered.
Recover autosave file
This dialog appears when the program closes unexpectedly, and it was not possible to save changes made to the file.
When the program is reopened, it detects that the autosave file (temporary file) has not been canceled, and then asks if you want to retrieve the file.

You can choose from the following options:
- Recover
- The autosave file is copied replacing the original file
- The original file is renamed as indicated in the dialog window
- Don't recover
- The program deletes the autosave file.
- The program opens the original file.
- Ignore
- The program keeps the autosave file and doesn't open any file.
- Next time you open this file, the program will warn you that an autosave file with unsaved changes was found
If the program stops working
If the program is closed normally, it asks whether to save the modified data, and the autosave file is deleted.
The program may however unexpectedly shut down for a number of reasons:
- A power outage or another event that caused an immediate arrest of the operating system
- A problem that led to the crash of the program
- Due to another program or to a situation of the operating system or driver that caused the program to stop.
Try to restart your computer and use the program without other programs.- A flaw in the operating system or a faulty program can cause an interruption of Banana Accounting.
- A computer fault (memory error)
- A virus or some other problem
- A problem in the Banana Accounting software
Usually when, repeating the same command always causes the program to crash.
If the program stops in completely different situations, it is more likely that the problem is due to a computer or operating system (see above)- First of all, make sure that you have the latest version of the program.
Install the updates if necessary. The problem could have been solved in the meantime
- First of all, make sure that you have the latest version of the program.
- Due to another program or to a situation of the operating system or driver that caused the program to stop.
Contact technical support
Countercheck the situation in which the program stops.
- It is important to understand in what situations the program stops, so that technicians can replicate the problem.
- When you contact the technical service:
- Describe the problem and how it can be reproduced - describe the error.
- Enter your system details (you can copy them under Tools menu > Program Options > Info System.
- If the problem occurs in relation to a file, send a copy of the file (removing confidential data).
Local copy of your work
One of the key points of any Desktop application is saving files. The user's work and the data entered must not be lost. Even in the case of a computer crash, the amount of work lost must be minimized.
A new strategy for saving files has been introduced with Banana Accounting+. From the user's point of view nothing has changed, but internally important improvements have been made to make the data saving process even more secure and solid, and to optimize it for use on cloud and mobile disks.
How it works
With the new implementation of the file saving and recovery process, Banana Accounting creates a local copy of the open file and then works on the local copy present in the device (pc, mobile, tablet) until the user saves the document. At this point Banana Accounting returns and saves the modifications in the source file. In the meantime, Banana Accounting regularly saves the modifications made to the document in the local copy.
Banana Accounting proceeds as follows:
- The user selects the file to be opened (source file)
- Banana Accounting create a local copy of the source file
- Banana Accounting blocks the opening of the source file to prevent modifications from multiple users
- Banana Accounting reads the local copy
- Banana Accounting regularly saves (by default every 2 minutes) the modifications made to the document in the local copy
- As soon as the user clicks on the Save button, Banana Accounting returns and saves the modifications in the source file.
- When the file is closed, Banana Accounting unlocks the source file and deletes the local copy.
- If the application cannot close or correctly save the modifications in the source file (electricity interruption or other causes), the local copy remains on the device and the its content can be recovered at the next Banana Accounting launch.
- If the file is temporarily not accessible (example if it is on a disconnected network disk or a USB pen), the user can keep working and the document modifications are saved in the local copy until when the source file is accessible again.
In other words the local copy is both a working document and a recovery document.
Advantages
The autosave feature is always active, so the work that could be lost (with the default settings for file recovery) corresponds at most to the work of the last two minutes.
Access to the file doesn't have to be continuous. Even if a file is temporarily inaccessible (e.g.: the file resides on a network disk or a disconnected USB pen), the user can continue working, and changes to the document are saved in the local copy until the source file is accessible again.
The local copy is not synchronized in the cloud. For this reason, the performance of the application is improved and the amount of data sent to the cloud is minimized.
This process is implemented in the same way on all operating systems: Windows, MacOS, iOS, Linux, Android and WebAssembly, regardless of where the file is saved.
Data recovery
In case of an interruption of the application, the local copy remains on the user's device. The next time the Banana Accounting is started, the application informs the user that changes have been found that have not been saved in the source file.
At this point the user has 3 choices:
- Open the recovered file
The user can decide whether to save the recovered file or to abandon the changes - Ignore the message
The user can later decide what to do - Cancel de recovered file
The recovered file will be canceled
The local copy remains on the user's device as long as the document remains in use or the changes have not been correctly returned to the source file. Once the file has been closed, the local copy is deleted.
The local copies are saved in a folder hidden under the system's user data. The user does not need to access this folder, access to this folder is not recommended. In case our support requires you to open this folder, you can access it through the menu Tools → Program Options → Advanced → System Info → Working copies path → Open path ....
Keep in mind
This implementation:
- It does not replace a good backup policy.
- It does not replace a version control system.
Although this implementation is very secure and robust, we cannot guarantee that it will work 100% smoothly in all cases. For this reason, we encourage our customers to adopt a good backup policy and version control system.
Several operating systems provide backup and versioning functions. We ask you to browse the documentation of your operating system....
File compatibility with previous versions
The Banana Accounting files are compatible with the previous versions starting from version 5.12.
This means that the files can be read and written by any version of the program.
We try to preserve compatibility as much as possible, so that files can be exchanged with different versions of the program.
- Newer versions implement new features that are not available in earlier versions. Using these features leads to incompatibility. When opening the file with an older version of the program, you are warned not to use the file, because there may be errors in calculations and/or data loss.
- Newer versions offer new applications. These cannot be opened with older versions.
Below we present the list of changes that lead to incompatibilities. If you use these features you should update the program to the new version.
Version 10 (BananaPlus 2020)
- Using the new Links column.
The new version introduces the possibility of linking a document in every row of any table, through the menu Data → Links.
In previous versions, this possibility existed only in the Transactions table. The ability to add links in any table is a feature that is highly requested by users; unfortunately, it was not possible to implement it, maintaining the compatibility of files created with previous versions. If links are used, the files are no longer compatible with previous versions.
In the new version, when the file is opened, a Link column is added to each table. The data contained in the DocLink column of the Transactions table is copied to the new column, and the DocLink column is deleted. - Accounting Applications:
- Use of the new Segments column.
- Use of VAT code for the Reverse charge.
- Use of the Payments column.
- Use of the BeginFormula column in the Budget table.
- Timesheet
- Added Columns "TimeWork", "TimeAbsence".
- Column Supplement.
- Applications Invoices and Inventory
They are not supported in previous versions.
Version 9
- Accounting applications:
- Items Table.
- Quantity columns in the Transactions table.
- Accounts and VAT codes with lowercase descriptions.
- New features for the Enhanced Balance Sheet with groups.
- New features for the PDF Archive command.
- New Print functionality.
- Timesheet application
It is not supported in previous versions.
Version 8
- Accounting applications:
- Budget table
- Documents table
- Library application
It is not supported in previous versions.
Version 7
- Accounting applications:
- Modification of VAT Base amount in the Transactions table.
File properties
When a new file is created, the basic data need to be entered in the File menu > File and accounting properties.
The file properties (Base data) can vary depending on the chosen accounting type.

For the explanations of the different tabs please refer to the menu on the left.
Accounting Tab
Access this section via the File > File and accounting properties > Accounting section.
Left and right headers
These are the two empty cells at the top where any desired text can be inserted which will be used as a header for print-outs (left and right).
Opening date
The opening date is the date when the accounting begins. It can also be left blank. If a date prior to the opening date is inserted when entries are made, the program will give an error message.
Closing date
This is the closing date of the accounting. It can also be left blank. If a date greater than the closing date is inserted when entries are made, the program will give an error message.
Base currency
The code of the currency in which the accounting is being handled. You can enter any currency code, even the one that are not in the list. When the code of the basic currency is being changed, the program changes the column headers for the amounts in basic currency using the new code.
In the multi-currency accounting files it is mandatory to select the basic currency, which will work as the functional currency, the one used for the calculation of the Balance sheet and Profit & Loss statement.
Changing the Basic currency symbol
If you change the basic currency symbol the program will not change the existing amounts. We advise you to change your basic currency symbol only if you don't have yet entered any opening balances and any transactions.
Accounting file WITHOUT foreign currencies
You can replace the basic currency symbol with the new symbol.
Accounting file WITH foreign currencies
To change the currency code in accounting with foreign currencies refer to the following page Change the basic currency.
Options Tab
This section is accessed via File > File and accounting properties > Options section.

Transaction date required
If this option is activated and then a transaction is entered without a date, there will be an error message.
Recalculate totals manually (F9)
If this option is activated, the program will not automatically recalculate the principal groups of the accounting file, but the user needs to use the F9 key.
File from previous year
By using the Browse button, the user can select a file from the previous year.
Smart fill with transactions from previous year
If this cell is checked, the program keeps the transactions from the previous year in memory, and offers them as Smart Fill while the user inputs new entries.
Use the minus sign (-) as segments separator
When this option is activated, the segments have to be entered in the Transactions table with the minus (-) sign preceding the segment code. When this option is deactivated, the segments need to be entered with the colon sign (:), as in the chart of accounts. The colon needs to always precede the segment code.
Records (+/-) cost centers according to the category
This function is only active for Income & Expenses accounting and Cash Manager. By activating this box, the amount is entered in the cost center (positive or negative) according to the category.
If, instead, this option is not active, in order to enter a negative value, it is necessary to enter a minus sign before the cost center (-CC).
Related document: Text input, edit and Smart fill
Address Tab
This section is accessed via the File > File and accounting properties > Address tab.
In this section it is possible to enter data concerning the company or person whose accounting is managed.

Foreign currency
This section is accessed via the File > File and accounting properties menu >Foreign currency section.

For the explanations of the different tabs please refer to the corresponding page Starting a multi-currency accounting.
VAT/Sales tax
This section is accessed via the File > File and accounting properties menu > VAT tab.

For the explanations of the different tabs please visit the corresponding page File properties (VAT/Sales tax tab).
Other Tab
This section is accessed via the File → File and accounting properties menu → Other tab.

Current language
There are some file texts that the program generates automatically, (e.g. the lines of the Totals table, the transactions on the account card, and the printout of the Enhanced balance sheet); in this tab, the user can indicate the language for these texts (usually the same as the creation language).
Creation language
This is the language chosen and selected when the user creates an accounting file; this language is used for the column headers. If the user wants to change the creation language, then it is necessary to convert the file to a new one using the Tools menu → Convert to new file command.
Extensions
It is possible to indicate extensions of Banana Accounting. When the file is opened, the program will automatically install the extensions. They can be used for templates or files that are combined with extensions. Other users who open the file receive directions or commands to install the necessary extensions.
The list shows all extensions that can be installed.
Extensions' keywords
Enter a keyword contained in the Banana Accounting extension. Usually these keywords are specified in the installation instructions of the extensions; most extensions don't use keywords to restrict viewing to certain files.
If a script has the @docproperties attribute, the command will be visible in the Extensions menu only for those Banana files that have set the same keyword in the Extensions field. To set multiple keywords, you need to separate them with the ; (example: datev; donations).
Password Tab
This section is accessed via the File → File and accounting properties menu → Password tab.

Files can be protected by using a password.
Enter a password for a file without a password
Confirm old password
Leave the cell empty.
New password
Enter the password.
Confirm new password
Enter the same password that you entered in the New Password box
Change an existing password
- Enter the existing password.
- Enter the new password twice.
- Confirm with OK.
Password compatibility with old versions
Activate this option if you want your password to be compatible with the previous Banana Accounting versions.
This option not recommended because the password is saved in a less secure mode.
How to cancel a password
- Enter the existing password.
- Leave the boxes for the new password empty.
- Confirm with OK.
Forgotten password
For information about a forgotten password, please refer to the Questions and Answers page, Password unlock paragraph.
Note
Using a password does not give a high level of protection. In order to render the data truly inaccessible to third parties, it is necessary to have the appropriate cryptographic software.
Text Tab
This section is accessed via the File → File and accounting properties menu → Texts tab.

In this tab it is possible to enter different keys in order to save extra information, such as the accountant name, for example. These keys and the resulting texts can be taken over and used in scripts.
Key
In this field, input the reference text (e.g.: accountant name).
Value
In this field, it is necessary to input the value related to the key (e.g.: Ocean Avenue, ...).
Add
This button saves the newly entered data.
Remove
This button removes the selected Key.
Create PDF
The Create PDF command is activated from the menu File > Create PDF and it prints in a PDF format everything that you see on screen.

There is also a different command from the menu File > Create PDF dossier, that gives you the possibility to choose which contents of your Banana Accounting Plus file you want to include in your Pdf dossier.
Saving options
Saving options are only available with the Advanced plan of Banana Accounting Plus.
Include attachments
Save the attachments within the PDF file. Attachments refer to local files that have been inserted in the Link columns of various tables. In the created PDF file, a symbol will be placed next to each attachment. By clicking on the symbol, the attachment will be opened and displayed. Please note that the ability to open the attached files is only available in PDF readers like Adobe Acrobat Reader, Foxit, and others. If the PDF file is opened in a web browser, it might not be possible to open the attachments.
This option is only visible if the document(s) contain Link elements.
Technical notes
- In print and print preview (physical printer and virtual pdf printer of the operating system) all fonts supported by the operating system are possible.
- In Windows pdf export only TrueType fonts that have Unicode cmap mapping and contain the following tables "OS/2", "cmap", "cvt ", "fpgm", "glyf", "head", "hhea", "hmtx", "loca", "maxp", "name", "post", "prep".
Error creating Pdf file: %1 - If the program fails to load the indicated font, it replaces it with a default one (Helvetica or Arial depending on the operating system) and a message is displayed to the user that it is unable to use the PDF font.
Printouts/preview
Print everything you see on the screen
In addition to the various reports available, Banana Accounting allows you to print everything you see on the screen, in any table, by simply using the File > Print command.
Print preview
All the printouts of the various accounting documents can be saved in PDF, Html, MS Excel and copied to the Clipboard, allowing the user to also access them many years later.

The button pulls up the Printer Setup window from your Windows system: the selections are valid for the current working session only. Permanent alterations need to be input using the Windows control panel.
Horizontal or vertical printing and other printing parameters of the table need to be input under the Page Setup command and are different for each view.

Print selected cells only
When you have a selection of cells in the table, the Selection option is activated and the preview and printing will concern the selected cells only. To print the entire table, turn off the Selection option.
Page size
The page size is taken over from the printer preferences. To change or correct the page size, go to the printing preferences and select the desired size (for example, A4). If you have already selected this size (A4), you must select it again to correct the page size.
Exporting to other formats
Printouts can be exported in different formats:
- PDF
The format that preserves the print layout. - Html / Excel / Latex
Formats to transfer data to other software.
Copy to clipboard
The entire report is copied to the clipboard. You can then paste it into Excel or other software using these formats below:
- Text
- Html (with formatting styles)
Print settings
Clicking the Toothed Wheel in the toolbar gives you access:
- For tables, to the page setup dialog.
- For reports, to the specific report setup dialog.
By default, the program is set to automatically resize the columns or reduce the zoom so that al columns are printed correctly on the page.
Page numbering
You can modify the page numbering by setting the starting number and the prefix.
Refresh
Clicking on the Refresh button regenerates the document according to the specific print or report settings.
Printing issues
- A slow preview display may be caused by the default printer being unavailable.
- It is important to use the updated printer driver.
Accounting printouts
You can find information on specific printouts for the different accounting types at the following pages:
- Double-entry accounting
- Multi-currency accounting
- Income & Expense accounting
- Cash Manager
- VAT Report
- Swiss VAT form - page in Italian, German or French
Page setup
The Print and Preview properties are accessed via the File menu > Page Setup command.
Each View of the table has its own print setting. The name of the view is indicated in the dialogue title.

Left header
This is where the title for the current view is shown. The title can be edited and appears at the top left of the printed page.
Right header
It is possible to enter a different text that will be printed at the top right-hand side of the page.
Logo
Allows you to add a logo:
- Use the Change button to the right of the Logo box; you access the Logo Formats dialog.
- Select Add and insert your own logo.
- From File > Page Setup , enter Logo in place of none.
- Confirm with the OK button.
More details for inserting a logo are available on the Logo setup page.
Margins
It is possible to input the page margins here: Left, Right, Top, Bottom. Measurements are in centimeters.
Shrink page to printable area
This function makes it possible to adapt the printable area when the print goes past the margins of the earlier defined page margins.
Include in print
When these functions are activated, they allow to display the following data:
File headers
This is the text that is being entered in the File properties found in the File menu.
Page headers
The page header will also be included in the printout.
Table name
The table header (f.i. Accounts, Transactions, etc.) is also included in the printout.
Column headers
Allows to display the various table columns.
Large font
The program prints the headers using a slightly larger font.
Page break
When activated, this option maintains the entered page breaks; if not, they will be ignored, even if they are present.
Page numbers
Activate this option to request that the pages be numbered.
Print time
Activate this option to include the time of when the page was printed.
Print date
Activate this option to include the date when the page was printed.
Row number
Activate this option if a progressive number is to be given to each row.
Grid
The grid can be printed just as it is viewed on screen.
Attachments
In the case of exporting to PDF, the attachments are included in the PDF file.
In Banana Accounting Plus this feature is only available with the Advanced plan. Explore all the Advanced plan features. Switch now to the Advanced plan!
Layout
The program automatically adapts the page dimension.
Zoom %
This allows the increase or decrease, on a percentage basis, of the size of the font to be printed.
Reduce to page width
If some columns exceed the width of the page, the program reduces the columns or reduces the zoom so that all the columns will be printed correctly on the page.
As on screen
The print-out will be carried out exactly as presented on the screen.
In case the contents goes past the page dimension:
- If the option "Reduce to page width" is activated, the font size will be reduced;
- If the option "Reduce to page width" is not activated, the part that goes past the paper will not be printed.
Print in black and white
All colors will be converted in gray scales.
Print landscape
To print in landscape format which makes the page read horizontal.
Export PDF from print preview
This window is displayed when you need to export to PDF from the print preview.
To export invoices in PDF:
- From the menu, Reports > Customers > Print invoices
- Specify the invoices to print (e.g., 1-10)
- Confirm with OK
- From the print preview, click on the PDF icon
File / Folder Name
Enter the name of the new file to create or choose an existing one using the Browse button. If the Separated Files option is active, enter the name of the folder in which the files are to be saved and check that there are no empty spaces at the end of the folder name.
Saving Options (Advanced plan)
Include attachments (PDF only)
Saves attachments within the pdf file. Attachments are local files that have been inserted in the Link column.
- This option is only visible if the document(s) contain Links.
- In the created PDF file, a symbol will be inserted at the attachments. By clicking on the symbol, the attachment will be opened and displayed.
- Only attachments located in the same folder as the accounting file or in a subfolder are exported. For attachments in other folders, an "access denied" message is reported.
This limitation is imposed to prevent the inadvertent export of a link to a system or confidential file located in any folder when generating the PDF.
It is advisable, therefore, to save attached documents in a subfolder within the accounting folder. - Files with absolute paths are not exported.
PDF Readers
- Only a few advanced readers like Adobe Acrobat Reader and Foxit allow viewing attached files.
- Other PDF readers, such as those integrated into browsers, do not support viewing attachments.
More information at the Create file PDF with digital attachments page.
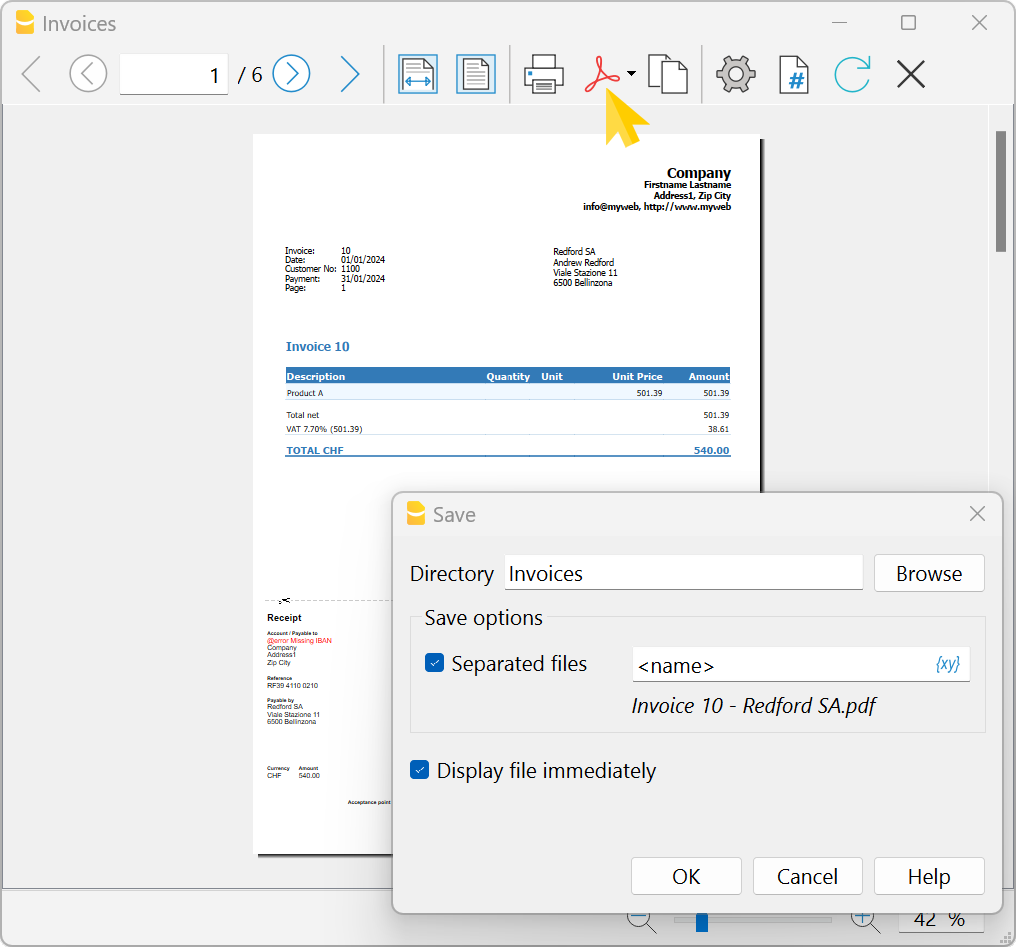
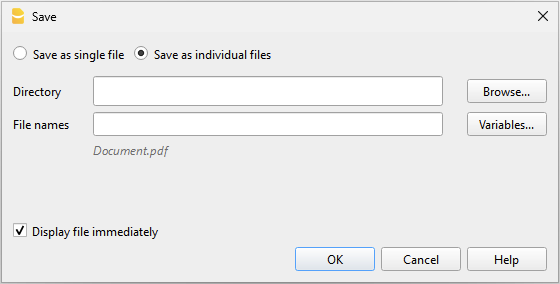
Separate file (PDF only)
Save the printout in separate PDF files. if several invoices or customer statements are printed. For more information please refer to the dedicated paragraph down below.
Display file immediately
As soon as the file has been created, the software to view it will be launched. In this way, the result of the export can be seen immediately.
Print invoices or customer statements in separate PDF documents
This feature allows several invoices or customer statements to be printed in a single operation, resulting in separate PDF files, which saves considerable time.
This option is only visible if multiple documents are included in the print.
- To use it, it is necessary to download the latest version of Banana Accounting Plus.
- The Print in separate files feature is only available with the Advanced plan .
To export invoices or customer statements in separate PDFs, you need to:
- From the print preview, click on Export > Create PDF.
- Enable the Separated Files option.
- Click on Browse to select or create the folder where you want to save the files.
You can customize the file names by using predefined variables listed in the dialog box. The selected variables are used to define the file name by incorporating information from each individual document.
- Click on the {xy} symbol to display the complete list of variables:
- cur_date: the current date when the PDF documents are created.
- cur_time: the current time when the PDF documents are created.
- customer_city: the customer's city.
- customer_email: the customer's email address.
- customer_name: the customer's full name or the company name (organization).
- customer_number: the customer number.
- doc_amount: the amount of the document.
- doc_date: the date of the document.
- doc_number: the document number.
- doc_title: the title of the invoice including the number and the customer's full name or company name.
- name: the default file name (invoice title with the number and the customer's full name or company name).
- Double-click on each variable you want to use to compose the file name.
As you add the variables, you'll immediately see a preview of the file name below.
Example: Use <doc_date> for the document date, <customer_name> for the customer's name, and <doc_number> for the document number.
- If a file with the same name already exists in the selected folder, the program will ask for confirmation during saving.
Page Size
The page size of the PDF is taken from the printer preferences.
Before creating PDFs for printing or emailing, ensure that the page size in the print preferences is set to A4.
PDF/A Format
The file is converted to the PDF/A format, which is an archival standard and a more restricted subset of the PDF standard. If certain elements are included, the PDF file may not comply with the PDF/A standard.
- The inclusion of attachments of any kind is compliant only in the PDF/A-3 standard.
- Links to external documents are not allowed.
Fonts
The program generates the PDF using user-specified fonts. If there are readability issues or if searching within the PDF is not functioning, you can disable True Type fonts from the Tools > Program Options > Advanced > True Type Fonts menu.
Export Print Preview
In the print preview toolbar:
- Click on the arrow beside the Adobe PDF button
- Choose the option that's right for you:
- Export PDF
- Export to Html
- Export to Excel
- Copy to clipboard
Page numbering
You can access the page numbering feature by clicking on the  icon on the Print Preview toolbar.

In this dialogue it is possible to assign the number with which to start the page numbering, and the prefix to be inserted in the numbering. Printing of the page number must be enabled or disabled through the settings of the displayed page or report.
Start with
The starting number for page numbering.
Add prefix
The prefix to insert to the page numbering.
Export file
Chose File → Export file command from the File menu in order to export several tables simultaneously.
In the Export file dialogue the following sections are also used:
- Those specific to the file type (see export formats).
- Include tab - to define the tables and the reports that must be included in the export
- Period (Accounting) tab, to define the period
- VAT tab (in the accounting files with VAT management)
- Customization tab
Create PDF dossier
Export to PDF is one of the most commonly used exports. Banana Accounting Plus allows you to export the entire accounting file, including the Reports, to PDF.
New! It is now also possible to export to PDF including all digital attachments.
The PDF export with digital attachments is only available in Banana Accounting Plus with the Advanced plan.
For the reports included in the PDF dossier, settings are taken as they were set with the commands from the Report menu. If other settings are desired, these must be changed via the commands in the Report menu.
In order to create a PDF file choose File menu > Create PDF dossier command (or click on the corresponding icon on the Toolbar).

File Name
Enter the name of the new file to be created or choose an existing one via the Browse button (the programme will rewrite the existing file with the new data).
Display file immediately
As soon as the PDF file has been created, the software to view it, will be opened. This way, the result of the export can be displayed immediately. Do remember that browsers like Mozilla and MS Explorer use a cache mechanism for files. When the export is made for a second time, it is possible that the user will see the previous version until the browser Reload button is pressed.
File creation options
Header 1, Header 2 , Header 3
You may enter up to three different headers which will appear in the PDF file.
Logo
If your logo has been set in the File menu > Logo Setup command, you can choose whether to display the logo in the PDF file or exclude it.
- None: the logo is excluded
- Logo: includes the logo.
See Logo Settings page.
Page options
By activating the page options it is possible to include:
- Page numbers
- Restart numbering for each section
- Date
Page size
You can select the page format
Create PDF file with digital attachments
The save option Include attachments allows you to include in the PDF export also all the digital documents entered in the Transactions table, in the Link column. This possibility allows you to have in a single file all your accounting, your reports such as Balance Sheet, Income Statement, etc. and all the documents (invoices, receipts, ...).
The possibility to include attachments to the PDF export is only available with the Advanced plan of Banana Accounting Plus.
See all the benefits of the Advanced plan.
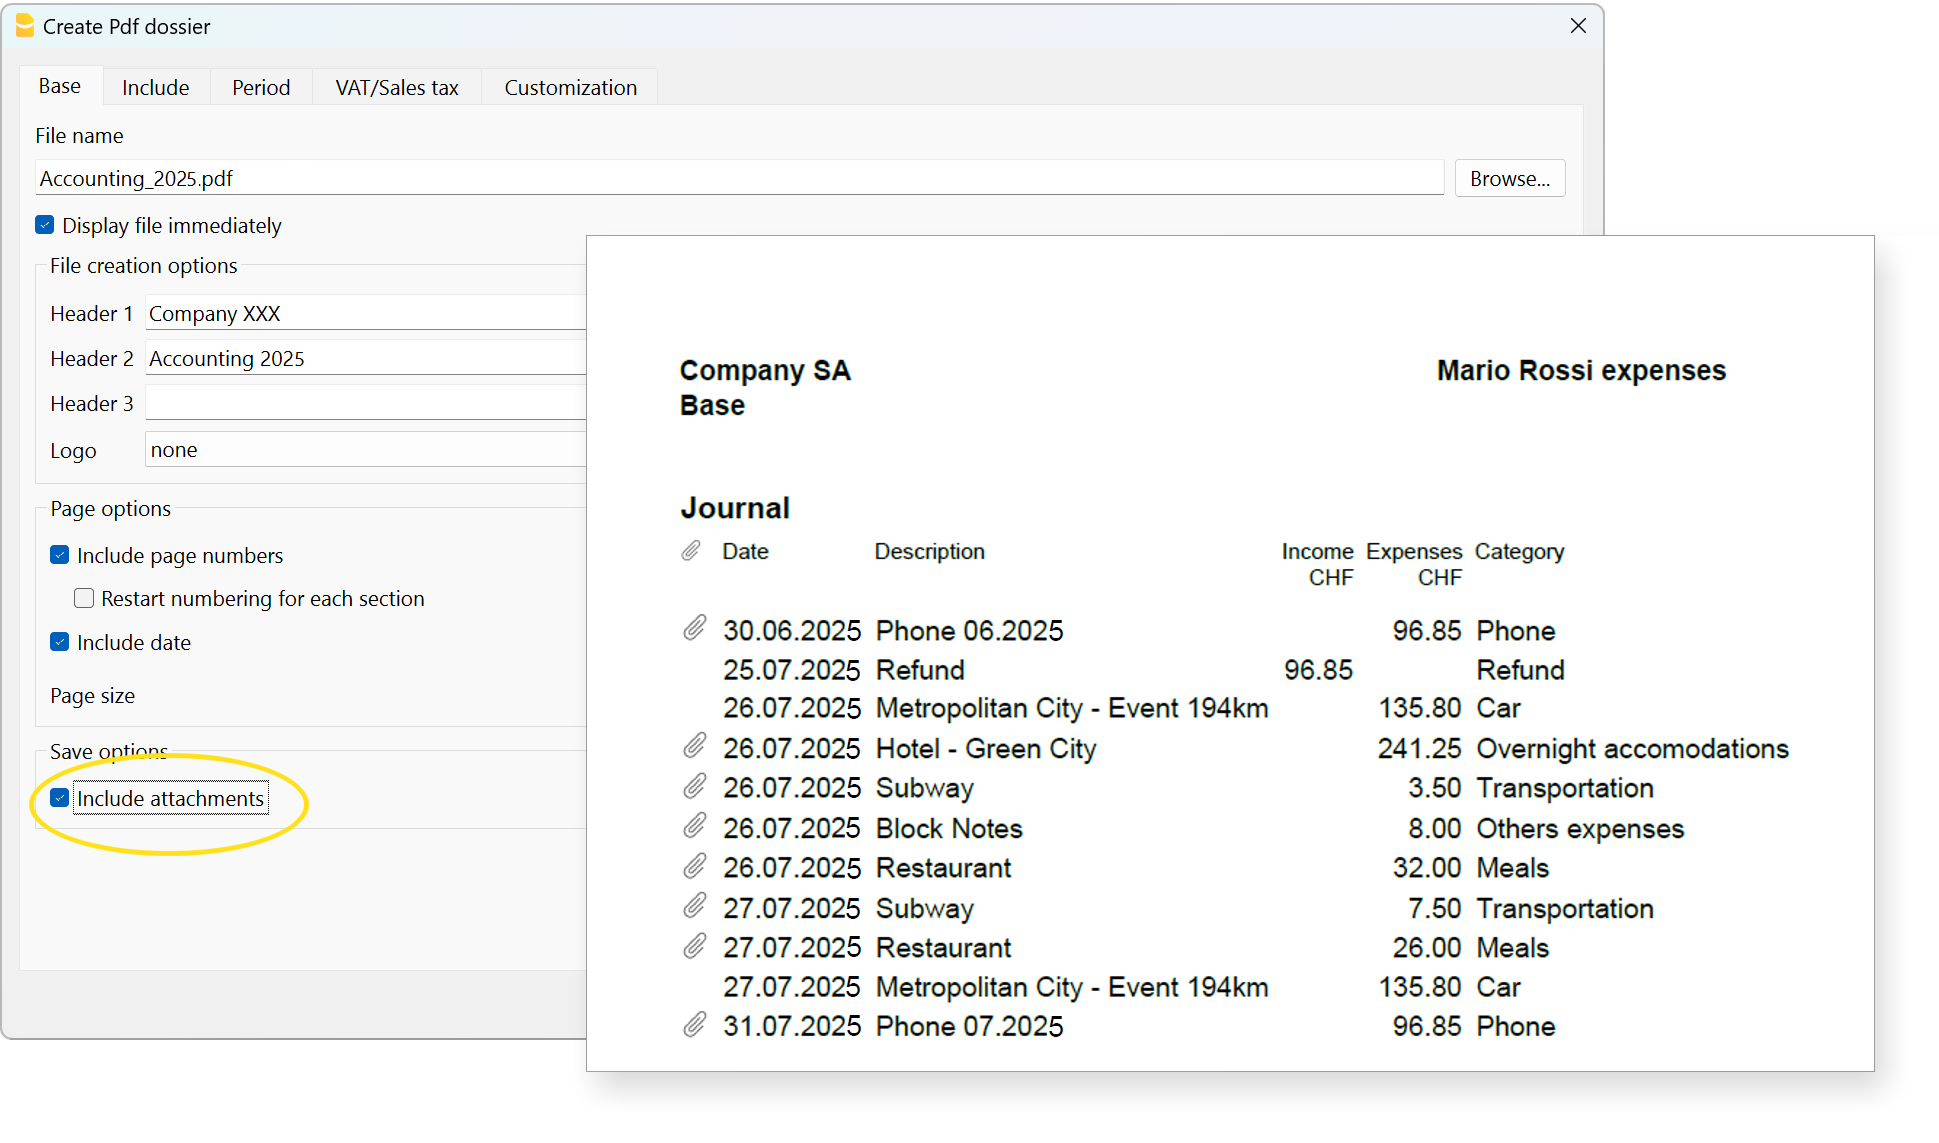
More details on the Include attachments option
Save the attachments within the PDF file. Attachments refer to local files that have been inserted in the Link columns of various tables. In the created PDF file, a symbol will be placed next to each attachment. By clicking on the symbol, the attachment will be opened and displayed. Please note that the ability to open the attached files is only available in PDF readers like Adobe Acrobat Reader, Foxit, and others. If the PDF file is opened in a web browser, it might not be possible to open the attachments.
This option is only visible if the document(s) contain Link elements.
Technical notes
For issues related to the PDF format or fonts, please refer to the Create PDF page.
Other Sections
For the explanations of the other sections, please visit the following pages:
Open file location
The Open File Location command from the File menu opens the Explorer folder (on Windows computers) or Finder folder (on Mac computers) where the file you are working on is located.
To rename, move, or delete the file, it must be closed.
Proceed as follows:
- File menu > Open File Location
- View the folder where the file is saved
- Perform the desired action (copy, rename, move the file).
Sometimes the file may remain locked even if it appears to be closed. In such cases, you may need to exit the program to fully unlock the file.
Send .ac2 file via email
To send a Banana accounting file (.ac2) you can use the command from the File menu → Send file via Email...
By choosing this command, Banana Accounting Plus opens the email program of your computer, creates a new message, inserting your Banana Accounting .ac2 file as attachment.
If your email program displays a message informing you that you need to create a Microsoft Outlook profile, you must follow the information found at the following link:
Logo setup
Logo setupIn Banana Accounting Plus to insert a logo go to the menu File → Logo setup.
Option tab
You can insert images, size and alignment of the logo and text in the header.
![]()
Logo
- Image. Allows you to add, edit and delete a logo.
- Add a logo:
- Insert a logo image via the Add button.
- Multiple images can be added.
- Edit or replace a logo:
- Select an image from the list.
- Edit or replace the selected image via the Edit button.
- Delete a logo
- Select an image from the list.
- Delete the selected image via the Delete button.
- Add a logo:
- Width.
- Enter the width in centimetres of the logo.
- Height.
- Enter the height in centimetres of the logo.
- Alignment.
- Select the position of the logo: left, centre or right.
Text
- When you activate the Text field:
- The header of the various accounting documents is inserted next to the logo image, provided the option to print the logo is activated in the report settings.
- When you deactivate the Text field:
- The logo is simply inserted without the report header information, again provided that the option to print the logo is activated in the report settings.
- Position relative to logo:
- You can choose where to position the text relative to the logo: below, on the left, above, on the right.
- Horizontal Alignment:
- You can choose to align the text left, centre, right relative to the logo.
- Vertical Alignment:
- You can choose to align the text top, centre, bottom in relation to the logo.
- Header font size:
- For printing reports or accounting documents, you can choose to set the font size for each header line.
- For invoicing, the font size can only be set by script.
Customization tab
Through this section you can customise and store various settings for your logo and texts.
If necessary, you can call them up by selecting the name of the desired customisation.
To print an invoice with the logo it is necessary to use a customization with the Logo name, to be entered in the Name box.
To print an enhanced balance sheet or an invoice with a different logo, a new customisation must be created (e.g. the name Logo_balancesheet, this name must be selected in the Embellished balance sheet setup or entered manually in the field Logo name in the Setup of the invoice layout.
Name
The name of your customisation (e.g. Logo1, Logo2,...).
Description
Enter a description for reference of the settings (e.g. 'Logo left, text right',..).
Set as default
With the set as default button you can set a customisation as default.
Options
For further information, see the Customisation page.
![]()
Add logo to all printouts
The logo can be inserted in the various printouts. Click on the links below to access information on how to insert the logo.
- Enhanced balance sheet
- Enhanced balance sheet by groups
- Invoices
- In the invoice header of the CH10 and UNI11 layout via the Invoice Settings → Logo option.
From the Print Preview of the Embellished Balance Sheet and the Embellished balance sheet by groups, the settings for the logo can also be accessed by clicking on the Settings icon (cogwheel).
Recent / Favorite files
These commands display the list of recently used files and favorite files.

Recent files
In this section, Banana Accounting lists the last files used and the path where they were saved.
A path indicates where a file is saved within the computer. It is like an ‘address’ that guides you to exactly where to find the file, for example C:\Documents\Banana\2024\Estimates and invoices.ac2.
Banana files are not stored in the programme, but it is the user who chooses where to save them.
Removing a recent file from the list
In order to remove just one single file from the Recent Files list of the Favorites (Start page), position the cursor on the file name, proceed with a right mouse click and select Remove (Mac users should use the key combination Ctrl + right mouse button).
Deleting the list of recent files
The list of recent files can be deleted in two ways:
- Place the cursor over any file name in the Recent or Favorites list, right-click and select Remove all.
- Click on File menu > Recent files > Clear list recent files.
If you cannot open Recent files
If, by chance, when clicking on one of the Recent files, you get the error message “File not found”, it means that the programme can no longer find the file in the path that was indicated.
The file may have been moved, deleted or renamed. For more information, please visit: https://www.banana.ch/doc/en/systemmsg_en_err_filenontrovato.
Open the folder where the file was saved
By selecting the Recent file and right-clicking, choose Open file location.

This automatically opens the folder in Explorer (or Finder on Macs) where the file was last saved. This can be useful to see if the file has been renamed.
In the same folder you can also find the .bak file (backup file), the backup copies that the programme automatically creates and updates each time it saves.
Favorite files
In this section you can list the files you use most often by indicating their path.
Creating a Favorite file
- Open the desired file
- Click on File > Favorite files
- Click on Add to favorites
The list can contain up to 16 files.
Editing the Favorite file's list
- File menu > Favorite files
- Edit list..
- In the window that appears, edit the favorites, by using the buttons: Add, Remove, Open folder.
Where are the accounting files saved?
Banana accounting files are saved in the .ac2 format, which should not be confused with the program’s executable file, which has the .exe extension. The file management process is similar to how Word or Excel files are handled (with the respective .doc or .xls formats).
When you save your file, you choose where to store it: on your computer (e.g., under C:\Documents...), on your Cloud service, on a USB stick, or elsewhere.
Banana Accounting shows shortcuts to the most recent files you’ve worked on (Recent) or those you’ve marked as Favorites.
The files are not stored within the program itself, but in the folder you selected when saving them. Banana.ch SA does not have any access to your files.
For more information, see Open and save files.