How to create Swiss QR-Code invoices/letters
The Swiss QR-Code is the Swiss standard for invoicing that will be mandatory from 1st October 2022.
Banana Accounting Plus offers several methods to automatically create your invoices with the QR-Code.
Make your invoices the way you want them!
Integrated invoicing
|
Invoice management within the accounting file. |
|
 |
Highlights
Notes
|
| Start with one of the predefined templates or adapt your existing file Detailed features |
|
Estimates and invoices
|
Managing estimates and invoices in an independent file from accounting. |
|
 |
Highlights
Notes
|
| Get started with our predefined template Detailed features |
|
Blank QR Slip
|
No invoice management. Only blank QR slips, no address and no amount. Ideal for small artisans, freelancers or associations. |
|
 |
Highlights
Notes |
| Get started with our predefined template | |
Letter with QR slip
|
Letter addressed to a single recipient with QR slip at the bottom. |
|
 |
Highlights
Notes |
| Get started with our predefined template | |
Bulk invoices with data taken from Excel
|
QR invoices for several customers automatically created from Excel data |
|
 |
Highlights
Notes
|
| Get started with our predefined template | |
Support to create QR invoices
Thanks to to the extensive online documentation and the facility of the programme, most of our users do not require support.
For special cases, we recommend the Advanced plan of Banana Accounting Plus, because it includes both technical support by phone and email, and also offers several additional features, often necessary for desired customisations.
Swiss QR-Code technical details and various modes
The Swiss QR-Code for invoices is the standard for printing payment information on the invoice so that it can be read digitally. From 1st October 2022, it becomes the mandatory standard to replace the red and orange inpayment slips.
The QR-Code for invoices offers various configurations, which will be introduced below. For technical information please refer to the QR-Code Customization and to the reference standards pages.
Banana Accounting Plus provides the CH10 layout that allows the personalization of the print and the inclusion of the QR-Code section and the parameterization.
Purpose of the QR-Code invoice
The purpose of the QR-Code is to make sure that payments and invoice reconciliation can be automated as much as possible. The information is printed on the invoice so that it can be digitally retrieved and processed.
Main benefits:
- Paying is very fast and errors in invoice payments are reduced because you don't have to copy account information, amount and more.
- Those who receive payment also have that allow them to automatically record payments.
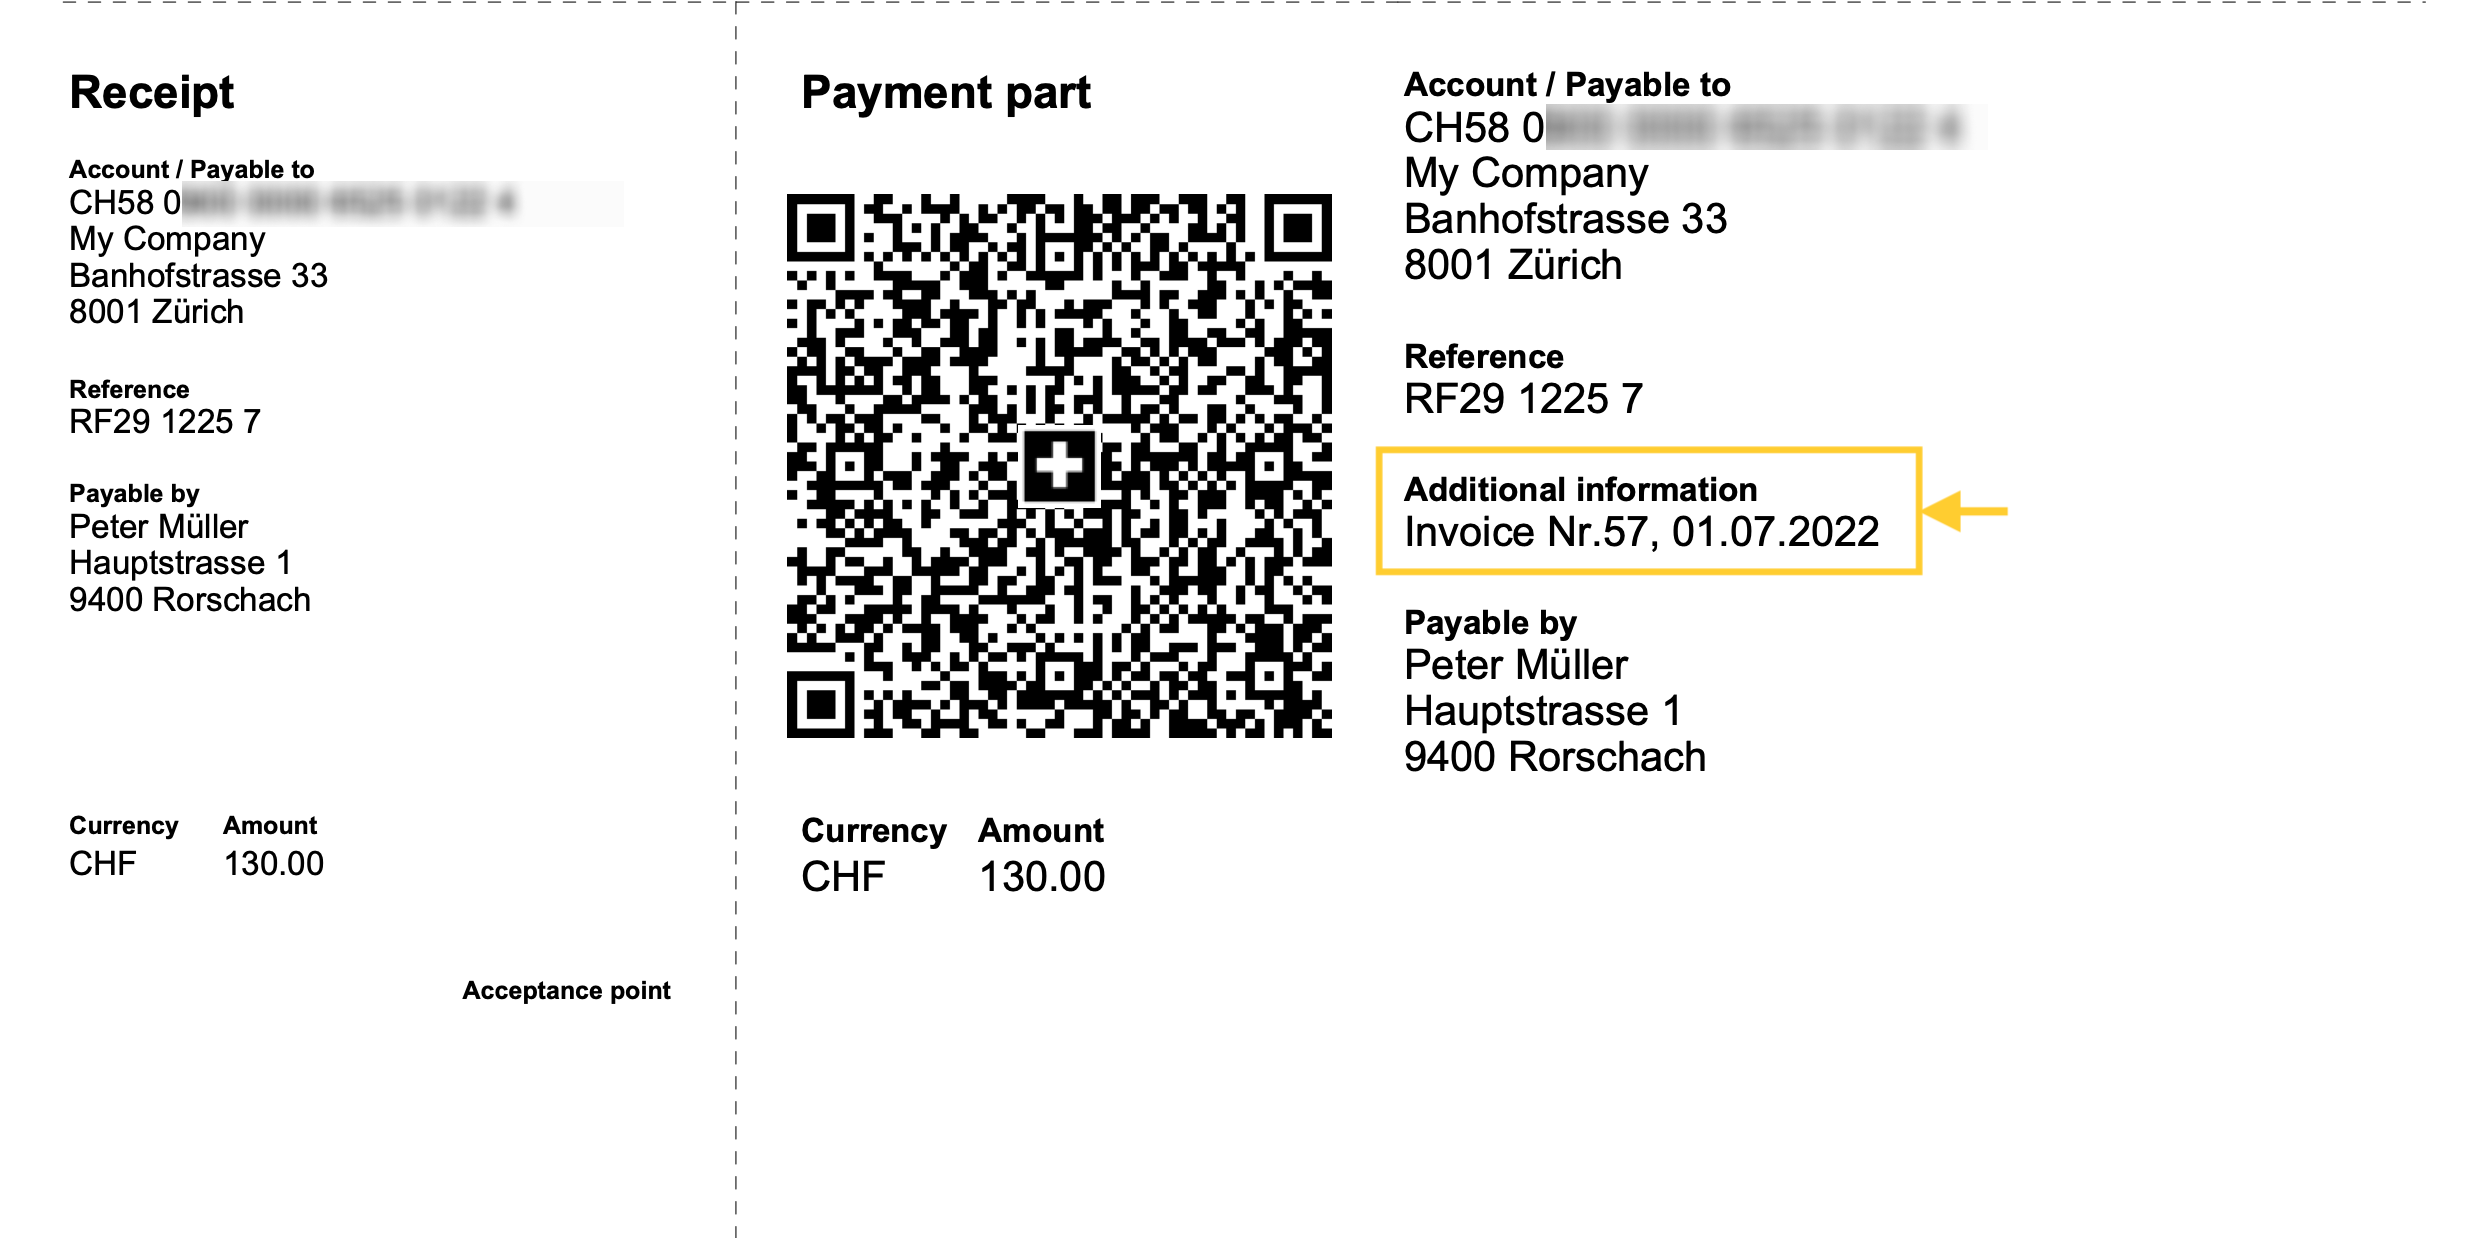
The invoice with the QR-Code section
Invoices with a QR-Code have a special section that is printed at the end of the invoice or on a subsequent page.
The content and its layout must be printed according to the standard. The section must be detachable so that when paying it can be processed by the reading system.
The QR-Code section is divided into two parts:
- Receipt→which is stamped and remains when paying at the counter.
- Payment section → with the QR-Code and the payment information.
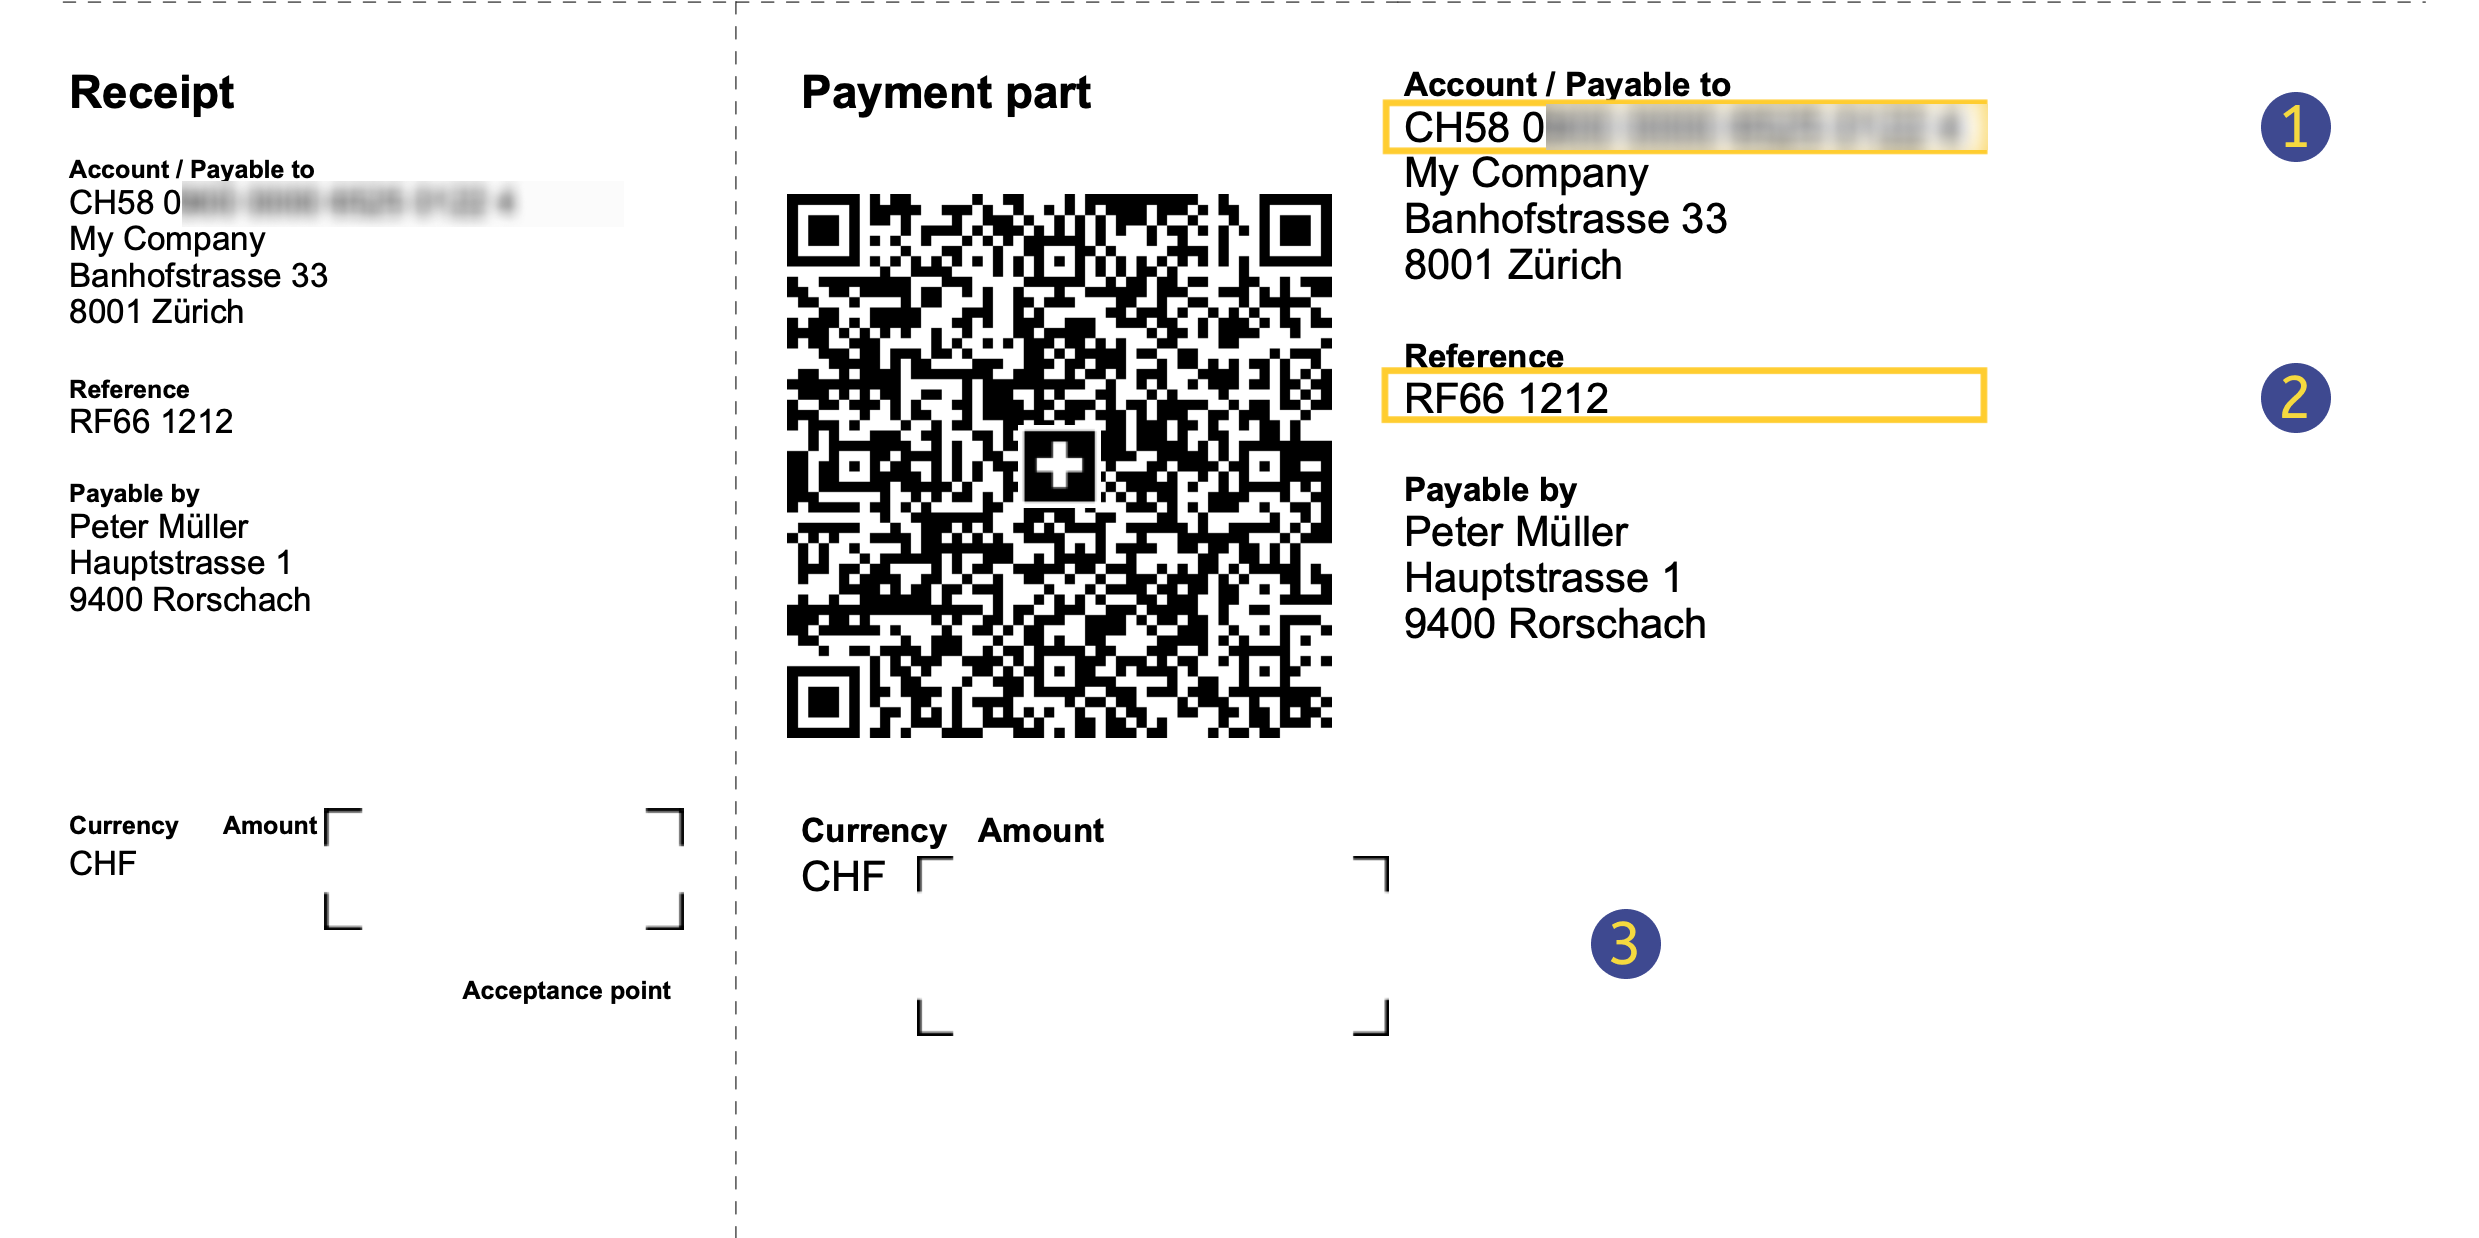
(1) The Receipt section
It contains a summary of the information to certify the payment:
- Receipt Title
- Account/Payable to
- The IBAN or QR-IBAN printed in 4-character blocks.
- The address of the account holder which is generally who issued the invoice and receives the payment.
- Reference
- The Creditor Reference (ISO 11649) or the QR reference.
- The Creditor Reference may also not be present.
- Payable by
- The address of the invoice recipient.
- If empty, a space is left for manually entering the payer's name.
- Currency
- Only CHF and EUR coins are accepted.
- Amount
- The decimal point "." is used as decimal separator and the space is used as thousand separator.
- If empty, a space is left for manual entry of the invoice amount.
- Point of acceptance
(2) The Payment section
It contains the details of the payment.
- The title "Payment Section"
- The Swiss QR-Code
- A graphic element that encodes all the data that is listed in the payment part.
- It can be easily read by digital devices.
- Account/Payable to
- The IBAN or QR-IBAN printed in blocks of 4 characters.
- The address of the account holder which is generally who issued the invoice and receives the payment.
- Reference
- The QR reference or the Creditor Reference (ISO 11649).
- It may or may not be present.
- Additional Information
- Additional data about the invoice that may be of use to the recipient, such as due date or other.
- It may or may not be present.
- Payable by
- The address of the invoice recipient.
- If blank, a space is left for manually entering the payer's name.
- Currency
- Only CHF and EUR currencies are accepted.
- The amount
- The decimal point "." is used as decimal separator and the space is used as thousand separator.
- If empty, a space is left for manual entry of the invoice amount.
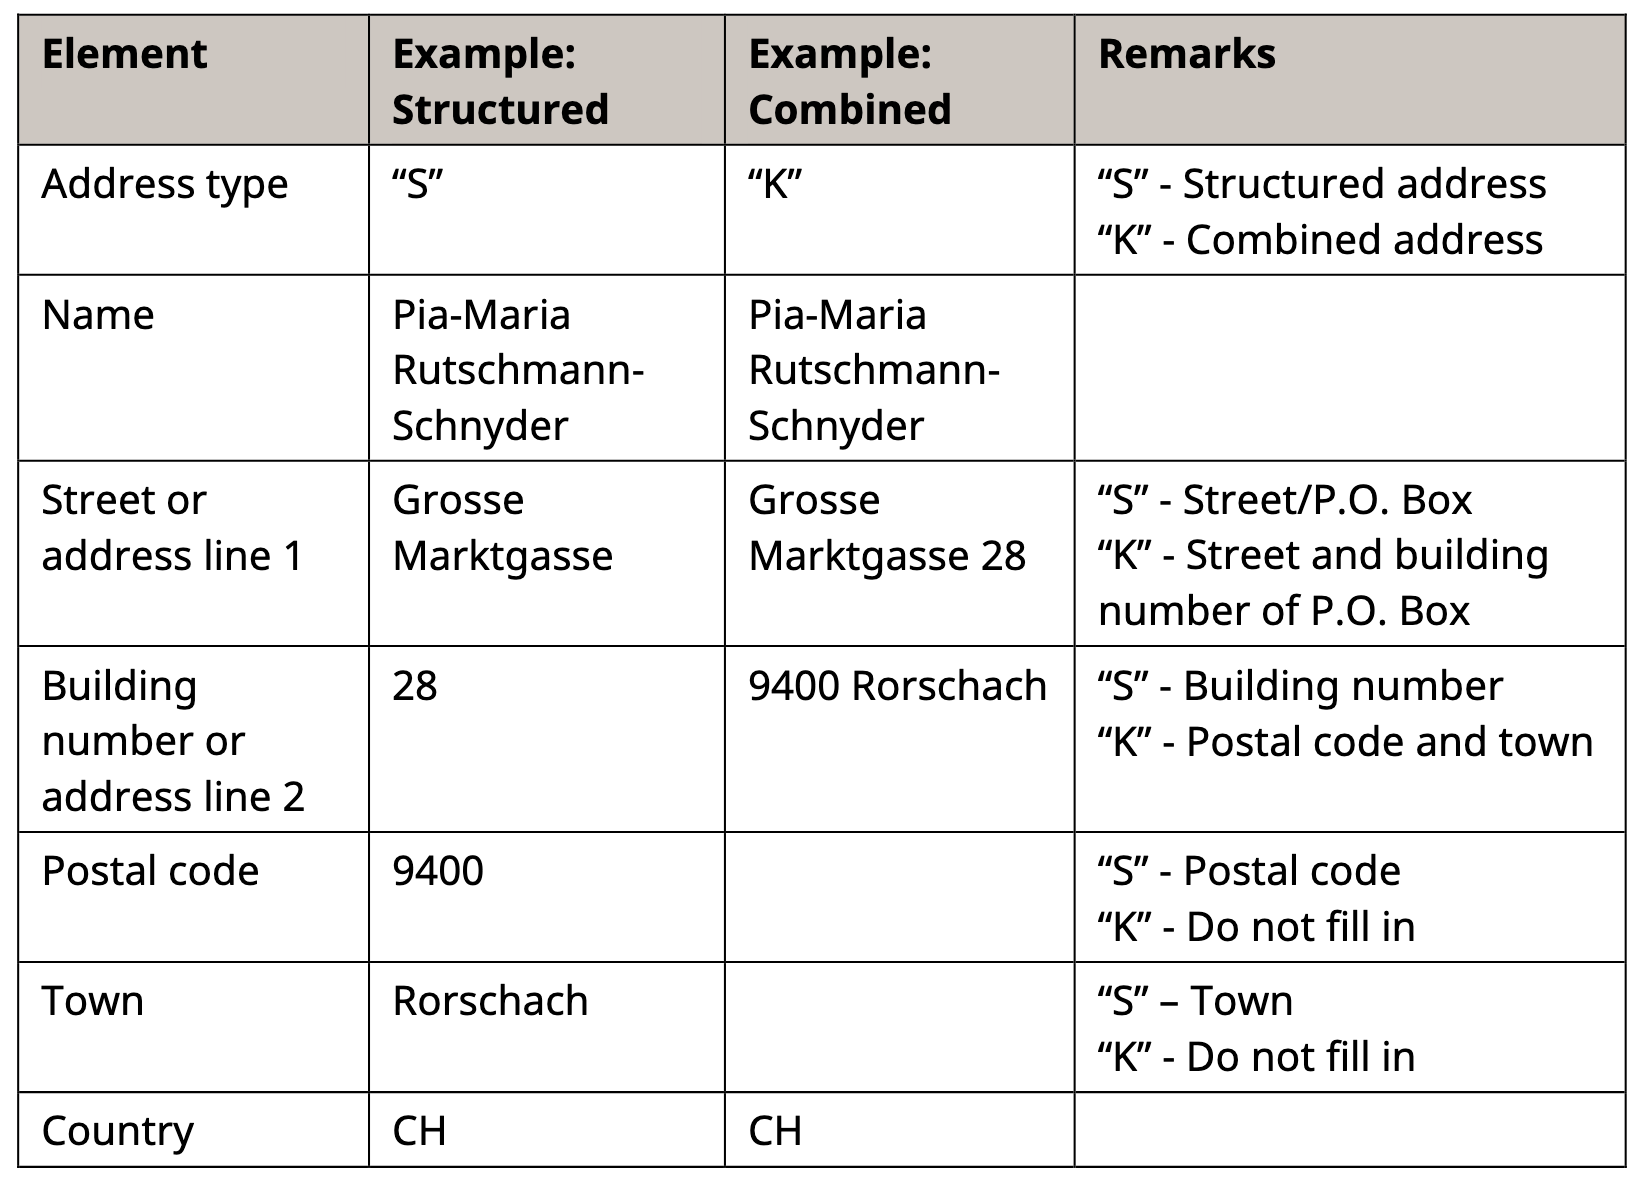
Addresses
The addresses in the "Payable to" and "Payable by" sections of the QR must always contain either the name of the organization or the first name and last name.
The name of the organization has priority over the name / last name: if it is present then the name of the organization will be entered, otherwise the name / last name will be entered.
Entering both is not possible as the rows are limited (max. 3 rows allowed) and each row must contain precise information.
The address structure is as follows:
- organization name or first / last name
- street and house number
- postal code and city
The addresses in the "Payable to" and "Payable by" sections of the QR follow the rules of the Swiss QR standard.
It is not possible to add rows or change the composition of the addresses on the QR.
IBAN / QR-IBAN Account and Reference
The system works with two types of bank accounts.
- THE IBAN
- The normal IBAN number of your account.
- If you use the IBAN the invoice can be in CHF or EUR.
- If you use the IBAN you can use the Reference (Structured Creditor Reference), which starts with "RF".
- See: QR-Invoice using the IBAN account
- The QR-IBAN
- A special account assigned by your bank to be used only for QR-Code payments.
- The second block of digits is a number starting with 3: CHXX 3000 0XXX XXXX X.
- It contains a special code that is used to identify the financial institution. The numbers ranging from 30000 to 31999 are reserved for this code.
- It is mandatory to have the ISR-compatible QR-Reference (27 numeric characters).
- See: QR-Bill using the QR-IBAN.
Mandatory elements
In QR-Code policies are mandatory:
- The IBAN or QR-IBAN and address of the account holder who issued the invoice and receives the payment.
- The address of the recipient.
- In case of QR-IBAN, there must also be the reference.
QR-Code payment slips without amount
In the payment slips without amount there is an empty box that must be completed by the payer. The amount must be entered by hand.
They serve to leave the customer the choice of what amount to pay.
There is the reference of the payer, so whoever receives the payment is able to attribute the amount to the customer.
They are useful for:
- Voluntary contributions to an association.
- Payments to the 3rd pillar retirement plan.
- Credit card down payments.
QR-Code payment slips with no amount and no customer address
Payment slips without amount and without payer reference serve as general deposit slips of a company.
The only encoded information is the account number to pay to.
Whoever carries out the payment, enters manually:
- The amount.
- The address of the payer.
The person receiving the payment must manually attribute the amount.
References and Standards
[CH10] Invoice layout with Swiss QR Code (Banana+)
[CH10] Invoice layout with Swiss QR Code (Banana+)This Invoice Printing Layout (called CH10) allows for the printing of customised invoices, including the printing of the Swiss QR-Code, which allows for easy payment control.
- Watch the video tutorial: Invoice customisation with Swiss QR Code (Layout CH10).
Preconditions
To use this layout you need to download and install Banana Accounting Plus.
This layout, as all others, can be used in the following applications:
QR-Code customisation and configuration
In the invoice settings you can activate QR-Code printing and set the parameters.
Note: QR invoices created with Banana Accounting+ are not compatible with TWINT. They cannot be paid with TWINT and a TWINT QR code cannot be generated.
Invoice printout customisation
The invoice print layout is already set. If you wish, however, you can customize. You can easily adapt the printing of the invoice to your requirements, decide which elements to print, change the description of the texts.
- Customisation via the settings dialogue
- Choose the elements of the invoice you want to include in the printout.
- Print the address on the right or left.
- Indicate which detail columns to include and define the sequence. You can have an invoice with quantities and prices, or only total amounts or even with columns that you have added in the transactions table.
- Change the default texts for use in printing.
- Add translations into other languages.
- Change the font and print character.
- Choose the color combination you want.
- Customisation examples
- Add logo.
- Print address in a different position.
- Print shipping address.
- Add custom texts.
- Change columns settings.
- Invoices without amounts.
- Print items pictures.
- Other examples.
Customisation using programming language
Using programming language you can adapt the existing layout or you can create new ones.
Features only available with the Advanced plan
The following customisation possibilities are only available with the Advanced plan:
- Print other columns from the Items or Transactions table (accounting).
- Print Items image.
- Print custom fields of the information section (Estimates and Invoices).
- Customisation with CSS programming, including (see examples):
- Change font, position and colour of the header, address and other invoice elements.
- Change row height.
- Change underline in total rows.
- Customisation with Javascript programming, including (see examples):
- Change final text or other texts depending of the invoice data.
- Use different data format.
- Use different printing formats depending on the printed items.
- Enter fields names in headers, initial and final texts.
Changes history
Please visit the changes history page.
Invoice settings and customisation of CH10 print layout invoice
This invoice layout allows you to change the print settings via the Settings dialogue. The settings are similar to the UNI11 layout with the added option of printing the Swiss QR Code.
See also:
- General Information on Customising Invoice
- Estimates and invoices
- Invoices in accounting
Invoice Settings Dialogue
To access the invoice parameter settings dialogue, you have two possibilities:
- From the Print Invoice dialogue, Layout section, Settings button.
- From the Print Preview, by clicking on the cogwheel symbol (settings).
The dialogue is composed of several levels and sub-levels that allows you to operate on a specific part of the invoice:
- Print
The elements that make up the invoice print, with the possibility of customising them. - Texts
The texts, in the different languages, which are used for printing. - QR-Code
- The settings for printing the Swiss QR-Code.
- Styles
Change font and colours. - Programming (own JavaScript file)
It is an even higher level of customization, but it requires programming knowledge.
You can change or replace the different printing elements by programming your own JavaScript file.
The Restore Defaults button in the dialogue resets all settings to the default values. Confirming with OK confirms and saves the parameters entered.
You can undo and restore changes made to parameters with the command Menu → Edit → Undo operation.
Print Property
This level defines which elements of the invoice to include and which to exclude from the invoice printing.
It is divided into several sub-levels that allow you to manage a different element of the invoice.
Header
Dialogue element that allows you to define the header on the top of the invoice page.
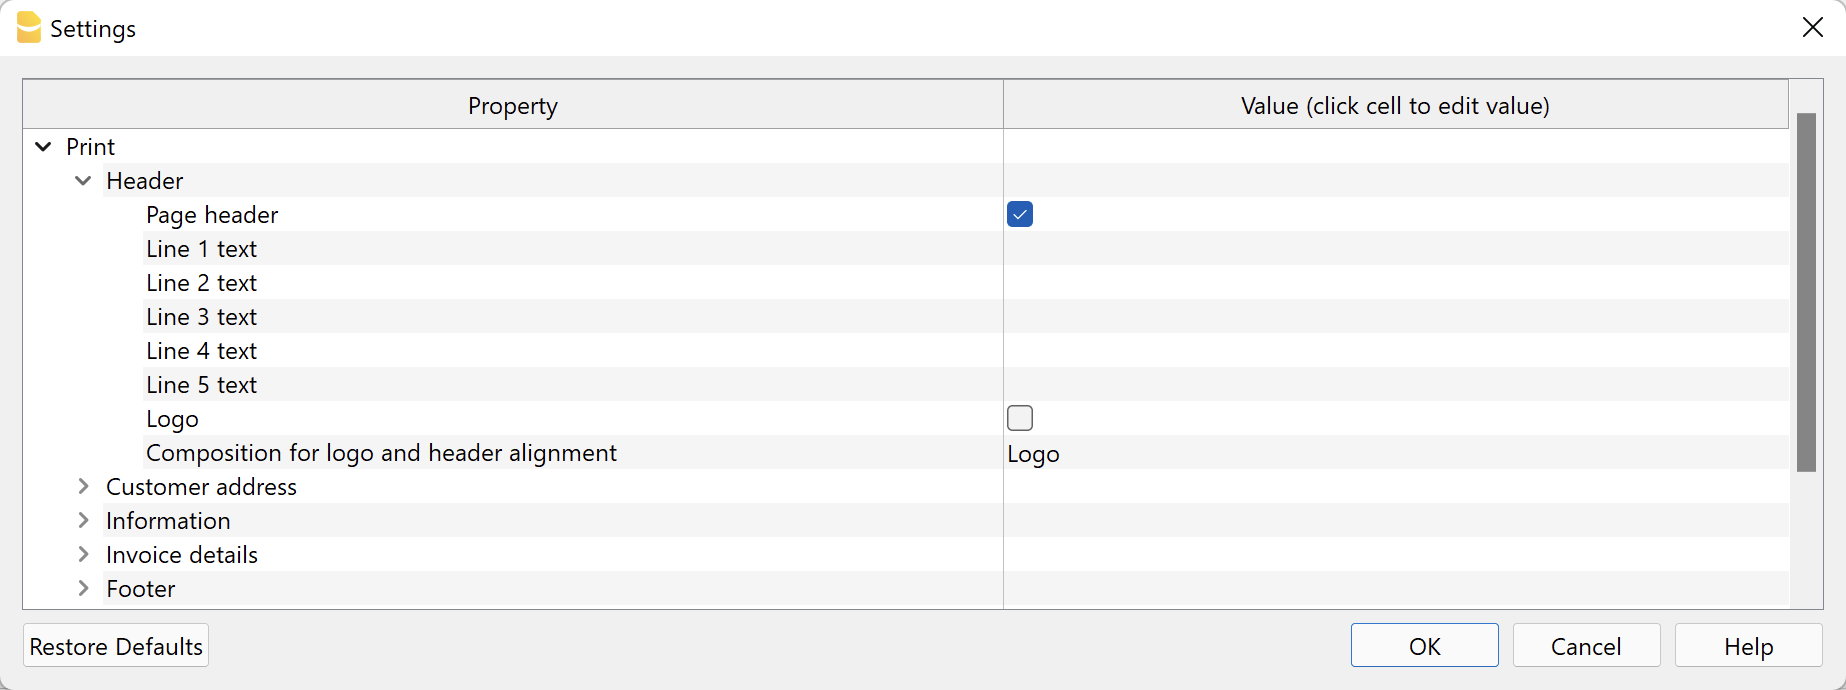
- Page header.
Check the box to include the sender's address in the invoice header.
The address is automatically taken from the basic data of the file, defined in File → File and accounting properties → Address.
The VAT number is mandatory and must be entered in the appropriate field. - Line 1 text ... Line 5 text.
If you do not wish to use the basic address data, you can enter the texts you wish to use manually.
These texts will be displayed in the header and replace any texts defined in the file properties.
In this case the VAT number is not automatically printed. Remember to add the VAT number in one line as it is mandatory. - Logo.
Check to include the logo in the header.
The logo is defined with the command File → Logo setup where you can also set the size, choose how to align it (left, centre, right), and also choose how to align the address with respect to the logo. - Logo name.
Enter the name of the logo customisation defined in the menu File → Logo setup, respecting upper and lower case.
Customer address
Element of the dialogue that allows you to set some parameters for the billing address.
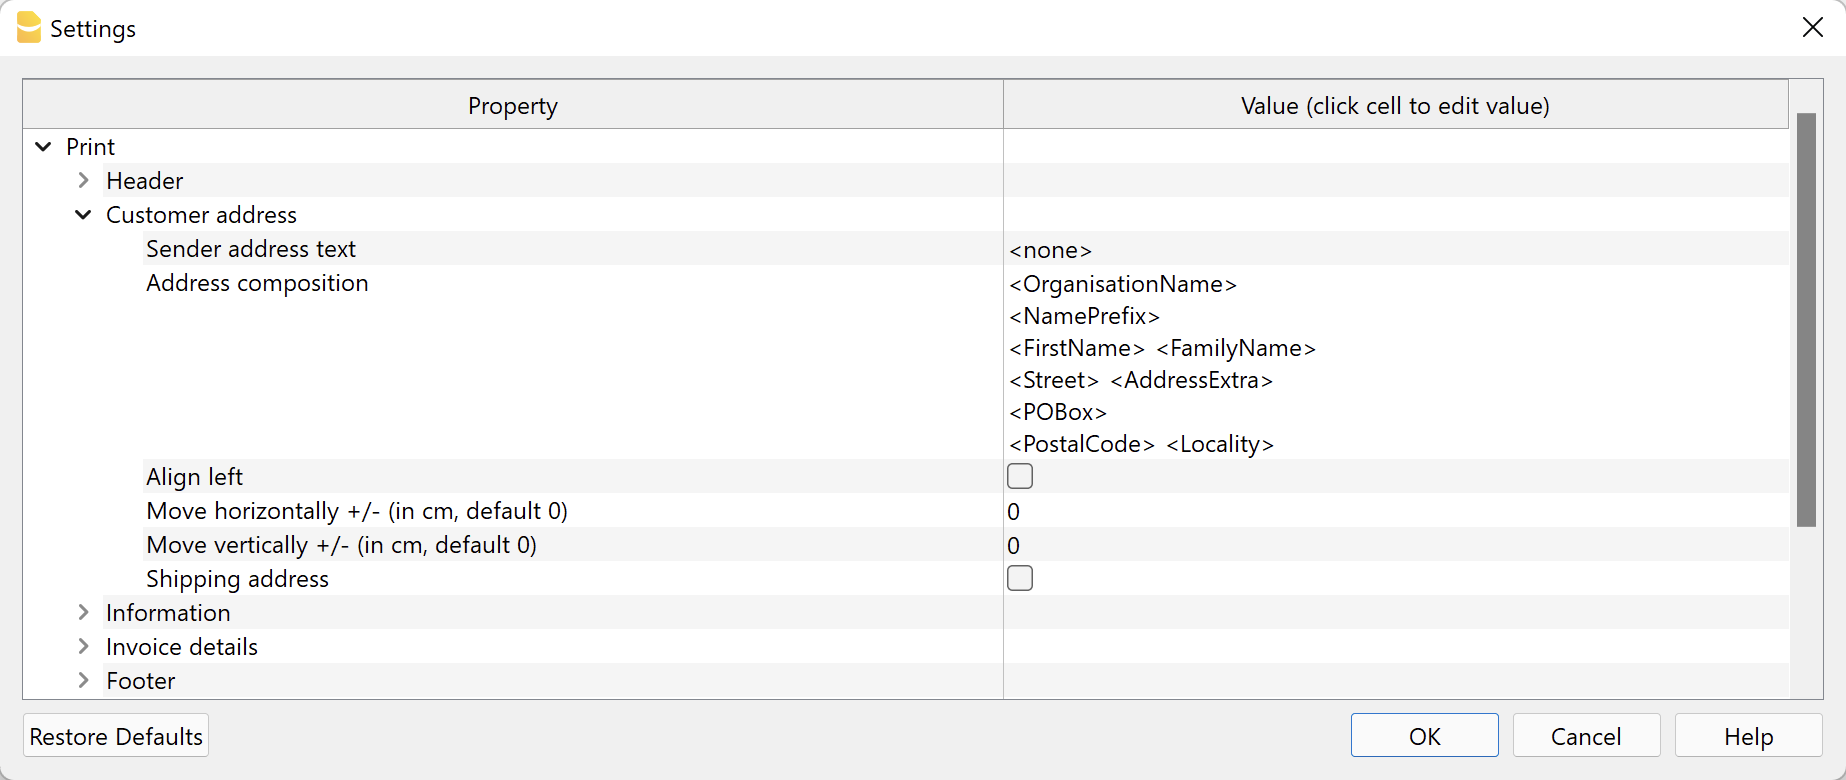
The customer addresses are taken from the specific columns of the table, see Accounts → Address view for integrated invoicing, and from the Contacts table for the Estimates and Invoices application.
- Sender address text.
Above the customer's address you can enter a line for the sender's address.
Leave empty to use the address defined in File → File and accounting properties → Address or enter text manually.
Enter <none> to not enter the sender line. - Address composition.
Decide how to compose the address. Enter the XML address column names in the order you prefer: for the integrated invoicing Accounts table (Address view), for the application Offers and Invoices Contact table. Each column name must be included between the signs '<' and '>'.
You can display the XML name of each column with the command Columns setup, Settings tab.
You may only use the following columns (other columns cannot be used):
Prefix column (XML name = NamePrefix).
Organisation Column (XML name = OrganisationName).
First Name column (XML name = FirstName).
Column Surname (Name XML = FamilyName).
Street Column (XML name = Street).
AddressExtra Column (XML name = AddressExtra).
PostBox Column (XML name = POBox).
PostalCode Column (XML name = PostalCode).
Location Column (XML name = Locality).
Region Column (XML name = Region).
Country Column (XML name = Country).
CountryCode column (XML name = CountryCode).
EmailWork column (XML name = EmailWork).
Some examples:- Include organisation name, address, postcode and location:
<OrganisationName>
<Street>
<PostalCode> <Locality> - Include prefix, first name, last name, address, postcode and locality:
<NamePrefix>
<FirstName> <FamilyName>
<Street>
<PostalCode> <Locality> - Include extra address, post office box and country code:
<OrganisationName>
<NamePrefix>
<FirstName> <FamilyName>
<Street> <AddressExtra>
<POBox>
<CountryCode> - <PostalCode> <Locality>
- Include organisation name, address, postcode and location:
- Align left.
Check to print the address on the left, otherwise it will be printed on the right. - Move horizontally.
Enter a value in cm to move the customer's address to the right (positive value) or to the left (negative value). - Move vertically.
Enter a value in cm to move the customer's address down (positive value) or up (negative value). - Shipping address.
Only available for invoicing integrated in accounting.
The shipping address is also printed.
The shipping address is entered by means of the code :sadr in the TypeDoc column of the Transactions table to define the shipping address.
Information
Element of the dialogue that allows you to define which invoice information to include and which to exclude from the print (top left):
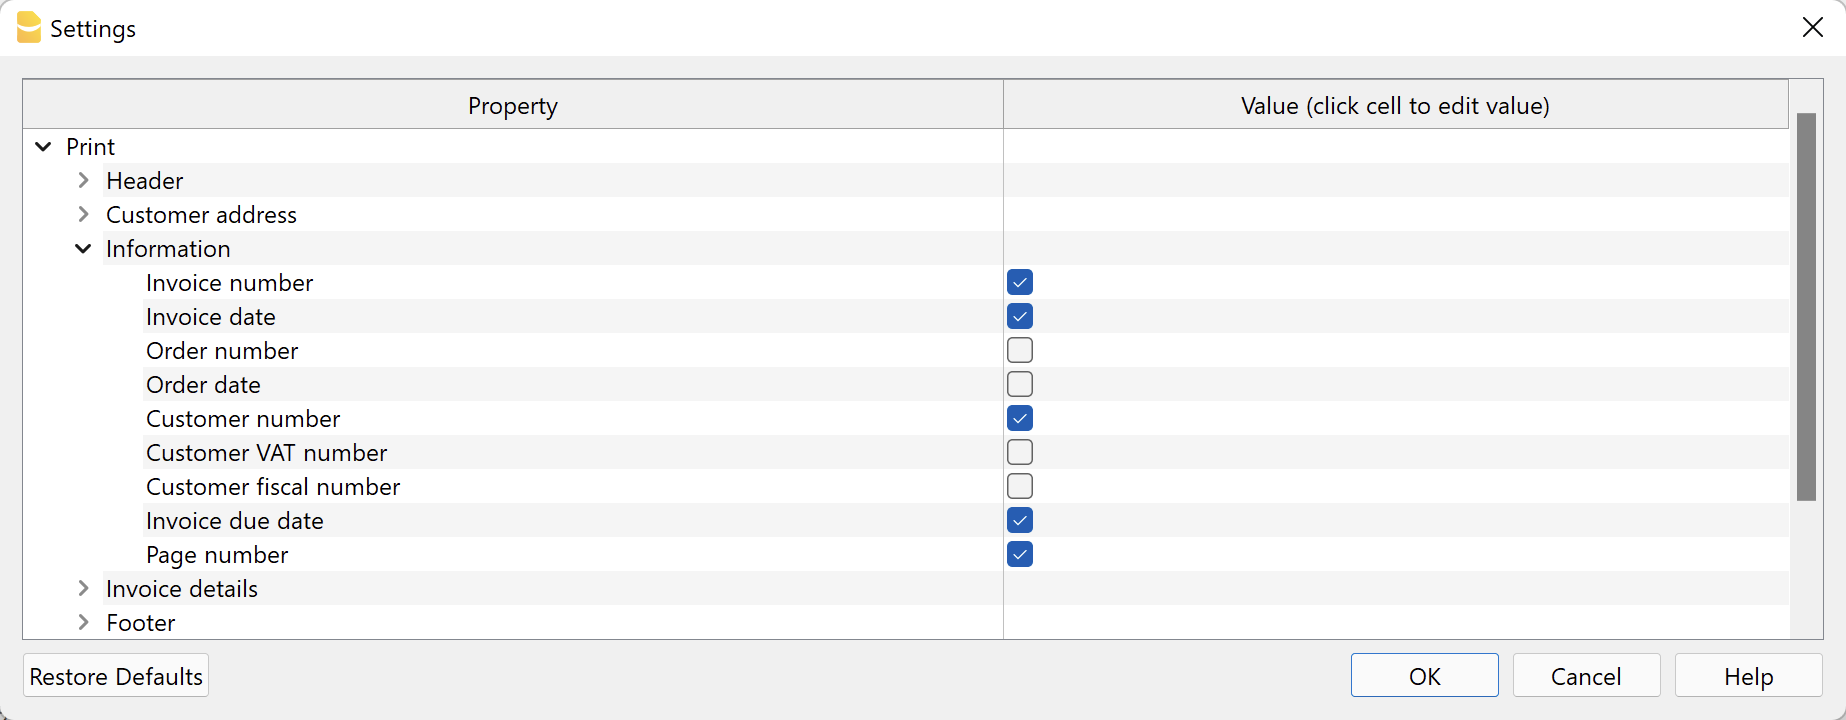
Integrated Invoicing:
- Invoice number / Credit note.
Specified in the DocInvoice column of the Transactions table. - Invoice date.
Specified in the Date column of the Transactions table. - Order number
Specified in the DocType column of the Transactions table with code: ordn - Order date
Specified in the DocType column of the Transactions table with code:ordd - Customer number
Specified in the invoice transaction of the Transactions table. - Customer VAT number.
Specified in the VAT number column of the Accounts table, Other view. - Customer fiscal number
Specified in the Fiscal number column of the Accounts table, Other view. - Invoice due date
The due date of an invoice can be set up in different ways. For more information, see the Due dates and payment terms page. - Page number
The current page number.
Estimates and invoices application
- Invoice number / Estimate
Specified in the Id column of the Invoices/Estimates table - Invoice date.
Specified in the Date column of the Invoices/Estimates table - Order number
Specified in the Order Nr of the create/edit invoice dialogue. - Order date
Specified in the order date of the create/edit invoice dialogue. - Customer number
Specified in the Contact Id column of the Invoice/Estimates table. - Customer VAT number.
Specified in the VAT number column of the Contacts table. - Customer fiscal number
Specified in the Fiscal number column of the Contacts table. - Invoice due date
Indicated in the Due Date column of the Invoices/Estimates table.
The due date of an invoice can be set up in different ways. For more information, see Set the payment term. - Page number
The current page number. - Customised fields
Only with the Advanced Plan.
Invoice section of the Invoice Dialogue are added.
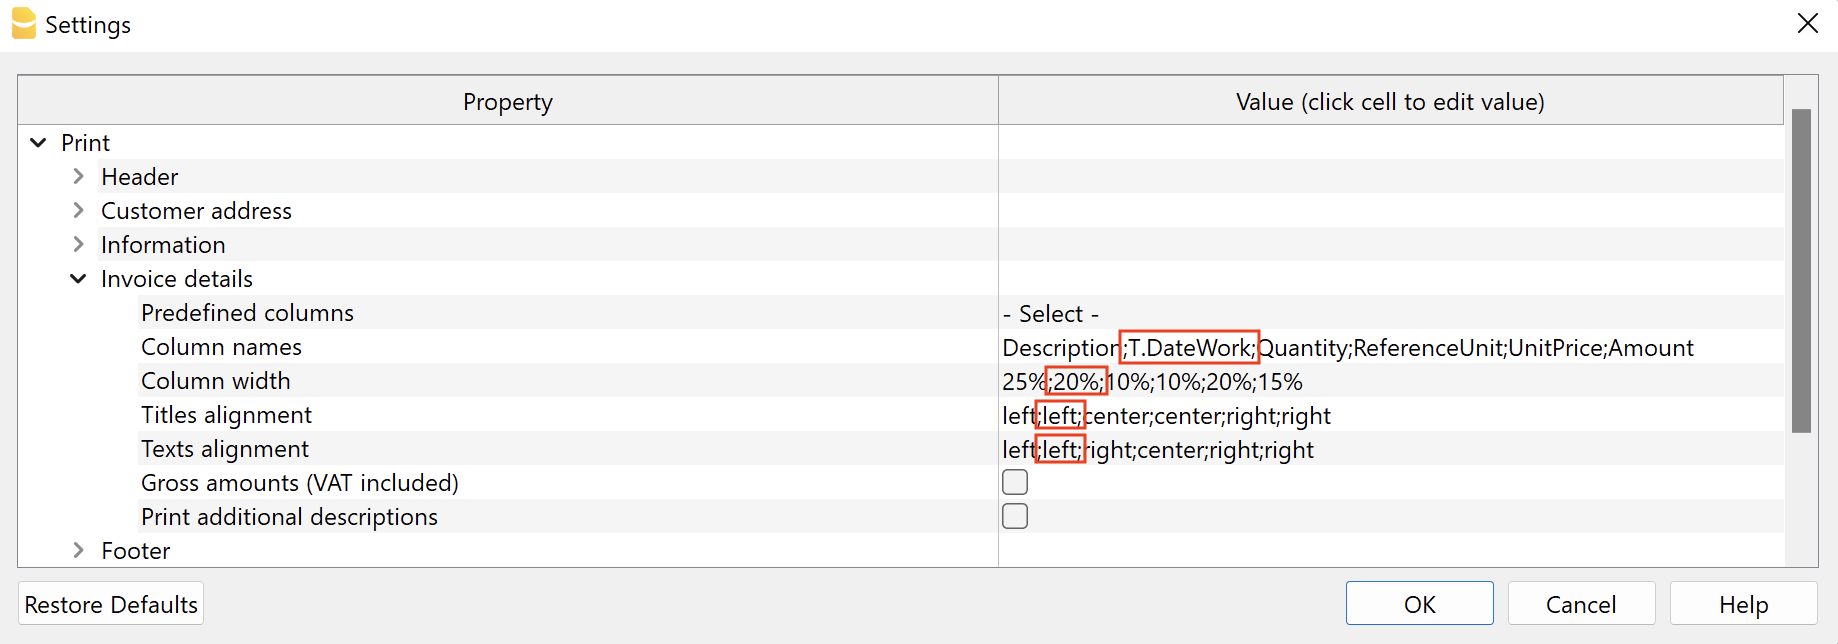
Invoice Details
By invoice details we mean the table showing the items, quantities, prices and totals.
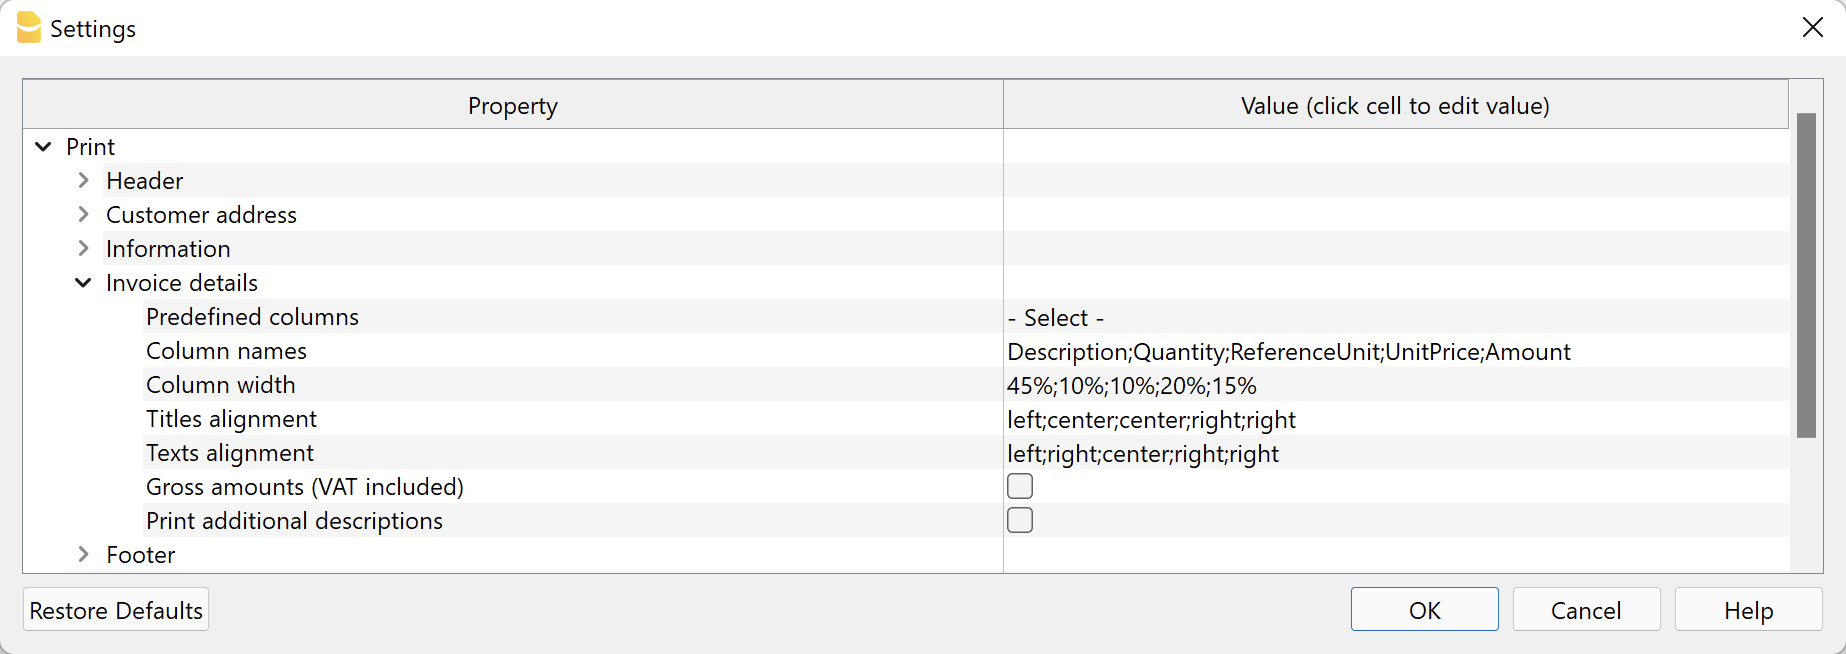
Predefined column compositions
Allows you to select the columns to be displayed in the invoice details directly from a list.
The list includes some predefined column compositions to choose from. Some of them require the Banana Accounting Plus Advanced Plan.

Select a pre-defined column composition from the list and confirm.
The values of the properties Column Names, Column Width, Title Alignment, Text Alignment of the Invoice Details section, and the property Invoice Details Column Names of the Text section, are set automatically by the programme.
Available from version 10.0.10.21348 or newer of Banana Accounting Plus.
Column Arrangement Logic
The columns to be displayed can be defined manually in this way:
- In the column names you indicate the XML names of the columns to be printed.
- In the subsequent fields, the print characteristics of the individual columns are indicated.
- Column width.
- Title alignment.
- Text alignment.
- In the section Texts you indicate the column header texts.
- For each language, the text for the header must be indicated.
If you select a default Columns setting, all elements are changed automatically.
Valid for all elements
- Elements are separated by ';' and must be the number of the defined columns.
- If one of these elements is left blank, the default values are taken over.
Column Names
Manually indicate which columns to display in the invoice details.
Enter the XML names of the columns in the Transactions table. You can display the XML name of each column with the command Columns setup, Settings tab. Separate column names with a ';' (semicolon).
The default columns are:
- For invoices integrated in accounting:
- Number (item Id)
This applies both to the Id column of the Item table in the Estimates and Invoices application, and to the Item column of the Transactions table in the Integrated Invoicing. - Description
- Quantity
- ReferenceUnit
- UnitPrice
- Amount
- VatRate
- Number (item Id)
- Plus for the invoice offer application:
- Date
- Discount
With the Advanced Plan of Banana Accounting Plus, you can add other table columns in addition to the predefined columns.
- Transactions table.
- Only for invoices integrated in accounting.
- The syntax to use is T.ColumnName.
"T." indicates that this is a column of the Transactions table, "ColumnName" is the XML name of the column (e.g. "T.Notes", "T.DateWork", etc.)
- Items table.
- The syntax to be used is I.ColumnName.
"I." indicates that it is a column of the Items table, "ColumnName" is the XML name of the column (e.g. "I.Links", etc.).
- The syntax to be used is I.ColumnName.
Column Width
Enter the width of each column with a percentage value. Each value defines how much space a column occupies in relation to the total width of the page. The sum must be 100%.
Separate column widths with a ";" (semicolon).
Title Alignment
Enter the title alignment for each column. You can align the text to the left, centre and to the right. Separate each alignment with a ";" (semicolon).
Text Alignment
Enter the text alignment of each column. You can align the text left, centre and right. Separate each alignment with a ";" (semicolon).
Gross amounts (including VAT)
You can decide whether to use gross amounts including VAT or net amounts excluding VAT.
Printing additional descriptions
Only available for invoicing integrated in accounting.
You can decide whether you want to enter additional descriptions on several rows.
- In the Transactions table with the Columns setup command add one or more additional description columns.
For each additional description row you need to add an appropriate column.
Create columns of type Text with the name "Description" followed by a number (e.g., Description1, Description2, Description3, etc.).
The "XML name" of each column must begin with the word "Description" (in English) followed by a number.
In the "Name" field you can enter whatever you want.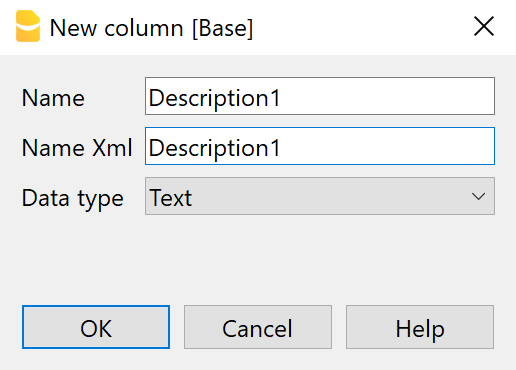
- In these columns enter additional text for invoice descriptions.
The text in each column will be displayed on a new line in the invoice description.
Some examples
- Include the columns Description, Quantity, Unit, Unit Price and Amount:
- Description;Quantity;ReferenceUnit;UnitPrice;Amount
50%;10%;10%;15%;15%
center;center;center;center;center
left;center;center;right;right
- Description;Quantity;ReferenceUnit;UnitPrice;Amount
- Include only the Description and Amount columns:
- Description;Amount
70%;30%
center;right
left;right
- Description;Amount
- Include the columns Description, Notes and Amount. Notes is not a default column, the name must be preceded by 'T.'. Requires the Banana Accounting Plus Advanced Plan.
- Description;T.Notes;Amount
35%;35%;30%
left;left;right
left;left;right
- Description;T.Notes;Amount
- Include the columns Description, DateWork, Quantity, Unit Price and Amount (DateWork is a manually created column, the name must be preceded by "T."). Requires the Advanced Plan of Banana Accounting Plus.
- Description;T.DateWork;Quantity;ReferenceUnit;UnitPrice;Amount
35%;15%;10%;10%;15%;15%
left;center;center;center;right;right
left;center;center;center;right;right
- Description;T.DateWork;Quantity;ReferenceUnit;UnitPrice;Amount
- For Estimates and Invoices application: include the columns Number, Date, Description, Quantity, Unit, Price, Discount and Amount.
- Item;Date;Description;Quantity;ReferenceUnit;UnitPrice;Discount;Amount
10%;10%;50%;10%;10%,10%;15%;15%
left;left;left;right;right;right;right;right
left;left;left;right;right;right;right;right
- Item;Date;Description;Quantity;ReferenceUnit;UnitPrice;Discount;Amount
Footer
Dialogue element that allows a footer to be inserted.

The footer can only be included if the QR code is excluded from printing. When the QR code is included, the footer is automatically excluded from printing.
- Print footer.
Indicates whether to include the footer, which consists of three columns (see the chapter "Text properties" below). - Print separating border.
Indicates whether to include the border on the top of the footer.
Texts Property
This level defines all invoice texts, which are grouped and divided by language.
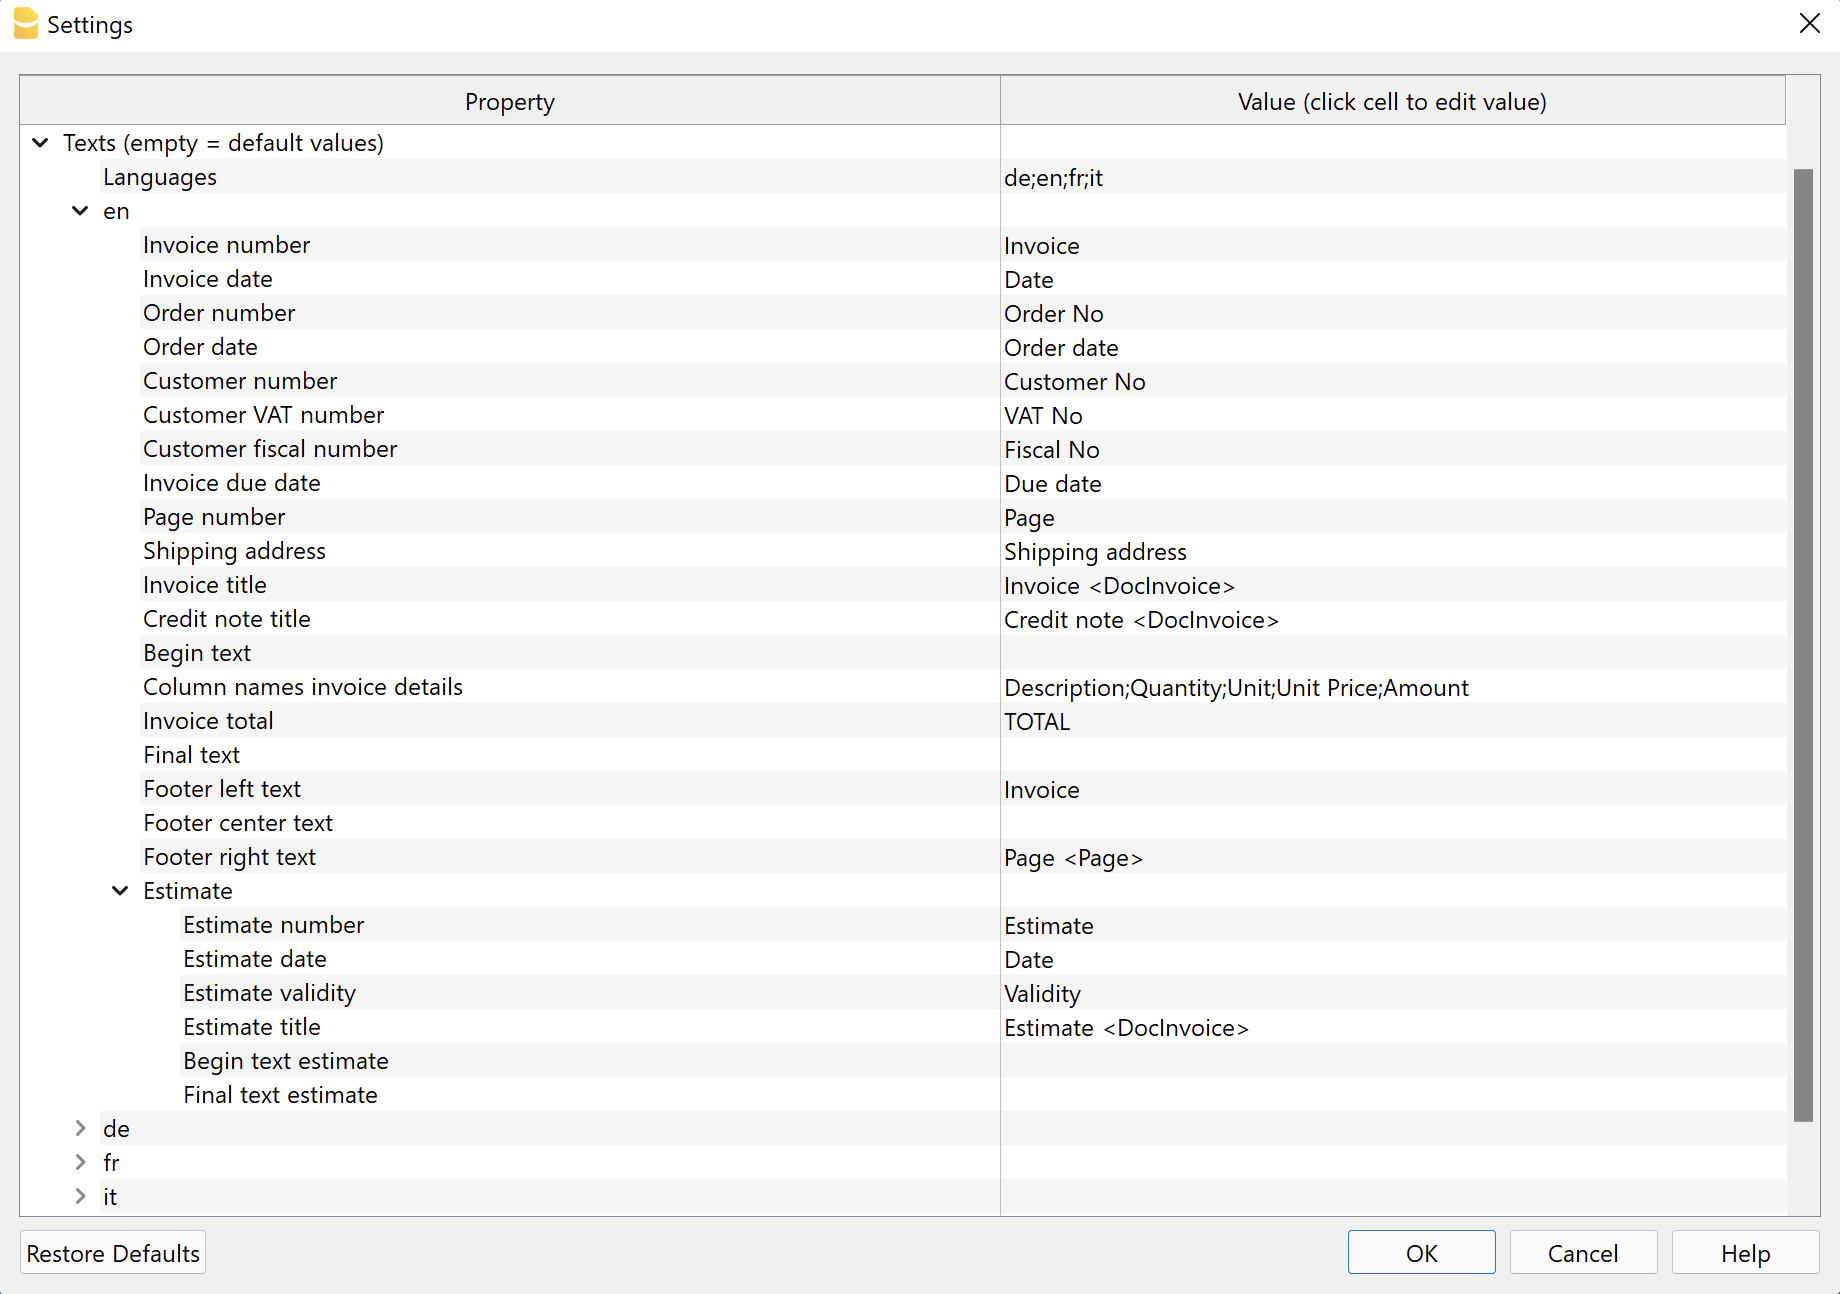
Languages
You can change the texts to be used for each language and also add translations for other languages.
The language to be used is chosen according to the language specified for the customer:
- For integrated invoicing, it is defined in the Accounts table, Address view, Language column.
- For the application Estimates and Invoices, it is defined in the Contacts table, Language Code column .
If no language is indicated for the customer, the default accounting language is used.
The default languages for which a complete translation exists are: German, English, French and Italian.
The first language to appear in the dialogue is always the current language of the file, defined in File > File and accounting properties > Other. The rest are listed in alphabetical order.
Define languages
- Default values: de;en;fr;it
- Enter the list of languages using the two-character codes.
- de = German
- en = English
- fr = French
- it = Italian
- Separate the language codes with a ";" (semicolon).
Add languages
- In the language field, at the end, add the new language code for the language you want to use.
For example if you want to use Spanish language add ";es" at the end of the existing language codes (e.g. "de;en;fr;it;es").
Always use the ";" (semicolon) to separate the language codes. - Click on Ok.
- The Settings dialogue closes to apply the changes.
- Reopen the Settings dialogue.
- In the Texts section, there is now a new section with the name of the language code you have entered (e.g. "es").
This new section contains all the texts described in the paragraph Text section for each language.
At first, all texts are in English. - In the right side, replace all existing english texts with the correct translations for the new language you added.
Do not replace texts between “<” and “>” because they are used by the program (e.g. "Factura <DocInvoice>"). - Click on Ok and print the invoice.
Remove languages
- In the language field delete the code of the language you want to remove.
- Click on Ok.
- Confirm with Yes to remove the language and its texts from the list.
- Reopen the Settings dialogue. Now the language section has been removed.
Text section for each language
Each language has its own section starting with the language code.
You can change the text to be used for each individual language.
If you delete the content, when you confirm with Ok, the default text will be automatically used.
- Invoice number.
Text in the information preceding the invoice number. - Invoice date.
Text in the information preceding the invoice date. - Invoice order.
Text in the information preceding the order number. - Order date.
Text in the information preceding the order date. - Customer number.
Text in the information preceding the customer number. - Customer VAT number
Text in the information preceding the customer's VAT number. - Customer tax number.
Text in the information preceding the customer's tax number. - Invoice due date.
Text in the information preceding the invoice due date. - Page number.
Text in the information preceding the page number. - Shipping address.
Text appearing above the shipping address. - Invoice title.
Optional text inserted before the details table.
Enter <none> to display no text. - Credit note title.
Optional text inserted before the table of details.
Enter <none> to display no text. - Begin text.
Optional text, on one or more lines, inserted immediately after the invoice title. - Invoice detail column names.
Must be separated by a ';' (semicolon).
When changing the columns to be displayed in the invoice (section Print, Invoice details, Column names), you must always also adapt the texts for the column headings. - Invoice total.
Text that appears in the invoice total line. - End text
Optional text, on one or more lines, inserted at the end of the invoice.
This text takes priority over text added from the dialogue Print invoices → Options → End text. - Left/centre/right footer text.
The <Page> code is replaced with the page number.
Enter <none> to display no text.
Specific texts for printing Proforma invoices, Estimates, Delivery notes, Order confirmations and Reminders (requires Advanced Plan):
- Proforma invoice
- Title.
Optional text inserted before the details table. Enter <none> to display no text. - Begin text.
Optional text, on one or more lines, inserted immediately after the proforma invoice title. - Final Text.
Optional text, on one or more lines, inserted at the end of the proforma invoice.
- Title.
- Estimate
- Number.
Text in the information preceding the estimate number. - Date.
Text in the information preceding the estimate date. - Validity.
Text in the information preceding the estimate validity date. - Title.
Optional text inserted before the details table. - Begin text.
Optional text, on one or more lines, inserted immediately after the estimate title. - Final text.
Optional text, on one or more lines, inserted at the end of the estimate.
- Number.
- Delivery note
- Delivery note number.
Text in the information preceding the delivery note number. - Delivery note date.
Text in the information preceding the date of the delivery note. - Title.
Optional text inserted before the details table. Enter <none> to display no text. - Begin text.
Optional text, on one or more lines, inserted immediately after the delivery note title. - End Text.
Optional text, on one or more lines, inserted at the end of the delivery note.
- Delivery note number.
- Order confirmation
- Order Confirmation Number.
Text in the information preceding the order confirmation number. - Order Confirmation Date.
Text in the information preceding the date of the order confirmation. - Title.
Optional text inserted before the details table. Enter <none> to display no text. - Begin text.
Optional text, on one or more lines, inserted immediately after the title. - Final text.
Optional text, on one or more lines, inserted at the end of the order confirmation.
- Order Confirmation Number.
- Reminder
- Invoice date (only for integrated invoicing in the accounting file).
Text in the information preceding the invoice date.
Used if there is the transaction with the reminder date created via the Reports > Customers > Print reminders command. - Date (only for integrated invoicing in the accounting file).
Text in the information preceding the reminder date.
Used if there is the transaction with the reminder date created via the Reports > Customers > Print reminders command. - Due date (only for integrated invoicing in the accounting file).
Text in the information preceding the reminder due date.
Used if there is the transaction with the reminder date created via the Reports > Customers > Print reminders command. - Title.
Optional text inserted before the details table. Enter <none> to display no text. - Begin Text
Optional text, on one or more lines, inserted immediately after the reminder title. - Final Text.
Optional text, on one or more lines, inserted at the end of the reminder.
- Invoice date (only for integrated invoicing in the accounting file).
Bold writing
With a specific annotation you can apply the bold style to certain texts. To do so, include the desired texts between double asterisks ** .
Applicable to:
- Start text.
- End text.
- Descriptions of items appearing in invoice details.
Examples:
**text** = text
**text1 text2**, text3 = text1 text2, text3
Customise title, begin text and final text
The data for the title, begin text and final text are taken over and inserted automatically with every new invoice.
If you also want to include customer information (first name, last name, etc.) or the invoice number in these texts, you can do so:
- With the Professional Plan the data must be entered manually each time you create an invoice.
- With the Advanced Plan you can automate data entry on all invoices.
For automated data entry (only with the Advanced Plan) you must use the predefined columns from which the data is taken:
- Customer Address Columns
- In integrated invoicing, from the Accounts table, Address view.
- In the Estimates and Invoices application, from the Contacts table.
- Invoice number column
- In integrated invoicing, from the Accounts table, Invoice column.
- In the Estimates and Invoices application, from the Invoices table, column Invoice Id.
In the texts you must insert the following columns, specifying the XML name of the columns between the signs '<' and '>'.
- Address
- <NamePrefix>, <OrganisationName>, <FirstName>, <FamilyName>, <Street>, <AddressExtra>, <POBox>, <PostalCode>, <Locality>, <Region>, <Country>, <CountryCode>, <EmailWork>.
- Invoice number
- <DocInvoice>.
In this case DocInvoice is used both for integrated invoicing and for the Estimates application and invoices.
- <DocInvoice>.
To display the XML name of each column, use the command Columns setup, Settings section.
When the invoice is created, these texts are replaced with the actual values.
- The text "Invoice <DocInvoice>" is converted to "Invoice 10".
- The text "Invoice <DocInvoice>, <FirstName> <FamilyName>" is converted to "Invoice 10, James Johnson".
Styles Properties
This level defines the parameters that affect the visual appearance of the invoice, like font type, size and colors.
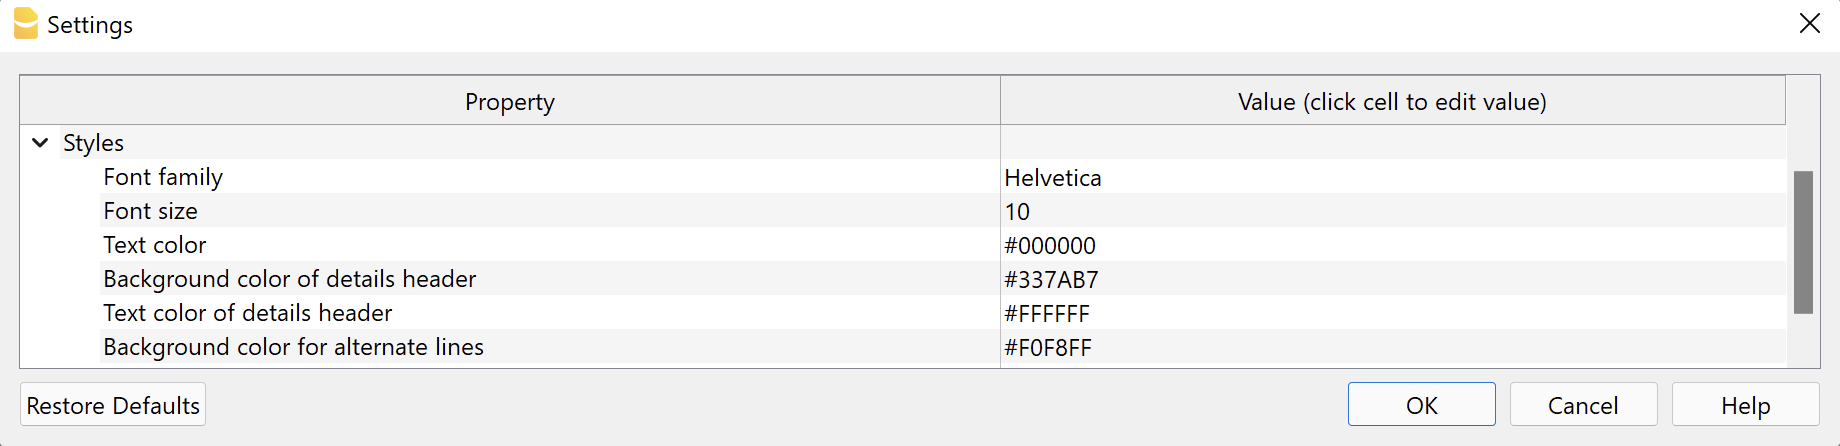
Font type and size
The font and font size are applied to all invoice texts, with the exception of the header, which has a fixed size that can only be changed with custom CSS Stylesheet.
The size of the title and the total line are resized according to the chosen font size.
For more information regarding the font that can be used and exporting to PDF, please see the Create PDF page.
Colours
Enter the colours you wish to apply to the invoice printout.
- Text Colour.
The colour applied to all text on the invoice: header, information, address, start text, invoice details, end text, footer.
The colour of the QR bulletin cannot be changed. - Header details background colour.
The main colour of the invoice. It is applied to: title, invoice details header, horizontal lines, total line and double underline. - Details header text colour.
The colour of the text in the column headings of the invoice details table. - Background colour for alternating rows.
The background colour applied to the rows of the various invoice items. - Title and total colour.
The colour of the title and total line (text and underline).
To enter a colour you have two possibilities::
- Select a color from those available.
- Enter the hexadecimal code of the colour (HEX). This is a code starting with # followed by six characters (e.g. #0000, #009FE3, #FF00EA).
Colour codes are easily found on the Internet. For example, you can consult the table at https://www.w3schools.com/cssref/css_colors.asp.
If no colour is entered (leaving the field empty), the default colour is set. Applies to every colour field. This is useful if you want to reset to the original colours.
Integrated Invoicing Texts
n integrated invoicing, certain texts can also be defined in the Transactions table when entering invoice data.
- Invoice title / credit note.
- Enter in the column TypeDoc the command 10:tit (12:tit for credit note).
- Enter the desired text in the Description column.
- It takes priority over any text defined in the settings of the invoice layout.
- Begin text.
- Enter in the column TypeDoc the command 10:beg.
- Enter the desired text in the Description column.
- Only one line of text can be entered.
- It takes priority over any text defined in the settings of the invoice layout.
- Notes.
- In the column TypeDoc enter the command 10:not.
- Enter the desired text in the Description column.
- Several lines of notes can be entered. Each note must be defined on a new line in the table Entries.
- Greetings.
- Enter the command 10:gre in the column TypeDoc.
- Enter the desired text in the Description column.
- Only one line of greetings can be entered.
Priority Title and Begin Text:
| Priority 1 | Priority 2 | |
| Invoice Proforma Invoice | Transactions table (10:tit / 10:beg) | Layout settings dialog |
| Estimate | Transactions table (10:tit / 10:beg) | Layout settings dialog |
| Delivery note | Layout settings dialog | - |
| Reminder | Layout settings dialog | - |
Priority Final Text:
| Priority 1 | Priority 2 | Priority 3 | |
| Invoice Proforma Invoice | Transactions table (10:not / 10:gre) | Layout settings dialog | Print Invoices dialog, Options section |
| Estimate | Transactions table (10:not / 10:gre) | Layout settings dialog | - |
| Delivery note | Layout settings dialog | - | - |
| Reminder | Layout settings dialog | - | - |
Error messages
- @error Text names and columns do not match.
The number of columns of the invoice details table (Print → Invoice Details → Column names) do not match with the texts to print (Texts → language code → Column names invoice details). Check the invoice settings.
QR settings and customisation invoice Switzerland
This page explains how to set up printing of the Swiss QR-Code on invoices and also refers to technical information on customisation possibilities, use of address formats and more.
For technical specifications please refer to the QR-Code References and Standards.
QR Section
In the Invoice settings there is a special section for data entry for the QR section printing.
- To print the QR on the invoice you must check the "Print QR Code" box.
There is then a very important choice to be made. The QR-Code system has two main modes depending on the type of account you want to use. In the Reference Type you have to indicate the system you want to use .
- Print QR-bills with the IBAN account.
You can immediately start printing invoices with the QR. The bank statement will show the account number of the customer and the invoice. In this way you will have immediate and automated control of payments. Print QR-bills with the QR-IBAN account.
If you want an ISR-compatible system or if you want your invoice payment data to be received in a different data file than the account statement.Your bank must give you a QR-IBAN account number and the individual payment data will not appear on the normal account statement, but on a separate one.
Then follow the available settings regardless of the chosen QR Reference Type.

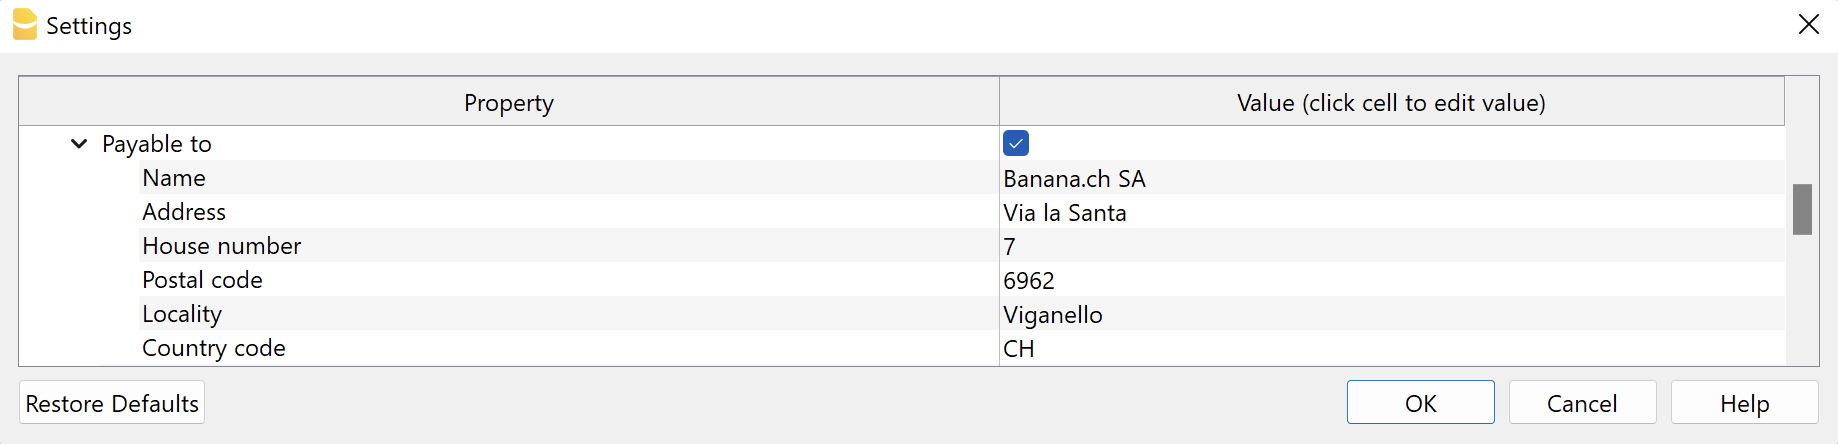
Addresses
- Address payable to
The program sets the address of the recipient of the payment using the address data in the File properties (from the File menu). In this case the address it is a combined (K) address type. - You can indicate another address, by completing the fields in the Payable to section. In this case the address it is a structured (S) address type.
- For further information please refer to the paragraph Technical information.
- Customer address type.
Select the type of address to use, structured (S) or combined (K).
For further information please refer to the paragraph Technical information.
The addresses in the "Payable to" and "Payable by" sections of the QR must always contain either the name of the organization or the first name and last name.
The name of the organization has priority over the name / last name: if it is present then the name of the organization will be entered, otherwise the name / last name will be entered.
Entering both is not possible as the rows are limited and each row must contain precise information.
The address structure is as follows:
- organization name or first / last name
- street and house number
- postal code and city
The addresses in the "Payable to" and "Payable by" sections of the QR follow the rules of the Swiss QR standard.
It is not possible to add rows or change the composition of the addresses on the QR.
Include / exclude from printing
Include additional information (XML column name )
You can enter additional invoice information to be displayed on the QR Bulletin in the 'Additional Information' section.
In the Invoice settings dialogue → QR section → Include additional information, enter the XML name of the column used from where the additional information is taken.
See how to display XML column names.
See how to add new columns.
- Integrated invoicing
In the Transactions table, add a new column where the additional information is to be entered, or use an existing column such as the Notes column.
- Estimates and Invoices application
In the Invoices table add a new column where you can enter additional information, e.g. Info.
Do not use the Notes column as this is used to display the final text of the invoice.
- Include billing information (optional).
Add automatically generated structured billing information.
If present, they are added after the additional information (see previous point). - Exclude invoice address.
Exclude the customer's billing address and leave an empty box to enter the address by hand. - Exclude invoice amount.
Exclude the invoice amount and leave an empty box to enter the amount by hand.
To be used when the customer can choose the amount to be paid.
QR section print format
- QR on separate page.
Print the payment and receipt sections of the QR-bill on a separate page.
This way there is more space for the invoice. - Separation border print.
Print a dashed separation border to separate the invoice from the payment and receipt sections. - Print scissors symbol.
Print the scissors symbol on the separating border. - QR X position and QR Y position (optional).
Change the horizontal and vertical position of the QR Code section - usually there is no need to change the default values.
Other information
- The addresses that appear on the payment and receipt sections must contain:
- Name and surname or company name (the company name has priority in case both are defined).
- Address.
- Postcode and town.
- Country code (is not on the print but is included in the QR code).
- The country code is a two-character code according to the specifications of the ISO 3166-1 standard (eg CH, LI, AT, DE, IT, FR).
- The country code of the invoice sender can be set via File → File and accounting properties → Address section, Country field.
- The customer's country code is set in the Country Code column of the Accounts table, Address view.
Technical information
In the QR Code the addresses of the issuer of the invoice and the customer can be of two types: combined or structured.
The type defines how the address data is represented within the QR code image.
Normally the combined type address (K) is used. However, in some cases it's possible to use the structured address type (S) because the bank may require it.
Regardless of the type chosen, the printing of the address on the receipt and payment section of the QR, will be the same.
- Combined address (K).
- This is used by default.
- The elements of the address are combined and inserted in maximum 4 fields of the QR code.
- The combined address is composed as follows:
- Field 1: Company name or customer name and surname (maximum 70 characters).
- Field 2: street and house number, P.O. box (maximum 70 characters).
- Field 3: postal code and city (maximum 70 characters).
- Field 4: country code (two-character code according to the specifications of the ISO 3166-1 standard).
- When printing on the invoice, the address structure is as follows:
- organization name or first / last name
- street and house number
- postal code and city
- Structured address (S).
- The address elements are divided and inserted in maximum 6 fields of the QR code.
- The structured address is composed as follows:
- Field 1: company name or customer name and surname (maximum 70 characters).
- Field 2: street and P.O. box (maximum 70 characters).
- Field 3: house number (maximum 16 characters).
- Field 4: postal code (maximum 16 characters).
- Field 5: city (maximum 35 characters).
- Field 6: country code (two-character code according to the specifications of the ISO 3166-1 standard).
- When printing on the invoice, the address structure is as follows:
- organization name or first / last name
- street and house number
- postal code and city
Here is the summary schema taken from the standard format documentation on page 35. On page 29, the details of the address sections.
Issuer address (beneficiary)
The address can be of two types:
- Combined address (K).
- The address is taken from File → File and accounting properties → Address.
- Use the Address1 field to enter the street and house number.
- In the Invoice settings, the section QR Code → Payable to must be unchecked.
- Structured address (S).
- The address is taken from the Invoice settings, section QR Code → Payable to.
- In the Invoice settings check the Payable to box and enter the address data in the fields below.
Customer address
The address can be of two types:
- Combined address (K).
- The address is taken from the Accounts table → Address view.
- Use the Street column to enter street and house number.

- In the Invoice settings, section QR Code → Customer address type, select K.
- Structured address (S).
- The address is taken from the Accounts table → Address view.
- Use the Street column to enter the street only.
- Use the Address Extra column to enter the house number (use the command Data → Columns setup to display the column if it is hidden).

- In the Invoice settings, section QR Code → Customer Address Type, select S.
Printing and sending in paper format
The QR-invoice can be printed and sent in paper format. To do so, it is necessary to use a special perforated sheet of white paper.
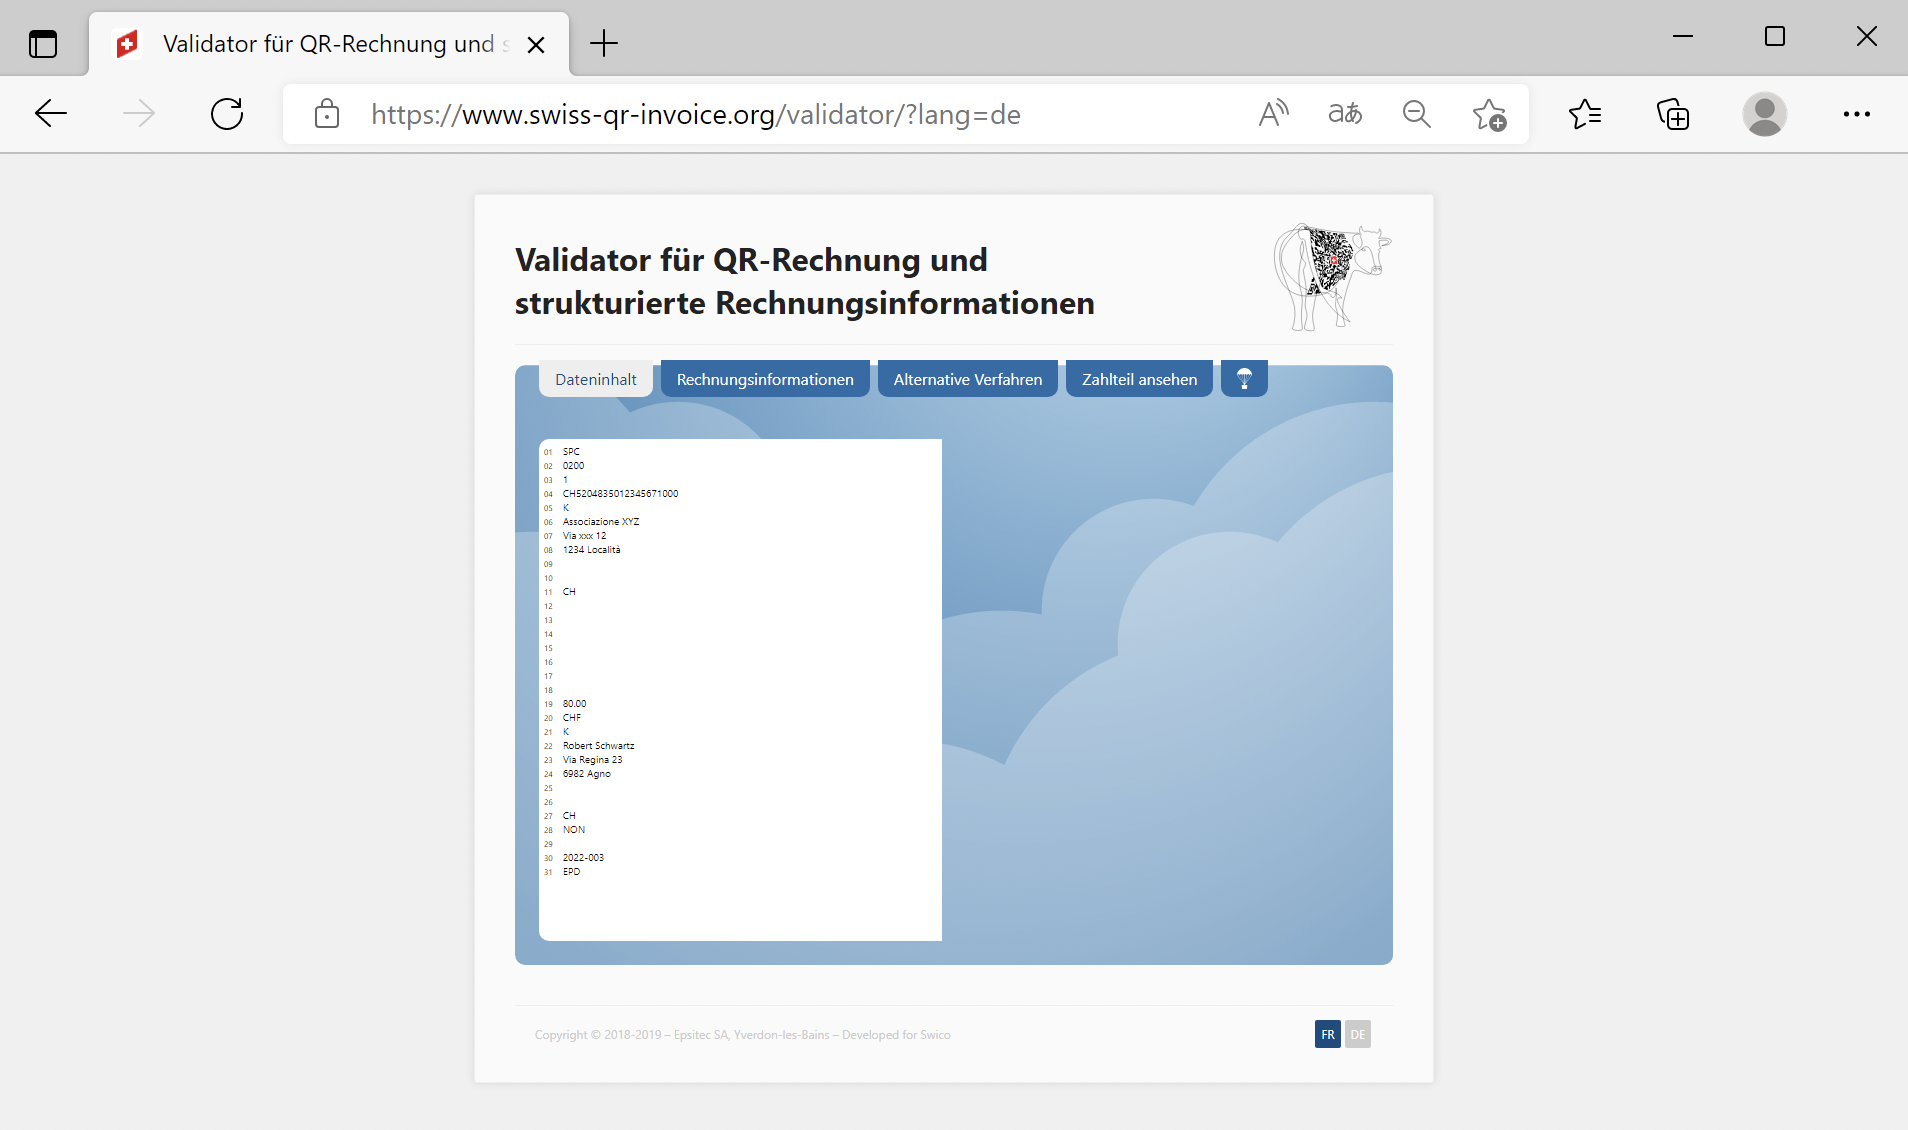
Testing QR-Code
The invoice PDFs with QR codes can be tested with the official validation page as described below:
- Create and save the QR invoice PDF.
- Visit the official validation page https://www.swiss-qr-invoice.org/validator
- Drag the PDF file to the blue area.
If the code is correct, the page will display the content of the QR code. On the other hand, if there are any problems, they will be displayed in red.
If no red messages are shown, the QR is considered correct (see example below).
QR-Invoice using a regular IBAN account
With the QR-Invoice you can use your normal IBAN account where you will receive invoice payments, which you will see on your bank statement along with all other movements.
You can use it for payments either in CHF or EUR, in Switzerland or towards Europe.
The QR policy with IBAN and Reference looks like this:

Importing payment data
Invoice payment data is contained along with all other movements in your IBAN account.
- The digital format bank statement is camt.053.
- The Bank statement extension Camt ISO 20022 (Switzerland) decodes the Creditor Reference and completes the entry with the customer account and invoice number.
- You can see paid and outstanding or partially paid invoices from the open invoice statement.
Entering the IBAN account number
You must indicate the IBAN account the first time you print invoices.
- The IBAN for an account in CHF:
- It is automatically resumed from the basic data File > File and accounting properties > Address tab IBAN account field.
- If it is not defined in the basic data, the IBAN is retrieved from the QR invoice settings, Code QR > SCOR/NON > IBAN section.
- If the IBAN code is entered both in the file properties and in the invoice settings, the one entered in the invoice settings will be used.
- The IBAN for an account in EUR:
- It is retrieved from the QR invoice settings, QR Code > SCOR/NON > IBAN EUR.
Type and IBAN setup:
- Access the QR invoice settings dialog, QR Code section
- Ensure that SCOR is selected as the QR reference type.
- Under SCOR / NON enter the IBAN of the account where you wish to receive payments.
You can use the default IBAN field or alternatively the IBAN EUR field.

IBAN is the account number where the payments will converge.
- It has the following format
- CHXX 3000 0XXX XXXX XXXX X
For a Swiss bank account it starts with "CH" - LIXX 3000 0XXX XXXX XXXX X
For a Liechtenstein bank account it starts with "LI"
- CHXX 3000 0XXX XXXX XXXX X
- It's length is of 21 characters.
The IBAN is mandatory and is provided by the bank.
Referencing (Creditor Reference)
Contains the customer's account number and invoice number and is used to automate the registering of invoice payments.
- Structured Creditor Reference (SCOR) follows the ISO 11649 standard, which allows the QR invoice to be used in International and European payment transactions (SEPA).
- The Creditor Reference is automatically generated when using the customer number and the invoice number.
- The format is RFXX XXXX XXXX XXXX:
- The Creditor Reference is an alphanumeric string, of up to 25 characters long and begins with the letters "RF".
The program automatically prepares the reference in this way:
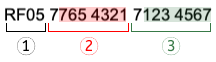
- Initial letters "RF" (1).
- After the letters, there are two control digits (calculated according to the specifications of the standard) (1).
- Follows the customer's account number of the Chart of Accounts, which receives the invoice (2).
- The first numeric character indicates the length of the account (minimum 1, maximum 7).
- The rest is the account ID of the Chart of Accounts.
It can only consist of numbers or letters of the ASCII alphabet (A-Z). It must not contain spaces, separators or other characters. These will be removed. - If the customer number is not present, a "0" is indicated.
- The invoice number follows (3).
- The first numeric character indicates the length of the invoice number (minimum 1, maximum 7).
- It can only consist of numbers or letters of the ASCII alphabet (A-Z) for a maximum length of 7 characters. It must not contain spaces, separators or other characters. If there are separators in the invoice number or else they are removed. It is therefore possible that when importing payment data, the program may not be able to match.
- If the invoice number is not present, a "0" is indicated.
QR-Invoice with IBAN and Creditor Reference number
The QR section will contain all the data necessary for payment:
- The IBAN account that will receive the payment and the name and address of the account holder.
- The reference number, with the customer's account and invoice number.
- The customer's address.
- It can be used for amounts in CHF or EUR.
| IBANIt must be entered in the File > File and accounting properties > Address section, or in the appropriate field of the invoice settings dialog. | |||
ReferenceIt is generated automatically using the customer number and the invoice number. |
QR-Invoice with IBAN, Reference and without amount
The invoice without amount is used when you want to let the customer choose the amount to be paid.
It contains the number of customer references, therefore it is possible to assign the amounts to the specific customer and hence automatically close any invoices still open.
In the printout, a box is left empty for the amount to be filled. It is used for:
- For donations where the payer freely decides the amount.
- For associations where the payer can choose different amounts.
- For several payments, always specific to the same customer.
For example rent payment. - Amounts in CHF and EUR can be indicated.
 | IBANIt must be entered in the File > File and accounting properties > Address section, or in the appropriate field of the invoice settings dialog. | |||
ReferenceIs generated automatically using the customer number and the invoice. | ||||
Without amountIn the QR Code section of the invoice settings dialogue, the option Exclude invoice amount must be selected. |
Printing without amount is not to be confused with the invoice with zero amount. If the amount is zero, it means that the customer does not have to pay anything, this way a notice is inserted on the bill indicating that the it must not be used.
QR invoice with IBAN and without Reference
QR invoice with IBAN and without reference
This method is used if you want to print bills without an invoice number and without a customer number.
Therefore it cannot be used to register payments automatically.
For the payment area in CHF (CH / FL), without reference. This replaces the current red payment slip PV.
 | IBANIt must be entered in the File > File and accounting properties > Address section, or in the appropriate field of the invoice settings dialog. | |||
|
- Reason for payment: in the QR invoice it is not possible to manually enter the payment reason, this must always be printed with the QR code.
Insert your data:
- Access dialog setup.
- Go to the QR Code section and fill in the following.
- From the QR reference type list select NON.
- Under SCOR / NON enter the IBAN.

QR-Invoice using special QR-IBAN account (ISR compatible)
The invoice system with the QR-IBAN is for those who want to have an invoicing and payment recording system that is compatible with the ISR payment slip orange (ISR) and red (IS).
- Your bank must assign you a QR-IBAN account number.
The IBAN number from the 5th number starts with 3. - In the digital bank statement (camt053) you only have the daily summary data.
- To register payments, you must download the appropriate file (Camt054).
Inserting of QR-IBAN account number
The QR-IBAN account is taken over from the QR invoice settings.
To use this QR invoice version, access the invoice settings dialog and enter your details.
- Access the dialog setup.
- Go to the QR Code section.
- Activate Print QR Code.
- From the QR reference type list select QRR.
- Under QRR insert:
- The QR-IBAN
- The Membership number.
It is communicated by your bank when it exists.
For Postfinance leave blank.

QR invoice with QR-IBAN and QR reference (QRR)
It will replace the current orange ISR payment slip and is limited to the CHF payment area in
 | QR-IBANMust be entered in the appropriate field of the invoice dialog setup of the invoice. | |||
QR referenceIt is generated using the membership number (when it exists), customer number and invoice number. |
QR-IBAN Account
- CHXX 3000 0XXX XXXX XXXX X
For a Swiss bank account it starts with "CH" - LIXX 3000 0XXX XXXX XXXX X
For a Liechtenstein bank account it starts with "LI" - The QR-IBAN is mandatory and is provided by the bank.
- The QR-IBAN contains a special code which is used to identify the financial institution (IID-QR). Numbers ranging from 30000 to 31999 are reserved for this code.
QR reference (QRR)
It contains the data that allows the precise identification of the invoice that has been collected. The QRR is returned at the moment of payment, so that the program can automatically complete the registration of the invoice that has been paid.
- XX XXXXX XXXXX XXXXX XXXXX XXXXX
- The QR reference is mandatory.
- The QR reference is structured in the same way as the PVR (27 numeric characters).
The program automatically prepares the reference in this way:
- The membership number (1).
- The maximum length allowed is of 8 digits.
- The number entered in the invoice settings is taken over.
- If it does not exist, zeros are inserted.
- There follow 3 digits always "000" (4).
- The customer number (2).
- The maximum length allowed is of 7 digits.
- It can only consist of numbers. It must not contain ASCII (A-Z) letters, spaces, separators or other characters.
- It is aligned to the right, with zeroes in front.
- Invoice number (3).
- The maximum length allowed is of 7 digits.
- It can only consist of numbers. It must not contain ASCII (A-Z) letters, spaces, separators or other characters.
- It is aligned to the right, with zeroes in front.
- The penultimate digit is always "0" (5).
- The last digit is the control digit (calculated according to the specifications of the standard) (5).
Import payment data
Using the extension Bank statement Camt ISO 20022 (Switzerland) it is possible to import and convert account statement movements into accounting movements.
The invoice data issued with the QR-IBAN are provided in a file in the camt054 format.
In the normal bank statement (camt053) there is only the sum of all the payments of the day.
Advanced invoice layout customisations
The following advanced customization features require the Advanced Banana Accounting Plus plan.
Advanced layout customisation (with programming)
The CH10 layout can be customised with specific programming.
- Programming in Javascript
- You can further customise the printout by creating functions that replace the default ones, for printing the header, addresses, details, text and footer.
- Creation of CSS styles
- You can tailor your printing even more with the creation of custom styles so that you can change the appearance of the invoice (text formatting, positioning of elements, etc.).
Creating your own print layouts
- Customisation by creating your own customised layout.
- Requires programming in Javascript.
- You can use the existing layout and modify it as desired.
Invoice customisation with JavaScript
The Banana invoice is constructed with a Javascript program. The Extension also allows you to add Javascript programming so that you can completely customize the content and format of the invoice (this functionality requires the Advanced plan).
See more about Banana Accounting API Extensions Reference.
Add your custom Javascript file
Three steps are required to define and use your Javascript file:
- Add the document table to the Banana Accounting file.
If it is not already present you need to add the Documents table in the Banana document with the menu command Tools > Add new features > Add document table. - Add a new Javascript type document to the document table.
- In the ID column enter the file name including the extension .js (e.g. "myFile.js").
If the id is missing the ".js" at the end, it won't work. - In the Description column enter a comment (optional).
- In the Attachments column, double click on the cell or select the edit symbol, then select Javascript Code and confirm with OK.
- An editor will open in which you can write the code.
- Delete everything in it.
- Insert the Javascript code. You can modify the content at any time.
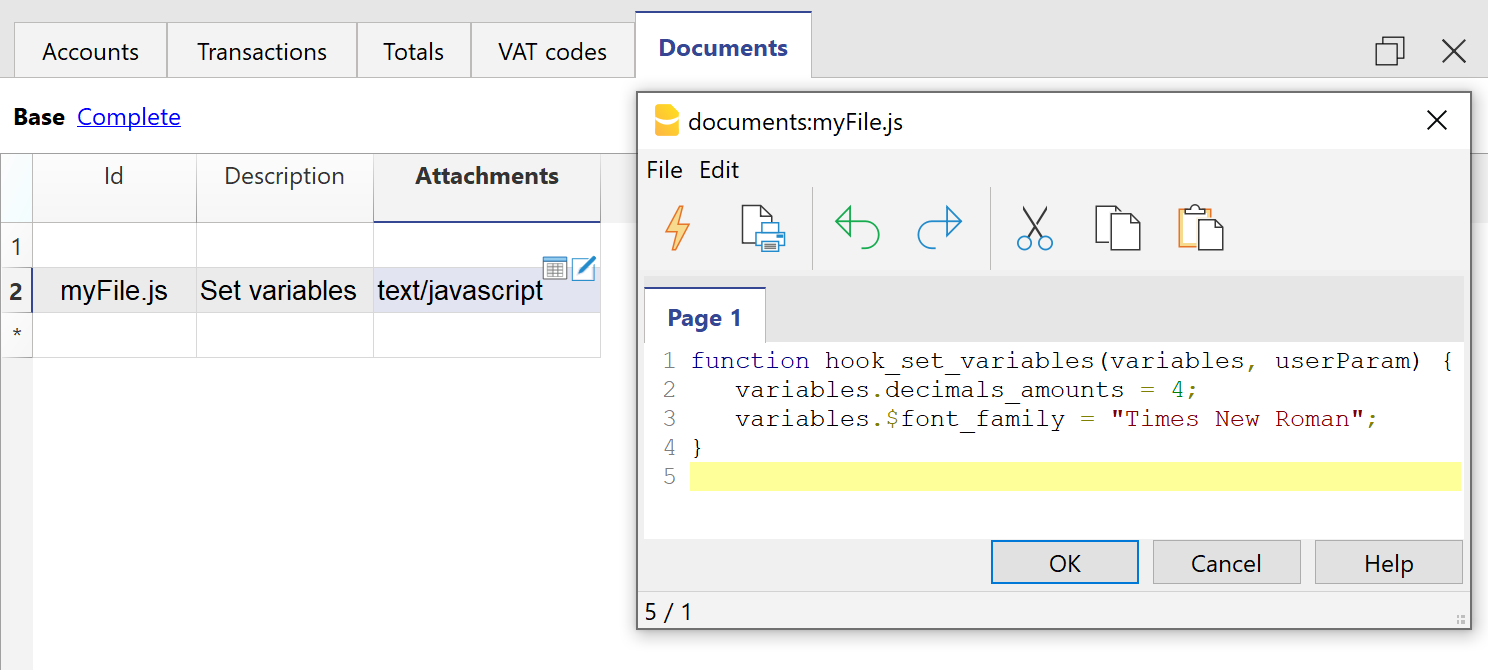
Documents table - Javascript Code attachment
- In the ID column enter the file name including the extension .js (e.g. "myFile.js").
- Tell the invoice layout to use the customized Javascript attachment file.
- Select Settings of the Print invoices dialogue.
- In the Javascript/CSS > JS file name, enter the name of the newly created Javascript attachment file with the extension ".js" at the end (e.g. "myFile.js").
- Click Ok to confirm.
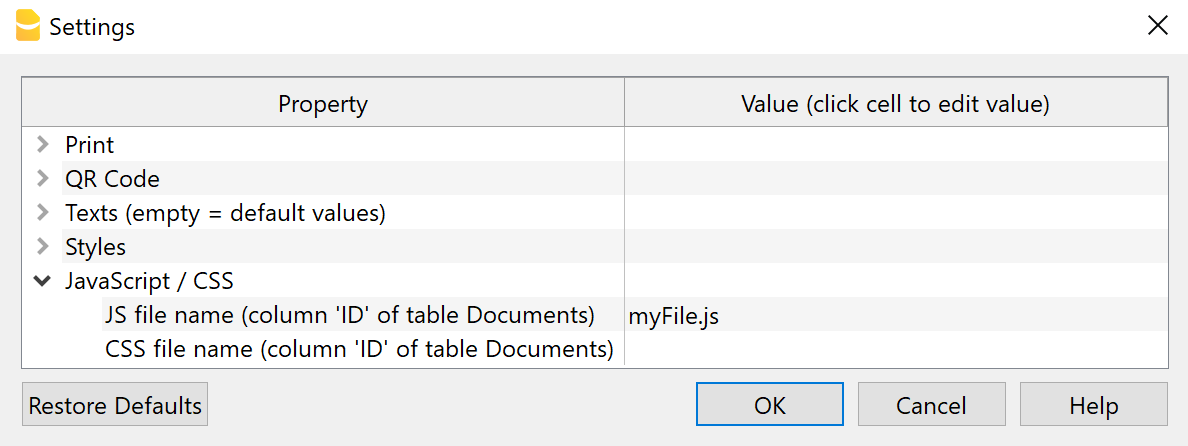
Settings Dialogue - Javascript File Property
Javascript Hook Replacement Functions
The invoice layout is created with a set of predefined Javascript functions.
The hook functions are Javascript replacements functions to be used instead of the the predefined.
The hook functions should be defined in the ".js" file of the Documents table.
- The name of the hook function is the name of the predefined function used in the layout, preceded by the text "hook_".
For example, if you want to change the header printing you have to define the hook_print_header() that will replace the predefined print_header() function.- The parameters must be the same as those used in the main function.
- If you create your own hook function, it is necessary to know how it works the function you want to replaces.
- When generating the invoice, the layout extension checks for the existence of a hook replacement function and, if available, utilizes it to substitute the predefined function.
- Hook functions let you selectively change some part of how the invoice is build, without directly modifying the original script of the invoice Layout.
Graphic explanation of the Hook functions
With the hook functions, you can customize the following sections of the invoice.
(1) hook_print_header()
Function that prints the header part of the invoice (logo and texts).
(2) hook_print_info_first_page() and hook_print_info_other_pages()
Functions that print the information parts of the invoice.
(3) hook_print_customer_address()
Function that prints the customer address part of the invoice.
(4) hook_print_shipping_address()
Function that prints the shipping address part of the invoice (in case it exists).
(5) hook_print_text_begin()
Function that prints the title and begin text parts of the invoice.
(6) hook_print_details_net_amounts() and hook_print_details_gross_amounts()
Functions that print the invoice details using net/gross amounts.
Use the hook_formatItemsValue() function to change the format and style of the items.
(7) hook_print_final_texts()
Function that prints the final texts, notes and greetings parts of the invoice, right after the invoice details.
(8) hook_print_footer()
Function that prints the footer at the bottom of the page (usable only when not printing the QR slip).
List of Hook functions
This file contains all the available hook functions with their parameters and an empty function body, that should be replaced with your implementation.
// Function used to set all the variable values used by the invoice layout script
function hook_set_variables(variables, userParam) {...}
// Function used to print the header at the top of the page (logo and text address)
function hook_print_header(repDocObj, userParam, repStyleObj, invoiceObj, texts) {...}
// Function used to print the invoice information on the first page
function hook_print_info_first_page(repDocObj, invoiceObj, texts, userParam) {...}
// Function used to print the invoice information from page 2 onward
function hook_print_info_other_pages(repDocObj, invoiceObj, texts, userParam) {...}
// Function used to print the customer address
function hook_print_customer_address(repDocObj, invoiceObj, userParam) {...}
// Function used to print the shipping address
function hook_print_shipping_address(repDocObj, invoiceObj, texts, userParam) {...}
// Function used to print the text before the invoice details (title and begin text)
function hook_print_text_begin(repDocObj, invoiceObj, texts, userParam) {...}
// Function used to print the invoice details using net amounts (VAT excluded)
function hook_print_details_net_amounts(banDoc, repDocObj, invoiceObj, texts, userParam, detailsTable, variables) {...}
// Function used to print the invoice details using gross amounts (VAT included)
function hook_print_details_gross_amounts(banDoc, repDocObj, invoiceObj, texts, userParam, detailsTable, variables) {...}
// Function used to print the text after the invoice details (notes, greetings, etc.)
function hook_print_final_texts(repDocObj, invoiceObj, userParam) {...}
// Function used to print the footer at the bottom of the page. Usable only when not printing the QR slip part.
function hook_print_footer(repDocObj, texts, userParam) {...}
// Function used to format the value and set the className of the item
function hook_formatItemsValue(value, variables, columnName, className, item) {...}
// Function used to modify the QR settings
function hook_modify_settings_qr(invoiceObj, qrcodeData) {...}
Examples of a hook functions
Within your hook function you can call the original hook function. This way you can limit the changes to the code.
For example this hook function call the original one, only in a specific case.
/**
 * This function prints the final text only for INVOICES and not for CREDIT NOTES.
 * Invoices = DocType 10
 * Credit notes = DocType 12
 */
function hook_print_final_texts(sectionClassFinalTexts, invoiceObj, userParam) {
   // We can check the DocType and print the text only when is not 12
   if (invoiceObj.document_info.doc_type !== "12") {
      print_final_texts(sectionClassFinalTexts, invoiceObj, userParam);
   }
}
Predefined variables
The predefined variables are the default used by the invoice layout script.
The variables for decimals start with "decimals_". (decimals_quantity, decimals_unit_price, decimals_amounts).
The variable that start with "$" are template variable that you can use in the CSS styles ($font_family, $font_size, $text_color, ...).
Example of an extract of the predefined CSS invoice layout.
body {
  font-family: $font_family;
  font-size: $font_size;
  color: $text_color;
}
List of all predefined variables and their default values that you can override with the hook_set_variables() function:
/* Variable that sets the decimals of the Quantity column */
variables.decimals_quantity = "";
/* Variable that sets the decimals of the Unit Price column */
variables.decimals_unit_price = 2;
/* Variable that sets the decimals of the Amount column */
variables.decimals_amounts = 2;
/* Variables that set the colors */
variables.$text_color = userParam.text_color;
variables.$background_color_details_header = userParam.background_color_details_header;
variables.$text_color_details_header = userParam.text_color_details_header;
variables.$background_color_alternate_lines = userParam.background_color_alternate_lines;
variables.$color_title_total = userParam.color_title_total;
/* Variables that set the font */
variables.$font_family = userParam.font_family;
variables.$font_size = userParam.font_size+"pt";
/* Variables that set the font size and margins of the Invoice Begin Text */
variables.$font_size_title = userParam.font_size*1.4 +"pt";
/* Variables that set font size, margins, padding and borders of the Invoice Details */
variables.$font_size_header = userParam.font_size*1.2 +"pt";
variables.$font_size_total = userParam.font_size*1.2 +"pt";
/* Variables that set the position of the invoice address
 * Default margins when the address on right: 12.3cm margin left, 4.5cm margin top
 * Default margins when the address on left: 2.2cm margin left, 5.5cm margin top
 * Sum userParam dX and dY adjustments to default values */
variables.$right_address_margin_left = parseFloat(12.3) + parseFloat(userParam.address_position_dX)+"cm";
variables.$right_address_margin_top = parseFloat(4.5) + parseFloat(userParam.address_position_dY)+"cm";
variables.$left_address_margin_left = parseFloat(2.2) + parseFloat(userParam.address_position_dX)+"cm";
variables.$left_address_margin_top = parseFloat(5.5) + parseFloat(userParam.address_position_dY)+"cm";
Example of 'hook_set_variables' function
You can overwrite the predefined variable with the hook_set_variables() function.
Only use the variable that you want to replace.
// Example of hook function usage that sets
// the decimals of the Amounts columns to 4
// the font type to Times New Roman
function hook_set_variables(variables, userParam) {
   variables.decimals_amounts = 4;
   variables.$font_family = "Times New Roman";
}
Customize invoice print with Javascript
The following examples show how to adapt invoice printing with custom JavaScript hook function codes.
See Javascript customization for more information.
Add the final text on a new page
This example shows how to add the final text on a new page of the invoice.
/**
 * This function prints the final text on a new page of the invoice.
 */
function hook_print_final_texts(repDocObj, invoiceObj, userParam) {
   // Adds a page break before printing the final text
   repDocObj.addPageBreak();
   print_final_texts(repDocObj, invoiceObj, userParam);
}
Credit Notes without final text
Final text, notes and greetings are always printed, when defined, for both invoices and credit notes document types.
You can define a document type with the Type column of the Transactions table:
- For credit notes insert the value 12.
- For invoices insert the value 10.
In this example we want to make sure that all these texts are printed only for invoices but not for credit notes.
To do that, we simply define an hook function that replaces the default print_final_texts() function.
/**
 * This function prints the final text only for INVOICES and not for CREDIT NOTES.
 * Invoices = DocType 10
 * Credit notes = DocType 12
 */
function hook_print_final_texts(repDocObj, invoiceObj, userParam) {
   // We can check the DocType and print the text only when is not 12
   if (invoiceObj.document_info.doc_type !== "12") {
      print_final_texts(repDocObj, invoiceObj, userParam);
   }
}
With this change the final text, notes and greetings are now printed only for invoices, and not for credit notes anymore.
Add information "Invoice paid" to the final text
This example shows how to add the information "Invoice paid" to the final text, when the invoice is paid.
/**
 * This function prints the text "Invoice paid" on paid invoices.
 */
function hook_print_final_texts(repDocObj, invoiceObj, userParam) {
   if (invoiceObj.payment_info && invoiceObj.payment_info.payment_date) {
      var paragraph = repDocObj.addParagraph("","final_texts");
      paragraph.addText("Invoice paid on " + Banana.Converter.toLocaleDateFormat(invoiceObj.payment_info.payment_date));
      // [Optionally] Add a signature
      repDocObj.addImage("documents:sign.jpg", "6cm", "auto");
   }
}
Add a custom table as final text
This example shows how to add a custom table in the final texts of the invoice.
The table consists of 2 columns and three rows:
- Row 1: the header of the table. Contains the titles of the columns (Description and Amount).
- Row 2: the first data row of the table.
- Row 3: the second data row of the table.
To do that, we simply define an hook function that replaces the default print_final_texts() function.
/**
 * This function adds at the end of the invoice a table with a custom text.
 */
function hook_print_final_texts(repDocObj, invoiceObj, userParam) {
   print_final_texts(repDocObj, invoiceObj, userParam);
   // Add a table
   var mytable = repDocObj.addTable("MyTable");
   var tableRow;

   // Row 1: the header of the table, columns titles
   var header = mytable.getHeader();
   tableRow = header.addRow();
   tableRow.addCell("Description").setStyleAttributes("text-align:left; font-weight:bold; border:thin solid black;");
   tableRow.addCell("Amount").setStyleAttributes("text-align:left; font-weight:bold; border:thin solid black;");
   // Row 2: first data row of the table
   tableRow = mytable.addRow();
   tableRow.addCell("Workshop").setStyleAttributes("text-align:left; border:thin solid black;");
   tableRow.addCell("2'600.00").setStyleAttributes("text-align:right; border:thin solid black;");
   // Row 3: second data row of the table
   tableRow = mytable.addRow();
   tableRow.addCell("Material").setStyleAttributes("text-align:left; border:thin solid black;");
   tableRow.addCell("76.00").setStyleAttributes("text-align:right; border:thin solid black;");

   //...
}
You can easily add as many columns and rows as you like.
Use the setStyleAttributes() to apply CSS styles, like text-align, font-weight, color, border, ... Find more information on Syntax of a CSS stylesheet.
Find more examples in Working with Report Tables.
Example print: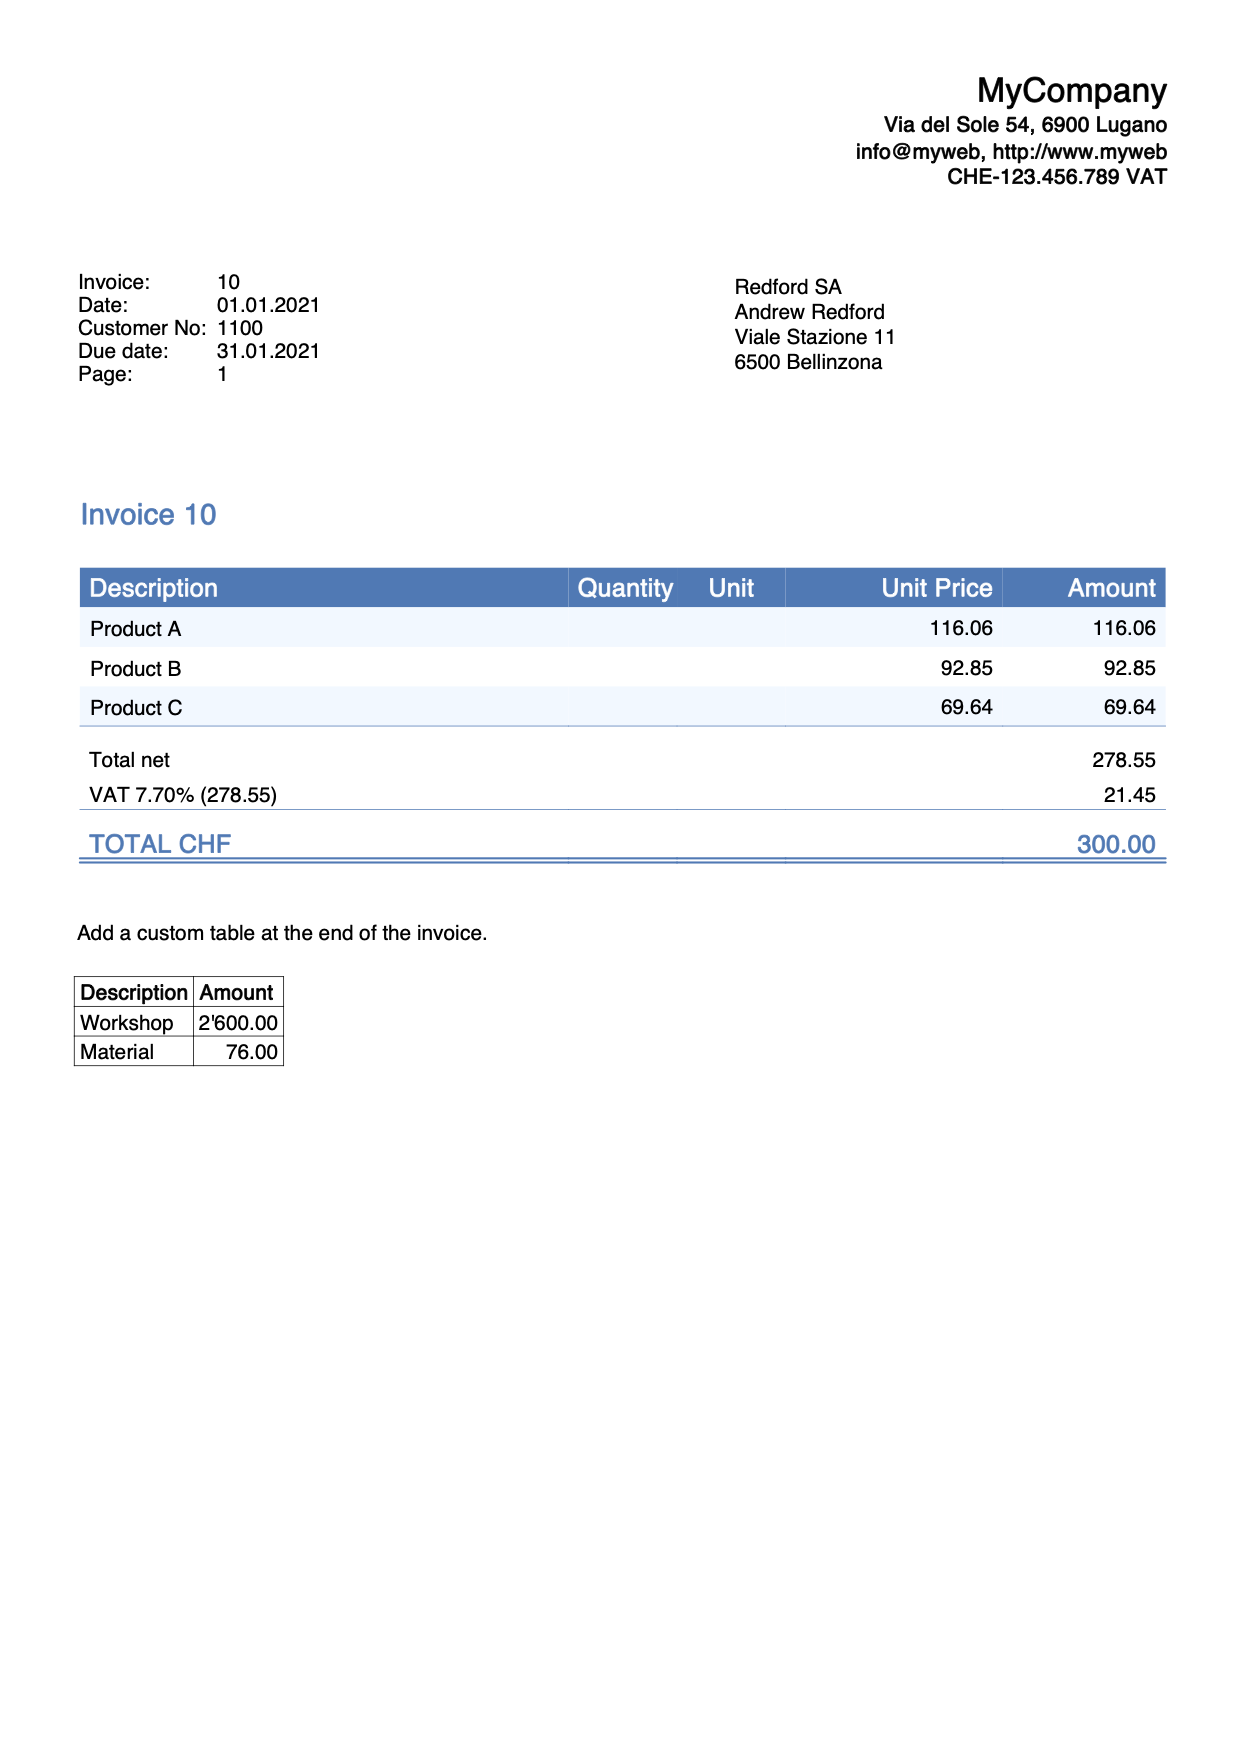
Add a custom table as final text with bank details
This example shows how to add a custom table in the final texts of the invoice with the bank details for the payment.
The table consists of 2 columns and 6 rows:
- Row 1: for the beneficiary data.
- Row 2-3-4: for the bank name and address.
- Row 5: for the IBAN code.
- Row 6: for the Swift code.
To do that, we simply define an hook function that replaces the default print_final_texts() function.
/**
 * This function adds at the end of the invoice a table with bank detais for the payment.
 */
function hook_print_final_texts(repDocObj, invoiceObj, userParam) {
   print_final_texts(repDocObj, invoiceObj, userParam);
   // Add a table
   var mytable = repDocObj.addTable("MyTable");
   var tableRow;
   // Row 1
   tableRow = mytable.addRow();
   tableRow.addCell("Beneficiary:").setStyleAttributes("text-align:left;padding-left:1px;");
   tableRow.addCell("BENEFICIARY NAME, ADDRESS, ZIP LOCALITY, COUNTRY").setStyleAttributes("text-align:left;padding-left:1px;");

   // Row 2
   tableRow = mytable.addRow();
   tableRow.addCell("Bank: ").setStyleAttributes("text-align:left;padding-left:1px;");
   tableRow.addCell("BANK NAME").setStyleAttributes("text-align:left;padding-left:1px;");
   // Row 3
   tableRow = mytable.addRow();
   tableRow.addCell("").setStyleAttributes("text-align:left;padding-left:1px;");
   tableRow.addCell("ADDRESS").setStyleAttributes("text-align:left;padding-left:1px;");
   // Row 4
   tableRow = mytable.addRow();
   tableRow.addCell("").setStyleAttributes("text-align:left;padding-left:1px;");
   tableRow.addCell("ZIP LOCALITY").setStyleAttributes("text-align:left;padding-left:1px;");
   // Row 5
   tableRow = mytable.addRow();
   tableRow.addCell("IBAN: ").setStyleAttributes("text-align:left;padding-left:1px;");
   tableRow.addCell("CHXX XXXX XXXX XXXX XXXX X").setStyleAttributes("text-align:left;padding-left:1px;");
   // Row 6
   tableRow = mytable.addRow();
   tableRow.addCell("Swift:").setStyleAttributes("text-align:left;padding-left:1px;");
   tableRow.addCell("AAAABBCCXXX").setStyleAttributes("text-align:left;padding-left:1px;");

   //...
}
You can easily add as many columns and rows as you like.
Use the setStyleAttributes() to apply CSS styles, like text-align, font-weight, color, border, ... Find more information on Syntax of a CSS stylesheet.
Example print: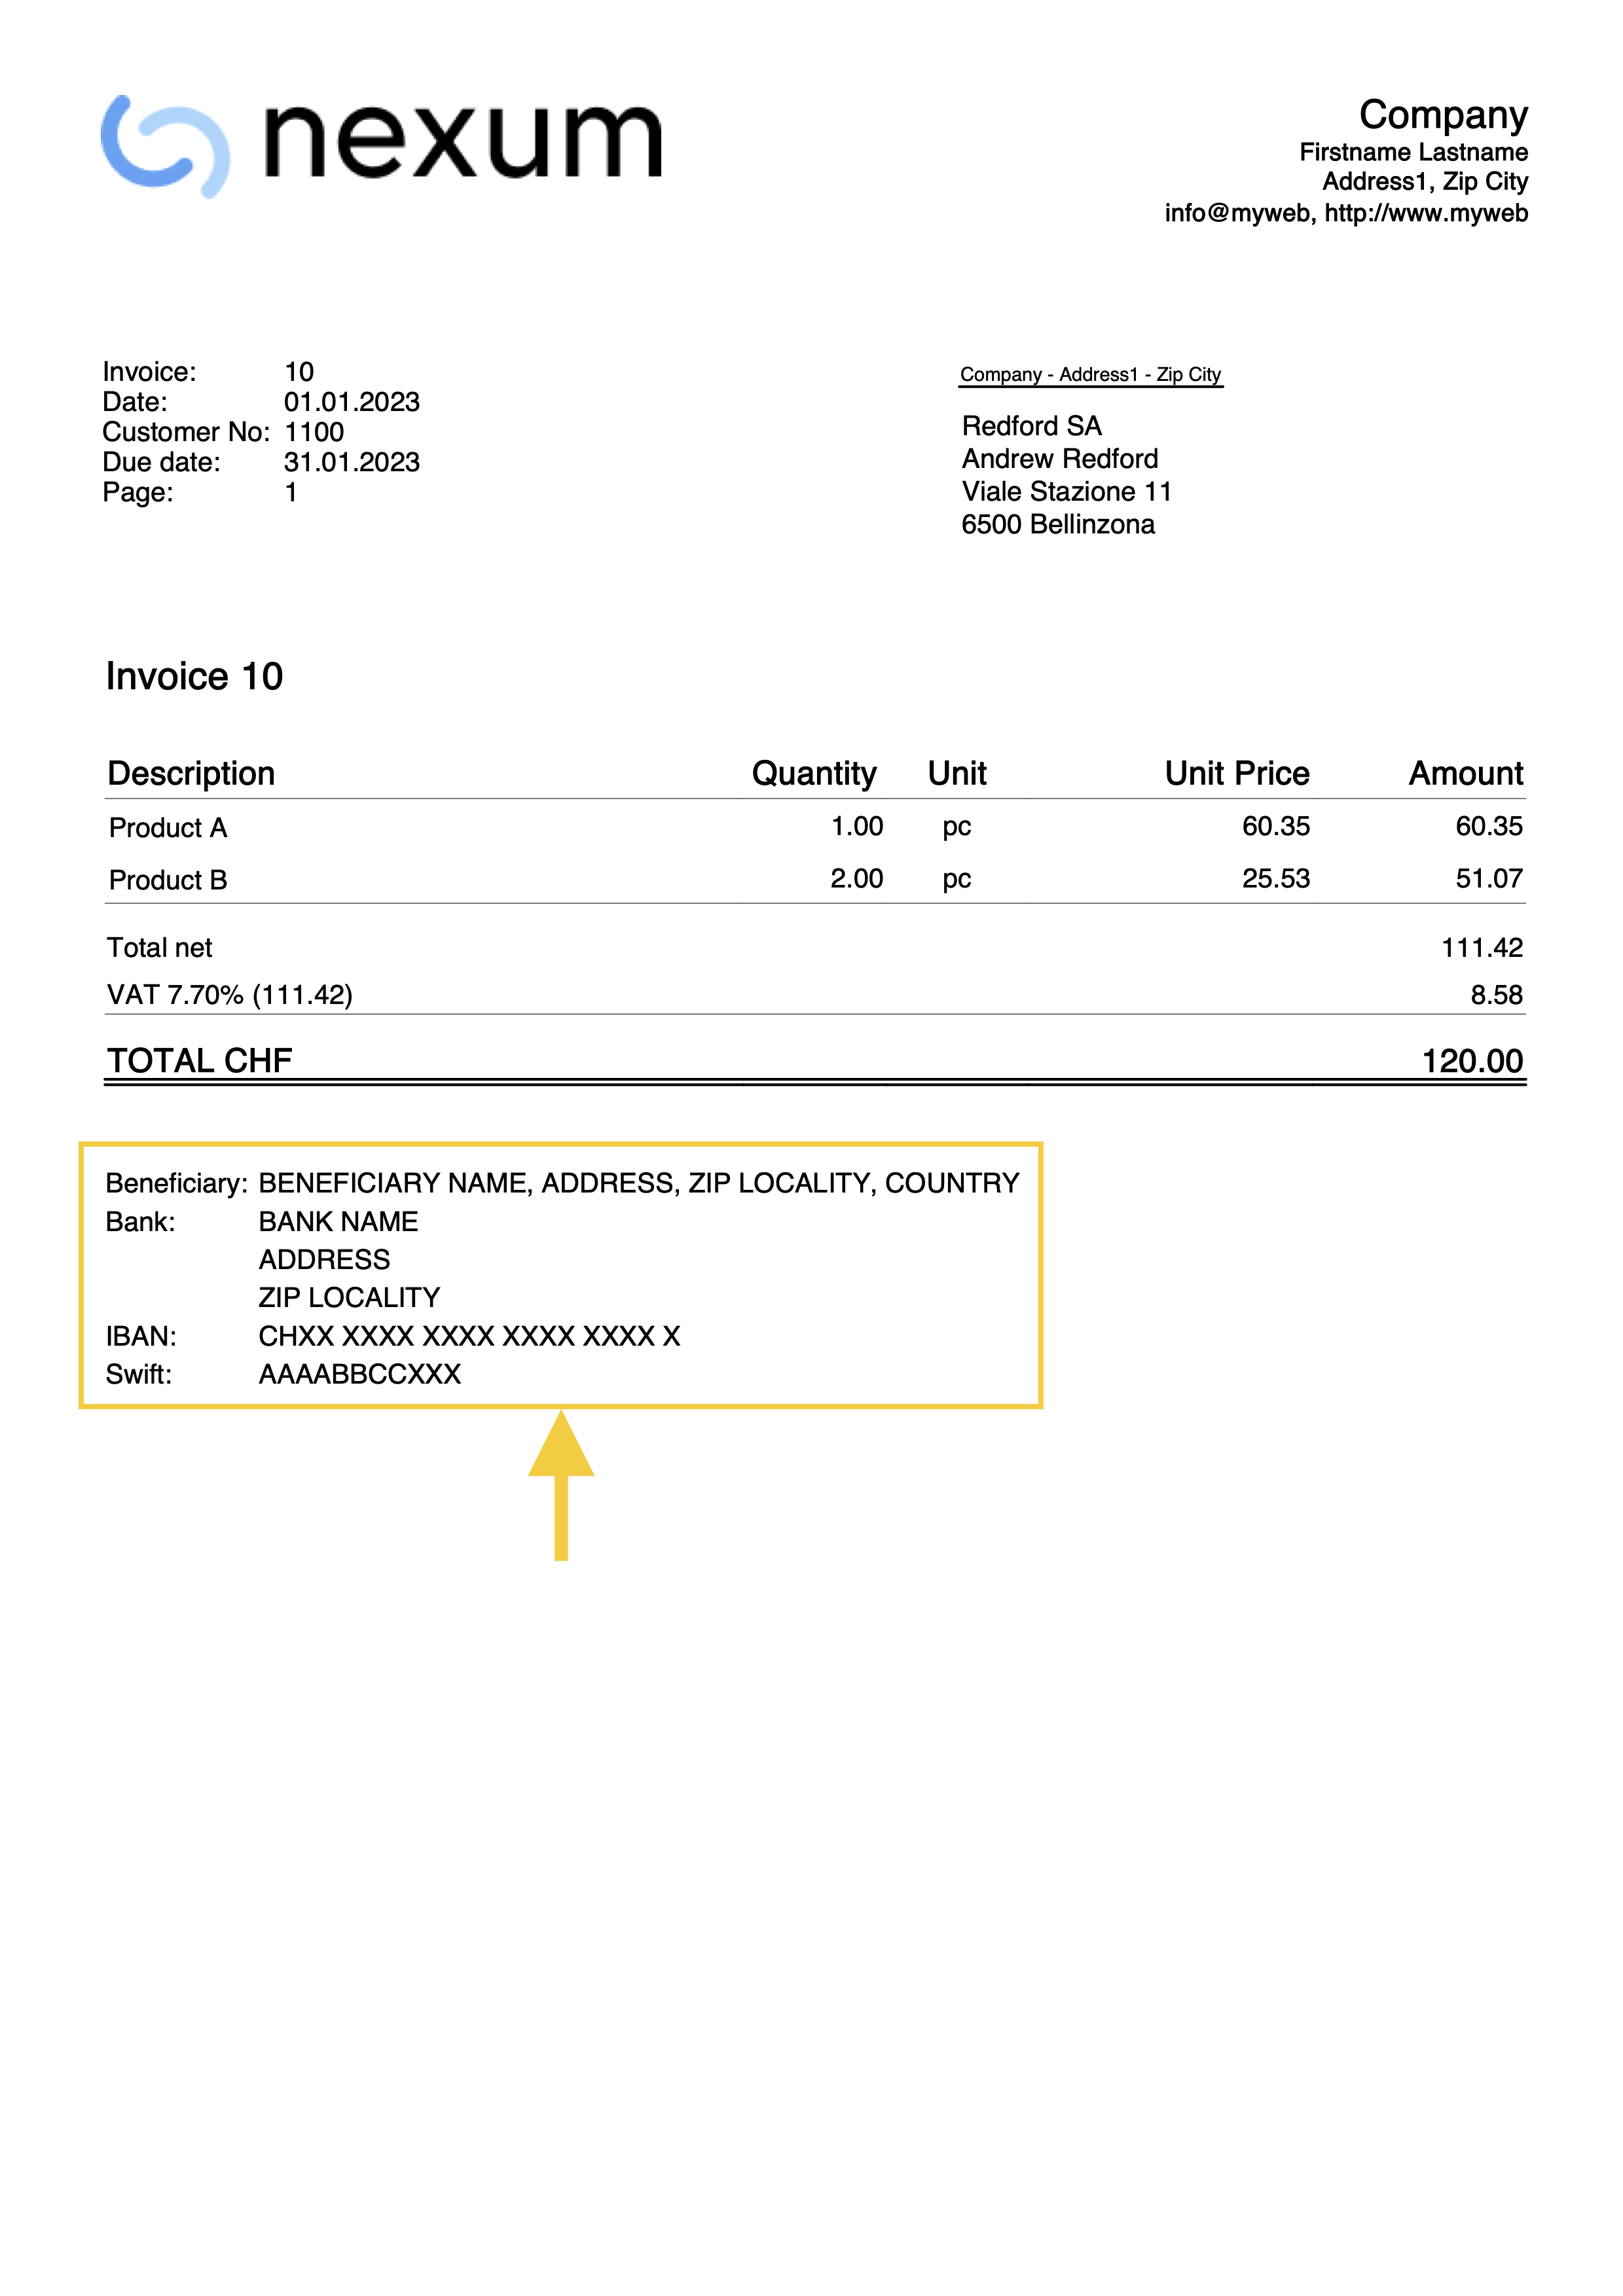
Add a custom table with text translation
This example shows how to add a custom table in the final texts of the invoice with text translations for different languages.
The table consists of 2 columns and three rows:
- Row 1: the header of the table. Contains the titles of the columns (Description and Amount).
- Row 2: the first data row of the table.
- Row 3: the second data row of the table.
To do that, we simply define an hook function that replaces the default print_final_texts() function.
/**
 * This function adds at the end of the invoice a table with a custom text.
 * The text is translated in different languages.
 * We use the text in the language of the invoice.
 */
function hook_print_final_texts(repDocObj, invoiceObj, userParam) {
   // Define the texts for all languages you need (en, de, fr, it, nl, pt, zh, es, ...)
   // Check the language of the invoice to use the appropriate text translation
   if (lang === "de") {
      var text1 = "Beschreibung";
      var text2 = "Betrag";
      var text3 = "Werkstatt";
      var text4 = "2'600.00";
      var text5 = "Material";
      var text6 = "76.00";
   }
   else if (lang === "it") {
      var text1 = "Descrizione";
      var text2 = "Importo";
      var text3 = "Officina";
      var text4 = "2'600.00";
      var text5 = "Materiale";
      var text6 = "76.00";
   }
   else {
      var text1 = "Description";
      var text2 = "Amount";
      var text3 = "Workshop";
      var text4 = "2'600.00";
      var text5 = "Material";
      var text6 = "76.00";
   }
   // Add a table
   var mytable = repDocObj.addTable("MyTable");
   var tableRow;

   // Row 1: the header of the table, columns titles
   var header = mytable.getHeader();
   tableRow = header.addRow();
   tableRow.addCell(text1).setStyleAttributes("text-align:left; font-weight:bold; border:thin solid black;");
   tableRow.addCell(text2).setStyleAttributes("text-align:left; font-weight:bold; border:thin solid black;");
   // Row 2: first data row of the table
   tableRow = mytable.addRow();
   tableRow.addCell(text3).setStyleAttributes("text-align:left; border:thin solid black;");
   tableRow.addCell(text4).setStyleAttributes("text-align:right; border:thin solid black;");
   // Row 3: second data row of the table
   tableRow = mytable.addRow();
   tableRow.addCell(text5).setStyleAttributes("text-align:left; border:thin solid black;");
   tableRow.addCell(text6).setStyleAttributes("text-align:right; border:thin solid black;");
}
You can easily add as many columns and rows as you like.
Use the setStyleAttributes() to apply CSS styles, like text-align, font-weight, color, border, ... Find more information on Syntax of a CSS stylesheet.
Find more examples in Working with Report Tables.
Use a very long begin text
When you insert a begin text between the title and details of the invoice, the text is usually quite short. The printing of the invoice is designed for a begin text that is not too long. However, if the text you want to insert is very long (for example, even a page or more), it may not be printed correctly on the invoice, and some parts may be missing. To solve this problem, it is necessary to adapt the part of the script that deals with printing the begin text.
In the example below, we define the hook_print_text_begin() function that replaces the default print_text_begin() function. This function allows to print very long begin texts. While the original function adds all the text in one table cell (and when it gets too big it can cause problems), this version instead adds one row to the table for each row of text (a side effect is that the space between rows increases slightly).
function hook_print_text_begin(repDocObj, invoiceObj, texts, userParam) {
  var textTitle = getTitle(invoiceObj, texts, userParam);
  var textBegin = invoiceObj.document_info.text_begin ||
                    (invoiceObj.document_info.doc_type === "17" ? userParam[lang+'_text_begin_offer'] : userParam[lang+'_text_begin']) ||
                    '';
  var table = repDocObj.addTable("begin_text_table");
  if (textTitle) {
    var titleCell = table.addRow().addCell("", "", 1);
    titleCell.addParagraph(textTitle.replace(/<DocInvoice>/g, invoiceObj.document_info.number.trim()), "title_text");
  }
  var textBeginLines = textBegin.split('\n');
  textBeginLines.forEach(line => {
    var textCell = table.addRow().addCell("", "begin_text", 1);
    addMdBoldText(textCell, columnNamesToValues(invoiceObj, line.trim() || " "));
  });
}
Use different long begin texts
This example allows you to define and use different begin texts in order to customize the estimates and invoices.
You can define your begin texts using the Documents table:
- First you must define the hook function that replaces the default print_text_begin().
- In the ID column enter the name of the javascript file with the extension .js at the end (e.g., "myFile.js").
- In the Attachments column, double click on the cell or select the edit symbol, then select Javascript Code and confirm with OK.
- Copy and paste the Javascript code included below.
- In the invoice layout settings, at the bottom, section JS file name (column ID in the document table), enter the id name of the javascript file from the Documents table (e.g., "myFile.js").
- Next you can create the documents you want to include.
- To include a normal text file
- In the ID column enter a name as you want.
- In the Attachments column, select text/plain type. An editor will open in which you can write your text.
- To include a markdown file
- In the ID column enter the name of the file with the extension .md at the end (e.g., "file2.md").
- In the Attachments column, select text/markdown type. An editor will open in which you can write your text.
- To include an html file
- In the ID column enter the name of the file with the extension .html at the end (e.g., "file3.html").
- In the Attachments column, select text/html type. An editor will open in which you can write your text.
- To include a normal text file
To use your texts when creating the estimate or invoice:
- In the Begin Text field of the estimate/invoice, on a new line enter the text "{{include document:<file>}}" where "<file>" is the ID of the attachment text defined in Documents table (e.g., "{{include document:file1}}", "{{include document:file2.md}}", "{{include document:file3.html}}").
You can add a page break somewhere in the text:
- In the Begin Text field of the estimate/invoice, on a new line enter the "{{page-break}}" text.
Here are some examples:
- Example 1: Include the content of the file1 defined in Documents table and a page break right after. In the Begin Text field of the estimate/invoice enter the following text:
{{include document:file1}}
{{page-break}} - Example 2: Include the content of the file1 defined in Documents table, then add a page break, then include the content of the file2 defined in Documents table, then add a page break, then include the content of the file3 defined in Documents table, then add a final page break.
{{include document:file1}}
{{page-break}}
{{include document:file2.md}}
{{page-break}}
{{include document:file3.html}}
{{page-break}} - Example 3: Combine the text written in the Begin Text field of the estimates/invoices with a text defined in Documents table.
"This is a begin text:"
{{include document:file1}} - Example 4: Simply add a page break after the begin text in the Begin Text filed of the estimates/invoices.
"This is a begin text"
{{page-break}}
Add your custom Javascript file using the following Javascript hook_print_text_begin function code:
function hook_print_text_begin(repDocObj, invoiceObj, texts, userParam) {
    var textTitle = getTitle(invoiceObj, texts, userParam);
    var textBegin = invoiceObj.document_info.text_begin || userParam[lang + '_text_begin'] || (invoiceObj.document_info.doc_type === "17" ? userParam[lang + '_text_begin_offer'] : '');
    var section = repDocObj.addSection();
    section.setStyleAttributes("margin-bottom: 1.0cm;");
    if (textTitle) {
        section.addParagraph(textTitle.replace(/<DocInvoice>/g, invoiceObj.document_info.number.trim()), "title_text");
    }
    var textBeginLines = textBegin.split('\n');
    textBeginLines.forEach(line => {
        line = line.trim();
        var paragraph = section.addParagraph("", "");
        if (line === "{{page-break}}") {
            section.addPageBreak();
        } else if (line.includes("{{include document:")) {
            var file = extractFileName(line);
            var text = getEmbeddedTextFile(file);
            if (file.includes(".md")) {
                paragraph.addStructuredText(text || " ", "md", "");
            } else if (file.includes(".html")) {
                paragraph.addStructuredText(text || " ", "html", "");
            } else {
                addMdBoldText(paragraph, columnNamesToValues(invoiceObj, text || " "));
            }
        } else {
            addMdBoldText(paragraph, columnNamesToValues(invoiceObj, line || " "));
        }
    });
}
function extractFileName(inputString) {
    var match = inputString.match(/document:(.*?)\}\}/);
    return match ? match[1] : "";
}
function getEmbeddedTextFile(file) {
    var documentsTable = Banana.document.table("Documents");
    if (!documentsTable) return "";

    for (var i = 0; i < documentsTable.rowCount; i++) {
        var tRow = documentsTable.row(i);
        if (tRow.value("RowId") === file) {
            return tRow.value("Attachments");
        }
    }
    return "";
}
Add a begin text with Markdown
This example for the Estimates and Invoice application, shows how to add a begin text of the invoice/estimate using the Markdown (requires Banana+ Dev Channel).
- Enter the markdown text from the Invoice dialog > Section (1) Information and Free Texts > Begin text.
- Define the hook function that replaces the default print_text_begin() function.
/**
* This function adds the begin text as Markdown
* Works with the Estimate and Invoice Application
*/
function hook_print_text_begin(repDocObj, invoiceObj, texts, userParam) {
  var textTitle = getTitle(invoiceObj, texts, userParam);
  var textBegin = invoiceObj.document_info.text_begin;
  var table = repDocObj.addTable("begin_text_table");
  if (textTitle) {
    textTitle = textTitle.replace("<DocInvoice>", invoiceObj.document_info.number);
    var tableRow = table.addRow();
    var titleCell = tableRow.addCell("","",1);
    titleCell.addParagraph(textTitle, "title_text");
  }
  if (textBegin) {
    var tableRow = table.addRow();
    var textCell = tableRow.addCell("","begin_text",1);
    textCell.addStructuredText(textBegin, "md", "");
  }
}
Add a final text with Markdown
This example for the Estimates and Invoice application, shows how to add a final text of the invoice/estimate using the Markdown (requires Banana+ Dev Channel).
- Enter the markdown text from the Invoice dialog > Section (1) Information and Free Texts > End text.
- Define the hook function that replaces the default print_final_texts() function.
/**
* This function adds the final text as Markdown
* Works with the Estimate and Invoice Application
*/
function hook_print_final_texts(repDocObj, invoiceObj, userParam) {
  if (invoiceObj.note.length > 0) {
    for (var i = 0; i < invoiceObj.note.length; i++) {
      if (invoiceObj.note[i].description) {
        var text = invoiceObj.note[i].description;
        var paragraph = repDocObj.addParagraph("","final_texts");
        paragraph.addStructuredText(text, "md", "");
      }
    }
  }
}
First page without page number
Normally the page number is printed on each page of the invoice in the information section.
In this example we want to make sure that the page number is not printed on the first page of the invoice.
To do that, we simply define an hook function that replaces the default print_info_first_page() function.
/**
* This function do not prints the PAGE NUMBER on first page
*/
function hook_print_info_first_page(repDocObj, invoiceObj, texts, userParam) {
   // Save the existing settings
   var originalInfoPage = userParam.info_page;
   // Set not to print the info_page
   userParam.info_page = false;
   // call the original function
   print_info_first_page(repDocObj, invoiceObj, texts, userParam);
   // Restore original values
   userParam.info_page = originalInfoPage ;
}
With this change the page number is now printed only from page two and above.
Add an additional image
In case you want to add an additional image in any section of the invoice, you can do it using the Documents table.
- Add a new image to the Documents table.
- In the ID column enter the file name (e.g. "myImage").
- In the Description column enter a comment (optional).
- In the Attachments column, double click on the cell or select the edit symbol, then select Image and comfirm with Ok.
- Select the image you want to use and confirm.
- Use javascript code to add the image in the hook function of the invoice section you want.
- The code addImage("documents:<id_value>", "<width>", "<height>") allows to add the image to the ReportElement.
- <id_value> the value of the ID column of the Documents table (e.g. "myImage").
- <width> you can adjust the width of the image.
- <height> you can adjust the height of the image.
Let's suppose for example that we want to add an image in the final text section, after the invoice details.
To do that, we simply define an hook function that replaces the default print_final_texts() function.
/*
 * This function adds an image in the final texts section
 */
function hook_print_final_texts(repDocObj, invoiceObj, userParam) {

  //Print final texts
  print_final_texts(repDocObj, invoiceObj, userParam);
  //Add an image of the table Documents at the end
  repDocObj.addImage("documents:myImage", "100%", "auto");
}
With this change, the image is printed at the end of the invoice.
Add additional notes based on quantity
Suppose you have an additional column called "AdditionalNotes", and you want to add a different text to this column depending on the quantity of the item.
For example, for quantities greater than 10 you want to add the text "Special price" in the "AdditionalNotes" column of the print, and you want to do it automatically without entering by hand the text on each invoice.
To do that, we define an hook function that replaces the default formatItemsValue() function.
function hook_formatItemsValue(value, columnName, className, item) {
  var itemFormatted = {};
  itemFormatted.value = "";
  itemFormatted.className = "";
  if (columnName === "additionalnotes") {
    if (item.quantity > 10) {
        itemFormatted.value = "Special price";
        itemFormatted.className = className;
    }
  }
  //If not used it must always return undefined
  return itemFormatted;
}
The itemFormatted object has two properties:
- value is the value of the column that is printed in the invoice.
- className is the name of the class in the CSS file.
With this, when you create the invoice all the items with the quantity greater than 10 have an additional text in the "AdditionalNotes" column. For all the others it remains empty.
Example print: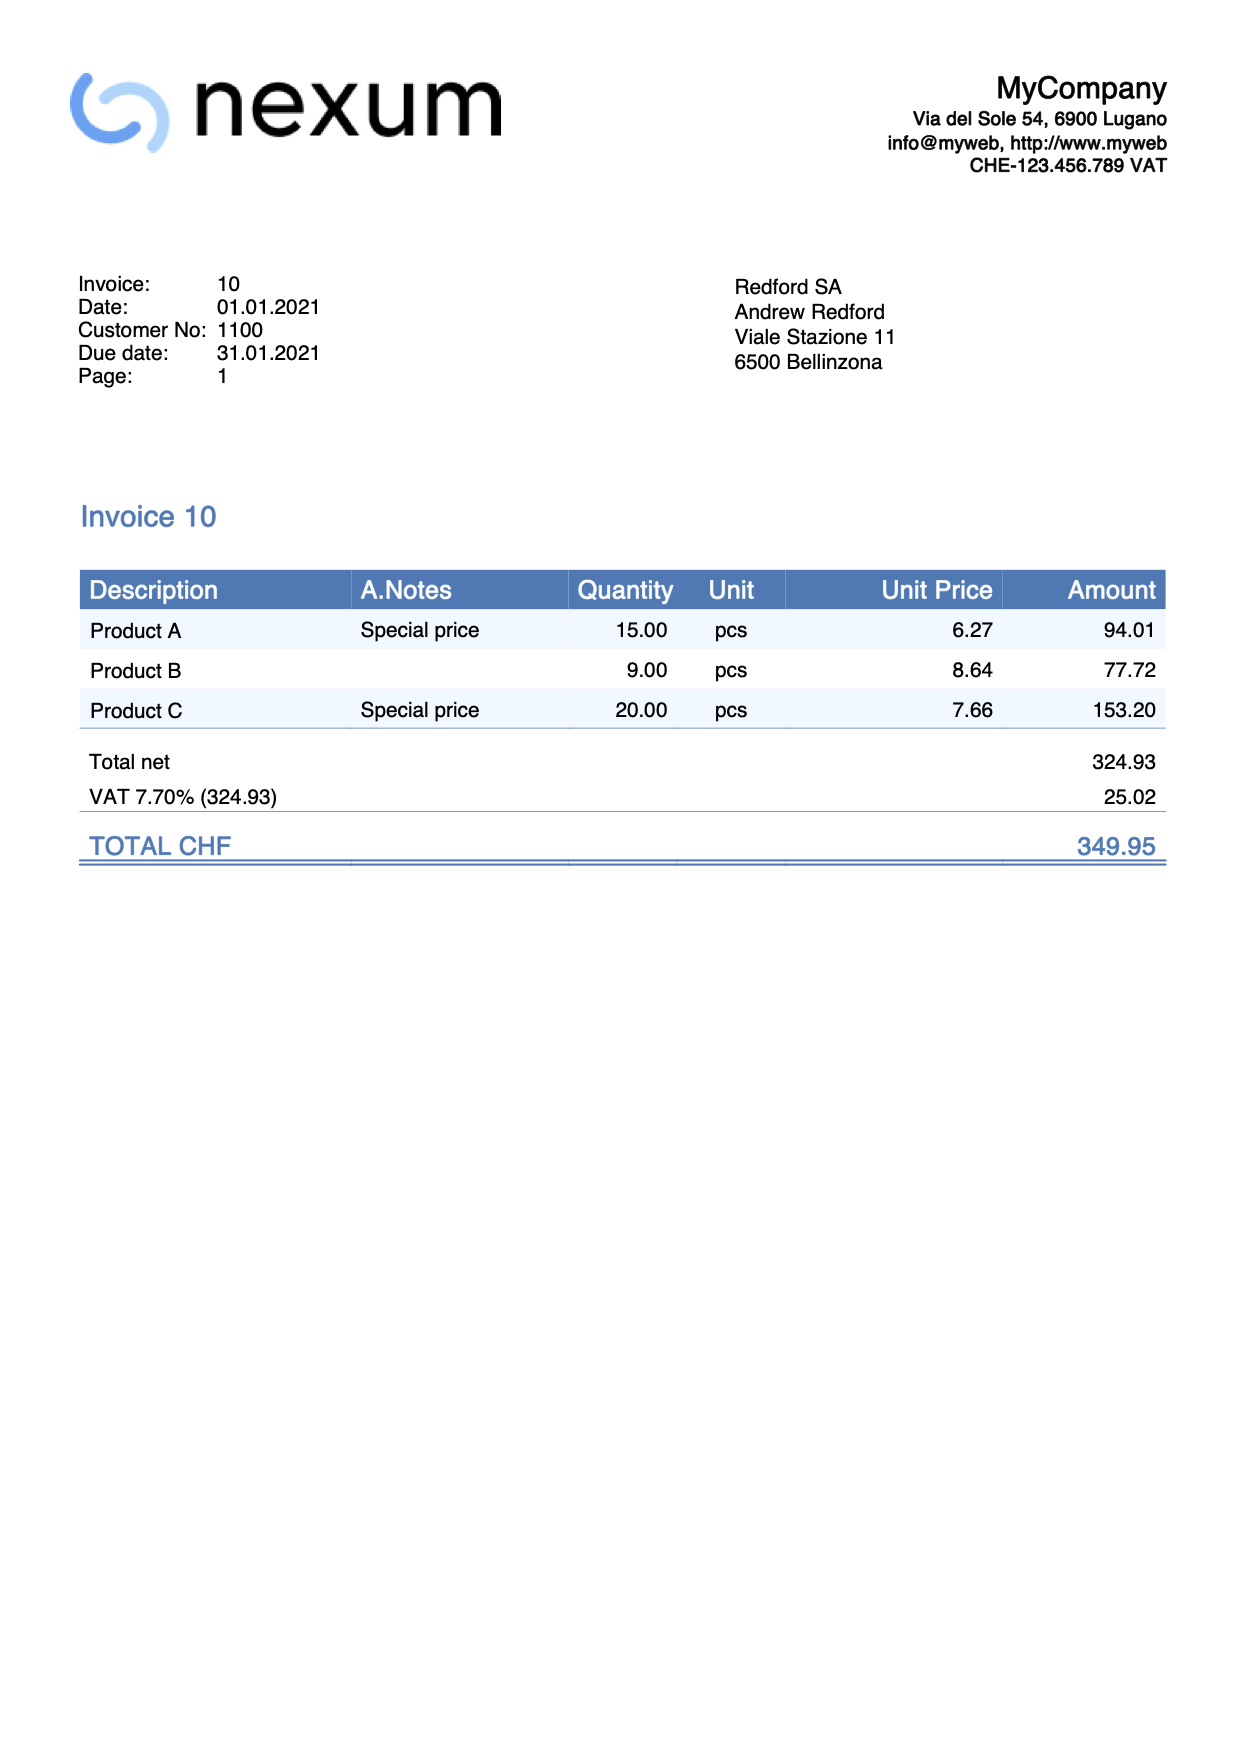
Use macros to add texts
Suppose you want to add a different text to the Description column of the invoice print depending on the item, and you want to do it automatically without entering by hand the text on each invoice.
You could for example associate the desired text to macros, add the macros in the Description column of the Transactions table, and then replace these macros with the acutal text.
To do that:
- Define the macro name and the text associated to it. For example, we want to associate the text "Special offer!" to the macro called "#macro1".
- Add the "#macro1" text to the Description column of the Transaction table for all the items we want to add the "Special offer" text.
- Define an hook function that replaces the default formatItemsValue() function. This automatically replaces "#macro1“ with "Special offer!".
function hook_formatItemsValue(value, columnName, className, item) {
  var itemFormatted = {};
  itemFormatted.value = "";
  itemFormatted.className = "";
  if (columnName === "description") {
    if (value && value.indexOf("#macro1") > -1) {
       itemFormatted.value = value.replace("#macro1","\nSpecial offer!");
       itemFormatted.className = className;
    }
  }
  return itemFormatted;
}
The itemFormatted object has two properties:
- value is the value of the column that is printed in the invoice.
- className is the name of the class in the CSS file.
With this, when you create the invoice, the “#macro1“ text contained in the items description are replaced with the "Special offer!" text.
Example print: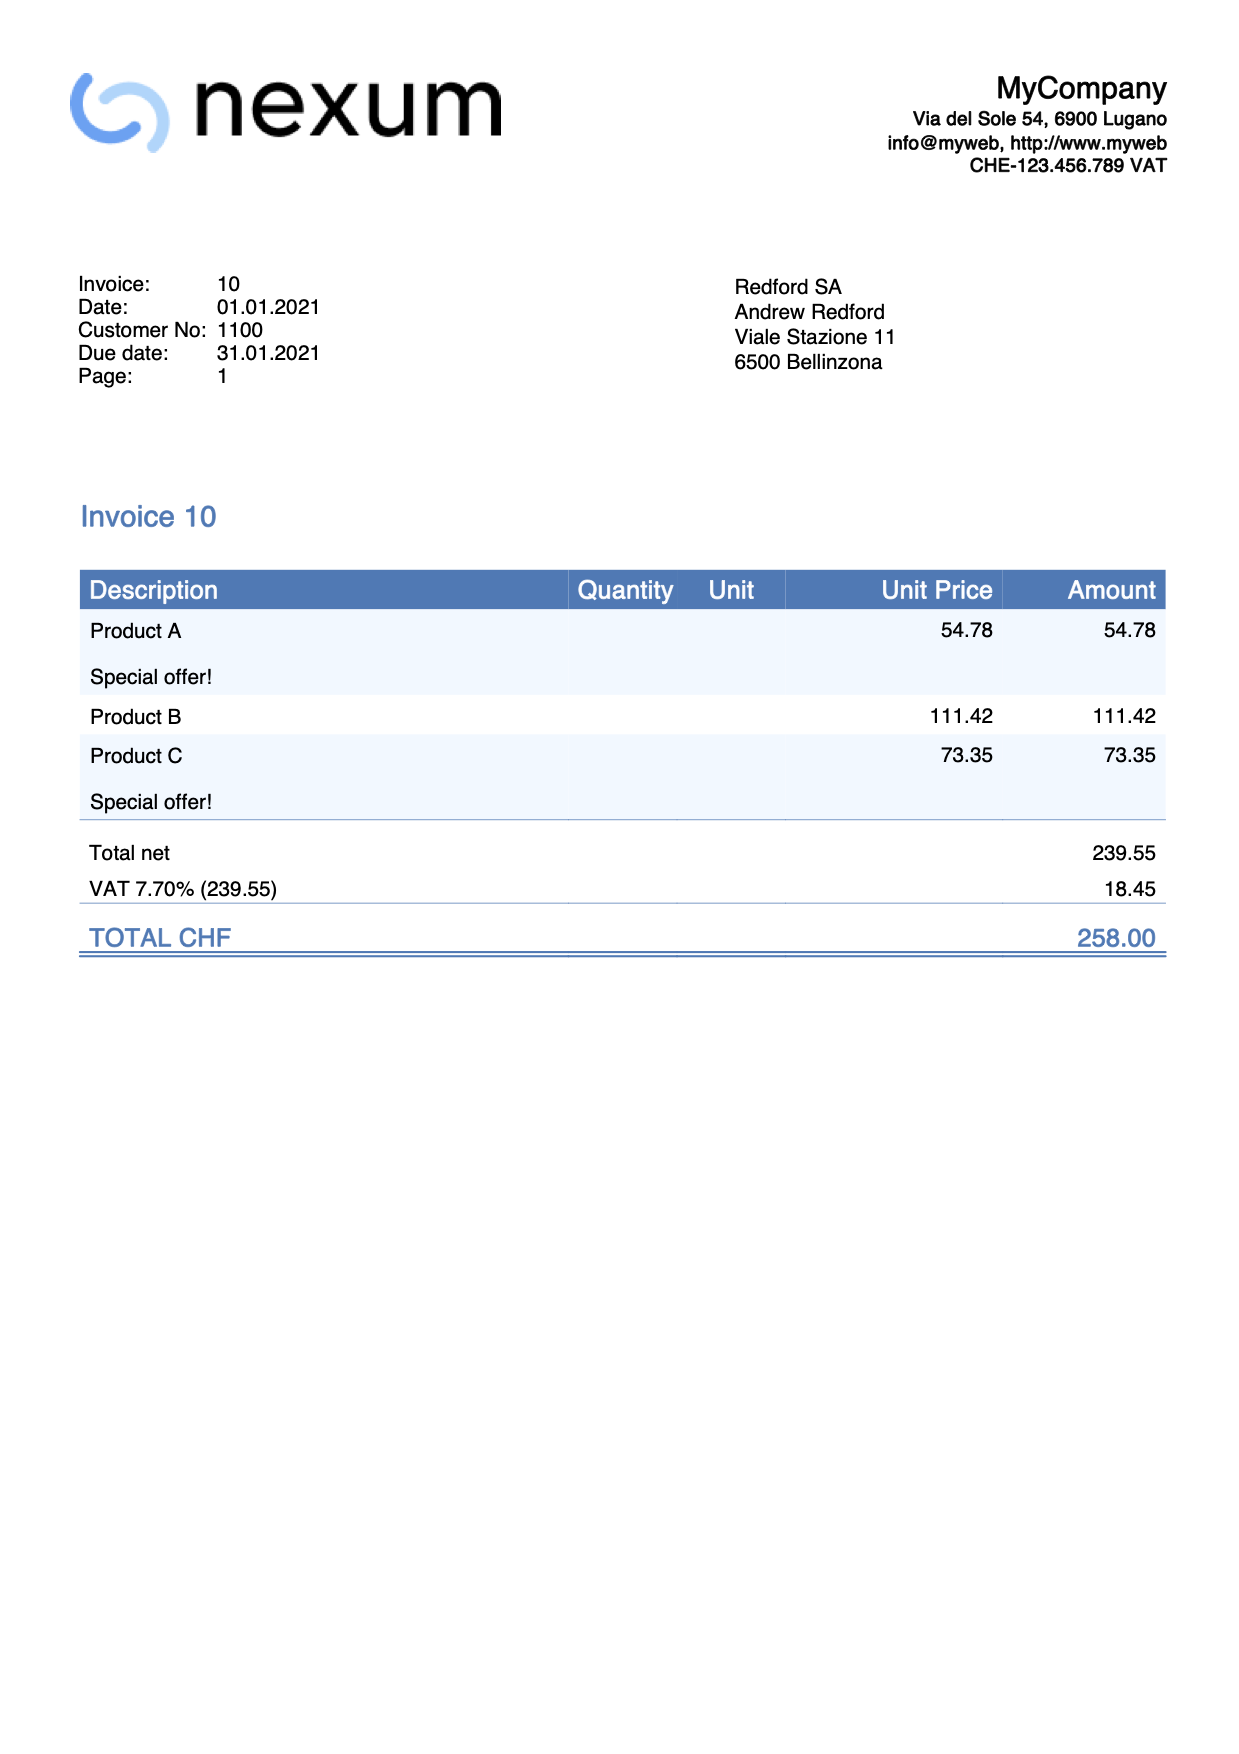
Change style of an item value
Suppose you want to change the style of an item in the Description column of the invoice in order to print it bold.
To do that:
- Define the macro name like for example "#bold".
- Add the "#bold" text to the Description column of the Transaction table for all the items you want to change the text style to bold.
- Define an hook function that replaces the default formatItemsValue() function. This automatically removes the "#bold“ text and change the style.
function hook_formatItemsValue(value, columnName, className, item) {
  var itemFormatted = {};
  itemFormatted.value = "";
  itemFormatted.className = "";
  if (columnName === "description") {
    if (value && value.indexOf("#bold") > -1) {
      itemFormatted.value = value.replace("#bold","");
      itemFormatted.className = "bold";
    }
  }
  return itemFormatted;
}
The itemFormatted object has two properties:
- value is the value of the column that is printed in the invoice.
- className is the name of the class in the CSS file.
In this case all the texts “#bold“ contained in the items description are not printed, and the styles are changed to bold.
The class "bold" that we set in the line itemFormatted.className = "bold" already exists in the CSS file of the invoice. If you want to use other classes that don't exist, you need also to use the CSS customization in order to create them first.
Example print: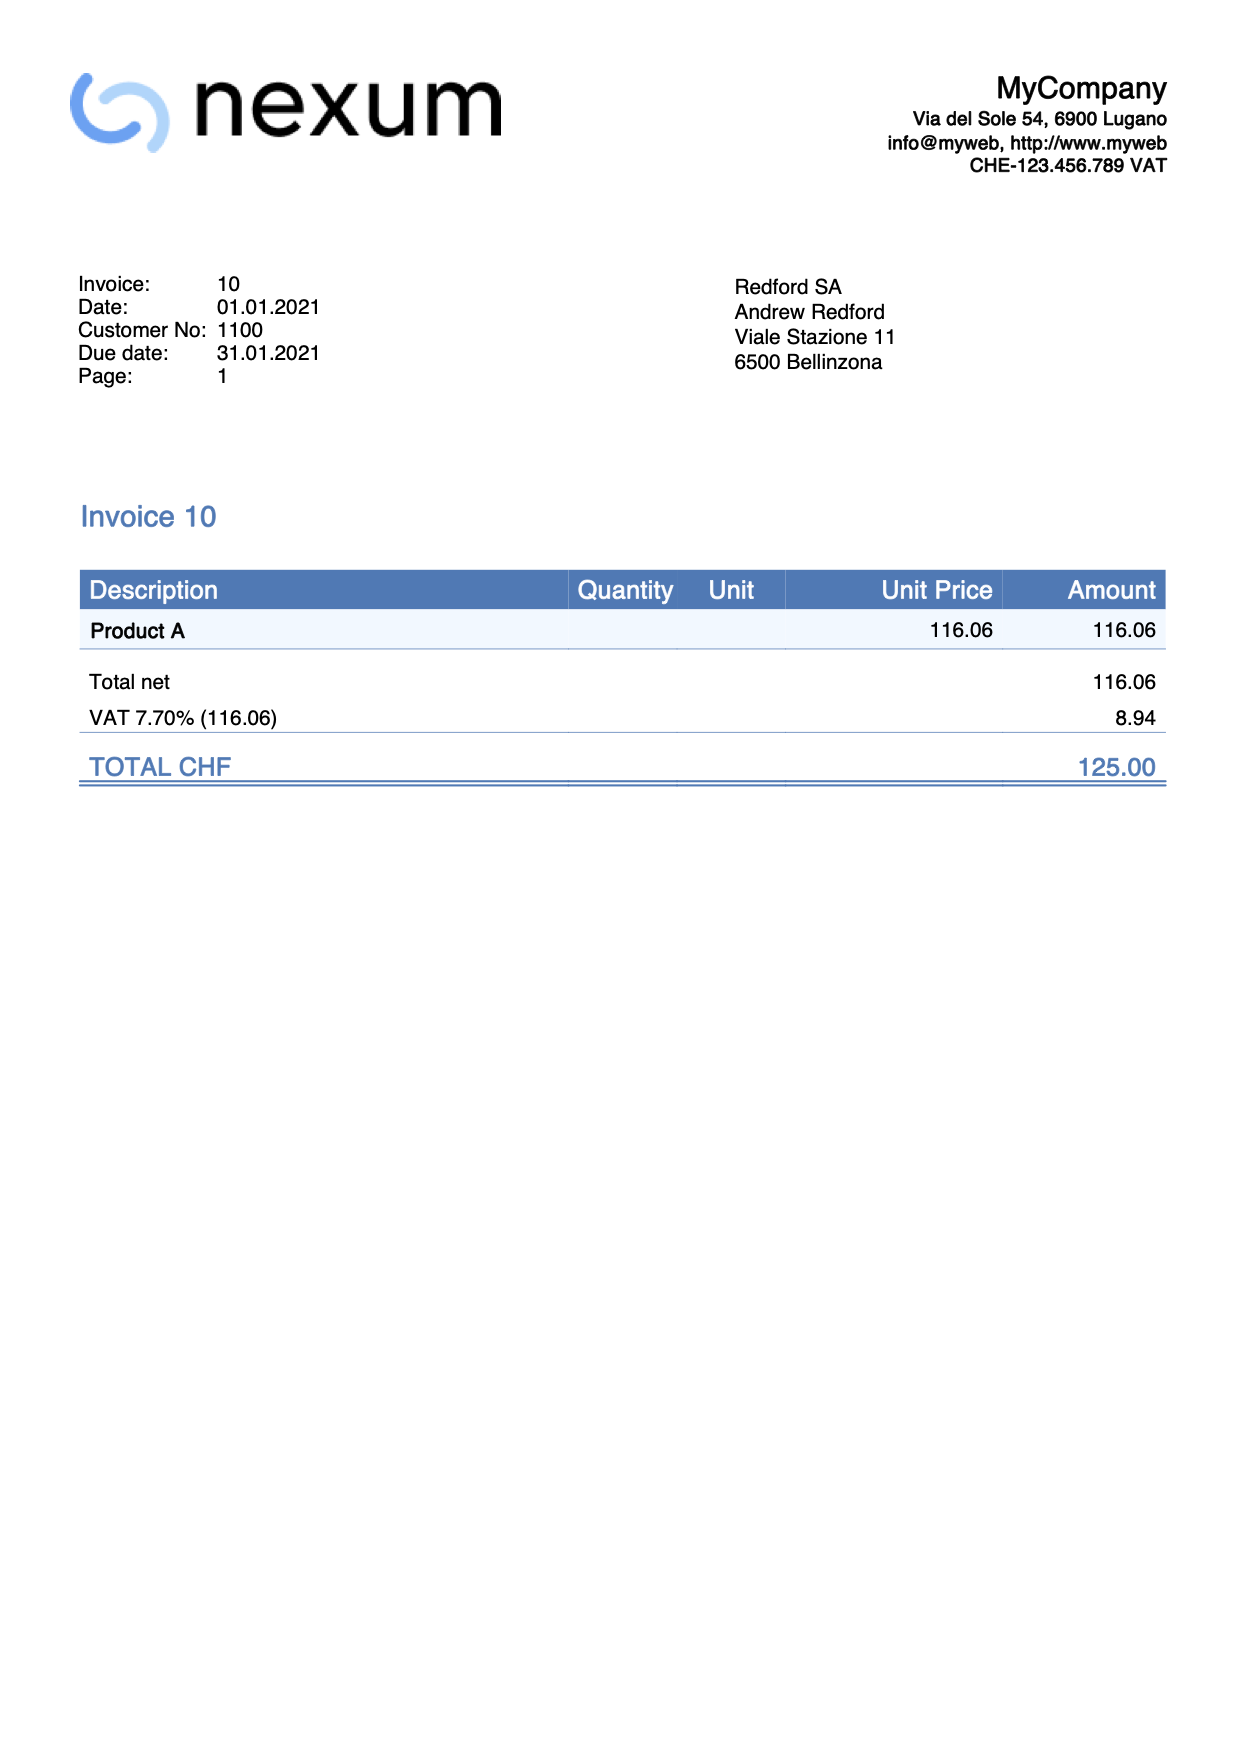
Change the font size of an item description
In this example, we want to change the font size of a specific item description text.
To do that we use the Javascript customization and also the CSS customization:
- Define a macro name like for example "#myFontSize". For each items description you want to change the font size, add the "#myFontSize" text at the end of the description.
- In Documents table:
- Add a new Javascript-type attachment.
Define then the hook function that replaces the default formatItemsValue() function.
This automatically removes the "#myFontSize“ text and changes the font size.
As ID name use for example "myStyle.js". - Add a new CSS-type attachment.
Define then the CSS class with the font size you want to use. Since the class that defines the font size does not exist in the CSS file of the invoice, you also have to create it.
As ID name use for example "myStyle.css".
- Add a new Javascript-type attachment.
- In CH10 / UNI11 layout settings, section Javascript / CSS, enter the appropriate names ("myStyle.js" and "myStyle.css").
Javascript hook function code:
function hook_formatItemsValue(value, columnName, className, item) {
  var itemFormatted = {};
  itemFormatted.value = "";
  itemFormatted.className = "";
  if (columnName === "description") {
    if (value && value.indexOf("#myFontSize") > -1) {
      itemFormatted.value = value.replace("#myFontSize","");
      itemFormatted.className = "myFontSize";
    }
  }
  return itemFormatted;
}
CSS code:
.myFontSize {
   font-size: 8pt;
}
Change the font size value as you desire.
When you create the invoice, the size of the texts in the descriptions changes.
Use different IBAN codes
The IBAN code is normally set either in the File → File and accounting properties → Address section or directly from the Invoice Settings under the related IBAN entry.
If you have more than one IBAN code to use and you want to decide to use one rather than another, you must manually change it when creating each invoice from the Invoice Settings.
However, using customization with Javascript it is possible to associate a different IBAN code to each customer. In this way, when you create the invoice, the script will automatically assign and insert the IBAN.
To do that we define the hook_modify_settings_qr() function that replaces the default modify_settings_qr() function.
function hook_modify_settings_qr(invoiceObj, qrcodeData) {
   //Assign the IBAN code CHXXXXXXXXXXXXXXXXXXX to the customer 1101
   if (invoiceObj.customer_info.number === "1101") {
      qrcodeData.supplierIbanNumber = "CHXXXXXXXXXXXXXXXXXXX";
   }
   //Assign the IBAN code CHYYYYYYYYYYYYYYYYYYY to the customer 1102
   else if (invoiceObj.customer_info.number === "1102") {
      qrcodeData.supplierIbanNumber = "CHYYYYYYYYYYYYYYYYYYY";
   }
   //Assign the IBAN code CHZZZZZZZZZZZZZZZZZZZ to the customer numbers from 1103 to 1107
   else if (invoiceObj.customer_info.number >= "1103" && invoiceObj.customer_info.number <= "1107") {
      qrcodeData.supplierIbanNumber = "CHZZZZZZZZZZZZZZZZZZZ";
   }
	// ...
}
Copy the code above and just replace:
- the value of invoiceObj.customer_info.number with the customer account you want (e.g. 1101, 1102, 1103, ...)
- the value of qrcodeData.supplierIbanNumber with the IBAN number you want (e.g. CHXXXXXXXXXXXXXXXXXXX, CHYYYYYYYYYYYYYYYYYYY, CHZZZZZZZZZZZZZZZZZZZ, ...)
- You can also add/remove more cases.
With this, when you create the invoice the IBAN code is set automatically, and it is no longer necessary to change the invoice settings every time.
Use another date format
The date format is taken from the operating system settings.
This example shows how to use another date format for all Date-type columns in the invoice details, without changing the operating system settings.
To do that:
- The XML name of the column in Transaction table must begin with the word Date (eg DateWork, DateExecution, DateXxx).
- Define the hook_formatItemsValue() function.
- In the function set the format of the date you want to use.
Format examples:- dd.mm.yyyy
- dd/mm/yyyy
- dd-mm-yyyy
- yyyy.mm.dd
- yyyy/mm/dd
- yyyy-mm-dd
function hook_formatItemsValue(value, columnName, className, item) {
  var itemFormatted = {};
  itemFormatted.value = "";
  itemFormatted.className = "";
  if (columnName.startsWith("date")) {
    itemFormatted.value = Banana.Converter.toLocaleDateFormat(value, "dd.mm.yyyy"); // insert here the format
    itemFormatted.className = className;
  }
  return itemFormatted;
}
When you create the invoice, all dates in details table will be printed with the new format.
Example print:
Print images of items
This example shows how to add and print items images on the invoice details. Each item in the Items table is associated with an image and the image is then printed on the invoice.
To do this see the instructions:
- Invoice with product images (English)
- Rechnung mit Produktfotos (German)
- Fattura con immagini prodotti (Italian)
- Facture avec images des produits (French)
When you print the invoice, the items will be printed with an image.
Example print:
Print the items row numbers
This example shows how to print a column displaying the row numbers of the items.
The first item starts at row 1.
Steps
- Add the JavaScript code as attachment in the Documents table.
- If not present, add the Documents table from the menu Tools > Add/Remove functionalities > Add Documents table.
- In the ID column, enter the name of the attachment including the .js extension (e.g., "myFile.js").
- In the Attachments column, click on the icon at the top right and select Javascript code.
An editor opens where you can enter javascript code. Delete all. - Copy and paste
- the javascript code of the 'hook_print_details_net_amounts' function (that prints the invoice with net amounts).
- the javascript code of the 'hook_print_details_gross_amounts' function (that prints the invoice with gross amounts).
- Click OK.
- Sets the parameters of the invoice layout.
- In the Invoice Settings:
- In the Invoice Details section, add the columns "RowNumber".
RowNumber;Description;Quantity;ReferenceUnit;UnitPrice;Amount
10%;40%;10%;10%;15%;15%
left;left;right;center;right;right
left;left;right;center;right;right
- In the Texts section > Column names invoice details, add the texts for the column headings (e.g., “#;Description;Quantity;Unit;Unit Price;Amount”).
- In the Javascript / CSS > JS File Name section, enter the id of the attachment that contains the javascript code (e.g., "myFile.js").
- In the Invoice Details section, add the columns "RowNumber".
- In the Invoice Settings:
Example: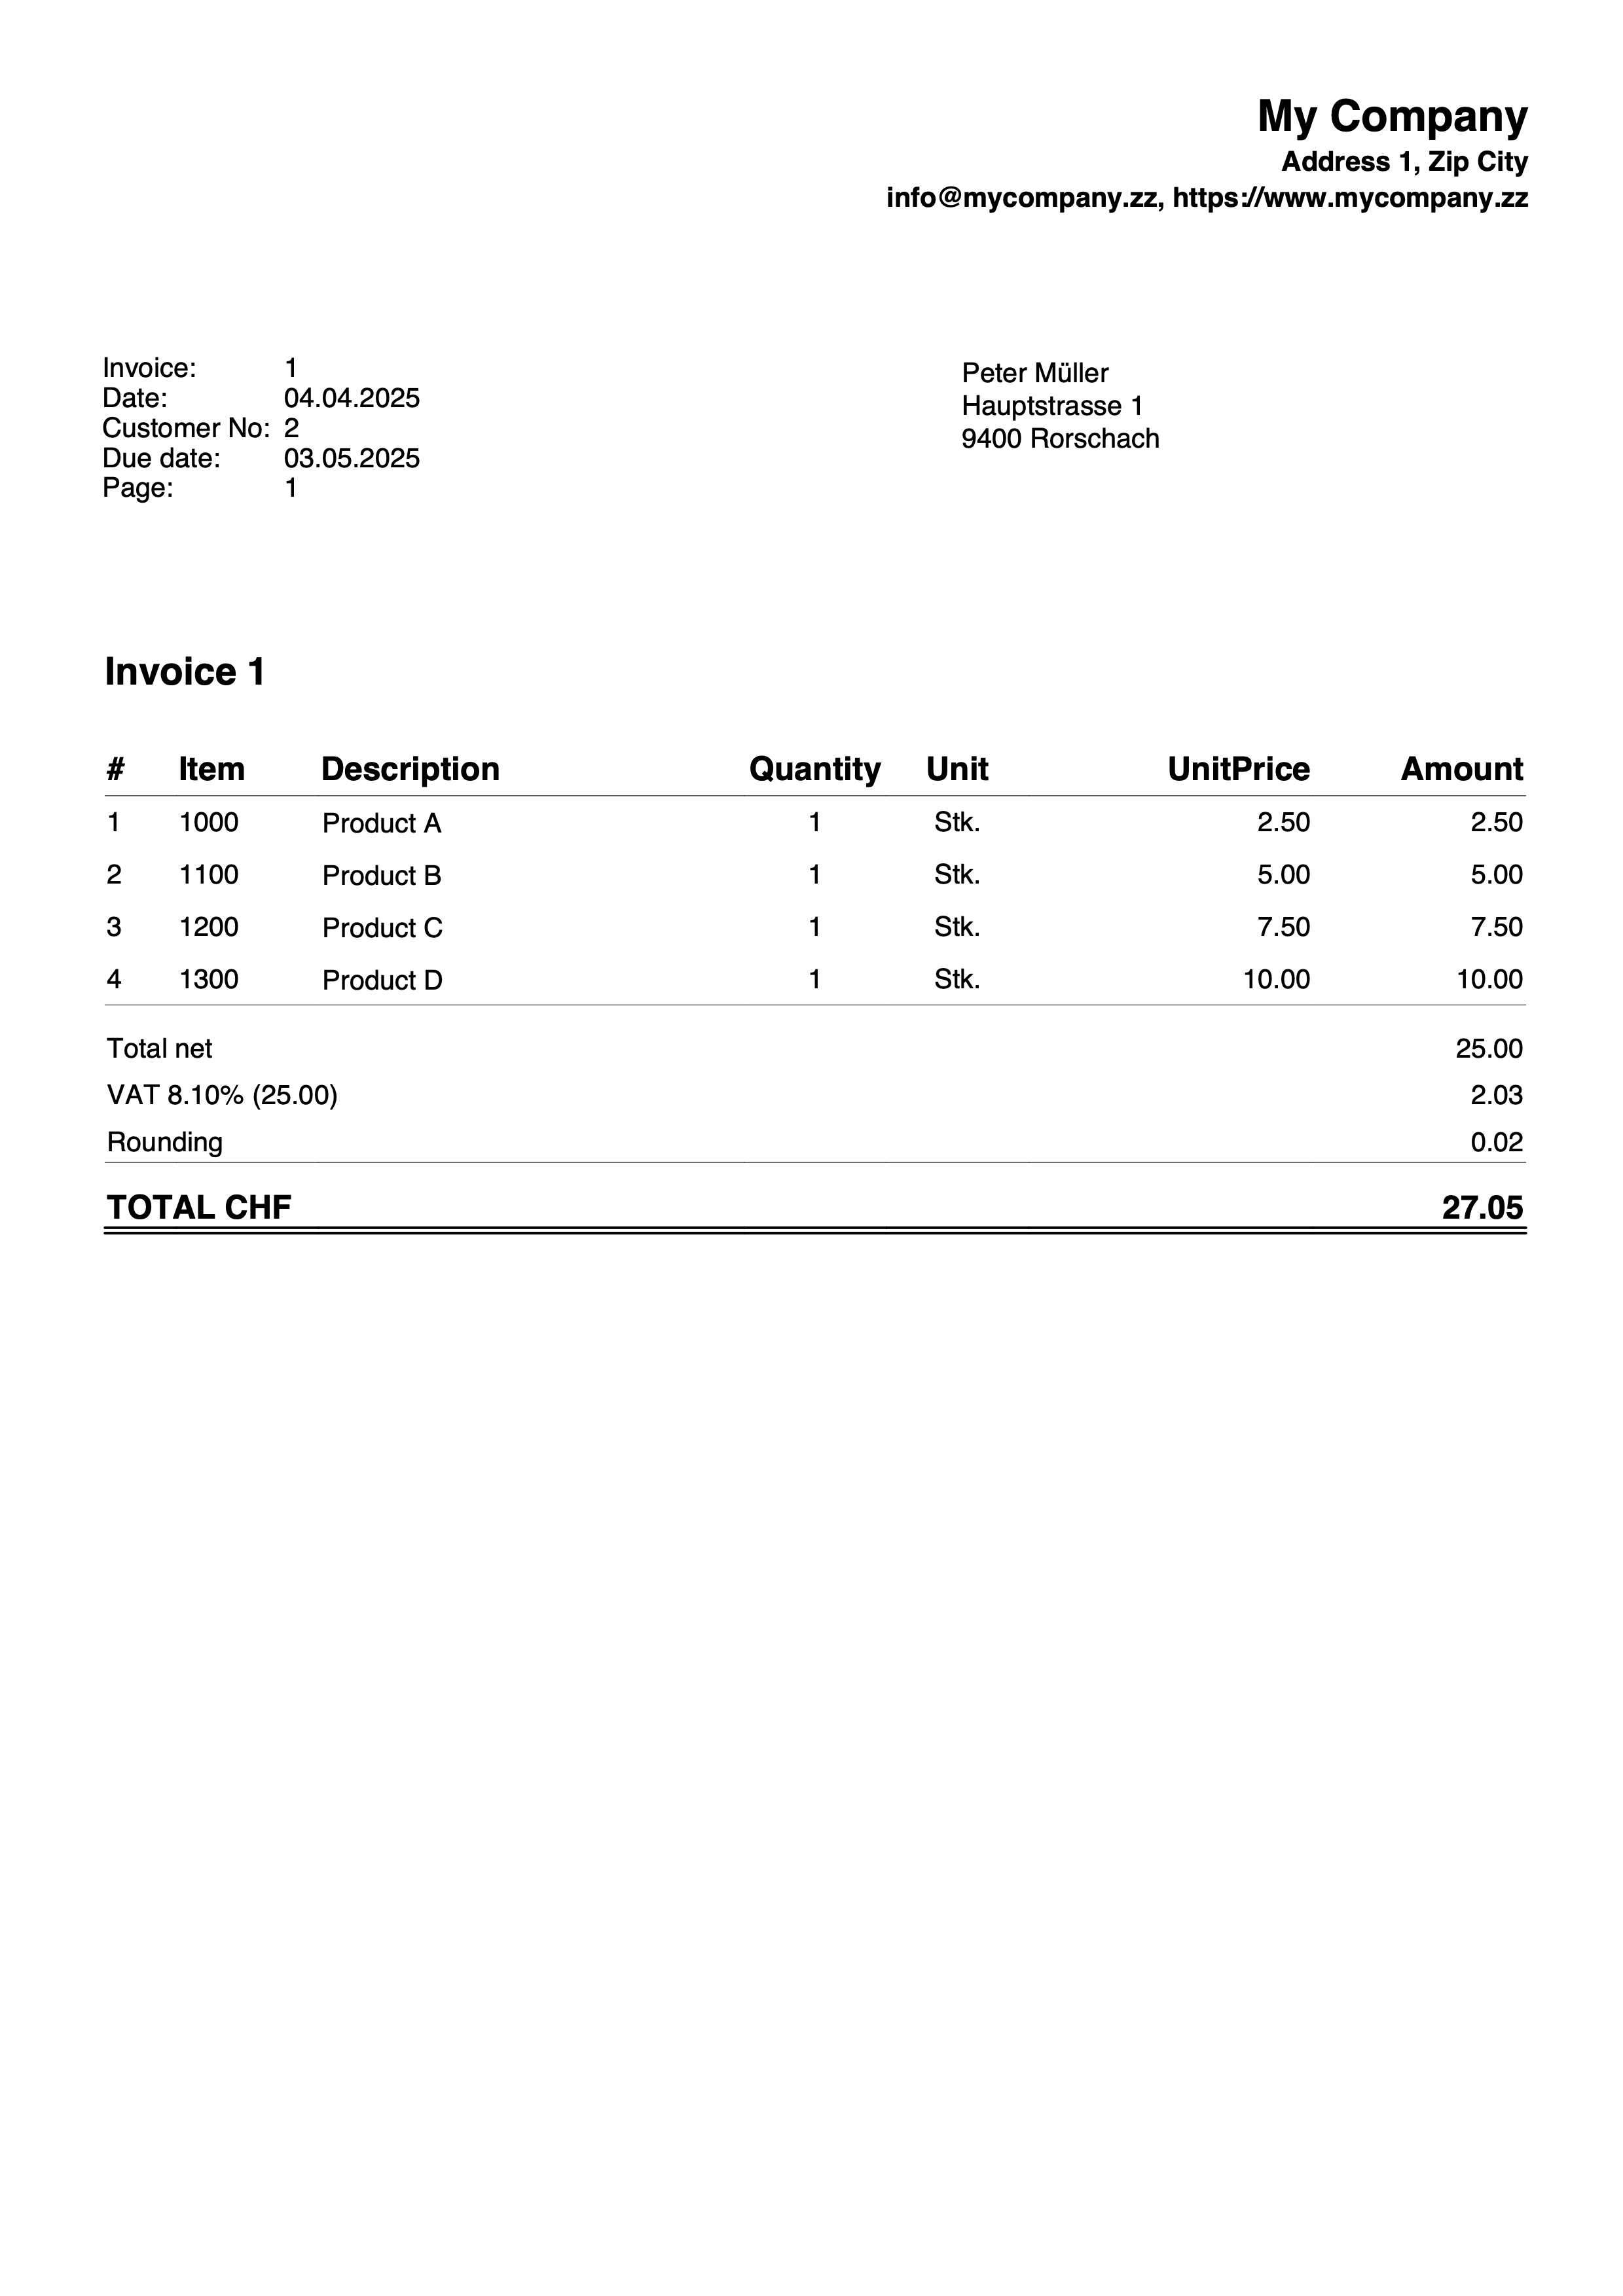
Print 0% VAT rate
This example shows how to print the VAT amounts with a rate of 0%.
To do this:
- add the following javascript snippet to your accounting in the documents table (see image below)
- add the reference to this hook in the settings dialog of the invoice extension (see image below)
function hook_print_details_net_amounts(banDoc, repDocObj, invoiceObj, texts, userParam, detailsTable, variables) {
  //PRINT 0% VAT RATE
  if (invoiceObj.billing_info.total_vat_rate_zero) {
    invoiceObj.billing_info.total_vat_rate_zero.vat_rate="0.00";
    invoiceObj.billing_info.total_vat_rates.unshift(invoiceObj.billing_info.total_vat_rate_zero);
  }
  print_details_net_amounts(banDoc, repDocObj, invoiceObj, texts, userParam, detailsTable, variables);
}
Example print:
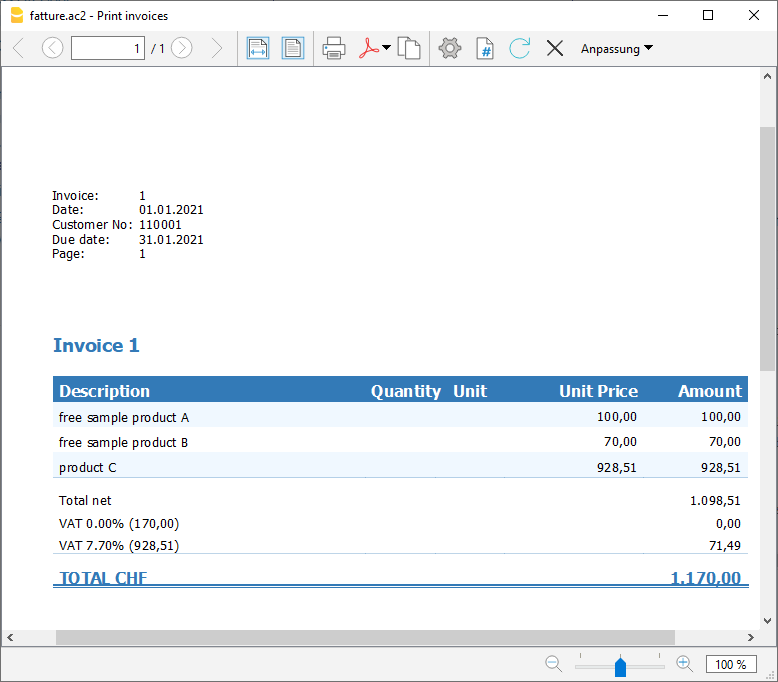
Table documents where the custom javascript is defined
Settings dialog of the invoice extension where you have to indicate the hook that overwrites the original function
Print quantities without decimals
This example for the Integrated Invoice, shows how to print quantities without decimals.
To do this:
- Add the following javascript code to your accounting in the Documents table.
- Add the reference to this code in the Invoice Settings.
For more information see Add your custom Javascript file.
function hook_set_variables(variables, userParam) {
	variables.decimals_quantity = 0;
}
Change decimals of amounts
This example for the integrated invoice shows how to change the decimals of the invoice amounts (quantity, unit price and amounts).
To do this:
- Add the following javascript code to your accounting in the Documents table.
- Change the number of decimals according to your needs.
- Add the reference to this javascript file in the Invoice Settings.
For more information see Add your custom Javascript file.
function hook_set_variables(variables, userParam) {
   variables.decimals_quantity = 4;
   variables.decimals_unit_price = 4;
   variables.decimals_amounts = 4;
}
Other examples and needs
With CSS and Javascript you can completely customize the invoice appearance.
If you have other specific needs, you can contact our customer service.
Invoice formatting with custom CSS Stylesheet
Banana invoices are formatted through a CSS Stylesheet. The extension allows you to use a customized stylesheet so you can fully modify the appearance of the invoice (this functionality requires the Advanced plan).
Following you will find information and examples that let anyone understand the basic of the CSS so that you are able to do a lot of customization to your invoice, even if you are not a CSS professional.
- See also the page CSS Examples.
Banana CSS Stylesheet file
The CSS file property let you specify an CSS stylesheet file to be used for formatting the invoice. You have to enter the name of a CSS document, contained in the Documents table.
The properties you define in the custom CSS file will extend or overwrite the styles of the default stylesheet.
Cascading Style Sheet (CSS) is a specification language that allows to customize the appearance of web pages, and a subset of the whole CSS specification is also used in Banana to prepare reports.
Here are some basics about CSS Stylesheet formatting.
- The document, in our case the invoice, is composed by a series of Elements that contains all the data of the invoice.
- Each element can have one or more class properties that specify which style should be used for that element.
- Each element can contain other elements.
- In the CSS stylesheet you specify the formatting properties of each class of style.
- The elements hynnerit the styles of the parent element.
- The main element for the invoice is the Document.
Add your custom CSS stylesheet
Three steps are required to define and use your CSS file:
- Add the document table to the Banana Accounting file.
If it is not already present you need to add the Documents table in the Banana document with the menu command Tools > Add new features > Add document table. - Add a new CSS type document to the document table.
- In the ID column enter the file name including the extension .css (e.g. "myStyle.css").
If the id is missing the ".css" at the end, it won't work. - In the Description column enter a comment (optional).
- In the Attachments column, double click on the cell or select the edit symbol, then select CSS stylesheet and confirm with Ok.
- An editor will open in which you can write the code.
- Enter or edit the script and confirm with Ok.
- Save the Banana Accounting file.
Documents table - CSS stylesheet attachment
- In the ID column enter the file name including the extension .css (e.g. "myStyle.css").
- Specify the CSS file created in the invoice layout extension.
- Select Settings of the Print invoices dialogue.
- In the Javascript/CSS > CSS file name, enter the name of the newly created CSS attachment file with the extension ".css" at the end (e.g. "myFile.css").
- Click Ok to confirm.
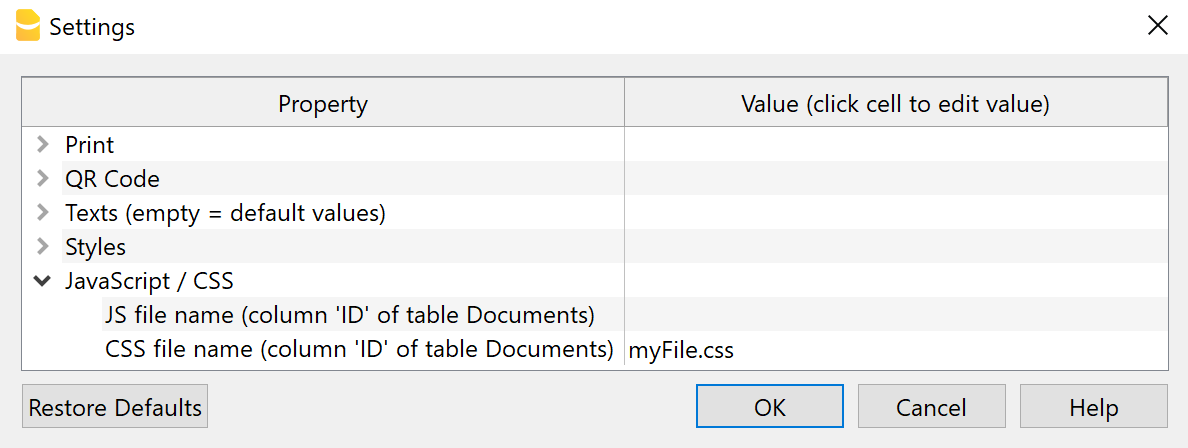
Settings Dialogue - CSS File Property
Syntax of a CSS stylesheet
The syntax of the CSS is quite simple as you see in this style definition that set the size of the Invoice title text element to 14 points and without bold.
/* this two lines are comment
   title_text is for the invoice number */
.title_text {
  font-family: Arial;
  font-size: 14;
  font-weight: normal;
  color: #6495ED;
}
Syntax rules:
- Element are case sensitive.
- You specify the style name ".title_text" starting with a dot (".") and followed by the curly open bracket "{".
- Property name, followed by the colon ":"
- Values followed by the semicolon ";"
- You can have has many allowed properties you need.
- End with the curly close bracket "}".
- You can have has many allowed style classes.
- The defined values overwrite the predefined one.
Comments:
- Add comments to the css by including the text within a /* comment */,
It help you remember the purpose of the code.
See the comments in the predefined CSS for explanations of the elements.
Most used properties
Font
- font-family
Specify the font name. - font-size
Specify the font size in points. - font-weight
Specify the font weight: normal, bold or value between 1-1000.
Text alignment
- text-align
Specify the horizontal alignment of the text.
It is used for example to align on the right of the cell all the amounts of the invoice (i.e. "text-align: right").
Colors
For the main colors you can use the name in English (black, yellow, white, blue, red, ...) or the hexadecimal values (HEX) preceded by the # sign (e.g. #000000, #009FE3, #FF00EA).
For codes see the table at https://www.w3schools.com/cssref/css_colors.asp.
- color
Define the color of a text. - background-color
Define the background color of an element.
It is used for example to set the background color of the header row of the invoice details.
Positioning
All elements in the invoice are positioned relative to the prior element. You can change the positioning.
- margin
- margin-top
To set the margin on the top of the element. - margin-right
To set the margin on the right side of the element. - margin-bottom
To set the margin on the bottom of the element. - margin-left
To set the margin on the left side of the element.
It is used for example in case it is required to move an element a bit to the right. More margin on the left means move the element to the right.
- margin-top
- padding
- padding-top
Sets the height of the area on the top of an element. - padding-right
Sets the width of the area on the right of an element. - padding-bottom
Sets the height of the area on the bottom of an element. - padding-left
Sets the width of the area on the left of an element.
- padding-top
/* For example it is used for the details table, to avoid that
all the texts are printed too close to the table border. */
.doc_table td {
  padding-top: 5px;
  padding-bottom: 1px;
  padding-left: 4px;
  padding-right: 4px;
}
Absolute positioning
Some elements are positioned relative to the begin of the document. The position of these elements does not depend on any other element in the document.
- postion
- For the logo, header text and address elements it is used the absolute positioning ("position: absolute").
Borders
To apply borders to tables and table rows.
- border-style
Sets the line style for all four sides of an element's border.- border-top-style
- border-right-style
- border-bottom-style
- border-left-style
- border-color
Sets the color for all four sides of an element's border.- border-top-color
- border-right-color
- border-bottom-color
- border-left-color
- border-width
Sets the width for all four sides of an element's border.- border-top-width
- border-right-width
- border-bottom-width
- border-left-width
/* For example use it to apply a double underline
 to the total line of the invoice. */
  .total_cell {
  border-bottom-style: double;
  border-bottom-color: #337ab7;
  border-bottom-width: 1px;
}
Display / Hide element
Set the attribute display to none to hide an element. In this case the Invoice number is hidden.
.title_text {
   display: none;
}
Predefined CSS stylesheet
The Javascript layout create a document with elements that include a specific class, that is then positioned and formatted based on the CSS style definition.
If you want to add other styles class you have to modify the Javascript code by using the hook functions.
Here you can see the complete CSS stylesheet used for invoices documents.
- Some styles are initialized with the predefined values set by the users (value that begin with the $.
For example The $font_family is replaced with the font name family specified by the user or initialized with the Javascript variable initialization function. - Test starting with /* and ending with */ are comments
/* Page definition.
   Sets margins of the document.
   Each elements of the invoice is positioned relative to these margins. */
@page {
  margin-top: 0cm;
  margin-bottom: 0cm;
  margin-left: 0cm;
  margin-right: 0cm;
}
/* Properties for all the content of the document.
   This values will be used for all elements, unless there is not a specific definition.
   Sets font family, font size and text color. */
body {
  font-family: $font_family;
  font-size: $font_size;
  color: $text_color;
}
/* Vertically align the content of a cell in a table. */
td {
  vertical-align: top;
}
/* Text that is right aligned.
   This class is used in combination of others */
.right {
  text-align: right;
}
/* Text that is center aligned.
   This class is used in combination of others */
.center {
  text-align: center;
}
/* Font that is bold. */
.bold {
  font-weight: bold;
}
/* The width of the area on the right of an element.
   This value is the space between an element and its border. */
.padding-right {
  padding-right: 20px;
}
/* The width of the area on the left of an element.
   This value is the space between an element and its border. */
.padding-left {
  padding-left: 20px;
}
/* The top border of an element.
   Sets the line style, the line color and the line width of the border.
   Used for example as horizontal line between the items and the total net */
.border-top {
  border-top-style: solid;
  border-top-color: $color_title_total;
  border-top-width: thin;
}
/* Text of the header when printed on the right of the document.
   Sets margins and position relative to the document.
   When no logo is used, text alignment is set to right. */
.header_text {
  margin-top: 1.2cm;
  margin-left: 1.2cm;
  margin-right: 1.2cm;
  text-align: right;
  position: absolute;
}
/* Text of the row 1 of the header (if defined through Invoice settings).
   Sets bold and size 16 of the font. */
.header_row_1 {
  font-weight: bold;
  font-size:16pt;
}
/* Text of the row 2, row 3, row 4 and row 5 of the header (if defined through Invoice settings).
   Sets bold and size 10 of the font. */
.header_row_2_to_5 {
  font-weight: bold;
  font-size: 10pt;
}
/* Logo positioning.
   Sets margins and position relative to the document. */
.logo {
  margin-top: 1.2cm;
  margin-left: 1.34cm;
  margin-right: 1.2cm;
  position: absolute;
}
/* Text of the information table when printed on the left of the document.
   Sets font size and margins relative to the document and the prior element. */
.info_table_left {
  font-size: $font_size;
  margin-top: 4.5cm;
  margin-left: 1.2cm;
  margin-right: 1.2cm;
}
/* Text of the information table when printed on the right of the document.
   Sets font size and margins relative to the document and the prior element. */
.info_table_right {
  font-size: $font_size;
  margin-top: 5.5cm;
  margin-left: 12.3cm;
  margin-right: 1.2cm;
}
/* Text of the information table when printed on page 2 and above.
   Sets font size and margins relative to the document and the prior element. */
.info_table_row0 {
  font-size: $font_size;
  margin-top: 4.5cm;
  margin-left: 1.2cm;
  margin-right: 1.2cm;
}
/* Cells of the information table rows when printed on the left.
   Sets the space between the text in the cell and the cell border (top and bottom). */
table.info_table_left td {
  padding-top: 0px;
  padding-bottom: 0px;
}
/* Cells of the information table rows when printed on the right.
   Sets the space between the text in the cell and the cell border (top and bottom). */
table.info_table_right td {
  padding-top: 0px;
  padding-bottom: 0px;
}
/* Cells of the information table rows when printed on page 2 and above.
   Sets the space between the text in the cell and the cell border (top and bottom). */
table.info_table_row0 td {
  padding-top: 0px;
  padding-bottom: 0px;
}
/* Display the information table for pages 2 and above.
   For pages 2 and above it is used a different information table (.info_table_row0).
   This table is not displayed on first view of the document (page 1).
   On first page it is used the other one (.info_table_left or .info_table_right). */
@page:first-view table.info_table_row0 {
  display: none;
}
/* Can be used to set the column width of the first column of info table
   width: 100px */
.info_table_first_column {
}
/* Can be used to set the column width of the second column of info table
   width: 100px */
.info_table_second_column {
}
/* Address positioning when printed on the right.
   Sets margins and position relative to the document.
   Sets also the font size. */
.address_table_right {
  font-size: $font_size;
  top: 4.5cm;
  left: 12.3cm;
  width: 7.5cm;
  position: absolute;
}
/* Address positioning when printed on the left.
   Sets margins and position relative to the document.
   Sets also the font size. */
.address_table_left {
  top: 5.5cm;
  left: 2.2cm;
  width: 7.5cm;
  position: absolute;
}
/* Address positioning when printed on the right,
   and moved horizontally/vertically through Invoice settings.
   Sets margins and position relative to the document.
   Sets also the font size. */
.custom_address_table_right {
  font-size: $font_size;
  top: $right_address_margin_top;
  left: $right_address_margin_left;
  width: 7.5cm;
  position: absolute;
}
/* Address positioning when printed on the left,
   and moved horizontally/vertically through Invoice settings.
   Sets margins and position relative to the document.
   Sets also the font size. */
.custom_address_table_left {
  top: $left_address_margin_top;
  left: $left_address_margin_left;
  width: 7.5cm;
  position: absolute;
}
/* Small address line of the sender, above the customer's address.
   Sets font size, text alignment.
   Sets also a bottom border used as underline. */
.small_address {
  font-size: 7pt;
  text-align: center;
  border-bottom-style: solid;
  border-bottom-color: $text_color;
  border-bottom-width: 1px;
  margin-bottom: 0.3cm;
}
/* Shipping address positioning.
   Sets font size and margins relative to the information table. */
.shipping_address {
  font-size: $font_size;
  margin-top: 0.4cm;
  margin-left: 1.2cm;
  margin-right: 1.2cm;
}
/* Shipping address title.
   Sets font weight and color of the text. */
.title_shipping_address {
  font-weight: bold;
  color: $color_title_total;
}
/* Invoice title.
   Sets font size, font weight and color of the text. */
.title_text {
  font-size: $font_size_title;
  font-weight: bold;
  color: $color_title_total;
}
/* Begin text positioning.
   Sets margins relative to the prior element.
   It is used all the available width of the document to insert the text. */
.section_class_begin {
  margin-top: 1.0cm;
  margin-left: 1.2cm;
  margin-right: 1.2cm;
  width: 100%;
}
/* Table for the begin text.
   Use all the available width of the document. */
.begin_text_table {
  width: 100%;
}
/* Begin text style.
   Sets the font size of the text. */
.begin_text {
  font-size: $font_size;
}
/* Invoice details positioning, first page.
   Sets the top margin relative to the prior element (begin text/title) */
.section_class_details:first-view {
  margin-top: 0.5cm;
}
/* Invoice details positioning, page 2 and above.
   Sets the margins relative to the prior element (information) */
.section_class_details {
  font-size: $font_size;
  margin-top: 0.5cm;
  margin-bottom: 0.5cm;
  margin-left: 1.3cm;
  margin-right: 1.2cm;
}
/* Invoice details table width.
   Use all the available width of the document. */
.doc_table {
  width: 100%;
}
/* Header row of the invoice details.
   Sets font size, font weight, text color and background color. */
.doc_table_header {
  font-size: $font_size_header;
  font-weight: bold;
  color: $text_color_details_header;
  background-color: $background_color_details_header;
  border-bottom: thin solid $color_title_total;
}
/* Cells of the invoice details table.
   Sets the space between the text in the cell and the cell border (top, bottom, left and right). */
.doc_table td {
  padding-top: 5px;
  padding-bottom: 1px;
  padding-left: 0px;
  padding-right: 0px;
}
/* Cells of header row of the invoice details table.
   Sets the space between the text in the cell and the cell border (top, bottom, left and right). */
.doc_table_header td {
  padding-top: 4px;
  padding-bottom: 2px;
  padding-left: 0px;
  padding-right: 0px;
}
/* Item row of the invoice details.
   Sets font weight. */
.item_cell {

}
/* Total row of the invoice details.
   Sets font size, font weight and text color.
   Sets also a bottom border used as double underline for the entire row. */
.total_cell {
  font-size: $font_size_total;
  font-weight: bold;
  color: $color_title_total;
  border-bottom-style: double;
  border-bottom-color: $color_title_total;
  border-bottom-width: 1px;
}
/* Subtotal row of the invoice details.
   Sets the font weight and a bottom border used as underline for the entire row. */
.subtotal_cell {
  font-weight: bold;
  border-bottom-style: solid;
  border-bottom-color: $color_title_total;
  border-bottom-width: thin;
}
/* Header cell of the invoice details.
   Sets the font weight as bold. */
.header_cell {
  font-weight: bold;
}
/* VAT text style of the invoice details.
   Sets the font size of the text.
   Used when printing the invoice details using gross amounts, through Invoice settings. */
.vat_info {
  font-size: $font_size;
}
/* Even rows style of the invoice details.
   Sets the background color for even rows. */
.even_rows_background_color {
  background-color: $background_color_alternate_lines;
}
/* Final texts positioning.
   Sets margins relative to the prior element (invoice details).
   Applied to notes, greetings and final texts. */
.section_class_final_texts {
  margin-top: 0cm;
  margin-bottom: 0.5cm;
  margin-left: 1.26cm;
  margin-right: 1.0cm;
}
/* Footer top border positioning.
   Sets margins relative to the prior element (final texts).
   Sets also a top border line over the text. */
.footer_line {
  margin-left: 1.2cm;
  margin-right: 1.0cm;
  border-top-style: solid;
  border-top-color: $color_title_total;
  border-top-width: thin;
}
/* Footer positioning and style.
   Sets margins relative to the prior element (footer line).
   Sets also font size and use all the available width of the document. */
.footer_table {
  font-size: 8pt;
  margin-bottom: 2.0cm;
  margin-left: 1.2cm;
  margin-right: 1.0cm;
  width: 100%;
}
How to adapt the invoice print with CSS
The following examples show how to adapt invoice printing with custom CSS stylesheet files.
See CSS customization for more information.
Change margins of the page
Page margins are set automatically when creating the invoice. It is possible to change margins with CSS.
To do this, the different elements of the invoice must be changed in the CSS:
- Header (Logo and text).
- Invoice Information.
- Title and begin text.
- Invoice details.
- Final texts.
Copy and paste the following code into the editor, and change the margin-left and margin-right values:
/* Header Logo margins */
.logo {
  margin-left: 1.34cm;
  margin-right: 1.2cm;
  margin-top: 1.2cm;
}
/* Header text margins (when logo is not used) */
.header_text {
  margin-top: 1.2cm;
  margin-left: 1.2cm;
  margin-right: 1.2cm;
}
/* Information margins */
.info_table_left {
  margin-left: 1.2cm;
}
/* Information margins (page 2+) */
.info_table_row0 {
  margin-left: 1.2cm;
}
/* Title and begin texts margins */
.section_class_begin {
  margin-left: 1.2cm;
  margin-right: 1.2cm;
}
/* Invoice details margins */
.section_class_details {
  margin-left: 1.3cm;
  margin-right: 1.2cm;
}
/* Final texts margins */
.section_class_final_texts {
  margin-left: 1.26cm;
  margin-right: 1.2cm;
}
Change style of the header
The header text by default is always printed in bold, the font size of the first line is larger than the others, and the font is the same used for the rest of the invoice.
With this example we want to change something:
- Set the text color.
- Add a new declaration using the property color: and enter a color value.
- The color value is an hexadecimal value (HEX) preceded by the # sign (e.g. #000000, #009FE3, #FF00EA).
For codes see the table at https://www.w3schools.com/cssref/css_colors.asp.
- Remove the bold style.
- Change the font-weight: property value from bold to normal.
- Set the same font size for all the lines.
- Change the font-size: property value with a different size, e.g. 12pt.
- Change the font type.
- Add a new declaration using the property font-family: and enter a font, e.g. Times New Roman.
Copy and paste the following code into the editor:
/* Header row 1 */
.header_row_1 {
  color: #0000FF;
  font-weight: normal;
  font-size: 12pt;
  font-family: Times New Roman;
}
/* Header text row 2+ */
.header_row_2_to_5 {
  color: #6495ED;
  font-weight: normal;
  font-size: 12pt;
  font-family: Times New Roman;
}
The header text style is now changed from the original settings and is the same for all the lines.
Example print: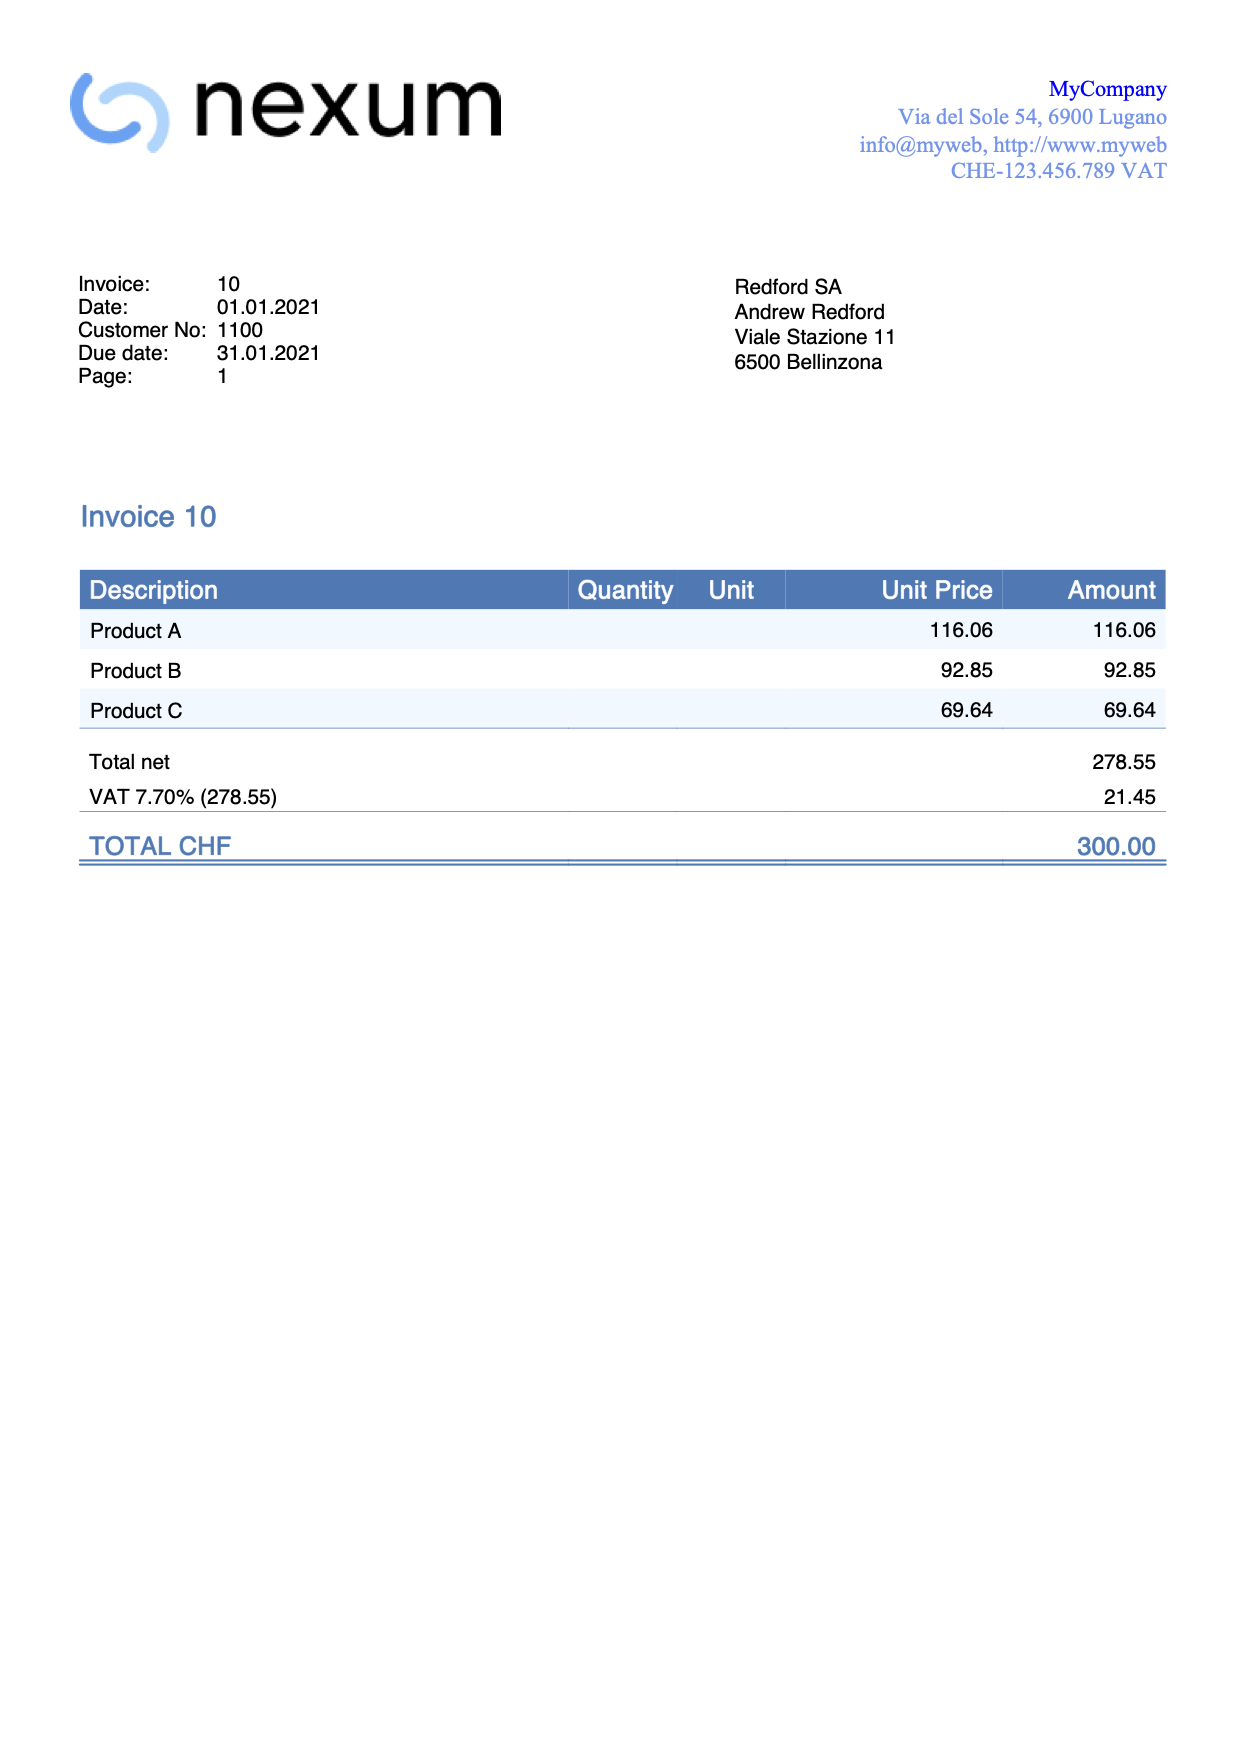
Change color of the header
The header text by default is always printed in black.
With this example we want to change the color:
- Set the text color.
- Add a new declaration using the property color: and enter a color value.
- The color value is an hexadecimal value (HEX) preceded by the # sign (e.g. #000000, #009FE3, #FF00EA).
For codes see the table at https://www.w3schools.com/cssref/css_colors.asp.
Copy and paste the following code into the editor, and change the color code:
/* Header row 1 */
.header_row_1 {
  color: #6495ED;
}
/* Header text row 2+ */
.header_row_2_to_5 {
  color: #6495ED;
}
The header color is now changed from the original settings.
Use grayscale colours
With this example we set text and background colours with grayscale colours.
.total_cell {
   color: black
}
.title_text {
   color: black
}
.header_row_1 {
   color: black;
}
.doc_table_header {
   color: black;
   background-color: white;
   border-bottom: solid black thin;
}
Change position of information section
The information section of the invoice is always placed at the same height of the invoice address.
In this example we want to change the position of the information section. We do this by changing the the predefined margins values:
- To move vertically change the margin-top value.
- To move horizontally change the margin-left value.
In case the information section is on the left, copy and paste the following code into the editor and edit it with your values:
.info_table_left {
  font-size: $font_size;
  margin-top: 4.5cm;
  margin-left: 1.2cm;
  margin-right: 1.2cm;
}
In case the information section is on the right, copy and paste the following code into the editor and edit it with your values:
.info_table_right {
  font-size: $font_size;
  margin-top: 5.5cm;
  margin-left: 12.3cm;
  margin-right: 1.2cm;
}
For the information section on the second page, copy and paste the following code into the editor and edit it with your values:
.info_table_row0 {
  font-size: $font_size;
  margin-top: 4.5cm;
  margin-left: 1.2cm;
  margin-right: 1.2cm;
}
With these changes the information section starts now on a different position (and also the invoice details).
Example print: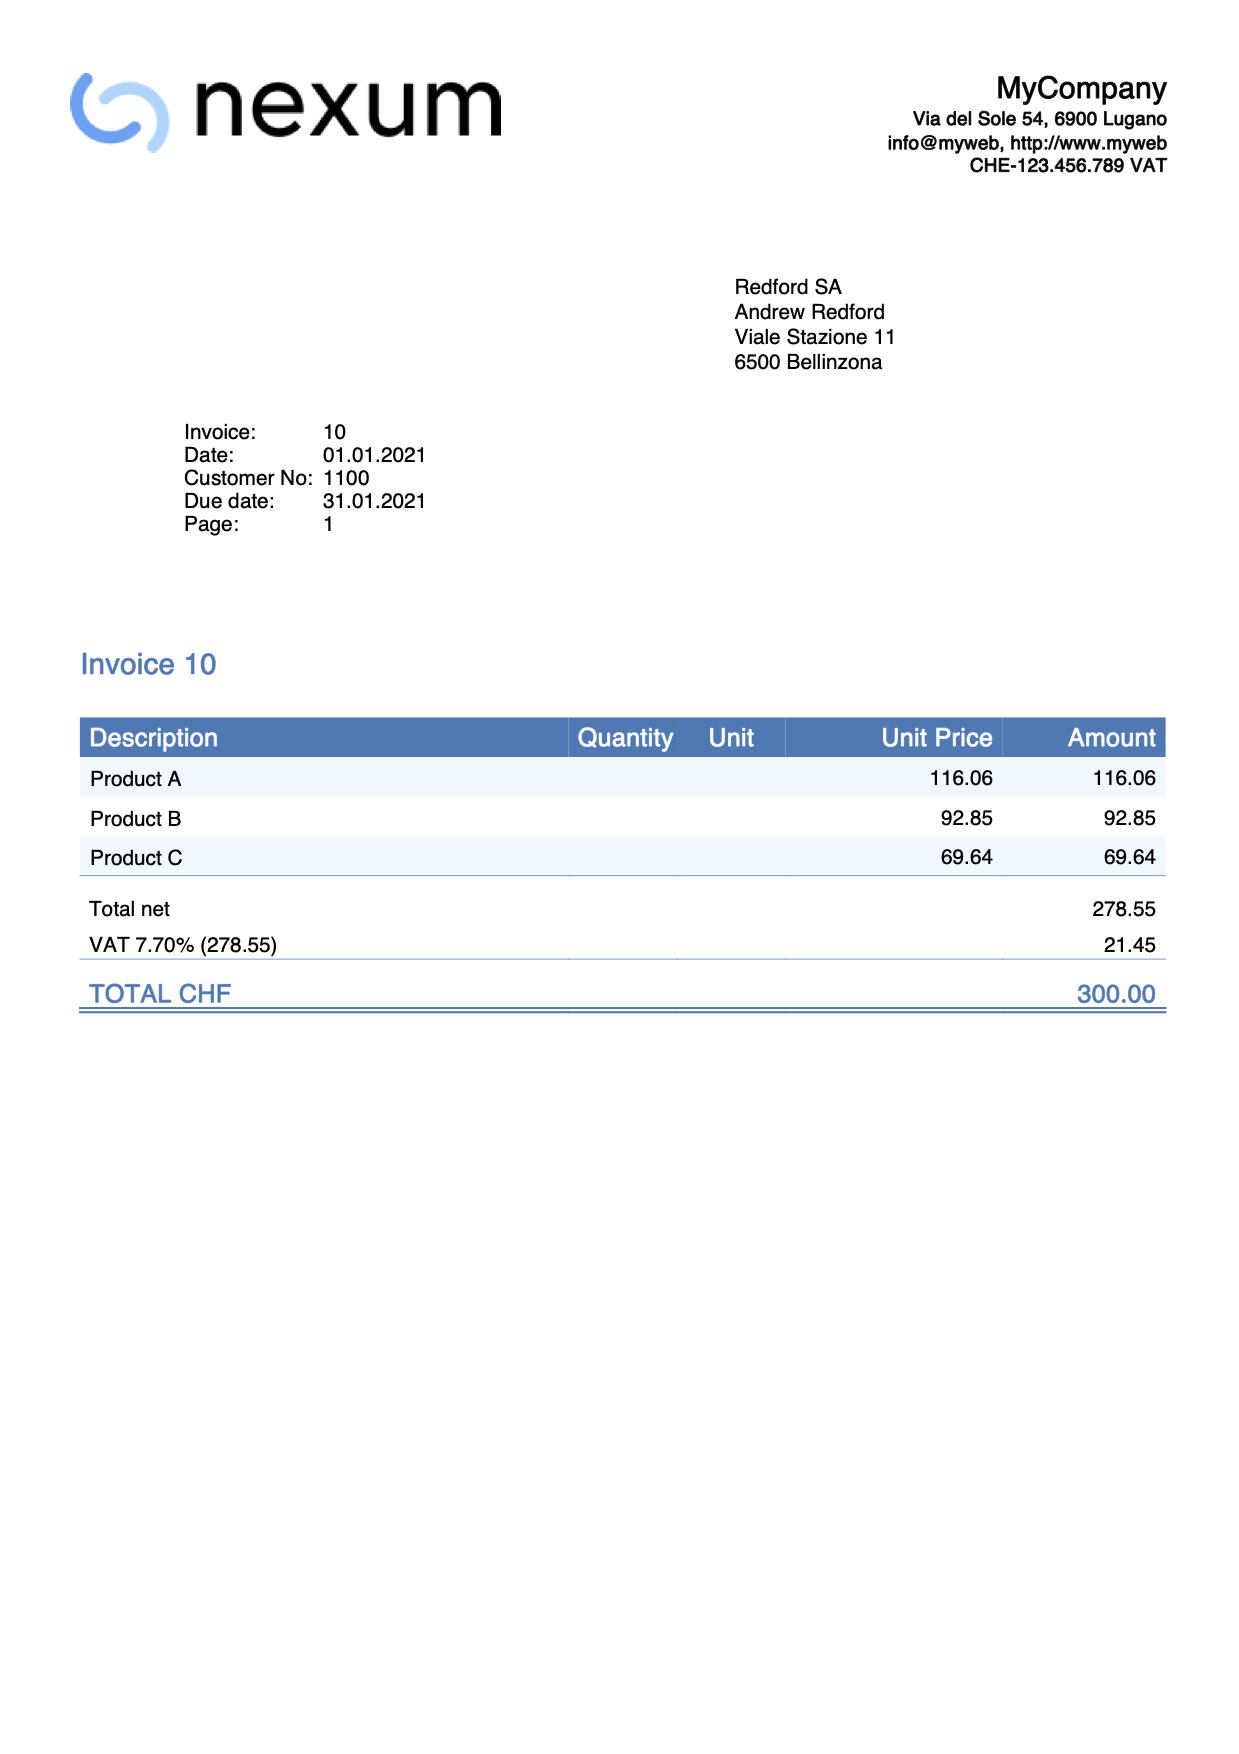
Change position of the address
The position of the invoice address is normally fixed, but with this example we want to change it.
First we have to decide whether the address should be printed on the right or on the left.
For this example let's suppose that it is printed on the right.
In order to move the address (up, down, left, right) we can change the predefined margins values of the address element.
- Move up/down.
- To move the address up, change the top property value with a smaller value
(less space from the top margin means that the address goes up). - To move the address down, change the top property value with a bigger value
(more space from the top margin means that the address goes down).
- To move the address up, change the top property value with a smaller value
- Move left/right.
- To move the address left, change the left property value with a smaller value
(less space from the left margin means that the address goes left). - To move the address right, change the left property value with a bigger value
(more space from the left margin means that the address goes right).
- To move the address left, change the left property value with a smaller value
Copy and paste the following code into the editor and adjust the values of top and left:
.address_table_right {
  font-size: $font_size;
  top: 4.5cm;
  left: 12.3cm;
  width: 7.5cm;
  height: 3.5cm;
  position: absolute;
}
This works both when the address is printed on the right and when it is printed on the left.
Simply use the correct element: ".address_table_right" for the address on the right and ".address_table_left" for the address on the left.
With this change the invoice address starts now on a different position.
N.B. In previous example it was suggested to use margin-left and margin-top. From october 1st 2022 we recommend to use left and top with width and height attributes instead.
If you are using margin-left and margin-top within your custom css, you now have to replace them with left, top, width and height attributes.
Print the address in bold
This example shows how to print the invoice address in bold.
To do that, we have to add the font-weight:bold property to the address style. The address used in the example is the default one positioned on the right.
Copy and paste the following code into the editor:
.address_table_right {
  font-size: $font_size;
  top: 4.5cm;
  left: 12.3cm;
  width: 7.5cm;
  height: 3.5cm;
  position: absolute;
  font-weight: bold;
}
Example print: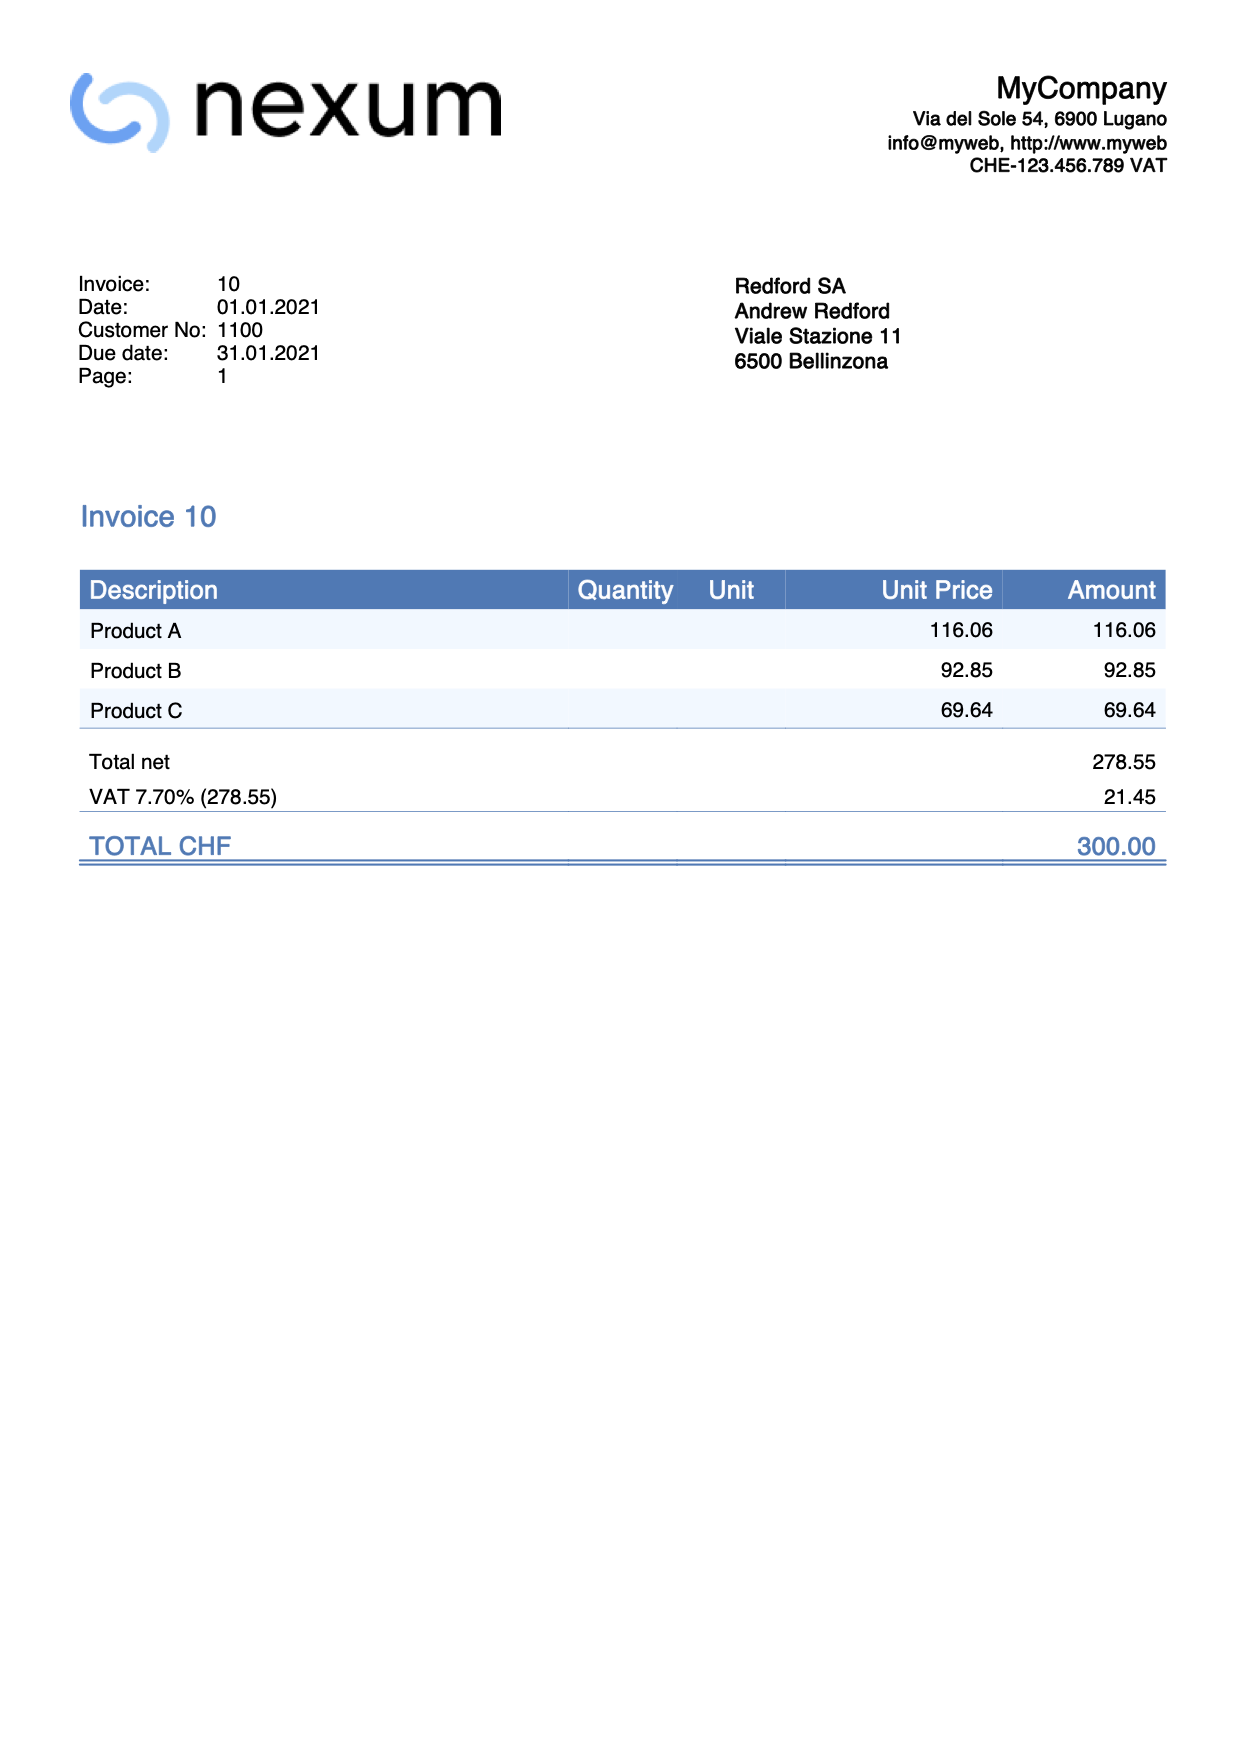
Change font type and font size of the address
This example shows how to print the invoice address with different font and size.
To do this:
- Add the font-family property to the address style. This is used to define the font type.
- Add the font-size property to the address style. This is used to define the font size.
If you are printing the address on the right, copy and paste the following code into the editor and replace the name of the font and the size:
.address_table_right {
  font-family: Helvetica;
  font-size: 12pt;
  top: 4.5cm;
  left: 12.3cm;
  width: 7.5cm;
  height: 3.5cm;
  position: absolute;
}
If you are printing the address on the left, copy and paste the following code into the editor and replace the name of the font and the size:
.address_table_left {
  font-family: Helvetica;
  font-size: 12pt;
  top: 5.5cm;
  left: 2.2cm;
  width: 7.5cm;
  height: 3.5cm;
  position: absolute;
}
In both examples you can also change the positions by editing the margin properties. More information Change position of the address.
Reduce space before and after invoice details
The positions of the elements and the space between them is predefined.
In this example we want to:
- Reduce spaces between address and title.
- Reduce spaces between details table and final texts.
Copy and paste the following code into the editor:
.section_class_begin {
  margin-top: 0mm; /*reduce the default 10mm */
  margin-left: 12mm;
  margin-right: 12mm;
  width: 100%;
}
.section_class_final_texts {
  margin-top: 0mm; /*reduce the default 5mm */
  margin-bottom: 10mm;
  margin-left: 12mm;
  margin-right: 10mm;
}
With this changes the spaces you have now less space before and after the invoice details.
Example print: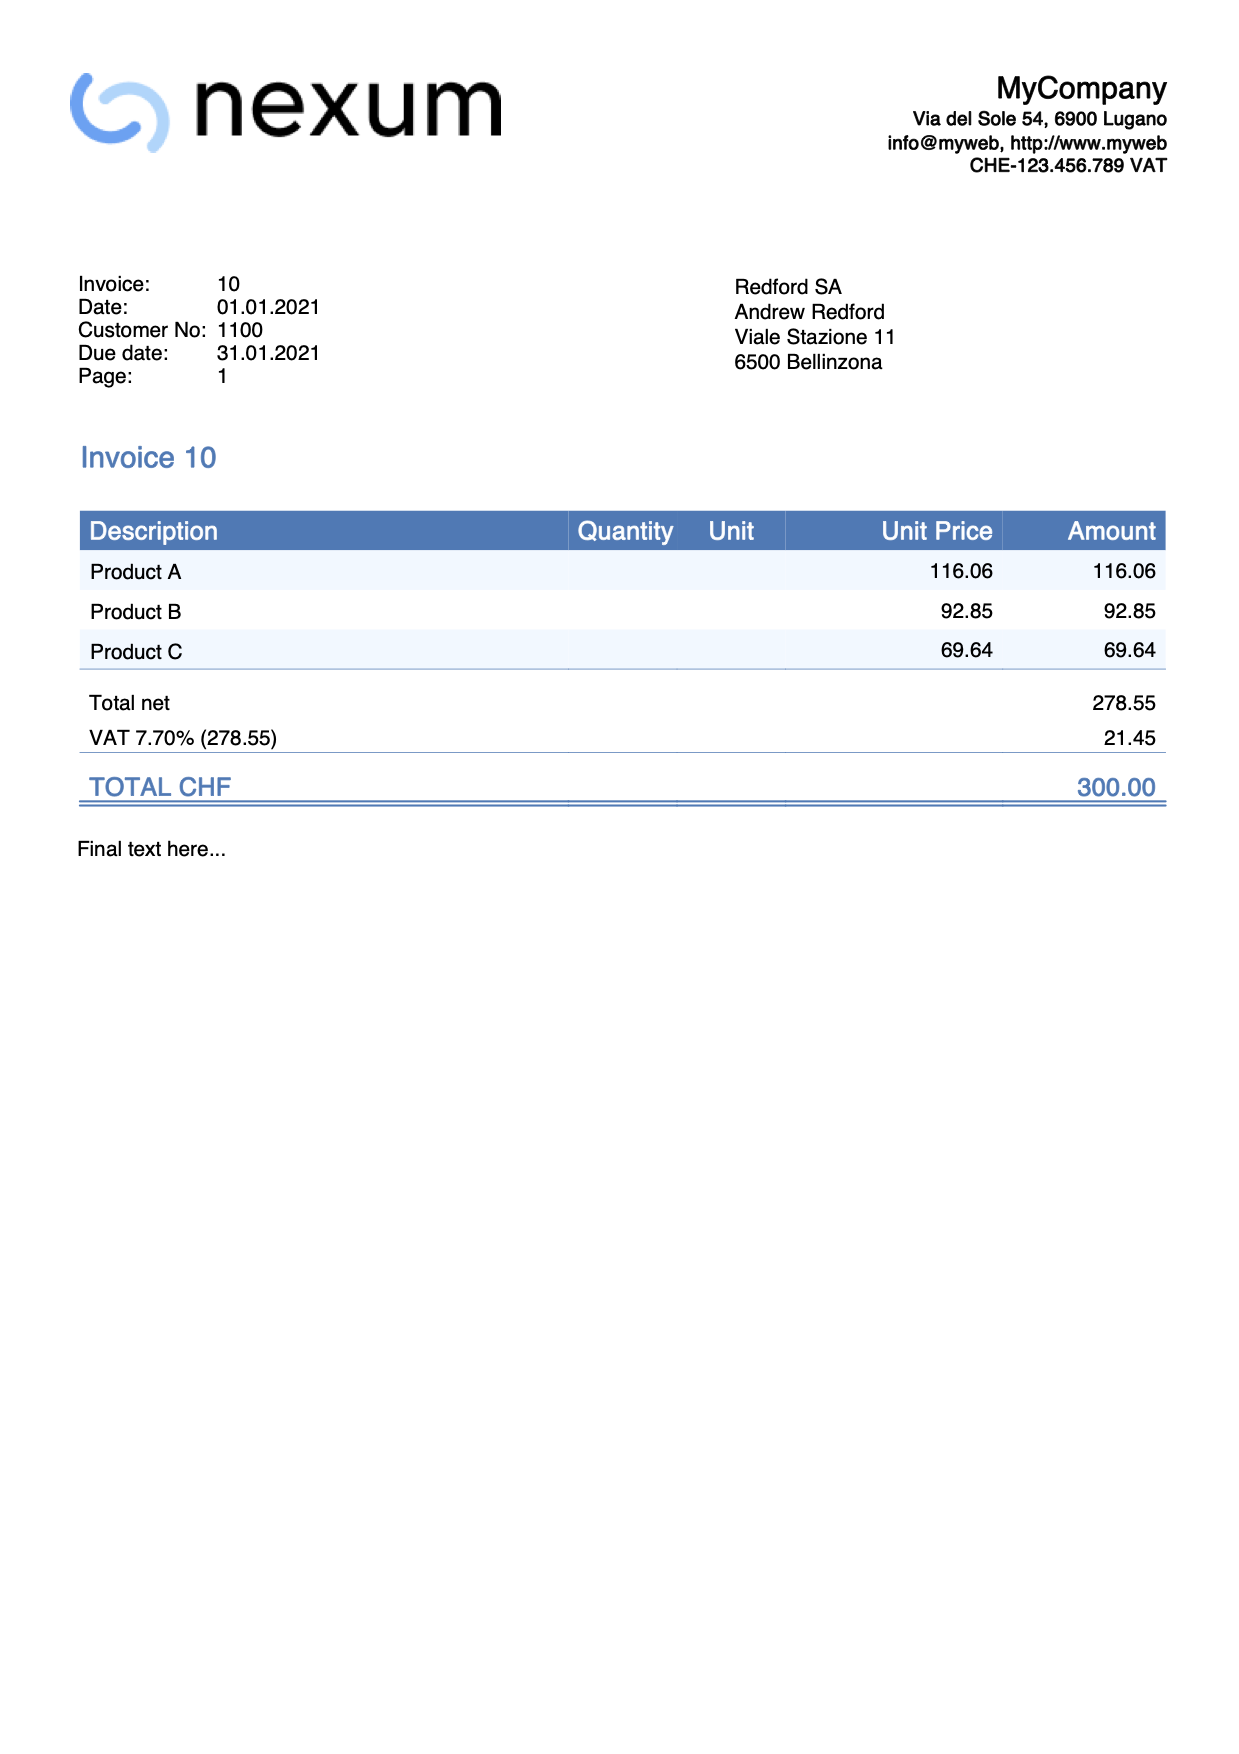
Change the title color
The title text by default is always printed with the same color of the total line.
With this example we want to change the title color without changing the total:
- Copy and paste the following code.
- Change the color property value with the color you want.
.title_text {
  font-size: $font_size_title;
  font-weight: bold;
  color: black;
}
The title color is now changed from the original settings.
Change the size of the item rows
With this example we want to change the font size of the item rows:
- Copy the following code.
- Change the font-size property value with the size you want.
.item_cell {
  font-size: 9pt;
}
Change the total line bottom border
The total text by default is always printed with a double bottom border.
With this example we want to:
- Remove the bottom border.
- Change the border-bottom-style property value from double to none. This displays no border.
.total_cell {
  font-size: $font_size_total;
  font-weight: bold;
  color: $color_title_total;
  border-bottom-style: none;
  border-bottom-color: $color_title_total;
  border-bottom-width: 1px;
}
- Change the border style.
- Change the border-bottom-style property value with a different type (dotted, dashed, solid, double).
- Change the border-bottom-width property value with a different value (thin, thick, 1px, 2px,...).
- Change the border-bottom-color property value with a different color.
The total line style is now changed from the original settings.
Example print:
More space between total text and double underline
In this example we want to change the space between the total line text and the double underline.
The text is in the last row of the details table, and the double underline is done using a bottom border.
To increase or decrease the space in between we can use the padding property, that is used to generate space around an element's content (in this case the text), inside of any defined borders.
To do that we have to:
- Add a new selector that works specifically on all the cells of the total row.
- We use the total_cell selector that already exists (see example above).
- We combine it with the td selector in order to work on each data/cell of the row.
- Add the padding-bottom property only, and define a value we want.
Copy and paste the following code into the editor:
.total_cell td {
   padding-bottom: 10px;
}
The bottom border distance of the total line is now changed from the original settings.
Example print: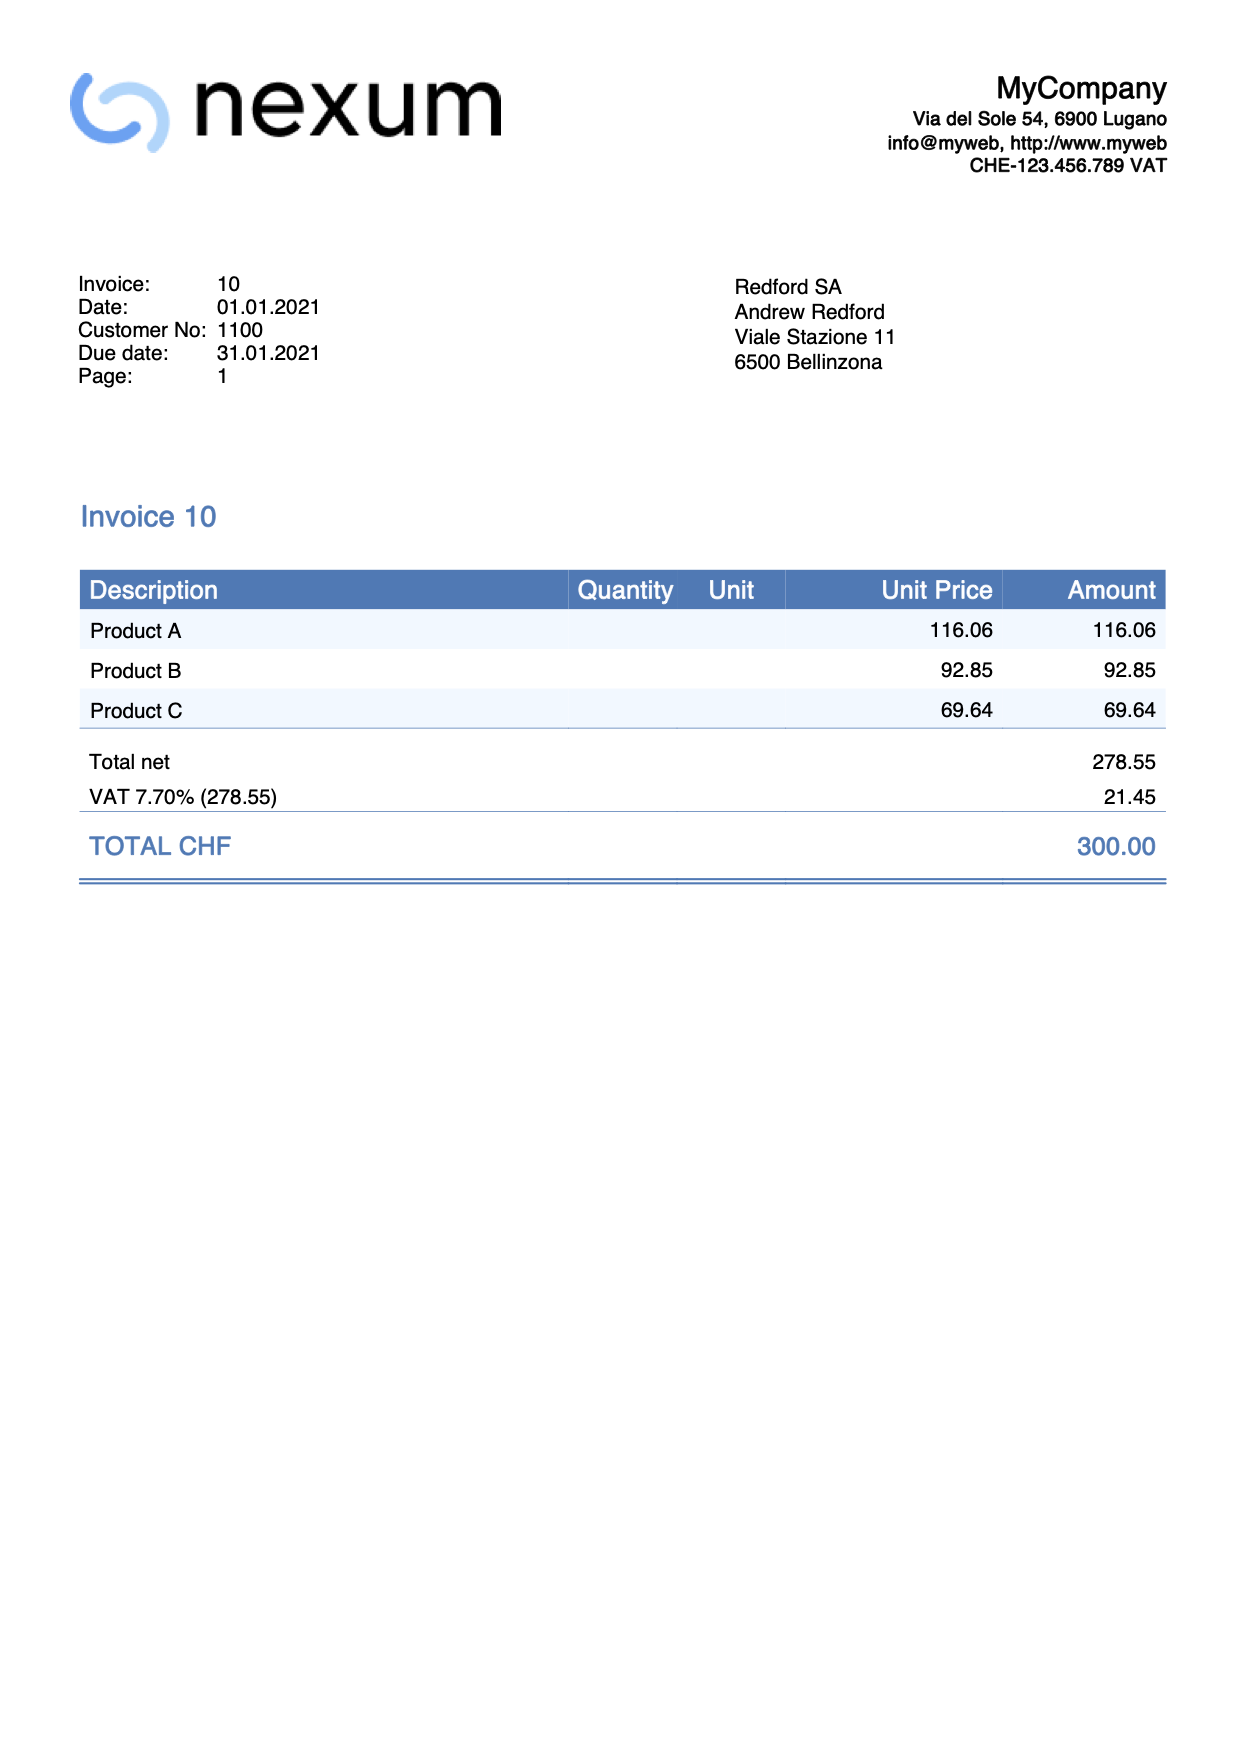
Print a stamp
In this example we want print a text as a stamp over and under the invoice's content.
The text will be printed rotated. For that we will use the css attribute transform.
To do that, we have to:
- Add a new selector that works specifically on the stamp text.
- Add the text as last first paragraph, so that it will be under the content.
- Add the text as last last paragraph, so that it will overlap the content.
Copy and paste the following code into the css editor:
.stamp1 {
    position: absolute;
    transform: translate(-0cm,10cm),rotate(-45deg);
    font-size: 60;
    text-align: center;
    color: #CCCCCCCC;
 }
.stamp2 {
    position: absolute;
    transform: translate(-0cm,16cm),rotate(-45deg);
    font-size: 60;
    text-align: center;
    color: #CCCCCCCC;
}
Copy and paste the following code into the js editor:
function hook_print_header(repDocObj, userParam, repStyleObj, invoiceObj, texts) {
   let stamp = repDocObj.addSection("stamp1");
   stamp.addParagraph("Stamp under text!");
   print_header(repDocObj, userParam, repStyleObj, invoiceObj, texts)
}
function hook_print_footer(repDocObj, texts, userParam) {
   print_footer(repDocObj, texts, userParam)
   let stamp = repDocObj.addSection("stamp2");
   stamp.addParagraph("Stamp over text!");
}
The bottom border distance of the total line is now changed from the original settings.
Example print: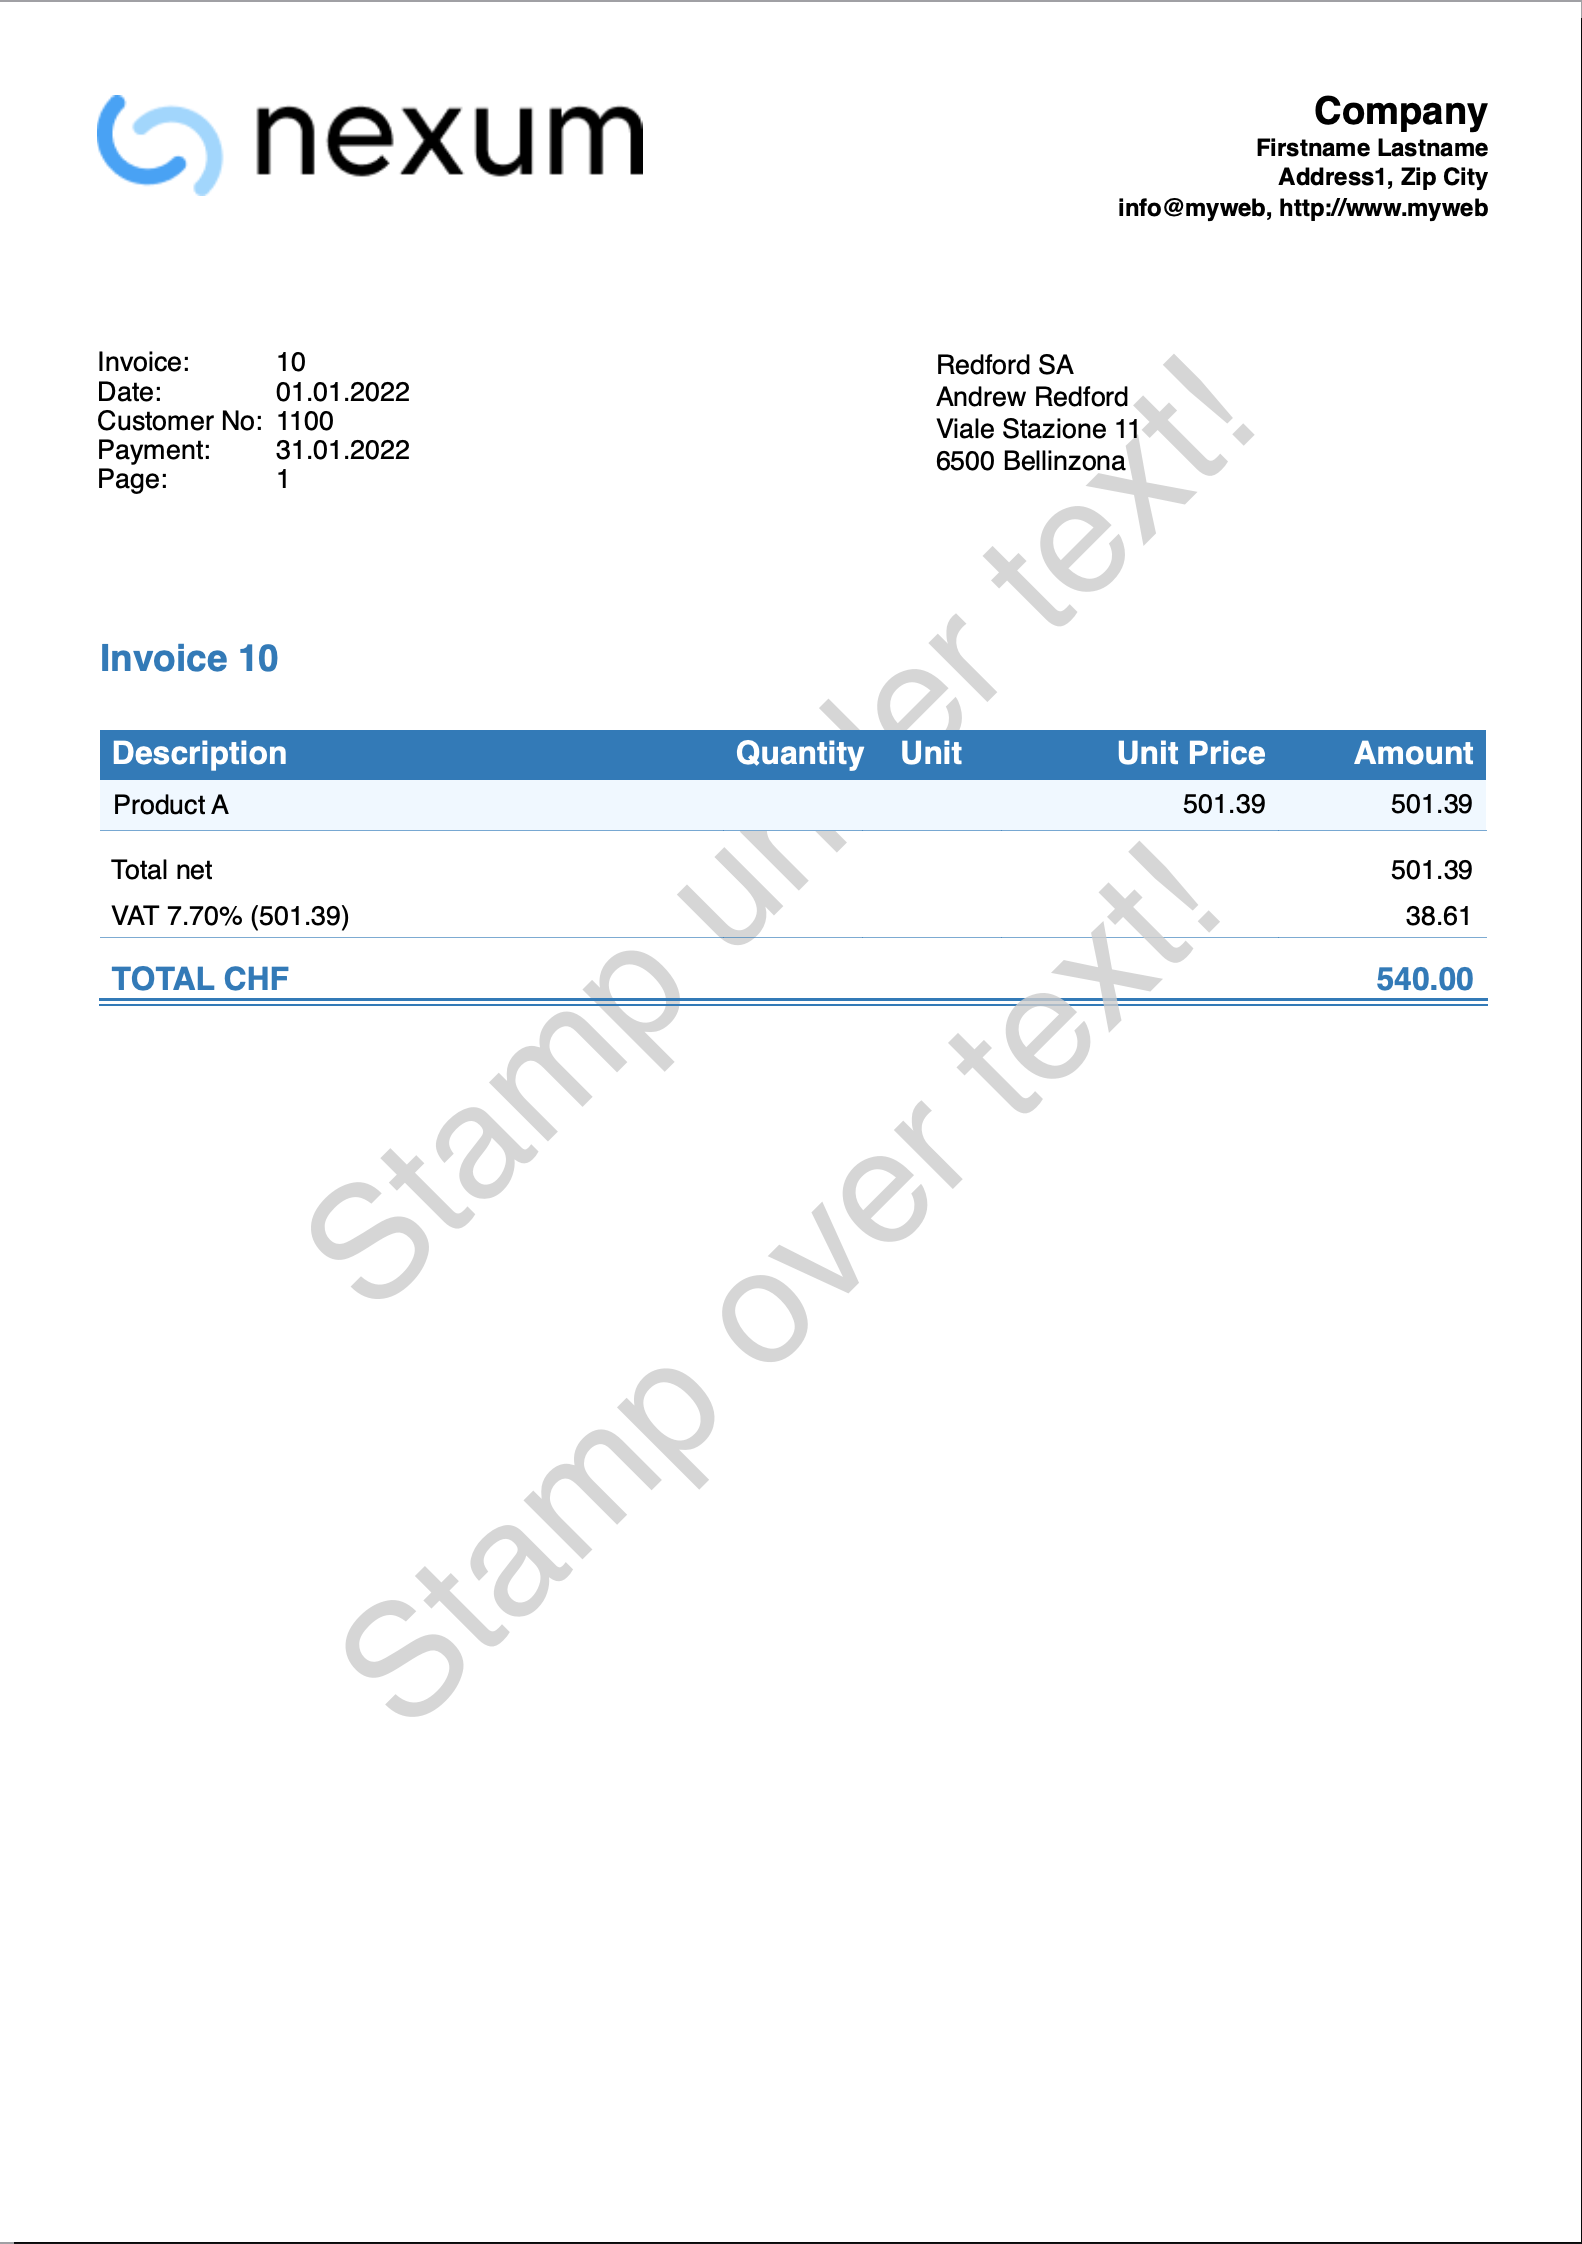
QR invoice error messages
Error Messages
@error Missing QR-IBAN
- The QR-IBAN code must be entered in the invoice settings, under the related QR-IBAN entry.
- Check that QR-IBAN code is not entered from File → File and accounting properties → Address section.
@error Incorrect QR-IBAN
Check that the QR-IBAN code entered in the invoice settings is correct.
@error Missing IBAN
- The IBAN for an account in CHF can be specified in two ways:
- From File → File and accounting properties → Address section.
- From invoice settings, under the related IBAN entry.
- The IBAN for an account in EUR must be entered in the invoice settings, under the IBAN EUR entry.
@error Incorrect IBAN
- Check that the IBAN code entered from File → File and accounting properties → Address section or in the invoice settings is correct.
- Check that the QR-IBAN has not been entered from File → File and accounting properties → Address section. The QR-IBAN code must be entered in the invoice settings.
@error Address: missing name/business
Set the sender's first and last name or company name from File → File and accounting properties → Address section, and the customer's first and last name or company name in the Accounts table → Address view.
@error Address: missing ZIP code
Set the sender's zip code from File → File and accounting properties → Address section, and the customer's zip code in the Accounts table → Address view.
@error Address: missing locality
Set the sender's locality from File → File and accounting properties → Address section, and the customer's locality code in the Accounts table → Address view.
@error Address: missing country code
Set the sender's country code from File → File and accounting properties → Address section, and the customer's country code in the Accounts table → Address view.
@error Address: Incorrect country code
The country code must be two characters in accordance with ISO 3166-1 (e.g. CH, LI, AT, DE, IT, FR).
@error isrId too long, max 8 chars. Your isrId %1
The membership number entered is too long. The maximum length allowed is of 8 digits. For more information QR reference.
@error isrId invalid, only digits are permitted. Your isrId %1
The membership number entered is not valid. It can only consist of numbers. For more information QR reference.
@error customerNo too long, max 7 digits. Your customerNo %1
The customer number is too long. The maximum length allowed is of 7 digits. For more information QR reference.
@error customerNo invalid, only digits are permitted. Your customerNo %1
The customer number is not valid. It can only consist of numbers. It must not contain ASCII (A-Z) letters, spaces, separators or other characters. For more information QR reference.
@error invoiceNo too long, max 7 digits. Your invoiceNo %1
The invoice number is too long. The maximum length allowed is of 7 digits. For more information QR reference.
@error invoiceNo invalid, only digits are permitted. Your invoiceNo %1
The invoice number is not valid. It can only consist of numbers. It must not contain ASCII (A-Z) letters, spaces, separators or other characters. For more information QR reference.
@error Name too long, max 70 characters
The name is too long. The maximum length allowed is of 70 characters. For more information Technical information.
@error Address too long, max 70 character
The address is too long. The maximum length allowed is of 70 characters. For more information Technical information.
@error House number too long, max 16 characters
The house number is too long. The maximum length allowed is of 16 characters. For more information Technical information.
@error Postal code too long, max 16 characters
The postal code is too long. The maximum length allowed is of 16 characters. For more information Technical information.
@error Locality too long, max 35 characters
The locality is too long. The maximum length allowed is of 35 characters. For more information Technical information.
@error Postal code+Locality too long, max 70 characters
The postal code + locality is too long. The maximum length allowed is of 70 characters. For more information Technical information.
Examples of QR invoice printouts
This page shows some examples of possible printouts of QR invoices.
Invoice with default settings
- Use the default settings of the templates for invoices dialog:
- Enter an IBAN account in the basic data File and accounting properties > Address or in the invoice settings.
Example print:
Invoice with logo
Via File > Logo setup:
- Define the logo, size and alignment.
- Set the alignment of the invoice header text.
Define the header text in File and accounting properties > Address or using the templates for invoices dialog:
Example invoice with logo aligned on the left and text on the right:![]()
Example invoice with logo aligned on the right and text on the left:![]()
Invoice with Letterhead-Style Logo (A4 Format)
This example explains how to set a full-page logo (like a letterhead). An image with a logo at the top and a footer at the bottom is used. The goal is to print the invoice with:
- On pages with invoice details, both the logo and the footer are displayed.
- On the last page with the QR slip, only the logo is displayed without the footer.
This is useful, for example, if you want to print a QR invoice that also includes the footer, because normally the footer can only be added if the QR slip is excluded from printing.
Here's how to do it:
- Create an A4-sized image of the letterhead with the logo at the top and the footer at the bottom.
Example:
- Insert the created image as the logo from the menu File > Logo setup.
- Set the size: width 21cm and height 29.7cm (if the image dimensions are already correct, you can skip this).
- Set alignment to left.
- The position and alignment of the text are irrelevant since no text will be printed in the header.
- Use custom CSS to adjust the logo margins.
In the Documents table, add a new row with the CSS as an attachment.- In the ID column, enter an ID (e.g., logo.css). It must end with ".css".
- In the Attachments column, double-click the cell and select CSS Stylesheet.
- In the editor that opens, paste the following code:
.logo {
  margin-top: 0cm;
  margin-left: 0cm;
  margin-right: 0cm;
}
- Set some parameters in the invoice settings dialog:
- In the Print > Header section, uncheck Page header.
- In the same section, check Logo.
- In the field Composition for logo and header alignment, enter the name of the customization you defined in File > Logo Setup > Customization > Name (default is "Logo").
- In the QR Code section, check QR on separate page.
- In the Javascript / CSS section, enter the CSS file ID defined in the Documents table (e.g., logo.css) in the CSS file name field.
Example of a QR invoice, with logo and footer on the first page, and logo with QR slip on the second page:![]()
![]()
Invoice without logo and company header on the left
Go the the File > Logo setup window:
- Do not add any logo image
- As Text position enter the following settings:
- Relative position to logo: To the left
- Horizontal align: Left
- Go to the Customization section and in the Name field enter a name for the customization (e.g., "Logo").

Now go to the invoice setup dialog window, in the Print > Header part:
- Check the Page header checkbox
- Check the Logo checkbox (although no logo image will be shown)
- In the field Composition for logo and header alignment enter the name of the customization that you previously defined in the Logo Setup > Customization > Name dialog (e.g., "Logo").
![]()
Printout example:
![]()
Invoice with customer address on the left
Via the templates for invoices dialog, in the client Address section:
- Define the composition of the address by specifying the XML names of the address columns of the Accounts table.
- Check the Align left box to print the address on the left and the part of the information on the right.
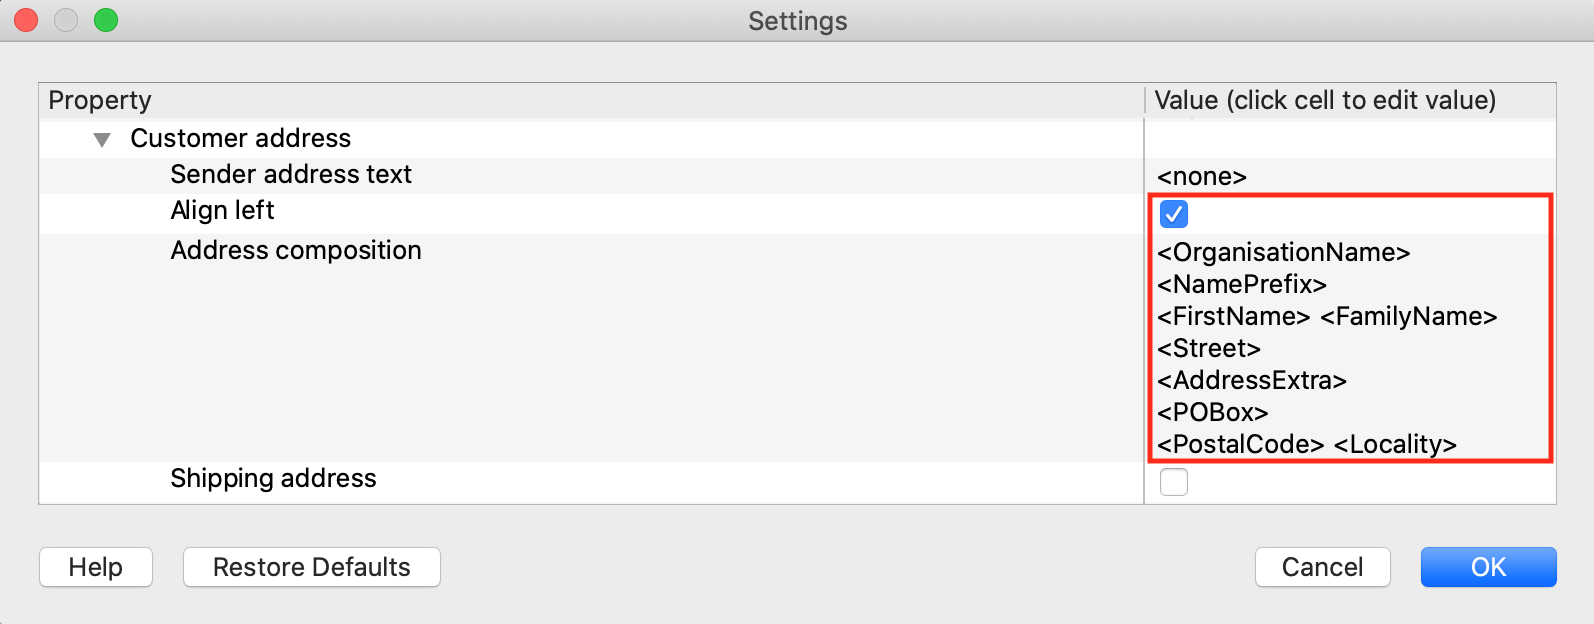
Printout example: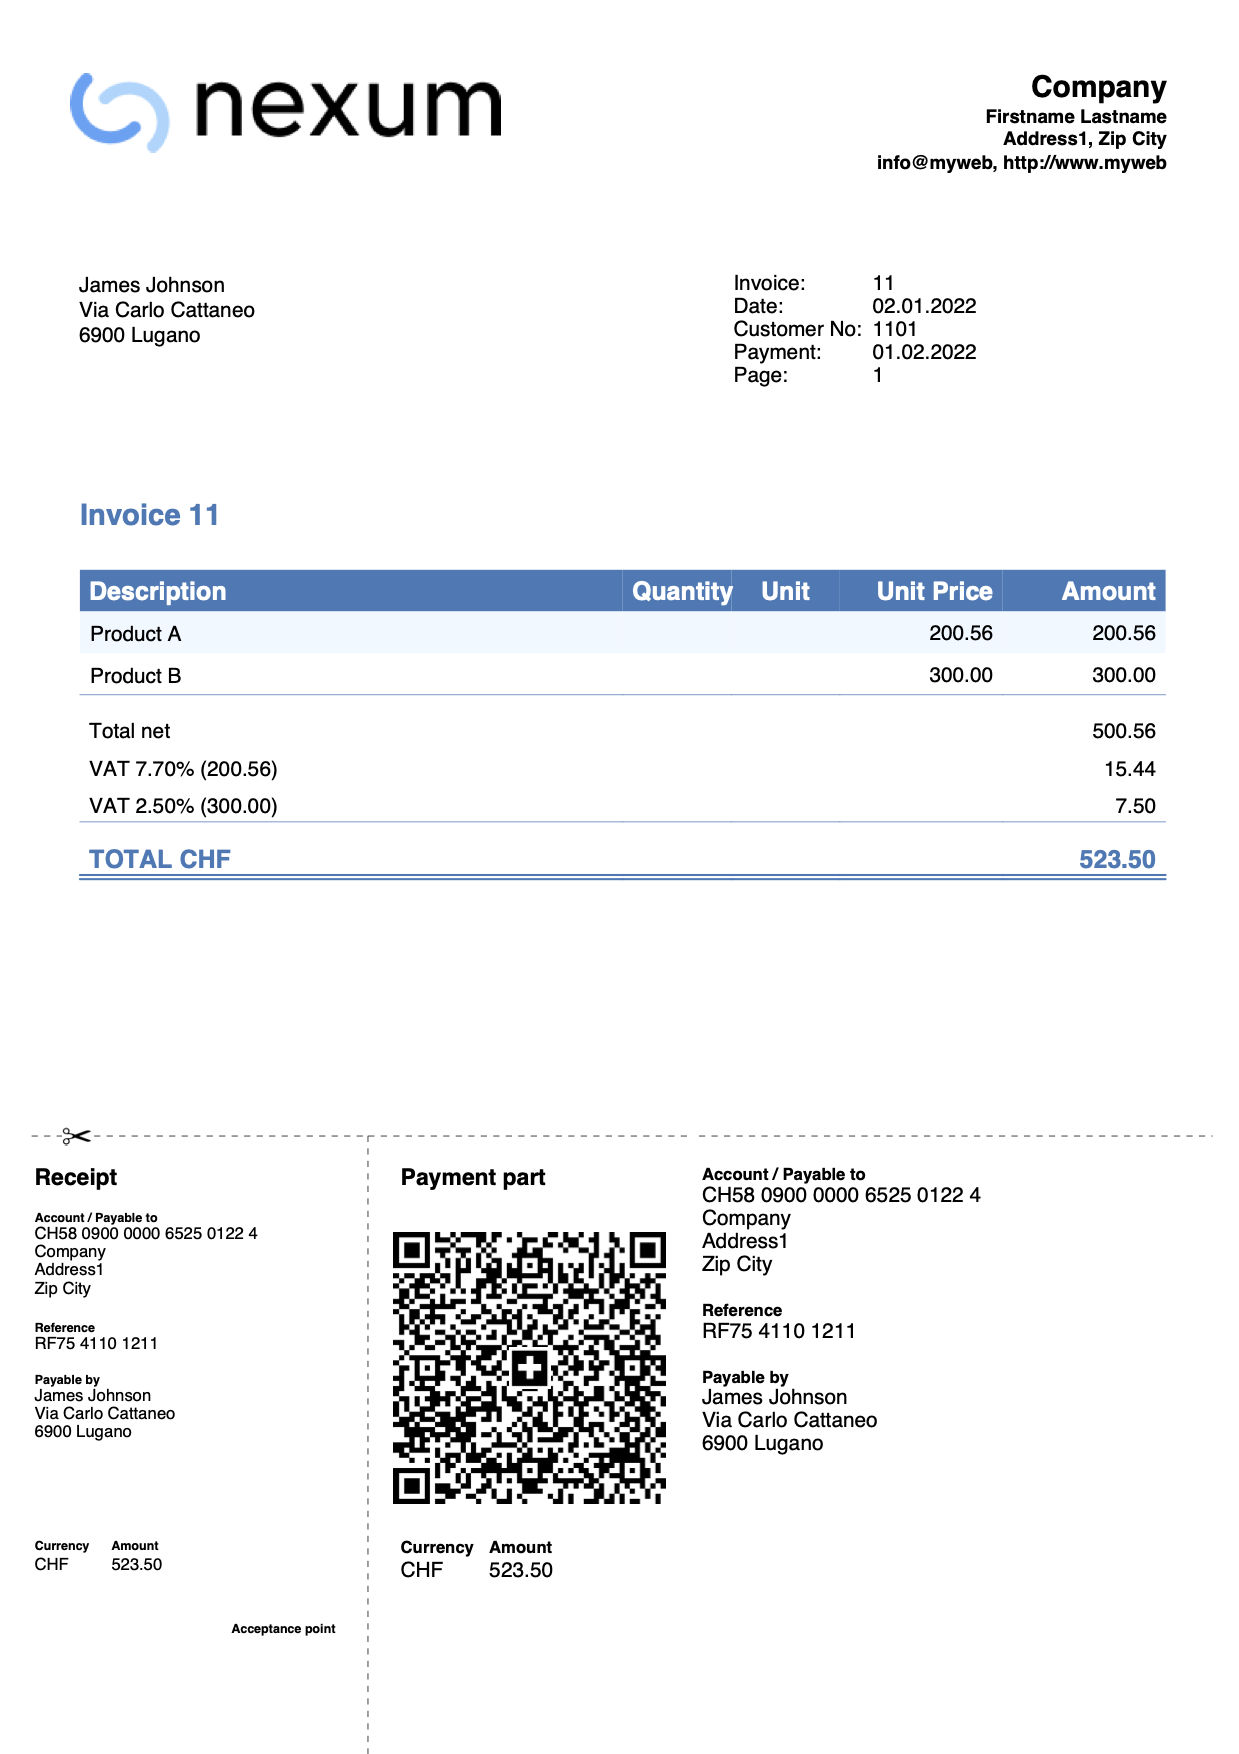
Invoice with headings and intermediate totals
In some cases it may be useful to add headers and intermediate totals in the invoice details.
In the Transactions table, define the header and intermediate totals rows using the Column type column:
- Header lines: enter the command 10: hdr and the text in the Description column.
- Intermediate totals rows: enter the command 10: tot and the text in the Description column.
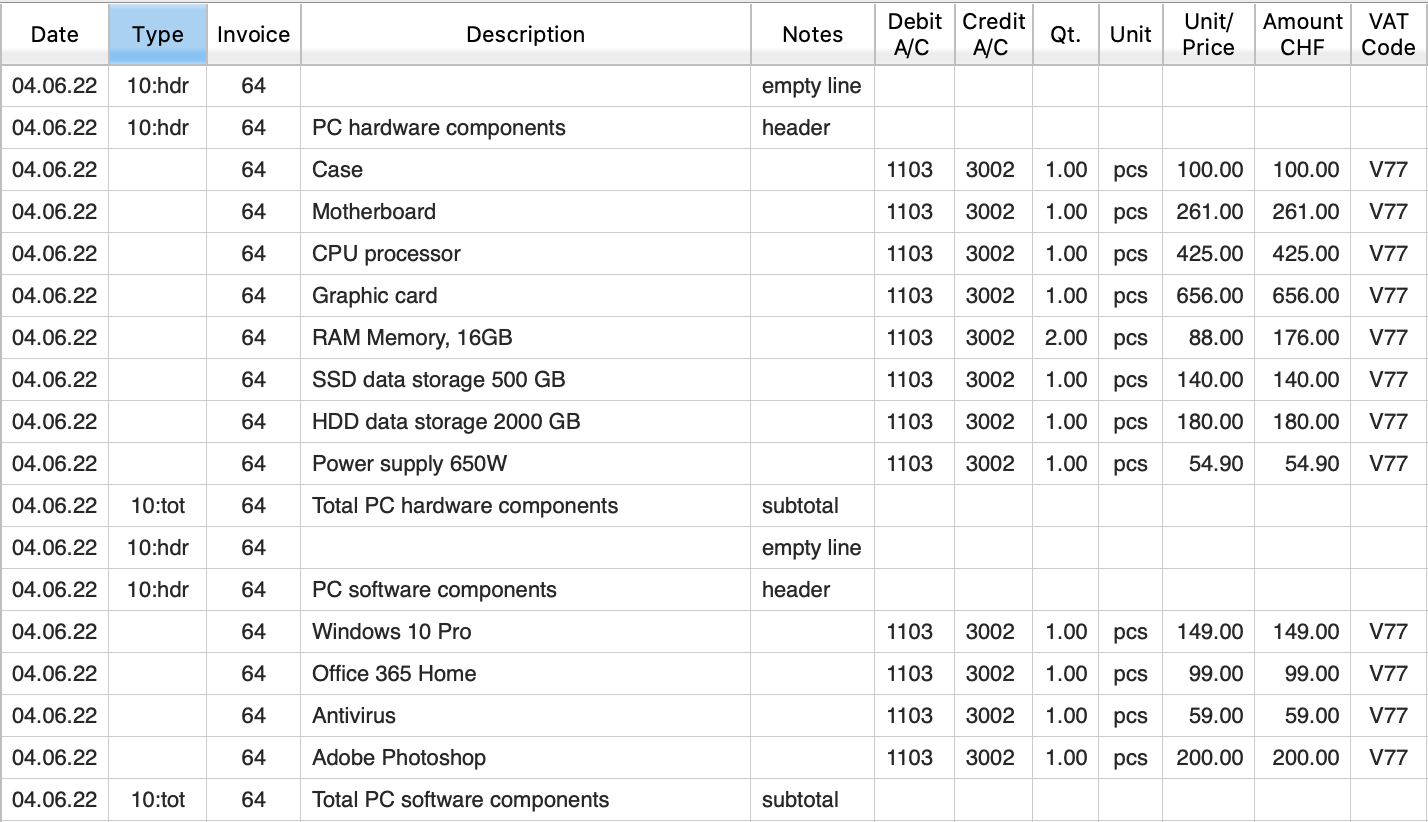
Multi-page invoice example: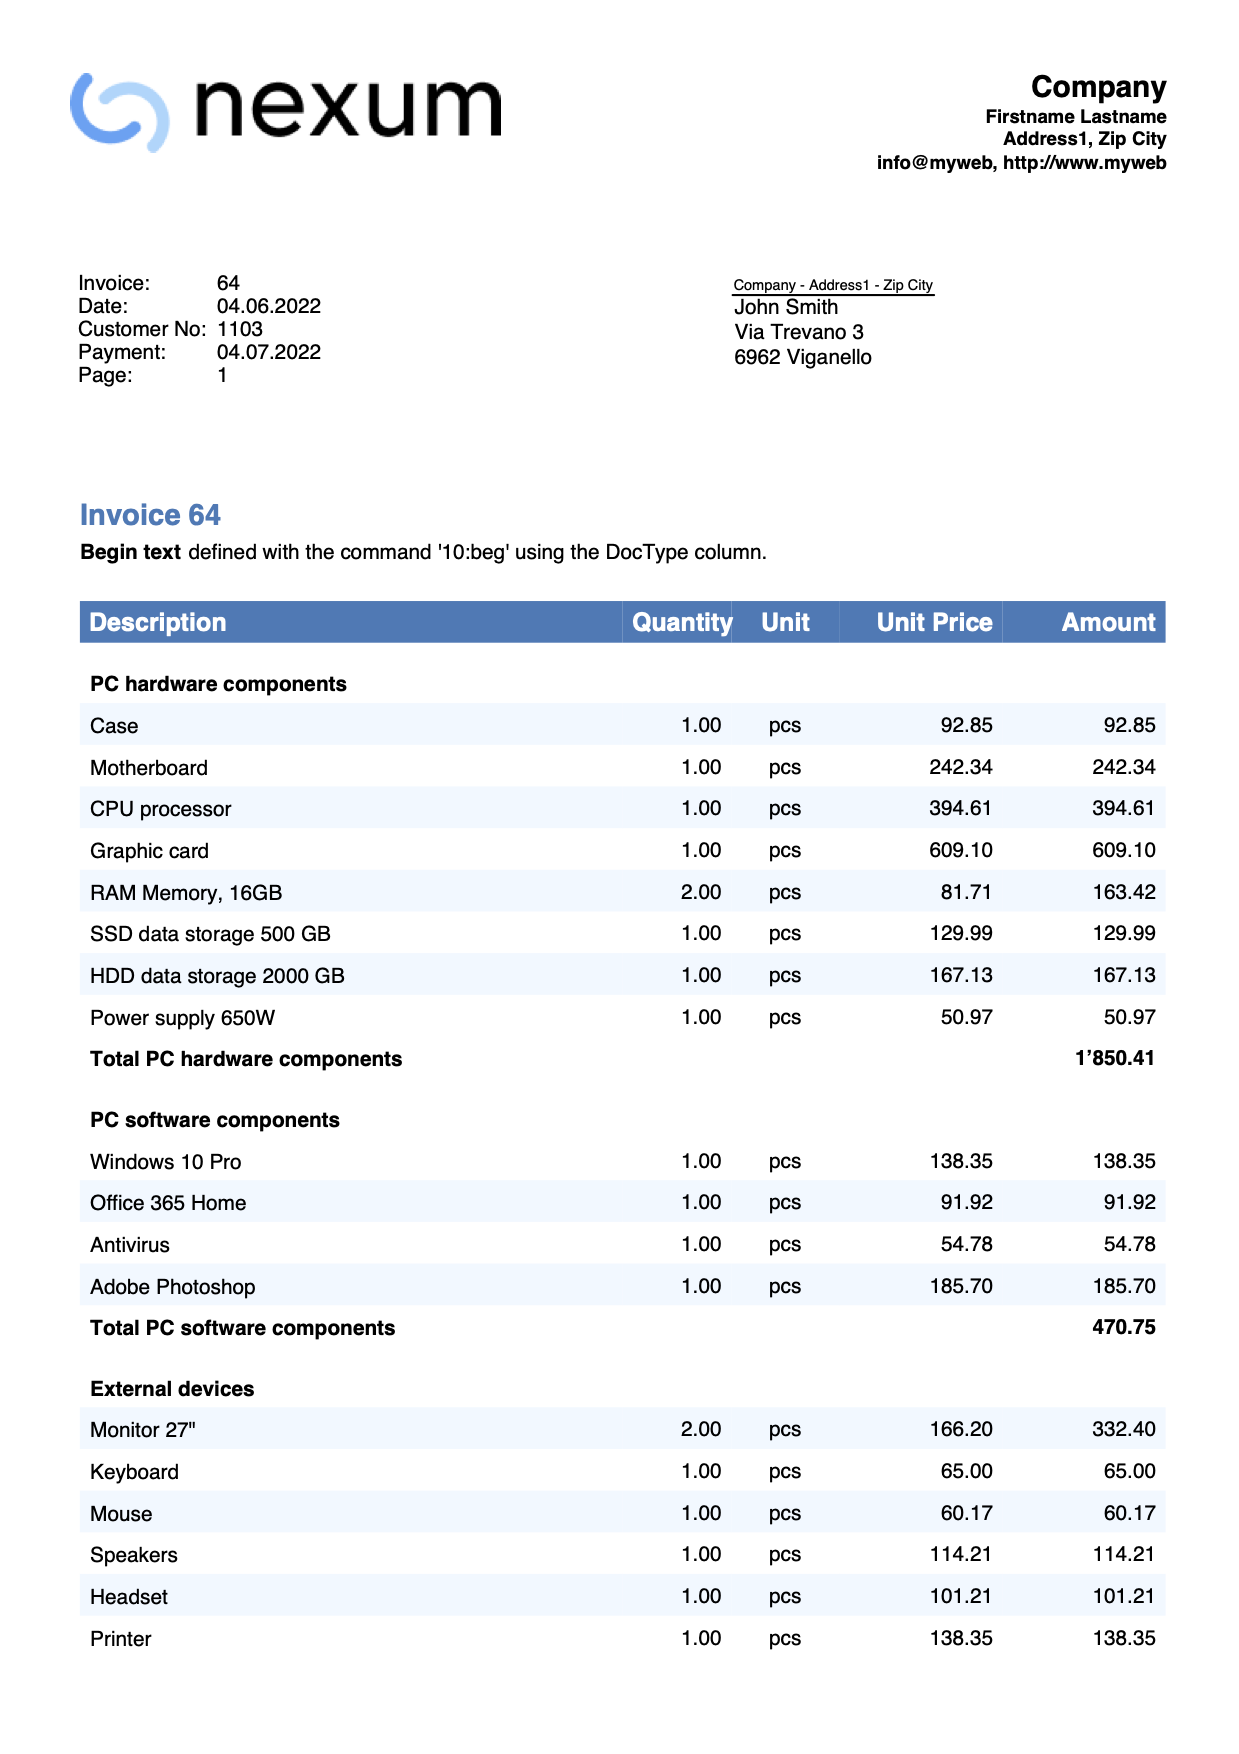
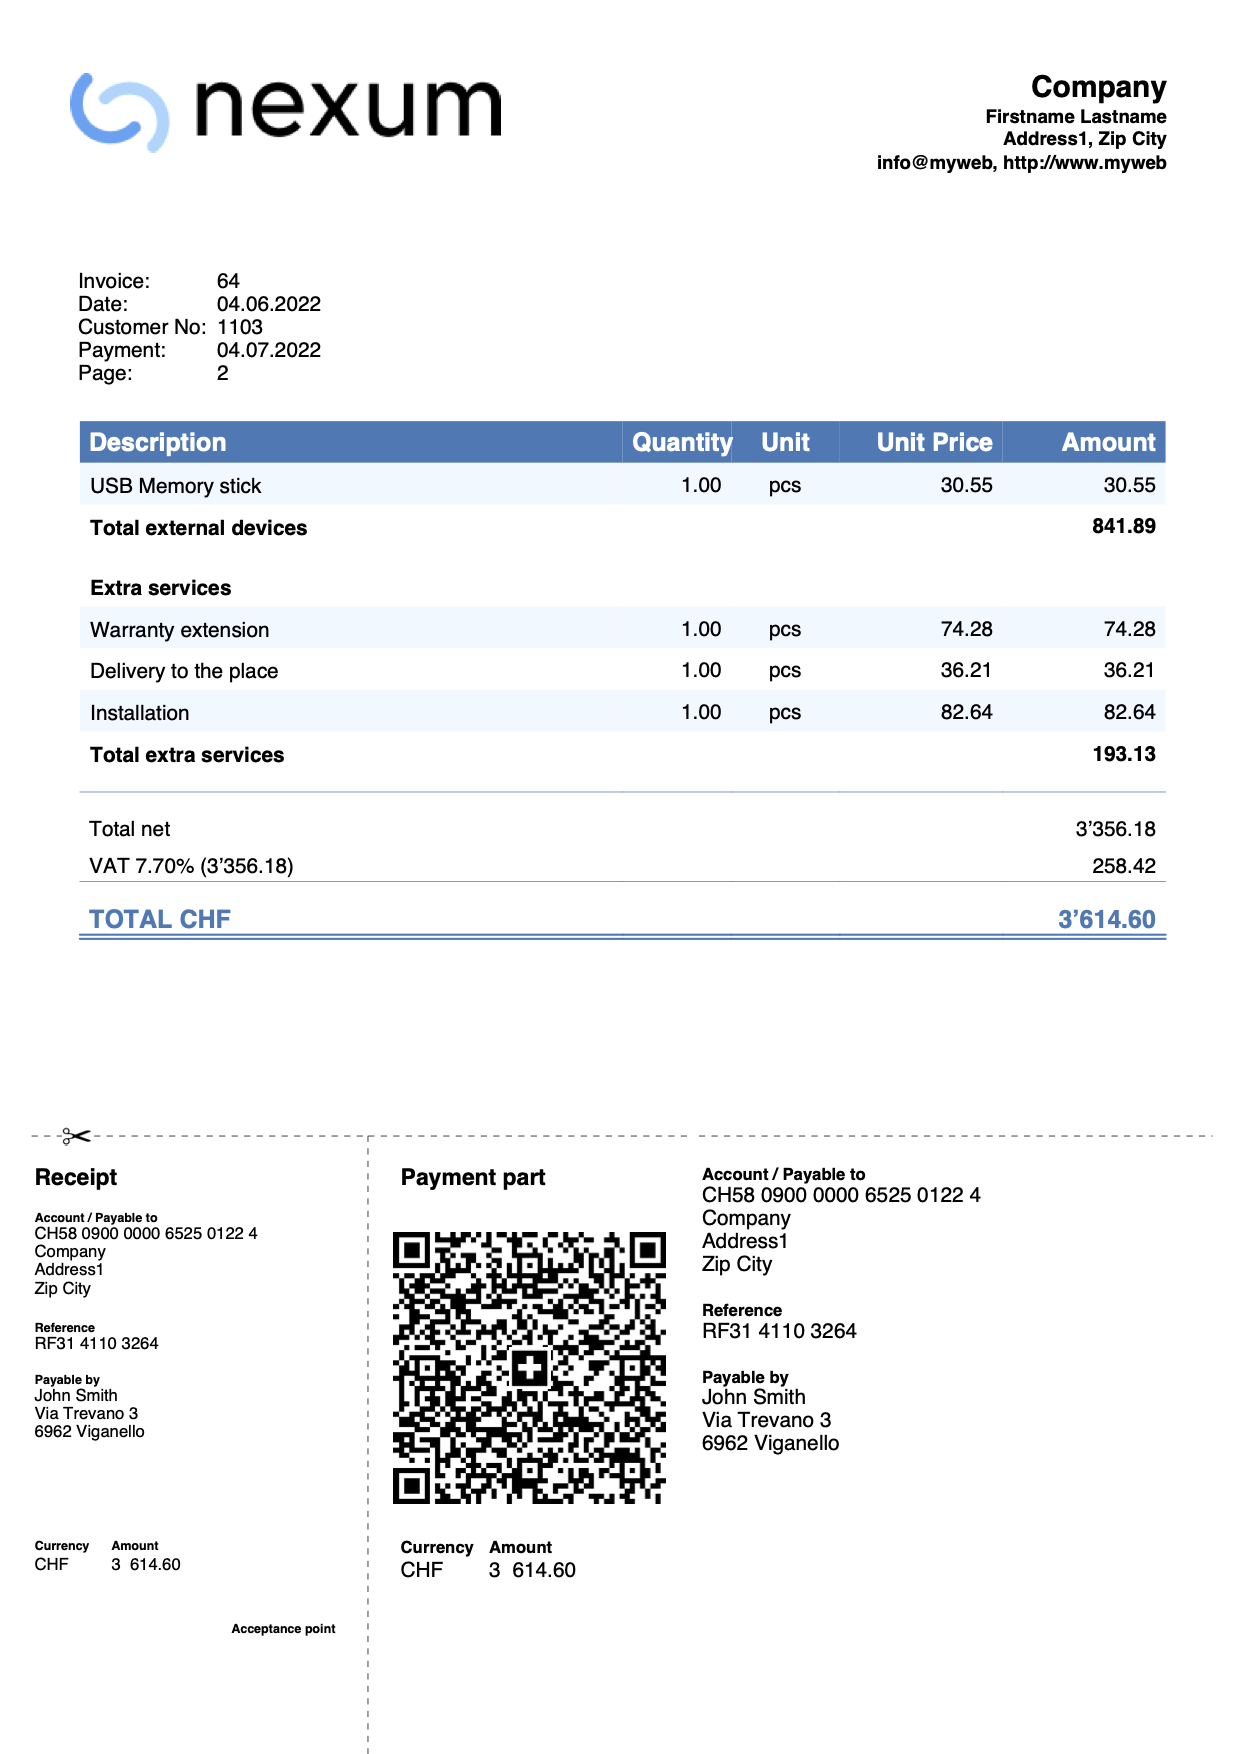
Invoice with shipping address, description and amount columns
Via the templates for invoices dialog:
- Check the Shipping address box in the Customer address section.
- In the Invoice Details section, define:
- The names of the columns to use, specifying the XML names of the Transactions table columns.
- The width of each column.
- The alignments of titles and texts of the columns.
- In the Texts section, define the header text of each column.
Add the translation for each language you intend to use.
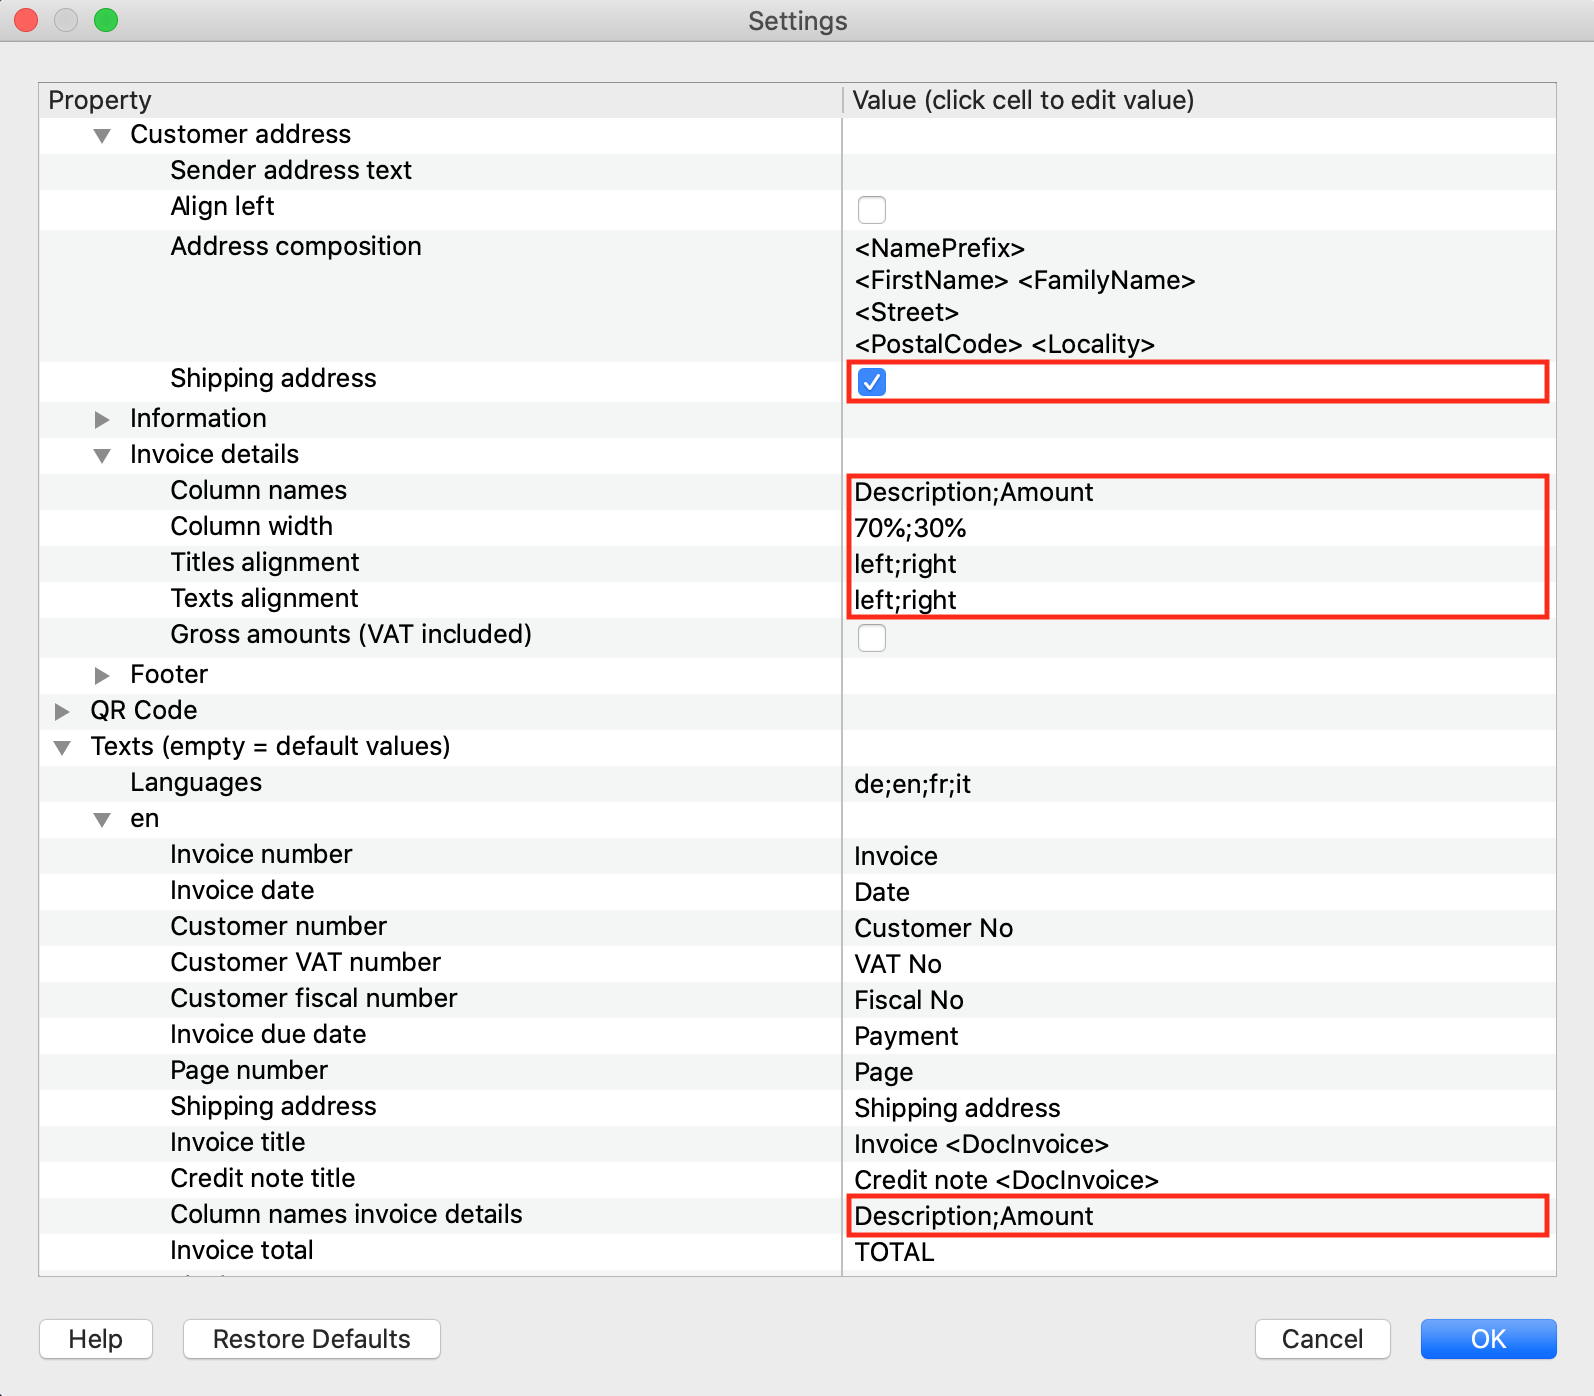
Invoice printout example with other settings: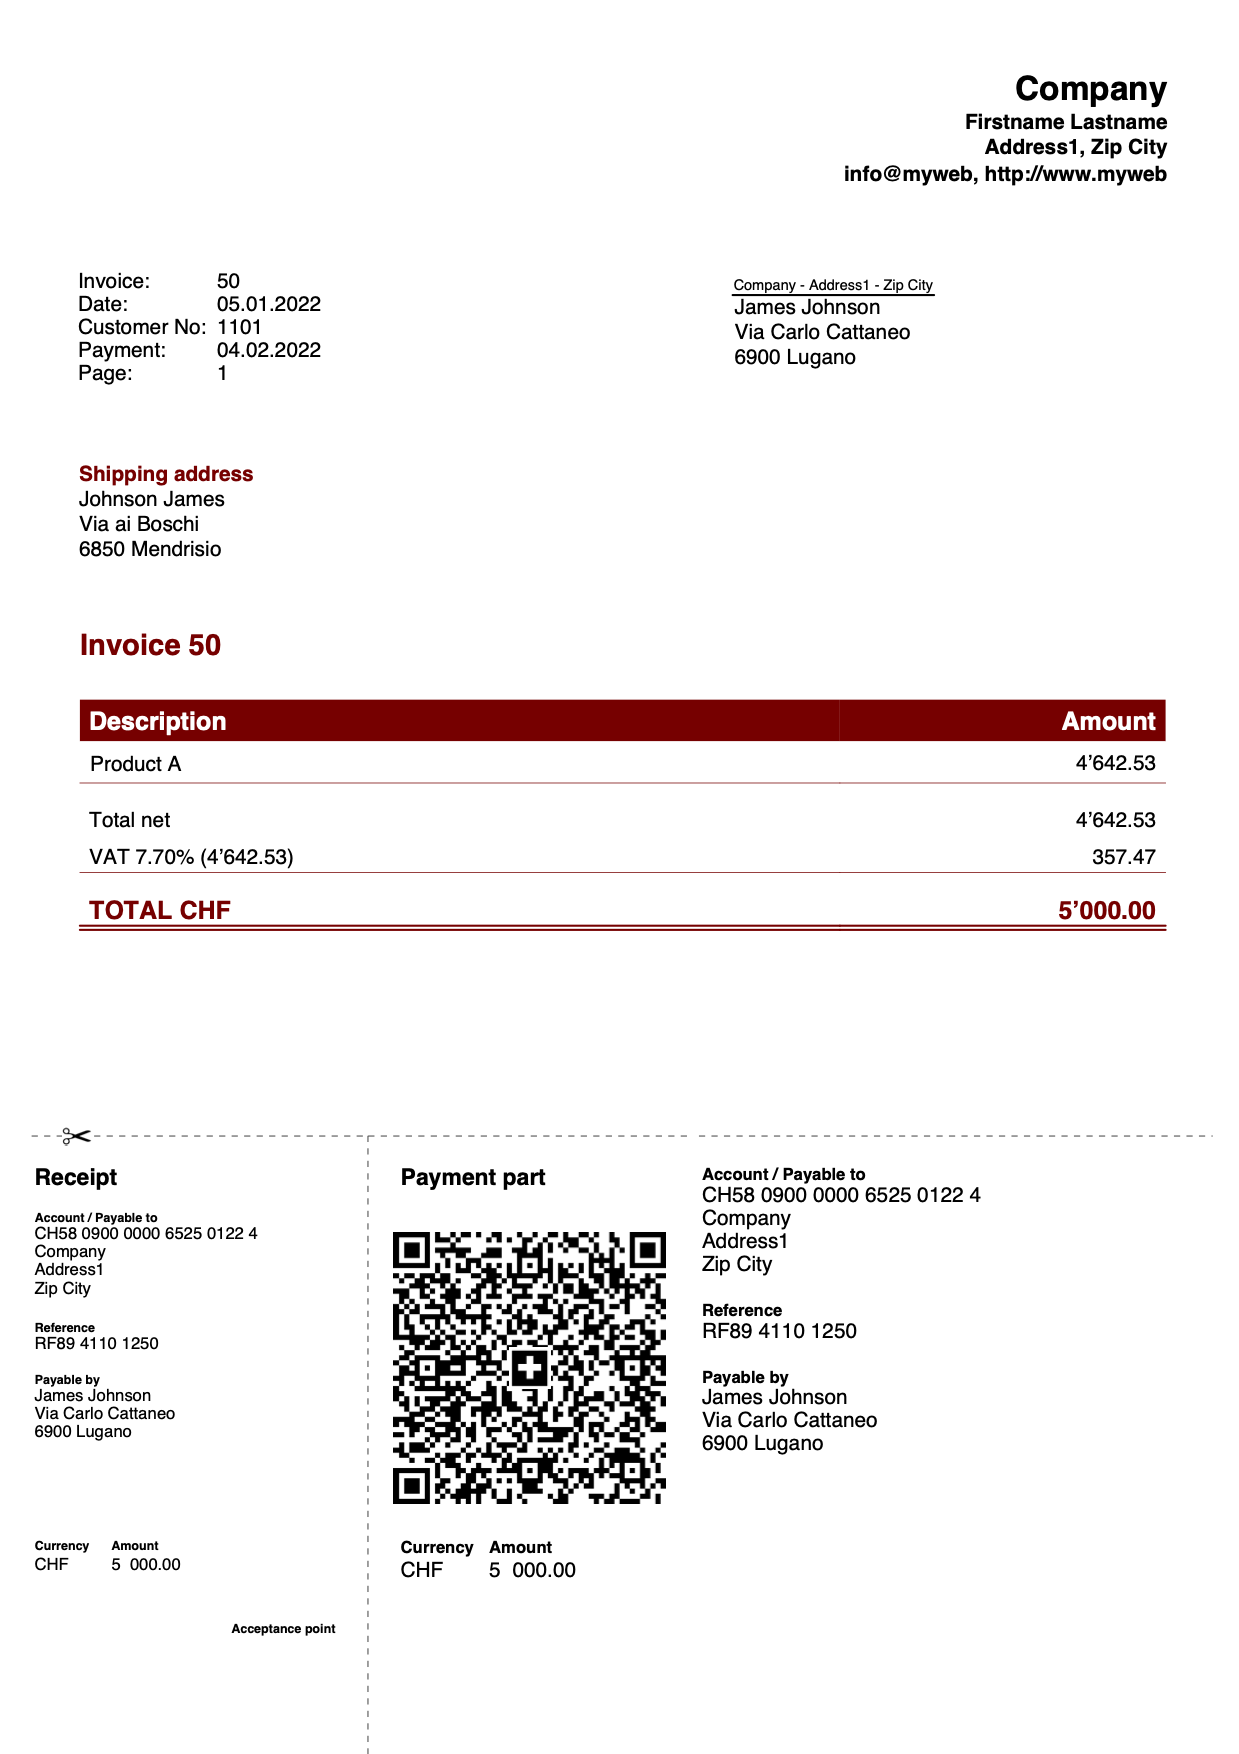
Use columns from the Transactions table
Prerequisites:
- Advanced Plan of Banana Accounting Plus.
In some cases it may prove useful to include a dedicated column (not predefined in the program)for invoice details, such as a column in which to indicate the date of execution of a job.
Column creation:
- With the Columns setup command, add a column in the Transactions table.
Each proper column of type Data must begin with the word Date (eg DateWork, DateExecution, DateXXX). - Enter your postings to create the invoice and in this column indicate the date of execution of the job.
- For the invoice printout, the program uses the date format defined in the operating system settings.
Via the templates for invoices dialog:
- In the Invoice Details section define:
- The names of the columns to use, specifying the XML names of the Transactions table columns.
Insert the column created in this way: T.DateWork (the own columns must be preceded by "T.") - The width of each column.
- The alignments of titles and texts of the columns.
- View the Gross amounts box to use gross amounts with VAT included.
- The names of the columns to use, specifying the XML names of the Transactions table columns.
- In the Texts section, define the header text of each column.
Add the translation for each language you intend to use.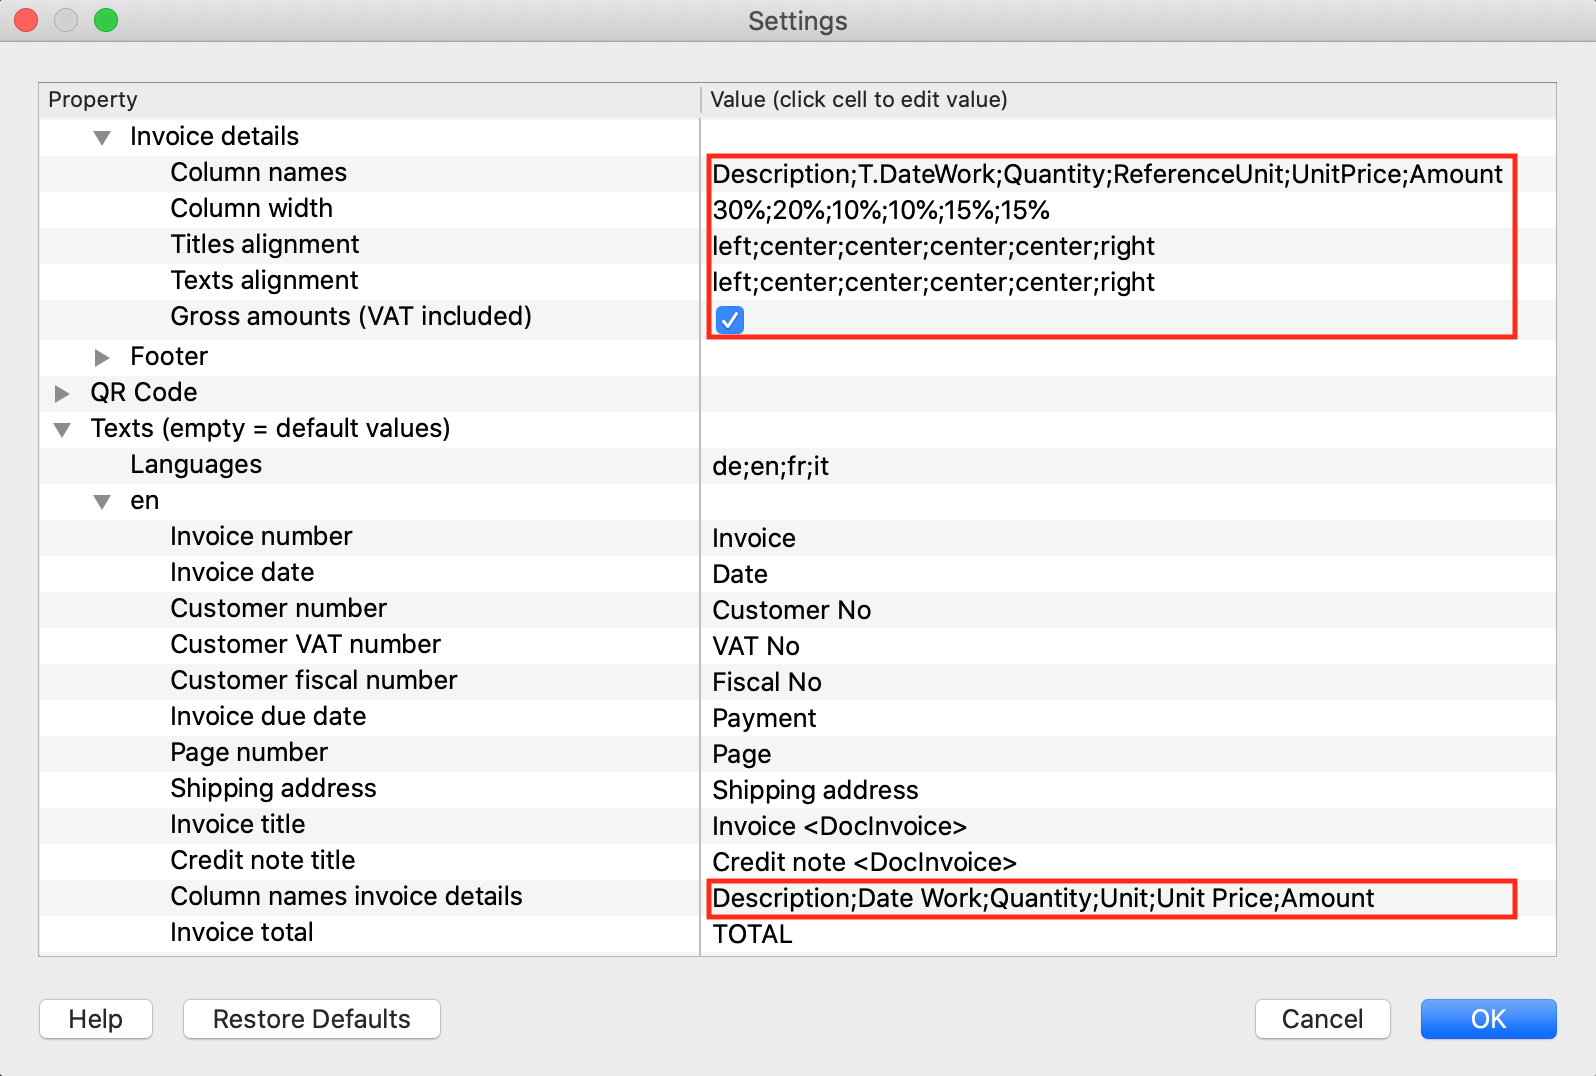
Invoice printout example: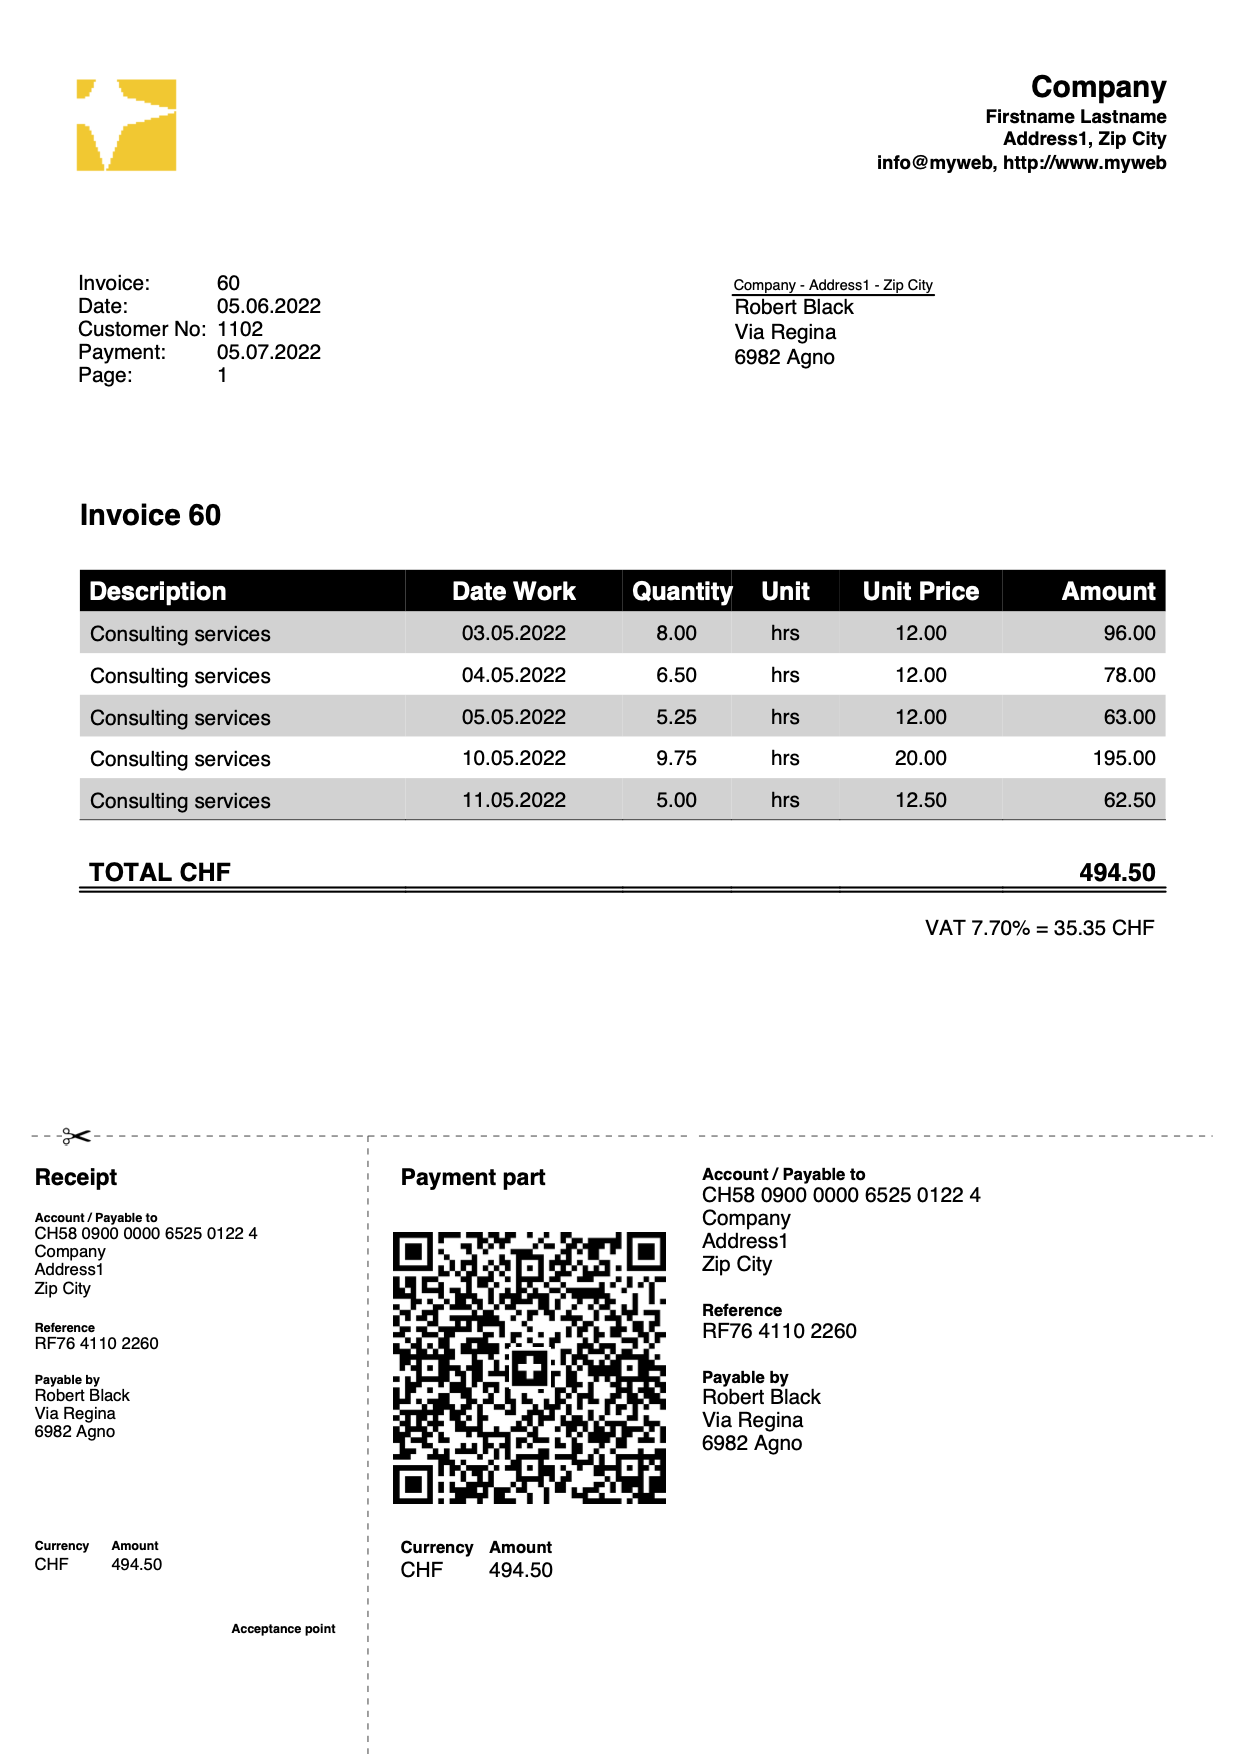
Invoice with initial, final text, notes and greetings
Define the initial texts in the Transactions table, notes and greetings using the Type column:
- Initial text: enter the command 10: beg and the text in the Description column.
- Note: enter the 10: not command and the text in the Description column
- Greetings: enter the command 10: gre and the text in the Description column.
- The text inserted between the double asterisks (**) will be displayed in bold.
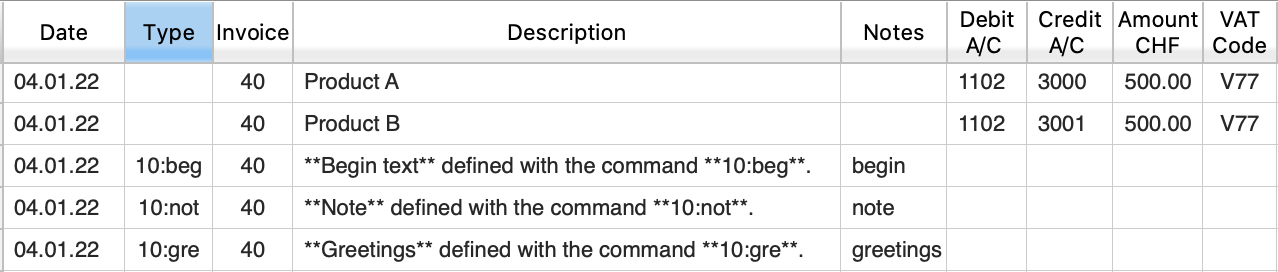
Via the templates for invoices dialog:
- In the Texts section, define the final text to be included immediately after the invoice details.
The text inserted between the double asterisks (**) will be displayed in bold.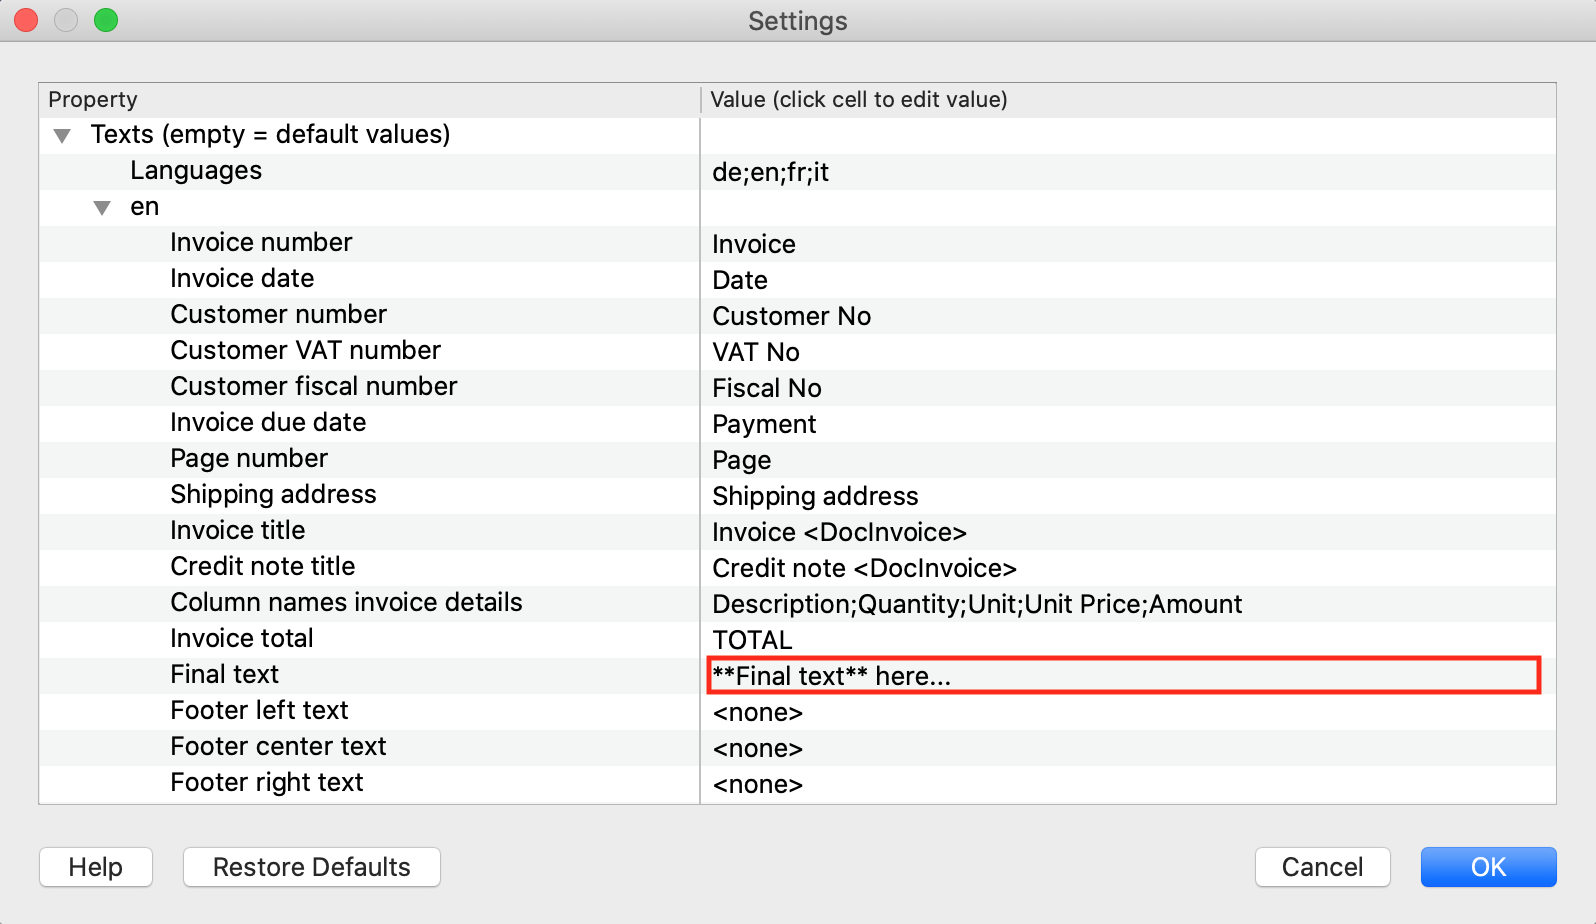
Invoice printout example: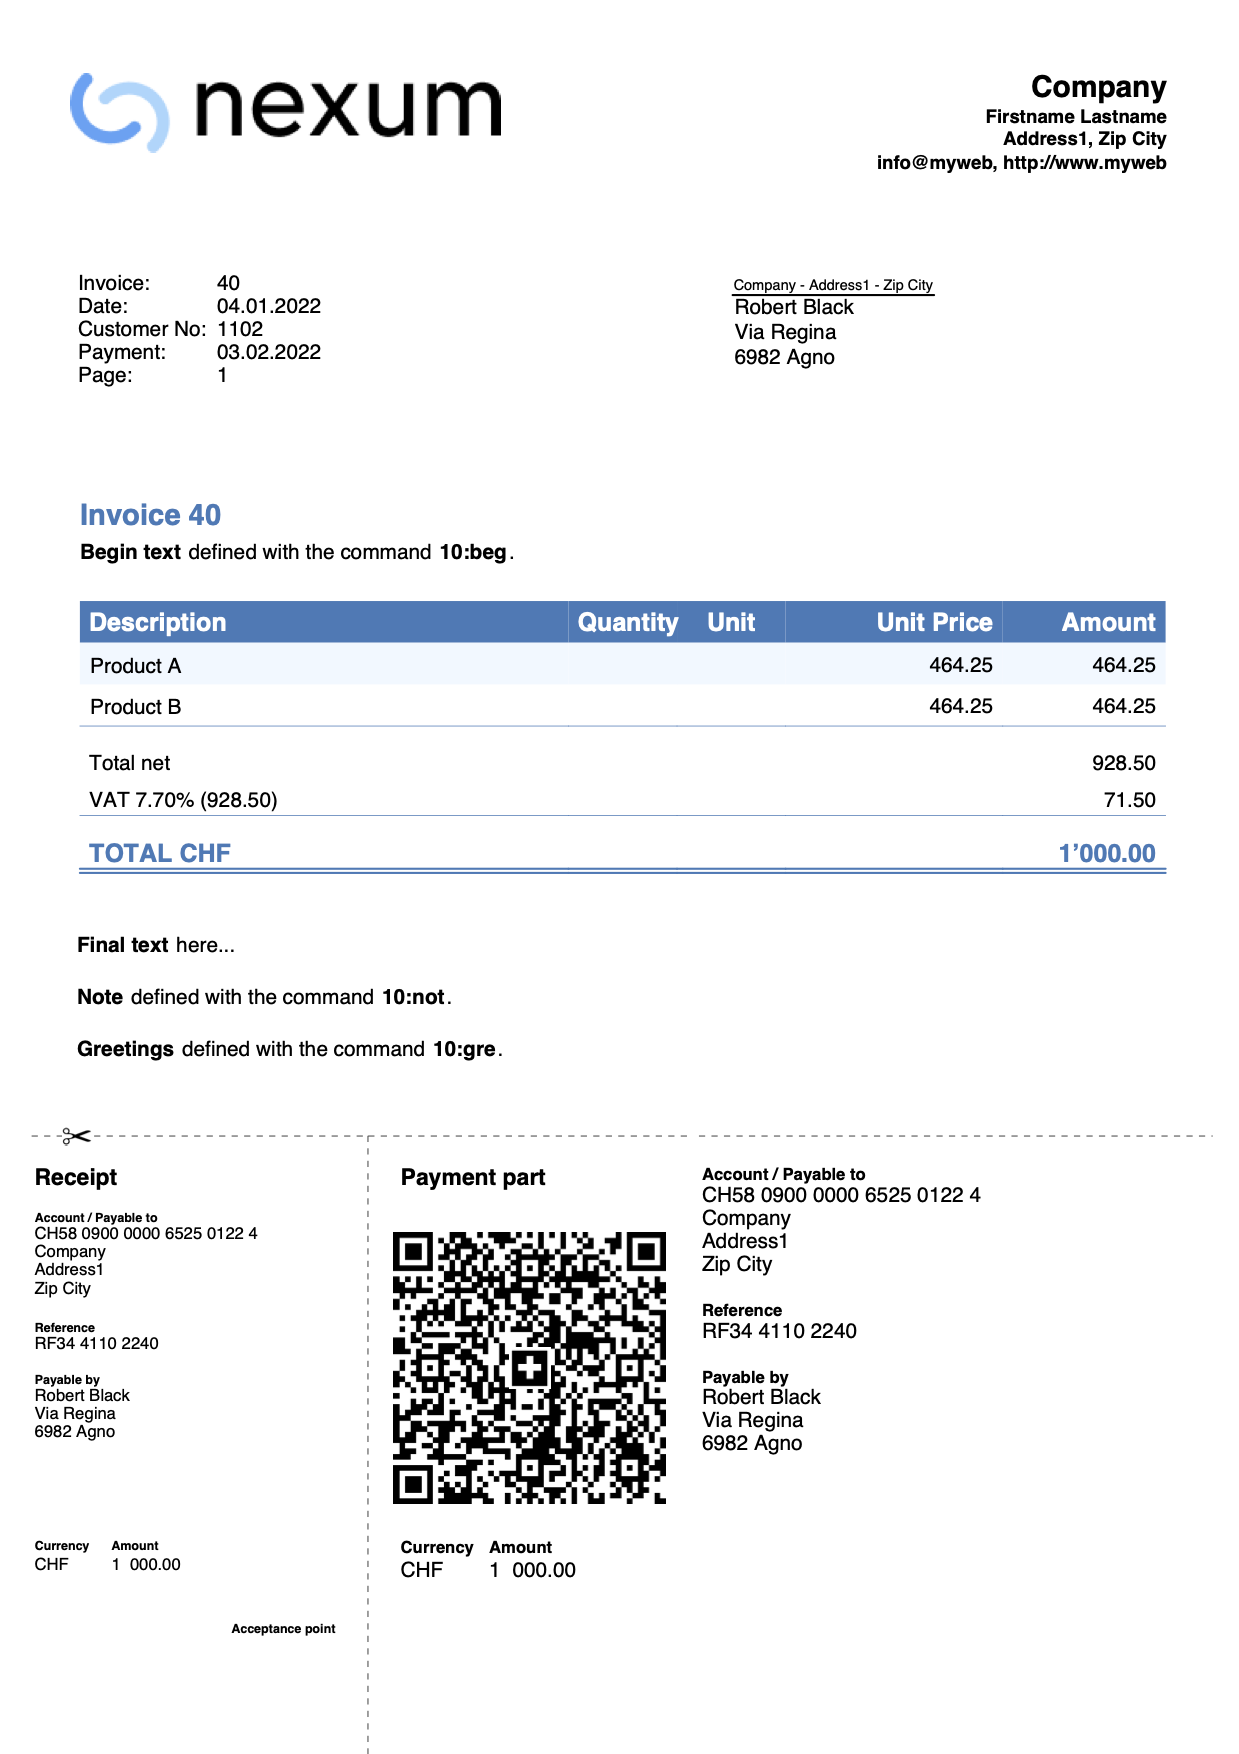
Invoice with no amount
It is used when you want to leave the possibility of choosing the amount to be paid to the person making the payment (for example for a donation).
In the QR part the amount is excluded, leaving an empty box to enter the amount by hand.
In the Transactions table enter the donation record without the amount.

Through the invoice settings dialog, in the QR Code section check the Exclude invoice amount box.

Example of invoice printing:
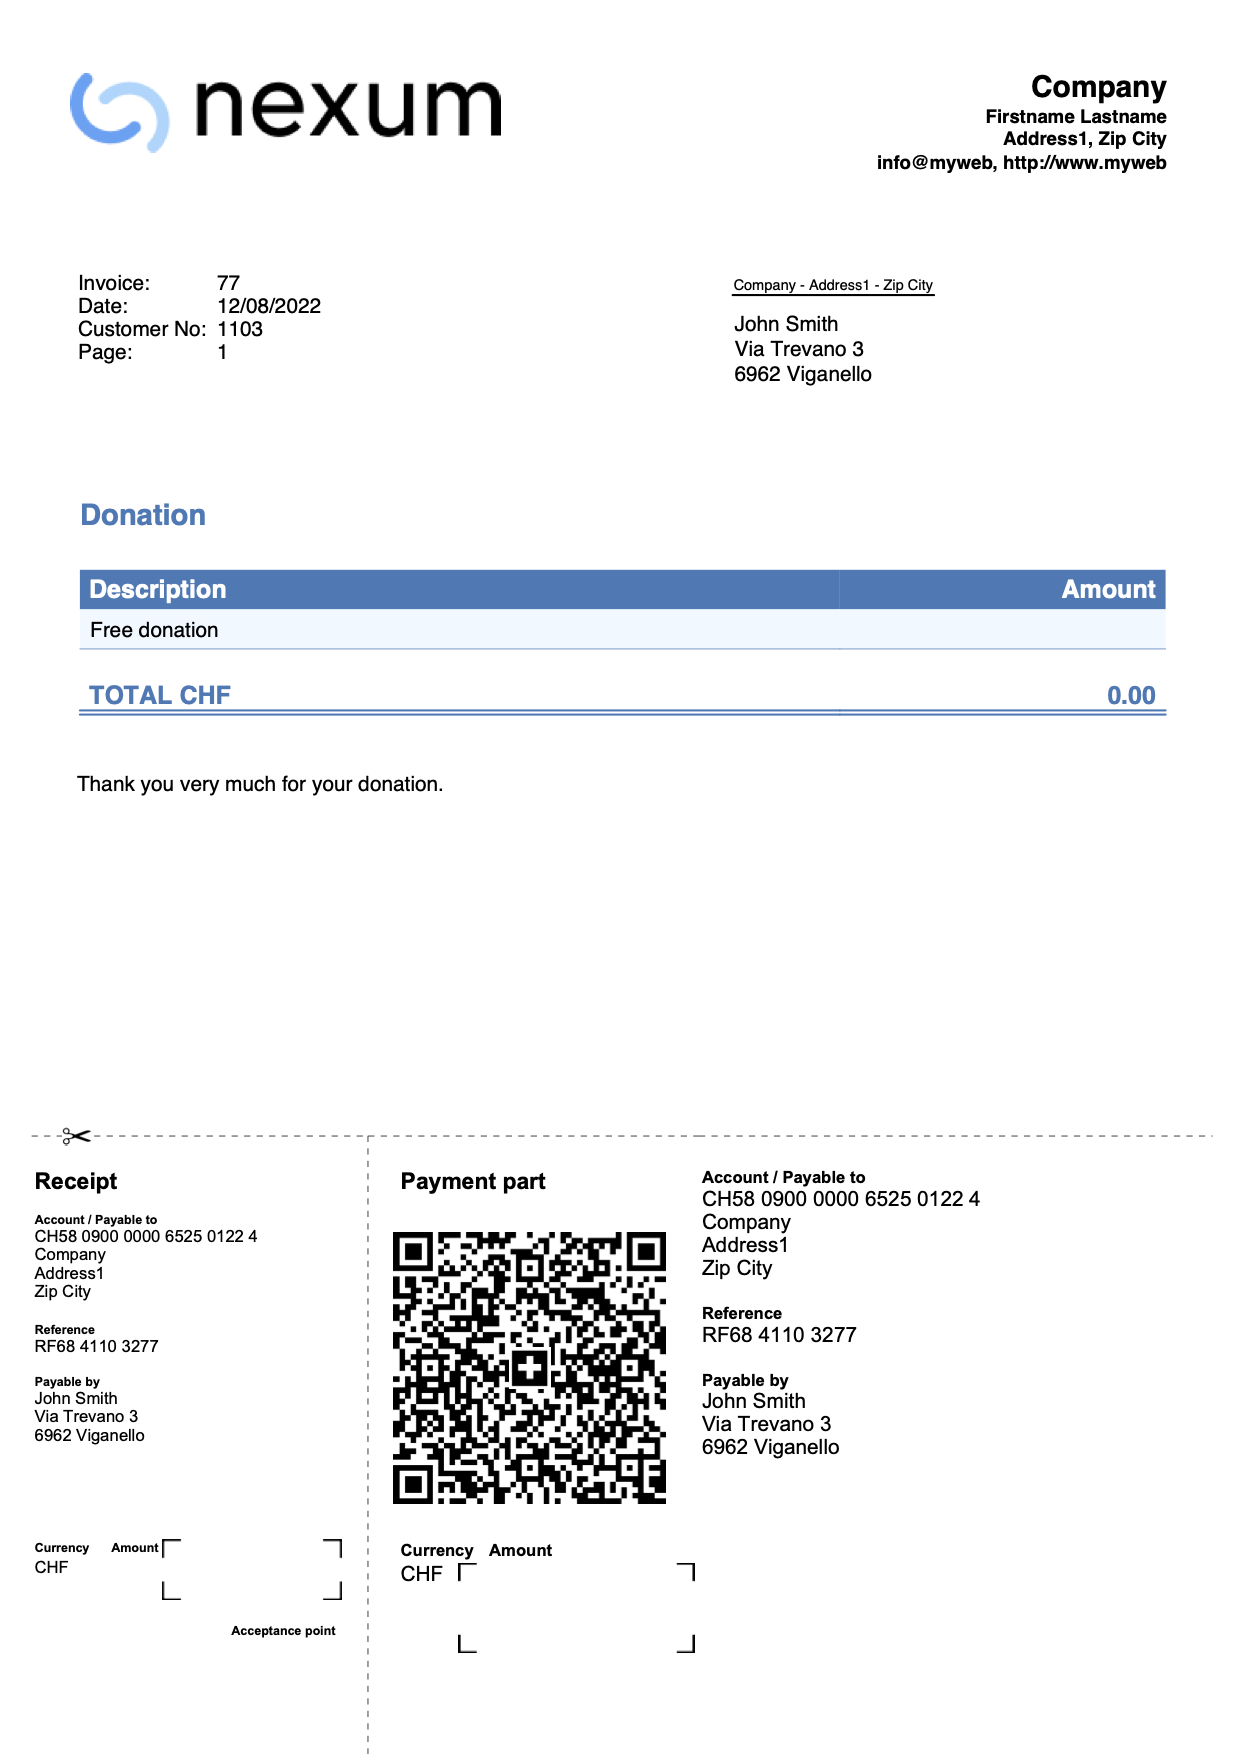
Invoice with multi-row descriptions (integrated invoicing)
This example for Integrated invoicing shows how to create invoices using multi-row descriptions.
The steps to follow are:
- Use the Arrange Columns command to add one or more additional description columns in the Transactions table.
Create columns of type Text with the name "Description" followed by a number (e.g., "Description1", "Description2", "Description3", etc.).
The XML name of each column must begin with the word "Description" followed by a number.
- In the newly created columns, enter additional text for the invoice description.
The text for each column will be displayed on a new line in the invoice description.
- In the Invoice parameters dialog box, in the Print > Invoice details section, display the Print additional descriptions box.
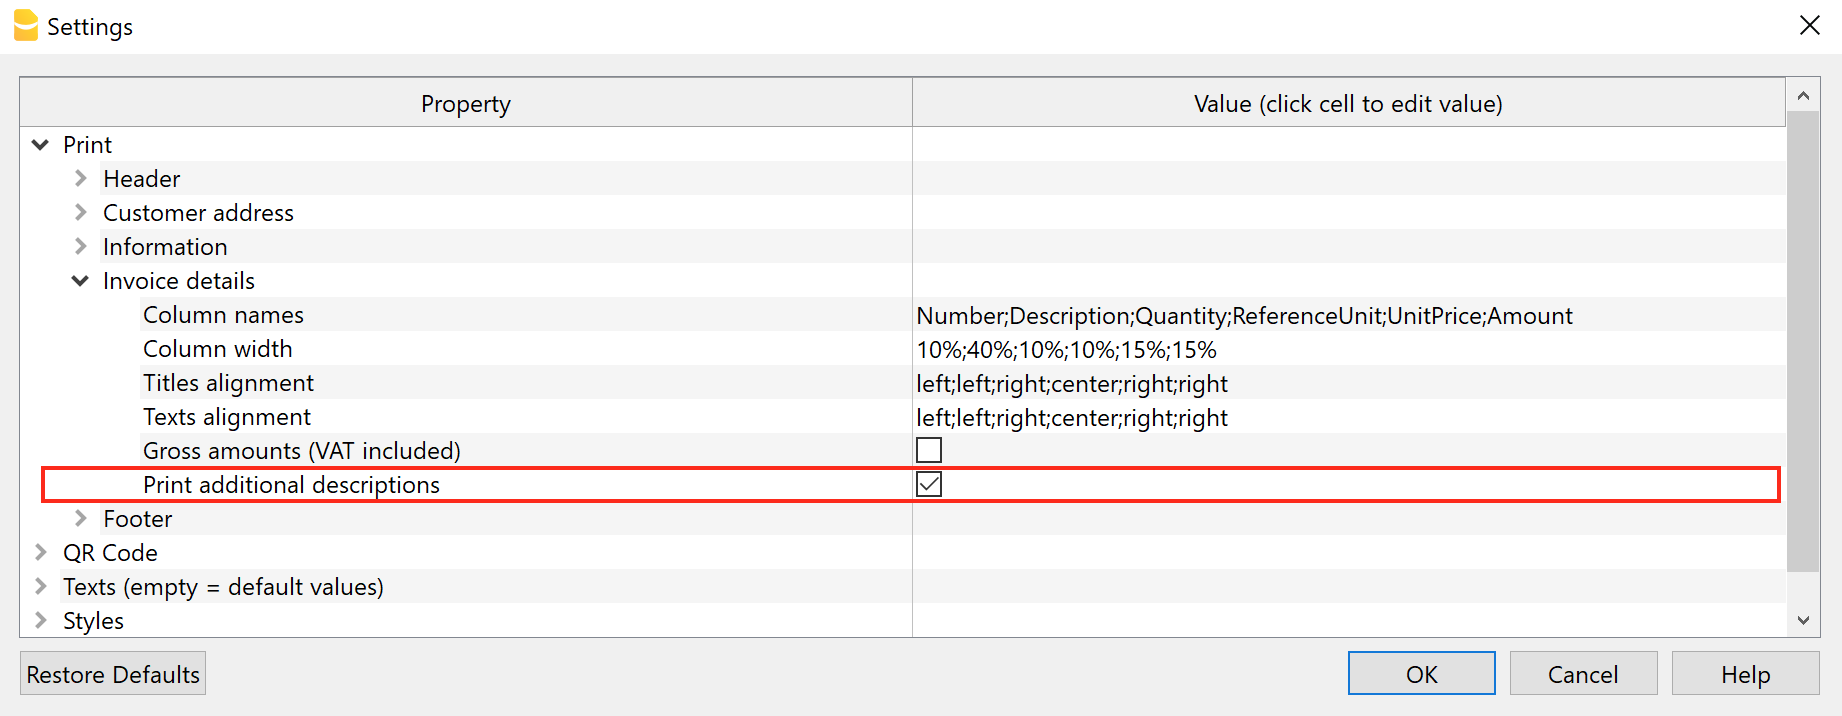
At this point, if there are additional description columns in the Transactions table and if they contain texts, these texts will be added on the invoice printout.
Example invoice printout: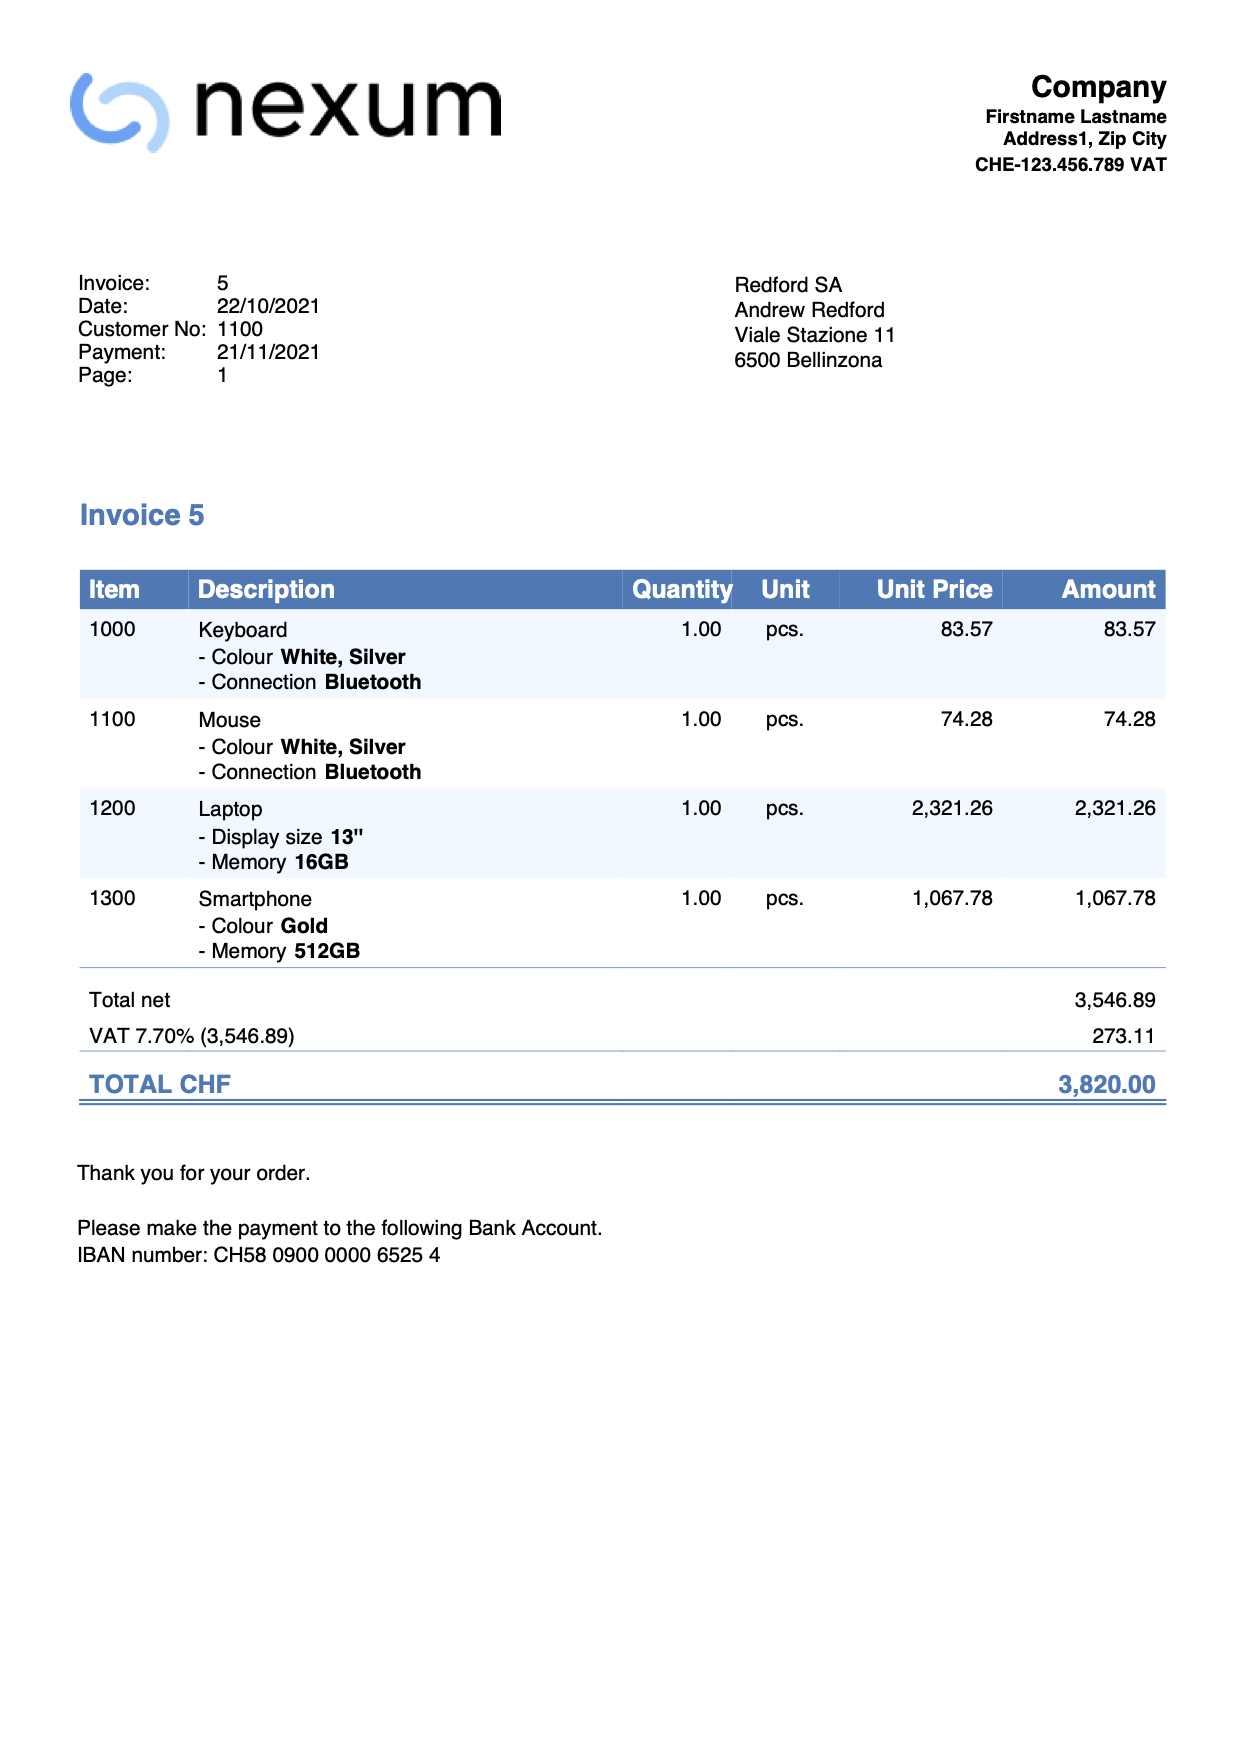
Invoice with multi- row descriptions (Estimates-Invoices)
This example for the Estimates and Invoices application shows how to create invoices with multi-row descriptions.
- In the invoice edit dialog, under the Invoice Details section, in the Description column:
- Enter the description text
- You can use line breaks and add as many lines as you want.
- You can also leave blank lines.
- You can insert one or more texts between double asterisks to apply bold styling (e.g. Bold text).
- You can enter the amount either on the same line as the multi-line description, or on a new line (see image).
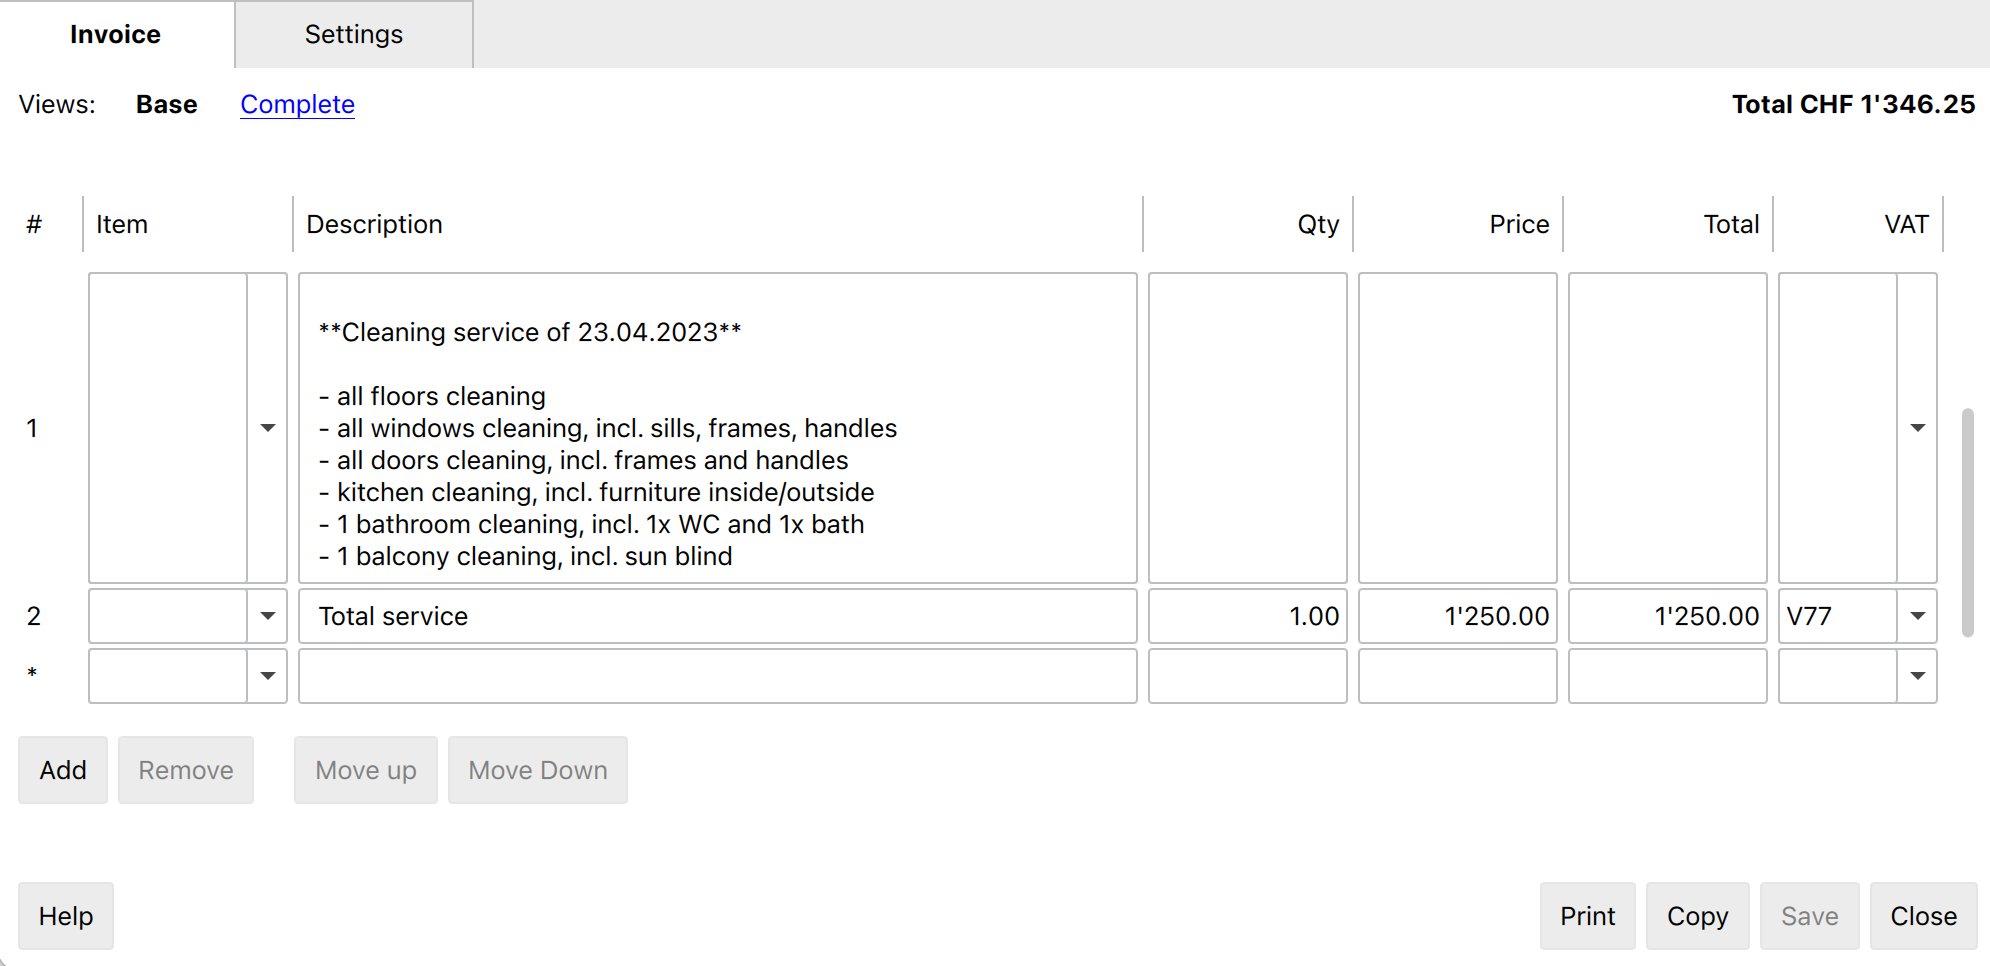
When printing the invoice, descriptions are displayed on several rows as in the dialogue.
Example invoice printout: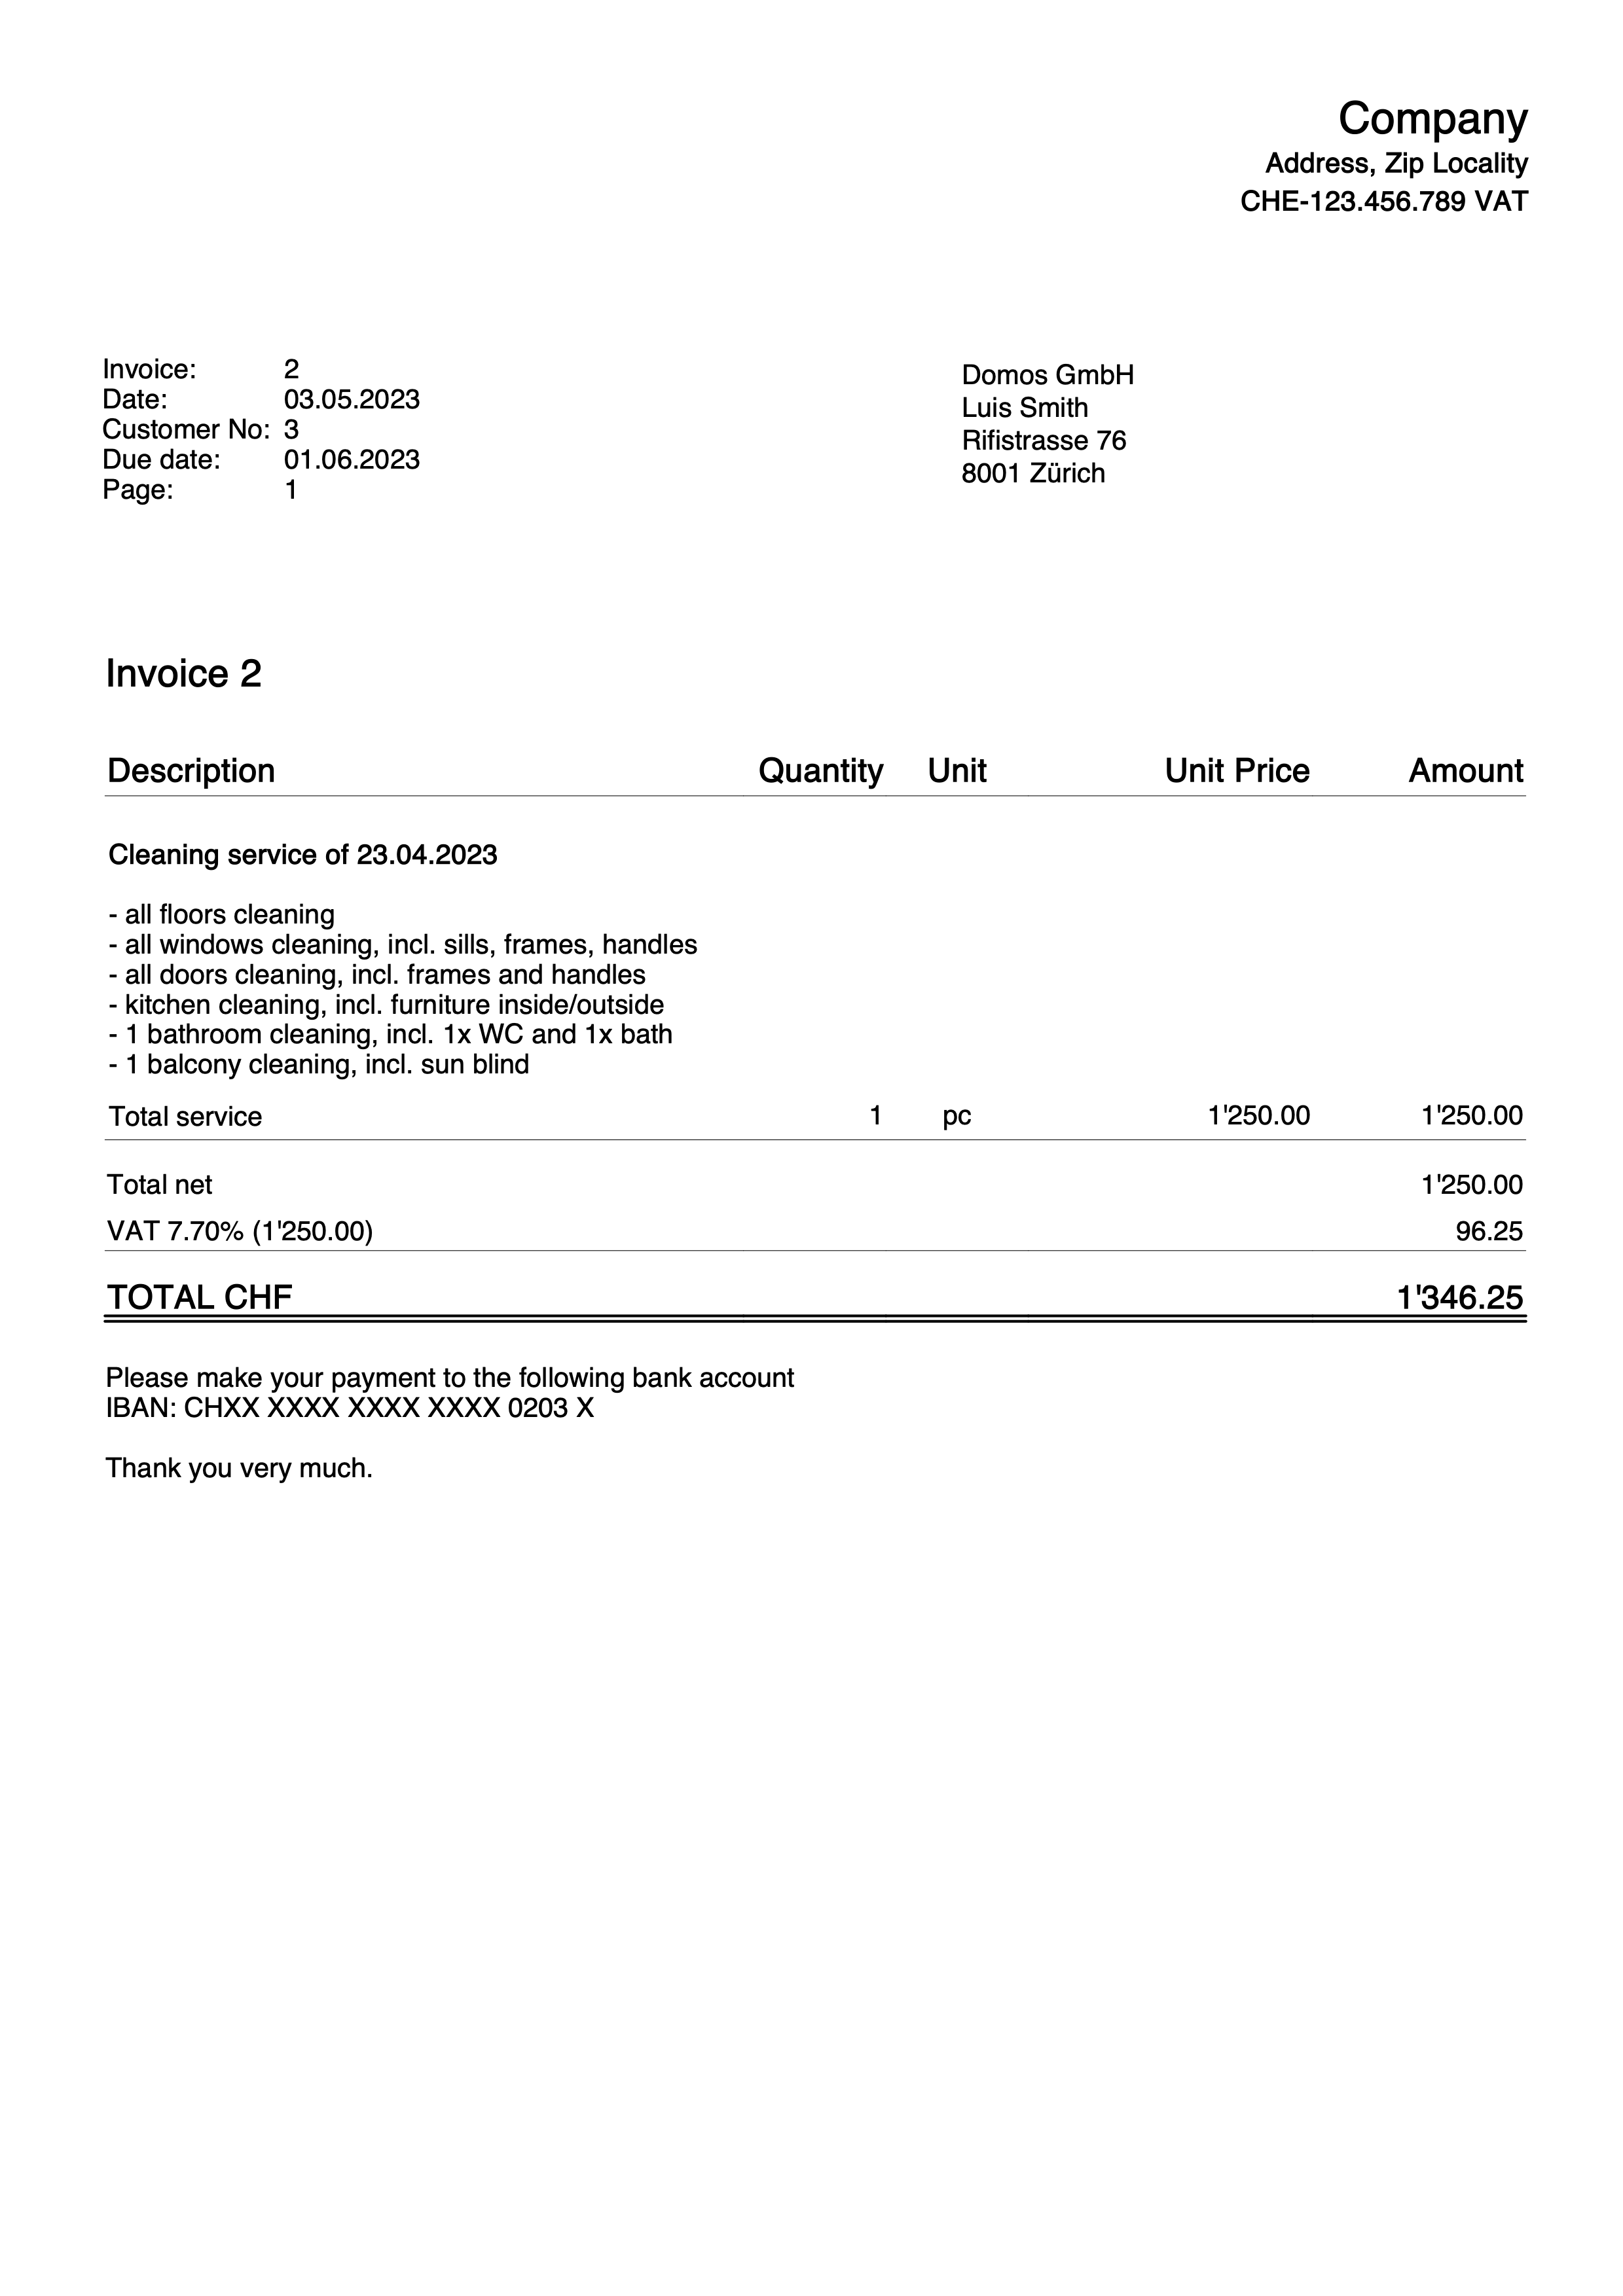
Invoice with Article Discount column
This example for invoicing with the Estimates and Invoices application shows how to add the Article Discount column in the invoice details.
Requirements:
- Banana Accounting Plus Advanced Plan.
- Beta Release version of the Estimates and Invoices application.
The steps to follow are as follows:Create invoices using the Discount column. Enter a percentage or a value.
- Via the invoice settings dialogue:
- Via the invoice settings dialogue:In the section Print > Invoice details add the Discount column, set the column widths and the alignment of headings and texts.
- Description;Quantity;ReferenceUnit;UnitPrice;Discount;Amount
35%;10%;10%;15%;15%;15%
left;center;center;right;right;right
left;center;center;right;right;right
- Description;Quantity;ReferenceUnit;UnitPrice;Discount;Amount
- In the section Texts > Invoice detail column header, for each language set the texts for the table headers, also adding the text for the Discount column.
- Description;Quantity;ReferenceUnit;UnitPrice;Discount;Amount
- Description;Quantity;ReferenceUnit;UnitPrice;Discount;Amount
- Via the invoice settings dialogue:In the section Print > Invoice details add the Discount column, set the column widths and the alignment of headings and texts.
Example invoice printout:
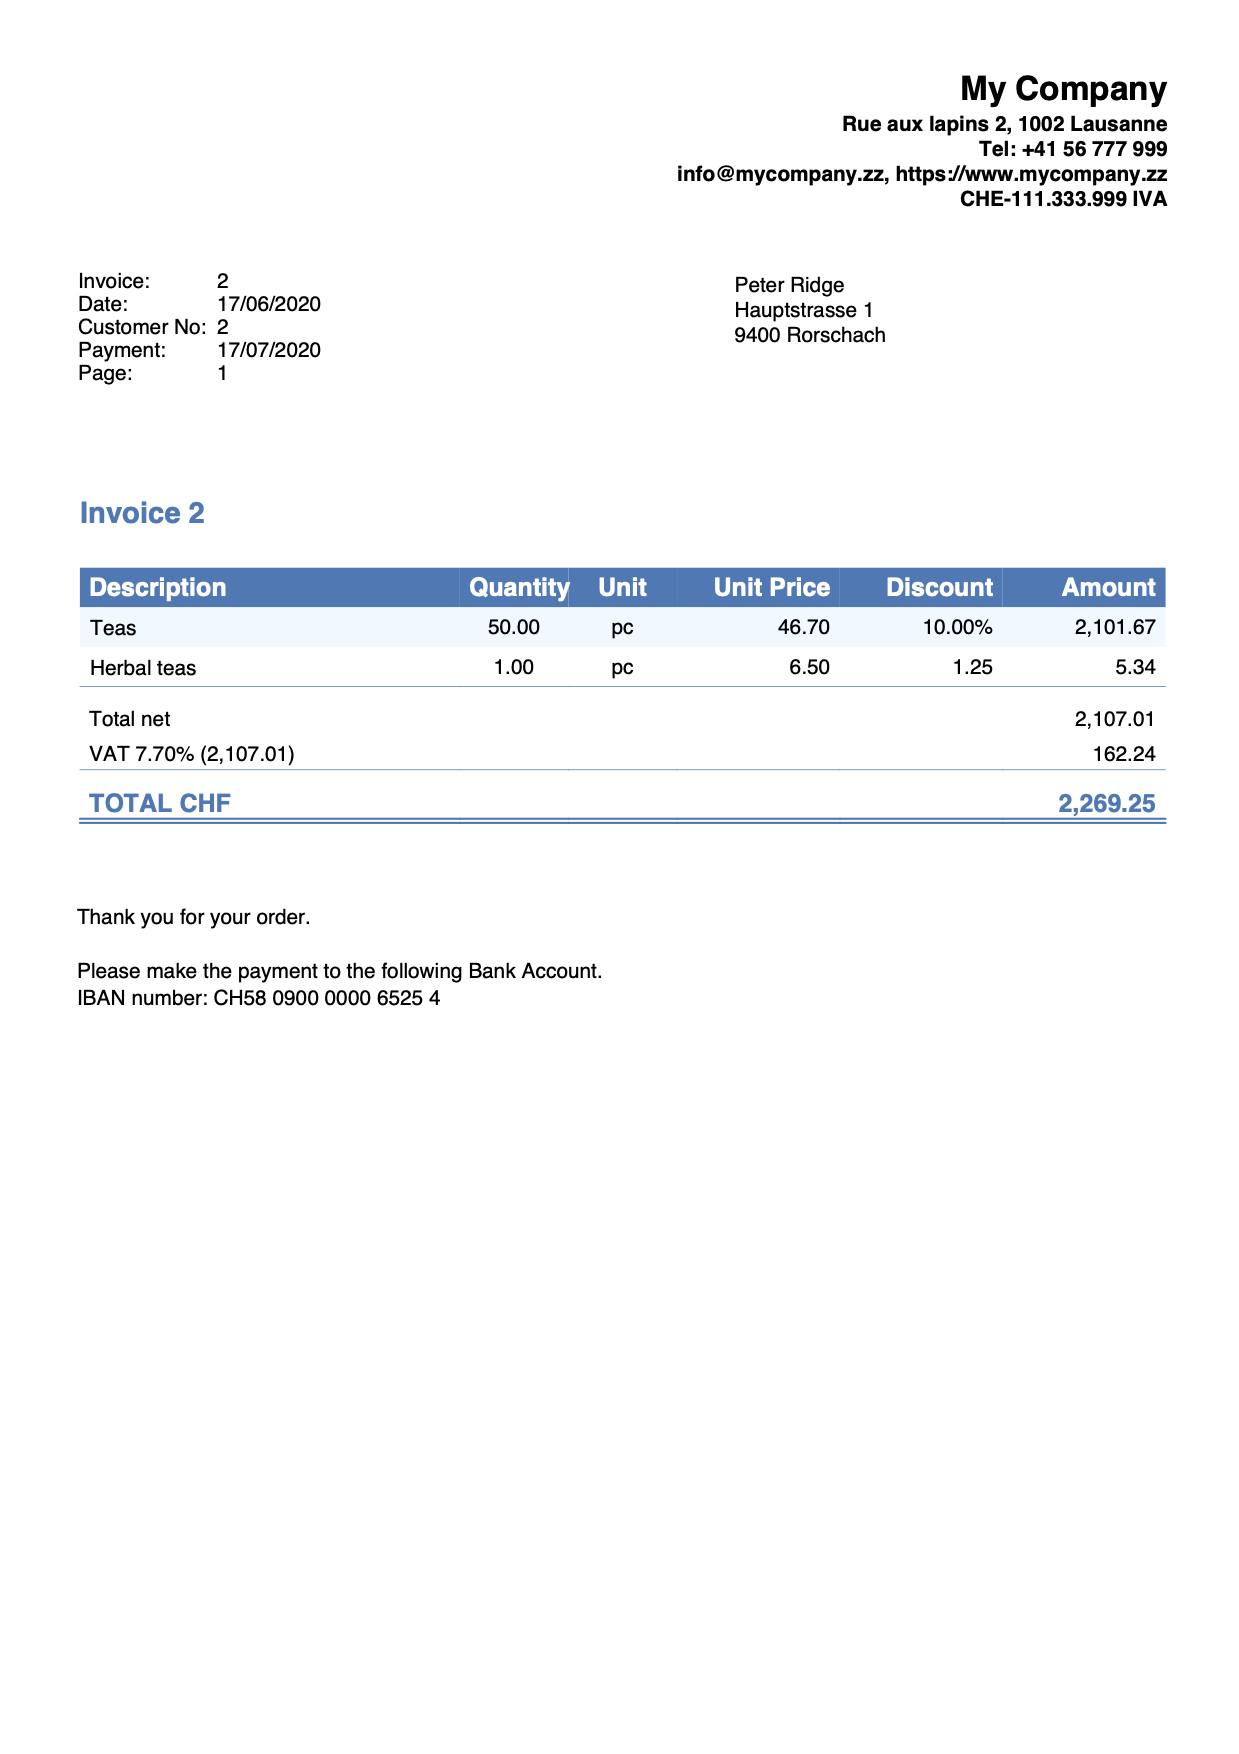
Invoice with product images
This example shows how to add and print product images in the invoice details.
Requirements
- Advanced plan of Banana Accounting Plus.
- Invoice customization with JavaScript.
Steps
- Add products images.
- Save images of each product.
Use the same directory where the .ac2 file is located or a subfolder.
The supported formats are PNG and JPG.
Use small images to reduce the weight of the generated PDF file.
- Save images of each product.
- Edit the Items table.
- Add the Links column.
In the Items table, make the Links column visible with the Columns setup command. - Link images to items.
In the Links column of Items table, add the link of the image for each product.
Click on the icon at the top right of the cell and select the corresponding image.
- Add the Links column.
- Add the Documents table.
- If not present, add the Documents table.
From the menu Tools > Add/Remove functionalities > Add Documents table.
- If not present, add the Documents table.
- Add the JavaScript code as attachment in the Documents table.
- In the ID column, enter the name of the attachment including the .js extension (e.g., "myFile.js").
- In the Attachments column, click on the icon at the top right and select Javascript code.
An editor opens where you can enter javascript code. Delete all. - Copy and paste
- the javascript code of the 'hook_print_details_net_amounts' function (that prints the invoice with net amounts).
- the javascript code of the 'hook_print_details_gross_amounts' function (that prints the invoice with gross amounts).
- Click OK.
- Sets the parameters of the invoice layout.
- In the Invoice Settings:
- In the Invoice Details section, add the columns "I.Links" (column for images) and "Number" (column for item number).
I.Links;Number;Description;Quantity;ReferenceUnit;UnitPrice;Amount
10%;10%;30%;10%;10%;15%;15%
left;left;left;right;center;right;right
left;left;left;right;center;right;right
- In the Texts section, add the texts for the column headings (e.g., “Image;Item;Description;Quantity;Unit;Unit Price;Amount”).
- In the Javascript / CSS > JS File Name section, enter the id of the attachment that contains the javascript code (e.g., "myFile.js").
- In the Invoice Details section, add the columns "I.Links" (column for images) and "Number" (column for item number).
- In the Invoice Settings:
Images of the products will also be included in the invoice printout.
Example:
Letter with Swiss QR
Letter with Swiss QRExtensions are additional programs that extend the functionality of Banana Accounting Plus.
This extension makes it easy to print :
- empty QR slips
- Letters or QR invoices with single recipients or without recipients
Different options (with or without amount, with or without customer data, etc.) can be selected to obtain a wide range of variants.
If you want multiple printing (several recipients), use the QR-Invoice Extension, which requires the Advanced plan of Banana Accounting Plus.
![]()
This extension is very handy in case of:
- Donations where the payer freely decides the amount.
- Associations where the payer can choose different amounts.
- Indicating amounts in CHF and EUR.
N.B:
- If you choose to include the customer's data, only a single printout is possible (i.e. you have to manually rewrite the data of each recipient.
- It can only be used with an IBAN account. It is not possible to use a QR-IBAN account.
QR policies are of the non-reference type. The QR cannot therefore be used to record payments automatically. - This is an extension and cannot be used as an invoice layout.
Prerequisites
To use this extension it is necessary to:
- Have the Professional Plan or the Advanced Plan of Banana Accounting Plus.
Beta Version
The extension is currently released as a beta version. This means that some details may change without notice.
Create a QR code slip
Create letter-invoices with QR as follows:
- Open an existing Banana Plus file or create a new one. You can use the extension with any type of Banana Plus file.
- From the Extensions menu → Manage Extensions, search for and install the extension Letter with Swiss QR slip.
- Start the extension from the Extensions menu > Letter with Swiss QR slip.
- Set up your data via the Settings dialogue (see below)
Settings dialogue
Run the extension from the Extensions menu > Letter with Swiss QR slip.
The extensions' Settings dialogue will open. From here you can define the information required to create the letter printout with the QRslip or the empty QR (depending on the settings entered).
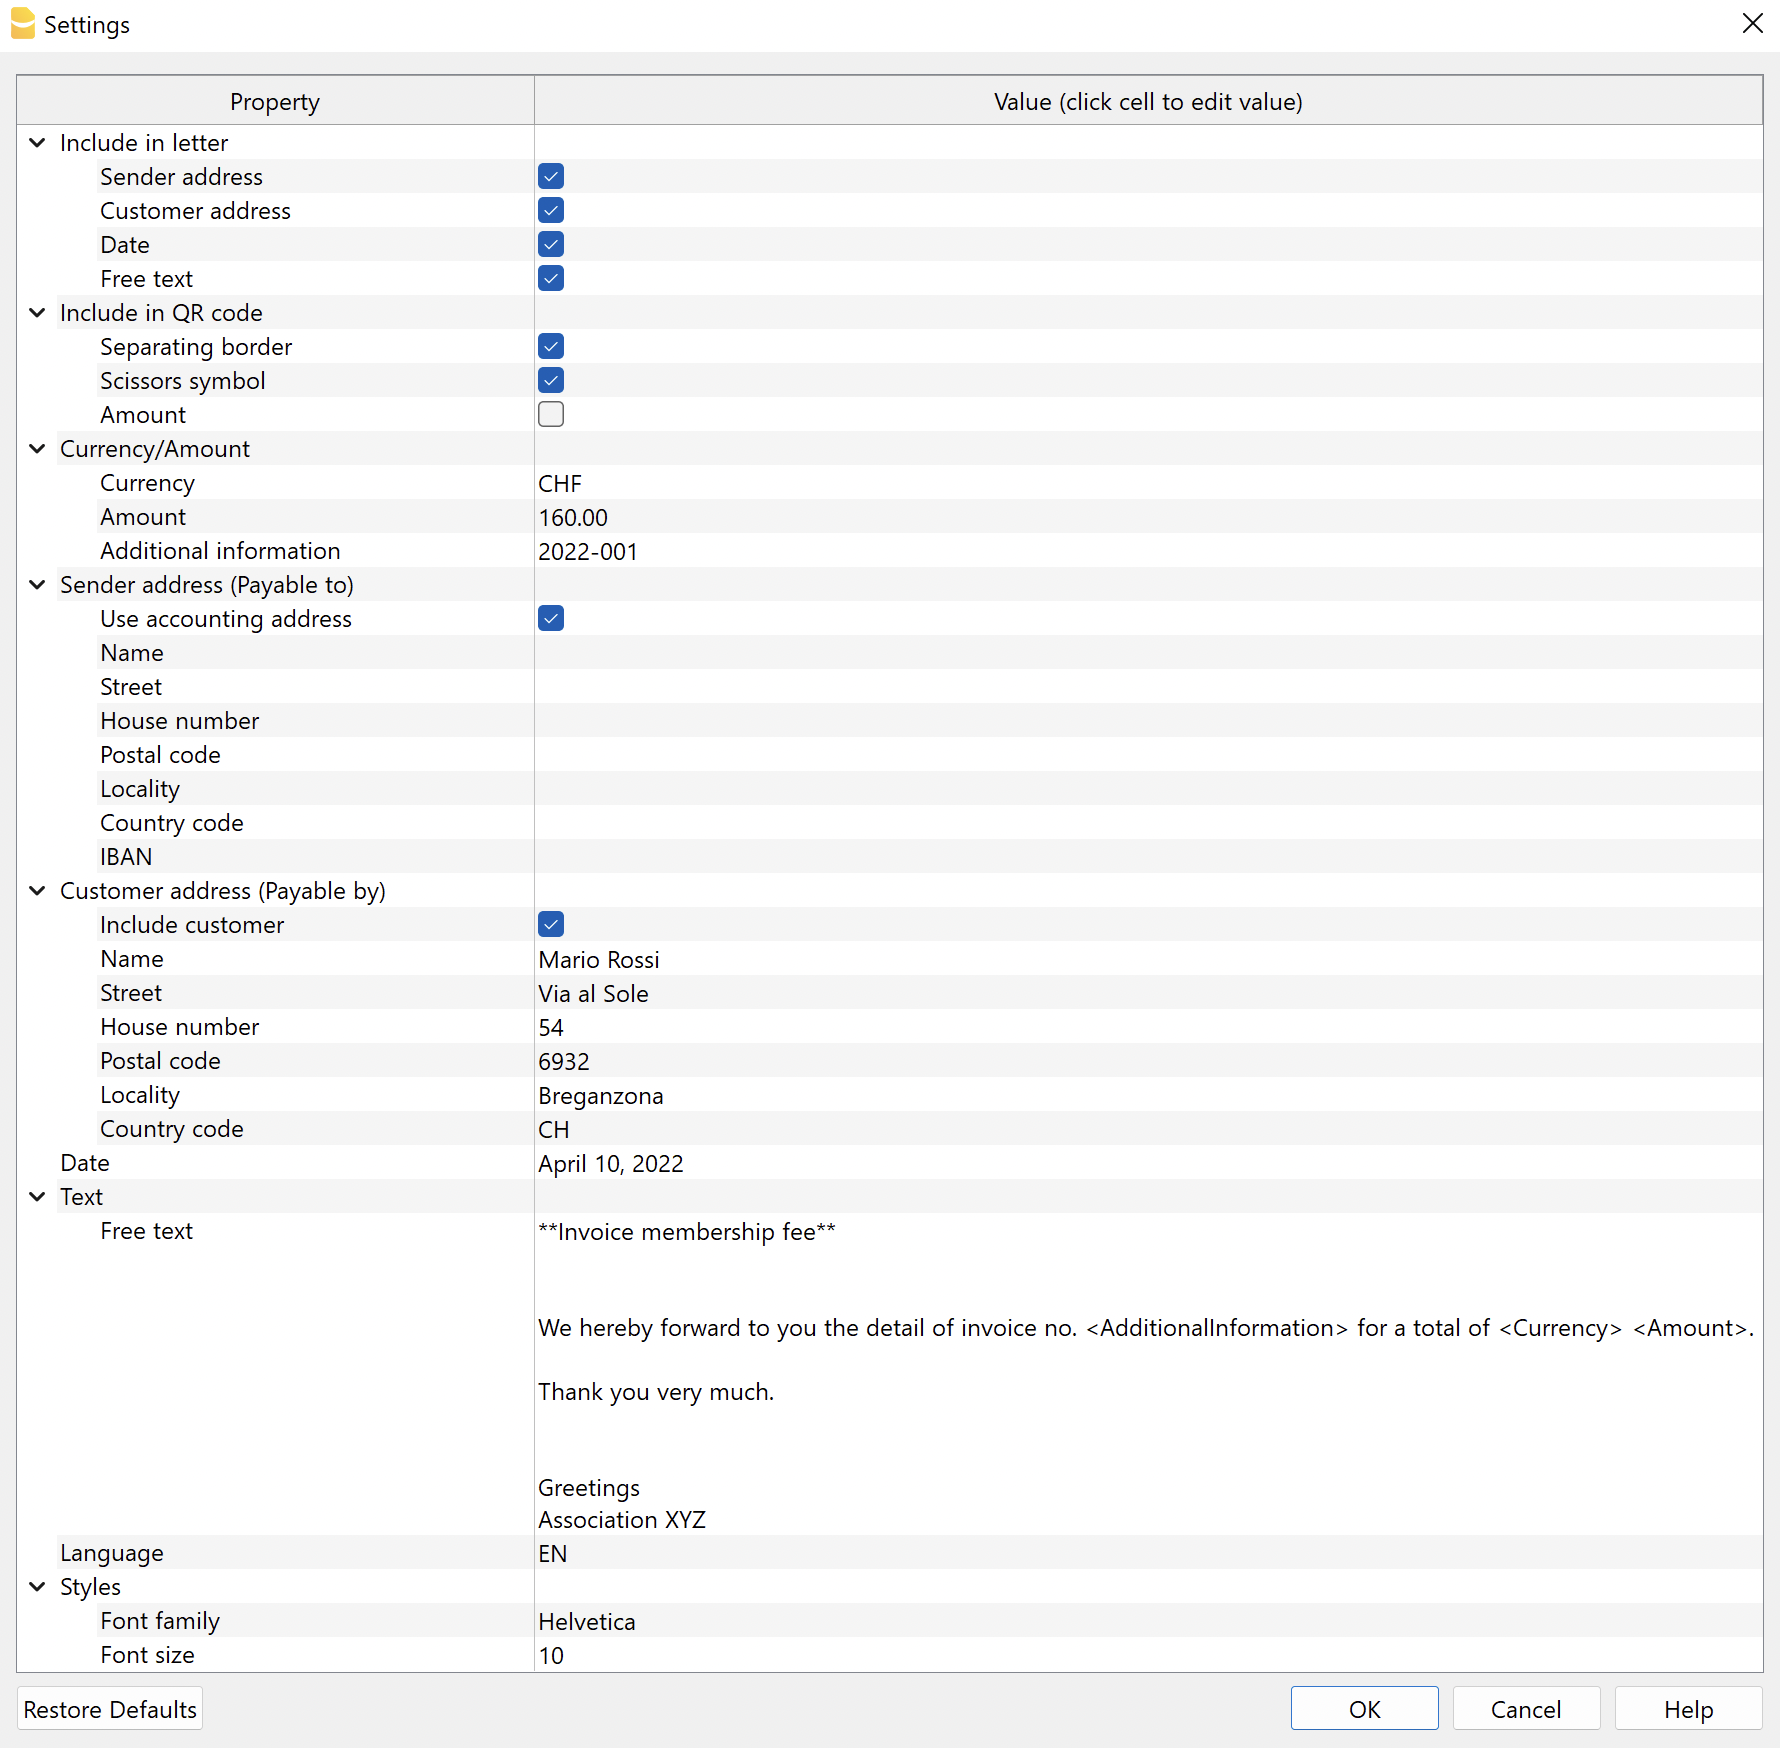
The fields are the default ones for the correct printing of the QR according to the specific standard. Additional information cannot be entered.
The settings are divided into the following groups:
- Include in the letter
- Select the elements to be included in the letter printout.
- Include in the QR code
- Select the items to be included in the QR slip.
- Currency / Amount
- Define the currency, amount and any additional information to be included in the QR.
- Sender's address (Payable to)
- Define the sender's address.
- Customer's address (Payable by)
- Define the customer's address.
- It can be included or excluded from the QR slip.
- Date
- Add a date to the letter.
- Letter text
- Add a text to the letter.
- Language
- Select the language of the QR slip print.
- Style
- Define font type and size for letter texts.
Include in the letter
Here you can decide what to print in the letter. If none of the options are selected, you obtain a blank page with a QR slip at the bottom of the page.
- Logo
- Check to include the logo in the header.
- The logo is defined with the command File > Logo setup where you can also set the size, choose how to align it (left, centre, right), and also choose how to align the address with respect to the logo.
- Logo name
- Enter the name of the logo customisation defined in the menu File > Logo setup, respecting upper and lower case.
- Sender's address
- Choose whether to include the sender's address in the letter.
- Customer's address
- Choose whether to include the customer's address in the letter.
- Date
- Choose whether to include the date in the letter.
- Free text
- Choose whether to include free text in the letter.
Include in QR code
Here you can decide what to print on the QR Bulletin.
- Separation edge
- Choose whether to include the dashed separation border in the QR slip.
- Scissors symbol
- Choose whether to include the scissors symbol in the QR slip.
- Amount
- Choose whether to include the amount in the QR slip.
If not included, an empty box will be left for manual input.
- Choose whether to include the amount in the QR slip.
Currency / Amount
In the Currency/Amount section there are the following settings:
- Currency
- Select the currency CHF or EUR.
- Amount
- Enter amount (ex. 1234.56).
- Additional information
- You can enter additional invoice information to be included in the QR slip.
Sender's address (Payable to)
Choose how to set the sender's address, which will appear in the 'Payable to' section of the QR slip and in the letter.
- Use accounting address
- View this option to use the address entered in File > File properties (Basic data) > Address section of your file. You must have entered at least the data in the fields Company, Address1, Postcode, Location, Country Code, IBAN.
- Alternatively, do not display this option and enter the address manually via the options below.
- Name
- Enter your first and last name or the name of your organisation.
- Street
- Enter the street
- House number
- Enter house number
- P.O.box
- Enter postcode.
- Locality
- Enter town
- Nation code
- Enter nation code (ex. CH, LI).
- IBAN
- Enter IBAN account.
An IBAN account must be used. It is not possible to use a QR-IBAN account.
- Enter IBAN account.
Customer address (Payable by)
Choose whether or not to include the customer's address, which will appear in the 'Payable by' section of the QR slip (max. 3 rows allowed - see also Addresses).
In the Customer Address section there are the following settings:
- Include customer
- View this option to include the customer's address in the QR slip.
If not included, an empty box will be left for manual input.
- View this option to include the customer's address in the QR slip.
- Name
- Enter your first and last name or the name of your organisation.
- Street
- Enter the street.
- House number
- Enter the house number.
- P.O.Box
- Enter the postcode.
- Locality
- Enter the town.
- Country code
- Enter the country code (ex. CH, LI).
Date
In the Date section, enter the date of the letter.
Letter text
In the Letter Text section you can add the text of your letter. If it is a long text, the QR Bulletin will automatically jump to the next page.
- Free text
- Enter the text of the letter.
- Can be inserted on several lines.
- You can apply the bold style by including the desired text between double asterisks ** (e.g. **text1 text2** text3 = text1 text2 text3).
- You can enter specific codes, which will be replaced with their actual values when printed:
- <AdditionalInformation> is converted to the value entered in the AdditionalInformation field of the settings.
(e.g. "Invoice No. <AdditionalInformation>" = "Invoice No. 2022-001"). - <Currency> is converted to the currency of the invoice, defined in the Currency field of the settings.
- <Amount> is converted to the total amount of the invoice, defined in the Amount field of the settings.
- <AdditionalInformation> is converted to the value entered in the AdditionalInformation field of the settings.
- Example:
We hereby forward to you the invoice detail of Invoice No. <AdditionalInformation> for a total of <Currency> <Amount> = We hereby forward to you the invoice detail of Invoice No. 2022-001 for a total of CHF 4'000.00.
Language
In the Language section select the language in which the QR Bulletin is to be printed.
The available languages are Italian, French, German and English.
Style
- Font style
- Enter the font (Helvetica, Arial, Times New Roman, etc.).
- Font size
- Enter the font size.
Troubleshooting
For further details, please visit the Error Messages page of the documentation.
Serial Invoice QR Code from Excel Data List
Serial Invoice QR Code from Excel Data ListWith this extension, you can quickly print a series of invoices with Swiss QR Code based on a data list in Excel. Ideal for sending batch invoices to clients or members of an association.
The Extensions are additional programs that extend the functionalities of Banana Accounting Plus.
This extension allows you to create Swiss QR invoices for multiple recipients with the possibility of inserting a customised letter text. Data can be taken from Excel.
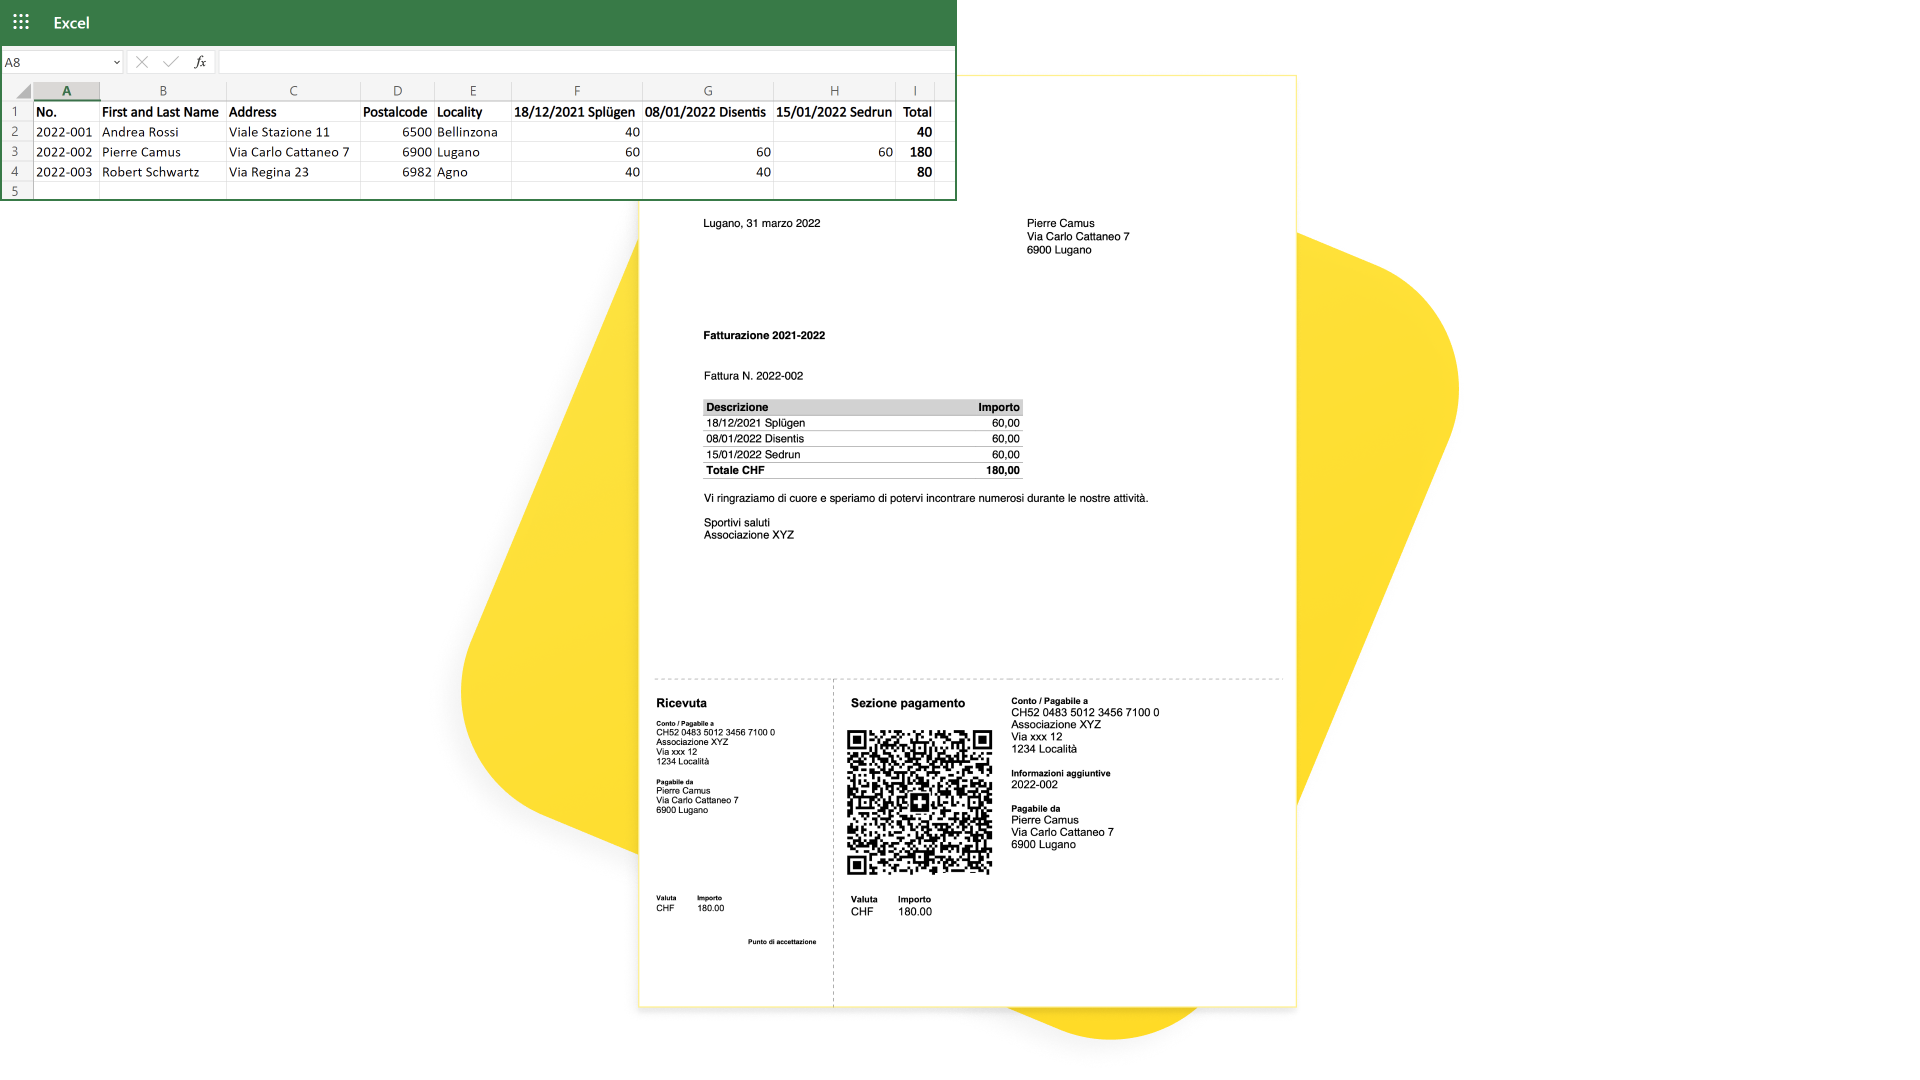
Prerequisites
To use this extension, you need to:
- Download and install Banana Accounting+ (version 10.1.7 or later).
- Have the Advanced Plan of Banana Accounting Plus.
- Use the ready to fill-in template for entering invoice data.
Description
The extension is suitable for:
- Associations or people who already have all invoice data in Excel and need to create QR invoices:
- Take the data from Excel.
- Insert them into Banana Plus with copy-paste.
- Print the QR invoices.
- Associations or people starting from scratch and need to keep user data and create QR invoices:
- Manually enter the data into Banana Plus.
- Print the QR invoices.
Notes:
- It can only be used with an IBAN account. It is not possible to use a QR-IBAN account.
QR bulletins are of the non-reference type. The QR cannot therefore be used to record payments automatically. - This is an extension and cannot be used as an invoice layout.
- The extension does not work with any other file type (e.g. accounting file).
Creating QR-Invoice letters
QR-invoice letters can be created in this way:
- Download and open the template.
- In Banana Plus enter the address of your organisation from the menu File > File and accounting properties (Basic data) > Address tab.
- If you already have all the invoice data in an Excel file, transfer it to Banana Plus:
- In Excel adapt and sort the columns to look like those in Banana Plus.
- In Excel select or filter the rows you need.
- Copy the rows from Excel and paste them into Banana Plus.
- If you don't have an Excel file to take the data from:
- Start working directly in Banana Plus.
- Enter the invoice data manually in the appropriate columns of the QRCode table.
- Print invoices:
- Run the extension from the menu Extensions > QR-Invoices from Excel.
- Decide what to include in the letter part and in the QR.
- Indicate which invoices you want to print.
- Enter the text of the letter with the invoice details.
Your Excel data
The extension is designed for associations, organisations or people who have data in Excel and want to print invoices with the QR.
With a few small adjustments to the Excel file you can use your data, transfer it to Banana Plus with a copy-paste, and immediately create QR invoices.
- In Excel you must have the same columns as in Banana Plus (see QRCode Table).
- It is very useful to have the columns also in the same sequence. It is easier to copy data: you can copy rows directly or a series of consecutive columns.
- If, however, the columns are not in the same sequence, you will have to copy/paste column by column.
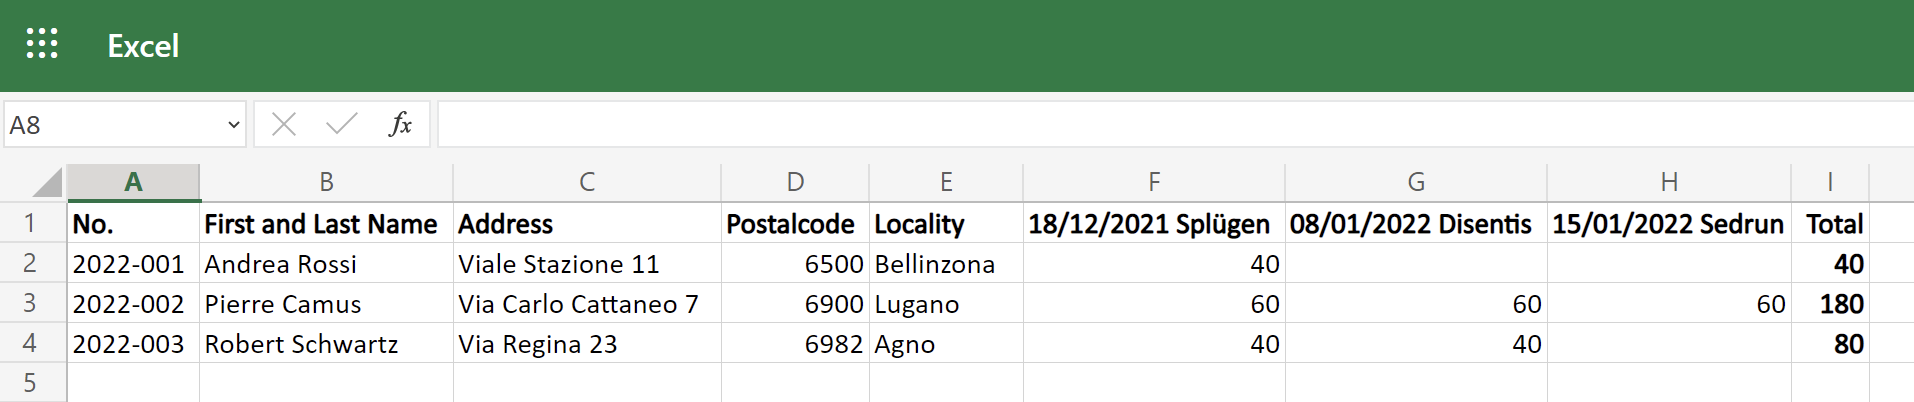
QRCode Table
This extension uses the ready to fill-in template where invoice data can be entered.
- The template consists of a ready to fill-in QRCode table with the necessary columns.
- The columns are predefined for the correct printing of the QR according to the specific standard. Additional information/columns cannot be used.
- Each row of the table represents an invoice, in which you have to indicate the invoice number, the address of the recipient and the amounts of the activities to be invoiced.
- Each activity has its own column with its amount.
- You can add as many activities as you like (see Activity Amount Columns).
- The invoice total is the sum of the various activities.
- On the invoice you will see a table with details of activities and amounts.
- You can decide whether to enter the invoice total on the QR slip or to leave it blank so that the person paying the invoice can decide the amount (e.g. for payment in instalments or for higher voluntary payment).
To insert invoice data into the QRCode table in Banana Plus, you can copy them directly from the Excel table:
- In Excel select or filter the rows you need and then copy them.
- Go to Banana Plus and paste them.
- Check that the data has been copied into the correct columns.
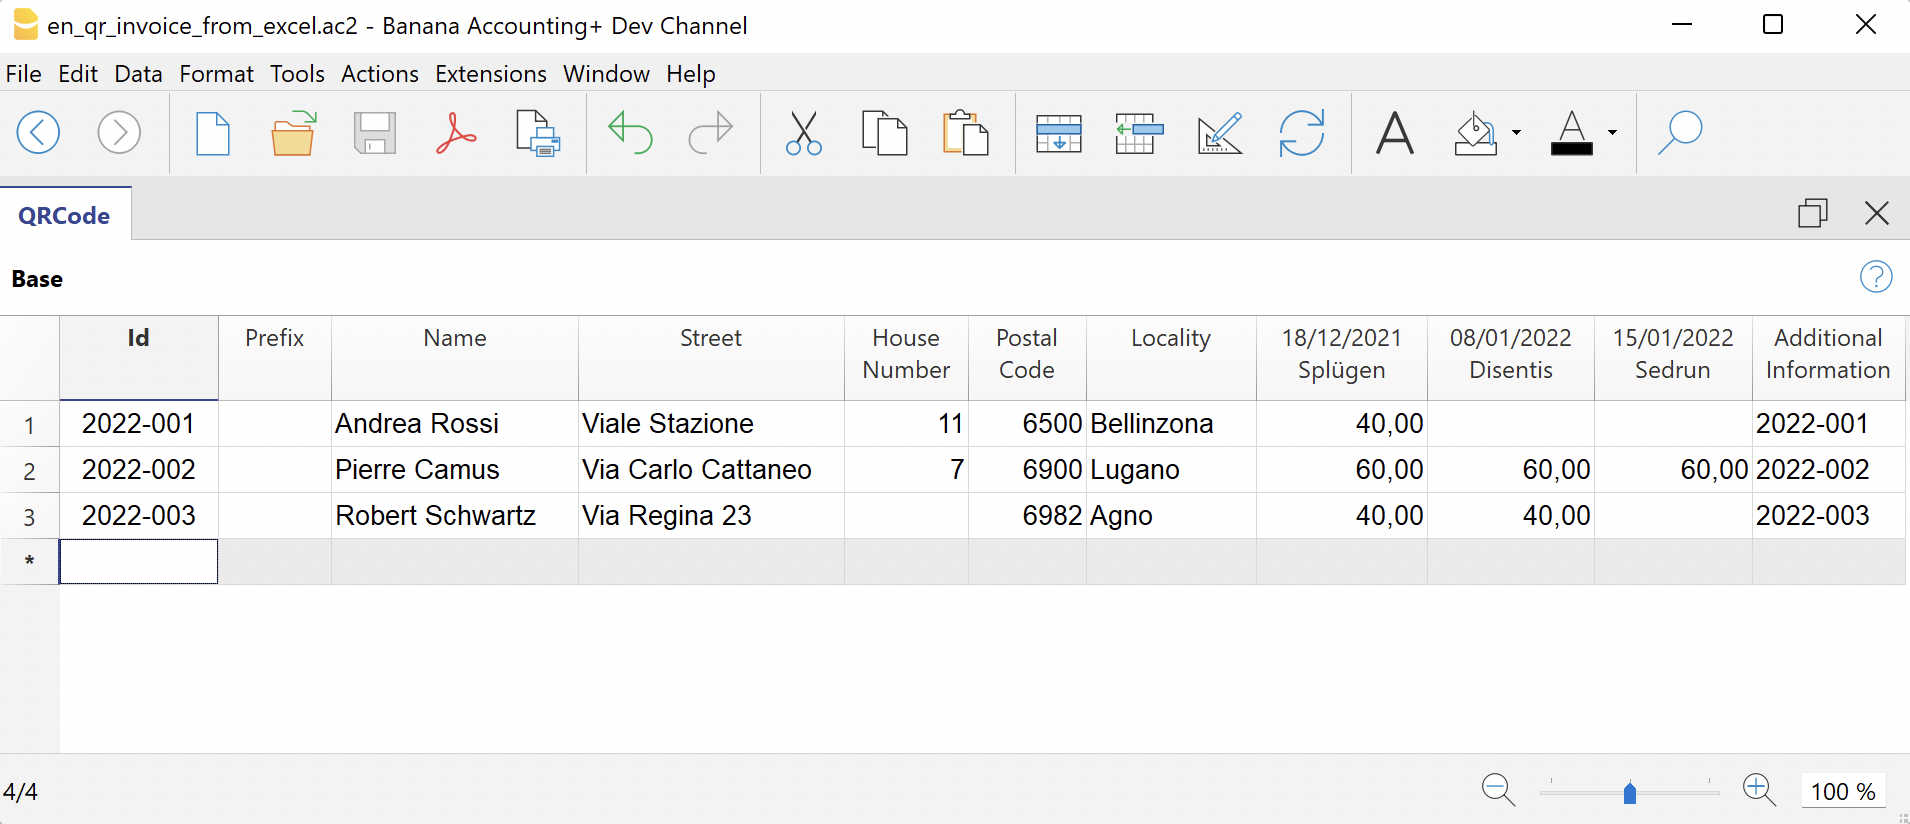
The Columns
The columns of the QRCode table are as follows:
- Id (Invoice)
- Enter the invoice number.
- Prefix
- Optional.
- Enter the prefix of the recipient.
- It is only printed in the invoice address (letter section). It is not printed in the QR slip.
- Name
- Enter the first and last name of the recipient.
- Address
- Enter the recipient's street address.
- You can enter the full address (street and house number).
- House Number
- Optional.
- Enter the house number of the recipient.
- You can enter the house number in a separate column.
- Postal Code
- Enter the postal code.
- Location
- Enter the location.
- Country Code
- Optional.
- Enter the country code.
- If you do not enter anything, the default country code used is always CH (Switzerland).
- Activity, Activity1, Activity2, ...
- Enter the amounts of the activities to be invoiced.
- See Activity Amount Columns.
- Additional Information
- Optional.
- You can enter additional information that will be included in the QR slip, in the 'Additional Information' section.
- Variable Text
- Optional.
- You can enter a specific text for each invoice and insert it automatically in the letter text (see Letter Text).
- Currency
- Optional.
- You can specify the currency to be used (CHF or EUR).
- If you do not enter anything, the default currency used is always CHF.
- Display the column with the command Columns setup.
Activity Amount Columns
In the activity columns you enter the amounts to be invoiced.
Each activity has its own column with the corresponding amount. Nella tabella ci sono già tre colonne preimpostate. There are already three preset columns in the table. You can add as many columns for activities as you like or delete those you do not need.
To add and customise columns for activities:
- Add a new column.
- Execute the command from the menu Data > Columns setup.
- Click on Add to add a new column.
IMPORTANT: The XML name of each column must begin with the word "Amount" (capital letter) followed by a number (e.g. Amount1, Amount2, Amount3, etc.).
In the Name and Xml Name fields enter e.g. Amount3, and in the Data Type field select Amount.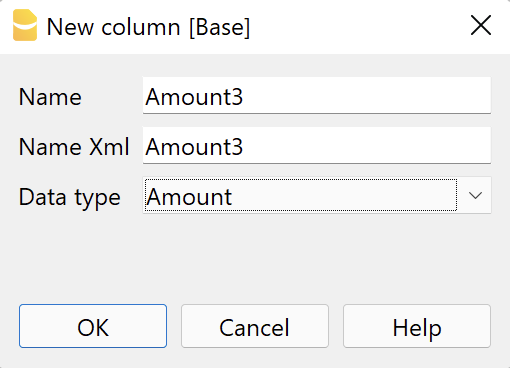
- Change task names (column headers).
- Execute the command from the menu Data > Columns setup .
- In the field Header enter the text of the task (e.g. 'Activity 3', '18/12/2021 Splügen').
The texts are used on the printout in the invoice details table.
N.B: Invoices without amounts (rows where the activity columns are all empty) are automatically excluded from printing.
Settings dialogue
Run the extension from the menu Extensions > QR-Invoices from Excel.
The Settings dialogue of the extension will open. From here you can define the information required to create the invoice printout.
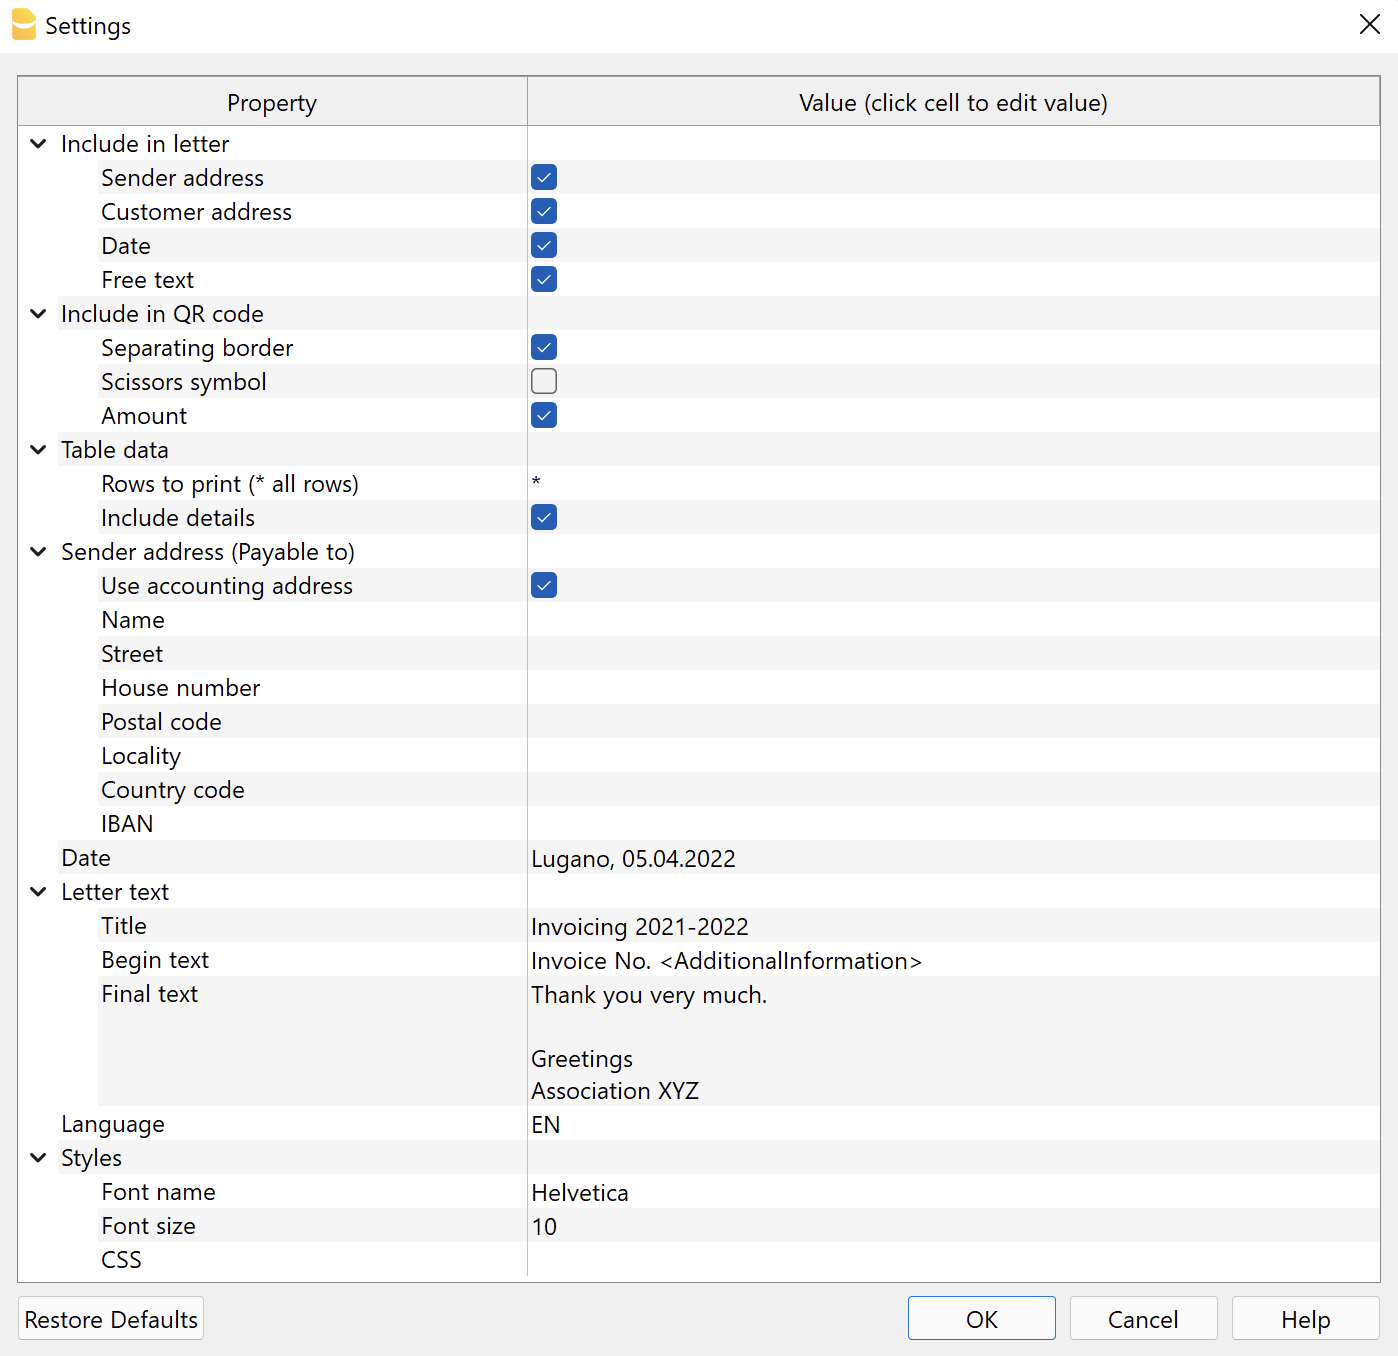
The fields are the default ones for the correct printing of the QR according to the specific standard. Further information cannot be entered.
The settings are divided into the following groups:
- Include in the letter
- Select the information to be included in the printing of the letter.
- Include in QR code
- Select the information to be included in the QR slip.
- Table data
- Select the table rows to be used for printouts and the data to be included.
- Sender Address (Payable to)
- Define the sender's address.
- Date
- Enter the date of the letter.
- Letter Text
- Enter the text of the letter..
- Language
- Select the language in which the QR is to be printed.
- Styles
- Define font type and size for the letter text.
Add to the letter
Here you can decide what to print in the letter. If none of the options are selected, you will get a blank page with the QR Slip at the bottom of the page.
- Logo
- Check to include the logo in the header.
- The logo is defined with the command File > Logo setup where you can also set the size, choose how to align it (left, centre, right), and also choose how to align the address with respect to the logo.
- Logo name
- Enter the name of the logo customisation defined in the menu File > Logo setup, respecting upper and lower case.
- Sender address
- Choose whether to include the sender's address in the letter.
- Customer address
- Choose whether to include the customer's address in the letter.
- Date
- Choose whether to include the date in the letter.
- Free Text
- Choose whether to add a free text to the letter.
Add to QR code
Here you can decide what to print on the QR code.
- Outline border
- Choose whether to include the dotted outline border in the QR slip.
- Scissors Symbol
- Choose whether to include the scissor symbol in the QR Bulletin.
- Amount
- Choose whether to include the amount of each invoice.
- If excluded, an empty box will be left for manual entry of the amount.
Table Data
Decide which rows of the QRCode table you want to create the invoice for.
One invoice is created for each row indicated.
A single report is created containing all selected invoices in sequence.
- Rows to print
- To print all rows enter the asterisk *
- To print specific lines
- Enter the number of rows separated by a comma (e.g. "1,2,3").
- Enter a range of lines (from... to...), indicating the first line and the last line separated by the hyphen "-" (e.g. "1-5").
- Add details
- Choose whether to add a table with invoice details.
- All activity columns are listed with their respective amounts and the final total.
- If an activity column has no amount, it is automatically excluded from the details.
Sender Address (Payable to)
Choose how to set the sender address that will appear in the 'Payable to' section of the QR slip and in the letter.
- Use Accounts Payable Address
- View this option to use the address entered in the menu File > File properties (Basic data) > Address tab of your file. You must have entered at least the data in the fields Company, Address1, Postcode, Location, Country Code, IBAN.
- Alternatively, do not display this option and enter the address manually via the options below.
- Name
- Enter your first and last name.
- Street
- Enter the street.
- House Number
- Enter the house number
- Postal code
- Enter the postal code.
- Location
- Enter the location.
- Country code
- Enter the country code.
- IBAN
- Enter bank account IBAN
Date
In the Date section, enter the date of the letter. The date can also be accompanied by the place (e.g. Lugano, 05.04.2022) and can be entered in any format (e.g. Lugano, 5 April '22).
It is not possible to change the position of where the Date appears in the invoice.
Letter Text
In the Letter Text section you can add the text of your letter. In the Letter Text section you can add the text of your letter. In case it is a long text the QR-slip will automatically jump to the next page.
- Title
- Enter the title/object of your letter.
- It can be entered on several lines.
- The text is automatically set in bold.
- Start text
- Enter text for the first part of the letter.
- Can be inserted on several lines.
- The text is automatically inserted immediately after the title.
- End text
- Insert a text for the final part of the letter.
- Can be inserted over several lines.
- The text is automatically inserted at the end of the letter.
Note:
- Invoice details (table with invoiced items), when included, are automatically inserted between the initial text and the final text.
- In all three fields you can enter codes, which will be replaced with their actual values when printed:
- <AdditionalInformation> is converted to the value contained in the Additional Information column (e.g. "Invoice No. <AdditionalInformation>" = "Invoice No. 2022-001").
- <Currency> is converted to the currency of the invoice.
- <Amount> is converted to the total amount of the invoice.
- <VariableText> is converted to the value contained in the VariableText column.
- <Notes> is converted to the value contained in the Notes column.
- Example:
We hereby forward to you the details of invoice no. <AdditionalInformation> for the total of <Currency><Amount> = We hereby forward to you the details of invoice no. 2022-001 for the total of CHF 4,000.
Language
In the Language section, select the language in which the QR Bulletin and the header of the details table are to be printed.
Available languages are Italian, French, German and English.
Styles
- Font type
- Enter the font type (Helvetica, Arial, Times New Roman, etc.).
- Font Size
- Enter the font size.
- CSS
- Optional.
- You can change the appearance of the print (text formatting, address positioning, etc.) by entering CSS code to customise the style.
CSS customization
Cascading Style Sheet (CSS) is a specification language that allows to customize the appearance of web pages, and a subset of the whole CSS specification is also used in Banana to prepare reports.
The "QR Invoice from Excel" extension is formatted through a CSS stylesheet. You can customize the printing of the report by editing the CSS.
The properties you define in the custom CSS will extend or overwrite the styles of the default stylesheet.
To add a custom CSS code:
- Run the extensions from menu Extensions
- In the extensions Settings, enter the code in Styles > CSS.
Example 1: Change position of the address
In order to move the address (up, down, left, right) we can change the predefined margins values of the "customer-address" element.
- Move up/down.
- To move the address up, change the top property value with a smaller value.
- To move the address down, change the top property value with a bigger value.
- Move left/right.
- To move the address left, change the left property value with a smaller value.
- To move the address right, change the left property value with a bigger value.
Into the extension settings under Styles > CSS, copy and paste the following code and adjust the margin-top and margin-left values.
.customer-address {
   margin-top: 4.5cm;
   margin-left:12.3cm;
}
Problem solving
For more information, please visit the Error Messages page of the documentation.
Related topics
The data in the QRCode table can also be used to print labels.