In this article
Serial Invoice QR Code from Excel Data List
This extension allows you to create QR invoices for Switzerland for several recipients, even from Excel, with the possibility of inserting a customised letter text. Requires Banana Accounting Plus - Advanced plan.
With this extension, you can quickly print a series of invoices with Swiss QR Code based on a data list in Excel. Ideal for sending batch invoices to clients or members of an association.
The Extensions are additional programs that extend the functionalities of Banana Accounting Plus.
This extension allows you to create Swiss QR invoices for multiple recipients with the possibility of inserting a customised letter text. Data can be taken from Excel.
Prerequisites
To use this extension, you need to:
- Download and install Banana Accounting+ (version 10.1.7 or later).
- Have the Advanced Plan of Banana Accounting Plus.
- Use the ready to fill-in template for entering invoice data.
Description
The extension is suitable for:
- Associations or people who already have all invoice data in Excel and need to create QR invoices:
- Take the data from Excel.
- Insert them into Banana Plus with copy-paste.
- Print the QR invoices.
- Associations or people starting from scratch and need to keep user data and create QR invoices:
- Manually enter the data into Banana Plus.
- Print the QR invoices.
Notes:
- It can only be used with an IBAN account. It is not possible to use a QR-IBAN account.
QR bulletins are of the non-reference type. The QR cannot therefore be used to record payments automatically. - This is an extension and cannot be used as an invoice layout.
- The extension does not work with any other file type (e.g. accounting file).
Creating QR-Invoice letters
QR-invoice letters can be created in this way:
- Download and open the template.
- In Banana Plus enter the address of your organisation from the menu File > File and accounting properties (Basic data) > Address tab.
- If you already have all the invoice data in an Excel file, transfer it to Banana Plus:
- In Excel adapt and sort the columns to look like those in Banana Plus.
- In Excel select or filter the rows you need.
- Copy the rows from Excel and paste them into Banana Plus.
- If you don't have an Excel file to take the data from:
- Start working directly in Banana Plus.
- Enter the invoice data manually in the appropriate columns of the QRCode table.
- Print invoices:
- Run the extension from the menu Extensions > QR-Invoices from Excel.
- Decide what to include in the letter part and in the QR.
- Indicate which invoices you want to print.
- Enter the text of the letter with the invoice details.
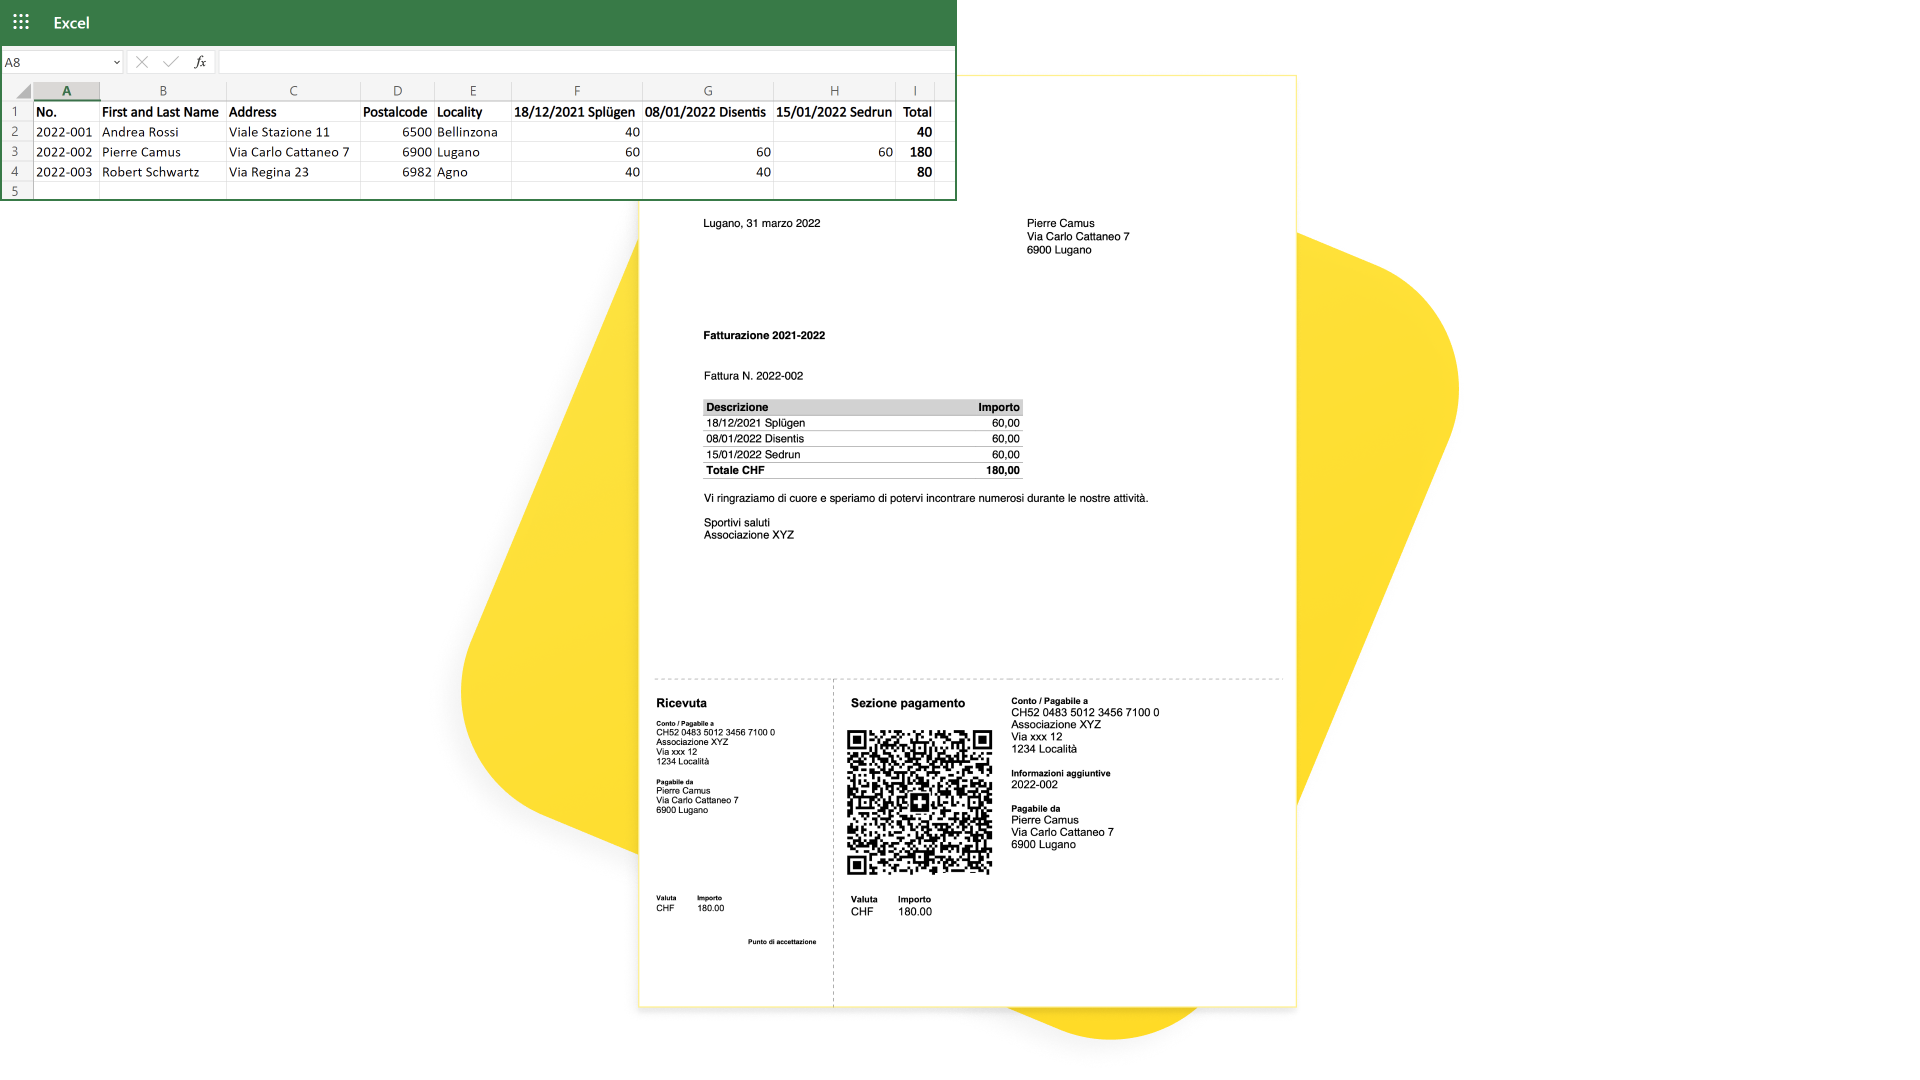
Your Excel data
The extension is designed for associations, organisations or people who have data in Excel and want to print invoices with the QR.
With a few small adjustments to the Excel file you can use your data, transfer it to Banana Plus with a copy-paste, and immediately create QR invoices.
- In Excel you must have the same columns as in Banana Plus (see QRCode Table).
- It is very useful to have the columns also in the same sequence. It is easier to copy data: you can copy rows directly or a series of consecutive columns.
- If, however, the columns are not in the same sequence, you will have to copy/paste column by column.
QRCode Table
This extension uses the ready to fill-in template where invoice data can be entered.
- The template consists of a ready to fill-in QRCode table with the necessary columns.
- The columns are predefined for the correct printing of the QR according to the specific standard. Additional information/columns cannot be used.
- Each row of the table represents an invoice, in which you have to indicate the invoice number, the address of the recipient and the amounts of the activities to be invoiced.
- Each activity has its own column with its amount.
- You can add as many activities as you like (see Activity Amount Columns).
- The invoice total is the sum of the various activities.
- On the invoice you will see a table with details of activities and amounts.
- You can decide whether to enter the invoice total on the QR slip or to leave it blank so that the person paying the invoice can decide the amount (e.g. for payment in instalments or for higher voluntary payment).
To insert invoice data into the QRCode table in Banana Plus, you can copy them directly from the Excel table:
- In Excel select or filter the rows you need and then copy them.
- Go to Banana Plus and paste them.
- Check that the data has been copied into the correct columns.
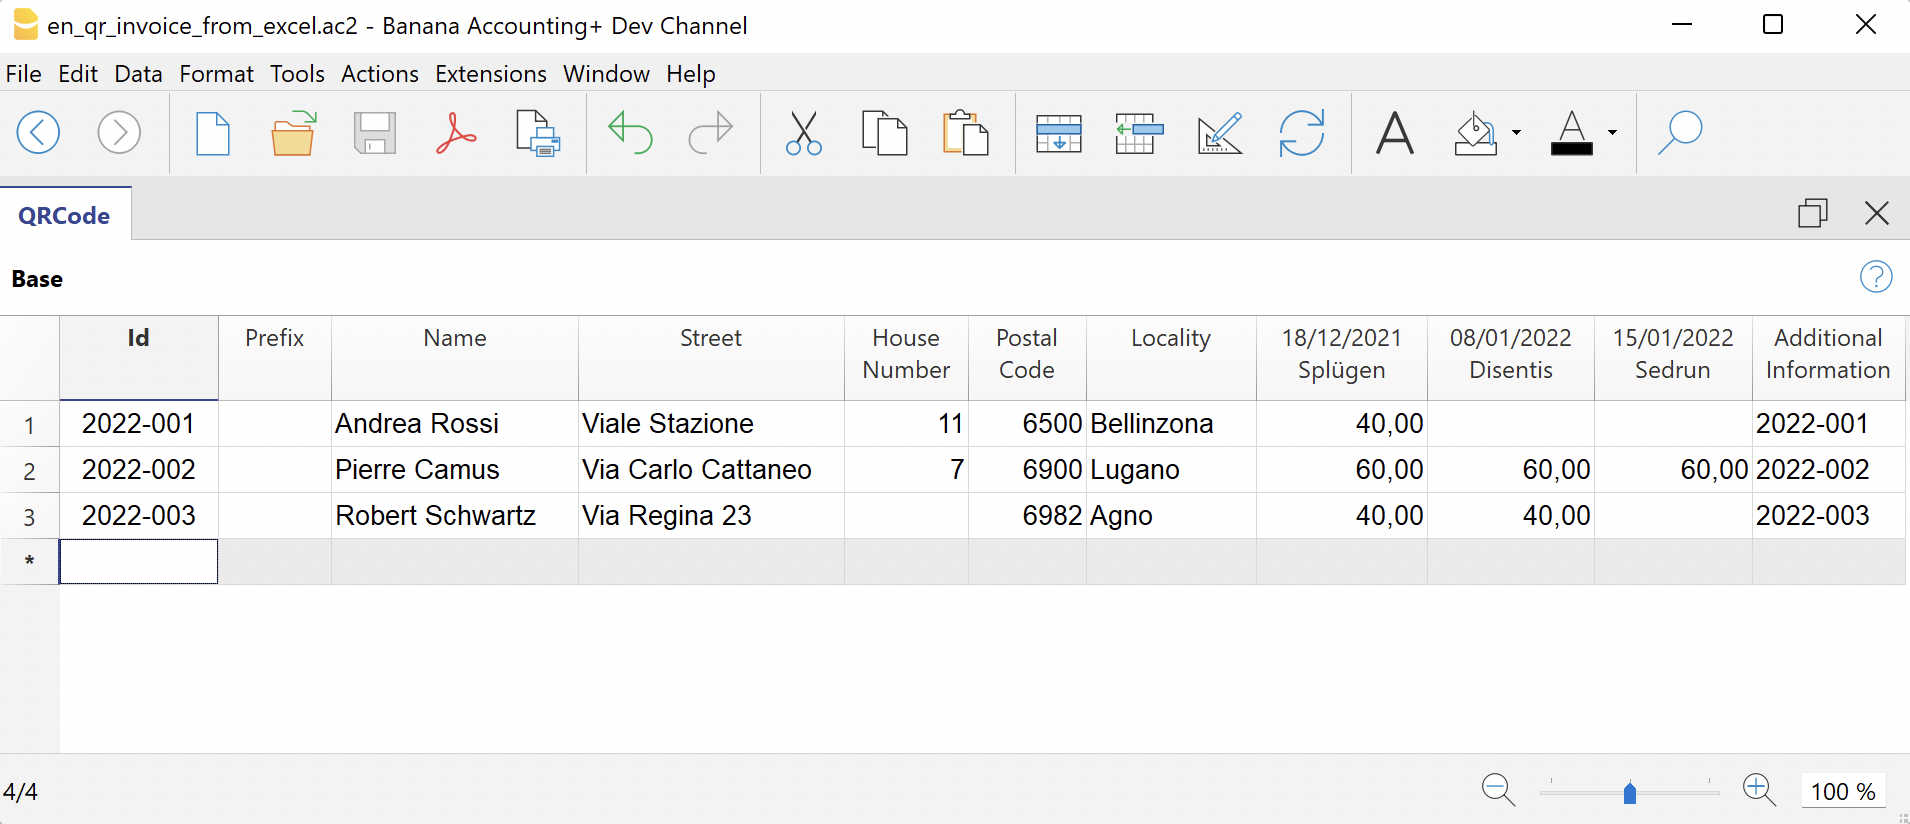
The Columns
The columns of the QRCode table are as follows:
- Id (Invoice)
- Enter the invoice number.
- Prefix
- Optional.
- Enter the prefix of the recipient.
- It is only printed in the invoice address (letter section). It is not printed in the QR slip.
- Name
- Enter the first and last name of the recipient.
- Address
- Enter the recipient's street address.
- You can enter the full address (street and house number).
- House Number
- Optional.
- Enter the house number of the recipient.
- You can enter the house number in a separate column.
- Postal Code
- Enter the postal code.
- Location
- Enter the location.
- Country Code
- Optional.
- Enter the country code.
- If you do not enter anything, the default country code used is always CH (Switzerland).
- Activity, Activity1, Activity2, ...
- Enter the amounts of the activities to be invoiced.
- See Activity Amount Columns.
- Additional Information
- Optional.
- You can enter additional information that will be included in the QR slip, in the 'Additional Information' section.
- Variable Text
- Optional.
- You can enter a specific text for each invoice and insert it automatically in the letter text (see Letter Text).
- Currency
- Optional.
- You can specify the currency to be used (CHF or EUR).
- If you do not enter anything, the default currency used is always CHF.
- Display the column with the command Columns setup.
Activity Amount Columns
In the activity columns you enter the amounts to be invoiced.
Each activity has its own column with the corresponding amount. Nella tabella ci sono già tre colonne preimpostate. There are already three preset columns in the table. You can add as many columns for activities as you like or delete those you do not need.
To add and customise columns for activities:
- Add a new column.
- Execute the command from the menu Data > Columns setup.
- Click on Add to add a new column.
IMPORTANT: The XML name of each column must begin with the word "Amount" (capital letter) followed by a number (e.g. Amount1, Amount2, Amount3, etc.).
In the Name and Xml Name fields enter e.g. Amount3, and in the Data Type field select Amount.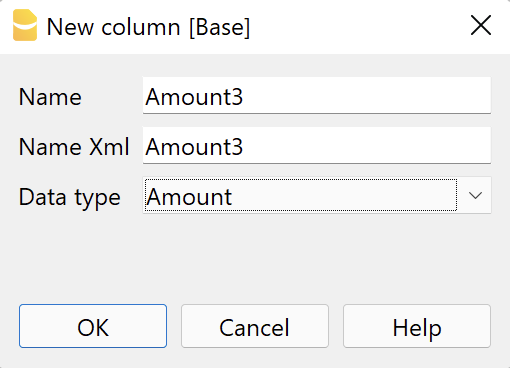
- Change task names (column headers).
- Execute the command from the menu Data > Columns setup .
- In the field Header enter the text of the task (e.g. 'Activity 3', '18/12/2021 Splügen').
The texts are used on the printout in the invoice details table.
N.B: Invoices without amounts (rows where the activity columns are all empty) are automatically excluded from printing.
Settings dialogue
Run the extension from the menu Extensions > QR-Invoices from Excel.
The Settings dialogue of the extension will open. From here you can define the information required to create the invoice printout.
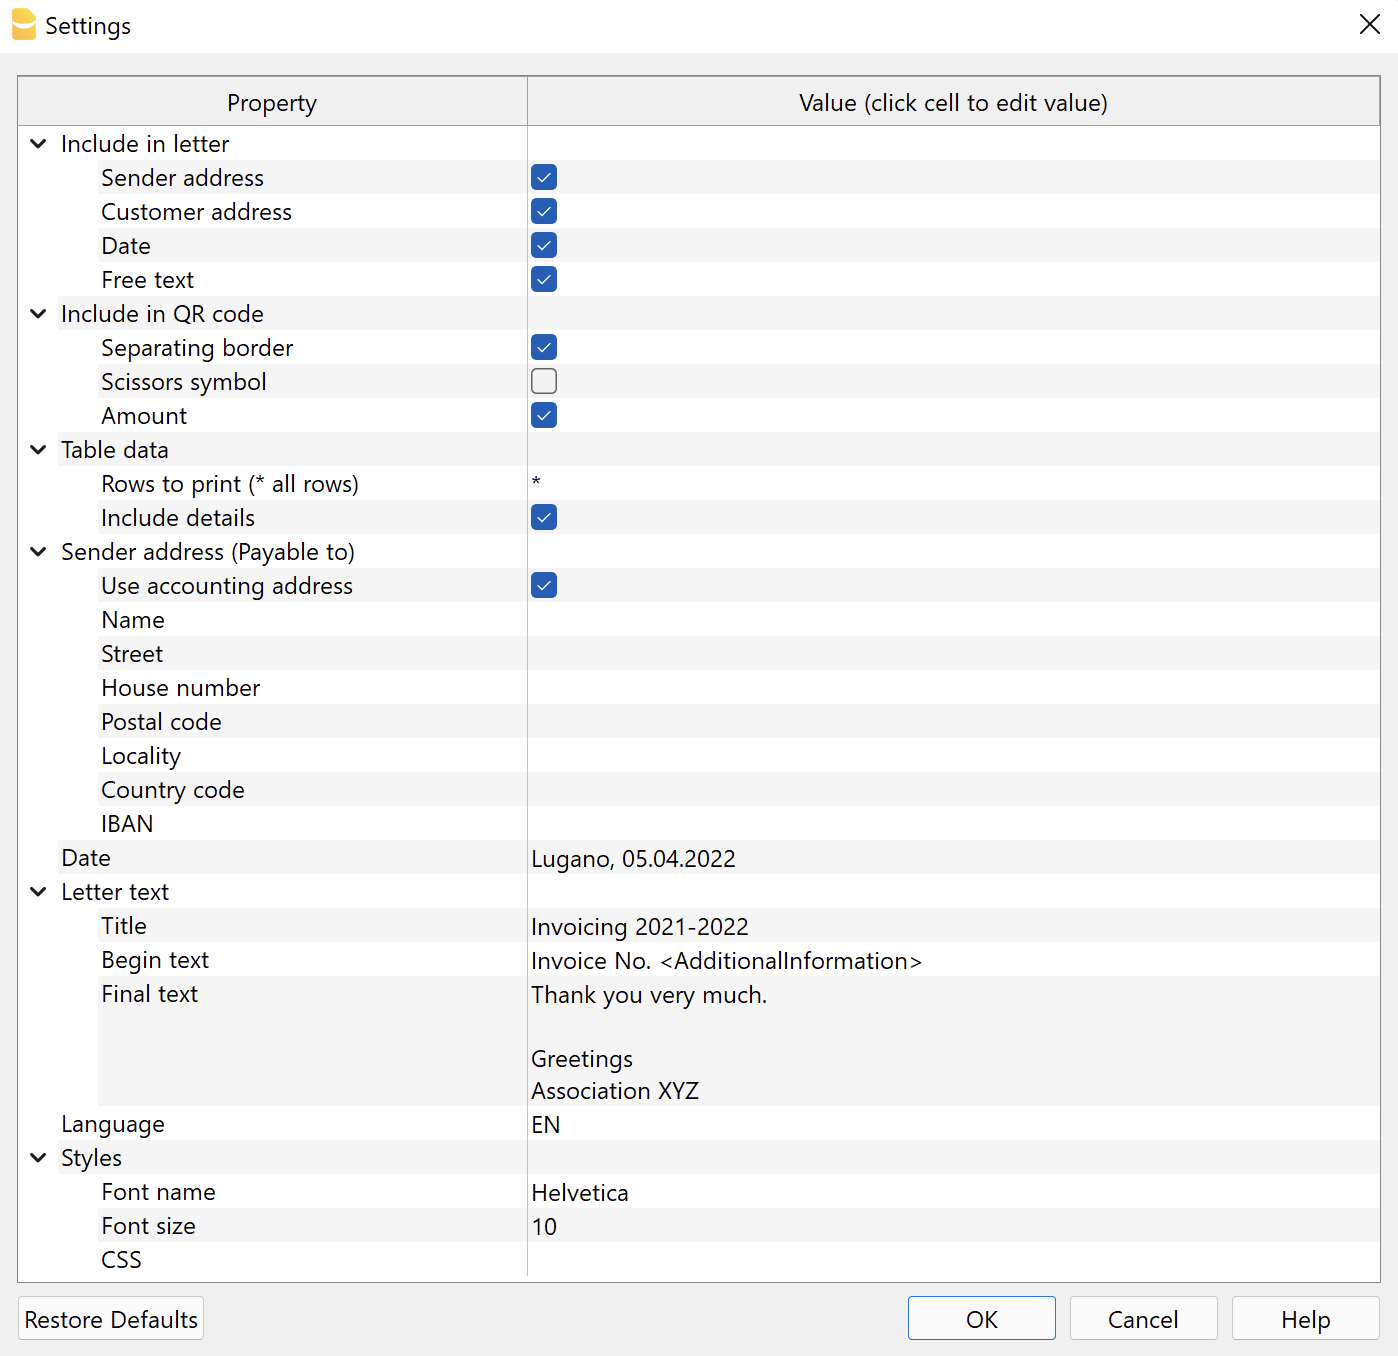
The fields are the default ones for the correct printing of the QR according to the specific standard. Further information cannot be entered.
The settings are divided into the following groups:
- Include in the letter
- Select the information to be included in the printing of the letter.
- Include in QR code
- Select the information to be included in the QR slip.
- Table data
- Select the table rows to be used for printouts and the data to be included.
- Sender Address (Payable to)
- Define the sender's address.
- Date
- Enter the date of the letter.
- Letter Text
- Enter the text of the letter..
- Language
- Select the language in which the QR is to be printed.
- Styles
- Define font type and size for the letter text.
Add to the letter
Here you can decide what to print in the letter. If none of the options are selected, you will get a blank page with the QR Slip at the bottom of the page.
- Logo
- Check to include the logo in the header.
- The logo is defined with the command File > Logo setup where you can also set the size, choose how to align it (left, centre, right), and also choose how to align the address with respect to the logo.
- Logo name
- Enter the name of the logo customisation defined in the menu File > Logo setup, respecting upper and lower case.
- Sender address
- Choose whether to include the sender's address in the letter.
- Customer address
- Choose whether to include the customer's address in the letter.
- Date
- Choose whether to include the date in the letter.
- Free Text
- Choose whether to add a free text to the letter.
Add to QR code
Here you can decide what to print on the QR code.
- Outline border
- Choose whether to include the dotted outline border in the QR slip.
- Scissors Symbol
- Choose whether to include the scissor symbol in the QR Bulletin.
- Amount
- Choose whether to include the amount of each invoice.
- If excluded, an empty box will be left for manual entry of the amount.
Table Data
Decide which rows of the QRCode table you want to create the invoice for.
One invoice is created for each row indicated.
A single report is created containing all selected invoices in sequence.
- Rows to print
- To print all rows enter the asterisk *
- To print specific lines
- Enter the number of rows separated by a comma (e.g. "1,2,3").
- Enter a range of lines (from... to...), indicating the first line and the last line separated by the hyphen "-" (e.g. "1-5").
- Add details
- Choose whether to add a table with invoice details.
- All activity columns are listed with their respective amounts and the final total.
- If an activity column has no amount, it is automatically excluded from the details.
Sender Address (Payable to)
Choose how to set the sender address that will appear in the 'Payable to' section of the QR slip and in the letter.
- Use Accounts Payable Address
- View this option to use the address entered in the menu File > File properties (Basic data) > Address tab of your file. You must have entered at least the data in the fields Company, Address1, Postcode, Location, Country Code, IBAN.
- Alternatively, do not display this option and enter the address manually via the options below.
- Name
- Enter your first and last name.
- Street
- Enter the street.
- House Number
- Enter the house number
- Postal code
- Enter the postal code.
- Location
- Enter the location.
- Country code
- Enter the country code.
- IBAN
- Enter bank account IBAN
Date
In the Date section, enter the date of the letter. The date can also be accompanied by the place (e.g. Lugano, 05.04.2022) and can be entered in any format (e.g. Lugano, 5 April '22).
It is not possible to change the position of where the Date appears in the invoice.
Letter Text
In the Letter Text section you can add the text of your letter. In the Letter Text section you can add the text of your letter. In case it is a long text the QR-slip will automatically jump to the next page.
- Title
- Enter the title/object of your letter.
- It can be entered on several lines.
- The text is automatically set in bold.
- Start text
- Enter text for the first part of the letter.
- Can be inserted on several lines.
- The text is automatically inserted immediately after the title.
- End text
- Insert a text for the final part of the letter.
- Can be inserted over several lines.
- The text is automatically inserted at the end of the letter.
Note:
- Invoice details (table with invoiced items), when included, are automatically inserted between the initial text and the final text.
- In all three fields you can enter codes, which will be replaced with their actual values when printed:
- <AdditionalInformation> is converted to the value contained in the Additional Information column (e.g. "Invoice No. <AdditionalInformation>" = "Invoice No. 2022-001").
- <Currency> is converted to the currency of the invoice.
- <Amount> is converted to the total amount of the invoice.
- <VariableText> is converted to the value contained in the VariableText column.
- <Notes> is converted to the value contained in the Notes column.
- Example:
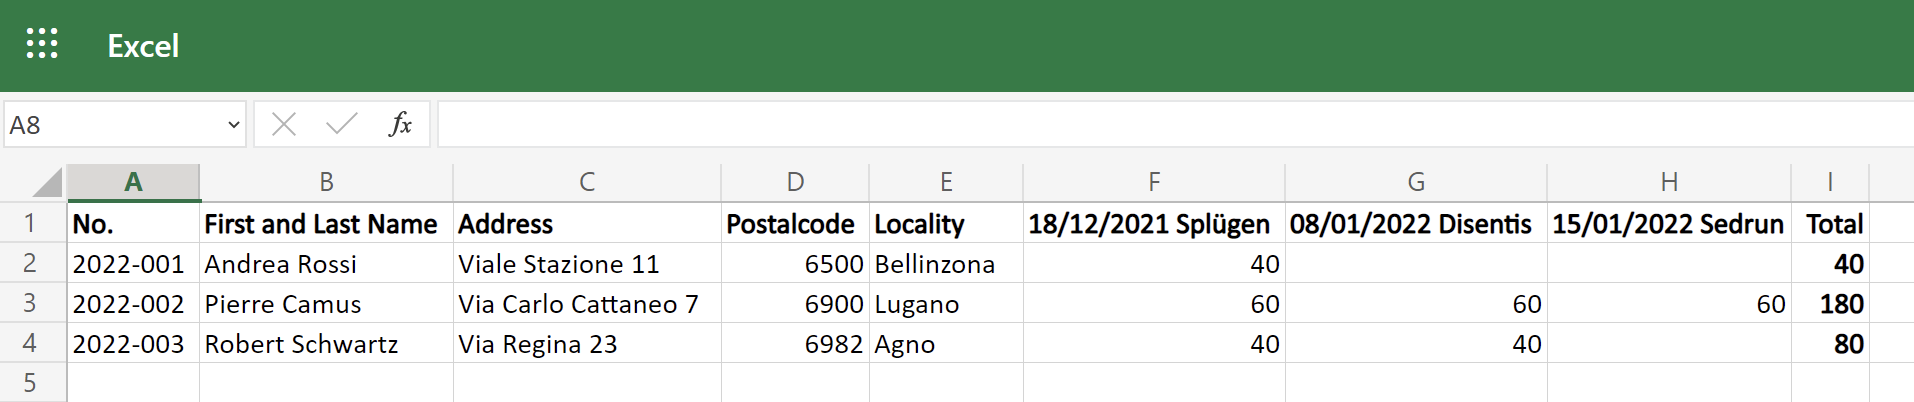
We hereby forward to you the details of invoice no. <AdditionalInformation> for the total of <Currency><Amount> = We hereby forward to you the details of invoice no. 2022-001 for the total of CHF 4,000.
Language
In the Language section, select the language in which the QR Bulletin and the header of the details table are to be printed.
Available languages are Italian, French, German and English.
Styles
- Font type
- Enter the font type (Helvetica, Arial, Times New Roman, etc.).
- Font Size
- Enter the font size.
- CSS
- Optional.
- You can change the appearance of the print (text formatting, address positioning, etc.) by entering CSS code to customise the style.
CSS customization
Cascading Style Sheet (CSS) is a specification language that allows to customize the appearance of web pages, and a subset of the whole CSS specification is also used in Banana to prepare reports.
The "QR Invoice from Excel" extension is formatted through a CSS stylesheet. You can customize the printing of the report by editing the CSS.
The properties you define in the custom CSS will extend or overwrite the styles of the default stylesheet.
To add a custom CSS code:
- Run the extensions from menu Extensions
- In the extensions Settings, enter the code in Styles > CSS.
Example 1: Change position of the address
In order to move the address (up, down, left, right) we can change the predefined margins values of the "customer-address" element.
- Move up/down.
- To move the address up, change the top property value with a smaller value.
- To move the address down, change the top property value with a bigger value.
- Move left/right.
- To move the address left, change the left property value with a smaller value.
- To move the address right, change the left property value with a bigger value.
Into the extension settings under Styles > CSS, copy and paste the following code and adjust the margin-top and margin-left values.
.customer-address {
   margin-top: 4.5cm;
   margin-left:12.3cm;
}
Problem solving
For more information, please visit the Error Messages page of the documentation.
Related topics
The data in the QRCode table can also be used to print labels.