In this article
The command can be activated via the Data > Columns setup menu. With this command, columns can be:
- Displayed
- Hidden
- Renamed
- Moved left or right in the various tables.
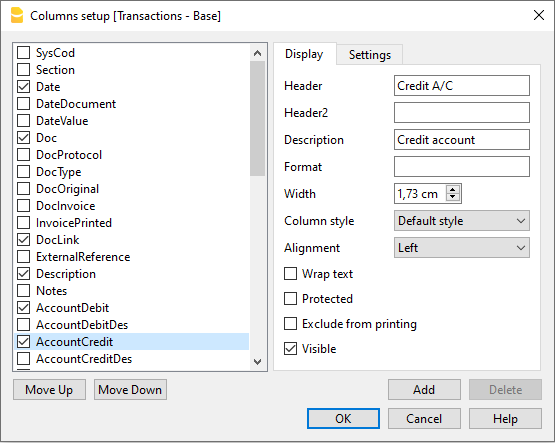
Display Tab
Header
This is the column header.
Header 2
This header is used by the program for only a few fields (e.g. Amount column).
Description
This is the column description field. This description will be shown as a tooltip.
Format
This is the format to show numbers, date and time (refer to Columns setup page for specific information).
Width
This section defines the horizontal size of the column.
Column Style
This is a drop-down menu that indicates the style to be used. This style has priority over the style of the row.
Alignment
The user can choose whether to align the text right, left or center.
Wrap text
This option allows the user to view the input text on more than one line.
Protected
This option allows the user to protect the entire column so that no data can be input or edited.
Exclude from printing
When this option is activated, the field will be excluded from printing.
Visible
This option allows the user to make column visible.
The tables can be modified. Columns can be added, headers can be changed, and column sizes and the order in which they are displayed can be altered.
Move up, Move down
The columns can be moved to the right or to the left.
- Just click on the name of the column:
- with the Move up button, the column is moved to the left.
- with the Move down button, the column is moved to the right
- Columns can also be moved simply by dragging them with the mouse.
Add
Add columns in the active table. The columns added by the user have a purely informative function and the program does not perform calculations on any numeric data.
If you add a column of type Amount in some cases, the data entered by the user is used in the calculations. Amount columns are summed only in the following tables:
- Accounts table,
- Account cards table,
- Extract rows table.
Delete
This function is used to delete a column from the list. A system column, however, cannot be deleted.
Settings
Name
Enter the name of the column field to add. The program automatically adds the new column to the list.
XML name
The column name for XML storage and for extensions.
Data type
You can choose from the following predefined data types:
- Text
- You can enter any kind of text, without a line break.
- Comment:
Element in square brackets not considered by the program as a value.
In certain contexts, in the Transactions table, columns Debit account or VAT code, you can enter a commented value, which is not treated as a value, for example: Commented account [1000], Commented VAT code [V10].
- Number
- Numbers with decimal and thousands separators.
- positive "+1'234.00"
- negative "-1'234.00"
- neutral "±1'234.00"
Except for special cases, the entered value equals "0".
You can write "+-" before the amount and the program replaces it with the "±" symbol.
- Comments, text in square brackets [comment]
- Numbers with decimal and thousands separators.
- Amount
- Numbers with decimal and thousands separators.
- positive "+1'234.00"
- negative "-1'234.00"
- neutral "±1'234.00"
Except for special cases, the entered value equals "0". - In tables with totals (Accounts table) the amounts are summed.
- Comments, text in square brackets [comment]
- Numbers with decimal and thousands separators.
- Date
- Dates in the format defined by the operating system.
- Comment, text in square brackets [comment].
- Time
- Time of day in the format defined by the operating system.
- Comment, text in square brackets [comment].
- True / False
- A value is present (Yes) or empty (No).
- Comment, text in square brackets [comment].
- Date/Time (Timestamp)
- Date and time in the international format "2025-09-24T03:49:42.000Z"
- Comment, text in square brackets [comment].
- Time counter
- Hours:Minutes:Seconds.Milliseconds "36:10:02.100".
- Comment, text in square brackets [comment].
- Links (Link)
- A link to a document or a web page.
- Comment, text in square brackets [comment].
- Multi-line text
- Text with line breaks.
- You must also enable the "Wrap text" option.
- Alt+Enter to insert a line break.
- Menu > Format > Calculate row height, to display the full text.
- Markdown
- Like Multi-line text, but assumed to be in markdown format.
- MIME
- Columns with special contents.
- Protected text
- Text not displayed.
Max and min length
Maximum and minimum length of the column.
Max and min value
You can enter maximum and minimum values (numbers and characters).
Decimals
You can define the number of decimals of the column.
Column number
It is a number that is automatically assigned to the column, but it has a purely technical purpose.
All uppercase
When you click this option, all data in the column are converted to uppercase.
Default date and number format on your computer
After installation, the program uses your operating system settings by default.
If you want to change the date, time and number formats in the program, you must change the settings in the Control Panel (Windows) or in System Preferences (Mac).
Detailed instructions for Windows:
- Start > Control Panel
- Under Regional options, click Change the date, time, or number format
- In the dialog that appears, in the Formats section, you can change the date format
- To change the number or currency format, in the same dialog, click the Additional settings button and then the Numbers or Currency sections.
Detailed instructions for Mac OS X:
- From Apple’s apple symbol (top left) choose the System Preferences command
- In the dialog that appears choose Date & Time
- From the window that appears click Open Language & Region... > Advanced > (General), Date and Time
where you can change the number format.
Settings Tab
Name
Enter the field name of the column to add. The program automatically inserts the new column in the list.
Xml name
This is the name of the active field in the Xml format and it is automatically inserted by the program.
Data type
It is possible to choose between the following preset types: Text, Number, Amount, Date, Time.
Max and Min length
Maximun and minimum field length.
Max and Min Value
It is possible to enter minimum and maximum values (numbers or characters).
Decimal points
It is possible to define the field decimal points
Column number
This is a number automatically attributed to a column, and has uniquely a technical purpose.
All caps
By clicking this option all column data will be converted to capital characters.
Date and numbers format by default
Once the program is installed, it automatically uses as default your operating system settings.
If you wish to change your operating system settings, you should go to your Control Panel (Windows) or your System Preferences (Mac).
Here is the step by step process on Windows 8 and Windows 10:
- from the Start → Control Panel menu
- click on International options and then on Change date, time or numbers format
- a dialog window will appear where you can change your data format (in the Format tab)
- in order to change your numbers or currency format, from the same window you can click on the Additional settings button and then on the Numbers or currency tab.
Here is the step by step process on Mac OS X 10.9.5:
- from the Apple logo (on the top left of your screen) click on System Preferences
- from the dialog window that appears choose the Date & time icon
- a new window will appear where you can choose Open language & Region...
- a new window will appear where you can click on the Advanced button
- finally a new window will appear where you can change the numbers format (General tab), date or time format (Date and Time tabs).
Date, time, numbers and links format in Banana Accounting Plus
When no particular formats are specified for the date, time and numbers, they are displayed in the formats specific to the operating system.
- Within Banana, only the display format can be changed.
- To change the input format (when changing a value) you must change the settings of your operating system.
To change the format, click on Data → Columns setup and enter the desired format type in the Format box. The format types are listed below with some explanatory examples:
| Date format | Examples for date |
| d mm yy | 1 01 15 |
| dd m yy | 01 1 15 |
| ddd mmm yyyy | Fri Jan 2015 |
| dddd mmmm yyyy | Friday January 2015 |
| The letter “d” (day) indicates the day, the “m” (month) indicates the month, and the “y” (year) indicates the year. | |
| Time format | Time examples |
| hh:mm:ss:zzz | 04:04:36:089 |
| h:m:ss:zz | 4:4:36:89 |
| Naturally the user can also invert the order of the elements making up the date or the time as desired (e.g.: mm dd yyyy). | |
| As far as the separators are concerned, the user can choose between all of those available on the keyboard (for example: #, @, -, /, ., etc.). | |
| Numbers Format | Example for numbers |
| 0. | 259 |
| 0.00 | 258.85 |
| 0.000 | 258.848 |
| The number of decimal spaces in a number field can be edited according to the user’s needs. Actual calculations are made using all the inserted decimal numbers. Rounding is only done for what is shown on screen. | |
| Link format | Link example | What it does |
| :link: | "receipts/office electricity october.pdf" | shows the full file path |
| :file: | "office electricity october.pdf" | shows the file name |
| :file:16: | "office electrici" | shows the first 16 characters of the file name |
| :file:16:ellipsis: | "office electr..." | shows the first 13 characters of the file name followed by ... (= total 16 characters) |
| :file:-24:ellipsis: | "...electricity october.pdf" | shows the last 21 characters of the file name preceded by ... (= total 24 characters) |
| :link:symbol: | ">>" | shows the >> symbol indicating that a file is linked |
| NB: The link format is applied only when printing on paper or to a PDF file and does not affect the on-screen display. | ||