Income & Expense accounting
Introduction
Income & Expense accounting is the ideal tool to manage the accounts of small to medium size companies, associations, private enterprise or project planning. It can be configured with or without VAT. On the other hand, it does not have the multi-currency options, that you will find in the double-entry book keeping version.
It does include:
- Income & Expense - allows you to manage income and expense for several accounts.
- Cash book - used to keep track of the income and expenses of one single account .
Features
- Manages your balance sheet and income statement (assets, liabilities, income and expense)
- VAT option allows VAT calculations and VAT tax returns
- Process all your accounting records: accounting journal, account cards, periodical and annual reporting
- Lets you manage your Cost Centres and their Segments
- Multiple options to present your data
- Export to Excel, Html, Xml, Pdf
- Import various types of data files.
Tables and Properties files
Income & Expense accounting contains the following tables:
- Accounts
Where you find the Chart of Accounts, the opening balances and define your groupings. - Categories
Define the categories of Income & Expense here, the cost centres and segments. - Transactions
Record your transactions here. - VAT Codes
If you have selected the VAT option, enter your VAT codes here. By selecting one of the VAT templates, VAT codes will be allocated correctly, allowing you to have a facsimile of your official VAT statement. - File and accounting properties
- Manage the general settings of your accounting here.
Immediate information
The account balances will be displayed instantly in the Accounts and Categories tables, after the income and expense recordings. Balances will be adjusted automatically after each registration of a transaction and you will not need to require a specific report to have an overview of your accounts, which you can call up via the Accounts and Categories tabs.
Support
- Detailed information on the different functionalities of the program, with concrete examples and screenshots of the software, for your use
- Free support for one year included.
Topics similar to Double-entry accounting
Commands
Printouts
Starting an Income/Expense accounting
Video Income & Expense accounting: video tutorial that shows you how to easily set up an Income & Expense accounting, adapt the Accounts and Categories tables, set a budget, enter the transactions and print reports.
Creating an accounting file, starting from a template
Proceed as follows:
- File menu, New command
- Select the Region, the Category and the Accounting type
- From the list of the templates that appears, select the template that is closest to your own needs.
- Click on the Create button
In the Search area, when entering a key word, the program displays the templates that contain the entered key word.
It is equally possible to start from a blank file, by activating the Create blank file option. In any case, in order to facilitate the start and avoid grouping errors, we recommend that you always start from an existing model.
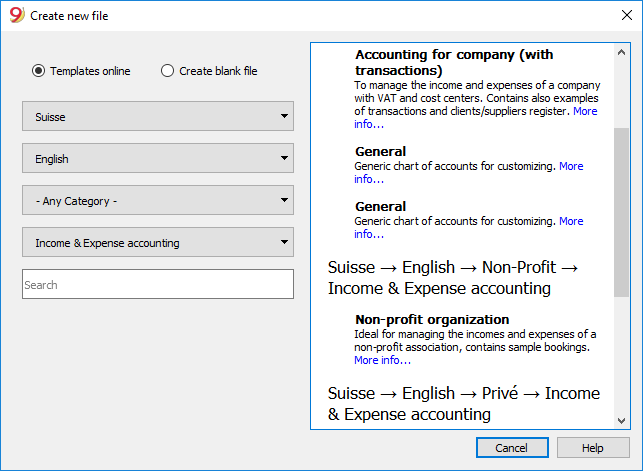
More information on how to create a new file is available on the Create New File page.
Setting up the File properties
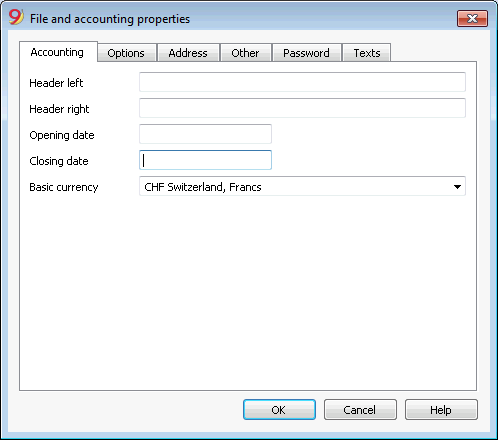
Set up your own data from the File and Accounting properties command and save with your own file name.
Save to disk
With the File-> Save As command, save the data and also assign an name to the file. The typical save dialog of your operating system appears.
- It is advisable to use the name of the company followed by the year "Company-2020." to distinguish it from other accounting files.
The program will add the "ac2" extension. - You can keep as many accounting files as you need, each will have its own name.
- You can choose the folder you want, (for example, Documents -> Accounting) or the support you want like a disk, usb or cloud.
If you also expect to have documents linked to the current year's accounts, it is suggested that you create a separate directory for each accounting year having to group all the files.
Customize the Accounts table
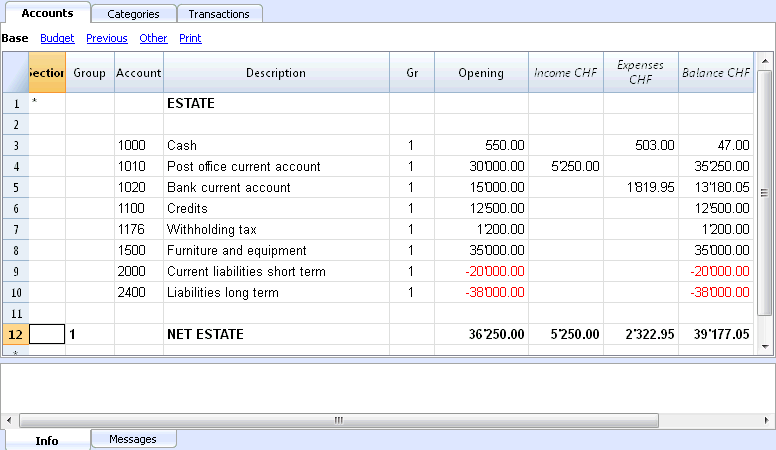
In the Accounts table, you can customize the estate accounts, according to your own needs:
- you can change the Account numbers
- you can change the Description
- In the Opening column you need to enter your opening balances
Please remember, that for the Liabilities' accounts (f.ex. debts), the opening balance should be preceded by the minus (-) sign.
This operation needs to be executed only the first time using Banana Accounting, since from then on, every end of the year, when creating a New Year (Account2 menu, Create New Year command), the opening balance will be automatically transferred.
Customize the Categories table
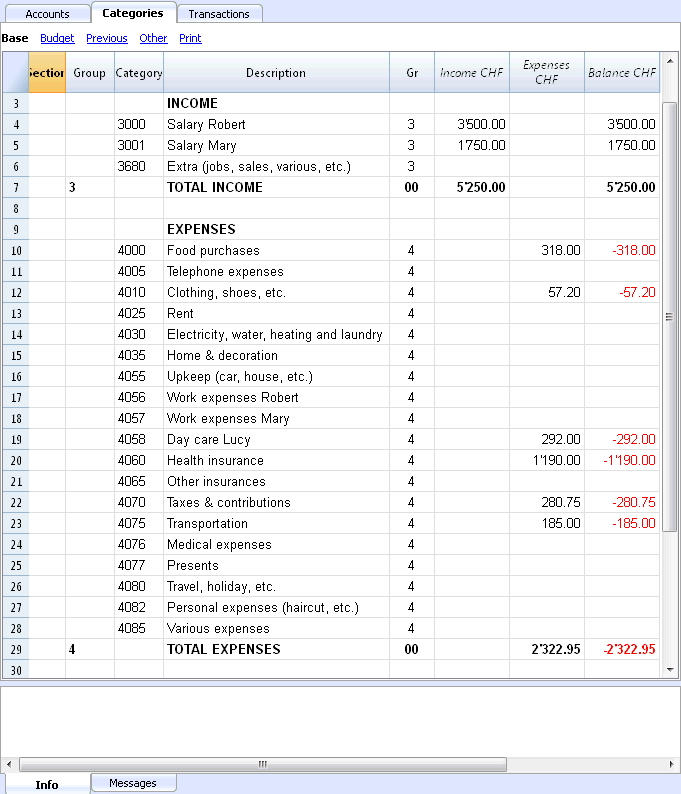
In the Categories table, customize the income (earnings/revenue) and expense (expenses/costs) categories.
The Category numbers can be amended, as well as the Description.
The categories don't and must not contain an opening balance, in order to determine the result of the accounting year.
Transactions table
In the Transactions table, the daily income and expense transactions are entered, indicating the account, for which the transaction was made and the category to which the income or expense is attributed.
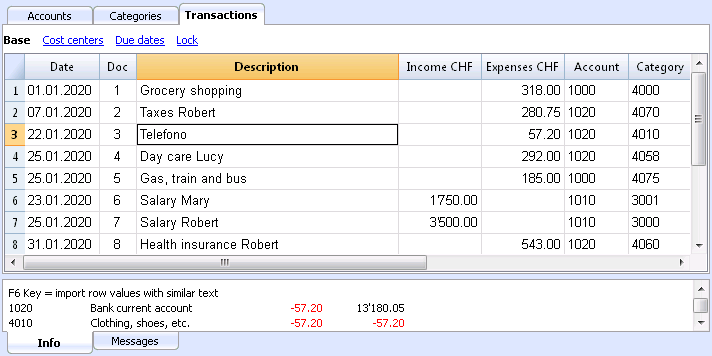
In the appropriate columns:
- Enter the date
- Enter the document number that is manually assigned to the paper document. This allows you to easily find documents, once the accounting transaction has been entered.
- Enter a description
- In the Income column, enter the income amount
- In the Expenses column, enter the expense amount
- In the Account column enter the account number (it has to be an existing account in the Accounts table, ex. Bank)
- In the Category column enter the expense or income category (it has to be an existing category in the Category table).
Speeding up the recording of the transactions
In order to speed up the recording of your transactions, you can use:
- the Smart fill function that allows the automatic autocomplete of data that have already been entered at an earlier date.
- the Recurring transactions function (Account2 menu), used to memorize recurring transactions into a separate table.
- import of your bank or post office statement.
Transactions with VAT
In order to enter transactions with VAT please proceed as follows:
- from the File menu, choose New command and choose Income /Expenses accounting with VAT/Sales taxes
- Choose one of the existing templates for your nation of the Income/expenses accounting with VAT type
In order to enter transactions with VAT, please refer to the Transactions page.
Transactions on multiple rows
Transactions on multiple rows, or Composed transactions are transactions involving more than two accounts and credits/debits on multiple accounts or categories (for example when you pay different invoices from the bank account). In this case you need to enter the transaction on multiple rows:
- in the first row enter the total amount of the income or expense and the account from which this amount is debited or credited
- in each subsequent row, enter the income or expense amount in the category column, and enter the appropriate category number.
Each individual amount is recorded on different row. When all the individual income and expenses rows are entered there shouldn't be any differences.
The Account card
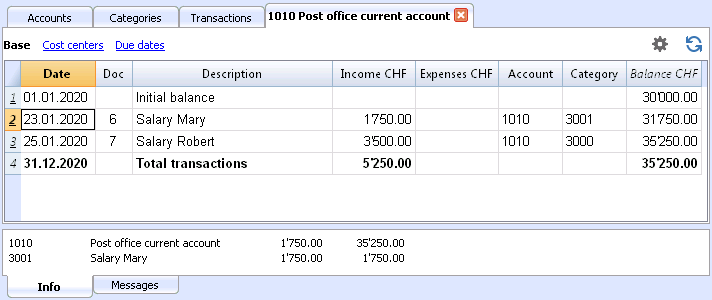
The Account card allows you to have a complete list of entries relating to the same account or the same group.
- To open an account card you click once on the account number cell and then click once on the small blue arrow appearing in the upper right corner of the cell.
- To open multiple account cards you must select the Account cards command from Account1 menu.
- To update the account cards, following changes in the Transactions table, you must click on the two circular arrows symbol, located at the top right of the account card.
The category card
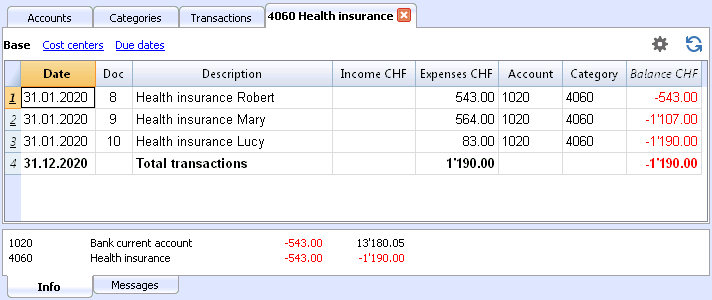
The Category card allows you to have a complete list of entries relating to the same category.
- To open a category card you click on the account number cell and then click once on the small blue arrow appearing in the upper right corner of the cell.
- To open multiple category cards you must select the Account cards command from Account1 menu.
- To update the category cards, following changes in the Transactions table, you must click on the two circular arrows symbol, located at the top right of the category card.
Account cards per period
To open an account card with account balances at predefined dates, click on Account1 in the menu, Account cards ... and click Period selected in the Period tab to insert your selected period.
Consult the Period page for further information.
Print the Account cards
To print an Account card, open it from any table (Accounts or Transactions) and start printing from the File menu.
To print out several or all the Account cards, click Account1 menu, select Account cards and select the Accounts you wish to print. The filter in the window allows you to select automatic selection of all accounts, cost centers, segments, groups etc.
For further information refer to the Account Cards page.
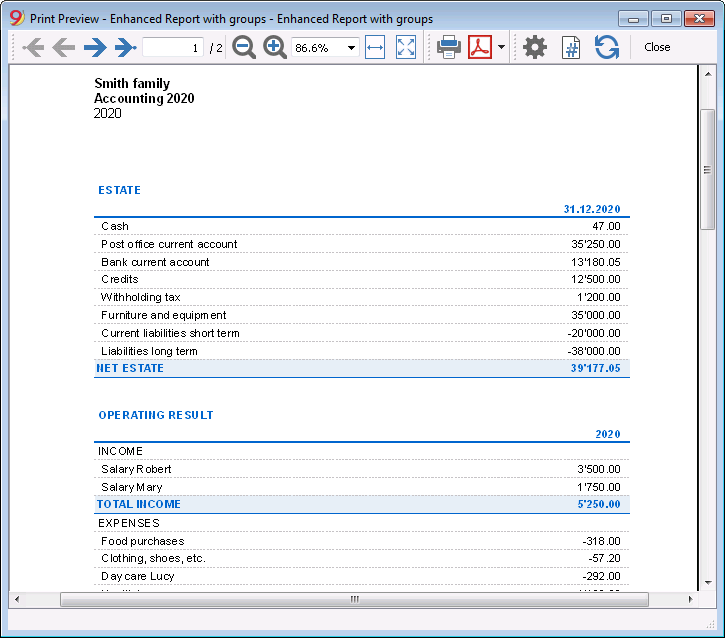
Enhanced Statement
To view the Enhanced Statement and the Enhanced Statement with groups, choose the Account1 menu and then the Enhanced statement or Enhanced statement with groups command. You can also obtain statements by period.
- The Enhanced statement displays all accounts and categories without any subgroups
- The Enhanced statement with groups displays all accounts and categories also with subgroups.
Archive data in PDF format
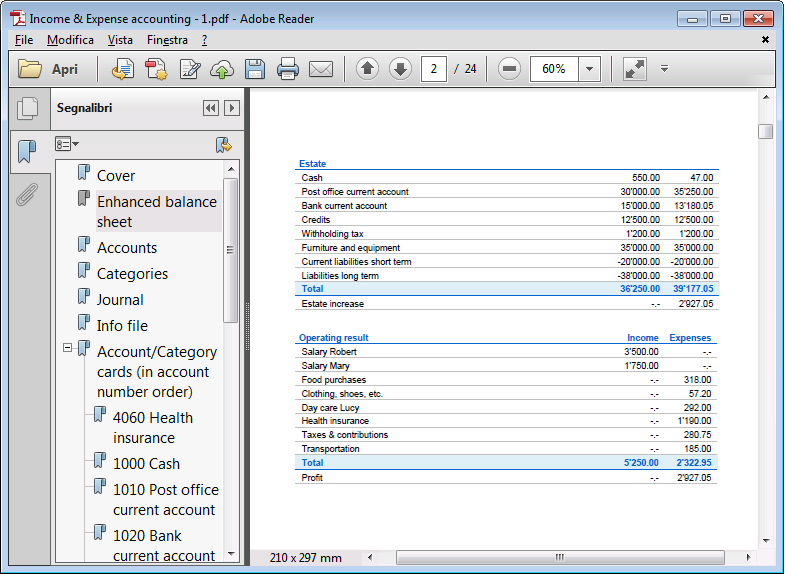
At the end of the year, when the accounting is done, corrected and revised, you can store all accounting data with the Create Pdf dossier command from the File menu.
The Budget
Before starting your accounting year, you can create a budget with your assumed expenses and revenue, in order to have control over the financial and economic situation of your company.
The budget can be set in two different ways:
- From the Budget column of the Categories table. For each account the yearly budget is indicated.
In this case, when you process the budget from the Account1 menu, Enhanced statement with groups command, the Budget column shows the amounts that relate to the entire year. - From the Budget table, that you need to manually activate using the Add new functionalities command from the Tools menu.
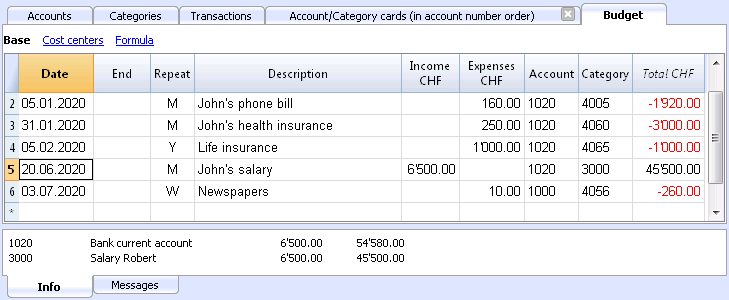
In this table all estimates are entered as budget transactions, either income or expenses. If you activate this table, the Budget column of the Accounts table is automatically deactivated.
In the Budget table you can setup a detailed budget that takes into account possible variations during the year and in different periods of the year.
Related document: Transactions, Enhanced statement.
Caratteristiche della Contabilità Entrate e Uscite
L'applicativo Entrate e Uscite di Banana Contabilità ti consente di gestire in modo semplice le entrate e le uscite della tua azienda, anche se non hai delle conoscenze contabili. La facilità d'uso e la flessibilità rendono il lavoro intuitivo e veloce.
È ideale per gestire la contabilità di piccole ditte, associazioni, imprese individuali o per contabilità ausiliarie di progetti o immobili.
Anche se non usi la contabilità professionale della contabilità in partita doppia, puoi ottenere ugualmente rendiconti e report professionali perché tecnicamente il programma utilizza il motore della contabilità in partita doppia. Puoi impostare il file partendo da uno dei nostri modelli e personalizzarlo come vuoi tu, senza essere obbligato a utilizzare schemi rigidi senza possibilità di modifiche.
Come per la Contabilità in partita doppia puoi avere rendiconti patrimoniali e di conto economico, estratti conto, gestione IVA, centri di costo e profitto, segmenti. Non è invece possibile tenere conti in in più monete.
Simile a Excel
Funzionalità e comandi simili a Excel
- Tutti i dati che inserisci nelle tabelle sono sempre visibili e a portata di mano.
- Lavori velocemente perché puoi selezionare, copiare e incollare, su più celle e più righe le registrazioni che si ripetono.
- Se sbagli puoi correggere annullando o ripristinando le operazioni.
- Aggiungi quante righe vuoi senza limiti, o elimina le righe che non hai bisogno.
- Se hai sbagliato un valore, un conto, un codice IVA, una descrizione, con la funzione Cerca e sostituisci correggi in un attimo
- Non hai bisogno d'inserire formule perché i calcoli vengono aggiornati immediatamente e hai una visualizzazione contestuale (come nei fogli di calcolo).
- Tutto quello che si vede può essere stampato o esportato in pdf o altri formati.
- Puoi impostare il logo della tua azienda per personalizzare le intestazione della stampa.
- Le colonne sono personalizzabili, puoi spostarle di posizione, aggiungerne nuove e cambiarne la larghezza.
- Lavora con il formato che ti è più congeniale.
- Colora le righe per individuare subito le registrazioni che devi rivedere o fare vedere al commercialista o che devi completare.
Struttura basata su tabelle
La gestione della contabilità si concentra principalmente su tre tabelle, che si usano in modo simile alle tabelle di Excel, ma che sono già completamente impostate e programmate con tutto quanto serve per tenere la contabilità in modo veloce e sicuro:
- Tabella Conti.
Imposti tutti i conti della liquidità, dei clienti, dei fornitori, ecc. e inserisci i saldi iniziali senza doverli registrare manualmente nella tabella registrazioni. Puoi raggruppare più conti insieme, come per esempio la cassa, la banca o la posta nel gruppo della liquidità, così in un attimo hai i saldi aggiornati che puoi verificare immediatamente. - Tabelle Categorie
In questa tabella imposti tutte le categorie di entrata e di uscita; saprai così tutti i dettagli di ogni spesa e di ogni entrata e potrai valutare dove hai speso di più o quale entrata ti ha reso maggiormente. Come nella tabella Conti vedi immediatamente tutti i saldi aggiornati e le colonne dei movimenti in entrata e in uscita. Sai subito quanto hai speso, quanto hai incassato e il guadagno ottenuto. - Tabella Registrazioni.
È la tabella dove registri tutti i movimenti giornalieri. Per registrare velocemente hai tante funzioni da utilizzare, dalla ripresa delle righe memorizzate, al copia e incolla delle registrazioni uguali, alla ripresa di operazioni ripetitive fino a importare i movimenti dagli estratti bancari.
Ulteriori tabelle che si possono aggiungere e che supportano ulteriori funzionalità.
- Tabella Preventivo.
Per allestire previsioni finanziarie, con il metodo delle entrate e uscite, complete di piano della liquidità, conti investimenti, clienti e fornitori e della previsione delle tue entrate e uscite, progetti, segmenti per uno o più anni. - Tabella Codici IVA.
Per impostare le aliquote e i parametri necessari da usare nella tabella Registrazioni per il calcolo automatico dell'IVA e i rendiconti da presentare alle autorità fiscali. - Tabella Articoli.
Per impostare un elenco di articoli da usare per la fatturazione. Il programma tiene nota delle entrate e uscite. - Tabelle libere.
Per fare fronte a ulteriori necessità.
Inizia veloce con i nostri Modelli
Inizia immediatamente con uno dei nostri modelli, senza perdere tempo. Puoi sceglierne uno tra quelli elencati per la tua nazione e per il tipo di attività che svolgi. Puoi personalizzarlo per renderlo ancora più ideale alle tue esigenze.
- Hai un avvio facile con la creazione di un nuovo file partendo da un modello.
- Tantissimi modelli suddivisi per nazione e tipologia di utenza, personalizzabili e con documentazione d'uso.
- Ricerca facile e uso modelli direttamente nel programma.
Impostazione contabile
- Per la tua contabilità imposta liberamente la moneta, la puoi scegliere da un elenco di monete mondiali o impostata liberamente (cripto monete).
- Puoi impostare liberamente un periodo contabile, senza essere obbligato a inserire il classico periodo dal 1 di gennaio al 31 di dicembre. Il periodo contabile può essere anche su più anni.
- Intestazioni e dati base contabilità impostate in un'unica finestra di dialogo, facile da visualizzare.
- Inserisci quanti decimali vuoi, da 0 a 27 (Scelti al momento della creazione della contabilità).
- Puoi cambiare il numero dei decimali della contabilità durante l'anno senza problemi.
Multi-lingue
- Hai libertà di scelta della lingua della contabilità, quando crei il tuo file.
- Personalizza le intestazioni delle colonne come desideri.
- Puoi avere contabilità in più lingue contemporaneamente.
- Personalizza le Stampe anche per più lingue.
File e salvataggio dati
- Hai tutti i dati salvati in un unico file, dove trovi facilmente tutto senza perdite di tempo.
- Per ogni anno crei un File separato. Tutti i dati sono riferiti all'anno e non ci sono confusioni.
- Attribuisci al file il nome che desideri.
- Con una sola licenza puoi gestire un numero illimitato di contabilità.
- I dati rimangono in tuo completo possesso.
- Salva i dati del su qualsiasi supporto, computer, rete, cloud o inviato per email. Puoi accedervi ovunque sei.
- Accesso in contemporanea da più utenti, ma solo una persona può invece aprire il file in modifica.
- Rendi più sicura la tua contabilità inserendo una protezione con password.
Pianifica-Esegui-Controlla
Con lo stesso file di contabilità Entrate e Uscite e la stessa modalità puoi fare anche le previsioni per le tue entrate e uscite future, mettendo in pratica facilmente il potente approccio gestionale Pianifica - Esegui - Controlla.
Stessa metodologia per varie finalità
- Se nelle registrazioni ci sono degli sbilanci, hai la segnalazione della differenza.
- Nelle colonne hai la visualizzazione degli importi nel formato usato dal tuo computer, senza doverti abituare ad altri formati a te non congeniali.
- Visualizzazione degli importi molto intuitivo, con importi di entrata in positivo, importi d'uscita in negativo.
- Rendiconto, giornale, schede conto e altri report con un click.
- Stampe tutte personalizzabili.
- Formato di visualizzazione a scelta.
- Protezione dati con la tecnologia blockchain (metodo brevettato) per garantire la massima integrità dei tuoi dati contabili.
Piano dei conti
- Piano conti personalizzabile. Inserisci quanti conti vuoi e gruppi di totalizzazione a scelta.
- Anche la tabella Categorie è personalizzabile, inserendo tutte le categorie che ti servono.
- Con lo stesso piano dei conti puoi registrare nella contabilità e anche per le tue previsioni finanziarie.
- Scegli tu l'identificativo del conto e della categoria (conto numerico o alfa-numerico, fino a 256 caratteri).
- Nella colonna Descrizione puoi inserire testi fino a 256 caratteri.
- Non serve più inserire il bilancio iniziale e finale nelle scritture contabili, inserisci i saldi direttamente nella colonna Apertura della tabella Conti e solo la prima volta che usi Banana Contabilità. Negli anni successivi il riporto è automatico.
- Saldi, movimenti conto e totali visualizzati contestualmente e sempre aggiornati.
- Ad ogni conto del cliente e del fornitore hai le colonne per inserire i relativi indirizzi e altri dati che ti necessitano.
- Aggiunta di altre colonne per note, raggruppamento o importi.
- Non devi totalizzare gli importi nelle colonne, tutto è automatizzato ottenendo somme e calcoli perfetti.
Registrazioni
- Puoi inserire registrazioni singole, su una sola riga, o registrazioni composte su più righe, quando l'operazione riguarda più conti.
- Quando registri hai dei suggerimenti di testi che hai già registrato, basta un click per completare la registrazione (auto-completamento).
- Segnalazione immediata di errore e differenze, con possibilità di verificare a completare successivamente.
- Se memorizzi le operazioni ripetitive puoi riprenderle quando ne hai la necessità e registrare velocemente, senza riscrivere nuovamente.
- Diverse colonne predefinite, visualizzabili a scelta per non perdere di vista contenuti per te importanti.
- Colonne quantità e prezzo, per fatturazione o controllo costi.
- Auto-numerazione documenti con numerazioni diverse contemporaneamente.
- Collegamento ai file dei giustificativi digitali (pdf, immagini) e apertura del documento con un click.
- Testo registrazione fino a 256 caratteri e anche su più righe.
- Colora le righe per cercare subito le registrazioni che devi verificare o correggere in seguito, oppure per segnalarle al revisore.
- Formattazione righe per personalizzare la visualizzazione.
- Aggiunta di colonne per inserire qualsiasi ulteriore informazione.
- Salva le disposizioni delle colonne (viste) per avere sotto controllo i contenuti per te importanti.
- Informazioni contestuali circa il saldo del conto e della categoria, differenze o errori.
- Prima delle chiusure periodiche o di fine anno puoi usare le Registrazione di verifica saldo
Potrai individuare errori tra i saldi effettivi (es. saldi bancari fornite dall'estratto, e quelli della contabilità). Ti accorgerai subito degli errori e puoi correggere per avere tutto in perfetto ordine. - Importazione movimenti:
- Velocizza l'inserimento delle registrazioni importando i dati dagli estratti bancari digitali.
- Puoi importare i movimenti nei diversi formati bancari.
- Le righe importate possono essere modificate, completate o rimosse.
- Importa anche dati fatture o da altri programmi.
Previsione finanziaria
- Se necessiti di creare un preventivo puoi attivare la funzione aggiungendo la tabella Preventivo.
- Lavori con la stessa metodologia basata su Entrate e Uscite, a te già familiare.
- Previsioni finanziarie completi di piano della liquidità
- Previsioni per le categorie delle tue Entrate e Uscite.
- Se devi fare degli investimenti a lungo termine puoi creare la Proiezione automatica su più anni.
- Crei la tua pianificazione tramite delle semplici registrazioni di preventivo.
- Entrate e uscite ricorrenti impostate con una sola registrazione.
- Tutte le funzionalità disponibili in contabilità:
- Formule di calcolo in Javascript con accesso ai valori della previsione in corso:
- Valori di previsioni disponibili nelle stampe contabili:
- Scheda conto con movimenti di previsione per conto o gruppo.
Rendiconto della liquidità ed economico
- Rendiconti con dati consuntivi, o preventivi oppure con entrambi i dati con indicazione degli scostamenti.
- Disposizione libera con gruppi e sottogruppi.
- Risultati aggiornati visibili direttamente nella tabella conti.
- Stampe personalizzabili:
- Aggiunta del proprio logo.
- Scelta delle colonne da includere.
- Scelta delle sezioni da includere.
- Stampa dettagliata o raggruppata.
- Stampe per solo un periodo.
- Colonne con suddivisione per periodo (mese, trimestre, semestre, anno).
- Valori anno precedente.
- Valore di previsione confronto.
- Colonne con suddivisione per segmento.
- Aggiunta note allegate.
- Raggruppamento come nel piano dei conti o secondo un proprio schema.
- Salvataggio della personalizzazione.
- Report tabellare (simile alle stampe personalizzabili, ma con i dati presenti nella tabella).
- Esportazione in pdf o altri formati.
Altre stampe contabili
- Contenuto tabelle completamente stampabile o stampa anche solo per selezione.
- Aggiunta del proprio logo.
- Giornale.
- Schede con movimenti conto, categorie e gruppi:
- Con i movimenti contabili o quelli di previsione.
- Per periodo.
- Per Conto, Categorie, Gruppo, Centro di Costo o Segmento.
- Dati contabili o di previsione.
- Disposizione colonne personalizzabile.
- Esportazione in pdf o altri formati.
Grafici
- Contestuali, a piè di tabella.
- Diverse disposizioni.
- Evoluzione dei conti, delle categorie e dei gruppi.
- Valori contabili.
- Previsione.
- Anno precedente.
- Scelta del tipo di grafico.
Ulteriori gestioni
Il programma ti consente anche di aggiungere ulteriori informazioni alle registrazioni, in modo che gli stessi dati ti servono anche per la gestione IVA, per il controllo dei clienti e fornitori, emissione di fatture, avere rendiconti per progetti o settori d'attività e fare fronte ai diversi adempimenti societari e fiscali.
Gestione IVA
- Funzione attivabile a scelta (quando si crea una contabilità).
- Tabella codici IVA per indicare le diverse aliquote e casistiche IVA.
- Supporta qualsiasi specifica nazionale.
- Può essere usato anche per gestire altri tipi di tasse di vendita (p.es. Sales tax Americana).
- Inserimento in registrazione del Codice IVA.
- Funzionalità di storno IVA (usando il Codice IVA preceduto dal segno meno).
- Calcolo IVA dal netto o dal lordo.
- Scomposizione e registrazione automatica sui conti o categorie IVA indicati.
- Rendiconti IVA di controllo:
- Per periodo o completo.
- Con o senza movimenti.
- A scelta con totali per aliquota, codice IVA, conto.
- Estensioni nazionali per rendicontazione IVA in base ai requisiti delle autorità fiscali.
Gestione e controllo clienti
- Funzione attivabile a scelta (aggiungendo i conti nel piano dei conti, tabella Conti).
- Controllo fatture e pagamento dei clienti.
- Anagrafica cliente impostata nel piano dei conti.
- Crea gruppi e totali per clienti in gruppi diversi.
- Fatture aperte per cliente o completa.
- Estratto conto movimento cliente e fatture aperte.
- Riconciliazione automatica, fatture aperte.
- Gestione clienti anche come Centri di costo (per principio di cassa).
Fatture ai clienti
- Funzione attivabile a scelta (utilizzando la colonna numero fattura nella tabella registrazione)
- Inserimento fatture direttamente nella tabella Registrazioni.
- Richiede l'impostazione dell'anagrafica clienti.
- Inserimento dei dati fatture come normali righe di registrazioni.
- Vedi emissione e stampa fatture ai clienti.
- Colonna per indicare quantità e prezzi.
- Con o senza IVA.
- Possibilità di modifica, correzione.
- Stampa della singola fattura con un click o di diverse fatture assieme.
- Scelta fra diversi layout di stampa.
- Personalizzazione della fattura in base alle proprie preferenze.
- Esportazioni in formato digitale tramite estensioni.
- Richiami personalizzabili con estensioni.
- Estratti conto clienti personalizzabili con estensioni.
Gestione fornitori
- Funzione attivabile a scelta (aggiungendo i conti nel piano dei conti, tabella Conti).
- Anagrafica fornitori impostata nel piano dei conti.
Possibilità di raggruppare i fornitori in gruppi diversi. - Controllo fatture e pagamento ai fornitori.
- Fatture aperte per fornitore o report completo.
Estratto conto movimento fornitore e fatture ancore aperte. - Riconciliazione automatica, fatture aperte.
Centri di costo e di profitto
- Funzione attivabile a scelta (aggiungendo i conti centri di costo e profitto nella tabella Categorie).
- Per progetti, contabilità costi o di redditività.
- Impostazione dei centri di costo direttamente nella tabella Categorie.
- Raggruppamento multi-livello.
- Tre livelli di centri di costo e profitto.
- Numero illimitato di centri di costo per livello.
- Registrazione in negativo (con segno meno).
- Reportistica e Rendiconto abbellito per i conti patrimoniali ed economici:
- Saldo costantemente aggiornato.
- Report personalizzabili.
- Scheda di tutti i movimenti con saldo progressivo.
- Grafico contestuale.
Segmenti
- Funzione attivabile a scelta (aggiungendo i conti segmenti).
- Per avere il Rendiconto patrimoniale ed economico per uno o più settori aziendali.
- Impostazione dei segmenti direttamente nella tabella Conti o Categorie
- Raggruppamento multi-livello.
- Fino a 10 livelli di segmento.
- Numero illimitato di segmenti per livello.
- Saldo costantemente aggiornato.
- Reportistica e Rendiconto abbellito per i conti patrimoniali ed economici:
- Rendiconto per ogni segmento.
Tabella Articoli
- Per fatture e con gestione integrata di magazzino o dei titoli.
- Collegamento degli articoli ai movimenti della tabella Registrazioni.
- Aggiornamento automatico movimenti in entrate e uscita.
- Valore iniziale e finale.
- Aggiunta di ulteriore colonne.
Controllo e chiusura
Segnalazioni errori e controllo contabilità
- Comando per controllare la contabilità.
In un attimo, la contabilità viene ricalcolata come se si inserissero tutte le operazioni nuovamente. - Segnalazione di eventuali impostazioni sbagliate, differenze o errori.
- Ogni segnalazione è collegata a una pagina di aiuto che spiega le cause e la soluzione.
- Verifica se il saldo del conto corrisponde a quello reale (cassa, banca, IVA).
- Possibilità di correggere.
Protezione delle registrazioni
- Protezione righe.
- Blocco dei movimenti inseriti con tecnologia di certificazione dati digitale (tipo Bitcoin).
- Protezione con password.
- Conforme ai requisiti di legge.
- Invio dati al revisore con la certezza dell'impossibilità di manomissioni.
- Sblocco movimenti con data.
Chiusura e nuovo anno
- Procedura automatica per creare il file del nuovo anno.
- Riporto dei saldi iniziali per i conti patrimoniali
- Si può iniziare a lavorare sul nuovo anno, anche se non è stato chiuso il precedente.
- Comando per riprendere i saldi definitivi quando è stato chiuso l'anno precedente.
Esportazione e archiviazione dati
- Copia e incolla direttamente da e per Excel.
- Esportazione tabelle in pdf e diversi altri formati.
- Archiviazione delle stampe e dei dati contabili in pdf o altri formati.
- Estensioni per creare gli Standard Audit File.
- Salvataggio del file contabile su qualsiasi supporto.
Estensioni e altre funzionalità
Aggiunta funzionalità
- Aggiunta di nuove funzionalità.
- Rimozione di funzionalità non più necessarie.
- Conversione da un tipo contabile a un altro:
- A contabilità con o senza IVA.
- A contabilità con multi-moneta o viceversa.
- Da contabilità entrata e uscite a doppia o viceversa.
Tabella Documenti
Altre Tabelle aggiuntive
- Aggiunta di altre tabelle dove inserire delle note o altre informazioni.
- Le tabelle possono essere personalizzate aggiungendovi colonne.
Estensioni
- Estensioni predefinite per diverse stampe e altre funzionalità.
- Ricerca e istallazione veloce.
- Estensioni personalizzabili.
- Aggiornamento automatico.
- Possibilità di creare e istallare delle proprie estensioni locali.
Documentazione completa
- Ogni dialogo ed errore ha una propria pagina di documentazione accessibile con un click.
- Documentazione aggiornata costantemente.
- Domande e risposte.
- Documentazione disponibile anche in formato Pdf.
The income & expense chart of accounts
Estate accounts are entered in the Accounts table. Only one account is entered in the cash register (cash, bank, postal account ...); In Income/Expense accounting more accounts are entered (cash, customers, suppliers ...) and the accounts that refer to existing debt must have the opening amount with preceded by the minus sign (-).
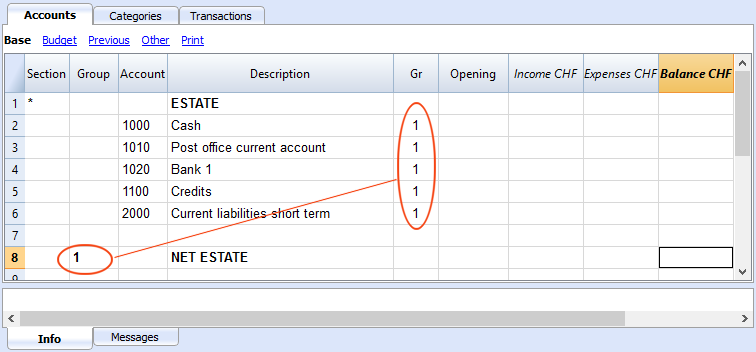
The columns of the Accounts table:
Section
Enter an asterisk to signal a section change. For example, to distinguish Total Assets from Cost Centers.
Values must be entered in the Sections table for presenting the enhanced Statement with groups.
Refer to the Sections page for further details and information.
Group
Values are added up for the categories that have the same GR. They are fundamental for totalization.
Account
Enter the number or initials of the account to be managed (cash, bank, post).
Description
Enter a description for the relative account.
Gr
Enter a value that identifies the category belonging to a specific group.
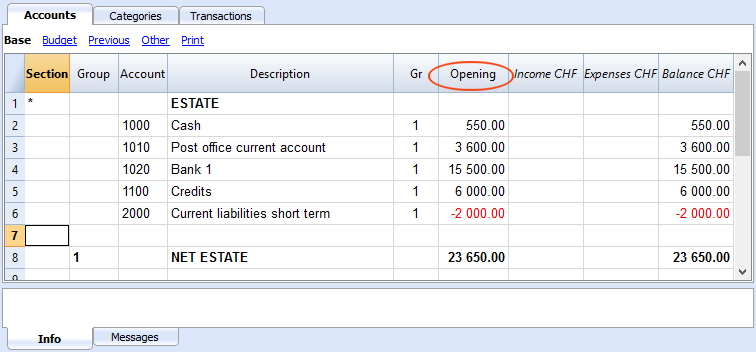
Opening
Entering an account balance is only necessary if a new file is opened or Banana Accounting 9 software is used for the first time. When creating a new accounting year, balances will be generated automatically.
Income
This locked column displays the balance of incoming entries. The balance will be updated automatically after each registration.
Expenses
This locked column displays the balance of expenses. The balance will be updated automatically after each registration.
Balance
This locked column displays the balance resulting after income and expenses. The balance will be updated automatically after each registration.
Opening balance
The first time Banana Accounting 9 software is used and new file is created, opening an account balances must be entered manually in the Accounts table Opening column.
Balances for Liabilites accounts must be entered preceeded by a minus (-) sign.
When creating a new accounting year, balances for the new year will be generated automatically.
The income & expense categories
The headings for Income and Expenses are entered in the Categories table via two principal groupings, which may - in their turn - contain subgroups. The set of categories will determine the profit or loss for the accounting period.
Groupings:
In the example below, there are three principal groupings:
- Group 3 - Total for Categories that have 3 in their Gr column (total Income)
- Group 4 - Total for Categories that have 4 in their Gr column (total Expenses)
- Group 00 - Total for groups 3 and 4 (Total Income and Expenses), which will determine the result for the accounting period.
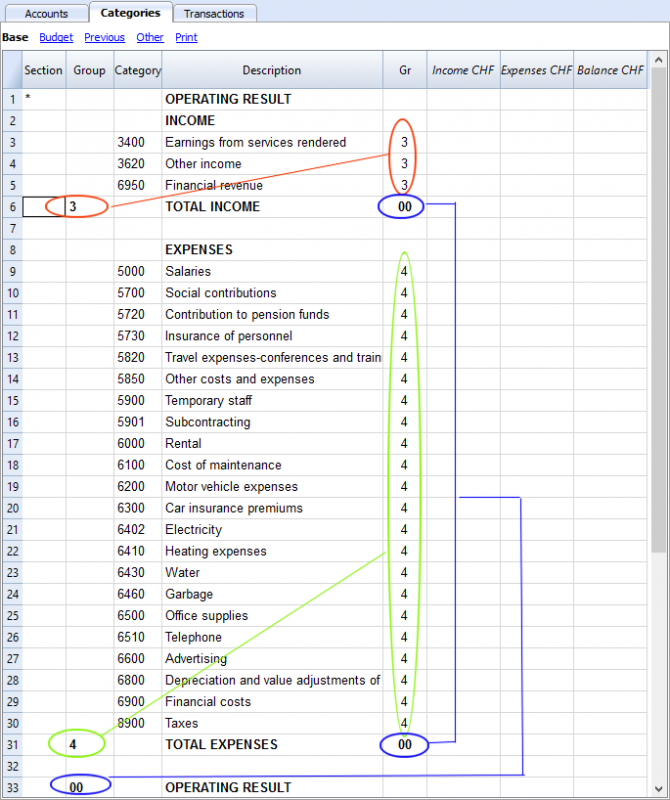
The columns of the Categories table:
Section
Enter an asterisk in the row that contains the title, to signal a section change, that will be displayed in the enhanced Statement with groups.
(the asterisk is inserted in the "Operating Result" title row in our example).
If different sections than Income and Expense are planned, such as Cost and Profit centers, another asterisk may be entered on the respective title row. Refer to the Sections page for further details and information.
Group
Enter an identifier (numerical or sign) identical to the one entered for each category in the GR column. The totals for each category belonging to the same GR will then be added up (in our example, Group 3 totals the Income Category and group 4 the Expenses category)
Description
Enter a description for the relative Income or Expense Category.
GR
Each Category has an identifier that allows the establishment of the totals for the relevant Group (in our example all categories of Income are GR3, because they will be total in Group 3, Total Income.
Income
This locked column displays the balance of incoming entries. The balance will be updated automatically after each registration.
Expenses
This locked column displays the balance of expenses. The balance will be updated automatically after each registration.
Balance
This locked column displays the balance resulting after income and expenses. The balance will be updated automatically after each registration.
Registrazioni del Preventivo
Tabella Preventivo
Nella tabella Preventivo si esegue la pianificazione finanziaria.
Le previsioni vengono inserire come se fossero delle normali registrazioni, come nella tabella Registrazioni.
Si possono anche inserire Quantità e Prezzi e anche delle Formule di calcolo.
Per maggiori informazioni sul Preventivo, consultare la pagina Tabella Preventivo.

Transactions income & expense accounting
Avoid mistakes with Banana Accounting Plus
In order to facilitate checking your accounting work and to immediately find differences, in Banana Accounting Plus, our new version, we added the Balance column in the Transaction table. You can now see potential differences on each row and you can correct them right away. It is a very useful feature when closing the accounting period.
Many of our clients have already tried it and are enthusiastic about it. We advise you to switch now to Banana Accounting Plus and take advantage of the many new features.
Transactions table
The transactions are entered in the Transactions table.
For every transaction enter the date, document number, description, incoming or expense, the account and the category.
- Income/Expenses: enter the amount coming in or going out.
- Account: enter one of the Estate accounts (cash, bank, post, clients, suppliers...).
- Category: enter an income or expense category.
Speeding up the recording of the transactions
In order to accelerate the recording of the transactions, you can use
- The Smart fill function that allows the automatic autocomplete of data that have already been entered at an earlier date.
- The Recurring transactions function, used to memorize recurring transactions into an appropriate table.
- Importing bank or post office statement.
Transactions with several bookings
When faced with operation involving several bookings, you need to enter them on several rows. We call them composed transactions.
In the following image (Doc n. 11) you can see an example, where multiple invoices are paid through the bank.
- Enter the same date and the same document number in all the rows that affect the same transaction. This allows you to easily locate a transaction with multiple bookings.
- In the first row, enter the total amount in the Expenses column if it is a payment, or in the Income column if it is deposit.
- In the Account column, enter the liquidity account (account through which you pay or collect). The Category column in the first row remains empty.
- In the following rows, enter the amount of the invoice paid or collected on each row (the Expenses column or the Income column).
Each invoice will be entered on a separate row. The Account column remains empty. - In the Category column, enter the category for each row to identify the entry or entry of the movement.

Examples of transactions without VAT
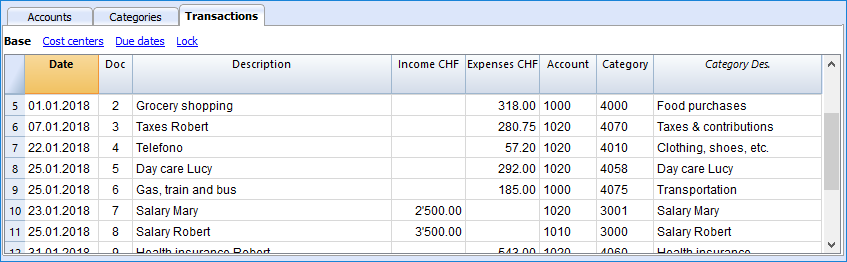
The columns of the Transactions table
Date
Enter the date for the transaction of Income or Expense
Doc
Enter Doc number. The number of the paper document is normally assigned here; this will facilitate retrieval of documents at later dates.
Description
Enter a description for the relative Income or Expense.
Income
Enter Income amount.
Expenses
Enter Expense amount.
Account
Enter the Estate account (cash, bank, Post, clients, suppliers..).
Category
Enter a category of Income or Expense, as defined in the Category table.
Examples of transactions with VAT
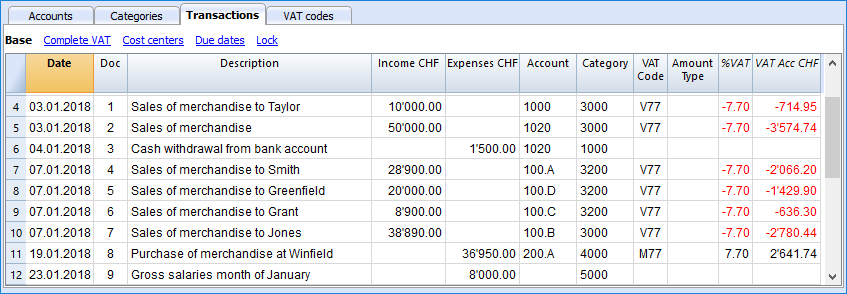
Additional columns
Depending on the type of Income / Expense accounts setup (with or without VAT) there are additional columns where VAT data is entered.
VAT Code
Enter the VAT code referring to a sale or a cost. There must be a code in the VAT Codes table.
Refer to the Transactions page for explanations of VAT codes and further information.
In the Account and Category columns, instead of entering the account and category number you can also write the text you wish to find.
The software will show you the list with all the accounts and categories containing the entered text. With the Arrow down key you can move directly in the list and select the desired account number by pressing the Enter key.
In order to display the movements of an account or a category, after entering the transactions, click on the small blue symbol in the account/category cell (top right corner of the selected cell).
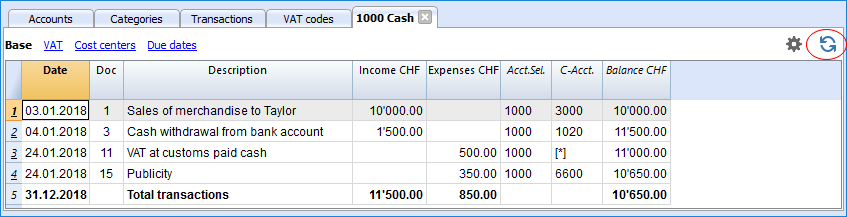
Account and category card
In the account or category card, the presentation of the transactions is very similar to the ones of the Transactions table. If you enter further transactions or make changes (always operated in the Transactions table), you can update the account/category card by clicking the Refresh icon on the right side of the screen.
Kreditkartenbewegungen erfassen
Kreditkartenkäufe werden immer häufiger getätigt, nicht nur in Unternehmen, sondern auch in Familien. Um eine bessere Kontrolle der Ausgaben der mit Kreditkarte getätigten Einkäufe zu haben, ist es notwendig, die Bewegungen in der eigenen Buchhaltung zu erfassen. In diesem Zusammenhang muss in der Tabelle Konten ein Kreditkartenkonto vorhanden sein und falls nicht, muss es hinzugefügt werden.
Erfassung der erfolgten Anzahlungen
Das Kreditkartenkonto ist ein Debitkonto und es wird in der Tabelle Konten eingegeben.

In den Einnahmen-Ausgaben-Rechnungen muss jede Anzahlung wie folgt gebucht werden:
- Geben Sie das Datum und die Beschreibung ein.
- Tragen Sie in der Spalte Ausgaben den ausgehenden Betrag vom Bankkonto oder einem anderen Liquiditätskonto ein.
- Geben Sie in der Spalte Konto das Konto ein, von dem aus die Einzahlung geleistet wurde (Bank, Post).
- In der Spalte Kategorien, ist das Kreditkartenkonto einzugeben.
Wenn nach Erhalt der Kreditkartenrechnung die Ausgaben durch die Anzahlungen (Akonti) gedeckt sind, müssen Sie Ihre Kreditkartenbewegungen verbuchen, um die angefallenen Kosten zu erfassen und das Guthaben zu stornieren.
In diesem Fall wird auf mehreren Zeilen gebucht:
- Geben Sie für jede Bewegung immer das gleiche Datum ein (verwenden Sie das Ausstellungsdatum der Kreditkartenrechnung).
- Wenn eine Dokumentnummer eingegeben wurde, ist die selbe Nummer bei allen Buchungszeilen zu verwenden.
- Geben Sie die Beschreibung ein, die die Art des Einkaufs angibt (auch die im Ausland getätigten Einkäufe).
- In der Spalte Ausgaben (eine Zeile pro Kosten), ist der Totalbetrag der Kreditkartenrechnung einzugeben.
- In der Spalte Konto das Kreditkartenkonto eingeben.
- Erfassen Sie in den folgenden Zeilen der Spalte Ausgaben den Betrag von jeder einzelnen Ausgabe.
- In der Spalte Kategorien ist für jede Bewegung, also in jeder einzelnen Zeile, die Kategorie die sich auf den entsprechenden Kauf bezieht, einzugeben.
Nachdem alle Transaktionen eingegeben wurden, überprüfen Sie den Saldo des Kreditkartenkontos, indem Sie einfach den Kontoauszug öffnen.
Hinweis: Wenn die MwSt-Abrechnung nach vereinnahmten Entgelten erfolgt bzw. die Rechnungen bei Erhalt gebucht werden, werden gleichzeitig die Schuld der Kreditkartenrechnung wie ein üblicher Lieferant gebucht als auch die Kosten der Kreditkarte.
New Year
You can automatically transfer to the New Year in the following ways:
- Open the file of the terminated year and click on the Create New Year command from the Account2 menu.
- Confirm the basic data of the Accounting properties.
- Save the file under a new name.
The program will automatically carry forward :
- The accounts, the opening balances
- The categories will be carried forward without an opening balance, because you start from scratch, in order to determine the business result for the New Year.
Printouts
Instant information
Account balances, income and expense are on ready display in the Accounts and Category tables.
After each entry of a transaction, balances are adjusted automatically and there is no need to run a report, as you can simply display the Accounts or Categories tables.
Advanced printouts
All printing is run from the Account1 menu, where the different functions for prining are located:
-
Journal by period command. You can display and print the whole table or just a specified period.
-
Account/Category cards command. You may select all cards or define your selection.
Define the required period in the Period tab and click the required settings in the Options tab. Print settings can be saved in the Composition tab so they can be resumed without them to be having defined again. -
Enhanced statement command. You may also print a defined period and various options and compositions may be included.
-
Enhanced statement with groups command. You may also print a defined period and various options and compositions may be included.
-
Accounting report command. The required options are displayed in the Accounts table. Reports are possible for current, previous periods or previous years; each period may contain subdivisions and the compositions can be saved.
Example of printout of Enhanced statement with groups
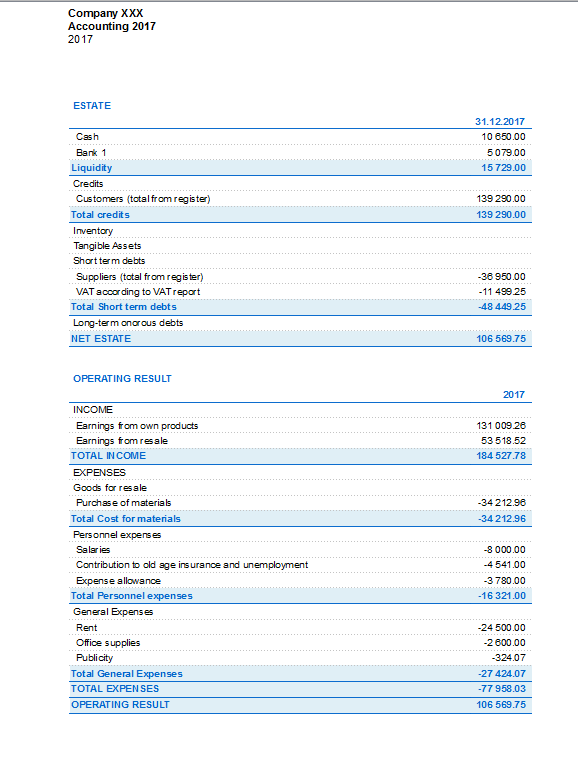
Enhanced statement with groups
This feature is only available in version 7.0.4 or higher. It allows the user to obtain the Enhanced statement with groups, with all the options that are available in the Double-entry accounting.
The Enhanced statement with groups makes it possible to:
- Include all the groups that are present in the Accounts- and the Categories tables nn the printout,
- Exclude groups or accounts individually
- Select a subdivision by period
(for example, in the first semester, one can select to have a subdivision by month or per quarter) - Select a subdivision by segment.
Sections
The sections present in the Accounts- and/or Categories table make it possible to define a set of accounts and categories to be printed with the 'Enhanced statement with groups' command from the 'Account1' menu.
- The sections are indicated in the Sections column of the Accounts- and the Categories table
- An * (asterisk) indicates the beginning of a section
- A ** (double asterisk) indicates the beginning of a subsection
- A # indicates the beginning of the Notes section
- A section ends once the next one begins
- Contrary to the Double-entry accounting, it is not possible to use numerical identications for the sections
- In case no section has been indicated, the program will enter them automatically when the command is used for the first time
- In the Accounts table "Estate"
- In the Categories table "Operating result"
- It is recommended to create separate sections if there are cost centers, segments or clients/suppliers registers.
In this way, it is possible to print reports with just the information that concerns the user.
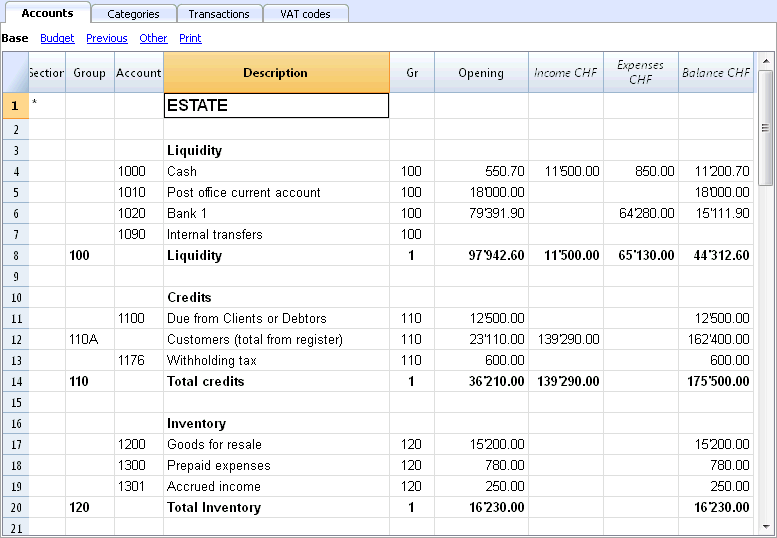
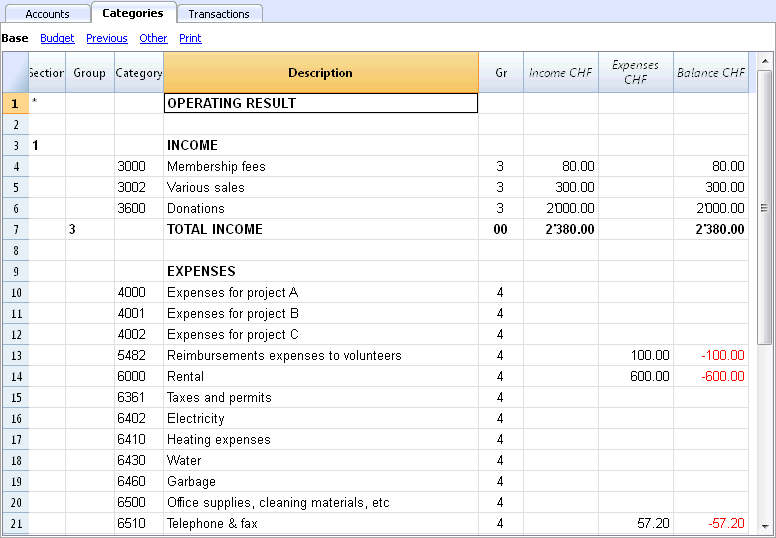
Configurations of Accounts & Categories
In the dialogue window, you can define how to print the accounts and the categories.
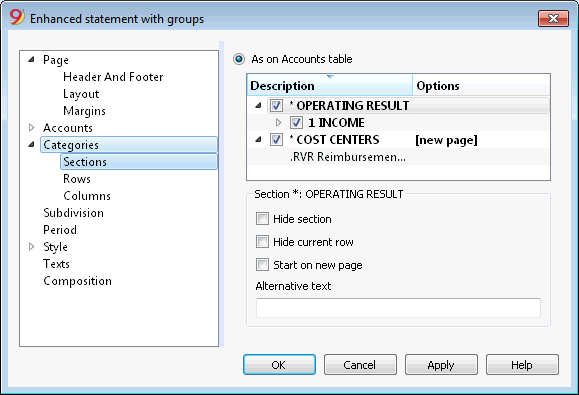
- The accounts, present in the Accounts table, will always be printed with the balances at the end of the indicated period.
- The categories will always be printed with the movements of the indicated period.
Enhanced Statement
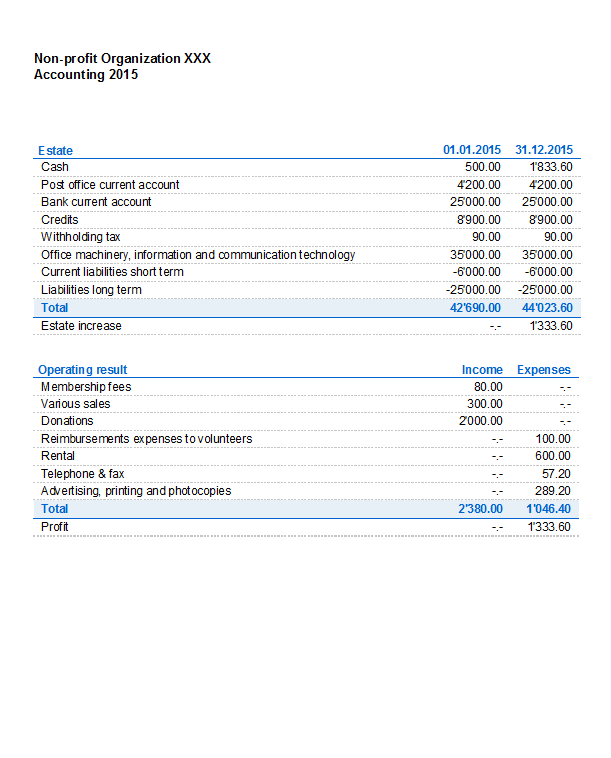
- The Enhanced Statement gives an overview of the progression of the Estate situation and the operating result of the year. This function is present in the Income & Expense accounting.
- The Enhanced Statement is calculated and displayed by means of the Enhanced Statement command, from the Account1 menu.
- In the window that pops up, you have the possibility to insert the header that will display on the first page of the Enhanced Statement; furthermore, a series of options can be selected in order to include further details in the printout.
- Transactions without date are being considered as opening transactions and will not appear in the printouts of the Profit & Loss Statement.
See also Print Example.
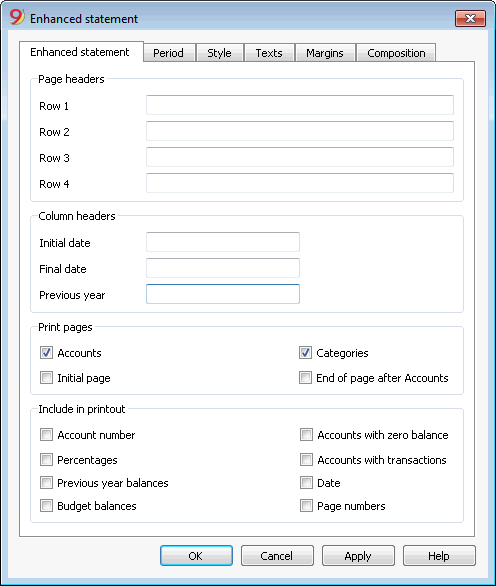
Page headers
Rows 1-4
These rows allow the definition of the Staement's headers.
Column heade
Initial date
Insert the initial date of the accounting.
Data finale
Insert the final date of the accounting.
Previous year
Insert the final date of the previous year's accounting.
Print pages
Checking the boxes you define the options you desire to appear in the statement printout:
Accounts
The accounts will be printed..
Initial page
The initial page of the document with the file headers will be printed.
Categories
The categories will be printed.
End of page after Accounts
The accounts and the categories will be printed on two different pages..
Include in printout
By selecting the boxes, you choose the options that must appear in the printout.
Some of these options are not available (e.g. Budget balances) if a specific period is selected in the Period section.
Other Tabs
The explanations for the other tabs are available at the following pages:
Accounting report
- This command displays the amounts of accounts according to a certain grouping, for a specified period or per subdivision.
- Transactions without date are being considered as opening transactions and will not appear in the printouts of the Profit & Loss Statement.
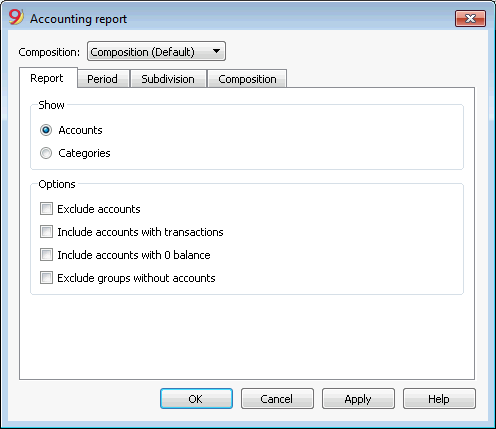
Display
You select the desired grouping scheme:
- Accounts - the Report will show a list of all accounts with the following columns: opening balance, income, expenses and account balance
- Categories - the Report will show a list of all categories with the following columns: opening balance, income, expenses and account balance.
Options
You select the accounts to be included or excluded:
- Exclude accounts - only the categories will be printed
- Include accounts with no transactions - accounts with no transactions will be printed as well
- Include accounts with 0 balance - accounts with zero balance will be printed as well
- Exclude groups without accounts - groups of accounts with zero balance will not be printed.
Other Tabs
The explanations for the other tabs are available at the following pages: