Invoicing with Banana Accounting
In Banana Accounting Plus, you can create your invoices directly within the accounting file or manage them completely separately using the Estimates and Invoices application.
- Integrated invoicing in accounting
Additional functionality included in all accounting applications (double-entry, income/expense, multi-currency, cash manager). - Estimates and Invoices application
A separate application from all other accounting applications, used only to create offers and invoices without any connection to the accounting file. There is no link to the accounting file.
Below is a summary table for the two methods, detailing what they allow you to do and the customisations available.
Legend: ✅ with Professional or Advanced plan, 🔒 only with Advanced plan, ❌ not available
Features | Integrated Invoicing | Offers and Invoices Application |
| Common Features | ||
| Invoice Creation | ✅Yes, directly in the Transactions table. | ✅Yes, in the dedicated dialog. |
| Proforma Invoice Creation | 🔒 Yes, create the invoice in the Transactions table and print it as a Proforma Invoice (Advanced plan only). | 🔒 Yes, create the invoice in the dialog and print it as a Proforma Invoice (Advanced plan only). |
| Estimates Management | 🔒 No, but an invoice can be created with the "Estimate" label and print it as Estimate (Advanced plan only). | ✅Yes, in the dedicated dialog. |
| Payment Reminders Management | ✅Yes, automated management with the Print Reminders command. | 🔒 No, create the invoice with the "Reminder" label. and print it as a Reminder. (Advanced plan only). |
| Delivery Notes Creation | 🔒 No, only invoice with "Delivery Note" label. From the Invoice Printing dialog > Print as > Delivery Note. (Advanced plan only). | 🔒 No, only invoice with "Delivery Note" label. From the Invoice Printing dialog > Print as > Delivery Note. (Advanced plan only). |
| Order Confirmation Creation | 🔒 No, only invoice with "Order Confirmation" label. From the Invoice Printing dialog > Print as > Order Confirmation. (Advanced plan only). | 🔒 No, only invoice with "Order Confirmation" label and print as Order Confirmation. (Advanced plan only). |
| Header Logo | ✅Yes, with the Logo setup command | ✅Yes, with the Logo setup command |
| Sender Address in Header | ✅Yes, with File and Accounting Properties command. | ✅Yes, with File and Accounting Properties command. |
| Invoice Information | ✅Data of the invoice (invoice number and date, customer number, due date, etc.). | ✅Data of the invoice (invoice number and date, customer number, due date, etc.). Customizable with additional fields. |
| Invoice Address (Customer) | ✅Customer ledger management in the Accounts table, Address view. | ✅Customer address management in the Contacts table. |
| Title / Subject | ✅Yes, customizable via the DocType column in the Transactions table, or in Invoice Settings. | ✅Yes, customizable in the Dialog, or in Invoice Settings. |
| Free Initial Text | ✅Yes, through the DocType column in the Transactions table, or in Invoice Settings. | ✅Yes, in the Dialog, or in Invoice Settings. |
| Default Columns and Column Layout | ✅Columns in the Transactions table and Items ( Items, Description, Quantity, Unit, Unit Price, Amount, VAT Code). Display columns in the printout from Invoice Settings. | ✅Columns in the Dialog (Date, Item, Description, Quantity, Unit, Unit Price, Discount, Amount, VAT Code). Display columns in the printout from Invoice Settings. |
| Custom Columns (Transactions / Items Table) | 🔒 Uses custom columns in the Transactions and Items tables (Advanced plan only). | 🔒 Uses custom columns in the Items table (Advanced plan only). |
| Discounts and Reductions | ✅Yes, add a line to the invoice via accounting transaction | ✅Yes, item discount column and overall discount via Invoice Dialog. |
| Advance Payments | ✅Yes, add a line to the invoice via accounting transaction. | ✅Yes, via Dialog. |
| Notes and Final Text | ✅Yes, from the Dialog Options or Invoice Settings or DocType column | ✅Yes, via Invoice Dialog > Final Text or from Dialog options or from Invoice Settings |
| QR Bill with IBAN Account | ✅Yes, invoices with Swiss QR bill with IBAN account. | ✅Yes, invoices with Swiss QR bill with IBAN account. |
| QR Bill with Special QR-IBAN Account | ✅Yes, invoices with Swiss QR bill with special QR-IBAN account. | ✅Yes, invoices with Swiss QR bill with special QR-IBAN account. |
| Style and Color Customization | ✅Yes, from dialog Invoice Settings > Font type and Colors. | ✅Yes, from dialog Invoice Settings > Font and Colors. |
| CSS Customization | 🔒 Yes, customize invoice styles and appearance via CSS customization (Advanced plan only). | 🔒 Yes, customize invoice styles and appearance via CSS customization (Advanced plan only). |
| JavaScript Customization | 🔒 Yes, set invoice printing via JavaScript customization (Advanced plan only). | 🔒 Yes, set invoice printing via JavaScript customization (Advanced plan only). |
| Product Images | 🔒 Yes, add product or service images to invoices. See Invoice with Product Images (Advanced plan only) | 🔒 Yes, add product or service images to both offers and invoices See Invoice with Product Images. (Advanced plan only). |
| VAT management | ✅ Yes, print invoices with VAT and manage in accounting. ⚠️ Limitation: Net VAT management | ✅ Yes, only print invoices with VAT |
| Multi currency invoices | ✅ Yes | ✅ Yes |
| Exclusive Features of Integrated Invoicing | ||
| Integrated Data in the Accounting File | ✅Yes, in the Transactions table. | ❌No |
| Revenue Management | ✅Yes, create invoices on revenue with customer subledger in the Balance sheet. | ❌No |
| Cash Basis Accounting Management | ✅Yes, create invoices upon cash method with Customer subledger via profit centers (CC3). | ❌No |
| Reporting | ✅Yes, account card per customer, history, and open invoice reports per customer and due date. | ❌No |
| Payment Reminders Management | ✅Yes, overdue invoice management and reminder printing with the Print Reminders command. | 🔒No, manual management of overdue invoices and reminder printing. (Advanced plan only). |
| Invoice Payment Management | ✅Yes, registration of invoice collection. | ✅No, it is possible to manually track paid invoices using the Payment column in the Invoices table. |
| Exclusive Features of the Estimates and Invoices Application | ||
| Offers Management | 🔒No, create the invoice with the label "Estimate" and print it as an Estimate (Advanced plan only) | ✅Yes, manage Estimates separately from invoices. |
| Offer Conversion | 🔒No, create the invoice with the label "Estimate" and print it as an Estimate (Advanced plan only). | ✅Yes, convert estimates into invoices with a simple command. |
在您的会计文件中生成发票
使用Banana财务会计软件的开发票功能,由于预设了一系列可以根据每个国家/地区定制的发票风格,因此您可以非常轻松地创建和打印发票。
要创建发票,您需要创建一个会计文件。如果您已经有一个了,则可以选择:
- 在您现有的会计文件中创建发票。
- 仅为发票管理创建单独的文件。
或者,您也可以使用预估和发票的功能,无需在会计文件中创建发票。
观看视频:如何生成形式发票。了解如何创建和打印自定义发票。
 |
|
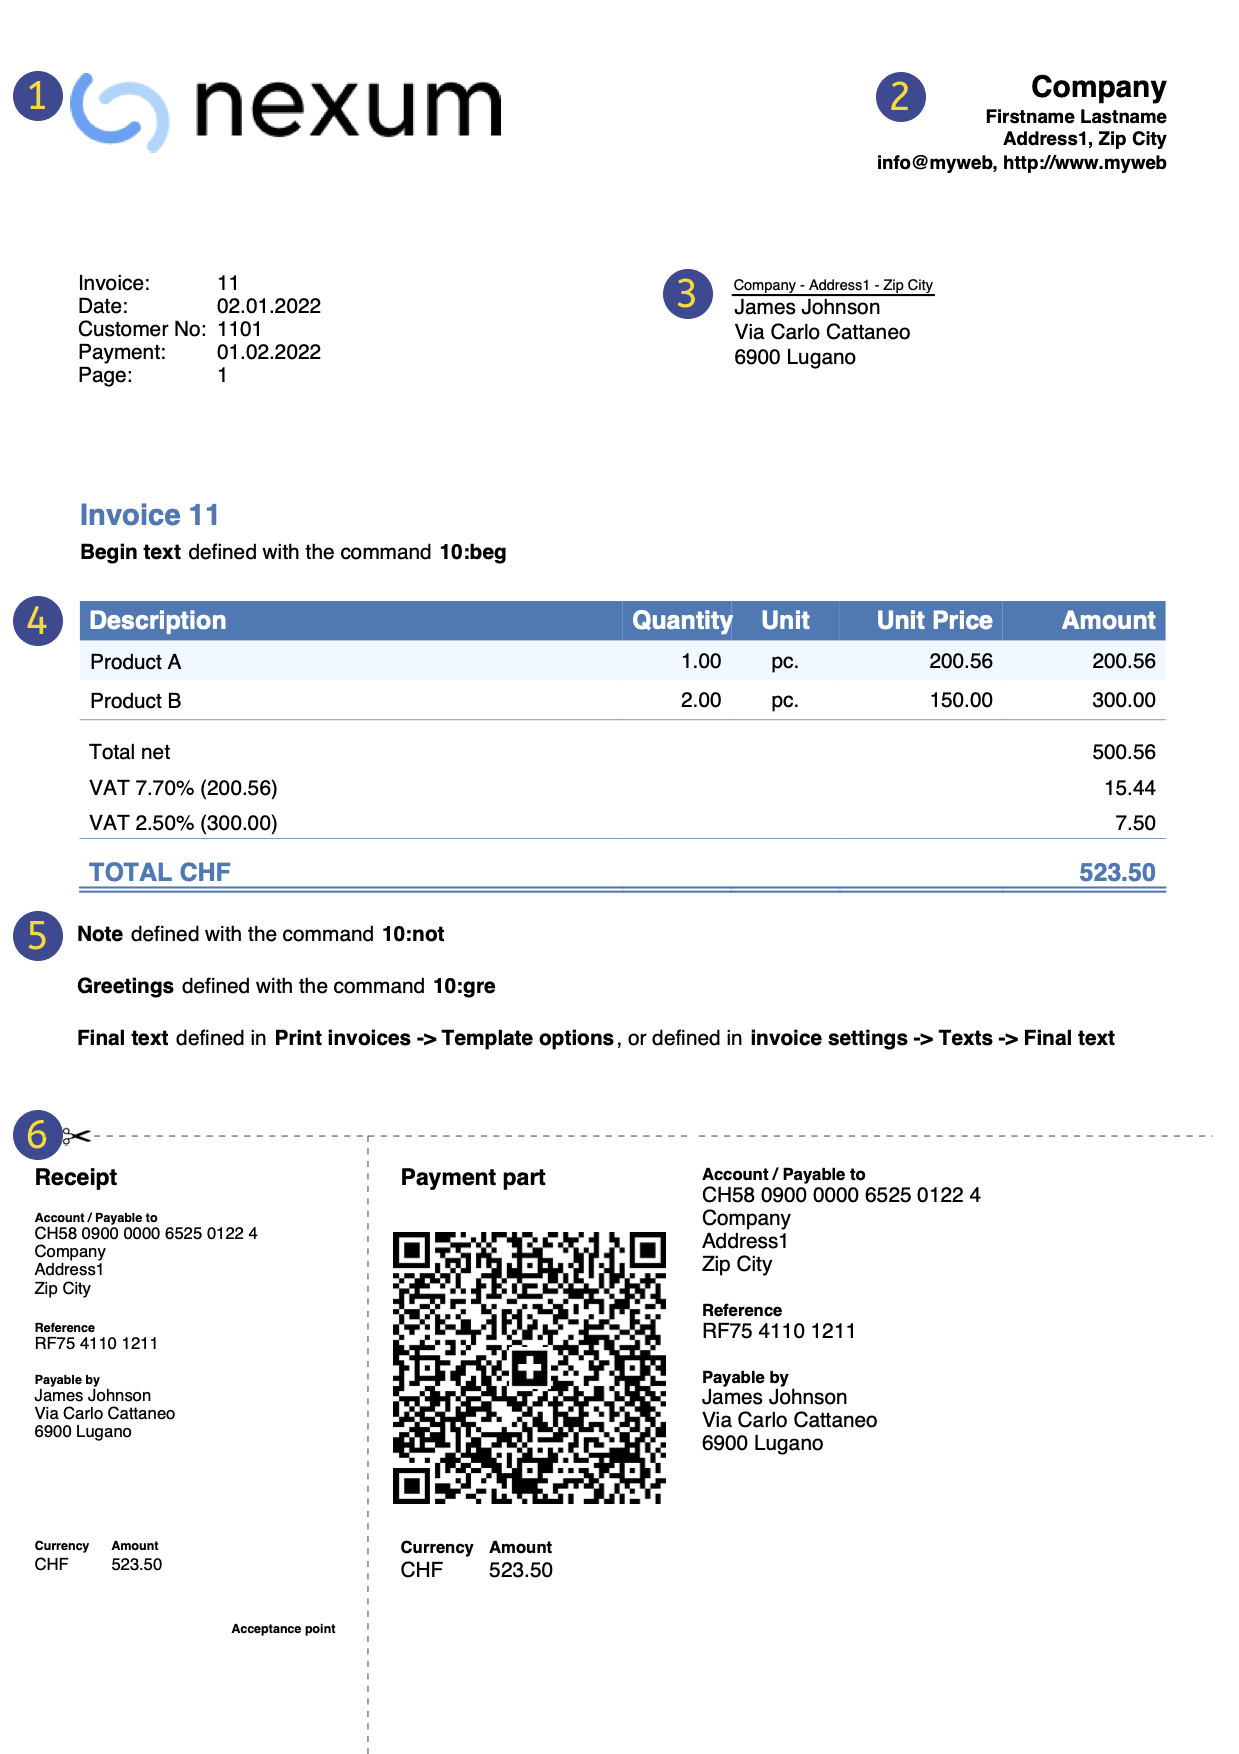
Logo(商标)可以插入客制化的logo/商标。 |
||
|
|
标题发票的标题将与输入的标题相同。 |
|||
|
|
客户地址客户的地址将从账户表中获取,在设置客户账户中了解更多信息。 |
|||
|
|
发票数据发票内容必须在发生业务表中输入,了解如何输入发票数据。 |
|||
|
|
自定义文字使用类型列输入文字开头、注释和问候语。使用报表 → 客户 → 打印发票 → 选项标签。 |
|||
|
|
设置瑞士二维码只能为瑞士和[CH10]开头的瑞士二维码式样做定义的设置。 |


请按照以下步骤创建发票:
欲了解更多信息,请访问如何打印发票的页面。
其它功能:
- 打印发票和增值税管理 (收取和开具发票)。
- 打印不同货币的发票。
- 以客户的语言打印发票。
- 设置发票到期日。
- 带有瑞士二维码和参考编号的发票。
- 带有瑞士二维码的发票,金额和地址为空白。
- 从银行报表中导入数据以更新发票收据。
相关话题:
- 收益&费用会计中的发票文件示例。
- 复式记账中的发票文件示例。
- 使用成本中心的发票文件示例。
对于已收取增值税的发票 (使用成本中心3设置的客户和供应商) 的情况很有用。
设置发票文件
有两种方式可以为开发票设置会计文件
- 使用现有模板创建新的会计文件。
- 调整您现有的会计文件。
新建会计文件
有几个模板可用,其中包含预设的客户分类帐。可以使用以下会计类型创建发票:
- 复式记账会计
- 多币种会计
- 收益&费用会计
列出的会计类型可能包含或不包含增值税选项。
新的会计文件创建方式如下:
- 文件菜单 → 新建命令。
- 选择地区和语言。
- 在按字段过滤器中输入发票。
- 在右侧部分选择模板。
- 命名文件并保存。
请按照开发票文档中的说明进行操作。
调整您现有的会计文件
如果您希望调整现有的会计文件以创建发票,则必须添加某些功能和设置才能打印它们:
为您的公司插入发票数据
- 在文件菜单 → 文件和账户属性命令 → 地址中,您可以设置公司地址和发票数据,将其用作发票标题。
- 如果想要使用个性化logo/商标,请查看设置Logo/商标的页面。
在账户表中设置客户列表
- 在账户表中, 您可以设置您的客户登记。
- 添加并显示客户地址列。
- 在账户表中,您可以选择地址视图并输入客户的数据。
- 如果地址视图不可见,您可以使用工具栏菜单 → 增添新功能... → 在账户表中添加地址列的命令增加。
- 通过报表菜单 → 客户 → 设置功能,管理您的客户设置。
在发生业务表中添加您要使用的列
- 在发生业务表中显示要开发票的列:
- 数据菜单 → 在列设置并选中文件类型和发票文件列
- 添加数量和单价列 (可选)
工具栏菜单 → 增添新功能 → 在发生业务表格中添加项目列 - 添加项目表格(可选)
这将有助于跟踪商品并精细管理库存。
工具栏菜单 → 增添新功能 → 添加项目表格
发票在单独的文件中管理,仅适用于发票
如果您希望与主会计分开管理发票,则必须创建一个新文件。您将在账户设计中仅插入发票所需的账户信息,通过发生业务表输入发票。
这种方法适用于:
- 收付实现制:在会计文件中仅输入已付金额。
- 希望将发票管理与您的主要会计分类账完全分开,例如对于需要向其会员发送会费的协会。
如何为发票创建单独的会计文件:
- 下载模板, 将其打开并根据需要进行调整。
或者,您可以从任何模板开始,并按照前面的说明对其进行调整以供开发票使用。 - 确保所有的设置和列都存在,如上所述。
在发生业务行中输入发票数据
在发生业务表中输入发票数据。对于每个新发票,输入一个新的发生业务行。
- 输入发生业务的日期
- 发票号码
- 在摘要列输入的文字 (商品,服务,咨询……) 将显示在您客户的发票上
- 在借方列中插入客户编号
- 在贷方列插入对应的事务 (销售账户,咨询费等)
- 输入金额
- 如果您要缴纳增值税,请输入相应的适用增值税税率的增值税代码。
多行发票
如果发票中有多个元素 (不同的项目或服务,或两者都有),则必须在单独的行中输入它们 (每行一个元素):
- 使用新行输入您希望在打印发票时显示的每个项目。
- 每行使用相等的日期和发票编号。

发生业务表中发票的基本列
日期
发票数据会在此列中报告。与文档相关的所有行必须报告同一日期。
发票
为了管理发票,必须在发票列中输入发票号码。在借方列中注明属于明细账的客户账户(如果是按收款金额管理客户,则为成本中心3的列)。
额外的列
类型
在类型列中,您可以定义详细的行,例如总计行或发票的特定付款条件。此列在默认情况下不可见,需要通过数据菜单 → 列设置命令并勾选文件类型列来显示。
数量
在此列中输入提供的商品和服务的数量。添加数量列需要使用工具栏菜单 → 增添新功能→ 在发生业务表中增添项目列命令
单位
输入统一类型(例如 ”一个“,”小时“,”米“,”千克“等)。
价格/单位
输入商品或服务的单价,程序将根据您在数量列的输入自动计算金额结果。
How to define Customer Number and Invoice Number
This page explains how to correctly define the length and format of the Customer number and the Invoice number when invoicing with Banana Accounting Plus.
Important: Correctly setting the Customer number and the Invoice number is essential, especially if you issue Swiss QR invoices and want to automatically record payments. Both numbers are included in the reference number on the QR slip and are used to automatically link imported payments to the related invoices.
This setting applies to:
- Invoicing integrated in the accounting file (with or without Swiss QR)
- Invoicing with the Estimates and Invoices application (with or without Swiss QR).
Customer number
The Customer number is the identifier of the customer in accounting (subaccount or cost center). In QR invoices, it is also used to automatically record payments of the invoices.
Customer number format for QR invoices
In QR invoices, the customer number is included in the reference number. For this reason, it must follow specific rules, which vary depending on the type of account used (IBAN or QR-IBAN) and the type of reference number chosen.
- QR Invoice with IBAN account:
- Only numbers or letters are allowed (A‑Z, 0‑9).
- Spaces, separators, or other characters (-, /, #, etc.) are not allowed.
If you insert separators or other characters, they will be removed from the invoice printout and may cause problems in automatically recording payments. - Customer number + Invoice number ≤ 19 characters.
The two numbers together must not exceed 19 characters. It is recommended to keep the Customer number to a maximum of 7 characters.
- QR Invoice with QR-IBAN:
- Only digits (0–9) are allowed.
- No spaces, letters, separators or other characters (-, /, #, etc.). If you insert separators or other characters, they will be removed from the invoice printout and may cause problems in automatically recording payments.
- Maximum length 7 digits.
- Customer number + Invoice number: together must not exceed 14 digits.
Customer number format for invoices without QR
For invoices without QR, there are no constraints regarding the format of the customer number. Best practices apply.
Best practices for customer numbers
- Uniqueness: each customer must have a unique number.
- Consistency: use a fixed scheme (e.g. 1000001, 1000002, etc.).
- Compatibility: if you plan to issue QR invoices with both standard IBAN accounts and special QR-IBAN accounts, or switch from IBAN to QR-IBAN, use only numbers.
Invoice number
The Invoice number uniquely identifies the invoice (mandatory). In QR invoices, it is also used to automatically record payments.
Invoice number format for QR invoices
In QR invoices, the invoice number is included in the reference number. For this reason, it must follow specific rules, which vary depending on the type of account used (IBAN or QR-IBAN) and the type of reference number chosen.
- QR Invoice with IBAN account:
- Only numbers or letters are allowed (A‑Z, 0‑9).
- Spaces, separators, or other characters (-, /, #, etc.) are not allowed. If you insert separators or other characters, they will be removed from the invoice printout and may cause problems in automatically recording payments.
- Customer number + Invoice number: ≤ 19 characters.
The two numbers together must not exceed 19 characters. It is recommended to keep the Customer number to a maximum of 7 characters.
- QR Invoice with QR-IBAN:
- Only digits (0–9) are allowed.
- No spaces, letters, separators, or other characters (-, /, #, etc.). If you insert separators or other characters, they will be removed from the invoice printout and may cause problems in automatically recording payments.
- Maximum length 7 digits.
- Customer number + Invoice number: together must not exceed 14 digits.
Invoice number format for invoices without QR
For invoices without QR, there are no constraints regarding the invoice number. Best practices apply.
Best practices for invoice numbers
- Uniqueness: each invoice must have a unique number.
- Consistency: use a fixed scheme (e.g. year+progressive: 2500001, 2500002, etc.).
- Compatibility: if you plan to issue QR invoices with both standard IBAN accounts and special QR-IBAN accounts, or switch from IBAN to QR-IBAN, use only numbers.
使用现金方法发行增值税票据
Banana财务会计程序总是要在收入入账的那一行输入增值税代码。收款时需要缴纳增值税,收入账户也会被相应地记录。客户管理是通过成本中心3的利润中心来完成的。
在这种情况下,为了登记客户并开具发票,就必须:
- 在会计科目表中设置利润中心成本中心3的客户分类账。
- 在客户菜单设置中,选择成本中心3利润中心组。
- 当开具发票记录时:
- 发票。
- 在成本中心3列中输入成本中心3的利润百分比 (无借记或贷记账户) 。
- 在同一行中,在方括号 [V81] 之间输入销售税代码。
插入方括号内的增值税代码允许您查看发票中的增值税金额,而不需要在记录发票时进行会计处理。

Invoicing on turnover
In integrated invoicing, invoices are created and recorded in the same file. Regarding accrual-based accounting, invoices must be recorded at the time of issuance.
In accrual-based invoicing management, it is necessary to set up the customer subaccount in the Accounts table as shown in the balance sheet.
- All customer accounts must have complete data (first name, last name or company name, address), because when creating the invoice, the program uses this data for the invoice header.
It is possible to create and record invoices with or without VAT.
Accrual-based Invoice
In the accrual-based system, the invoice is created to be sent to the customer, and it is recorded at the same time.
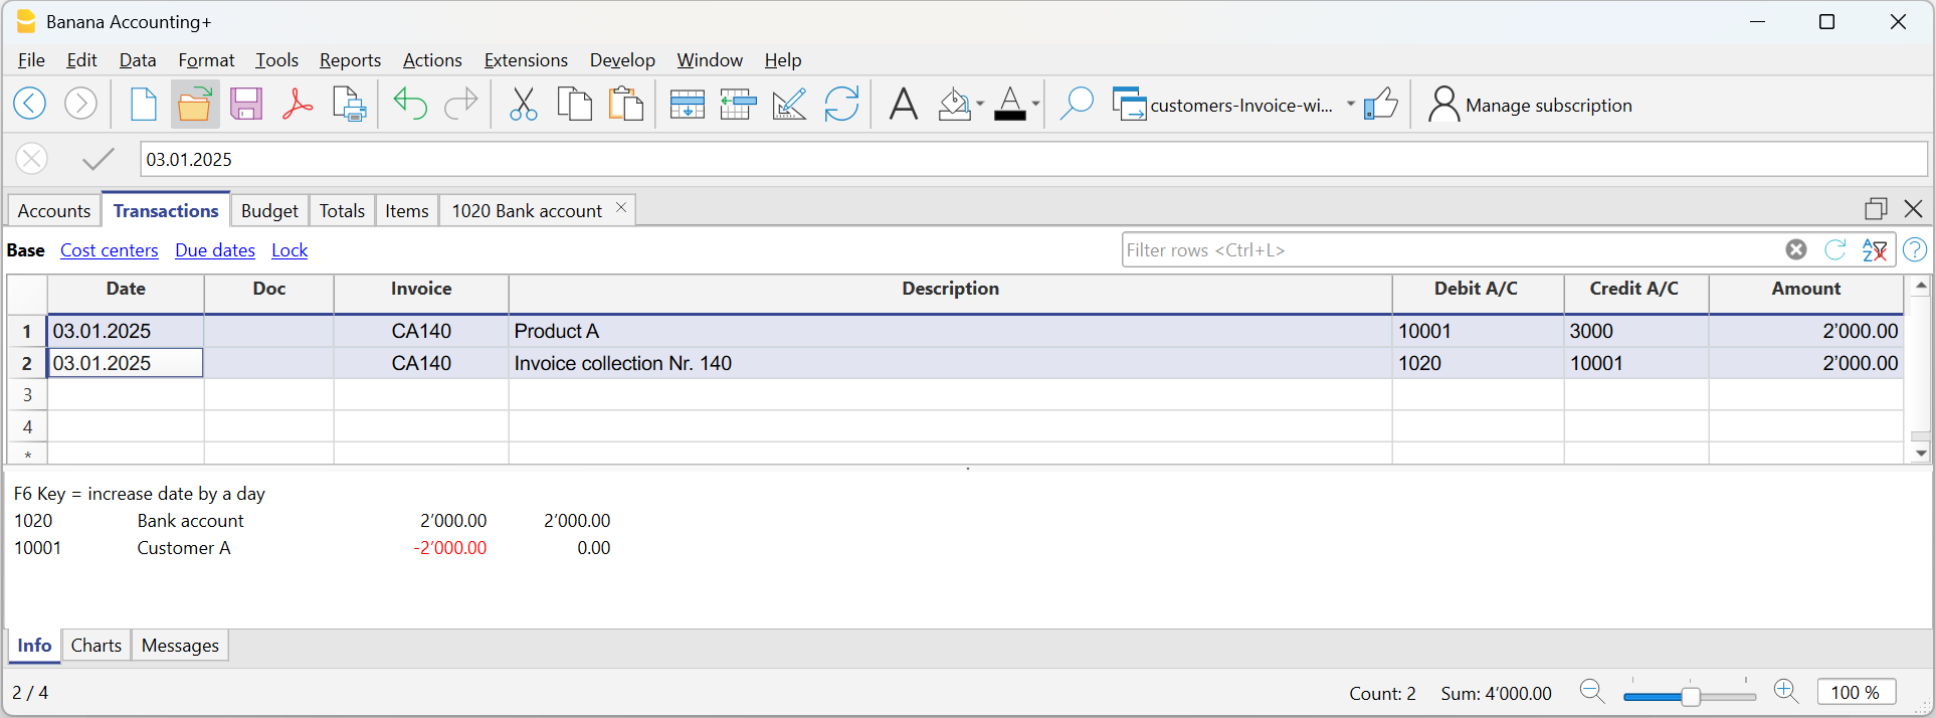
Therefore, with a single transaction, both the invoice is created and recorded:
- In the Date and Doc. column, enter the date and any document number.
- In the Invoice column, enter the invoice number.
It is important that the invoice number complies with certain requirements: see how to correctly create the invoice number. - In the Description column, enter the items to be invoiced that should appear on the invoice.
- In the Debit column, enter the customer's account from the subaccount.
It is important that the customer number complies with certain requirements: see how to correctly create the customer number. - In the Credit column, enter the revenue account.
- In the Amount column, enter the gross amount.
Accrual-based Invoice and VAT – Effective Method
The standard procedure in Banana Accounting for VAT management requires entering the VAT code on the same row where the income is recorded.
Issued invoices are immediately recorded and posted. Income is recognized at the time the invoice is issued.
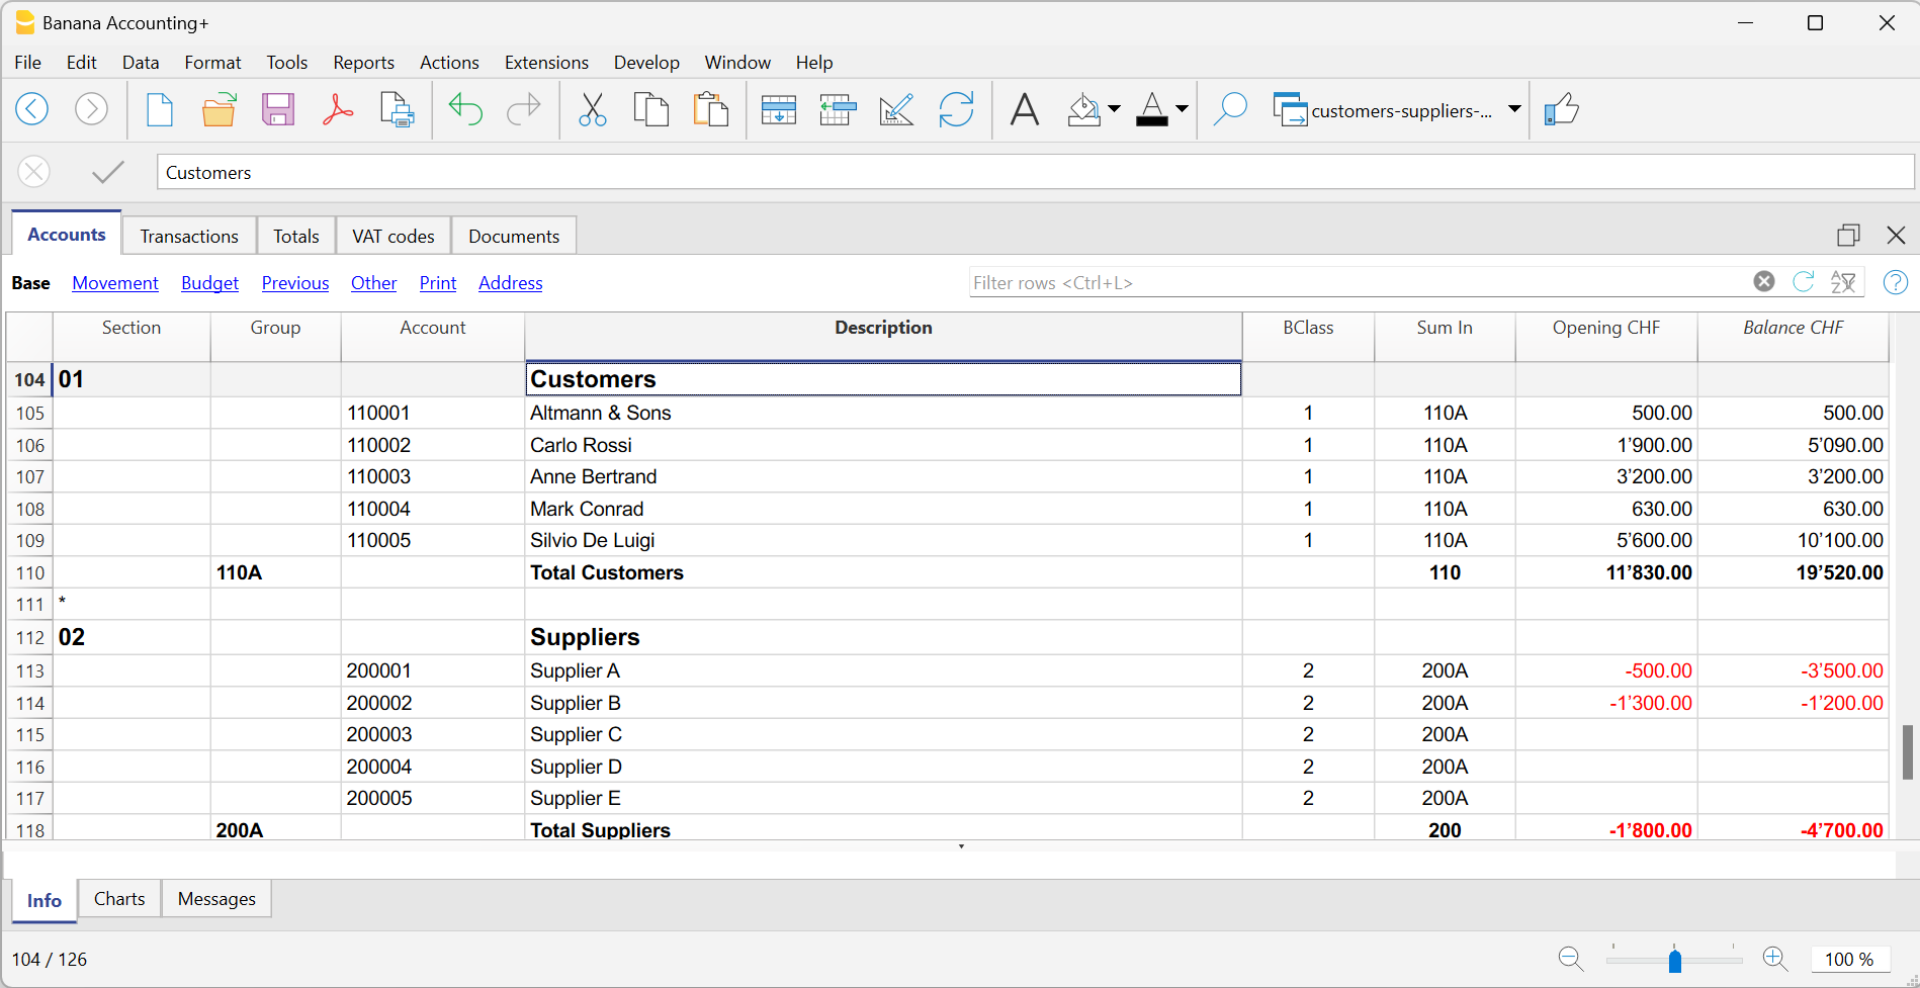
Therefore, in accrual-based VAT management, the VAT code is added when the invoice is created.
The invoice data is entered in the Transactions table. For each new invoice, enter a new transaction row.
- Enter the date of the transaction
- The invoice number
It is important that the invoice number complies with certain requirements: see how to correctly create the invoice number. - The description text (products, services, consulting...) that will appear on the customer invoice
- In the Debit account, enter the customer account number
It is important that the customer number complies with certain requirements: see how to correctly create the customer number. - In the Credit account, enter the counterpart (Sales account, Consulting or other)
- Enter the amount
- In cases subject to VAT, enter the VAT Code with the applicable VAT rate. See Print invoices and VAT management.
Invoicing and VAT net tax rate method
If you are subject to VAT under the balance rate or flat-rate regime with the cash-based system, you must record the invoice issuance to the customer and its accounting registration separately, for the following reasons:
- Invoice to be sent to the customer:
It must show a normal commercial VAT rate (e.g., 8.1%), as required by tax regulations. - Accounting of the invoice:
It must instead be recorded in accounting with the effective balance rate (e.g., 6.2%), using the corresponding VAT code (e.g., F1).
This approach is essential to ensure that the VAT paid corresponds to the applicable reduced regime, while still maintaining a formally correct invoice for the customer.
Issuing the invoice to the customer
To issue the invoice to the customer, proceed as follows:
In the Accounts Table:
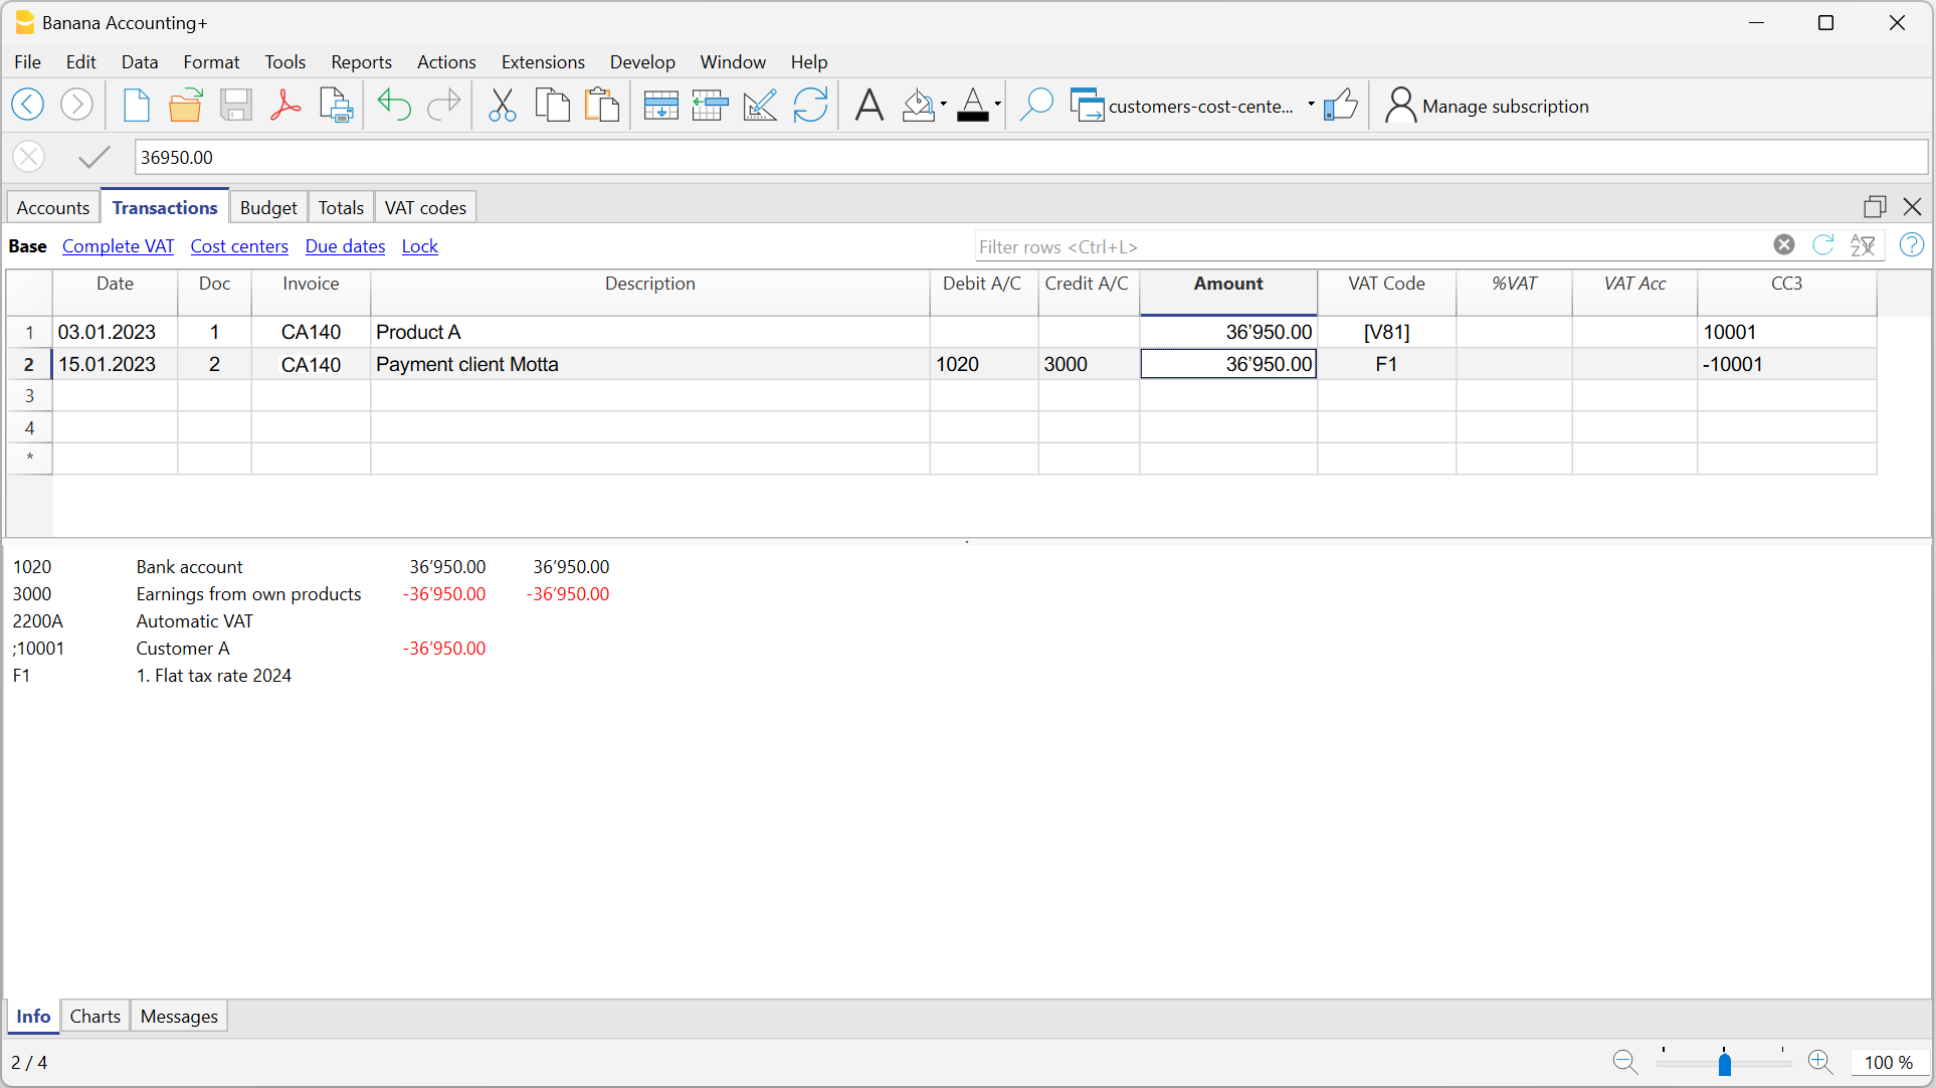
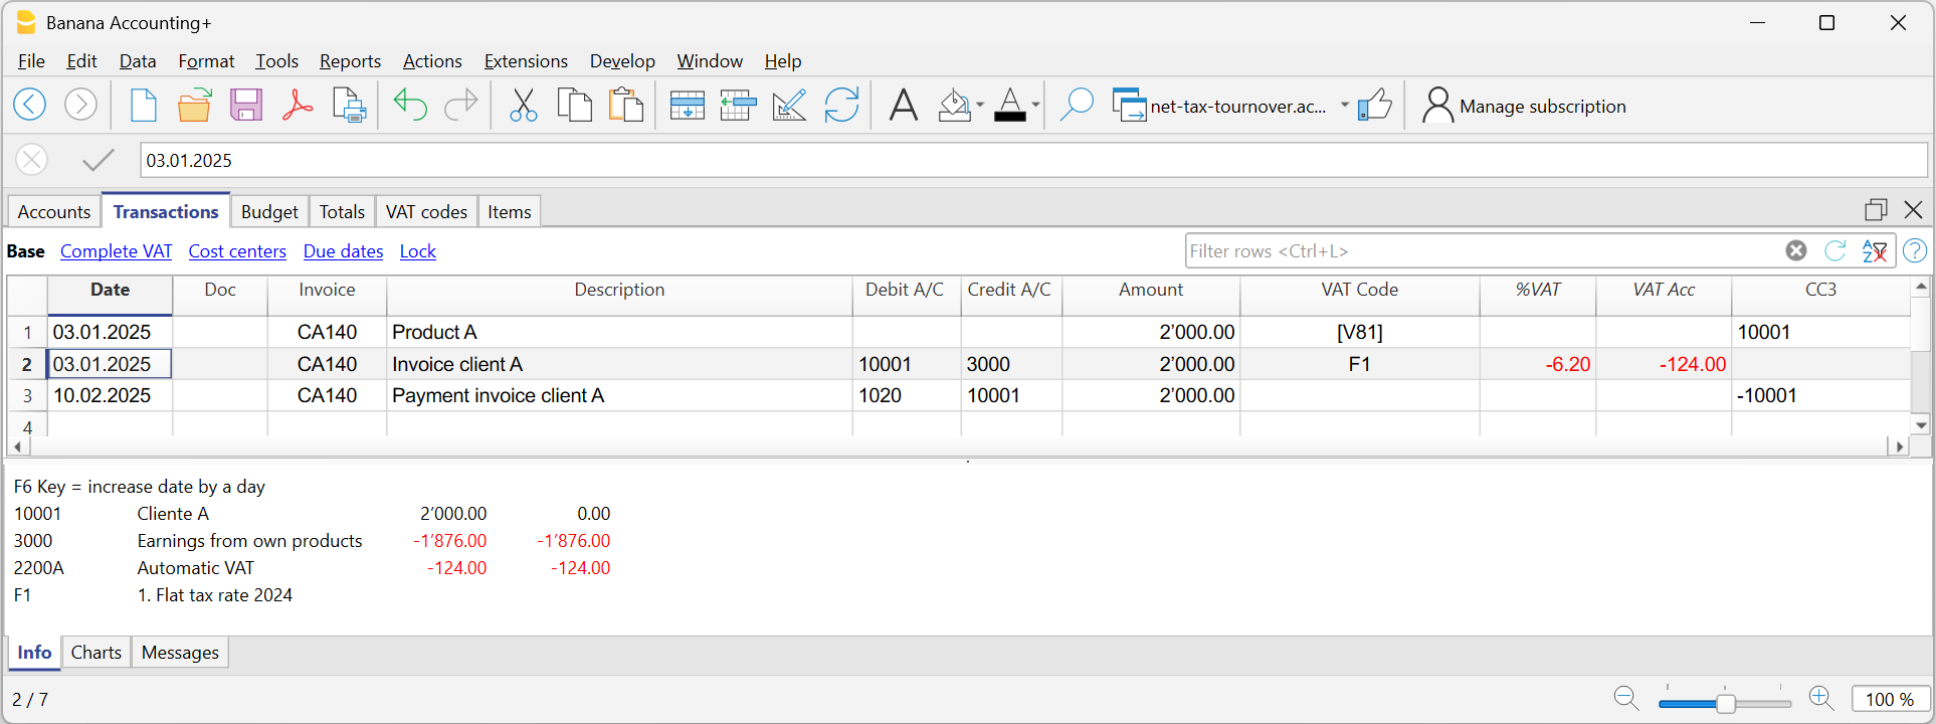
- Create a customer sub-account with the profit center CC3 (example: ;10001 for customer XX)
- In the Address view, enter all customer data.
In the Transactions table:
- In the Date column, enter the invoice issue date.
- In the Invoice column, enter the invoice number.
It is important that the invoice number complies with certain requirements: see how to correctly create the invoice number. - In the Description column, enter the description that should appear in the invoice details.
- In the Amount column, enter the amount
- The Debit and Credit columns must remain empty.
- In the VAT Code column, type the code V81 in square brackets [V81].
VAT codes in square brackets do not generate any VAT entry. - In the CC3 column, indicate the profit center number without semicolon (e.g., 10001).
It is important that the customer number complies with certain requirements: see how to correctly create the customer number.
Since there are no accounts in the Debit and Credit columns, the invoice creation entry will not be recorded in accounting.
Recording the invoice with VAT balance rate
When recording an invoice subject to VAT with a balance rate in accounting, it is sufficient to proceed as with a normal entry, indicating the accounts in the Debit and Credit columns and entering the VAT code corresponding to the balance rate (e.g., F1).
Two recording systems can be used to register the invoice with the balance rate:
- Recording with split
In the VAT codes table, VAT percentages have been assigned to balance rate VAT codes. In the transactions table, by entering the balance rate VAT code (e.g., F1), the program automatically enters the corresponding VAT percentage (e.g., 6.2) and the VAT amount. - Recording without split, by entering the balance rate VAT code (e.g., F1), percentage and amount are not entered. At the end of the period, the specific extension for calculating balance VAT is used.
Based on the rate defined in the extension dialog, the program:- Identifies all entries with balance rate VAT code.
- Automatically calculates the VAT due for the reporting period.
- Totals the amounts on a periodic basis (e.g., monthly, quarterly, yearly).
折扣和返利
要在发票中输入折扣或返利,请添加新行并输入:
- 发票日期。
- 发票编号。
- 折扣或返利的摘要。
- 借方和贷方列中的账户。与销售业务相比,倒转账户很重要。
当客户/供应商明细账设置了成本中心,并且有折扣和返利的发生业务时,为了使金额反转,必须将成本中心的符号也反转。 - 如果有增值税,请在增值税代码中加上负号,以便扣除增值税,或者如果使用当前增值税代码进行折扣和返利,则应扣除增值税。

Invoicing and VAT with balance rate using the invoicing method
The Banana Accounting procedure for VAT management requires entering the VAT code always on the line where the income is recorded. When accounting is managed based on turnover, the income is recorded when the invoice is issued.
When subject to VAT using the balance rates or flat-rate method, customer invoices must be issued using the normal rates (e.g., 8.1%). However, the accounting of invoices under the balance rates or flat-rate method involves reduced rates (e.g., 6.2%).
- If the amounts are gross, you can record them based on turnover or on cash received, by entering the VAT code in square brackets.
- If the amounts are net, it is not possible to create and post the invoices at the same time. In this case, it is necessary to manage:
- The creation of invoices in an accounting file, using the integrated invoicing or with the Offers and Invoices Application
- The posting of invoices in the accounting file.
In this case, the creation of the invoices must be handled in an accounting file or with the Offers and Invoices Application, and the posting in a separate accounting file.
Issuing an invoice with balance tax rate and gross amounts
To issue an invoice to customers with the standard VAT rate (e.g. 8.1%), you need to create a customer subaccount with profit centers CC3 (example: ;10001), completing all customer information in the columns of the Address view.
In the Transactions table:
- In the Date column, enter the invoice issue date.
- In the Invoice column, enter the invoice number:
It is important that the invoice number follows certain rules: see how to correctly create the invoice number. - In the Description column, enter the invoice details.
- The Debit and Credit columns must remain empty.
Since there are no accounts in the Debit and Credit columns, the invoice creation entry will not be recorded. - In the Amount column, enter the amount.
- In the VAT Code column, type the V81 code in square brackets [V81].
VAT codes in square brackets do not trigger VAT accounting. - In the CC3 column, enter the customer account, without semicolon (e.g. 10001).
It is important that the customer number follows certain rules: see how to correctly create the customer number.
Posting an Invoice with Balance Rate and Gross Amounts
When recording the invoice in the accounting, to post it using the VAT balance rate, you must enter the transaction as usual, also entering the accounts in the Debit and Credit columns and the VAT code of the balance rate:
- If the VAT breakdown method is used, enter the VAT code for the balance rate (e.g., F1). In this case, the VAT Codes table includes the VAT rates for the balance. In example F1 corresponds to 6.2%.
- If the non-VAT breakdown method is used, enter the VAT code without rate (e.g., F1). In the VAT code table, the balance rate codes do not have rates.
To post the invoice using the balance rate, it is necessary to create in the Accounts table:
- A customer sub-account using balance sheet accounts.
- Enter the date and description in the corresponding columns.
- In the Debit column, enter the customer account (e.g., 10001).
- In the Credit column, enter the income account.
- In the Amount column, enter the amount.
- In the VAT Code column, type the VAT code for the balance rate (e.g., F1)
Rounding in invoice printout
In the printout of invoices integrated in accounting, the total VAT amount corresponds to the sum of the individual VAT transactions that make up the invoice. Since the individual VAT transactions are rounded to the nearest cent, there may be a difference compared to the VAT calculated on the total invoice amount.
To better understand, let's consider the following example:
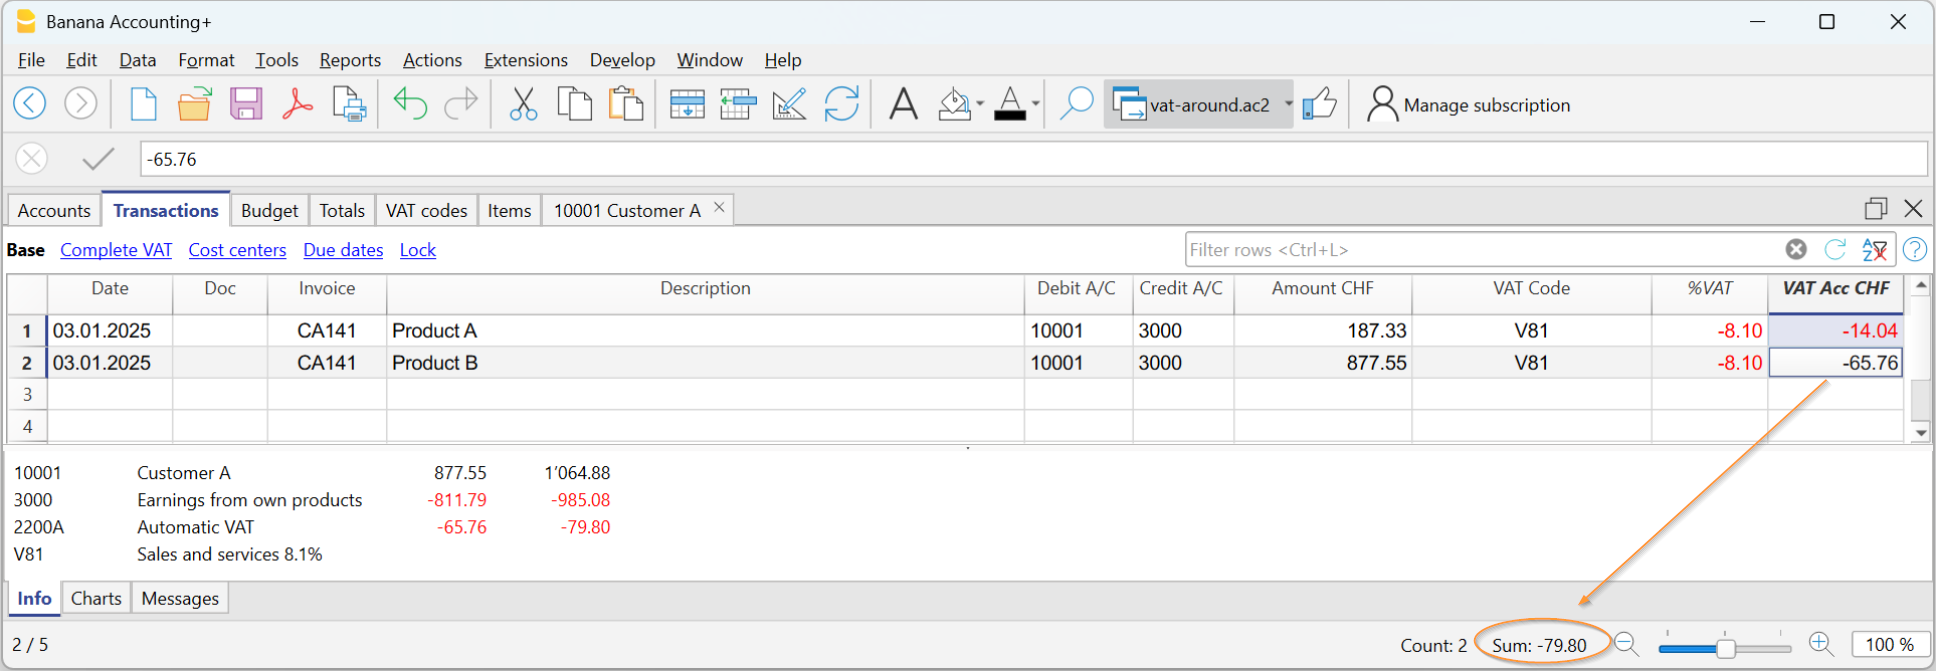
- Row 1: 8.1% of CHF 187.33 = Rounded: CHF 14.04
- Row 2: 8.1% of CHF 875.00 = Rounded: CHF 65.76
- Total: 8.1% of CHF 1064.88 = Rounded: CHF 79.80
The invoice shows a VAT amount of CHF 79.80 instead of CHF 79.79 (amount calculated directly on the total of 1064.88). In fact, the amount of CHF 79.80 corresponds to the sum of VAT individually calculated for each item (CHF 14.04 + CHF 65.76).
This logic is adopted to avoid discrepancies between the VAT amounts recorded in accounting and those shown on the invoice. In this way, the total VAT in accounting matches the one printed on the invoice.
设置客户语言
默认布局包括以下语言:意大利语,德语,英语,法语,荷兰语。
发票文本以客户的语言打印,但前提是在语言列 (账户表,地址视图) 中进行了设置。
语言是通常由2个小写字母组成的ISO代码 (it=意大利语, de=德语, en=英语, fr=法语, nl=荷兰语).
如果没有为客户账户指定语言,则使用文件 → 文件和账户属性 (基础数据) → 其它菜单中定义的会计语言。

到期日期和付款条款
发票的到期日可以用不同的方式设置:
- 广义到期日 - 所有发票的到期日相同
选择报表菜单 → 客户 → 设置 → 总的 → 发票到期的选项,定义发票应该到期的期限 (按天)。例如,如果文档的日期为5月10日,而您输入的值为10天,那么发票到期日期将为月20日。 - 每个客户的截止日期 - 针对每个客户定义
在账户表中, 可以使用到期日列 (如果未显示,通过数据 → 列设置 ...进行设置)。可以在此列设置发票应该到期的期限 (按天)。 - 每张发票的特定日期
在发生业务表中,到期日期选项可以让您显示到期日列。 -
到期日期的替代文本
可以将您选择的文本定义为每个发票的付款条件,这将替换到期日期的文本。请返回高级输入-类型列获取详细信息。
打印其它币种的发票
您也可以用不同的货币来打印发票:
- 您必须使用多币种会计文件。
- 发票以客户账户的币种打印。
如果要将不同币种的发票发送给同一客户,则必须为同一客户创建不同币种的账户。
高级输入文件类型列
发生业务表中的类型列可用于定义和显示打印发票特定数据有关的命令。
通过数据菜单 → 列设置的命令来查看并显示文件类型列。
输入数据
一旦显示出了该列,您就可以输入数据了。您将需要:
- 在发票日期之后添加一个空行。
- 在日期列中输入发票的日期。
- 在文件类型列中输入所需的参数 (请参阅下表)。
- 在发票列中输入发票编号。
- 在摘要列中输入要显示在发票上的相关数据。
给客户开具发票
输入10:文件类型列将列出可用于自定义发票数据的所有可能选项。
| 发票数据 | 文件类型列 | 摘要列 |
|---|---|---|
|
客户地址 如果需要一个与账户表 (地址视图) 中定义的地址不同的地址,则可以使用适当的选项指定该地址。 在每一行中指明地址的元素 (名称,姓氏,地址...)。 |
10:adr:fna |
输入名 |
|
问候 在发票详细信息之后,您可以在最后的问候语中添加一行文字 (另请参见示例发票的页面)。 |
10:gre | 输入您的问候语 |
|
备注 可以在发票明细之后,问候语之前插入一行或几行备注 (也可参见发票示例的页面)。 |
10:not | 输入备注信息 |
|
参数 (高级) 当想要在发票上打印个性化数据时,可以使用相应的命令。 这个选项是针对具有JavaScript编程知识的用户,允许您改变发票的式样,从而通过这个命令来使用指定的参数。 欲了解更多的信息请查看自定义数据打印的页面 (内容为英文的)。 |
10:par | 输入您的自定义参数 |
|
付款条件 如果您想指定一个替代文本作为付款期限,请输入所需的文本。其将显示在发票上。 |
10:ter | 输入付款期限的替代文本 |
|
标题 如果您不想使用默认的发票标题,可以选择不同的标题。 |
10:tit | 输入您的文字作为发票标题显示 |
|
项目小计 |
10:tot |
输入0级小计 |
|
标题行的文字 在发票明细表中,您可以将标题添加到组的项目中 (另请参见示例发票的页面)。 |
10:hdr | 输入您要添加到发票详细信息的文本。 留空用来添加空行。 |
中间总计
为了插入中间总计,您将需要在发生业务表中添加其它行:
- 在文件类型列中输入 10:从下拉菜单中选择 :tot,会显示 10:tot。选择并输入 :1
- 在摘要列中输入相对应的描述 (例如,总商品)
- 输入发票编号 (如果没有编号,则不会打印总计)。

含中间总计的发票示例。

付款条件的备选文字
可以将您自己的描述定义为每张发票的付款期限,这将替换现有文本作为到期日期。
- 在发生业务表中输入相同发票号的附加行。
- 您需要输入 10: 在文件类型列中并从下拉菜单中选择 :ter,选择 10:ter。
- 在摘要列中输入您的文字 (如30天净值,60天等)。
在打印发票时,将显示作为付款期限的指定值。
额外的自定义功能
在打印发票对话框中还提供了其它自定义的选项,例如定义银行详情或最后的问候语。
如何打印发票
可以轻松地自定义和调整发票的打印,以满足您的需求。
设置您的公司地址 (发件人)
点击文件菜单 → 文件和账户属性 → 地址,设置您公司的地址。
在账户表中设置客户列表
- 在账户表中,设置客户分类账。
- 显示地址视图中的地址列,并输入客户地址。
如果地址视图不可见,可通过工具栏菜单 → 添加/删除功能 → 在账户表中添加地址列的选项来进行添加。 - 在报表菜单 → 客户 → 设置中进行客户的设定。
设置客户语言
可以用您客户的语言来打印发票。要做到这一点,您必须首先设定客户的语言。
设置商标位置和发件人地址
要设置商标,您需要:
- 在文件菜单 → Logo(商标)设置中上传商标的图片。
- 要在发票上使用商标,在发票设置中,您必须激活商标的选项,并在商标名称栏中输入您所使用的定制名称,请注意大写和小写。
例如,您可以把商标放在左边,把地址放在右边,并改变商标的大小。
如果您不改变默认的设置,发件人的地址就会在右边输入,而不考虑商标的存在。
如果您想在左边设置没有任何商标的发件人地址,请查看以下页面:
自定义发票抬头中的地址
发票抬头中发件人地址的样式 (颜色、大小、字体......) 是由程序默认设置的。
Banana财务会计+ 的高级计划允许您自定义地址的风格。更多信息请参见实例页面 (英文)。
设置发票信息
发票信息是关于日期、客户编号、到期日等信息,通常位于页眉下方和客户地址旁边。
CH10和UNI11发票式样允许您定义哪些发票信息要包括在内,哪些要排除在打印之外。可以在发票设置页面找到相关说明。
对于其它打印式样 (CH01-CH09 / UNI01-UNI08),则不能修改这些信息。
设置发票到期日
程序中的默认到期日为开具发票后的30天。
如果您想要改变到期日,请按以下步骤操作:
- 在发生业务表中为发票添加一行。
- 在日期一列中,输入发票的日期。
- 在文件类型列中,输入10:ter (:ter付款期限)。
- 在发票一列中,输入发票号码。
- 在摘要列中,输入所需的到期日期 (如 "10天")。
输入的文字将出现在发票信息中。
设置客户地址的位置
CH10和UNI11的发票式样允许您定义客户地址的位置和地址元素的顺序。在发票设置页面您可以找到更详细的信息。
对于其它打印式样 (CH01-CH09 / UNI01-UNI08),不能改变客户地址的位置和组成。
设置发货地址
要在客户的地址之外再输入一个送货地址,步骤如下:
- 使用发生业务表的类型列,命令 10:sadr。
- 在发生业务表中的发票中添加一行。
- 在日期列中,输入发票日期。
- 在类型一列中,输入:
- 10:sadr:fna 为名字。
- 10:sadr:lna 为姓。
- 10:sadr:str1 为地址 (街道和号码)。
- 10:sadr:cod 为邮政编码。
- 10:sadr:cit 为位置。
- 在发票一列,输入发票号码。
- 在摘要列,输入要显示的文字。
- 在CH10和UNI11的发票式样,点击发票设置 → 客户地址部分,勾选送货地址的选项。
通过发生业务表类型列输入的数据会被提取并插入到发票打印中。
设定标题/对象
要输入发票的标题/对象,您有两个选择:
- 使用发生业务表中的文件类型列,命令10:tit。
- 对于每张发票,可以定义一个标题
- 适用于任何式样的打印。
- 如果使用文件类型列,它总是优先于任何式样的设置(见下一点)。
- 通过CH10和UNI11的发票式样,您可以在发票设置 → 文字部分 → 发票标题中输入文字。
- 该标题适用于所有使用该式样打印的发票。
- 只有在没有按照第一点定义标题的情况下,才适用该标题。
如果您不输入任何文字,程序会使用默认的文字。
设置初始文字
要输入发票的初始文字,您有两个选择:
- 使用发生业务表中的文件类型列,命令10:beg。
- 为每张发票定义一个初始文字。
- 这适用于任何式样的打印。
- 如果使用文件类型列,它总是优先于任何式样的设置(见下一点)。
- 通过CH10和UNI11的发票式样,您可以在发票设置 → 文字部分 → 发票标题中输入文字。
- 该标题适用于所有使用该式样打印的发票。
- 只有在没有按照第一点定义标题的情况下,才适用该标题。
设置发票细节
使用发生业务表来输入发票数据。
另见折扣和返利的页面。
通过CH10和UNI11的发票式样,您可以决定在打印中显示哪些列。请查看如何在发票设置 → 发票细节的页面中进行操作。
对于其它打印式样 (CH01-CH09 / UNI01-UNI08),这些列是不可编辑的。
设置最终文本
要输入发票的最终文本:
- 通过打印发票的窗口。
- 选择选项。
- 选择要打印发票的语言。
- 在最终文本字段中输入文字。
- 您输入的文字会被应用到您所使用的任何一个打印版面中。
通过CH10和UNI11的发票式样,允许您可以在发票设置中来定义最终文本。
- 在发票设置 → 文本部分 → 最终文本中输入文字。
- 这适用于与式样设计一起创建的同一.ac2文件中的每张发票。
- 它取代了在发票打印对话框 → 选项 → 最终文本中设置的任何文本。
为了给每张发票设置不同的最终文本,必须使用发生业务表中的文件类型列:
- 在文件类型列中,输入10:not (注释)。
- 在摘要列中,输入所需的最终文本。您所输入的文本将出现在单行上。
要添加额外的注释行,您必须在多行上重复文件类型和摘要列的条目。
设置银行账户号码
如果您不使用二维码,您必须在最后的文本中输入银行账号,作为支付发票的参考。
请参阅设置最终注释的部分来输入银行账户号码。
为瑞士二维码打印设置IBAN
如果您想用IBAN账户创建含二维码的发票,您需要:
- 在Banana财务会计+ 中使用发票式样 CH10。
- 设置IBAN账户。
- 设置打印瑞士二维码。
在带有IBAN账户的二维码发票页面,您会发现更多关于设置带有IBAN账户的二维码发票的信息。
设置QR-IBAN,用于打印瑞士的二维码
如果您想用二维码-IBAN账户创建二维码发票,您必须:
- 在Banana财务会计+ 中使用发票式样 CH10。
- 设立二维码-IBAN账户。
- 设置瑞士二维码打印。
在带有二维码-IBAN的二维码发票页面,您可以找到更多关于带有二维码-IBAN账户的二维码发票的设置信息。
打印没有金额和地址的二维码表
如果您想只打印没有金额和客户地址的二维码账单,必须这样做:
另请参见如何打印没有金额的发票。
设置风格和颜色
在发票风格打印页面,您可以找到详细的信息:
- 字体的类型。
- 输入字体的名称 (如Arial、Helvetica等)。
- 颜色。
- 可以使用英文名称 (black, yellow, white, blue, red, 等等)。
- 或十六进制值 (HEX) 前面有#号 (例如:#000000, #009FE3, #FF00EA)。
颜色代码在互联网上很容易找到。例如,您可以参考:https://www.w3schools.com/cssref/css_colors.asp
CH10和UNI11的发票式样也有一个发票设置来定义字体大小。
设置粗体字的文字
在CH10和UNI11的发票式样,可以在发票文字中使用粗体字。
在发票中添加图片
在Banana财务会计+ 的高级计划中,您可以将图像添加到要发送给客户的发票上。
这一功能使发票更容易定制,收到发票的客户会对项目的发票有一个更完整和直接的看法。
我们有几个关于在发票中输入图片的信息页面。我们建议您着看这些页面以更好的了解软件内的相关功能。
参考页面如下:
关闭已收到的发票
有两种方法可以关闭未结发票:
其它资料
打印发票
点击报表菜单 → 客户 → 打印发票,就会跳出打印发票对话框。
选择打印选项,按确定按钮可以预览发票。

打印标签
发票号码
您可以打印单张或多张发票:
- 单次打印时,请输入发票号码。
- 多个打印之间以逗号分隔的发票号码 (例如 1,3,6)。
- 对于按顺序打印的 (从...到...),请输入用连字符分隔的数字 (如1-3)。
如果发票号码已经包含连字符 (如2016-1),则必须用大括号{}括起来,以区别于文件范围的编号,{2016-1}-{2016-3}。
发票来自
此选项允许您打印所选期间中包含的所有发票。 您需要输入初始日期和最终日期。
未打印的发票
打印发生业务表格内的已打印发票列为空的发票。所有未被打印的发票也因此被打印。
样式
版式可以更改发票的样式。可以使用模板含有Logo/商标,数量列或附带付款单的发票样式。
更多样式
此按钮可以进入管理扩展程序的对话框,将模板更新为最新的模板或添加自定义的模板。
设置
允许您设置所选样式的参数。欲了解更多信息,请参见模板和设置的页面。
在打印后更新已打印发票列
您可以通过点击数据菜单→列设置命令,激活已打印发票列,来使该列出现在发生业务表格中。
该程序将在打印预览后更新此列的内容,添加文本 1。这将允许在选择未打印的发票命令后仅打印此列中没有内容的发票。
式样选项
在此标签中,可以为每种语言添加特定文本,例如问候语或您的银行详细信息,以方便付款。
根据客户的语言,程序会在发票结尾以指定语言显示保存的文本。
选择报表菜单 → 客户 → 打印发票 → 选项,输入所需的文本,点击确定按钮。您将看到打印预览。

将发票另存为 PDF
发票也可以保存为 PDF 格式,以便可以方便地通过电子邮件发送。
从预览视图 (报表菜单 → 客户 → 打印发票 → 确定),从顶部菜单中选择创建 PDF。有关更多的信息,请参阅打印/预览的页面。
Print Delivery notes | Integrated Invoicing
With Integrated invoicing, when you create an invoice, it is automatically recorded in the accounting system and the customer's account. It is possible to print an invoice with the wording "Delivery Note" containing the same invoice data, using layouts CH10 and UNI11.
However, it is not possible to create a standalone record for the delivery note without any accounting impact, one that doesn't debit the customer's account or credit other accounts.
Mandatory requirements to use the layout preferences:
- Banana Accounting Plus (Release 10.1.7 or later).
- The Advanced plan
How to print a delivery note
In the Transactions table select the row where the delivery note to be printed is located and proceed as follows:
- Menu Report > Customers > Print invoices
- Select Layout CH10 or UNI11
- Under Print as, select:
- Delivery note with amounts
In this case, amounts in details and total amount are included in the delivery note. - Delivery note without amounts
Only the details of the dispatched goods are displayed in the delivery note, without any amounts.
- Delivery note with amounts
- Conferm with OK.
Delivery address
When printing the delivery note with an address other than the billing address, the delivery address must be entered in the Transactions table, using the Type column.
In this case, the delivery note will print the address entered in the Transactions table and not that of the respective customer, which is instead found in the Accounts table, Address view.
Printing customization
All settings that characterise Layout CH10 and UNI11 are also retained when printing the delivery note.
To change the settings, go to Print Layout Settings.
Under Texts > Delivery Note you can define the initial and final texts in the delivery note.
Print example:
Print Estimates | Integrated Invoicing
With Integrated invoicing, when you create an invoice, it is automatically recorded in the accounting system and the customer's account. It is possible to print an invoice with the wording "Estimate" containing the same invoice data, using layouts CH10 and UNI11.
However, it is not possible to create a standalone transaction for the Estimate without any accounting impact, one that doesn't debit the customer's account or credit other accounts.
Requirements in order to use layout preferences to select the label "Estimate" are
- Banana Accounting+ (version 10.1.7 or later).
- Advanced plan
How to print an estimate
In theTransactions table, select the row that corresponds to the estimate and proceed as follows:
- Menu Reports > Customers > Print invoices
- Select Layout CH10 or UNI11
- Select the option Print as, and choose Estimate
- Confirm with OK.
The offer is always printed without the Swiss QR bulletin.
Printing customization
All the settings that characterize the CH10 and UNI11 Layout are also retained in the printing of the estimate.
To modify the settings, go to the Print Layout Settings.
In the Texts > Estimate section, you can define the initial and final texts of the quote.
Print Reminders | Integrated Invoicing
In Banana Accounting Plus you can print reminders in two different ways:
Print Reminders from the Print Invoice dialogue | Integrated Invoicing
Banana Accounting Plus, with the CH10 and UNI11 layouts, also allows you to print reminders.
Requirements for using layout preferences:
On the basis of the invoice data entered in the Transactions table, reminders can be printed.
How to print a reminder
In the Transactions table select the row where the invoice for which you need to print the reminder is located and proceed as follows:
- From the Menu Reports > Customers > Print Invoices
- Select Layout CH10 or UNI11
- Under Print as, select one of the following options:
- 1. reminder
- 2. reminder
- 3. reminder
- Confirm with OK
Print customization
All settings that characterise the CH10 and UNI11 layouts are also retained in the reminder printout.
To change the settings, go to Print Layout Settings.
Under Texts → Reminder you can define the start and end texts in the reminder.
Print example: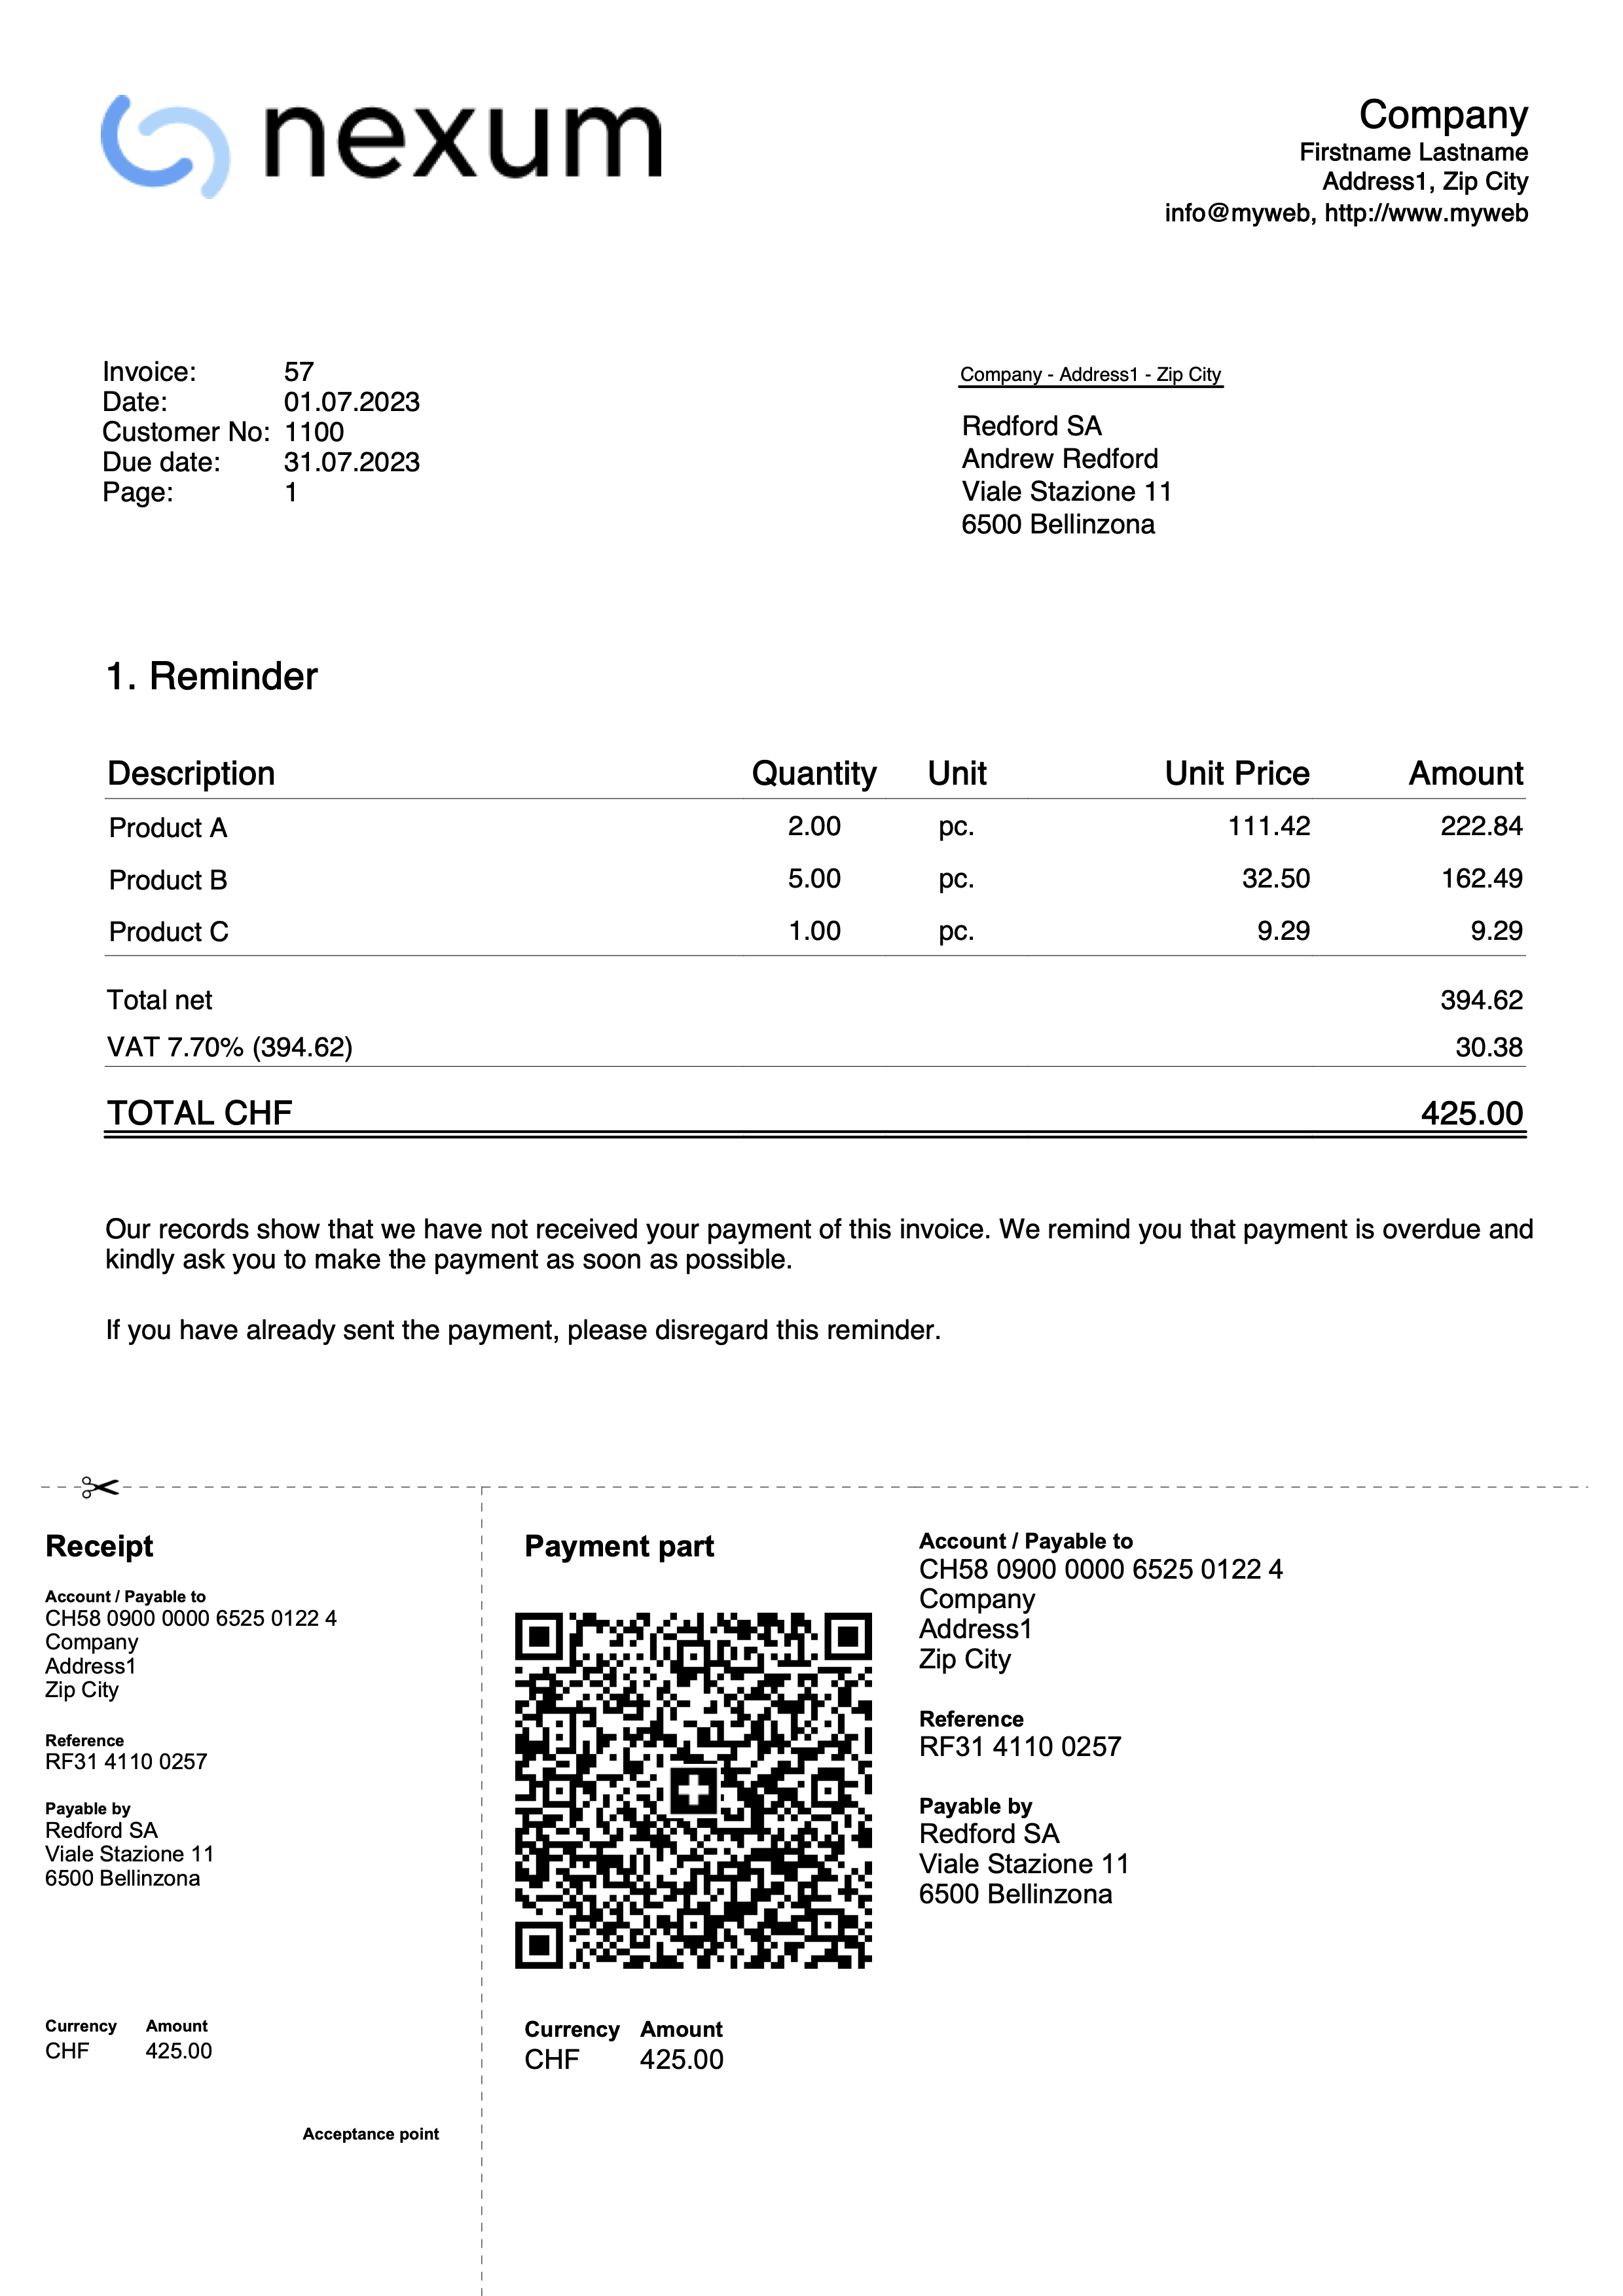
Export invoices in PDF
This dialog window appears from the print preview when you need to export invoices and customer statements to PDF.
To export invoices to PDF:
- From the menu Reports > Customers > Print invoices
- Specify the invoices to print (e.g. 1-10)
- Confirm with OK.
- From the print preview, click the PDF icon.
Export single invoices or customer statements to PDF
This function allows you to export an invoice or a customer statement into a PDF file.
The option is visible when only one invoice or one customer statement has been selected for PDF export.
To export a single invoice or customer statement to PDF, you must:
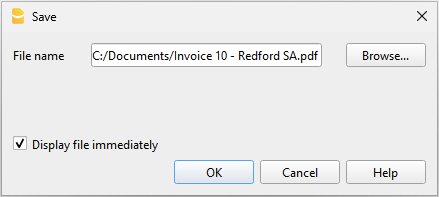
- From the print preview, click Export > Create PDF.
- Click Browse and select or create the folder where to save the file.
- Enter the PDF file name. The name is automatically filled in the File name field.
- Enable the Open file immediately option to view the created PDF.
- Confirm with OK.
Export multiple invoices or customer statements into a single PDF
This function allows you to export several invoices or customer statements into one single PDF.
The option is only visible when multiple invoices or customer statements have been selected for PDF export.
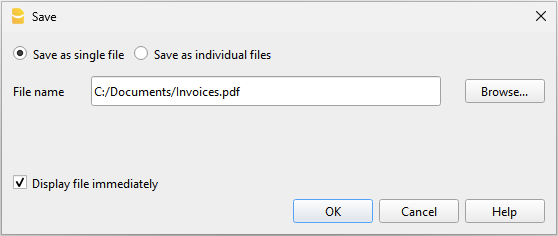
To export invoices or customer statements into a single PDF, you must:
- From the print preview, click Export > Create PDF.
- Enable the Save as single file option.
- Click Browse and select or create the folder where to save the file.
- Enter the PDF file name. The name is automatically filled in the File name field.
- Enable the Open file immediately option to view the created PDF.
- Confirm with OK.
Export multiple invoices or customer statements as separate PDFs
This function allows you to export several invoices or customer statements in a single operation, generating separate PDF files.
This option is only available:
- With the Advanced plan of Banana Accounting Plus.
- When multiple invoices or customer statements have been selected for PDF export.
To export invoices or customer statements as separate PDFs, you must:
- From the print preview, click Export > Create PDF.
- Enable the Save as individual files option.
- Click Browse and select or create the folder where to save the files.
- In the File names field, you can customize the file name using variables available in the dialog window.
- Click Variables to view the full list of variables.
- Double-click the variables you want to use and compose the file name. While composing, the resulting file name preview is updated automatically.
Example: <doc_date> for the document date, <customer_name> for the customer name, and <doc_number> for the document number.
- Enable the Open file immediately option to view the created PDF.
- Confirm with OK.
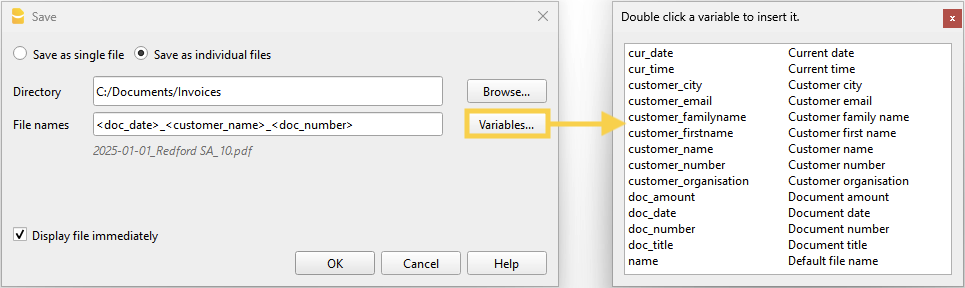
If a file with the same name already exists in the selected folder, the program will ask for confirmation during saving.
List of available variables
To customize the file names, use the following variables:
- cur_date: the current date when the PDF documents are created.
- cur_time: the current time when the PDF documents are created.
- customer_city: the customer's city.
- customer_email: the customer's email address.
- customer_familyname: the customer's last name.
- customer_firstname: the customer's first name.
- customer_name: the full name of the customer or the company name.
- customer_number: the customer number.
- customer_organisation: the company name.
- doc_amount: the amount of the document.
- doc_date: the date of the document.
- doc_number: the document number.
- doc_title: the invoice title with number, customer name or company name.
- name: the default file name (invoice title with number, customer name or company name).
Export other types of documents
From the print preview, you can export any document to PDF using the Create PDF command.
For more information, visit:
发票结算
有两种方法可以关闭未结清的发票:
- 用手工记录关闭。
- 通过导入ISO 20022格式的报表数据进行关闭。
用手动记录关闭
要手动记录发票收款情况,请看营业额或收款情况的页面。
以ISO 20022数据导入进行结算 (适用于瑞士)
要通过导入报表数据自动关闭未结清发票,您必须:
- 直接从银行网站下载并保存ISO 20022格式的数据到您的电脑上。
- ISO 20022格式的文件camt052、camt053和camt054支持瑞士规格。
- 安装ISO 20022 Camt银行报表 (瑞士) 扩展程序。
- 设置该扩展程序的一些参数。
- 通过选择Camt银行报表ISO 20022 (瑞士) 扩展程序导入发生业务。
通过导入功能,程序自动在发生业务表中创建发生业务,并在相应的列中输入数据:
- 在日期列中,是收取发票的日期。
- 在发票列中,从二维码参考号码中提取的发票号码 (见参数)。
- 在摘要列中,是二维码参考号码。
- 在贷方列中,从二维码参考号中提取的客户账户 (见参数)。
- 提取的客户账户将根据参数被保存为账户/科目或成本中心。
- 在金额列中,是发票金额。
- 在借方列中,如果在导入过程中启用了对应的账户 (收取金额的银行账户)。
欲了解更多信息,请参阅 Camt ISO 20022 (瑞士) 银行报表的页面。
二维码参考资料
以下几页解释了二维码参考的代码:
- 对于IBAN账户,使用结构化债权人参考(SCOR)类型。
- 对于QR-IBAN账户,使用QRR参考类型。
更改客户账户和发票号码
当改变分类账或成本/利润中心的客户编号或发票编号时,必须非常小心,以确保没有前几年的未结发票。
编辑客户账户,无需开立余额
客户账户可以用重命名命令来进行重新命名。
如果已经有旧账户的发生业务,这些业务将被自动更新为新的客户账户。
建议在年初和没有未结发票的情况下,对客户账户进行重新命名。
修改有期初余额的客户账户
当重新命名有期初余额 (未结发票) 的客户账户时,不可能简单地重新命名该账户,而是必须用新的编号创建一个额外的账户。期初余额将通过一个会计分录从旧账户转移到新账户。
- 在账户表中,添加新的账户,并使用新的编号。

- 在发生业务表中,创建一个发生业务,将期初余额从旧账户转到新账户。
- 如果在新的一年里有提到旧账户的发票,可以通过改变每个使用该账户的个别业务的账户号码,将它们分配到新的账户。如果发票已经发送给客户或已经支付,或文件编号包括客户编号,则要非常小心。

- 点击报表菜单 → 客户 → 按客户开发票的命令,显示的是关闭旧账户和将余额转入新账户的报告。
- 旧编号的账户,其余额为零,可以在下一年注销,此时初始余额为零。

更改已登记/签发的发票号码
如果您想改变一张未付发票的号码,有两种可能:
- 直接替换原始发票发生业务中的发票号码。
如果带有旧号码的发票在前一年的档案中登记,则不建议使用这一程序。
- 冲销发票过账。
- 在发票一列,输入发票号码。
- 在类型列中,输入15 (关闭客户文件)。
- 在借方一列,输入一个转账账户。
- 在账户一列,输入客户的账户。
- 在金额一列,输入金额。
如果带有旧号码的发票是在上一年的会计中登记的,建议采用此程序。

信用票据
信用票据有自己的文件类型,与发票不同。
- 像输入发票一样输入发生业务。
- 在 "发票 "栏中,您必须注明贷记通知所涉及的发票号码。
账户将遵循记录信用票据的逻辑,因此,该文件金额将为负数。 - 在文件类型列输入 12 。
- 在摘要列中输入信用票据措辞而不是发票。
在某些打印页面中,发票字样将始终被打印,为了更改:- 输入新的一行,发票号码和文件类型 12:tit 相同。
- 在摘要列中输入信用票据。
打印信用票据
与打印发票的命令一样:报表 → 客户 → 打印发票。

发票中的四舍五入
打印瑞士法郎的发票时,如有必要,总额将四舍五入到最接近的5分。如果打印出的发票总金额与发生业务金额不一致,用户会看到差额。
如果不想将总金额四舍五入,请使用报表 → 客户 → 设置 → 高级命令将发票四舍五入设置为所需的分值,例如设置为 0.01,则发票总金额与发生业务金额一致。
创建将包含在发票打印输出中的四舍五入发生业务。参见示例:

Item management integrated into accounting
In the accounting file, a table can be added to manage items and link them to individual transactions via the Item Id (item identifier) that is entered in the Item column.

This feature is very powerful and useful because it allows the following automations:
- To integrate a list of products or an inventory with descriptions, quantities, prices and groupings into the accounting.
- In the Transations table, by entering invoices and simply indicating the Item Id (Item identifier) in the Item column, the description, price and account are taken over.
- In the transaction row, by entering the quantity (positive or negative), the programme automatically updates the existing quantity balance. It thus functions as a small warehouse.
Some extensions, such as those for securities management, make use of this functionality, to manage the list of securities, have an inventory and calculate the accounting profit or loss at the time of sale.
Activate the functionality
The functionality is enabled from the menu Tools menu > Add/remove functionalites.
The options are as follows:
- Add Items table
Adds the Items table in the accounting file. - Add Items table and Items Columns in the Transactions table.
Adds the Items table and Items columns to the Transactions table at the same time.
项目表格
要加快创建发票的速度,可以使用项目表格的功能,您可以插入定期的产品或服务。
在创建发票内容的时候,只需按项目列中的 F2 键,然后从列表中选择产品;将使用项目表格中的数据完成发生业务。
要使用项目表格,您需要 :
- 添加项目表格。
- 在发生业务表中添加项目表格。
- 通过数据菜单 → 列设置的命令使项目列出现在发生业务的表格中。
项目列的内容是由项目表格中定义的。
添加项目表格
点击工具栏菜单 → 添加新功能 → 添加项目表格的命令来添加项目表。
在项目表格中,您可以输入项目,产品和其它内容。在某种程度上,它也可以用作库存控制。
默认的列如下:
- 总组: 生成总计行。
- 物品标识: 物品代码。
- 摘要: 项目描述。
- 所属组: 用于合计一组项目的组。
- 账号: 在分录表中使用的账户。
- Asset账户:这是资产负债表中记录该项目的账户。
它用于将复式记账与项目库存会计相连接。
如果指定了Asset账户:- Asset账户的货币必须与该项目的货币相同。
- Asset账户的期初余额应等于所有具有相同Asset账户的项目初始价值之和。
- Asset账户的余额应等于所有具有相同Asset账户的项目账面价值之和。
- Asset类型: 定义 Asset 的类型。这是程序内部的一种分类,由 投资会计扩展 用于计算数值;它不是标准分类,也不用于报表目的。目前支持的取值为:
- 1:股票、ETF、基金,...
按数量计量的投资。 - 2:债券、债务证券,...
按名义价值计量的投资。
- 1:股票、ETF、基金,...
- 货币: 需使用的币种(仅适用于多币种会计)。
- 增值税代码: 需使用的增值税代码(仅适用于增值税会计)。
- 单位: 用于定义数量类型的缩写。
- 销售: 单位销售价格。当在分录表中输入物品标识时,会被自动提取。
- 成本: 单位成本价格。仅供参考,程序不会使用此值。
- 初始数量: 项目的初始数量。
- 初始单价: 项目的初始单价。在多币种会计中,以项目的货币表示。
- 期初币种值: 在多币种会计中,以项目货币表示的初始数量乘以初始单价。
- 初始价值: 以基本货币表示。
在多币种会计中,表示按汇率表中指定的期初汇率转换的初始币种值。 - 当前数量: 当前数量,由程序计算,考虑初始数量和分录表中的项目记录。使用分录表中的数量列。
- 移动数量: 数量变动的总和。此值由程序根据分录表中数量列的记录自动计算。
- 当前价格: 物品的当前价格。
- 在多币种会计中,以项目货币表示。
- 必须由用户手动输入或从其他程序导入。
- 此值也用于会计的期末价值,在证券会计中,用于计算与账面价值相比的未实现盈亏。
- 币种值: 由程序计算。当前数量乘以项目币种中的当前价格。
- 当前价值: 按汇率表中指定的当前汇率计算的当前价值。
发生业务表中的物品标识列
分录表的项目列用于输入数量和单价。
- 可以通过菜单 工具 → 添加/删除功能 → 添加项目列 将其添加到 分录表 中。
- 分录金额根据数量列和单价列中的数值自动计算。
- 如果存在项目表,数量的变动将像库存管理一样,增加或减少当前数量。
更多信息请参阅:
在分录表中添加的列
- 项目编号 (IdItem)
- 即项目表中的项目。
- 默认情况下,在分录表中项目编号列不可见。
使用命令 数据 → 调整列 可使列可见以便使用。 - 如果不存在项目表,则该列仅作参考。
- 数量
- 正值 (+) 会增加项目的数量。
- 负值 (–) 会减少项目的数量。
- 中性值 (±) 将被用于计算分录金额,但不会影响项目表中的数量。
- 与单价一起用于计算分录金额。
- 如果存在项目编号,数量的正值将增加,负值将减少项目表中的数量。
- 中性值 (±123) 用于计算分录金额,但不会更改项目表中的数量。
- 单位
用于指示数量所属类型的缩写(例如 件、米、小时)。 - 单价
可以是正值、负值或中性值。
