In this article
When you open the program and select the Income / Expense accounting type, you will find several predefined templates with the Accounts and Categories tables already set up. In just a few steps, you're ready to record your transactions and, despite the simplicity, achieve professional results.
▶ Video: How to start an Income / Expense Accounting
The video shows you how to create an Income / Expense accounting, adapt the accounts and categories, enter income and expenses, and print the report.
Choose the ready-to-use template
To make it easier to get started, you can open one of the templates provided by the program.
For better understanding and more intuitive use, we recommend using descriptive accounts (with names) instead of numeric ones.
Templates can be opened via:
- our WebApp
- directly from the program (menu File > New).
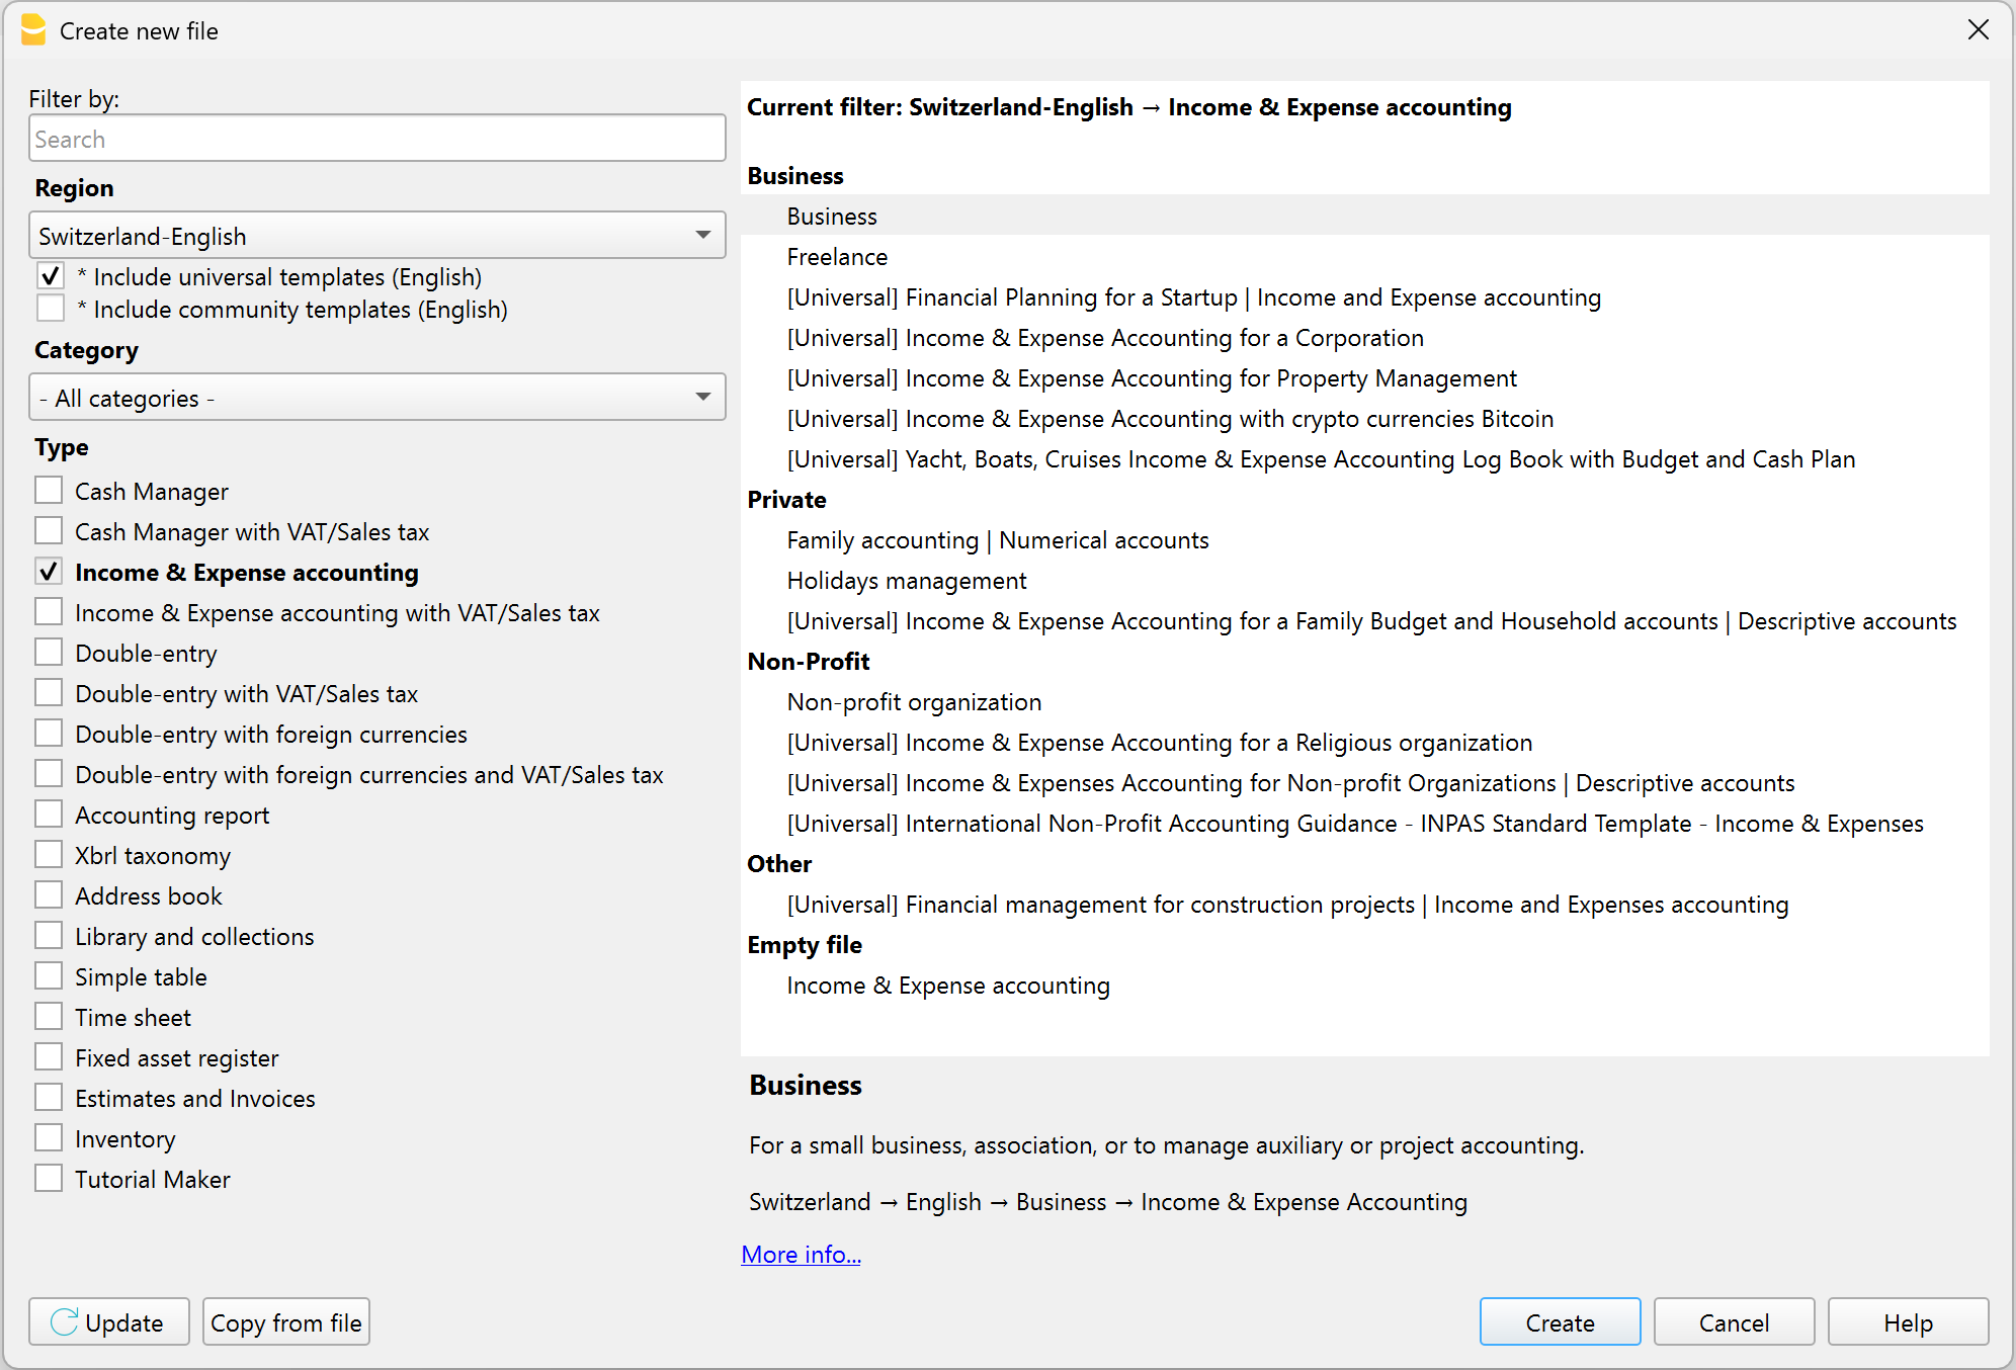
How to create the file from a template
- Start Banana Accounting
- Select Income and Expense Accounting as the accounting type
- Open one of the Income / Expense accounting templates
- Save the file with a name.
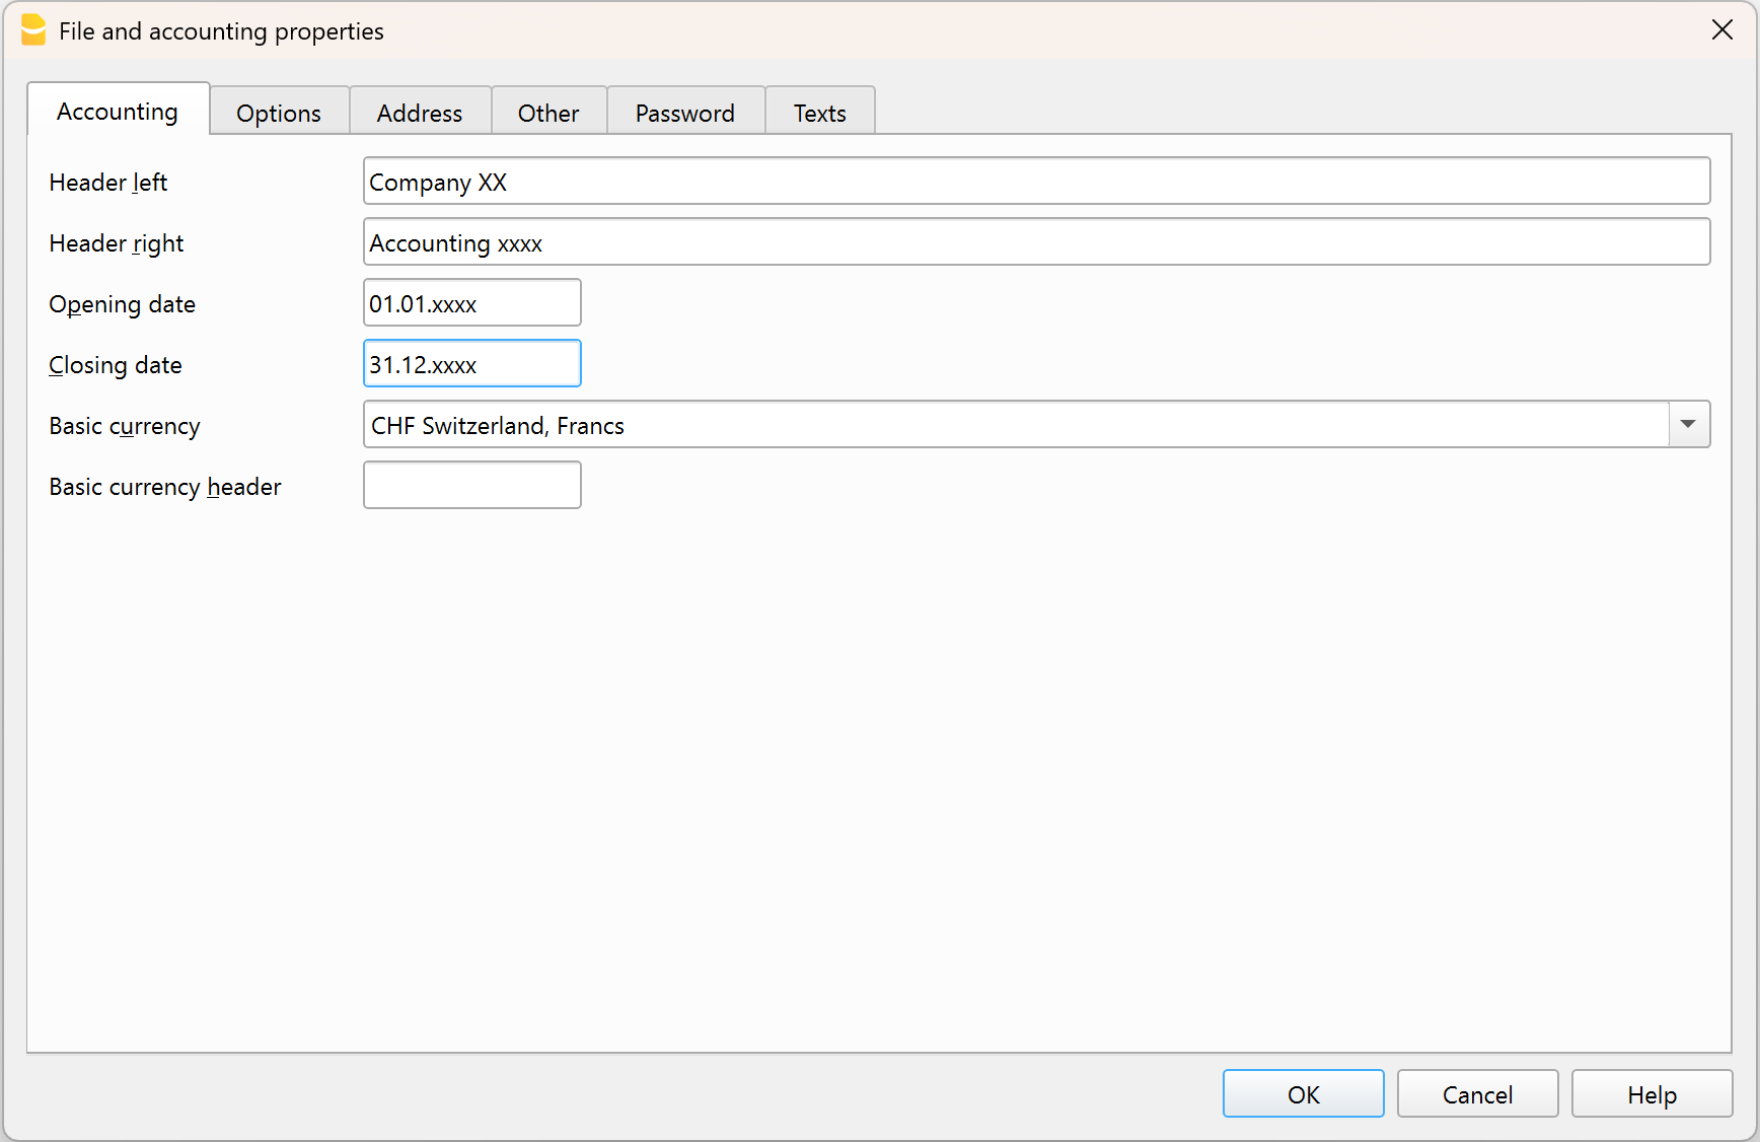
Enter your data in File Properties
Once the template is open, enter the basic data for your accounting:
- from the menu File > File Properties (Basic data)
- The name of your company (Left header).
- The start and end date of the accounting year (normally the current year date appears automatically).
- The base currency of your accounting.
- In the Address section, you can enter your company's address and other data.
Save to disk
With the File > Save As command, you save the data and also assign a name to the file. The standard save dialog of your operating system will appear.
- We recommend using your company name followed by the year, like "company-2025.ac2", to distinguish it from other accounting files.
- You can have as many accounting files as you need, each with its own name.
- You can save the file wherever you want on your computer or storage media (hard drive, USB stick, or cloud). If you use Banana on multiple computers or need to share the file with others, we recommend saving the file in your cloud (OneDrive, Dropbox, GoogleDrive, …)
- If you plan to have digital documents linked to the current year’s accounting, we recommend creating a separate folder for each accounting year to group all files together. See also the page Supporting Documents Folder.
Customize Accounts and Categories
The Accounts and Categories tables include everything needed to manage your accounting, but you can customize them according to your needs. For example:
- In the Accounts table, under the Description column:
- Enter the names of banks, your clients, suppliers, etc.
- You can delete the accounts and categories you don't use
- You can add new accounts, new categories, or new grouping totals.
For more information, visit the pages:
Enter the opening balances
In the Opening column, enter the opening balances of your accounts (cash, bank, customers, inventory, etc.).
- Opening balances for liability accounts (negative balance sheet accounts) must be entered with a minus sign before the amount.
- Manual entry of opening balances is done only the first time you use Banana Accounting Plus, because every time the program creates a new year (menu Actions > Create New Year), the new opening balances are carried over automatically.
Enter previous year's balances (only when creating the file)
If you need to include the previous year's balances for the accounts, you must enter them in the Previous Year column (Previous view). This step is also performed only the first time you use Banana Accounting Plus, because each time the program creates a new year (menu Actions > Create New Year), the previous year’s balances are automatically carried over.
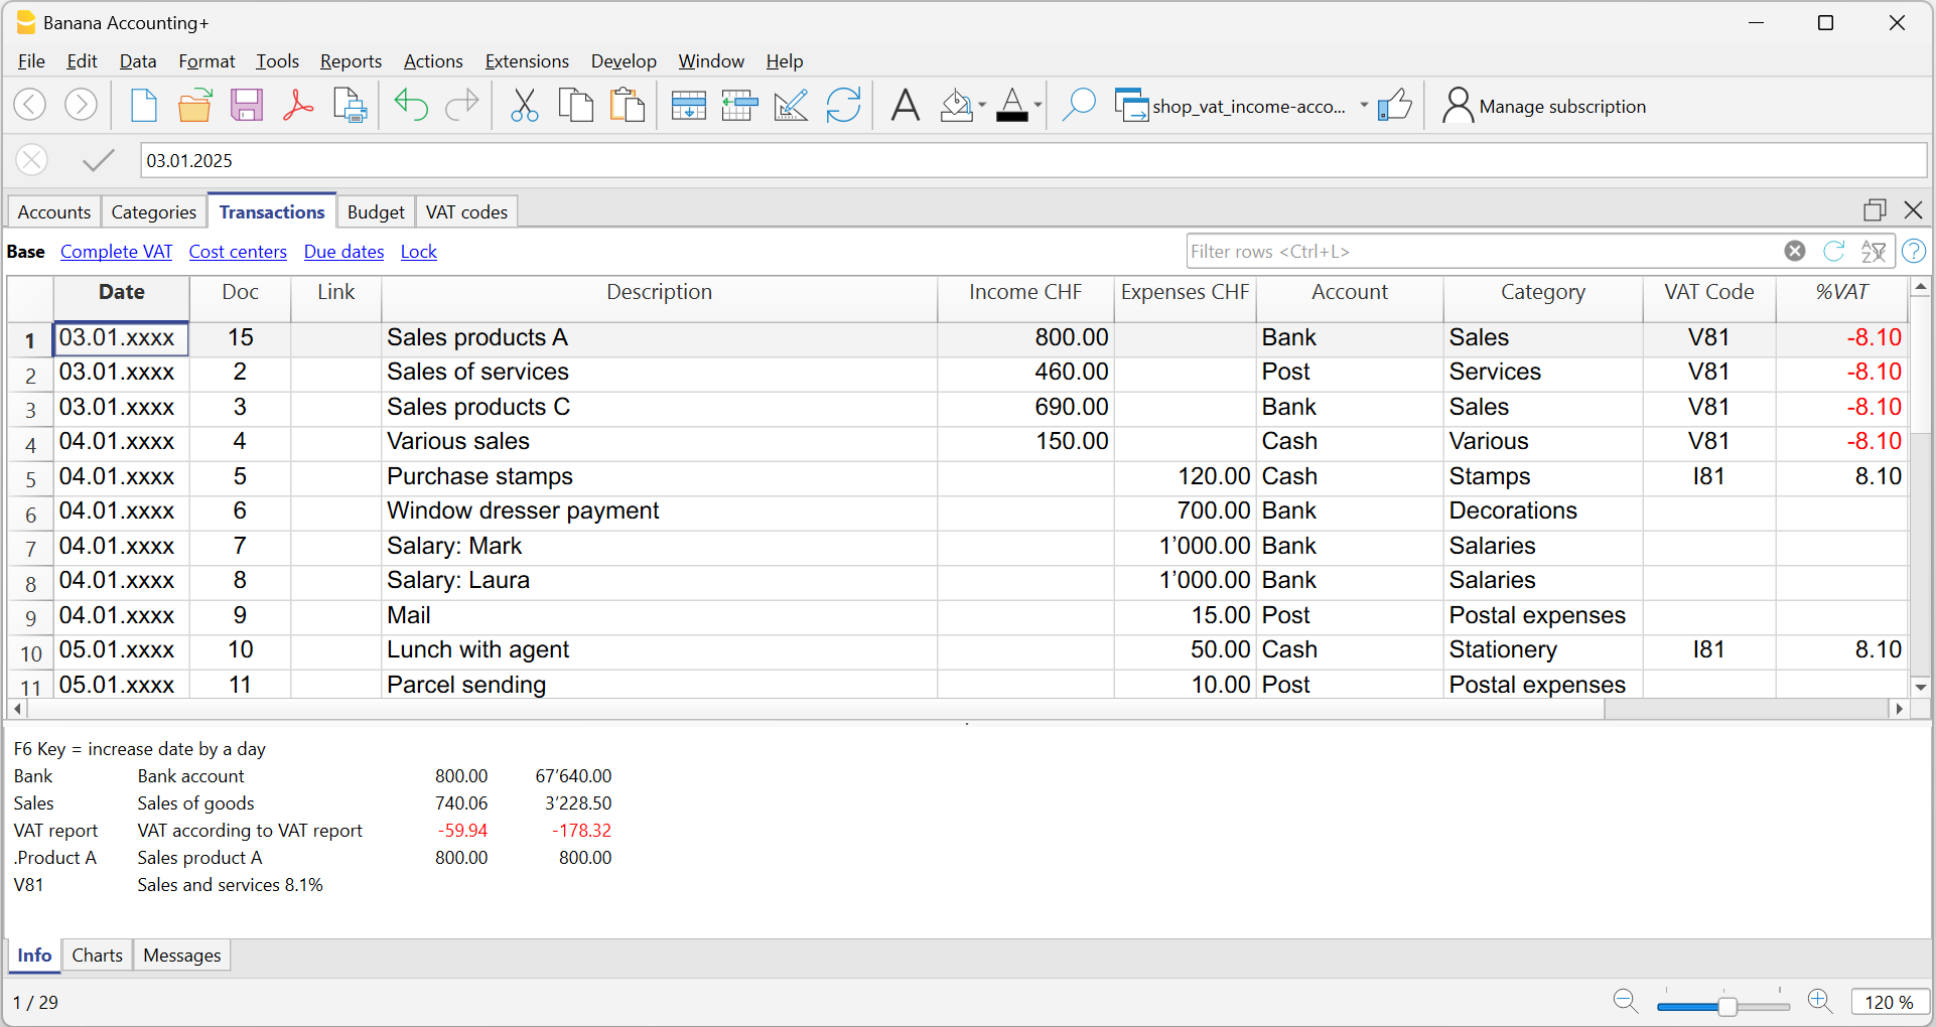
Record income and expenses
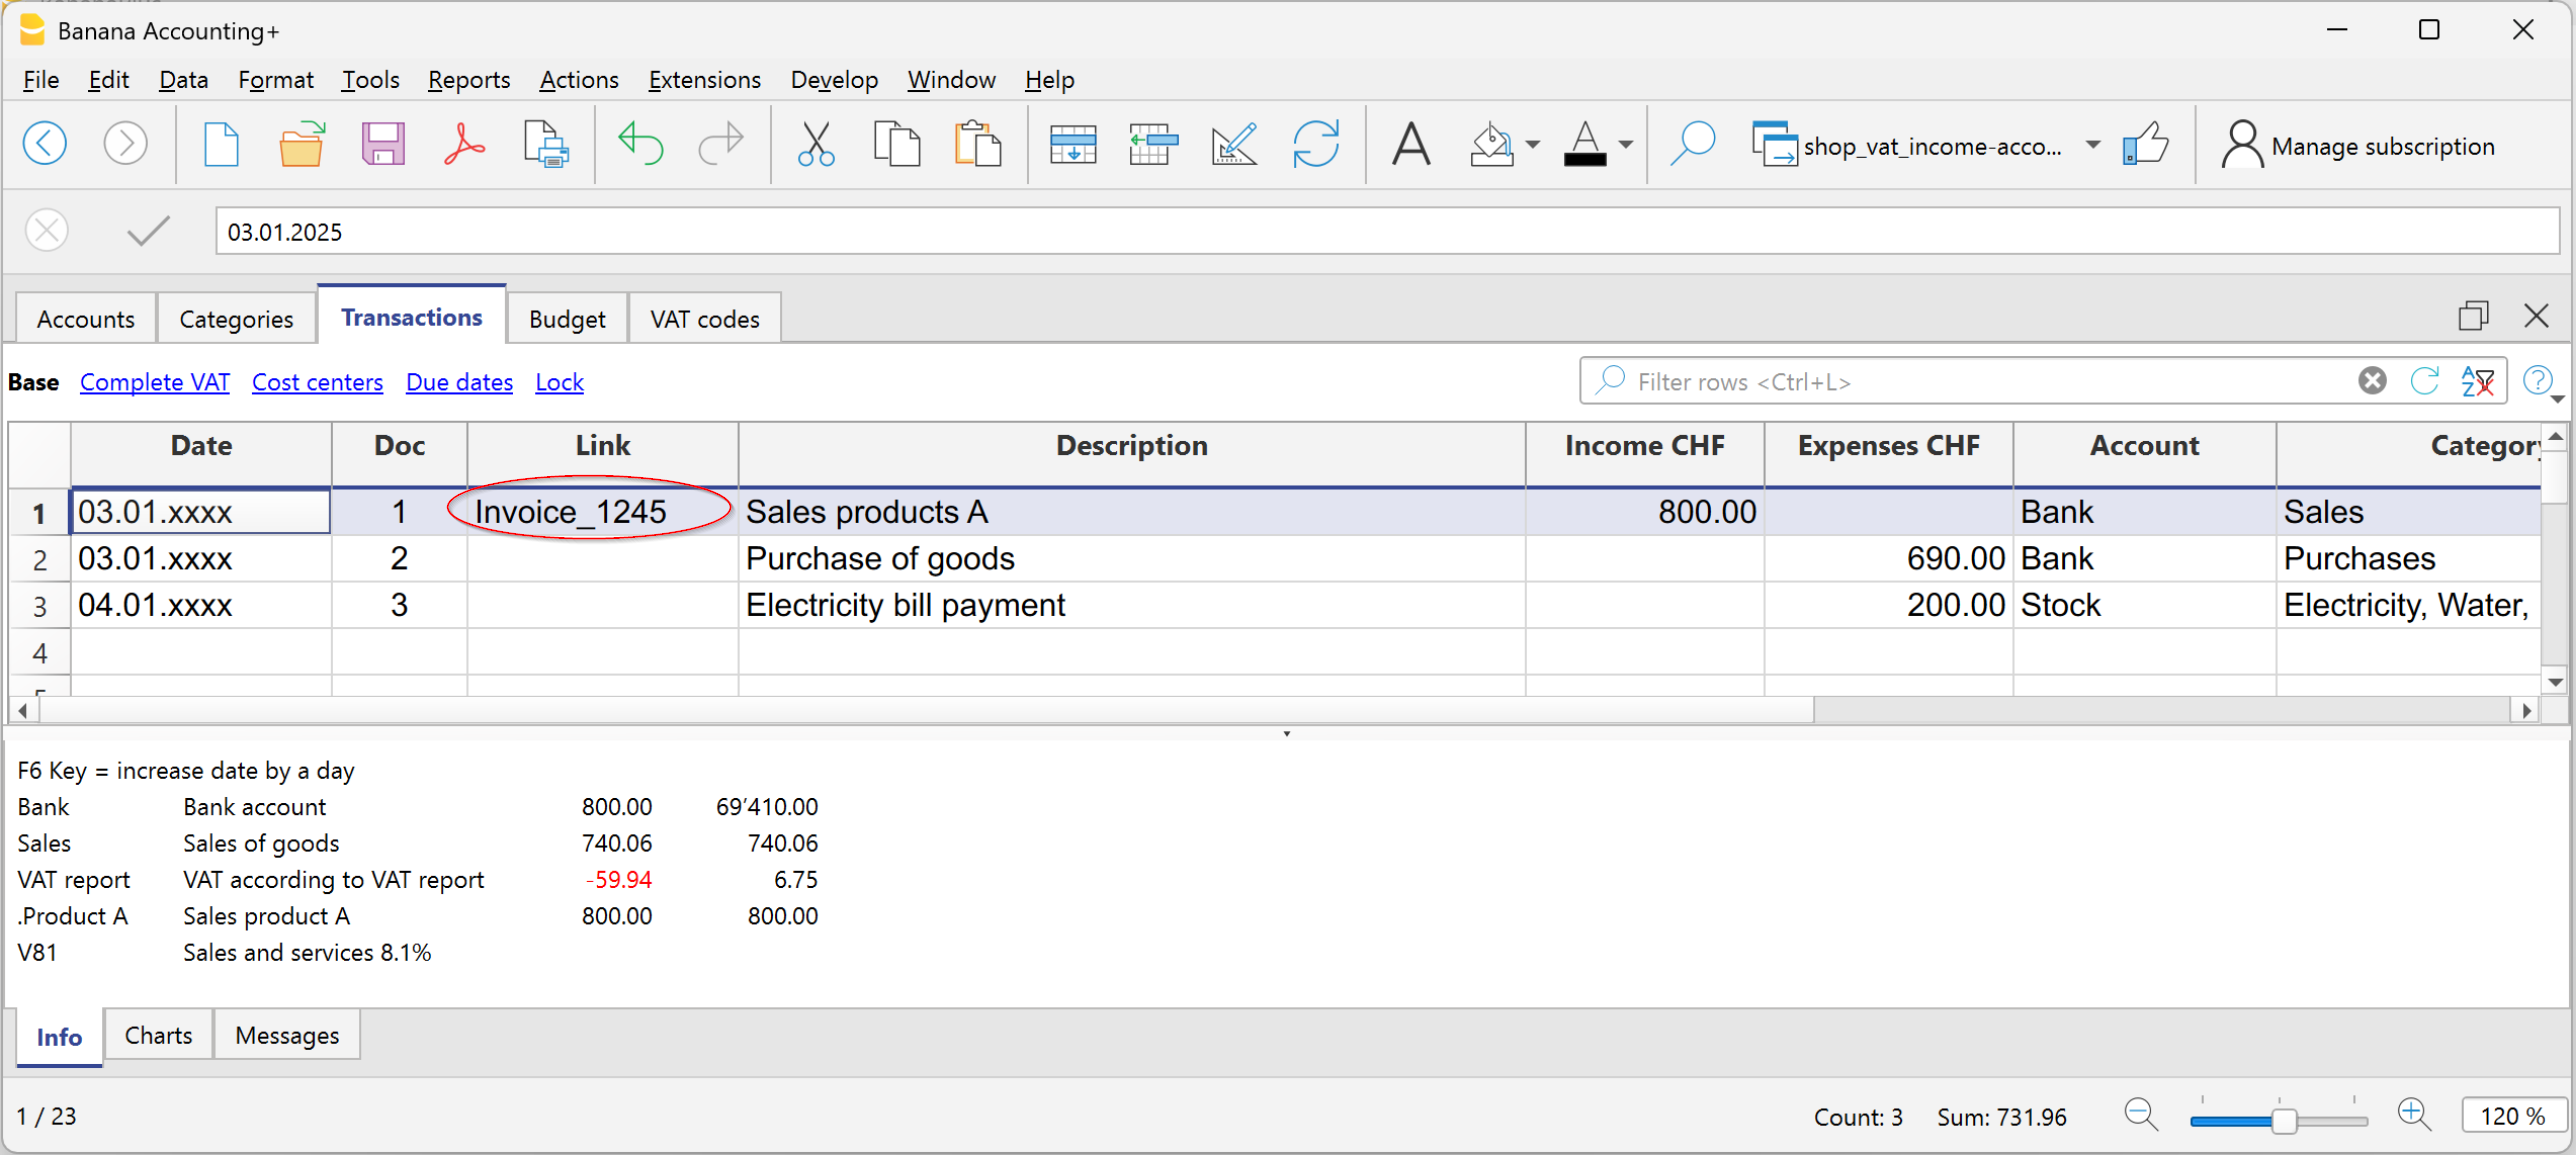
In the Transactions table, enter your daily income and expenses by filling in the appropriate columns.
You can record different types of transactions:
- Transactions between two accounts (without category)
- Transactions between two categories (without account)
- Transactions involving multiple accounts and/or categories
As you enter income and expenses, if you go to the Accounts and Categories table, you will immediately see the updated balances for all entries and quickly understand whether you are earning or losing money.
Speed up transaction entry
To speed up the entry of transactions, you can use:
- Data entry with auto-completion, which automatically recalls data previously entered.
- Recurring transactions (from the Actions menu), which allows you to save repetitive transactions in a dedicated table.
- Import data from bank or postal statement.
Immediate and efficient checks
With Banana Accounting, you can quickly check and correct your data:
- Advanced filter: instantly find rows by keyword or amount and edit them directly.
- Balance column: immediately identify differences and the row where they originate.
- Check accounting: performs automatic checks to detect errors or imbalances.
Use the Check Accounting command regularly, especially after making changes, when closing, and when creating a new year.
Digital links to your documents
If you wish, for each accounting entry you can link a digital document (in PDF format), saved on your computer or online. This allows you to open a receipt, invoice, or other document directly from the accounting file with a single click.
- To insert digital documents:
- Add the DocLink column in the Transactions table (menu Data > Colums Setup).
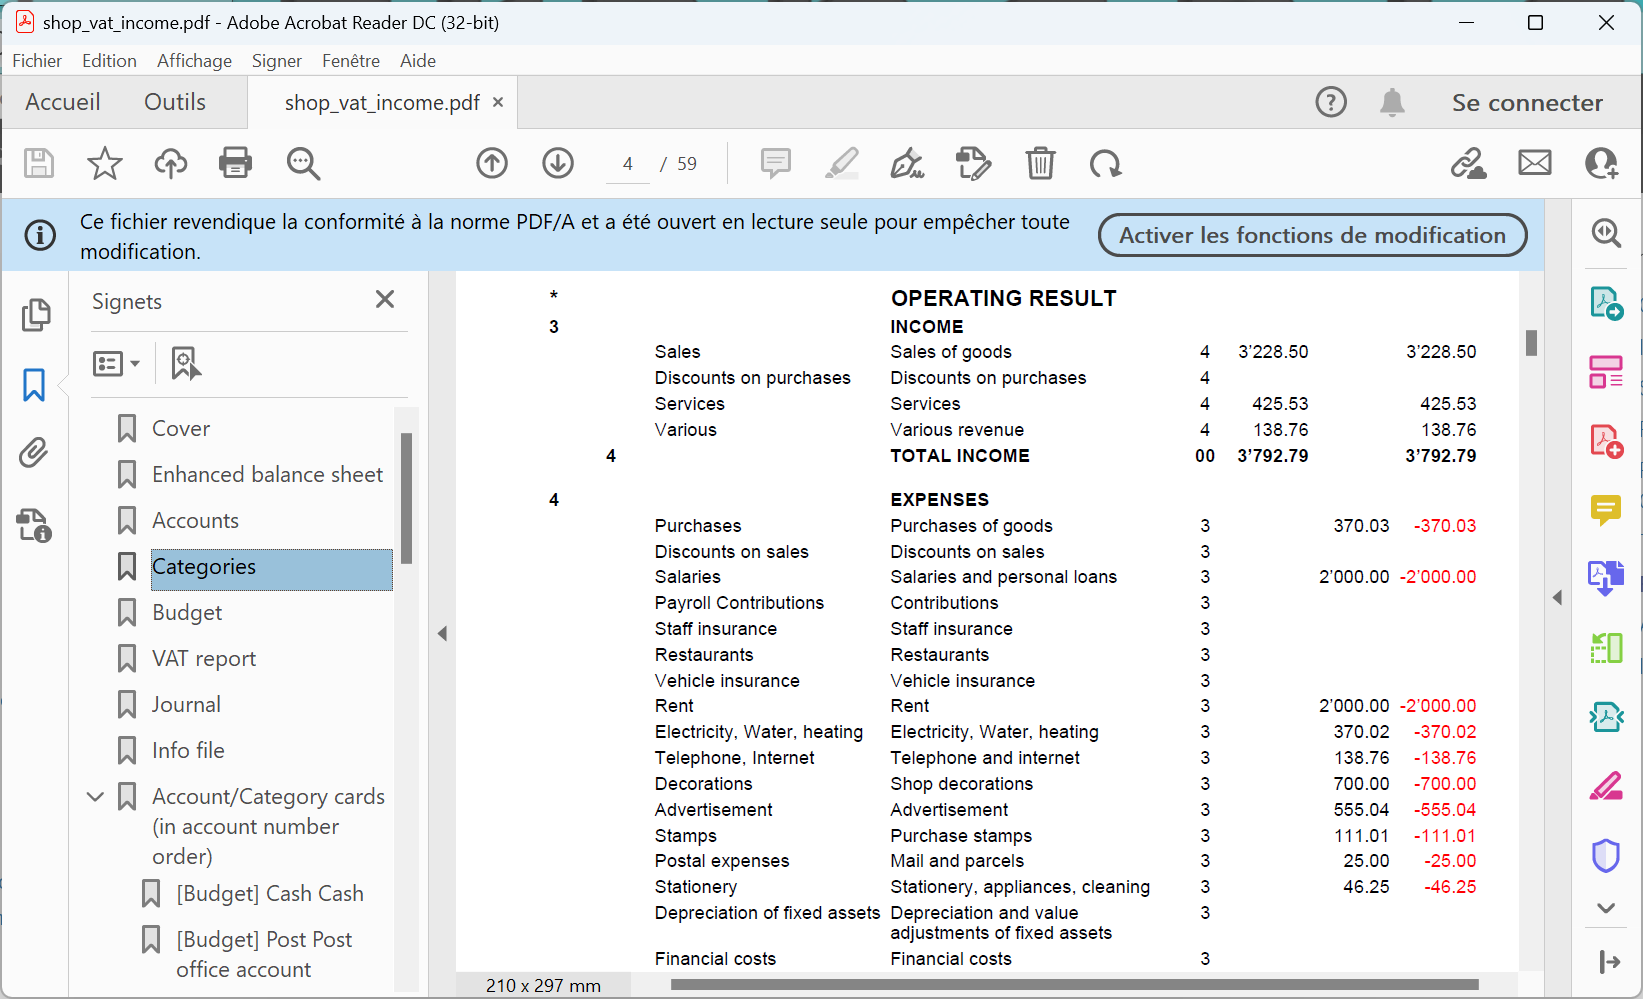
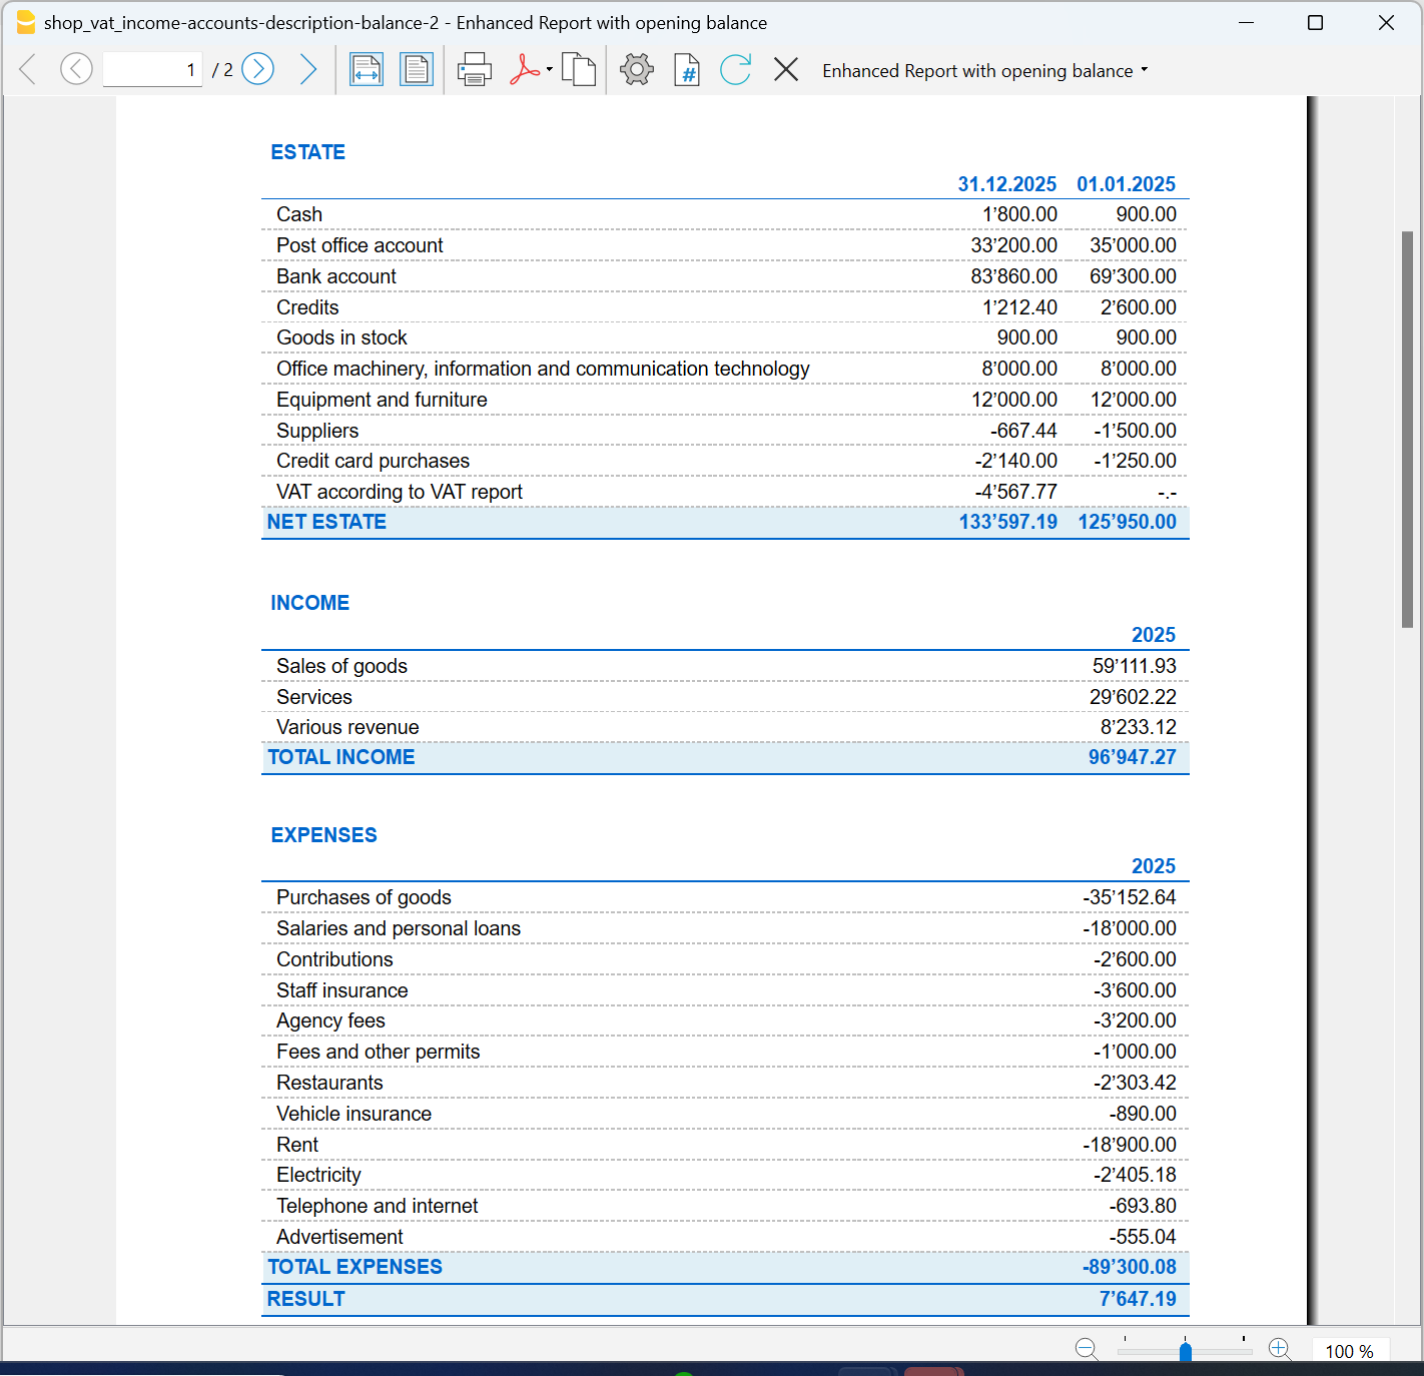
Get the Report (Balance Sheet and Profit & Loss)
To view the report (Balance Sheet and Profit & Loss), click the Report > Enhanced Statement or Enhanced Statement with Groups menu. It is also possible to generate reports by period.
- The Enhanced Statement shows all accounts and categories without subgroups.
- The Enhanced Statement with Groups shows all accounts and categories including subgroups.
The report can be reviewed, printed, or exported as a PDF file.
Archive data in PDF
At the end of the year, when all the accounting has been completed, corrected, and reviewed, you can archive all accounting data using the Create PDF dossier command from the File menu.