Dans cet article
Tous les modèles de Banana Comptabilité disposent déjà des tableaux Comptes et Catégories, avec toutes les rubriques essentielles pour gérer votre comptabilité. Toutefois, si vous souhaitez adapter le plan comptable à votre activité, vous pouvez facilement personnaliser ces tableaux.
Personnaliser les Comptes
Le tableau Comptes regroupe les éléments représentant ce que vous possédez (actifs) et ce que vous devez (passifs).
Vous pouvez le modifier comme vous le souhaitez :
- Modifier la description des comptes
Exemple : dans la ligne du compte Banque, saisissez le nom de votre banque (par ex. Banque UBS). - Ajouter de nouveaux comptes
Si vous avez plusieurs comptes bancaires, ajoutez une nouvelle ligne et saisissez le nom de la banque.
Il en va de même pour les clients et les fournisseurs : vous pouvez créer un compte distinct pour chacun, avec la description correspondante. - Modifier les numéros de compte
Si le modèle utilise des numéros, vous pouvez les remplacer par des noms descriptifs ou leur attribuer une numérotation différente. - Supprimer les comptes inutilisés
S’ils ne sont pas nécessaires, il suffit de supprimer la ligne correspondante.
Personnaliser le tableau Catégories
Le tableau Catégories contient les raisons pour lesquelles vous encaissez (recettes) et dépensez (dépenses).
Vous pouvez également y adapter librement les rubriques :
- Modifier la description des catégories
Exemple : à la place de Ventes, vous pouvez écrire Ventes au détail ou Ventes aux revendeurs. - Ajouter de nouvelles catégories
Insérez une nouvelle ligne et définissez la rubrique dont vous avez besoin. - Modifier les numéros des catégories
Vous pouvez remplacer les numéros par des noms descriptifs ou en attribuer de nouveaux. - Supprimer les catégories inutilisées
Si elles ne sont pas nécessaires, supprimez la ligne.
Personnalisation avancée
Lorsque votre activité se développe, vous pouvez avoir besoin d'informations plus détaillées. Avec Banana, vous pouvez étendre la structure en ajoutant :
- De nouveaux groupes de totalisation (sous-totaux), pour obtenir des subdivisions plus homogènes.
Voir paragraphe suivant "Comment ajouter un nouveau Groupe dans le tableau Comptes" - Les auxiliaires Clients et Fournisseurs, pour contrôler les soldes de chacun.
- Centres de coûts et de profits, pour analyser les dépenses et les recettes.
- Segments, pour distinguer les ventes ou les coûts par zone, secteur ou projet.
- Gestion de projets, pour suivre des activités spécifiques.
- Fonctions de facturation et rappels, si vous souhaitez émettre des factures et gérer les relances.
Comment ajouter un nouveau Groupe
Dans l'exemple suivant, nous expliquons comment ajouter le groupe Liquidités dans le tableau Comptes. Ce groupe permet d’obtenir le total des liquidités, distinct des autres montants.
La même procédure s'applique également à l'ajout de nouveaux groupes dans le tableau Catégories.
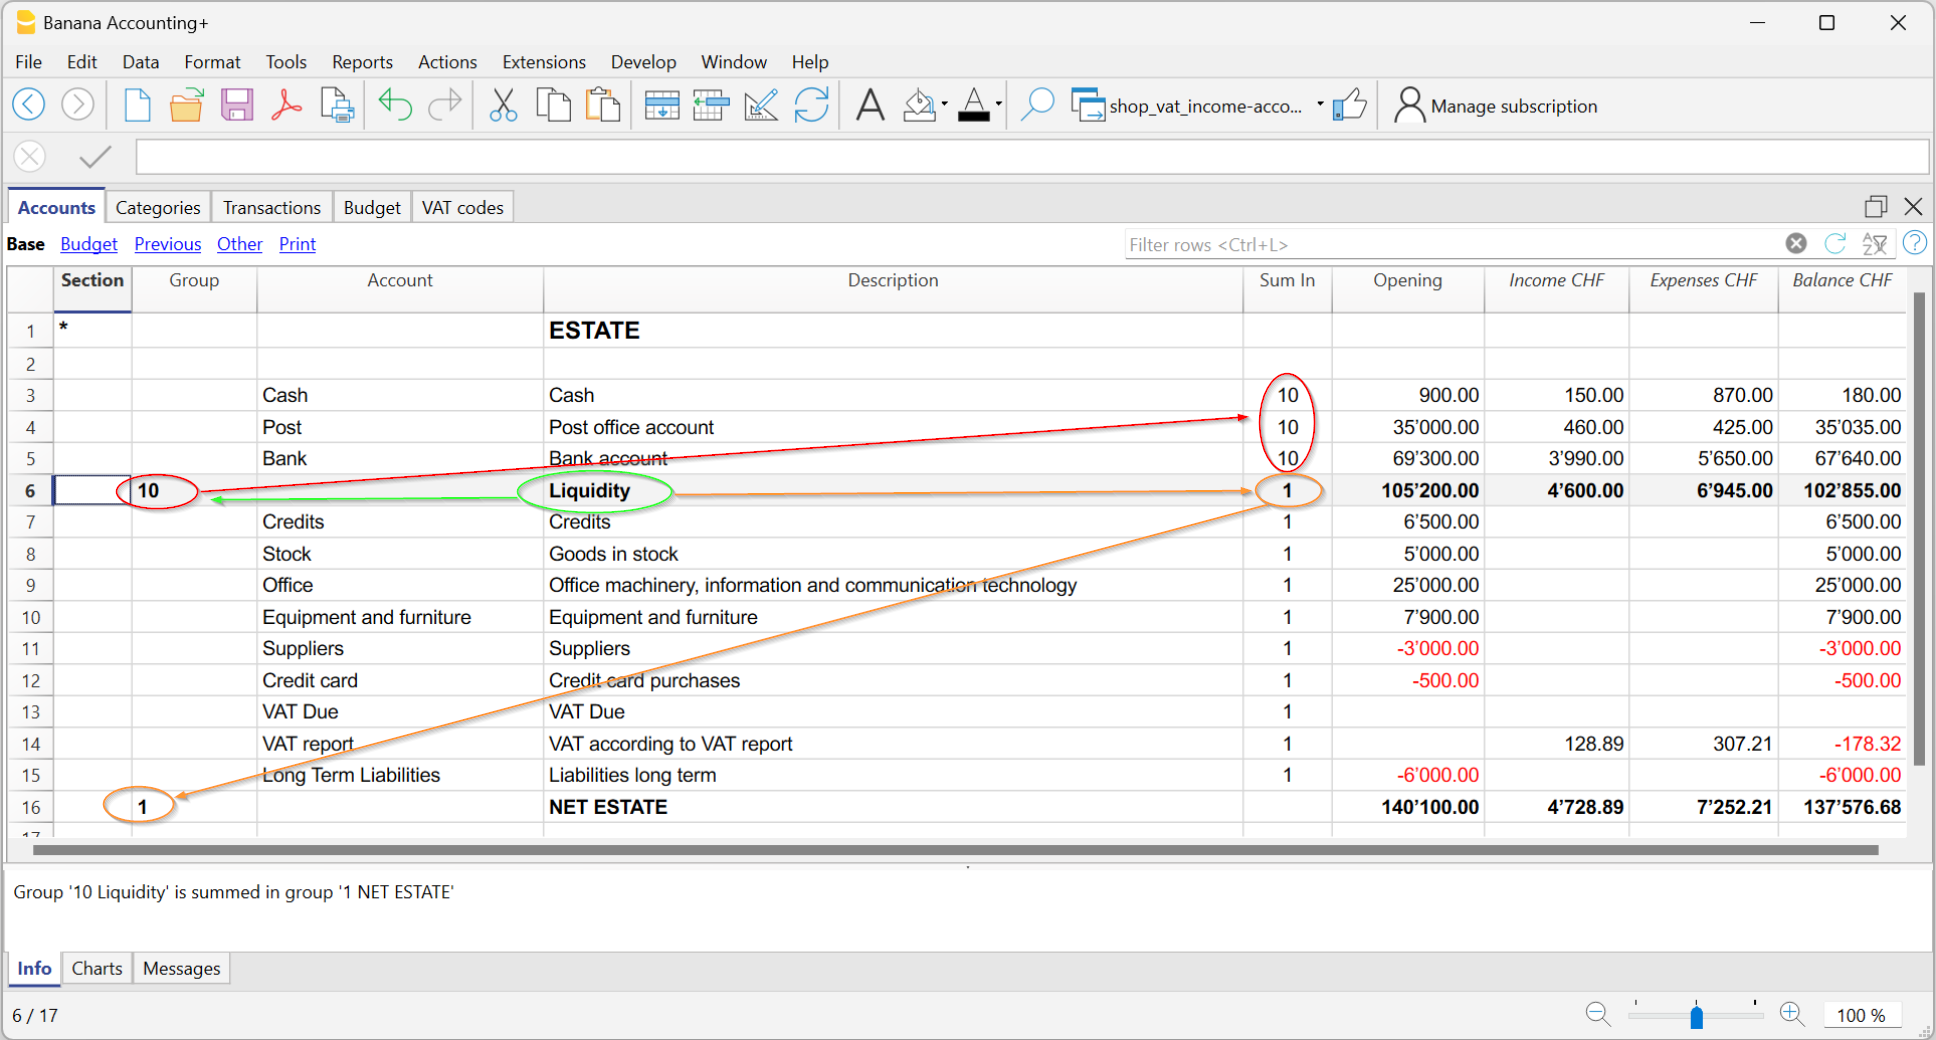
Vous pouvez créer un groupe de totalisation pour additionner les comptes liés aux liquidités (caisse, poste, banque).
- Ajoutez une nouvelle ligne sous les comptes bancaires.
- Dans la colonne Groupe, saisissez le code 10 (nouveau groupe).
- Dans la colonne Somme dans des lignes Caisse, Poste et Banque, écrivez 10.
Ainsi, tous les montants seront regroupés dans le Groupe 10. - Dans la colonne Somme dans de la ligne Liquidités (Groupe 10), écrivez 1 afin que le total soit regroupé dans le Groupe 1 – Capital propre.
Résultat : un nouveau sous-total “Liquidités” distinct des autres montants.
Vous trouverez aussi des informations sur les pages :