Customers and Suppliers
The features dedicated to customers, suppliers, and invoicing in Banana Accounting allow you to fully manage your business activities directly within your accounting.
You can monitor balances, due dates, transactions, and documents, keeping everything synchronized with the accounting records.
Thanks to these features, you can:
- Manage customers and suppliers integrated with accounting;
- Create and record invoices without duplicate work or risk of errors;
- Monitor due dates, receivables, and payables in real time;
- Speed up invoice entry using the Items table;
- Get clear and updated reports for full control over business relationships;
- Work more efficiently and save time in administrative tasks.
Customers
Customer management allows you to keep track of receivables, due dates, and transactions for each customer.
You can record issued invoices, received payments, and automatically generate customer statements and reports.
This way, you always have an up-to-date view of incoming payments, can easily monitor who has paid and who hasn't, and keep customer accounting perfectly aligned with the general ledger.
Suppliers
With the Suppliers function, you can manage payables to those who provide you with goods or services.
Each recorded payment is automatically linked to the corresponding invoice, so you always know how much you owe, to whom, and by when.
You can also generate payment lists and detailed reports for a complete overview of your supplier situation.
Customer Management
Customer management in Banana Accounting Plus allows you to record, organise, and manage customer information and allows you to keep track of customer transactions and payments, payment due dates, and contact information. You can track customer payments, update the payment status of issued invoices as well as enter and print invoices.
Customer management is a feature available in all accounting applications of Banana Accounting Plus, but it is especially used in double-entry accounting.
Please also visit Supplier management
Recording customer transactions
The Transactions table is the heart of Banana Accounting and is used to record all transactions, including customer transactions, simply by entering the customer's account. You work quickly because you can select, copy and paste customer transactions that have already been entered previously. If you make mistakes you can correct them so it is easy to record:

There are columns for entering various information, as:
- The date of the transaction, due date, expectation date and payment date.
- The Invoice Number.
- The Debit and Credit Account where to indicate the customer account and the counterpart.
- The amount.
- The VAT codes for the automatic calculation of VAT.
- Links to digital documents (e.g. the invoice issued to the customer, or notes in pdf).
Customer accounts
Customer accounts are used to record all transactions relating to the customers of a company.
The main functions of customer accounts are as follows:
- Create an account for each customer and keep track of all transactions made.
- Record the invoices issued for each customer.
- Record customer payments and associate them with the invoices issued.
In Banana Accounting:
- Customer accounts and addresses (first name, surname, company name, address, customer language, VAT number, etc.) are set up in the Accounts table.
- Account movements on the accounts are entered in the Transactions table.
- After each entry, all customer account balances (Accounts table) are automatically updated and you immediately have an overview of the outstanding balances.

Recording issued invoices
The invoice is used for accounting and tax purposes, as it allows you to accurately record the company's revenues and expenses, and to calculate sales or purchase tax.
If you issue invoices in Word, Excel or other programs, you can record the issuance in accounting so that you know what the customer owes and, if necessary, send reminders.
In Banana Accounting, the invoices are recorded in the Transactions table:
- By entering the date and description
- By entering an invoice number
- By recording in the Debit account the customer's account and in the Credit account the revenue
- By entering the VAT code for sales or services. The calculations and VAT amounts are entered automatically.
When the invoice is posted, the programme automatically creates the invoice and prints it out.
Creating and printing invoices
Directly in the Transactions table, you can also enter transactions to create invoices as simple entries in the Transactions table.
By entering the Debit and Credit account, in addition to printing the invoice, you have the accounting of the invoice in the accounting file at the same time.

From the menu, Reports > Customers > Print Invoices, you can:
- Preview and print the invoice.
- Choose the Print Layout and set other information to customise the printout, such as the QR Code.
More customisation is possible with the Advanced plan.

Recording collections
In Banana Accounting, collections are recorded in the Transactions Table in one of the following ways:
- Manually:
- The date and description are recorded
- In the Invoice column, by entering the customer's account, a drop-down menu displays the invoices still open, simply select the invoice collected and press the Enter key, the program automatically enters the customer's account in Credit, and the amount of the invoice. Then simply enter the cash account in Debit to complete the transaction.
- Importing Data from Account Statements with Rules
- The programme imports data from ISO 20022 account statements and with the use of Rules the programme enters the complete entry, entering all data, without manual intervention.
Open invoices
Open invoices per customer are issued invoices that remain open or outstanding because the customer has yet to make full payment.
Open invoices per customer can be managed via an accounting ledger that keeps track of invoices issued, payment due dates and payments received. In this way, the seller can monitor the financial situation of each customer and send payment reminders if invoices remain open for too long.
It is important to note that open invoices per customer can affect the liquidity of the seller's company, as the money tied up in these invoices has not yet been collected.
Banana Accounting automatically generates an open invoice report where you can immediately see which invoices are still outstanding and from which customer, as well as the total amount of outstanding invoices.
There are two types of reports:
- Open invoices by customer, where all open invoices for each customer are listed.
- Open invoices by due date, where open invoices are listed in order of due date.

The due date of an invoice can be set in different ways. More information can be found on the following page Due dates and payment terms

Account card
Account cards are documents used in accounting that record the financial transactions of a company. Each card represents a specific account in the company's general ledger and contains detailed information on the transactions involving that account, such as the date of the financial transaction, the type of transaction, the amount and the description of the transaction.
In Banana accounting, on the basis of the data entered in the Transactions table, the programme automatically prepares the Account card for each customer, where the opening balance, all transactions and relative closing balance are shown. You can also have the account card by period.

Reminders
Payment reminders are used to request customers to pay overdue or outstanding invoices.
Through the function of payment reminders you speed up the payment process from customers, reducing delays, and at the same time effectively manage cash flow.
Banana Accounting provides functions to:
- Identify overdue or outstanding invoices.
- Generate payment reminders.
- Customise payment reminders.
In Banana Accounting Plus you can print recalls in two different ways:
- With Reminder layouts
- Print reminder summary (list of overdue invoices).
- Print without QR payment slip.
- Limited customisations.
- Function available in Banana Accounting Plus - any plan (excluding Free plan limitations).
- With Invoice layout
- Print with QR payment slip.
- Layout customisations.
- Requires Banana Accounting Plus Dev-Channel version and Advanced plan.

Credit notes
A credit note is an accounting document used to correct or cancel an invoice already issued. It may be issued for a number of reasons:
- Reimbursement of an overpayment
- Reduction in the price of a product or service
- Product return
- Correction of an invoicing error
In Banana Accounting you account for credit notes in the Transactions table, entering the revenue account in the Debit account and the customer account in the Credit account; the VAT code must be entered with a minus sign in front, so that the VAT amount is reversed at the same time.
The programme uses the accounting entry of the credit note to automatically create a printout of the credit note.

Setting up and using the customers and invoices features
- Setting up accounting on actual bills issued (accrual principal) or
- Setting up accounting on a collected cash basis.
- Setting up Customers settings.
- Setting up the Transactions table and entering the invoices.
- Reports for open, overdue and issued invoices.
- Generating invoices.
Notes
- Multi-currency accounts: reports are based on the customer's account currency balances; possible exchange rate differences will not be taken into account.
In the Issued invoices table, the recordings of exchange rate differences are also listed, whereas only the customer's currency amount is used in other printouts.
Example file
Customers' register and checking of open invoices
Directly in the accounting you can:
- Prepare customers' accounts, with the related addresses and other customers' data.
- Add to the transactions:
- the data related to the issued invoices (invoice number, customer, amount, due date).
- the data related to the payment for the invoices and the issuing of credit notes, if any.
- Retrieve the list of your Payments schedule
Other features available:
Addresses | Customers / Suppliers register | Members
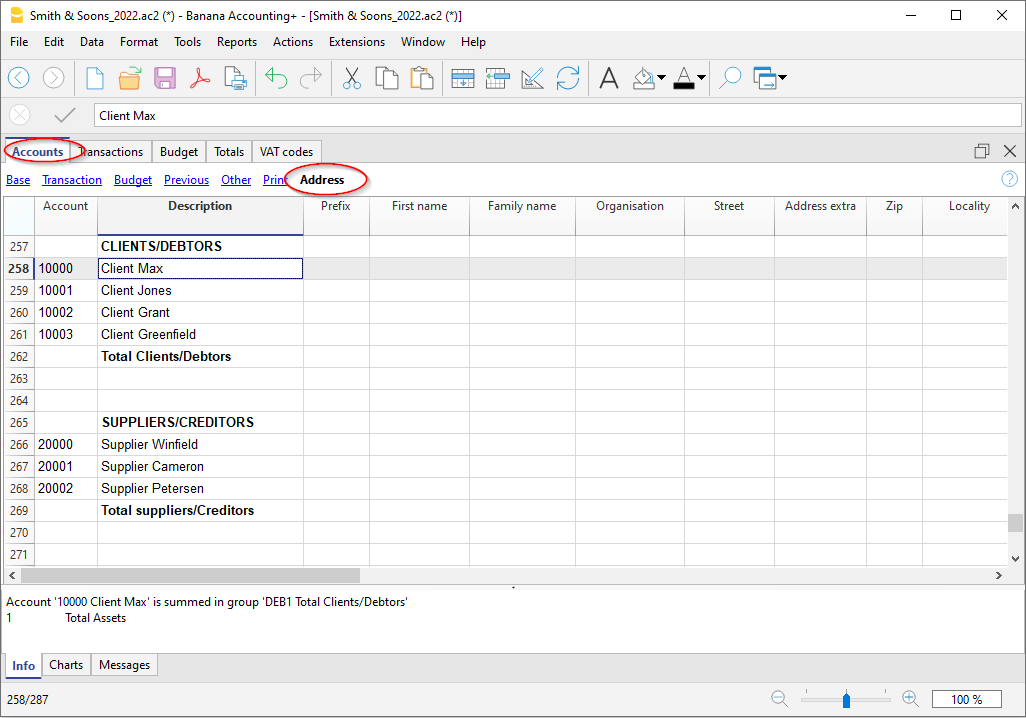
In the Addresses view of the Accounts table, there are columns to manage the addresses of customers, suppliers or members.
Address data are essential in order to manage billing, reminders and to control receipts and payments.
If columns for managing address data are missing in the Accounts table, you can add them:
If IBAN column is missing, your accounting file has an old configuration and you need to convert it with the command Tools > Convert to new file...

In the Accounts table the command will add:
- The Address view which displays columns for entering address data.
To change the display or arrangement of the columns use the Setup columns command.
The columns of the Address view
Prefix
Insert courtesy code (Mr., Mrs., Doctor or other).
First name
The name of the customer, supplier or member.
Family name
The name of the customer, supplier or member.
Organization
Enter the name of the company, of the association.
Street
The street where the customer, supplier or member resides.
Building Number
The building number of the address.
Address extra
Column to enter other address data, such as the post office box, or to enter a very large address.
Postal Code /ZIP
The postal/ZIP code.
Locality
The name of the city of the customer, supplier or member.
Country
The nation inherent in the city.
Country Code
The country code.
Language
You can define the language for each customer, supplier or member account. This allows you to view and print the documents (eg invoice) in their language.
Indicate:
- de - for German
- fr - for French
- it - for Italian
- en - for English
- es - for Spanish
- nl - for Dutch
- zh - for Chinese
- pt - for Portuguese
- ru - for Russian
Main phone
Landline phone number
Mobile
Mobile phone number
Fax
Fax number
Email work
email address.
www
website address of the customer, supplier, association.
Birth
The date of birth of the customer, supplier, association.
Days
Enter a number of days within which the collection and payment must take place
Limit
If a credit is made, the credit limit is indicated, or the debit limit if it is a supplier.
Bank name
The name of the customer's, supplier's or member's bank.
IBAN
IBAN number of the customer's, supplier's or member's bank.
Bank clearing
The identification code of the customer bank, supplier or member.
The accrual method management
Introduction
Banana Accounting allows you to manage the customers both on an accrual or cash method. A detailed explanation is available at the page Accounting with accrual or cash method.
The following explains how to set up separate accounts for each customer and a group for customers, so that you can have a list of separate invoices per customer available.
In case you only have few invoices and don't want to keep a detail per customer, you may also keep one single account only to record all customer invoices. The list of invoices will thus apply for all customers and not for any single customer.
Setting up the Customers' register
The customer ledger with its accounts and/or groups is inserted at the end of the chart of accounts with a separate section.
The following settings must be added to create the ledger:
- A * section (header) (see Sections)
- A 01 section for the Customers (see Sections)
- The Customers accounts that are required (see Adding a new account). Each customer will be allocated one row in the Chart of Accounts and a his/her single account number. Account numbers is at your discretion (see Accounts) it is however advisable to use numbers only, especially for the management of payments.
- A group where all customer accounts are totaled.
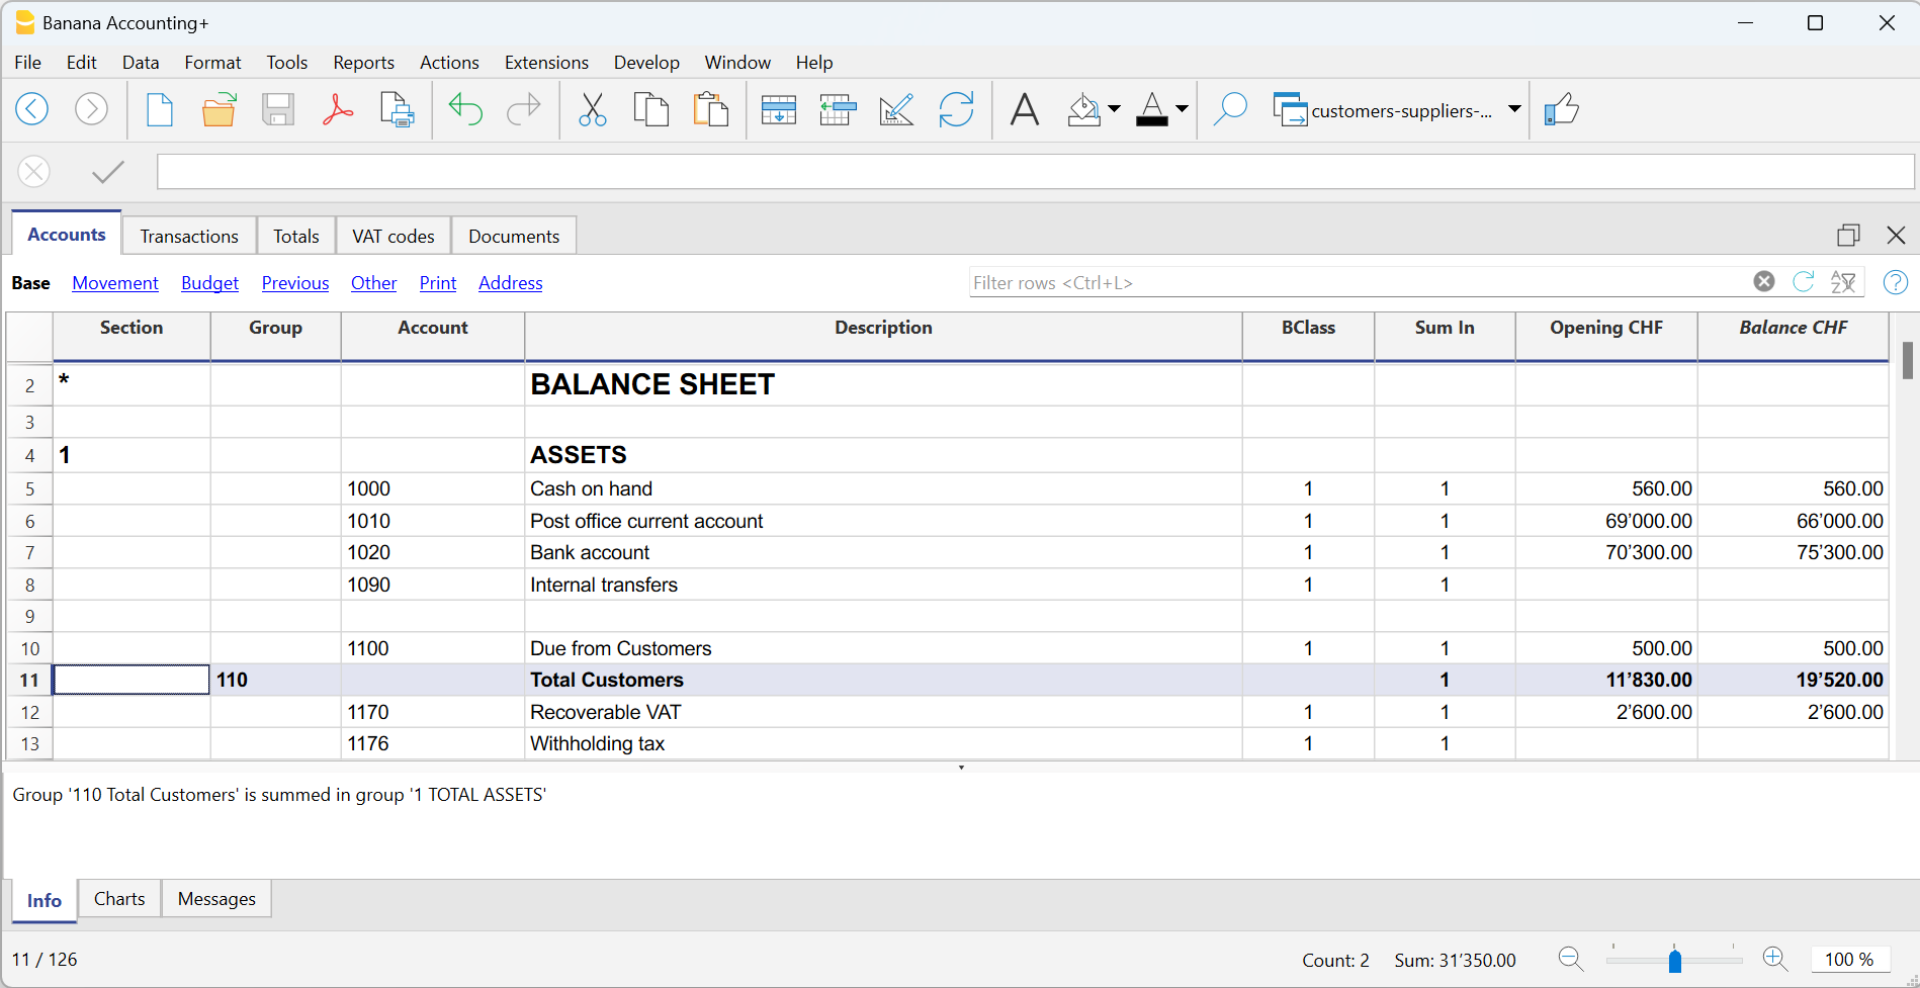
- This group, in turn, is totaled into a group present in the Assets.
Alternatively, customer accounts and/or groups can be entered directly in the assets section.
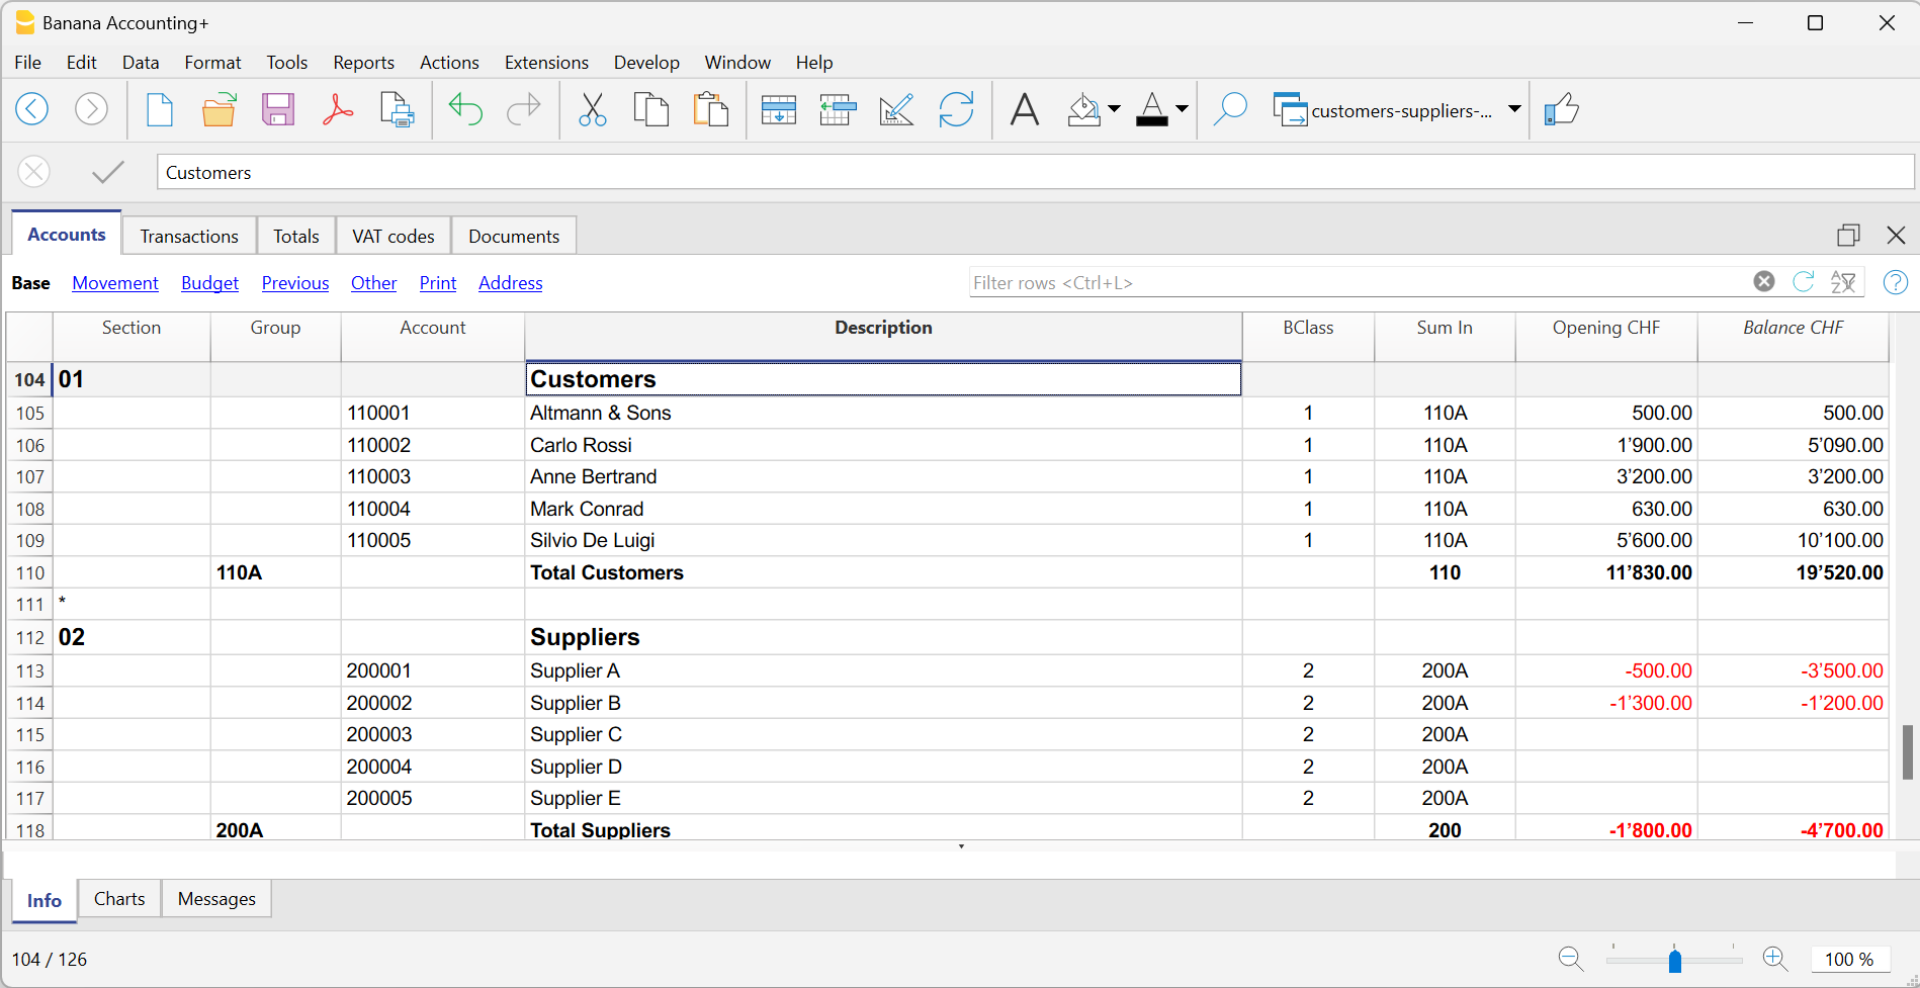
- The total for Customers will be totaled in the summary group 110A of the Sum in column.
- The same code or number used in the Sum in column (110A), must be used in the Assets Group column, in the row corresponding to the Total Customers of the Balance Sheet.
- The groups' numbering can be freely chosen (see Groups).
Recording an issued invoice
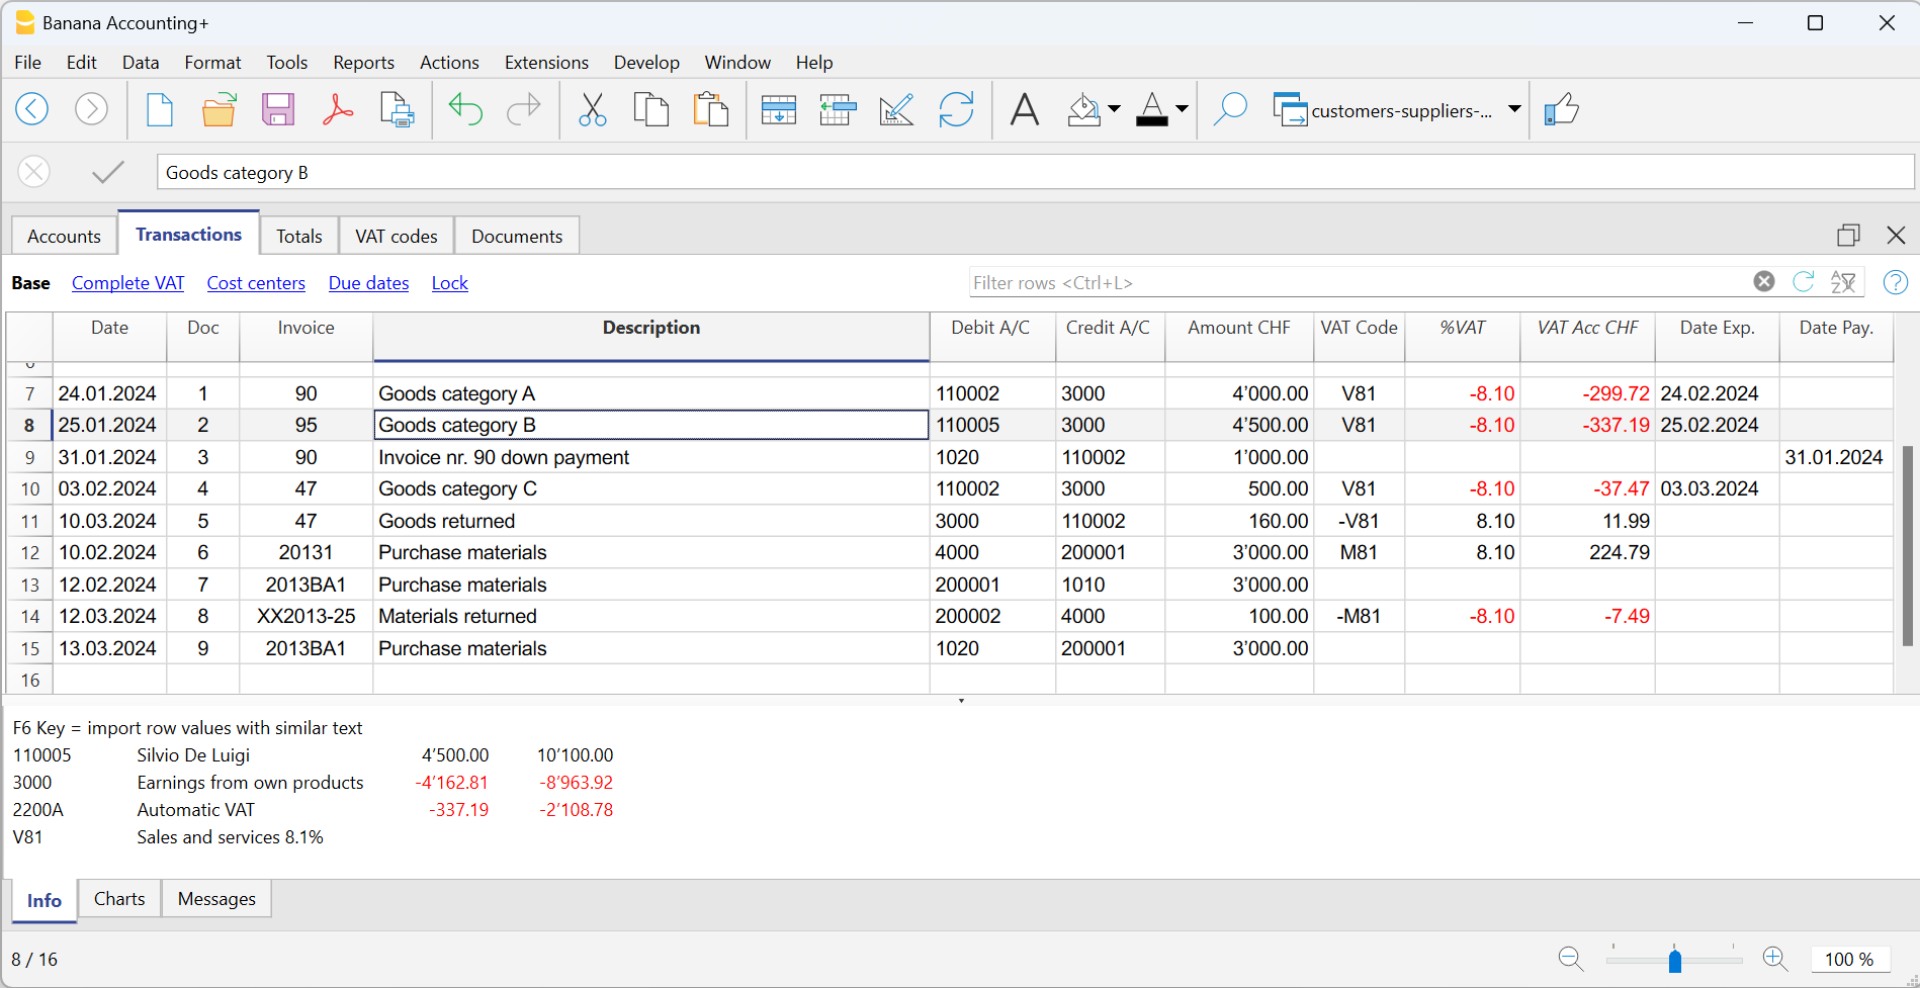
The issued invoice is registered by entering the following data in the respective columns:
- Date of the invoice and any document number
- Invoice number - It is very important to enter the invoice number in the Invoice column, because it is used to automate the various customer reports and to automatically close the customer's open invoice when recording the payment.
- Customer account in Debit and Revenue account in Credit
- The VAT code corresponding to the sale.
Recording a payment
There are two ways to record the collection of a customer invoice:
- Manual recording of customer invoice collection.
- Automatic recording with data import from account statement in ISO 20022 format.
The collection of a customer invoice is recorded by entering the following data in the respective columns:
- In the Date column enter the transaction date
- In the Type column enter 11 (customer payment)
Note: If an advance payment is to be recorded by the customer and is to appear on the invoice, the cell in the Type column must remain empty. - In the Invoice column enter the paid invoice number.
- With a double-click on the cell, the program will show a list of all open invoices.
Alternatively, you may also press the F2 button. If the F2 button doesn't work, you need to activate your customers/suppliers settings, by entering your customers register group, via the Reports menu → Customers → Settings. - Select the number of the paid invoice. The program will automatically enter:
- In the Description column, the payment description
- In the the Credit account column, the customer account number
- In the Amount column, the invoice amount.
If the entered amount does not include VAT and the customers are set up as cost centers, you must configure the cost centers correctly to use the amount with VAT in File and accounting properties (basic data), VAT/Sales tax tab. See also VAT amount with cost and profit centers.
- With a double-click on the cell, the program will show a list of all open invoices.
- In the Debit column, you must manually enter the conra account (the bank account where the amount has been credited).

Recording a credit note
In order for the amount to be deducted from the initial invoice, the same invoice number must be used.
- If the adjustment document (for example a credit note) has a different numbering that you still need to keep available, write this reference in another column, for example Doc Original.
- Enter data for the columns Date, Doc., Original Doc, Description
- The VAT Code must be preceded by the minus sign "-" so that the VAT operation is reversed, or use a specific VAT Code for debit notes (set in the VAT Codes table).
Note: to print the credit note to be sent to the customer, it is necessary to indicate in the DocType: 12 column, see Entering a credit note.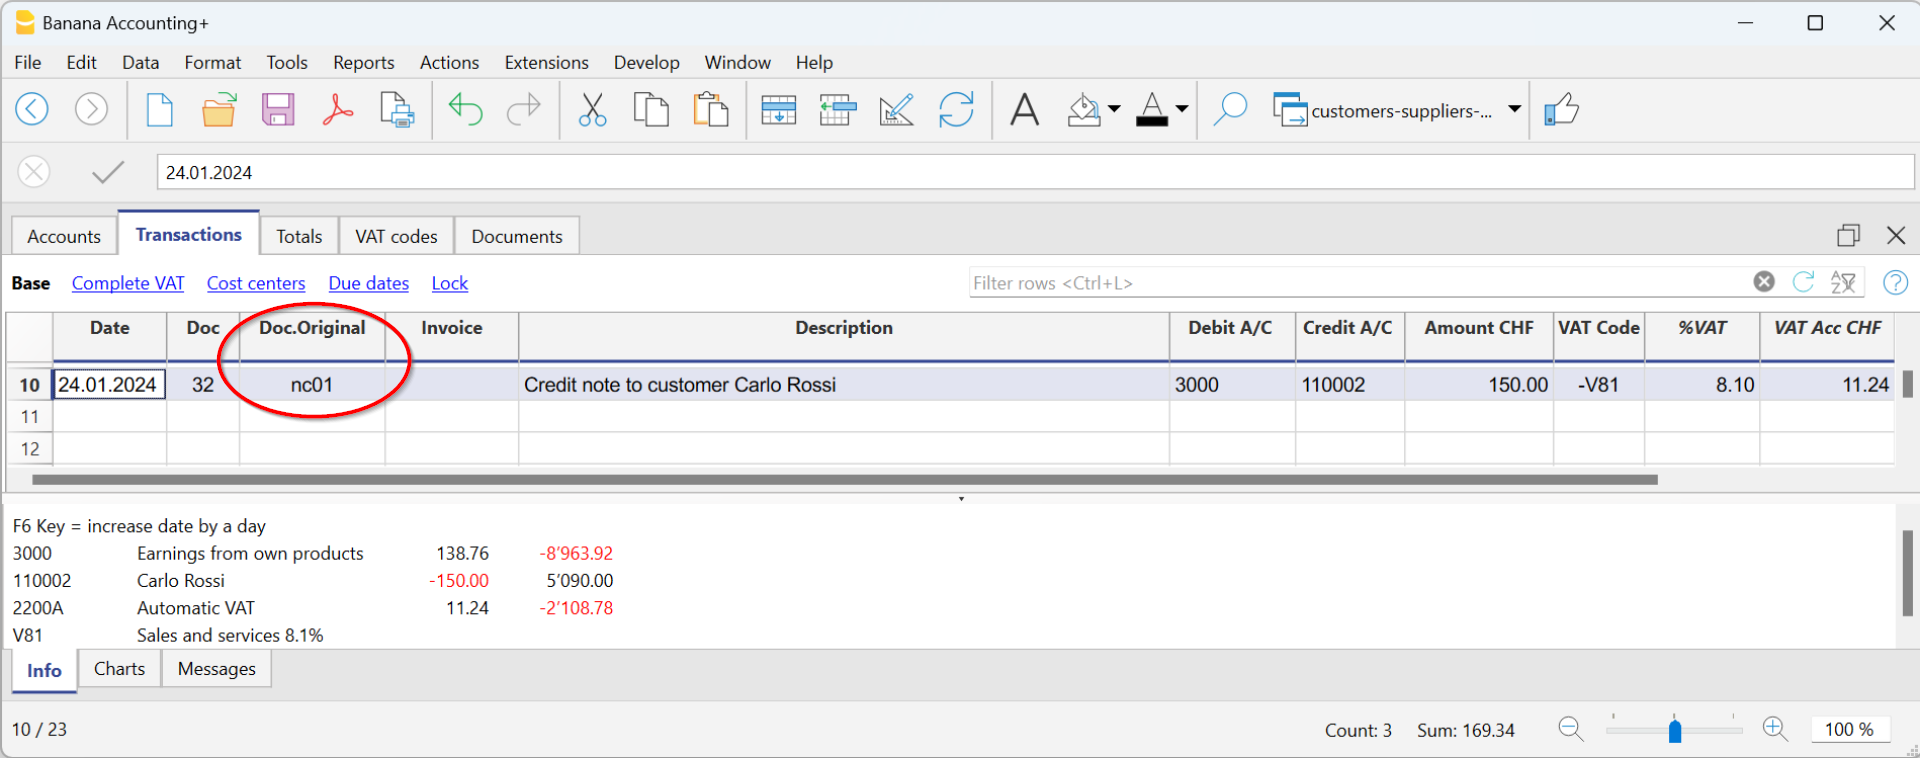
The cash method management
It is possible to manage the customers/suppliers register, even when using the cash method, as with the Cost and Profit Centers.
- We advise you to use the CC3 cost center (where the accounts are preceded by a semi-colon ";") to set up the customer and supplier register
- Set up the customers group via Reports → Customers → Settings.
For all Swiss users who manage the VAT on cash received, this setup is the best to manage the VAT. This setting allows to manage VAT optimally and to know the details for customers and suppliers.
By using this setup, the cost center balances for customers and suppliers will not appear in the Balance Sheet, but you will have all data and reports for internal purposes.

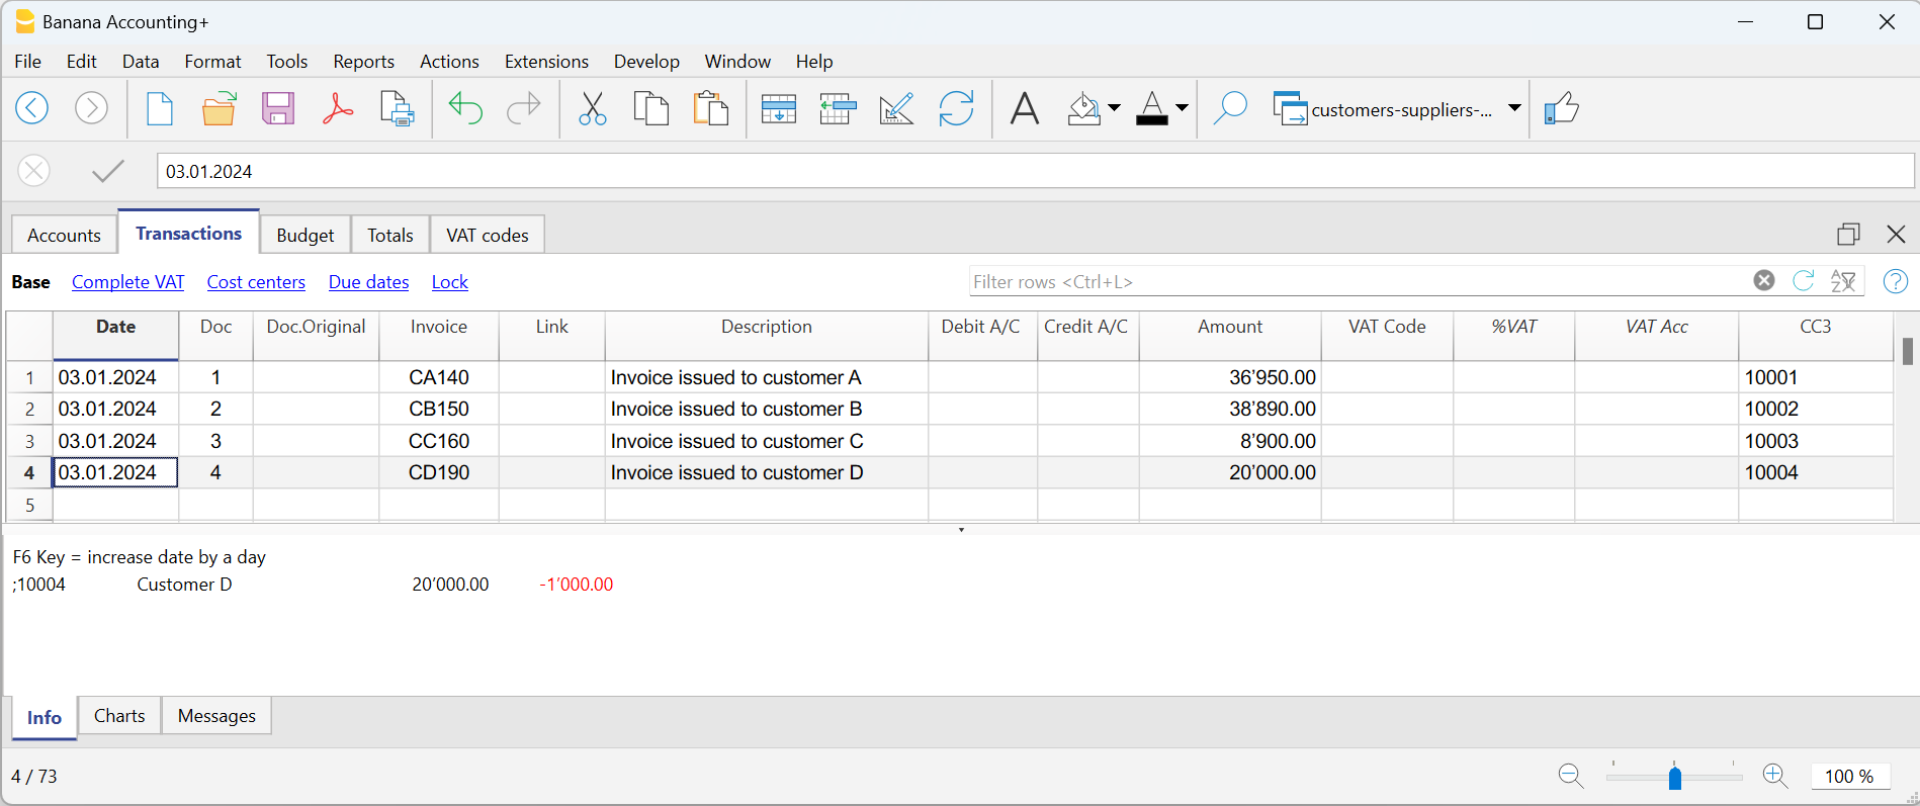
How to record when issuing an invoice
When you issue an invoice, record it as follows:
- In the Date column, enter the date of the invoice.
- In the Doc column, enter the document number if available.
- In the Invoice column, enter the invoice number.
- In the Description column, enter a description.
- In the Debit, Credit and VAT Code columns, do not enter any data.
- In the Amount column, insert the gross amount without any VAT code.
The VAT code in the case of cash management is recorded when the invoice is collected. - In the CC3 column, insert the CC3 account of the client without the ";" (ex. 10004).
How to record when an invoice is paid
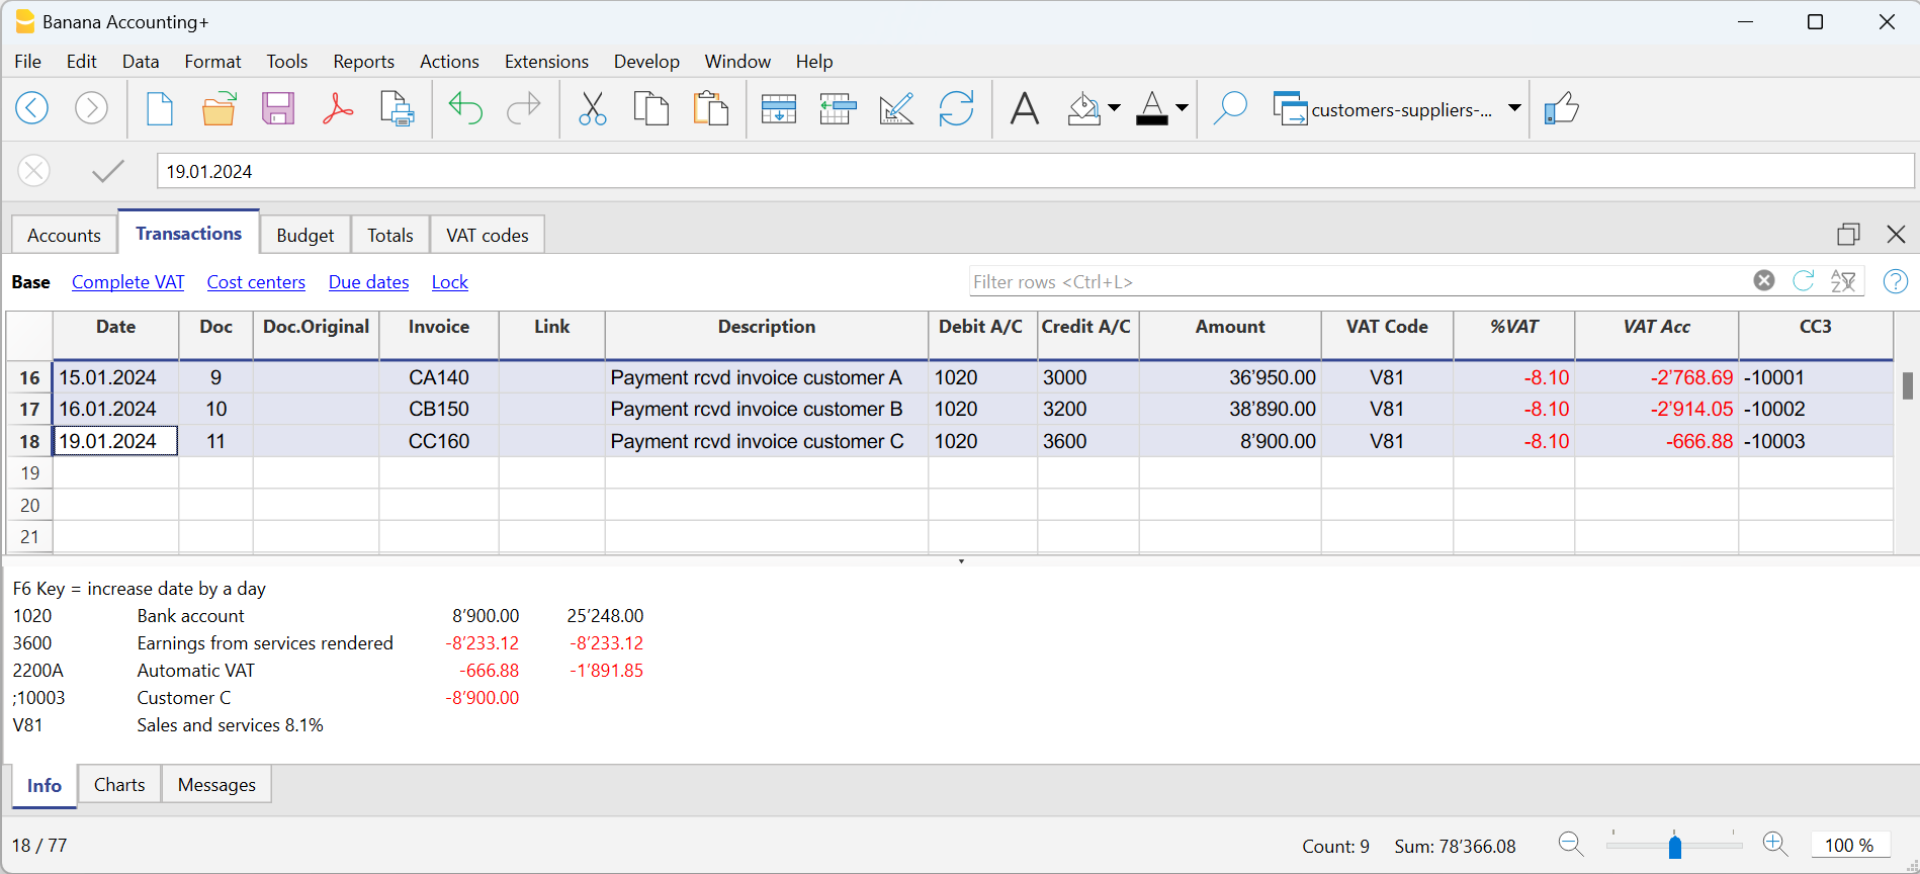
When you collect an invoice, record it as follows:
- In the Date column, enter the date the invoice was collected.
- In the Doc column, enter the document number if available.
- In the Invoice column, enter the invoice number collected.
- In the Description column, enter a description.
- In the Debit column, enter the bank account (or other cash account).
- In the Credit column, enter the revenue account corresponding to the invoice.
- In the Amount column, enter the gross amount.
- In the VAT Code column, enter the VAT code of the invoiced sales or service.
- In the CC3 column, enter the customer's CC3 account without the ";", with the minus sign "-" in front of the account (e.g. -10004).
In Integrated invoicing with Income/Expense accounting, with a customer ledger configured with profit centres, the option Record (+/-) cost centres as category should not be activated, as the account and category are not indicated when the invoice is issued.
More information can be found on page Clients and suppliers with VAT, using the Cash method.
How to record a credit note with cash method
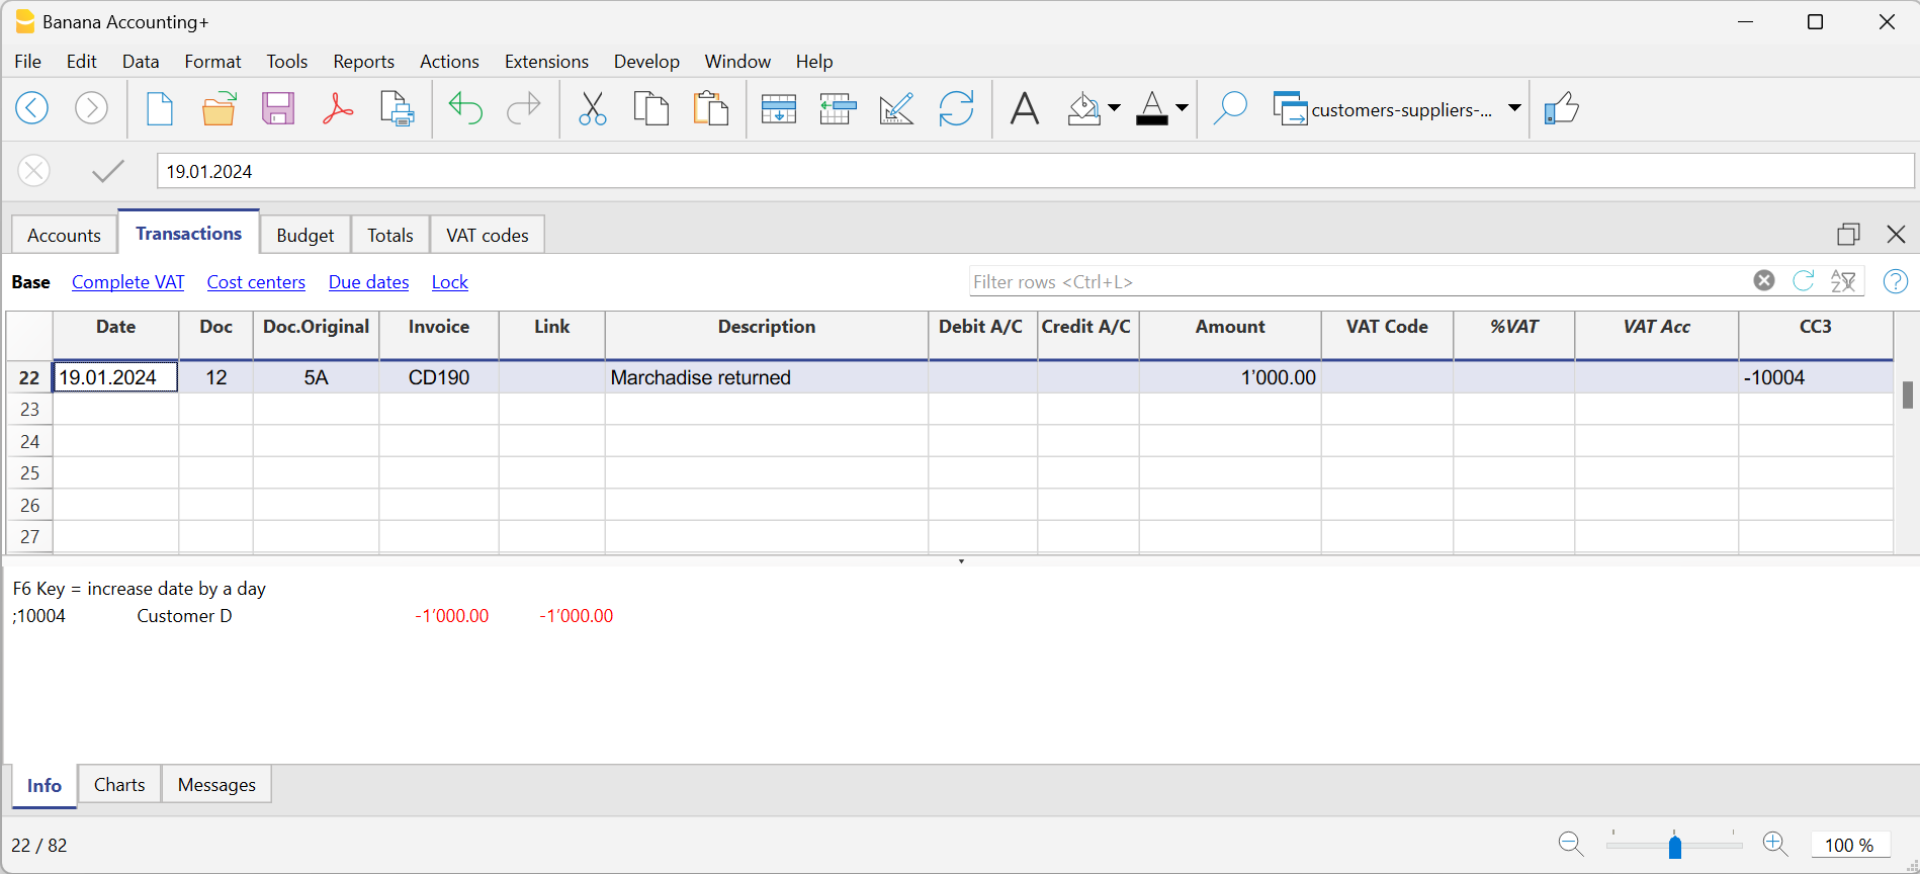
For the amount to be deducted from the initial invoice, the same invoice number must be used.
- If the adjusting document (e.g. a credit note) has a different number, which you must still keep, write this reference in another column, e.g. Doc. Original
- Enter the data for the Date, Original Document, Description columns
- Leave the Debit and Credit columns blank
- Enter the amount and in column CC3, enter the customer's cost centre with a - sign.
N.B: In order to print the credit note to be sent to the customer, you must indicate in the column TypeDoc: 12, see Credit notes.
Customers' settings
To activate the options in the Customers menu, you need to set the customer group via the menu Reports → Customers → Settings menu.
The functions related to customers are explained below, but also apply to those of suppliers (Reports → Suppliers → Settings). the dialogues that follow are identical for both customer and supplier functionalities.
Without the indication of the group in the settings of the Customers menu, all functions are disabled.

General
Group or account
Select the generic group or account that contains the Customers or Suppliers list. The group or the account needs to be already present in the Accounts table.
For further details on customers or suppliers settings see:
- Setting up the Customers' register and Setting up the Suppliers' register (accrual method).
- Setting up the Customers' register and Setting up the Suppliers' register (cash method).
Due date invoices (in days)
The program uses the following order of priority to calculate the invoice deadline:
- The due date if you entered it in the transaction row.
If there are several dates for the same invoice number, the program takes into consideration the most recent one. - If the number of days is indicated in the PaymentTermInDays column of the Accounts table, the transaction date is incremented by the number of days set.
- The date of the transaction is incremented by the days indicated in the settings dialog box.
Include transactions from previous (years)
- If 0, the program will not display invoices from the previous year, but only the opening balances of the customer account.
- If 1, the program will also include the invoices of the previous year in the customer card.
- If 2 or more, the program will also include invoices from years before in the customer card.
Advanced

Link to the invoice document
You can save invoices (pdf, doc or other) and insert the link in the Link to invoice document cell. In the Transactions table, Invoice column, the program will open the document if the invoice number is indicated, allowing access to the content.
The link may contain:
- The XML name <DocInvoice> or the name of another column contained between <>.
If you use the "<DocInvoice>.pdf" command and you are on the row with invoice number 100, the program will try to open the "100.pdf" file. You can also prefix the filename with the name of a directory. - Any file name extension can be used. This extension must, however, be included in the list of file extensions considered safe (Tools- Program options-Advanced).
- It is also possible to indicate a path preceding the field name, that contains the name of the document to be opened.
- With the "c:\temp\<DocInvoice>.pdf" link and the invoice number 100, the program proceeds to open the file c:\temp\100.pdf.
- The name of the directory is relative to the directory where the file is located.
Alternative text for payment auto-completion (Payment %1)
The entry of a payment for an invoice can be facilitated by the auto-completion of the payment, which can be activated via the F2 key in the Invoice field of the Entries table.
The auto-completion completes the entry columns such as invoice number, description, amount, accounts. In the Description column, it is possible to edit the text 'Payment' followed by the description of the first line of the invoice (%1), indicating the desired text.
Invoice rounding (base currency)
Indicate the minimum amount for rounding the invoice total. For example:
0.01 rounds the invoice total to the nearest cent, 0.10 rounds to the nearest 10 cents.
If the field is empty, the invoice total in CHF is rounded to the nearest 5 cents, for other currencies rounding is to the nearest cent.
Disable auto-completion of invoice data
This option is usually deactivated when there are many entries in the accounts and the data entry is slowed down by the display of the list of open invoices in the Invoice field of the Entries table.
Disable automatic compensation of open invoices with opening balances
Automatic compensation (or settlement) refers to the process where the opening balance of the account is used to offset open invoices. When the opening balance can fully cover the amounts in the transaction table, the invoices are considered paid, and their status will be marked as "paidOpening." If the opening balance is insufficient to cover the invoices, they will remain open.
Disabling this function means that the system will no longer use the opening balance to offset open invoices. As a result, the opening balance will be displayed separately from the invoices in the invoice list.
If you wish to offset an invoice with the opening balance, regardless of the 'Disable automatic compensation' option, simply enter 'openBalance' in the invoice number field.
Opening an invoice document
- Position yourself in the Invoice column of the transaction row related to the invoice you wish to open
- Open the context menu with the right mouse button
- Select the Open Invoice Link command.
Miscellaneous operations
Below we will explain some very important features and settings to best manage your customers, to speed up the work and get the reports correctly.
- Displaying the Invoice column in the Transactions table
- Auto-complete of invoice data
- Extract invoice rows and Open invoice link commands
- Activating the Address columns (optional)
- Setting up the expiration date for invoices
- Setting up the Customers' parameters
Displaying the Invoice column in the Transactions table
If the Invoice column is not displayed in the Transactions table, it can be activated via the Data Menu → Columns setup → Invoice Doc column.
It is very important to enter the invoice number for various program automatism that concern the processing of the various reports and the closing of the amount in the customer card when the invoice is collected.

Access the invoice saved in pdf format by clicking on the cell in the Invoice column.

Auto-complete of invoice data
When a payment is being recorded or an issued invoice is being corrected, the program offers suggestions to complete the transaction automatically. Proceed as follows:
- Create a new transaction row and add the date and the eventual document number.
- Press the F2 key in the Invoice column :
- The list of still open invoices will appear. If you type an invoice number or a customer number, the list will be filtered according to the entered text.
- Select the invoice you want from the list and press Enter. The program will automatically complete the registration with the description, the debit or credit account and the amount. The data can of course also be changed manually.
- In addition to the date, it is also possible to indicate the customer account before pressing F2 to display the list of open invoices, in this case the list will be filtered with the customer account present in the transaction row.
Note
The list displayed in the Invoice column includes both the Customers' and Suppliers' invoices. A supplier's invoice may have the same number as the invoice of another supplier, because the criterion for display takes into consideration the invoice number besides the Supplier's account number.
Extract invoice rows and Open invoice link commands

The Extract invoice rows command displays the transactions for the selected invoice.
The command is available by clicking on the small blue icon at the upper right corner of the cell or with the right mouse button.
The Open Invoice link command provides the text, as defined in the Customers' settings (Reports - Customers - Settings - Advanced - Link to the Invoice document).
On the command line, you can also indicate other columns in the table using their XML name.
If the message 'File with extension considered unsafe' appears, add the extension (for example .doc) using the Tools - Program options, Advanced, File extension command.
Activating the Address columns (optional)
It is possible to add some specific columns in the Chart of Accounts, to insert the address and other customers data:
- Choose the Tools → Add new functionalities command from the menu
- Choose the Add addresses columns in the Accounts table command
(If you don't see this option in the list, it means that this function has already been activated).
In the Accounts table, the program will add :
- An Address view, where the added columns are made visible.
- The columns that allow the insertion of the address data and other information.
- To display one or more of these columns, use the Columns setup command from the Data menu.
- To create other views with only selected columns, use the Tables setup command (Data menu).
Select Accounts table, Address view and add the required information to the customers' accounts.

Setting up the expiry date for invoices
To set / modify invoice expiration dates, you may act on three levels, where higher priority is given to the first one. Expiration data will be displayed in the payments schedule and printed out on the invoice document.
1. level - setting the expiry date on an individual invoice
In the row of the Transactions table, where your invoice is entered, you will find an Date Exp. column when using the Due Date view. If a date is set up, it will have priority over dates set up on the 2nd or 3rd level.
2. level - setting the expiry date on an individual customer/supplier account
In order to set up an expiration date on a customer level, for example +20 days after issuance of the invoice, select the account in the Accounts table, using the Address view, go to the Days Column (PaymentTermInDays) to set up the number of days to be used.
3. level - general setup
Expiration dates applying to all Customers/Suppliers can be set up via menu Reports → Customers → Settings.
Setting up the Customers' parameters
- Select the Reports → Customers → Settings command
- Please indicate the group of the Chart of Accounts in which the different customers' accounts are grouped in "Group or account".
- For an explanation of the different options, go to Customers and Suppliers settings.
List of customer invoices
Displaying invoices issued to customers
Reports menu → Customers → Invoices issued to customers...

This dialog box is identical for both Customers and Suppliers functionalities.
The following explains the functions related to customers, but they also apply to suppliers.
All customers
Displays the account statement of all customers belonging to the group, as defined in the Customers and Suppliers settings.
Select a single customer
Displays the account statement for the customer selected belonging to the group defined in the Customers and Suppliers settings.
Displaying open invoices
Command: Reports → Customers → Open invoices by customer
Invoices showing an open balance are being listed in this table.
For multi-currency accounting, if there are unposted exchange rate differences for a particular customer, an 'Adjustment exchange rate differences' line will be displayed that balances the balance in the open invoice list with the balance on the account card.

Displaying overdue invoices
Command: Reports → Customers → Open invoices by due date
In this table, invoices showing an open balance are being listed, filtered by due date.

The due date of an invoice can be set in different ways. More information can be found on the following page: Due dates and payment terms.
Print statements
To view this window, it is necessary to configure customer settings.
Access the printing of the statements via the menu Reports > Customers > Print statements.
It is essential to install the Customer Statement layout for printing the statement. There are two ways:
- From the Extensions menu > Manage extensions select the Customer Statement layout from the list of the extensions and click onto button Install.
- From the menu Reports > Customers > Print statements > More layouts select the Customer statement layout.

Statement date
This is the date printed on the statement. It is not possible to set up a date prior to the date of the last existing transaction.
Layout
The styles allow you to change the print layout.
Export PDF
The programme displays a preview of the extracts, with the Export PDF command you can then create the file containing all extracts or PDFs for each extract.
Print payment reminders
Feature available with Banana Accounting Plus - any plan (excluding Free plan limitations)
The printing of Payment reminders is accessed from the Reports menu > Customers > Print reminders.

The program automatically creates payment reminders from past due invoices.
- In addition to the printouts, the program directly creates the transactions in the Transactions table, which are used to recreate the issued reminders history.
- These transactions show the document date and the document Type: 16-1 first reminder, 16-2 second reminder and 16-3 third reminder.
Use last payment reminders
If in the Transactions table there are reminder transactions with the indicated date, the program will suggest to print these reminders.
Create new payment reminders
For all invoices that have expired, automatic reminder transactions are created in the Transactions table, which allow the printing of reminders.

Payment reminders
The program will show the expired invoices, which you can deactivate if you do not wish to send the reminder.

Template
Two reminder templates are available, one with a logo and one without (see Logo setup) . It is not possible to include the payment slip, insert notes and free texts.If you need the payment slip, use the Print Reminders Invoices dialogue.
Manage extensions
To update the templates with the latest ones or to add your own custom templates go to the Extensions menu.
It allows you to set the parameters of the selected style.
Show expiry dates
Customers & Suppliers Management
In order to automatically manage the invoices issued or received, we advise you to use the Customers Menu and the Suppliers Menu.
Associate an expiry date to a transaction
As an alternative to the customers and suppliers management, or for simpler checking purposes, you can also enter the payment date manually in the transaction row, in the Date Payment column.
This is an operating mode that consents simplified checkup.
With the Data menu → Columns Setup command, you should display the Date Exp. and Date Pay columns.
You should then enter the invoice expiration date in the Date Exp. column, and the invoice payment date in the Date Pay. column, when the payment is being recorded.
The due date of an invoice can be set in different ways. More information can be found on the following page: Due dates and payment terms.
Show expiry dates
With the Show expiry dates command of the Actions menu, the program displays in the Expiry dates table the transaction rows that have a due date and no payment date.
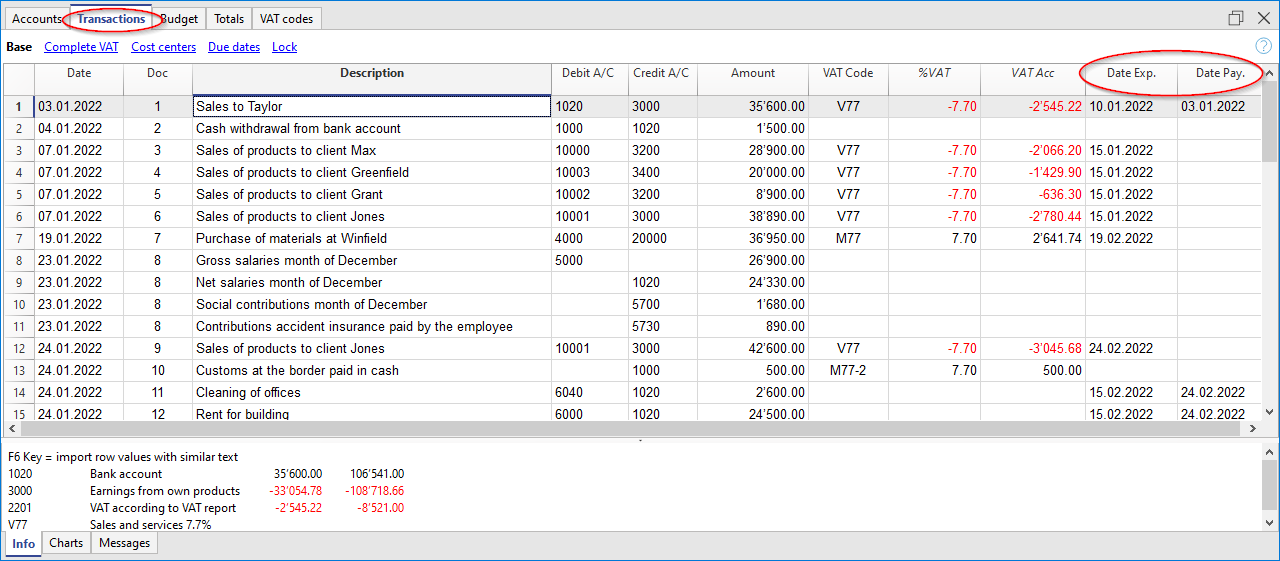
To obtain an automatic expiration schedule (Customer and Supplier open positions), see the List of customer invoices page.
Supplier Management
The supplier management allows you to record, organize, and manage supplier information, enabling you to keep track of supplier transactions and payments, payment deadlines, and contact information. You can monitor due invoices, paid invoices, and the account balance for each supplier, as well as the total open balance.
Supplier management is one of the features of Banana Accounting Plus available in all accounting applications.
Supplier master data settings include both revenue and cash management. Foreign currency supplier accounts can also be managed.
The function of making supplier invoice payments via e-banking is only available in the Advanced plan.
Recording Supplier Transactions
The Transactions table is the heart of Banana Accounting and is used to record all operations, including supplier transactions, simply by specifying the supplier's account. You can work quickly because you can select, copy, and paste supplier transactions that have been entered previously. If you make any mistakes, you can always correct them.
The supplier transactions recorded in the Transactions table include the following:
- Receiving invoices
- Making invoice payments
- Receiving credit notes or refunds
- Managing payments via e-banking
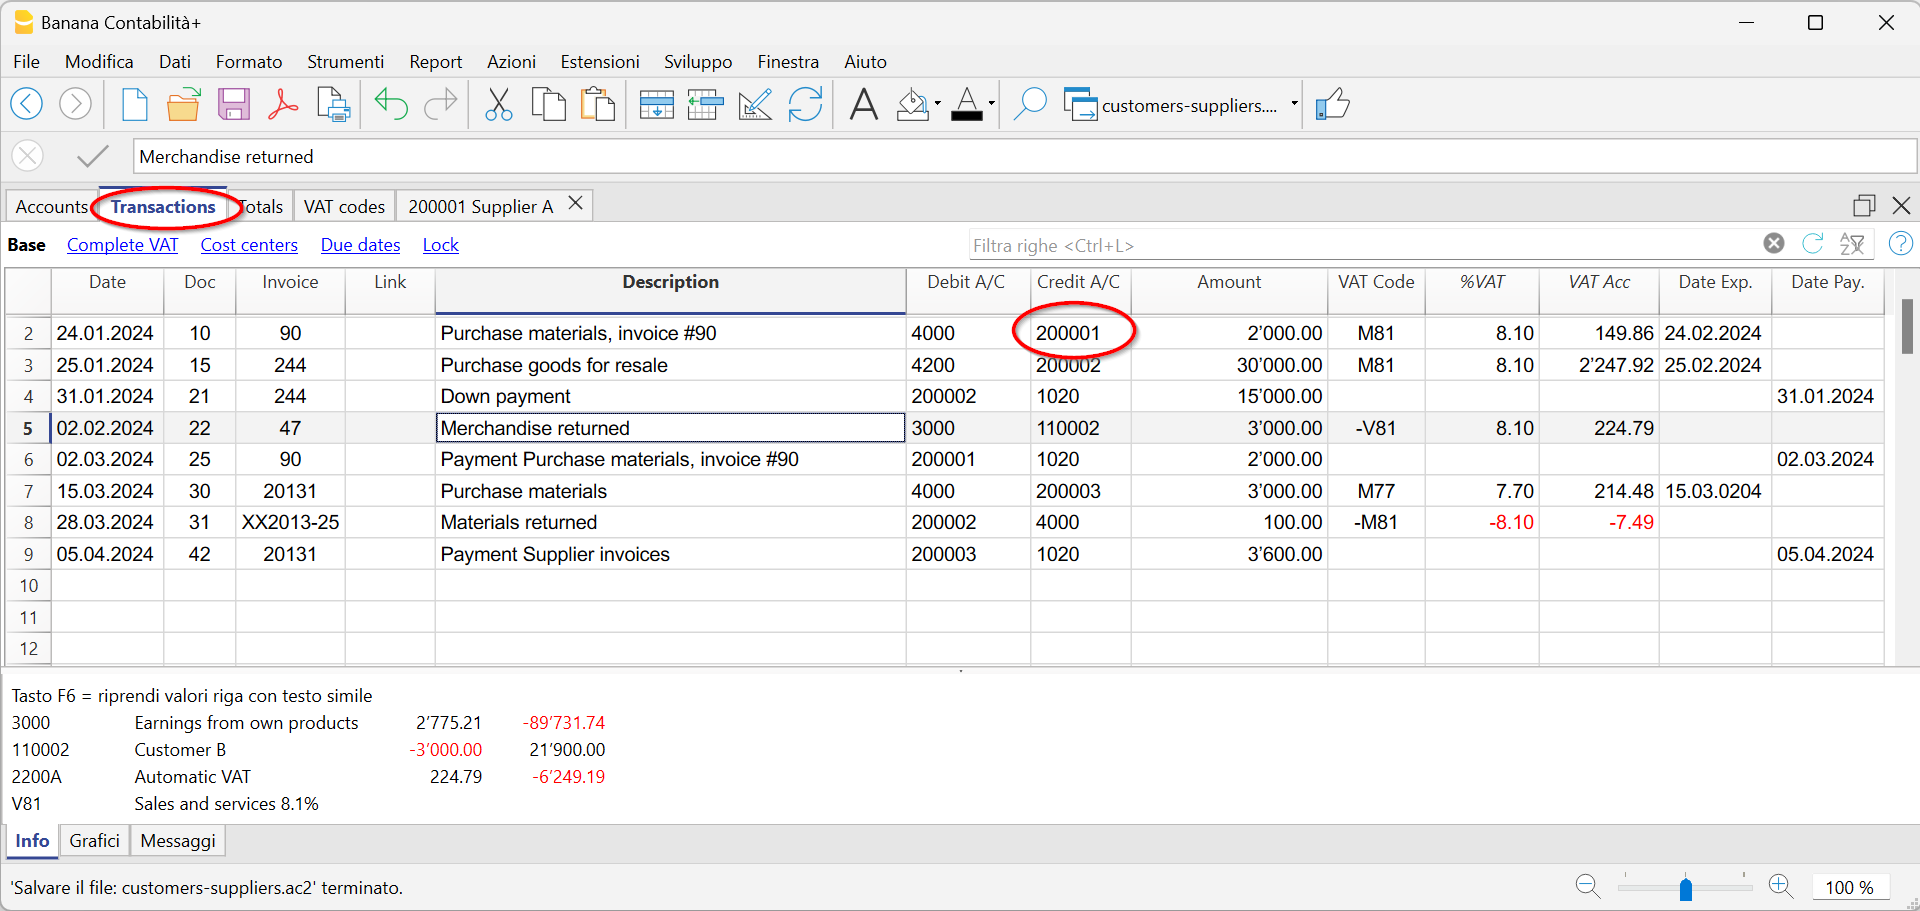
There are columns where you can enter various pieces of information, including:
- Date of the Transaction, Due Date, and Payment Date.
- Invoice number.
- Debit and Credit Accounts where you specify the supplier's account (Credit) and the counterpart account (Debit).
- Amount.
- VAT codes for the automatic calculation of VAT
- Links to Digital Documents (such as the invoice received from the supplier or PDF annotations).
Supplier Accounts
Supplier accounts are used to record all transactions related to a company's suppliers.
The main functions of supplier accounts are as follows:
- Create an Account for Each Supplier and Track All Transactions.
- Record Received Invoices for Each Supplier.
- Create an E-banking Payment Order Directly from the Supplier Invoice.
- Record Payments to Suppliers and Associate Them with Received Invoices.
- Generate Lists for Payment Verification.
In Banana Accounting Plus:
- Supplier accounts and their Addresses (name, surname, company name, address, VAT number, etc.) are set up in the Accounts table.
- Accounting transactions related to these accounts are entered in the Transactions table.
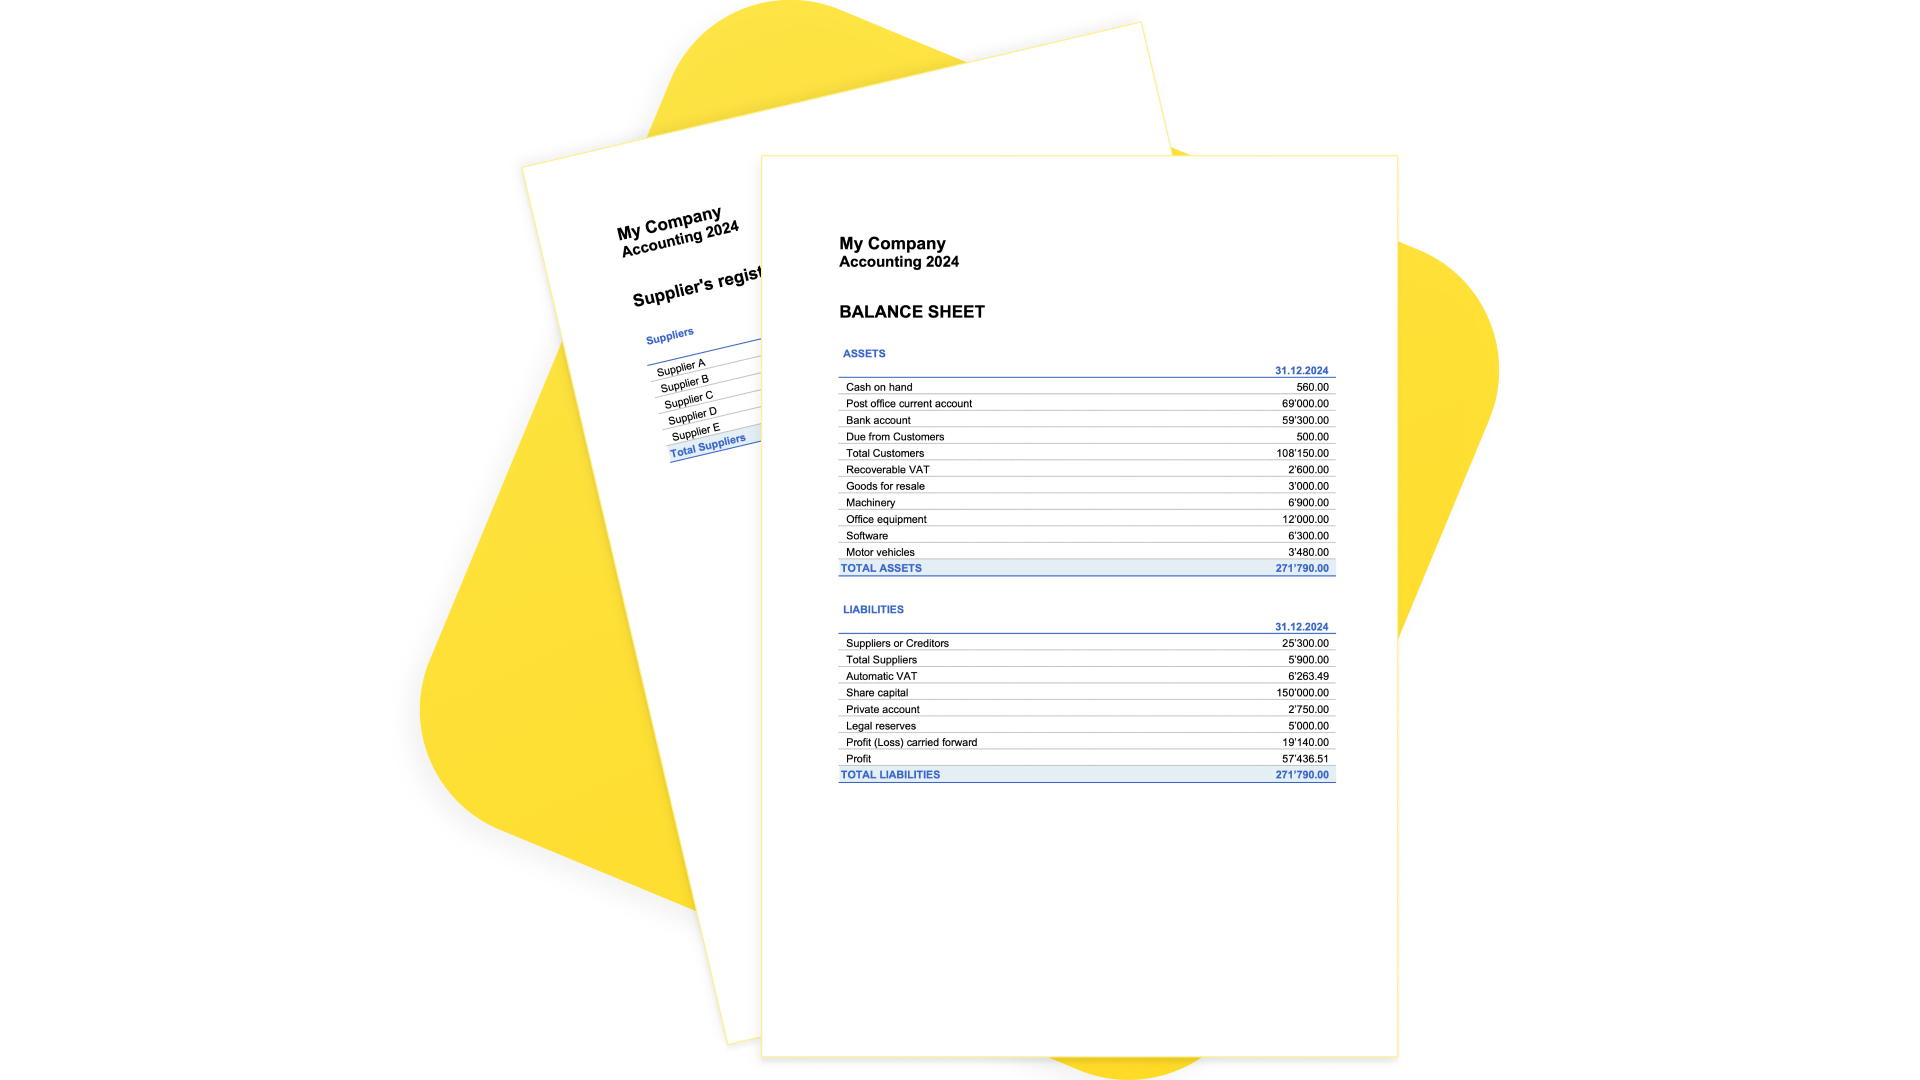
- After each entry, all supplier account balances (Accounts table) are automatically updated, providing an immediate overview of outstanding balances yet to be paid.
Recording Received Invoices
The invoice received from the supplier is used for accounting and tax purposes as it allows for the accurate recording of a company's costs and expenses, as well as the calculation of VAT.
In Banana Accounting, invoices are recorded in the Transactions table by:
- Entering the date and description.
- Adding an invoice number.
- Recording the cost account in the Debit column and the supplier account in the Credit column.
- Specifying the VAT code for goods or services purchased. Calculations and VAT amounts are automatically inserted.
Recording Payments
In Banana Accounting, payments are recorded in the Transactions table using one of the following methods:
- Manual Recording:
- Enter the date and description.
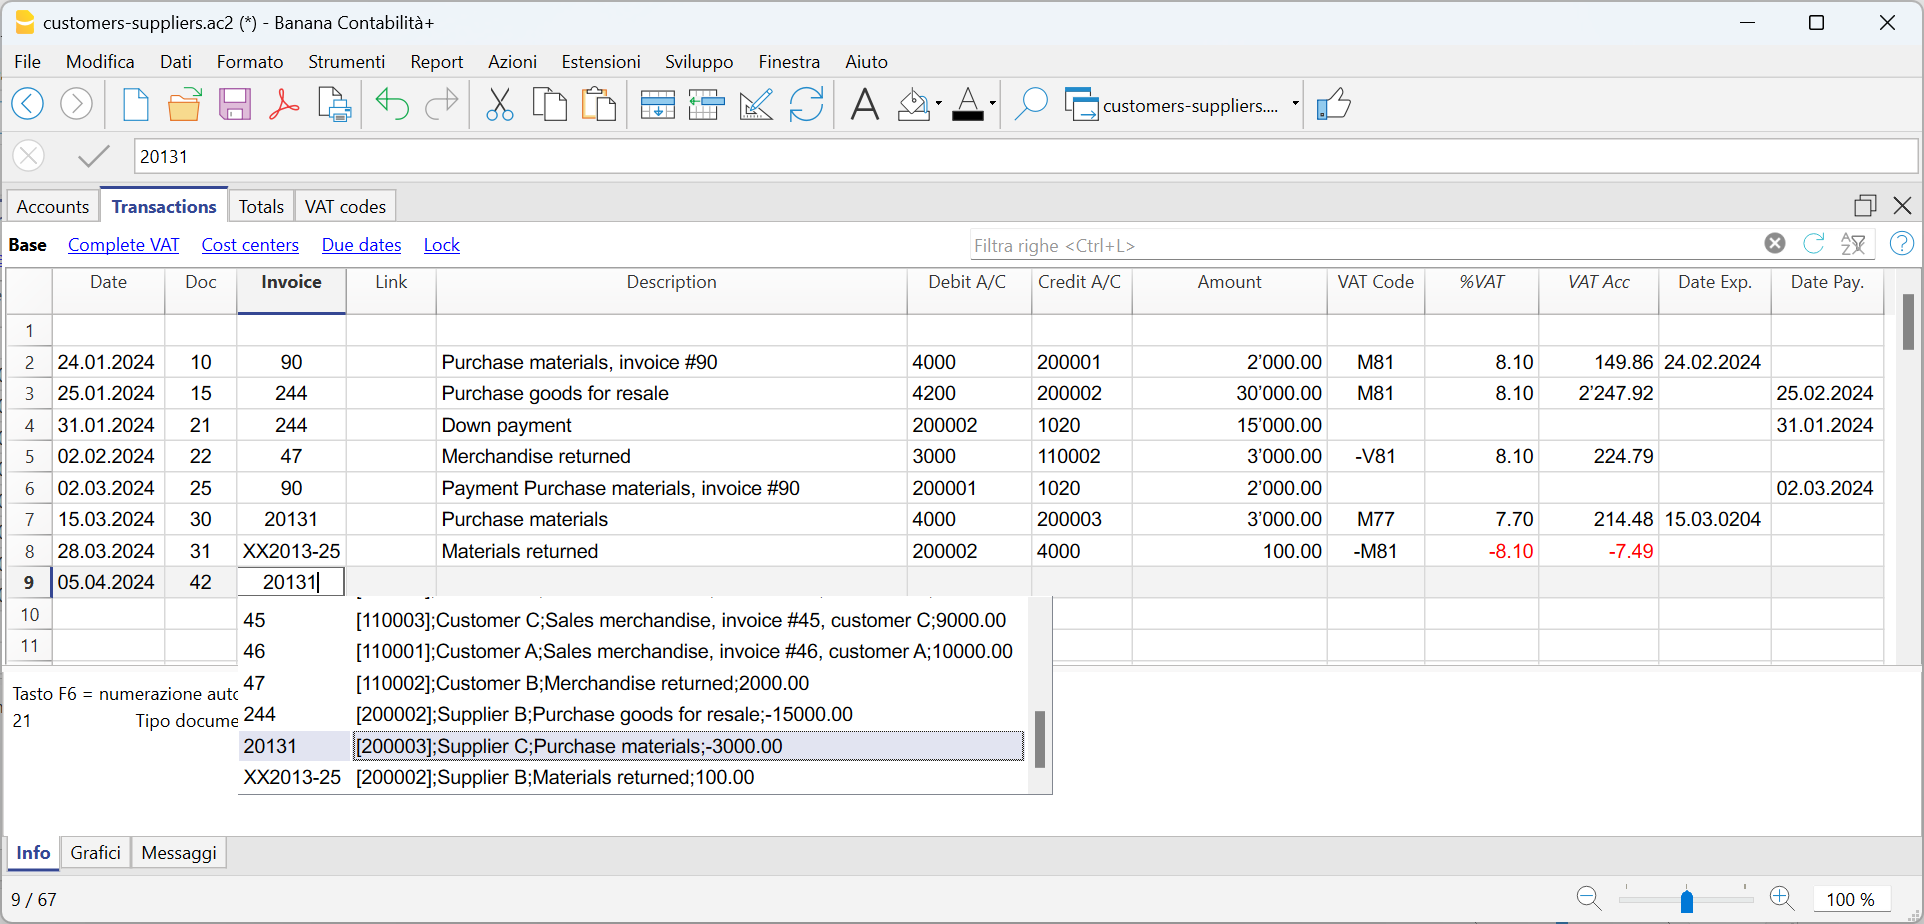
- In the Invoice column, specify the supplier's account. A dropdown menu will display the open invoices. Simply select the invoice received from the supplier, press Enter, and the program will automatically fill in the supplier's account in the Debit column, along with the invoice amount. Basta poi Then, enter the cash account in the Credit column to complete the recording.
- Data Import from Bank Statements Using Rules
- The program imports data from ISO 20022 bank statements, and with the use of Rules, it automatically enters complete transactions, including all necessary details, without the need for manual intervention.
Outstanding Invoices
Outstanding invoices from suppliers are those invoices that have been received but are still pending payment.
Supplier's outstanding invoices can be managed through an accounting register that tracks issued invoices, payment due dates, and received payments. This allows the seller to monitor the financial status of each supplier and send payment reminders if invoices remain unpaid for an extended period.
It's important to note that outstanding supplier invoices have an impact on a company's liquidity, as they represent funds that need to be allocated for payment.
Banana Accounting automatically generates a report of outstanding invoices, where you can quickly verify which invoices are still pending payment, from which supplier, and the total amount of outstanding invoices.
There are two types of reports:
- Open Invoices by Supplier, where all open invoices for each supplier are listed.
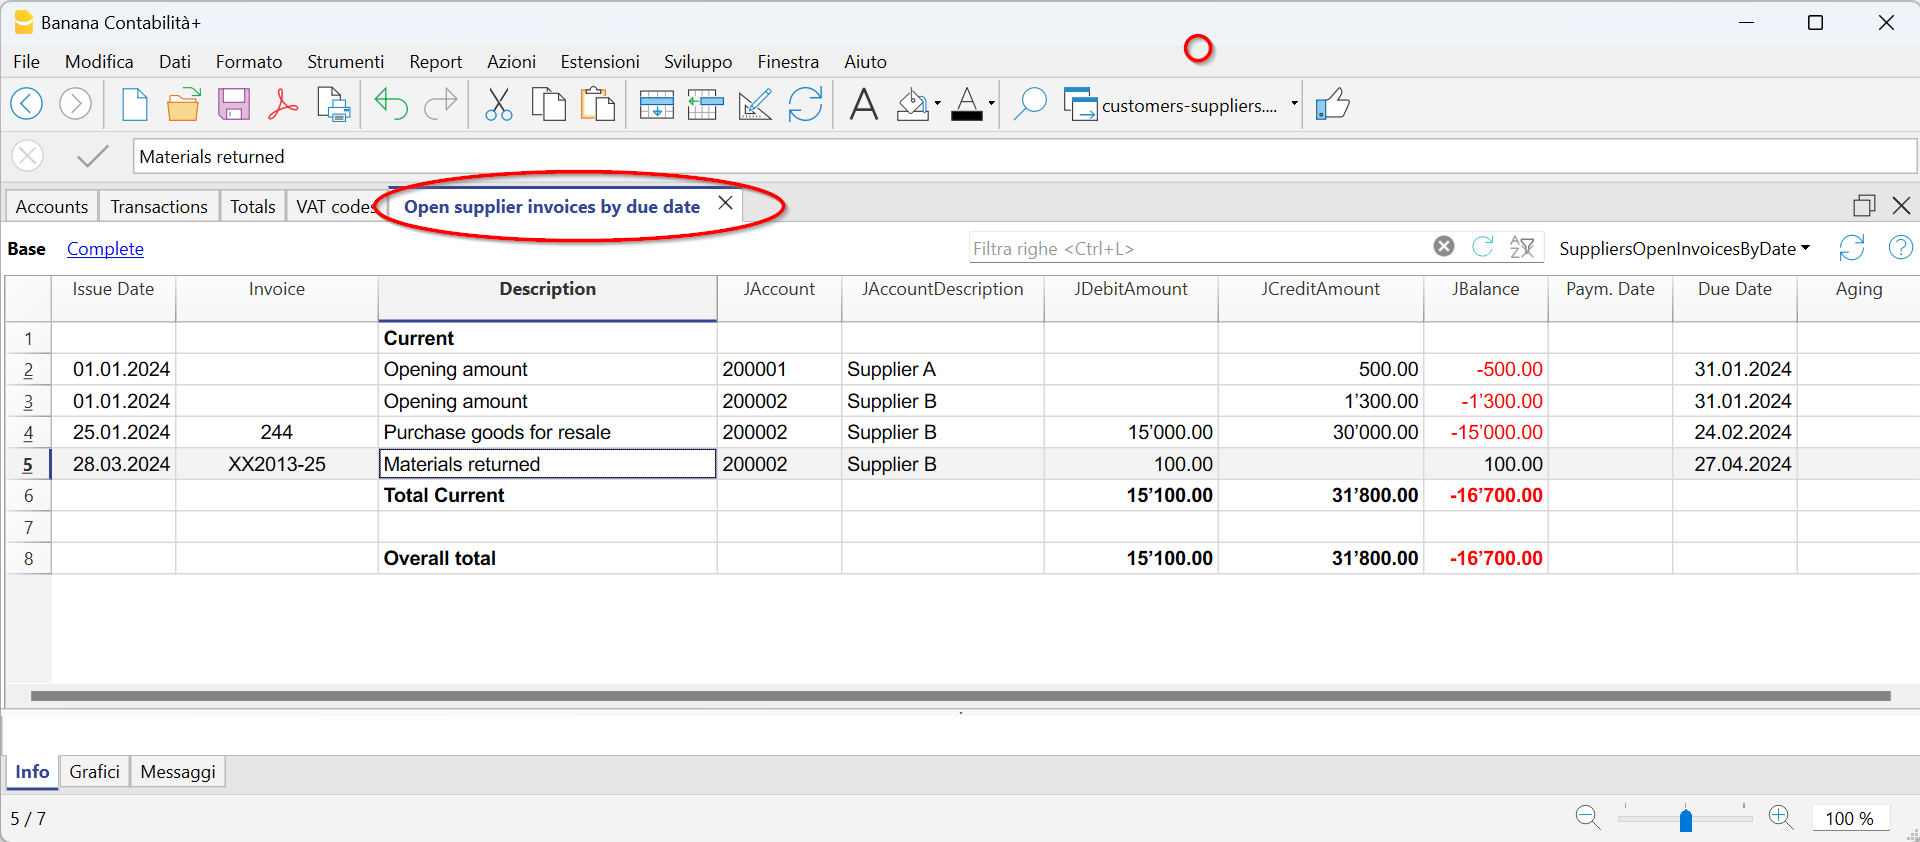
2. Open Invoices by Due Date, where open invoices are listed in order of their due dates.
The due date for an invoice can be set in various ways. Further information is available on the following page: "Expiry Dates and Payment Terms."
Accounts Cards
Accounts cards are accounting documents that record the financial transactions of a company. Each card represents a specific account in the company's general ledger and contains detailed information about the transactions related to that account, such as the date of the financial transaction, the type of transaction, the amount, and the description of the transaction.
In Banana Accounting, based on the data entered in the Transactions table, the program automatically generates an Accounts Card for each supplier. These cards display the opening balance, all transactions, and the final balance. You can also generate account cards for specific time periods.

Set up and use supplier features
- Set up accounts for turnover accounting (accrual principle).
- Set up accounts for collection accounting (cash principle).
- Configure supplier settings (explanation as for customers).
- Set up the transactions table and post supplier invoices.
- Open, overdue or received supplier invoice reports.
Notes
- In multi-currency accounting, the reports are based on the balances in the currency of the supplier's account, so any exchange rate differences are not taken into consideration.
- In the Invoices received table, the exchange rate differences transactions are also listed, while in the other printouts only the supplier's currency amount is valid.
- The Description column of the reports includes the first transaction row for each invoice.
- For the accounting on the collected, it is possible to set up a suppliers register with cost centers.
Example file
Managing with the accrual method
Introduction
In Banana Accounting it is possible to manage suppliers both with the accrual and cash method. A detailed explanation is available on the accounting with the accrual or cash principle page.
Below we explain how to set up the group and supplier accounts, so that you can have a separate invoice list for each supplier.
If you have few invoices and do not want to keep a detail by supplier, it is also possible to have only one account where all the invoices of the suppliers are recorded. In this case, the list of invoices will be grouped by all suppliers and not by a single supplier.
Setting up the Suppliers' register
To create the Suppliers' register, add at the end of the Chart of accounts:
- A* section (header) (see Sections)
- A 02 section for suppliers (see Sections)
- The Suppliers' accounts that are needed (see Adding a new account). Each supplier is entered on a row of the Chart of Accounts and has its own account number. The account numbering can be freely chosen (see Accounts), however it is recommended to use only numbers, in particular for the management of payments.
- A group where all the accounts payable are totaled.
- This group is in turn totaled into a group present in the liabilities.

- The total Suppliers will be totaled in the 200A summary group of the Sum in column.
- The same code or number used for the Gr (200A), must be used in the Liabilities Group column, in the row corresponding to the Total Suppliers. The groups numbering can be freely chosen (see Groups).

Record a received invoice

Record a payment
- Enter the transaction date
- Position yourself on the Invoice field and press the F2 key or double click on the cell.
The list of open invoices will be displayed. - Select the paid supplier invoice and press Enter.
The program will complete the transaction with the Description, Debit Account and Amount fields. As long as the contra account is not entered, the program will report the difference in the transactions.

Record a credit note
The same invoice number must be used for the amount to be deducted from the initial invoice. If the adjustment document (for example a credit note) has a different numbering that you still need to keep available, write this reference in another column, for example DocOriginal.

Collection management (cash principle)
Set up the suppliers register with the cost centers
For Swiss users who have VAT on their receipts, this setting allows you to manage VAT in an optimal way.
It is possible to manage the customers and suppliers register as cost centers (see also the Cost and Profit Centers page). A detailed explanation is available on the Accounting page on accrual or cash method.
- It is advisable to use the cost center CC3 (accounts preceded by a semicolon ";")
- The balances of the cost centers will therefore not appear in the balance sheet.

Transactions
The information is available on the Customers and suppliers page with VAT using the cash principle.

Miscellaneous operations
The various functions listed use the same methods as those used for clients. For further information, please refer to the relevant client pages.
View the Invoice column in the Transactions table
See Clients - Display Invoice columns.
Auto-complete
Extract invoice rows and open invoice link commands
Vedi Clients - Extract invoice rows commands.
Activating the Address columns (optional)
See Clients - Address column setup.

Configure supplier settings
- Select the Reports → Suppliers → Settings command.
- It is important to indicate in the "Group or account", the group of the chart of accounts where the various accounts of the suppliers are grouped.
- For explications of the different options see Customers/Suppliers settings.
List of supplier invoices
Displaying invoices received
Command: Reports → Suppliers → Open invoices by supplier.
All invoices that belong to the supplier register or to an individual supplier are displayed in this table.

Displaying the open invoices
Command: Reports → Suppliers → Open supplier invoices
In this table, only invoices that have an open balance are being listed.
For multi-currency accounting, if there are unrecorded exchange rate differences for a particular supplier, an 'Adjustment exchange rate differences' line will be displayed that balances the balance in the open invoice list with the balance on the account card.

Displaying invoices by due date
Command: Reports → Suppliers → Open supplier invoices by due date
Only invoices that have an open balance, are displayed in this table, grouped by due period.

Payment files for invoices from suppliers
The new Payments function allows you to create payment orders (pain.001) either from a list of transactions or by scanning the QR codes on received invoices.
The pain.001 files are XML messages that contains details of the payments to be made and that can be uploaded to the portal of the major financial institutions. Banana currently supports the Swiss payment standards (SPS).
More info Payment orders PAIN.001.
Migration to structured addresses
Prerequisites and important notes
Currently the payment functionality
- Is available in the Dev-Channel version, so please install the latest version of Banana Accounting+ Dev Channel.
- This extension works only with the Advanced Plan, you can request a 1 month promo code from our support service.
- The extension is currently in Beta Test, please check everything and report any problem.
How to create the payment file (pain.001)
- Open your accounting file (double entry accounting or income-expense accounting ) or download our example file Payments_2024_en.ac2
- In the Accounts table, verify the presence of the Address view.
You can add it using the menu command Tools > Add/Remove functionalities... > Add Address columns in Accounts table.
If your Address columns are different (e.g. missing IBAN, see the documentation Address view.
- The first time, install the Payment functionalities with the command Tools > Add/Remove functionalities... > Add payment functionalities
- Set up the debit bank account, which will be used when creating the payment order. In the Accounts table, select the debit account and complete the following data (Address view):
- Name, surname or company name (bank account holder)
- IBAN (IBAN account of the bank or postal account to be debited)
- Bank clearing (BIC code of the financial institution to be debited)
- Check and update the address and payment information of your suppliers in the Accounts table (Address view).
If you don't have a list of suppliers, please define it according to our explanation in the Suppliers section.
If you make payments by scanning QR-Codes you don't need to setup the addresses because all information for the payment is included in the QR-Code
- In the Transactions table enter the invoices of your suppliers or scan your QR-Codes

- Enter and complete the payment details by clicking directly on the Payment Data column. Ensure that all transactions to be paid are completed with the payment information.
If the supplier list (Account ID) is empty, it is necessary to configure the Payments extension by setting up the Suppliers group.
See the Payment orders extension (Payment Data dialog) for guidance.
- Select the command Reports > Suppliers > Create payment file

- Please fill in with the name of the account holder to be debited, their corresponding IBAN, and BIC code. If you have previously entered this information in the Accounts table, it will be automatically suggested.
If you want to display each payment separately on the bank statement, you must enable the "Individual booking" option when creating the payment order; otherwise, only the total amount will be shown on the bank statement.
Press the "Next" button.
- A summary of the payment file is displayed and you can specify where to save it. Click on Finish, you will be asked to save the payment file, which you can upload to your bank. Note: In Banana it's not possible to connect to your bank and transmit the file, you need to upload the file from your computer into the bank app or website.

- After saving the payment file, a row containing the payment/file object will be inserted into the Transactions table.
You can view the content of the XML file again by double-clicking on the Payment Data cell or by clicking on the edit icon located at the top right of the cell.
This is a receipt, and it is no longer possible to modify the payment file or send it again.
Warning! The payment/file objects are used to determine whether a payment has been transmitted to the bank.
Therefore, it is recommended not to delete the rows containing these objects; otherwise, payments that have already been transmitted will continue to appear among the pending ones.

- When creating a payment order in Banana, the related payment entries are not generated immediately, as the file must first be transmitted to the bank and the payment is only executed after bank confirmation.
Once the payments have been made, it is recommended to import into Banana the ISO 20022 file provided by the bank, which contains the details of the completed payments.
After importing the invoice payments, you can complete them by pressing F2 in the Invoice column, so that they are marked as paid in the Supplier Invoices table (menu Reports > Suppliers).
Opening a new year
The payment file (XML file) can only be created in the accounting file that contains the necessary payment data for its generation. When opening the new year, only customer and supplier invoices are carried forward, without their related payment data; therefore, it is not possible to create a payment file for invoices recorded in the accounting file of the previous year.
However, through the menu Report > Suppliers > List of payment files, you can also view the payment files from previous years, based on the Suppliers settings, by enabling the Include transactions from previous years option in the Report > Suppliers > Settings command.
Create payment file
The command Reports > Suppliers > Create payment file creates an XML message collecting information from payment data objects.
See How to create the payment file (pain.001)
Scanning QR-Codes
The Reports→ Suppliers→ Scan QR-code command displays the Scan code dialog,which allows you to enter one or more QR codes and create the accounting entries and related payment files from these data.
We tested the functionality with the Datalogic QuickScan reader (more on scanner configuration).
It is also possible to scan the QR-Codes with a mobile app, copy the data to the clipboard and paste them into the Banana Scan code dialog. You can search for an app that scans QR codes and saves them to the clipboard in the Apple or Android store. Our company does not provide or publish any software of this type.
If you have multiple QR codes to scan, use the Next Scan button after each scan.
If you are picking up a list of QR codes from the clipboard, they must be separated by semicolons, without adding spaces or line breaks (...EDP;SPC...).
To automatically retrieve the supplier's account number, you must correctly specify the supplier's name in the Organization column of the Accounts table, Address view. The text in the Organization column must exactly match the name indicated in the QR code.

Configure and Use QR Code Scanner
- Configure and connect the scanner.
- In Banana, select the command Reports > Suppliers > Scan QRCode (Ctrl+8) and place the cursor in the input field.
- Press the button on the scanner.
- The scan dialog will be automatically filled in.
- Complete the process.
Configure and Use Mobile App
- Install the mobile app, scan QR codes with the app, and save the data to the clipboard.
- Transfer the saved text to your computer with Banana (e.g., via email or AirDrop).
- In Banana, select the command Reports > Suppliers > Scan QRCode (Ctrl+8) and place the cursor in the input field.
- Paste the copied text into the scan dialog.
- Complete the process.
List of payments
The command Reports > Suppliers > List of payment files display all payments included in payment files present in the Transaction table (Payment file).

Payment List
