Cash Manager
The Cash Manager (or Cash Book) is an application of Banana Accounting Plus, to manage the cash or any other account. It is free and unlimited because it is included in the Free plan of Banana Accounting Plus. It is ideal for:
- Families - to keep track of expenses and income and plan a family budget.
- Children and Students - to learn how to manage their first expenses and be aware of their savings.
- Companies and Associations - to budget and manage cash income and expenditure, keep the first note and manage cash in a separate file from accounting.
Check out our resources for an easy and immediate start:
Getting Started with the Cash Manager
For a quick and easy start, choose one of our Cash Manager templates and save it as a name. For more information visit the generic page of How to get started with Banana Accounting Plus.
In the Transactions table you are immediately operational and can enter incoming and outgoing transactions. Entry is extremely easy and intuitive, even for those with no accounting knowledge.

The Transactions Table
The Transactions table is at the heart of the Cash Manager's bookkeeping.
It allows you:
- Clarity and order of the columns: thanks to the table layout you always have an immediate and complete overview of the data entered.
There are main columns, already predefined, in which you can enter:- The date of the transaction
- Any document number
- The incoming or outgoing amount
- The category for the entry or exit
- To insert digital attachments: in the Transactions table, you can also make the DocLink column visible, which allows you to add the receipt or invoice to each movement in PDF format, ensuring the immediate availability of the documents in case of future audits or to transmit them to the accountant.
- To always make corrections: if there are errors, you can easily correct them, ensuring correct and accurate results every time.
Speeding up the transaction registration
Banana Accounting Plus offers several functions to speed up the data entry process, such as:
- Auto-completion. In the Description column, by typing the first few characters, the programme automatically suggests similar movements that have already been entered previously and, by pressing F6, completes the current movement with the selected data.
- Recurring Transactions. It is possible to store recurring transactions in a special table, taken from the menu Actions > Recurring Transactions, and to resume them with a single click, saving time and simplifying work.
Reports and Printouts
After each transaction, the programme automatically updates all account balances in the Category table and in the account. You can easily print statements and reports for easy monitoring of income and expenditure and the status of available cash in the cash account.
Professional and accurate reports at the touch of a button:
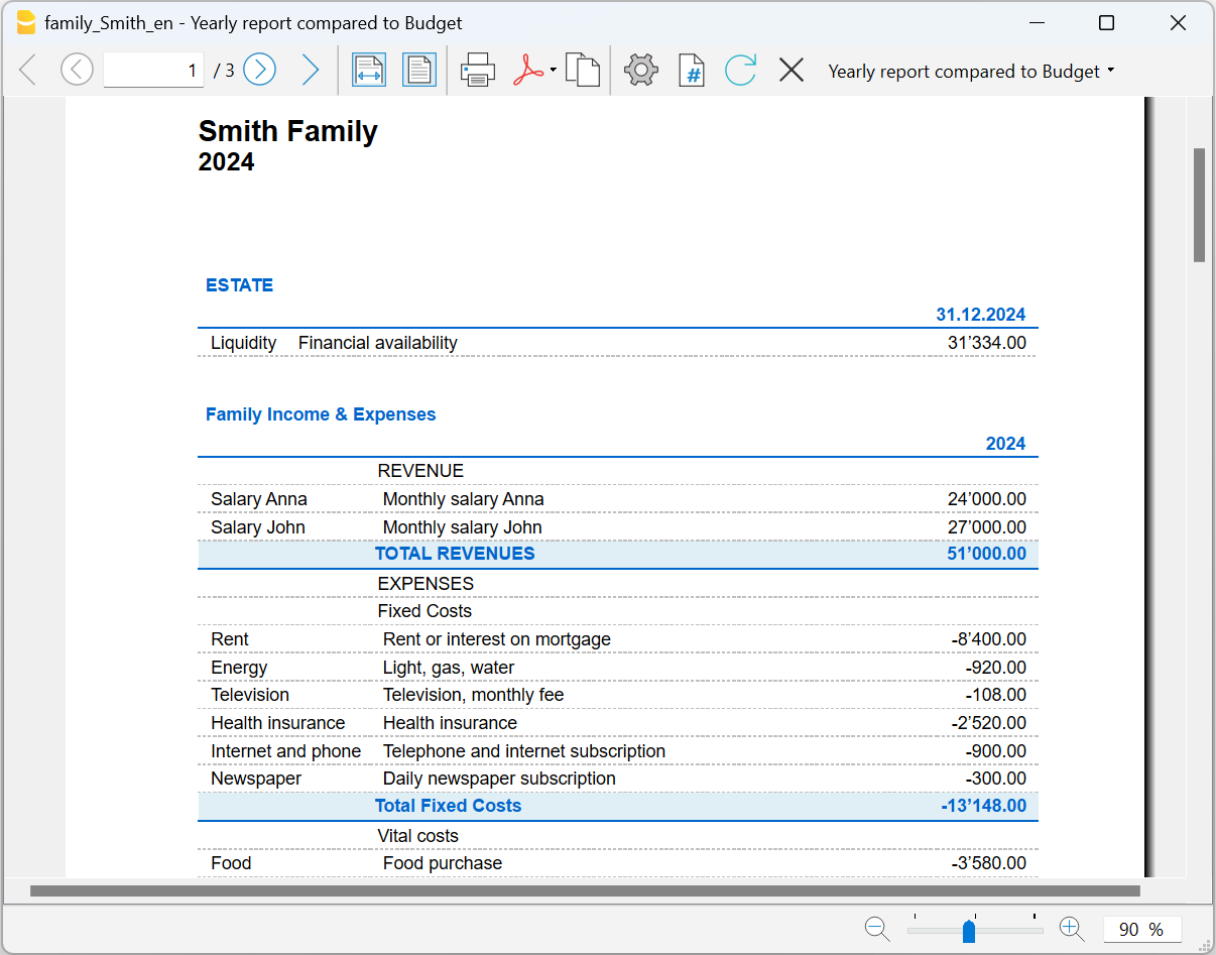
From the menu Reports > Enhanced statement or Enhanced statement with groups, get your reports in no time. Reports by period are also possible.
- The Enhanced statement displays all accounts and categories without any subgroups.
- The Enhanced statement with groups displays all accounts and categories also with subgroups.
PDF data archiving
All accounting data, over a period of years, must be available at all times, both for tax purposes and for any internal requirements.
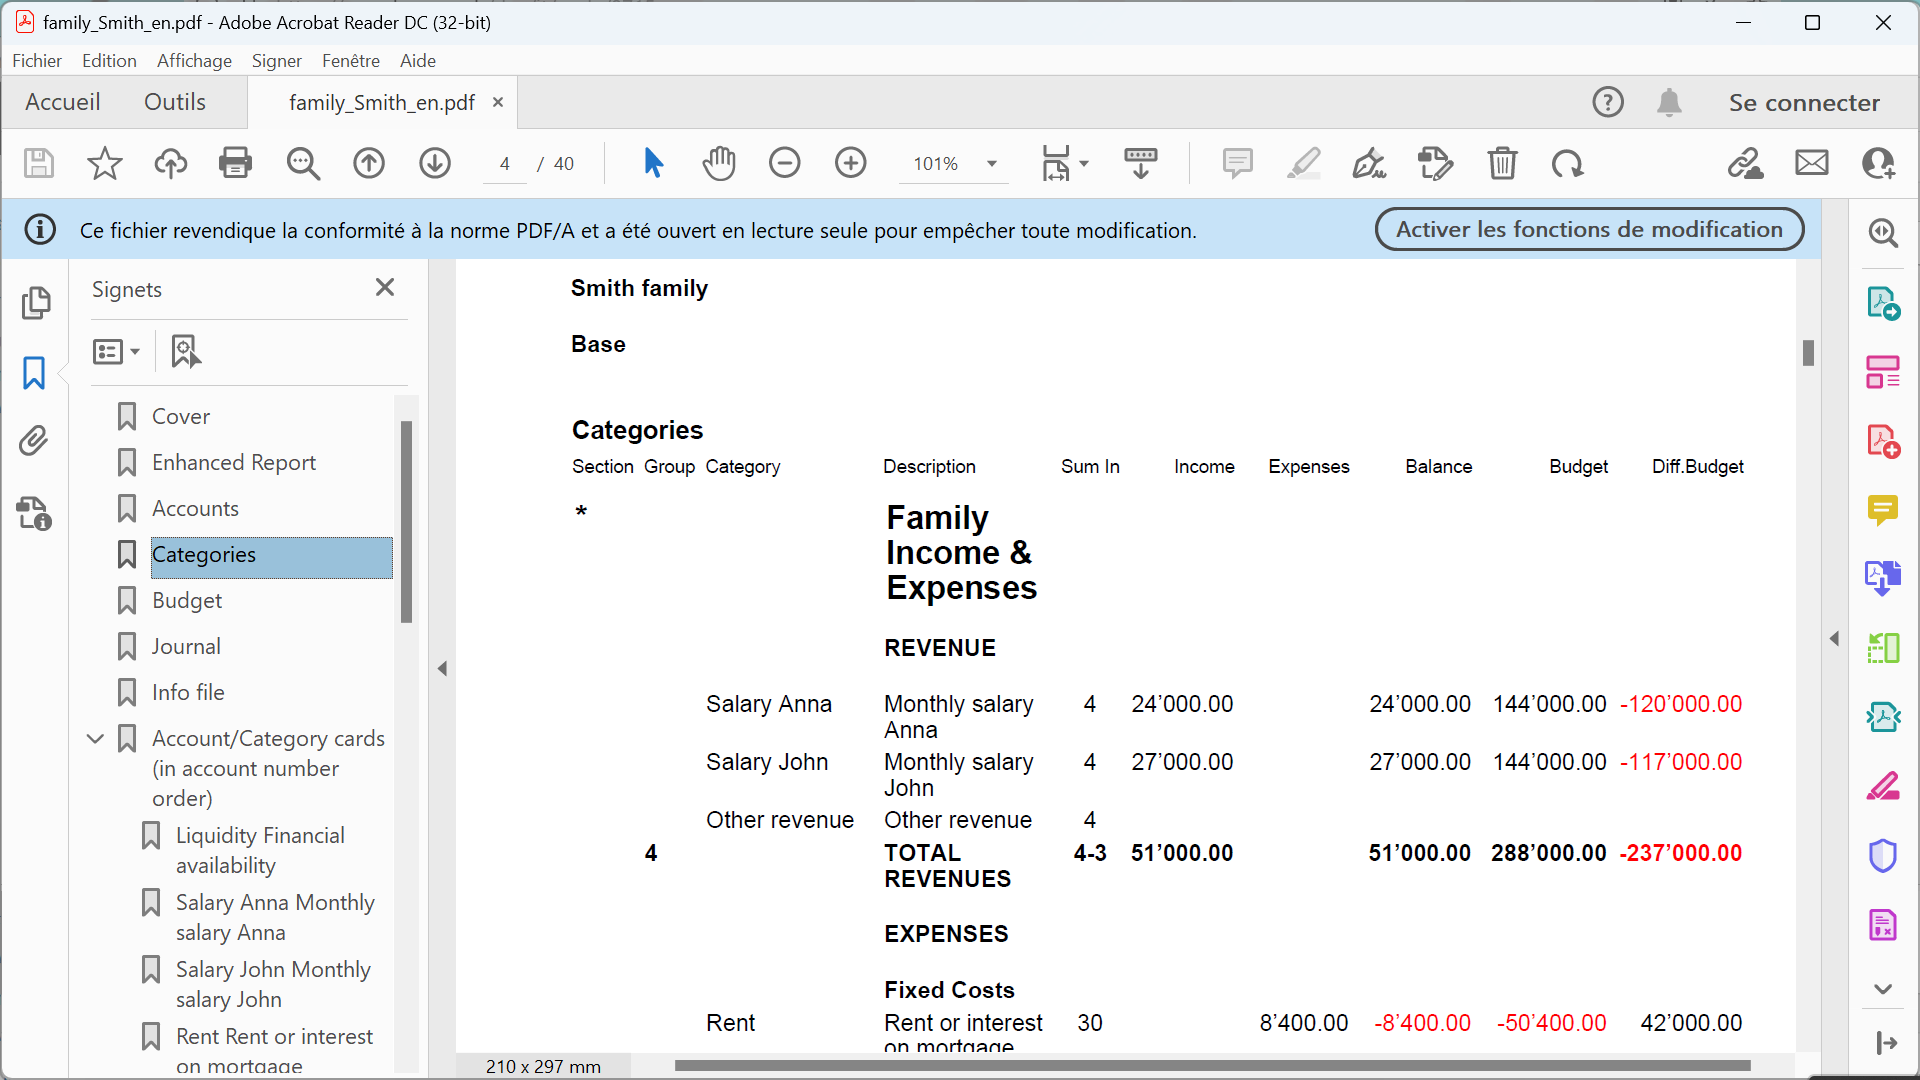
Simple and comprehensive archiving. From the menu File > Create Pdf dossier, you can easily archive all accounting data in a single PDF document. This allows you to store the entire accounting for the year in an orderly and complete manner, making it easier to access and consult the data in the future.
Topics common to other applications
- Add, cancel an account
- Rename an account
- Insert groups
- Cost and profit centers
- Segments
- The Balance column
Printouts
How to Start a Cash Manager
▶ Video: How to start a Cash Manager (Cash book) file. Learn how to enter and monitor the movements of your money of your cash account.
Creating an accounting file, starting from a template
Here is how to start choosing a template directly from the program:
- File menu → New command
- Select the Region, the category and the accounting type (with or without VAT).
- From the list of the templates that appears, select the template that is closest to your own needs.
- Click on the Create button.
You can search for a template by entering a keyword in the Search box; the program displays the templates containing the keyword entered.
It is equally possible to start from a blank file, by activating the Create blank file option. In any case, in order to facilitate the start and avoid grouping errors, we recommend that you always start from an existing template

Further information is available on the Create New File page.
Setting up the File properties
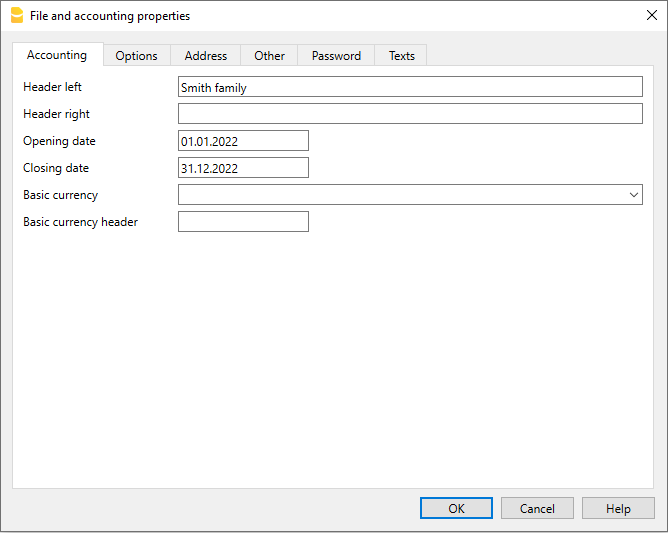
Set up your own data from the File and Accounting properties command and save with your own file name.
Save to disk
Via the File→ Save As command, save the data and also assign a name to the file. The typical save dialog of your operating system is displayed.
- It is advisable to use the name of the company followed by the year "Company-20xx.ac2" to distinguish it from other accounting files.
- You can keep as many accounting files as you need and each one will have its own name.
- You can choose the path or support you want (save on drive, USB or cloud).
If you also expect to have documents linked to the current year's accounts, it is suggested that you create a separate directory for each accounting year where all the files are to be grouped. Please also visit the Organizing your files page.
Entering the opening balance of the account
Enter the account you wish to manage in the Accounts table of the Cash Manager and the initial amount in the Opening column. At the start of a new year, using the menu Actions → Create New Year ... command will automatically generate the opening balances to be carried over.
Only one account can be entered: if you need to manage more than one you need to use the Income / Expenses accounting.
Customising the Categories table
In the Categories table, customize the income and expense categories, according to your own needs. It is possible to:
- Change the category numbers
- Change the description
- Add or delete categories
- Add or delete subgroups
All balances of the categories will determine the result of the accounting year (profit or loss) and must therefore not contain any balances at the start of the year.
Add new categories
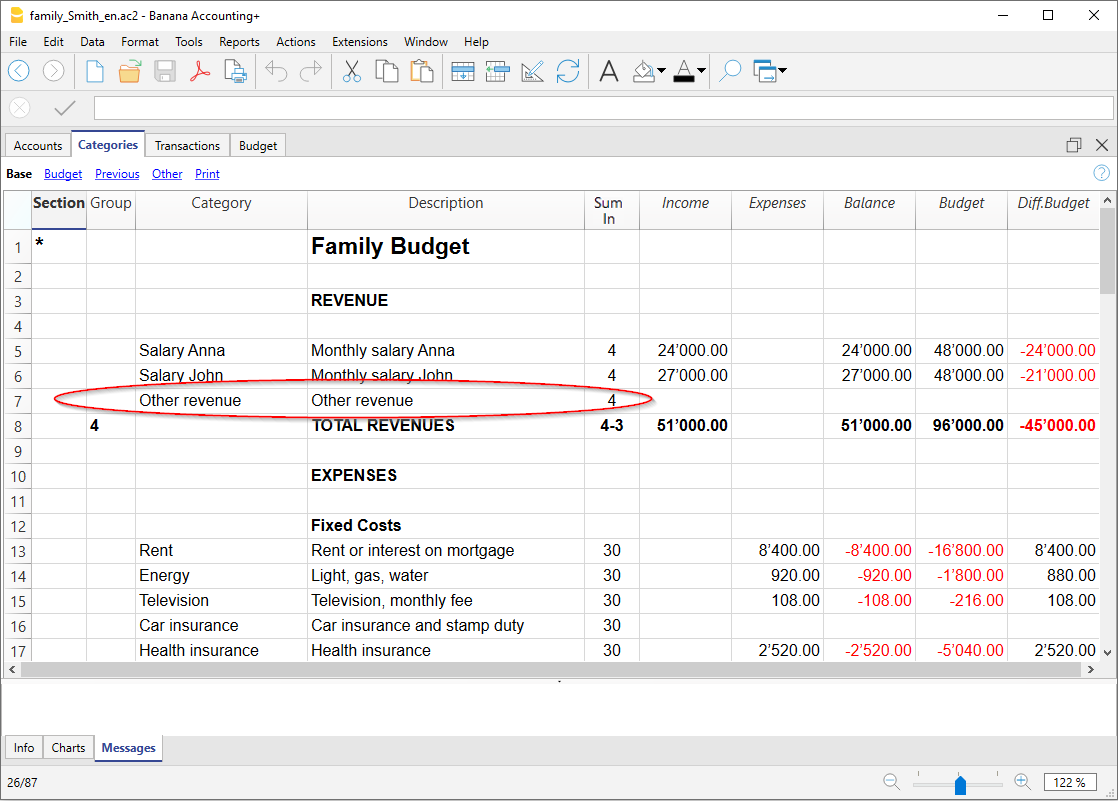
If new categories need to be added in an already existing group, proceed as follows:
- Add an empty row (Edit menu → Add rows ) before the Total of the Group
- Enter the category number or code in the Category column
- Enter the category description
- In the Sum in column add the same grouping code or number as the other categories belonging to the Group Total
Add subgroups
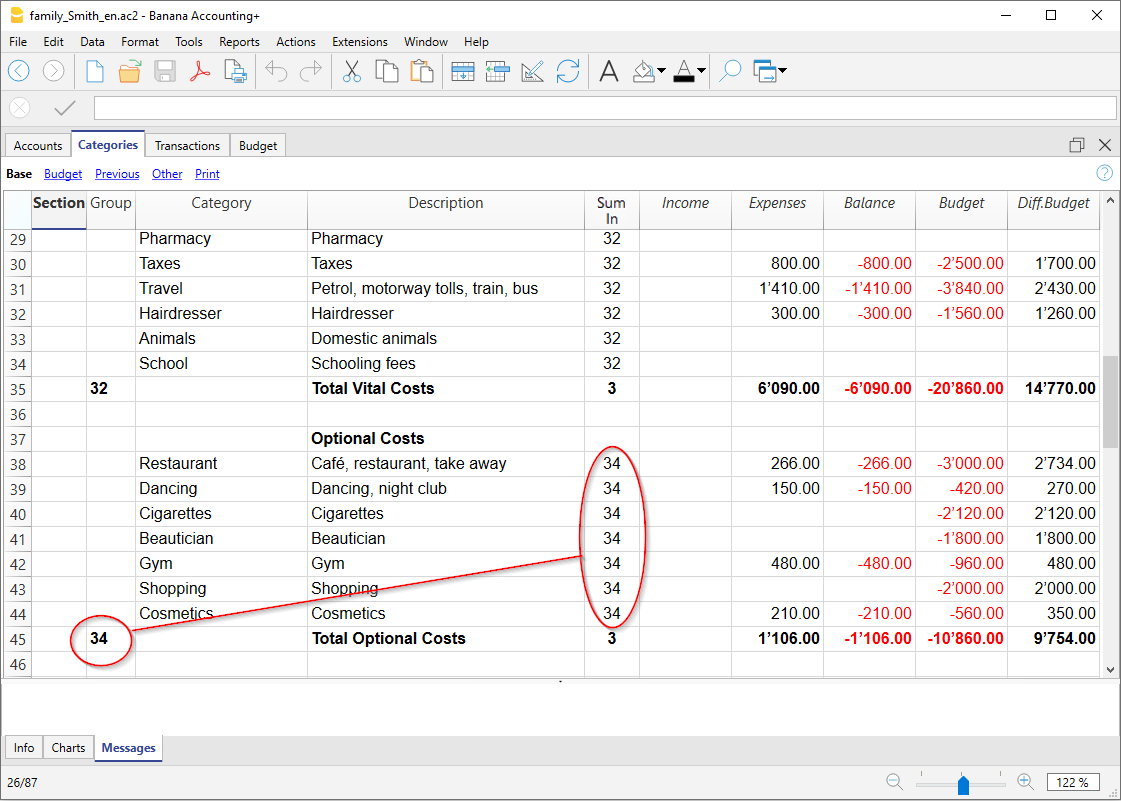
To add new subgroups, proceed as follows:
- Add an empty row (Edit menu → Add rows ... command) where you wish to add a new subgroup
- In the last empty row, in the Group column, enter a number or code for the totalisation group (in our example 31 - Other income)
- Enter the description that identifies the new subgroup
- In the Sum in column, enter the totalisation group (in our example 3 - Total sales).
Delete categories or subgroups
Select the categories or subgroups you wish to delete and proceed with in the Edit menu → Delete rows ... command.
Transactions
In the Transactions table, income and expense transactions are entered, indicating the category to which the income or expense is attributed.
Speeding up the recording of the transactions
In order to speed up the recording of your transactions, you can use:
- The Smart fill function that allows the automatic auto-complete of data that have already been entered at an earlier date.
- The Recurring transactions function (Actions menu), used to memorize recurring transactions into a separate table.
- Import of your bank or postal account statement.
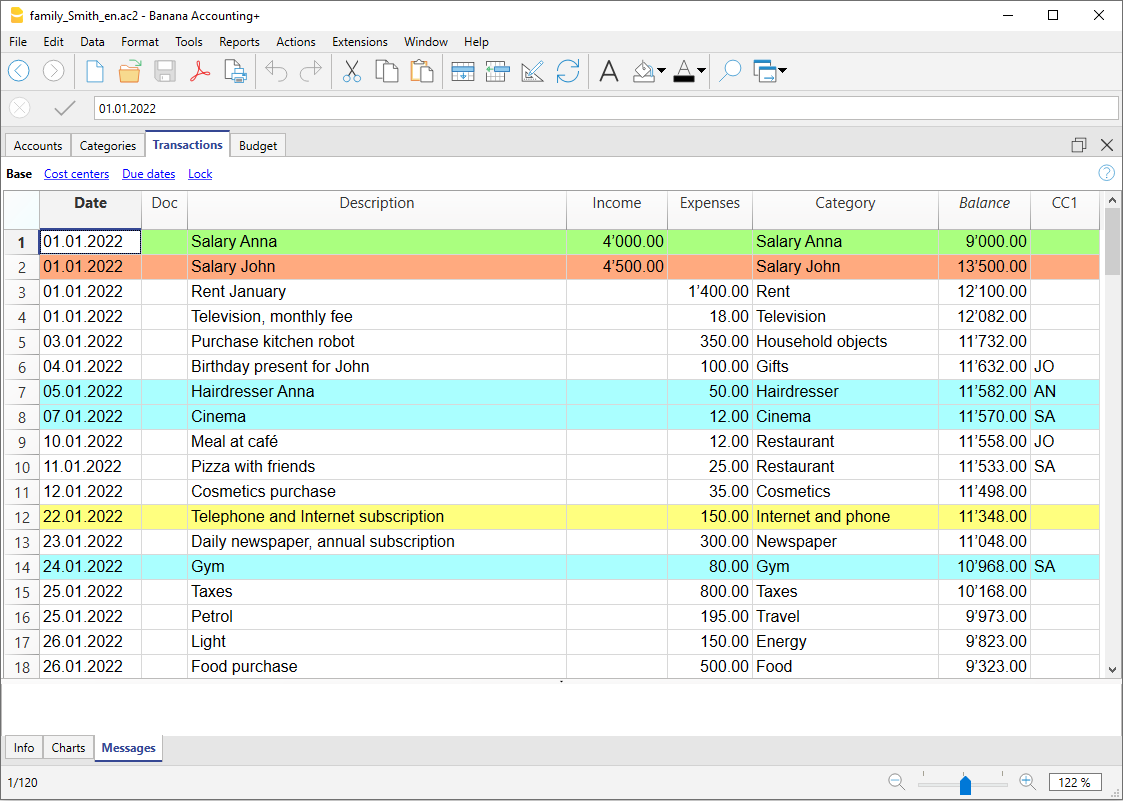
Make visible the Balance column in the Transactions table
The new Balance column is a very useful feature: it allows you to immediately spot possible differences.
The Balance column is not visible by default: you can make it visible via the Data → Columns setup menu.
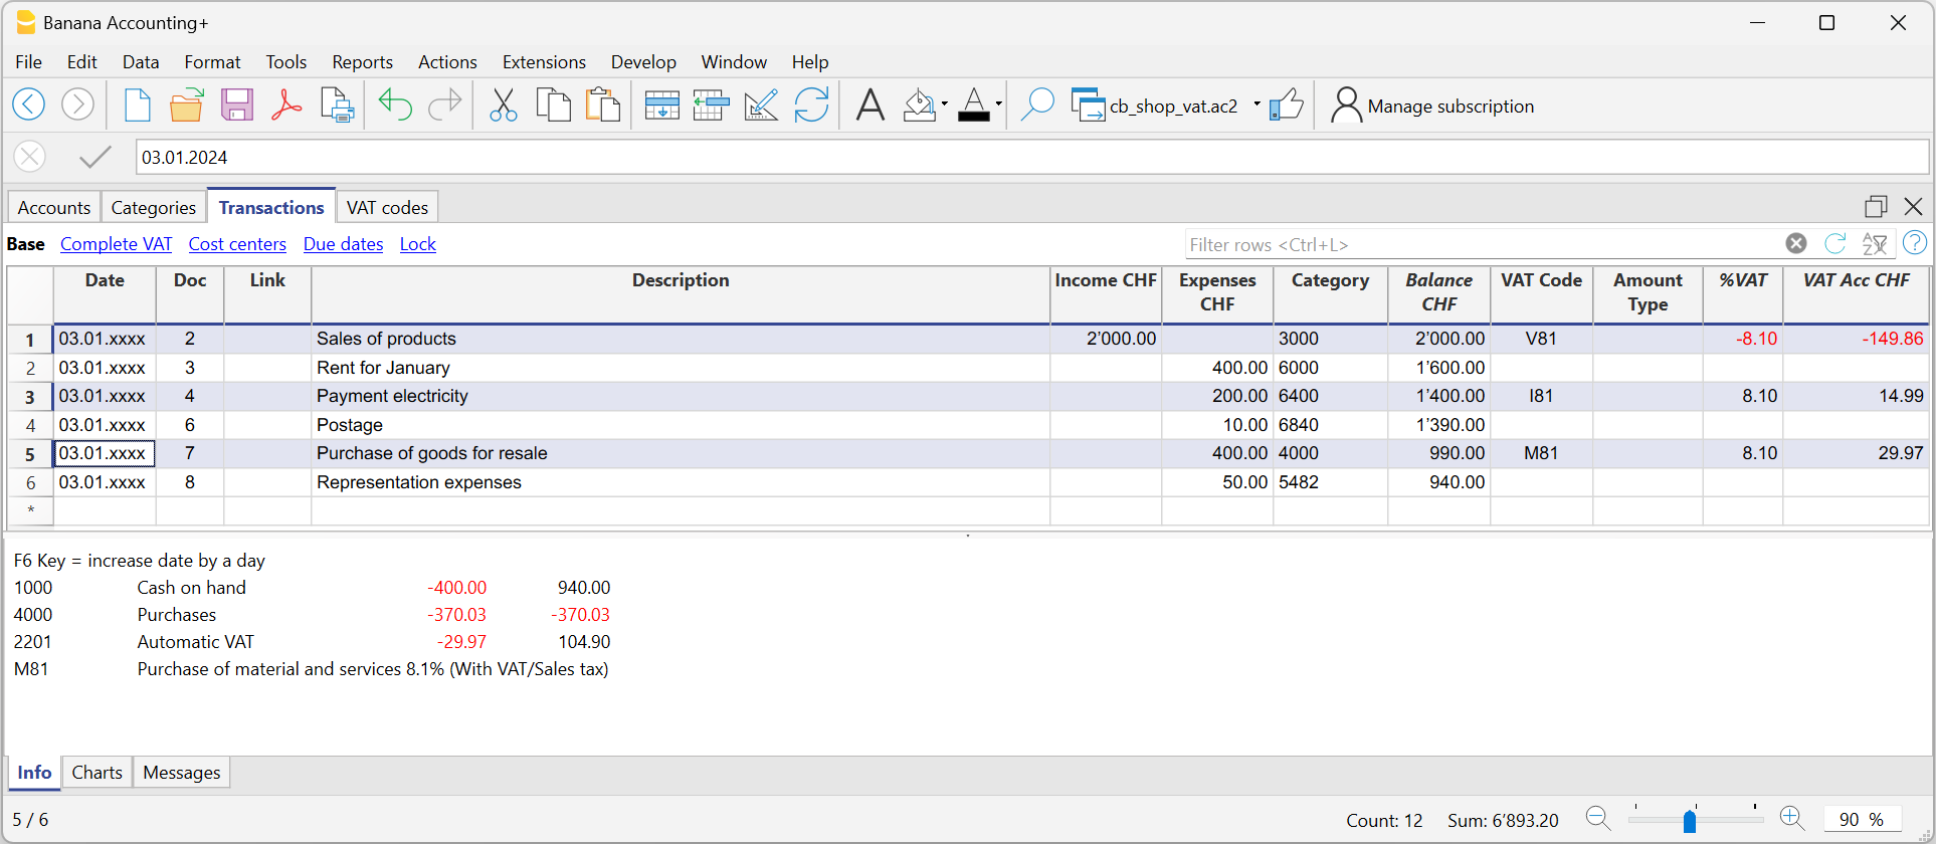
Transactions with VAT
In order to enter transactions with VAT please proceed as follows:
- from the File menu, choose New command and choose as Type the Cash Manager with VAT/Sales tax
- Choose one of the existing templates for your nation.
In order to enter transactions with VAT, please refer to the Transactions page.
The Category or Group card
The Category or Group card allows you to have a complete list of accounting entries relating to the same category or group.
- To open an category or group card you click once on the account number cell and then click once on the small blue arrow appearing in the upper right corner of the cell.
- To open multiple category or group cards you must select the Account cards command from Reports menu.
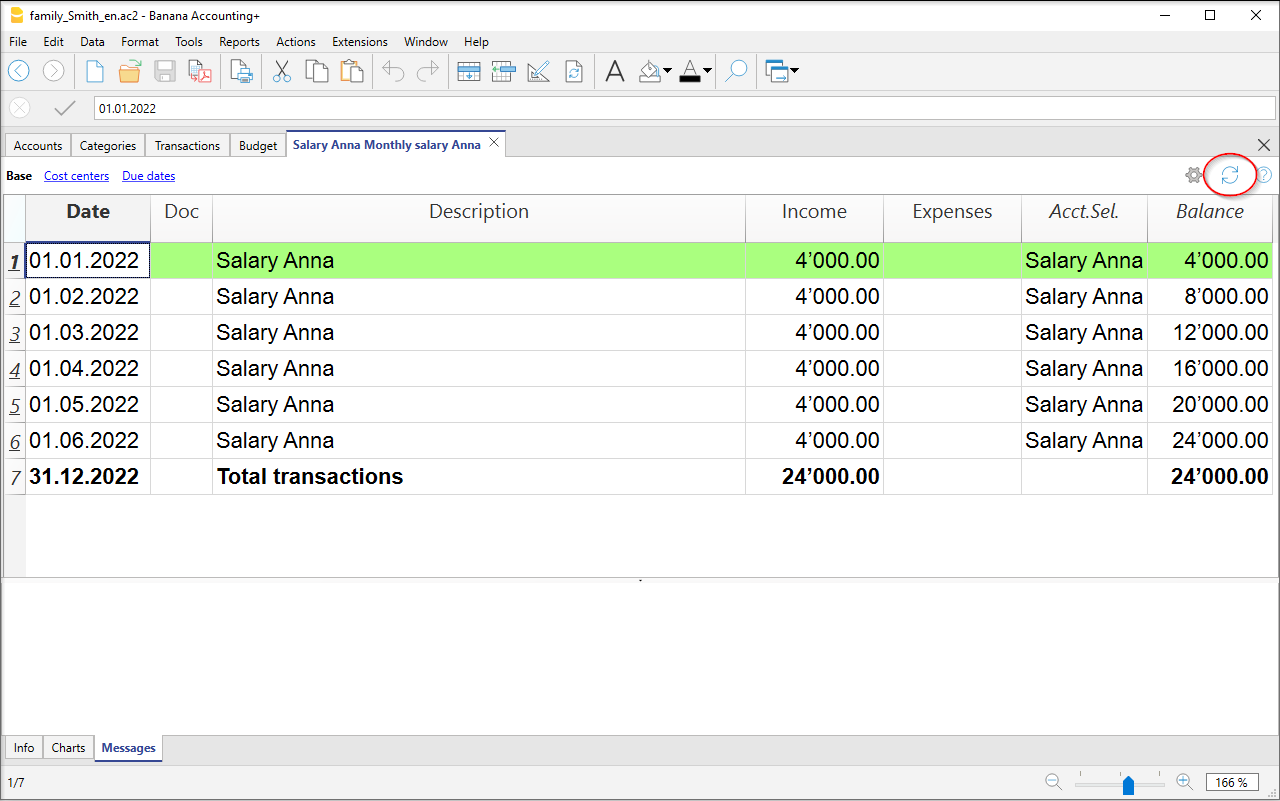
- To update the category or group cards, following changes in the Transactions table, you must click on the two circular arrows symbol, located at the top right corner of the account card.
Account cards per period
To open an category cards with account balances referring to a predefined period, click on the Reports menu, Account/Category cards ...command and click Period selected in the Period tab to insert your selected period. Visit the Period page for further information.
Print the Category card
To print a Category card, open it from any table (Accounts or Transactions) and start printing from the File menu.
To print out several or all the Account/category cards , click Reports menu, select Account/category cards and select the accounts/categories you wish to print. The filter in the window allows you to select automatic selection of all categories, cost centers, segments, groups etc ... Visit the Account Cards page for further information.
Enhanced Statement
To view the Enhanced Statement and the Enhanced Statement with groups, choose the Report menu → Enhanced statement or Enhanced statement with groups command. You can also obtain statements by period.
- The Enhanced statement displays all accounts and categories without any subgroups
- The Enhanced statement with groups displays all accounts and categories also with subgroups
Archive data in PDF format
At the end of the year, when the accounting is done, corrected and revised, you can store all accounting data with the Create PDF dossier command from the File menu.

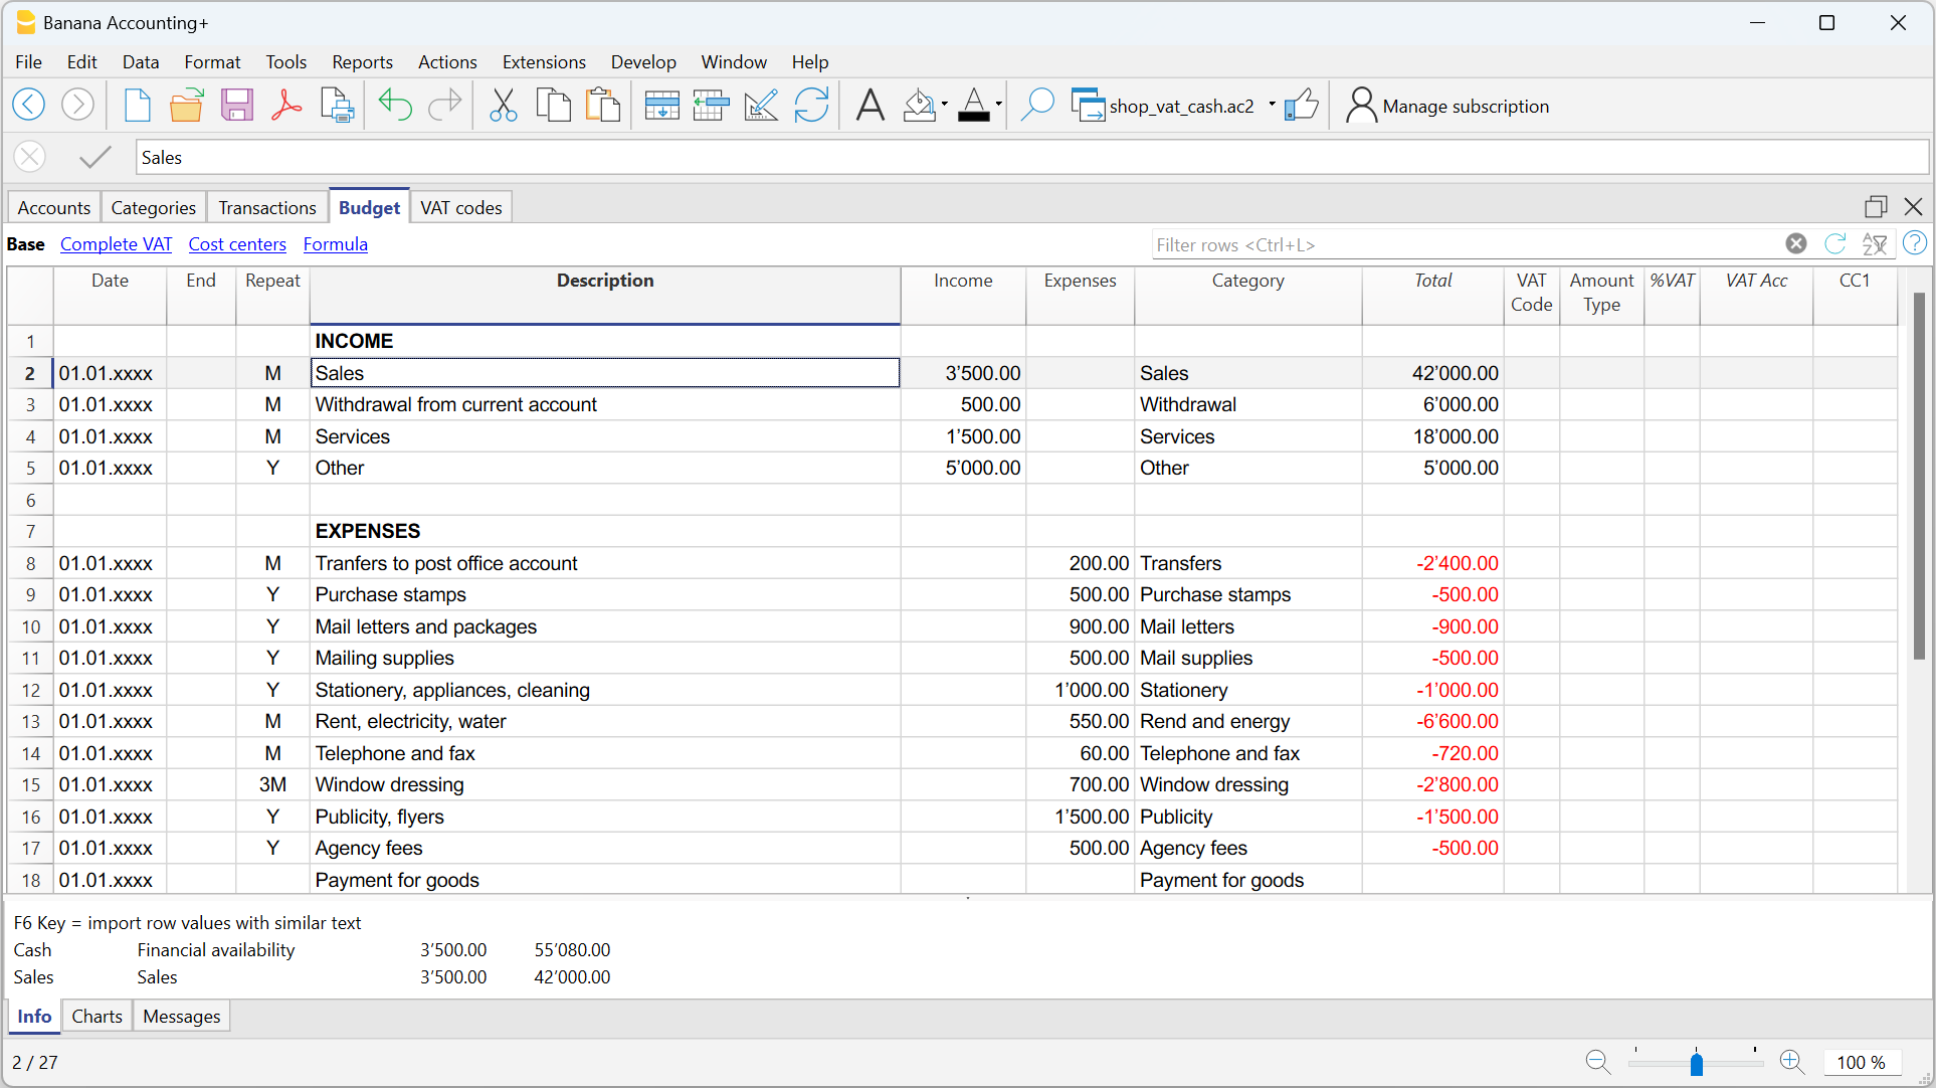
The Budget
Before starting your accounting year, you can create a budget with your assumed expenses and revenue, in order to have control over the financial and economic situation of your company.
The budget can be set in two different ways:
- From the Budget column of the Categories table. For each account the yearly budget is indicated.
In this case, when you process the Budget from the Reports menu, Enhanced statement with groups command, the Budget column shows the amounts that relate to the entire year. - From the Budget table, that you need to manually activate using the Tools menu → Add new functionalities → Add Budget table command.
In this table all estimates are entered as budget transactions, either income or expenses. If you activate this table, the Budget column of the Accounts table is automatically deactivated.
In the Budget table you can setup a detailed budget that takes into account possible variations during the year and in different periods of the year.
Cash Manager Accounts Table
The Cash Manager Accounts table contains only one account and no other accounts can be added.

The columns of the Accounts table:
The main columns of the Categories table are listed below. The display of columns changes according to the selected View.
Additional columns can be added either system or own columns via the menu Data > Columns setup.
Group
This column remains empty.
Account
Enter the number or initials of the account to be managed (cash, bank, post office).
Description
Enter a description relating to the account entered.
Opening
You need to enter the opening balance only the first time you use a new file or when using Banana accounting for the first time. At the beginning of the new year with automatic opening, the account balance is automatically updated.
Income
The column is protected and shows the balance of income transactions. The balance is updated automatically after each transaction.
Expenses
The column is protected and shows the balance of outgoing expenses. After each transaction the balance is updated automatically.
Balance
The column is protected and shows the total balance between income and expenses. After each transaction the balance is updated automatically.
Cash Manager Categories table
The Categories table presents the Income and Expenses situation.
The Categories table
In the Categories column, for each income and expense, the respective categories are set.
In addition to the Categories column, there are columns to set:
- Sections
- The Totalization groups.
For further information on the grouping system, refer to the Grouping system. - Any Cost and Profit centers.
In the example there are three main groupings:
- Group 4 - Totals all the Categories that have grouping 4 in their Sum in column (total Income)
- Group 3 - Totals all the Categories that have grouping 3 in their Sum in column (total Expenses)
- Group 00 - Totals groups 3 and 4 (Total Income and Expenses), which determine the Result for the accounting period.

The columns of the Categories table
The main columns of the Categories table are listed below. The display of the columns changes according to the selected View.
You can add additional system columns as well as your own columns via Data > Columns setup.
Section
An asterisk is inserted in the row where a title is entered, which will then be taken over in the Enhanced Statement with groups
(in our example the asterisk is inserted on the line of the title Operating result).
If other sections are provided in addition to income and expenses, such as cost and profit centers, another asterisk can be inserted in the Sections column, again on the title row. More details are available on the Sections page.
Group
Enter an identifier (numerical or sign) identical to the one entered for each category in the Sum in column. The totals for each category belonging to the same grouping of the Sum in column will then be added up (in our example, Group 4 totals the Income Category and group 3 the Expenses category).
Category
Enter the Category number that will identify the type of expense or income.
Description
A description is entered to identify the income or expenses category. This description is automatically taken from the Category Description column of the Records table (if displayed).
Sum in (Gr)
The code of a group is indicated so that the programme totals the amount of the line in the group.
The heading ‘Sum in’ has been adopted with the Banana Plus version.
The column name has remained Gr, to maintain compatibility with previous versions of the programme.
Each category has an identifier that is used to define in which group it is to be totalled (in the example, all revenue categories, in the Sum in column, have the grouping 4, because they are totalled in Group 4, Total Revenue).
Income
The column is protected and shows the balance of income transactions. The balance is updated automatically after each transaction.
Expenses
The column is protected and shows the balance of outgoing expenses. After each transaction the balance is updated automatically.
Balance
The column is protected and shows the total balance between income and expenses. After each transaction the balance is updated automatically.
Customising the Categories table
You may customise the entry and exit categories in the Categories table according to your needs. You can:
- Change category numbers
- Change description
- Delete or add categories
- Insert or delete subgroups
All category balances determine the operating result (profit or loss) and must therefore have no balance at the beginning of the year.
Adding new Categories
If you need to add new categories to an existing group, proceed as follows:
- Insert empty rows (menu Edit > Insert Rows) before the Totalisation Group row
- Enter the category number or abbreviation in the Category column
- Enter a description to identify the category
- Enter in the Sum in column , the same grouping number as the other categories, belonging to the same Totalisation Group.
Adding Subgroups
To add new subgroups, proceed as follows:
- Insert empty rows (menu Edit > Insert rows) in the area where you wish to insert the new subgroup
- In the last empty row enter a number or abbreviation for the totalisation in the Group column (in the example "34 - Total Optional Costs")
- Enter a description to identify the new subgroup
- Enter in the Sum in column the Totalisation Group (in the example "3 - Total Costs").
Deleting categories and subgroups
To delete categories or subgroups, select the rows with the categories and subgroup to be deleted and issue the command Delete rows from the Edit menu.
Opening Balances | Cash Manager
You only need to enter the Initial Balance the first time you use Banana Accounting Plus.
Opening balances when you start with Banana Accounting
When creating a new file for the first time with Banana Accounting, the opening balances must be entered manually in the Accounts table, Opening column.
When you move to the new year, using the Actions > Create new year command, Banana accounting reports all the opening balances automatically.
It is not possible to enter more than one account; for this you must use the Income/Expense Accounting.

Start with Banana Accounting during the year
If you start a new accounting, taking over the work already done with other programs, you have two possibilities:
- Start accounting from the start of the year, by entering the opening balances at the beginning of the year (Accounts table, Opening column) and the transactions (Transactions table) that have already been previously recorded with other programs (also see Transferring data from other software). Thus you will have all the accounting details a single file.
- Starting from the date when the accounting is resumed:
- Enter the opening balances (Accounts table, Opening column), taking over the values of the other accounting.
In addition to entering the opening balances of the Cash in the Accounts table, it is also necessary to enter the income (positive) and expenses (negative) balances in the Categories table. - Input the new entries in the Transactions table.
- Enter the opening balances (Accounts table, Opening column), taking over the values of the other accounting.
Balances of the previous year
If you start a new accounting by taking over an existing accounting and you want the previous year's values to appear on the printouts, it is necessary to enter the previous year's balances in Accounts and Categories > Previous view > Previous Year column:
- Enter the closing balances of the previous year's Cash (Accounts table).
- Enter the closing balances of the previous year's Expenses (Categories table).
- Enter the final balances of the previous year of Revenues (insert the minus sign in front of the amount).

Create new year
When you start the new year, the program automatically carries over the opening balances for the following year.
Consult the Create New Year lesson.
Print opening balances
To print the opening balances:
- To print the contents of the table, use the File > Print / Preview command, by selecting the rows of the Balance Sheet.
- You can also use the Accounting printouts and set the printout only for the Statement part and the opening column.
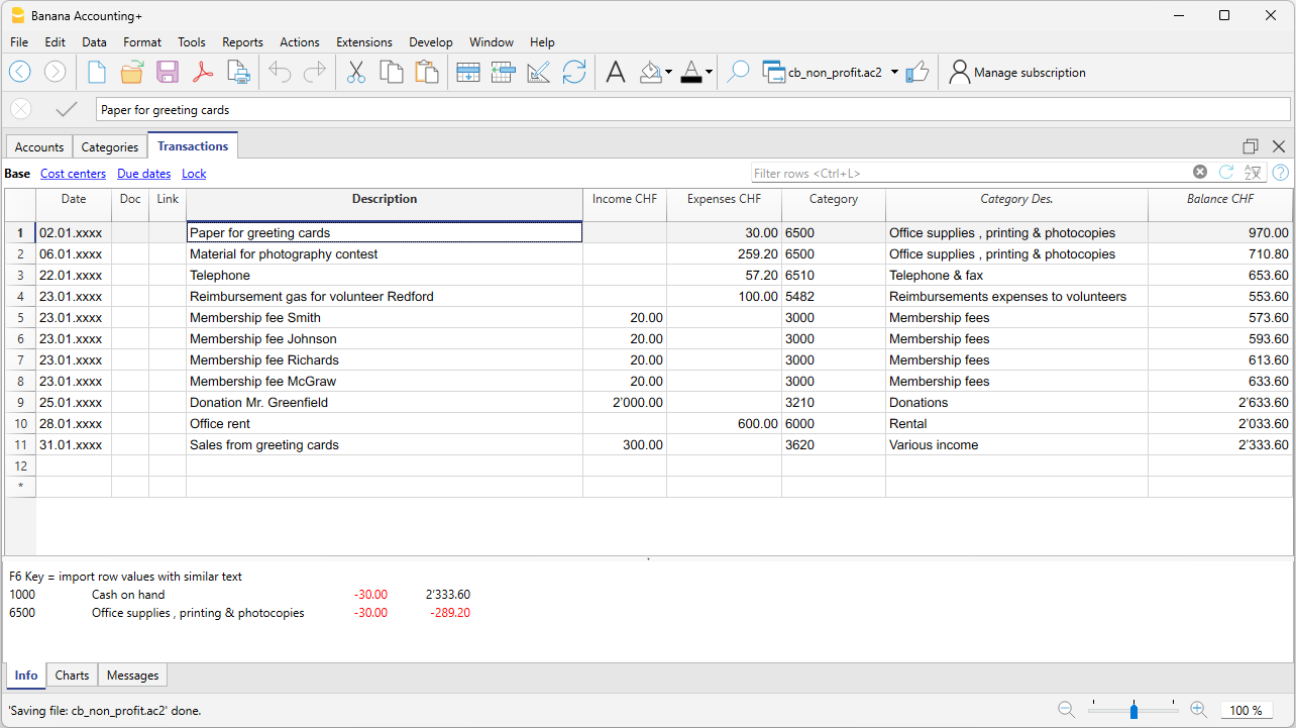
Transactions table of the Cash Manager
The transactions of the Cash Manager are entered in the Transactions table.
There are specific columns to enter:
- the date
- the document number
- the description
- the income or expense amount
- the category relevant to the income or expense in the Category table
- should the transaction be subject to VAT tax, enter the VAT code in the VAT code column.
The VAT codes are listed in the VAT codes table.
Speeding up the recording of the Transactions
In order to accelerate the recording of the transactions, you can use:
- the Smart fill function that allows the automatic auto complete of data that have already been entered at an earlier date.
- the Recurring transactions function (Actions menu), used to memorize recurring transactions into an appropriate table.
Examples of transactions without VAT
Examples of transactions with VAT
Category card
To display the transactions of a category, click once on the small blue arrow appearing in the upper right corner of the cell.
The display of entries in the Categories table is similar to the one in the Transactions table.
When new transactions are added or changes are made (i.e. in the Transactions table), it is possible to update the tab of a category by clicking on the Update symbol (blue symbol, of two circular arrows, located in the right part of the window).

Budget table of the Cash Manager
Financial planning is carried out in the Budget table.
Before starting a financial year, you can budget expenses and estimate income to keep the economic and financial situation under control.
The budget can be set in two different ways:
- In the Categories table, under the Budget column. For each category, the annual budget amount is indicated.
In this case, when you generate the Budget from the Report menu using the command Enhanced Statement with groups, the Budget column shows the amounts that refer to the entire year. - In the Budget table, which can be activated from the Tools menu > Add/Remove functionalities > Add Budget Table.
In this table, all budgeted expenses and incomes are recorded with transactions. If this table is activated, the Budget column in the Accounts table is automatically disabled. In this case, you can set a detailed budget that takes into account possible variations during the year and in different periods of the year.

Create new year
It is possible to transition to the new year automatically in the following ways:
- Open the file of the year that has just ended and from the Actions menu > Create new year.
- Confirm the basic file Properties.
- Save the file with a new name.
- The account, carrying over the initial balance.
- The categories are carried over without bringing an initial balance, as they start from zero, to determine the operating result of the new year.
Printouts
Instant information
In the Accounts and Categories tables, the balances of the accounts and the categories of income and expenses are displayed immediately. After each individual entry, the balances are updated automatically, and there is no need to generate reports to keep the situation under control; you simply need to position yourself in the Accounts and Categories table.
To print the content of the tables, please refer to the Page setup section (last paragraph).
Advanced printouts
All printing is run from the Reports menu, where the different functions for printing are located:
- Journal - command to define the period. You can display and print the whole table or just a specified period.
- Account/Category cards - Account cards / Categories. You may select all cards or define your selection.
Define the required period in the Period tab and click the required settings in the Options tab. Print settings can be saved in the Customization tab so they can be resumed without them to be having defined again.
- Enhanced statement - Enhanced statement command. You may also print a defined period and various options and customizations may be included.
- Enhanced statement with groups - Enhanced statement with groups command. You may also print a defined period and various options and customization may be included.
- Accounting report - Account report command. The required options are displayed in the Accounts table. Reports are possible for current, previous periods or previous years; each period may contain subdivisions and the customizations can be saved.
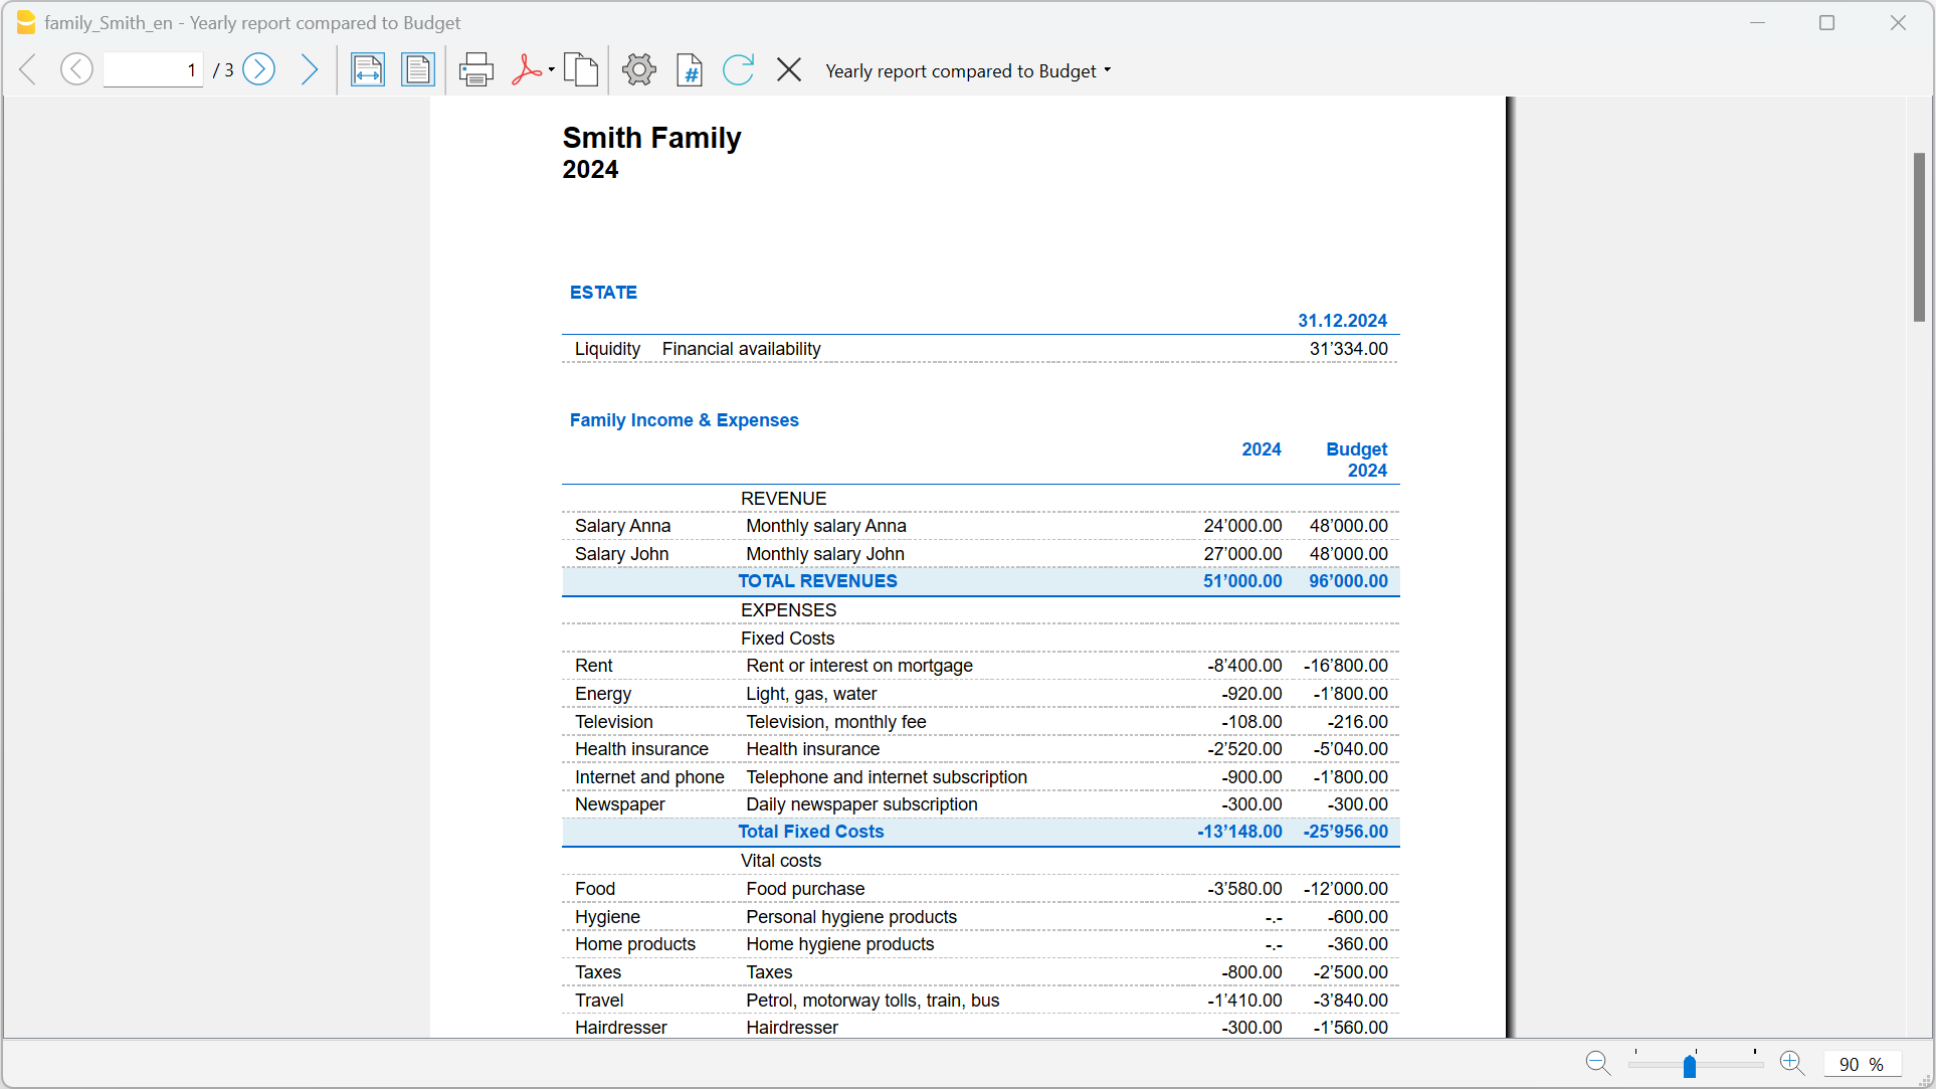
Example of printout of Enhanced statement with groups

Cash Manager account / category card
The account or category card corresponds to the ledger and allows you to have a complete list of the accounting entries concerning the same account, the same category, a cost center, a segment or a group.
Open the account card
There are two ways to open and print an account or category card.
First method
This method is recommended when you want to view and print all or several account/category cards.
- Via the Reports > Account / Category Cards menu

A dialog box with the following sections appears:
For detailed information on the sections, click on the corresponding links.
Second method
This method can be used when you need to open only one card at a time within the tables.
- Click on the small icon that appears when you select the cell that contains the account, category or group number.

Update the account card
The account or category card is temporary and is calculated at the time of the request. If transactions are changed or added in the Transactions table, the account card is not updated simultaneously.
To update the account card, following changes, it is necessary to use the Account / category card command again, or if the account card is still open, click on the symbol shown in the image below  .
.

Note
It is not possible to change the data in the account, category or group card. Within the account card, by double clicking on the row number, the program switches to the corresponding row of the Transactions table or of the Estimate.
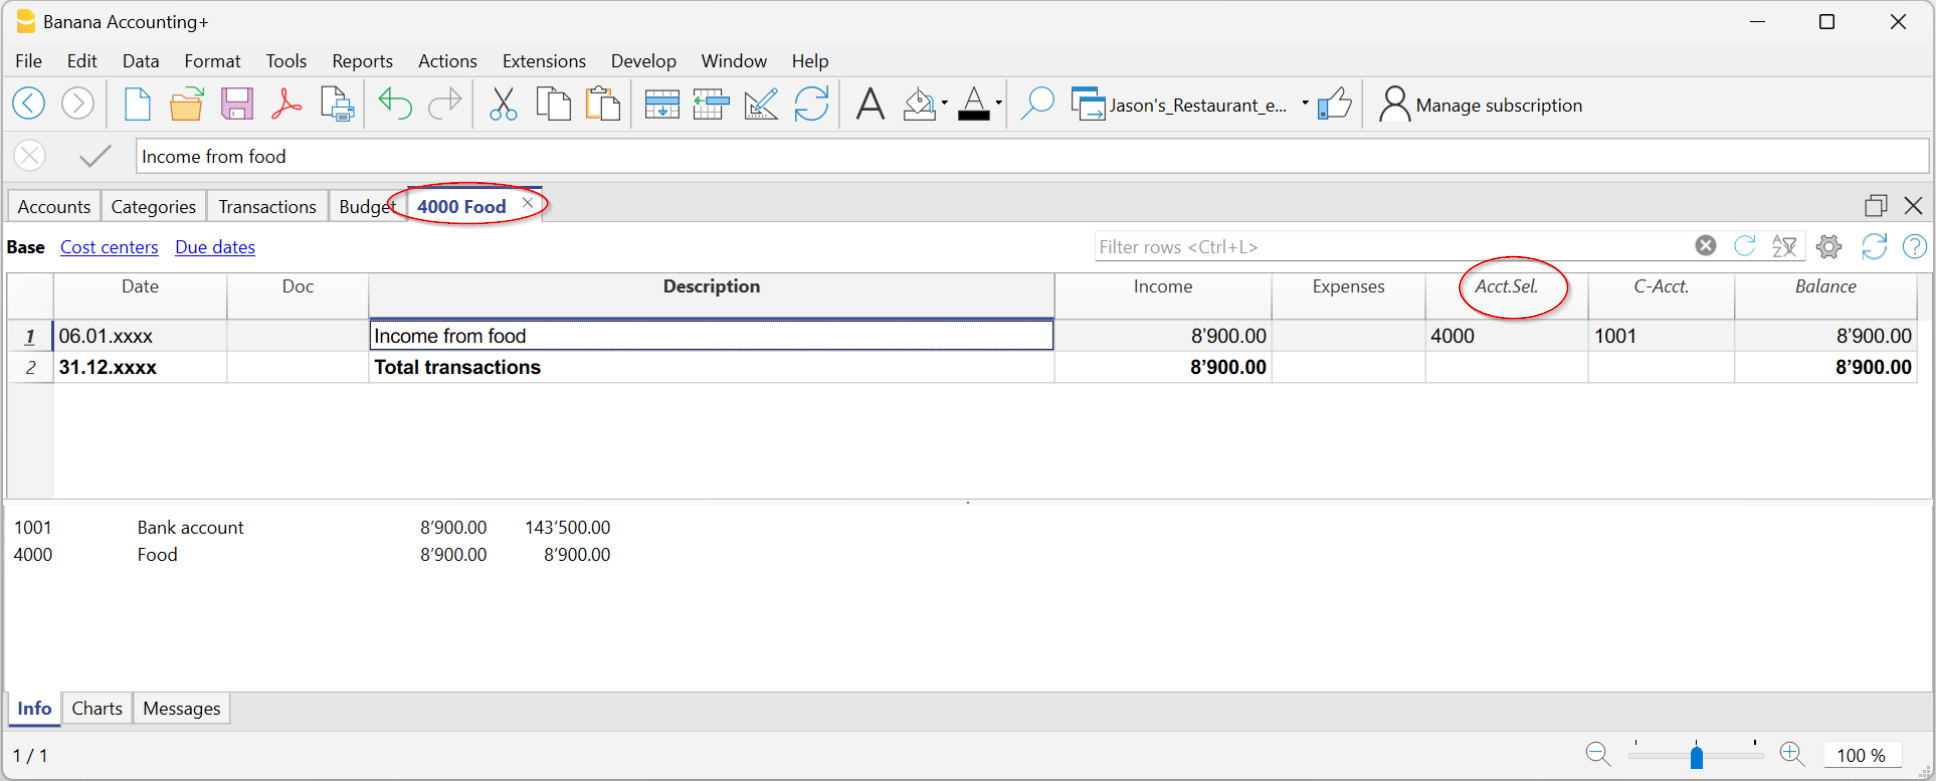
The Account Selection column
In the Account selected column, which can be made visible, starting from any account card, via the Data > Columns setup menu, the account on which the transaction took place will be displayed.
When you get an account card of one or more accounts, categories, groups and segments, you see exactly which account is used.
Cards of groups or classes
In the account card of a group or class, all the transactions of those accounts belonging to the selected group or class are regrouped.
The accounts or categories of the group or class can be viewed by making the Account Selected column visible.

Budget Account card
Once the budget transactions have been entered in the Budget table, it is possible to have the account or group cards of the budget:
- Reports menu > Account / category cards > activate Budget transaction.

Print the ledger (account cards)
To print the cards:
- Reports menu > Account cards
- Through the Filter it is possible to automatically select all the account cards to be printed or partially (eg only accounts, cost centers or segments).
- In the various sections Period, Options, Customization the desired functions are activated (eg period, one account per page ....).
- Confirm with OK after setting the desired options.
The selected account cards will be displayed on screen. To print, click on the File > Print menu.
Insert a logo in the account cards
As per Banana 9 version, it is possible to insert a logo also in the printout of the account cards.
After creation of the account card detail, proceed as follows:
- Reports menu > Account cards
- File menu > Print preview
- In the dialog box that opens, under Logo, indicate your logo (instead of none).
More detailed information is available on the Logo setup page.
Save the settings
If you happen to regularly print the cards of certain accounts, for example all those of sales, it is useful to create a relevant customization:
- Report menu > Account cards > Customization section
click on the New button - Indicate the name in the description, for example "Sales Accounts"
- Select the accounts you want to print
- From the File > Page setup menu you can determine the margins and other page settings.
Whenever you need to print the accounts, select the customization you created.
Movement Column
The Movement column, available in the Account card table, shows the debit and credit movements in a single column: positive amounts for debit entries and negative amounts for credit entries. The amounts are the same as those contained in the Debit and Credit columns.
A single column should allows for better control of your accounting.
You can activate the Movement column in the Account card, via the Data → Columns setup menu.


Journal Cash Manager
Journal
As in all Banana Accounting applications, transactions are entered in the Transactions table. If you want to print the Journal (list of all transactions), you can proceed in several different ways:
- Position yourself in the Transactions table and click on the Print preview icon; then click on the Print icon
- From the Transactions table and select from the File menu > Print preview > Print icon.
- From the menu Reports menu > Journal by period ...
Journal by period
Banana Accounting, through the menu Report > Journal by period, offers the possibility to print the Journal with the movements of the entire period or of the selected period, by entering the start and end date of the period.

The information on the Period section is available on the Period page of the common functions.
In the Sort column tab, you can select the base on which type of date to order and print the journal.
Enhanced Statement
The information on the Enhanced Statement is identical to that of the Enhanced Statement of Income / Expenses.
Enhanced Statement with groups
The information on the Enhanced Statement with groups is identical to that of the Enhanced Statement of Income / Expenses.
Accounting report
The information in the Cash Manager Accounting Report is identical to that of the Income / Expenses Accounting Report.
VAT/sales tax report (only with VAT option)

Information on the VAT Report is available on the web page VAT/Sales tax report.