Neste artigo
This page shows some examples of possible printouts of QR invoices.
Invoice with default settings
- Use the default settings of the templates for invoices dialog:
- Enter an IBAN account in the basic data File and accounting properties > Address or in the invoice settings.
Example print:
Invoice with logo
Via File > Logo setup:
- Define the logo, size and alignment.
- Set the alignment of the invoice header text.
Define the header text in File and accounting properties > Address or using the templates for invoices dialog:
Example invoice with logo aligned on the left and text on the right:![]()
Example invoice with logo aligned on the right and text on the left:![]()
Invoice with Letterhead-Style Logo (A4 Format)
This example explains how to set a full-page logo (like a letterhead). An image with a logo at the top and a footer at the bottom is used. The goal is to print the invoice with:
- On pages with invoice details, both the logo and the footer are displayed.
- On the last page with the QR slip, only the logo is displayed without the footer.
This is useful, for example, if you want to print a QR invoice that also includes the footer, because normally the footer can only be added if the QR slip is excluded from printing.
Here's how to do it:
- Create an A4-sized image of the letterhead with the logo at the top and the footer at the bottom.
Example:
- Insert the created image as the logo from the menu File > Logo setup.
- Set the size: width 21cm and height 29.7cm (if the image dimensions are already correct, you can skip this).
- Set alignment to left.
- The position and alignment of the text are irrelevant since no text will be printed in the header.
- Use custom CSS to adjust the logo margins.
In the Documents table, add a new row with the CSS as an attachment.- In the ID column, enter an ID (e.g., logo.css). It must end with ".css".
- In the Attachments column, double-click the cell and select CSS Stylesheet.
- In the editor that opens, paste the following code:
.logo {
  margin-top: 0cm;
  margin-left: 0cm;
  margin-right: 0cm;
}
- Set some parameters in the invoice settings dialog:
- In the Print > Header section, uncheck Page header.
- In the same section, check Logo.
- In the field Composition for logo and header alignment, enter the name of the customization you defined in File > Logo Setup > Customization > Name (default is "Logo").
- In the QR Code section, check QR on separate page.
- In the Javascript / CSS section, enter the CSS file ID defined in the Documents table (e.g., logo.css) in the CSS file name field.
Example of a QR invoice, with logo and footer on the first page, and logo with QR slip on the second page:![]()
![]()
Invoice without logo and company header on the left
Go the the File > Logo setup window:
- Do not add any logo image
- As Text position enter the following settings:
- Relative position to logo: To the left
- Horizontal align: Left
- Go to the Customization section and in the Name field enter a name for the customization (e.g., "Logo").

Now go to the invoice setup dialog window, in the Print > Header part:
- Check the Page header checkbox
- Check the Logo checkbox (although no logo image will be shown)
- In the field Composition for logo and header alignment enter the name of the customization that you previously defined in the Logo Setup > Customization > Name dialog (e.g., "Logo").
![]()
Printout example:
![]()
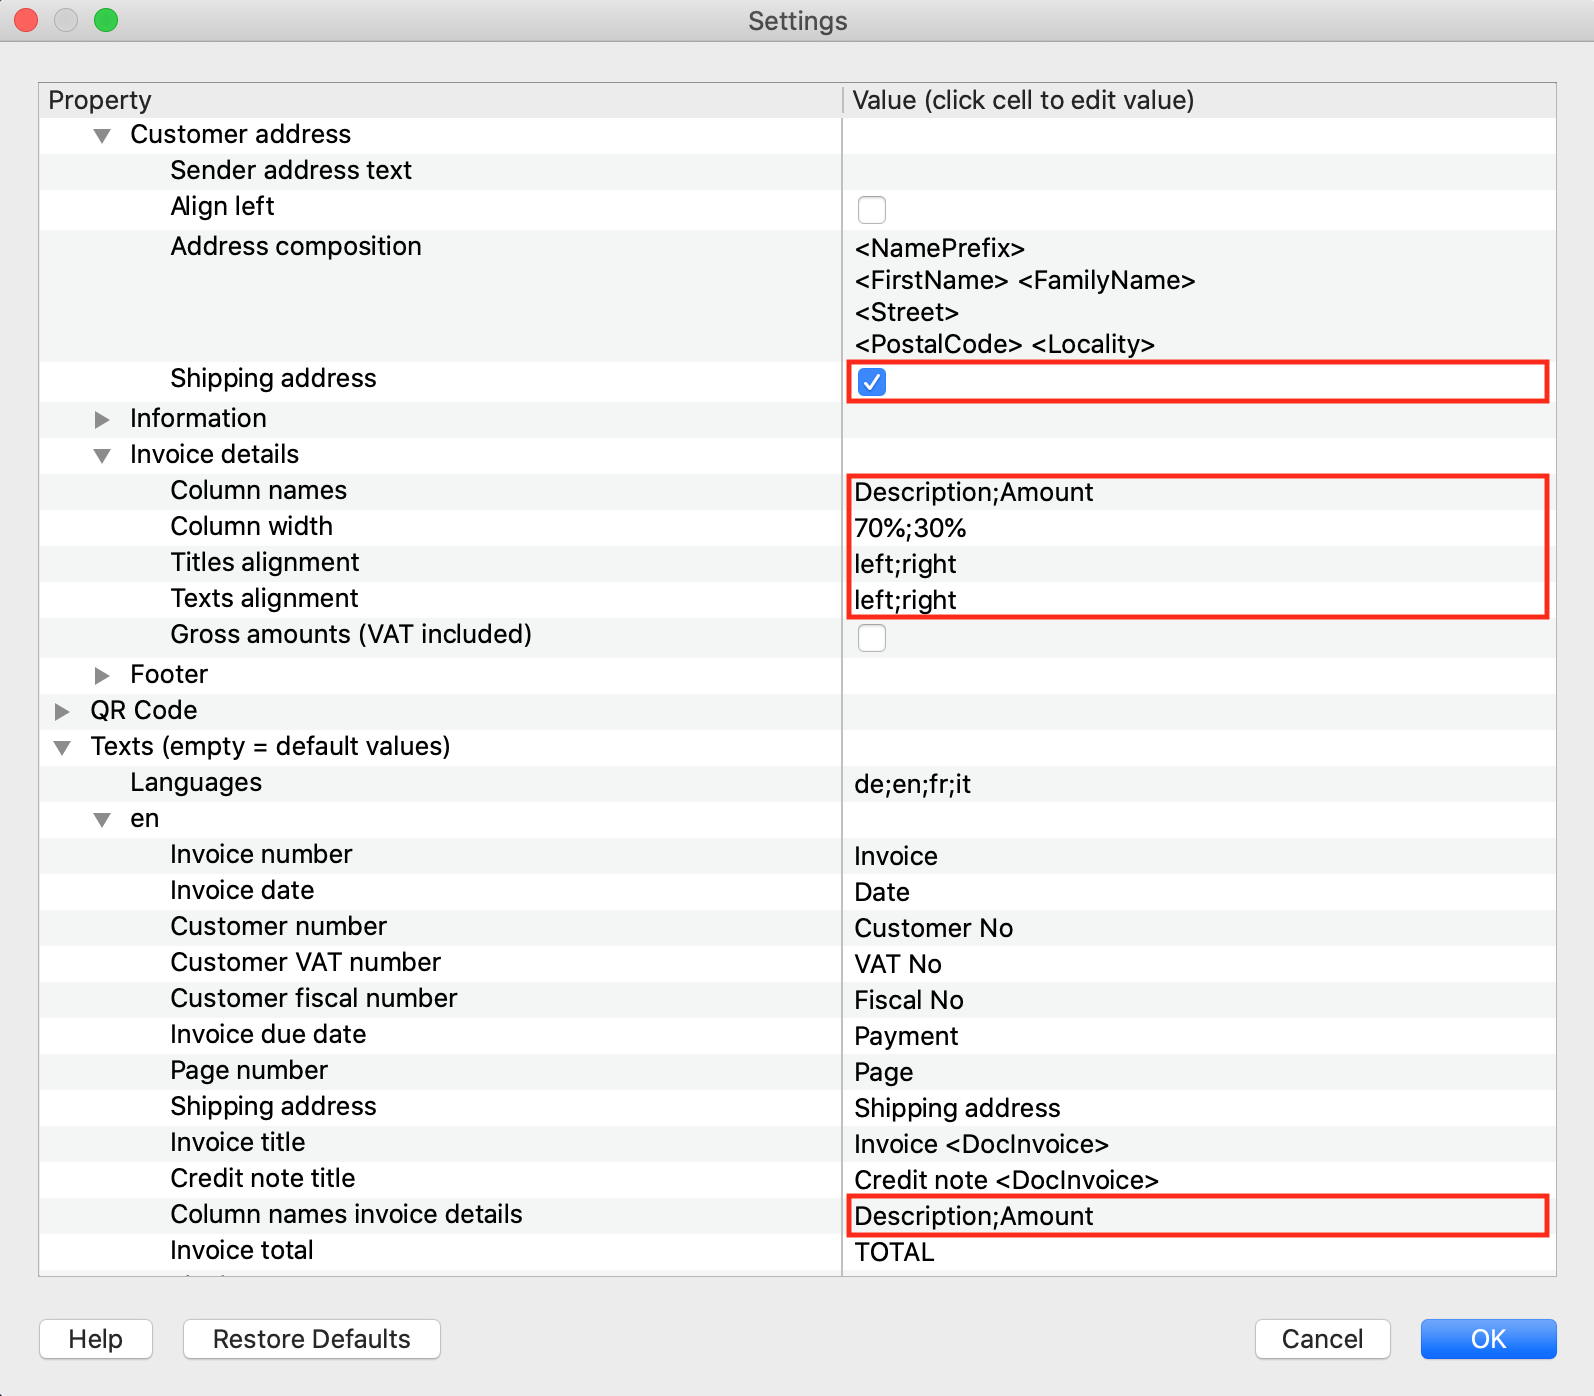
Invoice with customer address on the left
Via the templates for invoices dialog, in the client Address section:
- Define the composition of the address by specifying the XML names of the address columns of the Accounts table.
- Check the Align left box to print the address on the left and the part of the information on the right.
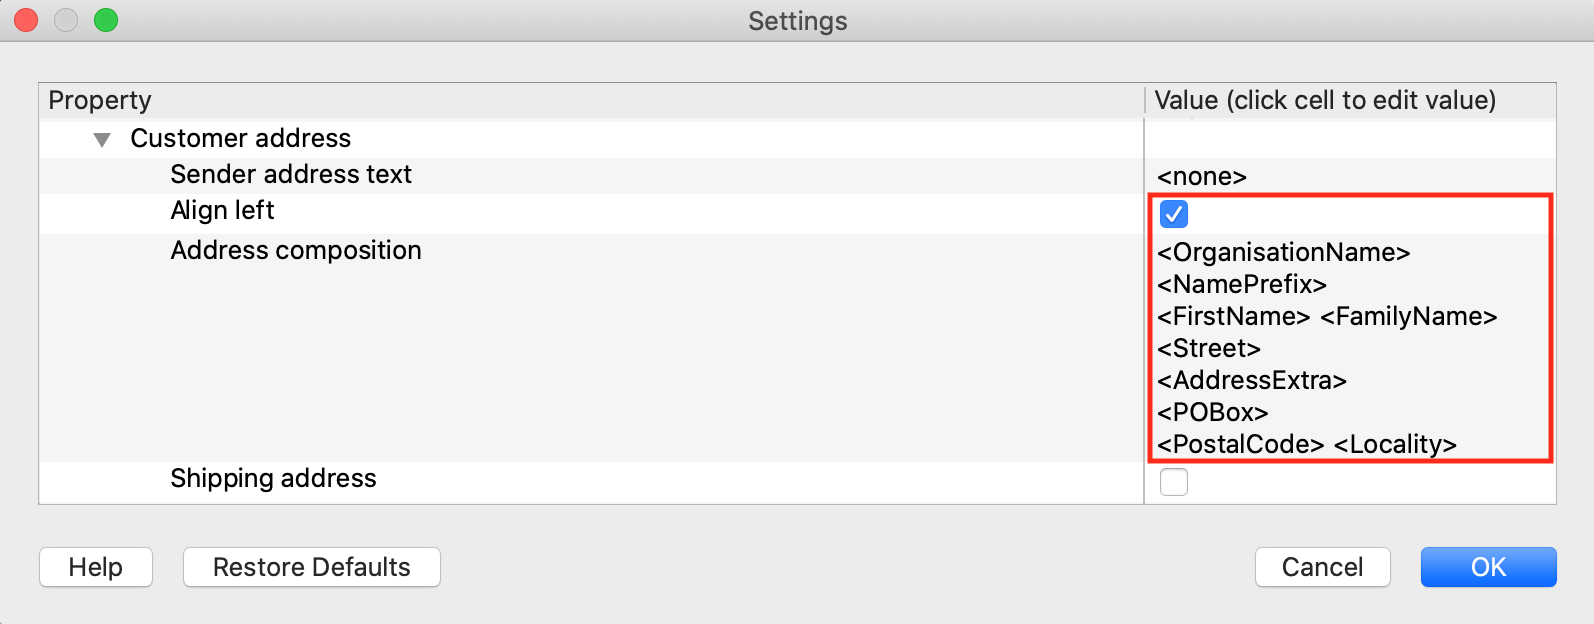
Printout example: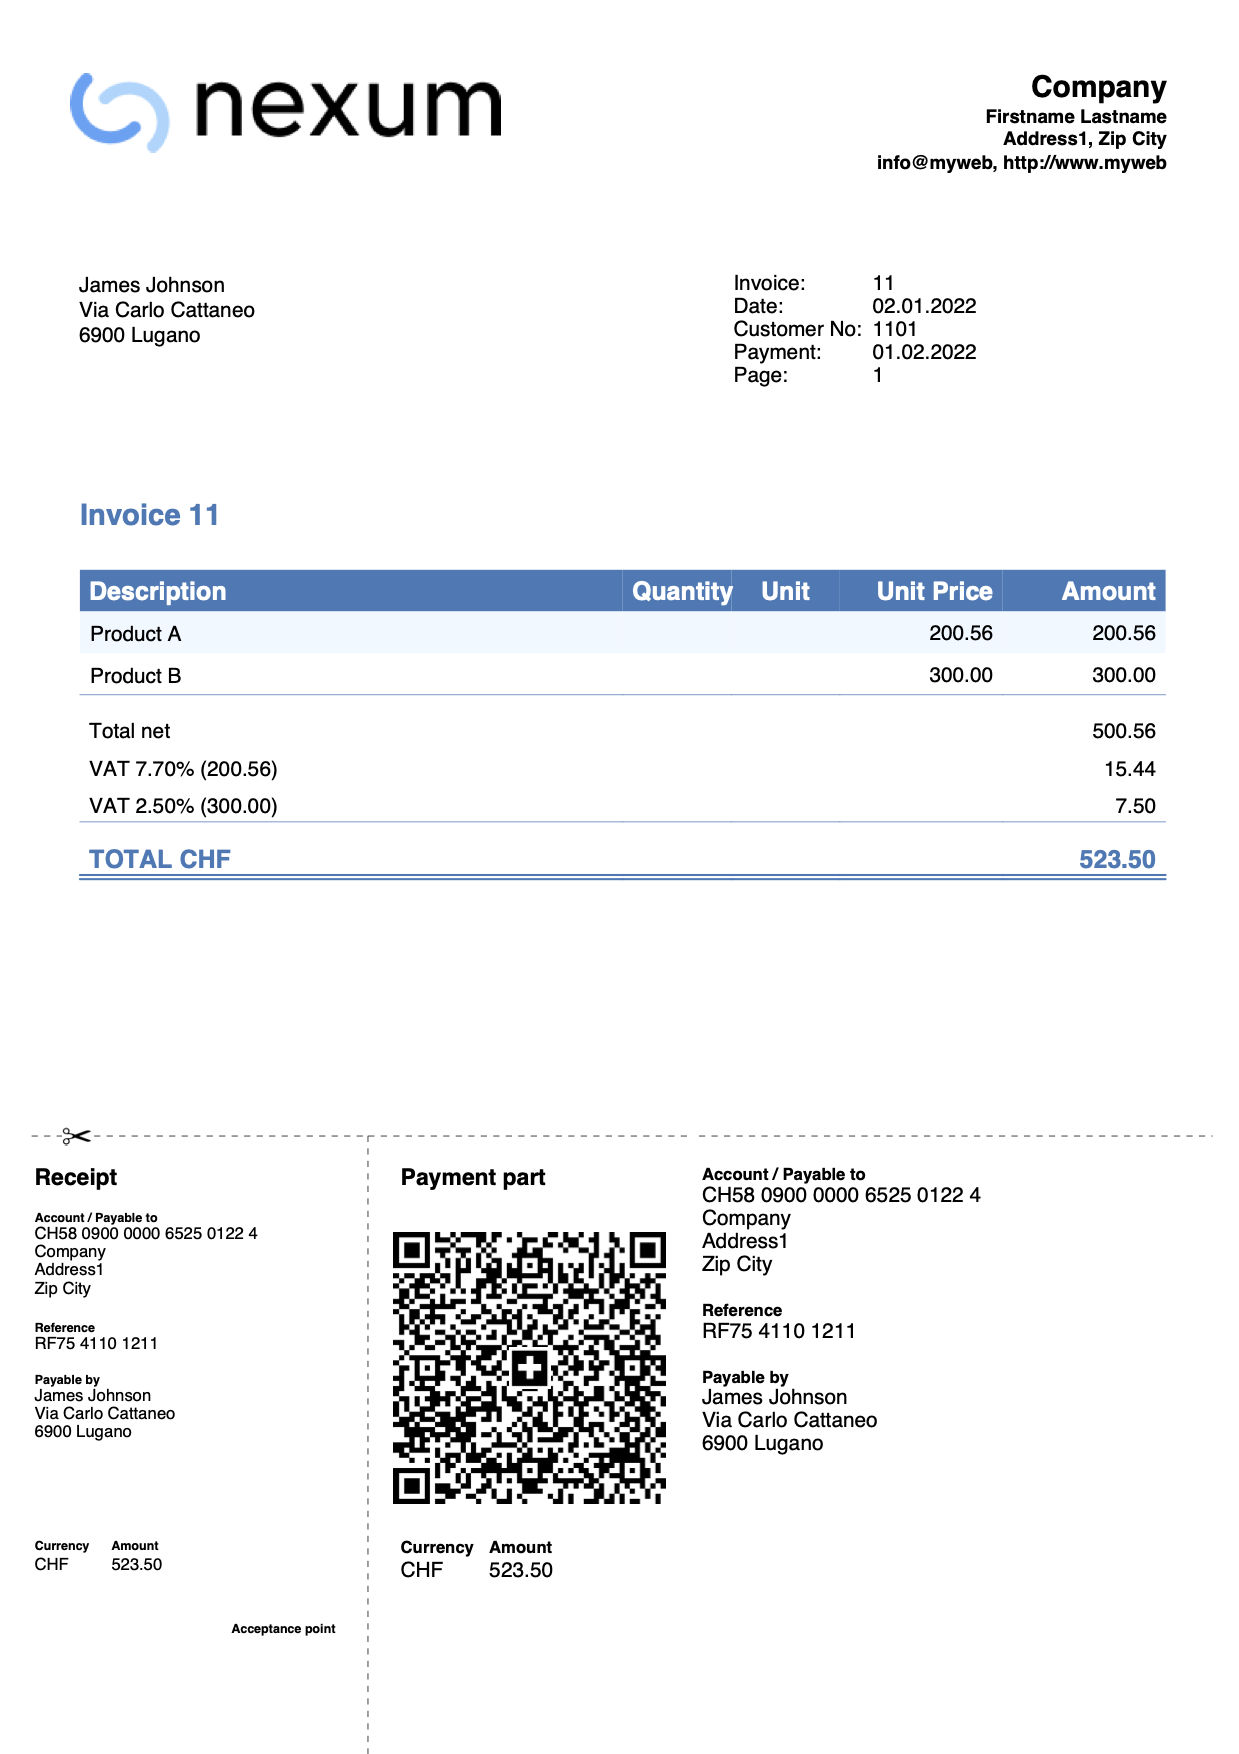
Invoice with headings and intermediate totals
In some cases it may be useful to add headers and intermediate totals in the invoice details.
In the Transactions table, define the header and intermediate totals rows using the Column type column:
- Header lines: enter the command 10: hdr and the text in the Description column.
- Intermediate totals rows: enter the command 10: tot and the text in the Description column.
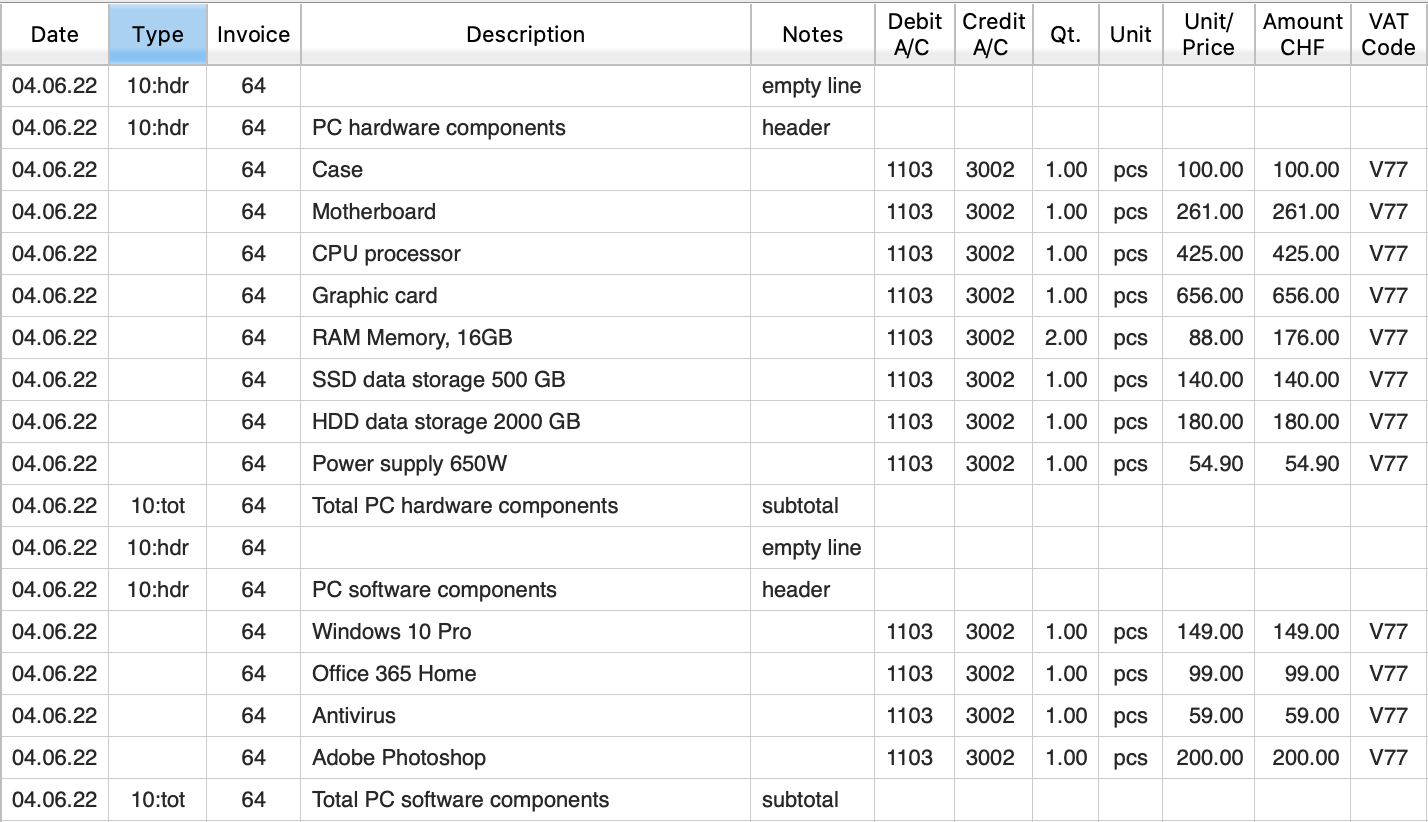
Multi-page invoice example: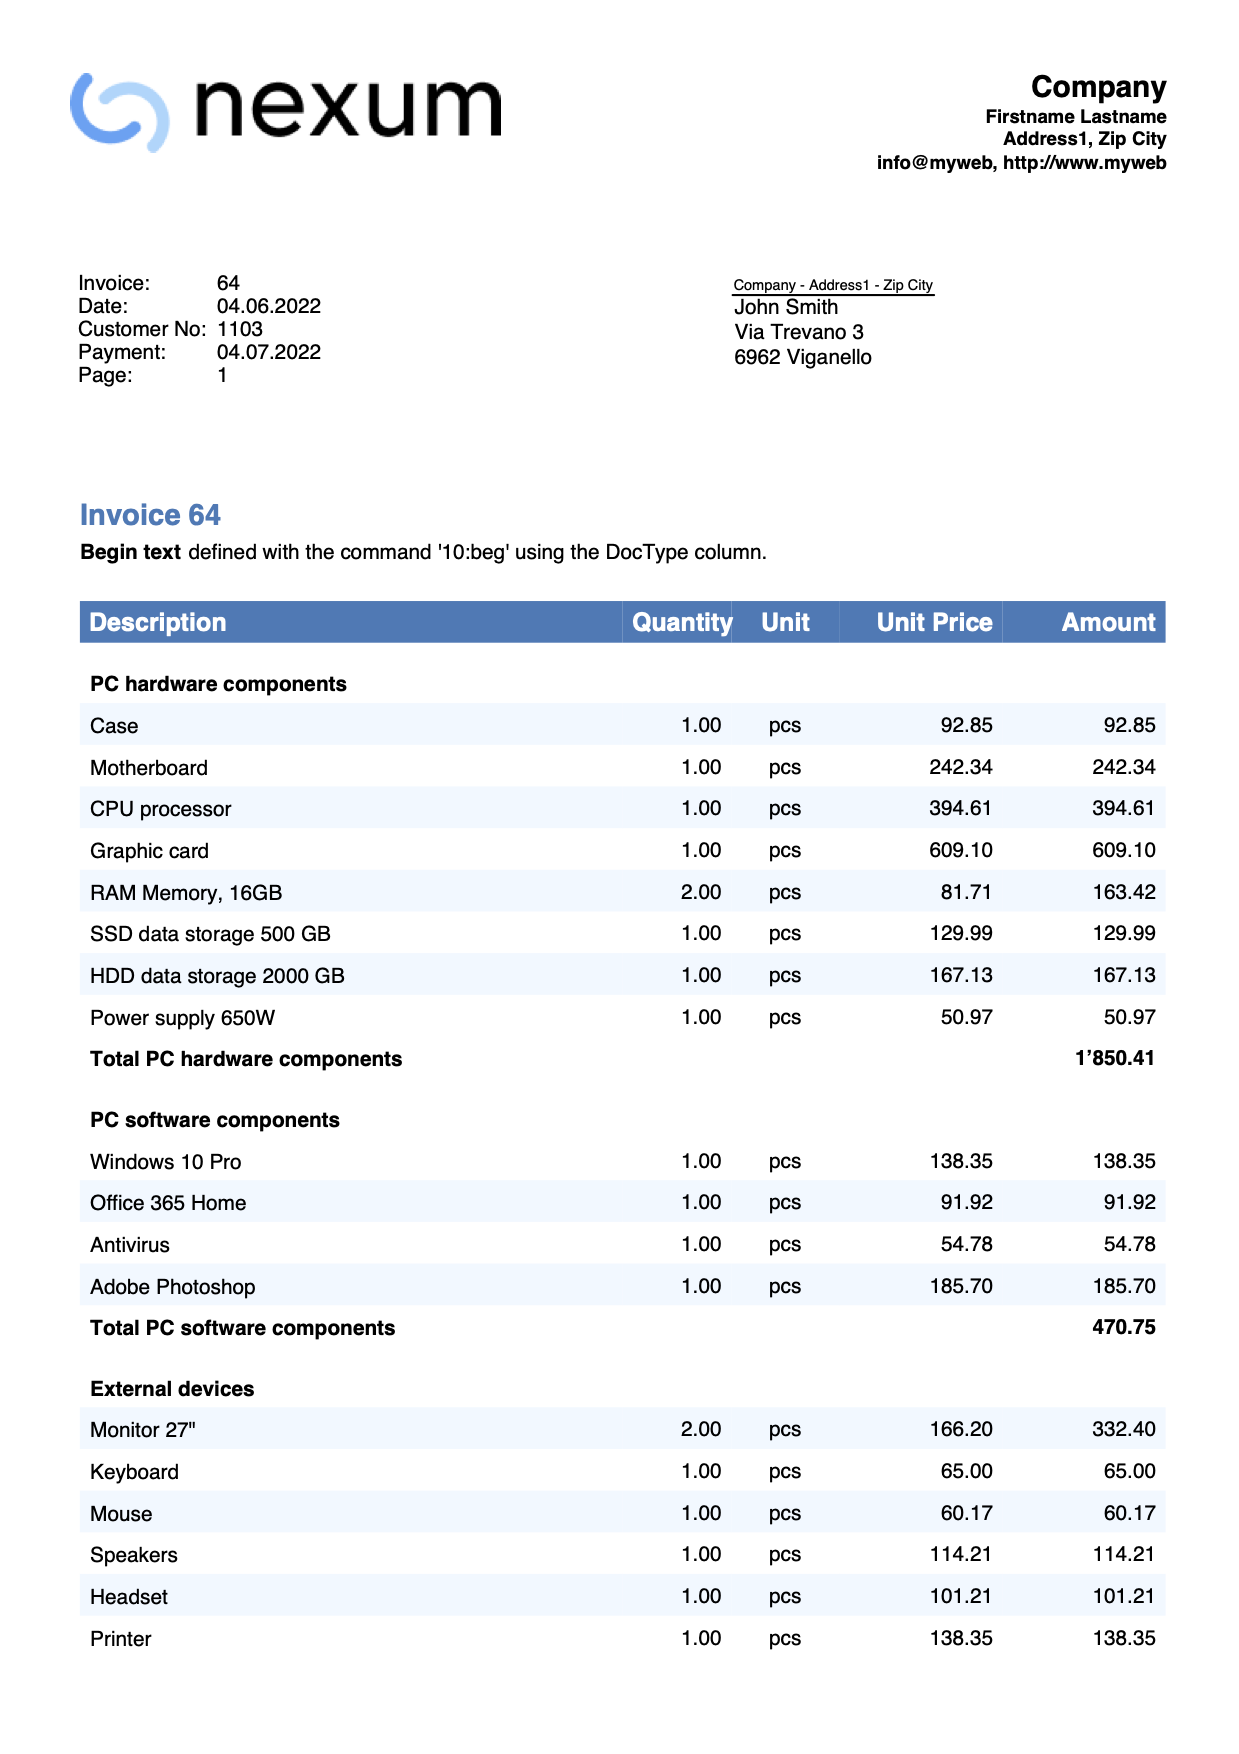
The information about entering the sender's address for window envelopes can be found in the Customer Address section on the Print Customization page.
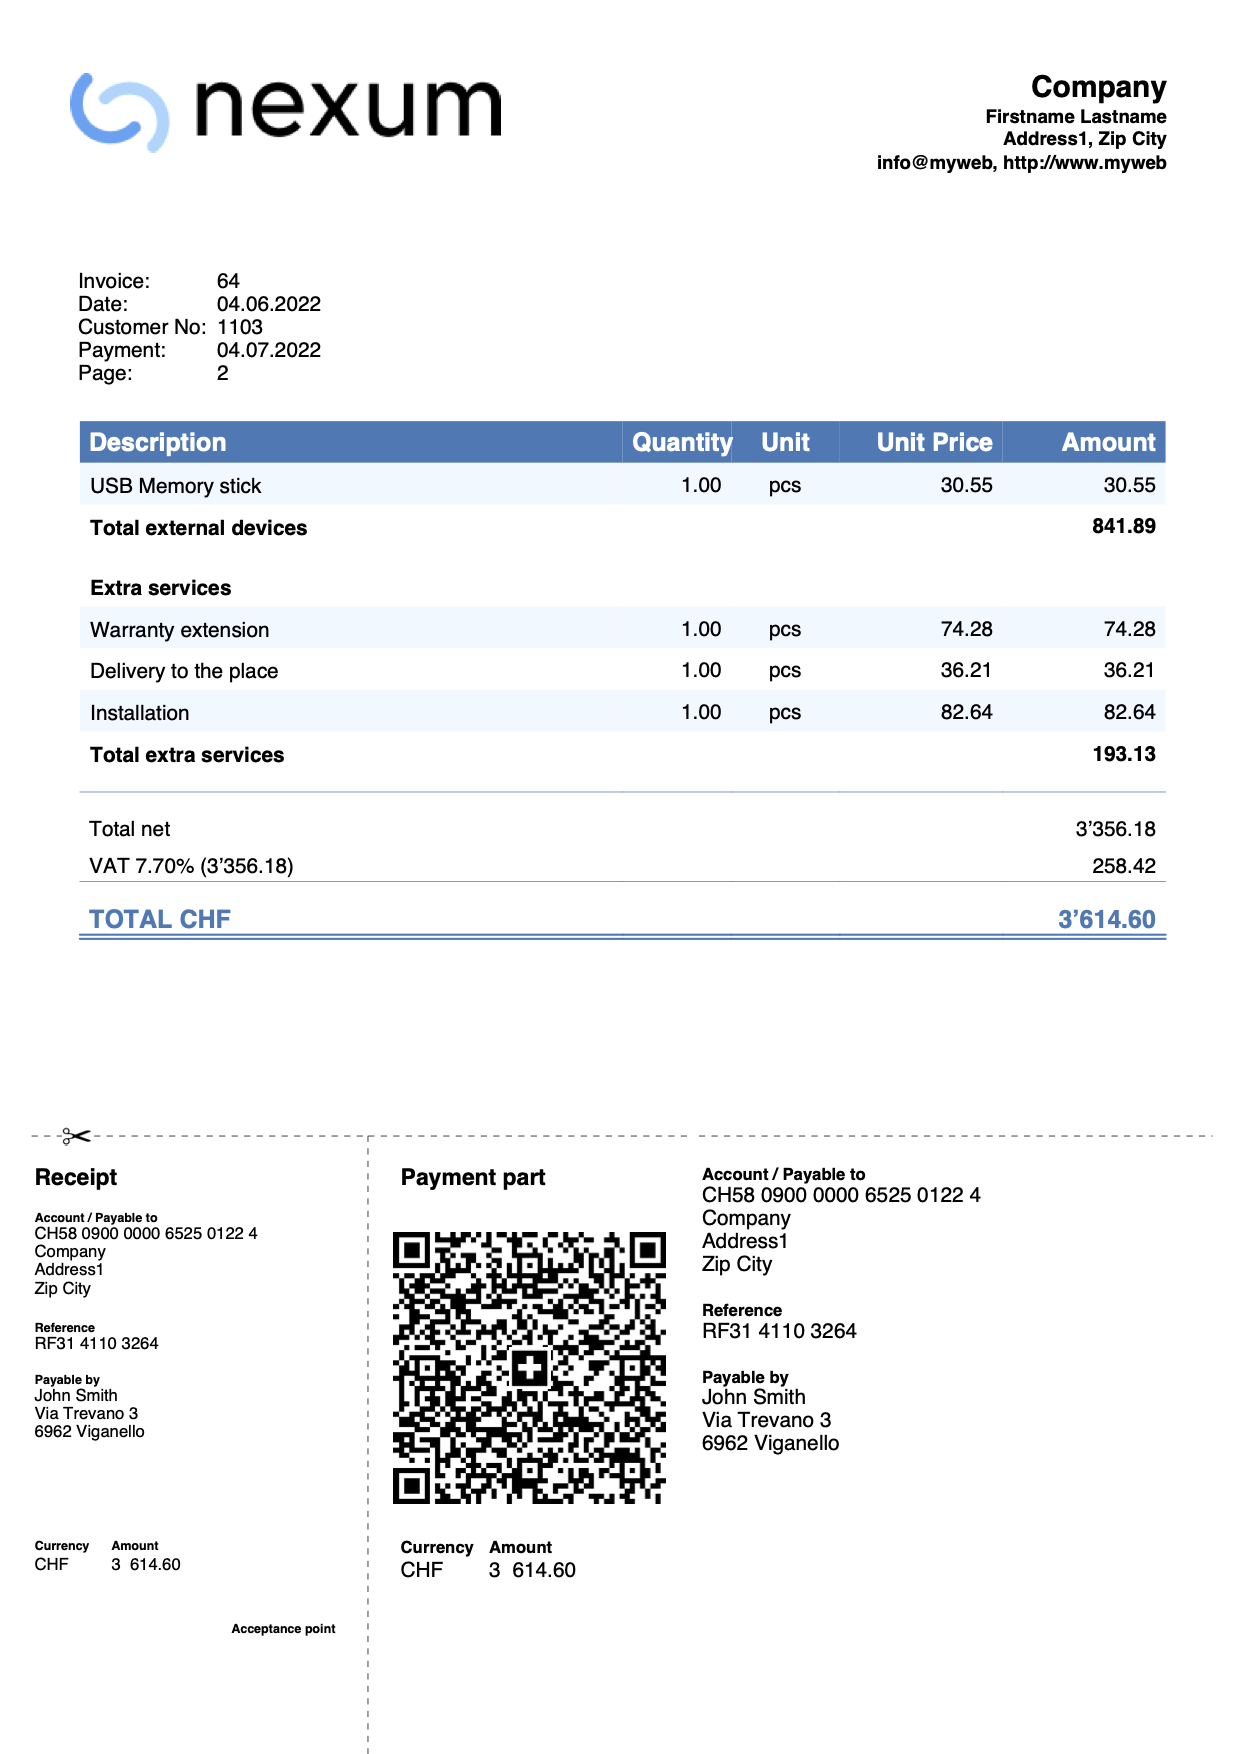
Invoice with shipping address, description and amount columns
Via the templates for invoices dialog:
- Check the Shipping address box in the Customer address section.
- In the Invoice Details section, define:
- The names of the columns to use, specifying the XML names of the Transactions table columns.
- The width of each column.
- The alignments of titles and texts of the columns.
- In the Texts section, define the header text of each column.
Add the translation for each language you intend to use.
Invoice printout example with other settings: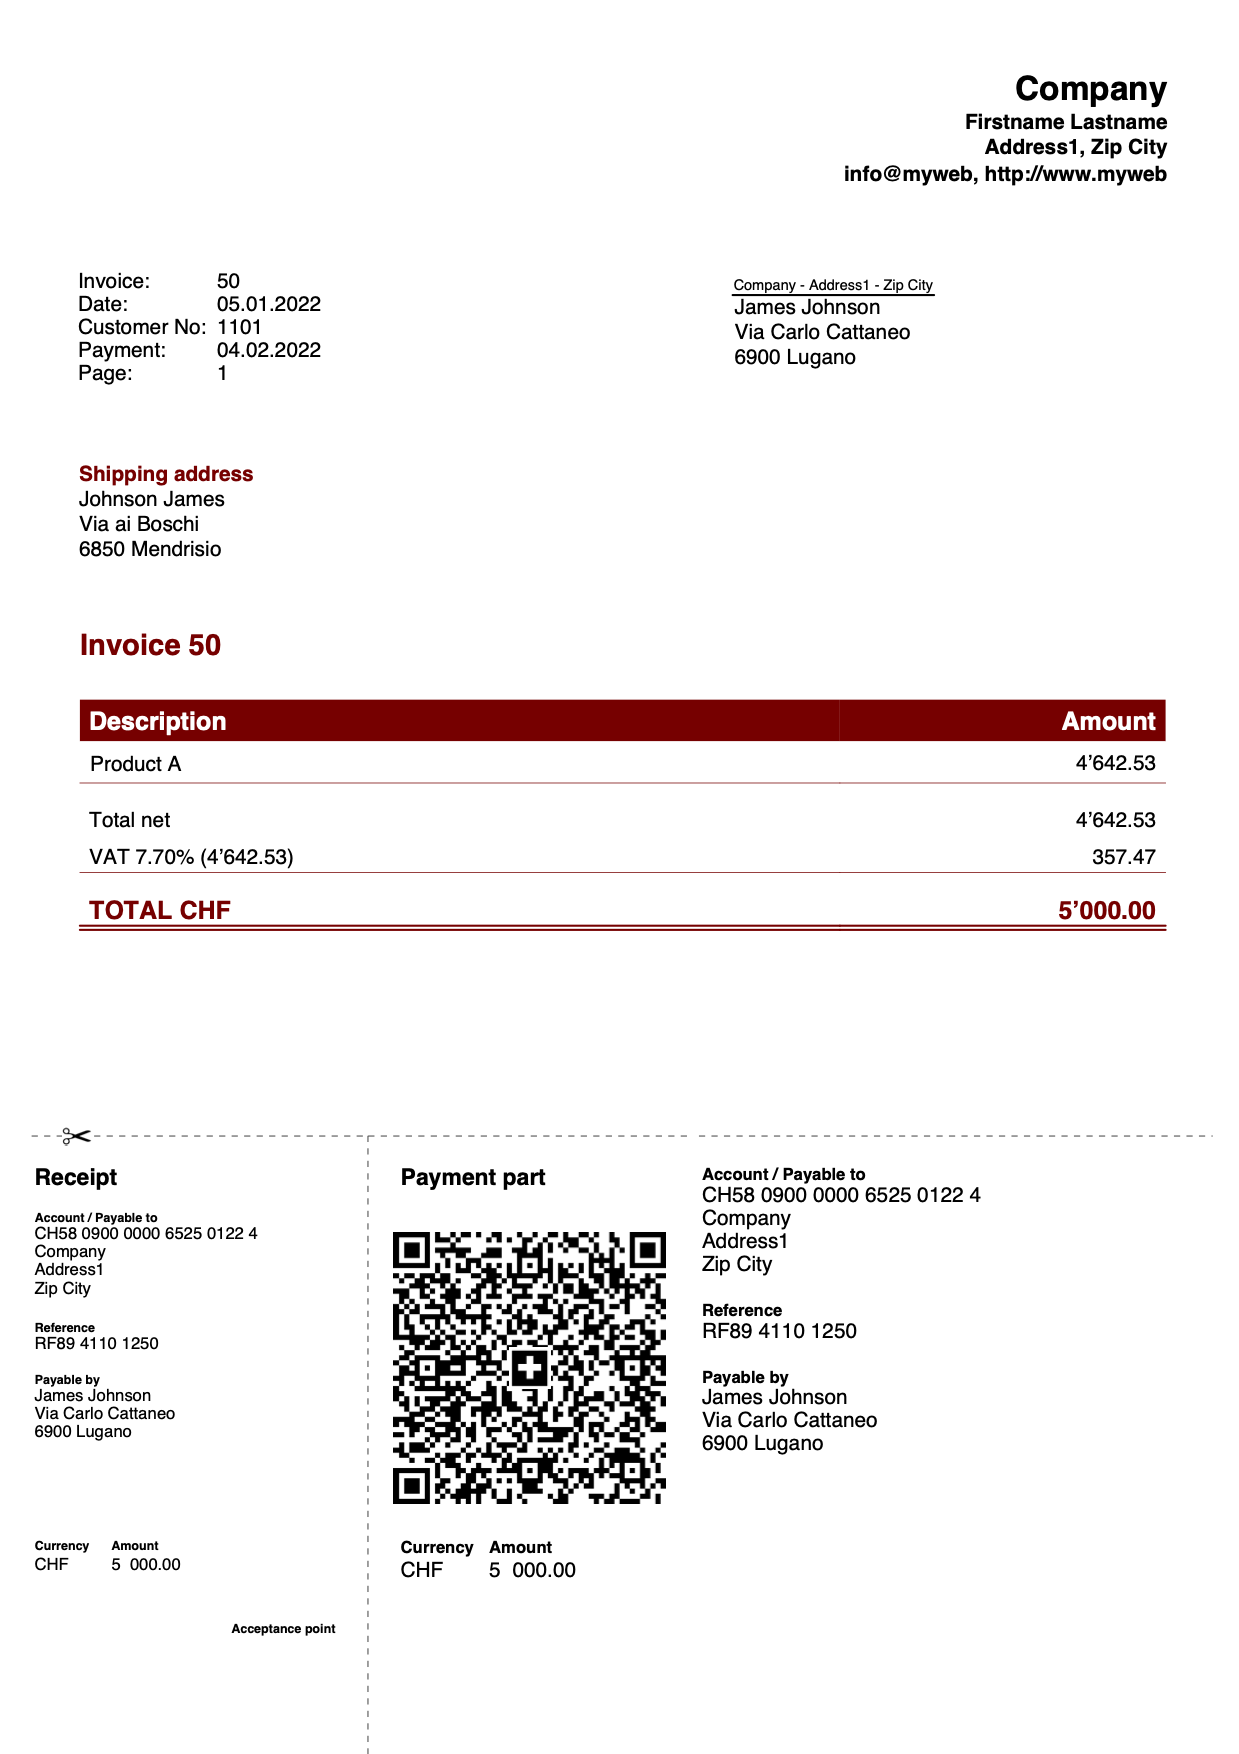
Use columns from the Transactions table
Prerequisites:
- Advanced Plan of Banana Accounting Plus.
In some cases it may prove useful to include a dedicated column (not predefined in the program)for invoice details, such as a column in which to indicate the date of execution of a job.
Column creation:
- With the Columns setup command, add a column in the Transactions table.
Each proper column of type Data must begin with the word Date (eg DateWork, DateExecution, DateXXX). - Enter your postings to create the invoice and in this column indicate the date of execution of the job.
- For the invoice printout, the program uses the date format defined in the operating system settings.
Via the templates for invoices dialog:
- In the Invoice Details section define:
- The names of the columns to use, specifying the XML names of the Transactions table columns.
Insert the column created in this way: T.DateWork (the own columns must be preceded by "T.") - The width of each column.
- The alignments of titles and texts of the columns.
- View the Gross amounts box to use gross amounts with VAT included.
- The names of the columns to use, specifying the XML names of the Transactions table columns.
- In the Texts section, define the header text of each column.
Add the translation for each language you intend to use.
Invoice printout example: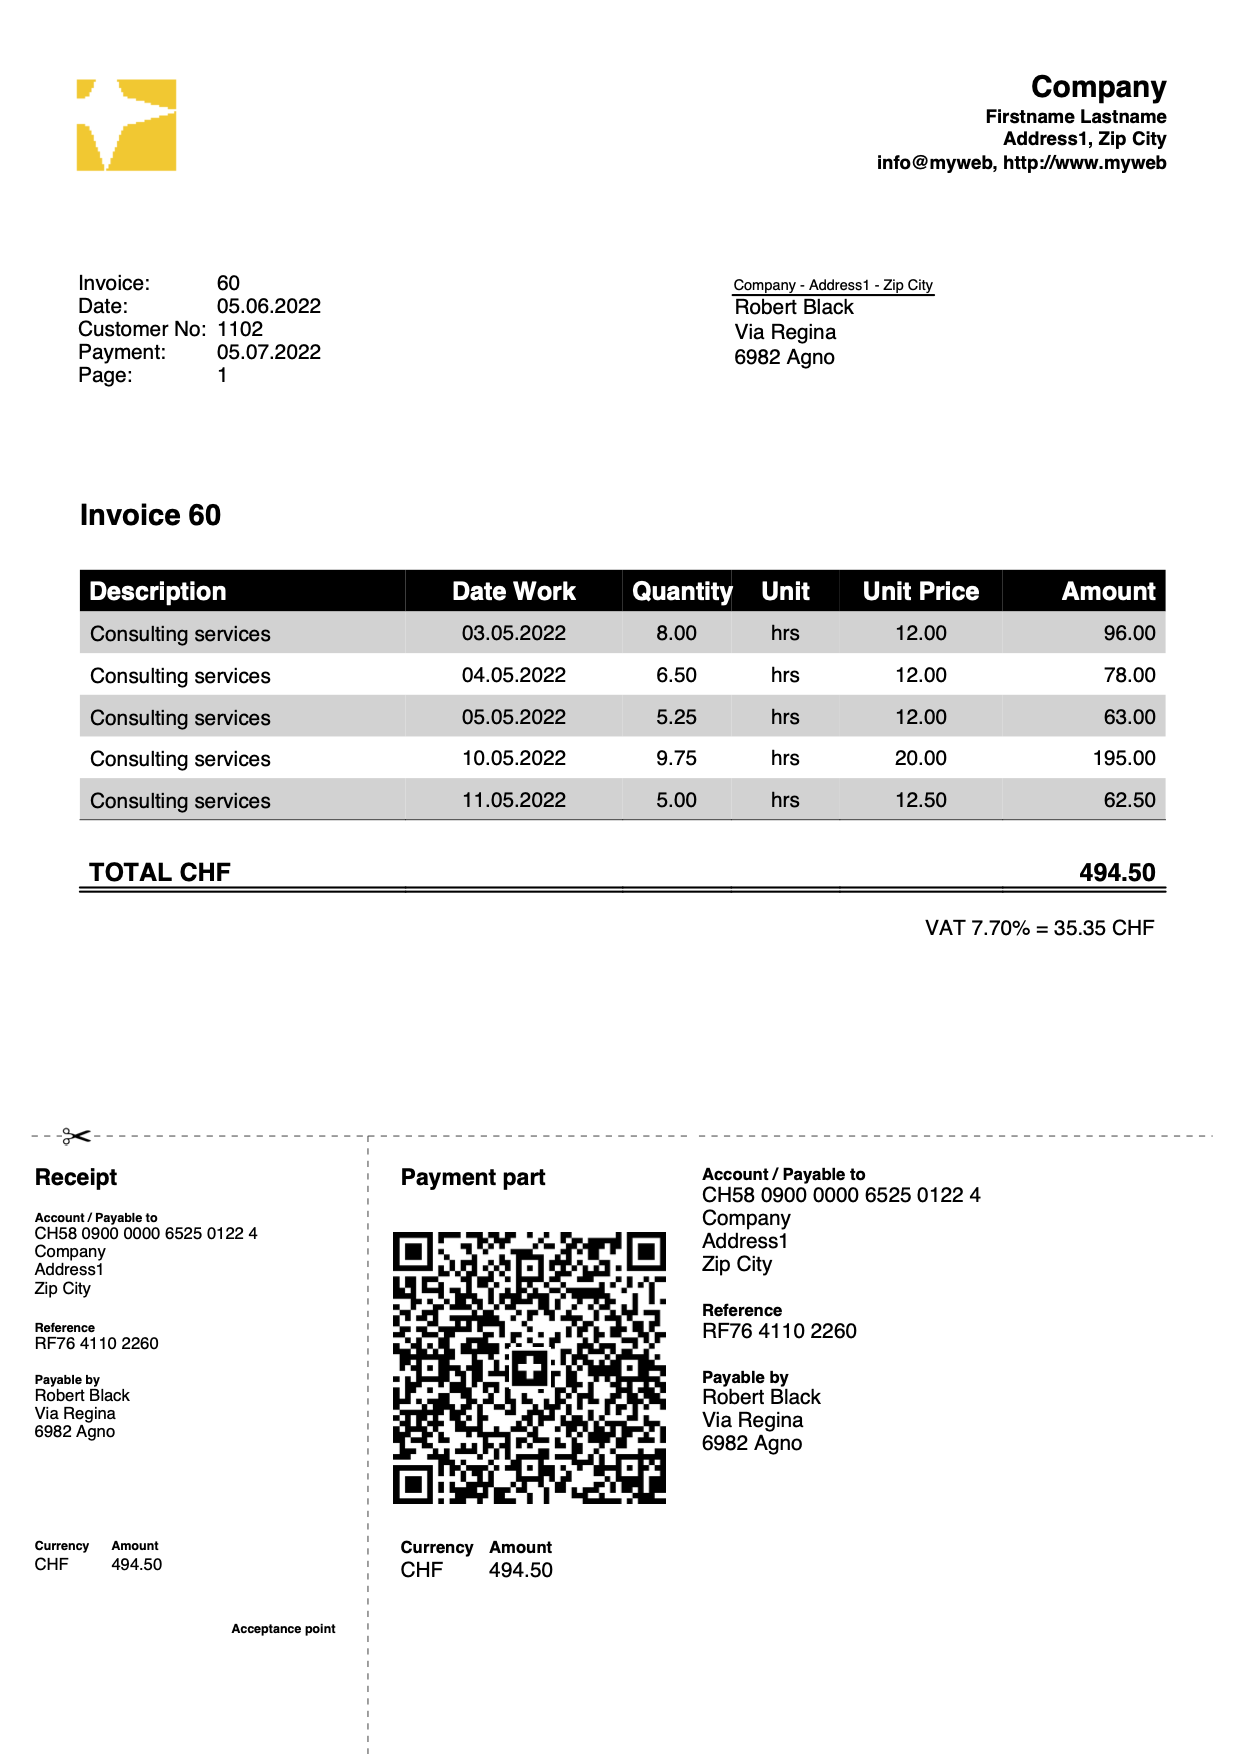
Invoice with initial, final text, notes and greetings
Define the initial texts in the Transactions table, notes and greetings using the Type column:
- Initial text: enter the command 10: beg and the text in the Description column.
- Note: enter the 10: not command and the text in the Description column
- Greetings: enter the command 10: gre and the text in the Description column.
- The text inserted between the double asterisks (**) will be displayed in bold.
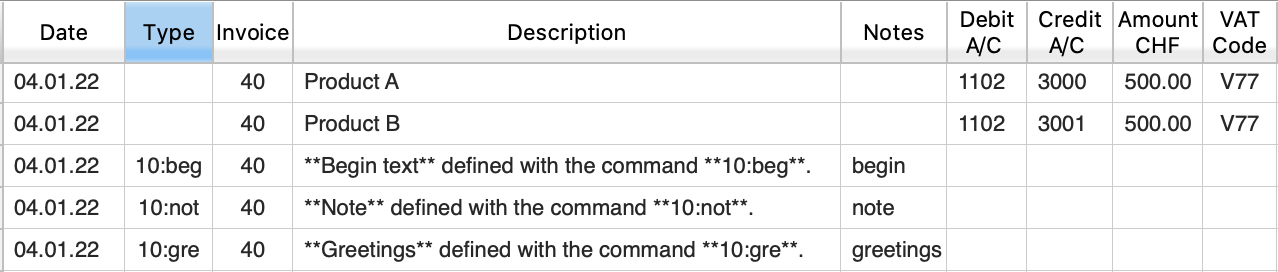
Via the templates for invoices dialog:
- In the Texts section, define the final text to be included immediately after the invoice details.
The text inserted between the double asterisks (**) will be displayed in bold.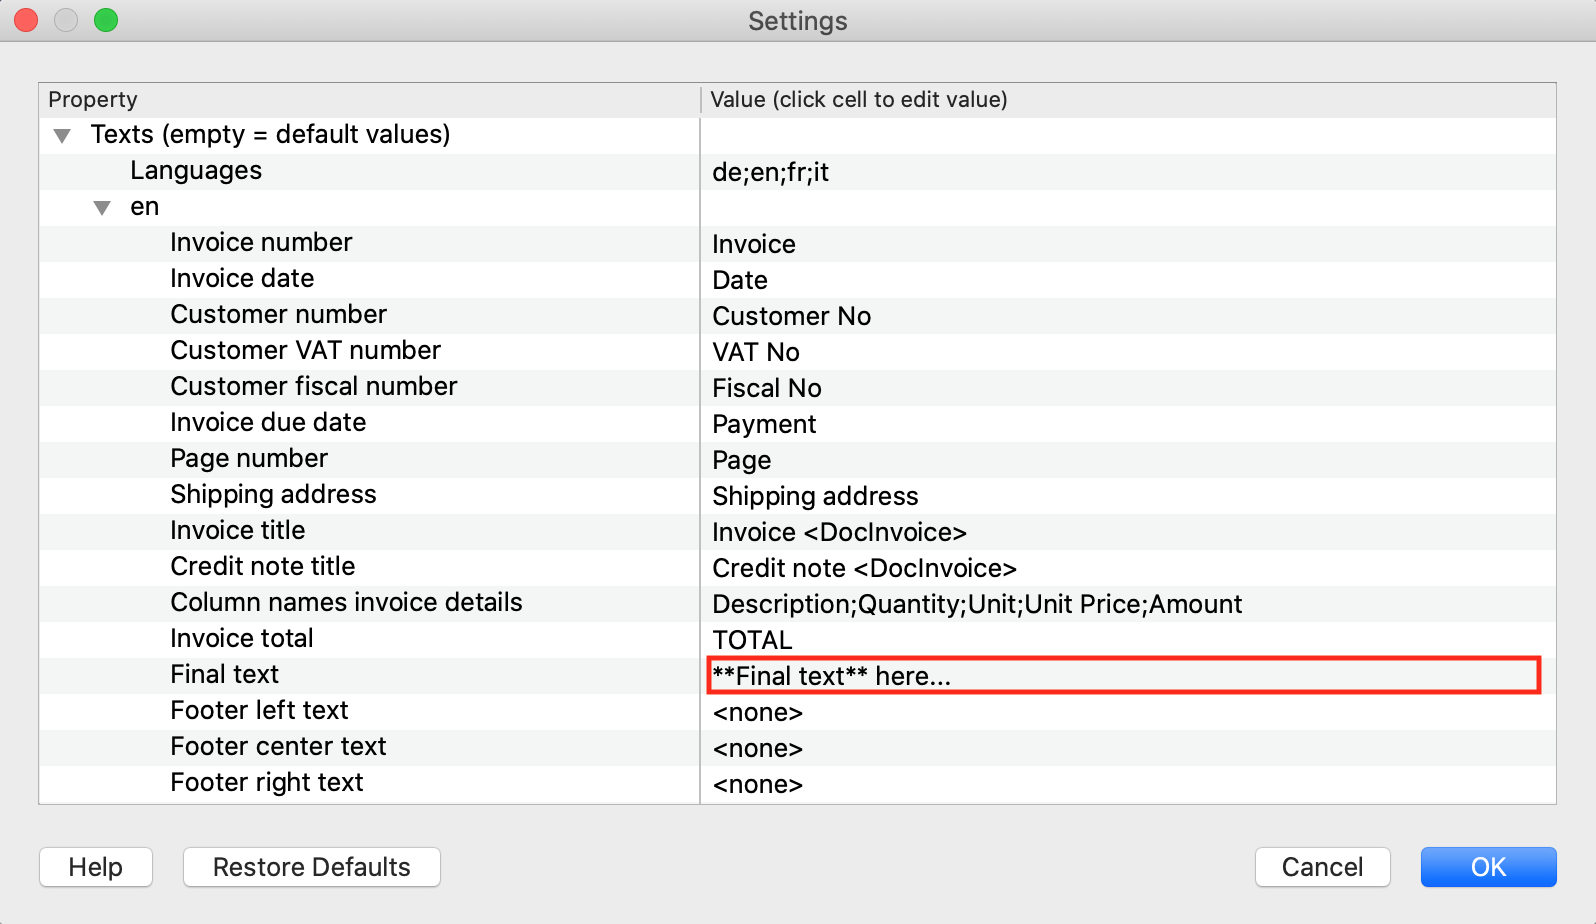
Invoice printout example: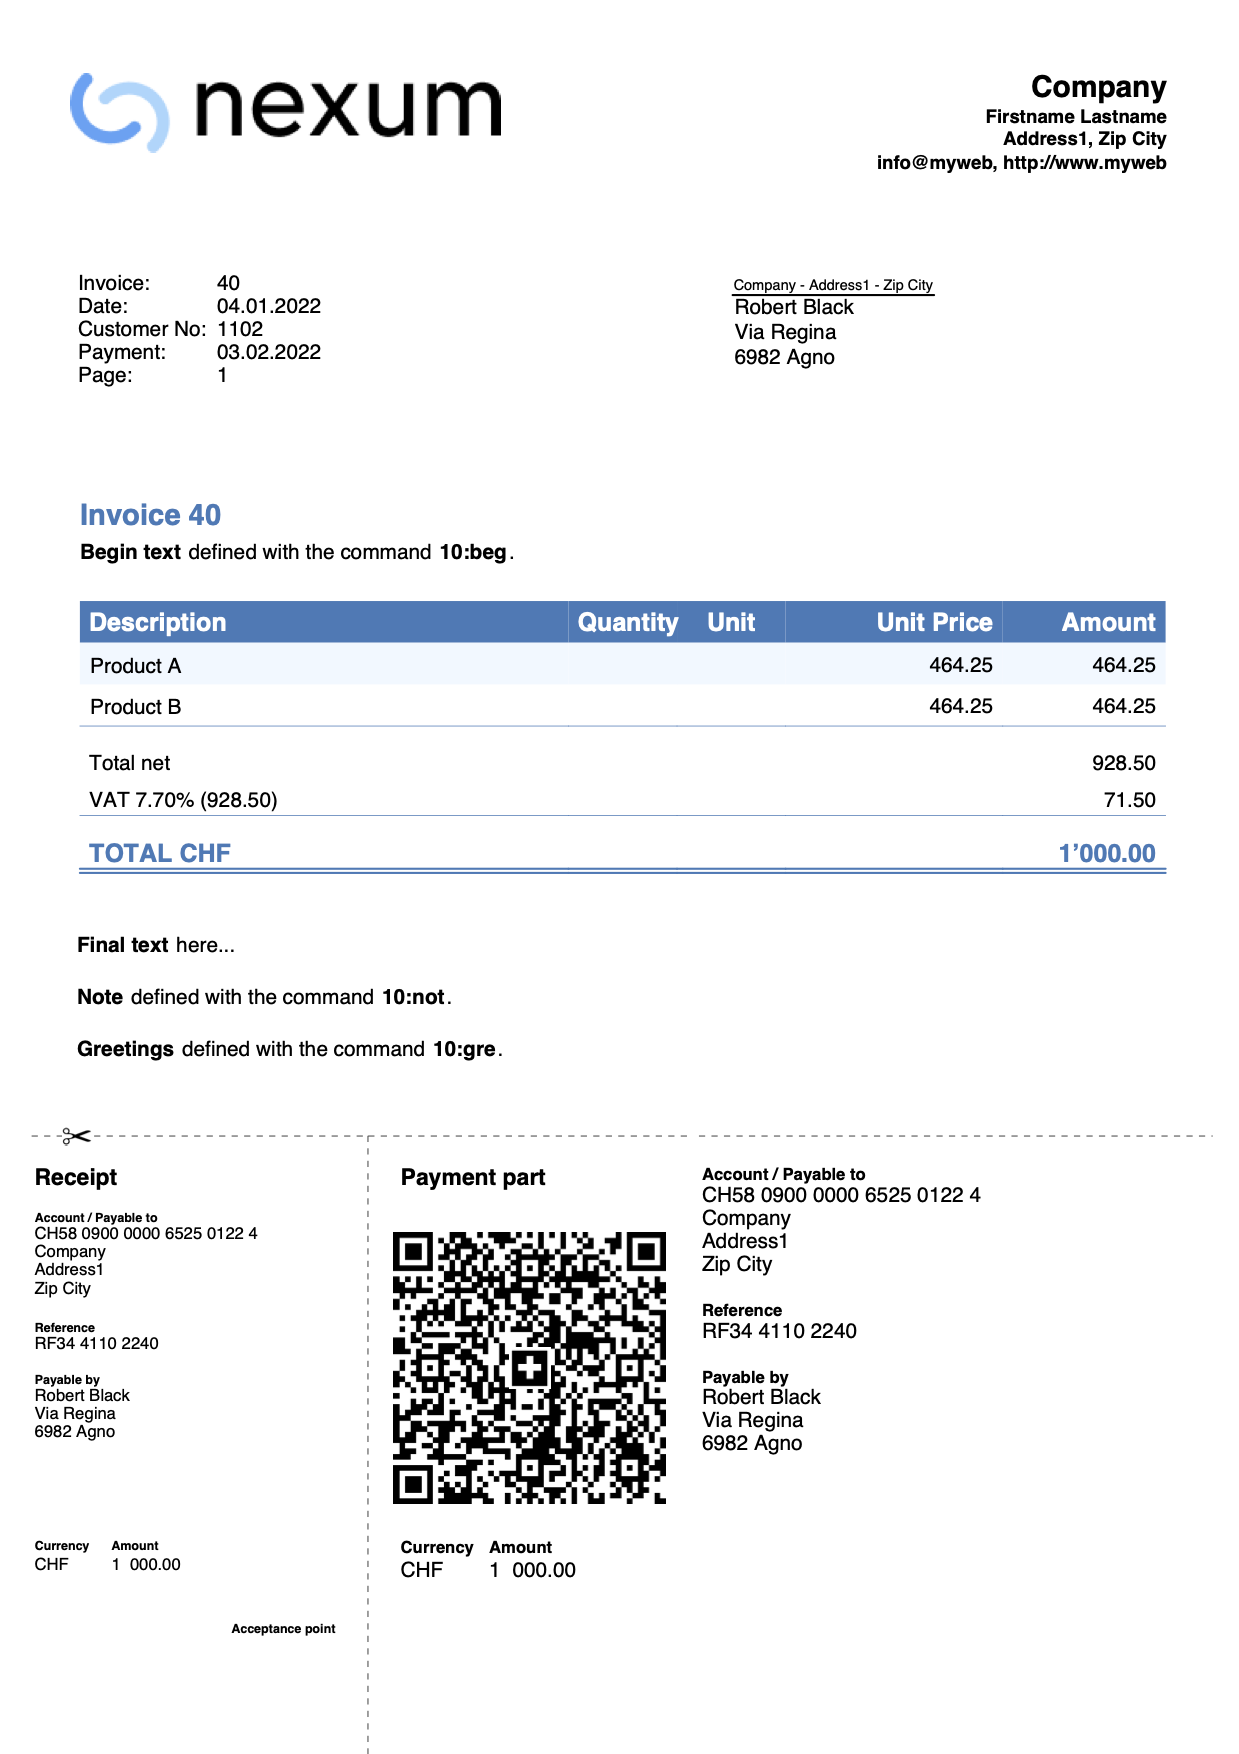
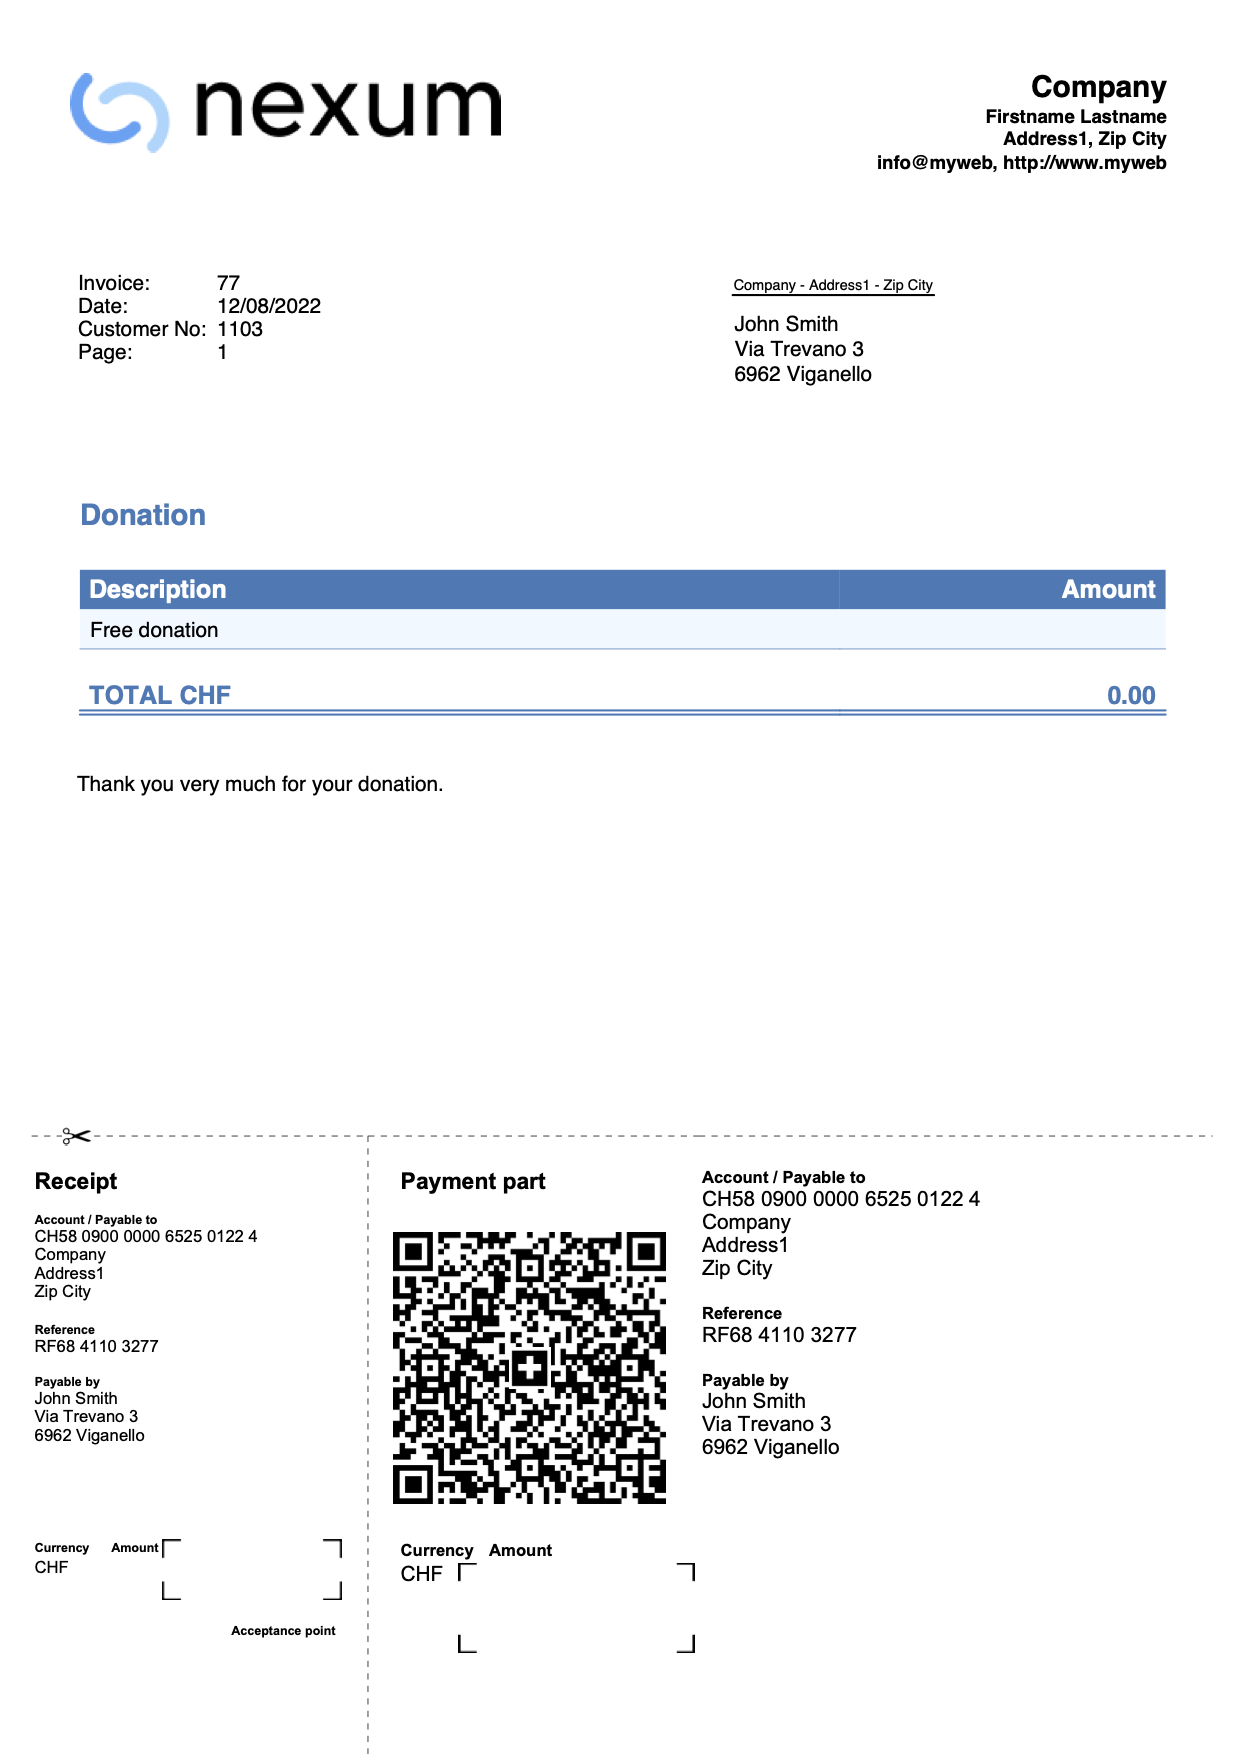
Invoice with no amount
It is used when you want to leave the possibility of choosing the amount to be paid to the person making the payment (for example for a donation).
In the QR part the amount is excluded, leaving an empty box to enter the amount by hand.
In the Transactions table enter the donation record without the amount.

Through the invoice settings dialog, in the QR Code section check the Exclude invoice amount box.

Example of invoice printing:
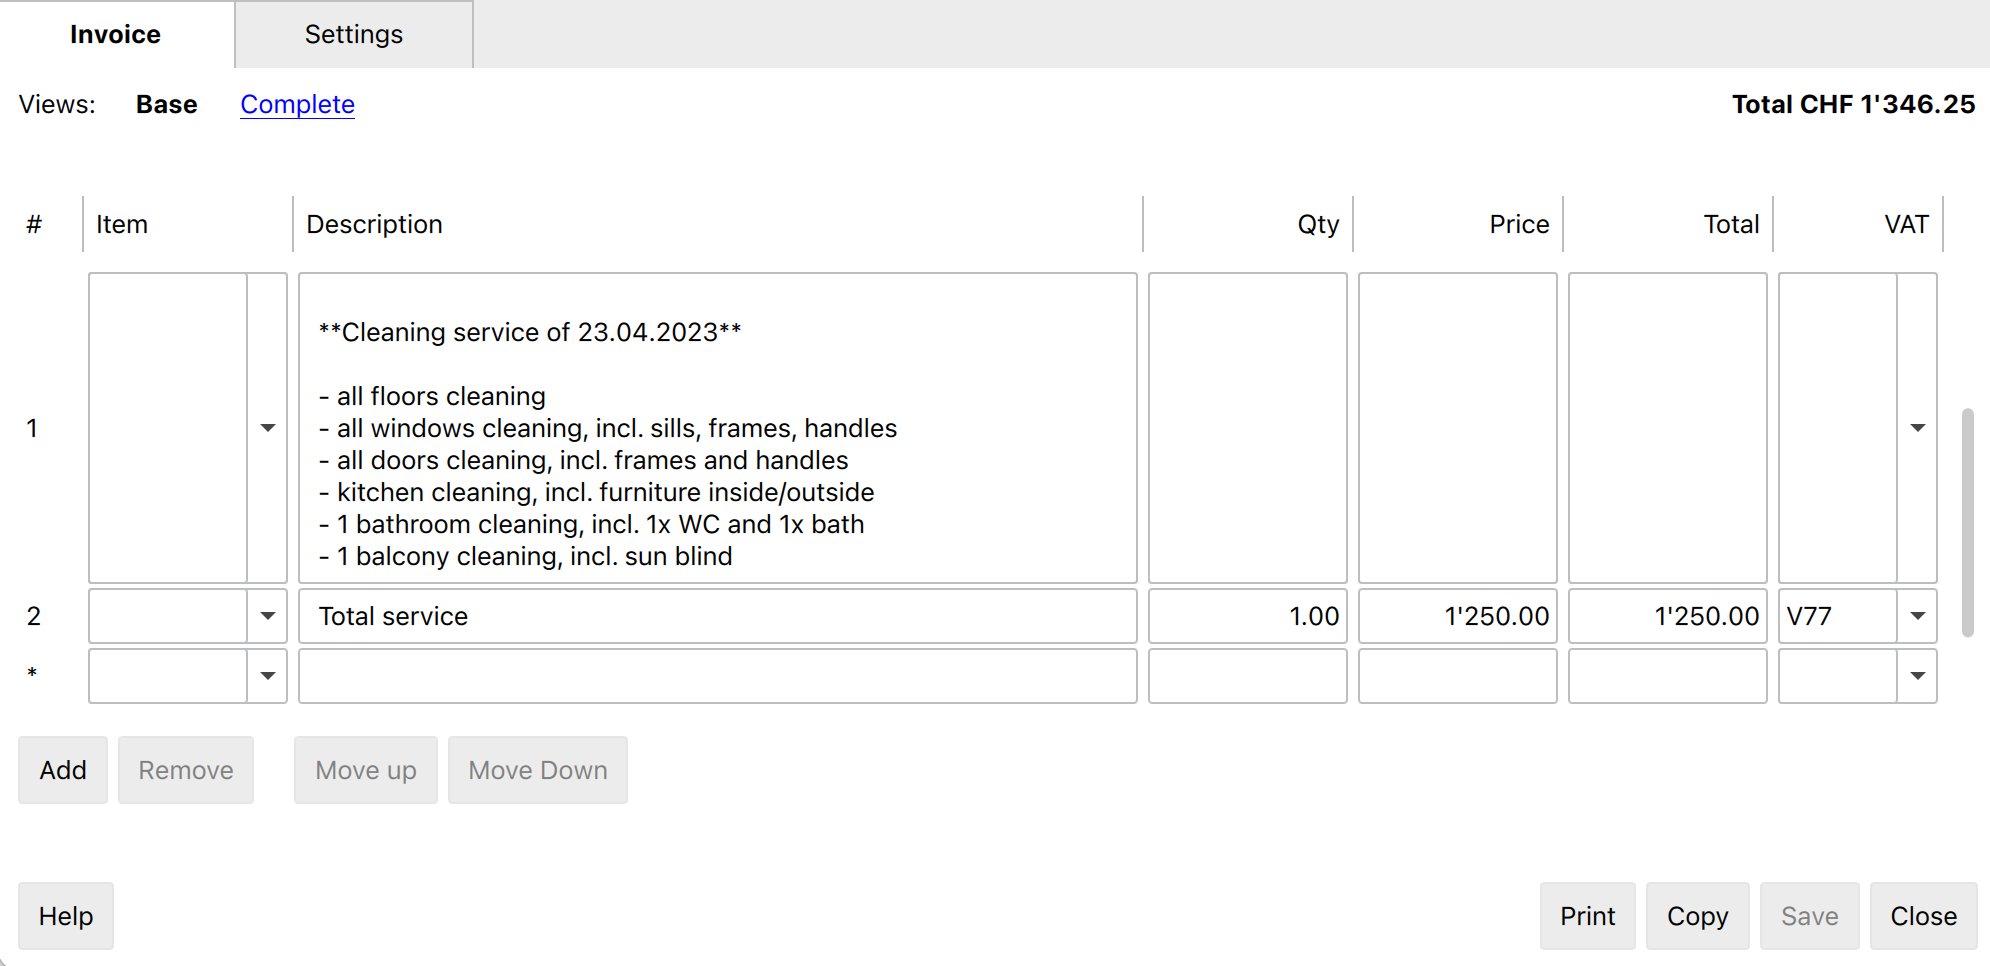
Invoice with multi-row descriptions (integrated invoicing)
This example for Integrated invoicing shows how to create invoices using multi-row descriptions.
The steps to follow are:
- Use the Arrange Columns command to add one or more additional description columns in the Transactions table.
Create columns of type Text with the name "Description" followed by a number (e.g., "Description1", "Description2", "Description3", etc.).
The XML name of each column must begin with the word "Description" followed by a number.
- In the newly created columns, enter additional text for the invoice description.
The text for each column will be displayed on a new line in the invoice description.
- In the Invoice parameters dialog box, in the Print > Invoice details section, display the Print additional descriptions box.
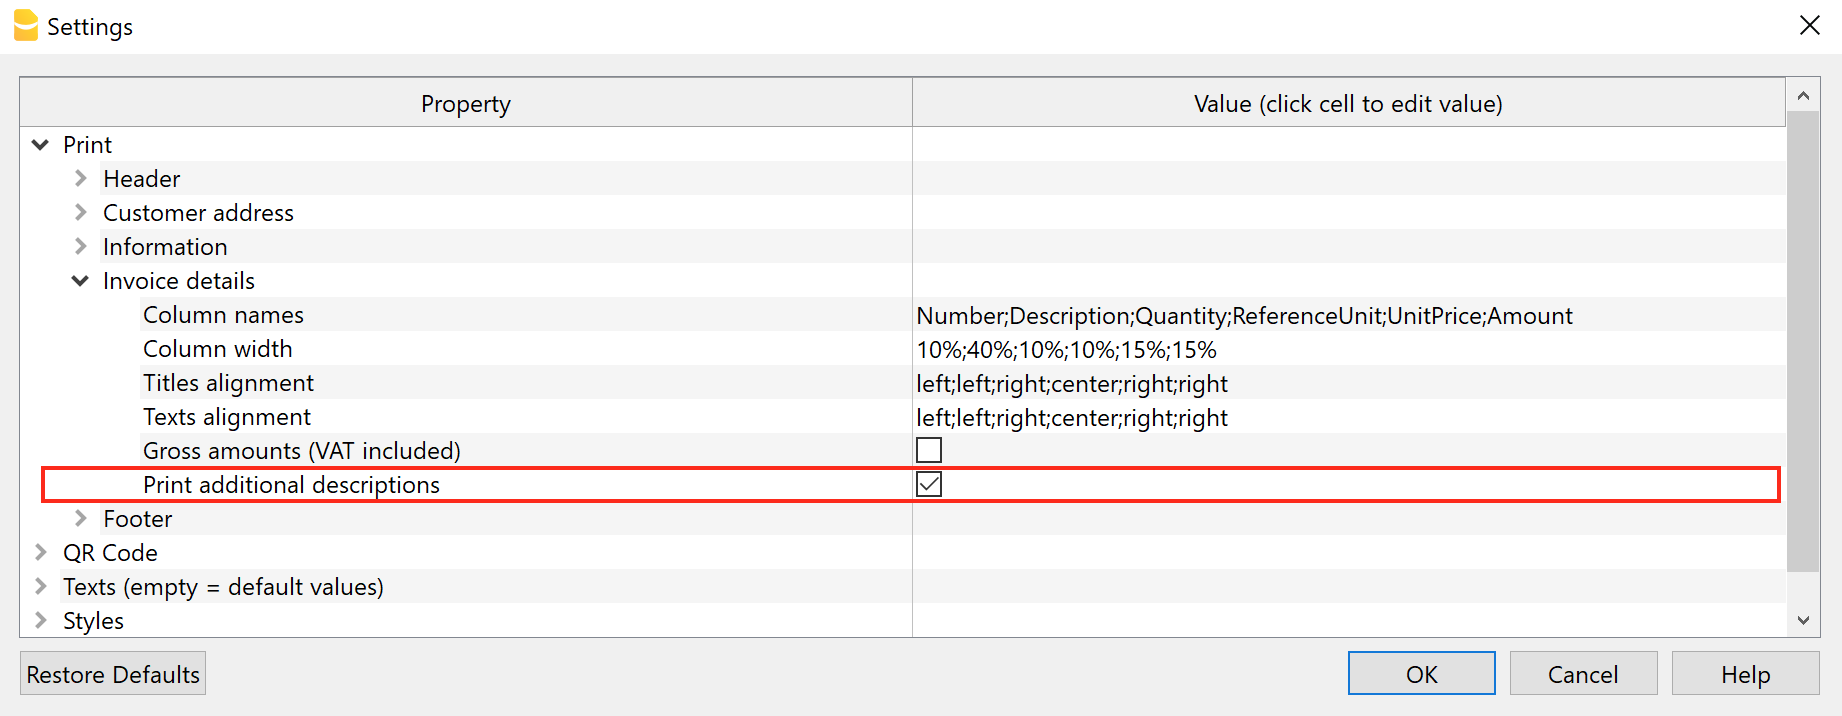
At this point, if there are additional description columns in the Transactions table and if they contain texts, these texts will be added on the invoice printout.
Example invoice printout: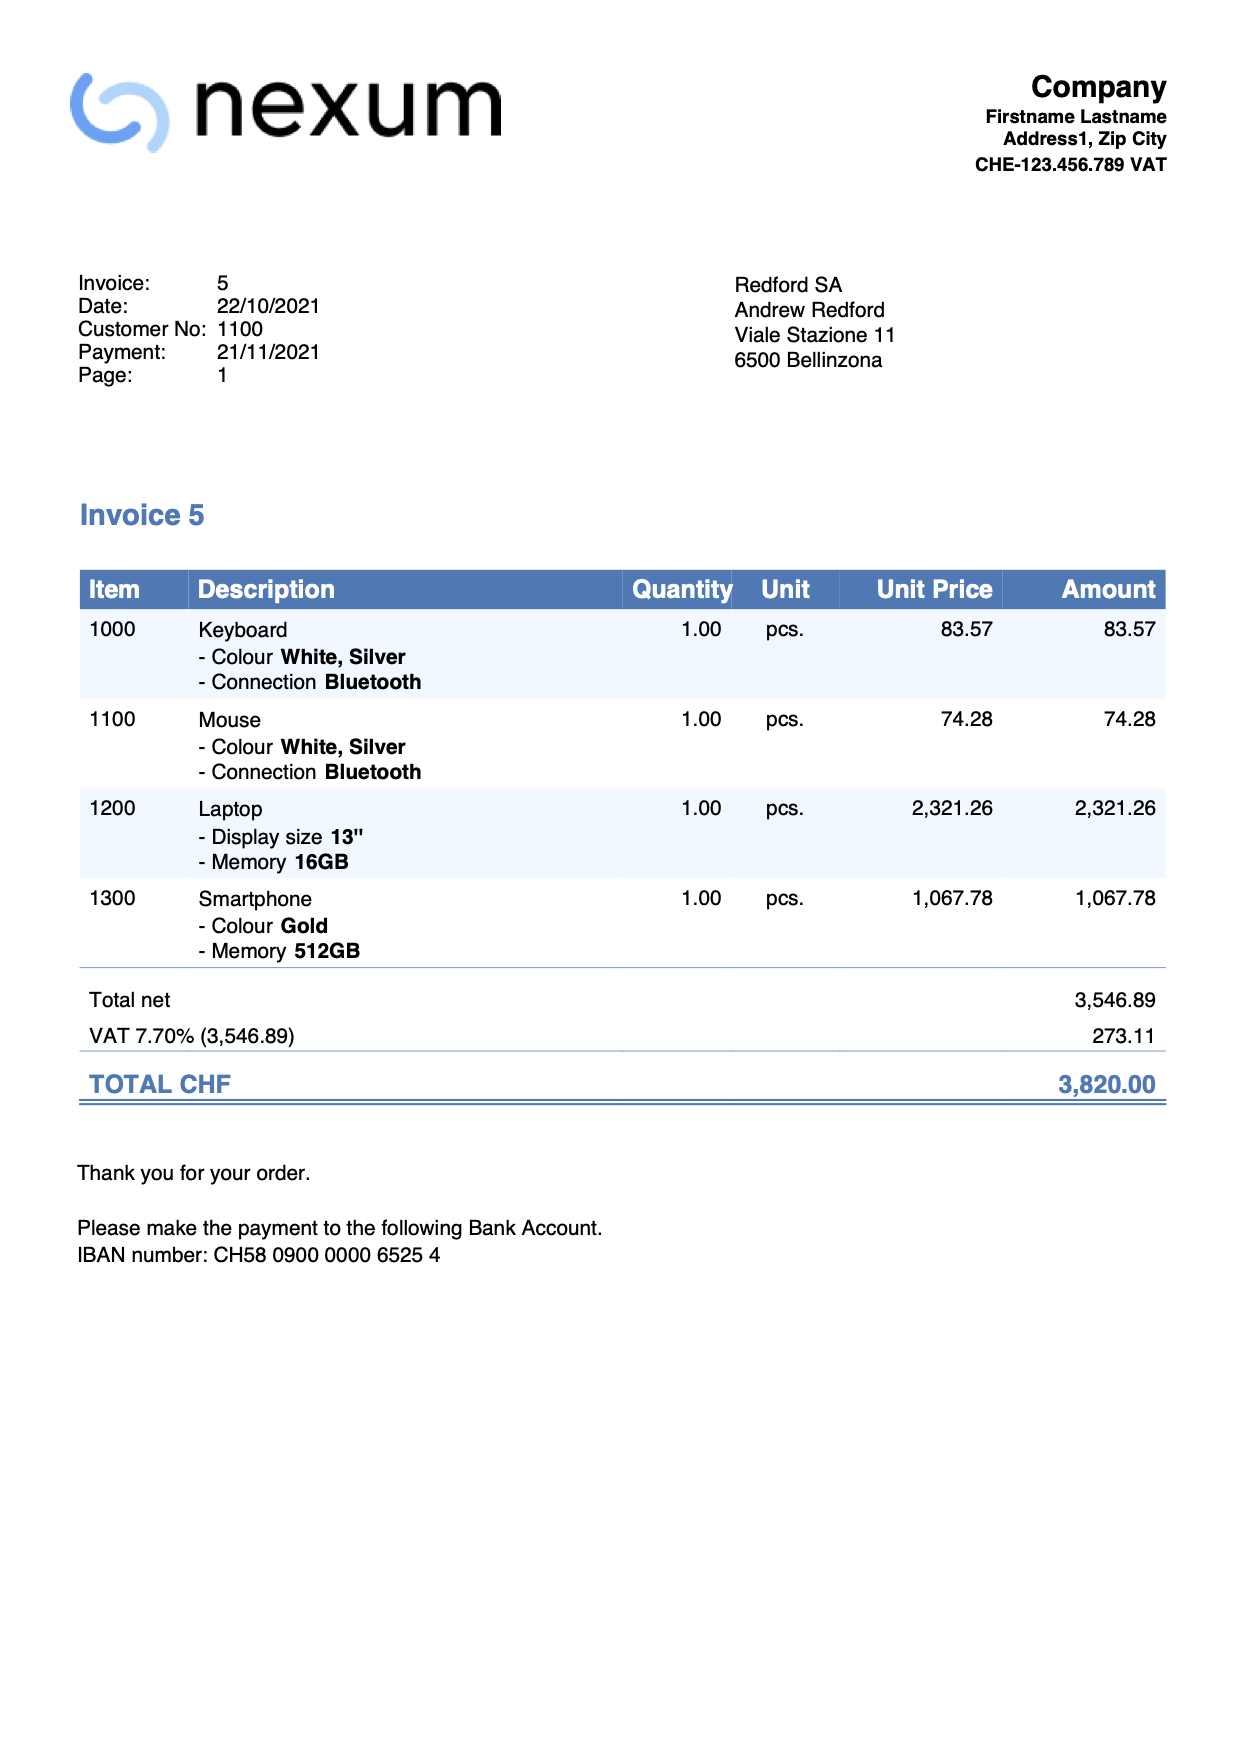
Invoice with multi- row descriptions (Estimates-Invoices)
This example for the Estimates and Invoices application shows how to create invoices with multi-row descriptions.
- In the invoice edit dialog, under the Invoice Details section, in the Description column:
- Enter the description text
- You can use line breaks and add as many lines as you want.
- You can also leave blank lines.
- You can insert one or more texts between double asterisks to apply bold styling (e.g. Bold text).
- You can enter the amount either on the same line as the multi-line description, or on a new line (see image).
When printing the invoice, descriptions are displayed on several rows as in the dialogue.
Example invoice printout: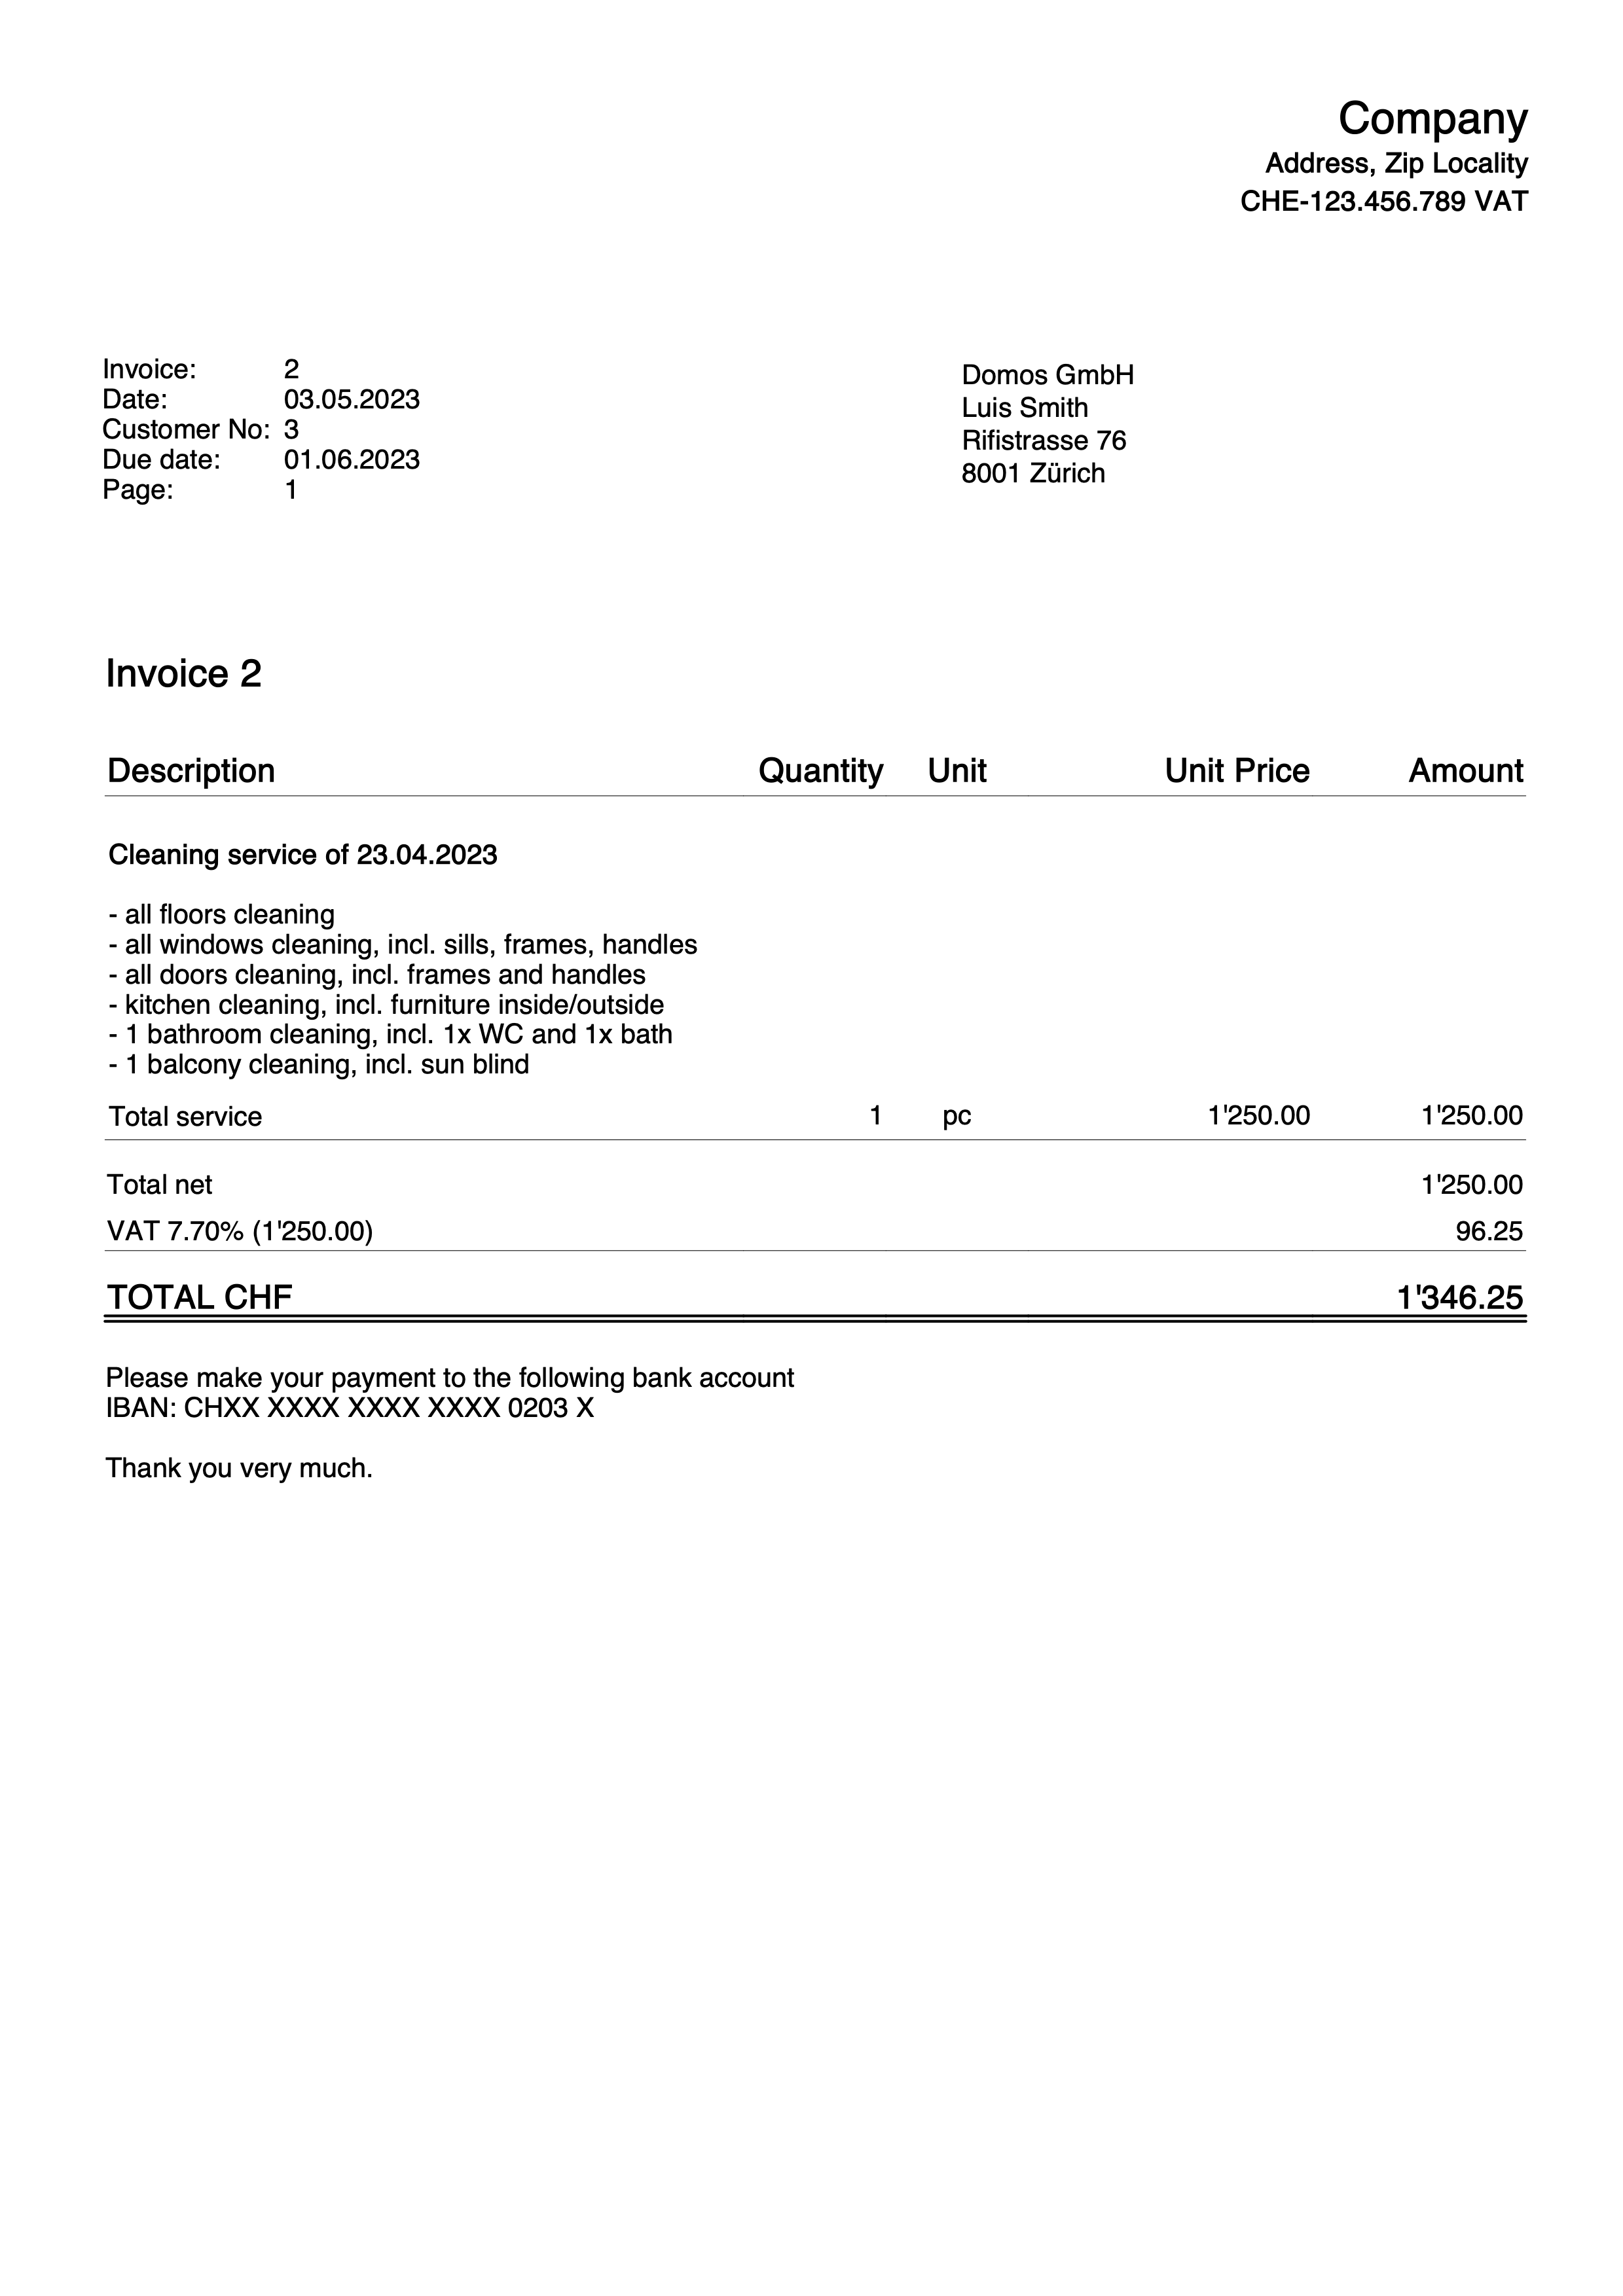
Invoice with Article Discount column
This example for invoicing with the Estimates and Invoices application shows how to add the Article Discount column in the invoice details.
Requirements:
- Banana Accounting Plus Advanced Plan.
- Beta Release version of the Estimates and Invoices application.
The steps to follow are as follows:Create invoices using the Discount column. Enter a percentage or a value.
- Via the invoice settings dialogue:
- Via the invoice settings dialogue:In the section Print > Invoice details add the Discount column, set the column widths and the alignment of headings and texts.
- Description;Quantity;ReferenceUnit;UnitPrice;Discount;Amount
35%;10%;10%;15%;15%;15%
left;center;center;right;right;right
left;center;center;right;right;right
- Description;Quantity;ReferenceUnit;UnitPrice;Discount;Amount
- In the section Texts > Invoice detail column header, for each language set the texts for the table headers, also adding the text for the Discount column.
- Description;Quantity;ReferenceUnit;UnitPrice;Discount;Amount
- Description;Quantity;ReferenceUnit;UnitPrice;Discount;Amount
- Via the invoice settings dialogue:In the section Print > Invoice details add the Discount column, set the column widths and the alignment of headings and texts.
Example invoice printout:
Invoice with product images
This example shows how to add and print product images in the invoice details.
Requirements
- Advanced plan of Banana Accounting Plus.
- Invoice customization with JavaScript.
Steps
- Add products images.
- Save images of each product.
Use the same directory where the .ac2 file is located or a subfolder.
The supported formats are PNG and JPG.
Use small images to reduce the weight of the generated PDF file.
- Save images of each product.
- Edit the Items table.
- Add the Links column.
In the Items table, make the Links column visible with the Columns setup command. - Link images to items.
In the Links column of Items table, add the link of the image for each product.
Click on the icon at the top right of the cell and select the corresponding image.
- Add the Links column.
- Add the Documents table.
- If not present, add the Documents table.
From the menu Tools > Add/Remove functionalities > Add Documents table.
- If not present, add the Documents table.
- Add the JavaScript code as attachment in the Documents table.
- In the ID column, enter the name of the attachment including the .js extension (e.g., "myFile.js").
- In the Attachments column, click on the icon at the top right and select Javascript code.
An editor opens where you can enter javascript code. Delete all. - Copy and paste
- the javascript code of the 'hook_print_details_net_amounts' function (that prints the invoice with net amounts).
- the javascript code of the 'hook_print_details_gross_amounts' function (that prints the invoice with gross amounts).
- Click OK.
- Sets the parameters of the invoice layout.
- In the Invoice Settings:
- In the Invoice Details section, add the columns "I.Links" (column for images) and "Number" (column for item number).
I.Links;Number;Description;Quantity;ReferenceUnit;UnitPrice;Amount
10%;10%;30%;10%;10%;15%;15%
left;left;left;right;center;right;right
left;left;left;right;center;right;right
- In the Texts section, add the texts for the column headings (e.g., “Image;Item;Description;Quantity;Unit;Unit Price;Amount”).
- In the Javascript / CSS > JS File Name section, enter the id of the attachment that contains the javascript code (e.g., "myFile.js").
- In the Invoice Details section, add the columns "I.Links" (column for images) and "Number" (column for item number).
- In the Invoice Settings:
Images of the products will also be included in the invoice printout.
Example: