Tools Menu
File info
The File info command, activated in the Tools menu, displays the characteristics of a file.
Columns
By activating the Complete view also the Xml columns are displayed, thanks to which, it is possible to retrieve the values automatically when the table is exported.
- Section: the Group name of the values
- ID: the specific and explicit identification of the value
- Description: contains an explanation of the value
- The rows in bold print are the section titles that group the different elements together
- Value: the formatted value
- Section XML: The name of the section in English
- ID XML: the identification in English
- Value Xml: the field contents in Xml format.
The Section XML and the ID Xml identify the value unambiguously.
Add/Remove functionalities
The Add/Remove functionalities command is in the Tools menu.
This option allows you to add tables completely managed by the user.
To add a new functionality you must select the functionality you need.

The options available depend on the type of file.
See the Add and remove accounting functionalities page for more details on the individual options.
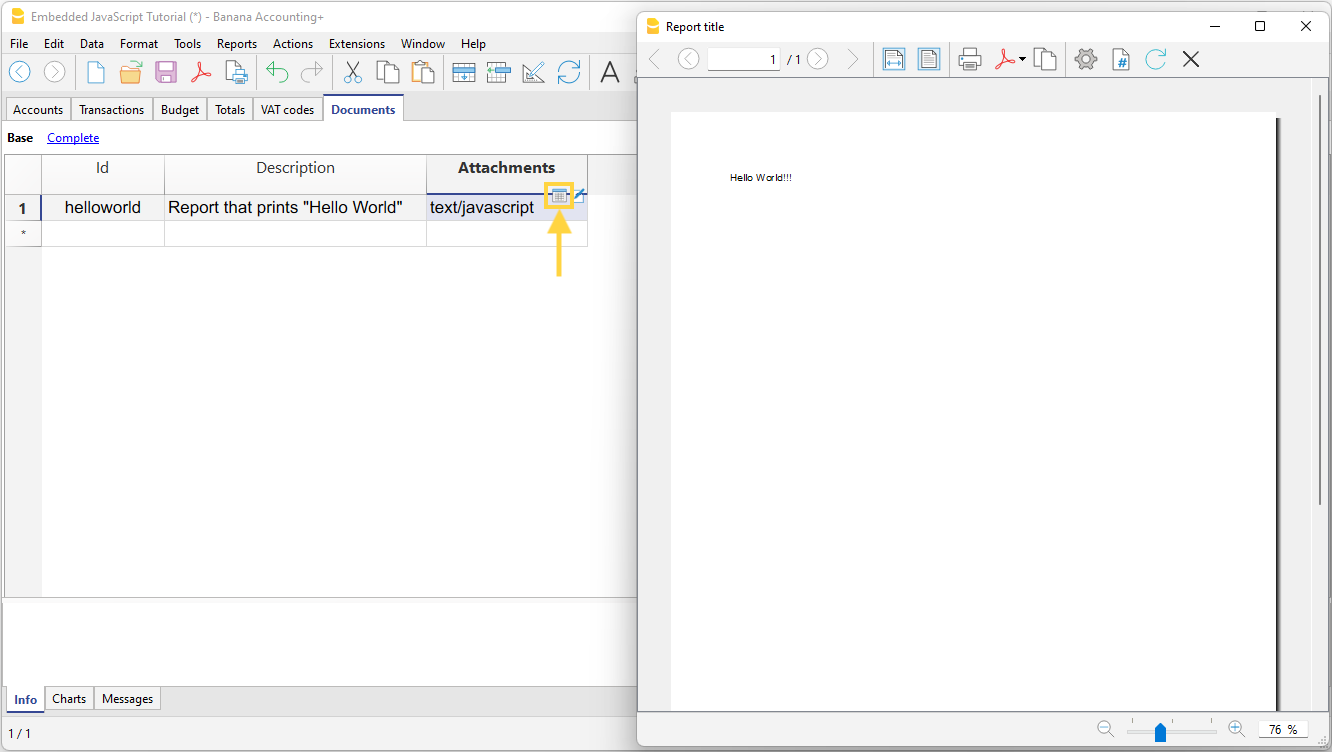
Documents table
The Documents table allows you to include text documents, images (including logo) or scripts in the accounting file.
It can be added by the user in two different ways:
- From menu Tools > Add functionalities > Add Documents table.
- This is created automatically when the program needs to save documents (e.g. adding the logo or attachments to the Enhanced Statement, Enhanced Statement with groups from the menu Reports > Attachments section).

The Documents table has the following columns:
- Id
The document's name. Id it is free text but should be unique within the table.- Documents starting with "_" are used for particular features of the programme.
- "_budget.js"
You insert your own functions created for the Budget table.
- "_budget.js"
- The dlgmanageaddons Id is used to save the image used as a logo.
- The attachment_ Id it is used for attachments in the enhanced balance sheet.
- Documents starting with "_" are used for particular features of the programme.
- Description
A brief description of the file (optional) - Attachments
Contains the file. By clicking on the cell it is possible to view or modify the contents of the file.
There are these types of possible content- Image (image/png, image/jpg)
- Normal text (text/plain)
- Formatted html text (text/html),
- Markdown-formatted text (text/markdown),
- Programming in javascript (text/javascript)
- Sheet style CSS (text/css).
Adding a new document

To insert a new document in the Documents table
- Add a new row.
- In the Id column write the name of the file .
- In the Description column you can write the desired text.
- In the Attachments column double-click on the cell or select the edit symbol, select the type of document you want to add.
See also:
Markdown Editor
In Banana Accounting Plus, balance sheets attachments can now also be inserted via markdown language, in addition to html. This is very convenient for inserting tables into attachments.
In Banana Accounting Plus this feature is only available with the Advanced plan.

Markdown is a language that allows you to create formatted text using a normal text editor and a syntax that is easy to write and read.
In Banana+ it is possible to use this language in the attachments of the Documents table and the GitHub Flavored Markdown specification is supported.
Documentation published by github.com:
Adding a Markdown document
- Select the Documents table.
- Add a new row.
- In the Id column write a name that identifies the document.
- In the Description column you can write the desired text.
- In the Attachments column double-click on the cell or select the edit symbol, select the Markdown Text type.
Add a balance sheet attachment with markdown text
How to create a table
To create tables in markdown, the content of the columns must be from the vertical slash sign, preceded and followed by a space " | ".
For the column alignment you must create a row with
- Left: simple hyphens (minimum three hyphens).
- Center: hyphens preceded and followed by the colon ":---:".
- Right: hyphens followed by the colon "---:".
# Notes to the Balance (Example)
The financial statements of Example have been prepared in accordance with the International Financial Reporting Standards (IFRS).
## Cash Positions
| Account | Description | Current Year | Previous Year |
| :---: | --- | ---: | ---: |
| 1000 | Cash | 23'000.00 | 17'000.00 |
| 1020 | Bank account| 9'000.00 | 1'000.00 |
| | **Total** | **32'000.00** | **18'000.00** |
## Other Fixed Assets
| Account | Description | Current Year | Previous Year |
| :---: | --- | ---: | ---: |
| 1000 | Machinery | 13'000.00 | 17'000.00 |
| 1020 | Furniture | 5'000.00 | 4'000.00 |
| | **Total** | **18'000.00** | **21'000.00** |

How to create an unordered list
# Create an unordered list
* First item
* Second item
* Third item
* Fourth item
How to create a task list with checkboxes
# Task list with checkboxes in Markdown
- [ ] Item 1
- [X] Item 2
- [X] Item 3
- [ ] Item 4
- [ ] Item 5

How to change the text color
# Change the text color using HTML syntax
This is normal text in black color, <span style="color:blue">and this text is blue!</span>
<span style="color:red">Another text in red color.</span>

How to change color, font and size of a text
# Change the text color, font and size using HTML syntax
<span style="color:green;font-size:20pt;font-family:Times New Roman;">Change color, font and size of a text</span>

How to apply bold format
# Use double asterisks ( **text** ) before and after the text
**This is a text written in bold**
How to apply italic format
# Use single asterisks ( *text* ) before and after the text
*This is a text written in italic*
How to apply bold and italic format
# Use three asterisks ( ***text*** ) before and after the text
***This is a text written in bold and italic***
Features currently not available
These features, although requested by some users, are not available at the moment:
- Add a link in the markdown text
HTML Editor

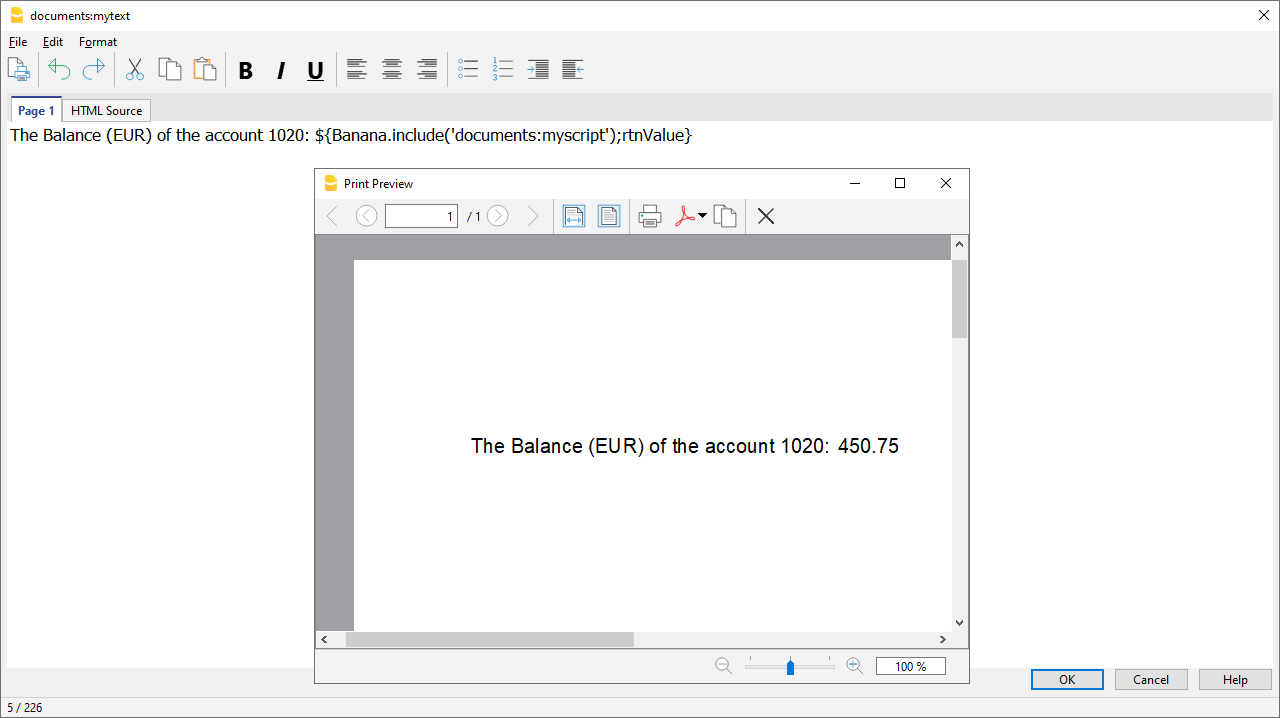
Adding the ${...} field
The ${...} field allows the user to add dynamic text to the document, for instance an account's balance or a Banana table. The Banana API interface is available at the following web address https://www.banana.ch/doc/en/node/4714
The command can be added manually or through the command Edit - Add script
Printing a blank line (put a space between the quotes)
${' '}
Printing the current balance of account 1020
${Banana.Converter.toLocaleNumberFormat(Banana.document.currentBalance('1020','','').balance);}
Output of the Accounts table, columns: Account, Group, Description, Balance.
${HTML Banana.document.table('Accounts').toHtml(['Account','Group','Description','Balance'],true);}
It is possible to write the javascript code in a separate document and include the script through the command Banana.include.
The scripts can be saved in the Documents table or in a local file.
${Banana.include('documents:myscript1');rtnValue}
${Banana.include('c://temp//myscript16.js');rtnValue}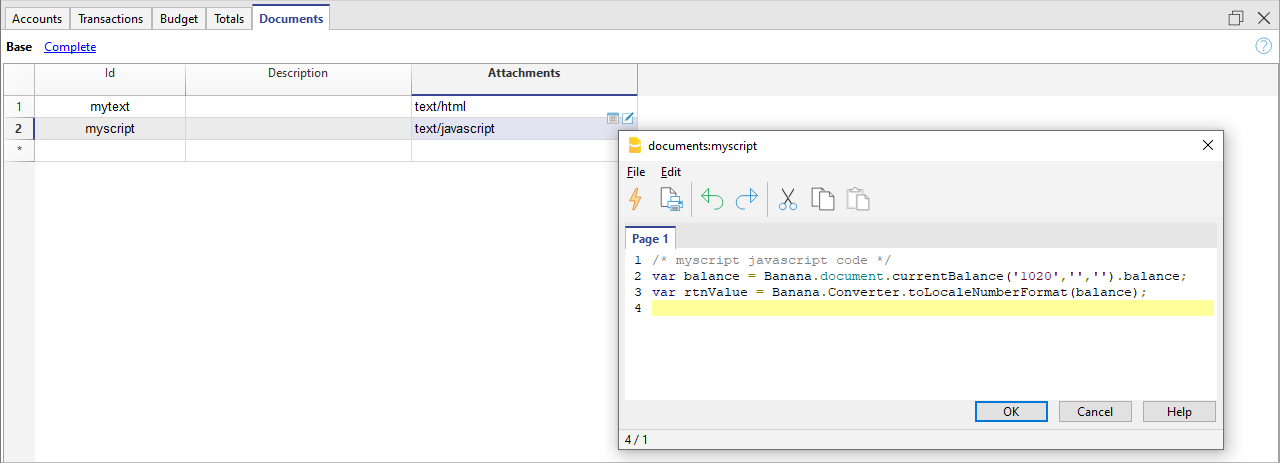
Adding a page break
The command can be added manually or through the command Edit - Add page break
Text in the first page
${PAGEBREAK}
Text in the second page
Troubleshooting
- When taking text from external sources (Word, Internet pages, ...), use the Edit > Paste as plain text command.
This command avoids problems with HTML formatting, which in some cases prevents correct display. - For the examples on this page, use the Copy link on the top right of each example, do not use CTRL+C (or CMD+C).
- If the ${…} field does not work, check that there is no HTML formatting (such as <span>…</span> elements or other) and possibly remove it from the HTML Source code.
- To remove existing HTML formatting from an entire page:
- copy text to clipboard (CTRL+C)
- go to the HTML Source tab and delete all content
- go to the Page 1 tab and paste the copied text with the Edit > Paste as plain text command.
Embedded Extension
Embedded Extensions are extensions written in JavaScript and saved directly in the Documents table of the accounting file. They work exclusively in that specific file without requiring installation. Once created, they are immediately ready to use.
Add an Embedded Extension
- Open an accounting file in Banana Accounting Plus.
- Ensure the Documents table is enabled:
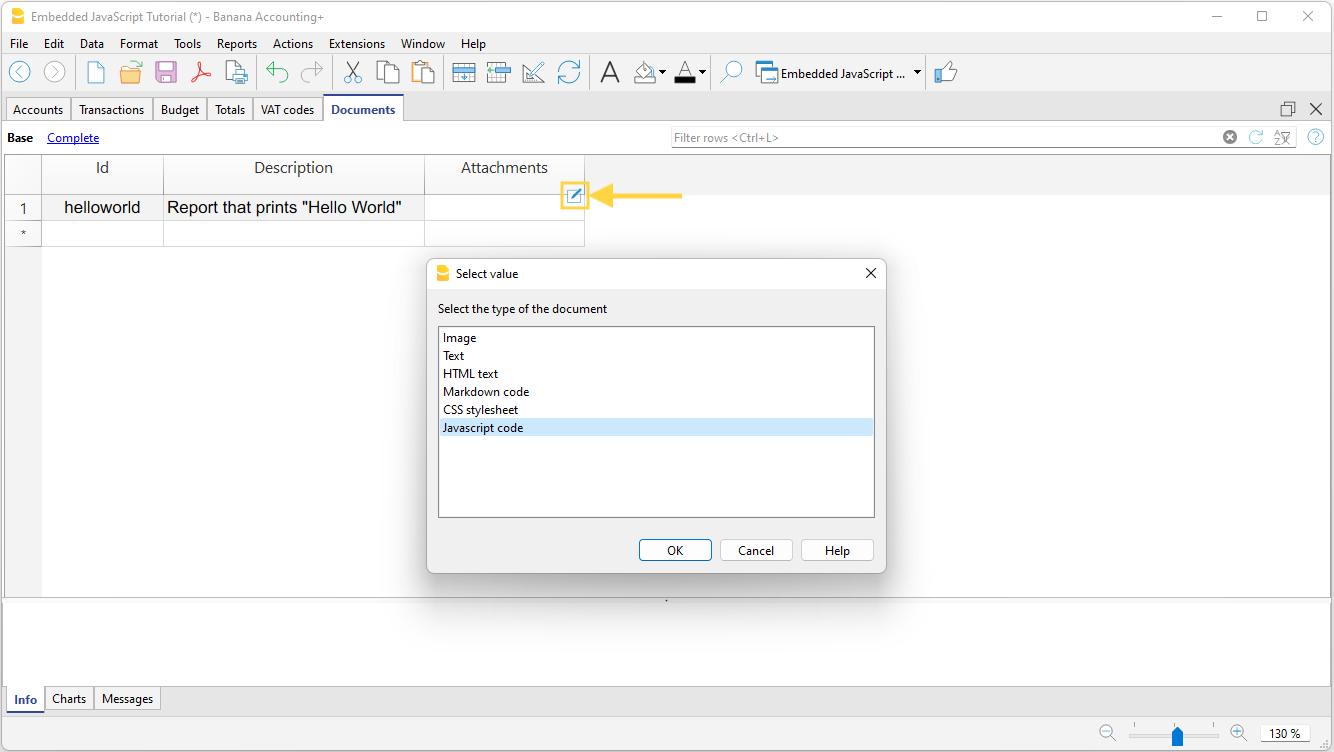
- Add the extension in the Documents table:
- In the ID column enter a name for the extension.
- In the Description column enter a comment.
- In the Attachments column, attach the JavaScript code with a double click on the cell or select the edit symbol in the top right corner, then select Javascript code and confirm with OK.
- An editor where you can write your javascript code opens.
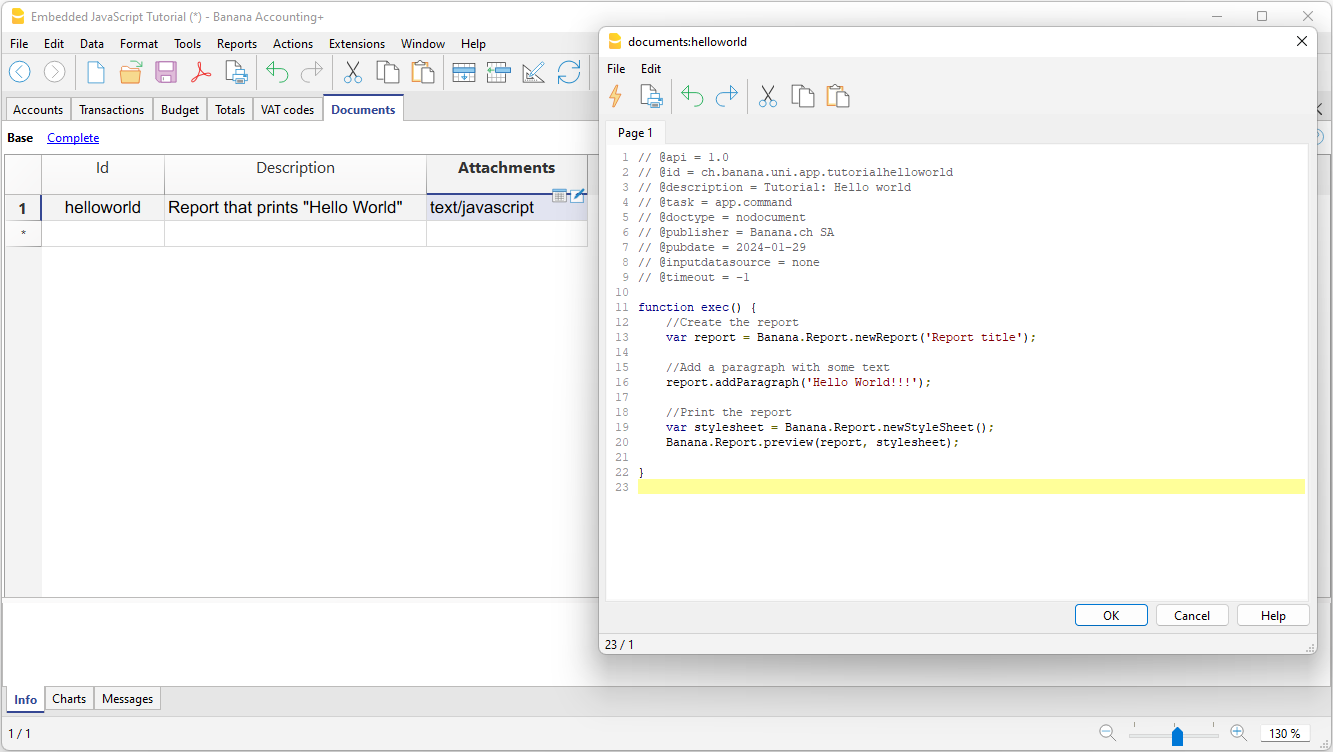
- When you are finished, confirm with OK, and save the accounting file.
Run the Extension
You have two options to run the embedded extensions:
- From the Documents table, click the run symbol in the Attachments cell containing your code.
- From the Extensions menu, select the extension from those listed.
More information
Documentation for developers:
Simple table (Add fonctionalities)
The programme adds a table consisting of these columns to the existing file.
- Id
- Description
- Notes
This is used to add codes for projects, for example, or other information that you want to encode.
In other tables, a column can then be added that links to this table.

Joining Tables
Add Link Column
In Banana Accounting Plus, you can create links between columns of different tables using the RowId column.
The command Tools > Add/Remove Functionalities > Add Columns for linking tables creates a link column in the current table, with another existing table.
The Description column is automatically added, but if it is not needed, it can be deleted or hidden.
The command only works if the table to be linked contains the "RowId" column.
Choose Table Dialog
A list of tables containing the "RowId" column, which are not linked to any table, is displayed.
Choose the column after which (position) you want the link columns to be added.
Choose Column Dialog
All columns of the table are displayed.
Choose the column after which (position) you want the link columns to be added.
Link between Tables
To create a link between a column of one table and a different one, proceed as follows:
- Open the file where you want to add the table.
- Add the new table "e.g., Projects".
- In the Id column of the added table (Projects), enter the project code, and in the Description column, enter the project description.
- In the Transactions table, link the columns of the added table (Projects):
- From the Tools > Add/Remove Functionalities > Add Columns for linking tables menu.
In the dialog that opens, you can choose the position of the column. - Confirm by clicking the OK button.
- New link columns are added and displayed, starting with the name of the table.
- ProjectsId where the corresponding code from the RowId column is entered.
- ProjectsDescription (protected column) where the description corresponding to the entered code is displayed.
- When the content of the Projects table is changed by entering the Id in the other table, the description text will automatically be retrieved.
- From the Tools > Add/Remove Functionalities > Add Columns for linking tables menu.
- If descriptions in the added table (Projects) are changed, to automatically retrieve the new texts, recalculate or close and reopen the file.
The program automatically links columns that start with the same nameXml of a table and are followed by "Id" or "Description".
- Link columns can be created or added manually by assigning them specific names.
- Do not use these names for columns that should not be linked.
Create file from external data
Banana Accounting allows for reading and displaying in tabular form multiple file formats.
View CSV File
When opening, or dragging and dropping a file of the CSV or JCSV type in the Banana window, Banana will automatically create a simple Table type file, resuming the columns and data contained in the CSV table.
View ISO 20022 file
The Banana software allows the user to view and print the contents of ISO20022 - camt. 052, camt. 053 (included version 4), camt. 054 - and MT940 bank statements.
The transactions of the electronic bank statement, with description, amount income or expenses, are being presented in separate columns and can be printed or pasted into Excel.
Open the ISO 20022 or MT940 file
In order to open and see the file :
-
Download your bank statement in ISO 20022 formatIf it is a compressed file, extract the XML file to be displayed with its own utility (p.es. 7zip)S
- Install and open Banana Accounting
- Drag the file inside Banana Accounting: Banana immediately shows all entries with text and date, amount and the progressive balance (the file is being opened as "read only")
- The data of the bank statement can then be printed or copied into Excel or other programs.
Additional indications
-
The opening balance in the ISO 20022 file is entered into the Accounts table.
- The column width can be adapted with the mouse.
-
To align the text of the description on several lines, use the command Format → Calculate all row heights
-
To categorize the movements and get statements, enter the appropriate categories in the Categories table and display the Categories column in the Transactions table with the Columns setup command.Or, create a new file with an existing template and categories and accounts already set up, and import the data of the bank statement as explained in the page Import ISO 20022 file.
-
In the free Starter Edition mode, files with more than 70 transactions cannot be saved.
More information
For more information with regard to the ISO 20022 Standard, please consult the page Import ISO 20022 file.
Create file copy
You can activate the command from the Tools menu → Create file copy.

This feature allows you to create a new file, identical to the existing one. You can choose to copy the file with the following options:
- Keep Opening balances. If the option is activated, the opening balances of the copied file will be shown in the new file.
- Keep Transactions. If this option is activated, transactions of the copied file will be shown in the new file.
- Keep Recurring transactions. If this option is activated, the recurring transactions of the copied file will be shown in the new file.
This feature is very useful when you want to make test changes and have the confidence that you can go back without losing data.
If none of the options are activated, a new file will be created only showing the same accounting plan.
The new file must be saved with a name.
Convert to new file
The command is activated from via Tools > Convert to new file.
In the dialog box that appears, the file type you are working on is selected.
A list of possible choices is also listed:

This command converts an existing file (which will not be modified) into another one with different characteristics:
- Change language
- Change the rounding
- Change the file type. For example:
- Pass from an accounting without VAT to one with VAT
- Pass from a Double-entry accounting to a Multi-currency accounting
This is similar to creating a new blank file and then transfer the data manually .
The existing file characteristics can be consulted by executing the Tools > File Info command
Creation and data transfer
The Tools → Convert to new file command:
- Creates a new file of the specified type with the predefined columns setup
- Transfers the data into the new file, proceeding with the necessary conversions
- Saves and indicates the name of the new file.
When converting a file with more options into one with fewer options, part of the data will be lost during conversion. If, for example, an accounting file with VAT/Sales tax is converted into an accounting file without VAT/Sales tax, all data in the VAT columns will be lost during conversion.
Conversion from a Double-entry accounting to a Multi-currency accounting file
- The currency symbol that is to become the basic currency must be specified in File and accounting properties
- Choose the Multi-currency accounting as destination
- The program creates a Multi-currency accounting, recovering the existing data:
- The Transactions table includes the columns for managing the Multi-currency accounting, as the base currency and a 1.0000 exchange rate
- The existing accounts in the Accounts table are being completed with the base currency symbol
- You must add the predefined accounts for exchange rate profit & loss.
- You must indicate the predefined accounts for exchange rate profit & loss in the File and accounting properties.
- The Exchange rate table will be empty; it is therefore necessary to add the currencies and exchange rates used in the transactions
- In the Accounts table, the accounts in foreign currency have to be added.
In order to change the currency of an accounting file, refer to the File Properties of the File and accounting properties.
Conversion from an accounting without VAT to one with VAT
- Choose the desired type of accounting with VAT as the destination
- The program creates an accounting with the VAT columns, recovering the existing data:
- Add the VAT accounts into the Chart of Accounts
- The File properties regarding the VAT need to be completed, and the default account on which the VAT must be recorded needs to be indicated
- Via Actions > Importa to accounting > VAT codes the applicable rates present in the VAT Codes table can be used.
Outline to create new file
For further details refer to:

Related documents:
The Merge file command in Banana Accounting+
The possibility of merging accounting files together is very useful; it allows, for example, to merge the accounting files of different branches of the same company, or to absorb the accounts of dislocated activities in the accounting file of the parent company, both for associations and businesses.
In Banana Accounting Plus this feature is only available with the Advanced plan. Explore all the Advanced plan features. Switch now to the Advanced plan!
The command is activated vie Tools → Merge File.
It is possible to merge two files, but they have to belong to the same application (for example two double-entry accounting files). It is not possible to merge files belonging to different applications (for example one double-entry accounting file and one income & expense file).
In order to successfully merge two files, it is crucial that they contain the same accounts numbers. Proceed as follows:
- Open the file which will contain the data of both files.
- Select the Tools → Merge File command.
- Select the path and the name of the file to be merged.
- Confirm the merge operation.
- If the files are not identical, even though they belong to the same application, (for example, accounting with VAT/Sales tax and accounting without VAT/Sales tax), a message will appear warning against probable data loss.
Program options
The program options are activated via the Tools → Program menu options and contain technical choices for the accounting document.

In the following pages you will find more detailed information.
General
The interface options are activated via Tools → Program Options → Interface.
Program options
Language
It is the language used by the program. You can change this setting if you want to use a language other than the default or if the default is not available.
Font type
You can choose the font.
% Zoom
If you want the data in the tables to be displayed in a different size, just adjust the Zoom percentage.
- The zoom percentage can also be changed with the zoom tool at the bottom right of the status line.
- The purpose of the zoom is to adapt the table content to the window size.
For the text size of menus, dialogues and icons, the operating system settings are used, but can also be adapted by the user.
Show negative numbers in red
Negative numbers and amounts are displayed in red in the tables.
Startup
Check for updates
Direct link the www.banana.ch website to the update download page.
Display start page
The news information home page is displayed.
Show recently used files
Recently opened files are displayed.
Start Web Server
Is used to access Banana Accounting data from external programs.
For more information see Integrated Webserver
Editor
The Editor options are activated from the menu Tools → Program Options → Editor.

Behavior
Edit table with single click
- If the function is activated, a single click on the selected cell is sufficient to introduce change.
- If the function is activated, a single click on the cell already selected is sufficient to change.
Autocomplete text (Smart fill)
By activating this option, the program automatically selects the first draft text in the drop down list and automatically fills it in the row where you are.
Add up during selection
By activating this option, the program will add up the selected amounts. Deactivate this function if this instantaneous addition slows certain operations down. One can select non-adjacent amounts by holding down the Ctrl key while selecting individual cells with the left mouse button.
On Enter go to the next row
By activating this option, the cursor will place itself on the next row when pressing the Enter key.
Input
Maximum number of undo operations
Insert the maximum number of undo operations when using the command from the menu Edit → Undo Operation (you undo one operation at a time).
Smart fill rows limit
When inserting data, the program reads the data that has already been entered and tries to suggest how to complete an entry. In cases where there are many rows, this function could slow down the process.
The user can define a limit for the number of rows, above which the smart fill will not be used. If there is no value entered or zero, smart fill will always be used.
File handling
The File Management options are activated via Tools → Program Options → File Handling tab.

Saving documents
This section contains the following options for saving documents.
Saving automatically when closing the documents
If this option is enabled, the data will be saved each time the file is closed.
Save autorecover information
The option allows automatic saving of the file with frequency (in minutes) to be indicated. The program saves the data in a document called autobackup + filename. If the program or computer crashes, you can recover the data by opening this file and saving it as from the File menu.
Create backup copy
When saving to disk with the same name, the pre-existing version of the file is renamed with the BAK extension.
Refer to the Save page for further information.
Files extension
Extension of files considered secure
This option defines the file types (eg: "pfd", "jpg", ...) and the url schemes (eg: "http:", "x-devonthink-item:", ...) that allow to open with a double click in the DocLink column of the Transactions table. Therefore, it prevents you from opening unsafe files or schemes. Extensions must be inserted without the period '.' initial, while the schemes must be inserted with a double dot ':' at the end.
Restore defaults
If certain settings have been changed, program will restore the default settings when clicking on this button.
Advanced
The Advanced options are activated Tools > Program Options > Advanced.

Enable TrueType Fonts
If this option is enabled when printing PDF files, the font selected in the Interface tab is used, otherwise a native font type of PDF files is used (Helvetica or Times New Roman). This option must be disabled if the texts in the generated PDF files are unreadable.
System info
Open the System info dialogue.