Chart of accounts | Double-entry accounting
The Accounts table is the control room of your accounting. It's use is similar to that of an Excel spreadsheet.
In the Accounts table you set up everything you need to manage the accounting and have a quick updated overview of the financial and economic situation of your company.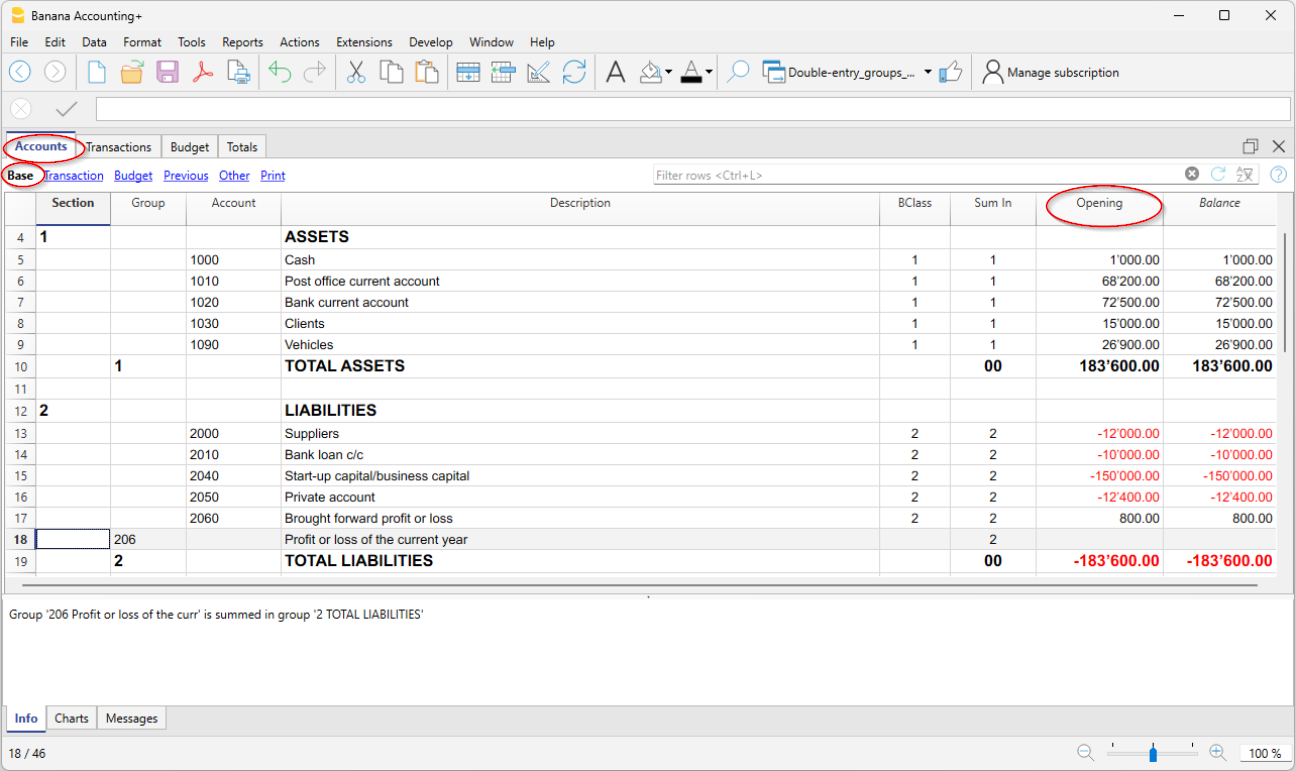
Ready-to-Use Chart of Accounts
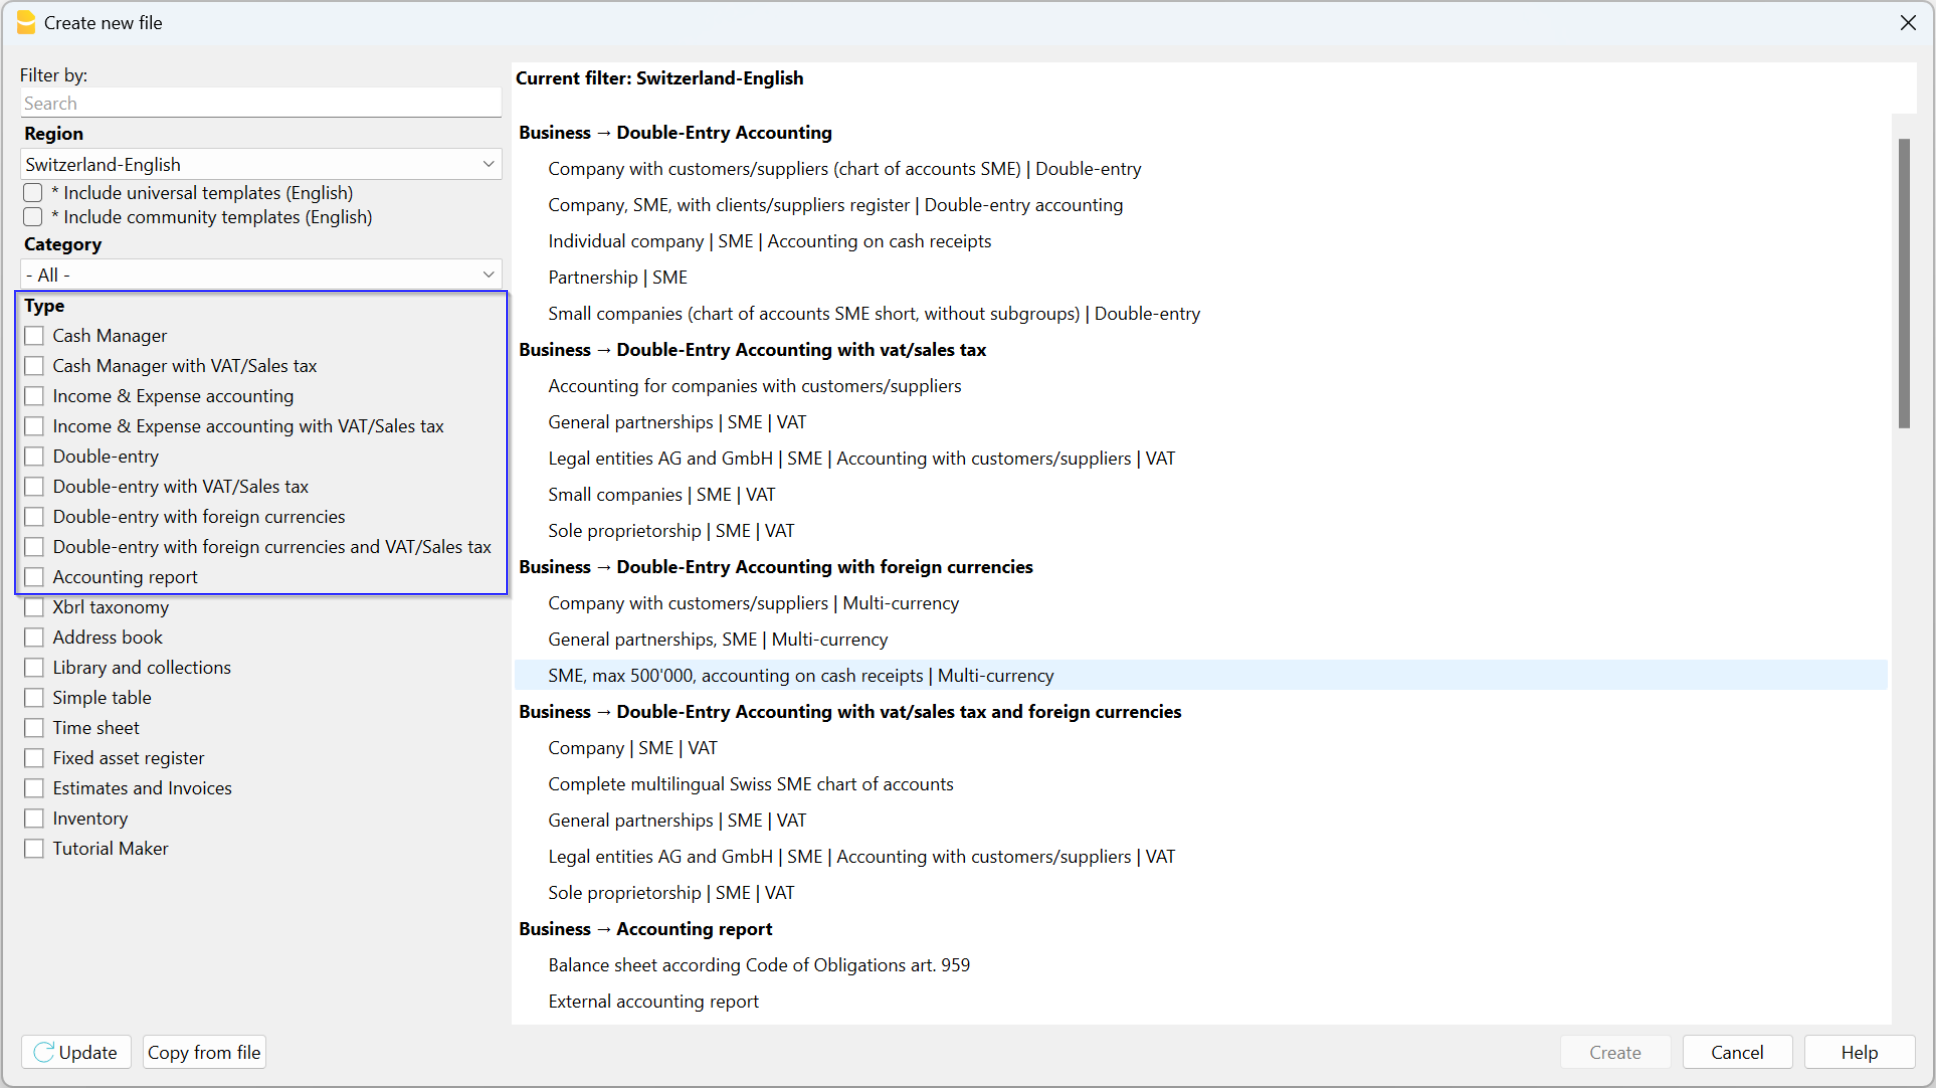
Each accounting application by Banana offers a wide variety of chart of accounts templates, already prepared for immediate use. Simply select the file whose template meets your needs, and you'll have the chart of accounts already set up. File templates can be chosen based on the type of business activity and legal regulations.
They have the following characteristics:
- Fully customizable chart and account structure.
- Account and group numbers can be numerical or alphanumeric.
- Ability to add notes or additional columns.
- Grouping and totals adaptable to any national grouping scheme.
- Balances, account movements, and totals displayed and always up to date.
- Cost and profit centers for detailed control of costs and revenues for specific activities or projects.
- Segments for sector reporting (branch).
- Customer database, with control over outstanding invoices, reminders, and statements.
- Supplier database, control over paid and outstanding invoices.
- Management of off-budget customers and suppliers (with cost center) for cash-based accounting.
- Off-balance sheet accounts.
Entering and editing data is simple
- Add and edit accounts quickly and easily by simply inserting or deleting the row.
- There is no limit on the number of accounts to be added in the Chart of Accounts.
- Each account can be set up using numbers or texts.
- The description can also be very long.
- The Groups and Subgroups can be freely arranged to compose the Balance Sheet and the Income Statement.
- The opening balances are immediately entered in the opening column.
- Columns can be added to enter additional information.
- Accounts can be renamed and replaced automatically in the Transactions table as well.
- The columns of the amounts are updated instantly, at glance you know the status of liquidity, capital, sales, profit.
- Then, set the budget and have the comparison with the final balance.
Flexible grouping system
The grouping system is highly flexible and powerful:
- It allows to set up the Chart of Accounts according to any national scheme and to adapt exactly to the needs of the company.
- If you are not satisfied with the arrangement or numbering of accounts and groups, these can easily be changed.
The structure present in the Accounts table is also maintained in the presentation of the Balance Sheet and Income Statement.
Main elements
- Sections
They are used to indicate the subdivisions of the chart of accounts for printing the balance sheet, income statement, etc. - Groups
They allow you to create items that total the accounts and subgroups at multiple levels. - Accounts
These are the elements of accounting where the movements are recorded. They can be indicated in Debit or Credit depending on the nature of the movement, destination or origin.
Each account has a number or abbreviation (account number), a description, the B class and group to which it belongs, the opening balance, current balance, estimate, etc.
Customer and supplier data
You can have specific accounts for issuing invoices and checking payments. They are usually set at the end of the chart of accounts. They can be set up as register with the totals linked to the balance sheet, or as cost and profit centers, with all the details but without links to the balance sheet.
Cost and profit centers
Great to manage projects or have precise details of a specific event, or to manage customers and suppliers on the Cash principle (collected).
- Costs and Profits centers
They are special accounts whose number is preceded by a full stop ".", a comma "," or by a semi-colon ";". Their purpose is to be able to assign some amounts to special accounts other than the general accounting accounts.
Segments
Used to generate financial statements also for different sectors or activities in which the company operates.
- Segments
They are a sort of sub-accounts who's number is preceded by a ":". Their purpose is to be able to assign some transactions to subcategories of the chart of accounts.
Advanced printouts
- Accounting report
It is possible to select just the accounts with transactions, to obtain temporary groupings or accounts grouped according to the BClass or an external grouping scheme. - Enhanced Balance sheet
Prints all the accounts of the accounting divided by Assets, Liabilities, Expenses and Revenue - Enhanced Balance sheet with groups
Allows the user to obtain customized printouts with groups - Specific advanced printouts are available using the Banana Extensions
The columns of the double-entry Accounts Table
The Accounts table is made up of several columns. Depending on the Views, columns are displayed simultaneously. Each column has its own purpose.
The data to be entered in the following columns are explained below:
- Section
Codes are being entered that allow the user to print determined parts of the Chart of accounts only, when printing the Enhanced Balance sheet by groups.
- Group
Contains the code that defines that this is a group row. The group code is then used in the GR column to indicate the total of an account or group.
- Account
The account number, cost center or segment is being entered.
- Description
A text to indicate the name of the account, group, or section.
- Disable (only visible in the Other view)
By entering 1, the account does not appear in the auto-complete list, but can be used in the Transactions table;
By entering 2, the account is disabled and can not be used.
- BClass
It indicates whether the account is 1 = Assets, 2 = Liabilities, 3 = Expenses, 4 = Revenue, see Accounts page
- Sum in (Gr)
The code of a group is indicated so that the programme totals the amount of the line in the group.
The heading 'Sum in' has been adopted with the Banana Plus version.
The column name has remained Gr, to maintain compatibility with earlier versions of the programme.
- Gr1 and Gr2
- Opening balance
- The account balance is entered at the beginning of the year.
- Credit amounts must be entered with a minus sign in front
- The sum of all the amounts, those in debit (positive) and credit (negative) of the accounts belonging to classes 1,2,3 and 4 must result as zero. If the opening balances do not balance, a difference is indicated in the information window.
If accounts have been added and the difference is not exact, Recalculate the accounting. - The opening balance, in the balance sheet accounts, is used to calculate the current balance.
- If values have been entered in the Budget table, the opening balance is used by the program for opening financial planning.
- For further information, see the Double Entry Opening Balances page.
- Debit and Credit movements (Protected columns)
The total of the debit and credit movements included in the Transactions table.
- If there are no errors, the totals of the two columns are balanced, otherwise a difference is displayed in the Balance column which must be checked and corrected.
- In line called Difference must be zero, regarding these two columns, it is correct that there are amounts. The important thing is that their values are equal. See also Mathematical Basis of Accounting.
- Balance (Protected column)
The balance of the account includes the opening balance and the movements in debit and credit.The balance in debit is positive, while a credit balance is negative (minus sign).
- Budget
You enter the budget amount for the current period.- The budgeted amount for costs (debit) must be entered in positive, for revenue in negative (credit).
- If the Budget table has been activated, the Budget column in the Accounts table is protected and the amounts are those calculated on the basis of the budget postings.
-
Difference Budget (Protected column)
The difference between Balance and Budget amount.
- Previous
The balance of the account at the end of the preceding year.
With the command Create new year or Update opening balances the values in the Balance column of the file of the preceding year are being carried forward.
When a new accounting is being created and the user wants to obtain printouts with the amounts of the preceding year, the values of that year have to be entered manually.
- Difference Prev. year (Protected column)
The difference between the Balance and the amount of last year.
- VATNumber
The VAT number in case this account is linked to a client or a supplier.
- VATCode
The VAT code that needs to be applied automatically, when this account is being entered in the debit A/c or credit A/c column of the Transactions.
- Address columns
These columns are used to enter the addresses of the customer and supplier accounts. If the columns are not present, they can be added by activating them via the Tools → Add new features → Add address columns menu in the Accounts table.
Adding or moving columns
- When an Amount column is being added in the Chart of accounts, the program will calculate the total of the amounts according to the selected grouping scheme
-
Columns added of the number type, on the contrary, are not being totaled.
- With the Columns setup command, the columns can be displayed, the sequences can be altered and it is equally possible to add other columns.
- With the Page setup command one can also define the layout of the print (portrait or landscape) and the zoom.
Accounts list sorted by description or other criteria
To obtain lists of accounts sorted in different ways, use the Extract and sort rows command from the Data menu. We recommend you to be very careful when sorting the rows with different criteria in order not to create confusion in the groupings and totals.
Views
- Base The principal columns, the grouping columns and the balances are displayed.
- Transaction The columns with the Debit and Credit transactions are displayed.
- Budget The Budget column and the Difference Budget column are displayed.
- Previous The Previous column and the Difference Prior columns regarding the previous year are displayed.
- Other The Disable column, the VAT number and the Fiscal number column are being displayed.
- Print Only the Account column, the Description and the Balance are being displayed.
The views can be customized and others can be added with the Views setup command.
Accounts | Double-entry book-keeping
Accounts constitute the main structure on which all accounting is created. If you open one of the templates included in Banana Accounting, the accounts are already present in the Accounts table and contain all the settings needed to instantly record the transactions in the Transactions table.
The accounts in the Accounts table are divided as follows:
- Balance Sheet Accounts - Assets and Liabilities.
- Profit and Loss Accounts - Expenses and Income.
- Customer and Supplier master Data
- Account Cost and Profit centers - for managing projects or keeping the Customers / Suppliers register
- Segment Accounts - for managing business segments or branches.
The BClass
The BClass is essential for the correct total of amounts and balances. In the BClass column, each account must be assigned one of the following values, regardless of the account number or group to which it belongs:
- 1 - for Assets
- 2 - for Liabilities
- 3 - for Expenses
- 4 - for Income
Groups and subgroups do not have BClass, so the cell of the relevant column remains empty.
BClass of off-balance sheet accounts
Off-balance sheet accounts are those whose amounts and balances do not fall within the totals of the balance sheet and income statement accounts. They are accounts that are entered in the chart of accounts to view guarantees and conditional commitments.
Off-balance sheet accounts must have the following BClass:
- 5 for Off Balance Sheet Assets
- 6 for Off Balance Sheet Liabilities
- 7 - 10 - for other Off Balance Sheet accounts
Add a new account or category
In the Accounts table, Base view, you can add new accounts (or new categories in the Income / Expense accounting).
Before adding an account or a category it is important to know:
- The account or category number can consist of numbers, letters and separator characters.
- There cannot be multiple accounts or categories with the same number.
- Each account must have a grouping (Gr) and a class (BClass).
To add an account or a category proceed as follows:
- Go to the row preceding the one where the new account or category will be inserted.
- Add a row with the Edit → Insert row command
- Fill in the respective columns the account or category number, the description, the BClass (1 for assets, 2 for liabilities, 3 for costs and 4 for revenues - only for double-entry accounting), the number of Gr which must be the same as the one entered for the accounts belonging to the same Group.
Warning: if you enter a transaction with an account that does not exist in the chart of accounts and only after creating the new account, you will initially receive an error message; to eliminate it, it is necessary to recalculate the accounting with the command Shift + F9 or through the menu Actions → Recalculate totals.
Rename an account
This is a very useful function because it allows you to change an account and simultaneously have it replaced in the Transactions table. It avoids having to change the account for each transaction that contained the previous account. In addition, it also allows you to rename a group or a VAT code.
- In the Accounts table go to the Account / Category or Group column, or to the VAT Code column of the VAT Codes table.
- Use the Data → Rename command.
- Indicate the new account number, group, category or VAT code.
The program automatically updates the Transactions table with the new VAT number or code.
Delete an account
If an accounting is already started, before deleting an account, make sure that it has not been used in the Transactions table or that it does not have an opening balance.
- Locate the row of the account that is to be deleted.
- Use the command Edit → Delete rows command.
After deleting an account or a category it is advisable to use the Actions → Recalculate totals command. If the deleted account or category is in use in transactions, the program reports an error message.
Opening balances of the accounts
The opening balance of an account is shown in the Opening column.
- Debit (Asset) balances are shown normally.
- Credit (Liabilities) balances are indicated with a minus sign (in negative) in front of the amount
- Typically, only the opening balances of the Asset and Liabilities accounts are indicated.
To carry over the opening balances automatically to the following year, see the Create New Year lesson.
Further details on opening balances are available on the Opening balances page.
Differences in opening balances
To have correct accounting, the total of the opening debit balances must match the total of the opening credit balances, so that there are no differences.
If the total does not correspond there will be a notification of the difference between the initial balances in the Info window.
If any account numbers have been changed and there are differences, perform the Full Accounting Recalculation.
When using Banana Accounting for the first time, to create the opening balance, it is necessary to manually enter the opening balances (Opening column), making sure to enter the balances of the Liabilities with the minus sign (-) in front of the amount.
Further details on opening balances are available on the:
- Differences in opening balances (Double-entry accounting).
- Differences in opening balances (Multi-currency accounting).
Customer and Supplier accounts
Customer and supplier accounts can be entered directly in the Balance Sheet sections, listing the accounts for each customer and supplier and creating two distinct totaling groups, one in the Assets for customers, the other in the Liabilities for suppliers. If the list of customers and suppliers is very extensive, it is possible to create a customers / suppliers ledger at the end of the chart of accounts.
There are several setting options:
- Setting up directly in the Financial Statements, listing customers and suppliers, respectively in the Assets and Liabilities.
- Setting up with the customers / suppliers register, at the end of the accounting plan, with the totalization reported in the financial statements. This setting is ideal for those who manage VAT with the accrual method.
- Setting up with cost and profit centers, at the end of the chart of accounts, without totaling in the balance sheet.
This setting is ideal for those who manage VAT with the cash method.
Accounts with addresses
In the Accounts table, Address view, there are columns to enter the addresses of customers, suppliers or members. If the columns of the address view are missing, you can add them:
The address columns are essential to be able to manage billing, reminders and the control of payments and collections.
More details are available on the Address page.

The Cost and Profit Centers accounts
They are ideal for project management, have precise details on a specific event or for any other need.
- Cost and profit centers
They are accounts that have the number preceded by a period ".", by a comma "," or by a semicolon ";" and are used to attribute the transaction amounts to additional accounts as well, with respect to the basic accounting ones.
All the amounts attributed to the cost and profit centers are separate from the Balance Sheet and the Income Statement and are entirely for information purposes.
The Segment Accounts
To have financial statements also of different sectors or activities in which the company operates.
- Segments
They are similar to sub-accounts that have the number preceded by a colon ":" and are used to attribute the accounting operations to sub-categories of accounts.
Customize accounts and categories
Adding a new account or category
With Banana Accounting it is possible to customize the chart of accounts by adding or deleting accounts and categories.
To add a new account or category, proceed as follows:
- Position yourself in the row above the one where you want to add the new account or category.
- Add a new empty row with the command Edit → Add rows.
- Enter in the respective columns:
- The Account number
- The Description,
- The BClass (1 for the Assets, 2 for the Liabilities, 3 for the Expenses and 4 for the Revenue)
- Grouping number (Sum in column) which must be the same as that entered for accounts or categories belonging to the same Totalization Group.
If in the Transactions table you enter a transaction with a non-existing account, the program gives you an error message; to take it away you have to create the new account in the chart of accounts and recheck the accounting with the Shift + F9 key, or with the menu Actions → Recheck accounting command.
Adding a new group
If you want new totalization groups, proceed as follows:
- Position yourself in the row above the one where you want to add the new group
- Add a new empty row with the command command Edit → Add rows.
- Enter in the respective columns:
- The Group number
- The Group Description,
- Grouping number (Sum in column) in which you wish this group to be totalized.
Renaming an account, a group, a category or a VAT Code
This is a very practical function that allows you to rename an account, a category, a group or a VAT code and to have the replacement automatically in the Transactions and Budget table without having to enter them manually.
To rename one of the elements proceed as follows:
- Position yourself in cell where the account or group (Accounts table) or the category (Categories table), that needs to be renamed, is present.
- If it is necessary to rename a VAT code, it is necessary to position yourself in the VAT Codes table, on the cell of the code to be substituted.
- Choose the Data menu → Rename command
- Indicate the new account, group, category or VAT code number.
Removing an account, a group, a category or a VAT Code
- Position yourself on the row number that contains the element that is to be deleted
- Click on the Edit menu → Delete rows.
- Enter the number of rows that you wish to delete
After deleting an account, a group, a category or a VAT code, it is necessary to use the Recheck accounting command. The program will give you a warning message if the deleted element was used in the transactions.
When deleting a group and not all accounts belonging to the deleted group are deleted, you must change the grouping number in the Sum in column for the remaining accounts, otherwise errors will be reported.
Groups
Banana has developed a very practical and immediate grouping system, which allows you to set in the Accounts table all the information necessary to define the structure of the Balance sheet, Profit & loss statement and of other sections of the accounting.
The grouping system is flexible; it allows you to implement any national chart of accounts and at the same time to adapt it to the specific needs of your business. Both very simple and very complex plans and presentations can be created, with multiple levels of totalling, for any type of accounting.
With grouping, the totals of balances, movements and the group budget are displayed immediately.
How it works
To understand how the Banana grouping system works, please refer to our documentation page:
Grouping and totalling system
The Banana grouping and totaling system is based on two columns of the Accounts and Categories table:
- Group (Total row)
- When, in a row, a group identifier is being entered, the row becomes a total row.
- In this row the amounts of the Sum in column, that contain the same identifier, are being totaled.
- In a row, when a group is present, there cannot be an account.
- Sum in
- Sums the row amounts in the indicated group.
- For each account or group row, you indicate the group in which the line is to be totaled.
- The number here must be one of the numbers defined in the Group column.

Main groups in double-entry accounting
Every accounting file template uses its own totaling system. Hereunder explanation of the main groups of double-entry accounting .
In double-entry accounting, the total of the Debit balances (positive) together with the Credit balances (negative) have to result in 0 (zero). In the case of differences, the group line 00 has a non-zero amount.
The calculation sequence to achieve 00 is therefore as follows:
- The 1000 accounts > group 1 (Total Assets) > Group 00
- The 2000 accounts > group 2 (Total Liabilities) > Group 00
- The 4000 accounts > group 4 (Total Expenses) > Group 02 (result Profit & Loss Statement) > Group 206 (Profit/Loss of the current year in the Balance Sheet) > Group 2 (Total Liabilities) > Group 00.
- The 3000 accounts > group 3 (Total Revenue) > Group 02 (result Profit & Loss Statement) > Group 206 (Profit/Loss of the current year in the Balance Sheet) > Group 2 (Total Liabilities) > Group 00.
- The 00 group is the control row where all the amounts are being added together.
- It is the "Grand total" of all the Debit & Credit balances as a result of the transactions entered in the Transactions table.
- If the line in the 00 group shows a difference (non-zero amount), this means that there are mistakes:
- If the difference is shown in the Accounts table, Opening column (all views) there are differences in the opening balances
- If the difference is shown in the Accounts table, Balance column (all views) there are differences in the Transactions table. In the Debit and Credit columns of the movement view, the totals are not balanced.
In cases where the difference is indicated issue the command Check and recalculate accounting. This command suggests any errors that need to be checked and corrected.
- In the Debit and Credit columns of the Movement view (Accounts table), the totals of the balances are always reported. If the totals in the two columns are equal, there are no errors.
The result of Profit & loss statement is added in equity capital
As you can see in the example, the Group 02 (Profit /Loss from Profit & Loss statement) is totalized in the 206 liabilities group (current year result).
With this group organization, we have several advantages:
- The current year operating result is displayed in the balance sheet
- The Total Liabilities will match the Total Assets (provided that there is no accounting error).
Set up of the Chart of Accounts structure
The chart of accounts in Banana Accounting can be set mainly in two different ways:
1. Structure without subgroups (or subtotals).
In this case, the structure is very simple. You list all accounts without subgroups, and total all accounts or categories in the main groups:
For Double-entry Accounting:
- Assets
- Liabilities
- Expenses
- Revenue
For Income/Expense Accounting or Cash Manager (Categories table):
- Income
- Expenses
2. Structure with subgroups
The structure is more complex. The accounts or categories of the main groups are divided into several subgroups, which in turn are totaled into the corresponding main groups.
Here we present a structure of the chart of accounts with an example of Subdivision with subgroups in Double-entry Accounting. Each subgroup can be in turn :
Assets
- Current Assets
- Cash and Cash equivalents
- Customers
- Inventory
- Fixed Assets
- Furniture
- Machinery and equipment
- Computers, software.
- Current Assets
Liabilities
- Third-party capital
- Suppliers
- Bank loans
- Other short-term debts
- Long-term debts
- Equity
- Equity
- Reserve funds
- Profit and loss carried forward
- Profit for the year
- Third-party capital
From the Accounts table, at any time, through the menu File > Print or Print Preview you can print the chart of accounts or part of it.
Always starting from the Accounts table, by selecting the Movement view, you have the printing of the verification balance.
Adding a new group
- Position yourself in the row preceding the one where the new group will be entered
- Add a row with the command Edit > Add Row
- Type in the group column the group number, description, and the number of the column Sum in where you want this group to be totaled.
Adding a totaling level
With this system it is easy to add totaling levels.
When we want to create a subgroup for the Cash & Cash equivalents accounts:
- Enter an empty row after the bank account
- Enter the value 10 into the Group column
- Enter the value 1 into the Sum in column
- Indicate the grouping 10 in columns Sum in the accounts 1000 and 1020
- The sequence for the calculation becomes:
The 1000 account > Group 10 (Cash & Cash equivalents) > Group 1 (Total Assets) > Group 00.
The programme totals the following:
- It totals the accounts in a group row.
For example, the Cash account is totalled in the Liquidity group. - Totallises a group or subgroup in another group, which in turn is totalled in another group, thus building the calculation structure of the Balance Sheet and Income Statement.
For example, the Liquidity group is totalled in Total Assets, which in turn will be totalled in group 00, in the control total row.

In case you want to insert another subgroup, "Current Assets", proceed in the same way.
- Add an empty row above the row of the Total Assets.
- In the new row:
- Indicate the number 11 in the Group column
- Indicate the number 1 in the Sum in column
- In the Clients and Goods for resale (inventory) rows, indicate the grouping 11 in column Sum in.
Title rows (with Sum in)
Also in the title rows it is useful to indicate the grouping Sum in (the group of the total row) to which it belongs.
In this way, in the printouts of the Enhanced Balance Sheet by groups, if the accounts are zero, the title will not be printed.

Deleting subgroups
In case the Chart of accounts shows subgroups that are no longer needed or not wanted, these can be deleted. Just delete the row of the subgroup and modify the grouping Sum in of every account that was part of that subgroup.
Checking of the structure
Once the Chart of accounts has been set up, execute the Actions menu > Check accounting command. In case there are errors, the program issues a warning.
Infinite loop error
This warning appears when a Group is being totaled in a Group of a lower level, reason for which an infinite error loop is being created.
There would be an infinite loop when, in the preceding example, the Assets Group (1) would be totaled in Group 10.
The program, after having calculated the Group 1, would total the amount in Group 10, which in turn would total the amount in Group 1, and then again in 10 without ending.
Profit & Loss Statement with Gross Profit
It is also possible to use a Profit & Loss Statement that starts with the total Business result and that subtracts the costs.
Hereunder the example of the Swiss PME Chart of Accounts is shown.

Related Documents
Sections
In the Section column, there must be an encoding that is used to determine the various settings of the printouts. The various items that make up the financial statements are divided into several sections; each section is as if it were in its own right.
This subdivision into sections allows you to choose whether to print the entire balance sheet and income statement, or choose which sections to print (eg only the balance sheet, or just a group, excluding the other components from printing).
Below we present a table with the coding to be used in the Accounts table, Section column.
| * | Title 1 | the asterisk separates the sections and indicates the main headers |
| ** | Title 2 | to be entered for the secondary headers |
| 1 | Assets | to be entered in the row of the Assets title |
| 2 | Liabilities | to be entered in the row of the Liabilities title |
| 3 | Expenses | to be entered in the row of the Expenses title |
| 4 | Revenue | to be entered in the row of the Revenue title |
| 01 | Client's Register | to be entered in the row of the Client's Register title |
| 02 | Supplier's Register | to be entered in the row of the Supplier's Register title |
| 03 | Cost Centers | to be entered in the row of the Cost Centers title |
| 04 | Profit Centers | to be entered in the row of the Profit Centers title |
| # | Notes | to be entered in the row of the Notes title |
| #X | Hidden data | to be entered in the row from whereon the data have to be hidden |
The type of encoding set in the Section column is used to determine the print settings for Enhanced Balance Sheet with Groups.
Each section is printed as if it were a separate table.
Title section
- *
The asterisk indicates a new section.- * Title 1 generates a level 1 folder.
- This section resets the level type to 1.
- It can contain level 2 sections or folders.
- It will be useful for grouping sections that need to be printed together such as the Balance Sheet, which contains both assets and liabilities.
- **
The double asterisk indicates a level 2 section.- ** Title 2 generates a level 2 folder
When you create a new title section, the numeric section is set to 1.
After a title section, the desired number section must therefore always be reset as well.
Numerical sections
The section number determines:
- How the amounts are printed; the amounts can be displayed as in the chart of accounts or reversed.
The credit amounts (in negative,) if they are inverted, are displayed in positive, while those in positive are displayed in negative. - Which columns are used to display the amounts; either the Balance column or the Period Movement column is used.
- The Balance column indicates the account balance at a certain point in time (balance as of June 30th).
- The Total Period Movement column indicates the amount of the movement in the indicated period; it is used for the income statement and indicates expenses or income for a certain period.
The explanations of the different sections are as follows:
- 1 Assets (amounts as in the chart of accounts, balance column).
- 2 Liabilities (inverted amounts, balance column).
- 3 Costs (amounts as in the chart of accounts, total movement column).
- 4 Revenues (inverted amounts, total movement column).
This section can also be used alone and include both costs and revenues (Income statement). In this case, revenues are shown in positive and costs in negative.
These sections must be unique. There can be only one section, 1 Assets or 2 Liabilities. Similar sections can be used for other sections, ledgers or cost centers.
Derived numerical sections
These are sections that behave like the main sections:
- 01 As Assets (amounts as in the chart of accounts, balance column)
Is used for the customer register. - 02 As Liabilities (inverted amounts, balance column)
Is used for the suppliers register. - 03 As Expenses (amounts as in the chart of accounts, total movement column)
Is used for cost centers. - 04 As Revenue (inverted amounts, total movement column)
Is used for profit centers.
Other Sections
There are other sections types:
- # Used to indicate the notes section (print description only)
To be used for budget annexes. - #X Hidden section. This section is not taken up in the selection of the sections nor in the printout. It is used to indicate a part that you do not want to print.
Disposition and width of columns in print
The disposition and the width of the columns are determined automatically by the program:
- Sections 1, 2, 01, 02 are printed with the balances on the specified date.
- Sections 3, 4, 03, 04 are printed with the movements for the period.
Sections of the Balance sheet report
In order to divide the Financial Statements into the various sections, the code indicated in the Section column must be entered:
- Insert a * on the same row as the Balance sheet title.
- Enter 1 on the same line as the Assets title.
- Enter 2 on the same line as the Liabilities title.

Sections of the Profit & Loss statement
- Enter a * on the same line as the Profit & Loss title.
- Enter 4 on the same line as the Revenue title.
- Enter 3 on the same line as the Expenses title.

Sections of the Profit & Loss statement in a graduated format
In the case of a graduated income statement, the groups of expenses and revenues alternate and consequently there is no clear distinction between the section of costs and revenues, therefore enter only:
- A * on the same row as the Profit & Loss Statement title
- 4 on the blank line below the income statement.

Sections in the customers / suppliers register
The display of the amounts is the same as for assets and liabilities. This coding also applies if customers and suppliers are set up as cost centers.
- Insert a * on the same row as the Customer / Debtors Register title or on a blank row (as in the example).
- Enter 01 on the same row as the Customers Register title
- Enter 02 on the same row as the Suppliers Register title

If there are cost and profit centers, you must enter:
- a * in the same row as the Cost and Profit Centers title or on a blank line
- 03 on the same row as the Cost Centers title or on a blank line (preceding the cost centers).
- 04 on the same row as the Profit Centers title or on a blank line (preceding the Profit Centers).
The cost center amounts will be shown in positive as the costs; profit centers will be displayed in negative as revenue.

Related document:
Enhanced Balance Sheet with groups
Transfer to a new Chart of Accounts
Hereunder we explain how to proceed when:
- passing to a chart of accounts with a different numbering,
- retrieve and convert the data of an existing accounting, including the transactions into the new Chart of Accounts.
Converting to the new year
There are two possibilities if you wish to start a new year with a new chart of accounts,
- Convert the previous year (2022) and then create the new year (2023).
There will be two files for 2022 (the one containing the Accounts column with the old account numbers and the Accounts_1 column with the new account numbers) and the file for 2023 with only the new chart of accounts.
This approach is ideal for having the two-year charts of accounts aligned.
This way you can also continue to make changes in the year 2022 and then resume the initial balances in the year 2023. - Create the new year (2023) and then convert the year 2023 file with the balances carried forward.
The 2022 year file will remain the same. For 2023 there will be an intermediate file, with the old chart of accounts, but the opening balances carried forward.
The conversion of the year 2023 file can be performed immediately or even after transactions have been entered.
Having the old account numbers in the year 2022 file, you will not be able to resume any further changes made in 2022 in 2023.
Step 1: Creating a new accounting file
- Create a new file:
- Adapt the chart of accounting to your own needs.
Step 2: Adding the matching accounts
- In the Accounts table:
- menu Data → Columns setup
- click the Add button
- insert Account_1 description .
- For each new account, enter the corresponding account in the Account_1 column of the old chart of accounts.
Should the account remain the same, you may also choose not to indicate it. - In case where several accounts need to be grouped in one, enter the separated accounts with a semi-colon "1000;1001".
- If one account needs to be subdivided into several accounts, you need to proceed manually, see below.

Step 3: Starting the import operation
- Via Actions →Import to Accounting → Import File.
- Using the Browse button, select the file of your old accounting plan

- Confirm by clicking the OK button and proceed to the next window
- Define the import options
- Enable the Convert account numbers option, indicating that the matches are in the target file.

Repeat the import
If errors are reported, and it is necessary to repeat the import, it is necessary to cancel the import operation, so that the starting file is empty, otherwise the balance amounts will be duplicated, both in the opening balances and in the transactions table.
Subdivision of one account into several accounts
When one transfers to a more detailed chart of accounts, it is probably necessary to subdivide one account into several accounts.
After the import operation, proceed manually in the following way:
- In the Chart of accounts, subdivide the opening amounts, budget amounts and previous amounts of one account into several accounts.
- Go over the transactions, one by one, of the account that needs to be subdivided and assign them to the more specific account, or create extra transactions if it is necessary to subdivide one amount into more detailed amounts.
- Proceed in the same way for the transactions of the Budget table.
Results and possible errors
If the program reports mistakes (absence of accounts or others), the import operation probably needs to be canceled, complete the pairing and then repeat the import operation.
The program, confronted with different charts of accounts, cannot automatically do extensive verifications and guarantee that all the data have been imported and grouped correctly.
It is therefore strongly advised to manually check the result, making sure that the totals of the Balance Sheet and the Profit & Loss Statement are correct.