En este artículo
The Banana invoice is constructed with a Javascript program. The Extension also allows you to add Javascript programming so that you can completely customize the content and format of the invoice (this functionality requires the Advanced plan).
See more about Banana Accounting API Extensions Reference.
Add your custom Javascript file
Three steps are required to define and use your Javascript file:
- Add the document table to the Banana Accounting file.
If it is not already present you need to add the Documents table in the Banana document with the menu command Tools > Add new features > Add document table. - Add a new Javascript type document to the document table.
- In the ID column enter the file name including the extension .js (e.g. "myFile.js").
If the id is missing the ".js" at the end, it won't work. - In the Description column enter a comment (optional).
- In the Attachments column, double click on the cell or select the edit symbol, then select Javascript Code and confirm with OK.
- An editor will open in which you can write the code.
- Delete everything in it.
- Insert the Javascript code. You can modify the content at any time.
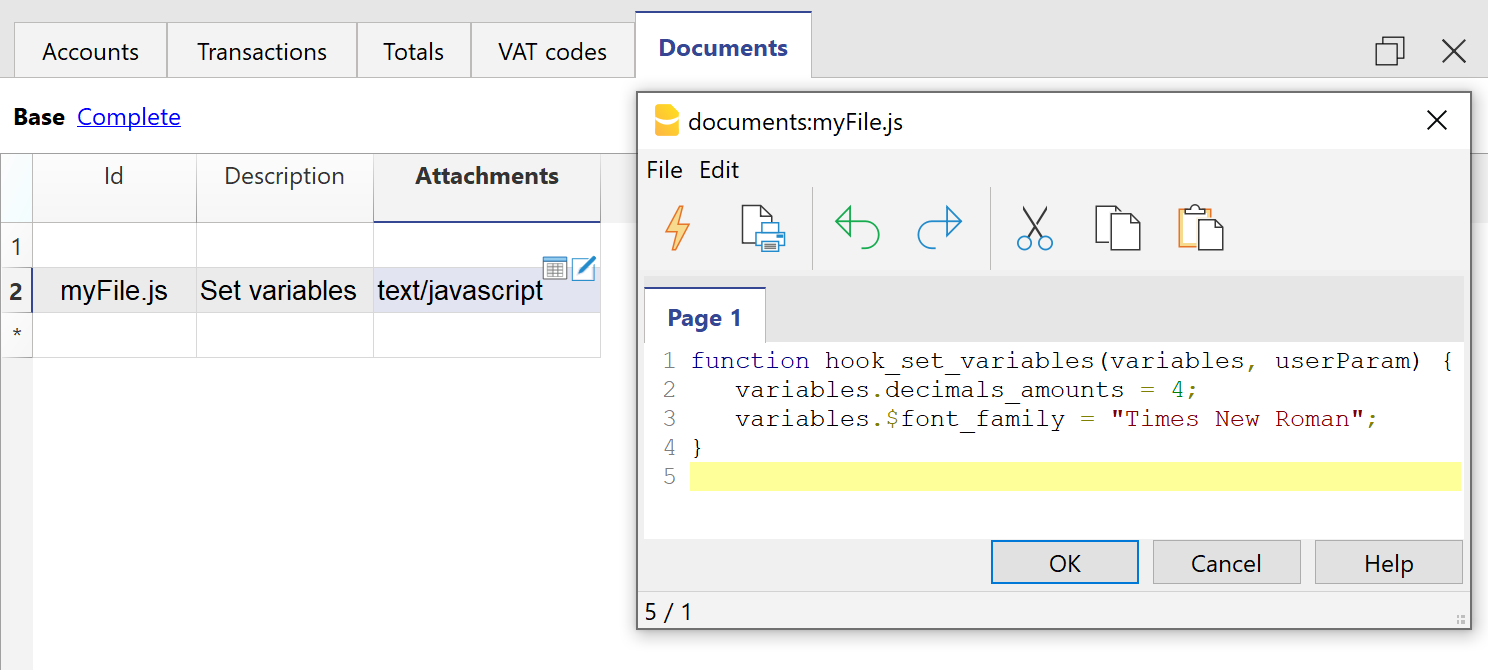
Documents table - Javascript Code attachment
- In the ID column enter the file name including the extension .js (e.g. "myFile.js").
- Tell the invoice layout to use the customized Javascript attachment file.
- Select Settings of the Print invoices dialogue.
- In the Javascript/CSS > JS file name, enter the name of the newly created Javascript attachment file with the extension ".js" at the end (e.g. "myFile.js").
- Click Ok to confirm.
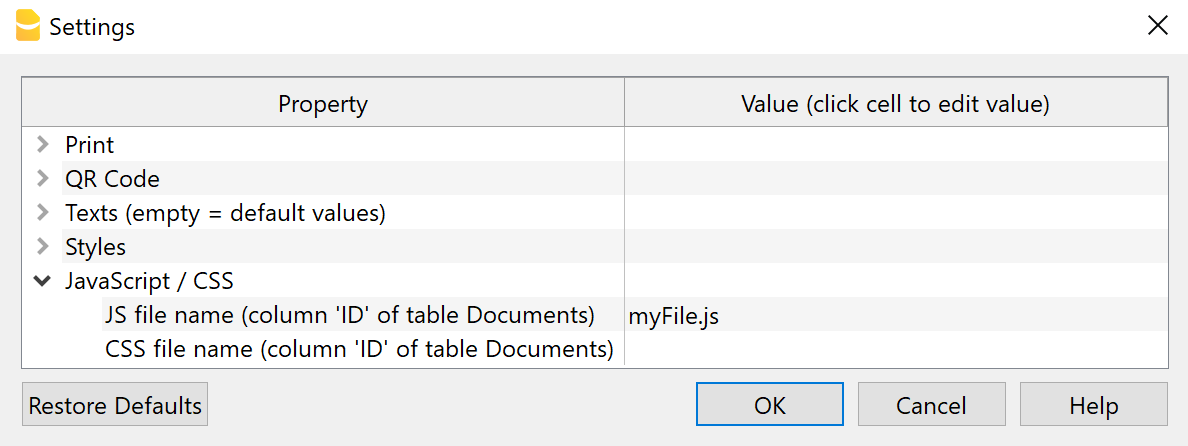
Settings Dialogue - Javascript File Property
Javascript Hook Replacement Functions
The invoice layout is created with a set of predefined Javascript functions.
The hook functions are Javascript replacements functions to be used instead of the the predefined.
The hook functions should be defined in the ".js" file of the Documents table.
- The name of the hook function is the name of the predefined function used in the layout, preceded by the text "hook_".
For example, if you want to change the header printing you have to define the hook_print_header() that will replace the predefined print_header() function.- The parameters must be the same as those used in the main function.
- If you create your own hook function, it is necessary to know how it works the function you want to replaces.
- When generating the invoice, the layout extension checks for the existence of a hook replacement function and, if available, utilizes it to substitute the predefined function.
- Hook functions let you selectively change some part of how the invoice is build, without directly modifying the original script of the invoice Layout.
Graphic explanation of the Hook functions
With the hook functions, you can customize the following sections of the invoice.
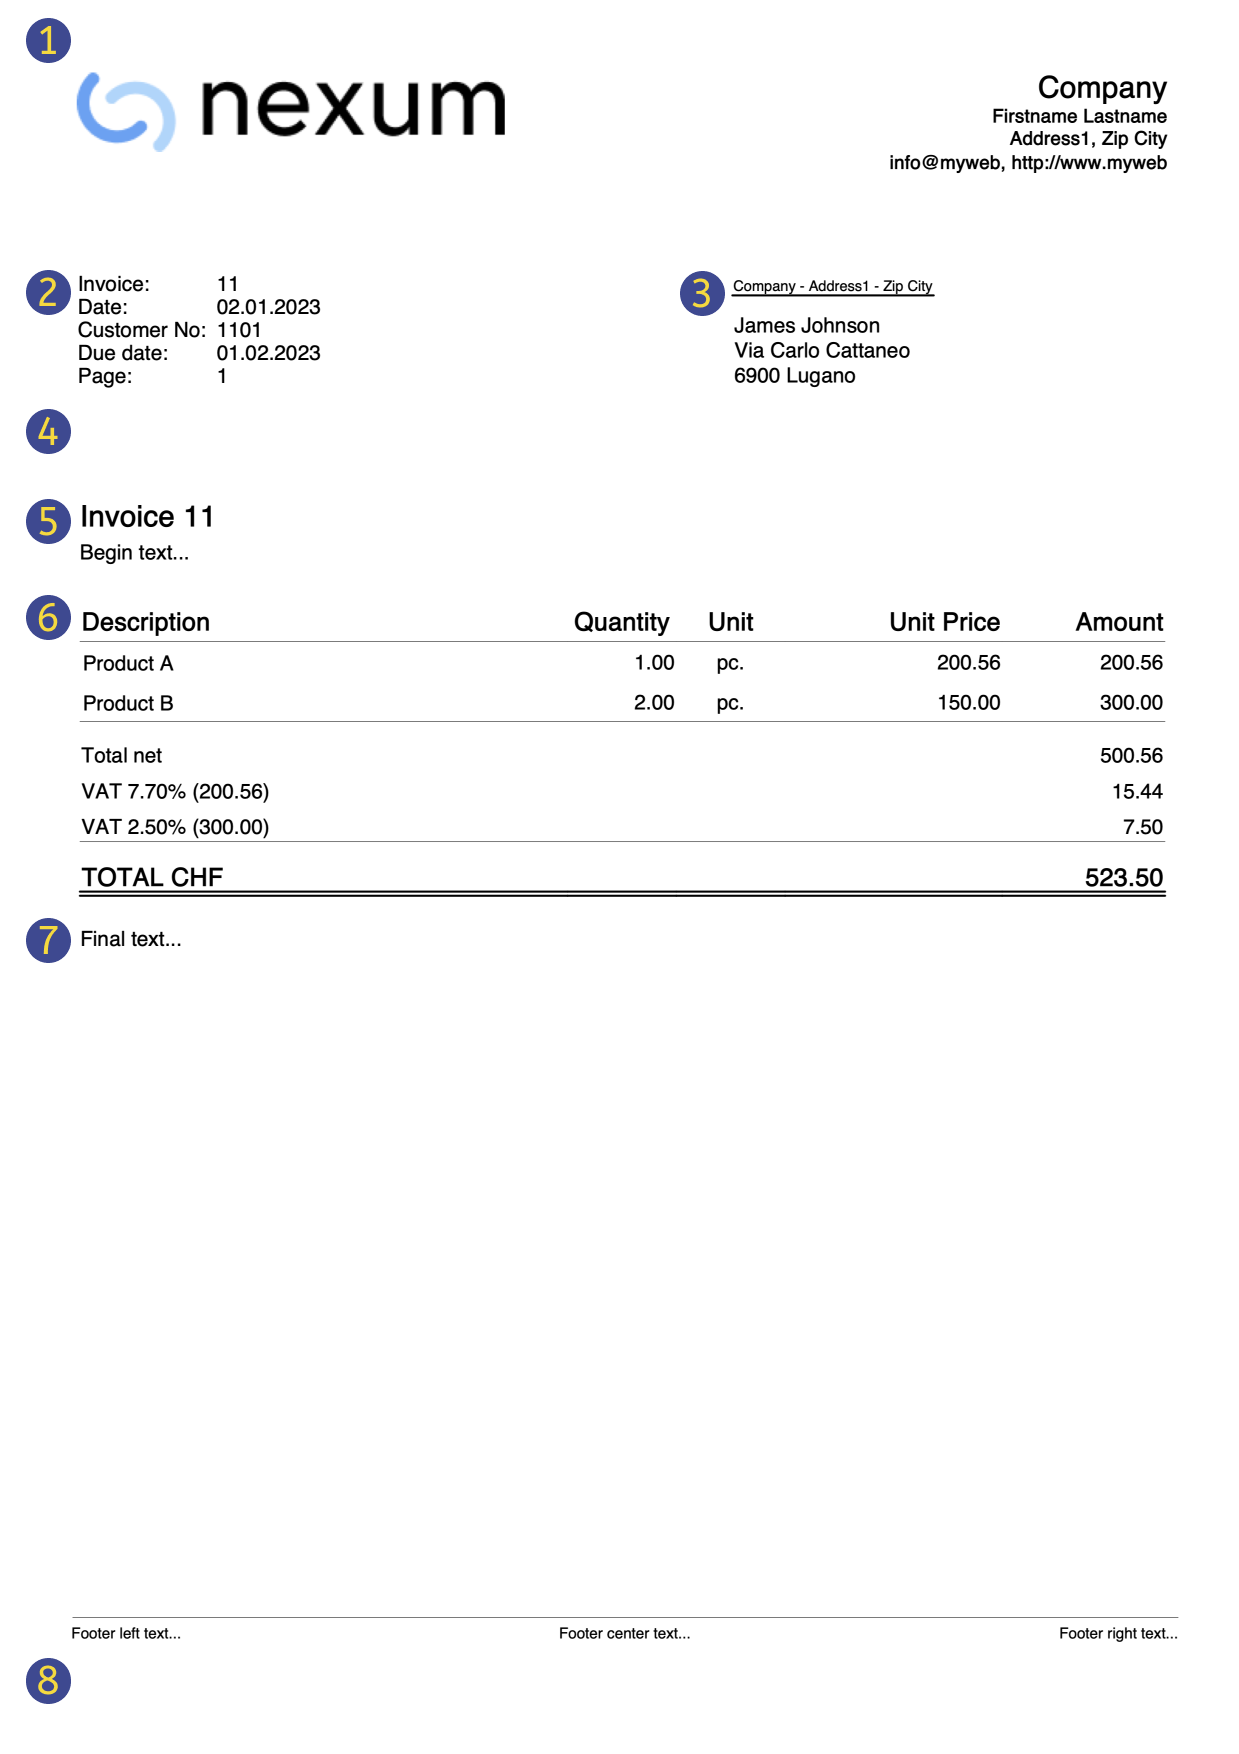
(1) hook_print_header()
Function that prints the header part of the invoice (logo and texts).
(2) hook_print_info_first_page() and hook_print_info_other_pages()
Functions that print the information parts of the invoice.
(3) hook_print_customer_address()
Function that prints the customer address part of the invoice.
(4) hook_print_shipping_address()
Function that prints the shipping address part of the invoice (in case it exists).
(5) hook_print_text_begin()
Function that prints the title and begin text parts of the invoice.
(6) hook_print_details_net_amounts() and hook_print_details_gross_amounts()
Functions that print the invoice details using net/gross amounts.
Use the hook_formatItemsValue() function to change the format and style of the items.
(7) hook_print_final_texts()
Function that prints the final texts, notes and greetings parts of the invoice, right after the invoice details.
(8) hook_print_footer()
Function that prints the footer at the bottom of the page (usable only when not printing the QR slip).
Invoice Layout Hook Functions Reference
This document provides a reference for all available invoice layout hook functions, including their exact names, the required parameters in the correct order, and detailed descriptions of each parameter’s purpose, and example usage. The empty function bodies should be replaced with your own implementation.
Rules:
- You must use the exact function name listed.
- Parameters must be passed in exact order shown.
- You cannot add, remove, or rename parameters.
- All parameters are required.
List of available invoice layout hook functions:
/**
 * Sets or updates all variables used by the invoice layout script.
 * @param {Object} variables - MUTABLE object containing layout variables (colors, fonts, decimals, margins).
 * @param {Object} userParam - User parameters that may override or extend the variables.
 * @returns {void}
 */
function hook_set_variables(variables, userParam) {...}

/**
 * Prints the header at the top of the page (logo, company name, address).
 * @param {Object} repDocObj   - Document object for output.
 * @param {Object} userParam   - User parameters that include affecting header content and style.
 * @param {Object} repStyleObj - Document CSS style object.
 * @param {Object} invoiceObj  - Invoice data (issuer, customer, logo, etc.).
 * @param {Object} texts       - Localized labels and strings (e.g., "Address", "Phone").
 * @returns {void}
 */
function hook_print_header(repDocObj, userParam, repStyleObj, invoiceObj, texts) {...}

/**
 * Prints invoice information on the first page (invoice number, date, terms, references).
 * @param {Object} repDocObj  - Document object for output.
 * @param {Object} invoiceObj - Invoice data (number, dates, payment terms, etc.).
 * @param {Object} texts      - Localized labels for displayed fields.
 * @param {Object} userParam  - User parameters that include affecting information content for page 1.
 * @returns {void}
 */
function hook_print_info_first_page(repDocObj, invoiceObj, texts, userParam) {...}

/**
 * Prints invoice information from page 2 onwards (invoice number, date, terms, references).
 * @param {Object} repDocObj  - Document object for output.
 * @param {Object} invoiceObj - Invoice data (number, dates, payment terms, etc.).
 * @param {Object} texts      - Localized labels for displayed fields.
 * @param {Object} userParam  - User parameters that include affecting information content for page > 1.
 * @returns {void}
 */
function hook_print_info_other_pages(repDocObj, invoiceObj, texts, userParam) {...}

/**
 * Prints the customer's billing address.
 * @param {Object} repDocObj  - Document object for output.
 * @param {Object} invoiceObj - Invoice data with customer information (name, street, ZIP, city, country).
 * @param {Object} userParam  - User parameters that include affecting customer address content and style.
 * @returns {void}
 */
function hook_print_customer_address(repDocObj, invoiceObj, userParam) {...}

/**
 * Prints the shipping address.
 * @param {Object} repDocObj  - Document object for output.
 * @param {Object} invoiceObj - Invoice data with shipping information (recipient, address).
 * @param {Object} texts      - Localized labels (e.g., "Ship to").
 * @param {Object} userParam  - User parameters that include affecting shipping address content visibility.
 * @returns {void}
 */
function hook_print_shipping_address(repDocObj, invoiceObj, texts, userParam) {...}

/**
 * Prints the introductory block before the invoice details (title, opening text).
 * @param {Object} repDocObj  - Document object for output.
 * @param {Object} invoiceObj - Invoice data with begin text.
 * @param {Object} texts      - Localized titles and messages (e.g., "Invoice").
 * @param {Object} userParam  - User parameters that include affecting text begin content.
 * @returns {void}
 */
function hook_print_text_begin(repDocObj, invoiceObj, texts, userParam) {...}

/**
 * Prints the details table using NET amounts (VAT excluded).
 * @param {Object} banDoc       - Accounting/data source (for calculations or lookups).
 * @param {Object} repDocObj    - Document object for output.
 * @param {Object} invoiceObj   - Invoice data (currency, items, amounts, VAT, totals, etc.).
 * @param {Object} texts        - Column labels and strings (Qty, Price, VAT, Total, etc.).
 * @param {Object} userParam    - User parameters that include affecting invoice details content and style.
 * @param {Array|Object} detailsTable - Rows/structure of the table (items, quantities, prices).
 * @param {Object} variables    - Calculated layout variables (column widths, CSS classes, partial totals).
 * @returns {void}
 */
function hook_print_details_net_amounts(banDoc, repDocObj, invoiceObj, texts, userParam, detailsTable, variables) {...}

/**
 * Prints the details table using GROSS amounts (VAT included).
 * @param {Object} banDoc       - Accounting/data source (for calculations or lookups).
 * @param {Object} repDocObj    - Document object for output.
 * @param {Object} invoiceObj   - Invoice data (currency, items, amounts, VAT, totals, etc.).
 * @param {Object} texts        - Column labels and strings (Qty, Price, VAT, Total, etc.).
 * @param {Object} userParam    - User parameters that include affecting invoice details content and style.
 * @param {Array|Object} detailsTable - Rows/structure of the table (items, quantities, prices).
 * @param {Object} variables    - Calculated layout variables (column widths, CSS classes, partial totals).
 * @returns {void}
 */
function hook_print_details_gross_amounts(banDoc, repDocObj, invoiceObj, texts, userParam, detailsTable, variables) {...}

/**
 * Prints the final texts (notes, terms, thanks) after the details table.
 * @param {Object} repDocObj  - Document object for output.
 * @param {Object} invoiceObj - Invoice data with final texts.
 * @param {Object} userParam  - User parameters that include affecting final texts content and style.
 * @returns {void}
 */
function hook_print_final_texts(repDocObj, invoiceObj, userParam) {...}

/**
 * Prints the footer at the bottom of the page. Use only when NOT printing the QR slip section.
 * @param {Object} repDocObj - Document object for output.
 * @param {Object} texts     - Localized labels and strings.
 * @param {Object} userParam - User parameters that include affecting footer content and style.
 * @returns {void}
 */
function hook_print_footer(repDocObj, texts, userParam) {...}

/**
 * Formats the value and sets the CSS className of the item.
 * @param {*} value           - Original cell value (number, string, date).
 * @param {Object} variables  - Layout/context variables for formatting rules.
 * @param {string} columnName - Column name (for column-specific rules).
 * @param {string} className  - Initial className that can be changed.
 * @param {Object} item       - The current row/item object (for data-dependent rules).
 * @returns {Object}          - Return the formatted value and className.
 */
function hook_formatItemsValue(value, variables, columnName, className, item) {...}

/**
 * Allows modification of QR code settings (fields and formatting) before printing.
 * @param {Object} invoiceObj - Invoice data relevant to payment/QR.
 * @param {Object} qrcodeData - QR settings object to read/overwrite (IBAN, amount, reference).
 * @returns {void}
 */
function hook_modify_settings_qr(invoiceObj, qrcodeData) {...}
Examples of a hook functions
Within your hook function you can call the original hook function. This way you can limit the changes to the code.
For example this hook function call the original one, only in a specific case.
/**
 * This function prints the final text only for INVOICES and not for CREDIT NOTES.
 * Invoices = DocType 10
 * Credit notes = DocType 12
 */
function hook_print_final_texts(sectionClassFinalTexts, invoiceObj, userParam) {
   // We can check the DocType and print the text only when is not 12
   if (invoiceObj.document_info.doc_type !== "12") {
      print_final_texts(sectionClassFinalTexts, invoiceObj, userParam);
   }
}
Predefined variables
The predefined variables are the default used by the invoice layout script.
The variables for decimals start with "decimals_". (decimals_quantity, decimals_unit_price, decimals_amounts).
The variable that start with "$" are template variable that you can use in the CSS styles ($font_family, $font_size, $text_color, ...).
Example of an extract of the predefined CSS invoice layout.
body {
  font-family: $font_family;
  font-size: $font_size;
  color: $text_color;
}
List of all predefined variables and their default values that you can override with the hook_set_variables() function:
/* Variable that sets the decimals of the Quantity column */
variables.decimals_quantity = "";
/* Variable that sets the decimals of the Unit Price column */
variables.decimals_unit_price = 2;
/* Variable that sets the decimals of the Amount column */
variables.decimals_amounts = 2;
/* Variables that set the colors */
variables.$text_color = userParam.text_color;
variables.$background_color_details_header = userParam.background_color_details_header;
variables.$text_color_details_header = userParam.text_color_details_header;
variables.$background_color_alternate_lines = userParam.background_color_alternate_lines;
variables.$color_title_total = userParam.color_title_total;
/* Variables that set the font */
variables.$font_family = userParam.font_family;
variables.$font_size = userParam.font_size+"pt";
/* Variables that set the font size and margins of the Invoice Begin Text */
variables.$font_size_title = userParam.font_size*1.4 +"pt";
/* Variables that set font size, margins, padding and borders of the Invoice Details */
variables.$font_size_header = userParam.font_size*1.2 +"pt";
variables.$font_size_total = userParam.font_size*1.2 +"pt";
/* Variables that set the position of the invoice address
 * Default margins when the address on right: 12.3cm margin left, 4.5cm margin top
 * Default margins when the address on left: 2.2cm margin left, 5.5cm margin top
 * Sum userParam dX and dY adjustments to default values */
variables.$right_address_margin_left = parseFloat(12.3) + parseFloat(userParam.address_position_dX)+"cm";
variables.$right_address_margin_top = parseFloat(4.5) + parseFloat(userParam.address_position_dY)+"cm";
variables.$left_address_margin_left = parseFloat(2.2) + parseFloat(userParam.address_position_dX)+"cm";
variables.$left_address_margin_top = parseFloat(5.5) + parseFloat(userParam.address_position_dY)+"cm";
Example of 'hook_set_variables' function
You can overwrite the predefined variable with the hook_set_variables() function.
Only use the variable that you want to replace.
// Example of hook function usage that sets
// the decimals of the Amounts columns to 4
// the font type to Times New Roman
function hook_set_variables(variables, userParam) {
   variables.decimals_amounts = 4;
   variables.$font_family = "Times New Roman";
}