In this article
Banana invoices are formatted through a CSS Stylesheet. The extension allows you to use a customized stylesheet so you can fully modify the appearance of the invoice (this functionality requires the Advanced plan).
Following you will find information and examples that let anyone understand the basic of the CSS so that you are able to do a lot of customization to your invoice, even if you are not a CSS professional.
- See also the page CSS Examples.
Banana CSS Stylesheet file
The CSS file property let you specify an CSS stylesheet file to be used for formatting the invoice. You have to enter the name of a CSS document, contained in the Documents table.
The properties you define in the custom CSS file will extend or overwrite the styles of the default stylesheet.
Cascading Style Sheet (CSS) is a specification language that allows to customize the appearance of web pages, and a subset of the whole CSS specification is also used in Banana to prepare reports.
Here are some basics about CSS Stylesheet formatting.
- The document, in our case the invoice, is composed by a series of Elements that contains all the data of the invoice.
- Each element can have one or more class properties that specify which style should be used for that element.
- Each element can contain other elements.
- In the CSS stylesheet you specify the formatting properties of each class of style.
- The elements hynnerit the styles of the parent element.
- The main element for the invoice is the Document.
Add your custom CSS stylesheet
Three steps are required to define and use your CSS file:
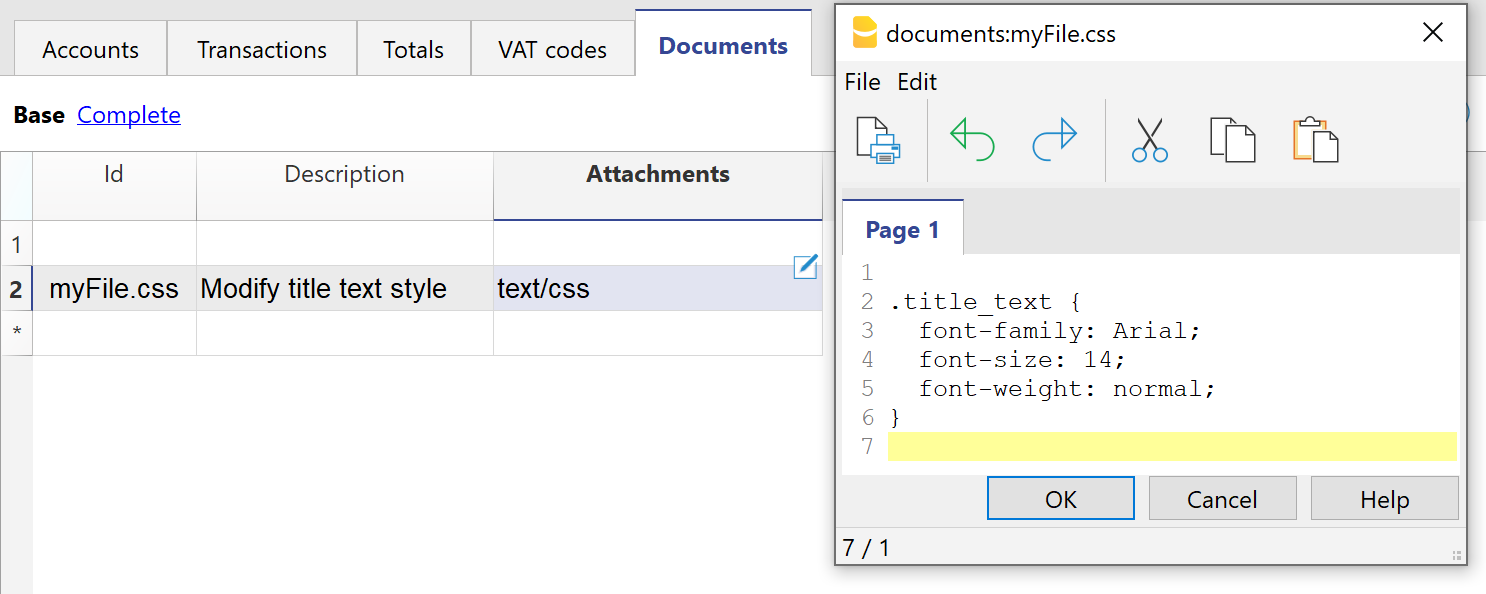
- Add the document table to the Banana Accounting file.
If it is not already present you need to add the Documents table in the Banana document with the menu command Tools > Add new features > Add document table. - Add a new CSS type document to the document table.
- In the ID column enter the file name including the extension .css (e.g. "myStyle.css").
If the id is missing the ".css" at the end, it won't work. - In the Description column enter a comment (optional).
- In the Attachments column, double click on the cell or select the edit symbol, then select CSS stylesheet and confirm with Ok.
- An editor will open in which you can write the code.
- Enter or edit the script and confirm with Ok.
- Save the Banana Accounting file.
Documents table - CSS stylesheet attachment
- In the ID column enter the file name including the extension .css (e.g. "myStyle.css").
- Specify the CSS file created in the invoice layout extension.
- Select Settings of the Print invoices dialogue.
- In the Javascript/CSS > CSS file name, enter the name of the newly created CSS attachment file with the extension ".css" at the end (e.g. "myFile.css").
- Click Ok to confirm.
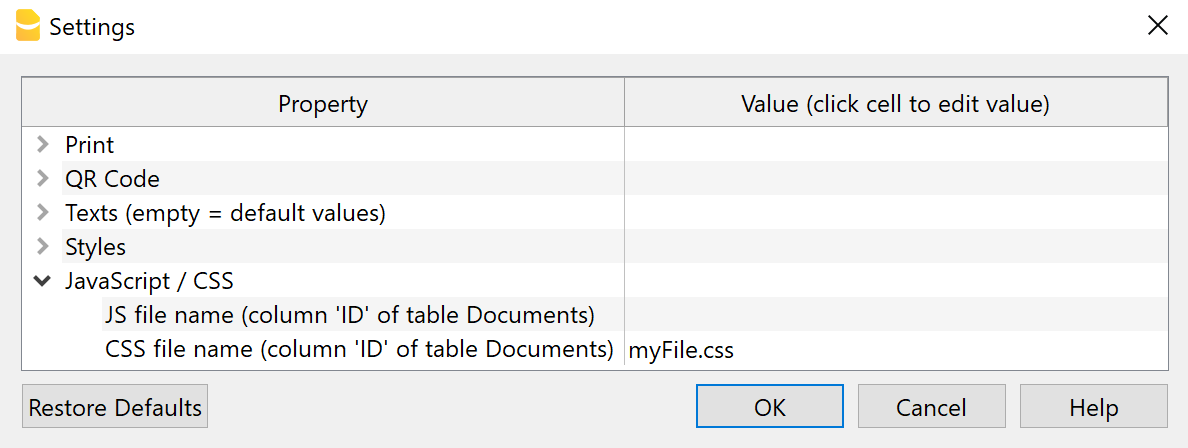
Settings Dialogue - CSS File Property
Syntax of a CSS stylesheet
The syntax of the CSS is quite simple as you see in this style definition that set the size of the Invoice title text element to 14 points and without bold.
/* this two lines are comment
   title_text is for the invoice number */
.title_text {
  font-family: Arial;
  font-size: 14;
  font-weight: normal;
  color: #6495ED;
}
Syntax rules:
- Element are case sensitive.
- You specify the style name ".title_text" starting with a dot (".") and followed by the curly open bracket "{".
- Property name, followed by the colon ":"
- Values followed by the semicolon ";"
- You can have has many allowed properties you need.
- End with the curly close bracket "}".
- You can have has many allowed style classes.
- The defined values overwrite the predefined one.
Comments:
- Add comments to the css by including the text within a /* comment */,
It help you remember the purpose of the code.
See the comments in the predefined CSS for explanations of the elements.
Most used properties
Font
- font-family
Specify the font name. - font-size
Specify the font size in points. - font-weight
Specify the font weight: normal, bold or value between 1-1000.
Text alignment
- text-align
Specify the horizontal alignment of the text.
It is used for example to align on the right of the cell all the amounts of the invoice (i.e. "text-align: right").
Colors
For the main colors you can use the name in English (black, yellow, white, blue, red, ...) or the hexadecimal values (HEX) preceded by the # sign (e.g. #000000, #009FE3, #FF00EA).
For codes see the table at https://www.w3schools.com/cssref/css_colors.asp.
- color
Define the color of a text. - background-color
Define the background color of an element.
It is used for example to set the background color of the header row of the invoice details.
Positioning
All elements in the invoice are positioned relative to the prior element. You can change the positioning.
- margin
- margin-top
To set the margin on the top of the element. - margin-right
To set the margin on the right side of the element. - margin-bottom
To set the margin on the bottom of the element. - margin-left
To set the margin on the left side of the element.
It is used for example in case it is required to move an element a bit to the right. More margin on the left means move the element to the right.
- margin-top
- padding
- padding-top
Sets the height of the area on the top of an element. - padding-right
Sets the width of the area on the right of an element. - padding-bottom
Sets the height of the area on the bottom of an element. - padding-left
Sets the width of the area on the left of an element.
- padding-top
/* For example it is used for the details table, to avoid that
all the texts are printed too close to the table border. */
.doc_table td {
  padding-top: 5px;
  padding-bottom: 1px;
  padding-left: 4px;
  padding-right: 4px;
}
Absolute positioning
Some elements are positioned relative to the begin of the document. The position of these elements does not depend on any other element in the document.
- postion
- For the logo, header text and address elements it is used the absolute positioning ("position: absolute").
Borders
To apply borders to tables and table rows.
- border-style
Sets the line style for all four sides of an element's border.- border-top-style
- border-right-style
- border-bottom-style
- border-left-style
- border-color
Sets the color for all four sides of an element's border.- border-top-color
- border-right-color
- border-bottom-color
- border-left-color
- border-width
Sets the width for all four sides of an element's border.- border-top-width
- border-right-width
- border-bottom-width
- border-left-width
/* For example use it to apply a double underline
 to the total line of the invoice. */
  .total_cell {
  border-bottom-style: double;
  border-bottom-color: #337ab7;
  border-bottom-width: 1px;
}
Display / Hide element
Set the attribute display to none to hide an element. In this case the Invoice number is hidden.
.title_text {
   display: none;
}
Predefined Invoice CSS stylesheet
The JavaScript layout generates an invoice document where each element is assigned a specific CSS class. These classes control the position, spacing, and formatting of the elements according to the stylesheet rules.
If you need to introduce additional style classes, you must also update the JavaScript code to reference them, typically by using the available hook functions.
The following section shows the complete CSS stylesheet used for invoice documents. This stylesheet defines how each part of the invoice is displayed (e.g., headers, addresses, tables, totals, footers).
- Some style properties use predefined variables (values starting with $).
For example, $font_family is replaced with the font name selected by the user, while other variables are initialized through the JavaScript variable initialization function. - Comments inside the CSS are written between /* ... */.
They describe the purpose of each selector and when it should be applied.
Full CSS Code
/* @page
   PURPOSE: Defines the physical page margins for printing.
   EFFECT: All elements are positioned relative to these margins.
   WHEN TO USE: When the user wants to change the page’s margin sizes. */
@page {
  margin-top: 0cm;
  margin-bottom: 0cm;
  margin-left: 0cm;
  margin-right: 0cm;
}

/* body
   PURPOSE: Base style for the whole document.
   EFFECT: Sets default font family, size, and text color for all content.
   WHEN TO USE: When the user wants to change the default font, size, or text color for the whole document. */
body {
  font-family: $font_family;
  font-size: $font_size;
  color: $text_color;
}

/* td
   PURPOSE: Aligns table cell content vertically to the top.
   WHEN TO USE: When the user wants all table cells aligned to the top vertically. */
td {
  vertical-align: top;
}

/* .right
   PURPOSE: Aligns text to the right.
   USAGE: Often combined with other classes for layout control.
   WHEN TO USE: When the user requests right-aligned text. */
.right {
  text-align: right;
}

/* .center
   PURPOSE: Centers text horizontally.
   USAGE: Often combined with other classes for layout control.
   WHEN TO USE: When the user requests centered text. */
.center {
  text-align: center;
}

/* .bold
   PURPOSE: Makes text bold.
   USAGE: Often combined with other classes for layout control.
   WHEN TO USE: When the user wants bold text. */
.bold {
  font-weight: bold;
}

/* .padding-right
   PURPOSE: Adds space inside the element on the right side.
   EFFECT: 20px right padding.
   WHEN TO USE: When the user wants extra padding on the right. */
.padding-right {
  padding-right: 20px;
}

/* .padding-left
   PURPOSE: Adds space inside the element on the left side.
   EFFECT: 20px left padding.
   WHEN TO USE: When the user wants extra padding on the left. */
.padding-left {
  padding-left: 20px;
}

/* .border-top
   PURPOSE: Adds a top border to an element.
   TYPICAL USE: Horizontal separator (e.g., between item list and totals).
   EFFECT: Solid, thin border in $color_title_total.
   WHEN TO USE: When the user requests a horizontal line above an element. */
.border-top {
  border-top-style: solid;
  border-top-color: $color_title_total;
  border-top-width: thin;
}

/* .header_text
   PURPOSE: Styles the header text block alignment and position.
   EFFECT: Sets margins, text alignment, and absolute positioning.
   NOTE: Used when no logo is present, or with right-aligned text layouts.
   WHEN TO USE: When the user wants to change or reposition the main header text. */
.header_text {
  margin-top: 1.2cm;
  margin-left: 1.2cm;
  margin-right: 1.2cm;
  text-align: right;
  position: absolute;
}

/* .header_row_1
   PURPOSE: Styles the first header row.
   EFFECT: Bold text, 16pt font size.
   WHEN TO USE: When the user wants to style the first line of header text (font weight, font size, font color, etc.). */
.header_row_1 {
  font-weight: bold;
  font-size: 16pt;
}

/* .header_row_2_to_5
   PURPOSE: Styles header rows 2–5.
   EFFECT: Bold text, 10pt font size.
   WHEN TO USE: When the user wants to style the lines 2,3,4 and 5 of header text (font weight, font size, font color, etc.). */
.header_row_2_to_5 {
  font-weight: bold;
  font-size: 10pt;
}

/* .logo
   PURPOSE: Positions the logo in the header.
   EFFECT: Sets margins and absolute positioning.
   WHEN TO USE: When the user wants to move or resize the logo position. */
.logo {
  margin-top: 1.2cm;
  margin-left: 1.34cm;
  margin-right: 1.2cm;
  position: absolute;
}

/* .info_table_left
   PURPOSE: Positions and styles the information table on the left side, when the customer address block is positioned on the right side.
   EFFECT: Sets font size and margins.
   WHEN TO USE: When the user wants to style/move the left-side info table. */
.info_table_left {
  font-size: $font_size;
  margin-top: 4.5cm;
  margin-left: 1.2cm;
  margin-right: 1.2cm;
}

/* .info_table_right
   PURPOSE: Positions and styles the information table on the right side, when the customer address block is positioned on the left side.
   EFFECT: Sets font size and margins.
   WHEN TO USE: When the user wants to style/move the right-side info table. */
.info_table_right {
  font-size: $font_size;
  margin-top: 5.5cm;
  margin-left: 12.3cm;
  margin-right: 1.2cm;
}

/* .info_table_row0
   PURPOSE: Positions and styles the information table for page 2 and later.
   EFFECT: Sets font size and margins.
   WHEN TO USE: When the user wants to change the info table style for second and later pages. */
.info_table_row0 {
  font-size: $font_size;
  margin-top: 4.5cm;
  margin-left: 1.2cm;
  margin-right: 1.2cm;
}

/* table.info_table_left td
   PURPOSE: Removes extra vertical padding in cells of left-side info tables.
   WHEN TO USE: When the user wants to change spacing in left-side info table cells. */
table.info_table_left td {
  padding-top: 0px;
  padding-bottom: 0px;
}

/* table.info_table_right td
   PURPOSE: Removes extra vertical padding in cells of right-side info tables.
   WHEN TO USE: When the user wants to change spacing in right-side info table cells. */
table.info_table_right td {
  padding-top: 0px;
  padding-bottom: 0px;
}

/* table.info_table_row0 td
   PURPOSE: Removes extra vertical padding in cells for page 2+ info tables.
   WHEN TO USE: When the user wants to change spacing in page 2+ info table cells. */
table.info_table_row0 td {
  padding-top: 0px;
  padding-bottom: 0px;
}

/* @page:first-view table.info_table_row0
   PURPOSE: Hides the page 2+ info table on the first page only.
   NOTE: :first-view is a custom pseudo-class used to target the first rendering of an element.
   WHEN TO USE: When the user wants to hide elements on the first page only. */
@page:first-view table.info_table_row0 {
  display: none;
}

/* .info_table_first_column
   PURPOSE: Optional override for the width of the first info-table column.
   DEFAULT: If unset, the column uses the default width.
   EXAMPLE: width: 100px;
   WHEN TO USE: When the user wants to set a specific width for the first column. */
.info_table_first_column {}

/* .info_table_second_column
   PURPOSE: Optional override for the width of the second info-table column.
   DEFAULT: If unset, the column uses the default width.
   EXAMPLE: width: 100px;
   WHEN TO USE: When the user wants to set a specific width for the second column. */
.info_table_second_column {}

/* .address_table_right
   PURPOSE: Positions the customer address block on the right side.
   EFFECT: Sets font size, absolute position, and width.
   WHEN TO USE: When the user wants to style or reposition the right-side address block. */
.address_table_right {
  font-size: $font_size;
  top: 4.5cm;
  left: 12.3cm;
  width: 7.5cm;
  position: absolute;
}

/* .address_table_left
   PURPOSE: Positions the customer address block on the left side.
   EFFECT: Sets absolute position and width.
   WHEN TO USE: When the user wants to style or reposition the left-side address block. */
.address_table_left {
  top: 5.5cm;
  left: 2.2cm;
  width: 7.5cm;
  position: absolute;
}

/* .custom_address_table_right
   PURPOSE: Positions the right-side address using configurable margins.
   SOURCE: $right_address_margin_top / $right_address_margin_left come from invoice settings.
   WHEN TO USE: When the user wants to move the right address block using specific measurements. */
.custom_address_table_right {
  font-size: $font_size;
  top: $right_address_margin_top;
  left: $right_address_margin_left;
  width: 7.5cm;
  position: absolute;
}

/* .custom_address_table_left
   PURPOSE: Positions the left-side address using configurable margins.
   SOURCE: $left_address_margin_top / $left_address_margin_left come from invoice settings.
   WHEN TO USE: When the user wants to move the left address block using specific measurements. */
.custom_address_table_left {
  top: $left_address_margin_top;
  left: $left_address_margin_left;
  width: 7.5cm;
  position: absolute;
}

/* .small_address
   PURPOSE: Styles the sender's small address line above the customer address.
   EFFECT: 7pt font, centered text, bottom underline, 0.3cm bottom margin.
   WHEN TO USE: When the user wants to style the small sender address above the customer’s. */
.small_address {
  font-size: 7pt;
  text-align: center;
  border-bottom-style: solid;
  border-bottom-color: $text_color;
  border-bottom-width: 1px;
  margin-bottom: 0.3cm;
}

/* .shipping_address
   PURPOSE: Styles the shipping address block.
   EFFECT: Sets font size and top/side margins.
   WHEN TO USE: When the user wants to style the shipping address section. */
.shipping_address {
  font-size: $font_size;
  margin-top: 0.4cm;
  margin-left: 1.2cm;
  margin-right: 1.2cm;
}

/* .title_shipping_address
   PURPOSE: Styles the "Shipping Address" title.
   EFFECT: Bold text, $color_title_total color.
   WHEN TO USE: When the user wants to style the shipping address title text. */
.title_shipping_address {
  font-weight: bold;
  color: $color_title_total;
}

/* .title_text
   PURPOSE: Styles the invoice title.
   EFFECT: Bold text, $font_size_title size, $color_title_total color.
   WHEN TO USE: When the user wants to style the invoice title text. */
.title_text {
  font-size: $font_size_title;
  font-weight: bold;
  color: $color_title_total;
}

/* .section_class_begin
   PURPOSE: Container for the introductory (begin) text after the invoice title.
   EFFECT: Full width with top/side margins.
   WHEN TO USE: When the user wants to change the position or spacing of the intro text section. */
.section_class_begin {
  margin-top: 1.0cm;
  margin-left: 1.2cm;
  margin-right: 1.2cm;
  width: 100%;
}

/* .begin_text_table
   PURPOSE: Table container for the "begin" text.
   EFFECT: Full width.
   WHEN TO USE: When the user wants to style the table of the begin text. */
.begin_text_table {
  width: 100%;
}

/* .begin_text
   PURPOSE: Styles the "begin" text.
   EFFECT: Sets font size.
   WHEN TO USE: When the user wants to change the style of the introductory text. */
.begin_text {
  font-size: $font_size;
}

/* .section_class_details:first-view
   PURPOSE: Applies a specific top margin to the details section on first render only.
   NOTE: :first-view targets the first time the section is displayed.
   WHEN TO USE: When the user wants to change the details section margin only on the first page. */
.section_class_details:first-view {
  margin-top: 0.5cm;
}

/* .section_class_details
   PURPOSE: Styles the invoice details section on all pages.
   EFFECT: Sets font size and outer margins.
   WHEN TO USE: When the user wants to style or adjust margins for the details section. */
.section_class_details {
  font-size: $font_size;
  margin-top: 0.5cm;
  margin-bottom: 0.5cm;
  margin-left: 1.3cm;
  margin-right: 1.2cm;
}

/* .doc_table
   PURPOSE: Table for invoice details.
   EFFECT: Full width.
   WHEN TO USE: When the user wants to style the details table. */
.doc_table {
  width: 100%;
}

/* .doc_table_header
   PURPOSE: Styles the header row of the invoice details table.
   EFFECT: Bold, $font_size_header, custom text/background colors, bottom border.
   WHEN TO USE: When the user wants to style the column headers of the details table. */
.doc_table_header {
  font-size: $font_size_header;
  font-weight: bold;
  color: $text_color_details_header;
  background-color: $background_color_details_header;
  border-bottom: thin solid $color_title_total;
}

/* .doc_table td
   PURPOSE: Sets cell padding for invoice details rows.
   WHEN TO USE: When the user wants to adjust padding inside detail table cells. */
.doc_table td {
  padding-top: 5px;
  padding-bottom: 1px;
  padding-left: 0px;
  padding-right: 0px;
}

/* .doc_table_header td
   PURPOSE: Sets cell padding for the invoice header row.
   WHEN TO USE: When the user wants to adjust header cell padding in the details table. */
.doc_table_header td {
  padding-top: 4px;
  padding-bottom: 2px;
  padding-left: 0px;
  padding-right: 0px;
}

/* .item_cell
   PURPOSE: Define the text style for each invoice item row.
   USAGE: Apply to cells/rows containing individual items.
   NOTE: Empty by default, add font/spacing/color rules as needed.
   WHEN TO USE: When the user wants to style the text of each line item in the details table. */
.item_cell {}

/* .total_cell
   PURPOSE: Styles the total row.
   EFFECT: Bold, $font_size_total, $color_title_total color, double bottom border.
   WHEN TO USE: When the user wants to style the row containing the total amount. */
.total_cell {
  font-size: $font_size_total;
  font-weight: bold;
  color: $color_title_total;
  border-bottom-style: double;
  border-bottom-color: $color_title_total;
  border-bottom-width: 1px;
}

/* .subtotal_cell
   PURPOSE: Styles the subtotal row.
   EFFECT: Bold text, single bottom border in $color_title_total.
   WHEN TO USE: When the user wants to style the subtotal row in the details table. */
.subtotal_cell {
  font-weight: bold;
  border-bottom-style: solid;
  border-bottom-color: $color_title_total;
  border-bottom-width: thin;
}

/* .header_cell
   PURPOSE: Styles any header cell in the invoice details.
   EFFECT: Bold text.
   WHEN TO USE: When the user wants to make any header cell bold in the details section. */
.header_cell {
  font-weight: bold;
}

/* .vat_info
   PURPOSE: Styles VAT-related text.
   EFFECT: Sets font size (used for gross amount layouts).
   WHEN TO USE: When the user wants to style VAT information text. */
.vat_info {
  font-size: $font_size;
}

/* .even_rows_background_color
   PURPOSE: Sets background color for even-numbered rows (striped tables).
   WHEN TO USE: When the user wants alternating row background colors in tables. */
.even_rows_background_color {
  background-color: $background_color_alternate_lines;
}

/* .section_class_final_texts
   PURPOSE: Styles the final notes/greetings section after the details.
   EFFECT: Sets top/side/bottom margins.
   WHEN TO USE: When the user wants to style or adjust spacing for final texts or notes. */
.section_class_final_texts {
  margin-top: 0cm;
  margin-bottom: 0.5cm;
  margin-left: 1.26cm;
  margin-right: 1.0cm;
}

/* .footer_line
   PURPOSE: Horizontal line above the footer section (separator).
   EFFECT: Top border, side margins.
   WHEN TO USE: When the user wants to add or style a separator line above the footer. */
.footer_line {
  margin-left: 1.2cm;
  margin-right: 1.0cm;
  border-top-style: solid;
  border-top-color: $color_title_total;
  border-top-width: thin;
}

/* .footer_table
   PURPOSE: Styles the footer table.
   EFFECT: 8pt font, bottom margin, full width, side margins.
   WHEN TO USE: When the user wants to style the footer section or adjust its spacing. */
.footer_table {
  font-size: 8pt;
  margin-bottom: 2.0cm;
  margin-left: 1.2cm;
  margin-right: 1.0cm;
  width: 100%;
}
CSS Class Reference
| Selector / Class | Purpose / Usage |
|---|---|
| @page | Defines page margins for printing. Use to change document margins. |
| body | Base font, size, and text color for the whole document. |
| td | Aligns table cells vertically to the top. |
| .right | Right-aligns text content. |
| .center | Center-aligns text content. |
| .bold | Makes text bold. |
| .padding-right | Adds padding on the right. |
| .padding-left | Adds padding on the left. |
| .border-top | Adds a border at the top (used as separator). |
| .header_text | Defines margins and styles of the header text block. |
| .header_row_1 | Defines styles of the first header row. |
| .header_row_2_to_5 | Defines styles of the header rows 2–5. |
| .logo | Defines margins of the logo in the header. |
| .info_table_left | Defines margins and styles of the left-side info table. |
| .info_table_right | Defines margins and styles of the right-side info table. |
| .info_table_row0 | Defines margins and styles of the Info table for page 2 and later. |
| table.info_table_left td | Defines spacing for left-side info table cells. |
| table.info_table_right td | Defines spacing for right-side info table cells. |
| table.info_table_row0 td | Defines spacing for page 2+ info table cells. |
| @page:first-view table.info_table_row0 | Hides info table (info_table_row0) on first page. |
| .info_table_first_column | Optional: defines width for first info table column. |
| .info_table_second_column | Optional: defines width for second info table column. |
| .address_table_right | Defines margins and styles for the right-side address block. |
| .address_table_left | Defines margins and styles for the left-side address block. |
| .custom_address_table_right | Defines margins and styles for the custom right address block. |
| .custom_address_table_left | Defines margins and styles for the custom left address block. |
| .small_address | Defines styles of the sender’s small address line. |
| .shipping_address | Defines margins and styles of the shipping address block. |
| .title_shipping_address | Defines styles of the shipping address title. |
| .title_text | Defines styles of the the invoice title. |
| .section_class_begin | Defines margins of the container for introductory text section. |
| .begin_text_table | Defines styles of the begin text in table. |
| .begin_text | Defines the styles of the introductory text. |
| .section_class_details:first-view | Adjusts details section margin on first page only. |
| .section_class_details | Defines margins and styles of the details section. |
| .doc_table | Defines the styles of the details table (items list). |
| .doc_table_header | Defines margins and styles for the header row of details table. |
| .doc_table td | Defines padding inside details table cells. |
| .doc_table_header td | Defines padding inside header row cells of details table. |
| .item_cell | Defines the styles of the invoice item rows (per line item). |
| .total_cell | Defines the styles of the total row. |
| .subtotal_cell | Defines the styles of the subtotal row. |
| .header_cell | Defines the styles of the invoice header rows. |
| .vat_info | Defines the styles of the VAT information text (for gross amounts only). |
| .even_rows_background_color | Applies background color to even table rows. |
| .section_class_final_texts | Defines margins and styles of the final notes/greetings section. |
| .footer_line | Defines margins and separator line above footer. |
| .footer_table | Defines margins and styles of the footer table. |