在此文中
The rules can be accessed via the command Actions > Recurring Transactions > Transactions table.
- Rule rows are those that contain !Rule or !RuleSplit in the Doc column.
- In rule rows, the columns have a different meaning:
- Condition Columns
Contain the values to be compared to determine whether the rule should be applied.
The condition columns are: Doc, Date, Description, Account Debit/Credit, Amount. - Action / Substitution Columns
Contain the values that will be applied and complete the imported transactions.
All columns that are not used as condition columns are considered substitution columns.
- Condition Columns
Condition columns
Condition columns (or search columns) contain the data used to search for matches in the imported transactions.
- Doc column (required)
- Must contain !Rule or !RuleSplit
- !Rule indicates it is a rule.
- !RuleSplit indicates that the rule above must also create split transactions.
- Must contain !Rule or !RuleSplit
- Description column (required)
- The Description column must contain the text to be searched in the description of imported transactions.
- When a description begins with text in square brackets, it is used as the rule name. The rule name is optional and can be used to better identify rules.
- Account column (recommended)
- In double-entry accounting: use the Debit column (to filter incoming transactions) or the Credit column (to filter outgoing transactions).
- In income and expense accounting: use the Account column.
- This is usually the bank account from which the transactions are imported.
- Date column (optional)
- Limits the application of the rule to a specific period of the transactions.
- Amount column (optional)
- Limits the application of the rule to a specific amount or range of amounts.
- In income and expense accounting: use the Income (incoming transactions) or Expense (outgoing transactions) column.
Substitution Columns
Substitution columns must be filled in with additional information.
- DocLink column
- Contra Account column
Enter the contra account that replaces the temporary contra account [CA] or the temporary contra selected in the Apply Rules dialog.- In double-entry accounting: use the Credit column (for incoming transactions) or the Debit column (for outgoing transactions).
- In income and expense accounting: use the Category column.
- VAT Code column
Enter the VAT code to be applied to the imported transaction.
The program automatically completes all VAT-related columns. - Cost Centers (CC1, CC2, CC3) columns
Specify the cost center to assign to the imported transaction. - Notes column
Enter any additional information to be included in the imported transaction. - Other columns
All columns that are not condition columns, except ExternalReference, are considered substitution columns.
ExternalReference is a reserved column used by the bank import to identify each transaction and prevent duplicates.
The DocLink column
In this column, it is not possible to insert a specific link to a document because each transaction will have its own document. However, you can add an annotation in square brackets (e.g., "[Doc]") to distinguish the rows that need to be associated with a digital document.
Once the transactions are imported, it may be necessary to link them to accounting documents. To speed up this process, it is recommended to proceed as follows:
- In the DocLink column of the Recurring Transactions table, use text enclosed in square brackets [ ].
- Within the square brackets, enter the text that should be searched for in the name of the supporting document file.
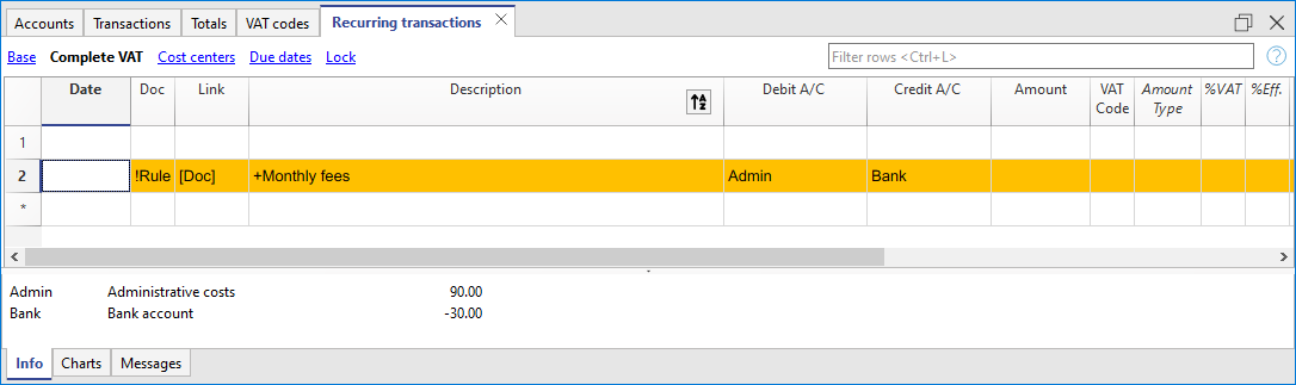
- In the Transactions table, the transactions are imported with the text in square brackets in the Link column.
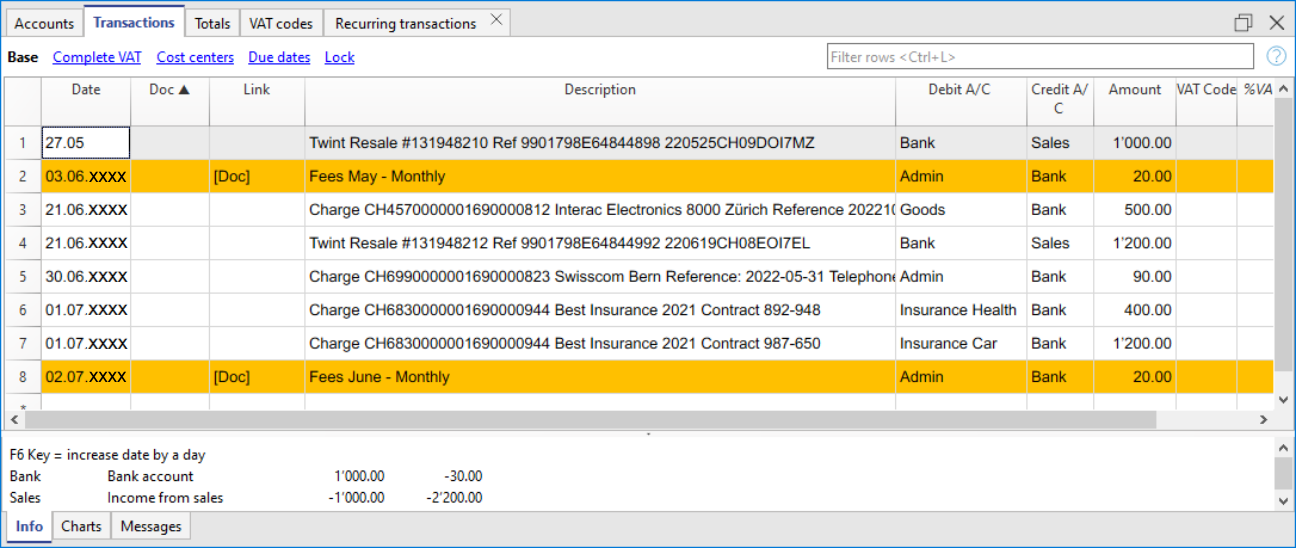
- In the Transactions table, use the Row Filter function and enter the text "!link![ ]". This will display all the rows in the Link column that contain square brackets where a link to the supporting document needs to be added.
- When editing the Link column in the Transactions table, the program will show, in the auto-completion, the files of supporting documents that have not yet been linked to a transaction and contain the text entered between the square brackets.
For example, if you enter "[invoice]," the program will display all the unlinked files containing the text "invoice" in the cell.
It is possible that after importing transactions with the Rules, some transactions may need to be manually completed with additional information.
To quickly find the transactions that need to be completed, you can use one of the following methods:
- Using the Notes Column
To quickly locate the transactions that need to be completed, we recommend adding temporary search texts that can be used to filter the transactions. For example:- In the Notes column of the Recurring Transactions table, or in any other column of the Rule row (except for those predefined for the Rule), enter a hashtag, such as #city.
- In the Row Filter function of the Transactions table, enter the same hashtag. This will display the rows that you need to complete.
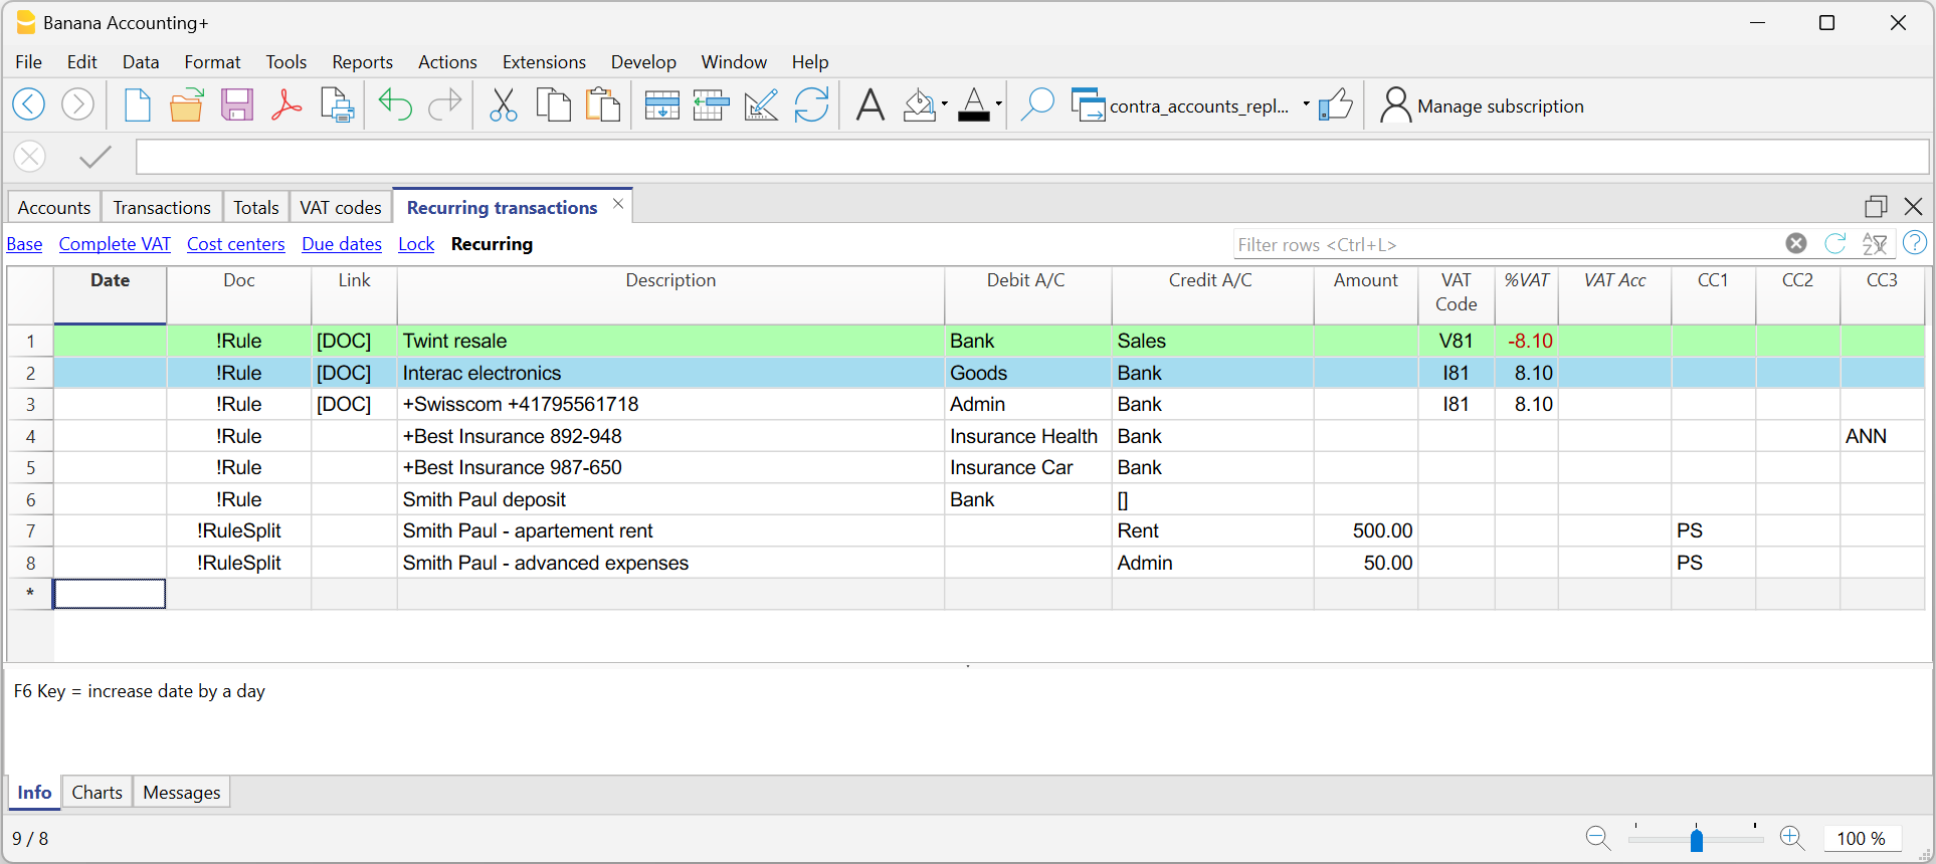
- Coloring Rule Rows
You can color the Rule rows in the Recurring Transactions table. The row color will be transferred to the Transactions table and used to highlight the transactions to which the rule is applied.
To identify only the colored rows, you can use the Row Filter function by entering the text "!_co!"
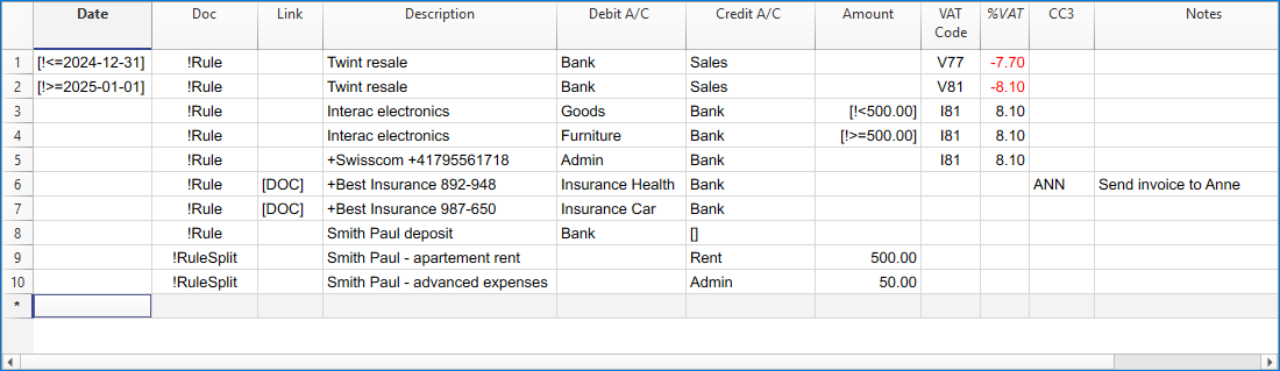
Split row transactions
Normally, when you import transactions from a bank statement with the Rule, a single counterpart account is recorded. If the total amount of the counterpart needs to be split across multiple counterpart accounts, you can create a multi-row Rule.
For example:
- You regularly receive a payment of 550 that must be recorded on three different accounts and therefore on three rows:
- (550) rent collection (no contra-account, as this involves recording the global amount split over three rows)
- (500) flat rent (contra account rent)
- (50) extra expenses (contra-account for extra expenses) .
To create a multi-row Rule:
- The first row corresponds to the total amount collected.
- In the Doc column, enter the text !Rule.
- In the Description column, enter the text to search for in the imported transactions.
- In the counterpart column, enter square brackets [].
In the following rows: - In the Doc column, enter the text !RuleSplit.
- In the Description column, enter the text to search for in the imported transactions.
- In the counterpart column, enter the counterpart accounts.
- In all other columns, input the values that should be included in the additional rows. In this example, we have added the tenant’s Cost Center.
In the following example, you can see the tenant’s Cost Center.
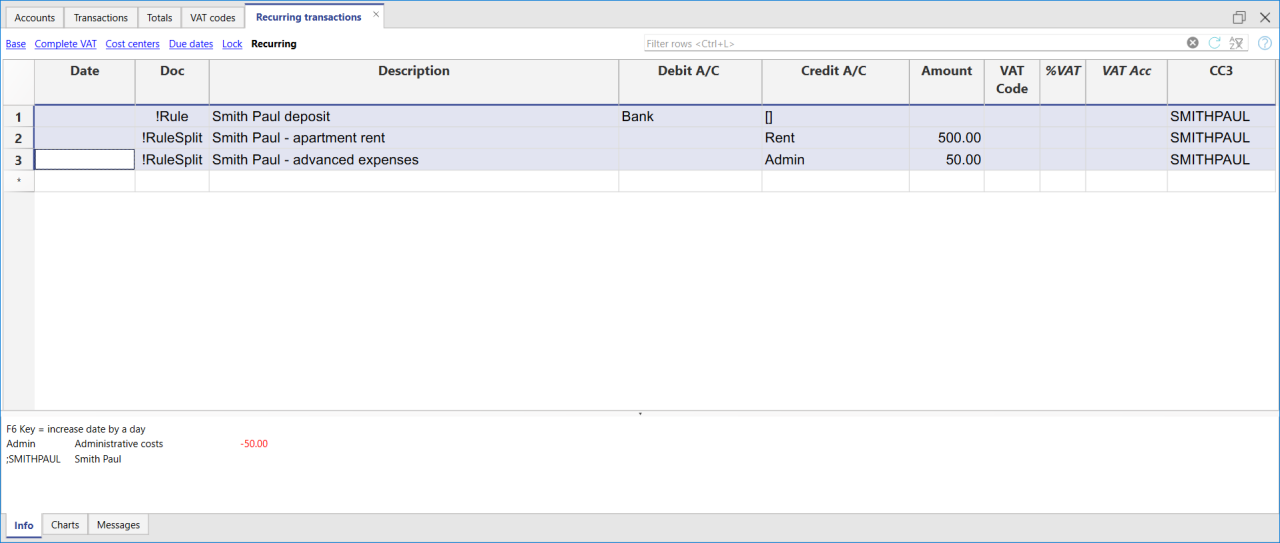
In the example of a multi-row rent transaction, it is assumed that the collected amount is always 550. If the collected amount is different from 550, the transaction will need to be completed manually.
Modifying rules in the Recurring Transactions Table
All completion Rules saved in the Recurring Transactions table, even if they were created from the Apply Rules dialog, can be modified, deleted, or new ones can be created in anticipation of a future import without a Rule.
Set a different description from the imported one
All imported transactions display the description from the bank statement in the Description column of the Transactions table. Typically, these descriptions are very detailed.
It is not possible to automatically change this description at the time of import.
If you wish to change the imported description, you can use the Notes column in the Recurring Transactions table.
Note: if the Notes column is already used for your own annotations, it cannot be used to modify the description.
If the Notes column is not being used, proceed as follows:
- Display the Recurring Transactions table.
- Make the Notes column visible by going to the menu Data > Columns set up > check the Notes column.
- In the Notes column, enter the description text that you want to appear in the Transactions table (Description column).
Repeat this step for each desired transaction.
Import the transactions - After importing into the Transactions table, make the Notes column visible (menu Data > Columns setup > check the Notes column)
The Notes column will display the notes defined in the Recurring Transactions table.
- For each transaction, copy the content from the Notes column and paste it into the Description column.

- For each transaction, copy the content from the Notes column and paste it into the Description column.
In the Recurring Transactions table, it is not possible to directly add custom columns.
To use a custom column in the Recurring Transactions table, you need to add the custom column to the Transactions table.
Once the column is added to the Transactions table, it will also be visible in the Recurring Transactions table and can be used to set a different description from the imported one.
Therefore, the insertion procedure is the same as described in the section Set a Different Description from the Imported One - Notes Column.
Create a new year with rules
When you create a new year using the command Actions > Create New Year, the existing Rules in the Recurring Transactions table are automatically carried over to the new year's file.
Accounting with the same rules
If you manage several similar accounting files (for example for clients with similar characteristics), it can be useful to reuse rules that have already been created, avoiding rewriting them every time.
When the accounting files have the same chart of accounts, or at least a compatible structure, you can copy the Recurring transactions from one file to another.
How to copy the rules
- Open the source file (the one that contains the rules to be reused).
- Display the Recurring transactions table using the command
Actions > Recurring transactions > Recurring transactions table. - Select the rows you want to copy.
- Use the Copy rows command, Edit > Copy rows.
- Open the destination file and display the Recurring transactions table.
- Paste the rules using the command Edit > Insert copied rows in the Recurring transactions table.
You can also create a dedicated accounting file, used as a rule library.
In this way, when you create a new accounting file, you can easily copy the necessary set of rules and paste it into the destination file.