Basic accounting features
The grouping system in Banana Accounting+
Banana Accounting's grouping system is used to totalise the amounts of accounts and groups quickly and easily. The programme gives you maximum flexibility to create as many levels of totalling as you want.
▶ Video: Grouping and totalling system
Where it is used
- In the Accounts and Categories tables to define the structure of the Balance sheet and the Profit & Loss Statement.
- In the VAT Codes table to group VAT codes
- In the Items table in the Stock Application.
- In the Items table in the Fixed asset register Application.
How it works
Grouping is always based on two columns:
- The Group column, where group identifiers are indicated, which may be textual or numeric.
- The column Sum In, where for each account or group row the Totalisation Group is indicated.
Each group row is a total row, where:
- Group balances are the sum of the rows that contain the group name in the Sum In column.
- The programme calculates the totals of all columns containing amounts (type Amount), both the predefined ones (Opening, Balance, etc.) and those added manually.
Grouping allows the creation of many levels of totalisation.
The logic of the programme
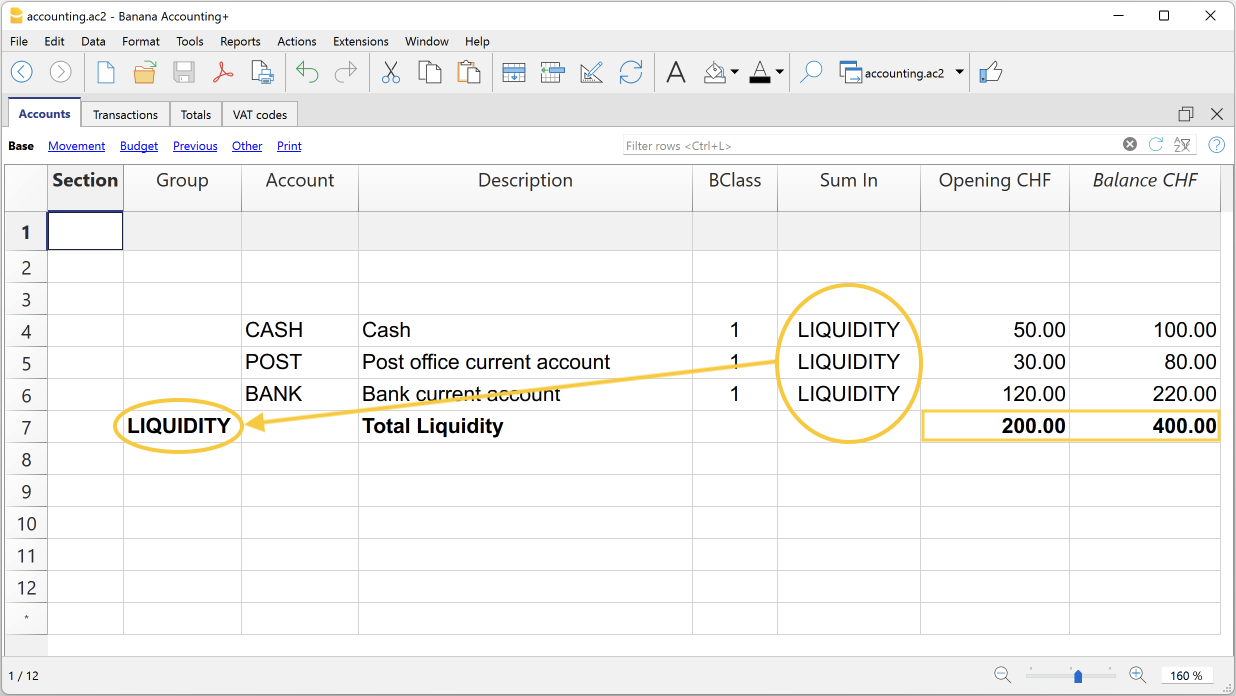
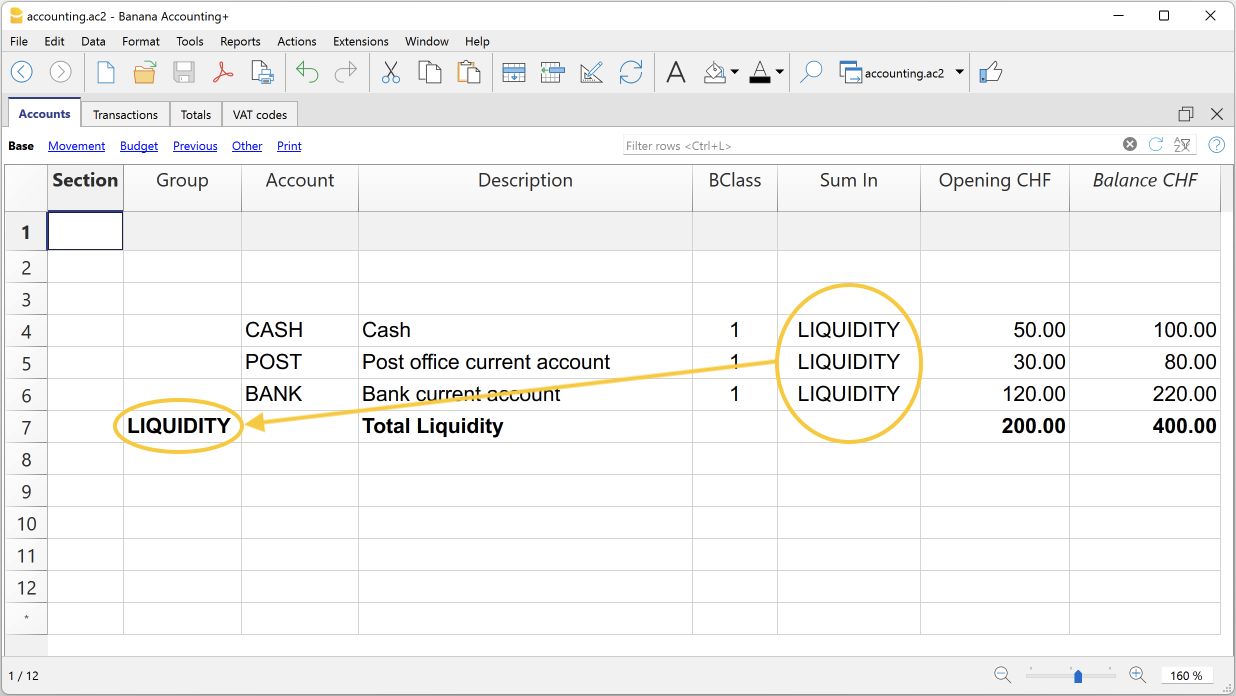
To understand the logic, let us present an example of a small part of the chart of accounts. For the accounts Cash, Post and Bank we create the Liquidity group:
- In the line below the liquidity accounts, in the Group column, enter the name of the Liquidity group.
- In the Description column, you enter the description of the group.
- In order for the programme to be able to update the balances in the liquidity group, it must be indicated which accounts are to be totalled.
In the Sum In column of the Cash, Post and Bank account, the name of the cash group is entered. The balances of the group are updated immediately.
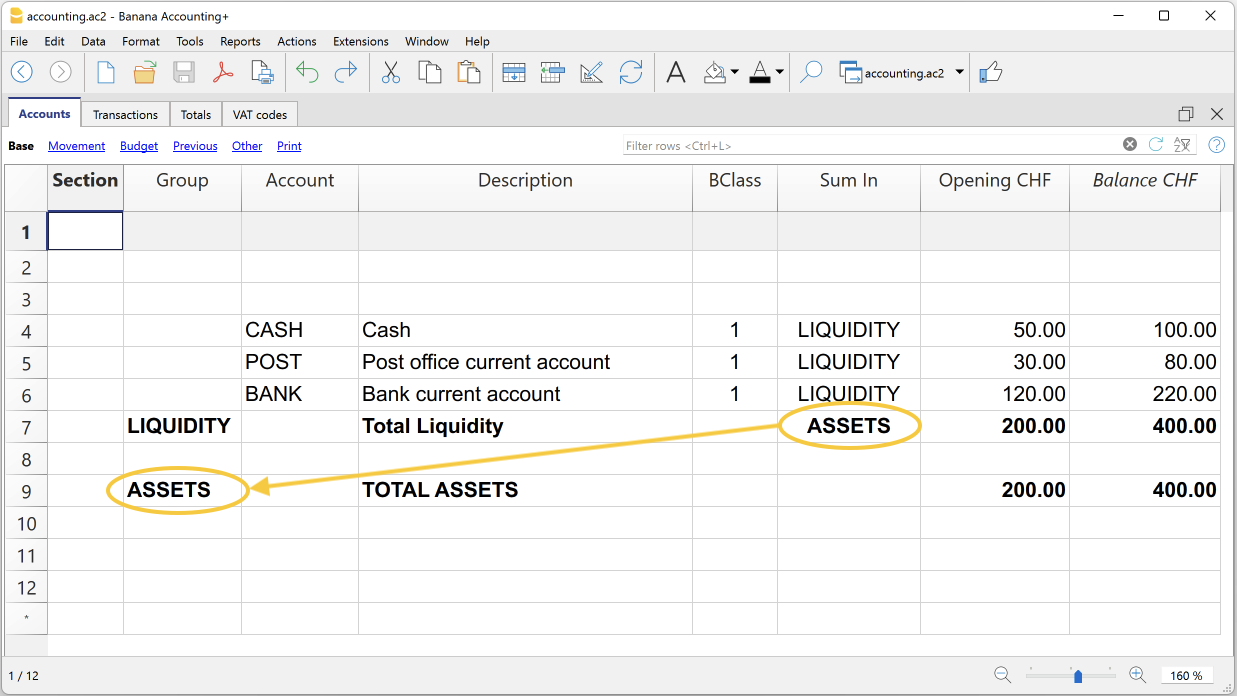
Using the same logic, we can also group groups. In fact, groups can also be totalled into other groups at a higher level.
Suppose we add a group into which to group and then total the Liquidity group.
- In the line below the Liquidity group, in the Group column, the name of the Assets group is entered.
- In the Description column, you enter the description of the group.
- In order for the programme to be able to update the balances in the Assets group, it must be indicated which groups are to be totalled.
In the Sum In column of the Liquidity group, the name of the Assets group is entered. The group's balances are updated immediately.
Following this logic, it is possible to create a structure with groups and subgroups for the entire chart of accounts, in order to create charts of accounts suitable for any specific country and requirement.
The exact same logic can also be applied for grouping VAT codes in the VAT Codes table, and also for grouping items in the Items table of the Warehouse and Fixed asset register.
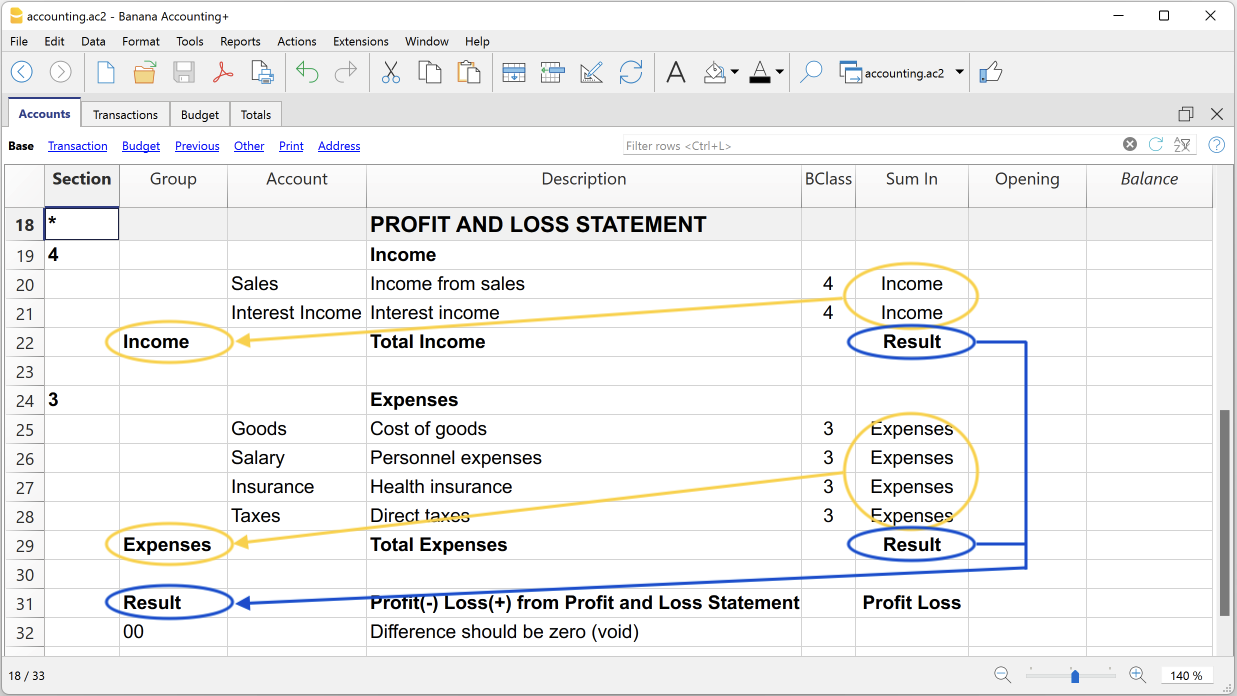
Extensive use of the totalisation system
The totalisation system is very flexible:
- Accounts and groups can be added together in a group.
- Title texts can be assigned the group to which they belong.
- Any kind of numbering (numerical and/or letter) can be used.
- Up to 100 totalisation levels can be created.
- Group totalisation is independent of the sequence of rows:
- The total row can be defined before and after the account or group rows.
- The total row can also be defined in a completely detached position from the account and group rows, as in the case of the Accounts Payable / Suppliers ledger.
- The same account cannot be totalled in two Groups at the same time.
- The system is also used to total the Cost Centres and Segments.
The totalisation of amount columns
The calculation procedure totals the columns of type amount.
- The amount columns defined by the system are totalled.
- The amount columns added by the user are totalled.
The calculation sequence
The programme calculates totals as follows:
- Clears the column amounts of the Group rows.
- Adds up the amounts of the Accounts rows in the Group rows (first level of calculation).
- Adds up the balance of the Group rows in the higher level Groups.
Repeats the operation until all levels are calculated.
When a Group is totalled in a lower level Group, an infinite error loop is created.
Error checking and reporting
When creating groupings, the programme checks and reports any errors so that they can be corrected immediately.
When a non-existent group has been indicated in the Sum In column, the programme reports the error 'Group not found'. In this case it is sufficient to:
- Create the group in the Group column.
- Recalculate accounting with the command Check and recalculate accounting
- Recalculate all totals with the command Recalculate totals.
Rename groups
With the Rename command, existing group names can be renamed automatically, without having to manually change the matches in the Group and Sum In columns.
Printouts
When printing the Balance Sheet, Profit and Loss Statement or other reports that contain groupings, the printout shows the order of the groupings as they have been set in the various tables.
Cost and profit centers
The Cost and Profit Centres of Banana Accounting Plus are used to analyse and monitor the performance of different areas or divisions of a company: organisational units, departments and branches, even if they are not related to each other. They allow records to be catalogued according to different criteria than normal accounts. The main objective is to minimise operating costs and optimise revenues, while guaranteeing the quality and efficiency of services.In Banana Accounting Plus, the cost and profit centre feature is available in all accounting applications.
Cost centers and profit centers are used solely for internal information purposes to monitor and control operating costs; therefore, they are not included in the Financial Statements.
▶ Video: Cost and profit centers
If you wish to have a Balance sheet broken down by projects, sectors or branches, we recommend using Segments.
Registering transactions in cost/profit centers
In Banana Accounting, cost/profit centers are recorded in the Transactions table, specifying the accounts related to the cost/profit centers in the appropriate columns, as set in the Accounts table. Cost centers are attributed to the transaction row and can be used simultaneously with segments.
Here are the most frequent uses:
- Cataloging specific expenses
- Events and manifestations
- Clients, suppliers, members
- Additional details for certain expenses (e.g., accessory expenses)

The columns for entering data are located in the Cost Centers view. If they are not visible, you can display them from any view via the menu Data > Columns setup. Three different columns are available: CC1, CC2, CC3, each of which is independent of the others.
For registration, proceed by entering:
- The date, the description, and other usual elements
- The Debit and Credit account
- The amount and any applicable VAT code
- In the appropriate column (CC1, CC2, CC3), enter the cost/profit center account without the preceding punctuation.
- To record a credit on the cost/profit center, precede the cost center with a minus sign.
In the Income/Expenses accounting and the Cash Manager, you can set the option Record (+/-) cost centers as categories so that the cost centers follow the sign of the category.
If an overall amount needs to be divided among multiple cost/profit centers at the same level, multiple transaction rows must be created. Each row specifies the amount to be allocated to the cost/profit center and the relevant account.
Recording cost centers in the Income & Expense Accounting and Cash Manager
In the Income & Expense accounting, cost centers can be set either in the Accounts table or in the Categories table, depending on the purpose for which they are created:
- Cost/profit centers related to customers/suppliers or to members/donors should be set in the Accounts table.
- Cost/profit centers related to expenses or revenues (such as refunds to members, events, projects, etc.) should be set in the Categories table.
To record an entry in a cost/profit center, simply enter the abbreviation or number defined in the Accounts table in the column designated as the cost/profit center.
When an amount needs to be reversed from a cost/profit center, it must be entered in the corresponding column with a minus sign (-) in front of the center’s abbreviation/number.
In the example:
- In the member 1 profit center, the CC3 column contains the abbreviation MEMBER 1 to indicate the credit for the membership fee owed by member 1.
- When member 1’s fee is collected, the CC3 column contains -MEMBER 1, so that the payment is recorded in member 1’s account and the credit owed by member 1 is thus zeroed out.
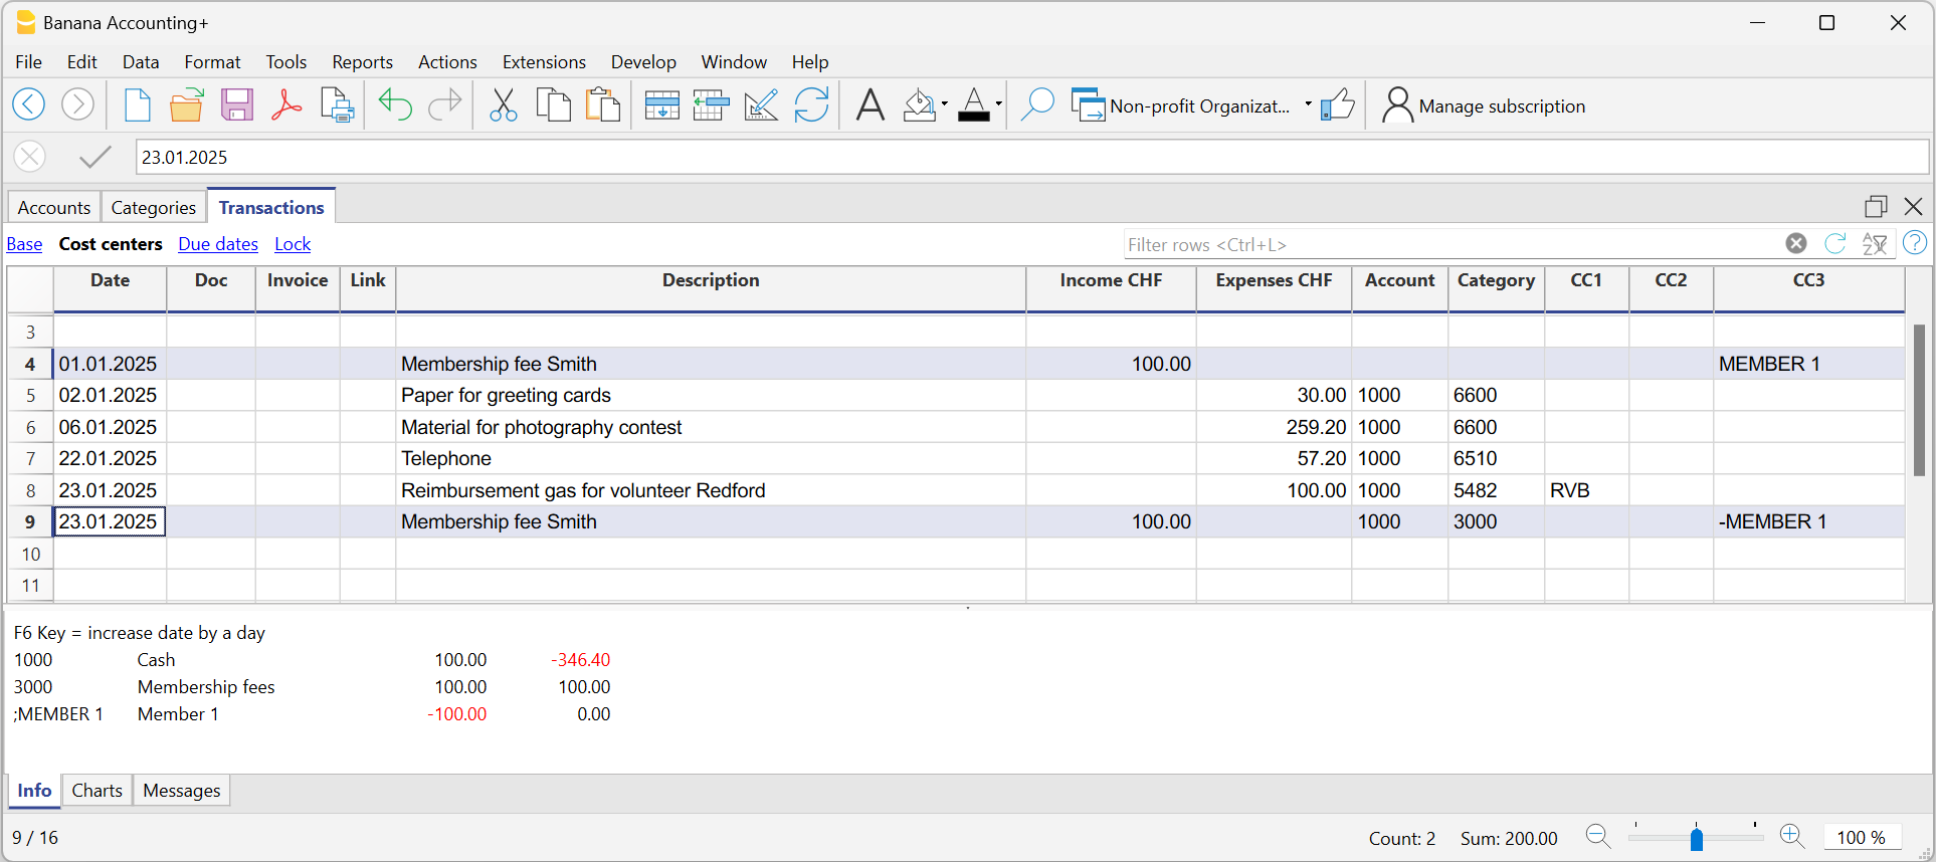
In the Income & Expense accounting and in Cash Manager, you can enable the option Record (+/-) cost centers like the category so that cost centers follow the category's sign.
However, be cautious when using this option, because if there are transactions that always go into the income or expenses column, while for the cost/profit centers the amount should be reversed, the program will sum up the amounts in the related cost/profit center ledgers.
In the previous example, the membership fee (credit and payment) is recorded in the income column for both entries. However, in the MEMBER 1 profit center, you need to reverse the amount to zero out the credit for member 1.
In this case, if you use the Record (+/-) cost centers like the category option, the balance in the corresponding profit center ledger would be incorrect. Since in both transactions the amount is always recorded in the Income column, in the corresponding profit center ledger it would be added instead of reversed, which is necessary to zero out the credit for member 1. Therefore, in these cases, you should not use this option, but rather manually place a minus sign before the cost/profit center.
It is therefore recommended to use this option only in cases where you are certain that the amount recorded in the cost/profit center aligns with the category.
Accounts of cost/profit Centers
The accounts of cost centers are set up in the Accounts table, except for the Cash Manager, where they are set up only in the Categories table.

- The Cost and Profit centers (CC) are accounts, preceded by the ".", "," and ";" signs
- There are three levels of cost centers:
- CC1 preceded by a period "."
- CC2 preceded by a comma ","
- CC3 preceded by a semicolon ";"
- Each level is independent of the other.
- For each level, there can be an unlimited number of cost and profit centers.
- A superior level can be used without using an inferior one.
- Cost center codes can be alphabetic or numeric.
- Cost centers can have their own grouping, different to that of normal accounts.
For the same level of cost centers, subgroups can be created. Be careful not to mix cost center groups with other groups of a different level or with normal accounts or segments. - Each cost and profit center has its own account card, complete with transactions and balances.
- A transaction on the cost center is independent of the account recorded in debit or credit.
It is possible to record on cost centers even if there is no account in the debit and credit column (as in the case of customer/supplier ledger with VAT on cash basis).
Setting up cost centers in the Accounts table
To set up the cost/profit centers in the Accounts table, proceed as follows:
- Create a specific section for the cost centers at the end of the chart of accounts:
- Enter a Section with an asterisk * for a section change and in the Description column, enter the title cost and profit centers.
- In the next row, on the Section column enter 03 and 04 for a profit center and the related description.
- Add rows for the cost center:
- In the Group column, enter the group to which the cost center account is assigned
- In the Account column, Add the cost or profit centers:
- With a preceding dot (.) for transactions in the CC1 column.
- With a comma (,) for bookings in the CC2 column.
- With a semicolon (;) for transactions in the CC3 column.
- In the Gr column, indicate the group into which the amounts are to be totaled.
- In a Multi-currency accounting, the account currency is also specified.
- Add the cost center groups
- In one and the same group, total only for one specific level.
- As for normal accounts, different levels can be created.
VAT amount with cost and profit Centers
In the File and accounting properties command, in the VAT tab you can set the amount of cost centers with the following options:
- Use transaction amount - The amount of the cost center is registered according the transaction amount
- Use amount excluding VAT - The amount of the cost center is registered net of VAT.
- Use amount including VAT - The amount of the cost center is registered including VAT.
Account card cost center
The cost center is treated as any other account, so each cost center has its own account card with account balance and account transactions.
Unlike all other accounts, the cost center account does not have a contra account. If you want to view the contra account we recommend using the Segments.
In order to view all cost center account cards, click on the menu Reports > Account/Category cards > Cost centers (Filter option).
Differences between Cost/Profit Centers and Segments
Cost and profit centers are units where costs or profits are assigned and accumulated with the purpose of monitoring a specific business area (departments, divisions, projects, operational units, or even specific machinery) to improve efficiency and expense management, and they serve an internal control function.
Segments, on the other hand, are assigned to a part of the business activity for external reporting purposes and strategic analysis. They are used to analyze profits and other financial metrics across different business areas, sectors, subsidiaries, projects, markets, customers, and other business dimensions to assess their economic performance
- Cost centers CC3 in Banana Accounting are used to manage Customers and Suppliers with VAT on a cash basis and to manage Members in non-profit organizations.
Differences in Settings and Transactions
In Banana Accounting, the settings and transactions for cost/profit centers and segments differ as follows:
Accounts Table
- Up to 3 cost/profit centers (CC1, CC2, CC3) can be set up, and each can have an unlimited number of cost/profit centers. They are entered in the Account column of the Accounts table with a comma, a period, and a semicolon (respectively, CC1, CC2, CC3) before the account number (or account code).
- Segments can be set up to 10 levels, and each level can have an unlimited number of segments. They are entered in the Account column of the Accounts table, with a double colon (:, ::, :::, etc.) before the code or number that defines the segment.
Transactions Table
- Cost/profit centers are recorded only in the CC1, CC2, CC3 columns of the Cost Centers view. The account is recorded without any punctuation in front.
- To record on the credit side of a cost/profit center, the cost center must be preceded by a minus sign.
Segments are recorded in the Debit and Credit columns, after the main account (e.g., 4000:P1). This means that the amount recorded in the Amount column is assigned to both the 4000 account and the P1 segment. Alternatively, they can be recorded in the specific Segment column of the Accounts table. - Segment amounts follow the debit and credit designation of the accounts.
Reports
- With Cost/Profit Centers, it is not possible to generate a Balance Sheet and an accounting report.
- Using Cost/Profit Centers, you can obtain an account statement for each cost and profit center.
- In the Accounts table, you can view the totalization of the different groups of cost and profit centers.
- With Segments, it is possible to generate a balance sheet with the breakdown of levels, showing the profit or loss for each segment.
- In the Accounts table, the total of the different segment groups is also visible, and you can view the account cards for the various Segments. Accounting reports are also possible.
- With Segments, you can also obtain a multi-level Report that combines accounts and segments, but specific extensions must be used.
Related documents:
Segments
Segments are used to systematically separate costs and revenues by unit, department, or branch. Using segments, you can generate an Income Statement divided by unit, department, or branch, without having to create specific accounts for each unit.
For example, a museum can use segments to track revenue, staff costs, and setup expenses for each individual exhibition.
In transactions, segments follow the account, unlike Cost Centers, which are specific to each entry and used for less structured categorizations (e.g., all expenses for an event or purchases for a specific purpose).
You can use both cost centers and segments simultaneously.
Segment Features
- Segments are accounts preceded by a colon ":".
- Account codes may use numbers or letters.
- Up to 10 segment levels are supported.
- The level is determined by the number of colons preceding the code:
- :LU → level 1 segment
- ::P1 → level 2 segment
- :::10 → level 3 segment
- Each level can include an unlimited number of segments.
- Segment levels are independent of one another.
- Segments do not have a class (BClasse) or a currency code.
- Calculations related to segments are made in the base currency.
- In transactions, the segment follows the debit or credit account.
There cannot be entries for segments without an associated account. - Account cards can be generated for transactions involving specific segments.
Segment Level Titles
Segment level titles are used to indicate what a specific segment level refers to.
- A segment consisting only of separators ":", "::", ":::", etc., allows you to specify a description for the level.
- Enter the segment level explanation in the Description column.
For example:
":" "Projects"
"::" "Branches"
Setting up Segments
Segments must be set up in the Accounts table, in the Account column, at the end of the chart of accounts.
- Enter an asterisk in the Section column to define the segment section.
- In the Description column, type the segment title.
- Enter segments using :
- In the Account column, prefix the segment identifier with a single colon for first-level segments.
- Second-level (and possibly third-level) segments are prefixed with :: or :::, depending on the level.
- Optionally, enter a description for the segment.
Unassigned Segment {}
If in the transactions you enter the debit or credit account without specifying a segment, the amount is recorded in the "empty" or unassigned segment.
In the chart of accounts, you can define a description for the unassigned segment of the level by following the colon with the text ":{}".
The unassigned segment symbol "{}" is useful for indicating in account cards and scripting that you want to see entries not assigned to any segment.

Transactions
Segments are recorded in the Transactions table, immediately following the main account.
When a segment includes multiple levels, you must follow the main account with the first-level segment, then the second-level one, and so on.

Using "-" as a segment separator
In transactions, the dash "-" can be used as a segment separator instead of the colon ":".
- In the file properties (basic data), activate the option Use dash (-) as segment separator.
- In the transactions, use the dash as separator.
- If using "-" as a separator, do not use accounts that contain dashes.
Segment Column
This column allows you to enter segments independently of the account.
- The Segment column is hidden by default; to use it, make it visible via the Data > Columns setup menu.
- Segments entered in the Segment column are applied to the accounts used in the transaction (columns Debit, Credit, VAT Account), if those accounts do not already specify a segment.
- You can use the Segment column along with segments directly in the Debit and Credit columns.
- When using the Segment column, the amount is recorded on the segment both in debit and credit, so the balance of the segment in the accounts table will be zero.

Movements between Segments
Usually, cost allocation is done for each individual accounting entry. However, in some cases, it's better to register costs to an account and only allocate them to segments at the end of the year. This applies, for example, to administrative costs that are distributed as a percentage across different company departments.
Here's how to proceed:
- During the year, enter transactions using the Debit and Credit columns, but leave the segment blank or assign the full amount to a single segment.
For example, all office supply costs may be recorded without a segment. - At the end of the year, enter allocation transactions for distributing the respective portion of each segment to a specific expense or income account:
- In the entry, use the same account in both the Debit and Credit columns.
- Indicate the source segment (which can be empty) and the destination segment.
- For example, to allocate office supply expenses to different departments:
- Create one transaction for each department.
- In each row, the credit account has no segment.
- The debit account includes the segment of the corresponding department.
- The amount is the portion of expenses to be allocated to that department.
- These entries assign each department its portion of unallocated expenses.

Opening Balances for Segments
Segments with an opening balance should preferably be entered as transactions, so that they can be associated with an account. If you enter the initial segment balance in the Opening column (Accounts table), it is assigned to the unallocated "{}" segment.
To assign opening balances to specific segments and accounts, you must enter opening transactions in the Transactions table.
- In the DocType (Type) column, enter value 01.
- The date must match the accounting start date.
With the segment opening entry, the amount is removed from the “empty” segment and assigned to the specific segment.
If the balance to be allocated is negative (credit), the account without a segment must be in the Debit column and the one with the segment in the Credit column.
Example of Segment Opening Transaction
Suppose account 1000 has an opening balance of 100.00 (without a segment, so assigned to the empty segment) and you want to assign 80.00 to segment 01 and 20.00 to segment 02, proceed as follows:
- The opening entries have the accounting start date and DocType value 01.
- The first entry has 1000:Events in the Debit column and 1000 in the Credit column. Amount: 80.00.
- The second entry has 1000:Courses in the Debit column and 1000 in the Credit column. Amount: 20.00.

Create New Year Command
The Create New Year or Carry Forward Opening Balances commands automatically generate opening entries for all segment levels.
If you don’t want to carry forward opening balances for a segment level, delete the automatically generated opening transactions.
Segment Account Card and Balance
Attention: do not interpret the segment movement as a standalone value.
The value shown for a Segment in the Balance or Movement column of the Accounts Table or the Categories Table should not be interpreted as an independent or standalone accounting value disconnected from the main account or category.
A segment is a subdivision of the total values of an account or category. It does not represent a separate accounting movement. As a result, the same movement may appear duplicated or zeroed out depending on how it's recorded.
- The amount recorded for a segment always follows the corresponding account or category.
- From an accounting perspective, it must always be considered in relation to a specific account or category.
- Typically, segments are used to subdivide the balance sheet or income statement into detailed columns without creating separate accounts for each entity.
To activate this feature, go to the menu Report > Accounting Report or Report with groups > Subdivision Section and enable Subdivision by Segment.
Segment Card Results in Double-entry Accounting
In double-entry accounting, the segment follows the account used in the Debit or Credit column, or both. Depending on how it's entered, the segment card shows different results:
- If in the Transactions table the segment is used in either the Debit or Credit column, the segment card displays the transaction amount.
- If the segment is used in both Debit and Credit, the segment card will show the amount on both sides, so the balance is zero.
- If the segment is entered in the Segment column, the amount appears in both Debit and Credit columns in the card, again resulting in a zero balance.
- In the Accounts table, the segment balance is the total of the transactions of accounts using that segment.
The segment card will only show a balance if the segment is used exclusively with Profit & Loss or Balance Sheet accounts.
Segment Card Results in Income & Expense Accounting
In income and expense accounting, the segment follows the account or category. Depending on how it's recorded, the segment card behaves as follows:
- If in the Transactions table the segment is entered after the category, the card shows the registered amount.
- If the segment is used in both the account and the category, the movement appears twice in the segment card (duplicated).
- If the segment is entered in the Segment column, the amount again appears twice (once for the account, once for the category).
- In these last two cases, the segment balance in the Accounts or Categories table may be double the recorded amount.
Reports
Segment-based reports can be generated from several accounting documents:
- Enhanced Balance Sheet by Groups
- Accounting Report
- Account Card
- Multi-level report
To generate reports that combine accounts and segments (e.g., all expenses for branch LU of P1), use Banana Extensions.
Subdivision Report by Level
In the Enhanced Balance Sheet by Groups, in the Subdivision section, specify the segment level you want to use.

Summary Report
This is a summary of all segments defined in the chart of accounts, with optional breakdown by period or by segment.

Unassigned Segment Report
The "empty" segment aggregates all entries without a specified segment. You can define a title for this segment in the accounts table. Also, enable the option Segment Header: Description in the Subdivision section.
Differences Between Segments and Cost Centers
Segments are assigned to part of the business activity for external reporting and strategic analysis. They are used to analyze profit and other financial metrics across different business areas, markets, customers, and other dimensions for evaluating performance.
Cost and profit centers are units where costs or revenues are assigned and accumulated to monitor a specific business area (departments, divisions, projects, operations, or even specific machinery) for internal control and management purposes.
- Objective: segments focus on assessing overall financial performance, while cost centers focus on cost tracking and management.
- Focus: segments are typically used for external reporting and strategic decisions, while cost centers are used for internal detailed cost analysis.
- Structure: segments are based on strategic criteria like product lines or markets, while cost centers can be any internal operational unit incurring costs.
- Accounting: segments are more relevant to financial and managerial accounting; cost centers are primarily used in analytical accounting.
Differences in Setup and Transactions
In Banana Accounting, the setup and registration of cost/profit centers and segments differ:
Accounts Table
- Segments can be defined up to 10 levels, each with unlimited segment codes. Entered in the Account column of the Accounts table, with colons (:, ::, :::) before the code.
- You can define up to 3 cost/profit centers (CC1, CC2, CC3), each with unlimited codes. They are entered in the Account column using punctuation (comma, dot, semicolon) before the account number or code.
Transactions Table
- Segments are recorded in the Debit and Credit columns after the main account (e.g., 4000:P1). Alternatively, they can be entered in the Segment column.
- Cost/profit centers are entered only in the CC1, CC2, CC3 columns of the Cost Centers view. Enter the code without punctuation.
Reports
- With Segments, you can generate a Balance Sheet with level subdivision, showing profit/loss per segment.
- In the Accounts table, totals of segment groups are visible, and you can view account cards by segment. You can also generate Accounting Reports.
- Segments also support multi-level reporting combining accounts and segments, but require specific extensions. Cost centers do not support Balance Sheet or accounting reports.
- With cost/profit centers, account cards can be generated per center.
- In the Accounts table, group totals for cost/profit centers can be displayed.
Further Reading
How to manage projects, departments, and branches
With the Segments feature it is possible to manage different sectors of a company or different projects of an association and to obtain for each one the balance sheet and the complete profit & loss statement with the breakdown of revenues, costs and profit or loss.
The segments are set out in the Chart of Accounts. When you enter a transaction, you also indicate the segment. Segments can also be used to manage branches, divisions or areas of business. A museum can use them to have reports of different exhibitions, a transport agency to have reports for each individual vehicle.
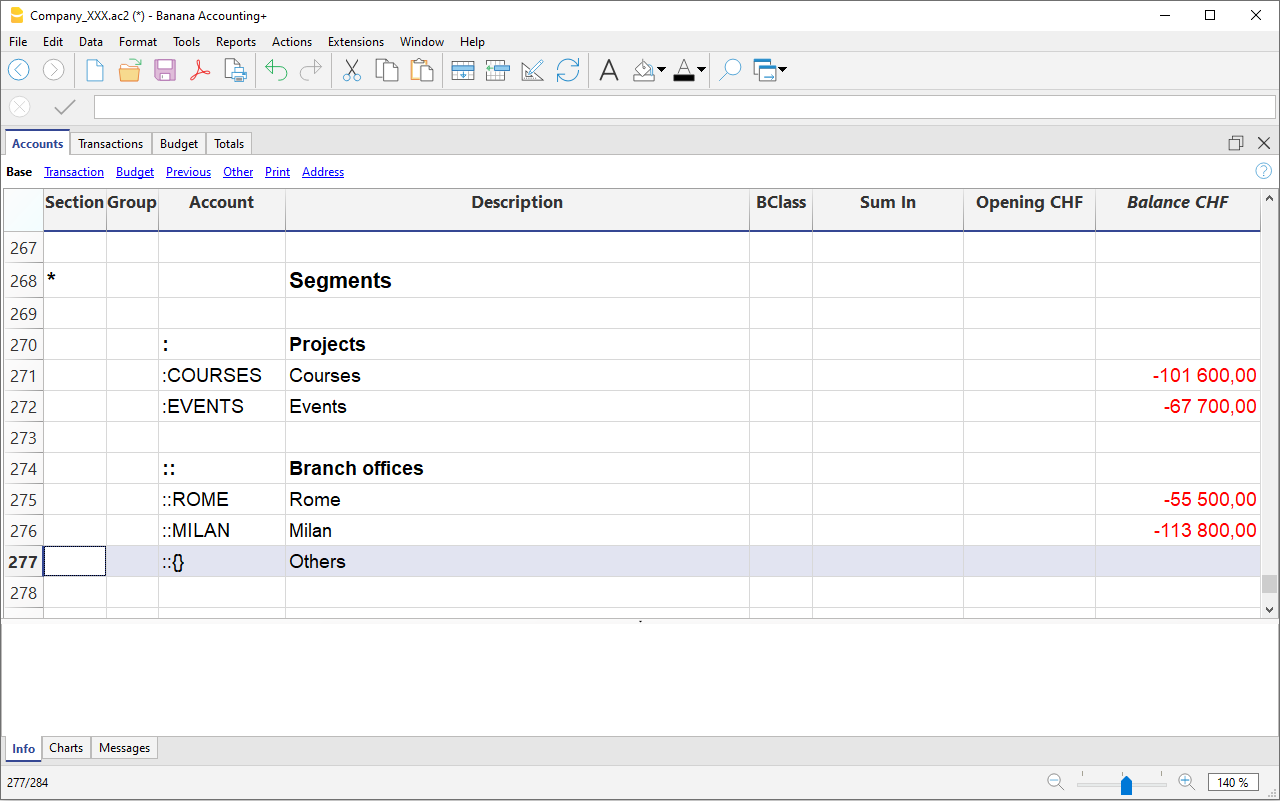
Setting up segments in your Chart of Accounts
It is useful for a company with several branches that organizes events and courses and wants separate statements for each field of activity and branch.
First level field of activity, accounts preceded by a colon ":":
- Courses
- Events
Second level branches, accounts preceded by a double colon "::":
- Rome
- Milan
It is generally more convenient to use acronyms rather than long names.
- Watch the video: Segments
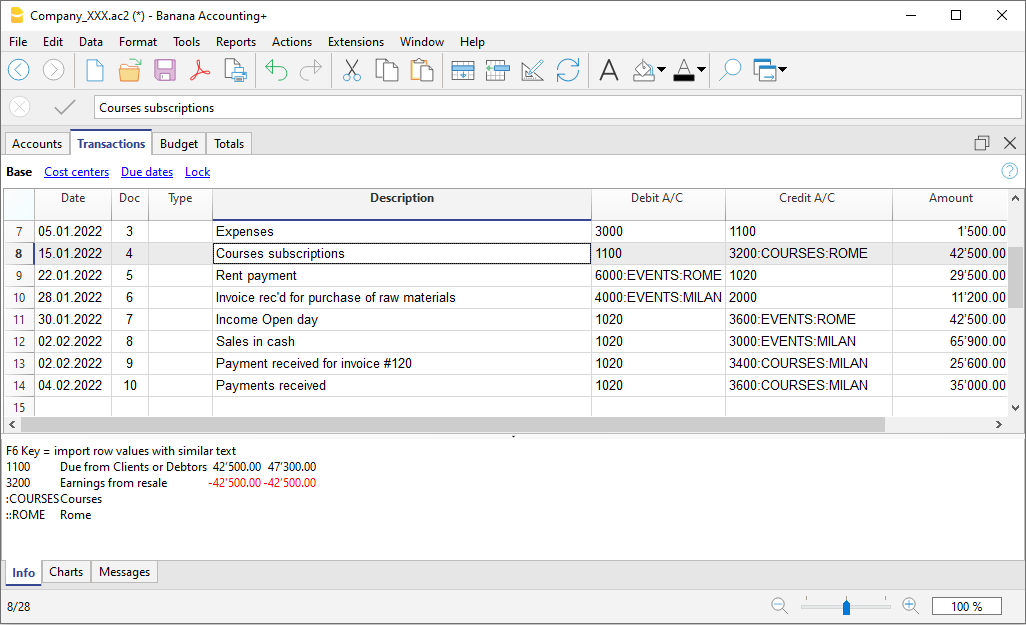
Entering transactions on the segments
Segments are entered into the Transactions table in the Debit and Credit columns following the account numbers.
- Segments can be recorded, by having them preceded after the account by either a colon (:) or a minus sign (-).
- If you want to enter segments with a minus sign preceding the segment code, you must activate the option 'Use minus sign (-) as segments separator, in the File menu, command File properties (basic data) > Options.
Profit & Loss Statement by segment
The report by segment can be obtained from the menu:
- Reports > Enhanced balance sheet with groups
- In the Chart of Accounts section and in the Sections section, select the Profit & Loss statement.
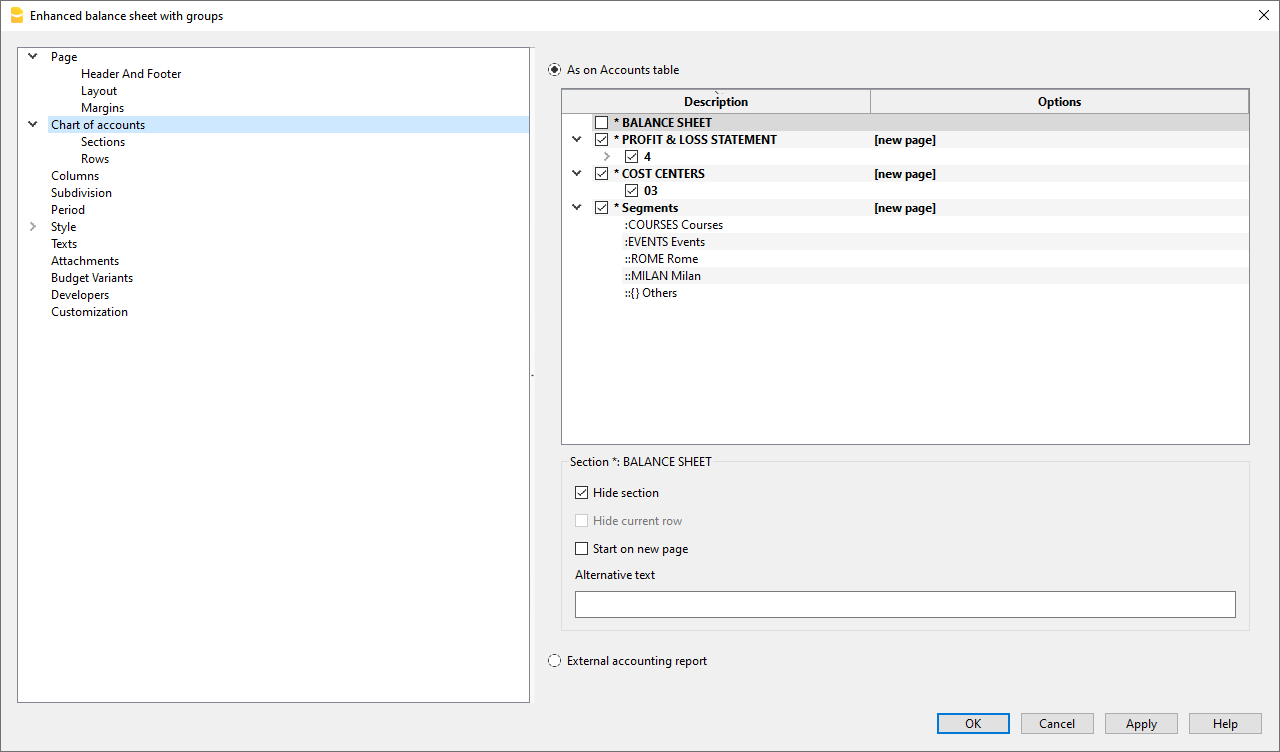
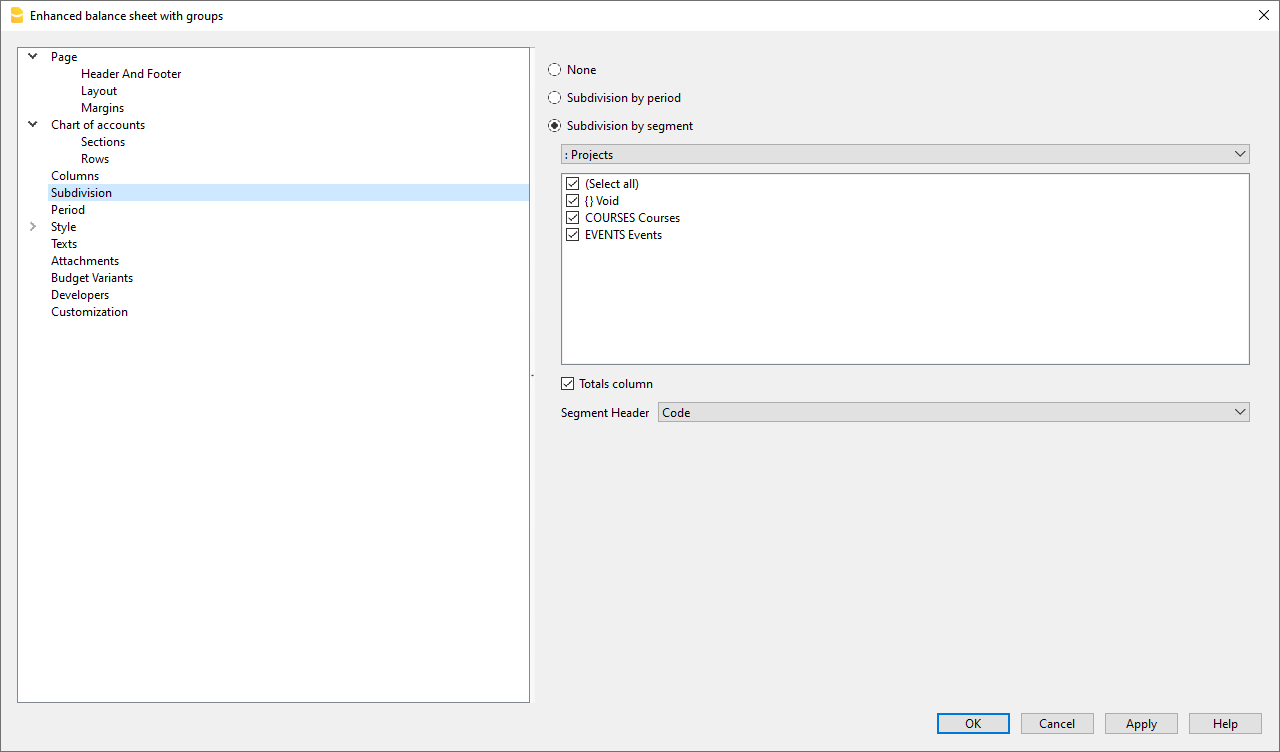
- Activate the Subdivision by segment option
- Select the segment for which the balance sheet should be obtained (by project or by branch office)
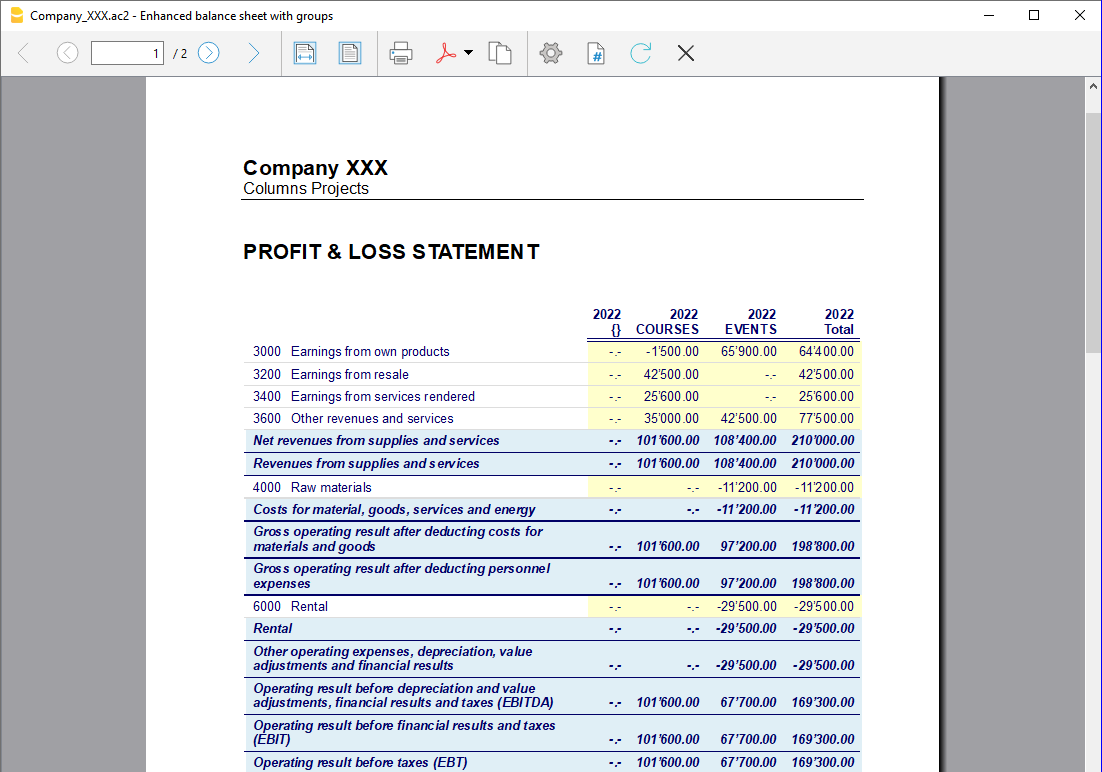
Report by Sector
The different segments appear in this report. The column with the curly brackets {} is that of values not assigned to any segment.
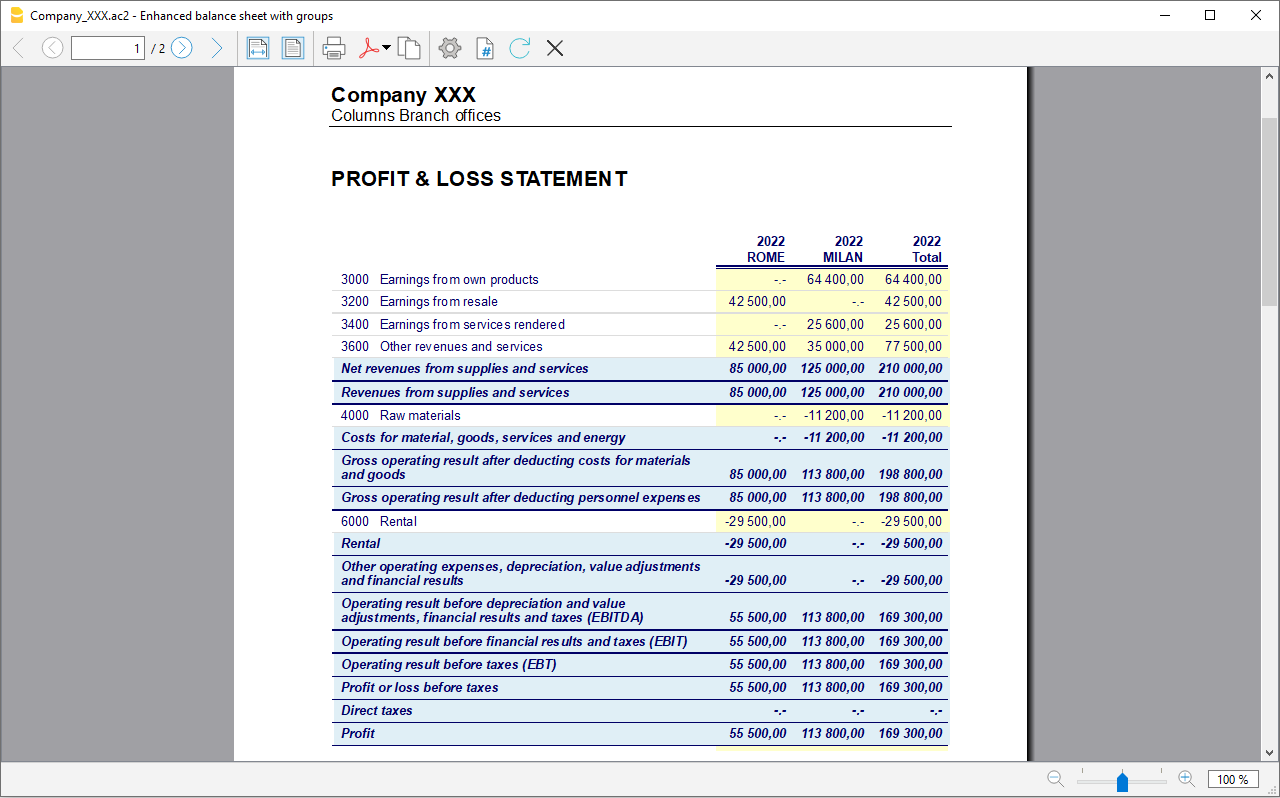
Report by Branch
The report shows revenues, expenses, and profit for the various branches.
Switch to new chart of accounts
Below is an explanation of how to proceed to:
- switch to a chart of accounts with a different numbering;
- retrieve and convert the existing accounting data, including transactions, into the new chart of accounts.
Conversion for the new year
If you want to start a new year with a new chart of accounts, there are two possible approaches.
1. Convert the previous year and then create the new year
In this case you will have two files:
- the file of the year being closed, which contains:
- the Accounts column with the old account numbers;
- the Accounts_1 column with the new account numbers;
- the file for the new year, based on the new chart of accounts.
This approach is recommended because it allows the charts of accounts of the two years to be aligned.
Furthermore, it allows you to continue making changes in the closing year and to later retrieve the opening balances in the file for the new year.
2. Create the new year and convert the new year file
The file for the year being closed remains unchanged.
For the new year, you initially get an intermediate file, with the old chart of accounts but with carried forward balances.
The conversion of the new year's file can be performed immediately or even after some transactions have already been entered.
With this method, since the previous year's file keeps the old account numbers, it will no longer be possible to retrieve later changes made in the previous year into the new year.
- Create a new accounting file
- Create a new file via the File > New menu.
- Choose a predefined chart of accounts template.
- Adapt the chart of accounts to your needs.
- Add the matching accounts in the Accounts table
- Open the Data > Columns setup menu.
- Click the Add button.
- Insert the column with the description Account_1.
For each account in the new chart, in the Account_1 column enter the corresponding number from the old chart of accounts.
- If an account remains unchanged, the Account_1 column can also be left empty.
- If multiple accounts must be grouped into a single account, indicate the numbers separated by semicolons, for example:
1000;1001
In this case, the first account must be repeated, otherwise only the last one will be considered. - If instead one account must be split into several accounts, the split must be performed manually.

Start the import
- Activate the command from the Actions > Import into accounting > Import file menu.
- With the Browse button, select the accounting file with the old chart of accounts.

- Click OK to proceed to the next window.
- Set the import options:
- enable the Convert account numbers option
- indicate that the matchings are present in the destination file.
- Start the import.

Repeat the import
If errors are reported and the operation needs to be repeated, it is essential to undo the previous import so that the destination file is empty.
Otherwise, the opening balances and transactions would be duplicated.
Splitting an account into multiple accounts
When switching to a more detailed chart of accounts, it may be necessary to split one account into several.
After the import, proceed manually as follows:
- in the chart of accounts, split the opening, budget and previous balances into several accounts;
- review each transaction of the account to be split and assign the more specific account;
- if necessary, create additional transactions to split an amount into several parts;
- proceed in the same way for the transactions in the Budget table.
Result and possible errors
If the program reports errors (missing accounts or other issues), it is often necessary to:
- undo the import;
- complete or correct the matchings;
- repeat the import operation.
Since the program works with different charts of accounts, it is not possible to automatically perform in-depth checks on the correctness of the groupings.
It is therefore recommended to manually check the result, ensuring that the totals of the balance sheet and income statement are correct.
How to reclassify the balance sheet and income statement
In Banana Accounting Plus, the reclassification of the balance sheet and income statement is done through the External Accounting Report, a file separate from the accounting, designed to set up a customized presentation of the data. This allows accounts to be grouped differently from the standard chart of accounts structure.
The grouping scheme defined in the External Accounting Report is linked to the accounting file to extract, total, and present the accounts according to the new desired classification. This feature is available exclusively with the Advanced plan of Banana Accounting Plus.
Create an Accounting Report File
To create an Accounting Report file:
- Menu File > New > Accounting Report
- You can choose from an existing template or start from a new one
- Once created, save the file with a name.
Below is an example of a predefined Accounting Report used to create a reclassification of the Balance Sheet according to Art. 959 of the Swiss Code of Obligations.
Everyone can choose to have their own, starting from an empty file.
- When creating your own Accounting Report, groups and totals can be freely defined.
- It is also possible to customize the Accounting Report used in this example by downloading it from our program, as indicated in the previous sections, and customize the accounts or groups for your own reclassification.

The Columns of the Accounting Report
The Accounting Report table includes the same columns found in the Accounts table, where the Accounts or Groups for Totals are set up based on a custom scheme.
In the example, groups and totals were created for the reclassification of the Balance Sheet according to Art. 959 of the Swiss Code of Obligations.

Section
This column is used to indicate the value to be used in the presentation.
For the different options, see the Documentation on sections.
Group
Indicates the group in which to totalize the accounts retrieved from the accounting and the total group.
Account (visible only in the Complete view)
The account from the accounting file to be included in the accounting report.
- If accounts are entered, only those specified accounts will be included when the Report is executed.
- If no accounts are entered, the accounts from the accounting will be included, linked via the group.
Description
Description of the grouping or account.
Sum In
In the Sum In column, the Group (total row) in which the row should be totalized is indicated.
Tot
If set to "Yes", only the total row is displayed, not the individual account rows that make it up.
See Show only group totals in the Accounting Report.
Keep
Normally, the report includes total rows that contain accounts with balances.
If set to Yes, this column ensures the row is always shown. It can be applied to both groups (totals) and accounts.
With Mov.
Applies to groups with a zero balance.
The row is displayed if there have been movements during the period.
Methods for Reclassifying the Balance Sheet and Income Statement
To reclassify the balance sheet and income statement, you must first prepare the Accounting Report file.
There are two methods to set up the Accounting Report file for the reclassification of the balance sheet and income statement:
1. Reclassify Based on the Group Column
This method allows the reclassification of the balance sheet and income statement using the Group column of the Accounting Report file.
In the Accounting Report, you create your own system of groups and subgroups
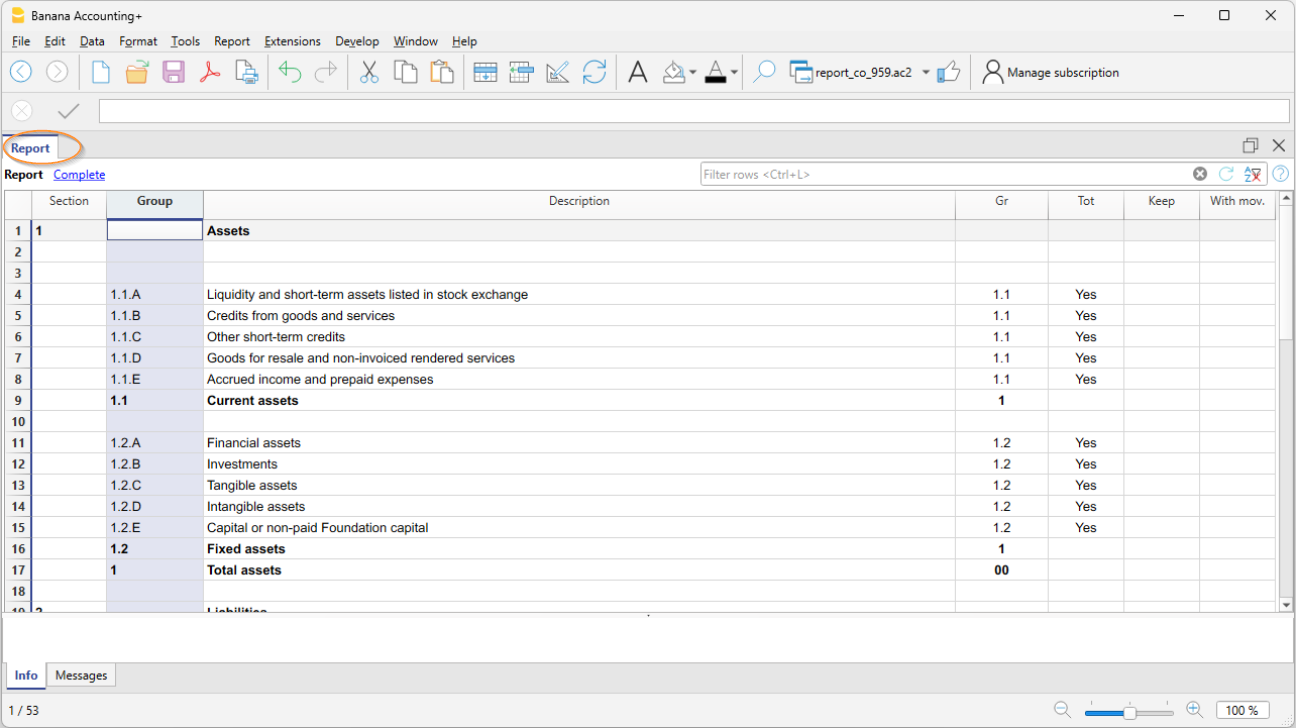
In the Section column, a number is inserted to define the title of the various sections in the printout.
- In the Group column, enter the groups that will total a series of accounts from the accounting file.
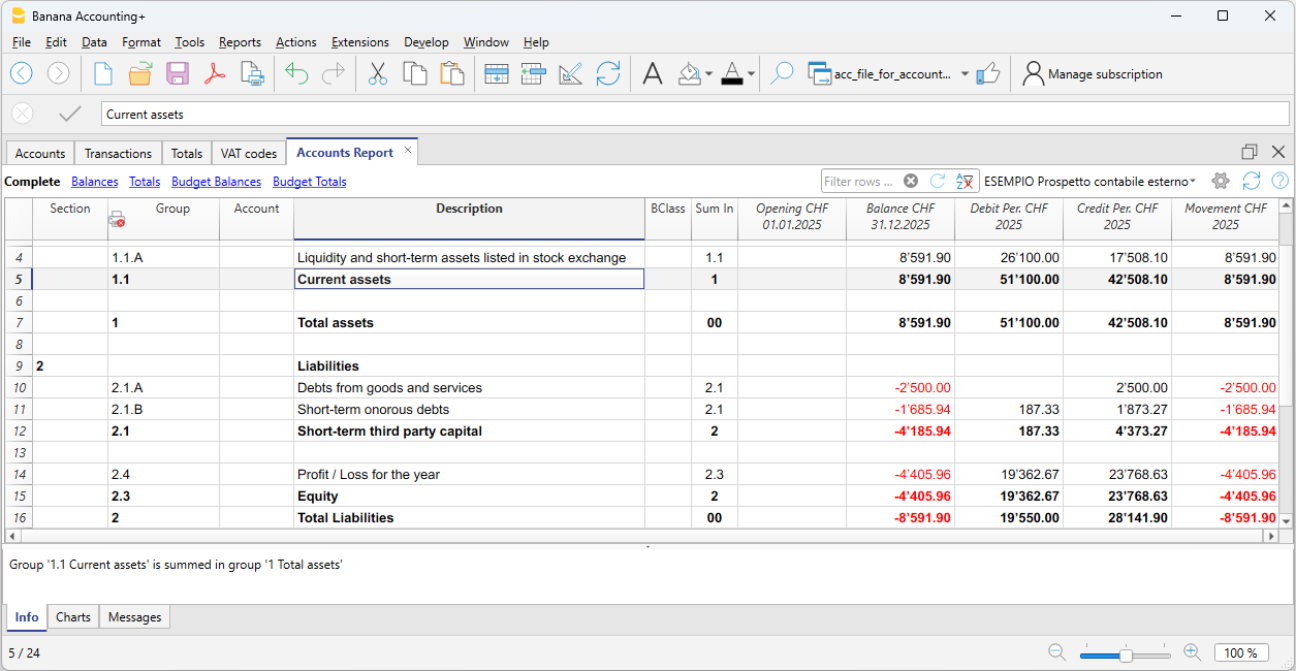
In the example, Group 1.1.A of the accounting report totals the liquidity accounts (cash, bank, post, etc.). - In the Gr column, insert the group that will totalize the individual groups listed in the previous rows.
In the example, in the Gr column, 1.1, which corresponds to Group 1.1, will totalize the Current Assets.
In the accounting file, to link with the Accounting Report, you must set the GR1 column
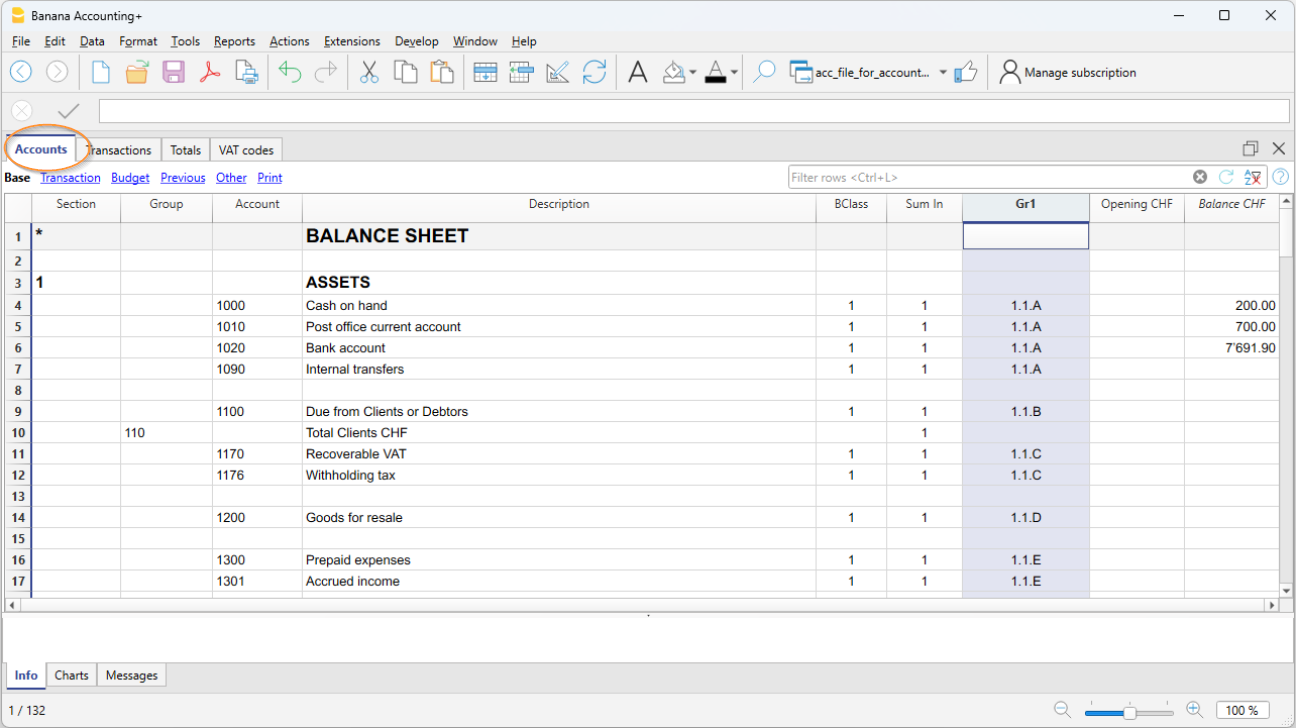
- In the Accounts table, column Gr1 or Gr2, insert the group set in the Accounting Report, in which the account should be totalized.
In the example, in the GR1 column all liquidity accounts have the group 1.1.A, which in the accounting report totalizes the Liquidity accounts.
If the Gr1 column is not visible, use the command Data > Columns setup. - Accounts without any linkage will not be included in the Report.
2. Reclassify Based on Accounts
This method is useful when you want to include only certain accounts from the accounting in the Accounting Report file
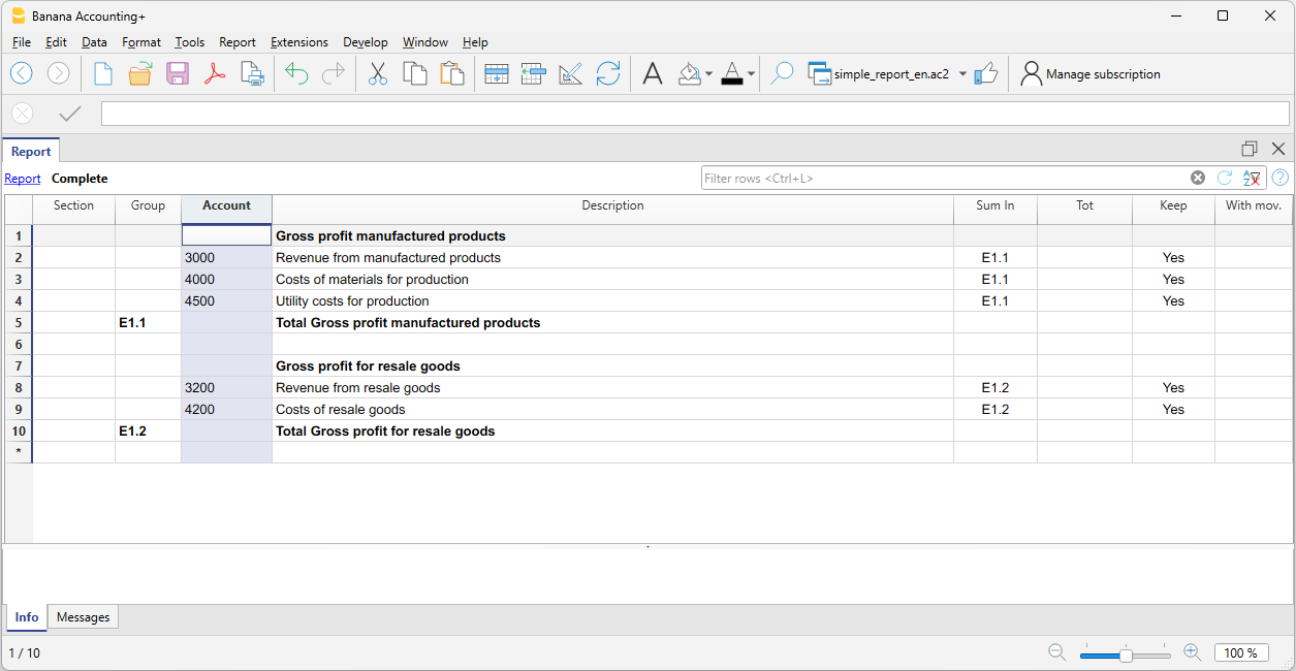
- In the Section column, a number is inserted to define the title of the various sections in the printout
- In the Group column, the groups that total each account imported from the accounting are defined
In the example, Group E1.1 of the accounting report totals accounts 3000, 4000, 4500 from the Accounting Report - In the Account column, enter the same account numbers from the accounting that you want to include in the Accounting Report
Only the specified accounts will be included in the report. - In the Description column, enter the description of the accounts
In the Sum In column, enter the totalization group (e.g. E.1, E1.2...).
Print the Accounting Report
The Accounting Report that reclassifies the balance sheet and income statement is displayed and printed from the accounting file :
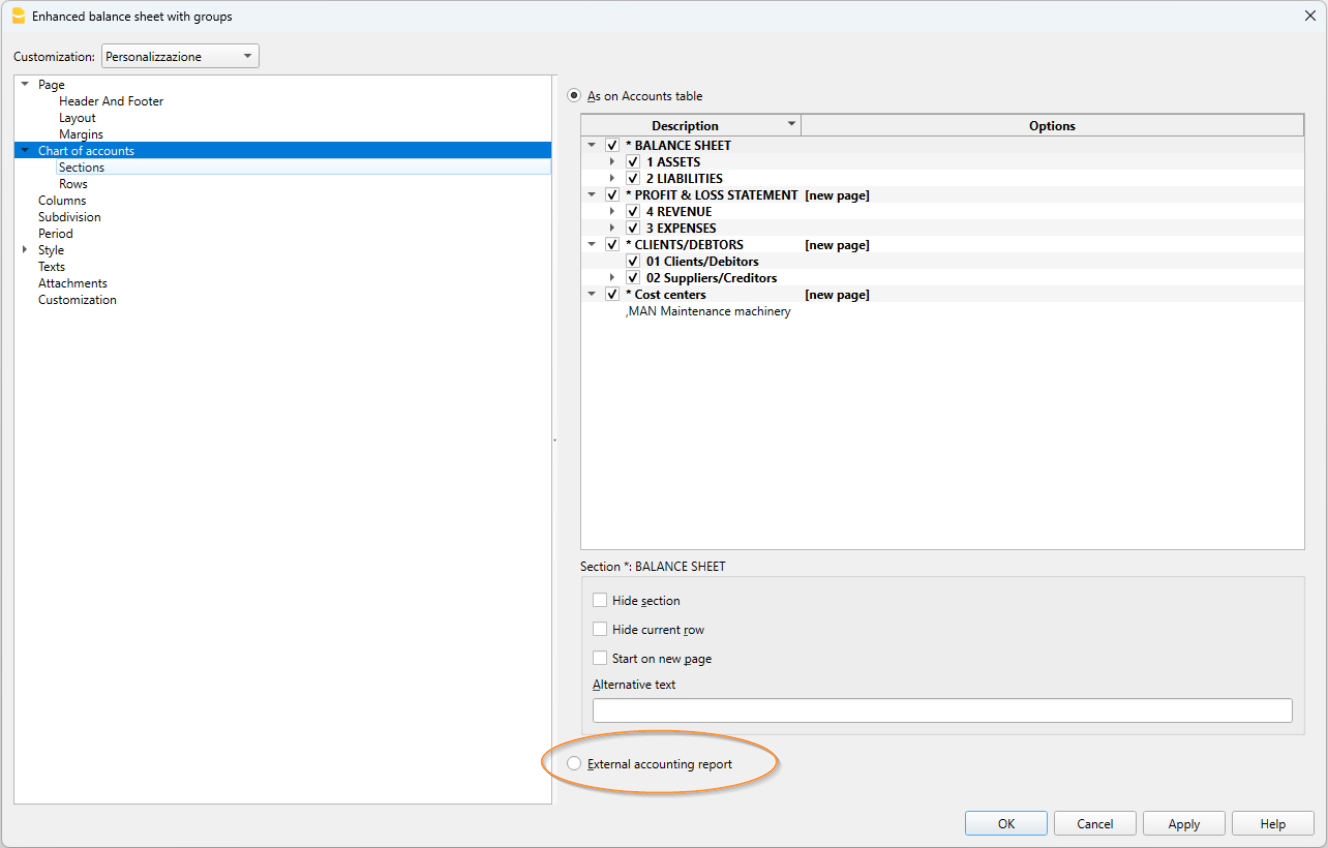
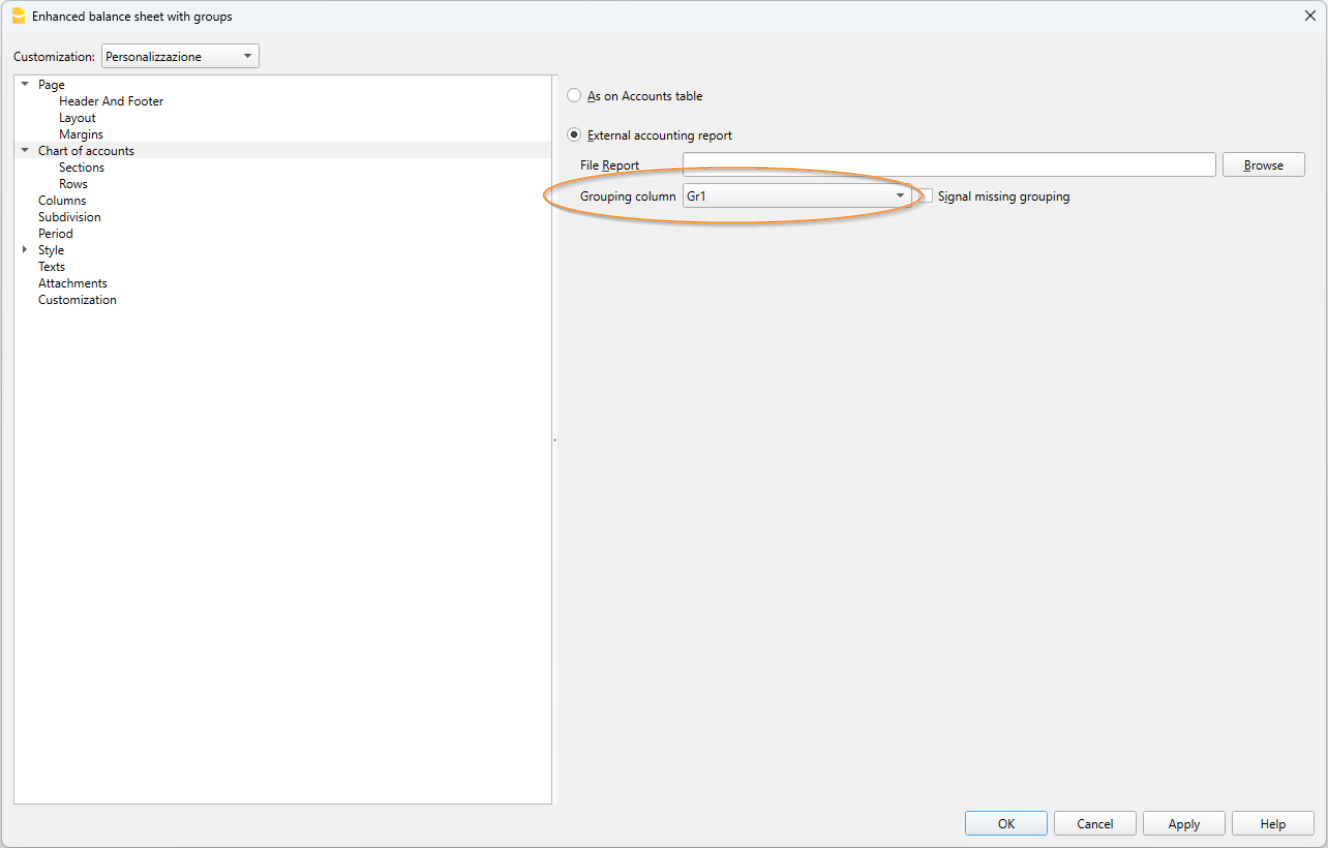
- Menu Reports > Enhanced balance sheet with groups
- Section Chart of Accounts > External Accounting Report
- In the dialog window, in the grouping column, select the column through which you want to apply the grouping (GR1, BClasse, VAT, etc...).
You obtain a printout like the Enhanced Balance Sheet with Groups, but with your own reclassification.
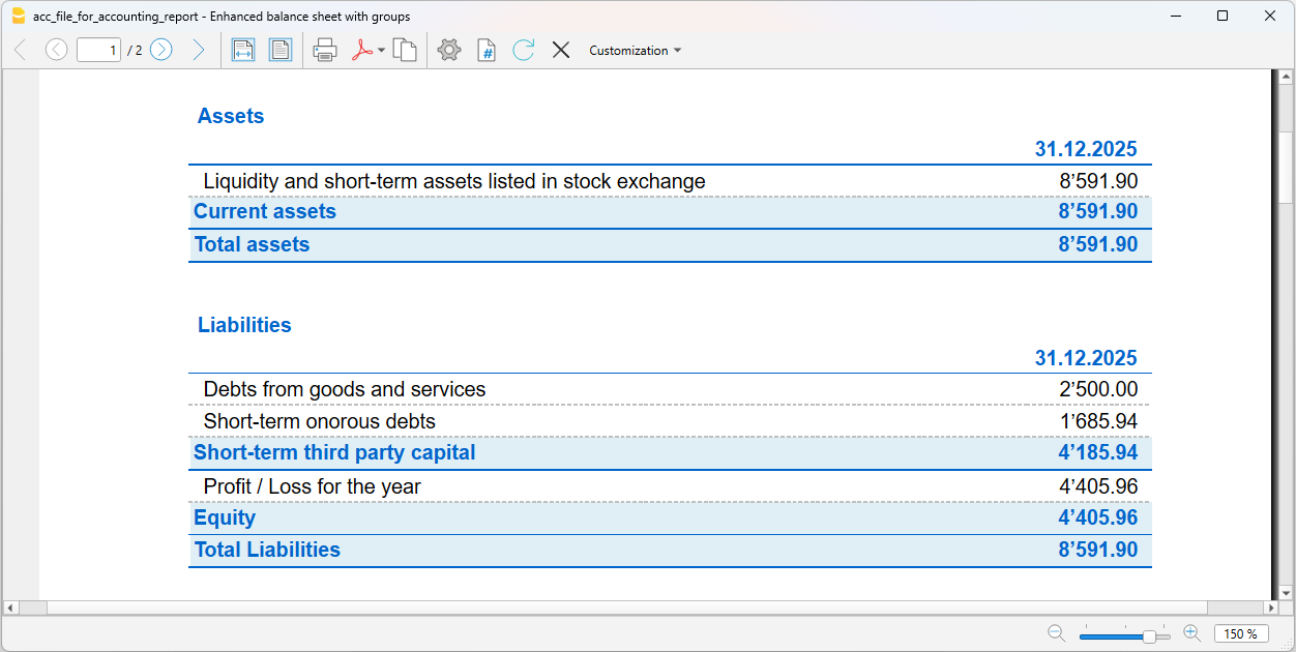
Or:
- Menu Report > Accounting Report
- In the Basic section, select the External Accounting Report option.
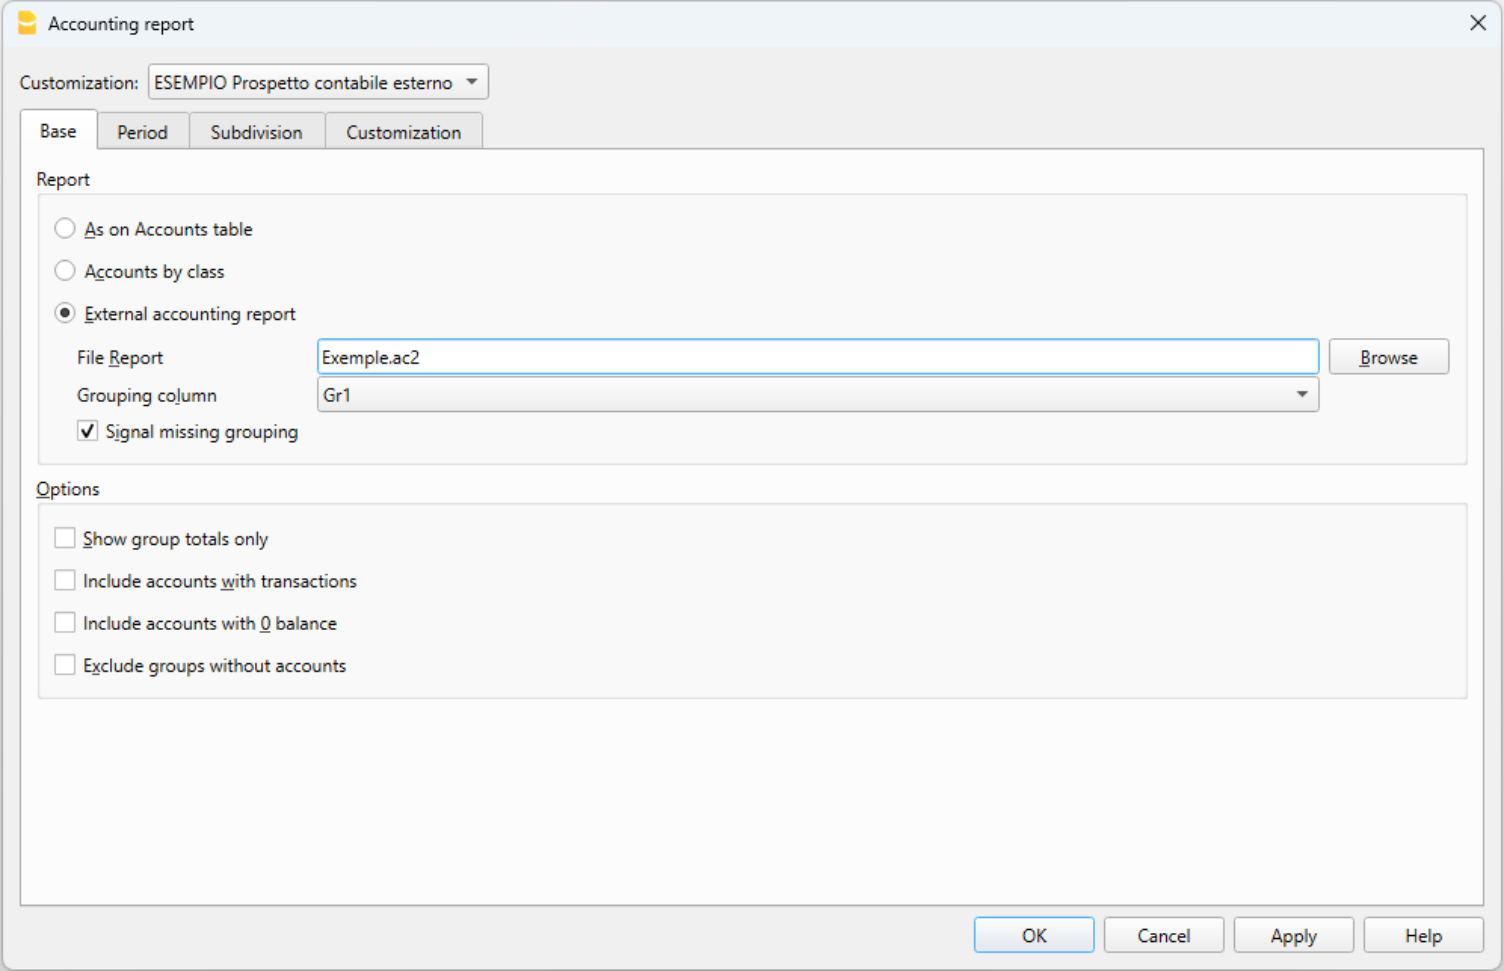
A table view is displayed, similar to the Accounts table, but with your own reclassification