Accounting Extensions
Universelle Import-Erweiterungen
Mit Banana Buchhaltung können Sie Daten aus verschiedenen Dateiformaten importieren.
SEPA/ISO 20022 – Import von Kontoauszügen
Das camt/ISO 20022-Format ist der aktuelle Standard für elektronische Kontoauszüge und wird von den meisten Schweizer Banken verwendet.
- Erweiterung 'Bankauszug SEPA/ISO 20022 (Schweiz)' - zum Import von Daten aus elektronischen Kontoauszügen im camt-Format.
Import von PayPal-Transaktionen
Mit dieser Erweiterung können Sie Ihre PayPal-Transaktionen direkt in Banana Buchhaltung importieren – schnell und effizient.
Import von Revolut-Buchungen
Diese Erweiterung ermöglicht den Import von Transaktionen aus der Revolut-Plattform – sowohl für Privat- als auch Geschäftskonten (Private & Business) – direkt in Banana Buchhaltung.
- Erweiterung zum Import von Revolut-Transaktionen (Seite in Englisch)
Bankauszug SEPA/ISO 20022-Import
Bankauszug SEPA/ISO 20022-ImportDatenimport in eine bestehende Buchhaltung
Der Datenimport ist eine in die Banana Buchhaltungssoftware integrierte Funktion. Bitte wie für Befehl In Buchhaltung importieren (Menü Aktionen) beschrieben vorgehen.
Mit diesem Befehl können Sie auch komprimierte Dateien (z.B. ZIP) öffnen. In diesem Fall fordert das Programm Sie auf, die konkrete Datei innerhalb des Archivs auszuwählen, aus der die Daten importiert werden sollen.
Anzeige des Inhalts vor dem Import
Um den Inhalt einer Datei vor dem Import einzusehen, verwenden Sie die Funktion ISO 20022 anzeigen.
Der ISO 20022-Standard für Kontoauszüge.
Mit der Einführung des SEPA-Standards (Single Euro Payment Area) wurde der ISO 20022-Standard am 1. Januar 2014 in Europa verpflichtend. Er ersetzt das frühere SWIFT MT940-Format für elektronische Kontoauszüge.
Die Finanzbuchhaltungssoftware Banana Buchhaltung unterstützt die ISO 20022-Formate camt.052, camt.053 (einschliesslich der Versionen 4 und 8) sowie camt.054.
Technische Anmerkungen zur ISO 20022-Konversion
Der ISO 20022-Standard kodiert die Buchhaltungsdaten von Kontoauszügen auf präzise und strukturierte Weise. Gleichzeitig bietet er eine gewisse Flexibilität, zusätzliche Informationen zu Konten und Transaktionen einzubinden – was je nach Bank und System unterschiedlich umgesetzt werden kann.
Beim Einlesen der ISO 20022-Datei passt sich Banana Buchhaltung flexibel an die Struktur und Formatierung der jeweiligen Datei an. Die Software erkennt automatisch die relevanten Felder und konvertiert sie in Buchungsbewegungen.
- Anfangssaldo – Erkennung von Feldern mit gleichbedeutender Kodierung als Anfangssaldo.
- Schlusssaldo – Ebenso werden Felder mit entsprechender Kodierung als Schlusssaldo-Information interpretiert.
- Alle enthaltenen Bewegungen werden ausgelesen und in Buchungen umgewandelt. Dabei werden folgende Informationen berücksichtigt:
- Transaktionen (Datum)
- Valutadatum
- Betrag der Bewegung (positiv oder negativ)
- Beschreibung – Derzeit fasst Banana Buchhaltung mehrere Beschreibungselemente automatisch zu einem einzigen Textfeld zusammen.
In Zukunft soll es möglich sein, diese Informationen gezielter zu extrahieren und bestimmten Spalten individuell zuzuordnen.
SumUp - Bewegungen im .csv-Format importieren (Banana+ Advanced)
SumUp - Bewegungen im .csv-Format importieren (Banana+ Advanced)Mit dieser Importerweiterung können Sie Transaktionen von der Plattform SumUp im .csv-Format direkt in Banana Buchhaltung importieren.
Weitere Informationen finden Sie in der englischsprachigen Dokumentation: SumUp - Import movements .csv
Chase - Import von Bewegungen im .csv-Format (Banana+ Advanced)
Chase - Import von Bewegungen im .csv-Format (Banana+ Advanced)Mit dieser Importerweiterung können Sie Transaktionen von der Plattform Chase im .csv-Format direkt in Banana Buchhaltung importieren.
Weitere Informationen finden Sie in der englischsprachigen Dokumentation: Chase - Import movements .csv
PayPal Import *.csv (Banana+) [BETA]
PayPal Import *.csv (Banana+) [BETA]Mit dieser Erweiterung können Sie in Banana Buchhaltung Ihre PayPal-Transaktionen importieren. Sie funktioniert nur mit Banana Buchhaltung Plus.
Separate Buchhaltung für PayPal-Transaktionen
PayPal-Transaktionen bestehen in der Regel aus kleinen Beträgen und haben viele Besonderheiten (Rückerstattung, Gebühren usw.).
Es kann teuer und zeitaufwendig sein, alle diese Buchungen innerhalb der Hauptbuchhaltung des Unternehmens zu erledigen.
Wir haben verschiedene Vorlagen vorbereitet, die Sie sofort verwenden können:
In vielen Fällen ist es angemessener, die PayPal-Transaktionen in einer separaten Buchhaltungsdatei zu verwalten und einmal im Monat die zusammenfassenden Daten (Bewegungen für den Monat) in die Hauptbuchhaltung zu übernehmen.
Diese Lösung ermöglicht es auch, dass eine Drittperson die Verantwortung für die PayPal-Buchhaltung übernimmt.
Wenn Sie Banana Buchhaltung für eine PayPal Buchhaltungs-Lösung verwenden, können Sie:
- Eine Buchhaltungsdatei für ein bestimmtes PayPal-Konto erstellen
- Über einen Kontenplan verfügen mit
- Ein anderes Konto für jede verwendete Währung
- Verschiedenen Konten für Einnahmen und Ausgaben
- Importieren Sie die PayPal-Transaktionen und lassen Sie alle Konten, Ausgaben, Einnahmen und PayPal-Gebühren automatisch zuweisen sowie die Währung in die Basiswährung umrechnen.
- Verbuchen Sie die Transaktionen auf den entsprechenden Konten für
- Banküberweisungen
- Einnahmen mit unterschiedlichen Umsatzsteuercodes
- Verschiedene Spesenarten
- Rückerstattungen und Rückbuchungen
- Hinzufügen weiterer Informationen für spezielle Berichte (Kostenstellen, Segmente, Kunden usw.)
- Importieren Sie die Daten regelmässig (Woche, Monat, Quartal) in die Hauptbuchhaltung, entweder durch
- Ausdrucken einer Zusammenfassung und manuelles Verbuchen
- Oder Export der Daten für den Zeitraum sowie Import in das Hauptsystem.
- Drucken Sie jederzeit das Journal und die erforderlichen Berichte zur Prüfung oder Kontrolle aus.
- Wenn Sie viele Transaktionen haben, können Sie evtl. den Importfilter (JavaScript) so anpassen, dass bestimmte Transaktionen auf bestimmten Kontennummern verbucht werden.
Innerhalb der Banana PayPal-Buchhaltung können Sie ganz einfach die gesamte Historie aufbewahren und haben sofortigen Zugriff auf alle Daten, die für einen guten Kundenservice erforderlich sind.
Aktivieren Sie die Import-PayPal-Transaktion
Zuerst müssen Sie die Importfilter in Banana Buchhaltung Plus aktualisieren. Siehe auch Erweiterungen verwalten.
- Starten Sie hierzu Banana Buchhaltung Plus
- Öffnen Sie Ihre Buchhaltungsdatei
- Wählen Sie aus Menü Aktionen > In Buchhaltung importieren > im Pulldownmenü Importieren: Buchungen auswählen
- Klicken Sie auf die Schaltfläche Erweiterungen verwalten
- Klicken Sie auf die Schaltfläche Erweiterungen aktualisieren
- Aktivieren Sie die Erweiterung "PayPal Importieren (*.csv)" und deaktivieren Sie die anderen Filter, die Sie nicht benötigen.
- Schliessen Sie das Dialogfenster.
Download PayPal-Transaktionen
PayPal - Anpassen von Feldern zum Herunterladen
Beachten Sie, dass die Standard-Download-Datei von PayPal nicht alle Felder enthält, die für den Import in Banana erforderlich sind.
Sie müssen die Einstellungen in PayPal anpassen, damit Sie einen korrekten Download erhalten.
Geschäftskunden
- Öffnen Sie PayPal und melden Sie sich mit Ihren Zugangsdaten an.
- Gehen Sie zu Aktivitäten.
- Klicken Sie auf Alle Berichte
- Klicken Sie unter Berichte auf Aktivität herunterladen.
- Wählen Sie den Transaktionstyp, den Datumsbereich und das CSV-Dateiformat aus.
- Klicken Sie auf Berichtsfelder anpassen und vergewissern Sie sich, dass alle Felder markiert sind oder markieren Sie alle verfügbaren Felder.
- Klicken Sie auf Bericht erstellen.
- Wenn der Bericht fertig ist, klicken Sie auf Herunterladen.
Privatkunden
- Öffnen Sie PayPal und melden Sie sich mit Ihren Zugangsdaten an.
- Gehen Sie zu Aktivitäten.
- Klicken Sie auf das Symbol der Download-Schaltfläche.
- Klicken Sie auf Benutzerdefiniert.
- Klicken Sie unter Berichte auf Aktivität herunterladen.
- Wählen Sie den Transaktionstyp, den Datumsbereich und das CSV-Dateiformat aus.
- Klicken Sie auf Berichtsfelder anpassen und vergewissern Sie sich, dass alle Felder markiert sind oder markieren Sie alle verfügbaren Felder.
- Klicken Sie auf Bericht erstellen.
- Wenn der Bericht fertig ist, klicken Sie auf Herunterladen.
PayPal-Sprachcodierungseinstellungen (nur für Geschäftskunden )
Wenn Sie eine lokale Codierung verwenden, stellen Sie sicher, dass die Codierung Ihre lokale Computercodierung widerspiegelt.
Der Import in Banana Buchhaltung Plus funktioniert besser, wenn Sie Ihre Dateicodierung in UTF-8 festlegen.
So ändern Sie Ihre Sprachcodierungseinstellungen in PayPal:
- Melden Sie sich in PayPal an.
- Mein Konto → Kontoeinstellungen → Webseite-Zahlungslösungen.
- PayPal-Schaltfläche Sprachkodierung (klicken Sie auf Bearbeiten).
- Unter Weitere Optionen können Sie die UTF-8-Kodierung in der Listbox einstellen.
Diese Einstellung kann den folgenden Fehler beheben: "Dateiheader kann nicht übersetzt werden: Konvertieren Sie die Paypal-Datei in die Codepage Latin1 oder verwenden Sie eine neue Version von Banana Buchhaltung"
Importieren PayPal-Transaktionen
Siehe auch Bewegungen importieren
- Öffnen Sie Ihre Buchhaltungsdatei.
- Wählen Sie aus Menü Aktionen > In Buchhaltung importieren > im Pulldownmenü Importieren: Buchungen auswählen
- Wählen Sie PayPal Import (*.csv) aus
- Geben Sie den Dateinamen und den Pfad des PayPal-Downloads (oder Blättern) ein.
- Klicken Sie auf OK.
- Geben Sie in den Einstellungsdialog ein:
- Wählen Sie das Datumsformat für das PayPal-Datumsformat.
Wenn Sie die Fehlermeldung "Datum Format nicht gültig" erhalten, öffnen Sie die Datei, die Sie von PayPal heruntergeladen haben, mit dem Notepad und überprüfen Sie, wie die Daten geschrieben werden, und wählen Sie dann das entsprechende Format aus. - Geben Sie die Kontonummern für das PayPal-Konto (PayPal Account) ein.
- Geben Sie die Kontonummern ein, in der Einnahmen registriert werden sollen (PayPal In).
- Geben Sie die Kontonummern ein, in der Ausgaben registriert werden sollen (PayPal Out).
- Geben Sie die Kontonummern ein, in der PayPal-Gebühren registriert werden sollen (PayPal Fee).
- Wenn es sich um eine Buchhaltung mit mehreren Währungen handelt, werden auch die Wechselkurse festgelegt.
- Wählen Sie das Datumsformat für das PayPal-Datumsformat.

Nachdem Sie die Transaktionen importiert haben, können Sie den Vorgang rückgängig machen oder die importierten Daten ändern.
Dies ist der Fall, wenn Sie möchten, dass einige Einnahmen oder Ausgaben auf einem anderen Konto registriert werden.
Passen Sie Ihre Buchhaltungsdatei für den Import an
Anstatt das PayPal-Konto beim Start des Skripts anzugeben, können Sie im Kontenplan von Banana Buchhaltung angeben, welche Konten verwendet werden sollen. Diese Methode ist auch notwendig, wenn Sie für jede Währung unterschiedliche Konten haben möchten.
- Die Basiswährung in den Eigenschaften (Stammdaten) aus Menü Datei sollte auf eine gültige Währung eingestellt werden.
- Vor dem Import sucht und verwendet das Programm Konten mit der folgenden Beschreibung:
- "PayPal Konto": das Konto für PayPal
- "PayPal Eingang": das Einkommenskonto
- "PayPal Ausgang": das Spesenkonto
- "PayPal Fee": das Konto für die PayPal-Gebühren.
- Legen Sie den Eröffnungssaldo der PayPal-Konten fest.
Für jede Währung können Sie ein Konto angeben. Alle Transaktionen für diese Währung werden auf dem angegebenen Konto erfasst. Sie haben auch die Währungsumrechnungstransaktionen zwischen den verschiedenen Währungen.
- Für eine Buchhaltungsdatei, die NICHT in Multi-/Fremdwährung ist, geben Sie den Währungscode in die Kontobeschreibung ein:
- PayPal-Konto EUR
- PayPal Konto USD
- PayPal Konto CHF
- PayPal Konto GBP
- Für eine Buchhaltungsdatei mit Multi-/Fremdwährung sucht das Programm nach dem Konto, bei dem die Beschreibung mit "PayPal Konto" beginnt, und verwendet dann das Währungssymbol der Währung Spalte.
Wenn für die Währung kein Konto angegeben wurde, wird der Betrag auf das Konto in Basiswährung überwiesen.
PayPal-Währungseinstellungen und Kontoführungseinstellungen
Es ist geeignet, dass Ihre PayPal-Währungseinstellungen (Mein Konto → Profil → Mein Geld→ PayPal Saldo → Währungen) mit denen der Buchhaltungsdatei übereinstimmen:
- PayPal "Primärwährung" ist die gleiche wie Ihre Basiswährung.
- Wenn Sie PayPal so eingerichtet haben, dass es mehrere Währungen (Hinzufügen Währung) verwendet, sollten Sie die Doppelte Buchhaltung mit Multi-Währung verwenden.
Sie können für jede Währung im ursprünglichen Wert ein separates Konto führen.
Mit dem Befehl Datei in neue konvertieren können Sie eine vorhandene Buchhaltungsdatei in eine Datei mit mehreren Währungen konvertieren. - Für die Mehrwährungsbuchhaltung sollten die Konten "PayPal Eingang", "PayPal Ausgang", "PayPal Fee" vorzugsweise in Basiswährung sein.
Transaktionsaufteilung und -auswahl
Jede PayPal-Transaktion beinhaltet den Bruttobetrag, den Gebührenbetrag und den Nettobetrag. Wenn sich der Nettobetrag vom Bruttobetrag unterscheidet, generiert das Programm 3 Zeilen:
- Linie mit dem Bruttobetrag, der auf dem PayPal-Konto registriert ist
- Linie mit dem auf dem Einnahmen- oder Spesenkonto registrierten Nettobetrag
- Linie mit dem auf dem Gebührenkonto registrierten Gebührenbetrag.
Buchungen bereits importiert
Die Spalten "ExternalReference" der Tabelle Buchungen werden mit der eindeutigen PayPal-Transaktions-ID gefüllt.
Beim nächsten Import werden Transaktionen mit demselben ID vom Import ausgeschlossen. Die Informationen aus den älteren Transaktionen werden für die Währungsumrechnung und -gruppierung verwendet.
Letzter Saldo
Der Import fügt auch eine Zeile mit Informationen über die letzte PayPal-Saldo für jede verwendete Währung hinzu. Wenn Sie diese Informationen nicht benötigen, löschen Sie die importierten Zeilen.
Ändern der importierten Transaktionen
Sobald die Transaktionen importiert wurden, können Sie die Transaktionen nach Belieben ändern.
- Erfassen Sie die Überweisungen zum und vom Bankkonto auf einem "Internen Überweisungskonto (Giro-Bankkonto)".
Tun Sie dasselbe, wenn Sie Ihre Bankkonto Transaktionen importieren.
Der Saldo des "Internen Überweisungskontos (Giro-Bankkonto)" sollte kompensiert und auf Null gehen. - Einnahmen aus Verkäufen können auf bestimmten Konten basierend auf der angewandten Umsatzsteuer oder auf der Grundlage der Art des Umsatzes registriert werden.
Sie müssen Ihren Buchhaltungsplan entsprechend anpassen. - Sie können Segmente oder Kostenstellen hinzufügen.
Passen Sie die Ansicht der Spalten so an, dass alle Spalten sichtbar und in der besten Reihenfolge zum Ändern der Daten angezeigt werden.
Gewinn aus Wechselkurs und Verlust
Die Salden der PayPal-Konten in der Währung stimmen mit dem Saldo des PayPal-Kontos überein.
Die Salden in Basiswährung können sich aus folgenden Gründen unterscheiden:
- Die Wechselkurse für die Transaktionen variieren im Laufe der Zeit.
- PayPal hat unterschiedliche Wechselkurse für den Verkauf oder Kauf einer bestimmten Währung.
Sie sollten die Basiswährung von Zeit zu Zeit mit dem Befehl Buchungen Wechselkurs Differenzen erstellen
Multi-Währungs-Umrechnung
Wenn es verschiedene Transaktionen in verschiedenen Währungen in der Datei gibt, werden die Beträge gemäss dieser Regel und Reihenfolge in Basiswährung umgerechnet:
- Basiswährung
- PayPal Währungsumrechnung
Buchungen, die zum selben Block gehören, verwenden die gleiche Umrechnung, so dass der Betrag in Basiswährung für den gleichen Betrag und die gleiche Transaktion immer derselbe ist. - Wechselkurs aus Währungsumrechnung des gleichen Datums
- Wechselkurse aus der Datei Buchhaltung (Tabelle Wechselkurse) entnommen
- Wechselkurs, der aus der PayPal-Währungsumrechnung stammt.
Die Umrechnung keinen gültigen Wechselkurs für eine Währung finden kann, macht Sie eine Meldung und fragt nach einem Wechselkurs für die Währung.
Importieren anderen PayPal-Feldern
Sie können andere Informationen, die in der PayPal-Datei enthalten sind, in Banana Buchhaltung importieren.
- Fügen Sie eine neue Spalte mit dem Namen "PayPal" + dem Spaltennamen der PayPal-Datei ein.
Zum Beispiel "PayPalTimeZone", "PayPalSalesTax", "PayPalTip".- Geben Sie den Spaltentyp an (Text, Nummer, Betrag, Datum, Zeit).
- Geben Sie für Betrag und Nummer auch die Dezimalstelle an.
- In den Konten haben die Spalten des Typs Betrag ebenfalls eine Endsumme.
- Im PayPal-Downloadverlauf mit "Customize Download Fields" können Sie die Spalte zum Herunterladen angeben.
- Die verfügbaren Spalten (Name in englisch, ohne Leerzeichen und in CamelCase) sind:
Time, TimeZone, Typ, Name, Status, Subject, Currency, Gross, Fee, Net, Note, FromEmailAddress, ToEmailAddress, TransactionId, PaymentType, CounterpartyStatus, ShippingAddress, AddressStatus. ItemTitle, ItemId, ShippingAndHandlingAmount, InsuranceAmount, SalesTax, Tip, Discount, SellerId, Option1Name, Option1Value, Option2Name, Option2Value, AuctionSite, BuyerId, ItemUrl, ClosingDate, ReferenceTxnId, InvoiceNumber,SubscriptionNumber, CustomNumber, ReceiptId, Balance, ContactPhoneNumber, BalanceImpact, AddressLine1, AddressLine2, State, Town, Zip, Country.
Wenn Sie die Transaktionen importieren, werden die PayPal*-Spaltenzellen mit dem Inhalt der PayPal-Datei vervollständigt.
Banana-PayPal-Importerweiterung
Die Konvertierung vom PayPal-Format in das Buchhaltungsformat ist ein JavaScript-Programm.
Das Programm ist "Open-Source-Software" und kann bestenfalls an die Bedürfnisse des Benutzers angepasst werden.
Um die Erweiterung zu ändern, ändern Sie zunächst die folgenden Werte, damit sie nicht mit dem Banana PayPal-Filter in Konflikt gerät:
- Verwenden eines anderen Dateinamens
- Verwenden eines anderen @id
- Verwenden Sie eine andere Beschreibung.
Lizenz Begriffe
Die PayPal-Dokumentation deckt nicht alle möglichen Transaktionen ab. Das Importskript wurde aufgrund Anwendungsfällen entwickelt und es ist möglich, dass nicht alle Möglichkeiten abgedeckt wurden und das Skript weiter verbessert werden muss.
PayPal kann auch das Datenformat ändern und die Skriptergebnisse sind möglicherweise nicht identisch.
Achten Sie beim Import darauf und überprüfen Sie immer, ob der Kontensaldo dem PayPal-Guthaben entspricht.
Die Verwendung des Importskripts wird durch die Apache 2.0-Lizenz geregelt, die Datei kann frei modifiziert werden.
Durch die Verwendung des Skripts akzeptieren Sie die Lizenz und die Haftungsausschlussbedingungen.
Problembehandlung
Wenn Probleme auftreten, aktualisieren Sie zuerst den Importfilter auf die neueste Version unter Erweiterungen verwalten.
- Rundungsproblem.
Es kann vorkommen, dass die PayPal-Datei ein Dezimalformat verwendet, das sich von dem Ihres Computers unterscheidet. Beträge werden daher abgeschnitten (12,34 wird zu 12 oder es wird 1234).
PayPal weist Ihnen ein bestimmtes Format für die Sprachcodierung basierend auf Ihrem Land zu (siehe Erläuterungen zur PayPal-Sprachcodierung).- Stellen Sie sicher, dass der PayPal-Download mit Ihren Computereinstellungen übereinstimmt
- Oder melden Sie sich in Ihrem PayPal-Konto an und ändern Sie die PayPal-Sprachkodierungseinstellung (https://www.paypal.com/cgi-bin/customerprofileweb?cmd=_profile-language-encoding).
Mit der Schaltfläche Mehr Option können Sie schliesslich die UTF-8 auswählen, die am besten für den Datenaustausch geeignet ist.
- Die Fehlermeldung "Dateiheader kann nicht übersetzt werden: .."
- Versuchen Sie, die Version Banana Buchhaltung Plus zu verwenden.
- Ändern Sie Ihre Download-Einstellungen wie oben in der "PayPal-Sprachcodierungseinstellung" angegeben
- Stellen Sie sicher, dass Sie die ursprüngliche CSV-Datei verwenden, die von PayPal heruntergeladen wurde, und nicht eine, die mit Excel geöffnet und gespeichert wurde.
- Die Fehlermeldung "Währung nicht konvertiert" weist darauf hin, dass für die Konvertierung keine Wechselkurse verfügbar waren.
- Es ist möglich, dass Sie Ihre Basiswährung nicht eingerichtet haben
- Sie haben PayPal so eingerichtet, dass mehr als eine Währung beibehalten wird. Die PayPal-Datei rechnet keine Währung um und Sie sollten daher eine Buchhaltung mit Fremdwährungen verwenden.
- Wenn der letzte Saldo vom Konto abweicht
- Überprüfen Sie, ob Sie einen korrekten Eröffnungsbetrag haben (den Saldo vor der ersten importierten Transaktion)
- Ihr Konto ist nicht in derselben Währung.
Wenn Ihr PayPal-Konto für die Verwendung anderer Währungen oder in einer anderen Währung als der Basiswährung eingerichtet ist, ist es geeignet, ein Konto mit mehreren Währungen zu verwenden.
- Wenn Sie ein Nachrichtenfeld "BalanceImpact nicht in Headern gefunden" oder die gleiche Nachricht mit einem anderen Feldnamen erhalten, liegt dies daran, dass die PayPal-Verlauf Datei kein Feld enthält, das für den Import benötigt wird.
- Melden Sie sich in PayPal an und gehen Sie zum Download-Verlauf
- Bevor Sie die PayPal-Verlaufsdatei herunterladen, klicken Sie auf "Mein Verlauf Download anpassen"
- Sie sehen eine Liste des verfügbaren Feldes und überprüfen dasjenige, das fehlt
Der "Saldo Impact" ist gegen Ende des Liste.
PayPal speichert die Einstellung. Beim nächsten Herunterladen, wird das Feld enthalten sein. - Downloaden Sie wieder die Verlaufsdatei.
- Wenn Sie eine Fehlermeldung "AccountDebit" und "AccountCredit" nicht gefunden haben, haben Sie eine Datei mit dem Namen der alten Spalten.
Verwenden Sie den Befehl Werkzeuge-> Kopie Datei erstellen, um eine Kopie der Datei mit den richtigen Spalten zu erstellen.
Referenz
PayPal-Dokumentation
Änderungen
- 2021-03-24 Neu Version für Banana Buchhaltung Plus
- Komplette Chronologie
Feedback
Lassen Sie uns bitte wissen, was Sie von dem Importskript halten oder wie wir das Skript noch verbessern könnten.
Revolut - Import movements .csv (Banana+ Advanced)
Revolut - Import movements .csv (Banana+ Advanced)Mit dieser Importerweiterung können Sie Transaktionen von der Plattform Revolut (Personal & Business) direkt in Banana Buchhaltung importieren.
Weitere Informationen finden Sie in der englischsprachigen Dokumentation: Revolut - Import movements .csv
Stripe - Import movements .csv (Banana+ Advanced) [BETA]
Stripe - Import movements .csv (Banana+ Advanced) [BETA]Mit dieser Importerweiterung können Sie Transaktionen von der Plattform Stripe direkt in Banana Buchhaltung importieren.
Weitere Informationen finden Sie in der englischsprachigen Dokumentation: Stripe - Import movements .csv
Wise - Import transactions (*.csv)
Wise - Import transactions (*.csv)Mit dieser Importerweiterung können Sie Transaktionen von der Plattform Wise (Personal & Business) direkt in Banana Buchhaltung importieren.
Weitere Informationen finden Sie in der englischsprachigen Dokumentation: Wise - Import transactions (*.csv)
Yokoy - Import movements .csv (Banana+ Advanced) [BETA]
Yokoy - Import movements .csv (Banana+ Advanced) [BETA]Mit dieser Importerweiterung können Sie Transaktionen von der Plattform Yokoy direkt in Banana Buchhaltung importieren.
Weitere Informationen finden Sie in der englischsprachigen Dokumentation: Yokoy - Import movements .csv
CiviCRM Contributions - Import movements .csv (Banana+ Advanced) [BETA]
CiviCRM Contributions - Import movements .csv (Banana+ Advanced) [BETA]You can install the extension from the menu Extensions > Manage Extensions.
Requirements for Use
Banana Accounting Plus with the Advanced Plan.
Send us a feedback
This extension is a BETA version, we welcome suggestions for improvement.
It may happen that the format of the csv file is updated and as a result the filter no longer functions correctly. Send us feedback and attach an example file (.csv) with the new format and we will proceed to update the filter.
OFX - Open financial exchange transactions import filter (*.ofx *.ofc *.xml)
OFX - Open financial exchange transactions import filter (*.ofx *.ofc *.xml)Import extension (*.ofx *.ofc *.xml). Install this filter via the menu command Extensions → Manage Extensions.
The file is an import extension for Banana Accounting 8 and following.
It allows the software to:
Read OFX (Open Financial Exchange) files
Extract financial transactions
Convert them into Banana’s Transactions table
What Is OFX?
OFX (Open Financial Exchange) is a structured financial data format used by banks and software such as:
Quicken
Microsoft Money
It is more reliable than QIF because it includes:
Unique transaction IDs (FITID)
Structured account information
Statement balances
Currency data
What the Script Does
The OFX import extension:
Parses the OFX file structure
Extracts transaction blocks (<STMTTRN>)
Reads key fields:
Date (<DTPOSTED>)
Amount (<TRNAMT>)
Description (<NAME>)
Memo (<MEMO>)
Transaction ID (<FITID>)
Converts them into Banana transaction rows
Prevents duplicate imports using FITID
Typical OFX Transaction Structure
<STMTTRN>
  <TRNTYPE>DEBIT
  <DTPOSTED>20260301
  <TRNAMT>-125.50
  <FITID>20260301001
  <NAME>Vendor Payment
  <MEMO>Invoice 4587
</STMTTRN>
Export from Online Banking (Recommended)
Many banks in USA allow transaction export.
Steps:
Log into your online banking portal
Go to transaction history
Select Download / Export
Choose format:
OFX
or QFX
Select date range
Download the file
Export from Financial Software
Software like Quicken allows exporting to OFX:
Open your account
Choose Export transactions
Select OFX format
Save the file
Quicken Interchange Format import filter (*.qif)
Quicken Interchange Format import filter (*.qif)It allows Banana Accounting to read and convert data from QIF (Quicken Interchange Format) files into Banana’s internal accounting structure (Transactions table, Accounts, Categories).
The script:
- Parses QIF records (such as date, amount, payee, memo, category)
- Transforms them into Banana-compatible transaction rows
- Handles different QIF types (Bank, Cash, Credit Card, etc.)
- Ensures correct formatting for dates and amounts
In short, it enables importing bank or financial transaction data exported in QIF format into Banana Accounting.
How to Export Data in QIF Format
QIF is an older financial exchange format originally used by Quicken.
Exporting from Financial Software
If your software supports QIF export:
Open your accounting or banking software
Go to Export or Data Export
Select:
Format: QIF (Quicken Interchange Format)
Account type: Bank / Cash / Credit Card
Choose date range
Save the
.qiffile
Exporting from Online Banking
Some banks still allow QIF export:
Log in to your online banking portal
Open the transaction history
Choose Download / Export
Select format:
QIF (if available)
Otherwise: CSV (you would need conversion)
Many banks today provide CSV or OFX instead of QIF.
Basic QIF Structure Example
A QIF file looks like this:
!Type:Bank
D03/01/2026
T-125.50
PPayment to Vendor
MInvoice 4587
LExpenses:Office
^Export Extensions
Export Address data in the VCard format
Export Address data in the VCard formatUsing the extension to export vCards
This extension is compatible only with the following file types:
- Address book
- Library and collections
- Estimates and Invoices
To generate and export vCards, the extension uses data from the Contacts table in the file. Specifically, it reads the following columns:
- First Name
- Family Name
- Street
- Zip
- Locality
- Country Code
- Country
- Mobile Phone
- Home Phone
- Email Home
Ensure that your file is of a supported type and that the required columns are filled in correctly to guarantee a successful export.
Install the extension
To install the extension:
- Open Banana Accounting Plus.
- Menu Extensions > Manage Extensions.
- In the search field enter Export Address data in the VCard format.
- From the extensions list select Export Address data in the VCard format.
- Select the extension and click Install.
- Click Close to close the window.
Export address data in vCard format
To export the vCard with the addresses data:
- Open the Banana file.
- From the Extensions menu select Export Address data in the VCard format.
- Enter the contact ID. You can export a vCard containing all contacts or just specific ones.
- Save the vCard.
The generated .vcf file contains a structure like the following one:
BEGIN:VCARD
VERSION:3.0
N:Pallino;Pinco
FN:Pinco Pallino
TEL;type=CELL:1234567890
TEL;type=HOME:1234567890
ADR;TYPE=HOME:;;Via Trevano 7a;Lugano;;6900;
LABEL;TYPE=HOME:Via Trevano 7a Lugano,6900
REV:2017-02-07T14:07:54.694Z
END:VCARD
Export vCard for unsupported file types
If you're using a file type that is not supported by this extension (e.g., a double-entry accounting file, an income/expense accounting file, etc.), you can still export the data for members, customers and suppliers by following these steps:
- Copy the contact information from your current accounting file.
- Create a new file of type Address book and paste the copied data into the appropriate columns.
- Run the extension to export the vCards in the new file.
Journal Export (Banana 9)
Journal Export (Banana 9)How to use it
In order to use this app you have to:
- Install the app
- Menu Apps → Manage Apps...
- Select Universal as country.
- Select english as language.
- Select Online → Productivity.
- From the apps list select Journal Export.
- Click Install to install the app.
- Click Close to close the window.
- Run the app
- Menu Apps → Journal Export.
- Export the content
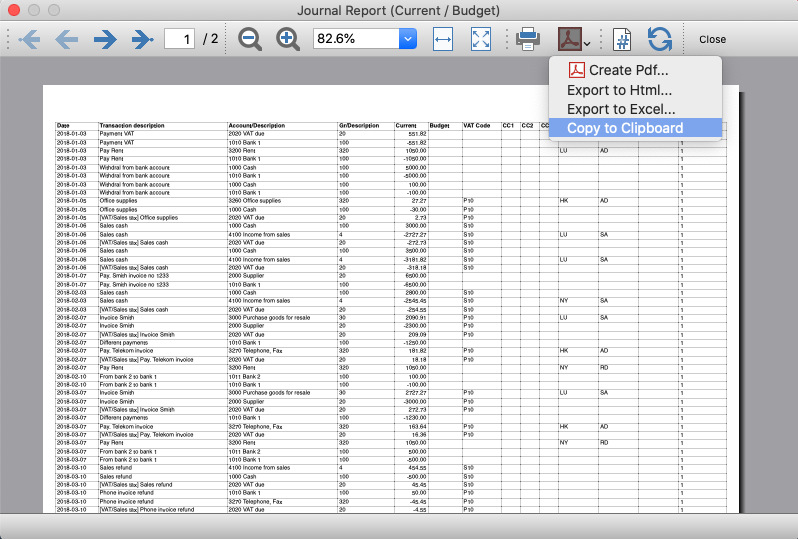
- From the top bar select Copy to Clipboard.
- Copy into Excel
- Open Excel and paste the copied content.
Journal Export (Banana+)
Journal Export (Banana+)Prerequisites
To use this extension you must download and install Banana Accounting Plus.
Install the extension
To install the extension:
- Open Banana Accounting Plus.
- Menu Extensions > Manage Extensions
- Select Universal as country.
- Select english as language.
- Select Online > Productivity.
- From the extensions list select Journal Export (Banana+).
- Click Install to install the extension.
- Click Close to close the window.
Create the journal report
To creare and export the journal:
- Open an accounting file.
- From the Extensions menu select the Journal Export (Banana+).
- In Settings dialogue choose the journal columns you want to display, then click OK.
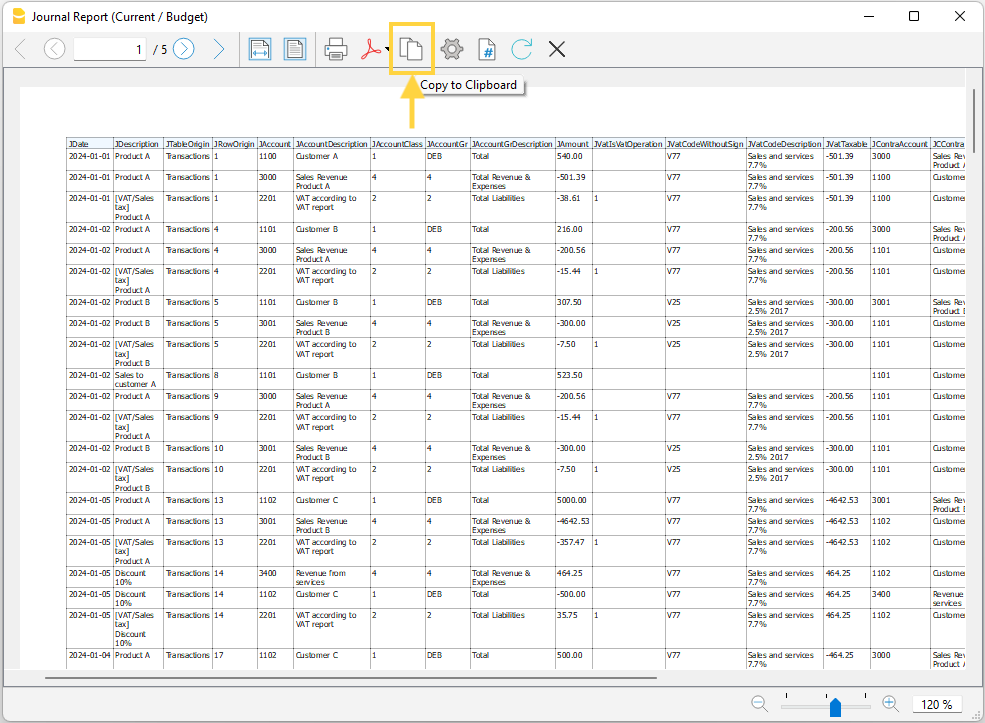
- From the Print Preview of the report select the Copy to Clipboard command in the top bar.
- Open Excel and paste the copied content. Columns headers and data will be copied in Excel. From there you can use it to create your own reports.
Settings dialogue
Run the extension from the menu Extensions > Journal Export (Banana+).
The extension Settings dialogue will open. From here you can choose the journal columns you want to include in the report.
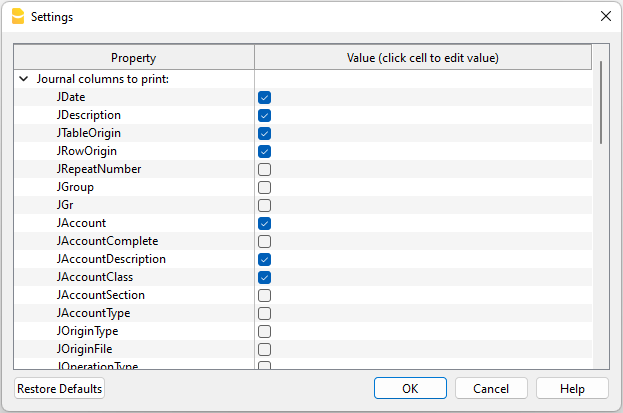
You can find more information about the journal columns in the Journal’s API documentation.
Print example
Time Sheet Export
Time Sheet ExportPrerequisites
- Download and install Banana Accounting Plus (or Banana Accounting 9, version 9.0.5).
Install the extension
To install the extension:
- Open Banana Accounting Plus.
- MenuExtensions > Manage Extensions.
- Select Universal as country.
- Select english as language.
- Select Online > Productivity.
- From the extensions list select Time Sheet Export.
- Click Install.
- Click Close to close the window.
Export the time sheet columns
To export the columns of the time sheet table:
- Open a time sheet file type.
- From the Extensions menu select the Time Sheet Export.
- In Settings dialogue choose the time sheet columns you want to export, then click OK.
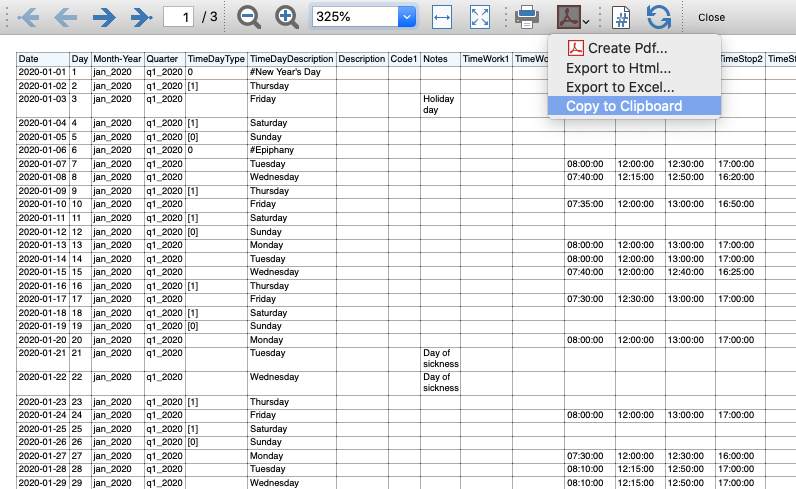
- From the Print Preview of the generated report select the Copy to Clipboard command in the top bar.
- Open Excel and paste the copied content. Columns headers and data will be copied in Excel. From there you can use it to create your own reports.
Report Extensions
Account Statement Letter
Account Statement LetterInstall the extension
To install the extension:
- Open Banana Accounting Plus.
- Menu Extensions > Manage Extensions.
- In the search field enter Account Statement Letter.
- From the extensions list select Account Statement Letter.
- Select the extension and click Install.
- Click Close to close the window.
Create the report
To creare the report:
- Open an accounting file.
- From the menu File > File and accounting properties > Address, enter the sender address.
- In the Accounts table (Address view) enter the receiver address for the account.
- From the Extensions menu select the Account Statement Letter.
- Enter the account number.
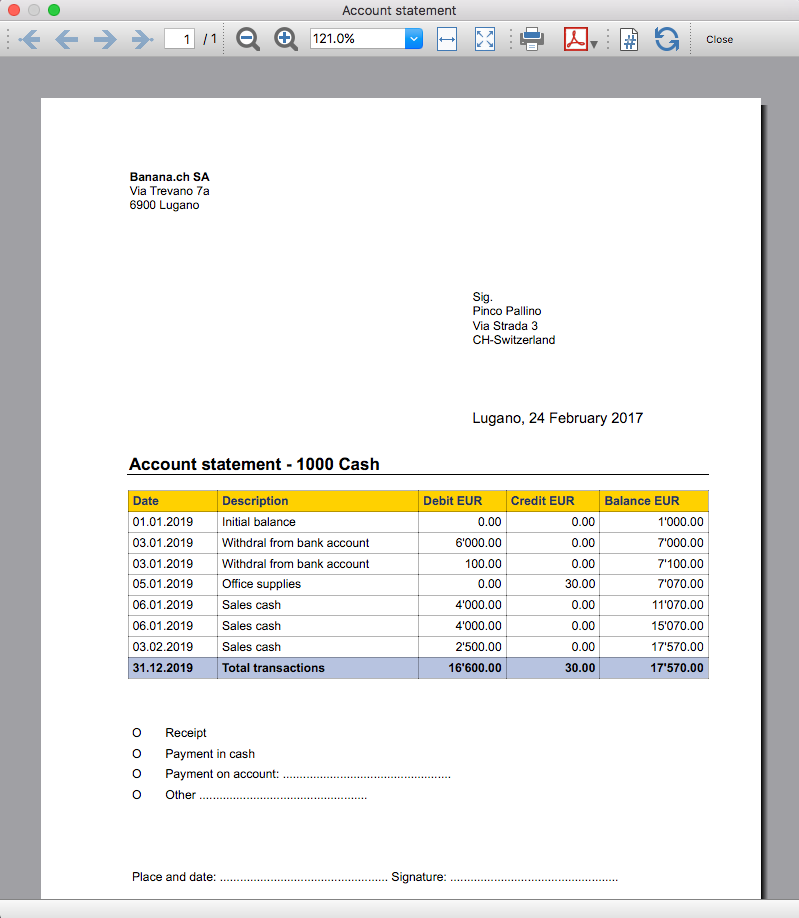
Example of account statement report:
Account balance by day within a period
Account balance by day within a periodInstall the extension
To install the extension:
- Open Banana Accounting Plus.
- Menu Extensions > Manage Extensions.
- In the search field enter Account balance by day within a period.
- From the extensions list select Account balance by day within a period.
- Select the extension and click Install.
- Click Close to close the window.
Create the report
To creare the report:
- Open an accounting file.
- From the Extensions menu select the Account balance by day within a period.
- Enter the account number.
- Select the period.
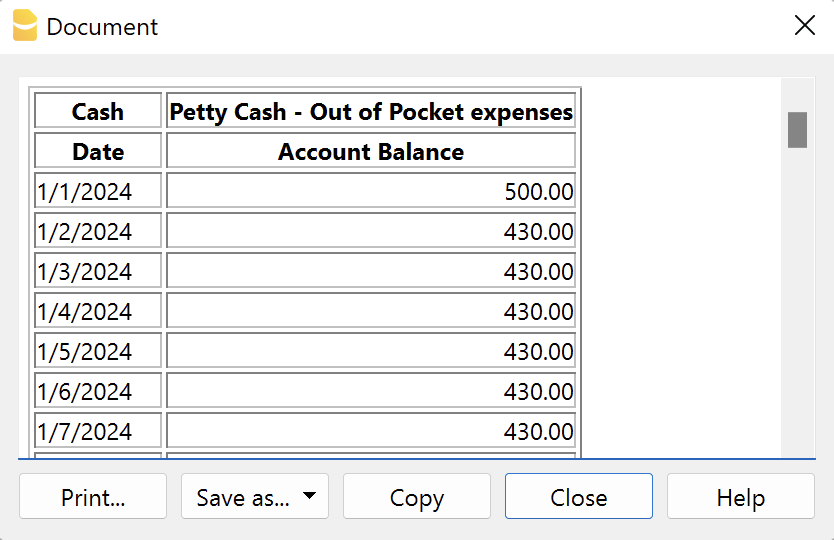
A window with results is displayed. You can copy, save and print the results.
Account balance for all days in a month
Account balance for all days in a monthInstall the extension
To install the extension:
- Open Banana Accounting Plus.
- Menu Extensions > Manage Extensions.
- In the search field enter Account balance for all days in a month.
- From the extensions list select Account balance for all days in a month.
- Select the extension and click Install.
- Click Close to close the window.
Create the report
To creare the report:
- Open an accounting file.
- From the Extensions menu select Account balance for all days in a month.
- Enter the month number.
- Enter the account number.
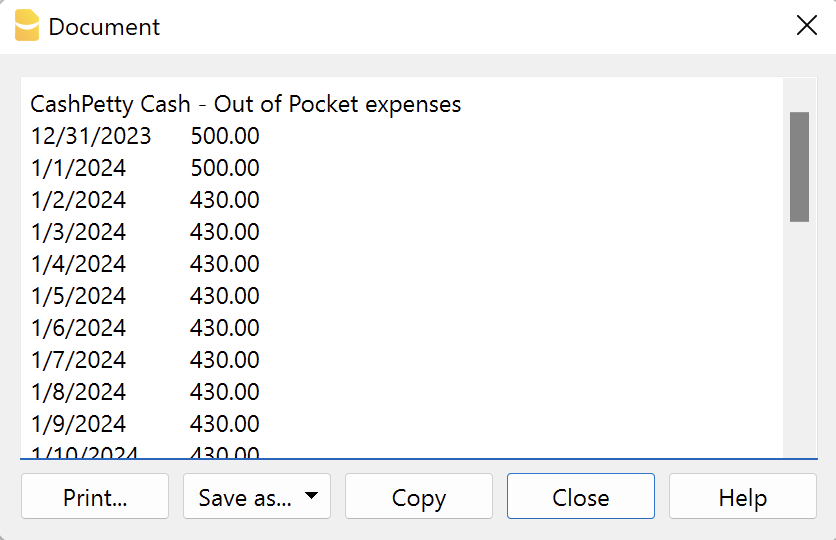
A window with results is displayed. You can copy, save and print the results.
Audit Reports [BETA]
Audit Reports [BETA]The main purpose of this extension is to provide reports that can be easily copied into excel, summarising and showing the main accounting data that are normally taken as a basis by auditors when preparing their analysis.
Useful reports for Banana users who need to send their auditor accounting data, but also for auditors who use Banana themselves, as these reports are based on the functionalities already offered by Banana and therefore facilitate and speed up the collection of accounting data.
Reports
The following reports can be generated:
- General Ledger: Shows the transactions for each account, like in the account card.
- Journal: Shows the details of each transaction.
- VAT Journal: Shows the details of each VAT transaction.
- Trial Balance: Shows the balance of all accounting items in two columns (debit and credit).
- Customers And Suppliers: Shows list of customers and suppliers and information about them.
Through a dialogue it is possible to decide the time of year to be taken into account in the reports.
Adding extra columns
Through the command "Columns Settings" additional columns can be inserted in each report, except for the trial balance, which remains as it is. To add a column to the report, simply enter its xml name in the dialogue. To add several columns, separate them with a semicolon ";" as shown in the example.

The columns you can add are the same present in the Transactions table, except for the Customers and Suppliers report, for which you find the data in the Accounts table.
If you accidentally add a column that is not contained in the tables mentioned, no error is currently raised, the column will be added but no value will be present.
Copy to Excel
Reports are easily copied to Excel, when the report preview is generated, just click on the "copy" icon and paste the copied table into an Excel sheet.

Once the whole table has been copied, you can arrange the file as you want and customise your report with Excel tools.

Messages
- Total debit and total credit are different: The total Debit and total Credit do not match, check if the same error is present in your Accounting file, if it is only present in the report send us a feedback
Brief mit freiem Text (Banana+) [BETA]
Brief mit freiem Text (Banana+) [BETA]Mit dieser Erweiterung können Sie einen Brief mit freiem Text für Mitglieder erstellen, die in der Konten-Tabelle von Banana Buchhaltung registriert sind.
Es ist wichtig, dass die Mitglieder mit Kostenstellen eingerichtet werden, wobei die Kostenstelle KS3 zu verwenden ist.
Voraussetzungen
Um diese Erweiterung zu benutzen, müssen Sie:
- Banana Buchhaltung+ herunterladen und installieren (Version 10.1.7 oder neuer).
- Den Advanced-Plan von Banana Buchhaltung Plus haben.
Beta-Version
Die Erweiterung ist derzeit als Betaversion freigegeben. Dies bedeutet, dass sich einige Details ohne vorherige Ankündigung ändern können.
Installation und Anwendung der Erweiterung
- Banana Buchhaltung Plus Dev-Channel installieren.
- Banana-Erweiterung Brief mit freiem Text (Banana +) installieren (siehe hierfür die Seite Erweiterungen verwalten).
- Sobald die Banana-Erweiterung installiert ist, wird sie im Menü Erweiterungen sichtbar sein, wo sie ausgeführt werden kann.
Einen Brief erstellen
- In der Buchhaltungsdatei unter Stammdaten -> Registerkarte 'Adresse' (Menü Datei), die Daten des Vereins eingeben.
- Aus Menü Erweiterungen die Banana-Erweiterung Brief mit freiem Text (Banana +) auswählen.
- Die hierauf folgenden Felder des Einstellungen-Dialog ausfüllen und danach auf die Schaltfläche OK klicken.
Einstellungen-Dialog
Starten Sie die Erweiterung über das Menü Erweiterungen > Brief mit freiem Text (Banana +).
Es öffnet sich ein Dialogfenster mit den Einstellungen der Erweiterung, wo Sie die erforderlichen Informationen für den Ausdruck des Briefes festlegen.
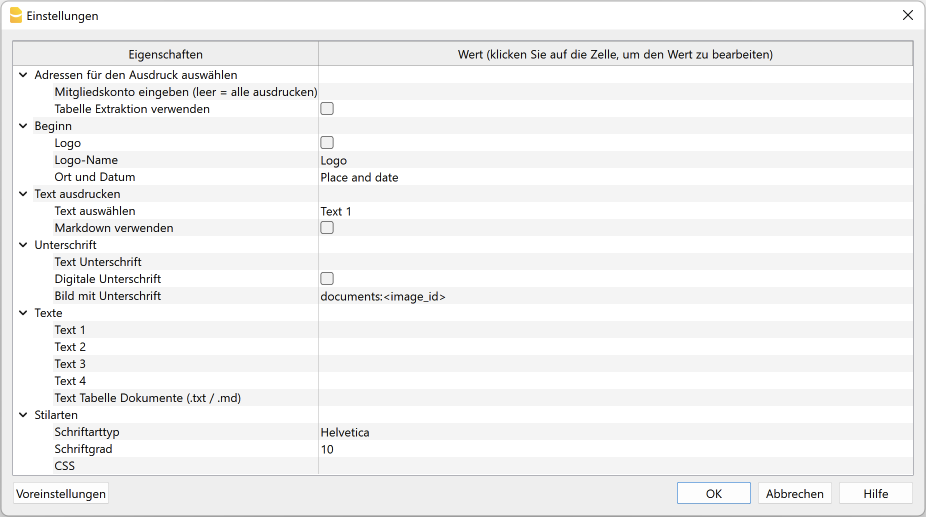
Für die Eingabe der Daten unterhalb der Spalte Wert einen Klick erteilen, um das Eingabefeld zu öffnen.
Die Einstellungen sind in die folgenden Gruppen unterteilt:
- Adressen für den Ausdruck auswählen
- Definieren Sie die Mitgliedskonten, für die der Brief erstellt werden soll.
- Beginn
- Legen Sie das Logo für die Kopfzeile, den Ort und das Datum des Schreibens fest.
- Text ausdrucken
- Definieren Sie, welcher Text verwendet werden soll.
- Unterschrift
- Definieren Sie den Text und das Bild für die Unterschrift (Signatur).
- Texte (des Briefes)
- Sie können bis zu 4 Textzeilen erfassen oder einen aus der Tabelle Dokumente gespeicherten Text übernehmen.
- Stilarten
- Legen Sie die Schriftart und -grösse für den Brieftext fest.
Aufgrund der eingegebenen Daten wird der Bericht generiert, welcher gespeichert und ausgedruckt werden kann.
Adressen für den Ausdruck auswählen
Hier können Sie entscheiden, für welche Mitglieder mit Kostenstellen KS3 der Brief erstellt werden soll.
- Mitgliedskonto eingeben (leer = alle ausdrucken)
- Konto des Mitglieds eingeben (z.B. "10001").
- Mehrere Mitgliedskonten eingeben, die durch ein Komma "," zu trennen sind (z.B. "10001,10002,10005").
- Wird nichts eingegeben, werden alle Mitglieder ausgedruckt.
- Tabelle Extraktion verwenden
- Die aus der Tabelle Extraktion herausgezogenen Konten verwenden.
- Es ist erforderlich den Befehl Daten > Zeilen extrahieren und sortieren... auszuführen, um die Zeilen mit den Konten zu extrahieren, die Sie verwenden möchten.
Beginn
Hier legen Sie das Logo für die Kopfzeile, den Ort und das Datum des Schreibens fest.
- Logo (Kontrollkästchen aktivieren)
- Fügen Sie ein Logo in die Kopfzeile ein. Das Logo kann unter Menü Datei > Logo einrichten definiert werden.
- Logo-Name
- Geben Sie den zu verwendenden Namen der Logo-Anpassung ein, wenn mehr Logos definiert sind.
- Ort und Datum
- Geben Sie den Ort und das Datum des Schreibens ein.
Text ausdrucken
Hier können Sie entscheiden, welcher der eingegebenen Texte im Brief gedruckt werden soll.
- Text auswählen
- Wählen Sie den gewünschten Text aus der Liste aus.
- Für das Einfügen eines Textes sehen Sie bitte den Absatz Texte.
- Markdown verwenden (Kontrollkästchen aktivieren)
- Der markierte Text wird als Markdown-Text interpretiert (erfordert Banana Buchhaltung Plus - Advanced-Plan).
Unterschrift
Hier können Sie entscheiden, welcher Text und welches Bild (mit digitaler Unterschrift) im Brief gedruckt werden soll.
- Text Unterschrift
- Sie geben den Vor- und Nachnamen der Person ein, die den Brief ausstellt.
- Digitale Unterschrift (Kontrollkästchen aktivieren)
- Hierfür ist ein Bild mit der digitalen Unterschrift zu benutzen.
- Bild mit Unterschrift
- Das gewünschte Bild kann auf zwei Arten eingefügt werden:
- documents:<name_id>: Dient zum Übernehmen eines in der Dokumente-Tabelle gespeichertes Bild mit der Unterschrift, wobei <name_id> dem Namen entspricht, welcher in der Spalte 'ID' ('ID-Wert') der Tabelle 'Dokumente' steht (z.B. "documents:unterschrift").
- file:document/<immagine>: Um ein Bild zu übernehmen, welches ausserhalb der Banana-Buchhaltungsdatei gespeichert worden ist, sich jedoch im selben Verzeichnis/Ordner wie die .ac2-Datei befindet. Es ist auch das Bildformat .png oder .jpg (z.B. "file:document/bildname.png") anzugeben.
- Das gewünschte Bild kann auf zwei Arten eingefügt werden:
Texte
Geben Sie den Text Ihres Schreibens. Es ist möglich, bis zu 4 Textzeilen einzugeben oder einen aus der Tabelle Dokumente gespeicherten Text zu übernehmen.
- Text 1, Text 2, Text 3, Text 4
- Text der Tabelle Dokumente (.txt / .md)
- Um die eingegebenen Texte zu verwenden, müssen Sie sich in die Tabelle Dokumente begeben.
- Geben Sie den ID-Wert des Dokuments ein (z.B. "Brief.txt", "Brief", "Brief.md" usw.).
- Die Texte können vom Typ Text und Markdown sein.
- Bei Texten vom Typ Markdown, muss der ID-Wert in der Dokumente-Tabelle mit ".md" enden; wobei auch der vollständige Name mit ".md" enden muss (z.B. "Brief.md").
Stilarten
Hier definieren Sie die Schriftart und -grösse für die Brieftexte fest.
- Schriftartyp
- Definiert die Schriftart
- Der Standardtyp ist "Helvetica"
- Schriftgrösse
- Definiert die Schriftgrösse
- Die Standardgrösse ist "10"
- CSS
- Opzional
- Sie können Ihren Ausdruck noch weiter anpassen, indem Sie eigene CSS-Stile erstellen, mit denen Sie das Erscheinungsbild des Briefes ändern können (Textformatierung, Positionierung von Elementen usw.). Erfordert Banana Buchhaltung Plus - Advanced-Plan!
- Siehe Dokumentation Erstellung von CSS-Stilen (Dokumentation auf Englisch).
Tabelle Extraktion (Befehl Zeilen extrahieren)
Mit der Funktion Zeilen extrahieren und sortieren... können Sie die Mitgliedskonten auswählen, für die der Brief erstellt werden soll. Dies ist besonders nützlich, wenn Sie z.B. einen Briefe nur für bestimmte Mitglieder ausdrucken wollen, ohne die Liste der Konten direkt in den Einstellungen der Erweiterung eingeben zu müssen.
Wenn Sie beispielsweise Mitglieder in verschiedene Gruppen gruppieren (Tabelle Konten), können Sie mit dem Befehl Daten > Zeilen extrahieren und Zeilen sortieren... die Zeilen der Mitglieder extrahieren, die nur zu bestimmten Gruppen gehören (im Beispiel Mitglieder, die zu den Gruppen S1 und S3 gehören).
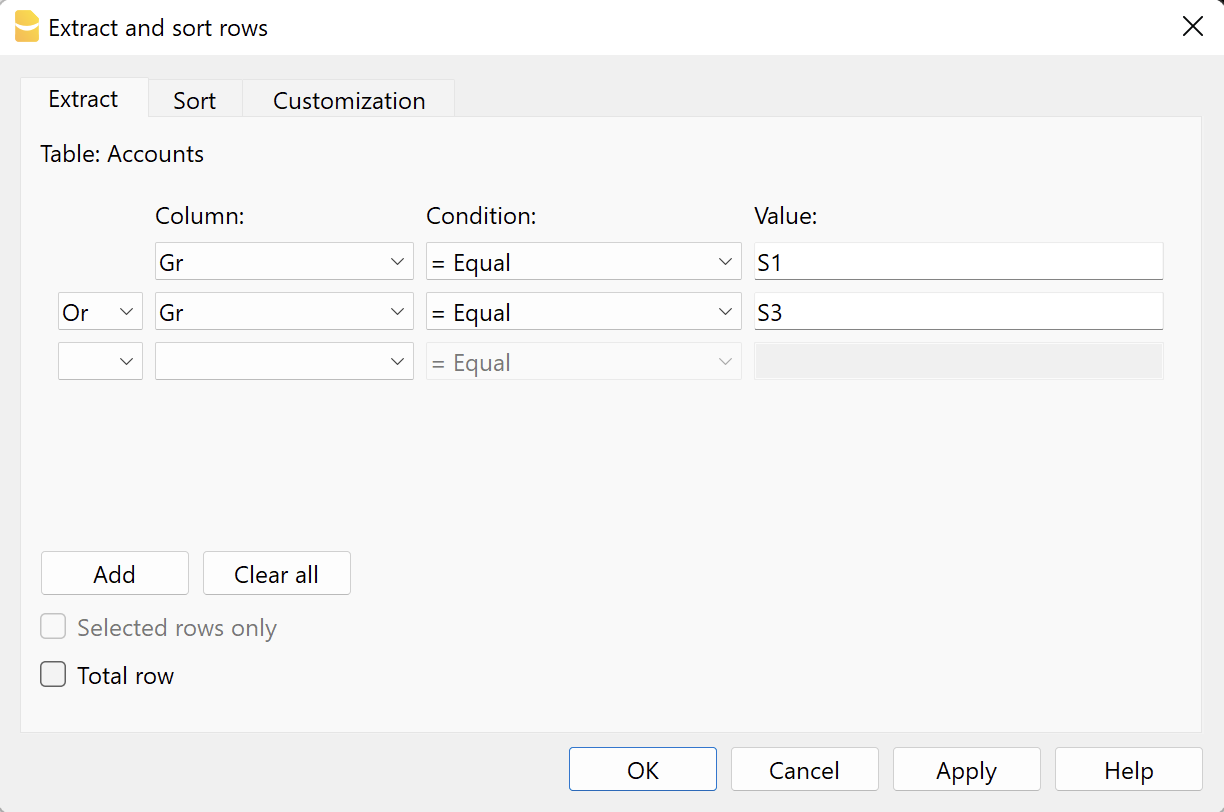
Um die extrahierten Zeilen anzuwenden, so vorgehen:
- Die gewünschten Zeilen mittels Menübefehl Daten > Zeilen extrahieren und sortieren... extrahieren.
- Die Erweiterung ausführen und im Abschnitt Adressen für den Ausdruck auswählen des Einstellungen-Dialog das Kontrollkästchen Tabelle Extraktion verwenden aktivieren.
- Wenn vor dem Druckvorgang keine Zeilen extrahiert wurden, wird eine Warnmeldung angezeigt und es werden alle Mitglieder ausgedruckt.
Text des Briefes (Standardtext)
Es gibt zwei Möglichkeiten, einen Standardtext einzugeben und zu verwenden. Sie können... :
- den Text direkt im Einstellungen-Dialog eingeben.
- Geben Sie den gewünschten Text in den Feldern Text 1, Text 2, Text 3 oder Text 4 ein.
Es können bis zu 4 Textzeilen hinzugefügt werden. - Wählen Sie unter Text ausdrucken > Text auswählen den zu verwendenden Text aus.
- Wichtig: Aktivieren Sie unter Text ausdrucken NICHT die Option Markdown verwenden.
- Geben Sie den gewünschten Text in den Feldern Text 1, Text 2, Text 3 oder Text 4 ein.
- den Text in der Tabelle Dokumente erfassen.
- Fügen Sie ein Dokument des Typs Standardtext (text/plain) hinzu.
Es gibt keine Einschränkungen; es können beliebig viele Texte hinzugefügt werden. - Im Einstellungen-Dialog:
- Unter Text ausdrucken > Text auswählen die Option Text Tabelle Dokumente (.txt / .md) auswählen. Um diese Option anzuzeigen, müssen Sie einen Doppelklick auf das Feld 'Text 1' auszuführen, wobei ein Dropdown-Menü mit den verfügbaren Textzeilen angezeigt wird.
- Unter Texte > Text Tabelle Dokumente (.txt / .md) den ID-Namen des in der Dokumente-Tabelle angegeben Textes eingeben (z.B. "text.txt").
- Fügen Sie ein Dokument des Typs Standardtext (text/plain) hinzu.
Für alle Textzeilen:
- Mit einer speziellen Anmerkung können Sie bestimmte Texte fett markieren. Fügen Sie dazu die gewünschten Texte zwischen zwei Sternchen ** ein.
Beispiele:- **text** = text
- **textA textB** textC = textA textB textC
- Werden die hierauf folgenden Werte (in Englisch) in den Textzeilen eingegeben, so werden sie mit den entsprechenden Werte ersetzt:
- <Account> : Mitgliedskonto
- <NamePrefix> : Höflichkeit/Anrede (Herr, Frau, Doktor oder anders)
- <FirstName> : Vorname des Mitglieds
- <FamilyName> : Nachname des Mitglieds
- <OrganisationName> : Organisation (z.B. gemeinnützige Vereine, Stiftungen usw.)
- <Address> : Mitgliedsadresse
- <AddressExtra> : Zusatzadresse
- <Region> : Kanton/Region/Provinz
- <Country> : Nation/Land/Bundesland
- <Currency> : Währung
- <Amount> : Gesamtsumme aller Spenden
Text des Briefes (mit Markdown-Text)
Markdown ist eine Sprache, mit der formatierter Text mit einem gewöhnlichen Textverarbeitungsprogramm (Texteditor) und einer leicht zu lesenden Syntax erstellt werden kann.
Um den Markdown zu benutzen, ist der Advanced-Plan von Banana Buchhaltung Plus erforderlich.
Es gibt zwei Möglichkeiten, einen Markdown-Text einzufügen und zu verwenden. Sie können... :
- den Text direkt im Einstellungen-Dialog erfassen.
- Geben Sie den gewünschten Text in den Feldern Text 1, Text 2, Text 3 oder Text 4 ein.
Es können bis zu 4 Textzeilen hinzugefügt werden. - Wählen Sie unter Text ausdrucken > Text auswählen den zu verwendenden Text aus.
- Aktivieren Sie unter Text ausdrucken die Option Markdown verwenden.
- Geben Sie den gewünschten Text in den Feldern Text 1, Text 2, Text 3 oder Text 4 ein.
- den Text in der Tabelle Dokumente eingeben.
- Verwenden Sie den Markdown-Editor, um ein Dokument hinzuzufügen, indem Sie den Markdown-formatierten Texttyp (text/markdown) auswählen.
Es gibt keine Einschränkungen; es können beliebig viele Texte hinzugefügt werden. - Der Dateiname in der Spalte ID muss mit ".md" enden (z.B. "text.md").
- Im Einstellungen-Dialog:
- Unter Text ausdrucken > Text auswählen die Option Text Tabelle Dokumente (.txt / .md) auswählen. Um diese Option anzuzeigen, müssen Sie einen Doppelklick auf das Feld 'Text 1' auszuführen, wobei ein Dropdown-Menü mit den verfügbaren Textzeilen angezeigt wird.
- Unter Texte > Text Tabelle Dokumente (.txt / .md) den ID-Namen des in der Dokumente-Tabelle angegeben Markdown-Textes eingeben (z.B. "text.md").
- Verwenden Sie den Markdown-Editor, um ein Dokument hinzuzufügen, indem Sie den Markdown-formatierten Texttyp (text/markdown) auswählen.
Für alle Textzeilen:
- Werden die hierauf folgenden Werte (in Englisch) in den Textzeilen eingegeben, so werden sie mit den entsprechenden Werte ersetzt:
- {{Account}} : Mitgliedskonto
- {{NamePrefix}} : Höflichkeit/Anrede (Herr, Frau, Doktor oder anders)
- {{FirstName}} : Vorname des Mitglieds
- {{FamilyName}} : Nachname des Mitglieds
- {{OrganisationName}} : Organisation (z.B. gemeinnützige Vereine, Stiftungen usw.)
- {{Address}} : Mitgliedsadresse
- {{AddressExtra}} : Zusatzadresse
- {{Region}} : Kanton/Region/Provinz
- {{Country}} : Nation/Land/Bundesland
- {{Currency}} : Währung
- {{Amount}} : Gesamtsumme aller Spenden
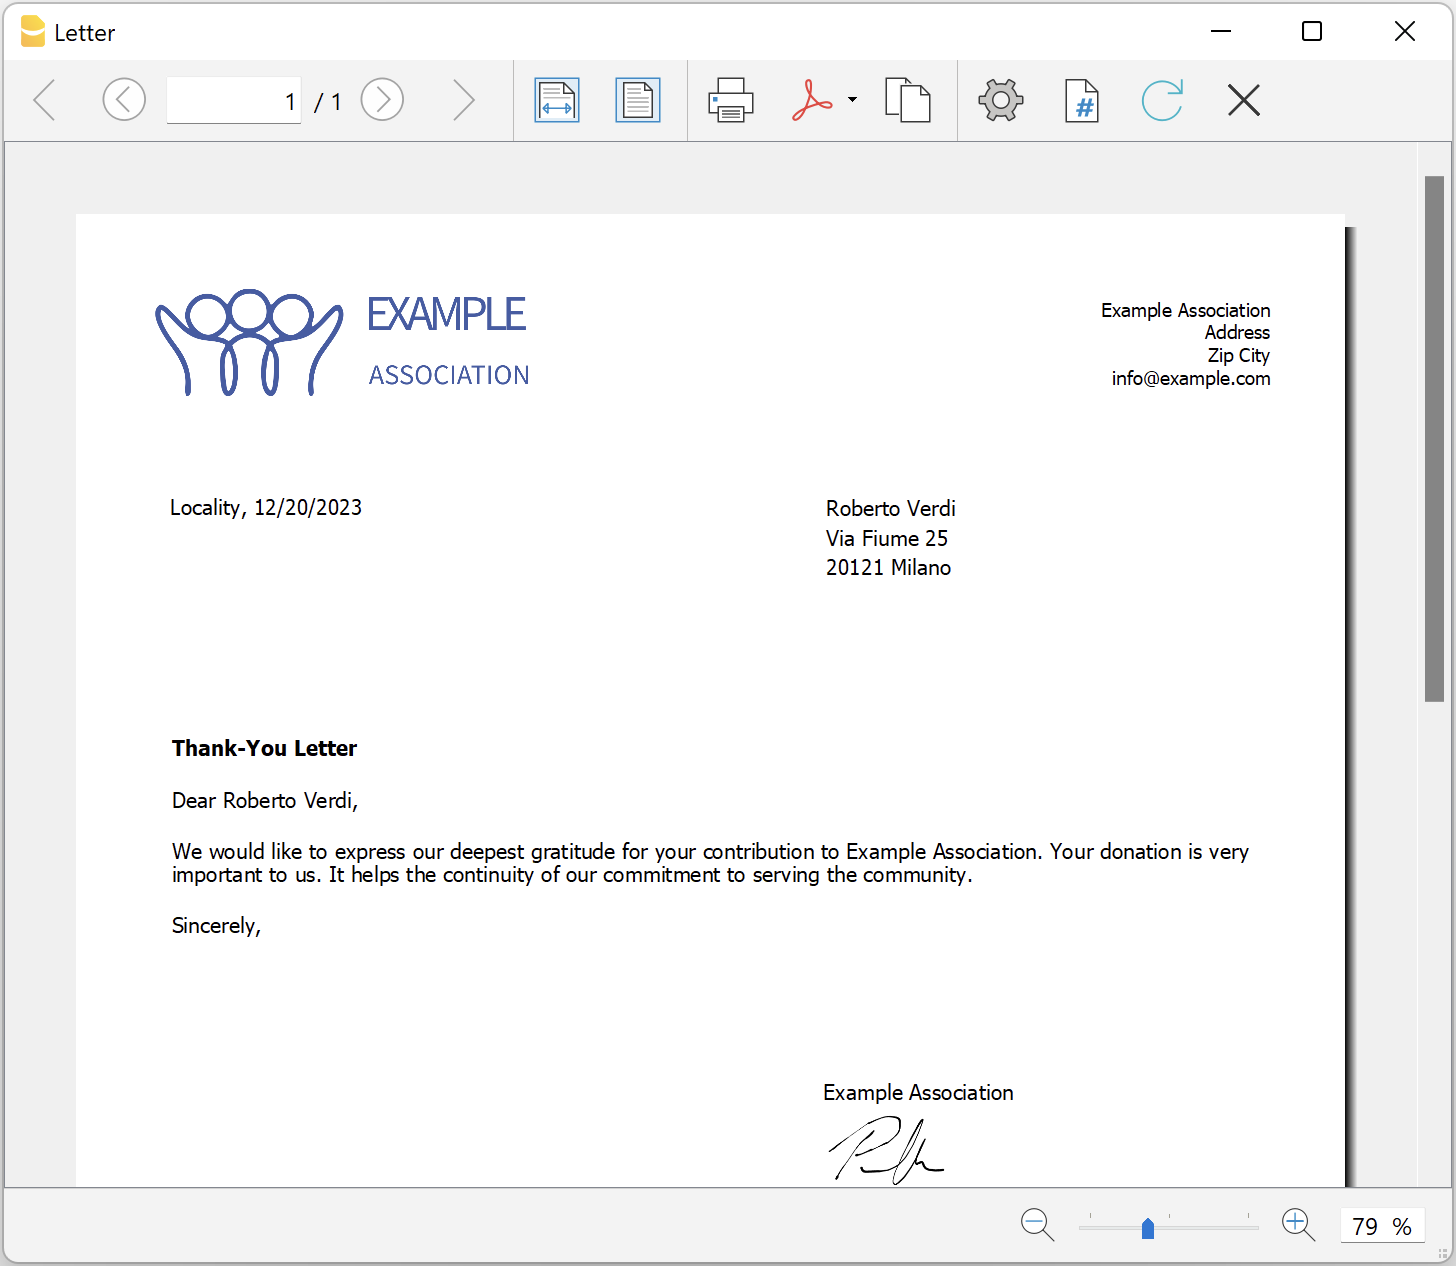
Beispiel eines Ausdruckes
Printing receipts from cash book transactions
Printing receipts from cash book transactionsThis extension prints payment receipts based on transactions from cash book accounting file.
Example of a payment receipt:
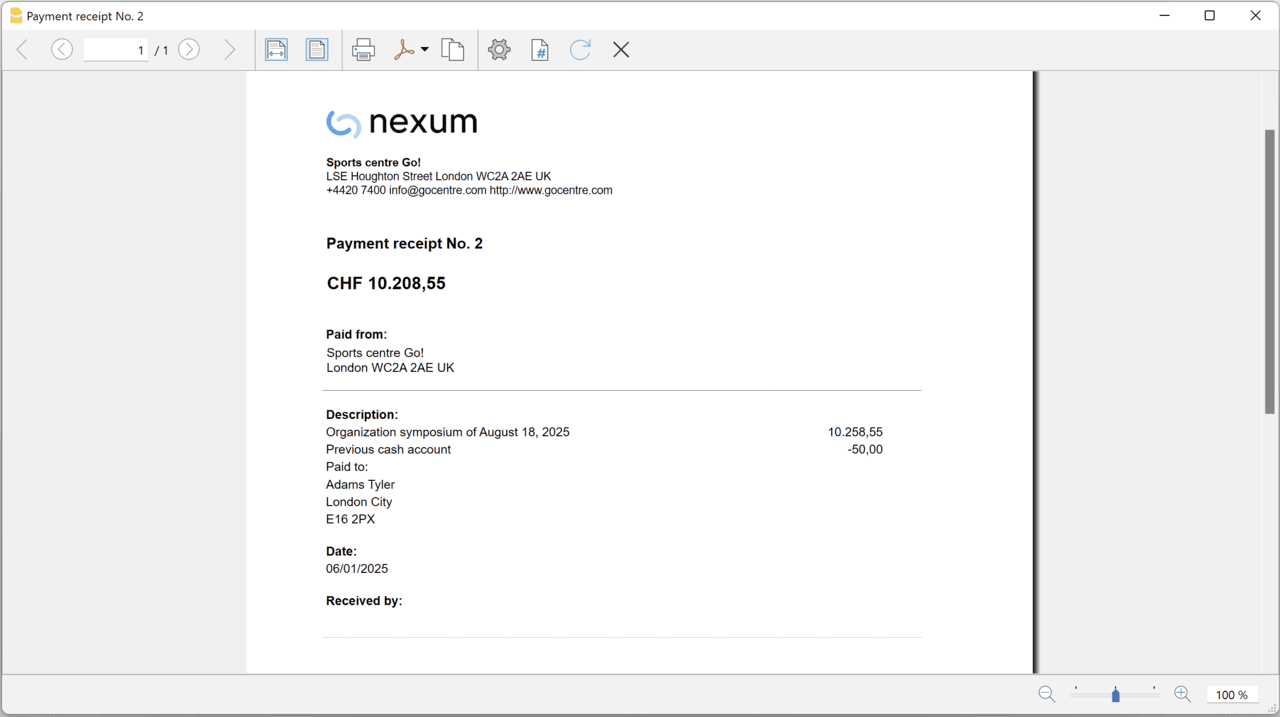
The program prints the receipt using the following logic:
- It takes all the lines with the same Doc Number, of the lines where the cursor is positioned.
- It prints the document number in the "Payment receipt No: "
- It prints the amount by summing all the amounts.
- It prints the Descriptions in different lines.
with the text of the Description column of all the transactions that have the same doc number.
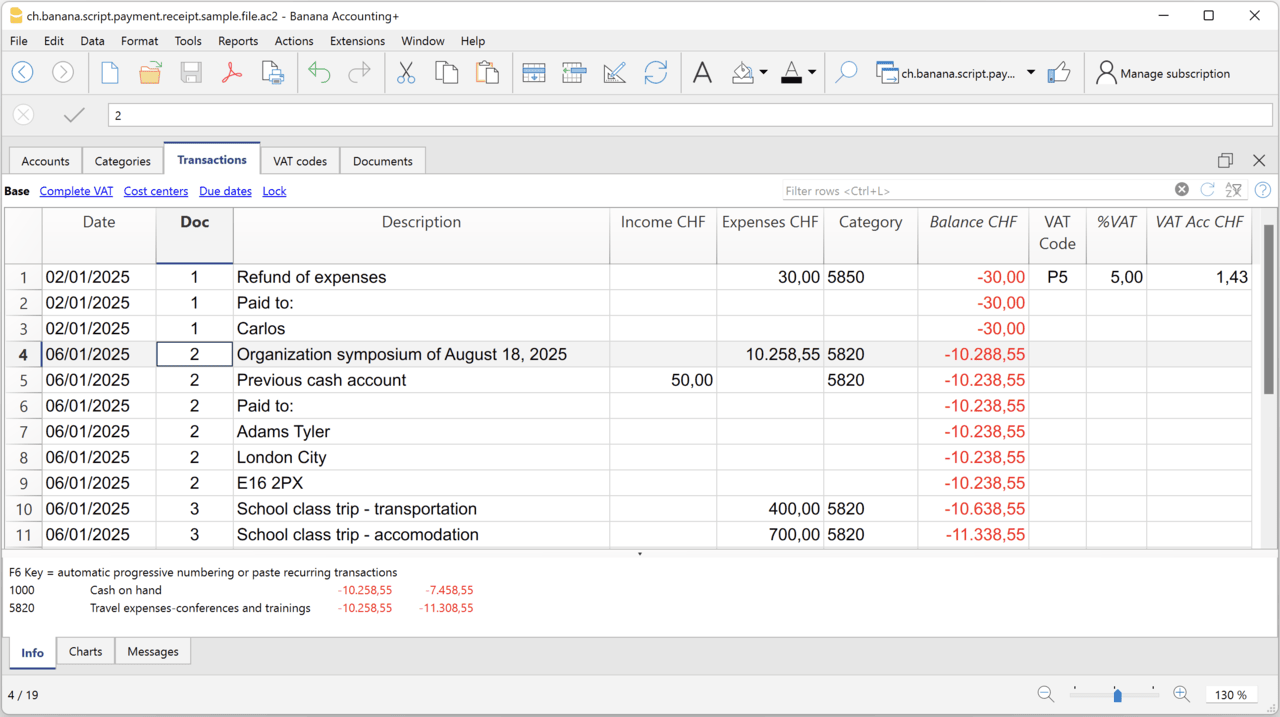
Example file
To created the receipts:
- Open a Cash Book file:
- Or download the example ch.banana.script.payment.receipt.sample.file.ac2 and open it.
- Positions on the line of the transaction group you wish to print.
- From the Extensions menu select the Printing receipts from cash book transactions.
Settings and properties
Prior to printing the receipt you can set the
Extension properties
You can set the following parameters from the menu Extensions > Manage Extensions, select the Printing receipts from cash book transactions extension and click on Settings.
- Include page header (1=yes, 0=no)
The logo and the address information can be included as header of the page. - Automatic date (1=yes, 0=no)
The date of the transaction is used. - Font type
The font type of the texts (Arial, Helvetica, Times New Roman, ...)
Address
Set your address from the menu File > File and accounting properties > Address.
Header logo
A logo for the header can be added as attachment in the Documents table.
- Add the Documents table to the Banana Accounting file.
If it is not already present you need to add the Documents table in the Banana document with the menu command Tools > Add new features > Add document table. - Add a row in the Documents table.
- In the ID column, enter "logo".
- In the Attachments column, double click on the cell and select Image, then choose the logo image you want to use.
Entering transactions
Cash book transactions are entered as usual in the Transactions table.
- Transactions are considered to belong to the same group when they have the same doc number.
- Paid to
- You can enter the text you want to display on the printout (e.g. "Paid to:").
- You can also enter text in bold by enclosing it in double asterisks ** (e.g. **Paid to:**)
- You can enter the text "#paidto" (without quotes) to let the program insert a blank line followed by the text in bold and in the language of the accounting file (it, fr, de, en, nl).
Report Balance and Profit & Loss with transactions details
Report Balance and Profit & Loss with transactions detailsThis extension creates a Balance Sheet and Profit & Loss report with transactions details for each account.
Install the extension
To install the extension:
- Open Banana Accounting Plus.
- Menu Extensions > Manage Extensions.
- In the search field enter Report Balance and Profit & Loss with transactions details.
- From the extensions list select Report Balance and Profit & Loss with transactions details.
- Select the extension and click Install.
- Click Close to close the window.
Create the report
To creare the report:
- Open an accounting file.
- From the Extensions menu select the Report Balance and Profit & Loss with transactions details.
- Select the financial report you want to print:
- Assets / Liabilities
- Income / Expenses
- All
Example of assets details: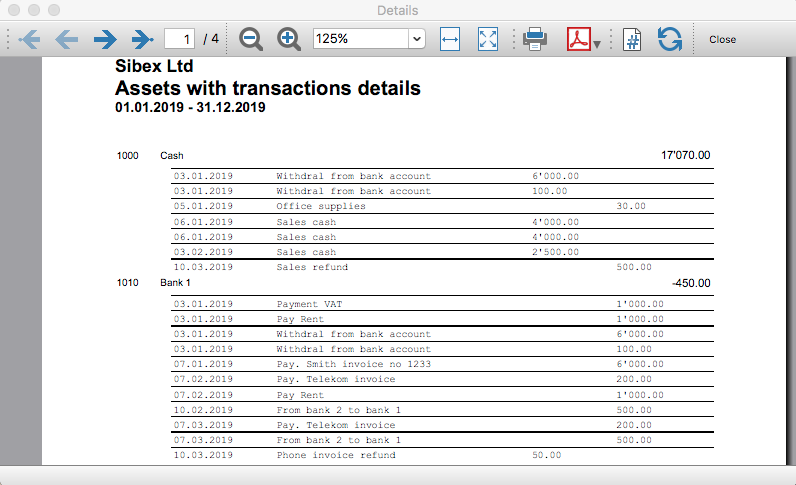
Example of liabilities details: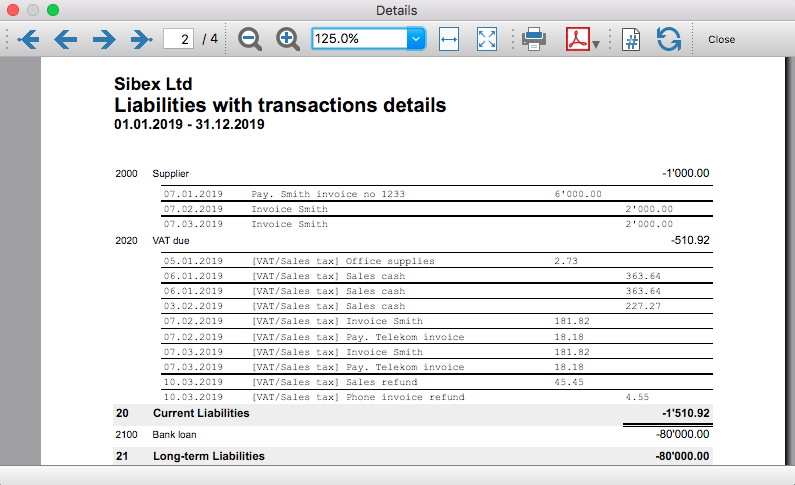
Example of income details: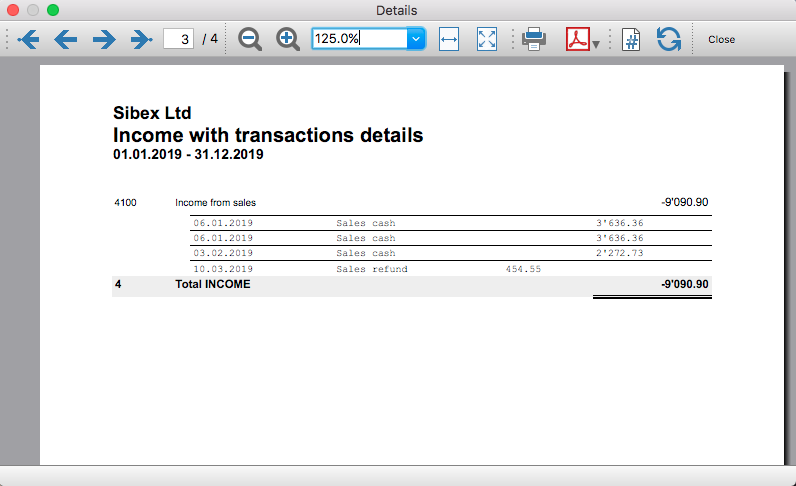
Example of expenses details: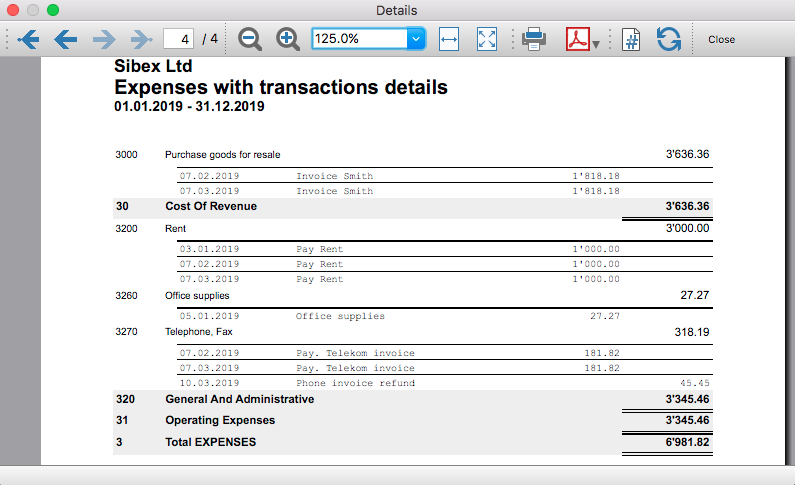
Transaction Voucher (Banana+)
Transaction Voucher (Banana+)Accounting settings
From menu File > File and accounting properties > Accounting Tab, enter the project number/name in the Header Left field.
How it works
- For each transaction of the Transactions table enter the voucher number in the Doc column.
- From the Transactions table of the accounting file select a row with the desired voucher number you want to create the report.
The voucher number is taken from the selected row where the cursor is positioned, but you can also change it manually into settings dialog. - Launch the extension from the menu Extensions > Transaction Voucher (Banana+).
- In the settings dialog window enter the required information.
- Logo
Check to include the logo in the header.
The logo is defined with the command File > Logo setup where you can also set the size, choose how to align it (left, centre, right). - Logo-Name
Enter the name of the logo customisation defined in the menu File > Logo setup, respecting upper and lower case. - Title
- Voucher number
- Paid to
- Paid in
- Cheque No.
- Payment Received by
- Paid by
- Prepared by
- Verified by
- Recommended by
- Approved by
- Logo
- All the values entered are saved and proposed the next time.
- The extension will print the information entered in the dialog plus the data of the transaction with the specified Voucher / Doc number.
Transaction Voucher (Helvetas model)
Transaction Voucher (Helvetas model)How it works
- From the Transactions table of the accounting file select a row with the desired Doc number.
- Launch the extension from the menu Extensions > Transaction Voucher (Helvetas model).
- A dialog window requesting some information will appear.
The voucher number is taken from the row selected where the cursor is positioned, but you can change it manually.
Complete all the remaining fields by entering your data and click Ok.
The values entered are saved and proposed the next time. - The extension will print the information entered in the dialog plus the data of the transactions with the specified Voucher / Doc number.
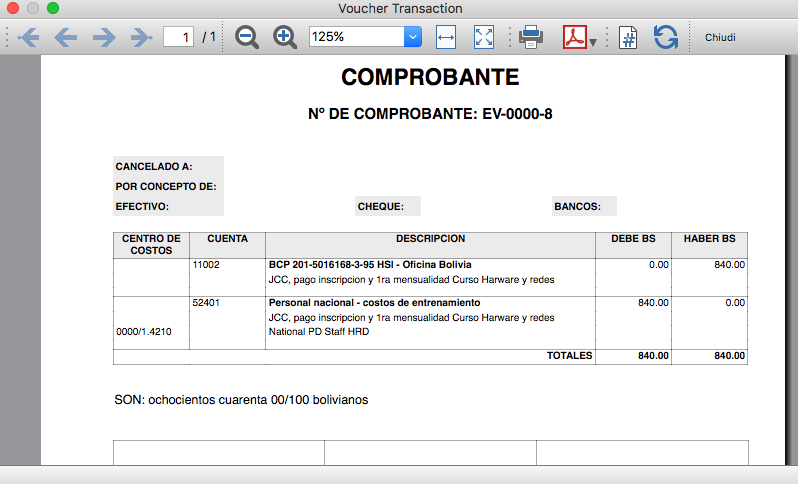
Example of Voucher report:
Transaction Voucher (Swiss Red Cross model)
Transaction Voucher (Swiss Red Cross model)Accounting settings
Two settings are required:
- the Header Left
- click menu File > File and accounting properties > Header Left.
The Header Left field must contain the project number and the project name divided by the "-" character (example: "1234 - Abc")
- click menu File > File and accounting properties > Header Left.
- add a small image/logo
- Add the Documents table to the Banana Accounting file.
If it is not already present you need to add the Documents table in the Banana document with the menu command Tools > Add new features > Add document table. - In the Id column, of the documents table insert transaction_voucher_image.
- In the Attachments column, double click on the cell, select Image and add the desired image.
- Add the Documents table to the Banana Accounting file.
How it works
- From the Transactions table of the accounting file select a row with the desired Doc number.
For example: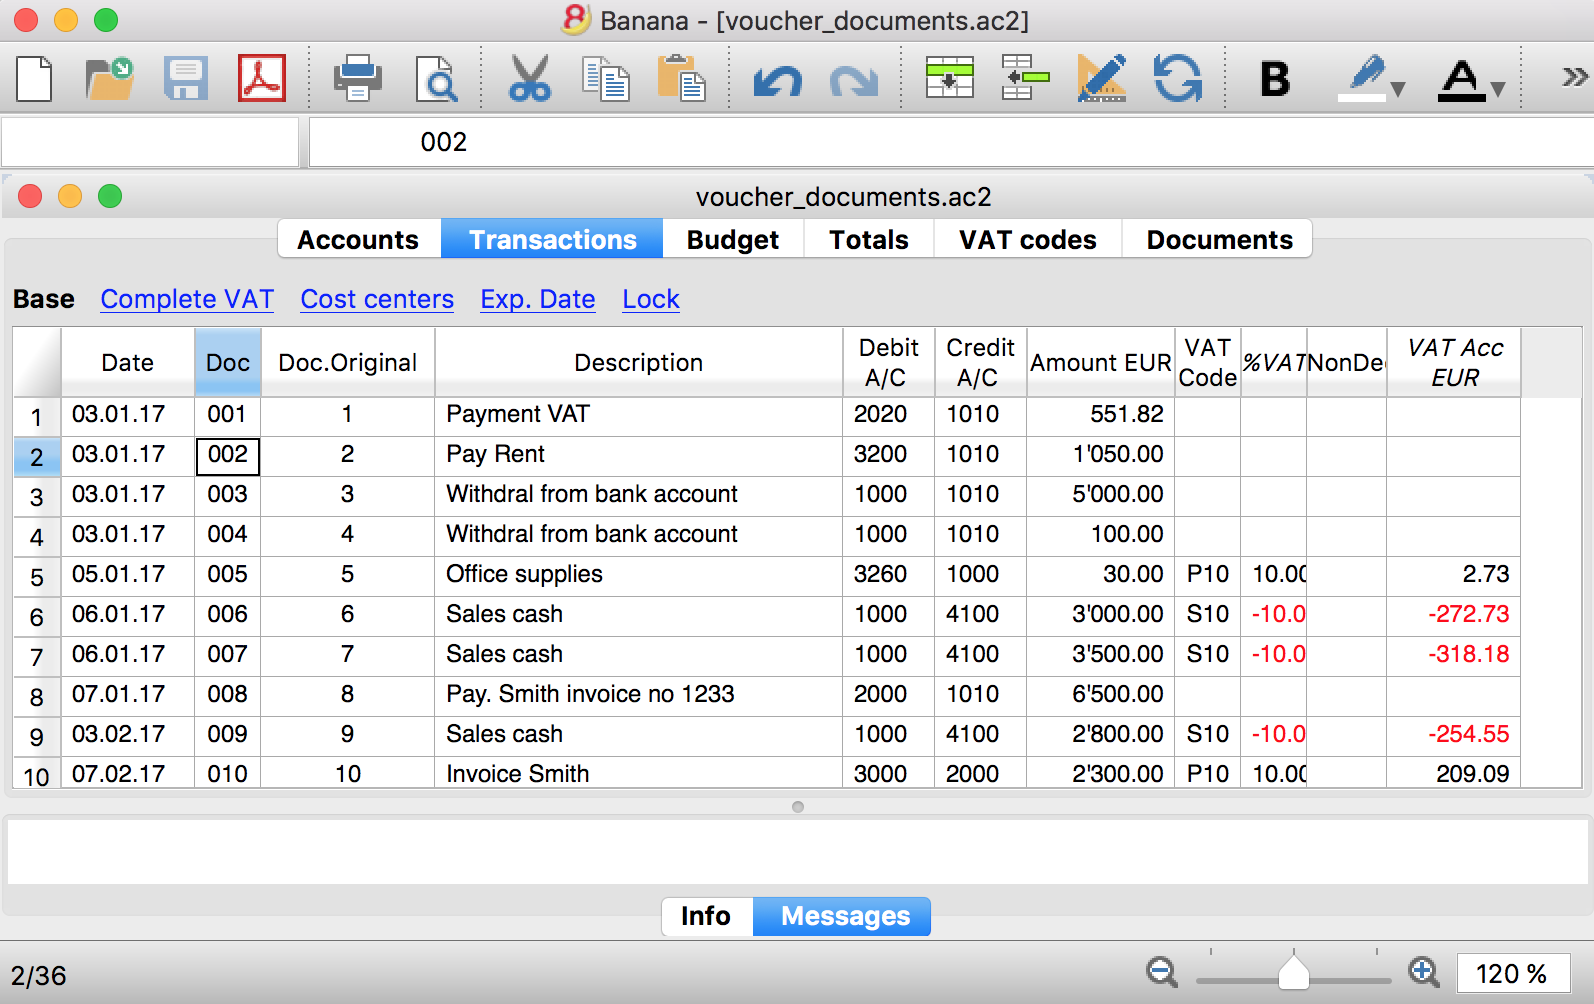
- Launch the extensions from the menu Extension > Transaction Voucher. A dialog window requesting some information will appear.
- The voucher number is taken from the row selected where the cursor is positioned, but you can change it manually.
- Complete all the remaining fields by entering your data and click Ok.
The values entered are proposed the next time.
Dialog example: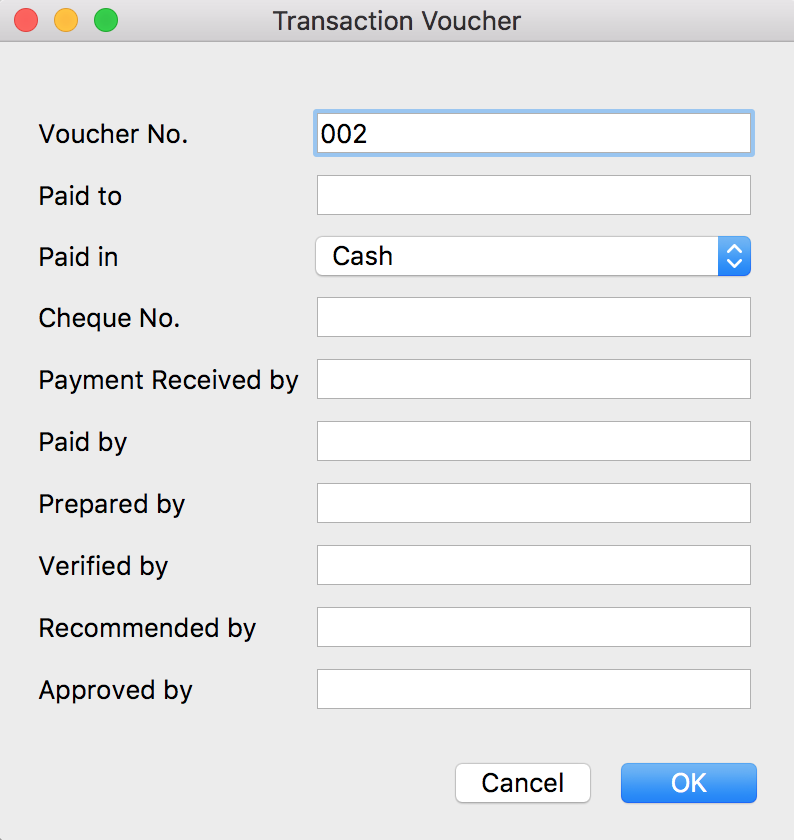
- The extension will print the information enterd in the dialog plus the data of the transactions with the specified Voucher / Doc number.
For example: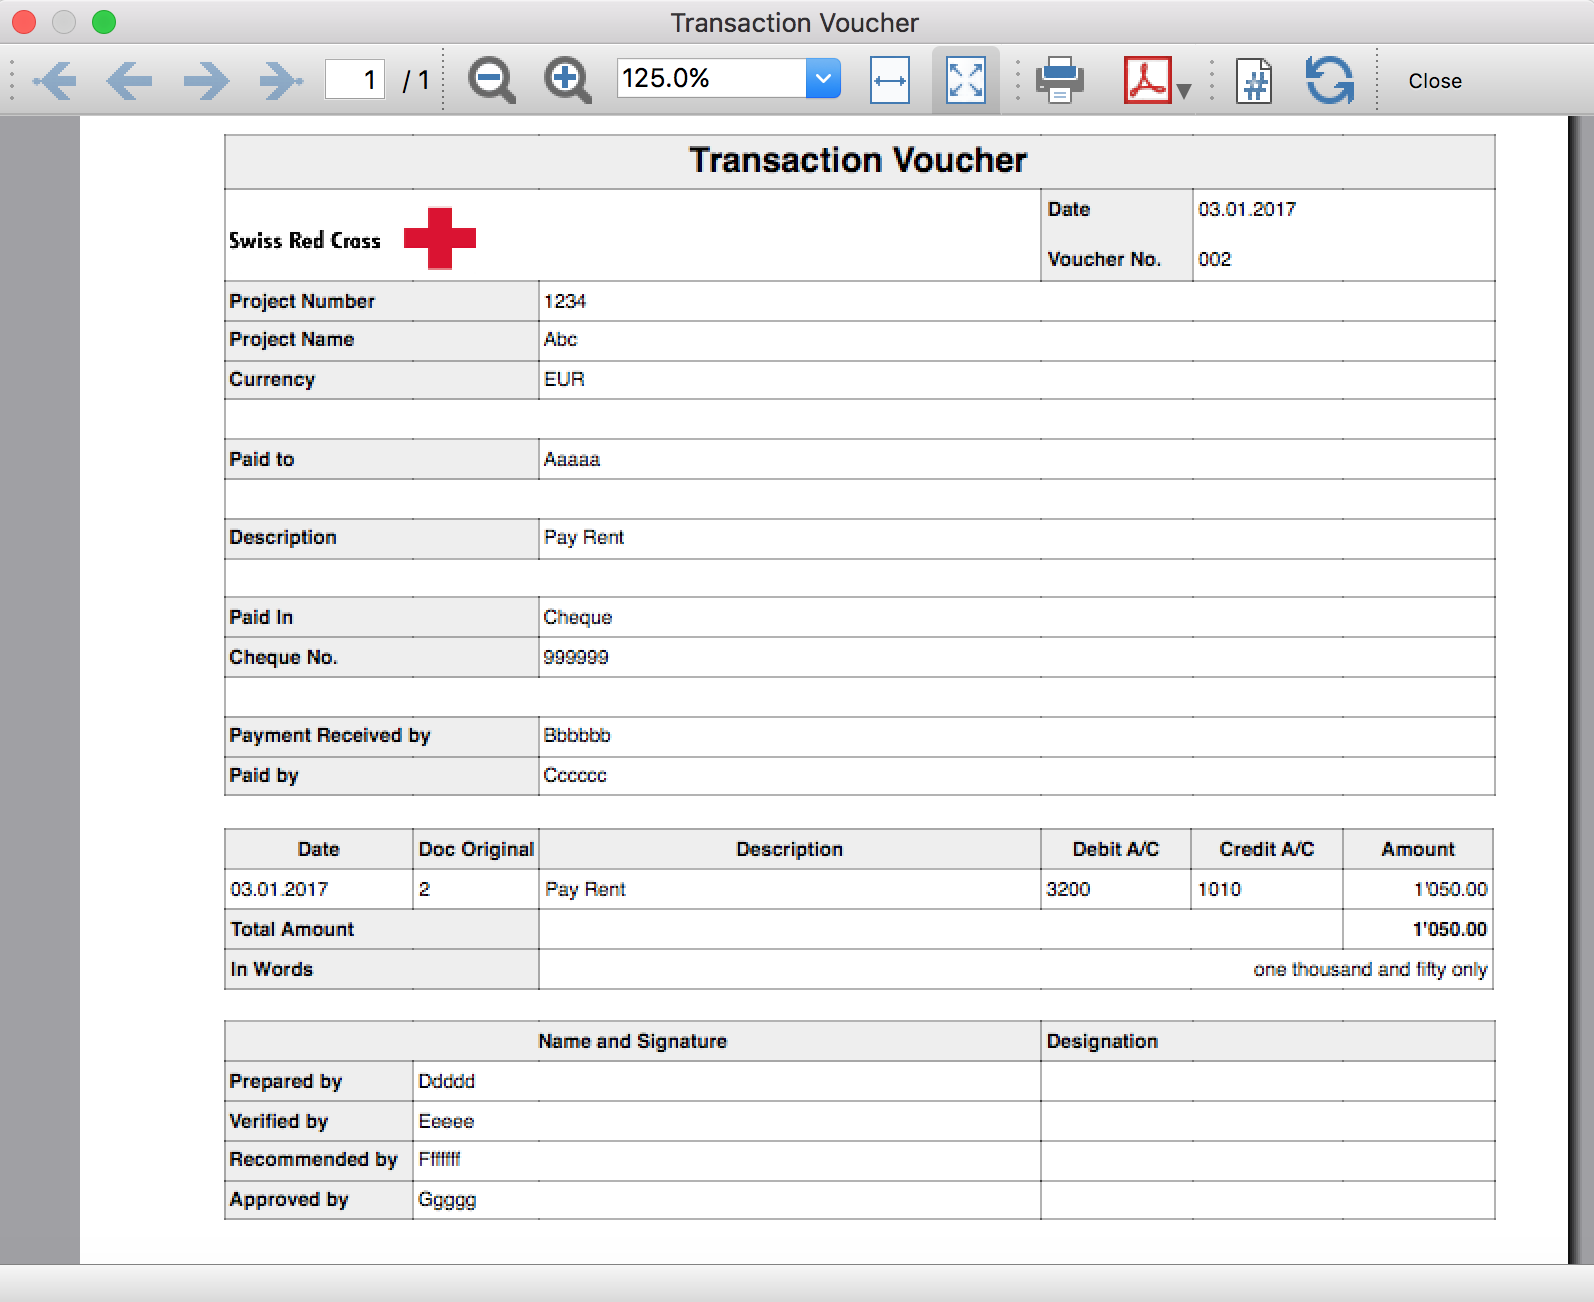
Trial Balance
Trial BalanceInstall the extension
To install the extension:
- Open Banana Accounting Plus.
- Menu Extensions > Manage Extensions.
- In the search field enter Trial Balance.
- From the extensions list select Trial Balance.
- Select the extension and click Install.
- Click Close to close the window.
Create the report
To creare the report:
- Open an accounting file.
- From the Extensions menu select the Trial Balance.
- Select the period.
For the given period, display a Trial Balance report containing:
- Balance sheet
- Profit & Loss
The details displayed are the following:
- Account
- Account description
- Debit amounts
- Credit amounts
Example of Trial Balance report: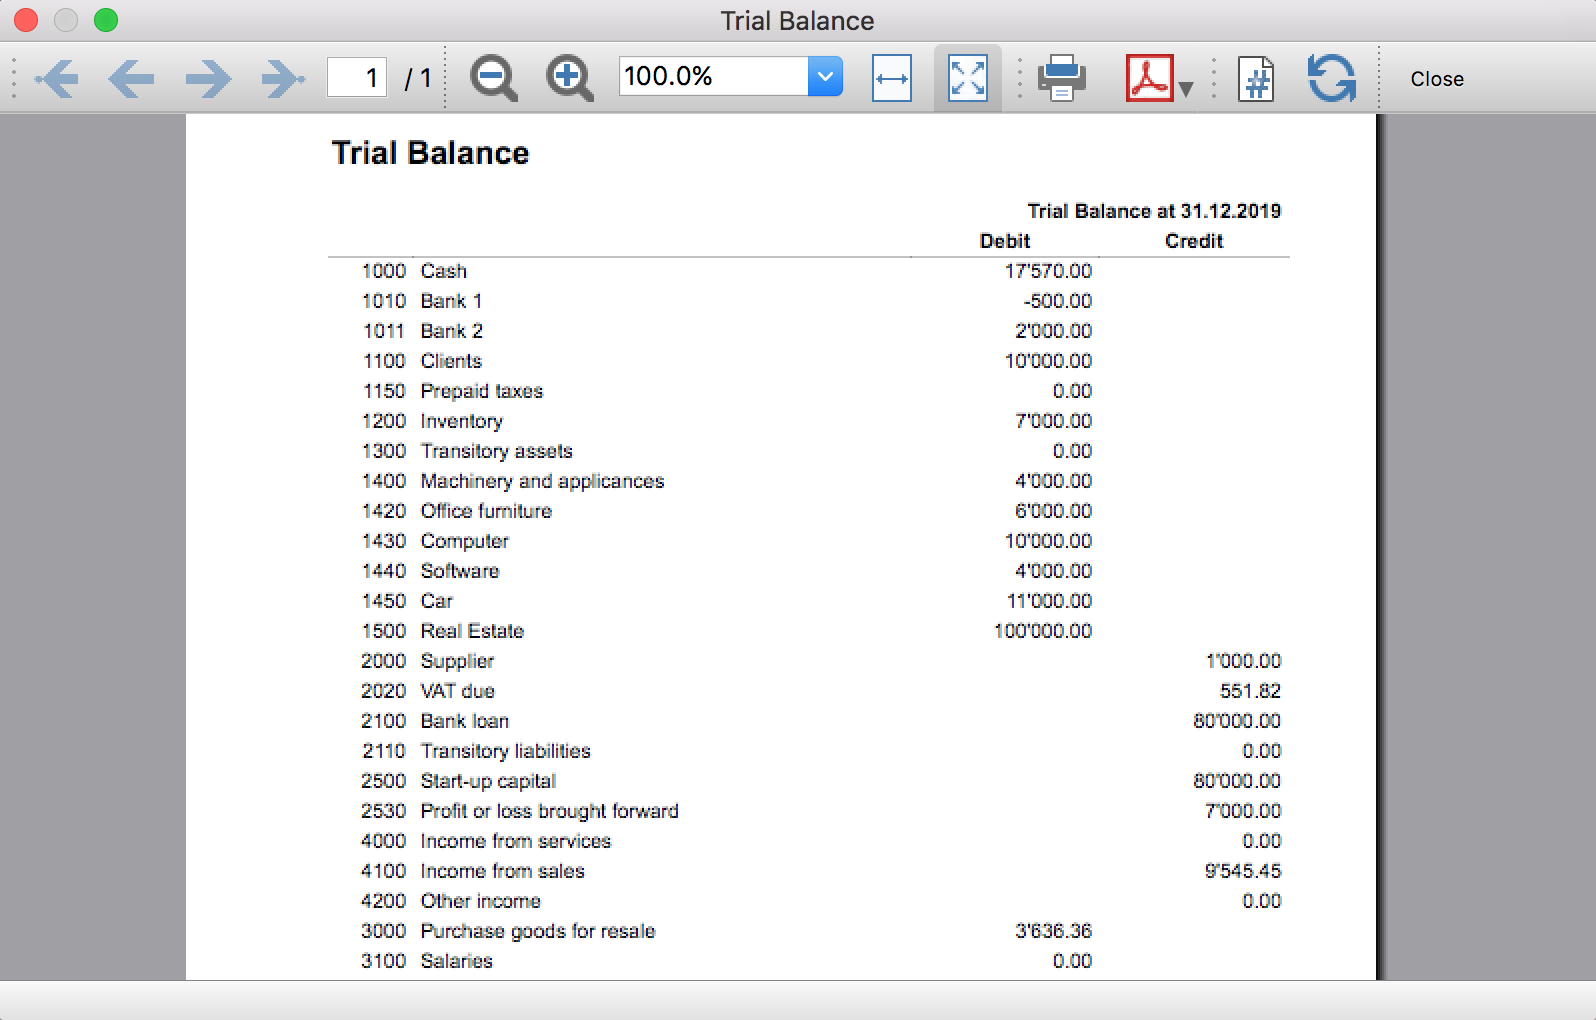
Trial Balance and Blockchain (Quarter periods)
Trial Balance and Blockchain (Quarter periods)This extension creates a report containing the table Accounts and at the end the blockchain for the selected quarter period.
Prerequisites
To use this extension you must download and install Banana Accounting Plus.
Install the extension
To install the extension:
- Open Banana Accounting Plus.
- Menu Extensions > Manage Extensions
- Select Universal as country.
- Select Online > Productivity.
- From the extensions list select Trial Balance and Blockchain (Quarter periods).
- Click Install to install the extension.
- Click Close to close the window.
Create the report
To creare the report:
- Open an accounting file.
- From the menu File > File and accounting properties, in the Header left and Header right fields enter the texts to be printed on the left and right in the page header.
- From the Extensions menu select Trial Balance and Blockchain (Quarter periods).
- In Settings dialogue select the period, set the header texts, the title and font, then click OK to create the report.
The texts of the settings dialog and column headers in the printout are fixed and are in the same language as the Banana file (defined from the menu File > File and accounting properties > Other > Current language). The languages that can be used are Italian, French, German and English.
Settings dialogue
Run the extension from the menu Extensions > Trial Balance and Blockchain (Quarter periods).
The extension Settings dialogue will open. From here you can choose some parameters to print the report.
- Period.
Select a period from the list. The periods are divided into three quarters. - Header left text.
Insert another text to be printed on the left side of the page header. - Header right text.
Insert another text to be printed on the right side of the page header. - Title.
Insert text to be printed as title of the page. - Font family.
Insert the font type. - Font size.
Insert the font size for all the page texts. - Title font size.
Insert the font size for the title.
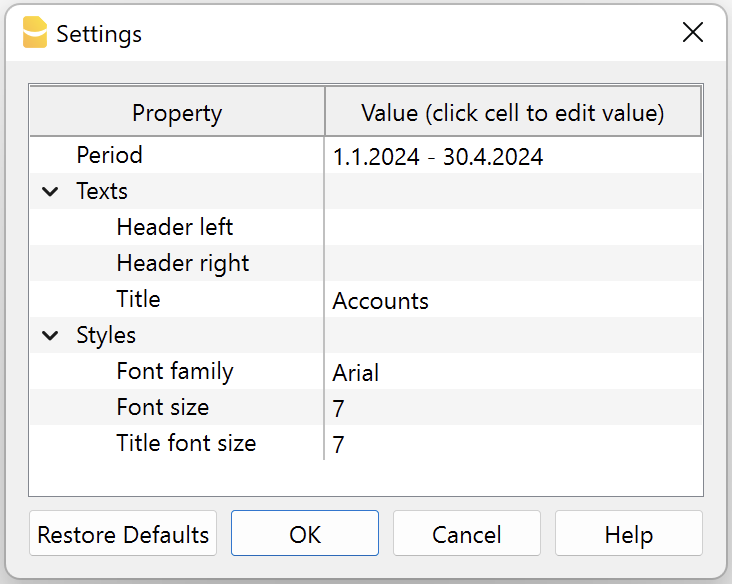
Print example
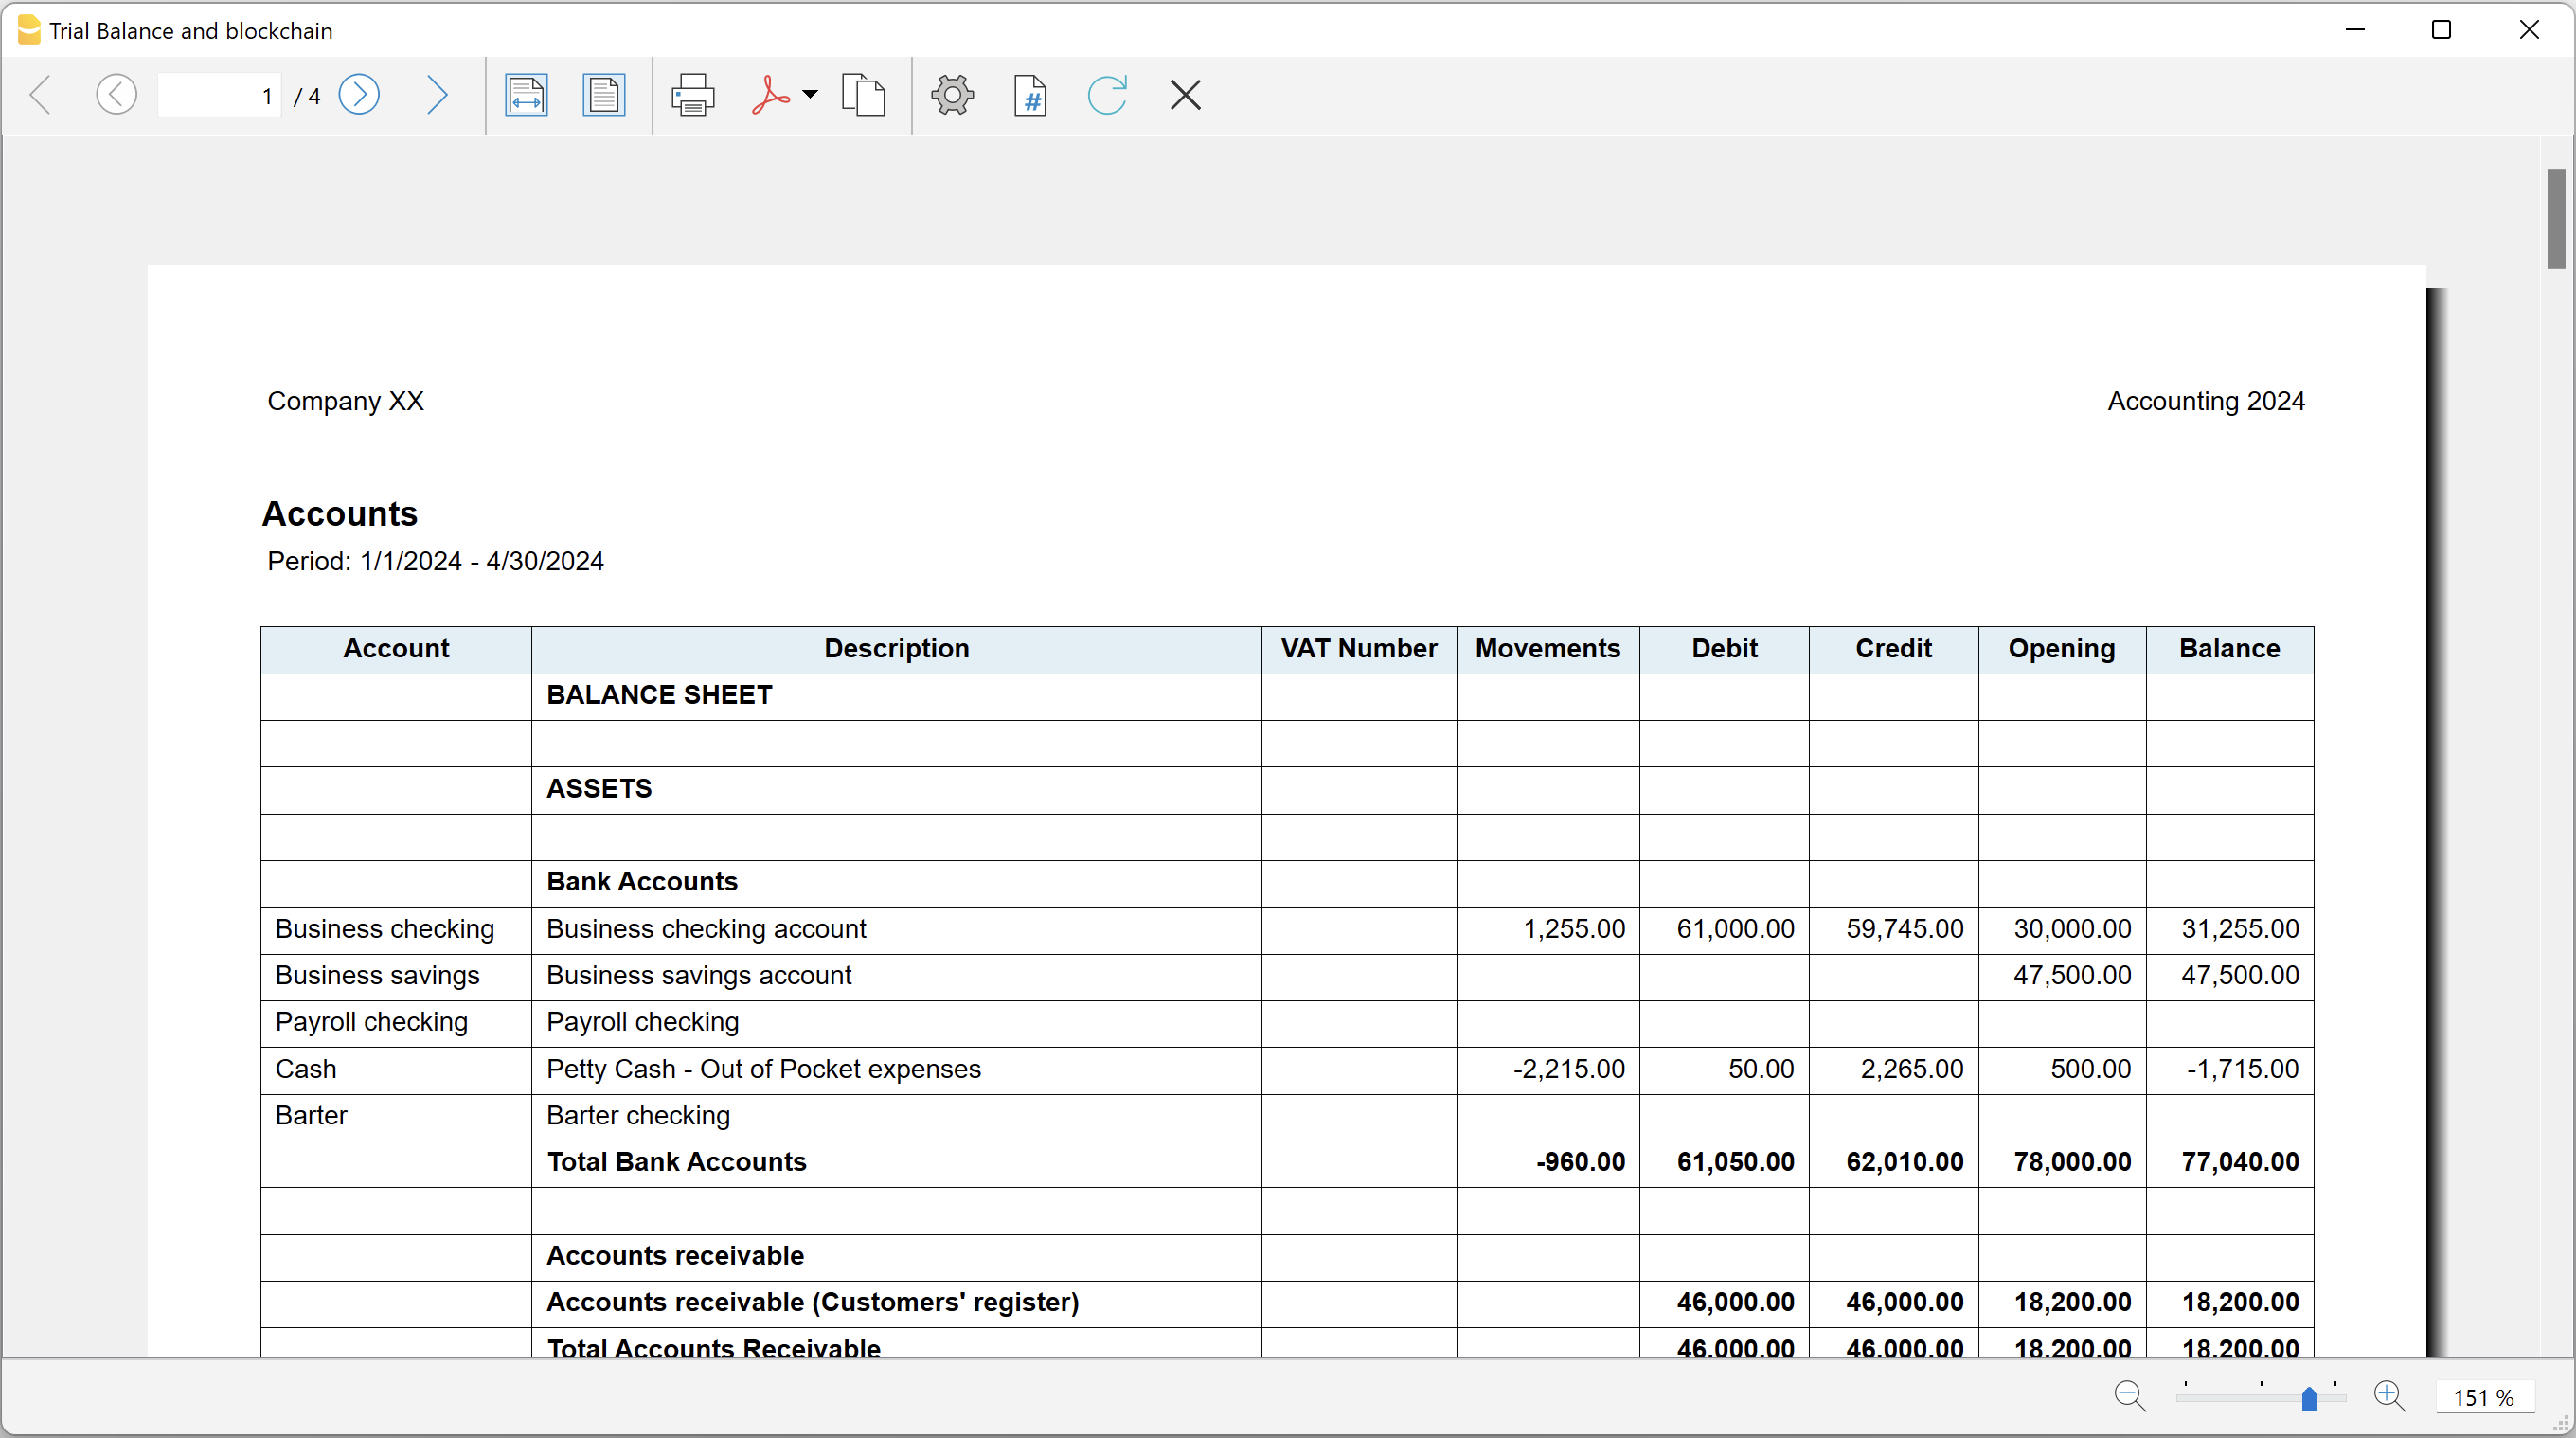
Trial Balance with transaction's lock blockchain information
Trial Balance with transaction's lock blockchain informationThe extension creates a report containing the table Accounts and the blockchain information regarding the transaction lock of the previous period and of the current period.
This printout has been conceived for a customer that has central SAP accounting and use Banana Accounting locally, to keep accounting for at more than 40 schools. Each school keep their own accounting and every 4 months the data is integrated in the main accounting system.
In order to assure that the information is perfectly synchronized:
- The school lock the transactions so that each movement is marked with a blockchain.
- The school print the report using this extension, with the data and the blockchain info of the current and last period.
- Prior to entering the data in the main system, the responsable verify that the blockchain of the last period already entered is the same as the one printed on the current report.
Personal at the schools can easily manage their finance locally and have more details and better control over the spending. Data is only entered in the main system periodically. The organisation have a better accounting system and save a lot of money in training and SAP licenses.
Install the extension
To install the extension:
- Open Banana Accounting Plus.
- Menu Extensions > Manage Extensions
- Select Universal as country.
- Select Online > Productivity.
- From the extensions list select Trial Balance with transaction's lock blockchain information.
- Click Install to install the extension.
- Click Close to close the window.
Create the report
To creare the report:
- Open an accounting file.
- From the menu File > File and accounting properties, in the Header left and Header right fields enter the texts to be printed on the left and right in the page header.
- From the Extensions menu select Trial Balance with transaction's lock blockchain information.
- In Settings dialogue set header texts, title and font as you want, then click OK.
- In Period dialogue select a period and confirm with OK to create the report.
The texts of the settings dialog and column headers in the printout are fixed and are in the same language as the Banana file (defined from the menu File > File and accounting properties > Other > Current language). The languages that can be used are Italian, French, German and English.
Settings dialogue
Run the extension from the menu Extensions > Trial Balance with transaction's lock blockchain information.
The extension Settings dialogue will open. From here you can choose some parameters to print the report.
- Header left text.
Insert another text to be printed on the left side of the page header. - Header right text.
Insert another text to be printed on the right side of the page header. - Title.
Insert text to be printed as title of the page. - Font family.
Insert the font type. - Font size.
Insert the font size for all the page texts. - Title font size.
Insert the font size for the title.
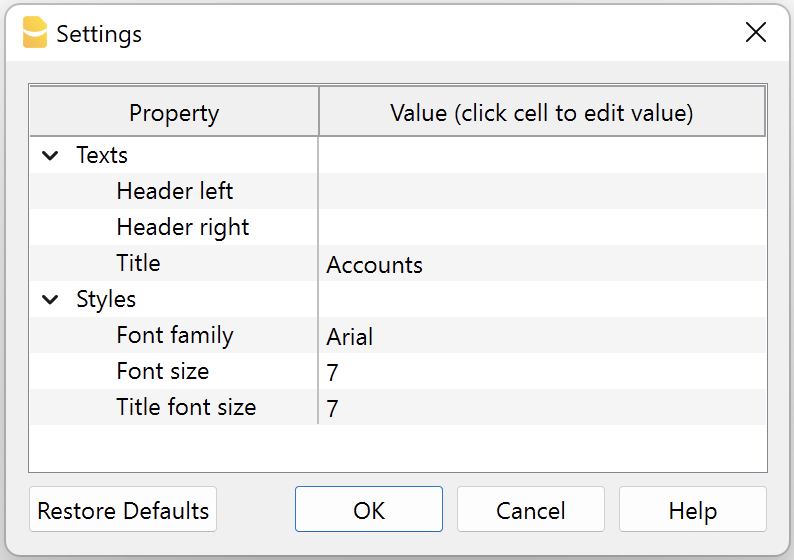
Print example
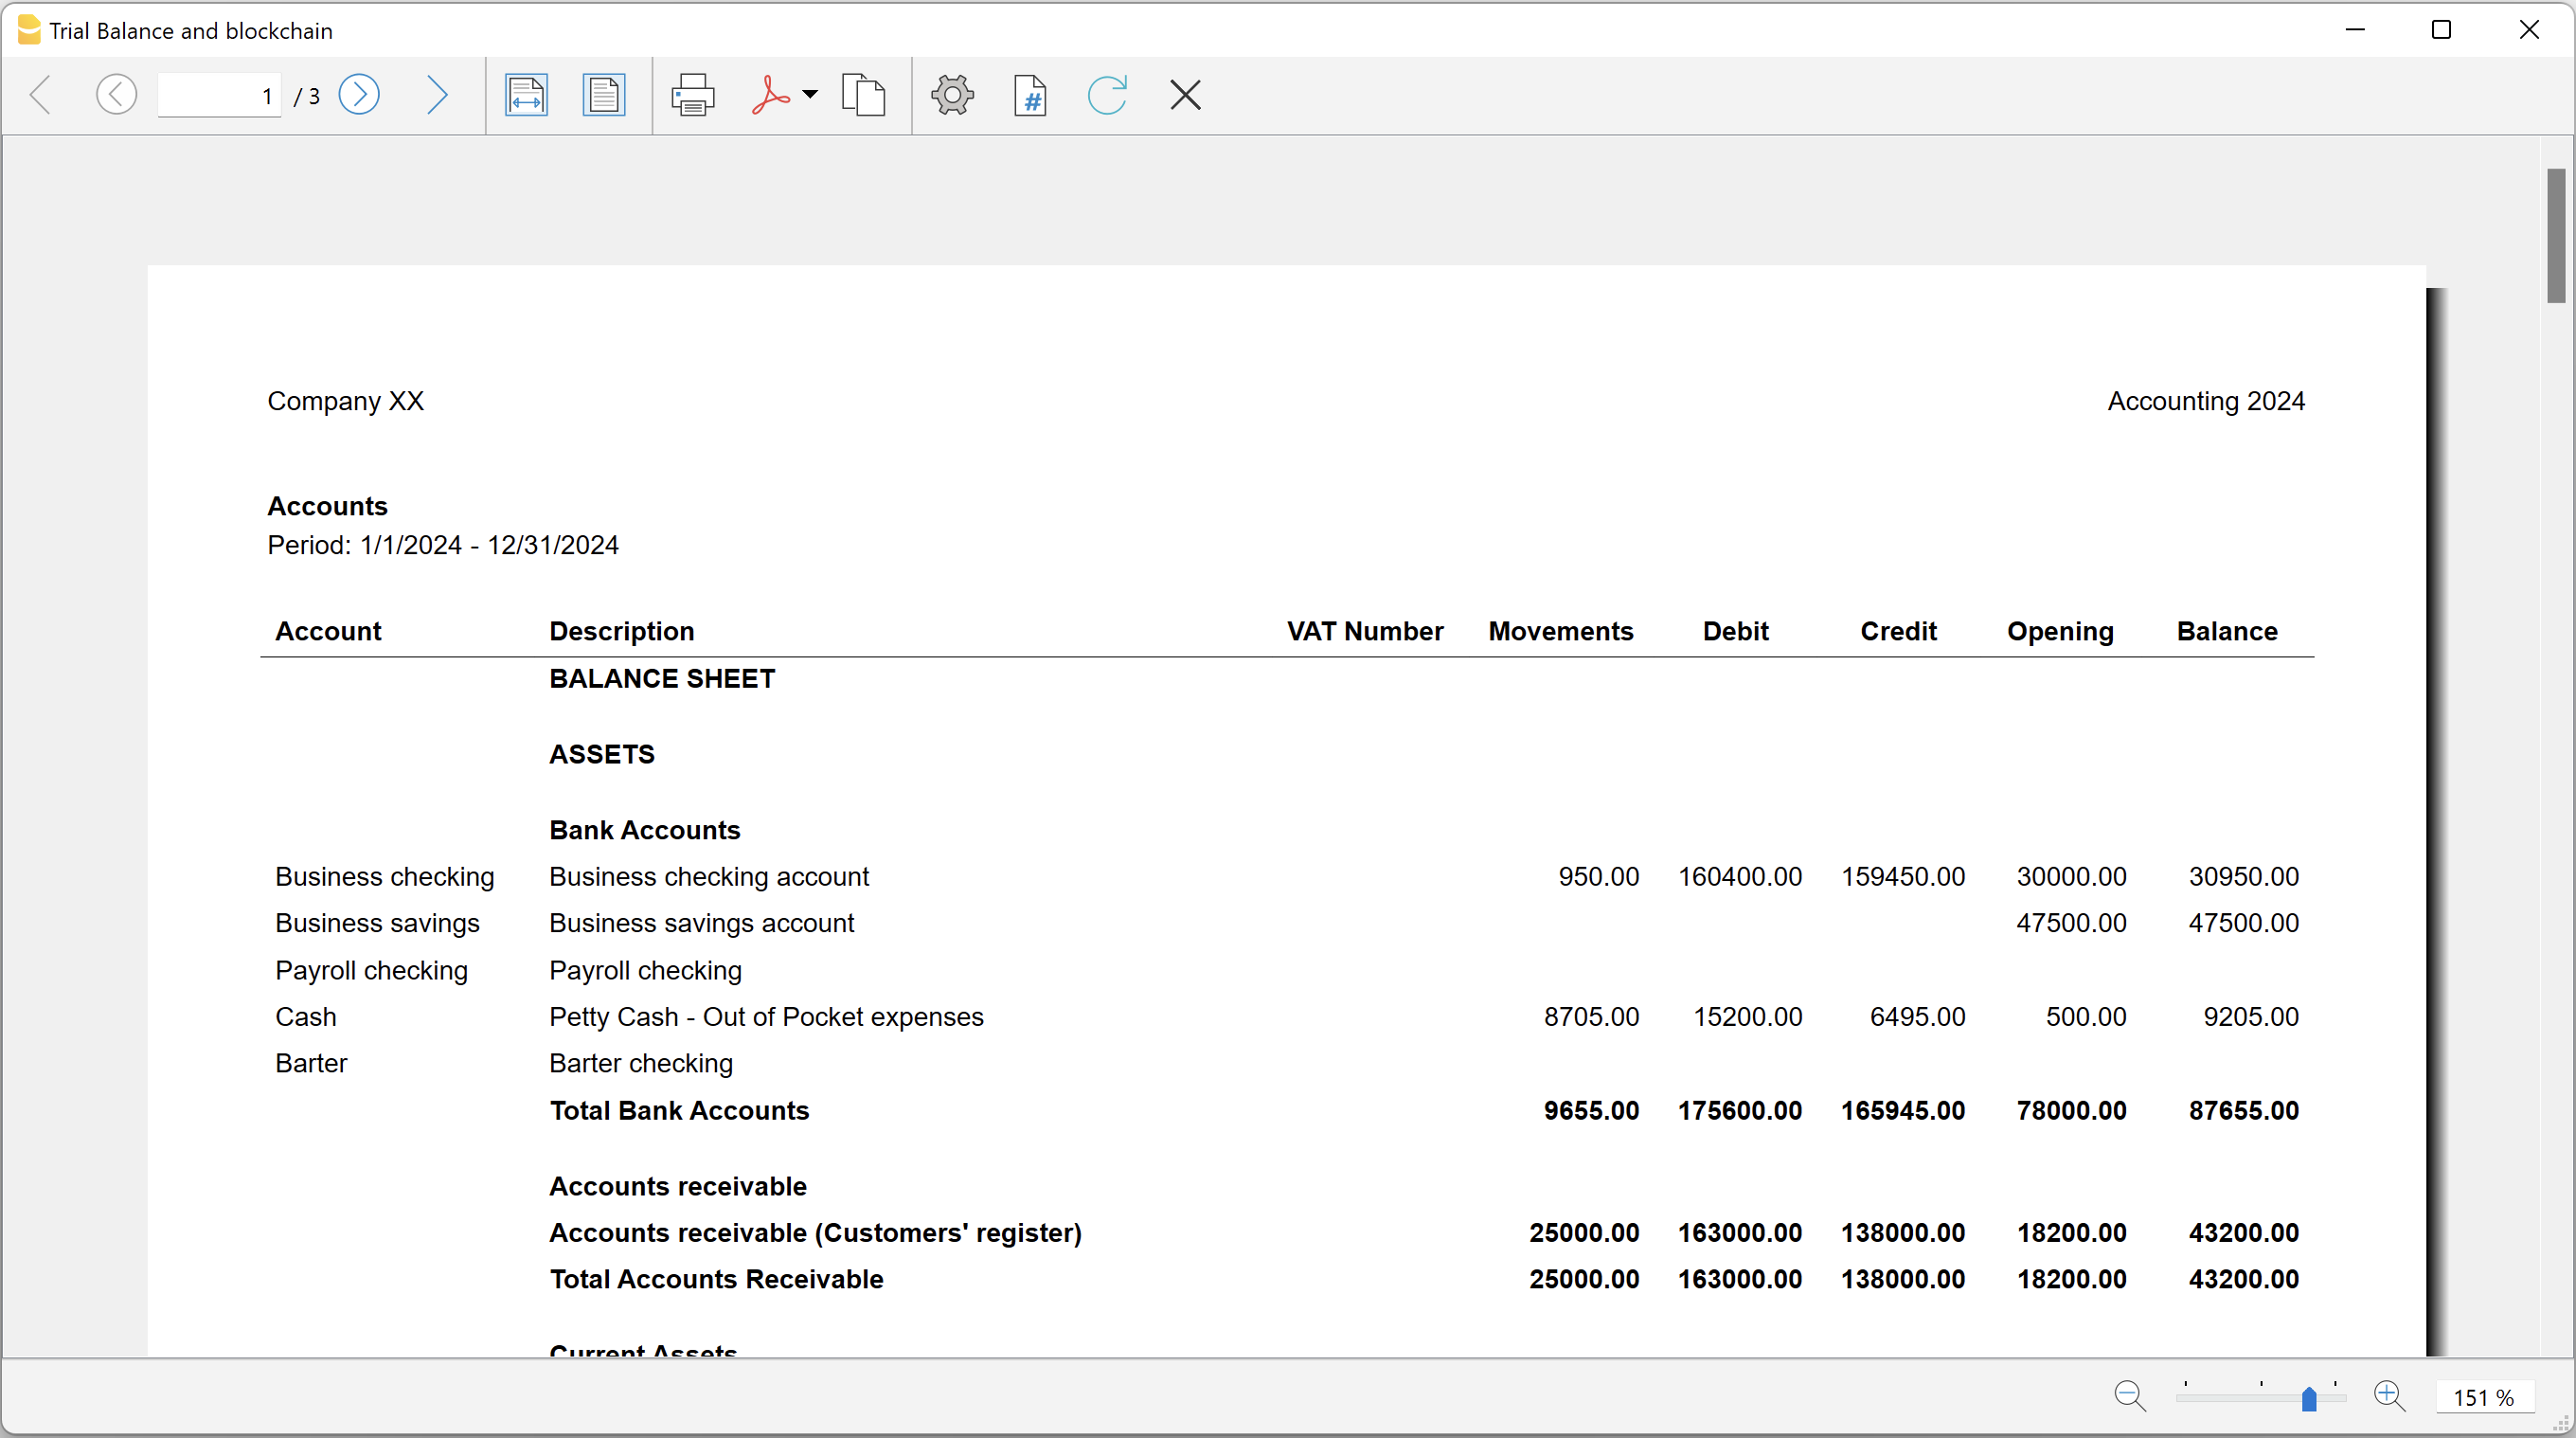
Blockchain row explanation:
- Date until which transactions are locked.
- Date of the last transaction.
- Number of locked transactions.
- Progressive hash of last locked transaction.
Utilities Extensions for accounting
This section covers general utility extensions for accounting.
Table of contents
- Compare current with other accounting file
- Calculate interest on account (exact days 365/365)
- Update Dates in the accounting file
- Invoice from member fee (Banana 9)
- Invoice from member fee (Banana+)
- Printing receipts from cash book transactions
- Reconcile account with mt940/ISO20022 file
- Duplicate transaction checking
Calculate interest on account (exact days 365/365)
Calculate interest on account (exact days 365/365)Install the extension
To install the extension:
- Open Banana Accounting Plus.
- Menu Extensions > Manage Extensions.
- In the search field enter Calculate interest on account (exact days 365/365).
- From the extensions list select Calculate interest on account (exact days 365/365).
- Select the extension and click Install.
- Click Close to close the window.
Create the report
To creare the report:
- Open an accounting file.
- From the Extensions menu select Calculate interest on account (exact days 365/365).
- Enter the account number.
- Select the period.
- Enter the interest rate on debit balance.
- Enter the interest rate on credit balance.
A window with results is displayed. You can copy, save and print the results. The transactions list can be paste into the table Transactions.
Compare current with other accounting file
Compare current with other accounting fileInstall the extension
To install the extension:
- Open Banana Accounting Plus.
- Menu Extensions > Manage Extensions.
- In the search field enter Compare current with other accounting file.
- From the extensions list select Compare current with other accounting file.
- Select the extension and click Install.
- Click Close to close the window.
Compare two accounting files
To compare two accounting files:
- Open an accounting file.
- From the Extensions menu select Compare current with other accounting file.
- Select a second accounting file to compare.
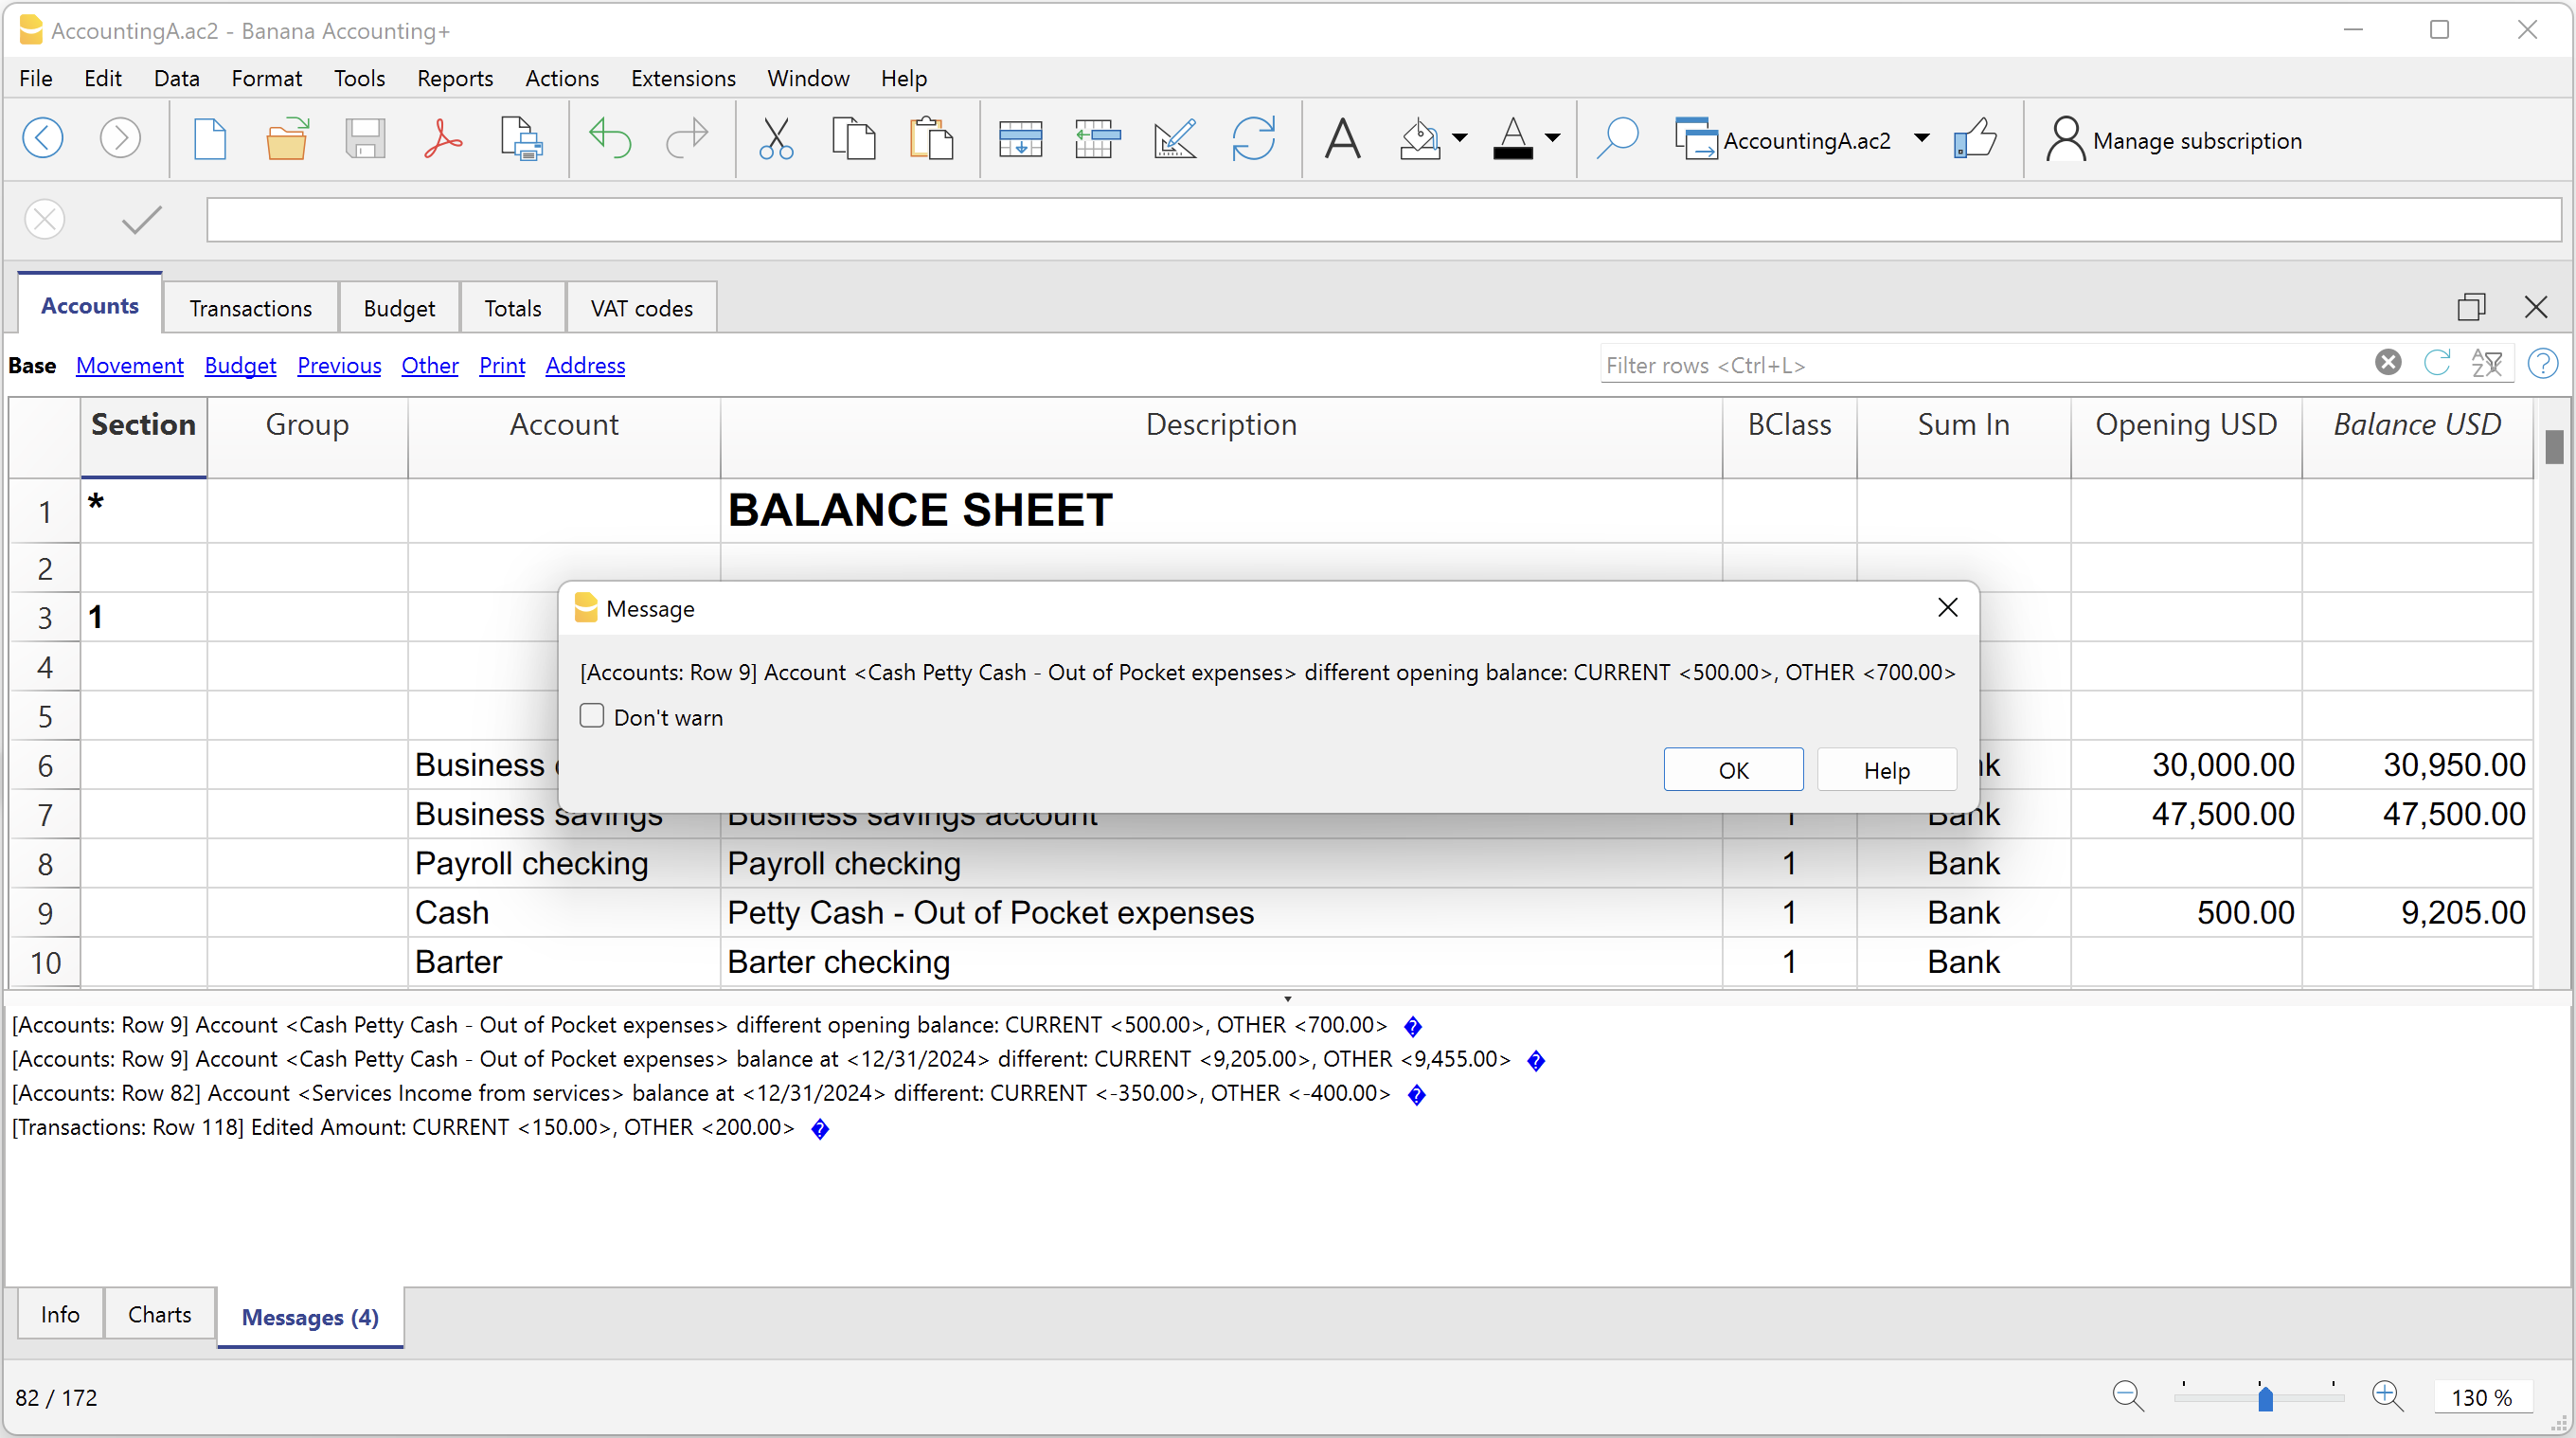
The differences are reported as messages, when you click on it you go to the row.
Create invoice transactions from member fee (Banana 9)
Create invoice transactions from member fee (Banana 9)Prerequisites
- Double-entry accounting file with normal accounts for members/customers is required.
Install the extension
To install the extension:
- Open Banana Accounting.
- Menu Extensions > Manage Extensions.
- In the search field enter Create invoice transactions from member fee (Banana 9).
- From the extensions list select Create invoice transactions from member fee (Banana 9).
- Select the extension and click Install.
- Click Close to close the window.
Add the MemberFee column
- Open the Accounts table (Address view).
- Activate the MemberFee column (the column already exists, it just needs to be activated).
- For each member/customer use the MemberFee column to enter the invoice amount.
Create invoice transactions
To creare the invoice transactions:
- Open an accounting file.
- From the menu Account1 select Import to accounting.
- As import option select Transactions.
- From the list select the Create invoice transactions from member fee extension.
- In the File name field, click Browse and select the current open accounting file.
- Click OK.
- Enter the invoice start number.
- Enter the revenue account.
- Enter the transaction description.
- The Import transactions opens, confirm with OK.
The program creates the invoice transactions for all the member/customer that has an amount in the MemberFee column of the table Accounts.
Create invoice transactions from member fee (Banana+)
Create invoice transactions from member fee (Banana+)Prerequisites
- Banana Accounting Plus.
- Double entry accounting file with Cost Centers accounts (Cc1, Cc2, Cc3) for members/customers is required.
Install the extension
To install the extension:
- Open Banana Accounting Plus.
- Menu Extensions > Manage Extensions.
- In the search field enter Create invoice transactions from member fee (Banana+).
- From the extensions list select Create invoice transactions from member fee (Banana+).
- Select the extension and click Install.
- Click Close to close the window.
Add the MemberFee column
- Open the Accounts table (Address view).
- Activate the MemberFee column (the column already exists, it just needs to be activated).
- For each member/customer use the MemberFee column to enter the invoice amount.
Create invoice transactions
To creare the invoice transactions:
- Open the accounting file.
- From the menu Extensions select Create invoice transactions from member fee (Banana+).
- In the Settings dialogue:
- Set the invoice description.
The text that is displayed on the invoice. This text is automatically followed by first and last name or company name. - Set the starting invoice number.
The first invoice starts whit this number, while all others invoices use progressive numbers.
- Set the invoice description.
- The program shows a dialog with all the invoice transactions that will be added.
- Confirm with OK.
The program creates the invoice transactions for all the members/customers that have an amount in the MemberFee column of the table Accounts.
- Date: the date of the current day.
- Description: text entered in the settings followed by first and last name or company name.
- Amount: the amount defined in the MemberFee column of the Accounts table.
- Cc1 / Cc2 / Cc3: the Cost Center account of the member/customer:
- Cc1 when using cost centers that starts with "."
- Cc2 when using cost centers that starts with ","
- Cc3 when using cost centers that starts with ";"
Duplicate transaction checking (auf Doppelbuchungen prüfen)
Duplicate transaction checking (auf Doppelbuchungen prüfen)Diese Applikation dient zur Prüfung auf Doppelbuchungen.
Es handelt sich um eine Doppelbuchung, wenn ein anderer Buchungssatz mit gleichem Betrag, sowie Haben-Konto und Soll-Konto in einem Zeitraum von 3 Tagen existiert.
Wird eine Doppelbuchung gefunden, wird dem Benutzer eine Meldung angezeigt.
Es ist möglich, die Prüfung einer Buchung zu überspringen, indem eine neue Spalte mit dem Namen 'SkipDuplicateCheck' hinzufügt und darin auf der Buchungszeile ein beliebiger Wert (z.B.:'x') eingegeben wird.
Siehe auch Installieren einer Banana-Erweiterungen.
Reconcile account with mt940/ISO20022 file
Reconcile account with mt940/ISO20022 fileThis extension takes as input an electronic bank statemant (MT940 or ISO20022) and compare day by day with the account statements and shows differences.
It is very usefull for finding transactions not recordered or incorrectly recorded.
Install the extension
To install the extension:
- Open Banana Accounting Plus.
- Menu Extensions > Manage Extensions.
- In the search field enter Reconcile account with mt940/ISO20022 file.
- From the extensions list select Reconcile account with mt940/ISO20022 file.
- Select the extension and click Install.
- Click Close to close the window.
Create the report
To creare the report:
- Open the accounting file.
- From the Extensions menu select the Reconcile account with mt940/ISO20022 file.
- Select the electronic bank statement (MT940 or ISO20022).
- Enter the account number.
A window with results is displayed. You can copy, save and print the results.
Update Dates in the accounting file
Update Dates in the accounting fileIn order to change the accounting data, the extension uses the Document Change API. For more information visit How-to update Accounting Dates using Document Change.
Install the extension
To install the extension:
- Open Banana Accounting Plus.
- Menu Extensions > Manage Extensions.
- In the search field enter Update Dates in the accounting file.
- From the extensions list select Update Dates in the accounting file.
- Select the extension and click Install.
- Click Close to close the window.
Change accounting dates
To change accounting dates using the extension:
- Open an accounting file.
- From the Extensions menu select the Update Dates in the accounting file.
- A confirmation window dialogue shows all the sections and tables of the accounting where dates will be changed.
- Confirm with OK to apply the changes to the accounting file.
[UNI11] Layout 11 – Programmierbares Rechnungslayout (Banana+)
[UNI11] Layout 11 – Programmierbares Rechnungslayout (Banana+)Dieses Layout für den Rechnungsausdruck mit Banana Buchhaltung Plus ist sehr anpassbar und programmierbar. Sie können Ihre Rechnungen ganz nach Wunsch gestalten, selbst festlegen, welche Elemente gedruckt werden sollen, und die Textbeschreibungen individuell anpassen.
Das Layout UNI11 verfügt über denselben Funktionsumfang wie das Layout CH10, mit Ausnahme des Ausdrucks des Schweizer QR-Codes.
Die Dokumentation zu Layout UNI11 verweist auf diejenige des Layouts CH10, da die Funktionalität weitgehend identisch ist.
Die Bankverbindung für die Bezahlung der Rechnung wird über einen Schlusstext eingefügt. Bitte beachten Sie die entsprechende Anleitung zum Eingeben eines Schlusstextes, um die Zahlungsinformationen korrekt darzustellen.
Voraussetzungen
Personalisierung des Rechnungsausdrucks
Das Rechnungsdrucklayout enthält vordefinierte Einstellungen, die Sie an Ihre individuellen Bedürfnisse anpassen können. Der Rechnungsausdruck lässt sich auf einfache Weise personalisieren: Bestimmen Sie selbst, welche Rechnungselemente angezeigt oder ausgeblendet werden sollen. Passen Sie die vordefinierten Beschreibungstexte flexibel an, um sie Ihrer Sprache oder Ihrem Stil anzupassen.
- Dialogfenster zur Einstellung der Rechnungsparameter – Im Dialogfenster für das Rechnungsdrucklayout können Sie zahlreiche Einstellungen vornehmen, um Ihre Rechnung individuell zu gestalten:
- Auswahl der Rechnungselemente – Bestimmen Sie, welche Informationen auf der Rechnung enthalten sein sollen.
- Position der Rechnungsadresse – Wählen Sie, ob die Adresse rechts oder links auf der Rechnung erscheinen soll.
- Detailspalten definieren – Legen Sie fest, welche Spalten angezeigt werden (z.B. Menge, Einzelpreis, Gesamtbetrag) und in welcher Reihenfolge.
Es können Rechnungen mit vollständigen Detailangaben (Mengen und Preisen) oder nur mit Gesamtsummen erstellt werden. Auch benutzerdefinierte Spalten sind möglich. - Standardtexte bearbeiten – Ändern Sie vordefinierte Texte wie "Rechnung", "Fälligkeitsdatum" oder "Zahlbar bis" nach Ihren Bedürfnissen.
- Mehrsprachigkeit – Fügen Sie Übersetzungen in anderen Sprachen hinzu – ideal für internationale Kunden.
- Schriftart anpassen – Die Schriftart des Textes kann nach Wunsch geändert werden.
- Farbschema auswählen – Passen Sie die Farbgestaltung Ihrer Rechnung nach Ihren Wünschen an.
- JavaScript-Programmierung
- Erstellen Sie eigene Druckfunktionen für: Kopfzeile, Adressbereich, Positionsdetails, Schlusstext und Fusszeile.
Diese Funktionen ersetzen die standardmässig vordefinierten Ausgaben beim Rechnungsausdruck.
- Erstellen Sie eigene Druckfunktionen für: Kopfzeile, Adressbereich, Positionsdetails, Schlusstext und Fusszeile.
- CSS-Programmierung
- Passen Sie Ränder, Abstände und andere Formatierungsparameter an, indem Sie die entsprechenden CSS-Eigenschaften verändern.
- Benutzerdefiniertes Layout erstellen
- Dies erfordert Kenntnisse in der JavaScript-Programmierung.
- Alternativ können Sie ein bestehendes Layout als Vorlage verwenden und es nach Belieben anpassen.