Double-entry accounting
The professional tool to manage assets, liabilities, expenses and income according to the international rules of the Double-entry (debit and credit) and to obtain a Balance Sheet and a Profit/loss Statement.
The double-entry accounting application is available with or without the VAT management option.
Characteristics
- Manages the estate accounts and the profit/loss accounts (assets, liabilities, expenses and revenue)
- The accounting type with VAT features the VAT calculations and VAT reports
- Produces all the accounting extracts: journal, account cards, balances by period and annual balances
- Allows Cost Centers and Segments management
- Offers different ways of data presentation
- Exports data to Excel, Html, Xml, Pdf
- Imports data from different files formats
Tables and File properties
The double-entry accounting is composed by the following tables:
- Accounts table
Where the accounting plan is located with opening balances, and where groups and subgroups can be defined along with cost centers and segments. - Transactions table
Where the accounting transactions are entered. - VAT Codes table
Where the VAT/Sales tax codes are set, only if the VAT management option has been chosen. - Exchange rates table
Where the different currencies are defined, only if the multi-currency accounting option has been chosen. - File properties
Where the accounting general settings are defined.
Changing accounting type
In order to change your file language, rounding system, or in order to add VAT or multicurrency columns, please refer to the Convert to new file command, from the Tools menu.
Theoretical part
In this chapter, the basic theory of the Double-entry accounting is being explained.
Debit and Credit
Double-Entry Accounting in Practice
Main rules to learn how to manage double-entry accounting Double-entry accounting is based on four main account categories:
| ASSETS | The accounts that represent the positive elements of the estate |
| LIABILITIES | The accounts that represent the negative elements of the estate |
| COSTS | The accounts that represent the costs (but not those related to the purchase of estate goods) |
| REVENUES | The accounts that represent the earnings (not those obtained by the sale of estate goods) |
- The account is an entity that groups the amounts that belong to the same transaction category.
- Every account must be registered as debit or credit depending on the type of accounting transaction.
- Double-entry accounting uses debit and credit instead of income and expenses.
The General Rule
|
ASSETS |
→ | DEBIT |
|
LIABILITIES |
→ | CREDIT |
|
COSTS |
→ | DEBIT |
|
REVENUES |
→ | CREDIT |
- The assets, liabilities, costs and revenues are subject to continuous variations: increases and decreases.
The increasing variations
|
INCREASE IN ASSETS |
→ |
DEBIT |
|
INCREASE IN LIABILITIES |
→ |
CREDIT |
|
INCREASE IN COSTS |
→ |
DEBIT |
|
INCREASE IN REVENUES |
→ |
CREDIT |
The decreasing variations
|
DECREASE IN ASSETS |
→ |
CREDIT |
|
DECREASE IN LIABILITIES |
→ |
DEBIT |
|
DECREASE IN COSTS |
→ |
CREDIT |
|
DECREASE IN REVENUES |
→ |
DEBIT |
Instruments in Double-entry Accounting
Double-entry accounting uses the following principal instruments: the Chart of Accounts, Journal, Balance Sheet and Profit and Loss Statement.
| Chart /Accounts |
This is the list of all the accounts that group the different transactions categories together (ex. cash book, bank, purchases, sales, etc.).
-
To use Banana Accounting, one must simply take an already predefined accounting plan, adapt it to the proper requirements and insert the transactions. The rest will be executed by the program.
| Journal |
This is the list of all the operations that influence the activity daily (withdrawals, deposits, purchases, sales, salaries, rent, etc.) It corresponds to that which the larger part of the small businesses already have even if it’s only on paper or Excel, to then give to the accountant.
| Balance Sheet |
This is a summary outline of the assets and liabilities. The difference between the assets and liabilities represents the net capital amount of the firm.
| Profit and Loss Statement |
This is a summary outline of all the costs and revenues. The balance represents the operational result (profit or loss).
Starting Accounting
Procedure to start accounting with Banana Accounting
|
1 |
Take an existing accounting model with a predefined chart of accounts. |
|
2 |
Adapt the chart of accounts to the proper requirements. |
|
3 |
Insert the transactions in the journal. |
Mathematical basis
For the user of Banana's Double-entry accounting, it may seem strange that the revenue/income (sales) and the liabilities (start-up capital) appear in negative, while normally one expects that the sales appear in positive and the expenses in negative.
The double-entry accounting is based on the debit and credit principle that usually appear in two seperate columns. If the amounts in debit and in credit appear in one column, the mathematics of the Double-entry accounting anticipates the use of the minus sign (-), so that the amounts in debit can be easily distinguished from the amounts in credit.
Banana goes completely with the mathematical logic of the Double-entry accounting and thus indicates the amounts with the minus sign (and in red print to let the user distinguish even better the amounts in debit and in credit). In the Double-entry accounting the amounts in negative (credit) don't have the same meaning as in the accounting that is based on income and expenses.
The indication of the credit amounts in negative is a much more efficient system than other ones that add codes to amounts, such CR, DEB, CR or brackets.
This system is based on simple mathematical equations which assure that the accounting is correct. It is not by accident that the Double-entry accounting method has in fact been encoded by Luca Pacioli in 1494, one of the most illustrious mathematicians of the Italian Renaissance (he taught mathematics to Leonardo da Vinci). In his "Summa de arithmetica, geometria, proportioni et proportionalita", Luca Pacioli didn't just deal with the Double-entry accounting, but also with other mathematical questions.
In the Renaissance there were no electronic calculators, and so they used to indicate the amounts in debit and in credit in separate columns. The result was that it became easier to totalize the amounts. Today, with the computers, no calculations need to be made and the principal issue is to use a user-friendly system which is at the same time easy and correct.
For those interested in accounting mathematics and the equations on which Banana accounting is based, the following explanation can be interesting.
Debit/Credit
The Double-entry accounting leans on the principle that each movement is noted in debit as well as in credit and the amounts have to match.
Debit = Credit
The balance (the total difference between debit and credit) has to always be equal to zero
Debit - Credit = 0
In order to easily distinguish (very useful while working on the screen), the amounts in credit are indicated in red, preceded by the minus sign
Debit + (-Credit) = 0
|
Two transaction examples |
Debit |
Credit |
|
Debit + (- Credit) |
|
Cash income |
200 |
|
|
200 |
|
for product sales |
|
200 |
|
-200 |
|
|
|
|
|
|
|
Several cash payments |
|
170 |
|
-170 |
|
for purchase of merchandise |
100 |
|
|
100 |
|
for office supplies |
50 |
|
|
50 |
|
small expenses |
20 |
|
|
20 |
|
Total |
370 |
370 |
|
0 |
|
Balance (Debit - Credit) |
0 |
|
0 |
|
Balance Sheet and Profit/Loss Statement
The mathematics of the Double-entry accounting anticipates the use of two "accounts".
- Balance Sheet Account (Balance Sheet) keeps note of the financial state at a certain moment.
- Debit represents the Assets
- Credit represents the Liabilities (here will always means including the Equity)
- Profit/Loss Account (Profit and Loss) keeps note of the progress.
- Debit represents the Expenses
- Credit represents the Revenue
The transactions are entered in debit and in credit in the appropriate accounts of the Balance Sheet and the Profit/Loss statement.
|
|
Balance Sheet |
|
Profit/Loss Statement |
||
|
Registrazioni |
Assets |
Liabilities |
|
Expenses |
Revenue |
|
Cash income |
200 |
|
|
|
|
|
for product sales |
|
|
|
|
200 |
|
|
|
|
|
|
|
|
Several cash payments |
|
170 |
|
|
|
|
for purchase of merchandise |
|
|
|
100 |
|
|
for office supplies |
|
|
|
50 |
|
|
small expenses |
|
|
|
20 |
|
|
Total |
200 |
170 |
|
170 |
200 |
|
Balance (difference debit - credit) |
30 |
|
30 |
||
|
Equations with two columns |
|
|
Debit = Credit |
370 = 370 |
|
Assets + Expenses = Liabilities + Revenue |
200 + 170 = 170 + 200 |
|
Assets - Liabilities = Revenue - Expenses |
200 - 170 = 200 - 170 |
|
Balance = Balance |
30 = 30 |
|
|
|
The same transactions can be represented in a single column (credit in negative)
The result is, of course, the same.
|
Transactions |
Balance Sheet |
|
Profit/Loss Statement |
|
Cash income |
200 |
|
|
|
for product sales |
|
|
-200 |
|
|
|
|
|
|
Several cash payments |
-170 |
|
|
|
for purchase of merchandise |
|
|
100 |
|
for office supplies |
|
|
50 |
|
small expenses |
|
|
20 |
|
|
|
|
|
|
Balence (debit - credit) |
30 |
|
-30 |
|
Equations single column (credit in negative) |
|
|
Debit - Credit = 0 |
270 - 270 = 0 |
|
Assets + Expenses - Liabilities - Revenue = 0 |
200 + 170 - 170 - 200 = 0 |
|
Assets - Liabilities - Revenue + Expenses |
200 - 170 - 200 + 170 = 0 |
|
Balance - Balance = 0 |
30 - 30 = 0 |
Equations for the business results
The business result is the balance (Debit - Credit) of the Balance Sheet and the Profit/Loss Statement.
|
Equations double column |
|
|
Assets - Liabilities = Revenue - Expenses |
200 - 170 = 200 - 170 |
|
Balance of the Balance Sheet = Balance of Profit/Loss Statement |
30 |
|
Balance of the Balance Sheet = Assets - Liabilities |
30 |
|
Equations for the determination of the result (in two columns) |
||
|
Profit |
Assets > Liabilities |
Expenses < Revenue |
|
Balance |
Assets = Liabilities |
Expenses = Revenue |
|
Loss |
Assets < Liabilities |
Expenses > Revenue |
One has a profit when the assets are higher than the liabilities and the revenue more than the expenses.
One has a loss when the liabilities are higher than the assets and the revenue is lower than the expenses.
|
Equations single column (credit in negative) |
|
|
Assets - Liabilities - (Revenue - Expenses) = 0 |
200 - 170 - (-200 - 170) = 0 |
|
Balance of the Balance Sheet - Balance of Profit/Loss Statement = 0 |
30 - 30 = 0 |
|
Balance of the Balance Sheet |
30 |
|
Balance of Profit/Loss Statement |
-30 |
|
Equations for the determination of the result in a single column |
||
|
Profit |
Assets - Liabilities > 0 |
Expenses - Revenue < 0 |
|
Balance |
Assets - Liabilities = 0 |
Expenses - Revenue = 0 |
|
Loss |
Assets - Liabilities <0 |
Expenses - Revenue > 0 |
One has a profit, when the balance of the Balance Sheet is positive and the balance of the Profit/Loss Statement negative.
One has a loss, when the balance of the Balance Sheet is negative and the balance of the Profit/Loss Statement positive.
Use of noting in a single column
Noting the data in double columns is ideal for transactions in paper books. The amounts in debit and in credit are inscribed in separate columns. The totals are being calculated at the end of the page and the totals and calculation of the results are being done at the end of the period.
Computerized systems offer the possibility to keep the balances of the accounts constantly updated. For the calculations, the software therefore normally use noting in a single column, with the amounts in debit in positive and the amounts in credit in negative. In order to use noting in double columns, the software would have to register the credit amounts in the Balance sheet in negative, and, in the Profit/loss Statement, register the credit amounts in positive and the debit amounts in negative.
For the programmer's point of view, this solution is more complicated, and thus the majority of the software use internally the mathematics of the single column and noting in double columns only for the presentation.
Banana Accounting instead systematically uses the minus sign to indicate the credit amounts. Initially, the user has to get used to this system, but it has the advantage of being linear and allows for a better understanding of the mathematics on which the Double-entry accounting is based, especially when more complicated operations are being required like write-off's, profit at the end of the year or VAT due/recoverable.
For the presentation of the Balance Sheet and the Profit/loss Statement, the logic of the double columns is however more adapted.
Thus the print-outs of the Balance Sheet and the Profit/Loss Statement that are used for the presentation of the results are edited with Assets, Liabilities, Expenses and Revenue always in positive. When the Profit/Loss Statement is presented in a scalar format (Revenue minus Expenses), the Revenue is indicated in positive and the Expenses in negative.
Organize yourself
At the basis of the accounting, there are the accounting documents and receipts.
The type of one's organizing with regard to the accounting, depends on the size of the activity and the amount of documents.
The way one organizes things has to be adapted to what is needed.
We are listing down below an indication of possibilities that have proven to be very useful.
The different types of documents
It is important to distinguish and organize specifically the different types of documents.
- Basic documents: contracts for rent, telephone subscriptions, statutes, insurance contracts and everything that gets signed only once and is valid for several years. These documents need to be kept in a separate folder or binder, containing just this type of documents. For some of these very important documents (like receipts for down payments, etc.) it may be useful to make a photocopy and keep the original in a safe or a safe place. Don't make holes in important documents, but put them in transparent plastic folders. This binder is the basis of your activity/company and you need to handle it carefully.
- Documents related to employees: Contracts, insurances related to personnel, and other; it is useful to keep these in a separate binder.
If there are lots of documents, we advise you to use one binder per theme. - VAT Declarations: it is good to keep a special binder with the different declarations that you present at a regular basis (quarterly, by semester or yearly). For your VAT inscription or other general documents, it is better to keep them together with the basic documents.
- Accounting receipts and documents of the year: these are receipts, invoices or other items that are related to an expense or a receipt. These have to be kept separately, year by year. For every year you will have a binder with these kinds of documents.
Accounting documents
A good day- to-day order is needed in order to enter the accounting transactions and to control the situation of the company, such as the cash flow, the totals of debtors and creditors, etc.
- All accounting documents (receipts, invoices, tickets) usually have to be kept for a minimum of ten years.
- Classify and put the accounting documents in order by date, together with the related bank statements for the payment or the receipt.
- Write a progressive number on the accounting documents (statements and others). With this number, that should be inserted in the Doc column, you can locate the accounting document, with the accounting as a starting point.
- At the end of the year, print a copy of the journal and keep it together with the accounting documents.
- Usually a new binder is being used for each year for the accounting documents.
Issued invoices or receipts with an accounting at the moment of payment
Small companies and associations enter the invoices only in the accounting at the moment of payment (cash method).
- Separate the issued invoices and those for which you have received the payment.
- Verify regularly the invoices on hold for which payment still needs to be received. As soon as the due date for the payment has passed, it is useful to send a payment reminder. Don't let too much time pass by, make sure you receive the payment for unpaid invoices. This takes time, but is it important.
- Once these invoices are paid, put them together with the normal accounting documents.
Issued invoices or receipts with an accounting on the sales volume
The invoices are being registered at the moment they are issued as well as at the time of payment.
See also: Clients/Suppliers Registers
- Separate the issued invoices and those for which you have received the payment.
- Verify regularly the invoices on hold for which payment still needs to be received.
As soon as the due date for the payment has passed, it is useful to send a payment reminder.
Don't let too much time pass by, make sure you receive the payment for unpaid invoices. This takes time, but is it important. - When you enter the issuing of the invoice in the accounting, make note of the registration on the invoice. On the transaction row, use the "Doc. Original" column to insert the invoice number.
- Once the are invoices are paid, move them over to the "paid" section, and enter them in the accounting.
- When you have entered them, make note of the accounting transaction on the invoice (for example with a "checked" sign)
Transactions / frequency
- It is good to regularly enter the transactions in the accounting (daily, weekly, monthly).
- We strongly advise you to not neglect entering the accounting transactions, so that you always have updated information and can evaluate the progress of your activity.
- By going over the different expenses account numbers, you can easily have an overview of the different expenses that you made.
- The accounting is not just done for the tax authority.
Starting a new accounting file
An even easier start with the new templates
In the new Banana Accounting Plus version, the start of a new accounting is made easier because many predefined templates for every need are included directly in the program. If you don't have specific accounting knowledge, you can use the new Income/Expense templates or the Cash Manager with descriptive accounts. The work will be intuitive, fast and professional.
We advise you to immediately switch to Banana Accounting Plus and take advantage of the many new features.
In order to create a new accounting file, there are different modes.
Creating an accounting file, starting from a template included in the program
Here we explain how to start an accounting file, starting from an existing template included in the program.
- File menu, New command
- From the Group section, select Double-entry accounting
- In the File section, select Double-entry accounting or Double-entry accounting with VAT/Sales tax.
- In the Examples/Templates section, select the language/nation and choose one of the templates that is closest to your own needs.
- By clicking on the Online Templates button you can access our website where we published all templates available for free.

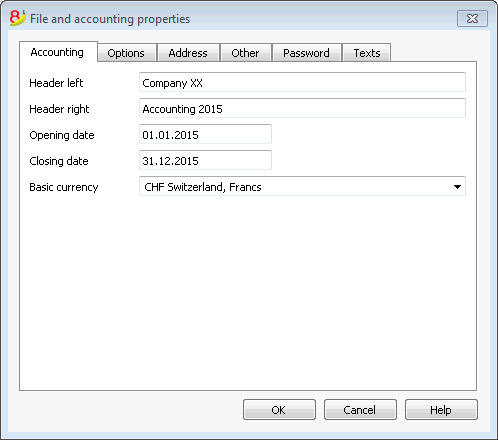
Setting up the file properties (basic data)
- From the File menu, File properties command, indicate the company name that will appear in the headers of the printouts and on the other data.
- Select the basic currency, with which the accounting will be kept.
General use of the program
Banana Accounting inspires itself from Excel. The user directions and the commands are kept as similar as possible to the ones of Microsoft Office.
For more information on the general use of the program, we refer to the explanations on our page Program interface.
The accounting is being contained in tables; all of them have the same way of operating.
Saving the file
- From the File menu choose the Save as... command, preferably indicating the name of the company and the current year (for example, "company_2017")
- Choose the folder where the file should be saved (for example, Documents -> Accounting)
- The program will add the "ac2" extension.
Customizing the Chart of accounts
In the Accounts table, customize the Chart of accounts and adapt it to your own needs:
- Add new accounts and /or delete existing ones (see Adding new rows)
- Modify the account numbers, the descriptions (for example, enter the name of your own Bank account), enter other groups, etc.
- To create subgroups, please consult our Groups page.

In the Chart of accounts, you can also define Cost centers or Segments, used to attribute the amounts in a more detailed or specific way.
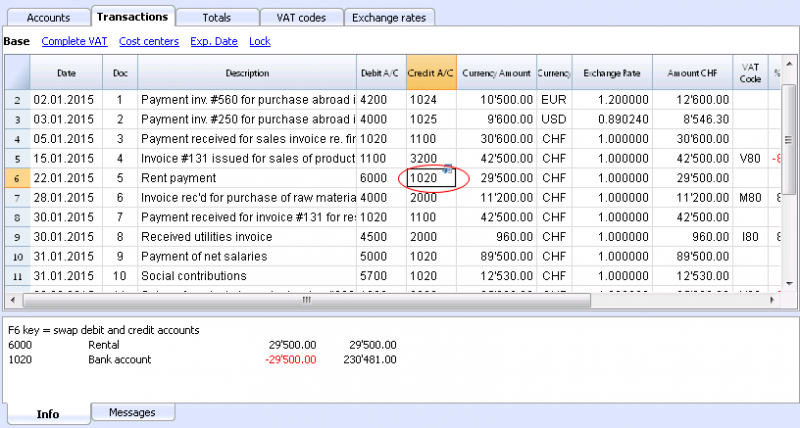
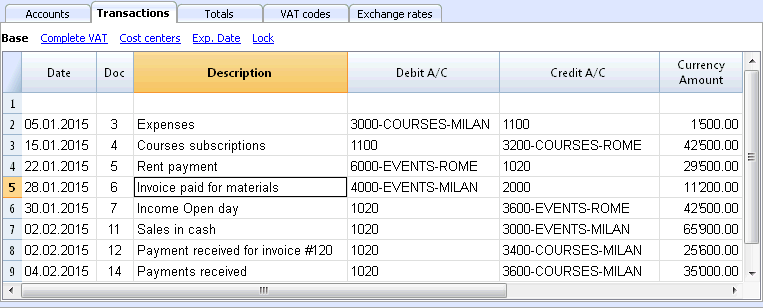
The Transactions
The Transactions have to be entered into the Transactions table; together they compose the Journal.
![]()
In the specific columns:
- Enter the Date
- Enter the Document number, manually assigned to the paper document. This makes it possible to easily locate the documents once the accounting transaction has been entered.
- Enter the Description
- Into the Debit account column, enter the destination account
- Into the Credit account column, enter the account of origin.
- Enter the Amount. In the accounting with VAT, enter the gross amount, VAT included. The program will separate the VAT, splitting the net cost or net income.
Speeding up the recording of the transactions
In order to accelarate the recording of the transactions, you can use
- the Smart fill function that allows the automatic autocomplete of data that have already been entered at an earlier date.
- the Recurring transactions function, used to memorize recurring transactions into a separate table.
- importing your bank or post office statement from the e-banking.
Transactions with VAT
In order to enter transactions with VAT please proceed as follows:
- from the File menu, choose New command and choose Double-entry accounting with VAT/Sales taxes
- Choose one of the existing templates for your nation with double-entry accounting with VAT codes and VAT Codes table.
In order to enter transactions with VAT, please visit the Transactions page.
Transactions on multiple rows
Transactions on multiple rows or Composed transactions are transactions involving more than two accounts and credits/debits on multiple accounts (for example when you pay different invoices from the bank account). In this case you need to enter the transaction on multiple rows:
- in the first row enter the total amount and the account debited or credited
- when all the individual debit and credit rows are entered there shouldn't be any difference
For more details, consult the page Composed transactions.
Checking customer and supplier invoices
Banana allows you to keep an eye on the invoices to be paid and the receivable, issued invoices. Please consult:
The Account card
The Account card automatically displays all the transactions that have been recorded on the same account (for example, cash, bank, clients, etc).
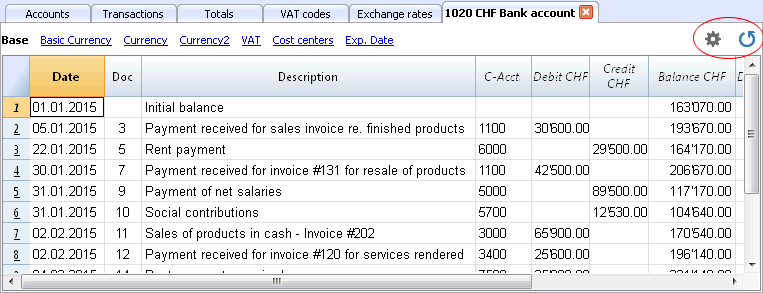
To display an account card, just position yourself with the mouse on the account number and click on the small blue symbol that appears.
Account card by period
To display the account card with the balances referring to a specific period, click on the Account1 menu, Account card command, and in the Period section, activate Period Selected, entering the Start and the End date of the period.
For more details, consult the Period page.
Printing the Account card
In order to print one account card, just display the card from the Accounts or the Transactions table and launch the print from on the File menu.
To print several or all account cards, click on the Account1 menu, Account card command, and select the account cards that need to be printed. By means of the Filter, all the account cards, or only a part of all of them (for example, only accounts, cost centers, segments), that need to be printed can be automatically selected.
For more details, consult the Account Card page.
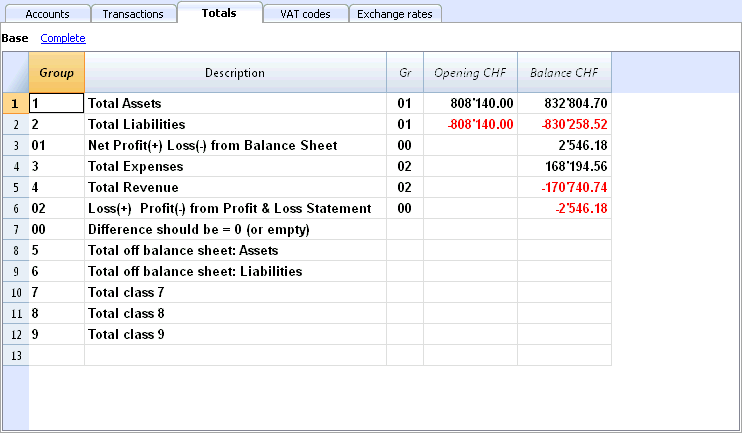
The Balance Sheet and Profit and Loss Statement
The Balance sheet shows the balances of all the estate accounts, Assets & Liabilities. The difference between the Assets and the Liabilities determines the Share capital.
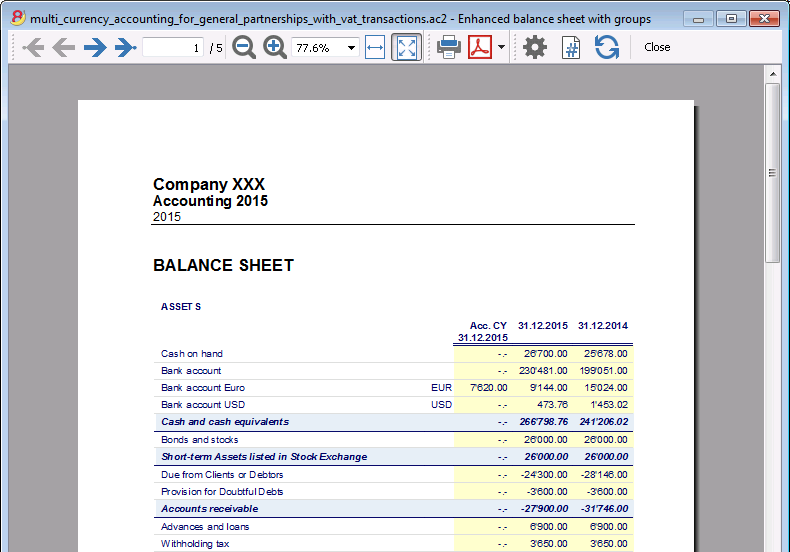
The Profit & Loss statement shows all the Expense & Revenue accounts. The difference between the Expenses & Revenue determines the Profit or Loss of the Accounting year.
The display and the printing of the Balance Sheet is being executed from the Account1 menu, Enhanced Balance Sheet and Enhanced Balance Sheet with groups commands.
- The Enhanced Balance Sheet command simply lists all the accounts without distinguishing Groups and Subgroups
- The Enhanced Balance Sheet with groups command lists all the accounts while subdividing Groups and Subgroups; besides, it presents numerous features to customize the presentation, functions that are not provided in the Enhanced Balance Sheet.
Data archiving in PDF format
At the end of the year, when the entire accounting has been completed, corrected and audited, all the accounting data can be archived with the Create PDF dossier command of the File menu.

The Budget
- Accounts table, Budget column. For each account, the annual budget amount is being indicated.
In this case, when you set up the Budget from the Account1 menu, Enhanced Balance Sheet with groups command, the Budget column displays the amounts that refer to the entire year. - In the Budget table, that can be activated through the Tools menu, Add new functionalities command.
In this table, you can enter all the budgeted costs and revenue by means of entering transactions. If you activate this table, the column of the accounts table will be automatically deactivated.In this case you can set up a detailed budget, taking into account the possible variations over the year and in different periods of the year.

For more details, consult the page Budget.
Chart of accounts
Financial situation under control
You need to setup you chart of accounts in the Accounts table: setup the accounts and the groups where the accounts must be totalized. With this operation you create the accouts that will be used when entering the transactions. The chart of accounts structure is the same that will show in all Balanche sheet and Profit & Loss statement presentations.
In the Accounts table there are also the columns of the initial balances, movements and current balance, which are automatically updated by the program.
The chats of accounts therefore provides an immediate and complete view of your financial situation.
- Liquidity accounts
- Balance sheet
- Profit & Loss statement
- Result of the current year
- Clients and Suppliers register
- Cost and Profit Centers

Different kinds of rows and sections
The Accounts table (charts of accounts) is both the setup tool and the viewing tool for the economic and financial situation.
In the chart of accounts (Accounts table) all data necerrary to group the mouvements are entered:
- Accounts
They indicate on what account (debit ore credit) the transactions must be registered.
Each account has a code or number (account number), a description, a class and a group to which it belongs; they also have an opening balance, the current balance, the budget, etc... - Costs and Profits centers
They are special accounts whose number is preceded by a full stop ".", a comma "," or by a semi-colon ";". Their purpose is to be able to assign some amounts to special accounts other than the basic accounting accounts. - Segments
They are a sort of sub-accounts who's number is preceded by a ":". Their purpose is to be able to assign some transactions to subcategories of the accounting plan. - Groups
Their purpose is to create rows where the program adds up the amounts of other rows. - Sections
They indicate the accounting plan divisions for the Balance Sheet and Profit and Loss Statement printouts, ...
The columns of the double-entry accounting charts of accounts
- Section
Codes are being entered that allow the user to only print determined parts of the Chart of accounts, when printing the Enhanced Balance sheet by groups. - Group
Contains the code that defines that this is a group row. The group code is then used in the GR column to indicate the totalization of an account or group.
- Account
The account number, cost center or segment is being entered. - Description
A text to indicate the name of the account, group, or section. - Disable (only visible in the Other view)
By entering 1, the account does not appear in the autocomplete list, but can be used in the Transactions table;
By entering 2, the account is disabled and can not be used. - BClass
It indicates whether the account is 1 = Assets, 2 = Liabilities, 3 = Expenses, 4 = Revenue, see the Accounts
- Gr (Totalize in)
It indicates a group so that the program can totalize this line in the group. - Gr1 and Gr2
Additional grouping codes to use with external accounting report files.
- Opening balance
Insert the account balance at the beginning of the year.The amounts in credit must be entered preceded by a minus sign. The total of the debit amounts (positive) and those in credit (negative) must balance and result in zero. If the opening balances do not balance a difference is shown in the information window.If you have added or pasted accounts and the difference is not correct, proceed with a Recheck of the accounting (Shift + F9)
- Movement Debit and Movement Credit (Protected columns)
The total of the debit and credit movements included in the Transactions table.
- Balance (Protected column)
The balance of the account includes the opening balance and the movements in debit and credit.The balance in debit is positive, while a credit balance is negative (minus sign). - Budget
The budget amount for the current year is being entered.The budget amount for the Expenses (debit) must be inserted in positive, the Revenue in negative (credit). -
Difference Budget (Protected column)
The difference between Balance and Budget amount. - Previous
The balance of the account at the end of the preceding year.
With the command "Create new year" or "Update opening balances", the values in the Balance column of the file of the preceding year are being carried forward.
When a new accounting is being created and the user wants to obtain printouts with the amounts of the preceding year, the values of that year have to be entered manually. - Prev. yr. Difference (Protected column)
The difference between the Balance and the amount of last year. - VATNumber
The VAT number in case this account is linked to a client or a supplier. - VATCode
The VAT code that needs to be applied automatically, when this account is being entered in the debit A/c or credit A/c column of the Transactions. - Adresses columns
It is possible to have the program add addresses columns in order to manage customers or suppliers data.
Adding or moving columns
- When an Amount column is being added in the Chart of accounts, the program composes the total of the amounts according to the selected grouping scheme
-
Added columns of the Number type, on the contrary, are not being totaled.
- With the Columns setup command, the columns can be made visible, the sequences can be altered and it is also possible to add other columns.
- With the Page setup command one can also define the layout of the print (portrait or landscape) and the zoom.
Accounts list ordered by description or other criteria
In you need to order your accounts in a different way, use the Extract and sort rows command from the Data menu.
Views
- Base Displayed are the principal columns, the grouping columns and the balances
- Transaction Displayed are the columns with the Debit and Credit transactions.
- Budget Displayed are the Budget column and the Difference Budget column.
- Previous Displayed are the Previous column and the Difference Prior columns regarding the previous year
- Other The Disable column, the VAT number and the Fiscal number column are being displayed.
- Print Just the Account column, the Description and the Balance is being displayed.
The views can be customized and others can be added with the command Views setup.
Trial Balance sheet
At any time, positioning yourself in the Accounts table and using the Print or Print preview commands (from the File menu), you can view and print the account plan or part of it.
Also from the Accounts table, if you select Movement view, you can view and print your trial balance sheet.
Advanced printouts
- Accounting report
It is possible to select just the accounts with transactions, to obtain temporary groupings or accounts grouped according to the BClass or an external grouping scheme. - Enhanced Balance sheet
Prints all the accounts of the accounting divided by Assets, Liabilities, Expenses and Revenue - Enhanced Balance sheet by groups
Allows the user to obtain customized printouts with groups - Specific advanced printouts are available using the BananaApps
Accounts
Bookkeeping accounts
In order to create an account, go to the Accounts table and enter a number or a code in the Account column.
This same number is then used in the Transactions table as Debit or Credit account.
- The account number can be composed by numbers, letter and separations characters.
- It is not possible to have more than one account with the same number.
- Each account must have a BClass and must belong to a group.
The BClasse
Each account must belong to one of the following BClasses:
- 1 for Assets
- 2 for Liabilities
- 3 for Expenses
- 4 for Income
The BClasse number must be as indicated, regardless the account or group code. It is also possible to create Off Balance Sheet accounts (for example for warranty down payments, e conditional committments), that must have the following BClass:
- 5 for Off Balance Sheet: Assets
- 6 for Off Balance Sheet: Liabilities
Opening balances
The opening balance of each account is entered in the Opening + currency symbol column.
- The Assets balances are shown normally
- The Liabilities balances are entered with the minus sign (negative)
- Usually only the Assets and Liabilities opening balances are entered.
In order to automatically transfer the opening balances for the following year, please visit the Create New Year lesson.

Opening balances differences
In a correct accounting file, the total of the Assets opening balance should be equal to the total of the Liabilities opening balance, so no differences are shown.
If the totals do not match, the program will show a warning message telling you that there is a opening balances difference (Information window).
If you have changed some account numbers and you think the error message is not correct, please Recheck the accounting.
When using Banana Accounting for the first time, the opening balances must be entered manually.
Accounts with addresses
It is possible to add a few columns in the chart of accounts, to include the addresses management:
Tools menu -> Add new functionalities command
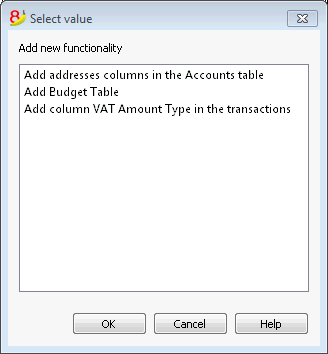
This command will add in the Chart of accounts the following things:
- several columns (name, last name, company, town, ...) where you can enter the client / supplier / member address and data
- the Address view where you can see the added columns (in order to change the view or the views organization please consult the Tables setup page)
Clients/supplier register
When in the accounting plan you need to manage a clients/supplier register, meaning a specific account list for all clients, you need to have complete data with address, phone number, email, VAT number, etc. in this case adding the columns of the Address view is very useful.

Groups
The grouping and totaling system
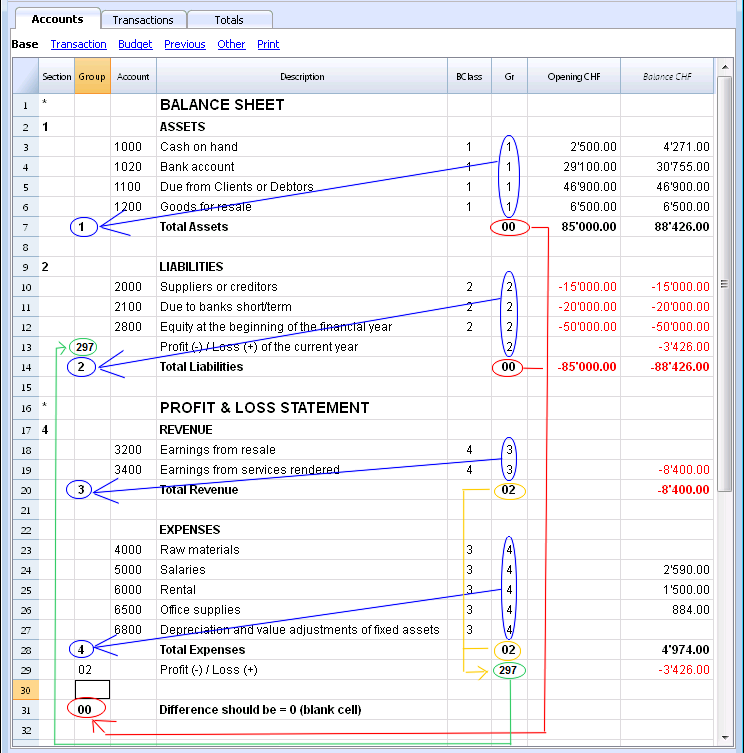
The Banana grouping and totaling system is based on the following columns:
- Group (TOTAL row)
When, in a row, a group identifier is being entered, the row becomes a TOTAL row.
In this row the amounts of the Gr column, that contain the same identifier, are being totaled.
When a group is present, there cannot be an account. . - Gr (Adds this row into the TOTAL row)
The number here must be one of the numbers defined in the Group column.
With this system, an account can be totaled in a group row, the group in another group and so on... in order to create different totaling levels.
This totaling system is very powerful and flexible, but it takes some "getting used" to it, in order to be able use it well.
Examples of the main groupes in the Double-entry accounting
Every Chart of accounts uses its own totaling system. Hereunder the main groupes of the Double-entry accounting are being explained.
In the Double-entry accounting, the total of the Debit balances (positive) together with the Credit balances (negative) have to result in 0 (zero).
- The 00 is the row where all the amounts are being added together.
It is the "Summa summarum" of all the Debit & Credit balances.
In case the Balances columns do not amount to zero, it means there is a Debit/Credit difference and thus most likely a mistake. In these cases it is useful to proceed with a checking of the accounting (see next point).
In the Debit and Credit columns of the Transactions view (Accounts table), there are only positive amounts, so also in the row of the 00 group, there will be the total of the transctions not equal to zero.
The calculation sequence to arrive at 00 is therefore as follows:
- The 1000 account -> group 1 (Total Assets)-> Group 00
- The 2000 account -> group 2 (Total Liabilities) -> Group 00
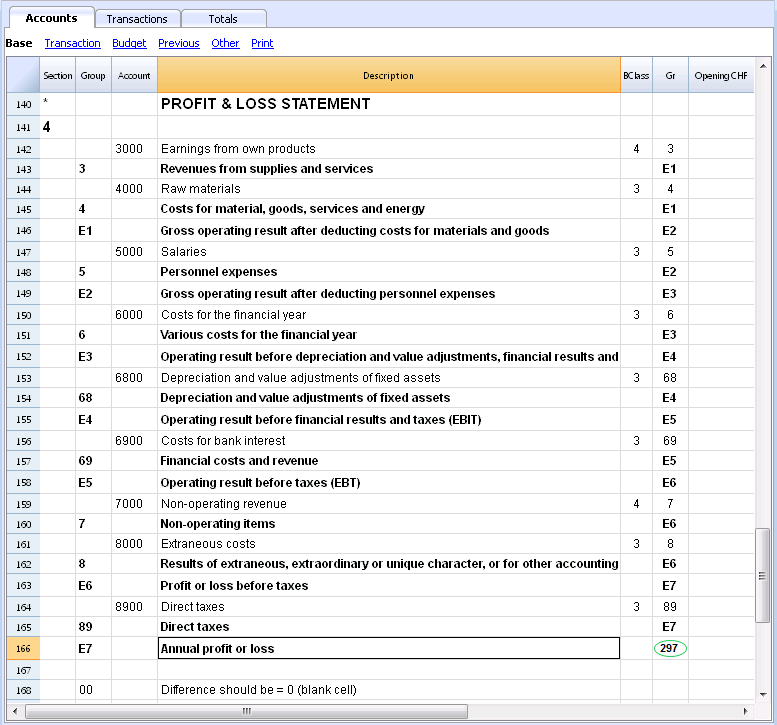
- The 3000 account -> group 3 (Total Revenue) -> Group 02 (result Profit & Loss Statement) -> Group 297 (Profit/Loss of the current year in the Balance Sheet) -> Group 2 (Total Liabilities) -> Group 00.
- The 4000 account -> group 4 (Total Expenses) -> Group 02 (result Profit & Loss Statement) -> Group 297 (Profit/Loss of the current year in the Balance Sheet) -> Group 2 (Total Liabilities) -> Group 00.
The result of profit & loss statement is added in equity
As you can see in the example, the Group 02 (Profit /Loss from Profit & Loss statement) is totalized in the 297 liabilities group (current year result).
With this group organization, we have several advantages:
- In current year operating result is displayed in the balance sheet
- The Total Liabilities will match the Total Assets (provided that there is no accounting error).
Adding or deleting subgroups
Adding a totaling level
With this system it is easy to add totaling levels.
When we want to create a subgroup for the Cash & Cash equivalents accounts:
- Enter an empty row after the bank account
- Enter the value 10 into the Group column
- Enter the value 1 into the Gr column
- Indicate the Gr 10 in the accounts 1000 et 1020
- The sequence for the calculation becomes:
The 1000 account -> Group 10 (Cash & Cash equivalents) -> Group 1 (Total Assets) -> Group 00.
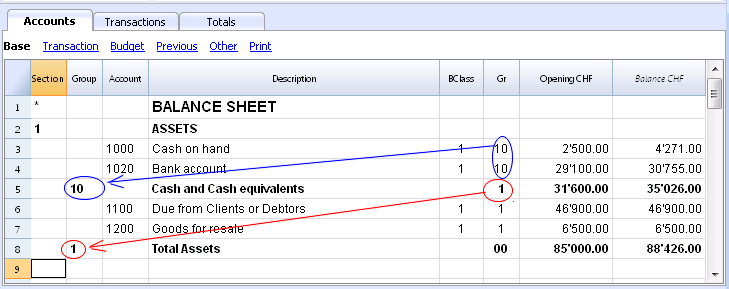
In case you want to insert another subgroup, "Current Assets", proceed in the same way.
- Add an empty row above the row of the Total Assets.
- In the new row:
- Indicate the number 11 in the Group column
- Indicate the number 1 in the Gr column
- In the Clients and Goods for resale (inventory) rows, indicate the Gr 11.
Deleting subgroups
In case the Chart of accounts shows subgroups that are no longer needed or not wanted, these can be deleted. Just delete the row of the subgroup and modify the Gr of every account that was part of that subgroup.
Checking of the structure
Once the Chart of accounts has been set up, execute the Check accounting command of the Account1 menu. In case there are errors, the program issues a warning.
Infinite loop error
This warning appears when a Group is being totaled in a Group of a lower level, reason for which an infinite error loop is being created.
There would be an infinite loop when, in the preceding example, the Assets Group (1) would be totaled in Group 10.
The program, after having calculated the Group 1, would total the amount in Group 10, which in turn would total the amount in Group 1, and then again in 10 without ending.
Profit & Loss Statement with Gross Profit
It is also possible to use a Profit & Loss Statement that starts with the total Business result and that subtracts the costs.
Hereunder the example of the Swiss PME Chart of Accounts is shown.
Extended use of the totaling system
The totaling system is very flexible:
- In one Group, it is possible to add Groups as well as Accounts
This can be seen in the earlier shown example where the Group Cash & cash equivalents (10) and the accounts (1100 and 1300) are being totaled in the Assets - You can use whatever kind of numbering
- You can create up to a hundred totaling levels
- The Total row can be after the rows
- The Total row can be before the rows
- The Total row can be completely elsewhere, in a separate position
This is being used to create registers (for example, a client register)
- The accounts and the Groups can be totaled in one single other Group.
It is not possible to total one and the same account at the same time in two groups. - This system is also being used to total the Cost centers and the Segments
Pay attention though to not use different groups for normal accounts and for cost centers, because the resulting amounts will not be correct.
Totaling of the Amount columns
The calculation procedure totals the amount columns
- The amount columns defined by the system are being totaled.
- The amount columns added by the user are being totaled.
The sequence of the calculation
The programme calculates the totals in the following manner:
- Sets the values of the Amount columns of the Groups rows on zero
- Totals the amounts of the Account rows into the Group rows (first calculation level)
- Adds the balance of the Group rows into the Group(s) of a superior level
Repeats the operation until all the levels have been calculated.
Related Documents
Sections
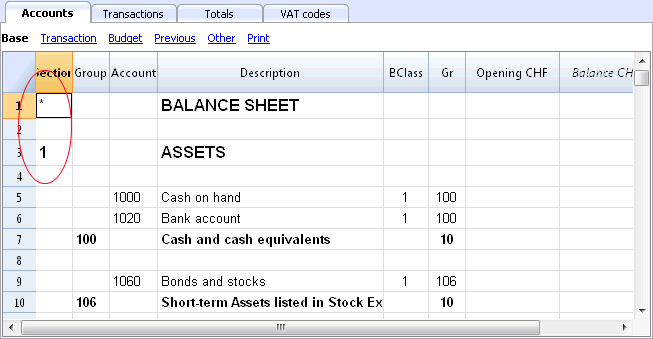
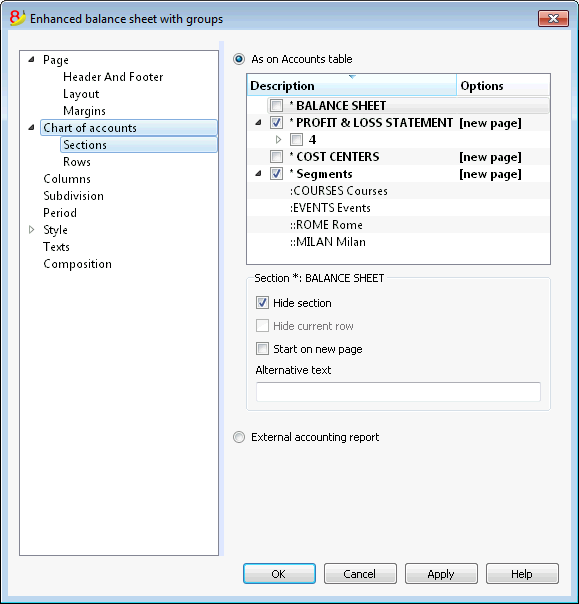
In order to create automatically an Enhanced Balance Sheet with groups, the chart of accounts needs to be configured with special codes that are to be entered in the Section column:
| * | Title 1 | the asterisk separates the sections and indicates the main headers |
| ** | Title 2 | to be entered for the secondary headers |
| 1 | Assets | to be entered in the row of the Assets title |
| 2 | Liabilities | to be entered in the row of the Liabilities title |
| 3 | Expenses | to be entered in the row of the Expenses title |
| 4 | Revenue | to be entered in the row of the Revenue title |
| 01 | Client's Register | to be entered in the row of the Client's Register title |
| 02 | Supplier's Register | to be entered in the row of the Supplier's Register title |
| 03 | Cost Centers | to be entered in the row of the Cost Centers title |
| 04 | Profit Centers | to be entered in the row of the Profit Centers title |
| # | Notes | to be entered in the row of the Notes title |
| #X | Hidden data |
to be entered in the row from whereon the data have to be hidden |
Sections in the Assets
- Enter a * on the same row as the Balance Sheet title
- Enter 1 on the same row as the Assets title
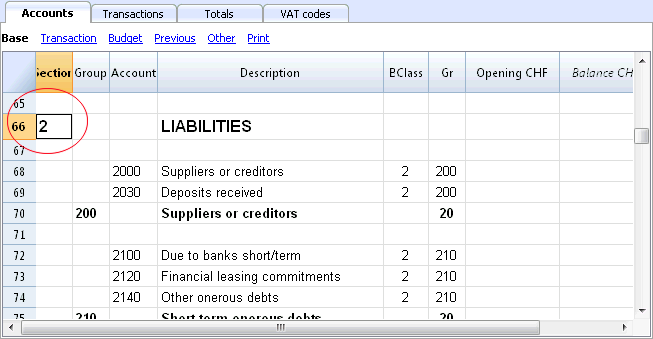
Sections in the Liabilities
- Enter 2 on the same row as the Liabilities title
Sections in the Profit & Loss Statement
- Enter a * on the same row as the Profit/Loss Statement title
- Enter 4 on the empty row below the Profit/Loss Statement title
Note: when there is a clear distintion between Revenue and Expenses in the Chart of accounts, you need to:
- Enter 3 on the same row as the Expenses title
- Enter 4 on the same row as the Revenue (Income) title .
Sections in the clients/suppliers register
- Enter * in the same row as the Clients/Suppliers register title or on a empty row (as in the following example)
- Enter 01 on the same row as the Clients register title
- Enter 02 on the same row as the Suppliers register title
The amounts will be shown in the same way as for the Assets and the Liabilities.
This encoding is also valid when the clients and suppliers are configured as cost centers.
In case there are cost or profit centers configured, enter the following elements
- An * on the row of the Costs and Profit Centers title, or on a empty row
- 03 on the same row as the Cost centers title or on an empty row preceeding the Cost Centers
- 04 on the same row as the Profit centers title or on an empty row preceeding the Profit Centers
The Cost Centers amounts will be shown as positive (in black) like the expenses; the Profit Centers amounts will be shown in negative (in red) like the revenue;
For more information please vist the Sections logic page
Related document: Enhanced Balance Sheet with groups
The Sections logic
The sections different encoding entered in the Section column determines how the printout will come out.
Each section is printed as a separate table.
The directories
- * Title 1 creates a level 1 directory.
It can contain level 2 sections or directories.
It is useful to group sections that need to be printed together, such as the Balance sheet, which contains Assets and Liabilities. - ** Title 2 creates a level 2 directory.
The Base sections
The section number or code determines:
- how the amounts are printed; the amounts can be visualized just like in the Balance sheet or inverted.
If the Credit amounts (in negative) are inverted, they will be visualized in positive, and the positive amounts will be visualized in negative. - which amount columns will be used; the Balance column or the Period Movement column are used.
The Balance column indicates the account balance at a specific date (balance at Jun 30th).
The Total Period Movement column indicates the movement amount on the indicated period.
It is used for the Profit and Loss Statement and indicates the costs or the revenues for a certain period.
Here is the explanation of the different sections
- 1 Assets (amounts as in the accounting plan, balance column)
- 2 Liabilities (inverted amounts, balance column)
- 3 Costs (amounts as in the accounting plan, total movement column)
- 4 Revenues (inverted amounts, total movement column)
This section can be also used alone and it can include both costs and revenues (in case of a Profit & Loss Statement that starts with the total Business result and that subtracts the costs). In this case revenues would be displayed in positive and costs in negative.
These sections must be unique. Therefore there can only be one 1 Assets, or one 2 Liabilities section. For other sections, like clients/suppliers register or cost center similar sections can be used.
Derivatives Sections
Those are Sections that are similar to the Base Sections
- 01 Similar to Assets (amounts as in the accounting plan, balance column)
It is used for the clients register. - 02 Similar to Liabilities (inverted amounts, balance column)
It is used for the suppliers register. - 03 Similar to Costs (amounts as in the accounting plan, total movement column)
It is used for Cost Centers. - 04 Similar to Revenues (inverted amounts, total movement column)
It is used for Profit Centers.
Other Sections
There are other kinds of sections
- # Indicates a Notes Section (it prints only the Description column)
It is used for the Balance sheet attachments - #X Hidden Section. This section is not included in the sections selection and it is not printed.
It is used to indicate parts not to be printed.
Column width in printout
The columns width is automatically set by the program.
Sections 1, 2, 01, 02 have the same column width
Sections 3, 4, 03, 04 have the same column width.
Segments
Introduction
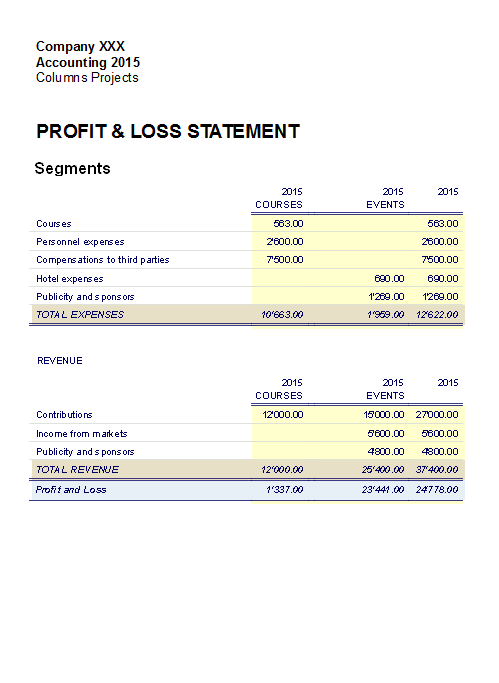
Segments are being used to have a more detailed classification of the costs, also to obtain calculations of components or departments of the company. By using the segments you can obtain a Profit & Loss Statement per unit, department or branch, without having to create specific accounts for each unit.
For example a museum can use the segments in order to know the income, the personnel expenses or the setting up expenses for each exhibit.
Segments are being used when a systematic attribution is necessary, that follows the transaction in debit or credit.
Cost centers, on the contrary, are normally being used for additional cataloging, less structured and when the account sign is not necessarily being followed.
Cost centers and segements can be used at the same time.
Characteristics of the segments
- Segments are accounts preceded by a colon ":".
- Segments codes can consist of numbers or letters.
- There may be up to 10 levels of segments.
- The number of colons preceding the symbol for the segment indicates the number of level.
- :LU segment of level 1
- ::P1 segment of level 2
- :::10 segment of level 3
- For each level there may be an illimited number of segments.
- The different levels of the segment are independent of each other.
- The segments do not have BClasses and do not have a currency symbol
- The calculations for segments are done in basic currency.
- In the transactions, the segment follows the debit and credit account.
It is not possible to record on a segment without having an account. - In the transactions, one can use a "-" as a separator instead of a ":" if on the File properties (Basic data) of the File menu the option Use the minus sign (-) as segments separator has been activated.
- Account cards of the transactions on single segments can be obtained.
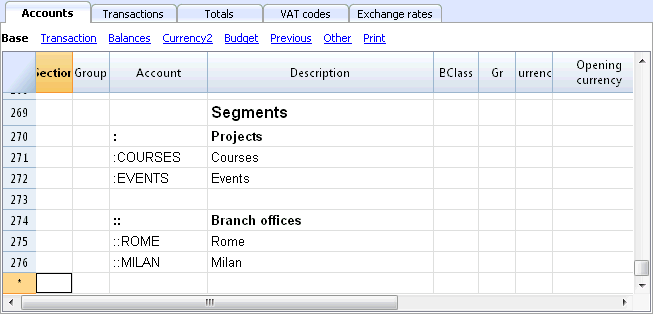
Setting up segments
The segments have to be configured in the Accounts table, Account column, at the end of the chart of accounts.
- Insert an asterisk in the Section column in order to define the section relative to the segments
- In the Description column enter the Segments title
- Enter the description of the first-level segments, and in the Account column, insert ":"
- List the segments of the first level, entering an identification code for each one of them in the Account column, preceded by ":"
- Proceed by entering the segments of the second level (and, if necessary, those of the third), in the same way as those of the first level, with the only difference that the segment codes need to be preceded by "::" or by ":::", depending on their level.
Segment balance
The segment is a subdivision of what has been entered on an account. The segment amount is thus always relative to an account, and in order to have the segment total, you need to use an Accounting report (from the Account1 menu), with a subdivision by segment (Subdivision tab).
In the chart of accounts the segment balance is indicated. This balance will be zero if the segment is used in both Debit and Credit accounts, since the amounts compensate themselves). The segment balance will be visible only when using it with the Credit or the Debit account, associated with the Profit and Loss statement account.
Transactions
The segments are being entered in the Transactions table, followed by the main account from the account segment.
Each segment is preceded by the colon, or by the minus sign (-), in case the option Use the minus sign (-) as segments separator has been activated in the File and Accounting properties (File menu).
If the chart of accounts contains accounts with "-" or "_", as for example in the clients/suppliers register's accounts), you can't use the same symbols as segments separators; in this case you need to deactivate the corresponding option and use the ":" symbol.
When a segment that belongs to more than one level is being recorded, the segment of the first level needs to be entered right after the main account; then, continue with the code of the second level.
![]()
Report
Reports of the segments are obtained with:
- Enhanced balance sheet with groups
- Accounting report.
- Account card
- Multi-level report
In order to obtain reports that combine accounts and segments (for example, all the expenses of the LU Branch for P1), the features of the Banana applications need to be used.
Report subdivision by level
In the Enhanced Balance Sheet with groups, in the Subdivision tab, indicate the segment level to be used.
Summary Report
This is a summary with the segment that have been setup in the Accounting plan section, with a possible subdivsion (if desired) by period or by segment.
Segment non assigned
The "empy" segment gathers all the amounts that have been recorded without specifying a segment. It is possible to setup the title for this segment in the Accounts table. Please also select the Segment heather: Description option in the Subdivision section.

Related document: Managing different projects
Managing different projects
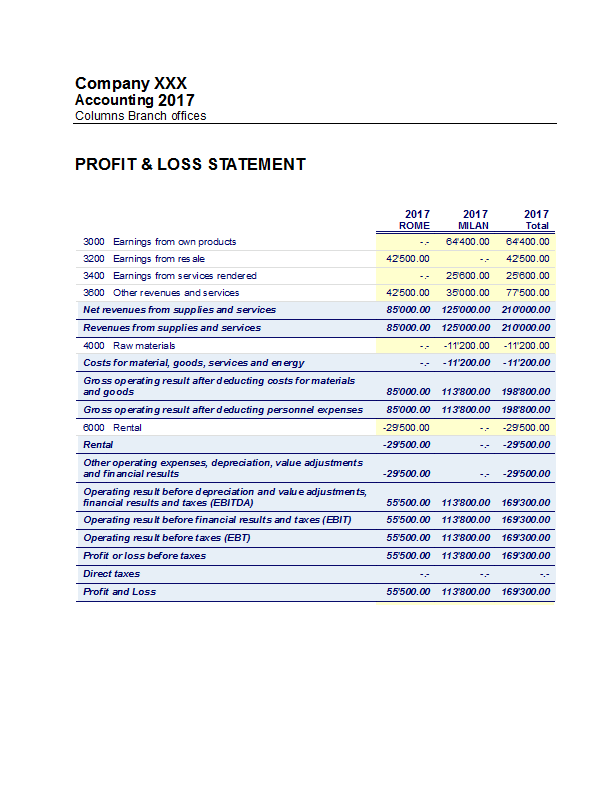
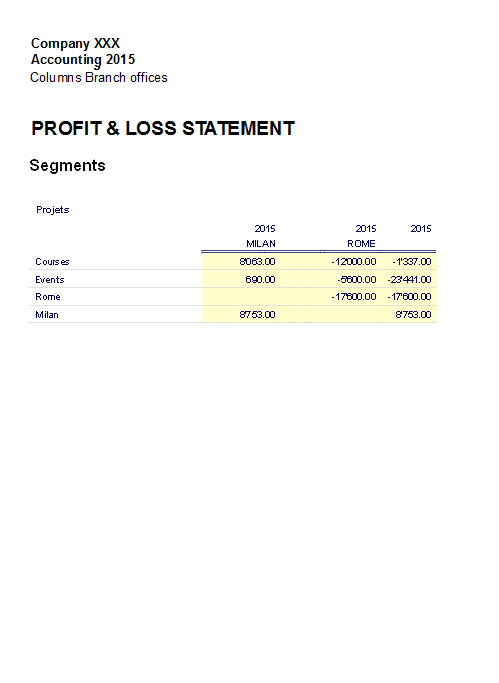
With the Segments feature, it is possible to manage different projects, obtaining balance sheets that determine the profit or the loss of each project.
Example
In an association, there are two projects that need to be managed:
- Courses
- Events
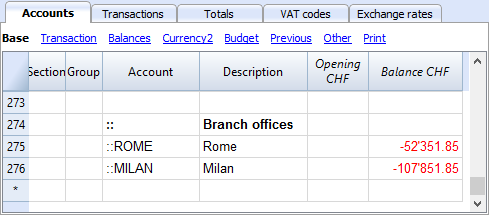
On top of that, there are different branch offices with the same projects to be managed:
- Rome
- Milan
The user wishes to obtain a balance sheet which indicates the profit or the loss of each project and branch office.
How to proceed:
- Insert the segments at the end of the chart of accounts
- Enter the transactions, and complete the debit and the credit accounts with the segments
- From the Account1 menu, activate the Enhanced balance sheet with groups command
- Select the available configurations in the different tabs; in the Sections tab in particular, deactivate the display of the Balance sheet accounts, the Client/Suppliers accounts and the Cost centers. The segments usually refer to the accounts of the Profit & Loss statement.
- In the Subdivision tab, activate the Subdivision by segment option
- Select the segment for which the balance sheet should be obtained (by project or by branch office)
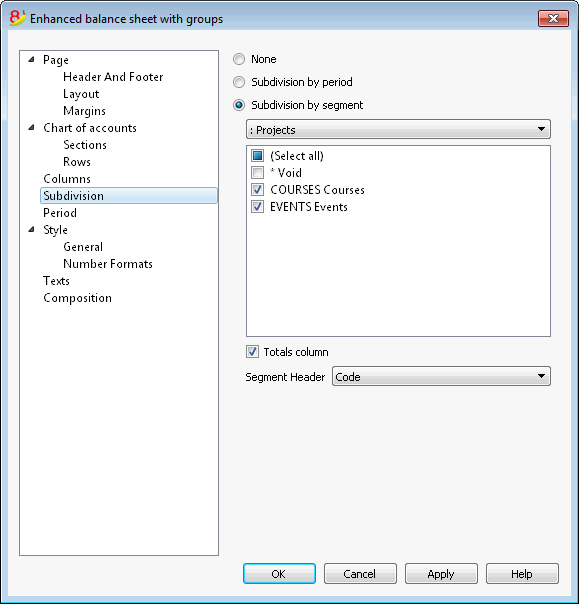
- Click on the OK button in order to display the report
Report by projects
Cost and Profit Centers
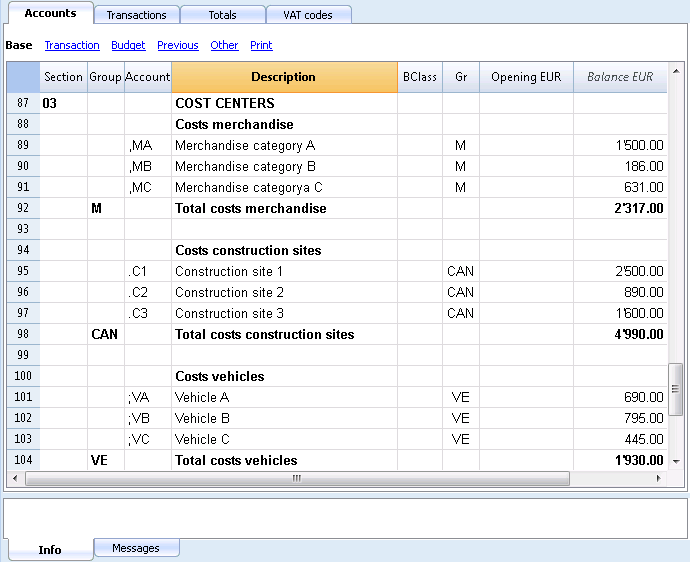
The Cost and Profit centers (hereunder being indicated as Cost centers) allow the user to catalog the transactions according to different criteria than the usual accounts.
Characteristics of Cost centers
- The Cost and Profit centers (CC) are accounts, preceded by the ".", "," and ";" signs
- There are three cost center levels:
- CC1 preceded by a period "."
- CC2 preceded by a comma ","
- CC3 preceded by a semicolon ";"
- Each level is independant of the other
- For each level, there can be an unlimited number of cost centers.
- A superior level can be used without using an inferior
- Cost center codes can be alphabetic or numeric
- Cost centers can have there own grouping, different than those of normal accounts. For the same level of cost centers, subgroups can be created. Be careful to not mix cost centers groups with other groups of a different level or with normal accounts or segments.
- Each cost and profit center has its own account card, complete with transactions and balance
- Recording on the cost center is independant of the account recorded in debit or credit. One can even record on a cost center without any account in the debit and credit column.
When to use cost centers
Cost centers are usually being used to catalog certain expenses to specific activities, that are not necessarily linked between each other.
- Projects, Events, Construction sites
- Clients and suppliers, Members, Sales agents
- Extra details for certain expenses
The segments, on the contrary, follow the debit and credit accounts, and are being used as further subdivisions for expenses and revenue.
It is possible to use cost centers and segments together at the same time.
Setting up cost centers in the Accounts table
Attention: If you work with a cash book, the cost and profit centers must be set up in the Categories table!
- Create a specific section for the cost centers.
This setup will be necessary for the presentation of the cost centers in the Enhanced Balance Sheet by groups.- Enter a section with an asterisk * for a section change
- In the next row, enter 03 (or 04 for a profit center).
- Add some empty rows for the cost center
- In the Group column, enter the group to which the cost center account belongs
- In the Account column, enter the cost center account precededs by a full stop "." for those to be registered in CC1 column (Transactions table), a comma "," for those to be registered in CC2 column and a semicolon ";" for the ones to be registered in the CC3 column.
- In the Gr column, indicate the group in which the amounts have to be totalized.
- In a Multi-currency accounting, the account currency is also specified.
- Add the cost center groups
- In one and the same group, totalize only one specific level.
- As for normal accounts, different levels can be created.
File Properties (VAT amount)
In the File and accounting properties command, in the VAT tab you can set the amount of cost centers with the following options:
- Use transaction amount - The amount of the cost center is registered according the registration amount
- Use amount excluding VAT - The amount of the cost center is registered net of VAT.
- Use amount including VAT - The amount of the cost center is registered inclusing the VAT.
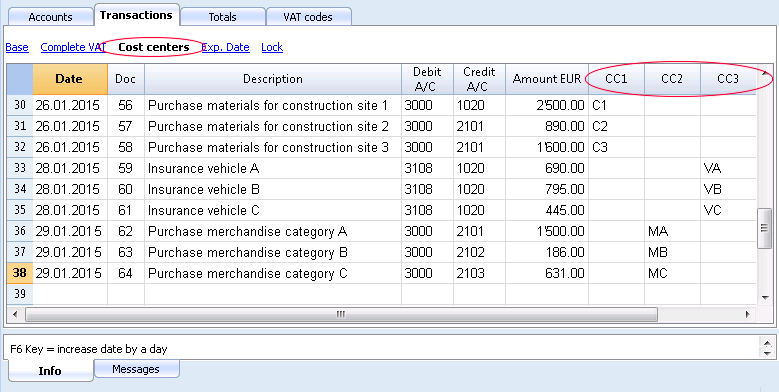
Transactions
In order to register on the cost centers, it is assumed that the cost center accounts have already been entered into the Chart os accounts.
To proceed with the recordings, you need to be in the Transactions table, in the Cost centers view; in the CC1, CC2, CC3 columns, you need to enter the cost center account without the punctuation that precedes it.
- To record on the cost center in credit, the cost center needs to be entered preceded by the minus sign (-).
- For the Income & Expense accounting, in the File and accounting properties, you can define for the cost centers to follow the sign of the category.
- In order to record a global amount on more than one cost center of the same level, a different row needs to be created for each different cost center.
Cost center account card
The cost center is treated as any other account, so each cost center has its own account card with account balance and account transactions.
In order to view all cost center account cards, click on the command Account/Category cards in the Account1, and then on the Cost centers button (Filter option).
Related documents:
Membership list
In order to obtain the membership list with all the data that are useful for an association, the user needs to proceed as follows:
- In the Accounts table, at the end of the Chart of Accounts, the membership list can be created by using the CC3 cost center column.
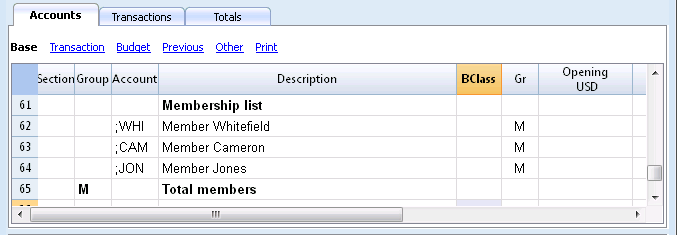
- Activate the Address view, selecting from the Tools menu, the Add new functionalities command
- In the window that appears, confirm the option Add addresses columns in Accounts table
- Insert the data of the members
- For a print-out: select the rows that need to be printed and activate the printing option only Selection.
In order to record the transfers from every member in the Transactions table, insert the CC3 account for each member, using the CC3 column. In order to display the CC3 column, click on the Columns setup command of the Data menu; double click on CC3 and activate Visible check box.
![]()
In the Accounts table, the balance of the member's transactions is shown.
To see all of a member's transactions, double-click on the CC3 account number.
Related document: Cost and Profit centers
Add / Rename
Adding a new account or category
- Position yourself in the row above the one where you want to add the new account
- Add a new empty row with the command Add rows from the Edit menu
- In the columns, insert the account number, the description, the BClass (1 for the Assets, 2 for the Liabilities, 3 for the Expenses and 4 for the Revenue), and the Gr which needs to be the same as the one inserted for the accounts belonging to the same Group.
Note: If you first enter a transaction with a non existing account and later you create the new account in the accounting plan, you will first get an error message, that will go away only if you recheck the accounting with the Shift + F9 key, or the Recheck accounting command from the Account1 menu.
Adding a new group
- Position yourself in the row above the one where you want to add the new group
- Add a new empty row with the command Add rows from the Edit menu
- In the columns, insert the group number, the description and the Gr which needs to be the same as the group you wish this group to be totalized.
Renaming an account or a group
- Position yourself in the Account or Group column in the Accounts table, or in the Category column of the Categories table (or in the VAT code column in the VAT codes table)
- Choose the Rename command from the Data menu
- Enter the new account, group, category or code number
The program will automatically update the Transactions table with the new number or code.
Deleting an account or a group
- Position yourself on the row number that contains the account that is to be deleted
- From the Edit menu, click on the Delete rows command
- Enter the number of rows that you wish to delete
After deleting an account, a category or a group it is necessary to use the Recheck accounting command from the Account1 menu. The program will give you a warning message if the deleted account, category or group was used in the Transactions table.
Opening balances
Avoid mistakes with Banana Accounting Plus
In order to facilitate checking your accounting work and to immediately find differences, in Banana Accounting Plus, our new version, we added the Balance column in the Transaction table. You can now see potential differences on each row and you can correct them right away. It is a very useful feature when closing the accounting period.
Many of our clients have already tried it and are enthusiastic about it. We advise you to switch now to Banana Accounting Plus and take advantage of the many new features.
Opening balances
When using Banana Accounting for the first time, the opening balances need to be inserted manually in order to create the opening balance sheet.
After having set up the Chart of Accounts, proceed as follows:
- Place yourself in the Accounts table, Base view, Opening column.
- Manually enter the opening balances of the Assets and Liabilities accounts. The Liabilities are entered preceded by the minus (-) sign.
- Check if the total Assets equals the total Liabilities so that your accounting balances. If there are differences in the opening balances you need to check and correct them.
In order to automatically transfer the opening balances for the next year, consult the lesson Create New Year
Transactions
Avoid mistakes with Banana Accounting Plus
In order to facilitate checking your accounting work and to immediately find differences, in Banana Accounting Plus, our new version, we added the Balance column in the Transaction table. You can now see potential differences on each row and you can correct them right away. It is a very useful feature when closing the accounting period.
Many of our clients have already tried it and are enthusiastic about it. We advise you to switch now to Banana Accounting Plus and take advantage of the many new features.
Entering Transactions
Transactions must be entered in the Transactions table.
![]()
The columns of the Transactions table
The columns listed hereunder and preceded by an * are usually not visible.
In order to make them visible, use the Columns setup command from the Data menu.
Date
The date the program uses to attribute the transaction to a certain time frame. The date should be within the limits of the accounting period defined in the Basic data of the accounting. In the Options tab, one can indicate whether the transaction date is required, if not this value can also be left empty.
If there are locked transactions, the program gives an error message when an equal or earlier date than the one of the lock is being entered.
*Date Document
The date of the document can be entered, for example the date of issue for an invoice.
*Date Value
The value date of the bank operation can be indicated. This value is being imported from an electronic bank statement.
Document
The number of the voucher that serves as a base for the accounting transaction. When entering transactions, it is advisable to indicate a progressive number on the document, so that the accounting document can be easily traced from the transaction.
The autocomplete feature proposes progressive values as well as transaction codes that have been defined earlier in the Recurring transactions table.
The program proposes the next document number, that can be resumed with the F6 key.
-
In case of a numeric numbering, the program simply increases the highest value found in the Doc column.
- Alphanumeric numbering: the program increases the final numeric part; this is useful when one would like to keep a separate numbering for cash and bank movements.
If earlier Doc number C-01 has been entered, and one starts to type C, the program proposes C-02.
If earlier Doc number B104 has been entered, and one starts to type B, the program proposes B-105.
If earlier Doc number D10-04 has been entered, and one starts to type D, the program proposes D10-05.
In the recurring transactions you can setup transactions groups that can be reloaded with a single code.
In order to add a large number of document numbers, you can also use Excel. You can create in Excel the desired quantity of document numbers and then copy and paste it into Banana, in the bcolumn of the Transactions Table.
*Document Protocol
An extra column in case an alternative numbering for the transactions or for the document is needed.
The autocomplete feature proposes progressive values that function in the same way as the ones in the Document column.
*Document Type
Contains a code that the program uses to identify a type of transaction. If you prefer to use your own codes, it is advisable to add a new column.
- 01 In the reports, this transaction is considered an opening transaction, so it doesn't show in the period but in the opening balances.
- from 10 to 19: codes for customers' invoices
- from 20 to 29: codes for suppliers' invoices
- from 30 to 1000: codes reserved for future purposes.
*Document Invoice
A number of an issued or paid invoice that will be used together with the invoice control feature for customers/suppliers
*Document Original
The reference number present on a document, to enter, for example, the number of a credit note.
*Link to external file
Serves to enter a link to an external file, usually the accounting voucher.
Pressing on the little arrow on the upper part of the cell, the program opens the document.
*External reference
Any reference number all ocated by a program that generated this operation. This value can be used to check whether a given task is imported twice.
Description
The text of the transaction.
The autocomplete feature proposes the text of an already entered transaction, or of one that has been entered in the preceding year when the appropriate option has been activated. When pressing the F6 key, the program retrieves the data of the preceding row with the same description and completes the columns of the active row.
In case the description begins with #CheckBalance, the transaction is being considered as one that serves to checkup the balance.
Please consult our page Check accounting for more information on the subject.
*Notes
Useful to add notes to the transaction.
Debit Account
The account that will be charged.
It is possible to also enter a segment in the Debit account column. These are usually separated by a ":" or a "-".
In the accounts list, pressing the key with the segment separator symbol, one goes immediately to the next segment.
If instead the Enter key is being pressed, the input finishes and one moves to the next column.
The autocomplete feature proposes the accounts and segments. One can also enter a search text and the program shows all the accounts that contain that text in one of the columns.
*Debit Account Description
The description of the entered account retrieved from the Chart of accounts.
Credit Account
The account that will be credited. We refer to the explanation under Debit account for the rest of the information.
*Credit Account Description
The description of the entered account retrieved from the Chart of accounts.
Amount
The amount that will be entered unto the debit- and credit account.
VAT columns
Information on the VAT columns can be found att the VAT columns in the Transactions table page
CC1
The Cost center account preceded by "."
*CC1 Description
The description of the Cost center, retrieved from the Chart of accounts.
CC2
The Cost center account preceded by ","
*CC2 Description
The description of the Cost center, retrieved from the Chart of accounts.
CC3
The Cost center account preceded by ";"
*CC3 Description
The description of the Cost center, retrieved from the Chart of accounts.
*Expiry date
The date before which the invoice has to be paid.
*Payment date
Used in combination with the Show Expiry dates command.
When instead using the invoices customers/suppliers control feature in order to check on the payments, a transaction has to be entered for an issued invoice and another one for the payment thereof.
*Lock Number, Lock Amount, Lock Progressive, Lock Line
More information at the Lock Transactions page.
Adding new columns
With the Columns setup command, it is possible to display, hide or move the order of columns, add new ones, or indicate that a column should not be included in the printout.
- The added columns in the Transactions table will be added also in the Recurring transactions table, in the Account card and in the VAT report, without being made visible.
In order to display these columns in the other tables, use the Columns setup command. - If a column of the "amount" type is being added, the entered amounts will be added up in the Account card.
Views
When a new accounting is being created, the following views are being automatically created as well:
- Base: the main columns are being displayed
- Cost centers: the CC1, CC2 and CC3 columns are being displayed
- Expiry dates: the columns Expiry date and Payment date are being displayed
- Lock: the columns relative to the Lock function are being displayed.
With the Views setup command, the views can be customized and personal, added views can be created.
With the Page setup command, you can modify the print mode of the view.
Info window
In the Information window at the bottom part of the screen, error messages and extra information about the used accounts and VAT codes are being displayed.
For the accounts, the Account number, the Description, the Amount of the transaction (debit or credit) and the Current balance of the account is being indicated.
Transaction types
Avoid mistakes with Banana Accounting Plus
In order to facilitate checking your accounting work and to immediately find differences, in Banana Accounting Plus, our new version, we added the Balance column in the Transaction table. You can now see potential differences on each row and you can correct them right away. It is a very useful feature when closing the accounting period.
Many of our clients have already tried it and are enthusiastic about it. We advise you to switch now to Banana Accounting Plus and take advantage of the many new features.
Simple transactions
Simple transactions are the ones regarding two accounts (one Debit account and one Credit account) and entered in one single row. Each transaction has its own document number.
![]()
Composed transactions
Composed transactions with more than two accounts involved, have to be entered on several rows. The user should enter one account per row. The counterpart account for the entire transaction has to be entered on the first row.
The document number, entered on the different rows, is the same because we are dealing with one and the same transaction.
Note:
In composed transactions, the dates of the transaction rows should be the same, otherwise, when doing calculations by period, there may be differences in the accounting.
![]()
Recurring Transactions
Recurring Transactions table
In order to avoid rewriting always the same texts, it is possible to store transaction groups in the Recurring transactions table (Account2 menu). These groups are identified with a code and can be retrieved and entered into the Transactions table just by entering the corresponding code.
When positioned on the Doc column of the Transactions table, the program proposes the list of the recurring transactions, grouped bycode. If one of these codes is selected:
- the program enters the recurring rows that have the same code
- the program completes the entered rows with the date and other values that have been entered earlier
- the program enters the progressif number in the Doc column (based on earlier entered values)
Entering recurring transactions
- You need to enter into the Recurring transactions table (or copy from the Transactions table) the transaction rows that should be retrieved regurlarly.
- Enter the code related to the recurring transactions group into the Doc column.
Rows with the same group code will be retrieved together (transaction on multiple rows).
![]()
- Progressive numbering of documents "docnum"
If, when retrieving recurring transactions, you wish to have a Doc number different from the automatic one, you need to create a row containing the code "docnum" in the Doc column, and your desired text in the Description column. For the following rows, the text specified in the Description column, will be applied in the Doc column when retrieving the transactions- "0" when no automatic numberting is desired
- "1" progressive numbering
- "cash-1" progressive numbering with the prefix "cash-" (cash-2, cash-3)
The program replaces the number indicated at the end of the text with the next progressive number.
- If you wish the program to suggest just one row per code, the description has to be preceded by:
- An "*": displays just this row and not the others with the same code.
- An "**" displays just this row, but don't retrieve this row (only title row).
- An "\*" allows the user to start the description with an asterisk, without it being interpretated as a command.
It is not possible to save customized setups in the Recurring transactions table; it uses the views and columns setup of the Transactions table.
Retrieving the recurring transactions into the Transactions table
- Enter the date and the information of the other columns that should not be modified
- In the Doc column, choose one of the codes defined in the Recurring Transactions table and press Enter.
- The program enters all the transactions with the same code, repeating the data column and other already entered values.
- In the Doc column, a progressive number is being inserted or one as specified in the docnum
- Or indicate the code in the Doc column and press F6
Copying transaction rows into the Recurring Transactions table
In order to copy rows from the Transactions table into the Recurring transactions table:
- In the Transactions table, select the rows that need to be copied;
- Edit menu -> Copy rows command;
- Go into the Recurring transactions table;
- Edit menu -> Insert copied rows command;
Bank checks
To enter issued bank checks, the user needs to insert an Issued checks account in the Liabilities.
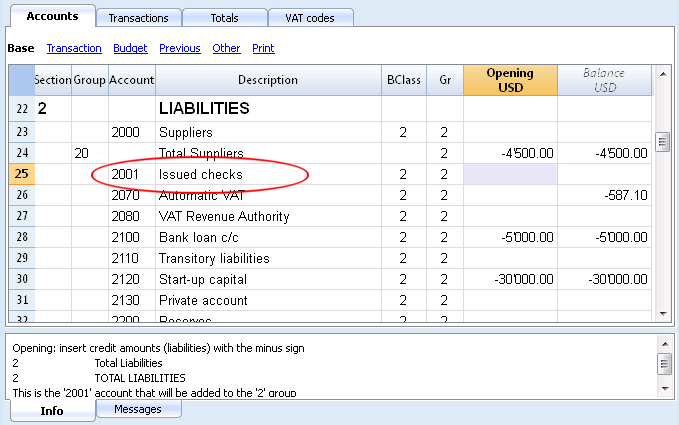
The check is issued at the moment of paying a supplier and later on is being debited from the Bank current account.
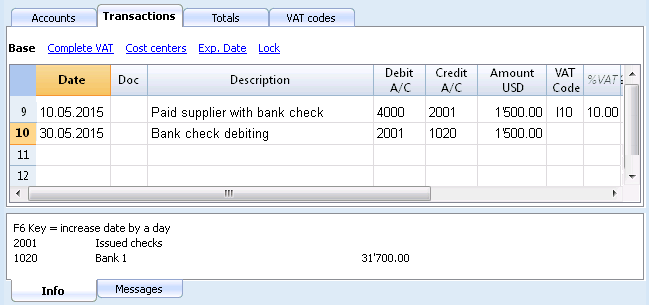
The Issued checks account card after the transactions.
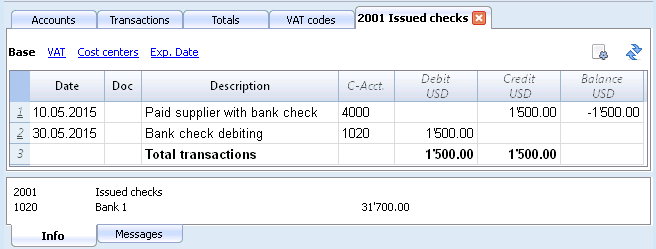
Displaying expiry dates
Customers & Suppliers Management
In order to manage the invoices issued or received, we advise you to use the Customers Menu and the Suppliers Menu.
Associate an expiry date to a transaction
As an alternative to the customers and suppliers management, or for simpler checking purposes, you can also enter the payment date in the transaction row.
This is an operating mode that consents simplified checkup.
With the Columns Setup command (from the Data menu), you should make visible the Date Exp. and Date Pay columns.
You should then enter the invoice expiration date in the Date Exp. column, and the invoice payment date in the Date Pay. column.
![]()
Show expiry dates
With the Show expiry dates command from the Account2 menu, the program displays the transaction rows that have an expiry date but no payment date.
![]()
Link to a document
Connecting digital documents to your accounting transactions
- Arrange a folder where you will save all your digital documents. It can be the folder where you keep your accounting file or subfolder.
- Use this folder to save all files containing documents, invoices, receipts, etc.
- Link the transaction to the digital document.
- From the Account 2 menu choose the Link -> Open Link command to view the contents of the digital document.
The DocLink Column
The DocLink column (Transactions table) makes it possible to enter a link to an external file (usually a scan of a receipt or an invoice).
- The DocLink column is usually not visible.
In order to display it, use the Columns setup function. - Once the Link column is visible, you can directly edit the file name.
- The file name is related to the accounting file; if the documents are in a sub-folder, the file name - in the DocLink column - will be preceded by the directory name.
- It is equally possible to manually enter a web address in the Link cell.
In order to open the linked document, click on the Open link command of the Account2 menu, or click on the small square that appears on the upper right hand corner of the cell that contains the link.
Entering a link to a file
There are two ways to enter a link to a document:
- Place yourself on the row of the Transactions table and the activate the Add link command from the Account2 menu -> Links;
- Select the file that corresponds to the document which needs to be linked and click on the Open button; the program inserts the link automatically.
The program enters the file name in the DocLink column, even if this last one would be invisible.
Or
- Display the DocLink column in the Transactions table. See: Columns setup;
- Click on the small square at the upper right hand corner of the cell;
- Indicate the path where the file can be found and select it.
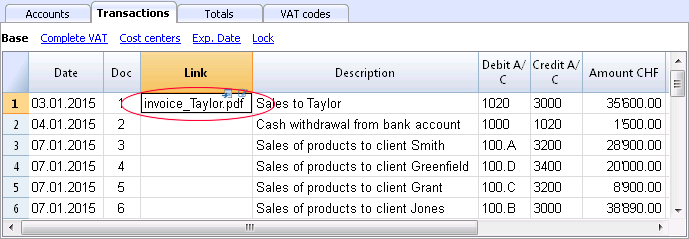
Editing a link
Proceed in the same way as when entering a new link.
Open link
There are two ways to open the link:
- Place yourself on the row of the Transactions table and the activate the Open link command from the Account2 menu -> Links;
- Place yourself on the DocLink cell and click on the icon to open the link.
For security reasons, the program opens only files with an extension that is considered secure, see Program Options -> Advanced, from the Tools menu.
Remove link
There are two ways to remove the link:
- Place yourself on the row of the Transactions table and the activate the Remove link command from the Account2 menu -> Links;
- Delete the contents of the DocLink cell.
Lock transactions
Blockchain certification
Banana uses a digital certification system for the accounting data, using what is now called blockchain technology. Transactions can be locked and marked with digital codes that can guarantee, even after many years, that the accounting data are authentic. They also allow the user to make sure that the accounting data have not been modified.
Banana.ch was the first company in the world to use the blockchain technology in the accounting field. This method (US Patent No. 7,020,640) was developped and patented in 2002..
This method guarantees one of the highest levels of data integrity and conformity to international law prescriptions. You can also see the evaluations on this matter of the audit company Ernst&Young, who verified the system conformity to the legislation requirements. The new versions of the Banana Accounting software don't use the MD5 method anymore (the one mentioned in the documents), but use the Hash SH256 method.
- Ernst&Young, compatibility check to Swiss legislation (pdf in German)
See also: Verordnung über die Führung und Aufbewahrung der Geschaftsbücher, 24.04.2002 (in German) - Ernst&Young, compatibility check to German legislation (pdf in German)
This method, based on the blockchain calculation system, is considered so reliable that it is employed to ensure the validity of the bitcoin and of all other modern crypto-currency.
The lock transactions command
With the Lock transactions command of the Account2 menu, the accounting transactions are locked and marked with control codes that can certify, over the years, that the transactions have not been modified.
- The validity of a possible already existing lock is being verified
- The transactions until the lock date are being numbered progressively and are being locked. For each transaction, the digital code of the row and the progressive one are being calculated.
The calculation of the digital codes is being done according to the sequence of the columns. - In the accounting is being indicated that transactions with an equal or earlier date than the lock date will no longer be accepted.
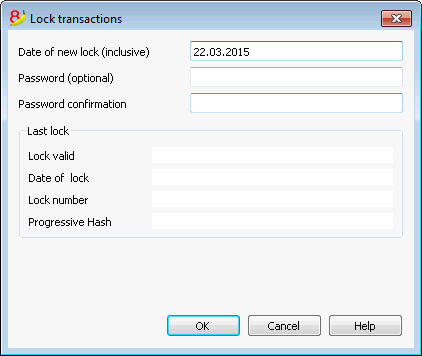
Date of new lock (inclusive)
Specify the date up until when the transactions will be locked.
Password (optional)
It is possible to insert a password to eventually unlock the transactions or to carry out a new lock in the future.
If the program finds no errors in the transactions included in the lock date, it will lock the transactions, calculate and assign individual numbers and codes to each row of transactions which can be viewed in the Lock view on the Transactions table.
Last lock
The data of the following fields are automatically filled out by the program based on the last executed lock.
Lock valid
A "Yes" is shown if the lock is valid.
Date of lock
The date of the last executed lock is shown.
Lock number
This is the value automatically entered by the program in the last row of the LockNum column.
When the lock is repeated, if the value of the last row lock number is unchanged, it means that the lock is valid and that the data have not been altered; if however the value is changed, the program shows the following codes:
- (-1) if the lock is invalid from the first row
- (-2) if there are rows that have the same LockNum.
Progressive Hash
This is the control code present in the last transaction.
Lock View
All digital codes are shown along with all the information that the program used to create the digital signature.
![]()
- LockNum: the progressive number that identifies the row
- LockAmt: the cumulative transactions total, similar to the total at the end of the page, as required by some national regulations
- LockLine (hidden column): the digital code calculated according to the row values.
- LockProg: the global electronic signature (SHA-256).
The digital code LockProg
This is the main element of the certification; it uses the blockchain methodology.
The digital code is calculated according to the following values:
- The contents of the current entry, including amounts, descriptions and the description of the account at the moment of the lock
- The progressive number (LockNum)
- The cumulative balance (LockAmt)
- The progressive code of the preceding entry (LockProg).
In case the accounting data undergo even the slightest modification (for example, a date or an amount is changed), the digital code will be different. If the control number remains the same, it implies that the data are original and therefore have not been changed.
Check Lock
With the Check lock info command of the Account2 menu, the program verifies the validity of the lock and displays the data.
- The program recalculates the digital control codes and verifies if they correspond with the ones related to the transactions.
- If the codes correspond, the lock is considered valid, and therefore the data are original
- If they do not correspond, it means that the data have been changed and that they are not the original ones calculated at the time of the lock.
![]()
Unlock transactions
The Unlock transactions command removes the lock and the control codes. If the lock was set with a password it will be necessary to reenter the password in order to remove the lock.
If later on you want to relock the transactions, and they have not been modified, the control numbers will be the same as the ones of the earlier lock; if however some data have been changed, the control numbers will be different.
Partial lock
If the transactions have been locked, it is possible to unlock them even partially, from a specified date. If a lock password has been set, in order proceed unlocking the transactions, you need to enter it in the specific field.
![]()
Why unlock the accounting?
In principle, the locked accounting should not be unlocked. It might happen that, after the lock, you find errors in the accounting and see the need to make corrections.
To have the opportunity to make further changes, users kept a copy of the file before the lock. If they found errors, they would restore the previous situation. In the meantime other transactions had perhaps been made, so often it happened that restoring previous versions of the accounting proved wrong. To avoid this unnecessary waste of time it was decided to make the Unlock transactions command available.
The certification must not be confused with data security. The data certification is a methodology that ensures that the accounting data are original. To prevent data from being modified, the methodology is the one related to data security. Data security procedures, however, can only be implemented in an environment that limits data access.
If the file is fully available to the user, such as when it is on a PC, people have complete control of the data. They can thus replace files easily. With a certification one cannot prevent that the data are being altered, but it will allow you to know if the data are the original ones.
The person who keeps the books is responsible for the accounting and decides whether a change is permissible or not.
Organizing the certification and data verification
Once you locked the transactions of the period, you need to:
- Print the lock information or print the last certified transaction row with its specific certification number (LockProgr).
- Sign and store this information along with the accounting documentation or in any other safe place.
In order to check that the accounting data are the original ones, you need to proceed as follows:
- Impart the Show lock info command.
- Go back to the document that shows the digital control number
- Check whether the row identified with the LockNum still has the same digital control number
- If the number matches , the accounting data are the same as those certified
- If the number does not match , it means that the accounting data have been modified.
Banana works on developing applications that make it possible to compare two files and obtain indications regarding data that have been altered.
Data security
Digital certification ensures that the data are still the original ones. It does not prevent the modification of data.
It is the responsability of the accountant to ensure that the data are not altered. Each administration must be organized according to its size and needs.
Those who want to make sure that the data are not being altered by unauthorized persons , must employ other methods and tools, such as :
- Save the data to a secure system (protected network drive), password protected.
- Keep the copies of the data.
- Encrypt archives.
Long-term archiving
The accounting file contains the entered data. In order to open the file and obtain a report or an account card, you need to have the program at your disposition.
Banana Accounting gives the possibility to export all the accounting data, and its printouts as well, to Pdf, Html and Xml.
The generated file can be saved on a CD and accessed on any computer even after many years, even by persons who do not have the Banana Accounting software.
File and accounting properties
This is where the main data of the accounting file are entered, such as the printout heading, the opening and closing dates, the basic currency, the company address, the profit and loss from exchange rate variation account (if you have a multicurrency accounting file), the VAT account (if you have chosen the VAT management option), the password, …
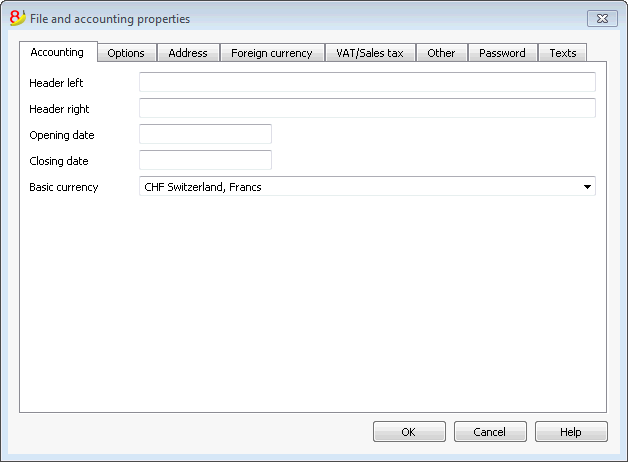
The File and accounting properties window has the following tabs:
- Accounting tab
- Options tab
- Address tab
- VAT/ICMS tab
- Foreign currency tab
- Texts tab
- Password tab
- Other tab
Printouts
New customization possibilities
In the new Banana Accounting Plus version, the printing has been improved thanks to new possibilities of customization. Moreover, you can print the invoice with the QR code and other predefined and customizable layouts.
We advise you to immediately switch to Banana Accounting Plus and take advantage of the many new features.
Enhanced Balance sheet with groups - colored columns
This example has been realized with the following features:
- Enhanced Balance sheet with groups
- Columns setup to indicate which columns are to be displayed (in the example the columns of the Current and the Preceding year are being displayed)
- Colors (Column properties) to indicate the color of a column.
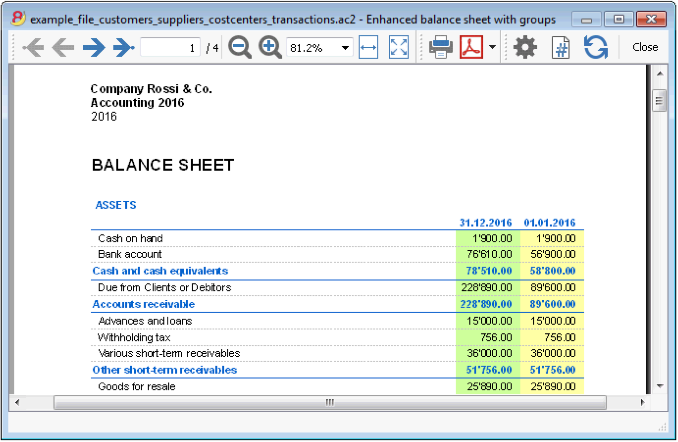
Profit & Loss Statement with budget
This example has been realized with the following features:
- Enhanced Balance sheet with groups
- Columns setup to indicate which columns are to be displayed (in the example the columns of the Current year, the Budget and the Preceding year are being displayed)
- Colors (Column properties) to indicate the color of a column.
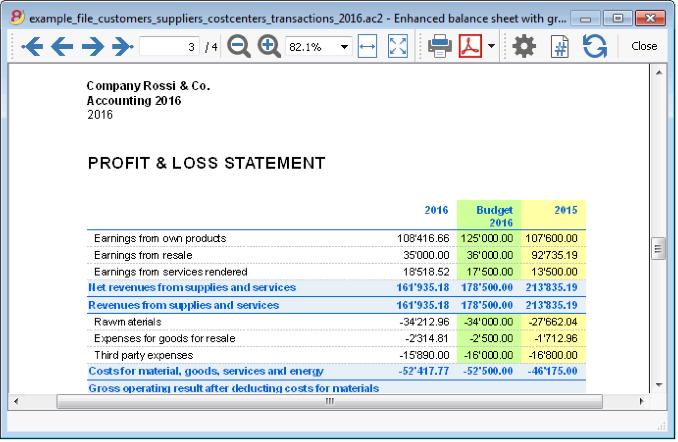
Enhanced Balance sheet
This example has been realized with the following features:
- Enhanced Balance sheet- Base tab
- Style setup (for this printout the Berlin style has been chosen)
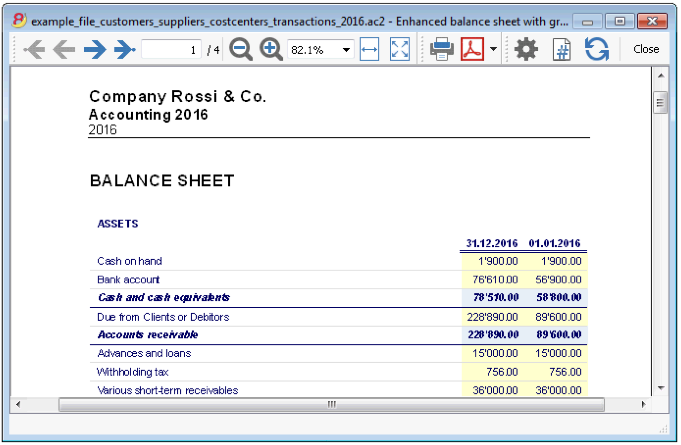
Subdivision by quarter
This example has been realized with the following features:
- Enhanced Balance sheet with groups
- Subdivision -> Subdivision by period in order to set up the subdivsion by period
- Columns setup to indicate which columns are to be displayed
- Colors (Column properties) to assign different colors to the columns.
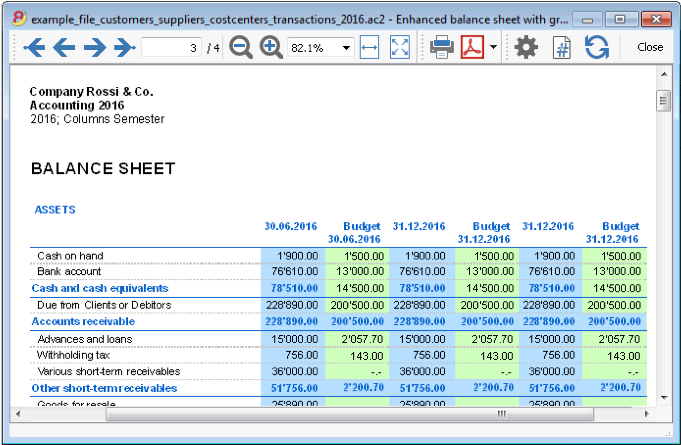
Subdivision by segment
This example has been realized with the following features:
- Enhanced Balance sheet with groups
- Subdivision -> Subdivision by segment in order to choose the segment level to be displayed.
- Print style
When printing the segments, it is not possible to set up the colors of the columns.
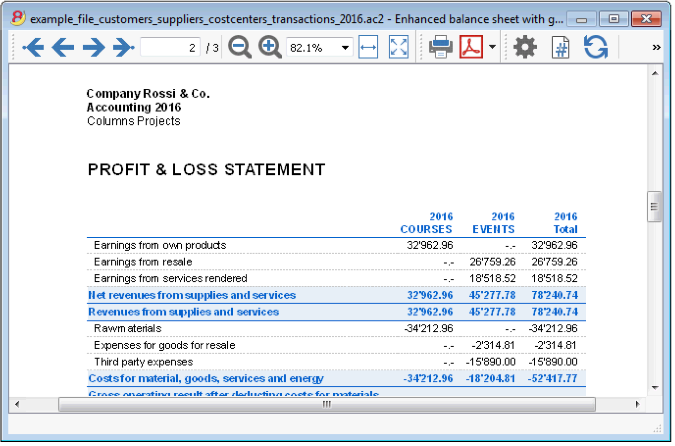
Pdf dossier with all the accounting data
The file is being created with a summary that gives access to the different printouts in an easy way.
The following data can be saved in PDF
- Balance sheet and Profit & Loss statement
- Accounts table, Transactions, VAT Codes, Totals
- VAT reports
- Account cards
If you save this file on a non-rewritable CD (to keep together with your accounting documents), this satisfies the legal requirements for archiving the accounting data.
This example has been realized with the following features:
File menu, Create Pdf dossier command
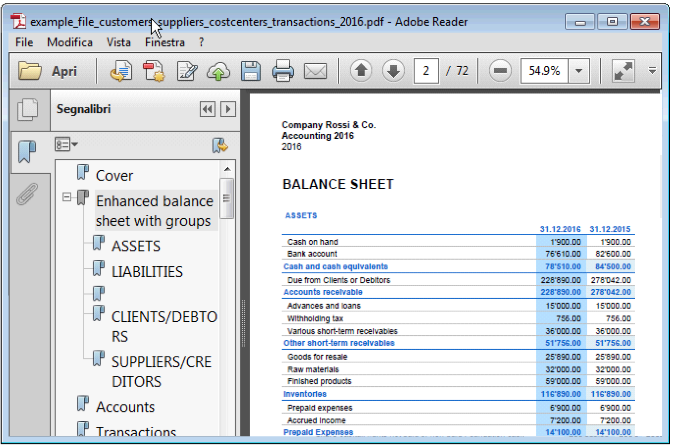
Printing an extra column
In order to print, in the Balance sheet, an extra column, the following features have been used:
- Columns setup, Data menu, in order to display or add a new column in the Accounts table
- Enhanced Balance sheet with groups
- Columns - advanced, to make the column visible.
Enhanced Balance Sheet
Print the Balance Sheet with your logo
In the new Banana Accounting Plus version, the Balance Sheet with groups printout has been improved with new customization possibilities. Among the new features, the possibility to insert your logo.
We advise you to immediately switch to Banana Accounting Plus and take advantage of the many new features.
- The Balance Sheet represents all the Assets, Liabilities, Expenses and Income in a specific moment. The difference between Assets and Liabilities gives the personal capital.
- The grouping of the accounts is done according to the contents of the BClass column.
- The Enhanced Balance Sheet, shown in the preview, can be saved in different formats (PDF, HTML, MS Excel) and can be copied in the clipboard.
- In order to calculate, display and print it at the end of year or the end of a period, activate the Enhanced balance sheet command from the Account1 menu.
- Transactions without date are being considered as opening transactions and will not appear in the printouts of the Profit & Loss Statement.
- The following window, in which several printing options can be activated, appears.
See also Print Examples.
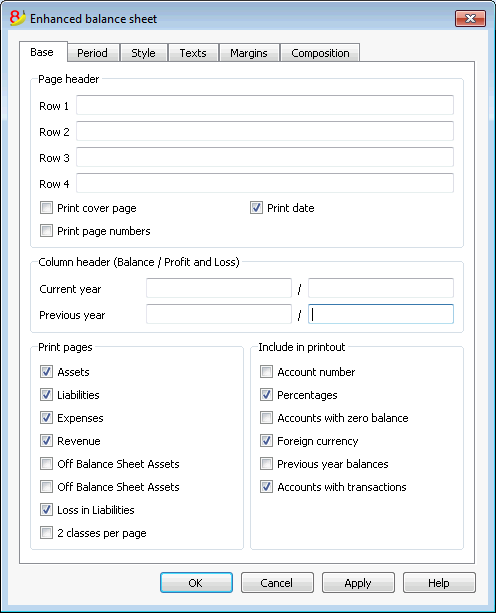
Page header
Rows 1 thru 4
In this field, enter texts to use as headers when printing.
Print cover page / Print date / Print page numbers
The activated options will be shown in the print-out.
Column header (Balance / Profit and Loss)
The first two vertical fields refer to the Balance Sheet, the two second ones refer to the Profit and Loss Statement.
Current year
Insert the final date of the current accounting.
Previous year
In this field, enter the final date of the previous year's accounting.
Print pages / Include in printout
By selecting the appropriate cells, it is possible to choose the options that should be activated in the printouts.
Other tabs
The explanations for the other tabs are available at the following pages:
Results
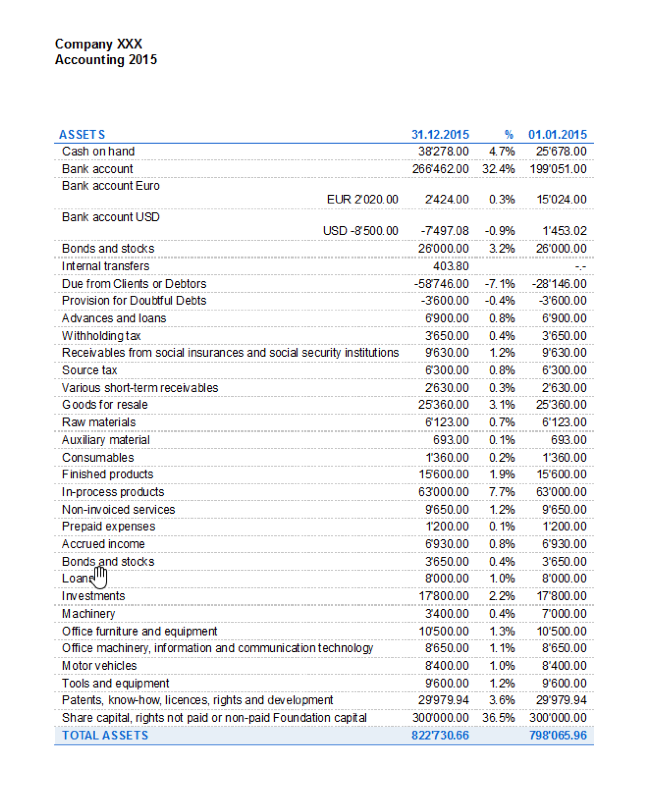
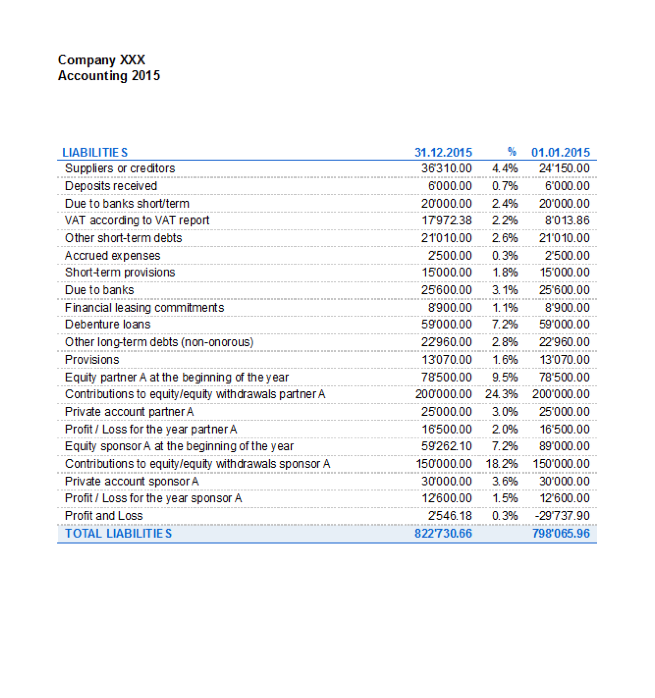
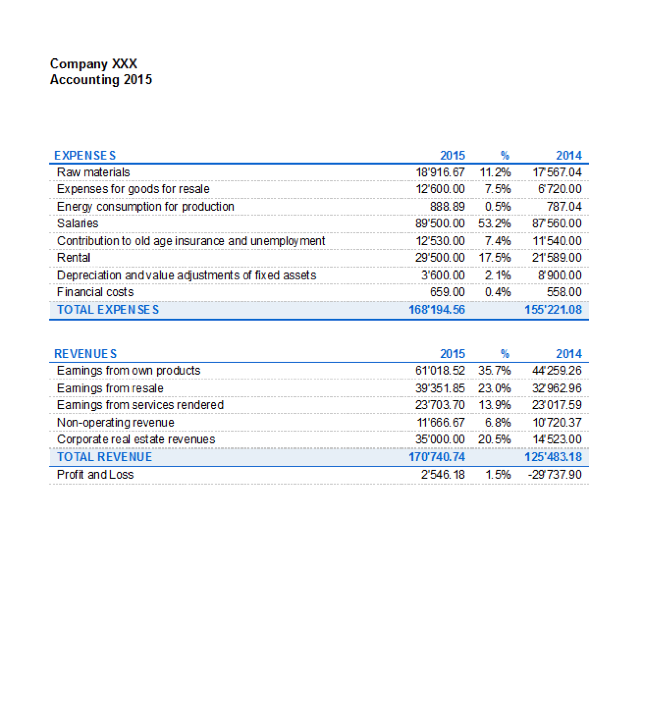
Enhanced Balance Sheet with groups
Print the Balance Sheet with your logo
In the new Banana Accounting Plus version, the Balance Sheet with groups printout has been improved with new customization possibilities. Among the new features, the possibility to insert your logo.
We advise you to immediately switch to Banana Accounting Plus and take advantage of the many new features.
The Balance sheet with groups differs from the Balance sheet for the following characteristics:
- Includes also subgroups in the printout, as in the chart of accounts (and not only groups).
- Offers the possibility to exclude groups or accounts (for instance, to display only the total of the group and not the accounts of which the total is composed).
- In the Chart of accounts - Sections it is possible to select which accounts to include or leave out in the printouts
- It is possible to choose, for a given period, what kind of subdivision you want (for example in the first semester, you can choose wether to obtain the data by month or by quarter)
- It is possible to have a subdivision by segment
- ... and much more!
In order to calculate, display and print the Enhanced Balance sheet by groups, click on the Enhanced balance sheet with groups command from the Account1 menu; a window appears, with different sections that allow the user to define the print setup.
See also Print Examples.
FAQ
- If I exclude the groups with a zero balance, the title rows that refer to the excluded groups are still being displayed; how can I erase them?
Go to Sections and activate Hide current row on the title rows that you wish to exclude. - I would like to exclude the display of the period in the titles of the printouts ("1st Semester 2013"); how can i do it?
Go to the Headers section and deactivate the Print period option. - On the cover page, when there are long titles, I would like to be able to choose how to subdivide the texts on two rows and whether I wish to apply bold print. Is it possible?
It is impossible to change the fonts on the cover page. - Some amounts are not included in the indicated period. Why?
Transactions without a date are being counted as openings and do not appear in the printouts of the Profit & Loss statement. Be sure to enter the date into all the transactions. - The Total groups that contain all the accounts of the classes 3 and 4 are being renamed with the text Profit or Loss, depending on the result of the accounting period. Can I change that?
Go to the Sections and overwrite the original text in the Alternate text zone of the active row. - In case the Show previous year option is being activated, and in the previous year file there are groups that are no longer present in the current year, the program will give error messages. Can I do something about it?
In order to print the Balance sheet with data of the previous and the current year, the groups of the previous year have to also be present in the current year.
Headers
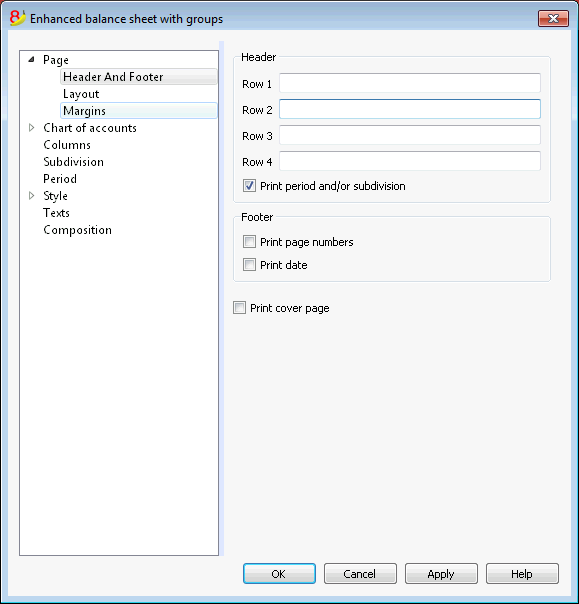
Header 1, Header 2, Header 3, Header 4
Enter as headers the text you wish appearing in the printouts. They will be on the cover page and on each page headings.
Print period and/or subdivision
This option is active only when a specific period has been defined. When you deactivate this option, the period will not be indicated in the titles of the printouts.
Footer
Print page numbers
By activating this function, page numbers will be printed.
Print date
By activating this function the date will be printed.
Print cover page
By activating this function the cover page will be printed.
Layout
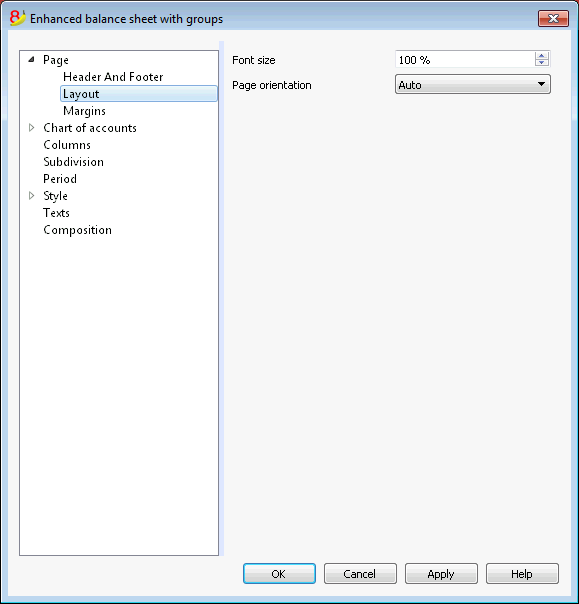
Zoom
The printout layout will change according to the entered value.
Page orientation
You can select the page orientation: automatic, landscape and portrait.
Margins
Top, Bottom, Left, Right
It's the distance between the page border and the content.
Header
It's the distance between the page header and the content.
Footer
It's the distance between the page footer and the content.
Increase margins to printable area
If the content exceeds the page margins it will be automatically adjusted to fit the printable area.
Sections
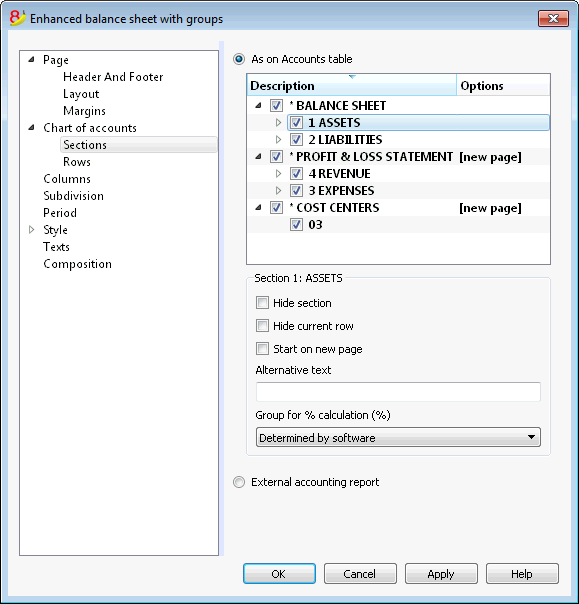
This section can vary depending on the settings of the Section column of the accounting plan - See the related document: Sections in the accounting plan
As on Accounts table
The display and the printout settings of the Enhanced Balance Sheet with groups, are the same as in the Accounts table.
Depending on the selection, there are different sections with different options:
- sections 1, 2, 3, 4, 01, 02, 03, 04... refer to the main items of the Balance Sheet
- account sections refer to the selected account
- group sections refer to the selected group
Section*
If you select a section with an asterisk, you will have the following options:
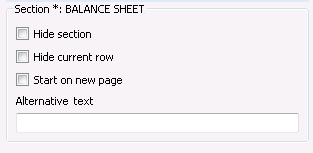
Hide section
Click on the section that you wish to hide.
Hide current row
Click on the row that you wish to hide.
Start on new page
Click on the header that you want to have on a new page and activate the option.
Alternative text
Enter an alternative text if you want to have a different one for the selected section or row.
If you select a number or a group section (1, 2, 3, 4.....), there are extra options:
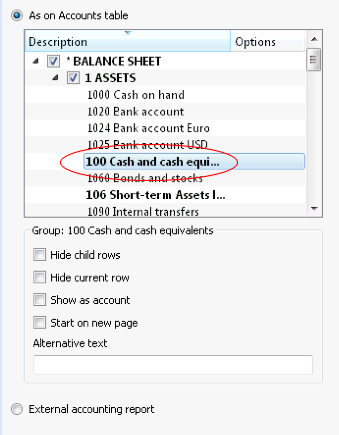
Group for % calculation (%)
This option is visible when selecting a section (Assets, Liabilities, ...). It is possible to indicate which group the % calculation should be based on.
Hide child rows
If you select a group and you activate this function, child rows of this group won't be printed in the Enhanced Balance Sheet.
Show as account
If you select a group and you activate this function, the group will be displayed as an account in the Balance sheet.
External accounting report
Print the Enhanced Balance Sheet by groups, based on the structure of the Accounting report file.
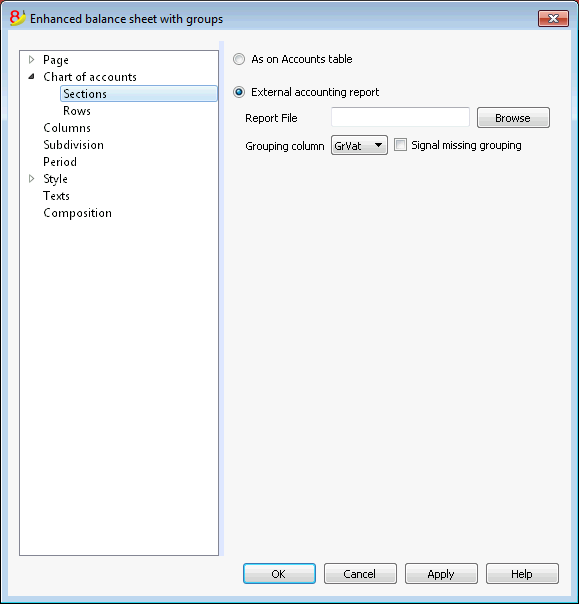
Report File
You can select the file of the External Accounting report with the Browse button.
Grouping column
Column in which the accounts refer to the groups defined in the External Accounting report. Available columns: Gr1, Gr2, Gr, BClasse and GrVat.
Signal missing grouping
Checks whether all accounts belong to a group in the External Accounting report.
Rows
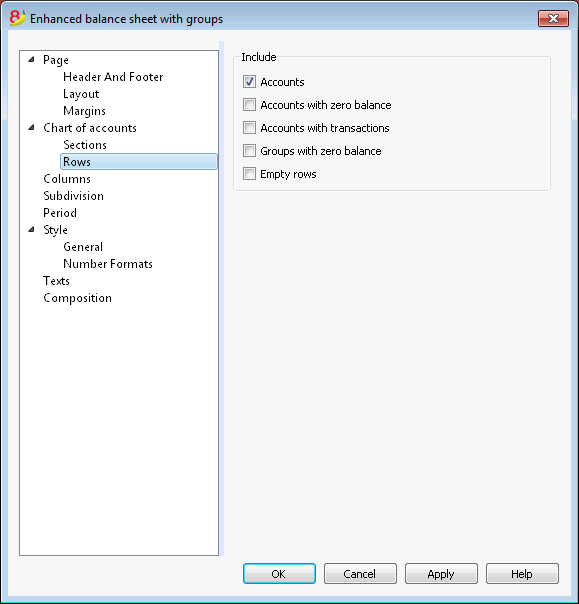
Accounts, accounts with zero balance, accounts with transactions, groups with zero balance, empty rows.
By activating the different options, you can include them in the printouts.
Columns
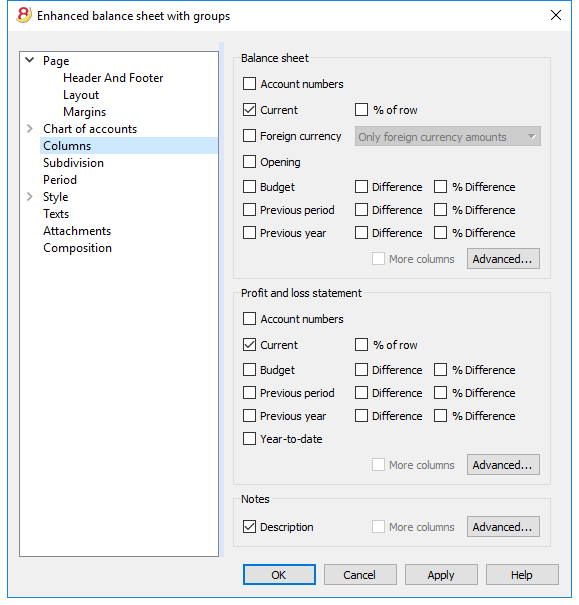
Balance Sheet, Profit & Loss Statement and Notes
You can choose the options you wish to include in the Balance Sheet, in the Profit and Loss Statement and in the Notes:
- Account number
- Current: the balance or movement in basic currency referred to the selected period or period subdivision
- Foreign currency: the balance in the account currency referred to the selected period or period subdivision
- % of row: includes the column with the percentage referring to the total (for example, % total Assets)
- Opening: opening balance at the beginning of the period
- Budget: budget amount referred to the selected period or period subdivision
- Previous period: the amount of the period previous to the selected period or period subdivision
- Previous year: the amount of the same period in the previous year
- Difference: the difference between the amounts of the current period and the other column (Budget, Previous period, Previous year)
- % Difference: is the difference, expressed in percentage, between the current period and the other column (Budget, Previous period, Previous year)
- Year-to-date: the balance or movement from the beginning of the accounting until the date of the last transaction.
Headers editing, color or display change of the columns
Each section has the Advanced button from where it is possible to change the column's settings and options.
Columns (Advanced)
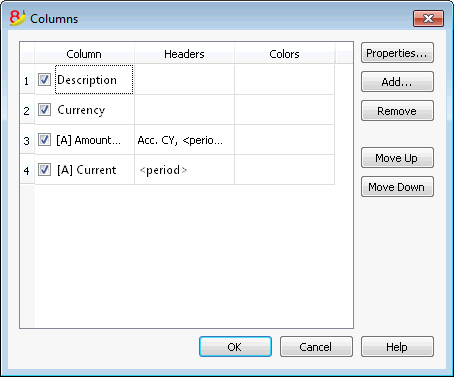
By pressing the Advanced button, it is possible to change the column's header:
- in order to make the column visible in the printout, check che corresponding checkbox
- in order to change the sequence of the columns, drag up or down the name of the column you wish to move, or use the Move Up and Move Down buttons
- In order to add new columns to be shown in the report (choosing them from a list) use the Add button
- In order to remove some columns from the list, use the Remove button
- In order to edit the display properties of a column (colors, headers, etc.) use the Properties button
Headers and options (Columns properties)
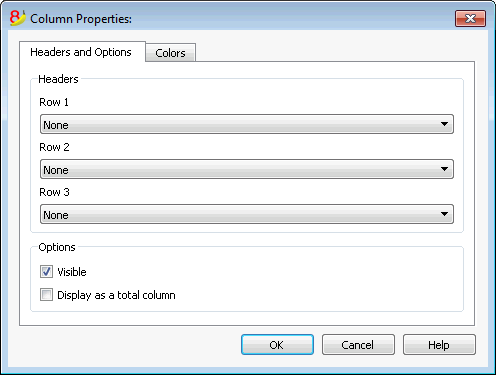
Headers
Row 1/ Row 2 / Row 3
It is possible to change the columns headers by selecting the Text option (from the drop down menu) and by entering the new header. If you select the Column option, the column name of the selected column will be shown.
Options
Visible
If this cell is activated, the column header will be shown.
Display as a total column
If activated, this option only shows the amounts in the Totals column.
Columns - add
Add / Delete
In the Balance sheet, Profit and Loss Statement and in the Notes, it is possible to add new columns (from the ones included in the list), or to delete the undesired ones. Starting from the Account1 menu -> Enhanced Balance sheet with groups -> Columns -> Advanced button -> Add button.
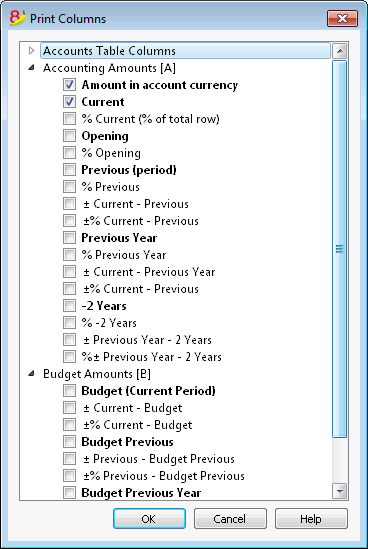
If one or more options are being activated, the program includes:
Accounts Table Columns
If you click on the header a list of all the columns of the Accounts Table will be shown:
You can then inlcude in the printout any column existing in the Accounts Table
Accounting amounts
These are the columns with the amounts calculated by the program, the opening balances and the entered transactions, for the indicated period or for the subdivision period
Amount in the Account currency
The account balances in foreign currencies will also be displayed.
Current
The balances of the current year will be displayed.
Opening
The Opening balances will be displayed.
Previous (period)
The balances of the previous period are being displayed (month, quarter, semester, etc).
Previous Year
The balances of the previous year are being displayed.
YTD (Year To Date)
This column is only available in the Profit & Loss Statement. The balances from the beginning of the year until the last transaction date are being displayed.
Budget amounts
See also Budget information. These are the columns with the amounts calculated by the program based on the budget amounts entered in the Accounts Table or in the Budget Table. If you created the Budget table and if some rows have been entered, the program will use the data of this table for its calculation, even if there are values in the Budget column of the Accounts Table.
Budget (Current period)
The amounts related to the foreseen budget of the current period are being displayed.
Budget Previous
The amounts related to the foreseen budget of the previous period are being displayed.
Budget Previous Year
The amounts related to the foreseen budget of the previous year are being displayed.
Notes on calculation period
The program cannot calculate amounts for periods overlapping between several accounting years or years with initial and final accounting dates that do not match.
Colors (Columns properties)
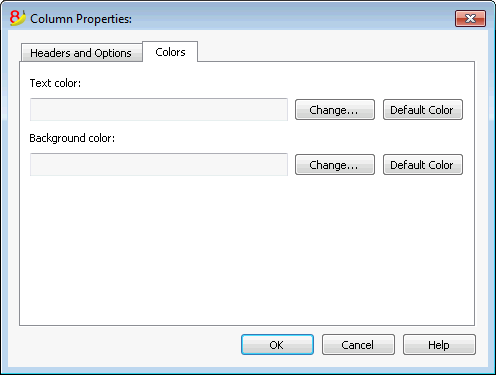
You can access this window by pressing on the Properties button, Colors tab (from the Enhanced balance sheet by groups command - Columns, from the Account1 menu)
Change
With this button you can change the text or the background color
Default color
With this button you can restore the default color for the text or the background.
Subdivision
From the Account1 menu choose the Enhanced Balance Sheet with groups command and select the Subdivision tab.
None
The whole period is shown.
Subdivision by period
This function makes it possible to display the dates of the selected period per day, month, bi-monthly, per quarter, per 4 months, per semester or per year. The selected period will be shown in the column headers.
Only segment
Only the data related to the selected segment are being shown.
Create periods for the whole year
When the accounting period is not the same as the solar year, but when the user still wants to see all months, this function needs to be activated.
Totals column
This function creates a Totals column for the selected periods in the Profit / Loss Statement and in the Totals view of the Accounting reports command (Account1 menu).
Max number of divisions
The default maximum number of periods is 36. In particular cases, if the user would want to obtain special and very detailed statistics over a long time span, this value can be changed manually. A very high maximum number of periods can slow down the program.
Subdivision by segment
The data related to the selected segment are being shown. This option is only available if segments have been set.
- Select all - all options will are selected
- Void - only the amount not assigned to any segment is shown
- Segments subdivision - Each subdivision will have the header given in the accounting plan. The data of the selected subdivision are shown.
Totals column
When this option is being activated, the totals for the selected segment will be obtained.
Segment header
You can choose the text to be displayed as column header for the segments.
Period
Explanation on the Period tab are available at the following link:
https://www.banana.ch/doc8/en/node/2766
Style Tab
Use style
There are different models of the Enhanced balance sheet provided. By selecting one, the user can obtain the Enhanced balance sheet of his choice.
Style property
For each style, the color of the fonts and the backgrounds can be defined.
Value / Change... / Default
These functions allow the user to change style or to restore the default style.
Ignore line formatting
If this function is activated, the formatting will not be maintained.
Number formats
Divide by 1'000
If there are big amounts, by activating this option, three zeros will be taken off.
Show cents
By activating this option the cents will be shown.
Show zero amounts
By activating this option it is possible to choose between having the zero amounts shown with the 0,00 number or with the -,- symbol.
Negative numbers
Negative amounts can be shown with a minus sign before the amount, after the amount or the amount can be shown between parenthesis. You can also activate the option to have the negative numbers shown in red.
Texts
This tab is used to alter the texts of the program columns headers for print-outs.
In order to change the Value column you just have to double-click on the cell you want to edit.
Attachments
This sections allows you to add text that will be printent with the Balance sheet and Profit & Loss statement.
- texts are printed after the Balance sheet and Profit & Loss statement.
- each document begins on a new page
Documents
All documents listed in the Documents table (Html or text format) are listed here.
- You can change the report sequence, just by dragging the item with your mouse
- All documents with a check mark will be printed.
Edit...
A text editor will open allowing you to enter new text or edit the existing one.
Add
This button will open a text editor where you can add new text.
If you haven't created the Documents table yet, the programm will automatically add it.
Remove
This button will remove the selected element and its content.
Notes
- This feature is not available in previous versions.
If the file is open with a previous version of the Banana Accounting software, you will get a message that the file is not totally compatible. - If you edit this section and you press OK, in order to undo the operation you need to give the Undo command more that once.
Composition
Explanations on the Composition section are available at the following link:
http://doc8.banana.ch/en/node/2768
Account/Category cards
The account card gives a complete list of the accounting transactions for one or several accounts, cost centers, segments and groupes.
Opening the Account card
There are two methods to open an account card or a category card:
- Select the Account/category Card (Cash book and Income & Expense accounting) command or the Account card (Double-entry accounting) command of the Account1 menu in order to open and print several or all account cards.
- On the account number cell there is a small blue symbol; click on it just once in order to obtain the account card.
The groups of the Chart of accounts have the same symbol available as well, in order to display the account card.
Updating the accounting card
The account card table is temporary and it is calculated when the command is given to do so. If, in the Transactions table, transactions are altered or added, they are not automatically updated on the account card - the user needs to select the Account Cards command again or click, in the Transactions table, once more on the account number's blue symbol, or in case the account card is still open, click on the small Refresh button on the right side (see image hereunder).
It is not possible to modify the data in the Account card. Double-click on the row number to go back to the original corresponding row of the Transactions or Budget table.
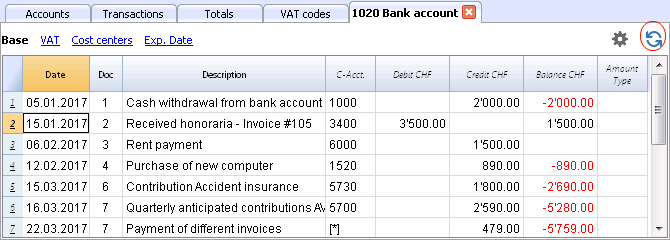
The AccountSelected column
In the AccountSelected column, which can be made visible, starting from any account card, through the Data menu -> Columns setup, the account on which the transaction took place is being displayed.
When you get an account card of one or more accounts, groups and segments, you will see the exact account that has been used.
The contra account in the account cards
In the Account cards, the Contra Account column (C-Acct.), which indicates the account that completes the transaction, is being shown.
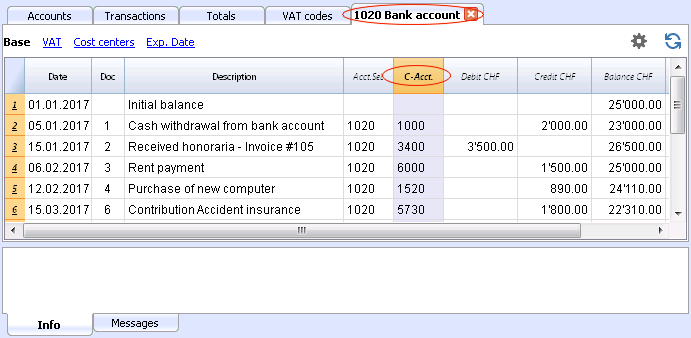
When there are transactions on multiple accounts (transactions on multiple rows) as in the example hereunder, and there is one account entered in debit and several accounts in credit, or the other way around, the software deducts the possible contra account using the following logic:
- In the first transaction row, the 1020 account is considered the common contra account of the transactions that follow.
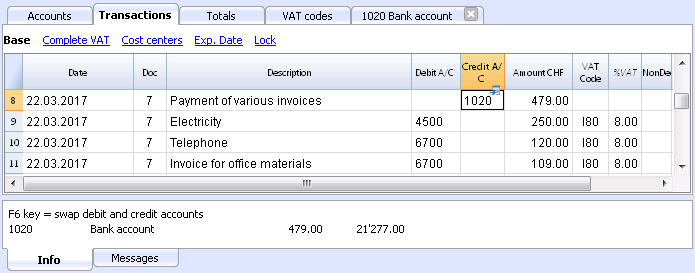
- On the Account card 1020, the composed transaction (Payment various invoices) shows the contra account indicated by the [*] symbol. It is impossible to have the indication of the contra accounts directly in the account card, because the account has several contra accounts (4500, 6700, 6700). For this reason the program indicates the [*] symbol in the C-Acct (Conta-Account) column, which means that we are dealing with a transaction on multiple accounts.
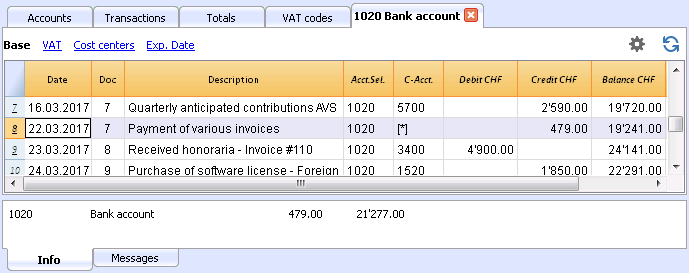
- On the Account cards of the next transaction rows (4500, 6700, 6700), the common contra account is indicated between square brackets ("[1020]"), and indicates a deducted contra account.
Cards of groups and classes
In the Account card of a group or a class, all the transactions of the accounts that belong to the selected group or class are being grouped together.
The accounts of the group or the class can be displayed by making the AccountSelected column visible.
Print all account cards
To print the Account cards:
- Account1 menu, Account cards command
- By means of the Filter, all the account cards that need to be printed completely or partially (for example, only accounts, cost centers, segments) can be automatically selected
- In the various sections Period, Options, Composition, activate the desired options (for ex. period, 1 account per page, ...)
- Press OK to confirm, after having selected the desired options.

For the explanations of the different tabs, please visit the next few pages: Accounts/Categories tab, Period and Options.
The program will show the selected account cards.
In order to print, choose the Print command from the File menu.
When you have activated the Budget table in your file, you may choose which transactions you want to see (actual transactions or budget transactions).
Save the settings
In case you regularly print the account cards of specific accounts, for example, all those that concern the Sales accounts, it is useful to create a specific composition.
- Go to the Composition tab
- Create a new composition, using the New button
- Indicate the name of the composition, for example "Sales accounts", in the Description field of the window
- Select the accounts that you want to be printed.
Every time you wish to print these accounts, you can select the composition that you created.
Page setup
In Page setup, you can specify the margins & other settings of the page.
Accounts/Categories tab

You can access this windows by choosing the Account1 menu -> Account cards command (see the Account cards page)
Search
Enter the account or the description in order to filter the accounts list.
You can also enter the account to be displayed with segments (only experimental version).
Accounts and segments can be combined (see developer explanations):.
- 10000:01 will show all transactions of the 1000 account with the 01 segment.
- 1000|1001will show the transactions for account 1000 and 1001.
Accounts
The list of all available accounts appears.
If you wish to print one or more account cards activate only the desired accounts.
- (Select All)
By activating this option, all the accounts that are part of the Chart of accounts are automatically selected. - Filter
This function allows you to filter all account cards or just a selection, specifically:- Accounts, cost centre and segments - if no selection is made they are filtered by default
- Accounts/categories (existing cost centres and segments are excluded)
- Accounts, Cost centres (only segments are excluded)
- Cost centres (accounts and/or categories and segments are excluded)
- Segments (accounts and/or categories and cost centres are excluded)
- Groups - existing groups will be shown - you need to select the ones to be printed
- Classes - all classes will be shown - you need to select the ones to be printed.
Actual or Budget
When you have activated the Budget table in your file, you may select:
- Actual transactions
The entries in the Transaction tab will be processed. - Budget transactions
The entries in the Budget tab will be processed.
In the absence of the Budget tab, the amounts in the budget column of the account card, will be converted to monthly amounts on the basis of the opening and closing dates of the accounting file (if this one year, will be devided by 12 monthly instalments).
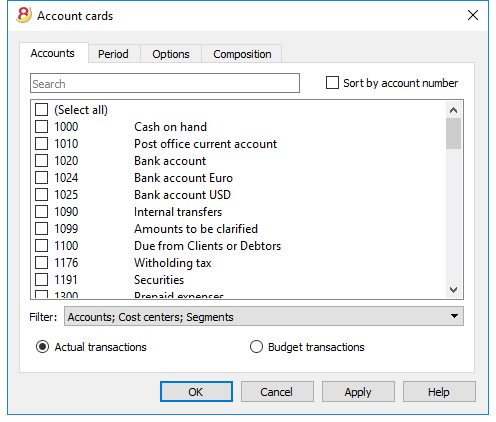
Differences in accounting entries (account card 00)
If differences in accounting entries occur (refer to the DEBIT - CREDIT difference error page), open the Group 00 account card (or the one in your Chart of Accounts that contains all the accounts of BClass 1,2,3,4).
You will have a list of all transactions with the successive balances, which after each entering should equal zero. The row which balance is not at zero contains the error.
Period tab
The explanations of the Period tab are the same as those for the Save file in Pdf - Period tab.
Options tab
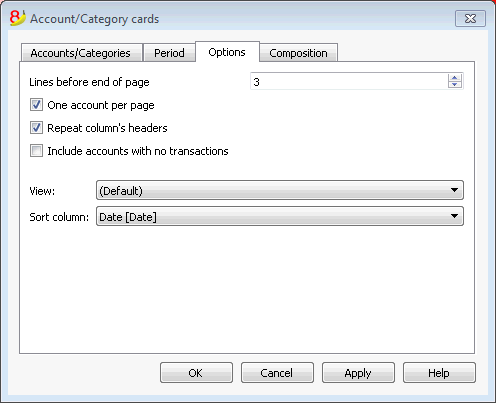
Lines before end of page
This function was created in order to avoid printing an account partially on one page and partially on the following. If the account card to be printed doesn't have at least a number of lines correspondent to the number input in this field, printing the whole card will be moved to the next page.
One account per page
By activating this function, each card will be printed on a separate page (even those with few transactions).
Repeat column's headers
By activating this function, the column headers will be repeated for each account, within the page.
Include accounts with no transactions
By activating this function, cards without transactions will be printed as well.
View
You can select the columns view to be included in the account cards display and printout:
- Base
- VAT
- Cost centers
- Expiration dates
If no criteria is specified the program will keep the order present in the transactions table.
Sort column
In the account card, transactions can be sorted according to different data criteria:
- Document date
- Value date
- Expiration date
- Payment date
Accounting report
New Customization possibilities
In the new Banana Accounting Plus version the Printouts have been improved thanks to the possibility of new customization possibilities.
We advise you to immediately switch to Banana Accounting Plus and take advantage of the many new features.
- This command allows the user to visualize the amounts of accounts with a specific grouping, for a specific period or with a specific subdivision.
- In order to calculate, obtain and print reports, choose the Accounting reports command form the Account1 menu.
- Transactions without date are being considered as opening transactions and will not appear in the printouts of the Profit & Loss Statement.
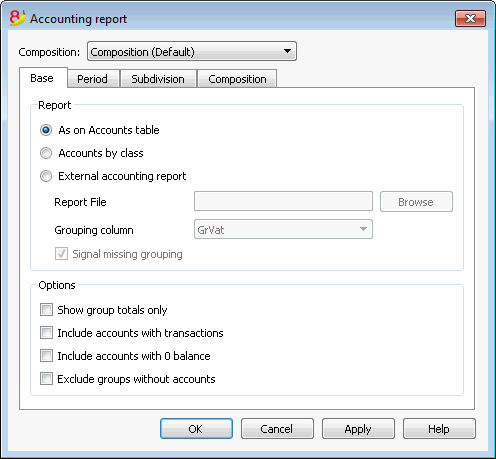
Base tab
Report
You can select the desired grouping scheme:
- As on Accounts table - the Report will show a list of all accounts just as in the Accounts table with the Opening balance and Balance columns
- Accounts by class - the Report will show the list of the accounts but without subgroups
- External accounting report - the Report will show the data according to a grouping system preset in a separate file (File menu, New command, Double-entry accounting group, Accounting Report).
Options
You can select the accounts to be included or excluded:
- Show group totals only - only the group totals will be shown
- Include accounts with transactions - only accounts with transactions will be printed
- Include accounts with 0 balance - accounts with zero balance will be printed as well
- Exclude groups without accounts - groups that contain only accounts with zero balance will not be printed.
Other tabs
The explanations for the other tabs are available at the following pages:
Report result
A new table is created where the results are shown.
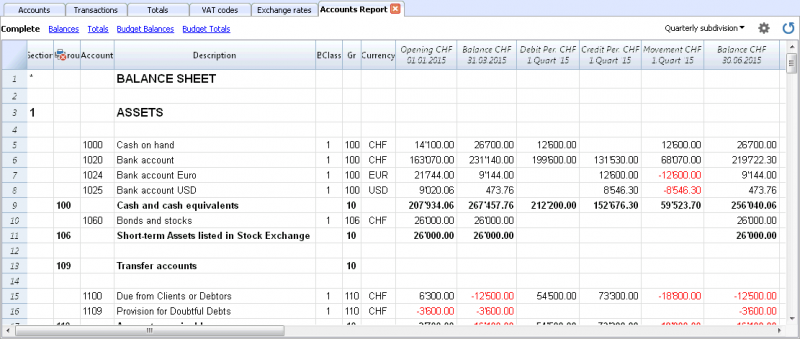
Journal
With Banana Accounting the Journal corresponds to the Transactions table. It is possible to print the whole journal or just a part of it, selecting the rows that you wish to print.
In order to personalize the journal printout you can change the columns order and headings: you can find all the information on how to proceed in the Columns setup page; you can also choose several options in the printout; please visit the Page setup page.
![]()
There are different ways to print:
- place yourself in the Transactions table and click on the Print icon
- place yourself in the Transactions table and launch the Print command form the File menu
- from the Account1 menu click on the Print journal by period command; in this case you should then indicate if you wish to print the whole table or just a specific period
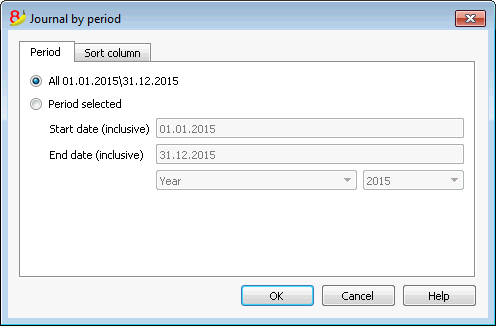
The information on the Period tab are explained in detail in the Period page of the General settings.
In the Sort column tab in is possible to choose the criteria the journal should be sorted and printed.
Budget
Budget amounts entered in the Accounts table
In the Accounts table, there is a Budget column where the budget for the current year can be entered.
The Budget table, on the contrary, offers many more possibilities, and allows you to enter budget transactions, creating a detailed planning of your financial and cash (or cash equivalent) situation.
For more information and examples please visit the Financial planning page.
Adding the Budget table
If your accounting file doesn't have the Budget table yet, proceed as follows.
- Go to the Tools menu
- Add new functionalities command
- Choose Add Budget table
Attention: this operation cannot be undone; if you want to go back to the previous situation, keep a copy of the pre-existing file.
Thereafter, the program will:
- Add the Budget table, carrying forward the budget values indicated in the Accounts table.
- Lock the Budget column in the Accounts table.
The values of this column are being calculated according to the budget transactions, using the period defined in the accounting tab basic data.
Preparing the budget
- Enter the individual budget transactions in the Budget table
Enter future operations as if they were normal transactions, but with a future date.
For example:- If you want to have a budget for the monthly sales, enter a sale transaction: enter your cash or cash equivalent account in the Debit account column and enter the sales account in the Credit account column, for each month. As date you can enter a date around the end of each month and as amount you can enter the amount you expect it to be.
If you want to have a budget for each product sale, enter some sale transactions for each product with your expected sale volume. - For your expenses budget, enter some transactions entering your expense account in the Debit account column your cash or cash equivalent account in the Credit account column.
If there are recurring operations, you can use the Repeat column to specify the repetition pattern.
- If you want to have a budget for the monthly sales, enter a sale transaction: enter your cash or cash equivalent account in the Debit account column and enter the sales account in the Credit account column, for each month. As date you can enter a date around the end of each month and as amount you can enter the amount you expect it to be.
- Display the budget data
- Go to the charts of accounts, and then into the Budget view, where you can view the total budget for your accounting period.
- You can also use the Balance sheet with groups print option and check the Budget column option, which will display budgeted date next to the actually registered data.
Budget table columns
The Budget table columns are very similar to the Transactions table columns. In the following example, to make it easier to understand, we used accounts with letters. Normally you would use your own account numbers.
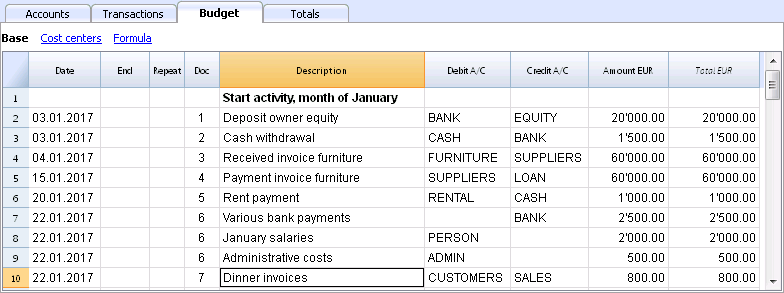
In order to prepare a budget is normally enough the amount column.
For more elaborate budgets you can also indicate the quantity, the unit prices, or you can enter a formula. The program will automatically calculate the amount in the Amount column.
Entering the Budget transaction rows
In the Budget table, the transactions can be entered in exactly the same way as in the Transactions table, indicating the date of the operation, the Debit and the Credit accounts and the amount.
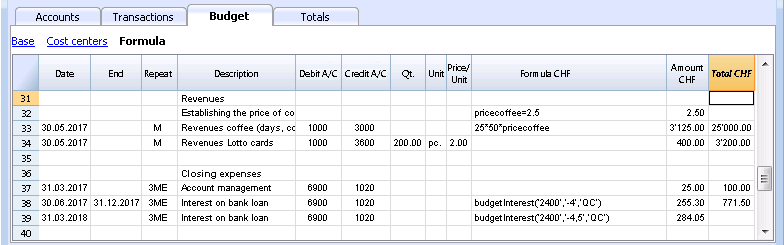
You will here find the budget columns explanations (not all columns are visible in the image above):
- Date column
The future date when you expect the operation to take place:
If you cannot precisely define the date, for example a monthly sales budget, enter the end of the month date. - Repeat column
A repetition code can be entered, possibly preceded by a number
(3M quarterly, 6M per semester, 7D weekly, 3ME quarterly end of month)- Empty: no repetition is taking place
- "D" for a daily repetition (Day)
- "W" for a weekly repetition (Week)
- "M" for a monthly repetition (Month)
- "ME" monthly repetition, but with a date at the end of the month.
If started the 28.02.2017, the next date will be 31.03.2017 - "Y" for a yearly repetition (Year)
- "YE" yearly, but with a date at the end of the month.
If started the 28.02.2015, the next date will be 29.02.2016.
- End column
The date beyond which no more repetition should appear is being indicated. - Variant column
A possible variant form of the budget can be indicated here, in combination with the Apps. - ForNewYear column
Here you can indicate how the transfer is to take place when Creating the New Year- No value: the date is being augmented by a year
- "1" The date remains the same
- "2" The operation is not being transferred to the new year
- Debit account and Credit account, CC1, CC2, CC3 columns
Just as in the Transactions table, you use these columns to define on which accounts the operation should be registered.
You can also use segments and cost centers, to obtain a budget by segment or cost center. - Quantity column
In this column you should enter the quantity description, for example sqm, ton, pc, .. - Price/Unit column
The unit price that, multiplied by the quantity, should give the total amount.- In the Income & Expenses accounting files, you should enter the price unit in negative (with a minus sign), so the amount will be entered in the Expenses column
- Amount column (in basic currency)
The amount to be recorded.
If the row has a repetition, the amount is indicated only in the first transaction; the amounts of the following transactions is shown in the account card.
The program will automatically calculate the amount in the following cases:- If there is a value in the Quantity or Price/Unit columns, the amount is automatically calculated according to the content of these two columns.
- In a double-entry accounting file the result will be a positive amount
- In an Income & Expenses accounting file, if the result is positive it will be considered an income, if it is negative it will be considered an expense.
- In case a formula was entered, the amount will be the result of the formula.
Formulas have priority over quantity and price/unit.
- If there is a value in the Quantity or Price/Unit columns, the amount is automatically calculated according to the content of these two columns.
- Total column
This is the sum of the amounts of the repetitive rows that are part of the specific accounting period.
To display the different amounts, use the Account cards command. - Formula column (in basic currency)
This column gives the user the possibility to enter calculation formulas, of the javascript language, plus the programming functions of the Banana Apps as well.
If there is a formula (or whichever text) the value of the Amount column is being set up according to the result of the formula. See below how to use it.- In a double-entry accounting file the formula result must always be a positive amount
- In an Income & Expenses accounting file, if the result is positive it will be considered an income, if it is negative it will be considered an expense.
- Amount in account currency column
This is the transaction amount in account currency (see multi-currency transactions).
This amount is necessary to calculate the value in basic currency, at the indicated exchange rate.
If there is a formula, the value is the result of the calculation of the formula.
In case of repetition, the first amount is being indicated. - Formula amount in account currency column
A calculation formula can be entered.
In case of repetition, the first amount is being indicated; the amounts of the following transactions is shown in the account card. - Total amount in account currency column
This is the sum of the amounts in account currency of the repetitive rows that are part of the specific accounting period.
If there is no date or if the initial or final date are not part of the accounting period, this column will be empty.
Functions you can use in the Formula column
If you want to see examples about formulas, please visit the following pages:
- Transactions template with use of Quantity and Formula columns.
- Transactions template for the multi-currency accounting with use of the Formula column in basic currency.
In the Formula column you can enter a formula in JavaScript language, plus the Banana Apps programming functions.
If there is a formula (or any text), the value in the Amount column is set according to the formula result.
It allows you to enter calculation formulas, in the JavaScript language, plus the Banana Apps programming functions.
- Last operation result.
The formula is executed and the result displayed.
10*3 //30 will be returned
If there is a sequence of several operations separated by a semicolon ";", the last operation will be resumed.
10*3;7;
7 will be returned - Decimal separator.
As decimal separator JavaScript only uses the point "."
If you use a different separator, the number is likely to be truncated. - DEBUG is a variable that can be true or false.
- If true, in the messages, all the results of the formulas are being displayed.
- row
Is a javascript object that refers to the current row.
The values of the cells can be retrieved with the value function ("columnNameXml").
row.value("date") returns to the date of the transaction.- row.value ("JRepeatNumber") returns the progressive of the repetition.
The first repetition is 0.
- row.value ("JRepeatNumber") returns the progressive of the repetition.
- budgetCurrent
It is a table that contains the budget rows after the repetitions creation. - budgetExchangeDifference (account, [date, exchangeRate])
This formula recalls the Banana.document.budgetExchangeDifference function. - BudgetGetPeriod(tDate, period)
Returns to the start date (startDate) and the end date (endtDate) relative to the date and the period where the period can be:- "MC", "QC", "YC" to indicate the month, the quarter or the current year.
- "MP", "QP", "YP" to indicate the month, the quarter or the previous year.
- t = BudgetGetPeriod('2015-01-01', 'MP') returns
t.strartDate // 2014-12-01
t.endtDate // 2014-12-31
- The following functions are similar to those available with Banana.document, however, with the added possibility to indicate as startDate the period of BudgetGetPeriod so that the function uses the current date and as a start date and end date the date returned of BudgetGetPeriod.
budgetBalance('1000', 'MP'); //returns the balance of 1000 to the end of the previous month
budgetTotal('1000', 'MC'); //returns the total movement of the 1000 account for the current month.- budgetBalance(account, startDate, endDate, extraParam)
- budgetOpening(account, startDate, endDate, extraParam)
- budgetTotal(account, startDate, endDate, extraParam)
- budgetBalanceCurrency(account, startDate, endDate, extraParam)
- budgetOpeningCurrency(account, startDate, endDate, extraParam)
- budgetTotalCurrency(account, startDate, endDate, extraParam)
- budgetInterest( account, interest, startDate, endDate, extraParam)
- credit(amount)
If the amount is under 0 returns the amount in positive, if not 0 returns. - debit(amount)
If the amount is greater than 0 returns the amount, if not 0 returns. - include
Includes and executes a javascript file, with the possibility to create its own functions and variables that can be recalled in the script.- include "file:test.js"
Executes the contents of the indicated file. The name refers to the file on which one is working. - include "documents:test.js"
Executes the contents of the text document contained in the documents table.
This has to be a file of the "text/javascript" type.
- include "file:test.js"
Variables
It is possible to define and use variables directly in the rows.
The variable must have been previously defined.
price = 10;
total = price * 5;
User defined functions
The user can define personal function with the JavaScript language, and recall them in the formulas.
It is possibile to define functions:
- Directly in a formula
- In a JavaScript coded attachment; this attachment must have as row id the "_budget.js" name
- In a text of the Documents table, that needs to be included with the Include command
function Taxcalculation(profit)
{
   var percentage = 10;
   if (profit > 50000)
      percentage = 10;
   else if (profit > 100000)
      percentage =20;
   return profit * percentage / 100;
}
Calculation and recalculation sequence
Each time that you change an amount in the Budget table, or that you manually recalculate the file (Shift+F9), the program:
- If it exists, first of all the program executes the "_budget.js" document content.
- It recalculates the Budget table rows:
- The program generates the repetitive row according to the Initial Date, Final Date and Repetition columns.
If there is in January a row with a monthly repetition, 12 identical rows will be created, each one with a date of a different month. - The budget rows are sorted by date (if they have the same date they will be listed in the order they were entered)
- The transaction amount is calculated according to the quantity and unit price or, if there is a formula, according to the formula result.
- For the multi-currency accounting, the program executes first the formula in the account currency, and then in the basic currency.
If there is no formula for the basic currency, the program will use the historic exchange rate and calculates the value in the basic currency. - For the accounting files with VAT, the VAT is calculated according to the transaction's amount.
- Rows previously processed will be used for the calculation of the following rows.
The accounts balance, at the budget row's date, will include the amounts previously processed.
If for example, in a February transaction you enter a formula to calculate the balance for the whole year, you will only get the balance up to the end of February.
- The program generates the repetitive row according to the Initial Date, Final Date and Repetition columns.
- It recalculates the budget values in the Accounts column, according to the budget transactions and to the opening balances.
- It updates the Total column amount in the Budget table.
If the initial or final date of the accounting is modified, as well as other values that are used for the calculation of the budget amounts (for example the VAT table), you need to operate a manual recalculation (Check accounting command from the Account1 menu).
If you have many rows, with many recurring transactions and with a long calculation period, the program may slow down when recalculation the Budget table. In this case we suggest you to uncheck the manual recalculation in the File & accounting properties (File menu).
Printing a budget
In order to print your budget, use the Balance sheet with groups command from the Account1 menu. In the Columns section, activate the Budget column.
If the budget was entered in the Budget table, you can also print the budget by period.
Creating the New Year
When creating the New Year, the program automatically recreates the budget transactions for the new year, according to the values of the New Year column in the Budget table. If this column is not visible you can activate it using the Columns setup command from the Data menu.
End of the Year closure and New Year
Avoid mistakes with Banana Accounting Plus
In order to have continuity and serenity of work, it is also worth starting the New Year with an updated software.
Facilitate checking your accounting work and immediately find differences: in Banana Accounting Plus, our new version, try the Balance column in the Transaction table. You can now see potential differences on each row and you can correct them right away. It is a very useful feature when closing the accounting period.
Many of our clients have already tried it and are enthusiastic about it. We advise you to switch now to Banana Accounting Plus and take advantage of the many new features.
Other resources: How to close and open the accounting year
End of the Year closure and New Year
At the end of every accounting year, before printing and filing the Balance Sheet and the Profit & Loss Statement, it is necessary to recheck the accounting file.
Please visit the Recheck the accounting page.
Tax aspects
Before closing the accounting, is is necessary to proceed with a series of operations that have fiscal implications. The marchandise account needs to be adapted, the transactions for depreciations need to be entered, the accrued income and liabilities, the VAT declaration needs to be completed, establish how and unto which accounts the profit or loss has to be attributed and there are many other operations for verification and checking.
From the program's point of view, there is no difference whether the profit is high or low. However, from a fiscal point of view, it implies a lot. These aspects need to be verified with your own tax advisor or accountant. It can be very useful, especially when you manage an accounting for the first the time and before you proceed with the closing of the books, to consult a specialist in order to understand what is required. The accountants are very busy at the beginning of the year and during the period preceding the deadline for the tax declaration. It can therefore be useful to meet with your accountant - or send him the accounting file - a few monts before the closing of the books, so that you can inform yourself on how to proceed.
Create a New Year
In order to start recording in the new year, with the Create New Year command of the Account2 menu and starting from the current year's file, a new accounting file is being created. Once the new year has been created and the file has been saved under a new name, the user can work in the file of the new year, but also in the one of the preceding year.
You can thus create the file of the new year, even before having closed the year in which you are still working. After having entered the last modifications in the previous year, use the Update Opening balances command of the Account2 menu, to retrieve the opening balances and again attribute the profit of the last year.
Performed Operations
The Create New Year command:
- Creates a new file (with no name) with the chart of accounts and all the settings identical to your current file, but without transactions.
- Copies the data from the Balance column of your current file to the Opening column of the new file (only for the selected classes)
- Adds the selected amount to the opening balance of the Profit or Loss from previous year account(s) in the new file.
- Copies the data from the Balance column of your current file to the Previous Year column of the new file (for all the accounts).
- Updates the opening and closing dates in the File and accounting Properties of the new file.
- In the Multi-currency accounting, enters the closing exchange rates of the previous year as opening exchange rates.
Create New Year command
- Open the current file and click on the Create New Year command from the Account2 menu: a window, that shows a difference corresponding to the profit or loss that has not yet been allocated, will appear. There may also be differences due to accounting errors.
- From the list that appears, the user can select the account to which the result of the accounting period has to be allocated, or one can directly confirm with OK if the allocation of the result has to be postponed.
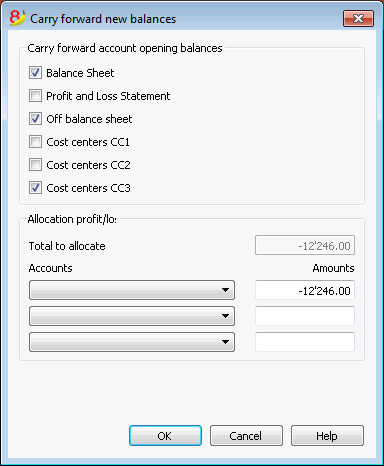
Carry forward account opening balances
The opening balances of the selected options are carried forward.
Indicate which accounts are required to have opening balances carried forward. Usually the Profit and Loss Statements balances are not carried forward. For specific needs you can always activate the option.
Allocation profit/loss
Total to allocate
The program will indicate the profit/loss that needs to be shared between various accounts.
Accounts/Amounts
If only one account is selected, the amount will automatically entered. Select the account or accounts (up to three) in which the result of the accounting period has to be allocated. In case there are several destination accounts for the result of the accounting period, the amounts should be inserted manually in the different boxes. The program will automatically update the opening balances. The Total Assets will exactly match the Total Liabilities.
Allocation of the result of the accounting period on more than three accounts.
In this case, allocate the result of the accounting period automatically on the Profit or loss brought forward account as usual, and continue to proceed with the creation of the new year.
In the new year (new file), Transactions table, proceed with a composed transaction in order to allocate the result of the accounting period from the Profit or loss brought forward account to the different destination accounts.
- Confirm the File and accounting properties for the new year.
- From the File menu, activate the Save as... command, indicating the folder where the new accounting file needs to be saved.
Updating opening balances command
The Updating Opening Balances command:
- Retrieves the closing data of the indicated file
- Copies them as data of the previous year in the current file (see Create New Year command).
This command doesn't influence the already entered recordings. Infact, it is like when creating a new year, as if you are recording in the current year.
Opening balances must be updated in the following situations:
- When you have created the new year and afterwards you entered more transactions - or made corrections - in the previous year
- When the profit/loss of the previous year has not been allocated.
Here is how to proceed to make the update:
- Open the current year accounting file and choose the Update opening balances command from the Account2 menu
- Select the previous year accounting file through the Browse button
- Follow the same steps as the ones of the Create New Year command (see top of the page)
Differences in the opening balances
Avoid mistakes with Banana Accounting Plus
In order to facilitate checking your accounting work and to immediately find differences, in Banana Accounting Plus, our new version, we added the Balance column in the Transaction table. You can now see potential differences on each row and you can correct them right away. It is a very useful feature when closing the accounting period.
Many of our clients have already tried it and are enthusiastic about it. We advise you to switch now to Banana Accounting Plus and take advantage of the many new features.
Differences in the opening balances
At the opening of the Accounting year, the amounts of the Total Assets should correspond to the Total Liabilities, otherwise it is not possible to have a correct balancing. You need to check that in the information window there is no Opening balances difference message. If there is, you first need to correct the opening balances of the Balance Sheet so that the Total Assets balances the Total Liabilities (Opening balance column).
In the following example the program shows an error message reporting a difference of 150.- CHF.

After having corrected the opening balances the Total Assets must correspond to the Total Liabilities.
It is also possible to check the balancing in the Totals table.