Menu Extra
Het menu Extra in Banana Boekhouding bevat geavanceerde functies die u helpen uw boekhoudbestanden te beheren, aan te passen en te optimaliseren.
Via dit menu kunt u informatie over het geopende bestand raadplegen, de beschikbare functies uitbreiden, bestanden aanmaken of converteren naar andere soorten boekhouding, verschillende bestanden samenvoegen en de algemene opties van het programma instellen.
Voor een gedetailleerde uitleg van de opdrachten klikt u op de links in het menu aan de linkerkant.
Bestandsinfo
Het Bestandsinfo commando van het menu Extra laat de eigenschappen van het boekhoudbestand zien.
Kolommen
Door op weergave Compleet te klikken worden ook de XML kolommen weergegeven waarmee het mogelijk is om gegevens automatisch over te dragen als de tabel geëxporteerd wordt.
- Sectie: de Groepnaam van de waarden
- ID: de specifieke en explicite identificatie van de waarde
- Beschrijving: geeft een uitleg van de waarde
- De rijen die vetgedrukt worden weergegeven zijn de sectietitels die de diverse elementen groeperen
- Waarde: de opgemaakte waarde
- Sectie in XML: de naam van de sectie in het Engels
- ID in XML: de identificatie in het Engels
- Waarde in XML: de inhoud van het veld in XML formaat.
De Sectie in XML en de ID in XML identificeren de waarde ondubbelzinnig.
Nieuwe functies toevoegen
Het Nieuwe functies toevoegen commando is te vinden in het menu Extra.
Met deze optie kunt u tabellen toevoegen die helemaal door de gebruiker beheerd worden.
Om een nieuwe functie toe te voegen moet u de functie die u nodig heeft selecteren.

De beschikbare opties zijn afhankelijk van het bestandstype.
Zie de pagina Boekhoudfuncties toevoegen voor meer details per afzonderlijke optie.
Tabel Documenten
Met de tabel Documenten kunt u teksten, afbeeldingen of programmeerscripts opnemen in uw boekhoudbestand.
De tabel kan op twee manieren worden toegevoegd:
- Door de gebruiker via het menu Extra → Functies toevoegen... → Documenten tabel toevoegen.
- Deze tabel wordt automatisch aangemaakt bij het opslaan van documenten (bv bij het toevoegen van het logo of bijlagen aan de Uitgebreide Balans of Uitgebreide Balans op groepen van het menu Rapporten → Bijlagen tabblad.
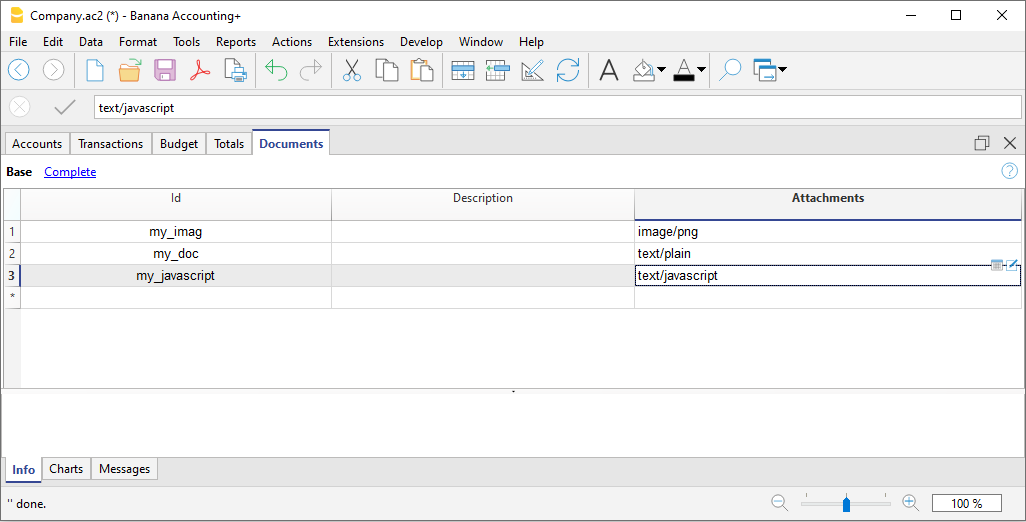
De tabel Documenten heeft de volgende kolommen:
- Id
Dit is de naam van het document.
Documenten waarvan de naam begint met een "_" hebben een speciale betekenis.- "_budget.js"
Hierin kunt u specifieke functies voor de Budget tabel invoeren. - De dlgmanageaddons Id wordt gebruikt om de afbeelding die als logo wordt gebruikt op te slaan.
- De attachment_ Id wordt gebruikt voor bijlagen in de uitgebreide balans.
- "_budget.js"
- Beschrijving
Een korte beschrijving van het bestand (optioneel) - Bijlagen
Bevat het bestand.
Door op de cel te klikken kunt u de inhoud van het bestand bekijken of veranderen.
- There are these types of possible content
- Image (image/png, image/jpg)
- Normal text (text/plain)
- Formatted text html (text/html),
- Programming in javascript (text/javascript)
- Sheet style CSS (text/css).
Een nieuwe bijlage toevoegen
- Voeg een nieuwe rij toe
- Voer in de kolom Id de bestandsnaam in
- In de kolom DBschrijving kunt u de benodigde tekst invoeren
- Klik in de kolom Bijlage op de cel, of kies het Edit symbool, kies het soort afbeelding en kies het plaatje dat u wilt invoegen in de afdruk.
Adding a new document

To insert a new document in the Documents table
- Add a new row.
- In the Id column write the name of the file .
- In the Description column you can write the desired text.
- In the Attachments column double-click on the cell or select the edit symbol, select the type of document you want to add.
See also:
Editor Markdown
In Banana Contabilità Plus gli allegati di bilancio ora si possono inserire anche tramite linguaggio markdown, oltre che in html. È molto comodo per inserire delle tabelle negli allegati.
Disponibile in Banana Contabilità Plus solo con il piano Advanced, o nei piani Professional e Free con l'Advanced in modalità dimostrativa (70 registrazioni) → passa ora al piano Advanced.

Il Markdown è un linguaggio che permette di creare del testo formattato usando un normale editore di testo e una sintassi semplice da scrivere e leggere.
In Banana Plus è possibile utilizzare questo linguaggio negli allegati della tabella Documenti e sono supportate le specifiche GitHub Flavored Markdown.
Documentazione pubblicata da github.com:
Aggiungere un documento Markdown
- Selezionare la tabella Documenti
- Aggiungere una nuova riga.
- Nella colonna Id scrivere un nome che identifica il documento.
- Nella colonna Descrizione si può scrivere il testo desiderato.
- Nella colonna Allegati fare doppio clic sulla cella oppure selezionare il simbolo di modifica, selezionare il tipo Testo Markdown.
Aggiungere un allegato di bilancio con testo markdown
Esempio di sintassi markdown per creare una tabella
Per creare delle tabelle in markdown, il contenuto delle colonne deve essere dal segno barra verticale, preceduto e seguito da uno spazio " | ".
Per l'allineamento della colonna si deve creare una riga con
- Sinistra: semplici trattini (minimo tre trattini).
- Centrato: trattini preceduti e seguiti dal duepunti ":---:".
- Destra: trattini seguiti dal duepunti "---:"
# Notes to the Balance (Example)
The financial statements of Example have been prepared in accordance with the International Financial Reporting Standards (IFRS).
## Cash Positions
| Account | Description | Current Year | Previous Year |
| :---: | --- | ---: | ---: |
| 1000 | Cash | 23'000.00 | 17'000.00 |
| 1020 | Bank account| 9'000.00 | 1'000.00 |
| | **Total** | **32'000.00** | **18'000.00** |
## Other Fixed Assets
| Account | Description | Current Year | Previous Year |
| :---: | --- | ---: | ---: |
| 1000 | Machinery | 13'000.00 | 17'000.00 |
| 1020 | Furniture | 5'000.00 | 4'000.00 |
| | **Total** | **18'000.00** | **21'000.00** |

HTML Editor

Adding the ${...} field
The ${...} field allows the user to add dynamic text to the document, for instance an account's balance or a Banana table. The Banana API interface is available at the following web address https://www.banana.ch/doc/en/node/4714
The command can be added manually or through the command Edit - Add script
Printing a blank line (put a space between the quotes)
${' '}
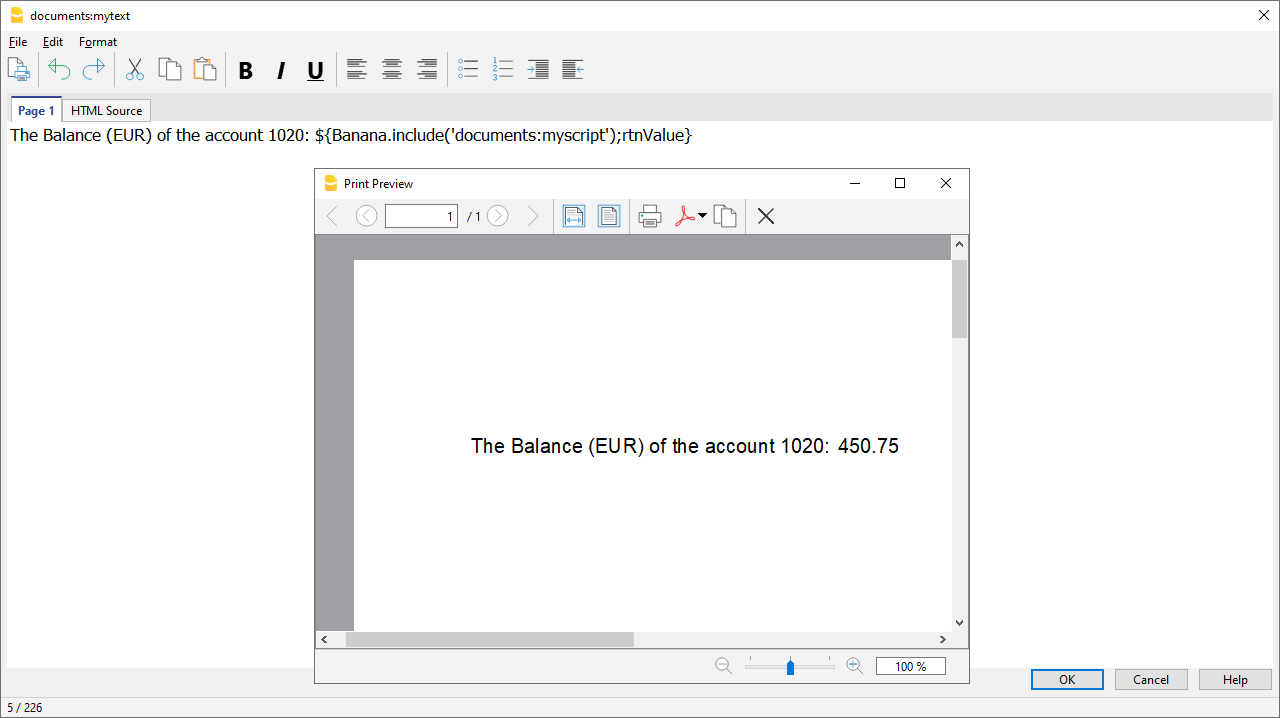
Printing the current balance of account 1020
${Banana.Converter.toLocaleNumberFormat(Banana.document.currentBalance('1020','','').balance);}
Output of the Accounts table, columns: Account, Group, Description, Balance.
${HTML Banana.document.table('Accounts').toHtml(['Account','Group','Description','Balance'],true);}
It is possible to write the javascript code in a separate document and include the script through the command Banana.include.
The scripts can be saved in the Documents table or in a local file.
${Banana.include('documents:myscript1');rtnValue}
${Banana.include('c://temp//myscript16.js');rtnValue}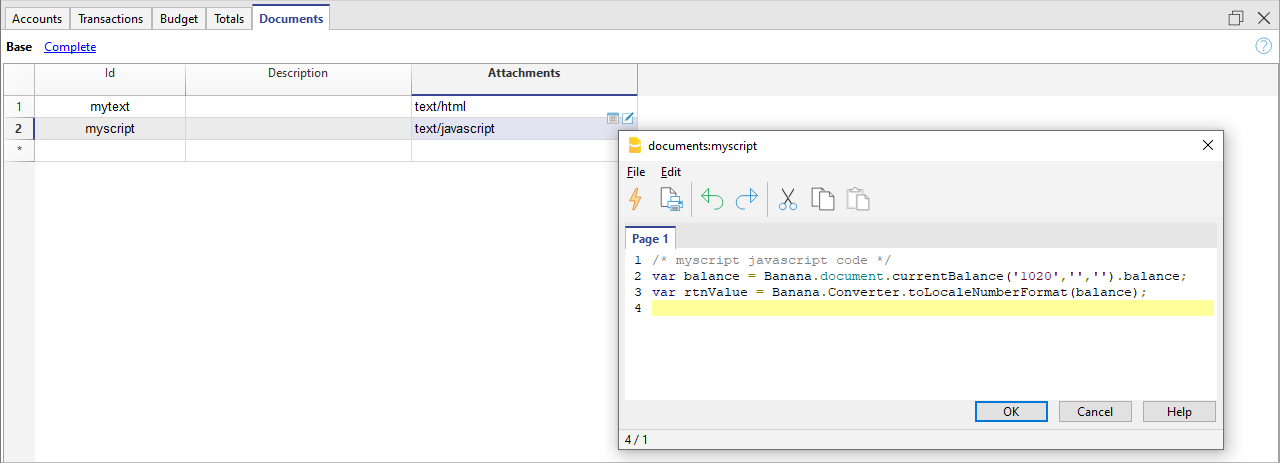
Adding a page break
The command can be added manually or through the command Edit - Add page break
Text in the first page
${PAGEBREAK}
Text in the second page
Troubleshooting
- When taking text from external sources (Word, Internet pages, ...), use the Edit > Paste as plain text command.
This command avoids problems with HTML formatting, which in some cases prevents correct display. - For the examples on this page, use the Copy link on the top right of each example, do not use CTRL+C (or CMD+C).
- If the ${…} field does not work, check that there is no HTML formatting (such as <span>…</span> elements or other) and possibly remove it from the HTML Source code.
- To remove existing HTML formatting from an entire page:
- copy text to clipboard (CTRL+C)
- go to the HTML Source tab and delete all content
- go to the Page 1 tab and paste the copied text with the Edit > Paste as plain text command.
Embedded Extension
Embedded Extensions are extensions written in JavaScript and saved directly in the Documents table of the accounting file. They work exclusively in that specific file without requiring installation. Once created, they are immediately ready to use.
Add an Embedded Extension
- Open an accounting file in Banana Accounting Plus.
- Ensure the Documents table is enabled:
- Add the extension in the Documents table:
- In the ID column enter a name for the extension.
- In the Description column enter a comment.
- In the Attachments column, attach the JavaScript code with a double click on the cell or select the edit symbol in the top right corner, then select Javascript code and confirm with OK.
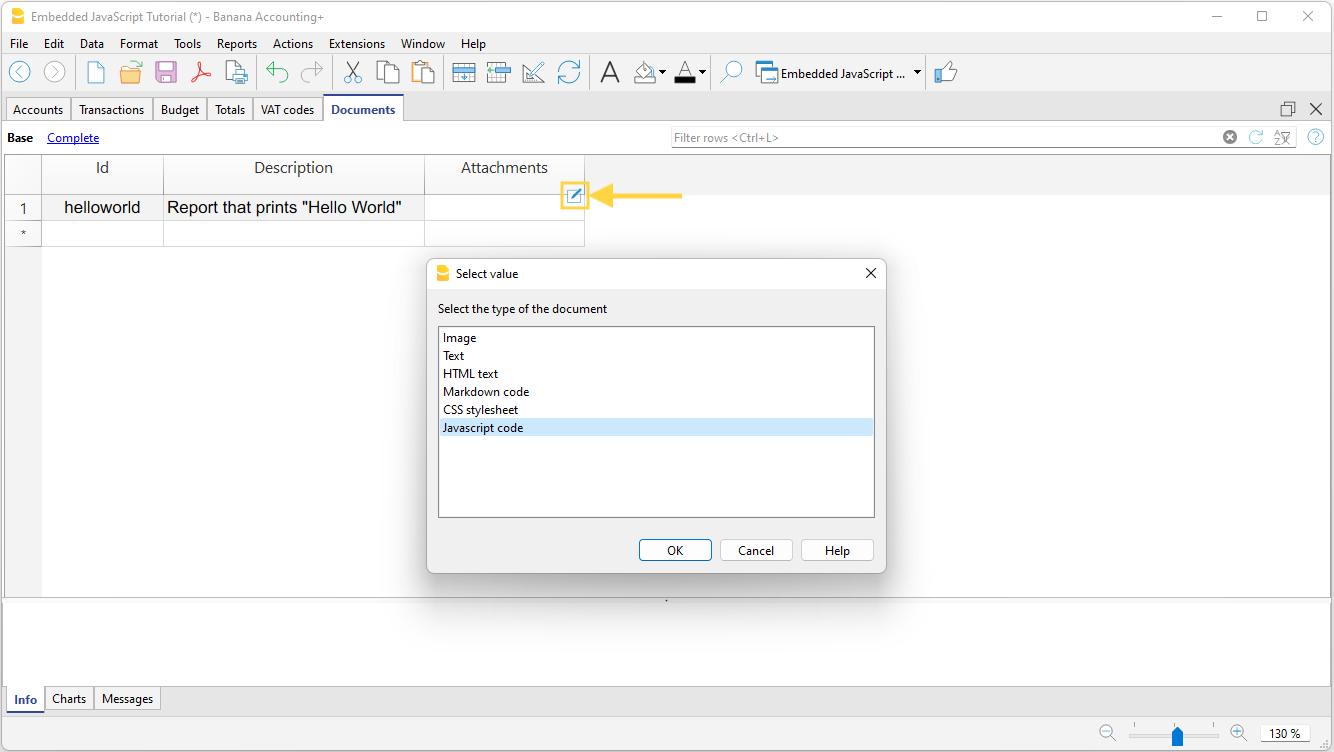
- An editor where you can write your javascript code opens.
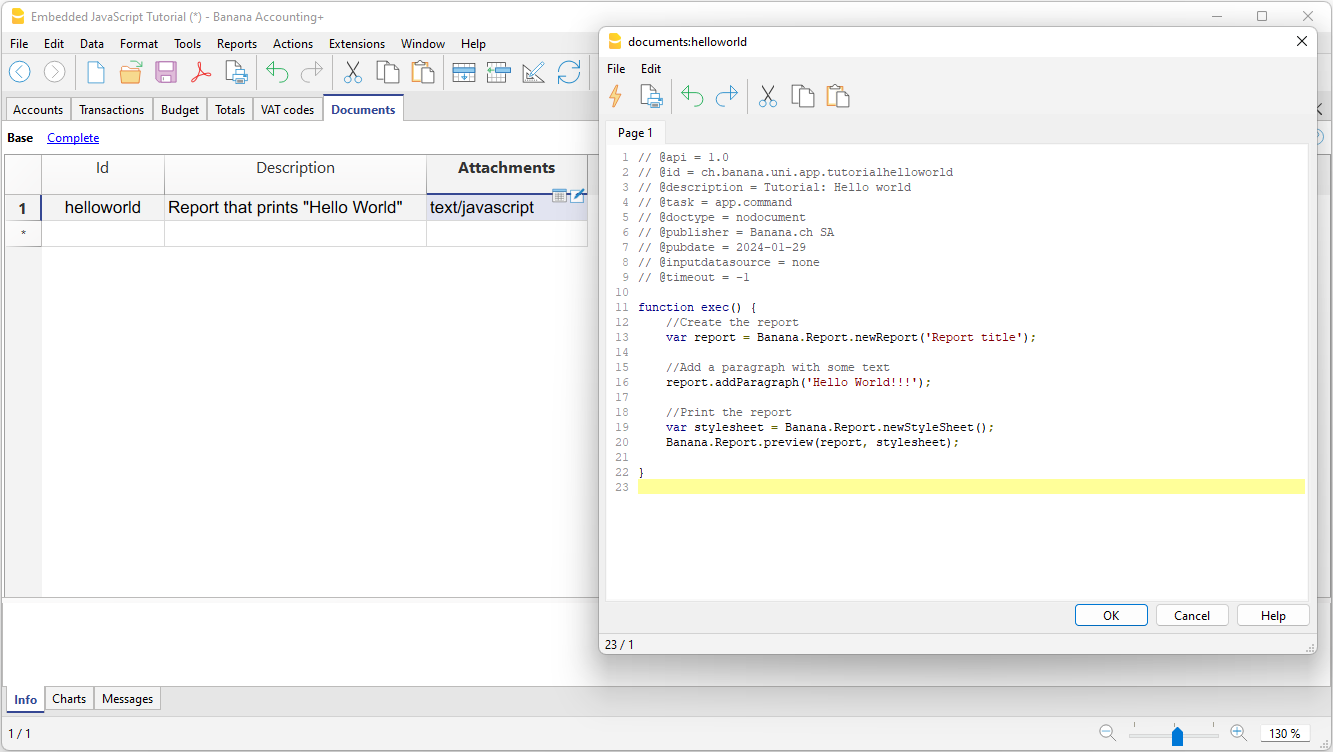
- When you are finished, confirm with OK, and save the accounting file.
Run the Extension
You have two options to run the embedded extensions:
- From the Documents table, click the run symbol in the Attachments cell containing your code.
- From the Extensions menu, select the extension from those listed.
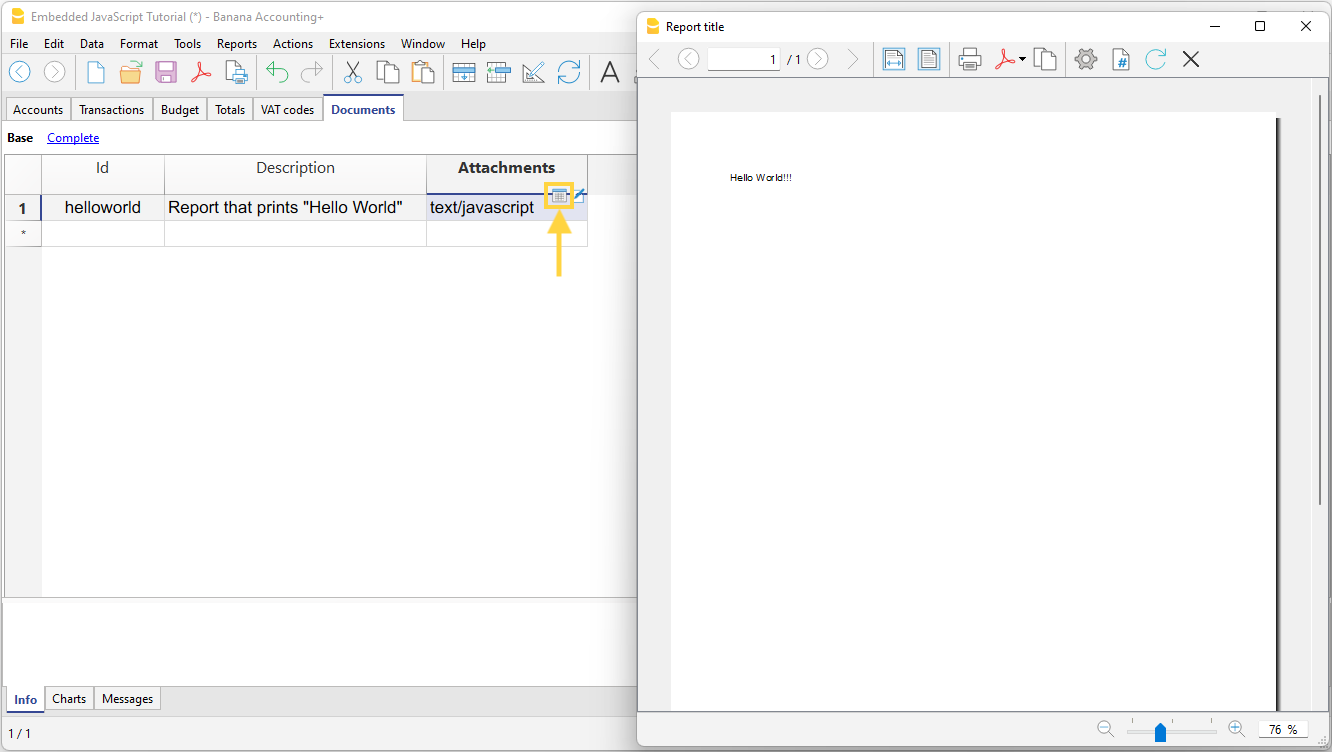
More information
Documentation for developers:
Add Simple table in the file (from Add functionalities)
You can add one or more simple tables to the same accounting file to include additional information without overloading the accounting data structure. Every time you need to add a simple table:
- From the Tools > Add/Remove functionalities > Add simple table menu
The program adds a table to the existing file with the name you assigned, and it includes the following columns:
- Id – Used to create a list of coded items. Each row is assigned an Id code to identify the item
- Description – Enter text to describe the item
- Notes – Enter text for notes or other information

- Assign a name to the table.
- In our example: Internal notes
- Confirm with OK
The new table is added to the file and is immediately available.
Customize the columns
In the simple table you can customize the columns by displaying other predefined columns and/or adding new ones.
Display other predefined columns:
- From the Data menu > Columns setup
- From the list, select the desired column (e.g. the Link column)
- Click on "Visible"
- Confirm with OK.
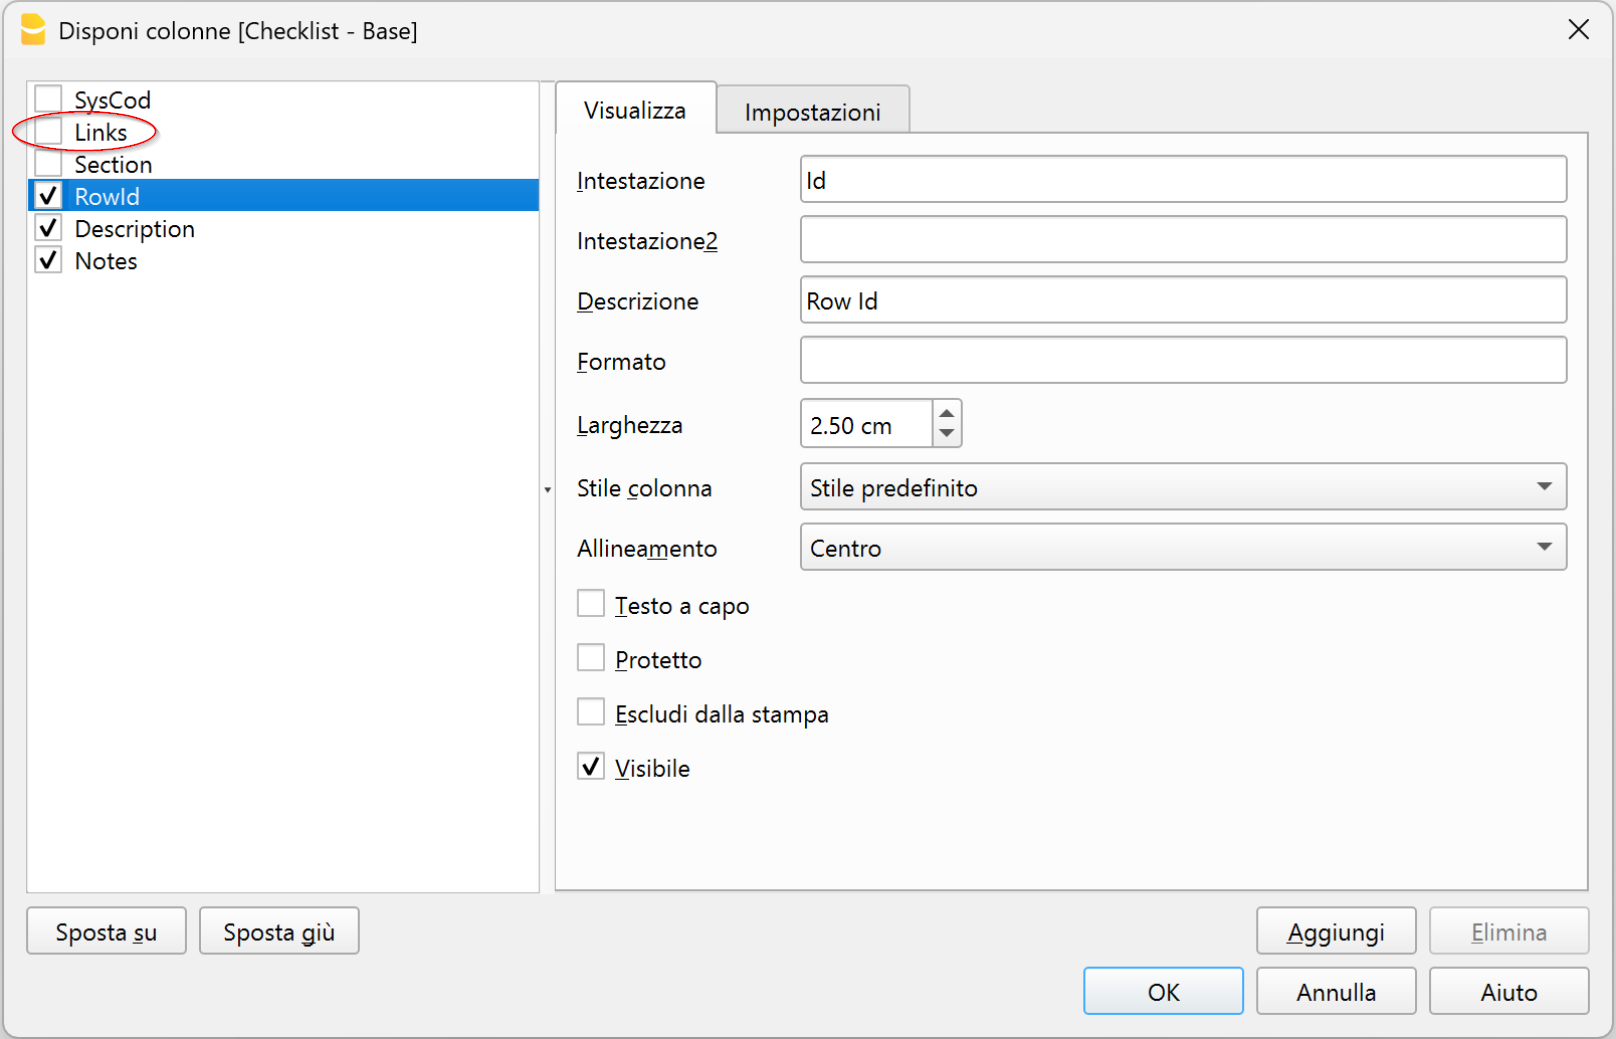
Add new columns:
- From the Data menu > Columns setup > Add
- Give a name to the column (e.g. Date)
- Define the column format (e.g. text, date, amount, currency...)
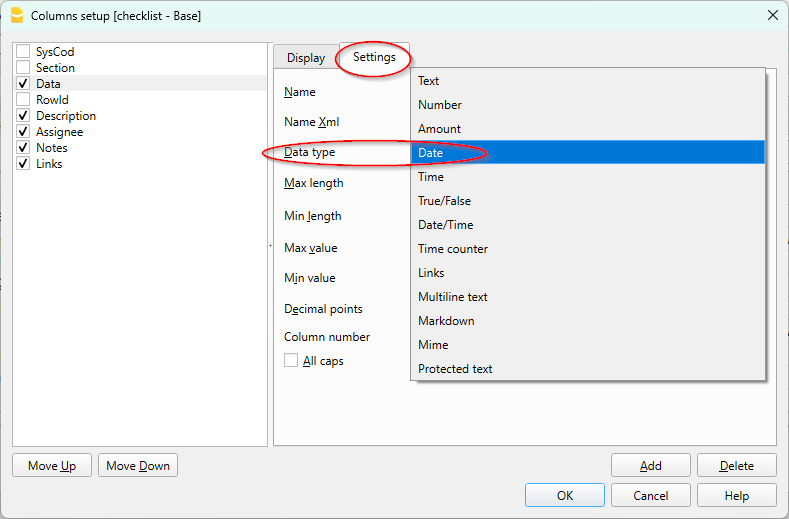
Change the header of a simple table
To change the header of a simple table, go to the simple table:
- Go to the Data menu > Tables setup
- In the dialog, select the simple table you want to change
- In the settings box, change the name
- Confirm with OK.
For more information, visit the page:
Tabella QuickSum (Technical preview)
QuickSum Table è una tabella strutturata, basata su una logica contabile, pensata per la preparazione di capitolati, computi metrici e richieste di offerta all’interno di un ambiente affidabile e controllato.
Vantaggi principali:
- Totali sempre corretti, calcolati automaticamente dal sistema secondo una logica contabile, senza formule manuali.
- Coerenza e tracciabilità dei dati, grazie a una struttura che evita incongruenze e modifiche accidentali.
- Riduzione degli errori, anche in presenza di aggiunte, correzioni o riorganizzazioni delle voci.
- Struttura chiara e stabile, adatta a documenti professionali e allegati contrattuali.
- Utilizzo immediato, simile a un foglio di calcolo, ma con i vantaggi di un sistema contabile.
- Documenti affidabili, pronti per essere condivisi, archiviati o allegati a offerte e contratti.
Technical Preview
La tabella QuickSum è uno strumento ancora in fase di sviluppo e che viene messo a disposizione a un limitato numero di utenti.
Ci sono diverse funzionalità che sono per il momento provvisorie e che subiranno cambiamenti con il tempo.
Per il momento è solo disponibile all'interno della versione Dev Channel.
Funzionamento
La QuickSum Table si usa come una tabella Excel, con colonne per l'identificativo, descrizione, quantità, prezzo e totale, con però i totali in verticale fatti in automatico.
- L'identificatore (ItemId) può essere suddiviso in più livelli tramite i punto ".".
- Gli identificatori devono essere disposti in sequenza ordinata, dal più piccolo al più grande.
- Il programma in automatico fa i totali.
Qui un esempio
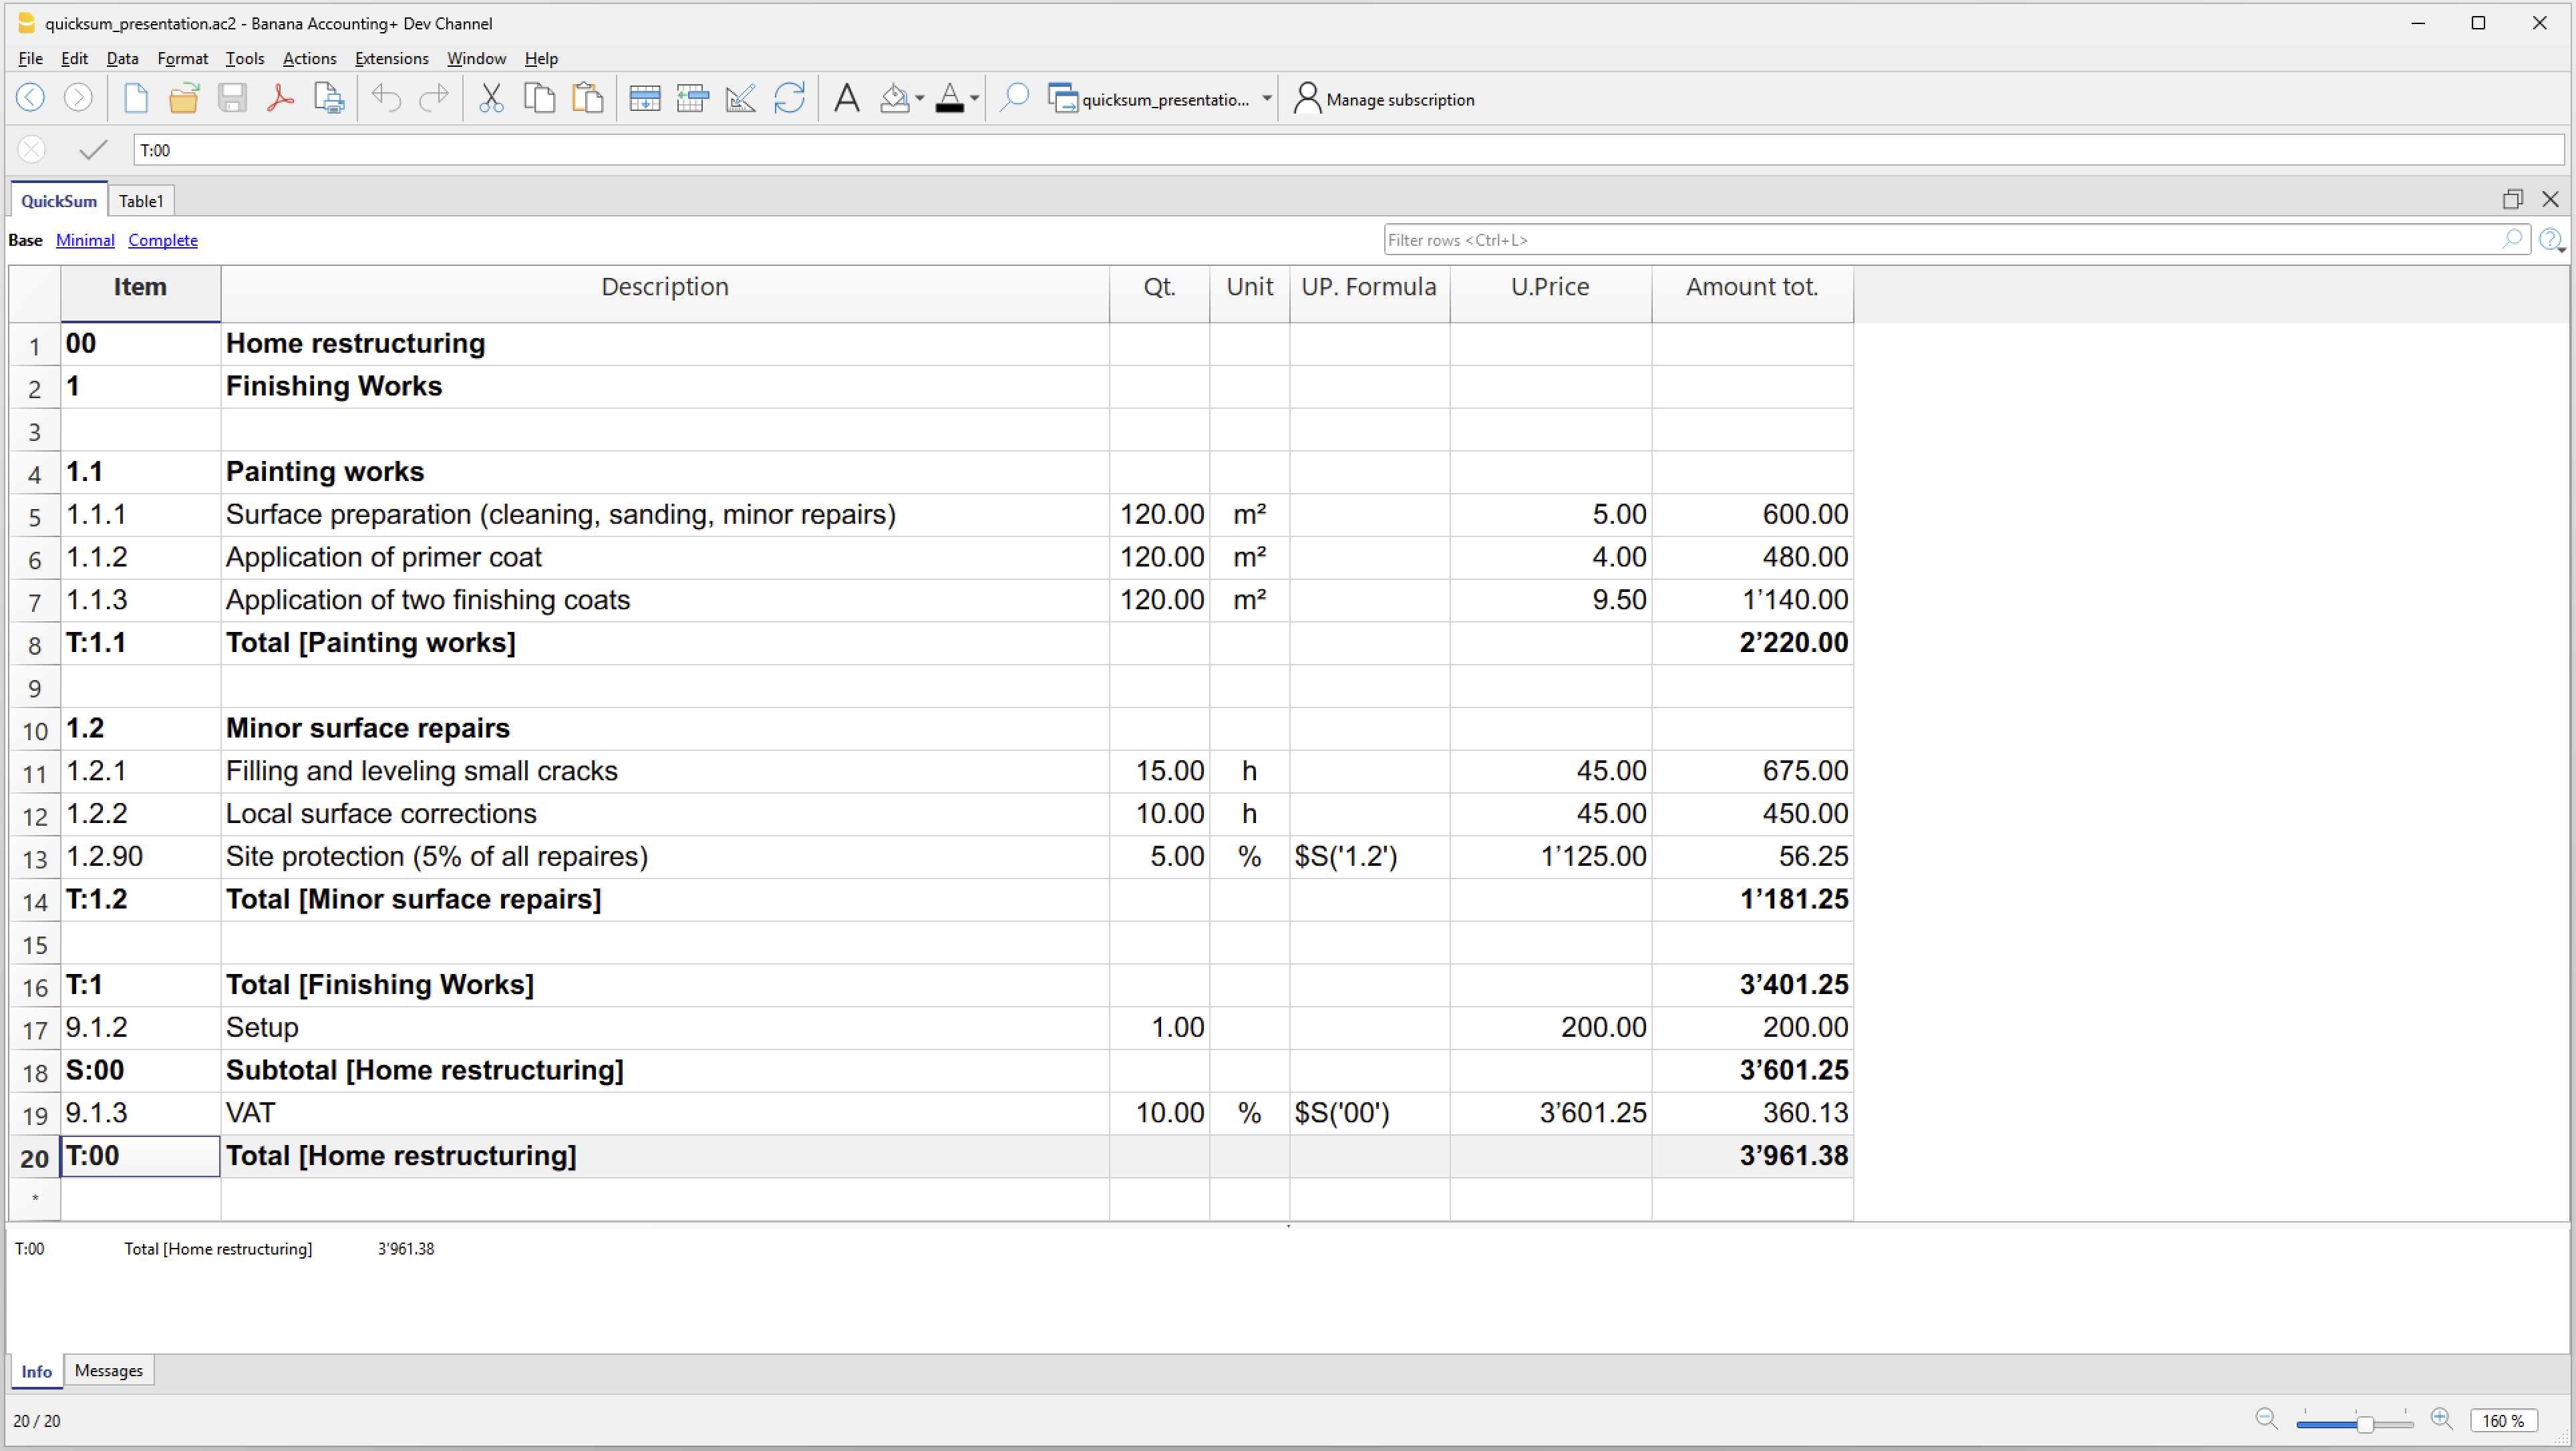
Aggiunta della tabella QuickSum
Attualmente la Tabella QuickSum è ancora in fase sperimentale ed è disponibile solo nella versione interna di Banana Contabilità.
Nella applicazioni di produttività viene aggiunta con il comando Menu Strumenti > Aggiungi Funzionalità > Tabella QuickSum
Le colonne
La Tabella QuickSum ha le seguenti colonne di inserimento dati :
- ItemId
L'id che identifica l'elemento- Può assumere diverse forme come spiegato in seguito.
- Deve essere sempre in sequenza crescente. Prima i valori più bassi e poi quelli più alti.
- Per esempio "2.1.1", "T:2.1.1", "V:2.1.1", "V:T:2.1.1"
- Stile
Per assegnare uno stile, per un uso futuro della stampa. - Codice Modifica.
Per quando la tabella è in modalità blocco, indica quale colonne devono essere modificabili.- D: Descrizione modificabile.
- N: Note modificabile.
- Q: Quantità modificabile.
- P: Prezzo unitario modificabile
- I valori indicati fra parentesi quadre e fra parentesi graffe sono inseriti in automatico dal programma e possono essere sovrascritti.
- Descrizione
La descrizione dell'elemento e anche i valori nel caso di sommario.
Se contiene tre punti "..." significa che vi è un valore da completare. - Note
Una colonna di testo per annotazioni. - Quantità
Un importo numerico. - Unità
Indica il tipo di valore indicato.- Un testo libero.
- "%" la quantità sarà considerata come un percento del prezzo.
- Formula Prezzo Unitario
Se presente la formula viene calcolata e il risultato rimpiazzera il valore nella colonna Prezzo. - Prezzo Unitario
Il prezzo che viene usato per calcolare il valore. - Formula inizio
Nel caso che si vuole indicare la formula in due parti. - Formula testo
- Una formula di calcolo in Javascript.
- Se presente viene eseguita e il risultato andrà a sostituire l'Importo calcolato.
- Importo risultato
Importo calcolato dal programma.- Se esiste una formuala il risultato della formula.
Altrimenti - La quantità moltiplicata per il prezzo unitario.
- Se unità "%" il prezzo unitario in percentuale della quantità.
- Se esiste una formuala il risultato della formula.
- Codice1 e Codice2
Delle colonne che servono per indicare che la riga è di un certo tipo.
Per esempio "S" può significare che a queste posizioni viene indicato uno sconto particolare.
Ci sono poi una serie di colonne che servono per i calcoli e il controllo:
- ItemIdCalc
È l'ItemId usato per il calcolo e considera anche le modifiche dovuta all'attivazione delle varianti. - Formula Prezzo Unitario Calc
È la formula di calcolo del prezzo unitario usata per i calcoli, creata partendo dalla formula del prezzo unitario modificata dal programma tenendo conto dell'attivazione delle varianti. - Formula Calc
È la formula di calcolo usata per i calcoli, creata partendo dalla formula inizio e formula modificata dal programma tenendo conto dell'attivazione delle varianti. - Testo Risultato
- È il risultato in formato testo ottenendo eseguendo la Formula Calc.
- Mostra eventuali errori.
- Sommato in
- Indica in che elemento è stato sommato il valore della riga.
- Permette di controllare l'itemId ne caso sia lasciato vuoto o si sia usato una variante.
L'ItemId
Viene inserito nella colonna ItemId ed identifica la riga e l'elemento. Può avere diverse forme
- Identificatore dell'elemento (ItemId)
Può essere composto dai seguenti elementi, separati da duepunti ";"
Per esempio "2.1.1", "T:2.1.1", "V:2.1.1", "V:T:2.1.1"- Il valore "00" è relativo al totale complessivo.
- Si inserisce all'inizio per indicare il testo del progetto.
- Il Subtotale "S:00" mostra la somma fino a quel momento.
- Il Totale "T:00" può essere usato solo come ultima riga di totale.
Oltre non ci possono più essere totali. - Nella formula $S('00') ritorna il totale complessivo di tutte le righe sommate fino a quel momento.
- Gerarchia.
- Dei valori separati da dei punti "." che definiscono l'emento e la struttura.
- Esempio "1", "1.9", "2", "2.1", "2.1.2", "A.1.2"
- La gerarchia è data dalla separazione.
Quindi gli elmenti "2.1" e "2.1.2" apparteranno all'elmento superiore "2". - La gerarchia determina anche la sequenza degli elementi in ordine alfabetico naturale.
L'elemento "1" dovrà precedere il "1.9" e il "2" e via di seguito.
In caso contrario verrà segnalato un errore.
- Prefisso.
- Determina il tipo di elemento.
- "F": riga finale gerarchia.
- Questo elemento è l'ultimo della gerarchia creata.
- Esempio: "2.1", "2.1.1", "2.1.1.1", "2.1.2", "F:2.1" chiude la sequenza e quindi dopo il "F:2.1" non ci potranno più essere elementi "2.1", "2.1.1".
- "S:" riga di subtotale
- Viene indicata la somma di tutti gli elementi che appartengono alla gerarchia.
- Esempio: "S:2.1" riprenderà la somma di tutti gli elmenti "2.1", "2.1.1", "2.1.1.1", "2.1.2"
- "T:" riga di totale
- Viene indicata la somma finale di tutti gli elementi che appartengono alla gerarchia.
- Esempio: "T:2.1" riprenderà la somma di tutti gli elmenti "2.1", "2.1.1", "2.1.1.1", "2.1.2"
- Chiude la sequenza e quindi dopo il "T:2.1" non ci potranno più essere elementi "2.1", "2.1.1".
- "F": riga finale gerarchia.
- Determina il tipo di elemento.
- Variante.
Vedi sezione successiva di spiegazione.- Un codice che identifica la Variante e precede l'ItemId.
- Deve obbligatoriamente iniziare con la lettera "V" ed esere seguito da dei duepunti ":" .
- Il codice della variante deve precedere gli elementi. V
- Esempi variante
- "VA:" "VA:2.1", "VA:2.1.1"
- "VB:" "VB:2.1", "VB:2.1.1"
- Le righe della variante devono essere in sequenza.
- Se si integrano o sostituiscono una riga devono essere anche nella sequenza.
- Il valore "00" è relativo al totale complessivo.
- Comandi "#"
Il valore viene indicato nella colonna Descrizione- Iniziano con il carattere "#"
- Sono usati internamente per indicare delle fuzionalità
- Gli elmenti non vengono sommati.
- "#scenario" permette di specificare nella colonna Descrizione le Varianti da usare in aggiunta o al posto delle posizioni esistenti.
per esempio la descrizione "VA;VB" - "#options" opzioni di calcolo separate da punti e virgola.
- "lock", attiva il blocco della tabella (comando provvisiorio).
- "onerrorcalculate" continua la calcolazione anche se ci sono degli errori.
- "#columnsSum" indica il nomeXml delle colonne da sommare nei contatori accessibili tramite la funzione "$S()".
- Diverse colonne vengono separate da punto e virgola ";".
- Le colonne "Code1;Code2" sono già considerare e non bisogna specificarle.
- Per esempio "Code3;Code4" .
- "#rounding" è il valore minimo in cui l'importo totale riga viene arrotondato.
- Si inderisce nella colonna Descrizione.
- Per esempio "0.05", "0.10", "1"
- Il separatore decimale deve sempre essere il punto "."
- Righe calcolo hash
Sevono a verificare se il documento è cambiato- "#hash-base"
Il programma inserisce nella Descrizione l'hash calcolato sugli elementi che non sono modificabili.
Se si modificano le celle in cui si possono inserire valori anche quando il documento è in modalità blocco, l'hash non cambia. - "#hash-all"
Il programma inserisce nella Descrizione l'hash calcolato su tutti gli elementi del documento.
Quindi qualsiasi valore viene modificato viene modificato anche l'hash.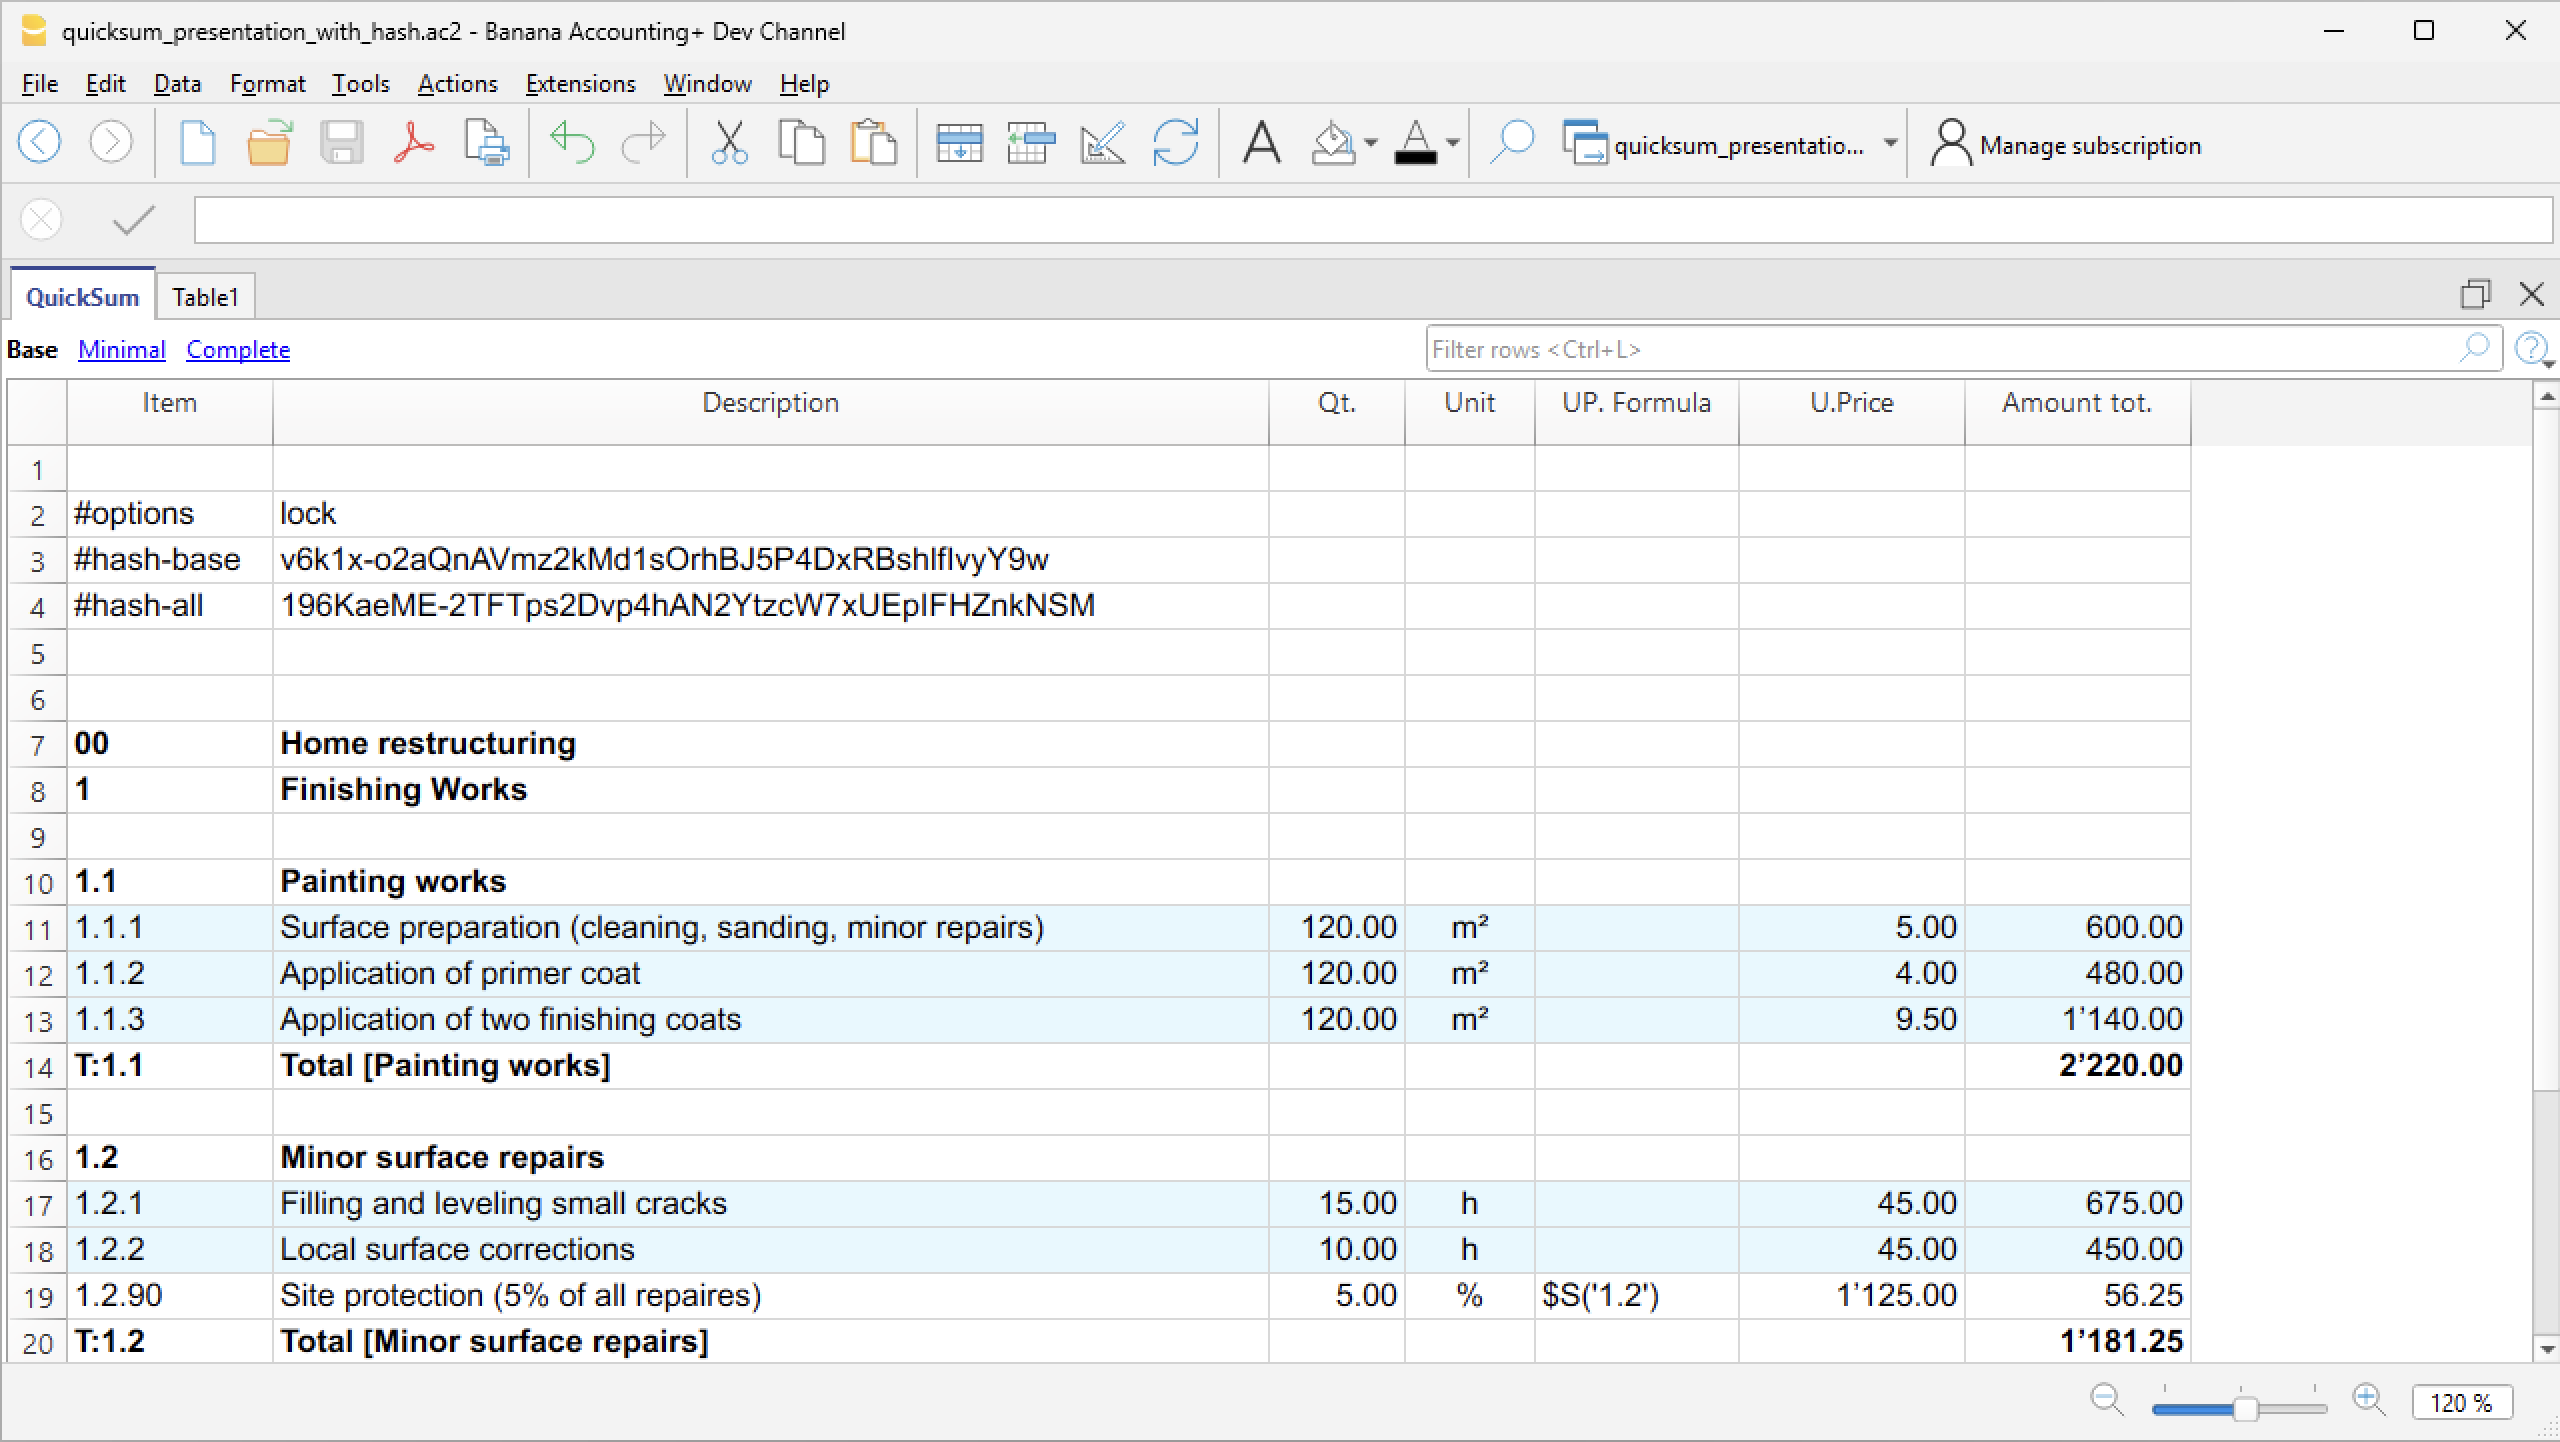
- "#hash-base"
- Commenti fra []
- Sono elementi che sono inclusi in parentesi quadre
"[]", "[testo]" - Gli elmenti non vengono sommati.
- Sono elementi che sono inclusi in parentesi quadre
- Elementi vuoti
- Viene ripreso l'id che precede e non è stato chiuso.
Logica di calcolo e somme
Nella tabella QuickSumi gli importi vengono calcolati e sommati in automatico.
- Dopo ogni modifica tutta la tabella viene ricalcolata.
- Il programma svuota tutte le colonne calcolate.
- Il programma parte della prima riga e continua fino all'ultima.
Se vi è un errore la calcolazione viene interrotta delle righe successive non viene eseguita. - Descrizione righe di Totale "T:" o sottototale "S:"
- Se la descrizione è vuota o termina con elemento commento (fra parentesi quadre), la descrizione viene messa automaticamente dal programma, facendo seguire al termine "Totale" o "Sottototale" l'intestazione dell'ItemId o se non presente il valore dell'ItemId.
- L'intestazione dell'ItemId è considerata la descrizione usata quando è stato usato per la prima volta l'ItemId.
- Calcolo importo riga.
- Vengono usati u contenuti delle colonne Quantità, Unità e Prezzo unitario
- Se vi sono delle formule queste vengono eseguiti e il risultato rimpiazza il valore.
- Il programma dopo ogni riga somma nel contatori dei diversi elementi strutturati.
- Somma il valore della riga nei diversi elementi che compongono l'ItemId strutturato.
- Se per esempio se l'item è "2.1" il programma andrà a sommare l'importo della riga nei seguenti contatori, accessibili con la formual $S('2.1.1') in:
- 2
- 2:{*}
- 2.1
- 2.1:{}
- Se per esempio se l'item è "2.1.1" il programma andrà a sommare l'importo della riga nei seguenti contatori, accessibili nelle formule con la funzione $S('2.1.1') in:
- 2
- 2:{*}
- 2.1
- 2.1:{*}
- 2.1.1
- 2.1.1:{}
- Il programma somma anche nei contatori relative alle colonne, accessibili nelle formule tramite la funzione $S().
Le colonne formule
Le colonne Formula prezzo unitario e Formula permettono di inserire delle espressioni in linguaggio Javascript.
- Gli importi si indicano nel formato di programmazione e non quello internazionale.
- Non vi sono separatori di migliaia.
- Il separatore di decimali è sempre il punto ".".
- Esempi di numeri "12345.67", "-123.45"
- Si può usare tutta la sintassi del Javascript e anche creare funzioni.
- Si possono usare le funzioni predefinite appositamente per la tabella QuickSum:
- $S('itemId')
- Ritorna la somma, fino a questo punto, del contatore specifico dell'item.
- Per esempio
- $S('2') ritorna la somma di tutti i totali che iniziano con 2
- $S('2.1') ritorna la somma di tutti i totali che iniziano con 2.1
- $S('2.1.1') ritorna la somma di tutti i totali che iniziano con 2.1.1
- $S('00') ritorna la somma di tutto
- Si può usare anche con parentesi graffe
- $S('2:{=}') solo gli elementi che sono esattamente 2, quindi senza i sotto elementi.
- $S('2:{+}') solo gli sottoelementi di 2.
- $S('2') = $S('2:{=}') + $S('2:{+}')
- $C('ColumnNameXml', 'Value')
- Sum values with conte
- ColumnNameXml è il nome in inglese della colonna.
- Value è il possibile contenuto della colonna.
- Ritorna la somma degli importi delle righe fino alla calcolazione precedente alla riga attuale, per tutte le colonne che contengono nella colonna specificata il valore indicato.
- Per esempio con un valore specifico
- "$C('Code1','X')" La somma degli importi delle righe che contengono nella colonna Code1 il valore "X".
- "$C('Code1','Y')" La somma degli importi delle righe che contengono nella colonna Code1 il valore "Y".
- Puoi usare anche un distintivo
- "$C('Code1','{*}')" La somma degli importi delle righe con qualsiasi valore (anche vuoto) nella colonna Code1 .
Corrisponde alla somma totale T00. - "$C('Code1','')" oppure "$C('Code1','{}')" La somma degli importi delle righe con la colonna Code1 vuota..
- "$C('Code1','{<>}')" La somma degli importi delle righe che contengono un valore non vuoto nella colonna Code1.
- "$C('Code1','{*}')" La somma degli importi delle righe con qualsiasi valore (anche vuoto) nella colonna Code1 .
- Valori non ammessi
- Nella colonna che viene usata per inserire dei valori non si possono usare
"{}","{*}","{<>}" - Ai fini dei totali per la funzione $C questi valori sono considerati come vuoti.
- Nella colonna che viene usata per inserire dei valori non si possono usare
- $V() L'elenco delle varianti usate nella calcolo separate da punti e virgole.
- Per esempio "VA;VB"
- $S('itemId')
- Arrotondamento finale.Si può inserire una formula prima della riga finale per calcolare l'arrotondamento al minore.
- Per esempio "Math.floor($S('00'))-$S('00')"
- Si può usare la formula anche in altre posizioni cambiando l'Id.
Varianti
La tabella permette di inserire degli elementi varianti per:
- Includere degli elementi.
Per esempio un'offerta che prevede appunto degli elementi opzionali. - Sostituire degli elementi.
Per esempio per cambiare le specifiche tecniche.
La variante viene indicata nell'ItemId, facendo precederla da un identificatore di variante.
- La sigla della variante deve iniziare obbligatoriamente con "V" ed essere separata da un due punti ":" dall'itemId.
- Per esempio "VA:2.1"; "VB:2.1.1"
- "VA:T:2.1" per indicare la riga di totale.
- Meglio usare sempre una sigla maiuscola.
- L'elenco degli elementi appartenenti alla variante deve seguire quello della gerarchia normale.
- Le Varianti possono essere degli elementi supplementari.
- Le Varianti possono sostituire un elemento già esistente.
- Normalmente le Varianti vengono calcolate a se stante.
L'attivazione di una Variante viene effettuata nel seguente modo:
- Andare sulla riga con ItemId "#scenario"
- Nella colonna Descrizione indicare la sigla della varianti che si vuole attivare.
- Se si vogliono attivare separate da un punto e virgola ";".
- Esempio:
- Inserire "VA" per attivare la variante "VA".
- Inserire "VA;VB" per attivare le varianti "VA" e "VB".
- Il programma attiva la variante selezionata "VA" ed esclude le posizioni che sono sotiute:
- Rimuove la sigla della Variante.
- "VA:2.1" diventa "2.1"
- "VA:T:2.1" diventa "T:2.1"
- Se vi è una posizione uguale principale, aggiunge a questa e a tutti gli elementi figli la sigla della Variante che sostituisce preceduta da X.
- "2.1" diventa "XVA:2.1"
- "T:2.1" diventa "XVA:T:2.1"
- "VA:2.1" diventa "2.1"
- "VA:T:2.1" diventa "T:2.1"
- Rimuove la sigla della Variante.
Modalità blocco per inserimento prezzi
La tabella prevede una modalità di inserimento prezzi, che blocca tutte le celle, eccetto quelle che servono a inserire prezzi e altri valori.
L'idea è che il file venga trasmesso alle imprese e queste possano inserire i loro prezzi e vedano subito i totali, senza però avere la possibilità di modificare altri elementi.
Se è attivata questa modalità il programma:
- Blocca tutte le celle eccetto quelle che sono destinate a inserire prezzi, percentuali o testi.
- Le righe dove devono essere inseriti dei valori sono colorate in giallo.
- Le righe già completate con il valore richiesto nella colonna ModifyCode, sono visualizzate in celeste chiaro.
Sarebbe stato più intuitivo il verde, ma non è facilmente distinguibile da persone daltoniche.
Per attivara la modalità blocco (provvisorio):
- Aggiungere una nuova riga a inizio file
- Nella colonna ItemId inserire il testo #options
- Nella colonna Descrizione inserire il testo lock
Le righe con le celle modificate sono indicate nella colonna "Mod. Code" (ModifyCode), tramite un carattere:
- D: Descrizione modificabile.
- N: Note modificabile.
- Q: Quantità modificabile.
- P: Prezzo unitario modificabile
- U: Unità
- Si possono combinare più codici, ad esempio "QP" (Quantità e Prezzo unitario modificabili).
- Il programma in automatico indica il codice in parentesi graffe "{P}", con la seguente logica.
- Il valore in automatico viene messo solo se la cella è vuota o vi è un valore fra parentesi quadre.
- Se vi è un valore nella colonna Quantità e non c'é formula prezzo viene messo "{P}" .
Colore righe
In modalità blocco le righe vengono colorate in automatico con questa logica.
- In giallo le righe che richiedono un inserimento di valore.
- Se vi è un codice di modifica e la rispettiva colonna è vuota.
- Oppure per la Colonna Descrizione contiene tre puntini "..."
Per esempio "Marca: ..."
- In verde chiaro se i valori sono completati.
Verifica dell’integrità tramite hash
QuickSumTable può calcolare un hash crittografico del contenuto della tabella. L’hash permette di verificare se i dati rilevanti del documento sono stati modificati dopo il calcolo.
L’hash non impedisce la modifica del documento, ma consente di rilevarla confrontando il valore memorizzato con quello ricalcolato.
Tipi di hash
QuickSumTable genera due valori distinti.
- Hash Base
- Id riga #hash-base
- L’Hash Base protegge i dati principali e le celle che non sono configurate come modificabili.
- È utile quando alcune informazioni del documento devono rimanere protette, mentre altre possono essere successivamente completate o modificate senza invalidare questo hash.
- Alcuni valori calcolati o dipendenti da formule possono essere esclusi per evitare che variazioni automatiche influenzino il risultato.
- Hash All
- Id riga #hash-all
- L’Hash All comprende un insieme più esteso di dati, incluse le colonne modificabili, le colonne definite dall’utente e alcuni risultati calcolati.
- È utilizzato per verificare l’integrità complessiva della tabella. Una modifica a uno dei valori inclusi produce un Hash All differente.
Comportamento delle righe e delle colonne
- Le righe completamente vuote non partecipano al calcolo. Di conseguenza, l’inserimento o la rimozione di una riga vuota non modifica l’hash.
- Il numero e la posizione fisica della riga non vengono memorizzati, mentre l’ordine delle righe non vuote rimane significativo.
- Le colonne di sistema sono identificate tramite il loro codice interno. Le colonne definite dall’utente sono identificate tramite il loro nome XML, così il risultato non dipende dall’identificatore numerico assegnato internamente.
- Le colonne vengono ordinate in modo deterministico prima del calcolo.
Informazioni tecniche
- L’algoritmo crittografico utilizzato è **SHA-256**.
- Il formato dell’algoritmo è versionato. La versione corrente è **QS1** e viene memorizzata alla fine dell’hash:
- <digest SHA-256>:QS1
- La versione permette a QuickSumTable di riconoscere le regole utilizzate per il calcolo e di gestire future evoluzioni del formato.
- I testi delle celle vengono:
- convertiti in UTF-8;
- codificati in Base64;
La codifica Base64 evita che il contenuto di una cella possa essere interpretato come un separatore, una nuova colonna o una nuova riga. - inseriti in una rappresentazione testuale strutturata della tabella.
Limitazioni
L’hash rileva le modifiche soltanto se il valore originale viene conservato in modo affidabile. Se una persona può modificare sia la tabella sia l’hash memorizzato, può ricalcolare un nuovo valore coerente con i dati alterati.
Per garantire anche l’autenticità dell’autore del documento è necessaria una firma digitale o un altro sistema basato su chiavi crittografiche.
Stampe
Per stampare i dati della tabella QuickSum, esistono le possibilità seguenti.
Stampa tramite l'Anteprima
Con il comando Anteprima di Stampa è possibile creare una stampa della tabella.
Si possono preparare delle Viste apposite in modo da definire quali colonne includere nella stampa.
Tramite la funzione Filtra righe, nella stampa si possono includere solo le righe desiderate. Ad esempio, se si vogliono avere solo le righe di totale:
- Posizionarsi nell'editor del filtro.
- Inserire
!itemcalc!^t:- Questo comando indica di selezionare solo le righe che nella colonna ItemCal iniziano con "T:".
- Sono le righe delle colonne che sono attivate.
Stampa tramite Estensioni
Con estensioni in Javascript è possibile creare dei report di stampa personalizzati, ad esempio che mostrano i dati desiderati con il riassunto dei diversi totali.
- Estensione QuickSum Stampa Capitolato d'offerta
Permette di creare una stampa del capitolato di offerta mostrando tutte le voci che compongono l'offerta e una pagina riassuntiva con tutti i totali.
Errori
La calcolazione parte dalla prima riga e se il programma trova un errore la riga viene messa in colore rosso e la calcolazione degli importi viene interrotta.
- Con l "#options" "onerrorcalculate", gli errori vengono segnalati, ma la calcolazione viene effettuata comunque, anche se è sbagliata.
- Serve per un controllo.
- Deve essere disattivata per avere dei risultati corretti.
Il programma segnale questi possibili errori:
- Per il momento la gestione degli errori è molto basilare e i codici deggli errori vengono visualizzati nella tabella Info.
- "err_Duplicate"
La riga di totale è gia presente. - "err_IdNotNumeric"
Si è attivata l'opzione che richiede che gli ItemId siano numerici, ma l'ItemId contiene altri caratteri. - "err_OutOfSequence";
- L'ItemId non è nella sequenza numerica/alfabetica corretta.
- "2.1" viene prima del "2"
- Si usa un ItemId di livello uguale o inferiore dopo avere fatto un totale.
- Vi è il "T:2.1"
- Successivamente si usa ancora "2.1" o "2.1.1"
- L'ItemId non è nella sequenza numerica/alfabetica corretta.
- "err_TotalWithoutElements"
- Si è indicata una riga di totale ma non è stato specificato alcun elemento.
- Per esempio vi è il "T:2.1", ma non vi è in precedenza alcun itemId "2.1" o "2.1.1"
- "err_UnitPriceFormulaUndefined"
- Il risultato della formula Prezzo Unitario è indefinito.
- Per esempio quando si usa nel "$S('2.1') ma l'item "2.1" non è mai stato usato.
- "err_UnitPriceFormulaError"
Il testo della formula Prezzo Unitario contiene un errore, per cui il codice Javascript non è valido. - "err_FormulaTextError"
- Il risultato della Formula Inizio e Formula assieme è indefinito.
- Per esempio quando si usa nel "$S('2.1') ma l'item "2.1" non è mai stato usato.
- "err_FormulaTextUndefined";
Il testo della Formula inizio o Fromula contiene un errore, per cui il codice Javascript non è valido. - "err_ParseError"
L'ItemId è in un formato non valido. - "wrn_totalRowWithCalcArguments"
Riga di totale "T:" o sottototale "S:" con elementi di calcolo (quantità, prezzo unitario, formula) che non vengono usati. - "wrn_emptyIdWithCalcArguments"
Non vi è un ItemId ma vi sono elementi di calcolo. - "others error"
Altri errori.
Link tables using the RowId column
In Banana Accounting Plus, you can create links between columns of different tables using the RowId column.
This feature allows you to enrich the main table (e.g. Transactions) with information from other tables, simplifying data management and analysis without complicating the structure.
You can create links between:
- Columns of a simple table (added by the user) and one of Banana's predefined tables (e.g. Accounts, Transactions).
- Columns of two or more simple tables added by the user.
How to add linking columns
To link columns between different tables:
- Go to the table where you want to insert the links.
- From the Tools > Add/Remove Functionalities > Add columns to link tables menu.
- Choose the position (after which column to insert the new columns).
- Confirm with OK.
The command only works if the table to be linked contains the RowId column. Along with the RowId, the Description column is also added (you can hide it if not needed).
Dialogs
Select table → lists the tables with a RowId column that are not yet linked. If the list is empty, there are no linkable tables.
Select column position → shows all columns of the current table and lets you choose where to insert the new columns.
Linking a simple table → predefined table
To link a simple table with one of Banana's predefined tables, such as the Transactions table, follow these steps:
- Open the Banana file
- Create the simple table (e.g. Internal Notes)
- Go to the Transactions table and from the Tools > Add/Remove Functionalities > Add columns to link tables menu
- In the dialog that opens, select the simple table you created (e.g. Internal Notes)
- Choose the position of the columns
- Confirm with OK.
In the Transactions table, Banana automatically adds two columns: Id and Description Id from the simple table, with the headers and contents you created in the two columns (Internal Notes).
For more information, see the detailed example:
Linking two simple tables
You can also create links between two simple tables. For example, linking the "Events" simple table with the "Volunteers" simple table:
Add simple table 1
- Id → where you enter the event code or name.
- Description → description of the event
- Add new columns or rename existing ones (Data > Columns setup)
Add simple table 2
- Id → where you enter the volunteer code or name
- Description → where you enter the volunteer's role.
- Add new columns or rename existing ones (Data > Columns setup)
Create the link
- Go to the table where you want to create the link and from the Tools > Add/Remove Functionalities > Add columns for linking tables menu.
- In the dialog that opens, select the name of the other simple table you created
- Choose after which column to place the columns to be linked
- Confirm with OK.
Banana automatically adds the two linking columns, Id and Description, with the headers and contents you created.
For more information, see the example:
Technical notes on table linking
For correct operation, Banana applies some automatic rules:
- Column names: are created as TableNameId and TableNameDescription.
- Automatic description: automatically filled in when you enter a valid Id.
- Updates: if you change the description in the linked table, it also updates in the Transactions table.
- Manual creation: you can manually add columns with these names, following the naming convention.
- Avoid ambiguity: do not use the Id or Description suffixes for columns that are not intended to be linked.
- Optional Description column: you can hide or delete it if not needed.
Limitations
- You can only link a table if it contains the RowId column.
- A table can only be linked to one other table at a time.
- If nothing appears in the Select table dialog, it means there are no linkable tables available.
Linked tables Volunteers/Events
Associations that organize activities and events often need to coordinate their volunteers. With Banana Accounting Plus, you can create two simple tables linked to each other – Volunteers and Events – to centrally manage who participates, which tasks have been assigned, and the organizational details of each event.
This way, all the information stays within the same accounting file, without the need for separate Excel sheets, giving you a clear, up-to-date, and immediate overview.
In Banana Accounting Plus, you can link simple tables to each other using the RowId column.
How to create the Volunteers and Events tables
- Open the accounting file
- From the menu Tools > Add/Remove Functionalities > Add Simple Table
- Create the simple table Volunteers
- Create the simple table Events.
Structure of the Volunteers table
The table can be customized by adding your own columns and displaying other predefined ones. In this example, the structure created is as follows:
- RowId → unique volunteer code (also serves as the linking key).
- Description → volunteer's full name; automatically appears in other linked tables.
- Email → “Notes” column renamed to “Email”.
- Phone number → column added via Data > Columns setup > Add.
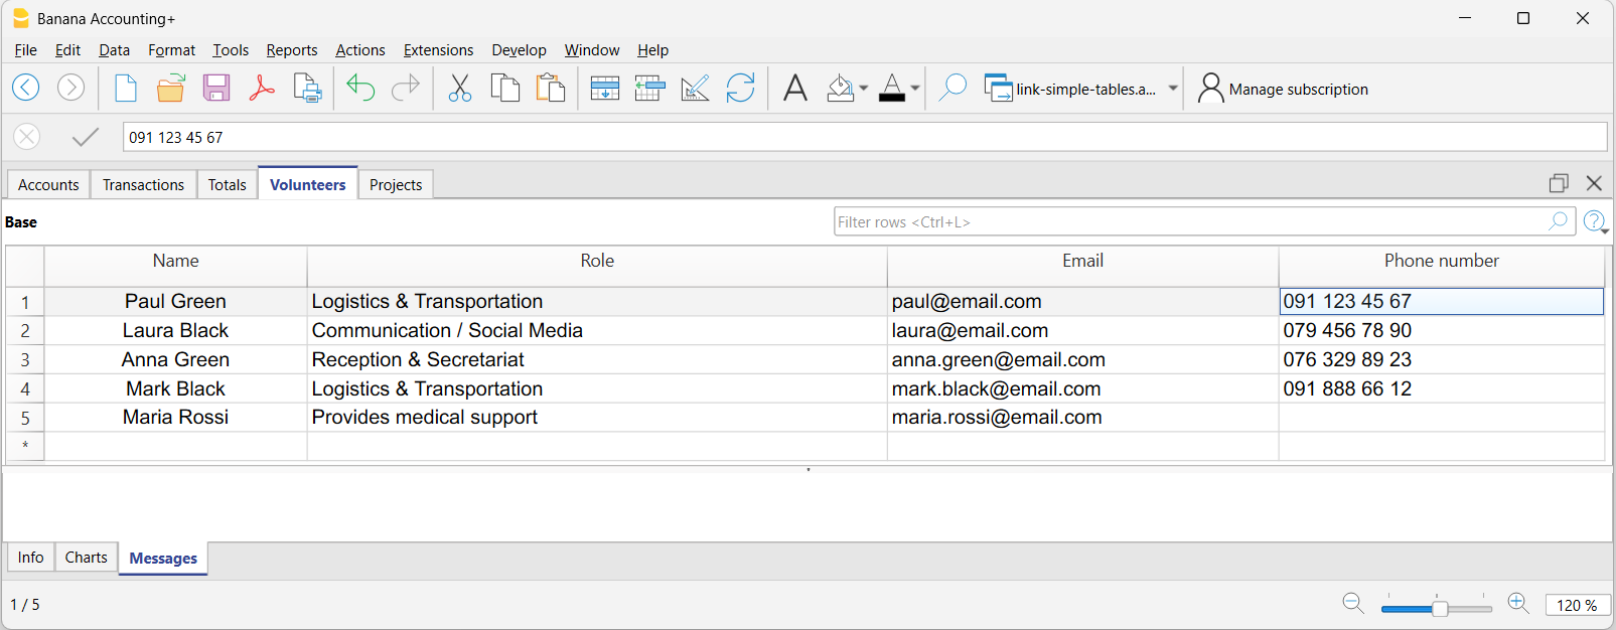
Structure of the Events table
The Events table can include these columns:
- RowId → short code to identify the event (e.g. SPRIFEST).
- Description (DescriptionId) → name of the event (e.g. Spring Festival).
- Date → column added via Data > Organize columns > Add.
- Location → column added via Data > Organize columns > Add.
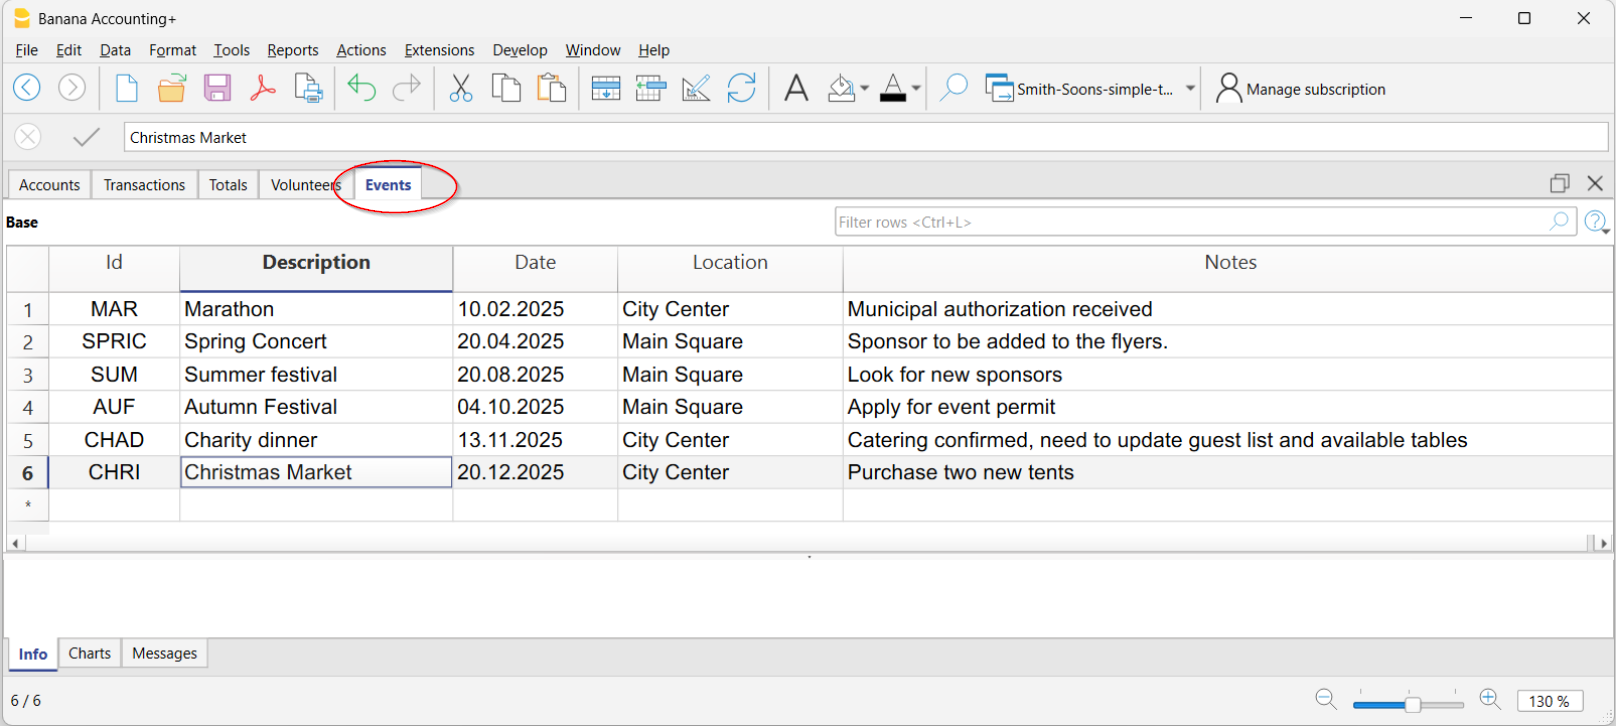
Creating a link between Volunteers and Events
In this example, the Volunteers columns were linked to the Events table.
- Tools > Add/Remove Functionalities > Add columns to link tables
- In the dialog window, select the Volunteers table.
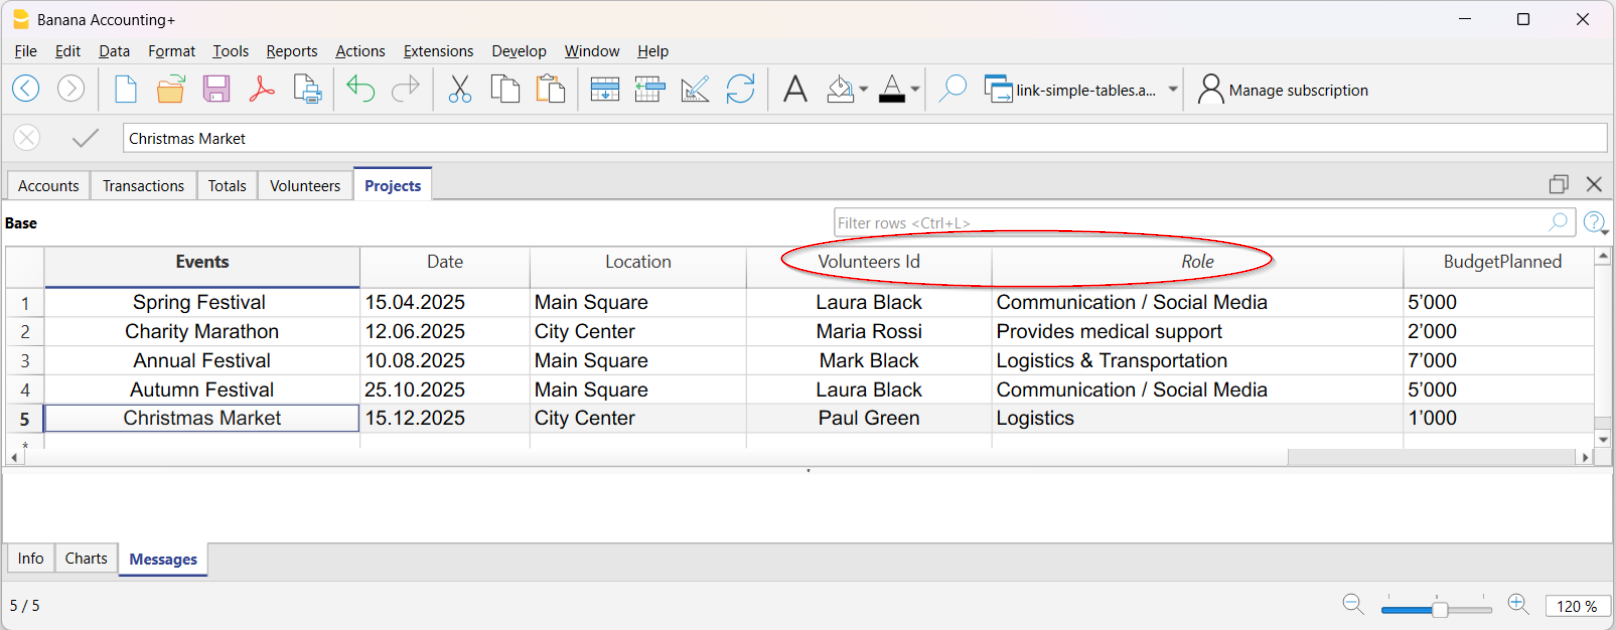
Banana automatically adds the following columns to the Events table:
- Volunteers Id → volunteer's code.
- Volunteers Description → name of the volunteer (or event manager)
When you enter the volunteer code in the Volunteers column, Banana automatically fills in the volunteer's name in the corresponding column.
Advantages of linking
- Clear overview → you immediately know who is participating in an event.
- Defined roles → assign specific tasks to each volunteer.
- Automatic updates → if you change data in the Volunteers table, Banana updates it in the Events table too.
- Simplified management → no more separate sheets, everything stays in the same file.
- Activity history → keep a record of volunteer participation over time.
This approach is ideal for cultural, sports, or charity associations that want to manage people and events in a simple, organized, and immediate way.
Bestand maken van externe gegevens
Banana Boekhouding kan gegevensbestanden omzetten en ze converteren naar een Banana Boekhouding-bestand, zodat je gemakkelijker toegang krijgt tot de inhoud.
Bijvoorbeeld:
Bekijk CSV-bestand
Banana converteert CSV-bestanden en toont ze in een tabel.
Je hoeft alleen het CSV-bestand naar het Banana Boekhouding-venster te slepen en het bestand wordt omgezet in een eenvoudige tabel.
Bekijk ISO 20022 of MT940-afschriften
Het bestand wordt omgezet in een kasboek en de transacties worden weergegeven als boekingen.
Sleep gewoon het bestand naar Banana.
Auditbestand voor belastingheffing
Het xml-bestand wordt omgezet in een dubbele boekhouding, met de bijbehorende rekeningenschema en boekingen.
Extensies voor het maken van bestanden
Bestand Creator-extensies stellen je in staat om bestandsconversieprogramma's te maken voor specifieke gegevenstypes en geven de gebruiker de mogelijkheid om te kiezen welke extensie te gebruiken.
Rekeningafschrift SEPA/ISO 20022
Banana allows the user to view and import the contents of ISO20022 and MT940 files, even in the free version (Starter Edition) of Banana.
Display of the ISO 20022 or MT940 bank statement
In order to open and see the file :
-
Download your bank statement in ISO 20022 formatIf it is a compressed file, extract the XML file to be displayed with its own utility (p.es. 7zip)S
- Install and open Banana Accounting
- Drag the file inside Banana Accounting: Banana immediately shows all entries with text and date, amount and the progressive balance
- The data of the bank statement can then be printed or copied into Excel or other programs
Additional indications
-
The opening balance in the ISO 20022 file is entered into the Accounts table.
- The column width can be adapted with the mouse.
-
To align the text of the description on several lines, use the command Format-> Calculate all row heights
-
To categorize the movements and get statements, enter the appropriate categories in the Categories table and display the Categories column in the Transactions table with the Columns setup command.Or, create a new file with an existing template and categories and accounts already set up, and import the data of the bank statement as explained in the next paragraph.
-
In the free Starter Edition mode, files with more than 70 transactions cannot be saved.
Data importing in the current accounting
Proceed as indicated with the Import into accounting command.
With this function, a compressed file can slo be opened. In this case the program will prompt the user to select the file from which to import the data in the compressed file.
The ISO 20022 standard for bank statements
With the SEPA (Single Euro Payement Area), the ISO 20022 standard becomes mandatory in Europe starting 01.01.2014, and supersedes the Swift MT940 format.
The SEPA area banks have to make the electronic account statement available in this format.
Technical notes on converting ISO 20022
Banana, when reading the file, tries to adapt itself to the ways in which the ISO 20022 file has been prearranged.
- Reads as opening balance the similar encodings
- Reads as closing balance the similar encodings
-
All contents are read and processed in movements
- Transaction date (Date)
- Valuta date
- Transaction amount (positive or negative)
- Description (Banana for now assembles the various descriptions in a single text)
In the future it will be possible to extract this information more specifically and indicate other columns where to enter it.
If there would be any specific or national requirements, please make them known to us, in order to improve that conversion- and import functions.
- Creates a new Cash book file
-
Adds all the transactions of the bank statement in that file
-
Defines the opening balance (Accounts table) with the value of the opening balance found in bank statement
- Defines the file header with the text found in the file and the IBAN account number
- Defines the currency as the one found in the ISO 20022 file
- Calculates the progressive balance.
Bekijk CSV-bestand
Als je een CSV- of JCSV-bestand opent of naar het Banana-venster sleept, maakt Banana automatisch een bestand van het type Eenvoudige tabel, waarbij de kolommen en de gegevens uit de CSV-tabel worden overgenomen.
Copie bestand creëren
You can activate the command from the Tools menu → Create file copy.

This feature allows you to create a new file, identical to the existing one. You can choose to copy the file with the following options:
- Keep Opening balances. If the option is activated, the opening balances of the copied file will be shown in the new file.
- Keep Transactions. If this option is activated, transactions of the copied file will be shown in the new file.
- Keep Recurring transactions. If this option is activated, the recurring transactions of the copied file will be shown in the new file.
This feature is very useful when you want to make test changes and have the confidence that you can go back without losing data.
If none of the options are activated, a new file will be created only showing the same accounting plan.
The new file must be saved with a name.
Naar nieuw bestand converteren
Het commando wordt geactiveerd via menu Extra > Naar nieuw bestand converteren.
In het dialoogvenster dat verschijnt is het bestandstype waarmee u aan het werk bent geselecteerd en een lijst van mogelijke keuzes wordt getoond:

Deze opdracht converteert een bestaand bestand (dat niet wordt veranderd) in een ander bestand met andere eigenschappen:
- Verander taal
- Verander afronding
- Verander het soort bestand Bijvoorbeeld:
- Van een boekhouding zonder BTW naar een met BTW
- Van een Dubbel-boekhouden naar een Vreemde-valuta boekhouding
Het is alsof u een nieuw leeg bestand heeft gemaakt en daarna de gegevens er handmatig in overgebracht.
De kenmerken van de bestaande file kunnen bekeken worden met het commando Extra > Bestandsinfo
Aanmaken en gegevensoverdracht
Het commando menu Extra > Naar nieuw bestand converteren:
- Maakt een nieuw bestand aan van het gespecificeerde type met voorgedefinieerde kolominstellingen
- Brengt de gegevens over naar het nieuwe bestand, intussen de nodige conversies uitvoerend
- Slaat het nieuwe bestand op onder een naam die het soort bestand aangeeft.
Overstap van een boekhouding met meer opties naar een boekhouding met minder opties
De volgende gevallen hebben betrekking op de overgang van een boekhoudingstype met meer opties naar een boekhoudingstype met minder opties:
Overgang van een boekhouding met btw naar een boekhouding zonder btw
Tijdens de conversie:
- wordt in de Bestands- en boekhoudingseigenschappen... de tab BTW verwijderd;
- wordt de tabel Btw-codes verwijderd;
- worden in de tabel Transacties de gegevens in de btw-gerelateerde kolommen verwijderd;
- kunnen in de tabel Rekeningen de btw-rekeningen worden verwijderd.
Overgang van een boekhouding met vreemde valuta naar een boekhouding zonder vreemde valuta
Tijdens de conversie:
- wordt in de Bestands- en boekhoudingseigenschappen... de tab Vreemde valuta verwijderd;
- wordt de tabel Wisselkoersen verwijderd;
- worden in de tabel Rekeningen de kolommen Valuta en Openingsvaluta verwijderd;
- kunnen in de tabel Rekeningen de rekeningen voor wisselkoersverschillen worden verwijderd;
- worden in de tabel Transacties de kolommen met betrekking tot wisselkoersen en vreemde valuta verwijderd.
Belangrijk: voordat u overschakelt van een boekhouding met vreemde valuta naar een boekhouding zonder vreemde valuta, moet u ervoor zorgen dat de saldi van de rekeningen in vreemde valuta op nul staan. Anders worden er openingsverschillen weergegeven in het geconverteerde bestand.
Overgang van een Dubbel-boekhouden naar een Vreemde-valuta boekhoudbestand
- Zorg ervoor dat in Bestands- en boekhoudingseigenscappen het valuta symbool wordt gespecificeerd dat de basisvaluta wordt
- Kies de boekhouding met vreemde valuta als doel
- Het programma maakt een boekhouding met vreemde valuta aan waarbij de bestaande gegevens behouden blijven:
- De Transactiestabel bevat de kolommen om de vreemde valuta te beheren zoals het valuta bedrag, de valuta en de wisselkoers 1,000
- De bestaande rekeningen in de Rekeningentabel worden aangevuld met het basis valutasymbool
- U dient de standaard rekeningen voor Wisselkoerswinst en - verlies toe te voegen
- In de Bestands- en boekhoudingseigenschappen dient u de standaard rekeningen voor Wisselkoerswinst en - verlies aan te geven.
- De Wisselkoersentabel is leeg; het is daarvoor nodig de valuta's en wisselkoersen die in de transacties gebruikt worden toe te voegen
- In de Rekeningentabel moeten de vreemde valuta toegevoegd worden.
Om de valuta van een boekhoudingsbestand te veranderen, zie de tabblad Boekhouding van Bestands- en Boekhoudingseigenschappen.
Overgang van een boekhouding zonder BTW naar een met BTW
- Kies het gewenste boekhoudtype met BTW als doel
- Het programma maakt een boekhouding aan met BTW kolommen waarbij de bestaande gegevens behouden blijven:
- Voegt de BTW rekeningen toe aan de Rekeningenkaart
- De Bestandsinfo met betrekking tot de BTW moet kompleet gemaakt worden en de standaard rekening, waarop de BTW geregistreerd moet worden, moet aangegeven worden
- Via Acties > Naar boekhouding importeren > BTW codes kunnen de betreffende percentages uit de BTW codes tabel worden gebruikt.
Parameters voor het aanmaken van een nieuw bestand
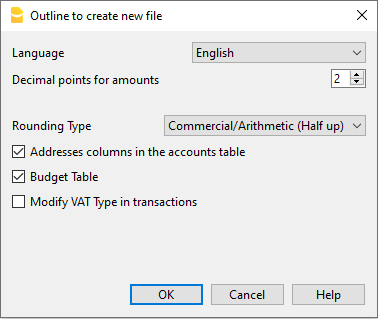
Voor meer informatie raadpleegt u de betreffende pagina.
Gerelateerde pagina's:
Bestand samenvoegen
Dit commando wordt geactiveerd via Extra → Bestand samenvoeten....
Het is mogelijk twee bestanden samen te voegen maar dan moeten ze wel van het zelfde soort zijn (bijvoorbeeld twee dubbel-boekhouden bestanden). Het is niet mogelijk verschillende soorten bestanden samen te voegen (bijvoorbeeld een dubbel-boekhouden bestand en een Inkomsten & Uitgaven bestand).
Om twee bestanden met goed gevolg samen te voegen is het belangrijk dat ze dezelfde rekeningnummers hebben. Ga als volgt te werk:
- Open het bestand waarin de gegevens van beide bestanden samengevoegd gaan worden
- Selecteer het Bestand samenvoegen commando van het menu Extra
- Selecteer het pad en de naam van het bestand dat samengevoegd moet worden
- Bevestig de samenvoeg operatie
- Als de bestanden niet helemaal hetzelfde zijn, ook al zijn ze van de zelfde soort, (bijvoorbeeld, boekhouding met BTW en boekhouding zonder BTW), dan verschijnt een waarschuwing voor mogelijk gegevensverlies.
Let op: het programma voert geen consolidatie van de gegevens uit, maar werkt de rekeningsaldi bij zonder de openingssaldi op te tellen.
Programmaopties
De instellingen voor het programma zijn te vinden via menu Extra → Programmaopties. Hier zijn diverse technische instellingen te vinden voor het programma.

In de volgende pagina's vindt u meer gedetailleerde informatie.
Algemeen
De interface opties zijn te vinden via menu Extra > Programmaopties > Algemeen.
Programmaopties
Taal
Dit is de taal die door het programma wordt gebruikt. U kunt deze instelling veranderen als u een andere dan de standaardtaal wilt gebruiken of als uw taal niet beschikbaar is als de standaardtaal.
Lettertype
Hiermee kunt u het gewenste lettertype kiezen.
%in-/uitzoomen
Hiermee kunt u de lettergrootte in de tabellen groter en kleiner maken als u dat wilt.
- Het zoom percentage kan ook worden veranderd met de schuifregelaar of in het vakje aan de rechterkant van de statusbalk.
- Het doel van zoom is de inhoud van de tabel aan te passen aan de grootte van het venster.
Voor de grootte van de tekst van menu's, dialogen en iconen worden de instellingen van het operating systeem gebruikt maar deze kunnen ook door de gebruiker aangepast worden.
Regelafstand
In dit veld kunt u de hoogte van de rijen van de verschillende tabellen van het programma instellen.
Negatieve getallen in rood weergeven
Door deze optie te gebruiken worden negatieve getallen in rood weergegeven in de tabellen.
Opstart
Controleren op updates
Met deze optie geactiveerd maakt het programma een verbinding met de website Banana.ch en controleert of er een update is voor de versie die nu in gebruik is.
Startpagina weergeven
Met deze optie geactiveerd laat het programma na het starten eerst de nieuwspagina zien.
Laatst gebruikte bestanden tonen
Met deze optie geactiveerd laat het programma in het menu Bestand de laatst gebruikte bestanden zien.
Webserver starten
Met deze optie geactiveerd kunnen Banana Boekhoudgegevens benaderd worden vanuit externe programma's.
Voor meer informatie zie Integrated Webserver (Engelstalig)
Editor
De Editor opties zijn te vinden via menu Extra > Programmaopties > Editor.
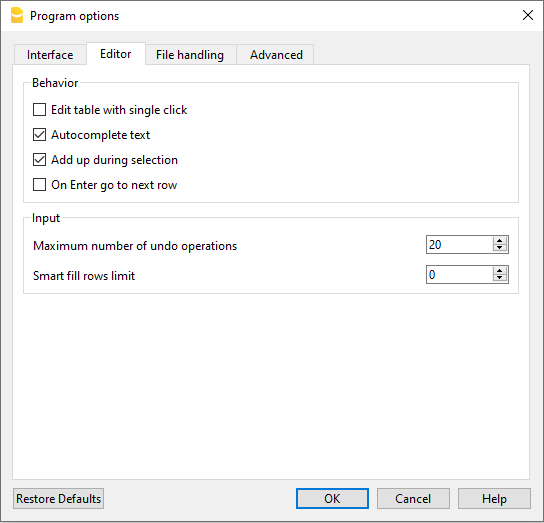
Gedrag
Tabel met een enkele klik bewerken
- Met deze optie geactiveerd is een enkele klik op een geselecteerde cel genoeg om deze te kunnen aanpassen.
- Als deze optie niet is geactiveerd is een dubbelklik nodig om de geselecteerde cel aan te kunnen passen.
Tekst automatisch aanvullen
Met deze optie geactiveerd selecteert het programma automatisch de eerste tekst in de drop-down lijst en vult deze in in de rij waar u bezig bent.
Optellen tijdens selectie
Met deze optie geactiveerd telt het programma geselecteerde bedragen op. Zet deze optie uit als dit instant optellen andere bewerkingen vertraagt. U kunt niet aansluitende bedragen selecteren door de Crtl toets ingedrukt te houden en dan de gewenste cellen ieder apart te selecteren met de linker muis knop.
Met Enter, ga naar de volgende rij
Met deze optie geactiveerd gaat de cursor naar de volgende rij als de Enter toets wordt ingedrukt.
Invoer
Maximum aantal ongedaan gemaakte bewerkingen
Voer het maximum aantal bewerkingen in dat ongedaan gemaakt kan worden met het menu Bewerken → Bewerking ongedaan maken (één bewerking per keer ongedaan maken).
Rijbeperking in Smart Fill
Bij het invoeren van gegevens leest het programma de gegevens die eerder ingevoerd zijn en probeert de invoer aan te vullen. Als er veel rijen zijn kan deze functie het invoeren van data vertragen. De gebruiker kan een limiet voor het aantal rijen instellen waarboven de smart-fill niet gebruikt wordt. Als er geen waarde wordt opgegeven of 0 dan wordt Smart Fill altijd gebruikt.
Bestandsbeheer
De opties voor Bestandsbeheer zijn te vinden via menu Extra > Programmaopties > Bestandsbeheer.
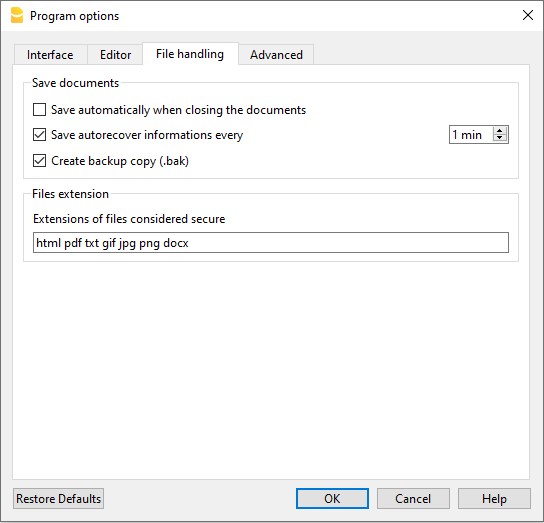
Documenten opslaan
Dit gedeelte bevat de volgende opties voor het opslaan van documenten.
Automatisch opslaan bij het sluiten van documenten
Als deze optie is geactiveerd worden de gegevens iedere keer als het bestand gesloten wordt automatisch opgeslagen.
Autorecover informatie elke
Met deze optie kan de frequentie (in minuten) van het automatisch opslaan worden ingesteld. Het programma slaat de gegevens op in een document genaamd autobackup+bestandsnaam. Als het programma of de computer ermee stopt kunt u de gegevens herstellen door dit bestand te openen en het in het bestandsmenu op te slaan als.
Reservekopie aanmaken (.BAK)
Bij het opslaan met dezelfde naam wordt de eerdere versie van het bestand hernoemd met de BAK extensie.
Zie de pagina Een bestand openen en opslaan voor meer informatie.
Bestandsextensie
Extensies van bestanden die veilig worden geacht
Deze optie definieert de bestandstypes (bijvoorbeeld: "pfd", "jpg", ... ) en de url schema's (bijvoorbeeld: "http:", "x-devonthink-item:", ...) die geopend mogen worden met een dubbelklik in de kolom Documentkoppeling van de transactietabel. Hierdoor wordt u beschermd tegen het openen van onveilige bestanden of schema's. Extensies moeten zonder punt aan het begin ingevoerd worden en schema's met een dubbele punt aan het eind.
Standaardinstellingen herstellen
Als op deze knop geklikt wordt zet het programma veranderde instellingen terug op de standaardwaarde.
Geavanceerd
De opties voor Geavanceerd zijn te vinden via menu Extra > Programmaopties > Geavanceerd.

TrueType-lettertypen inschakelen
Als deze optie is ingeschakeld, wordt het op het tabblad Interface geselecteerde lettertype gebruikt bij het afdrukken van PDF-bestanden, anders wordt een native PDF-bestandstype (Helvetica of Times New Roman) gebruikt. Deze optie moet worden uitgeschakeld als de tekst in de gegenereerde PDF-bestanden onleesbaar is.
Systeem info

Deze sectie geeft informatie over het besturingssysteem en de werkomgeving weer. Deze informatie kan worden opgevraagd door technische ondersteuning. Klik in dit geval op de knop Naar klembord kopiëren en plak de gegevens in een e-mail bericht of het contactformulier.