Automatización
Importación y autocompletado de transacciones bancarias
Es la funcionalidad que te permite llevar la contabilidad de forma rápida:
- Importa las transacciones bancarias en contabilidad
El programa crea los asientos con fecha, descripción, importe, cuenta y cambio. Los datos adicionales como la contrapartida deben completarse manualmente.
Los formatos estándar, como ISO 20022 o TXT están incluidos en el plan Professional; otros formatos requieren el plan Advanced. - Completa los asientos automáticamente gracias a las reglas (plan Advanced)
Puedes definir reglas de autocompletado para importar las transacciones añadiendo también la contrapartida, el código de IVA, los Centros de coste y otra información que hayas especificado.
Siempre puedes modificar y completar los asientos posteriormente.
Formatos de importación de transacciones bancarias
- Banana Contabilidad Plus lee las transacciones en varios formatos. Consulta la página Importar transacciones.
- Gracias a las Extensiones de importación desarrolladas a medida, puedes importar datos desde distintos extractos bancarios y otros programas estándar. Algunas extensiones están disponibles únicamente en el plan Advanced.
Otros comandos para la importación de datos
Banana Contabilidad Plus ofrece varias modalidades para la importación de datos:
- Importar en contabilidad
Puedes importar en cualquier tabla y desde distintos formatos. - Importar Filas
Todas las tablas permiten importar datos desde el formato CSV. - Copiar y pegar desde Excel u otros programas.
Puedes preparar las transacciones u otros datos en una hoja de Excel y copiarlos y pegarlos en bloque en la tabla Registros o en cualquier otra tabla.
Completado manual y anulación de la importación
Una vez importadas las transacciones u otros datos, puedes fácilmente completarlos y modificarlos. De esta forma, automatizar los procesos es muy fácil, ya que si hay excepciones no previstas, puedes modificar directamente los datos.
Como todos los comandos, también el de importación se puede anular. Así puedes probar fácilmente a importar los datos y comprobar si funciona como esperabas. Si no has elegido el formato correcto o no has configurado bien los parámetros, basta con anular la importación y volver a intentarlo.
Enlaces útiles
Reglas para completar automáticamente los registros importados
La Inteligencia Artificial (IA) se utiliza cada vez más en los sistemas de automatización. En colaboración con nuestros usuarios, hemos desarrollado sin embargo un sistema de autocompletado de los asientos importados basado en reglas definidas y controladas por el propio usuario, por lo tanto, basadas en algoritmos deterministas y no probabilísticos (IA).
Esta funcionalidad automatiza y simplifica el proceso de registro contable, permitiendo ahorrar tiempo y reducir errores en la introducción de datos.
Las Reglas son registros predefinidos que incluyen toda la información necesaria para completar automáticamente las operaciones contables de manera precisa y rápida.
A continuación el vídeo introductorio de las Reglas, y los vídeos sobre cómo crearlas:
- ▶ Vídeo: Importar y completar registros automáticamente (introducción) - 0'55"
- ▶ Vídeo: Reglas para completar registros importados (diálogo Aplicar reglas) - 7'26"
- ▶ Vídeo: Reglas para completar registros importados (tabla Registros memorizados) - 5'54"
Esta funcionalidad está disponible únicamente con el plan Advanced de Banana Contabilidad Plus (versión 10.1 o superior). También se puede probar con los planes Free o Professional hasta 70 líneas de transacción.
¿Qué son las Reglas?
Las Reglas son filas de registros predefinidas que contienen información útil para que el programa pueda:
- Identificar los registros importados que deben completarse
Si introduces en la columna Descripción "Swisscom", la regla se aplicará a los registros importados que contengan en la descripción el texto "Swisscom". - Indicar los elementos para completar el registro
- En la columna Cuenta Débito introduce la cuenta "Gastos telefónicos".
- En la columna IVA introduce el código "I81".
Las reglas de autocompletado se guardan en la tabla de Registros memorizados. Puedes introducirlas y modificarlas directamente en la tabla o utilizar el diálogo Añadir/Modificar reglas durante la fase de aplicación de reglas.

¿Para qué sirven las Reglas?
Normalmente, cuando importas transacciones bancarias en la tabla Registros, debes completar manualmente los registros añadiendo la contrapartida en Débito o Crédito, el código de IVA, los Centros de coste u otra información.
Ejemplo: cuando importas un movimiento de salida que indica un pago a la empresa "Swisscom", deberás completar la columna Cuenta Débito con "Gastos telefónicos" y la columna Código IVA con "I81".
Con la creación de Reglas, los movimientos importados son completados automáticamente por el programa, sin intervención manual.
Dependiendo del método utilizado para crear las reglas, estas pueden generarse antes o durante la importación. Una vez creadas, se aplican automáticamente en todas las futuras importaciones.
Procedimiento de trabajo
- Importa los movimientos bancarios
El programa crea las filas con fecha, descripción, importe, cuenta, número de documento, tipo de cambio. - Crea la regla utilizando uno de los métodos disponibles.
- En la tabla Registros, el programa completa automáticamente todos los movimientos importados con contrapartida, códigos de IVA, centros de coste y más.
- En la tabla Registros memorizados el programa guarda los registros con las Reglas.
Métodos para crear Reglas
Hemos creado un sistema que ofrece diferentes métodos para crear Reglas. Tú eliges cómo prefieres trabajar:
- Reglas desde la tabla Registros
- Reglas desde la tabla Registros memorizados
- Reglas desde el diálogo Aplicar Reglas
Ventajas de las Reglas
Las ventajas del sistema de autocompletado son inmediatamente evidentes:
- Completas los registros en segundos.
- Alto nivel de control y precisión.
- Evitas errores y omisiones.
- Puedes delegar fácilmente el trabajo de importar datos contables.
- Puedes ver cómo se han registrado ciertos movimientos.
- El auditor puede definir cómo registrar determinadas operaciones.
- Funciona de inmediato, incluso sin una base de datos de aprendizaje.
- Puedes añadir, modificar y eliminar reglas en cualquier momento.
Paso al nuevo año
Cuando creas el archivo del nuevo año desde el menú Acciones > Crear nuevo año, todas las Reglas presentes en la tabla Registros memorizados se trasladan e insertan en el nuevo archivo.
Cuando importas los movimientos del extracto bancario, las Reglas se aplican de inmediato.
Puedes añadir nuevas Reglas y adaptar las existentes a nuevas necesidades, como por ejemplo el cambio del IVA, la adición o eliminación de cuentas.
Copiar Reglas de un archivo a otro
Cuando creas un nuevo archivo, puedes copiar las reglas de un archivo a otro desde la tabla Registros memorizados:
- Ve a la tabla Registros memorizados
Asegúrate de que la disposición de las columnas sea la misma en ambos archivos. - Selecciona las filas de las Reglas que deseas copiar.
- Copia las filas desde el menú Editar > Copiar filas, o con la combinación Ctrl + C.
- Pega las filas copiadas en la tabla Registros memorizados del nuevo archivo desde el menú Editar > Pegar filas copiadas, o con la combinación Ctrl + V.
Algoritmos deterministas vs. probabilísticos (IA)
La Inteligencia Artificial (IA) se utiliza cada vez más en los sistemas de automatización. Sin embargo, los sistemas basados en algoritmos probabilísticos no son adecuados para el ámbito contable, donde los registros deben ser exactos.
En colaboración con nuestros usuarios, hemos desarrollado un sistema para el autocompletado de registros importados basado en Reglas, es decir, en algoritmos deterministas.
Es un enfoque más alineado con la lógica contable, porque:
- El enfoque probabilístico conlleva una serie de riesgos en el ámbito contable y fiscal, y es difícil de controlar.
- Las reglas ofrecen un nivel de control y precisión muy elevado.
Por ejemplo, los pagos realizados a compañías de seguros pueden asignarse con precisión a una cuenta según el número de contrato. - Todas las reglas constituyen una valiosa base de conocimiento.
Se enumeran en la tabla de Registros memorizados, pueden modificarse fácilmente (por ejemplo, cuando cambia el IVA) y sirven como referencia y herramienta de control. Puedes:- Ver cómo se registran determinadas operaciones si no lo recuerdas.
- Explicar a quienes llevan la contabilidad cómo registrar las operaciones.
- Definir para el auditor cómo registrar ciertas operaciones.
- Adaptar las reglas si cambian los códigos de IVA o se añaden o eliminan cuentas, centros de coste, etc.
- Eliminar reglas que ya no se aplican.
- Copiar y pegar las reglas en otra contabilidad y adaptarlas según tus necesidades.
- No requieren fase de aprendizaje y funcionan perfectamente incluso para pagos que ocurren solo una o pocas veces al año.
- Las reglas pueden adaptarse de inmediato a cambios normativos. En cambio, la Inteligencia Artificial aprende del pasado y tiende a repetir lo ya hecho, incluso si la situación ha cambiado.
Funcionalidades actualmente no disponibles
Estas funciones, aunque solicitadas por algunos usuarios, no están disponibles actualmente:
- Posibilidad de cambiar el texto del registro, para acortarlo y simplificarlo.
- Para los registros en varias líneas, posibilidad de usar fórmulas que calculen los importes en función del importe del registro importado.
- Posibilidad de aplicar una regla según la fecha del registro (condición: columna Fecha).
Cómo funcionan las reglas de autocompletado de registros importados en 3 pasos
A continuación se explica el procedimiento de funcionamiento de las Reglas y cómo se aplican.
El proceso puede resumirse en tres pasos:
- Importar los movimientos bancarios en la tabla Registros.
- Crear las reglas.
- Aplicar las reglas para el autocompletado de los registros.
1. Importar los movimientos bancarios
Cuando se importan los movimientos bancarios, el programa inserta una cuenta de contrapartida temporal [CA]. Normalmente, la contrapartida debe completarse manualmente en cada registro.

En la imagen de ejemplo, en la tabla Registros se observa que:
- (1) - Las celdas tienen la misma contrapartida temporal, relacionada con ventas a través de Twint.
- (2) - La celda tiene una contrapartida temporal relacionada con gastos mensuales de mayo.
- (3) - La celda tiene una contrapartida temporal relacionada con gastos telefónicos de Swisscom.
- (4) - La celda tiene una contrapartida temporal relacionada con costes de seguros, póliza nº 892-948.
- (5) - La celda tiene una contrapartida temporal relacionada con costes de seguros, póliza nº 987-650.
A continuación se explica el procedimiento de funcionamiento de las Reglas y cómo se aplican.
El proceso puede resumirse en tres pasos:
- Importar los movimientos bancarios en la tabla Registros
- Crear las reglas.
- Aplicar las reglas para el autocompletado de los registros.
1. Importar los movimientos bancarios
Cuando se importan los movimientos bancarios, el programa inserta una cuenta de contrapartida temporal [CA]. Normalmente, la contrapartida debe completarse manualmente en cada registro.
En la imagen de ejemplo, en la tabla Registros se observa que:
- (1) - Las celdas tienen la misma contrapartida temporal, relacionada con ventas a través de Twint.
- (2) - La celda tiene una contrapartida temporal relacionada con gastos mensuales de mayo.
- (3) - La celda tiene una contrapartida temporal relacionada con gastos telefónicos de Swisscom.
- (4) - La celda tiene una contrapartida temporal relacionada con costes de seguros, póliza nº 892-948.
- (5) - La celda tiene una contrapartida temporal relacionada con costes de seguros, póliza nº 987-650.
2. Crear las Reglas
Las Reglas sirven para completar automáticamente todas las contrapartidas temporales de los registros importados, añadiendo también códigos de IVA, centros de coste, enlaces y más.
Las reglas son registros modelo ya completos, presentes en la tabla Registros memorizados, donde:
- La columna Descripción contiene el texto (una o más palabras clave) que debe contener el registro importado.
- Las columnas Cuenta Débito y Cuenta Crédito contienen la Contrapartida que sustituirá la temporal.
Hemos creado un sistema que ofrece diferentes métodos para crear las Reglas:
- Reglas desde el diálogo Aplicar reglas
- Reglas desde la tabla Registros
- Reglas desde la tabla Registros memorizados
Sea cual sea el método utilizado, las Reglas creadas se guardan en la tabla Registros memorizados.

En el ejemplo, en la tabla Registros memorizados se ha creado una Regla para los siguientes movimientos:
- (1) - Para los movimientos "Twint", la regla reemplaza la contrapartida temporal con la cuenta "Sales". También se ha añadido el código de IVA.
- (2) - Para el movimiento "Interac Electronics", la regla reemplaza la contrapartida temporal con la cuenta "Goods". También se ha añadido el código de IVA.
- (3) - Para el movimiento "Swisscom", la regla reemplaza la contrapartida temporal con la cuenta "Admin".
- (4) - Para el movimiento "Best insurance" con número de póliza "892-948", la regla reemplaza la contrapartida temporal con la cuenta "Insurance Health".
- (5) - Para el movimiento "Best insurance" con número de póliza "987-650", la regla reemplaza la contrapartida temporal con la cuenta "Insurance Car".
3. Aplicar las Reglas para el autocompletado (Resultado)
En la tabla Registros, el programa completa automáticamente los registros importados añadiendo la cuenta de contrapartida, el código de IVA, etc., independientemente del método utilizado para crear las Reglas.

En el ejemplo, en la tabla Registros los movimientos importados han sido completados automáticamente:
- (1) - Para los movimientos "Twint", la contrapartida temporal fue sustituida por la cuenta "Sales", y se añadió el código de IVA.
- (2) - Para el movimiento "Interac Electronics", la contrapartida temporal fue sustituida por la cuenta "Goods" y se añadió el código de IVA.
- (3) - Para el movimiento "Swisscom", la contrapartida temporal fue sustituida por la cuenta "Admin".
- (4) - Para el movimiento "Best insurance" con número de póliza "892-948", la contrapartida temporal fue sustituida por la cuenta "Insurance Health".
- (5) - Para el movimiento "Best insurance" con número de póliza "987-650", la contrapartida temporal fue sustituida por la cuenta "Insurance Car".
Además, el programa reconoce los registros con código de IVA y completa todas las columnas relacionadas con el IVA (cuenta de IVA e importes).
Create Rules from the Apply Rules Dialog
One of the methods for creating Rules is from the Apply Rules dialog. The main advantages are as follows:
- You can see all imported transactions.
- The imported transactions are divided into incoming and outgoing transactions, with Rules and without Rules.
- For each group of identical transactions, the Rule being applied is shown in bold.
- Rules that are duplicated or in conflict are highlighted.
- You can add new rules and modify or delete existing ones.
- By changing the conditions of a Rule (description, amount, account), you can immediately see the list of transactions that comply with it.
- You can decide which rules to activate and which to deactivate.
Below is the complete procedure for creating Rules from the Apply Rules dialog.
1. Give the command Import into accounting
Before accessing the Apply Rules dialog, you must first import bank, postal, or other transactions as follows:
- Use the command from the Actions menu > Import into accounting > Transactions
- Select the appropriate format and indicate the path where the file with your bank statement data is located
- In the dialog that opens:
- Enter the account related to the statement from which you are importing the transactions (bank, postal service, etc.).
- Specify the start and end dates for the period of the transactions to import.
- Indicate the temporary contra account if you want it to be different from the default "[CA]".
You can use any account, and if you write it in square brackets, it will not be accounted for. - Activate the Apply Rules option (available only with the Advanced plan of Banana Accounting Plus).
- Confirm with OK.

2. Dialogue Apply Rules
The program opens the Apply Rules dialog.
In this dialog, you will find:
- The temporary contra account you entered previously or the default one "[CA]".
- The bank account entered, where all transactions imported from your bank or postal account are recorded.
- The imported transactions from the bank account, divided into:
- Incoming transactions without rules (Money In without rules).
- Outgoing transactions without rules (Money Out without rules).
- Incoming transactions with rules (Money In with rules).
- Outgoing transactions with rules (Money Out with rules).

3. Create new rules
To create new Rules:
- Position yourself on one of the transactions for which you want to create a rule.
- Go to the right-hand side until you see "...".
- Click on Add New Rule.

The Add Rule - Edit Rule dialogue appears.
In this dialog, you need to enter:
- In the Description, the text (keyword) that the program uses to find the matching Rule in the imported transactions.
Example:- Best Insurance Contract 892-948
applies to lines that contain exactly the specified text. - +Best Insurance Contract 892-948
applies to lines that contain the words "Best Insurance" and "892-948" in any position.
- Best Insurance Contract 892-948
- The contra account, used to replace the temporary contra account.
- Any other information (Cost centers, VAT codes, etc.).
Important: where there is a contract number, a policy number, a customer number, etc., it is recommended to add a "+" in front of the rule. The + allows the rule to search for individual words (or sequences of numbers) regardless of their position within the description of the imported transaction.
The program shows the transactions found based on the entered conditions to which the new rule will be applied. In the example, we have a single transaction.
- Confirm with OK.

4. Confirm Apply Rules
In the Apply Rules dialog, you will see:
- The row of the created Rule ("NEW") where the data of the temporary counteraccount [CA] and the other information entered in the rule are indicated.
- Below are the lines of the transactions to which the rule has been applied.
You can decide when to execute the Apply Rules command:
- You can apply the rules selectively and continue working on the others.
- You can exit the dialog and return later.
- You can cancel the operation of applying the rules and repeat it later.
- The Apply Rules command also saves any changes you made to the rules.
By clicking on the buttons:
- Apply Rules:
- The program adds the new Rules to the Recurring transactions table.
- The program completes the transactions in the Transactions table.
- The dialog remains open so you can add the rules to the other transactions.
- OK
- Confirms the applied rules and closes the dialog.
- Confirms the applied rules and closes the dialog.

Undo changes made
Once the dialogue is closed, you will see the completed transactions in the Transactions table.
If you wish, you can undo the changes you have made:
- Menu Edit > Undo edit
- With the Cancel button (green arrow).
To also cancel the import of the data, you need to repeat the Cancel command a second time.
Complete other transactions with Temporary contra account
After importing bank transactions, the aim is to complete all transactions so that there are no more transactions with Temporary contra accounts [CA].
You can manually complete the remaining transactions. This is useful for special cases that do not tend to repeat.
You can create new rules by chosing one of the following methods:
Adding information to completed transactions with rules
It is possible to add supplementary information to the Rules through the Recurring Transactions table.
Auto-completion rules from the Apply Rules dialogue
The Apply Rules window offers an excellent level of control over changes to accounting transactions because it shows a preview of existing rules, with an indication of which transactions match each one and which transactions do not yet match any rules. You then have the option of creating new rules, modifying or deleting existing ones.
▶ Video: Rules for completing imported transactions (Apply Rules dialogue)
The dialogue may be displayed:
- From the Import Transactions dialogue, when the Apply Rules option is checked
Rules are only applied to imported rows
- From the Actions menu > Recurring transactions > Apply rules...
Rules are applied to the entire contents of the Transactions table
The Apply Rules dialogue, coupled with the import of banking data, becomes a crucial tool for setting up all repetitive records. In this dialogue window, when faced with multiple repetitive transactions of the same type, it suffices to set the rule for just one of the transactions, and the rules are automatically applied to all other transactions in the dialogue, eliminating the need to set the rule again.
Once the rules are confirmed, all transactions are listed in the Transactions table, ensuring consistency and accuracy in records of the same type, and speed in accounting for all transactions.

This dialogue box is divided into three sections:
Apply rules to transactions with...
- Temporary contra account:
This field is mandatory.
It filters all imported transactions that contain that specific contra account, e.g. [CA], which was indicated in the Import transactions dialogue. - Account:
Filters all imported transactions that contain a specific account, usually a bank account or [A], which has been indicated in the Import Transactions Dialogue.
The rule-based auto-completion system assumes that once the transactions have been completed, there is no longer any transaction containing the temporary contra account.
Imported data corresponding to rules or not
The window shows all transactions that have temporary contra accounts indicated above (e.g. [CA]). These are grouped in four main sections:
- Incoming transactions with rules
Transactions with positive change of account (credit) and with indication of the rule to which they correspond - Outgoing transactions with rules
Transactions with negative account variation (debit) and with indication of the rule to which they correspond - Incoming transactions without rules
Transactions with positive change of account (credit) and not belonging to any rule - Outgoing transactions without rules
Transactions with negative account variation (debit) and not belonging to any rule
Contextual commands
From the row of a transaction without a rule, a simple click or the three dots (...) to the right, or a right click anywhere on the row, opens a menu allowing you to:
- Add/Edit Rule
- Cancel an existing rule
- Change an overlapping rule

The commands at the bottom of the dialogue
- Expand All/Collapse All: displays or hides the elements of the Transactions.
- Display unused rules: checking this option displays all rules defined in the Recurring transactions table; if the option is not checked, the programme only displays rules that have matches.
- Display rows without rules: if this option is checked, all imported transactions are displayed; if the option is not checked, the programme only shows transactions that match a rule.
- Remove accounts between [ ]: in multi-row transactions, the import account is placed in square brackets [ ] in the detail rows. If this option is activated, the programme removes the import account from the detail rows.
Rules with transactions on multiple rows can only be defined in the Recurring transactions table. - OK: this button applies the active rules and closes the window.
- The temporary contra account is replaced in all transactions that have a match with a rule.
- New or changed rules are also saved in the Recurring Transactions table.
- Cancel: this button closes the window without applying the rules.
- If there have been changes to one or more rules, you will be asked for confirmation before closing the window.
- With this button you cannot undo the Apply Rules command; to do so, you must close this window and use the Undo command from the Edit menu.
- Apply Rules: this button applies the rules without closing the window.
- The temporary contra account is replaced in all transactions that have a match with a rule.
- Rules that are added or changed are saved in the Recurring transactions table.
- If you wish to undo changes, you must close the window and use the Undo command from the Edit menu.
Tips on how to use the Apply Rules window
The most effective way to work with the Apply Rules window is as follows:
- Check that the transactions matching rules are correct.
- Use the Apply Rules button to update the Transactions table with the selected rules.
- Add new rules for the remaining transactions and check that they are applied correctly.
- Use the Apply Rules button again.
- Repeat steps 3 and 4 until all recurring transactions are associated with rules.
Recurring transactions table
Rules are saved and may be edited in the Recurring transactions table.
You can complete or add rules also with transactions on multiple rows in the Recurring transactions table.
As time goes by, you will see that more and more imported transactions will have matches with rules; the more rules you add, the more your accounting work will be reduced.
Apply Rules dialog – Add Rule
From the Apply rules dialogue you may access the Add/Edit rule section as follows:
- By right-clicking on one of the transactions or rules:
- For transactions that already have a rule, you can choose Edit Rule or Delete Rule.
- For transactions that do not have a rule, you can choose Add New Rule.
Add New Rule example
The following example in the dialogue below is an outgoing transaction of the payment of a health insurance.
To add a new rule:
- Right-click on the movement row and choose Add New Rule.
- The dialogue Add rule appears.
- Fill in the fields available.
- Confirm with OK.

Add New Rule dialogue
The Add New Rule dialogue shows the data of the selected transaction from which you are creating the rule.
- Complete the rule with the matching parameters (conditions) and the rule completion parameters.
- All rules are saved in the Recurring Transactions table (rules for completion), where you can also:
- Edit, add and delete rules.
- Add any other column for completion, which is not available in this dialogue (e.g. Notes or DocLink columns).
- Colour the row if you want to highlight the imported transaction.
- Add transactions on multiple rows (SplitRule).

The Rule
- Rule type.
The programme, depending on the type of transaction, if in credit or debit on the bank account, sets the rule as Money in or Money out transaction. - Rule title.
It is optional, it is displayed in the Apply Rule dialogue.
Conditions
These are the elements that are used to check whether there is a match for each individual transaction.
- A match is given if all conditions are found.
- If a match is given, the entry is listed among the transactions with rule.
The description
In the description, enter the text to be searched in the text of the imported transaction. If the text is found the transaction will be considered suitable for applying the rule, if the other conditions are then met.
- Exact word or phrase
- If you write only Best Insurance 982-948 as a condition of the rule, only transactions containing those words in that exact order will be considered matches.
- If you write only Insurance, as a condition of the rule, all entries containing this exact word will be considered matches.
- All words (starting with the "+ "sign)
- If you write +Best Insurance 982-948 as a condition of the rule, all records containing these exact words, in any position, will be considered matches.
All words must be present in the description of the transaction.
The position of the words in the sentence is not relevant.
The "+" sign is not considered in the search.
- If you write +Best Insurance 982-948 as a condition of the rule, all records containing these exact words, in any position, will be considered matches.
- List of words (using |)
- If you enter "coffee|restaurant", the program searches for imported transactions that contain the word "coffee" or "restaurant".
- This mode is useful for identifying multiple categories without having to create separate searches.
- Upper and lower case
When searching for input text, no case difference is made.
The text you enter is applied to both upper and lower case text.
Amount
If you indicate an amount in the rule, only transactions with the same amount, as well as a match in the Description, will be considered as matches.
If you do not indicate any amount, any transaction of any amount that meets all other criteria will be treated as a match.
Account
In this field you will already find by default the account from which you imported the transactions. If you leave the account field empty, all transactions, imported from any account, that meet all other criteria will be considered as matches.
Actions
These are the elements used to complete the transaction row if a match is given.
If the contra account or other items to be completed are not present, you can abort the Apply rules command, add the missing account, and call up the Actions > Recurring transactions > Apply rules... command.
Contra account
Enter the account in your chart of accounts that is to be matched in the rule. In this example, the correct contra account is the Health Insurance account.
VAT
You can already enter in the rule the VAT code that the programme must add to each movement considered as a match.
CC1, CC2, CC3
You can already enter in the rule the Cost Centres that the programme must add to each movement considered as a match.
By confirming with the OK button, the new rule is saved. You will return to the previous window where the imported movements with and without rules are displayed again.
Matching Transactions
This table shows all imported transactions selected in the Apply Rules dialogue, which fall under this rule.
Buttons
- The Delete button, cancels the rule.
- The OK button, saves the rule data.
Be aware though that, until you do not give the command Apply Rules, the new rules won't be saved in the Recurring transactions table.
Rules from Transactions table
One of the methods provided for creating Rules is from the Transactions table. The main advantages are as follows:
- You work directly in the Transactions table that you already use regularly. You are already familiar with the table.
- You see all the columns.
- You create Rules simply by completing the imported transactions.
You complete the transactions manually only the first time when creating the Rules. For subsequent imports, the program applies the already created Rules to the new imported transactions. - Speed in creating Rules.
Select the rows with completed transactions and, with a single click, create all the rules in the Recurring Transactions table. You only need to modify the description of each rule to ensure a precise match for future transactions. - You do not need to insert Rules through additional dialogs.
- You do not need to manually enter all the Rule data in the Recurring Transactions table.
Below is the complete procedure for creating Rules from the Transactions table.
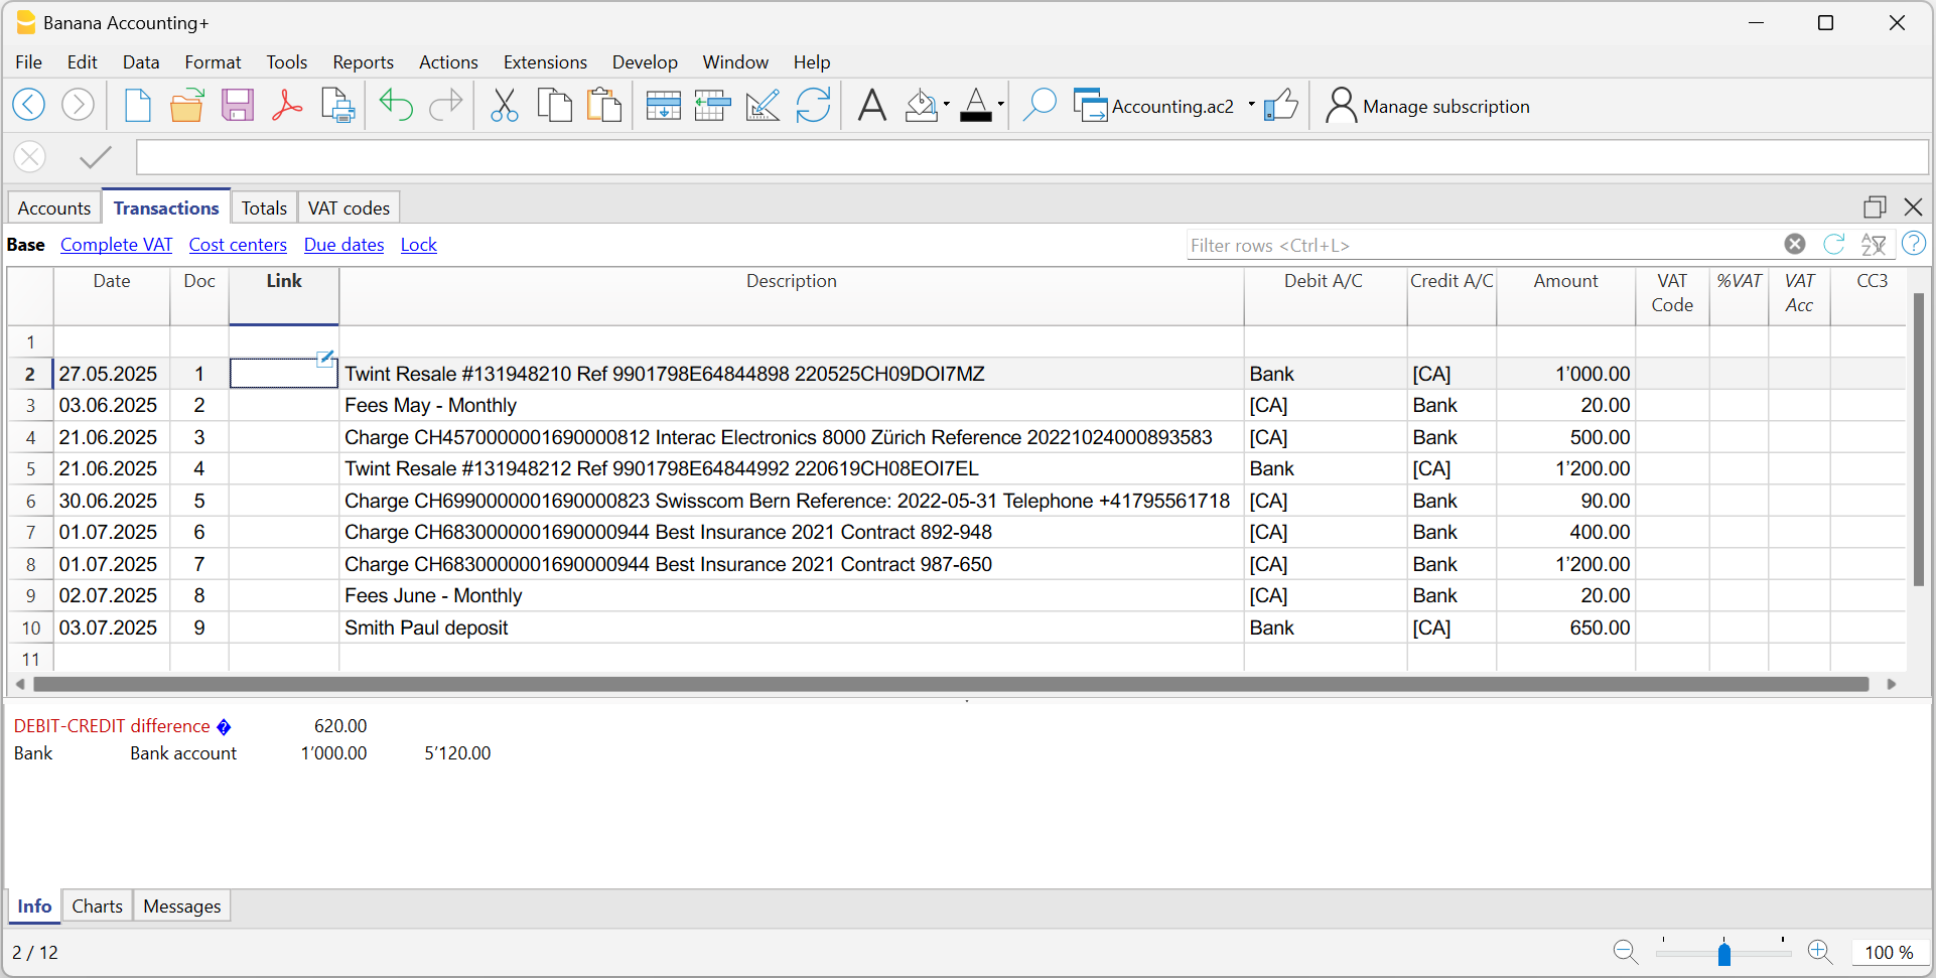
Import transactions
In the Transactions table, import transactions from bank, postal, or credit card statements.
Complete the imported transactions
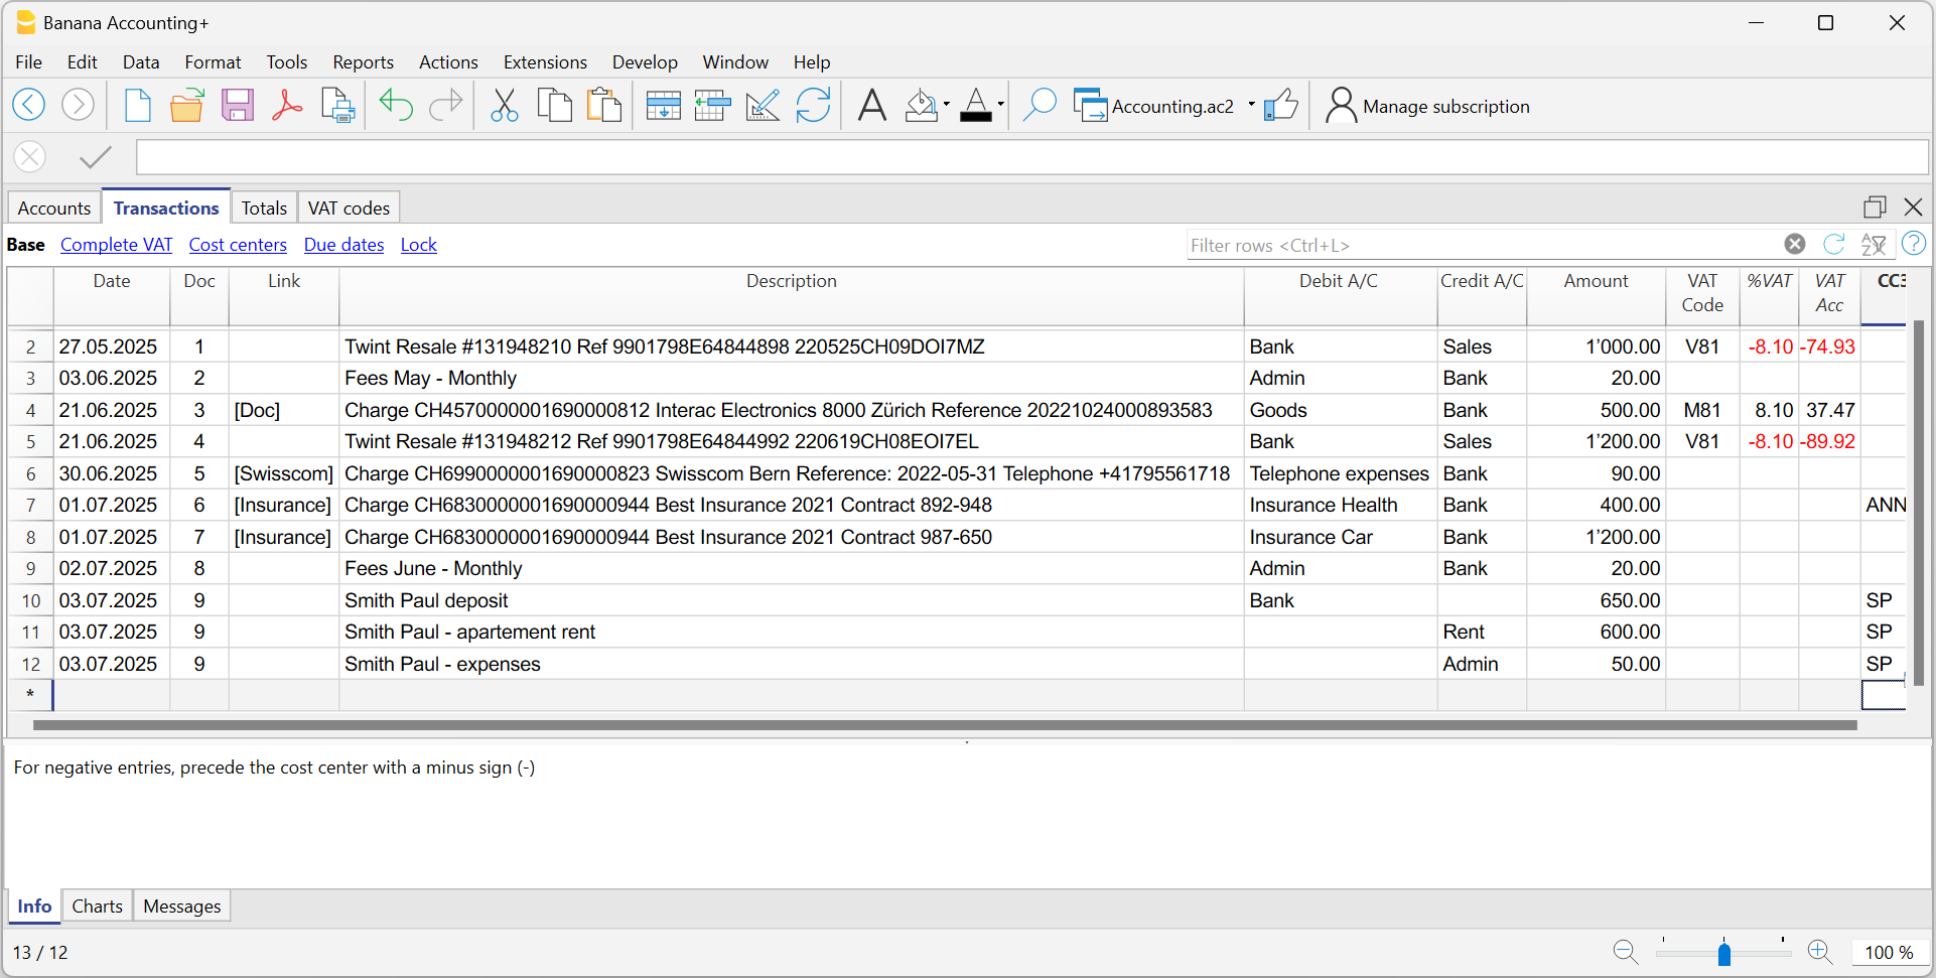
For each imported transaction, enter the counterpart, VAT code, cost center, or other information.
When you import a transaction that needs to be recorded on multiple lines, the program inserts a single entry with the total amount and a temporary counterpart [CA].
Proceed as follows:
- Remove the temporary counterpart account [CA] from the transaction.
- Insert new rows following the transaction. For each row, enter the complete transaction with description, counterpart, amount, any VAT code, and cost center.
Create Rules
Starting from the completed transactions, you can create Rules:
- Select from the Transactions table the entries to which you want to apply Rules.
- Right-click on a transaction without rules > Create rules from selection.
Alternatively, go to the Actions menu > Recurring Transactions > Create rules from selection.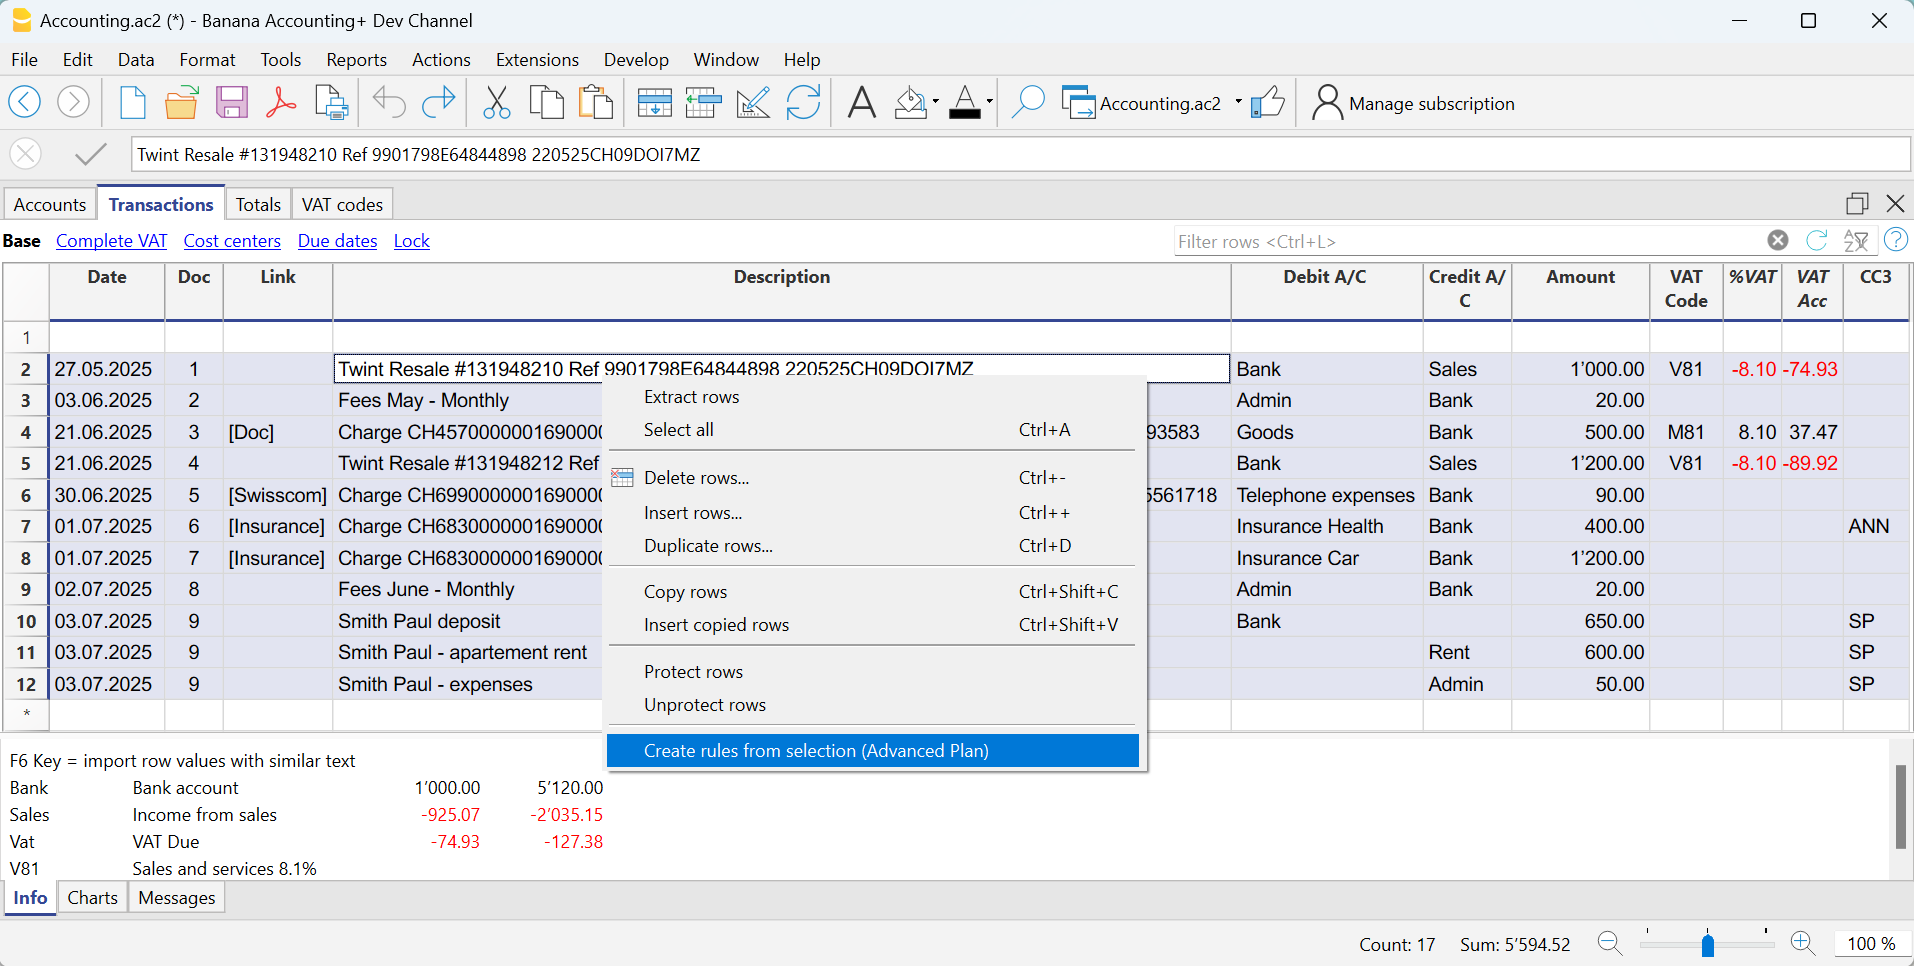
All selected transactions are transferred to the Recurring Transactions table, exactly as they were completed in the Transactions table.
How to complete the Rules
In the Recurring Transactions table, you need to complete the Rules:
- Edit the Description column.
Modify the text of the description to search for in the transactions from the imported bank statement. Initially, the program automatically uses the description found in the imported transaction.
Replace this text with one or more keywords so that the program can find matches in the description of the imported transaction (e.g., +Best Insurance).
See also Condition on Description - Debit and Credit Account Columns
The Debit and Credit columns show the counterpart and the imported bank account.- First, check whether the indicated counterpart is already the desired one; if not, update it accordingly.
- The main import account, used to identify matching transactions, must not be marked as a commented account (account enclosed in square brackets).
If the account matches the bank's main account from which the transactions are imported and is marked as a commented account, the brackets must be removed, otherwise the rule will not be applied correctly.
This may happen with detailed transactions imported from the statement for which no specific rules exist yet. - Alternatively, you can remove the main import account and leave only the counterpart. In this case, the rule will be applied based on the Description column (match with the transaction description) and will be valid for all imported bank accounts.
- For multi-line transactions, edit the Doc column.
In the first row of the transaction, enter empty square brackets [] in the counterpart column.
In subsequent rows, enter !RuleSplit in the Doc column (see rows 7,8,9 in the image below).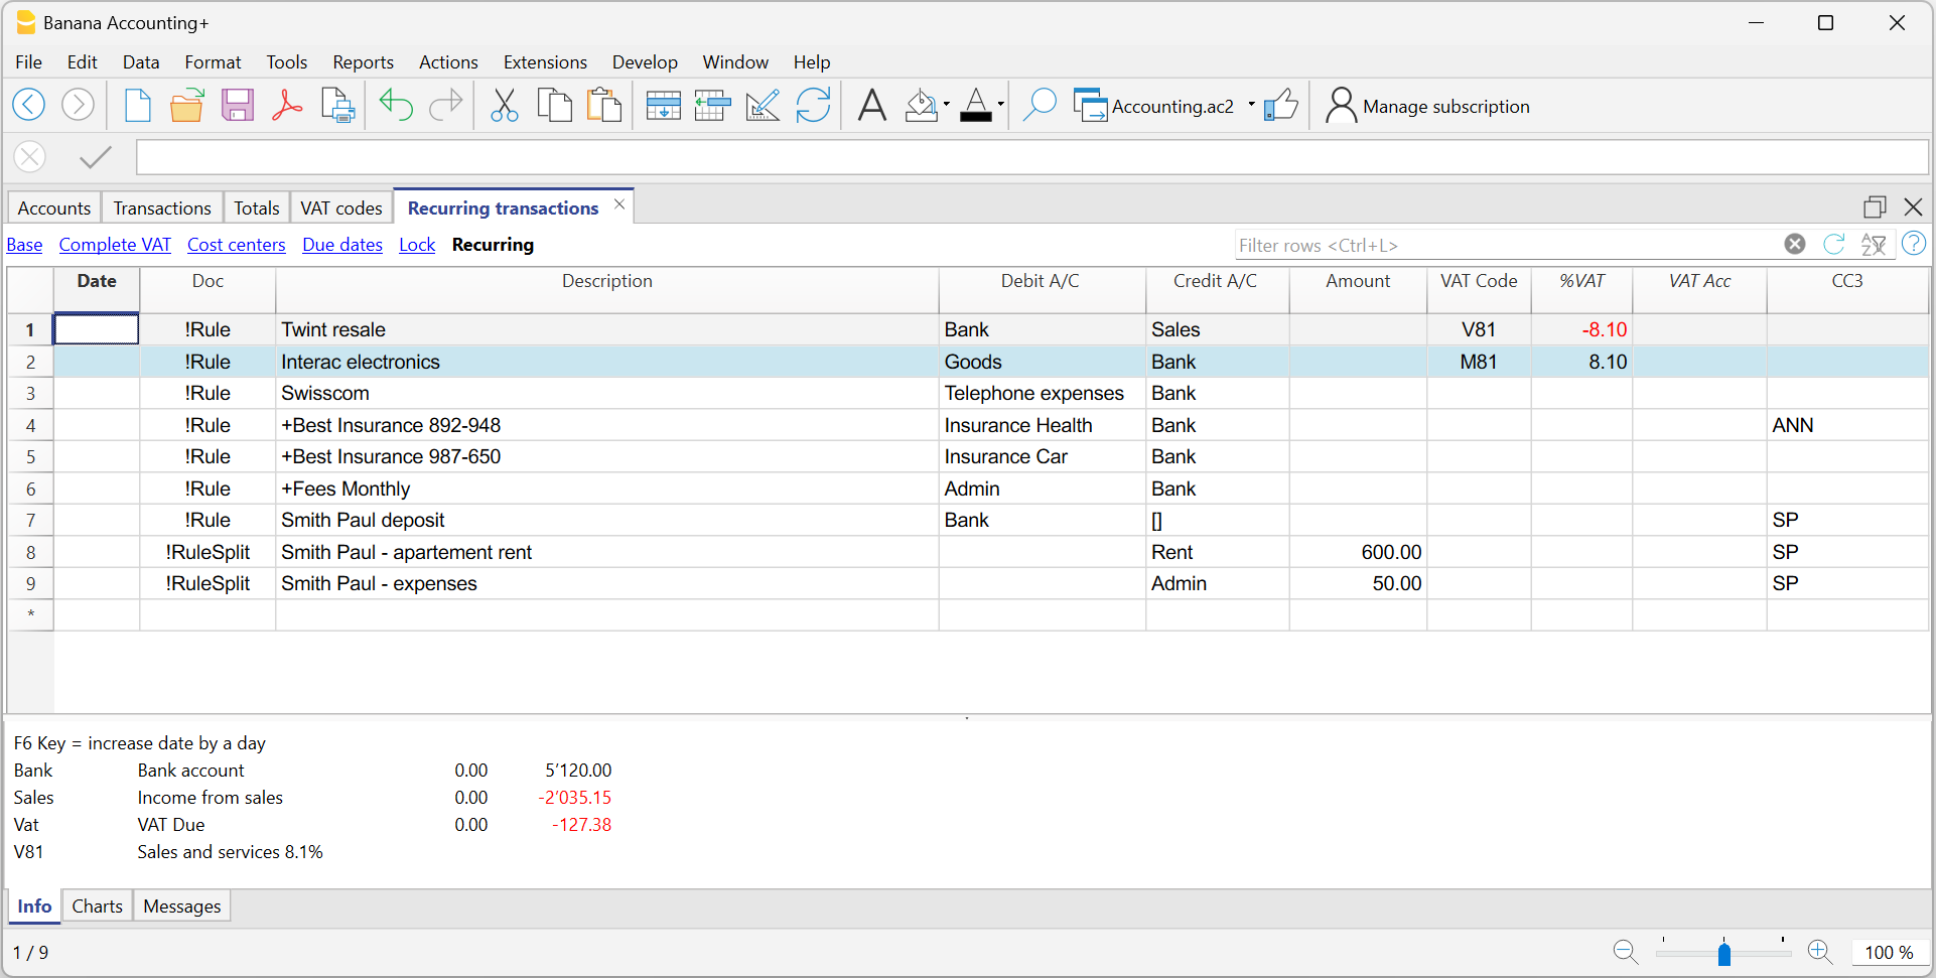
The explained procedure only needs to be performed the first time to set up the Rules. For future imports, the Rules found are applied automatically. You only need to complete the new imported transactions without a rule using the same procedure.
To find all imported transactions in the Transactions table that do not have a rule, you can use the Row filter function, entering the text "[CA]".
Recurring Transactions table Rules
The rules can be accessed via the command Actions > Recurring Transactions > Transactions table.
- Rule rows are those that contain !Rule or !RuleSplit in the Doc column.
- In rule rows, the columns have a different meaning:
- Condition Columns
Contain the values to be compared to determine whether the rule should be applied.
The condition columns are: Doc, Date, Description, Account Debit/Credit, Amount. - Action / Substitution Columns
Contain the values that will be applied and complete the imported transactions.
All columns that are not used as condition columns are considered substitution columns.
- Condition Columns

Condition columns
Condition columns (or search columns) contain the data used to search for matches in the imported transactions.
- Doc column (required)
- Must contain !Rule or !RuleSplit
- !Rule indicates it is a rule.
- !RuleSplit indicates that the rule above must also create split transactions.
- Must contain !Rule or !RuleSplit
- Description column (required)
- The Description column must contain the text to be searched in the description of imported transactions.
- When a description begins with text in square brackets, it is used as the rule name. The rule name is optional and can be used to better identify rules.
- Account column (recommended)
- In double-entry accounting: use the Debit column (to filter incoming transactions) or the Credit column (to filter outgoing transactions).
- In income and expense accounting: use the Account column.
- This is usually the bank account from which the transactions are imported.
- Date column (optional)
- Limits the application of the rule to a specific period of the transactions.
- Amount column (optional)
- Limits the application of the rule to a specific amount or range of amounts.
- In income and expense accounting: use the Income (incoming transactions) or Expense (outgoing transactions) column.
Substitution Columns
Substitution columns must be filled in with additional information.
- DocLink column
- Contra Account column
Enter the contra account that replaces the temporary contra account [CA] or the temporary contra selected in the Apply Rules dialog.- In double-entry accounting: use the Credit column (for incoming transactions) or the Debit column (for outgoing transactions).
- In income and expense accounting: use the Category column.
- VAT Code column
Enter the VAT code to be applied to the imported transaction.
The program automatically completes all VAT-related columns. - Cost Centers (CC1, CC2, CC3) columns
Specify the cost center to assign to the imported transaction. - Notes column
Enter any additional information to be included in the imported transaction. - Other columns
All columns that are not condition columns, except ExternalReference, are considered substitution columns.
ExternalReference is a reserved column used by the bank import to identify each transaction and prevent duplicates.
The DocLink column
In this column, it is not possible to insert a specific link to a document because each transaction will have its own document. However, you can add an annotation in square brackets (e.g., "[Doc]") to distinguish the rows that need to be associated with a digital document.
Once the transactions are imported, it may be necessary to link them to accounting documents. To speed up this process, it is recommended to proceed as follows:
- In the DocLink column of the Recurring Transactions table, use text enclosed in square brackets [ ].
- Within the square brackets, enter the text that should be searched for in the name of the supporting document file.

- In the Transactions table, the transactions are imported with the text in square brackets in the Link column.

- In the Transactions table, use the Row Filter function and enter the text "!link![ ]". This will display all the rows in the Link column that contain square brackets where a link to the supporting document needs to be added.
- When editing the Link column in the Transactions table, the program will show, in the auto-completion, the files of supporting documents that have not yet been linked to a transaction and contain the text entered between the square brackets.
For example, if you enter "[invoice]," the program will display all the unlinked files containing the text "invoice" in the cell.
It is possible that after importing transactions with the Rules, some transactions may need to be manually completed with additional information.
To quickly find the transactions that need to be completed, you can use one of the following methods:
- Using the Notes Column
To quickly locate the transactions that need to be completed, we recommend adding temporary search texts that can be used to filter the transactions. For example:- In the Notes column of the Recurring Transactions table, or in any other column of the Rule row (except for those predefined for the Rule), enter a hashtag, such as #city.
- In the Row Filter function of the Transactions table, enter the same hashtag. This will display the rows that you need to complete.
- Coloring Rule Rows
You can color the Rule rows in the Recurring Transactions table. The row color will be transferred to the Transactions table and used to highlight the transactions to which the rule is applied.
To identify only the colored rows, you can use the Row Filter function by entering the text "!_co!"

Split row transactions
Normally, when you import transactions from a bank statement with the Rule, a single counterpart account is recorded. If the total amount of the counterpart needs to be split across multiple counterpart accounts, you can create a multi-row Rule.
For example:
- You regularly receive a payment of 550 that must be recorded on three different accounts and therefore on three rows:
- (550) rent collection (no contra-account, as this involves recording the global amount split over three rows)
- (500) flat rent (contra account rent)
- (50) extra expenses (contra-account for extra expenses) .
To create a multi-row Rule:
- The first row corresponds to the total amount collected.
- In the Doc column, enter the text !Rule.
- In the Description column, enter the text to search for in the imported transactions.
- In the counterpart column, enter square brackets [].
In the following rows: - In the Doc column, enter the text !RuleSplit.
- In the Description column, enter the text to search for in the imported transactions.
- In the counterpart column, enter the counterpart accounts.
- In all other columns, input the values that should be included in the additional rows. In this example, we have added the tenant’s Cost Center.
In the following example, you can see the tenant’s Cost Center.
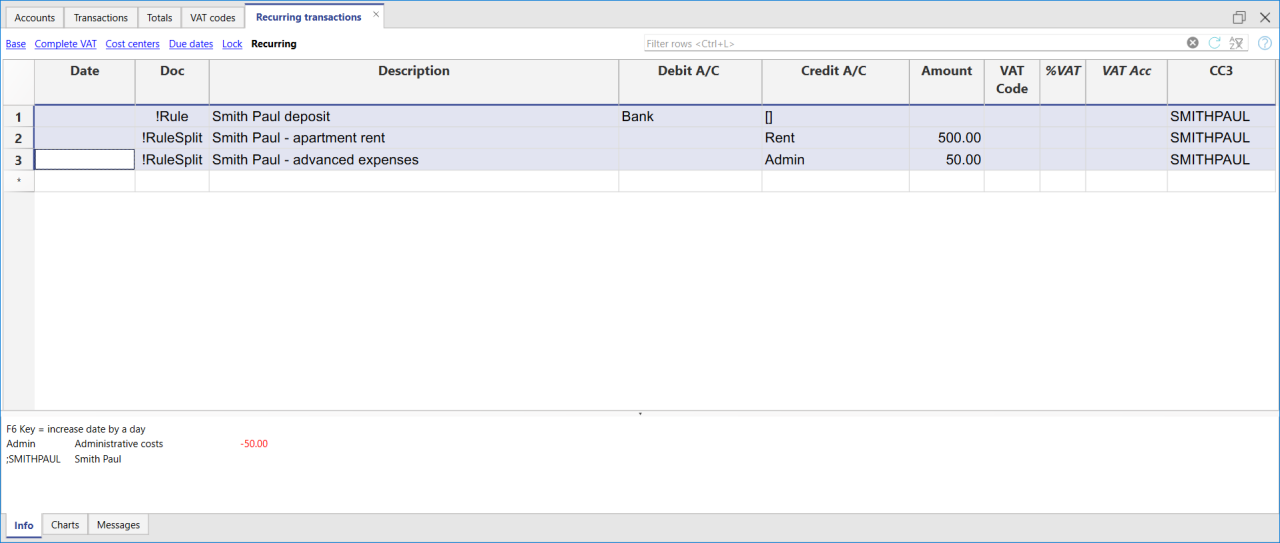
In the example of a multi-row rent transaction, it is assumed that the collected amount is always 550. If the collected amount is different from 550, the transaction will need to be completed manually.
Modifying rules in the Recurring Transactions Table
All completion Rules saved in the Recurring Transactions table, even if they were created from the Apply Rules dialog, can be modified, deleted, or new ones can be created in anticipation of a future import without a Rule.
Set a different description from the imported one
All imported transactions display the description from the bank statement in the Description column of the Transactions table. Typically, these descriptions are very detailed.
It is not possible to automatically change this description at the time of import.
If you wish to change the imported description, you can use the Notes column in the Recurring Transactions table.
Note: if the Notes column is already used for your own annotations, it cannot be used to modify the description.
If the Notes column is not being used, proceed as follows:
- Display the Recurring Transactions table.
- Make the Notes column visible by going to the menu Data > Columns set up > check the Notes column.
- In the Notes column, enter the description text that you want to appear in the Transactions table (Description column).
Repeat this step for each desired transaction.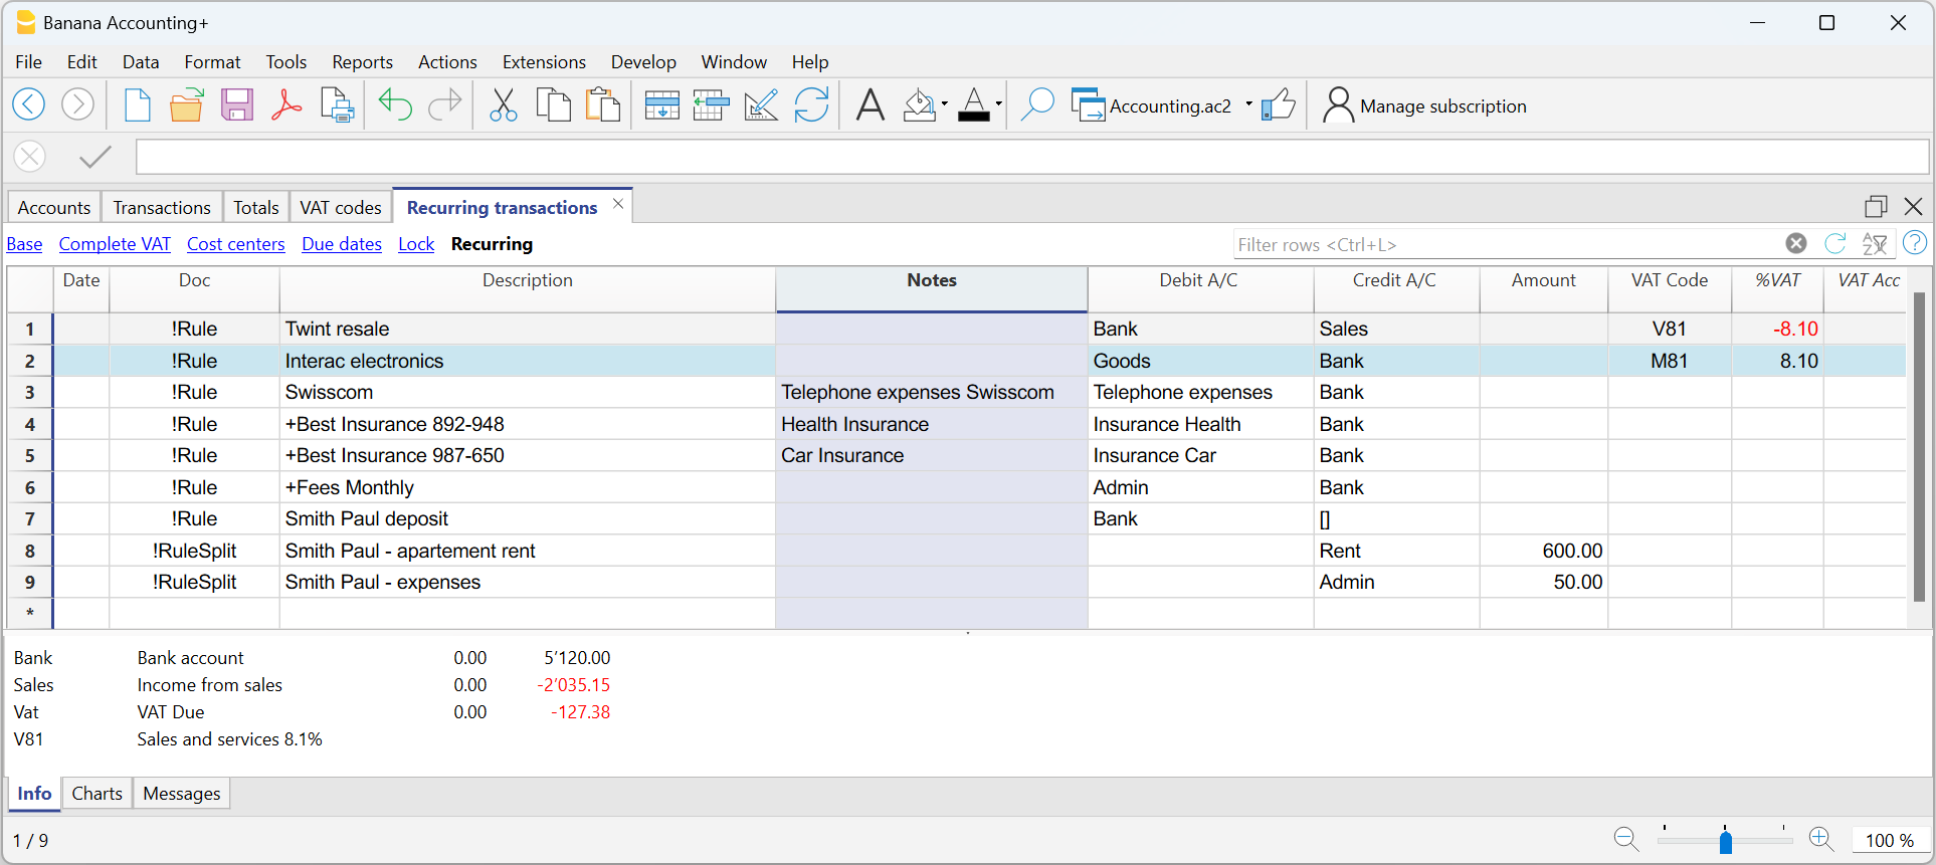
Import the transactions - After importing into the Transactions table, make the Notes column visible (menu Data > Columns setup > check the Notes column)
The Notes column will display the notes defined in the Recurring Transactions table.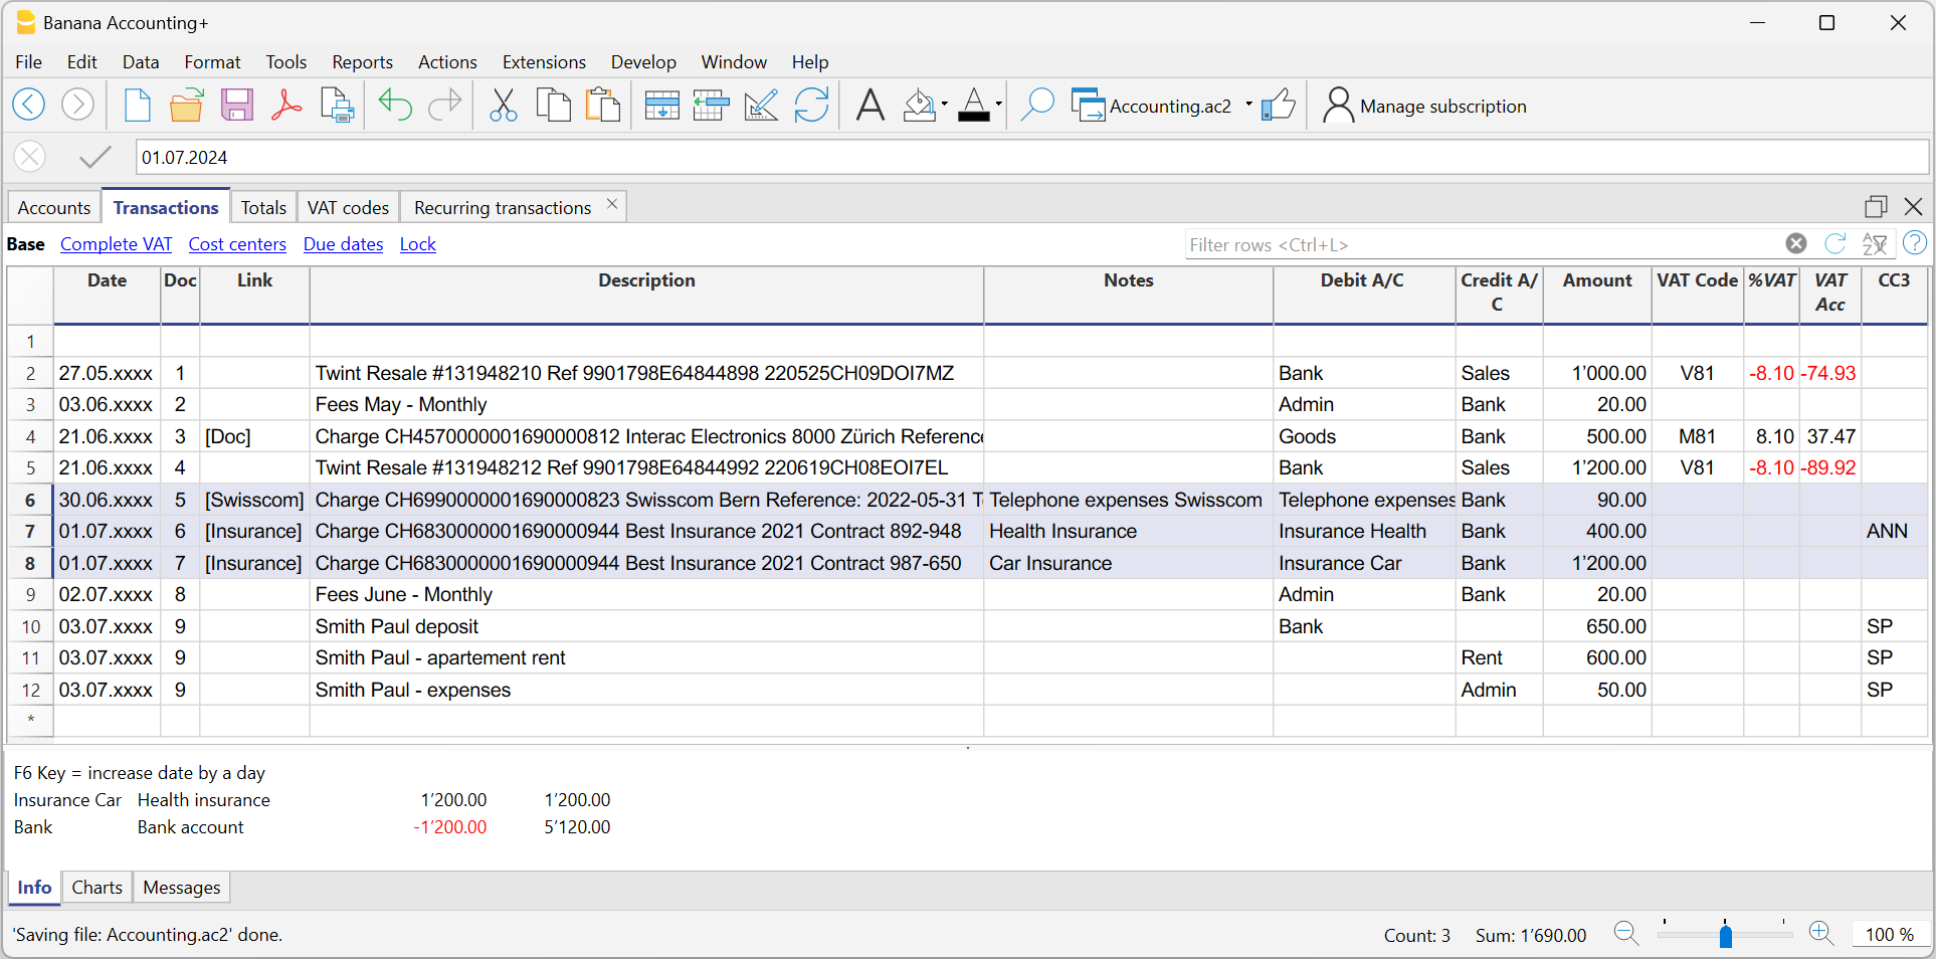
- For each transaction, copy the content from the Notes column and paste it into the Description column.
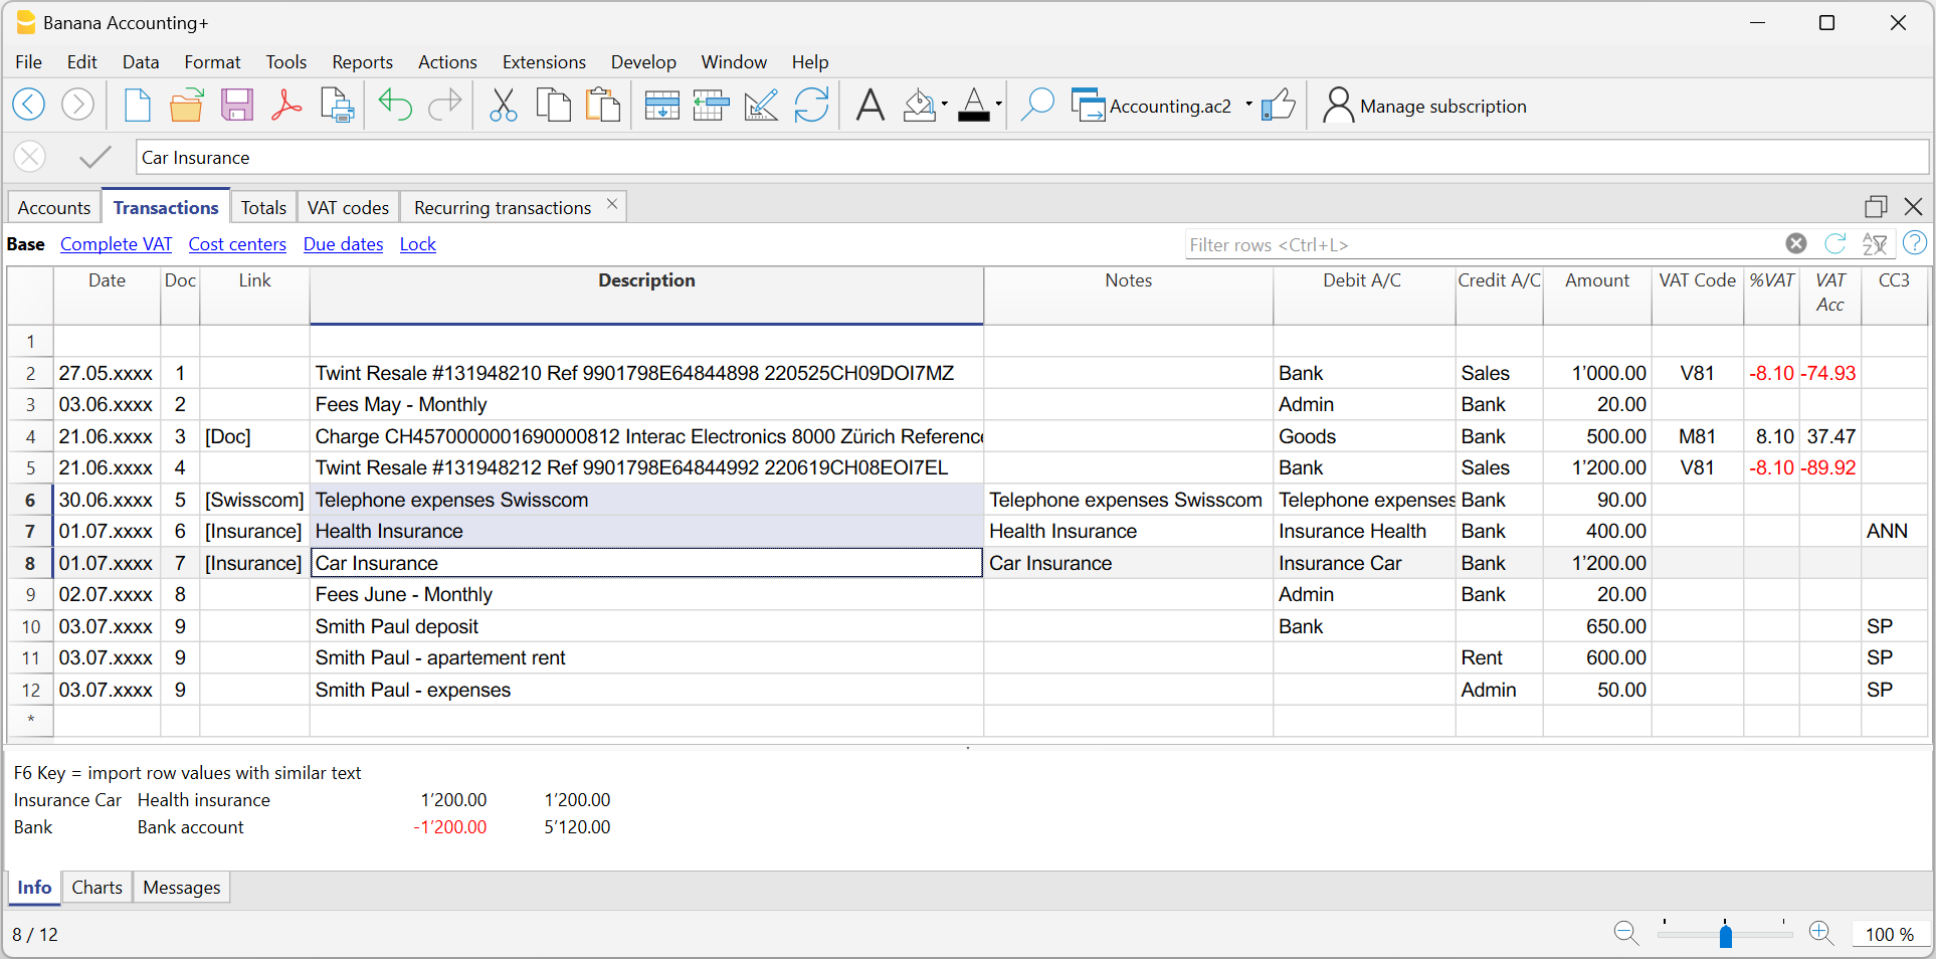
- For each transaction, copy the content from the Notes column and paste it into the Description column.
In the Recurring Transactions table, it is not possible to directly add custom columns.
To use a custom column in the Recurring Transactions table, you need to add the custom column to the Transactions table.
Once the column is added to the Transactions table, it will also be visible in the Recurring Transactions table and can be used to set a different description from the imported one.
Therefore, the insertion procedure is the same as described in the section Set a Different Description from the Imported One - Notes Column.
Create a new year with rules
When you create a new year using the command Actions > Create New Year, the existing Rules in the Recurring Transactions table are automatically carried over to the new year's file.
Accounting with the same rules
If you manage several similar accounting files (for example for clients with similar characteristics), it can be useful to reuse rules that have already been created, avoiding rewriting them every time.
When the accounting files have the same chart of accounts, or at least a compatible structure, you can copy the Recurring transactions from one file to another.
How to copy the rules
- Open the source file (the one that contains the rules to be reused).
- Display the Recurring transactions table using the command
Actions > Recurring transactions > Recurring transactions table. - Select the rows you want to copy.
- Use the Copy rows command, Edit > Copy rows.
- Open the destination file and display the Recurring transactions table.
- Paste the rules using the command Edit > Insert copied rows in the Recurring transactions table.
You can also create a dedicated accounting file, used as a rule library.
In this way, when you create a new accounting file, you can easily copy the necessary set of rules and paste it into the destination file.
Condiciones para las reglas
Las condiciones de las reglas son criterios que definen cuándo debe aplicarse automáticamente una regla de autocompletado a un registro contable.
Se configuran durante la creación o modificación de una regla en el diálogo Aplicar reglas, o directamente en la tabla de Registros memorizados.
Las condiciones pueden hacer referencia a la Descripción, a la Cuenta, al Importe y a la Fecha.
Una regla se aplica solo si se cumplen todas las condiciones definidas. Si incluso una sola condición no se cumple, la regla no se ejecuta. Las condiciones vacías se ignoran.

Condición sobre la Descripción
Introduce una palabra o frase corta como palabra clave para identificar los movimientos que deben automatizarse, según el texto en la columna Descripción del extracto bancario.
Banana Contabilidad compara automáticamente el texto de la descripción de cada movimiento con el indicado en la regla y, si encuentra una coincidencia, aplica la regla asociada.
Para obtener mejores resultados, se recomienda utilizar solo palabras clave representativas (por ejemplo, el nombre del proveedor o del servicio), para aplicar la regla a múltiples movimientos similares.
Los textos de búsqueda pueden introducirse de distintas maneras:
- Palabra o frase exacta
- Si introduces por ejemplo "Best Insurance 982-948", el programa busca movimientos importados que contengan exactamente "Best Insurance 982-948".
- Si introduces solo "Insurance", el programa buscará todos los movimientos que contengan la palabra "Insurance".
- Todas las palabras en cualquier orden (+ al inicio)
- Si introduces "+Best Insurance 892-948", el programa buscará los movimientos importados que contengan las palabras "Best", "Insurance" y el número "892-948", en cualquier orden.
- Todas las palabras deben estar presentes en la descripción del registro, pero el orden no es importante.
- El símbolo "+" no se considera en la búsqueda.
- Lista de palabras (usando |)
- Si introduces "café|restaurante", el programa buscará los movimientos que contengan la palabra "café" o "restaurante".
Esta opción es útil para identificar varias categorías sin tener que crear búsquedas separadas.
- Si introduces "café|restaurante", el programa buscará los movimientos que contengan la palabra "café" o "restaurante".
- Mayúsculas y minúsculas
- La búsqueda de texto no distingue entre mayúsculas y minúsculas. El texto se aplicará igual independientemente del uso de mayúsculas.
Todo el texto introducido en la Descripción se transfiere a la columna Descripción en la tabla Registros memorizados.
- La búsqueda de texto no distingue entre mayúsculas y minúsculas. El texto se aplicará igual independientemente del uso de mayúsculas.
Atención: NO utilices como descripción todo el texto del extracto bancario, ya que es único para cada movimiento.
Condición sobre la Cuenta
- Introduce la cuenta desde la que se importan los movimientos (banco, postal, etc.).
- El programa contabiliza automáticamente en Débito o en Crédito según el tipo de movimiento.
- Si el campo Cuenta se deja vacío, la regla se aplica a todas las cuentas que cumplan la condición sobre la descripción.
Condición sobre el Importe (o Importe en moneda)
- Permite aplicar una regla solo cuando el registro tiene un importe específico.
- Alternativamente, si el importe no es conocido con precisión, puedes definir un rango de importes, indicando un valor mínimo, máximo o un intervalo específico en el cual aplicar la regla.
- Disponible desde la versión 10.2.3 de Banana Contabilidad Plus (Dev Channel)
- La condición debe:
- empezar con el símbolo !
- escribirse entre corchetes [ ]
- usar el importe sin formato: sin separador de miles y con punto como separador decimal
(otros formatos no son reconocidos) - Los operadores disponibles son: mayor >, menor <, mayor o igual >=, menor o igual <=, distinto <>
- Ejemplo: para seleccionar registros con importe mayor o igual a CHF 1'000.00:
[!>=1000.00]

En la imagen se muestra el diálogo Aplicar reglas donde es posible seleccionar el campo Importe y definir un intervalo de cifras (en este ejemplo, se aplica la cuenta 1510 Mobiliario e instalaciones a los registros que tienen la descripción "Compra material de oficina" y un importe mayor o igual a CHF 1'000).
El uso de este filtro es útil cuando se desean asignar contrapartidas diferentes según el importe del registro.
Ejemplos de condiciones aplicables a la columna Importe
| Sintaxis | Significado |
| [!=1000.00] | registros con importe exacto de CHF 1'000.00 |
| [!>1000.00] | registros con importe superior a CHF 1'000.00 |
| [!>=1000.00] | registros con importe igual o superior a CHF 1'000.00 |
| [!<1000.00] | registros con importe inferior a CHF 1'000.00 |
| [!<=1000.00] | registros con importe igual o inferior a CHF 1'000.00 |
| [!>=1000.00 !<=2000.00] | registros con importe entre CHF 1'000 y CHF 2'000 |
| [! |!100.00 |!<150.00] | registros con importe exacto de CHF 100.00 o de CHF 150.00 |
Condición sobre la Fecha
A partir de la versión 10.2.3 de Banana Contabilidad Plus (Dev Channel), puedes aplicar una regla a registros que se encuentren dentro de un periodo de tiempo determinado (por ejemplo, solo los registros de enero).
Cómo proceder:
- Añade una nueva regla como se explica en la página Diálogo Aplicar reglas - Añadir regla
- Selecciona el campo Fecha
- Introduce la condición de filtro en el campo Comentario.
La condición debe:- empezar con el símbolo !
- escribirse entre corchetes [ ]
- usar el formato de fecha ISO YYYY-MM-DD
(otros formatos no son reconocidos)
- Ejemplo: para seleccionar los registros con fecha anterior al 01.04.2025:
[!<2025-04-01]

En la imagen se muestra el diálogo Aplicar reglas donde se puede seleccionar el campo Fecha y definir un intervalo (en este ejemplo se aplica a registros anteriores al 1 de abril de 2025).
El uso de este filtro es útil para diferenciar procesos por mes, trimestre o año, por ejemplo si hasta una fecha determinada se aplica un código de IVA y después cambia por la adopción de un nuevo método.
Ejemplos de condiciones aplicables a la columna Fecha
| Sintaxis | Significado |
| [!=2025-03-31] | registros con fecha 31.03.2025 |
| [!>2025-03-31] | registros con fecha posterior al 31.03.2025 |
| [!>=2025-03-31] | registros con fecha igual o posterior al 31.03.2025 |
| [!<2025-03-31] | registros con fecha anterior al 31.03.2025 |
| [!<=2025-03-31] | registros con fecha igual o anterior al 31.03.2025 |
| [!>=2025-03-31 !<=2025-06-30] | registros entre el 31.03.2025 y el 30.06.2025 |
| [! |!2025-03-15 |!<2025-03-18] | registros con fecha 15.03.2025 o 18.03.2025 |
Cómo definir condiciones en la tabla Registros memorizados
Las condiciones pueden introducirse directamente en la tabla Registros memorizados con la misma sintaxis explicada en los párrafos anteriores.

Tabla de Registros memorizados
La tabla Registros memorizados se utiliza para guardar los registros que se usan repetidamente.
Contiene tres tipos de registros repetidos:
- Transacciones repetidas recuperadas mediante la columna Doc en la tabla Registros.
Tienen en la columna Doc un código identificativo sin signos de puntuación. - Reglas para completar los registros importados.
Sirven para definir cómo deben completarse los registros importados.
Tienen en la columna Doc el código "!Rule" o "RuleSplit". - Registros automáticos con frecuencia regular.
Se utilizan para generar automáticamente registros que se repiten con una cierta frecuencia, por ejemplo mensual, trimestral, semestral o anual.
Tienen en la columna Doc el código "!Auto".
Visualizar y organizar columnas y vistas en la tabla Registros memorizados
Antes de introducir registros repetitivos, debes visualizar la tabla Registros memorizados desde el menú Acciones > Registros memorizados.
La tabla Registros memorizados no permite guardar configuraciones propias de visualización, sino que utiliza las vistas y configuraciones de columnas de la tabla Registros.
Para personalizar las columnas y su disposición en la tabla Registros memorizados, debes:
- Crear una nueva vista en la tabla Registros.
- Organizar las columnas en la tabla Registros en el orden deseado.
- En la tabla Registros memorizados, selecciona la vista creada en la tabla Registros. Se visualizarán las columnas en el mismo orden que esa vista.
Insertar transacciones repetidas mediante la columna Doc
- Si está presente la columna "Fecha fin" (ver Registros automáticos), también puedes indicar una fecha después de la cual el registro no debe recuperarse más en la tabla Registros.
Los registros que ya no se usan deben eliminarse manualmente.

La tabla Registros memorizados en la Contabilidad de Ingresos y Egresos
La funcionalidad de la tabla Registros memorizados es la misma que en la contabilidad de partida doble, solo cambian las columnas:
- En la contabilidad de Ingresos / Egresos se utilizan las columnas Cuenta y Categoría.
- La columna Cuenta corresponde a la cuenta bancaria, postal, tarjeta de crédito... Indica de dónde sale el dinero o hacia dónde va.
- La columna Categoría indica la categoría del gasto o ingreso. Representa el motivo por el que gastaste o ganaste dinero.
- Las columnas Entradas y Salidas son donde se indica el importe del movimiento.
- En la contabilidad de partida doble se utilizan las columnas Cuenta Débito y Cuenta Crédito, y la columna Importe.

Número progresivo de documentos "docnum"
Si en la columna Doc de la tabla Registros necesitas una numeración distinta a la automática, introduce en la tabla Registros memorizados una fila con el código "docnum" en la columna Doc. Para las filas siguientes se utilizará el tipo de numeración especificado en la columna Descripción.
- "0": si no necesitas numeración automática.
- "1": para numeración progresiva.
- "caja-1": para numeración progresiva con prefijo "caja-" (caja-2, caja-3).
El programa reemplaza el número al final del texto con un número progresivo. - Si en las sugerencias deseas que se visualice solo una fila por código, precede la descripción de la siguiente manera:
- Un "*": muestra solo esta fila y no las que tienen un código similar.
- Un "**": muestra solo esta fila, pero no se recupera (solo fila de título).
- Un "\*": permite iniciar la descripción con un asterisco, sin que se interprete como un comando.
Recuperar transacciones repetidas en la tabla Registros
En la tabla Registros puedes recuperar las filas definidas en la tabla Registros memorizados:
- En la tabla Registros, introduce la fecha en la fila del registro. También puedes añadir otras columnas no presentes en la tabla Transacciones Repetidas, según la vista activa.
- En la columna Doc de la tabla Registros, selecciona uno de los códigos definidos en la tabla Registros memorizados (columna Doc) y pulsa Enter:
- El programa inserta las filas repetitivas que tienen el mismo código.
- Si necesitas modificar o completar algún valor, siempre puedes hacerlo.
- Las filas almacenadas en la tabla Transacciones Repetidas también se pueden recuperar escribiendo el código en la columna Doc y presionando la tecla F6.
Copiar registros de la tabla Registros a la tabla Registros memorizados
Los registros repetitivos también pueden insertarse copiando las transacciones presentes en la tabla Registros y pegándolas en la tabla Registros memorizados.
Procede de la siguiente manera:
- En la tabla Registros, selecciona las filas que deseas copiar.
- Menú Editar > Copiar filas.
- Ve a la tabla Registros memorizados.
Menú Editar > Pegar filas copiadas
También puedes usar los atajos Ctrl + C y Ctrl + V para copiar y pegar los registros.
Automatic transactions with recurring deadlines
Automatic transactions are useful for facilitating the recording of repetitive entries, such as subscriptions, insurances or taxes. By using automatic transactions, you only have to enter the entry of interest once, set a few parameters such as the start date, the frequency and the end date and then Banana Accounting Plus will inform you when an automatic transaction is ready to be created and will create it for you.
In Banana Accounting Plus, there are two ways to create automatic transactions:
- From the Recurring Transactions table
- From the Manage Automatic Transactions dialogue.
Requirements
- This feature is available in the latest release of Banana Accounting+ Dev Channel.
- It requires the Advanced plan. If you do not have this plan, you can request a promotional code valid for 1 month via the contact form.
- You need to add the End Date and Repeat columns to your accounting file.
- This feature is in Beta Test; we kindly ask you to test it and report any problem.
Adding the End Date and Repeat columns to your accounting file
To be able to activate the commands for automatic transactions, the End Date and Repeat columns must be added; without these columns the commands will not be displayed.
- Open your accounting file or create a new accounting from the File menu > New command.
- Select the command from the Tools menu > Add/Remove Functionalities...
- The Add/Remove Functionality dialogue will appear with the list of available functionalities.
- Select the option Add End Date and Repeat columns in Transactions table.
If this option is not available, check the Banana version and the plan you are using, as described in the Requirements section. - Click on the OK button.

Creating an automatic transaction from the Recurring Transactions table
- Select the command from the Actions menu > Recurring transactions > Create automatic transaction.
- The Recurring transactions table will appear with a new row, showing the date of the day in the Date column and the text !Auto in the Doc column, which serves to identify the automatic transaction.
- Update the Date column with the date of the first occurrence you wish to schedule.
- Display the End Date and Repeat columns with the command from the Data menu > Columns setup...
Make sure to check the Visible box for both the End Date and Repeat columns.
If these columns are missing, you can add them as described in the Adding the End Date and Repeat columns paragraph.
Note: The new columns are added to the Transactions table, but are only used in the Recurring Transactions table, visible in the Recurring view. - Add the desired repetition to the Repeat column. For example, if you want a quarterly repetition, enter the text 3MS in the Repeat column.
- If the automatic transaction has an expiry date, set it in the End Date column.
- Complete the Description, Debit Account, Credit Account and Amount columns.
- Select the command from the Actions menu > Recurring transactions > Manage automatic transactions to display the scheduled transactions.
Note: If you use the command from the Actions menu > Recurring transactions > Create automatic transaction from an existing transactions in the Transactions table, the Description, Amount and Accounts columns will show the text of the original transaction.
The Create automatic transaction command is also available in the context menu of the Transactions table (right-click on a transaction, and choose the Create automatic transaction command).
Creating an automatic transaction from the Manage automatic transactions dialogue
- Select the command from the Actions menu > Recurring transactions > Manage automatic transactions.
- The Manage automatic transactions dialogue will appear.
- Click on New automatic transaction button at the bottom of the dialogue.
- Complete the necessary fields:
- Start date
Date from which the first automatic transaction will start. When the transactions are generated, this date will be updated with the date of the last automatic transaction created. - End Date
- Repeat
- Description
- Account
- Contra-account
- Amount
- CC1, CC2, CC3
- Name or description (optional)
- Start date
- Click on the OK button.
Auto-completion rules for income and expenses accounting
In Income and Expenses Accounting and the Cash manager, the functionality for Completing Imported transactions works in the same way as for Completing transactions in Double-entry Accounting.
The main difference is as follows:
- In the Income / Expenses accounting, the columns Account and Category are used.
- The Account column refers to the bank account.
- The Category column is where the category is specified. It represents the counterpart account entered automatically.
- The Income and Expense columns are where the amount for the transaction is indicated.
- In double-entry accounting, the Debit Account and Credit Account columns, along with the Amount column, are used.
Therefore, even with income and expense accounting, it is possible to create rules using one of the following methods:
- Rules from the Apply Rules dialog.
- Rules from the Transactions table.
- Rules from the Recurring Transactions table.
The Recurring transactions table in Income / Expenses accounting
In the Recurring Transactions table, all imported transactions to which Rules have been applied are saved:
- The columns associated with the amount are the Income and Expenses columns.
- If no amount is specified, the rule will be applied to both outgoing and incoming transactions.
