Biblioteca e coleções
Introdução e modo de uso
A aplicação Biblioteca e coleções do Banana Contabilidade permete inserir um elenco de livros, objetos ou contactos e manter o controlo dos objetos emprestados ou restituidos.
Criar novo
Menu Arquivo → Novo...
Selecione o tipo Biblioteca e coleções.
Tabela
Nos arquivos de tipo Biblioteca e coleções, encontrará várias tabelas:
- Tabela Grupos - onde são definidos os grupos segundo os quais se deseja separar os utentes.
- Tabela Contatos - onde são inseridos os dados dos utentes: nome, número de telefone, email, ...
- Tabela Artigos - onde são inseridos os artigos: objetos de valor, livros ou outros.
- Tabela Empréstimos - onde são geridos os artigos emprestados, o prazo e a data de restituição.
- Tabela Diário - onde se podem inserir notas diárias e combiná-las com um determinado contacto, por exemplo os turnos dos bibliotecários.
Outros comandos utéis
Impressões
Tudo aquilo que vê no ecrã pode ser imprimido ou salvo em PDF.
Use a extensão Library books Report para obter:
- Impressões do catalogo completo dos livros em PDF, para publicar num sítio internet.
- Impressão da ficha de contatos con o livros ainda em empréstimo (para enviar como anexo quando se fazem os lembretes).
Characteristics of Library and Collections
Library and collections is included in the Banana Accounting Plus version. It is the easy and innovative solution to organize books, loans, contacts and collections and, have all the lists instantly available for effective control. You can monitor loans, expiration dates and return dates or simply to put in place perfect order in your home library.
Multiple functions for a digitized and efficient organization:
- Fast data entry.
- Categorization by user groups.
- Retrieve book details from Google with ISBN.
- Copy and paste book list from Excel.
- Quick searches by title, author, keywords, user or user group.
- Internal planning with the Diary (library shifts, annotations or new orders to be made).
- Loan management.
Accounting setup
- Headers and basic data set in a single dialog box, easy to visualize.
- Headings with free texts.
- Default address fields
- Language settings.
- Link to extensions for customizations.
- Password to secure your Library file.
- You can have multiple files in different languages.
Tables
In the Library and Collection files there are several tables that allow you to always have data in order and easy to retrieve.
The tables are as follows:
Groups Table - where the groups are defined, according to the subdivision of users you require.
Contacts Table - where user data is entered: name, tel, email, ....
Items Table - items are entered: valuables, books or other.
Loans Table - manage the loaned items, the expiration and return dates.
Diary Table - to enter daily notes and link them to a specific contact, for example librarians' shifts.
File and data saving
- All your data is saved in a single file, where you can easily find everything without wasting time.
- Give the file the name you want.
- You can manage an unlimited number of files.
- Save data on any media, computer, network, cloud or send it by email. You can access it from wherever you are.
- Simultaneous access by multiple users, where, however, only one person can open the file to be edited.
- Make your accounting more secure by inserting password protection.
- In the Links column you can add a digital link for the registered item (receipt, purchase invoice, warranty).
- In all tables you have predefined columns that you can make visible by choice.
- The Search command allows you to quickly search for an item.
- You can sort the rows according to different sorting keys.
- Export to pdf for data storage and export to other formats for data re-processing.
- Importing data from other programs in Text, Ascii and CSV format, with the following options:
- Import data from the clipboard.
- Auto completion of values.
- Column header.
- Unicode (Utf-8).
- Columns for the archive of products no longer available.
Error reporting and control
- Command to check accounting.
- Reporting of any wrong settings, differences or errors.
- Each report is linked to a help page that explains the causes and the solution.
- Possibility to correct.
Reports and printouts
Everything you see on the screen can be printed or saved in pdf format.
Use the Library Books Report extension to get:
- Prints of the complete catalog of books in pdf, to be published on the website.
- Print the contact sheet with the books still on loan (to be sent as an attachment when making reminders).
- Customizable column arrangement.
- Print non returned items.
- Printing of the labels with the codes for the spine of the books.
- Print return labels inside the book.
- Print updated list of books not yet returned.
Data export and archiving
- Copy and paste directly to and from Excel.
- Export tables to pdf and various other formats.
- Archiving of printouts and data to pdf or other formats.
- Extensions for creating Standard Audit Files.
- Saving of the accounting file on any medium.
- Archive data.
Other features
Added functionalities
Extensions
- Predefined extensions for various printing and other features.
- Quick search and installation.
- Customizable extensions.
- Automatic update.
- Ability to create and install your own local extensions.
Comprehensive documentation
Other useful commands
Come iniziare con la Biblioteca e collezioni
Crea un nuovo file
È generalmente più semplice iniziare da un modello preimpostato, piuttosto che uno nuovo vuoto.
Pertanto consigliamo di procedere nel seguente modo:
- Menu File → Nuovo→ Biblioteca e collezioni. Scegli il modello che trovi a disposizione e personalizza i conti e i gruppi, secondo le proprie necessità.
- Scarica direttamente il nostro modello dalla pagina seguente: Biblioteca, collezione di libri e gestione prestiti e aprilo col Banana.
Imposta i dati base
Nel menu File → Proprietà file (Dati base) imposta i dati della tua Biblioteca.
Imposta i dati nelle tabelle
Report e Stampe
Scarica l'estensione Report libri biblioteca per ottenere le stampe dei dati e salvarli in *.pdf.
Groups table
Groups according to which you wish to divide the users are defined in the Groups table. To identify a group, enter an identification code Id (column Id). In the Description column you enter a text describing the group.

For a detailed explanation of the columns in the Groups table, please consult the Address Book page.
Contacts table
You can to enter user data in the Contacts table, divided into several customizable columns (you can make visible only the ones you need and hide all others - you can also add new ones).

For a detailed explanation of the columns, please consult the Address Book page.
Items table | Library and collections
In this table you can enter your items data: they can refer to valuables, books or other.
There are different ways of entering the items data: copy and paste from Excel, automatic data retrieving from the Internet, etc.
See detailed explanations below.

Columns
There are various columns and it is also possible to add new ones.
- Id: the item number that has to be attributed.
The F6 key assigns the number progressively.
It is also possible to use a prefix. For example: A-001, after that, the program suggests A-002. - ISBN
The International Standard Book Number.
When entering the ISBN in the Id column and pressing the F6 key (⌘+6 on Mac), the program automatically completes all the book's data in the other columns, incorporating them from the Google database, provided there is an internet connection available.
Any already present information will be overwritten.
For more information see: Google documentation.- The data in the Google database are not always complete. For example, the title might be present, but the editor or other data might be missing.
- In order to know which data are available on Google, please visit the following page:
https://www.googleapis.com/books/v1/volumes?q=9781906042509, entering after q= the book's ISBN number.
If you see "totalItems: 0" it means that the book is NOT in Google's database
If you see a page in a JSon format (programmers format) with the book's data, it means that the book IS in Google's database.
- Title
Is the title of the work. - Author
There can be several authors entered, separating them with semicolon ";". - Publisher
There can be several editors entered, separating them with semicolon ";". - Return date
The projected return date for this item.
This column is automatically completed according to the checked out item.
Entering books data
Book data can be entered in different ways:
- Manual insertion - You can manually enter the books data in the Items table (see previous paragraph)
- Retrieve data from Excel - If you already have a list of books from another program or Excel, you can simply copy/paste the data.
In order to copy / paste the data you need to make sure the columns in Excel as arranged in the same order as in Banana. If the column order is the same in both programs you can copy the data in block, otherwise you need to proceed column by column. The copy/paste operation is possible from Excel or from txt files. - Retrieve book data automatically from the internet - The ISBN column is very useful if you have an Internet connection: each book has an ISBN code (internationally recognized and generally written on the back of the cover); If you enter a book's ISBN code on the appropriate column in Banana and press the F6 key (or Cmd + 6 for Mac), the program automatically retrieves the books data from the Internet and inserts all data (title, author, publisher, etc. even a small summary).
- If the book has different authors or publishers, just separate the names with a semi-comma ";" - they will also be found individually in searches (for example if you need to find all the books of a certain author).
Loans table
In the Loans table you can enter the checked out items, the expiration date and the return date.

Columns
- Date
The date of the loan. - ItemId
The item number. A search can be made based upon the title. - ContactId
The contact number. A search can also be made based upon the name, family name, place. - Expiration date
The projected date for the item's return.
If you enter "+30", the program proposes the date that comes 30 days later. - Return date
Enter the return date.
How to manage the loans
Loan of a book
- Enter the date. If you click ".", the date of the day is automatically written.
- In the Item Id column, as you start typing the title of the book or library user, the program will display all choices available in your database; just select the right option and press the F6 key: the program will automatically fill the Item Id and Description cells.
- In the Expiration column (date of return for the book) the program automatically uses a date 30 days after your current date, but you can manually change that: you can enter the number of actual days (for example +40) to generate the correct return date (40 days later).
Diary table
In this table you can enter daily annotations and link them to a specific contact.
For example, you can enter the working shifts of librarians, or add relevant notes or facts, to-do lists, etc.
For each annotation you can enter the date, description, an expiration date and associate a user code.

Items return
How to register a book return:
To indicate that a book has been returned, simply enter the date the book was returned in the Return column of the Loans table.
If you have a lot of books on loan, the Items return dialogue lists the books on loan, allows you to search for them and indicate with a check that they have been returned.
Here is how to proceed:
- From the Actions menu, choose Items return;
- This will open a window where you type the name of the library user. This will display all books on loan to this library user.
- You can now check all returned books
- Click the Apply button and the program will automatically insert the actual date in the Return date column of the Loans table.
- In case of error, return to the Loans table and click the Undo command.

Archive table data
How to archive data
The Archive feature avoids the adding up of too many transactions of lent and returned books. Outdated data are being archived in hidden tabs without being deleted. This data can be recalled at any time for statistics or any other use.
Store data of returned books
- Choose Archive data from the Actions menu and then Archive table data → Loans. The program will delete all transactions of already returned books from the Loans table and store them in the Archive table.
- Only books on loan that are not yet returned will be shown in the Loans table.

Store contact information no longer used
As for your books, you can equally archive your old and unused contacts
- Indicate a storage date for all the contacts you wish to archive.
- Choose the Archive data from the Reports menu and then Archive table data and Contacts.
Archive data for Estimates and Invoices application
To archive data for the Estimates and Invoices application, please refer to the Archiving Invoices page.
Print library labels
You can print two different types of labels:
- Small labels (containing the book code) for use on the spine of the book, so that they are visible on the bookshelves
- Larger labels are used on the inside of the cover, mentioning that the book belongs to the library and has to be returned at a specified date
Labels can be printed either on the basis of the Banana file, where you have registered all the books in the library, or from an empty file in case you wish to print a list with codes, that you will then assign to the books.
Creating a file to print library labels
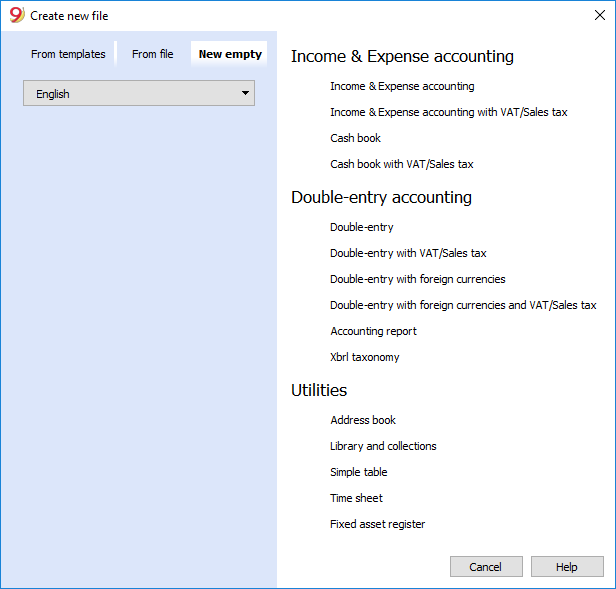
Via the File menu -> New... in the Filter by box : enter the the text "library" and select the Banana Library - printing book labels template (also make sure you have selected English as search language).
You can also find the template directly at this link: Banana Library - printing book labels
Printing labels for the spine of the book
In order to print the labels, you can open a new blank file in Banana, containing no data (File menu -> New), but, as stated, you may wish to start from an existing, as explained earlier.
There is a useful Excel function to generate a large amount of codes in a speedy manner, rather than entering them manually or than using F6 key. Here is how you do it:
- Open a new Excel file; in cell A1 entere the library code that suited your purpose (any combination of letters followed by numbers will do) - for example B1000.
- Choose the bottom right angle of your cell with your mouse (the point will now be a cross), and, while holding down the right click, drag down along the column; Excel will automatically generate autoprogressive numbers.
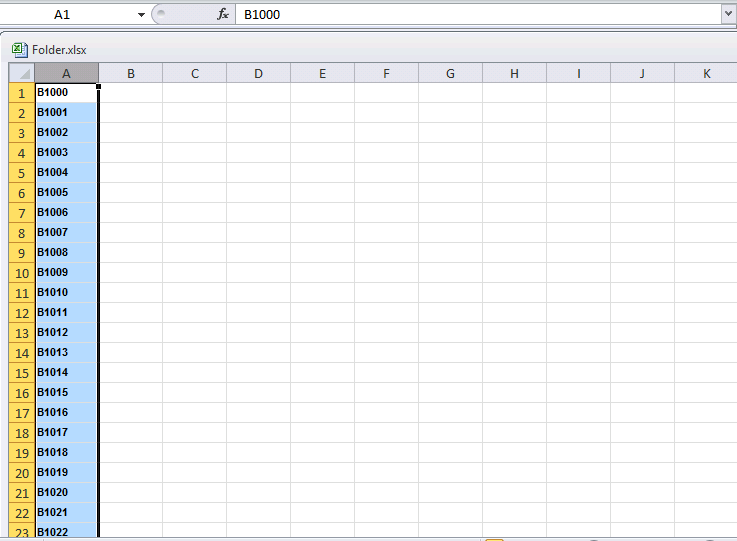
- Now copy (Ctrl + C keys) the codes that have been generated into Banana's Items table, in the Id column (Ctrl + V keys).
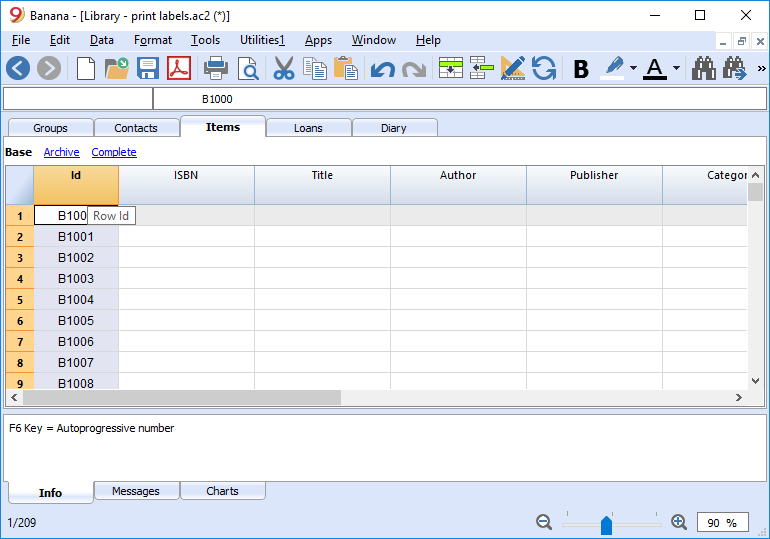
- You can now create the label. Choose the Labels -> Print command from the Extensions menu. This window will be shown:
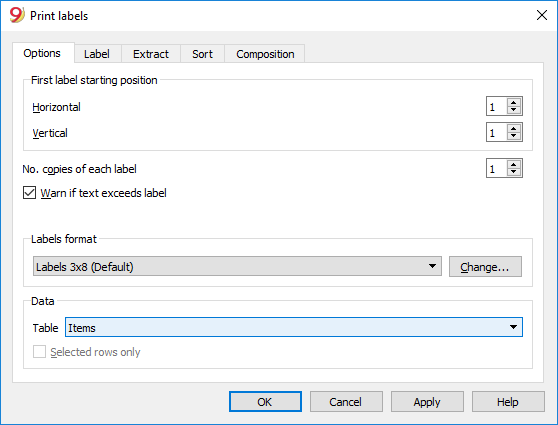
- It is important to have the Items table selected as the source for Data
- Now you can define your label by pressing the Extensions menu -> Labels -> format command.
I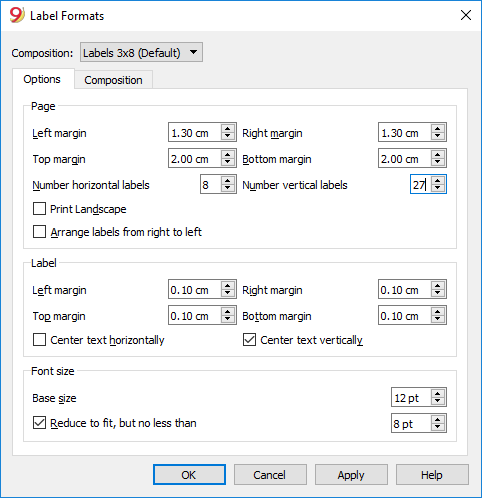
-
In the window now shown, enter the margins and other characteristics of your chosen label, Herma 10001 in this case.
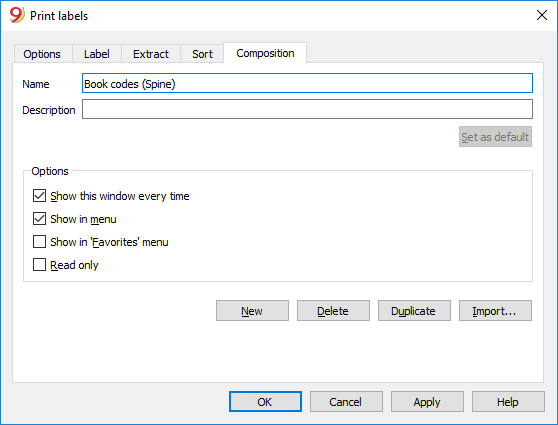
- Before hitting the OK key, open the Customization tab, where you can assign a name to your custom settings (so they can be used in the future). In this case it's Book codes (Spine).
- Hit the OK key
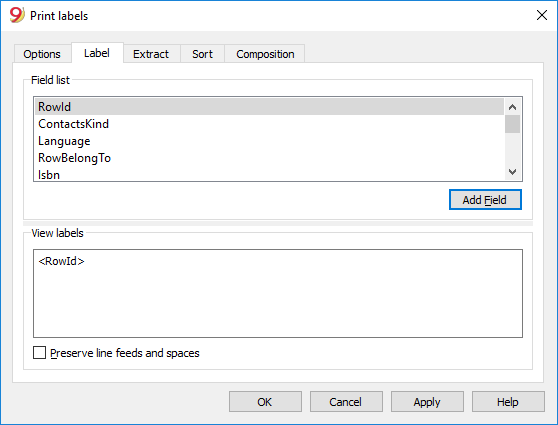
- In the Label section select RowId to indicate the contents of the label (in the example you indicate the book code) and press the Add field button. The RowId appears in the View Labels field.
- Pressing the OK button will generate a preview of your label.
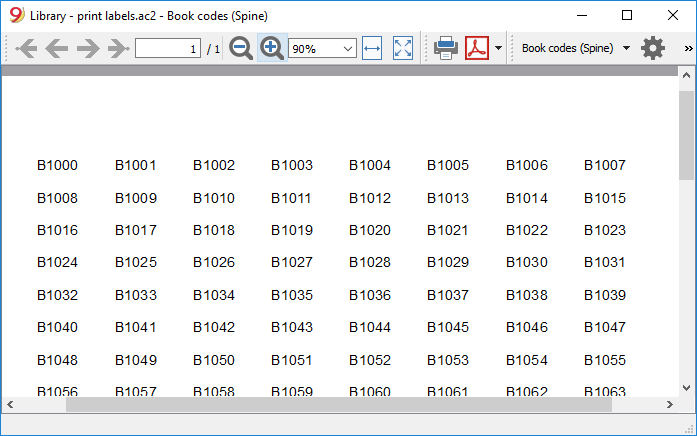
You may now print using your Herma sheets.
Printing labels for the inside cover
Choose your label format. In the example a 70x36mm (Herma 4630 or Avery 3490) format hase been chosen. The steps to follow are identical to the previous example::
- First, choose the Labels -> Print command from the Extensions menu
- Enter the margins for your new label in Extensions -> Labels -> format window.
- Before hitting the OK key, open the Customization tab, where you can assign a name for your new custom settings (Inside Cover label, for example), than hit OK.
- Select Label in the Print label section to add the content of your label.
You may enter text, other than the available fields, as well.
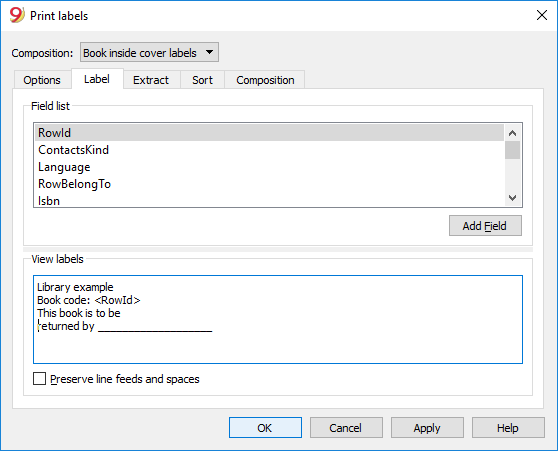
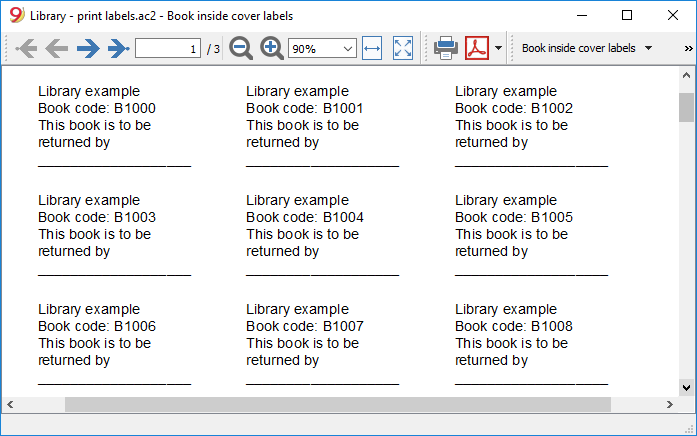
Pressing the OK button will generate a preview of your label.
Note:
The template available in Banana already includes the two mentioned label formats: label for the spine of the book and label for the inside of the cover.
Related features:
Management of yearly membership fees
If you run a library requiring an annual membership fee, or if fees are charged for the loan of individual books, it is useful to use the accounting functions of Banana Accounting.
Please check our page Accounting templates.