In this article
Automatic transactions are useful for facilitating the recording of repetitive entries, such as subscriptions, insurances or taxes. By using automatic transactions, you only have to enter the entry of interest once, set a few parameters such as the start date, the frequency and the end date and then Banana Accounting Plus will inform you when an automatic transaction is ready to be created and will create it for you.
In Banana Accounting Plus, there are two ways to create automatic transactions:
- From the Recurring Transactions table
- From the Manage Automatic Transactions dialogue.
Requirements
- This feature is available in the latest release of Banana Accounting+ Dev Channel.
- It requires the Advanced plan. If you do not have this plan, you can request a promotional code valid for 1 month via the contact form.
- You need to add the End Date and Repeat columns to your accounting file.
- This feature is in Beta Test; we kindly ask you to test it and report any problem.
Adding the End Date and Repeat columns to your accounting file
To be able to activate the commands for automatic transactions, the End Date and Repeat columns must be added; without these columns the commands will not be displayed.
- Open your accounting file or create a new accounting from the File menu > New command.
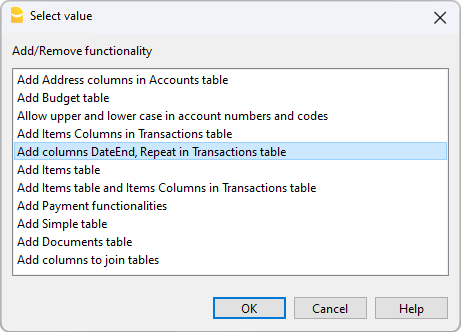
- Select the command from the Tools menu > Add/Remove Functionalities...
- The Add/Remove Functionality dialogue will appear with the list of available functionalities.
- Select the option Add End Date and Repeat columns in Transactions table.
If this option is not available, check the Banana version and the plan you are using, as described in the Requirements section. - Click on the OK button.
Creating an automatic transaction from the Recurring Transactions table
- Select the command from the Actions menu > Recurring transactions > Create automatic transaction.
- The Recurring transactions table will appear with a new row, showing the date of the day in the Date column and the text !Auto in the Doc column, which serves to identify the automatic transaction.
- Update the Date column with the date of the first occurrence you wish to schedule.
- Display the End Date and Repeat columns with the command from the Data menu > Columns setup...
Make sure to check the Visible box for both the End Date and Repeat columns.
If these columns are missing, you can add them as described in the Adding the End Date and Repeat columns paragraph.
Note: The new columns are added to the Transactions table, but are only used in the Recurring Transactions table, visible in the Recurring view. - Add the desired repetition to the Repeat column. For example, if you want a quarterly repetition, enter the text 3MS in the Repeat column.
- If the automatic transaction has an expiry date, set it in the End Date column.
- Complete the Description, Debit Account, Credit Account and Amount columns.
- Select the command from the Actions menu > Recurring transactions > Manage automatic transactions to display the scheduled transactions.
Note: If you use the command from the Actions menu > Recurring transactions > Create automatic transaction from an existing transactions in the Transactions table, the Description, Amount and Accounts columns will show the text of the original transaction.
The Create automatic transaction command is also available in the context menu of the Transactions table (right-click on a transaction, and choose the Create automatic transaction command).
Creating an automatic transaction from the Manage automatic transactions dialogue
- Select the command from the Actions menu > Recurring transactions > Manage automatic transactions.
- The Manage automatic transactions dialogue will appear.
- Click on New automatic transaction button at the bottom of the dialogue.
- Complete the necessary fields:
- Start date
Date from which the first automatic transaction will start. When the transactions are generated, this date will be updated with the date of the last automatic transaction created. - End Date
- Repeat
- Description
- Account
- Contra-account
- Amount
- CC1, CC2, CC3
- Name or description (optional)
- Start date
- Click on the OK button.