Printouts/preview
Print everything you see on the screen
In addition to the various available reports, Banana Accounting lets you print everything you see on the screen simply by clicking the File > Print menu.
Preview window
All printouts of the various accounting documents and invoices can be saved in PDF, HTML, MS Excel format and copied to the clipboard, allowing you to access them even after some time.

The button opens the Print Setup dialog of your operating system. Below is the dialog for Windows; those for other operating systems are similar. The choices you make are valid only for the current session; if you want to make permanent changes, they must be set through the control panel of your operating system (in this case Windows).
Landscape or portrait printing and other table print parameters must be set using the Page Setup command and they are different for each View.
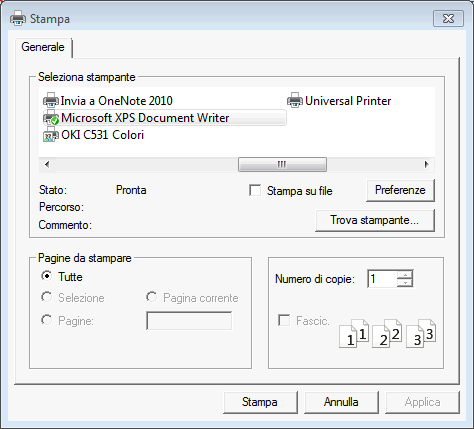
Print selected cells only
When you have a selection of cells in the table, the Selection option is enabled and the preview and printout refer only to the selected cells. To print the whole table, simply disable the Selection option.
Page size
The page size is taken from the printer preferences. To change or correct the page size, go to the print preferences and select the desired format (e.g. A4). If you have already selected this format (A4), you must select it again to correct the page size.
Print to PDF
Most modern operating systems offer the option to select a PDF printer or to export to PDF directly from the print dialog. This method of creating a PDF has limited features compared to exporting to PDF from the Banana program.
- It is recommended to use the Print to PDF option if exporting to PDF has problems.
- Printing to PDF does not include attachments.
- Printing to PDF is not available for the Create PDF dossier function.
Export to other formats
The printout can be exported to different formats:
- Export to PDF
The format that keeps the printout characteristics. - Export to HTML / Excel / LaTeX
Formats for using the data in other programs.
Copy to clipboard button
The whole report is copied to the clipboard, so you can paste it into Excel or other programs, in these formats:
- Text
- HTML (with formatting styles).
Print settings
By clicking the gear icon in the command bar you access:
- If it is a table, the print setup dialog.
- If it is a report, the specific report dialog.
In the default settings, the program is set to automatically resize the columns or reduce the zoom so that all columns are printed correctly on the page.
Page numbering
The page numbering can be changed by setting the start number and the prefix.
Refresh
By clicking the Refresh button the document is regenerated based on the specific print or report settings.
Printing issues
- If the preview display is slow, it is probably because the default printer is not available.
- It is important to use the updated printer driver.
Accounting printouts
The explanations of the printouts can be found on the following pages:
Page setup
The Print and Preview properties are accessed via the File menu > Page Setup command.
Each View of the table has its own print setting. The name of the view is indicated in the dialogue title.

Left header
This is where the title for the current view is shown. The title can be edited and appears at the top left of the printed page.
Right header
It is possible to enter a different text that will be printed at the top right-hand side of the page.
Logo
Allows you to add a logo:
- Use the Change button to the right of the Logo box; you access the Logo Formats dialog.
- Select Add and insert your own logo.
- From File > Page Setup , enter Logo in place of none.
- Confirm with the OK button.
More details for inserting a logo are available on the Logo setup page.
Margins
It is possible to input the page margins here: Left, Right, Top, Bottom. Measurements are in centimeters.
Shrink page to printable area
This function makes it possible to adapt the printable area when the print goes past the margins of the earlier defined page margins.
Include in print
When these functions are activated, they allow to display the following data:
File headers
This is the text that is being entered in the File properties found in the File menu.
Page headers
The page header will also be included in the printout.
Table name
The table header (f.i. Accounts, Transactions, etc.) is also included in the printout.
Column headers
Allows to display the various table columns.
Large font
The program prints the headers using a slightly larger font.
Page break
When activated, this option maintains the entered page breaks; if not, they will be ignored, even if they are present.
Page numbers
Activate this option to request that the pages be numbered.
Print time
Activate this option to include the time of when the page was printed.
Print date
Activate this option to include the date when the page was printed.
Row number
Activate this option if a progressive number is to be given to each row.
Grid
The grid can be printed just as it is viewed on screen.
Attachments
In the case of exporting to PDF, the attachments are included in the PDF file.
In Banana Accounting Plus this feature is only available with the Advanced plan. Explore all the Advanced plan features. Switch now to the Advanced plan!
Layout
The program automatically adapts the page dimension.
Zoom %
This allows the increase or decrease, on a percentage basis, of the size of the font to be printed.
Reduce to page width
If some columns exceed the width of the page, the program reduces the columns or reduces the zoom so that all the columns will be printed correctly on the page.
As on screen
The print-out will be carried out exactly as presented on the screen.
In case the contents goes past the page dimension:
- If the option "Reduce to page width" is activated, the font size will be reduced;
- If the option "Reduce to page width" is not activated, the part that goes past the paper will not be printed.
Print in black and white
All colors will be converted in gray scales.
Print landscape
To print in landscape format which makes the page read horizontal.
Export to PDF from print preview
From the Print preview you can export any document to PDF using the Create PDF command.
Depending on the documents you want to export to PDF, the program displays a dialog with different options.
Export a single document to PDF
This function allows you to export a document to a PDF file.
To export a document to PDF, you need to:
- From the print preview, click on Export > Create PDF.
- Click on Browse and select or create the folder where you want to save the file.
- Enter the name of the PDF file. The file name will appear in the File name field.
- Enable the Open file immediately option to view the created PDF.
- Confirm with OK
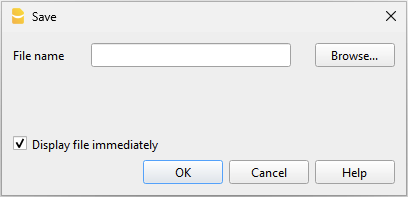
Export multiple documents in a single PDF
This option is only visible if several documents have been selected to export to PDF.
To export multiple documents into a single PDF, you need to:
- From the print preview, click on Export > Create PDF.
- Enable the Save as single file option.
- Click on Browse to select or create the folder where you want to save the file.
- Enter the name of the PDF file.
- Enable the Open file immediately option to view the created PDF.
- Confirm with OK
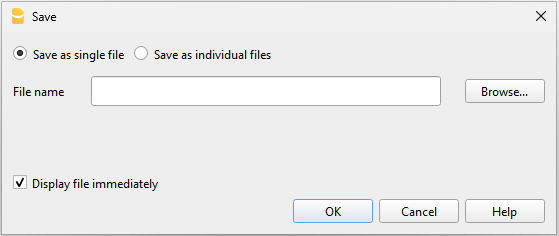
Export multiple documents as separate PDFs
This function allows you to export several documents in one operation, resulting in separate PDF files.
This option is only available:
- With the Advanced plan of Banana Accounting Plus.
- If several documents have been selected to export to PDF.
To export different documents as separate PDFs, you need to:
- From the print preview, click on Export > Create PDF.
- Enable the Save as individual files option.
- Click on Browse to select or create the folder where you want to save the files.
- Customize the file names using the variables available in the dialog window.
- Click on Variables to view the full list of variables.
- Double-click each variable you want to use to compose the file name.
While using the variables, you will immediately see a preview of the file name below.
- Enable the Open file immediately option to view the created PDF.
- Confirm with OK
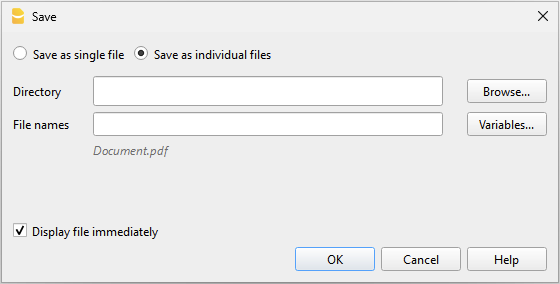
If a file with the same name already exists in the selected folder, the program will ask for confirmation before saving.
Export invoices or customer statements to PDF
The same dialog is also valid for exporting customer statements and invoices to PDF.
For more information, go to the page Export invoices to PDF
Include attachments in PDFs
When a document contains attachments external to the accounting file, the dialog includes the Include attachments option. This option saves the attachments in the PDF file and allows for their export.
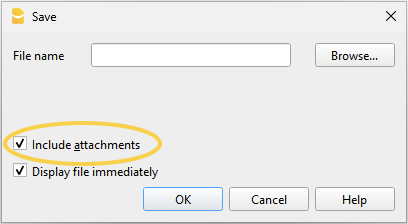
Attachments are local files added as digital links, for example PDF supplier invoices, credit notes or debit notes. The option is visible if links to the documents to be attached have been entered in the DocLink column.
- The attachment entered in the DocLink column is marked with a paperclip symbol. Clicking the symbol opens and displays the attachment.
- Only attachments that are in the same folder as the accounting file or in a subfolder are exported.
For attachments in other folders, a message "access denied" is shown.
This limitation prevents system or confidential files from being exported accidentally. It is therefore recommended to save attached documents in a subfolder of the accounting file. - Files with absolute paths are not exported.
Only some advanced readers like Adobe Acrobat Reader and Foxit allow viewing of attached files. Other PDF readers, such as those in browsers, do not allow viewing of attachments.
For more information, go to the page Create PDF file with digital attachments.
PDF creation parameters
- Page size
- The page size of the PDF is taken from the printer preferences.
- Before creating PDFs to print or send by email, make sure the page size in the print preferences is set to A4.
- PDF/A format
- The file is converted to the PDF/A format, the archiving standard, which is a more limited subset of the PDF standard.
- If certain elements are included, the PDF file will not comply with the PDF/A standard.
- Including any type of attachment is only compliant with the PDF/A-3 standard.
- Links to external documents are not allowed.
- Fonts
- The program creates the PDF using the fonts specified by the user.
- If there are readability issues or the PDF search function doesn't work, you can disable the True Type fonts from the menu Tools > Program Options > Advanced > True Type fonts.
PDF Creation Issues
In some situations, related to specific operating systems, fonts, or characters used, it may not be possible to correctly create a PDF file, or the text may appear cut off or not visible.
In these cases, it is recommended to use the operating system functionality by opening the print dialog window and choosing Print to Pdf.
Export Print Preview Html/Excel
In the print preview toolbar:
- Click on the arrow beside the Adobe PDF button
- Choose the option that's right for you:
- Export PDF
- Export to Html
- Export to Excel
- Copy to clipboard
Page numbering
You can access the page numbering feature by clicking on the  icon on the Print Preview toolbar.

In this dialogue it is possible to assign the number with which to start the page numbering, and the prefix to be inserted in the numbering. Printing of the page number must be enabled or disabled through the settings of the displayed page or report.
Start with
The starting number for page numbering.
Add prefix
The prefix to insert to the page numbering.