In this article
Access the invoice parameters settings properties:
- Button Settings dialogue of Account2 → Customers → Print invoices, section Layout.
- Button Settings of Print preview.
Settings properties are composed of several levels and sub-levels that allows you to operate on a specific part of the invoice:
- Print
Select which elements to display. - Texts
Change texts, add languages. - Styles
Change font and colors. - Programming (own JavaScript file)
It is an even higher level of customization, but it requires programming knowledge.
You can change or replace the different printing elements by programming your own JavaScript file. - Restore Defaults
Reset all the settings with default values.
With the command Menu → Edit → Undo operation you can undo and restore the changes made to the parameters.
Print property
This level defines which elements of the invoice to include and which to exclude from the invoice printing.
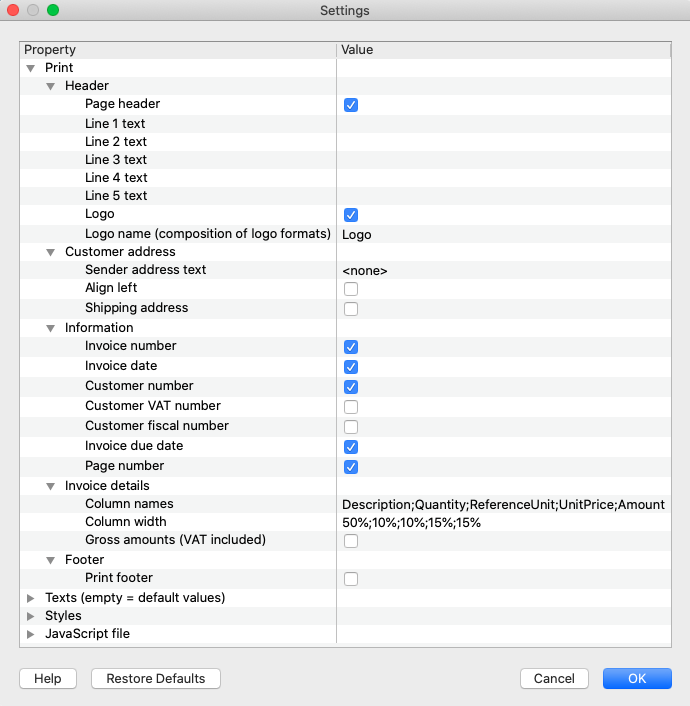
Settings dialogue - Print property
It is divided into several sub-levels that allows you to manage a different element of the invoice.
Header
Dialogue element that allows you to define the header on the top of the invoice page.
- Page header.
Check to include texts in the header.
The texts are taken from the address data of the accounting, defined in File → File and accounting properties → Address. - Line 1 text ... Line 5 text.
These texts will be displayed in the header and replace any texts defined in the Logo. - Logo.
Check to include the logo in the header.
The logo is defined with the command File → Logo setup. - Logo name.
Enter the name of the logo composition to be used, in case you have defined multiple logos.
Customer address
Element of the dialogue that allows you to set some parameters for the billing address.
The customer addresses are taken from the specific columns of the table, see Accounts → Addresses view.
- Sender address text.
Above the customer's address you can enter a line for the sender's address.
Leave empty to use the address defined in File → File and accounting properties → Address.
Enter <none> to not enter the sender line. - Align left.
Check to print the address on the left, otherwise it will be printed on the right. - Shipping address.
The shipping address is also printed.
The shipping address is entered using the code :sadr in the TypeDoc column of the Transactions table.
Information
Element of the dialogue that allows you to define which invoice information to include and which to exclude from the print:
- Invoice number / Credit note.
Specified in the DocInvoice column of the Transactions table. - Invoice date.
Specified in the Date column of the Transactions table. - Customer number.
Specified in the invoice transaction of the Transactions table. - Customer VAT number.
Specified in the VAT number column of the Accounts table, Other view. - Customer fiscal number.
Specified in the Fiscal number column of the Accounts table, Other view. - Invoice due date.
The expiration date is calculated automatically by the program, or can be changed using the code :ter in the TypeDoc column of the Transactions table. - Page number.
Invoice Details
By invoice details we mean the table showing the items, quantities, prices and totals.
You can indicate which items to indicate.
If you delete the content, when you confirm with Ok, the default column names and widths will be automatically used.
- Column names.
Enter the XML names of the columns of the Transactions table.
You can see the XML name of each column with the command Column Setup, Settings tab.
Separate column names with a ";" (semicolon). - Column widths.
Enter the width of each column with a percentage value. Each value defines how much space a column occupies in relation to the total page width. The sum must be 100%.
Separate column widths with a ";" (semicolon). - Column alignment.
Enter the text alignment for each column. You can align the text to the left, center and right.
Separate column alignments with a ";" (semicolon). - Gross amounts (VAT included).
You can decide between using gross amounts with VAT included or net amounts with VAT excluded.
Some examples:
- Include columns Description, Quantity, Unit, Price Unit and Amount:
- Description;Quantity;ReferenceUnit;UnitPrice;Amount
50%;10%;10%;15%;15%
left;center;center;right;right
- Description;Quantity;ReferenceUnit;UnitPrice;Amount
- Include only the Description and Amount columns:
- Description;Amount
70%;30%
left;right
- Description;Amount
- Include columns Description, Notes and Amount:
- Description;Notes;Amount
35%;35%;30%
center;center;right
- Description;Notes;Amount
You can of course also include columns you have added to the Transactions table.
Footer
Indicates whether to include the footer, which consists of three columns (see the chapter "Text properties" below).
Texts property
This level defines all invoice texts, which are grouped and divided by language.
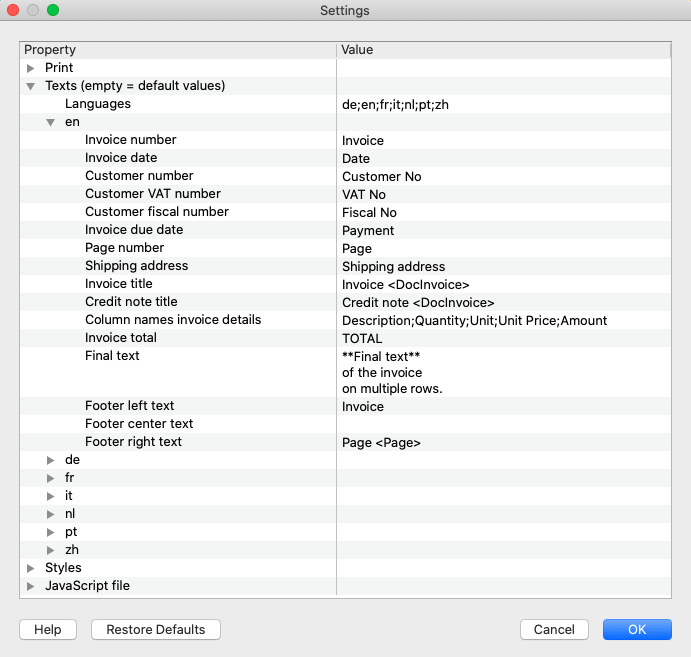
Settings Dialogue - Texts Property
Languages
You can change the texts to be used for each language and also add translations for other languages.
The language to be used is chosen according to the language indicated for the customer in the Accounts table, Language column. If no language is indicated for the customer, the default accounting language is used.
The default languages for which a complete translation exists are: German, English, French, Italian, Dutch, Portuguese and Chinese.
The first language to appear in the dialogue is always the current language of the file, defined in File → File and accounting properties → Other. The rest are listed in alphabetical order.
Define languages
- Default values: de;en;fr;it;nl;pt;zh
- Enter the list of languages using the two-character codes.
- de = German
- en = English
- fr = French
- it = Italian
- nl = Dutch
- pt = Portuguese
- zh = Chinese
- Separate the language codes with a ";" (semicolon).
Add languages
- In the language field enter the code of the language you want to add.
- Click on Ok.
- Reopen the Settings dialogue. Now there is a new section for the language you have entered with english texts.
- In the added language section, replace existing texts with the correct ones.
Remove languages
- In the language field delete the code of the language you want to remove.
- Click on Ok.
- Confirm with Yes to remove the language and its texts from the list.
- Reopen the Settings dialogue. Now the language section has been removed.
Text section for each language
Each language has its own section starting with the language code.
You can change the text to be used for each individual language.
If you delete the content, when you confirm with Ok, the default text will be automatically used.
- Invoice title / Credit note title.
The text <DocInvoice> is replaced with the invoice or credit note number.
Enter <none> to not display any text.
Priority is given to any text defined by the code :tit in the TypeDoc column of the Transactions table. - Invoice details column header.
Enter the texts for the headers of the columns.
Separate the texts with a ";" (semicolon). - Final text.
Enter the text on a single line or on multiple lines to display it after the invoice details table.
This text has priority over the text added in Print invoices → Template options.
You can use bold style for one or more words by entering the annotation with double asterisks ** (see "Styles" properties). - Footer.
The code <Page> is replaced with the page number.
Enter <none> to not display any text.
Styles property
This level defines the parameters that affect the visual appearance of the invoice, like font type, size and colors.
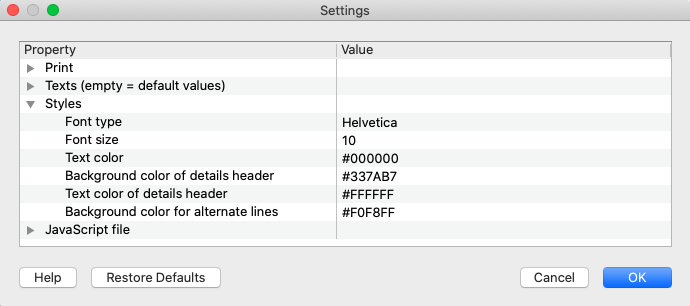
Settings Dialogue - Styles Property
Font type and size
The font type and the size are applied to all invoice texts, except the header, which has a fixed size that can only be changed with the hook functions.
The size of the title and the total line are automatically resized according to the font size chosen.
Color
For the main colors, you can use the name in English (black, yellow, white, blue, red, ...) or the hexadecimal value (HEX) preceded by the # sign.
For codes see the table at https://www.w3schools.com/cssref/css_colors.asp.
Bold
Using a specific annotation you can apply the bold style to one or more words.
To do so, include the desired text between double asterisks ** .
Examples:
**text** = text
**text1 text2** text3 = text1 text2 text3
The bold style can be applied to the following invoice texts:
- Begin text - text defined with the code :beg in the TypeDoc column of the Transactions table.
- Final text - text defined in the Settings dialogue → Final text or in Account2 → Customers → Print invoices → Options tab.
- Greetings text - text defined with the code :gre in the TypeDoc column of the Transactions table.