Free Time Sheet application
The Banana Accounting Time sheet is a free application, included in Banana Accounting, that allows you to plan and manage your working hours.
It consists of a table with several columns and calculations already set to fit all needs. Depending on your needs, the columns of your choice can be displayed.
Watch the video tutorial which briefly shows you the main steps to create and manage a time sheet.
Immediate start thanks to the templates
If you need to start immediately, you may use one of the preset templates, with already set up columns:
- Systematic registrations - start and end times of work are indicated, as, generally speaking, is required by law
- Simplified registrations - indicate daily hours worked (with settings of due hours).
- Hourly pay - indicate the daily hours worked (without settings of hours due).
Complete and flexible
With the Time sheet you can plan and manage:
- Hours worked.
- Overtime worked.
- Project hours.
- Travel and reimbursements.
- Absences, holidays and leave.
- Discrepancies between scheduled and completed hours.
- Carrying over data to the following year (outstanding holidays and unpaid time).
- Print of monthly reports.
To be able to create and use Time sheet, you will have to be Setting up the Time Sheet file:
 |
|
HeadingThe Time sheet header data is taken from those entered in the menu |
||
|
|
Schedule Working time scheduleYou can plan your working hours by entering the hours carried over of the previous year, working days, holidays and working hours due in via the following menu |
|||
|
|
Dates, holidays and festive daysYou can define the period and customize holidays and non-working days. Use the Journal table of the Time Sheet, Festive column |
|||
|
|
Time sheet dataEnter the Time sheet data, recording your working hours, absences and planning your vacation day by day. Go to the Journal table of the Time Sheet to enter your data . |
|||
|
|
CheckStay in control of the totals and balances of hours worked, payment due, leaves and holidays. |


How to start a Time Sheet
It is assumed that Banana Accounting 9 has been installed. In the free version, the Time sheet is in unrestricted mode.
Start easily and quickly by using one of our preset templates.
Banana Accounting includes two types of template:
- Time sheet - Simplified ledger
The total hours worked are registered on a daily basis - Time sheet - Systematic ledger
Start and end time of the work are registered (multiple work intervals are possible) and the program will calculate the total hours worked.
Setting up your Time Sheet file
Proceed as follows:
- File menu → New command
- Select the Region/Language
- Select the Category -> All or Other
- In the Search area, type Time Sheet, or activate under Type -> Time Sheet. The program shows the available templates.
- In the section on the right, select the desired template.
- By double clicking on the name of the selected template or on the Create button, the program will directly open the file.
- Save the file under a new name.

Setting up your data
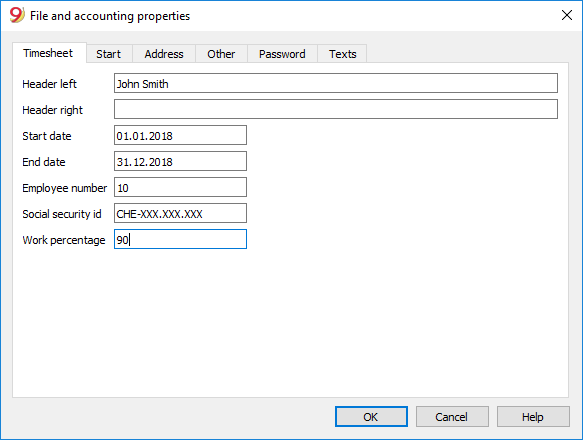
Set up your own data from the File menu -> File and accounting properties (Basic data) -> Time Sheet.
Enter your first and last name, start and end date, work percentage of work and other required data if available.

Set working hours as per contract
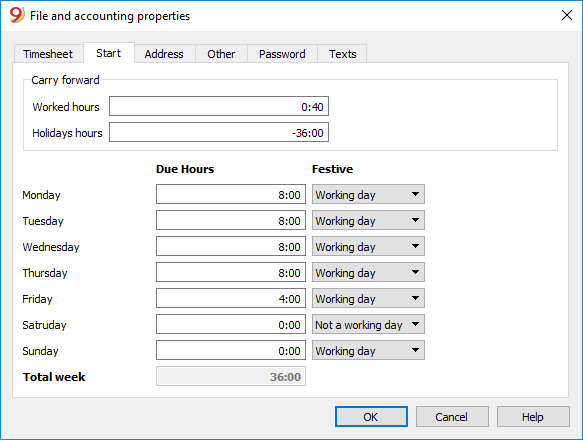
Set the weekly working time via the File → File and accounting properties → Start.
The cells of the report are intended for unpaid hours of work and for hours of unused holidays carried over from the previous year.
Enter working hours for each day and define working days, festive days and holidays. These settings are displayed in the Journal table.
Recording work time
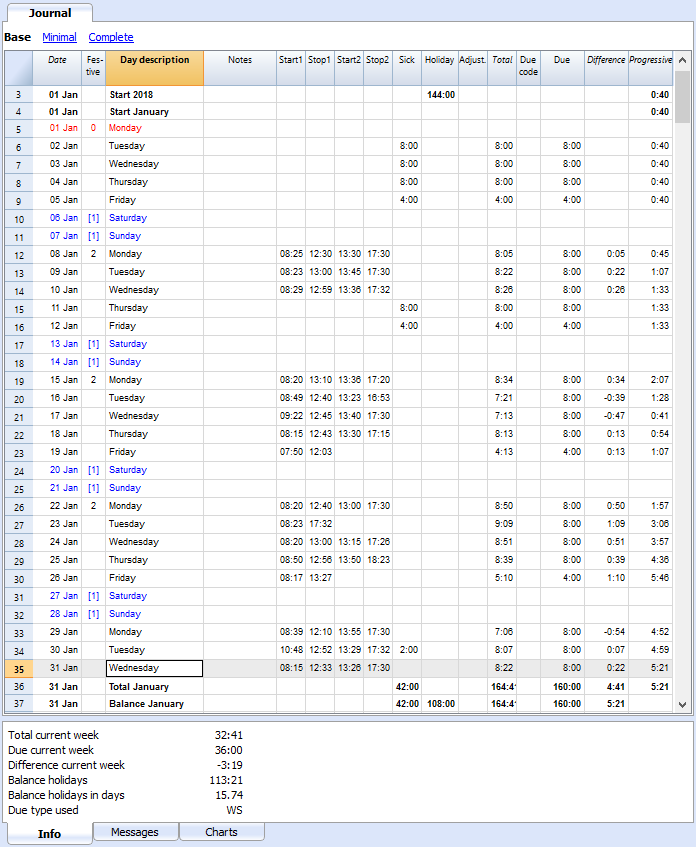
Start and end time of the job, hours of absence due to illness, holidays and leave are registered in the Journal table.
The first line of the report there will carry over the hours of holidays not taken during the previous year; the hours of annual holidays to which you are entitled, as per contract, are to be entered on the first day of the month row.
Non-working days are designated in blue and festive ones in red.
The program will calculate the daily and monthly totals of amounts due on the basis of inserted data, as well as the difference between hours worked and those to be payed and the balance to be carried forward.
Weekly hours due and worked, as well as the balance of the holiday hours are reported automatically as in the window below.
Printing your end of month report
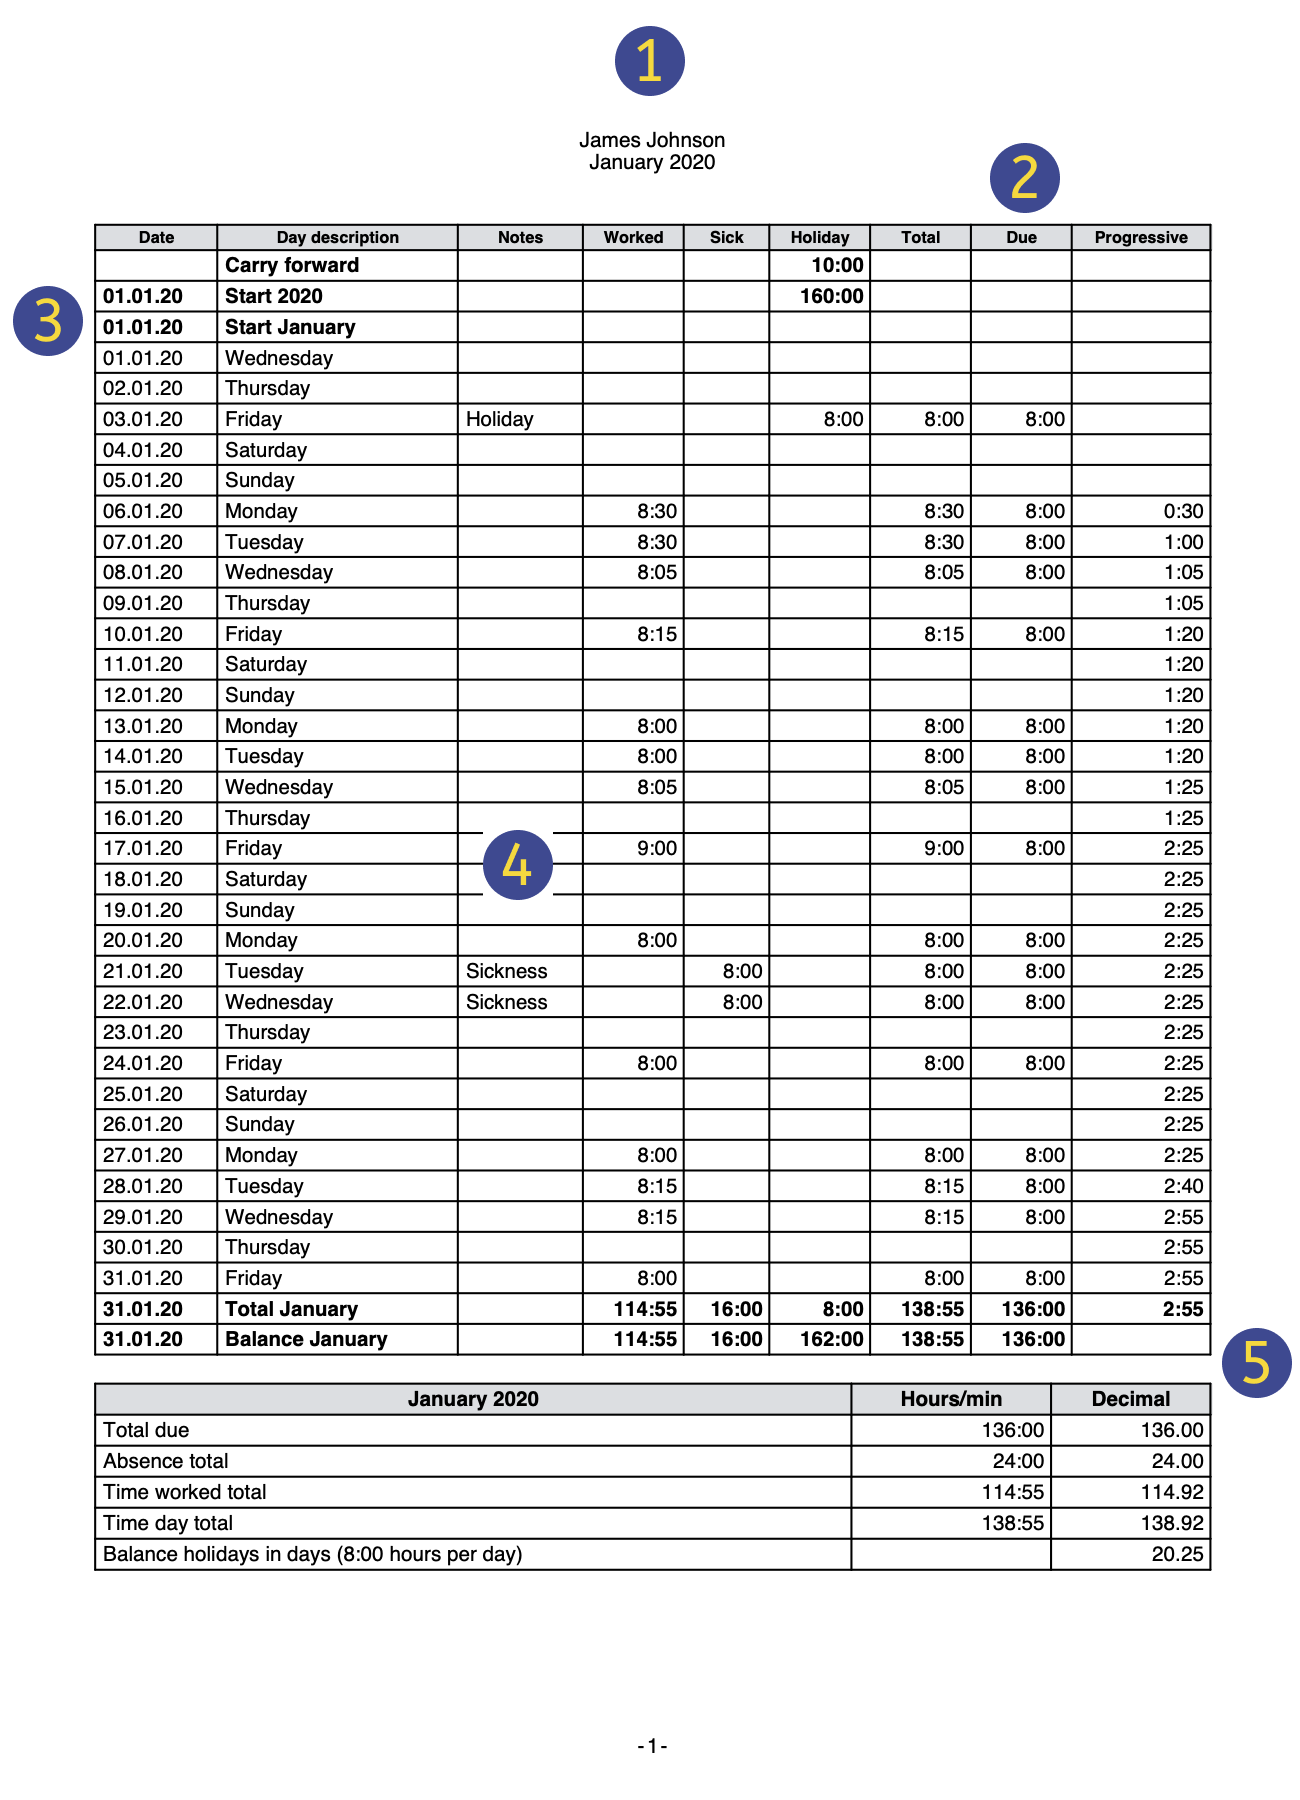
Using the Utilities1 menu → Monthly Report... command, you can instantly generate, print and save a complete monthly report of the selected period with the main columns used.

For more detailed information and specific examples of the Time sheet application, please refer to the following pages:
Setting up the Time Sheet file
Create a new Time sheet using a preset template, as follows:
- Menu File → New.
- Select your Region/Language.
- Select Category → All or Other.
- Filter for the Time sheet via search, or check in Type →Time sheet. The program will display the available templates.
- Select the template you require in the right hand section.
- Double-click on the template name or click on the Create button. The program will open the selected file directly.
- Save your file with a name.

Set up your data via the File → File properties and accounting properties... :
- File properties - Timesheet, to set up period and name.
- File properties - Start, to set up working hours and festive day.
File properties - Time Sheet
Set up your data from the File menu -> File and accounting properties ... -> Timesheet tab.
Enter into the Timesheet tab:
- Name and Surname,
- Start and End date for the current year
- Work percentage and other data, if applicable.
File properties - Start
Set up your data from the File menu -> File and accounting properties ... -> Start tab.
In the Start section, you can set the initial data for working hours and holidays.
Hours are considered to be hours and minutes.
By entering the amount preceded by the "<" o ">" sign, the program considers it a decimal value and converts it into hours and minutes.
"<8.2" is converted to "8:12".
Carry forward
Initial values of the period or previous year are carried forward:
- Worked hours
Enter the balance of hours of the previous period or year (for example, extra hours worked but not yet paid or not yet used as vacation time).
These hours are taken into account in the Journal table, Carry forward row. - Holidays hours
Input hours of unused holidays of the previous year.
These hours are taken into account in the Journal table, Carry forward row, Holiday column.
Due hours and weekly festive days.
Input your weekly values.
- Due hours
Enter the working hours for the days of the week.
In the example we are presenting, this is a flexible working time, referring to part-time work.- The program calculatesthe total number of hours per week.
- The predetermined working hours are automatically recorded in the Journal table, Due column.
- If you want to reach a precise number of hours per week, adjust the time for the different days until you reach the desired total.
- Festive
Define for yourself the day considered to be a working day, not a working day or a festive day.
If a day is generally considered to be a "festive day", but on which you are required to work, you must enter "working day".
The value is reported in the Journal table, Festive column.
Journal table of the Time Sheet
In the Journal table of the Time Sheet, you can enter the daily data, which can be modified and entered according to your needs.
Thanks to the rows and columns with totals, it allows you to have an immediate overview of the situation.
The Journal table includes several columns to suit all needs. Depending on your needs, the columns of your choice can be displayed.
Typology of rows, colors, and formats
When creating a new file, the rows of the Journal are generated automatically by the program. When using an existing template, they will already be predefined.
Daily rows
Daily rows are used for entering your data.
- Normal rows - refer to rows for working hours.
- Rows in red - refer to official holidays
- Rows in blue - refer to non working days.
- Rows high-lighted in yellow - refer to the current date.
Multiple rows for a day
By duplicating the day row, you can enter additional information about the same day, such as timetables by project, annotations, or other.
To differentiate between the following rows, the Day description is slightly indented.
Carried forward, Start, Total and Balance rows
The Carried forward, Start, Total and Progressive row are indicated in bold character.
- The Carried forward row will automatically display holidays and hours belonging to the previous year, that were entered via File property → Start.
- The Start rows refer to the start of the year and month. Enter the initial values for holidays and hours.
- The Total rows refer to the end of the year and month. The total of columns are automatically reported and totalized here.
- The Balance rows are automatically calculated by the program and will the progressive value of the columns that contain data.
Journal table view
The Journal table is created with a series of columns that will cover the major part of your requirements.
Predefined columns are displayed, depending on the view you select:
- Base - displays the main principal columns.
- Minimal - displays the columns to enter your data.
- Complete - displays all available columns of the Journal.
Columns for the Journal in Base view
The Base view displays the principal columns in use for the Time sheet.
Date
This column is protected and is used to insert the date of the day.
Festive
This column for calibrating the type of day. If the cell remains empty, the value will be set to the one defined in the File properties, or to the one defined with the W code (see below).
Possible values are:
- Empty. Working day
- 0 - The current day is set as festive (the row will be displayed in red).
If a day is generally considered to be a "festive day", but on which you are required to work, you must enter "working day". - 1 - The current day is set as non-working (the row will be displayed in blue).
- 2 - The current day is a working day. It overwrites the predefined value.
- [0] - A festive day set up automatically as defined in File properties. There will be no value in the Due column.
- [1] - A up day set up automatically as defined in File properties. There will be no value in the Due column.
- W0 - Defines the current day as festive. The same day in successive weeks will be set up with a value of (0).
- W1 - Defines the current day as non-working day. The same day in successive weeks will be set up with a value of (1).
- W2 - Defines the current day as working day. The same day in successive weeks will be set up with a value of (2)
- WR - Resets the current day to the value of the predefined one from the File properties.
- WA - Resets the current day to the value of the predefined one from the File properties. The same day in successive weeks will be set up with a value of Properties file.
Day description
This column is used by the program to generate the name of the day date based on your data.
If you wish a different text than the one suggested by the program, enter a your one preceded by the # character (ex. #Christmas, #National Holiday).
Start1, Stop1, Start2, Stop2...
These columns allow you to enter the stop and start date of worked hours. The Total and Difference columns are automatically updated by the program.
Sick leave
Column to insert hours of absence due to sick leave.
Holidays
Column to insert hours of holidays.
Adjustment
Column to insert any adjustment values.
Total
This column is protected. The program uses it to automatically insert the total sum of hours worked, extra hours, leaves and adjustments.
Due Code
This column helps you define, if needed, the value of Due amounts (hours worked).
If the Due code is left empty, the due value is completed by the software, according to the File menu → File and accounting settings → Start.
To change the Due amount in the Journal table:
- Reset the Due time.
Codes to be entered in the Due code column, in order to edit the daily due from the row you are in. You will then need to enter the new value in the Due column.- DS (Set Today) the due hours for the current day, without modifying other days.
- WS (Set Week Day)
Sets the due hours for a specific week day and for the same days for the subsequent weeks. - PS (Set Predefined)
Sets the due hours for that day and successive days, keeping same preset value.
- Reset codes for the daily Due time.
- WR (Reset Week Day).
Resets the predefined value for the week day. - WA (Reset All Week Days)
Resets all predefined values related to the weekdays. - PR (Reset Predefined)
Resets the general predefined value. Removes the general predefined value. - PA (Reset Predefined and Week Day)
Resets the general predefined value and the ones of the week.
It will be like starting from scratch.
- WR (Reset Week Day).
- Code to reset the Progressive calculation
- RP (Restart progressive)
The Progressive column amount will restart from zero. Insert this code in the first row of the month, when all hourly worked hours, with an hourly pay, have been payed for the previous month.
- RP (Restart progressive)
Due
This column is protected. The software will automatically calculate the difference between hours worked and hours due. At the end of each month the total for hours due is carried forward
- If no data is present in the Due column, the program will use those present in the Properties file -Start tab.
- When codes are entered in the Due column, calculations will be executed on the basis of those codes (see previous paragraph).
- All of the rows in Festive that contain 0 (festive) or 1 (non working), in the Due column will display an empty cell.
Difference
This column is protected. The software will automatically calculate the difference between hours worked (Total) and hours due (Due). Totals for the differences will be reported for month and year end.
Progressive
This column is protected. The software will automatically calculate the difference between hours worked (Total) and hours due (Due). Totals for the progressive differences will be reported for month and year end.
Columns for the Journal in Complete view
Additional columns to the Base view will be available in the Complete view.
Section
This is a protected column. It is used by the program to make a distinction between the lines to be used for data entry and system specific lines.
The codes used are: AllStart, YearStart_2020, MonthStart_202001, MonthTotal_202001, MonthBalance_202001, SpaceAfterMonth_202001.
Values of a code is defined by different elements:
Period
- All - Refers to all rows.
- Year - Refers to the rows of the Year.
- Month - Refers to the rows of the Month.
- Week - Refers to the rows of the Week.
- Day - Refers to the rows of the Day.
Type
- CarryForward - Rows report previous year. Automatically generated by the software from Properties file.
- Start - Opening rows. Insert initial balances (planned holidays, effective holidays etc).
- Total - Rows used for totals (columns related to daily hours, adjustments to Start or Carry Forward Balances).
- Balance - Holiday balance. Displays difference between balance of holidays due that are carried over and current holidays due and taken).P
- SpaceAfterMonth - To specify that there must be an empty row (year, month or day referred by the identifier).
Description
Column used to insert additional description.
Code1
Use this column to add a client, project or other identification number.
Work1 and Work2 (only Experimental version)
The Work1 and Work2 columns are used in particular to record working hours in the Time Sheet - Simplified template. In addition, in the Experimental version they can be used to enter particular working hours (e.g. nights, holidays).
In parallel to these columns the surcharge columns are also used (see explanations below).
Worked
This is a protected column. This is used by the software to automatically calculate the total of hours worked.
Detail
This is a protected column. It is used by the program to automatically display work details (e.g. projects). See Managing projects details.
Surcharge
You can add enter working time with a surcharge, with a different pay, in hours and minutes. It can also be used to manage recoveries or penalties for delays or other.
%Surcharge
You can enter the percentage increase in working time that is paid with a different pay.
If on the same day you work both hours without surcharge and hours with surcharge, you must enter the time on two rows:
- Add row Day
- On the first row you will indicate the work (beginning and end) normally.
- In the second line, the overtime hours will be indicated and the appropriate percentage will be indicated.
If you want the daily total directly in the table, you must add a daily total line.
Surcharge calc.
This is a protected column. It is used by the program to calculate the surcharge time (overtime), indicated in the Surcharge or %Surcharge column.
Surcharge total
This is a protected column. It is used by the program to calculate the total surcharge time (overtime), indicated in the Surcharge or %Surcharge column.
This value is added to the total hours column.
Service
Compulsory leaves, such as military duties, civil service or other can be registered here.
Other
Different types of absence can be defined. Do not indicate Sick Leave or Holidays in the Service column, if you use this option.
Absence
This is a protected column. It is used by the software to calculate the total hours of absence leave.
Split1 and Split2
These columns may be used to distinguish between hours invested in different projects.
Adding columns and changing the header
With the command Data->Columns setup you can add new columns or change the column's headers.
Currently the columns added are not shown in the monthly report.
Arbeitszeiten und Stunden
Das Programm berücksichtigt alle Zeitwerte als Stunden und Minuten (z.B. 8:30 bedeutet 8 Stunden und 30 Minuten).
- Intern werden die Werte als Sekunden gespeichert und dann im Stunden- und Minutenformat angezeigt.
- Bei der Eingabe von Arbeitszeiten werden die Zeitwerte auf die Minute gerundet.
Stunden im Dezimalformat
Stunden können auch im Digitalformat (Dezimalen) eingegeben werden (z.B. 1:50). Eineinhalb Stunden werden mit 1:30 (1 Stunde und 30 Minuten) angezeigt.
Der ":" (Doppelpunkt) trennt die Stunden, Minuten und Sekunden. Der Punkt "." trennt die Tausendstel.
- Wird einem Zeitwert in Dezimalen das Zeichen ">" oder "<" (grösser als oder kleiner als) vorangestellt, erkennt das Programm ihn als Dezimalwert und rechnet ihn in Stunden und Minuten um:
- "<1.50" wird umgerechnet in 1.30 (1 1/2 Stunden)
- "<1.75" wird umgerechnet in 1:45 (1 3/4 Stunden).
- Geben Sie im Stundenrechner die Anzahl der Stunden mit dem Dezimaltrennzeichen ein. Wenn Sie beispielsweise 1.75 schreiben, zeigt das Programm den Wert in Stunden und Minuten (1:45) an. Dieser Wert muss übernommen werden.
Im Digitalformat (Dezimalen) anzeigen
-
Im Fenster Info wird auch der Wert der Stunden in Dezimalstellen angezeigt.
- Im Monatsausdruck werden bestimmte Werte auch als Dezimalstellen angegeben (da Lohnabrechnungsprogramme oft mit Dezimalstellen arbeiten).
Schnelle Eingabe der täglichen Arbeitszeiten - Tipps und Tricks
- Sich auf die Tageszeile begeben.
- Die Zeile des aktuellen Tages ist gelb markiert.
- Menü Verschiedene1 → Zu heute gehen.
- In der Spalte Anfang1 die Zeit des Arbeitsbeginns erfassen sowie in der Spalte Ende1 die Zeit des Arbeitendes.
- Mit dem "." (Punkt) wird die Uhrzeit des Computers eingefügt.
- Wird hierauf +5 oder -5 erfasst (oder jede andere Nummer) zeigt das Programm die aktuelle Uhrzeit des Computers plus oder minus 5 Minuten an. Diese ist auszuwählen, um sie zu übernehmen.
- Von vorheriger Woche übernehmen.
- Aus Menü Verschiedene1 kann man Mittels Befehl Woche übernehmen (von vorheriger Woche) die erfassten Arbeitszeiten für denselben Wochentag der vorherigen Woche übernehmen.
- Die Werte der vorherigen Zeile kopiert.
- Mit der Ikone 'Von oben kopieren' der Werkzeugleiste (F4 oder Cmd 4) werden die Werte der Zeile zuvor kopiert.
- Autovervollständigung der Urlaubstage oder Abwesenheiten.
- Bearbeiten Sie die Zelle (mit einem Leerzeichen), und das Programm schlägt die fälligen Stunden abzüglich der der bereits geleisteten Stunden vor.
Stundenspalten in Blöcke
Die Stundenspalten der Journal-Tabelle sind wie unten erläutert in Blöcken zusammenfasst.
Geleistete Arbeitsstunden
Dies sind die Spalten, in denen die täglichen Arbeitsstunden angegeben sind.
Es gibt zwei Möglichkeiten, die effektiv geleisteten Stunden einzugeben:
- Als geleisteten Arbeitsstunden (Spalten Arbeit1 und Arbeit2 ).
In der Experimental-Version werden alle Spalten vom Typ Zeitrechner, die mit 'TimeWork' beginnen, als geleisteten Arbeitsstunden betrachtet. - Als Uhrzeit Anfang und Ende der Arbeit (Anfang1, Ende1, Anfang2, Ende2, ...).
Das Programm berechnet automatisch die Dauer zwischen den zwei Zeitangaben.
Total geleisteter Arbeitsstunden
In der Spalte Total (Tageszeit) werden die in den Spalten für die geleisteten Arbeitsstunden angegebenen Stunden zusammen mit den als Anfangs- und Endzeiten angegebenen Stunden addiert.
In der Experimental-Version gibt es zusätzlich die Spalte Detail (Total Details Arbeitszeit). Wenn der Zeilentyp den Wert "D" enthält, werden die gearbeiteten Stunden in der Spalte 'Detail' und nicht in der Spalte 'Total' addiert.
Überstunden
Diese Spalten sind nur in der Experimental-Version vorhanden.
Sie werden zur Eingabe zusätzlicher Stunden verwendet. Zum Beispiel bei Feiertage oder Nachtschichten, die mit einem Zuschlag ausbezahlt werden.
Das Total 'Überstunden' ist die Gesamtsumme zusätzlicher geleisteten Stunden (in Stunden erfasst) addiert mit den aufgrund eines Prozentsatzes berechneten Stunden.
Abwesenheiten und Krankheiten
Die Abwesenheitsstunden werden in den Spalten Krankheit, Ferien, Dienst oder Sonstige erfasst.
Diese Stunden werden dann automatisch in der Spalte Abwesenheit (TimeAbsenceTotal) und dann in der Spalte Total summiert. Bei der Berechnung der Differenz zwischen den fälligen Stunden gelten Abwesenheiten als bezahlt.
In der Experimental-Version werden alle Spalten vom Typ Zeitrechner, die mit 'TimeAbsense' beginnen, zum Total 'Abwesenheiten' addiert. Der Benutzer kann Abwesenheitsspalten für andere Fälle hinzufügen.
Wenn Sie den Überblick über Abwesenheiten behalten möchten, die nicht zu den Gesamtstunden summiert werden sollten, müssen Sie Spalten vom Typ Zeitrechner hinzufügen.
Korrektur
Es handelt sich um eine Spalte, die für buchhalterische Anpassungen verwendet wird, z.B. wenn es angehäufte Stunden gibt, die bezahlt werden. Um sie dann von der Totalsumme abzuziehen, geben Sie in der Spalte Korrektur den Wert der bezahlten Stunden mit Minuszeichen an.
Totale Arbeitsstunden
Dies ist die Totalsumme der geleisteten Arbeitsstunden, die als zu bezahlende Stunden und als Teil der zu leistenden Stunden betrachtet werden.
Es schliesst folgende Spalten ein:
- Total geleisteter Arbeitsstunden
- Total Überstunden
- Total Abwesenheiten
- Total Korrekturen
Sollzeit
Im Zeiterfassungsblatt (Timesheet) können Sie die täglich zu leistenden Stunden erfassen. Beim einem fixen Monatslohn (Fixlohn) wird die im Arbeitsvertrag vereinbarte Stundenzahl angegeben. Bei einem Stundenlohn, deren Arbeitsvertrag eine Entlöhnung pro Stunde ohne eine vereinbarte Stundenzahl vorsieht, wird der Stundenanteil Sollzeit in der Regel nicht verwendet.
In der Spalte Sollzeit wird die tägliche Arbeitszeit des Mitarbeiters angezeigt. Der Wert wird aufgrund verschiedener Parametern angegeben (siehe Spalten der Journal-Tabellen):
- Die Arbeitszeiteinstellungen, die in den Dateieigenschaften → Anfang angegeben sind.
- Spalte Feiertag.
Das Programm vervollständigt den Sollzeit-Wert nur für die als Arbeitstage angegebenen Tage. - Spalte Sollzeit-Typ.
Bei der Eingabe eines Codes kann der Inhalt der Spalte Sollzeit (täglich zu leistenden Arbeitsstunden) anders festlegen.
Sollstundendifferenz und progressiver Stunden-Saldo
In der Spalte Differenz gibt das Programm die Differenz zwischen den geleisteten Arbeitsstunden und der Sollzeit (in Stunden) an.
In der Spalte Progressiv gibt das Programm die kumulierte Differenz an.
Wurde keine Sollzeit angegeben, entspricht der progressive Stunden-Saldo der Summe geleisteter Arbeitsstunden. Um diesen Wert auf Null zurückzusetzen, ist in der Spalte Code Sollzeit der RP-Code (Progressiver Neustart) anzugeben.
Unterteilung1 und Unterteilung2
Diesen Spalten können verwendet werden, um die Zeit anzugeben, die man für ein bestimmtes Projekt gebraucht hat (dienen nur zu Informationszwecken).
Managing holidays with the Time Sheet
Holidays are designated in hours and are entered in the Holiday column of the Journal.
Holidays carried forward
When creating a new year via File and accounting properties ... → Start, any holidays to be carried forward from the previous year must be indicated.
The value is indicated automatically in the Carry forward row of the Holiday column.
Paid holidays or paid leaves, as defined by contract
If some holidays are already included in your schedules :
- Indicate the number of hours of paid holiday in the Start year (for example, Start 2020) initial row.
- Enter the number of paid holiday hours, as per your contract, in the Holiday column. (ex. for 20 days of 8 hours, enter 160, or 80 hours in case you would work part-time at 50%).
- Paid leave days, considered as holidays:
Enter the amount of hours you are entitled to (days x daily hours) in the Start Month row .
Setting up holidays and paid leaves
The start rows are used to indicate the number of holidays granted in hours and minutes. You may indicate the holidays either in the Start year or in the Start month row.
If a person is entitled to 4 weeks of holidays and works 40 hours a week: 40 * 4 = 160. This value will be indicated in the Start year row.
If the hours of allocated holidays changes during the year, enter the number of hours as plus or minus (negative sign) in the available Start month row, Holiday column.
The Holiday column is also used to indicate paid leaves.
Completed and paid holidays
Completed or paid hours of holidays are indicated In the Holiday column of the daily rows.
Remaining holidays
The hours of remaining holidays is indicated in the Total column and calculated automatically.
When holidays are paid:
- In the start row of the following month enter the vacation hours paid with a negative sign.
- For example, indicate "Payment Holidays" in the Notes column.
Printouts
Print Journal table
When using the File → Print ... command, you can:
- Print all the rows of the Journal table.
- Print the selected lines of the Journal table.
Monthly report
Using the Utilities1 → Monthly report ... the program will calculate and display a summary report of the selected period including the main columns used

Arbeitszeiterfassung - Details
Das Arbeitszeiterfassungsblatt vereinfacht und beschleunigt die Berechnung und Präsentation der geleisteten Arbeitsstunden.
Es ist völlig kostenlos, Sie müssen nur Banana Buchhaltung 9 herunterladen und installieren.
Eigenschaften
Konzipiert für Mitarbeiter mit flexiblen Arbeitszeiten oder für Mitarbeiter, die die geleisteten Arbeitsstunden berechnen müssen.
- Wird wie Excel benutzt; kopieren und einfügen sowie korrigieren möglich.
- Planung der vorgesehenen Stunden, mit anpassbarem Wochenplan.
- Alle Berechnungen (Urlaub, Absenzen wegen Krankheit, bezahlte Abwesenheit und anderes) in Stunden: Minuten.
- Sehr schnelle Datenerfassung. Wie:
- Anfangs- und Endzeiten mit täglicher Gesamtberechnung.
- Automatische Eingabe der aktuellen Uhrzeit
- Abweichung + oder - von der aktuellen Zeit
Wenn man früher ankommt oder früher geht.
- Totalsumme der täglich geleisteten Arbeitsstunden.
- Anfangs- und Endzeiten mit täglicher Gesamtberechnung.
- Abweichung zwischen geplanten und geleisteten Stunden.
- Unmittelbare Abrechnung der geleisteten Arbeitsstunden, Urlaubstagen und Abwesenheiten.
- Totalsummen und Saldi pro Tag, Monat und Jahr.
- Übertragung nach Monat und Jahr.
- Leicht konfigurierbar, passt sich den unterschiedlichen Arbeitszeiten an.
- Mit Möglichkeit der Einstellung von Urlaub und unbezahltem Urlaub.
- Möglichkeit Spalten hinzuzufügen, um Spesen, gefahrene Kilometer oder anderes einzugeben.
- Kann das ganze Jahr oder auch nur für einen Teil davon verwendet werden.
- Druckt Monatsbericht (auch mit Summen in Dezimalstunden) aus.
Wichtige Dinge, die man wissen sollte
- Das Arbeitszeiterfassungsblatt besteht aus einer Tabelle, die Journal genannt wird, in welcher die Arbeitsstunden erfasst und die Einstellungen gemacht werden.
- Es werden die unterschiedlichen täglichen Anfangs- und Endzeiten erfasst.
- Urlaub, Absenzen wegen Krankheit, bezahlte Abwesenheit und anderes werden mit Stunden und Minuten angegeben.
- Das Programm berechnet und zeigt die Berichte immer in Stunden und Minuten an.
Eingabe der täglichen Arbeitszeiten - Tipps und Tricks
- Die Datei öffnen (Menü Datei, Befehl Öffnen).
- Sich auf die gelb markierte Zeile des aktuellen Tages begeben (aus Menü Verschiedene1 den Befehl Zu heute gehen ausführen).
- In der Spalte Anfang1 die Zeit des Arbeitsbeginns erfassen sowie in der Spalte Ende1 die Zeit des Arbeitendes.
- Mit dem "." (Punkt) wird die Uhrzeit des Computers eingefügt.
- Wird hierauf +5 oder -5 erfasst (oder jede andere Nummer) zeigt das Programm die aktuelle Uhrzeit des Computers plus oder minus 5 Minuten an. Diese ist auszuwählen, um sie zu übernehmen.
- Aus Menü Verschiedene1 kann man mittels Befehl Woche übernehmen (von vorheriger Woche) die erfassten Arbeitszeiten für denselben Wochentag der vorherigen Woche übernehmen.
- Mit der Ikone 'Von oben kopieren' der Werkzeugleiste (F4 oder Cmd 4) werden die Werte der Zeile zuvor kopiert.
- Urlaubstage oder Abwesenheiten erfassen:
- Die Anzahl Stunden des Urlaubstages oder des Tages der Abwesenheit sind in der spezifischen Spalte zu erfassen.
- Begibt man sich mittels Doppelklick in die Bearbeitung der Zelle, gibt das Programm die für den Tag vorgesehenen Stunden an.
- Gibt man die Stunden im Dezimalformat (z.B. 1.75) an, zeigt das Programm sie in Stunden und Minuten (z.B.1:45) an und man kann diesen Wert auswählen, um ihn zu übernehmen.
Ausdrucke und Berichte
- Der Befehl Ausdrucken (Menü Datei) erlaubt:
- die Tabelle auszudrucken
- die aktuell markierte Zone auszudrucken.
- Der Befehl Monatsbericht (Menü Verschiedene1)
druckt die monatliche Zusammenfassung aus.
Umrechnung von Dezimalstunden in Stunden:Minuten
Das Programm arbeitet immer mit Stunden und Minuten; 8:30 bedeutet 8 Stunden und 30 Minuten.
Es gibt jedoch Situationen, in denen die Stunden mit Dezimalstellen verwendet werden. In diesem Fall entspricht der Wert 8,50 in Stunden : Minuten 8:30. Wenn die Anzahl der Stunden pro Tag auf Dezimalbasis berechnet wird (43 Stunden pro Woche, aufgeteilt in 5 Tagen), müssen Sie 8,6 Stunden pro Tag Arbeiten.
Das Programm hilft bei der Konvertierung wie folgt:
-
In den Spalten vom Typ Anzahl Stunden (Krankheit, Ferien, Soll), wenn nach der Eingabe der Stunde ein Punkt und eine Dezimalzahl eingegeben wird, zeigt das Programm in Autovervollständigung die Zeit in Stunden und Minuten an. Wenn Sie beispielsweise 8.6 schreiben, schlägt das Programm 8:36 vor.
- Dieser Wert muss übernommen werden
-
Im Fenster Info wird auch der Wert der Stunden in Dezimalstellen angezeigt.
- Im Monatsausdruck werden bestimmte Werte auch als Dezimalstellen angegeben (da Lohnabrechnungsprogramme oft mit Dezimalstellen arbeiten).
Spezifische Befehle (Menü 'Verschiedene1')
Zu heute gehen
Positioniert den Cursor auf die Zeile für den aktuellen Tag.
Alles nachkontrollieren...
Kontrolliert alles nach, berechnet alles neu und meldet dabei allenfalls gefundene Fehler.
Tag übernehmen (von vorheriger Woche)
Übernimmt im aktuellen Tag die Werte der Arbeitszeit und Abwesenheit vom entsprechendem Wochentag der Vorwoche.
Woche übernehmen (von vorheriger Woche)
Übernimmt für die aktuelle Woche die Werte der Arbeitszeiten und Abwesenheiten der Vorwoche.
Monatsbericht
Druckt die Zeilen und Totale des aktuellen Monats.
Der zu druckende Zeitraum kann ausgewählt werden. Es kann hierzu ein Monat ausgewählt oder das Anfangs- und Enddatum der gewünschten Periode erfasst werden.
Zeilen für Periode erstellen...
Erstellt die Zeilen für jeden Tag, vom Anfang und vom Total für das angegebene Jahr.
Die Zeilen der Tabelle werden geordnet.
Arbeitszeiterfassung importieren
Übernimmt die Werte eines externen Arbeitszeiterfassungsblattes.
- Man gibt die Datei an, aus welcher die Werte importiert werden sollen.
- Man spezifiziert, welche der folgenden Daten zu übernehmen sind:
- Nur Feiertage importieren:
Die Werte der Spalte Feiertage übernehmen.
Wird ein Wert übernommen, werden auch die 'Anmerkungen' übernommen. - Alle Daten importieren:
Übernimmt die Werte Feiertage, Anmerkungen, erfasste Arbeitszeit, Krankheit, Abwesenheit wegen Ferien, Korrektur, Geschuldet pro Tag (Sollzeit) und Unterteilung (Split).
- Nur Feiertage importieren:
Das Programm sucht in der importierten Datei nach Zeilen mit dem gleichen Datum und Sektion und übernimmt die Werte.
Wenn es in der importierten Datei mehrere Zeilen mit gleichem Datum gibt, werden Werte nach der ersten Zeile nicht importiert.
Productivity Applications Commands
Working with the Banana Accounting Time sheet can be optimized, via different functions in the Utilities1 and Utilities2 menus .
Utilities1 Menu
Go to today
Positions the cursor on today's line.
Check-in or Check-out
Inserts the current time in the selected cell. Alternatively, you may type "." (point without quotes) in the selected start or end cell.
Fill Day (from last week)
Resumes work and absence time of the current day with the values of the day of the previous week.
Fill Week (from last week)
Resumes work and absence time of the current week with the values of the respective days of the previous week.
Add row day
Adds a row successive to the selected one and with the same date. Use this to enter additional daily values.
Add row total day
Adds a row, where daily values will be totaled.
Monthly report ...
Calculates and displays a summary report of the selected period including the main columns used.
Utilities2 Menu
Sort journal
Sort the lines by date.
Create rows for period ...
Add rows (daily, start, total, balances and carryovers) based on the selected period. All rows of the Journal will be sorted by date.
Import Timesheet
Imports the values from an external Timesheet.
- Indicate the Timesheet containing the values to be imported.
- Indicate the values to be imported.
- Import festive only.
Resumes the values of the Festive column only
If it resumes a value, it also resumes the value in the Notes column. - Import all.
Resumes the values of Festive, Notes, Work, Sick, Adjust., Due and Subdivision (split).
- Import festive only.
The program checks the imported file for rows with the same date and section and resumes their values.
If the imported file contains multiple rows for the same date, the values following the first row are not imported.
Create New Year
Creates a new Timesheet file for the year to follow. The program automatically sets the initial values of the holiday balance and the hours according to the previous year.
Warning! When creating a New Year, holidays may differ from the previous year - you need to check and change them manually. Alternatively, Banana.ch SA each year makes available several templates with national holidays already set for some countries.
Inserimento valori
Ore nel formato decimale
Il programma lavora sempre con ore e minuti 8:30 significa 8 ore e 30 minuti.
Si possono però anche inserire le ore nel formato decimale (1.5 = 1:30).
- Se si inserisce un valore preceduto dal segno ">" o "<" (maggiore o minore), il programma lo considera come un valore decimale lo converte in ore e minuti:
- "<1.50" viene convertito in 1:30
- "<1.75" viene convertito in 1:45 un ora e tre quarti.
- Nei contatore ore inserire il numero delle ore con il separatore decimale. Per esempio se si inserisce 1.75, il programma visualizza il valore in ore e minuti (1:45).
Visualizzazione nel formato digitale
- Nell'info Windows viene indicato anche il valore delle ore in decimali.
- Nella stampa mensile certi valori sono anche indicati come decimali (questo perché i programmi dei salari lavorano spesso con i decimali).
Velocizzazione inserimento
- Posizionarsi sul giorno corrente
- La riga del giorno corrente corrente è quella in in giallo.
- Menu Utilità -> Vai a giorno.
- Inserisci l'ora di entrata e uscita.
- Con il "." viene inserita l'ora del computer.
- Se inserisci +5 o -5 (o qualsiasi altro numero) il programma visualizza l'ora attuale con 5 minuti in più o in meno rispetto all'ora del computer.
- Ricopia dalla settimana precedente
Usare i comandi menu Utilità1-> Ricopia si riprendono orari della settimana precedente. - Riprende il valore della riga precedente
Comando Riprendi da sopra (o il bottone F4 o Cmd 4) - Autocompletamento Vacanze o Assenza
Andare in modifica della cella (con uno spazio) e il programma suggerisce le ore dovute, meno le ore già eseguite.
Gestione progetti
Il Foglio ore si presta bene anche per prendere nota delle ore lavorate su progetti.
Nella Versione Experimental sono state aggiunte ulteriori possibilità proprio per facilitare la gestione dei progetti.
Il Foglio di calcolo offre diverse possibilità, si deve scegliere quella che fa al proprio caso, eventualmente combinando gli approcci. .
Attribuire i tempi con le colonne suddivisioni
Con questo approccio, la tenuta delle ore avviene normalmente con le normali colonne (Lavoro o ora entrata e uscita). Nelle colonne Suddivisioni indichi le ore da attribuire a un determinato progetto.
- Ci sono due colonne predefinite per la suddivisione e puoi ovviamente aggiungere altre colonne (Tipo contatore) per altri progetti.
- Nelle righe di totale si ha poi la somma per ogni progetto.
- Nella riga Riporto puoi inserire manualmente il riporto per ogni progetto.
Nella versione Experimental se aggiungi una colonna con il nome TimeSplitTotal, di tipo contatore tempo, il programma somma tutte le colonne il cui nome campo XML inizia con TimeSplit.
Se vuoi il totale giornaliero di tutti le suddivisioni, quando aggiungi una nuova colonna dagli il nome XML che inizia con TimeSplit (per esempio TimeSplitP1, TimeSplitProjectX).
Inserire le ore nelle colonne Lavoro (TimeWork)
Puoi usare le colonne Lavoro1 e Lavoro2 per inserire le ore lavorate al progetto. Le ore del progetto andranno a sommarsi alle ore di lavoro giornaliero.
Nelle righe di totale avrai la somma di ogni progetto.
Nella versione Experimental se aggiungi delle colonne di tipo contatore tempo, che iniziano con TimeWork, verranno anche queste sommate nella colonna Lavoro totale. Hai la possibilità quindi di aggiungere quante colonne progetto ti servono.
Più righe giornaliere per lo stesso giorno
Nel Foglio ore puoi avere diverse righe dello stesso giorno.
- Puoi creare una riga per ogni progetto. Se sullo stesso giorno lavori su più progetti dovrai aggiungere una nuova riga, con la stessa data del giorno.
- A partire dalla seconda riga dello stesso giorno, la descrizione risulterà leggermente rientrata.
- Per aggiungere una nuova riga puoi usare la funzione duplica riga.
- Nella versione Experimental c'é il comando per aggiungere una riga giornaliera e anche la riga di totale giorno.
Righe di Dettaglio
Nella versione Experimental è stata aggiunta una colonna RigaTipo. Se in questa colonna inserisci il valore "D" (Dettaglio), le ore di lavoro inserite in questa riga, sono sommate nella colonna Dettaglio totale, invece che nella colonna Totale.
Nella riga giornaliera normale inserisci le ore di lavoro effettive, anche con ora inizio e fine.
Nelle righe supplementari di Dettaglio, inserisci le ore per i singoli progetti. Puoi indicarli come ora inizio o fine o anche inserendo le ore nella colonna Lavoro (TimeWork).
Se usi le colonne TimeWork è meglio non usare delle colonne diverse per inserire le ore effettuate e quelle dei progetti, in questo modo nel totale giornaliero o mensile avrai le somme separate.
Stampe
Per il momento non vi sono ancora stampe che raggruppano i valori per progetto inseriti su righe diverse. Si prevede che verranno create in futuro.
Se sai programmare in Javascript puoi creare delle stampe come desideri e anche metterli a disposizione di altri.
Aggiunta Tabella Progetti, Categorie
Nella Versione Experimental puoi aggiungere delle Tabelle Progetti e Categorie, dove indicare l'elenco progetti.
Nella tabella Giornale ti troverai una colonna dove, per ogni riga, inserire il codice del progetto o della categoria.
Puoi anche aggiungere altre tabelle e collegarli con la tabella Giornale, per codificare altri valori.
Fixlohn
Fixer Lohn
Der Angestellte hat einen fixen Monatslohn, muss eine bestimmte Anzahl Arbeitsstunden leisten und verfügt über eine bestimmte Anzahl von bezahlten Ferien.
Beachten Sie, dass alle Werte, auch die Ferien, in Stunden angegeben werden.
- Ein vordefiniertes Muster öffnen
- Im Menü Datei, Befehl Eigenschaften (Stammdaten), angeben:
- Registerkarte Arbeitszeiterfassung, Namen und Vornamen im Feld Überschrift links und Überschrift rechts einrichten, das Anfangssdatum und das Enddatum und den Prozentsatz der Arbeit.
- In Registerkarte Anfang, Feld Übertrag übertragen Sie eventuell Stunden und/oder Ferien (immer in Stunden) der vorherigen Periode
- Felder Wochentage Zu leistende Arbeitsstunden, für jeden Tag angeben, wieviel gearbeitet werden muss
- für jeden Arbeitstag die vorgesehenen Stunden eingeben
- Für jeden Tag der Woche angeben, ob es sich um einen Arbeitstag handelt oder nicht, oder um einen Feiertag
- In der Tabelle Journal, auf der ersten Zeile, Spalte Ferien; die Ferien in Stunden angeben
(Z.B. Wenn jemand Recht auf vier Wochen Ferien hat und pro Woche 40 Stunden arbeitet, bedeutet das: 40 * 4 = 160). - Jeden Tag in die Tabelle Journal die Stunden eingeben, während denen gearbeitet worden ist und die Stunden, während denen man abwesend war (Ferien, Krankheit)
- In Spalte Total steht die Totalsumme der Stunden
- In Spalte Sollzeit steht die Anzahl der Arbeitsstunden pro Tag. Das Programm übernimmt die Sollzeit aus den Einrichtungen in Registerkarte Anfang, Befehl Eigenschaften (Stammdaten)
- In Spalte Progressiv steht die Differenz in Stunden zwischen Sollarbeitszeit und effektiver Arbeitszeit
- Die Zeilen Total übertragen die Totalsumme von Stunden der Periode
- Die Zeilen Übertrag übertragen die Anzahl Stunden seit Anfang (progressiv)
Prozentsatz Arbeit unter dem Jahr ändern
Wenn der Prozentsatz der Arbeit während des Jahres ändert, kann man die Einrichtungen direkt in Tabelle Journal ändern
Neuer Prozentsatz Arbeit ab einem bestimmten Datum
Z.B. ab 1. Februar wird am Dienstag und Mittwoch statt 8 Stunden nur 4 Stunden gearbeitet
Tabelle Journal, am ersten Dienstag und Mittwoch (die Werktage sind)
- In Spalte Code Sollzeit den Code "WS" eingeben, was heisst, als Wochentag festlegen
- In Spalte Sollzeit "4" eingeben
- Ab diesem Tag, ist die Sollzeit für den gleichen Wochentag und für das ganze Jahr immer 4 Stunden
- Nur für einige Tage ändern
(Z.B. Eine Woche lang arbeitet man alle Tage 4 Stunden)
In Tabelle Journal, für alle Tage:- In Spalte Code Sollzeit, Code "DS" eingeben, was heisst, Heute setzen
- Spalte Sollzeit "4" eingeben
- Beurlaubung:
Wenn für einen bestimmten Tag eine Beurlaubung gegeben wird- In Spalte Code Sollzeit, Code "DS" eingeben (heute setzen)
- In Spalte Sollzeit "0" eingeben
Ferientage anpassen
Wenn es unter dem Jahr Änderungen gibt, was die Anzahl bezahlter Stunden Urlaub betrifft, muss man:
- in der Tabelle Journal, Zeile Anfang Monat, Spalte Ferien die Stunden eingeben, die man zusätzlich bekommt oder die, die man weniger zur Verfügung hat (mit Minuszeichen).
Überstunden bezahlen
Wenn der Mitarbeiter mehr Stunden gearbeitet hat, als er muss, und wenn diese bezahlt werden, gibt s zwei Möglichkeiten, um die Spalte Progressiv auf Null zu setzen:
- In Spalte Anmerkungen angeben "10 Überstunden bezahlt". Wenn die "Spalte" nicht sichtbar ist, sie im Menü Daten einrichten, Befehl Spalten einrichten aktivieren.
- Oder in Spalte Code Sollzeit "DS" eingeben und in Spalte Sollzeit die Anzahl Stunden, die gearbeitet werden müssen und die, die bezahlt worden sind.
Type of salary
Hereafter the setting up of time sheets for the different types of salary are explained .
Fixed salary
The employee receives a fixed monthly salary, which involves a certain number of hours worked and paid vacations.
Take into account that all values, even holidays, are indicated in hours.
- Open the template that has been set up.
- In the File menu, use the File and accounting properties command and indicate:
- Enter the first and last names in the Timesheet in the Header left and Header right sections, as well as start date and end date and the work percentage.
- Enter eventual worked hours to carry forward from previous period in the Start section, hours and/or holidays (always expressed in hours).
- Enter total hours worked for each day in the Due Hours boxes.
- Indicate the planned hours for each working day.
- Select Working day, Festive or Not a working day for each day of the week.
- In the Journal Tab, indicate the number of holiday hours in the initial row of the Holiday column.
(Ex. If a person is due 4 weeks of holiday and works 40 hours a week: 40 * 4 = 160). - Insert effective hours worked, or absences (sick leave, holidays) for each day in the Journal tab.
- The Total column reports the sum of hours.
- The Due column reports the sum of daily hours. The software will report as per the hours due that are indicated in the Start section of the File and accounting properties command.
- The Progressive column displays the difference in hours (plus or minus) between hours due and the actual ones.
- The Total row displays the total number of hours for the period.
- The Carry forward rows display the number of progressive hours (since the start).
Percentage change during a working year
If the work percentage of working hours is altered during the year, as per 1st of Feb, you can reset those directly in the Journal tab.
New work percentage as per a set date
If for example, Tuesday and Wednesday will only be worked 4 hours per day instead of 8, proceed as follows:
- Insert the WS code in the Due code column (working day setup).
- Insert 4 in the Due column.
- As per that day, the Due column will show 4 hours and for the rest of the year.
- Punctual change for a few days.
(Ex. 4 hours worked every day for just one week).
In the Journal tab, for each day:- Insert code DS (sets up day) in the Due code column.
- Insert 4 in the Due column.
- Leave of absence:
If leave is granted for a certain day:- Insert code DS (sets up day) in the Due code column.
- Insert 0 in the Due column.
Adjustment of holiday days
If the assigned holiday hours change during the year, it is necessary to:
- Insert the number of available hours in plus or minus in the Journal tab, initial row for the month and in the Holiday column.
Payment of extra work hours
If the employee accumulates extra hours other than those due and they are to be paid, there are two possible ways to reset the Progressive column to zero:
- Indicate "Payment 10 extra hours" in the Notes column. If the Notes column is not displayed, set it up via the Data menu, Columns setup ... command.
- Alternatively insert DS in the Due code column and the number of hours due in the Due column, plus those paid.
Salary per hour
In this case the employee is paid according to actual hours worked.
The employee receives a fixed monthly salary which includes a certain number of hours of work and paid vacations.
It must be taken into account that all values, even holidays, are indicated in hours.
- Open the template already set up.
- In the File menu, use the File and accounting properties command and indicate::
- Enter the first and last names in the Timesheet in the Header left and Header right sections, as well as start date and end date and the work percentage. .
- Enter eventual worked hours to carry forward from previous period in the Start section, hours and/or holidays (always expressed in hours).
- Select Working day, Festive or Not a working day for each day of the week.
- In the Journal Tab, indicate the number of actual hours worked or leave of absence (sickness, holidays):
- The Total column reports the sum of hours.
- The Progressive column displays the difference in hours (plus or minus) between hours due and the actual ones.
- The Total row displays the total number of hours for the period.
- The Carry forward rows display the number of progressive hours (since the start).
Progressive resetting
If at the beginning of the following month you want to reset the Progressive, in the Start row of the new month, in the Due Code column, you just need to enter RP (= Restart Progressive). This value will restart the Progressive column from zero.
Documentation Time Sheet for employees paid for agreed hours as per contract
The Time Sheet is ideal for employees under contract for a number of agreed weekly hours.
The application allows you to indicate the days and hours of work as per contract and the hours of work performed. This allows for an immediate view of the situation, with the difference between the agreed and the effective.
The monthly report to be delivered to your employer is exhaustive and complies with legal requirements.
It is recommended to visit the How to start page to get an overall view of this operation.
Methods for managing your hours
The Time sheet allows for different methods for data collection, thanks to the various preset columns in the Journal table.
Depending on your needs, you can make the columns you need visible and hide those that will not be used.
- Systematic collection.
Enter the work start and stop times and the program will calculate the hours worked. Via Data ->Columns setup ..., display the Start1-Stop1, Start2-Stop2, ... , Start5-Stop5 columns where you can enter the times of beginning and end. - Simplified collection.
Indicate the hours worked in a day,
Via Data ->Columns setup ..., display Work1 and Work2 columns to enter the hours worked of the day. - Mixed collection.
You can enter both the time of beginning and end, or the time worked.
Display the Start and Stop columns and the Work columns.
Setting up the weekly working time
The Time Sheet can be adapted to any kind of time schedule, fixed, flexible, part-time or any combination.
In File and accounting properties ... - Start indicate the weekly working time.

Change of working and festive days
If you change the days you work during the year, you must enter the appropriate code in the Festive column to indicate the days you work.
- W1. The day of the week will always be considered non working.
- W2. The day of the week will always be considered as working.
For the other possibilities available, see the explanation of the Festive column.
Change of planned work hours for the day
Indicate the new work schedule in the column Due code and Due columns.
- Due code
With the WS code, you indicate that from this day onwards a value of different hours is set. - Due
Enter the number of working hours scheduled for this day.
For other possibilities and displays please revert to the explanation of the Due code column.
Absences and sick leave
Enter the hours of absences for Illness, Vacations, Service or Other.
Add km and expenses
To register kms traveled or of expenses incurred which must be reimbursed, a special column is added to the Journal table, via the following command Menu →Data → Columns setup ...
If the added column is of the Amount Type, the program will automatically sum up in the total rows.
Further information.
- Holiday page, to set up your holidays and absences.
- Print monthly reports, for your report to be presented to your employer.
Documentation Time Sheet hours for employees paid per hour
The Time Sheet is ideal for employees working under a remuneration per hour contract, without an agreed amount of hours.
After the time or hours of work are indicated, the program allows for an immediate display of your situation.
The monthly report to be delivered to your employer is complete and complies with legal requirements.
Refer to the How to start page for a comprehensive explanation of it's functions.
Methods for managing your hours
The Time sheet allows for different methods for data collection:
- Systematic collection.
Enter the work start and stop times and the program will calculate the hours worked. Via Data ->Columns setup ..., display the Start1-Stop1, Start2-Stop2, ... , Start5-Stop5 columns where you can enter the times of beginning and end. - Simplified collection.
Indicate the hours worked in a day,
Via Data ->Columns setup ..., display Work1 and Work2 columns to enter the hours worked of the day. - Mixed collection.
You can enter both the time of beginning and end, or the time worked.
Display the Start and Stop columns and the Work columns.
Setting up working day
In File and accounting properties ... - Start indicate the weekly working days.
Indicate 0 in hours Due.

Change of working hours during the year
A change in working time is indicated in the Journal table, using the following columns:
Working and festive days
If you change the days you work during the year, you must enter the appropriate code in the Festive column to indicate the days you work.
- W1. The day of the week will always be considered non working.
- W2. The day of the week will always be considered as working.
For the other possibilities available, see the explanation of the Festive colum
Setting the progressive column to 0
By entering "RS" code in the Due code, the progessive balance will revert to 0.
Absences and sick leave
Enter the hours of absences for Illness, Vacations, Service or Other.
Add km and expenses
To register km's traveled or expenses incurred which must be reimbursed, a special column is added to the Journal table, via the following command Menu →Data → Columns setup ...
If the added column is of the Amount Type, the program will automatically sum up in the total rows.
Further information.
- Holiday page, to set up your holidays and absences.
- Print monthly reports, for your report to be presented to your employer.
Obligation to register working hours
In order to protect their employees, companies are obliged by law to establish a daily work time monitoring system, complete with absences and holidays.
- This principle was reiterated in Europe by a ruling of the European Court of Justice. The related regulation is up to the member states.
-
In Switzerland there are ordinances in this regard, that provide for the obligation of systematic recording of working time, with some exceptions provided for a simplified recording (only number of hours worked).(The Swiss ordinance is only available in GE/FR/IT).
Banana Accounting Timesheet provides an excellent compromise
Centralized timekeeping systems are not suitable or applicable to all situations. They are valid for companies, where staff do their job on the premises and where there is staff who adjust automatic data. The system is not suitable, when workers carry out their tasks from home or outside or in small businesses.
There is also another very important aspect. In many companies a relationship of trust exists between employee and employer for which there is no systematic collection of working time. Today, this approach is no longer acceptable as it puts companies in a situation of great legal uncertainty as well as making it difficult for workers to claim and justify hours actually worked.
Banana Accounting Timesheet offers an excellent compromise
- It is up to the employee to make notes of working times, absences and holidays, so that it will be easy to check them.
- The employee has an immediate, comprehensive and precise view of hours worked, overtime, holidays and other absences.
All the elements are thus at disposal and allow to manage the recovery of hours worked, preventing therefore an excessive build up of hours. - The reporting will enable the employer to monitor the situation of each employee on a constant basis.
- Clear data for the preparation of the pay slip, recovery of hours, holidays and overtime payments are made available.
Advantages for the employee and the employer
- The solution easy to use and implement.
- Fully adaptable to the needs of the employee and the company.
- Great time savings are achieved and calculation errors are averted.
- Possibility for the company to encode other useful information (projects, expenses, notes).
- The software is available for free on any operating system, including mobile devices.
We are committed to keep the offer free of charge
The free Timesheet and the Cash manager are tools that are made available to get the ample range of possibilities on Banana Accounting known to a very wide audience.
With this free offer, we equally adhere to the purpose of the company to assist enterprising people.
Banana.ch therefore commits to keeping the offer free of charge over time, so that all employees and companies are in possession of an effective tool to keep notes of their hours without incurring additional costs.
Make the free Timesheet known
If you are a satisfied company or employee or you are an employers' or trade union association or an institution, you can help others by letting them know about the existence of the Banana Accounting Timesheet.
Insert a link to the presentation page of the Timesheet for employees (https://www.banana.ch/it/timesheet-lavoratori-dipendenti) on your website, post it on Facebook or other social media.
When doing so, it will be useful to indicate the main advantages and the fact that you have tried and used it.
Version for employers
We are thinking about developing an application for employers that will allow for the collection and consolidation of the data contained in the files managed by employees for statistical or other purposes.
Should there be a wider interest in such a tool, please report it to us via the contact form, by also indicating which functionalities would be of interest to you.
Information on the time sheet for employers
The Timesheet allows companies that don't own an automatic time recording system to have a modern data collection system.
This offers several advantages:
- You enter the times worked quickly and the totals are displayed immediately, without any waste of time.
- Precise calculation, errors are avoided.
- Comprehensive, it allows you to take note of absences, holidays.
- Schedule of working hours and holidays.
- Display differences between agreed and effective hours worked.
- Flexible and adaptable to any type of contract.
- Expandable via addition of columns.
- Reports are compliant with legal requirements.
- Can also be used for project management.
- Entirely free of charge.
- Can be used on any desktop and mobile operating system.
Self-declaration of hours worked
The Banana Accounting Timesheet allows each employee to input their hours individually and to always be in control of their situation.
The month-end report will summarize all the necessary information. You can also create specific reports for specific needs, if required.
Centralized data entry
The Timesheet is also suitable if the employer collects the data of the hours delivered by the employees.
Hours can be attributed to projects or whatever else is needed.
Provide templates for your company's employees
Each company has different requirements.
To facilitate keeping hours for your employees, it is useful to prepare Timesheet files that serve as templates, with presets:
- Annual holidays.
- The columns for the type of data collection required (systematic, simplified, mixed).
- The columns for the type of salary.
- The columns for absences.
- Additional columns for reimbursable expenses, projects and notes on the progress of the work can also be added.
Specific reports
Extensions allow you to create specific reports, tailored to the needs of a company.
Version for employers
We are thinking about developing an application for employers that will allow for the collection and consolidation of the data contained in the files managed by employees, for statistical or other purposes.
Should there be a wider interest in such a tool, please report it to us via the contact form, by also indicating which functionalities would be of interest to you.
Managing project hours in the Time Sheet
This mode is under development and is currently only available in the Experimental version. Users who have files created with older versions must convert their file.
To manage working hours for projects, add the required columns in the Journal table.
There are two ways to manage project hours:
- Work with the Projects table.
- Work with the Work1, Work2 columns, etc.
Manage projects in the Projects table
You will need to add the Projects table if using this method:
Tools menu → Add new functionalities → Add table: Projects
The following columns are available in the Projects table:
- Id - enter an id unique for each project
- Description - enter the name/description the project.
- Notes - enter any additionally required notes.
Adding the Projects table will automatically add the Projects Id and Projects Description columns in the Journal table.
Display the following columns in the Journal table via the Data → Columns display ... menu:
- RowType (Type) column - enter D if you wish to separate the detail of the project hours from the total of hours worked.
- TimeDetailTotal (Detail) - is a protected column. If D has been entered in the Type column, the program calculates and displays the total project hours projects separately.
- If the Type column is empty, the program calculates and displays the total of project hours in the Total column.
Enter project hours
The hours dedicated to projects can be managed within their own worksheet.
To separate the hours of work done, from the project hours of, it is necessary to:
- Position yourself on the line of the day to which you want to add the project (or projects).
- Via Utilities1 → Add row Day add a new row.
- Enter D in the Type column if you want to separate the detail of the project hours from the total hours worked. Leave blank, if you want the total project hours to be added to the hours worked (Total column).
- Enter the Id of the project, as set up in the Id table. The project description is automatically displayed.
- Enter the start and end time of the project.
The program calculates and updates the Total, Due, Difference and Progressive columns
Manage projects in the Work1, Work2 (etc) table
As an alternative to the Projects table to manage project hours, it is possible to use the Work1, Work2 (etc.) columns.
Each column refers to the hours of a different project. The program includes two predefined columns, but you can add other columns under condition that TimeWork3, TimeWork4... is inserted in the Xml name of the New column window (menu: Data → Columns setup ... → Add).
Via Data → Columns setup, display the following columns in the Journal:
- RowType (Type) column - enter D if you wish to separate the detail of the project hours from the total of hours worked.
- TimeDetailTotal (Detail) column - is a protected column. If D has been entered in the Type column, the program calculates and displays the total project hours projects separately.
- If the Type column is empty, the program calculates and displays the total of project hours in the Total column.
Enter project hours
The hours dedicated to projects can be managed within their own worksheet.
To separate the hours of work done from the project hours, it is necessary to:
- Position yourself on the line of the day to which you want to add the project (or projects).
- Via Utilities1 → Add row Day add a new row.
- Enter D in the Type column if you want to separate the detail of the project hours from the total hours worked. Leave blank,k if you want the total project hours to be added to the hours worked (Total column).
- Enter the Id of the project, as set up in the Id table. The project description is automatically displayed.
- Enter the start and end time of the project.
The program calculates and updates the Total, Due, Difference and Progressive columns.
Timesheet Experimental features
These Timesheet features are only available in the experimental version.
Allow for future possible modifications.
Journal table
Columns have been added to the Experimental version, in order to calculate surcharge hours (holidays, nights) and to manage multiple rows per day.
New columns
Detail
The column is protected. It is used by the program to display work details automatically (e.g.. projects). See details Project Management.
Surcharge
You can enter the additionally paid work either in hours and or minutes. It can also be used to manage recoveries or penalties for late arrivals or other.
%Surcharge
You can enter the percentage of additional work that is to be paid separately.
If on the same day, both hours without surcharge and hours with surcharge have taken place, the times must be entered in two separate rows:
- Add row
- Indicate the work (start and end) as usual on the first line.
- The second row will indicate the extra hours and indicate the appropriate percentage.
If you wish to display the daily total directly in the table, you will have to add a daily total row.
Surcharge calc.
The column is protected. It is used by the program to calculate the total extra time, indicated in the Surcharge or Surcharge% column.
This value is added up to the total hours column.
New User columns
You have the possibility to add columns which are then added up in the groups. The XML name of the column must be of the Time Count type and must begin with:
- TimeWork. Added up in work total work.
- TimeSurchargeManual. Added up in surcharge total.
- TimeAbsence. Added up in absence total.
- TimeSplit. Added up in TimeSplitTotal, if existent.
You may define columns to indicate the hours of a project, which are also added up in TimeWork or absences for training courses or others, that are considered as absences accounted for in the total absences.
Menu
There are two menus in the application:
Utilities1
The Utilities1 menu contains specific commands in the Journal table:
- Go to today - positions the cursor on today's line.
- Check-in or Check-out - inserts the current time in the selected cell. Alternatively, you may type "." (point without quotes) in the selected start or end cell.
- Fill day (from last week) - resumes work and absence time of the current day with the values of the day of the previous week.
- Fill week (from last week) - resumes work and absence time of the current week with the values of the respective days of the previous week.
- Add row day - adds a row successive to the selected one and with the same date. Use this to enter additional daily values.
- Add row total day - adds a row, where daily values will be totaled.
- Monthly report ... - calculates and displays a summary report of the selected period including the main columns used.
Utilities2
Commands specific to importing data and creating a new year are contained in the Utilities2 menu.
- Sort journal - sort the lines by date.
- Create rows for period ... - add rows (daily, start, total, balances and carryovers) based on the selected period. All rows of the Journal will be sorted by date.
- Import Time sheet - imports the values from an external time sheet. The program checks for rows with the same date and section in the imported file, and will take over their values.
If multiple lines are present in the imported file for the same date, the values following the first line are not imported.
The dialog window allows you to choose one of the following options:- Import festive only resumes the values of the Festive column only).
- Import all values (resumes the values of Festive, Notes, Start1/2, Sick, Adjust., Due and subdivision columns).
- Create new year - create a new Time sheet file for the year to follow. The program automatically sets the initial values of the holiday balance and the hours according to the previous year.