Extension's Types
The Extension type is defined within the attribute @task.
There are many types, and some of them are started in different ways.
Every extension need a specific type and a startup function.
- Types: app.command, export.file, export.rows, export.transactions, report.general
- Startup function: exec()
- How to run it:
- File based Apps are started from the menu App.
- Embedded Apps are run with the button within the Document table
General extension
The General extension type is used for anything that is not specific. It can input data, prepare report or modify the accounting.
- // @task = app.command
The extension is shown in the Menu extension.
You can run the extensions in two way:
- Menu > Extensions settings > Execute
- Menu Extension > the specific extension command
Export extension
Export extensions create and return a content that is than saved to a file.
- @task: import.transactions
Import extensions
The purpose is to translate the content of a file to a Banana Compatible format.
Import extensions are displayed in the Menu Action > Import in to Accounting.
There are different type:
- import.transactions
- @task: import.transactions
- Startup function: excec(fileContent) with the content of the file as parameter. The function should return a comma separated file.
- How to run it:
- Select from the menu Actions the command Import to accounting...
- As Import type select Transactions
- Select an import app from the list
- Click Browse to select the file with the data to import in Banana
- import.rows
- import.accounts
- import.categories
- import.exchangerates
- import.vatcodes
Report extensions
Report extensions purpose it to create a report.
- The report startup function is called by the specific function in Banana, for example the print invoice function.
- The function should return a Banana.Report document.
- The result is displayed on the preview windows.
Customer Report Extensions
Customer Report Extensions are of different type :
- report.customer.invoice
- Type: report.customer.invoice
- Startup function printDocument(jsonInvoice, repDocObj, repStyleObj)
- How to run it:
- Accounting: menu Reports > Customers the command Print invoices...
- Inoice & Estimate : menu Reports > Print invoices...
- report.customer.statement
- Type: report.customer.statement
- Startup function printDocument(jsonInvoice, repDocObj, repStyleObj)
- How to run it:
- Select from the menu Reports > Customers the command Print statements...
- report.customer.reminder
- Type: report.customer.reminder
- Startup function printDocument(jsonInvoice, repDocObj, repStyleObj)
- How to run it:
- Select from the menu Reports > Customers the command Print reminders...
Payment extensions
Payment extensions are used in the accounting to enter payment data and create payments orders.
Invoice Dialog extensions
Invoice Dialog extensions is a special type that is called by the Invoice & Expense application to edit or update the content of an invoice or estimate.
File Creator Extensions
File Creator Extensions are used to create a Banana Accounting file by importing and transforming the data.
General Extensions
General extensions are extensions that are not specific. You can use for anything.
- Entering data.
- Creating a report.
- Making changes to a file.
Attributes
In the attribute the Productivity extension should define:
- @tast = app.command
// @task = app.command
Starting function
The entry point of an Productivity extension is the function exec().
function exec(inData) {

}
Return value
The return value is an error or a JSON containing a documentChange to modify the accounting data.
General Reports Extensions
Extensions are used to create reports.
Report Extensions are General Extensions that use the Report functionality. They have the following structured:
- Have the attribute "app.command".
- Contain the function exec() tha
- create ReportObject
and populate with data. - create a Banana.Report.ReportStylesheet
use the function Banana.Report.newStyleSheet() - call a function Banana.Report.preview(reportObject, stylesheet)
The program will then open the preview window and visualize the content.
- create ReportObject
Specific Report Extensions
Specific report extensions are for:
Example Extension for Creating a Report with a Table
Introduction
All the following code samples are used in the embedded_javascript_tutorial1.ac2 file as embedded BananaApps. This file contains a list of complete and working examples that can be run.
Another complete and working example of BananaApp that use a table can be found here.
Table object
Tables are used in BananaApps to present tabular data as reports.
A Table object is defined using the addTable([classes]) function, and contains a number of table cells which are organized into table rows.
The process for creating a table is the following:
- Create the report object that willl contain the table
- Add a table object to the report
- Add a row object to the table using the addRow([classes]) method.
- Add cells objects to the row using the addCell([span]) or addCell(text [,classes, span]) methods.
- Repeat steps 3 and 4
Table Code Sample: Simple Table
// @api = 1.0
// @id = ch.banana.uni.app.tablereport
// @description = Tutorial: Table example report
// @task = app.command
// @doctype = nodocument
// @publisher = Banana.ch SA
// @pubdate = 2019-01-25
// @inputdatasource = none
// @timeout = -1

function exec() {
	var report = Banana.Report.newReport("Report title"); // create the report
	var myTable = report.addTable("myTable");             // create and add a table to the report

	var tableRow = myTable.addRow();                      // add a row to the table
	tableRow.addCell("Cash");                             // add a first cell to the row
	tableRow.addCell("500.00");                           // add a second cell to the row

	var tableRow = myTable.addRow();                      // add a row to the table
	tableRow.addCell("Bank");                             // add a first cell to the row
	tableRow.addCell("1200.50");                          // add a second cell to the row
    var stylesheet = Banana.Report.newStyleSheet();
    Banana.Report.preview(report, stylesheet);
}
Output: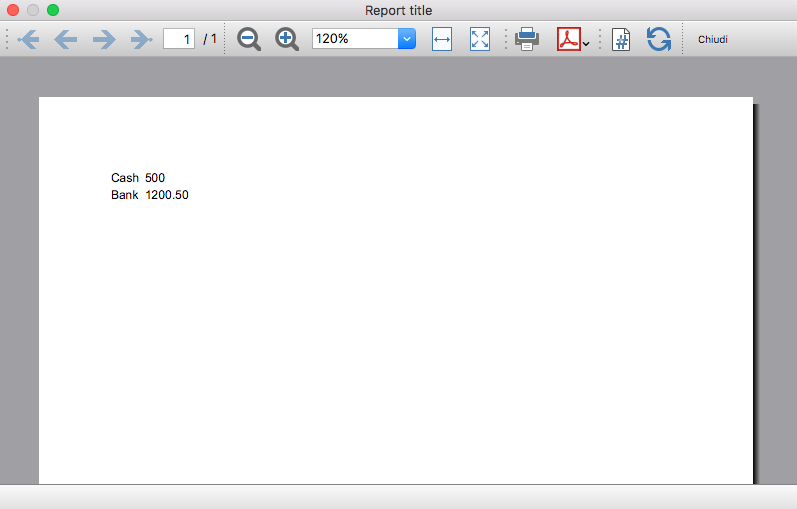
Column headers
Table cells may should act as column headers, in such cases it should be used the getHeader() function.
If the table goes over several pages, this would allow you to repeat at the beginning of each page the headers of the columns.
var report = Banana.Report.newReport("Report title");
var table = report.addTable("myTable");

// add the table header
var tableHeader = table.getHeader();
var tableRow = tableHeader.addRow();
tableRow.addCell("Description");
tableRow.addCell("Amount");

// add the first row of the table
tableRow = table.addRow();
tableRow.addCell('Cash');
tableRow.addCell('1200');
Output: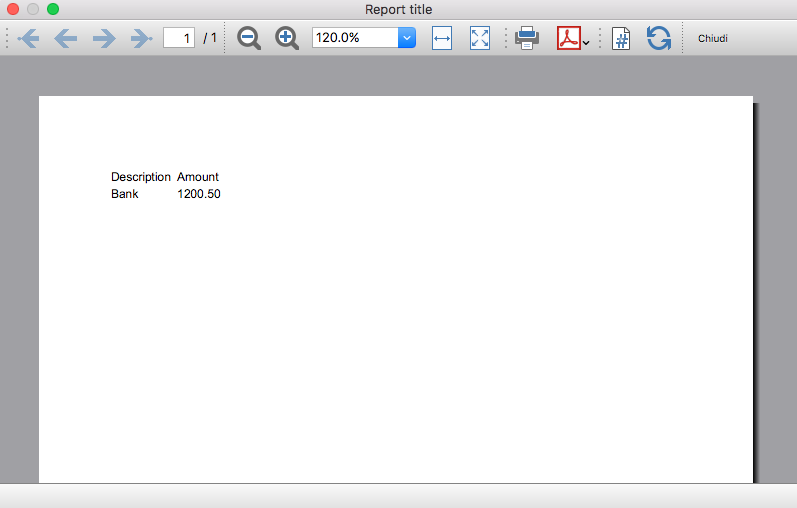
Caption
A caption, which is a descriptive text associated with the element, can be added to a table using the getCaption() function.
var table = report.addTable("MyTable");
var caption = table.getCaption();
caption.addText("Table caption text", "captionStyle");
Output: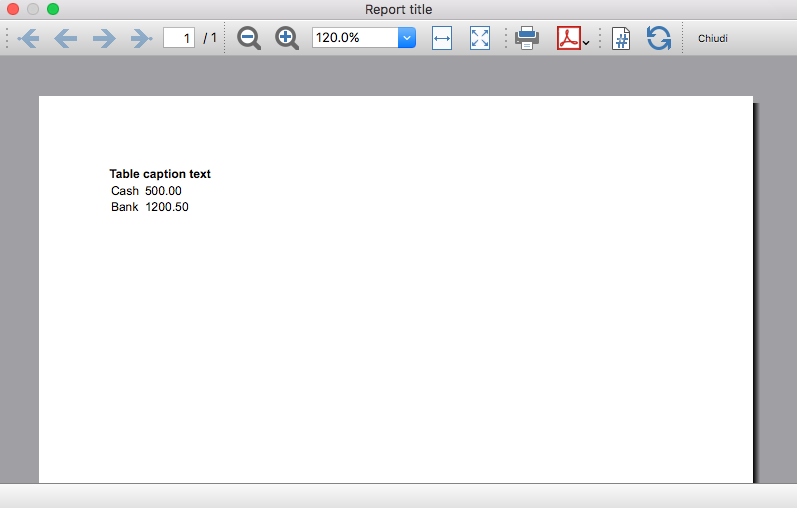
Merge cells
Table cells can be merged using the span attribute of the addCell([span]) or addCell(text [,classes, span]) functions.
tableRow.addCell();                        // span empty cell over 1 column (default value)
tableRow.addCell("", 3);                   // span empty cell over 3 columns
tableRow.addCell("Cash", 2);               // span the cell over 2 columns
tableRow.addCell("Cash", "classStyle", 2); // span the cell over 2 columns
Columns and Cells attributes
Styles attributes can be defined to set, for example, the columns width and cells borders using the addColumn([classes]) and setStyleAttributes(attributes) functions.
- The width attribute (applied to a table) specifies the width of a table. If the width attribute is not set, a table takes up the space of the report page.
- The width attribute (applied to a column) specifies the width of a column. If the width attribute is not set, a column takes up the space it needs to display the data.
- The border attribute (applied to a cell) specifies the border of a cell. If the border attribute is not set, a cell will be displayed without borders.
var report = Banana.Report.newReport("Report Title");
var table = report.addTable("MyTable");
table.setStyleAttributes("width:100%;"); // specifies the width of the table

var column1 = table.addColumn("col1");
column1.setStyleAttributes("width:10%"); // specifies the width of the column1
var column2 = table.addColumn("col2");
column2.setStyleAttributes("width:55%"); // specifies the width of the column2
var column3 = table.addColumn("col3");
column3.setStyleAttributes("width:30%"); // specifies the width of the column3
var column4 = table.addColumn("col4");
column4.setStyleAttributes("width:5%");  // specifies the width of the column4

var tableRow = table.addRow();
tableRow.addCell("A", "", 1).setStyleAttributes("border:thin solid black"); // specifies the cell border
tableRow.addCell("B", "", 1).setStyleAttributes("border:thin solid black"); // specifies the cell border
tableRow.addCell("C", "", 1).setStyleAttributes("border:thin solid black"); // specifies the cell border
tableRow.addCell("D", "", 1).setStyleAttributes("border:thin solid black"); // specifies the cell border
Output: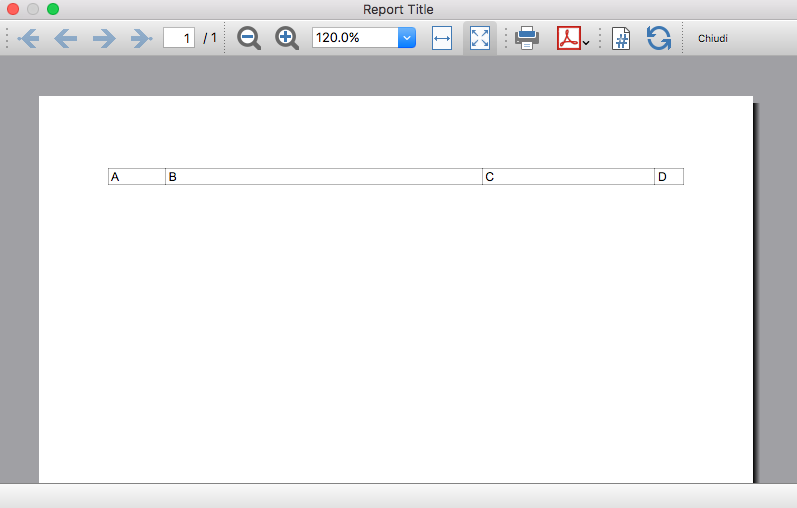
Cell with multiple paragraphs
Table cells can contain multiple paragraphs of text or data. Use the addParagraph([text, classes]) function to add many paragraphs to a cell.
var report = Banana.Report.newReport("Report Title");
var table = report.addTable("MyTable");
table.setStyleAttributes("width:100%;");
tableRow = table.addRow();

// Add first cell with paragraphs
var cell1 = tableRow.addCell("", "", 1);
cell1.setStyleAttributes("border:thin solid black");
cell1.addParagraph("First paragraph...", "");
cell1.addParagraph("Second paragraph...", "");
cell1.addParagraph(" "); //empty paragraph
cell1.addParagraph("Fourth paragraph...", "");

// Add second cell without paragraphs
var cell2 = tableRow.addCell("Cell2...", "", 1).setStyleAttributes("border:thin solid black");
Output: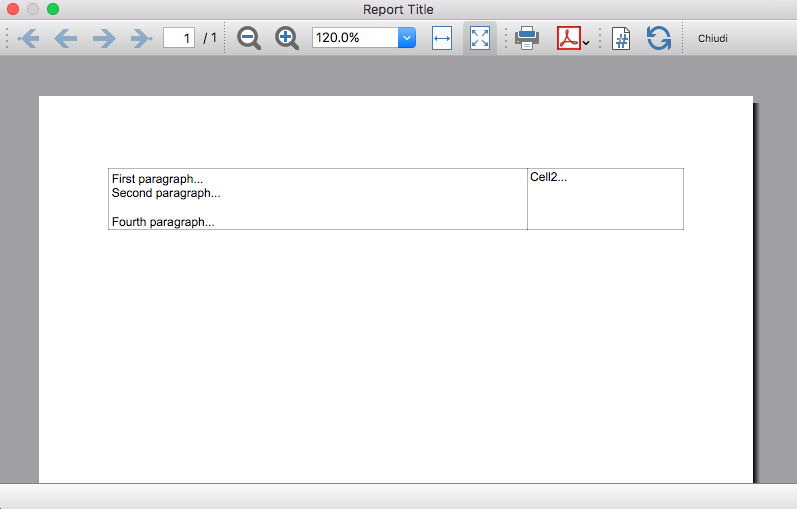
Table Code Sample: Complex Table
var report = Banana.Report.newReport("Report Title");
var table = report.addTable("MyTable");
table.setStyleAttributes("width:100%;");

var column1 = table.addColumn("col1");
column1.setStyleAttributes("width:25%");
var column2 = table.addColumn("col2");
column2.setStyleAttributes("width:25%");
var column3 = table.addColumn("col3");
column3.setStyleAttributes("width:25%");
var column4 = table.addColumn("col4");
column4.setStyleAttributes("width:25%");

// 1st row
tableRow = table.addRow();
tableRow.addCell("Row 1, Cell 1: span cell over 4 columns", "", 4).setStyleAttributes("border:thin solid black");

// 2nd row
tableRow = table.addRow();
tableRow.addCell("Row 2, Cell 1: span cell over 2 columns", "", 2).setStyleAttributes("border:thin solid black");
tableRow.addCell("Row 2, Cell 3: span cell over 2 columns", "", 2).setStyleAttributes("border:thin solid black");

// 3rd row
tableRow = table.addRow();
tableRow.addCell("Row 3, Cell 1", "", 1).setStyleAttributes("border:thin solid black");
tableRow.addCell("Row 3, Cell 2: span cell over 2 columns", "", 2).setStyleAttributes("border:thin solid black");
tableRow.addCell("Row 3, Cell 4", "", 1).setStyleAttributes("border:thin solid black");

// 4th row
tableRow = table.addRow();
tableRow.addCell("Row 4, Cell 1", "", 1).setStyleAttributes("border:thin solid black");
tableRow.addCell("Row 4, Cell 2", "", 1).setStyleAttributes("border:thin solid black");
tableRow.addCell("Row 4, Cell 3", "", 1).setStyleAttributes("border:thin solid black");
tableRow.addCell("Row 4, Cell 4", "", 1).setStyleAttributes("border:thin solid black");

// 5th row
tableRow = table.addRow();
tableRow.addCell("Row 5, Cell 1: span cell over 3 columns", "", 3).setStyleAttributes("border:thin solid black");
tableRow.addCell("Row 5, Cell 4", "", 1).setStyleAttributes("border:thin solid black");
Output: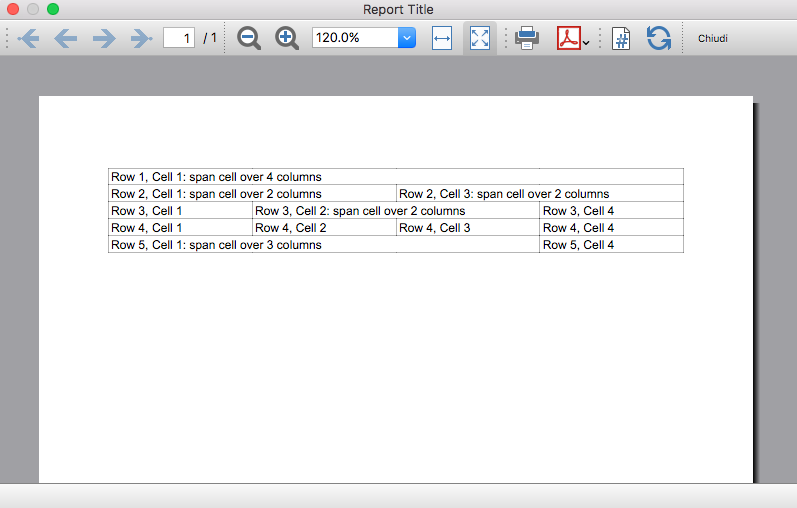
Table within a Table
Tables can also be added within other tables, in particular to cells of "externals" tables. This might be useful when you need to create tables with more complex structures.
In these cases it is only necessary to add a tables to the cell object of the external tables instead of the report. These tables are treated as a separate table, with their own rows, cells and attributes.
var report = Banana.Report.newReport("Report Title");

/*  EXTERNAL TABLE */
var table = report.addTable("outTable");
// ... add style attributes, rows, cells, etc. for the first external table

/* INTERNAL TABLE */
row_out = table.addRow(); // add a new row and a cell
cell_out = row_out.addCell("", "", 1);

var insideTable = cell_out.addTable("inTable"); // add a second table within a cell of the first table

var row_in = insideTable.addRow();
var cell_in = row_in.addCell("1", "", 1);
cell_in = row_in.addCell("2", "", 1);

row_in = insideTable.addRow();
cell_in = row_in.addCell("3", "", 1);
cell_in = row_in.addCell("4", "", 1);

// add a second cell to the first table
cell_out = row_out.addCell("row 2, cell 2", "", 1);
Output example: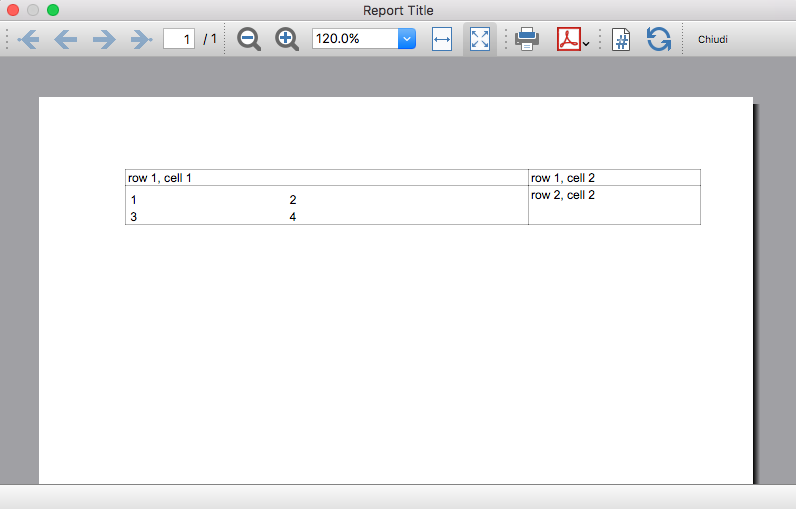
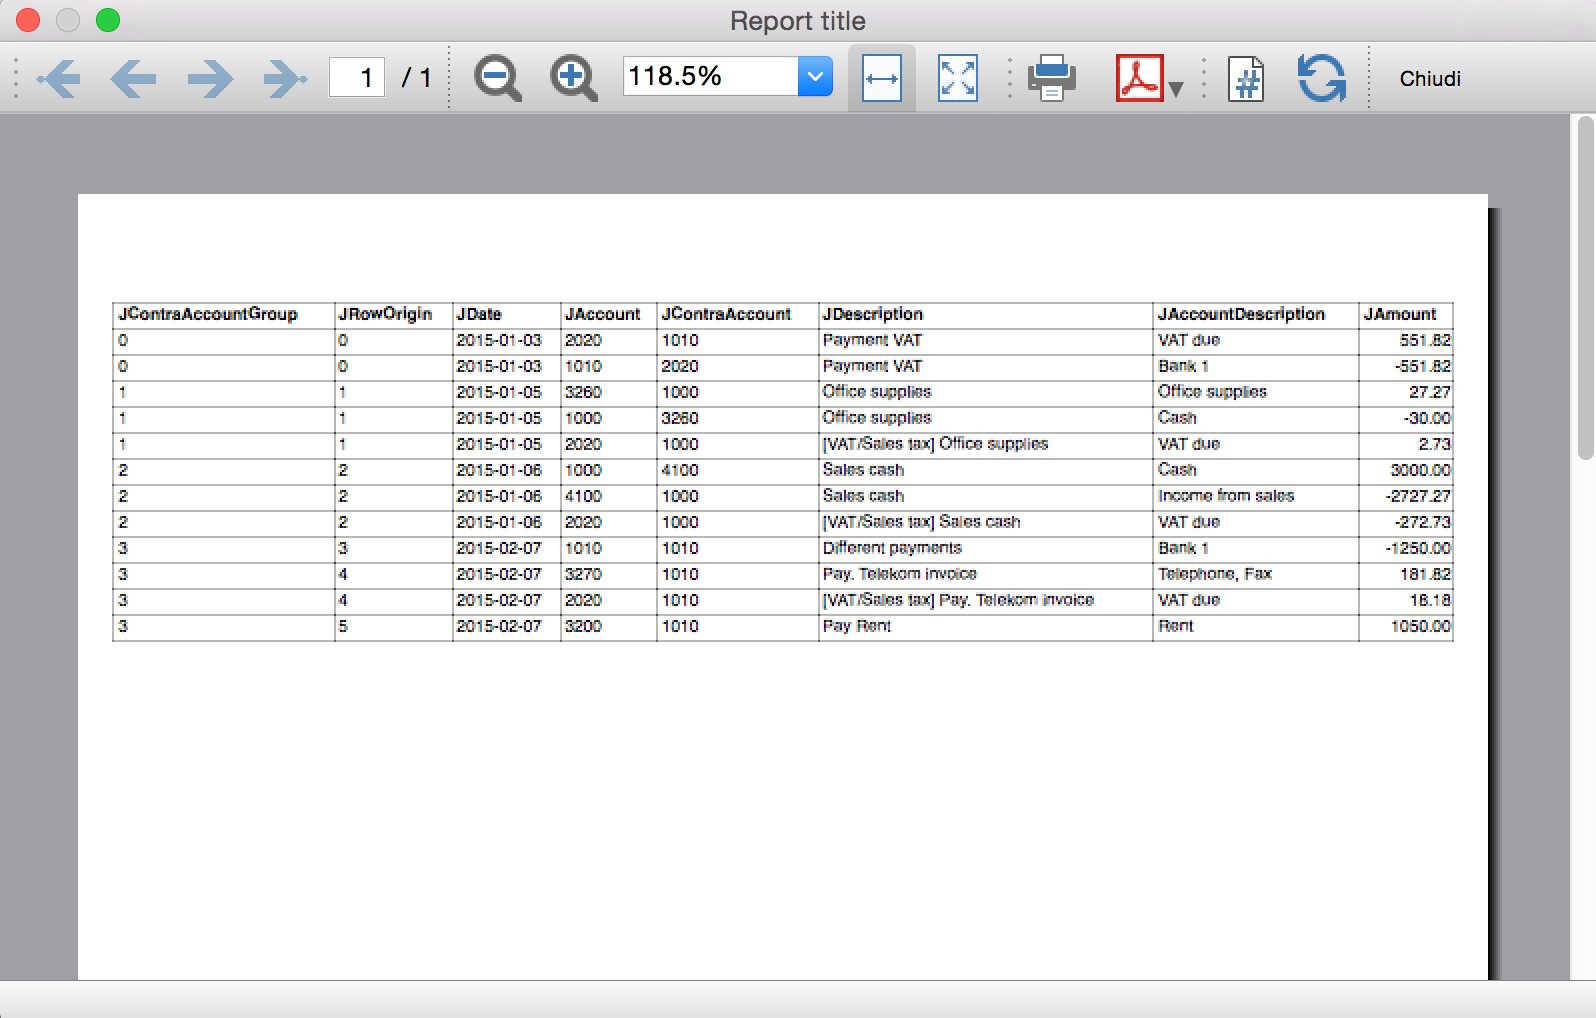
Example Extension for Journal reporting
In the following we will explain what need to be considered when creating a new BananaApps for a journal reporting.
- Retrieving the transactions data.
- Creating specific reports using the functionalities offered by the Banana API.
Documentation
Example files
- The examples files are available on github/General/CaseStudies/JournalReport.
- Solutions making use of the journal api:
- China, Voucher report
- Netherlands, Auditfile
Transactions table
The following table is an example of transactions:
![]()
We see above different types of transactions. The transactions can be on a single line or over multiple lines, with or without VAT.
The idea here is to print a journal’s table that contains all the accounts and the transactions. The final result it’s the following one:
Javascript API equivalent
To retrieve a Table object with all the amount registered on the accounts, we use the Journal’s API:
var journal = Banana.document.journal(Banana.document.originType, Banana.document.accountType);
where
originType specifies the row to be filtered for. Can be one of:
- ORIGINTYPE_NONE no filter is applyied and all rows are returned (current and budget)
- ORIGINTYPE_CURRENT only the normal transactions are returned
- ORIGINTYPE_BUDGET only the budget transactions are returned
accountType specifies the row to be filtered for. Can be one of:
- ACCOUNTTYPE_NONE no filter is applied and all rows are returned.
- ACCOUNTTYPE_NORMAL only rows for normal accounts are returned
- ACCOUNTTYPE_CC1 only rows for Cost Center 1 are returned
- ACCOUNTTYPE_CC2 only rows for Cost Center 2 are returned
- ACCOUNTTYPE_CC3 only rows for Cost Center 1 are returned
- ACCOUNTTYPE_CC Cost Center rows are returned same as using (ACCOUNTTYPE_CC1 | ACCOUNTTYPE_CC2 | ACCOUNTTYPE_CC3)
The returned table has all the columns of the transaction's table plus many other (please, visit the Journal's API for more information).
Code example
A common use to create and use a journal table to retrieve transactions data would be:
// Copyright [2024] [Banana.ch SA - Lugano Switzerland]
// @id = ch.banana.addon.journalreport.js
// @api = 1.0
// @pubdate = 2016-06-01
// @publisher = Banana.ch SA
// @description = Journal Report Example
// @task = app.command
// @doctype = 100.*;110.*;130.*
// @docproperties =
// @outputformat = none
// @inputdataform = none
// @timeout = -1


function exec() {

	//Create the report
	var report = Banana.Report.newReport('Report title');

	//Create a journal table
	var journal = Banana.document.journal(Banana.document.ORIGINTYPE_CURRENT, Banana.document.ACCOUNTTYPE_NORMAL);

	//Print the table header
	var table = report.addTable("table");
	tableRow = table.addRow();
	tableRow.addCell("JContraAccountGroup", "bold", 1);
	tableRow.addCell("JRowOrigin", "bold", 1);
	tableRow.addCell("JDate", "bold", 1);
	tableRow.addCell("JAccount", "bold", 1);
	tableRow.addCell("JContraAccount", "bold", 1);
	tableRow.addCell("JDescription", "bold", 1);
	tableRow.addCell("JAccountDescription", "bold", 1);
	tableRow.addCell("JAmount", "bold", 1);

	//Read the table row by row and save some values
	for (var i = 0; i < journal.rowCount; i++) {

		var tRow = journal.row(i);

		//From the journal table we want only the transactions rows
		if (tRow.value('JOperationType') == Banana.document.OPERATIONTYPE_TRANSACTION) {

			var jContraAccountGroup = tRow.value('JContraAccountGroup');
			var jRowOrigin = tRow.value('JRowOrigin');
			var jDate = tRow.value('JDate');
			var jAccount = tRow.value('JAccount');
			var jContraAccount = tRow.value('JContraAccount');
			var jDescription = tRow.value('JDescription');
			var jAccountDescription = tRow.value('JAccountDescription');
			var jAmount = tRow.value('JAmount');

			tableRow = table.addRow();
			tableRow.addCell(jContraAccountGroup, "", 1);
			tableRow.addCell(jRowOrigin, "", 1);
			tableRow.addCell(jDate, "", 1);
			tableRow.addCell(jAccount, "", 1);
			tableRow.addCell(jContraAccount, "", 1);
			tableRow.addCell(jDescription, "", 1);
			tableRow.addCell(jAccountDescription, "", 1);
			tableRow.addCell(jAmount, "right", 1);
		}
	}

	//We apply some style and print the report
	var stylesheet = Banana.Report.newStyleSheet();

	var pageStyle = stylesheet.addStyle("@page");
    pageStyle.setAttribute("margin", "15mm 5mm 10mm 5mm");

    stylesheet.addStyle("body", "font-size: 7pt; font-family: Helvetica");
    stylesheet.addStyle(".bold", "font-weight:bold");
    stylesheet.addStyle(".right", "text-align:right");
    stylesheet.addStyle(".backgroundColor", "background-color:#464e7e");

    style = stylesheet.addStyle(".table");
	style.setAttribute("width", "100%");
	stylesheet.addStyle("table.table td", "border: thin solid black");

	Banana.Report.preview(report, stylesheet);
}
Results of the Journal’s table for each transaction
The journal’s table above is useful to better understand exactly how the journal works.
In general:
- For each account used in the transaction table (AccountDebit, AccountCredit, CC1, CC2, CC3) the program generates a journal row with the JAccount column set with the specific account.
- For a double entry account transaction that use AccountDebit, AccountCredit, AccountVat, CC1, CC2, CC3 the Journal will contain six rows. If the transaction has only AccountDebit and AccountCredit, then two rows will be generated.
All transactions in specific:
- Doc 001 – Single line transaction without VAT
Journal:
One line for the 2020 JAccount
One line for the 1010 JAccount
- Doc 005 – Single line transaction with VAT
Journal:
One line for the 3260 JAccount
One line for the 1000 JAccount
One line for the 2020 JAccount
- Doc 006 – Single line transaction with negative VAT
Journal:
One line for the 1000 JAccount
One line for the 4100 JAccount
One line for the 2020 JAccount. The VAT amount is in negative for the fact that the VAT amount is registered in credit, and therefore the amount must be pay to the tax authority
- Doc 011 – Multiple lines transaction with VAT
Journal:
One line for the 1010 JAccount
One line for the 3270 JAccount
One line for the 2020 JAccount
One line for the 3200 JAccount
Example Extension for Cash Flow Report
Introduction
This walkthrough provides step-by-step guidance for creating an Extension for printing a cash flow report.
As example we use the Cash Flow Report that is part of the Rapports comptables (OHADA - RDC) Extension, developed following the specifications for the OHADA-RDC in Africa (for more information, visit the GitHub documentation).
There are three basic steps in order to experiment with this Extension:
- Prepare for programming
- Create a JavaScript programming
- Install the Extension
- Run the Extension
Preparation work
Before you start programming, you need to define how the output should look like and how its calculations will be done.
With the following information the software developer will be able to program the software:
- Prepare an accounting file with:
- The accounting plan you will use as the base for the report.
The Cash flow report is related to a specific accounting plan, its accounting groups and its numbers. - The data that is necessary to test if the report is correct.
- Opening balances for all the accounts and groups that partecipate in the calculation.
Possibly use simple to understand amounts (10, 20, 100, 1000). - Transactions for all relevant accounts.
- Opening balances for all the accounts and groups that partecipate in the calculation.
- The accounting plan you will use as the base for the report.
- Decide how the report should look like.
If you aren't already in process of an example printout, use Excel and prepare an example of the desired printout.
On the left side ad a column with the name for each row.
See OHADA example. - Explain for each row how the calculation for the related row of the report should be done.
See OHADA example.- Specify the accounts or groups that will be summed
- Specify amounts that should be entered manually.
In case the information cannot be retrieved from the accounting data (lack of account), the programmer can easily create a dialog in order to enter the information manually.
How to specify calculations for programmers
In order to understand how to specify calculations for programmers, you need to know which amounts you can retrieve from the Accounts table of Banana Accounting.
You can retrieve amounts for both, accounts and groups, and specify the type of amount:
- opening: the amount at the beginning of the period (the Opening column of the Accounts table). Can be positive or negative.
- debit: the amount of debit transactions for the period (the Debit column of the Accounts table). Only positive values.
- credit: the amount of credit transactions for the period (the Credit column of the Accounts table). Only positive values.
- total: the difference between debit-credit for the period. Can be positive or negative.
- balance: the balance for the period (opening + total). Can be positive or negative.
The combination of account/group and amounts type can be used to specify the calculations for programmers:
- In case of accounts, indicate "account_number , amount_type" (i.e. "1000 , opening").
- In case of groups, indicate "Gr=group_number , amount_type" (i.e. "Gr=10 , total").
See the table below for more examples:
| Row name | Formula | Description |
|---|---|---|
| ZA | getAmount(Gr=BT, opening) | Takes the opening amount of the group BT |
| FA | + (-1) getAmount(Gr=134, total) + getAmount(6541, total) + getAmount(6542, total) - (-1)getAmount(7541, total) - (-1)getAmount(7542, total) + (-1)getAmount(Gr=136, total) + (-1)getAmount(Gr=TO, total) - getAmount(Gr=RP, total) - getAmount(Gr=RQ, total) - getAmount(Gr=RS, total) | add (inverted) total amount of group 134 add total amount of account 6541 add total amount of account 6542 subtract (inverted) total amount of account 7541 subtract (inverted) total amount of account 7542 add (inverted) total amount of group 136 add (inverted) total amount of group TO subtract total amount of group RP subtract total amount of group RQ subtract total amount of group RS |
| FB | getAmount(488, total) | Takes the movement of the period (total) for the account 488 |
| FJ | + getAmount(826, credit) + getAmount(Gr=AS-1, credit) - getAmount(4856, debit) | add credit amount of account 826 add credit amount of group AS-1 subtract debit amount of account 4856 |
Example of the "FA" row in the report with the sum of all the amounts:
Here is the Javascript code for the calculation of each line. For a better control there has been created a function for each row, that retrieves and sums the values for a specific period and then returns the amount to be printed.
function calculate_ZA(banDoc, startDate, endDate) {
   /*
      Gr=BT,opening - (- Gr=DT,opening)
   */
   var grBT = getAmount(banDoc,'Gr=BT','opening',startDate,endDate);
   var grDT = getAmount(banDoc,'Gr=DT','opening',startDate,endDate);
   return Banana.SDecimal.subtract(grBT, Banana.SDecimal.invert(grDT));
}
function calculate_FA(banDoc, startDate, endDate) {
   /*
      + (-Gr=134, total)
      + account 6541, total
      + account 6542, total
      - (-account 7541, total)
      - (-account 7542, total)
      + (-Gr=136, total)
      + (-Gr=TO, total)
      - Gr=RP, total
      - Gr=RQ, total
      - Gr=RS, total
   */
   var gr134 = getAmount(banDoc,'Gr=134','total',startDate,endDate);
   var acc6541 = getAmount(banDoc,'6541','total',startDate,endDate);
   var acc6542 = getAmount(banDoc,'6542','total',startDate,endDate);
   var acc7541 = getAmount(banDoc,'7541','total',startDate,endDate);
   var acc7542 = getAmount(banDoc,'7542','total',startDate,endDate);
   var gr136 = getAmount(banDoc,'Gr=136','total',startDate,endDate);
   var grTO = getAmount(banDoc,'Gr=TO','total',startDate,endDate);
   var grRP = getAmount(banDoc,'Gr=RP','total',startDate,endDate);
   var grRQ = getAmount(banDoc,'Gr=RQ','total',startDate,endDate);
   var grRS = getAmount(banDoc,'Gr=RS','total',startDate,endDate);
   var res = 0;
   res = Banana.SDecimal.add(res, Banana.SDecimal.invert(gr134));
   res = Banana.SDecimal.add(res,acc6541);
   res = Banana.SDecimal.add(res,acc6542);
   res = Banana.SDecimal.subtract(res, Banana.SDecimal.invert(acc7541));
   res = Banana.SDecimal.subtract(res, Banana.SDecimal.invert(acc7542));
   res = Banana.SDecimal.add(res, Banana.SDecimal.invert(gr136));
   res = Banana.SDecimal.add(res, Banana.SDecimal.invert(grTO));
   res = Banana.SDecimal.subtract(res,grRP);
   res = Banana.SDecimal.subtract(res,grRQ);
   res = Banana.SDecimal.subtract(res,grRS);
   return res;
}
function calculate_FB(banDoc, startDate, endDate) {
   /*
      account 488, total
   */
   return getAmount(banDoc,'488','total',startDate,endDate);
}
function calculate_FJ(banDoc, startDate, endDate) {
   /*
      + account 826, credit
      + Gr=AS-1, credit
      - 4856, debit
   */
   var acc826 = getAmount(banDoc,'826','credit',startDate,endDate);
   var grAS1 = getAmount(banDoc,'Gr=AS-1','credit',startDate,endDate);
   var acc4856 = getAmount(banDoc,'4856','debit',startDate,endDate);
   var res = 0;
   res = Banana.SDecimal.add(res,acc826);
   res = Banana.SDecimal.add(res,grAS1);
   res = Banana.SDecimal.subtract(res,acc4856);
   return res;
}
Create the JavaScript programming
The script retrieves all the required data from Banana Accounting files, makes some addition and subtraction operations, and presents the data in a table.
By looking a the source code for Cash Flow Report (OHADA - RDC) you will understand how the report is setup.
If you want to experiment with the script, copy and paste it on your text editor and save the file as .js (i.e. cashflow.js). Otherwise you can just install and run the app following the GitHub documentation.
Retrieve data from Banana
In order to build a cash flow it is required to get different data from the accounting. These data are values related to specific accounts or groups and to some columns of the table accounts.
But how to do that? How to retrieve a specific account value for a specific column of the accounts table and period?
Function currentBalance()
To retrieve the various amounts of the report, we use the currentBalance(account, startDate, endDate) function.
The function sums the amounts of opening, debit, credit, total and balance calculated based on the opening and all transactions for the given accounts/group and period.
To build the cash flow report we use this function for accounts and groups:
// example for account 1000
var currentBal = Banana.document.currentBalance('1000','2019-01-01','2019-12-31');
// example for group 10
var currentBal = Banana.document.currentBalance('Gr=10','2019-01-01','2019-12-31');
The parameters of the function are:
- account or group number (the group number is preceded by "Gr=")
- start date of the period we are intrested
- end date of the period we are intrested
The returned value of the currentBalance() function is an object, which has name:values pairs called properties. These properties are the values we need.
The object structure is like the following one:
{
   "amount":"17570.00",
   "amountCurrency":"",
   "bClass":"1",
   "balance":"17570.00",
   "balanceCurrency":"",
   "credit":"30.00",
   "creditCurrency":"",
   "debit":"16600.00",
   "debitCurrency":"",
   "opening":"1000.00",
   "openingCurrency":"1000.00",
   "rowCount":"6",
   "total":"16570.00",
   "totalCurrency":""
}
As you can see this object has many properties, but the cash flow report we want to build uses only four of them:
- opening the amount at the beginning of the period (the Opening column of the Accounts table). Can be positive or negative.
- debit the amount of debit transactions for the period (the Debit column of the Accounts table). Only positive values.
- credit the amount of credit transactions for the period (the Credit column of the Accounts table). Only positive values.
- total the difference between debit-credit for the period. Can be positive or negative.
- balance the balance for the period. (opening + total). Can be positive or negative.
For more information, see the documentation here.
Accessing Object Properties
Ok, now we have the object with all the properties. But how to get a single property value?
There are three methods for accessing the property of an object:
// method 1: objectName.property
var value = currentBal.debit; // returns 16600.00
// method 2: objectName["property"]
var value = currentBal["credit"]; // returns 30.00
// method 3: objectName[expression]
var x = "total";
var value = currentBal[x]; // returns 16570.00
It doesn't matter which method is used, the result does not change.
Calculate totals
The cash flow report requires to do addition and subtraction operations using some specific values retrieved from the accounting file.
To build all the various totals we encounter in the report we use the add(value1, value2) and the subtract(value1, value2) functions.
// example sum the amounts of accounts 6541 and 6542
var acc6541 = Banana.document.currentBalance('6541','2019-01-01','2019-12-31').total;
var acc6542 = Banana.document.currentBalance('6542','2019-01-01','2019-12-31').total;
var sum = Banana.SDecimal.add(acc6541, acc6542);
Previous year Banana document
To generate the report, the Extension retrieves data from the current year accounting file and from the previous year accounting file.
The current year accounting file is the one that is opened in Banana, the one that starts the execution of the Extension.
The previous year accounting file is not opened in Banana, it is just selected from the menu File -> File and accounting properties... -> Options tab -> File from previous year.
In order to retrieve data from the previous year we use the previousYear([nrYears]) function.
The function returns the previous year as a Banana.Document object. If the previous year is not defined or it is not found it returns null.
/* CURRENT year file: the opened document in Banana */
var current = Banana.document;
/* PREVIOUS year file: open a dialog window to select the previous year .ac2 file */
var previous = Banana.document.previousYear();
The object Banana.document represent the current document opened in the application.
The previous variable represent the defined previous year document.
Function getAmount()
We have added to the script a parameterized function that calls the currentBalance() and retrieves the value for the given parameters.
With this function it is possible to define which value to extract and from which Banana document file.
function getAmount(banDoc,account,property,startDate,endDate) {
   var currentBal = banDoc.currentBalance(account,startDate,endDate);
   var value = currentBal[property];
   return value;
}
The parameters are:
- banDoc: the Banana document from which retrieve the data (see Open Banana document);
- account: the account or group;
- property: the property of the returned currentBalance() object (i.e. opening, debit, credit, total);
- startDate: the opening date of the accounting period;
- endDate: the closing date of the accounting period;
// retrieve from the current year Banana document the 6541 account's total value
var current6541 = getAmount(current,'6541','total','2019-01-01','2019-12-31');
// retrieve from the previous year Banana document the 6541 account's total value
var previous6541 = getAmount(previous,'6541','total','2018-01-01','2018-12-31');
The use of the function is the same, but the returned values are different: one returns the value of the current year and the other the value of the previous year.
The Dates
Dates that we use in the script are taken from the accounting file using the info(section, id) function.
These dates are retrieved from the Opening and Closing dates of the accounting file (File properties > Accounting Tab).
// Accounting period for the current year file
var currentStartDate = current.info("AccountingDataBase","OpeningDate");
var currentEndDate = current.info("AccountingDataBase","ClosureDate");
// Accounting period for the previous year file
var previousStartDate = previous.info("AccountingDataBase","OpeningDate");
var previousEndDate = previous.info("AccountingDataBase","ClosureDate");
Function toLocaleNumberFormat()
The function toLocaleNumberFormat is used to convert all the amount numbers to the local format.
Banana.Converter.toLocaleNumberFormat('16570.00'); // returns 16'570.00
Install and run the Extension
Visit the Install your Extension documentation to install and run the app.
Report example:
Example Extenstion for a Country Specific VAT Report
Following, we will explain what needs to be considered when creating a Banana Accounting Extension for VAT reporting suitable for a specific country.
- Creating the Vat code for the specific country.
- Creating the country specific reports or export files, using the functionalities offered by the Banana API .
Documentation
Banana Accounting manage all kinds of VAT, thanks to the use of customizable VAT Code. For more information on how it managed and recorded VAT see:
Vat Table
Countries require to fill a form with the VAT grouped by different percentages and criterias. In order to achieve this goals it is necessary to create a specific VAT code for each type of VAT that need to be reported.
There are two main groups:
- Vat due to the tax authority.
- Vat recoverable
Creating the VatCode for a specific country
When you use Banana Accounting in a new country, you need to adapt the VatCode table to your country needs. Basically you should procede as described here:
- The starting point is the Vat reporting form of the country.
- You need to create a VAT Code in the VAT Code Table.
- The user, for each transaction that is related to the VAT, will specify the VAT code so that similar transactions can be grouped and summed together, based on the form requirements.
- For each case there should be a specific VAT Codes. The parameters will vary base on:
- VAT recoverable and payable
- Percentage of VAT.
- Tax reporting requirements.
There should be a different VAT Code for export of goods and goods that are exempt.
Tax authorities requires the amounts to be reported sepately even if the percentage applicable is always zero.
Example, for a country that has a VAT percentage of 0% and 5%.
- For the 0% you need to report both the sales exempt and the export:
- Create a Vat code S0 for Vat Exempt (Vat due Yes even if percentage is 0)
- Create a Vat code SE for Vat Export. (Vat due Yes even if percentage is 0)
- For the 5%
- Create a Vat code S5 for sales at 5% (Vat due Yes)
- Create a Vat code P5 for purchase. (Vat due void, means recoverable)
- If you need to show separatly on the tax form the discounts, create a Vat code SD5 for discount on sales at 5%.
If it is not necessary to show separatly the discounts, when entering the transactions for discounts we precede the VAT code with the "-S5" so the amount will be reversed.
There are countries where the are many VAT percentages and a complex tax reporting form. In this case, you will end up having a VAT table with many codes.
Use the Gr1 to groups VAT Code together
If the VAT amounts for different VAT code need to be grouped together, you can use the Gr1 to enter to witch field the VAT code belong.
- When creating a Banana Extension to groups the amounts together, you can use this groups to report the amounts.
- In case the user need to add a new VatCode that fit in a form, he can do it and get it correctly summed in the tax form.
Specify in the Gr1 the field number of the VAT form, separating the number with ";" if the same goes in more than one group. For example:
- The field 100 of the tax form require to declare all sales amounts.
- The different sales need also to be indicated in the specific tax field, so we specify also the other tax field.
- Discount need to be indicate separately so we specify for a discount the specific field. The same for purchases.
Give the full VAT code table
It is possible that you will end up with a very complex VAT table.
Some user will probably use only few VAT code, the one that are necessary for their actitivity.
It is better not to give to the user a stripped down Vat table, for the fact that it may need one specific Vat code.
In this case enter the 1 in the Disable columns. The user will be able to use the code but this will not appear in the list of available VatCode when entering it in the Transactions table.
Assigning vat code to the accounts table
For each account you can assign a default Vat Code (column Vat code).
When you enter or import transactions the Vat code will be retrieved, but you can change it.
Vat Transactions
When entering transactions you also specify the VAT code, so that:
- The VAT code parameters are retrieved.
- The VAT Amounts are calculated.
- The VAT is recorded on the appropriate accounts.
- You will have all the information necessary to prepare a summary report.
![]()
We see above different examples of VAT transactions.
- Doc 10-11.
We record cash sale using different Amount type.
We see that the transaction amount is different but the Taxable amount and VAT amount are always the same.
VAT amount is in negative for the fact that the VAT amount is registered in credit, and therefore the amount must be payed to the tax authority. - Doc 20.
Return of goods from customer.
We use the same VAT code, but preceeded by the minus sing. The taxable amount and VAT amout sign is inverted.
Vat Amount is positive (debit), meaning we recover the VAT from the tax authoriy. - Doc 100-102.
Purchase the VAT amount is positive (debit) meaning we recover the VAT from the tax authortity. - Doc 130.
Return of good to suppliers the VAT code is inverted, and we owe the taxt to the authority.
VAT documentation
For each country there should be a documentation that explain the VAT theme with:
- Page for the VAT codes.
Explaining the single VAT code and grouping. - Page for the transactions with examples and explanations
In one or more pages all possible transactions case should be explained. The page is a reference that allows user to understand how a specific case should be recorded.- Create a file with transactions examples.
- Create header and sub header for the different cases, user should be able to find the case by going through the page or an index. Typical:
- VAT Due
- Normal
- Credit notes
- Reverse charge
- VAT Recoverable
- Normal
- Credit note
- VAT not fully deductible.
- VAT Exempt
- VAT 0 %
- Adjustments
- Corrections
- End of period transactions.
- VAT Due
- Create images of the Transaction's table.
- Use the column Doc to number each transaction group.
- When you write explanations you will precede the explanation with the doc number of the tranasaction.
- Use bullet paragraph when explaining single transactions.
- End of period
Explain what procedure do to at the and of period.- Check accounting.
- Account1 -> VAT report
- Country specific report
- Transaction to move the automatic VAT amount to the VAT due or recoverable.
- Transaction to pay the VAT
Banana Extension for VAT country summary report
Before creating a country specific VAT report you should have created a file containing:
- Account plan for the country.
- VAT code table with all the necessary VAT codes for the country, with the GR1 set with the group.
- Test Transactions for all the cases and VAT codes. Including also che reversal transactions (like discounts or credit notes).
This transactions will allow the programmer to immediately test the results.
Examples files
- The examples files are available on github/General/CaseStudies.
- Solutions making use of the VAT API.
Javascipt API to use for VAT Calculation
The API to retrieve the values above would be:
//get the description of the vat code
Banana.document.vatDescription("S10");
// use the vatCurrent Balance to retrieve the different values
Banana.document.vatCurrentBalance("S10").vatTaxable;
Banana.document.vatCurrentBalance("S10").vatAmount;
Banana.document.vatCurrentBalance("S102").vatNotDeductible;
Banana.document.vatCurrentBalance("S10").vatPosted;
Banana.document.vatCurrentBalance("S10").rowCount;
- vatTaxable is the net amount, the one that usually must figure on the vat report as the amount of revenue to declare.
- vatAmount is the VAT amount.
- vatTaxable + vatAmount is the gross amount or inclusive Vat..
- vatNotDeductible is the amount of vat that cannot be fiscally deducted. In case you have an expense where the VAT cannot be totally deducted.
- vatPosted (vatAmount - vatNotDeductible) is the amount that has been posted on tha VAT account.
- count is the number of row that have been found to use the vatCode.
Grouping VAT Codes
The VAT call can only be made for one or more VAT Codes.
If more VAT code need to be grouped together, you should have a Javascript function that take as parameter the GR1.
The function should iterate the VAT table and return the VAT code that have the the corresponding GR1.
The sign of the vatAmount
The sign of the vatAmount follows the accounting convention.
- If the sign of the vatAmount is negative (debit), it means that the vat is due.
- If the sign of the vatAmount is positive, it means that the vat is recoverable.
The sign of the vatTaxable follow the sign of the vatAmount. In case the vatAmount is zero the vatTaxable sign is negative if the isDue of the vatCode is true.
If you use the vatAmount to create a tax form you should take care to invert the amount.
vatAmount sign and isDue flag:
- Vat code that have the isDue to true (1) normally have the vatAmount in negative, but the vatAmount could also be positive in case the user has used the vatCode with the minus sign "-S10".
The minus sign before the vatCode is used in case of reversal transaction (correction of an incorrect transactions). In this case, the vatAmount would be recorded in the positive. - Vat code that have the isDue to false (void) normally have the vatAmount in positive, but the vatAmount could also be negative in case the user has used the vatCode with the minus sign "-P10".
In this case the vatAmount would be recorded in negative.
Amount used in the vat report for the tax authorities
Vat due
The amounts are usually in negative,so they must be inverted.
Banana.document.vatCurrentBalance("S10").vatTaxable * (-1);
Banana.document.vatCurrentBalance("S10").vatAmount * (-1);
They could be positive in the case that there have been a good returned from clients that exceeds the amount of sales.
Vat recoverable
The amounts are usually in negative,so they must be inverted.
Banana.document.vatCurrentBalance("P10").vatTaxable;
Banana.document.vatCurrentBalance("P10").vatAmount;
They could be negative in the case that there have been a good returned to suppliers that exceed the amount of sales.
Combination of sign and typology (VAT Class)
Combining sign and typology we have the different case that come up in the VAT reporting:
- "1" Recoverable VAT Taxable (VAT netto)
- "2" Due VAT Taxable (VAT netto)
- "3" Recoverable VAT posted (VAT Amount)
- "4" Due VAT posted (VAT Amount)
- "5" Recoverable VAT gross amount (VAT taxable + VAT amount)
- "6" Due VAT gross amount (VAT taxable + VAT amount)
The VAT class is used in a function to automate the calculation and reporting with the correct sign.
Period
VAT report are usually done for a period (month, quarter or semester).
You should use the vatCurrentBalance with tha startDate and endDate
//vat report for January 2018
var startDate = "2018-01-01";
var endDate = "2018-01-31
Banana.document.vatCurrentBalance("S10", startDate, endDate).vatTaxable;
Banana.document.vatCurrentBalance("P10", startDate, endDate).vatTaxable;
Summing many VAT codes
You can have the total of different code by separating the VAT code with the sign "|"
//vat report for January 2018
var startDate = "2018-01-01";
var endDate = "2018-01-31
// The taxable amount
Banana.document.vatCurrentBalance("S0|S5|S10|SD5|SD10", startDate, endDate).vatTaxable * (-1);
// The vat due
Banana.document.vatCurrentBalance("S0|S5|S10|SD5|SD10", startDate, endDate).vatAmount * (-1);
// The vat taxable vat recoverable
Banana.document.vatCurrentBalance("P0|P5|P10|PD5|PD10", startDate, endDate).vatTaxable;
// The vat vat recoverable
Banana.document.vatCurrentBalance("P0|P5|P10|PD5|PD10", startDate, endDate).vatAmount;
VAT Extra Info
There are some case where for appropriate reporting the VAT code alone is not sufficient. The VAT Extra info allows to define an extra code and enter in the Transactions to further specify the case. The VAT Extra code allows to limit the number of VAT codes needed, but also to track exceptions.
Printing the VAT transactions list
To print the transactions with VAT or doing VAT calculations, use the function Banana.document.journal().
// use the data from the transactions and only normal accounts (exclude cost centers)
var journal = Banana.document.journal(Banana.document.ORIGINTYPE_CURRENT, Banana.document.ACCOUNTTYPE_NORMAL);
for (i = 0; i < journal.rowCount; i++) {
  var tRow = journal.row(i);
  // we get the vat values
  var vatTaxable = tRow.value('JVatTaxable');
  var vatAmount = tRow.value('VatAmount');
  var vatPosted = tRow.value('VatPosted');
}
Within the samples apps repository you find two examples of transactions list:
- List of transactions with vatTaxable, vatAmount and vatPosted.
- List of transctions with vatTaxable, vatAmount and vatPosted also converted in the transaction's currency.
Export Extensions
Export apps are used to export data in a custom format.
-
Define attribute @task as export.file
// @task = export.file -
Define the extension of the file to be exported.
// @exportfiletype = xml -
The text to be written to the export file is the return value of the exec function and must be a return.
return "exported text". -
When the script terminate and if the return text is not null and does not start with "@Cancel ", the user will be promped with a dialog to choose a file name where to export.
Example
Export all the accounting with description and balance in a xml file.
// @id = ch.banana.apps.export
// @api = 1.0
// @pubdate = 2016-04-08
// @doctype = *.*
// @description = Export into a text file (.txt)
// @task = export.file
// @exportfiletype = txt
// @timeout = -1

function exec() {
var exportResult = '<accounts>';
    var tableAccounts = Banana.document.table('Accounts');
    if ( !tableAccounts) {
      return;
   }
   for (i=0;i<tableAccounts.rowCount;i++) {
        if (tableAccounts.row(i).value('Account')) {
            exportResult += '<account>';
            exportResult += '<accountnr>' + tableAccounts.row(i).value('Account') + '</accountnr>';
            exportResult += '<description>' + tableAccounts.row(i).value('Description') + '</description>';
            exportResult += '<balance>' + tableAccounts.row(i).value('Balance') + '</balance>';
            exportResult += '</account>';
        }
    }
    exportResult += '</accounts>';
    //return the string
    return exportResult;
}
Develop an Import Extensions
Most software or online banking can only export data in a proprietary format that Banana Accounting cannot understand.
For this cases it is possible to create an Import Extension that that converts data from a proprietary format to a format that is accepted by Banana.
Import Extensions read a custom format and convert in an import format suitable for using with the command "Import to accounting".
- Import extension for Bank Statements
- Extension for importing transactions
- For examples see the Github.com template page.
Create an Import Extensions for converting from other formats
The Import Extensions can be used within the Command Action->Import into Accounting.
Extension Attributes
An Import extension has the Extension attribute @task of type "import.":
- import.accounts
See the format specified in: Import Accounts. - import.categories
- import.vatcodes
- import.transaction
When importing transaction you can set the @outputformat- tablewithheaders
will take the columns exactly as in the Transactions table, that varies depending on the account type.
For double entry transaction see: Import Double-entry transactions in CSV format. - transactions.simple
Will take the format that is typical for a bank account statement.
See: Import Income & Expenses transactions in CSV format.
- tablewithheaders
exec() function
Banana load an extension and call the Exec(inText) function of an Import Extention:
- The exec( inText) the argument receive the row data that is read from the file or clipboard.
- The exec() function should return a value that contains the converted data that is to be imported. It can be of type:
- TSV (Tab separated Value)
- The first line should contains the column names.
Columns names varies dependent on the table or functionality.
See Import data from a txt file. - The other lines should contain the data to be imported.
- The first line should contains the column names.
- JSon in the the DocumentChange API Format.
- TSV (Tab separated Value)
Convert to a tab separated text
Imports Extensions are JavaScript program that import data to a specific table.
The import with tab separated text only allow to add rows to a table:
Import Extensions have:
- the attribute @task defined as one of the import for example //@task = import.transactions (for more information, see Apps attributes documentation)
- the attribute @outputformat defines the format of the imported data:
- For a Double-entry accounting use the value //@outputformat = tablewithheaders.
- For an Income/Expenses accounting use the value //@outputformat = transactions.simple.
- The parameter in the function exec contains the import data (the content of the file specified in the input box)
- You can specify that the data is read from the file specified on the input box or that the user can select the file with "// @inputdatasource = openfiledialog"
- The import text is returned as a String in the function exec with the return statement
Import with DocumentChange
You can directly import the data into accounting using the DocumentChange API. Parse the information, define the changes to be made to the document and return the JSON Object.
With the DocumentChange API you can add, modify or remove line from any tables. You can also add or modify columns.
Import Extensions "transactions.simple" Income & Expenses for Digital Bank Statements
An import extension that is used to import a bank account statements, takes as input a bank statements in digital format and convert into a "transactions.simple" format that is accepted as input from Banana Accounting.
See also:
transactions.simple converted to the accounting file
Using the "transactions.simple" has the advantage that the program automatically convert the data to the specific accounting you are using. So the format is adequate to be used for double entry, multi-currency or Income & expenses.
The program automatically convert the data to the specific accounting file format.
- Cash Manager and Income & Expenses
- Income Amounts goes in the column Income
- Expense Amounts or negative Income Amounts goes in the column Expenses.
- Double entry accounting
- Income Amounts goes in the column Amount.
Bank Account goes in the Account Debit Column - Expense Amounts or negative Income Amounts goes in the column Amount as positive values.
Bank Account goes in the Account Credit Column
- Income Amounts goes in the column Amount.
Digital Bank Statement
A digital bank statement is a file containing the transactions of a bank account within a specific period.
Bank statements have usually this elements:
- Information regarding the accounts.
- Account id
- Account holder
- Period information.
- Start Date
- End Date
- Begin Balance
- End Balance
- Transactions with all for each movement a least the following information.
- Date
- Description of the transactions
- Income amount, positive for the customer
- Outcome amount , negative for the customer
- Amount an amount that contain income as positive number and negative numbers as expenses.
Digital Bank Customer Statements Formats
Banks can make their bank statements available in different formats.
- ISO 20022 Bank Statements Format camt.052, camt.053, camt.054.
It is an XML file that can contain multiple bank statements.
Each country can have a specific implementation of this format.
Banana Accounting provides extensions to read such file. - ISO MT940.
Is a text based format. - CSV (Comma separated file format) containing bank statements transactions.
Banks, within online application, usually allows customer to export the transaction in a CSV or Excel file.
Bank CSV Bank Statements
Banks usually let you export the bank statement in a CSV format, but the columns header, columns sequence and format of the data usually differs.
When converting the data from a Bank Statement to a "transactions.simple" file format it is important to analyze with attention the bank statement:
The structure of a Bank Statement CSV is usually this:
- Optional Information regarding the account and holder.
- Unstructured data at the begin of the file.
- The columns headers.
- A line with the name of the columns.
For examples "Date,Description,Income,Expense" - Columns name are separated by a character, usually a comma "," or a semicolon ";".
- The columns name use similar naming, but are also usually in a language specific to the customer. For example:
- German "Datum,Buchungstext,Einnahmen, Ausgaben“
- A line with the name of the columns.
- The transactions movements.
- Multiple lines each one containing a single movement.
- Date may be expressed in a specific format.
- Number may be expressed in a specific localized format.
- For example
- "31.12.2024,"Payment to Albert",,"1'344,22",
- "31.12.2024,"Income from Albert","344,22",
- Other optional information.
- Unstructured data at the end of the file.
Banks use different naming for columns containing the income and expenses amount.
- Double entry column's naming convention:
Debit and Credit is usually referred to the bank point of view. "We have debited you", "We have credited you".- Debit for the costumer is an Expense (credit amount).
- Credit for the costumer is an Income (debit amount).
In the example the values are written in an excel document.

Import Extension for transactions.simple
The import Extension takes a
Extensions attributes
The Extensions attributes should contains the following lines:
//@task = import.transaction
//@outputformat = transactions.simple
JavaScript code
The function takes the input data (e.g. csv file) and converts it to a "transactions.simple" tabulator separated values (tsv file).
- An exec(data)
- It take as parameter the CSV bank statement.
- It process the input data and convert to transactions.simple data structure.
- It returns the data.
- Mapping the CSV columns to the transactions.simple naming
When mapping column, the Date column must always be on first position.
For example:- "Datum" to "Date"
- "Buchungstext" to "Description"
- "Einnahmen" to "Income"
- "Ausgaben" to "Expenses"
- Converting the date value to transactions.simple format yyyy-mm-dd.
- To convert a date, use the "Banana.Converter.toInternalDateFormat(date, input_format)"
- Date "31.12.2024," to "2024-12-31"
- Example: Banana.Converter.toInternalDateFormat("31.12.2024", "dd-mm-yyyy") returns "2024-12-31"
- To convert a date, use the "Banana.Converter.toInternalDateFormat(date, input_format)"
- Converting the numeric value to transactions.simple format
- To convert a numeric value, use the "Banana.Converter.toInternalNumberFormat(numeric_value, input_decimal_separator)"
- Numeric "344,22" to "344.22"
- Example: "Banana.Converter.toInternalNumberFormat("123,45", ",")" returns "123.45"
- For all numeric operations, use the Banana.SDecimal class.
- To convert the sign of a numeric value, use the "Banana.SDecimal.invert(numeric_value)"
Example: Banana.SDecimal.invert("123.45") returns "-123.45" - To verify the when a numeric value is positive or negative, use the "Banana.SDecimal.sign(numeric_value)"
Example: Banana.SDecimal.sign("-123.45") returns "-1".
- To convert the sign of a numeric value, use the "Banana.SDecimal.invert(numeric_value)"
- To convert a numeric value, use the "Banana.Converter.toInternalNumberFormat(numeric_value, input_decimal_separator)"
- Creating the output in the transactions.simple format, containing:
- The columns header
- The transactions data
"transactions.simple" format (Income & Expenses)
The import extension takes in input the bank statement and convert to a "transactions.simple" format with the following characteristics:
- Tabulator Separated Values (tsv).
- Column headers and data must use the tab character as separator "\t"
- Each line (after a "\n") is a new record
- The first line of the file contains the Columns headers.
After the header come the lines with the transactions data. - Columns header
They specify the name of the column.- Column names are case sensitive.
- Required Columns
- Date
The date of the transaction.
Date should be in format "yyyy-mm-dd" (e.g. "2024-12-31"). - Description
A a brief text of the transaction. - Income
The income amount.
For double-entry accounting, the the amount in debit, if negative is considered in credit.
The amount should be in simple numeric format, with the point "." as a decimal separator.
- Date
- Optional predefined columns:
When present the import function will use the content.- Expenses
The outcome amount.
For double entry the amount is in credit.
The Expense can also be specified as a negative number in the column "Income". - DocInvoice
The invoice number. - ContraAccount
The account number (debit/credit) or category.
Enter square brackets [] to keep the field empty. - Account
The account of the transaction when the file contains the movements of multiple accounts.
Enter square brackets [] to keep the field empty. - VatCode
The VAT code that should be used.
The VatCode should be defined in the VatCodes Table.
Precede with the minus "-" sign if the Transaction is a correction of an existing transactions. - IsDetail
For composed transactions a "S" identifies a counterpart transaction and a "D" a detail transactions
- Expenses
- Transactions data in column format
- Tabulator separated values following the headers.
- Date columns should be in the format "yyyy-mm-dd".
- Amount should be in a standard JavaScript decimal number format:
- Decimal separator is the point "."
- No thousands separators
- Only numeric characters "12345678.90"
- Negative number with a minus sign "-" preceding the numbers (e.g. "-100.00").
Example Extension
This extension example return a predefined data content, does not convert the data.
// @api = 1.0
// @id = ch.banana.scripts.import.example
// @description = Import Example bank (*.csv)
// @task = import.transactions
// @doctype = nodocument
// @publisher = Banana.ch SA
// @pubdate = 2024-06-21
// @outputformat = transactions.simple
// @inputdatasource = openfiledialog
// @inputfilefilter = Text files (*.txt *.csv);;All files (*.*)
// @inputfilefilter.de = Text (*.txt *.csv);;Alle Dateien (*.*)

/**
* Parse the data and return the data to be imported as a tab separated file.
*/
function exec(inText) {

  // parse the inText and set to outText
  // in the return text the data is tab separated

  var outText = "";
  outText += "Date\tDescription\tIncome\tExpenses\n";
  outText += "2015-01-01\tIncome text\t100.25\t\n";
  outText += "2015-01-02\tExpense text\t\t73.50\n";

  return outText;
}
Banks Statement in Excel Format
If your bank makes available the statements in Excel format, proceed in the following way:
- Open the statement file in excel.
- Select and Copy to the clipboard content of the statement.
- When Importing in Accounting, tell Banana to use the Clipboard as input.
You can create an Import Extension for CSV that use the content of the file you copy to a clipboard.
Installing and Running a Bank CSV Import Extension
Introduction
This page provides you with step-by-step guidance for creating a file based Javascript extension to import a typical bank statement in CSV format.
You find simple examples in the Repository China/ImportExtensions. All the examples have also their own test.
The steps in order to experiment with import Banana Extension are the following:
- Create a CSV file example
- Create the import file based javascript extension
- Install the extension
- Run the extension
Create the CSV file
For test purpose we create a file in CSV format using the format specified import income & expenses transactions in CSV format.
Copy the following CSV example, paste it on your text editor and save it as csv_example.csv:
"Date","Description","Income","Expenses"
"2019-01-01","Income transaction text","100.00",""
"2019-02-02","Expense transaction text","","200.00"- First line is the fields header. Fields names are case sensitive and must correspond to the NameXml (English) of the columns in Banana Accounting.
- Fields names and data values are between double quotes.
- Fields and values are separated with a comma
- Each line is a new record
- The format for the Date fields is yyyy-mm-dd
Create the file based javascript import extension
Copy the following JavaScript code, paste it on your text editor and save it as import_transaction_example.js:
// @id = ch.banana.app.importtransactionexample
// @api = 1.0
// @pubdate = 2018-10-30
// @publisher = Banana.ch SA
// @description = Example Import Transactions (*.csv)
// @doctype = *
// @docproperties =
// @task = import.transactions
// @outputformat = transactions.simple
// @inputdatasource = openfiledialog
// @inputencoding = latin1
// @inputfilefilter = Text files (*.txt *.csv);;All files (*.*)

/* CSV file example:
"Date","Description","Income","Expenses"
"2019-01-01","Income transaction text","100.00",""
"2019-02-02","Expense transaction text","","200.00"
*/

// Parse the data and return the data to be imported as a tab separated file.
function exec(inText) {
   // Convert a csv file to an array of array.
   // Parameters are: text to convert, values separator, delimiter for text values
   var csvFile = Banana.Converter.csvToArray(inText, ',', '"');

   // Converts a table (array of array) to a tsv file (tabulator separated values)
   var tsvFile = Banana.Converter.arrayToTsv(csvFile);

   // Return the converted tsv file
   return tsvFile;
}
When it is used transaction.simple as @outputformat attribute in the script, it's important that CSV file includes "Income" and "Expenses" fields.
Install the Extension
For the installation of the file based extension, see First File Based Extension > Install the Extension.
Run the import Extension
To run an import Extension follow the steps below:
- Open an accounting file in Banana Accounting.
- In Banana select from the menu Actions the command Import to accounting...
- From the import type selection select Transactions.
- From the list select the Example Import Transactions (*.csv) extension.
- Click on Browse and look for the csv_example.csv file, then click to Open.
- Click Ok to begin the import process.
- On the dialog window select a Destination account and click on Ok to import the data.
The data from the CSV file are imported into the Transactions table of your accounting file like the following examples.
- For a Double-Entry accounting:
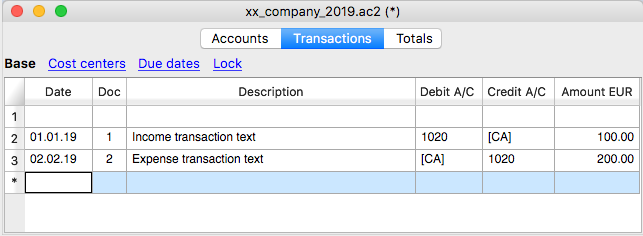
You can now replace all the [CA] values with the appropriate contra-account, so that the Credit transactions will be balanced with the Debit transactions.
- For an Income & Expenses accounting:
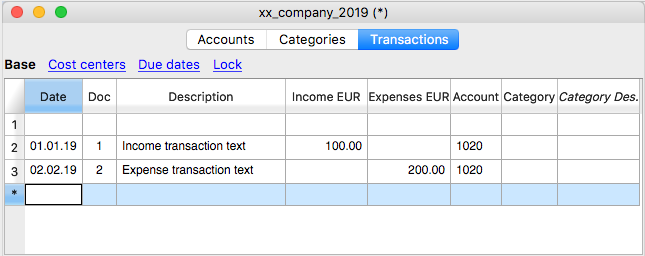
For each transaction you can now enter an income or expense category, as defined in the Categories table.
More about Import Extensions
Parameterizable import CSV extension
This guide explains how to create your own import CSV extension, starting from the Banana Accounting parametrizable import template.
For more information see the import as "transactions.simple" .
Requirements
To create your import extension, you need:
- A CSV file: Ensure you can open the file to review its contents.
- The template code: Use import.csvstatement.parametrizable.template.js as your base.
- Adaptable parameters: Update the parameter values in the JavaScript code based on your CSV file structure.
Extension parameters
At the beginning of the JavaScript code, locate the getConversionParamUser() function. This is where you change parameter values based on your CSV file.
//This function defines the parameters specific for the CSV Transactions file to be imported
function getConversionParamUser(convertionParam) {

    // The following variables need to be set according to the specific
    // CSV file that will be imported

    // Column separator character
    // Use '\t' for tab separated columns.
    // Use the '\t' when processing CSV copied from Excel to the clipboard
    convertionParam.column_separator = ';';

    // Text delimiter character for string
    convertionParam.text_delimiter = '"';

    // Decimal separator charachter used for amounts
    convertionParam.amounts_decimal_separator = '.';

    // Line number where the column header starts (with the columns name)
    // First line is 0
    convertionParam.header_line_start = 0;

    // Line number where data starts
    // Usually header_line_start + 1
    convertionParam.data_line_start = 1;

    // Column name header for the date transaction
    convertionParam.column_date_name = '';

    // Date format for column containing dates
    // For example 'dd.mm.yyyy', 'mm/dd/yyyy', 'dd.mm.yy', 'yyyy-mm-dd'
    convertionParam.date_format = '';

    // Column name for the column description
    convertionParam.column_description_name = '';

    // Column name for the income amount
    convertionParam.column_income_name = '';

    // Column name for the expenses/outcome amounts
    convertionParam.column_expenses_name = '';

    // Column name for the external reference identification number of the transaction
    convertionParam.column_external_reference_name = '';
}
Parameter Descriptions
The parameters are in an object called convertionParam and are as follows:
- convertionParam.column_separator
Parameter used to specify the separator character used in the CSV file to separate the columns (e.g., ;). - convertionParam.text_delimiter
Parameter used to specify the text delimiter character used in the CSV file to delimit the text (e.g., "). - convertionParam.amounts_decimal_separator
Parameter used to specify the amounts decimal separator used in the CSV file to indicate the decimals of the amounts (e.g, .). - convertionParam.header_line_start
Parameter used to specify at which row of the CSV file is the header with the column titles.
Zero-based index (start counting from 0) of the row containing column titles (e.g., 0 for the first row). - convertionParam.data_line_start
Parameter used to specify at which row of the CSV file start the transactions rows.
Zero-based index (start counting from 0) of the first row containing transaction data (e.g., 1 if it follows the header). - convertionParam.column_date_name
Parameter used to specify the name for the column with the date of the transaction used in the CSV file. - convertionParam.date_format
Parameter used to specify the format of the date used in the CSV file (e.g., dd.mm.yyyy for 31.12.2024). - convertionParam.column_description_name
Parameter used to specify the name for the column with the description of the transaction used in the CSV file. - convertionParam.column_income_name
Parameter used to specify the name for the column with the income amount of the transaction used in the CSV file. - convertionParam.column_expenses_name
Parameter used to specify the name for the column with the expenses amount of the transaction used in the CSV file (only if using two-column format). - convertionParam.column_external_reference_name
Parameter used to specify the name for the column with the identification number of the transaction used in the CSV file.
CSV amount columns format
The CSV file can have two format for amount columns:
- one-column amounts: income is positive, expenses are negative.
In this case use only the convertionParam.column_income_name to define the column name used for the amounts. - two-column amounts: income and expense amounts have separate columns.
In this case use both convertionParam.column_income_name for income amounts and convertionParam.column_expenses_name for expenses amounts.
Example
Sample CSV file contents:
xxxx;;;;;
;;;;;
;;;;;
Datum;Buchungstext;Betrag;Saldo;Valuta;Id
03.01.2024;"aaa";127.2;42282.99;03.01.2024;1
04.01.2024;"bbb";-165.75;42117.24;04.01.2024;2
05.01.2024;"ccc";90.05;42207.29;05.01.2024;3
CSV file structure:
- ; is used as column separator.
- " is used as text delimiter (e.g., "aaa").
- . is used as amounts decimal separator (e.g., 127.2).
- 3 is the row where the header line starts (start counting from 0).
- 4 is the row where the data start (start counting from 0).
- Datum is used as column name for the date.
- dd.mm.yyyy is used as date format (e.g., 03.01.2024).
- Buchungstext is used as column name for the description.
- Betrag is used as column name for the amounts (one-column format: income amounts are positive, expenses amounts are negative).
- Id is used as column name for the external reference identification numbers (e.g., 1,2,3).
Updated parameters:
// example with setting for the CSV file above
function getConversionParamUser(convertionParam) {
    convertionParam.column_separator = ';';
    convertionParam.text_delimiter = '"';
    convertionParam.amounts_decimal_separator = '.';
    convertionParam.header_line_start = 3;
    convertionParam.data_line_start = 4;
    convertionParam.column_date_name = 'Datum';
    convertionParam.date_format = 'dd.mm.yyyy';
    convertionParam.column_description_name = 'Buchungstext';
    convertionParam.column_income_name = 'Betrag';
    convertionParam.column_expenses_name = '';
    convertionParam.column_external_reference_name = 'Id';
}
How to Create and Run the Parameterizable CSV Import Extension
There are two methods to create an import extension:
- As an Embedded Extension.
- As a File Based Extension.
Embedded Extension
For detailed instructions on creating and running embedded extensions, refer to the First Embedded Extension documentation.
Follow these steps to create and run the extension:
- Creating the Extension
- Add the extension to the Documents table.
- Copy and paste the template code from import.csvstatement.parametrizable.template.js.
- Customizing the Extension
- Adjust the parameters within the getConversionParamUser() function.
- Open the CSV file to inspect its content and edit the parameter values based on the CSV structure.
- Running the Extension
- Save the accounting file.
- Run the extension from the Documents table by clicking the run icon in the Attachments cell containing your code.
- Select the CSV file to import.
- In the Import Transactions dialog, choose the destination account and confirm with OK.
- The transactions will be imported and displayed in the Transactions table.
File-Based Extension
For detailed instructions on creating and running file based extensions, refer to the First File Based Extension documentation.
Follow these steps to create and run the extension:
- Creating the Extension
- Copy and paste the template code from import.csvstatement.parametrizable.template.js.
- Save the file as .js.
- Customizing the Extension
- Adjust the parameters within the getConversionParamUser() function.
- Open the CSV file to inspect its content and edit the parameter values based on the CSV structure.
- Installing the Extension
- Install the extension from the menu: Extensions > Manage Extensions > Add from file.
- Running the Extension
- Run the extension from the menu: Actions > Import to accounting > Import: Transactions.
- In the Import to accounting dialog, select the "Parameterizable Import CSV" extension and the CSV file to import.
- In the Import Transactions dialog, choose the destination account and confirm with OK.
- The transactions will be imported and displayed in the Transactions table.
Invoice Layout Extension
The Invoice Layout Extension is a report extension for printing invoices.
It is used on the
- Accounting file
- Menu Reports > Customers > Print invoices...
- In the Estimate & Invoice
- Menu Invoices > Print invoice...
- Menu Invoices > Print estimate...
Structure of the extensions
The Invoice Layout Extension need to contains the following elements:
- The extension attribute with
@task = report.customer.invoice. - printDocument(jsonContent, repDocObj, repStyleObj [, prefSelected])
the main function that is called by the program
Is use the content of the invoice json object to add element to the reportDocObj. - settingsDialog() (optional)
called from user to set up parameters like colour or additional text. - getPrintPreferences() (optional)
returns a JSON object with the available print options.
Invoice Json Properties.
Extension attributes
// @id = scriptfilename.js
// @api = 1.0
// @pubdate = yyyy-mm-dd
// @publisher = yourName
// @description = script description
// @task = report.customer.statement
Function printDocument
The main function is printDocument(jsonStatement, repDocObj, repStyleObj [, format]). The parameter jsonStatement object contains the data, repDocObj is the document object and repStyleObj is the stylesheet object where you can add styles.
function printDocument(jsonStatement, repDocObj, repStyleObj) {
  var param = initParam();
  var savedParam = Banana.document.getScriptSettings();
  if (savedParam.length > 0) {
    param = JSON.parse(savedParam);
    param = verifyParam(param);
  }
  printInvoice(jsonInvoice, repDocObj, repStyleObj, param);
}
Function settingsDialog
The function settingsDialog() is called from Banana when you select the button Params... from dialog Manage apps. You can write any code you need for your script.
/*Update script's parameters*/
function settingsDialog() {
   var param = initParam();
   var savedParam = Banana.document.getScriptSettings();
   if (savedParam.length > 0) {
      param = JSON.parse(savedParam);
   }
   param = verifyParam(param);
   ...
   var paramToString = JSON.stringify(param);
   var value = Banana.document.scriptSaveSettings(paramToString);
}
Invoice Json Object
Data structure used by the Invoice Layout Extension to print an invoice.
{
    "billing_info": {
        "discount": {
            "amount_vat_exclusive": "2.20"
        },
        "due_date": "2020-06-17",
        "total_advance_payment": "",
        "total_amount_vat_exclusive": "122.15",
        "total_amount_vat_exclusive_before_discount": "124.35",
        "total_amount_vat_inclusive": "131.56",
        "total_amount_vat_inclusive_before_discount": "133.93",
        "total_categories": [],
        "total_discount_percent": "1.8",
        "total_discount_vat_exclusive": "2.20",
        "total_discount_vat_inclusive": "2.37",
        "total_rounding_difference": "",
        "total_to_pay": "131.56",
        "total_vat_amount": "9.41",
        "total_vat_amount_before_discount": "9.58",
        "total_vat_codes": [
            {
                "total_amount_vat_exclusive": "122.15",
                "total_amount_vat_inclusive": "131.56",
                "total_vat_amount": "9.41",
                "vat_code": "V77"
            }
        ],
        "total_vat_rates": [
            {
                "total_amount_vat_exclusive": "122.15",
                "total_amount_vat_inclusive": "131.56",
                "total_vat_amount": "9.41",
                "vat_rate": "7.70"
            }
        ]
    },
    "creator_info": {
        "name": "ch.banana.application.invoice.default",
        "pubdate": "2021-09-24",
        "publisher": "Banana.ch SA",
        "version": ""
    },
    "customer_info": {
        "address1": "Via ai Salici 12",
        "address2": "",
        "address3": "",
        "business_name": "La stanza del Te SA",
        "city": "Lugano",
        "country": "",
        "country_code": "CH",
        "courtesy": "",
        "email": "",
        "first_name": "pinco",
        "iban": "",
        "last_name": "",
        "mobile": "",
        "number": "1",
        "phone": "",
        "postal_code": "6900",
        "web": ""
    },
    "document_info": {
        "currency": "CHF",
        "customer_reference": "asdf",
        "date": "2020-06-17",
        "decimals_amounts": 2,
        "description": "Fornitura merce (esempio iva esclusa)",
        "doc_type": "10",
        "locale": "it",
        "number": "3",
        "rounding_totals": "0.05",
        "text_begin": "",
        "title": "Fornitura merce (esempio iva esclusa)",
        "vat_mode": "vat_excl"
        "custom_info": [
            {
                "id": "custom_field_1",
                "title": "Weight",
                "value": "45 kg"
            },
            {
                "id": "custom_field_2",
                "title": "Packages",
                "value": "3"
            }
        ]
    },
    "items": [
        {
            "description": "Te\n1\n2\n3",
            "item_type": "item",
            "mesure_unit": "pz",
            "number": "1000",
            "price": "",
            "quantity": "4.00",
            "total": "",
            "total_amount_vat_exclusive": "19.68",
            "total_amount_vat_inclusive": "21.20",
            "total_vat_amount": "1.52",
            "unit_price": {
                "amount_vat_exclusive": null,
                "amount_vat_inclusive": "5.30",
                "calculated_amount_vat_exclusive": "4.92",
                "calculated_amount_vat_inclusive": "5.30",
                "calculated_vat_amount": "0.38",
                "vat_code": "V77",
                "vat_rate": "7.70"
            },
            "vat_code": "",
            "vat_rate": ""
        },
        {
            "description": "Te",
            "discount": {
                "percent": "30."
            },
            "item_type": "item",
            "mesure_unit": "pz",
            "number": "1000",
            "quantity": "4.00",
            "total": "",
            "total_amount_vat_exclusive": "13.78",
            "total_amount_vat_inclusive": "14.84",
            "total_vat_amount": "1.06",
            "unit_price": {
                "amount_vat_exclusive": null,
                "amount_vat_inclusive": "5.30",
                "calculated_amount_vat_exclusive": "4.92",
                "calculated_amount_vat_inclusive": "5.30",
                "calculated_vat_amount": "0.38",
                "discounted_amount_vat_exclusive": "3.44",
                "discounted_amount_vat_inclusive": "3.71",
                "discounted_vat_amount": "0.27",
                "vat_code": "V77",
                "vat_rate": "7.70"
            }
        },
        {
            "description": "Te",
            "discount": {
                "amount": "1.60"
            },
            "item_type": "item",
            "mesure_unit": "pz",
            "number": "1000",
            "quantity": "4.00",
            "total": "",
            "total_amount_vat_exclusive": "13.74",
            "total_amount_vat_inclusive": "14.80",
            "total_vat_amount": "1.06",
            "unit_price": {
                "amount_vat_exclusive": null,
                "amount_vat_inclusive": "5.30",
                "calculated_amount_vat_exclusive": "4.92",
                "calculated_amount_vat_inclusive": "5.30",
                "calculated_vat_amount": "0.38",
                "discounted_amount_vat_exclusive": "3.44",
                "discounted_amount_vat_inclusive": "3.70",
                "discounted_vat_amount": "0.26",
                "vat_code": "V77",
                "vat_rate": "7.70"
            }
        },
        {
            "description": "Te",
            "item_type": "item",
            "mesure_unit": "pz",
            "number": "",
            "quantity": "10000",
            "total_amount_vat_exclusive": "17.18",
            "total_amount_vat_inclusive": "18.50",
            "total_vat_amount": "1.32",
            "unit_price": {
                "amount_vat_exclusive": null,
                "amount_vat_inclusive": "0.00185",
                "calculated_amount_vat_exclusive": "0.00172",
                "calculated_amount_vat_inclusive": "0.00185",
                "calculated_vat_amount": "0.00013",
                "vat_code": "V77",
                "vat_rate": "7.70"
            }
        },
        {
            "description": "Te",
            "discount": {
                "amount": "0.00035"
            },
            "item_type": "item",
            "mesure_unit": "pz",
            "number": "1000",
            "quantity": "10000",
            "total": "",
            "total_amount_vat_exclusive": "13.93",
            "total_amount_vat_inclusive": "15.00",
            "total_vat_amount": "1.07",
            "unit_price": {
                "amount_vat_exclusive": null,
                "amount_vat_inclusive": "0.00185",
                "calculated_amount_vat_exclusive": "0.00172",
                "calculated_amount_vat_inclusive": "0.00185",
                "calculated_vat_amount": "0.00013",
                "discounted_amount_vat_exclusive": "0.00139",
                "discounted_amount_vat_inclusive": "0.00150",
                "discounted_vat_amount": "0.00011",
                "vat_code": "V77",
                "vat_rate": "7.70"
            }
        },
        {
            "description": "Te",
            "discount": {
                "percent": "3."
            },
            "item_type": "item",
            "mesure_unit": "pz",
            "number": "1000",
            "quantity": "10000",
            "total": "",
            "total_amount_vat_exclusive": "16.67",
            "total_amount_vat_inclusive": "17.95",
            "total_vat_amount": "1.28",
            "unit_price": {
                "amount_vat_exclusive": null,
                "amount_vat_inclusive": "0.00185",
                "calculated_amount_vat_exclusive": "0.00172",
                "calculated_amount_vat_inclusive": "0.00185",
                "calculated_vat_amount": "0.00013",
                "discounted_amount_vat_exclusive": "0.00167",
                "discounted_amount_vat_inclusive": "0.00179",
                "discounted_vat_amount": "0.00013",
                "vat_code": "V77",
                "vat_rate": "7.70"
            }
        },
        {
            "description": "Te",
            "item_type": "item",
            "mesure_unit": "pz",
            "number": "",
            "quantity": "0.00025",
            "total_amount_vat_exclusive": "9.33",
            "total_amount_vat_inclusive": "10.05",
            "total_vat_amount": "0.72",
            "unit_price": {
                "amount_vat_exclusive": null,
                "amount_vat_inclusive": "40200.00",
                "calculated_amount_vat_exclusive": "37325.91",
                "calculated_amount_vat_inclusive": "40200.00",
                "calculated_vat_amount": "2874.09",
                "vat_code": "V77",
                "vat_rate": "7.70"
            }
        },
        {
            "description": "Te",
            "discount": {
                "amount": "8000"
            },
            "item_type": "item",
            "mesure_unit": "pz",
            "number": "1000",
            "quantity": "0.00025",
            "total": "",
            "total_amount_vat_exclusive": "7.47",
            "total_amount_vat_inclusive": "8.05",
            "total_vat_amount": "0.58",
            "unit_price": {
                "amount_vat_exclusive": null,
                "amount_vat_inclusive": "40200.00",
                "calculated_amount_vat_exclusive": "37325.91",
                "calculated_amount_vat_inclusive": "40200.00",
                "calculated_vat_amount": "2874.09",
                "discounted_amount_vat_exclusive": "29897.86",
                "discounted_amount_vat_inclusive": "32200.00",
                "discounted_vat_amount": "2302.14",
                "vat_code": "V77",
                "vat_rate": "7.70"
            }
        },
        {
            "description": "Te",
            "discount": {
                "percent": "25."
            },
            "item_type": "item",
            "mesure_unit": "pz",
            "number": "1000",
            "quantity": "0.00025",
            "total": "",
            "total_amount_vat_exclusive": "7.00",
            "total_amount_vat_inclusive": "7.54",
            "total_vat_amount": "0.54",
            "unit_price": {
                "amount_vat_exclusive": null,
                "amount_vat_inclusive": "40200.00",
                "calculated_amount_vat_exclusive": "37325.91",
                "calculated_amount_vat_inclusive": "40200.00",
                "calculated_vat_amount": "2874.09",
                "discounted_amount_vat_exclusive": "27994.43",
                "discounted_amount_vat_inclusive": "30150.00",
                "discounted_vat_amount": "2155.57",
                "vat_code": "V77",
                "vat_rate": "7.70"
            }
        },
        {
            "description": "Spese di spedizione",
            "item_type": "item",
            "mesure_unit": "",
            "number": "4000",
            "price": "",
            "quantity": "1.00",
            "total": "",
            "total_amount_vat_exclusive": "5.57",
            "total_amount_vat_inclusive": "6.00",
            "total_vat_amount": "0.43",
            "unit_price": {
                "amount_vat_exclusive": null,
                "amount_vat_inclusive": "6.00",
                "calculated_amount_vat_exclusive": "5.57",
                "calculated_amount_vat_inclusive": "6.00",
                "calculated_vat_amount": "0.43",
                "vat_code": "V77",
                "vat_rate": "7.70"
            },
            "vat_code": "",
            "vat_rate": ""
        }
    ],
    "note": [
        {
            "date": null,
            "description": "aFASD\nF AS\nDF\n AS\nDF ASDF"
        }
    ],
    "payment_info": {
        "due_date": "2020-07-17"
    },
    "supplier_info": {
        "address1": "VIa alle colline 12",
        "address2": "",
        "address3": "",
        "business_name": "My Company",
        "city": "Lugano",
        "country": "Svizzera",
        "country_code": "CH",
        "courtesy": "",
        "email": "info@mycompany.zz",
        "first_name": "",
        "fiscal_number": "",
        "iban_number": "CH93 0076 2011 6238 5295 7",
        "last_name": "",
        "mobile": "",
        "phone": "+41 56 777 999",
        "postal_code": "600",
        "vat_number": "CHE-111.333.999 IVA",
        "web": "https://www.mycompany.zz"
    },
    "type": "invoice",
    "version": "1.0"
}
Invoice Json Properties Explanation
The Json has the following main elements:
- type
"invoice" - version
"1.0" - document_info
- Information relative to the invoice or estimate (currency, doctype,...)
- Initial texts, before Items
- payment_info
Invoice due date. - supplier_info
Address of the company that issue/send the invoice.customer_info - Address of one receiving the invoice.
- shipping_info
Shipping Address - items
The list of items - billing_info
Total of the invoices.note - note
Array that contains the notes, to be printed at the end. - parameters
Not used - template_parameters
- Texts that are defined in the Invoice Dialogs
- transactions
Payment information (not used in transactions)
Source of data
This list explains where the actual information on your invoice json object is coming from
| Invoice Object Property | Source |
|---|---|
| customer_info.address1 | Table: Accounts, View: Address, Column: Street |
| customer_info.address2 | Table: Accounts, View: Address, Column: AddressExtra |
| customer_info.address3 | Table: Accounts, View: Address, Column: POBox |
| customer_info.balance | Table: Accounts, View: Address, Column: Balance |
| customer_info.balance_base_currency | Table: Accounts, View: Address, Column: BalanceCurrency |
| customer_info.bank_account | Table: Accounts, View: Address, Column: BankAccount |
| customer_info.bank_clearing | Table: Accounts, View: Address, Column: BankClearing |
| customer_info.bank_name | Table: Accounts, View: Address, Column: BankName |
| customer_info.business_name | Table: Accounts, View: Address, Column: OrganisationName |
| customer_info.city | Table: Accounts, View: Address, Column: Locality |
| customer_info.country | Table: Accounts, View: Address, Column: Country |
| customer_info.country_code | Table: Accounts, View: Address, Column: CountryCode |
| customer_info.courtesy | Table: Accounts, View: Address, Column: NamePrefix |
| customer_info.credit_limit | Table: Accounts, View: Address, Column: CreditLimit |
| customer_info.currency | Table: Accounts, View: Address, Column: Currency |
| customer_info.date_birth | Table: Accounts, View: Address, Column: DateOfBirth |
| customer_info.email | Table: Accounts, View: Address, Column: EmailWork |
| customer_info.fax | Table: Accounts, View: Address, Column: Fax |
| customer_info.first_name | Table: Accounts, View: Address, Column: FirstName |
| customer_info.fiscal_number | Table: Accounts, View: Address, Column: FiscalNumber |
| customer_info.iban_number | Table: Accounts, View: Address, Column: BankIban |
| customer_info.lang | Table: Accounts, View: Address, Column: Language |
| customer_info.last_name | Table: Accounts, View: Address, Column: FamilyName |
| customer_info.member_fee | Table: Accounts, View: Address, Column: MemberFee |
| customer_info.mobile | Table: Accounts, View: Address, Column: PhoneMobile |
| customer_info.number | Table: Accounts, View: Address, Column: Account |
| customer_info.payment_term_days | Table: Accounts, View: Address, Column: PaymentTermInDays |
| customer_info.phone | Table: Accounts, View: Address, Column: PhoneMain |
| customer_info.postal_code | Table: Accounts, View: Address, Column: PostalCode |
| customer_info.state | Table: Accounts, View: Address, Column: Region |
| customer_info.vat_number | Table: Accounts, View: Address, Column: VatNumber |
| customer_info.web | Table: Accounts, View: Address, Column: Website |
| document_info.currency | Invoice currency which usually corresponds to the customer account currency |
| document_info.date | Table: Transactions, Column: DateDocument or Date |
| document_info.decimals_amounts | Decimals are the same as the decimals used in the accounting file |
| document_info.description | Not used |
| document_info.doc_type | Table: Transactions, Column: DocType |
| document_info.greetings | Table: Transactions, Column: DocType Transactions with DocType=10:gre If there are many rows with 10:gre the texts are joined with ','. More info... |
| document_info.locale | Menu: File-File and accounting properties, Other, current Language |
| document_info.number | Table: Transactions, Column: DocInvoice |
| document_info.order_date | Table: Transactions, Column: DocType Transactions with DocType=10:ordd More info... |
| document_info.order_number | Table: Transactions, Column: DocType Transactions with DocType=10:ordn More info... |
| document_info.origin_row | Row index of source transaction |
| document_info.origin_table | Table name of source transaction |
| document_info.rounding_total | Default value for CHF: 0.05 You can overwrite this value with the menu command: Account2 - Customers - Settings - Advanced - Invoice rounding For multicurrency accounting: you can setup the rounding value for each currency in the table ExchangeRates, column DecimalPoints |
| document_info.text_begin | Table: Transactions, Column: DocType Transactions with DocType=10:beg More info... |
| document_info.type | invoice |
| items | Table: Transactions All rows with the same invoice number and transaction date are invoice's items (lines) |
| note | Table: Transactions, Column: DocType Transactions with DocType=10:not. More info... |
| parameters | Table: Transactions, Column: DocType Transactions with DocType=10:par:key Key: any key text you wish Value: is taken from column Description More info... |
| payment_info | Calculated from journal |
| shipping_info | Delivery address if different from the invoice address (customer_info) Table: Transactions, Column: DocType Transactions with DocType=10:sadr More info... |
| supplier_info.address1 | Menu: File-File and accounting properties, Address, Address 1 |
| supplier_info.address2 | Menu: File-File and accounting properties, Address, Address 2 |
| supplier_info.business_name | Menu: File-File and accounting properties, Address, Company |
| supplier_info.city | Menu: File-File and accounting properties, Address, City |
| supplier_info.country | Menu: File-File and accounting properties, Address, Country |
| supplier_info.courtesy | Menu: File-File and accounting properties, Address, Courtesy |
| supplier_info.email | Menu: File-File and accounting properties, Address, Email |
| supplier_info.fax | Menu: File-File and accounting properties, Address, Fax |
| supplier_info.first_name | Menu: File-File and accounting properties, Address, Name |
| supplier_info.fiscal_number | Menu: File-File and accounting properties, Address, Fiscal Number |
| supplier_info.last_name | Menu: FilevFile and accounting properties, Address, Family Name |
| supplier_info.mobile | Menu: File-File and accounting properties, Address, Mobile |
| supplier_info.phone | Menu: File-File and accounting properties, Address, Phone |
| supplier_info.postal_code | Menu: File-File and accounting properties, Address, Zip |
| supplier_info.state | Menu: File-File and accounting properties, Address, Region |
| supplier_info.vat_number | Menu: File-File and accounting properties, Address, Vat Number |
| supplier_info.web | Menu: File-File and accounting properties, Address, Web |
| transactions | Table: Transactions All rows with the same invoice number and different transaction date, which are not considered invoice items, like payments transactions |
Layout Preferences Json Object
The function getPrintPreferences() returns a list of user-selectable preferences for printing an invoice in Json format.
Banana takes care of checking whether the getPrintPreferences() function exists in the script and whether it returns the available choices. If found, the layout preferences are displayed within the dialogue for printing invoices, if not, no choices are displayed.
Layout preferences depend on the selected layout type, currently, the returning layouts of the preferences are:
This feature is available only with the Advanced plan, those who own another plan still see the layout preference box but the choices are disabled.
The layout preferences the user can choose from are:
- Print as: The user can decide the type of document to print:
- Automatic (default, depends on invoice status).
- Invoice.
- Delivery note.
- Delivery note without amounts.
- Reminder (number 1,2 or 3).

Complete Json structure
This is the layout preferences structure with multiple elements, that serve as a reference for future implementation:
- version: JSON structure version
- id: Id of the structure.
- text: Name of the structure.
- base_options: Array of objects, each object represents a basic customization option, like the 'print as' options.
- advanced_options_function: Object that contains advanced customization options.
The script defines the language in which to return the Json object, the structure remains the same, only the texts in the 'text' fields change.
The Json code include comments that should not be present in the code.
{
  "version" : "1.0",
  "id": "invoice_available_layout_preferences",
  "text":"Layout Preferences",
  "base_options" : [
  {
// first combo box
    "id": "invoice_available_print_as",
    "text": "Print as",
    "print_as": [
      {
        "id":"automatic",
        "text":"Automatic"
      },
      {
        "id":"invoice",
        "text": "Invoice"
      },
      {
        "id":"delivery_note" ,
        "text": "Delivery Note"
      },
      {
        "id":"reminder_1",
        "text": "Reminder 1"
      },
      {
        "id":"reminder_2",
        "text":"Reminder 2"
      },
      {
        "id":"reminder_3",
        "text": "Reminder 3"
      }
    ],
    "default": "automatic"
  },
],
// button.
//  When clicked the "function_name" is called
// Not yet implemented
"advanced_options_function" :{
  "text": "Print options",
  "function_name": "dialog_print_options"
}
}
Base preferences JSON structure example
The basic layout preferences concern more basic customisations, such as the document type (invoice status). The Json for the basic options is structured as follows:
- id: Id of the structure.
- text: Name of the structure.
- print_as: Array of objects, each object represents an available document type (or invoice status). Each element has an id and a text that is displayed in the combo box.
{
  "version" : "1.0",
  "id": "invoice_available_layout_preferences",
  "text":"Layout Preferences",
  "base_options" : [
  {
    "id": "invoice_available_print_as",
    "text": "Print as",
    "print_as": [
      {
        "id":"automatic",
        "text":"Automatic"
      },
      {
        "id":"invoice",
        "text": "Invoice"
      },
      {
        "id":"delivery_note" ,
        "text": "Delivery Note"
      },
      {
        "id":"reminder_1",
        "text": "Reminder 1"
      },
      {
        "id":"reminder_2",
        "text":"Reminder 2"
      },
      {
        "id":"reminder_3",
        "text": "Reminder 3"
      }
    ],
    "default": "automatic"
  }],
}
Advanced preferences JSON structure example
The advanced print options concern more detailed customisations. (to define)
{
  "version" : "1.0",
  "id": "invoice_available_print_preferences",
  "text":"Layout Preferences",
  "base_options" : [{/*Base options*/}],
  "advanced_options_function" :{
    "text": "Print options",
    "function_name": "dialog_print_options"
}
Returned JSON structure example
Banana returns a Json with user-selected layout preferences to the invoice layout script.
This structure is passed to the script through printDocument function.
- version: JSON structure version
- id: Id of the structure.
- print_choices: Object that contains the print choices selected by the user. We send to the script the id of the preference choosed by the user.
In the following example, the user chose to print the third reminder, the value returned to the script, in this case 'reminder_3'.
{
    "version" : "1.0",
    "id": "invoice_available_layout_preferences",
    "print_choices" : {
        "print_as":"reminder_3",
        //other preferences
    },
}
Adapt Existing Invoice Layouts
In Banana Accounting Plus (Advanced plan only) you can take an existing invoice layout, modify it and use it as a new custom layout.
A layout is an Extension that is specific for printing an invoice.
The following steps describe how to adapt to your needs the existing [CH10] Layout with Swiss QR Code and [UNI11] Layout 11 Programmable Invoice layouts.
- Choose the layout to start from
- Save the layout files
- Modify the layout
- Add your layout to the Banana Extensions
- View an invoice with the custom template
Choose the layout to start from
On GitHub you can find the following layouts:
These layouts extensions are packed into .sbaa files that include all the required files needed to run the extensions.
- CH10 Swiss layout, ch.banana.ch.invoice.ch10.sbaa:
- ch.banana.ch.invoice.ch10.js
The javascript code of the layout. - ch.banana.ch.invoice.ch10.texts.js
The javascript code of the layout texts. - ch.banana.ch.invoice.ch10.parameters.js
The javascript code of the layout parameters. - ch.banana.ch.invoice.ch10.printpreferences.js
The javascript code of the layout preferences. - invoice.css
The css stylesheet code. - swissqrcode.js
The javascript code of the QR Code part. - checkfunctions.js
The javascript code of some check functions.
- ch.banana.ch.invoice.ch10.js
- UNI11 Universal layout, ch.banana.uni.invoice.uni11.sbaa:
- ch.banana.uni.invoice.uni11.js
The javascript code of the layout. - ch.banana.uni.invoice.uni11.texts.js
The javascript code of the layout texts. - ch.banana.uni.invoice.uni11.parameters.js
The javascript code of the layout parameters. - ch.banana.uni.invoice.uni11.printpreferences.js
The javascript code of the layout preferences. - invoice.css
The css stylesheet code.
- ch.banana.uni.invoice.uni11.js
Save the layout files
Choose the layout you want to start from and download all the files included in the .sbaa package on your computer.
- Open the links above.
- Right click on the page.
- Select Save page.
All the files must be saved in the same directory.
Modify the layout
- Open the local file ch.banana.ch.invoice.ch10.js or ch.banana.uni.invoice.uni11.js with a text editor program.
- Right click on the file.
- Open with and select the text editor program.
- Change the @id with a new one.
Each new invoice layout must have a different @id text. - Change the @description with a new one.
The description will appear in the print dialog window when selecting the invoice layout. - Modify then the script as you want.
Find more information about the content of the Json Object of the invoice. - Save the file.
Add your layout to the Banana Extensions
At this point you can choose the way you want to add the layout to the Banana Extensions.
You have two options:
- Install the layout without recreating a new package.
- This can be useful if you don't need to share the layout with someone else, and also if you want to test your changes faster.
- From Banana, menu Extensions → Manage Extensions.
- Click on the button Add from file... and choose the file you just downloaded and modified (ch.banana.ch.invoice.ch10.js or ch.banana.uni.invoice.uni11.js).
- Create a new Extension Package (.sbaa file).
- This can be useful if you need to share the layout with someone else.
- Use the following manifest and QRC files and adapt them as you need:
- ch.banana.ch.invoice.ch10.manifest.json
- Open the link, right click on the page, select Save page.
- Open the file using a text editor program and change description and title.
- ch.banana.ch.invoice.ch10.qrc.
- ch.banana.ch.invoice.ch10.manifest.json
- From Banana, menu Extensions → Manage Extensions.
- Click on the button Add from file... and choose the file .sbaa you just created.
Important: Do not delete the extension file from your pc or move it to another directory after the installation, otherwise the extension will no longer work. If you want to move the extension to another directory, you must reinstall it from the new location.
View an invoice with the custom layout
- From Banana, menu Reports → Customers → Print Invoices select the layout you just added.
- Confirm with Ok to see the preview.
Customize Invoice Layout
With the Advanced plan of Banana Accounting Plus, you can create your own Invoice Layout.
A Layout is an Extension that is specific for printing an Invoice.
The following steps describe how to create an invoice template starting from an existing one and adapting it to your needs.
Choose your print style
- From the Banana program, select menu Extensions > Manage Extensions...
- Select Online > Invoice.
- Choose one of the existing templates (i.e. [UNI01] Layout 1)
- Click on Show details.
- Click on URL.

Save the layout's script
A page with the JavaScript code opens. Save the script file to your documents folder (menu File > Save Page As) or right click somewhere on the page > Save As.

Modify the template
- Open the local file with a text editor program
- Right click on the file.
- Open with .... and select the text editor program.
- Change the @description and the @id.
- Save the file.
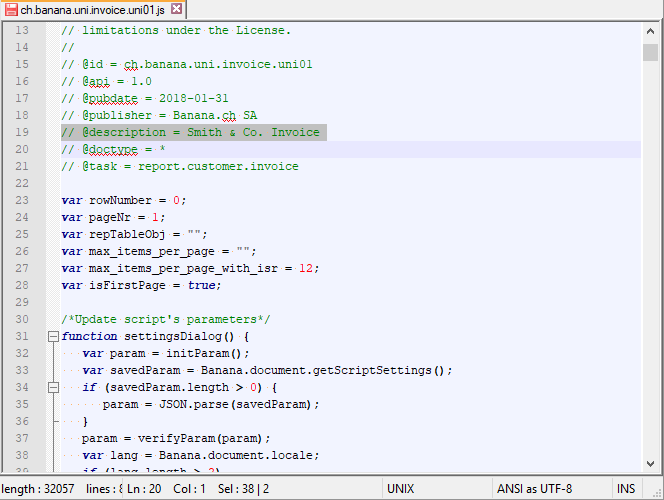
Add your layout to the Banana extensions
- From the Banana program, menu Extensions > Manage Extensions....
- Click on the button Add from file... and choose the file you just downloaded and modified.
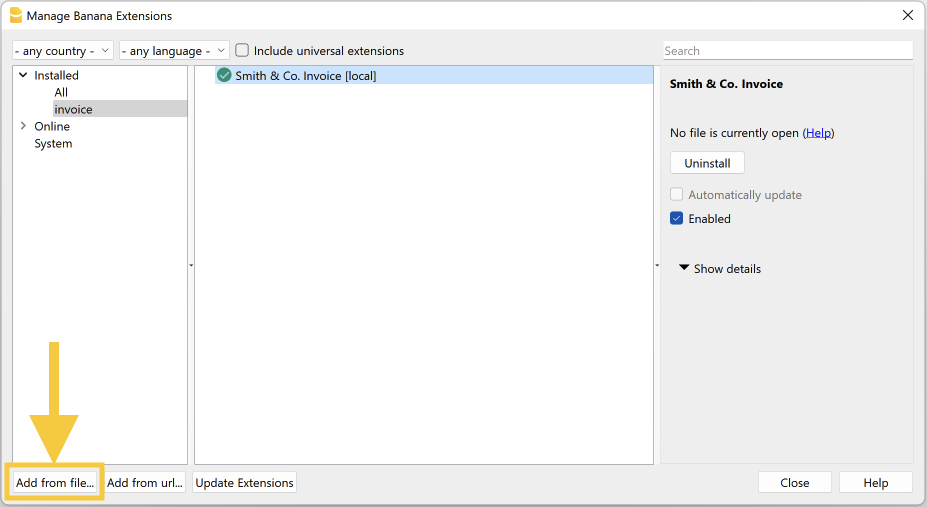
View an invoice with the custom template.
- In menu Reports > Customers > Print Invoices select the layout Smith & Co. Invoice.
- Click Ok.
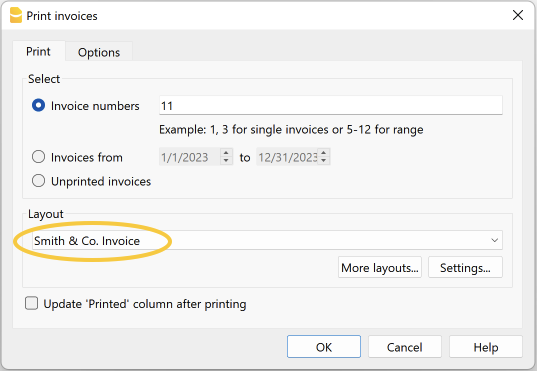
Preview:
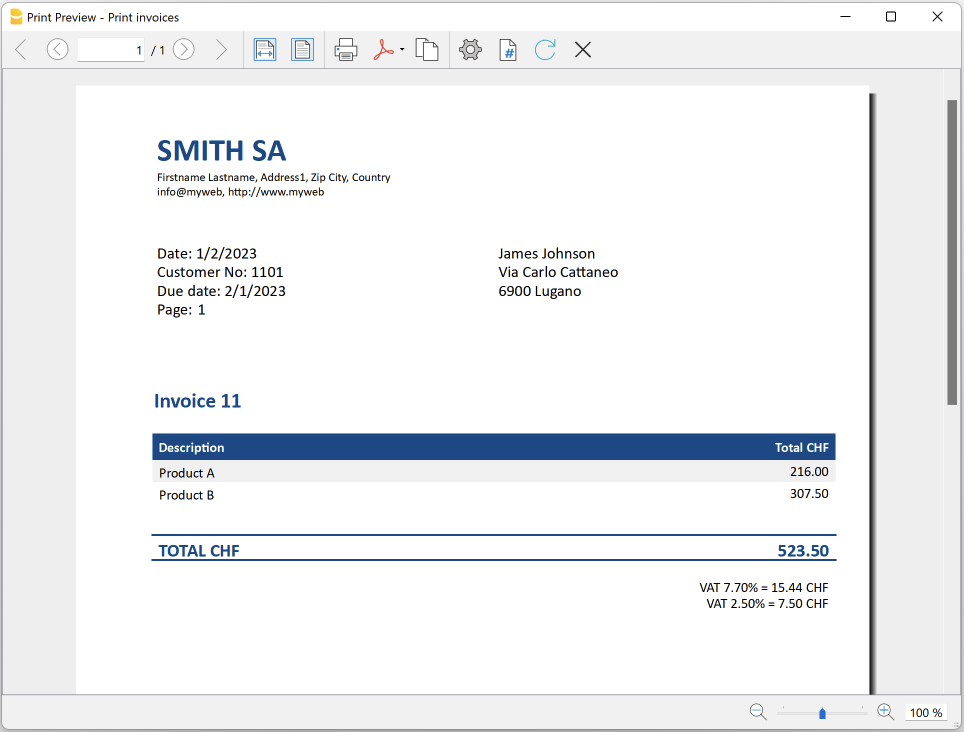
Additional changes
The images below illustrates how to carry out the following changes to your layout.
- How to change the header position to the right:
- Modify the lines as described here (see from row 683 to 686). Save changes.
- How to change the text "Customer No" to "Customer"
See your changes
Simply click on the refresh button

Exporting Invoices to XML
This page explains how to create a Banana Accounting Javascript Extension, that creates the invoice in a specific format. The explanation takes as example the extension Fattura Elettronica , which exports electronic invoices according to Italian B2B standards in XML format.
The Extension has the following steps:
- Use the Banana API, to retrieve the list invoicesCustomers in Json format.
- InvoiceCustomers includes the Invoice objects.
- For the Italian export it is necessary to have also information regarding the Tax code. This supplementary information is calculated by the VAT Extension. That is why the Extensions includes different files.
- The user is given the ability to enter data. So a dialog is displayed with the information required.
See Extension documentation in Italian. - The Extension can also have parameters that can be set with the settings dialog.
- Once you have all the information, you need to convert the data in the format that you need. In the Italian case, the invoice is in the XML format that follows the specific requirements.
- At the end, the Extension calls a function that prompts the user to specify the file where he wants to save the XML data.
- The Extension for Italy also includes a possibility to have a preview of the invoice and export it in PDF.
References:
- Information on creating invoices in Banana is available in our Invoicing documentation.
- All the code reported can be found in the following folder: Italia/Fatture elettroniche/B2B/
- Build you first Extension.
Attributes list
Each extension must declare some attributes in order to run in Banana environment. For more info see Extension's Attributes page
- @id: this is the script ID. It will be used by getScriptSettings() and setScriptSettings() to save params values for this script
- @includejs: ch.banana.it.invoice.it05.js this is the invoice template used to print out the invoice in preview and PDF format.
- @includejs: ch.banana.script.italy_vat_2017.journal.js this file contains the class Journal, used to retrieve transactions and customer info such as adresses. Other includes are dependencies of ch.banana.script.italy_vat_2017.journal.js
// @id = ch.banana.it.efattura.b2b
// @api = 1.0
// @pubdate = 2019-04-25
// @publisher = Banana.ch SA
// @description = [BETA] Fattura elettronica (XML, PDF)...
// @description.it = [BETA] Fattura elettronica (XML, PDF)...
// @doctype = *
// @task = app.command
// @inputdatasource = none
// @timeout = -1
// @includejs = ch.banana.it.invoice.it05.js
// @includejs = ch.banana.script.italy_vat_2017.errors.js
// @includejs = ch.banana.script.italy_vat_2017.journal.js
// @includejs = ch.banana.script.italy_vat.daticontribuente.js
// @includejs = ch.banana.script.italy_vat_2017.xml.js
Function exec()
The exec() function is the main function, which is called when the extension is executed. This function does the following:
- loads user parameters
- creates an EFattura-class object
- the EFattura object loads data according to user parameters
- the EFattura object issues invoices in xml format or in print preview
function exec(inData, options) {
...
   // creates the EFattura object that contains the logic to load the invoices
   // and transform them into the required formats
   var eFattura = new EFattura(Banana.document);
   if (!eFattura.verifyBananaVersion())
      return "@Cancel";

   // user params can be retrieved using the method Banana.document.getScriptSettings()
   // they are saved in the system table syskey using the method Banana.document.setScriptSettings()
   var param = {};
...
   param = JSON.parse(Banana.document.getScriptSettings());
...
   eFattura.setParam(param);
   //loadData() retrieves data from table invoicesCustomers() and returns an array of json invoices grouped by customer
   var jsonCustomerList = eFattura.loadData();
...
   //output the data according to user param (xml or pdf)
   if (eFattura.param.output == 0) {
      var docs = [];
      var styles = [];
      for (var i in jsonCustomerList) {
         var jsonInvoices = jsonCustomerList[i];
         for (var j = 0; j < jsonInvoices.length; j++) {
            var jsonInvoice = jsonInvoices[j];
            if (jsonInvoice.customer_info) {
               var repDocObj = Banana.Report.newReport('');
               var repStyleObj = Banana.Report.newStyleSheet();
               eFattura.createReport(jsonInvoice, repDocObj, repStyleObj);
               docs.push(repDocObj);
               styles.push(repStyleObj);
            }
         }
      }
      if (docs.length) {
         Banana.Report.preview("", docs, styles);
      }
   }
   else {
      //output xml
      for (var i in jsonCustomerList) {
         var jsonInvoices = jsonCustomerList[i];
         var xmlDocument = Banana.Xml.newDocument("root");
         var output = eFattura.createXml(jsonInvoices, xmlDocument, true);
         if (output != "@Cancel") {
            var xslt = "";
            var outputStyled = output.slice(0, 39) + xslt + output.slice(39);
            eFattura.saveFile(outputStyled);
         }
      }
   }
}
Class EFattura()
This class contains all the logic of the application in order to print out the invoices. The costructor initializes some variables.
function EFattura(banDocument) {
this.banDocument = banDocument;
...
this.name = "Banana Accounting EFattura";
this.version = "V1.0";
this.helpId = "ch.banana.it.efattura.b2b.js";
this.errorList = [];
/* errors id*/
this.ID_ERR_ACCOUNTING_TYPE_NOTVALID = "ID_ERR_ACCOUNTING_TYPE_NOTVALID";
...
this.initParam();
this.initNamespaces();
this.initSchemarefs();
}
EFattura.initParam()
This method initializes the class parameters, which will resume user-set values using the setParam() method and the settingsDialog() function.
EFattura.prototype.initParam = function () {
this.param = {};
/*output format 0=pdf, 1=xml*/
this.param.output = 0;
/*selection 0=single invoice, 1=single customer 2=all*/
this.param.selection = 0;
/*invoice number*/
this.param.selection_invoice = '';
/*customer number*/
this.param.selection_customer = '';
/* periodSelected 0=none, 1=1.Q, 2=2.Q, 3=3Q, 4=4Q, 10=1.S, 12=2.S, 30=Year */
this.param.periodAll = true;
this.param.periodSelected = 1;
this.param.periodStartDate = '';
this.param.periodEndDate = '';
/*params for xml format*/
this.param.xml = {};
this.param.xml.progressive = '1';
this.param.xml.open_file = false;
this.param.xml.destination_folder = '';
/*params for pdf format*/
this.param.report = {};
this.param.report.print_header = true;
this.param.report.print_logo = true;
this.param.report.print_quantity = false;
this.param.report.font_family = '';
this.param.report.color_1 = '#337ab7';
this.param.report.color_2 = '#ffffff';
this.param.report.header_row_1 = '';
this.param.report.header_row_2 = '';
this.param.report.header_row_3 = '';
this.param.report.header_row_4 = '';
this.param.report.header_row_5 = '';
this.param.report.footer = '';
}
EFattura.loadData()
The loadData() declares the following objects:
- this.journal: this is an object available from the script Iva Italia. The journal contains all the accounting transactions and the list of customers, including their addresses.
In order to use this object you need to include the file ch.banana.script.italy_vat_2017.journal.js using the statement @includejs = ch.banana.script.italy_vat_2017.journal.js in the attribute list of the script.
- this.journalInvoices: this can be loaded directly from Banana.document.invoicesCustomers and contains all invoices.
EFattura.prototype.loadData = function () {
//loads transactions, the journal is declared in script /iva/2017/ch.banana.script.italy_vat_2017.journal.js
//the journal is used for retrieving the following data: "IT_TipoDoc" (type of document), "IT_Natura" (nature of the transaction)
//see @includes at the beginning of this script
if (!this.journal) {
this.journal = new Journal(this.banDocument);
this.journal.excludeVatTransactions = true;
this.journal.load();
}
//loads list of invoices using the Banana.document object
if (!this.journalInvoices) {
this.journalInvoices = this.banDocument.invoicesCustomers();
}
var jsonInvoiceList = [];
//if invoice filter is defined and invoice number is empty, no invoice is returned
if (this.param.selection == 0 && this.param.selection_invoice.length <= 0)
return jsonInvoiceList;
//if customer filter is defined and customer number is empty, no invoice is returned
if (this.param.selection == 1 && this.param.selection_customer.length <= 0)
return jsonInvoiceList;
//if tax payer data is not defined, no invoiced is returned
if (!this.initDatiContribuente())
return jsonInvoiceList;
//set period of the transactions to be loaded
var periodAll = this.param.periodAll;
var startDate = this.param.periodStartDate;
var endDate = this.param.periodEndDate;
for (var i = 0; i < this.journalInvoices.rowCount; i++) {
var tRow = this.journalInvoices.row(i);
//the column 'ObjectJSonData', in the table journalInvoices, contains the invoice object
if (tRow.value('ObjectJSonData') && tRow.value('ObjectType') === 'InvoiceDocument') {
var jsonData = {};
jsonData = JSON.parse(tRow.value('ObjectJSonData'));
var addInvoice = true;
if (parseInt(this.param.selection) === 0 && jsonData.InvoiceDocument.document_info.number !== this.param.selection_invoice) {
addInvoice = false;
}
if (parseInt(this.param.selection) === 1 && jsonData.InvoiceDocument.customer_info.number !== this.param.selection_customer) {
addInvoice = false;
}
if (addInvoice && !periodAll) {
if (jsonData.InvoiceDocument.document_info.date < startDate || jsonData.InvoiceDocument.document_info.date > endDate) {
addInvoice = false;
}
}
if (addInvoice) {
jsonInvoiceList.push(jsonData.InvoiceDocument);
}
}
}
if (jsonInvoiceList.length<=0) {
var msg = this.getErrorMessage(this.ID_ERR_NOINVOICE);
this.addMessage(msg, this.ID_ERR_NOINVOICE);
}
//data is grouped by customer because the xml file can contain only one customer per file
//if many customers are printed, these will be splitted into many files
var jsonCustomerList = {};
for (var i = 0; i < jsonInvoiceList.length; i++) {
var jsonInvoice = jsonInvoiceList[i];
if (jsonInvoice.customer_info) {
var accountId = jsonInvoice.customer_info.number;
if (!jsonCustomerList[accountId])
jsonCustomerList[accountId] = [];
jsonCustomerList[accountId].push(jsonInvoice);
}
}
return jsonCustomerList;
}
EFattura.createReport(jsonInvoice, report, stylesheet)
The createReport() generates the preview of the invoice. If you wish to change the layout of the invoice you can modify or replace the script ch.banana.it.invoice.it05.js
@jsonInvoice: this is the json invoice object which contains all data to print out
@report: this is the Banana.Report.ReportElement object which permits you to preview and print out the data
@stylesheet: this is the Banana.Report.ReportStyleSheet object which contains all css information for printing out the report.
//print the single invoice to the object report,
//the methods printInvoice and setInvoiceStyle are declared in the file ch.banana.it.invoice.it05.js
if (jsonInvoice && jsonInvoice.customer_info) {
printInvoice(jsonInvoice, report, stylesheet, this.param.report);
...
setInvoiceStyle(report, stylesheet, this.param.report);
stylesheet.addStyle("@page").setAttribute("margin", "0");
}
EFattura.createXml(jsonInvoiceList, xmlDocument, indent)
The createXml() generates the xml code of the invoice. The XML file will contains one or more invoices of a single customer.
@jsonInvoiceList: this is an array with the list of invoices which belong to a single customer
@xmlDocument: this is a Banana.Xml.XmlElement which contains all XML data
@indent: if true the string xml will be indented and formatted with spaces
if (!xmlDocument || jsonInvoiceList.length<=0)
return "@Cancel";
var nodeRoot = this.createXmlHeader(jsonInvoiceList[0], xmlDocument);
if (!nodeRoot || this.isEmpty(nodeRoot))
return "@Cancel";
for (var i = 0; i < jsonInvoiceList.length; i++) {
this.createXmlBody(jsonInvoiceList[i], nodeRoot);
}
return Banana.Xml.save(xmlDocument, indent);
Customer Report Extensions
Report extensions are java-script programs that are used to customize printouts like invoice documents.
The program:
- Will call the main function printDocument() with the json object (for example the invoice) and the other parameters.
- It create a print document and shows the result in a print preview window.
Copies of some report apps that you can use as starting point are available at the following address: github.com/BananaAccounting
Important notes
- Banana Accounting uses Qt script engine to execute report extension.
- Mandatory and optional functions:
- printDocument(jsonContent, repDocObj, repStyleObj [, prefSelected])
the main function that is called by the program - settingsDialog() (optional)
called from user to set up parameters like colour or additional text. - getPrintPreferences() (optional)
returns a JSON object with the available print options.
- Available jsonContent formats:
- The extension of custom report apps should be ".js" and the script must contains the main attributes, see Apps Attributes.
- The attribute @id of the script should correspond to the file name.
- System report apps are downloaded to the folder /User/.../AppData/Local/Banana.ch/.../Apps
(Mac Users: /Users/.../Library/Application Support/Banana.ch/.../Apps) - Do not overwrite system report apps because updates will overwrite your changes.
- You can save your report app anywhere, Banana Accounting saves the path to your app in the configuration file /AppData/Local/Banana.ch/.../Apps/apps.cfg
Customer Statement Layout Extension
Create personalized statement report extension
We have published our templates on github.com/BananaAccounting. In this section you will find different basic examples.
You can save a copy of one template in your computer and make the changes you wish. In order to use your custom template in Banana you have to:
- select the command Reports - Customers - Print statements...
- In the Print statements dialog select Manage apps...
- In the Manage apps dialog select Add from file... and choose your statement report file you just created
Extension attributes
// @id = scriptfilename.js
// @api = 1.0
// @pubdate = yyyy-mm-dd
// @publisher = yourName
// @description = script description
// @task = report.customer.statement
Report code
The main function is printDocument(jsonStatement, repDocObj, repStyleObj [, format]). The parameter jsonStatement object contains the data, repDocObj is the document object and repStyleObj is the stylesheet object where you can add styles.
function printDocument(jsonStatement, repDocObj, repStyleObj) {
var param = initParam();
var savedParam = Banana.document.getScriptSettings();
if (savedParam.length > 0) {
param = JSON.parse(savedParam);
param = verifyParam(param);
}
printInvoice(jsonInvoice, repDocObj, repStyleObj, param);
}
The function settingsDialog() is called from Banana when you select the button Params... from dialog Manage apps. You can write any code you need for your script.
/*Update script's parameters*/
function settingsDialog() {
var param = initParam();
var savedParam = Banana.document.getScriptSettings();
if (savedParam.length > 0) {
param = JSON.parse(savedParam);
}
param = verifyParam(param);
...
var paramToString = JSON.stringify(param);
var value = Banana.document.scriptSaveSettings(paramToString);
}
Customer Statement Json Object
Statement Json Object
Data structure you can access through the report:
{
"customer_info": {
"address1": "Viale Stazione 11",
"business_name": "Rossi SA",
"city": "Bellinzona",
"first_name": "Andrea",
"last_name": "Rossi",
"number": "1100",
"origin_row": "26",
"origin_table": "Accounts",
"postal_code": "6500"
},
"document_info": {
"date": "20160927",
"decimals_amounts": 2,
"description": "",
"locale": "it",
"number": "",
"type": "statement"
},
"items": [
{
"balance": "540.00",
"credit": "",
"currency": "CHF",
"date": "20160101",
"debit": "540.00",
"due_date": "20160131",
"due_days": "240",
"item_type": "invoice",
"last_reminder": "",
"last_reminder_date": "",
"number": "10",
"payment_date": "",
"status": "",
"total_amount_vat_exclusive": "",
"total_amount_vat_inclusive": "",
"total_vat_amount": "",
"unit_price": {
}
},
{
"balance": "540.00",
"credit": "",
"currency": "",
"date": "",
"debit": "540.00",
"item_type": "total",
"number": "",
"status": "",
"total_amount_vat_exclusive": "",
"total_amount_vat_inclusive": "",
"total_vat_amount": "",
"unit_price": {
}
}
],
"supplier_info": {
"address1": "Indirizzo 1",
"address2": "Indirizzo 2",
"business_name": "Società",
"city": "Loc",
"email": "info@myweb",
"first_name": "Nome",
"fiscal_number": "numerofiscale",
"last_name": "Cognome",
"postal_code": "CAP",
"web": "http://www.myweb"
}
}
Reminder Extensions Layout
Create personalized reminder report extensions
We have published our templates on github.com/BananaAccounting. In this section you will find different basic examples.
You can save a copy of one template in your computer and make the changes you wish. In order to use your custom template in Banana you have to:
- select the command Reports - Customers - Print reminders...
- In the Print payment reminders dialog select Manage apps...
- In the Manage apps dialog select Add from file... and choose your reminder report file you just created
Extensions attributes
// @id = scriptfilename.js
// @api = 1.0
// @pubdate = yyyy-mm-dd
// @publisher = yourName
// @description = script description
// @task = report.customer.reminder
Report code
The main function is printDocument(jsonReminder, repDocObj, repStyleObj).
- The parameter jsonReminder object contains the data,
- repDocObj is the document object.
- repStyleObj is the stylesheet object where you can add styles.
function printDocument(jsonReminder, repDocObj, repStyleObj) {
var param = initParam();
var savedParam = Banana.document.getScriptSettings();
if (savedParam.length > 0) {
param = JSON.parse(savedParam);
param = verifyParam(param);
}
printReminder(jsonReminder, repDocObj, repStyleObj, param);
}
The function settingsDialog() is called from Banana when you select the button Params... from dialog Manage apps. You can write any code you need for your script.
/*Update script's parameters*/
function settingsDialog() {
var param = initParam();
var savedParam = Banana.document.getScriptSettings();
if (savedParam.length > 0) {
param = JSON.parse(savedParam);
}
param = verifyParam(param);
...
var paramString = JSON.stringify(param);
var value = Banana.document.setScriptSettings(paramString);
}
Reminder Json Object
Reminder Json Object
Data structure you can access through the report:
{
"customer_info": {
"address1": "Viale Stazione 11",
"business_name": "Rossi SA",
"city": "Bellinzona",
"first_name": "Andrea",
"last_name": "Rossi",
"number": "1100",
"origin_row": "26",
"origin_table": "Accounts",
"postal_code": "6500"
},
"document_info": {
"date": "20160927",
"decimals_amounts": 2,
"description": "",
"locale": "it",
"number": "",
"type": "reminder"
},
"items": [
{
"balance": "540.00",
"balance_base_currency": "540.00",
"base_currency": "CHF",
"credit": "",
"credit_base_currency": "",
"currency": "CHF",
"date": "20160101",
"debit": "540.00",
"debit_base_currency": "540.00",
"item_type": "invoice",
"number": "10",
"status": "1. reminder",
"total_amount_vat_exclusive": "",
"total_amount_vat_inclusive": "",
"total_vat_amount": "",
"unit_price": {
}
},
{
"balance": "540.00",
"balance_base_currency": "540.00",
"base_currency": "",
"credit": "",
"credit_base_currency": "",
"currency": "",
"date": "",
"debit": "540.00",
"debit_base_currency": "540.00",
"item_type": "total",
"number": "",
"status": "",
"total_amount_vat_exclusive": "",
"total_amount_vat_inclusive": "",
"total_vat_amount": "",
"unit_price": {
}
}
],
"supplier_info": {
"address1": "Indirizzo 1",
"address2": "Indirizzo 2",
"business_name": "Società",
"city": "Loc",
"email": "info@myweb",
"first_name": "Nome",
"fiscal_number": "numerofiscale",
"last_name": "Cognome",
"postal_code": "CAP",
"web": "http://www.myweb"
}
}
Estimate and Invoice Dialog Extensions
The Invoice Dialog Extension is used by the the Application Estimate and Invoice. It open a dialog and let the user Enter the invoice data.
The extension uses as input and output a JSON invoice structure.
The Invoice Dialog Extension allows to completely customize the dialog for specific purposes in case you have a high volume of invoices or you have specific needs. Please contact our support for more information.
For more information see the github documentation:
Payment Extension
The payment interface allows you to generate payment messages (xml files) that can be transmitted to a financial institution to make payments.
The payment interface is based on the JsAction class. This class allows you to define through a javascript file all operations on table's fields of Mime Data Type, which contains json objects, such as an invoice or a payment. The various operations allow you to update the transaction row that contains the object and to update the object itself.
See the Payment Extension for Switzerland on Github
Documentation Payment Extension
JsAction::JsAction(banDocument)
/*
* Class Constructor
*/
JsAction::create(tabPos, uuid)
/*
* Creates the payment data object
* Returns a json patch document to be applied or null if the user discard the changes.
* @tabPos: Table name and position row
* @uuid: unique id to identify the payment/data object generated by c++
*/
JsAction::createTransferFile(paymentFile)
/*
* Create a payment file (pain.001 A-level)
* @param paymentData contains a json object of type payment/file
*/
JsAction::edit(tabPos, isModified)
/*
* It is like the updateRow() method, except for displaying the dialog with the properties of the object
* @tabPos: Table name and position row
* @isModified:
*/
JsAction::exportTransferFile(xml, fileName)
/*
* Save the xml pain file to the selected destination folder
* @fileName: suggested fileName
*/
JsAction::getInfo()
/*
* Returns the info to show in the info panel as object (see class InfoMessage)
*/
JsAction::listPainFormats()
/*
* Return the list of the supported transfer file formats
*/
JsAction::scanCode(tabPos, code)
/*
* Scans an invoice QRCode and creates the related transaction
* Returns a json patch document to be applied, null if no changes, or an Error object.
* @tabPos: Table name and position row
* @code: QR-Code text
*/
JsAction::updateRow(tabPos, uuid)
/*
* This method updates the transaction row according to the payment object.
* It returns a json patch document, null if no changes, or an Error object.
* Uuid is used only for new rows (copied or duplicated rows)
*/
JsAction::validateTransferFile(xml, painFormat)
/*
* Validate xml pain file against schema available in package
*/
Example of Payment/Data object
The Payment/Data object is a JSON object which contains the information for making a payment.
{
"methodId":"QRCODE",
"creditorAccountId":";8004",
"creditorName":"Ernesto Verdi",
"creditorStreet1":"Piazza Luvini","creditorStreet2":"",
"creditorCity":"Chiasso",
"creditorPostalCode":"6800",
"creditorCountry":"",
"creditorBankName":"",
"creditorBankAddress1":"",
"creditorBankAddress2":"",
"creditorBankAccount":"",
"creditorIban":"CH58 0900 0000 6525 0122 4",
"creditorBic":"",
"ultimateDebtorName":"",
"ultimateDebtorStreet1":"",
"ultimateDebtorStreet2":"",
"ultimateDebtorCity":"",
"ultimateDebtorPostalCode":"",
"ultimateDebtorCountry":"",
"amount":"140.00",
"currency":"CHF",
"referenceType":"NON",
"reference":"",
"unstructuredMessage":"",
"billingInfo":"",
"categoryPurpose":"",
"invoiceNo":"1002",
"transactionDate":"2022-05-05",
"dueDate":"2022-07-31",
"description":"Fattura Verdi",
"syncTransaction":true,
"@appId":"ch.banana.switzerland.pain001",
"@type":"payment/data",
"@version":"1.0",
"@uuid":"c4ab8cf6-b9e7-4904-80e8-39bfa433ec6a"
}
Example of Payment/File object
The Payment/File object is a JSON object, which contains one or more Payment/Data objects and the pain XML file transmitted to the financial institution.
{
"@appId": "ch.banana.switzerland.pain001",
"@format": "pain.001.001.03.ch.02",
"@title": "Payment June",
"@type": "payment/file",
"@uuid": "c05f6a7b8c9a4c27a55255fcd19c444a",
"@version": "1.0",
"confirmationDetailed": true,
"confirmationExecution": true,
"debtorAccountId": "1020",
"debtorBic": "POFICHBEXXX",
"debtorIban": "CH5809000000652501224",
"debtorName": "Tarchini SA",
"requestExecutionDate": "2022-06-08",
"requestExecutionDateApplyAll": false,
"transactions": [
{
"@appId": "ch.banana.switzerland.pain001",
"@type": "payment/data",
"@uuid": "c4ab8cf6-b9e7-4904-80e8-39bfa433ec6a",
"@version": "1.0",
"amount": "140.00",
"billingInfo": "",
"categoryPurpose": "",
"creditorAccountId": ";8004",
"creditorBankAccount": "",
"creditorBankAddress1": "",
"creditorBankAddress2": "",
"creditorBankName": "",
"creditorBic": "",
"creditorCity": "Chiasso",
"creditorCountry": "",
"creditorIban": "CH58 0900 0000 6525 0122 4",
"creditorName": "Ernesto Verdi",
"creditorPostalCode": "6800",
"creditorStreet1": "Piazza Luvini",
"creditorStreet2": "",
"currency": "CHF",
"description": "Fattura Verdi",
"dueDate": "2022-07-31",
"invoiceNo": "1002",
"methodId": "QRCODE",
"reference": "",
"referenceType": "NON",
"syncTransaction": true,
"transactionDate": "2022-05-05",
"ultimateDebtorCity": "",
"ultimateDebtorCountry": "",
"ultimateDebtorName": "",
"ultimateDebtorPostalCode": "",
"ultimateDebtorStreet1": "",
"ultimateDebtorStreet2": "",
"unstructuredMessage": ""
}
],
"transferFile": "\n\n \n \n c05f6a7b8c9a4c27a55255fcd19c444a \n 2022-06-08T15:35:37 \n 1 \n 140.00 \n \n message sender name missing \n \n Banana Accounting+/Banana.ch SA \n 10.0.12.22152 \n \n \n \n \n PAYMT-2022068133537178-000 \n TRF \n true \n 1 \n 140.00 \n 2022-07-31 \n \n Tarchini SA \n \n \n \n CH5809000000652501224 \n \n \n CWD \n \n \n \n \n POFICHBEXXX \n \n \n CRED \n \n \n INSTRID-1 \n c4ab8cf6b9e7490480e839bfa433ec6a \n \n \n \n 140.00 \n \n \n Ernesto Verdi \n \n Piazza Luvini \n 6800 Chiasso \n \n \n \n \n CH5809000000652501224 \n \n \n \n \n \n \n"
}
File Creator Extensions
The File Create extensions transforms allow to create Banana file, by importing a data formats (like audit files, bank statements or invoices files) .
For example of File Creator Extensions, see the Menu Tools > Create file from external data.
Extension Package
The Create extension must be published as sbaa package and contains at least the following two files:
- manifest.json
The description of the package
- createlocate.json
This file specify to which file the conversion apply, and the resource used for converting and creating a file.
- createinit.js
A javascript file that analyse the data and return a Json text, that specify what script is used to convert the data and what document Banana Accounting will create.
createlocate.json
The text file createlocate.json associates a specific file format to an extension. When opening a text file, whose format is defined in createlocate.json, Banana Accounting will create a new accounting file and import the content of the text file.
In the following example, opening an XML file with namespace 'http:://ivaservizi.agenziaentrate.gov....', Banana Accounting will look for the extension to be executed defined in the createlocate.json file.
{
"country":"italy",
"countryCode":"it",
"description": "Importazione e-fatture ordinarie v1.2 (xml)",
"docUri": "",
"fileExtension": "xml",
"mimeType": "text/xml",
"script": {
"function": "exec",
"uri": "ch.banana.it.import.efattura.sbaa/createinit.js"
},
"xml": {
"namespace": "http://ivaservizi.agenziaentrate.gov.it/docs/xsd/fatture/v1.2",
"rootItem": "FatturaElettronica"
},
"type": "text/json",
"version": "1.0"
}
Example of XML Data
This example will be imported according to the instructions contained in the createlocate.js file
<?xml version="1.0" encoding="UTF-8" standalone="no"?>
<?xml-stylesheet type='text/xsl' href='fatturaPA_v1.2.1.xsl'?>
<p:FatturaElettronica versione="FPR12" xmlns:p="http://ivaservizi.agenziaentrate.gov.it/docs/xsd/fatture/v1.2" xmlns:xsi="http://www.w3.org/2001/XMLSchema-instance">
<FatturaElettronicaHeader>
<DatiTrasmissione>
<IdTrasmittente><IdPaese>IT</IdPaese><IdCodice>09009900999</IdCodice></IdTrasmittente>
...
</DatiTrasmissione>
</FatturaElettronicaHeader>
</p:FatturaElettronica>
createinit.js
This is a script file with the attribute @task create.init.
The script returns a json object which defines the type of accounting file to create and the extension to execute for importing data.
The argument of the exec function (inData) is the data to be imported.
// @id = createinit
// @api = 1.0
// @pubdate = 2021-07-28
// @publisher = Banana.ch SA
// @description = Create Init for importing Italy's XML Invoices
// @task = create.init
// @doctype = *
function exec(inData) {
var jsonData = {
"fileType": {
"accountingType" : {
"docGroup" : "100",
"docApp" : "110",
"decimals" : "2"
},
"template" : "https://github.com/BananaAccounting/Italia/raw/master/templates/contabilita_doppia/cd_commerciale.ac2",
},
"scriptImport": {
"function": "exec",
"uri": "ch.banana.it.import.efattura.sbaa/ch.banana.it.import.efattura"
},
"scriptSetup": {
"function": "setup",
"uri": "ch.banana.it.import.efattura.sbaa/ch.banana.it.import.efattura"
},
};
return jsonData;
}
- fileType: the ac2 file which will contain the imported data
- accountingType: if template is empty, a new empty accounting file will be created. You can decide which type to create:
docGroup 100 double entry accounting
docGroup 110 simple accounting (income - expenses accounting)
docGroup 130 cash book accounting
docApp 100 without VAT
docApp 110 with V AT
docApp 120 multicurrency without VAT
docApp 130 multicurrency with VAT
- template: url of an ac2 file. You can download ac2 files from our website (resources). If template is empty a new empty file will be created.
- scriptImport:
function is the method which will be called when importing data. uri is the name of the file which contains the javascript with this method.
- scriptSetup:
function is the method which will be called when setting up the script. uri is the name of the file which contains the javascript with this method.