Transactietabel | Dubbel boekhouden
De transactietabel is de centrale plaats voor de boekhouding waar alle bewerkingen met financiële en economische gevolgen worden ingevoerd. Het gebruik is gelijkwaardig aan Excel. In de transactietabel zijn de mutaties altijd zichtbaar en in perfecte volgorde en door er doorheen te bladeren heeft u een duidelijk zicht op alle gebeurtenissen.
Alle ingevoerde gegevens kunnen worden aangepast en gecorrigeerd waardoor u altijd eenvoudig een perfecte boekhouding heeft.
Snelle invoer
De tabel is gelijkwaardig aan Excel, U kunt op en neer scrollen en in elke cel gaan staan.
Er zijn heel wat functies die gegevens invoeren en aanpassen erg snel maken.
De volgende bewerkingen zijn mogelijk:
- Annuleren en Opnieuw uitvoeren.
- Een of meer cellen selecteren en kopiëren / plakken.
- Toevoegen, kopiëren en verwijderen van regel, per stuk of meerdere tegelijk.
- Teksten zoeken en vervangen.
- Rijen op datum sorteren.
- De auto-aanvullen functie geeft suggesties voor gegevens die ingevoerd kunnen worden (bijvoorbeeld een lijst met rekeningen).
- Met de F6 toets waardes overnemen van dezelfde soort rij.
- Met de F4 toets waardes overnemen van de vorige rij.
- De datum overnemen van de vorige rij.
- In de kolom Doc worden oplopende nummers (met verschillende tellers) aangegeven.
- In de kolommen Debet of Credit kunt u zoeken naar de rekening door de beschrijving ervan in te typen.
- In de kolommen voor bedragen kunt u formules invoeren zoals "30 + 25" en het programma voert het resultaat in.
Meer informatie is beschikbaar op de pagina Cellen.
Mutaties importeren
Door transacties van bank- of creditkaartafschriften te importeren wordt gegevensinvoer in de transactietabel versneld en worden fouten voorkomen. Gegevens worden vastgelegd precies zoals ze op het afschrift staan.
- Behalve van rekeningafschriften kunt u ook gegevens van andere programma's importeren.
- Het programma vult automatisch ontbrekende gegevens aan.
- Er zijn diverse formaten beschikbaar voor het importeren.
- U kunt gegevens van andere programma's kopiëren en plakken.
- Geïmporteerde gegevens kunnen worden aangevuld, aangepast of verwijderd.
- Het is mogelijk extensies te programmeren om elk soort bestand te importeren.
Meer informatie is beschikbaar op de pagina Naar boekhouding importeren.
Beheer van uiteenlopende informatie
Er kan veel informatie worden aangegeven in iedere invoerregel:
- De valutadatum en die van het document.
- Een oplopend nummer van document en protocol, of externe referentie.
- Alle extra informatie die u nodig heeft, door het toevoegen van kolommen.
- Koppeling naar een digitaal document.
- Koppelingen toevoegen en verwijderen.
- Open de koppeling en bekijk de inhoud.
- BTW Beheer (als gekozen is voor een boekhouding met BTW bij het aanmaken van het bestand):
- Door de BTW code in te voeren berekent het programma automatisch de BTW.
- Opsplitsing en boeking van de BTW op de aangewezen rekening.
- U kunt definiëren of het bedrag netto of bruto BTW is.
- U kunt aangeven dat het om een omgekeerde btw-code gaat door een minteken "-" vóór de btw-code.
- U kunt een BTW-percentage aangeven dat niet kan worden teruggevorderd.
- U kunt speciale gevallen coderen met extra codes.
- Kostenplaatsen en Winstcentra:
- Tot 3 Kostenplaatsen en Winstcentra voor iedere boekingsregel.
- U kunt negatief boeken door een minteken "-" voor het Kostenplaatsen en Winstcentra bedrag te plaatsen.
- Segmenten:
- U kunt tot 10 segmenten aangeven voor iedere debet of credit rekening.
- Leveranciers beheer:
- Beheer op basis van transacties (opgezet als grootboek) als op basis van kasmiddelen (instelling als kostenplaatsen en winstcentra).
- Beheer van de vervaldatum en betaling voor een overzicht van de uitstaande en betaalde facturen.
- Klanten beheer:
- Beheer op basis van transacties (opgezet als grootboek) als op basis van kasmiddelen (instelling als kostenplaatsen en winstcentra).
- Beheer van de vervaldatum en betaling voor een overzicht van de uitstaande en geïnde facturen.
- Facturen naar klanten:
- Invoer van de aanmaak van facturen.
- Suggestie voor te gebruiken klantenrekening.
- Hoeveelheid en prijs (kolommen zichtbaar maken).
- Voor facturatie of kostenbeheersing.
- Automatische berekening van het bedrag.
- Artikelnummer (als de optie is geactiveerd).
- Om te koppelen aan de itemstabel.
- Automatische berekening van de hoeveelheden van binnenkomende en uitgaande producten.
- Afdrukken facturen.
- Aanduiding van informatie die nodig is om de factuur af te drukken.
Rekeningkaart
Vanuit de transactietabel kunt u elke rekeningkaart aanmaken. Ga naar de cel waar het rekeningnummer in staat (in de debet of credit kolom) en klik op het icoontje dat in de rechterbovenhoek van de cel verschijnt.
Als u zich in de rekeningkaart bevindt brengt klikken op het rijnummer van een transactie u terug naar de transactietabel, precies op de originele transactie.
Meer informatie over rekeningkaarten is te vinden op de pagina rekening- / categoriekaart.
Gegevenserificatie
Het invoeren van gegevens is erg veilig. Banana Boekhouding heeft functies waarmee automatische detectie en rapportage van fouten gedaan worden.
- Het programma verifieert dat ingevoerde waardes correct zijn.
- Als er onbalans is tussen de debet en credit kolommen wordt dit in rood aangegeven in het informatievenster.
- Transacties waar u onzeker over bent kunt u "in behandeling" laten en later afhandelen.
- Voor iedere foutmelding is er een overeenkomstige help pagina (vereist een internetverbinding).
- In het informatievenster onderaan het scherm vindt u de volgende informatie:
- Beschrijving, mutatie en saldo van de gebruikte rekeningen.
- Foutmeldingen met een koppeling naar de help pagina.
- Vermelding van het debet en credit verschil.
- Door de werkelijke banksaldi in te voeren met de #checkbalance functie kunt u direct de balans van de saldi in de boekhouding controleren en fouten vermijden.
- Met het commando Boekhouding controleren controleert het programma alle ingevoerde gegevens opnieuw en attendeert u op vergissingen en fouten.
- U kunt rijen een kleur geven, lettertype ervan veranderen en vetgedrukt maken.
- U kunt rijen beveiligen.
- Transacties blokkeren met blockchain technologie.
Indeling van de kolommen
Voor een prettiger gegevensinvoer kunt u alle kolommen in uw eigen volgorde zetten.
U kunt ervoor kiezen om:
- Kolommen naar rechts of naar links te schuiven.
- Extra kolommen weer te geven of onnodige te verbergen.
- Eigen kolommen toe te voegen.
- De volgorde van de kolommen op te slaan in Weergaven.
Meer informatie is beschikbaar op de pagina Kolommen instellen.
Transactietabel kolommen en weergaven | Dubbel boekhouden
De transactietabel heeft vooraf ingestelde kolommen en weergaven.
De kolommen van de transactietabel
De kolommen die hieronder weergegeven worden met * ervoor zijn doorgaans niet zichtbaar.
Gebruik het commando Menu Gegevens → Kolommen instellen om deze zichtbaar te maken.
Datum
De datum die het programma gebruikt om de transactie in een bepaalde tijd te plaatsen. De datum moet binnen de limieten van de boekhoudperiode liggen die gedefinieerd zijn in het Tabblad Boekhouding (van Bestands- en boekhoudeigenschappen). In het Opties tabblad van hetzelfde venster kan men aangeven of de transactiedatum verplicht is. Als dit niet het geval is kan dit veld leeg gelaten worden.
Als er geblokkeerde transacties zijn geeft het programma een foutmelding als een datum wordt ingevoerd die gelijk aan of eerder is dan de datum van de blokkering.
*Doc.Datum (Documentdatum)
De datum van het document kan hier ingevoerd worden, bijvoorbeeld de datum van het sturen van de factuur.
*Datumwaarde
De valutadatum van de banktransactie kan hier worden aangegeven. Deze datum wordt geïmporteerd van een elektronisch bankafschrift.
Doc (Documentnummer)
Het nummer van het boekstuk dat dient als basis voor de boekhoudkundige transactie. Het wordt geadviseerd om bij het invoeren van de transactie een oplopend nummer aan te geven op het document zodat het boekstuk makkelijk kan worden teruggevonden vanuit de transactie.
De functie voor automatisch aanvullen stelt oplopende waardes voor maar ook de transactie codes die eerder zijn gedefinieerd in de Terugkerende transacties tabel.
Het programma stelt het volgende document nummer voor waarmee kan worden doorgegaan door op F6 te drukken.
- In het geval van numerieke documentnummers verhoogt het programma eenvoudigweg de hoogste waarde die het vindt in de Doc kolom.
- In het geval van alfanumerieke documentnummers verhoogt het programma het laatste numerieke deel; dit is nuttig als men een aparte nummering aan wil houden voor contante en bank mutaties.Als eerder Documentnummer C-01 is ingevoerd en men begint een C in te typen dan stelt het programma C-02 voor.Als eerder Documentnummer B-104 is ingevoerd en men begint een B in te typen dan stelt het programma B-105 voor.Als eerder Documentnummer D10-04 is ingevoerd en men begint een D in te typen dan stelt het programma D10-05 voor.
Bij Terugkerende transacties kunt u groepen transacties opzetten die met een enkele code ingevoerd kunnen worden.
Om een groot aantal documentnummers toe te voegen kunt u ook Excel gebruiken. U kunt in Excel de gewenste hoeveelheid documentnummers aanmaken en dan kopiëren en plakken in Banana Boekhouding in de Doc kolom van de Transacties tabel.
*Doc.Prot. (Protocolnummer)
Een extra kolom voor het geval dat er een alternatieve nummering voor de transacties of voor het document nodig is.
De functie voor automatisch aanvullen stelt oplopende waardes voor die op dezelfde manier werken als in de Doc kolom. Dit wordt bijvoorbeeld gebruikt voor:
- Wanneer het nodig om oplopende nummers toe te kennen aan transacties die verschillen van het document nummer.
- Wanneer de transacties worden ingevoerd door anderen in een ander bestand en deze dan worden geïmporteerd in de boekhouding. Op deze manier is het mogelijk oplopende nummering te gebruiken in de boekhouding en het originele nummer te behouden.
*Type (Type document)
Bevat een code die het programma gebruikt om een transactie type te identificeren. Als u liever uw eigen codes gebruikt is het aan te raden een nieuwe kolom toe te voegen.
- 01 voor in rapporten ((zoals op het rekeningoverzicht)): deze transactie wordt beschouwd als een begin transactie, dus deze wordt niet getoond in balansen per periode maar wel in de openingsbalans beginsaldi.
- van 10 tot 19: codes voor facturen aan klanten
- van 20 tot 29: codes voor facturen van leveranciers
- van 30 tot 1000: codes gereserveerd voor toekomstig gebruik.
*Factuur (Factuurnummer)
Een nummer van een verstuurde of betaalde factuur dat wordt gebruikt bij de facturen controle functie voor klanten en leveranciers.
*Doc.Origineel (Origineel documentnummer)
Het referentie nummer dat op een document staat bijvoorbeeld het nummer van een credit nota.
*Koppeling (Koppeling extern bestand)
Dient om een koppeling naar een extern bestand in te voeren, doorgaans een boekstuk.
Door op de symbooltjes aan de bovenkant van de cel te klikken opent het programma het document. Zie ook de pagina Koppeling naar een document invoeren, aanpassen en openen.
- Als een link is ingevoerd in de cel verschijnt een icoontje door erop te klikken wordt het document geopend, maar alleen als het een extensie heeft die veilig wordt geacht.
- Met het andere icoontje kunt u een koppeling invoeren en aanpassen.
*Ext.Verwijzing (Externe verwijzing)
Een referentienummer toegewezen door een programma dat deze bewerking uitvoerde. Deze waarde kan gebruikt worden om te controleren of een gegeven transactie dubbel is geïmporteerd.
Beschrijving
De tekst van de transactie.
De auto-aanvullen functie stelt de tekst van een eerder ingevoerde transactie voor, of van één die ingevoerd is in het voorafgaande jaar, als de betreffende optie (Smart fill met transacties van vorig jaar) is geactiveerd. Door op de F6 toets te drukken haalt het programma de gegevens van de voorafgaande rij met dezelfde beschrijving op en vult daarmee de kolommen van de actieve rij aan.
In het geval dat de beschrijving begint met #CheckBalance wordt de transactie beschouwd als één die dient om het saldo te controleren. Zie de pagina Boekhouding controleren voor meer informatie over dit onderwerp.
*Opmerkingen (Annotaties)
In dit veld kunnen opmerkingen toegevoegd worden aan de transactie.
Deb.Rek. (Debetrekening)
De debetrekening waarop geboekt wordt.
- Het is mogelijk een segment in de Debet rekening kolom in te voeren. Deze worden doorgaans gescheiden door een "." of een "-".
- Als men in de rekeningenlijst de toets met het segmentscheidingssymbooel aanslaat gaat men meteen naar het volgende segment.
- Als men daarentegen de Enter toets aanslaat wordt de invoer beëindigd en gaat men naar de volgende kolom.
- De autoaanvullen functie geeft suggesties voor rekeningen en segmenten. Men kan ook een zoektekst invoeren en dan toont het programma alle rekeningen met deze tekst in één van de kolommen.
*Beschr. Debetrek. (Beschrijving Debetrekening)
De beschrijving van de ingevoerde rekening zoals die voorkomt in het Rekeningschema.
Cred.Rek. (Creditrekening)
De creditrekening waarop geboekt wordt. We verwijzen voor de rest van de informatie naar de uitleg onder de Debetrekening.
*Beschr. Credittrek. (Beschrijving Creditrekening)
De beschrijving van de ingevoerde rekening zoals die voorkomt in het Rekeningschema.
Bedrag
Het bedrag dat ingevoerd wordt in de debet- of creditrekening.
*Saldo
De kolom Saldo laat de som van debet en credit zien. Er wordt daarom alleen een bedrag getoond voor invoer in verschillende rekeningen. Aan het eind zou het saldo nul moeten zijn. Als er een bedrag terugkomt is dat omdat er een fout is.
BTW kolommen
Informatie over de BTW kolommen kan gevonden worden in de pagina Transacties onder BTW Beheer.
KP1 (Kostenplaats 1)
De Kostenplaatsrekening voorafgegaan door een ".".
*KP1-beschrijving (Beschrijving van kostenplaats 1)
De beschrijving van de Kostenplaats zoals die in het Rekeningschema voorkomt.
KP2 (Kostenplaats 2)
De Kostenplaatsrekening voorafgegaan door een ",".
*KP2-beschrijving (Beschrijving van kostenplaats 2)
De beschrijving van de Kostenplaats zoals die in het Rekeningschema voorkomt.
KP3 (Kostenplaats 3)
De Kostenplaatsrekening voorafgegaan door een ";".
*KP3-beschrijving (Beschrijving van kostenplaats 3)
De beschrijving van de Kostenplaats zoals die in het Rekeningschema voorkomt.
*Verv. Datum (Vervaldatum)
De datum waarvoor de factuur betaald moet zijn. Voor meer informatie zie de pagina's Klanten en Leveranciers.
*Bet. Datum (Betalingsdatum)
Wordt gebruikt in combinatie met het Vervaldatums weergeven commando.
Als men echter de controlefunctie voor de klanten/leveranciers facturen wil gebruiken om de betalingen te controleren moet men een transactie invoeren voor een gestuurde factuur en een andere voor de betaling ervan.
*Blok.Num (Nummer blokkeren), Blok.Bedr. (Bedrag blokkeren), Blok.Progr. (Progressief blokkeren), Blok.Regel (Regel blokkeren)
Meer informatie vindt u in de Transacties blokkeren pagina.
Aanvullende kolommen
Via het menu Extra → Functies toevoegen/verwijderen → Artikelkolommen toevoegen in de tabel Boekingen worden de volgende kolommen toegevoegd.
Voor meer informatie, zie ook Artikelkolommen in de tabel Boekingen.
ArtikelId
- De identificatie van het artikel uit de Items-tabel. Wanneer u een artikel invoert dat in de tabel Artikelen voorkomt, worden de beschrijving, eenheid, eenheidsprijs, btw-code en rekening automatisch overgenomen.
Hoeveelheid
- De hoeveelheid die, vermenigvuldigd met de eenheidsprijs, het totaalbedrag oplevert (kan ook een negatief getal zijn).
- Als de tabel Artikelen aanwezig is:
- Een positieve waarde (+) wordt toegevoegd aan de hoeveelheid van het artikel.
- Een negatieve waarde (–) wordt afgetrokken van de hoeveelheid van het artikel.
- Een neutrale waarde (±) wordt meegenomen voor de berekening van het totaalbedrag, maar beïnvloedt de hoeveelheid in de tabel Artikelen niet.
Neutrale waarden worden gebruikt bij het beheer van effecten (beleggingen) voor het registreren van winsten of verliezen. U kunt de hoeveelheid en het bedrag van een winst of verlies voor een specifiek effect opgeven, zonder dat dit invloed heeft op de beschikbare hoeveelheid effecten. U kunt het symbool "±" invoeren door eerst "+" en daarna "-" te typen. Het programma herkent deze combinatie automatisch en zet deze om in het symbool "±".
- Wanneer een hoeveelheid wordt ingevoerd en de eenheidsprijs leeg is, maar er een boekingsbedrag aanwezig is, wordt de eenheidsprijs automatisch berekend.
Eenheid
- Een aanduiding die verwijst naar de hoeveelheid, bijvoorbeeld: m², ton, st.
Prijs/Eenheid
- De prijs per eenheid, die vermenigvuldigd met de hoeveelheid het totaalbedrag oplevert (kan ook een negatief getal zijn).
- Het aantal decimalen kan worden aangepast via de bijbehorende opdracht in het menu Extra > Functies toevoegen/verwijderen.
Boekingsbedrag
- Als er een waarde is ingevoerd in de kolom Hoeveelheid of Eenheidsprijs, wordt het boekingsbedrag berekend op basis van de inhoud van deze twee kolommen en omgezet in een positief getal.
Nieuwe kolommen toevoegen
Met het Kolommen instellen commando is het mogelijk in te stellen dat kolommen worden weergegeven, verborgen gehouden of verhuisd worden, nieuwe kolommen toe te voegen of aan te geven dat een kolom niet in de afdruk meegenomen moet worden.
- De toegevoegde kolommen in de Transactietabel worden ook toegevoegd in de Terugkerende transacties tabel, in de Rekeningenkaart en in het BTW rapport zonder zichtbaar te zijn.
Om deze kolommen zichtbaar te maken gebruikt u het Kolommen instellen commando. - Als een kolom van het "bedrag" type wordt toegevoegd dan worden de ingevoerde bedragen opgeteld in de Rekeningkaart.
Weergaven
De volgende weergaven worden automatisch aangemaakt wanneer een nieuwe boekhouding wordt geopend:
- Basis: de hoofdkolommen worden weergegeven
- Kostenplaatsen: de KP1, KP2 en KP3 kolommen worden weergegeven
- Vevaldatums: de kolommen Vervaldatum en Betalingsdatum worden weergegeven
- Blokkeren: de kolommen die te maken hebben met de Blokkeringsfunctie worden weergegeven.
Met het Weergaven instellen commando kunnen de weergaven worden aangepast en kunnen persoonlijke weergaven worden toegevoegd.
Met het Pagina instelling commando kunt u het afdrukformaat van de weergave aanpassen.
Het boeken van bankcheques
Om de uitgifte van bankcheques te boeken, moet een rekening Uitgegeven cheques in de passiva worden aangemaakt.

De check wordt uitgegeven op het moment dat een leverancier wordt betaald en later wordt deze gedebiteerd van de bankrekening.

De rekening kaart van de uitgegeven checks na de transacties.

Registrazioni su conto privato
Il conto privato è un conto finanziario, utilizzato nella contabilità per registrare quelle transazioni che non riguardano direttamente l'azienda, ma il patrimonio personale del titolare. Questo conto tiene traccia dei prelievi e degli apporti del titolare a scopi privati; pertanto serve per tenere separate le finanze aziendali da quelle personali, evitando confusione contabile.
Prelievi dall'azienda del privato/socio
I prelievi personali vengono registrati come diminuzione del patrimonio netto. Se il titolare/socio utilizza fondi aziendali per spese personali, l'importo viene addebitato al conto privato.
Esempio di scrittura contabile per un prelievo in contanti:
- Dare: Conto privato (per il prelievo del titolare/socio)
- Avere: Cassa/Banca (per l'importo prelevato).
Apporti nell'azienda dal privato/socio
Gli apporti personali del titolare (es. aumento di capitale o versamenti per coprire spese) vengono registrati come incremento del patrimonio netto.
Esempio di scrittura contabile per un apporto in contanti:
- Dare: Cassa/Banca (per l'importo versato dal titolare/socio)
- Avere: Conto privato (per l'apporto del titolare/socio).
Utili prelevati
Se il titolare/socio preleva utili maturati:
- Dare: Conto utili a nuovo (o Risultato di esercizio)
- Avere: Conto privato
Saldo del Conto Privato/socio
- Saldo positivo: indica che il titolare ha un credito verso l'azienda.
- Saldo negativo: indica che il titolare ha debito verso l'azienda.
Transactions for Balances Verification (#CheckBalance) | Double-entry accounting
Banana Accounting Plus includes the #CheckBalance function in the Check and recalculate accounting command for verifying and matching account balances.
This check is essential for the accuracy of the accounting. It is recommended to perform the balance verification periodically at the end of each month, in addition to the end of the accounting period, to avoid incorrect balances being carried over from month to month.
To perform this check, follow these steps:
- Record the date to which the balance refers.
- In the Description column, enter #CheckBalance followed by the amount corresponding to the balance to be verified (e.g., the actual cash balance, bank account balance from the bank statement, etc.).
- In the Debit column, indicate the account being checked (bank account, cash, VAT account, or another account to be verified).
- The Amount column must be left empty.
With this command, the program will flag any accounts with mismatched balances in the Messages window if discrepancies are found.
Creditcard betaling met vooruitbetaling
Vooruitbetaling op creditcards
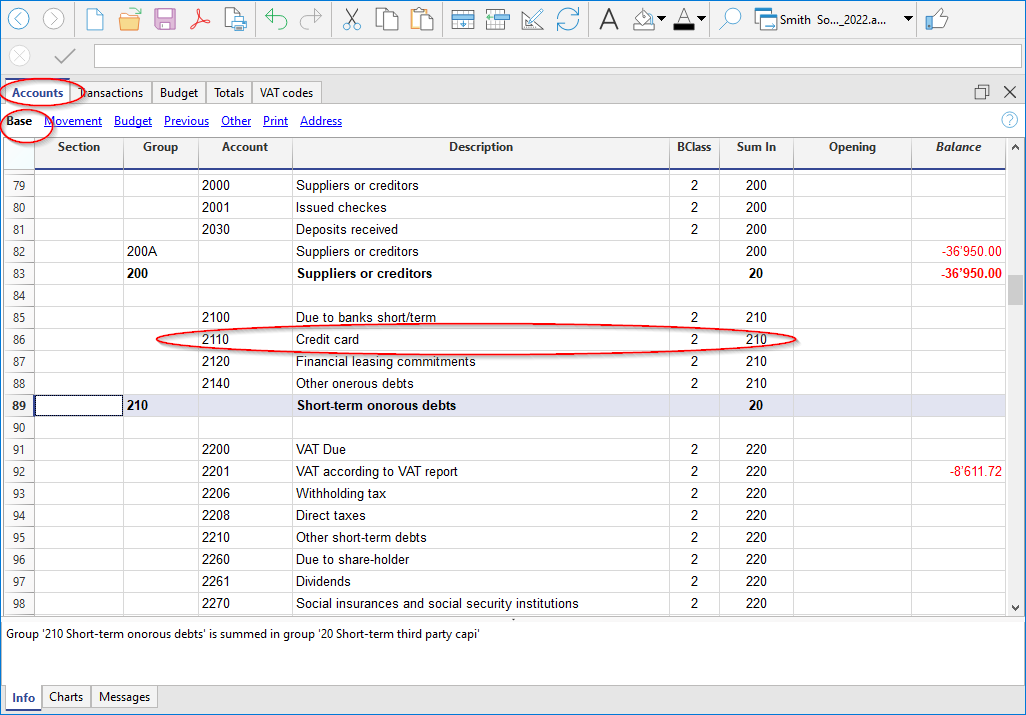
Controleer of er een rekening voor de creditcard bestaat in het passiva gedeelte van het rekeningschema voordat u boekingen gaat doen. Maak er een aan als dit niet het geval is.
De rekening voor de creditcard wordt toegevoegd aan de groep of sub-groep van de kortlopende schulden als dit een vereiste is in het gekozen rekeningschema. Als er geen sub-groepen zijn moet deze rekening worden opgenomen in de passiva sectie.
Voorbeeld:
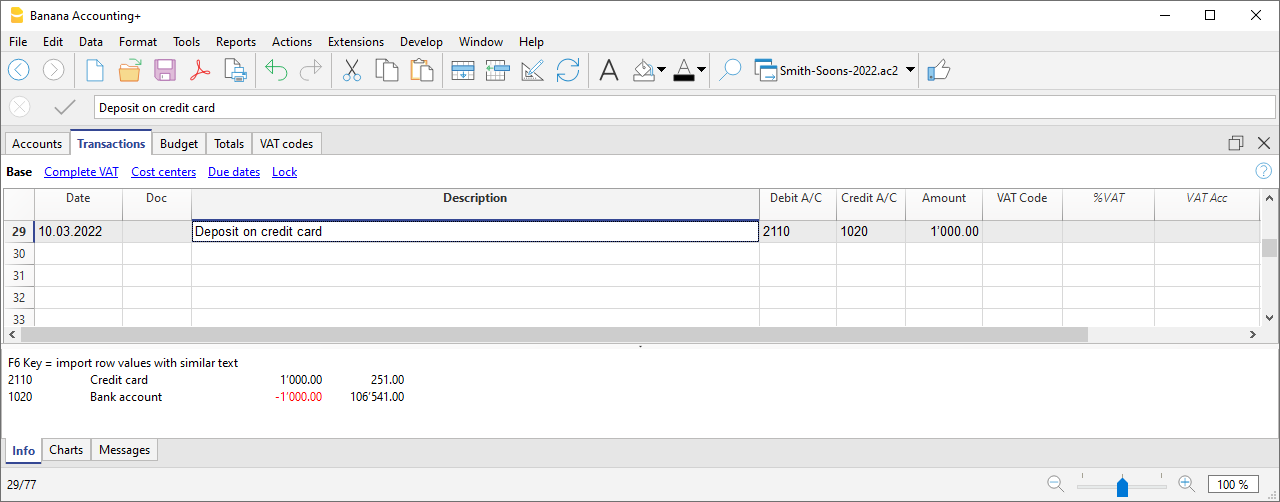
Een bedrag van € 1000 wordt overgemaakt van de bankrekening naar de creditcard.
- In Debet wordt de creditcardrekening geregistreerd
-
In Credit wordt de bankrekening geregistreerd waarmee de betaling wordt verricht.
Uw creditcardafrekening boeken
Wanneer de rekening van de creditcard komt, moet u alle kosten op de creditcard boeken en het tegoed van de creditcardrekening terugboeken.
Voorbeeld:
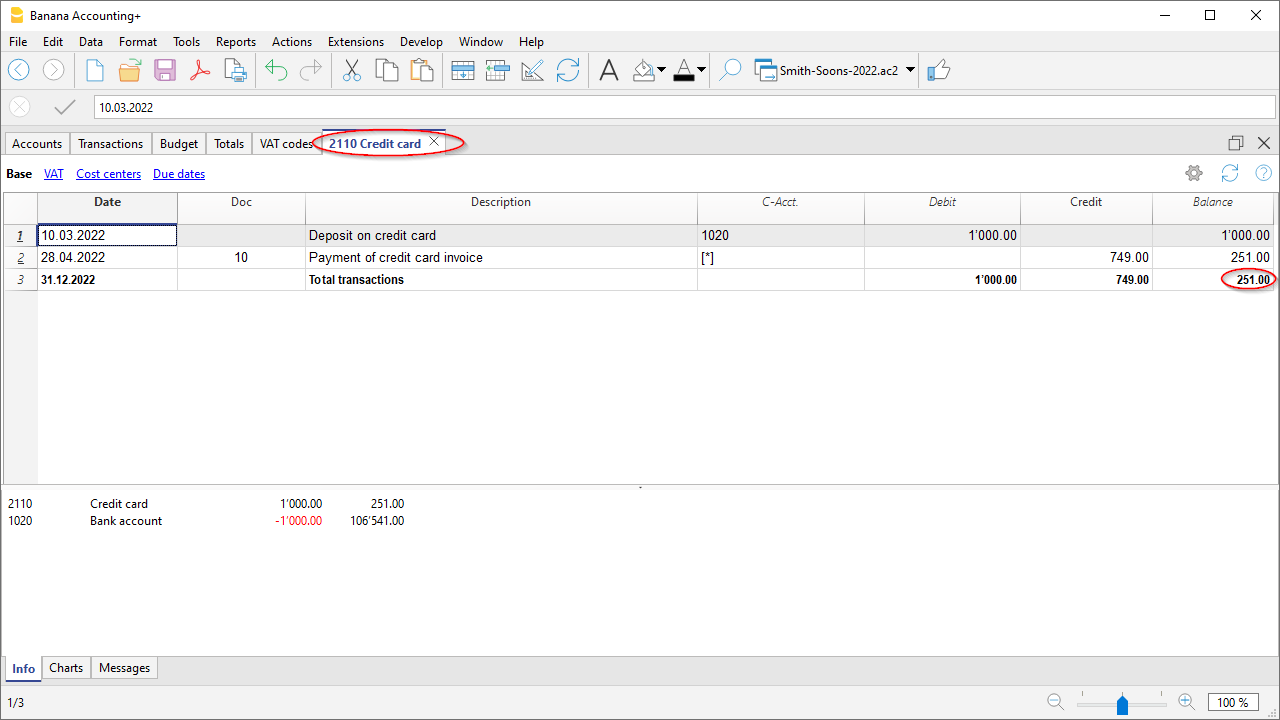
We ontvangen de creditcardafrekening voor een totaal van € 749 (details: € 479 voor aanschaf computer, € 150 voor hotelkosten, € 120 voor kantoorbenodigdheden) (Doc. 10).
Dit wordt geboekt op meerdere rijen :
- In Debet neemt u alle kosten op die verband houden met de uitgaven die in de credit card zijn opgenomen; u neemt één uitgave per rij op.
- In Credit wordt het totaalbedrag van de creditcarduitgaven geboekt.

Controleer het saldo van de creditcard
Iedere keer als u een voorschot op de creditcard zet en na het boeken van alles wat met de creditcard betaald is, moet u controleren dat het saldo van de creditcard in de boekhouding overeenkomt met het saldo op de creditcard.
Uw creditcardtransacties boeken volgens het kas- en facturatiestelsel
Creditkaart in een boekhouding met het kasprincipe
Als er geen betalingen worden gedaan op de kredietkaart en de factuur wordt helemaal via de bank betaald moet u de creditkaart factuur boeken op het moment van betalen als de kosten ook geboekt zouden moeten worden.
U moet op meerdere rijen boeken:
- Voer dezelfde datum en hetzelfde documentnummer in voor iedere transactie op elke rij die voor de boeking gebruikt wordt.
- Voer in de kolom Credit van de eerste rij de bankrekening in waarmee de factuur wordt betaald.
- Voer in deze rij in de kolom Bedrag het totale bedrag in dat betaald is op de creditkaart factuur.
- Voer in de kolom Debet van iedere volgende rij de rekening in die verwijst naar de uitgaven van de creditkaart transactie.
- Voer het bedrag voor iedere deeltransactie in Debet in.
- Voer, in het geval van BTW, voor iedere rij een BTW code in de kolom BTW Code in.

Na het boeken van alle mutaties controleert u het creditkaart saldo door de rekeningkaart voor de creditkaart te openen.
Creditcard en boekhouding volgens factuurstelsel
Als de boekingen zijn gebaseerd op het facturatiestelsel worden alle kosten die betrekking hebben op creditkaartaankopen geboekt bij de ontvangst van de creditkaartfactuur:
- Voer dezelfde datum en hetzelfde documentnummer in voor iedere transactie op elke rij die voor de boeking gebruikt wordt.
- Alle uitgaven worden Debet geboekt. Iedere uitgave moet een aparte rij ingevoerd worden.
- Voer in de kolom Bedrag het bedrag van een enkele transactie in Debet in.
- Boek uw creditkaartrekening als Credit, zoals voor elke leverancier.
- Voer in de kolom Bedrag het totale bedrag in dat betaald moet worden van de creditkaart.
- Voer, in het geval van BTW, voor iedere rij een BTW code in de kolom BTW Code in.

Wanneer de creditkaartrekening wordt betaald voert u de betaling in:
- Als debet op de creditkaartrekening (de schuld is opgeheven)
- Als credit op de bankrekening waarmee de factuur is betaald.
- Het totale bedrag van de creditkaartrekening wordt ingevoerd.

Transacties van uw creditcard importeren
Met Banana Boekhouding kunt u de transacties van uw creditcard in het boekhoudbestand importeren.
U moet ervoor zorgen dat het rekeningschema de creditcardrekening en de overschrijvingsrekening omvat die voor stortingen moet worden gebruikt
Installeer het gegevensformaat van uw bank
Om het importeren uit te kunnen voeren is het nodig dat het formaat van de gegevens die de creditcardorganisatie levert compatibel is met een van de formaten die Banana Boekhouding levert.
Om de extensie te installeren die bij het formaat hoort van de gegevens die de bank van uitgifte levert gaat u als volgt te werk:
- Menu Extensies → Extensies beheren.
- Selecteer de bank waar de creditcard vandaan komt en klik op de knop Installeren.
Het formaat zal weergegeven worden in het Naar boekhouding importeren venster.
De creditcard mutaties importeren
Nadat u de extensie voor het met Banana Boekhouding compatibele gegevensformaat heeft geïnstalleerd gaat u als volgt te werk om de gegevens te importeren:
- Kies van het Acties → Naar boekhouding Importeren → Transacties venster het formaat dat bij de bank hoort die de creditcard uitgegeven heeft.
- Kies met de knop Bladeren het bestand dat de bank gestuurd heeft en bevestig met OK.
- Indien nodig voert u de periode in en geeft u de bankrekening aan. Bevestig met OK.
Alle transacties worden in de transactietabel geïmporteerd. - Voer in iedere rij de tegenrekening in die bij de boeking hoort.
Creditcard transacties importeren als er stortingen gedaan zijn
Wanneer er stortingen gedaan zijn op de creditkaart worden deze geboekt in de boekhouding. In dit geval is er, na het importeren van de creditkaartgegevens, het probleem van het boeken van de stortingen. Hiervoor verschijnt een dubbele mutatie op de creditkaartrekening:
- De creditkaartrekening is aanwezig als tegenrekening voor de bankkosten voor de betalingen aan de creditkaart.
- De creditkaartrekening is aanwezig in de transacties die geïmporteerd worden van de creditkaart.
Om deze overlap te vermijden wordt de overschrijvingsrekening gebruikt tijdens het importeren.
Zo gaat het importeren:
- Kies van het Acties → Naar boekhouding Importeren → Transacties venster het formaat dat bij de bank hoort die de creditcard uitgegeven heeft.
- Kies met de knop Bladeren het bestand dat de bank gestuurd heeft en bevestig met OK.
- Indien nodig voert u de periode in en geeft u de overschrijvingsrekening aan. Bevestig met OK. Alle transacties worden in de transactietabel geïmporteerd.
- Voer in iedere rij de tegenrekening in die bij de boeking hoort.
Salary transactions
Companies that have employees must manage salaries, as well as employees’ social security and insurance contributions.
Salaries can be managed in two different ways:
Net salary management is the simplest solution because it provides for:
- recording salaries at the time they are paid
- recording social security and insurance contributions only when advance payments of contributions and employees’ insurance premiums are paid.
Gross salary management is much more complex because transactions must record monthly gross salaries and the social security and insurance contributions deducted from employees’ pay, as well as the withholdings on employees’ salaries.
Net salary transactions
Net salary accounting consists of recording in the accounting only the amounts actually paid to employees. It is a simple and practical method, particularly suitable when payroll processing is carried out using dedicated payroll software or outsourced to a fiduciary firm.
Compared with gross salary accounting, it provides a less detailed view of personnel costs, as it does not separately show the employer's social security contributions and the contributions withheld from employees.
For this reason, the calculation of gross salaries, deductions, and social security contributions is performed by the payroll software or by a fiduciary firm, which submits the required declarations to the relevant authorities. The annual declaration to the AHV Compensation Office is based on the gross payroll, which must be determined from the payroll statements.
What is recorded
With net salary accounting, the following items are normally recorded in the accounting:
- net salaries paid to employees
- advance payments of social security contributions (AHV/IV/EO/ALV), paid monthly or quarterly
- insurance and pension premiums, paid at the beginning of the year or every six months.
- any year-end adjustments.
What is not recorded:
- Gross salary
- Employee deductions
- Liabilities towards social security institutions at the end of the period.
Advantages of net salary accounting
- Simple transactions
- Few accounts to manage
- Faster accounting.
Limitations of net salary accounting
- The gross salary does not appear in the accounting.
- The details of employee salary deductions are not visible.
- Employer and employee contributions are not shown separately.
When to use net salary accounting
Recording salaries on a net basis is recommended when payroll management is handled by payroll software or by a fiduciary firm, and the main purpose of the accounting is to record payments and accounting transactions.
It is particularly suitable when:
- the details of salaries, deductions, and social security contributions are managed outside the accounting
- there is no need to analyse personnel costs separately in the accounting
- you want to keep the accounting simpler and reduce the number of transactions.
Accounts normally used
Only a few accounts are normally required to manage net salaries.
Expense accounts
- 5000 Salaries
- 5700 AHV/IV/EO/ALV Contributions
- 5710 Family allowance fund contributions
- 5720 Mandatory occupational pension contributions
- 5730 Occupational accident insurance premiums
- 5740 Daily sickness allowance insurance
- 5790 Withholding tax
Payment accounts
- 1020 Bank
- Another cash account.
Distinction between the employer's share and the employee's share
With net salary accounting, the accounting records do not directly show the allocation of social security contributions between the employer's share and the share withheld from employees.
Payments made to social security institutions (AHV, occupational pension fund, insurance companies, and other institutions) generally include both shares and are recorded as total amounts. Consequently, it is not possible to identify the employer's share directly from the accounting entries alone.
To determine it, you need to refer to:
- the expense accounts dedicated to social security contributions
- the payroll statements generated by the payroll software.
The accounting correctly records the total personnel cost, while the detailed allocation of contributions is provided by the payroll statements.
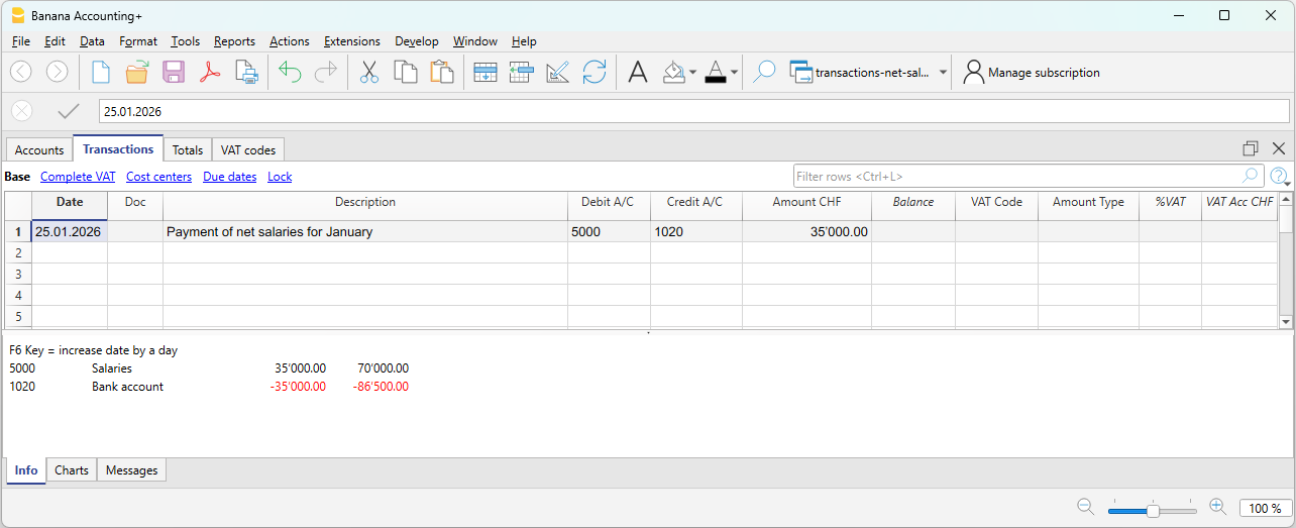
Payment of net salaries
When paying employees, the net salary paid is recorded.
In the Transactions table, record the following each month:
- Date: the salary payment date
- Description: the payment description
- Debit: account 5000 Salaries
- Credit: the Bank account
Periodic payment of social security contributions
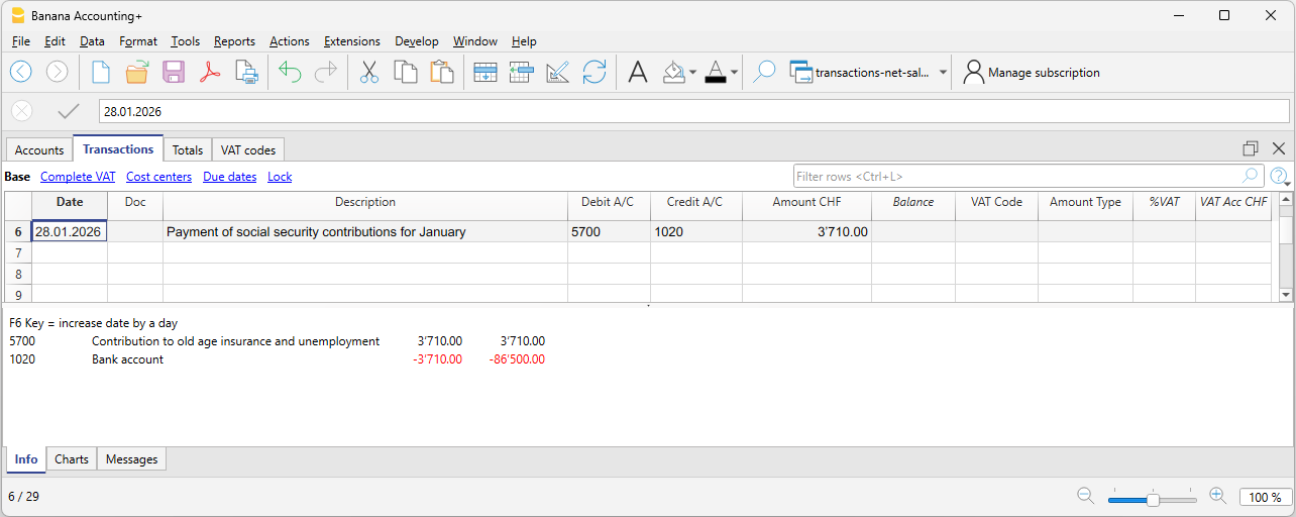
When paying advance social security contributions, record:
- Date: the payment date of the social security contributions
- Description: the payment description
- Debit: account 5700 AHV/IV/EO/ALV Contributions
- Credit: the Bank account
- Amount: enter the amount of the social security contributions (shown on the advance invoice), including both the employer's share and the employee's share.
Annual payment of insurance premiums
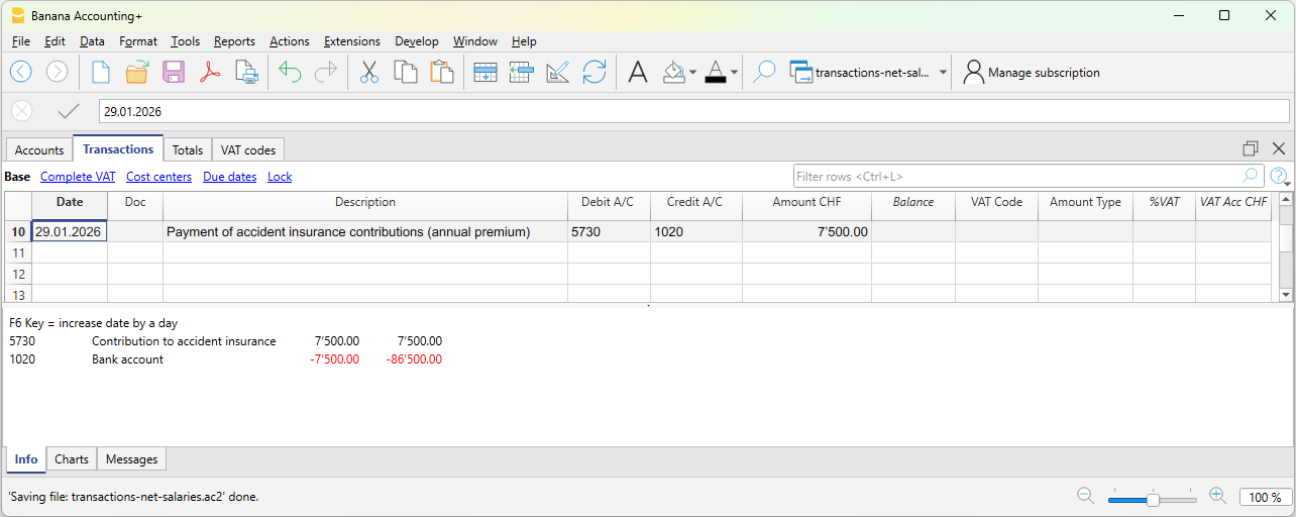
When paying insurance premiums, for example Occupational Accident Insurance or supplementary Occupational Accident Insurance, record the payment to the insurance company.
- Date: the annual insurance premium payment date
- Description: the payment description
- Debit: account 5730 Occupational accident insurance premiums
- Credit: the Bank account
- Amount: enter the amount shown on the invoice. It includes both the employer's share and the employee's share.
Annual payment of the pension fund premium
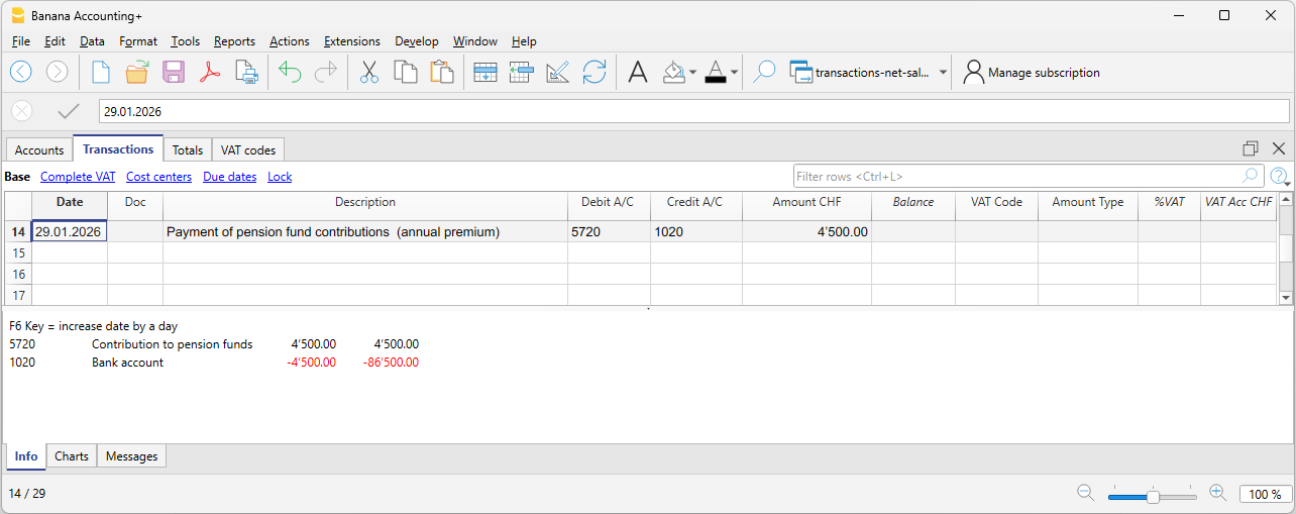
When paying the annual occupational pension fund premium:
- Date: the annual pension fund premium payment date
- Description: the payment description
- Debit: account 5720 Mandatory occupational pension contributions
- Credit: the Bank account
- Amount: enter the amount shown on the invoice. It includes both the employer's share and the employee's share.
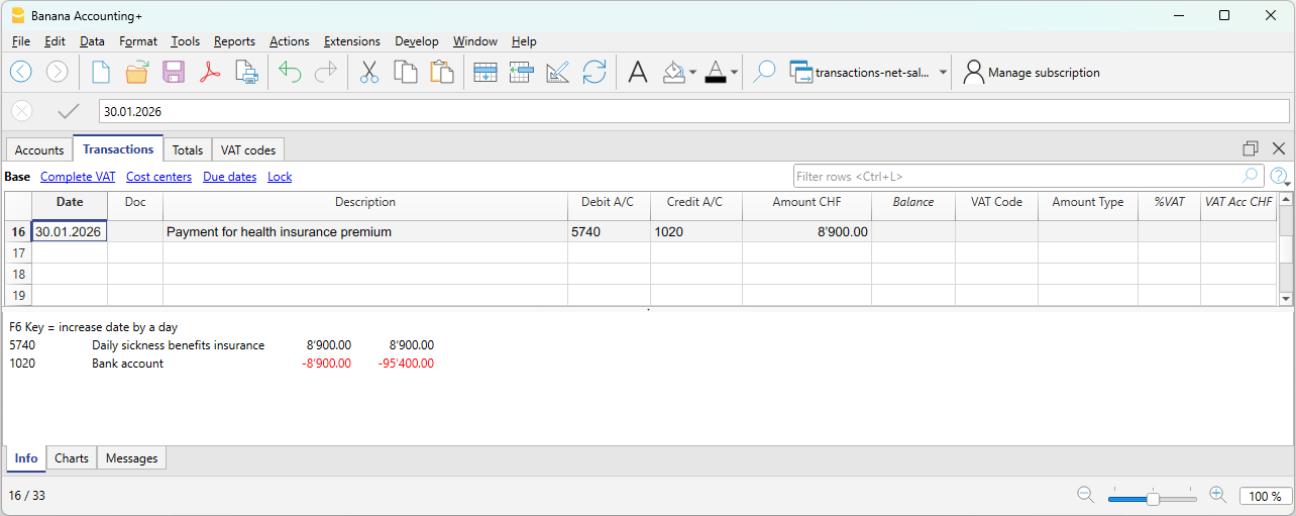
Payment of the daily sickness allowance insurance premium
When paying the annual daily sickness allowance insurance premium:
- Date: the payment date of the daily sickness allowance insurance premium
- Description: the payment description
- Debit: account 5740 Daily sickness allowance insurance
- Credit: the Bank account
- Amount: enter the amount shown on the invoice. It includes both the employer's share and the employee's share.
Expense reimbursement included in the net salary paid
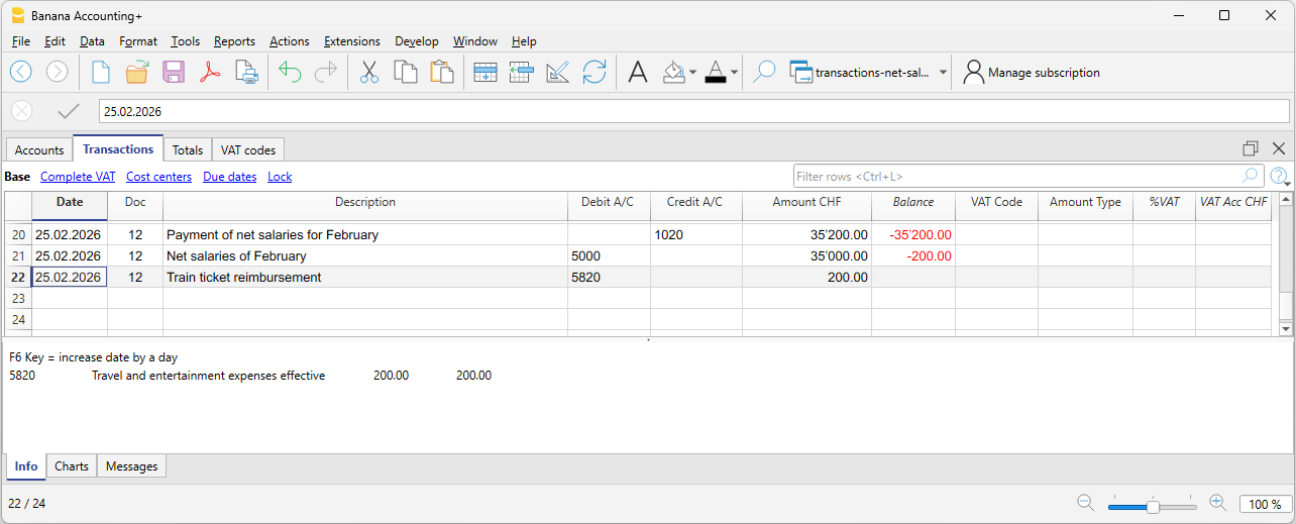
When the net salary paid includes an expense reimbursement, it is advisable to separate the net salary from the expense reimbursement in the accounting records. This ensures that the salary account is not affected by amounts that do not actually represent salary.
Example:
- Net salary: CHF 4'000
- Expense reimbursement: CHF 200
- Total payment through the bank: CHF 4'200
In the accounting entry, the two amounts must be recorded separately. Therefore, the transaction should be entered using three rows:
In the Transactions table:
- First row – total payment through the bank
- Date: the transaction date
- Description: monthly salary payment
- Debit: leave blank
- Credit: the Bank account
- Amount: the total amount paid CHF 4'200
- Second row – monthly net salary
- Date: the transaction date
- Description: monthly salary payment
- Debit: account 5000 Salaries
- Credit: leave blank
- Amount: the net salary paid CHF 4'000
- Third row – expense reimbursement
- Date: the transaction date
- Description: expense reimbursement
- Debit: the Expense reimbursement account (for example, travel expenses)
- Credit: leave blank
- Amount: the expense reimbursement amount CHF 200
Payment of withholding tax
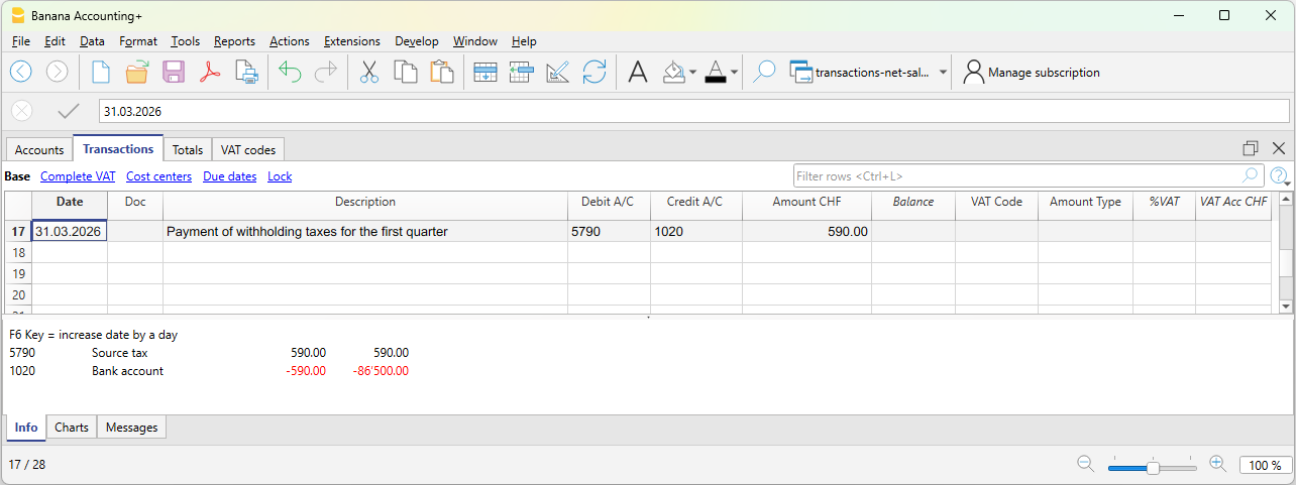
When paying withholding tax at the end of the quarter:
- Date: the withholding tax payment date
- Description: the payment description
- Debit: account 5790 Withholding tax
- Credit: the Bank account
- Amount: enter the amount calculated by the payroll software according to the requirements of the Withholding Tax Office.
Checks and verification
During the year, social security contributions and some insurance premiums are generally paid as advance payments. The actual amount due is determined only when the final statements or the year-end adjustments are issued.
For this reason, when using net salary accounting, it is essential to carry out regular checks and a thorough verification at the end of the financial year.
For more information, see the Net salary reconciliation.
Gross salary transactions
Gross salary management consists of recording in the accounting the entire salary, including all employee salary deductions and social security contributions.
Unlike net management, this method provides a complete view of salary costs and liabilities toward social institutions.
What is recorded
With gross management, the following are recorded monthly:
- the gross salary
- employee deductions (AVS, LPP, withholding tax, etc.)
- employer’s social security contributions
- liabilities toward social security and insurance institutions (if the accounting is kept on an accrual basis)
- the net salary paid
In gross management, the accounting clearly distinguishes between:
- the employee’s share (deducted from the salary),
- the employer’s share.
The accounting principle
Gross management follows the accrual principle:
Salary costs and the related liabilities are recorded in the period in which they arise, regardless of the time of payment.
Difference compared to net management
Unlike net management, which records only actual payments, gross management records all salary components and the related liabilities.
When to use gross management
Gross management is appropriate when:
- A complete and detailed accounting is required
- You want to monitor personnel costs precisely
- Liabilities toward social security and tax authorities must be recorded
- The accounting is used for analysis and reporting
Accounts normally used
Gross management requires a larger number of accounts compared to net management.
Expense accounts
- 5000 Gross salaries
- 5700 Employer social security contributions
- 5710 Family allowance fund contributions
- 5720 Occupational pension contributions (LPP)
- 5730 Accident insurance premiums (LAINF)
- 5740 Daily sickness allowance insurance
Liability accounts
- 2270 Liabilities to social security institutions (AVS/AI/IPG/AD)
- 2272 Pension fund liabilities (LPP)
- 2273 Accident insurance liabilities
- 2274 Collective health insurance liabilities
- 2209 Withholding tax liabilities
- 2371 Liabilities to employees
Payment accounts
- 1020 Bank
- other Cash accounts
Employer’s share of social security and insurance contributions
In gross salary management, the accounts relating to social security contributions and insurance costs make it possible to clearly identify the portion effectively borne by the employer.
In the dedicated account cards (for example AVS, LPP, accident insurance, etc.), the following are recorded:
- in Debit, the total amounts due to the institutions (employer + employee),
- in Credit, the employee’s share deducted from the salary.
The difference between these amounts represents the employer’s share, i.e. the portion borne by the company as its own expense.
This approach makes it possible to:
- clearly distinguish between company costs and amounts withheld from employees,
- have a transparent view of obligations toward social institutions,
- accurately monitor the impact of personnel costs on the company’s results.
Accounting entry of gross salaries
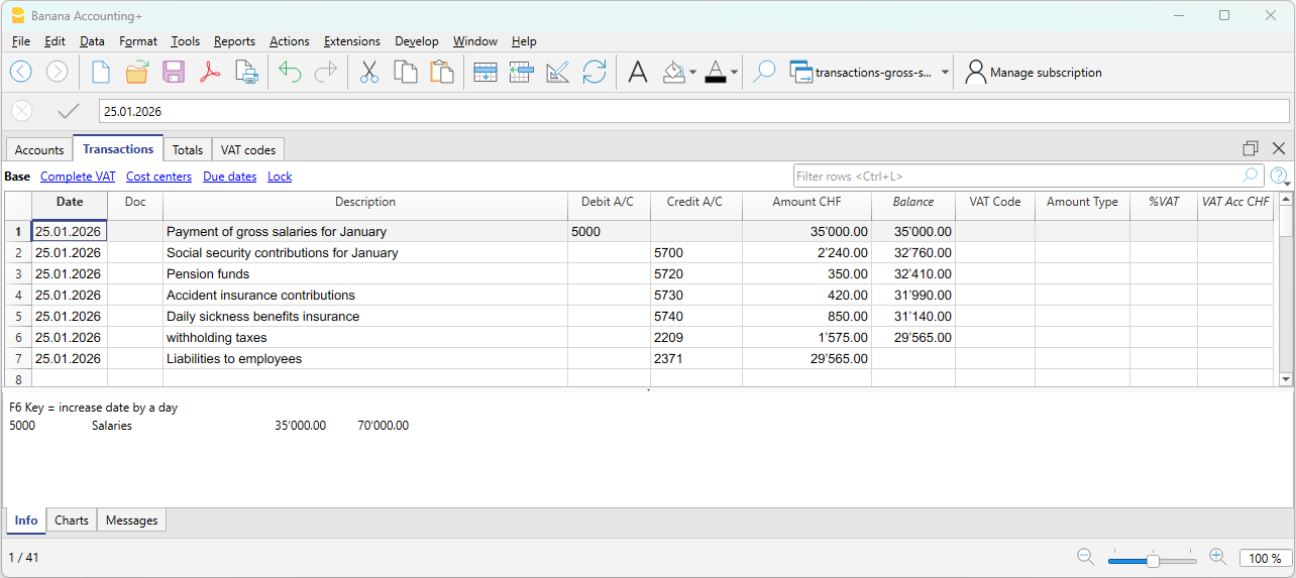
At the end of the payroll period, the gross salary and the related deductions from employees’ pay are recorded. With gross recording, both the salary cost and the deductions and liabilities toward third parties are recognized.
Example:
- 5000 Gross salaries → Debit
- 1181 Family allowances → Debit
- 5700 AVS/AI/IPG/AD Contributions → Credit (employee’s share, deducted from salary)
- 5720 LPP Contributions → Credit (employee’s share, deducted from salary)
- 5730 LAINF Contributions → Credit (employee’s share, deducted from salary)
- 5740 Sickness contributions → Credit (employee’s share, deducted from salary)
- 2209 Withholding tax liabilities → Credit (fully borne by the employee). The withholding tax deducted from the employee’s salary must be fully paid to the Withholding Tax Office and represents a liability for the company.
- 2371 Liabilities to employees → Credit
Payment of the net salary
If salaries have been recorded when accrued and the payment takes place later, the payment entry is recorded as follows:
- 2371 Liabilities to employees → Debit
- 1020 Bank → Credit
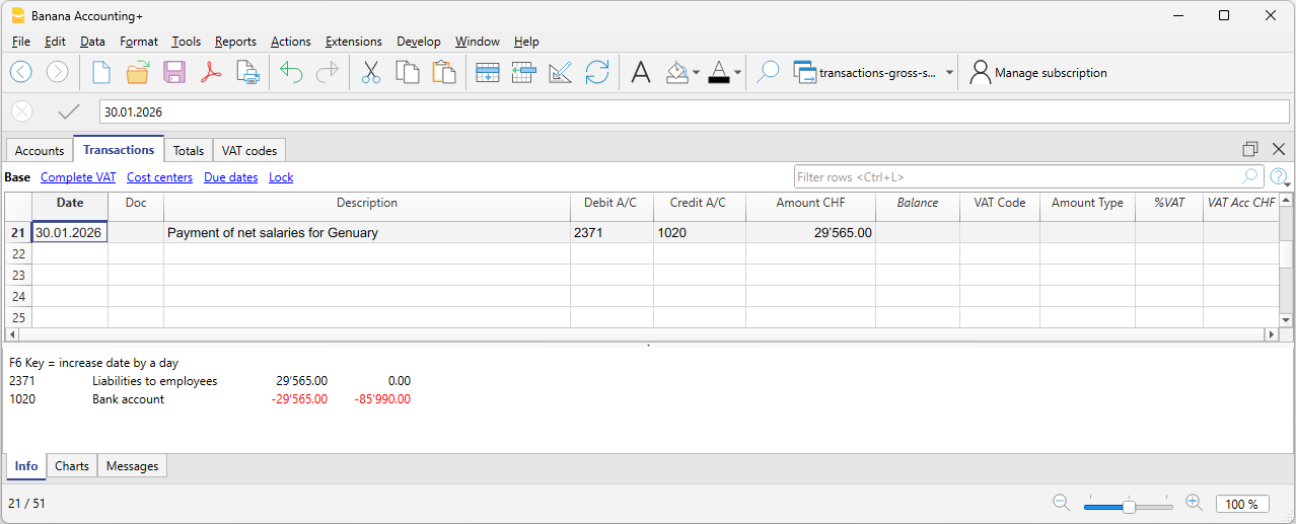
Recording AVS advances and payment
Monthly or at another regular interval, the employer receives from the cantonal AVS office the advance invoices for AVS contributions to be paid. These amounts also include any allowances advanced in the salary of the employee entitled to them.
The advance invoice includes both the employer’s share and the employee’s share.
Recording the invoice:
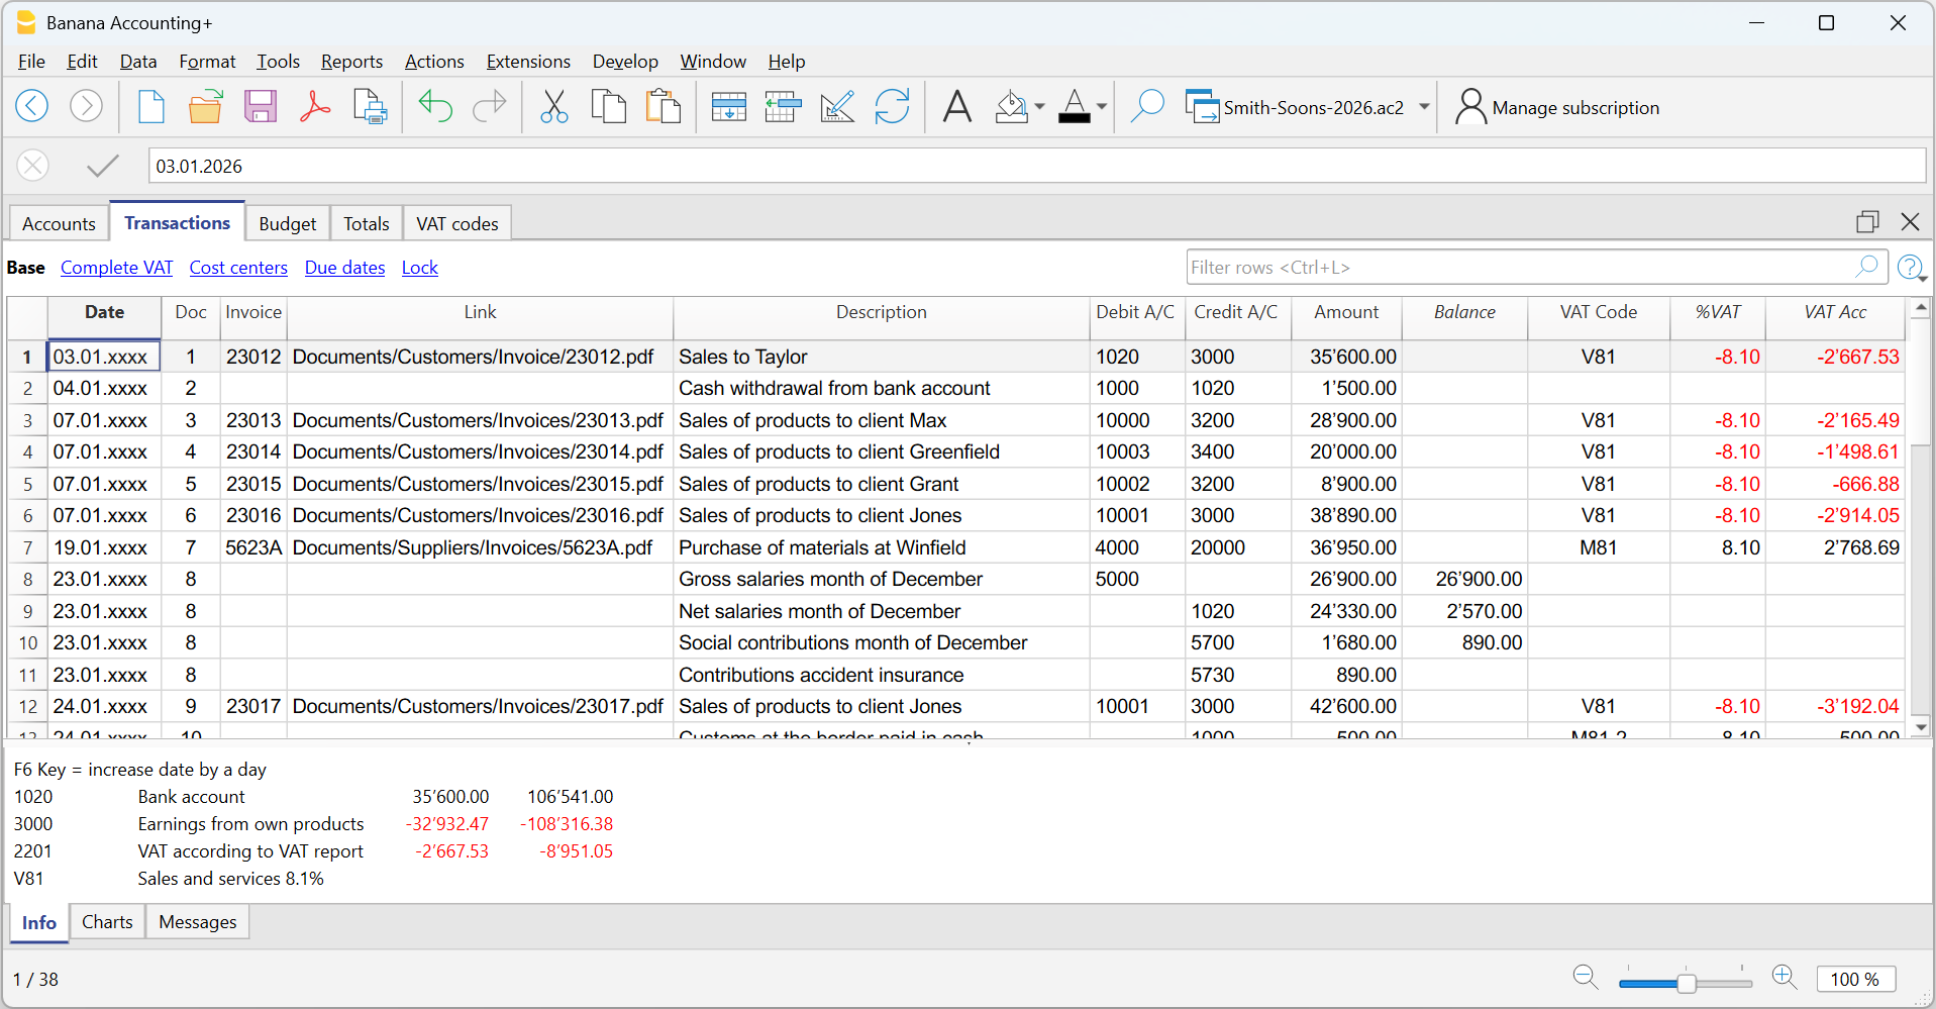
On 03.01.2026 we record the invoice for AVS advances:
- 5700 Employer social security contributions → Debit
- 2270 Liabilities to social security institutions (AVS/AI/IPG/AD) → Credit
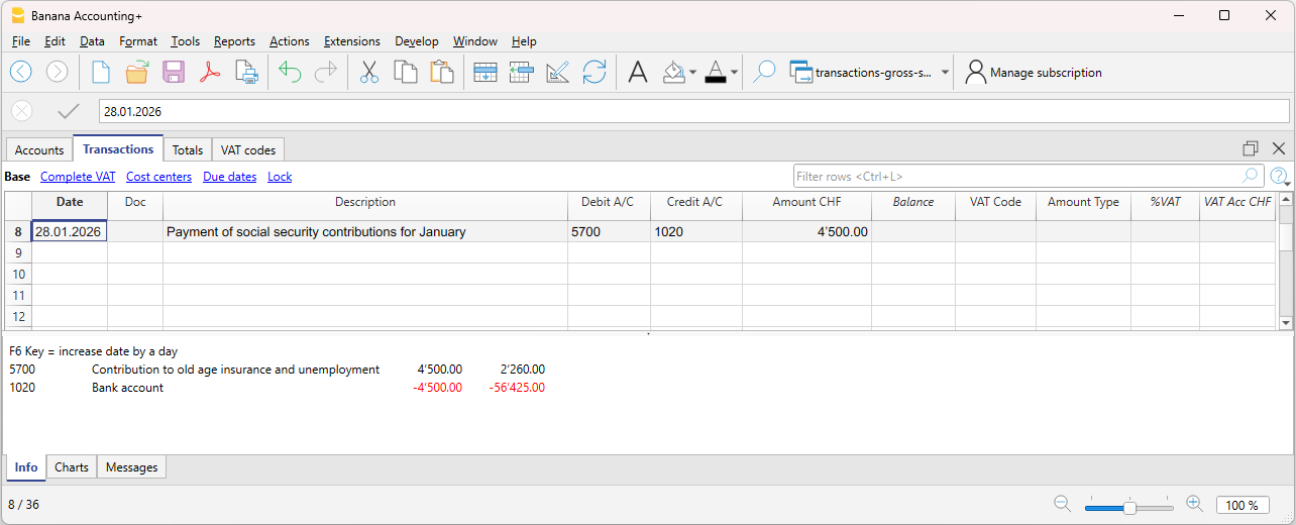
Payment:
On 30.01.2026 we record the payment of the AVS advances:
The contributions are paid according to the invoice, the amount of which is net of any family allowances or other benefits.
- 2270 Liabilities to social security institutions (AVS/AI/IPG/AD) → Debit
- 1020 Bank → Credit
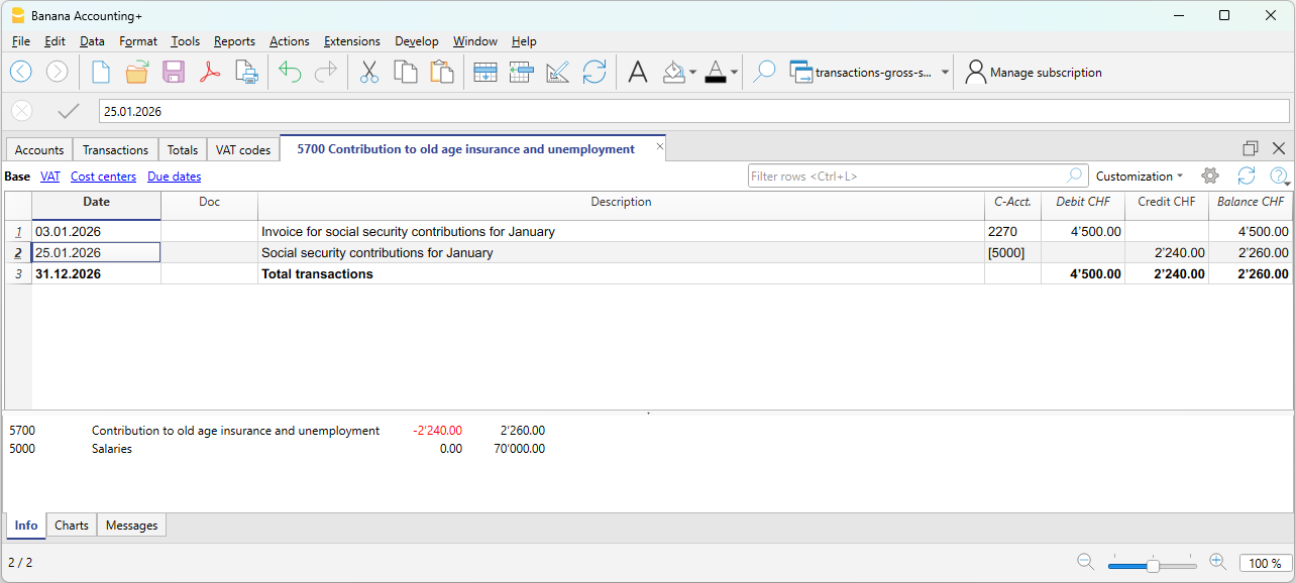
The AVS account plays a central control role:
- in Credit, employees’ salary deductions are recorded
- in Debit, payments to the institution.
The account balance therefore represents the employer’s share.
In the AVS contributions account card (see image), advances paid appear in Debit, while contributions deducted from employees’ salaries appear in Credit. The account balance therefore represents the employer’s share. This presentation makes it easy to verify the correctness of contributions and payments made.
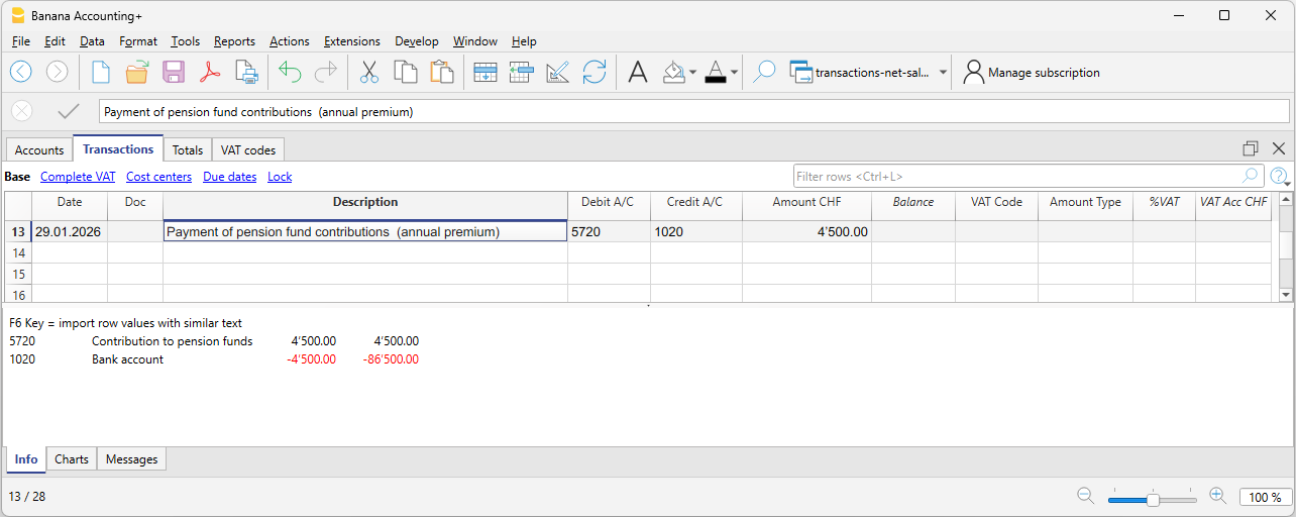
LPP contribution premium and payment
When the annual LPP premium is received, the total cost borne by the employer and the liability toward the LPP insurer are recorded.
When we receive the LPP premium invoice:
- 5720 LPP Contributions → Debit
- 2272 LPP Liabilities → Credit
When we pay the LPP premium invoice:
- 2272 LPP Liabilities → Debit
- 1020 Bank → Credit
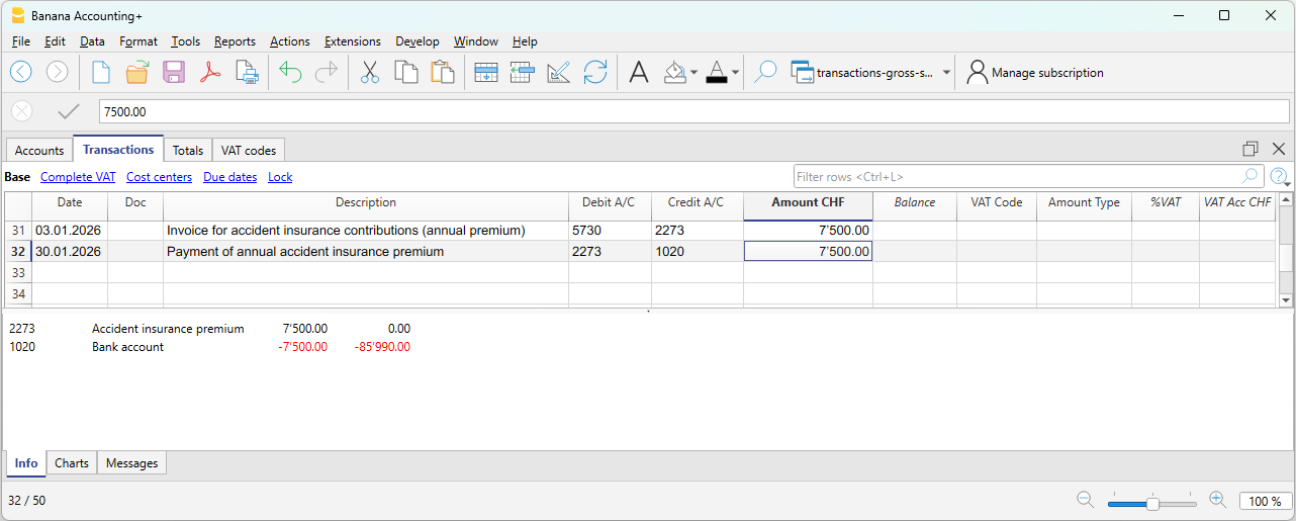
Annual accident insurance premium (LAINF) and payment
When the annual LAINF premium is received, the total cost borne by the employer and the liability toward the LAINF insurance are recorded.
When we receive the LAINF premium invoice:
- 5730 Accident insurance premiums (LAINF) → Debit
- 2273 Accident insurance liabilities → Credit
When we pay the LAINF premium invoice:
- 2273 Accident insurance liabilities → Debit
- 1020 Bank → Credit
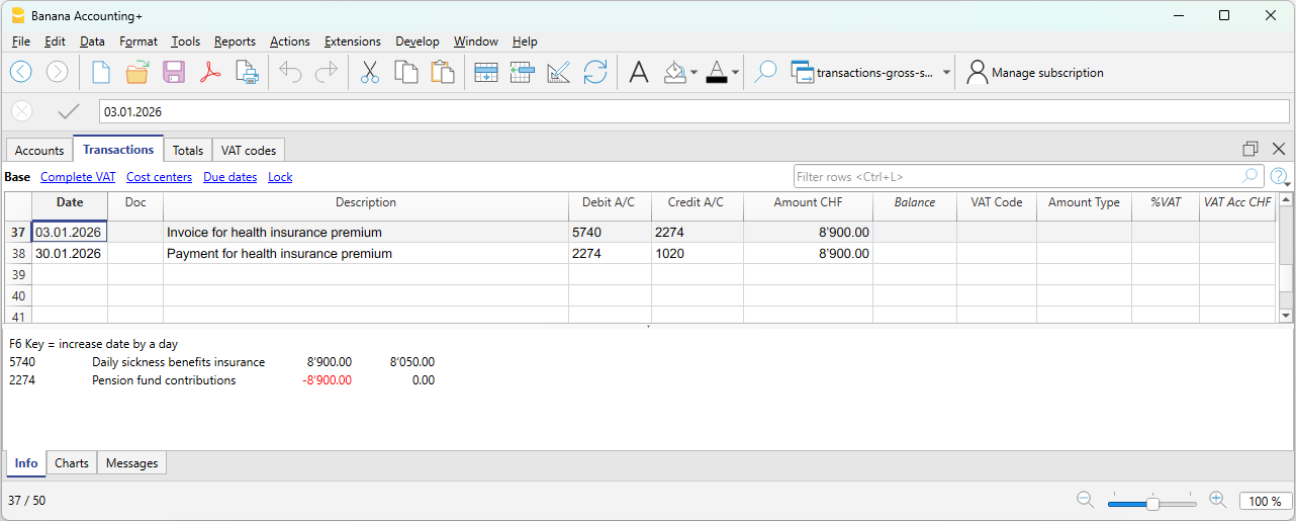
Annual collective health insurance premium (IGM) and payment
When the annual collective health insurance premium is received, the total cost (including both the employer’s and the employee’s share) and the liability toward the health insurance are recorded.
When we receive the health insurance premium invoice:
- 5740 Daily sickness allowance insurance → Debit
- 2274 Health insurance liabilities → Credit
When we pay the health insurance premium invoice:
- 2274 Health insurance liabilities → Debit
- 1020 Bank → Credit
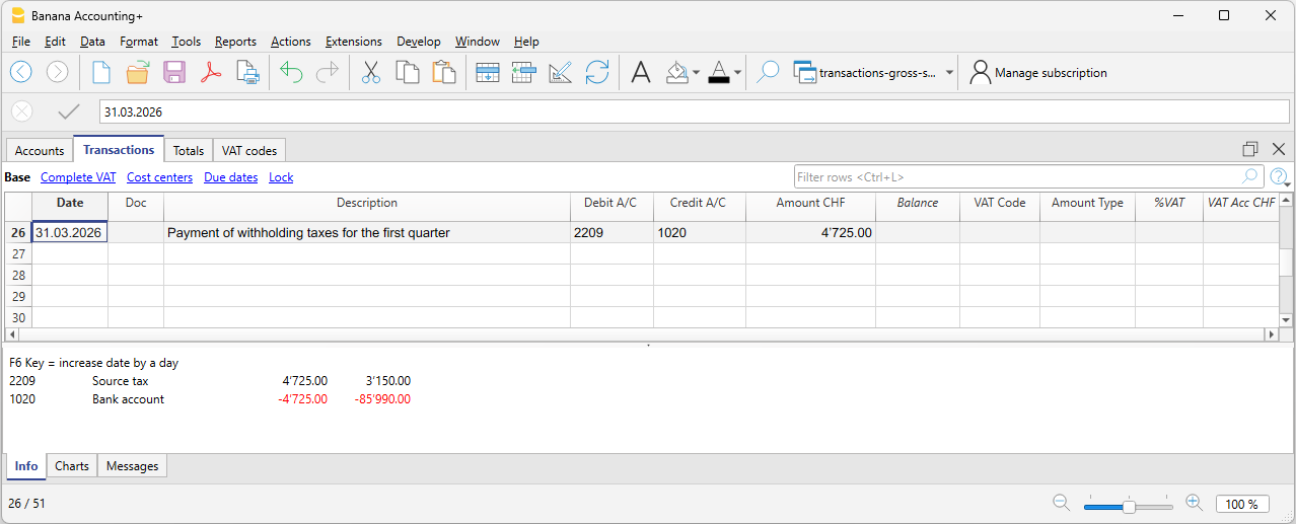
Payment of withholding tax
The withholding tax, deducted from the monthly salaries of employees subject to withholding tax, must be declared and paid by the employer within the prescribed deadlines. It is borne solely by the employee.
- 2209 Withholding tax liabilities → Debit
- 1020 Bank → Credit
Control and verification
It is important to regularly verify:
- the consistency between accounting and payroll calculations
- the balances of liability accounts toward social institutions
- the payments made
During the year, social contributions are often paid as advances.
Following the final statements from the social institutions, any adjustments are recorded to align costs and liabilities with the amounts actually due.
Advantages of gross management
- Complete view of salary costs
- Greater accounting transparency
- Detailed control of deductions and contributions
- Proper representation of liabilities
Limitations of gross management
- Greater complexity
- More accounting transactions
- Requires more accounts and careful management
Salary Reconciliation and Verification of the OASI Declaration
When salary accounting is managed on a net basis, the annual OASI declaration cannot be verified by directly comparing the Salaries account with the final statement issued by the OASI Compensation Office. This is because the Salaries account contains the recorded net amounts, whereas the OASI statement is based on the gross payroll calculated by the payroll management software.
To verify the accuracy of the annual OASI declaration and the other year-end statements, it is therefore necessary to reconstruct the gross payroll and carry out a series of reconciliation checks.
The reconciliation process makes it possible to verify the consistency between:
- the accounting records
- the payroll statements generated by the payroll management software
- the annual OASI declaration
- the final statements issued by the social security institutions.
Reconciliation objectives
The year-end reconciliation has two main objectives:
- to reconstruct the gross payroll and compare it with the gross payroll declared to the OASI Compensation Office;
- to reconcile the OASI contributions by comparing account 5700 OASI Contributions with the final statement issued by the OASI Compensation Office.
Required documents
The following documents are normally required to perform the reconciliation:
- the accounting file
- the payroll statements
- the annual OASI declaration
- the final statement issued by the OASI Compensation Office
- the occupational pension (LPP/BVG) statements
- the insurance statements (OAI, daily sickness allowance insurance, etc.).
Verification of net salaries
The first check is to verify that the amounts paid to employees match those shown in the payroll statements generated by the payroll management software.
The total net salaries recorded in the accounting records must match the net salaries shown in the payroll statements.
It is also necessary to verify that there are no missing or duplicate transactions and that all entries have been recorded in the correct accounting period.
Any differences must be analyzed and corrected before proceeding with the reconciliation of the gross payroll.
Reconstruction of the gross payroll
To compare the accounting records with the OASI statement, the gross payroll must first be reconstructed.
The reconstruction must be carried out using the data from the payroll management software, which provides the details of the deductions applied to each employee.
Start from the net salaries recorded in the accounting records and add only the deductions withheld from employees, such as:
- OASI, DI, IC, and ALV
- occupational pension (LPP/BVG) contributions
- withholding tax
- other salary deductions.
The following must instead be excluded:
- family allowances;
- expense reimbursements;
- other allowances that are not subject to OASI contributions.
Verification of OASI contributions
During the year, OASI contributions are normally paid as advance payments. The actual amount due is determined only by the final statement.
For this reason, the balance of account 5700 OASI Contributions must be compared with the final statement issued by the OASI Compensation Office.
The account balance must include the advance payments made during the year as well as any year-end adjustments. The total must match the contributions shown on the final statement issued by the OASI Compensation Office.
Verification of other social security contributions
The same principle can also be applied to other social security and insurance contributions by comparing the balances of the related accounts with the annual statements issued by the relevant institutions.
In particular, it is advisable to verify:
- occupational pension (LPP/BVG) contributions;
- occupational accident insurance (OAI) premiums;
- daily sickness allowance insurance premiums;
- other recorded social security contributions or insurance premiums.
Any differences relating to these institutions should also be analyzed and reconciled before the financial year is closed.
Year-end checks
At the end of the financial year, the reconciliation should confirm that:
- the gross payroll matches the gross payroll declared to the OASI Compensation Office;
- the recorded contributions match the final statements issued by the institutions;
- all advance payments and any year-end adjustments have been recorded;
- there are no differences between the accounting records, the payroll statements, and the declarations submitted to the social security institutions.
A complete reconciliation makes it possible to identify any differences before submitting the declarations to the social security institutions and ensures consistency between the accounting records, the payroll management software, and the annual statements.
FAQ
Why doesn't the gross payroll in the OASI declaration match the Salaries account?
- Because under net salary accounting, the Salaries account records only the net amounts paid to employees, whereas the OASI declaration is based on the gross payroll.
Why is the balance of the OASI account different from the advance payments made?
- Because advance payments are normally made during the year. The actual amount due is determined only by the final statement.
How is the gross salary determined?
- The gross salary is reconstructed using the payroll statements generated by the payroll management software.
How do you reconstruct the gross salary starting from the net salary?
- Start with the net salary recorded in the accounting records and add the deductions withheld from the employee (OASI/DI/IC/ALV, occupational pension (LPP/BVG) contributions, withholding tax, and other deductions). Family allowances, expense reimbursements, and other allowances that are not subject to OASI contributions must instead be excluded.