Issuing invoices in the transaction rows.
With integrated invoicing, invoices are created and simultaneously recorded in the accounting. You can create invoices with or without VAT.
Before creating and recording invoices, you must define the accounting method. The available methods are:
- Invoicing on turnover (revenue-based accounting).
- Issued invoices are immediately recorded and accounted for.
- Revenue is recognized when the invoice is issued.
- Customer ledger through balance sheet accounts.
- Cash-based accounting.
- Issued invoices are only recorded when payment is received.
- Revenue is recognized only when the invoice is actually paid, by recording the transactions at the time of payment.
- Customer ledger through profit centers CC3.
VAT Management
- Accounting with the effective method
- Invoices are issued with rates according to the effective method (e.g. 8.1%, 3.8%, 2.6%).
- Revenue is recorded when the invoice is issued.
- The amount to be recorded is usually gross of VAT.
- The VAT code is entered on the revenue line when the invoice is issued.
- With cash-basis accounting, if the amounts are net, the invoices must be managed in a separate file (Quotations and Invoices application or accounting file).
- Accounting with flat rate VAT.
- Invoices are issued with a VAT rate different from the one used for accounting.
- Revenue is recognized only when the invoice is actually paid, by recording the transactions at the time of payment.
- If the amounts are gross, accounting can be done on issuance or on payment, entering the VAT code in square brackets.
- With both accounting methods (turnover or cash-based), if the amounts are net, the invoices must be managed in a separate file (Quotations and Invoices application or accounting file).
Invoice with net VAT and VAT management on payment:
- When creating invoices with VAT, there are limitations if in the accounting the amounts are recorded net and the cash method is used. In this case, it is not possible to enter net VAT amounts, because at the time of issuing the invoice the VAT codes must be enclosed in square brackets. VAT is not calculated automatically, but shown only as an indication for printing purposes.
The columns to create invoices
To enter the standard invoice data, there are basic columns. If more details are needed, such as quantity, unit price, etc., additional columns can be added by adding the Items table.
The columns can also be customized in terms of display order.

Basic columns
Date
The invoice will show the date indicated in this column. All rows belonging to the document must show the same date.
Invoice
To manage invoices, it is mandatory to indicate an invoice number in the Invoice column.
Description
A description of the goods or services to be invoiced. These texts appear on the invoice.
Debit
Use this column only to record the payment of the invoice, entering the liquidity account (bank, postal account,...).
Credit
Use this column only to record the payment of the invoice, entering the revenue account.
Amount
An amount. If VAT is managed, enter the gross amount (including VAT).
VAT Code
The VAT code corresponding to the revenue account (sales or services):
- When issuing the invoice, the VAT code must be entered in square brackets (e.g. "[V81]").
- When recording the payment of the invoice, the VAT code must be entered without square brackets.
CC3
A customer account present in the Accounts table, in the Profit Center CC3 group.
Optional columns
Type
In the Type column you can define detail rows, such as subtotal rows or specific payment terms for an invoice.
This column is not visible by default but must be displayed through the Data menu > Columns setup command and by selecting the DocType column.
Quantity
The quantity of goods or services to be invoiced.
To add the quantity column, use the menu Tools > Add new features > Add Item columns in the Transactions table.
Unit
A type of unit (e.g. 'pcs', 'h', 'm', 'kg').
Unit Price
The unit price for the goods or services.
The program automatically calculates the total amount based on the quantities entered in the Quantity column.
Other columns
When printing the invoice, you can add other columns from the Transactions table, including those that were manually added to the table. See example Use columns from the Transactions table.
Invoice with multiple rows
When the invoice includes multiple items to be charged (products, services or both), you must enter each item on a separate row.
- Enter a new transaction row for each item you want to include in the invoice.
- On each additional row, repeat the invoice date and number, identical to those in the first row.
Customer account management
- Composed transactions (on several rows)
If the customer account is not indicated in the detail rows, but only the account opposite, you must specify the customer account in the first row.
Otherwise, the accounts of the following rows will not be correctly displayed in the invoice printout. - Simple transactions (on one row)
Alternatively, you can enter both the customer account and the income account on each detail row, ensuring a correct data association.
How to define Customer Number and Invoice Number
This page explains how to correctly define the length and format of the Customer number and the Invoice number when invoicing with Banana Accounting Plus.
Important: Correctly setting the Customer number and the Invoice number is essential, especially if you issue Swiss QR invoices and want to automatically record payments. Both numbers are included in the reference number on the QR slip and are used to automatically link imported payments to the related invoices.
This setting applies to:
- Invoicing integrated in the accounting file (with or without Swiss QR)
- Invoicing with the Estimates and Invoices application (with or without Swiss QR).
Customer number
The Customer number is the identifier of the customer in accounting (subaccount or cost center). In QR invoices, it is also used to automatically record payments of the invoices.
Customer number format for QR invoices
In QR invoices, the customer number is included in the reference number. For this reason, it must follow specific rules, which vary depending on the type of account used (IBAN or QR-IBAN) and the type of reference number chosen.
- QR Invoice with IBAN account:
- Only numbers or letters are allowed (A‑Z, 0‑9).
- Spaces, separators, or other characters (-, /, #, etc.) are not allowed.
If you insert separators or other characters, they will be removed from the invoice printout and may cause problems in automatically recording payments. - Customer number + Invoice number ≤ 19 characters.
The two numbers together must not exceed 19 characters. It is recommended to keep the Customer number to a maximum of 7 characters.
- QR Invoice with QR-IBAN:
- Only digits (0–9) are allowed.
- No spaces, letters, separators or other characters (-, /, #, etc.). If you insert separators or other characters, they will be removed from the invoice printout and may cause problems in automatically recording payments.
- Maximum length 7 digits.
- Customer number + Invoice number: together must not exceed 14 digits.
Customer number format for invoices without QR
For invoices without QR, there are no constraints regarding the format of the customer number. Best practices apply.
Best practices for customer numbers
- Uniqueness: each customer must have a unique number.
- Consistency: use a fixed scheme (e.g. 1000001, 1000002, etc.).
- Compatibility: if you plan to issue QR invoices with both standard IBAN accounts and special QR-IBAN accounts, or switch from IBAN to QR-IBAN, use only numbers.
Invoice number
The Invoice number uniquely identifies the invoice (mandatory). In QR invoices, it is also used to automatically record payments.
Invoice number format for QR invoices
In QR invoices, the invoice number is included in the reference number. For this reason, it must follow specific rules, which vary depending on the type of account used (IBAN or QR-IBAN) and the type of reference number chosen.
- QR Invoice with IBAN account:
- Only numbers or letters are allowed (A‑Z, 0‑9).
- Spaces, separators, or other characters (-, /, #, etc.) are not allowed. If you insert separators or other characters, they will be removed from the invoice printout and may cause problems in automatically recording payments.
- Customer number + Invoice number: ≤ 19 characters.
The two numbers together must not exceed 19 characters. It is recommended to keep the Customer number to a maximum of 7 characters.
- QR Invoice with QR-IBAN:
- Only digits (0–9) are allowed.
- No spaces, letters, separators, or other characters (-, /, #, etc.). If you insert separators or other characters, they will be removed from the invoice printout and may cause problems in automatically recording payments.
- Maximum length 7 digits.
- Customer number + Invoice number: together must not exceed 14 digits.
Invoice number format for invoices without QR
For invoices without QR, there are no constraints regarding the invoice number. Best practices apply.
Best practices for invoice numbers
- Uniqueness: each invoice must have a unique number.
- Consistency: use a fixed scheme (e.g. year+progressive: 2500001, 2500002, etc.).
- Compatibility: if you plan to issue QR invoices with both standard IBAN accounts and special QR-IBAN accounts, or switch from IBAN to QR-IBAN, use only numbers.
Issuing invoices with VAT with the Cash method
In integrated invoicing, invoices are created and recorded in the same file. As for cash-based accounting, invoices must be recorded at the time of payment.
In managing cash-based invoicing, it is necessary to set up the customer subaccount in the Accounts table using the Profit Center CC3.
- All customer accounts must have complete information (first name, last name or company name, address), because when creating the invoice, the program uses this data for the invoice header.
It is possible to create and record invoices with or without VAT.
Cash-based Invoice
In the cash-based system, the invoice is created to be sent to the customer, but the accounting entry is made later when payment is received.
Therefore, to create the invoice, the items to be invoiced are recorded using the customer’s CC3 profit center:
- In the Date and Doc. columns, enter the date and any document number.
- In the Invoice column, enter the invoice number.
It is important that the invoice number complies with certain requirements: see how to correctly create the invoice number. - In the Description column, enter the items to be invoiced that should appear on the customer’s invoice.
- The Debit and Credit columns must remain empty because the accounting entry is made when the customer's payment is received.
- In the Amount column, enter the gross amount.
- In the CC3 column, enter the customer's CC3 profit center account.
It is important that the customer number complies with certain requirements: see how to correctly create the customer number.
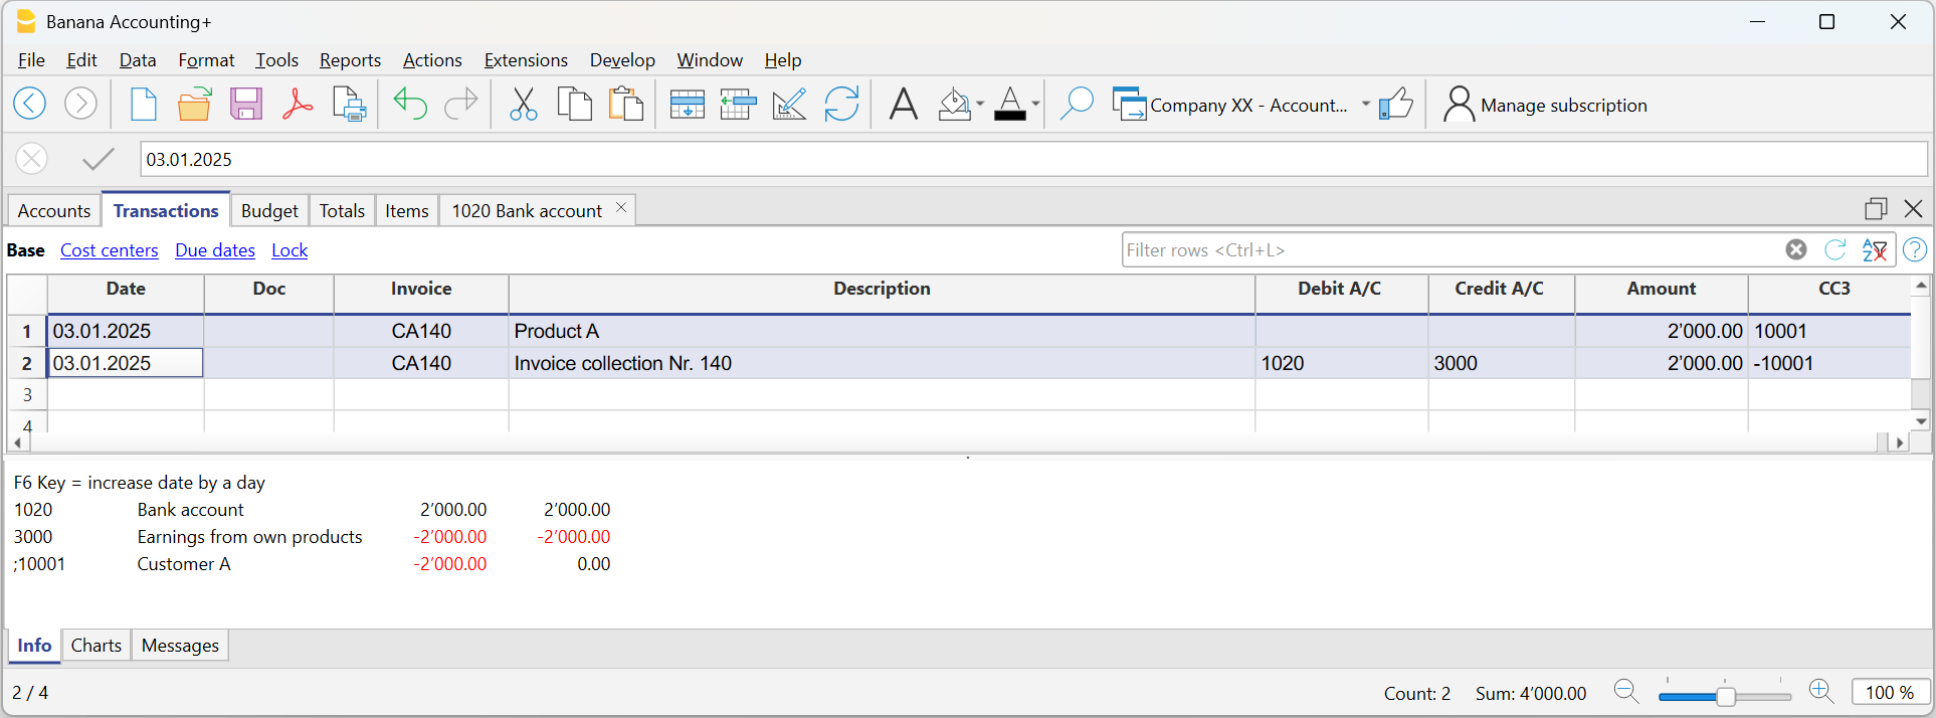
Cash-based Invoice and Effective VAT Method
The Banana Accounting VAT management procedure requires that the VAT code is always entered on the line where the income is recorded.
Income is recorded only when the invoice is actually paid. Therefore, in cash-based VAT management, the VAT code is entered only when the invoice is paid.

Invoice data is entered in the Transactions table. Enter a new transaction row for each new invoice.
- Enter the transaction date
- The invoice number
It is important that the invoice number complies with certain requirements: see how to correctly create the invoice number. - The description text (products, services, consulting...) that will appear on the customer’s invoice
- The Debit account must remain empty
- The Credit account must remain empty
- Enter the gross amount
- In cases subject to VAT, enter the sales VAT code in square brackets (e.g. "[V81]").
The VAT code entered in square brackets allows the VAT amount to be displayed on the invoice, without its accounting entry, which will occur when the payment is recorded. - In the CC3 column, enter the customer’s profit center account (CC3). It is important that the customer number complies with certain requirements: see how to correctly create the customer number.
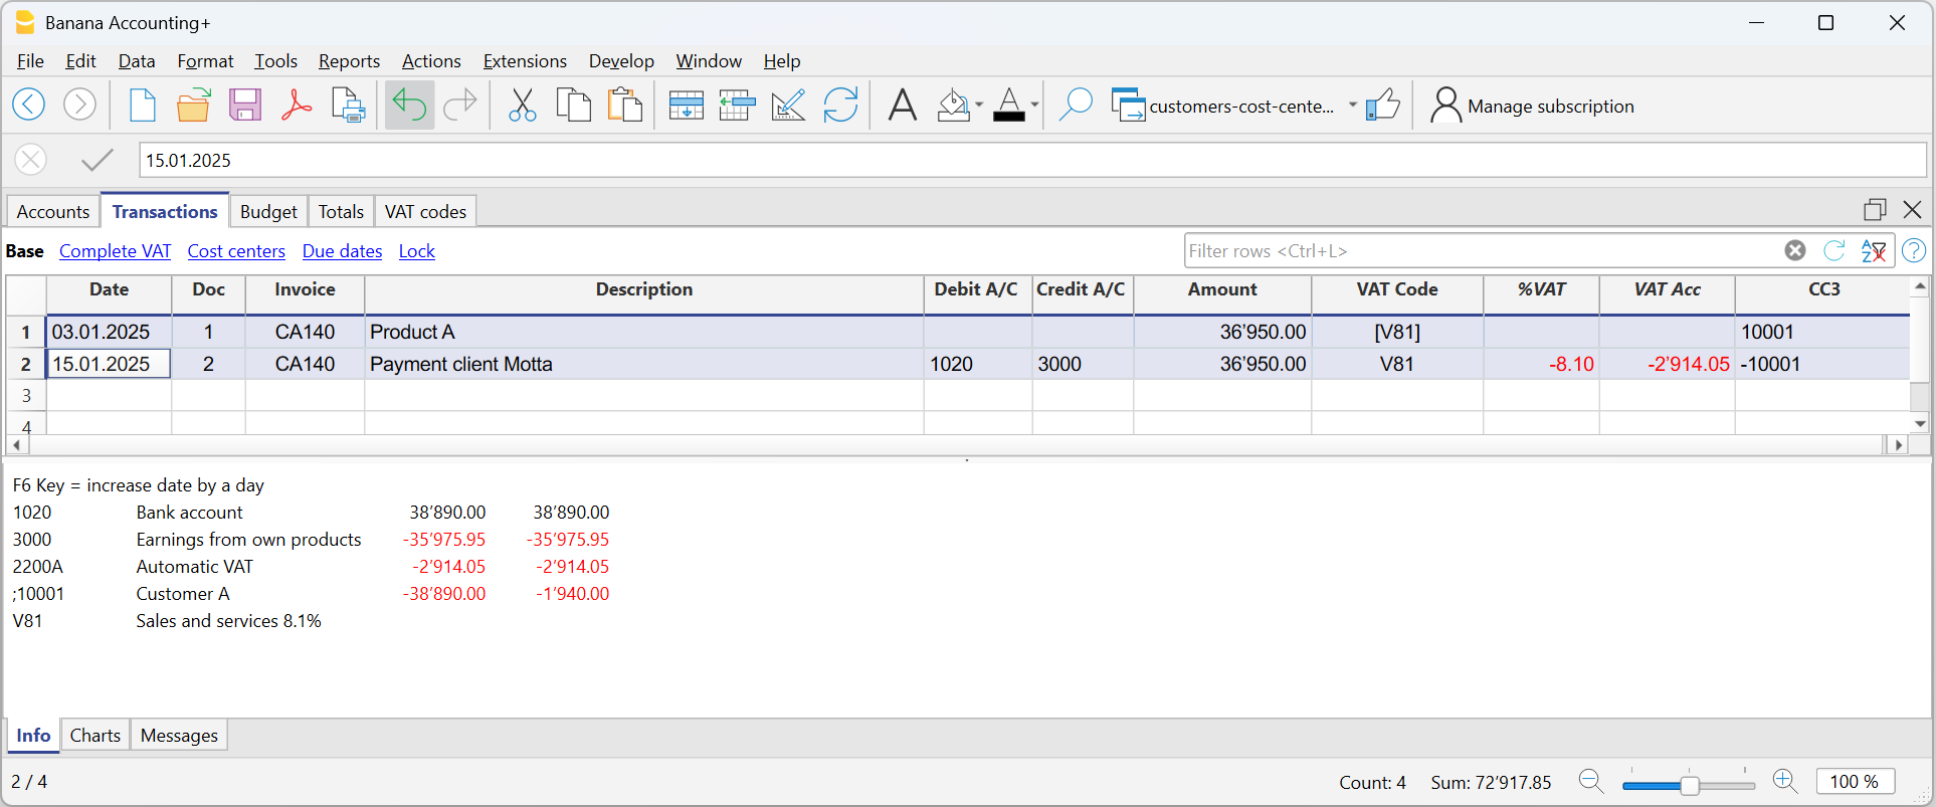
Invoicing on turnover
In integrated invoicing, invoices are created and recorded in the same file. Regarding accrual-based accounting, invoices must be recorded at the time of issuance.
In accrual-based invoicing management, it is necessary to set up the customer subaccount in the Accounts table as shown in the balance sheet.
- All customer accounts must have complete data (first name, last name or company name, address), because when creating the invoice, the program uses this data for the invoice header.
It is possible to create and record invoices with or without VAT.
Accrual-based Invoice
In the accrual-based system, the invoice is created to be sent to the customer, and it is recorded at the same time.
Therefore, with a single transaction, both the invoice is created and recorded:
- In the Date and Doc. column, enter the date and any document number.
- In the Invoice column, enter the invoice number.
It is important that the invoice number complies with certain requirements: see how to correctly create the invoice number. - In the Description column, enter the items to be invoiced that should appear on the invoice.
- In the Debit column, enter the customer's account from the subaccount.
It is important that the customer number complies with certain requirements: see how to correctly create the customer number. - In the Credit column, enter the revenue account.
- In the Amount column, enter the gross amount.
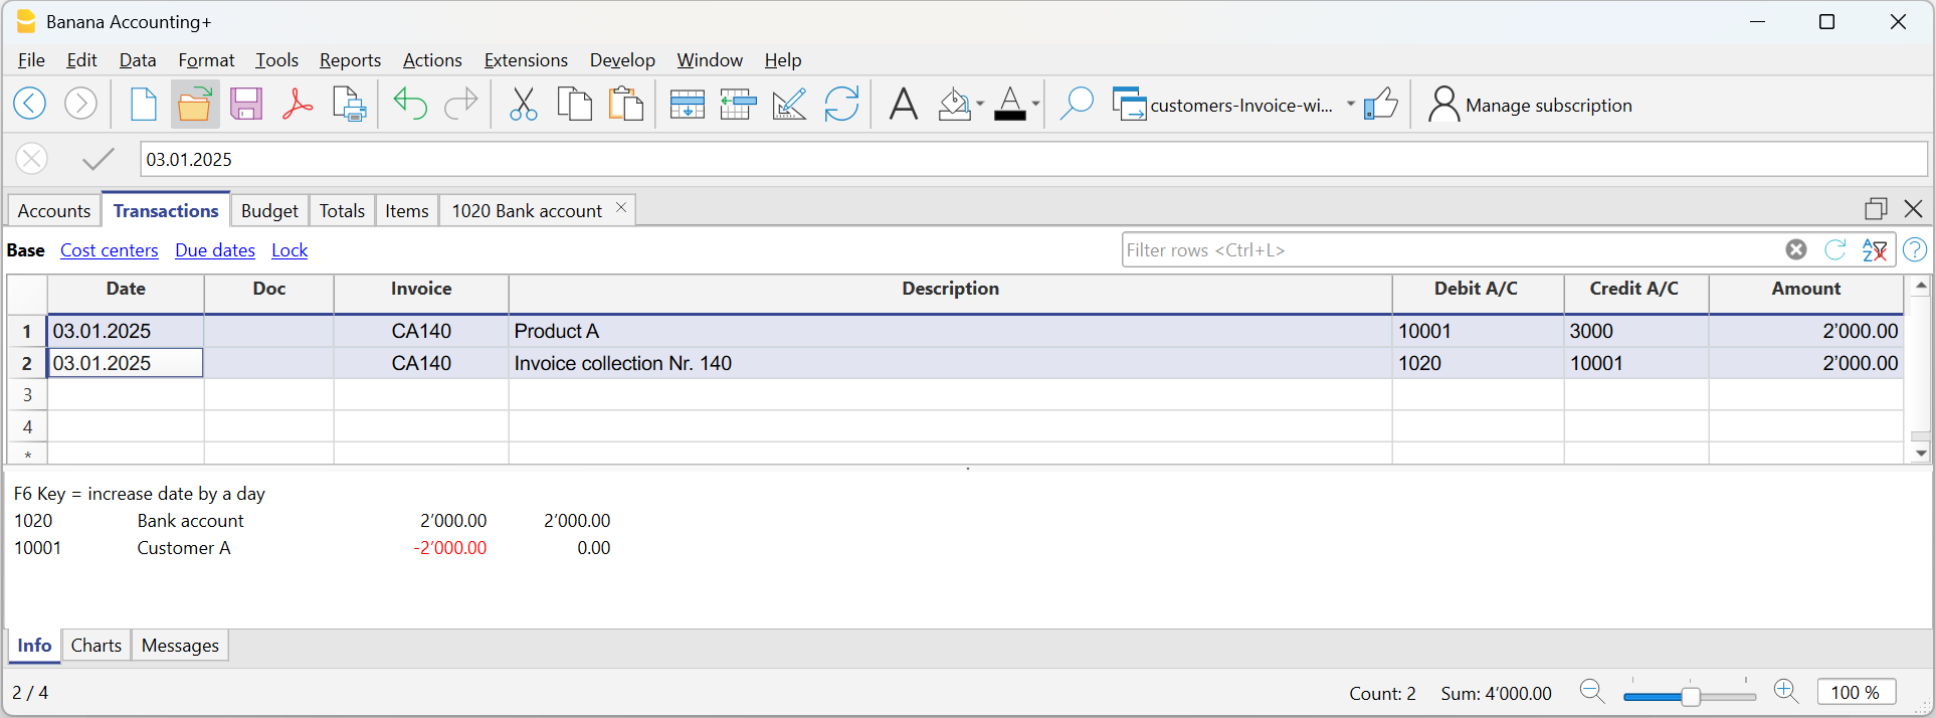
Accrual-based Invoice and VAT – Effective Method
The standard procedure in Banana Accounting for VAT management requires entering the VAT code on the same row where the income is recorded.
Issued invoices are immediately recorded and posted. Income is recognized at the time the invoice is issued.
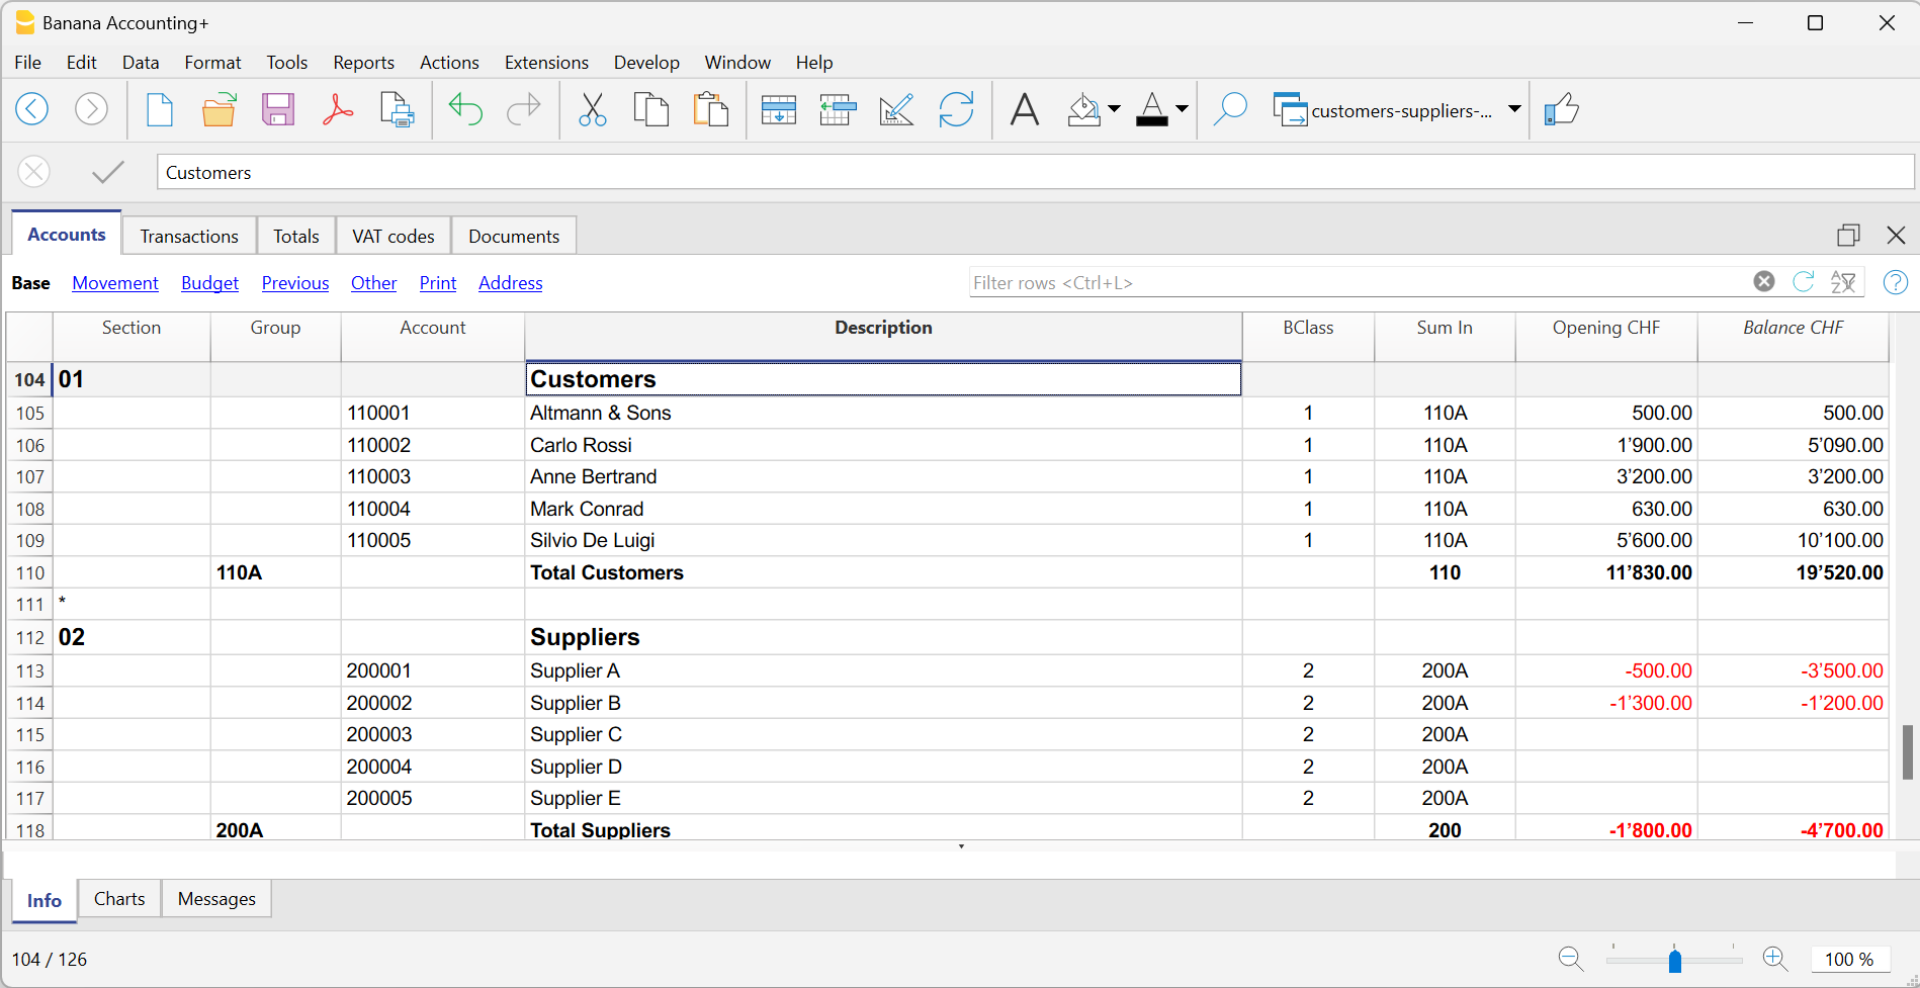
Therefore, in accrual-based VAT management, the VAT code is added when the invoice is created.
The invoice data is entered in the Transactions table. For each new invoice, enter a new transaction row.
- Enter the date of the transaction
- The invoice number
It is important that the invoice number complies with certain requirements: see how to correctly create the invoice number. - The description text (products, services, consulting...) that will appear on the customer invoice
- In the Debit account, enter the customer account number
It is important that the customer number complies with certain requirements: see how to correctly create the customer number. - In the Credit account, enter the counterpart (Sales account, Consulting or other)
- Enter the amount
- In cases subject to VAT, enter the VAT Code with the applicable VAT rate. See Print invoices and VAT management.
Invoicing and VAT net tax rate method
If you are subject to VAT under the balance rate or flat-rate regime with the cash-based system, you must record the invoice issuance to the customer and its accounting registration separately, for the following reasons:
- Invoice to be sent to the customer:
It must show a normal commercial VAT rate (e.g., 8.1%), as required by tax regulations. - Accounting of the invoice:
It must instead be recorded in accounting with the effective balance rate (e.g., 6.2%), using the corresponding VAT code (e.g., F1).
This approach is essential to ensure that the VAT paid corresponds to the applicable reduced regime, while still maintaining a formally correct invoice for the customer.
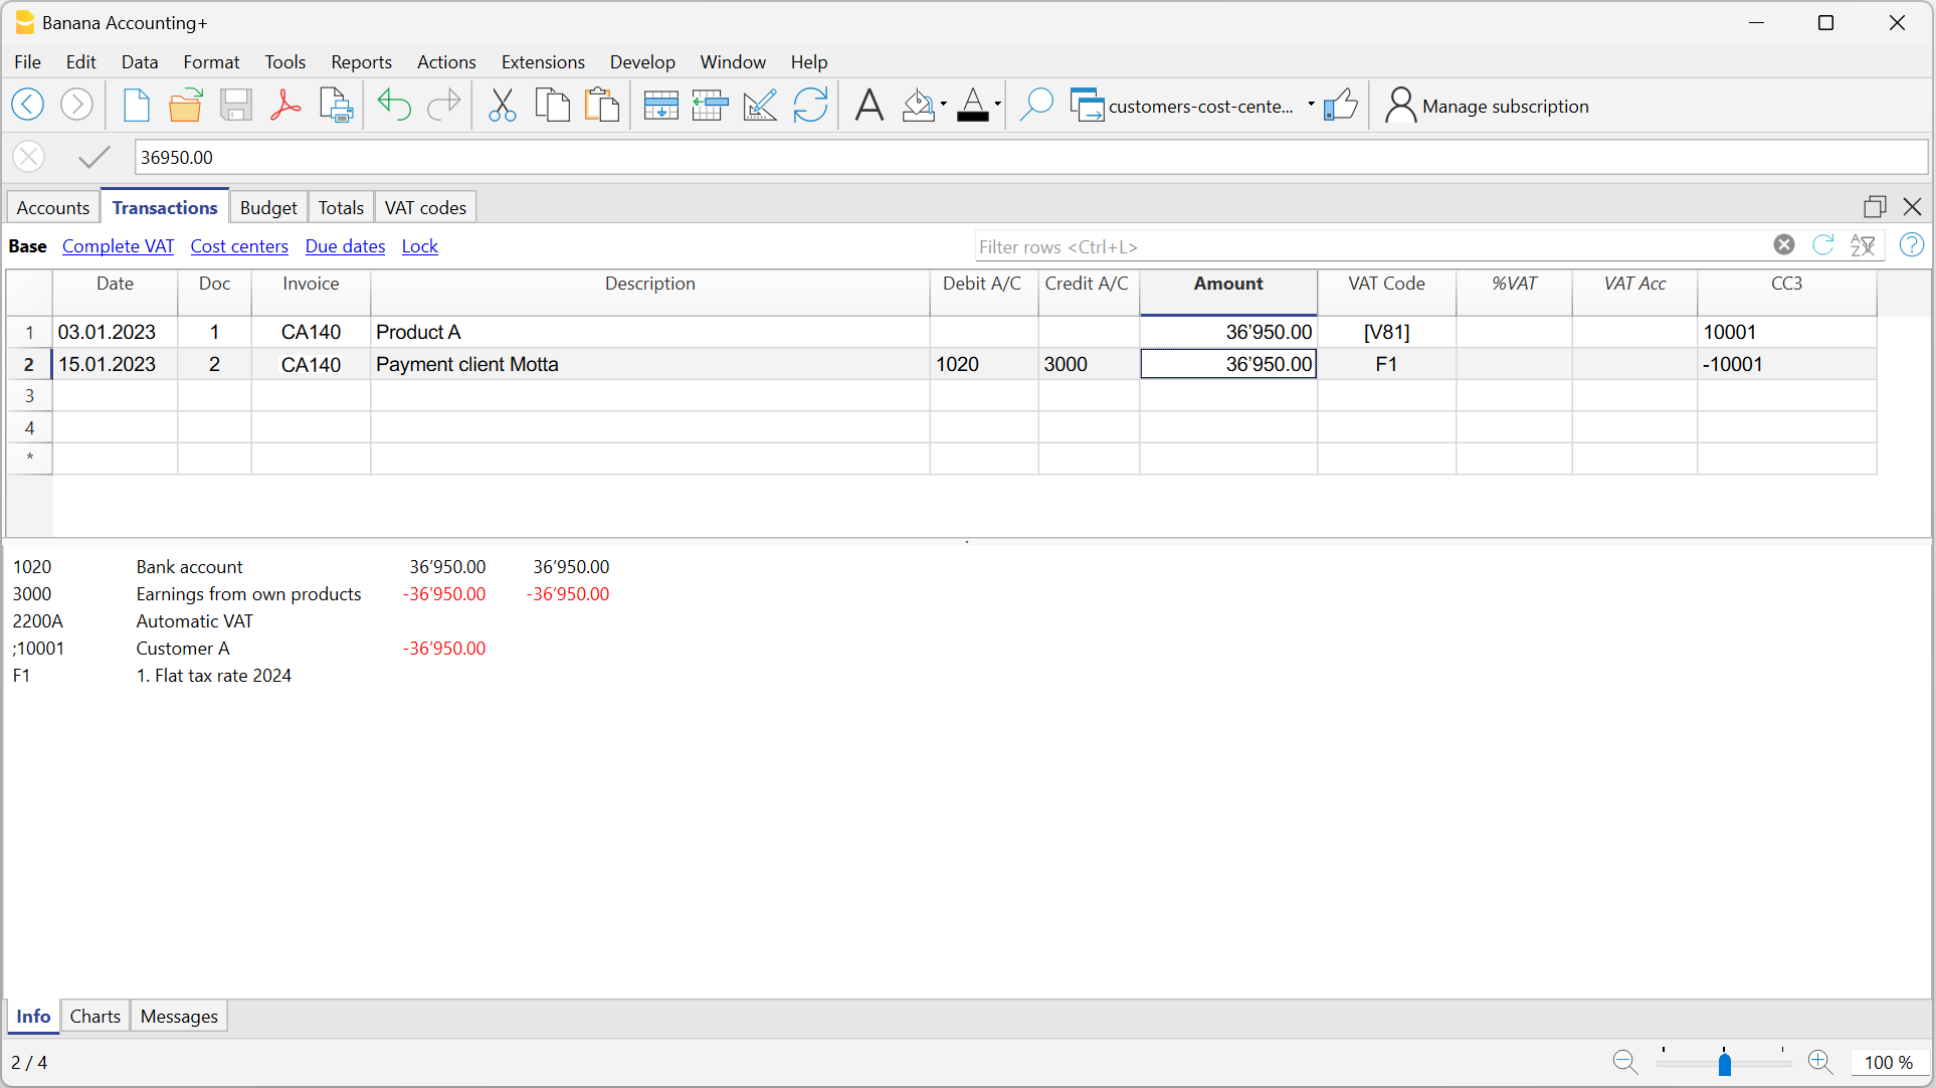
Issuing the invoice to the customer
To issue the invoice to the customer, proceed as follows:
In the Accounts Table:
- Create a customer sub-account with the profit center CC3 (example: ;10001 for customer XX)
- In the Address view, enter all customer data.
In the Transactions table:
- In the Date column, enter the invoice issue date.
- In the Invoice column, enter the invoice number.
It is important that the invoice number complies with certain requirements: see how to correctly create the invoice number. - In the Description column, enter the description that should appear in the invoice details.
- In the Amount column, enter the amount
- The Debit and Credit columns must remain empty.
- In the VAT Code column, type the code V81 in square brackets [V81].
VAT codes in square brackets do not generate any VAT entry. - In the CC3 column, indicate the profit center number without semicolon (e.g., 10001).
It is important that the customer number complies with certain requirements: see how to correctly create the customer number.
Since there are no accounts in the Debit and Credit columns, the invoice creation entry will not be recorded in accounting.
Recording the invoice with VAT balance rate
When recording an invoice subject to VAT with a balance rate in accounting, it is sufficient to proceed as with a normal entry, indicating the accounts in the Debit and Credit columns and entering the VAT code corresponding to the balance rate (e.g., F1).
Two recording systems can be used to register the invoice with the balance rate:
- Recording with split
In the VAT codes table, VAT percentages have been assigned to balance rate VAT codes. In the transactions table, by entering the balance rate VAT code (e.g., F1), the program automatically enters the corresponding VAT percentage (e.g., 6.2) and the VAT amount. - Recording without split, by entering the balance rate VAT code (e.g., F1), percentage and amount are not entered. At the end of the period, the specific extension for calculating balance VAT is used.
Based on the rate defined in the extension dialog, the program:- Identifies all entries with balance rate VAT code.
- Automatically calculates the VAT due for the reporting period.
- Totals the amounts on a periodic basis (e.g., monthly, quarterly, yearly).
Invoicing and VAT with balance rate using the invoicing method
The Banana Accounting procedure for VAT management requires entering the VAT code always on the line where the income is recorded. When accounting is managed based on turnover, the income is recorded when the invoice is issued.
When subject to VAT using the balance rates or flat-rate method, customer invoices must be issued using the normal rates (e.g., 8.1%). However, the accounting of invoices under the balance rates or flat-rate method involves reduced rates (e.g., 6.2%).
- If the amounts are gross, you can record them based on turnover or on cash received, by entering the VAT code in square brackets.
- If the amounts are net, it is not possible to create and post the invoices at the same time. In this case, it is necessary to manage:
- The creation of invoices in an accounting file, using the integrated invoicing or with the Offers and Invoices Application
- The posting of invoices in the accounting file.
In this case, the creation of the invoices must be handled in an accounting file or with the Offers and Invoices Application, and the posting in a separate accounting file.
Issuing an invoice with balance tax rate and gross amounts
To issue an invoice to customers with the standard VAT rate (e.g. 8.1%), you need to create a customer subaccount with profit centers CC3 (example: ;10001), completing all customer information in the columns of the Address view.
In the Transactions table:
- In the Date column, enter the invoice issue date.
- In the Invoice column, enter the invoice number:
It is important that the invoice number follows certain rules: see how to correctly create the invoice number. - In the Description column, enter the invoice details.
- The Debit and Credit columns must remain empty.
Since there are no accounts in the Debit and Credit columns, the invoice creation entry will not be recorded. - In the Amount column, enter the amount.
- In the VAT Code column, type the V81 code in square brackets [V81].
VAT codes in square brackets do not trigger VAT accounting. - In the CC3 column, enter the customer account, without semicolon (e.g. 10001).
It is important that the customer number follows certain rules: see how to correctly create the customer number.
Posting an Invoice with Balance Rate and Gross Amounts
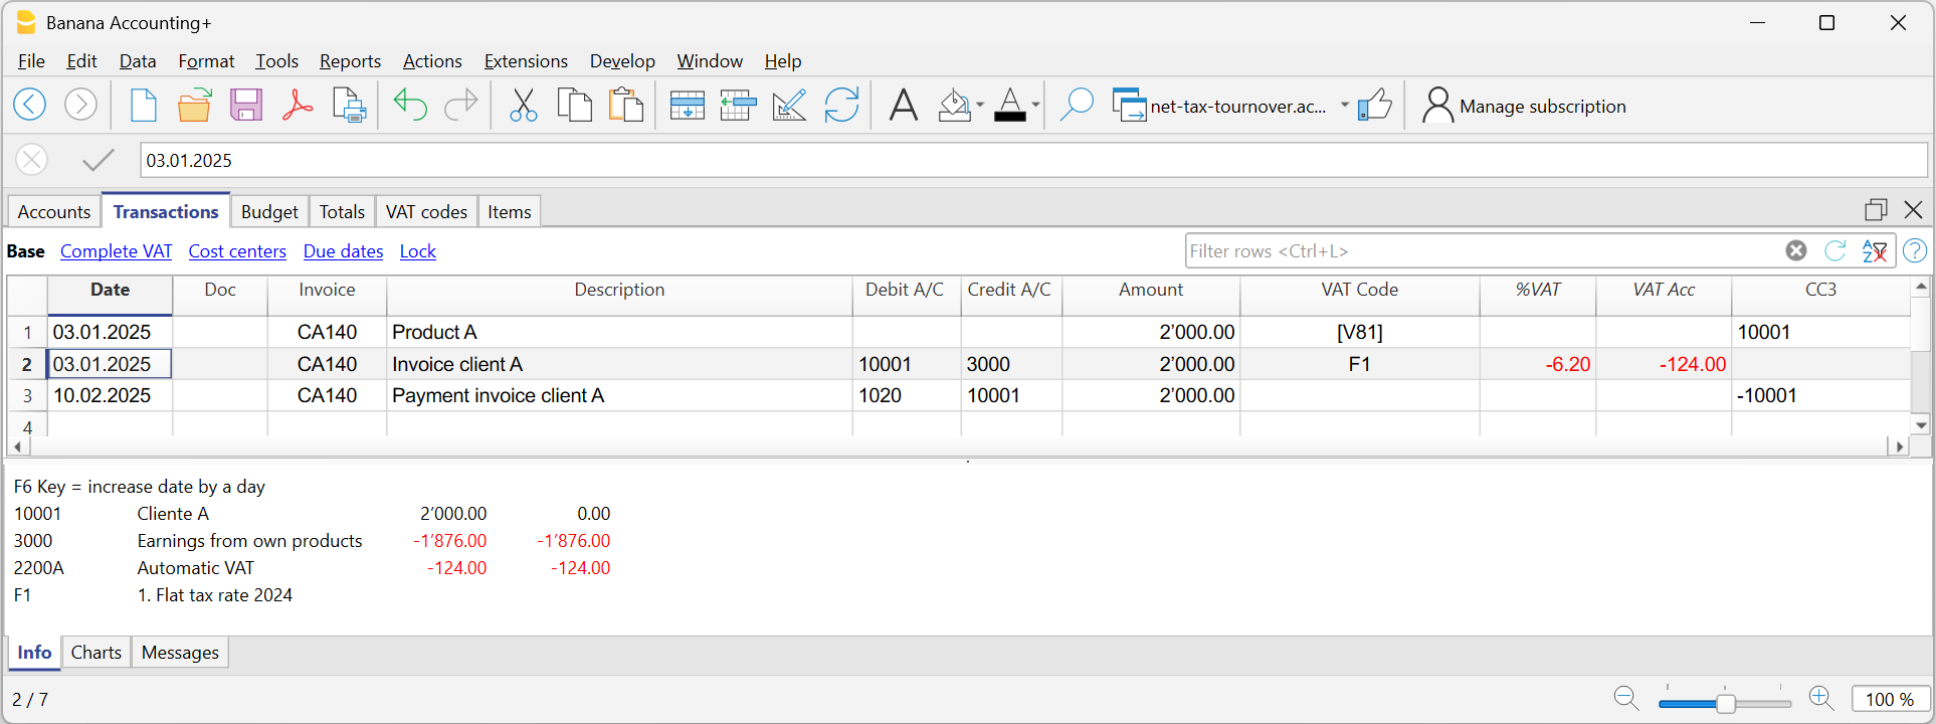
When recording the invoice in the accounting, to post it using the VAT balance rate, you must enter the transaction as usual, also entering the accounts in the Debit and Credit columns and the VAT code of the balance rate:
- If the VAT breakdown method is used, enter the VAT code for the balance rate (e.g., F1). In this case, the VAT Codes table includes the VAT rates for the balance. In example F1 corresponds to 6.2%.
- If the non-VAT breakdown method is used, enter the VAT code without rate (e.g., F1). In the VAT code table, the balance rate codes do not have rates.
To post the invoice using the balance rate, it is necessary to create in the Accounts table:
- A customer sub-account using balance sheet accounts.
- Enter the date and description in the corresponding columns.
- In the Debit column, enter the customer account (e.g., 10001).
- In the Credit column, enter the income account.
- In the Amount column, enter the amount.
- In the VAT Code column, type the VAT code for the balance rate (e.g., F1)
Discounts and reductions
To enter a discount or reduction in an invoice, add a new row and enter:
- Invoice date
- Invoice number
- Description of the discount or reduction
- Accounts in the Debit and Credit columns. It is important to invert the accounts compared to the sales transaction.
When the customers / suppliers register is set up with cost centers and there are registrations with discounts and reductions, in order for the amount to be reversed, the sign of the cost centers must be inverted. - In case of VAT, indicate the VAT code with the minus sign, so that the VAT is deducted, or, if present use the VAT code for discount and reductions.

Rounding in invoice printout
In the printout of invoices integrated in accounting, the total VAT amount corresponds to the sum of the individual VAT transactions that make up the invoice. Since the individual VAT transactions are rounded to the nearest cent, there may be a difference compared to the VAT calculated on the total invoice amount.
To better understand, let's consider the following example:
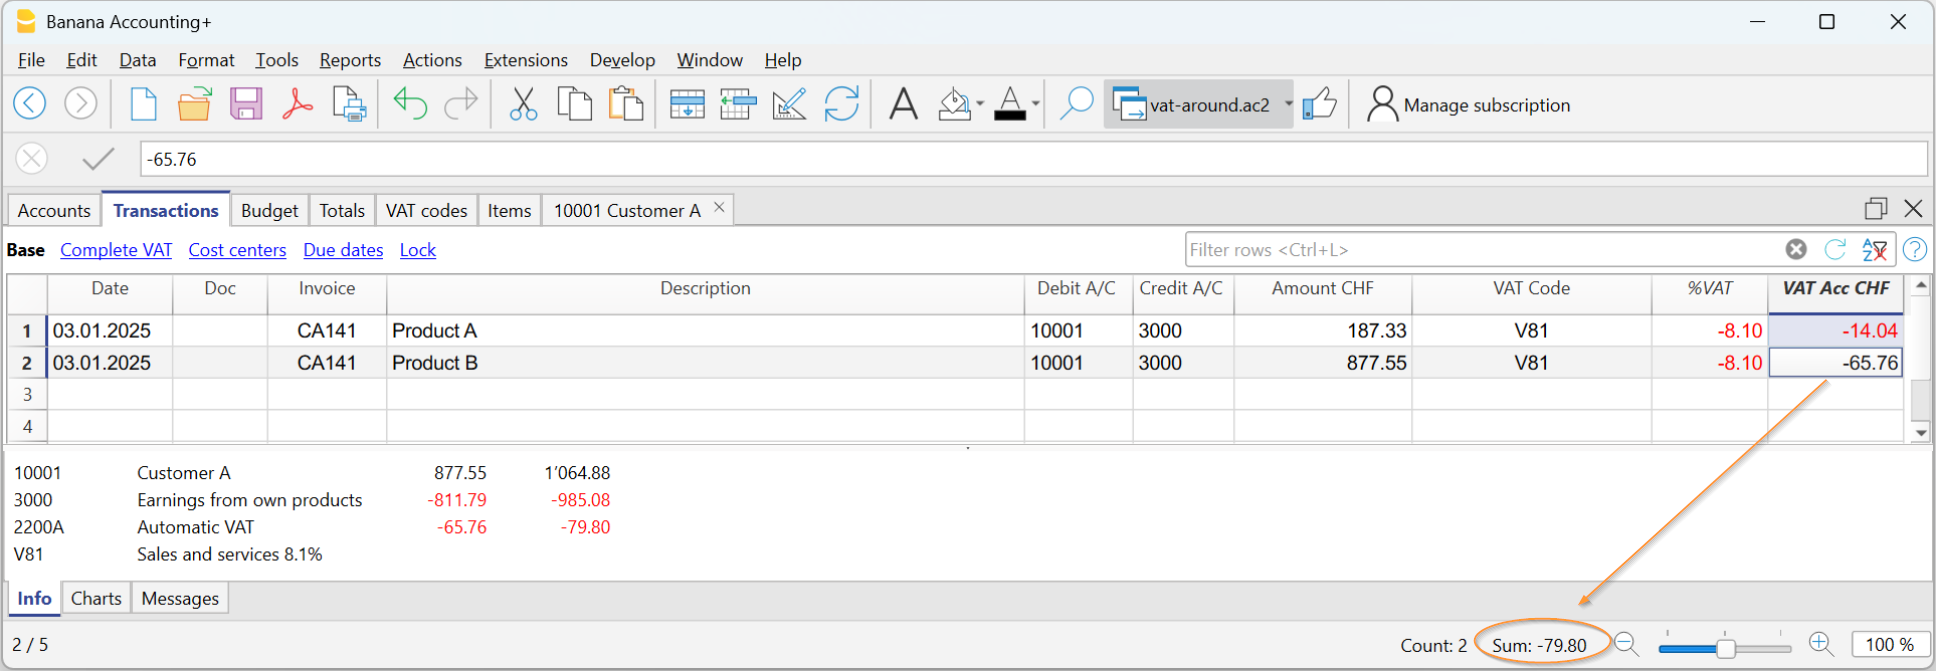
- Row 1: 8.1% of CHF 187.33 = Rounded: CHF 14.04
- Row 2: 8.1% of CHF 875.00 = Rounded: CHF 65.76
- Total: 8.1% of CHF 1064.88 = Rounded: CHF 79.80
The invoice shows a VAT amount of CHF 79.80 instead of CHF 79.79 (amount calculated directly on the total of 1064.88). In fact, the amount of CHF 79.80 corresponds to the sum of VAT individually calculated for each item (CHF 14.04 + CHF 65.76).
This logic is adopted to avoid discrepancies between the VAT amounts recorded in accounting and those shown on the invoice. In this way, the total VAT in accounting matches the one printed on the invoice.
Set customer language
The default layouts include the following languages: Italian, German, English, French, Dutch.
Invoice texts are printed in the customer's language, provided that this is set in the Language column (Accounts table, Address view).
The language is an ISO code, generally of 2 lowercase letters (it=italian, de=german, en=english, fr=french, nl=dutch).
When no language has been indicated for the customer account, the language of the accounting is used, defined in the File menu→ File and accounting properties (basic data) → Other.

Due dates and payment terms
The due date of an invoice can be set up in different ways:
- Generalized due date - identical due date for all invoices
Select menu Reports→ Customers → Settings → General → Invoices are due, indicate the period (in days) after which the invoice is considered due. As an example, if the date of your document is the 10th of May and you enter a value of 10 days, the due date will be the 20th of May. - Due dates per customer - specific for each customer
In the Accounts table, a DateExpiration column is available (if not on display set up via Data → Columns setup ...). The period (in days) after which the invoice is considered to be due can be set up in this column. - Specific dates per invoice
In the Transactions table, Due dates view, the Date Exp. column is visble; you can indicate the expiration date directly in this column. -
Alternative text for the expiration date
It is possible to define a text of your choice as a payment term for each invoice. This will replace the text of the expiration date. Revert to Advanced input -Type column for detailed information.
Print invoices in other currencies
With Banana Accounting Plus, you can also print invoices in foreign currency.
Invoices in foreign currency
Required settings:
- Open one of our multi-currency accounting templates.
- Set up in the Accounts table, in the customer ledger, the customer with the foreign currency. Invoices are printed in the currency of the customer's account.
- If you want to send invoices in different currencies to the same customer, you must create accounts in different currencies for the same customer (Accounts table).
- Use the UNI11 layout for printing invoices to be sent abroad.
Invoices in foreign currency with VAT in base currency
It is not normally possible to enter a foreign currency invoice with VAT in base currency. This can be overcome with the following procedures:
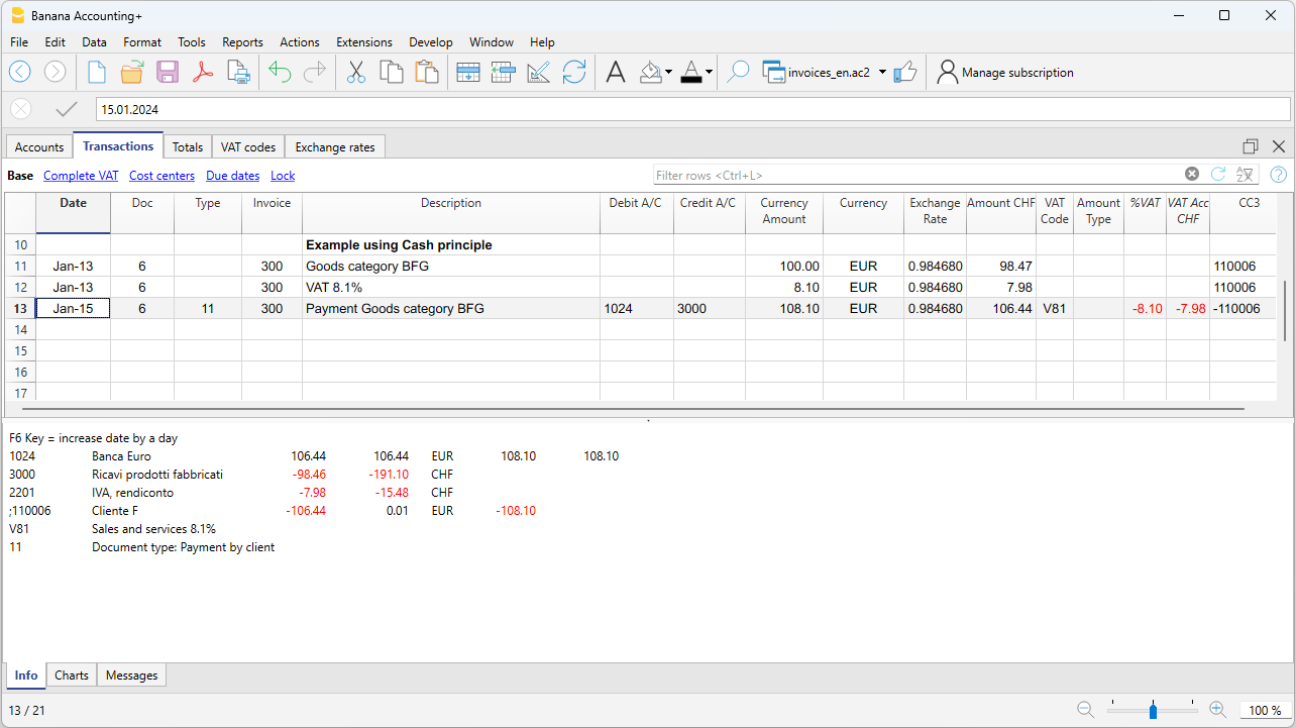
Invoices in foreign currencies with VAT using Cash principle
- Open one of our multi-currency accounting templates with VAT with cost centres CC3.
- Set up in the Accounts table, customers in foreign currencies as CC3 cost centres (;).
If you wish to send invoices in different currencies to the same customer, you must create accounts in different currencies for the same customer (Accounts table). - From the menu, Reports > Customers > Settings, set the Customer group/account to use the CC3 cost center.
- In the Transactions table, you must enter the invoice data on several rows:
- In the first row:
- In the Amount Currency column (Currency Amount) enter the amount net of VAT (without entering any debit or credit account).
- In the column CC3 enter the customer's cost centre account in foreign currency.
- In the second line:
- In the Amount Currency column (Currency Amount) enter the VAT amount in foreign currency (without entering any debit or credit account), manually calculating the VAT amount in foreign currency.
- In column CC3 enter the customer's cost centre account in foreign currency.
- In the first row:
- For printing invoices with Swiss QR code use layout CH10.
To register the receipt:
- In the Debit column enter the liquidity account.
- In the Debit column enter the revenue account.
- In the VAT Code column enter the VAT code of the sale.
- In the column CC3 enter the customer's cost centre account in foreign currency with a negative sign.
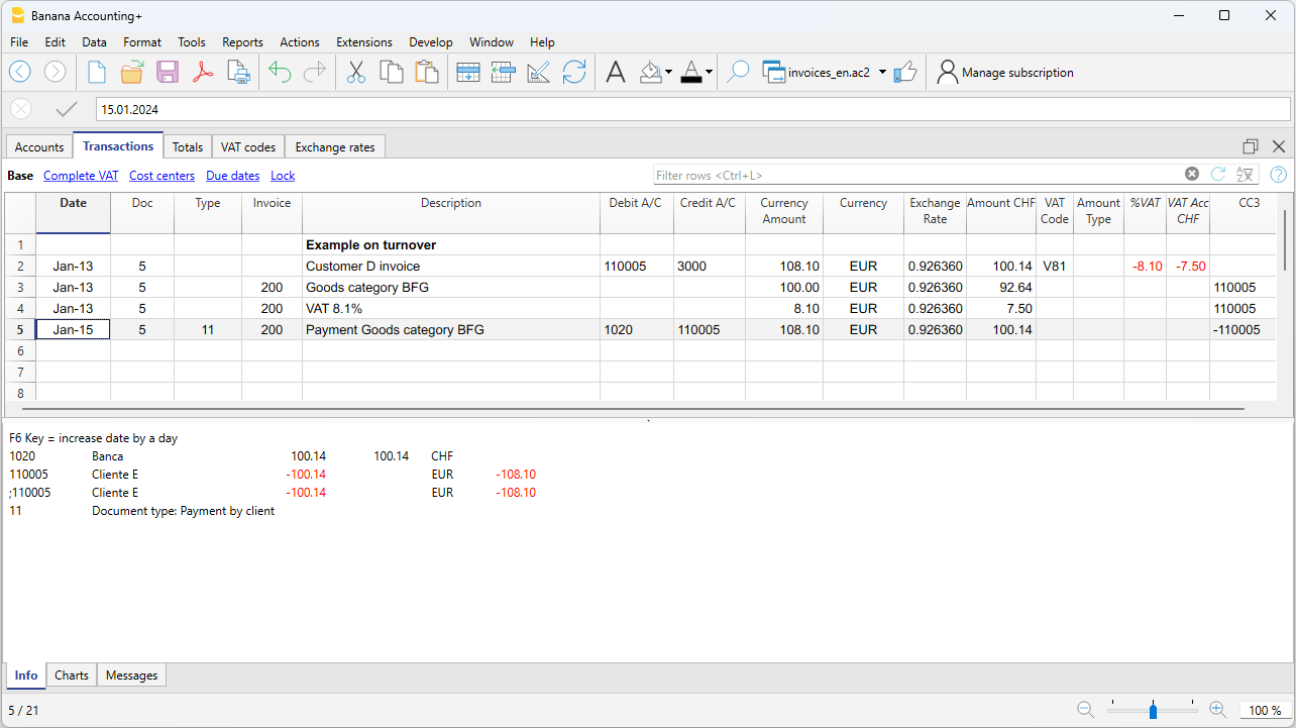
Example: Invoice entry in foreign currency (EUR) with VAT on receipts in base currency (CHF):
Invoices in foreign currencies with VAT on turnover
- Open one of our multi-currency accounting templates with VAT and a customer ledger.
- In the Accounts table, set the customers in foreign currencies both as a ledger (Accounts) and as CC3 cost centres (;).
From the Reports > Customers > Settings menu, set the Customer group/account to use the CC3 cost centre.
Note: If you set this option to CC3, invoices issued to a normal account will no longer be created. Therefore, we recommend also setting up your customers as CC3 cost centres.- In the Transactions table, you must enter the invoice data on several rows:
- In the first line enter the invoice issue normally:
- The date, the description, in the Debit account the customer account in foreign currency and in the Debit account the revenue, the amount before VAT and the VAT code of the sale.
- The invoice number does not have to be entered.
- In the second line:
- In the Amount Currency column (Currency Amount) enter the invoice amount net of VAT (without entering any debit or credit account).
- In column CC3 enter the customer's cost centre account in foreign currency.
- Where the columns Quantity, Unit and Unit Price are used, the unit price must be net of VAT.
- In the third line:
- In the Amount Currency column (Currency Amount) enter the VAT amount in foreign currency (without entering any debit or credit account), manually calculating the VAT amount in foreign currency.
- In column CC3 enter the customer's cost centre account in foreign currency.
- In the first line enter the invoice issue normally:
Rows with cost centres are simply used to search invoices in foreign currency with VAT.
To register the receipt:
- In the Debit column enter the liquidity account.
- In the Debit column enter the customer's foreign currency account.
- In the column CC3 enter the customer's cost centre account in foreign currency with a negative sign.
Example: Invoice entry in foreign currency (EUR) with VAT on turnover in base currency (CHF):
Advanced input Type column
The Type column in the Transactions table can be used to define the commands that are relevant to the display for printing data specific to your Invoice.
Check the DocType column via menu Data → Columns setup ..., to display the column and use it.
Entering data
Once the column is displayed, you may proceed by entering your data. You will need to:
- Add an empty row after the Date of the Invoice.
- Enter the date of the Invoice in the Date column.
- Enter the required command in the Type column (refer to table below)
- Enter the Invoice number in the Invoice column.
- Enter the data relevant to appear on the Invoice in the Description column.
Invoice to the customer
Typing 10: the Type column will list all possible options available to customize the data of your invoice.
These command lines should, except for the total lines, be placed at the end of the invoice, after all detail lines related to items or services.
| Invoice data | Column Type | Description column |
|---|---|---|
Client address If you want the address to look differently from the one defined in the Accounts table (Address view), you can change it using using the appropriate options. On each row a different element of the address is indicated (name, surname, address...). | 10:adr:fna 10:adr:lna 10:adr:bna 10:adr:str1 10:adr:str2 10:adr:str3 10:adr:cod 10:adr:cit 10:adr:sta 10:adr:cou | Enter name Enter surname Enter name of company/organization Enter line 1 of address Enter line 2 of address Enter line 3 of address Enter postal code Enter the location Enter the state /province Enter the country |
| Shipping address | 10:sadr:pna 10:sadr:fna 10:sadr:lna 10:sadr:str1 10:sadr:cod 10:sadr:cit | Enter prefix Enter name Enter surname Enter line 1 of address Enter postal code Enter the country |
Greetings After the invoice details, you may add a line of text for your final greetings (also see Examples invoices). | 10:gre | Enter your greetings |
Final notes One or several rows of notes can be inserted after the details of the invoice and before the greetings (also see Examples invoices). | 10:not | Enter your notes |
| Order date | 10:ordd | Enter the order date |
| Order number | 10:ordn | Enter the order number |
Parameters (advanced) When wanting to print personalized data on the invoice, you can use the appropriate command. This option is aimed at users with JavaScript programming knowledge, and allows you to change the invoice layout, so as to use the parameters indicated via this command. For further information please revert to Printing custom data. | 10:par | Enter your customized parameters |
Payment term Should you want to indicate an alternative text as a payment term, enter the desired text. This will be displayed on the invoice. | 10:ter | Enter the alternative text for the payment term |
| Text begin | 10:beg | Enter the text printed before the invoice title |
Title If you do not wish to use the default invoice title, you can choose a different title. | 10:tit | Enter your text to appear as the invoice title |
Items subtotals It is possible to enter intermediate totals for your invoice in the table with the details of the invoice (also see Examples invoices). | 10:tot 10:tot:0 10:tot:1 10:tot:2 | Enter level 0 subtotal (tot and tot: 0 is always level 0) Enter level 1 subtotal Enter level 2 subtotal |
Header line text In the invoice details table you can add headers to group items (also see Examples invoices). | 10:hdr | Enter the text you want to add to the invoice details. Leave empty to add an empty line. |
Intermediate Totals
In order to insert intermediate totals, you will need to add additional rows in the Transactions table:
- Enter 10 in the Type column: select :tot from the drop down menu, 10:tot will display. Enter again : and enter :1
- Enter the appropriate description in the Description column (ex. Total goods)
- Enter the Invoice number (in the absence of number, the total will not be printed).

Example of Invoice with intermediate totals.

Alternative text for payment terms
It is possible to define your own wording as a payment term for each invoice and this will replace the existing text for the expiry date.
- Enter an additional line with the same invoice number in the Transactions table.
- You will need to enter 10: in the Type column and select :ter from the drop-down menu, therefore the wording 10:ter will appear
- In the Description column, enter your text (ex 30 days net, 60 days etc ..).
When the invoice is printed, the value assigned as a payment term will be displayed.
Additional customisations
Other customisation options, such as the definition of bank details or final greetings, are available in the Print invoices dialog.