Printouts | Income/Expense accounting
In the Accounts and Categories tables, the updated balances of all accounts are always visible: you can check your assets, receivables, and payables at any time.
After each transaction, the balances are updated automatically, without needing to generate reports: just open the Accounts or Categories table to keep the situation under control.
To print the contents of the tables, see the page Page setup (last paragraph).
Advanced printouts
All printouts are executed from the Reports menu, which contains the main functions:
Journal – (Chronological list of all transactions).
- Command Journal by period.
Allows you to view and print the entire period or a specific range.
Account, category, or group cards – (Detail of transactions for each account or category).
- Command Account / Category cards.
You can print all cards or just a selection.- In the Period section choose the desired interval
- In the Options section, activate or exclude elements to include in the printout.
- The Customization section allows you to save print settings for future use.
Enhanced Statement – (Formatted income and expense report)
- Command Enhanced Statement
Prints the list of income and expenses without subtotals (in case subgroups were entered in the Accounts and Categories table).
Enhanced Statement with groups – (Formatted income and expense report with more details)
- Command Enhanced Statement with groups
Same as above, but with the option to display and print group subtotals as well.
Accounting Report – (Summary report with various comparison options)
- Command Accounting Report
Displays in the Accounts table the reports with the chosen options. It is possible to generate reports by period, with comparisons between periods or previous years. Each report can be divided into sections and customized, with the possibility of saving the settings for later use.
Journal | Income/Expense accounting
In Banana Accounting, as in all applications, transactions are entered in the Transactions table.
If you want to print the Journal (that is, the complete list of all accounting entries), you can do it in two ways:
- from the Transactions table
- from the Journal by period command (Reports menu)
Printing the Journal from the Transactions table
- Go to the File > Page setup menu to set margins and print options.
- Return to the File > Print menu to obtain the journal with all entries.
Printing the Journal from the Reports menu
From the Reports menu select the Journal by period command.
This option allows you to print the journal with more filter options.
- Enter the start and end dates of the period you want to print.
- Confirm to obtain the journal of the selected period or the whole year.

Sorting options
In the Column for sorting section you can decide by which type of date to sort the entries, for example:
- by document date,
- by transaction date,
- or other available criteria.
More information about the Period section is available on the page Period of common functions.

Example of Journal Preview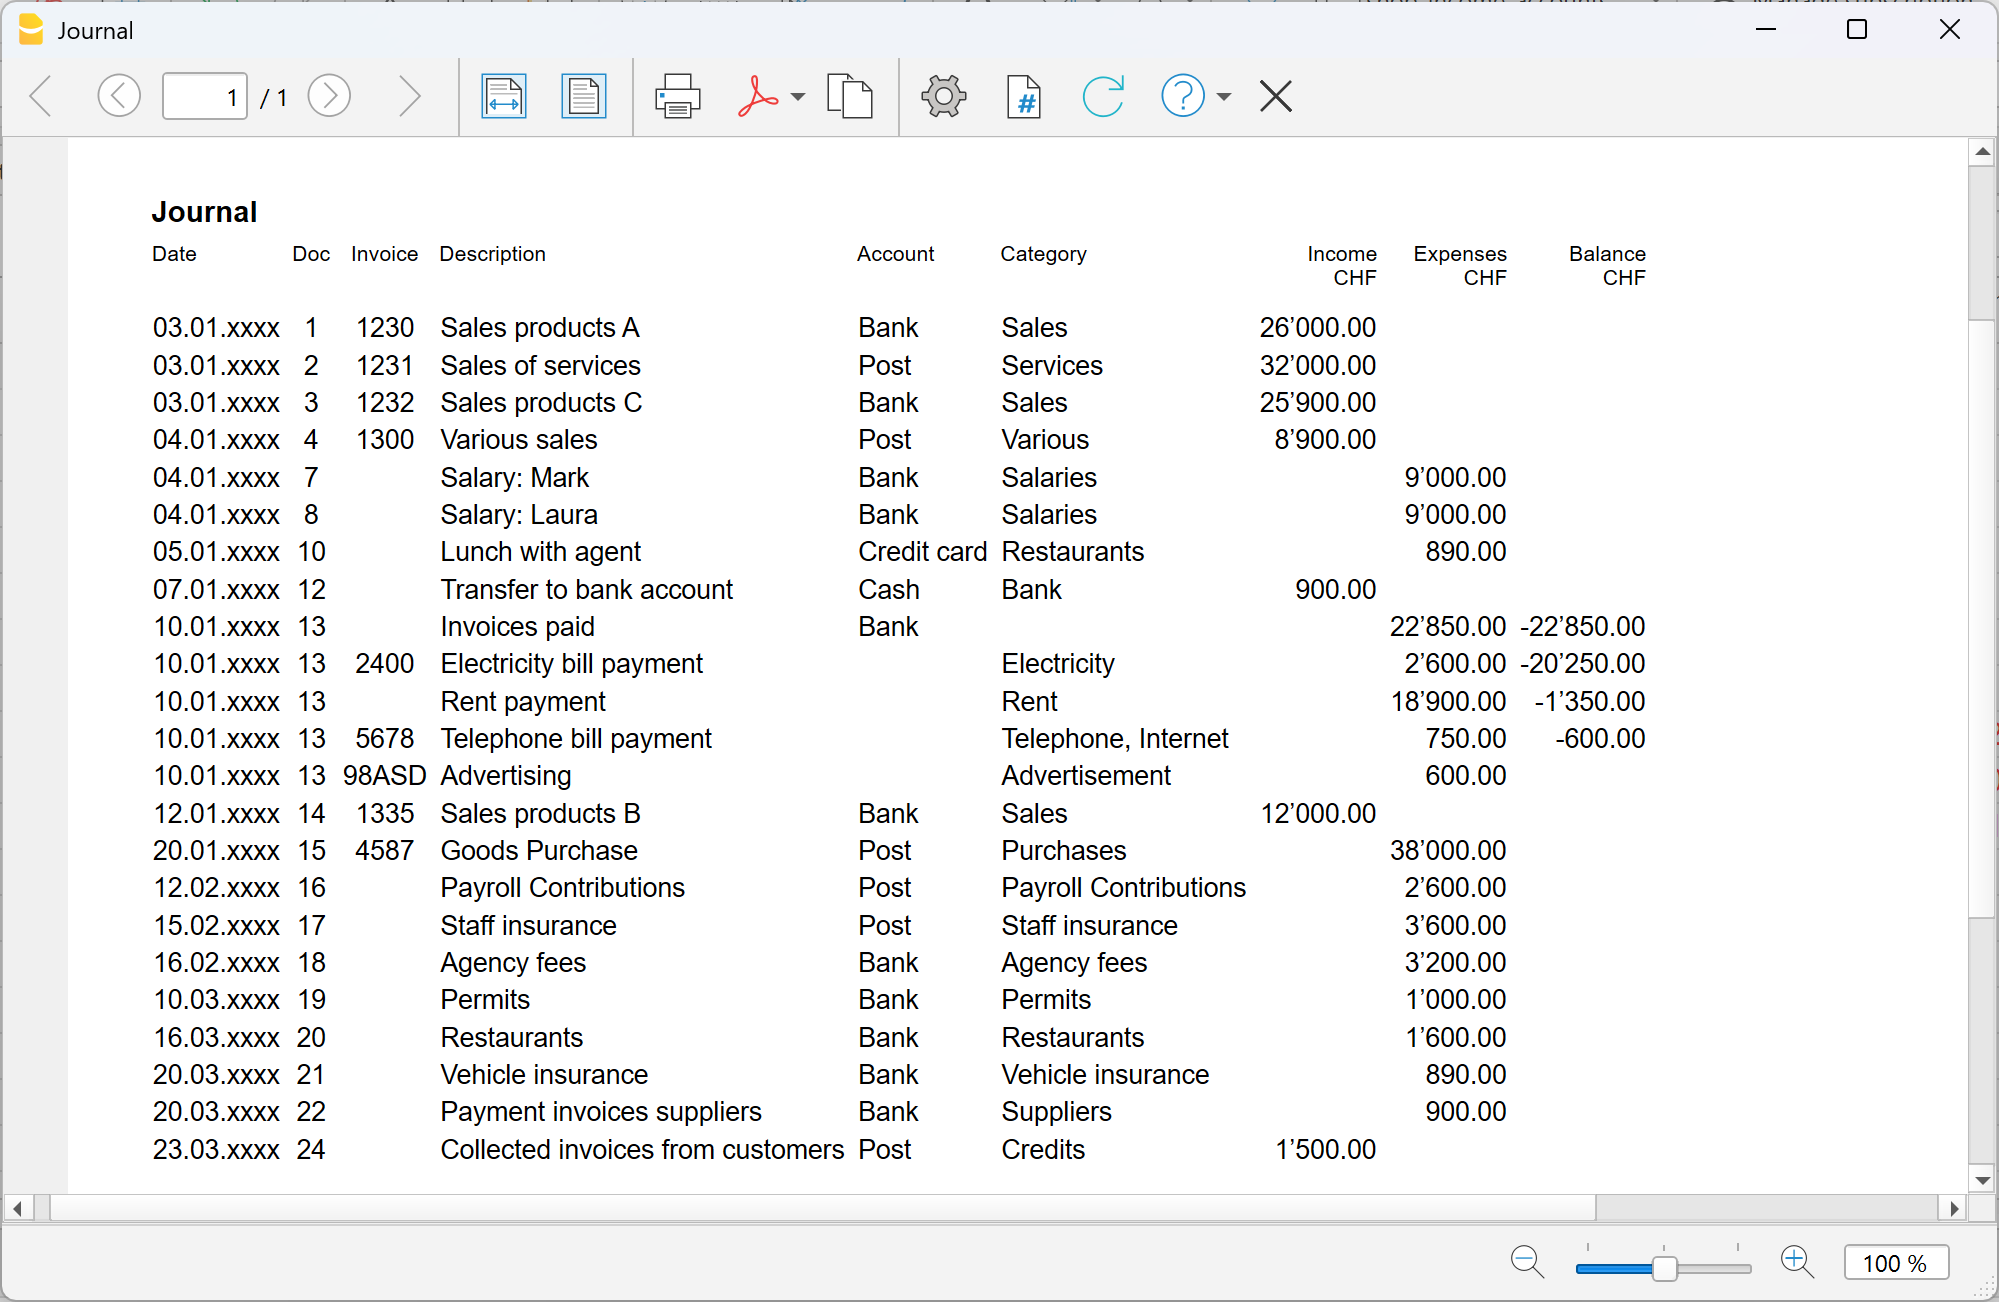
Account/Category Cards | Income/Expense Accounting
In Banana Accounting, as in all applications, transactions are entered in the Transactions table.
If you want to print the Account card and Category card (the complete list of all entries for a specific account, category or group), you can do it in two ways:
- in the Cash account card you see all cash movements,
- in the Customers card you find the receipts collected from customers,
- in the Rent category card you see all payments related to rent.
In accounting, the set of all account cards is called the General Ledger.
How account/category cards work
When you record a transaction in the Transactions table, Banana Accounting automatically updates the account and category cards.
- Each income or expense is posted to the corresponding account and category.
- In this way, every new transaction is immediately reflected in the cards.
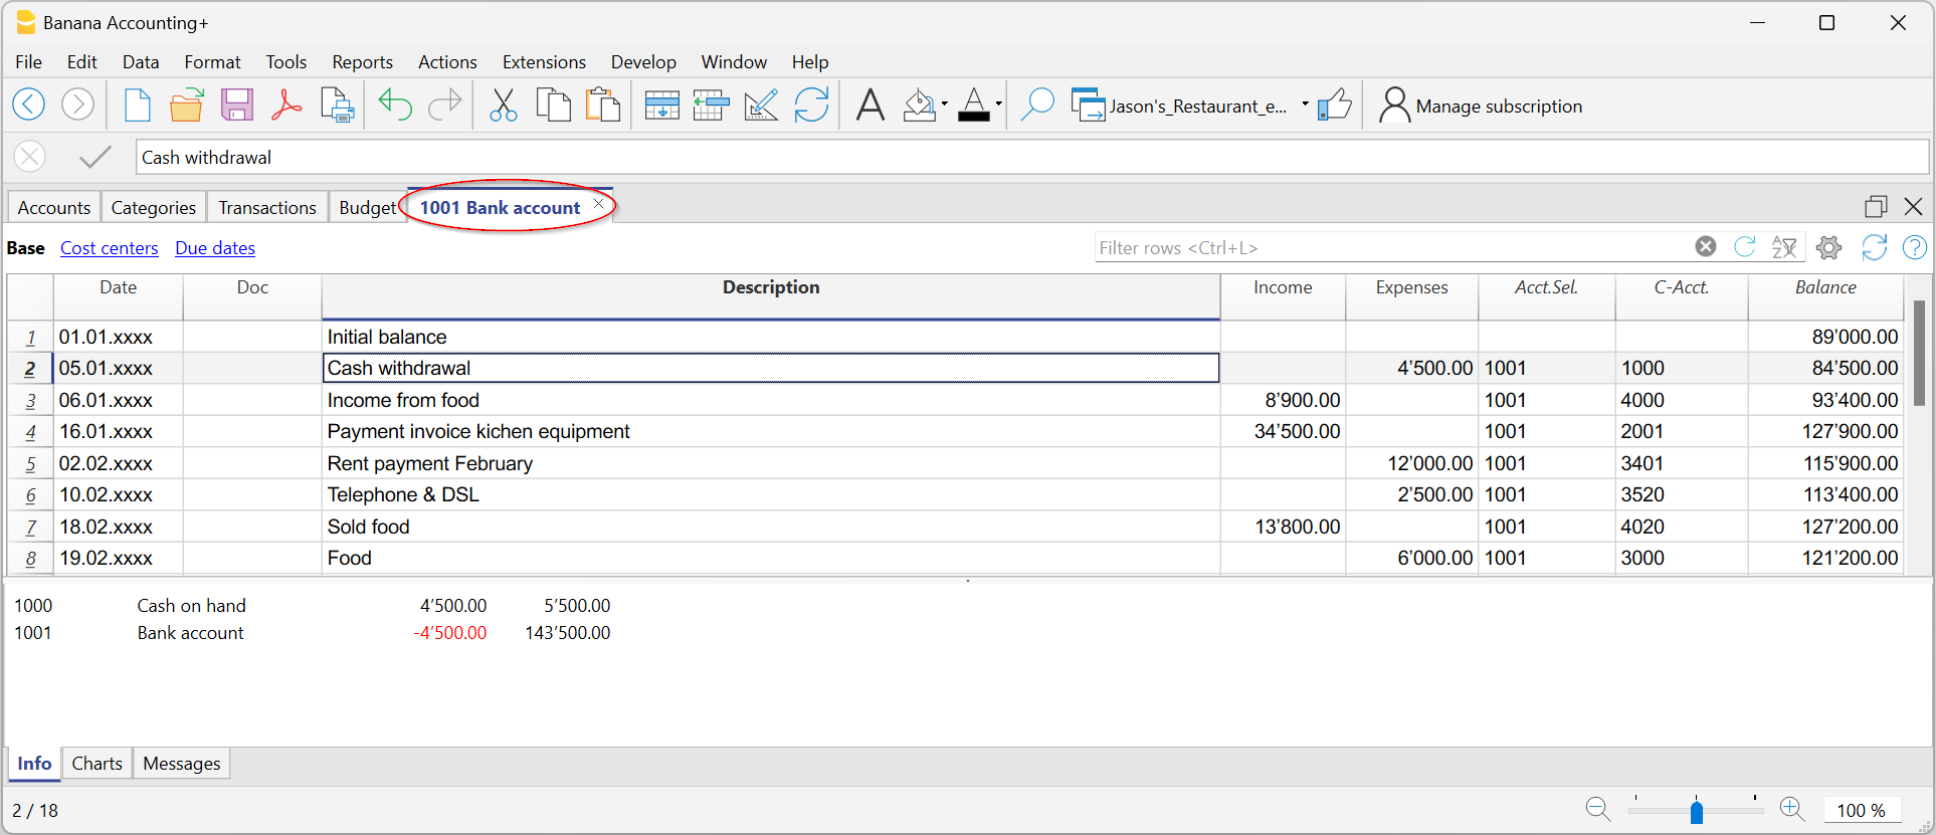
Structure of Account and Category cards
Each Account card or Category card has a header, i.e. the name of the account or category (for example UBS Bank or Rent), which distinguishes it from the others.
The card is made up of several main columns, which neatly list the data of each recorded transaction.
The most important columns are:
- Date → the date of the transaction.
- Document number (if present) → for example the related invoice or receipt.
- Description → a short text explaining the operation (e.g. payment to supplier Rossi).
- Income / Expenses → the amount recorded as positive (income) or negative (expense).
- Selected account → shows the number of the account or category to which the card belongs.
- Contra account → the account linked to the transaction (e.g. Rent expense paid via Bank).
- Balance → the running balance of the account or category, updated line by line.
In this way, each card becomes a sort of automatically updated “account statement”, allowing you to check in detail the movements of a single account or category.
Open the account or category card
You can open it in two ways:
- From the Transactions table or from the Accounts or Categories table → click the account/category number and then the small blue icon that appears.

- From the menu Report > Account cards → useful if you want to open or print multiple cards at once.

The account/category cards dialog has the following sections:
For detailed information about the sections, click the corresponding links.
Update the account or category card
The cards are recalculated on request.
If you modify or add transactions:
- reopen the card with the command Report > Account/Category cards,
- or, if the card is already open, click the refresh icon (two circular arrows).
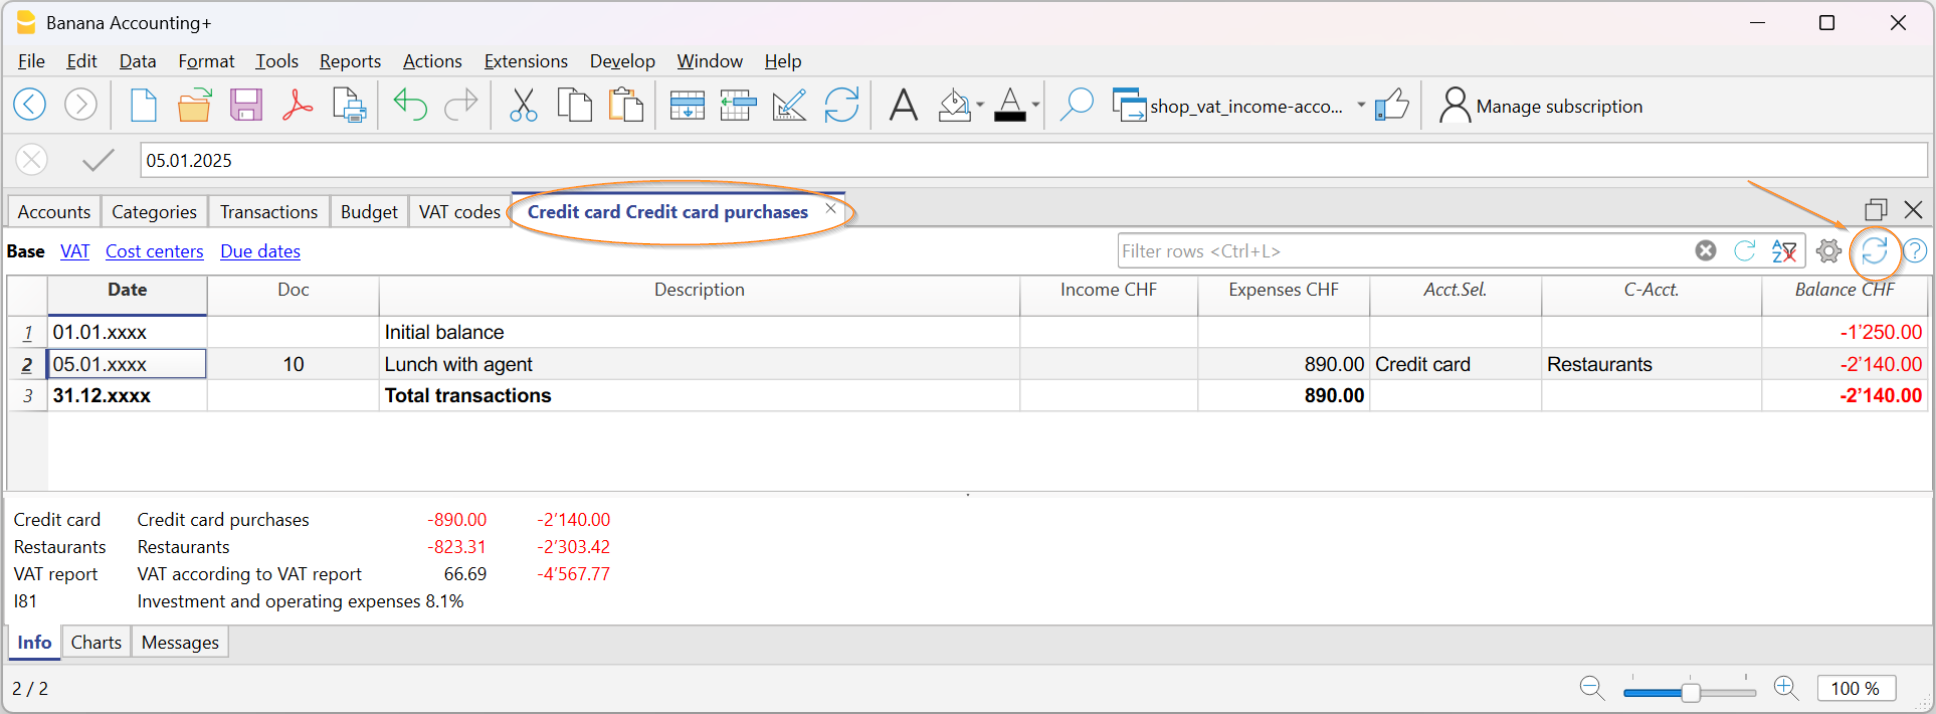
The Selected Account column
From any account card, via the menu Data > Columns setup you can make visible:
- Selected account column, indicating the account on which the movement took place.
When you obtain a card for one or more accounts, categories, groups, and segments, you can see exactly which account was used.
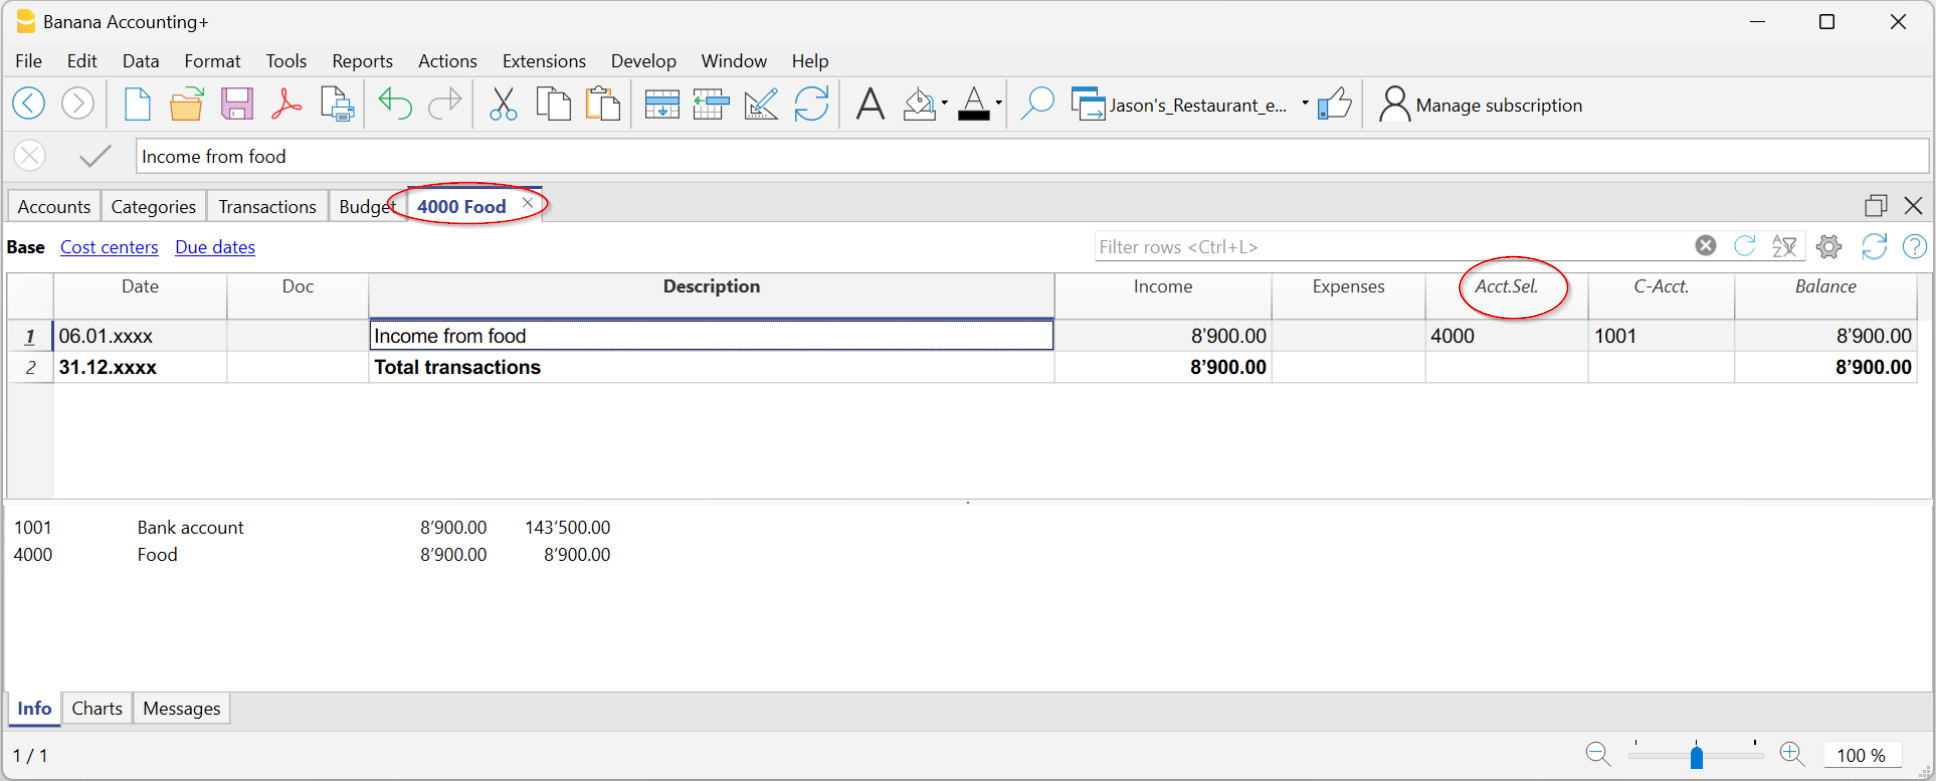
The Contra Account column
In the account or category cards you can see:
- the C-Acct column, which indicates the contra account that completes the transaction.

Print account cards
You can print a single account/category card, a selection, or all cards.
To print one account card:
- display the card from any table (Accounts or Transactions)
- Start printing from File > Print.
To print multiple account cards:
- Menu Report > Account cards, choose which cards to include and confirm.
- You can also use the Filter to automatically select Accounts, Cost centers and Segments.
- Once shown in preview, start printing from File > Print.
Print Account cards by period
To view the account cards with balances for a specific period:
- click the menu Report > Account cards.
- in the Period section, enable Specified, entering the start and end dates.
- For more information see the page Period.
Print Budget account cards
If budget transactions have been entered in the Budget table, you can display the budget account/category or group cards:
- Report menu > Account/Category cards > Budget transactions.

Delete or edit data in account or category cards
In the cards you cannot modify or delete transactions.
If you need to correct:
- Go back to the Transactions table (or to the Budget, if it concerns planned transactions).
- Make the change.
- Recalculate the accounting (Shift + F9).
- Reopen the card to see the update.
From the card you can also go directly to the transaction to edit:
- double-click the row number.
Group cards
A group card is a statement that combines the data of several accounts or categories belonging to the same group.
In practice, instead of seeing the movements of a single account (e.g. only Bank), you can view all those of an entire group (e.g. Liquidity, which includes cash, post and bank).
To open and print a group card:
- Go to the menu Data > Columns setup
- Enable the Selected account column.
In this way, in the group card you will also see the accounts that make up the group.

Accounts and Categories in the Formatted report with groups
From the menu Report > Enhanced report with groups you can open a dialog that lets you decide how to print accounts and categories.
In this window you can:
- choose whether to include accounts, categories or both
- decide which groups to show (e.g. only administrative expenses, only sales)
- enable or disable some display options (e.g. show period balances, hide empty items, etc.)
- customize the look of the printout (headers, margins).
This way you can get a clear and organized report, with group totals and a layout suitable for official printouts or for presenting data to third parties.

Add a logo to account/category cards
If you want to personalize the account cards with your business logo, you can do it directly at print time.
Proceed as follows:
- File > logo setup and insert the logo
- Go to Report > Account cards and open the card you are interested in.
- From File > Print preview click the settings icon.
- In the dialog that opens, look for the Logo option.
- Instead of None, select Logo.
In this way, every printed account card will also show your logo, making the documents more professional.
For more details you can see the page Logo settings.
Create a print customization for account cards
If you often print the same cards (for example all the sales ones), you can create a customization that saves you from repeating the same settings every time.
Here’s how:
- Go to Report > Account cards.
- In the Customization section, click New.
- Enter a name that clearly describes the print, for example Sales accounts.
- Select the accounts you want to include.
- From File > Page setup define margins and other print settings.
From now on, whenever you need to print those cards, just select the saved customization: in a few clicks you’ll have the report ready.
Enhanced Statement | Income/Expense Accounting
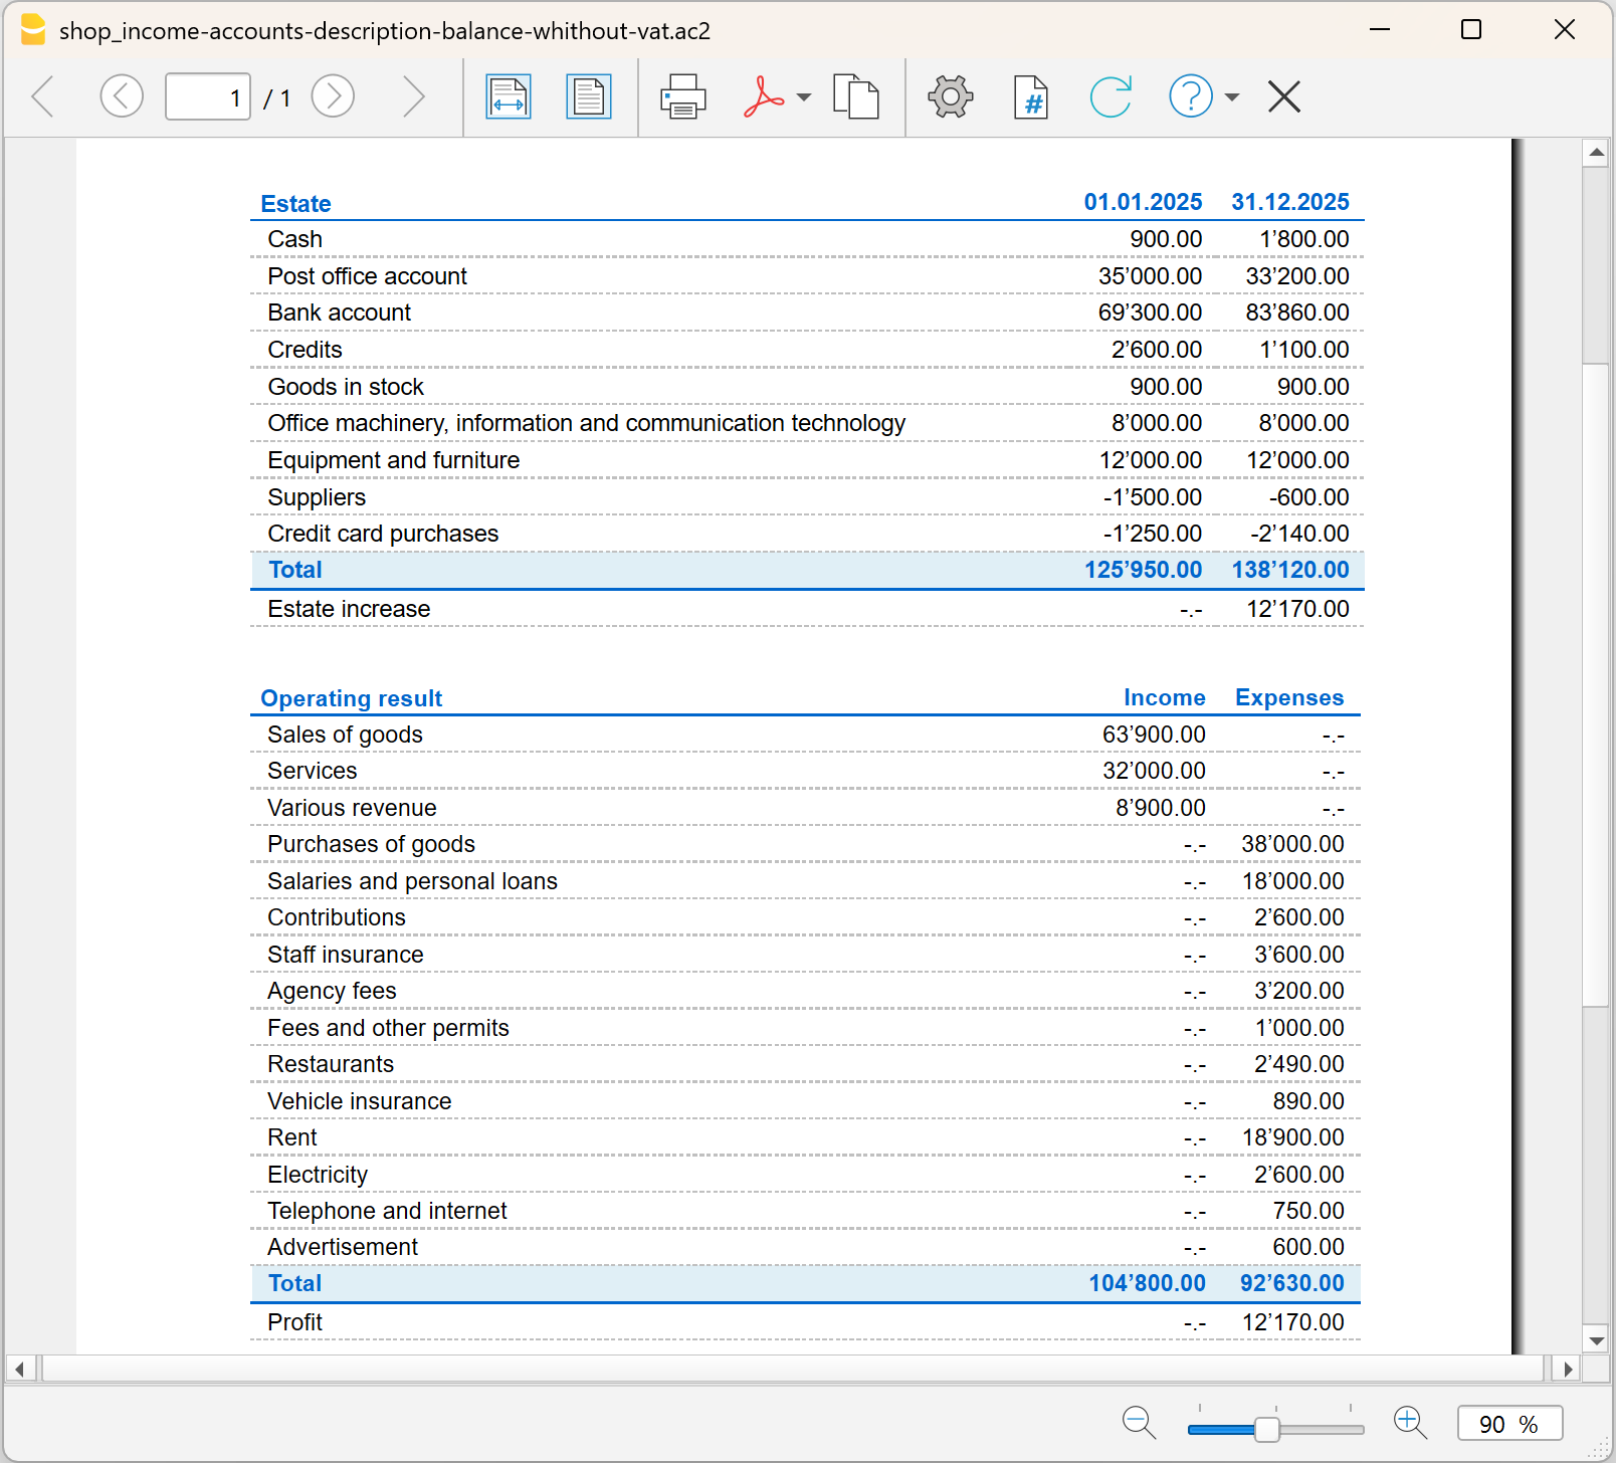
The Enhanced statement is a clear summary of the financial position and performance of your business.
What it’s for:
- to see income and expenses,
- to check the result of the period
- to have an overview of the financial trend.
How to view the Enhanced statement
- Go to Report > Enhanced statement.
- You can see a preview and, if you want, save the report in PDF, HTML, or Excel formats, or copy it to the clipboard.
Customize the Report
The report can be customized in different ways. Below you find the explanation of the different options.

Page header
- Lines 1–4: space to enter a title or other information.
- Logo: you can insert your business logo.
- If you have already loaded logos in File > logo setup, you can select one from the list.
- Alternatively, using the Edit button, you can add a new one.
Column header
- Start date: start of the accounting period.
- End date: end of the accounting period.
- Previous year: end date of the previous period (for comparisons).
Cover page
- You can print a dedicated cover page.
- Here too you can insert a logo, choosing from the ones set or adding a new one.
Print pages
You can choose what to include:
- Accounts → list of accounts.
- Categories → list of categories.
- First page → prints the document header.
- Page break after accounts → prints accounts and categories on two separate pages.
Include in printout
In the Include in print section you can enable other choices, such as showing or not certain data (some options, for example budget balances, are not available if you choose a specific period).
Other sections
The explanations for the other sections are available at the following pages:
Enhanced Statement with Groups | Income/Expense Accounting
The Enhanced report with groups is a statement that shows a summary of the financial position and performance of your business. Compared to the Enhanced report, it is the most complete and detailed version, because, in addition to the main totals, it also displays subgroup totals.
This way you not only have an overview, but you can also analyze in detail income and expenses grouped by categories or sections, getting a more precise and in-depth picture.

How to get the Enhanced report with groups
- Go to Report > Enhanced report with groups.

Options of the Enhanced report with groups
From the Enhanced report with groups dialog you can:
- Include all groups → all the groups present in the Accounts and Categories tables are printed.
- Exclude single groups or accounts → if you don’t want to show them in the report.
- Split by period → for example, in the first half-year you can choose a monthly or quarterly breakdown.
- Split by segments → useful to distinguish results by projects, sectors, or other business areas.
All the sections of the Enhanced report with groups are explained on the page Enhanced Balance Sheet with groups, with reference to double-entry accounting.
The exceptions in the contents are the following:
In the options, besides the Accounts settings there are also those related to Categories, but the approach is the same.
Accounting Report | Income/Expense Accounting
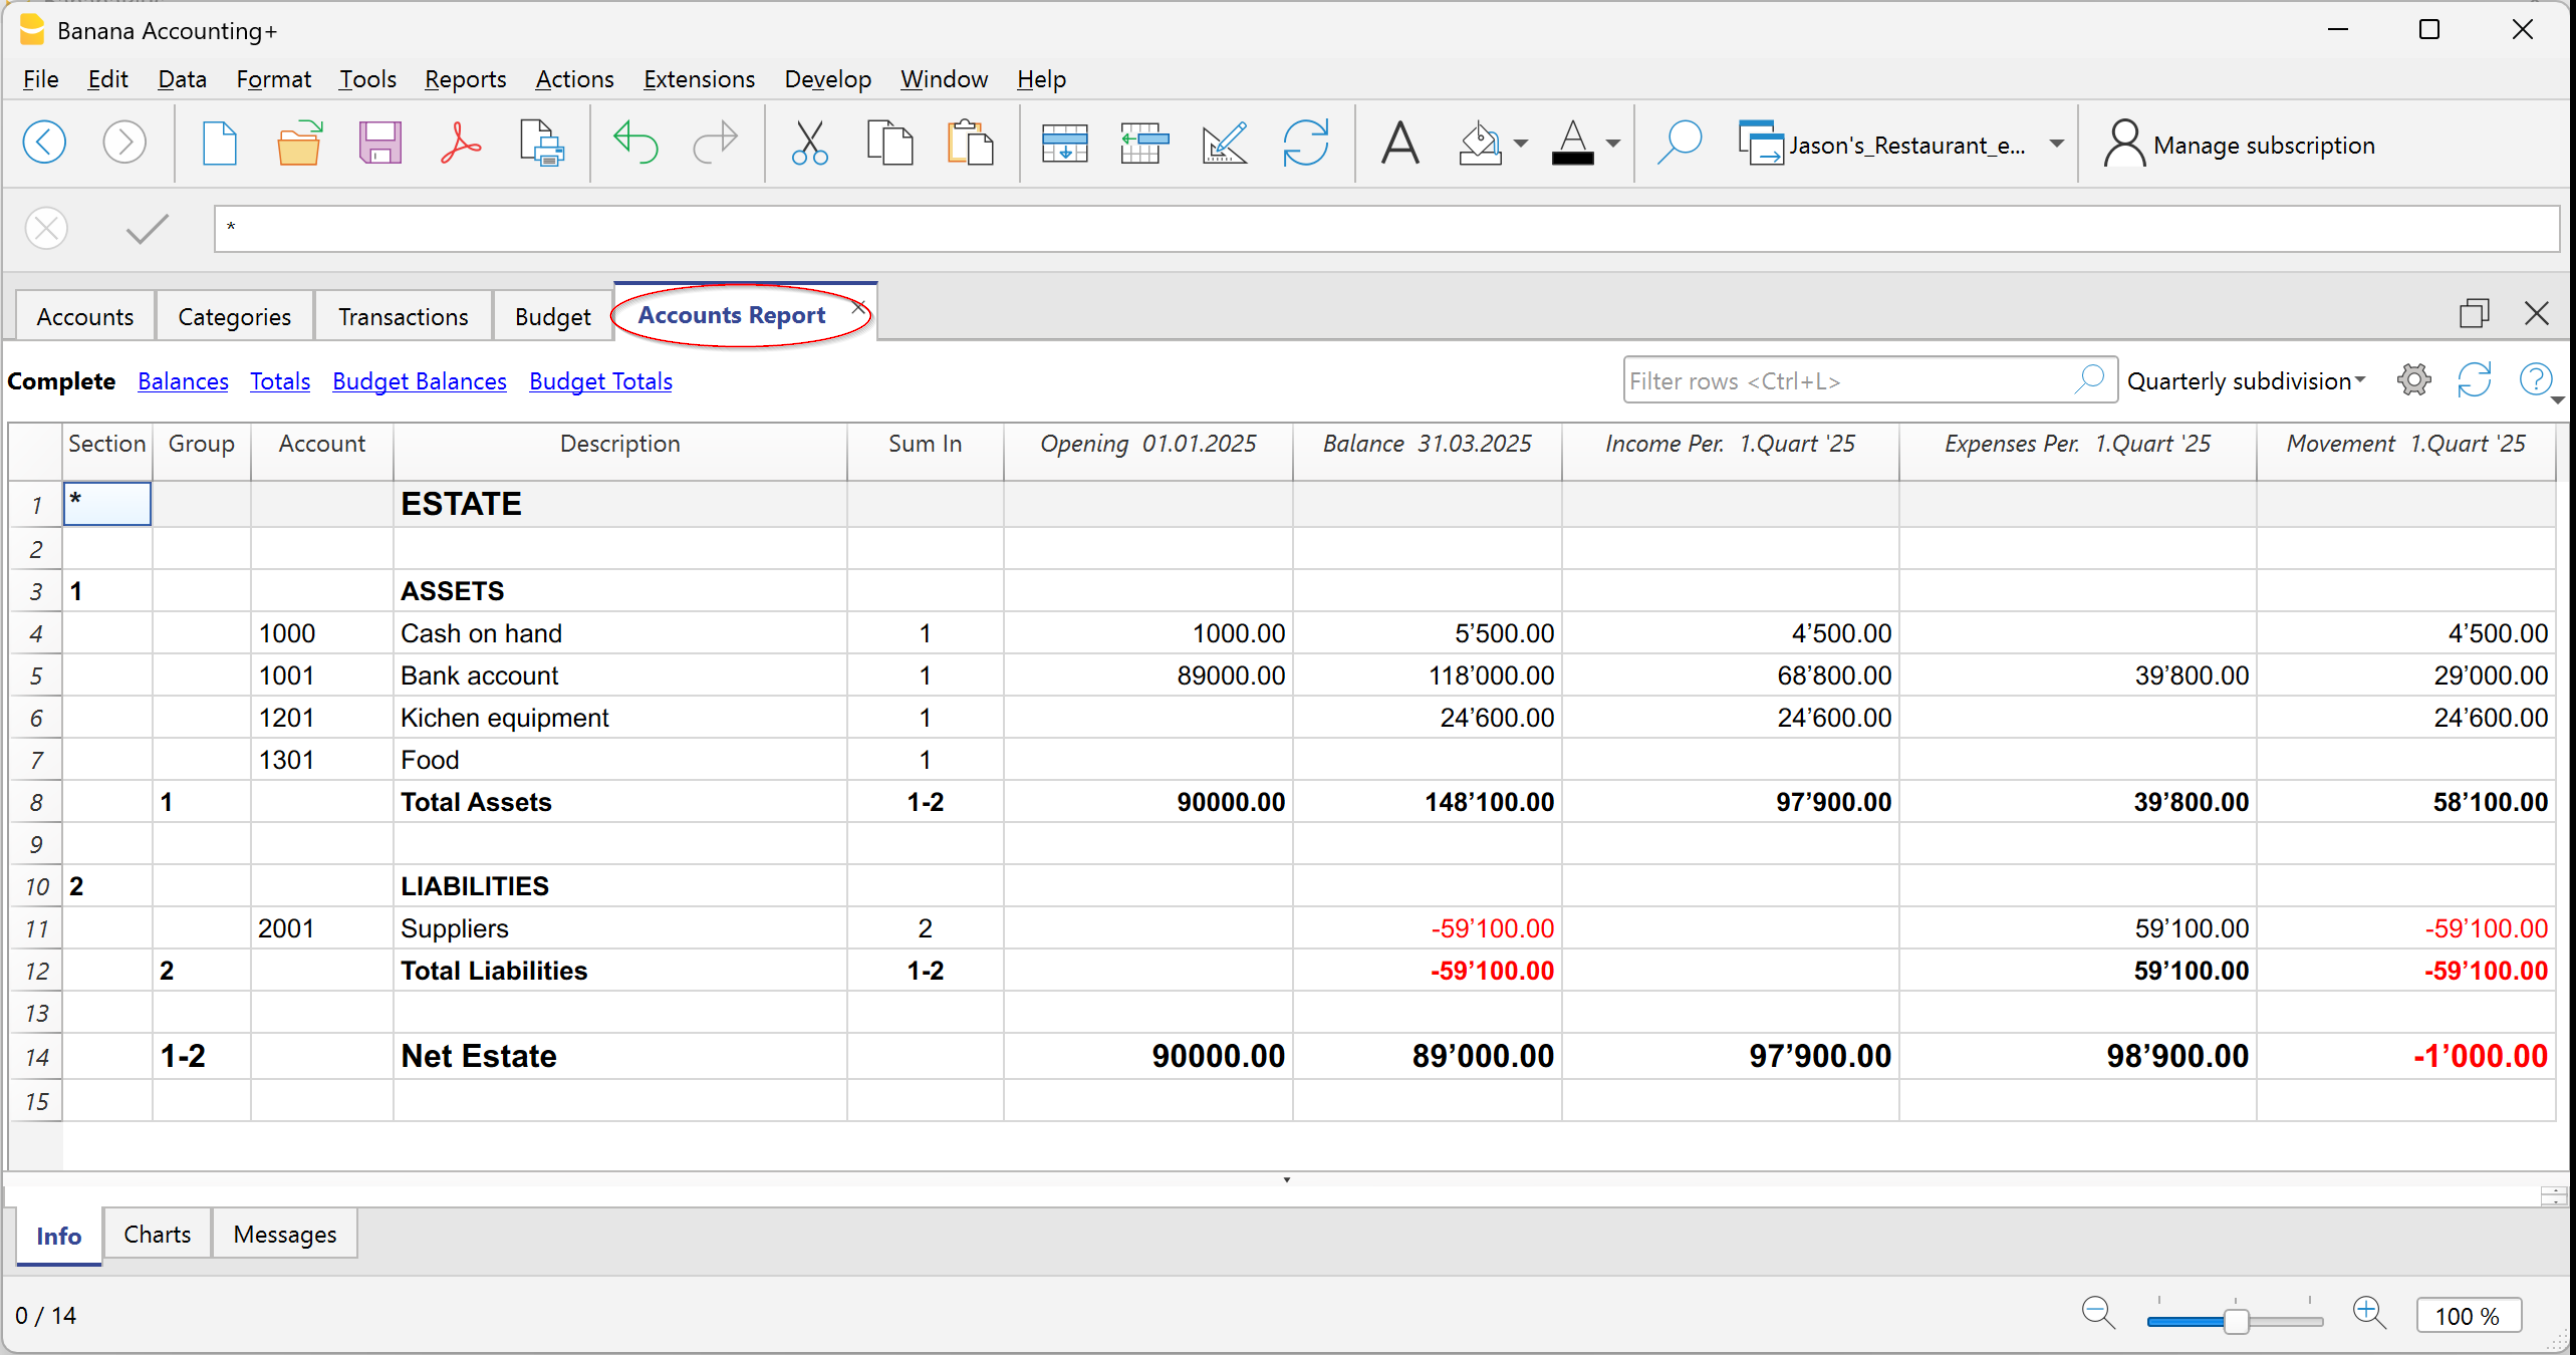
The Accounting Report is a tool that allows you to view the Accounts or Categories table based on the options you choose in the configuration dialog.

What you can view
You can decide the type of grouping to display:
- Accounts → the report lists all the accounts with the following columns:
- Opening
- Income for the period
- Expenses for the period
- Transactions of the period
- Final balance
- Categories → the report lists all the categories with the same columns:
- Income for the period
- Expenses for the period
- Transactions of the period
- Final balance
In the categories report, the Opening column is always empty.
This is because categories are used to calculate the annual result (that is, the difference between income and expenses) and should not have opening balances carried over from the previous year.
Therefore, each year categories start from zero, so it is possible to correctly calculate the result only for the current period.

Print options
You can choose whether to include or exclude certain items:
- Exclude accounts → only the categories will be printed.
- Include accounts without transactions → also shows accounts that have no transactions.
- Include accounts with 0 balance → also includes accounts that have no balance.
- Exclude groups without accounts → hides groups made up only of accounts with a zero balance.
Other sections
For the other sections, see the following web pages:
VAT Report | Income/Expense Accounting (only with VAT option)
The VAT Report in Banana Accounting is a report that gives you a complete and up-to-date overview of all VAT transactions recorded in your accounting. It is a useful tool both for internal control and for preparing periodic VAT returns.
The VAT Report function is only available in the Income and Expenses templates with VAT.
What the VAT Report is for in Banana Accounting
With the VAT Report you can:
- clearly see VAT on sales (VAT payable),
- check VAT on purchases (VAT receivable),
- calculate the VAT balance to be paid or recovered,
- get a summary of the transactions divided by VAT codes.
This way you always know your VAT position without having to make manual calculations.
How to get the VAT Report
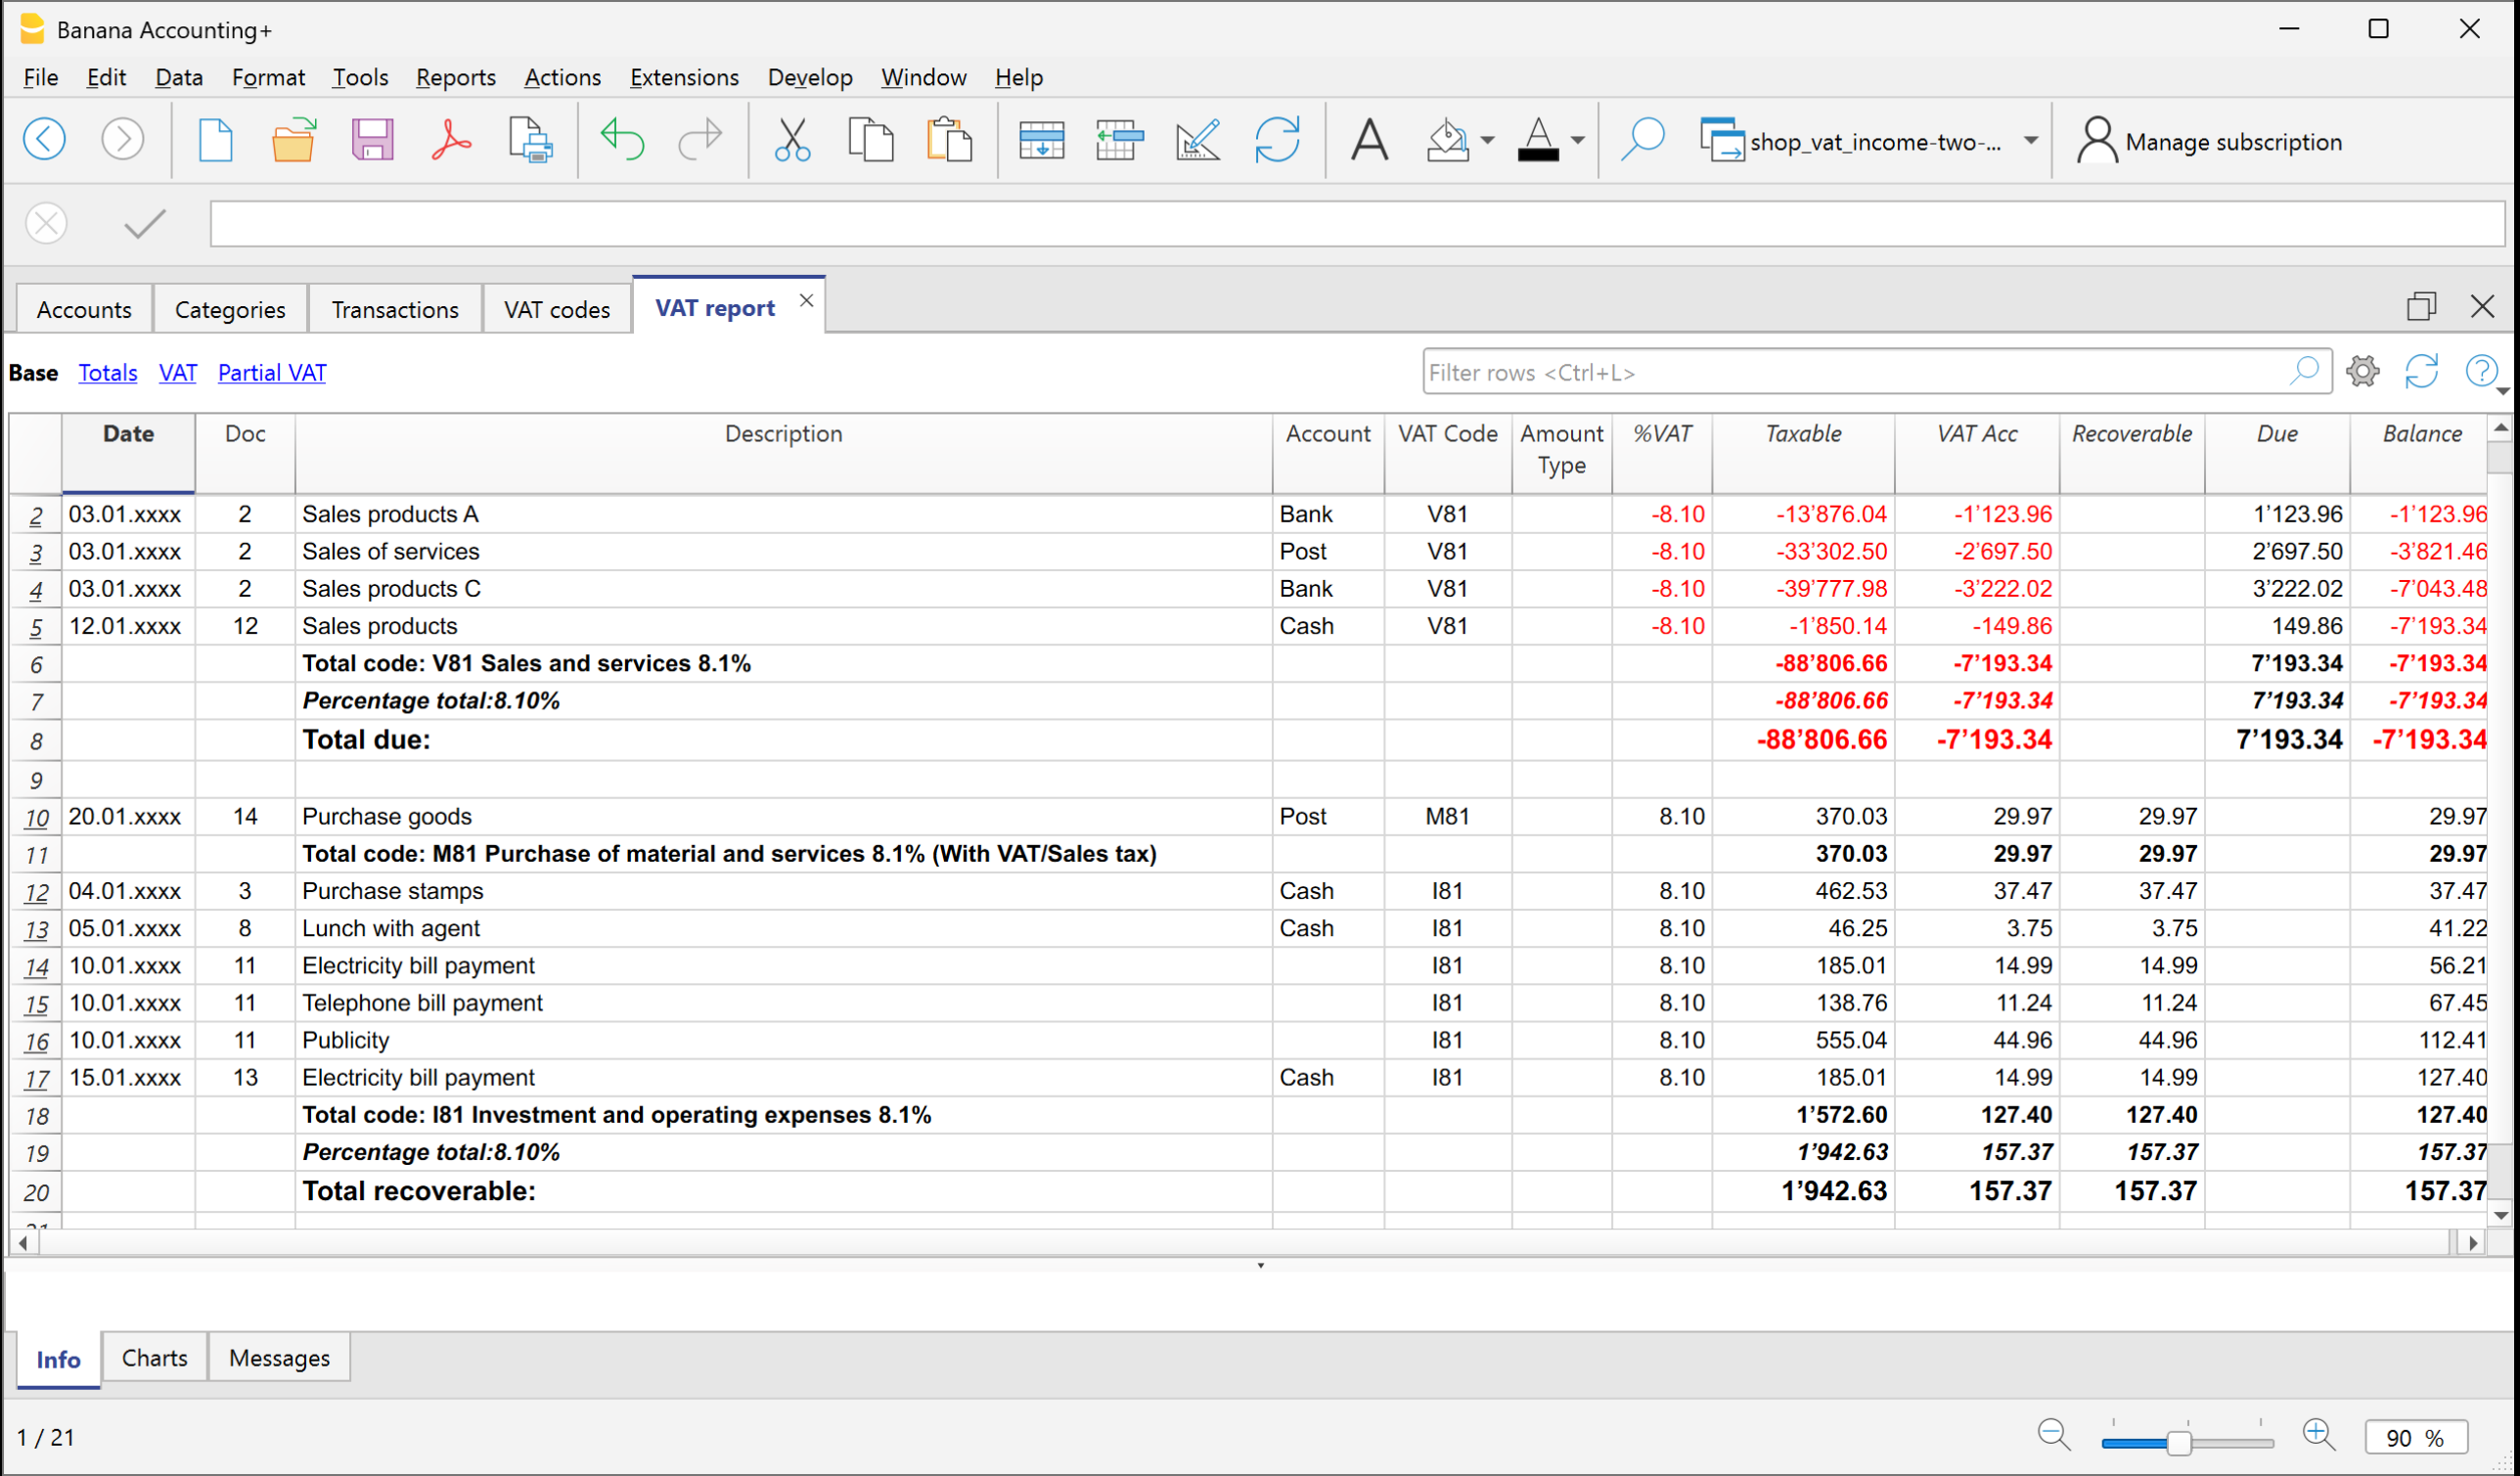
Based on the transactions with a VAT code, the program calculates and displays the VAT Summary.
To get the VAT Summary:
- From the menu Reports > VAT /Sales tax report.
- In the window that opens you can select:
- the period to analyze (e.g. month, quarter, year),
- optional filters to display only certain codes or transactions.
The program processes the data and shows you a report with the totals of VAT collected and paid.

VAT Report options
When you generate the VAT Report, you can activate several options that allow you to create a customized VAT Report, from the details of individual transactions to totals by account, code, or rate, so that you always have your VAT position under control.
Include transactions
Shows in detail all the accounting records with VAT.
Include totals by Accounts
Sums up VAT operations grouped by each account (e.g. Bank, Cash).
Include totals by Code
Shows the totals of VAT operations grouped by VAT code (e.g. V81, M81, I81).
Include totals by Percentage
Groups the totals of VAT operations based on the applied VAT rate (e.g. 8.1%).
Include unused codes
Adds to the report also the VAT codes present in the table but not used in transactions.
Use own (group and Gr)
VAT operations are sorted according to the groupings defined in the VAT Codes table.
Sort transactions by filter
You can choose how to sort the transactions: by date, document number, description, etc.
Partial Report
Allows you to get a VAT summary limited to a specific element:
- only one VAT code (by selecting it from the list),
- only a group of codes (for example all codes related to purchases).
What the VAT Summary contains
The report shows, for each VAT code:
- the taxable amount (the amount on which VAT is calculated),
- the VAT rate applied,
- the corresponding VAT amount,
- the overall totals of VAT payable and VAT receivable.
Printing and saving the VAT Report
The VAT Report can be:
- printed on paper,
- saved in PDF, HTML or Excel for digital archiving,
- copied to the clipboard to be pasted into other documents.
Save accounting data as PDF | Income/Expense Accounting
At the end of the year, when the accounting has been completed, checked, and reviewed, you can create an archive of your data in PDF format.
To do this:
- Go to the menu File > Create PDF dossier.
The program gathers all the main accounting information of the year into a single PDF document. You can keep the file as a digital archive, print it, or share it.
This allows you to have an organized and non-editable copy of your accounting, useful for long-term storage or for presenting to auditors, partners, or external entities.
