Invoice customisation with JavaScript
The Banana invoice is constructed with a Javascript program. The Extension also allows you to add Javascript programming so that you can completely customize the content and format of the invoice (this functionality requires the Advanced plan).
See more about Banana Accounting API Extensions Reference.
Add your custom Javascript file
Three steps are required to define and use your Javascript file:
- Add the document table to the Banana Accounting file.
If it is not already present you need to add the Documents table in the Banana document with the menu command Tools > Add new features > Add document table. - Add a new Javascript type document to the document table.
- In the ID column enter the file name including the extension .js (e.g. "myFile.js").
If the id is missing the ".js" at the end, it won't work. - In the Description column enter a comment (optional).
- In the Attachments column, double click on the cell or select the edit symbol, then select Javascript Code and confirm with OK.
- An editor will open in which you can write the code.
- Delete everything in it.
- Insert the Javascript code. You can modify the content at any time.
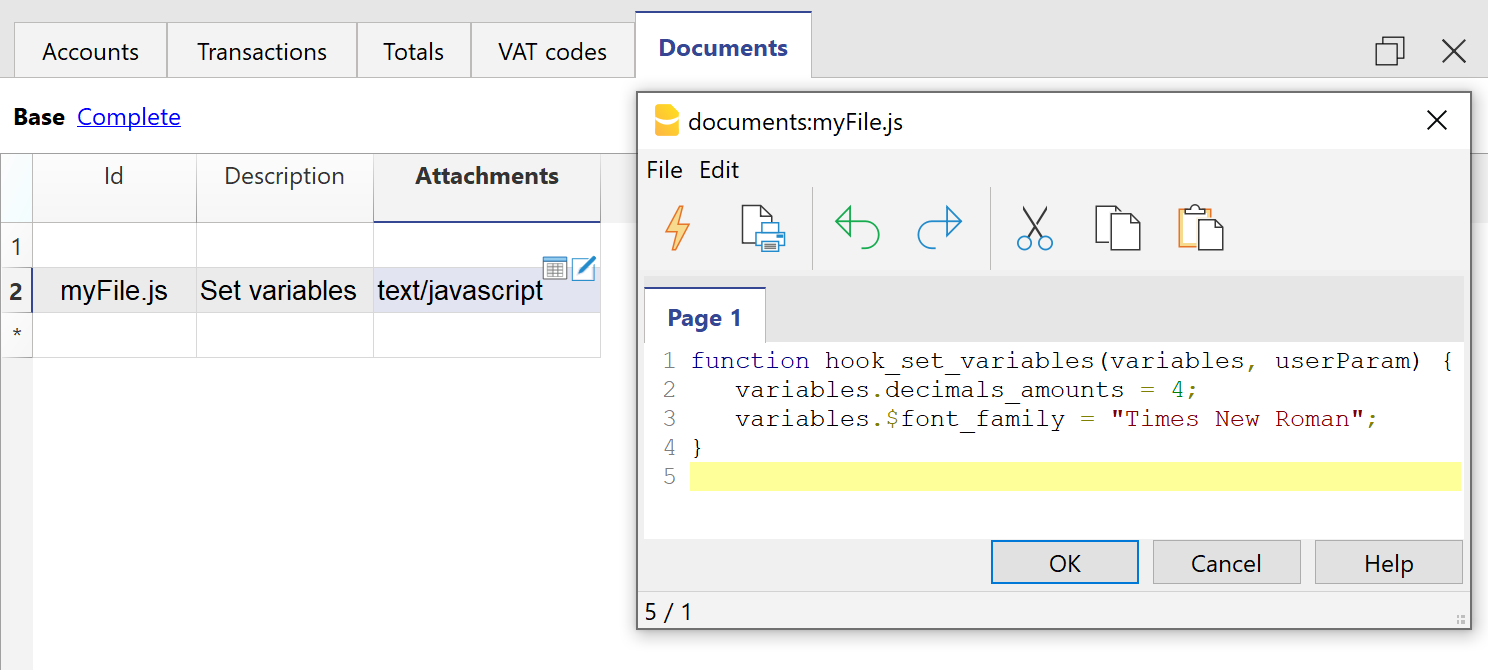
Documents table - Javascript Code attachment
- In the ID column enter the file name including the extension .js (e.g. "myFile.js").
- Tell the invoice layout to use the customized Javascript attachment file.
- Select Settings of the Print invoices dialogue.
- In the Javascript/CSS > JS file name, enter the name of the newly created Javascript attachment file with the extension ".js" at the end (e.g. "myFile.js").
- Click Ok to confirm.
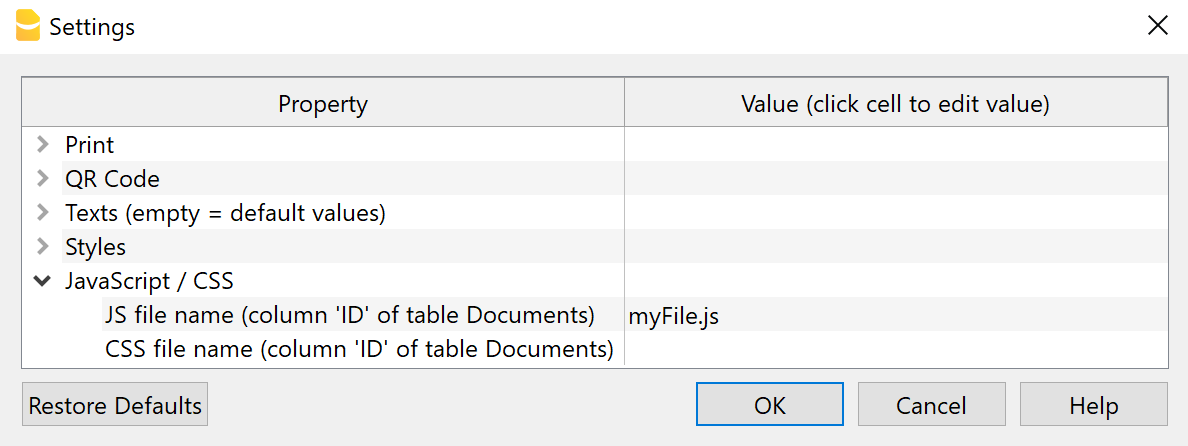
Settings Dialogue - Javascript File Property
Javascript Hook Replacement Functions
The invoice layout is created with a set of predefined Javascript functions.
The hook functions are Javascript replacements functions to be used instead of the the predefined.
The hook functions should be defined in the ".js" file of the Documents table.
- The name of the hook function is the name of the predefined function used in the layout, preceded by the text "hook_".
For example, if you want to change the header printing you have to define the hook_print_header() that will replace the predefined print_header() function.- The parameters must be the same as those used in the main function.
- If you create your own hook function, it is necessary to know how it works the function you want to replaces.
- When generating the invoice, the layout extension checks for the existence of a hook replacement function and, if available, utilizes it to substitute the predefined function.
- Hook functions let you selectively change some part of how the invoice is build, without directly modifying the original script of the invoice Layout.
Graphic explanation of the Hook functions
With the hook functions, you can customize the following sections of the invoice.
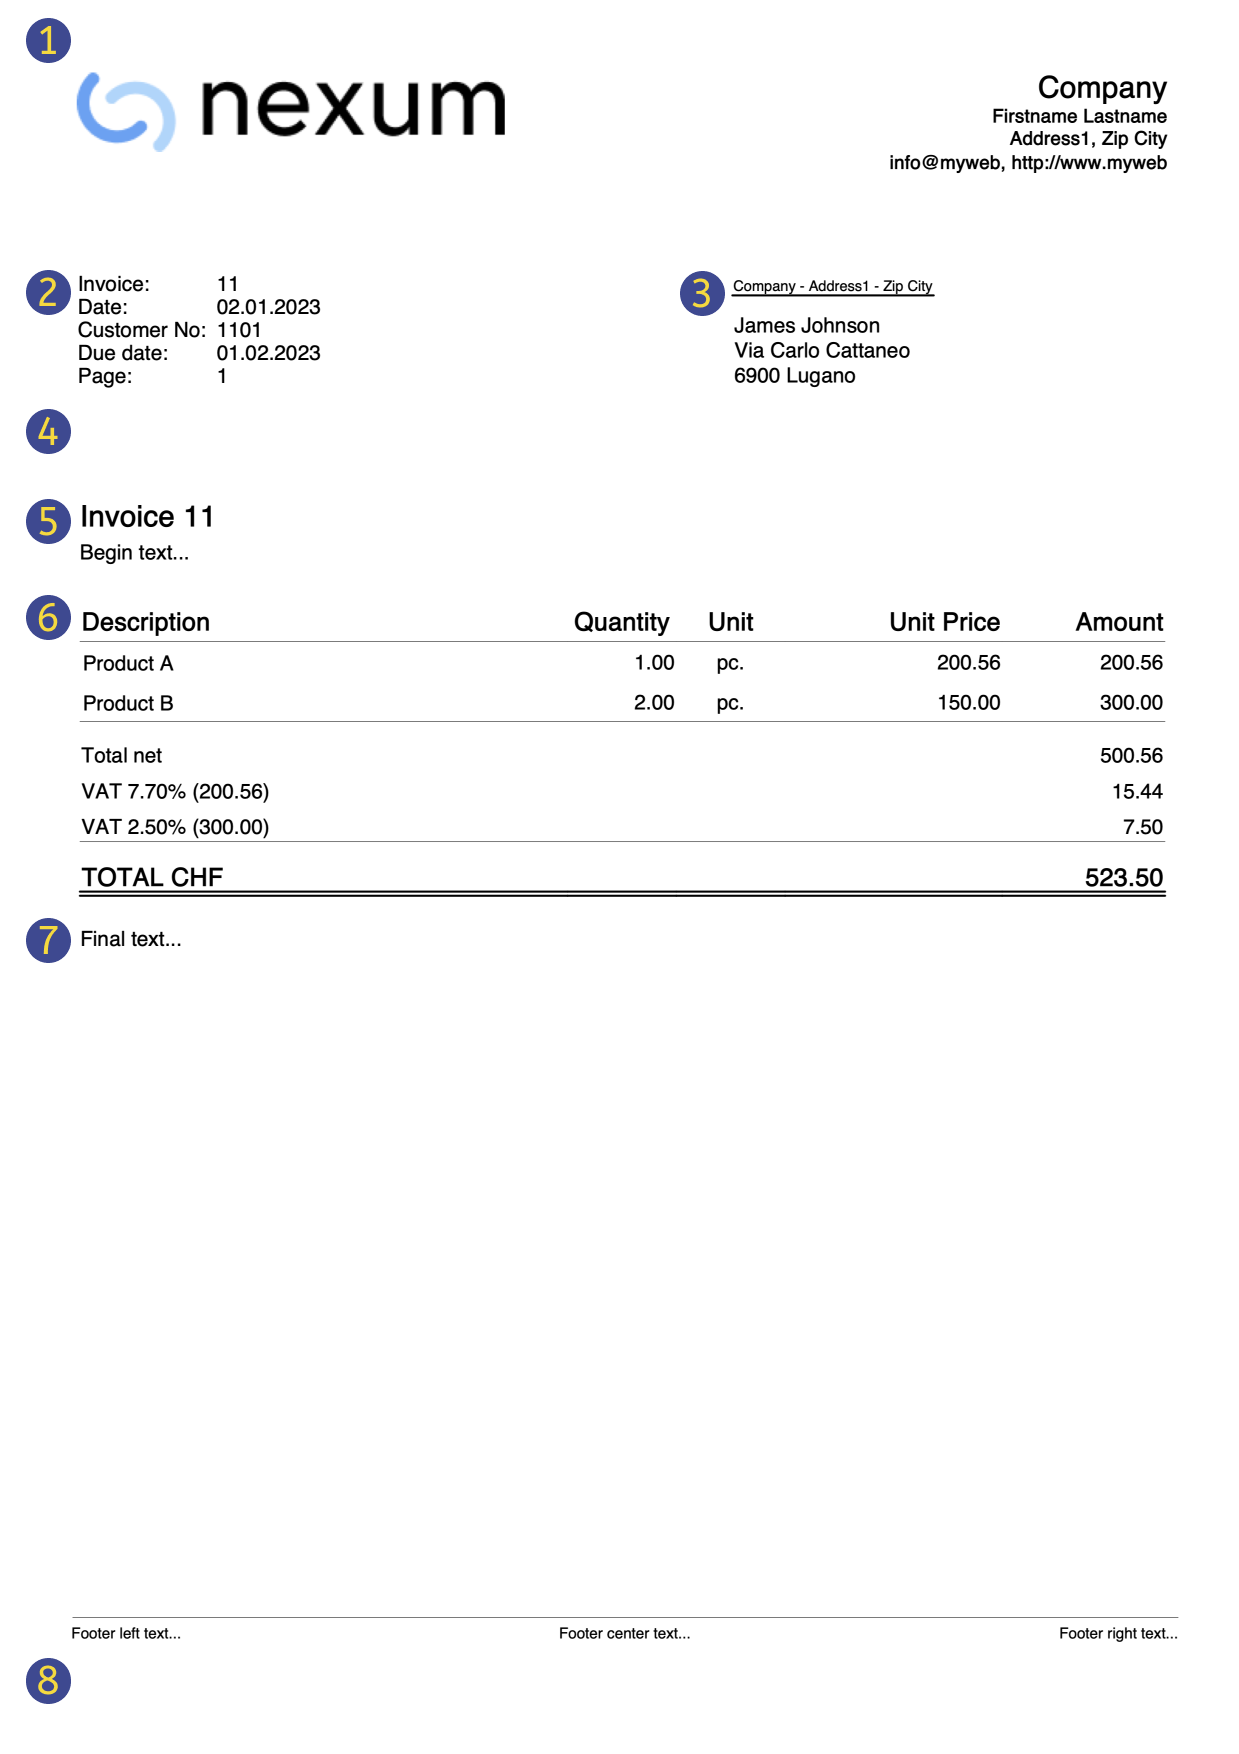
(1) hook_print_header()
Function that prints the header part of the invoice (logo and texts).
(2) hook_print_info_first_page() and hook_print_info_other_pages()
Functions that print the information parts of the invoice.
(3) hook_print_customer_address()
Function that prints the customer address part of the invoice.
(4) hook_print_shipping_address()
Function that prints the shipping address part of the invoice (in case it exists).
(5) hook_print_text_begin()
Function that prints the title and begin text parts of the invoice.
(6) hook_print_details_net_amounts() and hook_print_details_gross_amounts()
Functions that print the invoice details using net/gross amounts.
Use the hook_formatItemsValue() function to change the format and style of the items.
(7) hook_print_final_texts()
Function that prints the final texts, notes and greetings parts of the invoice, right after the invoice details.
(8) hook_print_footer()
Function that prints the footer at the bottom of the page (usable only when not printing the QR slip).
List of Hook functions
This file contains all the available hook functions with their parameters and an empty function body, that should be replaced with your implementation.
// Function used to set all the variable values used by the invoice layout script
function hook_set_variables(variables, userParam) {...}
// Function used to print the header at the top of the page (logo and text address)
function hook_print_header(repDocObj, userParam, repStyleObj, invoiceObj, texts) {...}
// Function used to print the invoice information on the first page
function hook_print_info_first_page(repDocObj, invoiceObj, texts, userParam) {...}
// Function used to print the invoice information from page 2 onward
function hook_print_info_other_pages(repDocObj, invoiceObj, texts, userParam) {...}
// Function used to print the customer address
function hook_print_customer_address(repDocObj, invoiceObj, userParam) {...}
// Function used to print the shipping address
function hook_print_shipping_address(repDocObj, invoiceObj, texts, userParam) {...}
// Function used to print the text before the invoice details (title and begin text)
function hook_print_text_begin(repDocObj, invoiceObj, texts, userParam) {...}
// Function used to print the invoice details using net amounts (VAT excluded)
function hook_print_details_net_amounts(banDoc, repDocObj, invoiceObj, texts, userParam, detailsTable, variables) {...}
// Function used to print the invoice details using gross amounts (VAT included)
function hook_print_details_gross_amounts(banDoc, repDocObj, invoiceObj, texts, userParam, detailsTable, variables) {...}
// Function used to print the text after the invoice details (notes, greetings, etc.)
function hook_print_final_texts(repDocObj, invoiceObj, userParam) {...}
// Function used to print the footer at the bottom of the page. Usable only when not printing the QR slip part.
function hook_print_footer(repDocObj, texts, userParam) {...}
// Function used to format the value and set the className of the item
function hook_formatItemsValue(value, variables, columnName, className, item) {...}
// Function used to modify the QR settings
function hook_modify_settings_qr(invoiceObj, qrcodeData) {...}
Examples of a hook functions
Within your hook function you can call the original hook function. This way you can limit the changes to the code.
For example this hook function call the original one, only in a specific case.
/**
 * This function prints the final text only for INVOICES and not for CREDIT NOTES.
 * Invoices = DocType 10
 * Credit notes = DocType 12
 */
function hook_print_final_texts(sectionClassFinalTexts, invoiceObj, userParam) {
   // We can check the DocType and print the text only when is not 12
   if (invoiceObj.document_info.doc_type !== "12") {
      print_final_texts(sectionClassFinalTexts, invoiceObj, userParam);
   }
}
Predefined variables
The predefined variables are the default used by the invoice layout script.
The variables for decimals start with "decimals_". (decimals_quantity, decimals_unit_price, decimals_amounts).
The variable that start with "$" are template variable that you can use in the CSS styles ($font_family, $font_size, $text_color, ...).
Example of an extract of the predefined CSS invoice layout.
body {
  font-family: $font_family;
  font-size: $font_size;
  color: $text_color;
}
List of all predefined variables and their default values that you can override with the hook_set_variables() function:
/* Variable that sets the decimals of the Quantity column */
variables.decimals_quantity = "";
/* Variable that sets the decimals of the Unit Price column */
variables.decimals_unit_price = 2;
/* Variable that sets the decimals of the Amount column */
variables.decimals_amounts = 2;
/* Variables that set the colors */
variables.$text_color = userParam.text_color;
variables.$background_color_details_header = userParam.background_color_details_header;
variables.$text_color_details_header = userParam.text_color_details_header;
variables.$background_color_alternate_lines = userParam.background_color_alternate_lines;
variables.$color_title_total = userParam.color_title_total;
/* Variables that set the font */
variables.$font_family = userParam.font_family;
variables.$font_size = userParam.font_size+"pt";
/* Variables that set the font size and margins of the Invoice Begin Text */
variables.$font_size_title = userParam.font_size*1.4 +"pt";
/* Variables that set font size, margins, padding and borders of the Invoice Details */
variables.$font_size_header = userParam.font_size*1.2 +"pt";
variables.$font_size_total = userParam.font_size*1.2 +"pt";
/* Variables that set the position of the invoice address
 * Default margins when the address on right: 12.3cm margin left, 4.5cm margin top
 * Default margins when the address on left: 2.2cm margin left, 5.5cm margin top
 * Sum userParam dX and dY adjustments to default values */
variables.$right_address_margin_left = parseFloat(12.3) + parseFloat(userParam.address_position_dX)+"cm";
variables.$right_address_margin_top = parseFloat(4.5) + parseFloat(userParam.address_position_dY)+"cm";
variables.$left_address_margin_left = parseFloat(2.2) + parseFloat(userParam.address_position_dX)+"cm";
variables.$left_address_margin_top = parseFloat(5.5) + parseFloat(userParam.address_position_dY)+"cm";
Example of 'hook_set_variables' function
You can overwrite the predefined variable with the hook_set_variables() function.
Only use the variable that you want to replace.
// Example of hook function usage that sets
// the decimals of the Amounts columns to 4
// the font type to Times New Roman
function hook_set_variables(variables, userParam) {
   variables.decimals_amounts = 4;
   variables.$font_family = "Times New Roman";
}
Customize invoice print with Javascript
The following examples show how to adapt invoice printing with custom JavaScript hook function codes.
See Javascript customization for more information.
Add the final text on a new page
This example shows how to add the final text on a new page of the invoice.
/**
 * This function prints the final text on a new page of the invoice.
 */
function hook_print_final_texts(repDocObj, invoiceObj, userParam) {
   // Adds a page break before printing the final text
   repDocObj.addPageBreak();
   print_final_texts(repDocObj, invoiceObj, userParam);
}
Credit Notes without final text
Final text, notes and greetings are always printed, when defined, for both invoices and credit notes document types.
You can define a document type with the Type column of the Transactions table:
- For credit notes insert the value 12.
- For invoices insert the value 10.
In this example we want to make sure that all these texts are printed only for invoices but not for credit notes.
To do that, we simply define an hook function that replaces the default print_final_texts() function.
/**
 * This function prints the final text only for INVOICES and not for CREDIT NOTES.
 * Invoices = DocType 10
 * Credit notes = DocType 12
 */
function hook_print_final_texts(repDocObj, invoiceObj, userParam) {
   // We can check the DocType and print the text only when is not 12
   if (invoiceObj.document_info.doc_type !== "12") {
      print_final_texts(repDocObj, invoiceObj, userParam);
   }
}
With this change the final text, notes and greetings are now printed only for invoices, and not for credit notes anymore.
Add information "Invoice paid" to the final text
This example shows how to add the information "Invoice paid" to the final text, when the invoice is paid.
/**
 * This function prints the text "Invoice paid" on paid invoices.
 */
function hook_print_final_texts(repDocObj, invoiceObj, userParam) {
   if (invoiceObj.payment_info && invoiceObj.payment_info.payment_date) {
      var paragraph = repDocObj.addParagraph("","final_texts");
      paragraph.addText("Invoice paid on " + Banana.Converter.toLocaleDateFormat(invoiceObj.payment_info.payment_date));
      // [Optionally] Add a signature
      repDocObj.addImage("documents:sign.jpg", "6cm", "auto");
   }
}
Add a custom table as final text
This example shows how to add a custom table in the final texts of the invoice.
The table consists of 2 columns and three rows:
- Row 1: the header of the table. Contains the titles of the columns (Description and Amount).
- Row 2: the first data row of the table.
- Row 3: the second data row of the table.
To do that, we simply define an hook function that replaces the default print_final_texts() function.
/**
 * This function adds at the end of the invoice a table with a custom text.
 */
function hook_print_final_texts(repDocObj, invoiceObj, userParam) {
   print_final_texts(repDocObj, invoiceObj, userParam);
   // Add a table
   var mytable = repDocObj.addTable("MyTable");
   var tableRow;

   // Row 1: the header of the table, columns titles
   var header = mytable.getHeader();
   tableRow = header.addRow();
   tableRow.addCell("Description").setStyleAttributes("text-align:left; font-weight:bold; border:thin solid black;");
   tableRow.addCell("Amount").setStyleAttributes("text-align:left; font-weight:bold; border:thin solid black;");
   // Row 2: first data row of the table
   tableRow = mytable.addRow();
   tableRow.addCell("Workshop").setStyleAttributes("text-align:left; border:thin solid black;");
   tableRow.addCell("2'600.00").setStyleAttributes("text-align:right; border:thin solid black;");
   // Row 3: second data row of the table
   tableRow = mytable.addRow();
   tableRow.addCell("Material").setStyleAttributes("text-align:left; border:thin solid black;");
   tableRow.addCell("76.00").setStyleAttributes("text-align:right; border:thin solid black;");

   //...
}
You can easily add as many columns and rows as you like.
Use the setStyleAttributes() to apply CSS styles, like text-align, font-weight, color, border, ... Find more information on Syntax of a CSS stylesheet.
Find more examples in Working with Report Tables.
Example print: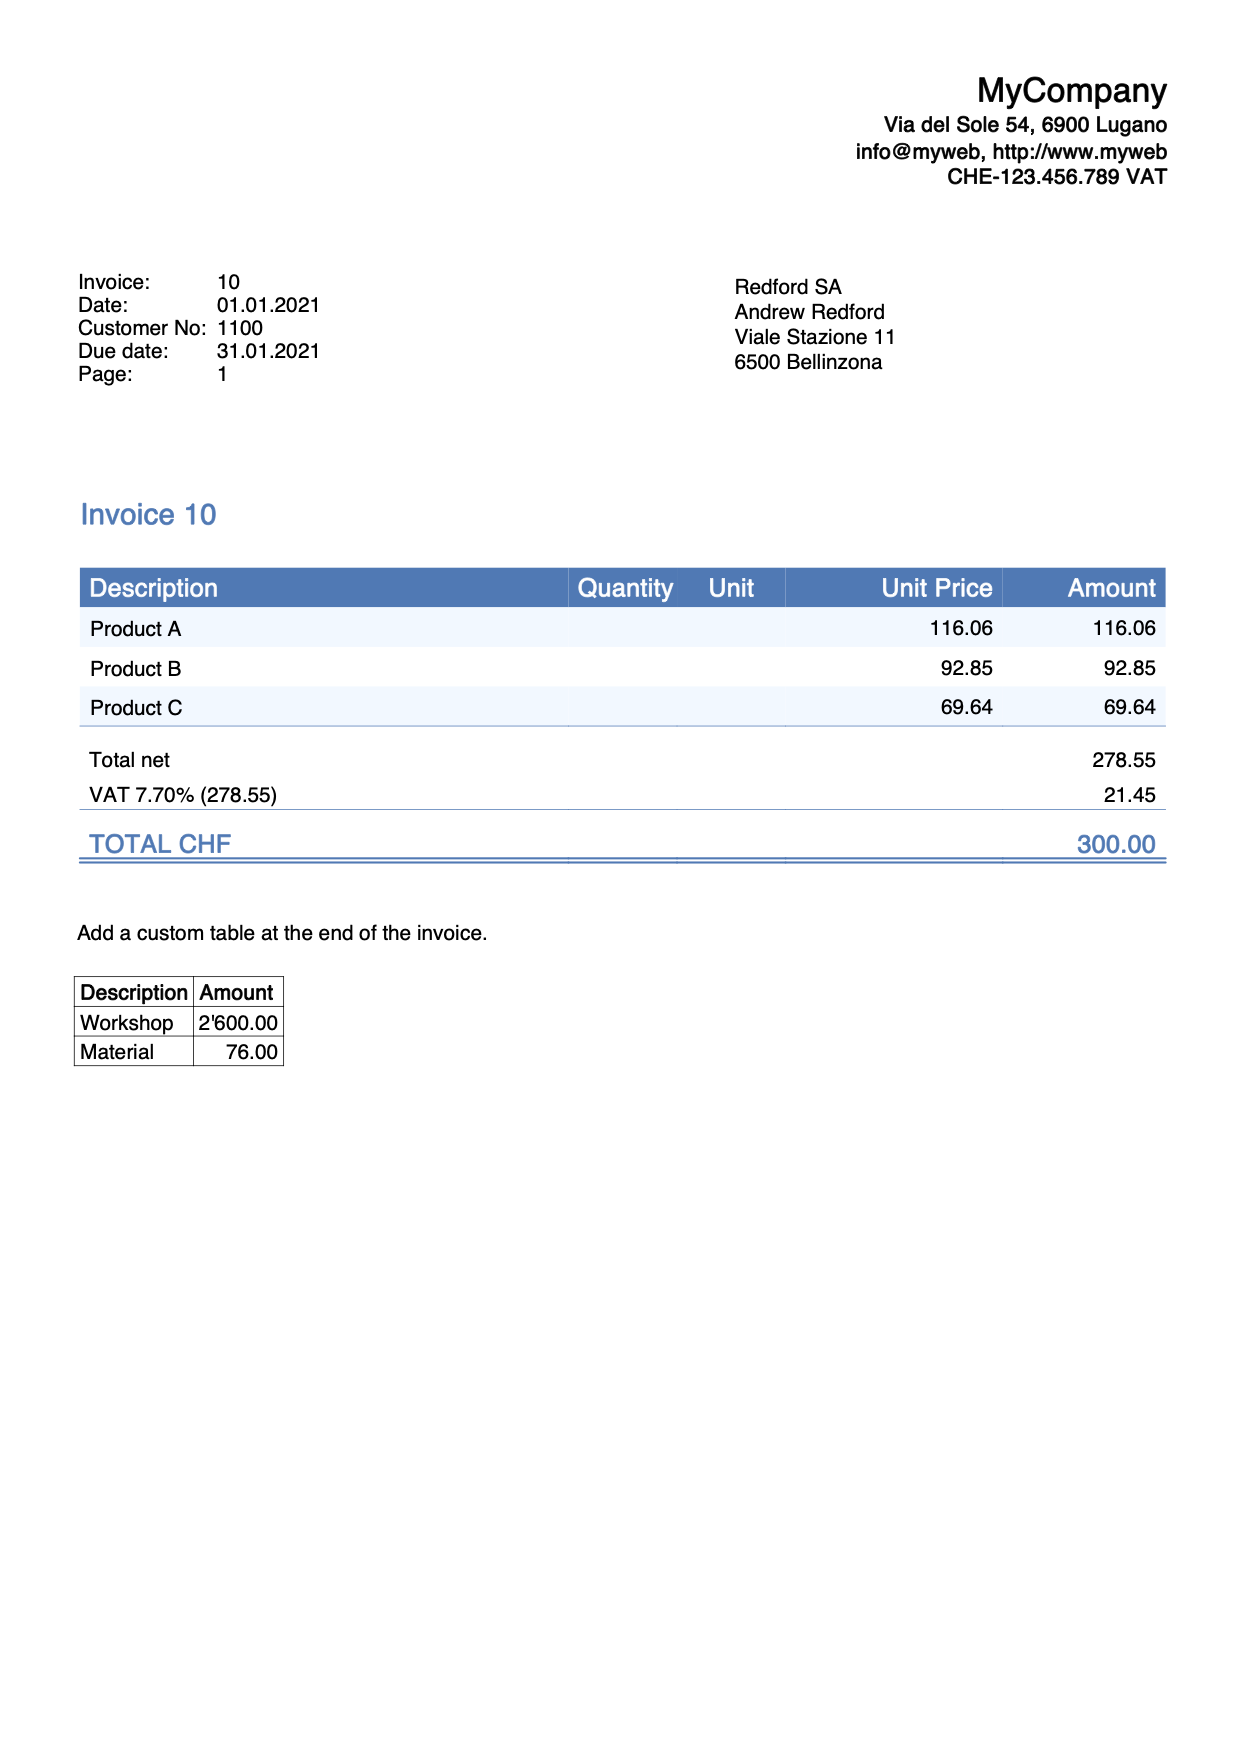
Add a custom table as final text with bank details
This example shows how to add a custom table in the final texts of the invoice with the bank details for the payment.
The table consists of 2 columns and 6 rows:
- Row 1: for the beneficiary data.
- Row 2-3-4: for the bank name and address.
- Row 5: for the IBAN code.
- Row 6: for the Swift code.
To do that, we simply define an hook function that replaces the default print_final_texts() function.
/**
 * This function adds at the end of the invoice a table with bank detais for the payment.
 */
function hook_print_final_texts(repDocObj, invoiceObj, userParam) {
   print_final_texts(repDocObj, invoiceObj, userParam);
   // Add a table
   var mytable = repDocObj.addTable("MyTable");
   var tableRow;
   // Row 1
   tableRow = mytable.addRow();
   tableRow.addCell("Beneficiary:").setStyleAttributes("text-align:left;padding-left:1px;");
   tableRow.addCell("BENEFICIARY NAME, ADDRESS, ZIP LOCALITY, COUNTRY").setStyleAttributes("text-align:left;padding-left:1px;");

   // Row 2
   tableRow = mytable.addRow();
   tableRow.addCell("Bank: ").setStyleAttributes("text-align:left;padding-left:1px;");
   tableRow.addCell("BANK NAME").setStyleAttributes("text-align:left;padding-left:1px;");
   // Row 3
   tableRow = mytable.addRow();
   tableRow.addCell("").setStyleAttributes("text-align:left;padding-left:1px;");
   tableRow.addCell("ADDRESS").setStyleAttributes("text-align:left;padding-left:1px;");
   // Row 4
   tableRow = mytable.addRow();
   tableRow.addCell("").setStyleAttributes("text-align:left;padding-left:1px;");
   tableRow.addCell("ZIP LOCALITY").setStyleAttributes("text-align:left;padding-left:1px;");
   // Row 5
   tableRow = mytable.addRow();
   tableRow.addCell("IBAN: ").setStyleAttributes("text-align:left;padding-left:1px;");
   tableRow.addCell("CHXX XXXX XXXX XXXX XXXX X").setStyleAttributes("text-align:left;padding-left:1px;");
   // Row 6
   tableRow = mytable.addRow();
   tableRow.addCell("Swift:").setStyleAttributes("text-align:left;padding-left:1px;");
   tableRow.addCell("AAAABBCCXXX").setStyleAttributes("text-align:left;padding-left:1px;");

   //...
}
You can easily add as many columns and rows as you like.
Use the setStyleAttributes() to apply CSS styles, like text-align, font-weight, color, border, ... Find more information on Syntax of a CSS stylesheet.
Example print: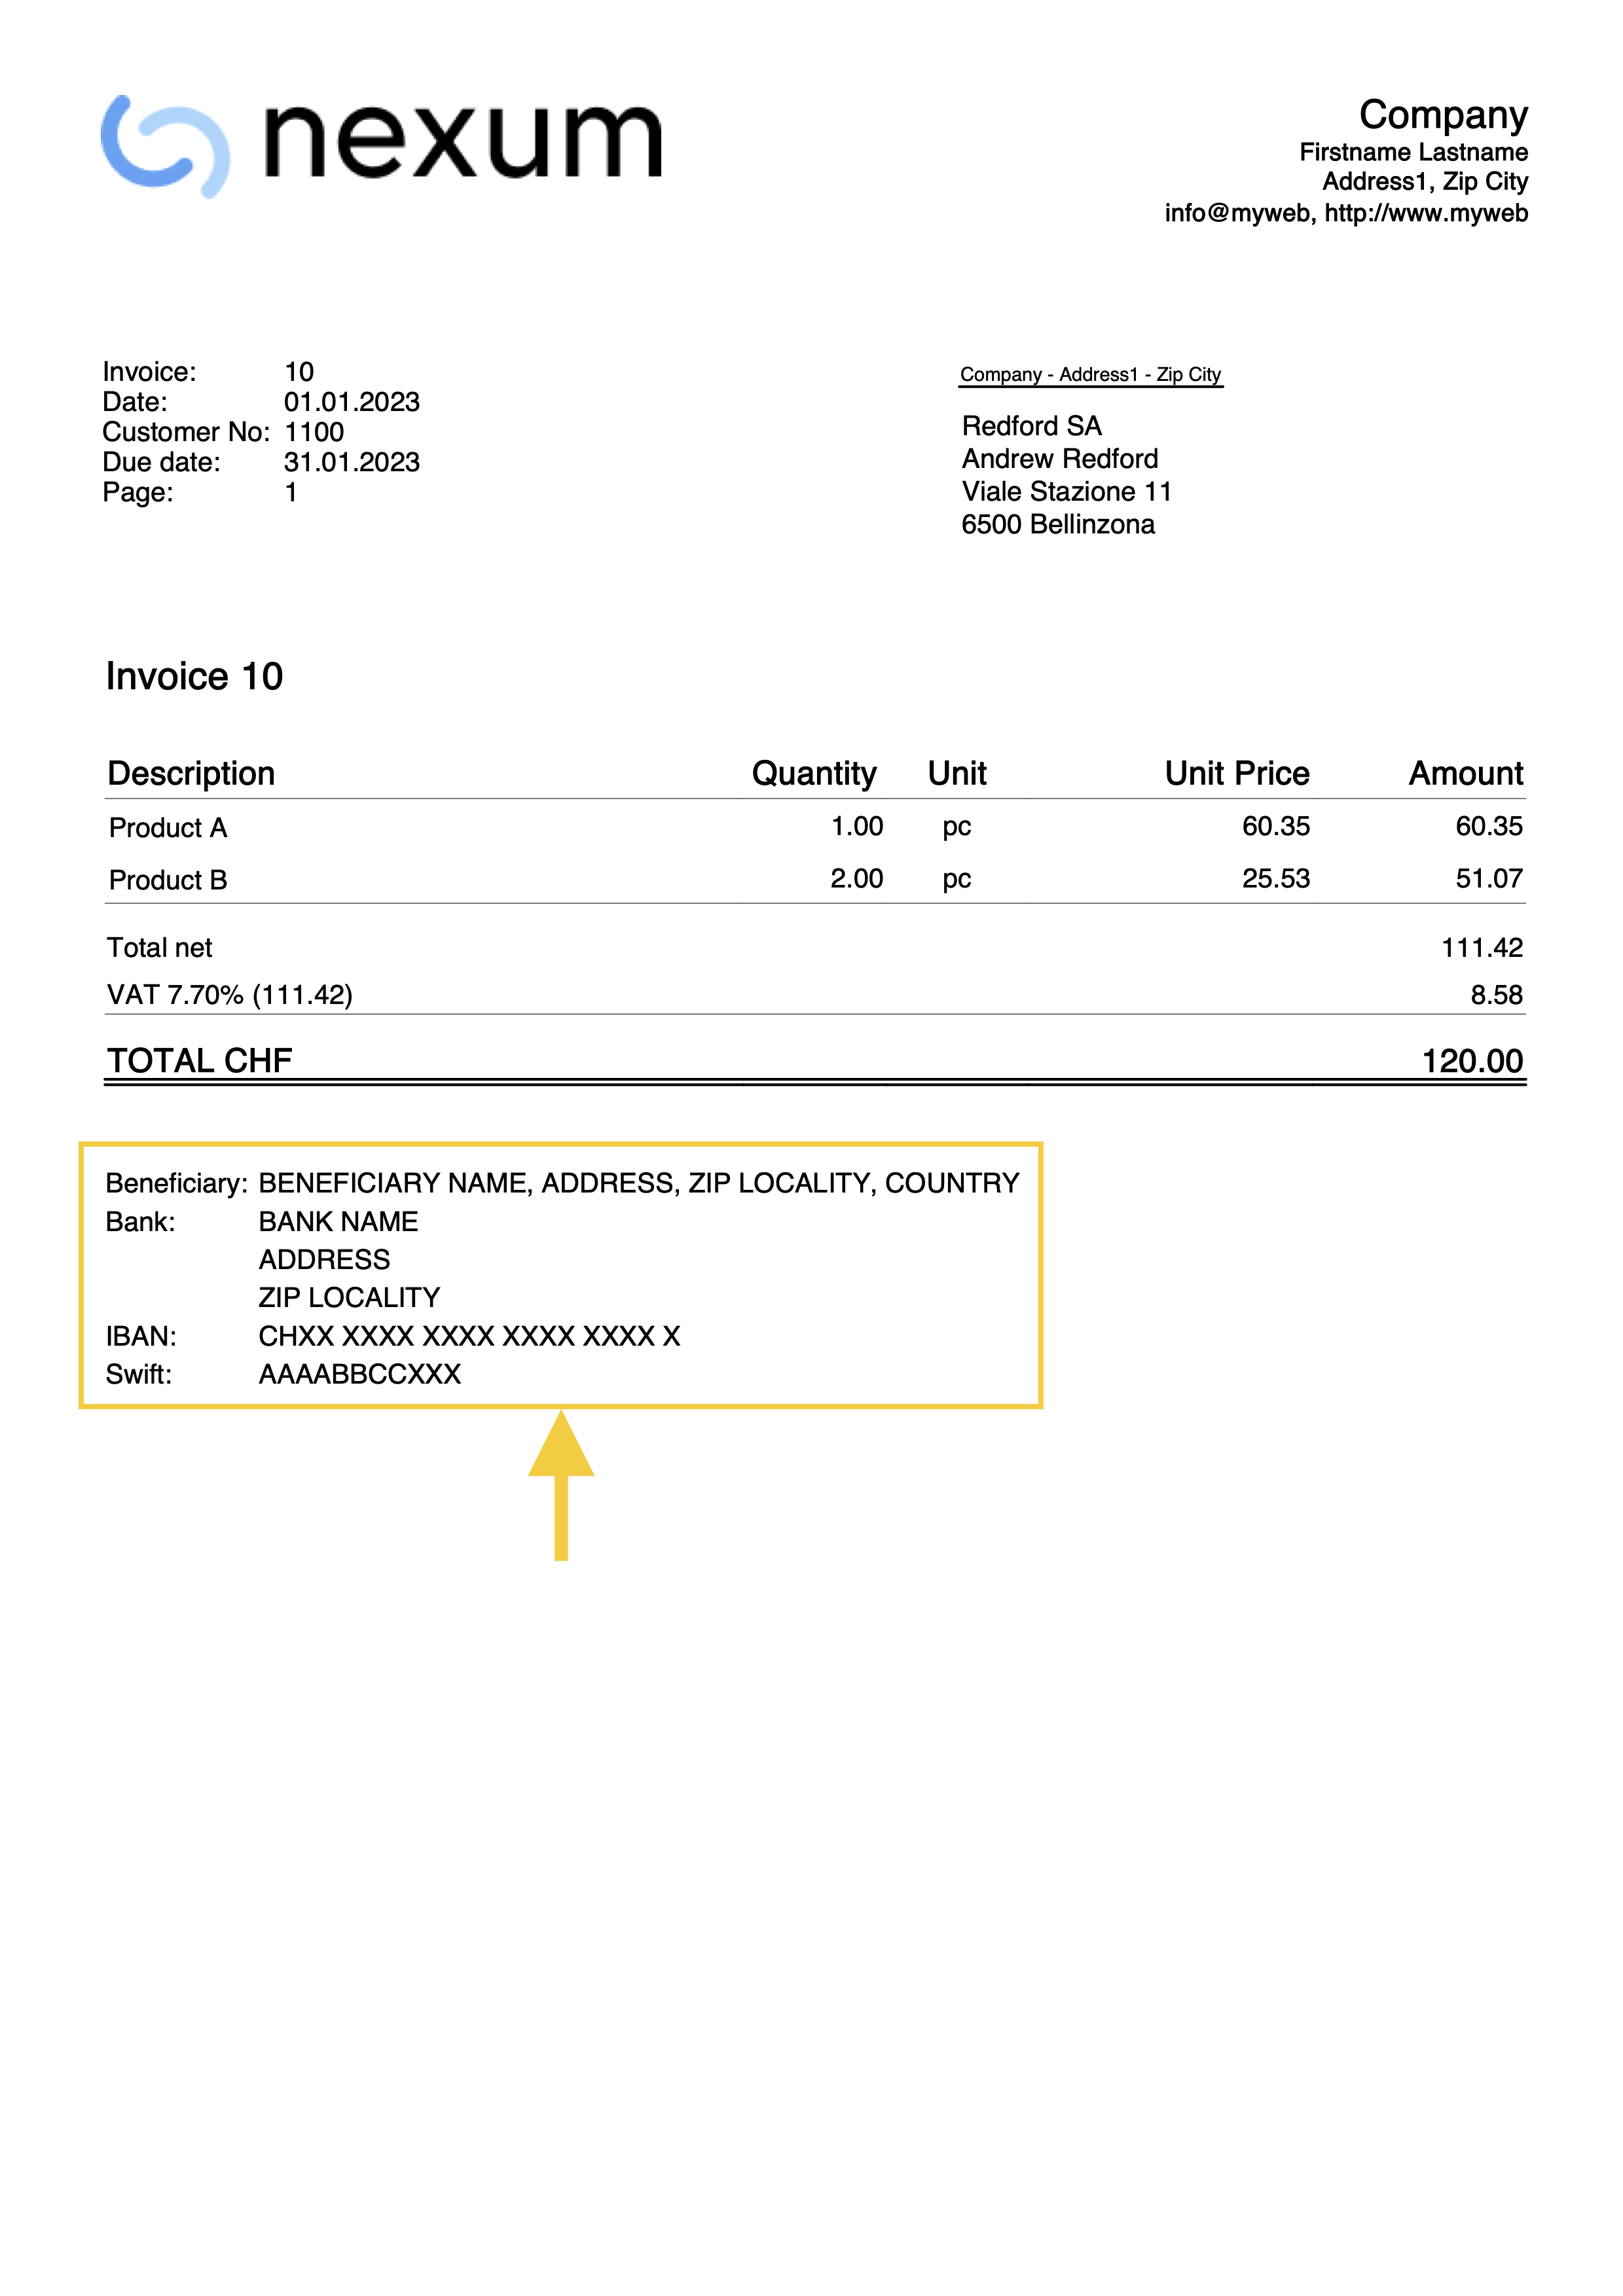
Add a custom table with text translation
This example shows how to add a custom table in the final texts of the invoice with text translations for different languages.
The table consists of 2 columns and three rows:
- Row 1: the header of the table. Contains the titles of the columns (Description and Amount).
- Row 2: the first data row of the table.
- Row 3: the second data row of the table.
To do that, we simply define an hook function that replaces the default print_final_texts() function.
/**
 * This function adds at the end of the invoice a table with a custom text.
 * The text is translated in different languages.
 * We use the text in the language of the invoice.
 */
function hook_print_final_texts(repDocObj, invoiceObj, userParam) {
   // Define the texts for all languages you need (en, de, fr, it, nl, pt, zh, es, ...)
   // Check the language of the invoice to use the appropriate text translation
   if (lang === "de") {
      var text1 = "Beschreibung";
      var text2 = "Betrag";
      var text3 = "Werkstatt";
      var text4 = "2'600.00";
      var text5 = "Material";
      var text6 = "76.00";
   }
   else if (lang === "it") {
      var text1 = "Descrizione";
      var text2 = "Importo";
      var text3 = "Officina";
      var text4 = "2'600.00";
      var text5 = "Materiale";
      var text6 = "76.00";
   }
   else {
      var text1 = "Description";
      var text2 = "Amount";
      var text3 = "Workshop";
      var text4 = "2'600.00";
      var text5 = "Material";
      var text6 = "76.00";
   }
   // Add a table
   var mytable = repDocObj.addTable("MyTable");
   var tableRow;

   // Row 1: the header of the table, columns titles
   var header = mytable.getHeader();
   tableRow = header.addRow();
   tableRow.addCell(text1).setStyleAttributes("text-align:left; font-weight:bold; border:thin solid black;");
   tableRow.addCell(text2).setStyleAttributes("text-align:left; font-weight:bold; border:thin solid black;");
   // Row 2: first data row of the table
   tableRow = mytable.addRow();
   tableRow.addCell(text3).setStyleAttributes("text-align:left; border:thin solid black;");
   tableRow.addCell(text4).setStyleAttributes("text-align:right; border:thin solid black;");
   // Row 3: second data row of the table
   tableRow = mytable.addRow();
   tableRow.addCell(text5).setStyleAttributes("text-align:left; border:thin solid black;");
   tableRow.addCell(text6).setStyleAttributes("text-align:right; border:thin solid black;");
}
You can easily add as many columns and rows as you like.
Use the setStyleAttributes() to apply CSS styles, like text-align, font-weight, color, border, ... Find more information on Syntax of a CSS stylesheet.
Find more examples in Working with Report Tables.
Use a very long begin text
When you insert a begin text between the title and details of the invoice, the text is usually quite short. The printing of the invoice is designed for a begin text that is not too long. However, if the text you want to insert is very long (for example, even a page or more), it may not be printed correctly on the invoice, and some parts may be missing. To solve this problem, it is necessary to adapt the part of the script that deals with printing the begin text.
In the example below, we define the hook_print_text_begin() function that replaces the default print_text_begin() function. This function allows to print very long begin texts. While the original function adds all the text in one table cell (and when it gets too big it can cause problems), this version instead adds one row to the table for each row of text (a side effect is that the space between rows increases slightly).
function hook_print_text_begin(repDocObj, invoiceObj, texts, userParam) {
  var textTitle = getTitle(invoiceObj, texts, userParam);
  var textBegin = invoiceObj.document_info.text_begin ||
                    (invoiceObj.document_info.doc_type === "17" ? userParam[lang+'_text_begin_offer'] : userParam[lang+'_text_begin']) ||
                    '';
  var table = repDocObj.addTable("begin_text_table");
  if (textTitle) {
    var titleCell = table.addRow().addCell("", "", 1);
    titleCell.addParagraph(textTitle.replace(/<DocInvoice>/g, invoiceObj.document_info.number.trim()), "title_text");
  }
  var textBeginLines = textBegin.split('\n');
  textBeginLines.forEach(line => {
    var textCell = table.addRow().addCell("", "begin_text", 1);
    addMdBoldText(textCell, columnNamesToValues(invoiceObj, line.trim() || " "));
  });
}
Use different long begin texts
This example allows you to define and use different begin texts in order to customize the estimates and invoices.
You can define your begin texts using the Documents table:
- First you must define the hook function that replaces the default print_text_begin().
- In the ID column enter the name of the javascript file with the extension .js at the end (e.g., "myFile.js").
- In the Attachments column, double click on the cell or select the edit symbol, then select Javascript Code and confirm with OK.
- Copy and paste the Javascript code included below.
- In the invoice layout settings, at the bottom, section JS file name (column ID in the document table), enter the id name of the javascript file from the Documents table (e.g., "myFile.js").
- Next you can create the documents you want to include.
- To include a normal text file
- In the ID column enter a name as you want.
- In the Attachments column, select text/plain type. An editor will open in which you can write your text.
- To include a markdown file
- In the ID column enter the name of the file with the extension .md at the end (e.g., "file2.md").
- In the Attachments column, select text/markdown type. An editor will open in which you can write your text.
- To include an html file
- In the ID column enter the name of the file with the extension .html at the end (e.g., "file3.html").
- In the Attachments column, select text/html type. An editor will open in which you can write your text.
- To include a normal text file
To use your texts when creating the estimate or invoice:
- In the Begin Text field of the estimate/invoice, on a new line enter the text "{{include document:<file>}}" where "<file>" is the ID of the attachment text defined in Documents table (e.g., "{{include document:file1}}", "{{include document:file2.md}}", "{{include document:file3.html}}").
You can add a page break somewhere in the text:
- In the Begin Text field of the estimate/invoice, on a new line enter the "{{page-break}}" text.
Here are some examples:
- Example 1: Include the content of the file1 defined in Documents table and a page break right after. In the Begin Text field of the estimate/invoice enter the following text:
{{include document:file1}}
{{page-break}} - Example 2: Include the content of the file1 defined in Documents table, then add a page break, then include the content of the file2 defined in Documents table, then add a page break, then include the content of the file3 defined in Documents table, then add a final page break.
{{include document:file1}}
{{page-break}}
{{include document:file2.md}}
{{page-break}}
{{include document:file3.html}}
{{page-break}} - Example 3: Combine the text written in the Begin Text field of the estimates/invoices with a text defined in Documents table.
"This is a begin text:"
{{include document:file1}} - Example 4: Simply add a page break after the begin text in the Begin Text filed of the estimates/invoices.
"This is a begin text"
{{page-break}}
Add your custom Javascript file using the following Javascript hook_print_text_begin function code:
function hook_print_text_begin(repDocObj, invoiceObj, texts, userParam) {
    var textTitle = getTitle(invoiceObj, texts, userParam);
    var textBegin = invoiceObj.document_info.text_begin || userParam[lang + '_text_begin'] || (invoiceObj.document_info.doc_type === "17" ? userParam[lang + '_text_begin_offer'] : '');
    var section = repDocObj.addSection();
    section.setStyleAttributes("margin-bottom: 1.0cm;");
    if (textTitle) {
        section.addParagraph(textTitle.replace(/<DocInvoice>/g, invoiceObj.document_info.number.trim()), "title_text");
    }
    var textBeginLines = textBegin.split('\n');
    textBeginLines.forEach(line => {
        line = line.trim();
        var paragraph = section.addParagraph("", "");
        if (line === "{{page-break}}") {
            section.addPageBreak();
        } else if (line.includes("{{include document:")) {
            var file = extractFileName(line);
            var text = getEmbeddedTextFile(file);
            if (file.includes(".md")) {
                paragraph.addStructuredText(text || " ", "md", "");
            } else if (file.includes(".html")) {
                paragraph.addStructuredText(text || " ", "html", "");
            } else {
                addMdBoldText(paragraph, columnNamesToValues(invoiceObj, text || " "));
            }
        } else {
            addMdBoldText(paragraph, columnNamesToValues(invoiceObj, line || " "));
        }
    });
}
function extractFileName(inputString) {
    var match = inputString.match(/document:(.*?)\}\}/);
    return match ? match[1] : "";
}
function getEmbeddedTextFile(file) {
    var documentsTable = Banana.document.table("Documents");
    if (!documentsTable) return "";

    for (var i = 0; i < documentsTable.rowCount; i++) {
        var tRow = documentsTable.row(i);
        if (tRow.value("RowId") === file) {
            return tRow.value("Attachments");
        }
    }
    return "";
}
Add a begin text with Markdown
This example for the Estimates and Invoice application, shows how to add a begin text of the invoice/estimate using the Markdown (requires Banana+ Dev Channel).
- Enter the markdown text from the Invoice dialog > Section (1) Information and Free Texts > Begin text.
- Define the hook function that replaces the default print_text_begin() function.
/**
* This function adds the begin text as Markdown
* Works with the Estimate and Invoice Application
*/
function hook_print_text_begin(repDocObj, invoiceObj, texts, userParam) {
  var textTitle = getTitle(invoiceObj, texts, userParam);
  var textBegin = invoiceObj.document_info.text_begin;
  var table = repDocObj.addTable("begin_text_table");
  if (textTitle) {
    textTitle = textTitle.replace("<DocInvoice>", invoiceObj.document_info.number);
    var tableRow = table.addRow();
    var titleCell = tableRow.addCell("","",1);
    titleCell.addParagraph(textTitle, "title_text");
  }
  if (textBegin) {
    var tableRow = table.addRow();
    var textCell = tableRow.addCell("","begin_text",1);
    textCell.addStructuredText(textBegin, "md", "");
  }
}
Add a final text with Markdown
This example for the Estimates and Invoice application, shows how to add a final text of the invoice/estimate using the Markdown (requires Banana+ Dev Channel).
- Enter the markdown text from the Invoice dialog > Section (1) Information and Free Texts > End text.
- Define the hook function that replaces the default print_final_texts() function.
/**
* This function adds the final text as Markdown
* Works with the Estimate and Invoice Application
*/
function hook_print_final_texts(repDocObj, invoiceObj, userParam) {
  if (invoiceObj.note.length > 0) {
    for (var i = 0; i < invoiceObj.note.length; i++) {
      if (invoiceObj.note[i].description) {
        var text = invoiceObj.note[i].description;
        var paragraph = repDocObj.addParagraph("","final_texts");
        paragraph.addStructuredText(text, "md", "");
      }
    }
  }
}
First page without page number
Normally the page number is printed on each page of the invoice in the information section.
In this example we want to make sure that the page number is not printed on the first page of the invoice.
To do that, we simply define an hook function that replaces the default print_info_first_page() function.
/**
* This function do not prints the PAGE NUMBER on first page
*/
function hook_print_info_first_page(repDocObj, invoiceObj, texts, userParam) {
   // Save the existing settings
   var originalInfoPage = userParam.info_page;
   // Set not to print the info_page
   userParam.info_page = false;
   // call the original function
   print_info_first_page(repDocObj, invoiceObj, texts, userParam);
   // Restore original values
   userParam.info_page = originalInfoPage ;
}
With this change the page number is now printed only from page two and above.
Add an additional image
In case you want to add an additional image in any section of the invoice, you can do it using the Documents table.
- Add a new image to the Documents table.
- In the ID column enter the file name (e.g. "myImage").
- In the Description column enter a comment (optional).
- In the Attachments column, double click on the cell or select the edit symbol, then select Image and comfirm with Ok.
- Select the image you want to use and confirm.
- Use javascript code to add the image in the hook function of the invoice section you want.
- The code addImage("documents:<id_value>", "<width>", "<height>") allows to add the image to the ReportElement.
- <id_value> the value of the ID column of the Documents table (e.g. "myImage").
- <width> you can adjust the width of the image.
- <height> you can adjust the height of the image.
Let's suppose for example that we want to add an image in the final text section, after the invoice details.
To do that, we simply define an hook function that replaces the default print_final_texts() function.
/*
 * This function adds an image in the final texts section
 */
function hook_print_final_texts(repDocObj, invoiceObj, userParam) {

  //Print final texts
  print_final_texts(repDocObj, invoiceObj, userParam);
  //Add an image of the table Documents at the end
  repDocObj.addImage("documents:myImage", "100%", "auto");
}
With this change, the image is printed at the end of the invoice.
Add additional notes based on quantity
Suppose you have an additional column called "AdditionalNotes", and you want to add a different text to this column depending on the quantity of the item.
For example, for quantities greater than 10 you want to add the text "Special price" in the "AdditionalNotes" column of the print, and you want to do it automatically without entering by hand the text on each invoice.
To do that, we define an hook function that replaces the default formatItemsValue() function.
function hook_formatItemsValue(value, columnName, className, item) {
  var itemFormatted = {};
  itemFormatted.value = "";
  itemFormatted.className = "";
  if (columnName === "additionalnotes") {
    if (item.quantity > 10) {
        itemFormatted.value = "Special price";
        itemFormatted.className = className;
    }
  }
  //If not used it must always return undefined
  return itemFormatted;
}
The itemFormatted object has two properties:
- value is the value of the column that is printed in the invoice.
- className is the name of the class in the CSS file.
With this, when you create the invoice all the items with the quantity greater than 10 have an additional text in the "AdditionalNotes" column. For all the others it remains empty.
Example print: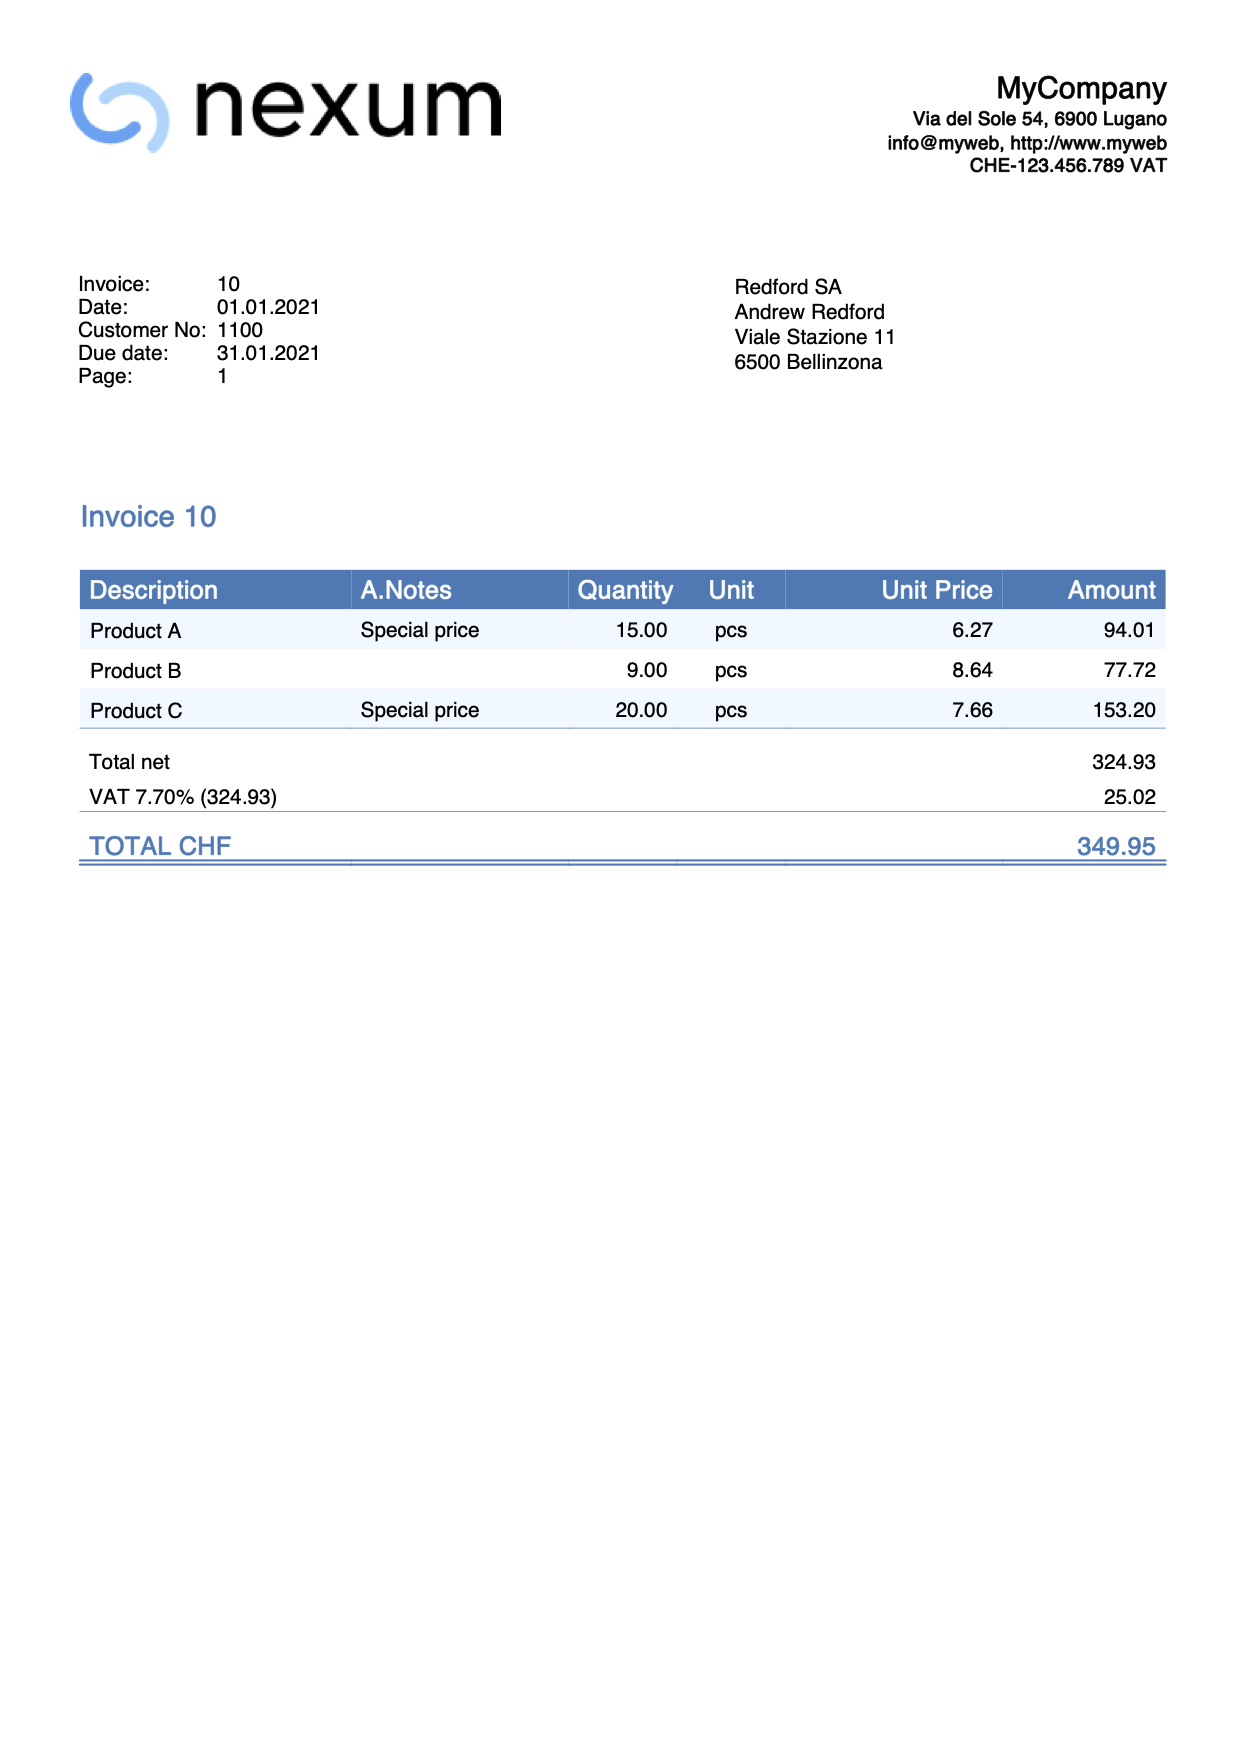
Use macros to add texts
Suppose you want to add a different text to the Description column of the invoice print depending on the item, and you want to do it automatically without entering by hand the text on each invoice.
You could for example associate the desired text to macros, add the macros in the Description column of the Transactions table, and then replace these macros with the acutal text.
To do that:
- Define the macro name and the text associated to it. For example, we want to associate the text "Special offer!" to the macro called "#macro1".
- Add the "#macro1" text to the Description column of the Transaction table for all the items we want to add the "Special offer" text.
- Define an hook function that replaces the default formatItemsValue() function. This automatically replaces "#macro1“ with "Special offer!".
function hook_formatItemsValue(value, columnName, className, item) {
  var itemFormatted = {};
  itemFormatted.value = "";
  itemFormatted.className = "";
  if (columnName === "description") {
    if (value && value.indexOf("#macro1") > -1) {
       itemFormatted.value = value.replace("#macro1","\nSpecial offer!");
       itemFormatted.className = className;
    }
  }
  return itemFormatted;
}
The itemFormatted object has two properties:
- value is the value of the column that is printed in the invoice.
- className is the name of the class in the CSS file.
With this, when you create the invoice, the “#macro1“ text contained in the items description are replaced with the "Special offer!" text.
Example print: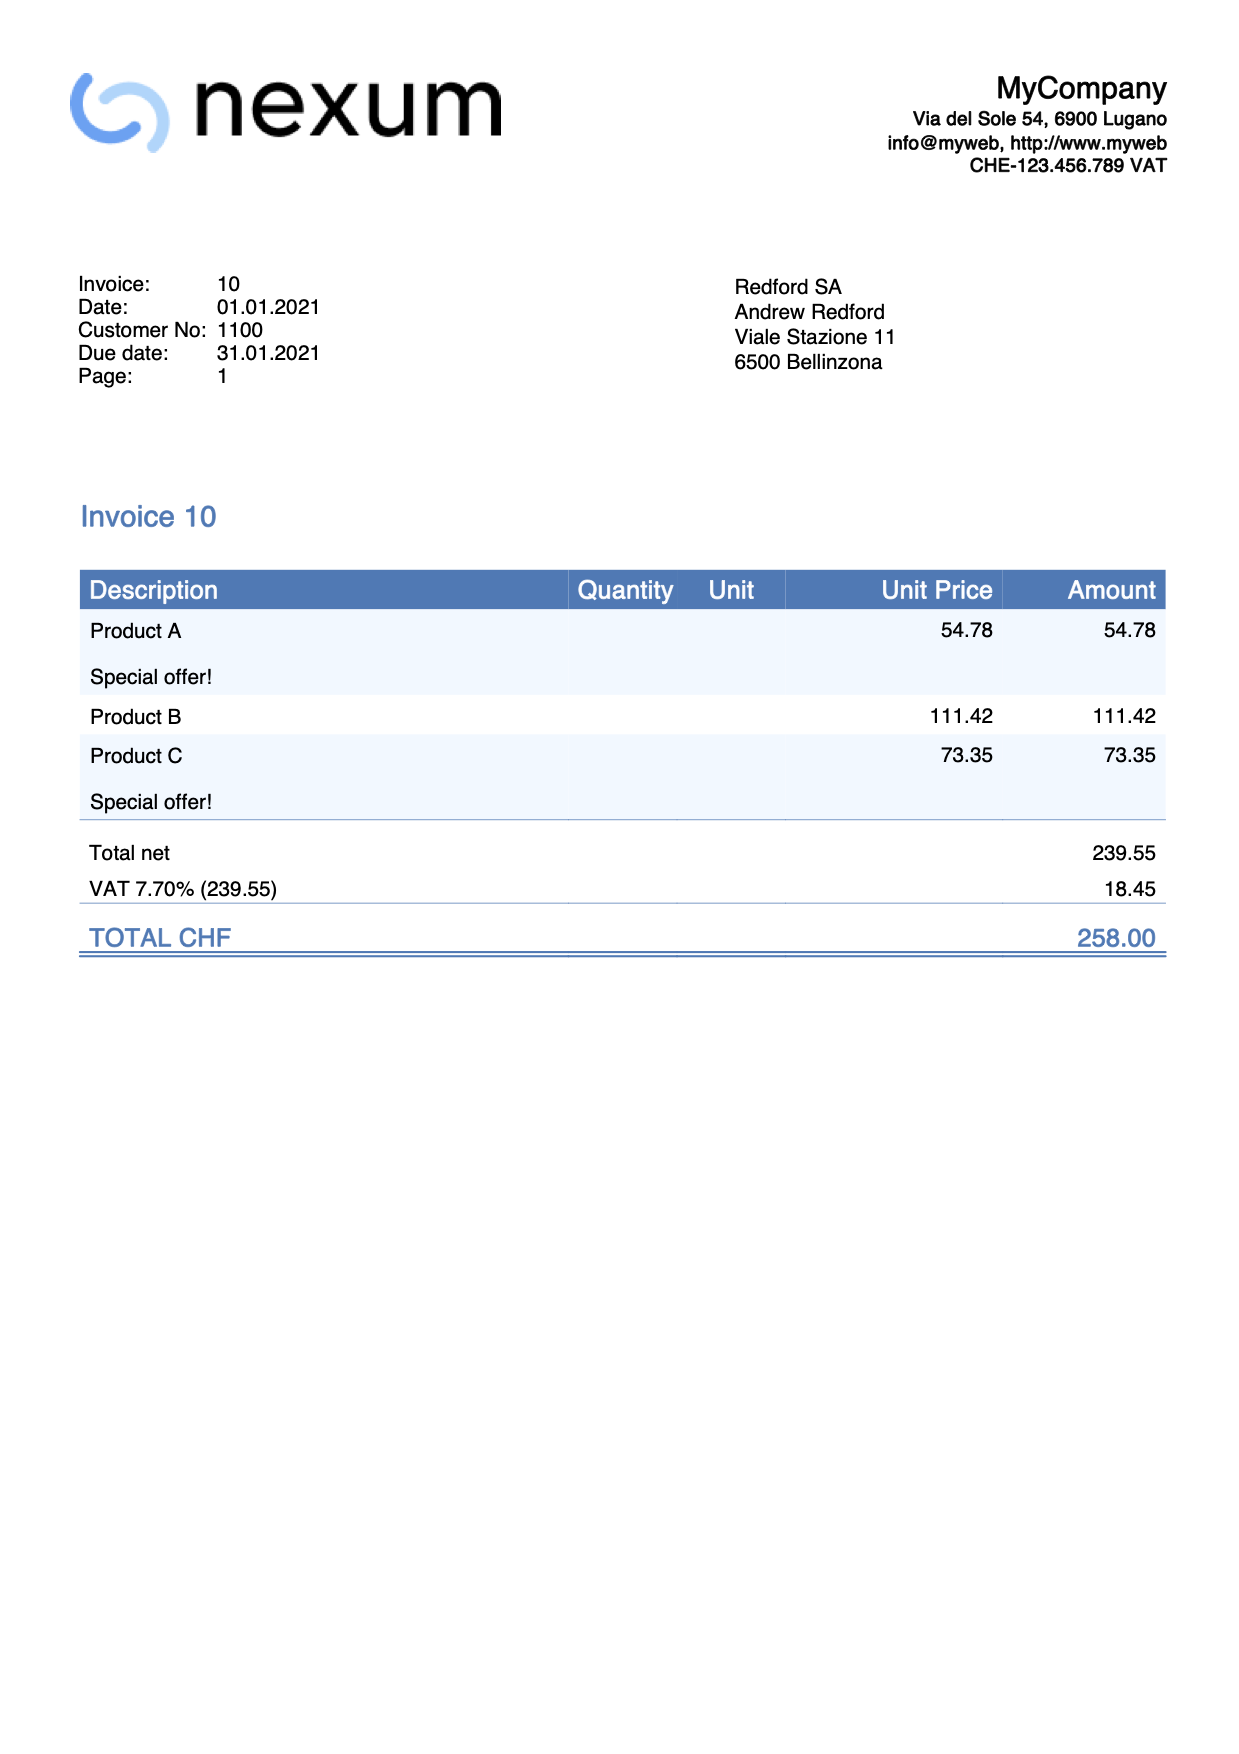
Change style of an item value
Suppose you want to change the style of an item in the Description column of the invoice in order to print it bold.
To do that:
- Define the macro name like for example "#bold".
- Add the "#bold" text to the Description column of the Transaction table for all the items you want to change the text style to bold.
- Define an hook function that replaces the default formatItemsValue() function. This automatically removes the "#bold“ text and change the style.
function hook_formatItemsValue(value, columnName, className, item) {
  var itemFormatted = {};
  itemFormatted.value = "";
  itemFormatted.className = "";
  if (columnName === "description") {
    if (value && value.indexOf("#bold") > -1) {
      itemFormatted.value = value.replace("#bold","");
      itemFormatted.className = "bold";
    }
  }
  return itemFormatted;
}
The itemFormatted object has two properties:
- value is the value of the column that is printed in the invoice.
- className is the name of the class in the CSS file.
In this case all the texts “#bold“ contained in the items description are not printed, and the styles are changed to bold.
The class "bold" that we set in the line itemFormatted.className = "bold" already exists in the CSS file of the invoice. If you want to use other classes that don't exist, you need also to use the CSS customization in order to create them first.
Example print: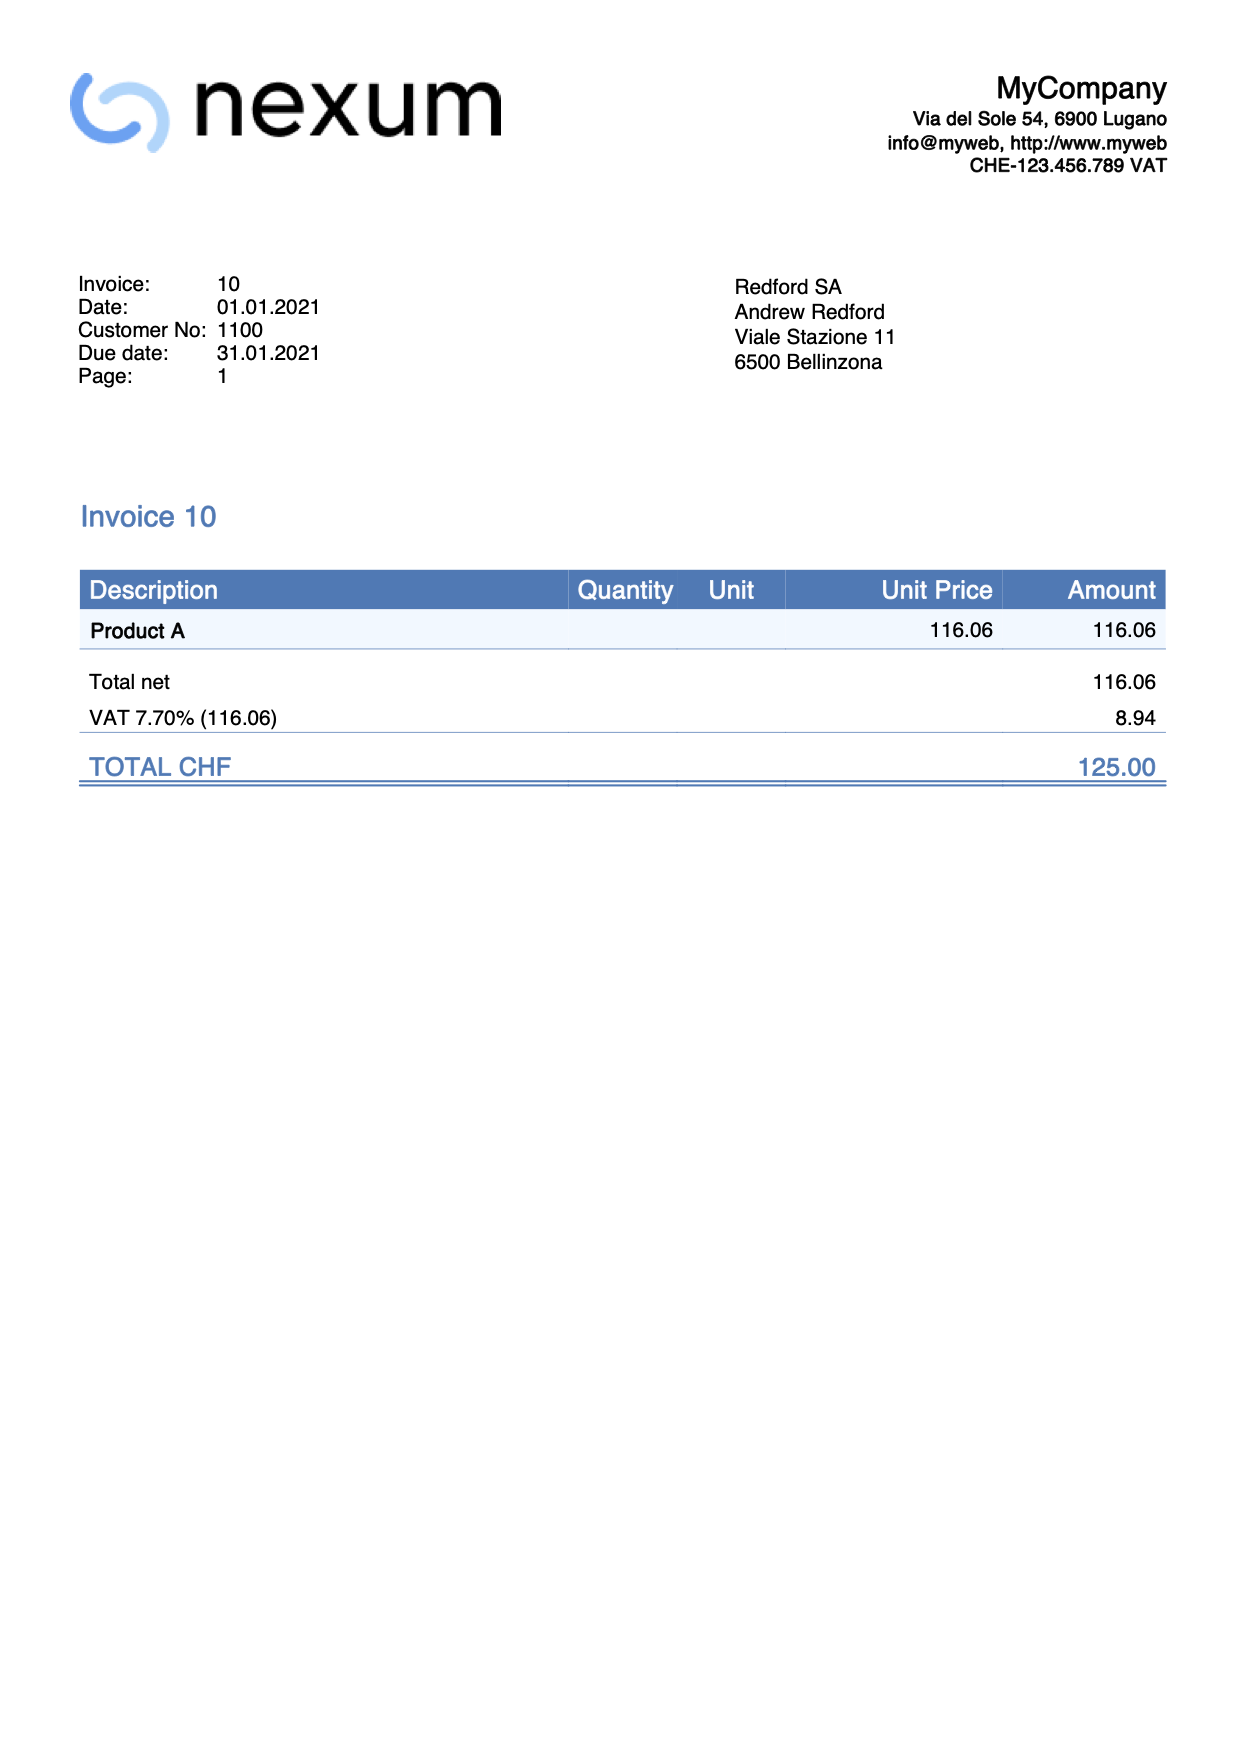
Change the font size of an item description
In this example, we want to change the font size of a specific item description text.
To do that we use the Javascript customization and also the CSS customization:
- Define a macro name like for example "#myFontSize". For each items description you want to change the font size, add the "#myFontSize" text at the end of the description.
- In Documents table:
- Add a new Javascript-type attachment.
Define then the hook function that replaces the default formatItemsValue() function.
This automatically removes the "#myFontSize“ text and changes the font size.
As ID name use for example "myStyle.js". - Add a new CSS-type attachment.
Define then the CSS class with the font size you want to use. Since the class that defines the font size does not exist in the CSS file of the invoice, you also have to create it.
As ID name use for example "myStyle.css".
- Add a new Javascript-type attachment.
- In CH10 / UNI11 layout settings, section Javascript / CSS, enter the appropriate names ("myStyle.js" and "myStyle.css").
Javascript hook function code:
function hook_formatItemsValue(value, columnName, className, item) {
  var itemFormatted = {};
  itemFormatted.value = "";
  itemFormatted.className = "";
  if (columnName === "description") {
    if (value && value.indexOf("#myFontSize") > -1) {
      itemFormatted.value = value.replace("#myFontSize","");
      itemFormatted.className = "myFontSize";
    }
  }
  return itemFormatted;
}
CSS code:
.myFontSize {
   font-size: 8pt;
}
Change the font size value as you desire.
When you create the invoice, the size of the texts in the descriptions changes.
Use different IBAN codes
The IBAN code is normally set either in the File → File and accounting properties → Address section or directly from the Invoice Settings under the related IBAN entry.
If you have more than one IBAN code to use and you want to decide to use one rather than another, you must manually change it when creating each invoice from the Invoice Settings.
However, using customization with Javascript it is possible to associate a different IBAN code to each customer. In this way, when you create the invoice, the script will automatically assign and insert the IBAN.
To do that we define the hook_modify_settings_qr() function that replaces the default modify_settings_qr() function.
function hook_modify_settings_qr(invoiceObj, qrcodeData) {
   //Assign the IBAN code CHXXXXXXXXXXXXXXXXXXX to the customer 1101
   if (invoiceObj.customer_info.number === "1101") {
      qrcodeData.supplierIbanNumber = "CHXXXXXXXXXXXXXXXXXXX";
   }
   //Assign the IBAN code CHYYYYYYYYYYYYYYYYYYY to the customer 1102
   else if (invoiceObj.customer_info.number === "1102") {
      qrcodeData.supplierIbanNumber = "CHYYYYYYYYYYYYYYYYYYY";
   }
   //Assign the IBAN code CHZZZZZZZZZZZZZZZZZZZ to the customer numbers from 1103 to 1107
   else if (invoiceObj.customer_info.number >= "1103" && invoiceObj.customer_info.number <= "1107") {
      qrcodeData.supplierIbanNumber = "CHZZZZZZZZZZZZZZZZZZZ";
   }
	// ...
}
Copy the code above and just replace:
- the value of invoiceObj.customer_info.number with the customer account you want (e.g. 1101, 1102, 1103, ...)
- the value of qrcodeData.supplierIbanNumber with the IBAN number you want (e.g. CHXXXXXXXXXXXXXXXXXXX, CHYYYYYYYYYYYYYYYYYYY, CHZZZZZZZZZZZZZZZZZZZ, ...)
- You can also add/remove more cases.
With this, when you create the invoice the IBAN code is set automatically, and it is no longer necessary to change the invoice settings every time.
Use another date format
The date format is taken from the operating system settings.
This example shows how to use another date format for all Date-type columns in the invoice details, without changing the operating system settings.
To do that:
- The XML name of the column in Transaction table must begin with the word Date (eg DateWork, DateExecution, DateXxx).
- Define the hook_formatItemsValue() function.
- In the function set the format of the date you want to use.
Format examples:- dd.mm.yyyy
- dd/mm/yyyy
- dd-mm-yyyy
- yyyy.mm.dd
- yyyy/mm/dd
- yyyy-mm-dd
function hook_formatItemsValue(value, columnName, className, item) {
  var itemFormatted = {};
  itemFormatted.value = "";
  itemFormatted.className = "";
  if (columnName.startsWith("date")) {
    itemFormatted.value = Banana.Converter.toLocaleDateFormat(value, "dd.mm.yyyy"); // insert here the format
    itemFormatted.className = className;
  }
  return itemFormatted;
}
When you create the invoice, all dates in details table will be printed with the new format.
Example print:
Print images of items
This example shows how to add and print items images on the invoice details. Each item in the Items table is associated with an image and the image is then printed on the invoice.
To do this see the instructions:
- Invoice with product images (English)
- Rechnung mit Produktfotos (German)
- Fattura con immagini prodotti (Italian)
- Facture avec images des produits (French)
When you print the invoice, the items will be printed with an image.
Example print:
Print the items row numbers
This example shows how to print a column displaying the row numbers of the items.
The first item starts at row 1.
Steps
- Add the JavaScript code as attachment in the Documents table.
- If not present, add the Documents table from the menu Tools > Add/Remove functionalities > Add Documents table.
- In the ID column, enter the name of the attachment including the .js extension (e.g., "myFile.js").
- In the Attachments column, click on the icon at the top right and select Javascript code.
An editor opens where you can enter javascript code. Delete all. - Copy and paste
- the javascript code of the 'hook_print_details_net_amounts' function (that prints the invoice with net amounts).
- the javascript code of the 'hook_print_details_gross_amounts' function (that prints the invoice with gross amounts).
- Click OK.
- Sets the parameters of the invoice layout.
- In the Invoice Settings:
- In the Invoice Details section, add the columns "RowNumber".
RowNumber;Description;Quantity;ReferenceUnit;UnitPrice;Amount
10%;40%;10%;10%;15%;15%
left;left;right;center;right;right
left;left;right;center;right;right
- In the Texts section > Column names invoice details, add the texts for the column headings (e.g., “#;Description;Quantity;Unit;Unit Price;Amount”).
- In the Javascript / CSS > JS File Name section, enter the id of the attachment that contains the javascript code (e.g., "myFile.js").
- In the Invoice Details section, add the columns "RowNumber".
- In the Invoice Settings:
Example: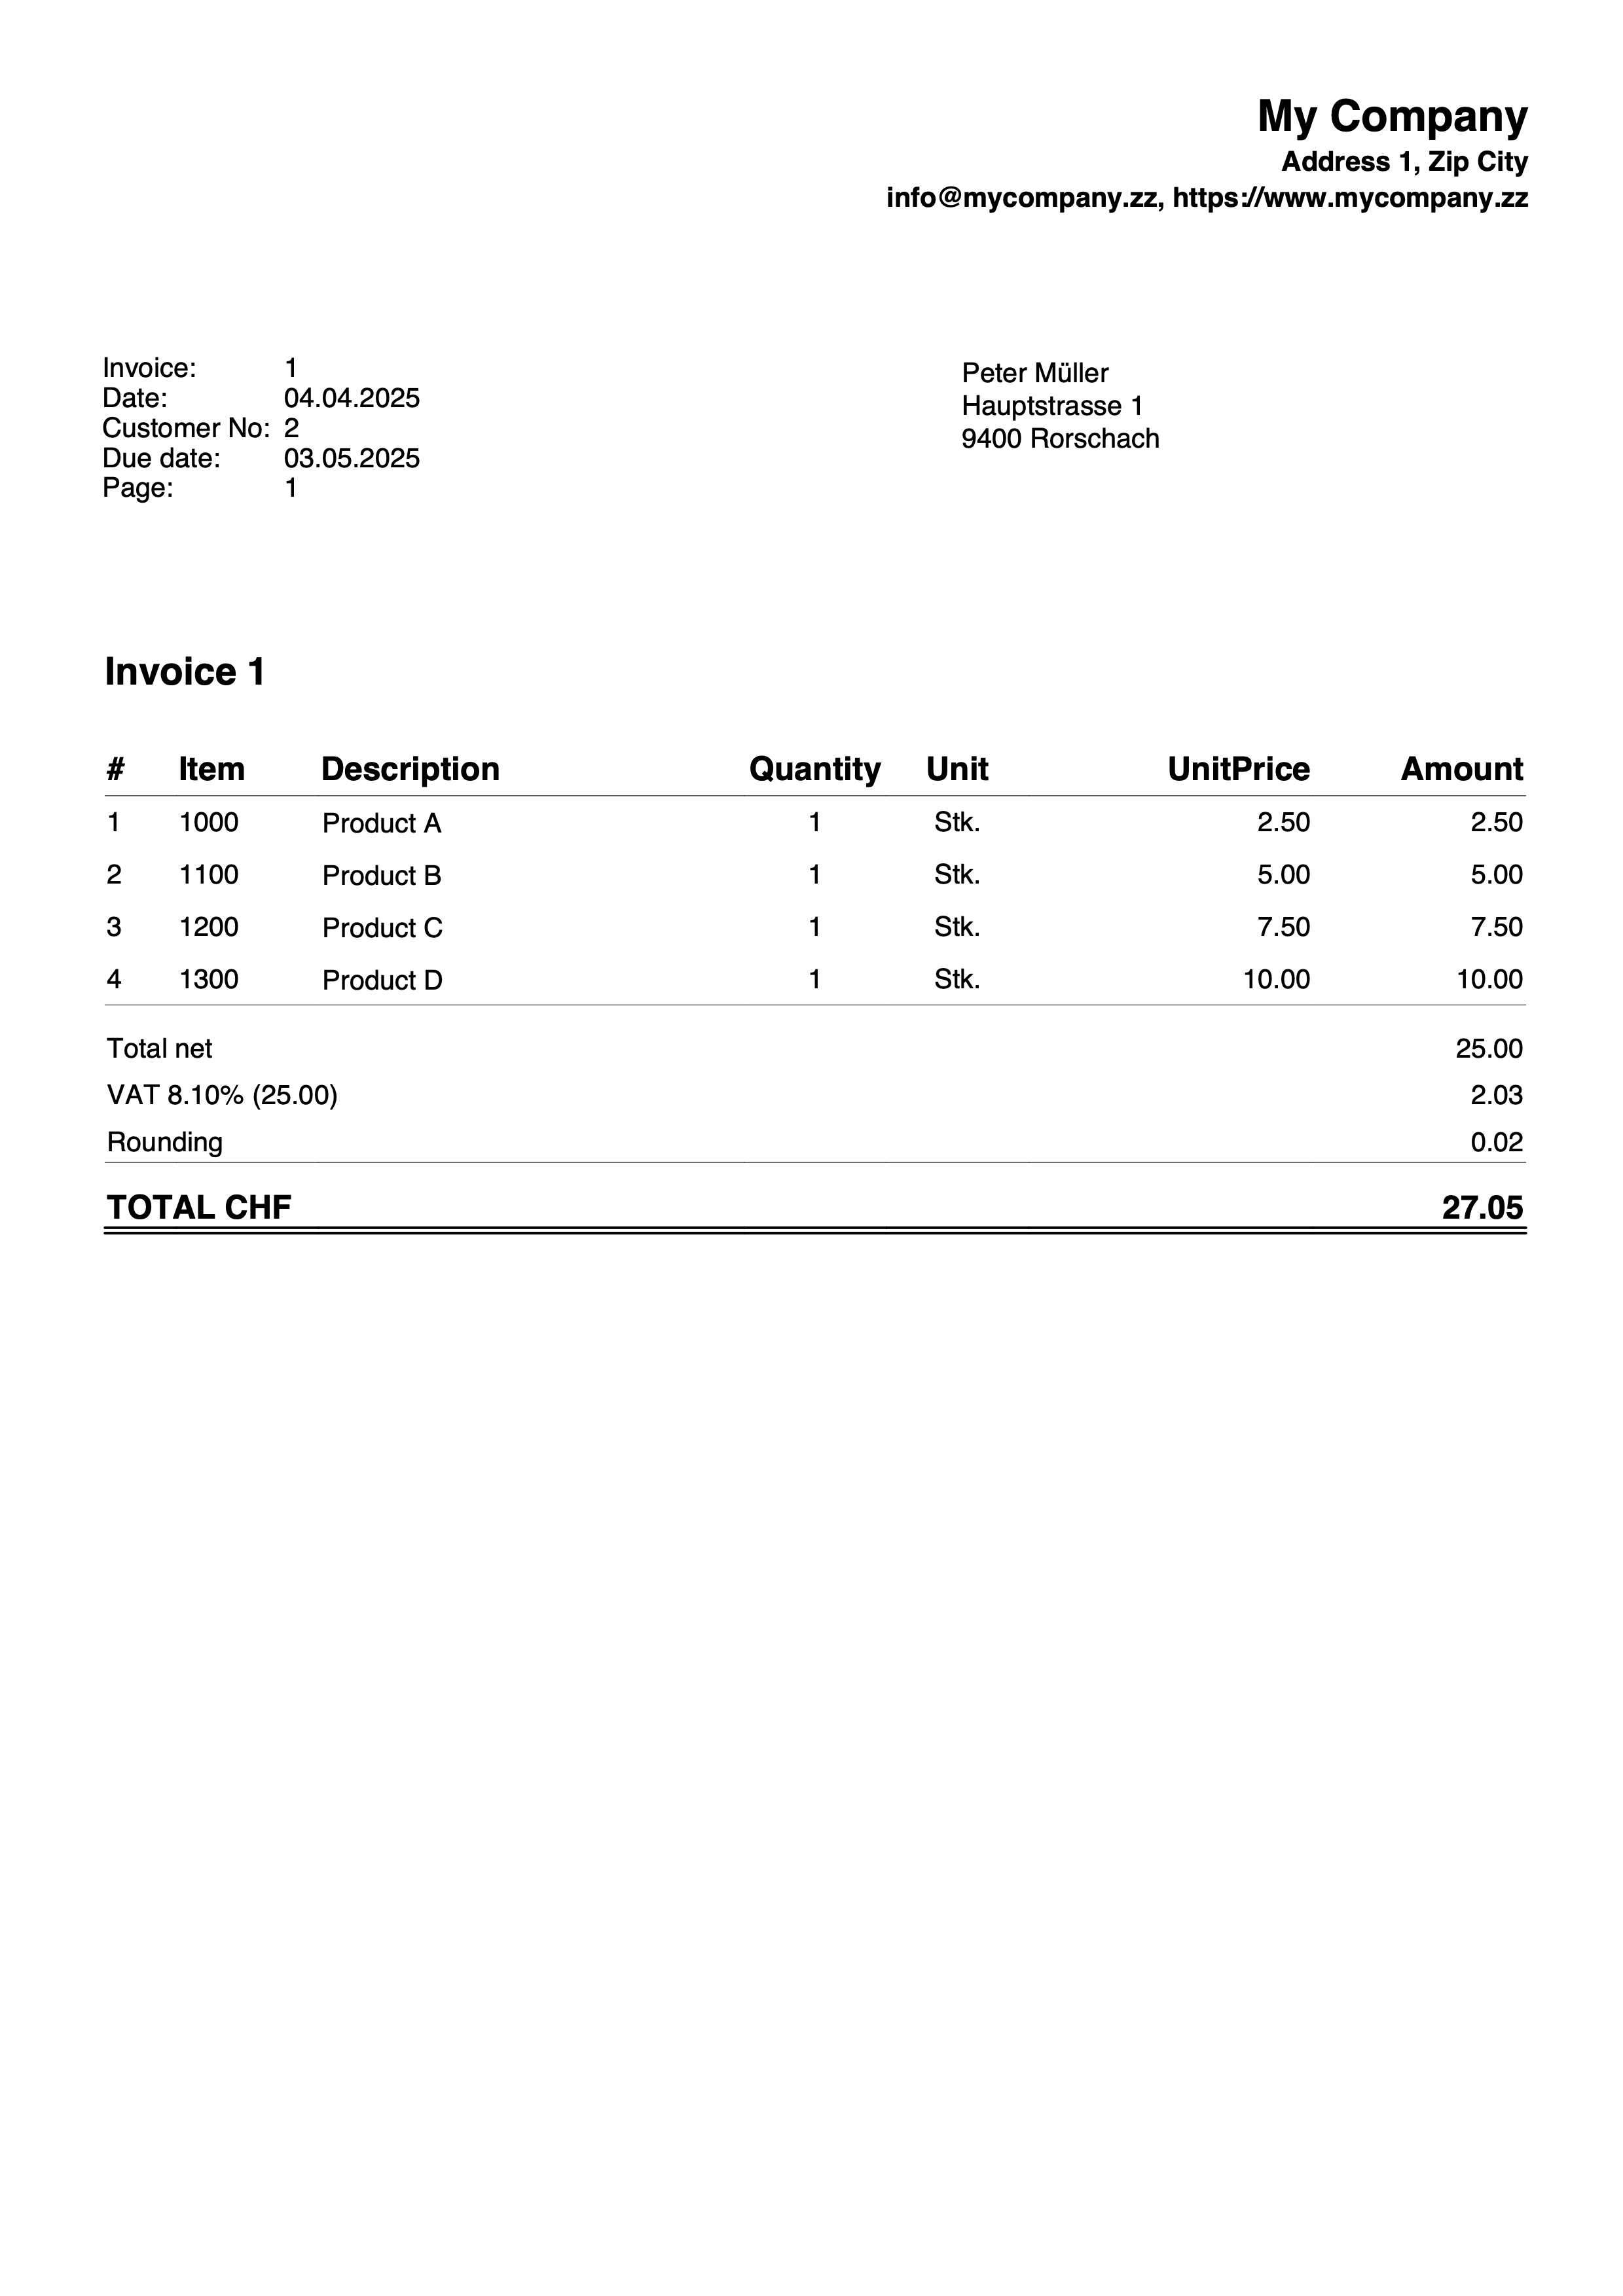
Print 0% VAT rate
This example shows how to print the VAT amounts with a rate of 0%.
To do this:
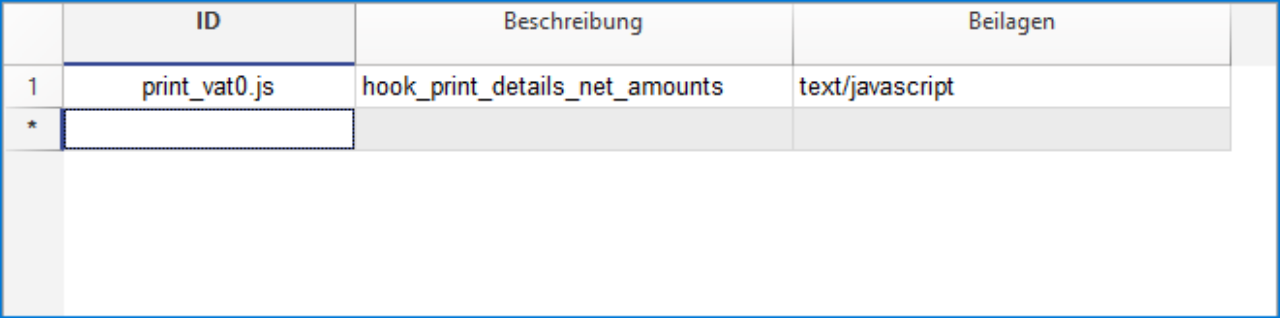
- add the following javascript snippet to your accounting in the documents table (see image below)
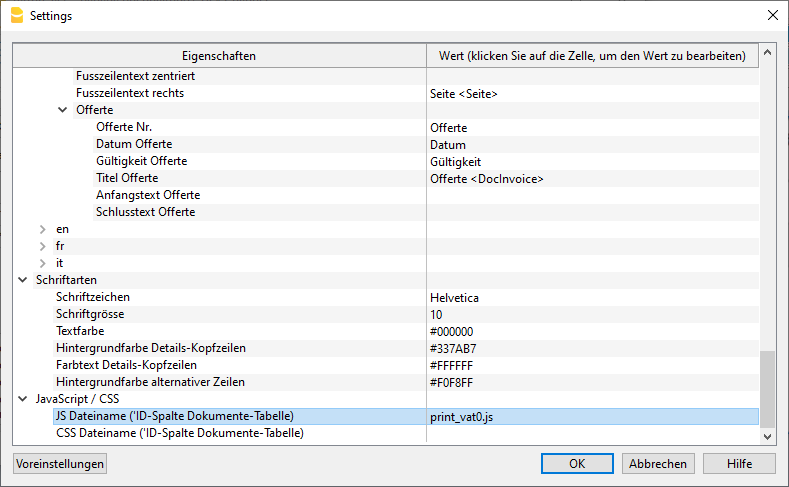
- add the reference to this hook in the settings dialog of the invoice extension (see image below)
function hook_print_details_net_amounts(banDoc, repDocObj, invoiceObj, texts, userParam, detailsTable, variables) {
  //PRINT 0% VAT RATE
  if (invoiceObj.billing_info.total_vat_rate_zero) {
    invoiceObj.billing_info.total_vat_rate_zero.vat_rate="0.00";
    invoiceObj.billing_info.total_vat_rates.unshift(invoiceObj.billing_info.total_vat_rate_zero);
  }
  print_details_net_amounts(banDoc, repDocObj, invoiceObj, texts, userParam, detailsTable, variables);
}
Example print:
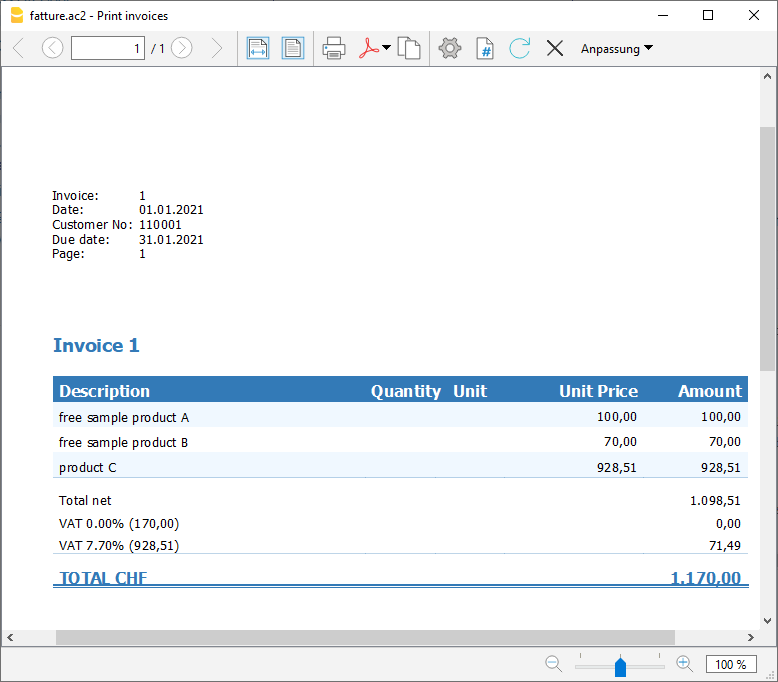
Table documents where the custom javascript is defined
Settings dialog of the invoice extension where you have to indicate the hook that overwrites the original function
Print quantities without decimals
This example for the Integrated Invoice, shows how to print quantities without decimals.
To do this:
- Add the following javascript code to your accounting in the Documents table.
- Add the reference to this code in the Invoice Settings.
For more information see Add your custom Javascript file.
function hook_set_variables(variables, userParam) {
	variables.decimals_quantity = 0;
}
Change decimals of amounts
This example for the integrated invoice shows how to change the decimals of the invoice amounts (quantity, unit price and amounts).
To do this:
- Add the following javascript code to your accounting in the Documents table.
- Change the number of decimals according to your needs.
- Add the reference to this javascript file in the Invoice Settings.
For more information see Add your custom Javascript file.
function hook_set_variables(variables, userParam) {
   variables.decimals_quantity = 4;
   variables.decimals_unit_price = 4;
   variables.decimals_amounts = 4;
}
Other examples and needs
With CSS and Javascript you can completely customize the invoice appearance.
If you have other specific needs, you can contact our customer service.