Installing Banana Accounting+
Follow the step-by-step explanation of the Banana Accounting Plus installation process.
Once the installation is done, check out our page Manage your Banana Accounting+ subscription.
Before installing Banana Accounting Plus, consult the system requirements.
- ▶ Installation of Banana Accounting Plus on Windows - video 0'52"
- ▶ Installation of Banana Accounting Plus on macOS - video 0'52"
The installation images refer to a Windows environment; the other operating systems adopt similar procedures. For more information you can see the:
How to download Banana Accounting Plus
As soon as you click on the Download button, your browser will download the Banana Accounting Plus executable file. In order to see the downloaded file, click on your browser's down facing arrow. Here are a couple of examples with Microsoft Edge and Firefox. If you have a different browser the appearance may change slightly. Double-click on the bananaplus-setup.exe file.

Depending on your operating system you may or may not see this dialog window. If not, please skip to the next images.

Choose the Save File button to download the program and double click on the file to start the installation process.
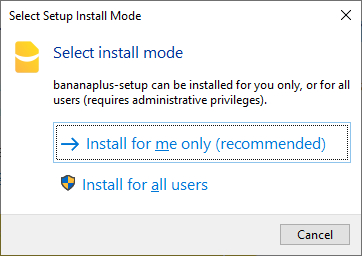
When first run, the program offers the option to install for the current user (recommended choice) or for all users (see advanced installation for windows). If you want to change this choice later, you must first uninstall the application.

The program suggest to save in the AppData\Local folder of your user name. If you want to save it in another folder choose it using the Browse button. If you change the proposed folder and the program warns that it does not have the permissions to create one or more folders, restart the program with administrator rights.

The installation usually only takes a few seconds. At the end of the installation process Banana Accounting Plus is launched.
Special cases
For installations of Banana Accounting Plus on servers, USB sticks, or computers, an internet connection is required.
Related information:
Banana Accounting Custom, RDS Installation and App Packaging for Windows
This page contains details regarding the Banana Accounting installation on Windows Operating System and the different options available to install Banana Accounting on Windows operating systems. Below you will find:
- Technical information and requirements regarding the installation.
- Parameters that can be used with the bananaplus-setup.exe.
- How to install on a single computer, on multiple computers, or on a server for multiple users.
- Installation on servers for RDS (Remote Desktop Services) users.
- Packaged installation (automatic Distribution)
- Enterprise offline multi-user subscription
Installation types
There are three main types of installation :
- Manual local Installation
Banana Accounting software is installed manually on the personal computer and runs locally.
This is the standard installation. - Packaged Installation
For large organizations. The personal computer is managed centrally. The Banana Accounting application is packaged on the server and is than automatically installed on the local computer through a central application management tool. - Remote Desktop Services (RDS), is a feature in Windows Server that allows users to access a desktop or applications hosted on a central server from a remote location.
The Banana Accounting application and accounting files live on a central server computer in an office or cloud data center. Your laptop/tablet at home is just a screen showing you what's happening on the server.
Stable and Developer versions
Banana Accounting Plus is available in two installers:
- Stable Version, the normal one available under Download
- Application id of the normal version: BananaPlus
- Developer Version, the one available on the Insider Program Page
- Application id of the dev-channel: BananaPlusDev
Although they are different programs, they share the same settings and at startup you will find the same list of recent files in both programs.
Common settings and requirements
Valid internet connection
Once you have installed Banana Accounting Plus, the application will need to connect to banana.ch web server:
- A valid internet connection is required:
- Access to the https://www.banana.ch (port 80) must be granted for:
- Subscription registration and activation
- Check for updates
- Download of templates
- Download of extensions
- Download of news
Application data
Customization and settings are saved in the users profile; the following folders and Registry keys should be granted read/write rights to the user:
- Folders:
- %localappdata%\Banana.ch\BananaPlus
- %appdata%\Banana.ch
- Registry:
- HKEY_CURRENT_USER\SOFTWARE\Banana.ch\BananaPlus
Windows bananaplus-setup.exe installer
This is the default way to install Banana Accounting on your computer.
You download the bananaplus-setup.exe, run it and it takes care of the installation.
- It will display the information necessary for completing the installation
- It will also install the uninstall command that is registered in the Window App Setup.
- No internet connection is necessary.
Subscription activation:
- The first time you install the software, it will operate according to the Free plan.
- You need to Start the program and connect to your subscription by entering the e-mail address that you have used to buy the subscription or has been assigned to the subscription (administrator e-mail).
Command line installation
This option is intended for advanced users or IT technicians. It allows you to install the program automatically using commands, without manually clicking through the installation windows. It is useful, for example, when installing Banana on many computers.
You can start the BananaSetup.exe program from a command line. The bananaplus-setup.exe is created with the InnoSetup tool and you can use the command available from InnoSetup:
Here a list of the most used parameters:
- /ALLUSERS
Instructs Setup to install in administrative install mode. (install under C:\Program Files) - /CURRENTUSER
Instructs Setup to install in non administrative install mode. (install under %localappdata%\Programs) - /VERYSILENT
Setup will run without showing any progress window or dialog. (/ALLUSERS or /CURRENTUSER must be set to silent the initial dialog). - /NORESTART
Prevents from restarting the system following a successful installation (usually not necessary). - /DIR="x:\bananaPlus"
Overrides the default installation directory. - /GROUP="Banana plus"
Overrides the folder name displayed on the Start Menu Folder
Example: silent install in C:\Program Files\BananaPlus:
.\bananaplus-setup.exe /ALLUSERS /VERYSILENT /DIR="C:\Program Files\BananaPlus"
Default local installation
When running the bananaplus-setup.exe without parameters the program will start in default mode.
During the installation, you can choose whether to install Banana only for yourself or for all users of the computer. This choice depends on how the computer is used (personal or shared).
Install for me only
This is the simplest option and is suitable if you are the only person using the computer. This is the default setting if you run the installer without administrative privileges.
- No password is requested
- The uninstall info will be under HKEY_CURRENT_USER.
- The installation directory is %localappdata%\Programs\BananaPlus
Install for all users (Administrator)
- Administrator password will be requested
- The uninstall info will be under HKEY_LOCAL_MACHINE.
- The installation directory is %ProgramFiles%\BananaPlus
Installing Updates
To update Banana Accounting, simply run the installer again with the BananaSetup.exe. When installing it for the second time, the installer will overwrite the existing installation and you will not need to uninstall anything:
- Run the installer as administrator.
- The installer will suggest the last directory used for installation. If you have last installed a Dev-Channel and you are installing the Release version, it will suggest to you the Dev-Channel directory.
- You have to manually select the right directory for installation.
RDS - Remote Desktop Service - Server Installation (centralized)
With an RDS deployment, Windows applications run on a central server (historically called a Terminal Server). Users then connect to that server and interact with the software using a Remote Desktop application. Banana Accounting+ can be installed on computers registered in a Windows domain with Active Directory and Roaming User Profiles and on computers that offer a Remote Desktop Services.
Banana Accounting+ works on Windows Server 2016 and following, and also with Citrix, TSPlus or other similar technologies.
Banana Accounting+ requires a graphics driver that supports Direct 3D 11, Direct3D 12, Vulkan 1.0, or OpenGL 2.1 or higher is required. As of Qt 6, the default for Qt Quick on Windows is Direct3D 11.
In case of problems, you will find troubleshooting info on this website.
Installation for Remote Desktop Service
You need to install Banana Accounting on your server.
- Use the "Install for all users" at the beginning of the installation process.
- Once the installation is completed you can copy the content of the installation to any other suitable directory.
An update is the same as a new installation.
To automate the update process you can create a script that use a Command Line .
Subscription License requirements
Each user of the application must have a valid Banana Accounting subscription.
Packaged Installation (Distributed)
With a "packaged installation" (often called software distribution or local installation) the installer resides on the server and the application is automatically installed on the user device.
- The software runs directly on the user's laptop.
- A "package" (like an .msi or .exe file), that contains the application is created and then sent out to be installed on every single user's device.
- The system allows to define the users that will be able to use a specific application
There are many technologies to distribute and install software on the users computer. Microsoft Intune and others.
They usually all provide their own tool to create a package.
Subscription license requirements
Each user of the application must have a valid Banana Accounting subscription.
Create a package using the BananaPlus-Setup.exe
The InnoSetup installer is compatible with most packaging tools. You can therefore include the BananaSetup.exe that should be run with the appropriate parameters to ensure a "silent" install:
- /VERYSILENT
This is the most important switch. It tells the installer to run completely in the background with no windows shown at all. - /SUPPRESSMSGBOXES
Prevents any small warning or info pop-ups that might halt the installation. - /NORESTART
Tells the installer not to automatically reboot the computer if it finishes—allowing the distribution tool to handle the reboot schedule instead. - /SP-
Skips the "This will install... Do you wish to continue?" prompt that usually appears at the start.
Create a package using the installed directory
Your packaging tool probably lets you also create package using the installed files:
- Install Banana Accounting on you local computer, specifying the desired directory.
- Create a package using the file on your directory.
Subscription license activation
Each user of Banana Accounting Plus must have a valid subscription. The following options are available:
- Single-user subscription.
Each user purchases and manages their own subscription individually. - Multi-user subscription
An administrator manages licenses for multiple users. The administrator purchases the subscriptions and assigns them to users by linking their email addresses in the Banana user account. The administrator may also be a user of the program, but this is not required. - Enterprise offline-subscription.
For large organizations we provide the possibility to purchase Enterprise offline-subscriptions.
Please contact our offices with your request.
Multi-user subscription
- The administrator can purchase and manage a multi-user subscription within the Banana User Account.
- Each user must activate their subscription by linking their email in the program via:
- Menu, Help > Manage Subscription
- In order to activate the subscription, the user must be able to connect to the banana.ch website via the https protocol.
- The activation is stored in the user's profile (see Common settings and requirements above).
Enterprise offline-subscription (Windows only)
This is a special subscription that does not require the user to connect and activate the license. It is intended for large organizations that use Banana Accounting on a central server RDS or use a prepackaged installation.
Banana.ch provides the possibility to purchase Enterprise offline-subscriptions.
Please contact our offices with your request.
- The subscription is purchased upon request to Banana.ch SA.
- The organization must qualify for this subscription model.
- The organization should have a system in place to manage and distribute the application, with the ability to track which users are authorized to use it and who has actually used it.
- The subscription is assigned to the organization email.
- The administrator will receive a special key.
Subscription dialog
When you use the offline activation method the Manage Subscription (from the Help menu) will show the subscription information.
Users will not be able to modify their subscription information.
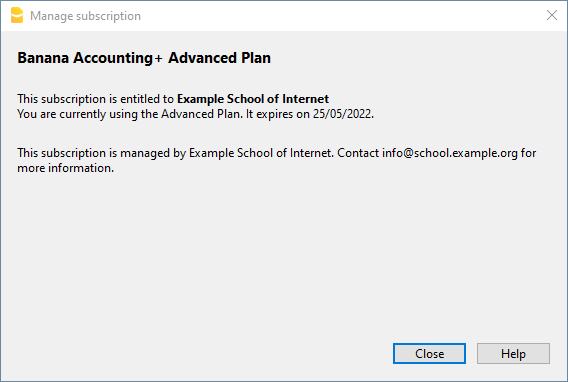
License information
For Enterprise subscriptions, the system administrator receives a dedicated encrypted activation code linked to a specific email address.
- To activate a subscription, Banana Accounting Plus requires a valid email address.
- During the installation process, this activation code can be provided to automatically generate and store an organization activation key file in the installation directory. Banana Accounting Plus will then read the subscription details directly from this file, ensuring a seamless and centralized activation experience across all systems.
- If Banana Accounting Plus has already been installed without activation, the activation key file can be added manually afterwards. Alternatively, the file can be distributed across multiple systems using automated deployment tools such as Group Policy or Microsoft Intune, simplifying large-scale rollouts.
- Application updates do not remove or overwrite the activation key file, ensuring that the subscription remains active across software upgrades without requiring reactivation.
- Subscription renewals are handled automatically: all client computers with internet access and the ability to reach the Banana subscription server will receive updated subscription information without requiring manual intervention. This ensures continuous service availability while minimizing administrative overhead.
Starting BananaPlus with the Subscription information
You can start BananaPlus.exe with the subscription information.
The parameters are different:
- Start BananaPlus.exe with the following parameters
It is better to put the parameters in quotes,- -cmd=activate_sub
Instruct BananaPlus that this is a subscription activation - -cmd_p1=your@mail.address
- -cmd_p2=<the activation code without line break>
- -cmd=activate_sub
- The installation process will update the information regarding your license.
Example:
BananaPlus.exe "-cmd=activate_sub" "-cmd_p1=info@school.example.org" "-cmd_p2=U0QxM8o77zlMg16K7HohVa8Ex1njLn+o8
Installation with organization license key
When installing the application, or using the package, you need to provide the email and the encrypted license key, that will be used during the installation
- Start the Bananaplus-setup.exe installation with a Command Line
- Provide the appropriate parameters, see above:
- /VERYSILENT
- /<user option>
- /ALLUSERS
Instruct Setup to install in administrative mode. (Installation under C:\Program files). - /CURRENTUSER
Instruct Setup to install in normal user mode. (Installation under %localappdata%\Programs)
- /ALLUSERS
- /MAIL=your@mail.address
The administrative address for which you have requested the subscription. - /KEY=<the activation code without line break>
The code you have received from Banana.ch that is connected to your email and subscription.
Bananaplus-setup.exe /VERYSILENT /ALLUSERS /MAIL=info@school.example.org /KEY=U0QxM8o77zlMg16K7HohVa8Ex1njLn+o8
Installing on Mac
Installing the software is very easy, thanks to the autoinstall function.
By downloading the program, you accept the user license conditions.
Before installing Banana Accounting Plus, consult the system requirements.
Follow these steps:
- Download the .dmg file by clicking on the Download BananaPlus for Mac button.
After saving the file in your Download folder, double click on it. - Drag the Banana Plus icon in the Applications folder

The first time installing Banana Plus on your Mac, the following window will appear:

You can safely press the Open button.
The installation usually only takes a few seconds. At the end of the installation process Banana Accounting Plus is launched. Once the installation is done, check out how to activate your Banana Plus subscription.
Once Banana Accounting Plus is open, hover over the Banana icon in the Dock, then right-click and select Options > Keep in Dock.
Particularities
Installations of Banana Accounting Plus on servers, USB flash drives or on computers not connected to the Internet are not possible.
Related information
Installing under Linux
By downloading the program, you accept the user license conditions.
Linux store - Ubuntu Software - snapcraft.io
Banana Accounting+ is published on snapcraft.io, the app store for Linux. On Ubuntu, Ubuntu software lists all apps published on snapcraft.io.
To Install Banana Accounting+, Simply open Ubuntu software, click on the search button in the upper left corner and search for "banana".
In the list of the results, click on Banana Accounting+ and finally click on Install.
Choosing the beta channel
If you want to install our Dev-channel from the Insider Program, choose the latest/beta channel from the source option, on top of the store window.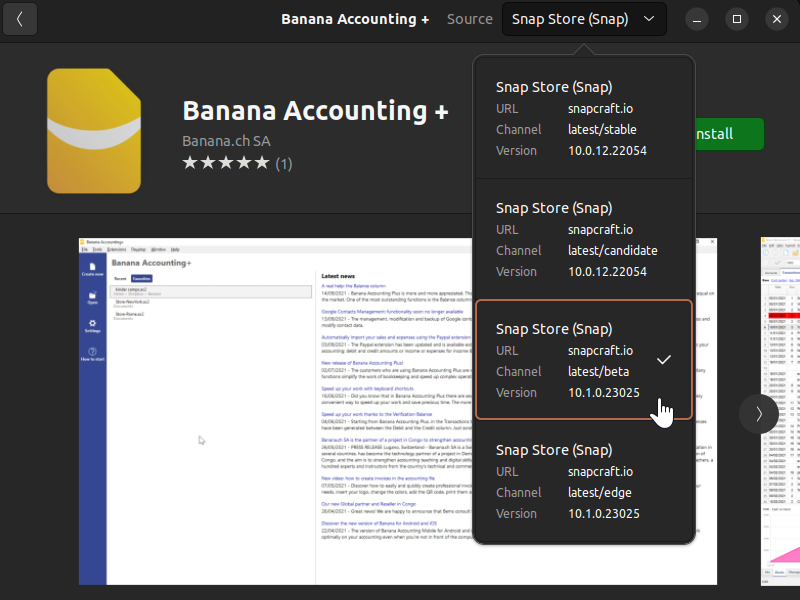
Or install from the command line:
sudo snap install banana-accounting --channel=betaIf you are missing the snap command you might need to install snapd first.
.AppImage Package
Download the application, make it executable, and run!
- Download the package
- Make the package executable
- Right click the package and select Properties
- Under the tab Permission activate the option "Allow execution ..."
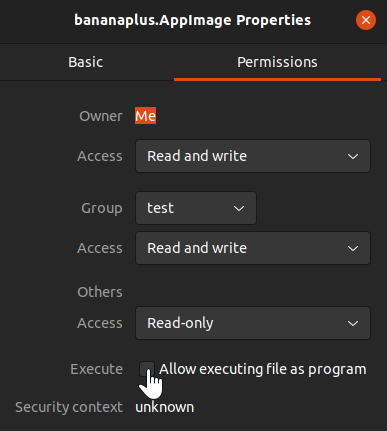
- Confirm the change with Ok
- Start the application with a double click on the package
Package .tgz
For those who need it...
- Download the .tgz package
- Extract the .tgz package
- Run the file start_Banana.sh
The .tgz package contains the script install-banana.sh. When you execute it, Banana Accounting+ will be copied to the /opt/ folder, registered in the system and associated with the .ac2 files.
Or install from the command line:
wget https://cdn.banana.ch/accounting/files/bananaplus/exe/bananaplus.tgzDownload tar.gz
mkdir bananaplus
tar -xvzf bananaplus.tgz -C bananaplus
bananaplus/install-banana.sh
Install Banana Accounting Plus on Android
You can download and install Banana Mobile for Android for free from the Google Android Play Store
Banana Mobile versions are an excellent support if you already have a desktop version and want to access your files from outside your office. These applications are constantly updated and improved.
Limitations of Banana Mobile compared to the Desktop version
- Cloud storage services other than Google Drive and Dropbox work in read-only mode.
- Import - export functions from files are not available.
- Multiple cell selection in touch mode is not available.
- Copy and paste functions in touch mode are not available.
- It is not possible to print data and create PDFs.
OneDrive "File Access Error"
Unfortunately Microsoft Onedrive Application does not fully support the SAF (Android standard Storage Access Framework API) , therefore when you are saving the data to a OneDrive you will get a "File Access Error".
Users think that this is a bug of Banana Accounting, but instead it is a limitation of OneDrive.
On this Github issue page "OneDrive Android API" you can see a full technical description of the problem and why it is related to Microsoft and not Banana Accounting.
Access documents on the cloud from your Android
Banana Accounting, like many other apps, relies on the Android standard Storage Access Framework API (SAF) to select, read, and write files that are stored on Cloud storage services like Google Drive, iCloud, OneDrive, etc.
Unfortunately, some Android cloud storage apps do not fully or correctly implement the SAF standard.
Kindly use the comment feature of the storage app to request the cloud service to fully and correctly support the SAF standard.
The following table shows you the available operations for the main Cloud storage services:
| Provider | Open | Create | Modify |
|---|---|---|---|
GoogleDrive | Yes | Yes | Yes |
Swisscom MyCloud | Yes | Yes | Yes |
Yes | Yes | Yes | |
Yes | No | No |
Install Banana Accounting+ on iOS and iPadOS
You can download and install Banana Mobile for iOS/iPadOS from the Apple App Store.
Banana Mobile versions are an excellent support if you already have a desktop version and want to access your files from outside your office. These applications are constantly updated and improved.
Limitations compared to the Desktop version
Banana Accounting Mobile looks similar and has many features that are also available on the Desktop version, like creating new accounting sheets, opening and modifying existing files, execute accounting calculations, show print previews, etc. At the moment, functionalities using external files, i.e. "Import to accounting", are disabled. It is not possible to print data and create PDF files. It does not allow opening password-protected files.
Access documents on the cloud from your cell iPhone
With Banana Accounting+ Mobile you can access to *.ac2 files stored on Cloud storage services like GoogleDrive, OneDrive, etc. Therefore you can easily share accounting files between your desktop and your iPhone or iPad. What you just need is to install on your device the corresponding app from the cloud storage provider.
The available operations on the cloud storage services depends on their implementation of the iOS FileProvider Framework. If the implementation is complete (like for iCloud or Dropbox) you will be able to open, create and modify ac2 files with Banana Accounting+ Mobile. For other providers that doesn't fully implement the FileProvider Framework, the available operations could be limited.
The following table shows you the available operations for the main Cloud storage services as of 2022-05-03:
Provider | Open | Create | Modify |
|---|---|---|---|
| iCloud | yes | yes | yes |
| Dropbox | yes | yes | yes |
GoogleDrive | yes | no | yes |
| Infomaniak KDrive | yes | no | yes |
Microsoft OneDrive | yes (1) | no | yes |
Swisscom MyCloud | yes | no | yes |
(1) The file have to be opened via the Open File Dialog. If the file is opened via the Recent Files list ti don't match the latest version present on the cloud.
Associate .ac2 files with the most recent Banana Accounting version
When the Banana Accounting program is being installed, the "Associate Banana Accounting+ with the .ac2 file extension" option is activated by default; as a result all the accounting files will be opened with the new version.
If, when clicking directly on the file before opening the program, it should occur that the file gets opened with a previous version of Banana Accounting, this problem can be solved in the following way:
Windows:
- right-click on the file icon
- on the menu that appears select "Open with" and then "Choose Default Program..."
- choose the Banana program, the latest installed version.
Mac:
- right-click (or "ctrl "+ click) on the file icon
- on the menu that appears select "Get Info"
- under "Open with..." choose the latest installed version of Banana, click then on "Change All..." option.
Important information when updating to Banana Accounting+
The following information is intended for those who already have an accounting file created with a previous version (4, 5, 6, 7, 8, 9) and are upgrading to Banana Accounting Plus.
▶ Video: How to update to Banana Accounting Plus (Switzerland)
Step by step guide on how to update from an old version to Banana Plus.
File management and exchange
Once Banana Accounting Plus has been installed (either on Windows or Mac), you can launch the program and open the accounting files that have been created with Banana Accounting:
- Banana Plus opens the files of all previous versions: 2.02, 3, 4, 5, 6, 7 , 8 and 9.
- Files saved with Banana Accounting Plus can be opened and edited with the versions 5, 6, 7 , 8, and 9 of Banana Accounting.
- If you are using features only available in Banana Plus, these do not work with previous versions.
- Files saved with Banana 5, 6, 7, 8 , 9 and 10 cannot be opened anymore with Banana 2, 3 or 4.
- Files can be transferred easily from one operating system to another.
If the files are not listed in the recent files (Initial page), they can be searched for as indicated on our web page Open and save.
Free Version / Full version
If you install Banana Accounting Plus, without subscribing and activating it , the new version operates in Free mode, which allows the unlimited and complete use of the Cash Book and Time Sheet, but for all other applications it allows the use of all functions and the saving of up to 70 lines of entries. To use Banana Accounting Plus in full, a subscription must be carried out and it needs to be activated.
Version for Mac
In order to avoid conflicts with the keys used by the Apple operating system, the function keys F4, F5, F6 of Windows have become CMd+4, Cmd+5, Cmd+6 under Mac.
Importing bank statements
Banana Accounting Plus provides various import extensions to import data from bank statements.
To import the bank statements / update the extensions, you need to:
- Via the Actions → Import to accounting → Import transactions.
- click on the Manage extensions button to see all the available extensions.
- click on the Update extensions button.
- enable the desired extensions by selecting them and clicking on OK.
Importing Postfinance Xml files
Banana Accounting Plus imports bank statements using the new XML ISO 20022 standard. Postfinance supplies this format only upon request of the customer.
It is therefore necessary to ask your Postfinance consultant to change the format and switch to ISO 20022.
Postfinance Business clients can ask to have the Pdf as well as the ISO 20022 format.
Swiss VAT Report with new rates
The current VAT rates are integrated into the programme and can be imported. See Updating the VAT Code Table with the 2024 VAT rated 2024.
In order to obtain the quarterly Swiss VAT report, ready for the official form, proceed as follows:
- From the Menu Extensions > Manage extensions and according to the VAT method:
- Choose the Swiss VAT tax report - effective method
- Choose the Swiss VAT tax report - Flat tax rate method
- The Electronic transmission of the XML file to the AFC- VAT Authority is also forseen .
Changes from Banana 6 (or previous versions)
In Banana Accounting Plus, compared to version 6 or earlier versions, some functions have changed:
- Data can be edited directly in the table cell (just like in Excel)
- With a double-click you go in the cell editing mode.
In order to open an account card or to access the Extract rows command, instead of the double-click you can use:- Alt + mouse click and then choose command Account card
- Right mouse click (opens the menu) and then choose Account card
- A mouse click on the little blue arrow next to the account number (cell top left corner)
- The Messages window has been moved in the lower corner of the screen, next to the Info window.
The Messages window can be reached by clicking on the corresponding table. - The Views list has been moved to the top of the screen, just below the tables list.
- When scrolling the vertical bar, the table content now immediately scrolls too.
- In the transactions, the indication of the date and the document are not shown any more.
- From the Banana 7 version it is possible to update the Account card (see refresh button on the top right corner); in Banana Accounting 6 it was necessary to give the command again.
- When printing or when viewing the print preview, it is now possible to only print a selection of rows.
In the print dialog window, it is possible to choose if you want to print everything or just a selection (only in Banana for Windows). - In the Date column, by entering the “.” symbol, the program automatically enters the date of the day.
- Simple Accounting → has been changed into→ Income & Expense accounting
- The Cash1, Simple1, Cash2 and Simple2 menus have been replaced by the menu Actions
- Accounts by period → has been changed into → Accounting report
- Export file in pdf → has been changed into → Create Pdf dossier
- In some functions, such as the Enhanced Balance sheet, a new submenu called "Customizations" has been created in order to recall saved personal settings (in Banana 6 they were called Favorites).
- In the Help menu→ Keyboard Shortcuts, you find the list of key-combinations and the commands that are associated with them.
- In the Info and Messages windows, next to the error message, there is now the
 symbol: if you click on it, you will be directly connected to the online page explaining the error message and suggesting possible causes and solutions.
 - DDE connections are no longer supported
Banana Accounting+ WebApp
Banana Accounting Plus WebApp is based on the innovative WebAssembly technology, which lets you run the application locally in modern browsers without installing anything. In addition, you don’t need to register or provide any email address, and your accounting data stays private (which does NOT happen with other cloud programs).
With Google Chrome, Microsoft Edge, and Apple Safari you can save and install the WebApp. This is useful to create shortcuts on the desktop or the taskbar for quicker access.
Installing the WebApp with Google Chrome
To install Banana Accounting Plus WebApp with Google Chrome, follow these steps:
- Launch Google Chrome.
- Open Banana Accounting Plus WebApp in Google Chrome.
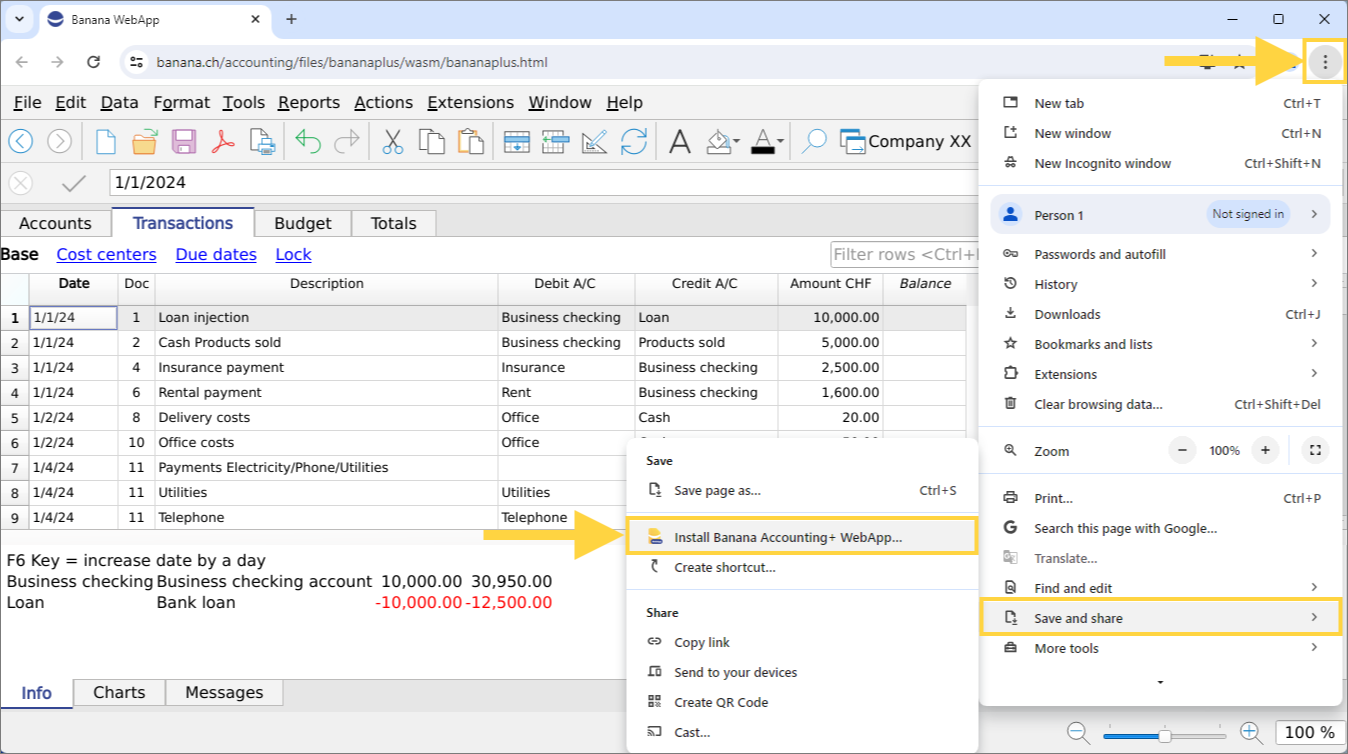
- Click Customize and control Google Chrome (three vertical dots).
- Select Save and share > Install Banana Accounting Plus WebApp.
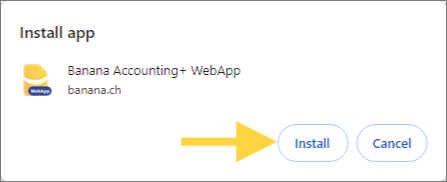
- In the dialog that opens, click Install.
- The WebApp starts immediately and is saved as a shortcut on the Desktop and also on the taskbar at the bottom.
To launch the WebApp, click the shortcut on the Desktop or from the taskbar.
If you want to uninstall Banana Accounting Plus WebApp, proceed as follows:
- Launch Banana Accounting Plus WebApp.
- Click Customize and control Banana Accounting Plus WebApp (three vertical dots).
- Click Uninstall Banana Accounting Plus WebApp.
- Confirm with Remove.
Installing the WebApp with Microsoft Edge
To install Banana Accounting Plus WebApp with Microsoft Edge, follow these steps:
- Launch Microsoft Edge.
- Open Banana Accounting Plus WebApp in Microsoft Edge.
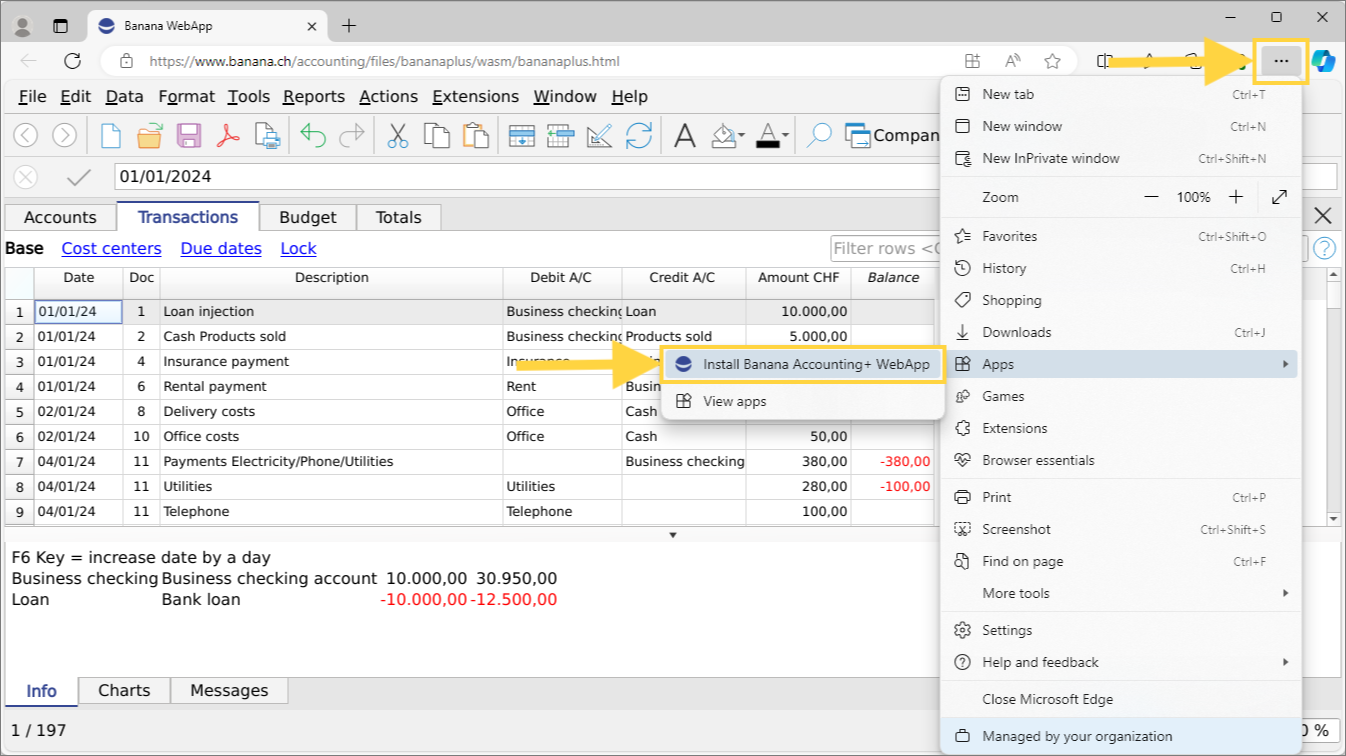
- Click Settings and more (three dots).
- Select Apps > Install Banana Accounting Plus WebApp.
- In the dialog that opens, click Install.
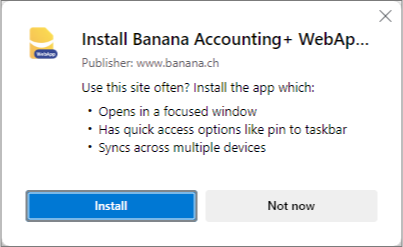
- In the installation confirmation window, select your preferred options and then click Allow.
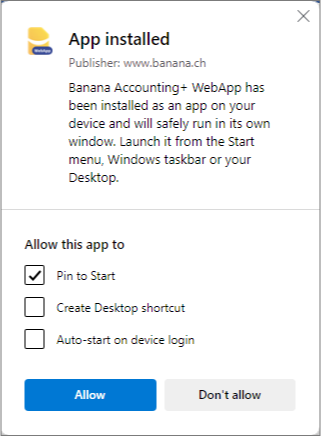
- The WebApp starts immediately and is saved according to the chosen options (taskbar, Start menu, desktop shortcut).
To launch the WebApp, click the icon on the taskbar, from the Start menu, or the desktop shortcut.
If you want to uninstall Banana Accounting Plus WebApp, proceed as follows:
- Launch Microsoft Edge.
- Click Settings and more (three dots).
- Select Apps > View apps.
- Click More options (three dots) > Manage app.
- Find Banana Accounting Plus WebApp, click More options (three dots) > Uninstall.
- Confirm with Remove.
Installing the WebApp with Apple Safari
WebApp installation is available starting from macOS Sonoma.
To install Banana Accounting Plus WebApp with Safari, follow these steps:
- Launch Safari.
- Open Banana Accounting Plus WebApp in Safari.
- From Safari’s menu, select File > Add to Dock.
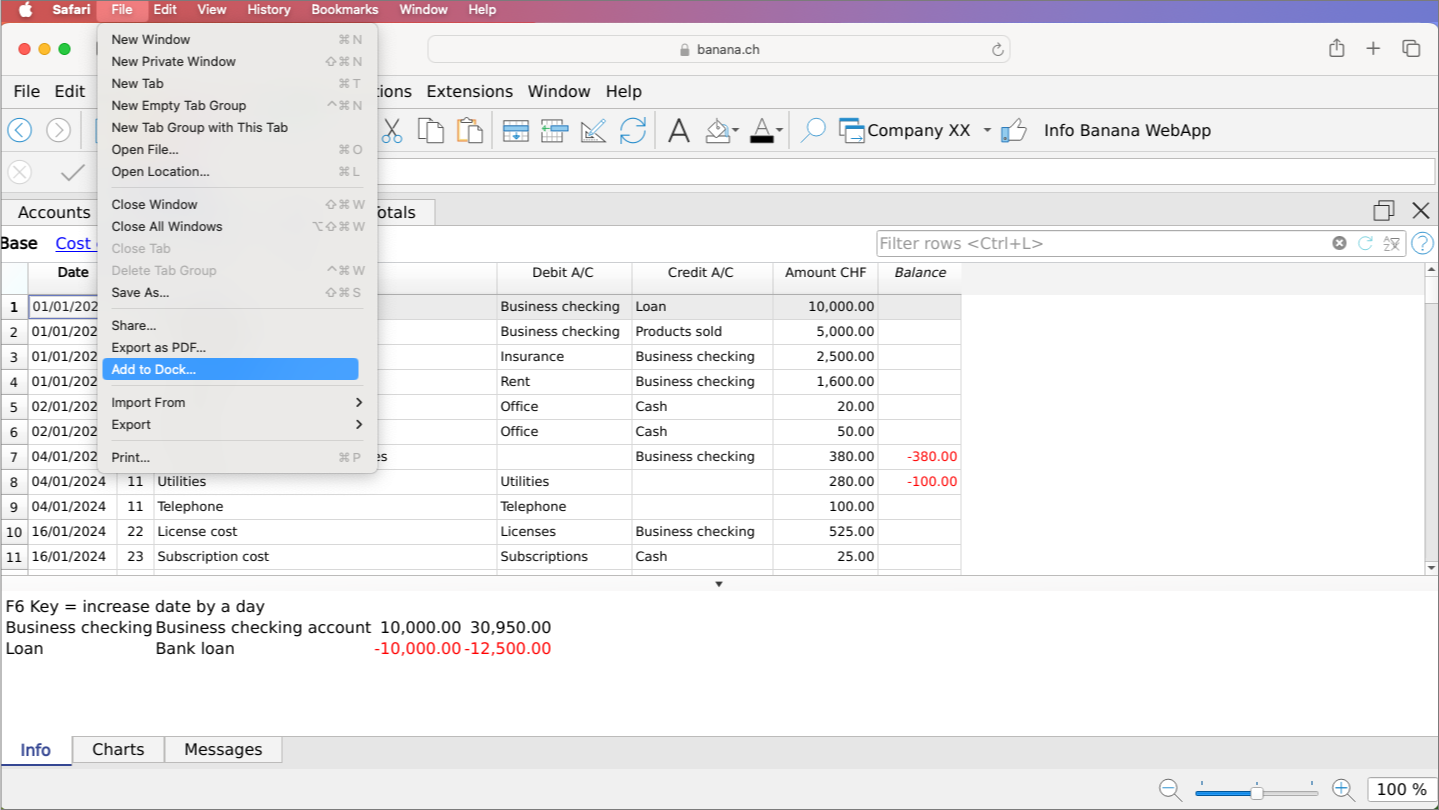
- In the dialog that opens, enter the name you want to use for the WebApp and then click Add.
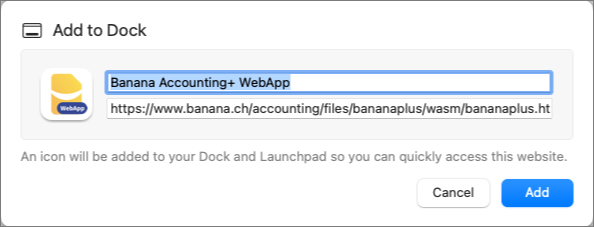
- The WebApp starts immediately and is saved in the Dock.
To launch the WebApp, click its icon in the Dock.
If you want to uninstall Banana Accounting Plus WebApp, proceed as follows:
- Open Finder.
- From the menu bar select Go > Home.
- Go to the Applications folder (web apps created by Safari are saved in this folder).
- Locate Banana Accounting Plus WebApp and drag it to the Trash.
- Empty the Trash to complete the uninstallation.
Known issues
- 13.08.2024
When selecting the command File > Open, the file selection dialog does not appear.
Safari Web App cannot access local files after updating to macOS 14.6 (Sonoma) with Safari 17.6 on ARM processors.
macOS 15 Sequoia works correctly, as does running the application inside the browser (without installing the Web App).
Banana Accounting for Microsoft Teams
Banana Contabilità arriva dentro Microsoft Teams. Con la nuova Banana Teams App lavori sulla tua contabilità direttamente dalla finestra di Teams, apri i file salvati su OneDrive o SharePoint senza scaricarli, e li condividi con il tuo team senza cambiare strumento.
Con Banana Teams App è come lavorare in cloud, perché su qualsiasi dispositivo su cui hai installato Teams puoi aprire e salvare file con Banana, senza fare alcun login supplementare. Rispetto agli altri software contabili che lavorano in cloud sei però solo tu che hai il controllo dei tuoi dati, puoi copiare e spostare il file.
L'app si presenta come una scheda (tab) personale di Teams. Una volta installata, la trovi nella barra laterale di Teams o all'interno di un canale del tuo team, esattamente come qualsiasi altra app Microsoft o di terze parti.
Funzionalità
In sintesi, ti permette di:
- Tenere la contabilità all'interno dell'ambiente di lavoro Teams, vicino a chat, riunioni e documenti
- Aprire e modificare file
.ac2archiviati sul tuo dispositivo, su OneDrive o su SharePoint - Salvare le modifiche direttamente nel cloud, mantenendo il file sempre disponibile per i colleghi
- Vedere se altri utenti hanno aperto lo stesso file in quel momento
- Aprire un file da un link condiviso (1drv.ms, onedrive.com, sharepoint.com) o un URL pubblico
- Ritrovare velocemente i file recenti e i preferiti, sincronizzati tra dispositivi diversi
L'app è adatta sia per uso individuale che per lavoro di squadra in studi commercialisti, associazioni, ONG e piccole-medie imprese.
Limitazioni
Teams è una tecnologia legata al browser e quindi presenta ancora alcune limitazioni.
Banana Teams App è ancora in fase di sviluppo e può quindi non offrire tutte le possibilità di Banana Desktop.
- Teams non permette di avere degli zoom differenti per ogni tab o finestra separata.
- Per i file in cloud, non puoi accedere agli allegati.
- Quando si passa dalla tab di Banana a un'altra e viceversa, il caricamento può richiedere del tempo.
Oppure Teams potrebbe chiudere la tab. Meglio aprire Banana in una nuova finestra.
Installare Banana Teams App
Prerequisiti
Per usare la Banana Teams App ti servono:
- Un account Microsoft 365 aziendale o scolastico (un account Microsoft personale, tipo Outlook.com non è sufficiente, perché l'app utilizza l'autenticazione single sign-on di Microsoft Teams)
- L'applicazione Microsoft Teams (versione desktop, web o mobile)
- Spazio su OneDrive o SharePoint per archiviare i file di contabilità (consigliato, ma non obbligatorio: puoi anche aprire e salvare file dal tuo dispositivo)
- La possibilità di installare app dal Microsoft Teams Store. In alcune organizzazioni l'amministratore IT deve prima consentire l'app o approvarne i permessi.
- Un browser moderno, se usi Teams nel browser: Edge o Chrome aggiornati. WebAssembly è supportato anche da Firefox e Safari recenti.
- L'app NON È disponibile per gli account personali, perché non hanno la funzionalità di Single sign-on.
Non serve installare alcun software aggiuntivo sul tuo computer: tutto il software Banana Contabilità viene caricato dentro Teams.
Attivare l'app per il tuo tenant
Banana Contabilità è disponibile dal Microsoft Teams Store. Se il tuo tenant Microsoft 365 consente l'installazione delle app pubblicate nello Store, puoi cercarla direttamente in Teams e aggiungerla come qualsiasi altra app.
La disponibilità effettiva dipende però dalle impostazioni della tua organizzazione. L'amministratore Microsoft 365 può:
- Consentire l'installazione delle app pubblicate nel Teams Store
- Bloccare o approvare singole app
- Rendere l'app disponibile solo ad alcuni utenti o gruppi
- Installare o appuntare l'app automaticamente per gli utenti
- Richiedere il consenso amministrativo ai permessi Microsoft 365 dell'app
Installare la Banana Contabilità Teams App
Per aggiungerla al tuo Teams:
- Apri Microsoft Teams
- Clicca sull'icona App nella barra laterale sinistra
- Cerca Banana Contabilità
- Clicca su Aggiungi
- Conferma l'installazione
- Suggerimento: puoi appuntare l'app nella barra laterale cliccandoci sopra con il tasto destro e scegliendo Appunta (in alcune versioni: Pin), così ti basta un click per aprirla.
Se non trovi l'app, contatta l'amministratore IT della tua organizzazione e chiedi di consentire Banana Contabilità in Microsoft Teams.
Al primo avvio potrebbe essere richiesto il consenso ai permessi Microsoft 365.
- In alcuni tenant può concederlo direttamente l'utente.
- In altri casi serve l'approvazione di un amministratore.
- I permessi servono per identificarti e per aprire e salvare, per tuo conto, i file
.ac2a cui hai accesso su OneDrive e SharePoint.
Note tecniche sull'installazione
Banana per Teams è un'applicazione che viene caricata sul Marketplace e viene aggiornata automaticamente ogni volta che noi rilasciamo una nuova versione.
- Quando installi la Teams App, questa lavora all'interno del tuo spazio di lavoro e di calcolo messo a disposizione da Microsoft.
- Per l'apertura e il salvataggio dei file vengono usate le Azure Functions serverless di Microsoft Graph (OneDrive/SharePoint). Questi servizi sono gestiti da Microsoft e, secondo le specifiche di Microsoft, elaborano la richiesta in modo serverless, senza conservare copie dei dati.
- Banana.ch, in quanto sviluppatore del software, non ha alcun accesso ai tuoi spazi. Non riceve copie dei tuoi dati, non può vedere cosa fai e tantomeno può accedere o modificare i tuoi file.
Avvio di Banana Contabilità per Teams
Primo avvio e accesso
La prima volta che apri la Banana Teams App, vedrai una schermata di caricamento con il messaggio "Caricamento di Banana Contabilità...". L'app sta scaricando il motore di Banana e preparando l'ambiente di lavoro: questa operazione può richiedere da pochi secondi a più tempo, soprattutto al primo avvio o con una connessione lenta.
Una volta caricata, l'interfaccia di Banana Contabilità è identica a quella che già conosci dalla versione desktop.
Apri in finestra nuova
Quando lanci Banana direttamente nella finestra di Teams, come una nuova scheda, questa finestra viene automaticamente chiusa quando ti sposti su un'altra scheda di Teams.
È quindi meglio usare i “...” e scegliere Apri in nuova finestra.
Accessi ai file (single sign-on)
Quando hai effettuato il login in Teams (single sign-on), in Banana hai automaticamente accesso a tutti i tuoi file e alle condivisioni.
Se è la prima volta in assoluto, Teams o Microsoft 365 potrebbero chiedere a te o al tuo amministratore di concedere all'app i permessi di accesso a:
- Il tuo profilo utente
- I file su OneDrive
- I siti SharePoint a cui hai accesso
- Le informazioni di base necessarie per mostrare la presenza dei collaboratori
Questi permessi servono per consentire l'apertura e il salvataggio dei file e per mostrare chi ha aperto lo stesso documento. Senza i permessi richiesti, le funzioni cloud dell'app non possono funzionare.
Aprire e condividere un file di contabilità
Per aprire un file, clicca su Apri dal menu di Banana, oppure utilizza la pagina iniziale dei file recenti. Si aprirà la finestra Carica file dal dispositivo o dal cloud, divisa in quattro schede:
Dispositivo locale
- La scheda Dispositivo ti permette di selezionare un file
.ac2salvato localmente sul tuo computer. - Clicca su Apri dal dispositivo, scegli il file dal selettore di sistema e Banana lo caricherà immediatamente.
- I file aperti dal dispositivo non vengono inseriti nella lista dei file recenti, perché non hanno un'identità stabile nel cloud.
OneDrive
- Nella scheda OneDrive trovi un esploratore dei tuoi file personali su OneDrive for Business.
- Naviga tra cartelle e sottocartelle come faresti su OneDrive nel browser. Le colonne disponibili mostrano nome, dimensione, data di modifica e autore della modifica.
- Clicca su un file
.ac2per aprirlo: l'app scarica il contenuto in modo sicuro, senza farti uscire da Teams.
SharePoint
- La scheda SharePoint elenca i siti SharePoint a cui hai accesso.
- Seleziona il sito desiderato, poi naviga tra le librerie di documenti per trovare il file.
- La struttura è identica a quella di OneDrive: cartelle, file, breadcrumb di navigazione.
- Se appartieni a molti siti, puoi tornare alla radice cliccando sul pulsante home nel breadcrumb.
Apri da URL (file condivisi)
- La scheda Incolla URL ti consente di aprire un file partendo da un link. È utile in tre casi:
- Un collega ti ha condiviso un link a un file su OneDrive o SharePoint (1drv.ms, onedrive.com, sharepoint.com): incollalo qui e l'app lo aprirà usando il sistema di sharing di Microsoft Graph
- Hai un link diretto a un file
.ac2pubblico su un server web (HTTPS o HTTP) - Stai aprendo un link generato da un'altra applicazione Banana
Link condivisi Microsoft
Quando un collega ti condivide un file .ac2 da OneDrive o SharePoint usando la funzione Condividi di Microsoft 365, ottieni un URL del tipo https://...sharepoint.com/.... Puoi:
- Incollarlo nella scheda Incolla URL dell'app
- Aprire il file da OneDrive o SharePoint con l'opzione Apri con Banana Contabilità, quando disponibile nel menu del file
L'app riconosce automaticamente i domini di Microsoft (onedrive.com, 1drv.ms, sharepoint.com) e usa il sistema di sharing di Graph per scaricare il file con i tuoi permessi.
Incolla il link nel campo URL del file e clicca su Apri URL. Vengono accettati solo link http:// e https://.
Suggerimento: la combinazione Ctrl+V (o Cmd+V su Mac) è supportata anche dentro la finestra di Teams, anche se Teams in genere blocca l'accesso agli appunti per ragioni di sicurezza.
Pulsante di ricarica
Quando navighi in OneDrive o SharePoint, in alto a destra della finestra trovi un pulsante con l'icona di ricarica. Cliccalo per aggiornare la lista dei file e delle cartelle, ad esempio se un collega ha appena caricato un nuovo documento.
Apri con Banana Contabilità
Quando l'integrazione file di Microsoft 365 è disponibile nel tuo tenant, i file .ac2 salvati su OneDrive o SharePoint possono mostrare l'azione Apri con Banana Contabilità. Se la scegli, Teams apre direttamente Banana Contabilità e carica il file selezionato.
Questa funzione dipende dalla pubblicazione dell'app nel Teams Store, dalla disponibilità dell'integrazione nel tenant e dalle policy configurate dall'amministratore.
Aprire file da link condivisi
La Banana Teams App supporta i deep link, ovvero i link che aprono direttamente un file specifico al posto di mostrarti la pagina iniziale dell'app.
Esistono due modi per usarli:
- Deep link Teams
Se inserisci un link di Teams che punta direttamente a un file (con i parametrifileIdesource), l'app lo apre automaticamente al primo avvio. Questo è utile, ad esempio, per inserire un link a un file di contabilità in un messaggio di Teams o in una scheda di un canale: chi ci clicca arriva direttamente sul file aperto.
- File recenti e preferiti
La schermata iniziale di Banana mostra i tuoi file aperti di recente (fino a 8) e quelli che hai marcato come preferiti.
Sincronizzazione fra dispositivi
I file recenti e i preferiti sono memorizzati sia localmente che nel tuo profilo cloud, in modo che li ritrovi anche se apri Teams da un altro computer. La sincronizzazione è automatica.
La lista contiene i riferimenti ai file, come nome, posizione e identificativo cloud. Non contiene il contenuto dei file .ac2.
Operazioni disponibili
- Apri: clicca sul file per riaprirlo. L'app scarica la versione più recente dal cloud, non una copia obsoleta.
- Apri posizione file: ti porta direttamente nella cartella che contiene il file, dentro la finestra di esplorazione di OneDrive o SharePoint.
- Aggiungi ai preferiti: contrassegna un file come preferito. I preferiti non vengono mai rimossi automaticamente dalla lista, anche quando ne apri di nuovi.
- Rimuovi dai recenti: elimina una singola voce dalla lista (il file rimane sul cloud).
- Cancella tutti: svuota completamente la lista dei recenti.
I file aperti dal solo dispositivo non vengono memorizzati nei recenti, perché non hanno un riferimento univoco nel cloud.
Salvare il file
Banana distingue automaticamente fra due situazioni:
- Salva (Ctrl+S): se il file proviene dal cloud, viene aggiornato direttamente nella sua posizione originale (OneDrive o SharePoint), senza chiederti nulla
- Salva con nome: apre la finestra di salvataggio dove puoi scegliere posizione, nome e destinazione
Quando il file salvato proviene dal dispositivo, anche un semplice Salva apre la finestra di salvataggio: è necessario perché il browser, per ragioni di sicurezza, non può sovrascrivere file locali automaticamente.
La finestra di salvataggio
La finestra di salvataggio offre tre destinazioni, simili a quelle di apertura:
- Dispositivo: scarica il file sul tuo computer (cartella Download del browser)
- OneDrive: salva il file sul tuo OneDrive personale, scegliendo la cartella di destinazione
- SharePoint: seleziona prima il sito, poi la cartella
Il campo Nome file ti permette di rinominare il file prima del salvataggio.
Caricamento intelligente
Per i file di grandi dimensioni l'app suddivide automaticamente il caricamento in più parti, in modo da rendere il salvataggio resistente a interruzioni di rete. Per i file più piccoli (sotto i 4 MB) il caricamento avviene in un unico passaggio. Tu non devi fare nulla: è l'app a scegliere il metodo migliore.
Durante il salvataggio vedrai una serie di messaggi di stato:
- "Esportazione .ac2 da Banana..."
- "Verifica della versione remota..."
- "Preparazione del payload di caricamento..."
- "Caricamento in OneDrive..." (o SharePoint)
- "File salvato in OneDrive."
Gestione delle versioni e dei conflitti
Quando lavori su un file condiviso, può capitare che un collega lo modifichi e lo salvi mentre tu lo hai ancora aperto. La Banana Teams App rileva automaticamente questa situazione confrontando la versione del file remoto con quella che hai in memoria.
Se al momento del salvataggio la versione remota è cambiata, l'app non sovrascrive automaticamente il lavoro del collega: invece, ti mostra una finestra di dialogo Il file remoto è cambiato con tre opzioni:
- Sovrascrivi: forza il salvataggio della tua versione, perdendo le modifiche fatte dal collega. Da usare solo se sei sicuro di cosa stai facendo.
- Salva con nome: salva il tuo lavoro come copia separata. L'app suggerisce automaticamente un nome del tipo
NomeFile (conflict 2026-05-09 10-30-15).ac2, così poi puoi confrontare le due versioni con calma. - Annulla: chiude la finestra senza salvare, ti permette di riconsiderare cosa fare.
L'app verifica anche lo scenario opposto: se il file remoto è stato eliminato mentre lavoravi, ti viene proposto direttamente di salvare la tua copia di conflitto.
Presenza dei collaboratori
Quando apri un file .ac2 da OneDrive o SharePoint, la Banana Teams App ti dice se altri colleghi della tua organizzazione hanno lo stesso file aperto in quel momento. Ne vedrai gli avatar (foto del profilo Microsoft 365) accanto al nome del file.
Questo ti aiuta a:
- Coordinarti con il collega prima di iniziare modifiche importanti
- Evitare conflitti di versione, ad esempio mettendoti d'accordo su chi salva per primo
- Avere un riscontro immediato su chi sta consultando o modificando lo stesso file
La presenza viene aggiornata circa ogni 30 secondi e si chiude automaticamente quando chiudi il file o l'app.
Nota tecnica: la presenza non condivide il contenuto del file né modifiche in tempo reale. Mostra solo chi sta lavorando sullo stesso file. Le modifiche vere e proprie restano legate al ciclo "apri - modifica - salva", come nella versione desktop.
Lingue e tema
Lingue supportate
L'interfaccia della Banana Teams App è disponibile in:
- Italiano
- Inglese
- Tedesco
- Francese
La lingua viene scelta automaticamente in base alla lingua del tuo Teams. Se Teams è in italiano, anche l'app sarà in italiano. Se la tua lingua non è fra quelle supportate, l'app usa l'inglese come ripiego.
Tema chiaro e scuro
L'app segue il tema di Teams: chiaro, scuro o ad alto contrasto. Quando cambi tema in Teams, l'app si adatta automaticamente alla nuova combinazione di colori.
Privacy e sicurezza
La sicurezza dei tuoi dati di contabilità è una priorità. Ecco come è progettata l'architettura dell'app:
- Single sign-on: non devi inserire nuovamente la password. L'app usa il token di autenticazione di Teams attraverso il flusso On-Behalf-Of, lo standard Microsoft per le app di Teams.
- Token mai esposti al browser: i token di accesso a OneDrive e SharePoint non vengono mai memorizzati nel browser né nel local storage. Sono trattati esclusivamente lato server.
- Microsoft Graph dietro le quinte: la comunicazione con OneDrive e SharePoint passa sempre attraverso un servizio backend dedicato, che fa da intermediario sicuro fra l'app e Microsoft Graph. Il tuo browser non chiama mai direttamente le API di Microsoft Graph.
- Trasmissione fedele dei file: i file
.ac2vengono trasmessi byte per byte, senza trasformazioni che possano alterare il contenuto. L'app può mantenere copie tecniche temporanee o di recupero solo sul dispositivo dell'utente, dentro IndexedDB, il database locale del browser, per proteggere il lavoro non salvato. Queste copie non vengono usate per condividere i tuoi dati con altri servizi. - Permessi limitati allo scopo dell'app: l'app richiede i permessi necessari per identificarti, leggere e scrivere i file a cui hai accesso e mostrare la presenza dei collaboratori. Non richiede accesso a email, calendario o chat.
Trovi maggiori dettagli nelle pagine Informativa sulla privacy e Condizioni d'uso, accessibili dal menu dell'app dentro Teams.
Domande frequenti
Posso lavorare offline?
L'apertura del file richiede una connessione attiva, perché Banana viene caricato dinamicamente. Una volta aperto il file, le modifiche locali al documento non richiedono la rete, ma il salvataggio nel cloud sì. Se la connessione cade durante una modifica, puoi sempre salvare il file sul dispositivo come copia di sicurezza.
Banana Teams App sostituisce l'app desktop di Banana Plus?
No: è una modalità aggiuntiva, pensata per chi lavora prevalentemente in Teams. Continui ad avere a disposizione anche la versione desktop completa di Banana Contabilità Plus per Windows, Mac e Linux.
Posso aprire i file .ac2 con la Banana Teams App e poi continuare a lavorarci nella versione desktop?
Sì. Il formato .ac2 è lo stesso. Puoi aprire un file su Teams, salvarlo su OneDrive, poi aprire lo stesso file dalla versione desktop di Banana sincronizzata via OneDrive (o scaricato manualmente).
Cosa succede se chiudo Teams mentre sto lavorando?
L'app rileva la chiusura del tab e ti avvisa se ci sono modifiche non salvate, esattamente come la versione desktop. Esistono inoltre meccanismi di recupero automatico delle modifiche per i casi più estremi.
Posso installare l'app su Teams mobile?
Sì, se l'app è consentita dalla tua organizzazione anche su Teams mobile. L'esperienza è pensata soprattutto per desktop, browser e tablet; su smartphone alcune operazioni possono risultare meno comode a causa delle dimensioni dello schermo.
Quante persone possono modificare lo stesso file contemporaneamente?
Tecnicamente, più persone possono aprire lo stesso file allo stesso tempo, e l'app vi avvisa visivamente con gli avatar di presenza. Non si tratta però di co-authoring in tempo reale come in Word o Excel: ogni utente lavora sulla propria copia aperta e salva poi il risultato nel cloud. Se nel frattempo la versione remota è cambiata, l'app mostra il dialog di conflitto e ti permette di sovrascrivere, salvare una copia separata o annullare. Il consiglio è di coordinarsi nel team prima di iniziare a modificare un file già in uso.
Come posso segnalare un problema o suggerire un miglioramento?
Contatta il supporto Banana.ch attraverso il formulario di contatto. Nella segnalazione, ricordati di indicare che stai usando la versione Teams App, così il team di supporto può indirizzarti subito alla persona giusta.
In conclusione
La Banana Teams App porta la potenza di Banana Contabilità Plus dentro l'ambiente di lavoro che già usi ogni giorno. Apri i tuoi file ovunque siano, salva direttamente nel cloud e lavora sui documenti condivisi senza scambi di email: tutto in un unico posto.
Se non l'hai ancora installata, prova ad aggiungerla a Teams oggi stesso. Per qualsiasi domanda o supporto, il sito banana.ch è sempre a tua disposizione.