Microsoft Excel integrazione in Banana Contabilità
Excel Reports Add-in (Beta)
With this add-in there will no longer need to make "copy and paste" of the values each time you update your accounting file.
You create worksheets with formulas, charts, formatting and more in Excel, and the add-in will retrieve for you the data from the accounting file.
Just click on the update button and your Excel worksheet will be automatically filled with the new values from Banana Accounting, and the results of formulas and charts will be updated accordingly.
See Documentation Banana Accounting Excel Add-in.
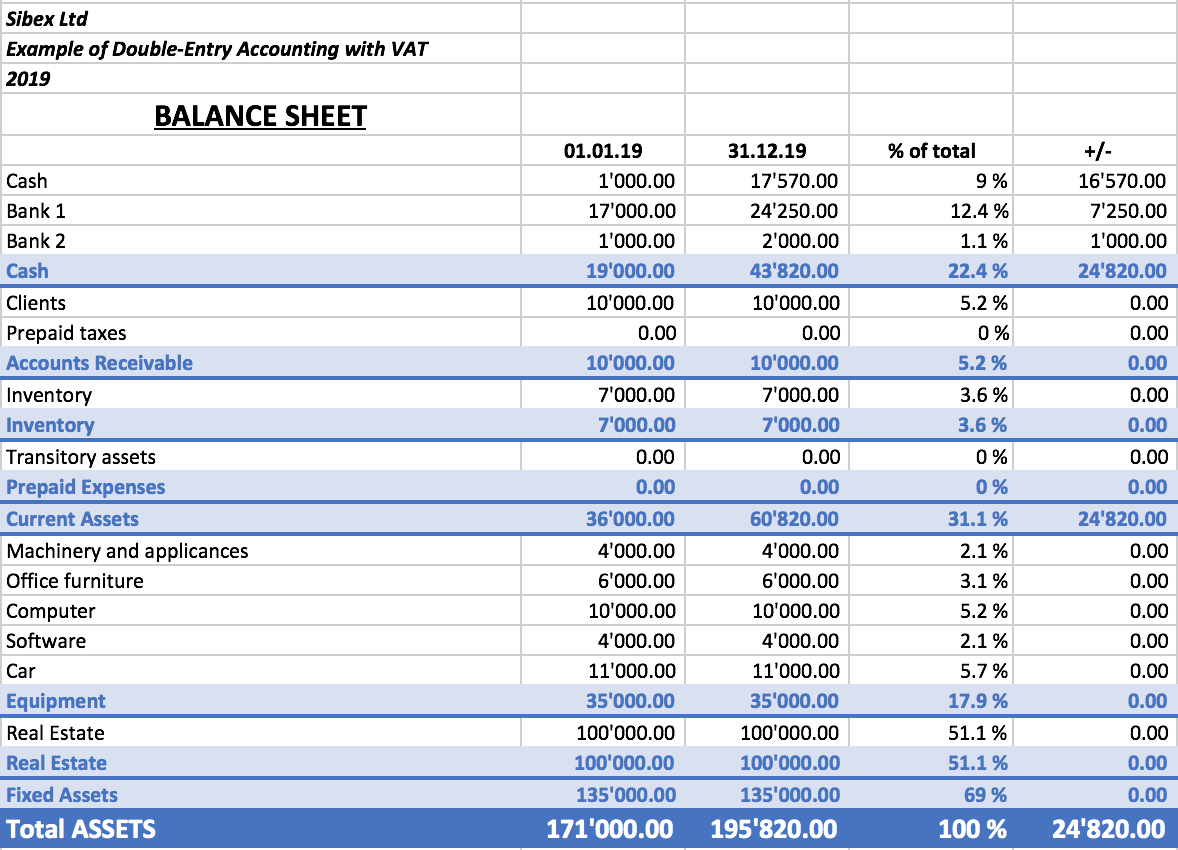
Example of a Balance sheet report created with the Excel Reports add-in
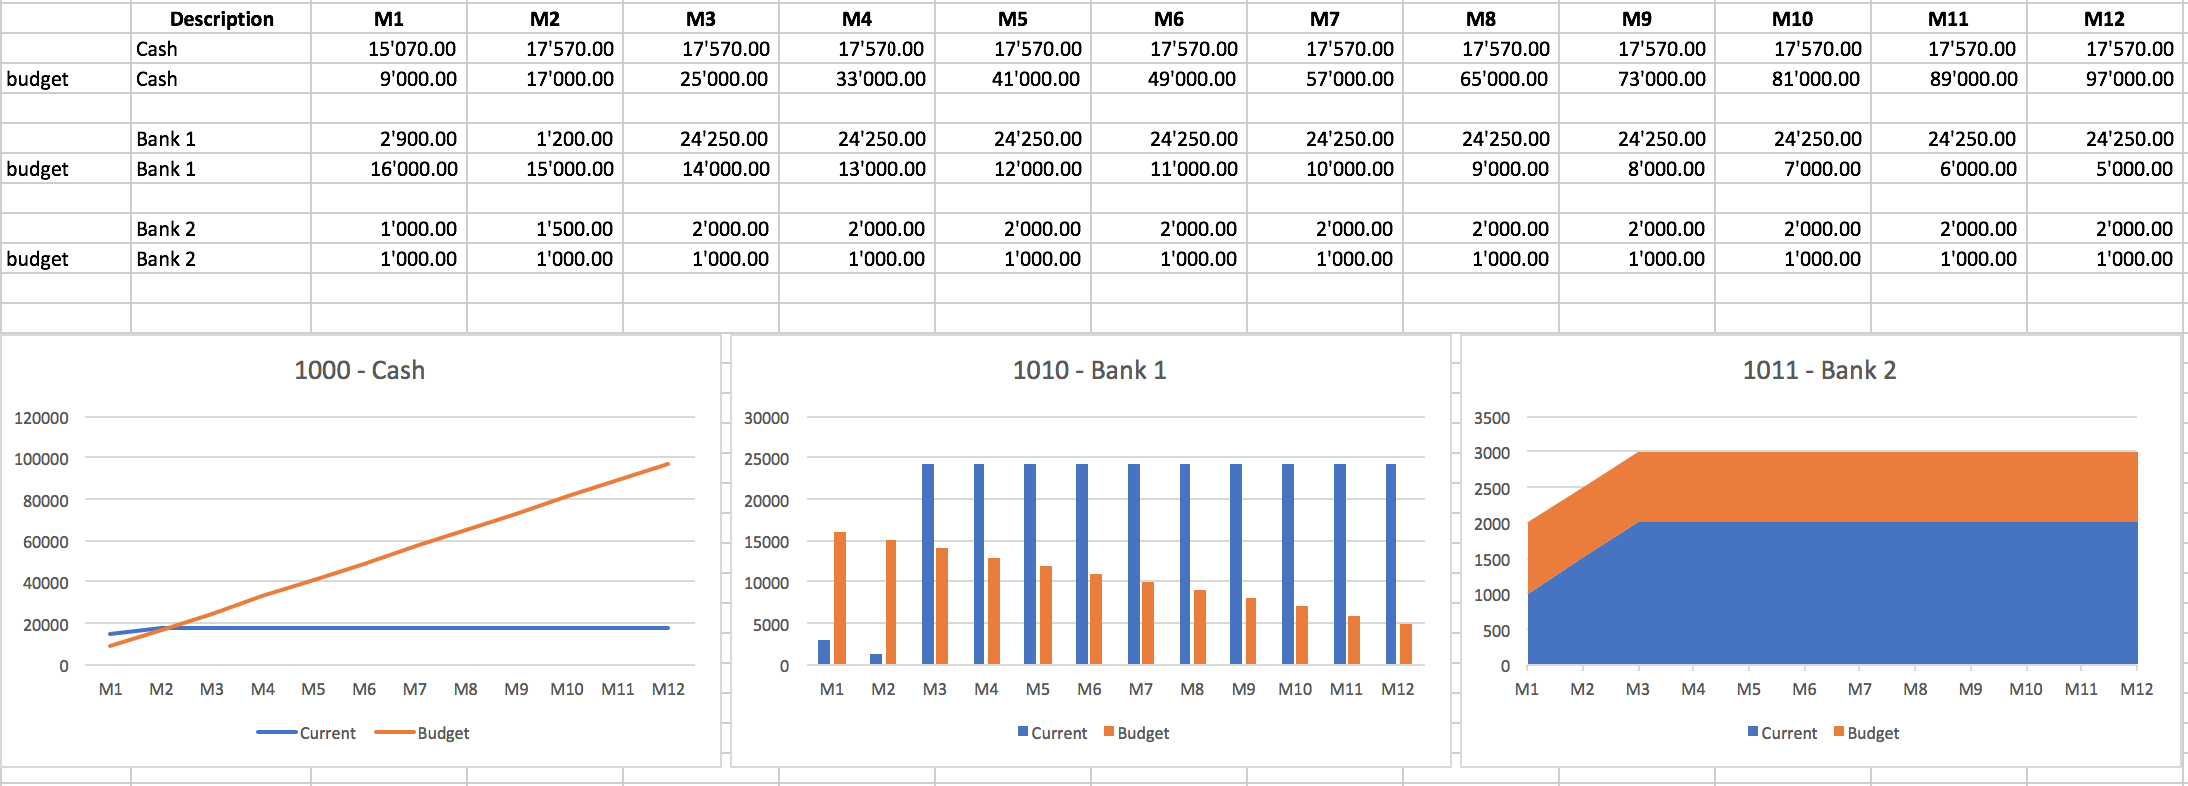
Example of a report with charts created with the Excel Reports add-in
Characteristics
- This add-in is hosted on our server.
Once you have installed the manifest on your computer, your will automatically use the last version. - The add-in are secure.
Unlike Excel-macros the Add-in are secure and cannot compromise your computer. - The add-in is currently in Beta Test.
- Please check everything and report any problem.
- You can use for free, but It is also possible that it will be made available with a cost.
Installation Banana Accounting Excel Add-In
The steps below walk you through all the setup to run the Banana Office Add-ins for Microsoft Office 2016 or more recent.
Minimum requirements:
- Banana Accounting Plus or Banana Accounting 9.
- Microsoft Office 2016 or more recent (Word, Excel, PowerPoint, Outlook).
Get Banana Accounting
- Download Banana Accounting for Windows or Mac.
- Install it on your pc.
Activate Banana Accounting web server
- Start Banana Accounting.
- On Menu bar click Tools → Program options and select the Interface tab
- Check the Start Web Server and Start Web Server with ssl options.
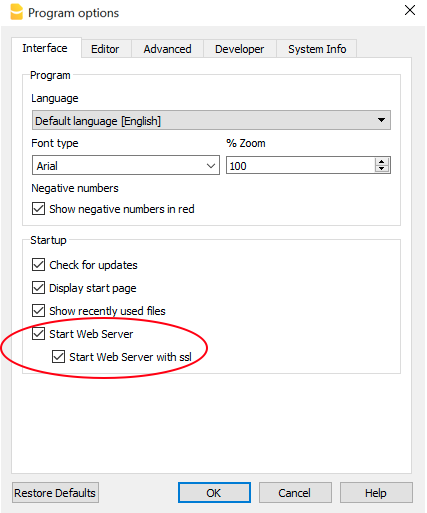
- Click OK.
Load the Add-in
- Open Excel.
- Click on Insert tab.
- Click on the Get Add-ins icon to open the Office Add-ins store.

- In the Office store page search for "Banana" add-in.
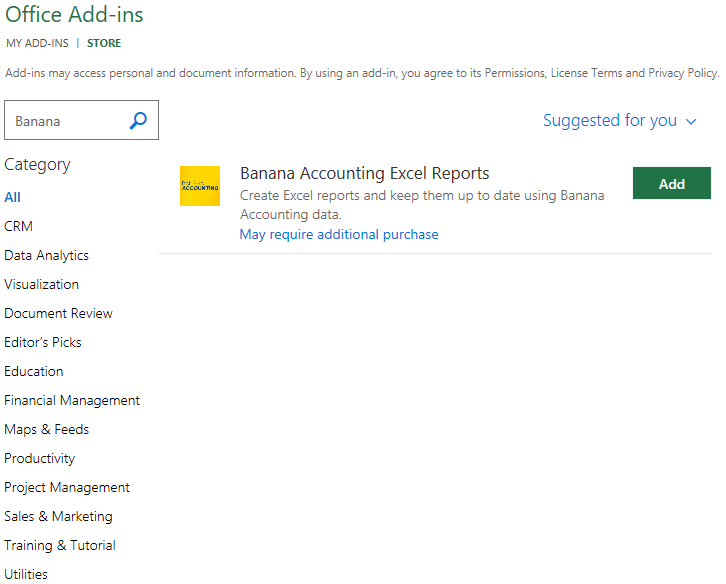
- Click on the Add button to add the Banana Accounting Excel Reports add-in.
- As soon as the add-in is added in Excel, on the Home tab of the main ribbon is loaded the Banana Accounting add-in command.
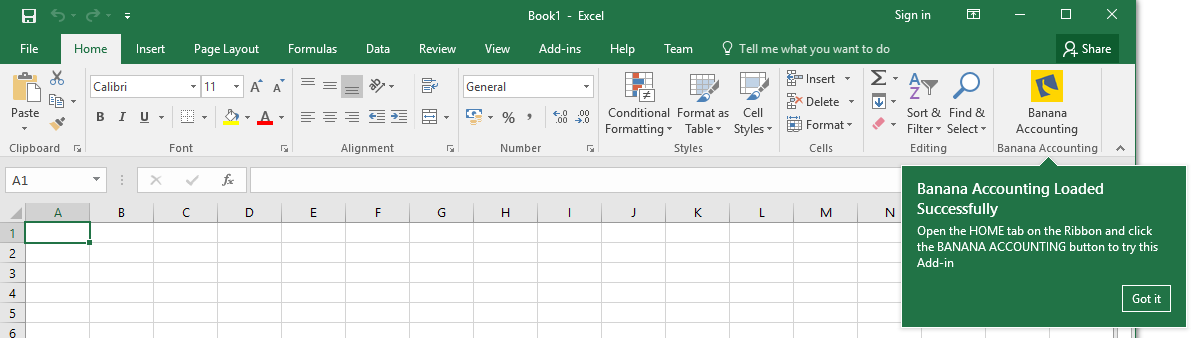
- Click on the Banana Accounting icon to use the add-in.
Once the add-in has been added from the Office store it is saved into My Add-ins section.
To load an add-in previously added from the office store:
- Click on Insert tab.
- Click on the My Add-ins icon.

- Select the Banana Accounting add-in.
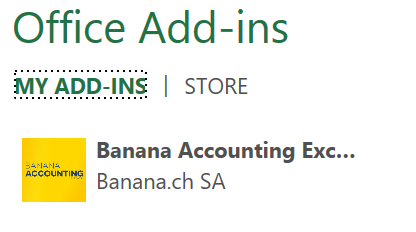
- Click on the Add button.
Windows users
For Windows users, please also follow the Troubleshooting for Windows guide to complete the installation of the add-in.
macOS users
For macOS users, please also follow the Troubleshooting for macOS guide to complete the installation of the add-in.
Troubleshooting Excel add-in for Windows
The guide below walk you through the Windows troubleshooting step by step.
- Download and install the latest version of Banana Accounting Plus for Windows.
- Update Windows and Excel.
- Open Excel and check you are logged in with your Microsoft account (File → Account → User Information).
- Start Banana Accounting web server:
- Open Banana Accounting Plus.
- Click on menu Tools > Program Options.
- Select the tab Interface.
- Check the options Start Web Server.

- Edit the BananaPlus web server configuration file:
- Click on menu Tools > Program Options.
- Select the tab Advanced.
- Click on System info button

- Select the entry Web Server > Settings file path
- Click on Open path... button

- Open the file httpconfig.ini
- Right click > Open with > Notepad.
- In the file look for the following properties and edit as indicated:
- accessControlAllowOrigin
Modify the value of property accessControlAllowOrigin to "*" (accessControlAllowOrigin=* ) - accessToken
Modify the value of property accessToken with a password of your choice (e.g. "accessToken=MyPasswordX" )
It is used to have more security when using the Banana Web Server. For more information visit Web Server Security. - authenticationMode (starting from Banana Accounting version 10.2.12)
Modify the value of property authenticationMode to "fixed-token" (authenticationMode=fixed-token).
This is required when using a personal accessToken
- accessControlAllowOrigin
- Save the file and restart BananaPlus
- Add a local loopback exemption to Microsoft Edge Web Viewer (see Microsoft documentation , Add-ins and Edge for more information):
- In the search box enter cmd.

- On the right side select Run as administrator.

- Confirm with Yes.

- Copy and paste the following command:
CheckNetIsolation LoopbackExempt -a -n="microsoft.win32webviewhost_cw5n1h2txyewy"
- Press enter to run the command.
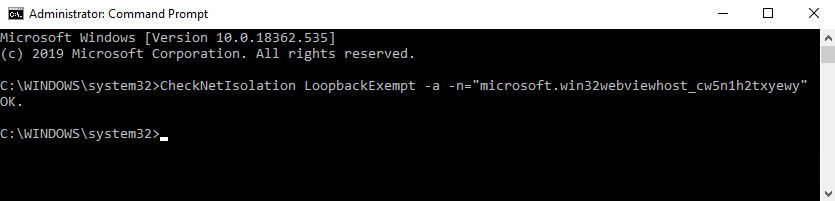
- Close the command prompt.
- In the search box enter cmd.
- Change the server URL on the Add-in settings:
- Start Excel Add-in.
- Click the Options tab.
- As Server informaion select Other, and complete as following:
- Server URL
Enter http://localhost:8081 - Connection token
If you have configured the accessToken password during the Setup of the Banana Web Server (Windows), you have to enter the password here.
- Click OK to confirm and save the changes.
- On the Setup tab of the add-in refresh the files list.
Note: in case you don't want to use the Excel add-in anymore, you can remove the local loopback exemption at any time with the command:
CheckNetIsolation LoopbackExempt -d -n="microsoft.win32webviewhost_cw5n1h2txyewy"
Messages
- Error Loading Add-in
You may get this error while trying to install the add-in from the Store. This is due to an authentication issue. To get this solved you need to:- Logout of Microsoft Excel.
- Restart Excel and sign in again.
- Restart Excel.
- Load the add-in.
- Cannot connect to local web server. Incorrect URL server or Banana Accounting/web server are not running.
The connection between Banana Accounting and Excel add-in did not occur. Please follow step by step the Troubleshooting for Windows guide on this page. - No file is open in Banana Accounting.
Banana Accounting is working but no file is open. Open at least one file in Banana Accounting. - File not selected.
No file is selected from the files list. Refresh the files list and select one of them.
Troubleshooting Excel add-in for macOS
The guide below walk you through the macOS troubleshooting step by step.
- Download and install the latest version of Banana Accounting Plus for Mac.
- Start Banana Accounting Plus web servers:
- Open Banana Accounting Plus.
- Click on menu Tools > Program Options.
- Select the tab Interface.
- Check the options Start Web Server and Start Web Server with ssl.
- Edit the BananaPlus web server configuration file:
- Click on menu Tools > Program Options.
- Select the tab Advanced.
- Click on System info button

- Select the entry Web Server > Settings file path
- Click on Open path... button

- Open the file httpconfig.ini
- Right click > Open with > Notepad.
- In the file look for the following properties and edit as indicated:
- accessControlAllowOrigin
Modify the value of property accessControlAllowOrigin to "*" (accessControlAllowOrigin=* ) - accessToken
Modify the value of property accessToken with a password of your choice (e.g. "accessToken=MyPasswordX" )
It is used to have more security when using the Banana Web Server. For more information visit Web Server Security. - authenticationMode (starting from Banana Accounting version 10.2.12)
Modify the value of property authenticationMode to "fixed-token" (authenticationMode=fixed-token).
This is required when using a personal accessToken
- accessControlAllowOrigin
- Save the file and restart BananaPlus
- Open Safari and insert the url https://127.0.0.1:8089
- When the dialog appears, insert your system password and click on Always allow button.
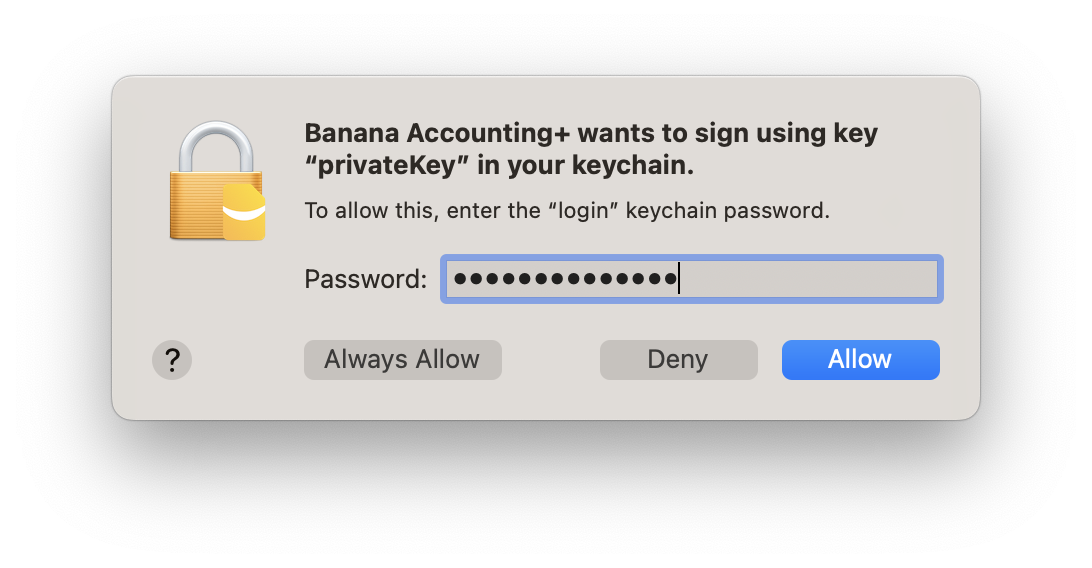
- Open macOS Keychain Access application (Applications > Utilities) and search for the banana.localhost certificate.

- Double click on the banana.localhost certificate, expand the Trust section and for "Secure Socket Layer (SSL)" select "Always Trust".
Close the dialog and enter your system password to confirm the changes.
- Close and reopen the macOS Keychain Access application, the banana.localhost certificare appears now with a blue plus icon.

- Start Excel 2016 and load the Add-in.
- Click on the Refresh file list button.
Messages
- Cannot connect to local web server. Incorrect URL server or Banana Accounting/web server are not running.
The connection between Banana Accounting and Excel add-in did not occur. Please follow step by step the Troubleshooting for macOS guide on this page. - No file is open in Banana Accounting.
Banana Accounting is working but no file is open. Open at least one file in Banana Accounting. - File not selected.
No file is selected from the files list. Refresh the files list and select one of them.
Documentation Excel Add-in
Introduction
With this add-in you can create Excel sheet that are filled with Banana Accounting data. Once you have added transactions to the accounting file you just need to click on the Update Button of the add-in and your spreadsheet content will be updated with the new data.
Your existing formatting and formula will be preserved.
- Create an Excel sheet with headers information
This information allows the add-in to retrieve data from Banana Accounting.
There are information relative to the file, column and account or group to be retrieved.
The add-in help you add the necessary information to retrieve the data. - Click on the Update button
The add-in will retrieve the values from Banana Accounting software.
It mantains the format or formula you enter.
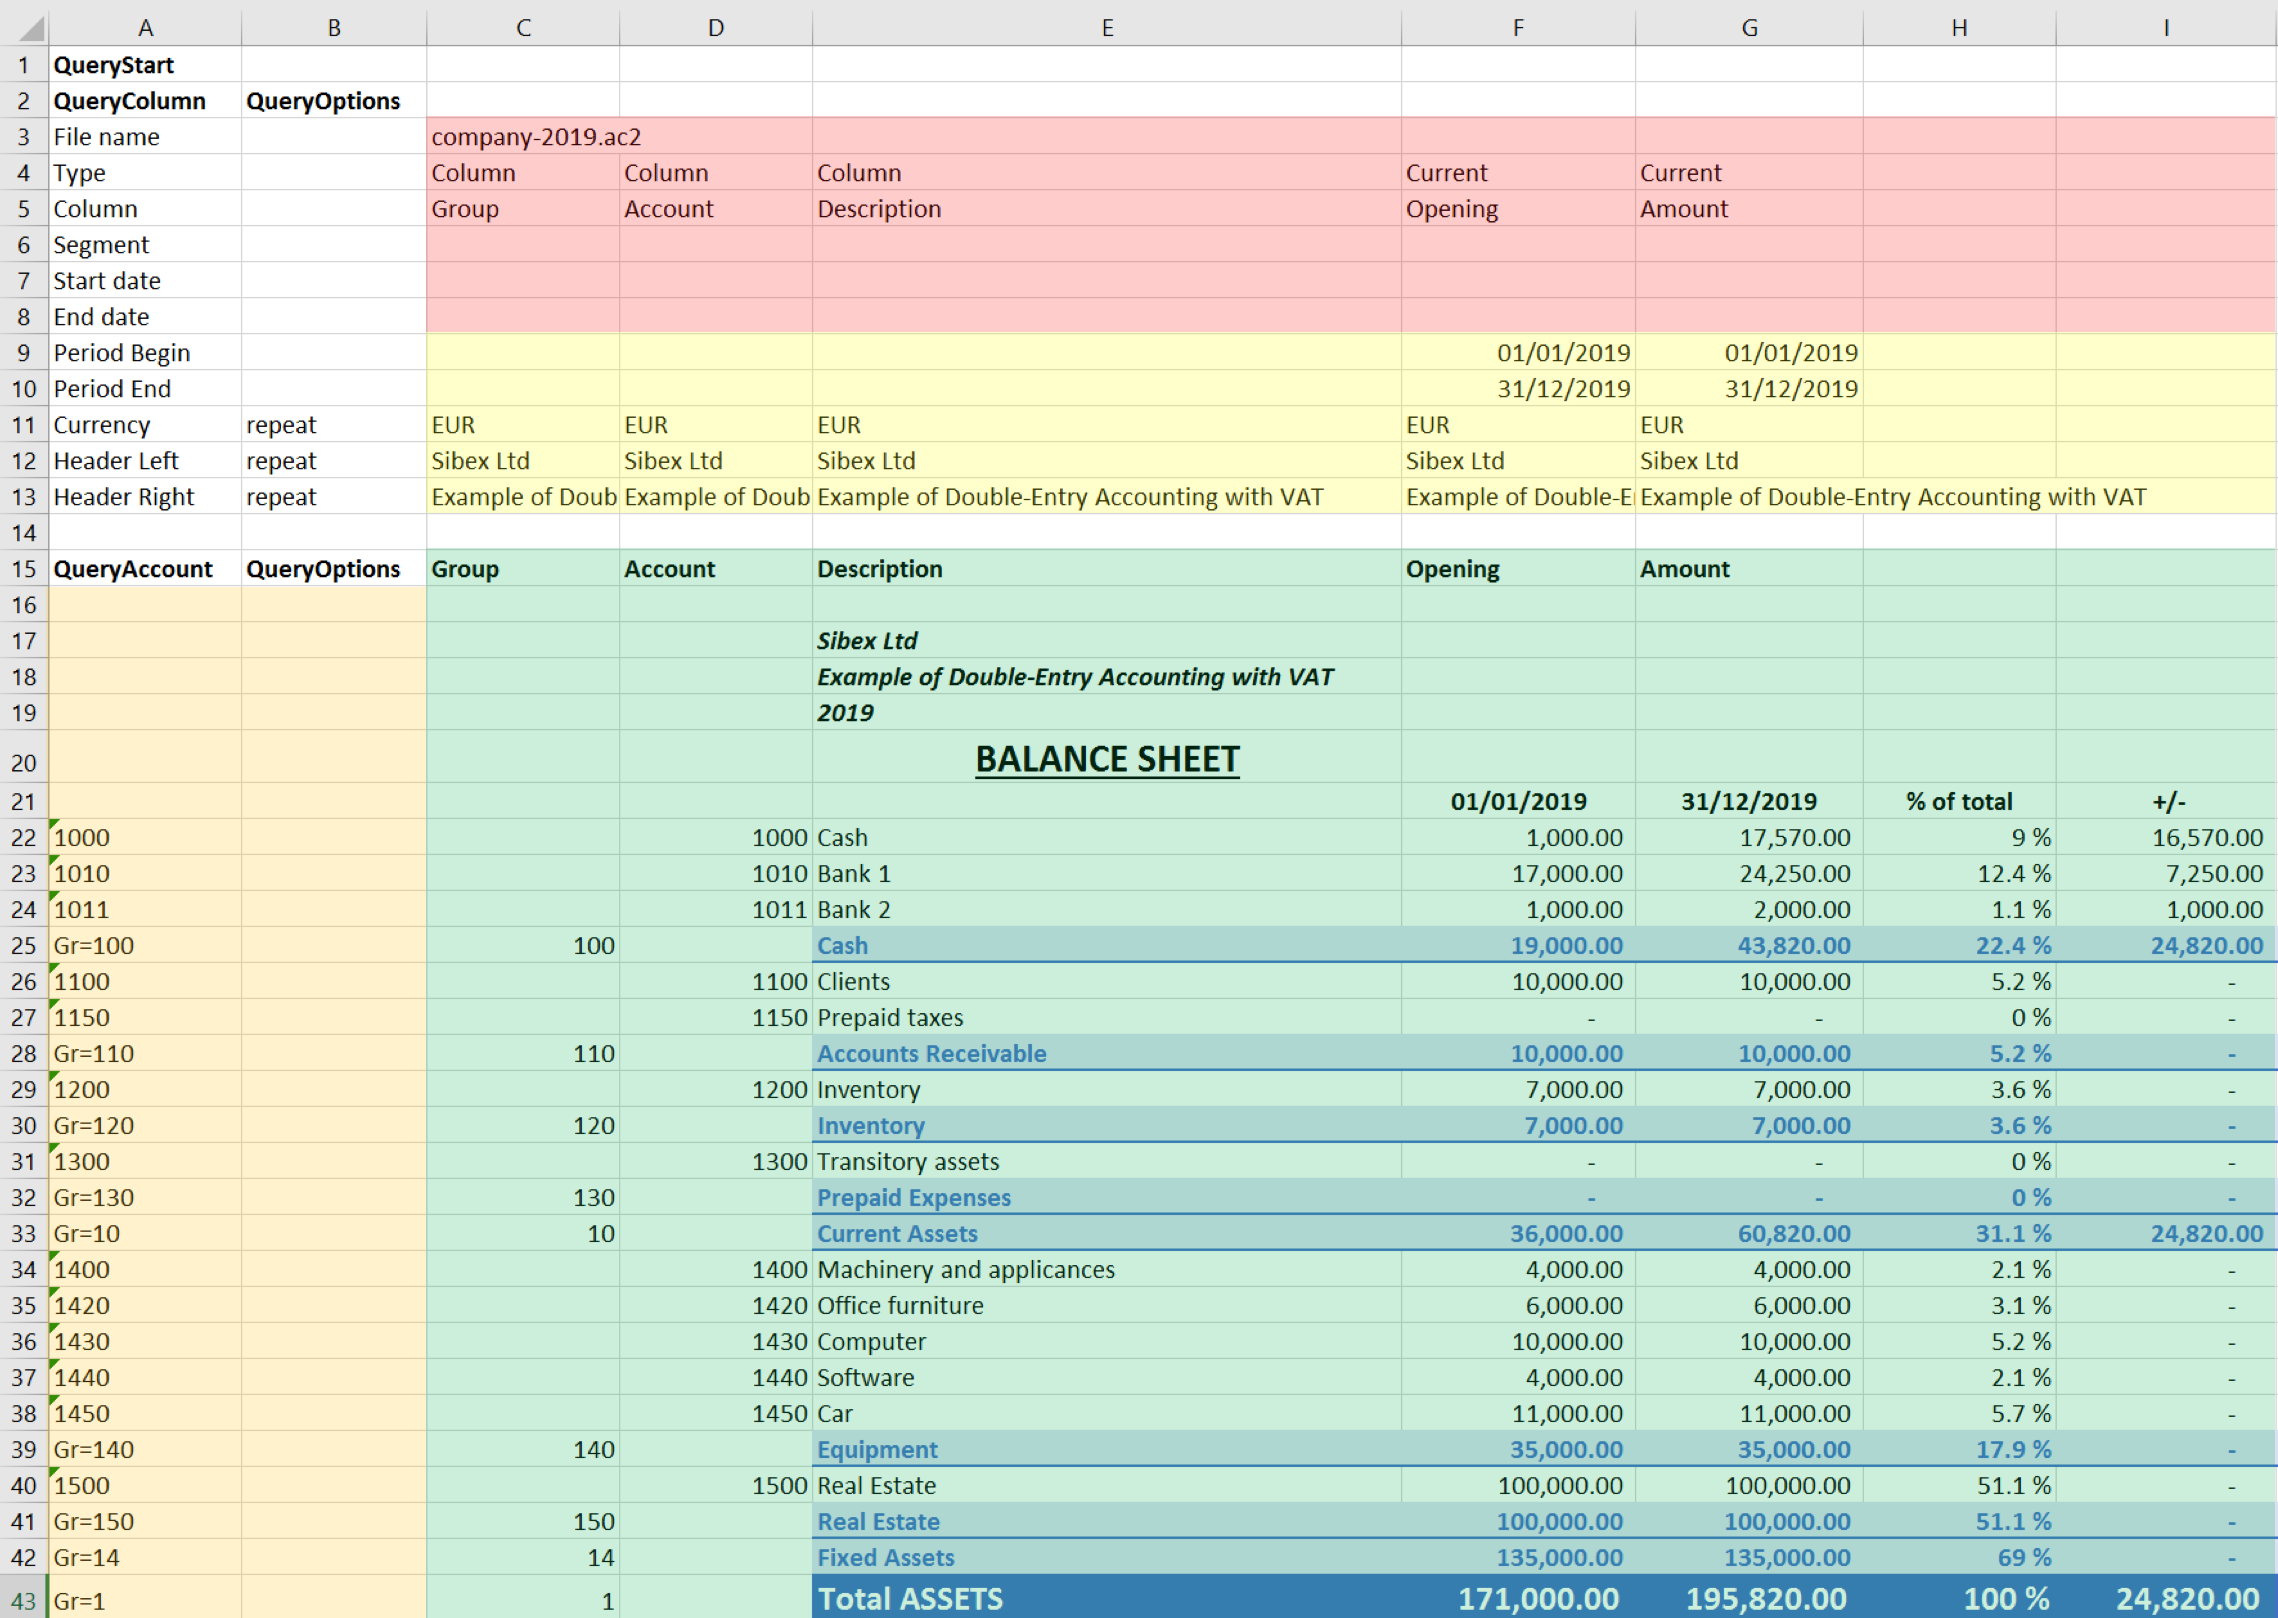
Example of a Balance sheet report created with the Banana Accounting Excel add-in
In the example above we can see:
- The data part
Here is where the data is synchronized, based on the QueryAccount and QueryColumns.- Accounting data (Green)
Filled with the information coming from Banana Accounting - Header data (Yellow)
- Accounting data (Green)
- QueryColumns (Red)
The file name, columns names and type to retrieve.
If the column is empty no data in this column will be retrieved. You can use the columns to enter formula. - QueryAccounts (Orange)
The accounts or groups to retrieve.
If the row is empty no data in this row will be retrieved. You can use the row for entering formula o text that is not overwritten.
By clicking on the update button the Data part is updated with the new data of the accounting file, and all the previously settings like fonts, colors, formulas will remain.
Download and installation
See documentation on how to Download and install the Add-in
Example files:
- File Excel already with columns setup.
- Banana Accounting file used for the example excel file.
Add-in Command
As soon as the add-in is added in Excel, on the Home tab of the main ribbon is loaded the Banana Accounting add-in command.
Banana Accounting Add-in command
When the Banana Accounting button is clicked, it loads the start screen of the add-in. The start screen provides additional information describing the functionalities of the add-in.
Click on the Let's Begin! button to start using the add-in.
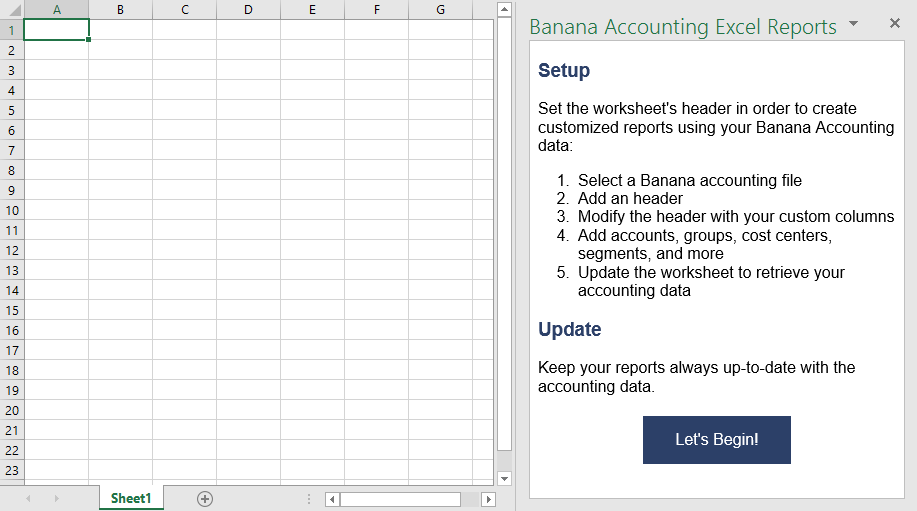
Banana Accounting Add-in start screen
Add-in general overview
The add-in is a task pane add-in type. This means that the add-in is loaded in a pane on the right side of the Excel worksheet.
It is composed by three tabs, each of them has one specific task:
- The Setup tab contains all the tools needed to add information to your sheet so that the add-in can fill the data part with the accounting data. Typically it is used every time you want to create something new, like for example the very first time you use this add-in.
- The Update tab is used to update the content of the Excel worksheet with the accounting data. It is used after the header section and some accounts/groups has been added.
- The Messages tab shows some messages about the add-in and the operations it does. For example when you update the sheet a message is displayed telling you that the update is completed.
- The Options tab is used to set some settings like the language and the server's Url.
Update of the worksheet
The Update tab is composed only of one button: Update current worksheet.
When clicked, this will start the updating process of the current Excel worksheet. Combining Header, QueryAccount and QueryOptions information, the add-in retrieves all the data directly from the Banana Accounting file and writes them in the Excel worksheet.
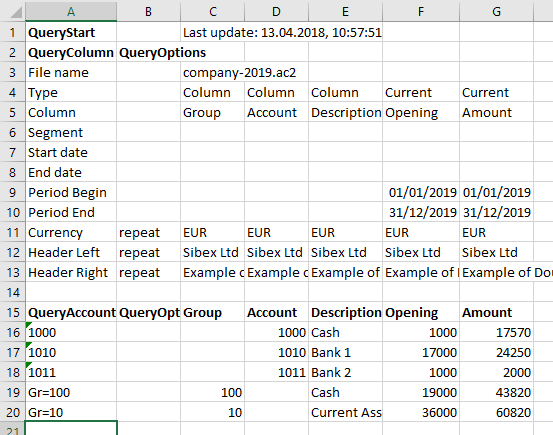
Retrieve data from Banana Accounting and update the worksheet
Setup of the worksheet
These features will add the necessary information to the current worksheet to retrieve data from Banana Accounting.
In the Setup tab there are four sections:
- Accounting file selection
- Set Header
- Set QueryColumns
- Set QueryAccounts
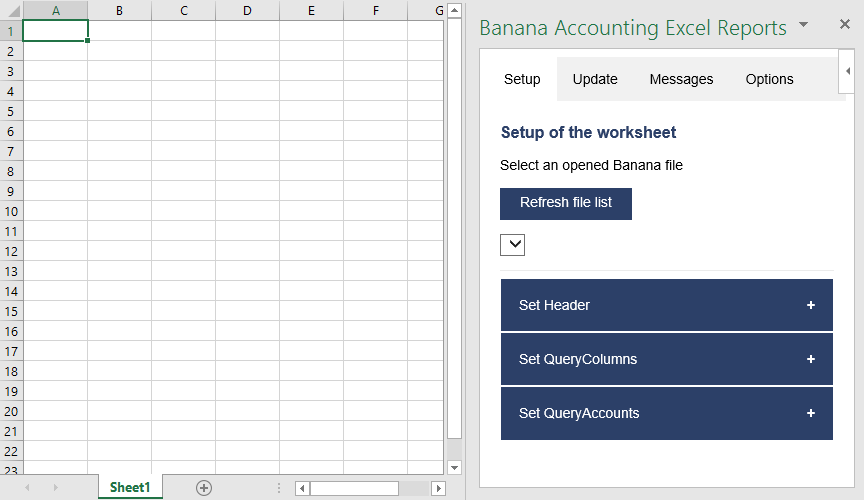
Setup of the worksheet tab
Select an opened Banana file
The first section of the setup page lists all the currently opened Banana Accounting files.
When the Refresh file list button is clicked, the add-in checks for all the opened Banana Accounting files and lists them.
Click the button, select a file, then go to the next setup section.
If you cannot see any file on the list and an error message is displayed, please follow the Troubleshooting for Windows or the Troubleshooting for macOS documentations.
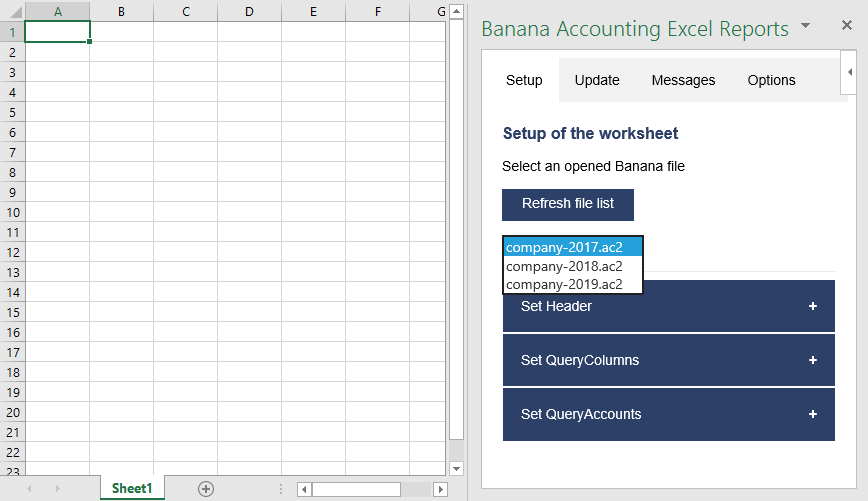
Example of file selection
Set Header
The second section of the setup page inserts, on the top of the current worksheet, the header that allows the user to insert information that will be used by the add-in to retrieve data from the accounting file.
Add an header
The first step is to select from the list a type of header. There are two options:
- Predefined header with columns to insert an header with default values for columns and options
- Empty header to insert a blank header. In this case you must manually add columns and options values.
When the button Add Header is clicked, the selected type of header is inserted in the worksheet. It is then possible to modify it by changing the values of QueryColumns and QueryOptions.
Add header options
The second step is to define some options for the Currency, Header Left and Header Right values using the QueryOptions column. The options are:
- Repeat to repeat the values in each column
- Do not repeat to avoid repeated values. Only when the file name changes the values are entered again.
When the button Add options is clicked, the selected options will be inserted in the related cells.
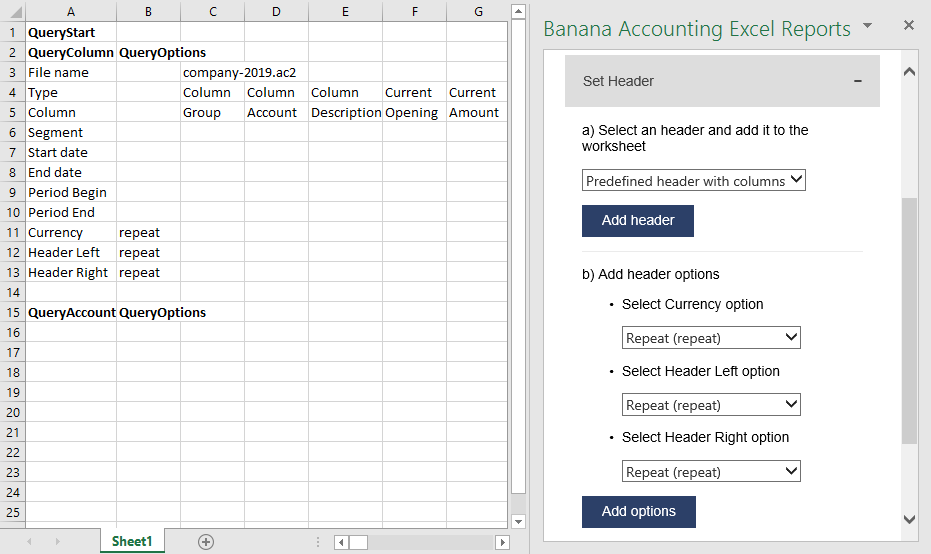
Example of predefined header
Set QueryColumns
This section guides step by step the user to modify the header by adding QueryColumns to the worksheet.
The QueryColumns information allows the user to define exactly which data the add-in has to retrieve from the accounting file and in which column of the worksheet insert them.
Each QueryColumn consists of six information:
- The Column of the worksheet is used to define in which column of the worksheet all the QueryColumns values will be inserted.
- The File name is used to define the accounting file to use when retrieving data.
- The Type value is used to define the type of data of the accounting file.
- The Column value is used to define the accounting file data for the given type.
- The Segments (OPTIONAL) is used to have a more detailed classification of the costs. It is optional, if not specified none segments are added.
- The Periods (OPTIONAL) is used to define a period of the accounting. It is optional, if not specified all accounting period is automatically used.
When the button Add values to column is clicked, all the information are automatically added to the selected column of the worksheet.
You must repeat this process for each column you want to add to the worksheet.
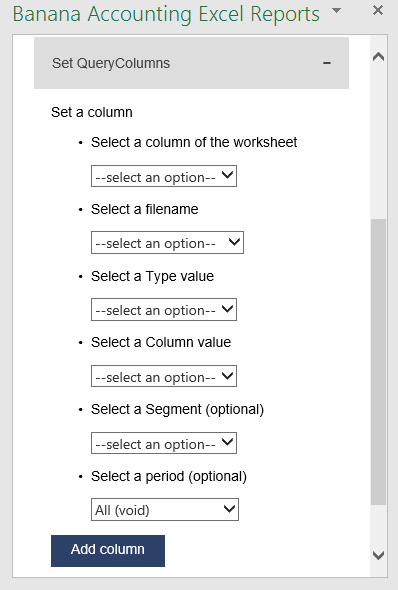
Set QueryColumns section
Select a column of the worksheet
Use this to define in which column of the worksheet all the values of the QueryColumns are inserted. Possible values are:
- Current selected to use the colum of the cell selected on the worksheet (ex. if the cell D8 is selected, D column will be used).
- From C to Z.
The list shows only columns from C to Z, but it is also possible to use columns until AZ by adding them manually.
Select a filename
Use this to define the file name for a QueryColumn. When a file name is specified it is used until a new file name is inserted.
The possible values are:
- Current to use the selected file from the list on the top.
- Current (void) to use the previously inserted file but let the cell empty. It works only if in previous columns there is a specified file name.
- 1 previous year (p1) to use the previous year file of the last file inserted (example: if current year is "2019.ac2", p1 refers to "2018.ac2").
- 2 previous years (p2) to use two previous years file of the last file inserted(example: if current is "2019.ac2", p2 refers to "2017.ac2").
- 3 previous years (p3) to use three previous years file of the last file inserted(example: if current is "2019.ac2", p3 refers to "2016.ac2").
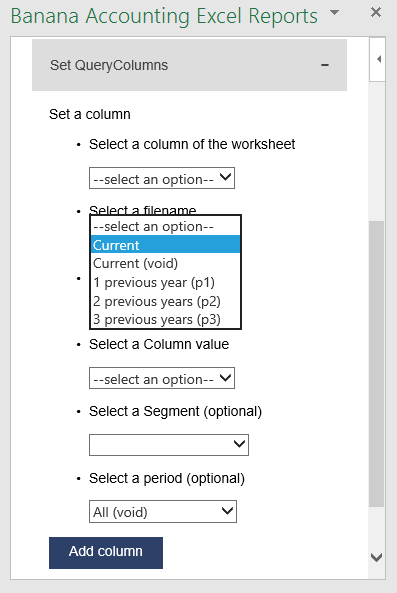
Filename selection
Notes:
- Remember to always open in Banana Accounting all the files specified in the header.
- The p1, p2 and p3 abbreviations always refer to the last file specified in the header.
- Use p1, p2 and p3 only if in the accounting file is used the File and accounting properties → Options → File from previous year.
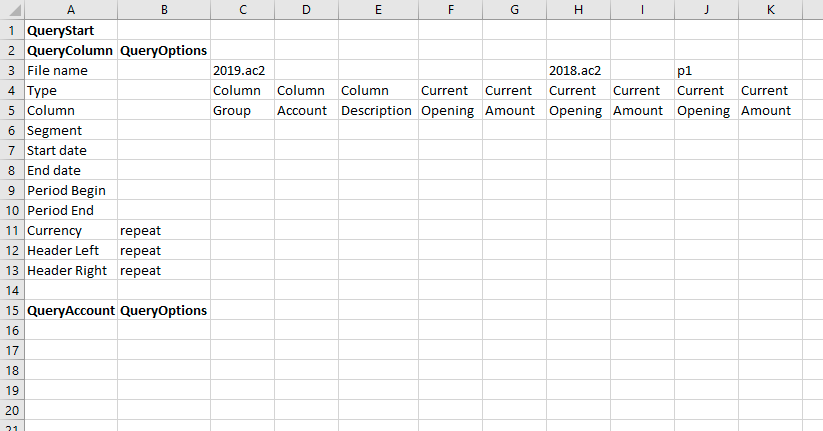
Example of more file insertion
On the image above we can see there are three different files defined, each of them using different columns.
- The columns from C to G refer to the 2019.ac2 file.
- The columns from H to I refer to the 2018.ac2 file.
- The coumns from J to K refer to the previous year file of the 2018.ac2 file. This file must be specified in the File and accounting properties → Options → File from previous year of the 2018.ac2 file.
Select a Type and a Column value
Use Type and Column rows to define the data you want to retrieve from the accounting file.
- Type specify the type of data of the accounting file.
- Column specify the data of the accounting file for the given Type.
Enter the values using the add-in or writing them directly into the worksheet cells.
List of possible Type-Columns combinations (not Case-Sensitive) you must enter into the related Type and Column rows of the header:
- column
- Group, Account, Description, Disable, FiscalNumber, BClass, Gr, Gr1, Gr2, Opening, Debit, Credit, Balance, Budget, BudgetDifference, Prior, PriorDifference, BudgetPrior, PeriodBegin, PeriodDebit, PeriodCredit, PeriodTotal, PeriodEnd, NamePrefix, FirstName, FamilyName, OrganisationName, Street, AddressExtra, POBox, PostalCode, Locality, Region, Country, CountryCode, Language, PhoneMain, PhoneMobile, Fax, EmailWork, Website, DateOfBirth, PaymentTermInDays, CreditLimit, MemberFee, BankName, BankIban, BankAccount, BankClearing, Code1
- current
- amount, amountcurrency, balance, balancecurrency, bclass, credit, creditcurrency, debit, debitcurrency, enddate, opening, openingcurrency, periodstring, rowcount, startdate, total, totalcurrency
- budget
- amount, amountcurrency, balance, balancecurrency, bclass, credit, creditcurrency, debit, debitcurrency, enddate, opening, openingcurrency, periodstring, rowcount, startdate, total, totalcurrency
- columnvat
- Group, VatCode, Description, Gr, Gr1, IsDue, AmountType, VatRate, VatRateOnGross, VatPercentNonDeductible, VatAccount
- currentvat
- taxable, amount, notdeductible, posted, rowcount
- taxable, amount, notdeductible, posted, rowcount
Below some examples of queries that can be entered in the header:
- Example 1: return from the Accounts table the value of the column description for the account specified in the QueryAccount column.
Type: column
Column: description
- Example2: return the amount of debit transactions for all the accounting period for the account specified in the QueryAccount column.
Type: current
Column: debit
- Example 3: return the opening + debit-credit from the 01.01 to 10.01.2022 for the account and segment specified in the QueryAccount column.
Type: current
Column: balance
Segment: :S1
Start date: 01.01.2022
End date: 10.01.2022
- Example 4: return the difference between debit-credit for the 6th month for the account specified in the QueryAccount colum.
Type: current
Column: total
Start date: M6
- Example 5: return the difference between debit-credit for the second quarter for the account specified in the QueryAccount column.
Type: current
Column: total
Start date: Q2
- Example 6: return from the Vat Codes table the value of the column description for the vat code specified in the QueryAccount column.
Type: columnvat
Column: description
- Example 7: return the amount of the taxable column for the vat code specified in the QueryAccount column.
Type: currentvat
Column: taxable
Select a Segment (optional)
If the selected file has segments they will appear in the list.
Use this to define a segment to have a more detailed classification of the costs.
Select a period (optional)
Use this to define the accounting period that will be used to retrieve data from the accounting file.
Possible values are:
- All (void) to use all the accounting period.
- Custom date to specify a custom period (example: Start date "04.02.2022", End date "12.03.2022").
- Month 1 (M1) ... Month 12 (M12) to specify a single month (example: M1 for 1st month, M2 for 2nd month, etc.).
- Quarter 1 (Q1) ... Quarter 4 (Q4) to specify a single quarter (example: Q1 for the 1st quarter, period from 01.01 to 31.03).
- Semester 1 (S1) ... Semester 2 (S2) to specify a single semester (example: S2 for the 2nd semester, period from 01.07 to 31.12).
- Year 1 (Y1) ... Year 10 (Y10) to specify a single year (example: Y1 for the 1st year).
Set QueryAccounts
This section provides to insert:
- QueryAccounts to specify all the desired accounts, groups, cost centers, segments or vat codes that will be used with the data specified in the header to retrieve the accounting data.
- QueryOptions (OPTIONAL) to specify an option for a specific QueryAccount. Just select a cell next to the account and insert the option. It is optional, if not specified none options are added.
Add accounts
When an option is selected, the add-in loads the appropriate check box list with all the elements taken from the selected accounting file. It is possible to choose between six options:
- Accounts to load a list of all the accounts/categories codes taken from the table Accounts/Category of the accounting file.
- Groups to load a list of all the groups codes taken from the table Accounts/Category of the accounting file.
- Cost centers to load a list of all the cost centers codes taken from the table Accounts/Category of the accounting file.
- Segments to load a list of all the segments codes taken from the table Accounts/Category of the accounting file.
- All to load a list of all the accounts/categories, groups, cost centers and segments codes taken from the table Accounts/Category of the accounting file.
- Vat codes to load a list of all the VAT codes taken from the table VAT codes of the accounting file.
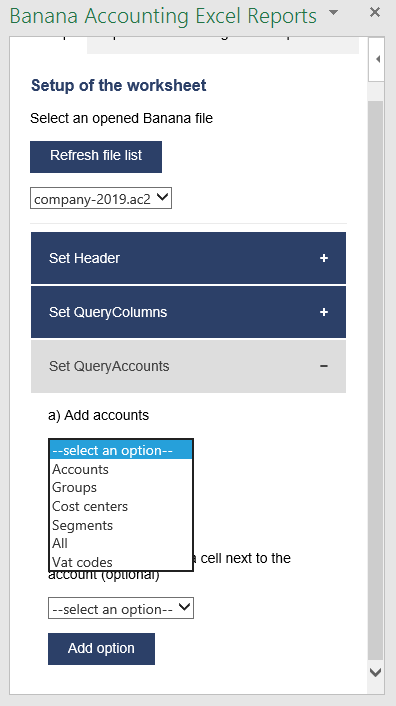
Type of account selection
For example, choosing the All option, the add-in loads a list containing all the accounts, groups, cost centers and segments respecting the order in which they appear in the accounting file.
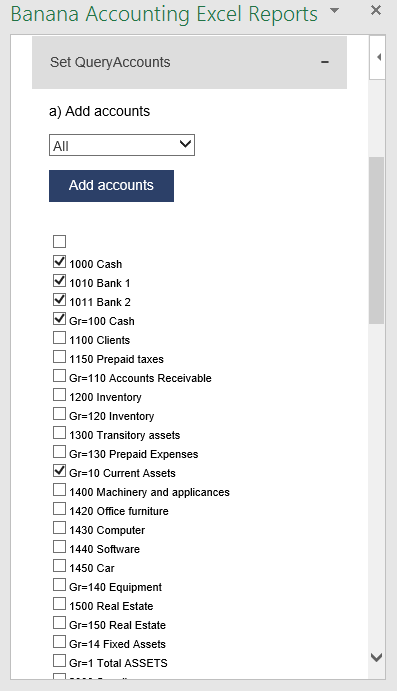
Example of accounts and groups selection
Select the desired elements and click the Add accounts button to add them to the worksheet under the QueryAccount (column A) starting from the selected cell. By default the add-in starts the insertion immediately after the QueryAccount title (row 16).
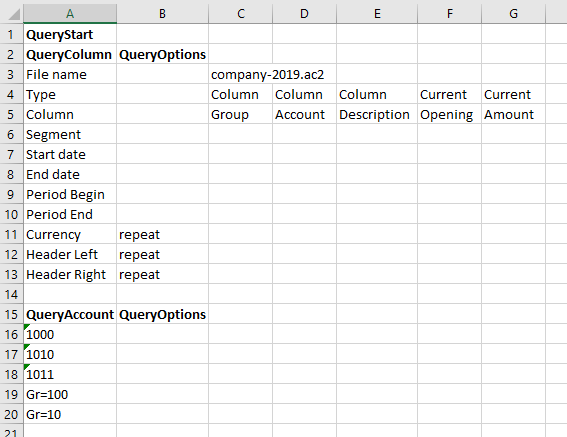
Add the selected accounts and groups to the Excel worksheet
Add option
The QueryOptions column is designed to add some options to the query. It is optional, if not specified no options are used.
The possible values are:
- invert to invert the sign of the current and budget balances.
- budget to get the budget balances of the selected QueryAccount.
- budgetinvert to get the budget balances of the selected QueryAccount and also to invert the sign.
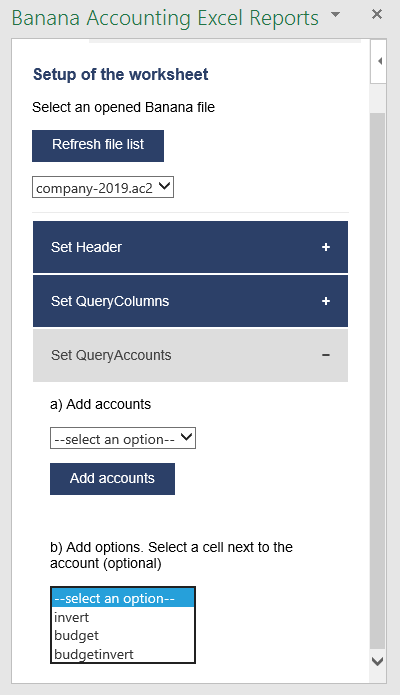
QueryAccounts options selection
Header settings
- Do not add or delete rows in the header.
- Do not add or delete columns before the column B.
- From column C forward, it is possible to add or remove columns. Columns A (QueryColumn) and B (QueryOptions) must always exist.
- Added columns can also be empty.
- If columns from AA to AZ are used, plese re-enter the file name at least on the AA column, even if it is the same used in the previous column.
To better understand how exactly the header works and how to properly modify it, below there are some explanation about the most important things.
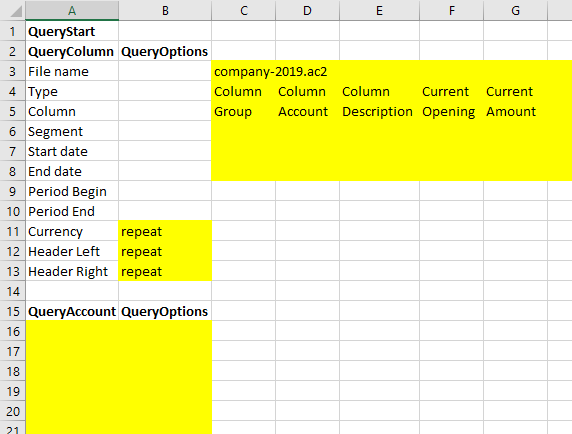
Editable header parts
On the image above we highlighted in yellow all the header's parts that can be modified by adding information when creating a report.
Everything else will be automatically filled by the add-in when the Update current worksheet button is clicked.
Period Begin
A conversion of the start date to be easily read.
This is automatically filled for each column by the add-in when the worksheet is updated.
Period End
A conversion of the end date to be easily read.
This is automatically filled for each column by the add-in when the worksheet is updated.
Currency
The accounting basic currency.
This is automatically filled for each column by the add-in when the worksheet is updated.
Header Left
One of the information property of the accounting.
This is automatically filled for each column by the add-in when the worksheet is updated.
Header Right
One of the information property of the accounting.
This is automatically filled for each column by the add-in when the worksheet is updated.
QueryAccount
As already said, in this column are listed all the chosen accounts, each on a different row.
Instead of insert an account, is also possible to add a custom regroup using a particular accounting column.
The custom regroup QueryAccount syntax is $column=value, where:
- $ indicates that a custom regroup is used.
- column is the Xml name of the column. It can be a user created column (for example "Abc") or a column that already exists in the accounting (for example the "Gr").
- value indicates the regroup.
If we insert something like "$Abc=1" in the QueryAccount cell, this means that the add-in takes and sums together all the accounts/groups balances that have the 1 value in the "Abc" column of the accounting.
Messages
The Messages tab shows some information about the add-in and the operations that it does.
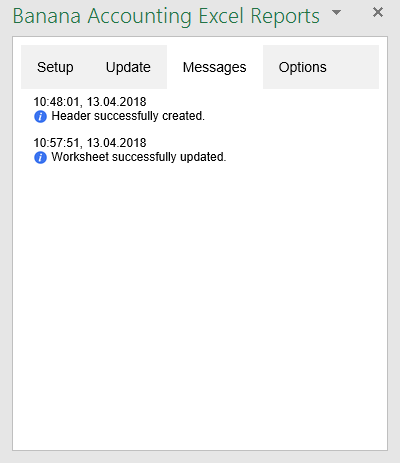
Example of messages
Settings
The Settings tab allows to change some settings of the add-in:
- the Server information.
- Define the URL of Banana Accounting Web Server.
- On Windows, select http://localhost:8081.
- On macOS, select https://127.0.0.1:8089.
- Define the URL of Banana Accounting Web Server.
- the Connection token.
- Enter the security password used when connecting to the Banana Web Server. It is necessary to set it first via Banana Web Server configuration (file httpconfig.ini > accessToken).
- the Language to define the language of the Banana Excel Add-in. Available languages are english, french, german and italian.
- the Development is used only by developers for testing purposes, and users cannot access it.
Click on the Ok button and accept to reload the add-in in order to use the new settings. The settings are saved for future use of the add-in.
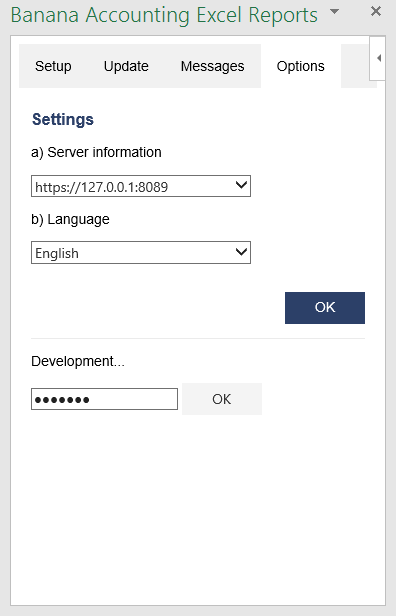
Settings tab
Release History
- 2017-06-12 First release
- 2017-07-07
- Added Add-in Commands functionality.
- Added a start screen that provides additional information describing the functionalities of the add-in.
- Added the settings tab to allow the user to change the Port of the URL.
- 2017-09-29
- Changed the name of the add-in to "Banana Accounting Excel Reports".
- Changed some texts.
- New add-in design.
- Added new functionalities that allow the user to set and insert all the required information more easily.
- Added localization language for english, french, german and italian.
- 2017-11-24
- Added new functionality that allows to set the parameters for the connection.
- 2018-04-04
- Settings options are now saved.
- Changed the appearance of the error messages.
- Changed some texts.
- Other minor changes.
Add-in Funzioni Excel di Banana Contabilità
L'add-in gratuito Funzioni di Banana Contabilità ti permette di recuperare e visualizzare i dati della contabilità in Excel tramite l'utilizzo di semplici formule.
Per leggere e recuperare i dati da Banana Contabilità, l'add-in si connette al Web Server integrato di Banana (versione API V2).
I principali vantaggi sono i seguenti:
- Recupera dinamicamente i dati da Banana Contabilità.
- Quando il file di contabilità viene modificato puoi aggiornare istantaneamente il foglio di Excel con i nuovi valori.
- Non devi più riscrivere i dati in Excel tramite importazione o con il copia-incolla.
- Le Formule sono facili da usare e permettono di creare potenti fogli di calcolo in Excel per analizzare e presentare i dati contabili.
Prerequisiti
Per utilizzare l'add-in Funzioni di Banana Contabilità è necessario:
- Scaricare e installare Banana Contabilità Plus (versione 10.1.7 o superiore).
- Avere il piano Advanced di Banana Contabilità Plus.
- Utilizzare Microsoft Excel per Windows o Mac (versione desktop Microsoft 365, 2019 o più recente).
Come iniziare
Per leggere e recuperare i dati da Banana Contabilità, l'add-in utilizza il Web Server integrato di Banana (versione API V2). Quindi devi configurare il webserver sia in Banana Contabilità e indicare nell'add-in i parametri di collegamento.
- Scarica e installa Banana Contabilità Plus (versione 10.1.7 o superiore).
- Configura il Web Server Banana.
- Avvia Banana Contabilità Plus e attiva il Web Server.
- Scarica i due file della contabilità di esempio e aprili con Banana Contabilità Plus.
- Scarica il file Excel già predisposto e aprilo.
- Installa l'add-in.
- Verifica le impostazioni dell'add-in.
- Nelle celle gialle del foglio Start inserisci i nomi dei file di esempio della contabilità che hai scaricato. Negli altri fogli vedi i dati ripresi dalla contabilità.
- Quando aggiorni la contabilità in Banana, reinserisci i nomi dei file nelle celle gialle per ricalcolare tutte le formule.
Installa l'add-in di Excel
- Apri Excel.
- Controlla di aver effettuato l'accesso a Office con il tuo conto utente Microsoft.
- Apri Excel e in alto a destra clicca Accedi.
- Inserisci l'indirizzo email e la password del tuo account utente Microsoft.
- Seleziona Home > Componenti aggiuntivi > Altri componenti aggiuntivi (oppure File > Ottieni componenti aggiuntivi).
- Clicca su Store.
- Nello store cerca "Banana".
- Seleziona l'add-in Banana Accounting Functions e clicca su Aggiungi.
- L'add-in viene aggiunto in Excel, nella sezione Home.
Ora puoi trovare l'add-in nella sezione Home > Componenti aggiuntivi > Altri componenti aggiuntivi > Miei componenti aggiuntivi. Da quì, se vuoi puoi anche rimuoverlo cliccando sui tre puntini in alto a destra dell'add-in e poi su Rimuovi.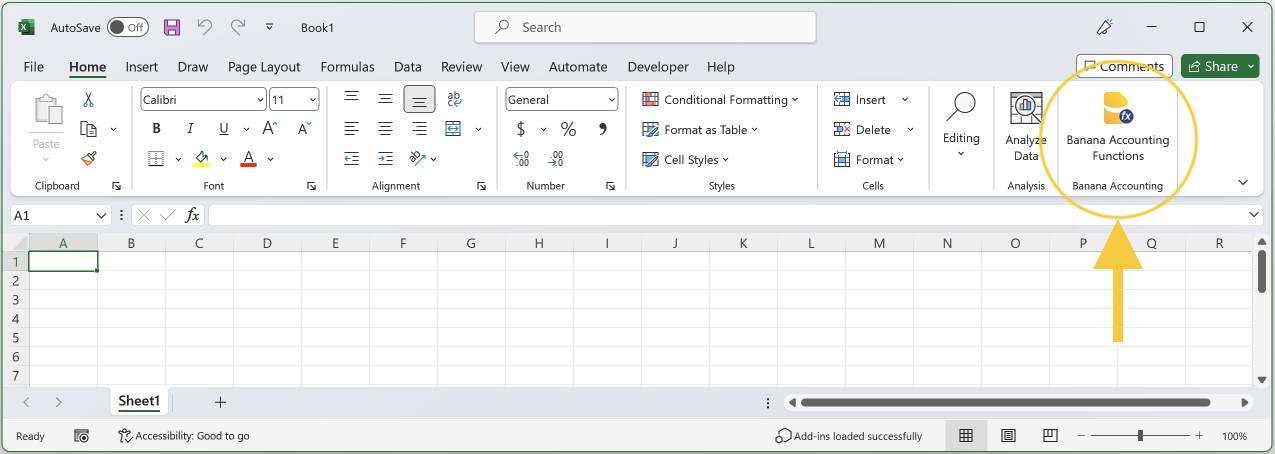
- Clicca sull'icona dell'add-in.
- Si apre il pannello dell'add-in sulla destra.

Impostazioni add-in
Quando clicchi sull'icona dell'add-in Funzioni Banana Contabilità, un pannello laterale si apre. Quì puoi impostare alcuni parametri per permettere all'add-in di connettersi con il Web Server Banana (assicurati prima di aver effettuato la configurazione del Web Server).
Le impostazioni sono le seguenti:
- Informazioni server
Imposta l'URL del Web Server Banana:- Su Windows, seleziona http://localhost:8081.
- Su macOS, seleziona https://127.0.0.1:8089.
- Token di accesso
Inserisci la password di sicurezza utilizzata per connettersi al Web Server Banana.
È necessario prima impostarla durante la configurazione del Web Server (file httpconfig.ini > accessToken).
Dopo aver inserito l'URL del web server e la password, clicca su "Test connessione" per applicare i cambiamenti e per testare la connessione con il Web Server Banana.
In caso di problemi, vedi Messaggi di errori > Errori Add-in per maggiori informazioni.
Puoi anche cambiare la lingua selezionando quella che preferisci tra inglese, italiano, francese e tedesco.
Una volta finito con le impostazioni, se vuoi puoi anche chiudere il pannello laterale dell'add-in. Non è necessario tenerlo aperto per utilizzare le Funzioni di Banana Contabilità.
Il foglio Start
Il file Excel di esempio ha un foglio chiamato Start. È usato per inserire i nomi dei file della contabilità da cui riprendere i dati.
Come usare il foglio Start:
- Nelle celle gialle inserisci i nomi dei file della contabilità da cui vuoi riprendere i dati.
Puoi inserire il file dell'anno corrente e i file degli anni precedenti.
Per ricalcolare, reinserisci i nomi dei file oppure fai doppio click sui nomi dei file e premi INVIO. - Quando inserisci i nomi dei file, una funzione controlla la connessione con i file.
I file devono essere aperti in Banana.
Se la connessione è OK, i nomi dei file vengono inseriti nelle celle chiamate File0, File1 e File2. In caso contrario, vedi la sezione Messaggi di errore > Errori Excel per maggiori informazioni. - Le celle di nome File0, File1, e File2 sono utilizzate come riferimento per i nomi dei file della contabilità in tutte le formule.
Questo significa che nelle formule puoi inserire direttamente File0, File1 e File2 come nomi di file (File0 per l'anno corrente, File1 per l'anno precedente, File2 per due anni precedenti).
Aggiungere il foglio Start in un file Excel
Nel caso in cui non vuoi utilizzare il file Excel di esempio, puoi anche aggiungere il foglio Start a qualsiasi file Excel.
- Crea un nuovo file Excel vuoto.
- Clicca sull'icona dell'add-in per aprire il pannello laterale.
- Clicca Aggiungi foglio Start.
- Il foglio Start viene aggiunto al file Excel sul quale stai lavorando.
Nota: se nel file Excel è già presente un foglio di nome "Start", questo verrà sostituito.

Come creare il tuo file Excel
- Scarica il file Excel già predisposto e salvalo con un altro nome, oppure crea un nuovo file Excel vuoto e utilizza il comando "Aggiungi foglio Start" dell'add-in per creare il foglio Start.
- Apri i file della tua contabilità in Banana.
- Nelle celle gialle del file Excel (foglio Start), sostituisci i nomi dei file di esempio con i nomi dei tuoi file contabili.
- Cambia gli altri fogli di calcolo secondo i tuoi bisogni.
- Ricalcola i dati Excel: doppio click sulle celle gialle dove hai inserito i nomi dei file e premi subito INVIO. Questo ricalcolarà tutte le formule.
Nome del file
La maggior parte delle Funzioni Banana Contabilità richiedono come primo parametro il nome del file della contabilità. Può essere:
- Una stringa con il nome completo del file tra le virgolette (es. "company-2024.ac2").
- Il riferimento a una cella che contiene il nome del file.
È meglio utilizzare il riferimento a una cella che contiene il nome del file. In questo modo puoi utilizzare lo stesso file Excel anche per anni diversi. Dovrai solamente inserire il nuovo nome del file in un'unica cella, senza andare a cambiare il nome in ogni formula che hai inserito.
Il miglior modo di fare è come impostato nel file Excel di esempio (foglio Start):
- Il nome del file dell'anno corrente è ripreso come riferimento dalla cella chiamata File0.
- Il nome del file dell'anno precedente è ripreso come riferimento dalla cella chiamata File1 .
- Il nome del file di due anni precedenti è ripreso come riferimento dalla cella chiamata File2.
Le celle chiamate File0, File1 e File2 contengono la funzione BA.FileName. La funzione controlla se il file è aperto in Banana:
- Se il file è aperto in Banana e l'add-in riesce a connettersi con il web server, la funzione ritorna il nome del file. Tutte le altre funzioni ritornano i valori ripresi dalla contabilità.
- Se il file non è aperto in Banana o l'add-in non riesce a connettersi al web server, la funzione non ritorna niente. Tutte le altre funzioni non ritornano nessun valore (per maggiori informazioni vedi la sezione Messaggi di errore > Errori Excel).
Periodo
Molte funzioni utilizzano il periodo come parametro opzionale. Può essere:
- Una stringa vuota oppure non presente del tutto.
In questi casi vengono utilizzate le date di inzio e di fine della contabilità, definite in File > Proprietà file > Contabilità > Contabilità. - Una data di inizio e di fine periodo nella forma "yyyy-mm-dd/yyyy-mm-dd" (es. "2024-01-01/2024-01-31").
Per creare un periodo da due date in Excel, si usa la funzione BA.CreatePeriod. - Un'abbreviazione.
Utilizzando un'abbreviazione puoi utilizzare lo stesso Excel con file contabili di diversi periodi.- M + numero del mese (es. "M1", "M2", ..)
- Q + numero del trimestre (es. "Q1", "Q2",..)
- Y + numero dell'anno (es. "Y1", "Y2", ...)
Funzioni Banana Contabilità
Le Funzioni Banana Contabilità sono delle formule da utilizzare in Excel. Le formule sono così composte:
- Iniziano con "BA."
- Segue il nome della funzione (in inglese).
- Poi tra le parentesi i parametri della funzione.
I parametri possono essere inseriti come riferimento di altre celle o scritte manualmente tra i doppi apici (es. "1000", "2024-01-01/2024-01-31").
I parametri tra parentesi quadre sono falcoltativi (es. "[period]").
Quando inizi a digitare "=BA." in una cella, vedi tutte le funzioni di Banana disponibili.
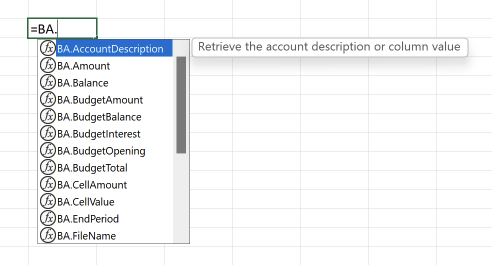
Seleziona la funzione che vuoi utilizzare, inserisci i parametri richiesti dalla funzione e infine premi INVIO.

Nella cella vedrai il valore ritornato dalla funzione.

BA.FunctionsVersion()
Ritorna la data della versione corrente pubblicata dell'add-in.
BA.FileName(fileName)
Ritorna il nome del file o una stringa vuota se il file specificato non è corretto o non viene trovato.
Parametri:
- fileName: nome del file della contabilità.
Esempi:
- =BA.FileName(C3)
- =BA.FileName("company-2024.ac2")
Si consiglia di utilizzare le celle che contengono il risultato di questa funzione come parametro per il nome del file di tutte le altre funzioni che ritornano i dati della contabilità.
Se torna una stringa vuota viene eseguita solamente una chiamata al web server.
BA.CreatePeriod(startDate, endDate)
Prende due date e crea la stringa del periodo secondo il formato utilizzado da Banana "yyyy-mm-dd/yyyy-mm-dd".
Parametri:
- startDate: data di inizio periodo.
- endDate: data di fine periodo.
Le due date devono essere un rifermimento delle celle che contengono le date.
In alternativa, si può utilizzare la funzione Excel DATEVALUE che converte una data inserita come testo in un numero seriale che Excel riconosce come tipo data.
Esempi:
- =BA.CreatePeriod(D4, D5)
Ritorna la strina del periodo (es. "2023-01-01/2023-12-31") - =BA.CreatePeriod(DATEVALUE("01.01.2023"), DATEVALUE("31.12.2023"))
Ritorna "2023-01-01/2023-12-31"
BA.StartPeriod(fileName, [period])
Ritorna la data di inizio periodo.
Parametri:
- fileName: nome del file della contabilità.
- period (opzionale): il periodo dal quale prendere la data di inizio.
Esempi:
- =BA.StartPeriod(File0)
Data di inizio del periodo contabile. - =BA.StartPeriod(File0, "M1")
Data di inizio del primo mese. - =BA.StartPeriod(File0, "Q2")
Data di inizio del secondo trimestre.
BA.EndPeriod(fileName, [period])
Ritorna la data di fine periodo.
Parametri:
- fileName: nome del file della contabilità.
- period (opzionale): il periodo dal quale prendere la data di fine periodo.
Esempi:
- =BA.EndPeriod(File0)
Data fine del periodo contabile - =BA.EndPeriod(File0, "M1")
Data fine del primo mese. - =BA.EndPeriod(File0, "Q2")
Data fine del secondo trimestre
BA.Info(fileName, sectionXml, idXml)
Ritorna informazioni riguardanti il file e le proprietà del file.
Per verdere quese informazioni in Banana, visualizzare la tabella Info file: menu Strumenti > Info file, vista Completa.
Parametri:
- fileName: nome del file della contabilità.
- sectionXml: può essere un valore indicato nella colonna "Section Xml" della tabella "Info file".
- idXml: può essere un valore indicato nella colonna "ID Xml" della tabella "Info file".
Esempi:
- =BA.Info(File0, "Base", "HeaderLeft")
- =BA.Info(File0, "Base", "HeaderRight")
- =BA.Info(File0, "AccountingDataBase", "Company")
- =BA.Info(File0, "AccountingDataBase", "OpeningDate")
- =BA.Info(File0, "AccountingDataBase", "BasicCurrency")
BA.AccountDescription(fileName, account, [column])
Ritorna la descrizione del conto o del gruppo specificati della tabella Conti.
Parametri:
- fileName: nome del file della contabilità.
- account: conto o gruppo della tabella Conti.
- column (opzionale): puoi indicare di ritornare un altra colonna invece che la colonna Descrizione. Indica il valore XML della colonna desiderata.
Puoi visualizzare il nome XML di ogni colonna con il comando disponi colonne, scheda Impostazioni.
Esempi:
- =BA.AccountDescription(File0, "1000")
Descrizione del conto 1000 - =BA.AccountDescription(File0, "Gr=10")
Descrizione del gruppo 10 - =BA.AccountDescription(File0, "1000", "Gr1")
Contenuto della colonna Gr1 del conto 1000 - =BA.AccountDescription(File0, "1000", "Notes")
Contenuto della colonna Notes del conto 1000
BA.Amount(fileName, account, [period ])
Ritorna l'importo normalizzato in base alla BClass.
Funziona con con la la contabilità doppia. Per la contabilità Entrate/Uscite utilizza le funzioni BA.Balance o BA.Total.
- Per conti con BClass 1 o 2, ritorna il saldo (valore in un istante specifico).
- Per conti con BClass 3 o 4, ritorna il totale (valore per la durata).
- Per conti con BClass 2 e 4, il segno dell'importo è inverito.
Per usare questa funzione con i gruppi è necessario assegnare una BClass anche al gruppo (tabella Conti).
Parametri:
- fileName: nome del file della contabilità.
- account: conto, centro di costo, gruppo o segmento della tabella Conti.
- period (opzionale): il periodo.
Esempi:
- =BA.Amount(File0, "1000")
- =BA.Amount(File0, "1000", "2024-01-01/2024-12-31")
- =BA.Amount(File0, "1000", "M1")
BA.Balance(fileName, account, [period ])
Ritorna il saldo alla fine del periodo per il conto, centro di costo, gruppo o segmento indicato.
Il risultato del BA.Balance è la somma di BA.Opening + BA.Total.
È usato per riprendere i dati contabili dai conti del bilancio (Attivi, Passivi).
Parametri:
- fileName: nome del file della contabilità.
- account: conto, centro di costo, gruppo o segmento della tabella Conti.
- Numeri di conto singoli (es. "1000").
- Più conti sommati assieme, inserisci i conti separati da "|" (es. "1000|1001").
- Puoi inserire anche centri di costo e segmenti.
- Per inserire un gruppo, utilizza "Gr=" seguito dal gruppo.
- Per maggiori informazioni guarda la descrizione della funzione Javascript per currentBalance (in inglese).
- period (opzionale): il periodo.
Esempi:
- =BA.Balance(File0, "1000")
Saldo del conto 1000 - =BA.Balance(File0, "1000", "2020-01-01/2020-12-31")
Saldo del conto 1000 per il periodo indicato - =BA.Balance(File0, "1000|1010")
Somma dei saldi dei conti 1000 e 1010 - =BA.Balance(File0, "10*|20*")
Somma dei saldi dei conti che iniziano con 10 e 20 - =BA.Balance(File0, "Gr=10")
Saldo del gruppo 10 - =BA.Balance(File0, "Gr=10|20")
Somma i saldi dei gruppi 10 e 20 - =BA.Balance(File0, ".P1")
Saldo del centro di costo .P1 - =BA.Balance(File0, ";C01|;C02")
Somma i saldi dei centri di costo ;C01 e ;C02 - =BA.Balance(File0, ":S1|S2")
Somma i saldi dei segmenti :S1 e :S2 - =BA.Balance(File0, "1000:S1:T1")
Saldo del conto 1000 con i segment :S1 e ::T1 - =BA.Balance(File0, "1000:{}")
Saldo del conto 1000 con i segmenti non assegnati
BA.Opening(fileName, account, [period])
Ritorna il saldo di inizio periodo per il conto indicato.
Parametri:
- fileName: nome del file della contabilità.
- account: conto, centro di costo, gruppo o segmento della tabella Conti.
- period (opzionale): il periodo.
Esempi:
- =BA.Opening(File0, "1000")
Saldo inizio del conto 1000 - =BA.Opening(File0, "1000", "M1")
Saldo inizio del conto 1000 per il periodo primo mese - =BA.Opening(File0, "1000", "Q2")
Saldo inizio del conto 1000 per il periodo secondo trimestre
BA.Total(fileName, account, [period])
Ritorna i movimenti per il periodo indicato (differenza "Dare - Avere").
Dovrebbe essere utilizzato per i conti del conto economico (costi e ricavi).
Parametri:
- fileName: nome del file della contabilità.
- account: conto, centro di costo, gruppo o segmento della tabella Conti.
- period (opzionale): il periodo.
Esempi:
- =BA.Total(File0, "4100")
Movimenti conto 4100 per tutto il periodo contabile - =BA.Total(File0, "Gr=3", "M1")
Movimenti gruppo 3 per il periodo primo mese - =BA.Total(File0, "Gr=4", "Q2")
Movimenti gruppo 4 per il periodo secondo trimestre
BA.Interest(fileName, account, interestRate, [period])
Calcola l'interesse per il conto e il periodo indicati.
Parametri:
- fileName: nome del file della contabilità.
- account: può essere qualunque conto come indicato nella funzione BA.Balance.
- interestRate: l'interesse in percentuale:
- > 0 calcola l'interesse degli importi in Dare
- < 0 calcola l'interesse degli importi in Avere
- period (opzionale): il periodo.
Esempi:
- =BA.Interest(File0, "1000", "5")
Interesse 5% del conto 1000 - =BA.Interest(File0, "1000", "5", "M1")
Interesse 5% del conto 1000 del periodo M1 - =BA.Interest(File0, "2000", "-5")
Intresse -5% del conto 2000 - =BA.Interest(File0, "2000", "-5", "M1")
Interesse -5% del conto 2000 del periodo M1
BA.VatBalance(fileName, vatCode, vatValue, [period])
Ritorna i saldi riguardanti il codice IVA indicato (o più codici IVA).
Parametri:
- fileName: nome del file della contabilità.
- vatCode: il codice IVA.
- vatValue: può essere “taxable”, “amount”, “notdeductible”, “posted”.
- period (opzionale): il periodo.
Examples:
- =BA.VatBalance(File0, "V10", "taxable")
- =BA.VatBalance(File0, "V10|V20", "posted")
BA.VatDescription(fileName, vatCode, [column])
Ritorna la descrizione del codice IVA specificato nella tabella Codici IVA.
Parametri:
- fileName: nome del file della contabilità.
- vatCode: codice IVA.
- column (opzionale): puoi indicare di ritornare un altra colonna invece che la colonna Descrizione.
Indica il valore XML della colonna desiderata.
Puoi visualizzare il nome XML di ogni colonna con il comando disponi colonne, scheda Impostazioni.
Esempi:
- =BA.VatDescription(File0, "V10")
Descrizione del codice V10 - =BA.VatDescription(File0, "V10", "VatRate")
Percentuale IVA del codice V10
BA.BudgetAmount(fileName, account, [period])
Come il BA.Amount ma utilizza i dati del budget invece che i dati della contabilità.
BA.BudgetBalance(fileName, account, [period])
Come il BA.Balance ma utilizza i dati del budget invece che i dati della contabilità.
BA.BudgetOpening(fileName, account, [period])
Come il BA.Opening ma utilizza i dati del budget invece che i dati della contabilità.
BA.BudgetTotal(fileName, account, [period])
Come il BA.Total ma utilizza i dati del budget invece che i dati della contabilità.
BA.BudgetInterest(fileName, account, interestRate, [period])
Come il BA.Interest ma utilizza i dati del budget invece che i dati della contabilità.
BA.CellValue(fileName, table, rowColumn, column)
Ritorna il contenuto della cella di una tabella come testo.
Parametri:
- fileName: nome del file della contabilità.
- table: il nome XML della tabella (Accounts, Categories, Transactions, Budget, Totals, VatCodes,...).
- rowColumn: la riga della tabella.
- column: il nome XML della colonna (Group, Account, Description, Notes,...).
Esempi:
- =BA.CellValue(File0, "Accounts", 2, "Description")
Tabella Conti, riga 2, colonna Descrizione - =BA.CellValue(File0, "Accounts", "Account=1000", "Description")
Tabella Conti, riga dove il conto=1000, colonna Descrizione - =BA.CellValue(File0, "Accounts", "Group=10", "Description")
Tabella Conti, riga dove il gruppo=10, colonna Descrizione
BA.CellAmount(fileName, table, rowColumn, column)
Ritorna il contenuto della cella di una tabella come importo.
- fileName: nome del file della contabilità.
- table: il nome XML della tabella (Accounts, Categories, Transactions, Budget, Totals, VatCodes,...).
- rowColumn: la riga della tabella.
- column: il nome XML della colonna (Group, Account, Description, Notes,...).
Esempi:
- =BA.CellAmount(File0, "Accounts", 2, "Opening")
Tabella Conti, riga 2, colonna Apertura - =BA.CellAmount(File0, "Accounts", "Account=1000", "Balance")
Tabella Conti, riga dove il conto è 1000, colonna Saldo - =BA.CellAmount(File0, "Accounts", "Account="&$A4, "Balance")
Tabella Conti, riga dove il conto è il valore $A4 (riferimento cella in Excel), colonna Saldo - =BA.CellAmount(File0, "Accounts", "Group=10", "Balance")
Tabella Conti, riga dove il gruppo è 10, colonna Saldo
Messaggi di errore
Errori Excel
Quando inserisci i nomi dei file della contabilità nelle celle gialle, i messaggi seguenti potrebbero essere visualizzati accanto a ogni cella gialla:
- Banana not open, file not open or WebServer not active.
Significa che il Web Server Banana non riesce a trovare il file inserito.- Assicurati di inserire correttamente il nome del file.
- Assicurati che Banana Contabilità Plus sia aperto e che il Web Server sia attivo.
- Assicurati di aprire in Banana il file che hai indicato.
Errori Add-in
In alcuni casi potrebbero comparire dei messaggi in rosso nella parte bassa dell'add-in. I messaggi sono i seguenti:
- "Scaricare e installare Banana Contabilità+ (versione 10.1.7 o successive)."
Significa che non è possibile utilizzare l'add-in con versioni di Banana Contabilità precedenti a quella indicata. - "Connessione Web Server Banana non riuscita. Versione Banana non supportata, Banana non è aperto, il WebServer non è attivo o le impostazioni del server del componente aggiuntivo sono errate."
Significa che la connessione con il Web Server Banana non funziona. Le cause possono essere differenti come indicato.- Assicurati di utilizzare la versione 10.1.7 (o successiva) di Banana Contabilità Plus.
Scarica e installa l'ultima versione di Banana Contabilità Plus. - Assicurati che Banana Contabilità Plus sia stato avviato.
- Assicurati che il Web Server Banana sia attivo e correttamente configurato. Vedi la configurazione del Web Server:
- Assicurati che i nomi dei file inseriti nelle celle gialle in Excel siano corretti.
- Assicurati che i file indicati siano aperti in Banana.
- Assicurati di impostare correttamente le informazioni server nelle impostazioni dell'add-in:
- Vedi Impostazioni add-in.
- Assicurati di utilizzare la versione 10.1.7 (o successiva) di Banana Contabilità Plus.
- "Connessione non autorizzata. Token di accesso mancante o sbagliato."
Significa che la password dell'access token manca o è sbagliata, e quindi la connessione con il Web Server Banana non può essere stabilita.- Durante la configurazione Web Server Banana, definisci la password nel campo "accessToken" nel file "httpconfig.ini". Vedi la configurazione del Web Server:
- Nell'add-in Impostazioni > Access Token, devi inserire la stessa password.
Cronologia rilascio
- 2023-07-21 Primo rilascio.
- 2023-09-20
- Aggiunto un comando per testare la connessione con il Web Server Banana.
- Selezionando una lingua ora il pannello viene ricaricato immediatamente.
- Aggiunto un comando per creare foglio Start.
Office Scripts in Excel
With Banana Accounting Plus you can use Office Scripts in Excel (the successor of VBA Scripts) to retrieve and display the data of your accounting in Excel.
To read and retrieve data from Banana Accounting with Office Scripts, we use the integrated Banana Web Server.
Prerequisites
To use Office Scripts you need to:
- Download and install Banana Accounting Plus.
- Have the Advanced plan of Banana Accounting Plus.
- Have Excel for Windows (version 2210 or higher) or Excel for Mac.
- Use OneDrive for Business.
Office Scripts files
Office Scripts are written using the TypeScript language. They are stored as .osts files in your Microsoft OneDrive, separately from the Excel file.
For more information visit Office Scripts file storage and ownership.
Configure Banana Accounting Web Server
To read and retrieve data from Banana Accounting with Office Scripts we use the Banana integrated Web Server.
IMPORTANT: To properly configure the Banana Web Server, follow the guide for your operating system:
How to start
- Open Banana Accounting Plus and Configure Banana the Web Server
- Open an accounting file.
- Open an empty Excel file or download the example file from here.
- Select the Automate tab and click on New Script.

- The Code Editor opens on right side of the Excel window.
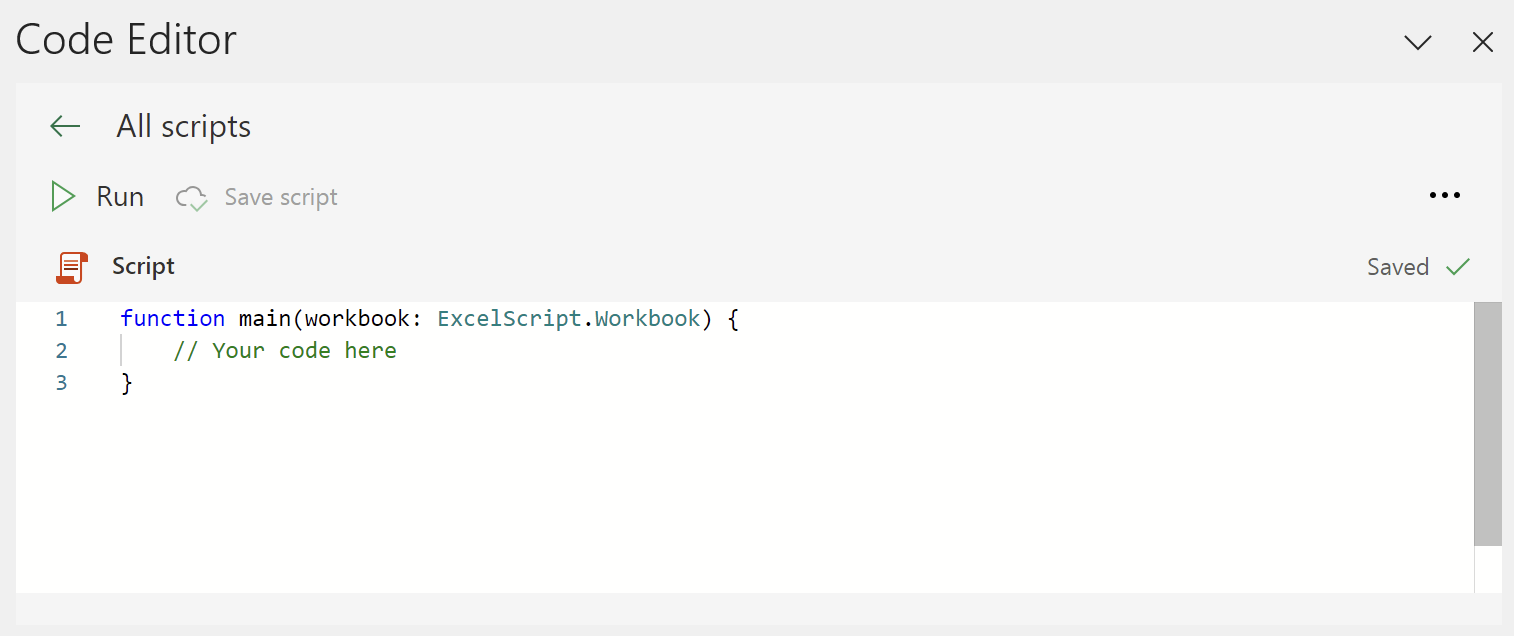
- Enter an example code in the Code Editor. If you want to try all the examples, you have to create a new script for each example.
- In the Code Editor delete all the code.
- Copy the code from one of the examples below.
- Paste the copied code in the Code Editor.
- Rename the script as you want.
- Click on Save script .
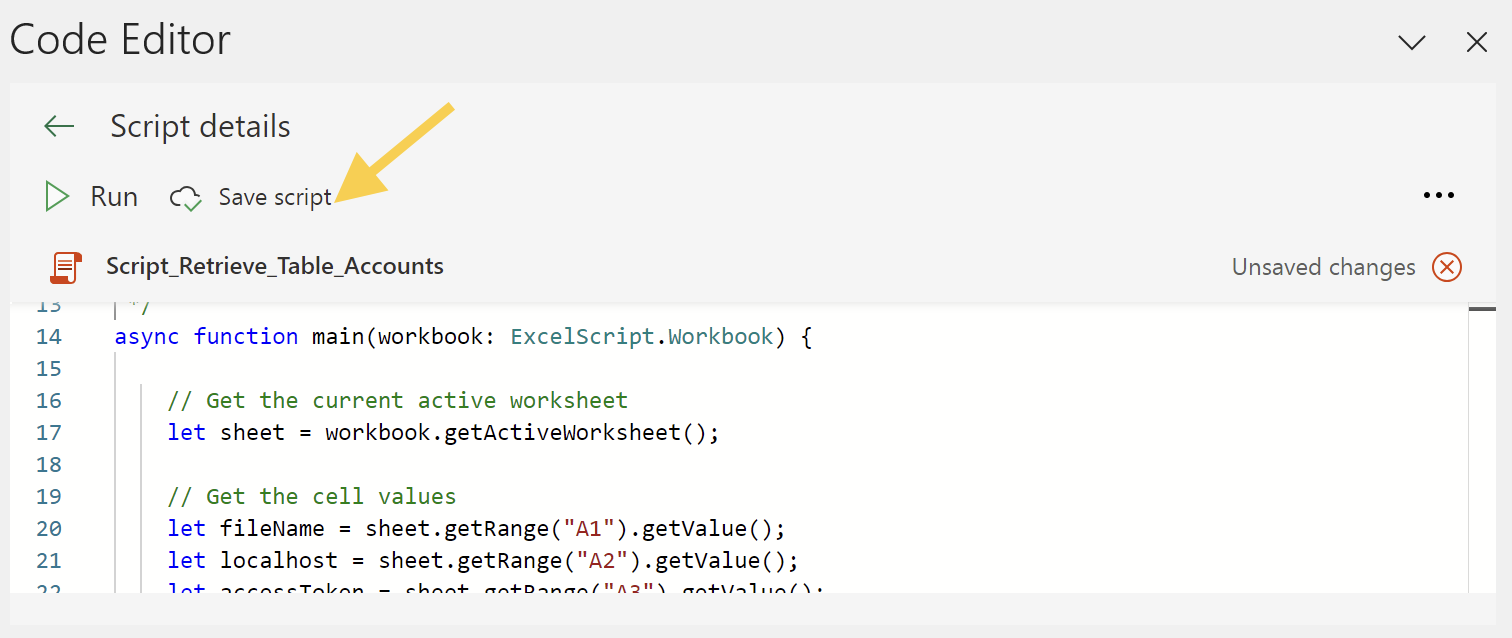
- Click on Run to run the script.
Note: before running the scripts, set the file name and the server settings.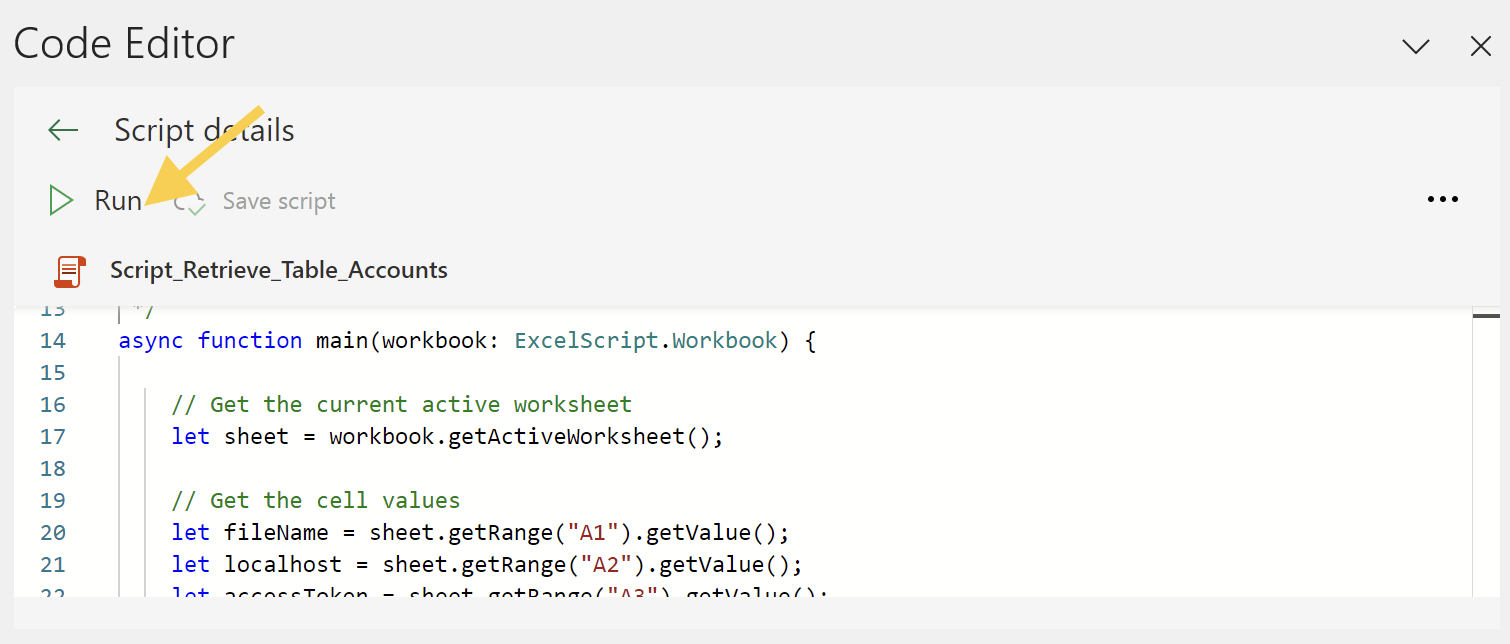
File Name and Server settings
Define the accounting file name and the server settings (yellow cells). In the Excel file:
- In cell B1, enter the accounting file name (e.g. "company-2024.ac2").
- In cell B2, enter the webserver URL:
- If you are on Windows, enter "http://localhost:8081".
- If you are on macOS, enter "https://127.0.0.1:8089".
- In cell B3, enter the same Access Token key you defined in the httpconfig.ini file during the Configuration Banana Accounting Web Server.
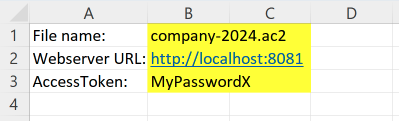
In these examples, we use the B1, B2 and B3 cells to also show how to get a value from a specific cell and use it inside of the Office Script code.
let fileName = sheet.getRange("B1").getValue();
let localhost = sheet.getRange("B2").getValue();
let accessToken = sheet.getRange("B3").getValue();
But if you want, you can also enter the file name, the Web Server URL and the Access Token key directly in your Office Script code, without using the B1, B2, and B3 cells.
let fileName = "company-2024.ac2";
let localhost = "http://localhost:8081";
let accessToken = "MyPasswordX";
Example 1: Retrieve data from the table Accounts
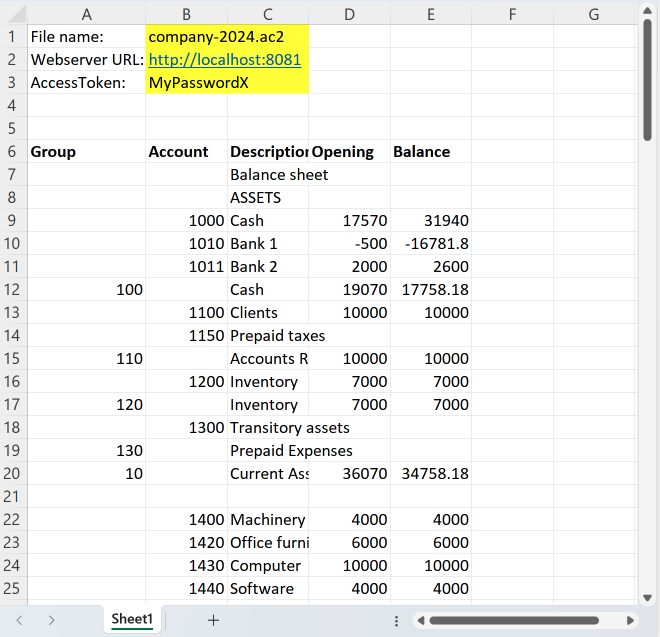
This example shows how to retrieve and display the data from the table Accounts.
If the worksheet you are working already contains data, these will be overwritten. Make sure you are in an empty sheet.
To use this script:
- Copy the following script code.
- Paste the script in the Code Editor.
- Save and Run the script.
Note: before running the scripts, set the file name and the server settings.
When you run the script:
- The data of the table Accounts are displayed on the current worksheet.
- If the worksheet you are working already contains data, these will be overwritten.
Script code:
/**
 * This example retrieves all the Accounts table.
 *
 * In order to connect to the Banana Web Server, define some information:
 * - Cell B1 the accounting file name
 * - Cell B2 the localhost web server url
 * - Cell B3 the accessToken security password
 *
 * You can get these information from cells of the worksheet or you can define them in the script.
 * In this example we get the information from the cells B1, B2, B3.
 */
async function main(workbook: ExcelScript.Workbook) {
  // Get the current active worksheet
  let sheet = workbook.getActiveWorksheet();
  // Get the cell values
  let fileName = sheet.getRange("B1").getValue();
  let localhost = sheet.getRange("B2").getValue();
  let accessToken = sheet.getRange("B3").getValue();
  // Retrieve JSON data of table Accounts from Banana Web Server.
  let fetchResult = await fetch(localhost + '/v1/doc/' + fileName + '/table/Accounts?view=Base&format=json&acstkn=' + accessToken);
  // Convert the returned data to the expected JSON structure.
  let json: JSONData = await fetchResult.json();
  // Display the content in a readable format.
  console.log(JSON.stringify(json));
  // Write columns headers texts on the row 6
  let row = 6;
  let col = sheet.getRange('A' + row);
  col.setValue([['Group']]);
  col.getFormat().getFont().setBold(true);
  col = sheet.getRange('B' + row);
  col.setValue([['Account']]);
  col.getFormat().getFont().setBold(true);
  col = sheet.getRange('C' + row);
  col.setValue([['Description']]);
  col.getFormat().getFont().setBold(true);
  col = sheet.getRange('D' + row);
  col.setValue([['Opening']]);
  col.getFormat().getFont().setBold(true);
  col = sheet.getRange('E' + row);
  col.setValue([['Balance']]);
  col.getFormat().getFont().setBold(true);
  // Write table Accounts data from the row 7
  row = 7;
  for (let i in json) {
    let col = sheet.getRange('A' + row);
    col.setValue(json[i].Group);
    col = sheet.getRange('B' + row);
    col.setValue(json[i].Account);
    col = sheet.getRange('C' + row);
    col.setValue(json[i].Description);
    col = sheet.getRange('D' + row);
    col.setValue(json[i].Opening);
    col = sheet.getRange('E' + row);
    col.setValue(json[i].Balance);
    // increase row
    row++;
  }
}
// Json structure of table Accounts
interface JSONData {
  Section: string;
  Group: string;
  Account: string;
  Description: string;
  BClass: number;
  Gr: string;
  Opening: number;
  Balance: number;
}
/* Complete list of columns
SysCod,Links,Section,Group,Account,Description,Notes,Disable,VatCode,GrVat,VatNumber,FiscalNumber,BClass,Gr,Gr1,Gr2,Opening,Debit,Credit,Balance,Budget,BudgetDifference,Prior,PriorDifference,BudgetPrior,PeriodBegin,PeriodDebit,PeriodCredit,PeriodTotal,PeriodEnd,NamePrefix,FirstName,FamilyName,OrganisationName,Street,AddressExtra,POBox,PostalCode,Locality,Region,Country,CountryCode,LanguageCode,PhoneMain,PhoneMobile,Fax,EmailWork,Website,DateOfBirth,PaymentTermInDays,CreditLimit,MemberFee,BankName,BankIban,BankAccount,BankClearing,Code1
*/
After running the script, the result is the following:
Example 2: Retrieve Transactions from the Journal
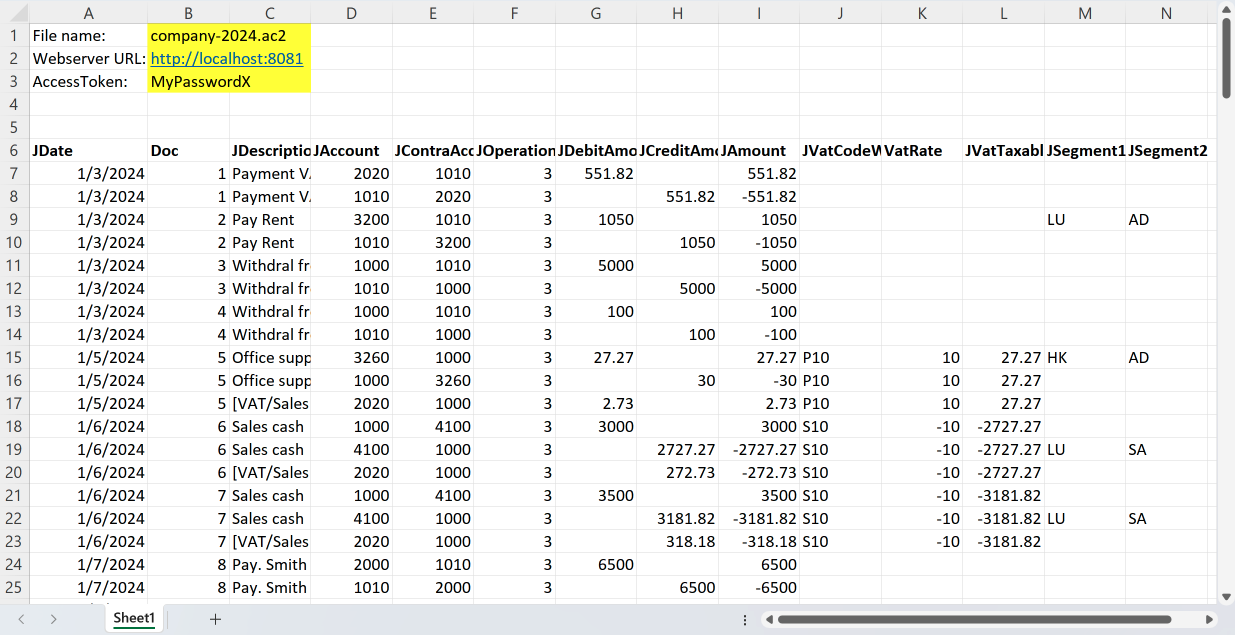
This example shows how to use the Banana Journal to get all the data, and from that retrieve only the Transactions rows.
The Banana Accounting Journal contains the Transactions Data with one row for each account. It can be useful for creating pivot tables.
If the worksheet you are working already contains data, these will be overwritten. Make sure you are in an empty sheet.
To use this script:
- Copy the following script code.
- Paste the script in the Code Editor.
- Save and Run the script.
Note: before running the scripts, set the file name and the server settings.
When you run the script:
- The transactions rows of the Journal are displayed.
- If the worksheet you are working already contains data, these will be overwritten.
Script code:
/**
 * This example retrieves all the Transactions rows from the Journal
 *
 * In order to connect to the Banana Web Server, define some information:
 * - Cell B1 the accounting file name
 * - Cell B2 the localhost web server url
 * - Cell B3 the accessToken security password
 *
 * You can get these information from cells of the worksheet or you can define them in the script.
 * In this example we get the information from the cells B1, B2, B3.
 */
async function main(workbook: ExcelScript.Workbook) {
  // Get the current active worksheet
  let sheet = workbook.getActiveWorksheet();
  // Get the cell values
  let fileName = sheet.getRange("B1").getValue();
  let localhost = sheet.getRange("B2").getValue();
  let accessToken = sheet.getRange("B3").getValue();
  // Retrieve JSON data of the journal from Banana Web Server
  let fetchResult = await fetch(localhost + '/v1/doc/' + fileName + '/journal?format=json&acstkn=' + accessToken);
  // Convert the returned data to the expected JSON structure.
  let json: JSONData = await fetchResult.json();
  // Display the content in a readable format.
  console.log(JSON.stringify(json));
  // Write columns headers texts on the row 6
  let row = 6;
  let col = sheet.getRange('A' + row);
  col.setValue([['JDate']]);
  col.getFormat().getFont().setBold(true);
  //col.getFormat().getFont().setColor("black");
  //col.getFormat().getFill().setColor("yellow");
  col = sheet.getRange('B' + row);
  col.setValue([['Doc']]);
  col.getFormat().getFont().setBold(true);
  col = sheet.getRange('C' + row);
  col.setValue([['JDescription']]);
  col.getFormat().getFont().setBold(true);
  col = sheet.getRange('D' + row);
  col.setValue([['JAccount']]);
  col.getFormat().getFont().setBold(true);
  col = sheet.getRange('E' + row);
  col.setValue([['JContraAccount']]);
  col.getFormat().getFont().setBold(true);
  col = sheet.getRange('F' + row);
  col.setValue([['JOperationType']]);
  col.getFormat().getFont().setBold(true);
  col = sheet.getRange('G' + row);
  col.setValue([['JDebitAmount']]);
  col.getFormat().getFont().setBold(true);
  col = sheet.getRange('H' + row);
  col.setValue([['JCreditAmount']]);
  col.getFormat().getFont().setBold(true);
  col = sheet.getRange('I' + row);
  col.setValue([['JAmount']]);
  col.getFormat().getFont().setBold(true);
  col = sheet.getRange('J' + row);
  col.setValue([['JVatCodeWithoutSign']]);
  col.getFormat().getFont().setBold(true);
  col = sheet.getRange('K' + row);
  col.setValue([['VatRate']]);
  col.getFormat().getFont().setBold(true);
  col = sheet.getRange('L' + row);
  col.setValue([['JVatTaxable']]);
  col.getFormat().getFont().setBold(true);
  col = sheet.getRange('M' + row);
  col.setValue([['JSegment1']]);
  col.getFormat().getFont().setBold(true);
  col = sheet.getRange('N' + row);
  col.setValue([['JSegment2']]);
  col.getFormat().getFont().setBold(true);
  // Write the transactions rows data from the row 7
  row = 7;
  for (let i in json) {
    if (json[i].JOperationType === "3") {  // JOperationType=3 are rows from table Transactions
      let col = sheet.getRange('A' + row);
      col.setValue(json[i].JDate);
      col = sheet.getRange('B' + row);
      col.setValue(json[i].Doc);
      col = sheet.getRange('C' + row);
      col.setValue(json[i].JDescription);
      col = sheet.getRange('D' + row);
      col.setValue(json[i].JAccount);
      col = sheet.getRange('E' + row);
      col.setValue(json[i].JContraAccount);
      col = sheet.getRange('F' + row);
      col.setValue(json[i].JOperationType);
      col = sheet.getRange('G' + row);
      col.setValue(json[i].JDebitAmount);
      col = sheet.getRange('H' + row);
      col.setValue(json[i].JCreditAmount);
      col = sheet.getRange('I' + row);
      col.setValue(json[i].JAmount);
      col = sheet.getRange('J' + row);
      col.setValue(json[i].JVatCodeWithoutSign);
      col = sheet.getRange('K' + row);
      col.setValue(json[i].VatRate);
      col = sheet.getRange('L' + row);
      col.setValue(json[i].JVatTaxable);
      col = sheet.getRange('M' + row);
      col.setValue(json[i].JSegment1);
      col = sheet.getRange('N' + row);
      col.setValue(json[i].JSegment2);
      // increase row
      row++;
    }
  }
}
// JSON structure of the Journal
interface JSONData {
  JDate: string;
  Doc: string;
  JDescription: string;
  JAccount: string;
  JContraAccount: string;
  JOperationType: number;
  JDebitAmount: number;
  JCreditAmount: number;
  JAmount: number;
  JVatCodeWithoutSign: string;
  VatRate: number;
  JVatTaxable: number;
  JSegment1: string;
  JSegment2: string;
}
/* Complete list of journal
    SysCod, Section, Date, DateDocument, DateValue, Doc, DocProtocol, DocType, DocOriginal, DocInvoice, InvoicePrinted, DocLink, ExternalReference, Description, Notes, AccountDebit, AccountDebitDes, AccountCredit, AccountCreditDes, Amount, Balance, VatCode, VatAmountType, VatExtraInfo, VatRate, VatRateEffective, VatTaxable, VatAmount, VatAccount, VatAccountDes, VatPercentNonDeductible, VatNonDeductible, VatPosted, VatNumber, Cc1, Cc1Des, Cc2, Cc2Des, Cc3, Cc3Des, Segment, DateExpiration, DateExpected, DatePayment, LockNumber, LockAmount, LockProgressive, LockLine, JDate, JDescription, JTableOrigin, JRowOrigin, JRepeatNumber, JGroup, JGr, JAccount, JAccountComplete, JAccountDescription, JAccountClass, JAccountSection, JAccountType, JOriginType, JOriginFile, JOperationType, JAccountGr, JAccountGrPath, JAccountGrDescription, JAccountCurrency, JAmountAccountCurrency, JAmount, JTransactionCurrency, JAmountTransactionCurrency, JTransactionCurrencyConversionRate, JAmountSection, JVatIsVatOperation, JVatCodeWithoutSign, JVatCodeDescription, JVatCodeWithMinus, JVatNegative, JVatTaxable, JContraAccount, JCContraAccountDes, JContraAccountType, JContraAccountGroup, JCC1, JCC2, JCC3, JSegment1, JSegment2, JSegment3, JSegment4, JSegment5, JSegment6, JSegment7, JSegment8, JSegment9, JSegment10, JDebitAmountAccountCurrency, JCreditAmountAccountCurrency, JBalanceAccountCurrency, JDebitAmount, JCreditAmount, JBalance, JInvoiceDocType, JInvoiceAccountId, JInvoiceCurrency, JInvoiceStatus, JInvoiceDueDate, JInvoiceDaysPastDue, JInvoiceLastReminder, JInvoiceLastReminderDate, JInvoiceIssueDate, JInvoiceExpectedDate, JInvoicePaymentDate, JInvoiceDuePeriod, JInvoiceRowCustomerSupplier, ProbableIndexGroup, VatTwinAccount, DateEnd, Repeat, Variant, ForNewYear, ItemsId, Quantity, ReferenceUnit, UnitPrice, FormulaBegin, Formula, AmountTotal
*/
After running the script, the result is the following:
Example 3: Create a new accounting file using data from Excel Sheets
For following this example you can download a Excel file that content some data of transactions and accounts.
Download Excel file with transaction and accounts
In this example we want to:
- Create a new Banana Accounting file using the web server Create a new file functionality.
- Take some transactions data from Excel.
For this example, transactions in Excel are entered as shown in the following image: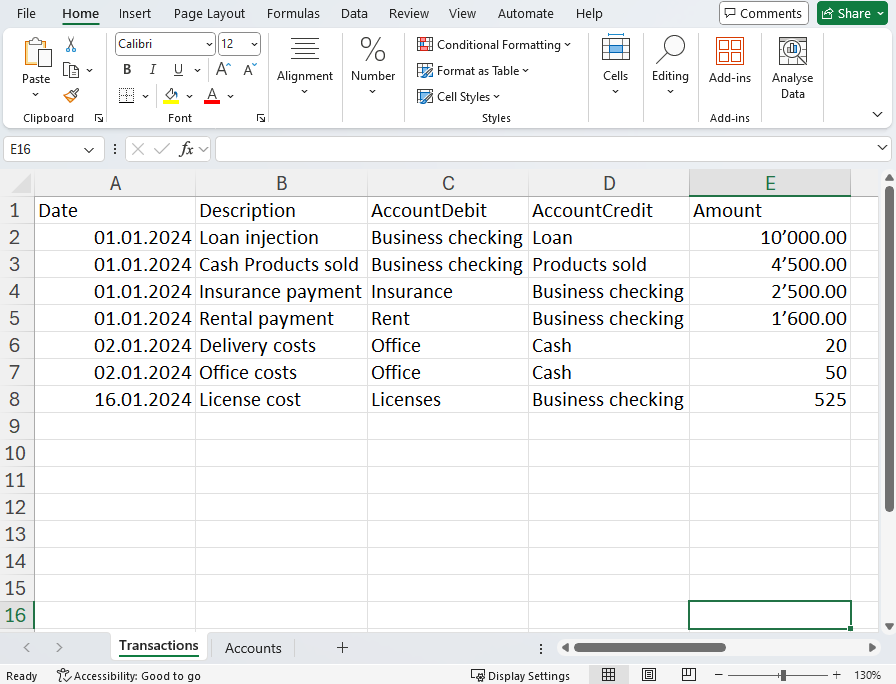
- Take some accounts and descriptions data from Excel.
Accounts can be numbers or texts.
The BClass columns set the type of account (1=assets, 2=liabilities, 3=expenses, 4=revenues).
For this example, accounts in Excel are entered as shown in the following image.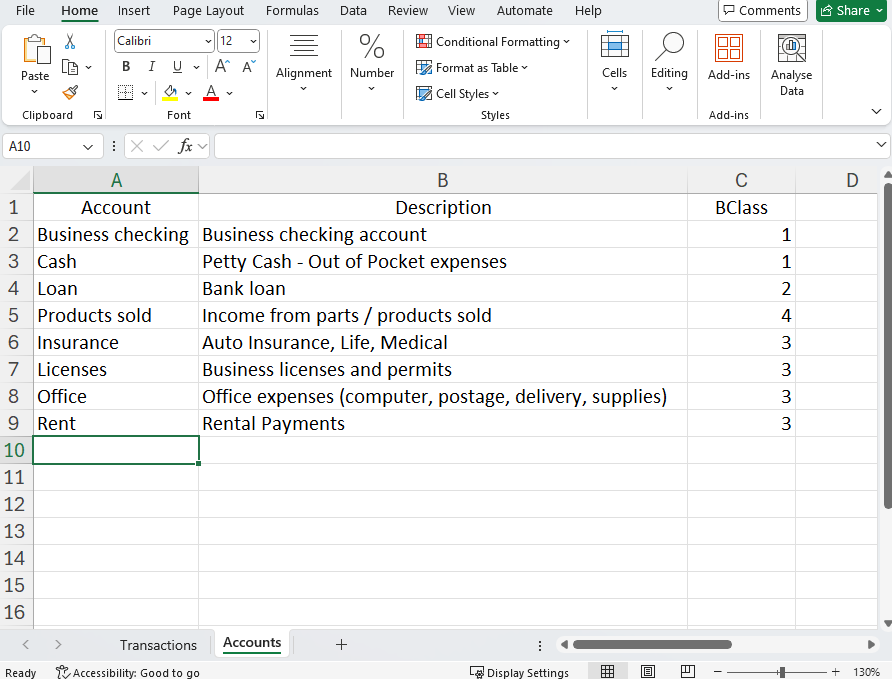
- Create a specific JSON used by the Document change API to add the the data in the accounting file.
We use the add Rows operation to append the transactions to the Transactions table and accounts to the Accounts table.
To use this script:
- Open Banana Accounting Plus and Configure Banana the Web Server.
- Copy the following script code.
- Paste the script in the Code Editor.
- Save and Run the script.
When you run the script:
- The script creates a new Banana Accounting file.
- The Excel transactions rows are added to the Transactions table in the accounting file.
- The Excel accounts rows are added to the Accounts table in the accounting file.
Script code:
async function main(workbook: ExcelScript.Workbook) {
    // Get the specific sheet
    const sheetTransactions = workbook.getWorksheet("Transactions");
    const sheetAccount = workbook.getWorksheet("Accounts");
    // Get the range of cells used in the sheet
    const usedRangeTransactions = sheetTransactions.getUsedRange();
    const usedRangeAccounts = sheetAccount.getUsedRange();
    // Get the last used row of the sheet
    const lastRowTransactions = usedRangeTransactions.getLastRow().getRowIndex();
    const lastRowAccounts = usedRangeAccounts.getLastRow().getRowIndex();
    // TRANSACTIONS
    const dateRange = sheetTransactions.getRange(`A2:A${lastRowTransactions + 1}`).getValues(); // From line 2 (skip header)
    const descriptionRange = sheetTransactions.getRange(`B2:B${lastRowTransactions + 1}`).getValues();
    const accountDebitRange = sheetTransactions.getRange(`C2:C${lastRowTransactions + 1}`).getValues();
    const accountCreditRange = sheetTransactions.getRange(`D2:D${lastRowTransactions + 1}`).getValues();
    const amountRange = sheetTransactions.getRange(`E2:E${lastRowTransactions + 1}`).getValues();
    // ACCOUNTS
    const accountRange = sheetAccount.getRange(`A2:A${lastRowAccounts + 1}`).getValues();
    const descRange = sheetAccount.getRange(`B2:B${lastRowAccounts + 1}`).getValues();
    const bclassRange = sheetAccount.getRange(`C2:C${lastRowAccounts + 1}`).getValues();
    // Initialize JSON structure.
    // The JSON is used by the documentChange to add rows in Transactions table
    // https://www.banana.ch/doc/en/node/9841#example_adding_a_row
    var jsonData = {
        "format": "documentChange",
        "error": "",
        "data": [
            {
                "document": {
                    "dataUnits": [
                        {
                            "data": {
                                "rowLists": [
                                    {
                                        "rows": []
                                    }
                                ]
                            },
                            "nameXml": "Transactions"
                        },
                        {
                            "data": {
                                "rowLists": [
                                    {
                                        "rows": []
                                    }
                                ]
                            },
                            "nameXml": "Accounts"
                        }
                    ]
                }
            }
        ]
    };
    // TRANSACTIONS: Iteration on each row of the columns.
    for (let i = 0; i < dateRange.length; i++) {
        let dateValue = dateRange[i][0]; // Value of column A (Date)
        let descriptionValue = descriptionRange[i][0]; // Value of column B (Description)
        let accountDebitValue = accountDebitRange[i][0]; // Value of column C (AccountDebit)
        let accountCreditValue = accountCreditRange[i][0]; // Value of column D (AccountCredit)
        let amountValue = amountRange[i][0]; // Value of column E (Amount)
        // adds "fields" object to "rows"
        jsonData.data[0].document.dataUnits[0].data.rowLists[0].rows.push({
            "fields": {
                "Date": formatDateToYyyyMmDd(Number(dateValue)),
                "Description": descriptionValue,
                "AccountDebit": accountDebitValue,
                "AccountCredit": accountCreditValue,
                "Amount": amountValue.toString()
            },
            "operation": {
                "name": "add"
            }
        });
    }
    // ACCOUNTS: Iteration on each row of the columns.
    for (let i = 0; i < accountRange.length; i++) {
        let accountValue = accountRange[i][0]; // Value of column A (Account)
        let descValue = descRange[i][0]; // Value of column B (Description)
        let bclassValue = bclassRange[i][0]; // Value of column C (BClass)
        // adds "fields" object to "rows"
        jsonData.data[0].document.dataUnits[1].data.rowLists[0].rows.push({
            "fields": {
                "Section": "",
                "Group": "",
                "Account": accountValue.toString(),
                "Description": descValue.toString(),
                "BClass": bclassValue.toString(),
                "Gr": ""
            },
            "operation": {
                "name": "add"
            }
        });
    }
    let jsonString = JSON.stringify(jsonData);
    //console.log(jsonString);
    createAc2(JSON.parse(jsonString));
}
async function createAc2(jsonData: JSON) {
    // Web server url
    let _LOCALHOST = "http://localhost:8081"; //for macOS use "https://127.0.0.1:8089";
    // Web server password
    let _PASSWORD = "MyPasswordX";
    // Request to Banana web server
    let url = _LOCALHOST + "/v2/doc?show&acstkn=" + _PASSWORD;
    // Accounting type parameters
    let fileTypeGroup = 100; // Double entry accounting
    let fileTypeNumber = 100; // without VAT
    let fileDecimals = 2;
    try {
        // Body of the request
        const httpBody = {
            fileType: {
                accountingType: {
                    docGroup: fileTypeGroup,
                    docApp: fileTypeNumber,
                    decimals: fileDecimals
                }
            },
            data: jsonData,
        }
        const response = await fetch(url, {
            method: 'POST',
            headers: {
                'Content-Type': 'application/json'
            },
            body: JSON.stringify(httpBody)
        });
        //const responseData: string = await response.text();
        //console.log(responseData);
    } catch (error) {
        console.log(error);
    }
}
// Convert Date type of Excel in yyyy-mm-dd string format
function formatDateToYyyyMmDd(date: number): string {
    let dateString = new Date(Math.round((date - 25569) * 86400 * 1000)).toISOString().split("T")[0];
    return dateString;
}
Accounting type parameters "_DOC_GROUP" and "_DOC_APP" define the type of accounting to create. For more information please visit the @doctype Attributes page.
Useful resources
Create a Banana Accounting File Using Excel Office Script
This page explains:
- How to create a Banana Accounting file with double registration without VAT starting from Excel data using the Excel Office Script module.
- How to use the http POST protocol with Banana APIs to transfer the current and budget transactions, the chart of accounts into Banana Accounting Plus from the Excel file.
- How to create financial statement and income statement reports in Banana with this data.
Prerequisites
For use these functions you need to have:
- Download and install Banana Accounting Plus.
- Have the Advanced plan of Banana Accounting Plus.
- Have Excel for Windows (version 2210 or higher) or Excel for Mac.
- Use OneDrive for Business.
- Configure the webserver in Banana Accounting Plus based on your operating system.
Note
- The entered budget and transaction data must be considered over the period defined in the FileInfo in order to be calculated and evaluated
Steps to Integrate Excel Office Script
After checking the prerequisites for this use case, you can follow the next steps:
- Download the example Excel with data.
- Create a new Office Script file in Excel, copy and paste the example code into the code editor in Office Script.
- Open Banana Accounting Plus.
- Make sure that the Webserver is working.
- Save and Run the code in Office Script.
- See the results in the Banana Accounting Plus.
The Office Script will do the following:
- Create a Banana Accounting Json Document Change Object
- For each Excel Sheet:
- Read the content of the Excel Sheet.
- Add the data to the Json Document Change Object.
- Send the Json Document Change Object to the Banana Web Server using the http POST method.
The Banana Accounting software will create a new file and display within the software.
The structure of the Excel file
The file is divided into several sheets, each corresponding to the data structure and Table in the Banana Accounting file.
- FileInfo: Banana Accounting File Properties.
- Accounts: Accounts Table.
- Transactions: Transactions Table.
- Budget: Budget Table.
All the data you enter into Excel sheets are used to create a basic Json structure (documentchange) that must pass into Banana Accounting Plus.
FileInfo
In this sheet, you will enter basic business data. This information is essential to ensure that all entries are consistent and properly contextualized. Here you will be able to specify:
- Company: The company name, that is the name and legal form.
- Opening and closure date: The date the accounts were opened and closed, that are related to period that you want evalueted your accounting.
- Basis currency: The currency to be used.
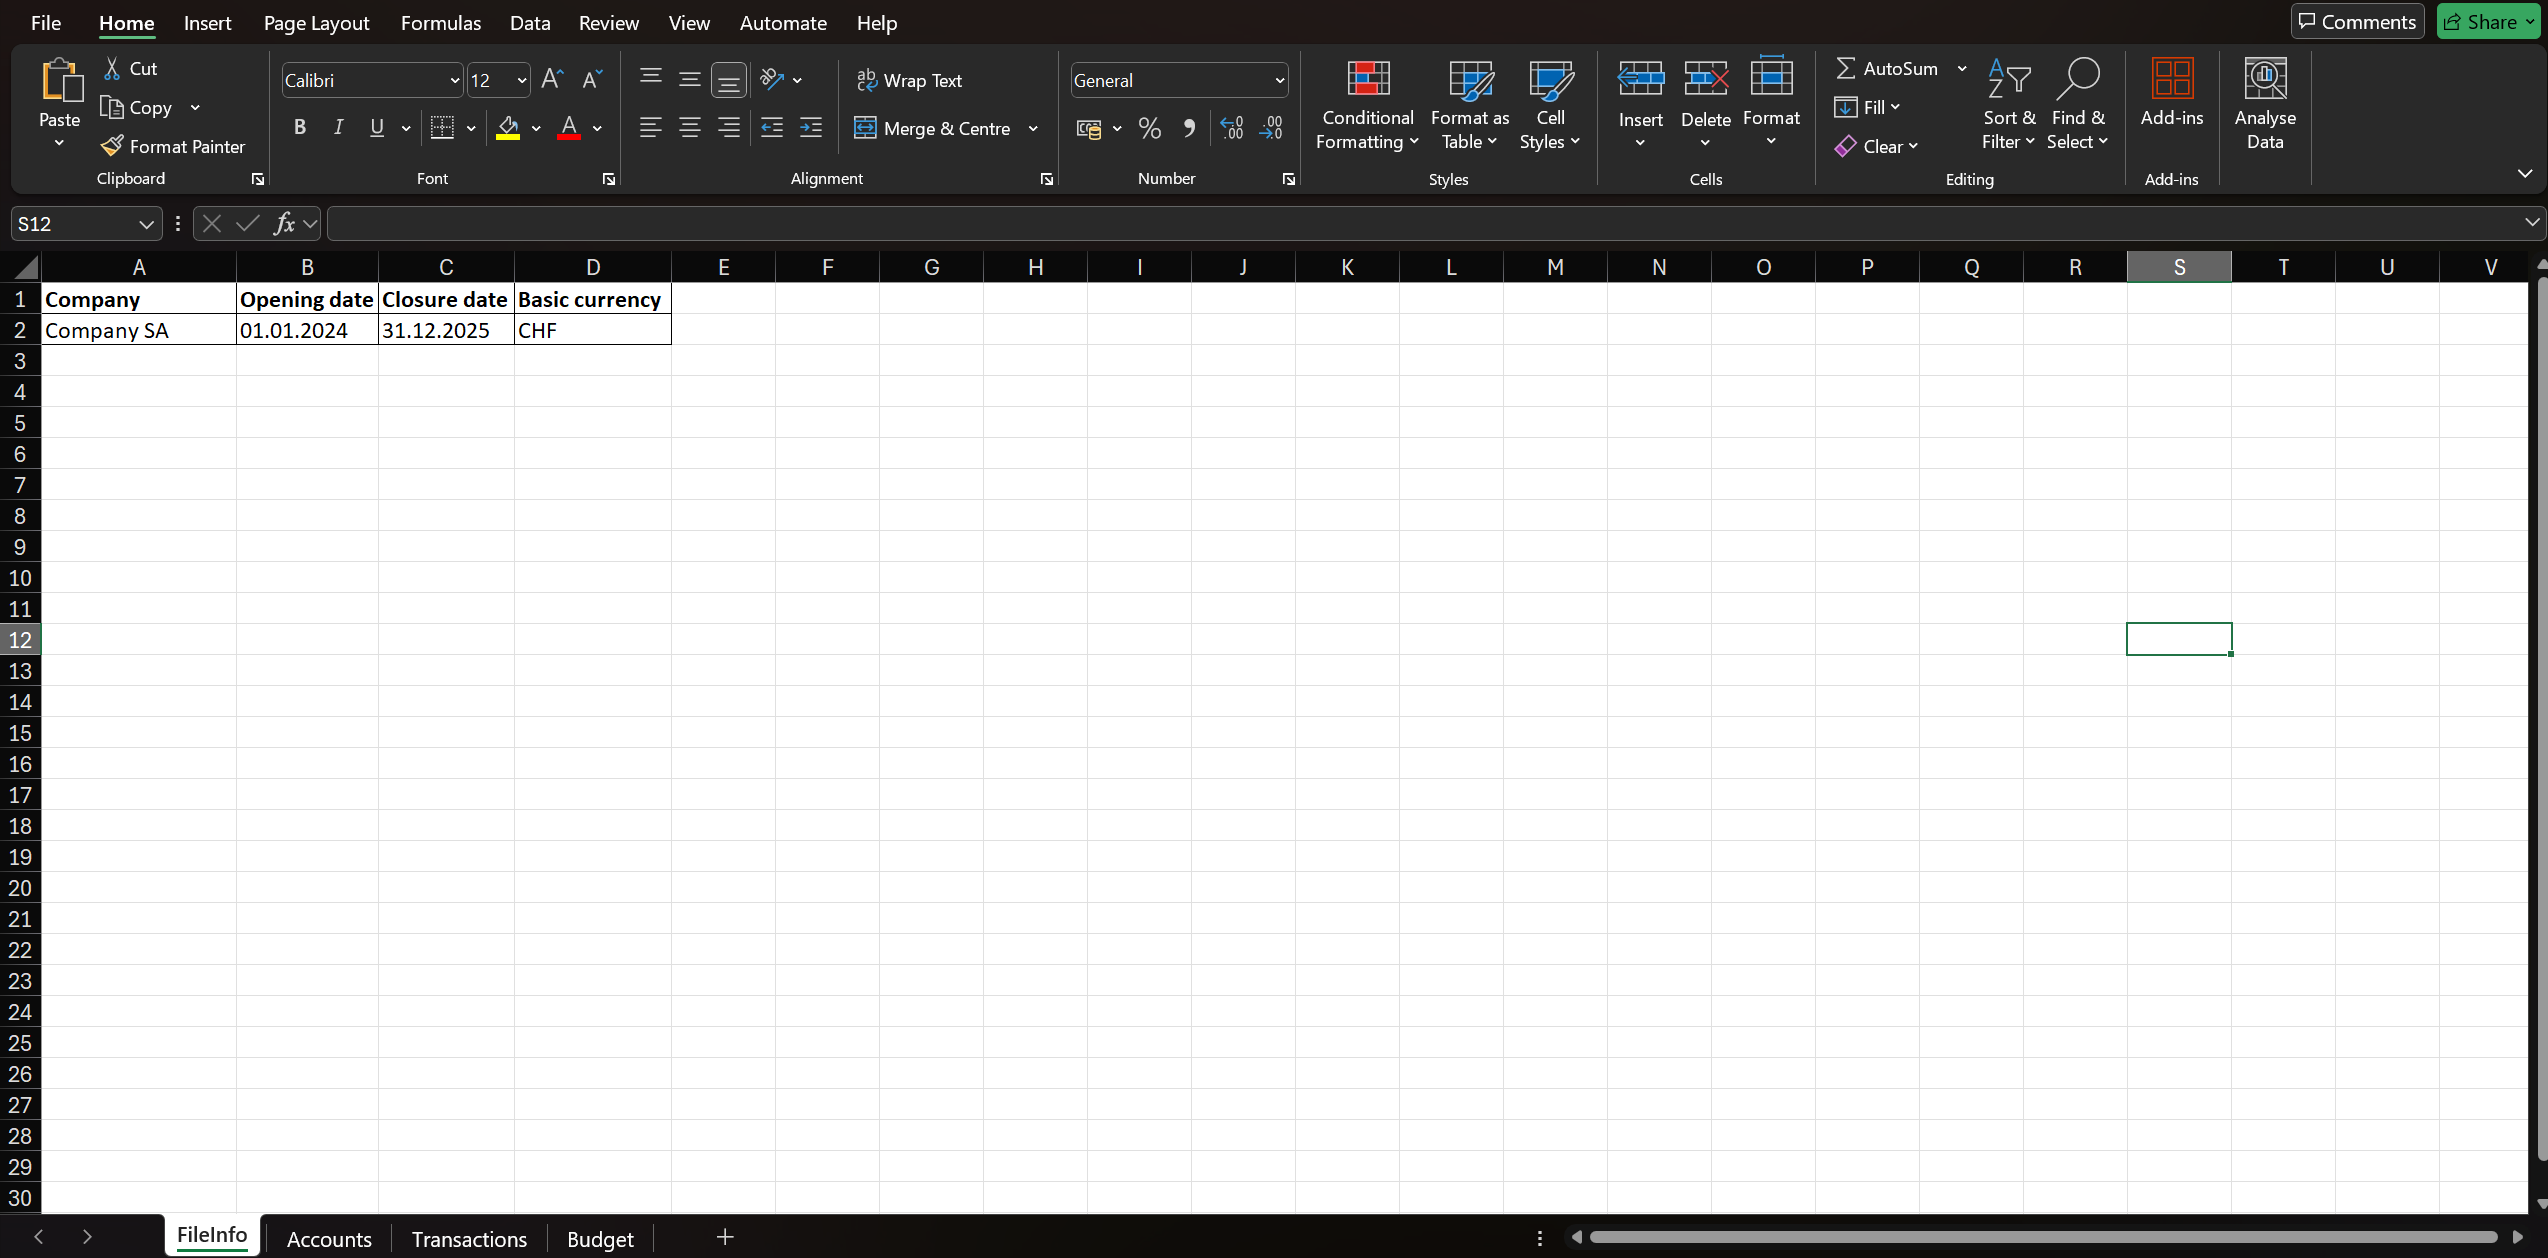
Accounts
This sheet is dedicated to creating the chart of accounts. Here you will be able to define:
- The account names and codes.
- The type of account.
- The groupings required for summing account groups.
- For example, you will be able to sum all accounts receivable to get the total assets, thus facilitating the preparation of the fiancial statement and income statement.
The columns of the sheet Accounts in Excel file refer the same table in Banana Accounting Plus.
The accounting sheet contains the main data for constructing the chart of accounts based on the document change structure and later creating the Financial statement and Income Statement reports, with the same columns that find in Banana Accounting Plus:
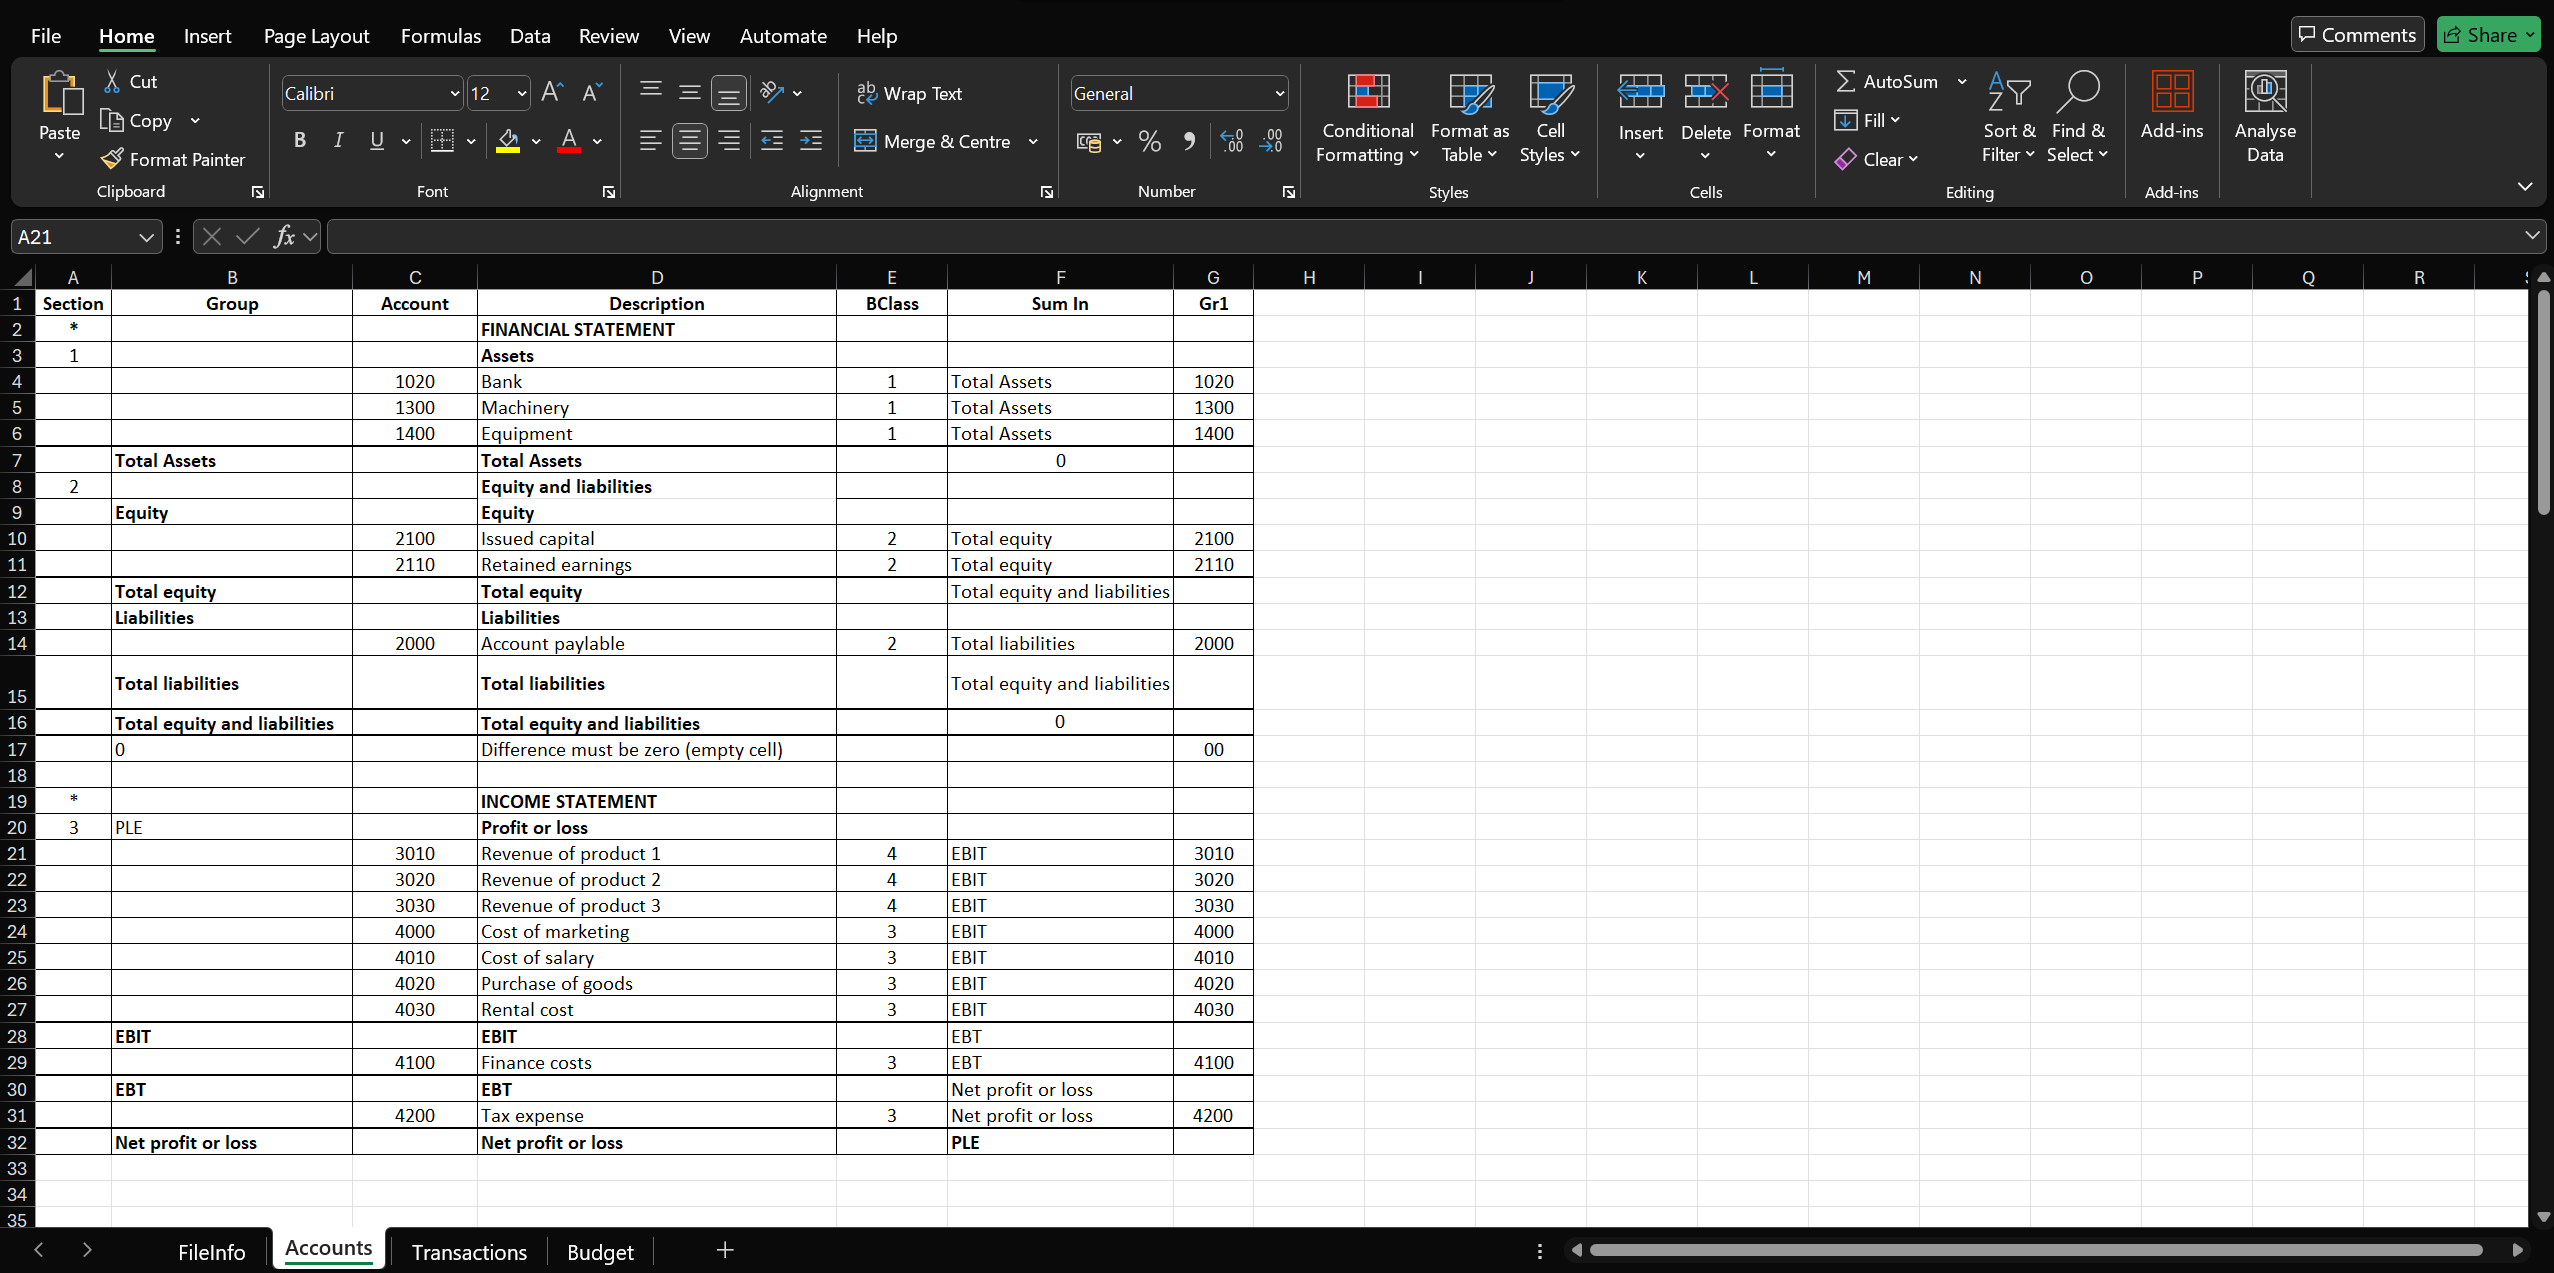
Transactions
In this sheet, you will record:
- All accounting transactions for the current year.
The entries will include key data such as:
- Date: The date of the transaction.
- Description: Transaction description.
- AccountDebit: Debit account.
- AccountCredit: Credit account.
- Amount: Amount of your transaction.
This will enable you to keep track of financial transactions in a detailed and organized manner.
The sheets of Transactions and Budget have the same columns, but refer to different table.
To understand and learn more about the use of these columns you can look at this link Transactions.
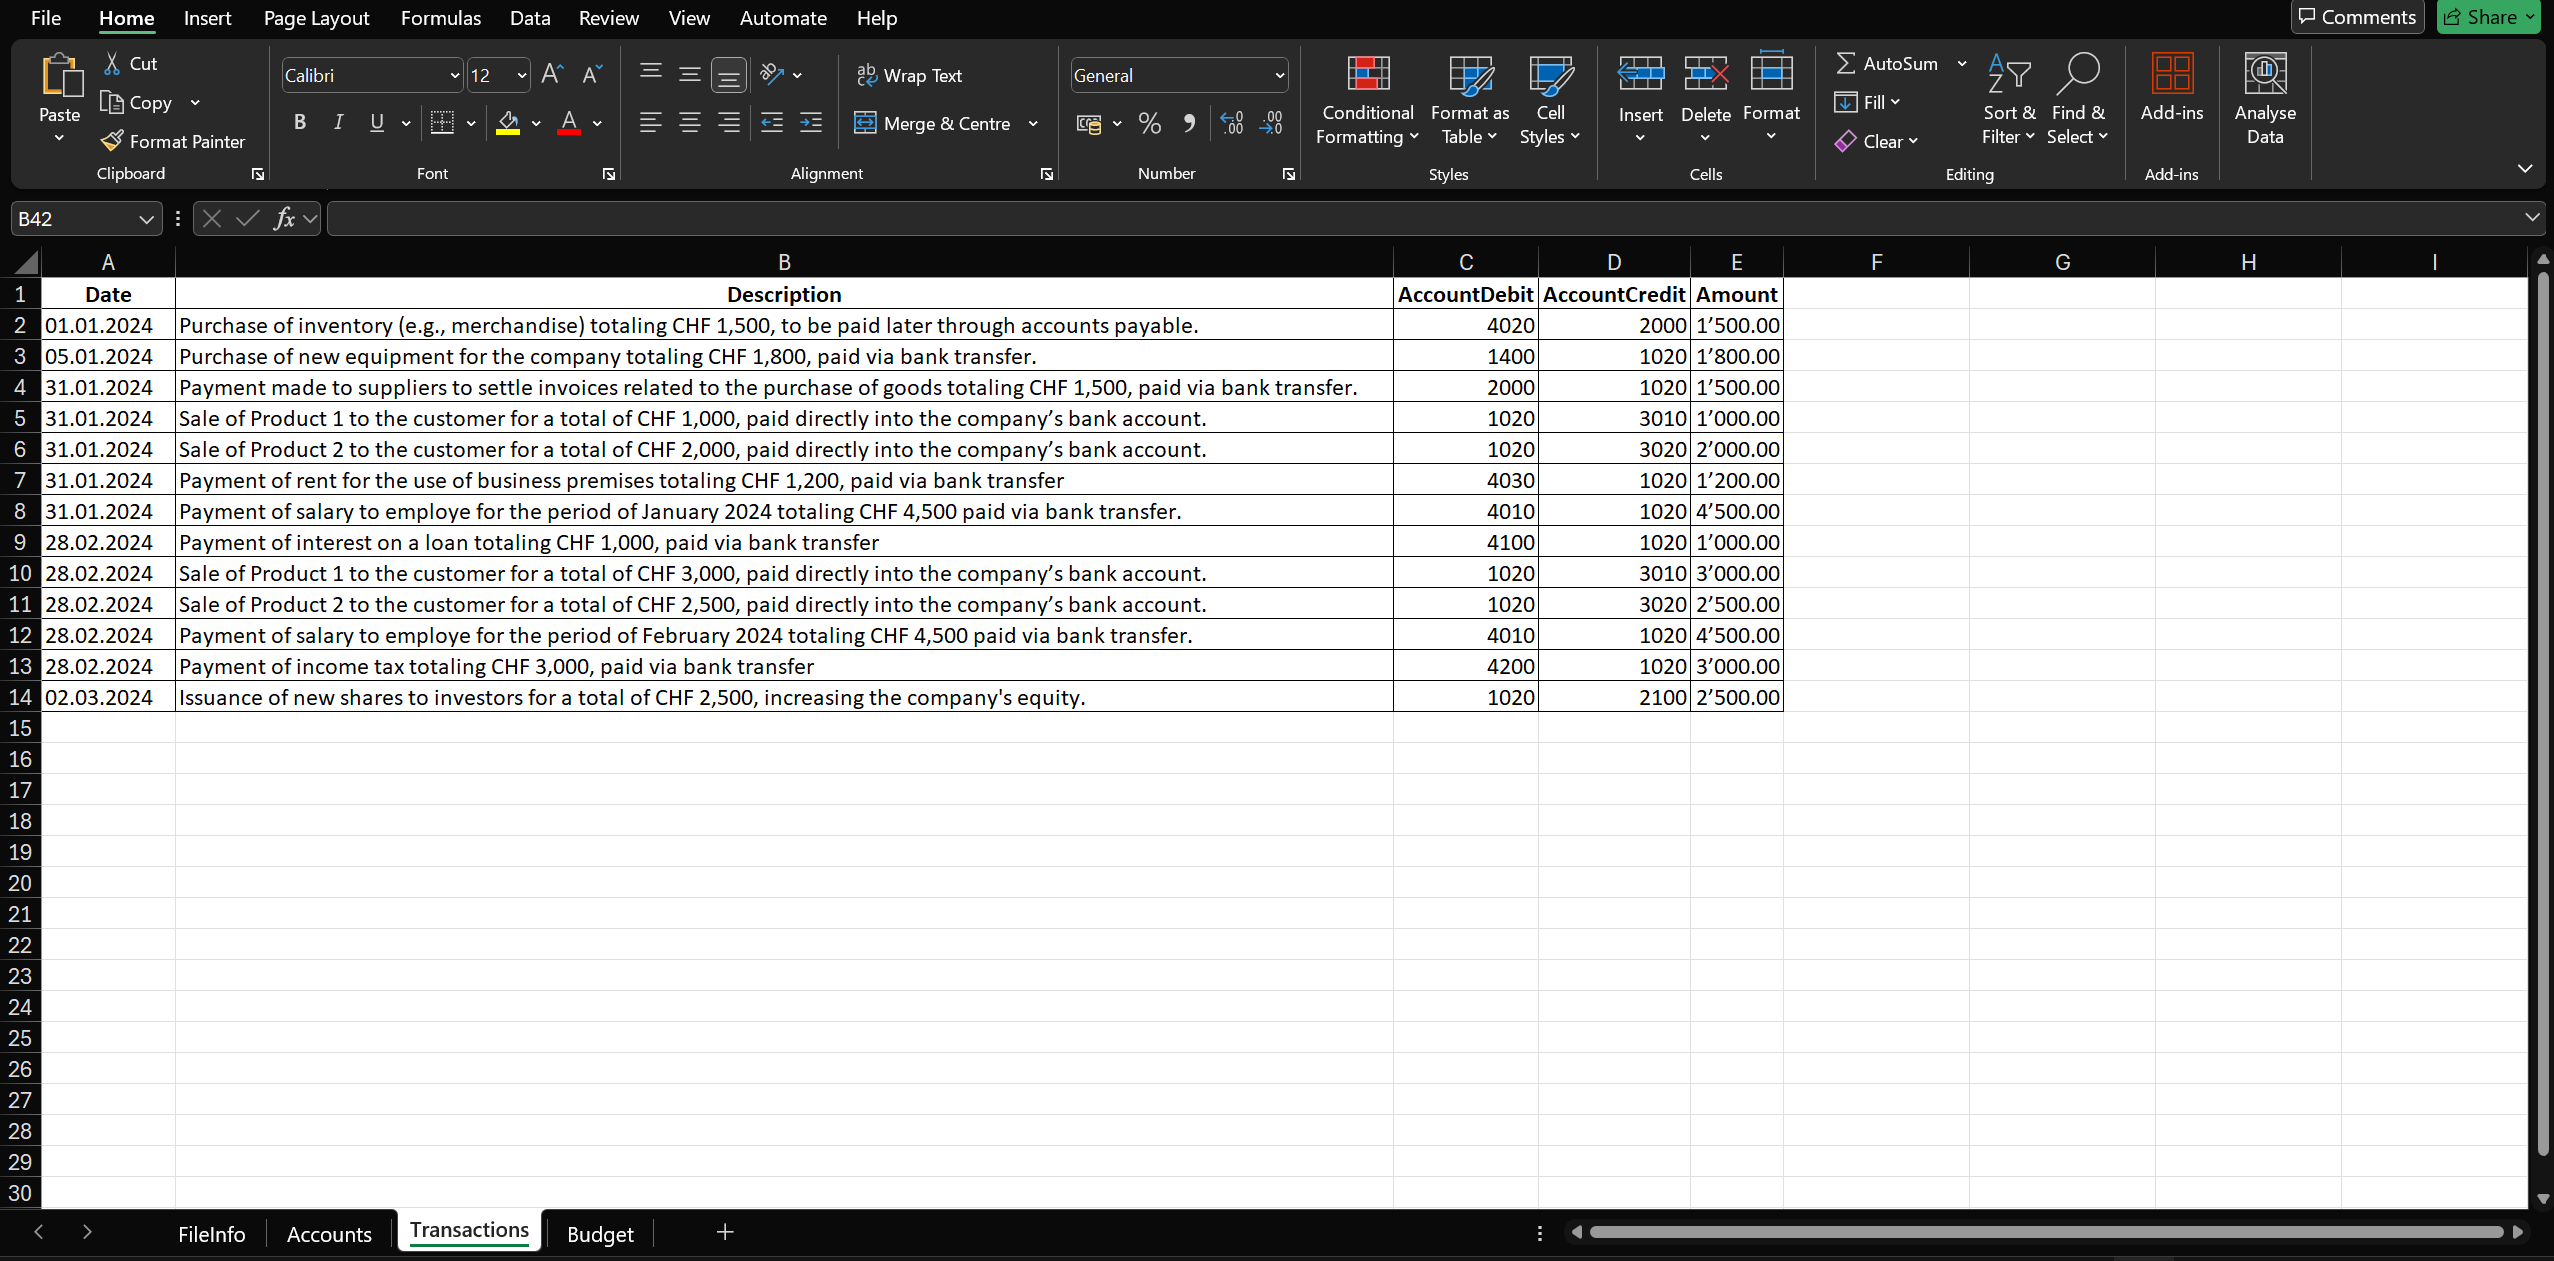
Budget
The entries will include key data such as:
- Date: The date of the budget transaction.
- Description: Budget transaction description.
- AccountDebit: Debit account.
- AccountCredit: Credit account.
- Amount: Amount of your budget transaction.
Finally, the Budget sheet is dedicated to planning future expenses.
Here you will be able:
- To enter the projected expenses you intend to incur, taking into account the closing date indicated on the FileInfo sheet.
- Monitor and manage the company budget proactively.
These data even though they have the same columns as transactions will be recorded in the Budget table for future forecasting.
For further study: Budget Table
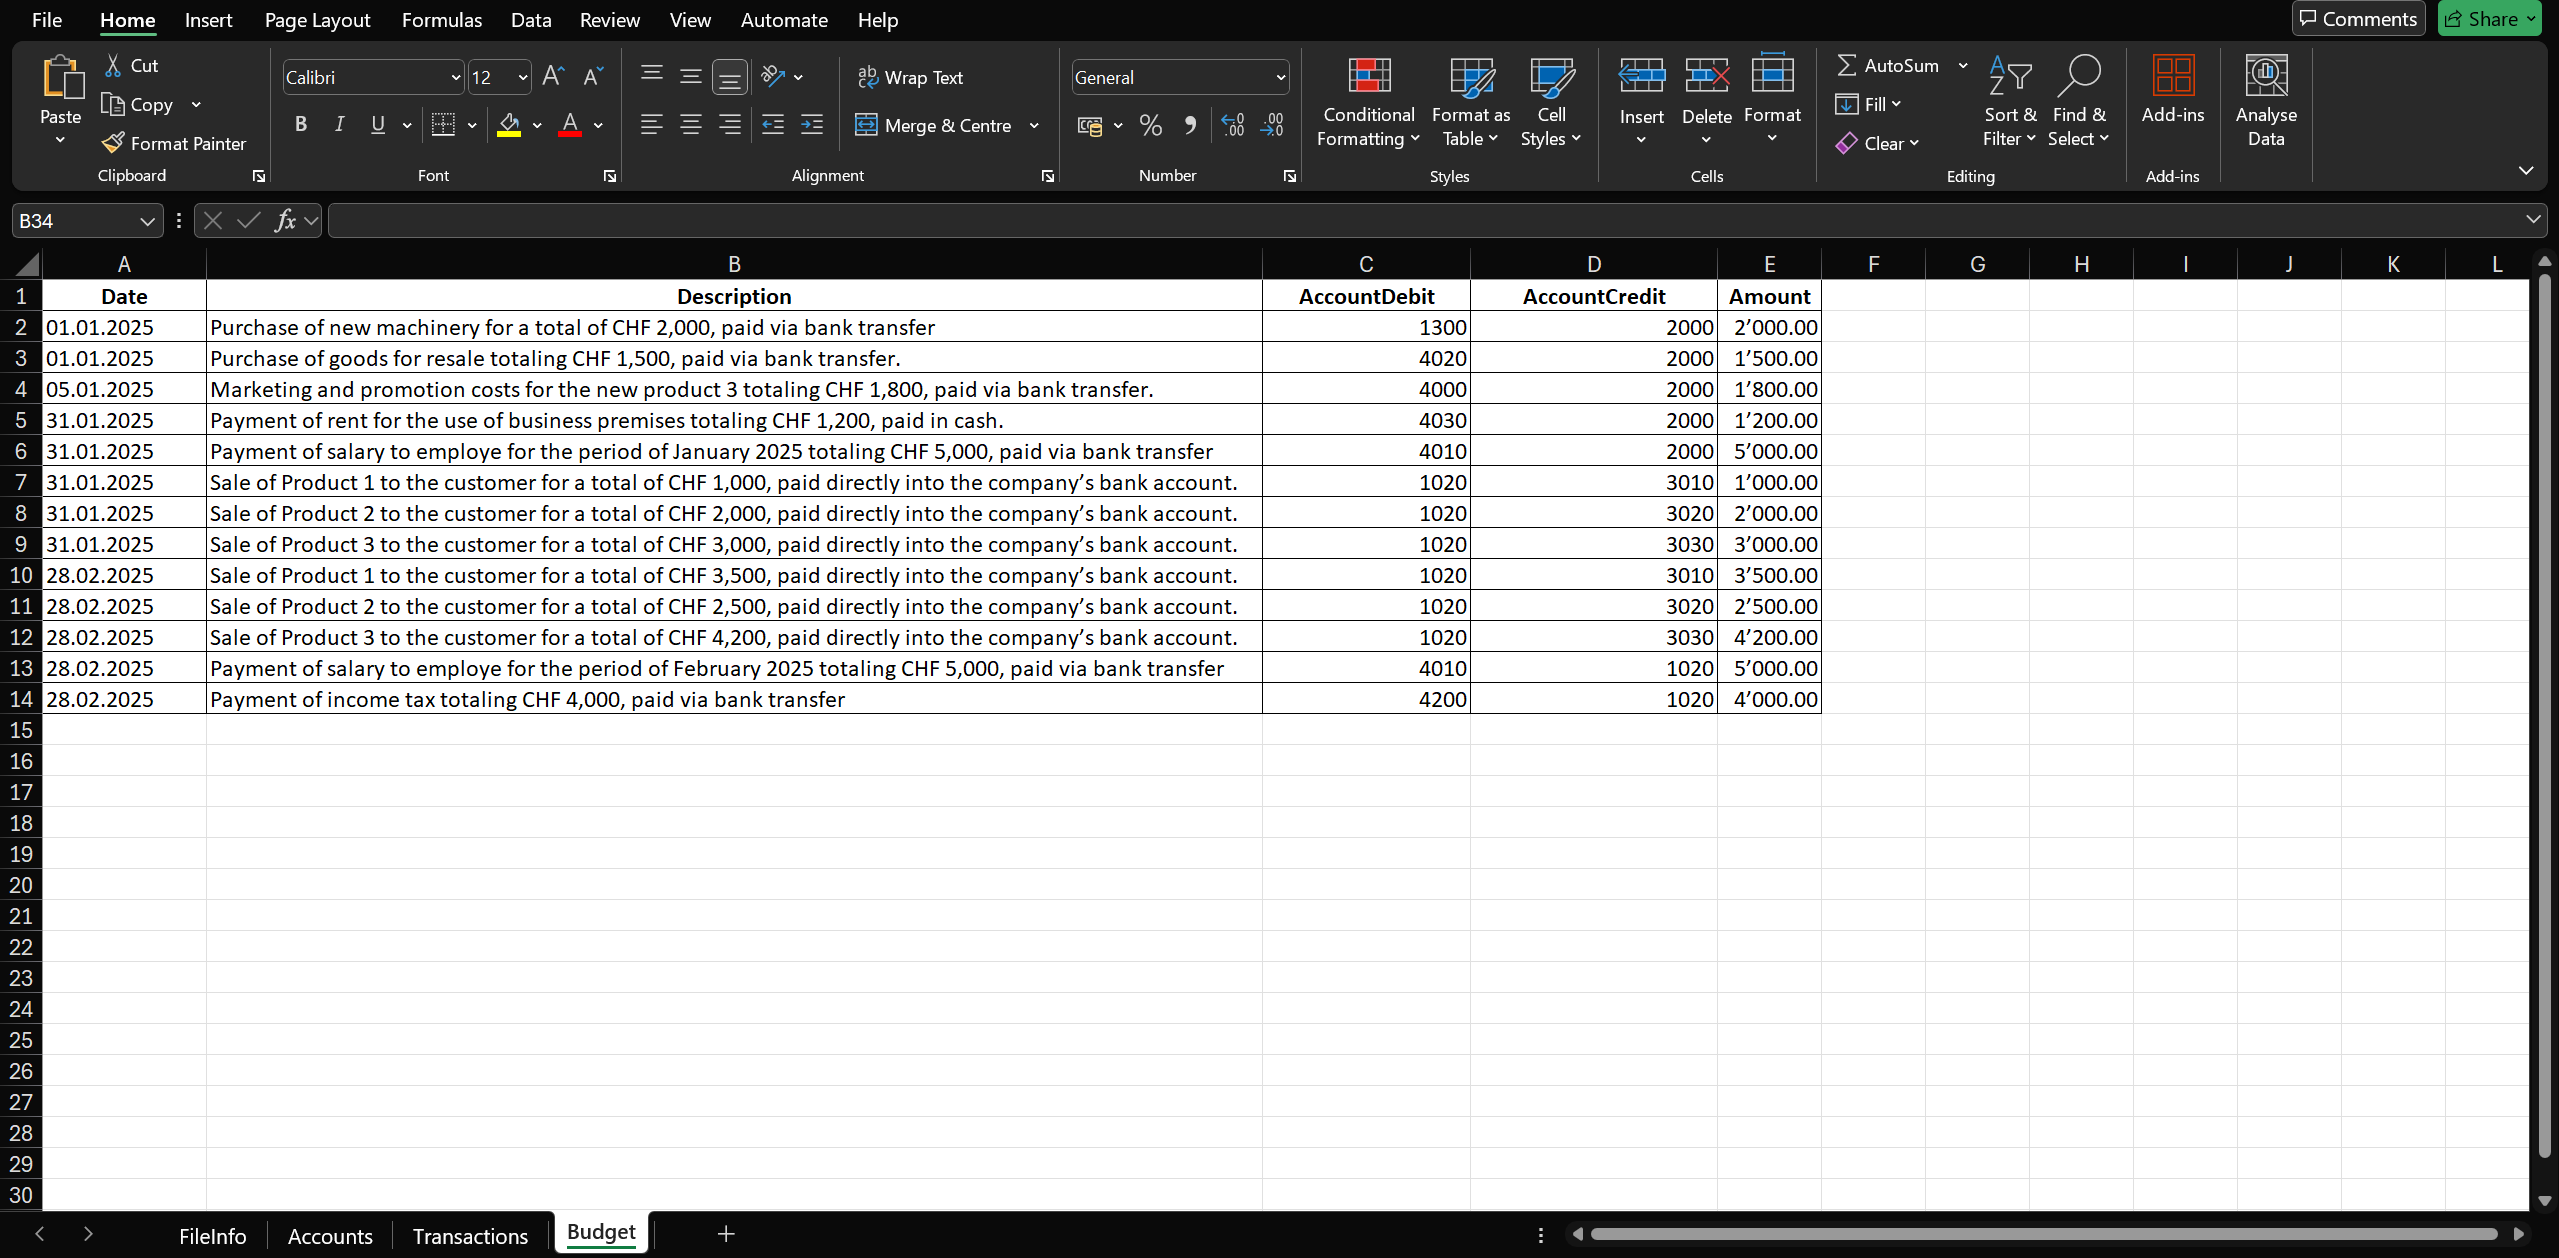
Script code in Office Script
The code is structured as:
- The function main.
- An Office Script for Excel must include a main function with the ExcelScript.Workbook as its first parameter.
- When you execute a function, the Office Script calls the main function by providing the workbook as first parameter.
- ExcelScript.Workbook should always be first parameter.
- The function is defined async because the script needs to interact with APIs (forsend data).
Using async allows you to handle these calls without blocking the execution of the rest of the script.
- Initialization in the jsonData variable based JSON who are structured as DocumentChange that have an array of dataUnits objects defined by the following properties:
- FileInfo.
- Transactions.
- Budget.
- Accounts.
- For each sheet:
- There is the initialization of the parameters of the range that are used to read the cells.
- There are the reading the rows containing the data needed to build the DocumentChange and inserting them into the rows object array of variable jsonData.
- To send the data contained in the jsonData variable to Banana Accounting Plus using the function createAc2(jsonData: JSON).
- The body of request:
- jsonData
represents the data of Documentchange that need to create a file accounting in Banana Accounting. - fileType
that define the which type of accounting you want to create in Banana Accounting.- docGroup: if you set the number 100 you create a file with double-entry accounting.
- docApp: if you set the number 100 you create a file without VAT.
- decimals: is the number of decimal digits (default value is 2).
- jsonData
- HTTP method:
- POST.
- Header:
- 'Content-Type': 'application/json'.
- Is defined to Async:
- The script needs to interact with APIs.
- Errors:
- To verify the success of the Banana API call, I print an error message if a problem occurs.
- Endpoint:
- http://<_PASSWORD>/v2/doc?show&acstkn=<_LOCALHOST >
- The _PASSWORD variable must be replaced with your own token password used to configure the Banana Accounting Plus webserver as described in Integrated Web Server
- The _LOCALHOST variable must be replaced with your compatible with your operating system if it is Windows or if is Mac, have a different localhost.
- The body of request:
- Formatting the date with the function formatDateToYyyyMmDd(date: number | string | number | boolean): string
- date: Office Script when reading a cell, there are different types of data and it is not possible to impose which input format arrives for reading, so to avoid possible errors it has been integrated as possible data: boolean, number and string.
- The date is first verified as a number, because at the time of reading the cell the data is in number and subsequently if it is a number it is converted to a string with a calculation because the format being read is a number and the destination format in Banana accepts the string format.
Note
- You can add rows to create more records or change data of row without modifying the code.
- If you move, delete, or add new columns, you must update the column references in the code accordingly.
- Adding Rows:
You can add a row in the Transactions sheet (or any other sheet) following the existing column order without any code changes.
Adding Columns:
If you add a column in the Transactions sheet to include a new field, you must adapt the code to reflect this change in the document structure.
The structure of Json data that rapresent the Document Change Object
The Office Scipt will generate a DocumentChange Json object with the following properties:
- FileInfo: refers to the FileInfo table of Banana Accounting.
- Accounts: refers to the Accounts table of Banana Accounting.
- Transactions: refers to the Transactions table of Banana Accounting.
- Budget: refers to the Budget table of Banana Accounting.
These properties of the DocumentChange object are technically called nameXml and refer to the data structured, that in this is the tables of Banana Accounting.
These properties are directly connected to the structure of the Banana Accounting and are used to pass data to the corresponding table.
For further details and references, please see the Structure of DocumentChange and DocumentChange JSON.
Code
async function main(workbook: ExcelScript.Workbook) {
    // Initialize JSON structure.
    // The JSON is used by the documentChange to add rows in Transactions, Budget and Accounts table.
    // The data of property FileInfo in JSON is related of the properties in the Accounting File
    // https://www.banana.ch/doc/en/node/9841#example_adding_a_row
    var jsonData = {
        "format": "documentChange",
        "error": "",
        "data": [
            {
                "document": {
                    "dataUnits": [
                        {
                            "nameXml": "FileInfo",
                            "data": {
                                "rowLists": [
                                    {
                                        "nameXml": "Base",
                                        "rows": []
                                    }
                                ]
                            }
                        },
                        {
                            "data": {
                                "rowLists": [
                                    {
                                        "rows": []
                                    }
                                ]
                            },
                            "nameXml": "Transactions"
                        },
                        {
                            "data": {
                                "rowLists": [
                                    {
                                        "rows": []
                                    }
                                ]
                            },
                            "nameXml": "Budget"
                        },
                        {
                            "data": {
                                "rowLists": [
                                    {
                                        "rows": []
                                    }
                                ]
                            },
                            "nameXml": "Accounts"
                        }
                    ]
                }
            }
        ]
    };
    //FILE INFO
    // Get the specific sheet
    const sheetFileInfo = workbook.getWorksheet("FileInfo");
    // Get the range of cells used in the sheet
    const usedRangeFileInfo = sheetFileInfo.getUsedRange();
    const columnRangeFileInfo = sheetFileInfo.getUsedRange().getRow(0).getColumnCount();
    // Get the last used row of the sheet
    const lastRowFileInfo = usedRangeFileInfo.getLastRow().getRowIndex();
    // Get data range of File Info
    const companyRange = sheetFileInfo.getRange(`A2:A${lastRowFileInfo + 1}`).getValues();
    const openingDateRange = sheetFileInfo.getRange(`B2:B${lastRowFileInfo + 1}`).getValues();
    const closingRange = sheetFileInfo.getRange(`C2:C${lastRowFileInfo + 1}`).getValues();
    const basicCurrencyRange = sheetFileInfo.getRange(`D2:D${lastRowFileInfo + 1}`).getValues();
    // iteration on each row of the columns.
    let companyValue = companyRange[0][0];
    let openingDateValue = openingDateRange[0][0];
    let closureDateValue = closingRange[0][0];
    let basisCurrencyValue = basicCurrencyRange[0][0];
    jsonData.data[0].document.dataUnits[0].data.rowLists[0].rows.push({
        "fields": {
            "SectionXml": "AccountingDataBase",
            "IdXml": "Company",
            "ValueXml": companyValue.toString()
        },
        "operation": {
            "name": "modify"
        }
    });
    jsonData.data[0].document.dataUnits[0].data.rowLists[0].rows.push({
        "fields": {
            "SectionXml": "AccountingDataBase",
            "IdXml": "OpeningDate",
            "ValueXml": formatDateToYyyyMmDd(openingDateValue)
        },
        "operation": {
            "name": "modify"
        }
    });
    jsonData.data[0].document.dataUnits[0].data.rowLists[0].rows.push({
        "fields": {
            "SectionXml": "AccountingDataBase",
            "IdXml": "ClosureDate",
            "ValueXml": formatDateToYyyyMmDd(closureDateValue)
        },
        "operation": {
            "name": "modify"
        }
    });
    jsonData.data[0].document.dataUnits[0].data.rowLists[0].rows.push({
        "fields": {
            "SectionXml": "AccountingDataBase",
            "IdXml": "BasicCurrency",
            "ValueXml": basisCurrencyValue.toLocaleString()
        },
        "operation": {
            "name": "modify"
        }
    });
    // TRANSACTIONS
    // Get the specific sheet
    const sheetTransactions = workbook.getWorksheet("Transactions");
    // Get the range of cells used in the sheet
    const usedRangeTransactions = sheetTransactions.getUsedRange();
    // Get the last used row of the sheet
    const lastRowTransactions = usedRangeTransactions.getLastRow().getRowIndex();
    // Get data range of Transactions
    const dateRange = sheetTransactions.getRange(`A2:A${lastRowTransactions + 1}`).getValues();
    const descriptionRange = sheetTransactions.getRange(`B2:B${lastRowTransactions + 1}`).getValues();
    const accountDebitRange = sheetTransactions.getRange(`C2:C${lastRowTransactions + 1}`).getValues();
    const accountCreditRange = sheetTransactions.getRange(`D2:D${lastRowTransactions + 1}`).getValues();
    const amountRange = sheetTransactions.getRange(`E2:E${lastRowTransactions + 1}`).getValues();
    //Iteration on each row of the columns.
    for (let i = 0; i < dateRange.length; i++) {
        let dateValue = dateRange[i][0]; // Value of column A (Date)
        let descriptionValue = descriptionRange[i][0]; // Value of column B (Description)
        let accountDebitValue = accountDebitRange[i][0]; // Value of column C (AccountDebit)
        let accountCreditValue = accountCreditRange[i][0]; // Value of column D (AccountCredit)
        let amountValue = amountRange[i][0]; // Value of column E (Amount)
        // adds "fields" object to "rows"
        jsonData.data[0].document.dataUnits[1].data.rowLists[0].rows.push({
            "fields": {
                "Date": formatDateToYyyyMmDd(dateValue),
                "Description": descriptionValue.toString(),
                "AccountDebit": accountDebitValue.toString(),
                "AccountCredit": accountCreditValue.toString(),
                "Amount": amountValue.toString()
            },
            "operation": {
                "name": "add"
            }
        });
    }
    //BUDGET
    // Get the specific sheet
    const sheetBudget = workbook.getWorksheet("Budget");
    // Get the range of cells used in the sheet
    const usedRangeBudget = sheetBudget.getUsedRange();
    // Get the last used row of the sheet
    const lastRowBudget = usedRangeBudget.getLastRow().getRowIndex();
    // Get data range of BUDGET
    const dateRangeBudget = sheetBudget.getRange(`A2:A${lastRowBudget + 1}`).getValues();
    const descriptionRangeBudget = sheetBudget.getRange(`B2:B${lastRowBudget + 1}`).getValues();
    const accountDebitRangeBudget = sheetBudget.getRange(`C2:C${lastRowBudget + 1}`).getValues();
    const accountCreditRangeBudget = sheetBudget.getRange(`D2:D${lastRowBudget + 1}`).getValues();
    const amountRangeBudget = sheetBudget.getRange(`E2:E${lastRowBudget + 1}`).getValues();
    // iteration on each row of the columns.
    for (let i = 0; i < dateRangeBudget.length; i++) {
        let dateValueBudget = dateRangeBudget[i][0]; // Value of column A (Date)
        let descriptionValueBudget = descriptionRangeBudget[i][0]; // Value of column B (Description)
        let accountDebitValueBudget = accountDebitRangeBudget[i][0]; // Value of column C (AccountDebit)
        let accountCreditValueBudget = accountCreditRangeBudget[i][0]; // Value of column D (AccountCredit)
        let amountValueBuget = amountRangeBudget[i][0]; // Value of column E (Amount)
        jsonData.data[0].document.dataUnits[2].data.rowLists[0].rows.push({
            "fields": {
                "Date": formatDateToYyyyMmDd(dateValueBudget),
                "Description": descriptionValueBudget.toString(),
                "AccountDebit": accountDebitValueBudget.toString(),
                "AccountCredit": accountCreditValueBudget.toString(),
                "Amount": amountValueBuget.toString()
            },
            "operation": {
                "name": "add"
            }
        });
    }
    // ACCOUNTS
    // Get the specific sheet
    const sheetAccount = workbook.getWorksheet("Accounts");
    // Get the range of cells used in the sheet
    const usedRangeAccounts = sheetAccount.getUsedRange();
    // Get the last used row of the sheet
    const lastRowAccounts = usedRangeAccounts.getLastRow().getRowIndex();
    // Get data range of ACCOUNTS
    const sectionRange = sheetAccount.getRange(`A2:A${lastRowAccounts + 1}`).getValues();
    const groupRange = sheetAccount.getRange(`B2:B${lastRowAccounts + 1}`).getValues();
    const accountRange = sheetAccount.getRange(`C2:C${lastRowAccounts + 1}`).getValues();
    const descRange = sheetAccount.getRange(`D2:D${lastRowAccounts + 1}`).getValues();
    const bclassRange = sheetAccount.getRange(`E2:E${lastRowAccounts + 1}`).getValues();
    const sumInRange = sheetAccount.getRange(`F2:F${lastRowAccounts + 1}`).getValues();
    const grRange = sheetAccount.getRange(`G2:G${lastRowAccounts + 1}`).getValues();
    // Iteration on each row of the columns.
    for (let i = 0; i < accountRange.length; i++) {
        let sectionValue = sectionRange[i][0]; // Value of column A (section)
        let groupValue = groupRange[i][0]; // Value of column B (Group)
        let accountValue = accountRange[i][0]; // Value of column C (Account)
        let descValue = descRange[i][0]; // Value of column D (Description)
        let bclassValue = bclassRange[i][0]; // Value of column E (BClass)
        let sumInValue = sumInRange[i][0]; // Value of column F (Sum In)
        let gr1Value = grRange[i][0]; // Value of column G (Gr1)
        // adds "fields" object to "rows"
        jsonData.data[0].document.dataUnits[3].data.rowLists[0].rows.push({
            "fields": {
                "Section": sectionValue.toString(),
                "Group": groupValue.toString(),
                "Account": accountValue.toString(),
                "Description": descValue.toString(),
                "BClass": bclassValue.toString(),
                "Gr": sumInValue.toString(),
                "Gr1": gr1Value.toString()
            },
            "operation": {
                "name": "add"
            }
        });
    }

    let jsonString = JSON.stringify(jsonData);
    createAc2(JSON.parse(jsonString));

}
async function createAc2(jsonData: JSON) {
    // Web server url
    let _LOCALHOST = "http://localhost:8081"; //for macOS use "https://127.0.0.1:8089";
    // Replace with your Webserver password
    let _PASSWORD = "My_Password";
    // Request to Banana web server
    let url = _LOCALHOST + "/v2/doc?show&acstkn=" + _PASSWORD;
    // Accounting type parameters
    let fileTypeGroup = 100; // Double entry accounting
    let fileTypeNumber = 100; // without VAT
    let fileDecimals = 2;
    try {
        // Body of the request
        const httpBody = {
            fileType: {
                accountingType: {
                    docGroup: fileTypeGroup,
                    docApp: fileTypeNumber,
                    decimals: fileDecimals
                }
            },
            data: jsonData,
        }
        const response = await fetch(url, {
            method: 'POST',
            headers: {
                'Content-Type': 'application/json'
            },
            body: JSON.stringify(httpBody)
        });
    } catch (error) {
        console.log(error);
    }
}
// Convert Date type of Excel in yyyy-mm-dd string format
function formatDateToYyyyMmDd(date: number | string | number | boolean): string {
    if(typeof date == 'number'){
        let dateString = new Date(Math.round((date - 25569) * 86400 * 1000)).toISOString().split("T")[0];
        return dateString;
    }

}
Results in Banana Accounting Plus
If you don't see the Budget data, use the command with the Shift + F9 keys (Windows and Mac) or Cmd + 9 (Mac) for recalcute the data in Banana Accounting.
Output of accounts base
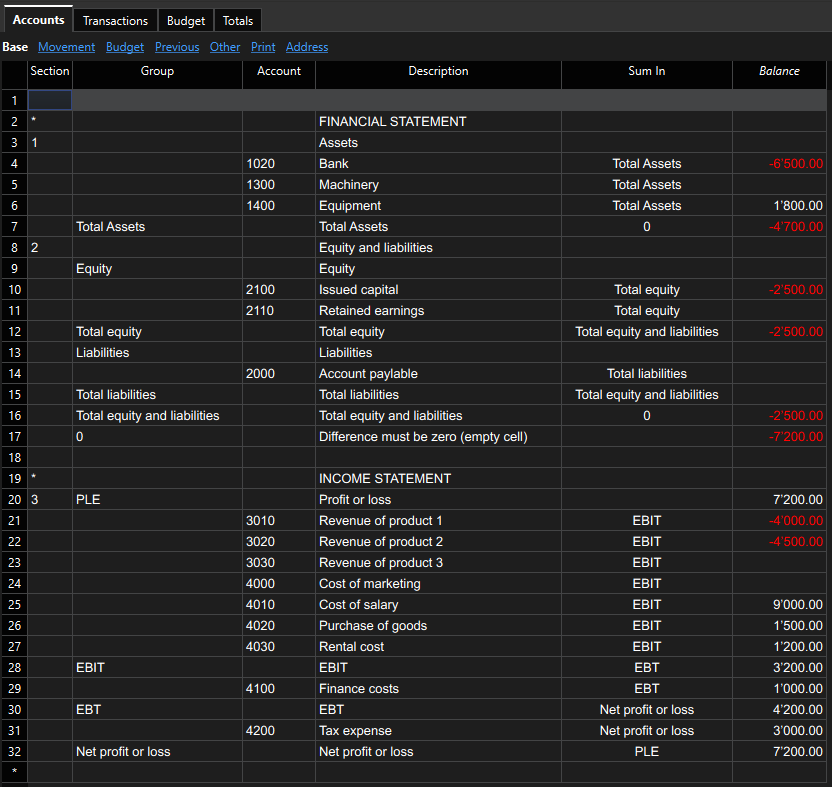
Output of accounts of budgeting
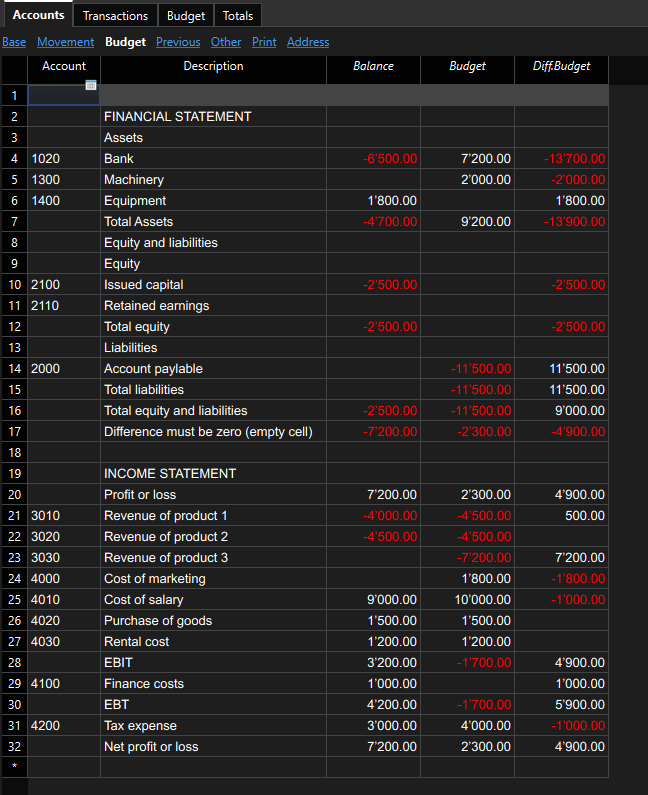
Output of transactions of budgeting
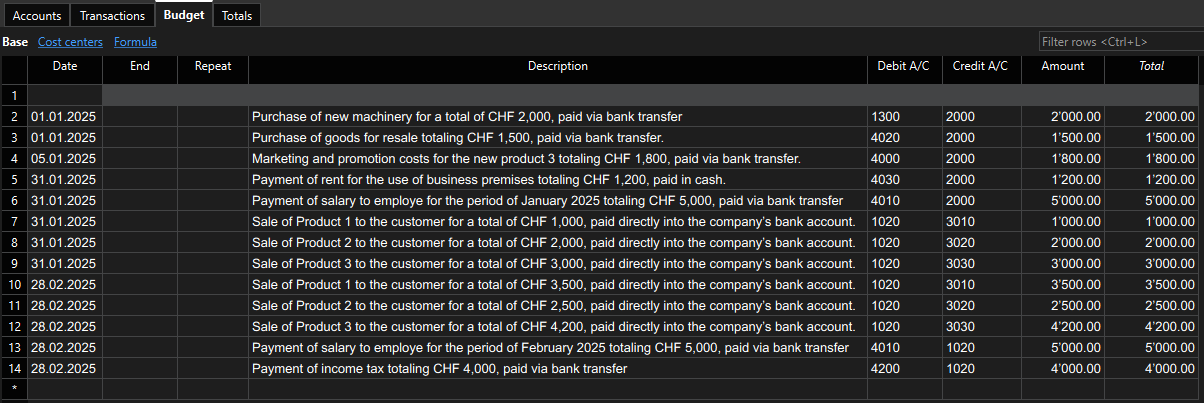
Output of transactions
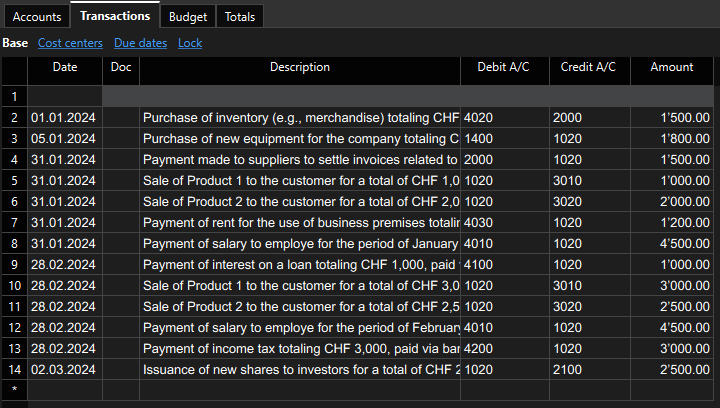
Create a report Financial statement and Income statement
- When you pass all the data in Banana Accounting Plus, you can print the report in base of your configuration in the table Accounts.
- You can use a Enhanced Balance Sheet with groups report for printing, which integrates transaction and budget data as described in this image.
Procedure to create a report with Enhanced Balance Sheet with Groups
- Open the file that you have created.
- menu Reports → Enhanced balance sheet with groups → select Columns → in the section Balance sheet and Profit and loss statement → select Current and Budget → click Ok.
- You can see a tutorial of how to create and customize the Balance Sheet and Profit & Loss Statement.
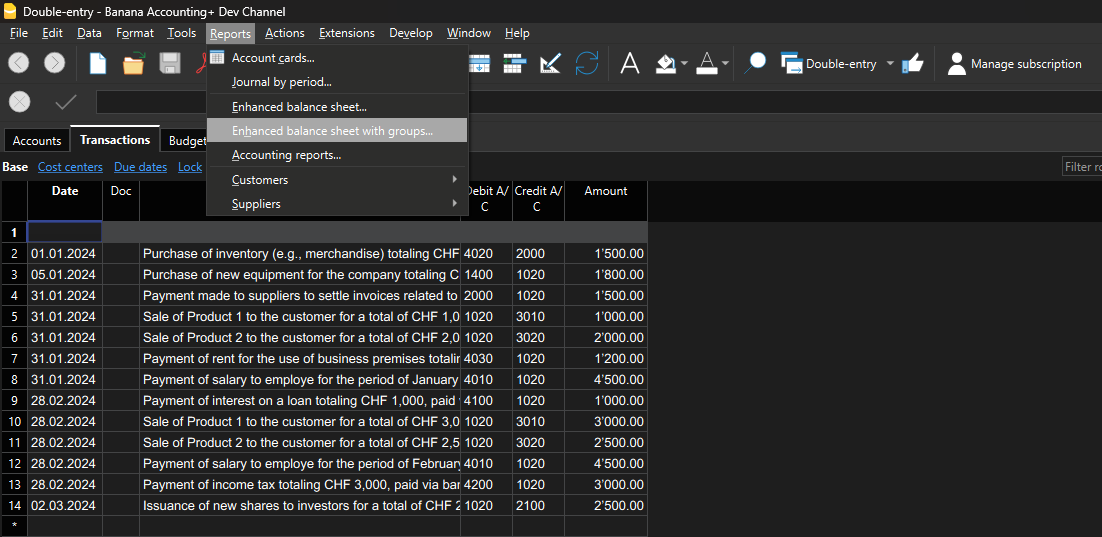
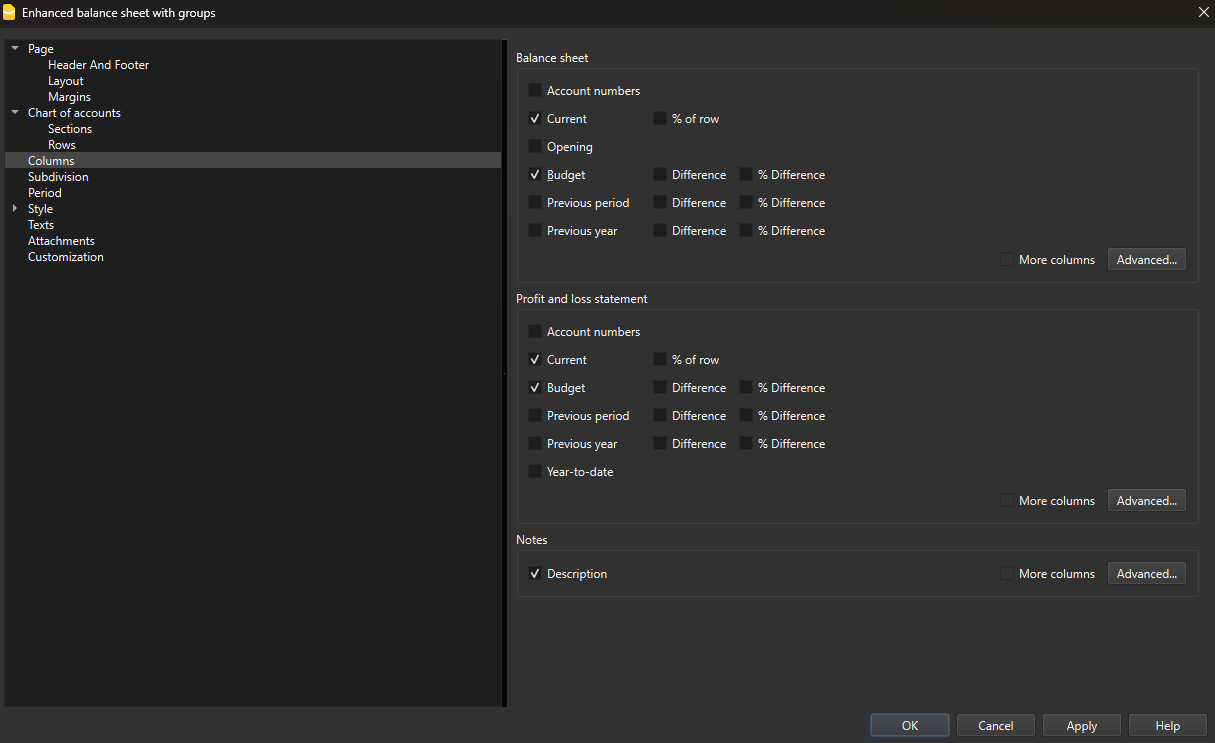
Report of Financial statement
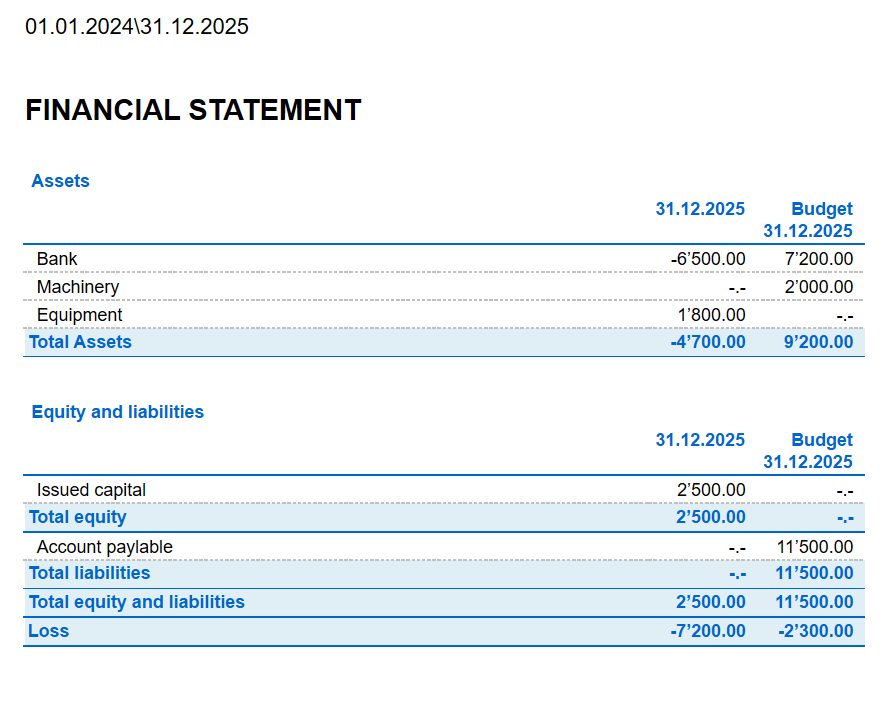
Report of Income statement
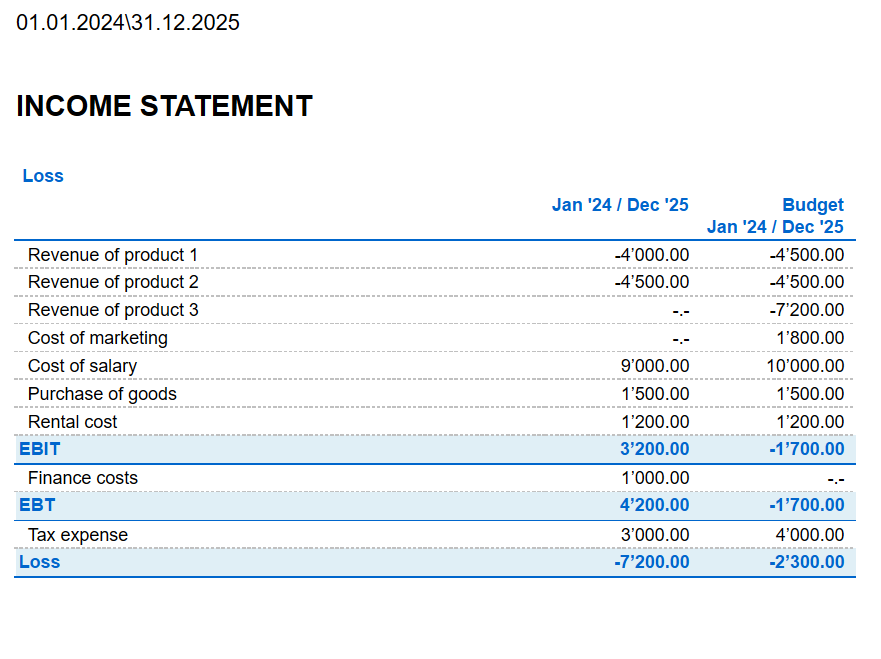
Funzioni Excel VBA (outdated)
Alcune funzioni Excel definite dall'utente permettono di recuperare facilmente dati da Banana Contabilità in tempo reale.
Tu aggiorni la tua contabilità e immediatamente viene aggiornato anche il tuo file Excel. Questa funzione non è possibile su Mac.
Queste Funzioni Excel usano il linguaggio VBA, è una tecnologia che Microsoft non consiglia più di utilizzare.
Si prega di consultare la pagina in inglese per informazioni tecniche più aggiornate.
Esempio costi divisi per cliente
Con ExcelSync si usano delle formule che riprendono i saldi aggiornati direttamente dal software Banana Contabilità.
Il foglio di Excel si aggiorna in base agli ultimi dati inseririti in contabilità.
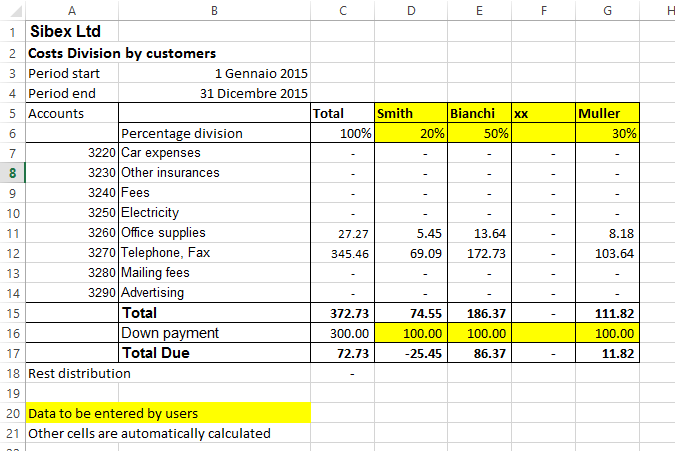
Funzioni Excel definite dall'utente
Le funzioni definite dall'utente (UDF = User defined funtions) sono piccoli programmi in Visual Basic (o macro) che espandono Excel, permettendo l'inserimento di formule all'interno delle celle.
- Per poter usare le UDF devi avere un file Excel che abbia l'estensione *.xlsm.
- Le UDF Banana sono fornite secondo la Licenza Apache (open source software - vedi: /www.apache.org/licenses/LICENSE-2.0)
- Sviluppo e ultima versione della funzione sono disponibili su github.com/BananaAccounting/General/
- Le UDF usano il Banana web server.
Grazie alle UDF potrai scrivere formule in Excel che riprendano dati direttamente da Banana Contabilità.
- Non c'é più bisogno di riscrivere i dati in Excel (o importare, copiare e incollare)
- Quando la contabilità viene cambiata, il foglio Excel é aggiornato con i nuovi valori
- Le formule sono facili da usare e permettono di calcolare valori per periodo e creare tabelle efficaci per valutare, presentare i dati o creare grafici.
Come vedere l'esempio
- Scarica il foglio Excel con i files di esempio
- Decomprimi (Unzip) il contenuto
- Avviare Banana contabilità.
- La prima volta attiva il Webserver di Banana
Strumenti -> Opzioni programma -> Interfaccia -> Avvia web server - Apri il file contabile Banana "company_2014.ac2" e "company_2015.ac2"
- Apri il file "BananaSync.xlsm" in Excel e attiva le Macro.
Se le macro sono disabilitate automaticamente da Excel devi cambiare le impostazioni di sicurezza delle macro.
Eventualmente segui le istruzioni Mostra scheda Sviluppo sulla barra multifunzione - Ricalcola il foglio Excel con la Macro "Recalculate" (Ctrl+R)
Come creare il tuo foglio
- Salva il file "BananaSync.xlsm" con un altro nome
- Apri i tuoi files contabili in Banana
- Nel file Excel cambia il nome del file (celle evidenziate in giallo) con il nome del tuo file contabile.
- Cambia il foglio di calcolo secondo le tue necessità.
- Ricalcola con il bottone "Recalculate" o con i tasti di scelta rapida "Ctrl+R"
Uso delle funzioni
Parametro nome file
Se il programma Banana o il Banana web server non sono aperti, Excel impiega del tempo per rispondere alla query http.
Per risolvere questo problema:
- La maggior parte delle funzioni usano il parametro nome file
Se il nome del file é vuoto non c'é alcuna chiamata http. - Invece che inserire il nome del file usare un riferimento alla cella che contenga la formula =BFileName(“myfile.ac2”).
- Nel caso in cui Banana non sia avviato, il BFileName risulterà in una string vuota, e nessuna query successiva verrà avviata.
Parametro periodo
Molte funzioni usano il parametro facoltativo periodo. Questo può essere:
- Una string vuota. Vengono usate le date iniziali e finali della contabilità.
- Una data iniziale e una data finale nel formato yyyy-mm-dd/yyyy-mm-dd
esempio “2015-01-01/2015-01-31”
Per creare un periodo tra due date Excel usa la funzione BCreatePeriod. - Un'abbreviazione (M1, M2, Q1, Q2, Y1) che indica il mese, il trimestre o l'anno della contabilità.
Puoi usare la funzione BCreatePeriod per cerare una string di periodo basata sulla data di due celle.
Descrizione delle funzioni
- BAccountDescription(account[, column])
Riprende la descrizione del conto o del gruppo specificato.
Con il parametro column puoi indicare di riprendere un'altra colonna invece che la colonna Descrizione.
Esempi:
=BAccountDescription('1000')
=BAccountDescription('1000', 'Gr1')
=BAccountDescription('Gr=10')
=BAccountDescription('1000', 'FiscalNumber') - BAmount(fileName, account, [,period ])
Retrieve the normalized amount based on the BClass. - BBalance(fileName account [, period])
Riprende il Saldo del conto indicato alla fine del periodo.
Il risultato del BBalance é la somma di BOpening + BTotal
È usato per riprendere i dati contabili dai conti del bilancio (Attivi, Passivi)- Il conto può essere un numero di conto o una string contenente diversi conti, separati dal carattere “|”.
Puoi specificare conti normali, centri di costo o segmenti.
Puoi anche usare wild cards e anche “Gr=” seguito dal gruppo contabile.
Per maggiori informazioni guarda la descrizione della funzione Javascript per currentBalance (in inglese) - Esempio
“1000” “1000|1001” “10*|20*” “Gr=10” “Gr=10|Gr=20” “Gr=1*”
".P1" ";C01|,C02",":S1|:S2"
"1000:S1"
- Il conto può essere un numero di conto o una string contenente diversi conti, separati dal carattere “|”.
- BBalanceGet(fileName, account, cmd, valueName [,period ])
Questa funzione permette di accedere facilmente a tutti gli altri dati resi disponibili dal REST API come “saldo”, “budget”
Esempi:
=BAmount( FName, “1000”, “balance”, “currencyamount”)
=BAmount( FName, “1000”, “balance”, “count”)
=BAmount( FName, “1000”, “balance”, “debit”)
=BAmount( FName, “1000”, “budget”, “debit”) - BBudgetAmount(fileName account [, period])
Uguale al BAmount ma usa i dati saldo invece dei dati contabili. - BBudgetBalance(fileName account [, period])
Uguale al BBalance ma usa i dati budget invece dei dati contabili. - BBudgetInterest(filename, account, interestRate [, period])
Uguale al BInterest ma usa i dati budget invece dei dati contabili. - BBudgetOpening(fileName account [, period])
Uguale al BOpening ma usa i dati budget invece dei dati contabili. - BBudgetTotal(fileName account [, period])
Uguale al BTotal ma usa i dati budget invece dei dati contabili. - BCellValue(fileName, table, rowColumn, column)
Riprende il contenuto di una cella della tabella.
Esempi:
=BCellValue(FName, “Accounts”, 2, “Description”)
=BCellValue(FName, “Accounts”, “Account=1000”, “Description”)
=BCellValue(FName, “Accounts”, “Group=10”, “Description”) - BCreatePeriod( startDate, endDate)
Prende le date di due celle e crea una string di periodo
=BCreatePeriod(D4, D5) - BDate(isoDate)
Converte una Iso Date in una data Excel. - BFileName(fileName [, disable connection])
Riprende il FileName o una string vuota, se non c'é collegamento con il web server o se il file non é corretto.
Se il valore del disableConnection non é vistato, la funzione dà una string vuota.
Usa le celle che contengono il risultato di questa funzione come parametro file name, quando usi le altre funzioni. Se il programma Banana non é aperto viene fatta solo una query e Excel non aspetterà molto tempo. - BFunctionsVersion()
Riprende la versione della funzione nel formato data. - BInfo(fileName, sectionXml, idXml)
Recupera le informazioni riguardanti le proprietà del file.
Esempi:
=BInfo( FName, “Base”, “HeaderLeft”)
=BInfo( FName, “Base”, “DateLastSaved”)
=BInfo( FName, “AccountingDataBase”, “OpeningDate”)
=BInfo( FName, “AccountingDataBase”, “BasicCurrency”)
- BInterest(filename, account, interestRate [, period])
Calcola gli interessi per questo conto per il periodo specificato.- il conto può essere qualsiasi conto, come specificato nel BBalance
- il calcolo degli interestRate in percentuale
- > 0 calcola l'interesse degli importi in Dare
- < 0 calcula l'interesse degli importi in Avere
- BOpening(filename, account [period])
Retrieve the Balance for balance of period start for the indicated account. - BQuery(fileName, query)
Riprende il risultato di una query definita liberalmente.
Esempi:
=BQuery(FName;"startperiod?M1”)
=BQuery(FName;"startperiod?M1”) - BTotal(filename, account [,period])
Riprende il movimento del periodo.
Dovrebbe essere usato per riprendere i dati dei conti del Conto Economico (Costi e Ricavi). - BVatBalance(filename, vatCode, vatValue [, period])
Riprende un valore rispetto ad un VatCode (=importo IVA) definito (o diversi VatCodes).
“vatValue” can be “taxable”, “amount”, “notdeductible”, “posted”
Esempi:
=BVatBalance( FName, “V10”, “taxable”)
=BVatBalance( FName, “V10|V20”, “posted”)
Ricalcolo
Il ricalcolo automatico non aggiorna i dati del file contabile.
Per ottenere un aggiornamento dei dati occorre chiamare la macro RecalculateAll() che chiama il metodo Application.CalculateFullRebuild
I files di esempio contengono il bottone “Recalculate” che chiama la macro RecalculateAll.
Banana host name and port
I dati del web server sono ripresi da “localhost:8081”
Puoi specificiare un host diverso inserendo un valore nella cella chiamata “BananaHostName”
Modifica le funzioni o aggiungine di nuove
Le funzioni sono definite nel modulo "Banana" del Visual Basic.
Potremmo aggiornare questo module e aggiungere nuove funzioni.
Se aggiungi delle funzioni tue sarebbe meglio aggiungerle al tuo modulo.
Per accedere alle funzionalità Macro del Visual Basic dovresti attivare le macro.
Per vedere e modficare le funzioni devi Mostrare la scheda Sviluppo sulla barra multifunzione
Cronologia delle versioni
- 2014-07-24 prima versione
- 2015-02-28 aggiornamento per la nuova versione con nuove funzioni
- 2015-05-12 chiamata al web server ora richiede v1
- 2015-05-12 sviluppo spostato su github
- 2015-05-25 cambiato la funzione BAmoount per usare la BClass
- 2015-10-04 aggiunta la funzione BDate