在此文中
Letter with Swiss QR
This extension allows you to easily create blank QR slips for Switzerland, letters with QR slips (single recipient or without recipient) or individual QR invoices. Requires Banana Accounting Plus.
Extensions are additional programs that extend the functionality of Banana Accounting Plus.
This extension makes it easy to print :
- empty QR slips
- Letters or QR invoices with single recipients or without recipients
Different options (with or without amount, with or without customer data, etc.) can be selected to obtain a wide range of variants.
If you want multiple printing (several recipients), use the QR-Invoice Extension, which requires the Advanced plan of Banana Accounting Plus.
![]()
This extension is very handy in case of:
- Donations where the payer freely decides the amount.
- Associations where the payer can choose different amounts.
- Indicating amounts in CHF and EUR.
N.B:
- If you choose to include the customer's data, only a single printout is possible (i.e. you have to manually rewrite the data of each recipient.
- It can only be used with an IBAN account. It is not possible to use a QR-IBAN account.
QR policies are of the non-reference type. The QR cannot therefore be used to record payments automatically. - This is an extension and cannot be used as an invoice layout.
Prerequisites
To use this extension it is necessary to:
- Have the Professional Plan or the Advanced Plan of Banana Accounting Plus.
Create a QR code slip
Create letter-invoices with QR as follows:
- Open an existing Banana Plus file or create a new one. You can use the extension with any type of Banana Plus file.
- From the Extensions menu → Manage Extensions, search for and install the extension Letter with Swiss QR slip.
- Start the extension from the Extensions menu > Letter with Swiss QR slip.
- Set up your data via the Settings dialogue (see below)
Settings dialogue
Run the extension from the Extensions menu > Letter with Swiss QR slip.
The extensions' Settings dialogue will open. From here you can define the information required to create the letter printout with the QRslip or the empty QR (depending on the settings entered).
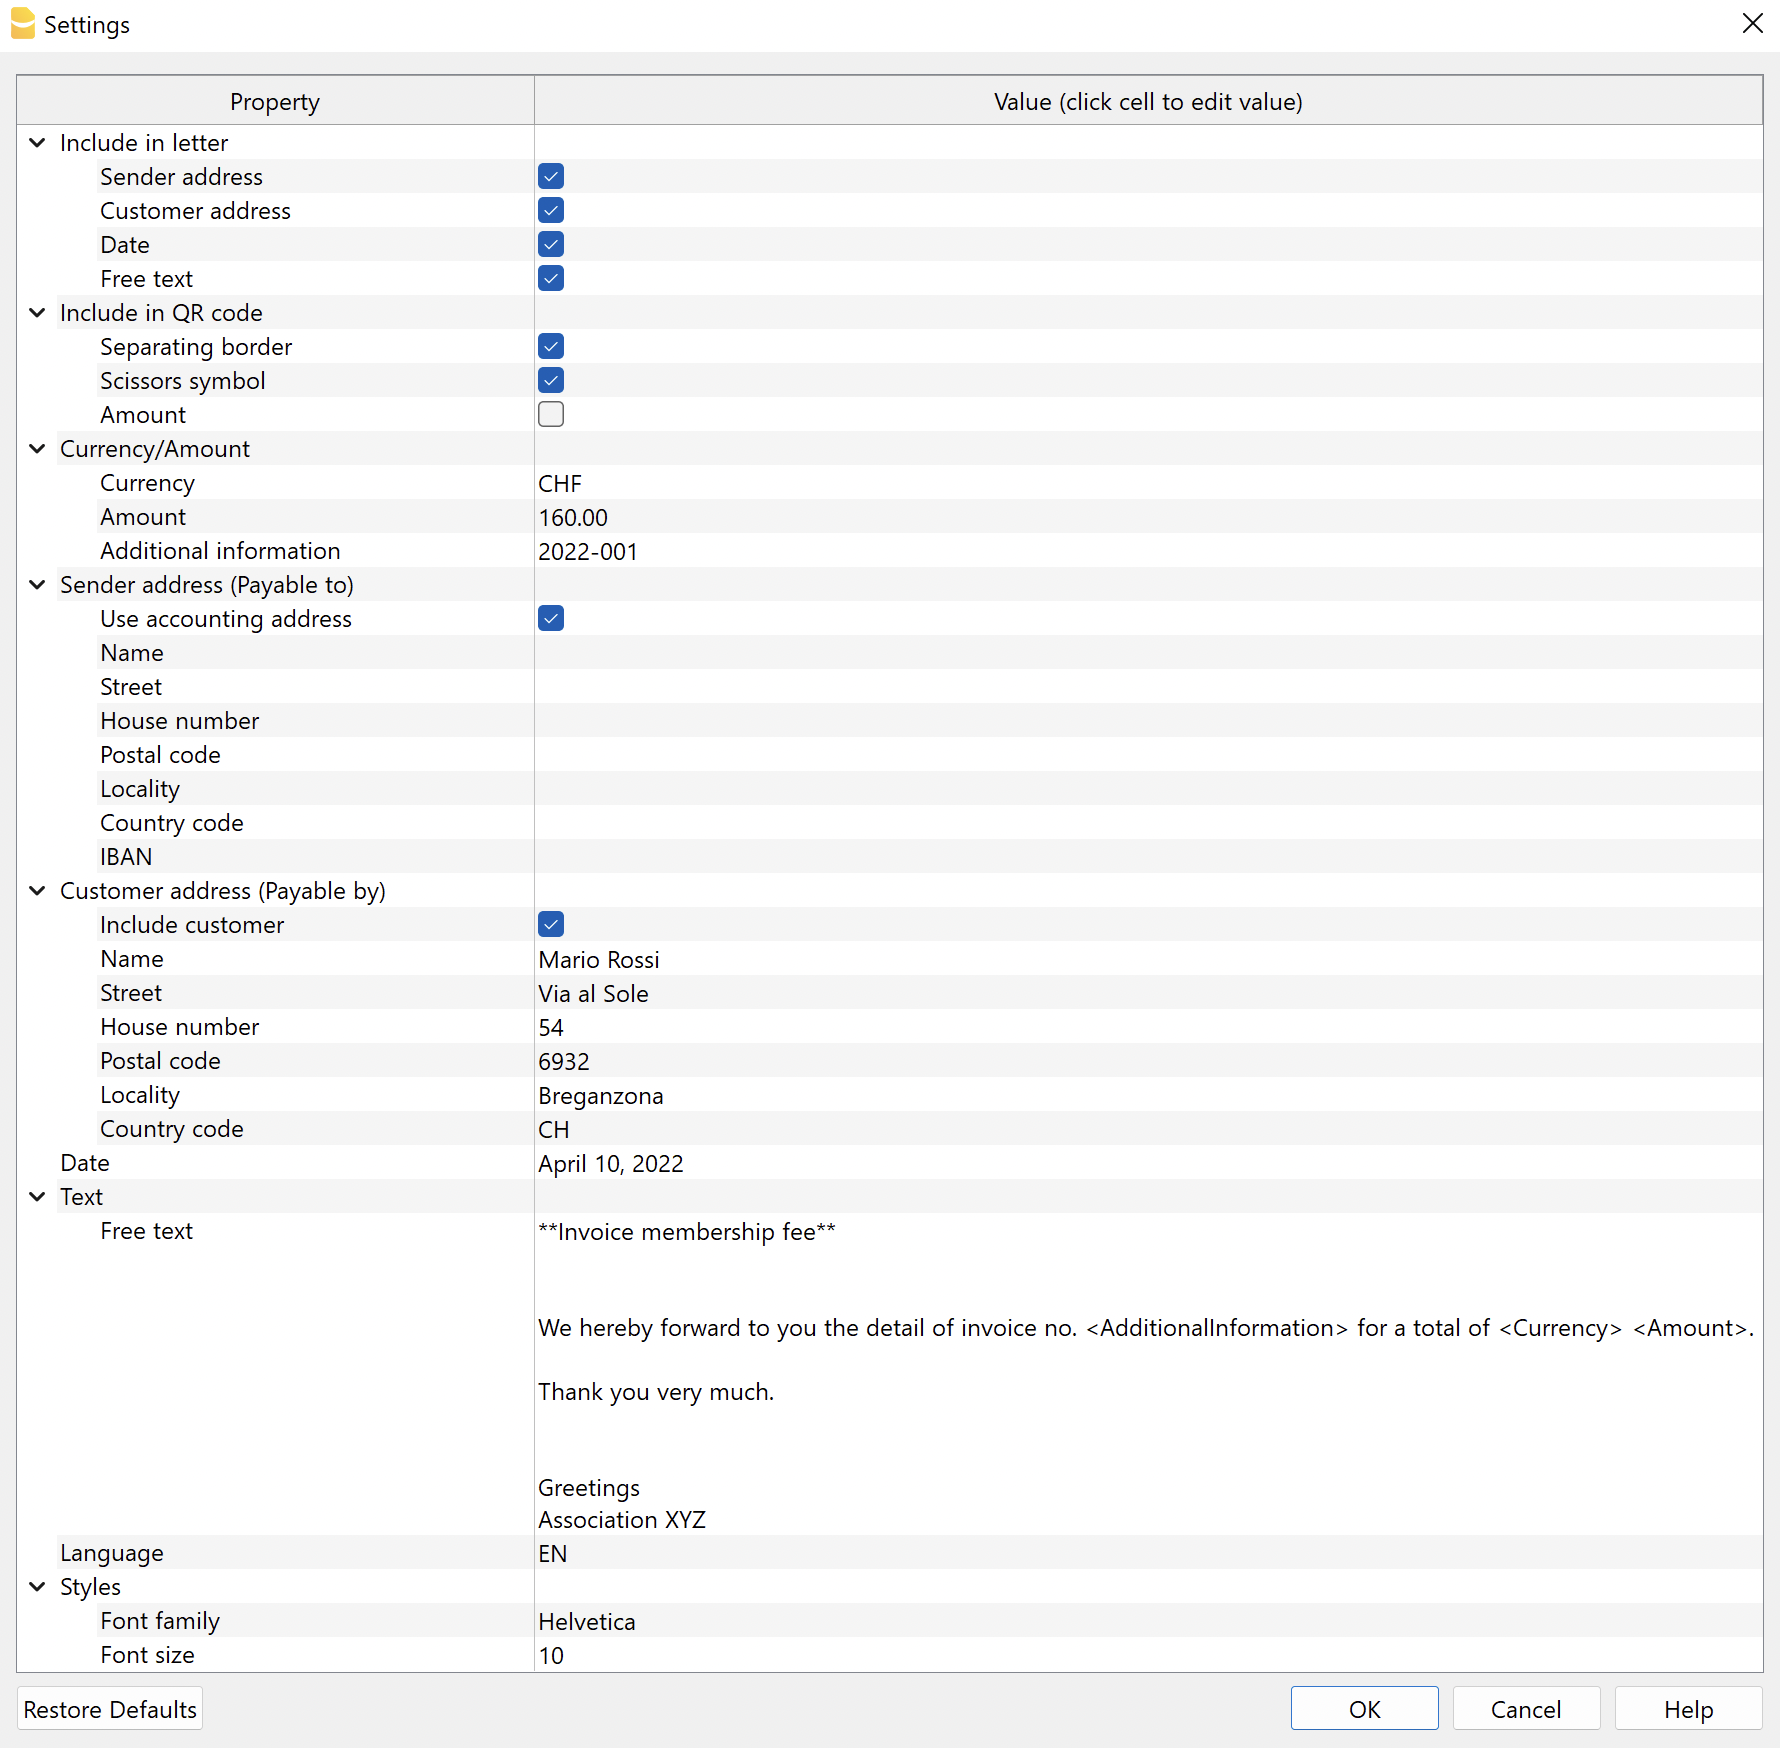
The fields are the default ones for the correct printing of the QR according to the specific standard. Additional information cannot be entered.
The settings are divided into the following groups:
- Include in the letter
- Select the elements to be included in the letter printout.
- Include in the QR code
- Select the items to be included in the QR slip.
- Currency / Amount
- Define the currency, amount and any additional information to be included in the QR.
- Sender's address (Payable to)
- Define the sender's address.
- Customer's address (Payable by)
- Define the customer's address.
- It can be included or excluded from the QR slip.
- Date
- Add a date to the letter.
- Letter text
- Add a text to the letter.
- Language
- Select the language of the QR slip print.
- Style
- Define font type and size for letter texts.
Include in the letter
Here you can decide what to print in the letter. If none of the options are selected, you obtain a blank page with a QR slip at the bottom of the page.
- Logo
- Check to include the logo in the header.
- The logo is defined with the command File > Logo setup where you can also set the size, choose how to align it (left, centre, right), and also choose how to align the address with respect to the logo.
- Logo name
- Enter the name of the logo customisation defined in the menu File > Logo setup, respecting upper and lower case.
- Sender's address
- Choose whether to include the sender's address in the letter.
- Customer's address
- Choose whether to include the customer's address in the letter.
- Date
- Choose whether to include the date in the letter.
- Free text
- Choose whether to include free text in the letter.
Include in QR code
Here you can decide what to print on the QR Bulletin.
- Separation edge
- Choose whether to include the dashed separation border in the QR slip.
- Scissors symbol
- Choose whether to include the scissors symbol in the QR slip.
- Amount
- Choose whether to include the amount in the QR slip.
If not included, an empty box will be left for manual input.
- Choose whether to include the amount in the QR slip.
Currency / Amount
In the Currency/Amount section there are the following settings:
- Currency
- Select the currency CHF or EUR.
- Amount
- Enter amount (ex. 1234.56).
- Additional information
- You can enter additional invoice information to be included in the QR slip.
Sender's address (Payable to)
Choose how to set the sender's address, which will appear in the 'Payable to' section of the QR slip and in the letter.
- Use accounting address
- View this option to use the address entered in File > File properties (Basic data) > Address section of your file. You must have entered at least the data in the fields Company, Address1, Postcode, Location, Country Code, IBAN.
- Alternatively, do not display this option and enter the address manually via the options below.
- Name
- Enter your first and last name or the name of your organisation.
- Street
- Enter the street
- House number
- Enter house number
- P.O.box
- Enter postcode.
- Locality
- Enter town
- Nation code
- Enter nation code (ex. CH, LI).
- IBAN
- Enter IBAN account.
An IBAN account must be used. It is not possible to use a QR-IBAN account.
- Enter IBAN account.
Customer address (Payable by)
Choose whether or not to include the customer's address, which will appear in the 'Payable by' section of the QR slip (max. 3 rows allowed - see also Addresses).
In the Customer Address section there are the following settings:
- Include customer
- View this option to include the customer's address in the QR slip.
If not included, an empty box will be left for manual input.
- View this option to include the customer's address in the QR slip.
- Name
- Enter your first and last name or the name of your organisation.
- Street
- Enter the street.
- House number
- Enter the house number.
- P.O.Box
- Enter the postcode.
- Locality
- Enter the town.
- Country code
- Enter the country code (ex. CH, LI).
Date
In the Date section, enter the date of the letter.
Letter text
In the Letter Text section you can add the text of your letter. If it is a long text, the QR Bulletin will automatically jump to the next page.
- Free text
- Enter the text of the letter.
- Can be inserted on several lines.
- You can apply the bold style by including the desired text between double asterisks ** (e.g. **text1 text2** text3 = text1 text2 text3).
- You can enter specific codes, which will be replaced with their actual values when printed:
- <AdditionalInformation> is converted to the value entered in the AdditionalInformation field of the settings.
(e.g. "Invoice No. <AdditionalInformation>" = "Invoice No. 2022-001"). - <Currency> is converted to the currency of the invoice, defined in the Currency field of the settings.
- <Amount> is converted to the total amount of the invoice, defined in the Amount field of the settings.
- <AdditionalInformation> is converted to the value entered in the AdditionalInformation field of the settings.
- Example:
We hereby forward to you the invoice detail of Invoice No. <AdditionalInformation> for a total of <Currency> <Amount> = We hereby forward to you the invoice detail of Invoice No. 2022-001 for a total of CHF 4'000.00.
Language
In the Language section select the language in which the QR Bulletin is to be printed.
The available languages are Italian, French, German and English.
Style
- Font style
- Enter the font (Helvetica, Arial, Times New Roman, etc.).
- Font size
- Enter the font size.
Troubleshooting
For further details, please visit the Error Messages page of the documentation.