在此文中
Payment orders PAIN.001 for Switzerland [BETA]
The extension allows you to generate Electronic Payment Orders (EPO) for Switzerland in XML pain.001 format, based on accounting transactions or QR code scanning.
This extension allows you to generate payment files ready to be electronically submitted to your bank or financial institution (Post) for payment execution.
The generated XML messages comply with the standards required for payments in Switzerland:
- International Standard: ISO 20022 (message format pain.001.001.09).
- Compliance with Swiss recommendations pain.001.001.09.ch.03 and pain.001.001.03.ch.02 (the current Swiss Payment Standards).
Once the payment orders have been processed and recorded by your financial institution, you can import bank statements (CAMT format) directly into Banana Accounting Plus for automatic reconciliation of transactions.
New version (Release Beta channel)
Starting from November 21, 2026, addresses in pain.001 payment files must be submitted exclusively in structured or hybrid form. Submission in these formats is already possible from November 21, 2025.
In preparation for these changes, a new version of the extension has been released, currently available only in the Release Beta channel, which integrates the SPS 2025 standard and enables submission of payment orders with hybrid addresses.
For a period of time the extension will stay available in the Release Beta channel, so users can test it and report any problems or suggestions for improvement, also for the documentation.
It is recommended to use a copy of your accounting file or an empty file to make some payment transmission tests.
To test the new transmission format with structured/hybrid addresses in the Release Beta channel:
- Download and install the latest version of Banana Accounting+ Dev Channel
- Open the Extensions menu > Manage Extensions...
- Select the Payment Orders pain.001 extension
- In the right side of the dialog, select Preferred Channel as Beta Release (instead of Stable Release)
You can switch from the Beta channel to the Stable version at any time - When creating the payment order, use the command Report > Suppliers > Create payment file. In the dialog select the Swiss Payment Standard 2025 [BETA] format
Useful links
Prerequisites
- Currently the payment functionality is available in the Dev-Channel version, so please install the latest version of Banana Accounting+ Dev Channel
- This extension works only with the Advanced Plan, you can request a 1 month promo code from our support service
- The extension is currently in Beta Test, please check everything and report any problem
Supported payment types
The extension supports the following standards
- SPS 2025 ISO-Version 2019 (pain.001.001.09.ch.03)
with structured/hybrid addresses - SPS 2022 ISO-Version 2019 (pain.001.001.09.ch.03)
with unstructured addresses and valid until 20.11.2026 - SPS 2021 ISO-Version 2009 (pain.001.001.03.ch.02)
valid until 20.11.2026
With the following payment types:
- D (payments within Switzerland in CHF and EUR)
- S (SEPA payments in EUR)
Installation
Before using this extension you need to proceed as follows:
- Download and install the latest version of Banana Accounting+ Dev Channel
- Open your accounting file or create a new accounting file
(a double entry accounting or an income & expense accounting) - In the Accounts table check that the Address view is present.
If the view is not available you can add it using the menu command Tools > Add/Remove functionalities... > Add Address columns in Accounts table.
If your Address columns are different (e.g. missing IBAN, see the documentation Address view. - Select the command Tools > Add/Remove functionalities... > Add payment functionalities, click on the OK button.
This feature is only available in Banana+ Dev Channel with Advanced Plan
If you are using an accounting with base currency CHF, this command will automatically install the payment extension otherwise you will need to install the payment extension in addition:- Menu Extensions > Manage Extensions...
- Click on the category Online on the left bar
- Search for pain.001 or select the extension by filtering country Switzerland and category Online > Productivity
- Click on the Install button to the right
Setting up the payment extension
- Open your accounting file
- From Extensions > Manage Extensions...
- Select the installed extension Payment orders PAIN.001 for Switzerland
- Click on the arrow > to the left of the extension's name, you will see the content of the extension
- Select Credit Transfer File for Switzerland
- Click on the Settings button to the right


- Message sender name
Name of the pain.001 message sender, maximum 70 characters. By default the name set in the accounting file is used (command File > File and accounting properties..., Address). You can use this field if the name differs from the address of the accounting file. - Field for additional infos (XML name)
Field name in the transaction table which contains the additional infos. Unstructured information can be used to indicate the payment purpose or for additional textual information about payments with a structured reference. - Groups of creditors (separate groups with a semicolon)
Specify the group defined in the Accounts table, which contains the list of supplier accounts. The accounts within this group will be displayed under Account ID in the Payment Data dialog when entering details, enabling the automatic completion of payment information.
To include multiple groups, separate them with a semicolon. For example, if you have two creditor groups, enter: CRED_CHF;CRED_EUR.
Setting up bank details
1. Setting up your bank account
These settings are not mandatory but can speed up the creation of your payment files, because this information is proposed during creation.
- In the Accounts table, select the Address view (see Installation)
- Select your bank or post accounts that will be used to pay the invoices.
- Fill in the following fields:
- Name, surname or company name (these fields correspond to the account holder sending the payment order)
- IBAN (IBAN number of the bank or post account to be charged)
- Bank clearing (BIC number of the bank to be charged)

2. Setting up your suppliers
These settings are not mandatory but can speed up the creation of your payment files. If you enter the address and bank details of your suppliers, this information will be proposed when entering payment data.
- In the Accounts table select the Address view (see Installation)
- For each supplier enter its address and bank details, like supplier name, IBAN account and BIC number

Adding payment data
The payment data are those data necessary to make a payment, such as the name of the beneficiary, his IBAN account, the amount to be paid. This information is saved at the row level in the transactions table and will be used when generating the payment order.
There are different ways to add payment data:
- By editing the table Transactions, clicking on the Payment Data column. If the transaction line concerns the posting of the invoice with the supplier's account, this data will be taken over automatically
- By scanning a QR-Code with the command Reports > Suppliers > Scan QR-Code... The Payment Data dialog will appear and upon confirming the information will be saved in a new transaction row
- By selecting the command Reports > Suppliers > Create payment file... This command will display the dialog Create payment file with the list of open payment data. In this dialog you can add new payments with the button Add Payment or Scan QR-Code. This data will be stored in new transaction rows.
In all these cases, payment data is saved in the column Payment Data of the Transactions table. You can display or hide this column with the command Data > Columns setup. If this column is not available you can add it selecting the command Tools > Add/Remove functionalities... > Add payment functionalities.
Dialog payment data
- Payment Method
You can select between Bank or postal payment (IBAN/QR-IBAN) for payments inside Switzerland and SEPA transfers for payment inside Europe.
- Creditor Account ID
When you select a creditor from the list, their details will be automatically filled in using the information stored in the Accounts table. If the list is empty, check the extension settings.
To display the accounts, as defined in the Accounts table, you must specify the creditor group in the payment extension settings. You can include multiple creditor groups by separating them with a semicolon.
See the chapter Setting up the payment extension

Creating payment files
A payment file is an XML document that contains information for your bank regarding which invoices you want to pay. The file can be sent to a bank electronically and the bank will execute your order.
To create the payment file follow these steps:
- Prepare the payment data as described in the section Adding payment data of this page
- Select the command Reports > Suppliers > Create payment file...
You can also previously select the payment data in the Transactions table and use the context menu Create payment file... by right-clicking - Select the payments you want to include in the order. If ** appears, it means that the payment contains some errors you have to correct.
- Click on Next. This button is enabled only when transactions are selected without errors.
- Complete with the information of the account to which the debit will be made
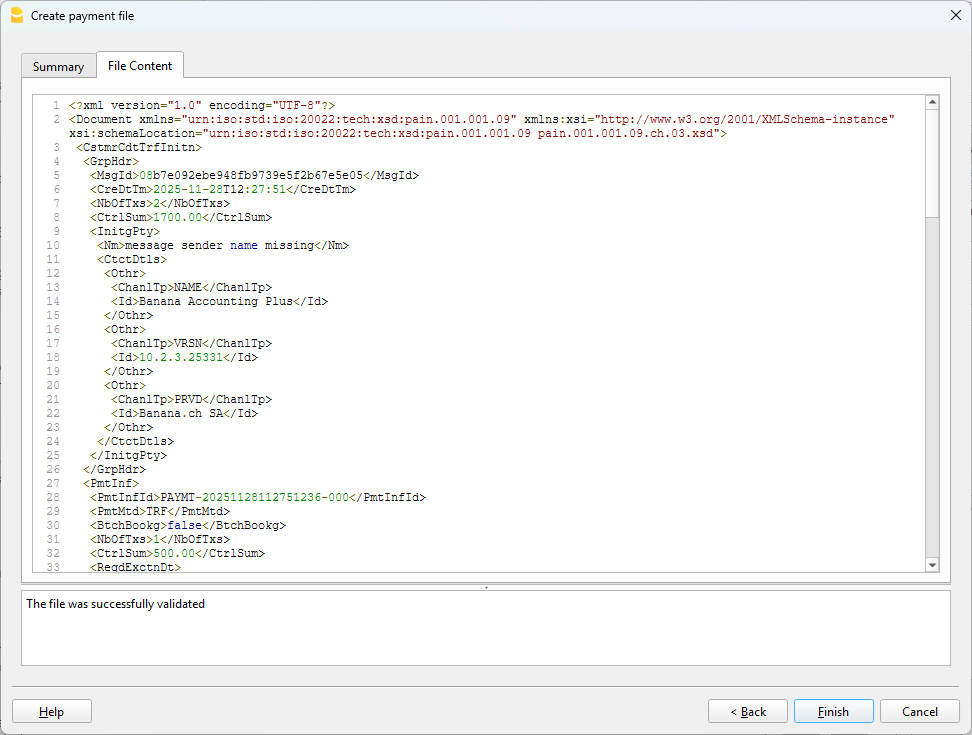
- Click on Next. You will see the summary of the file content. If you click on File Content you will see the original format of the XML.
- Click on Browse to select the destination folder where the XML file will be saved.
- Click on Export. You will be prompted to save the XML file in a folder
At the moment it is not possible to connect directly to the bank in order to transmit the message. By creating the payment file you will be asked to save the XML message in your computer. In your bank application you have to upload the XML file, selecting it from your computer.


Displaying or removing payment files
The payment file is inserted in a new row of the transactions table (Payment/file object). By clicking on the Payment Data column of this row, the contents of the file will be displayed.
Editing or removing the payment data and the payment files
Payments are stored in the Payment Data column of the Transactions table. There are two types of objects that can be stored:
- payment/data object that contains information about a specific payment. This information will be used to complete the payment order.
- payment/file object containing the information of a payment order file, including the xml file created.
To remove this data, simply delete the record line or the objects themselves.
Attention! The payment/file objects are used to determine whether a payment has been executed or not.
It is therefore recommended not to remove the rows containing these objects, otherwise payments that have already been executed will still appear as pending, since their reference will be deleted along with the payment/file object.

Payment status
There are two status of payment:
- pending
the payment data is not included in any payment file
- downloaded
the payment data is included in one or more payment files
List of payments
This table list all pending and downloaded payments. You can filter and group the payments according to your needs.
Tip: to edit the payment information starting from these tables, you can double-click the row number to the left of the table or select the command Go to Original Row from the table's context menu. With this action you select the original transaction row that contains the payment data to update.

API
Change History
See the change log.