Report Extensions
Account Statement Letter
Account Statement LetterInstall the extension
To install the extension:
- Open Banana Accounting Plus.
- Menu Extensions > Manage Extensions.
- In the search field enter Account Statement Letter.
- From the extensions list select Account Statement Letter.
- Select the extension and click Install.
- Click Close to close the window.
Create the report
To creare the report:
- Open an accounting file.
- From the menu File > File and accounting properties > Address, enter the sender address.
- In the Accounts table (Address view) enter the receiver address for the account.
- From the Extensions menu select the Account Statement Letter.
- Enter the account number.
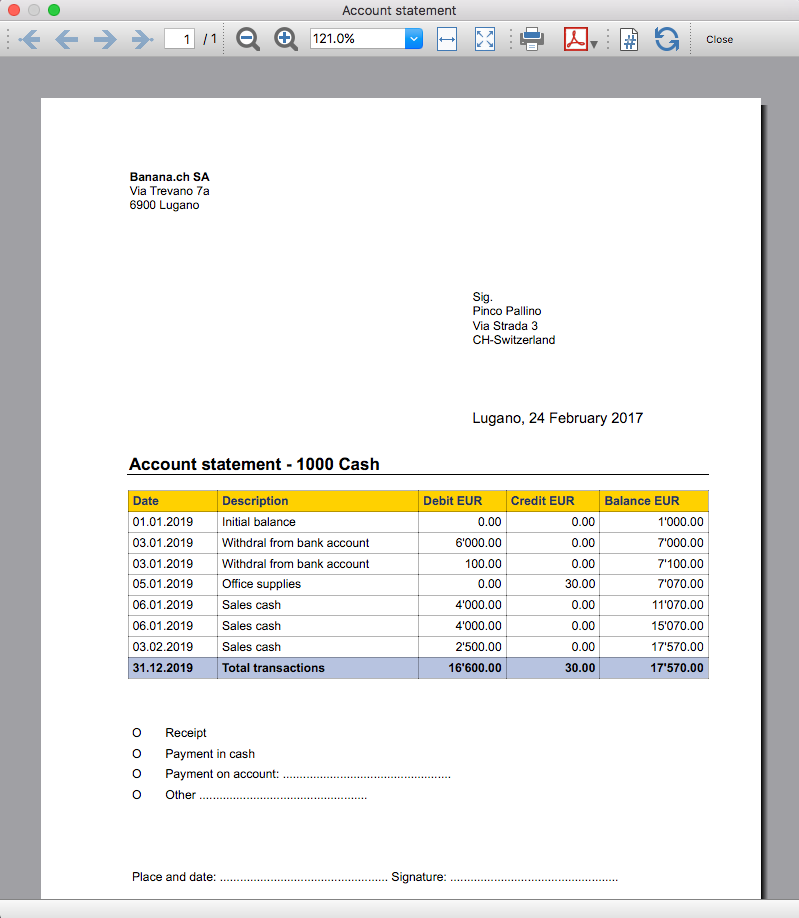
Example of account statement report:
Account balance by day within a period
Account balance by day within a periodInstall the extension
To install the extension:
- Open Banana Accounting Plus.
- Menu Extensions > Manage Extensions.
- In the search field enter Account balance by day within a period.
- From the extensions list select Account balance by day within a period.
- Select the extension and click Install.
- Click Close to close the window.
Create the report
To creare the report:
- Open an accounting file.
- From the Extensions menu select the Account balance by day within a period.
- Enter the account number.
- Select the period.
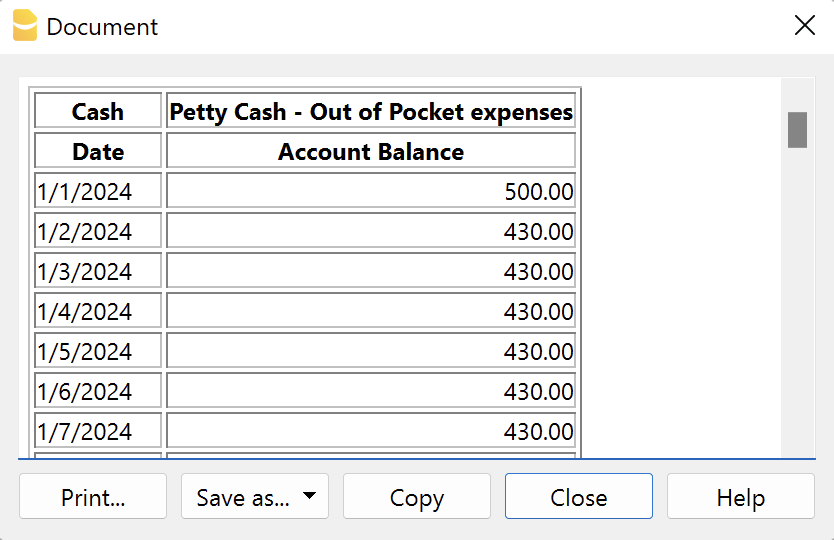
A window with results is displayed. You can copy, save and print the results.
Account balance for all days in a month
Account balance for all days in a monthInstall the extension
To install the extension:
- Open Banana Accounting Plus.
- Menu Extensions > Manage Extensions.
- In the search field enter Account balance for all days in a month.
- From the extensions list select Account balance for all days in a month.
- Select the extension and click Install.
- Click Close to close the window.
Create the report
To creare the report:
- Open an accounting file.
- From the Extensions menu select Account balance for all days in a month.
- Enter the month number.
- Enter the account number.
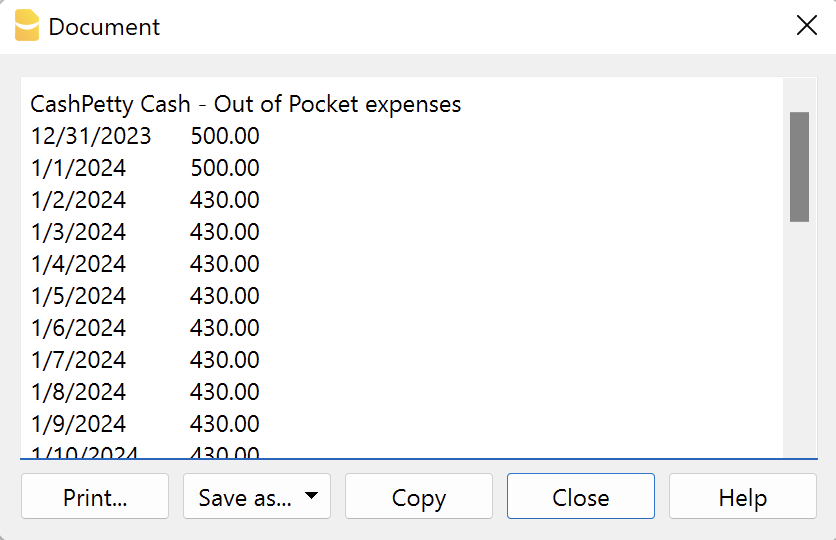
A window with results is displayed. You can copy, save and print the results.
Audit Reports [BETA]
Audit Reports [BETA]The main purpose of this extension is to provide reports that can be easily copied into excel, summarising and showing the main accounting data that are normally taken as a basis by auditors when preparing their analysis.
Useful reports for Banana users who need to send their auditor accounting data, but also for auditors who use Banana themselves, as these reports are based on the functionalities already offered by Banana and therefore facilitate and speed up the collection of accounting data.
Reports
The following reports can be generated:
- General Ledger: Shows the transactions for each account, like in the account card.
- Journal: Shows the details of each transaction.
- VAT Journal: Shows the details of each VAT transaction.
- Trial Balance: Shows the balance of all accounting items in two columns (debit and credit).
- Customers And Suppliers: Shows list of customers and suppliers and information about them.
Through a dialogue it is possible to decide the time of year to be taken into account in the reports.
Adding extra columns
Through the command "Columns Settings" additional columns can be inserted in each report, except for the trial balance, which remains as it is. To add a column to the report, simply enter its xml name in the dialogue. To add several columns, separate them with a semicolon ";" as shown in the example.

The columns you can add are the same present in the Transactions table, except for the Customers and Suppliers report, for which you find the data in the Accounts table.
If you accidentally add a column that is not contained in the tables mentioned, no error is currently raised, the column will be added but no value will be present.
Copy to Excel
Reports are easily copied to Excel, when the report preview is generated, just click on the "copy" icon and paste the copied table into an Excel sheet.

Once the whole table has been copied, you can arrange the file as you want and customise your report with Excel tools.

Messages
- Total debit and total credit are different: The total Debit and total Credit do not match, check if the same error is present in your Accounting file, if it is only present in the report send us a feedback
Brief mit freiem Text (Banana+) [BETA]
Brief mit freiem Text (Banana+) [BETA]Mit dieser Erweiterung können Sie einen Brief mit freiem Text für Mitglieder erstellen, die in der Konten-Tabelle von Banana Buchhaltung registriert sind.
Es ist wichtig, dass die Mitglieder mit Kostenstellen eingerichtet werden, wobei die Kostenstelle KS3 zu verwenden ist.
Voraussetzungen
Um diese Erweiterung zu benutzen, müssen Sie:
- Banana Buchhaltung+ herunterladen und installieren (Version 10.1.7 oder neuer).
- Den Advanced-Plan von Banana Buchhaltung Plus haben.
Beta-Version
Die Erweiterung ist derzeit als Betaversion freigegeben. Dies bedeutet, dass sich einige Details ohne vorherige Ankündigung ändern können.
Installation und Anwendung der Erweiterung
- Banana Buchhaltung Plus Dev-Channel installieren.
- Banana-Erweiterung Brief mit freiem Text (Banana +) installieren (siehe hierfür die Seite Erweiterungen verwalten).
- Sobald die Banana-Erweiterung installiert ist, wird sie im Menü Erweiterungen sichtbar sein, wo sie ausgeführt werden kann.
Einen Brief erstellen
- In der Buchhaltungsdatei unter Stammdaten -> Registerkarte 'Adresse' (Menü Datei), die Daten des Vereins eingeben.
- Aus Menü Erweiterungen die Banana-Erweiterung Brief mit freiem Text (Banana +) auswählen.
- Die hierauf folgenden Felder des Einstellungen-Dialog ausfüllen und danach auf die Schaltfläche OK klicken.
Einstellungen-Dialog
Starten Sie die Erweiterung über das Menü Erweiterungen > Brief mit freiem Text (Banana +).
Es öffnet sich ein Dialogfenster mit den Einstellungen der Erweiterung, wo Sie die erforderlichen Informationen für den Ausdruck des Briefes festlegen.
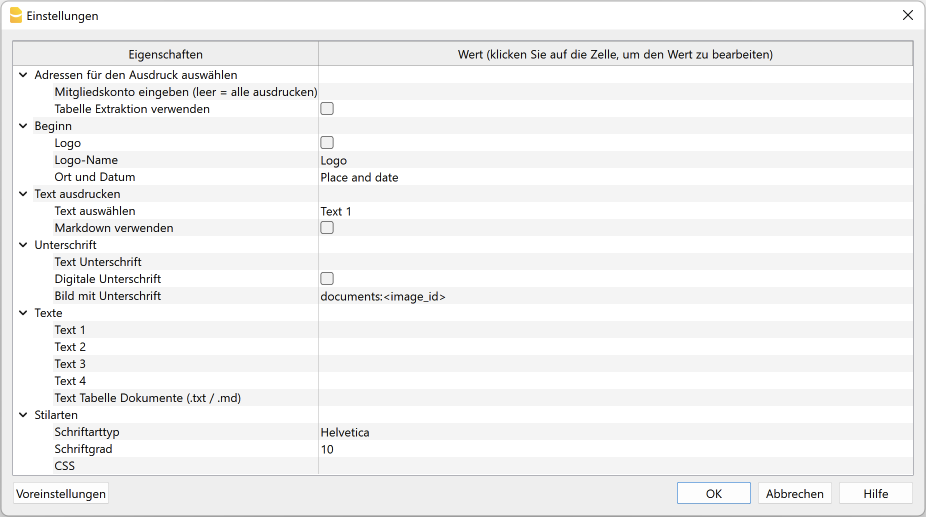
Für die Eingabe der Daten unterhalb der Spalte Wert einen Klick erteilen, um das Eingabefeld zu öffnen.
Die Einstellungen sind in die folgenden Gruppen unterteilt:
- Adressen für den Ausdruck auswählen
- Definieren Sie die Mitgliedskonten, für die der Brief erstellt werden soll.
- Beginn
- Legen Sie das Logo für die Kopfzeile, den Ort und das Datum des Schreibens fest.
- Text ausdrucken
- Definieren Sie, welcher Text verwendet werden soll.
- Unterschrift
- Definieren Sie den Text und das Bild für die Unterschrift (Signatur).
- Texte (des Briefes)
- Sie können bis zu 4 Textzeilen erfassen oder einen aus der Tabelle Dokumente gespeicherten Text übernehmen.
- Stilarten
- Legen Sie die Schriftart und -grösse für den Brieftext fest.
Aufgrund der eingegebenen Daten wird der Bericht generiert, welcher gespeichert und ausgedruckt werden kann.
Adressen für den Ausdruck auswählen
Hier können Sie entscheiden, für welche Mitglieder mit Kostenstellen KS3 der Brief erstellt werden soll.
- Mitgliedskonto eingeben (leer = alle ausdrucken)
- Konto des Mitglieds eingeben (z.B. "10001").
- Mehrere Mitgliedskonten eingeben, die durch ein Komma "," zu trennen sind (z.B. "10001,10002,10005").
- Wird nichts eingegeben, werden alle Mitglieder ausgedruckt.
- Tabelle Extraktion verwenden
- Die aus der Tabelle Extraktion herausgezogenen Konten verwenden.
- Es ist erforderlich den Befehl Daten > Zeilen extrahieren und sortieren... auszuführen, um die Zeilen mit den Konten zu extrahieren, die Sie verwenden möchten.
Beginn
Hier legen Sie das Logo für die Kopfzeile, den Ort und das Datum des Schreibens fest.
- Logo (Kontrollkästchen aktivieren)
- Fügen Sie ein Logo in die Kopfzeile ein. Das Logo kann unter Menü Datei > Logo einrichten definiert werden.
- Logo-Name
- Geben Sie den zu verwendenden Namen der Logo-Anpassung ein, wenn mehr Logos definiert sind.
- Ort und Datum
- Geben Sie den Ort und das Datum des Schreibens ein.
Text ausdrucken
Hier können Sie entscheiden, welcher der eingegebenen Texte im Brief gedruckt werden soll.
- Text auswählen
- Wählen Sie den gewünschten Text aus der Liste aus.
- Für das Einfügen eines Textes sehen Sie bitte den Absatz Texte.
- Markdown verwenden (Kontrollkästchen aktivieren)
- Der markierte Text wird als Markdown-Text interpretiert (erfordert Banana Buchhaltung Plus - Advanced-Plan).
Unterschrift
Hier können Sie entscheiden, welcher Text und welches Bild (mit digitaler Unterschrift) im Brief gedruckt werden soll.
- Text Unterschrift
- Sie geben den Vor- und Nachnamen der Person ein, die den Brief ausstellt.
- Digitale Unterschrift (Kontrollkästchen aktivieren)
- Hierfür ist ein Bild mit der digitalen Unterschrift zu benutzen.
- Bild mit Unterschrift
- Das gewünschte Bild kann auf zwei Arten eingefügt werden:
- documents:<name_id>: Dient zum Übernehmen eines in der Dokumente-Tabelle gespeichertes Bild mit der Unterschrift, wobei <name_id> dem Namen entspricht, welcher in der Spalte 'ID' ('ID-Wert') der Tabelle 'Dokumente' steht (z.B. "documents:unterschrift").
- file:document/<immagine>: Um ein Bild zu übernehmen, welches ausserhalb der Banana-Buchhaltungsdatei gespeichert worden ist, sich jedoch im selben Verzeichnis/Ordner wie die .ac2-Datei befindet. Es ist auch das Bildformat .png oder .jpg (z.B. "file:document/bildname.png") anzugeben.
- Das gewünschte Bild kann auf zwei Arten eingefügt werden:
Texte
Geben Sie den Text Ihres Schreibens. Es ist möglich, bis zu 4 Textzeilen einzugeben oder einen aus der Tabelle Dokumente gespeicherten Text zu übernehmen.
- Text 1, Text 2, Text 3, Text 4
- Text der Tabelle Dokumente (.txt / .md)
- Um die eingegebenen Texte zu verwenden, müssen Sie sich in die Tabelle Dokumente begeben.
- Geben Sie den ID-Wert des Dokuments ein (z.B. "Brief.txt", "Brief", "Brief.md" usw.).
- Die Texte können vom Typ Text und Markdown sein.
- Bei Texten vom Typ Markdown, muss der ID-Wert in der Dokumente-Tabelle mit ".md" enden; wobei auch der vollständige Name mit ".md" enden muss (z.B. "Brief.md").
Stilarten
Hier definieren Sie die Schriftart und -grösse für die Brieftexte fest.
- Schriftartyp
- Definiert die Schriftart
- Der Standardtyp ist "Helvetica"
- Schriftgrösse
- Definiert die Schriftgrösse
- Die Standardgrösse ist "10"
- CSS
- Opzional
- Sie können Ihren Ausdruck noch weiter anpassen, indem Sie eigene CSS-Stile erstellen, mit denen Sie das Erscheinungsbild des Briefes ändern können (Textformatierung, Positionierung von Elementen usw.). Erfordert Banana Buchhaltung Plus - Advanced-Plan!
- Siehe Dokumentation Erstellung von CSS-Stilen (Dokumentation auf Englisch).
Tabelle Extraktion (Befehl Zeilen extrahieren)
Mit der Funktion Zeilen extrahieren und sortieren... können Sie die Mitgliedskonten auswählen, für die der Brief erstellt werden soll. Dies ist besonders nützlich, wenn Sie z.B. einen Briefe nur für bestimmte Mitglieder ausdrucken wollen, ohne die Liste der Konten direkt in den Einstellungen der Erweiterung eingeben zu müssen.
Wenn Sie beispielsweise Mitglieder in verschiedene Gruppen gruppieren (Tabelle Konten), können Sie mit dem Befehl Daten > Zeilen extrahieren und Zeilen sortieren... die Zeilen der Mitglieder extrahieren, die nur zu bestimmten Gruppen gehören (im Beispiel Mitglieder, die zu den Gruppen S1 und S3 gehören).
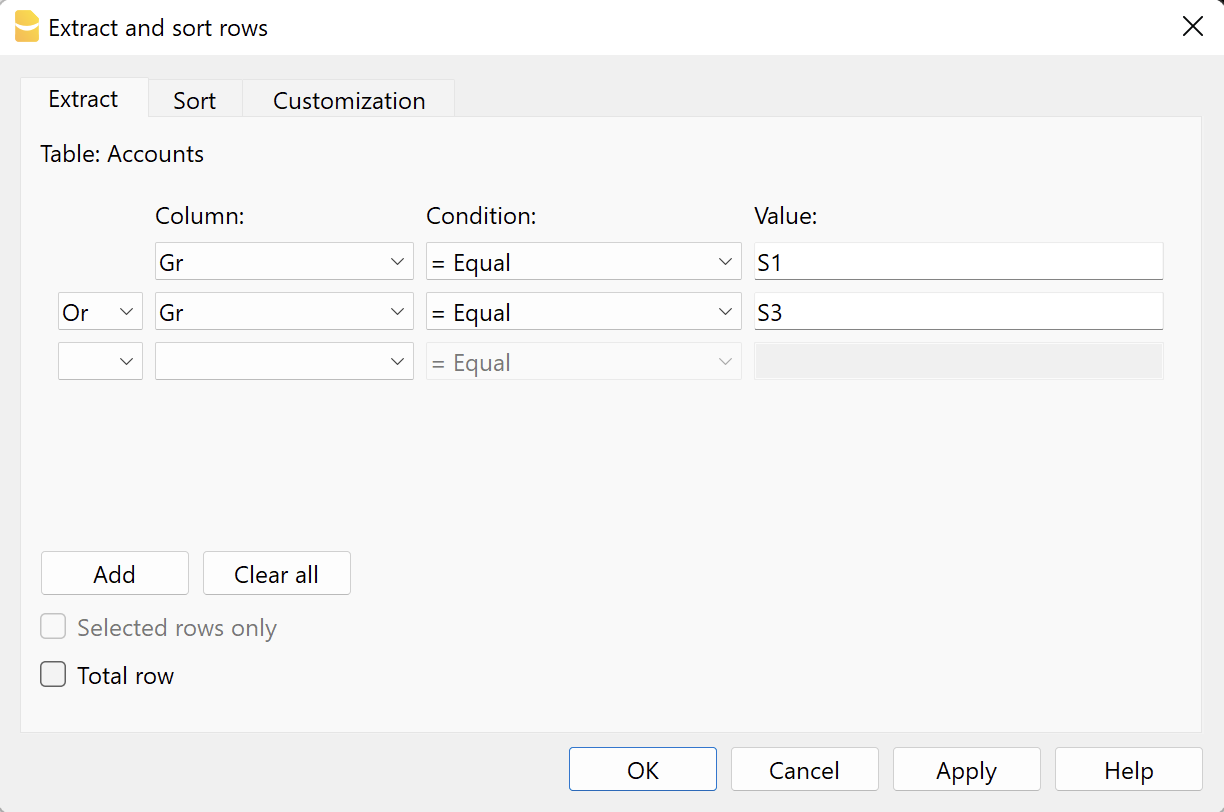
Um die extrahierten Zeilen anzuwenden, so vorgehen:
- Die gewünschten Zeilen mittels Menübefehl Daten > Zeilen extrahieren und sortieren... extrahieren.
- Die Erweiterung ausführen und im Abschnitt Adressen für den Ausdruck auswählen des Einstellungen-Dialog das Kontrollkästchen Tabelle Extraktion verwenden aktivieren.
- Wenn vor dem Druckvorgang keine Zeilen extrahiert wurden, wird eine Warnmeldung angezeigt und es werden alle Mitglieder ausgedruckt.
Text des Briefes (Standardtext)
Es gibt zwei Möglichkeiten, einen Standardtext einzugeben und zu verwenden. Sie können... :
- den Text direkt im Einstellungen-Dialog eingeben.
- Geben Sie den gewünschten Text in den Feldern Text 1, Text 2, Text 3 oder Text 4 ein.
Es können bis zu 4 Textzeilen hinzugefügt werden. - Wählen Sie unter Text ausdrucken > Text auswählen den zu verwendenden Text aus.
- Wichtig: Aktivieren Sie unter Text ausdrucken NICHT die Option Markdown verwenden.
- Geben Sie den gewünschten Text in den Feldern Text 1, Text 2, Text 3 oder Text 4 ein.
- den Text in der Tabelle Dokumente erfassen.
- Fügen Sie ein Dokument des Typs Standardtext (text/plain) hinzu.
Es gibt keine Einschränkungen; es können beliebig viele Texte hinzugefügt werden. - Im Einstellungen-Dialog:
- Unter Text ausdrucken > Text auswählen die Option Text Tabelle Dokumente (.txt / .md) auswählen. Um diese Option anzuzeigen, müssen Sie einen Doppelklick auf das Feld 'Text 1' auszuführen, wobei ein Dropdown-Menü mit den verfügbaren Textzeilen angezeigt wird.
- Unter Texte > Text Tabelle Dokumente (.txt / .md) den ID-Namen des in der Dokumente-Tabelle angegeben Textes eingeben (z.B. "text.txt").
- Fügen Sie ein Dokument des Typs Standardtext (text/plain) hinzu.
Für alle Textzeilen:
- Mit einer speziellen Anmerkung können Sie bestimmte Texte fett markieren. Fügen Sie dazu die gewünschten Texte zwischen zwei Sternchen ** ein.
Beispiele:- **text** = text
- **textA textB** textC = textA textB textC
- Werden die hierauf folgenden Werte (in Englisch) in den Textzeilen eingegeben, so werden sie mit den entsprechenden Werte ersetzt:
- <Account> : Mitgliedskonto
- <NamePrefix> : Höflichkeit/Anrede (Herr, Frau, Doktor oder anders)
- <FirstName> : Vorname des Mitglieds
- <FamilyName> : Nachname des Mitglieds
- <OrganisationName> : Organisation (z.B. gemeinnützige Vereine, Stiftungen usw.)
- <Address> : Mitgliedsadresse
- <AddressExtra> : Zusatzadresse
- <Region> : Kanton/Region/Provinz
- <Country> : Nation/Land/Bundesland
- <Currency> : Währung
- <Amount> : Gesamtsumme aller Spenden
Text des Briefes (mit Markdown-Text)
Markdown ist eine Sprache, mit der formatierter Text mit einem gewöhnlichen Textverarbeitungsprogramm (Texteditor) und einer leicht zu lesenden Syntax erstellt werden kann.
Um den Markdown zu benutzen, ist der Advanced-Plan von Banana Buchhaltung Plus erforderlich.
Es gibt zwei Möglichkeiten, einen Markdown-Text einzufügen und zu verwenden. Sie können... :
- den Text direkt im Einstellungen-Dialog erfassen.
- Geben Sie den gewünschten Text in den Feldern Text 1, Text 2, Text 3 oder Text 4 ein.
Es können bis zu 4 Textzeilen hinzugefügt werden. - Wählen Sie unter Text ausdrucken > Text auswählen den zu verwendenden Text aus.
- Aktivieren Sie unter Text ausdrucken die Option Markdown verwenden.
- Geben Sie den gewünschten Text in den Feldern Text 1, Text 2, Text 3 oder Text 4 ein.
- den Text in der Tabelle Dokumente eingeben.
- Verwenden Sie den Markdown-Editor, um ein Dokument hinzuzufügen, indem Sie den Markdown-formatierten Texttyp (text/markdown) auswählen.
Es gibt keine Einschränkungen; es können beliebig viele Texte hinzugefügt werden. - Der Dateiname in der Spalte ID muss mit ".md" enden (z.B. "text.md").
- Im Einstellungen-Dialog:
- Unter Text ausdrucken > Text auswählen die Option Text Tabelle Dokumente (.txt / .md) auswählen. Um diese Option anzuzeigen, müssen Sie einen Doppelklick auf das Feld 'Text 1' auszuführen, wobei ein Dropdown-Menü mit den verfügbaren Textzeilen angezeigt wird.
- Unter Texte > Text Tabelle Dokumente (.txt / .md) den ID-Namen des in der Dokumente-Tabelle angegeben Markdown-Textes eingeben (z.B. "text.md").
- Verwenden Sie den Markdown-Editor, um ein Dokument hinzuzufügen, indem Sie den Markdown-formatierten Texttyp (text/markdown) auswählen.
Für alle Textzeilen:
- Werden die hierauf folgenden Werte (in Englisch) in den Textzeilen eingegeben, so werden sie mit den entsprechenden Werte ersetzt:
- {{Account}} : Mitgliedskonto
- {{NamePrefix}} : Höflichkeit/Anrede (Herr, Frau, Doktor oder anders)
- {{FirstName}} : Vorname des Mitglieds
- {{FamilyName}} : Nachname des Mitglieds
- {{OrganisationName}} : Organisation (z.B. gemeinnützige Vereine, Stiftungen usw.)
- {{Address}} : Mitgliedsadresse
- {{AddressExtra}} : Zusatzadresse
- {{Region}} : Kanton/Region/Provinz
- {{Country}} : Nation/Land/Bundesland
- {{Currency}} : Währung
- {{Amount}} : Gesamtsumme aller Spenden
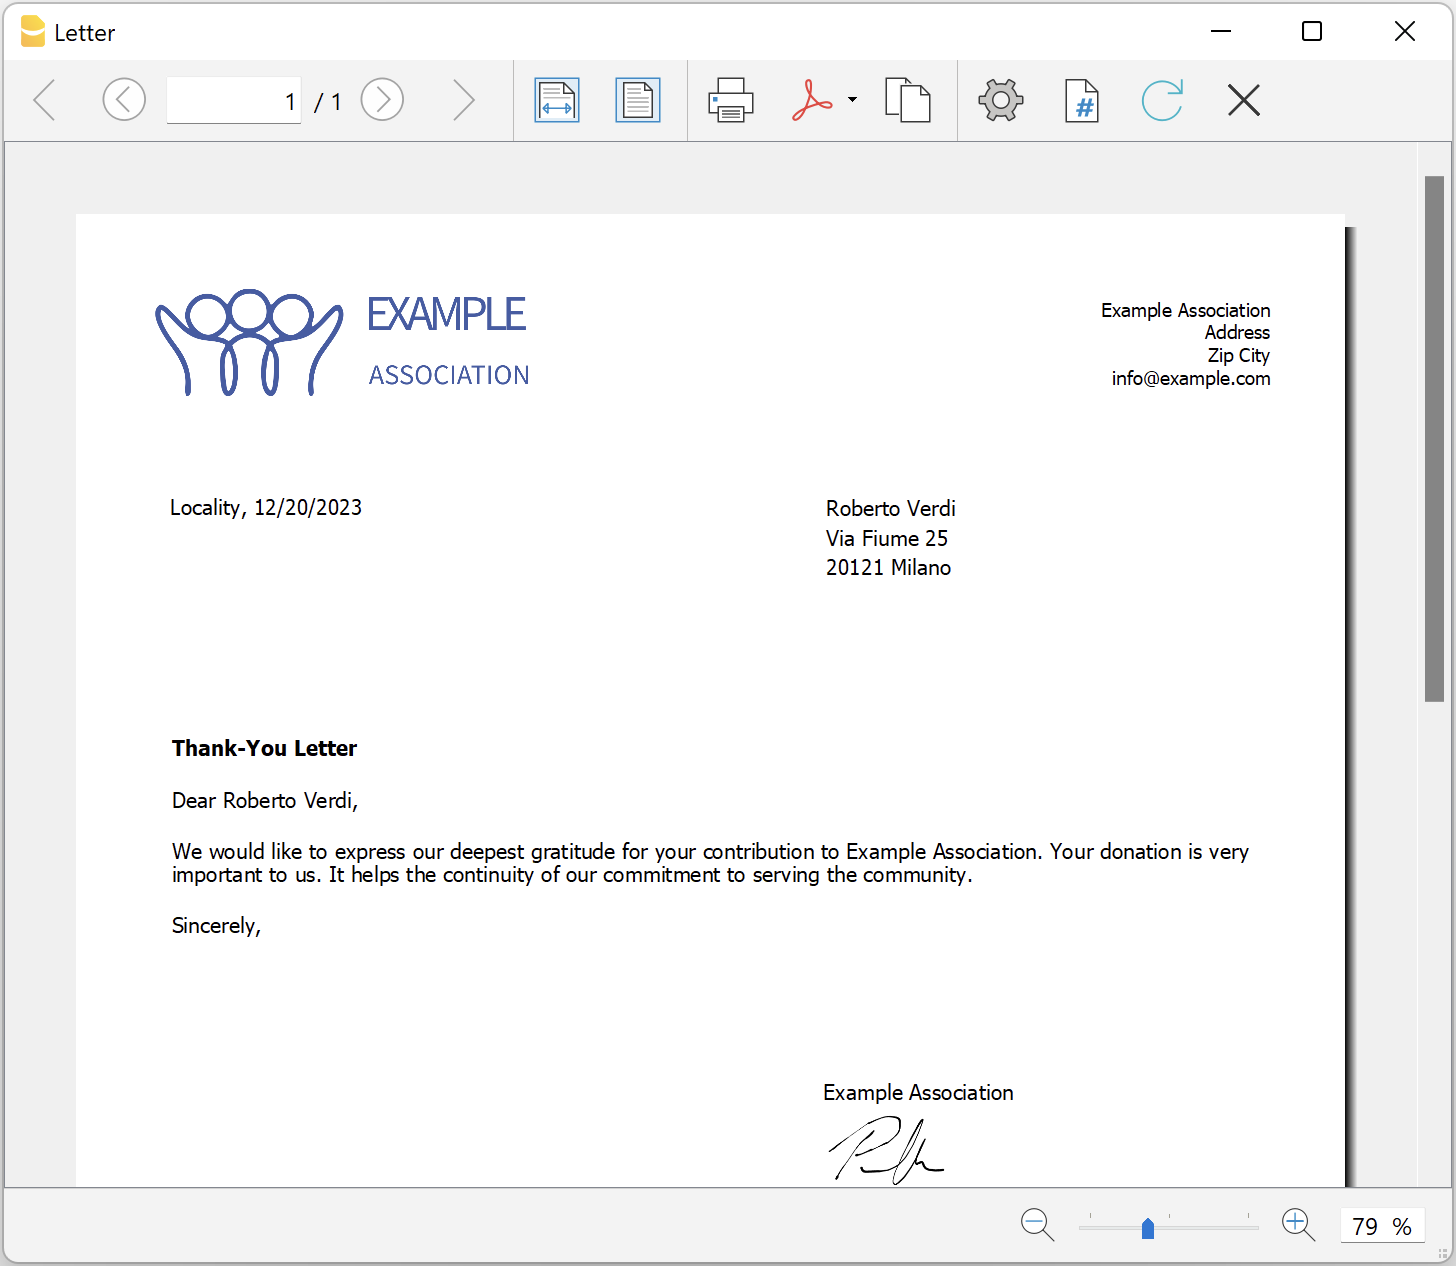
Beispiel eines Ausdruckes
Printing receipts from cash book transactions
Printing receipts from cash book transactionsThis extension prints payment receipts based on transactions from cash book accounting file.
Example of a payment receipt:
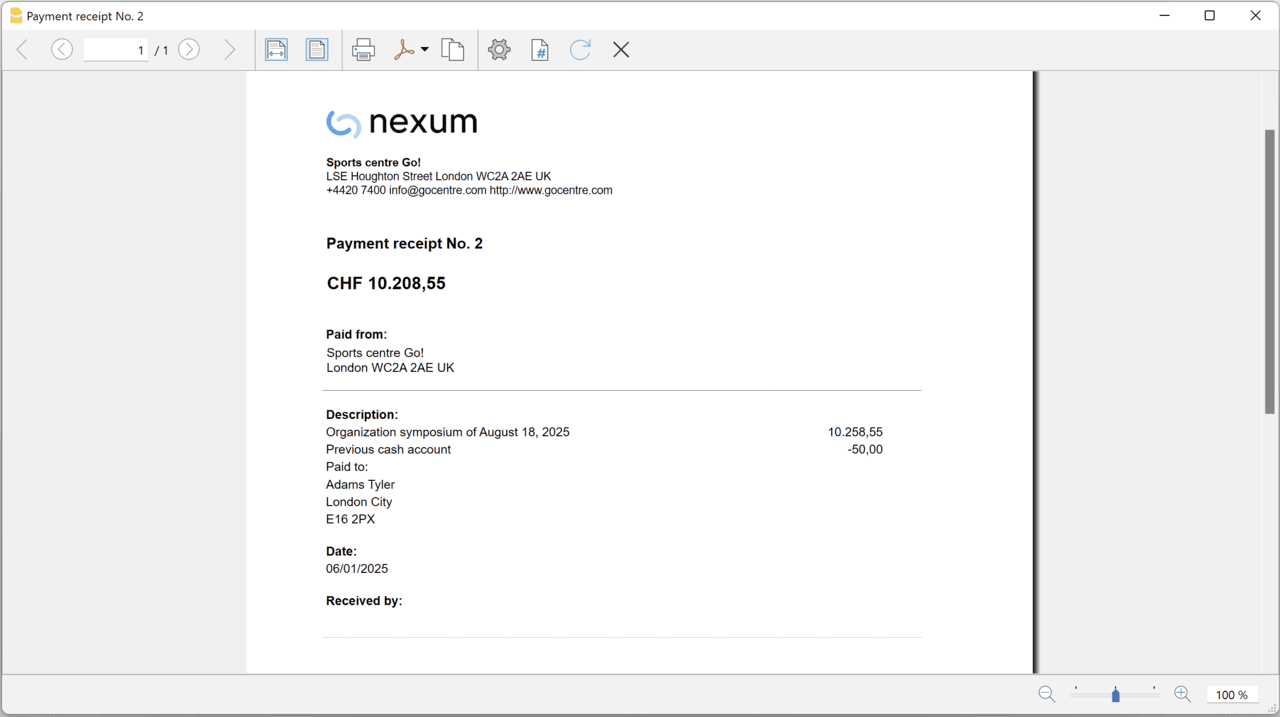
The program prints the receipt using the following logic:
- It takes all the lines with the same Doc Number, of the lines where the cursor is positioned.
- It prints the document number in the "Payment receipt No: "
- It prints the amount by summing all the amounts.
- It prints the Descriptions in different lines.
with the text of the Description column of all the transactions that have the same doc number.
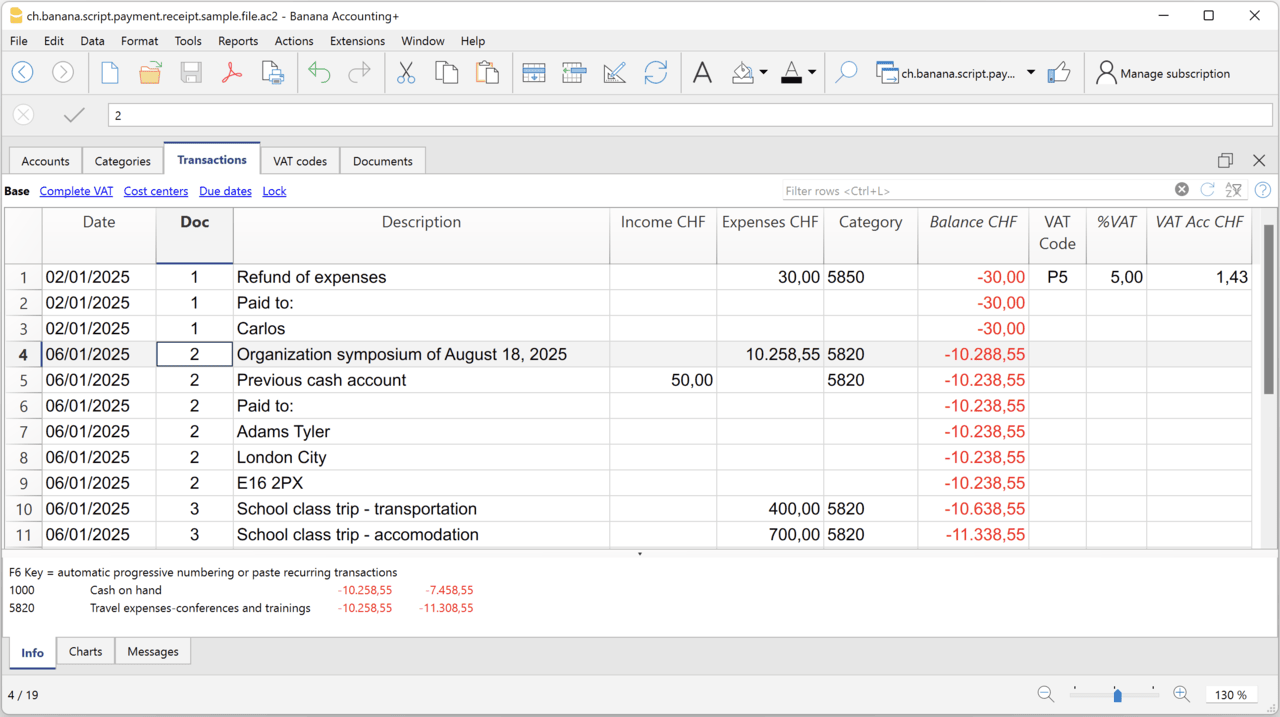
Example file
To created the receipts:
- Open a Cash Book file:
- Or download the example ch.banana.script.payment.receipt.sample.file.ac2 and open it.
- Positions on the line of the transaction group you wish to print.
- From the Extensions menu select the Printing receipts from cash book transactions.
Settings and properties
Prior to printing the receipt you can set the
Extension properties
You can set the following parameters from the menu Extensions > Manage Extensions, select the Printing receipts from cash book transactions extension and click on Settings.
- Include page header (1=yes, 0=no)
The logo and the address information can be included as header of the page. - Automatic date (1=yes, 0=no)
The date of the transaction is used. - Font type
The font type of the texts (Arial, Helvetica, Times New Roman, ...)
Address
Set your address from the menu File > File and accounting properties > Address.
Header logo
A logo for the header can be added as attachment in the Documents table.
- Add the Documents table to the Banana Accounting file.
If it is not already present you need to add the Documents table in the Banana document with the menu command Tools > Add new features > Add document table. - Add a row in the Documents table.
- In the ID column, enter "logo".
- In the Attachments column, double click on the cell and select Image, then choose the logo image you want to use.
Entering transactions
Cash book transactions are entered as usual in the Transactions table.
- Transactions are considered to belong to the same group when they have the same doc number.
- Paid to
- You can enter the text you want to display on the printout (e.g. "Paid to:").
- You can also enter text in bold by enclosing it in double asterisks ** (e.g. **Paid to:**)
- You can enter the text "#paidto" (without quotes) to let the program insert a blank line followed by the text in bold and in the language of the accounting file (it, fr, de, en, nl).
Report Balance and Profit & Loss with transactions details
Report Balance and Profit & Loss with transactions detailsThis extension creates a Balance Sheet and Profit & Loss report with transactions details for each account.
Install the extension
To install the extension:
- Open Banana Accounting Plus.
- Menu Extensions > Manage Extensions.
- In the search field enter Report Balance and Profit & Loss with transactions details.
- From the extensions list select Report Balance and Profit & Loss with transactions details.
- Select the extension and click Install.
- Click Close to close the window.
Create the report
To creare the report:
- Open an accounting file.
- From the Extensions menu select the Report Balance and Profit & Loss with transactions details.
- Select the financial report you want to print:
- Assets / Liabilities
- Income / Expenses
- All
Example of assets details: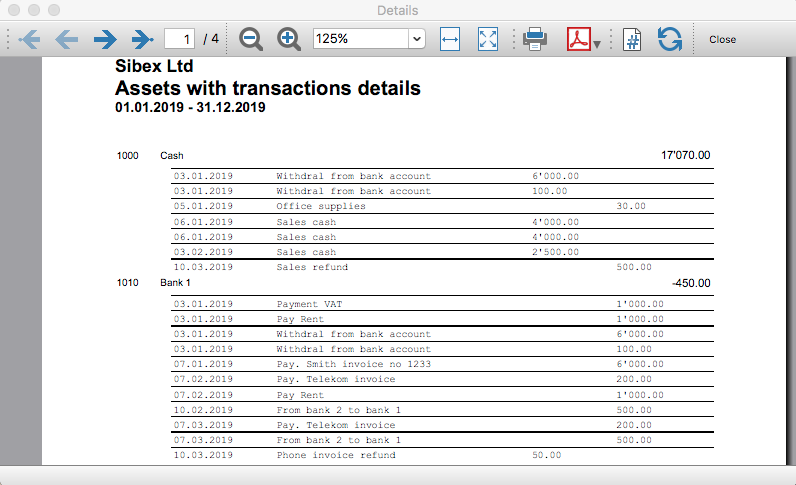
Example of liabilities details: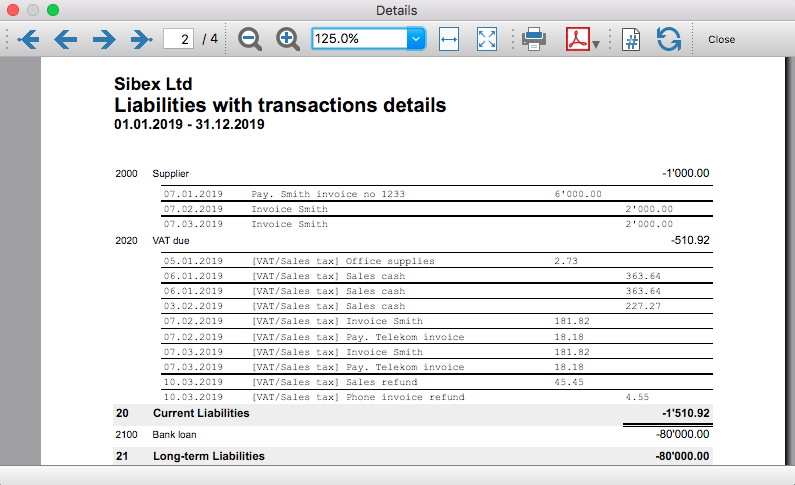
Example of income details: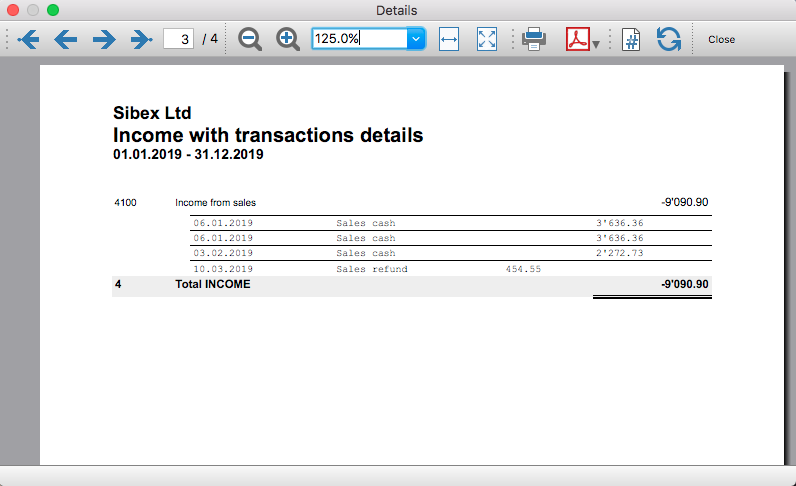
Example of expenses details: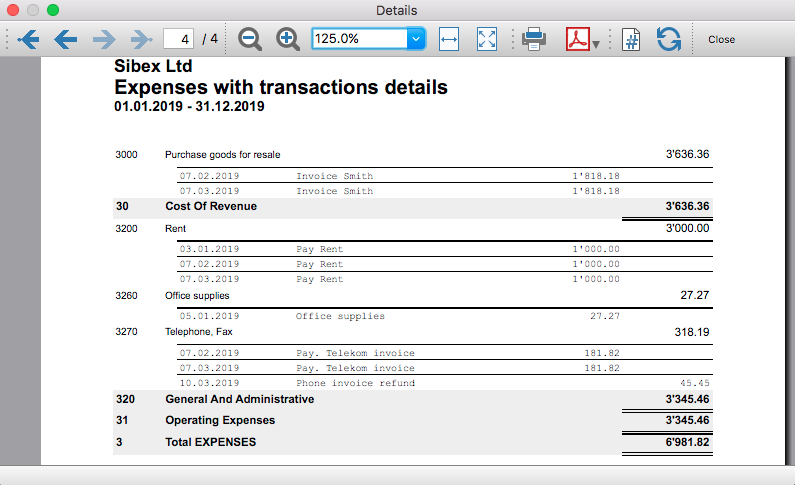
Transaction Voucher (Banana+)
Transaction Voucher (Banana+)Accounting settings
From menu File > File and accounting properties > Accounting Tab, enter the project number/name in the Header Left field.
How it works
- For each transaction of the Transactions table enter the voucher number in the Doc column.
- From the Transactions table of the accounting file select a row with the desired voucher number you want to create the report.
The voucher number is taken from the selected row where the cursor is positioned, but you can also change it manually into settings dialog. - Launch the extension from the menu Extensions > Transaction Voucher (Banana+).
- In the settings dialog window enter the required information.
- Logo
Check to include the logo in the header.
The logo is defined with the command File > Logo setup where you can also set the size, choose how to align it (left, centre, right). - Logo-Name
Enter the name of the logo customisation defined in the menu File > Logo setup, respecting upper and lower case. - Title
- Voucher number
- Paid to
- Paid in
- Cheque No.
- Payment Received by
- Paid by
- Prepared by
- Verified by
- Recommended by
- Approved by
- Logo
- All the values entered are saved and proposed the next time.
- The extension will print the information entered in the dialog plus the data of the transaction with the specified Voucher / Doc number.
Transaction Voucher (Helvetas model)
Transaction Voucher (Helvetas model)How it works
- From the Transactions table of the accounting file select a row with the desired Doc number.
- Launch the extension from the menu Extensions > Transaction Voucher (Helvetas model).
- A dialog window requesting some information will appear.
The voucher number is taken from the row selected where the cursor is positioned, but you can change it manually.
Complete all the remaining fields by entering your data and click Ok.
The values entered are saved and proposed the next time. - The extension will print the information entered in the dialog plus the data of the transactions with the specified Voucher / Doc number.
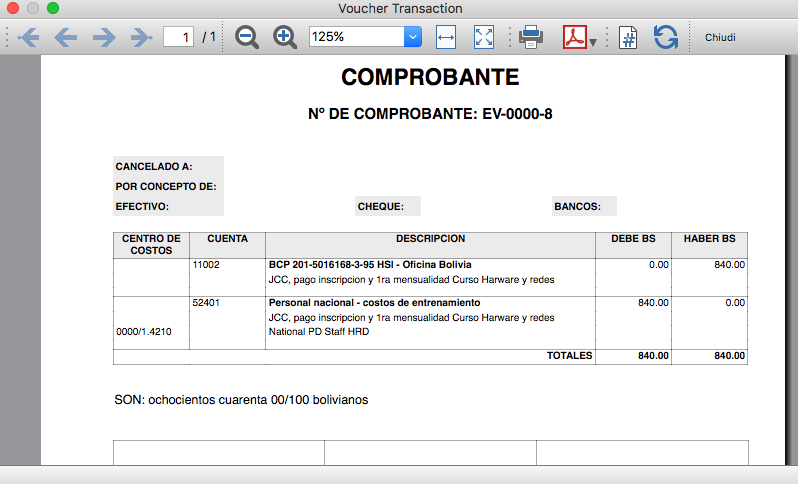
Example of Voucher report:
Transaction Voucher (Swiss Red Cross model)
Transaction Voucher (Swiss Red Cross model)Accounting settings
Two settings are required:
- the Header Left
- click menu File > File and accounting properties > Header Left.
The Header Left field must contain the project number and the project name divided by the "-" character (example: "1234 - Abc")
- click menu File > File and accounting properties > Header Left.
- add a small image/logo
- Add the Documents table to the Banana Accounting file.
If it is not already present you need to add the Documents table in the Banana document with the menu command Tools > Add new features > Add document table. - In the Id column, of the documents table insert transaction_voucher_image.
- In the Attachments column, double click on the cell, select Image and add the desired image.
- Add the Documents table to the Banana Accounting file.
How it works
- From the Transactions table of the accounting file select a row with the desired Doc number.
For example: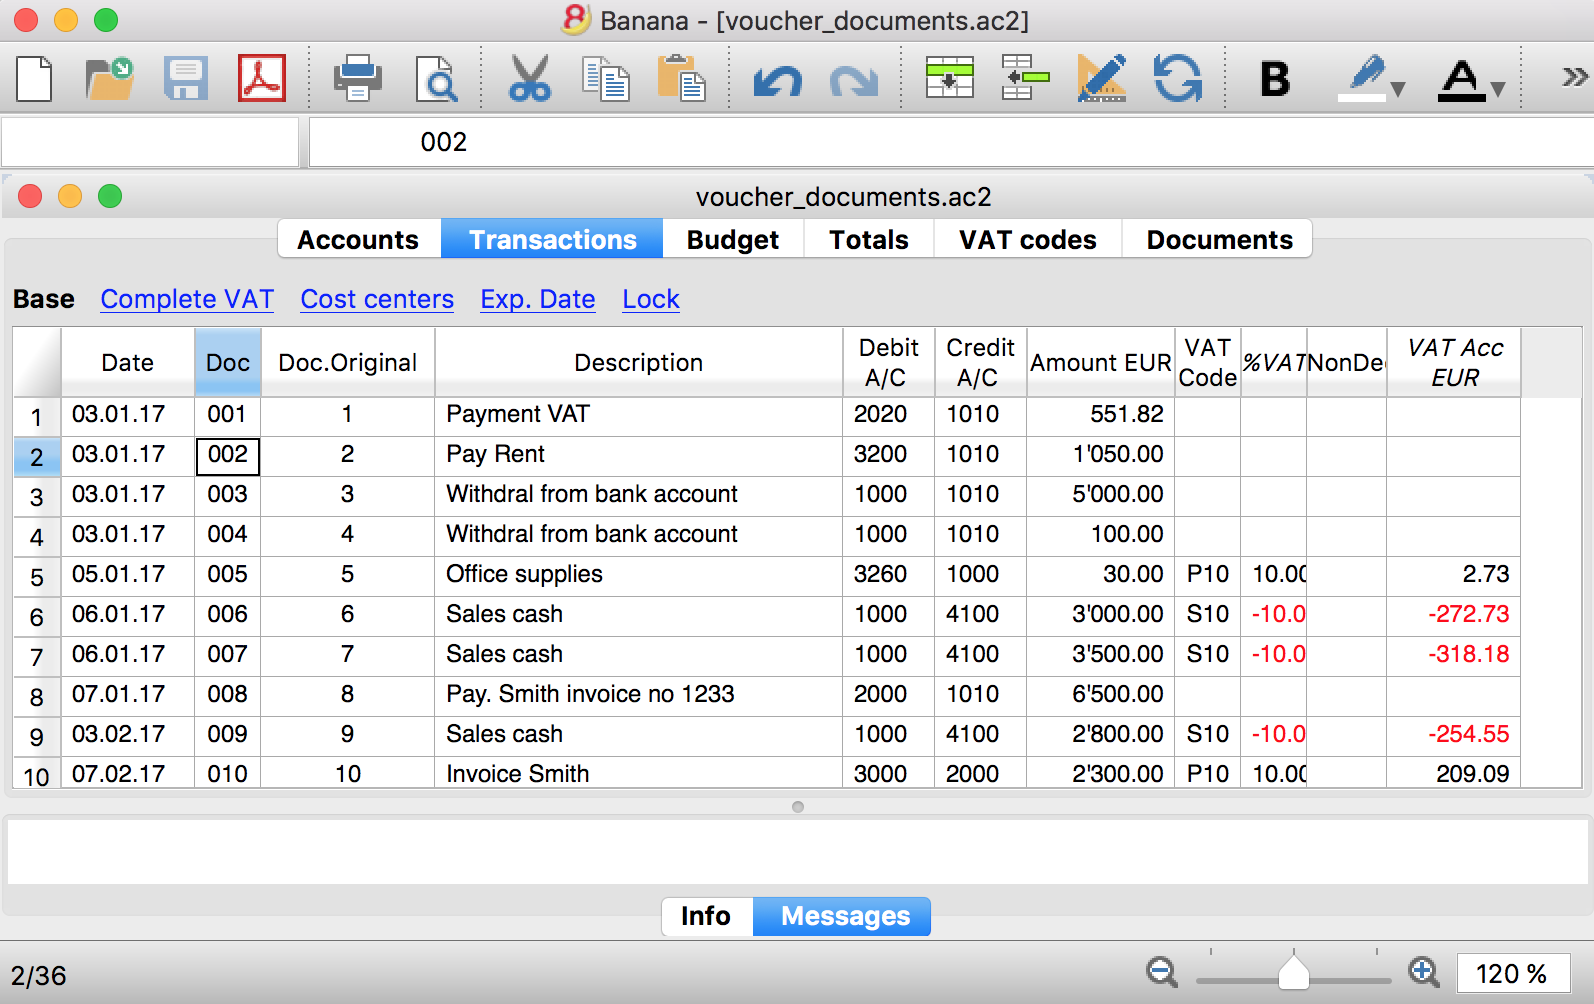
- Launch the extensions from the menu Extension > Transaction Voucher. A dialog window requesting some information will appear.
- The voucher number is taken from the row selected where the cursor is positioned, but you can change it manually.
- Complete all the remaining fields by entering your data and click Ok.
The values entered are proposed the next time.
Dialog example: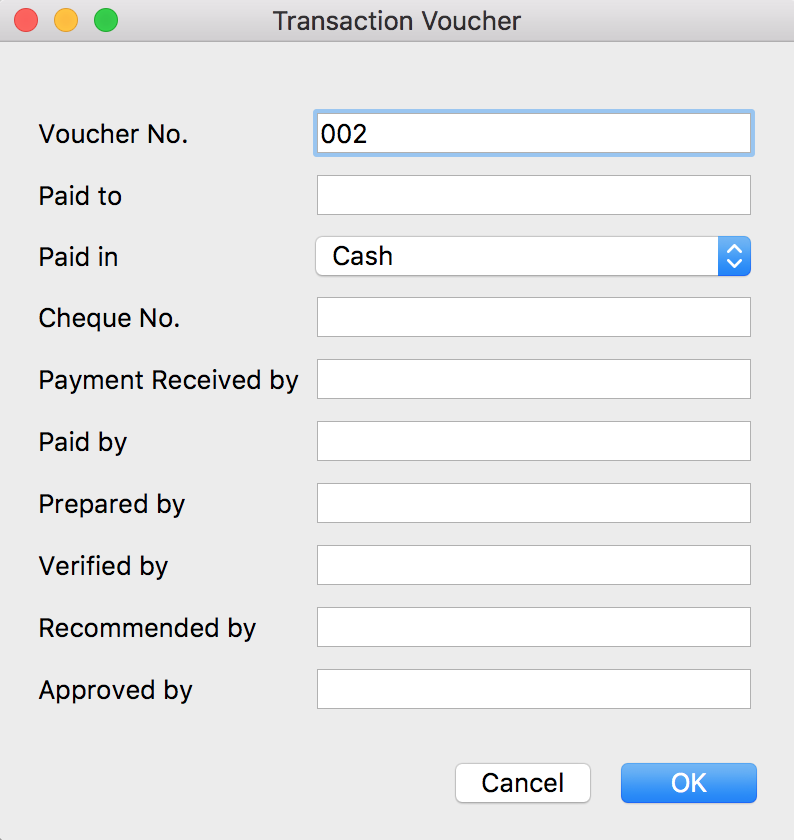
- The extension will print the information enterd in the dialog plus the data of the transactions with the specified Voucher / Doc number.
For example: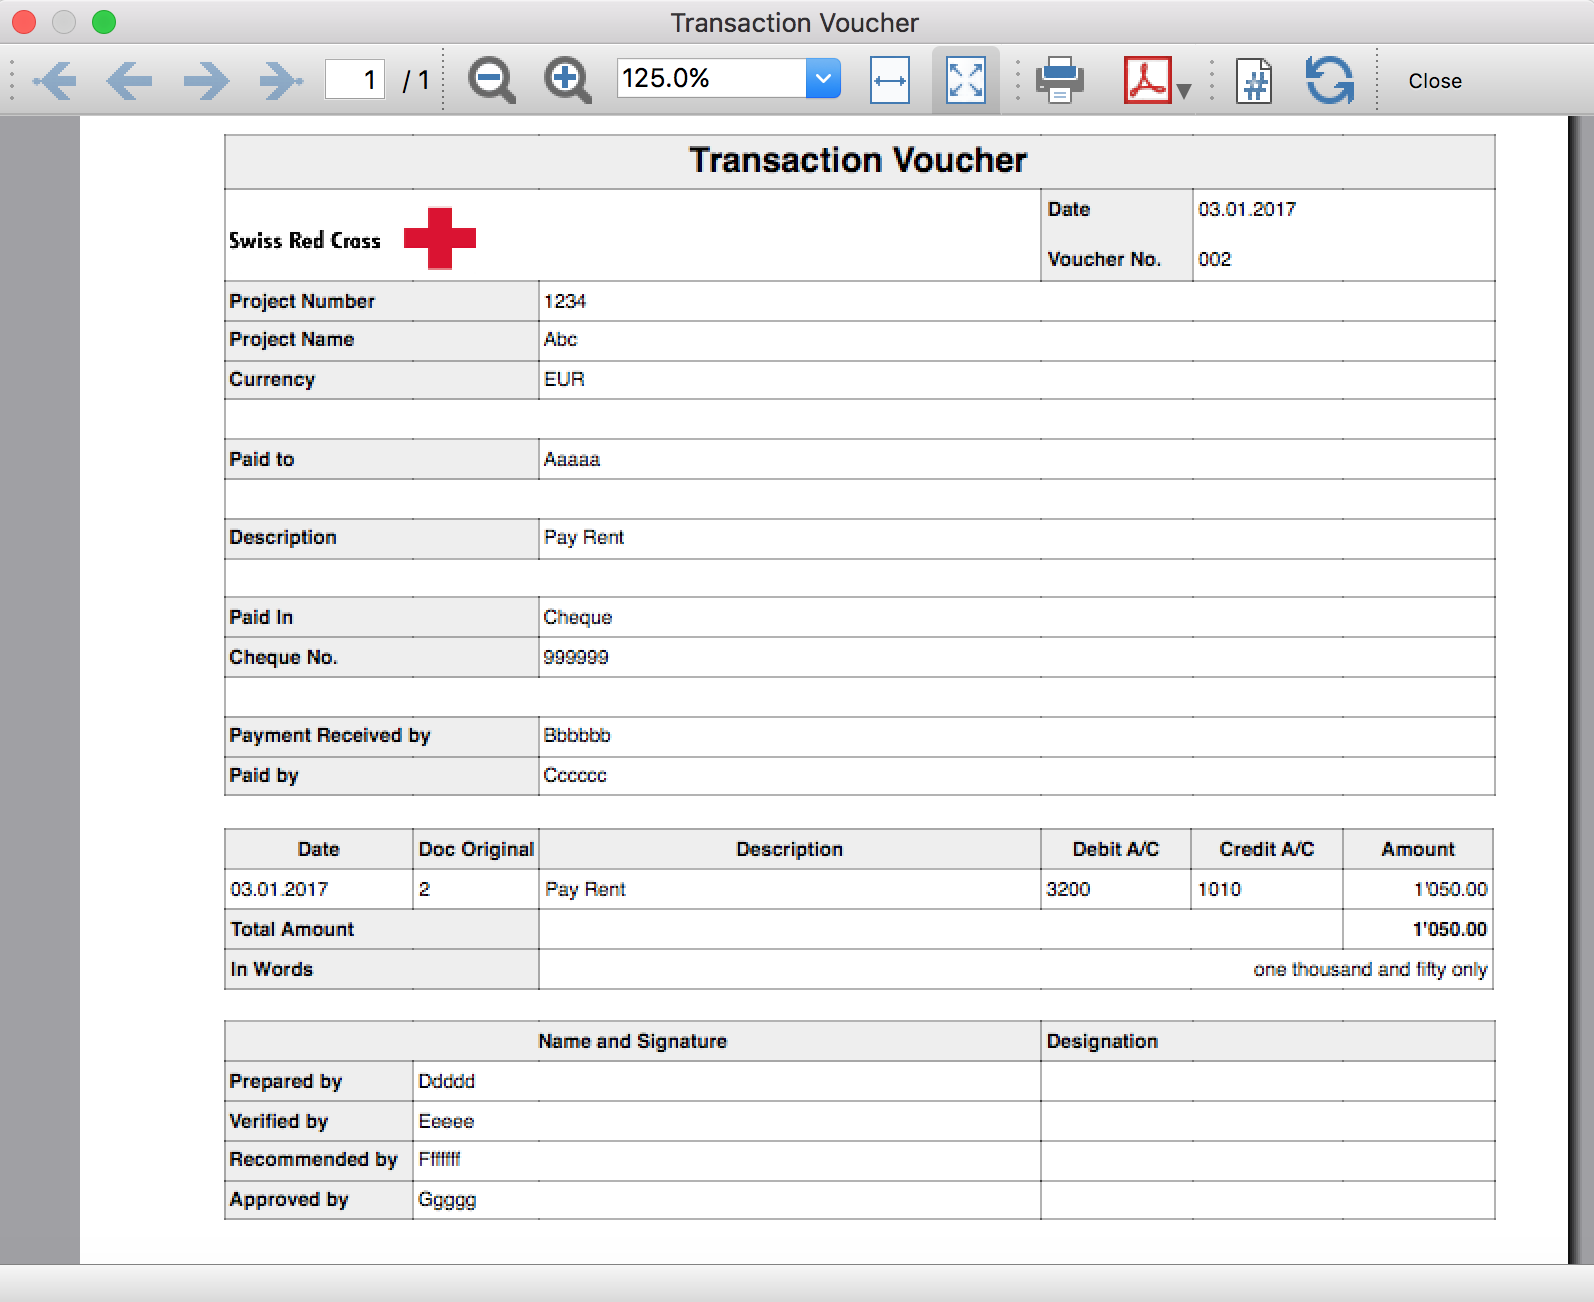
Trial Balance
Trial BalanceInstall the extension
To install the extension:
- Open Banana Accounting Plus.
- Menu Extensions > Manage Extensions.
- In the search field enter Trial Balance.
- From the extensions list select Trial Balance.
- Select the extension and click Install.
- Click Close to close the window.
Create the report
To creare the report:
- Open an accounting file.
- From the Extensions menu select the Trial Balance.
- Select the period.
For the given period, display a Trial Balance report containing:
- Balance sheet
- Profit & Loss
The details displayed are the following:
- Account
- Account description
- Debit amounts
- Credit amounts
Example of Trial Balance report: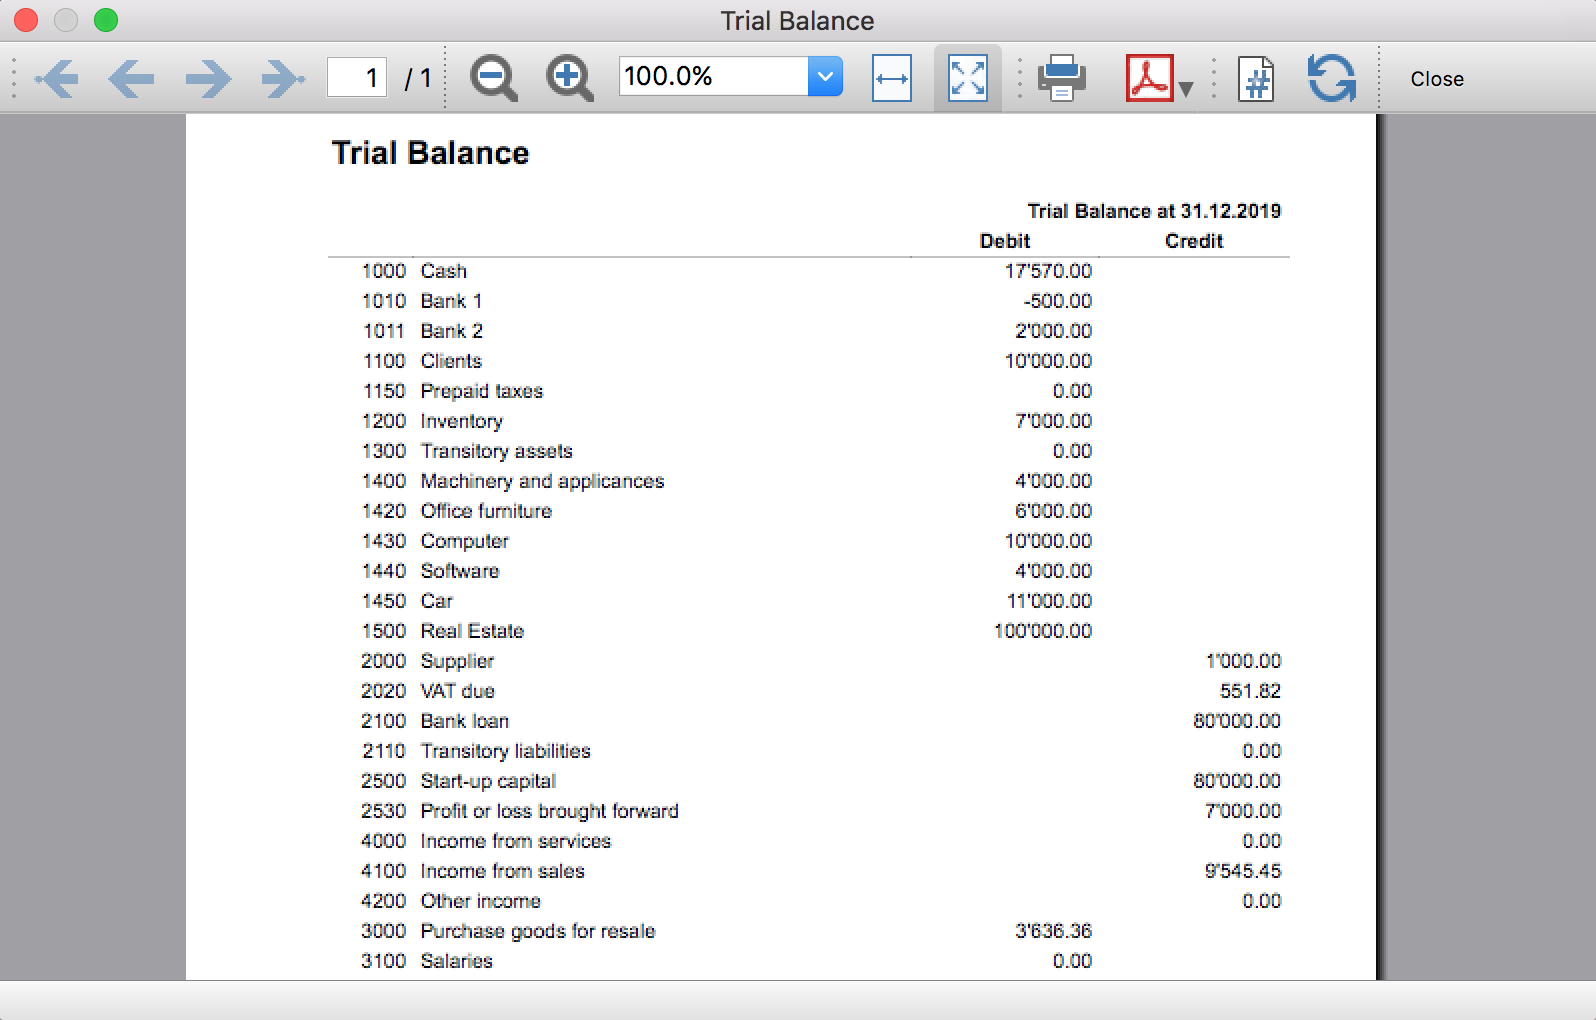
Trial Balance and Blockchain (Quarter periods)
Trial Balance and Blockchain (Quarter periods)This extension creates a report containing the table Accounts and at the end the blockchain for the selected quarter period.
Prerequisites
To use this extension you must download and install Banana Accounting Plus.
Install the extension
To install the extension:
- Open Banana Accounting Plus.
- Menu Extensions > Manage Extensions
- Select Universal as country.
- Select Online > Productivity.
- From the extensions list select Trial Balance and Blockchain (Quarter periods).
- Click Install to install the extension.
- Click Close to close the window.
Create the report
To creare the report:
- Open an accounting file.
- From the menu File > File and accounting properties, in the Header left and Header right fields enter the texts to be printed on the left and right in the page header.
- From the Extensions menu select Trial Balance and Blockchain (Quarter periods).
- In Settings dialogue select the period, set the header texts, the title and font, then click OK to create the report.
The texts of the settings dialog and column headers in the printout are fixed and are in the same language as the Banana file (defined from the menu File > File and accounting properties > Other > Current language). The languages that can be used are Italian, French, German and English.
Settings dialogue
Run the extension from the menu Extensions > Trial Balance and Blockchain (Quarter periods).
The extension Settings dialogue will open. From here you can choose some parameters to print the report.
- Period.
Select a period from the list. The periods are divided into three quarters. - Header left text.
Insert another text to be printed on the left side of the page header. - Header right text.
Insert another text to be printed on the right side of the page header. - Title.
Insert text to be printed as title of the page. - Font family.
Insert the font type. - Font size.
Insert the font size for all the page texts. - Title font size.
Insert the font size for the title.
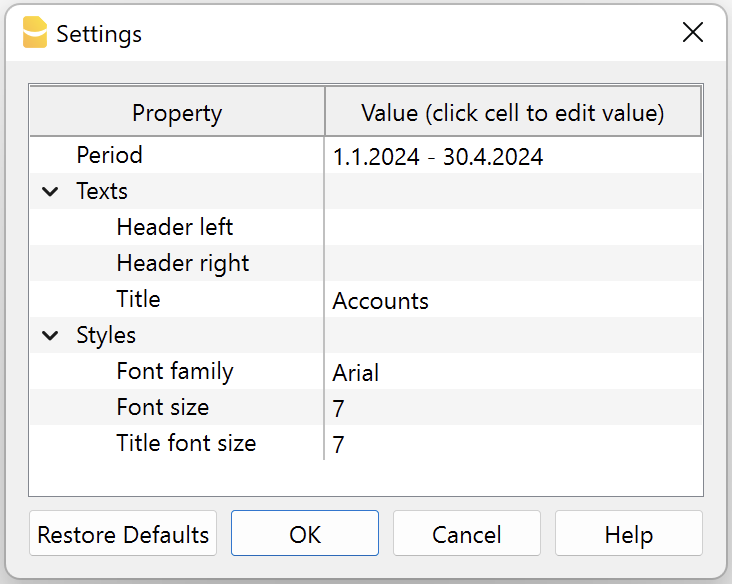
Print example
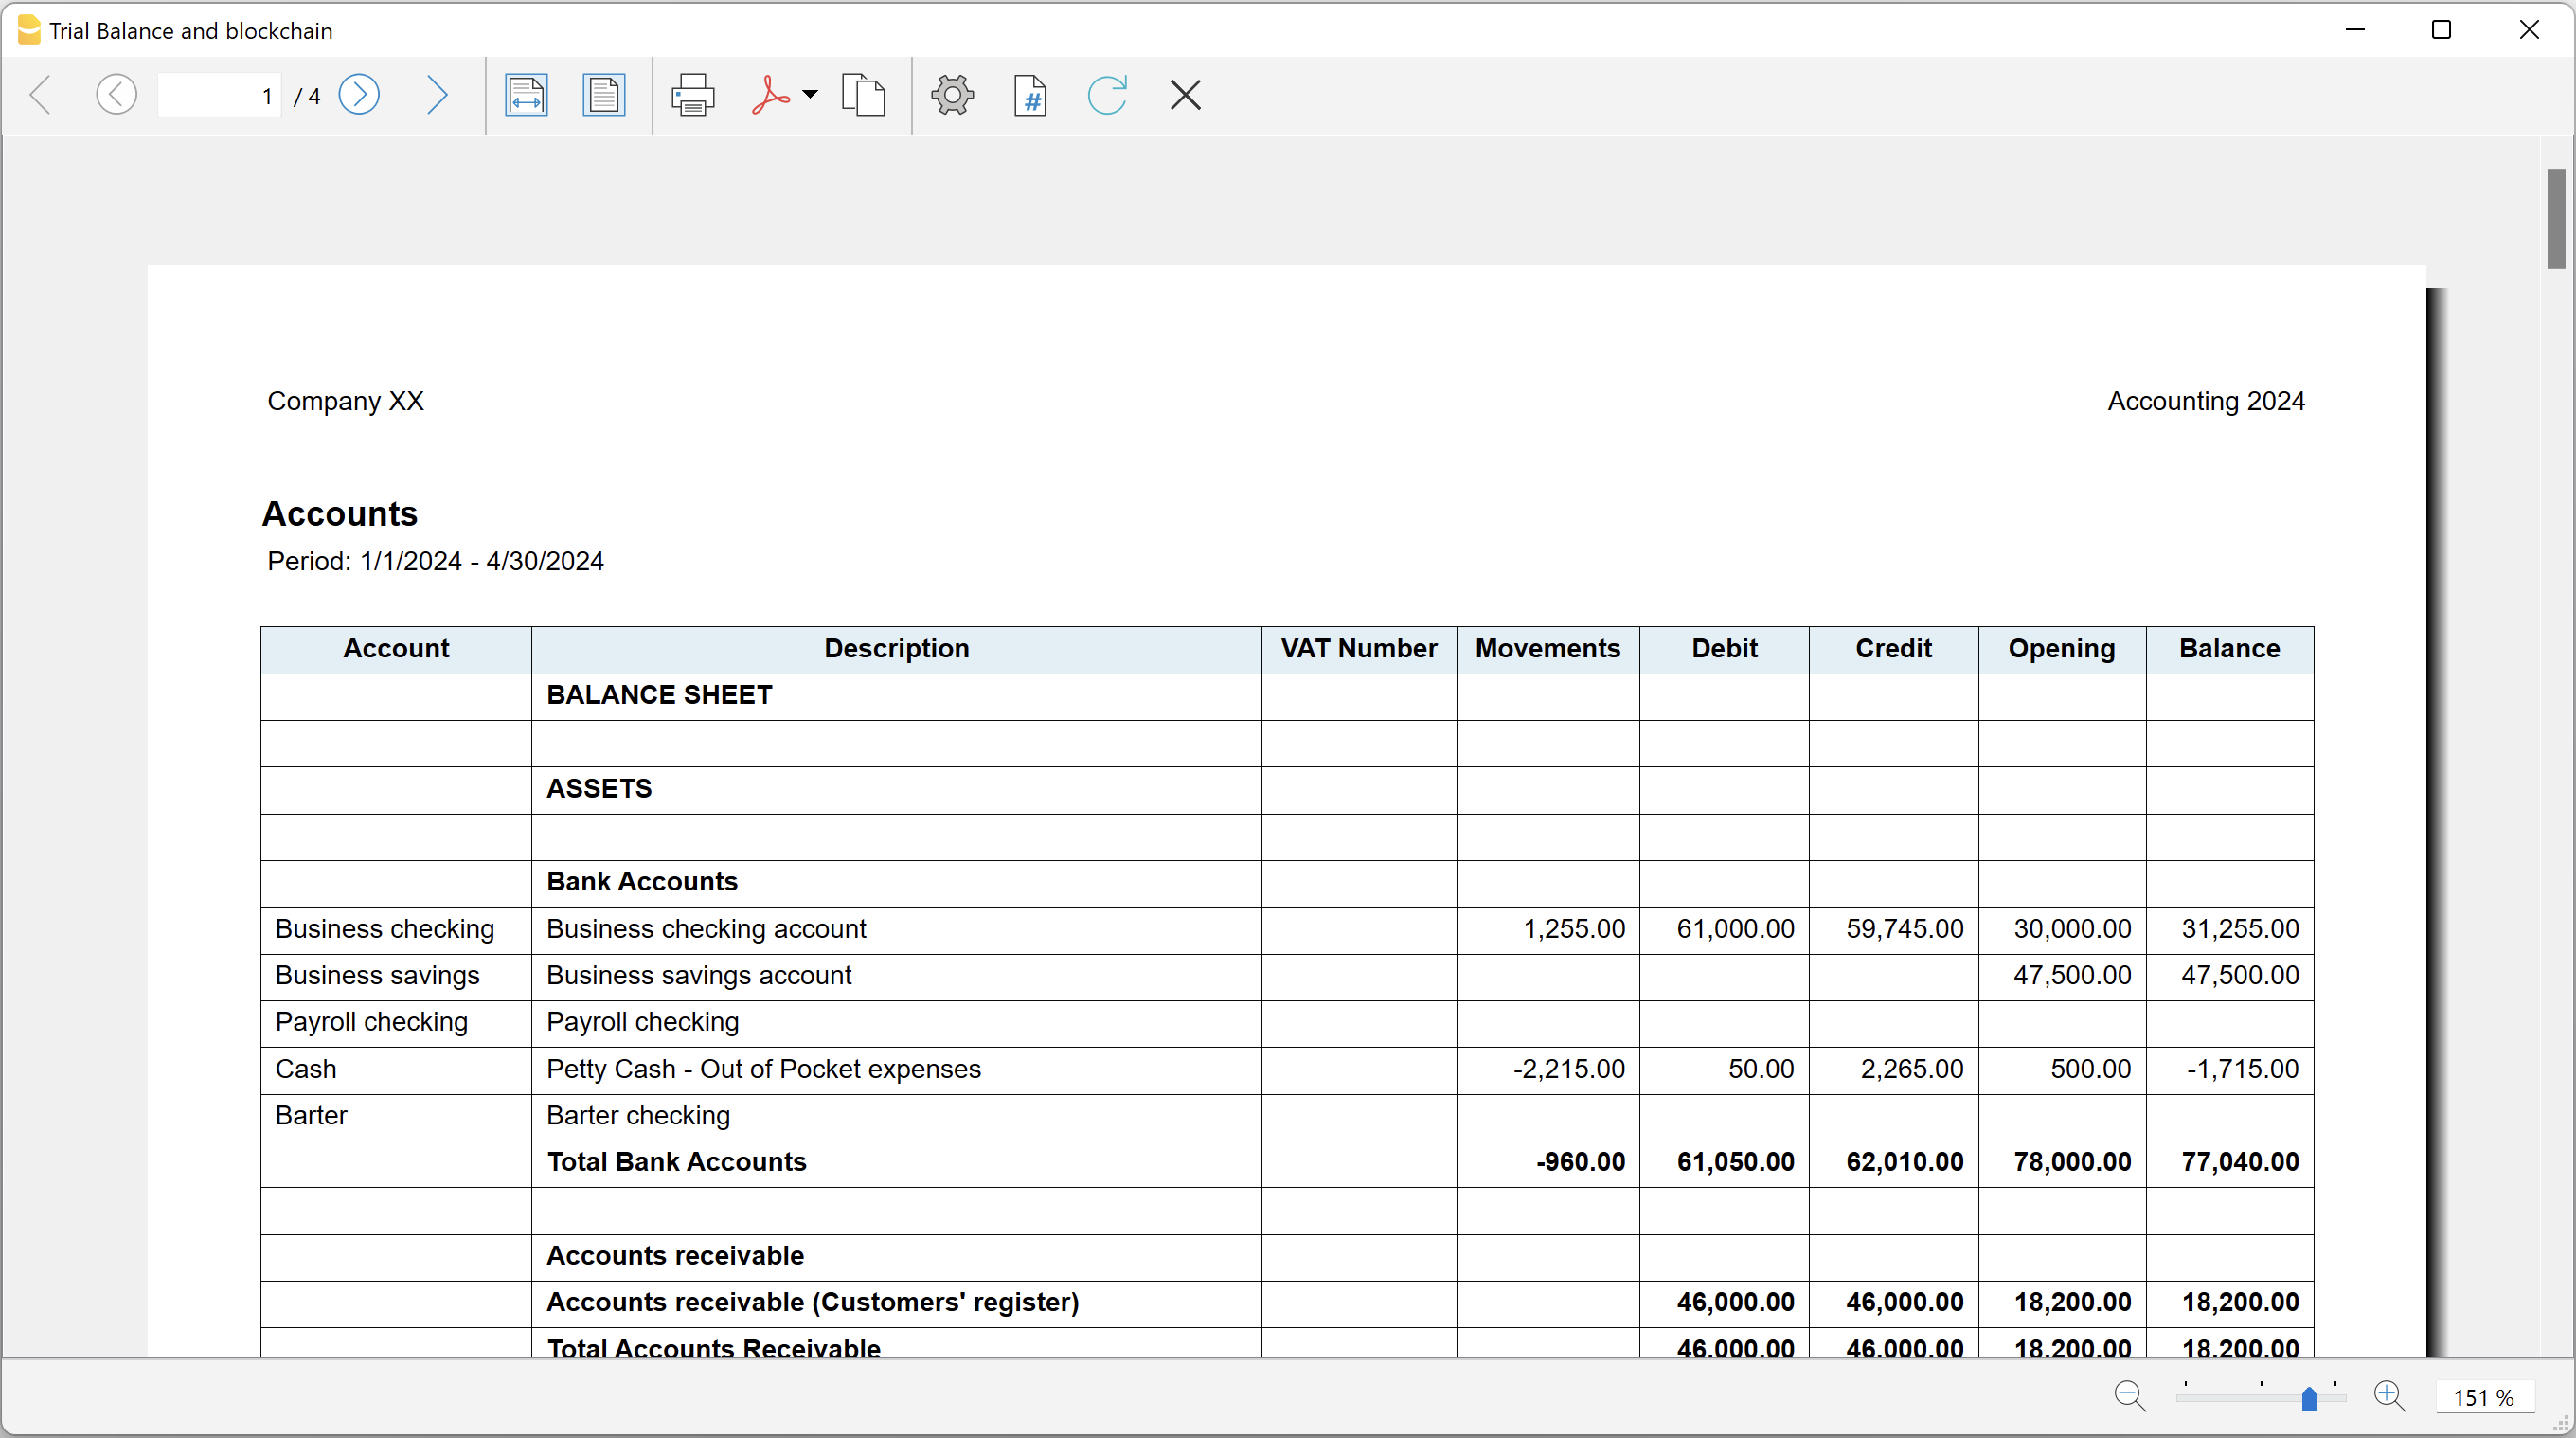
Trial Balance with transaction's lock blockchain information
Trial Balance with transaction's lock blockchain informationThe extension creates a report containing the table Accounts and the blockchain information regarding the transaction lock of the previous period and of the current period.
This printout has been conceived for a customer that has central SAP accounting and use Banana Accounting locally, to keep accounting for at more than 40 schools. Each school keep their own accounting and every 4 months the data is integrated in the main accounting system.
In order to assure that the information is perfectly synchronized:
- The school lock the transactions so that each movement is marked with a blockchain.
- The school print the report using this extension, with the data and the blockchain info of the current and last period.
- Prior to entering the data in the main system, the responsable verify that the blockchain of the last period already entered is the same as the one printed on the current report.
Personal at the schools can easily manage their finance locally and have more details and better control over the spending. Data is only entered in the main system periodically. The organisation have a better accounting system and save a lot of money in training and SAP licenses.
Install the extension
To install the extension:
- Open Banana Accounting Plus.
- Menu Extensions > Manage Extensions
- Select Universal as country.
- Select Online > Productivity.
- From the extensions list select Trial Balance with transaction's lock blockchain information.
- Click Install to install the extension.
- Click Close to close the window.
Create the report
To creare the report:
- Open an accounting file.
- From the menu File > File and accounting properties, in the Header left and Header right fields enter the texts to be printed on the left and right in the page header.
- From the Extensions menu select Trial Balance with transaction's lock blockchain information.
- In Settings dialogue set header texts, title and font as you want, then click OK.
- In Period dialogue select a period and confirm with OK to create the report.
The texts of the settings dialog and column headers in the printout are fixed and are in the same language as the Banana file (defined from the menu File > File and accounting properties > Other > Current language). The languages that can be used are Italian, French, German and English.
Settings dialogue
Run the extension from the menu Extensions > Trial Balance with transaction's lock blockchain information.
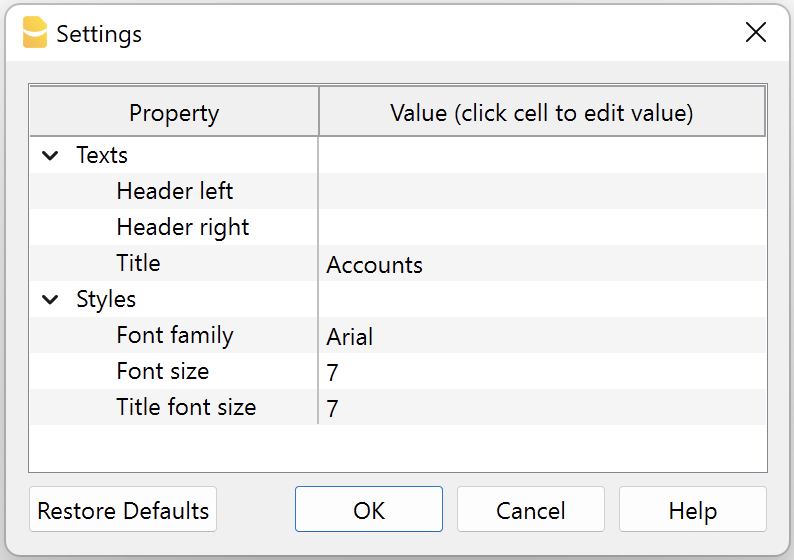
The extension Settings dialogue will open. From here you can choose some parameters to print the report.
- Header left text.
Insert another text to be printed on the left side of the page header. - Header right text.
Insert another text to be printed on the right side of the page header. - Title.
Insert text to be printed as title of the page. - Font family.
Insert the font type. - Font size.
Insert the font size for all the page texts. - Title font size.
Insert the font size for the title.
Print example
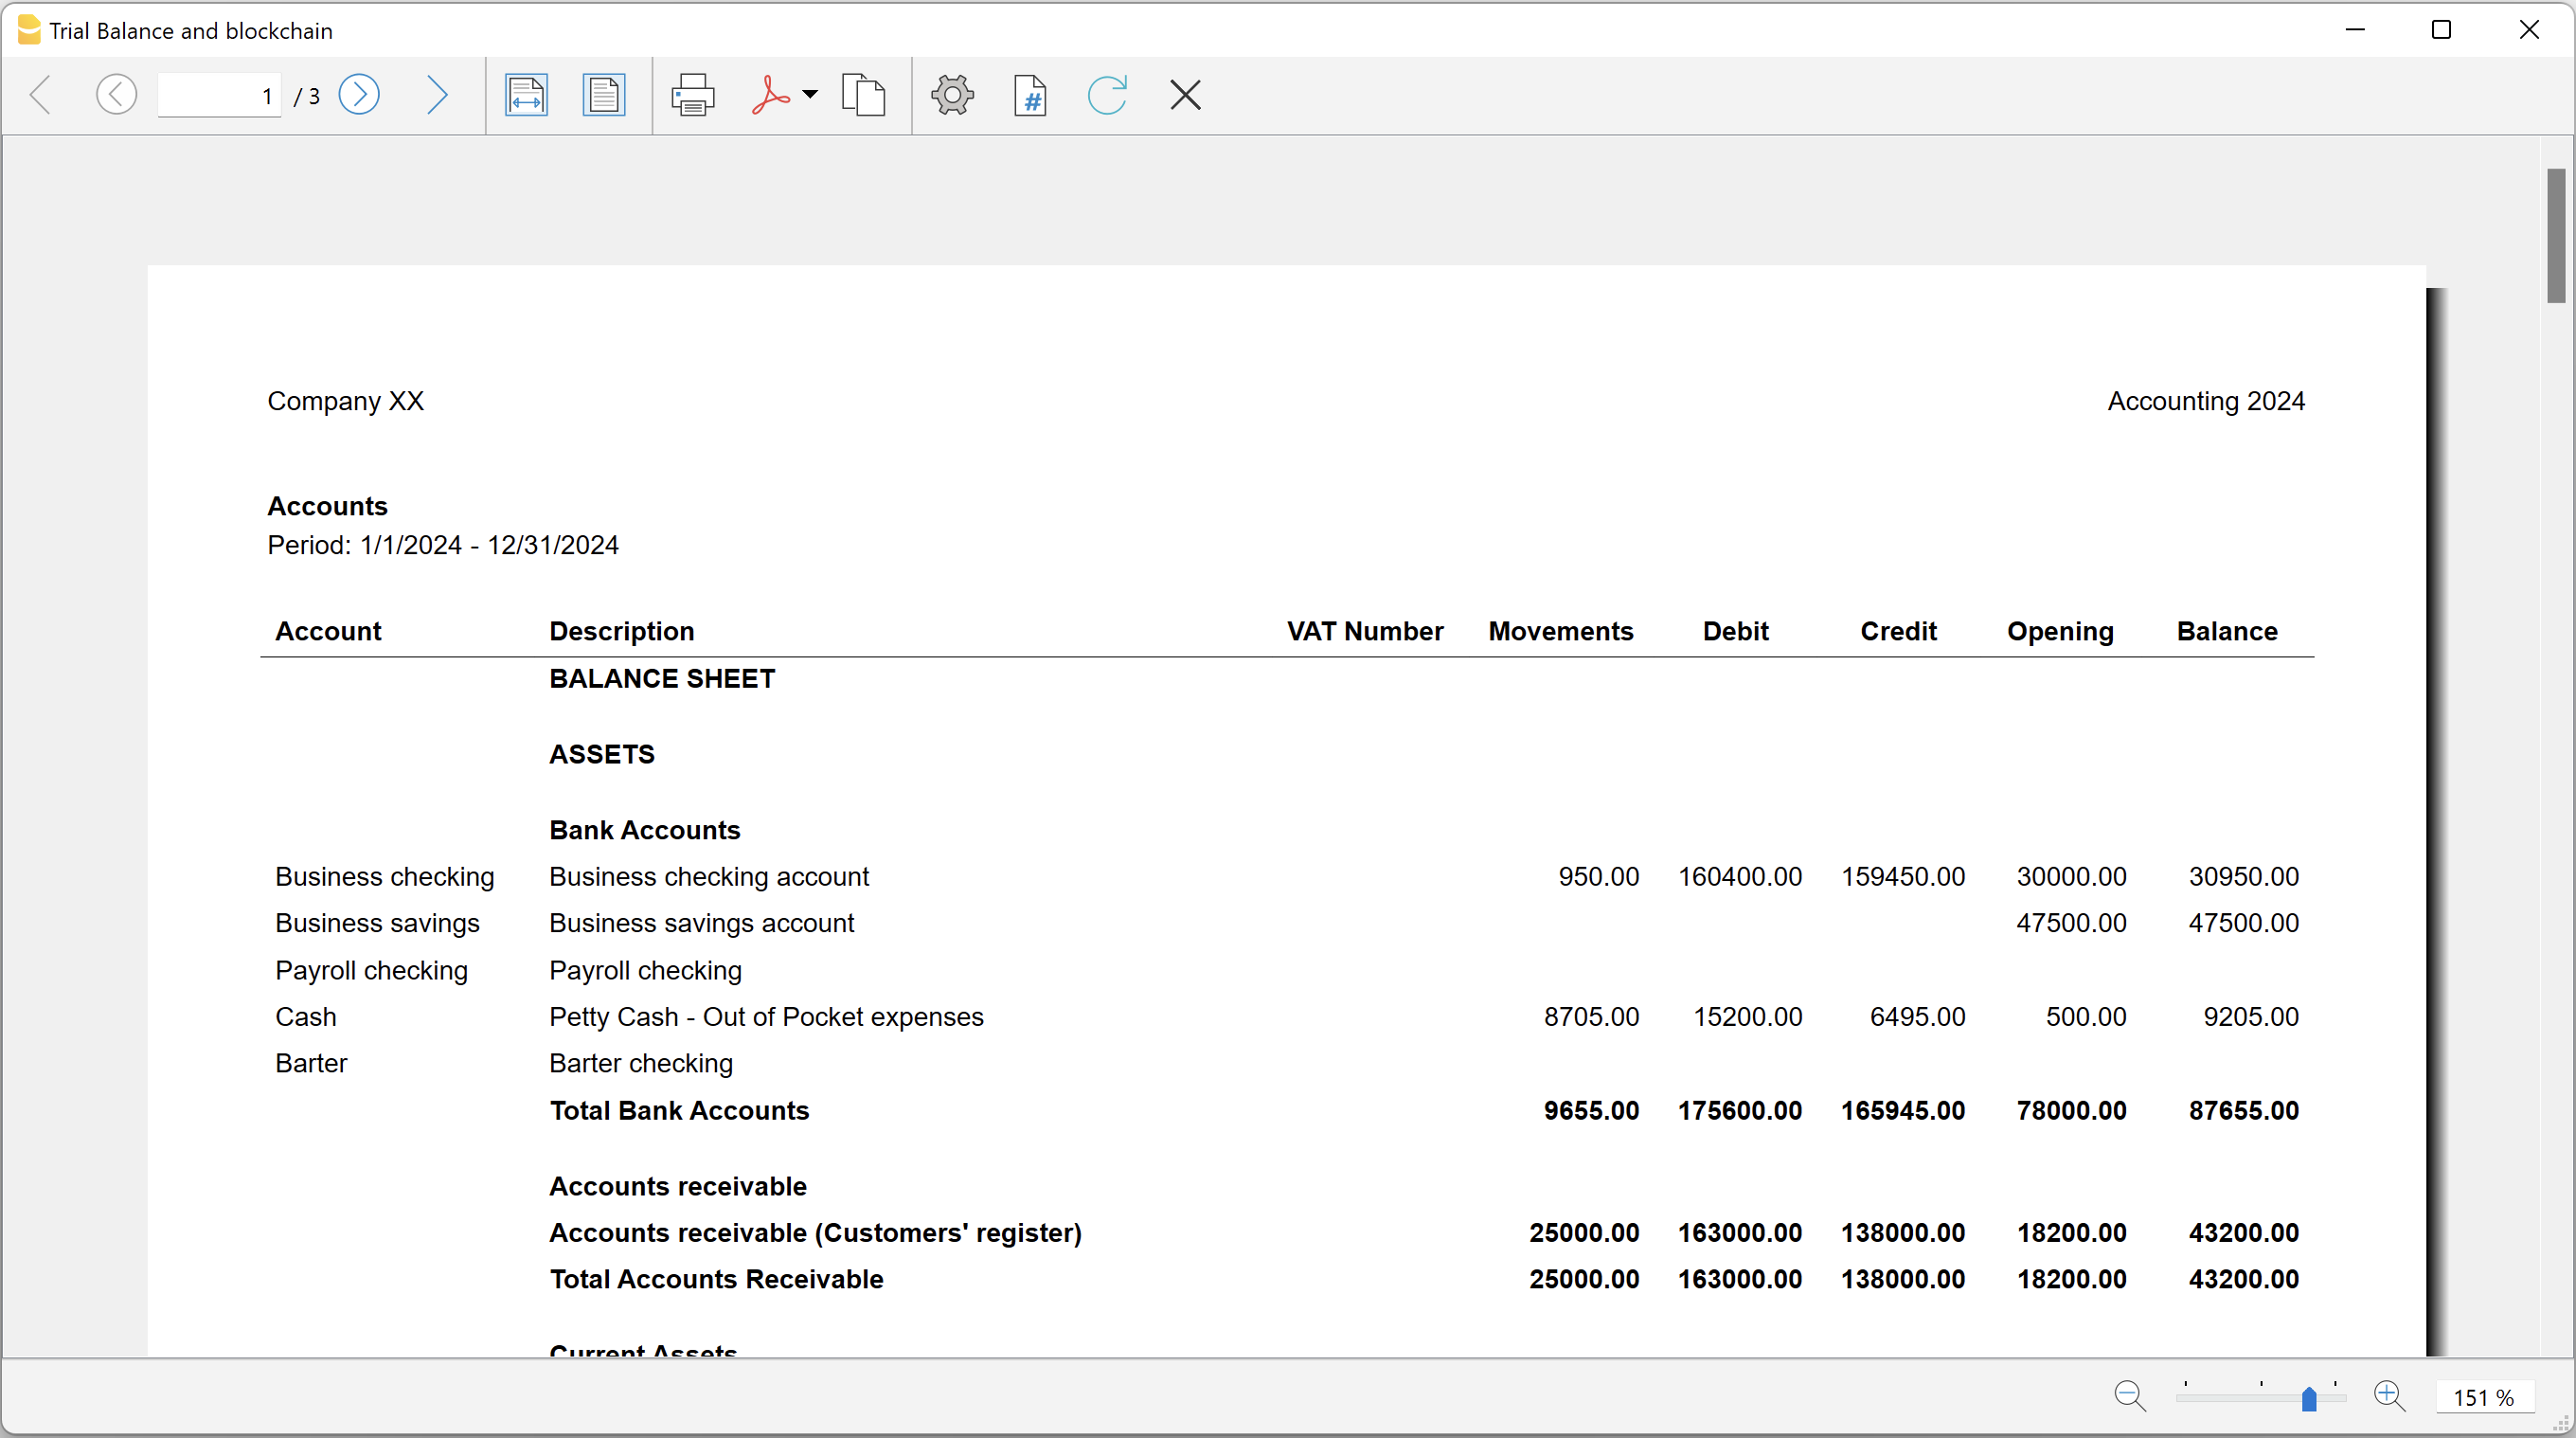
Blockchain row explanation:
- Date until which transactions are locked.
- Date of the last transaction.
- Number of locked transactions.
- Progressive hash of last locked transaction.